Embed Size (px)
DESCRIPTION
Full detail about Openerp
Citation preview


v
Contents
Foreword ixOpen Source Software: Making Business Applications accessible . . . . . . . . . . . . . . . ix
The OpenERP Solution . . . . . . . . . . . . . . . . . . . . . . . . . . . . . . . . . . . . . x
Structure of this book . . . . . . . . . . . . . . . . . . . . . . . . . . . . . . . . . . . . . . x
About the authors . . . . . . . . . . . . . . . . . . . . . . . . . . . . . . . . . . . . . . . . xi
Fabien Pinckaers . . . . . . . . . . . . . . . . . . . . . . . . . . . . . . . . . . . . . xi
Els Van Vossel . . . . . . . . . . . . . . . . . . . . . . . . . . . . . . . . . . . . . . . xi
Acknowledgements . . . . . . . . . . . . . . . . . . . . . . . . . . . . . . . . . . . . . . . xii
I Installation and Initial Setup 3
1 Use OpenERP Online 5
2 Getting Started with OpenERP Online 7
II Complete Example: from Lead to Sales Order 11
III RH 21
3 Key Features HR 23
3.1 Managing Human Resources . . . . . . . . . . . . . . . . . . . . . . . . . . . . . . . 23
3.1.1 Link employees and OpenERP users to facilitate the management of rights . . 24
3.1.2 Define employees’ billing prices and costs . . . . . . . . . . . . . . . . . . . . 25
3.1.3 Define employee categories to assign different Holiday’s rights to differentemployee groups . . . . . . . . . . . . . . . . . . . . . . . . . . . . . . . . . 27
3.1.4 Define contract types and wage types with start and end dates for contracts aswell as trial periods . . . . . . . . . . . . . . . . . . . . . . . . . . . . . . . . 28
3.1.5 Manage attendance (Sign in / Sign out) . . . . . . . . . . . . . . . . . . . . . 30
3.2 Talent Acquisition . . . . . . . . . . . . . . . . . . . . . . . . . . . . . . . . . . . . . 31

vi
3.2.1 Create applicants automatically based on incoming mail and keep track ofattachments such as resumes and cover letters . . . . . . . . . . . . . . . . . . 33
3.2.2 Define stages to track the progress in the recruitment process . . . . . . . . . . 35
3.2.3 Define next action and next action dates . . . . . . . . . . . . . . . . . . . . . 36
3.2.4 Track the history of the e-mail communication with the applicant . . . . . . . 36
3.2.5 Plan phone calls or appointments . . . . . . . . . . . . . . . . . . . . . . . . 36
3.2.6 Fill questionnaires for each applicant (for instance preliminary questionnaires) 40
3.3 Holiday Management . . . . . . . . . . . . . . . . . . . . . . . . . . . . . . . . . . . 41
3.3.1 Define different leave types . . . . . . . . . . . . . . . . . . . . . . . . . . . 42
3.3.2 Manage Holiday requests and approvals . . . . . . . . . . . . . . . . . . . . . 43
3.3.3 Track previous Holiday requests . . . . . . . . . . . . . . . . . . . . . . . . . 44
3.3.4 Allow employees to enter their own allocation requests . . . . . . . . . . . . . 46
3.4 Inspire your People through Assessments . . . . . . . . . . . . . . . . . . . . . . . . 47
3.4.1 Define different evaluation categories . . . . . . . . . . . . . . . . . . . . . . 48
3.4.2 Plan assessment dates . . . . . . . . . . . . . . . . . . . . . . . . . . . . . . 49
3.4.3 Link survey and job evaluations . . . . . . . . . . . . . . . . . . . . . . . . . 50
3.5 Attendances and Timesheet Management . . . . . . . . . . . . . . . . . . . . . . . . 50
3.5.1 Manage attendance through Sign in / Sign out . . . . . . . . . . . . . . . . . . 55
3.5.2 Keep track of differences between timesheets and attendance . . . . . . . . . . 56
3.6 Keeping Track of Expenses . . . . . . . . . . . . . . . . . . . . . . . . . . . . . . . . 59
3.6.1 Allow employees to enter professional expenses . . . . . . . . . . . . . . . . 61
3.6.2 Track the approval management process . . . . . . . . . . . . . . . . . . . . . 62
3.6.3 Rebill customers through analytical accounts . . . . . . . . . . . . . . . . . . 62
IV Process 63
4 Process 65
4.1 Process Integration in the Management System . . . . . . . . . . . . . . . . . . . . . 65
4.1.1 Examples of Process . . . . . . . . . . . . . . . . . . . . . . . . . . . . . . . 65
4.2 Workflows and User Processes . . . . . . . . . . . . . . . . . . . . . . . . . . . . . . 67
4.2.1 Using Processes Effectively . . . . . . . . . . . . . . . . . . . . . . . . . . . 70
4.2.2 Defining your Own User Processes . . . . . . . . . . . . . . . . . . . . . . . 71

vii
V DMS 75
5 Integrated Document Management 77
5.1 The Importance of Good Document Management . . . . . . . . . . . . . . . . . . . . 77
5.2 Classic Document Management Solutions . . . . . . . . . . . . . . . . . . . . . . . . 79
5.3 The OpenERP Solution . . . . . . . . . . . . . . . . . . . . . . . . . . . . . . . . . . 80
5.3.1 Getting Started . . . . . . . . . . . . . . . . . . . . . . . . . . . . . . . . . . 80
5.4 Internal and External Access using FTP . . . . . . . . . . . . . . . . . . . . . . . . . 82
5.5 Mapping between OpenERP Resources and Directories . . . . . . . . . . . . . . . . . 83
5.6 Managing Attachments . . . . . . . . . . . . . . . . . . . . . . . . . . . . . . . . . . 86
5.7 Virtual Files . . . . . . . . . . . . . . . . . . . . . . . . . . . . . . . . . . . . . . . . 86
5.8 Standardizing Structures . . . . . . . . . . . . . . . . . . . . . . . . . . . . . . . . . 89
5.9 Optimizing Document Management . . . . . . . . . . . . . . . . . . . . . . . . . . . 91
5.9.1 Searching for Documents . . . . . . . . . . . . . . . . . . . . . . . . . . . . . 91
5.9.2 Integration with Emails . . . . . . . . . . . . . . . . . . . . . . . . . . . . . . 92
5.9.3 Working with Users’ Changes . . . . . . . . . . . . . . . . . . . . . . . . . . 92
5.9.4 Version Management . . . . . . . . . . . . . . . . . . . . . . . . . . . . . . . 94
Index 97

viii

ix
ForewordInformation Systems have played an increasingly visible role over the past several years in improvingthe competitiveness of business. They are more than just tools for handling repetitive tasks; they willguide and advance all of a company’s daily activities. Integrated Management Software is today veryoften a key source of significant competitive advantage.
Open Source Software: Making Business Applicationsaccessible
Some may look at the Business Application market as a mature market dominated by a few large keyplayers, with no new business opportunities.
This would be ignoring the market reality. So many customers are frustrated by their experience withexisting vendors; so many companies around the world need to have access to business applications,but cannot afford them.
OpenERP believes that business applications should not be a luxury. That any company, anywhere inthe world, should be able to afford the best tools to professionally expand business. That is one of thereasons why OpenERP needs to break the existing rules of the ERPs and the Business Applicationsmarket.
Customers should use their budget smartly and invest in customizing the application to their specificneeds, rather than paying expensive license fees. OpenERP is committed to the Open Source BusinessModel precisely because Open Source allows for this. Open Source is a disruptive model, as it createsmore value for the customers.
For decades, customers have developed applications which remained specific to their own needs, and inthe end proved extremely expensive to maintain. Open Source means that customers can benefit frompast developments of other companies. Also by contributing to the evolution of the software, the userswill enjoy the guarantee that their development will be included in future versions of the software. Oneof the major advantages is that such a Community brings a wealth of new functionality.
Open Source also allows us to engage with our customers differently. Since there is no licensing cost,any potential customer can download, test and use the software. OpenERP has no need for an expensivesales force to promote the product. OpenERP just needs to make the best product and make it availableto customers.
Open Source allows for many barriers in this industry to be broken. The software is available to manycompanies who could otherwise not afford expensive business applications license fees. The OpenERPsolution allows customers to use their money smartly and tailor the software to their individual needs.OpenERP leverages from its customer base to enrich the software and finally eradicate any lock-in toallow customers to use and even drop the software freely.

x
The OpenERP Solution
OpenERP can build a new breed of business applications, more modular, more customer-friendly, fullyweb-based, which others cannot due to the heritage of their legacy systems.
OpenERP is a comprehensive suite of business applications including Sales, CRM, Projectmanagement, Warehouse management, Manufacturing, Financial management, and Human Resources,just to name a few. More than 1000 OpenERP modules are available from the OpenERP Apps marketplace (http://apps.openerp.com/).
The key to continued sales success is effective Customer Relationship Management, and that isprecisely the main topic of the book you are reading. OpenERP’s CRM and Sales features are flexibleand highly developed to assist you in managing all aspects of partner relationships.
OpenERP can share information with the most common email clients, calendars and mobile phones,allowing your staff to build on previous productivity and experience by continuing to use familiaremail and office systems, now connected to OpenERP. In a few clicks, your sales person can transfernecessary information to the OpenERP software. You can link important emails to the CRM directlyfrom your current mailbox and even reply from your own mailbox and have the answer stored in yourCRM automatically.
Structure of this book
Part One, First Steps with OpenERP (page ??), starts with the basic steps to install OpenERP. You willalso be introduced to the main concepts, such as Sales Teams & Stages, and you will be guided througha complete workflow, from Quotation to Sales Order. Part One also presents the OpenERP Online offer(SaaS solution), and the configuration wizards in the ch-start chapter. To discover OpenERP’s features,you can jump directly to Part Two.
Part Two, part2-beg explains you how to manage your customer relationships with OpenERP. You willlearn more about how to manage Leads and Opportunities, to integrate existing communication toolswith OpenERP, to efficiently manage a sales and channel department, and to monitor performance.
Part Three, part3-crm-market, is devoted to Direct Marketing. In a step-by-step tutorial, we will guideyou through the process of setting up a marketing campaign in OpenERP.
Part Four, part4-crm-sales, guides you from quotation to sales order, explaining several advanced salesfeatures.
Finally part Five, part5-crm-install, explains the detailed installation procedures for OpenERP. Thischapter also explains how to install the Thunderbird & Outlook plugins, to get the most out of yourexisting email programs.

xi
About the authors
Fabien Pinckaers
Fabien Pinckaers was only eighteen years old when he started his first company. Today, over ten yearslater, he has founded and managed several new technology companies, all based on Free / Open Sourcesoftware.
He originated Tiny ERP, now OpenERP, and is the director of two companies including OpenERPS.A., the editor of OpenERP. In a few years time, he has grown the Tiny group from one to sixty-fiveemployees without loans or external fund-raising, and while making a profit.
He has also developed several large scale projects, such as Auction-in-Europe.com, which became theleader in the art market in Belgium. Even today people sell more art works there than on ebay.be.
He is also the founder of the LUG (Linux User Group) of Louvain-la-Neuve, and of several free projectslike OpenReport, OpenStuff and Tiny Report. Educated as a civil engineer (polytechnic), he has wonseveral IT prizes in Europe such as Wired and l’Inscene.
A fierce defender of free software in the enterprise, he is in constant demand as a conference speakerand he is the author of numerous articles dealing with free software in the management of the enterprise.
Follow Fabien on his blog http://fptiny.blogspot.com/ or on twitter fpopenerp.
Els Van Vossel
Els Van Vossel always had a dedication to both written and spoken word. Clear and explicitcommunication is crucial.
Educated as a Professional Translator in Antwerp, she worked as an independent translator on thelocalization of major ERP software. Els acquired ERP knowledge and decided to start working as afunctional ERP consultant and a Technical Communicator for ERP software.
As such, the world of OpenSource software became more and more attractive. She started workingwith OpenERP software in her free time and doing so, Els really wanted to meet Fabien Pinckaers toshare thoughts about documentation and training strategy. At a Partner Meeting she heard Fabien waslooking for someone to manage the trainings & documentation. This was absolutely an opportunity tobe qualified, and now Els is the OpenERP Training Program Manager and in this job responsible forthe worldwide training and certification program of OpenERP.
Being an author of several Software Manuals, she finds it exciting to work on the OpenERPdocumentation and continuously take it to a higher level. Please note that this is a hell of a job, but Elsfinds great pleasure in doing it!
Follow Els on her blog http://training-openerp.blogspot.com/ or on twitter elsvanvossel.

xii
Acknowledgements
From Els Van Vossel
Thank you Fabien, for offering me the opportunity to work with OpenERP. I thank all OpenERP teammembers for their support and understanding. My special thanks to my family who encouraged me towrite this book.
From Fabien Pinckaers
I address my thanks to all of the team at OpenERP for their hard work in preparing, translating andre-reading the book in its various forms. My particular thanks to Laurence Henrion and my family forsupporting me throughout all this effort.

CONTENTS 1
OpenERP is an impressive software system, being easy to use and yet providing great benefits in helpingyou manage your company. It is easy to install under both Windows and Linux compared with otherenterprise-scale systems, and offers unmatched functionality.

2 CONTENTS

3
Part I
Installation and Initial SetupWhether you want to test OpenERP or put it into full production, you have at least two possible startingpoints:
• you can use OpenERP Online by subscribing to http://www.openerp.com/online/;
• you can install the solution on your own computers to test it in your company’s systemenvironment.
In this chapter, the easy-to-use OpenERP Online solution will be briefly explained. For moreinformation about installing OpenERP on your computer, please refer to the chapter part5-crm-install.
Some Interesting Websites from OpenERP
• Main Site: http://www.openerp.com,
• OpenERP Online Site: http://www.openerp.com/online,
• Online demo at http://demo.openerp.com,
• Documentation site: http://doc.openerp.com/,
• Community discussion forum where you can often receiveassistance: http://www.openerp.com/forum/.
Current documentation
The procedure for installing OpenERP and its web server are likely tochange and improve with each new version, so you should always checkeach release’s documentation on the website for the latest installationprocedures.

4

5
Use OpenERP Online 1Nothing is easier for you to discover OpenERP than subscribing to the OpenERP Online offer. You justneed a web browser to get started.
The Online service can be particularly useful to small companies, that just want to get going quickly atlow cost. You have immediate access to OpenERP’s Integrated Management System built on the typeof enterprise architecture used in many organizations.
OpenERP’s Online offer includes several services: hosting at high bandwidth, database management,stable security update, backups, maintenance (24/7 server monitoring), bug fixing and migrations.
OpenERP guarantees that the software running on OpenERP Online is exactly the same as the OpenSource official version of OpenERP. Any improvement made on OpenERP will be available online.This allows you to easily switch from the online version to the local version anytime.
So even if the OpenERP Online solution might be the best solution to suit your needs today, you caneasily switch to an installation on your own servers according to your company’s changing requirementsor growth. You are also able to change your service provider anytime, while continuing to use the exactsame system. Hence, you do not depend on your host. In addition, OpenERP works with standard andopen formats and programming languages which allow you to export your data and use them in anyother software.
These advantages give you total control over your data, your software, your platform.
Figure 1.1: Subscribe and Start with OpenERP Online
If you want to start working with the online platform, you can navigate to

6 CHAPTER 1. USE OPENERP ONLINE
http://www.openerp.com/online. After successful registration, you will be able to configure anduse OpenERP online. To log in to your OpenERP Online account, you will receive a username andpassword. You can build the software to fit your needs, at your own pace!
OpenERP Online - Software as a Service - is hosted by OpenERP and paid in the form of a monthlysubscription. The pricing model is extremely simple. OpenERP charges a fixed fee per month per user.You will get an invoice each month according to the number of users registered in the system at thattime. If you add new users during the next 30 days, they will only be charged with the next invoice.You can find the details of current pricing and payment options at http://www.openerp.com/online.
Free Trial
For a month’s free trial, check out OpenERP’shttp://www.openerp.com/online, which enables you to get started quicklywithout incurring costs for integration or for buying computer systems.After the free trial expires, you can easily continue using OpenERP Online.

7
Getting Started with OpenERP Online 2If you want to focus on your customers, you need tools: to capture all the knowledge you have available;to help you analyze what you know; to make it easy to use all of that knowledge and analysis. OpenERPinvites you to discover the CRM & Sales Management Business Application!
In this chapter, you can start exploring OpenERP!
Use a web browser of your choice to connect to OpenERP Web.
Figure 2.1: Web Client at Startup
OpenERP suggests that you configure your database using a series of questions. In the software, theseseries of questions are managed through so-called Configuration Wizards.
Click the Start Configuration button to continue.
The next configuration wizard will help you to decide what your user interface will look like, whetherthe screens will only show the most important fields - Simplified - or whether you also want tosee the fields for the more advanced users, the Extended view. Select Extended and click Next tocontinue.
User Preferences
You can easily switch from Simplified to Extended view by changing yourUser Preferences.
In the next wizard, you can fill your company data, select your company’s base currency and add yourcompany logo which can be printed on reports. Click Next to continue.
Select the Customer Relationship Management and Sales Management businessapplications for installation and click Install. Now OpenERP will start to install CRM & Sales, allowing

8 CHAPTER 2. GETTING STARTED WITH OPENERP ONLINE
you to do a complete sales cycle, from lead / opportunity to quotation and sales order. You will have towait for the next configuration wizard to be displayed (Loading will appear).
Figure 2.2: Selecting the CRM & Sales Functionality
OpenERP’s modularity enables you to install a single Business Application (such as CRM) if thatis all you need. Of course, you can choose to also install Sales Management, to handle quotations,sales orders and sales invoices as well. For now, please install Customer RelationshipManagement and Sales Management, as these two Business Applications will be discussed inthis book.
Reconfigure
Keep in mind that you can change or reconfigure the system any time, forinstance through the Reconfigure option in the main bar.
When you choose a business application for installation, OpenERP will automatically propose to addor configure related (smaller) applications to enrich your system. When you install CRM, OpenERPwill also ask you whether you want to install Fetchmail, or Sales FAQ, for instance.
The figure Selecting Accounting Configuration (page 9) shows the Accounting ApplicationConfiguration screen that appears when you select Sales Management to be installed.
Indeed, accounting is required to create sales invoices. Select the Generic Chart of Account and fill inthe Sale Tax (%) applicable in your country. Click Configure to continue the configuration.
Accounting
Please note that you can perfectly well use OpenERP’s CRM without doingyour accounting in OpenERP. When you only install CRM, there is no needto configure accounting.
OpenERP CRM offers lots of features. You can easily manage your address book (prospects, customers,

CHAPTER 2. GETTING STARTED WITH OPENERP ONLINE 9
Figure 2.3: Selecting Accounting Configuration
...), keep track of leads and/or opportunities, manage meetings & phone calls, share (sales) knowledgeand much more.
The figure Selecting CRM Configuration (page 9) shows the CRM Application Configuration screenthat appears when you select Customer Relationship Management to be installed.
Figure 2.4: Selecting CRM Configuration
To stay in line with what will be described later in this book, please install the following options:
• Opportunity to Quotationwill be checked by default, allowing you to create quotationsfrom an opportunity,
• Sale FAQ to install a company wiki to share your sales knowledge,

10 CHAPTER 2. GETTING STARTED WITH OPENERP ONLINE
• Calendar Synchronizing to link your OpenERP calendar to your mobile device, forinstance,
• Fetch Emails to manage incoming and outgoing emails in OpenERP directly,
• Thunderbird or Outlook according to the email client you are using, to link your currentmailbox to OpenERP and to create new leads or partners in OpenERP, directly from yourmailbox.
If you have selected all of the above options, the following Configuration Wizards will appear:
• Configure your Sales application: click Configure to accept the default settings (no optionschecked).
• Configure your Knowledge application: click Configure to accept the default settings.
• Thunderbird / Outlook Plug-in Configuration: for now, you only have to click the Save asbutton to save the plug-in to your disk (or desktop). Then you can click Configure to continuethe installation.
• Configure your Accounting application: click Configure to accept the default settings.
• Configure your Sales application: click Configure to accept the default settings.
• Knowledge application configuration: click Next to accept the default settings for the serveraddress.
Plug-ins
For the configuration of the plug-in, please refer to the settings in chapterthunder or outl.
OpenERP’s menu will be displayed, because your system is now ready for actual configuration. To getstarted, you click the Sales button in OpenERP’s main screen. In the next chapter ch-team you will startworking in the CRM application by telling OpenERP how your company’s sales teams are organized.
As your business is growing and evolving all the time, your requirements as to the use of OpenERPare likely to change. To sustain your growth, you can easily extend your CRM with other OpenERPbusiness applications, such as logistics or HR, to name some. OpenERP offers this flexibility; youcan start with one business application, such as Customer Relationship Management, and graduallycomplete OpenERP to suit your ever changing needs!

11
Part II
Complete Example: from Lead toSales Order
In this chapter, we will show you a complete sales flow, from lead to opportunity to quotation to salesorder in a step-by-step scenario.
First you will get an explanation about the use case (what Thomas or one of his colleagues is supposedto do). Then the Notes will learn you how Thomas (or a colleague of his) enters the information inOpenERP CRM. For the simplicity of the use case, we will do all of the steps under the Admin user.
Simplified or Extended View
In OpenERP your user interface will look slightly different according tothe User Preferences. In Simplified view, the screens will only showthe most important fields / tab pages. To see also the fields for the moreadvanced users, you should switch to the Extended view. You caneasily switch from Simplified to Extended view by changing your UserPreferences through the ‘Edit Preferences´ button. For this use case, pleaseswitch to ´Extended´ view.
1. Create a new campaign
Your company is exhibiting at the “House & Design” Fair in Paris and Thomas, a salesman of yourcompany, meets lots of prospects during this event. Because Luc, the Sales Manager, would like toknow the return on investment from hiring a stand at this fair, he asks Thomas, who will be hosting thisevent, to make a “House & Design” campaign.
Campaign
To create a new campaign, Thomas goes to Sales → Configuration → Sales→ Campaigns and clicks the New button. In the Campaign Name field, hetypes House & Design.
2. Create and qualify a new lead
Thomas has to enter all contacts he met at the House & Design Fair as a new lead (contacts, prospects),assigning each individual lead to the “House & Design” campaign. He will start by adding a lead forMr. John Doe of the The Interior Design Company who is interested in redecorating his office.

12
Figure 2.5: Campaign
Leads
To create a new lead, Thomas goes to Sales → Leads and clicks the Newbutton. The subject of a lead is in blue, because it is a mandatory field,so Thomas enters Potential interior design customer in that field. He usesthe Notes field to add more information about the lead. When saving thelead, it will be in Draft state. Thomas opens it for further follow-up. In thechapter part2-crm-leads you will find more details about lead creation.
Figure 2.6: Example of a Lead
To contact his leads after the Fair and check if any of them can be qualified as a business opportunity,Thomas would like to group his leads by the “House & Design” Campaign, to have an overview of allthe leads generated through this campaign.

13
Group by
To group his leads by campaign, Thomas goes to Sales → Leads and clicksthe Group by list to show the buttons he can use. He clicks the Campaignbutton and notices that no lead is visible, but only the various campaigns.Each campaign has an arrow in front; he clicks the arrow to display all theleads for that campaign.
Figure 2.7: Leads grouped by Campaign
3. Convert the lead into an opportunity and create a new customer
Because the lead for John Doe from The Interior Design Company looks promising, Thomas decidesto convert it into an opportunity and at the same time add a new Customer to the company’s addressbook.
On the business opportunity, the salesman should provide more information, such as the estimatedincome. Thomas indicates that the expected revenue would be 5,000.00C, and that the success rate ofthe opportunity at this stage is 20%.
Thomas sets Luc, the sales manager, as the person responsible to follow up the opportunity. He alsosets the date for the next action and describes that he has to call the potential customer to plan a meetingwith Luc, the sales manager.

14
Convert to Opportunity
To convert the lead into an opportunity, Thomas goes to Sales → Sales→ Leads and opens the lead concerned (there are various possibilitiesto quickly find the lead he needs). Thomas opens the lead and clicksthe Convert to Opportunity button (he can also do this from the list ofleads by clicking the Convert to Opportunity arrow of the lead concerned).OpenERP asks Thomas whether he wants to create a new partner. Heconfirms by clicking Continue to add the new potential customer to yourcompany’s address book. Then he clicks Next to convert the promisinglead into an opportunity. In the Expected Revenue field, Thomas types5,000.00C, and he enters a success rate of 20%. Thomas clicks the CreateOpportunity button. As a Next Action Date, he sets tomorrow’s date and inthe Next Action field he types Phone customer to plan meeting.
Filters
The Advanced Search View provides a very user-friendly filteringmechanism to easily look up desired records from the list.
Usually, a filter view is composed of three elements, the Filter buttons at the top, the Extended Filtersand the Group by option.
These filters are dynamic, so according to filters you apply, extra columns may be addedto the view.
You can also easily combine filters; an arrow will be displayed and you will get a structure accordingto the order in which you clicked the Filter buttons.
Simply by changing the order in which you select your buttons, you will get a completelydifferent filtered view. E.g. select Salesman first, then Campaign or vice versa.
4. Plan a meeting
One day later, Thomas contacts the prospect and convinces him to meet Luc so that the sales managercan give more information about the product range in view of a quotation.
Thomas plans a meeting for Luc. This meeting is organized next week with the customer and is relatedto the opportunity. He sets a reminder for Luc.

15
Figure 2.8: Convert Lead to Opportunity
Meeting
Thomas goes to the list of opportunities through Sales → Sales →Opportunities to check his next actions. He opens the opportunity andcontacts John Doe. He enters the key elements of his phone call in theDetails field. To plan the meeting, Thomas clicks the Schedule Meetingbutton and clicks the Week button in the Calendar view. He uses the dragand drop function to schedule the meeting for Luc. He plans the meetingnext week from 2 pm to 3 pm. He sets Luc as the person responsible andsets a reminder to be send 2 hours before the start of the meeting. He alsochanges the Next Action Date in the opportunity to the meeting date.
Figure 2.9: Meeting Calendar

16
5. Log an incoming phone call from the customer
Figure 2.10: Incoming (Inbound) Call
A few days later, John Doe calls and Eric, the Product Manager, answers the phone. The customer asksEric if Luc, the Sales Manager, can bring a product catalog when he comes to see him.
Eric enters a summary of the phone call as an inbound call, and links it to The Interior Design Company.
Phone Calls
Eric goes to Sales → Sales → Phone Calls and clicks Inbound, then Newto start entering the call. The call can be entered in the line. In the CallSummary, he enters Bring product catalog on next visit and assigns thecall to The Interior Design Company. He enters a summary of the phonecall in the Description field so that Luc knows exactly what has beendiscussed.
Call Summary
Eric can also click the Form view button to open the call form, so that hecan add a summary of the phone call in the Description field to makesure that Luc knows exactly what has been discussed.
6. Check the history of the customer
To prepare his meeting with The Interior Design Company, Luc checks the related customer form toget the history of all related events.
History
Luc goes to Sales → Address Book → Customers and types Interior in theName field and clicks Search. He clicks the customer to open the form. Onthe History tab, Luc gets an overview of all the events, such as meetingsand phone calls. So he notices that he has to bring a product catalog to themeeting.
7. Convert the opportunity into a sales quotation

17
Figure 2.11: Customer History
During the meeting, the customer The Interior Design Company finally asks to receive a quotation foran Office Desk and Chair. Luc generates the quotation directly from the business opportunity.
Figure 2.12: Product

18
Quotation & Products
Luc opens the opportunity concerned from Sales → Sales → Opportunities.He clicks the Convert to Quote button, then Create to make a quotation thatis automatically linked to the opportunity. Now he can enter the products hewill be selling. Luc has to create a new product, because the desk ordered isa brand new product. From the sales order line, Luc presses the F1 button inthe Product field to create a new product. He enters the data as specifiedin the screenshot. To print the quotation, he clicks Quotation / Order in theReports section at the right side of the screen.
8. Check the pipeline of revenues for the next months
Luc, the Sales Manager, would also like to check the quality of his sales team, and he would like toknow the delay to close the opportunity. He would like to see the average closing time for the House &Design campaign.
Average Closing Time
From the Sales → Reporting → Opportunities Analysis, Luc finds theaverage time taken to successfully respond to a request from a customer inthe Delay to Close field. Instead of using the default grouping by salesman,Luc clicks the Salesman button in the Group by list to no longer group bysalesman, and then he clicks the Campaign button to group by campaign.
9. Convert the quotation into a sales order
After some discussion about the prices, the customer decides to sign a contract. Luc confirms thequotation to turn it into a sales order.
Sales Orders
Luc opens the quotation concerned from Sales → Sales Orders. He clicksthe Quotation button to see no confirmed sales orders. He opens thequotation by clicking the pencil in front of it, and changes the prices. Thenhe clicks the Confirm Order button to turn the quotation into a sales order.To print the sales order, he clicks Quotation / Order in the Reports sectionat the right side of the screen.
Below you find a graphical representation of the sales flow we explained before; the part from quotationto sales order. This view is available in OpenERP. You can open this Process view by clicking thequestion mark next to the Sales Order title.

19
Figure 2.13: From Quotation to Invoice
Figure 2.14: View Buttons
Before going to the next chapter, just a quick word about the different View buttons in OpenERP.The screenshot below shows the kinds of buttons available. Each button represents a different way oflooking at data.
From the opportunities screen, Thomas will click the first List view button to get an overview ofseveral opportunities at a time. When Thomas wants more information about a specific opportunity,he will switch to Form view. Then Thomas decides he wants to see the opportunities in a graphicalrepresentation, so he clicks the Graph (3rd) button to display a graph with the opportunities expressedaccording to Category versus Expected Revenue. He could choose to display the opportunities inCalendar view. Thomas wants to see his meetings in a bar chart representation, and so he clicks theGannt view button. To see a process representation of his marketing campaign, he clicks the Diagramview button.
Please note that this is just an explanation of the different view buttons.

20

21
Part III
RH

22

23
Key Features HR 3This chapter describes OpenERP’s main Human Resources and Employee Servicesfeatures. Most of the solutions discussed after this chapter concern management bybusiness or by project, and depend mostly on analytic accounting, with each business orproject represented by an analytic account.
A company’s effectiveness depends on its employees’ good work. OpenERP’s Human Resourcesmodules enable you to manage important aspects of staff work efficiently, such as their skills, contracts,and working time.
For this chapter, you should start with a fresh database that includes demo data. To configure the HumanResource Application you should check Human Resources in the following configuration wizard.
Figure 3.1: Human Resources Application in the Configuration wizard
3.1 Managing Human Resources
To establish a system that is integrated into the company’s management, you need to start with a currentlist of collaborators.

24 CHAPTER 3. KEY FEATURES HR
Do not confuse employees and users
For OpenERP, “employee” represents all of the physical people whohave a work contract with the company. This includes all types ofcontracts: contracts with both fixed and indeterminate time periods, andalso independent and freelance service contracts.
A “user” is a physical person who is given access to the company’s systems.Most employees are users but some users are not employees: externalpartners can have access to parts of the system.
Here are some examples of functions which depend on the accuracy of the employee list:
• the cost of a service, which depends on the employee’s working contract,
• project planning, which depends on the work pattern of the project contributors,
• the client billing rate, which probably depends on the employee’s job function,
• the chain of command, or responsibilities, which is related to the hierarchical structure of thecompany.
3.1.1 Link employees and OpenERP users to facilitate the managementof rights
To define a new employee in OpenERP, use the menu Human Resources → Employees.
Start by entering the employee’s name in Name and the company that this employee works for inCompany. You can then create a new user of the OpenERP system linked to this employee by filling ina new User form through the User field.
Even if the employee is not a user, it is best if you create a system access for most of your staff just sothat you can control their access rights from the outset (and you can do that through this field if youneed to).
Employee and User link.
If the employee has a user account on the system, you always link his orher user account to the employee form.
Creating this link enables automatic completion to be done on the Employeefield in the relevant forms, such as services and expense records.
Then enter the employee’s address.
This appears in the partner contact form in OpenERP. Since employees are people that have contractswith your company, it is logical that they have entries like any other partner in your database. So enterthe name of the employee as a new partner Name and the address in the Partner Contact section of the

CHAPTER 3. KEY FEATURES HR 25
Figure 3.2: Form describing an employee
General tab. Then all of the functions that apply to a partner can also be applied to an employee. Thisis particularly useful for tracking debits and credits in the accounts – so you can track salary payments,for example.
To help employees encode and validate timesheets and attendances, you can installhr_timesheet_sheet by selecting Timesheets in the Reconfigure wizard. You can then setboth an analytic journal and a linked product to this employee in the Timesheets tab. If you do it thatway, then this information can be used to track services. For now, just complete the form with thefollowing information:
• Analytic Journal : usually a Timesheet Journal,
• Product : a service product that describes how this employee would be charged out, for exampleas Service on Timesheet.
3.1.2 Define employees’ billing prices and costs
To be able to use the timesheets at all, you must first define those employees who are system users. Theemployee definition forms contain the information necessary to use that sheet, such as the job title, andhourly costs.

26 CHAPTER 3. KEY FEATURES HR
Two fields will be of particular interest to you for managing timesheets: the Analytic Journal and theProduct.
All the analytic entries about the costs of service times will be stored in the analytic journal. Theseenable you to isolate the cost of service from other company costs, such as the purchase of rawmaterials, expenses receipts and subcontracting. You can use different journals for each employeeto separate costs by department or by function.
The employee is also associated with a product in your database in OpenERP. An employee is linkedwith a product, so they can be ‘bought’ (subcontracting) or ‘invoiced’ (project management). You haveto create a product for each job type in your company.
The following information is important in the product form:
• Name : Secretary , Salesperson or Project Manager
• Product Type : Service
• Unit of Measure : Hour or Day
• Cost Price
• Sale Price
• Costing Method : either Standard Price or Average Price
Price Indexation
When the Costing Method is Average Price in the Product form, you canhave a button Update, beside the Cost Price field, that opens up a wizardfor changing the cost price.
In summary, each company employee corresponds, in most cases, to:
• a Partner
• an Employee form,
• a System User.
And each company job position corresponds to a Product.

CHAPTER 3. KEY FEATURES HR 27
Time Charge Rates
By default, the hourly cost of an employee is given by the standard cost ofthe product linked to that employee. But if you install the hr_contractmodule, it is possible to manage contracts differently. The hourly cost of theemployee is then automatically calculated from their employment contractwhen they enter their timesheet data.
To do this, the software uses a factor defined in the contract type (forexample, the gross monthly salary, calculated per day). Ideally, this factorshould take into account the salary costs, taxes, insurances and otheroverheads associated with pay.
3.1.3 Define employee categories to assign different Holiday’s rights todifferent employee groups
You must create and assign employee categories for employees in order to be able to assign and manageleave and allocation requests by category. You can define employee categories from Human Resources→ Configuration → Human Resources → Employees → Categories of Employee. For a new category,define its name in Category. A category may also be assigned a Parent Category.
Figure 3.3: Example of categories defined for employees
To link an employee to a category, open the employee form through Human Resources → HumanResources → Employees. In the Categories tab, you can assign more than one category to an employeeby clicking Add and selecting a category.
Now, when you create a new leave or allocation request from the menuitems under Human Resources→ Holidays, if your Leave Category or Allocation Category is By Employee Category, thenyou must choose a pre-defined Category. The request will then be applicable to all those employeeswho belong to the category selected. For example, you can create an allocation request for employeesbelonging to the Trainee category, entitling them to fewer leaves than the rest of the employees.

28 CHAPTER 3. KEY FEATURES HR
Figure 3.4: Assign categories to an employee in the Employee form
3.1.4 Define contract types and wage types with start and end dates forcontracts as well as trial periods
If you install the hr_contract module you can link contract details to the employee record. Theconfiguration wizard to install this module is shown below.
Figure 3.5: Configuration wizard to install hr_contract
Define new contract types at Human Resources → Configuration → Human Resources → Contract →Contract Types.
You may similarly define wage types at Human Resources → Configuration → Human Resources →Contract → Wage Type. Enter the following details in the form:

CHAPTER 3. KEY FEATURES HR 29
Figure 3.6: Contract Types list
• Wage Type Name : A name for the wage type.
• Wage Period : Select a pre-defined wage period. Wage periods are defined at Human Resources→ Configuration → Human Resources → Contract → Wage period.
• Type : Either Gross or Net.
• Factor for hour cost : Used by the timesheet system to compute the price of an hour of workbased on the contract of an employee.
Figure 3.7: Wage Type form
Using Human Resources → Human Resources → Contracts you can create and edit contracts.
You can enter information about the employment contract for the employee, such as:
• Contract Reference
• Job Title
• Working Schedule
• Start Date
• End Date
• Wage Type : Select one from pre-defined wage types.
• Contract Type : Select one from pre-defined contract types.

30 CHAPTER 3. KEY FEATURES HR
Figure 3.8: Definition of a working contract for a given employee
• Trial Start Date : Start date for the contract trial period, if any.
• Trial End Date : End date for the contract trial period, if any.
3.1.5 Manage attendance (Sign in / Sign out)
In some companies, staff have to sign in when they arrive at work and sign out again at the end of theday. If each employee has been linked to a system user, then they can sign into OpenERP by using themenu Human Resources → Attendances → Sign in / Sign out.
If an employee has forgotten to sign out on leaving, the system proposes that they sign out manuallyand type in the time that they left when they come in again the next day. This gives you a simple wayof managing forgotten sign-outs.
Find employee attendance details from their forms in Human Resources → Employees.
To get the detail of attendances from an employee’s form in OpenERP, you can use the available reports:
• Attendances By Month
• Attendances By Week
• Attendance Error Report
CHAPTER 3. KEY FEATURES HR 31
The last report highlights errors in attendance data entry. It shows you whether an employee has enteredthe time of entry or exit manually and the differences between the actual and expected sign out timeand the sign in time.
The second report shows the attendance data for the selected month.
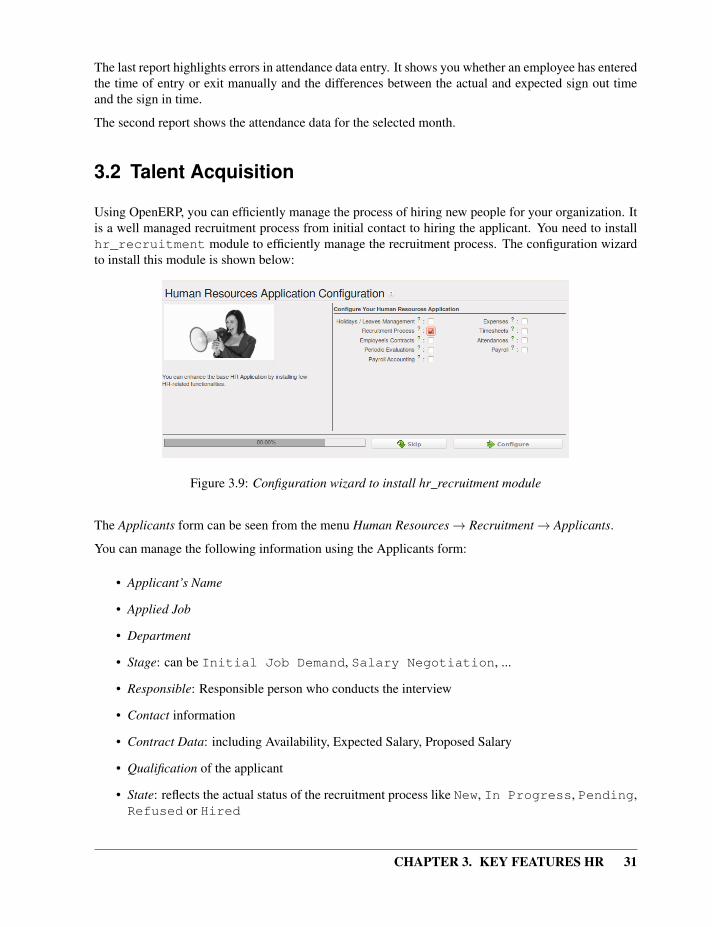
3.2 Talent Acquisition
Using OpenERP, you can efficiently manage the process of hiring new people for your organization. Itis a well managed recruitment process from initial contact to hiring the applicant. You need to installhr_recruitment module to efficiently manage the recruitment process. The configuration wizardto install this module is shown below:
Figure 3.9: Configuration wizard to install hr_recruitment module
The Applicants form can be seen from the menu Human Resources → Recruitment → Applicants.
You can manage the following information using the Applicants form:
• Applicant’s Name
• Applied Job
• Department
• Stage: can be Initial Job Demand, Salary Negotiation, ...
• Responsible: Responsible person who conducts the interview
• Contact information
• Contract Data: including Availability, Expected Salary, Proposed Salary
• Qualification of the applicant
• State: reflects the actual status of the recruitment process like New, In Progress, Pending,Refused or Hired
32 CHAPTER 3. KEY FEATURES HR
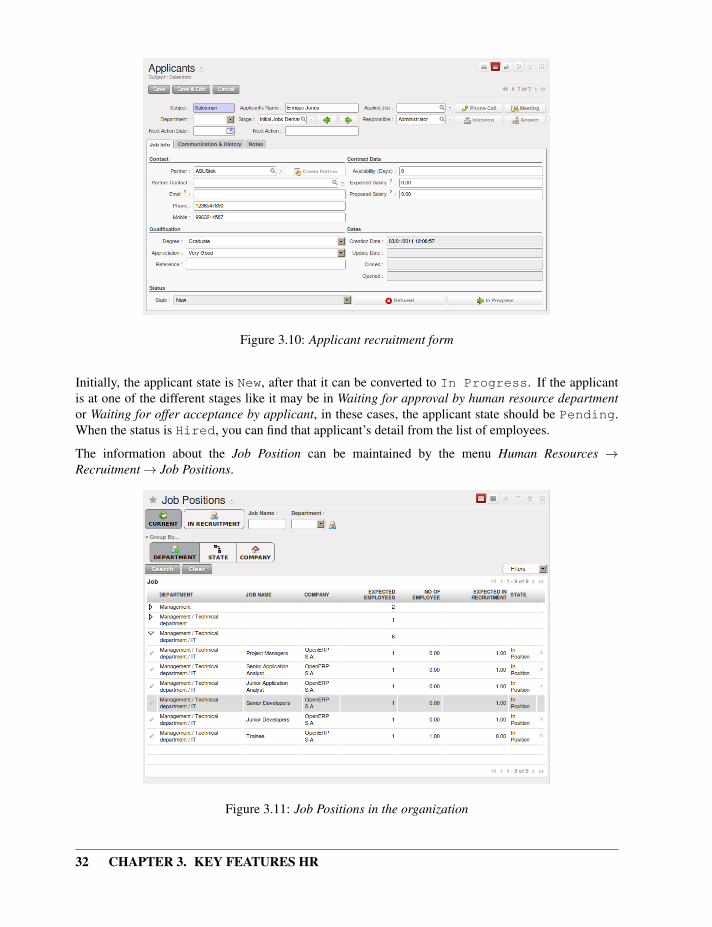
Figure 3.10: Applicant recruitment form
Initially, the applicant state is New, after that it can be converted to In Progress. If the applicantis at one of the different stages like it may be in Waiting for approval by human resource departmentor Waiting for offer acceptance by applicant, in these cases, the applicant state should be Pending.When the status is Hired, you can find that applicant’s detail from the list of employees.
The information about the Job Position can be maintained by the menu Human Resources →Recruitment → Job Positions.
Figure 3.11: Job Positions in the organization

CHAPTER 3. KEY FEATURES HR 33
The key features of OpenERP for the process of hiring new people using hr_recruitment moduleare:
• It manages job positions and the recruitment process.
• It is integrated with the survey module to allow you to define interviews for different jobs.
• This module is integrated with the mail gateway to automatically track emails sent [email protected].
• It is also integrated with the document management system to store and search CVs in your CVbase.
You can analyse data of recruitment process through the menu Human Resources → Reporting →Recruitment Analysis.
3.2.1 Create applicants automatically based on incoming mail and keeptrack of attachments such as resumes and cover letters
You have seen how to create new applicants from the Applicants form. You can also configure youremail server in OpenERP to create new applicants based on incoming mails. For example, if you havean e-mail ID [email protected], you can configure it such that all emails received at this IDautomatically generate new job applicants.
For this, you have to install the fetchmail module by using the Reconfigure wizard and configuringFetch Emails for installation in the CRM Application Configuration section.
Navigate to Sales → Configuration → Emails → Email Servers and click New. Supply the followinginformation in the Email Servers form:
• Name : A name for the server configuration.
• Server Type : Either POP Server or IMAP Server.
• Add Attachment : Set to True, to be able to retrieve attachments like CVs, cover letters, etc.
• Server : Server name.
• Port : Server port.
• User Name : The username on this e-mail server.
• Password : The password for access to this e-mail account.
• Model : The object model for which you wish to generate a record. Select Applicant(hr.applicant) in this case.
After configuring your server, click the Confirm button to enable this configuration and start receivinge-mails.
Whenever you receive a new e-mail at the configured e-mail address, a new applicant record is createdhaving the same subject name as the e-mail subject. The applicants e-mail details are stored too, for

34 CHAPTER 3. KEY FEATURES HR
Figure 3.12: Configuring an e-mail server
future correspondence. You can add more details to this job application. You can view these newlycreated applicants from Human Resources → Recruitment → Applicants and by clicking the Clearbutton to clear all filters. In the figure Job applicants automatically created from e-mails (page 34), thetop three applicants have been created automatically from received e-mails.
Figure 3.13: Job applicants automatically created from e-mails

CHAPTER 3. KEY FEATURES HR 35
Because you have configured your server to add attachments, if an incoming applicant e-mail containsattachments, it will be linked to the corresponding applicant record. You can find it in the Attachmentssection at the right of the applicant form. You can click on the attachment name to open it.
Figure 3.14: Applicant form with its corresponding attachments
3.2.2 Define stages to track the progress in the recruitment process
Rarely will a recruitment process end after just a single meeting or a phone call. It is in fact a string ofstages through which a recruitment progresses in order to bear a favourable outcome. You can define thestages which a recruitment process would undergo. Use the menu Human Resources → Configuration→ Recruitment → Stages to define various stages.
Figure 3.15: Defining recruitment stages
You must give the stage a Name. Use the Sequence field to give a sequence order when displaying alist of stages. You may also associate the stage with a Department. The stages that you have definedthen become available in the Applicants form’s Stage field. Using this, you can qualify an ongoingrecruitment process from one stage to another.

36 CHAPTER 3. KEY FEATURES HR
3.2.3 Define next action and next action dates
The Next Action Date and Next Action fields on the Applicants form let you define an action you wouldlike to initiate on a given date. It serves as a reminder to the recruitment officer regarding what step hemust take next and on which date.
3.2.4 Track the history of the e-mail communication with the applicant
Using the Communication & History tab in the Applicants form, you can add notes for internal referenceor send e-mails to the applicant. You can also view the history of communication and notes for arecruitment application in the History section. If you specify e-mail addresses in the Global CC field,these e-mail addresses will be added to the CC field of all inbound and outbound e-mails for this recordbefore being sent. You can separate multiple e-mail addresses with a comma.
To create an internal note, click the Add Internal Note button. Add a note description in the popup thatappears. You also have a choice to change the application state at this stage. Click Add to save the noteand see it listed in the History section.
To send an e-mail to the applicant, click the Send New Email button. In the popup, you must enter thefollowing:
• From : E-mail address used to send an e-mail.
• Reply To : E-mail address for receiving a reply.
• To : The applicants e-mail address
• Subject : Subject of the e-mail. By default, it takes the subject of the recruitment application.
• Message : The message to send in the e-mail.
Here too, you have a choice to change the application state. You may also add attachments through theAttachments tab in the popup. Click Send to send the e-mail. You can see a listing of the correspondenceas shown in the figure below:
3.2.5 Plan phone calls or appointments
One of the advantages of using the hr_recruitmentmodule is that you can plan and organise phonecalls to and appointments with prospective employees. This is made possible due to its integration withcrm module’s Phone Calls and Meetings features.
You can schedule a phone call from the Applicants form by clicking the Phone Call button. This bringsup a popup as shown below:
You can enter the following details in the popup:
• Assign To : The user who is responsible for making the call.
• Planned Date : The scheduled date and time to make the call.

CHAPTER 3. KEY FEATURES HR 37
Figure 3.16: Send an e-mail to the applicant
Figure 3.17: History of communication for the recruitment application
Figure 3.18: Schedule an outbound phone call to an applicant

38 CHAPTER 3. KEY FEATURES HR
• Goals : The agenda of the phone call.
• Category : Whether the call is Outbound (default) or Inbound.
You can then click the Schedule Phone Call button to create a plan for making the call. If the Categoryof your phone call is Outbound, the Outbound form opens where you may add additional details.Once you have made the phone call, you can enter the Duration as well and click the Held button. Youcan track and evolve your plans of phone calls to an applicant from Sales → Phone Calls → Outbound.
Figure 3.19: Details of an outbound phone call to an applicant
Just like you schedule phone calls, you can also schedule meetings with an applicant. To do this, clickthe Meeting button on the Applicants form. A calendar of meetings opens in the Meetings form. Here,you click an empty area on a date for which you wish to schedule the meeting. A popup appears asshown below:
You can manage the following details from this form:
• Summary : Is the recruitment application subject by default, although you can change it.
• Start Date : The scheduled start date and time.
• End Date : The scheduled end date and time.
• Duration : The duration of the meeting in hours.
• Location : Location of the meeting.
• Reminder : If you want to be reminded about the meeting, you can select an alarm time beforethe event occurs.
• Description : You may specify the agenda of the meeting here.

CHAPTER 3. KEY FEATURES HR 39
Figure 3.20: Schedule a meeting with an applicant
On the Invitation Detail tab, you also have the choice to invite people for the meeting. Click Save onceyou have entered the necessary details. You can then see the meeting appear in the calendar as shownbelow:
Figure 3.21: The scheduled meeting “Trainee - MCA” with the applicant as seen in the calendar
You can track and edit your meetings with applicants from the menu Sales → Meetings → Meetings.By default, you will see the month-wise calendar view of meetings.

40 CHAPTER 3. KEY FEATURES HR
3.2.6 Fill questionnaires for each applicant (for instance preliminaryquestionnaires)
You can use questionnaires as a tool to interview a job applicant. To be able to use questionnaires fora job applicant you must first define one through Tools → Surveys → Define Surveys → Survey. ClickNew to open a new survey form. You may enter the Survey Title and the Responsible user for the survey.
Figure 3.22: The survey form
A survey may have multiple pages. Each page may contain multiple questions and each question mayhave multiple answers. Different users may give different answers to the questions. You can definethese in the Survey tab of the form. When you have entered the necessary details in the form, clickSave. Since you will use this survey in a job interview, click the Open button to change the survey’sstate from Draft to Open.
Then, go to Human Resources → Recruitment → Job Positions and select the job position that theapplicant has applied for, or create a new job position. In the Survey field of the Job Positions form,enter the name of the survey you have just created, thus linking a questionnaire with this job profile andmaking it available for use during the interview.
You can now open the form of the applicant whose interview you wish to initiate. If an Applied Jobis specified to which a survey is linked, the Answer button becomes accessible. Click it to initiate thesurvey, and fill in the applicant’s response as you proceed. After the questionnaire has been completed,

CHAPTER 3. KEY FEATURES HR 41
you can click the Interview button on the Applicants form to view the applicant’s response in a PDFfile.
Figure 3.23: The applicant’s response in a PDF file
3.3 Holiday Management
You can manage leaves taken by employees using the hr_holidays module. The configurationwizard to install this module is shown below:
Using the menu Human Resources → Holidays → Leave Requests an employee can request a leave.
Leaves requests can be recorded by employees and validated by their managers. Once a leave requestis validated, it appears automatically in the agenda of the employee. You can define several allocationtypes (paid holidays, sickness, etc.) and manage allocations per type.
OpenERP can provide the following features for efficient holiday management process:
• It helps you to manage leaves and leave requests.

42 CHAPTER 3. KEY FEATURES HR
Figure 3.24: Configuration wizard to install hr_holidays module
• Synchronisation with an internal agenda (use of crm) is possible: in order to automatically createa case when a holiday request is accepted, you have to link the holidays status to a case section.
• You can set up colour preferences according to your leave type, for example, Sick Leave shouldbe red in reports.
• An employee can request for more days off, by making a new Allocation Request through HumanResources → Holidays → Allocation Requests.
The statistical report for leaves can be seen using the Human Resources → Reporting → Holidays →Leaves Analysis menu.
3.3.1 Define different leave types
You can define various leave types which can be availed of by an employee during a request for leave.To define a new leave type, navigate to Human Resources → Configuration → Holidays → Leave Typeand click New.
Figure 3.25: Leave Type form
You can configure the following information:
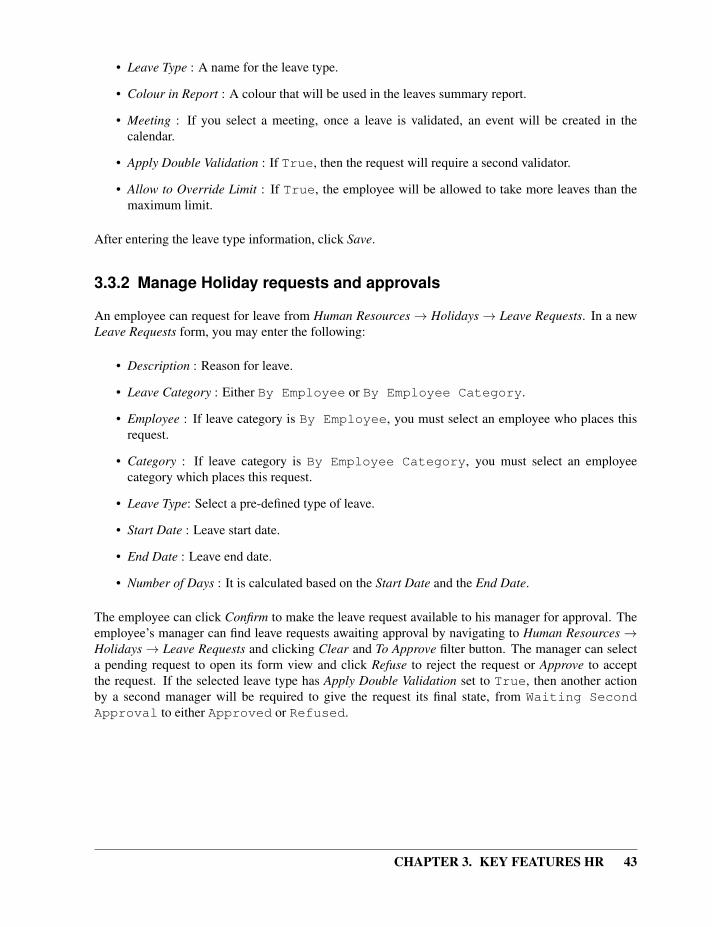
CHAPTER 3. KEY FEATURES HR 43
• Leave Type : A name for the leave type.
• Colour in Report : A colour that will be used in the leaves summary report.
• Meeting : If you select a meeting, once a leave is validated, an event will be created in thecalendar.
• Apply Double Validation : If True, then the request will require a second validator.
• Allow to Override Limit : If True, the employee will be allowed to take more leaves than themaximum limit.
After entering the leave type information, click Save.
3.3.2 Manage Holiday requests and approvals
An employee can request for leave from Human Resources → Holidays → Leave Requests. In a newLeave Requests form, you may enter the following:
• Description : Reason for leave.
• Leave Category : Either By Employee or By Employee Category.
• Employee : If leave category is By Employee, you must select an employee who places thisrequest.
• Category : If leave category is By Employee Category, you must select an employeecategory which places this request.
• Leave Type: Select a pre-defined type of leave.
• Start Date : Leave start date.
• End Date : Leave end date.
• Number of Days : It is calculated based on the Start Date and the End Date.
The employee can click Confirm to make the leave request available to his manager for approval. Theemployee’s manager can find leave requests awaiting approval by navigating to Human Resources →Holidays → Leave Requests and clicking Clear and To Approve filter button. The manager can selecta pending request to open its form view and click Refuse to reject the request or Approve to acceptthe request. If the selected leave type has Apply Double Validation set to True, then another actionby a second manager will be required to give the request its final state, from Waiting SecondApproval to either Approved or Refused.

44 CHAPTER 3. KEY FEATURES HR
Figure 3.26: Leave Requests form
3.3.3 Track previous Holiday requests
Previous holidays can be tracked in a number of ways in OpenERP. You can get a report of leaverequests by all users from Human Resources → Holidays → Leave Requests. Click Clear and thenValidated to see a list of all approved leave requests. To see refused requests, click Clear and see therecords marked with the colour red.
To see previous allocation requests, navigate to Human Resources → Holidays → Allocation Requestsand follow the same procedure as above.
Through Human Resources → Holidays → Leaves Summary, you can track previous leaves as well asallocation requests in the same manner, but only for the currently logged in user. By default, you cansee the requests grouped by leave type.
Human Resources → Reporting → Holidays → Leaves Analysis will give you the statistical report ofleaves and allocations grouped by employee and leave type. To see all requests without grouping, clickClear.
All the above statistical reports are enhanced by various filters and groupings to assist you in your searchfor required information. You can filter requests by their State (Validated, To Confirm, To Approve),Employee, Department and Leave Type. You can also view requests placed in This Month. You cangroup by Employee, Manager, Department, Type and State.
To get an overview of leaves by department, go to Human Resource → Reporting → Holidays →Leaves by Department. You may select a From date, a Leave Type (Validated, Confirmed orBoth Validated and Confirmed) and select atleast one department. Click Print to generate aPDF report based on your specifications.

CHAPTER 3. KEY FEATURES HR 45
Figure 3.27: Leaves Analysis statistical report
Figure 3.28: Leaves by Department PDF report

46 CHAPTER 3. KEY FEATURES HR
3.3.4 Allow employees to enter their own allocation requests
To be able to request leaves at all, an employee must be allocated some leaves which he can avail of.Usually the management makes an allocation of leaves for its employees. But, for instance, when anemployee has been working on an exceptional basis on weekends, he might be entitled to extra leaves.In such a case, the employee himself can be allowed to place a request for allocation, which can then beapproved or rejected by his manager. If approved, the employee can request leaves based on the typeand limit of this allocation too.
Leave allocations can be requested from Human Resources → Holidays → Allocation Requests. In itsform view you can fill the following details:
• Description : A name for the request.
• Allocation Category : Either By Employee or By Employee Category.
• Employee : If allocation category is By Employee, you must select an employee for whomthis allocation is made.
• Category : If allocation category is By Employee Category, you must select an employeecategory for whom this allocation is made.
• Leave Type : Select a pre-defined leave type.
• Number of Days : The number of days requested for allocation.
• Reasons : Specify the reason of request.
The remaining fields are read-only and will acquire details once the request has been accepted orrejected. The employee can click Confirm to send the allocation request to his manager. The stateof the request will now be Waiting Approval.
The manager will then find this request in his list of allocation requests. He can then either click Refuseto reject the request or click Approve to accept the request.

CHAPTER 3. KEY FEATURES HR 47
Figure 3.29: Allocation Requests form
3.4 Inspire your People through Assessments
A motivated workforce of people can give the best outcome for an organization. OpenERP can maintainthis motivational process by periodical evaluation of employees’ performance.
The regular assessment of human resources can benefit your people as well your organization. Forefficient periodical evaluation of employees’ performance, you need to install the hr_evaluationmodule. The configuration wizard to install this module is shown below:
Figure 3.30: Configuration wizard to install hr_evaluation module
To create and manage new evaluations, you can use the menu Human Resources → Evaluations →Evaluations.
Each employee can be assigned an evaluation plan. These plans define the frequency and the way you

48 CHAPTER 3. KEY FEATURES HR
Figure 3.31: Employee Evaluation form
manage your periodic personal evaluation. You will be able to define steps and attach interview formsto each step. OpenERP manages all kinds of evaluations: bottom-up, top-down, self evaluation andfinal evaluation by the manager.
The main features of the evaluation process covered by OpenERP are as follows:
• Ability to create employees evaluation.
• An evaluation can be created by an employee for subordinates, juniors as well as his manager.
• The evaluation is done under a plan in which various surveys can be created. Each survey can beanswered by a particular level of employee hierarchy. The final review and evaluation is done bythe manager.
• Every evaluation filled by employees can be viewed through a PDF form.
• Interview Requests are generated automatically by OpenERP according to employees evaluationplans. Each user receives automatic emails and requests to perform evaluation of their colleaguesperiodically.
You can analyse evaluation data through the menu Human Resources → Reporting → EvaluationsAnalysis.
3.4.1 Define different evaluation categories
You can create new evaluation plans from Human Resources → Configuration → Periodic Evaluations→ Evaluation Plans. Click New and fill in the following details:
• Evaluation Plan : A name for the evaluation plan.

CHAPTER 3. KEY FEATURES HR 49
• First Evaluation in (months) : This will be used to schedule the first evaluation date of theemployee when selecting an evaluation plan.
• Periodicity of Evaluations (months) : This depicts the delay between each evaluation of this plan(after the first one).
Figure 3.32: Evaluation Plans form
You must also create Evaluation Plan Phases, to let your plan evolve from one stage to another and beable to take appropriate action at every stage, like sending an e-mail. You can configure the followingsettings in an evaluation plan phase:
• Phase : A name for the evaluation plan phase.
• Wait Previous Phases : Set to True if you want all preceding phases to finish before launchingthis phase.
• Sequence : The sequence number of this phase.
• Action : Select an action, either Top-Down Appraisal Requests, Bottom-UpAppraisal Requests, Self Appraisal Requests or Final Interview.
• Appraisal Form : The survey to link to this phase.
If you use the GTK-client, it will be possible to open the form view of an evaluation plan phase. Hereyou will be able to customize more settings, like whether you would like to send an e-mail for thisphase and the corresponding layout for it. You can also choose to send the results (answers) of thisphase to the managers and employees.
3.4.2 Plan assessment dates
Once an evaluation plan is created, you can use it in an evaluation of an employee. Create a newevaluation from Human Resources → Evaluations → Evaluations. Select an Employee for whom thisevaluation is being designed and select a Plan too. Here you must specify a deadline for the evaluationin the Evaluation Deadline field.

50 CHAPTER 3. KEY FEATURES HR
Although, evaluation reminders are sent based on the First Evaluation in (months) and Periodicity ofEvaluations (months) fields in Evaluation Plans form. You can use these to regulate assessment datesof evaluations that utilize a corresponding plan.
3.4.3 Link survey and job evaluations
An evaluation plan is a sequence of phases, and each phase is linked to an appraisal form. This appraisalform is nothing but a survey, a tool for assessment through a questionnaire. Surveys are defined atTools → Surveys → Define Surveys → Surveys. When an evaluation is started, interview requests areautomatically created based on evaluation plans. If you create additional interview requests, there tooyou have to link the interview to a Survey. You may link to a survey that is any state (even Draft), butin order to start the interview, the linked survey must be in Open state.
3.5 Attendances and Timesheet Management
In most service companies where OpenERP has been integrated, service sheets, or timesheets, haverevolutionized management practices. These service sheets are produced by each employee as theywork on the different cases or projects that are running. Each of these is represented by an analyticaccount in the system.
Throughout the day, when employees work on one project or another, they add a line to the timesheetswith details of the time used on each project. At the end of the day, each employee must mark all thetime worked on client or internal projects to make up the full number of hours worked in the day. If anaccount is not in the system, then the time is added to the hours that have not been assigned for the day.
Figure 3.33: Timesheet for a working day
The figure Timesheet for a working day (page 50) gives an example of a timesheet for an employee.

CHAPTER 3. KEY FEATURES HR 51
Do not confuse timesheets and attendance compliance
The timesheet system is not intended to be a disguised attendance form.There is no control over the service times and the employee is free to encode8 or 9 hours or more of services each day if they want.
If you decide to put such a system into place, it is important to clarify thispoint with your staff. The objective here is not to control hours, becausethe employees decide for themselves what they will be entering – but totrack the tasks running and the allocation of costs between them is theresponsibility of the management.
To enable your system with all the features related to Timesheet, your configuration wizard should belike this.
Figure 3.34: Configuration wizard for Timesheet
Amongst the many uses of such a timesheet system for a company, here are some of the most important:
• enabling tracking of the true costs of a project by accounting for the time used on it,
• tracking the services provided by different employees,
• comparing the hours really used on a project with the initial planning estimates,
• automatically invoicing based on the service hours provided,
• obtaining a list of the service hours for a given client,
• knowing the costs needed to run the company, such as the marketing costs, the training costs fora new employee, and the invoicing rates for a client.
Timesheet Categories
You will need to install the Manufacturing application (mrp) in order to access timesheet categories.The different timesheet categories (working time sessions) can be defined through the menu

52 CHAPTER 3. KEY FEATURES HR
Figure 3.35: Timesheet category for full time 38 hours per week
Manufacturing → Configuration → Resources → Working Period and selecting one of the groupsthere such as 38 Hours/Week.
Entering Timesheet Data To be able to use timesheets fully, install the modulehr_timesheet_sheet through the Reconfigure wizard by selecting Timesheets and clickingConfigure. Once this module has been installed and the employees configured, the different systemusers can enter their timesheet data in the menu Human Resources → Time Tracking → WorkingHours, then click New.
Shortcut to Timesheets
It is a good idea if all employees who use timesheets place this menu intheir shortcuts. That is because they will need to return to them severaltimes each day.
For a new entry:
1. The User : proposed by default, but you can change it if you are encoding the first timesheet foranother company employee.
2. The Date : automatically proposed as today’s date, but it is possible to change it if you areencoding the timesheet for a prior day.
3. Analytic Account : for the project you have been working on - obviously it should be predefined.
4. Description : a free text description of the work done in the time.
5. Quantity : number of units of time (the units are defined as part of the product).

CHAPTER 3. KEY FEATURES HR 53
The other fields are automatically completed, but can be modified: the Product which is the serviceproduct such as consultancy, the Unit of Measure (predefined, and could perhaps be minutes, hours ordays), the Cost of the service (which is calculated by default), and the associated General Account.
The hours are then encoded throughout the day by each employee. It helps to revisit the list at the endof the day to verify that the number of hours of attendance in the company has been properly accountedfor. The total entered is shown at the bottom right of the list of service hours.
Hiding Service Costs
By default, OpenERP is configured to show the cost of each service whenan employee encodes the number of hours per project. You can modify thisfield by adding the attribute invisible=True in the timesheet view.
(And the way to do that is either to modify the view on the file system, orto use the web client to modify the view in the current database. For thelatter, there is a pale grey [Customize] label to the bottom left of each formthat gives you access to the Manage Views option. If you have sufficientpermissions, you can edit the XML that defines the current view.)
The value in the cost field shows employees the cost of their time used inthe company, so masking this field might not always be the best option.
The accuracy of the services entered is crucial for calculating the profitability of the different jobs andthe recharging of services. Different reports are therefore available for verifying employees’ data entry.Employees can verify their own timesheet using the following reports:
• Printing the particular employee’s timesheet, using the menu Human Resources → Reporting →Timesheet → Employee Timesheet.
• Printing more than one employees’ timesheet, using the menu Human Resources → Reporting→ Timesheet → Employees Timesheet.You can print a summary in the form of a table per userand per day.
Figure 3.36: Employees’ monthly summary timesheet

54 CHAPTER 3. KEY FEATURES HR
• Reviewing profit of timesheet, using the menu Human Resources → Reporting → Timesheets →Timesheet Profit.
• You can then use the statistical reports to analyze your services by period, by product or byaccount using the menu Human Resources → Reporting → Timesheets → Timesheet Analysisand Human Resources → Reporting → Timesheets → Timesheet Sheet Analysis.
Figure 3.37: Chart of timesheet by account
The data making up these list views can be varied using the filters available in the upper part of thescreen. If you want to see more detail, switch to the graph view. Evaluation of Service Costs
You already know that timesheets are closely linked with analytic accounts. The different projectsreported on the timesheets correspond to analytic accounts. The timesheet entries themselves areanalytic entries.
These entries comprise various analytic operations that do not correspond to any of the generalaccounts. Therefore all operations that modify and create timesheet lines automatically impact thecorresponding analytic line and, conversely are automatically modified by changes in that line.
Timesheets and Analytical Data
The implementation of timesheets in OpenERP relating to analytic entriesis managed by an inheritance mechanism: the timesheet object inherits theanalytic entry object.
The information is therefore not encoded into the database as two separateevents, which avoids many synchronization problems. They are stored intwo different tables, however, because a service is an analytical entry, butan analytical entry is not necessarily a service.

CHAPTER 3. KEY FEATURES HR 55
This is not a classical approach, but it is logical and pragmatic. Employee timesheets are a goodindication of how the costs of a service enterprise are spread across different cases, as reported in theanalytic accounts. An analytic account should be reflected in the general accounts, but there is nodirect counterpart of these analytic accounts in the general accounts. Instead, if the hourly costs of theemployees are correctly accounted for, the month’s timesheet entries should be balanced by the salary+ benefits package paid out to all the employees at the end of the month.
Despite all this, it is quite difficult to work out the average hourly cost of an employee precisely, becauseit depends on:
• the extra hours that they have worked,
• holidays and sickness,
• salary variations and all the linked costs, such as social insurance charges.
The reports that enable you to relate general accounts to analytic accounts are valuable tools forimproving your evaluation of different hourly costs of employees. The difference between productbalances in the analytic account and in the general accounts, divided by the total number of hoursworked, can then be applied to the cost of the product. Some companies adjust for that difference bycarrying out another analytic operation at the end of the month in an account created for that purpose.This analytic account should have a balance that tends towards zero.
Because you have got a system with integrated timesheets, you can then:
• track the profitability of projects in the analytic accounts,
• look at the history of timesheet entries by project and by employee,
• regularly adjust hourly costs by comparing your rates with reality,
Project Cost Control
Controlling the costs and the profitability of projects precisely is veryimportant.
It enables you to make good estimates and to track budgets allocated todifferent services and their projects, such as sales and, R&D costs. You canalso refine your arguments on the basis of clear facts rather than guessesif you have to renegotiate a contract with a customer following a projectslippage.
The analyses of profitability by project and by employee are available from the analytic accounts. Theytake all of the invoices into account, and also take into account the cost of the time spent on each project.
3.5.1 Manage attendance through Sign in / Sign out
In some companies, staff have to sign in when they arrive at work and sign out again at the end of theday. If each employee has been linked to a system user, then they can sign in on OpenERP by using the

56 CHAPTER 3. KEY FEATURES HR
menu Human Resources → Attendances → Sign in / Sign out.
If an employee has forgotten to sign out on leaving, the system proposes that they sign out manuallyand type in the time that they left when they come in again the next day. This gives you a simple wayof managing forgotten sign-outs.
Find employee attendance details from their forms in Human Resources → Employees.
To get the detail of attendance from an employee’s form in OpenERP, you can use the available reports:
• Attendances By Month
• Attendances By Week
• Attendance Error Report
The last report highlights errors in attendance data entry. It shows you whether an employee has enteredthe time of entry or exit manually and the differences between the actual and expected sign out timeand the time.
3.5.2 Keep track of differences between timesheets and attendance
When they are used properly, timesheets can be a good control tool for project managers and canprovide awareness of costs and times.
When employee teams are important, a control system must be implemented. All employees shouldcomplete their timesheets correctly because this forms the basis of planning control, and the financialmanagement and invoicing of projects
You will see in ch-services that you can automatically invoice services at the end of the month based onthe timesheet. But at the same time, some contracts are limited to prepaid hours. These hours and theirdeduction from the original limit are also managed by these timesheets. In such a situation, hours thatare not coded into the timesheets represent lost money for the company. So it is important to establisheffective follow-up of the services timesheets and their encoding. To set up a structure for control usingtimesheets you should install the module hr_timesheet_sheet (Timesheets in the Reconfigurewizard).
This module supplies a new screen enabling you to manage timesheets by period. Timesheet entriesare made by employees each day. At the end of the week, employees validate their week’s sheet and itis then passed to the services manager, who must approve his team’s entries. Periods are defined in thecompany forms, and you can set them to run monthly or weekly.
To enter timesheet data each employee uses the menu Human Resources → Time Tracking → MyTimesheet.
In the upper part of the screen, the user starts with the sign-in and sign-out times. The system enablesthe control of attendance day by day. The two buttons Sign In and Sign Out enable the automaticcompletion of hours in the area to the left. These hours can be modified by employee, so it is not a truemanagement control system.
The area to the bottom of the screen represents a sheet of the employee’s time entries for the selectedday. In total, this should comprise the number of hours worked in the company each day. This providesa simple verification that the whole day’s attendance time has been entered properly.

CHAPTER 3. KEY FEATURES HR 57
Figure 3.38: Process of approving a timesheet
The second tab of the timesheet, By Day, gives the number of hours worked on the different projects.When there is a gap between the attendance and the timesheet entries, you can use the second tab todetect the days or the entries that have not been correctly entered.
The action Timesheet by Account shows the time worked on all the different projects. That enables youto step back to see an overview of the time an employee has worked spread over different projects.
At the end of the week or the month, the employee confirms his timesheet. If the attendance time inthe company corresponds to the encoded entries, the whole timesheet is then confirmed and sent to hisdepartment manager, who is then responsible for approving it or asking for corrections.
Each manager can then look at a list of his department’s timesheets waiting for approval using the menuHuman Resource → Reporting → Timesheet → Timesheet Sheet Analysis by applying the proper filters.He then has to approve them or return them to their initial state.

58 CHAPTER 3. KEY FEATURES HR
Figure 3.39: Form for entering timesheet data
To define the departmental structure, use the menu Human Resources → Configuration → HumanResources → Departments.
Timesheet Approval
At first sight, the approval of timesheets by a department manager canseem a bureaucratic hindrance. This operation is crucial for effectivemanagement, however. We have too frequently seen companies in thesituation where managers are so overworked that they do not know whattheir employees are doing.
So this approval process supplies the manager with an outline of eachemployee’s work at least once a week. And this is carried out for the hoursworked on all the different projects.
Once the timesheets have been approved, you can then use them for cost control and for invoicing hours

CHAPTER 3. KEY FEATURES HR 59
Figure 3.40: Detail of hours worked by day for an employee
to clients.
Contracts and their rates, planning, and methods of invoicing are the object of the following chapter,ch-services.
3.6 Keeping Track of Expenses
Employee expenses are charges incurred on behalf of the company. The company then reimburses theseexpenses to the employee. The receipts encountered most frequently are:
• car travel, reimbursed per unit of distance (mile or kilometer),
• subsistence expenses, reimbursed based on the bill,
• other purchases, such as stationery and books, destined for the company but carried out by theemployee.
Expenses generated by employees are grouped into periods of a week or a month. At the end ofthe period, the employee confirms all of his expenses and a summary sheet is sent to the departmentmanager. The manager is responsible for approving all the expense requests generated by his team. Theexpense sheet must be signed by the employee, who also attaches its receipts to the expense sheet.
Once the sheet has been approved by the head of department, it is sent to the Accounting department,which registers the company’s liability to the employee. Accounting can then pay this invoice andreimburse the employee who originally advanced the money.
Some receipts are for project expenses, so these can then be attached to an analytic account. The costsincurred are then added to the supplementary cost of the analytic account when the invoice is approved.

60 CHAPTER 3. KEY FEATURES HR
Figure 3.41: Process for Dealing with Expense Reimbursements
You often need to invoice expenses to a customer, depending on the precise contract that has beennegotiated. Travelling and subsistence expenses are generally handled this way. These can be chargedto the customer at the end of the month if the contract price has been negotiated inclusive of expenses.
If you have to go through many steps to reclaim expenses, it can all quickly become too cumbersome,especially for those employees who claim large numbers of different expense lines. If you have got agood system that integrates the management of these claims, such as the one described, you can avoidmany problems and increase staff productivity.
If your systems handle expenses well, then you can avoid significant losses by setting your terms ofsales effectively. In fixed-price contracts, expense reimbursements are usually invoiced according tothe actual expense. It is in your interest to systematize their treatment, and automate the process to themaximum, to recharge as much as you are contractually able.

CHAPTER 3. KEY FEATURES HR 61
3.6.1 Allow employees to enter professional expenses
Install the module hr_expense to automate the management of expense claims. The configurationwizard to install this module is shown below.
Figure 3.42: Configuration wizard to install hr_expense module
Users can then enter and review their expenses using the menu Human Resources → Expenses →Expenses.
Figure 3.43: Expenses form to enter and review expenses
Create templates for the various expenses accepted by the company using OpenERP’s product form.You could, for instance, create a product with the following parameters for the reimbursement of travelexpenses by car at 0.25 per kilometer:
• Name : Car travel ,

62 CHAPTER 3. KEY FEATURES HR
• Default Unit Of Measure : km ,
• Cost Price : 0.25 ,
• Sale Price : 0.30 ,
• Product Type : Service .
The employee keeps his expenses sheet in the Draft state while completing it throughout the period.At the end of the period (week or month), the employee can confirm his expense form using the Confirmbutton on the form. This puts it into the state Waiting Approval .
3.6.2 Track the approval management process
At the end of the period, the department manager can access the list of expense forms awaiting approvalusing the menu Human Resources → Expenses → Expenses.
The department manager can then approve the expenses. Now, the Invoice button is visible which onclicking creates a supplier invoice in the employee’s name so that the employee can be reimbursed. Ananalytic account is coded onto each line of the invoice. When the invoice is confirmed, general andanalytic accounting entries are automatically generated as they would be with any other invoice.
3.6.3 Rebill customers through analytical accounts
If you base your invoicing on service time or analytic costs, the expense will automatically be chargedto the customer when the customer invoice is generated for services associated with the project.
Invoicing from timesheets allows you to prepare all your invoices, both expenses and timesheets for aproject’s customer.
You can view the statistical analysis of expenses using menu Human Resources → Reporting →Expenses Analysis.

63
Part IV
Process

64

65
Process 4If you have reached this far in the book, your mind may well be reeling with the numberof new documents (based on business objects) and processes that you need to encounter tomodel and manage your business.
OpenERP’s process module, which is installed automatically when a process-awaremodule is installed, shows you cross-functional processes and technical workflowsfor those nodes in the process that have them. This visualization is invaluable fordocumentation - but it also goes a step further. You can modify processes and workflowsand even generate entirely new processes and workflows for your various document types.
If your starting point is a specific document, such as an invoice or order, then you will alsobe shown the exact position of that document on its process and workflow diagrams.
For this chapter you should start with a fresh database that includes demonstration data, with sale andits dependencies installed and no particular chart of accounts configured. process is one of thosedependencies. Also install some of the hr modules for the second example in this chapter, such ashr_attendance, hr_contract, and hr_holidays.
4.1 Process Integration in the Management System
Processes are at the heart of a company: they form a structure for all activities that enable the companyto function effectively. A company’s human dimension is often disconnected from its processes atthe moment, preventing individual employees’ aspirations from being directed towards a collectiveobjective.
From a mapping process, integrating management and the changing needs of each employee becomesvery useful for the fulfilment of each. Based on that, each employee becomes aware of his own personalcontribution to the company’s value chain. This representation also helps an employee’s own personalmanagement because it shows his place and his role in the overall process, very often over severaldepartments.
The system of ‘Corporate Intelligence’ will also be highly useful to system implementers who, afterstudying the requirements, have to formalize a company’s processes to put them into operation inOpenERP.
4.1.1 Examples of Process
To understand the aims of the system of Corporate Intelligence (process) better, you will now see anoverview of the functions available to you in a the study of two processes:
• A customer order quotation,

66 CHAPTER 4. PROCESS
• The engagement of a new employee.
Following a Customer Sales Order
The example Example of a process handling a customer order quotation (page 66) shows the processfor handling a customer sales order. Use the menu Sales → Sales → Sales Orders to list all orders, thenchoose Order SO001 – you can either check the checkbox to its left, or you can open the order itself byclicking the row containing the order.
To view the process for that specific order, click the Corporate Intelligence button (displayed as aquestion mark) at the top right of the title of the list or form. The process for this order is shown in thewindow, and the current state of this document can be seen by looking for the node whose left edge iscolored maroon rather than grey.
Figure 4.1: Example of a process handling a customer order quotation
This order is in the Quotation state. The whole of some nodes is greyed out because the selecteddocument will never enter into that state, such as invoicing based on deliveries (the order is in aninvoicing mode that is based on orders, not deliveries).
The process is completely dynamic and based on that specific sale order document. You can click eachof the process nodes (Quotation, Sale Order, Procurement, Draft Invoice, Outgoing Products) usingone of the links or icons on it:
• Obtaining the documentation and the corresponding process in the quality manual, using the Help(or Information) icon,

CHAPTER 4. PROCESS 67
• Obtaining the documents that an employee needs to carry out the process by clicking the greenarrow icon,
• Seeing the menu that OpenERP uses to get the document by hovering over the green arrow icon.
New Employee Induction
Open the employee form for Fabien Pinckaers from the menu Human Resources → Human Resources→ Employees. Click the Corporate Intelligence button to open the detailed process of engagement.
Figure 4.2: Example of a process engaging a new employee
You can immediately see things that might interest the HR manager. On a single screen she has all of thedocuments about the selected employee. She can then zoom into each document to look at associateddocuments or the user account in the system.
4.2 Workflows and User Processes
Workflows are used to define the behaviour of a given document. They are used by developers andsystem implementers to determine which object should execute which actions and at which moments.These are principally technical processes defined in a vertical way on the lifecycle of a complete object(represented by a document). Changing a workflow will have a direct impact on the behaviour of thesoftware in response to user actions. You handle all possible exceptions there, so that the software isrobust.

68 CHAPTER 4. PROCESS
Figure 4.3: Example of a workflow handling a customer order
Unlike workflows, user processes represent workflows across all of a company and its documents. Theyare used by end-users to locate an action for more complete handling. A change of user process willnot have any effect on the software but will show the user another way of working on a given problem.
Processes are used by end-users to help them understand the problems which have not been handled inOpenERP. You can find actions that have no influence on the software, such as “Telephone customerto thank him”, and “Send a fax to reassure him”. Alongwith providing user help, processes providefunctions such as:
• integration with OpenERP Help and the company’s quality manual,
• showing the user the menu for finding a specific document.
User processes are thus connected to technical workflows. If you modify the software’s behaviour witha workflow, the changes will be directly visible in the user processes that are based on the modifieddocument. So if you modify certain transitions on a workflow they will automatically be shown in theprocess corresponding to the modified document.
To get maximum benefit from the power of user processes and the workflow engine, OpenERP providesan integrated workflow editor and user process editor. These enable you to modify them through theclient interface.
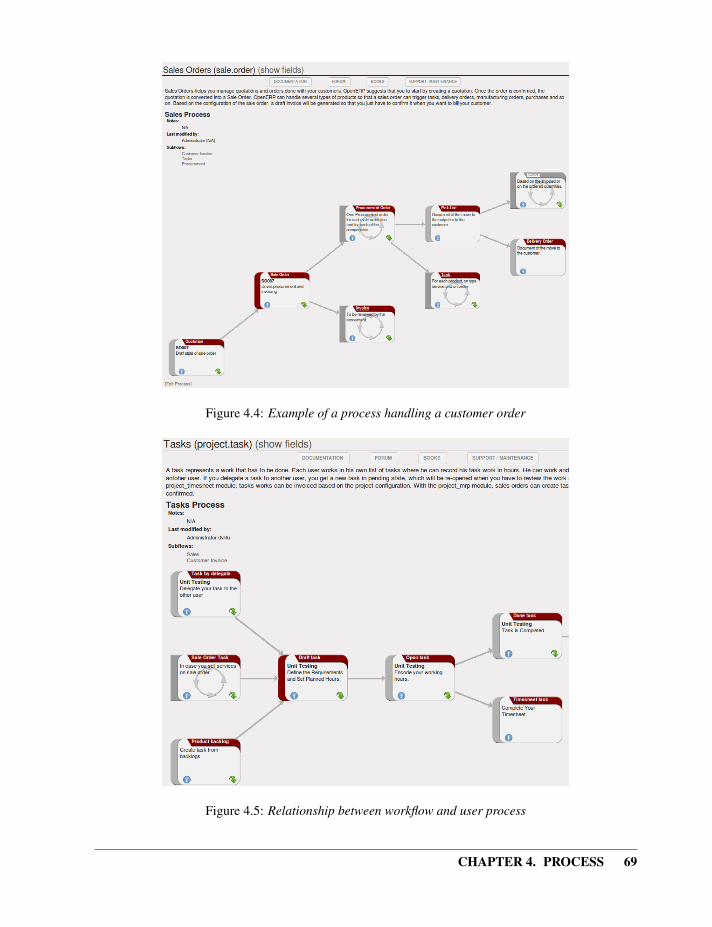
CHAPTER 4. PROCESS 69
Figure 4.4: Example of a process handling a customer order
Figure 4.5: Relationship between workflow and user process

70 CHAPTER 4. PROCESS
You will only work with the process editor in this chapter. If you want to view and edit the workflow ofa document, click on the link Edit Workflow to the right of the document. OpenERP opens a graphicalview of the workflow for the selected document type.
If you want to edit a workflow in a text-based editor, you can use the menus under Administration →Customization → Workflows.
4.2.1 Using Processes Effectively
Regardless of which OpenERP screen you are in you can call up a process on the current document byclicking the Corporate Intelligence (question mark) icon. Depending on the document, you can haveseveral processes defined using it. OpenERP then asks you to choose which one of them you want.
For example, if you are in a meeting form, OpenERP will ask you to choose from the processes itknows about that involve such forms:
• processes for selecting and inducting new employees,
• tracing customer orders in pre-sales,
• processes for visiting customers and handling expenses.
Figure 4.6: Button for entering a user process from a form
The element colored red shows the active process for the selected document. Elements in grey are thestates that the selected document will not go through because of its configuration. You can use thedifferent icons to open the document, print it, or get its documentation.
Some states have an image inside of arrows formed into a circle. These show that the state refers toanother process. To go to this other process, you can click on the title of the state. For example, youcan click on the invoice in the customer order management workflow to see in detail how that invoiceis handled.

CHAPTER 4. PROCESS 71
Figure 4.7: A state that refers to another workflow
4.2.2 Defining your Own User Processes
Use the menus under Administration → Customization → Enterprise Process to define new processesor modify existing processes. When entering a process, OpenERP shows you the list of states availablefor that process.
You can add a new state or modify an existing state. A state can be associated with an object (whoseinstances are represented by documents). If that is the case, choose it in the case object. You can set anexpression that shows if the object can be found in that state or not. Expressions are in Python format.For example, for the quotation state choose the object sale.order and set the following expressionobject.state == ’draft’ .
You can also link to a menu so that users can learn which menu to use to access objects in a state. Youcan set the conditions in which this object is in a greyed-out state in the section Conditions. Theseexpressions, too, are encoded in Python format.
Once the node has been defined, you should set the transitions leaving this object. For each transitionyou can:
• Give the leaving and destination states,
• Set up a list of buttons that start various transitions in the process,
• Map between workflow transitions and the document that is selected,
• Put an explanatory notice in different languages.

72 CHAPTER 4. PROCESS
Figure 4.8: Form for defining a process
Figure 4.9: Screen for defining a process transition
The organization and quality of a company is typically related to its maturity. A mature company is onewhere processes are well established, and where staff do not waste much time searching for documentsor trying to find out how to do their different tasks.
From this need for effective organization and explicit quality improvement, have appeared numeroustools:
• The ISO9001 quality standard,
• Business Process Management (BPM) tools,
• Use Case workflows, and formalized standards such as UML,

CHAPTER 4. PROCESS 73
• The company Quality Manual.
The problem is that these tools are usually quite separate from your management system and oftenreserved for the use of just a few specific people in your company. They are treated separately ratherthan put at the heart of your management system. When you ask company staff about ISO9001 theyusually see it as a constraint rather than a helpful daily management tool.
To help the company meet its quality requirements and to form these processes into assistance integratedwith everyday work, OpenERP supplies a Corporate Intelligence® tool that enables you to put companyprocesses at the heart of your management system.
The system enables:
• new employees to learn how to use the software by graphically and dynamically, discoveringhow each document and action works,
• easy access to the all the links to a document and everything that is attached to it,
• people to see both a high-level map and the detail of all the company’s processes,
• access to a graphical model and integrated quality manual for rapid access that depends on thework context,
• use of a knowledge base and capitalization of that knowledge for all of the company’s actions inthe form of interactive processes,
• an employee to become more aware of his role in the whole environment.

74 CHAPTER 4. PROCESS

75
Part V
DMS

76
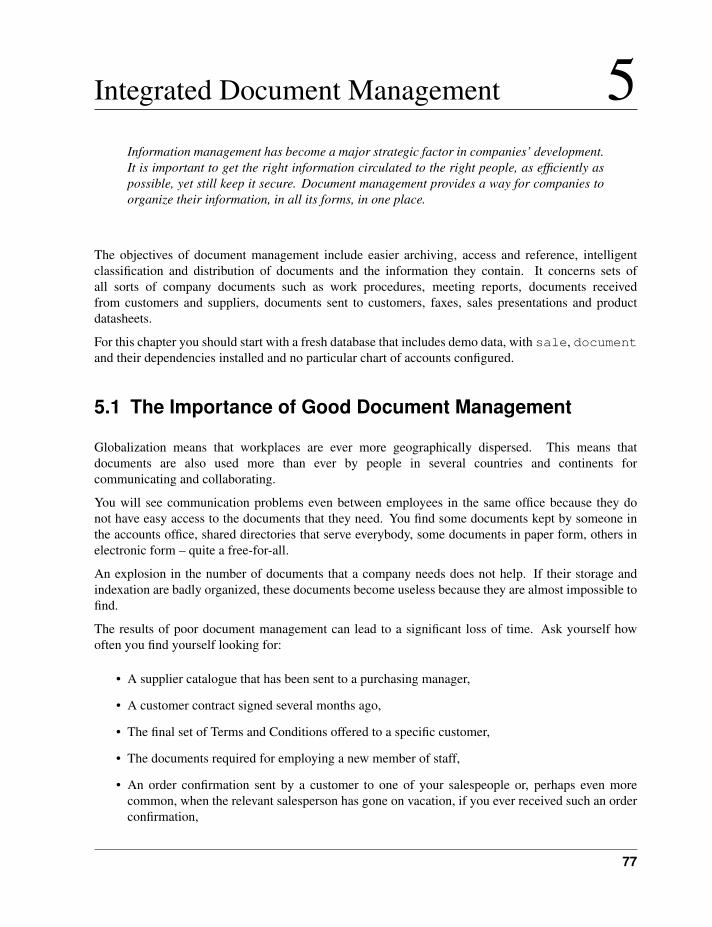
77
Integrated Document Management 5Information management has become a major strategic factor in companies’ development.It is important to get the right information circulated to the right people, as efficiently aspossible, yet still keep it secure. Document management provides a way for companies toorganize their information, in all its forms, in one place.
The objectives of document management include easier archiving, access and reference, intelligentclassification and distribution of documents and the information they contain. It concerns sets ofall sorts of company documents such as work procedures, meeting reports, documents receivedfrom customers and suppliers, documents sent to customers, faxes, sales presentations and productdatasheets.
For this chapter you should start with a fresh database that includes demo data, with sale, documentand their dependencies installed and no particular chart of accounts configured.
5.1 The Importance of Good Document Management
Globalization means that workplaces are ever more geographically dispersed. This means thatdocuments are also used more than ever by people in several countries and continents forcommunicating and collaborating.
You will see communication problems even between employees in the same office because they donot have easy access to the documents that they need. You find some documents kept by someone inthe accounts office, shared directories that serve everybody, some documents in paper form, others inelectronic form – quite a free-for-all.
An explosion in the number of documents that a company needs does not help. If their storage andindexation are badly organized, these documents become useless because they are almost impossible tofind.
The results of poor document management can lead to a significant loss of time. Ask yourself howoften you find yourself looking for:
• A supplier catalogue that has been sent to a purchasing manager,
• A customer contract signed several months ago,
• The final set of Terms and Conditions offered to a specific customer,
• The documents required for employing a new member of staff,
• An order confirmation sent by a customer to one of your salespeople or, perhaps even morecommon, when the relevant salesperson has gone on vacation, if you ever received such an orderconfirmation,

78 CHAPTER 5. INTEGRATED DOCUMENT MANAGEMENT
• A procedure from your quality manual if there has been a process fault,
• An email which was sent to one of your colleagues,
• A document that you need to be a template for a specific type of contract,
• A complete history of communications between yourselves and a supplier about a given contract.
Even worse than the loss of time, perhaps, the lack of good document management is bad for the qualityof your organization and the service provided by your company. In such a company it is likely that:
• sets of documents do not follow a standard layout,
• all the salespeople prepare quotations in their own way and gradually change the way they do itfor themselves but not for the group,
• a correction to a type of contract stays with a small group of people and does not percolate backinto the rest of the company to benefit other users,
• version management is chaotic or even non-existent.
So a good integrated document management system can be a powerful tool to help in day-to-daycompany management. With it you could also easily:
• Continue the work started by a colleague if she has gone on vacation, and respond to hercustomers if needed,
• Get hold of examples of all document types with just a few clicks, so that you can follow companystandards in such areas as order confirmation, price requests, meeting minutes, customerdeliverables, contract examples, and models for faxes and letters,
• Retrieve procedures and other associated documents if you do not know how to do a certaintask – such as things you should do when hiring a new employee, organizing a conference, orstructuring meeting minutes,
• Reuse work done by a colleague to meet similar needs and build on all the individual work donein your own company,
• Find all the orders for a customer or from a supplier in just a few seconds to answer questions orto continue a discussion when the initial contact point in your company is not available,
• Build on your working methods and enable your colleagues to benefit from each improvement ina document type or a procedure.
From these examples you can see the importance of a good document management system, and what itmight contribute to the improvement of productivity and the quality of the output from each employee.

CHAPTER 5. INTEGRATED DOCUMENT MANAGEMENT 79
5.2 Classic Document Management Solutions
Faced with the need to organize documents, companies have looked at a number of documentmanagement solutions that are promoted today, from simple email archiving to complete electronicmanagement systems dedicated to arbitrary documents.
Unfortunately, these solutions have not always been very useful because they are too little integratedin companies’ management systems. Most solutions that we have come across, are underused by theemployees – often used by some of them but not by all.
The primary reason for this is that a document management system that is not integrated imposes extrawork on an employee. For example, a salesperson should ideally save each customer confirmation inthe document management system. Only that means quite a heavy additional workload just for an orderconfirmation:
1. Receive and read the email from the customer,
2. Save the email and its attachments on the desktop,
3. Connect to the ERP system and confirm the order,
4. Connect to the document management system,
5. Look for the best place to store the document,
6. Create a directory for the customer and the order if it does not yet exist,
7. Copy the files from the desktop to the right place in the document management system.
This is obviously a lot of operations just to handle a simple order confirmation. You can understandwhy many companies hardly use their document management system even if they have gone to the costand effort of purchasing and installing one.
Free Document Management Systems
A number of free document management applications exist. The most wellknown are:
• Alfresco: http://www.alfresco.com
• Quotero: http://www.quotero.com
It is very difficult to keep information in the company’s management system synchronized with thatin the document management system. For example, when a customer changes his address, users willmodify the details in the management software, but usually, not in the document management system.
Furthermore, since users should create the same storage structure in both systems, you quickly findafter only a few months that the information in the document management system is quite disconnectedfrom that in the company’s management system, if the two are separate. For example, how do you

80 CHAPTER 5. INTEGRATED DOCUMENT MANAGEMENT
know where to store your least-frequently used documents such as (perhaps) employee car-leasingdocuments? Also, document management systems are typically very complex because they mustmanage user access rights in just the same way as those that are available in the company managementsystem. This means that you have to enter the same sort of data about access rights twice for the systemadministrators.
You will see that the total integration of OpenERP’s document management system with the maincompany management system, and plugins to Outlook and Thunderbird email clients, offers an elegantsolution that addresses these problems.
5.3 The OpenERP Solution
OpenERP’s management of documents is unique and totally innovative in its integrated approach. Itscomplete integration with the company’s management system solves most of the problems that areencountered when you use independent document management systems:
• Login and the management of access rights is integrated with that of OpenERP for controllingaccess to different document types,
• Ultra-rapid access to documents, which are directly accessible through your email client orthrough the company management software,
• Automatic assignment of meta-information comes directly from information contained in yourOpenERP login registration,
• Document workflow, which automatically follows OpenERP’s documentation process, providescomplete synchronization between the systems,
• Document classification is determined by OpenERP itself so that the structure that is created isalways synchronized between the systems,
• Automatic indexation and classification of all documents produced by OpenERP for maximumefficiency.
5.3.1 Getting Started
This section is about how to get started with the document management system from its installation toadvanced use with FTP access.
Installation
To install OpenERP’s document management system, you just need to install the document anddocument_ftp modules through the Reconfigure wizard by selecting Knowledge Management, andfurther on, Shared Repositories (FTP) for installation. As the module installation proceeds, the systemautomatically proposes that you configure the FTP server.
Once the module has been installed, you will see a new entry in the main menu called Knowledge.

CHAPTER 5. INTEGRATED DOCUMENT MANAGEMENT 81
Figure 5.1: Screen for configuring document management
Figure 5.2: The Knowledge menu

82 CHAPTER 5. INTEGRATED DOCUMENT MANAGEMENT
5.4 Internal and External Access using FTP
The first configuration step is to create a directory structure that will be used to classify your documentset. You can use the structure automatically proposed by OpenERP from the menu Knowledge →Configuration → Document Management → Directories’ Structure.
Figure 5.3: Structure of directories when the document module has been installed
In addition to the usual access to documents through OpenERP, you will be able to connect to themdirectly through the file system using the FTP protocol. To connect to the FTP server, use the followingaddress:
Parameter ValueServer Your OpenERP server, for example 127.0.0.1Port 8021Path The ‘/’ character, for the rootUser Your user account in OpenERPPassword Your OpenERP password
FTP Server
These comments about an FTP server may appear a bit technical, but it isjust a general standard for getting hold of files without worrying too muchabout the platform (Windows, Mac, Linux, or other Unix-like system).So FTP is just a way of getting access to files without needing to use anOpenERP client. There could have been other ways, but FTP proved itselfto the developers to be the one that performed best at lowest cost.
Once you are connected using FTP, you get to the root of a directory for the document managementsystem. Once you enter that directory you find a structure that matches the structure defined inOpenERP.

CHAPTER 5. INTEGRATED DOCUMENT MANAGEMENT 83
Figure 5.4: Root of the database directory seen through FTP
Figure 5.5: Structure of the directories in the document management system
5.5 Mapping between OpenERP Resources and Directories
Each directory can either have the type Static or Folders per resource. A static directory,as with operating systems, is the classic directory that can contain a set of files. On the other hand, thedirectories linked to systems resources automatically possess sub-directories for each of the resourcetypes defined in the parent directory.
Directories in English
To keep them synchronized to the working language, directory names arenot translatable. But OpenERP’s demonstration data automatically createsdirectories in English. You can rename them through the menu Knowledge→ Configuration → Document Management → Directories.
For example, you can look at the directory shown in Documents → Sales Order → All Sales Order.You will see the directory for all the orders present in OpenERP that was created automatically by thesystem.
Directories can follow a tree structure, like the tree of resources in OpenERP. For example, if you go tothe directory Documents → Projects you will see the structure of the analytic accounts.
To define a directory containing a specific type of resource, you have to define parameters when you

84 CHAPTER 5. INTEGRATED DOCUMENT MANAGEMENT
Figure 5.6: Orders in OpenERP
Figure 5.7: Directories representing all the orders in the document management system

CHAPTER 5. INTEGRATED DOCUMENT MANAGEMENT 85
define the directory itself:
• Type : Folders per resource
• Resource model : Choose one of the system objects
• Domain : an event filtered so that it sees only a subset of the resources
• Tree Structure : to show the resources hierarchically
Figure 5.8: Configuration of the directory containing All Sales Orders
This is a very flexible approach because any modification of the resource in OpenERP is automaticallyreflected in the document management system. So when the quotation gets confirmed in OpenERP thedirectory no longer appears as a quotation through FTP access.
Here are some examples of directories linked to OpenERP resources that could be helpful whenconfigured in the document management system:
• Quotations and Order: storing documents that relate to orders,
• Products: for storing products’ technical datasheets,
• Users: to automatically define a directory owned by each user of the system,
• Employees: to store documents about employees, such as their CVs, your interview notes,contract details, and their annual assessments,
• Support Requests: storing items about requests or about technical support responses,
• Analytic Accounts or Project: to store project management and tracking documents.

86 CHAPTER 5. INTEGRATED DOCUMENT MANAGEMENT
5.6 Managing Attachments
As you see, you can connect any directory in the document management system to an OpenERPresource. The system then manages its creation and keeps the directory synchronized with the reportsgenerated by OpenERP from its own data. You do not have to create or rename these directories becauseOpenERP does all this automatically as it resynchronizes with its own database.
You can then copy the files in the directories that correspond to any of the resources. The files areautomatically attached to OpenERP’s documents through attachment management. Conversely, if youattach a document to one of OpenERP’s resources then that document will automatically become visibleover FTP in the document management system.
File Storage
If you do not install the document management system then the files thatare attached to an OpenERP resource are stored directly in the database.Once the document management system has been installed, the contents ofthe files are no longer stored in the database but are stored instead on theOpenERP server filesystem in a directory named ‘filestore’.
You can then read and add attachments to OpenERP resources quiteindependent of the OpenERP interface or the FTP server using simple dragand drop.
5.7 Virtual Files
The most well-organized companies keep track of all the documents they have sent to customers intheir document management system. It is very useful to be able to retrieve every document about acustomer or a project. But the work of storing these documents can itself often take up quite a bit oftime for staff. Each report must be saved in the document management system as well as be sent byemail to the customer.
That is not the case in OpenERP. To automatically make OpenERP reports available in the FTP server,OpenERP automatically uses virtual files. You can put virtual files into directories that have the specialtype of linked resource and link the virtual files to OpenERP’s reports.

CHAPTER 5. INTEGRATED DOCUMENT MANAGEMENT 87
Virtual Files
Virtual files do not actually exist in OpenERP but are made visible with asize of 0 in the FTP server. Once these files have been read by the clientsoftware, OpenERP prints the document related to this file and returns aPDF document linked to the resource.
When you copy or open a virtual file you print the selected resource. You donot then have to go and print a document through OpenERP – you just openthe file containing that document in the document management system. ThePDF file is then created in real time by OpenERP by reading the relevantdata.
The screen Virtual files for Sales Orders in OpenERP (page 87) shows the parameters of the virtualfiles in All Sales Order. You define the virtual files using the name ORDERNUM_print.pdf, whereORDERNUM represents the reference to the order. To do this, you must check the option IncludeRecord Name of the file for a directory. You can then find a virtual file for each report associated withan order.
Figure 5.9: Virtual files for Sales Orders in OpenERP
To see the effect of this configuration, connect to the FTP server and go into a directory for an ordersuch as Documents → Sales Order → All Sales Order → SO003. You can then just click the fileSO003_print.pdf to get a printout of Order SO003. You can attach it to an email or put it on yourdesktop.
This system of virtual files is very useful in a lot of situations. For example, if you must quickly re-senda quotation to a customer, you do not have to open OpenERP, you can just attach the relevant virtualfile to your email.
Importantly, once files have been read or copied, they become real files, taking up real space, ratherthan just virtual. This means that you can keep a legal record of all documents that have been created

88 CHAPTER 5. INTEGRATED DOCUMENT MANAGEMENT
Figure 5.10: Virtual files for Sales Orders through FTP
and sent to customers and suppliers.

CHAPTER 5. INTEGRATED DOCUMENT MANAGEMENT 89
5.8 Standardizing Structures
You now have a configuration that enables you to automatically get a directory structure linked toOpenERP for each resource, such as for projects and orders. The ideal situation would now beto automatically structure the documents about projects, say for example, you could classify themdepending on their type:
• Quotations,
• Meeting Minutes,
• Delivery Documents,
• Documentation.
OpenERP provides you with a system that lets you create a structure type for each type of a givendocument. It then provides that classification for all documents in the directories structured in thattype.
So create the structure above for your project management system. To do that, create the four directoriesabove and give them the following data:
• Type : Static Directory,
• Parent Model : Analytic Account.
Then in each project (represented by analytic accounts) you will get this substructure for organizingyour documents efficiently.
Mapping
In practice, OpenERP does not create directories or files for every resource.It actually manages this by mapping between OpenERP resources and theFTP interface.
This approach gives a lot of flexibility because there is no synchronizingto do, nor any redundancy. Changes in either the document managementsystem or in OpenERP will automatically be reflected over in the other side.
And system resources are obviously not used up by storing things twice.
Once a new project has been defined in OpenERP, the system automatically creates a directorycorresponding to the project in the right place in the document management system, and creates astructure type there for classifying documents.

90 CHAPTER 5. INTEGRATED DOCUMENT MANAGEMENT
Figure 5.11: Substructure common to all projects
CHAPTER 5. INTEGRATED DOCUMENT MANAGEMENT 91
5.9 Optimizing Document Management
All documents produced by OpenERP are automatically indexed and classified for maximum efficiency.There is an ultra-rapid access to documents, which are directly available from your email client or thecompany management software. The user access rights are managed just the same way as those thatare available in the company management system. All these features help you to get the best out ofOpenERP’s document management system.
5.9.1 Searching for Documents
You have seen several methods of accessing documents quickly:
• From attachments to an OpenERP resource,
• Through FTP access to OpenERP,
• Using the menu Knowledge → Document Management → Directories’ Structure.
But if you do not know where a specific document can be found, OpenERP also has a search toolintegrated into its document management to simplify your search. To search for a file, use the menuKnowledge → Documents → Documents. You get to a document search view that lets you searchamongst all the attachments and all the documents in the FTP server.
You can search for a file using various different criteria:
• The attachment name,
• The attachment type,
• The filename,
• The owner of a file,
• The directory that it is found in,
• The indexed content.
Notice here an important advantage for an integrated document management system. Informationsuch as which partner is associated with a document is automatically detected by OpenERP whenthe document has been stored in a directory. This information is never input by the user – it is detectedautomatically using the information about the resource when it is being saved as a file.
But your search is not limited to these few fields. You can also search on the content in the files. Eachfile is automatically indexed by the system to give you a search engine rather like Google’s on the wholeset of company documents.

92 CHAPTER 5. INTEGRATED DOCUMENT MANAGEMENT
Supported File Formats
The OpenERP document management system can index the following fileformats:
• TXT : text files,
• PDF : PDF files,
• SXW : OpenOffice V1 files,
• ODT : OpenOffice V2 files,
• DOC : Microsoft Word files.
The other file formats are properly handled in the document managementsystem, but their content is not indexed automatically.
This functionality is very significant. All you need to do is search for a partner name or an order numberto automatically get all the documents that are referenced there. And you can use a fragment of text tofind the document you need from within that subset.
5.9.2 Integration with Emails
Using Outlook and Thunderbird
OpenERP’s document management system is well-integrated with popular email clients like MicrosoftOutlook and Mozilla Thunderbird. For this, you can install the required plugins available in OpenERP,usually made available when you install and configure crm. Or you may install outlook orthunderbird module according to your requirement, and take advantage of its compatibility withOpenERP’s documents. For more on this, refer ch-commtools.
5.9.3 Working with Users’ Changes
To make the document management system’s use as unobtrusive as possible, the system’s users shouldeasily be able to store all the documents that they produce or receive from their customers and suppliers.So OpenERP supplies dashboards to help system users approve their acceptance of such documents.
So you will find two dashboards in the menu Knowledge → Reporting → Dashboard. One dashboardis for the document management system manager and one dashboard is for tracking use by differentusers.
The first lets you track the changes to documents by month, by customer and by type of resource. Youcould also quickly assess the use that is made of the system by the various users.
The second dashboard shows you how different employees use the system. You can see the numberof files sent by each user and who uses the document management system the least. That tells you

CHAPTER 5. INTEGRATED DOCUMENT MANAGEMENT 93
Figure 5.12: Creating a new contact through the Document Management System from Outlook
Figure 5.13: Pushing an attachment in the Document Management System from Thunderbird

94 CHAPTER 5. INTEGRATED DOCUMENT MANAGEMENT
Figure 5.14: Dashboard for the document management system manager
something about your user training and whether you need to do something about changing workmethods.
5.9.4 Version Management
There is usually a need to keep track of all the important documents that you have printed. For example,when you send an invoice to a customer it is a good idea to store a copy of that invoice internally inpaper or electronic form. Then you can reprint it exactly in the same format as when you sent it, evenif the company’s details have changed in the meantime.
To do this, OpenERP can automatically store as attachments the different reports printed by users. Bydefault, only invoices are saved as attachments, and they are saved when they are printed. That isbecause they are commonly legally required.
But you can configure the system so that it does not matter which type of report is printed - they canall be stored automatically. To activate that functionality on another type of report, modify this in themenu Administration → Low Level Objects → Actions → Reports. To be able to access this menu, theuser should be added to the group Useability / No One.
Select the report that you want to change and complete the field Save As Attachment Prefix. Onceyou have done that, each document print action will automatically be saved as an attachment to thedocument.

CHAPTER 5. INTEGRATED DOCUMENT MANAGEMENT 95
Figure 5.15: Dashboard for the document management system analyzed by user
Figure 5.16: Modifying the definition of a report

96 CHAPTER 5. INTEGRATED DOCUMENT MANAGEMENT

Index
Aaccess
user, 80allocation
cost, 50attachments, 85attendance, 50
differences, 56sign in / sign out, 55
Bbenefits, 55
CCampaigns, 10Centralise, 10configuration
setup, 1Contacts, 10cost
allocation, 50
Ddirectory, 82document
optimize, 89Document Management, 75
Eemployee, 23
billing, 25categories, 27contracts, 27sign in / sign out, 30
evaluation, 46define categories, 48link to survey, 50plan dates, 49
expense, 59approval, 62entered by employee, 60
rebill customers, 62
FFTP, 80
Hholidays
allocation requests, 44leave types, 42manage requests and approvals, 43previous requests, 43
HRmanagement, 23
Human Resources, 21holidays, 41
IInitial Setup, 1Installation, 1
LLeads, 10
Mmodule
board_document, 80document, 80, 82hr_attendance, 65hr_contract, 26, 65hr_expense, 61hr_holidays, 65hr_holidays_request, 65hr_recruitment, 31hr_timesheet, 52hr_timesheet_sheet, 56product_index, 26sale, 65
moduleshr_, 65
OOpenERP Online, 5
Opportunities, 10optimize
document, 89
PProcess, 63process, 67
customer order, 66defining, 70new employee, 67
process integration, 65
Rrecruitments, 31
appointments, 36communication history, 36create applicants from e-mail, 33next action, 35phone calls, 36questionnaires, 39stages, 35survey, 39
SSales Cycle, 10Sales Stages, 10setup
configuration, 1
Ttimesheet, 50
entering data, 52evaluation, 54
Vvirtual
file, 86
Wworkflow, 63, 67