Embed Size (px)
Citation preview

-1-
THE OLIGOPAINTS SCRIPTS SUITE MANUAL By Chamith Fonseka, Feyza Yilmaz, and Brian Beliveau Last updated: 8/22/2012 Contact: [email protected]
TABLE OF CONTENTS
Introduction...................................................................................................2 Installation.....................................................................................................2 Overview.......................................................................................................6 Oligopaints Scripts........................................................................................8 grabLines.py........................................................................................8 grabRegion.py.....................................................................................8 orderFile.py..........................................................................................9 probeRegion.py.................................................................................12 probeNumber.py................................................................................13 sortFile.py..........................................................................................14 windowSize.py...................................................................................15 Walkthroughs..............................................................................................17 Designing 20,000 probes to human 19p12........................................17 Designing 10,000 probes to the gene BCKDK..................................18 Creating a banding pattern on chr2R with 15,000 oligos...................20

-2-
INTRODUCTION Welcome to the Oligopaints script suite. This manual will familiarize users with the database files that detail the genomic position and melting temperature (TM) of Oligopaints probes and the python scripts created to manipulate them. The first section of the manual deals with the installation of Python and accessing the Command Line or Terminal to use the scripts. The next section contains detailed information on each individual script, followed by guided walkthroughs of common tasks one can complete using the scripts to process Oligopaints files.
INSTALLATION Python 2.7 or later is required to use the Oligopaints scripts. Although some scripts may run using Python 3.0+, we encourage using Python 2.7 to avoid compatibility issues. To install Python, please navigate to http://www.python.org/download/releases/2.7.3/ and choose the appropriate installer for your operating system. Our scripts are designed to run in a command-line environment on Mac OS X, Linux or UNIX operating systems, and can also be run on a Windows machine. Explanations of using OS X and UNIX/LINIX commands can be found Here and a list of commands Here; for Windows users an overview of the command prompt can be found Here and a list of commands Here. You can test which version of Python you have by opening the terminal (Terminal in OS X, see below for Windows) and typing in “python”. If Python is installed, the program will open and the first line will show what version of Python is installed. The graphic below shows an OS X system running Python 2.7:
Note: The number after 2.7 refers to the minor version number and is not important for determining compatibility. As long as the first two numbers are 2.7, the correct version of Python has been installed. If Python 2.7+ has been installed successfully, you are now ready to use the Oligopaints scripts. The next sections will cover each script’s usage individually.
Last login: Thu Jun 21 17:33:57 on ttys000dhcp10-200-12-151:~ bjb$ pythonPython 2.7.1 (r271:86832, Jul 31 2011, 19:30:53) [GCC 4.2.1 (Based on Apple Inc. build 5658) (LLVM build 2335.15.00)] on darwinType "help", "copyright", "credits" or "license" for more information.>>>

-3-
Windows Installation Notes
Proper installation of Python on a Windows OS can vary depending on the exact version of Windows being used (such as XP/Vista/7). We recommend reading the first two questions of the following FAQ during the installation process: http://docs.python.org/faq/windows.html It is also important to be able to access a command-line interface for using the Oligopaints scripts. In most installations of Windows, the easiest way to do this is to open the Command Prompt. Usually, this program can be found in the start menu, selecting Start → Programs → Accessories → Command Prompt. The window should appear similar to the image below:
From this window, scripts can be executed using the examples shown later on in the manual.

-4-
Command Prompt/Terminal Commands
The Command Prompt (Windows) or Terminal (OS X/Linux/UNIX) window is a text-based, command-line interface with the computer. Commands are typed into the window, as opposed to using the mouse. When the Command Prompt or Terminal is first opened, a single line noting the current directory is displayed, followed by a symbol and then a space to type commands. This symbol may change depending on the computer, but is normally > for the Command Prompt and $ for the Terminal. In this document, we will use the $ symbol to represent a command line.
While the next section will explain specifically what commands are used to run python scripts, it is helpful to understand the basic commands that allow one to navigate the computer using the command prompt or terminal. The following commands should be typed in as written and followed by pressing the enter key, which will produce the desired action. Command (Windows)
Command (OS X)
Command (Linux/UNIX)
Action
dir ls ls Lists the files in the current directory. cd cd cd Changes the current directory to the directory
listed after the command. For example, > cd C:\ changes the directory to the C drive on the Windows command prompt.
help man help Brings up the help manual for the Command Prompt/Terminal
A full listing of commands can be found at the following links for Windows (http://ss64.com/nt/), Mac OS X (http://ss64.com/osx/), and Linux/UNIX (http://ss64.com/bash/). It’s important to note that although the commands for the Linux/UNIX terminal and the Mac OSX Terminal are similar, there are subtle differences between the programs.

-5-
Executable Scripts
The examples in the following guide show the scripts run in their executable form. Simply put, this means that there is a line in the script telling the computer that the script is a Python script, and must be deciphered and executed by the Python interpreter. When this line is present and working, the script is considered executable (Linux/UNIX users will note that the script must also have the appropriate permissions). If a script is not executable, the user must explicitly tell the computer what program should be used to run the script. This is done by using the scripts in the following format: python script.py Instead of the format used in the examples: ./script.py Both forms are acceptable and the scripts will behave identically, regardless of which version is used. The scripts will attempt to automatically find the Python interpreter. However, it is often simpler for users to use the first, explicit format, which will avoid errors in case the script cannot properly find the interpreter. Note: If you would like to make the scripts executable, it is important to modify the shebang line (i.e. the line beginning with !# at the top of the file) in the beginning of the scripts to reflect the location of the interpreter in the current environment. Instructions for finding the location of the Python interpreter are in the Windows Python FAQ, for Windows users. OS X and Linux/Unix users should simply modify the line to wherever the correct installation of Python is located. If you chose to do this, make sure to overwrite the existing shebang line.

-6-
chr19 82603 82634 GAGATTCTCAGGAGCTTATAGAACAATCCAAA 75.70chr19 83598 83629 ATGGCAGGAGAGTCAAAGCCACAGGTGGAAAA 84.12chr19 88703 88734 CAGATCTAGAGAAACACTTTTGAGCCCTTTTA 76.12chr19 89309 89340 AGTGGGTCTCTAACATCTAGTGGTACTAATTA 75.47chr19 91600 91631 TAGGATCCTCTATAAACAGGTTAATCGCCACG 78.30chr19 93063 93094 GCAGAAGAGTAAGTCTTTGCATTTTATGCTAC 75.74chr19 93594 93625 AACATGGGTGAGTAAGACTGAAGCAGCCGTAA 81.92chr19 93650 93681 GAAGCACTCCGTTACGGAAATTATATTCTTTG 75.56chr19 94604 94635 ACTTGCTTGTGTAGATACTTACAAACTAGAGG 75.51chr19 96565 96596 TGGATGCCACACAAGATCTTCCACTCAACAAG 81.24chr19 99570 99601 TCTCGTCTATTTCCATCCTATTTGAAAACCAG 76.01chr19 100007 100038 CCAAGAAAGCATAGACCACTATTGAGAAAGAT 76.06chr19 102839 102870 GGTTTAGTCTCCTATGAGTCAATCCTAGTTTT 75.30chr19 104573 104604 ATTACTTGGACTTGCACAATCCTTGGAAATGC 79.09chr19 108577 108608 CCCTCGGGTCAACCTCATCCTTGGCATATTTC 82.69chr19 108805 108836 TATTACAGTGCTAAGCAGAAGAGAACTGAAGT 76.76chr19 111568 111599 GGGATGCACATTCTAGTGTAAAGTTTTAGATC 75.12chr19 113582 113613 TCCTGAAATTTGACCAGAAGTTATGGACATCC 77.86chr19 159256 159287 CTGGTTAAGACCAAACTAACCATAGATTGCTA 75.84chr19 251962 251993 GTAGTATTGCAATCACATTAGTCAGGGTTCTC 76.32chr19 252708 252739 GGATCATGCTTATCTCAGTGTCTTCCAGAAAC 77.91chr19 252963 252994 CTGTGTGTGTCCTTAATCCGATCAAGTAGATG 77.62chr19 253618 253649 CAACAAGAAGCCAAGTATTTTCTCTCCTAGTA 75.75chr19 254543 254574 CATAATATTCAGAATACGCAGCCTCAGGTATT 75.97
OVERVIEW This suite of scripts is primarily designed for working with Oligopaints .bed files, which are files containing the position of probes for each chromosome in the genome. For example, the hg19 folder contains chr1.bed, chr2.bed and so on, up to chrX.bed and chrY.bed. The dm3 folder contains chr2L.bed, chr2R.bed and so on. In this document, these files are referred to as a generic “chrN.bed” file. An example of the first lines of a chrN.bed file is shown below:
Our files are browser extendible data files (.bed) files, a data format used by UCSC to store information about genomic reigons. These files are tab-delimited text files, which can be made using text editors such as Notepad (Windows) and TextEdit (OS X). When making .bed files, it is critical to make sure that the text editor is outputting plain text and not rich text or other formats, as the use of the latter can result in the inclusion undesirable hidden characters. All .bed files contain at least 3 columns, which refer to the chromosome, start, and end of each region, with one region provided per line. Other columns can contain further information about the region. The following link to the UCSC genome browser provides a full description of the .bed format (http://genome.ucsc.edu/FAQ/FAQformat.html#format1). Although the later columns in the Oligopaints files do not correspond to the columns described in the definition, the files are fully compatible with the UCSC genome browser as the first 3 columns are preserved. The scripts provided for working with chrN.bed files are described in the table below: Script Name Description grabLines.py Returns a specific range of lines from a chrN.bed file. E.g. the first 10,000
lines in the file. grabRegion.py Returns all the probes from a chrN.bed file falling within the specified
chromosomal region. E.g. all of the probes within a chromosomal band or gene.
orderFile.py Appends primer sequences to Oligopaints probes using user-specified
Chromosome Start End Sequence Tm

-7-
primers and banding patterns. probeRegion.py Tiles a specified number of probes across a region of interest. E.g. 1,000
probes across a gene body. probeNumber.py Returns all possible contiguous sets of probes in a chrN.bed file that meet a
user-specified number of probes. E.g. sets of 10,000. sortFile.py Sorts a given file by the specified column in either ascending or descending
order. windowSize.py Returns all contiguous probe sets that cover a specified window size in
kilobase pairs (e.g. 50 kb) from a chrN.bed file. Options are a way to provide scripts the information they need on the command-line when the script is run. Options have a long form, which is the name of the option proceeded by two dashes, and a short form, which is usually the first letter of the option proceeded by one dash. All of the Oligopaints scripts contain three common options: --help, --interactive, and --output. Each script also has individual options so that necessary information can be provided on the command-line. It is possible to give the script only some of the necessary input on the command-line; if the script doesn’t receive necessary user input or cannot understand it, it will run interactively and prompt the user for input. The options common to all Oligopaints scripts are detailed below: -h, --help When the “-h” or “--help” option is given with any script, information describing the usage and possible options for the script will be reported. -i, --interactive This option tells the script to run interactively, meaning that it will prompt the user for necessary information during the process of running the script. -o, --output Use this option to specify the name of the output file that the script should write to. For example: ./grabLines.py –o lines.txt This will write the output of grabLines.py to the file “lines.txt”. If the file does not exist in the working directory, it will be created. The script will warn the user if an existing file will be overwritten. Each script has a default filename it will use if no output file is given by the –o option, which changes based on the options the user specifies. This output filename is described in the section for the script.

-8-
OLIGOPAINTS SCRIPTS
grabLines.py A chrN.bed file contains hundreds of thousands of lines describing the location of probes along the chromosome. Often, it is convenient to work with a small subset of the lines in a given chrN.bed file. grabLines.py allows the user to reduce any chrN.bed file to the specified lines. The ranges given must fall within the range of lines in the chrN.bed file; for example, a range of -1:40 would not be valid for a file containing only ten lines. The script will warn the user if the range appears to be invalid, and will not execute if more lines are specified than exist in the chrN.bed file. Usage: grabLines.py [OPTIONS] chrN.bed Input: chrN.bed Output: chrN_lines_[start line]_to_[end line].bed Option Description -h, --help Brings up help menu -i, --interactive Runs script interactively -o, --output The name of the output file. If the file doesn’t exist, it will be created. -r, --range The range of lines to grab, given as [start:end]. For example:
$ ./grabLines.py –r [5:50] Examples: Retrieve the first 20 lines from chr13.bed and output to 20_lines.txt $ ./grabLines.py –r [1:20] –o 20_lines.txt chr13.bed Wrote to 20_lines.txt Interactively use the script to get the 100th line to the end of chr2R.bed $ ./grabLines.py –i chr2R.bed Please enter the number of the first line needed [min = 1]: 100 Please enter the number of the last line needed [max = 313768]: 313768 Wrote to chr2R_lines_100_to_313768.bed
grabRegion.py There are many tasks where it could be useful to find all probes within a chrN.bed file that fall into a certain region. The grabRegion.py script allows the user to intersect regions of interest with a chrN.bed file, returning all probes that fall into the region. The script also reports the
-9-
probe density for the region as probes/kb. Advanced users may choose to use the intersectBed component of the bedtools package in place of this script (available here) The script will accept the start and end coordinates for a region of interest given as an –r, --region argument and in the format [start:end]. This region must make sense for the file – if the coordinates given are outside the range of coordinates in the chrN.bed file, the script warn the user and correct the coordinates. When run interactively, the script will display the minimum start coordinate and maximum end coordinate possible for the chrN.bed file. Usage: grabRegion.py [OPTIONS] chrN.bed Input: chrN.bed Output: chrN_region_[start coordinate]_to_[end coordinate].bed Option Description -h, --help Brings up help menu -i, --interactive Runs script interactively -o, --output The name of the output file. If the file doesn’t exist, it will be created. -r, --range The range of lines to grab, given as [start:end]. For example:
$ ./grabRegion.py –r [20000:24000] Examples: Get all probes from chr2R.bed between 20000th base and the 24000th base $ ./grabRegion.py –i chr2R.bed Please enter the region start coordinate [min = 3120]: 20000 Please enter the region end coordinate [max = 21145723]: 24000 Returned 45 probes with a density of 11.503 probes/kb Wrote to chr2R_region_20000_to_24000.bed Get all probes from chr16.bed from the 60000th base to 100 kb away, writing to chr16_probes.txt $ ./grabRegion.py –r [60000:160000] –o chr16_probes.txt chr16.bed Start coordinate is less than minimum start in file, correcting to 60081 Returned 838 probes with a density of 8.389 probes/kb Wrote to chr16_probes.txt
orderFile.py This script aids in preparing an order file by appending primer sequences to the probes in a chrN.bed file. The user can specify the number of primer pairs to be used and the probes that each pair is appended to. Primers can either be entered interactively, or given as a text file consisting of the forward primer sequence, the reverse primer sequence, and the range of

-10-
probes for the primer pair separated by tabs. The sequences must be given 5’ to 3’, and the ranges should be given as start-stop, with multiple ranges separated by commas. The script will automatically convert the reverse primer to its reverse complement and warn if different primer pairs overlap in their range of probes. Note that a given primer sequence can be present in multiple primer pairs – for example, a common forward primer could be used with multiple reverse primers. Usage: order.py [OPTIONS] chrN.bed Input: chrN.bed Output: chrN_order.bed Option Description -h, --help Brings up help menu -i, --interactive Runs script interactively -o, --output The name of the output file. If the file doesn’t exist, it will be created. -p, --primer A file containing one line for each primer being used. The forward and reverse
sequences of each primer 5’ to 3’ and the range of probe lines being targeted must be separated by tabs and given in that order left to right. See the example below for details.
Examples: Creating an order file for chr2R.bed, with a file containing the information required for two different primers, each targeted to a separate range of probes
This file describes two primers: one that is targeted to the first 10 probes, and then the 21st probe to the last probe in the file, and one that is targeted to the 11th through 20th probes. The file is then passed to order.py using the –p option: $ ./order.py –p primers.txt chr2R.bed This will create a file called chr2R_order.bed in the current directory. An example of the output file is shown below:
CTCGGCCAAT GGTCAGTACT 1-10,21-313768TTTTCAGACG CCTTAGTAGC 11-20
-11-
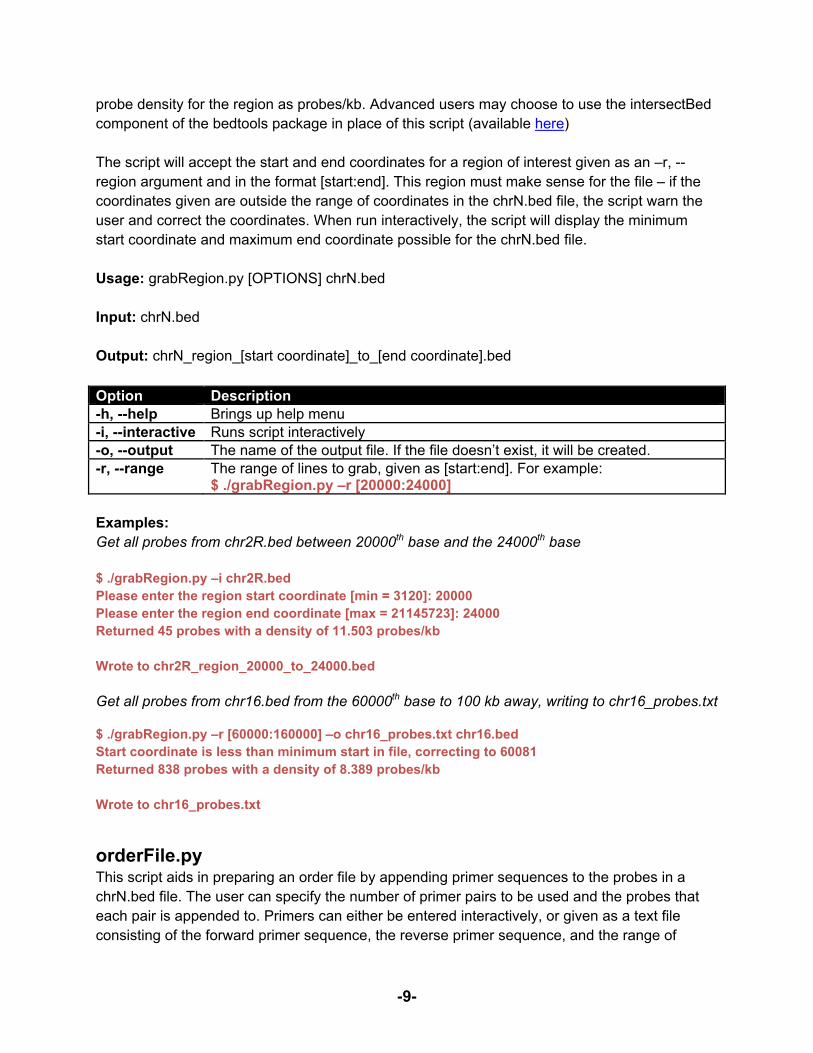
The first column displays the line number of each line in the file, while the dashed lines indicate a switch between one set of primers to the other. Just as the primers.txt file specified, the first primer set is used for probes 1-10 and 21-onwards, while the second primer set is used for probes 11-20. Creating an order file for chr16.bed interactively, with the output file set to order_June1.txt $ ./order.py –i –o order_June1.txt chr16.bed Number of primers: 1 Enter primers 5' to 3' Please enter the 1st forward primer: CCATACCA Please enter the 1st reverse primer: GTGCCATC The maximum probe range is 1-846611 Enter the range of probes for this primer to cover [ex. 1-30, 41-60]: 1-846611 Wrote to order_June1.txt

-12-
probeRegion.py There are many reasons to want to target a region of interest with a specific number of probes. However, due to the density of the probe database, the region in question may contain more probes than the user actually needs. The probeRegion.py script allows the user to define the number of probes needed in a region, and returns a list of probes that tile across the region of interest. If there are fewer probes in the given region than requested, the probeRegion.py script will notify the user and allow them to either reduce the probe number or increase the region size. Usage: probeRegion.py [OPTIONS] chrN.bed Input: chrN.bed Output: chrN_[number of probes]_probes_from_[start]_to_[end] .bed Option Description -h, --help Brings up help menu -i, --interactive Runs script interactively -o, --output The name of the output file. If the file doesn’t exist, it will be created. -p, --probes The number of probes to pull out of the given region -r, --region The region to search in the chrN.bed file, given as [start:end]. For example:
$ ./probeRegion.py –r [1000:50000] Examples Searching chr16.bed interactively to get 1000 probes in a 1 Mb window $ ./probeRegion.py –i chr16.bed Please enter the number of probes per region [ex. 1000]: 1000 Please enter the start coordinate for the region [min = 60081]: 1000000 Please enter the end coordinate for the region [max = 90290462]: 2000000 Found 9696 probes in region Tiling 1000 probes (out of 9696) evenly across region Wrote to chr16_1000_probes_from_1000000_to_2000000.bed An example of the output file is shown below:
chr16 1000118 1000149 CGAAAGACTCAGAGCCAATGACAGAGTCAGAG 80.43chr16 1002045 1002076 CGCCTCGGCAAAGTCAGGCATGTGTGCGTGGA 89.15chr16 1004124 1004155 CTTTAAGTAAGGAAGAGCTACTGCAAAGAGGT 77.34chr16 1004642 1004673 TGGAAAGCCACCAGGAATGCCACGACTGGAAG 85.87chr16 1005789 1005820 TCACCATTATGAAACACACCCTGAGGACCCTG 82.14chr16 1007287 1007318 TGTCTGTGTAACTGTGCATGCTGGTTTGGAGT 82.57chr16 1007835 1007866 AACTACACAGACAAAGAGCAGCCTTGGGCCGG 85.77chr16 1008948 1008979 AAGGTTCGGGACAGCAGGAGTGCCCTCGCTGT 89.53chr16 1009634 1009665 GCAACTCCGGAAAATGTTCTGAGTGGAGACCG 82.90chr16 1010084 1010115 CCTCCCAGTGCCCAGACTGAAGTTTCTATGCT 83.54

-13-
PROBENUMBER.PY This script allows the user to parse a chrN.bed file into a series of regions that meet a specified probe threshold. For example, one could find the regions in a chromosome that contain 1000 probes. The output file contains the coordinates for each region and the probe density (probes/kb) for the region. The user can limit the search to a specific region of the chrN.bed file by providing start and stop coordinates using the-r, --region option. Usage: probeNumber.py [OPTIONS] chrN.bed Input: chrN.bed Output: chrN_[number of probes]_probe_regions.bed Note: If the –r, --region option has been used, the file name will change to reflect the region searched, becoming chrN_[number of probes]_probe_regions_from_[start]_to_[end].bed Option Description -h, --help Brings up help menu -i, --interactive Runs script interactively -o, --output The name of the output file. If the file doesn’t exist, it will be created. -p, --probes The number of probes per region -r, --region The region to search in the chrN.bed file, given as [start:end]. For example:
$ ./probeNumber.py –r [1000:50000] Examples: Searching chr16.bed interactively to find windows with 500 probes from the beginning of the file to 100,000 bases afterwards $ ./probeNumber.py –i chr16.bed Please enter the number of probes per region [ex. 1000]: 500 Would you like to specify a region to search within the file? [Y/n]: y Please enter the start coordinate for the region [min = 60081]: 60081 Please enter the end coordinate for the region [max = 90290462]: 160081 Wrote to chr16_500_probe_regions_from_60081_to_160081.bed

-14-
An example of the output file is shown below:
Finding all regions containing 1000 probes in chr2R.bed and writing to chr2R_windows.bed $ ./probeNumber.py –p 1000 –o chr2R_windows.bed chr2R.bed Wrote to chr2R_windows.bed
sortFile.py There are many reasons a user may want to sort chrN.bed files. For example, one could sort a chrN.bed file to pull out probes with the highest Tm, or sort an output file to pull out the densest regions of a chromosome. While sorting small files is easily done using spreadsheet software, such as Excel, some files are too large to easily manipulate with such programs. The sortFile.py script allows the user to sort any tab-delimited text file by a column in ascending or descending order. Usage: sortFile.py [OPTIONS] chrN.bed Input: chrN.bed Output: chrN_sorted.bed Option Description -h, --help Brings up help menu -i, --interactive Runs script interactively -c, --columns The column to sort the file by (e.g. -c 1 for the first column) -s, --sort The order in which the file should be sorted. The only two options are “a” or
“d”, for ascending or descending order, respectively. Defaults to descending order.
-o, --output The name of the output file. If the file doesn’t exist, it will be created. Examples Sorting chr2R.bed by Tm in descending order
chr16 60081 130439 7.107chr16 64122 130481 7.535chr16 67574 130531 7.942chr16 69680 130891 8.168chr16 71255 130952 8.376chr16 71407 130994 8.391chr16 71480 131037 8.395chr16 71522 131084 8.395

-15-
The first ten lines of chr2R.bed before the sort:
$ ./sortFile.py –c 5 chr2R.bed Sorting chr2R.bed by the 5th column in descending order Wrote to chr2R_sorted.bed The first ten lines of chr2R_sorted.bed:
Interactively sorting chr16.bed by the start position (2nd column) in ascending order, and writing to sorted.txt $ ./sortFile.py –i –o sorted.txt chr16.bed Please enter the column to sort by [5 columns in file]: 2 Ascending or descending sort? [a/d]: a Sorting chr16.bed by the 2nd column in ascending order Wrote to sorted.txt
WINDOWSIZE.PY This script allows the user to parse a chrN.bed file into windows of a certain size, reporting the coordinates, probe density (defined as probes/kb) and number of total probes for each window. The script attempts to find windows of the user-defined size, within a tolerance level that defaults to 10% of the window size. This tolerance level can be changed by the user, using the
chr2R 4153 4184 CATCGAAAACCTATAATCAAAACAGGCAACAG 76.12chr2R 9775 9806 CACTTAGAGACGAATGAAATTTCTGTAACAGG 75.12chr2R 9913 9944 CTAAGATAATTGAGGGAAAGACTTCGGTAACG 76.05chr2R 9968 9999 GAGGTCCATGTCATTGGAGTCACTGGAGGCTC 83.59chr2R 10340 10371 CCGCTAAAGAACTACAACTACAACTACAACTT 76.09chr2R 10382 10413 CGTCGGTAAATCGGTACAATCACTTCAAAATT 77.03chr2R 10570 10601 TGTCTTTGAGTATACCTAGACGACATCATAGT 75.72chr2R 10689 10720 CAAATGCGAATTCTAAAACCAAACCCGGATAA 77.60chr2R 10880 10911 CAGTTCAGAATACTTAGAAGCATTCGAAAGGT 76.24chr2R 11031 11062 CCTGTTAGCTACATCAGCAGAACAATTAATGA 76.35
chr2R 20946954 20946985 TTGCCGTGTCATCCCGGAGGTGCGTGTGTCCG 89.99chr2R 20936608 20936639 GAGTGTATGCTGGGAGTGCGGCCACCGTCCGG 89.99chr2R 20826078 20826109 TGGAGGACGGCACCAAGCGCGAGGTGGTCAAG 89.99chr2R 20775361 20775392 GAGCGCTGGAGGAACCACCGAGCCTTCCACCG 89.99chr2R 20742317 20742348 TGTAGACCACTGGCGGTGCTGCACTCGGCCAC 89.99chr2R 20718469 20718500 GTGTGTGCTCGAGGGAAGGGCGGCTTCTCCGG 89.99chr2R 20476447 20476478 AACCTGGATGCGGGACTGGAGGCCACAGCGAC 89.99chr2R 20462538 20462569 TCCGCAGTACCGCCCAGCTCATCCTGGCCAAC 89.99chr2R 20461562 20461593 ATGGTGCAGACTGGCGATCCCACGGGAACGGG 89.99chr2R 20458935 20458966 TTCTTGGCTCCGCTTCCTCCGCCGCCATCGTC 89.99

-16-
–t, --tolerance option. The –s, --sort option sorts the output file by decreasing probe density, allowing the user to quickly find the densest regions of a given size for the chrN.bed file. Usage: windowSize.py [OPTIONS] chrN.bed Input: chrN.bed Output: chrN_[window size]kb.txt Option Description -h, --help Brings up help menu -i, --interactive Runs script interactively -o, --output The name of the output file. If the file doesn’t exist, it will be created. -s, --sort Sort output file by probe density in descending order -t, --tolerance The tolerance for variation in the window size. It defaults to 10% of the window
size, but can be changed by providing the tolerance as a fraction of window size. Example: $ ./windowSize.py –t 0.05
-w, --window The target window size, in kb. The script will attempt to find windows of that size, modified by the tolerance option.
Examples: Finding the densest 10kb windows in chr16.bed with window size variation limited to 100 bp. $ ./probeNumber –w 10 –t 0.01 -s chr16.bed Sorting chr16_10kb.txt Wrote to chr16_10kb.txt An example of the output file, which gives the start and stop coordinates, probe density in probes/kb, and the number of probes in the window is shown below:
chr16 10033096 10043060 17.26 172chr16 10033138 10043103 17.26 172chr16 10035402 10045309 17.26 171chr16 10035913 10045818 17.26 171chr16 52216234 52226201 17.26 172chr16 52216633 52226596 17.26 172chr16 52216760 52226724 17.26 172chr16 10035582 10045496 17.25 171chr16 10035845 10045818 17.25 172chr16 51020010 51029979 17.25 172
-17-
WALKTHROUGHS This section contains detailed walkthrough of three different tasks that can be completed using Oligopaints scripts. For each step involving a script, the terminal window will be shown with the script run interactively for greater clarity. Although the images shown will be from a UNIX Terminal, the scripts will behave in the same way using the same commands from a Mac OS X Terminal or a Windows Command Prompt.
EXAMPLE 1: DESIGNING 20,000 PROBES TO 19P12 In this first example, we are aiming to design a block of 20,000 probes to 19p12, using the chr19.bed file. First, we need to get the position of 19p12, which we can easily get from UCSC Genome Browser by typing “19p12” into the position bar when browsing the GRCh37/hg19 genome. We then define our region of interest (ROI) as chr19:20,000,001-24,400,000. Next, we want to intersect our ROI with the chr19.bed file. We use grabRegion.py to do so: $ ./grabRegion.py –I chr19.bed Please enter the region start coordinate [min = 82603]: 20000001 Please enter the region end coordinate [min = 58128975]: 24400000 Returned 26927 probes with a density of 6.12 probes/kb Wrote to chr19_region_20000001_to_24400000.bed As shown above, we now have the file chr19_region_20000001_to_24400000.bed, which contains 26,927 probes. Since we only want 20,000 probes, we’ll narrow down our list by picking the top 20,000 with the highest Tm. We’ll use sortFile.py to sort our file by Tm, which is the fifth column in our file. $ ./sortFile.py –i chr19_region_20000001_to_24400000.bed Please enter the column to sort by [5 columns in file]: 5 Ascending or descending sort? [a/d]: d Sorting chr19_region_20000001_to_24400000.bed by the 5th column in descending order Wrote to chr19_region_20000001_to_24400000_sorted.bed We now have our 26,927 probes sorted by Tm in descending order. Since we want probes with the highest Tm, we will take the first 20,000 lines from the sorted file and use those to order primers. In Linux/UNIX and OS X, the “head” command returns the first lines of a file, using the option -20000 to pick the first 20,000. This is used in the example below. On a Windows system, one could use grabLines.py to return the first 20,000 lines, or open the file in Excel and take only the first 20,000 rows. In addition, we’ll rename the file to chr19_20000_probes.bed to cut down on the length of the filename. $ head –20000 chr19_region_20000001_to_24400000_sorted.bed > chr19_20000_probes.bed

-18-
Finally, we will create an order file with primer sequences appended to our oligos. The example below uses one primer pair, but multiple pairs can easily be used if so desired. $ ./orderFile.py –i chr19_20000_probes.bed Number of primers: 1 Enter primers 5’ to 3’ Please enter the 1st forward primer: CTCGGCCAAT Please enter the 1st reverse primer: TCATGACTGG The maximum probe range is 1-20000 Enter the range of probes for this primer to cover [ex. 1-30, 41-60]: 1-20000 Wrote to chr19_20000_probes_order.txt Our final result: 20000509 CTCGGCCAATTGGTACAGTCACTCACTGCAAGCTTCCCATCTCCAGTCATGA 20000737 CTCGGCCAATCCAAGCTTGGCCTGTTCAATTTATTCTGAATTCCAGTCATGA 20000831 CTCGGCCAATGCCATGCTGCCCAAATATTTTGTATACATTGTCCAGTCATGA 20001078 CTCGGCCAATTGCTACAGCCATTCCTGTTTGGATTACTGCAGCCAGTCATGA 20001120 CTCGGCCAATTCTGTAACATTTACCTTTAGACTCAGCAGACTCCAGTCATGA 20001178 CTCGGCCAATTTTCAGCATTTTATGTCATGGGAGACATTAGCCCAGTCATGA 20001963 CTCGGCCAATAAAAGCACAATGTTATACTGGGCAGCAGGAAGCCAGTCATGA 20002153 CTCGGCCAATAATCAGAACTGGTGGTATTTTGCTATGTCATCCCAGTCATGA 20002309 CTCGGCCAATCTTTGGCCAGAGAACATACAAAATTCTTTCCACCAGTCATGA 20003356 CTCGGCCAATACTGCATCCTCAACTCTAACTACACATAAGAGCCAGTCATGA 20003721 CTCGGCCAATTCATACCAAACAGAAGCCCTACAAGTGTGAAGCCAGTCATGA EXAMPLE 2: DESIGNING 10,000 PROBES TO THE GENE BCKDK
In this second example, we want to target the gene BCKDK with 10,000 probes. We’ll first get the genomic coordinates for BCKDK, ensuring that the genome build we get coordinates for is the same as the genome build used by Oligopaints (in this case, hg19/GRCh37). By typing BCKDK into the position bar, we search for all genes matching this name and pick the gene to get its coordinates. The coordinates for the gene are chr16: 31,119,662-31,124,112, and we’ll use grabRegion.py to get the probes we need: $ ./grabRegion.py –i chr16.bed Please enter the region start coordinate [min = 60081]: 31119662 Please enter the region end coordinate [max = 90290462]: 31124112 Returned 57 probes with a density of 13.137 probes/kb We immediately run into a problem. There are only 57 probes that cover our region of interest. In order to get around this, we can expand the flanks of our ROI to pick up more probes. We

-19-
can use probeRegion.py to efficiently parse chr16.bed until we get a region that meets our threshold probe number of 10,000 probes: $ ./probeRegion.py –i chr16.bed Please enter the number of probes per region [ex. 1000]: 10000 Please enter the region start coordinate [min = 60081]: 30619662 Please enter the region end coordinate [max = 90290462]: 31624112 Found 9431 probes in region Less probes found (9431) than requested (10000) Would you like to change the region size? [Y/n]: y Please enter the region start coordinate [min = 60081]: 30619662 Please enter the region end coordinate [max = 90290462]: 31874112 Found 13536 probes in region Tiling 10000 probes (out of 13536) evenly across region Wrote to chr16_10000_probes_from_30369662_to_31874112 As you can see above, we first try expanding our ROI by 500 kb on each side, giving us a spot of roughly 1 Mb. We enter the minimum number of probes/region, 10,000, and the new coordinates. However, this region only contains 9431 probes. We try again, using 750 kb flanks, and find 13536 probes in our new ROI. probeRegion.py then returns 10,000 probes tiled across our region of interest, out of the possible 13536. Finally, we will use orderFile.py to get append one primer pair to all of our probes: ./orderFile.py –i chr16_10000_probes_from_30369662_to_31874112.bed Number of primers: 1 Enter primers 5’ to 3’ Please enter the 1st forward primer: ACCTGCATGCGG Please enter the 1st reverse primer: CCGTGATCGTCA The maximum probe range is 1-10000 Enter the range of probes for this primer to cover [ex. 1-30, 41-60]: 1-10000 Wrote to chr16_10000_probes_from_30369662_to_31874112_order.txt And here’s our order file, ready to go:
30027206 ACTAGTTGACGCGTTTGTTTTGTAGAGATGGGTCTTACTATGGTTACGGCATACGG30027691 ACTAGTTGACGCACCGTTAGGTTTCCTTCGTGGCTCTCCAGAATTACGGCATACGG30027733 ACTAGTTGACGCGCAGGACGAAGGGAGACACAGTGCAGTGTGAATACGGCATACGG30027865 ACTAGTTGACGCTCCTGTGCTCTCTTCCCACGGTGCTTGCTCAATACGGCATACGG30027926 ACTAGTTGACGCTGTTGAAGACAGGTAAGGATGAGGCTGGAGTTTACGGCATACGG30028032 ACTAGTTGACGCGTCACCCAGTCATTCAGTAAATATTGACTGAATACGGCATACGG30028127 ACTAGTTGACGCTCATAGGGAAGACAGACAAATACACAGACAATTACGGCATACGG30028232 ACTAGTTGACGCGAGGGAACAAAGATTAACACCTCACTTCCCAGTACGGCATACGG30028351 ACTAGTTGACGCTGTGCCAAAGCTGGGAGGCAGTCCAGAGTACGTACGGCATACGG30028393 ACTAGTTGACGCAAAAGAAATCATTCTACCAGCCTGGTCAACATTACGGCATACGG
-20-
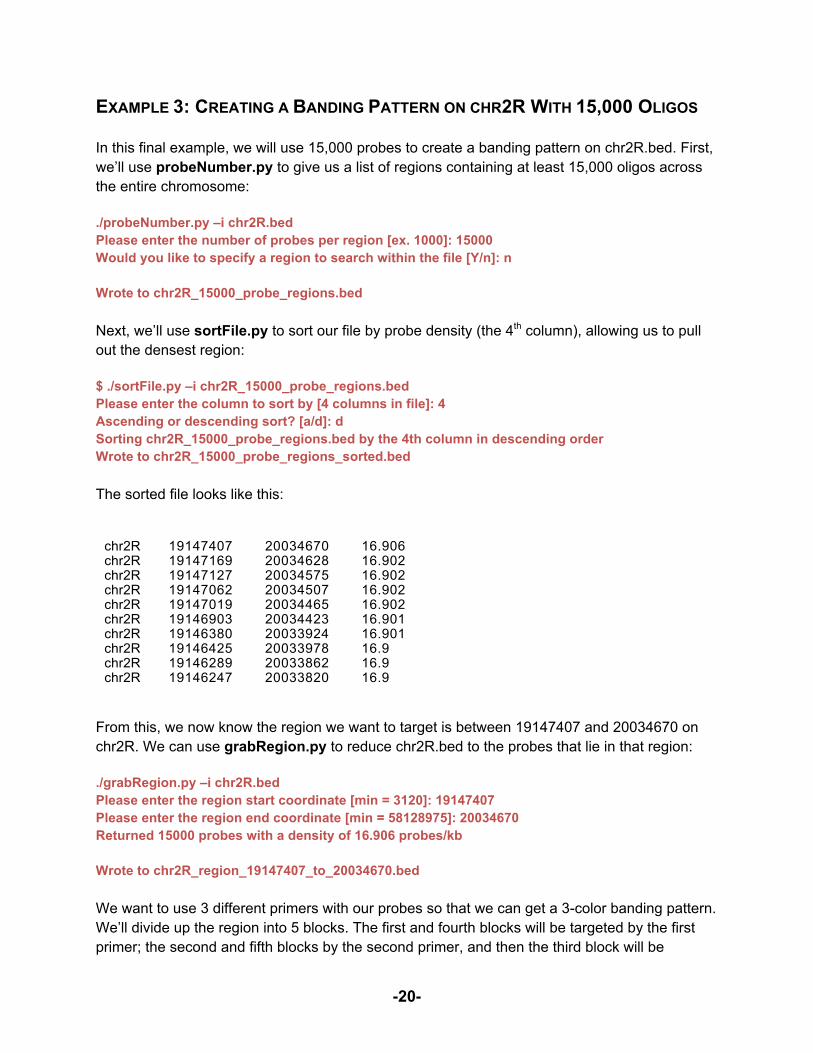
EXAMPLE 3: CREATING A BANDING PATTERN ON CHR2R WITH 15,000 OLIGOS In this final example, we will use 15,000 probes to create a banding pattern on chr2R.bed. First, we’ll use probeNumber.py to give us a list of regions containing at least 15,000 oligos across the entire chromosome: ./probeNumber.py –i chr2R.bed Please enter the number of probes per region [ex. 1000]: 15000 Would you like to specify a region to search within the file [Y/n]: n Wrote to chr2R_15000_probe_regions.bed Next, we’ll use sortFile.py to sort our file by probe density (the 4th column), allowing us to pull out the densest region: $ ./sortFile.py –i chr2R_15000_probe_regions.bed Please enter the column to sort by [4 columns in file]: 4 Ascending or descending sort? [a/d]: d Sorting chr2R_15000_probe_regions.bed by the 4th column in descending order Wrote to chr2R_15000_probe_regions_sorted.bed The sorted file looks like this:
From this, we now know the region we want to target is between 19147407 and 20034670 on chr2R. We can use grabRegion.py to reduce chr2R.bed to the probes that lie in that region: ./grabRegion.py –i chr2R.bed Please enter the region start coordinate [min = 3120]: 19147407 Please enter the region end coordinate [min = 58128975]: 20034670 Returned 15000 probes with a density of 16.906 probes/kb Wrote to chr2R_region_19147407_to_20034670.bed We want to use 3 different primers with our probes so that we can get a 3-color banding pattern. We’ll divide up the region into 5 blocks. The first and fourth blocks will be targeted by the first primer; the second and fifth blocks by the second primer, and then the third block will be
chr2R 19147407 20034670 16.906chr2R 19147169 20034628 16.902chr2R 19147127 20034575 16.902chr2R 19147062 20034507 16.902chr2R 19147019 20034465 16.902chr2R 19146903 20034423 16.901chr2R 19146380 20033924 16.901chr2R 19146425 20033978 16.9chr2R 19146289 20033862 16.9chr2R 19146247 20033820 16.9
-21-
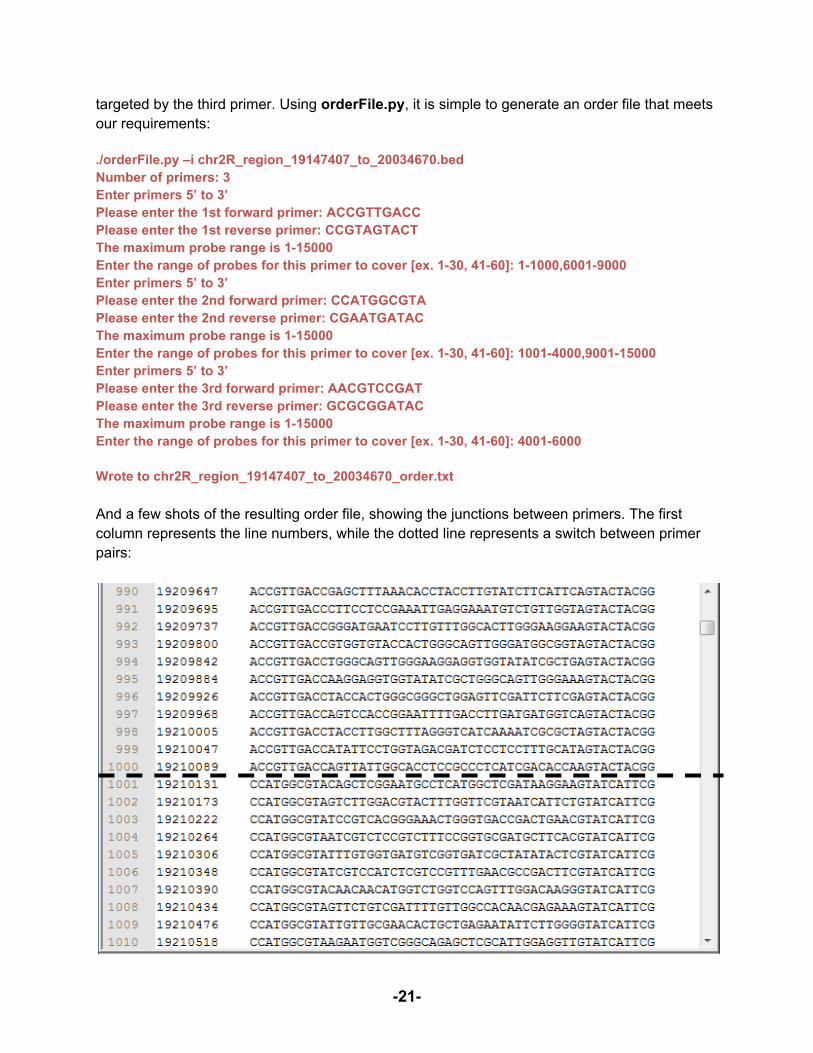
targeted by the third primer. Using orderFile.py, it is simple to generate an order file that meets our requirements: ./orderFile.py –i chr2R_region_19147407_to_20034670.bed Number of primers: 3 Enter primers 5’ to 3’ Please enter the 1st forward primer: ACCGTTGACC Please enter the 1st reverse primer: CCGTAGTACT The maximum probe range is 1-15000 Enter the range of probes for this primer to cover [ex. 1-30, 41-60]: 1-1000,6001-9000 Enter primers 5’ to 3’ Please enter the 2nd forward primer: CCATGGCGTA Please enter the 2nd reverse primer: CGAATGATAC The maximum probe range is 1-15000 Enter the range of probes for this primer to cover [ex. 1-30, 41-60]: 1001-4000,9001-15000 Enter primers 5’ to 3’ Please enter the 3rd forward primer: AACGTCCGAT Please enter the 3rd reverse primer: GCGCGGATAC The maximum probe range is 1-15000 Enter the range of probes for this primer to cover [ex. 1-30, 41-60]: 4001-6000 Wrote to chr2R_region_19147407_to_20034670_order.txt And a few shots of the resulting order file, showing the junctions between primers. The first column represents the line numbers, while the dotted line represents a switch between primer pairs:

-22-
The screenshot above shows the junction between the first primer pair and the second primer pair, at the 1000th line.
The second screenshot above shows the junction between the first primer pair and the third primer pair at the 4000th line.

-23-
Finally, this screenshot shows the switch between the first primer pair and the second primer pair at the 9000th line.


![Adodb Scripts And Some Sample Scripts[1]](https://img.dokumen.tips/doc/110x75/558c78c9d8b42a566c8b4732/adodb-scripts-and-some-sample-scripts1.jpg)