Embed Size (px)
Citation preview


Ohio Historic Bridge Maintenance and Preservation Guidance
1
Table of Contents
1 Defining Maintenance Treatments for Historic Bridges ............................................................3
1.1 Introduction ....................................................................................................................3
1.2 How Manual Is Organized .............................................................................................3
1.3 Intent and Direction of Guidance ...................................................................................4
1.3.1 Types of Work Appropriate for Historic Bridges ..............................................4
1.3.2 Defining Levels of Treatment ............................................................................5
1.4 Other Available Bridge-Specific Information ................................................................6
2 Materials – Properties and Common Problems .........................................................................7
2.1 Stone ..............................................................................................................................7
2.1.1 Common Stone Deterioration Problems ............................................................8
2.2 Wood ..............................................................................................................................9
2.2.1 Common Wood Deterioration Problems .........................................................10
2.3 Steel and Iron ...............................................................................................................10
2.3.1 Common Steel and Iron Deterioration Problems .............................................12
2.4 Concrete / Reinforced Concrete ...................................................................................12
2.4.1 Common Concrete and Reinforced Concrete Deterioration Problems ............13
3 Preservation and Rehabilitation Strategies by Bridge Type .....................................................15
3.1 General Maintenance/Preservation Strategies For All Bridge Types ..........................15
3.2 Steel Stringer Bridges ..................................................................................................17
3.2.1 Appropriate Maintenance and Preservation Treatments ..................................17
3.2.2 Appropriate Rehabilitation Treatments ............................................................18
3.3 Girder-Floorbeam Bridges ...........................................................................................19
3.3.1 Appropriate Maintenance and Preservation Treatments ..................................19
3.3.2 Appropriate Rehabilitation Treatments ............................................................20
3.4 Metal Truss Bridges .....................................................................................................21
3.4.1 Appropriate Maintenance and Preservation Treatments ..................................21
3.4.2 Appropriate Rehabilitation Treatments ............................................................25
3.5 Stone and Brick Arch Bridges .....................................................................................31
3.5.1 Appropriate Maintenance and Preservation Treatments ..................................31
3.5.2 Appropriate Rehabilitation Treatments ............................................................35
3.6 Reinforced Concrete Arch Bridges ..............................................................................36
3.6.1 Appropriate Maintenance and Preservation Treatments ..................................36
3.6.2 Appropriate Rehabilitation Treatments ............................................................38
3.7 T Beam and Slab Bridges .............................................................................................39
3.7.1 Appropriate Maintenance and Preservation Treatments ..................................39
3.7.2 Appropriate Rehabilitation Treatments ............................................................40
3.8 Reinforced Concrete Rigid Frame/Box Culvert Bridges .............................................41
3.8.1 Appropriate Maintenance and Preservation Treatments ..................................41
3.8.2 Appropriate Rehabilitation Treatments ............................................................41
3.9 Bridge Railings ............................................................................................................42
3.9.1 Appropriate Maintenance and Preservation Treatments ..................................43
3.9.2 Appropriate Rehabilitation and Replacement Treatments ...............................43

Ohio Historic Bridge Maintenance and Preservation Guidance
2
Table of Contents (continued)
4 Selected Bibliography ..............................................................................................................47
Appendices
Appendix A – Secretary of the Interior’s Standards for the Treatment of Historic
Properties
Preservation
Rehabilitation
Appendix B – Selected National Park Service Preservation Briefs
1 Assessing Cleaning and Water-Repellent Treatments for Historic
Masonry Buildings
2 Repointing Mortar Joints in Historic Masonry Buildings
15 Preservation of Historic Concrete
38 Removing Graffiti from Historic Masonry

Ohio Historic Bridge Maintenance and Preservation Guidance
3
1 - Defining Maintenance Treatments for Historic Bridges
1.1 Introduction
This guidance is intended as a “users’ manual” to assist owners, managers, and maintenance forces
effectively manage the state’s remarkable assemblage of masonry, concrete and metal historic
bridges. From early cast and wrought iron pony truss bridges that did so much to make the metal
truss bridge one of the most important inventions of the 19th century to those that reflect the Ohio
Highway Department Bridge Bureau’s mid-20th century emphasis on aesthetics or the oldest
prestressed concrete I beam bridge in the country, historic bridges are located in all parts of the state.
Because of their recognized significance and distinction, historic bridges are worthy of preservation,
which starts with cyclical and routine maintenance to ensure their long-term viability. Owners and
managers are encouraged to be proactive about routine maintenance so that these bridges continue to
be useful as transportation facilities as well as valued artifacts from our past. While this manual is
primarily directed toward historic bridges, the treatments are certainly applicable to and appropriate
for all older bridges.
Maintenance and preservation guidance for wood truss bridges is addressed in the 2005 Covered
Bridge Manual produced as part of the National Historic Covered Bridge Preservation Program. It is
available at the website http://www.tfhrc.gov/structur/pubs/04098/index.htm .
Successful maintenance/conservation strategies include routine maintenance activities that are
obvious but sometimes are not performed. The best and most cost effective strategy remains to
perform routine maintenance activities and to address problems when they first manifest themselves.
It is a time-honored truism that lack of proper maintenance results in more extensive and expensive
rehabilitation work that could have been avoided. Fortunately, there are many effective and often
very economical procedures that, when performed regularly or when problems are first noticed, will
prolong the useful life of a bridge.
Once deterioration is identified, the best maintenance practices are those that address the source(s) of
the problem, not just the manifestation(s) of the problem. For example, patching an eroded section
of a concrete pier is not a long-term solution if the failed deck joint causing the deterioration is not
also addressed. Similarly, applying shotcrete to spalled reinforced concrete that has chloride
infiltration and/or corroded reinforcing steel does little more than cover up the underlying causes of
the spalls. Quick fixes like these can do more harm than good because the reason for the
deterioration has not been addressed. The best strategy remains to perform routine maintenance and
preservation activities that address problems when they appear and before they affect other bridge
components.
1.2 How Manual is Organized
This manual addresses effective and appropriate measures for preservation and rehabilitation, the
two treatments most associated with maintaining and keeping historic bridges in service. The
information is organized by material and bridge type. To assist with understanding some common

Ohio Historic Bridge Maintenance and Preservation Guidance
4
sources of deterioration related to materials, a chapter on materials commonly used to construct old
bridge types has also been provided. Under each bridge type are listed appropriate preservation and
rehabilitation treatments that conform to generally accepted preservation/conservation practices.
Additional sources of information are cited in a selected bibliography and the appendices.
1.3 Intent and Direction of Guidance
1.3.1 Types of Work Appropriate for Historic Bridges
Since historic bridges, those that are listed in or are eligible for the National Register of Historic
Places, are considered worthy of preservation, work to them should support that goal. Needed
maintenance and repair should not do more harm than good, like repointing stone masonry with
Sakcrete will do, or destroy historic fabric or detailing, like not keeping drains functioning on
reinforced concrete deck arch bridges will do. Using treatments that balance maintaining and
upgrading historic properties like bridges while conserving historic fabric has been an effective
practice in this country since the 1930s, and much has been learned over the decades. The
Department of the Interior has always been the agency responsible for advising all federal agencies
on preservation of historic properties. Since the mid 1970s, the National Park Service, which is part
of the Department of the Interior, has provided sound and practical guidance for appropriate
approaches in the form of 10 broad standards or guidelines known as The Secretary of the Interior’s
Standards for Rehabilitation. The Standards are widely used, common-sense guidance that
encourages retaining and conserving sound historic material and replacing deteriorated material in
kind and in character with the original. They have become the definition of acceptable work for
historic resources. If work is determined to meet The Secretary of the Interior’s Standards for
Rehabilitation, then it is deemed acceptable and appropriate. The Standards are the measure against
which federally funded or permitted bridge rehabilitation work is evaluated (whether the work will
have an adverse effect or not).
In 1992, the National Park Service recognized that there were types of work, or treatments, to
historic properties in addition to rehabilitation. The standards for rehabilitation were expanded to
include guidance for preservation, reconstruction, and restoration as well. The expanded guidance is
known as The Secretary of the Interior’s Treatment of Historic Properties, and their intent is to
outline a hierarchy of actions in addition to specific guidance. So, for example, if it was determined
that the maintenance work needed was more in the nature of conservation rather than rehabilitation,
the appropriate level of action, or treatment, would be “preservation.” While the 1990s Treatments
overlay The Secretary of the Interior’s Standards for Rehabilitation with a hierarchy of levels of
treatment, the guidance and definitions of what are balanced and appropriate treatments remains
rooted in the tried-and-true original ten Standards. They still remain the best source of guidance for
how to sensibly and effectively maintain historic properties for current uses.
The Secretary of the Interior’s Standards for the Treatment of Historic Properties (1995) for
preservation and rehabilitation are included as Appendix A.

Ohio Historic Bridge Maintenance and Preservation Guidance
5
1.3.2 Defining Levels of Treatment
The Secretary of the Interior’s Standards for the Treatment of Historic Properties defines a distinct
but interrelated hierarchy of approaches that define appropriate types of work associated with
preservation of historic bridges – preservation and rehabilitation. Both preservation and
rehabilitation emphasize retaining existing fabric whenever possible or, when it is too deteriorated
and must be replaced, that new material is an in kind replacement of the existing and/or historic
feature. Most of the work to maintain historic bridges will fall under preservation or rehabilitation.
Refer to Appendix A for the standards for the specific treatments.
Preservation is the treatment most associated with the cyclical work needed to keep bridges in good
repair. It targets the maintenance and repair of existing historic materials and retention of a
property’s form as it has evolved over time. Preservation is defined as the act or process of applying
measures necessary to sustain the existing form, integrity, and materials of a historic property. Work
generally focuses upon the ongoing maintenance and repair of existing materials rather than their
replacement, but limited and appropriate upgrading is included within preservation. Successful
preservation strategies include routine maintenance activities that are obvious but sometimes are not
routinely performed. This includes tasks such as ensuring that all drains are kept open and in good
repair, seasonally removing accumulated debris, washing the bridge, and keeping steel
painted/coated.
Rehabilitation acknowledges the need to modify or add to a historic property to meet continuing or
changing uses while retaining the property’s historic character. It is defined as the act or process of
making possible an efficient compatible use for a property through repair, alterations, and additions
while preserving those portions or features that convey its historical, cultural, or architectural values.
This can include making a bridge stronger in order to accommodate modern loads or adding safety
features. Historic bridges should be rehabilitated in accordance with The Secretary of the Interior’s
Standards for Rehabilitation. These standards provide practical considerations to guide upgrading
historic bridges that also result in preserving what makes them historic.
Figure 1.3.2-1. Work to the 1886 Buckeye
Bridge Works (Cleveland) double
intersection Pratt thru truss bridge was done
using two different treatments. The truss
lines were conserved in accordance with The
Secretary of the Interior’s treatment for
preservation while the deteriorated
floorbeams were rehabilitated using the
original riveted construction technique. The
old beams served as the pattern for the new
beams. All preservation and rehabilitation
work was completed after the bridge was
disassembled.

Ohio Historic Bridge Maintenance and Preservation Guidance
6
1.4 Other Available Bridge-Specific Information
To develop successful historic bridge rehabilitation treatments, it is important to first understand
what it is that makes a bridge historic and what portions or features of the bridge contribute to its
historical significance so that they can be preserved. Within specific bridge types, not all elements
are equally important. Decks and stringers that are part of a flooring system, for instance, are seldom
important to the historical or cultural values of a truss bridge. Features such as pinned connections
of a truss bridge or the scale of a common bridge located in a historic district, however, can be
important. For more information on specific bridges, consult the historic bridge survey form that
was completed for each pre-1960 bridge in the state available at the website www.buckeyeassets.org.
Wood truss bridge information can be found at FHWA’s website for the National Historic Covered
Bridge Preservation http://www.fhwa.dot.gov/bridge/covered.cfm .
Sources of additional information are also cited at the end of specific sections.
Selected National Park Service Preservation Briefs, technical how-to data that represents generally
accepted treatments of concrete and masonry, are included as Appendix B. Although prepared to
primarily address buildings, the information is relevant and applicable to masonry bridges.

Ohio Historic Bridge Maintenance and Preservation Guidance
7
2 - Materials – Properties and Common Problems
An important first step in developing effective maintenance/preservation and rehabilitation
treatments is to understand the properties of the material used to construct the bridge and the
common types of deterioration associated with them. This knowledge can then be used to identify
appropriate strategies that address the source of the problem and prevent, or at least delay, its return.
The most common materials used in the construction of Ohio’s historic bridges roads are steel,
reinforced concrete, stone, and wood. Unreinforced or plain concrete and iron were also used, but are
not as common.
2.1 Stone
Stone is a permanent but brittle material noted for its compressive strength, shear strength, moisture
resistance, and durability. It is best suited in compression applications such as for an arch
superstructure, abutment, pier, wingwall, or retaining wall. In the 20th century, stone was
increasingly used as a veneer material on reinforced concrete bridges, particularly arch and rigid
frame types. The natural divisions in rocks (igneous, sedimentary, and metamorphic) are related to
the molecular shape of the material so that the manner in which a given stone will break depends on
its crystalline structure. How stones will erode or deteriorate is related to several specific
characteristics like its porosity, hardness, and the nature of the constituent minerals.
Stone masonry is classified by the pattern in which it is laid up. Undressed fieldstone laid up in a
random pattern with no alignment of joints is referred to as rubble. Rectangular shaped or dressed
stones are called ashlar or random ashlar depending on whether the horizontal joints are aligned or
not. Dressed stones can have a variety of face finishes including smooth, rusticated (a choppy, jagged
finish), pecked with a bush hammer, or tooled (a grooved finish). They can also have tooled margins.
Figure 2.1-1. Common Stone Masonry Patterns

Ohio Historic Bridge Maintenance and Preservation Guidance
8
2.1.1 Common Stone Deterioration Problems
The durability of stone is dependent on its natural characteristics to resist the weathering effects of
climatic, environmental, and usage conditions. Deterioration affects not only the individual stones
themselves but also the stone structure as a unit. Stone decay is a complex problem involving a
number of factors, but it is always associated with the presence of water.
Cracks
Even though stone has excellent compressive strength, it is considered a weak material when
subjected to tension or bending forces. Cracks are generally a manifestation of tensile stresses.
Cracks can result from a variety of conditions such as settlement, increased lateral earth pressure, or
impact damage. Localized differential expansion or settlement of the structure’s foundation material
often results in fracturing of the stone and subsequent weakening of the structure.
Figure 2.1.1-1. Cracked ashlar
masonry at an abutment. Cracks like the
ones shown are most likely due to
settlement of the abutment or overloads.
Note moisture seepage from joints
between masonry units. Seepage
indicates a possible lack of drainage that
may result in excessive hydrostatic
pressures that may cause additional
tensile stresses in the masonry.
Cyclic Freezing
The deterioration of stone due to freezing cycles is caused by water trapped in small pores and
cracks. Upon freezing, the moisture expands and causes further cracking that in turn allows room for
more water to be trapped and for cyclic freezing to accelerate deterioration. Freeze-thaw cycle
damage can result in cracking, exfoliation along natural bedding planes, or delamination. It can also
dislodge individual stones and sections of the bridge. Debris accumulation can also accelerate this
process because the stones are unable to dry out.
Dirt and Vegetation
Whenever suitable conditions of dampness, warmth and light occur, algae, lichens, mosses, and
higher plant life will cultivate. Their development is aided by other natural conditions like wind-
blown dirt onto surfaces and into crevices, debris accumulation from overhanging vegetation, and
bird droppings. Vegetation accelerates erosion and deterioration of stone and any mortar connecting
the stones as a unit.

Ohio Historic Bridge Maintenance and Preservation Guidance
9
Movement
Water trapped behind a stone wall can expand upon freezing and cause movement of individual
stones or parts of the wall, including the arch ring of a stone arch bridge. Under repeated freeze-thaw
cycles, stones can become dislodged or stone walls can bow and eventually collapse. Vegetation
growing on the walls or tree roots in close proximity to the masonry can also trigger movement with
the same result. Loads on a bridge in excess of what the masonry unit can withstand can also result in
movement.
Figure 2.1.1-2. The combination of
failed mortar joints, repeated freeze-
thaw cycles, and growth are causing this
wingwall to fail. Note bulging and
dislodging of stones. These problems
are common when routine maintenance
is not performed on a regular basis.
Acid Attack
Acid attack refers to the corrosive action of acidic rainwater, which can dissolve the intergranular
cement in some stone types like sandstones, limestone, and marble and weaken the structure of the
stone. Wind-driven rain, stream channel flow, and drainage runoff over time will abrade and
mechanically erode stone surfaces.
Mortar Joint Failure
Lime-based mortar, which is subjected to many of the same deterioration factors that affect stone,
was used to construct most 19th century and early 20th century stone bridges. The lime-based setting
and pointing mortars are generally and purposely softer/weaker than the stone, so it may exhibit more
decay more quickly than the stones it joins. The mortar is porous and changes little in volume during
temperature fluctuations. It is slightly water soluble and thus able to re-seal any hairline cracks that
develop. Twentieth-century mortar that uses Portland cement as a primary binding material is subject
to the same types of deterioration. When mortar joints fail, moisture-penetration related
deterioration of stone and the structure itself is rapidly accelerated.
2.2 Wood
Wood is a biological material. It is a hard, fibrous material made up of elongated, round or
rectangular tube-like cells that are found beneath the bark of a tree. The cell walls are cellulose, and
they are bound together by lignin, which makes the wood solid. Trees are classified as either
hardwood or softwood, but the terms are not necessarily a description of the physical properties.
Most structural timber (except for timber truss members) comes from softwood species.

Ohio Historic Bridge Maintenance and Preservation Guidance
10
The physical properties of wood vary from specie to specie. This is due to the different growth
characteristics and varying environmental factors the specie is subjected to during growth. Some of
the more important growth characteristics that affect its strength and other structural properties are
moisture content, knots, splits, slope of grain, and decay. Wood is very good in compression, and it
has good fatigue characteristics because it can support higher stresses if the stresses are applied for a
short period of time. This makes wood an ideal material for bridges. While it is not uncommon to
find exceptions, 35-40 years is generally the life expectancy of exposed wood bridge members.
Timber bridges generally have a great deal of in kind replacement material that has been placed as
part of routine or enhanced maintenance.
2.2.1 Common Wood Deterioration Problems
Common problems associated with wood range from moisture-related decay, insect damage, fire, and
degradation of the lignin.
Decay and Insect Damage
Decay is caused by organisms like fungi, bacteria, marine borers, and insects that feed on the wood
cells. Their presence results in the loss of substantial portions of the material, which causes the wood
to weaken. Once established, these organisms continue to grow if oxygen, suitable temperature
range, food, and water are present. Depriving the organisms of any one of those conditions by
treating the wood with preservatives will effectively curtail or slow the decay process. Organisms
generally thrive in temperatures between 70 and 85 degrees Fahrenheit and hibernate below 32
degrees.
Degradation of Lignin
When wood is exposed to ultraviolet rays over extended periods, it undergoes a chemical reaction
that causes a photo-chemical degradation in the lignin. As a result, the wood surface develops a
grayish color (weathering). As the wood degrades, the wood cells near the surface are destroyed
exposing the wood cells beneath. This kind of degradation is a very slow process and is not normally
a structural concern.
2.3 Steel & Iron
Even though steel, wrought iron, and cast iron are ferrous metals, there is considerable difference
between them with respect to their chemical and physical properties. All are manufactured from pig
iron, a class of iron alloys containing approximately 3% to 4.5% carbon and small amounts of other
elements. Pig iron is produced by the reduction of iron ore in a blast furnace.
Cast iron is made from smelting the pig iron that flows directly from the blast furnace. The material
is thus high in carbon and impurities, but it is cheap, easy to pour and mold, high in compressive
strength, fairly hard, and resistant to abrasion. With these advantages, it was a logical material for
early metal bridges. However, it has some serious weaknesses. The presence of the carbon as
separate flakes of graphite makes cast iron brittle and relatively low in tensile strength. Additionally,
the quality of the material varied greatly from foundry to foundry and could not be predicted exactly.

Ohio Historic Bridge Maintenance and Preservation Guidance
11
It is most often found in early metal truss bridges (pre-1894) for cast connecting pieces or
compression members. It was also used for railings, railing posts, and bosses.
Figure 2.3-1. Cast iron castings for
upper panel point connection. Truss
members are built up from wrought iron
shapes. Wrought Iron Bridge Co. used
these connecting pieces through the
early 1890s. Note how unpainted
wrought iron resists corrosion.
Wrought iron is refined from pig iron that has been manipulated into a material in which carbon
forms less than 0.1% and the total proportion of impurities is no more than 0.4%. It is the oldest type
of iron, and with virtually no carbon, it is not brittle like cast iron. Wrought iron is ideal for rolling,
impact shaping, and even splitting. Its long fiber structure and mechanical working give it a
relatively high tensile strength and elasticity. It also has the highest resistance to corrosion of all
ferrous metals other than special alloy steels.
Steel embraces a wide range of ferrous metals developed for specific purposes and is well suited for
structural shapes. It is intermediate between wrought and cast iron in the percentage of carbon that it
contains. The introduction of alloys increases the strength and desirable properties of steel. The
chemistry of steel is complex and depends not only on the initial ingredients but on the process by
which it was produced. The presence of carbon distributed in various forms imparts a definite but
intricate internal structure to the metal that is the basis of its wide range of superior physical
properties. It is much stronger than cast and wrought iron in all areas – tension, compression, and
resistance to impact and fatigue. Steels are susceptible to corrosion (rust), which can be prevented by
maintaining a protective coating such as paint.
Structural steels prior to 1890 were Bessemer process steels. After 1890, structural steels consisted
of open-hearth process steel. Bessemer steel is a low-carbon, moderate quality, general purpose steel
that was produced largely for the production of railroad rails and is more brittle and has a lower
strength than the open-hearth process steel. Open hearth steel was first manufactured in this country
in 1886 at Cleveland. The quality of the open-hearth steel, which is produced at a much more
leisurely rate than the 10-minute Bessemer blow, could be examined and tested to ensure good
quality. In 1896, Andrew Carnegie noted: “Engineers are all specifying for open hearth steel. It is
impossible to sell Bessemer steel for bridges, boiler plates, ships, or even for those enormous 22-
story steel-frame buildings which are going up throughout the country.”

Ohio Historic Bridge Maintenance and Preservation Guidance
12
2.3.1 Common Steel and Iron Deterioration Problems
Iron and steel are susceptible to deterioration when left unprotected (unpainted) or are overstressed.
Rust/Corrosion
Rust or corrosion is the general disintegration of surface metal through oxidation. For rust to form,
three components must be present: oxygen, water, and electrolyte. Rust results in the loss of material
(section) that then lessens the strength of the member. Iron and most grades of steel will rust.
Wrought iron has the highest resistance to corrosion (rusting) of all ferrous metals other than special
alloy steels. Steel has the least resistance.
Another source of corrosion is chemical corrosion, especially when moisture is present. Deicing
salts are a common source of chemical corrosion.
Fatigue and Fracture
Fatigue is the tendency for a metal member to fail at a lower stress when subjected to cyclic loads,
such as live loads on a bridge, than when it is subjected to a static loading. It occurs when the metal
is subjected to repeated load variations or reversals of stress (cycles). After a certain number of
cycles, cracks are initiated and propagated at critical points. When propagation of the crack reaches
its critical dimension, fracture of the member occurs. The number of cycles to initiate a crack and
propagate it until fracture is dependent on the magnitude of the loads in the member, properties of
the metal, design details, and external environmental conditions such as temperature. Any pre-
existing notch or discontinuity can accelerate the fatigue cycle. Fatigue and fracture cracks are more
likely to appear in tension members.
Because of its high ductility, wrought iron is known to be relatively insensitive to notch effects and
unusually resistant to overstress. The presence of slag fibers gives the material toughness and
deflects slip planes that contribute to fatigue failure. The slag also tends to resist the formation of
cracks.
2.4 Concrete/ Reinforced Concrete
Concrete consists of sand, gravel, crushed stone, slag, or other coarse material, bound together with a
cementitious medium such as lime or cement. When water is added, the mix undergoes a chemical
reaction and hardens. It is an extraordinarily versatile material, and it is used for utilitarian and the
monumental bridges alike. Concrete is noted for its strength, moldable qualities, and abrasion
resistance. It has good compressive strength but little tensile strength. Tensile strength is provided by
introducing internal metal reinforcement, generally as deformed reinforcing rods placed in the
tension zones. Reinforced concrete came into common use in bridge construction in this country by
about 1905.
The most common binder for concrete used in bridge construction is Portland cement. Portland
cement is a manufactured cement that is a closely controlled, chemical combination of calcium,
silicon, aluminum, iron, and small amounts of other ingredients to which gypsum is added in the

Ohio Historic Bridge Maintenance and Preservation Guidance
13
final grinding process to regulate the setting time. Portland cement was first produced in this country
in 1871. It replaced natural or hydraulic cement during the 1870s and 1880s and was in common use
by 1890. Portland cement was more dependably uniform than natural or hydraulic cement, and it
could be produced in much larger quantities to meet the ever-increasing demand. Concretes produced
from Portland cement can be extremely hard, are resistant to movement of water, shrink upon setting,
and undergo relatively large thermal movements. Typically, Portland cement concrete is 75%-85%
aggregate. Admixtures can be used to modify the properties of the concrete to make it more suitable
for the required task.
The character of concrete is determined primarily by the quality of the cement-water paste that binds
the aggregate. The strength of the paste, and ultimately its durability, water tightness and other
properties, are dependent on the amount of water used. If too much water is used, the paste is thin
and will be weak when it hardens.
2.4.1 Common Concrete/Reinforced Concrete Deterioration Problems
Concrete and reinforced concrete deterioration may occur for two principal reasons: corrosion of the
embedded steel and degradation of the concrete itself.
Corrosion
Concrete typically protects the embedded reinforcing steel through its alkalinity. Corrosion occurs
when the embedded steel is not protected and the steel is exposed to water, relatively high humidity,
and/or chemical corrosion. The chloride ions present in deicing salts or marine salt, when dissolved
in water, can cause the loss of passivation in the alkaline concrete. When the chloride content of the
concrete at the level of the reinforcing steel exceeds 0.2 percent by weight of cement, the normal
passivating characteristics of the concrete are destroyed and corrosion of the steel can occur. With its
protection degraded, the corroded steel expands significantly, resulting in expansive forces that cause
the adjacent concrete to crack and spall. Many older concrete structures are more porous than modern
concrete, which allows moisture and chlorides to penetrate through the concrete cover to the internal
reinforcing steel.
Carbon dioxide can also cause concrete to deteriorate by reacting with the cement paste at the surface
and converting very alkaline components to less alkaline carbonates. Carbonation normally occurs
only at the surface, but it can extend to the level of the steel in poor-quality concrete. Older bridges
were designed and constructed with less concrete between the surface and the internal reinforcing
steel. In combination with the more porous nature of older concrete, the lack of concrete cover can
be the primary cause of spalls on concrete components. Once chlorides penetrate through the cover
thickness, the concrete no longer protects the steel and corrosion begins.
Cyclic Freezing
Concrete is porous and permeable, and it absorbs moisture readily. Damage due to cyclic freezing
actions occurs when saturated concrete freezes. It appears as surface degradation such as scaling and
cracking. The presence of water in the material may also leach out the calcium hydroxide and cause
weakening of the paste bond and subsequently weaken the member or structure. Modern concretes
Ohio Historic Bridge Maintenance and Preservation Guidance
14
tend to be less permeable than older concretes.
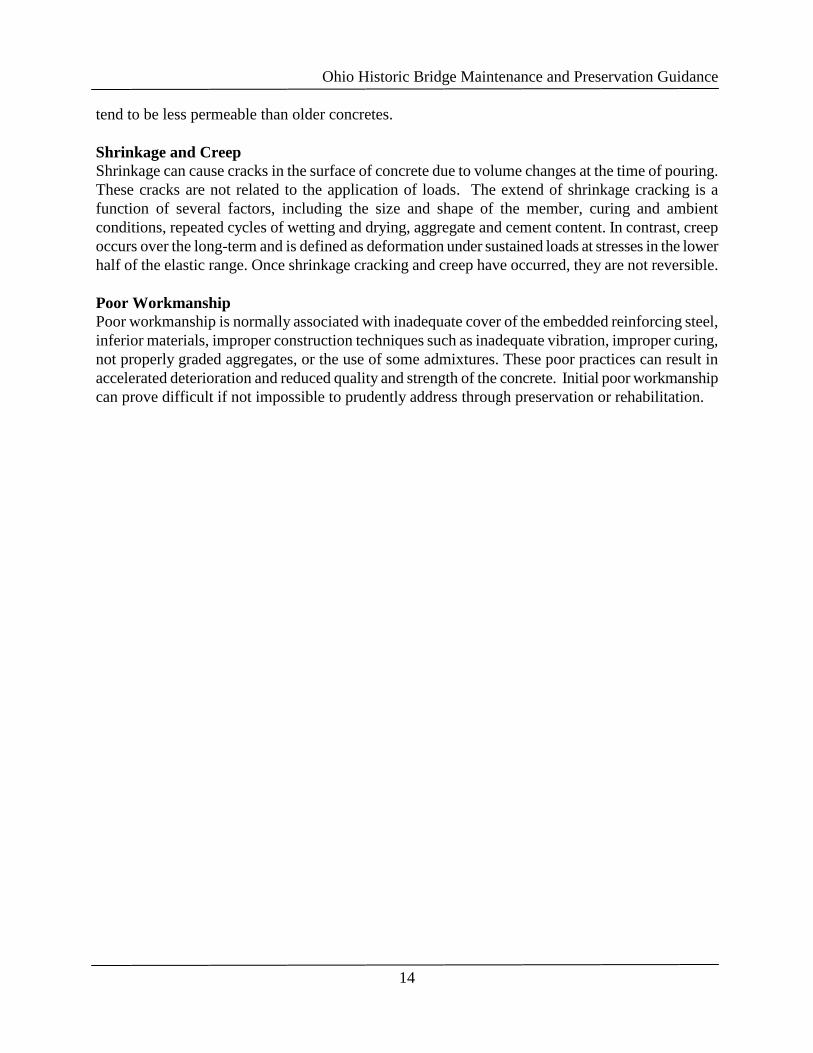
Shrinkage and Creep
Shrinkage can cause cracks in the surface of concrete due to volume changes at the time of pouring.
These cracks are not related to the application of loads. The extend of shrinkage cracking is a
function of several factors, including the size and shape of the member, curing and ambient
conditions, repeated cycles of wetting and drying, aggregate and cement content. In contrast, creep
occurs over the long-term and is defined as deformation under sustained loads at stresses in the lower
half of the elastic range. Once shrinkage cracking and creep have occurred, they are not reversible.
Poor Workmanship
Poor workmanship is normally associated with inadequate cover of the embedded reinforcing steel,
inferior materials, improper construction techniques such as inadequate vibration, improper curing,
not properly graded aggregates, or the use of some admixtures. These poor practices can result in
accelerated deterioration and reduced quality and strength of the concrete. Initial poor workmanship
can prove difficult if not impossible to prudently address through preservation or rehabilitation.
Ohio Historic Bridge Maintenance and Preservation Guidance
15
3 - Preservation and Rehabilitation Strategies by Bridge Type
3.1 General Maintenance/Preservation Strategies For All Bridge Types
There are several routine maintenance practices that are applicable to all bridge types. They are also
among the most effective and least costly treatments, thus providing a great cost benefit to an owner,
yet they are rarely implemented. It is recommended that preservation of all bridges start with these
four good maintenance practices.
Remove Accumulated Debris– Preferably on a Seasonal Basis
Removal of accumulated debris is the single most cost effective maintenance practice for any bridge,
yet it is rarely done with any regularity. Debris accumulates on exposed horizontal surfaces such as
deck joints and abutment seats at the bearings of most bridges and on the lower chords of truss
bridges. Accumulated debris can accelerate material deterioration and it should be removed
seasonally. The presence of debris greatly reduces the evaporation of water and thereby provides
favorable conditions for metal to rust and for concrete and pointing mortar to deteriorate. Where
deicing salts are used, debris removal should also include a washing with a low-pressure, clean water
wash each spring.
Keep Concrete Decks, Expansion Joints and Drains in Good Condition
One of the most effective maintenance/preservation strategies for any historic bridge with a concrete
deck is to keep the deck watertight. The possible sources of moisture penetration from a failing deck
include cracked or deteriorated deck pavement, depressions in the deck that collect and retain water,
roadway drains that are clogged or not functioning properly, failed expansion joints, and leaking
utility pipes buried within the fill of a closed spandrel arch.
Deck cracks should be sealed or patched, and scuppers and bridge drainage systems should be
cleaned and kept open. Accumulations of dirt and debris should be routinely removed as they can
retain moisture. Any expansion joints or seals should also be cleaned and kept in good repair or
replaced as needed.
If not already in place, adequate means of draining water away from the bridge should be installed.
Depending on the type of bridge, scuppers can be installed at the deck level either on or adjacent to
the bridge. Weep holes or pipes wrapped in filter fabric can be installed into cored holes placed
inconspicuously to drain any accumulated moisture.
Keep Vegetation Off Masonry Bridge Elements
Keeping bridges free of vegetation prolongs the useful life of all types of masonry from mortar joints
to decks, concrete piers, arch rings, spandrel walls, wingwalls, railings and decks. Vegetation such
as lichen, moss, grass, or trees can break down both the masonry and the bond between the masonry
units. This permits moisture penetration, deterioration, and when severe enough, can cause
movement of walls or masonry units. All vegetation should be killed and removed from masonry
bridges and/or units like wingwalls before it has the opportunity to grow and become well
established in the masonry. This includes curb lines.

Ohio Historic Bridge Maintenance and Preservation Guidance
16
Figure 3.1-1. Growth and debris allowed to accumulate and flourish on bridges accelerates deterioration.
Trapped moisture expresses itself on underside of slab. Seasonally removing debris and keeping deck joints
watertight would have significantly slowed this failure.
Enforce Load Limits
Many historic bridges were designed for lighter loads and require posting for the heavier trucks in
use today. Often bridges are posted for restricted loads, but the posted restrictions are ignored by the
public. Enforcing posted load restrictions protects the bridge from structural damage and prolongs its
useful life. Some jurisdictions have adopted programs to protect their posted historic bridges by
enforcing weight restrictions or by placing vertical clearance barriers on the approaches to the bridge.
Height restriction barriers can also be placed in an
attempt to enforce posted load restrictions.
Figure 3.1-2. A frame prevents oversized
vehicles from reaching the portal of a historic
Phoenix-section bridge in New Jersey. The
bridge authority that owns the bridge takes
preservation of its historic bridges, safety, and
enforcing load restrictions very seriously.

Ohio Historic Bridge Maintenance and Preservation Guidance
17
3.2 Steel Stringer Bridges
3.2.1 Appropriate Maintenance and Preservation Treatments - Steel Stringer Bridges
Keep Concrete Decks, Joints and Drains in Good Condition
Keep deck watertight by making sure that the joints/seals are intact, the drains are clear and the
concrete is not cracked. This will prevent deck concrete spalls that may be caused by expansion of
corroded internal reinforcing steel, as well as protect the beams and the substructure units from being
subjected to any extra water or debris that could promote corrosion or allow moisture to be retained
on the beams or pier caps. Deck cracks should be sealed and scuppers and bridge drainage systems
should be cleaned and kept open. If not already in place, adequate means of draining water away
from the bridge should be installed. Expansion joints should also be cleaned and kept in good repair
or replaced as needed.
Keep Paint or Coating System in Good Condition
The paint or coating system is the most significant mechanical tool for preservation of steel stringer
bridges. A sound coating system will prevent corrosion of the steel and require little additional work
to the steel components. Paint/coating systems should be maintained. However, it is not necessary
to rush out and spot paint every small area of corrosion as it appears. A more cost-effective method
of maintaining the coating system may be to wait until several locations appear yet before the
corrosion has advanced to the stage that it is causing measurable loss to the steel. If corrosion is
noted at common locations on multiple stringers, it may be prudent to paint all of the stringers at that
location. An example of this could be at the ends of all stringers at expansion joint locations when
the joint has been compromised and is allowing water to flow onto the stringers.
Research should be done to determine what the best coating system is for a given bridge.
Consideration should also be given to what is the most cost effective way to clean and coat it as well
as where that investment can be more beneficial, like at the ends of the beams at the bearings where
the potential for corrosion is the greatest.
It is important to properly prepare the steel surfaces prior to painting. Preparing the metal surfaces
on an existing bridge for application of a new coating system can easily account for half of the cost
of a painting project. Applying any coating to an improperly prepared surface is likely to result in
poor adhesion and a much shorter lifespan for the coating. This will ultimately lead to more money
being spent at the bridge to clean and re-coat the steel. Cleaning can be done to various degrees, but
the best method for getting a good coating system is to clean metal to a “white metal” condition.
Hand cleaning and power washing the metal is less costly, but may also result in a paint system with
a shorter lifespan.
For older bridges, lead paint removal may be necessary, which will add to the cost due to
requirements to provide greater levels of containment and personal protection for workers removing
the existing coating. Lead paint removal can account for up to 75% of the cost of recoating.

Ohio Historic Bridge Maintenance and Preservation Guidance
18
Keep Railings in Good Condition
Many steel stringer bridges have reinforced concrete railings. Some can be important to the
historical significance of the bridge, especially custom-design and aesthetic railings. Mortar joints
between the units and the curb/deck should be maintained to ensure the long-term conservation of
the railings. Any impact damage should be quickly repaired for safety reasons. Guidance for
working with mortar and historic concrete can be found in Preservation Briefs 2: Repointing Mortar
Joints in Historic Masonry Buildings and Preservation Briefs 15: Preservation of Historic Concrete:
Problems and General Approaches (Appendix B). If there is a history of impacts at the bridge or
safety issues dictate a more crash-worthy design and the railing is historically significant, modern
traffic barriers or guide rail systems should be placed inside the existing railings so that the original
railings can remain in place.
Bearings
Frozen expansion bearings on steel stringer bridges are usually not critical to the function of the
bridge. In fact, many steel stringer bridge have minimal bearings, such as simple steel plates
anchored to the substructure. However, the bridge should be inspected for distress to the stringers or
the abutments and piers to determine if expansion and contraction of the superstructure is causing
any deficiencies to the beams or the substructure elements.
3.2.2 Appropriate Rehabilitation Treatments - Steel Stringer Bridges
Deck Replacement to Reduce Dead Load
Replacing existing decks with lighter weight decks of concrete, timber, steel or other material is
often an effective way to reduce dead load and thus increase load-carrying capacity. Decks and
wearing surfaces are not important features and changing them will generally not have an adverse
effect. For bridges carrying railroad, ballast and ties are not important features and can be replaced
without an adverse effect.
Before any decisions can be made about the extent of the replacement or repair of an existing deck, a
deck condition survey should be conducted to determine if a partial or full deck replacement is
required.
Strengthening Members
Steel stringers can be made stronger by attaching cover plates to the web or the flanges. This is
accomplished by connecting plates in areas where additional strength is required. The supplemental
plates can be bolted or welded to the existing material. Bolting is preferred because field-placed
welds commonly lack quality and can result in details that may be prone to fatigue-related cracking.
However, bolted connections may be more visible and considered unsightly. Where the existing
bridge may not have been constructed to be composite with a concrete deck, the deck can be
removed and shear studs installed on the top flange to allow the concrete deck to help the stringers
carry the loads. This method requires the deck to be replaced and may require the installation of
cover plates to the bottom flanges of the stringers, which will reduce the vertical clearance under the
stringers. Post tensioning the stringers is also an effective method to add capacity, but the treatment
will likely reduce vertical clearance.

Ohio Historic Bridge Maintenance and Preservation Guidance
19
Strengthening members, particularly on steel stringer bridges where most or all of the stringers are
likely to have the same strength and are likely to require strengthening, is expensive to construct,
regardless of the method selected.
Add Auxiliary Members To Increase Load Carrying Capacity
This option involves the placement of additional stringers between the existing stringers to help
support live loads. The placement of additional beams should have no adverse effect when they are
placed inside the existing beams (i.e., not a bridge/deck widening).
Widening
Stringer bridges can easily be widened by extending abutments/wingwalls and then placing
additional beams. The original geometrics, if they are important, and the railings will be lost.
Widening may have an adverse effect to historic stringer bridges if the railings are a significant
feature, but significant railings can also be restored or rehabilitated.
3.3 Girder-Floorbeam Bridges
3.3.1 Appropriate Maintenance and Preservation Treatments - Girder-Floorbeam Bridges
Keep Concrete Decks, Joints and Drains in Good Condition
Keep deck watertight by making sure that the joints/seals are intact, the drains are clear and the
concrete is not cracked. This will prevent deck concrete spalls that may be caused by expansion of
corroded internal reinforcing steel, as well as protect the beams and the substructure units from being
subjected to any extra water or debris that could promote corrosion or allow moisture to be retained
on the beams or pier caps. Deck cracks should be sealed and scuppers and bridge drainage systems
should be cleaned and kept open. If not already in place, adequate means of draining water away
from the bridge should be installed. Expansion joints should also be cleaned and kept in good repair
or replaced as needed.
Keep Paint or Coating System in Good Condition
The paint or coating system is the most significant mechanical tool for preservation of steel girder-
floorbeam bridges. A sound coating system will prevent corrosion of the steel and require little
additional work to the steel components. Paint/coating systems should be maintained. However, it
is not necessary to rush out and spot paint every small area of corrosion as it appears. A more cost-
effective method of maintaining the coating system may be to wait until several locations appear yet
before the corrosion has advanced to the stage that it is causing measurable loss to the steel. If
corrosion is noted at common locations on multiple stringers, it may be prudent to paint all of the
stringers at that location. An example of this could be at the ends of girders at expansion joint
locations when the joint has been compromised and is allowing water to flow onto the girders.
Research should be done to determine what the best coating system is for a given bridge.
Consideration should also be given to what is the most cost effective way to clean and coat it as well
as where that investment can be more beneficial, like at the ends of the beams at the bearings where

Ohio Historic Bridge Maintenance and Preservation Guidance
20
the potential for corrosion is the greatest.
It is important to properly prepare the steel surfaces prior to painting. Preparing the metal surfaces
on an existing bridge for application of a new coating system can easily account for half of the cost
of a painting project. Applying any coating to an improperly prepared surface is likely to result in
poor adhesion and a much shorter lifespan for the coating. This will ultimately lead to more money
being spent at the bridge to clean and re-coat the steel. Cleaning can be done to various degrees, but
the best (and most expensive) method for getting a good coating system is to clean metal to a “white
metal” condition. A less expensive method involves hand cleaning and power washing to a lower
standard, applying a penetrating sealer that bonds any remaining paint and rust to the base metal
followed by one or two top coats. This technique does not last as long, but it costs considerably less.
For older bridges, lead paint removal may be necessary, which will add to the cost due to
requirements to provide greater levels of containment and personal protection for workers removing
the existing coating. Lead paint removal can account for up to 75% of the cost of recoating.
Bearings
Frozen expansion bearings on girder-floorbeam bridges are considered by many to be a non-critical
deficiency. However, the bridge should be inspected for distress to the girders or the abutments and
piers to determine if expansion and contraction of the superstructure is causing any deficiencies to
the beams or the substructure elements.
3.3.2 Appropriate Rehabilitation Treatments - Girder-Floorbeam Bridges
Deck Replacement to Reduce Dead Load
Replacing existing decks with lighter weight decks of concrete, timber, steel or other material is
often an effective way to reduce dead load and thus increase load-carrying capacity. Decks and
wearing surfaces are not important features and changing them will generally not have an adverse
effect. For bridges carrying railroad, ballast and ties are not important features and can be replaced
without an adverse effect.
Before any decisions can be made about the extent of the replacement or repair of an existing deck, a
deck condition survey should be conducted to determine if a partial or full deck replacement is
required.
Strengthening Members
If necessary, it is appropriate to increase capacity of girder-floorbeam bridges by replacing flooring
system members with similarly sized members of higher strength materials. Since the floorbeams
and stringers are generally not important features, they can be upgraded as long as they are replaced
in kind and connected in the original manner using modern high strength bolts to replace the rivets.
Because the girder-floorbeam bridges are usually built up from angles and plates, they lend
themselves well to being strengthened by using the conventional method of adding material to the
flanges and webs. This operation may involve the removal of existing rivets and their subsequent

Ohio Historic Bridge Maintenance and Preservation Guidance
21
replacement with high strength bolts. If the rivets are visually prominent and it is important to
preserve the historic appearance, button head, high-strength bolts can be used. The supplemental
plates can also be welded to the existing material. Bolting is preferred because field-placed welds
commonly lack quality and can result in details that may be prone to fatigue-related cracking,
particularly of concern for non-redundant members such as floorbeams. Temporary support may be
necessary to perform strengthening activities.
The same treatments described above can be applied to replacing/repairing deteriorated sections of
plate or angle that may be reducing the load carrying capacity. Strengthening members is expensive
to construct, regardless of the method selected.
Remove Concrete Encasement to Reduce Dead Load
On bridges that have concrete encased members (common on railroad bridges), consideration can be
given to removing the encasement of the flooring system but not to removing encasement of the
fascia girders. In those instances, the encasement was generally an architectural treatment added in
deference to an urban or scenic location. If the removal of the encasement does not provide a
sufficient decrease in dead load, a lighter deck system may be considered.
3.4 Metal Truss Bridges
3.4.1 Appropriate Maintenance and Preservation Treatments - Metal Truss Bridges
Keep Bridge Free of Debris to Extend Life of Paint/Coating System
The best maintenance and preservation strategy for preservation of steel truss bridges is to keep them
painted and free from accumulated debris. This will minimize the effects that environmental factors
and water have on the lifespan of the coating system, which when broached allows corrosion to form
on the metal. Keeping the bridge as clean as possible will extend the life of the coating system as
much as possible, which is important given the cost to re-coat and the inconveniences to the public
that painting operations can have in the forms of lane or bridge closures.
A principal source of moisture penetration and paint failure is debris, which frequently accumulates
on exposed horizontal surfaces such as abutment seats at the bearings, top flanges of stringers,
floorbeams and lower chord panel points. Rust can occur above and below the deck, and section loss
due to corrosion can significantly reduce the load-carrying capacity of the truss. Rust also occurs at
the interface of rivet- and bolt- connected
members, a condition known as impacted
rust. Routinely removing accumulated
debris and washing bridges with potable
water after the danger of frost has passed
will significantly lessen conditions that
promote rust.
Figure 3.4.1-1. As gravel kicked off the
bridge deck accumulates in the channels,
it traps moisture and accelerates coating
system failure, which leads to corrosion.

Ohio Historic Bridge Maintenance and Preservation Guidance
22
Keep Concrete Decks, Joints and Drains in Good Condition
Keep solid decks watertight by making sure that the joints/seals are intact, the drains are clear and
the concrete is not cracked. This will prevent deck concrete spalls that may be caused by expansion
of corroded internal reinforcing steel, as well as protect the beams and the substructure units from
being subjected to any extra water or debris that could promote corrosion or allow moisture to be
retained on the beams or pier caps. Deck cracks should be sealed and scuppers and bridge drainage
systems should be cleaned and kept open. If not already in place, adequate means of draining water
away from the bridge should be installed. Expansion joints should also be cleaned and kept in good
repair or replaced as needed.
Keep Paint or Coating System in Good Condition
The paint or coating system is the most significant mechanical tool for preservation of metal truss
bridges, and also frequently the most costly. A sound coating system will prevent corrosion of the
metal and require little additional work to the steel components. Paint/coating systems should be
maintained. However, it is not necessary to rush out and spot paint every small area of corrosion as
it appears. Maintenance and preservation activities related to paint and coatings should be done in a
manner that is both cost effective and of maximum benefit to the overall operations. A more cost-
effective method of maintaining the coating system may be to wait until several locations appear yet
before the corrosion has advanced to the stage that it is causing measurable loss to the steel. An
option appropriate for through trusses is to only paint or coat the lower portions of the truss lines
where debris accumulates and the potential for corrosion is the greatest. For a small bridge, moving
the trusses to an offsite location for cleaning is often a cost-effective strategy, especially when
combined with making other repairs.
Wrought iron, cast iron and the various grades of steels used on bridges all require different levels of
attention when considering painting. Wrought iron is not as prone to corrode, so it is not as urgent to
paint areas where a coating may be peeling and exposing the metal. Research should be done to
determine what the best coating system is for a given bridge. Consideration should also be given to
what is the most cost effective way to clean and coat it as well as where that investment can be more
beneficial, like at the ends of the flooring system at expansion joints and truss lines at the bearings
where the potential for corrosion is the greatest.
It is important to properly prepare the steel surfaces prior to painting. Preparing the metal surfaces
on an existing bridge for application of a new coating system can easily account for half of the cost
of a painting project. Applying any coating to an improperly prepared surface is likely to result in
poor adhesion and a much shorter lifespan for the coating. This will ultimately lead to more money
being spent at the bridge to clean and re-coat the steel. Cleaning can be done to various degrees, but
the best (and most expensive) method for getting a good coating system is to clean metal to a “white
metal” condition. A less expensive method involves hand cleaning and power washing to a lower
standard, applying a penetrating sealer that bonds any remaining paint and rust to the base metal
followed by one or two top coats. This technique does not last as long, but it costs considerably less.

Ohio Historic Bridge Maintenance and Preservation Guidance
23
For older bridges, lead paint removal may be necessary, which
will add to the cost due to requirements to provide greater
levels of containment and personal protection for workers
removing the existing coating. Lead paint removal can account
for up to 75% of the cost of recoating
Figure 3.4.1-2. Example of why keeping steel painted
matters. When water gets between the plates of built up
members, impacted rust develops. The rust lessens section
and eventually fails members, particularly built up
floorbeams. This knee brace on a pony truss bridge was not
well designed, as the angled plate channels water into the
floorbeam connection.
Protect the Bridge from Potential Impact Damage
It is appropriate to install a traffic railing or beam guide rail system to protect the truss lines from
impact damage. On one-lane bridges with adequate stopping sight distance, placement of guide rail
also serves to clearly define to motorists that the bridge serves alternating traffic. Placing traffic
railings is an important conservation measure because it significantly reduces the chance that the
bridge will be damaged or lost if a critical member is impacted/damaged.
All railings should be attached to the floor system, not the truss lines. As a result of the connection
details, guide rail across the bridge is more expensive than guide rails on approaches, and can be
more than twice that cost. Whenever possible, any original railings should be left in place and
modern, crash-tested, traffic railings installed just inside the existing railings. Proper guide rail
systems should also be in place at the approaches.
When aesthetic considerations are important, there are many standard and custom railing systems
that can be used on historic truss bridges and their approaches, such as coated guide rail and wood-
backed steel. See section 3.10 and www.fhwa.dot.gov/bridge/bridgerail for appropriate treatments.

Ohio Historic Bridge Maintenance and Preservation Guidance
24
Figure 3.4.1-3. Two examples of bridges with guide rails installed to protect truss. Traffic railings need
to be attached to the flooring system, not the truss lines. The bridge on the top shows an inappropriate
installation where a vehicle impacting the railings would result in damage to the truss members. The
bridge on the bottom shows appropriate attachment to the stringers, not the truss line.
Replace Deteriorated Members in Kind and Use Original Method of Connection
It is proper to replace deteriorated members in kind while maintaining the original pinned or riveted
(bolted) connections. This is important to preserve not only for the appearance and historical
significance of the bridge but also the way it performs. Pinned and rigid connection designs handle
stresses differently. For example, replacing a failed eye bar on a pin connected bridge with a modern
steel rod with end eyes that fit around the original pin is proper. This permits the bridge to continue
to accommodate stresses as it was originally designed. Welding new or replacement members to a
pin or welding the pin itself creates a rigid connection that will introduce forces for which the
members were not originally designed. High residual stresses are then introduced, particularly into
the tension members, and could lead to the initiation of cracks. Likewise, welding counters together
to eliminate noise from vibration should not be done. Welding to the pins is seldom reversible. New

Ohio Historic Bridge Maintenance and Preservation Guidance
25
material to replace deteriorated members can be higher strength or have slightly larger dimensions
with no adverse effect.
Bearings
Frozen expansion bearings on truss bridges are considered by many to be a non-critical deficiency.
Most have been frozen for decades with little evidence of that causing distress. However, if it
appears that the truss members are in distress due to thermal forces and the lack of ability to expand
and contract, bearing replacement or modification should be considered. Bearings are rarely
considered to be historically significant, so they can be replaced so long as the type of bearing is
maintained (i.e. pin connected bearing or rigid bearing).
3.4.2 Appropriate Rehabilitation Treatments - Metal Truss Bridges
Deck Replacement to Reduce Dead Load
Replacing existing decks with lighter weight decks of concrete, timber, steel or other material is
often an effective way to reduce dead load and thus increase load-carrying capacity. Decks and
wearing surfaces are not important features and changing them will generally not have an adverse
effect. If significant overlay is present, consideration should be given to reduce its thickness. For
bridges carrying railroad, ballast decks or ties are not important features and can be replaced without
an adverse effect.
Before any decisions can be made about the extent of the replacement or repair of an existing deck, a
deck condition survey should be conducted to determine if a partial or full deck replacement is
required.
Increase Load-Carrying Capacity by Making Flooring System Stronger
The flooring system is generally not a historically significant component. Fortunately, it is common
for stringers to be weakest truss member and the floorbeams likely to be the next weakest, so that
often the bridge load capacity can be improved by strengthening or replacing these members. It is
very important that the floorbeams are connected in the original manner, meaning with eye heads or
pin plates at pin connections or with bolts or rivets at gusset plates at rigid connections. Stringer-to-
floorbeam connections are not as critical, which means that seat angles or notching does not
necessarily need to be reproduced.
In-kind replacement of flooring system members with higher strength steel is an appropriate way to
increase load-carrying capacity. In many instances, the floorbeams and stringers can be upgraded to
increase load-carrying capacity by replacing the members in kind with modern steels that have higher
strength.
Another way to increase capacity of floorbeams or indeed any beam is to weld or bolt cover plates to
beam flanges. Bolting is preferred because field-placed welds commonly lack quality and can result
in details that may be prone to fatigue-related cracking, particularly of concern for non-redundant
members such as floorbeams. If welding is done at the bridge, care needs to be taken to never weld
to the pinned or riveted connections of the truss. As discussed above, it is important to not change

Ohio Historic Bridge Maintenance and Preservation Guidance
26
the original manner of connection at the panel point or
gusset plate.
Figure 3.4.2-1. An example of rehabilitation that
meets The Secretary of the Interior’s Standards. Here
the new floorbeam has been connected using the
original method using a pinned connection, and the
original rivets have been replaced using high strength
bolts (both are mechanical connections).
Truss Member Strengthening
If the truss members do not have the capacity required, there are several methods available to
strengthen them, including the addition of supplemental steel, providing auxiliary members and post-
tensioning. These methods are discussed below.
Shapes built-up from angles and plates (i.e., members like verticals, chords, and end posts) lend
themselves to being strengthened by using the conventional method of adding material to the flanges
and webs. Adding section is a way to keep historic fabric in place, but it can also involve the
removal of existing rivets and their subsequent replacement with high-strength bolts. If the rivets are
visually prominent and it is important to preserve the historic appearance and mechanical connection,
button-head bolts can be used. It is important to define which side will have the head and which will
have the shank. If not specified, the contractor will generally do whichever is easiest, not which is
best for the appearance of the bridge. The same treatment can be used to replace or repair
deteriorated sections of built-up members.
It is important to be aware of the type of metal of which the bridge is constructed. Most post-1895
truss bridges are steel, but the transition from wrought iron to steel starting in the mid 1880s was
gradual. There are two low-cost, non-destructive tests that can be performed to characterize ferrous
material as to whether it is wrought iron, mild steel, or steel. These include the spark test and field
metallography where the metal is polished, etched and then its microstructure is replicated for
examination in the laboratory. Iron and steel each have a distinctive microstructure that reveals
which material it is.

Ohio Historic Bridge Maintenance and Preservation Guidance
27
Steel members that by analysis have exceeded or will exceed their fatigue life within the expected
life of the rehabilitation should be replaced in-kind. When fracture is a concern over the entire
structure, consideration should be given to providing
auxiliary members or replacing the members
in-kind. If cracks are found, the member should be replaced
in-kind. The new auxiliary members should be positioned in
the least conspicuous location. Typically, new upper chord
members should be placed on the inside rather than the
outside of the existing chords.
Any new auxiliary members need to structurally tie into the
existing panel point connections. On pinned trusses, a new
connection must be designed to connect at the existing pin.
High strength bolts are appropriate for gusset plate
connections on rigid connection trusses.
Post tensioning is a form of auxiliary member but is only
useful to strengthen tension members of a truss. Post
tensioning consists of installing a high strength cable or rod
at both ends of individual members and tensioning the cable
or rod to reduce some of the load carried by the members.
The result is an increase in the live loads that the truss
members can carry. Since the post tensioning principle
relies on reducing the dead load capacity of the truss
members, it is best suited for longer trusses where the dead
load is very significant. This is a cost effective treatment that
has also been used to provide redundancy.
Figure 3.4.2-2. Higher strength angle
was used for replacement diagonals. Note
that the bolts are used to replace rivets. A
lighter weight open-grid deck is used to
decrease dead load.
Figure 3.4.2-3. Post tensioned lower chord of pin-connected thru truss. Note new strands and guide
placed between the eyebar packs. The floorbeam is post tensioned to increase its capacity by using
standard high-strength rods.

Ohio Historic Bridge Maintenance and Preservation Guidance
28
Add Auxiliary Superstructure Support
When none of the above options are viable or the costs are prohibitive, placing auxiliary supports
(also known as helper bents or underpinning) may be considered. Auxiliary supports for a truss
bridge could be accomplished in several ways. One is to install steel stringers that span from
abutment to abutment and support the roadway loads. The existing truss then supports its own weight
but does not carry live loads.
Another scheme is to place girders that span from abutment to abutment outside of the truss lines.
The auxiliary girders are connected to the existing floor beams and share the applied loads with the
existing trusses. Helper bents can be placed under the existing floorbeams thus converting the bridge
or span from simply supported to a continuous arrangement.
Figure 3.4.2-4. Steel stringers placed under floorbeams of historic truss bridge in
order to provide the needed load carrying capacity without changing many truss
members. This can be an economical way to keep truss bridges in service.
Heat Straighten Minor Damage
Over the past decades, research has demonstrated that instead of mechanical force, which can further
damage a member or impose residual stresses, heat straightening can be an efficient and economical
way to repair steel members that have been deformed as a result of impact damage. The technique is
to apply repetitive heating and cooling cycles and restraints to produce a gradual straightening of the
material. Its advantages are that it is economical as it does not require removal of the member nor
temporary shoring. The work should be performed by skilled professionals (there are several in the
region) as the location and the amount of heat is critical to the success of the process. Additionally,
extreme care needs to be exercised to remove nicks and other defects so there is no chance of future
fatigue or fracture occurring. In 2000, FHWA issued Heat-Straightening Repairs of Damaged Steel
Bridges: A Technical Guide and Manual of Practice. More in-depth discussion of the technique can

Ohio Historic Bridge Maintenance and Preservation Guidance
29
be found in the recently completed NCHRP 10-63: Heat Straightening Repair of Damaged Steel
Bridge Girders: Fatigue and Fracture Performance. This technique is most cost effective when
several bridges in an area are repaired as a group as this spreads the mobilization cost over several
bridges. The greatest expense is getting the practitioner to the site.
Figure 3.4.2-5. Heat straightening to bring bowed diagonal back into plane. Work
can be accomplished on site. Skilled tradesmen in region can perform this work.
Increasing Vertical Clearance
Many thru truss bridges have a vertical clearance that does not meet current standards and/or
requirements. Oversized loads that impact portal braces have the potential to dislodge sway bracing
and vertical truss members. When analysis supports that it is structurally acceptable to do so, the
knee braces and lower struts of portal and lateral bracing can be raised to increase vertical clearance
across a bridge. This is a common technique to protect vulnerable members from impact damage,
and it generally has no adverse effect on the bridge. Since this issue is not new, it is quite possible
that the lower struts and knee braces have already been raised or are an in kind replacement of the
original fabric. Any raising of members, however, needs to be kept in scale with the overall
proportions of the bridge, which means that less increase is possible on shorter and smaller spans
than on longer and larger ones.
Enforcing vertical clearance can be achieved by erecting barriers that restrict passage of vehicles that
conform to posted height limit. This strategy also serves the purpose of limiting overweight vehicles.
Increase Width of Bridge

Ohio Historic Bridge Maintenance and Preservation Guidance
30
Both pony and through truss bridges have been widened successfully, and the treatment is popular
with the public but it is recommended only when none of the other treatments can provide the
desired operational and functional criteria. Whether or not a truss bridge is a candidate for widening
will depend on, among other issues, its length and how much it needs to be widened. Proportionally,
a 70'-long and 18'-wide pony truss bridge visually cannot accommodate a 10' or 12' widening, but a
140'-long and 18'-wide through truss might.
Widening is accomplished by removing and then cutting the truss lines inside the lower panel points
taking care to retain a truncated section of the floorbeam and then moving the truss lines out and
installing a new superstructure such as steel stringers or prestressed box beams. Typically the
truncated floorbeam ends are connected to the fascia beams, and the trusses support themselves and
any sidewalks. Any portal and upper bracing is extended in kind or replaced in kind to match the
width.
If a truss bridge does not need to be
widened very much, and if supported by
analysis, it may be possible to install a
new, wider floor flooring system with
longer floorbeams instead of a new
superstructure. Care needs to be taken to
ensure that the new flooring system is
connected at the lower panel points in the
historic manner.
In both widening schemes, the substructure
units will have to be extended. While this
strategy has been evaluated in the past to
have an adverse effect on historic truss
bridges because the original proportions of
the bridge are changed along with the
superstructure, it has become increasingly
popular with the public and
preservationists. Truss bridges are often
character-defining resources and their
presence in the landscape, as well as the
record of important bridge type, is highly
valued.
Preserve Bridge By Relocation For Adaptive Use
In many instances, the geometric deficiencies are so significant that the truss bridge, which is often
narrow and located on sharp curves, cannot remain in service. When it is not possible to keep the
bridge in service, it is appropriate to remove it and relocate for adaptive reuse. Since the advent of
metal truss bridges in the middle of the 19th
century, they have historically been dismantled and
relocated, so doing so continues a historical trend. Nineteenth century truss bridges, in particular, are
Figure 3.4.2-6. The historic truss bridge was widened by
placing a new steel stringer superstructure and attaching
the truss lines to the fascia beams. For this treatment,
which is frequently used as a balanced solution, the
integrity of the panel points must be maintained by
cutting the floorbeams or upper lateral bracing inside the
truss lines and then using those remnants to make the
connection to the new components.

Ohio Historic Bridge Maintenance and Preservation Guidance
31
important artifacts that merit placement in a more restricted use setting, like on pedestrian and
bicycle trails or in parks. Moving a historic truss bridge and rehabilitating it for an adaptive use is an
acceptable treatment, and the relocation is often considered as the mitigation of any adverse effect
the removal of a historic bridge may have. It is a treatment that does result in the preservation of the
historic bridge. There are many truss bridges in Ohio that have been preserved for adaptive use on
trails, in cemeteries, or at county fair grounds.
3.5 Stone and Brick Arch Bridges
3.5.1 Appropriate Maintenance and Preservation Treatments - Stone and Brick Arch
Bridges
Keep Roadway and Drains in Good Condition
Keep the roadway surface, whether asphalt on fill or concrete slab on fill, as watertight as possible by
making sure that any possible openings are kept sealed with a flexible sealant. Typical locations
include where the roadway surface meets curbs, sidewalks or railings/parapets. It is also necessary to
ensure that any utility pipes buried within the fill are not leaking. This will minimize water
infiltration of the fill and core material and the ensuing degradation of the masonry. Cracks in the
roadway surface should be sealed, and scuppers and bridge drainage systems should be cleaned and
kept open. If not already in place, adequate means of draining water away from the bridge should be
installed. The deck and approaches need to be maintained to prevent ponding and to encourage the
flow of water off the bridge. Weep holes or pipes wrapped in filter fiber can be installed into cored
holes placed inconspicuously at the bottom of the arch ring to drain any accumulated moisture that
does get into the fill.
Keep Dry Laid Masonry in Sound Condition
Dry laid masonry that becomes misaligned or shows evidence of movement should be reset after the
problem the movement is expressing has been addressed. Mortar should not be added to any
originally/historically dry laid stonework.
Routinely Remove Vegetation and Accumulated Debris
If vegetation has established itself on or adjacent to a masonry arch bridge or the stone substructure
units, it should be killed and removed. Attempting to remove live vegetation that has established its
root structure in the masonry can dislodge or loosen the units and affect structural integrity. Trees of
any size should be cut as close to the ground or wall as possible, and the root system should be left to
decompose. Holes can be drilled in the stumps and an herbicide used to accelerate decomposition.
Accumulated debris on and adjacent to the structure should be removed seasonally, especially in the
late fall and spring. Buildup of debris, including leaves and litter, holds moisture and prevents the
structure from drying out. All roadway and structure drains should also be cleared of debris.
Clean Masonry Only When Necessary and with the Gentlest Means Possible
Cleaning masonry can be a highly technical and specialized process, and inappropriate cleaning can
cause irrevocable damage. Cleaning should be done only after the reason for the cleaning has been

Ohio Historic Bridge Maintenance and Preservation Guidance
32
fully assessed and the characteristics of the material as well as what is being removed is fully
understood. Masonry cleaning is generally divided into three groups: water, chemical, and abrasive.
Maintenance forces should only be performing water cleaning, the gentlest means.
Water cleaning can effectively remove dirt. A low pressure wash, augmented by hand scrubbing
with a natural-bristle brush and non-ionic detergents (not household soap) is an appropriate
treatment. Dried-up plant material and accumulated debris can be removed using a hot pressurized
wash. Any use of high pressure water, however, requires care not to use too great a pressure or the
wrong nozzle, both of which can cause damage.
The advantages and appropriateness of masonry cleaning are thoroughly described in several
National Park Service publications including Preservation Brief 1: Assessing Cleaning and Water-
Repellent Treatments (Appendix B). Although the briefs address cleaning buildings, the information
is applicable to all masonry. Other publications on the conservation of historic masonry are available
online or in the local state historic preservation office.
Keep Mortar Joints Watertight
Keep all mortar joints watertight and in good condition. Water tightness is achieved by replacing
lost and failing mortar joints with an appropriate mortar before moisture penetration damage affects
the masonry units, and thereby the structural integrity. Repoint as needed, making sure that the new
mortar is compatible with the historic material in compressive strength, texture, color, and style (size
and finish of joint). Improperly done repointing can be unsightly, can adversely affect the historical
significance of the bridge and can cause damage to the masonry units.
It should be noted that filling failing or lost mortar joints or cracks with a modern masonry cement
(premixed, bagged mixtures like Sakrete) is not considered repointing, and the practice is not a
suitable strategy for historic masonry. Modern masonry cement does not bond well with the historic
mortar, and it never matches the historic mortar. Such work is generally irreversible. It is also a
common error to assume that hardness or high strength in repointing mortar is appropriate for
historic masonry, particularly lime-based
mortars. Stresses occur in a masonry
structure and, if the mortar is too hard, the
stress will be relieved by cracking the softer
masonry units rather than the too-hard
mortar joints. While stresses can also break
the bond between the mortar and the
masonry units, it is much easier to correct
the problem by repointing the joints than by
replacing cracked bricks and stones or
rebuilding the structure.
Before proceeding with repointing, the cause
of the failure of the joints must be
determined and corrected. Joints may have
failed for reasons other than age-related
deterioration. Open joints may be providing
Figure 3.5.1-1. Example of poor and inappropriate
repointing. A commercial masonry cement like Sakcrete
is smeared over the historic mortar. Note that the bond
is not good and the joints are not water tight. Such
work is unsightly, and the hard mortar can harm historic
material.

Ohio Historic Bridge Maintenance and Preservation Guidance
33
relief of hydraulic pressure for moisture trapped behind the wall. Closing the joints will only worsen
the problem of improper drainage of the bridge deck. It is important to provide a means of escape
for any water that does enter the structure. Any repointing, especially on the intrados, should include
installation of weep holes. Strategically located weep holes will ensure relief of water pressure and
provide a drainage path.
Proper Repointing
It is important to use accepted conservation standards when repointing historic masonry, and this
starts with understanding the make-up of the old mortar. The setting and pointing mortars used
before World War I are different from modern, portland cement-based mortar and premixes, and
have many advantages over their modern counterparts. Lime-based mortars are generally and
purposely softer/weaker than the masonry units. New mortar with a high lime content bonds well
with old mortar, is porous and changes little in volume during temperature fluctuations. It is slightly
water soluble and thus able to re-seal any hairline cracks that may develop. Portland cement, on the
other hand, can be extremely hard, is resistant to movement of water, shrinks upon setting, and
undergoes relatively large thermal movements.
An appropriate mortar mix is composed of sand, a small part of portland cement, and lime. The mix
ratio is generally not greater than one part white, nonstaining portland cement (to achieve workability
and plasticity), two parts lime, and six to eight parts sand for setting mortar and up to 12 parts sand
for pointing mortar, which is usually softer than the setting mortar. While mortar analysis by a
qualified laboratory can be useful by providing information about the historic mortar, it is not always
crucial to success. The most useful information that can come out of laboratory analysis is the
identification of the sand (the largest component of mortar) gradation and color. This information is
useful in achieving a match of color and texture. A fracture test will identify the compressive
strength of the historic mortar.
The color and texture of the new mortar will usually fall into place if the sand is successfully
matched. Simply matching the original mortar in formulation and color rather than the existing
appearance generally results in mortar that is too light and too smooth. Be clear on what is being
matched. If the bridge is not being cleaned, then the new mortar should match the existing mortar,
which is usually weathered and showing the aggregate. If the bridge is to be cleaned then the cleaned
appearance is what to match. There are many appropriate finishing techniques to match the existing
texture of weathered mortar, including rubbing or a mild water blast to expose the sand using a wood
rather than a steel finishing tool. Crushed or manufactured sand is generally not the appropriate type
of sand to use. Rounded or natural sand is preferred because (1) it is usually similar to the original
sand and is thus a better match, and (2) it has better working qualities and can be forced into joints
more easily. Test patches to determine how well a mortar mix will match the existing mortar should
always be done in an inconspicuous part of the structure.
The proper methodology for repointing historic masonry, including substructure units and stone
veneers, is clearly and thoroughly explained in the National Park Service’s Preservation Briefs 2:
Repointing Mortar Joints in Historic Masonry Buildings (Appendix B). This guidance is directly
applicable to historic bridges.

Ohio Historic Bridge Maintenance and Preservation Guidance
34
Install Weep Holes
Any repointing, especially on the barrel of an arch or intrados, should include installation of weep
holes. Strategically located weep holes will ensure relief of water pressure and provide a drainage
path for any moisture that does penetrate the fill.
Use Waterproof and Water-Repellent Coatings Only When and Where Necessary
As a rule, waterproof and water-repellent coatings on historic masonry should be avoided.
Experience has demonstrated that it is not a cost effective way to keep masonry watertight.
Waterproof coatings seal the surface from liquid water and water vapor, and they may be clear or
opaque and make a surface impervious to water. Water-repellent coatings keep liquid water from
penetrating the surface but allow water vapor to enter and leave through “pores” of the masonry.
Once water vapor is inside the masonry wall, however, it can condense into liquid water and be
unable to get back out through the water-repellent coating. These coatings seldom stop the source(s)
of moisture penetration, and they can trap moisture and salts resulting in efflorescence and spalling.
If conditions are severe enough to require a coating, only the affected areas of the bridge should be
treated, not the whole structure. A test patch that is allowed to go through a freeze-thaw cycle/season
is recommended. See Preservation Brief 1 Assessing Cleaning and Water-Repellent Treatments in
Appendix B.
Replace Missing/Damaged Stones in Kind
Replacing damaged or missing stones with concrete fill is not appropriate. All damaged and lost
stones should be replaced in kind. Lost stones that have fallen from the structure may well be on site
or in the stream bed. If used, note that setting mortar is often a different mixture than pointing
mortar (differences are discussed in the prior section regarding repointing).
Repairing Bulging Spandrel Walls
Bulging of stone spandrel walls and wingwalls must be addressed by remedial action or the failing
wall or section of wall will eventually collapse. The failing sections need to be dismantled, the cause
of the problem (usually moisture penetration or roots dislodging the stonework) addressed, and the
stone then relaid in the same bond/pattern with a mortar mix that matches the existing mortar in
texture, color, and composition.
If analysis demonstrates that the wall would be structurally sound if no bulging existed, then the wall
can be dismantled and reset/rebuilt using the same material. The historic bonding and mortar joints
should inform the reconstruction.
If the bulging of the wall is minor, consideration may be given to addressing the source of the
bulging and then installing metal tie rods that span from spandrel wall to spandrel wall and are
hidden by the earth fill. Plates should be provided at each end of the rod to help prevent further
displacement of the walls. The technique has successfully been used on buildings for centuries. This
method does not address the displacement that has already occurred, and it may be considered to be
visually unacceptable.

Ohio Historic Bridge Maintenance and Preservation Guidance
35
Repointing Stone Veneer
Refer to sections “Keep Mortar Joints Watertight” and “Proper Repointing” above.
3.5.2 Appropriate Rehabilitation Treatments - Stone and Brick Arch Bridges
Increasing Capacity
Increasing the capacity of an arch bridge must be done in an unobtrusive manner and should
preferably be performed internally to avoid any adverse visual effect.
Relieving or Saddle Slabs
Relieving slabs are used to relieve the existing arch from some or all of its live load. One method to
accomplish this is to construct a reinforced concrete arch slab directly over the extrados of the
existing arch. Another method is to construct the reinforced concrete slab on the fill over the arch
ring thereby distributing the live load away from the arch. Since excavation of some fill might be
required to install a relieving slab, replacement of unsuitable fill with a properly draining material
and installation of drains can be accomplished at the same time.
Construct a New Bridge within the Confines
of the Spandrel Walls
When there is sufficient fill above the arch
crown, a new bridge can be constructed over
the existing arch. This is accomplished by
constructing abutments and piers behind or
at the base of the existing arch and spanning
the distance between these units with a new
superstructure (usually prestressed concrete
slab or box beams). If there is not sufficient
depth of fill, it is sometimes possible to
reprofile the existing roadway to provide
sufficient depth. It may also require
reconstruction of or modification of the
existing bridge railings.
Light Weight Fill
The replacement of the existing fill with
engineered fill material such as Solite will
decrease the dead load on the structure and
increase the live load capacity of the bridge.
Figure 3.5.2-1. Fouled fill has been removed and new
waterproofing installed in advance of placing engineered
fill material.

Ohio Historic Bridge Maintenance and Preservation Guidance
36
Provide Proper Drainage
If inspection reveals that the existing fill material is saturated, it should be replaced with a free-
draining material. Moisture-saturated fill material will eventually damage the arch ring as the water
seeks a way out of the structure. There may be utilities present in the fill that may be the source of
the problem, such as leaks from a water main. To provide a way for any trapped water to escape,
weep holes should be installed in the arch ring.
During the excavation to install any of these options, extreme care must be exercised to avoid uneven
excavation of the fill, which may cause the arch to lose its shape and therefore its load carrying
capabilities. This situation can be avoided by providing temporary centering below the arch during
the operation. Utilities need to be avoided and protected during excavation.
3.6 Reinforced Concrete Arch Bridges
3.6.1 Appropriate Maintenance and Conservation Treatments - Reinforced Concrete Arch
Bridges
Keep Roadway and Drains in Good Condition
Keep the roadway surface, whether asphalt on fill or concrete slab on fill, as watertight as possible by
making sure that any possible openings are kept sealed with a flexible sealant. Typical locations
include where the roadway surface meets curbs, sidewalks or railings/parapets. It is also necessary to
ensure that any utility pipes buried within the fill are not leaking. This will minimize water
infiltration of the fill and core material and the ensuing degradation of the masonry. Cracks in the
roadway surface should be sealed, and scuppers and bridge drainage systems should be cleaned and
kept open. If not already in place, adequate means of draining water away from the bridge should be
installed. The deck and approaches need to be maintained to prevent ponding and to encourage the
flow of water off the bridge. Weep holes or pipes wrapped in filter fiber can be installed into cored
holes placed inconspicuously at the bottom of the arch ring to drain any accumulated moisture that
does get into the fill.
Provide Good Waterproofing and Proper Drainage
When moisture penetration has saturated the fill, whether through seepage through the roadway, poor
drainage, or by leaking utility pipes buried in the fill, and the waterproofing has failed, the saturated
fill material should be removed and a new waterproofing membrane installed over the arch ring
along with an adequate means for drainage to prevent the problem from reoccurring. Fill is not a
significant feature of any arch bridge, and its replacement has no effect on the historic value of the
structure. The replacement of the existing fill with a solid engineered backfill material or flowable
fill will decrease the dead load on the structure, increase the live load capacity of the bridge and
minimize water infiltration. If solid fill is placed, the waterproofing membrane should be placed
between the pavement and the new fill. Install proper drainage to direct the water off of the bridge or
through drains in the abutment to the ground line.
During the excavation to install any of these options, extreme care must be exercised to avoid uneven
excavation of the fill which may cause the arch to lose its shape and therefore its load carrying

Ohio Historic Bridge Maintenance and Preservation Guidance
37
capabilities. This situation can be avoided by providing temporary centering below the arch during
the operation. If there are utilities present in the fill, it will be necessary to consider methods to retain
the pipes within the fill.
Make Repairs with Compatible Material That Matches the Existing Concrete
Any new concrete or repair material needs to visually match the existing material as closely as
possible and also match its physical properties. While it is acceptable to use air-entrained or
polymer-modified material, it is important that the properties of the historic and new materials, such
as the coefficient of thermal expansion, modulus of elasticity, and strength, are compatible so that the
old and new material will bond well. The new material should be applied only to a properly prepared
substrate where all deteriorated concrete has been removed to expose sound concrete. Corroded or
lost reinforcing steel must be cleaned or replaced. Removal of concrete will typically extend beyond
the level of the reinforcing steel so that the patch encapsulates it and thus provides the mechanical
attachment for the repair. Failure to address the soundness of the substrate often results in the failure
of the repair and continued deterioration of the bridge.
Preservation Briefs 15: Preservation of Historic Concrete: Problems and General Approaches
(Appendix B) describes the proper strategy for planning and executing concrete repairs. Test patches,
including finishing techniques, on inconspicuous parts of the structure should be done and allowed to
cure completely before being evaluated. The new material should match the existing in color,
composition and finish. This may require rubbing or a mild pressure wash to achieve the
“weathered” appearance. The techniques described in Preservation Briefs 2: Repointing Mortar
Joints in Historic Masonry Buildings (Appendix B) should be followed to achieve a proper patching
concrete. The “briefs” should also be consulted for the suitable strategy for repairing or replacing lost
mortar joints between precast elements on railings and any architectural detailing on the bridge.
Hiding problems under a pneumatically or troweled application of cementitious materials, including
shotcrete and bagged masonry cement, does not address the cause(s) of the problems or contribute to
their solution, and it is not a suitable strategy. With proper substrate preparation, shotcrete can be
used to repair reinforced concrete, but it should never be used to “solve” moisture penetration
problems without first making sure that the structure is watertight.
All repairs should be done in a manner that
reproduces original accenting like scoring or
cornices/string courses.
Figure 3.6.1-1. Poorly bonded patch
that is failing.

Ohio Historic Bridge Maintenance and Preservation Guidance
38
3.6.2 Appropriate Rehabilitation Treatments - Reinforced Concrete Arch Bridges
Increasing Capacity
Increasing the capacity of an arch bridge must be done in an unobtrusive manner and should
preferably be performed internally to avoid any adverse visual effect.
Relieving Slabs
Relieving slabs are used to relieve the existing arch from some or all of its live load. One method to
accomplish this is to construct a reinforced concrete arch slab directly over the extrados of the
existing arch. Another method is to construct the reinforced concrete slab on the fill over the arch
ring thereby distributing the live load away from the arch. Since excavation of some fill might be
required to install a relieving slab, replacement of unsuitable fill with a properly draining material
can be accomplished during at the same time as can installation of drains.
Construct a New Bridge within the Confines of the Spandrel Walls
When there is sufficient fill above the arch crown, a new bridge can be constructed over the existing
arch. This is accomplished by constructing abutments and piers behind or at the base of the existing
arch and spanning the distance between these units with a new superstructure (usually prestressed
concrete slab or box beams). If there is not sufficient depth of fill, it is sometimes possible to
reprofile the existing roadway to provide sufficient depth. It may also require reconstruction of or
modification of the existing bridge railings.
Light Weight Fill
The replacement of the existing fill with engineered fill material such as Solite will decrease the dead
load on the structure and increase the live load capacity of the bridge.
Make Repairs with Compatible Material that Matches the Existing Concrete
Any new concrete or repair material needs to visually match the existing material as closely as
possible and also match its physical properties. While it is acceptable to use air-entrained or
polymer-modified material, it is important that the properties of the historic and new materials, such
as the coefficient of thermal expansion, modulus of elasticity, and strength, are compatible so that the
old and new material will bond well. The new material should be applied only to a properly prepared
substrate where all deteriorated concrete has been removed to expose sound concrete. Corroded or
lost reinforcing steel must be cleaned or replaced. Removal of concrete will typically extend beyond
the level of the reinforcing steel so that the patch encapsulates it and thus provides the mechanical
attachment for the repair. Failure to address the soundness of the substrate often results in the failure
of the repair and continued deterioration of the bridge.
Preservation Briefs 15: Preservation of Historic Concrete: Problems and General Approaches
(Appendix B) describes the proper strategy for planning and executing concrete repairs. Test patches,
including finishing techniques, on inconspicuous parts of the structure should be done and allowed to
cure completely before being evaluated. The new material should match the existing in color,
composition and finish. This may require rubbing or a mild pressure wash to achieve the
“weathered” appearance. The techniques described in Preservation Briefs 2: Repointing Mortar

Ohio Historic Bridge Maintenance and Preservation Guidance
39
Joints in Historic Masonry Buildings (Appendix B) should be followed to achieve a proper patching
concrete. The “briefs” should also be consulted for the suitable strategy for repairing or replacing lost
mortar joints between precast elements on railings and any architectural detailing on the bridge.
Hiding problems under a pneumatically or troweled application of cementitious materials, including
shotcrete and bagged masonry cement, does not address the cause(s) of the problems or contribute to
their solution, and it is not a suitable strategy. With proper substrate preparation, shotcrete can be
used to repair reinforced concrete, but it should never be used to “solve” moisture penetration
problems without first making sure that the structure is watertight.
All repairs should be done in a manner that reproduces original accenting like scoring or
cornices/string courses.
Increasing Roadway Width
Arch bridges can be widened using cantilevered deck sections. This will necessitate removing the
existing railings, so it is important to understand how significant the railing is to the historical
significance of the bridge. The original/existing design could be reproduced or serve as the source
for the design of new railings that conform to current design and safety guidelines. Custom-design
railings are often an effective and successful way to mitigate or eliminate any adverse effect, and
many acceptable ones have been crash tested (see section 3.9).
Arch bridges can also be “widened” by constructing a parallel span and creating a one-way pair. In
urban settings, that one-way pair may be separated in order to use the existing street pattern.
3.7 T Beam and Slab Bridges
3.7.1 Appropriate Maintenance and Preservation Treatments - T Beam and Slab Bridges
Keep Concrete Decks, Joints and Drains in Good Condition
Keep deck watertight by making sure that the joints/seals are intact, the drains are clear and the
concrete is not cracked. This will prevent deck concrete spalls that may be caused by expansion of
corroded internal reinforcing steel, as well as protect the beams and the substructure units from being
subjected to any extra water or debris that could promote corrosion or allow moisture to be retained
on the beams or pier caps. Deck cracks should be sealed and scuppers and bridge drainage systems
should be cleaned and kept open. If not already in place, adequate means of draining water away
from the bridge should be installed. Expansion joints should also be cleaned and kept in good repair
or replaced as needed.
Keep Bridge Watertight
Keep all concrete watertight so that moisture and any deicing or marine salts are not allowed to
penetrate the structure and cause corrosion in the internal reinforcing steel. Hiding problems under a
pneumatically or troweled application of cementitious materials, including shotcrete and bagged
masonry cement, does not address the cause(s) of the problems or contribute to their solution and it
is not a suitable strategy. With proper substrate preparation, shotcrete can be used to repair reinforced

Ohio Historic Bridge Maintenance and Preservation Guidance
40
concrete, but it should never be used to “solve” moisture penetration problems without first making
sure that the structure is watertight.
Bearings
Many older reinforced concrete tee beam and slab bridges have minimal bearing devices, such as felt
paper to serve as a bond breaker between the superstructure and substructure. Over time, many of
these sorts of bearings tend to stop functioning due to deterioration of the bond breaker. At many
bridges, this results in little negative impact to the structure. However, if the bridge shows signs of
distress due to expansion and contraction of the superstructure, work to reset a functional bearing
may be in order. The bearings are not historically significant, so modifications can be made with no
adverse effect.
3.7.2 Appropriate Rehabilitation Treatments - T Beam and Slab Bridges
Because the deck is integral with the tee beams and slabs, it is difficult to increase the structural
capacity of this bridge type. Generally, rehabilitation treatments are limited save for repair of
deteriorated material. Slab bridges are most often known to have superior load carrying capacity,
and therefore structural capacity is not usually an issue. Non-structural solutions, such as load
restrictions and making the bridge one lane, may be used.
Make Repairs with Compatible Material that Matches the Existing Concrete
Any new concrete or repair material needs to visually match the existing material as closely as
possible and also match its physical properties. While it is acceptable to use air-entrained or
polymer-modified material, it is important that the properties of the historic and new materials, such
as the coefficient of thermal expansion, modulus of elasticity, and strength, are compatible so that the
old and new material will bond well. The new material should be applied only to a properly prepared
substrate where all deteriorated concrete has been removed to expose sound concrete. Corroded or
lost reinforcing steel must be cleaned or replaced. Removal of concrete will typically extend beyond
the level of the reinforcing steel so that the patch encapsulates it and thus provides the mechanical
attachment for the repair. Failure to address the soundness of the substrate often results in the failure
of the repair and continued deterioration of the bridge.
Preservation Briefs 15: Preservation of Historic Concrete: Problems and General Approaches
(Appendix B) describes the proper strategy for planning and executing concrete repairs. Test patches,
including finishing techniques, on inconspicuous parts of the structure should be done and allowed to
cure completely before being evaluated. The new material should match the existing in color,
composition and finish. This may require rubbing or a mild pressure wash to achieve the
“weathered” appearance. The techniques described in Preservation Briefs 2: Repointing Mortar
Joints in Historic Masonry Buildings (Appendix B) should be followed to achieve a proper patching
concrete. The “briefs” should also be consulted for the suitable strategy for repairing or replacing lost
mortar joints between precast elements on railings and any architectural detailing on the bridge.
All repairs should be done in a manner that reproduces original detailing.
Increasing Roadway Width

Ohio Historic Bridge Maintenance and Preservation Guidance
41
T beam bridges can be widened slightly using cantilevered deck sections or placing additional
beams. In many instances, T beam bridges already have cantilevered deck sections. Any widening
will necessitate removing the existing railings, so it is important to understand how significant the
railings are to the historical significance of the bridge. The original/existing design could be
reproduced or serve as the source for the design of new railings that conform to current design and
safety guidelines. Custom-design railings are often an effective and successful way to mitigate or
eliminate any adverse effect, and many acceptable ones have been crash tested.
3.8 Reinforced Concrete Rigid Frame/Box Culvert Bridges
3.8.1 Appropriate Maintenance and Preservation Treatments - Reinforced Concrete Rigid
Frame/Box Culvert Bridges
Refer to section 3.5.1 for conservation of stone veneer and stone masonry that are often components
of rigid frame bridges.
Keep Concrete Decks, Joints and Drains in Good Condition
Keep deck watertight by making sure that the joints/seals are intact, the drains are clear and the
concrete is not cracked. This will prevent deck concrete spalls that may be caused by expansion of
corroded internal reinforcing steel, as well as protect the beams and the substructure units from being
subjected to any extra water or debris that could promote corrosion or allow moisture to be retained
on the beams or pier caps. Deck cracks should be sealed and scuppers and bridge drainage systems
should be cleaned and kept open. If not already in place, adequate means of draining water away
from the bridge should be installed. Expansion joints should also be cleaned and kept in good repair
or replaced as needed.
Keep Bridge Watertight
Keep all concrete watertight so that moisture and any deicing or marine salts are not allowed to
penetrate the structure and cause corrosion in the internal reinforcing steel. Hiding problems under a
pneumatically or troweled application of cementitious materials, including shotcrete and bagged
masonry cement, does not address the cause(s) of the problems or contribute to their solution and it
is not a suitable strategy. With proper substrate preparation, shotcrete can be used to repair reinforced
concrete, but it should never be used to “solve” moisture penetration problems without first making
sure that the structure is watertight.
3.8.2 Appropriate Rehabilitation Treatments - Reinforced Concrete Rigid Frame/Box
Culvert Bridges
Rigid frame bridges are known to have superior load carrying capacity, so structural capacity is not
usually an issue. Given the design of rigid frame and box bridges, where the abutments and slab are
integral, it is difficult to increase the structural capacity of this bridge type. Non-structural solutions
may be used such as load restrictions and making the bridge one lane.
Make Repairs with Compatible Material that Matches the Existing Concrete

Ohio Historic Bridge Maintenance and Preservation Guidance
42
Any new concrete or repair material needs to visually match the existing material as closely as
possible and also match its physical properties. While it is acceptable to use air-entrained or
polymer-modified material, it is important that the properties of the historic and new materials, such
as the coefficient of thermal expansion, modulus of elasticity, and strength, are compatible so that the
old and new material will bond well. The new material should be applied only to a properly prepared
substrate where all deteriorated concrete has been removed to expose sound concrete. Corroded or
lost reinforcing steel must be cleaned or replaced. Removal of concrete will typically extend beyond
the level of the reinforcing steel so that the patch encapsulates it and thus provides the mechanical
attachment for the repair. Failure to address the soundness of the substrate often results in the failure
of the repair and continued deterioration of the bridge.
Preservation Briefs 15: Preservation of Historic Concrete: Problems and General Approaches
(Appendix B) describes the proper strategy for planning and executing concrete repairs. Test patches,
including finishing techniques, on inconspicuous parts of the structure should be done and allowed to
cure completely before being evaluated. The new material should match the existing in color,
composition and finish. This may require rubbing or a mild pressure wash to achieve the
“weathered” appearance. The techniques described in Preservation Briefs 2: Repointing Mortar
Joints in Historic Masonry Buildings (Appendix B) should be followed to achieve a proper patching
concrete. The “briefs” should also be consulted for the suitable strategy for repairing or replacing lost
mortar joints between precast elements on railings and any architectural detailing on the bridge.
Hiding problems under a pneumatically or troweled application of cementitious materials, including
shotcrete and bagged masonry cement, does not address the cause(s) of the problems or contribute to
their solution, and it is not a suitable strategy. With proper substrate preparation, shotcrete can be
used to repair reinforced concrete, but it should never be used to “solve” moisture penetration
problems without first making sure that the structure is watertight.
All repairs should be done in a manner that reproduces original detailing.
3.9 Bridge Railings
On some bridges, but certainly not all, railings can be an important feature of historic bridges. On
aesthetic bridges, they are integral to the overall design scheme. In historic districts, it is often the
material and scale of the railings that make the bridge a contributing feature important to conveying
its historic character. For these and other reasons, there can be a desire to retain original railings on
historic bridges. If the actual railing cannot be retained due to condition, modern requirements, or
other factors, new railings are often desired to mimic or match the appearance of the original. This
desire to preserve the fabric and style of the old railing is commonly perceived to be a conflict with
modern safety-oriented railings that meet current design criteria, but the state of the practice is such
that there are many appropriate solutions that satisfy both considerations.

Ohio Historic Bridge Maintenance and Preservation Guidance
43
3.9.1 Appropriate Maintenance and Preservation Treatments - Bridge Railings
Keep Historic Railings In Place
The single most effective treatment is to keep the historic/original railings in place and in good repair
using generally accepted maintenance practices. Appropriate means to conserve and maintain metal,
stone, stone veneer, and reinforced concrete bridge railings are the same as for metal, stone, and
reinforced concrete bridge types described in previous sections.
Figure 3.9.1-1. Architectural railings are important features of bridges and worthy of preservation. There are
conventional means to restore them, even make them crashworthy, as demonstrated by Indianola Avenue in
Columbus.
Keep Original Railings In Place Behind Place Crashworthy Traffic Barriers
Railings on historic bridges are often substandard because they do not meet today’s safety standards
for crashworthiness, adequacy of geometry and safety. Railings on historic bridges frequently do not
meet present guidelines for height. Some aesthetic railings can also create snagging and pocketing
problems that result in excessive and unacceptable vehicular deceleration.
Railings can be a visually important aspect of a bridge. It is desirable to leave the existing railing in
place and place a new crash tested barrier system at the curbline in front of the old railings. The
original bridge rail material should not be removed to accommodate installation of the new railings
and the connection details. Options include Kansas corral rails, W-beam guide rails, and steel post
and tube railings.
3.9.2 Appropriate Rehabilitation and Replacement Treatments - Bridge Railings
Many railing systems and traffic barriers on historic bridges do not meet current safety standards for
crashworthiness, minimum height, adequacy of guardrails at the approaches, or the transition
between the two systems. They are therefore evaluated as substandard and obsolete. Additionally,
older railings may be deteriorated due to normal deterioration and deferred maintenance. On some,
the opening size between individual rail components can create snagging hazards and pocketing
problems that can result in unacceptable vehicular deceleration. This can be an issue if the bridge is

Ohio Historic Bridge Maintenance and Preservation Guidance
44
being rehabilitated to meet current guidelines for rehabilitation, is using federal funds that carry with
them geometric and strength requirements, or there is a desire to make the bridge adequate to current
safety standards.
Crashworthiness is based on a railing’s capability to effectively redirect an errant vehicle and to
safely stop it in a controlled manner, and it is determined by conducting crash tests on full-scale
railings in accordance with established guidelines. Ohio bridge design criteria have adopted the test
levels specified in NCHRP Report 350, Recommended Procedures for the Safety Performance
Evaluation of Highway Features, which requires that new railings be crash tested or meet a
prescribed TL level. The test levels range from TL-1 for low volume, low speed local streets to TL-6
for high speed highways with heavy truck traffic and unfavorable site conditions. Replication of
historic railings to meet crash test requirements is difficult because the older railings were not
designed for modern design impact loads. Fortunately, there are many appropriate “balanced
solution” railings that are aesthetic and crash tested.
Consider Placing Modern Traffic Railings In Front of Existing Railings Instead of
Replacement
If the railings are determined to be substandard or inadequate, or if the superstructure is above the
deck and needs to be protected from potential impact damage, consider placing an adequate traffic
railing inside the existing railings, which will then be left in place. Generally accepted preservation
guidance is that it is always better to add to historic properties rather than take away. The modern
railings are reversible and will thus have no adverse effect on the historic bridge.
Use Crash-Tested and Approved Railing
One approach is to find a crash-tested barrier, like the open balustrade Texas railing (T411) that can
be modified to recreate the appearance of a historic design. Many configurations of railings have
been crash tested and can be found at the website www.fhwa.dot.gov/bridge/bridgerail/. The
information is well organized and complete. It provides good insights into the wide variety of open
and solid barriers available, many of which are
appropriate for historic bridges.
Long-term maintenance should be considered when
selecting a new design. Some form liners with a
color finish may not retain the desired appearance
over time. When workmanship is poor, stone veneer
can have similar problems.
Use Tubular Railing to Increase Height or Rods
to Decrease Opening Size
Tubular hand rails can often be added to the tops of
railings that do not meet current height
requirements. With the range of styles and finishes,
compatibility with the original aesthetic is generally
not an issue. Likewise, opening in balustrades that Figure 3.9.2-1. Stainless rods used to reduce
openings to meet current safety standards.

Ohio Historic Bridge Maintenance and Preservation Guidance
45
do not meet current design criteria can be made adequate by using inconspicuously placed wire rope
or rods.
New Railings Based on Design of Original
It is often not possible to place a new traffic railing in front of an existing railing because of
roadway/bridge width or the condition of the original railings. In those instances, it is appropriate to
base the design of new railings on the existing ones. The dimensions and end detailing do not have
to match the original exactly, and this permits use of safer, stronger, and/or crash-tested railings that
defer to the original and are compatible in design with the bridge. Existing stone barriers can be
rebuilt as reinforced concrete safety shape barriers to meet current codes and faced with stone if the
veneer does not pose a snag hazard.
Figure 3.9.2-2. When impact testing
proved that using wood for a railing for
bridges over a canal linking a highway
with the towpath would not provide the
desired level of safety, the owners used
powder finished tubular steel to create a
design based on the historic treatment.
The guide rail at the approach has also
been powder finished in brown to blend
with the bucolic setting.
Figure 3.9.2-3. Contemporary interpretation of
urban open balustrade designed for New Jersey
Department of Transportation. Railings of this
type are appropriate for use as replacements in
urban and suburban settings but open balustrades
are generally not a good choice for rural settings.
Figure 3.9.2-1. Stainless rods used to
reduce openings to meet current safety
standards.

Ohio Historic Bridge Maintenance and Preservation Guidance
46
Care Attaching Modern Guide Rail Systems to Existing Bridge Railing
In many instances, there is no alternative but to attach the end of an approach guide rail system to the
end posts of old railings. Such attachments should be made in the least intrusive manner possible.
On local bridges, any plaques that are in the area of attachment should be relocated to ensure their
preservation and conservation.
Figure 3.9.2-4. Space permitted the
guide rail to be attached to connecting
block rather than the historic masonry.
Avoid Unsuitable Railing Rehabilitation Strategies
In general, unsuitable rehabilitation strategies for railings relate to strategies that destroy the historic
railing or, even worse, give a false sense of history by replacing the historic bridge rails with weak
interpretations of the historic design. In rehabilitating railings, it is generally not acceptable to use
new materials that are not compatible with the original historic material or design of the bridge.
Connections are also very important. For example, do not specify welding the railings when there
were originally bolted connections.
When selecting a new railing, it is important
to consider the context and thus
appropriateness of the design. For example,
the open balustrade design is generally an
urban railing. It may not be appropriate for
a rural setting where open, one- or two rail
high concrete railings on brush curbs were
more commonly used. The selection of the
new design needs make sense and be
compatible with its setting, context, and the
original design of the bridge. The new
railings should make sense with the overall
design of the bridge. Combinations that
never existed in history, like form liner-
finish stone parapets that attempt to create
false history, should be not be used.
Figure 3.9.2-5. Form liners should not be used to create
the illusion of a historic material. The Secretary of the
Interior’s Standards say to avoid changes that create a
false sense of history. Here the rubble stonework form
liner pattern was inappropriately used in an attempt to be
historic and blend with the mill. A simple, open railing,
like a powder finish tubular traffic railing meeting current
safety standards, would have been a compatible choice.

Ohio Historic Bridge Maintenance and Preservation Guidance
47
4 - Selected Bibliography
American Society for Civil Engineers. Repairing and Strengthening Old Steel Truss Bridges -
Procedures for Improving Bridge Behavior.
AASHTO. Maintenance Manual for Roadways and Bridges. 2007.
Coney, William B. Preservation Briefs 15: Preservation of Historic Concrete – Problems and
General Approaches. U.S. Dept. of the Interior, National Park Service, Cultural Resources, nd.
Ferris, Herbert W. (Compiler). Historical Record Dimension and Properties Rolled Shapes Steel and
Wrought Iron Beams & columns As Rolled in U.S.A., Period 1873 to 1952 with Sources as Noted.
AISC, 1953 (subsequent editions through 1985). PDF version available from Ohio Department of
Transportation Office of Environmental Services’s Historic Bridge Program Manager.
Federal Highway Administration. Eastern Federal Lands. “Aesthetic Barrier Systems.”
http://www.efl.fhwa.dot.gov/technology-abs.aspx (May 2008).
Federal Highway Administration. Seismic Design and Retrofit Manual for Highway Bridges. Report
No. FHWA-IP-87-6. May 1987.
Grimmer, Anne E., compiler. A Glossary of Historic Masonry Deterioration Problems and
Preservation Treatments. U.S. Department of the Interior National Park Service. 1984.
Jester, Thomas, editor. Twentieth-Century Building Materials History and Conservation. The
McGraw-Hill Companies, 1995.
Mack, Robert C. and John P. Spewik. Preservation Briefs 2: Repointing Mortar Joints in Historic
Masonry Buildings. U.S. Dept. of the Interior, National Park Service, Cultural Resources, 1998.
The 1998 brief updates the 1980 bridge of the same name by Robert C. Mack, et al. It too is worth
consulting.
McKee, Harley J. Introduction to Early American Masonry, Stone, Brick, Mortar and Plaster.
Preservation Press, 1973.
Slaton, Deborah and Paul Gaudette. 15 Preservation Briefs: Preservation of Historic Concrete. U.S.
Department of the Interior, National Park Service, Historic Preservation Services, 2008.
United States Department of Agriculture. Timber Bridges: Design, Construction, Inspection, and
Maintenance. Forest Service, Engineering Staff, 1992.
Park, Sung H. Bridge Rehabilitation and Replacement (Bridge Repair Practice). Privately published
by author, 1984. (S.H. Park, PO Box 7474, Trenton, NJ 08628). (particularly useful for more modern
bridge types and materials, including prestressed concrete. Mr. Park was with NJDOT).

Ohio Historic Bridge Maintenance and Preservation Guidance
Appendices Appendix A – Secretary of the Interior’s Standards for the Treatment of Historic
Properties
Preservation
Rehabilitation
Appendix B – Selected National Park Service Preservation Briefs
1 Assessing Cleaning and Water-Repellent Treatments for Historic
Masonry Buildings
2 Repointing Mortar Joints in Historic Masonry Buildings
15 Preservation of Historic Concrete
38 Removing Graffiti from Historic Masonry