Embed Size (px)
Citation preview
Office 365for Mason
OFFICE 365 CALENDARQUICK GUIDE
FOR USERS OF:OUTLOOK 2010 FOR WINDOWS
office365.gmu.edu | 703-993-8870 | [email protected]
All Mason faculty and staff are invited to use the calendar function included with Office 365. The following instructions have been created for Microsoft Outlook 2010 users who will access their calendar using a PC. If you are using either a Mac or the Outlook Web App (accessible via the web), please visit office365.gmu.edu and click on the TRAINING & WORKSHOPS page to obtain those specific instructions. These instructions will help you to get started using your Office 365 calendar and are a useful quick reference guide.
I. GETTING STARTED/BASIC CALENDAR CONFIGUATION
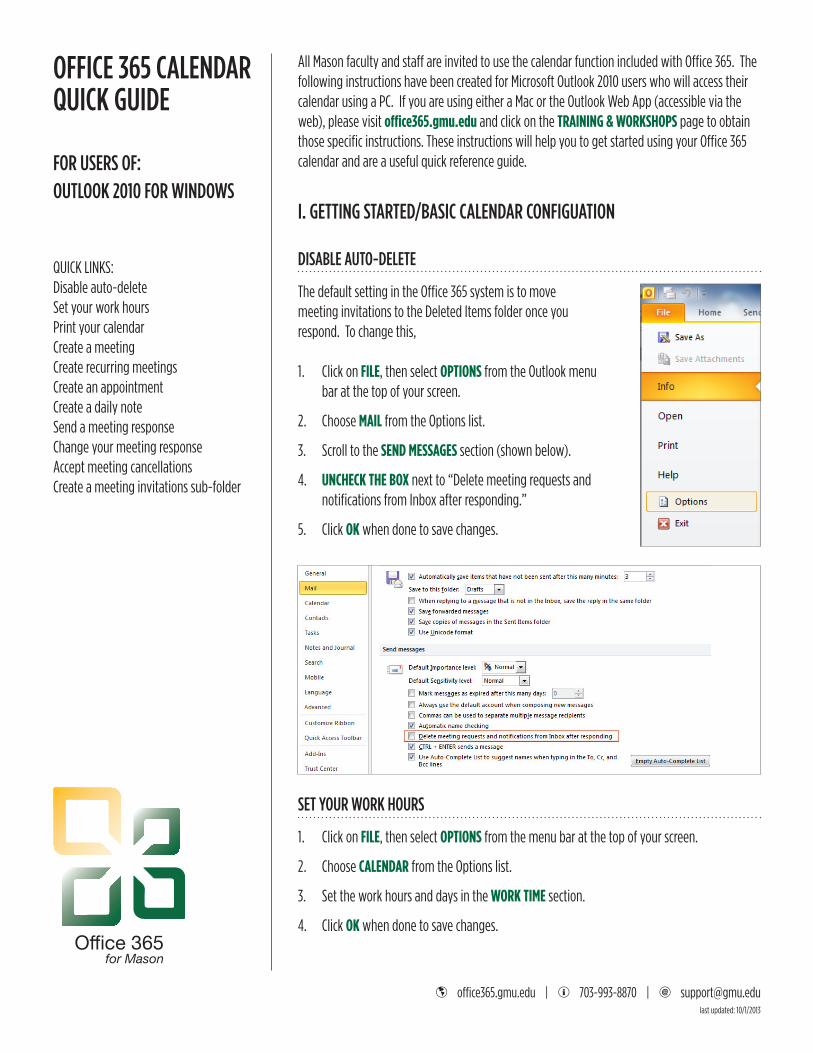
DISABLE AUTO-DELETE
The default setting in the Office 365 system is to move meeting invitations to the Deleted Items folder once you respond. To change this,
1. Click on FILE, then select OPTIONS from the Outlook menu bar at the top of your screen.
2. Choose MAIL from the Options list.
3. Scroll to the SEND MESSAGES section (shown below).
4. UNCHECK THE BOX next to “Delete meeting requests and notifications from Inbox after responding.”
5. Click OK when done to save changes.
SET YOUR WORK HOURS
1. Click on FILE, then select OPTIONS from the menu bar at the top of your screen.
2. Choose CALENDAR from the Options list.
3. Set the work hours and days in the WORK TIME section.
4. Click OK when done to save changes.
QUICK LINKS:Disable auto-deleteSet your work hoursPrint your calendarCreate a meetingCreate recurring meetingsCreate an appointmentCreate a daily noteSend a meeting responseChange your meeting responseAccept meeting cancellationsCreate a meeting invitations sub-folder
last updated: 10/1/2013

OFFICE 365 CALENDAR QUICK GUIDE: OUTLOOK 2010 FOR WINDOWS office365.gmu.edu | 703-993-8870 | [email protected]
PRINT A PAPER COPY OF YOUR CALENDAR
1. On your calendar, select the day/week you wish to print.
2. Click on FILE, then select PRINT from the menu bar.
3. Under SETTINGS, choose which calendar view you wish to print (clicking on each will show you a print preview).
4. Click the PRINT button.
II. CREATING MEETINGS, APPOINTMENTS, AND DAILY NOTES
CREATE A MEETING
1. From the Home tab on the top menu bar, select NEW MEETING.
2. Type in the meeting details.
3. If needed, after listing the attendees, click on the SCHEDULING ASSISTANT button to find open times for the meeting (this works like the “open group agenda” in Corporate Time).
4. Click SEND to send the invitation to the participants.
CREATE RECURRING MEETINGS
1. To create repeating instances for your meetings, click on the RECURRENCE icon inside the main meeting request window.
2. Inside the APPOINTMENT RECURRENCE window, select the desired recurrence options: start and end times, pattern for recurrence, as well as how long or how many instances are desired (always select an end date for the recurrence).
3. Click OK to return to the main meeting request window.

OFFICE 365 CALENDAR QUICK GUIDE: OUTLOOK 2010 FOR WINDOWS office365.gmu.edu | 703-993-8870 | [email protected]
CREATE AN APPOINTMENT
An appointment is a meeting that includes just yourself.
1. From the Home tab on the top menu bar, select NEW APPOINTMENT.
2. Type in the appointment details into the window that opens.
3. Click the SAVE & CLOSE button to save the appointment to your calendar.
CREATE A DAILY NOTE
To put a notice on your calendar and/or someone else’s calendar (like the Daily Note in Corporate Time), please follow these steps.
1. From the Home tab on the top menu bar, select NEW MEETING.
2. In the TO line, type in your name as well as the names of those that you would like to receive this note and have it posted on their calendar.
3. In the SUBJECT line, type in the note message (for example, Your name - vacation day).
4. Click on the ALL DAY CHECK BOX to the ight of the start/end time area.
5. In the OPTIONS area, verify that FREE is selected from the drop down menu.
6. In the ATTENDEES section, de-select REQUEST RESPONSES.
7. Click SEND to post the note.
III. RESPONDING TO MEETING REQUESTS
When you are invited to a meeting, a meeting request message (an e-mail messsage) will appear in your e-mail inbox. That meeting will also be placed on your calendar with the time blocked off as “tenative.” It is recommended that you respond to the meeting request by using the buttons included in the e-mail invitation.
If you delete the meeting request message from your inbox BEFORE responding to it, you will also delete the “tentative” meeting from your calendar.

OFFICE 365 CALENDAR QUICK GUIDE: OUTLOOK 2010 FOR WINDOWS office365.gmu.edu | 703-993-8870 | [email protected]
SEND A MEETING RESPONSE
In order for meeting organizers to know who will be attending a meeting, always send a meeting response (even if it is a tentative response).
CHANGING YOUR MEETING RESPONSE
After you have responded to a meeting, you can change your response by either:
1. Updating your response from within the original meeting request message
2. Updating your response from the meeting entry on your calendar
ACCEPTING MEETING CANCELLATIONS
If you receive a meeting cancellation message via e-mail, open the message and click on the REMOVE FROM CALENDAR button. Failure to click this button will result in the cancelled meeting still showing as an entry on your calendar.
CREATING A MEETING INVITATIONS SUB-FOLDER
If you would like to keep your meeting invitations separate from your main e-mail inbox, follow these instructions to set up a mailbox rule.
1. Create a NEW FOLDER inside your inbox where you would like all of your meeting invitations to be stored.
2. From the HOME tab on the top menu bar, select RULES, then select MANAGE RULES & ALERTS from the drop-down list.
3. In the Rules and Alerts dialog box, click NEW RULE.
4. On the Rules Wizard dialog box, for STEP 1: SELECT A TEMPLATE, select APPLY RULE ON MESSAGES I RECEIVE (in the Start from a blank rule area). Click NEXT.
5. On the next screen, scroll down and select WHICH IS A MEETING INVITATION OR UPDATE as your condition, then click NEXT.
6. The next screen asks WHAT DO YOU WANT TO DO WITH THE MESSAGE? Select MOVE IT TO THE SPECIFIED FOLDER from the Step 1: select action section. Then, in the Step 2 section, click the underlined word SPECIFIED. Choose the name of the folder that you created in step 1 above.
7. Click NEXT. On the ARE THERE ANY EXCEPTIONS? screen, do not select anything and then click NEXT.
8. To finish the rule setup, give your rule a name (we suggest Meeting Invitations Rule) and select TURN ON THIS RULE, then click FINISH.
9. With your new rule selected in the E-MAIL RULES area, click APPLY, then click OK.