Embed Size (px)
Citation preview

Nova Security Appliance User Manual Revision 1.3
1
Nova Network Security Appliance User Manual
Contacts
DataSoft Corporation 1275 W. Washington Street, Suite 106
Tempe, AZ 85281
Technical Support Phone: (480) 763-5777
Email: [email protected] Website: www.novanetworksecurity.com
Nova Network Security Appliance User Manual Revision 1.3
2
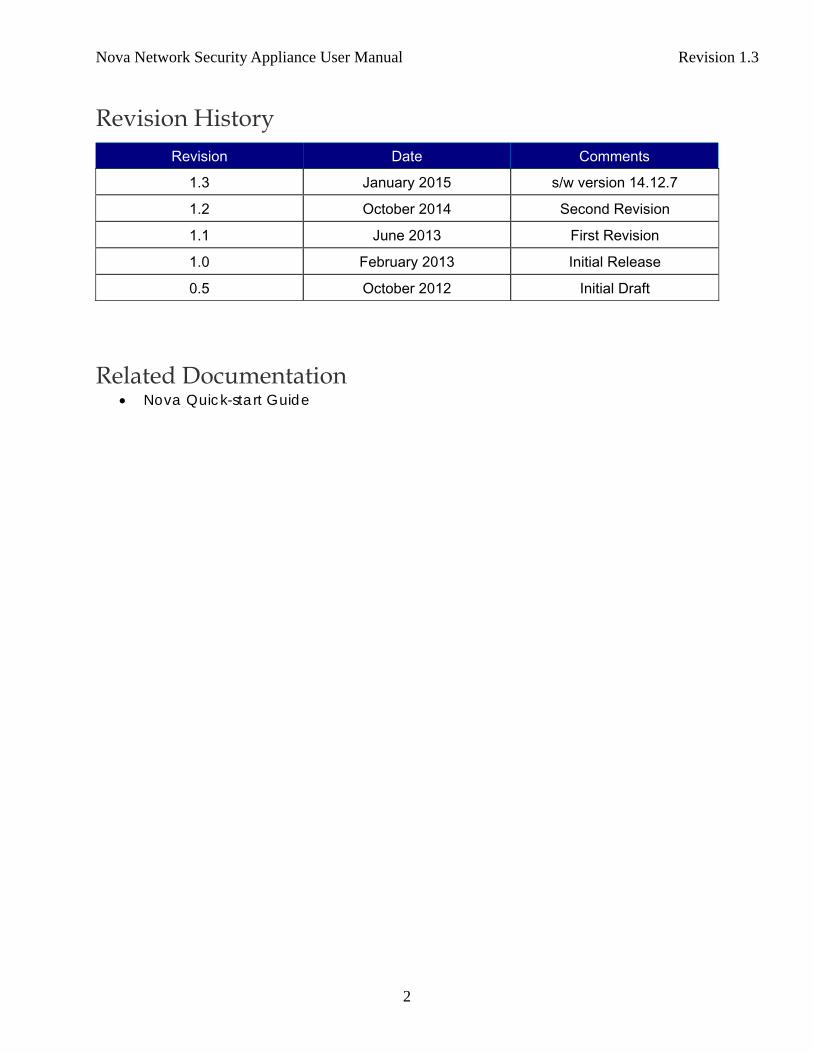
Revision History
Revision Date Comments
1.3 January 2015 s/w version 14.12.7
1.2 October 2014 Second Revision
1.1 June 2013 First Revision
1.0 February 2013 Initial Release
0.5 October 2012 Initial Draft Related Documentation
Nova Quick-start Guide
Nova Network Security Appliance User Manual Revision 1.3
3
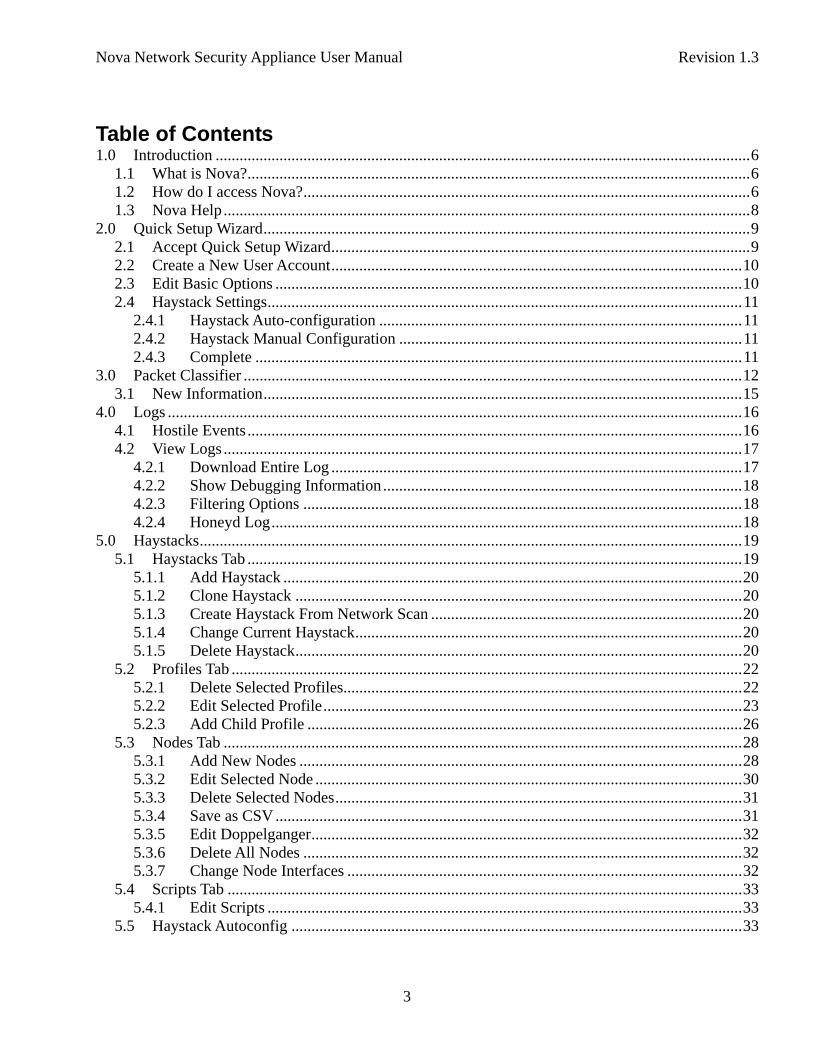
Table of Contents1.0 Introduction ...................................................................................................................................... 6
1.1 What is Nova? .............................................................................................................................. 6 1.2 How do I access Nova? ................................................................................................................ 6 1.3 Nova Help .................................................................................................................................... 8
2.0 Quick Setup Wizard .......................................................................................................................... 9 2.1 Accept Quick Setup Wizard ......................................................................................................... 9 2.2 Create a New User Account ....................................................................................................... 10 2.3 Edit Basic Options ..................................................................................................................... 10 2.4 Haystack Settings ....................................................................................................................... 11
2.4.1 Haystack Auto-configuration ........................................................................................... 11 2.4.2 Haystack Manual Configuration ...................................................................................... 11 2.4.3 Complete .......................................................................................................................... 11
3.0 Packet Classifier ............................................................................................................................. 12 3.1 New Information ........................................................................................................................ 15
4.0 Logs ................................................................................................................................................ 16 4.1 Hostile Events ............................................................................................................................ 16 4.2 View Logs .................................................................................................................................. 17
4.2.1 Download Entire Log ....................................................................................................... 17 4.2.2 Show Debugging Information .......................................................................................... 18 4.2.3 Filtering Options .............................................................................................................. 18 4.2.4 Honeyd Log ...................................................................................................................... 18
5.0 Haystacks ........................................................................................................................................ 19 5.1 Haystacks Tab ............................................................................................................................ 19
5.1.1 Add Haystack ................................................................................................................... 20 5.1.2 Clone Haystack ................................................................................................................ 20 5.1.3 Create Haystack From Network Scan .............................................................................. 20 5.1.4 Change Current Haystack ................................................................................................. 20 5.1.5 Delete Haystack ................................................................................................................ 20
5.2 Profiles Tab ................................................................................................................................ 22 5.2.1 Delete Selected Profiles.................................................................................................... 22 5.2.2 Edit Selected Profile ......................................................................................................... 23 5.2.3 Add Child Profile ............................................................................................................. 26
5.3 Nodes Tab .................................................................................................................................. 28 5.3.1 Add New Nodes ............................................................................................................... 28 5.3.2 Edit Selected Node ........................................................................................................... 30 5.3.3 Delete Selected Nodes ...................................................................................................... 31 5.3.4 Save as CSV ..................................................................................................................... 31 5.3.5 Edit Doppelganger ............................................................................................................ 32 5.3.6 Delete All Nodes .............................................................................................................. 32 5.3.7 Change Node Interfaces ................................................................................................... 32
5.4 Scripts Tab ................................................................................................................................. 33 5.4.1 Edit Scripts ....................................................................................................................... 33
5.5 Haystack Autoconfig ................................................................................................................. 33
Nova Network Security Appliance User Manual Revision 1.3
4
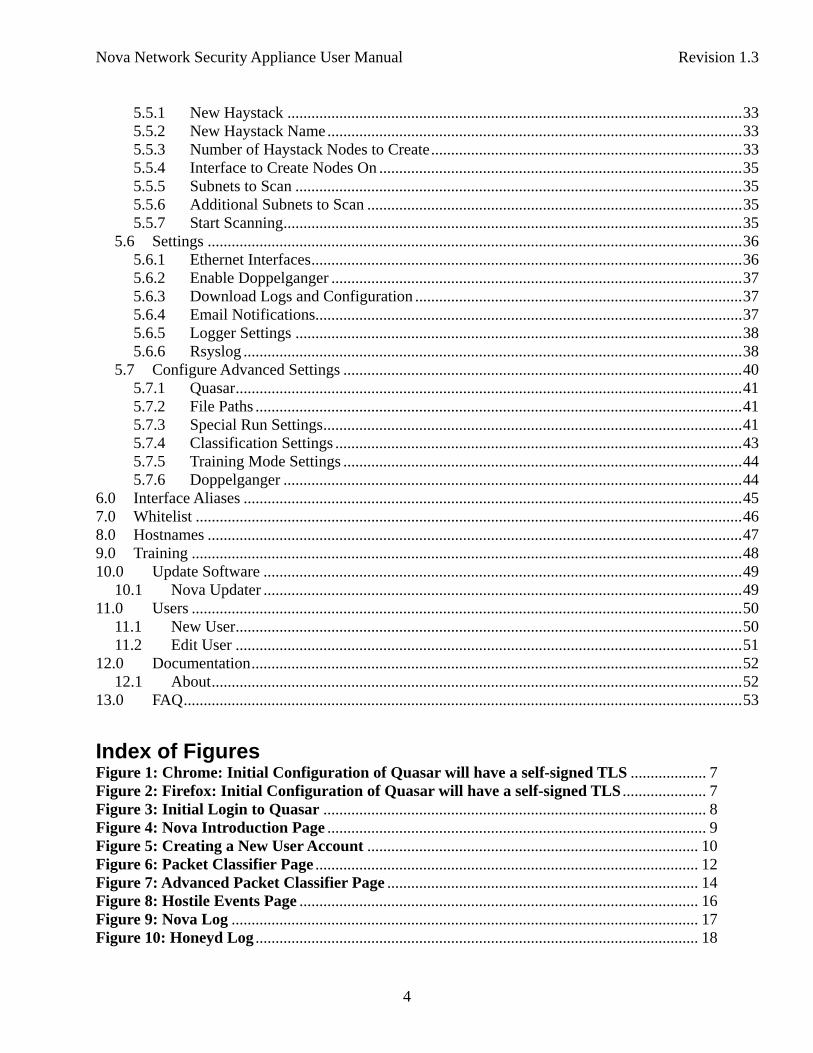
5.5.1 New Haystack .................................................................................................................. 33 5.5.2 New Haystack Name ........................................................................................................ 33 5.5.3 Number of Haystack Nodes to Create .............................................................................. 33 5.5.4 Interface to Create Nodes On ........................................................................................... 35 5.5.5 Subnets to Scan ................................................................................................................ 35 5.5.6 Additional Subnets to Scan .............................................................................................. 35 5.5.7 Start Scanning ................................................................................................................... 35
5.6 Settings ...................................................................................................................................... 36 5.6.1 Ethernet Interfaces ............................................................................................................ 36 5.6.2 Enable Doppelganger ....................................................................................................... 37 5.6.3 Download Logs and Configuration .................................................................................. 37 5.6.4 Email Notifications........................................................................................................... 37 5.6.5 Logger Settings ................................................................................................................ 38 5.6.6 Rsyslog ............................................................................................................................. 38
5.7 Configure Advanced Settings .................................................................................................... 40 5.7.1 Quasar ............................................................................................................................... 41 5.7.2 File Paths .......................................................................................................................... 41 5.7.3 Special Run Settings ......................................................................................................... 41 5.7.4 Classification Settings ...................................................................................................... 43 5.7.5 Training Mode Settings .................................................................................................... 44 5.7.6 Doppelganger ................................................................................................................... 44
6.0 Interface Aliases ............................................................................................................................. 45 7.0 Whitelist ......................................................................................................................................... 46 8.0 Hostnames ...................................................................................................................................... 47 9.0 Training .......................................................................................................................................... 48 10.0 Update Software ........................................................................................................................ 49
10.1 Nova Updater ........................................................................................................................ 49 11.0 Users .......................................................................................................................................... 50
11.1 New User ............................................................................................................................... 50 11.2 Edit User ............................................................................................................................... 51
12.0 Documentation ........................................................................................................................... 52 12.1 About ..................................................................................................................................... 52
13.0 FAQ ............................................................................................................................................ 53
Index of FiguresFigure 1: Chrome: Initial Configuration of Quasar will have a self-signed TLS ................... 7 Figure 2: Firefox: Initial Configuration of Quasar will have a self-signed TLS ..................... 7 Figure 3: Initial Login to Quasar ................................................................................................ 8 Figure 4: Nova Introduction Page ............................................................................................... 9 Figure 5: Creating a New User Account ................................................................................... 10 Figure 6: Packet Classifier Page ................................................................................................ 12 Figure 7: Advanced Packet Classifier Page .............................................................................. 14 Figure 8: Hostile Events Page .................................................................................................... 16 Figure 9: Nova Log ..................................................................................................................... 17 Figure 10: Honeyd Log ............................................................................................................... 18
Nova Network Security Appliance User Manual Revision 1.3
5
Figure 11: Haystacks Tab ........................................................................................................... 19 Figure 12: Are you sure you want to delete this Haystack? .................................................... 21 Figure 13: Profiles Tab ............................................................................................................... 22 Figure 14: Profile Editing, Part 1 .............................................................................................. 23 Figure 15: Ethernet Vendor Editing, Part 2 ............................................................................. 24 Figure 16: Profile Editing, Part 3 .............................................................................................. 25 Figure 17: Add Child Profile ...................................................................................................... 27 Figure 18: Adding Nodes ............................................................................................................ 28 Figure 19: Nodes Tab .................................................................................................................. 30 Figure 20: Nodes Tab .................................................................................................................. 31 Figure 21: Auto-configuration Options ..................................................................................... 34 Figure 22: Basic Options ............................................................................................................ 36 Figure 23: Basic Options: Email Alerts .................................................................................... 38 Figure 24: Basic Options: Rsyslog ............................................................................................. 39 Figure 25: Advanced Options Part 1 ......................................................................................... 41 Figure 26: Advanced Options, Part 2 ........................................................................................ 42 Figure 27: Interface Aliasing ...................................................................................................... 45 Figure 28: Whitelist Page ........................................................................................................... 46 Figure 29: Classification Training ............................................................................................. 48 Figure 30: New User Page .......................................................................................................... 50 Figure 31: Edit User Page .......................................................................................................... 51 Figure 32: About Page ................................................................................................................ 52
Nova Network Security Appliance User Manual Revision 1.3
6
1.0 Introduction
1.1 What is Nova?
Nova is an anti-reconnaissance system and tool for network security; helps to keep your network private. This means it has two principle features:
Prevent Hostile Reconnaissance
Detect Hostile Reconnaissance
Prevention applies a large array of fake decoy virtual machines (called the “Haystack”) to the protected network. These virtual machines, however, may be unlike others you're used to. They are “Low Fidelity” honeypots: They do not fully emulate the machine they are pretending to be. They only appear real from the perspective of someone out on the network. This gives Nova the ability to pretend to be any* type of machine and emulate thousands at the same time. Other characteristics of these fake machines can also be set: Open and closed ports, services running on those ports, uptime values, Ethernet addresses, etc. For more information about setting these configurations, see Section 5.0 .
Detection of hostile reconnaissance is accomplished by using an assisted machine-learning algorithm. Having the Haystack applied to your private network gives Nova an important advantage: they are decoys. Benign network nodes should not be contacting the decoys at all and definitely should not be contacting thousands of ports on all of the decoys. Thus, traffic going to the Haystack is presumptively hostile and lets us feed this information back into the system for automated classification. Specifically, Nova uses k-NN (k Nearest Neighbors) to perform the statistical classification. For more information about classification, see section 4.0 .
* Any Operating System in the nmap-os-db (Nmap's OS Database) can be made using Nova.
1.2 How do I access Nova?
The primary user interface that you will be accessing is Nova's Web UI, called Quasar. This design lets you use Nova from nearly any computer on your network, regardless of platform. For best results, use up-to-date Firefox or Chrome browsers. Internet Explorer may function, but it is not recommended. JavaScript must be enabled when viewing Nova pages since it uses JavaScript to display much of its data. JavaScript is typically the default.
Quasar will, by default, run on TCP port 8080 over HTTPS. In order to access the interface, follow this URL from your browser:
https://YOUR_IP_ADDRESS:8080
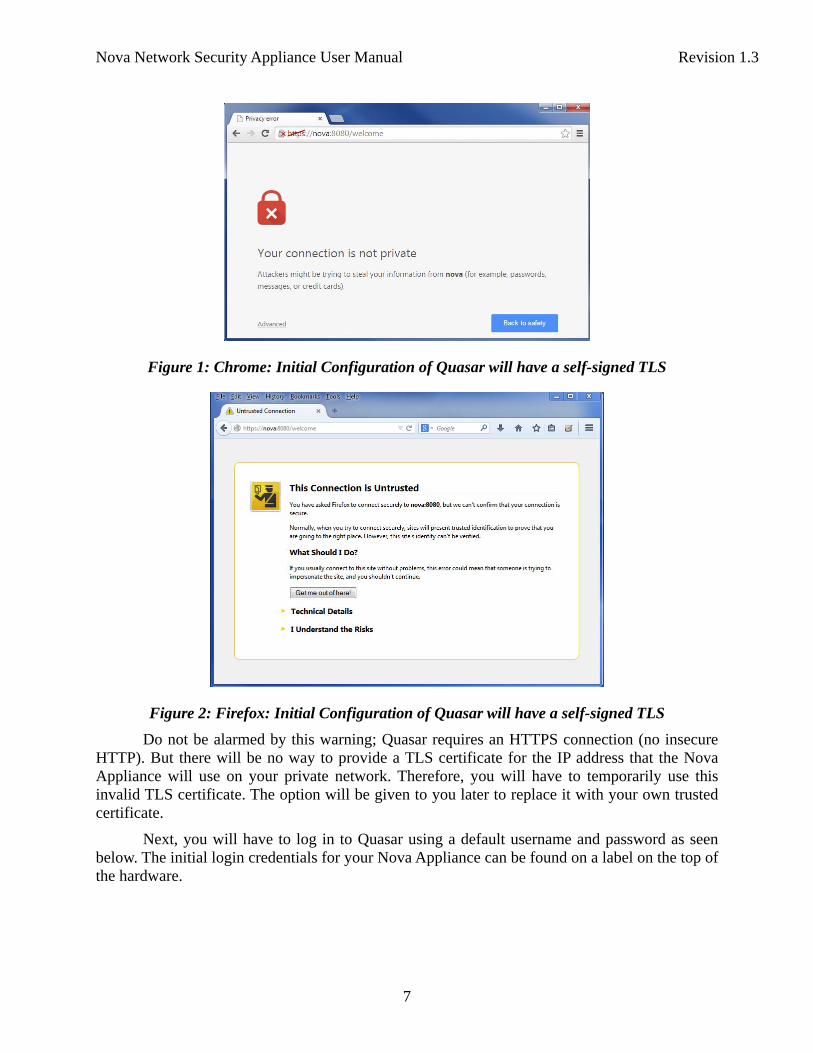
“YOUR_IP_ADDRESS” is the IP address of the appliance on your network. You may initially be prompted with a TLS certificate error, such as shown in Figure 1.
Nova Network Security Appliance User Manual Revision 1.3
7
Figure 1: Chrome: Initial Configuration of Quasar will have a self-signed TLS
Figure 2: Firefox: Initial Configuration of Quasar will have a self-signed TLS
Do not be alarmed by this warning; Quasar requires an HTTPS connection (no insecure HTTP). But there will be no way to provide a TLS certificate for the IP address that the Nova Appliance will use on your private network. Therefore, you will have to temporarily use this invalid TLS certificate. The option will be given to you later to replace it with your own trusted certificate.
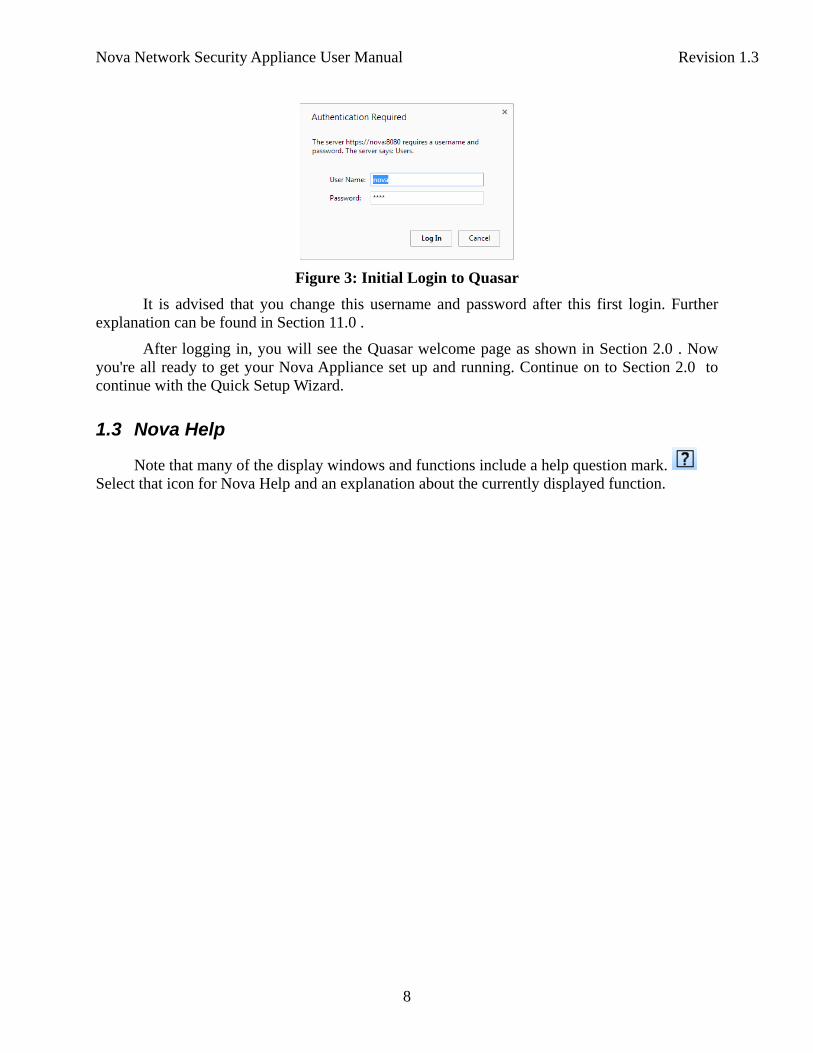
Next, you will have to log in to Quasar using a default username and password as seen below. The initial login credentials for your Nova Appliance can be found on a label on the top of the hardware.
Nova Network Security Appliance User Manual Revision 1.3
8
Figure 3: Initial Login to Quasar
It is advised that you change this username and password after this first login. Further explanation can be found in Section 11.0 .
After logging in, you will see the Quasar welcome page as shown in Section 2.0 . Now you're all ready to get your Nova Appliance set up and running. Continue on to Section 2.0 to continue with the Quick Setup Wizard.
1.3 Nova Help
Note that many of the display windows and functions include a help question mark. Select that icon for Nova Help and an explanation about the currently displayed function.
Nova Network Security Appliance User Manual Revision 1.3
9
2.0 Quick Setup Wizard
2.1 Accept Quick Setup Wizard
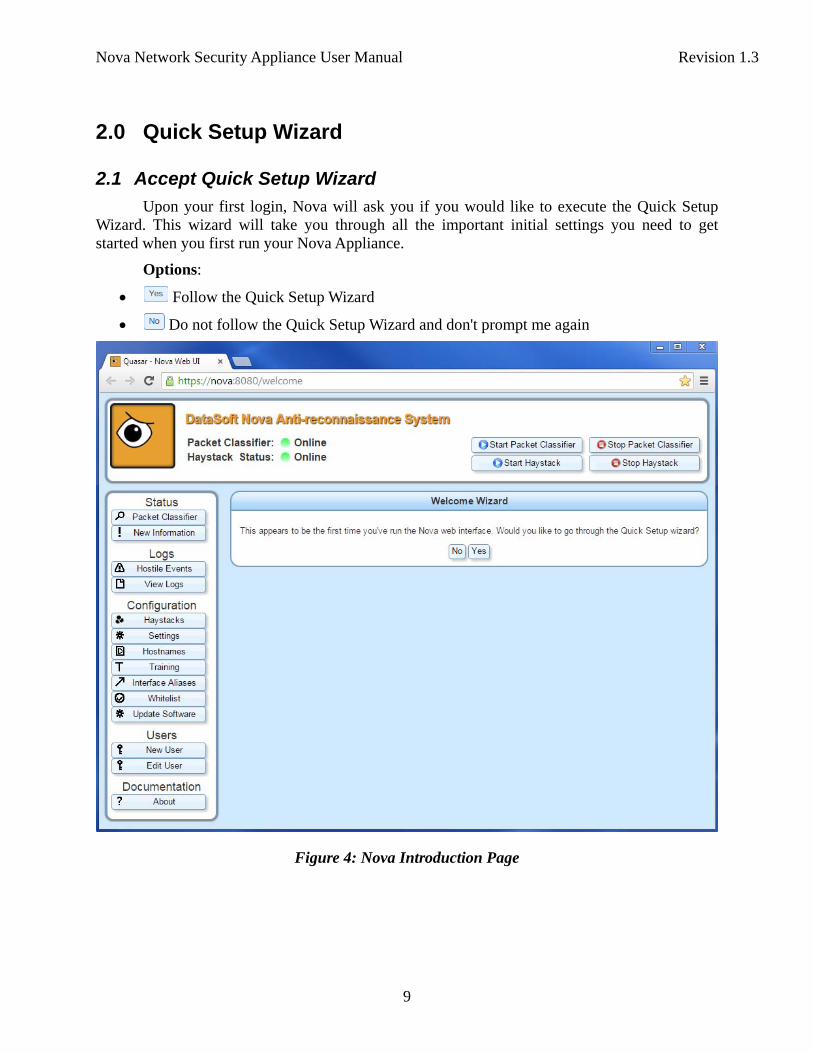
Upon your first login, Nova will ask you if you would like to execute the Quick Setup Wizard. This wizard will take you through all the important initial settings you need to get started when you first run your Nova Appliance.
Options:
Follow the Quick Setup Wizard
Do not follow the Quick Setup Wizard and don't prompt me again
Figure 4: Nova Introduction Page
Nova Network Security Appliance User Manual Revision 1.3
10
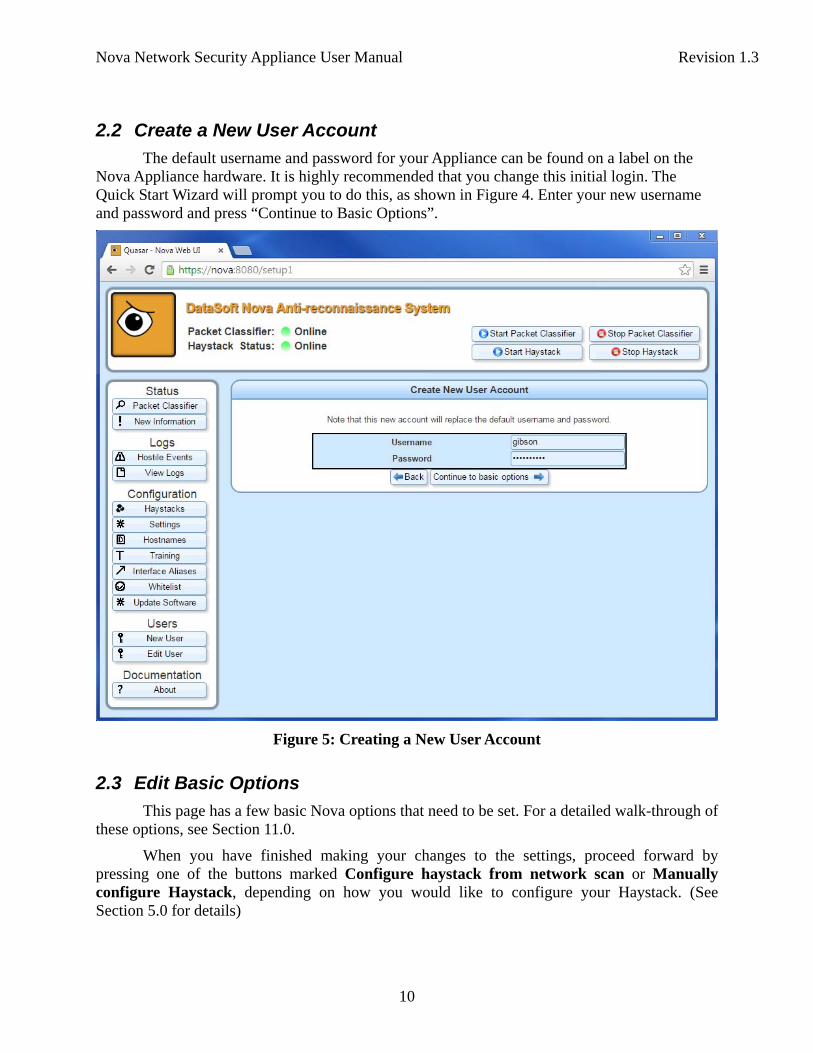
2.2 Create a New User Account
The default username and password for your Appliance can be found on a label on the Nova Appliance hardware. It is highly recommended that you change this initial login. The Quick Start Wizard will prompt you to do this, as shown in Figure 4. Enter your new username and password and press “Continue to Basic Options”.
Figure 5: Creating a New User Account
2.3 Edit Basic Options
This page has a few basic Nova options that need to be set. For a detailed walk-through of these options, see Section 11.0.
When you have finished making your changes to the settings, proceed forward by pressing one of the buttons marked Configure haystack from network scan or Manually configure Haystack, depending on how you would like to configure your Haystack. (See Section 5.0 for details)
Nova Network Security Appliance User Manual Revision 1.3
11
2.4 Haystack Settings
The Haystack is at the heart of the concept and effectiveness behind Nova. This is a large set of virtual decoy machines that you deploy onto your network to protect your real assets. Since there are potentially thousands of these decoy machines, setting them up individually can be a difficult and time consuming process. They all have a deep amount of configurability from Operating System, open and closed ports, uptime, running services, etc. For this reason, Nova has the ability to automatically create a Haystack for you that looks similar to your protected network. If you would like to use this feature, press the Automatically Configure Haystack button at the end of the Basic Options page. For manual configuration, press the Manually Configure Haystack button. You will be able to manually adjust the settings and add or remove decoy machines later no matter what option you choose now.
2.4.1 Haystack Auto-configuration
For detailed information on how to automatically configure your Haystack, see Section 5.5 .
2.4.2 Haystack Manual Configuration
For detailed information on how to manually configure your Haystack, see Section 5.0 .
2.4.3 Complete
You will now have completed the Nova Quick Setup Wizard! Please continue reading the remaining sections to learn more about how to configure and use your Nova appliance.

Nova Network Security Appliance User Manual Revision 1.3
12
3.0 Packet Classifier The Packet Classifier page shows the list of all network entities the Nova system has seen. From the perspective of Nova, anything with an IP address is a “suspect” and possibly hostile. This page gives you an overview of these suspects. Each row in the table depicted in Figure 6 represents a single network suspect Nova detected.
Figure 6: Packet Classifier Page
By default, suspects are sorted by their classification value. This is a percentage between 0% (almost surely benign) and 100% (almost surely hostile). This is shown as a bar that fills up toward the right side as classification rises. When a suspect reaches a certain threshold, the system makes the determination that the suspect is hostile, and marks this with a red indicator in the first column.
Other columns in the table include:
Interface: The Ethernet interface on which the suspect was seen
Nova Network Security Appliance User Manual Revision 1.3
13
Address: The IP address of the suspect
Last Seen: Timestamp of the last packet that was received from the suspect
The Packet Classifier and Haystack can be started/stopped
Start/Stop Packet Classifier Choose to Start or Stop the Packet Classifier by selecting the associated button in the top, right corner of the interface. By default, the packet classifier will be online (started) and updating at a rate of once-per-second. You should leave the packet classifier online as the network traffic will not be classified and hostile behavior will not be detected if the packet classifier is stopped (offline).
Start/Stop Haystack Choose to Start or Stop the Haystack by selecting the associated button in the top, right corner of the interface. By default, the haystack will be online (started). Quasar will automatically stop and then start the haystack when changes have been made to the haystack. You should leave the haystack online as it is the critical component that allows Nova to detect, classify and alert to hostile behavior.
Some advanced options on this page include:
Live Grid Update By default, the suspect grid will automatically update as suspects are found and information is gained. However, you may wish to pause auto-updating in order to focus on a single suspect. Simply uncheck this box to disable live updating of the suspects grid. *Note: This only disables the live updating of the suspects display. Nova will safely continue to monitor the network and update suspects in either case.
Show Advanced Suspect Statistics This check box will expand the suspects table to show all the statistics Nova gathered on each suspect; shown in Figure 6. These statistics include aggregated traffic data “Packet Size Mean” and “Distinct TCP ports Contacted”. Nova also uses this data to perform classification. You can enable this check box to get a closer look into why Nova classified a suspect as it did or possibly to debug an issue with the classification process.

Nova Network Security Appliance User Manual Revision 1.3
14
Figure 7: Advanced Packet Classifier Page
Show Unclassified Suspects By default, Nova will withhold classification on a suspect until a total of 5 packets have been received from it. When a suspect has little data, classification will be inaccurate and not useful. Furthermore, meaningful reconnaissance would consist of more than 5 packets sent. If you wish to see the complete list of suspects, including unclassified, check this box.
Additionally, the suspects grid has a right-click menu with more options:
Detailed Report This option will bring up the further details on the selected suspect. The details page opens a new tab and displays real-time packet data information in charts and graphs for the given suspect. The Suspect Identification Information displays key information about the IP/MAC address source, interface and a reverse DNS lookup. The Classification Engine Notes indicate the KNN classification data as well as information about the hostile activity. The types of packets by protocol, flags, and size are presented as well as the IP and port hits from the packets.
Train Suspect as Hostile This option manually tells the Nova classification this suspect is hostile. Future suspects that resemble this suspect will also be marked as hostile.
Train Suspect as Benign This option manually tells the Nova classification this suspect is benign. Future suspects that resemble this suspect will also be marked as benign.
Clear Suspect Clear any data saved from this suspect; resets and it is as if no packets were received.
* Note: This is different than whitelisting since the suspect will be classified again as its new data becomes available. This option is useful if, for example, one of your machines needs to temporarily do something that would normally be considered hostile, e.g. do an Nmap scan. In that case, you wouldn't want to mark the suspect as benign, nor permanently whitelist it.
At the bottom of the page, there are two buttons with the following options:
Clear All Suspects This button will clear all suspect data from Nova's classification. This will have the effect of completely starting over from scratch in terms of data collected from your network;
Nova Network Security Appliance User Manual Revision 1.3
15
just as if you clicked “Clear Suspect” for each suspect.
Save as CSV File If you wish to view the list of suspects offline, or do some spreadsheet processing on it, you can use this option. It will give you a CSV file, which is easily imported into any spreadsheet application.
3.1 New Information
The New Information page shows the Nova and Honeyd logs (see Section 4.0 below) with only information that you have not yet seen. At each log line, you will see a “Mark As Seen” button, where you can dismiss a notification. This will permanently remove that notification from the page.
Nova Network Security Appliance User Manual Revision 1.3
16
4.0 Logs This section contains information about logs. Logs describe various events that occurred on your Nova Appliance.
4.1 Hostile Events
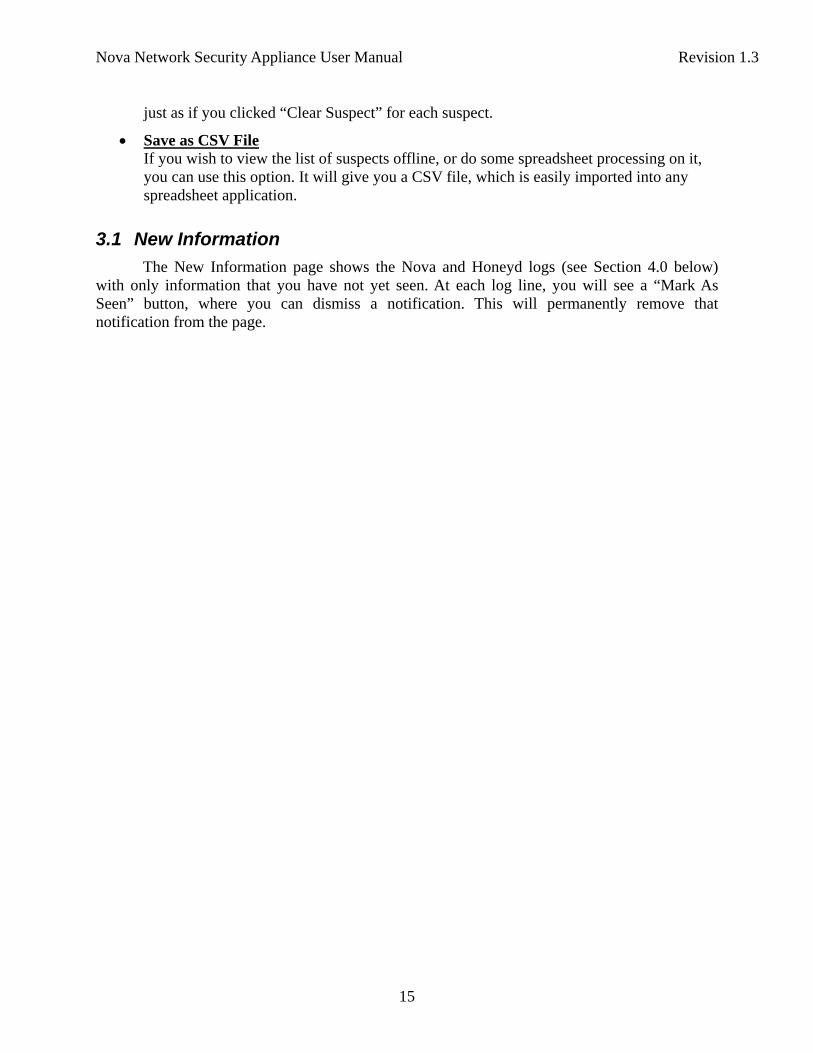
The hostile events page describes any recent hostile activity on your network. Every entry in the table represents a suspect being classified as hostile and the time the event occurred. Additional advanced statistics on the suspect's classification can be seen by checking the “Show Advanced Suspect Statistics” check box.
Figure 8: Hostile Events Page
Nova Network Security Appliance User Manual Revision 1.3
17
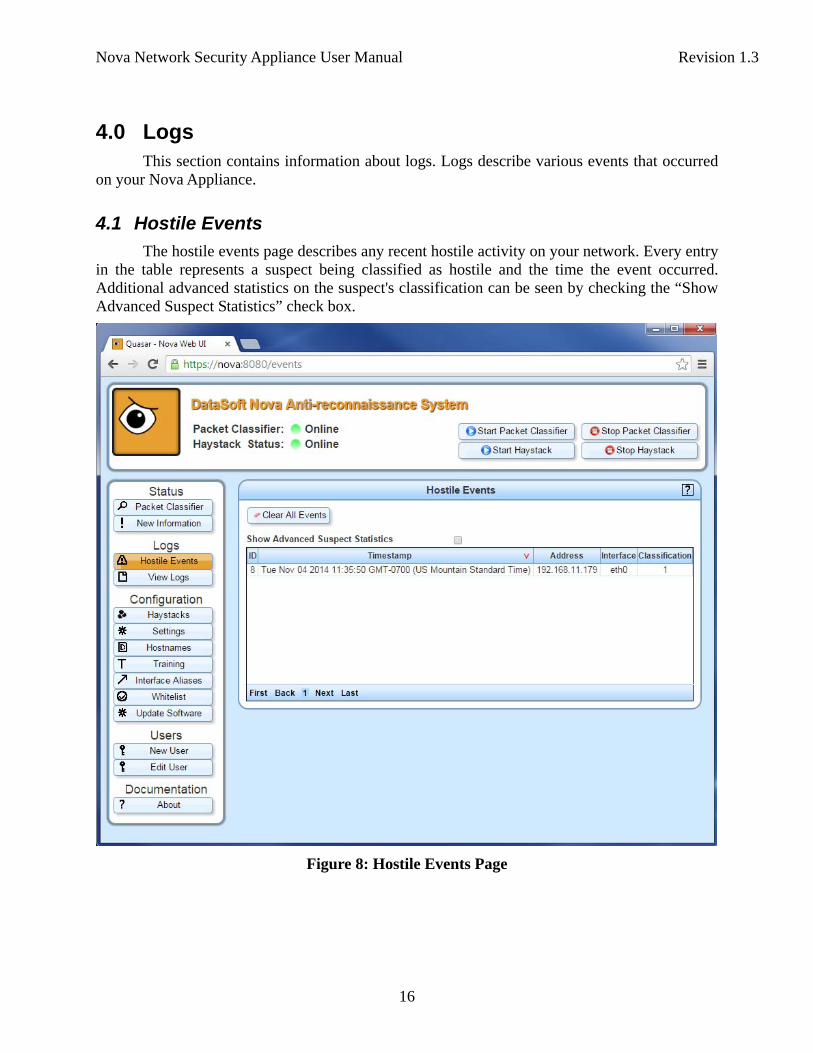
4.2 View Logs
The View Logs page will show you any important event occurring within the Nova system. This is typically for use in debugging issues with the Nova system itself and not for ordinary classification status purposes.
Figure 9: Nova Log
Additional options on this page include:
4.2.1 Download Entire Log
This button will download the full log file to your computer. You can analyze it or save it for your needs.
Nova Network Security Appliance User Manual Revision 1.3
18
4.2.2 Show Debugging Information
This check box will display some detailed debug info that will be useful in the event of a system error.
4.2.3 Filtering Options
The Nova Log can be filtered based on the level of criticality. The various increasing levels include: Debug, Info, Notice, Warning, Error, Critical, Alert, and Emergency. Check the boxes for the associated level of log information you want to view.
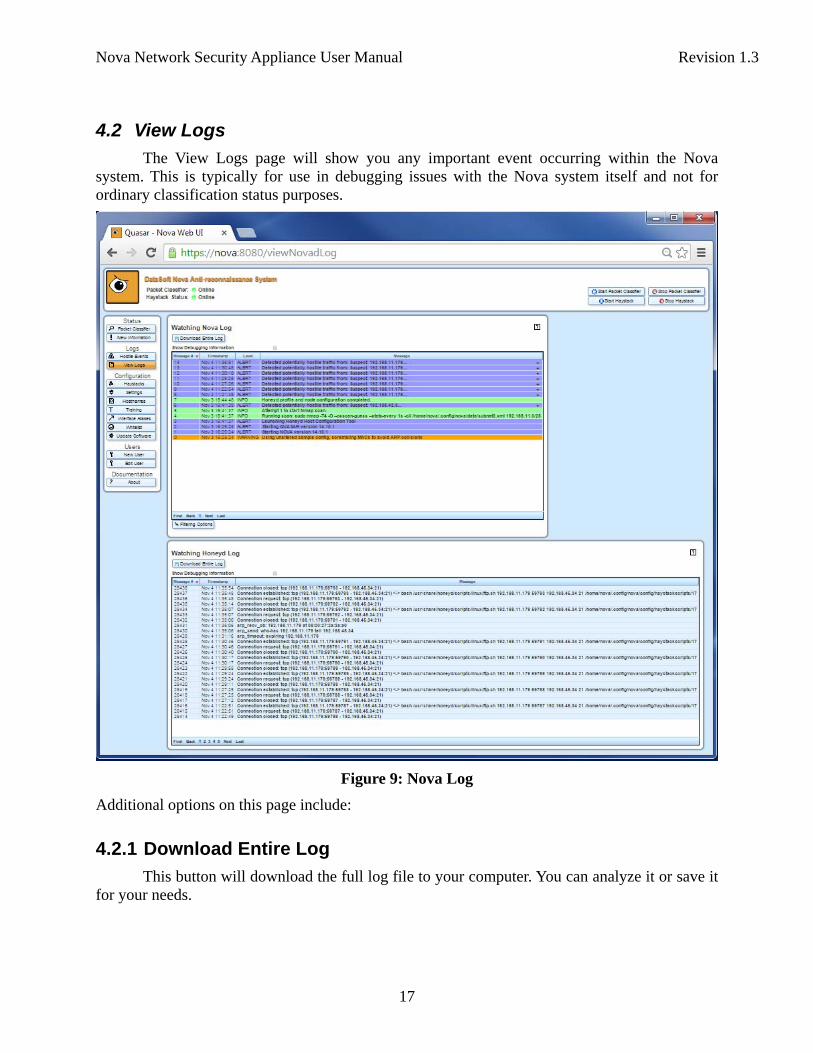
4.2.4 Honeyd Log
The Honeyd Log page shows you any important events occurring in the Haystack. This is typically for debugging issues within the Haystack and not for ordinary status information about Haystack.
Figure 10: Honeyd Log
Nova Network Security Appliance User Manual Revision 1.3
19
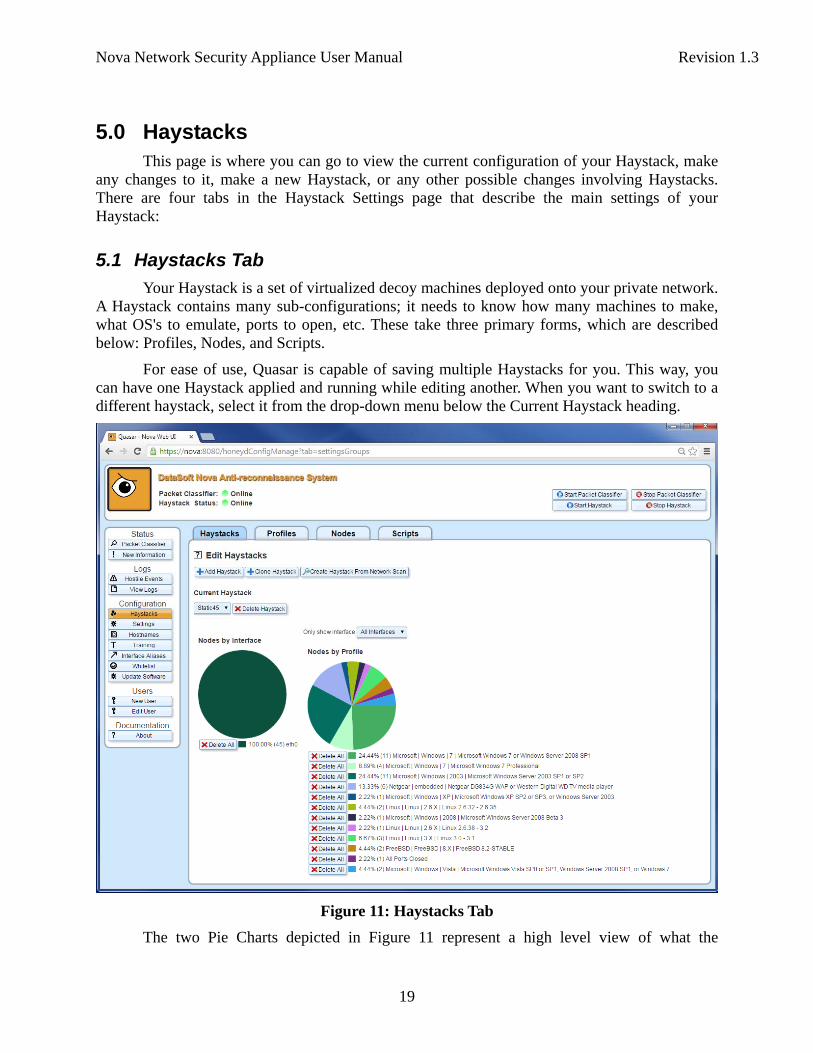
5.0 Haystacks This page is where you can go to view the current configuration of your Haystack, make any changes to it, make a new Haystack, or any other possible changes involving Haystacks. There are four tabs in the Haystack Settings page that describe the main settings of your Haystack:
5.1 Haystacks Tab
Your Haystack is a set of virtualized decoy machines deployed onto your private network. A Haystack contains many sub-configurations; it needs to know how many machines to make, what OS's to emulate, ports to open, etc. These take three primary forms, which are described below: Profiles, Nodes, and Scripts.
For ease of use, Quasar is capable of saving multiple Haystacks for you. This way, you can have one Haystack applied and running while editing another. When you want to switch to a different haystack, select it from the drop-down menu below the Current Haystack heading.
Figure 11: Haystacks Tab
The two Pie Charts depicted in Figure 11 represent a high level view of what the
Nova Network Security Appliance User Manual Revision 1.3
20
currently selected Haystack looks like. This is shown in terms of both the proportional representation of how many Nodes are using a given Ethernet Interface (Pie Chart on the left) and how many Nodes are using each given Profile.
5.1.1 Add Haystack
This button will create a new Haystack from scratch for you. Enter a name on the pop-up that appears and click submit.
5.1.2 Clone Haystack
This button will create a new Haystack copied from another one. Enter a name and what Haystack to clone on the pop-up that appears and click submit.
5.1.3 Create Haystack From Network Scan
This button will direct you to the Auto-configuration page where you can create an entire Haystack automatically from scanning your own network. This method of making a Haystack has the benefit of being easier to use, less prone to mistake, and designed to resemble your network. It is recommended that you use it. For more details on the Auto-configuration and how to use it, see Section 5.5.
5.1.4 Change Current Haystack
This drop-down box selects the current Haystack. If you want to change what Haystack is current, select a new one here. All other options which depend on the current Haystack will automatically update.
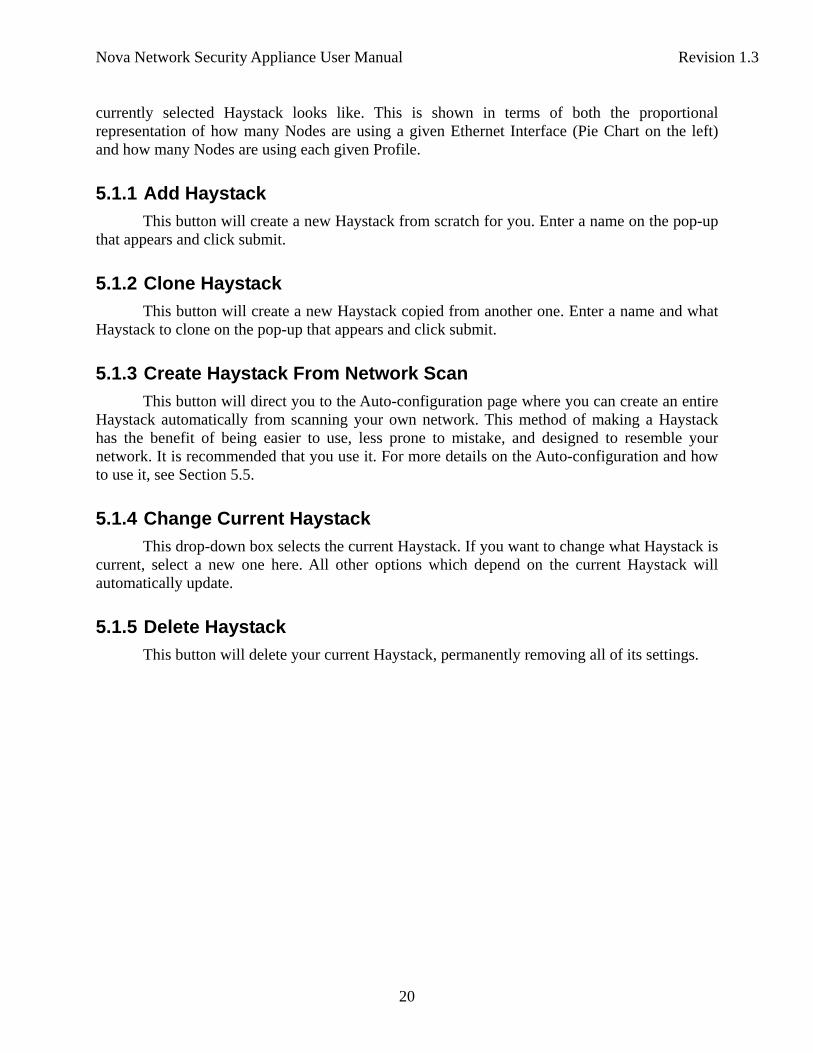
5.1.5 Delete Haystack
This button will delete your current Haystack, permanently removing all of its settings.
Nova Network Security Appliance User Manual Revision 1.3
21
Figure 12: Are you sure you want to delete this Haystack?
Nova Network Security Appliance User Manual Revision 1.3
22
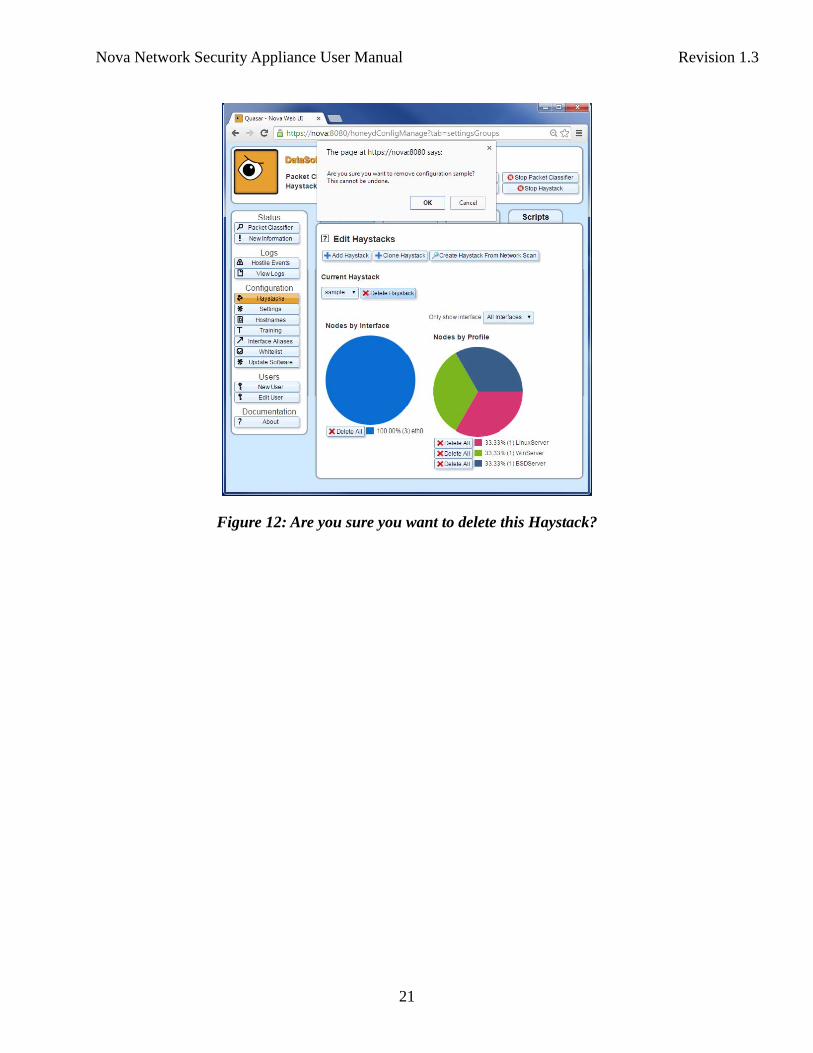
5.2 Profiles Tab
A Profile is a “kind” of machine that will be created on your network. If you're a programmer, think of the Profile as an object oriented Class (to which a Node, is an Object). A profile contains some aggregate information that describes a network machine, such as personality (usually Operating System), Ethernet Vendor (but not full address), and open ports.
It is important to know Profiles are arranged in a tree hierarchy. Nearly any field in a Profile can choose to inherit a value from its parent (which is applied recursively). This structure is useful in the common case where many different Profiles are similar to one another.
Figure 13: Profiles Tab
As you can see in Figure 13, profiles are identified by a string (typically their OS). You can multi-select profiles on this page by clicking and ctrl-clicking on the rows.
There are three buttons at the bottom of the page that give you the following options:
5.2.1 Delete Selected Profiles
This button will delete all profiles selected along with their children in the tree structure. Remember that you can multi-select profiles (shown in Figure 13) by clicking or ctrl-clicking them.
Nova Network Security Appliance User Manual Revision 1.3
23
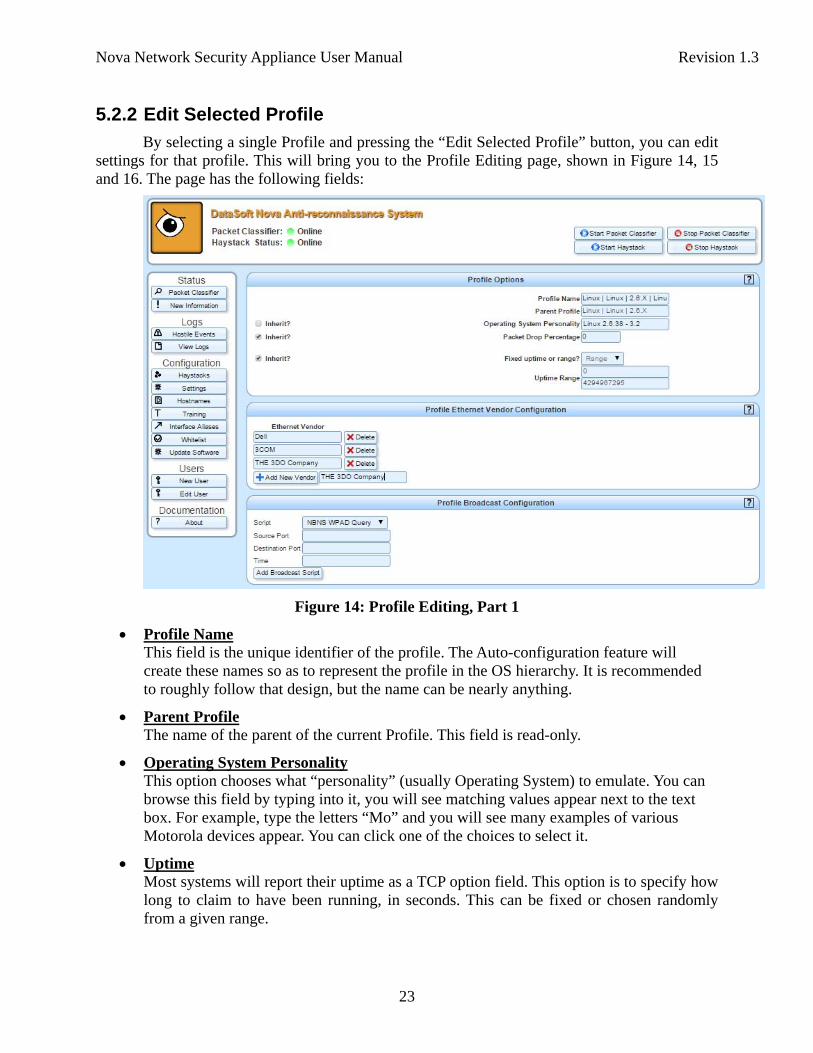
5.2.2 Edit Selected Profile
By selecting a single Profile and pressing the “Edit Selected Profile” button, you can edit settings for that profile. This will bring you to the Profile Editing page, shown in Figure 14, 15 and 16. The page has the following fields:
Figure 14: Profile Editing, Part 1
Profile Name This field is the unique identifier of the profile. The Auto-configuration feature will create these names so as to represent the profile in the OS hierarchy. It is recommended to roughly follow that design, but the name can be nearly anything.
Parent Profile The name of the parent of the current Profile. This field is read-only.
Operating System Personality This option chooses what “personality” (usually Operating System) to emulate. You can browse this field by typing into it, you will see matching values appear next to the text box. For example, type the letters “Mo” and you will see many examples of various Motorola devices appear. You can click one of the choices to select it.
Uptime Most systems will report their uptime as a TCP option field. This option is to specify how long to claim to have been running, in seconds. This can be fixed or chosen randomly from a given range.
Nova Network Security Appliance User Manual Revision 1.3
24
*Note: This value will increment over time and, depending on the system, this value may not be precisely in seconds (possibly partially randomized) too. It's a rough estimate.
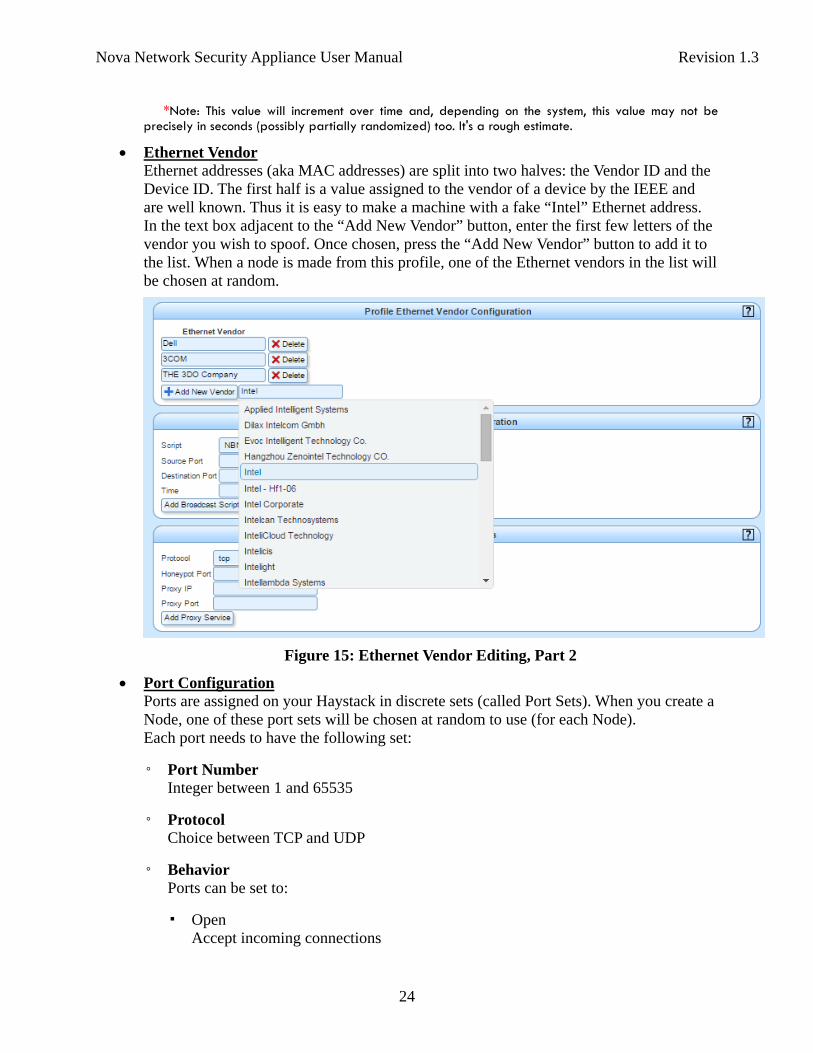
Ethernet Vendor Ethernet addresses (aka MAC addresses) are split into two halves: the Vendor ID and the Device ID. The first half is a value assigned to the vendor of a device by the IEEE and are well known. Thus it is easy to make a machine with a fake “Intel” Ethernet address. In the text box adjacent to the “Add New Vendor” button, enter the first few letters of the vendor you wish to spoof. Once chosen, press the “Add New Vendor” button to add it to the list. When a node is made from this profile, one of the Ethernet vendors in the list will be chosen at random.
Figure 15: Ethernet Vendor Editing, Part 2
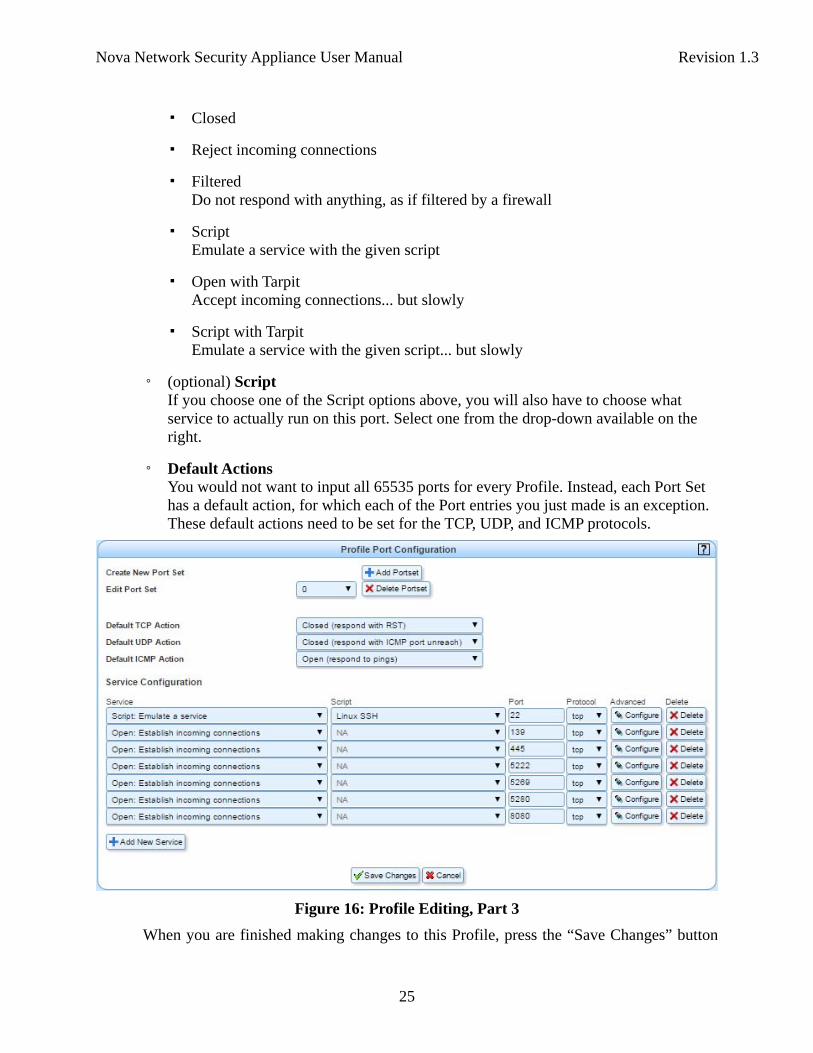
Port Configuration Ports are assigned on your Haystack in discrete sets (called Port Sets). When you create a Node, one of these port sets will be chosen at random to use (for each Node). Each port needs to have the following set:
◦ Port Number Integer between 1 and 65535
◦ Protocol Choice between TCP and UDP
◦ Behavior Ports can be set to:
▪ Open Accept incoming connections
Nova Network Security Appliance User Manual Revision 1.3
25
▪ Closed
▪ Reject incoming connections
▪ Filtered Do not respond with anything, as if filtered by a firewall
▪ Script Emulate a service with the given script
▪ Open with Tarpit Accept incoming connections... but slowly
▪ Script with Tarpit Emulate a service with the given script... but slowly
◦ (optional) Script If you choose one of the Script options above, you will also have to choose what service to actually run on this port. Select one from the drop-down available on the right.
◦ Default Actions You would not want to input all 65535 ports for every Profile. Instead, each Port Set has a default action, for which each of the Port entries you just made is an exception. These default actions need to be set for the TCP, UDP, and ICMP protocols.
Figure 16: Profile Editing, Part 3
When you are finished making changes to this Profile, press the “Save Changes” button
Nova Network Security Appliance User Manual Revision 1.3
26
at the bottom of the page.
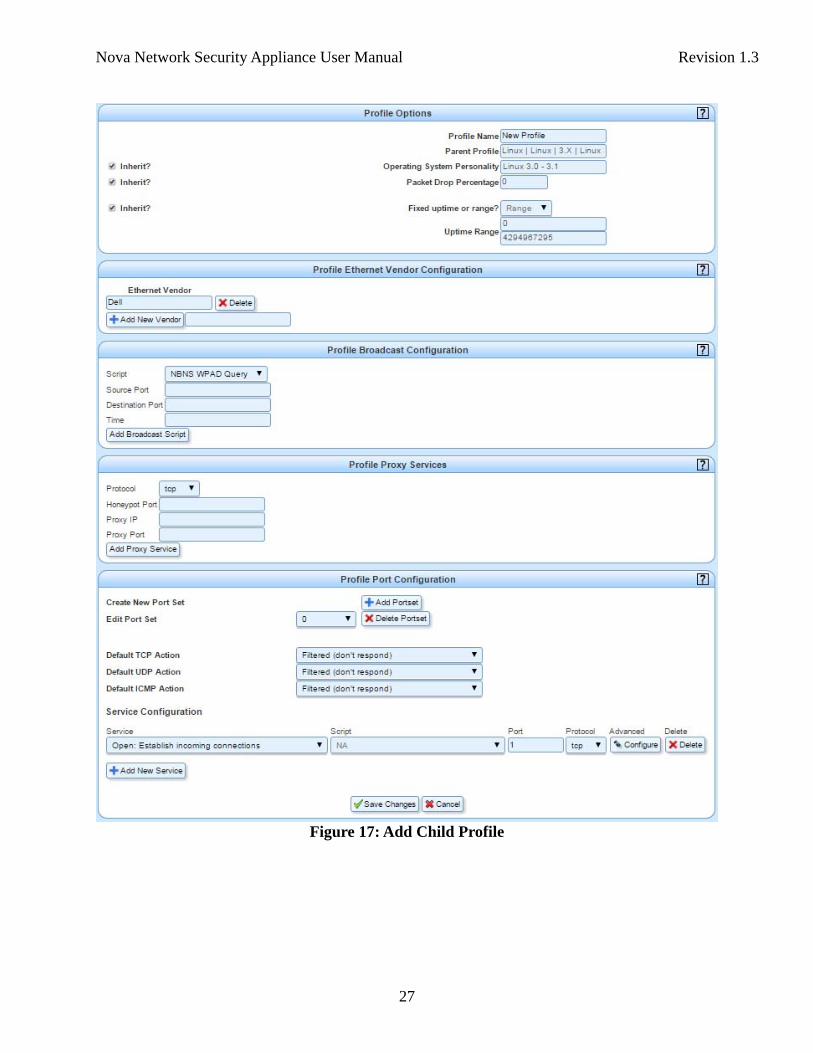
5.2.3 Add Child Profile
To add a new profile, select an existing one and press “Add Child Profile”. This will create a new profile as a child of the one selected. You will then be shown a page as shown in Figure 17. The fields that you see will be identical to those found in “Edit Profile” options in 5.2.2 above. When you are finished setting options on this page, press “Save Changes” at the bottom to create this new profile and continue on with making configuration changes.
Nova Network Security Appliance User Manual Revision 1.3
27
Figure 17: Add Child Profile
Nova Network Security Appliance User Manual Revision 1.3
28
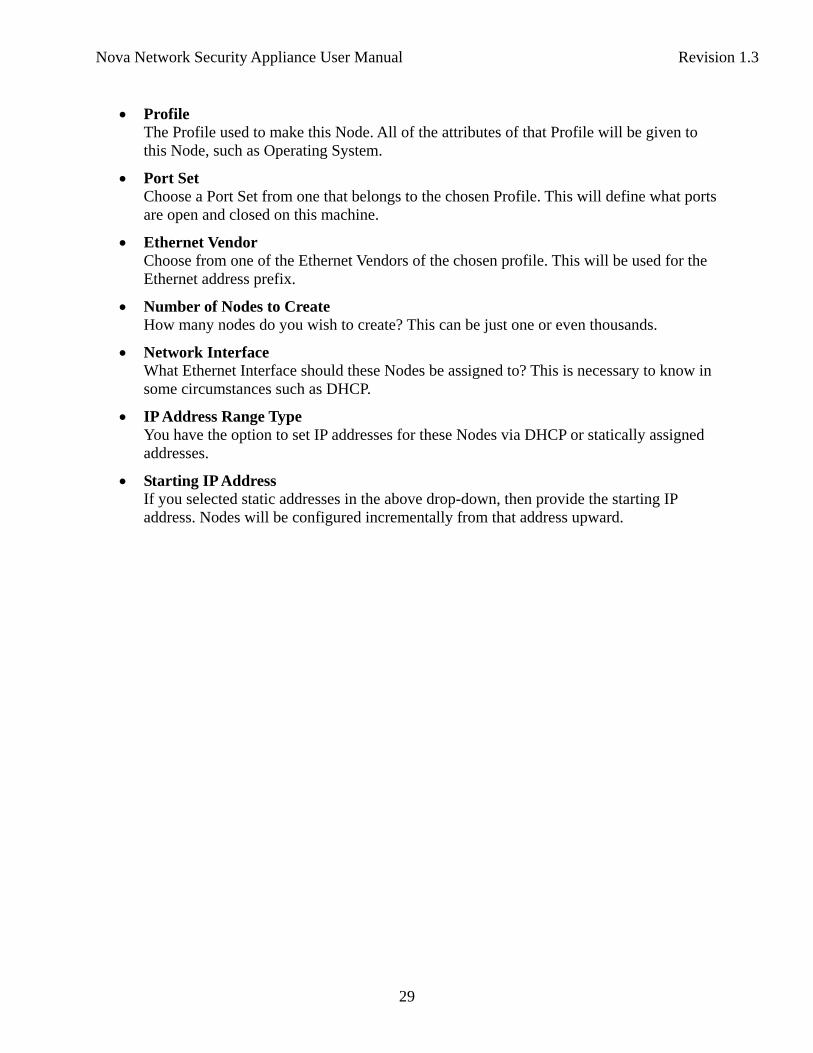
5.3 Nodes Tab
A Node is a single instantiation of a Profile. It represents an actual decoy machine to be placed on your network. So if you make 17 Nodes, you will have 17 new decoy machines appear on your network.
The Nodes tab, shown in Figure 19, contains a table of all Nodes in the current Haystack. Buttons on this page include:
5.3.1 Add New Nodes
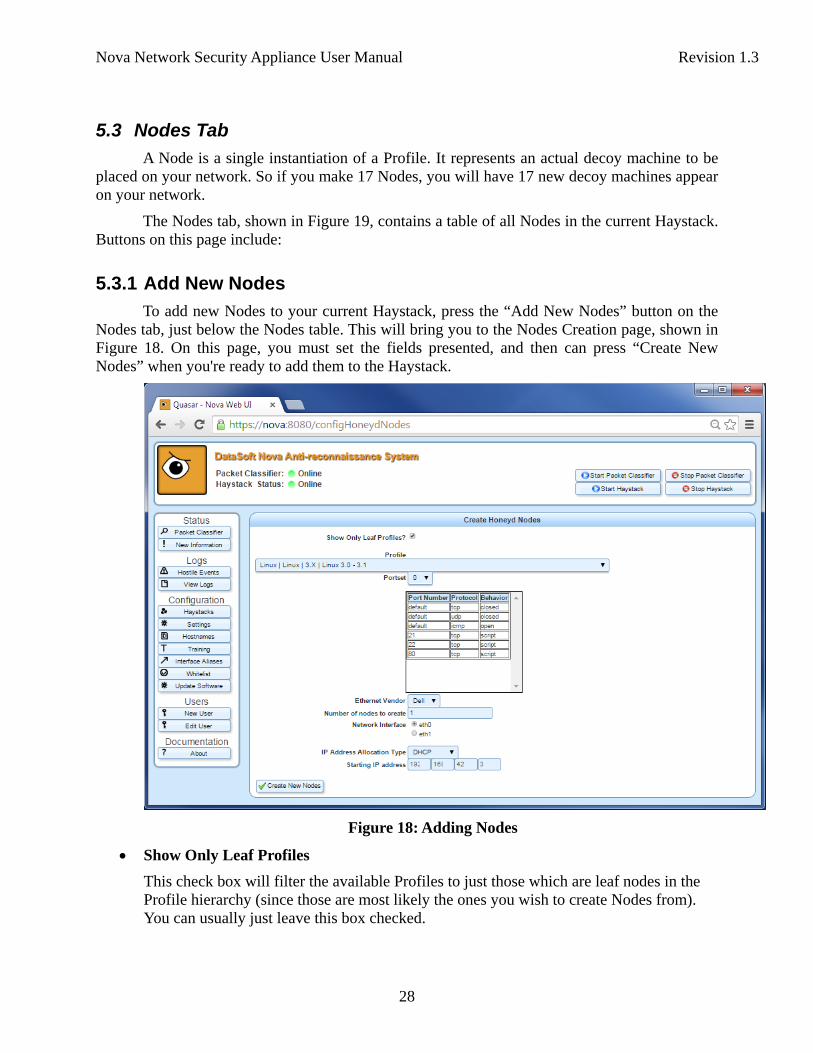
To add new Nodes to your current Haystack, press the “Add New Nodes” button on the Nodes tab, just below the Nodes table. This will bring you to the Nodes Creation page, shown in Figure 18. On this page, you must set the fields presented, and then can press “Create New Nodes” when you're ready to add them to the Haystack.
Figure 18: Adding Nodes
Show Only Leaf Profiles
This check box will filter the available Profiles to just those which are leaf nodes in the Profile hierarchy (since those are most likely the ones you wish to create Nodes from). You can usually just leave this box checked.
Nova Network Security Appliance User Manual Revision 1.3
29
Profile The Profile used to make this Node. All of the attributes of that Profile will be given to this Node, such as Operating System.
Port Set Choose a Port Set from one that belongs to the chosen Profile. This will define what ports are open and closed on this machine.
Ethernet Vendor Choose from one of the Ethernet Vendors of the chosen profile. This will be used for the Ethernet address prefix.
Number of Nodes to Create How many nodes do you wish to create? This can be just one or even thousands.
Network Interface What Ethernet Interface should these Nodes be assigned to? This is necessary to know in some circumstances such as DHCP.
IP Address Range Type You have the option to set IP addresses for these Nodes via DHCP or statically assigned addresses.
Starting IP Address If you selected static addresses in the above drop-down, then provide the starting IP address. Nodes will be configured incrementally from that address upward.
Nova Network Security Appliance User Manual Revision 1.3
30
Figure 19: Nodes Tab
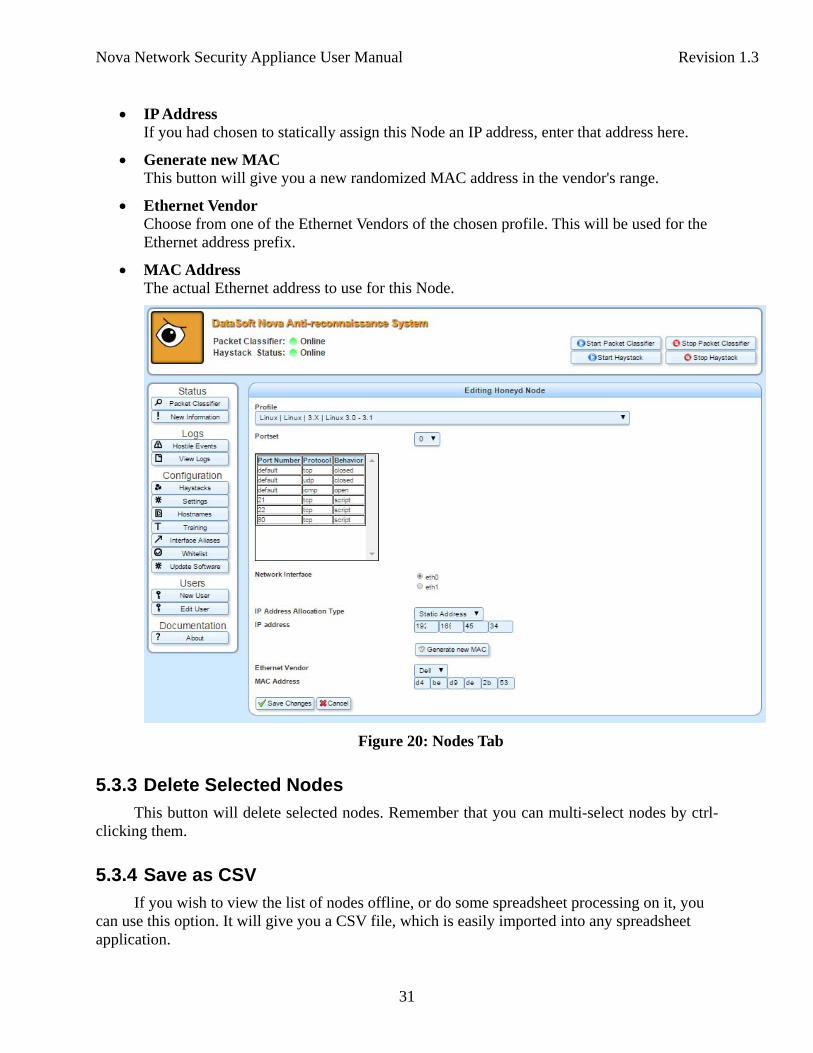
5.3.2 Edit Selected Node
Individual nodes can be edited by clicking one of them as shown in Figure 19, and pressing the “Edit Selected Node” button. On this page, you will have the option to change any settings for the selected Node.
Profile The Profile used to make this Node. All of the attributes of that Profile will be given to this Node, such as Operating System.
Port Set Choose a Port Set from one that belongs to the chosen Profile. This will define what ports are open and closed on this machine.
Network Interface What Ethernet Interface should this Node be assigned to? This is necessary to know in some circumstances such as DHCP.
IP Address Allocation Type Choose how this Node is allocated an IP address: DHCP or statically
Nova Network Security Appliance User Manual Revision 1.3
31
IP Address If you had chosen to statically assign this Node an IP address, enter that address here.
Generate new MAC This button will give you a new randomized MAC address in the vendor's range.
Ethernet Vendor Choose from one of the Ethernet Vendors of the chosen profile. This will be used for the Ethernet address prefix.
MAC Address The actual Ethernet address to use for this Node.
Figure 20: Nodes Tab
5.3.3 Delete Selected Nodes
This button will delete selected nodes. Remember that you can multi-select nodes by ctrl-clicking them.
5.3.4 Save as CSV
If you wish to view the list of nodes offline, or do some spreadsheet processing on it, you can use this option. It will give you a CSV file, which is easily imported into any spreadsheet application.
Nova Network Security Appliance User Manual Revision 1.3
32
5.3.5 Edit Doppelganger
This allows the user to define a honeypot that can be used to ‘hide’ the actual Nova appliance. Once a source is classified as hostile, this decoy, when engaged (see section 5.6.2), will respond to any type of reconnaissance that is directed from the hostile source towards the Nova appliance.
5.3.6 Delete All Nodes
This button will delete all of your Nodes the current Haystack.
5.3.7 Change Node Interfaces
This button allows you to change the Ethernet interface address for the selected node(s).
Nova Network Security Appliance User Manual Revision 1.3
33
5.4 Scripts Tab
Network services that Nodes provide are not fully implemented daemons, as doing so would be both insecure and impractical. Instead, shallow shell scripts written in any scripting language (python, perl, ruby, bash, etc.) emulate what a normal service should behave like. For instance, a simple FTP script may pretend to be a server but reject any attempt to log in. Such a service would be indistinguishable from a real FTP server that you don't know the password to. Many such scripts are provided with Nova and can be applied to each node.
5.4.1 Edit Scripts
It’s possible to edit the various scripts by first selecting this button. A list of the Honeyd Scripts shows which scripts can be edited. For those scripts that are editable, the user can choose to delete some of the service prompts or add a new prompt. The list of prompts for each service are selectable though the Advanced buttons when editing the Profile Port Configuration (see Figure 14).
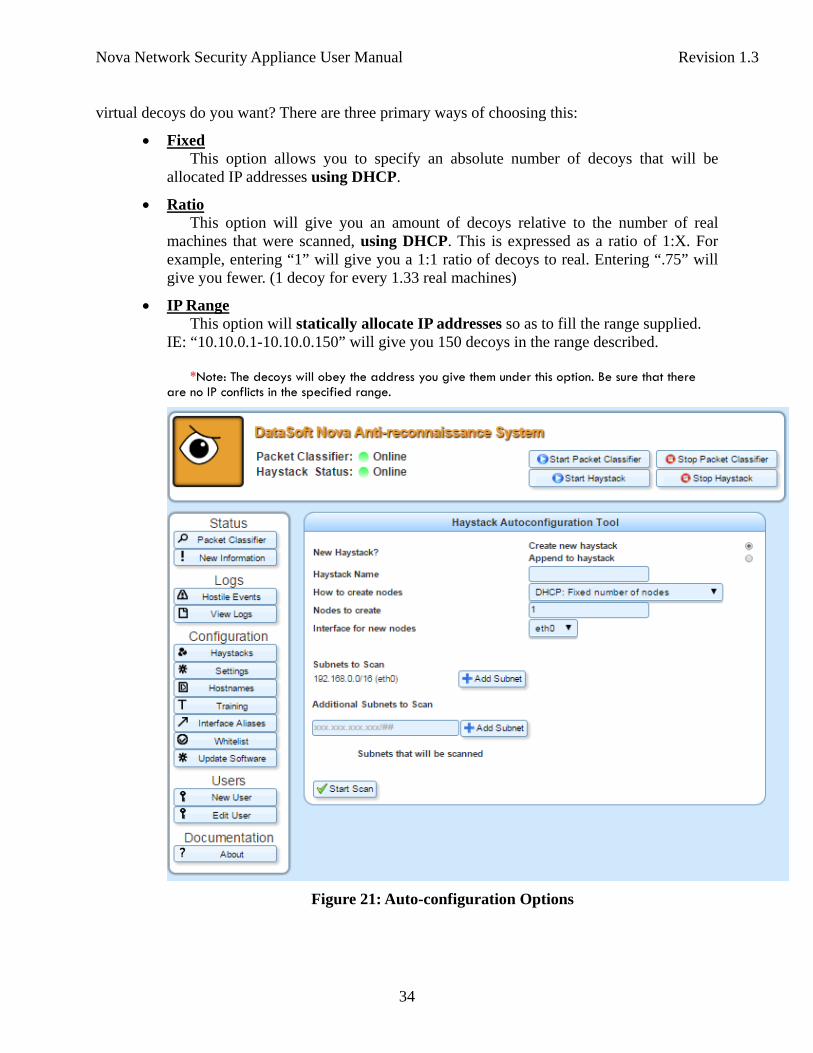
5.5 Haystack Autoconfig
The Autoconfig feature will perform a network scan of where you point it and read in what the network looks like. It will then generate a Haystack automatically for you that is similar to yours. This way the decoys don't “stand out” in your network. The goal here is to make it hard for attackers to figure out what's real and what's fake; blending in is a good thing.
*Note: This feature will perform an Nmap scan of the networks you define. This may sometimes cause alerts amongst other security devices on your network. OS scan packets, for example, are often in a firewall's rule of hostile traffic.
The following describes the options when automatically configuring your Haystack:
5.5.1 New Haystack
If you have not yet set up any Haystacks, you will need to make a new one and leave this option as check marked. If you already have created a Haystack and choose to append the Autoconfig nodes, choose to ‘Append to haystack’.
5.5.2 New Haystack Name
Quasar is able to remember more than one Haystack that you create. You can modify one and save it, while actively using another. You will then be able to easily switch between them. In order to remember which one you're creating now, enter a unique name in the text box.
5.5.3 Number of Haystack Nodes to Create
The size of your Haystack is the first important choice that you need to make. How many
Nova Network Security Appliance User Manual Revision 1.3
34
virtual decoys do you want? There are three primary ways of choosing this:
Fixed This option allows you to specify an absolute number of decoys that will be allocated IP addresses using DHCP.
Ratio This option will give you an amount of decoys relative to the number of real machines that were scanned, using DHCP. This is expressed as a ratio of 1:X. For example, entering “1” will give you a 1:1 ratio of decoys to real. Entering “.75” will give you fewer. (1 decoy for every 1.33 real machines)
IP Range This option will statically allocate IP addresses so as to fill the range supplied. IE: “10.10.0.1-10.10.0.150” will give you 150 decoys in the range described. *Note: The decoys will obey the address you give them under this option. Be sure that there are no IP conflicts in the specified range.
Figure 21: Auto-configuration Options
Nova Network Security Appliance User Manual Revision 1.3
35
5.5.4 Interface to Create Nodes On
For DHCP allocated nodes, they need to be told which Ethernet interface to request their addresses on. For instance, you may have 3 different DHCP servers on 3 different networks connected to Nova. The system needs to be told which of these servers to obtain the addresses from.
5.5.5 Subnets to Scan
Here is where you can choose from some pre-canned subnets, chosen from the settings of your underlying network. You can include them in the scan or not by selecting the ‘Add Subnet’ button. Selecting that button will tell Nova to scan that whole subnet when auto-configuring.
5.5.6 Additional Subnets to Scan
In this box, you can supply additional networks to scan during the auto-configuration. These are specified in CIDR notation, IE: 192.168.5.0/24
*Note: Trying to scan a very large subnet (/16 or larger) can potentially take a long time. If you do want to scan such a network, then just be patient while the scan is active. You will be able to see its progress after it starts.
5.5.7 Start Scanning
When you're ready, hit the “Start Scan” button to initiate the auto-configuration.
Nova Network Security Appliance User Manual Revision 1.3
36
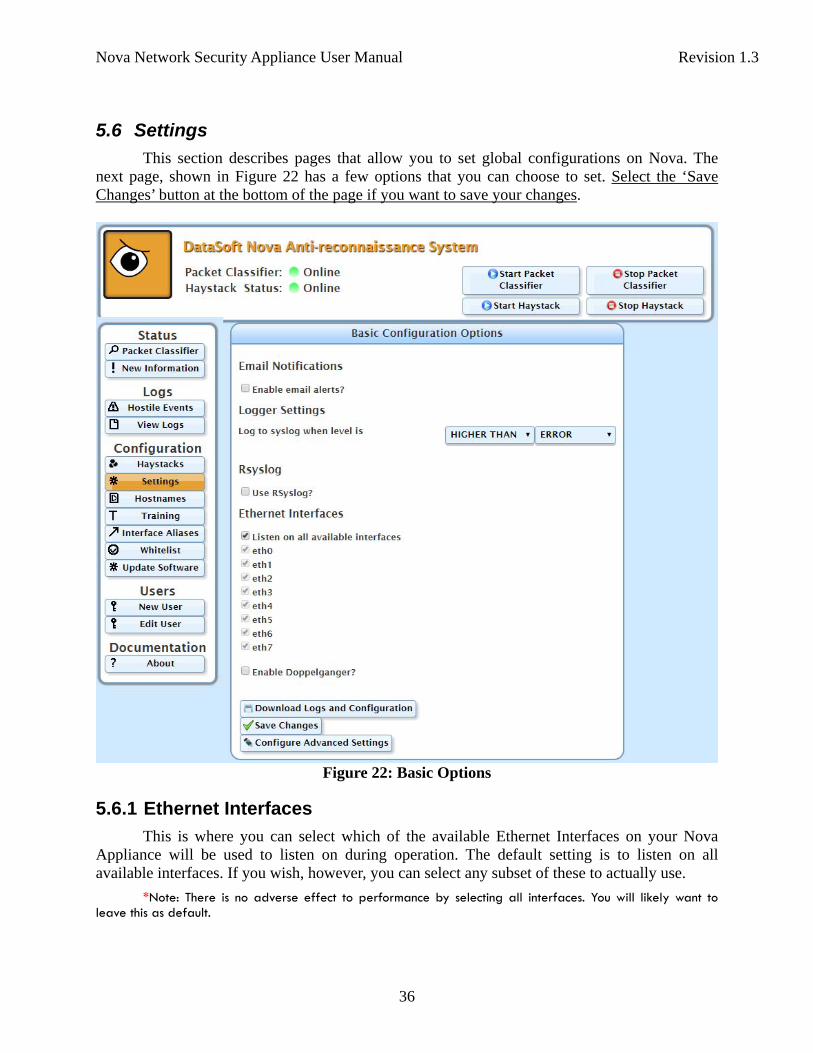
5.6 Settings
This section describes pages that allow you to set global configurations on Nova. The next page, shown in Figure 22 has a few options that you can choose to set. Select the ‘Save Changes’ button at the bottom of the page if you want to save your changes.
Figure 22: Basic Options
5.6.1 Ethernet Interfaces
This is where you can select which of the available Ethernet Interfaces on your Nova Appliance will be used to listen on during operation. The default setting is to listen on all available interfaces. If you wish, however, you can select any subset of these to actually use.
*Note: There is no adverse effect to performance by selecting all interfaces. You will likely want to leave this as default.
Nova Network Security Appliance User Manual Revision 1.3
37
5.6.2 Enable Doppelganger
The “Doppelganger” which is disabled by default is most probably not applicable to your network. The Doppelganger is an advanced feature that allows the machine running the Nova software (The Appliance itself) to hide when an attacker is found. Thus, when an attacker tries to scan the Nova Appliance, it will instead receive packets from a decoy machine (per 5.3.5) just as with the Haystack. If the Doppelganger node has not be defined, enabling the Doppelganger will black hole packets coming from hostile IP’s.
You can safely leave this disabled.
5.6.3 Download Logs and Configuration
Select the “Download Logs and Configuration” button to obtain the text and config files necessary for debugging any issues with Nova. It may be necessary to provide these files when contacting DataSoft technical support.
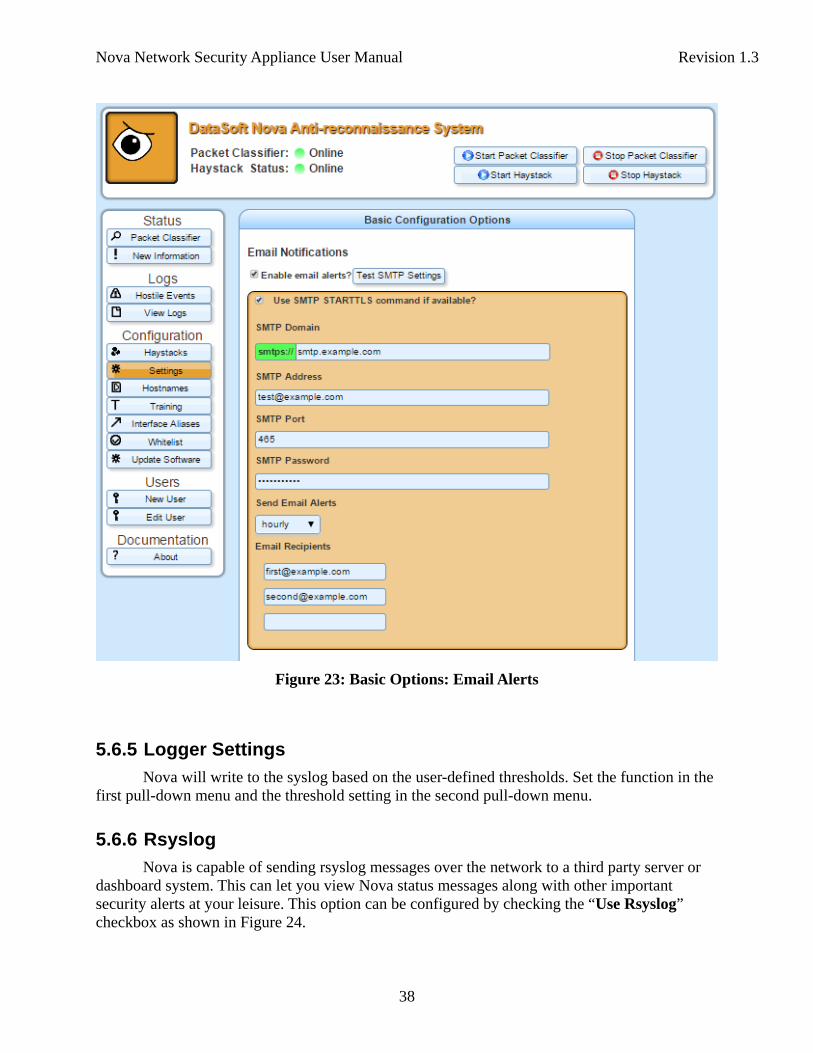
5.6.4 Email Notifications
Nova is able to send you email alerts to tell you when an attacker is detected by the system. Whenever a new hostile suspect is found, an email will be generated to the address(es) listed in the fields below, using the given SMTP settings.
To enable email alerts, check the “Enable Email Alerts” checkbox, and then enter the following information as seen in Figure 23.
Use SMTP Authentication Use an authenticated SMTP server, over a secure port
SMTP Domain
The URL of the SMTP server where the email messages will be sent from
SMTP Address The email address that messages will be sent from
SMTP Port The TCP port on which to contact the server. This will be set to the normal default for secure SMTP (465) or insecure (25), but can be overridden
SMTP Password The password of the account on the SMTP server to log in as
Email Recipients Enter the list of email addresses that should receive the alerts
Nova Network Security Appliance User Manual Revision 1.3
38
Figure 23: Basic Options: Email Alerts
5.6.5 Logger Settings
Nova will write to the syslog based on the user-defined thresholds. Set the function in the first pull-down menu and the threshold setting in the second pull-down menu.
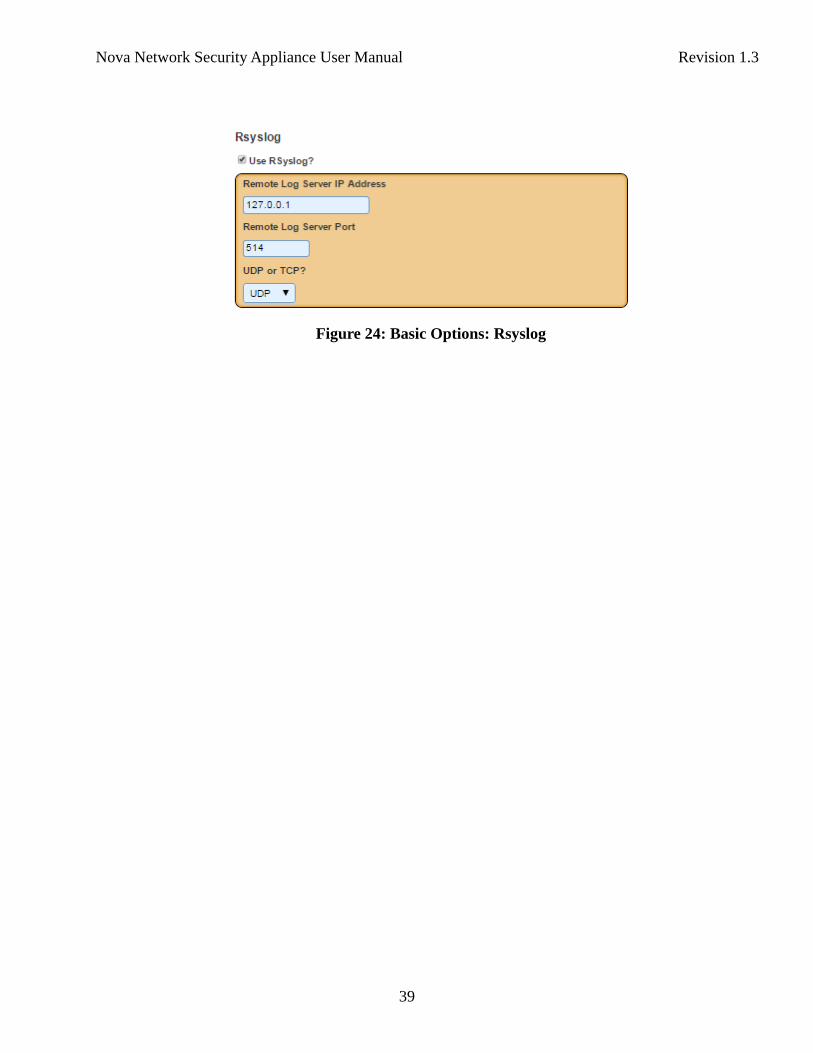
5.6.6 Rsyslog
Nova is capable of sending rsyslog messages over the network to a third party server or dashboard system. This can let you view Nova status messages along with other important security alerts at your leisure. This option can be configured by checking the “Use Rsyslog” checkbox as shown in Figure 24.
Nova Network Security Appliance User Manual Revision 1.3
39
Figure 24: Basic Options: Rsyslog
Nova Network Security Appliance User Manual Revision 1.3
40
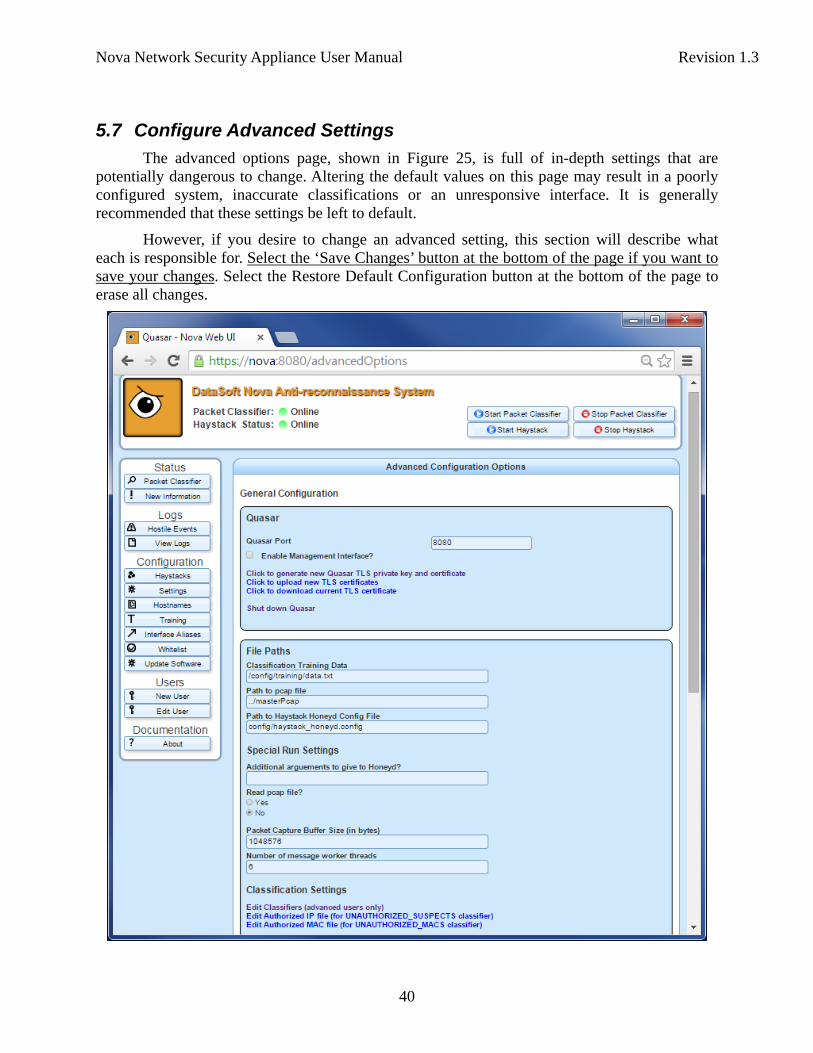
5.7 Configure Advanced Settings
The advanced options page, shown in Figure 25, is full of in-depth settings that are potentially dangerous to change. Altering the default values on this page may result in a poorly configured system, inaccurate classifications or an unresponsive interface. It is generally recommended that these settings be left to default.
However, if you desire to change an advanced setting, this section will describe what each is responsible for. Select the ‘Save Changes’ button at the bottom of the page if you want to save your changes. Select the Restore Default Configuration button at the bottom of the page to erase all changes.
Nova Network Security Appliance User Manual Revision 1.3
41
Figure 25: Advanced Options Part 1
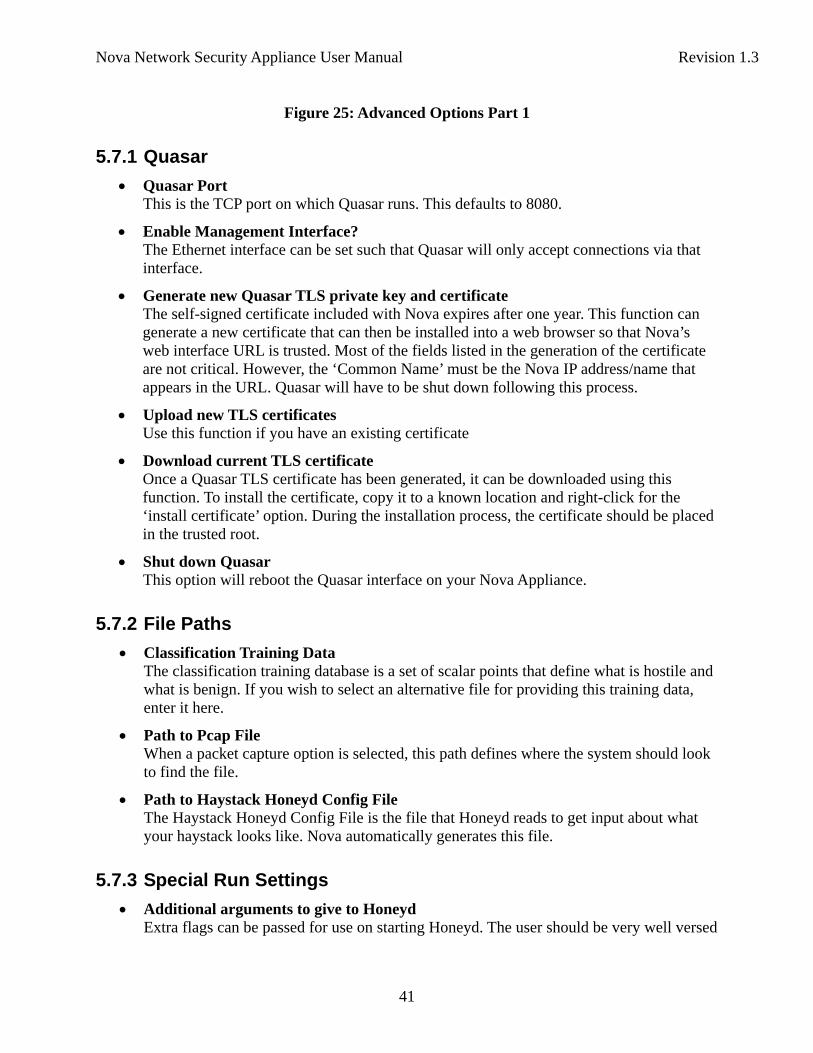
5.7.1 Quasar
Quasar Port This is the TCP port on which Quasar runs. This defaults to 8080.
Enable Management Interface? The Ethernet interface can be set such that Quasar will only accept connections via that interface.
Generate new Quasar TLS private key and certificate The self-signed certificate included with Nova expires after one year. This function can generate a new certificate that can then be installed into a web browser so that Nova’s web interface URL is trusted. Most of the fields listed in the generation of the certificate are not critical. However, the ‘Common Name’ must be the Nova IP address/name that appears in the URL. Quasar will have to be shut down following this process.
Upload new TLS certificates Use this function if you have an existing certificate
Download current TLS certificate Once a Quasar TLS certificate has been generated, it can be downloaded using this function. To install the certificate, copy it to a known location and right-click for the ‘install certificate’ option. During the installation process, the certificate should be placed in the trusted root.
Shut down Quasar This option will reboot the Quasar interface on your Nova Appliance.
5.7.2 File Paths
Classification Training Data The classification training database is a set of scalar points that define what is hostile and what is benign. If you wish to select an alternative file for providing this training data, enter it here.
Path to Pcap File When a packet capture option is selected, this path defines where the system should look to find the file.
Path to Haystack Honeyd Config File The Haystack Honeyd Config File is the file that Honeyd reads to get input about what your haystack looks like. Nova automatically generates this file.
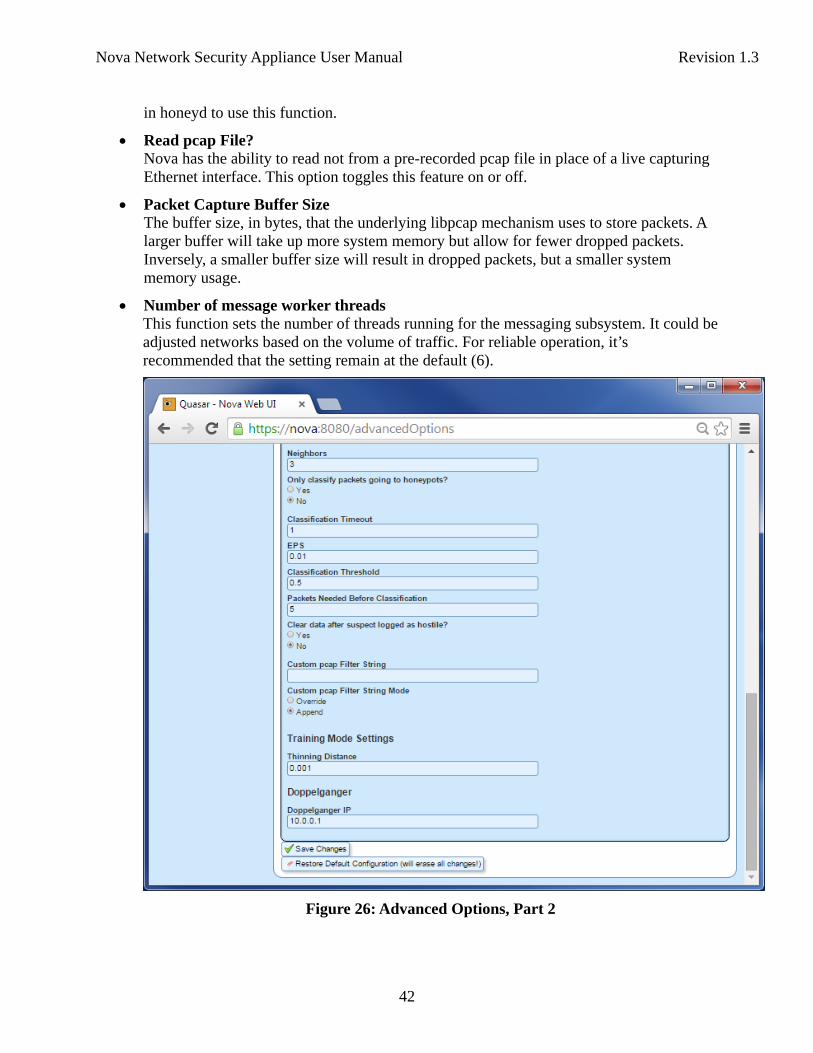
5.7.3 Special Run Settings
Additional arguments to give to Honeyd Extra flags can be passed for use on starting Honeyd. The user should be very well versed
Nova Network Security Appliance User Manual Revision 1.3
42
in honeyd to use this function.
Read pcap File? Nova has the ability to read not from a pre-recorded pcap file in place of a live capturing Ethernet interface. This option toggles this feature on or off.
Packet Capture Buffer Size The buffer size, in bytes, that the underlying libpcap mechanism uses to store packets. A larger buffer will take up more system memory but allow for fewer dropped packets. Inversely, a smaller buffer size will result in dropped packets, but a smaller system memory usage.
Number of message worker threads This function sets the number of threads running for the messaging subsystem. It could be adjusted networks based on the volume of traffic. For reliable operation, it’s recommended that the setting remain at the default (6).
Figure 26: Advanced Options, Part 2
Nova Network Security Appliance User Manual Revision 1.3
43
5.7.4 Classification Settings
Edit Classifiers This is an advanced option that allows fine grain control over how suspects are classified. For example, you can choose to weigh any subset of statistical features that Nova gathers as higher or lower than the others. It is recommended for ordinary use, that this option be left at default.
Edit Authorized IP file A list of authorized IP addresses can be added as a file. This is part of the configuration for the unauthorized IP’s classification engine. The engine is disabled by default but, if enabled, it will mark any suspects not on a list of authorized IP addresses as hostile. In order to enable this function, you must add an UNAUTHORIZED_SUSPECTS classifier with mode of HOSTILE_OVERRIDE and weight of 0 in the classifier settings in the Edit Classifiers section.
Edit Authorized MAC file A list of authorized MAC IP addresses can be added as a file (in place or in addition to the Authorized IP file). This is part of the configuration for the unauthorized IP’s classification engine. The engine is disabled by default but, if enabled, it will mark any suspects not on a list of authorized MAC addresses as hostile. In order to enable this function, you must add an UNAUTHORIZED_SUSPECTS classifier with mode of HOSTILE_OVERRIDE and weight of 0 in the classifier settings in the Edit Classifiers section.
Neighbors The number of neighbors that are checked during classification (The k in the knn algorithm) is listed here. It’s recommended that you leave this at the default (3) unless you are a knn expert. Modifying the number of neighbors has the ability to classify more precisely but will increase the probability of false positives/negatives. Increasing the number will increase processing time and may exceed the performance capability.
Only Classify Packets Going to Honeypots?
Even in a fully switched network, it's not uncommon to receive packets that are not destined for yourself. This option will tell Nova to ignore any packets that are not destined for a Haystack machine.
Classification Timeout How often (in seconds) should Nova reclassify its suspect list? No matter what, only suspects that receive new data (packets) are reclassified. Only a small subset of the whole suspects list are ever reclassified every iteration.
EPS This is an allowed error threshold in Nova's classification. A higher value will make for more erroneous distance measuring (and thus classification) but potentially much greater efficiency.
Classification Threshold Nova calculates classification on a range from 0 to 1, but the binary decision about when
Nova Network Security Appliance User Manual Revision 1.3
44
a suspect is hostile must be made at some point. This value specifies the cutoff classification value at which suspects are called “hostile.” Raising the value will raise the bar on what it takes to become “hostile,” thus lowering your false positive rate but also lowering your true positive rate and vice-versa.
Packets Needed Before Classification Nova will withhold classification on suspects until they reach a certain number of packets received. This eliminates the problem of low information data jitter. In practice, this value can be quite low (5) and still function well.
Clear Data after Suspect Logged As Hostile? In some circumstances, it may be desirable to automatically clear out the data from a suspect once they have been classified as hostile. For instance, if you wanted to catch specifically how many times an attacker performed a scan, then this feature may be useful. Without it, their classification rating will quickly rise and then stay there. Future scans will only serve to maintain their high rating and not raise more alarms.
Custom pcap Filter String This option lets you provide a custom pcap filter string (the strings you use to filter results in Wireshark) for Nova to capture on. This will have the effect of limiting what packets reads. Nova uses a default filter string of “not src net 0.0.0.0 && not src net 255.255.255.255”.
Custom pcap Filter String Mode Set the above Custom pcap Filter String to be applied in addition to or in place of the existing default filter.
5.7.5 Training Mode Settings
Thinning Distance This is a constant used in classification.
5.7.6 Doppelganger
Doppelganger IP The Doppelganger must reside on an IP address internally, but is not exposed as this address. Pick an IP address here that is not in use by another computer. (Providing an address in use cause the Doppelganger to not function properly) As the default behavior is to disable the Doppelganger entirely, this option can be safely ignored.
Nova Network Security Appliance User Manual Revision 1.3
45
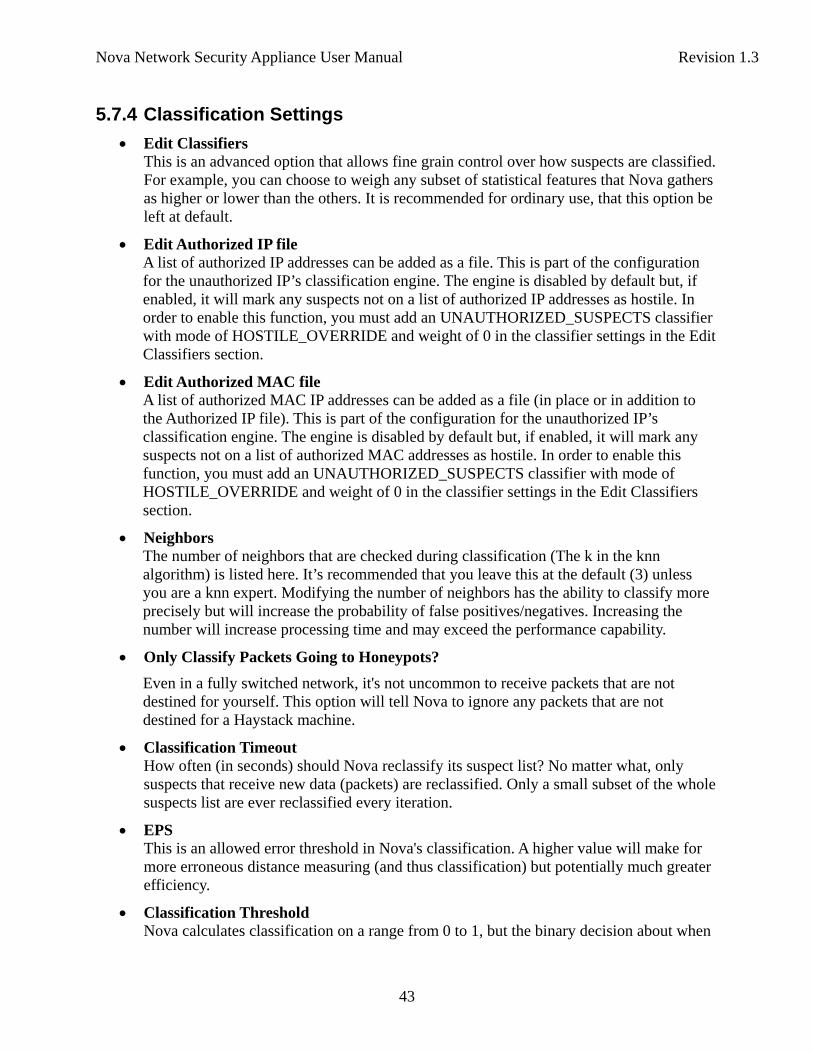
6.0 Interface Aliases Your Nova appliance may have more than one physical Ethernet port on the back of the device. In order to keep better conceptual track of where each of these ports go, you can give each one a human readable string as an alias.
On this page, shown in Figure 27, you can create an alias by selecting an Ethernet port in the drop-down box, entering a string in the text box below it, and pressing “Add/Update Alias”
Figure 27: Interface Aliasing
Nova Network Security Appliance User Manual Revision 1.3
46
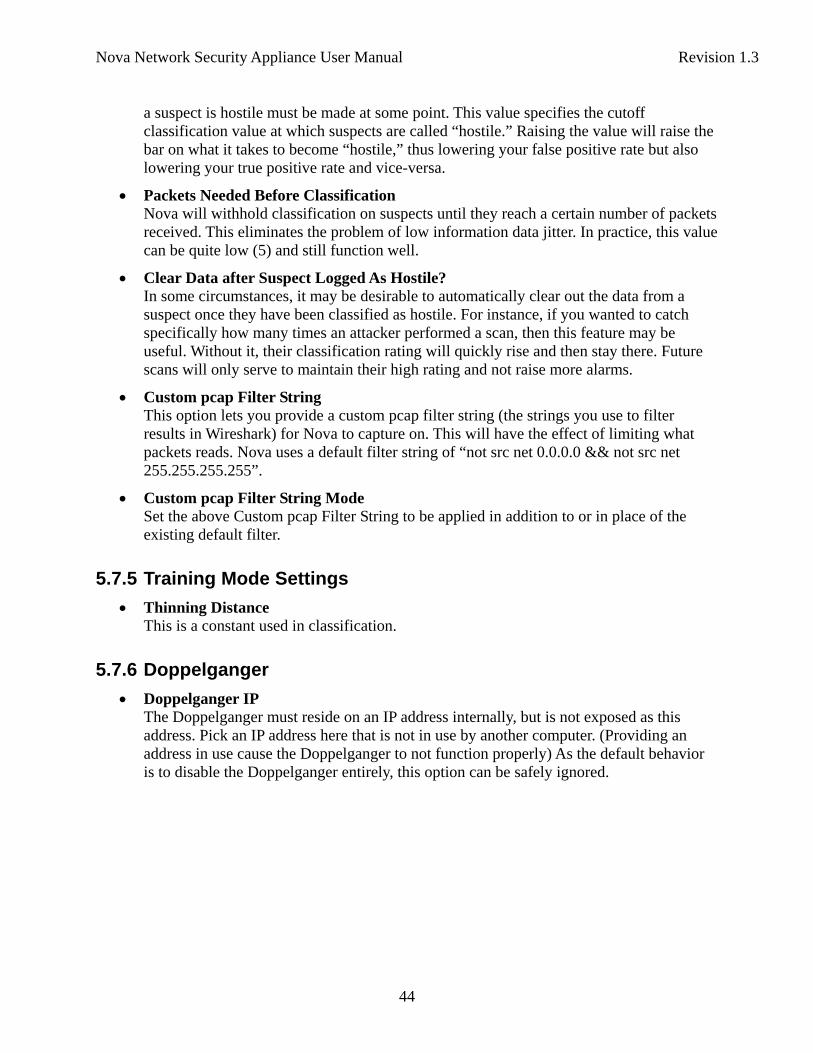
7.0 Whitelist Nova has the ability to Whitelist certain IP addresses, shown in Figure 28, in the event that you possess a machine on your private network that needs to perform activities that resemble reconnaissance. This will prevent Nova from classifying the given suspect IPs in the future.
Whitelisting should only be used in the case that a machine on your network needs to do activities that DO resemble reconnaissance; port scanning or heartbeat monitoring, but otherwise typical and benign. If this is the case, you would not want to “Mark Suspect as Benign” as shown in Section 3.0 . Doing so would inform the Nova system that the behavior of the machine is benign and to classify other similar machines as benign, too.
Figure 28: Whitelist Page
Interface Select the Ethernet interface where the whitelisted IP resides (there may be more than
Nova Network Security Appliance User Manual Revision 1.3
47
one of the same IP from different networks).
IP Address / Netmask Provide the IP address of the machine to whitelist. You can also provide an optional netmask input (in CIDR format) to whitelist a whole subnet at once.
Add to Whitelist Once you’ve entered the desired IP or subnet to whitelist, press the “Add to Whitelist” button.
Delete Selected Entry To remove an item from the whitelist, select it and then press the “Delete Selected Entry” button.
8.0 Hostnames The Hostnames editing sections allow you to enter a set of hostnames that will be used by
the honeypots. The hostnames will be used if mDNS or the Netbios Name Service scripts are used on a honeypot.
Nova Network Security Appliance User Manual Revision 1.3
48
9.0 Training The Nova classification system is an assisted machine learning algorithm similar to that of a spam filter. The system has to have a database of information to tell it what “hostile” traffic looks like and what “benign” traffic looks like. DataSoft does its best to provide quality default databases of this information, but tweaking and altering this for your own experience or context might improve the system's performance.
*Note: This is an advanced feature and not normally necessary in the ordinary course of use.
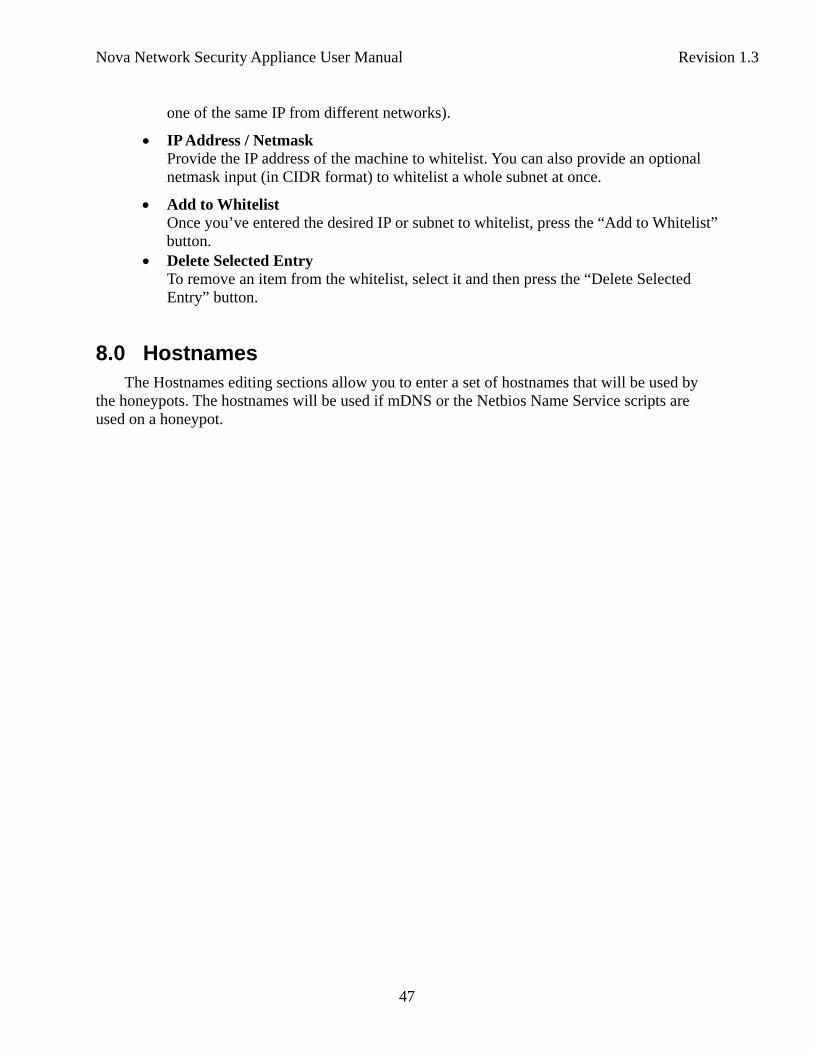
The Classification Training page lists the database of training points that are used to feed the system. The table shown in Figure 29 describes groups of data points and whether they are currently in use or not.
Figure 29: Classification Training
Nova Network Security Appliance User Manual Revision 1.3
49
To begin with, each of the rows in the table represent a group of related data points that were given along with the Nova system. Each time that you “Mark Suspect as Hostile/Benign” (as in Section 3.0 ), a new row of training data is added/displayed in this list.
10.0 Update Software Software updates are available to customers with the enterprise level support package.
Software updates are typically provided no more frequently than quarterly unless it’s necessary to correct critical bugs.
10.1 Nova Updater
The Nova Updater can check online for software updates. Select the “Click to update Nova and Honeyd to the newest version” button to check if updates are available. If new software updates are available, they will be downloaded and installed automatically.
Nova Network Security Appliance User Manual Revision 1.3
50
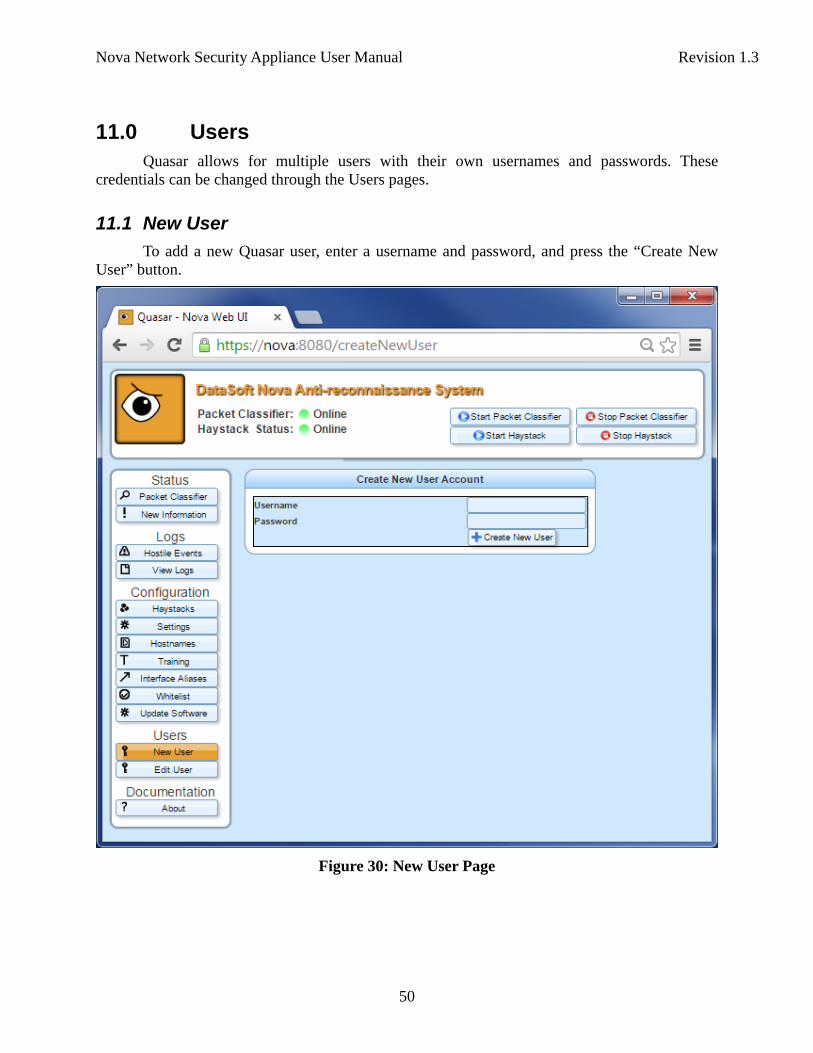
11.0 Users Quasar allows for multiple users with their own usernames and passwords. These credentials can be changed through the Users pages.
11.1 New User
To add a new Quasar user, enter a username and password, and press the “Create New User” button.
Figure 30: New User Page
Nova Network Security Appliance User Manual Revision 1.3
51
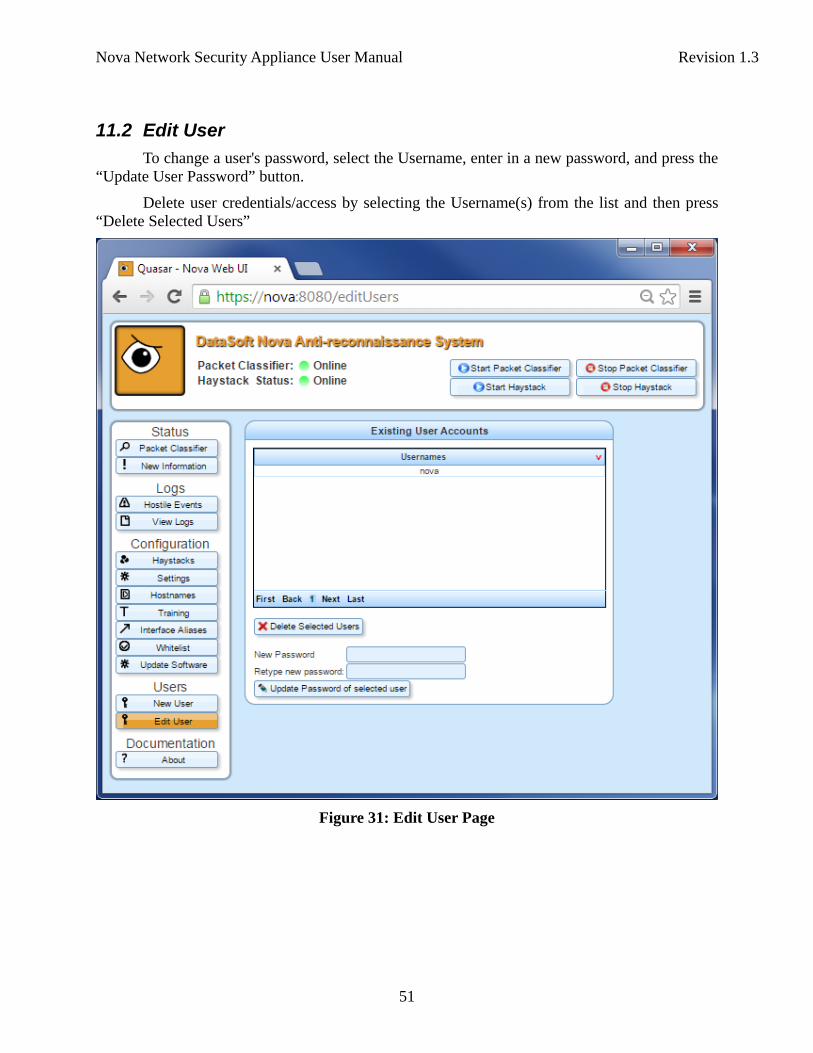
11.2 Edit User
To change a user's password, select the Username, enter in a new password, and press the “Update User Password” button.
Delete user credentials/access by selecting the Username(s) from the list and then press “Delete Selected Users”
Figure 31: Edit User Page
Nova Network Security Appliance User Manual Revision 1.3
52
12.0 Documentation The Documentation page shows help and documentation for the Nova system.
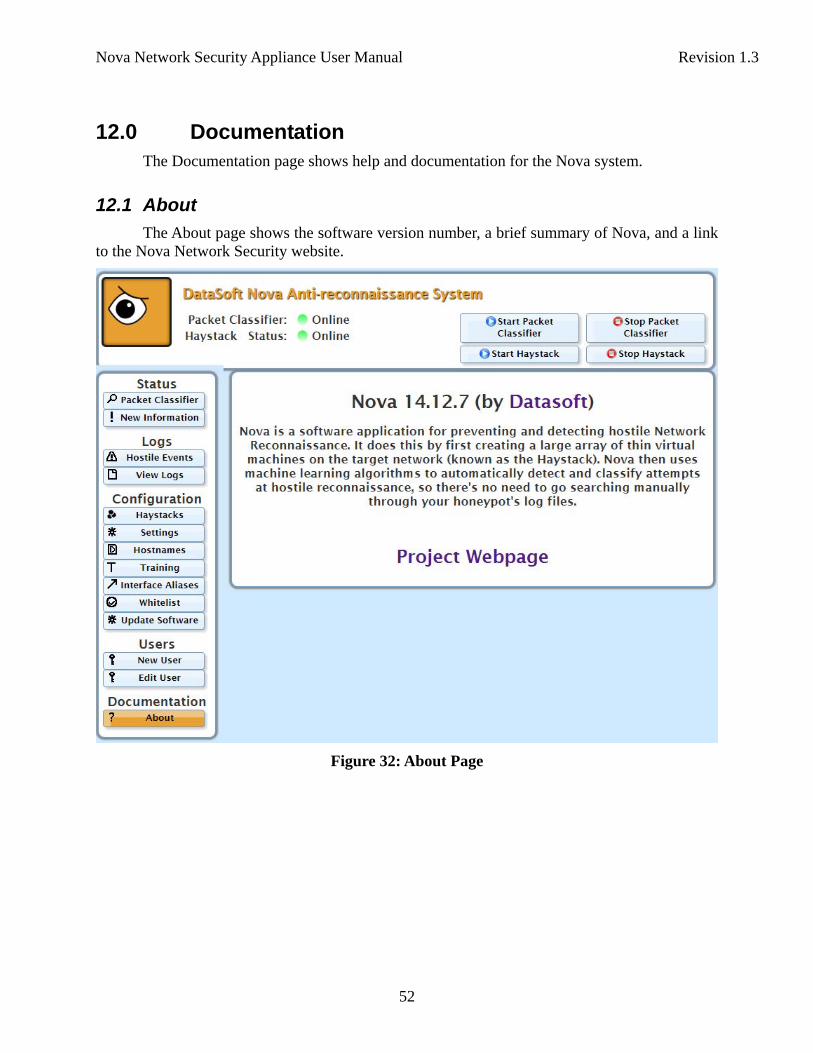
12.1 About
The About page shows the software version number, a brief summary of Nova, and a link to the Nova Network Security website.
Figure 32: About Page
Nova Network Security Appliance User Manual Revision 1.3
53
13.0 FAQ The following are Frequently Asked Questions that you may have during installation or operation of your Nova appliance.
1. What do I do if there is a false positive?
There are two kinds of false positives; make sure you know which yours is. The first kind occurs when a benign machine on your network becomes mistakenly classified as hostile for doing things which are not suspicious or hostile. If this is the case, then you will want to “Mark Suspect as Benign” in the Packet Classifier page as described in 3.0 . This will have two effects: It will lower the classification of the suspect in question and it will also inform the Nova system to classify other suspects that resemble it as benign, too.
The second kind of false positive occurs when a machine on your network does something that would be considered hostile, such as a port scan, but is not an intruder (perhaps an over-eager intern or a curiously configured server). In this case, you do not want to “Mark Suspect as Benign” since any future port scans may then be classified as benign. Instead, if this was a single event, press the “Clear Suspect” option on the Packet Classifier page. If this suspect will be continuing to appear hostile in the future, add it to Nova's Whitelist, shown in Section 7.0.
2. What do I do if there is a false negative?
If there is hostile reconnaissance performed on your network, and Nova does not correctly classify this as hostile, then you will want to “Mark Suspect as Hostile” in the Packet Classifiers page as described in Section 3.0 .
3. Why did Nova classify Suspect X as Hostile / Benign?
If you would like to see more detailed information about a suspect and what information Nova has gathered on them, there are two pages that will interest you. First is the Packet Classifiers page. Check the “Show Advanced Suspect Statistics” check box. This will expand the Suspects Grid to include much more detailed information. Of particular importance are usually the following columns: “Distinct TCP Ports Contacted” and “Protected IPs Contacted.” Reconnaissance will invariably involve contacting a large number of ports and IPs.
For even more information, right click on the Suspect in question and select “Detailed Report”. This will show you even more information, such as Pie charts of the type of traffic seen from the suspect, as well as graphs of the various statistical features over time.
4. Is Nova spying on my network?
The short answer is no. The long answer is that Nova places a set of decoy machines (called The Haystack) on your network and monitors packets going to only the decoys. Furthermore, Nova does not perform deep packet inspection. It only looks at packets up to the TCP/UDP headers and throws the rest away. Nova performs classification on the basis of overall traffic patterns and not specific byte signatures.
In this way, Nova is far less intrusive than a typical IDS that must be placed in a position such that it can do deep packet inspection on all traffic in and out of your network.
Nova Network Security Appliance User Manual Revision 1.3
54
5. Does Nova send any data back to DataSoft?
No, your privacy and security are very important to us. In order to work in highly secure and private networks, Nova does not send any information to anywhere you don't tell it.
6. I think I've found a bug, what do I do?
Oh, no! We're sorry. You can simply email us about the problem to [email protected]. Please include “Download Logs and Configuration” file. This file can be downloaded by going to Settings under Basic Configuration Options and clicking on the “Download Logs and Configuration” button. We'll get the problem fixed for you as soon as we can.
7. I'm seeing a lot of “Distinct UDP Ports Contacted” from a computer on my network. Should I be worried?
Most likely not. Ordinary UDP services will respond to the provided source port, but for many services, particularly DNS, this port is randomized. Nova sees your machine sending packets to many UDP ports. A high UDP port count alone should not cause a machine to be classified as hostile. However, there is the possibility that the high UDP count came from a hostile UDP port scan! The difference should be obvious when looking at other statistics on your suspect, such as “Protected IPs Contacted” and “Average UDP Ports Per Host”.