Embed Size (px)
DESCRIPTION
cisco
Citation preview
Web Security Deployment Guide
Revision: H1CY11
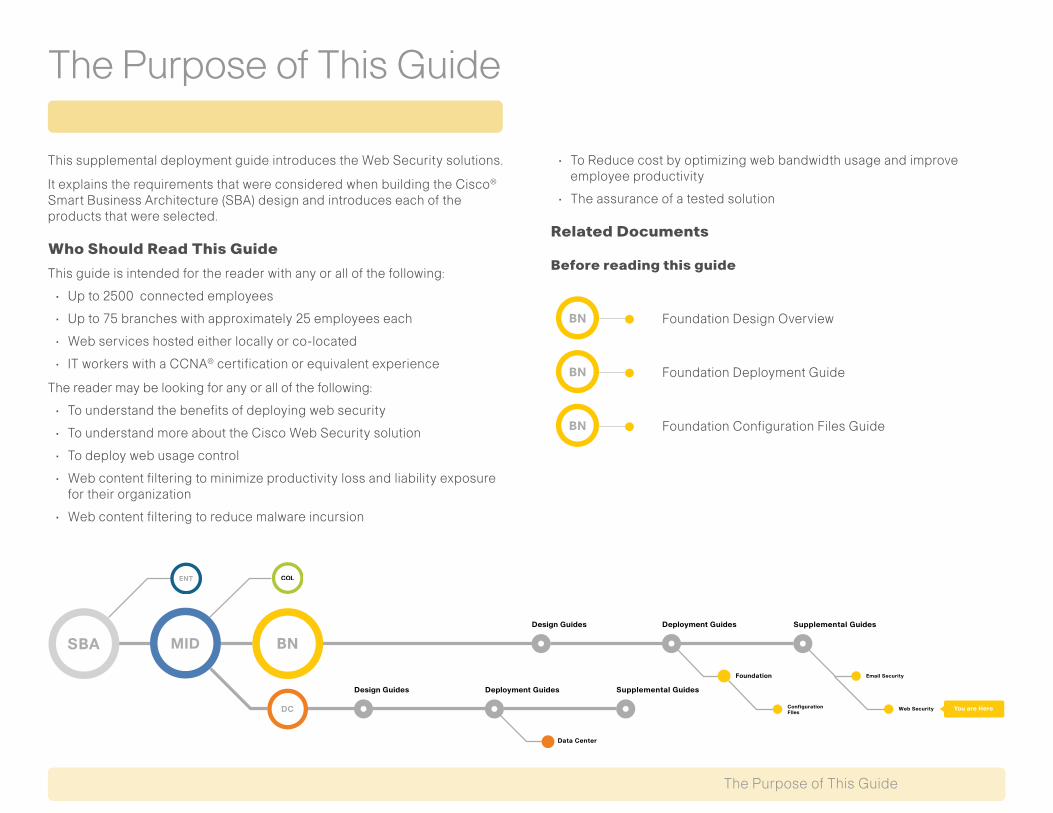
The Purpose of This Guide
The Purpose of This Guide
This supplemental deployment guide introduces the Web Security solutions.
It explains the requirements that were considered when building the Cisco® Smart Business Architecture (SBA) design and introduces each of the products that were selected.
Who Should Read This Guide
This guide is intended for the reader with any or all of the following:
• Upto2500connectedemployees
• Upto75brancheswithapproximately25employeeseach
• Webserviceshostedeitherlocallyorco-located
• ITworkerswithaCCNA® certification or equivalent experience
Thereadermaybelookingforanyorallofthefollowing:
• Tounderstandthebenefitsofdeployingwebsecurity
• TounderstandmoreabouttheCiscoWebSecuritysolution
• Todeploywebusagecontrol
• Webcontentfilteringtominimizeproductivitylossandliabilityexposurefortheirorganization
• Webcontentfilteringtoreducemalwareincursion
• ToReducecostbyoptimizingwebbandwidthusageandimproveemployee productivity
• Theassuranceofatestedsolution
Related Documents
Before reading this guide
Foundation Design Overview
Foundation Deployment Guide
Foundation Configuration Files Guide
Design Guides Deployment Guides Supplemental Guides
Email Security
Web Security ConfigurationFIles
You are Here
Foundation
Data Center
Deployment GuidesDesign Guides Supplemental Guides
Table of Contents
ALLDESIGNS,SPECIFICATIONS,STATEMENTS,INFORMATION,ANDRECOMMENDATIONS(COLLECTIVELY,"DESIGNS")INTHISMANUALAREPRESENTED"ASIS,"WITHALLFAULTS.CISCOANDITSSUPPLIERSDISCLAIMALLWARRANTIES,INCLUDING,WITHOUTLIMITATION,THEWARRANTYOFMERCHANTABILITY,FITNESSFORAPARTICULARPURPOSEANDNONINFRINGEMENTORARISINGFROMACOURSEOFDEALING,USAGE,ORTRADEPRACTICE.INNOEVENTSHALLCISCOORITSSUPPLIERSBELIABLEFORANYINDIRECT,SPECIAL,CONSEQUENTIAL,ORINCIDENTALDAMAGES,INCLUDING,WITHOUTLIMITA-TION,LOSTPROFITSORLOSSORDAMAGETODATAARISINGOUTOFTHEUSEORINABILITYTOUSETHEDESIGNS,EVENIFCISCOORITSSUPPLIERSHAVEBEENADVISEDOFTHEPOSSIBILITYOFSUCHDAMAGES.THEDESIGNSARESUBJECTTOCHANGEWITHOUTNOTICE.USERSARESOLELYRESPONSIBLEFORTHEIRAPPLICATIONOFTHEDESIGNS.THEDESIGNSDONOTCONSTITUTETHETECHNICALOROTHERPROFESSIONALADVICEOFCISCO,ITSSUPPLIERSORPARTNERS.USERSSHOULDCONSULTTHEIROWNTECHNICALADVISORSBEFOREIMPLEMENTINGTHEDESIGNS.RESULTSMAYVARYDEPENDINGONFACTORSNOTTESTEDBYCISCO.
AnyInternetProtocol(IP)addressesusedinthisdocumentarenotintendedtobeactualaddresses.Anyexamples,commanddisplayoutput,andfiguresincludedinthedocumentareshownforillustrativepurposesonly.AnyuseofactualIPaddressesinillustrativecontentisunintentionalandcoincidental.CiscoUnifiedCommunicationsSRND(BasedonCiscoUnifiedCommunicationsManager7.x)
©2010CiscoSystems,Inc.Allrightsreserved.
Table of Contents
SBA Overview . . . . . . . . . . . . . . . . . . . . . . . . . . . . . . . . . . . . . . . . . . . . . . . . . . . . . . . . . . . . .1Guiding Principles . . . . . . . . . . . . . . . . . . . . . . . . . . . . . . . . . . . . . . . . . . . . . . . . . . . . . . 1
Web Security Basics . . . . . . . . . . . . . . . . . . . . . . . . . . . . . . . . . . . . . . . . . . . . . . . . . . . . . . .3Business Overview. . . . . . . . . . . . . . . . . . . . . . . . . . . . . . . . . . . . . . . . . . . . . . . . . . . . . . 3
Technology Overview . . . . . . . . . . . . . . . . . . . . . . . . . . . . . . . . . . . . . . . . . . . . . . . . . . . 3
Deploying the Cisco IronPort Web Security Appliance . . . . . . . . . . . . . . . . . . . .5
Appendix A: Product Part Numbers . . . . . . . . . . . . . . . . . . . . . . . . . . . . . . . . . . . . . 26
Appendix B: SBA for Midsize Organizations Document System . . . . . . . . . .27
1SBA Overview
SBA Overview
The Cisco® Smart Business Architecture (SBA) is a comprehensive design fornetworkswithupto2500users.Thisout-of-the-boxdesignissimple,fast,affordable,scalable,andflexible.Therearethreeoptionsbasedonyourscalingneeds:upto600users,1000users,andupto2500users.
TheCiscoSBAforMidsizeOrganizationsincorporatesLAN,WAN,wireless,security,WANoptimization,andunifiedcommunicationtechnologiestestedtogetherasasolution.Thissolution-levelapproachsimplifiesthesystemintegrationnormallyassociatedwithmultipletechnologies,allowingyoutoselectthemodulesthatsolveyourorganization’sproblemsratherthanworrying about the technical details.
We have designed the Cisco Smart Business Architecture to be easy to configure,deploy,andmanage.Thisarchitecture:
• Providesasolidnetworkfoundation
• Makesdeploymentfastandeasy
• Acceleratesabilitytoeasilydeployadditionalservices
• Avoidstheneedforre-engineeringofthecorenetwork
BydeployingtheCiscoSmartBusinessArchitecture,yourorganizationcangain:
• Astandardizeddesign,testedandsupportedbyCisco.
• Optimizedarchitecturesformidsizeorganizationswithupto2500users.
• WANwithupto75remotesiteswithaheadquarterssite,regionalsite,andapproximately25usersperremotesite.
• Flexiblearchitecturetohelpensureeasymigrationastheorganizationgrows.
• Seamlesssupportforquickdeploymentofwiredandwirelessnetworkaccessfordata,voice,teleworker,andwirelessguest.
• Securityandhighavailabilityforcorporateinformationresources,servers,andInternet-facingapplications.
• ImprovedWANperformanceandcostreductionthroughtheuseofWANoptimization.
• SimplifieddeploymentandoperationbyITworkerswithCCNA® certifica-tion or equivalent experience.
• Ciscoenterprise-classreliabilityinproductsdesignedformidsizeorganizations.
Guiding Principles
We divided the deployment process into modules according to the following principles:
• Ease of use: A top requirement of Cisco SBA was to develop a design that could be deployed with the minimal amount of configuration and day-twomanagement.
• Cost-effective: Another critical requirement as we selected products wastomeetthebudgetguidelinesformidsizeorganizations.
• Flexibility and scalability: Astheorganizationgrows,sotoomustitsinfrastructure. Products selected must have the ability to grow or be repurposed within the architecture.
• Reuse: Westrived,whenpossible,toreusethesameproductsthroughoutthevariousmodulestominimizethenumberofproductsrequiredforspares.
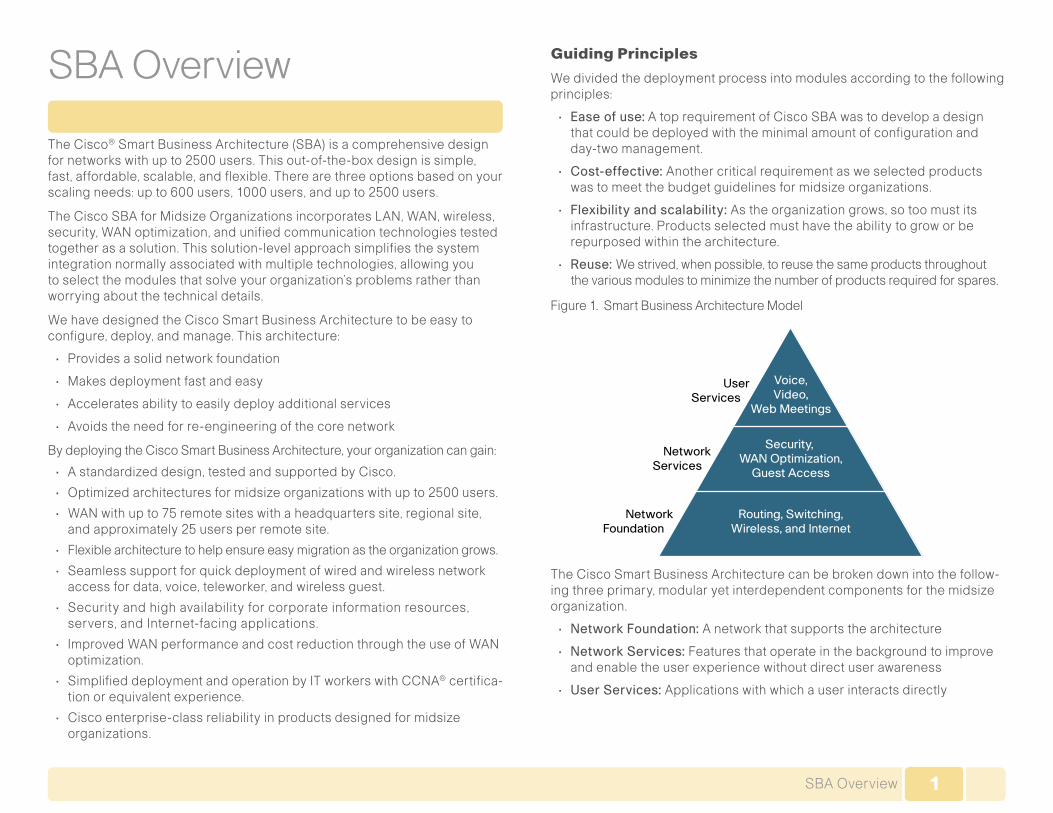
Figure 1. SmartBusinessArchitectureModel
UserServices
NetworkServices
NetworkFoundation
Voice,Video,
Web Meetings
Security, WAN Optimization,
Guest Access
Routing, Switching,Wireless, and Internet
TheCiscoSmartBusinessArchitecturecanbebrokendownintothefollow-ingthreeprimary,modularyetinterdependentcomponentsforthemidsizeorganization.
• Network Foundation: Anetworkthatsupportsthearchitecture
• Network Services: Featuresthatoperateinthebackgroundtoimproveand enable the user experience without direct user awareness
• User Services: Applications with which a user interacts directly
2SBA Overview
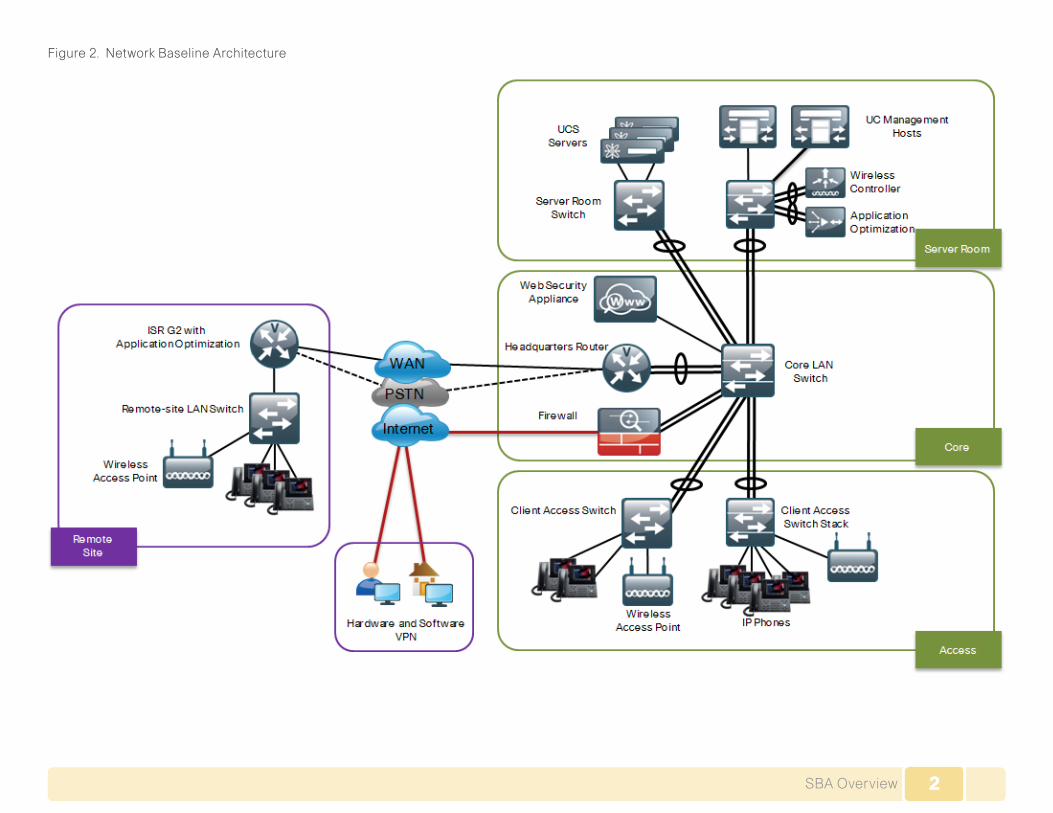
Figure2.NetworkBaselineArchitecture
3Web Security Basics
Web Security Basics
Business Overview
Webaccessoffersgreatrewardsfororganizations,aswellasgreatrisks.
Offeringemployeewebaccesscreatesthreesubstantialrisks:
• Thelossofemployeeproductivitylossbrowsingandbandwidthconsumption.
• Threatsfrommalicioussoftwarewhichcancausedataleakage.
• Liabilityexposureresultingfromemployees’accessofunsavorycontent.
Figure 3. Business Reasons for Deploying WSA
Theproliferationofuser-createdcontentcombinedwiththesheervolumeofhosts on the Internet that are distributing compromised or malicious content as a result of inattention to update requirements or lax security configuration makesemployees’webaccessariskyproposition(Figure3).Thedynamicnatureofthecontentonthewebmakesitatremendouschallengetomain-tainanup-to-dateperspectiveonthethreatprofileofthewholeInternet.Human-operatedandworm-infestedcomputersconstantlyscantheInternetin search of web servers that they can infect in order to continue propagat-ingtheircontagiontothegreaterweb-surfingpopulace.
Technology Overview
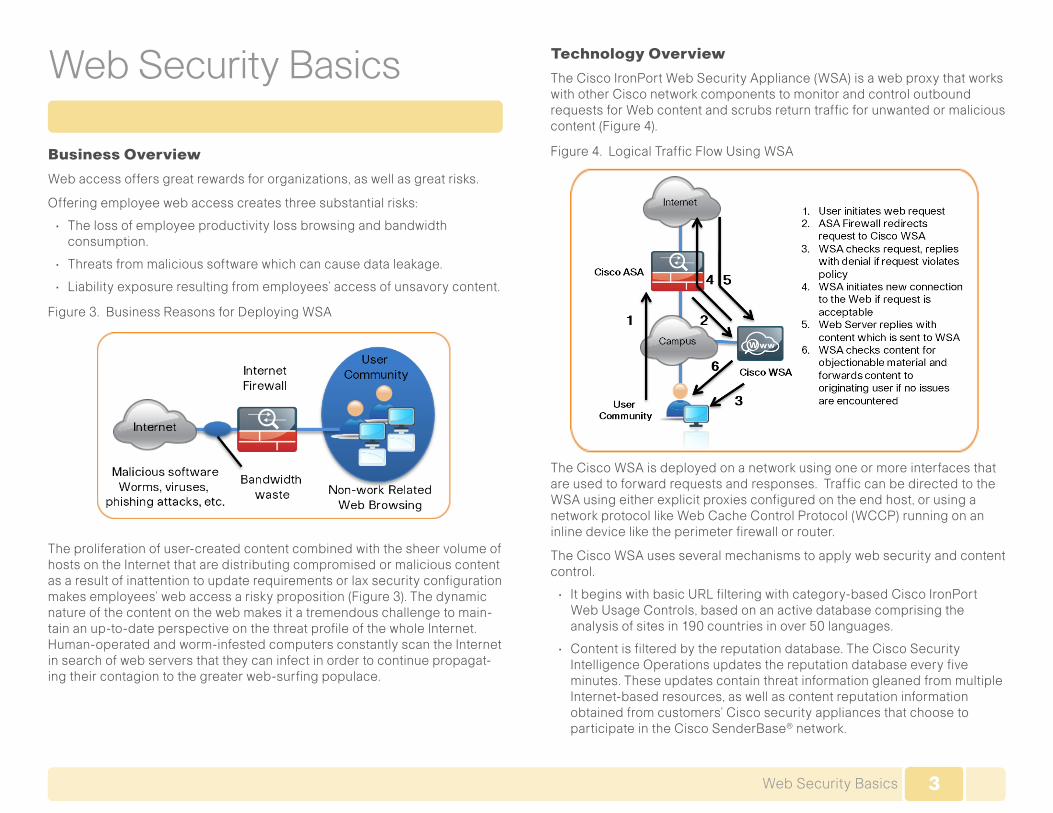
TheCiscoIronPortWebSecurityAppliance(WSA)isawebproxythatworkswithotherCisconetworkcomponentstomonitorandcontroloutboundrequests for Web content and scrubs return traffic for unwanted or malicious content (Figure 4).
Figure 4. LogicalTrafficFlowUsingWSA
TheCiscoWSAisdeployedonanetworkusingoneormoreinterfacesthatare used to forward requests and responses. Traffic can be directed to the WSAusingeitherexplicitproxiesconfiguredontheendhost,orusinganetworkprotocollikeWebCacheControlProtocol(WCCP)runningonaninlinedeviceliketheperimeterfirewallorrouter.
The Cisco WSA uses several mechanisms to apply web security and content control.
• ItbeginswithbasicURLfilteringwithcategory-basedCiscoIronPortWebUsageControls,basedonanactivedatabasecomprisingtheanalysisofsitesin190countriesinover50languages.
• Contentisfilteredbythereputationdatabase.TheCiscoSecurityIntelligence Operations updates the reputation database every five minutes. These updates contain threat information gleaned from multiple Internet-basedresources,aswellascontentreputationinformationobtainedfromcustomers’Ciscosecurityappliancesthatchoosetoparticipate in the Cisco SenderBase®network.
4Web Security Basics
• Ifnodetailsofthewebsiteoritscontentareknown,theCiscoWSAapplies dynamic content analysis to determine the nature of the content inrealtimeandfindingsarefedbacktotheSenderBaserepositoryifthecustomer has elected to participate in it.
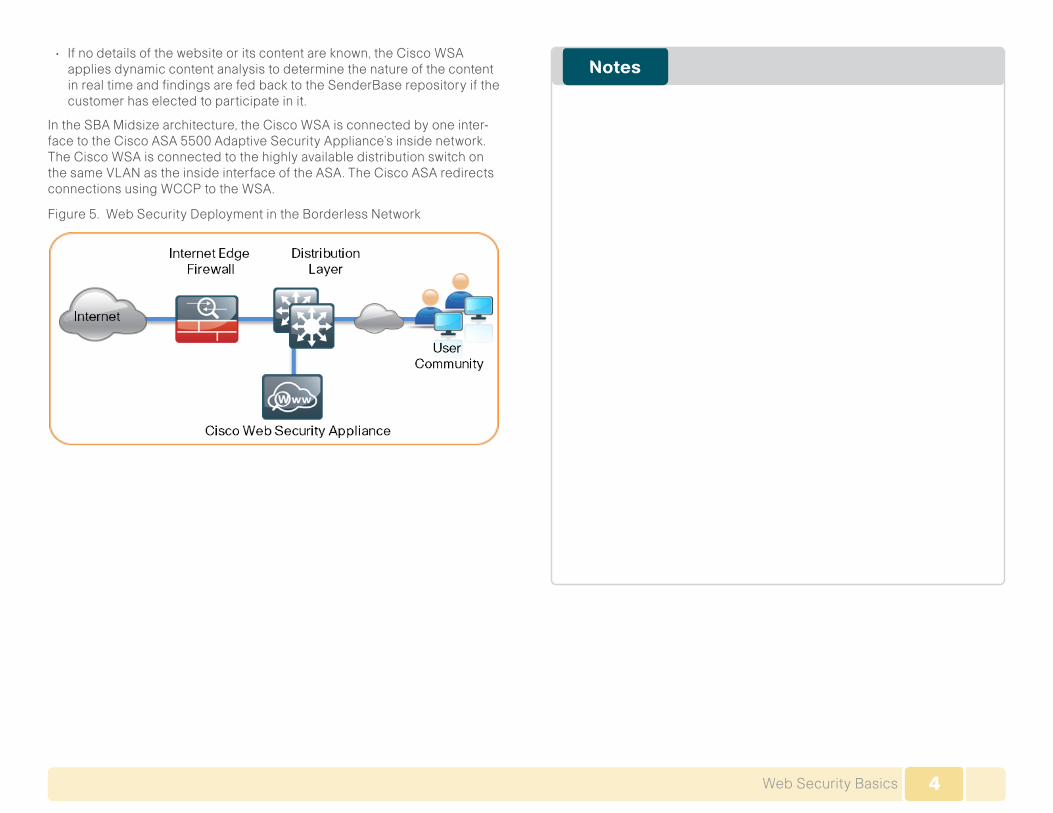
IntheSBAMidsizearchitecture,theCiscoWSAisconnectedbyoneinter-facetotheCiscoASA5500AdaptiveSecurityAppliance’sinsidenetwork.The Cisco WSA is connected to the highly available distribution switch on thesameVLANastheinsideinterfaceoftheASA.TheCiscoASAredirectsconnections using WCCP to the WSA.
Figure5.WebSecurityDeploymentintheBorderlessNetwork
5Deploying the Cisco IronPort WSA
Deploying the Cisco IronPort Web Security Appliance
This section details the processes you need to complete to deploy the CiscoWSA,including:
• PreparingforWSADeployment
• CompletingtheBasicDeployment
• EnablingSecurityServices
• DeployingWCCP
• DeployingHTTPS
• EnablingAuthentication
• MaintainingtheWSA
Process
Preparing for WSA Deployment
1. Plan the WSA Installation
Procedure 1 Plan the WSA Installation
Step 1: Determine how web traffic will be sent to the WSA. This is often perceived as the most challenging portion of the WSA integration since it involves devices outside the WSA.
Since the WSA is not deployed in an inline manner where it would sit between theclientandthewebsitetheclientistryingtoaccess,analternativemethodto divert or redirect Web traffic to the WSA must be used. There are two pos-sible methods to accomplish this redirection of traffic to the WSA.
Explicit Proxy Deployment
Anexplicitproxydeploymentiswhenaclientproxy-awareapplication,likeamaturewebbrowser,hasaconfigurationareawithinforproxysettingstodeclareanduseaproxy,liketheWSA.ThismethodistypicallycombinedwithafirewallrestrictingwebtrafficthatdoesnotoriginatefromtheWSA’sIP to prevent users from circumventing web policy controls and accessing theInternetdirectly.Fromanoperationalstandpoint,thismethodintroducestheleastamountofcomplicationsasproxy-awareapplicationsunderstandwhataproxyisandworkwiththeproxytoprovidetheclientwiththerequestedserviceasopposedtothenextmethod,whichtrickstheapplica-tionsintousingaproxy.However,fromadeploymentstandpoint,itpresentssurface-levelchallengesastohowanadministratorwillconfigureeveryclient with the WSA proxy settings.
Explicit proxy is a good way to test the configuration of the WSA as you deployit,becauseexplicitmodedoesnotdependonanythingelseinthenetworktofunction.
Reader Tip
Tomakeanexplicitproxydeploymentmoresimple,MicrosoftActiveDirectory(AD)supportsprotocolssuchasWPAD,PACscripts,andtoolssuchasMicrosoftGroupandSystempolicycontrols;however,thisisbeyond the scope of this document.
Transparent Proxy Deployment
TheotherdeploymentoptionisaTransparentProxydeployment,whereallport80(andpossiblyport443)trafficisredirectedtotheWSAbyanothernetworkdeviceatsomenetworkchokepoint.ThisiseasilyaccomplishedusingtheCiscoASAfirewall(orpossiblyanyothernetworkdevicethatsupportsWCCPv2redirection)andisthemethodusedinthisdeploymentguide.
Tech Tip
Ifyourusertestbaseissmall,youcanmanuallyconfigureeachclienteasilywithoutaffectingyourentirenetwork,skippingtheWCCPportionof this deployment guide.
6Deploying the Cisco IronPort WSA
Inanycase,itisalwayspossibletousebothoptionsatthesametime(explicit and transparent proxy) on the same WSA.
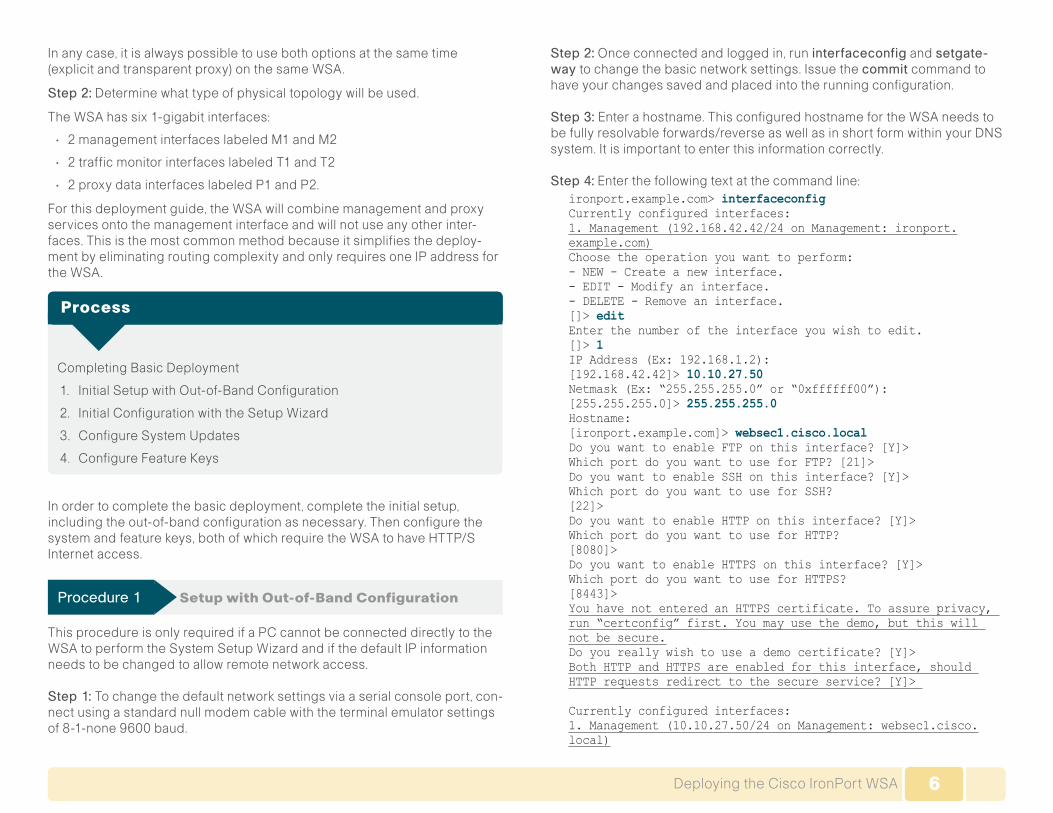
Step 2: Determine what type of physical topology will be used.
TheWSAhassix1-gigabitinterfaces:
• 2managementinterfaceslabeledM1andM2
• 2trafficmonitorinterfaceslabeledT1andT2
• 2proxydatainterfaceslabeledP1andP2.
Forthisdeploymentguide,theWSAwillcombinemanagementandproxyservices onto the management interface and will not use any other inter-faces. This is the most common method because it simplifies the deploy-ment by eliminating routing complexity and only requires one IP address for the WSA.
Process
Completing Basic Deployment
1. InitialSetupwithOut-of-BandConfiguration
2. InitialConfigurationwiththeSetupWizard
3. ConfigureSystemUpdates
4. Configure Feature Keys
Inordertocompletethebasicdeployment,completetheinitialsetup,includingtheout-of-bandconfigurationasnecessary.Thenconfigurethesystemandfeaturekeys,bothofwhichrequiretheWSAtohaveHTTP/SInternet access.
Procedure 1 Setup with Out-of-Band Configuration
This procedure is only required if a PC cannot be connected directly to the WSAtoperformtheSystemSetupWizardandifthedefaultIPinformationneedstobechangedtoallowremotenetworkaccess.
Step 1: Tochangethedefaultnetworksettingsviaaserialconsoleport,con-nect using a standard null modem cable with the terminal emulator settings of8-1-none9600baud.
Step 2:Onceconnectedandloggedin,runinterfaceconfig and setgate-waytochangethebasicnetworksettings.Issuethecommit command to have your changes saved and placed into the running configuration.
Step 3: Enter a hostname. This configured hostname for the WSA needs to befullyresolvableforwards/reverseaswellasinshortformwithinyourDNSsystem. It is important to enter this information correctly.
Step 4: Enter the following text at the command line:ironport.example.com> interfaceconfig Currently configured interfaces: 1. Management (192.168.42.42/24 on Management: ironport.example.com) Choose the operation you want to perform: - NEW - Create a new interface. - EDIT - Modify an interface. - DELETE - Remove an interface. []> edit Enter the number of the interface you wish to edit. []> 1 IP Address (Ex: 192.168.1.2): [192.168.42.42]> 10.10.27.50 Netmask (Ex: “255.255.255.0” or “0xffffff00”): [255.255.255.0]> 255.255.255.0 Hostname: [ironport.example.com]> websec1.cisco.local Do you want to enable FTP on this interface? [Y]> Which port do you want to use for FTP? [21]> Do you want to enable SSH on this interface? [Y]> Which port do you want to use for SSH? [22]> Do you want to enable HTTP on this interface? [Y]> Which port do you want to use for HTTP? [8080]> Do you want to enable HTTPS on this interface? [Y]> Which port do you want to use for HTTPS? [8443]> You have not entered an HTTPS certificate. To assure privacy, run “certconfig” first. You may use the demo, but this will not be secure. Do you really wish to use a demo certificate? [Y]> Both HTTP and HTTPS are enabled for this interface, should HTTP requests redirect to the secure service? [Y]>
Currently configured interfaces: 1. Management (10.10.27.50/24 on Management: websec1.cisco.local)
7Deploying the Cisco IronPort WSA
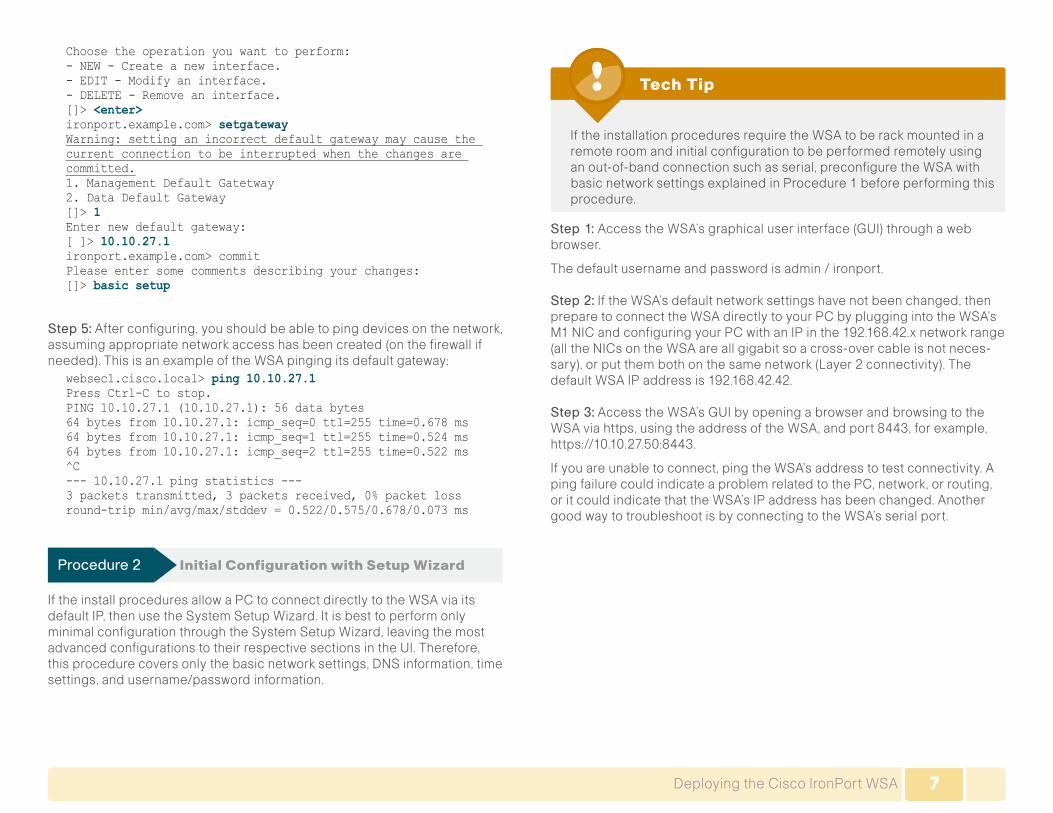
Choose the operation you want to perform: - NEW - Create a new interface. - EDIT - Modify an interface. - DELETE - Remove an interface. []> <enter>ironport.example.com> setgateway Warning: setting an incorrect default gateway may cause the current connection to be interrupted when the changes are committed. 1. Management Default Gatetway 2. Data Default Gateway []> 1 Enter new default gateway: [ ]> 10.10.27.1ironport.example.com> commit Please enter some comments describing your changes: []> basic setup
Step 5:Afterconfiguring,youshouldbeabletopingdevicesonthenetwork,assumingappropriatenetworkaccesshasbeencreated(onthefirewallifneeded). This is an example of the WSA pinging its default gateway:
websec1.cisco.local> ping 10.10.27.1 Press Ctrl-C to stop. PING 10.10.27.1 (10.10.27.1): 56 data bytes 64 bytes from 10.10.27.1: icmp_seq=0 ttl=255 time=0.678 ms 64 bytes from 10.10.27.1: icmp_seq=1 ttl=255 time=0.524 ms 64 bytes from 10.10.27.1: icmp_seq=2 ttl=255 time=0.522 ms ^C --- 10.10.27.1 ping statistics --- 3 packets transmitted, 3 packets received, 0% packet loss round-trip min/avg/max/stddev = 0.522/0.575/0.678/0.073 ms
Procedure 2 Initial Configuration with Setup Wizard
If the install procedures allow a PC to connect directly to the WSA via its defaultIP,thenusetheSystemSetupWizard.ItisbesttoperformonlyminimalconfigurationthroughtheSystemSetupWizard,leavingthemostadvancedconfigurationstotheirrespectivesectionsintheUI.Therefore,thisprocedurecoversonlythebasicnetworksettings,DNSinformation,timesettings,andusername/passwordinformation.
Tech Tip
IftheinstallationproceduresrequiretheWSAtoberackmountedinaremote room and initial configuration to be performed remotely using anout-of-bandconnectionsuchasserial,preconfiguretheWSAwithbasicnetworksettingsexplainedinProcedure1beforeperformingthisprocedure.
Step 1: AccesstheWSA’sgraphicaluserinterface(GUI)throughawebbrowser.
Thedefaultusernameandpasswordisadmin/ironport.
Step 2:IftheWSA’sdefaultnetworksettingshavenotbeenchanged,thenpreparetoconnecttheWSAdirectlytoyourPCbypluggingintotheWSA’sM1NICandconfiguringyourPCwithanIPinthe192.168.42.xnetworkrange(alltheNICsontheWSAareallgigabitsoacross-overcableisnotneces-sary),orputthembothonthesamenetwork(Layer2connectivity).ThedefaultWSAIPaddressis192.168.42.42.
Step 3:AccesstheWSA’sGUIbyopeningabrowserandbrowsingtotheWSAviahttps,usingtheaddressoftheWSA,andport8443,forexample,https://10.10.27.50:8443.
Ifyouareunabletoconnect,pingtheWSA’saddresstotestconnectivity.ApingfailurecouldindicateaproblemrelatedtothePC,network,orrouting,oritcouldindicatethattheWSA’sIPaddresshasbeenchanged.AnothergoodwaytotroubleshootisbyconnectingtotheWSA’sserialport.
8Deploying the Cisco IronPort WSA
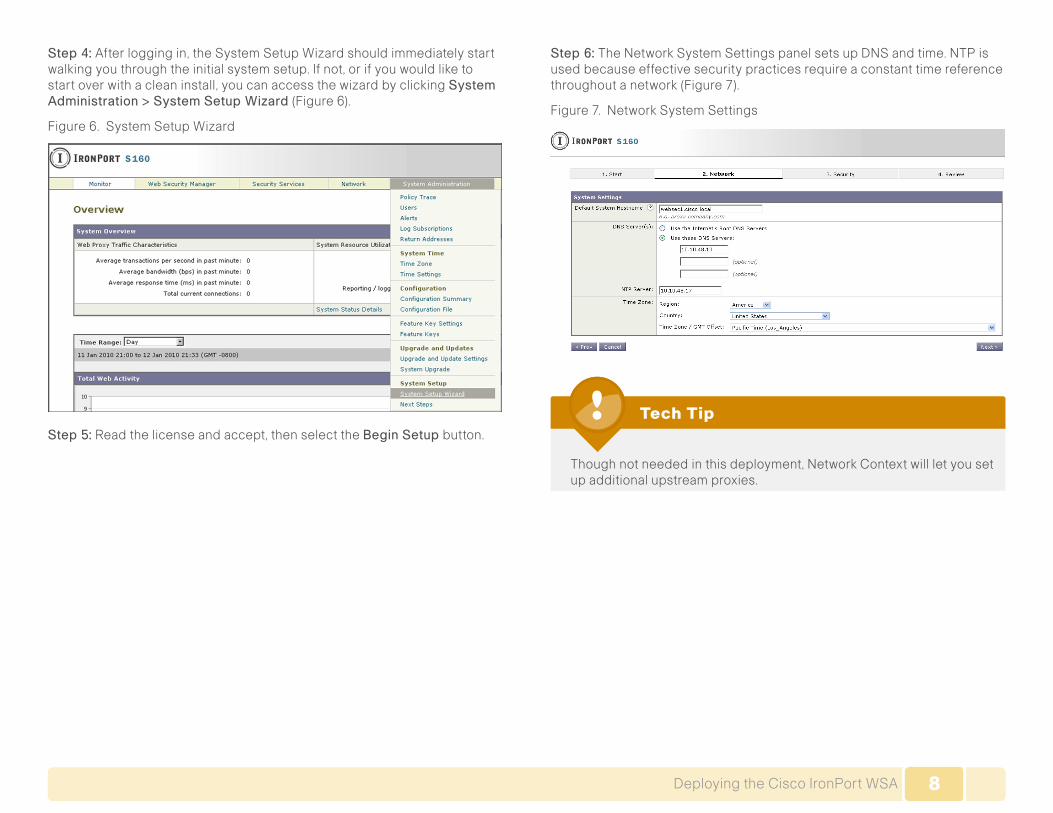
Step 4: Afterloggingin,theSystemSetupWizardshouldimmediatelystartwalkingyouthroughtheinitialsystemsetup.Ifnot,orifyouwouldliketostartoverwithacleaninstall,youcanaccessthewizardbyclickingSystem Administration > System Setup Wizard (Figure 6).
Figure 6. SystemSetupWizard
Step 5: Readthelicenseandaccept,thenselecttheBegin Setup button.
Step 6: TheNetworkSystemSettingspanelsetsupDNSandtime.NTPisused because effective security practices require a constant time reference throughoutanetwork(Figure7).
Figure7.NetworkSystemSettings
Tech Tip
Thoughnotneededinthisdeployment,NetworkContextwillletyousetup additional upstream proxies.
9Deploying the Cisco IronPort WSA
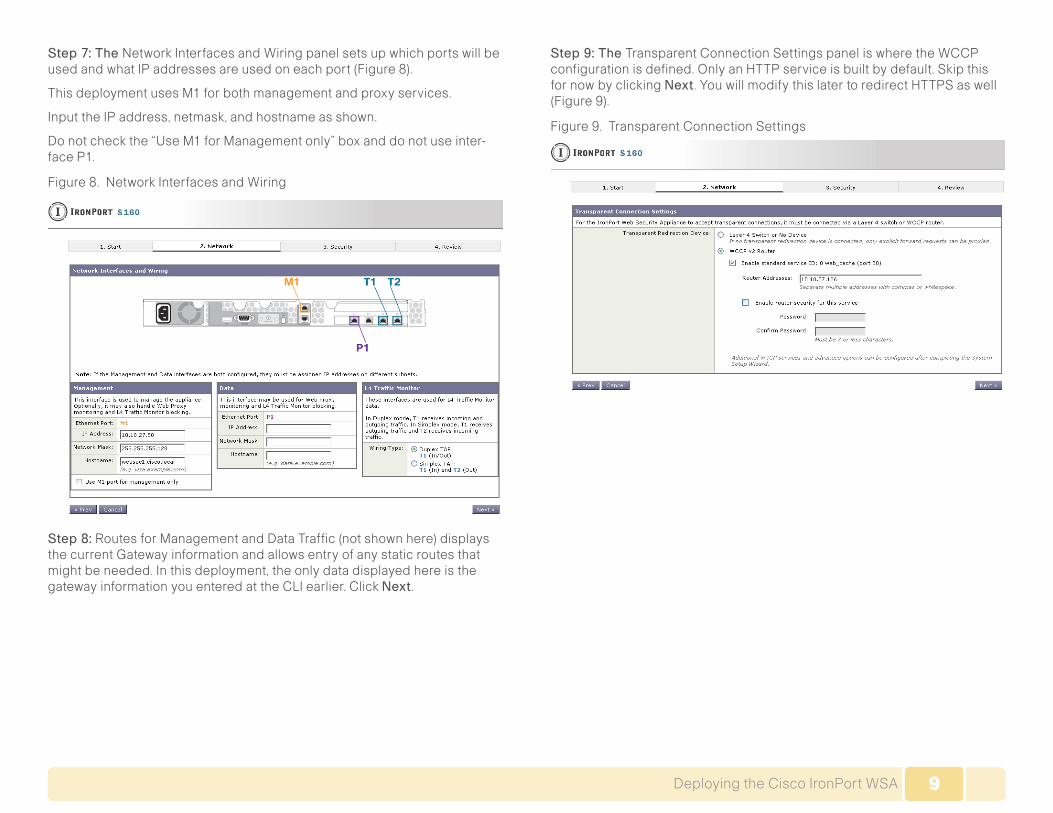
Step 7: The NetworkInterfacesandWiringpanelsetsupwhichportswillbeused and what IP addresses are used on each port (Figure 8).
ThisdeploymentusesM1forbothmanagementandproxyservices.
InputtheIPaddress,netmask,andhostnameasshown.
Donotcheckthe“UseM1forManagementonly”boxanddonotuseinter-face P1.
Figure 8. NetworkInterfacesandWiring
Step 8: RoutesforManagementandDataTraffic(notshownhere)displaysthe current Gateway information and allows entry of any static routes that mightbeneeded.Inthisdeployment,theonlydatadisplayedhereisthegatewayinformationyouenteredattheCLIearlier.ClickNext.
Step 9: The Transparent Connection Settings panel is where the WCCP configurationisdefined.OnlyanHTTPserviceisbuiltbydefault.SkipthisfornowbyclickingNext. You will modify this later to redirect HTTPS as well (Figure 9).
Figure 9. Transparent Connection Settings
10Deploying the Cisco IronPort WSA
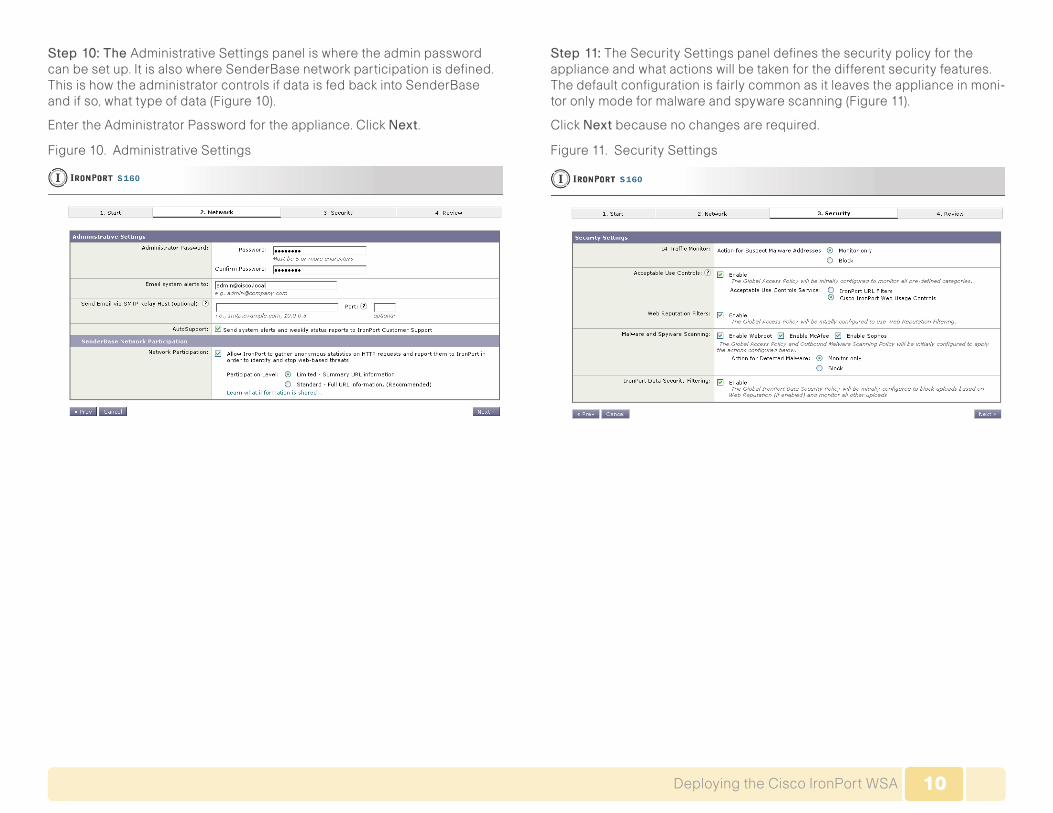
Step 10: The Administrative Settings panel is where the admin password canbesetup.ItisalsowhereSenderBasenetworkparticipationisdefined.ThisishowtheadministratorcontrolsifdataisfedbackintoSenderBaseandifso,whattypeofdata(Figure10).
EntertheAdministratorPasswordfortheappliance.ClickNext.
Figure10.Administrative Settings
Step 11: The Security Settings panel defines the security policy for the applianceandwhatactionswillbetakenforthedifferentsecurityfeatures.The default configuration is fairly common as it leaves the appliance in moni-tor only mode for malware and spyware scanning (Figure 11).
ClickNext because no changes are required.
Figure 11. Security Settings
11Deploying the Cisco IronPort WSA
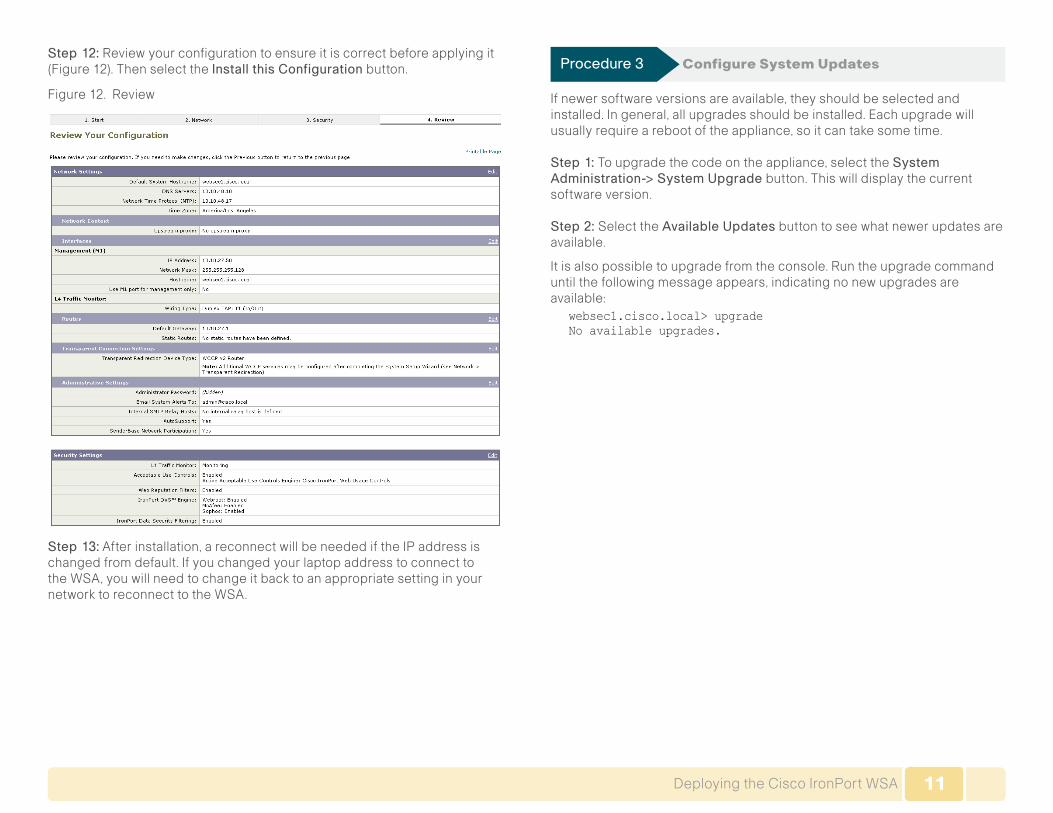
Step 12: Review your configuration to ensure it is correct before applying it (Figure12).ThenselecttheInstall this Configuration button.
Figure12.Review
Step 13:Afterinstallation,areconnectwillbeneedediftheIPaddressischanged from default. If you changed your laptop address to connect to theWSA,youwillneedtochangeitbacktoanappropriatesettinginyournetworktoreconnecttotheWSA.
Procedure 3 Configure System Updates
Ifnewersoftwareversionsareavailable,theyshouldbeselectedandinstalled.Ingeneral,allupgradesshouldbeinstalled.Eachupgradewillusuallyrequirearebootoftheappliance,soitcantakesometime.
Step 1: Toupgradethecodeontheappliance,selecttheSystem Administration-> System Upgrade button. This will display the current software version.
Step 2: Select the Available Updates button to see what newer updates are available.
It is also possible to upgrade from the console. Run the upgrade command untilthefollowingmessageappears,indicatingnonewupgradesareavailable:
websec1.cisco.local> upgrade No available upgrades.
12Deploying the Cisco IronPort WSA
Procedure 4 Configure Feature Keys
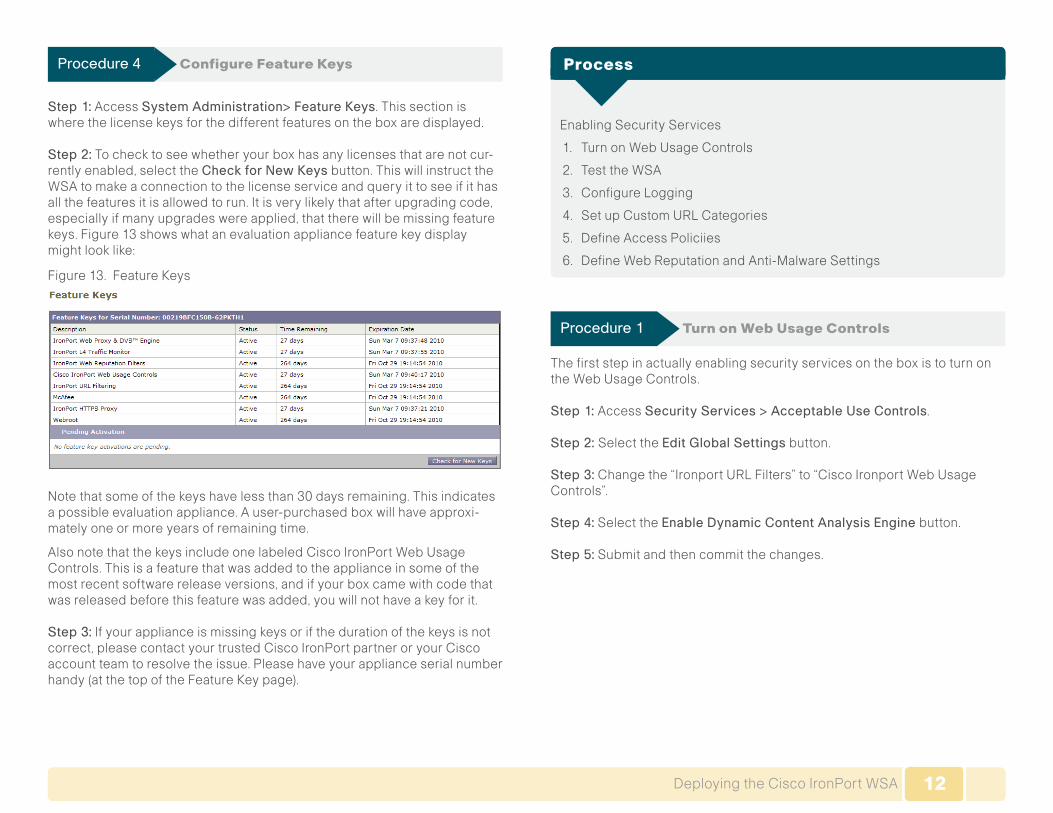
Step 1: Access System Administration> Feature Keys. This section is wherethelicensekeysforthedifferentfeaturesontheboxaredisplayed.
Step 2:Tochecktoseewhetheryourboxhasanylicensesthatarenotcur-rentlyenabled,selecttheCheck for New Keys button. This will instruct the WSAtomakeaconnectiontothelicenseserviceandqueryittoseeifithasallthefeaturesitisallowedtorun.Itisverylikelythatafterupgradingcode,especiallyifmanyupgradeswereapplied,thattherewillbemissingfeaturekeys.Figure13showswhatanevaluationappliancefeaturekeydisplaymightlooklike:
Figure 13. Feature Keys
Notethatsomeofthekeyshavelessthan30daysremaining.Thisindicatesapossibleevaluationappliance.Auser-purchasedboxwillhaveapproxi-mately one or more years of remaining time.
AlsonotethatthekeysincludeonelabeledCiscoIronPortWebUsageControls. This is a feature that was added to the appliance in some of the mostrecentsoftwarereleaseversions,andifyourboxcamewithcodethatwasreleasedbeforethisfeaturewasadded,youwillnothaveakeyforit.
Step 3:Ifyourapplianceismissingkeysorifthedurationofthekeysisnotcorrect,pleasecontactyourtrustedCiscoIronPortpartneroryourCiscoaccount team to resolve the issue. Please have your appliance serial number handy (at the top of the Feature Key page).
Process
Enabling Security Services
1. TurnonWebUsageControls
2. Test the WSA
3. Configure Logging
4. SetupCustomURLCategories
5. Define Access Policiies
6. DefineWebReputationandAnti-MalwareSettings
Procedure 1 Turn on Web Usage Controls
The first step in actually enabling security services on the box is to turn on theWebUsageControls.
Step 1: Access Security Services > Acceptable Use Controls.
Step 2: Select the Edit Global Settings button.
Step 3:Changethe“IronportURLFilters”to“CiscoIronportWebUsageControls”.
Step 4: Select the Enable Dynamic Content Analysis Engine button.
Step 5: Submit and then commit the changes.
13Deploying the Cisco IronPort WSA
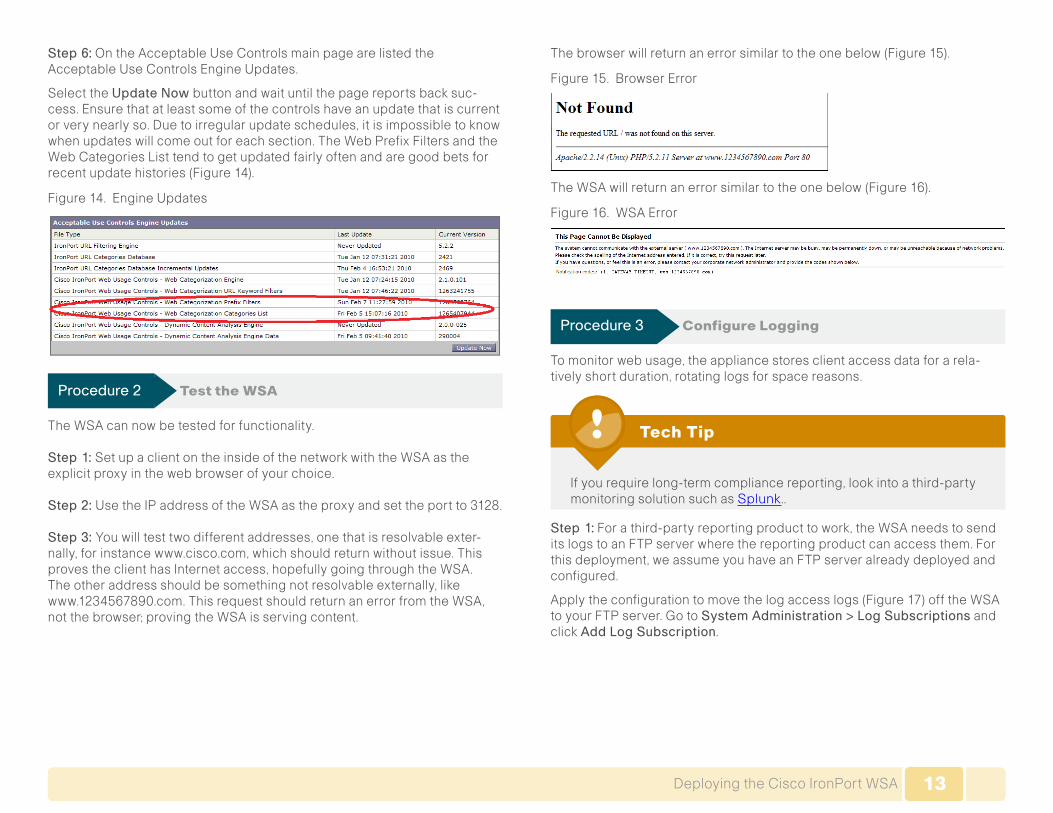
Step 6:OntheAcceptableUseControlsmainpagearelistedtheAcceptableUseControlsEngineUpdates.
Select the Update Nowbuttonandwaituntilthepagereportsbacksuc-cess. Ensure that at least some of the controls have an update that is current orverynearlyso.Duetoirregularupdateschedules,itisimpossibletoknowwhen updates will come out for each section. The Web Prefix Filters and the Web Categories List tend to get updated fairly often and are good bets for recent update histories (Figure 14).
Figure 14. EngineUpdates
Procedure 2 Test the WSA
The WSA can now be tested for functionality.
Step 1: SetupaclientontheinsideofthenetworkwiththeWSAastheexplicit proxy in the web browser of your choice.
Step 2: UsetheIPaddressoftheWSAastheproxyandsettheportto3128.
Step 3: Youwilltesttwodifferentaddresses,onethatisresolvableexter-nally,forinstancewww.cisco.com,whichshouldreturnwithoutissue.ThisprovestheclienthasInternetaccess,hopefullygoingthroughtheWSA.Theotheraddressshouldbesomethingnotresolvableexternally,likewww.1234567890.com.ThisrequestshouldreturnanerrorfromtheWSA,notthebrowser;provingtheWSAisservingcontent.
Thebrowserwillreturnanerrorsimilartotheonebelow(Figure15).
Figure15.Browser Error
The WSA will return an error similar to the one below (Figure 16).
Figure 16. WSA Error
Procedure 3 Configure Logging
Tomonitorwebusage,theappliancestoresclientaccessdataforarela-tivelyshortduration,rotatinglogsforspacereasons.
Tech Tip
Ifyourequirelong-termcompliancereporting,lookintoathird-partymonitoring solution such as Splunk ..
Step 1:Forathird-partyreportingproducttowork,theWSAneedstosendits logs to an FTP server where the reporting product can access them. For thisdeployment,weassumeyouhaveanFTPserveralreadydeployedandconfigured.
Applytheconfigurationtomovethelogaccesslogs(Figure17)offtheWSAto your FTP server. Go to System Administration > Log Subscriptions and clickAdd Log Subscription.
14Deploying the Cisco IronPort WSA
Figure17.Log Subscriptions
Step 2: Verifythatyoursubscriptionlooksliketheinformationbelow (Figure 18).
Figure 18. Configured Subscriptions
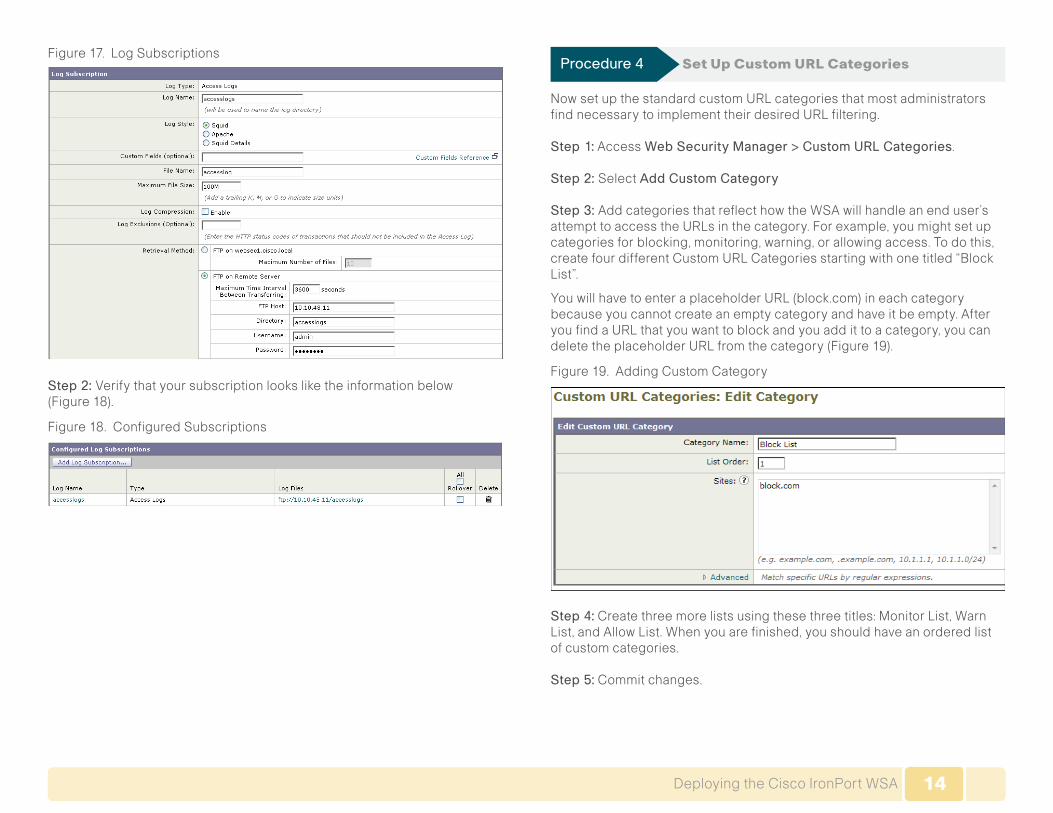
Procedure 4 Set Up Custom URL Categories
NowsetupthestandardcustomURLcategoriesthatmostadministratorsfindnecessarytoimplementtheirdesiredURLfiltering.
Step 1: Access Web Security Manager > Custom URL Categories.
Step 2: Select Add Custom Category
Step 3: AddcategoriesthatreflecthowtheWSAwillhandleanenduser’sattempttoaccesstheURLsinthecategory.Forexample,youmightsetupcategoriesforblocking,monitoring,warning,orallowingaccess.Todothis,createfourdifferentCustomURLCategoriesstartingwithonetitled“BlockList”.
YouwillhavetoenteraplaceholderURL(block.com)ineachcategorybecause you cannot create an empty category and have it be empty. After youfindaURLthatyouwanttoblockandyouaddittoacategory,youcandeletetheplaceholderURLfromthecategory(Figure19).
Figure 19. Adding Custom Category
Step 4:Createthreemorelistsusingthesethreetitles:MonitorList,WarnList,andAllowList.Whenyouarefinished,youshouldhaveanorderedlistof custom categories.
Step 5: Commit changes.
15Deploying the Cisco IronPort WSA
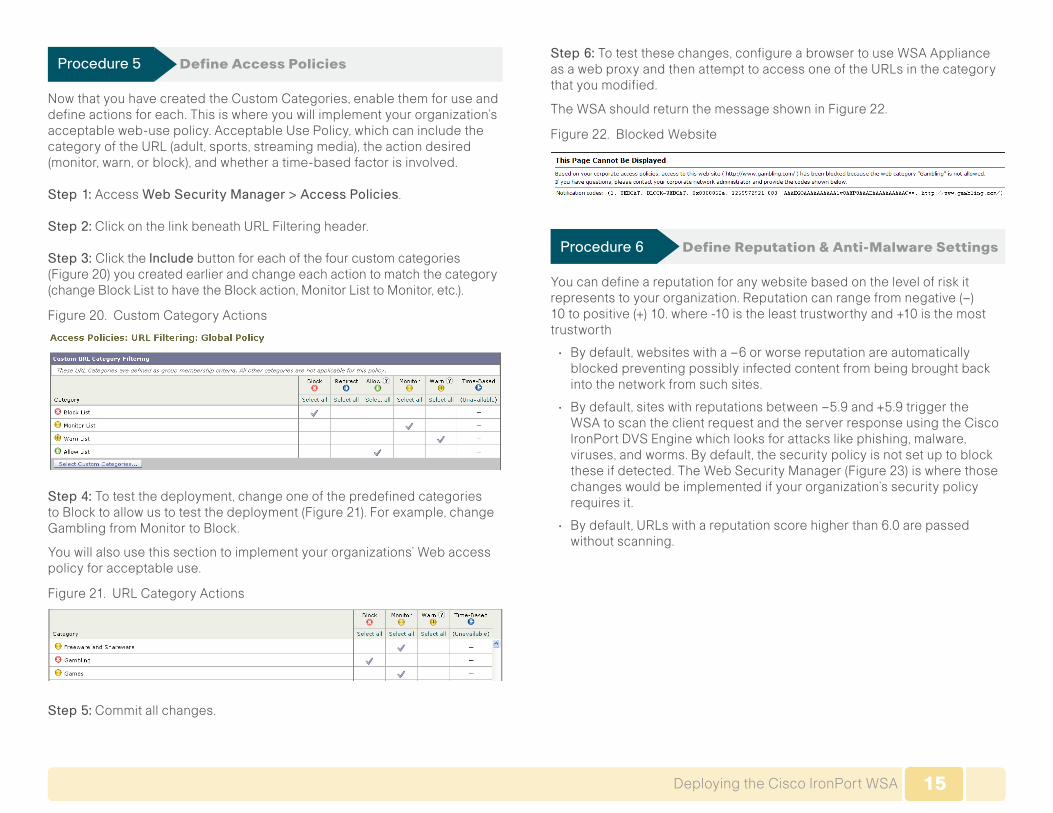
Procedure 5 Define Access Policies
NowthatyouhavecreatedtheCustomCategories,enablethemforuseanddefineactionsforeach.Thisiswhereyouwillimplementyourorganization’sacceptableweb-usepolicy.AcceptableUsePolicy,whichcanincludethecategoryoftheURL(adult,sports,streamingmedia),theactiondesired(monitor,warn,orblock),andwhetheratime-basedfactorisinvolved.
Step 1: Access Web Security Manager > Access Policies.
Step 2:ClickonthelinkbeneathURLFilteringheader.
Step 3: ClicktheInclude button for each of the four custom categories (Figure20)youcreatedearlierandchangeeachactiontomatchthecategory(changeBlockListtohavetheBlockaction,MonitorListtoMonitor,etc.).
Figure20.Custom Category Actions
Step 4: Totestthedeployment,changeoneofthepredefinedcategoriestoBlocktoallowustotestthedeployment(Figure21).Forexample,changeGamblingfromMonitortoBlock.
Youwillalsousethissectiontoimplementyourorganizations’Webaccesspolicy for acceptable use.
Figure21.URLCategoryActions
Step 5: Commit all changes.
Step 6: Totestthesechanges,configureabrowsertouseWSAApplianceasawebproxyandthenattempttoaccessoneoftheURLsinthecategorythat you modified.
TheWSAshouldreturnthemessageshowninFigure22.
Figure22.BlockedWebsite
Procedure 6 Define Reputation & Anti-Malware Settings
Youcandefineareputationforanywebsitebasedonthelevelofriskitrepresentstoyourorganization.Reputationcanrangefromnegative(–)10topositive(+)10.where-10istheleasttrustworthyand+10isthemosttrustworth
• Bydefault,websiteswitha–6orworsereputationareautomaticallyblockedpreventingpossiblyinfectedcontentfrombeingbroughtbackintothenetworkfromsuchsites.
• Bydefault,siteswithreputationsbetween–5.9and+5.9triggertheWSA to scan the client request and the server response using the Cisco IronPortDVSEnginewhichlooksforattackslikephishing,malware,viruses,andworms.Bydefault,thesecuritypolicyisnotsetuptoblocktheseifdetected.TheWebSecurityManager(Figure23)iswherethosechangeswouldbeimplementedifyourorganization’ssecuritypolicyrequires it.
• Bydefault,URLswithareputationscorehigherthan6.0arepassedwithout scanning.
16Deploying the Cisco IronPort WSA
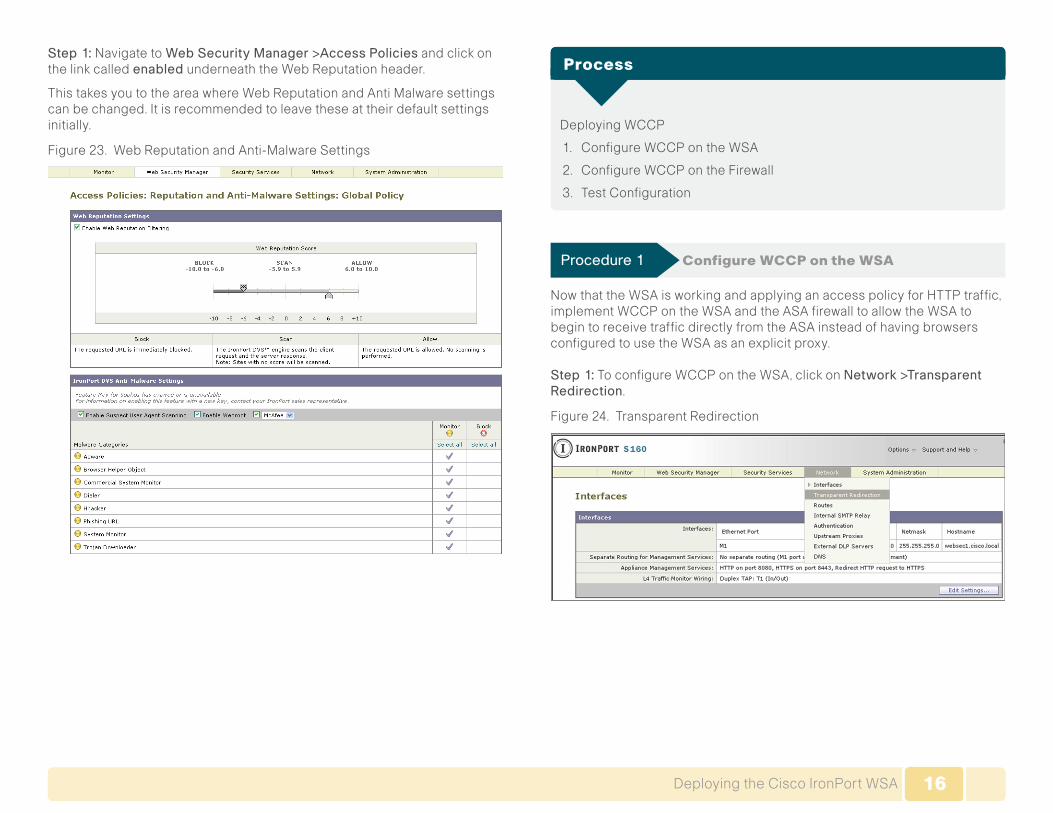
Step 1: NavigatetoWeb Security Manager >Access Policiesandclickonthelinkcalledenabled underneath the Web Reputation header.
ThistakesyoutotheareawhereWebReputationandAntiMalwaresettingscan be changed. It is recommended to leave these at their default settings initially.
Figure23.WebReputationandAnti-MalwareSettings
Process
Deploying WCCP
1. Configure WCCP on the WSA
2. Configure WCCP on the Firewall
3. Test Configuration
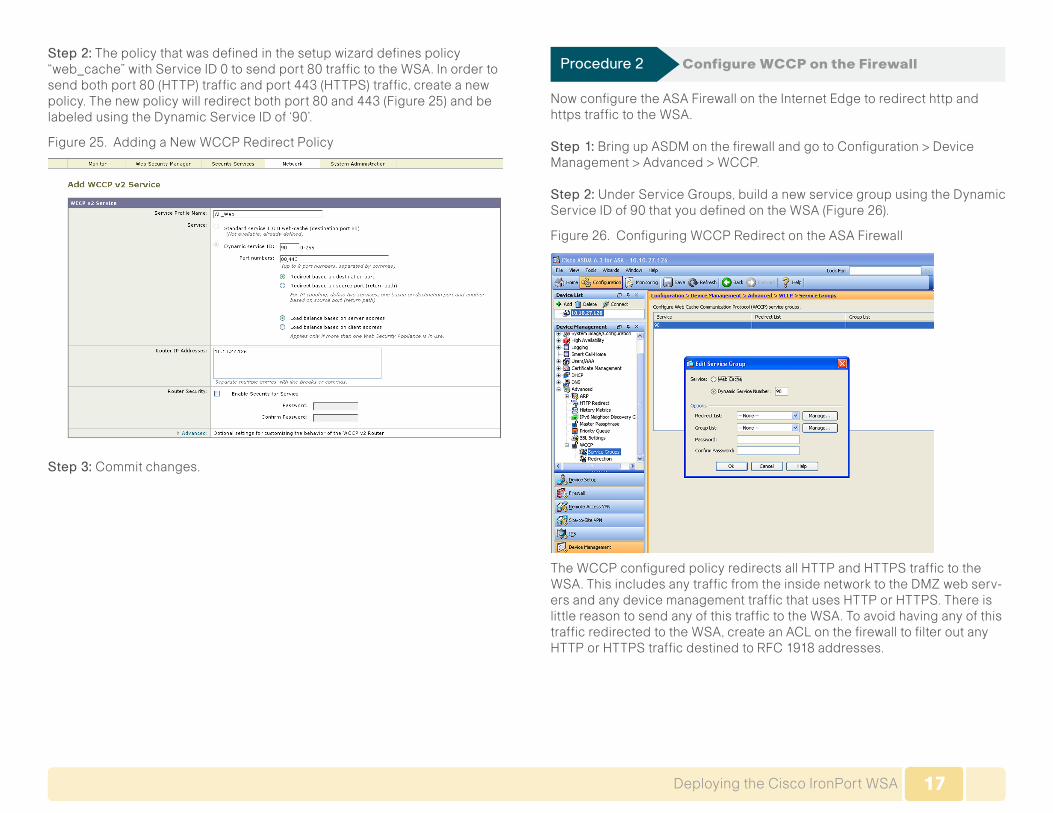
Procedure 1 Configure WCCP on the WSA
NowthattheWSAisworkingandapplyinganaccesspolicyforHTTPtraffic,implement WCCP on the WSA and the ASA firewall to allow the WSA to begin to receive traffic directly from the ASA instead of having browsers configured to use the WSA as an explicit proxy.
Step 1:ToconfigureWCCPontheWSA,clickonNetwork >Transparent Redirection.
Figure24.Transparent Redirection
17Deploying the Cisco IronPort WSA
Step 2:Thepolicythatwasdefinedinthesetupwizarddefinespolicy“web_cache”withServiceID0tosendport80traffictotheWSA.Inordertosendbothport80(HTTP)trafficandport443(HTTPS)traffic,createanewpolicy.Thenewpolicywillredirectbothport80and443(Figure25)andbelabeledusingtheDynamicServiceIDof‘90’.
Figure25.AddingaNewWCCPRedirectPolicy
Step 3: Commit changes.
Procedure 2 Configure WCCP on the Firewall
NowconfiguretheASAFirewallontheInternetEdgetoredirecthttpandhttps traffic to the WSA.
Step 1: BringupASDMonthefirewallandgotoConfiguration>DeviceManagement>Advanced>WCCP.
Step 2: UnderServiceGroups,buildanewservicegroupusingtheDynamicServiceIDof90thatyoudefinedontheWSA(Figure26).
Figure26.Configuring WCCP Redirect on the ASA Firewall
The WCCP configured policy redirects all HTTP and HTTPS traffic to the WSA.ThisincludesanytrafficfromtheinsidenetworktotheDMZwebserv-ers and any device management traffic that uses HTTP or HTTPS. There is little reason to send any of this traffic to the WSA. To avoid having any of this trafficredirectedtotheWSA,createanACLonthefirewalltofilteroutanyHTTP or HTTPS traffic destined to RFC 1918 addresses.
18Deploying the Cisco IronPort WSA
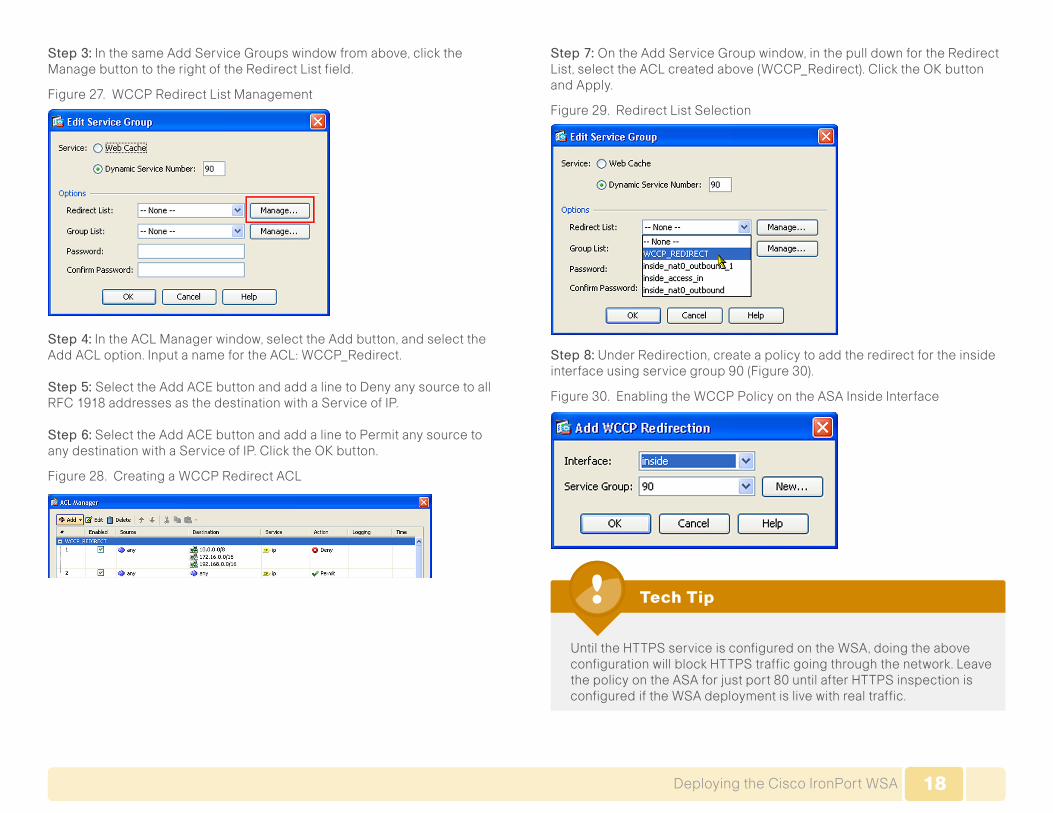
Step 3:InthesameAddServiceGroupswindowfromabove,clicktheManagebuttontotherightoftheRedirectListfield.
Figure27.WCCPRedirectListManagement
Step 4:IntheACLManagerwindow,selecttheAddbutton,andselecttheAddACLoption.InputanamefortheACL:WCCP_Redirect.
Step 5: Select the Add ACE button and add a line to Deny any source to all RFC 1918 addresses as the destination with a Service of IP.
Step 6: Select the Add ACE button and add a line to Permit any source to anydestinationwithaServiceofIP.ClicktheOKbutton.
Figure28.Creating a WCCP Redirect ACL
Step 7: OntheAddServiceGroupwindow,inthepulldownfortheRedirectList,selecttheACLcreatedabove(WCCP_Redirect).ClicktheOKbuttonand Apply.
Figure29.Redirect List Selection
Step 8:UnderRedirection,createapolicytoaddtheredirectfortheinsideinterfaceusingservicegroup90(Figure30).
Figure30.Enabling the WCCP Policy on the ASA Inside Interface
Tech Tip
UntiltheHTTPSserviceisconfiguredontheWSA,doingtheaboveconfigurationwillblockHTTPStrafficgoingthroughthenetwork.LeavethepolicyontheASAforjustport80untilafterHTTPSinspectionisconfigured if the WSA deployment is live with real traffic.
19Deploying the Cisco IronPort WSA
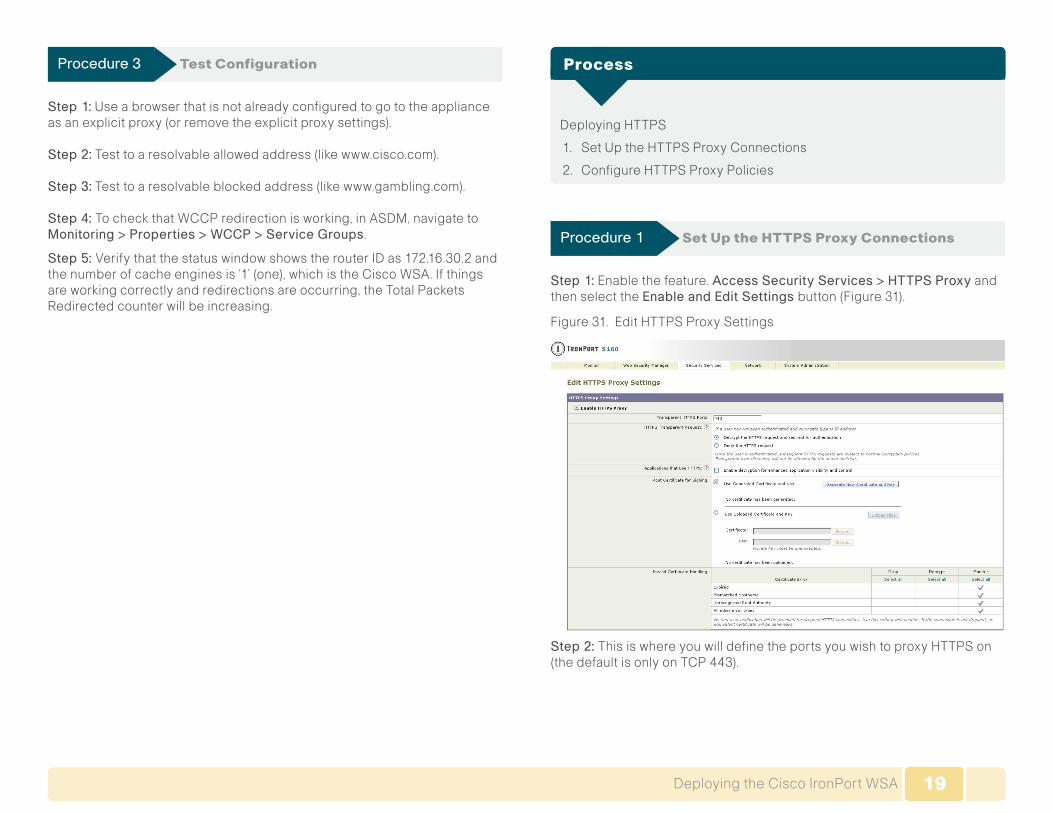
Procedure 3 Test Configuration
Step 1:Useabrowserthatisnotalreadyconfiguredtogototheapplianceas an explicit proxy (or remove the explicit proxy settings).
Step 2:Testtoaresolvableallowedaddress(likewww.cisco.com).
Step 3:Testtoaresolvableblockedaddress(likewww.gambling.com).
Step 4: TocheckthatWCCPredirectionisworking,inASDM,navigatetoMonitoring > Properties > WCCP > Service Groups.
Step 5: VerifythatthestatuswindowshowstherouterIDas172.16.30.2andthenumberofcacheenginesis‘1’(one),whichistheCiscoWSA.Ifthingsareworkingcorrectlyandredirectionsareoccurring,theTotalPacketsRedirected counter will be increasing.
Process
Deploying HTTPS
1. SetUptheHTTPSProxyConnections
2. Configure HTTPS Proxy Policies
Procedure 1 Set Up the HTTPS Proxy Connections
Step 1: Enable the feature. Access Security Services > HTTPS Proxy and then select the Enable and Edit Settings button (Figure 31).
Figure 31. Edit HTTPS Proxy Settings
Step 2: This is where you will define the ports you wish to proxy HTTPS on (the default is only on TCP 443).
20Deploying the Cisco IronPort WSA
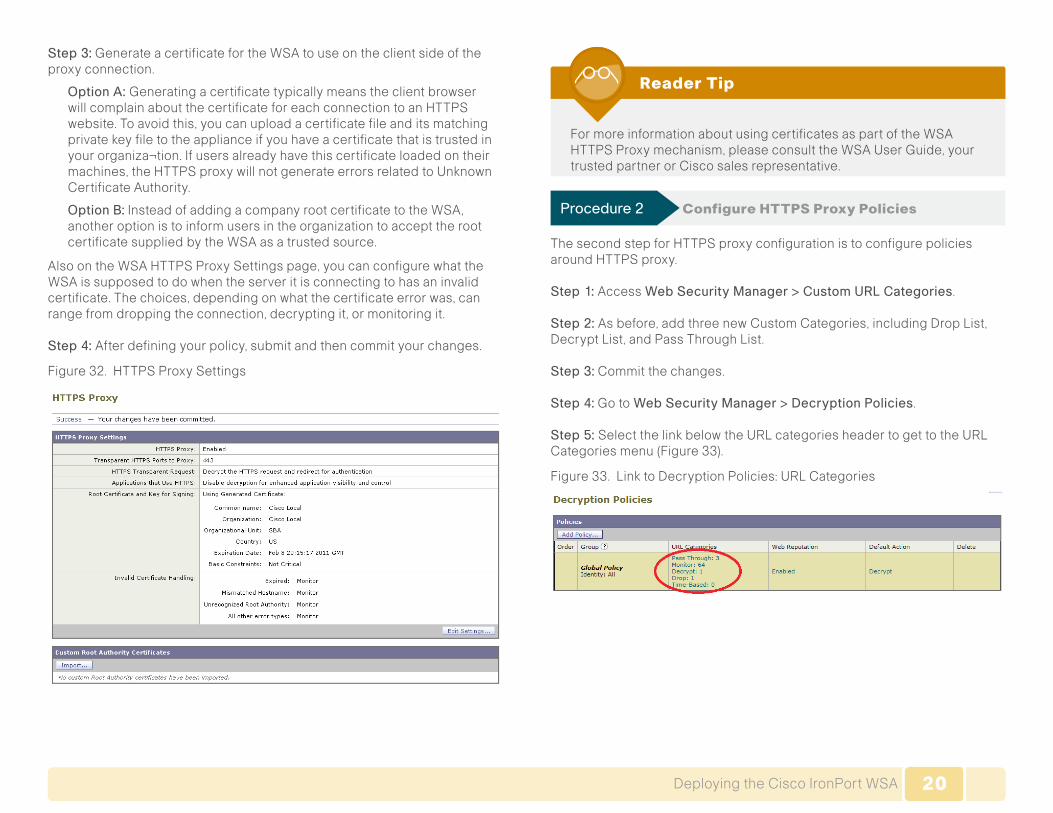
Step 3: Generate a certificate for the WSA to use on the client side of the proxy connection.
Option A: Generating a certificate typically means the client browser will complain about the certificate for each connection to an HTTPS website.Toavoidthis,youcanuploadacertificatefileanditsmatchingprivatekeyfiletotheapplianceifyouhaveacertificatethatistrustedinyourorganiza¬tion.Ifusersalreadyhavethiscertificateloadedontheirmachines,theHTTPSproxywillnotgenerateerrorsrelatedtoUnknownCertificate Authority.
Option B:InsteadofaddingacompanyrootcertificatetotheWSA,anotheroptionistoinformusersintheorganizationtoaccepttherootcertificate supplied by the WSA as a trusted source.
AlsoontheWSAHTTPSProxySettingspage,youcanconfigurewhattheWSA is supposed to do when the server it is connecting to has an invalid certificate.Thechoices,dependingonwhatthecertificateerrorwas,canrangefromdroppingtheconnection,decryptingit,ormonitoringit.
Step 4: Afterdefiningyourpolicy,submitandthencommityourchanges.
Figure32.HTTPS Proxy Settings
Reader Tip
For more information about using certificates as part of the WSA HTTPSProxymechanism,pleaseconsulttheWSAUserGuide,yourtrusted partner or Cisco sales representative.
Procedure 2 Configure HTTPS Proxy Policies
The second step for HTTPS proxy configuration is to configure policies around HTTPS proxy.
Step 1: Access Web Security Manager > Custom URL Categories.
Step 2: Asbefore,addthreenewCustomCategories,includingDropList,DecryptList,andPassThroughList.
Step 3: Commit the changes.
Step 4: Go to Web Security Manager > Decryption Policies.
Step 5: SelectthelinkbelowtheURLcategoriesheadertogettotheURLCategories menu (Figure 33).
Figure 33. LinktoDecryptionPolicies:URLCategories
21Deploying the Cisco IronPort WSA
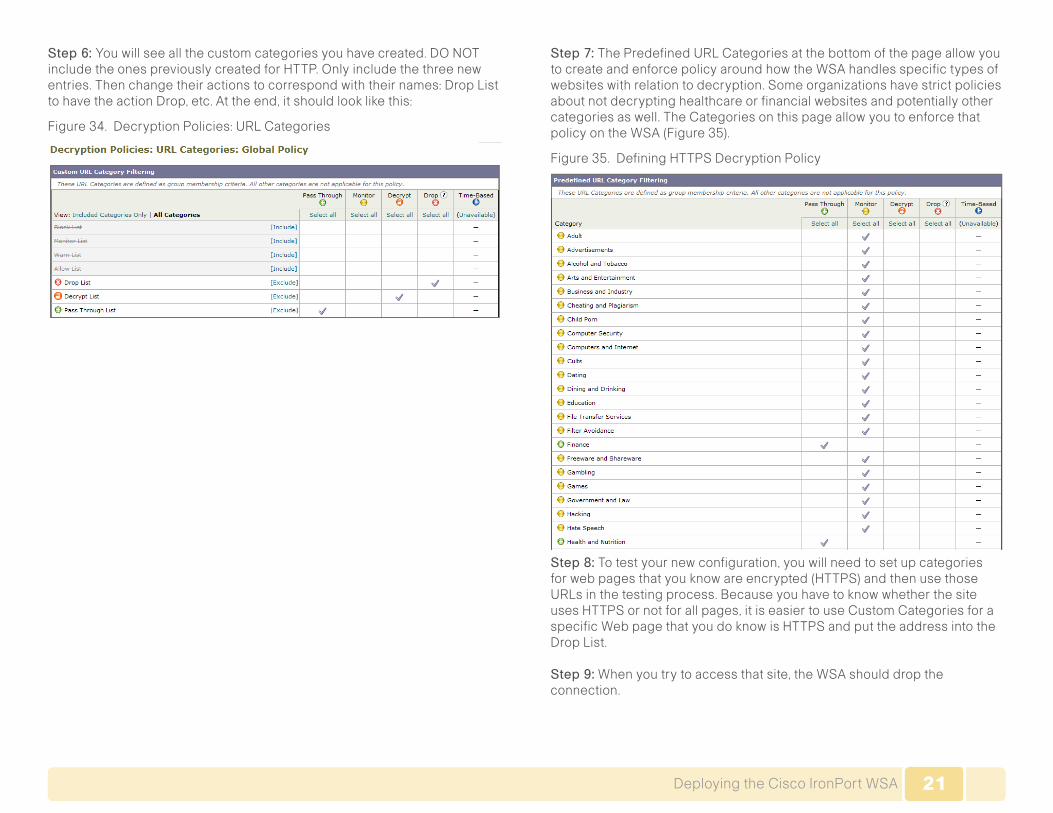
Step 6: Youwillseeallthecustomcategoriesyouhavecreated.DONOTinclude the ones previously created for HTTP. Only include the three new entries. Then change their actions to correspond with their names: Drop List tohavetheactionDrop,etc.Attheend,itshouldlooklikethis:
Figure 34. DecryptionPolicies:URLCategories
Step 7: ThePredefinedURLCategoriesatthebottomofthepageallowyouto create and enforce policy around how the WSA handles specific types of websiteswithrelationtodecryption.Someorganizationshavestrictpoliciesabout not decrypting healthcare or financial websites and potentially other categories as well. The Categories on this page allow you to enforce that policyontheWSA(Figure35).
Figure35.Defining HTTPS Decryption Policy
Step 8: Totestyournewconfiguration,youwillneedtosetupcategoriesforwebpagesthatyouknowareencrypted(HTTPS)andthenusethoseURLsinthetestingprocess.BecauseyouhavetoknowwhetherthesiteusesHTTPSornotforallpages,itiseasiertouseCustomCategoriesforaspecificWebpagethatyoudoknowisHTTPSandputtheaddressintotheDrop List.
Step 9:Whenyoutrytoaccessthatsite,theWSAshoulddroptheconnection.
22Deploying the Cisco IronPort WSA
Process
Enabling Authentication
1. SetUpAuthentication
2. Configure Identity Groups
Authentication is the act of confirming the identity of a user. When you enableauthentication,theWSAverifiestheidentityofclientsonthenetworkbefore allowing them to connect to a destination server. By using authentica-tionintheWSA,youcan:
• Setupdifferentwebaccesspoliciesbyuserorgroupmembershipagainst a central user directory.
• Enableusertracking,sothatwhenauserviolatesanacceptableusepolicy,theWSAcanmatchuptheuserwiththeviolationinsteadofjustusing an IP address.
• Enablecompliancereporting.
The WSA supports two different authentication protocols: Lightweight DirectoryAccessProtocol(LDAP)andNTLANManager(NTLM).SincemostorganizationswillhaveanADserver,theywillbeusingNTLM.Singlesign-on(SSO)isalsoonlyavailablewhenusingNTLM.
When the WSA is deployed in transparent mode with authentication enabled andatransactionrequiresauthentication,theWSArepliestotheclientapplicationaskingforauthenticationcredentials.However,notallclientapplicationssupportauthentication,sotheyhavenowaytopromptusersto provide their usernames and passwords. These applications might have issues when the WSA is deployed in transparent mode because the applica-tiontriestorunnon-HTTPtrafficoverport80andcannothandleanattemptby the WSA to authenticate the connection.
Applications in the following list do not support authentication at this time (subject to change as newer versions are released):
• MozillaThunderbird
• AdobeAcrobatUpdates
• MicrosoftWindowsUpdate
• OutlookExchange(whentryingtoretrieveInternet-basedpicturesforemail messages)
Tech Tip
IfapplicationsneedtoaccessaparticularURL,youcancreateanidentitybasedonacustomUserAgentcategorythatdoesnotrequireauthentication.Whenthisisdone,theclientapplicationwillnotbeaskedforauthentication.
Fororganizationsthatrequireauthentication,pleaseconsultyourtrusted Cisco IronPort partner or reseller or your Cisco account team. They will be able to help you set up an authentication solution that meetsyourrequirementswhileminimizinganypossiblecomplications.
Procedure 1 Set Up Authentication
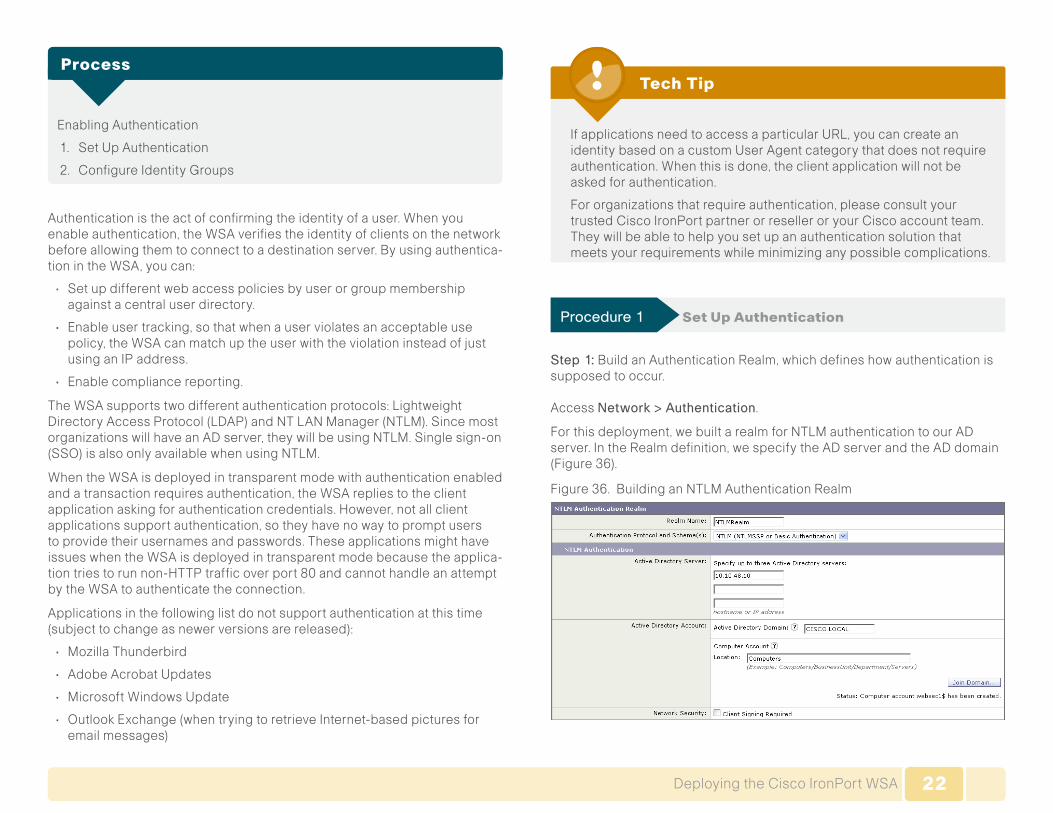
Step 1: BuildanAuthenticationRealm,whichdefineshowauthenticationissupposed to occur.
Access Network > Authentication.
Forthisdeployment,webuiltarealmforNTLMauthenticationtoourADserver.IntheRealmdefinition,wespecifytheADserverandtheADdomain(Figure 36).
Figure 36. BuildinganNTLMAuthenticationRealm
23Deploying the Cisco IronPort WSA
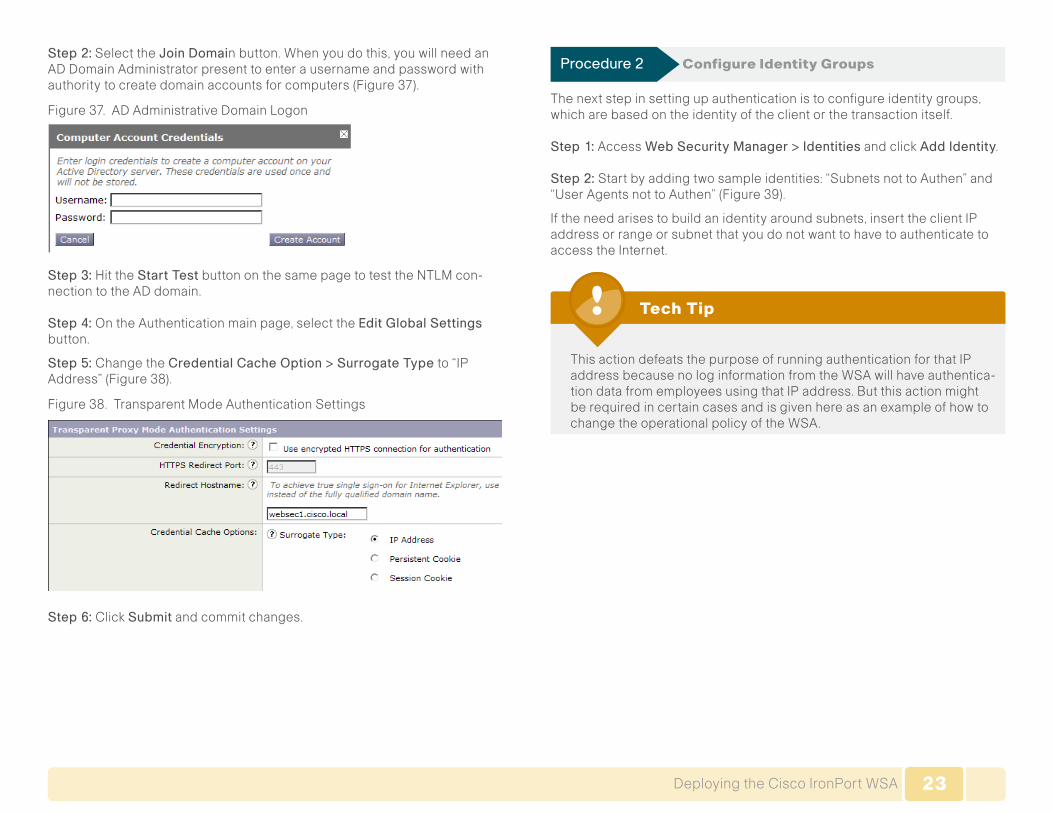
Step 2: Select the Join Domainbutton.Whenyoudothis,youwillneedanAD Domain Administrator present to enter a username and password with authoritytocreatedomainaccountsforcomputers(Figure37).
Figure37.AD Administrative Domain Logon
Step 3: Hit the Start TestbuttononthesamepagetotesttheNTLMcon-nection to the AD domain.
Step 4: OntheAuthenticationmainpage,selecttheEdit Global Settings button.
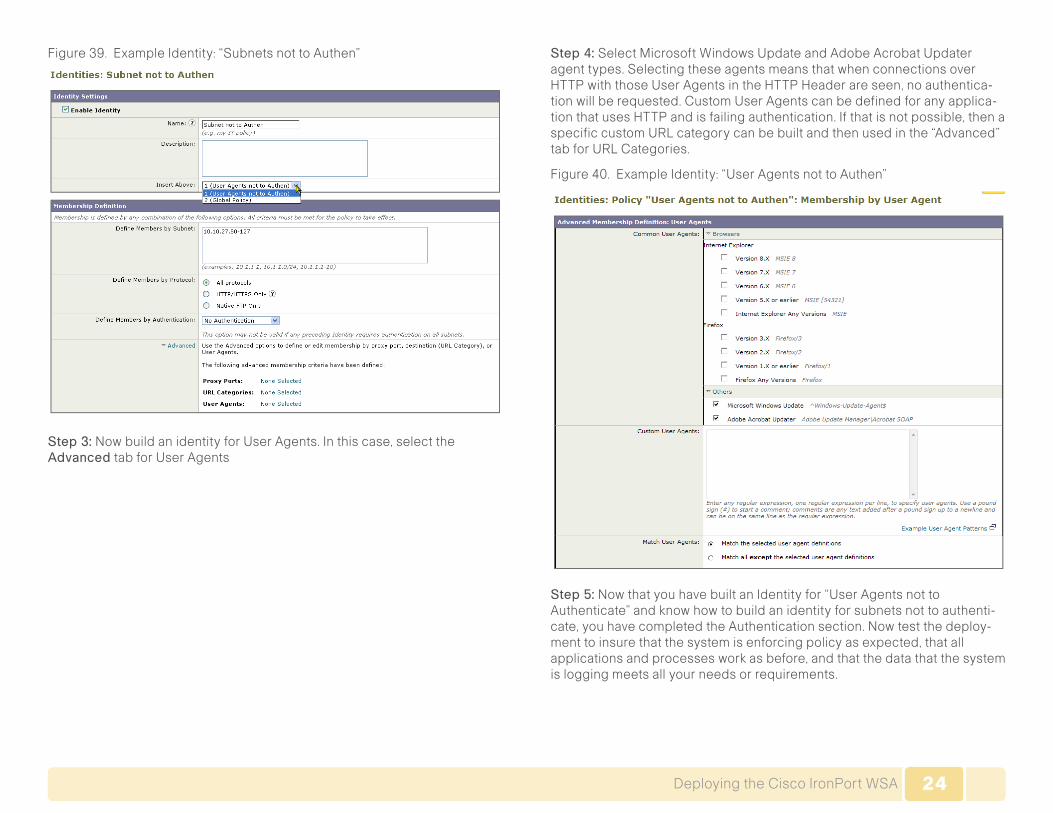
Step 5: Change the Credential Cache Option > Surrogate Typeto“IPAddress”(Figure38).
Figure 38. TransparentModeAuthenticationSettings
Step 6: ClickSubmit and commit changes.
Procedure 2 Configure Identity Groups
Thenextstepinsettingupauthenticationistoconfigureidentitygroups,which are based on the identity of the client or the transaction itself.
Step 1: Access Web Security Manager > IdentitiesandclickAdd Identity.
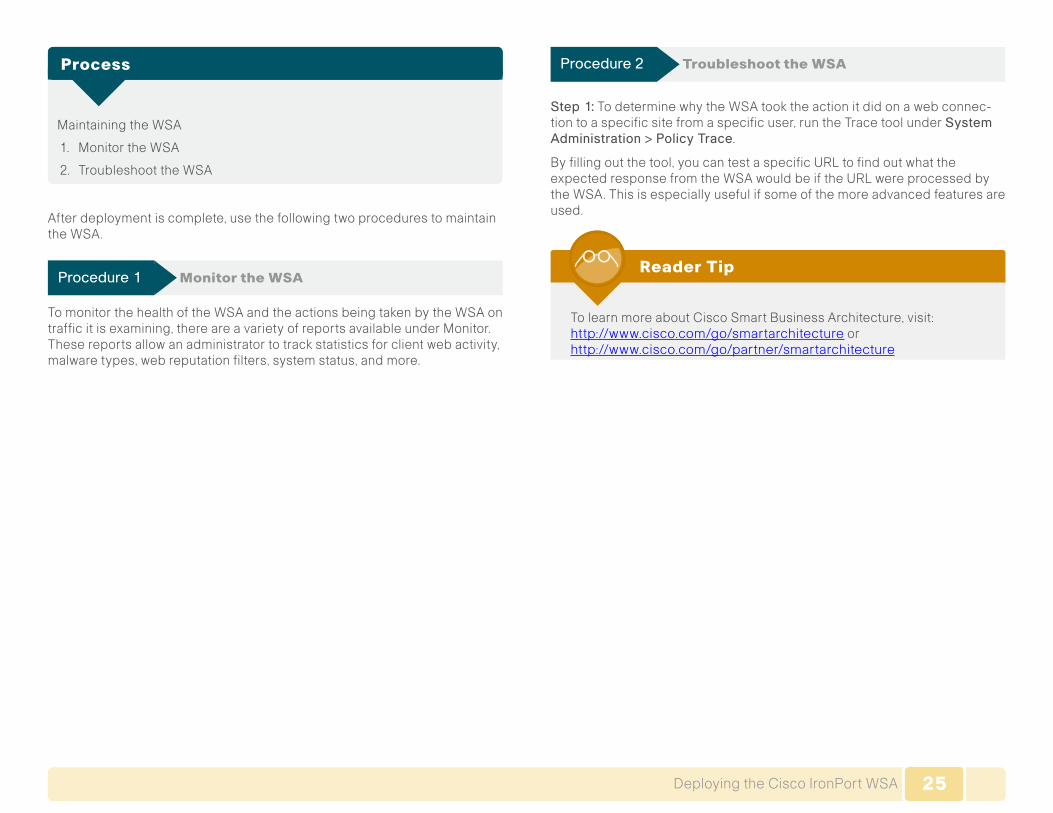
Step 2: Startbyaddingtwosampleidentities:“SubnetsnottoAuthen”and“UserAgentsnottoAuthen”(Figure39).
Iftheneedarisestobuildanidentityaroundsubnets,inserttheclientIPaddress or range or subnet that you do not want to have to authenticate to access the Internet.
Tech Tip
This action defeats the purpose of running authentication for that IP address because no log information from the WSA will have authentica-tion data from employees using that IP address. But this action might be required in certain cases and is given here as an example of how to change the operational policy of the WSA.
24Deploying the Cisco IronPort WSA
Figure 39. ExampleIdentity:“SubnetsnottoAuthen”
Step 3: NowbuildanidentityforUserAgents.Inthiscase,selecttheAdvancedtabforUserAgents
Step 4: SelectMicrosoftWindowsUpdateandAdobeAcrobatUpdateragent types. Selecting these agents means that when connections over HTTPwiththoseUserAgentsintheHTTPHeaderareseen,noauthentica-tionwillberequested.CustomUserAgentscanbedefinedforanyapplica-tionthatusesHTTPandisfailingauthentication.Ifthatisnotpossible,thenaspecificcustomURLcategorycanbebuiltandthenusedinthe“Advanced”tabforURLCategories.
Figure40.ExampleIdentity:“UserAgentsnottoAuthen”
Step 5: NowthatyouhavebuiltanIdentityfor“UserAgentsnottoAuthenticate”andknowhowtobuildanidentityforsubnetsnottoauthenti-cate,youhavecompletedtheAuthenticationsection.Nowtestthedeploy-menttoinsurethatthesystemisenforcingpolicyasexpected,thatallapplicationsandprocessesworkasbefore,andthatthedatathatthesystemis logging meets all your needs or requirements.
25Deploying the Cisco IronPort WSA
Process
MaintainingtheWSA
1. MonitortheWSA
2. Troubleshoot the WSA
Afterdeploymentiscomplete,usethefollowingtwoprocedurestomaintainthe WSA.
Procedure 1 Monitor the WSA
TomonitorthehealthoftheWSAandtheactionsbeingtakenbytheWSAontrafficitisexamining,thereareavarietyofreportsavailableunderMonitor.Thesereportsallowanadministratortotrackstatisticsforclientwebactivity,malwaretypes,webreputationfilters,systemstatus,andmore.
Procedure 2 Troubleshoot the WSA
Step 1:TodeterminewhytheWSAtooktheactionitdidonawebconnec-tiontoaspecificsitefromaspecificuser,runtheTracetoolunderSystem Administration > Policy Trace.
Byfillingoutthetool,youcantestaspecificURLtofindoutwhattheexpectedresponsefromtheWSAwouldbeiftheURLwereprocessedbythe WSA. This is especially useful if some of the more advanced features are used.
Reader Tip
TolearnmoreaboutCiscoSmartBusinessArchitecture,visit: http://www.cisco.com/go/smartarchitecture or http://www.cisco.com/go/partner/smartarchitecture
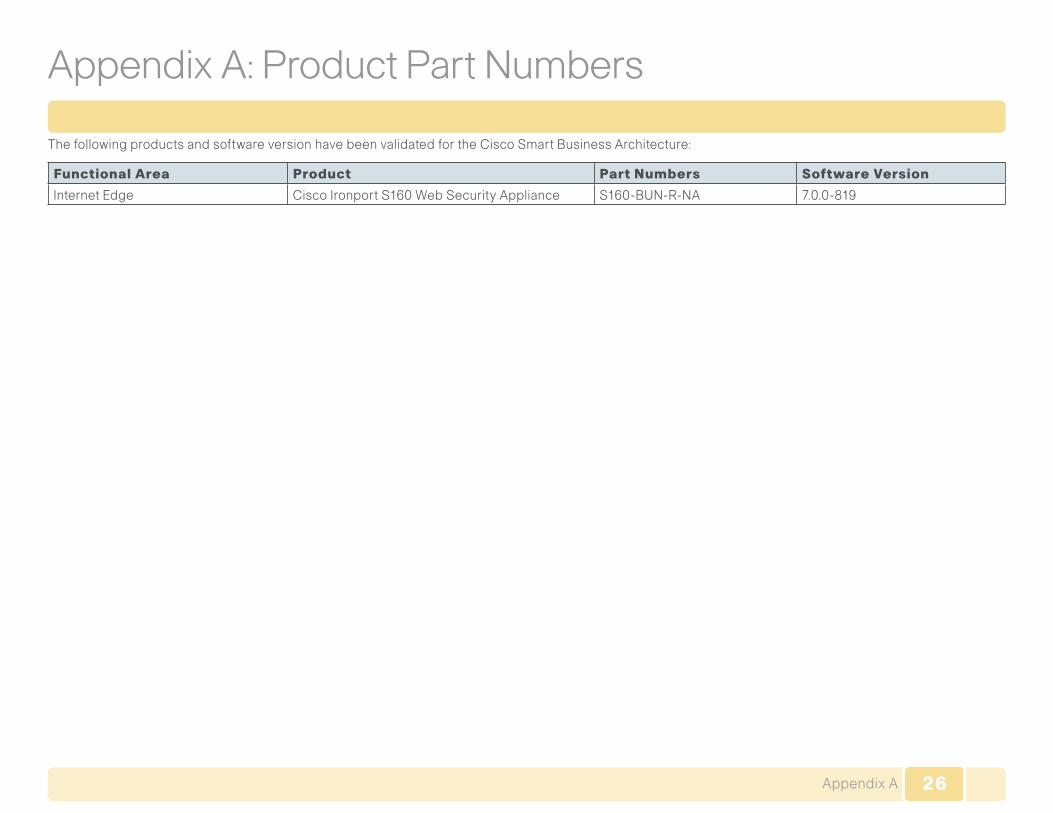
26Appendix A
AppendixA:ProductPartNumbers
The following products and software version have been validated for the Cisco Smart Business Architecture:
Functional Area Product Part Numbers Software Version
Internet Edge CiscoIronportS160WebSecurityAppliance S160-BUN-R-NA 7.0.0-819
27Appendix B
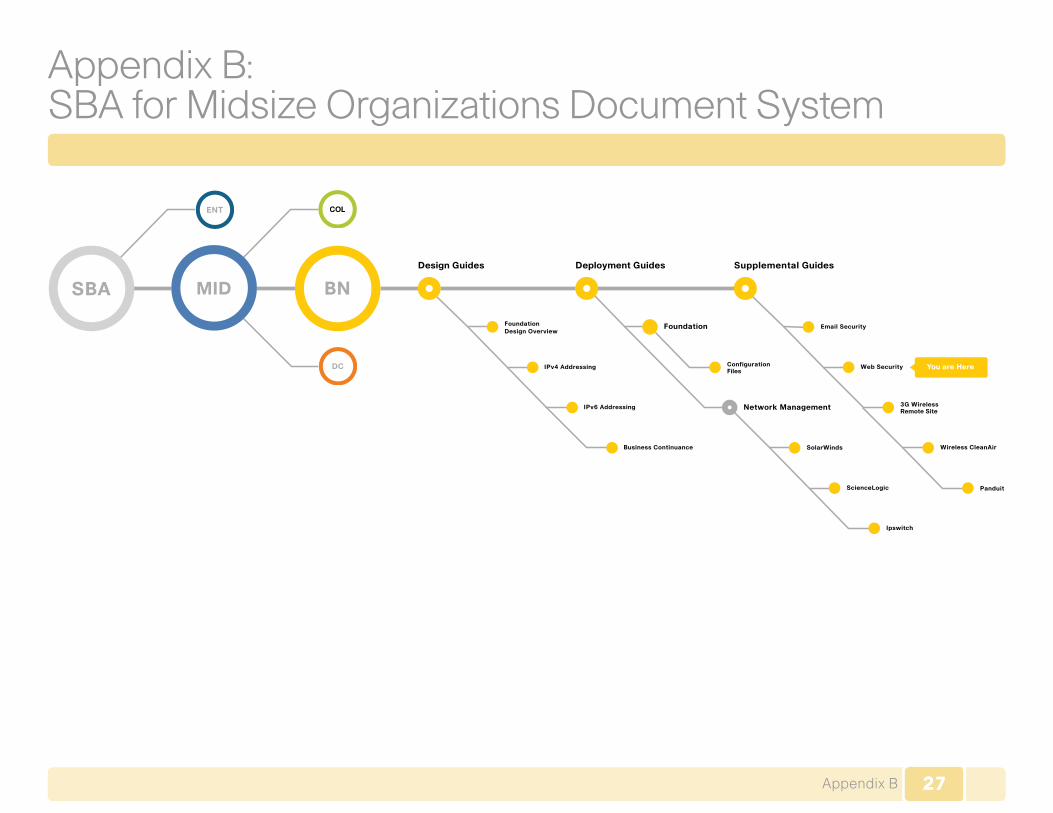
Appendix B: SBAforMidsizeOrganizationsDocumentSystem
Panduit
Wireless CleanAir
Web Security
Email Security
Ipswitch
ScienceLogic
SolarWinds
Network Management
Configuration Files
Foundation
Business Continuance
IPv6 Addressing
IPv4 Addressing
FoundationDesign Overview
3G Wireless Remote Site
Design Guides Deployment Guides
You are Here
Supplemental Guides
Cisco has more than 200 offices worldwide. Addresses, phone numbers, and fax numbers are listed on the Cisco Website at www.cisco.com/go/offices.
Cisco and the Cisco Logo are trademarks of Cisco Systems, Inc. and/or its affiliates in the U.S. and other countries. A listing of Cisco's trademarks can be found at www.cisco.com/go/trademarks. Third party trademarks mentioned are the property of their respective owners. The use of the word partner does not imply a partnership relationship between Cisco and any other company. (1005R)
Americas HeadquartersCisco Systems, Inc.San Jose, CA
Asia Pacific HeadquartersCisco Systems (USA) Pte. Ltd.Singapore
Europe HeadquartersCisco Systems International BVAmsterdam, The Netherlands
C07-582352-0201/11