Embed Size (px)
Citation preview

EMC® NetWorker®Version 9.1
Virtual Edition Deployment Guide302-003-269
REV 03

Copyright © 1990-2017 Dell Inc. or its subsidiaries. All rights reserved.
Published October 2017
Dell believes the information in this publication is accurate as of its publication date. The information is subject to change without notice.
THE INFORMATION IN THIS PUBLICATION IS PROVIDED “AS-IS.“ DELL MAKES NO REPRESENTATIONS OR WARRANTIES OF ANY KIND
WITH RESPECT TO THE INFORMATION IN THIS PUBLICATION, AND SPECIFICALLY DISCLAIMS IMPLIED WARRANTIES OF
MERCHANTABILITY OR FITNESS FOR A PARTICULAR PURPOSE. USE, COPYING, AND DISTRIBUTION OF ANY DELL SOFTWARE DESCRIBED
IN THIS PUBLICATION REQUIRES AN APPLICABLE SOFTWARE LICENSE.
Dell, EMC, and other trademarks are trademarks of Dell Inc. or its subsidiaries. Other trademarks may be the property of their respective owners.
Published in the USA.
EMC CorporationHopkinton, Massachusetts 01748-91031-508-435-1000 In North America 1-866-464-7381www.EMC.com
2 EMC NetWorker 9.1 Virtual Edition Deployment Guide

5
7
Deployment and Update 11Overview of NetWorker Virtual Edition....................................................... 12Predeployment requirements and best practices........................................ 12
System requirements..................................................................... 12Virtual disk configuration best practices.........................................12Preconfiguration checklist..............................................................13Verify the DNS configuration......................................................... 14
Deploy the NVE appliance........................................................................... 15Set up the NetWorker software on NVE.....................................................20Starting the NMC server GUI for the first time.......................................... 23
Preparing to connect to the NMC server.......................................23Launching the Networker Manangement Console .........................24
Configuring sendmail and NetWorker notifications.....................................26Configure the sendmail application................................................ 26Configuring NetWorker to send operation notifications by email... 27Edit policy notifications................................................................. 28Edit workflow notifications............................................................ 29Edit action notifications.................................................................29
Upgrade the NVE appliance........................................................................30
Maintenance 31Password maintenance...............................................................................32
Review password policies.............................................................. 32Modify passwords..........................................................................33
Change the storage disk configuration....................................................... 33
Troubleshooting 39Enable SSH for root................................................................................... 40NVE installation log files............................................................................. 40
Preconfiguration checklist 41
Figures
Preface
Chapter 1
Chapter 2
Chapter 3
Appendix A
CONTENTS
EMC NetWorker 9.1 Virtual Edition Deployment Guide 3

CONTENTS
4 EMC NetWorker 9.1 Virtual Edition Deployment Guide

Select source page......................................................................................................15Review details page.....................................................................................................16End User License Agreements page............................................................................ 16Select a name and folder page.................................................................................... 17Select a resource page................................................................................................ 17Select storage page.................................................................................................... 18Setup networks page.................................................................................................. 18Customize templates page.......................................................................................... 19Recent Tasks.............................................................................................................. 19Summary tab ............................................................................................................. 20Associating a jnlp file with Java (TM) web Start Launcher for Mozilla Firefox............25Deleting a disk device................................................................................................. 35Deleting the old VMDK file..........................................................................................37
12345678910111213
FIGURES
EMC NetWorker 9.1 Virtual Edition Deployment Guide 5

FIGURES
6 EMC NetWorker 9.1 Virtual Edition Deployment Guide

Preface
As part of an effort to improve its product lines, EMC periodically releases revisions ofits software and hardware. Therefore, some functions described in this documentmight not be supported by all versions of the software or hardware currently in use.The product release notes provide the most up-to-date information on productfeatures.
Contact your EMC technical support professional if a product does not functionproperly or does not function as described in this document.
Note
This document was accurate at publication time. Go to EMC Online Support (https://support.emc.com) to ensure that you are using the latest version of this document.
PurposeThis document describes how to set up NetWorker Virtual Edition in a NetWorkerenvironment.
AudienceThis guide is part of the NetWorker documentation set, and is intended for use bysystem administrators during the installation and setup of the NetWorker software.
Revision historyThe following table presents the revision history of this document.
Table 1 Revision history
Revision Date Description
03 October 26, 2017 Updated to use mail command to send notifications instead ofthe sendmail command.
02 February 6, 2017 Second release of this document for EMC NetWorker 9.1.Updates include:
l Preconfiguration checklist for information required beforedeployment.
l Appendix with a blank preconfiguration checklist.
l Corrections to the "Configuring sendmail" section in the"Deployment" chapter.
01 December 22,2016
First release of this document for EMC NetWorker 9.1.
Related documentationThe NetWorker documentation set includes the following publications, available onEMC Online Support:
l EMC NetWorker Online Software Compatibility MatrixProvides a list of client, server, and storage node operating systems supported bythe EMC information protection software versions. You can access the matrix at http://compatibilityguide.emc.com:8080/CompGuideApp/.
EMC NetWorker 9.1 Virtual Edition Deployment Guide 7

l EMC NetWorker Administration GuideDescribes how to configure and maintain the NetWorker software.
l EMC NetWorker Network Data Management Protocol (NDMP) User GuideDescribes how to use the NetWorker software to provide data protection forNDMP filers.
l EMC NetWorker Cluster Integration GuideContains information related to configuring NetWorker software on cluster serversand clients.
l EMC NetWorker Installation GuideProvides information on how to install, uninstall, and update the NetWorkersoftware for clients, storage nodes, and servers on all supported operatingsystems.
l EMC NetWorker Updating from a Previous Release GuideDescribes how to update the NetWorker software from a previously installedrelease.
l EMC NetWorker Release NotesContains information on new features and changes, fixed problems, knownlimitations, environment and system requirements for the latest NetWorkersoftware release.
l EMC NetWorker Command Reference GuideProvides reference information for NetWorker commands and options.
l EMC NetWorker Data Domain Boost Integration GuideProvides planning and configuration information on the use of Data Domaindevices for data deduplication backup and storage in a NetWorker environment.
l EMC NetWorker Performance Optimization Planning GuideContains basic performance tuning information for NetWorker.
l EMC NetWorker Server Disaster Recovery and Availability Best Practices GuideDescribes how to design, plan for, and perform a step-by-step NetWorker disasterrecovery.
l EMC NetWorker Snapshot Management Integration GuideDescribes the ability to catalog and manage snapshot copies of production datathat are created by using mirror technologies on EMC storage arrays.
l EMC NetWorker Snapshot Management for NAS Devices Integration GuideDescribes how to catalog and manage snapshot copies of production data that arecreated by using replication technologies on NAS devices.
l EMC NetWorker Security Configuration GuideProvides an overview of security configuration settings available in NetWorker,secure deployment, and physical security controls needed to ensure the secureoperation of the product.
l EMC NetWorker VMware Integration GuideProvides planning and configuration information on the use of VMware in aNetWorker environment.
l EMC NetWorker Error Message GuideProvides information on common NetWorker error messages.
l EMC NetWorker Licensing GuideProvides information about licensing NetWorker products and features.
l EMC NetWorker REST API Getting Started GuideDescribes how to configure and use the NetWorker REST API to createprogrammatic interfaces to the NetWorker server.
Preface
8 EMC NetWorker 9.1 Virtual Edition Deployment Guide

l EMC NetWorker REST API Reference GuideProvides the NetWorker REST API specification used to create programmaticinterfaces to the NetWorker server.
l EMC NetWorker 9.1 with EMC CloudBoost 2.1 Integration GuideDescribes the integration of NetWorker with CloudBoost.
l EMC NetWorker Management Console Online HelpDescribes the day-to-day administration tasks performed in the NetWorkerManagement Console and the NetWorker Administration window. To view theonline help, click Help in the main menu.
l EMC NetWorker User Online HelpDescribes how to use the NetWorker User program, which is the Windows clientinterface, to connect to a NetWorker server to back up, recover, archive, andretrieve files over a network.
Special notice conventions that are used in this documentEMC uses the following conventions for special notices:
NOTICE
Identifies content that warns of potential business or data loss.
Note
Contains information that is incidental, but not essential, to the topic.
Typographical conventionsEMC uses the following type style conventions in this document:
Table 2 Style conventions
Bold Used for names of interface elements, such as names of buttons,fields, tab names, and menu paths (what the user specifically selectsor clicks)
Italic Used for full titles of publications that are referenced in text
Monospace Used for:
l System code
l System output, such as an error message or script
l Pathnames, file names, prompts, and syntax
l Commands and options
Monospace italic Used for variables
Monospace bold Used for user input
[ ] Square brackets enclose optional values
| Vertical bar indicates alternate selections - the bar means “or”
{ } Braces enclose content that the user must specify, such as x or y orz
... Ellipses indicate non-essential information that is omitted from theexample
Where to get helpEMC support, product, and licensing information can be obtained as follows:
Preface
EMC NetWorker 9.1 Virtual Edition Deployment Guide 9

Product informationFor documentation, release notes, software updates, or information about EMCproducts, go to EMC Online Support at https://support.emc.com.
Technical supportGo to EMC Online Support and click Service Center. Several options for contactingEMC Technical Support appear on the site. Note that to open a service request, youmust have a valid support agreement. Contact your EMC sales representative fordetails about obtaining a valid support agreement or with questions about youraccount.
Online communitiesGo to the EMC Community Network at https://community.emc.com for peercontacts, conversations, and content on product support and solutions. Interactivelyengage online with customers, partners, and certified professionals for all EMCproducts.
Your commentsYour suggestions help to improve the accuracy, organization, and overall quality of theuser publications. Send your opinions of this document to [email protected].
Preface
10 EMC NetWorker 9.1 Virtual Edition Deployment Guide

CHAPTER 1
Deployment and Update
This chapter includes the following topics:
l Overview of NetWorker Virtual Edition............................................................... 12l Predeployment requirements and best practices................................................ 12l Deploy the NVE appliance...................................................................................15l Set up the NetWorker software on NVE............................................................ 20l Starting the NMC server GUI for the first time.................................................. 23l Configuring sendmail and NetWorker notifications............................................ 26l Upgrade the NVE appliance............................................................................... 30
Deployment and Update 11

Overview of NetWorker Virtual EditionNetWorker® Virtual Edition (NVE) is a NetWorker Server that runs as a virtualmachine in a VMware environment. NVE integrates the latest version of theNetWorker software with SuSE Linux as a VMware virtual machine. NVE is available asa 250 GB virtual appliance.
Note
You cannot update a NetWorker Server that resides on a physical host to an NVEappliance.
Predeployment requirements and best practicesBefore you deploy an NVE virtual machine, review the predeployment requirementsand best practices in the following sections.
Note
NVE does not support data migration from another instance of NetWorker.
System requirementsNetworker Virtual Edition (NVE) supports the following VMware versions:
l VMware vCenter 5.1, 5.5, 5.5u2, 6.0, and 6.5
l ESXi 5.1, 5.5, 5.5u2, 6.0, and 6.5
The NVE disk layout consists of one operating system disk (256 GB) and one storagepartition (250 GB).
The following table defines the minimum system requirements for each size of NVE.
Table 3 Minimum requirements for NVE
System object Requirement
Processors Minimum four 2 GHz processors
Memory 8 GB
Disk space 600 GB
Network connection 1 GbE connection
Virtual disk configuration best practicesESXi supports multiple disk formats. For NVE virtual machines, the initial configurationis thick provision lazy zeroed.
Note
NVE does not support thin provisioning.
Deployment and Update
12 EMC NetWorker 9.1 Virtual Edition Deployment Guide

After the initial deployment, if you configure the virtual disks for the thick provisioneager zeroed, you will get better initial performance because the first write to the diskwill require fewer operations.
Note
VMware documentation provides information about converting lazy zeroed virtualdisks to eager zeroed virtual disks. Converting a disk from thick provisioned lazyzeroed to thick provisioned eager zeroed is time-consuming and can consume asignificant number of storage I/O processes.
A virtual machine that runs NVE aggressively uses disk I/O and is almost never idle.VMware recommendations for appropriate resources for high-performance databasevirtual machines are generally applicable to an NVE virtual machine. In particular, astorage pool that is allocated from a group of dedicated physical disks in a RAID 1(mirror) or RAID 10 (combines RAID 0 with RAID 1) configuration provides the bestperformance.
Preconfiguration checklistBefore you deploy the NVE appliance, gather the following information.
Table 4 Preconfiguration checklist
Completed? Information
□□□□□□
Network configuration details:
l IP address of the default gateway:
l DNS server:
l NVE IP address:
l NVE FQDN:
l Netmask:
l SMTP mail relay host (to send notifications):
Note
The OVA package for NVE does not support dual stack and IPv6, useIPv4.
□□□
Ensure that the following firewall ports are open between the NetWorkerServer and the :
l 27000
l 27010
l 51000
□□□□
Data Domain system information (when DD Boost devices are used):
l IP address of the Data Domain system:
l Administrator account name:
l Password of the administrator account:
l Storage folder location:
Deployment and Update
Preconfiguration checklist 13

Table 4 Preconfiguration checklist (continued)
Completed? Information
□□□
l DDBoost user username:
l Password of the DDBoost user:
l SNMP community string:
Verify the DNS configurationBefore you deploy the NVE, ensure that the DNS server is configured correctly for thehostname and IP address of the vCenter server and the NVE appliance. Incorrectname resolution results in runtime errors and configuration issues.
From a command prompt on the vCenter server, type the following commands:
Procedure
1. To perform a reverse DNS lookup of the IP address of the NVE, type thefollowing command:
nslookup NVE_IP_address DNS_Server_IP_address
The IP address configuration is correct when the nslookup command returnsthe fully qualified domain name (FQDN) of the NVE.
2. To perform a forward DNS lookup of the FQDN of the NVE, type the followingcommand:
nslookup NVE_FQDN DNS_Server_IP_address
The FQDN configuration is correct when the nslookup command returns thecorrect IP address of the NVE.
3. To perform a reverse DNS lookup of the IP address of the vCenter server, typethe following command:
nslookup vCenter_FQDN DNS_Server_IP_address
The IP address configuration is correct when the nslookup command returnsthe FQDN of the vCenter server.
4. To perform a forward DNS lookup of the FQDN of the vCenter server, type thefollowing command:
nslookup FQDN_of_vCenter DNS_Server_IP_address
The FQDN configuration is correct when the nslookup command returns thecorrect IP address of the vCenter Server.
Results
If the nslookup commands return the proper information, close the commandprompt. If the nslookup commands do not return the correct information, before youinstall NVE, resolve the DNS configuration.
Deployment and Update
14 EMC NetWorker 9.1 Virtual Edition Deployment Guide

Deploy the NVE applianceNVE uses an open virtualization format template (OVF Template) to deploy andconfigure the appliance. The OVF template is distributed as an open virtual appliance(OVA) package.
Before you begin
Download and install the vSphere Web Integration Client Plug-in on a host that hasnetwork access to the vCenter server that manages the NVE appliance.
Perform the following steps from a host that has the vSphere Web Integration ClientPlug-in and network access to the vCenter server.
Note
The following procedure and screen shots are specific to vCenter 6.0. Other vCenterserver versions might display the information in the deployment screens differently.
Procedure
1. Download the NVE OVA package from http://support.emc.com.
2. Connect to the vCenter server, by using the VMware vSphere Web Client. Onthe Login screen, specify a user account that has administrative rights.
3. In the vCenter server console, browse to vCenter > vCenter server.
4. Right-click the vCenter server that manages the NVE appliance and selectDeploy OVF template.
The Deploy OVF Template wizard appears.
5. On the Select source page, select one of the following options, and then clickNext.
l URL—Type the path to the OVA file.
l Local file—Click Browse, and then search for the OVA file.
The following figure provides an example of the Select source page.Figure 1 Select source page
6. On the Review details page, verify the details about the template, and thenclick Next.
The following figure provides an example of the Review details page.
Deployment and Update
Deploy the NVE appliance 15

Figure 2 Review details page
7. On the End User License Agreement page, if you agree to the license terms,click Accept, and then click Next.
The following figure provides an example of the Accept License Agreementspage.Figure 3 End User License Agreements page
8. On the Select a name and folder page page, type a descriptive name for theNVE, select the inventory location, and then click Next.
The following figure provides an example of the Select a name and folder pagewith a Datacenter named Burlington IDD lab selected.
Deployment and Update
16 EMC NetWorker 9.1 Virtual Edition Deployment Guide

Figure 4 Select a name and folder page
9. On the Select a resource page, select the ESXi host, cluster, vApp, or resourcepool on which to run the deployed template, and then click Next.
The following figure provides an example of the Select a resource page with anESXi host selected.Figure 5 Select a resource page
10. On the Select storage page, perform the following configuration tasks:
a. In the Select virtual disk format field, leave the default selection ThickProvisioned Lazy Zeroed.
Thin provisioning is not supported with NVE.
b. In the VM Storage Policy field, select a storage policy.
c. In the Storage table, select the datastore for NVE.
d. Click Next
The following figure provides an example of the Select storage page with aVNX datastore selected.
Deployment and Update
Deploy the NVE appliance 17

Figure 6 Select storage page
11. On the Setup networks page, select the destination network, and then clickNext.
The following figure provides an example of the Setup networks page.Figure 7 Setup networks page
12. On the Customize template page, perform the following configuration tasks,and then click Next:
a. In the IP Address field, type the IPv4 address for the NVE appliance.
b. In the Netmask field, type the netmask address for the NVE appliance.
c. In the Default Gateway, type the address of the gateway host.
d. In the FQDN field, type the fully qualified domain name (FQDN) for the NVEappliance.
e. In the DNS field, type the IP address of up to three DNS servers, which areseparated by commas.
The following figure provides an example of the Customize templates page.
Deployment and Update
18 EMC NetWorker 9.1 Virtual Edition Deployment Guide

Figure 8 Customize templates page
13. On the Ready to complete page, confirm the deployment settings, selectPower on after deployment, and then click Finish.
The deployment might take several minutes. After the deployment completes,the Recent tasks section of the vSphere Web Client displays the status of theDeploy OVF template task as Completed. The following figure provides anexample of the Recent Tasks window after the deployment completes.Figure 9 Recent Tasks
14. In the vCenter console, browse to the Hosts window and select the NVE virtualmachine. To monitor the progress of the installation, open the Virtual Console.
15. On the Summary tab, verify that the status for VMware Tools changes toRunning or Unmanaged.
The following figure provides an example of the Summary tab where the statusof VMware Tools appears as Running.
Deployment and Update
Deploy the NVE appliance 19

Figure 10 Summary tab
Set up the NetWorker software on NVEThe NVE appliance includes an installation manager that prompts you forenvironment-specific information, such as passwords, and then automatically installsof the NetWorker server software.
To set up the NetWorker software on a new NVE appliance, perform the followingsteps:
Procedure
1. On a host that has network access to the NVE virtual machine, open a webbrowser and type the following URL:
https://NVE_VMwhere NVE_VM is the hostname or IP address of the NVE appliance.
When you use Internet Explorer, if any security messages appear, clickContinue. When you use Firefox, if any connection warnings appear, select Iunderstand the risks, and then add an exception for the website.
The EMC NetWorker Installation Manager login page appears.
2. In the User field, type root.
3. In the Password field, type changeme.
Note
The default password expiration policy on the NVE is once every 60 days. If thepassword that you specify has expired, a messages similar to the followingappears:Error "Login failed. The password has alreadyexpired or is within the warning period. You must changeand verify the password expiration date." To resolve this issue,change the passwords assigned to the root and admin users. Modifyingpasswords provides more information.
Deployment and Update
20 EMC NetWorker 9.1 Virtual Edition Deployment Guide

4. Click Login.
5. On the SW Releases tab, to the right of the NveConfig package, click Install.
The installation initialization begins. The initialization extracts files from thepackage and prepares the environment for the installation. The process cantake a few minutes. After the initialization completes, the Installation Setuppage appears.
6. On the Authc Settings tab, specify the following attributes:
a. In the Tomcat KeyStore Password and Tomcat KeyStore password(Confirm) fields, type a password for the keystore file that the NetWorkerAuthentication Service uses to store data.
Specify a password that contains at least six characters and does notcontain dictionary words.
b. In the Authc Password and Authc Password (confirm) fields, type apassword for the NetWorker Authentication Service administrator account.
Ensure the password complies with the following minimum requirements:
l Nine characters long
l One uppercase letter
l One lowercase letter
l One special character
l One numeric character
Note
You will use the administrator account to log in to the NMC Server.
c. Click Save.
7. (Optional) To install additional language packs, on the NetWorker Settings tab,from the Value list, select the language pack, and then click Save.
8. On the Passwords tab, and specify the OS admin user and OS root userpasswords, and then click Save.
Ensure that the passwords comply with the following minimum requirements:
l Nine characters long
l One uppercase letter
l One lowercase letter
l One special character
l One numeric character
9. On the Server Settings tab, from the Value list, select the time zone for theappliance, and then click Save.
10. (Optional) To configure Data Domain devices in the NetWorker datazone, onthe Data Domain Settings tab, select the box in the Value column, and thenspecify the following configuration attributes:
a. In the Data Domain Address field, type the IP address or the FQDN of theData Domain system.
Deployment and Update
Set up the NetWorker software on NVE 21

b. In the Data Domain Administrator Name field, type the username for aData Domain Administrator account.
c. In the Data Domain Administrator Password field, type the password forthe Data Domain Administrator account.
d. In the Data Domain Storage Folder field, type a new or existing name for afolder that you want to use for DD Boost storage.
The installation process automatically creates a Storage Unit (SU) and folderfor the appliance in the hidden mount point folder, /data/col1. Do notmodify this folder structure, which all NetWorker server hosts use.
e. (Optional) To create a DD Boost account, select DDBoost create new loginaccount.
f. In the Data Domain Login field, type the account for the DD Boost user.
g. In the DDBoost Login Password field, type the password for the DD Boostuser that you specified in the Data Domain Login field.
Note
The DD Boost user that you specify must have an assigned role that is notnone.
h. In the DDBoost Login Password Confirm field, type the password for theDD Boost user that you specified in the Data Domain Login field.
i. Click Save.
j. To specify the SNMP community string to monitor the Data Domain system,on the NetWorker Settings tab, in the SNMP Community String field,type the string value. Click Save.
The default SNMP Community String on a Data Domain system is Public.
11. (Optional) To install or upgrade the password hardening package, on theSecurity Settings tab, select Show advanced settings, and then select thebox in the Value column. Click Save.
12. Click Continue.
The Installation Progress window appears and displays information about thestatus of the installation actions. The Information Log pane displays messagesabout the status of each task. To generate a file that contains each message,click Export, and then select Excel to export the information to an Excelspreadsheet or select PDF to export the information to a PDF file.
Results
The EMC NetWorker Installation Manager installs the NetWorker and NMC serversoftware on the NVE appliance.
After you finish
Install and configure the on a host in the datazone that the NetWorker server canaccess. EMC NetWorker Licensing Guide provides more information.
Deployment and Update
22 EMC NetWorker 9.1 Virtual Edition Deployment Guide

Starting the NMC server GUI for the first timeThe NMC server is a web-based Java application that manages NetWorker serveroperations. An NMC client is a host that connects to the NMC server through asupported web browser to display the NMC server GUI.
The following sections outline how to prepare the NMC client and how to connect tothe NMC server GUI.
Preparing to connect to the NMC serverYou cannot connect to the NMC GUI with any of the following, previously supported,operating systems:
l AIX
l HP-UX
l Solaris
Before you try to connect to the NMC server from a supported host, ensure that JREis correctly configured.
Enabling temporary internet file cachingEnable the Temporary internet file caching attribute in the Java ControlPanel of the NMC client. When you do not enable this option in JRE, JavaWebStart fails to start.
For Windows NMC clients:
1. Browse to Control Panel > Java > General > Temporary Internet Files >Settings.
2. Ensure that the option Keep temporary files on my computer is selected.
For UNIX NMC clients:
1. Start the Java W Start Application Manager, javaws.
2. Select Enable temporary internet file caching.
Windows only, confirming JRE and Internet Explorer compatibilityFor Windows hosts only, ensure that you install the correct JRE program for theinstalled version of Microsoft Internet Explorer (IE). 32-bit IE requires 32-bit JRE. 64-bit IE requires 64-bit JRE
To determine the Microsoft Internet Explorer version on the Windows NMC client,perform the following steps.
Procedure
1. Right-click the Microsoft Internet Explorer shortcut and select Properties.
2. Review the Target Location field.
The Target Location is one of the following paths:
l 32-bit IE —C:\Program Files (x86)\Internet Explorer\l 64-bit IE—C:\Program Files\Internet Explorer\
Deployment and Update
Starting the NMC server GUI for the first time 23

Adding the NMC server to Exception Site listJava security settings block the NMC server application.
Therefore, you must add the NMC server address to the JRE Exception site list.
Procedure
1. Open the Java Control Panel.
2. On the Security tab, select Edit Site list.
3. Click Add.
4. In the Location field, specify the URL to the NMC server in the format http://server_name:9000where server_name is the hostname of the NMC server.
Note
If you connect to the NMC server by using the IP address of the NMC server,add an entry for the IP address in the following format:
http://ip_address:9000
5. Click OK.
6. In the Security Warning window, click Continue.
7. Click OK.
Launching the Networker Manangement ConsoleComplete the following procedure to connect to the NMC Server GUI from an NMCclient. By default, the NetWorker Authentication Service uses the local user databasefor user authentication. Specify the NetWorker Authentication Service administratoraccount to log in to the NMC Server. The EMC NetWorker Security Configuration Guidedescribes how to configure the NetWorker Authentication Service to use LDAP or ADfor user authentication.
Procedure
1. From a supported web browser session, type the URL of the NMC Server:
http://server_name:http_service_portwhere:
l server_name is the name of the NMC Server.
l http_service_port is the port for the embedded HTTP server. The defaultHTTP port is 9000.
For example: http://houston:9000The gconsole.jnlp file downloads to the host. When the downloadcompletes, open the file.
2. When you use Mozilla Firefox on Windows, and the jnlp extension is notassociated with Java, you are prompted to choose the program that opens thejnlp file. In the dialog box that appears, select Open with, and then selectJava (TM) Web Start Launcher. If this application does not appear,browse to the Java 8 folder and select the javaws.exe file.
Deployment and Update
24 EMC NetWorker 9.1 Virtual Edition Deployment Guide

The following figure provides an example of the file association dialog box thatappears with the Mozilla Firefox browser.Figure 11 Associating a jnlp file with Java (TM) web Start Launcher for Mozilla Firefox
3. In the Welcome page, click Start.
Note
If the Start button does not appear but you see a warning message that statesthat Java Runtime Environment cannot be detected, click the here hyperlink.
4. When you use Internet Explorer, if a security warning appears, select I acceptthe risks and want to run this application, then click Run.
5. In the Log in page, specify the NetWorker Authentication Service administratorusername and password, and then click OK.
6. In the Licensing Agreement page, select Accept.
7. If you did not install a supported version of JRE on the host, then a prompt toinstall JRE appears. Cancel the installation, install JRE, and then re-run theinstallation.
8. In the Welcome to the NMC Server Configuration Wizard page, click Next.
9. In the Specify a list of managed NetWorker Servers page:
a. Specify the names of the NetWorker Servers that the NMC Server willmanage, one name per line.
Note
If the NMC Server is also the NetWorker Server, specify the name of theNetWorker Server.
b. Leave the default options Capture Events and Gather Reporting Dataenabled.
Consider the following option:
Deployment and Update
Launching the Networker Manangement Console 25

l To allow the NMC Server to monitor and record alerts for events that occuron the NetWorker Server, enable the Capture Events option.
l To allow the NMC Server to collect data about the NetWorker Server andgenerate reports, enable the Gather Reporting Data option.
10. Click Finish. The installation starts the default web browser and connects tothe NMC server. The NetWorker Management Console and Getting Startedwindows appear.
11. In the Enterprise window, right-click the NetWorker Server, and then selectLaunch Application.
Note
If you do not specify any NetWorker Servers in the Specify a list of managedNetWorker servers window, the NMC Enterprise window does not display anyNetWorker Servers. To add a host, right-click Enterprise in the left navigationpane and click New > Host. The Add New Host wizard appears.
After you finish
After you launch the NVE appliance, refer to the standard NetWorker documentationfor any additional configuration.
Configuring sendmail and NetWorker notificationsReview this section to configure the sendmail application and modify NetWorkeremail notifications.
The EMC NetWorker Administration Guide provides more information about servernotifications and how to configure notifications when you create the Policy, Workflowand Action resources.
Configure the sendmail applicationThe sendmail application is automatically installed on the NVE. To configure theNetWorker server to send notifications, configure sendmail.
Before you begin
The sendmail application is an SMTP Mail Transfer Agent, not an SMTP server. Touse the sendmail application, the environment must have a configured SMTP relayhost, which the NVE will use to send email messages.
Procedure
1. Connect to the NVE.
If you connect by using the vSphere client to open a VM Console session, log into the NVE with the root or admin account. If you connect by using SSH, youmust log in as admin, and then use the su command to change to the rootaccount. The default password for the root and admin accounts is changeme.
2. Create the /etc/rc.conf file, and then add the following line:
sendmail_enable="YES"
3. Save the file.
4. Edit the /etc/sysconfig/sendmail file, and change the lineSENDMAIL_SMARTHOST=" " to include the hostname of the SMTP relay host.
Deployment and Update
26 EMC NetWorker 9.1 Virtual Edition Deployment Guide

For example:
SENDMAIL_SMARTHOST="mysmtp_relay.corp.com"
5. Restart the sendmail service. At the command prompt, type the followingcommand:
service sendmail restart
6. Test the connection to the SMTP relay host.
For example, at the comand prompt, type the following command:
echo "Subject: sendmail test" | sendmail -v [email protected]
When the test succeeds, output similar to the following example appears:
[email protected]... Connecting to [127.0.0.1] port 25 viarelay...220 bu-idd-nve.iddlab.local ESMTP Sendmail 8.14.3/8.14.3/SuSE Linux 0.8; Mon, 3 Oct 2016 10:36:58 -0400>>> EHLO bu-idd-nve.iddlab.local250-bu-idd-nve.iddlab.local Hello localhost.localdomain[127.0.0.1], pleased to meet you250-ENHANCEDSTATUSCODES250-PIPELINING250-8BITMIME250-SIZE250-DSN250-ETRN250-AUTH GSSAPI250-DELIVERBY250 HELP>>> MAIL From:<[email protected]> [email protected] 2.1.0 <[email protected]>... Sender ok>>> RCPT To:<[email protected]>>>> DATA250 2.1.5 <[email protected]>... Recipient ok354 Enter mail, end with "." on a line by itself>>> .250 2.0.0 u93Eaws2014693 Message accepted for [email protected]... Sent (u93Eaws2014693 Message acceptedfor delivery)Closing connection to [127.0.0.1]>>> QUIT221 2.0.0 bu-idd-nve.iddlab.local closing connection
Configuring NetWorker to send operation notifications by emailBy default, NetWorker writes operation notifications to log files.
To configure NetWorker to send system notifications to email recipients, perform thefollowing steps:
Procedure
1.Click the Enterprise button on the taskbar.
Deployment and Update
Configuring NetWorker to send operation notifications by email 27

2. Highlight a host in the navigation tree:
a. Right-click NetWorker.
b. Select Launch Application. The NetWorker Administration windowappears.
3. On the main toolbar, click Server, and then from the left navigation pane, selectNotifications.
4. Right-click a notification and select Properties.
5. In the Action field, specify the mail command in the following format:
/usr/bin/mail -s "subject_text" recipient_emailwhere:
l subject_text is the subject of the email address, enclosed in quotationmarks.
l recipient_email is the email address for the recipient of the notification.
For example, to edit the Bus/Device Reset action, type:
/usr/sbin/sendmail -v [email protected] "host <bu-iddnwserver.iddlab.local>: Bus/Device reset detected"
Edit policy notificationsTo modify the notification configuration for an existing policy resource, when theSend notification option is set to On Completion or On Failure, perform thefollowing steps.
Procedure
1.Click the Enterprise button on the taskbar.
2. Highlight a host in the navigation tree:
a. Right-click NetWorker.
b. Select Launch Application. The NetWorker Administration windowappears.
3. In the NetWorker Administration window, click Protection.
4. In the left navigation pane, expand Policies, right-click the policy, and thenselect Properties.
5. Edit the Command field, and then type the mail command in the followingformat:
/usr/bin/mail -s "subject_text" recipient_emailwhere:
l subject_text is the subject of the email address, enclosed in quotationmarks.
l recipient_email is the email address for the recipient of the notification.
6. Click OK.
Deployment and Update
28 EMC NetWorker 9.1 Virtual Edition Deployment Guide
Edit workflow notificationsTo modify a workflow notification, when the Send notification option is set to OnCompletion or On Failure, perform the following steps.
Procedure
1.Click the Enterprise button on the taskbar.
2. Highlight a host in the navigation tree:
a. Right-click NetWorker.
b. Select Launch Application. The NetWorker Administration windowappears.
3. In the NetWorker Administration window, click Protection.
4. In the left navigation pane, expand Policies, and then expand the policy thatcontains the workflow.
5. Right-click the workflow, and then select Properties.
6. In the Command field, type the mail command in the following format:
/usr/bin/mail -s "subject_text" recipient_emailwhere:
l subject_text is the subject of the email address, enclosed in quotationmarks.
l recipient_email is the email address for the recipient of the notification.
7. Click OK.
Edit action notificationsTo modify an action notification when the Send notification option is set to OnCompletion or On Failure, perform the following steps.
Procedure
1.Click the Enterprise button on the taskbar.
2. Highlight a host in the navigation tree:
a. Right-click NetWorker.
b. Select Launch Application. The NetWorker Administration windowappears.
3. In the NetWorker Administration window, click Protection.
4. In the left navigation pane, expand Policies, and then expand the policy thatcontains the workflow.
5. Select the workflow. In the Workflow pane, click the Action tab.
6. Right-click the action, and then select Properties.
7. In the Policy Action wizard, browse to the Specify the Action Informationpage.
8. In the Command field, type the mail command in the following format:
/usr/bin/mail -s "subject_text" recipient_emailwhere:
Deployment and Update
Edit workflow notifications 29

l subject_text is the subject of the email address, enclosed in quotationmarks.
l recipient_email is the email address for the recipient of the notification.
9. Click OK.
Upgrade the NVE applianceThe installation manager automates the upgrade process on an NVE appliance.
Perform the following steps from a host that has network access to the NVEappliance.
Procedure
1. Download the NVE upgrade file (NVEUpgrade*.avp) from http://support.emc.com.
2. Use a file transfer program to copy the AVP file to the /data01/avamar/repo/packages folder on the NVE appliance.
For example, to use the scp application to copy the file to the NVE appliance,first perform the following steps on the NVE appliance:
a. Log in to the NVE console with the root account.
b. Start the ssh daemon by typing /etc/init.d/sshd.
c. Edit the /etc/ssh/sshd_config file, and then uncomment the line:PermitRootLogin yes.
3. Open a web browser and type the following URL:
https://NVE_addressWhere NVE_address is the hostname or IP address of the NVE appliance.
When you use Internet Explorer, if any security messages appear, clickContinue. When you use Firefox, if any connection warnings appear, select Iunderstand the risks, and then add an exception for the website.
The EMC NetWorker Installation Manager login page appears.
4. In the User field, type root.
5. In the Password field, type the password for the root account.
6. On the SW Releases tab, to the right of the NveConfig package, click Install.
The Installation Setup page appears.
7. Click Continue.
8. When the upgrade completes, to connect to the NMC server, click LaunchNMC.
Deployment and Update
30 EMC NetWorker 9.1 Virtual Edition Deployment Guide

CHAPTER 2
Maintenance
This chapter includes the following topics:
l Password maintenance...................................................................................... 32l Change the storage disk configuration...............................................................33
Maintenance 31
Password maintenanceThis section describes how to manage the root and admin passwords.
Review password policiesUse the chage command to review password policy configuration for an OS user.
Procedure
1. Connect to the NVE, and perform the following tasks from a prompt.
Note
If you connect by using the vSphere client to open a VM Console session, youcan log in to the NVE with the root or admin account. If you connect by usingSSH, you must log in as admin, and then use the su command to change to theroot account. The default password for the root and admin accounts ischangeme.
2. Use the chage command to determine the password expiration policy and thescheduled expiration date for a user account.
For example, to determine the policy assigned to the root user account, and thepassword expiration date, type:
chage -l rootOutput similar to the following example appears:
Minimum: 1Maximum: 60Warning: 7Inactive: -1Last Change: Dec 07, 2015Password Expires: Feb 05, 2016Password Inactive: NeverAccount Expires: NeverThe following table provides more information about the chage output.
Table 5 chage output
Option Definition
Minimum Defines the minimum numbers of days thatare allowed between password changes.When this value is 0, a user can change thepassword at any time.
Maximum Defines the maximum numbers of days that apassword remains valid, after which apassword change is required.
Inactive Defines the number of days that a useraccount can remain inactive after thepassword has expired and before the user
Maintenance
32 EMC NetWorker 9.1 Virtual Edition Deployment Guide

Table 5 chage output (continued)
Option Definition
account is locked out of the system. Whenthis value is -1, the inactive feature is disabled.
Last change Displays the date that the password was lastchanged.
Password expires Defines the date that the current passwordwill expire.
Password inactive Defines the date that the current passwordwill become inactive.
Account expires Defines the date that the user account willexpire.
Modify passwordsBy default, the password expiration policy for the admin and root user accounts is 60days.
Perform the following steps to change the passwords.
Procedure
1. Connect to the NVE, and perform the following tasks from a prompt.
Note
If you connect by using the vSphere client to open a VM Console session, youcan log in to the NVE with the root or admin account. If you connect by usingSSH, you must log in as admin, and then use the su command to change to theroot account. The default password for the root and admin accounts ischangeme.
2. Use the passwd command to change the password for an OS user account.
For example, to change the password for the root account, type:
passwd root
Change the storage disk configurationPerform the following steps to configure the NVE to support higher-performing andlarger capacity datastores.
Procedure
1. From the virtual machine console of the NVE appliance, perform the followingconfiguration tasks:
a. Use the su command to change to the root account.
b. Stop the NetWorker and NMC daemons:
/etc/init.d/networker stop/etc/init.d/gstd stop
Maintenance
Modify passwords 33

c. Confirm that the NetWorker daemons are not running:
/etc/init.d/networker status
Output similar to the following example appears when the daemons are notrunning:
nsr_shutdown: There are currently no running NetWorkerprocesses.
d. Disable NetWorker:
chkconfig gst off networker off
2. In the Vsphere Web Client, perform the following configuration tasks:
a. Right-click the appliance and select Edit Settings.
b. From the New Device list, select New Hard Disk, and then click Add.
c. Expand New Hard disk.
d. In the Size field, type the size of the disk.
e. In the Disk Provisioning field, leave Thick provision lazy zero.
f. In the Disk Mode list, select Independent - Persistent.
g. Click OK.
3. From the virtual machine console of the NVE appliance, perform the followingconfiguration tasks:
a. Rescan the SCSI devices, by typing the following command:
echo "- - -" > /sys/class/scsi_host/host0/scan
b. Verify that the new /dev/sdc disk appears on the system, by typing thefollowing command:
ls /dev/sd*Output similar to the following example appears:
/dev/sda /dev/sda1 /dev/sda2 /dev/sda3 /dev/sda4 /dev/sda5 /dev/sda6 /dev/sda7 /dev/sda8 /dev/sdb /dev/sdb1 /dev/sdc
c. Partition the new disk.
For example, type the following command:
parted -a minimal -s -- /dev/sdc mklabel msdos mkpart p ext31s -1s
d. Rescan the partition table, by typing the following command:
partprobe
e. Confirm that the new disk partition /dev/sdc1 appears, by typing thefollowing command:
ls /dev/sd*Output similar to the following appears:
dev/sda /dev/sda1 /dev/sda2 /dev/sda3 /dev/sda4 /dev/sda5 /dev/sda6 /dev/sda7 /dev/sda8 /dev/sdb /dev/sdb1 /dev/sdc /dev/sdc1
Maintenance
34 EMC NetWorker 9.1 Virtual Edition Deployment Guide

f. Create a file system on the /dev/sdc1 partition, by typing the followingcommand:
mkfs.ext3 /dev/sdc1
g. Mount /dev/sdc1, by typing the following command:
mkdir /tmpmnt mount/dev/sdc1 /tmpmnt
h. Stop the avinstaller, by typing the following command
avinstaller.pl --stop
i. Copy the contents from the old disk to the new disk, by typing the followingcommand:
cp -rfp /data01/* /tmpmnt/
j. Relabel the old and new disks, by typing the following command:
e2label /dev/sdb1 dataolde2label /dev/sdc1 data01
k. Power off the NVE, by typing the following command:
poweroff
4. After the NVE power off completes, use the vSphere Web Client to perform thefollowing configuration tasks:
a. Right-click the appliance, and then select Edit Settings.
b. Hover over Hard disk 2, and then click X, do not select Delete files fromdatastore. Click OK.
The following figure shows the Edit Settings screen, when the systemdeletes the disk device.Figure 12 Deleting a disk device
c. Right-click the virtual machine and select Power > Power On.
5. From the VM console of the NVE appliance, perform the following configurationtasks:
a. Type mount and verify that disk /dev/sdc1 is mounted on /data01.
For example, the mount output would include the following line:
/dev/sdc1 on /data01 type ext3 (rw,noatime)
Maintenance
Change the storage disk configuration 35

b. Confirm that the avinstaller is started:
avinstaller.pl --testOutput similar to the following example appears when the avinstallerhas started:
Avistart process: 3311
c. Enable NetWorker and NMC, by typing the following commands:
chkconfig networker onchkconfig gst on
d. Start the NetWorker and NMC daemons, by typing the following commands:
/etc/init.d/networker start/etc/init.d/gstd start
e. Confirm that the NetWorker daemons have started, by typing the followingcommand: /etc/init.d/networker status
Note
Before you run this command, wait several minutes for the daemons to start.
For a NetWorker server, the nsrctld daemon starts. The nsrctlddaemon starts other processes that the NetWorker server requires. Outputsimilar to the following appears when the daemons are started:
+--o nsrctld (29021) +--o epmd (29029) +--o rabbitmq-server (29034) +--o beam (29038) +--o inet_gethost (29144) +--o inet_gethost (29145) +--o jsvc (29108) +--o jsvc (29114) +--o nsrd (29123) +--o java (29135) +--o nsrmmdbd (29828) +--o nsrindexd (29842) +--o nsrdispd (29853) +--o nsrjobd (29860) +--o nsrvmwsd (29968) +--o connectemc (29131) +--o eventservice.ru (29154) +--o jsvc (29158) +--o jsvc (29159) +--o java (29838) +--o node-linux-x64- (29885)+--o nsrexecd (29004) +--o nsrlogd (29899) +--o nsrsnmd (30038)
6. Perform a backup and recovery operation. If NetWorker operations succeed,use the vSphere Web Client to delete the old VMDK file:
a. Browse to the datastore that contains the VM files and expand the NVEfolder.
b. Select the VMDK file, VM_name_2.vmdk, and then click X.
The following figure provides an example of the expanded NVE folder withthe old VMDK file selected.
Maintenance
36 EMC NetWorker 9.1 Virtual Edition Deployment Guide
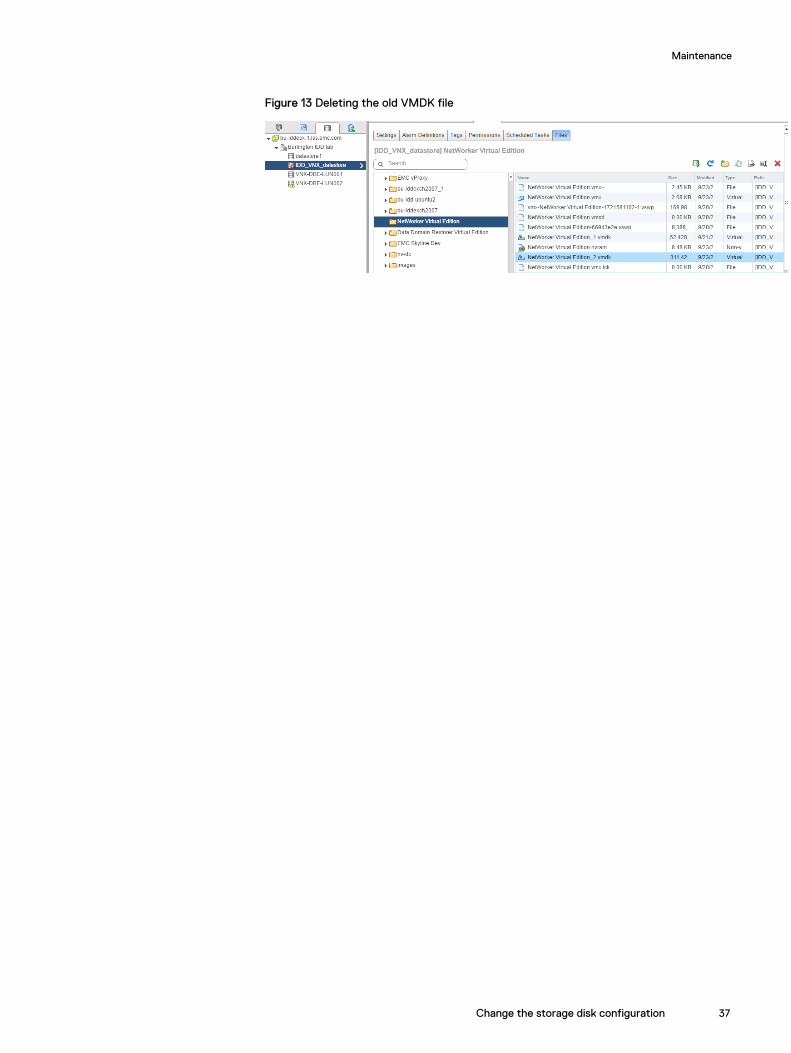
Figure 13 Deleting the old VMDK file
Maintenance
Change the storage disk configuration 37

Maintenance
38 EMC NetWorker 9.1 Virtual Edition Deployment Guide

CHAPTER 3
Troubleshooting
This chapter contains the following topics:
l Enable SSH for root........................................................................................... 40l NVE installation log files.....................................................................................40
Troubleshooting 39

Enable SSH for rootBy default, you cannot use SSH to log in to the NVE appliance with the root account.Enable SSH to allow root to transfer log files from the NVE appliance fortroubleshooting.
Procedure
1. From a vSphere client, launch the console window for the NVE appliance.
2. Log in to the NVE as the root user.
3. Edit the /etc/ssh/sshd_config file.
For example, type the following command to edit the file with the vimapplication:
vim /etc/ssh/sshd.config
4. In the Authentication section, remove the # from the beginning of the linePermitRootLogIn yes
For example, the Authentication section will appear similar to the following:
#Authentication:#LoginGraceTime 2mPermitRootLogin yes#StrictModes yes#MaxAuthTries 6#MaxSessions 10
5. Save the file.
6. Restart the SSH service, by typing the following command:
service sshd restart
NVE installation log filesThe following table provides a summary of log files on the NVE that are related toinstallation.
Table 6 NVE installation log files
Log file Purpose
/usr/local/avamar/var/avi/server_log/avinstaller.log.0
Installation log file
/data01/avamar/repo/temp/****/tmp/workflow.log
Installation log file
Troubleshooting
40 EMC NetWorker 9.1 Virtual Edition Deployment Guide

APPENDIX A
Preconfiguration checklist
Use the following checklist to record information the environment that you require todeploy the NVE.
Table 7 Preconfiguration checklist
Completed? Information
l
l
l
l
l
l
l
l
l
l
l
l
l
l
Preconfiguration checklist 41

Table 7 Preconfiguration checklist (continued)
Completed? Information
l
l
Preconfiguration checklist
42 EMC NetWorker 9.1 Virtual Edition Deployment Guide