Embed Size (px)
Citation preview

navhaxs
Minecraft Server Dashboard simplifies your server management experience by
replacing all the manual editing of configuration files and console commands with a
graphical interface to get your game server up and running in no time.
Contents
1. Licence agreement
2. Before you start (Requirements)
3. Getting started
4. Joining new players
5. Exploring the Dashboard
6. Troubleshooting
7. Still stuck?
a. Overview tab b. Players c. World d. Console e. Configuration
Minecraft Server Dashboard Users Guide

Licence agreement This software is licensed under the GNU General Public License, version 2 or later. A copy of the
license can be obtained at http://opensource.org/licenses/GPL-2.0
The Minecraft trademark remains the property of Mojang AB
This product uses the Elysium library, which is licensed under the MIT License
http://elysium.codeplex.com
This product uses the following third-party online services: DynDNS CheckIP http://dyndns.com, and
the Minotar (Minecraft avatars) http://minotar.net
Usage of this software requires compliance with the terms and conditions of these services.
Minecraft Server Dashboard Copyright (c) 2013 navhaxs
This program is free software; you can redistribute it and/or modify it under the terms of the GNU
General Public License as published by the Free Software Foundation; either version 2 of the License,
or any later version.
This program is distributed in the hope that it will be useful, but WITHOUT ANY WARRANTY; without
even the implied warranty of MERCHANTABILITY or FITNESS FOR A PARTICULAR PURPOSE. See the
GNU General Public License for more details.
You should have received a copy of the GNU General Public License along with this program; if not,
write to the Free Software Foundation, Inc.,
51 Franklin Street, Fifth Floor, Boston, MA 02110-1301 USA.
Before you start (Requirements)
The following requirements are necessary to run Minecraft Server Dashboard software on your
computer:
Microsoft .NET Framework 4.0 (http://go.microsoft.com/fwlink/?LinkID=186913) 512 MB RAM
1 GHz CPU
Windows XP or above
Oracle Java SE 7 (http://www.java.com)
To run the Minecraft game server efficiently on your machine, the following hardware is
recommended for 2-6 players connected at the same time, and additionally a Minecraft client for
yourself to play. The more players, the more RAM required to maintain the game server experience.
4G RAM
Dual-core CPU such as Intel Core 2 Duo or AMD Athlon 64 x2
At least 200MB for world saves
A more definite guideline to Minecraft-specific game server requirements is available here (MinecraftWiki.net)

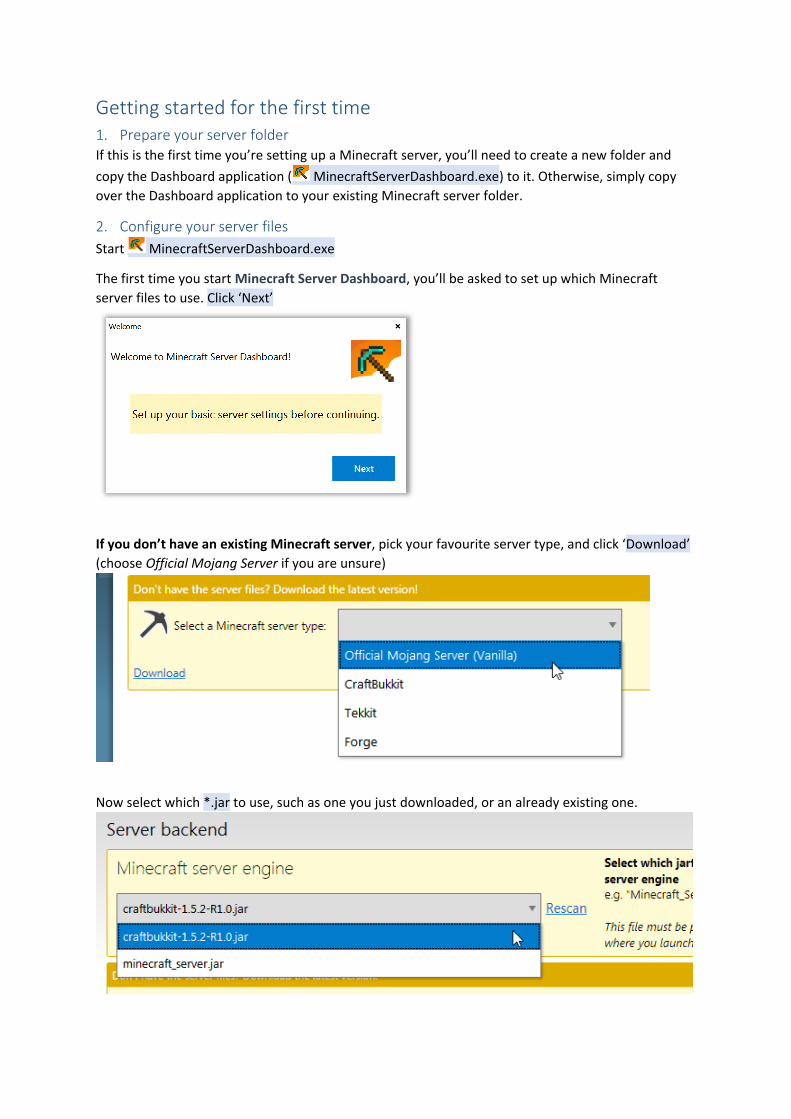
Getting started for the first time 1. Prepare your server folder If this is the first time you’re setting up a Minecraft server, you’ll need to create a new folder and
copy the Dashboard application ( MinecraftServerDashboard.exe) to it. Otherwise, simply copy
over the Dashboard application to your existing Minecraft server folder.
2. Configure your server files
Start MinecraftServerDashboard.exe
The first time you start Minecraft Server Dashboard, you’ll be asked to set up which Minecraft
server files to use. Click ‘Next’
If you don’t have an existing Minecraft server, pick your favourite server type, and click ‘Download’
(choose Official Mojang Server if you are unsure)
Now select which *.jar to use, such as one you just downloaded, or an already existing one.

3. That’s it, ready to go! Now you can start the game server by clicking Start server from the Dashboard.
Joining new players Your friends can connect to your server over the internet by entering your IP address in the
Minecraft game multiplayer menu.
To view your external IP address, click on the Tools menu, and select Join new players
If you have problems connecting, refer this Minecraft Wiki article on ensuring that your equipment is properly configured (i.e. router port forwarding, firewall, etc.)

Exploring the Dashboard Each of the Dashboard’s functions are grouped under their respective tabs to the left of the main
window. The navigation tabs can be temporally hidden under the Tools menu. The menu bar
includes shortcuts to many of the Dashboard’s functions.
Overview tab The overview tab enables quick access to:
Current running state of the server
Start/stop the server
Create a backup of your Minecraft world
Shows which players are online, and their avatar (the player’s skin)
Displays RAM usage of the server against the total memory of the machine
Displays RAM usage of the server against the total allocated RAM to server (‘memory load’)
Your external IP address

Players Use the players tab to:
Easily promote Online players to ‘Op’ (Operators) to enable access to full server commands
o ‘Op’ permissions can be set in the server properties (see here)
Manage your white-list
o White-list mode means that only players listed in the white-list are allowed to
connect and join the game server. Your game server must have white-list mode
enabled for this list to be applied (see here)
Ban players, or ban IP addresses
o Blacklist who can’t connect and join the game
Dashboard allows two lists to simultaneously be edited so that you can transfer players between
lists (such as from Online players to Op)
Hold down the shift key to select multiple items at a time.
Holding down the shift key will also copy items instead of moving them between lists when you use
the transfer arrows:
The transfer arrows may be greyed out if the selected list cannot be modified manually, such as the
list of Online players.
World The world tab presents options for backup and other world management functions.
Creating Backups
Create a backup of the current Minecraft world data at any time in the World tab.
Simply click “Create Backup” and enter a name for the backup. The time and date of when
the backup was created is automatically stored, so you don’t have to worry about adding it
yourself.
Restoring your backups
To access the backup manager, click the View or restore My World Backups link at the
bottom of the World tab. This screen will display all the previous backups you’ve created,
and will let you delete or restore them. Note: When restoring backups of the world that is
currently active in the server, make sure you stop the server first.
Clearing the Minecraft world
To recreate the Minecraft world, Dashboard can delete the current world so that a brand
new one is generated. This requires the server to be stopped, as the world generation occurs
during the server start-up.
To customise the new world, you can input a level seed, or choose between default, large
biomes, or Superflat. Advanced level-generator settings used by Superflat is also available.
World profiles World profiles let you swap between different Minecraft worlds, storing your creations in
separate worlds. For example, you could create a new profile to use at a LAN party, or keep
one for a particular theme (‘Medieval’, ‘Futuristic’, etc.)
Only one profile can be played in at a time – the active world profile.
To import your own pre-existing worlds, or to export worlds, click the Add and remove
worlds in Windows Explorer link at the bottom of the screen, and copy over the world data
folder into this directory. Once you’re done, use the refresh link to update the world profile
list, select the desired world, and click “Set as active”.
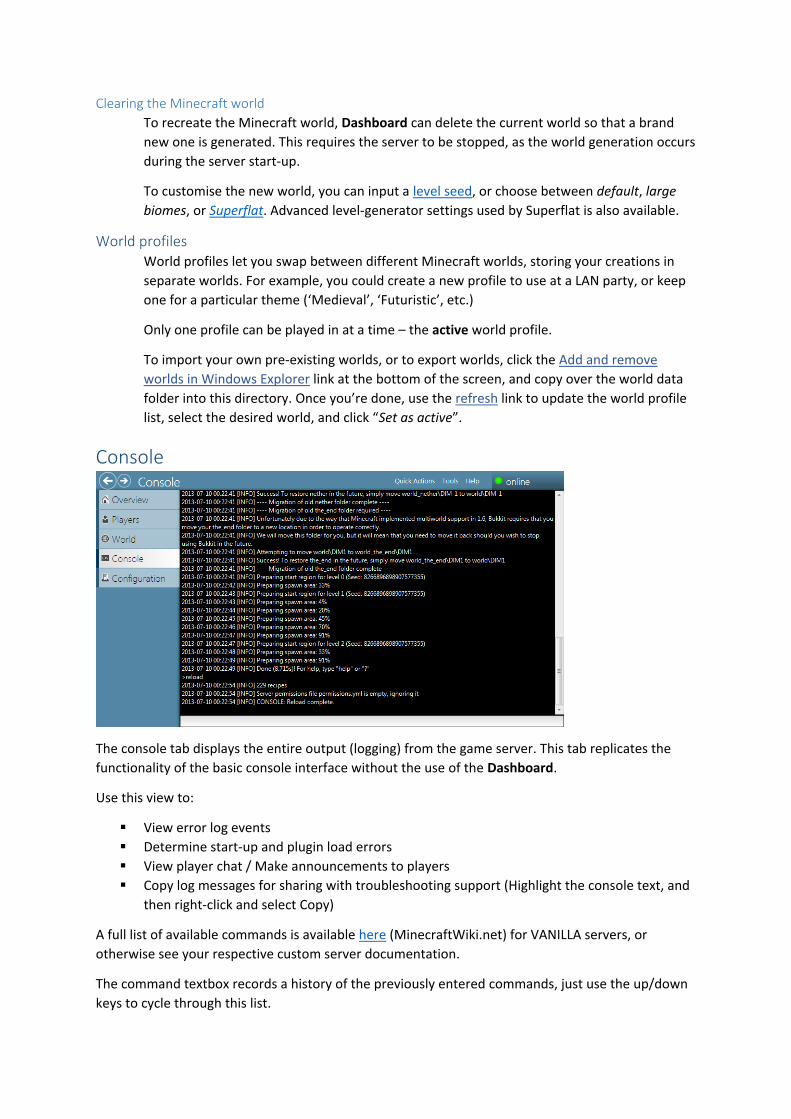
Console
The console tab displays the entire output (logging) from the game server. This tab replicates the
functionality of the basic console interface without the use of the Dashboard.
Use this view to:
View error log events
Determine start-up and plugin load errors
View player chat / Make announcements to players
Copy log messages for sharing with troubleshooting support (Highlight the console text, and
then right-click and select Copy)
A full list of available commands is available here (MinecraftWiki.net) for VANILLA servers, or
otherwise see your respective custom server documentation.
The command textbox records a history of the previously entered commands, just use the up/down
keys to cycle through this list.

Configuration Fine tune your Minecraft server here! This page also includes links to open the folder of the server in
Windows Explorer, and the backups, at the bottom of the screen (you may need to scroll down).
Server.Properties
The majority of game settings are stored in the server.properties configuration file.
Dashboard provides a graphical interface to easily edit these settings. Click the help button
to open the MinecraftWiki reference page for a description of each of the server settings.
Backend Use the Backend settings to:
Change the server type, e.g. VANILLA to CraftBukkit
When changing the server *.jar used
Download the latest server release.
Remember, the jar file must remain in the same folder as the Dashboard
Java, memory and startup Use this screen to adjust the amount of memory to reserve for the server. Changing this
property requires a server restart.
See this article (MinecraftWiki.net) for guidelines on how much memory to dedicate to the server.
Advanced users:
You can also set a custom path to the Java executable (java.exe), such as to force 64-bit / 32-
bit Java installation to be used instead of the default Java in the system path.
Dashboard Options This screen lets you:
Customise the default action when you try to exit whilst the server is still running
(You cannot exit the Dashboard whilst leaving the server running in the background
– as you will lose interaction with the server’s console stream)
Customise the default text editor, e.g. notepad
This field is automatically set to notepad if it is left blank.
Customise which directories to exclude from the My World Profiles list.

Reset application – this will reset the default startup memory, java executable, etc.
and all dashboard settings on this screen. This does not affect the game server (i.e.
server.properties, whitelists, ops, world save data, world backups, etc.)
Troubleshooting To reset the Dashboard completely, and to reset the game server settings (leaving world data
intact):
1. Ensure server is stopped
2. Under Configuration -> Server Properties, select ‘reset settings’
3. Under Configuration -> Dashboard Options, select ‘reset all Dashboard settings’
The server is lagging! How do I increase performance?
Try dedicating more memory to the server.
Close unused application on your desktop.
The ‘reload’ menu item doesn’t do anything!
This command only works for the CraftBukkit custom server.
I click ‘Start Server’, but I get stuck on “Server starting…”?
Check the Console tab, if you see a ‘binding error’ message, it is probably due to an incorrect
exit of the previous Dashboard session. Start Task Manager, and kill ‘java.exe’, then back in
the dashboard, use Quick Actions menu -> Force stop, and then finally try start the server
again. If this still does not help, try search for issues regarding firewall settings here
Otherwise check if Oracle Java 7 is installed correctly; try a reinstall.
Still stuck? (I need help!) Problems? Suggestions? Feedback? If you’ve looked through our FAQ and still have problems, the best way to contact us is through the
contact form on our website http://navhaxs.tk/minecraft-dashboard/
Visit us online for the latest updates
http://navhaxs.tk/minecraft-dashboard/
Minecraft Server Dashboard User Guide ©navhaxs 2013.
All rights reserved. No unauthorised redistribution, copying or transmission.