Embed Size (px)
Citation preview

CHM 292 PRACTICAL CHEMISTRY IV (ORGANIC AND PHYSICAL) Course Team Dr. Uduak Aletan (Course Writer/Developer) - NOUN
Dr. Akeem Abayomi (Course Editor) – UNILAG Dr. Abimbola Ogunsipe (Programme Leader) – NOUN
Dr. Emeka Ogoko (Course Coordinator) – NOUN
NATIONAL OPEN UNIVERSITY OF NIGERIA
COURSE GUIDE

CHM 292 COURSE GUIDE
ii
National Open University of Nigeria Headquarters 14/16 Ahmadu Bello Way Victoria Island, Lagos Abuja Office 5 Dar es Salaam Street Off Aminu Kano Crescent Wuse II, Abuja e-mail: [email protected] URL: www.nou.edu.ng Published by National Open University of Nigeria Printed 2015 ISBN 978-058-582-6 All Rights Reserved

CHM 292 COURSE GUIDE
iii
CONTENTS PAGE Introduction………………………………………………… iv What you will Learn in this Course……………………… iv The Course Aim…………………………………………… iv Working through this Course…………………………….. iv The Course Materials……………………………………… v Study Units……………………………………………….. v Presentation Schedule…………………………………….. vi Assessment………………………………………………… vi Sources of Information……………………………………. vi

CHM 292 COURSE GUIDE
iv
INTRODUCTION This course guide informs you about the course, the materials available and how to work with them to take full advantage of learning through effective time management. Practical Chemistry IV is a second semester, two-credit unit compulsory course for all Bachelor of Science (B.Sc.) Chemistry students. It is a dual practical course addressing the practical aspects necessary for students offering Organic Chemistry II (CHM 203), as well as Physical Chemistry II (CHM 201). Being a practical based course, you are expected to carry out the experiments in your laboratory. WHAT YOU WILL LEARN IN THIS COURSE In this course you will learn how to prepare common organic compounds, how to purify or analyse (thin layer chromatography) these compounds. Finally, you will learn how to determine the functional groups in organic compounds (qualitative analysis). In the second part, you will deal with experiments in physical chemistry. These include pH measurement, determination of relative molar mass from colligative properties (that is the boiling point, freezing point, vapor pressure, and osmotic pressure), demonstration of partition coefficient in two immiscible solvent, temperature measurement and heat of dissolution, ideal gas law (measuring the molar volume of a gas and the universal gas constant). THE COURSE AIMS Generally, the course is aimed at encouraging you to have a practical knowledge of important aspects of courses in organic and physical chemistry. WORKING THROUGH THIS COURSE Each unit has specific learning laboratory experiment with specific objectives. Endeavour to achieve these objectives when you go through these experiments. Attend the practical classes and make sure you participate fully. Again, go through the objectives after completing the unit to see whether you have understood the concepts treated in the unit. Read textbooks and other materials which may be provided by the National Open University of Nigeria. Make sure you do not miss the practical classes.

CHM 292 COURSE GUIDE
v
THE COURSE MATERIALS The main components of the course are: 1. The Course Guide 2. Study Units 3. Laboratory Experiments 4. Tutor-Marked Assignments 5. References/Further Reading STUDY UNITS The following are the units contained in this course: Module 1 Organic Chemistry Unit 1 The Preparation of Esters Unit 2 The preparation of Aldehydes and Ketones Unit 3 Vinegar Analysis Unit 4 Chromatography Unit 5 Thin Layer Chromatography Unit 6 Dehydration of Alcohol Unit 7 Qualitative Analysis of Common Functional Groups Module 2 Physical Chemistry Unit 1 pH Measurement
Unit 2 Determination of Relative Molar Mass from Colligative Properties
Unit 3 Demonstration of Partition Coefficient in two Immiscible Solvents
Unit 4 Temperature Measurement and Heat of Dissolution Unit 5 Heat of Neutralisation
Unit 6 Determination of Critical Solution Temperature of Water- Phenol System Unit 7 Ideal Gas Law: Measuring the Molar Volume of a Gas
and the Universal Gas Constant The first module focuses on organic chemistry this is divided into seven units. Units 1 and 2 deal with the preparation of simple organic compounds (esters, aldehydes and ketones). Unit 3 deals with the analysis of vinegar .The fourth unit deals with a commonly used analytic method – chromatography. A simple experiment on thin layer chromatography has been described for you. The sixth unit deals with dehydration of alcohol while the seventh unit deals with qualitative analysis of common functional groups.

CHM 292 COURSE GUIDE
vi
The second module focuses on physical chemistry; it is divided into seven units of simple experiments in physical chemistry. Unit 1 focuses on pH measurements, you will carry out a simple experiment on pH measurements. Unit 2 deals with the determination of relative molar mass using colligative properties. In unit 3, the focus is on the determination of partition coefficient in two immiscible solvents. Units 4 and 5 focus on temperature measurement, heat of solution and heat of neutralisation. Unit 6 deals with determination of critical solution temperature of water-phenol system. Finally, unit 7 is on ideal gas law. PRESENTATION SCHEDULE As you must have read earlier, this course is practical. It is important you attend the practical classes that will be organised by your study centres and participate. Submit your report on time. You should guard against falling behind in your work. ASSESSMENT There are three aspects to the assessment of the course. First is made up practical assessment, second consists of the tutor-marked assignment and third is the written examination.
The practical work you do will account for 20% of your total course work. Your TMA will account for 30% of your total course work. At the end of the course you will need to sit for a final or end of course examination of about two-hour. This examination will count for 50% of your course mark. I wish you success in the course and I hope that you will find it interesting and useful.
SOURCES OF INFORMATION http://swc2.hccs.edu/pahlavan/ http://web.me.com/dbyrum/Ris/ChmY2InClassS2/ http://course1.winona.edu/tnalli/spring05/209labs http://www.sep.alquds.edu/chemistry/scripts/student/ http://cemca.org/andcollege/andcwebsite/subject01/ http://chemistry.slss.ie/resources/downloads/ http://www.chem.wisc.edu/courses http://www.bc.edu/schools/cas/chemistry/undergrad/org http://orgchem.colorado.edu/Technique/Procedures/ http://webs.anokaramsey.edu/chemistry/Chem1062 http://www.xula.edu/chemistry/documents http://www.uncp.edu/home/mcclurem/courses

CONTENTS PAGE Module 1 Organic Chemistry ………………………… 1 Unit 1 The Preparation of Ester………………........... 1 Unit 2 The Preparation of Aldehydes and Ketones…. 5 Unit 3 Vinegar Analysis………………….…………. 11 Unit 4 Chromatography…….………………….......... 15 Unit 5 Thin Layer Chromatography……..………….. 23 Unit 6 Dehydration of Alcohol……………………… 31 Unit 7 Qualitative Analysis of Common Functional
Groups………………………………………… 36 Module 2 Physical Chemistry………………………….. 51 Unit 1 pH Measurement…………………………….. 51
Unit 2 Determination of Relative Molar Mass from Colligative Properties ……………………….. 57
Unit 3 Demonstration of Partition Coefficient in Two Immiscible Solvents…………………………. 62
Unit 4 Temperature Measurement and Heat of Dissolution…………………………………… 68
Unit 5 Heat of Neutralisation……………………….. 73 Unit 6 Determination of Critical Solution Temperature
of Water-Phenol System………………………. 77 Unit 7 Ideal Gas Law: Measuring the Molar Volume
of a Gas and the Universal Gas Constant……… 81
MAIN COURSE
CHM 292 MODULE 1
1
MODULE 1 ORGANIC CHEMISTRY Unit 1 The Preparation of Esters Unit 2 The Preparation of Aldehydes and Ketones Unit 3 Vinegar Analysis Unit 4 Chromatography Unit 5 Thin Layer Chromatography Unit 6 Dehydration of Alcohol Unit 7 Qualitative Analysis of Common Functional Groups UNIT 1 THE PREPARATION OF ESTERS 1.0 Introduction 2.0 Objectives 3.0 Main Content
3.1 Preparation of Esters 3.1.1 Apparatus/Reagents Required 3.1.2 Procedure
4.0 Conclusion 5.0 Summary 6.0 Tutor-Marked Assignment 7.0 References/Further Reading 1.0 INTRODUCTION When an organic acid, R-COOH, is heated with an alcohol, R'-OH, in the presence of a strong mineral acid, the chief organic product is a member of the family of organic compounds known as esters. The general reaction for the esterification of an organic acid with an alcohol is: R-COOH + HO-R' ↔ R-CO-OR' + H2O In this general reaction, R and R' represent hydrocarbon chains, which may be the same or different. As a specific example, suppose acetic acid, CH3COOH, is heated with ethyl alcohol, CH3CH2OH, in the presence of a mineral acid catalyst. The esterification reaction will be: CH3-COOH + HO-CH2CH3↔ CH3 -COO-CH2 CH3 + H2O The ester product of this reaction (CH3-COO-CH2 CH3) is named ethyl acetate, indicating the acid and alcohol from which it is prepared. Esterification is an equilibrium reaction, which means that the reaction does not go to completion on its own. Frequently, however, the esters
CHM 292 PRACTICAL CHEMISTRY IV (ORGANIC & PHYSICAL)
2
produced are extremely volatile and can be removed from the system by distillation. If the ester is not very easily distilled, it may be possible instead of adding a desiccant to the equilibrium system, thereby removing water from the system and forcing the equilibrium to the right. Unlike many organic chemical compounds, esters often have very pleasant, fruitlike odours. Many of the odours and flavourings of fruits and flowers are due to the presence of esters in the essential oils of these materials. Table 1 gives some esters with pleasant fragrances, as well as indicating from what alcohol and which acid the ester may be prepared. A fruit or flower generally contains only a few drops of ester, giving a very subtle odour. Usually, the ester is part of some complex mixture of substances, which, taken as a whole, have the aroma attributed to the material. When prepared in the laboratory in relatively large amounts, the ester may seem to have a pronounced chemical odour, and it may be difficult to recognise the fruit or flower that has this aroma. Table 1: Common Esters and their Constituents Ester Aroma Constituents n-propyl acetate Pears n-propyl alcohol/acetic acid methyl butyrate Apples methyl alcohol/ butyric acid isobutyl Rum isobutyl alcohol/propionic octyl acetate Oranges n-octyl alcohol/acetic acid methyl Grapes Methyl alcohol/2-aminobenzoic
isoamyl acetate Bananas isoamyl alcohol/acetic acid ethyl butyrate Pineapples ethyl alcohol/butyric acid benzyl acetate Peaches benzyl alcohol/acetic acid 2.0 OBJECTIVES At the end of this unit, you should be able to: • explain what esters are • prepare an ester in the laboratory. 3.0 MAIN CONTENT 3.1 Preparation of Esters 3.1.1 Apparatus/Reagents Required Hotplate; 50% sulphuric acid; assorted alcohols and organic acids, as provided by the instructor, for the preparation of fruit and flower
CHM 292 MODULE 1
3
aromas; methyl salicylate; 20% NaOH; disposable 4 mL plastic pipette with stem cut to 2.5 cm. 3.1.2 Procedure Safety precautions • Protective eyewear approved by your institution must be worn at
all times while you are in the laboratory. • Most of the organic compounds used or produced in this
experiment are highly flammable. Heating will be done using a hotplate, and no flames will be permitted in the laboratory.
• Sulphuric acid is used as a catalyst for the esterification reactions. Sulphuric acid is dangerous and can burn skin very badly. If it is spilled, wash immediately before the acid has a chance to cause a burn, and inform your instructor.
• The vapours of the esters produced in this experiment may be harmful. When determining the odours of the esters produced in this experiment, do not deeply inhale the vapours. Merely waft a small amount of vapour from the ester toward your nose.
• NaOH solution is highly corrosive to eyes and skin. Wash immediately if spilled.
Set up a water bath in a 250-mL beaker on a hotplate in the exhaust hood. Most of the reactants and products in this choice are highly flammable, and no flames are permitted in the lab during this experiment. Adjust the heating control to maintain a temperature of around 70°C in the water bath. Some common esters, and the acids/alcohols from which they are synthesised, were indicated in the Table 1. Synthesise at least two of the esters, and note their aromas. Different students might synthesise different esters, as directed by the instructor, and compare the odours of the products. To synthesise the esters, mix 3-4 drops (or approximately 0.1g if the acid is a solid) of the appropriate acid with 3-4 drops of the indicated alcohol on a clean, dry watch glass. Add 1 drop of 50% sulphuric acid to the mixture on the watch glass (caution!). Use the tip of a plastic pipette to stir the mixture on the watch glass, and then suck as much as possible of the mixture into the pipette. Place the pipette, tip upward, into the warm-water bath, and allow it to heat for approximately 5 minutes.
CHM 292 PRACTICAL CHEMISTRY IV (ORGANIC & PHYSICAL)
4
Squirt the resulting ester from the pipette into a beaker of warm water, and cautiously waft the vapours toward your nose. Remember that the odour of an ester is very concentrated. Several sniffs may be necessary for you to identify the odour of the ester. Record which esters you prepared and their aromas. 4.0 CONCLUSION Esters can be found as both natural and artificial products. Esters can be prepared in the laboratory using different materials. 5.0 SUMMARY In this unit, attempts have been made to explain what esters are and how you can prepare a sample in the laboratory. 6.0 TUTOR-MARKED ASSIGNMENT Esters are frequently used as additives in commercial products found in the home. Examine the labels of things you may have at home, such as shampoos, hand creams, and prepared foods, and find the names of two esters among the ingredients. List here the products and the esters you found. 7.0 REFERENCES/FURTHER READING http://web.me.com/dbyrum/Ris/ChmY2InClassS2/Lab-
Preparation_of_Esters.pdf http://course1.winona.edu/tnalli/spring05/209labs/expt5.pdf

CHM 292 MODULE 1
5
UNIT 2 PREPARATION OF ALDEHYDES AND KETONES
CONTENTS 1.0 Introduction 2.0 Objectives 3.0 Main Content
3.1 Preparation of Acetone from 2-Propanol 3.1.1 Materials 3.1.1 Procedure 3.2 Oxidation of Ethanol to Ethanal using Copper (II) Oxide
4.0 Conclusion 5.0 Summary 6.0 Tutor-Marked Assignment 7.0 References/Further Reading 1.0 INTRODUCTION Aldehydes and ketones both contain the C=O or carbonyl group. Aldehydes have at least
one hydrogen bonded directly to the C=O whereas ketones always have two alkyl groups attached to the C=O. Aldehydes may be prepared by oxidation of 1⁰ alcohols; potassium dichromate (K2Cr2O7) in acidic solution (H2SO4 (aq)) can sometimes be used as the oxidising agent (eq. 1).
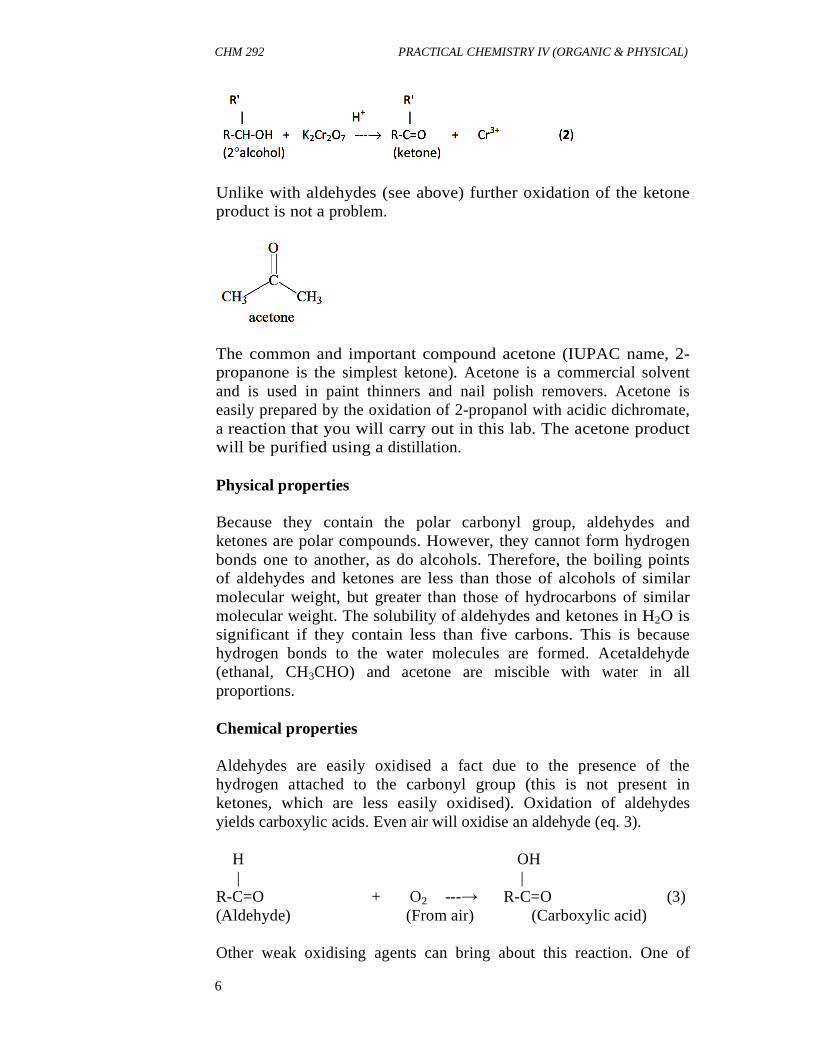
However, it is difficult to prevent further oxidation of the aldehyde product to a carboxylic acid. Ketones may be prepared by oxidation of 2⁰ alcohols. Again, acidic K2Cr2O7 may be used (eq. 2).
CHM 292 PRACTICAL CHEMISTRY IV (ORGANIC & PHYSICAL)
6
Unlike with aldehydes (see above) further oxidation of the ketone product is not a problem.
The common and important compound acetone (IUPAC name, 2-propanone is the simplest ketone). Acetone is a commercial solvent and is used in paint thinners and nail polish removers. Acetone is easily prepared by the oxidation of 2-propanol with acidic dichromate, a reaction that you will carry out in this lab. The acetone product will be purified using a distillation. Physical properties Because they contain the polar carbonyl group, aldehydes and ketones are polar compounds. However, they cannot form hydrogen bonds one to another, as do alcohols. Therefore, the boiling points of aldehydes and ketones are less than those of alcohols of similar molecular weight, but greater than those of hydrocarbons of similar molecular weight. The solubility of aldehydes and ketones in H2O is significant if they contain less than five carbons. This is because hydrogen bonds to the water molecules are formed. Acetaldehyde (ethanal, CH3CHO) and acetone are miscible with water in all proportions. Chemical properties Aldehydes are easily oxidised a fact due to the presence of the hydrogen attached to the carbonyl group (this is not present in ketones, which are less easily oxidised). Oxidation of aldehydes yields carboxylic acids. Even air will oxidise an aldehyde (eq. 3). H OH | | R-C=O + O2 ---→ R-C=O (3) (Aldehyde) (From air) (Carboxylic acid) Other weak oxidising agents can bring about this reaction. One of

CHM 292 MODULE 1
7
these is Tollens' reagent, a basic (OH-) solution of the silver complex ion, Ag (NH3)
+. The reaction produces metallic silver (Ag0), which often forms a shiny "mirror" on the sides of the container (eq. 4).
Tollens' reagent is used to detect the presence of aldehydes. A solution of Benedict's reagent can also oxidise aldehydes. This solution consists of a basic (OH-) solution of copper (II) citrate (whose complex composition cannot be represented by a simple formula):
The conversion of the clear, blue copper (II) citrate to insoluble, reddish copper(I)oxide indicates a positive test. The reaction occurs not only with simple aldehydes but also with "reducing sugars" such as glucose. 2.0 OBJECTIVES At the end of this unit, you should be able to: • explain what aldehydes and ketones are • prepare samples of aldehydes and ketones in your laboratory. 3.0 MAIN CONTENT SAFETY PRECAUTIONS - WEAR YOUR SAFETY GLASSES AT ALL TIMES. - IF YOU SPILL A SOLUTION ON YOUR SKIN, BE SURE TO FLUSH THE AREA PROMPTLY WITH LOTS OF WATER. - TAKE SPECIAL CARE WITH ACIDIC DICHROMATE SOLUTION, WHICH IS AN EXTREMELY CORROSIVE AND DANGEROUS SUBSTANCE. IF YOU GET ANY ON YOUR SKIN OR CLOTHING, RINSE IT WITH WATER I MMEDIATELY. DOING SO WILL AVOID SERIOUS INJURY. - It is important that the directions be followed exactly. Carelessness can be DANGEROUS!

CHM 292 PRACTICAL CHEMISTRY IV (ORGANIC & PHYSICAL)
8
3.1 Preparation of Acetone from 2-Propanol 3.1.1 Materials • 20 mL 70% 2-propanol (isopropyl alcohol) • Distilled water • 100 mL acidic dichromate (K2Cr2O7/H2SO4) solution • Distillation apparatus including thermometer • Ice/water bath.
3.1.2 Procedure Prepare an ice/water bath; this may be conveniently done in a large (i.e., > 500 mL) beaker. Place 20 mL of 70% 2-propanol in a 250-mL beaker, and add 20 mL of distilled H2O. Stir to mix, and cool the beaker in an ice bath to about 10⁰C. With the solution still in the ice bath, add, all at once, 100 mL of "acidic dichromate" solution (CAUTION : Corrosive!). In a few seconds, the mixture will turn dark, followed by a rather sudden rise in temperature to 50-60⁰C. Stir the mixture (still in the ice bath!) until its temperature has fallen to below 50⁰C. NOTE: Do not use the thermometer as a stirring rod. Pour the mixture into a 250 mL (or larger) distilling flask using a funnel to prevent spilling any. Assemble a distillation apparatus as demonstrated by your lab instructor. Use a graduated cylinder as the receiver. Heat gently. After 10-15 minutes, the liquid should begin to boil and drops of acetone begin to collect in the receiver. Record the temperature when the first drop appears. Continue the distillation until at least 5 mL of acetone has collected. Record the temperature again, and then stop the distillation. Measure the volume of acetone obtained. 3.2 Oxidation of Ethanol to Ethanal using CuO In this experiment, you will study how to prepare acetaldehyde from ethanol.

CHM 292 MODULE 1
9
Materials: • 10 ml Ethanol C2H5OH • Cu wire Equipment: • Safety glasses • Test tube + holder on a stand
Tongs • Bunsen burner Experimental procedure a. Add the ethanol to the test tube and place the test tube on the
stand. b. Heat the Cu wire in an open fire until it becomes black (CuO)
1. What is the original colour of the Cu wire? _______________________________________________ 2. Write the chemical equation for the reaction between
copper and oxygen. ______________________________________________________________________________________________
c. Put the hot Cu wire into the test tube containing ethanol. 3. Describe your observations.
______________________________________________________________________________________________
4. Write the chemical equation for the reaction between CuO and ethanol. _______________________________________________
d. Notice the change of colour of the wire.
5. Explain your observations. 4.0 CONCLUSION Aldehydes and ketones are polar compounds which you can prepare in your laboratory. 5.0 SUMMARY In this unit, attempt has been made to explain some properties of aldehydes and ketones and some methods of preparing these compounds in the laboratory.
CHM 292 PRACTICAL CHEMISTRY IV (ORGANIC & PHYSICAL)
10
6.0 TUTOR-MARKED ASSIGNMENT 1. Draw the structure of acetone. 2. Draw the structure of propanal. 7.0 REFERENCES/FURTHER READING http://www. course 1.winona.edu/tnalli/fall02/209 EXPT%/204.doc http://www.sep.alquds.edu/chemistry/scripts/student/student/Exp_12
html

CHM 292 MODULE 1
11
UNIT 3 VINEGAR ANALYSIS CONTENTS 1.0 Introduction 2.0 Objectives 3.0 Main Content
3.1 Theory 3.2 Procedure
4.0 Conclusion 5.0 Summary 6.0 Tutor-Marked Assignment 7.0 References/Further Reading 1.0 INTRODUCTION Many commercial products contain or are low per cent acid solutions. Vinegar is a water solution that is 4 to 5 per cent by weight acetic acid, CH3COOH. Many manufacturers add flavourings and colour to make the product sell better. Vinegar is commonly used in flavouring and preservation of food. This is because the acidity adds “tang” and inhibits bacterial growth. 2.0 OBJECTIVES At the end of this unit, you should be able to: • determine the percent by weight of acetic acid in vinegar • perform an acid-base titration.
3.0 MAIN CONTENT 3.1 Theory In the investigation that follows, the strength of one brand of vinegar will be determined by titration. The acetic acid is neutralised with a standardised sodium hydroxide solution as shown in the following equation:
Any vinegar sample may be used, but colourless vinegar is preferred because it gives less interference with the observation of the indicator endpoint colour change.

CHM 292 PRACTICAL CHEMISTRY IV (ORGANIC & PHYSICAL)
12
As the concentration of the vinegar solution is much higher than the concentration of your standardised sodium hydroxide solution, the original vinegar solution is diluted ten times prior to the titration. This dilution factor must be taken into account when calculating the concentration of the original vinegar solution. 3.2 Procedure 1. Clean and dry the following material:
a. 500 mL plastic bottle b. 100 mL beaker.
2. Clean and rinse the following glassware with distilled water: a. 25.00 ml volumetric pipet b. 250.0 mL volumetric flask c. 250 mL Erlenmeyer flask d. 50 mL Burette.
3. Measure exactly 25.00 mL of vinegar into a clean 250.0 mL volumetric flask.
Note: Be sure to use a dry beaker to transfer the vinegar. Do not put any used vinegar back in the vinegar supply. Be sure to rinse your pipette with vinegar prior to using it. 4. Dilute the vinegar with deionised water to the mark on the
volumetric flask. 5. Stopper the flask and mix the solution well. (Invert the solution
slowly for at least 10 times to completely mix the contents). 6. Transfer the dilute vinegar solution to a clean and dry 500 mL
plastic bottle and label it with both the contents and your name. 7. Immediately wash your volumetric flask with plenty of tap water
and several portions of deionised water. Let the flask dry at room temperature.
8. Pour about 50 mL of the dilute vinegar solution in your 100 mL beaker.
9. Rinse your 25.00 mL volumetric pipette several times with portions of diluted vinegar from your beaker.
Be careful; do not accidentally add any water to the diluted vinegar solution in the beaker. 10. Carefully pipet 25.00 mL of diluted vinegar solution into the 250
mL Erlenmeyer flask. 11. Add about 50 mL of deionised water to the erlenmeyer flask.

CHM 292 MODULE 1
13
12. Add 2 drops of phenolphthalein indicator solution and swirl the flask to thoroughly mix the solution.
13. Rinse your 50 mL burette several times with a few milliliters of your standardised sodium hydroxide solution.
14. Fill the burette with your standardised sodium hydroxide solution. a. Make sure that the tip does not have any air bubbles. b. Record the volume or the burette to the nearest 0.01 mL.
15. Titrate the acid sample to a faint pink end point. 16. Record the final volume of the burette to the nearest 0.01 mL. 17. Repeat the titration procedure described above for at least two
more trials. The number of trials run depends on: a. How much standardised sodium hydroxide solution you
have available b. The precision of your data.
Calculations
(Molarity of base) (Liters of base) Moles of acid (diluted vinegar) = Moles of base
The molarity of the original vinegar solution can be found by keeping in mind that the vinegar has been diluted ten times (from 25.00mL to 250.0 mL) to obtain the diluted vinegar, whose molarity has been determined by titration with standardised NaOH.
4.0 CONCLUSION Vinegar is essentially a solution of acetic acid, CH3CO2H, in water. Vinegar is supposed to have 4 g of acetic acid per 100 mL of vinegar or 4%, does your vinegar meet this requirement?
CHM 292 PRACTICAL CHEMISTRY IV (ORGANIC & PHYSICAL)
14
5.0 SUMMARY In this unit, you have analysed a sample of vinegar and you also performed an acid base titration. 6.0 TUTOR-MARKED ASSIGNMENT A student titrates a 25.00 mL sample of vinegar with 1.000 molar NaOH. The volume of base needed to reach the equivalence point is17.00 mL. What is the concentration of acetic acid in the vinegar in units of grams per 100 mL? 7.0 REFERENCES/FURTHER READING www.profpaz.com/Files/chem52/Exp_5.pdf http://wwwchem.csustan.edu/consumer/vinegar/analysis.htm

CHM 292 MODULE 1
15
UNIT 4 CHROMATOGRAPHY CONTENTS 1.0 Introduction 2.0 Objectives 3.0 Main Content
3.1 Chromatography 3.2 Types of Chromatography 3.3 Applications of Chromatography
4.0 Conclusion 5.0 Summary 6.0 Tutor-Marked Assignment 7.0 References/Further Reading 1.0 INTRODUCTION Chromatography is a separation and analytical technique widely used in chemistry and the biological sciences. Most things that occur in nature are a mixture of substances which can only be separated or analysed using any of the techniques known. In this unit, you will not be involved in any practical exercise but rather shall be exposed to the principles of the various forms of chromatography. 2.0 OBJECTIVES At the end of this unit, you should be able to: • explain the principle on which chromatography as a separation
technique is based • describe the different methods of chromatography • list some applications of chromatography. 3.0 MAIN CONTENT 3.1 Chromatography Chromatography, firstly introduced by the Russian botanist Micharl Iswett is a method for separating the components of a mixture by differential distribution of the components of the mixture between a stationary phase and a mobile (moving) phase. Initially used for the separation of coloured substances from the plants, (Greek, Chromos meaning coloured) is now the most extensive technique of separation and purification of coloured/colourless organic compounds.

CHM 292 PRACTICAL CHEMISTRY IV (ORGANIC & PHYSICAL)
16
Separation of two sample components in chromatography is based on their different distribution between two non-miscible phases. The one, the stationary phase, a liquid or solid, is fixed in the system. The other, the mobile phase, a fluid, is streaming through the chromatographic system. In gas chromatography, the mobile phase is a gas, while it is a liquid in liquid chromatography. The molecules of the analytes (mixture to be separated) are distributed between the mobile and the stationary phase. When present in the stationary phase, they are retained, and are not moving through the system. In contrast, they migrate with the velocity, v, of the mobile phase when being there. Due to the different distribution of the particular analytes, the mean residence time in the stationary phase differs, too, resulting in a different net migration velocity. This is the principle of chromatographic separation. Separation of two sample components in chromatography is based on their different distribution between two non-miscible phases. 3.2 Types of Chromatography 3.2.1 Paper Chromatography Paper chromatography is one of the most common types of chromatography in which filter paper serves as a support for immobile liquid phase. Removing liquid flows between the fibres of the cellulose but these are not the stationary phase. The true stationary phase is the very thin film of liquid usually water adhering to the surface of the fibers. (Water is absorbed on the fibers/ cellulose by strong hydrogen bonds with - OH of the cellulose). The substrate to be separated is distributed between the two liquids, stationary liquid that is held on the fibres of the paper and moving liquid in developing solvent. It uses a strip of paper and capillary action is used to pull the solvents up through the paper to separate the solutes. A small concentrated spot of solution that contains the sample is applied to a strip of chromatography paper about 2 cm away from the base of the plate, usually using a capillary tube for maximum precision. This sample is absorbed onto the paper and may form interactions with it. Any substance that reacts or bonds with the paper cannot be measured using this technique. The paper is then dipped into a suitable solvent, such as ethanol or water, taking care that the spot is above the surface of the solvent, and placed in a sealed container. The solvent moves up the paper by capillary action, which occurs as a result of the attraction of the solvent molecules to the paper. This can be explained as differential absorption of the solute components into the solvent. As the solvent rises through the paper, it meets and dissolves the sample mixture, which will then travel up the paper with the solvent solute
CHM 292 MODULE 1
17
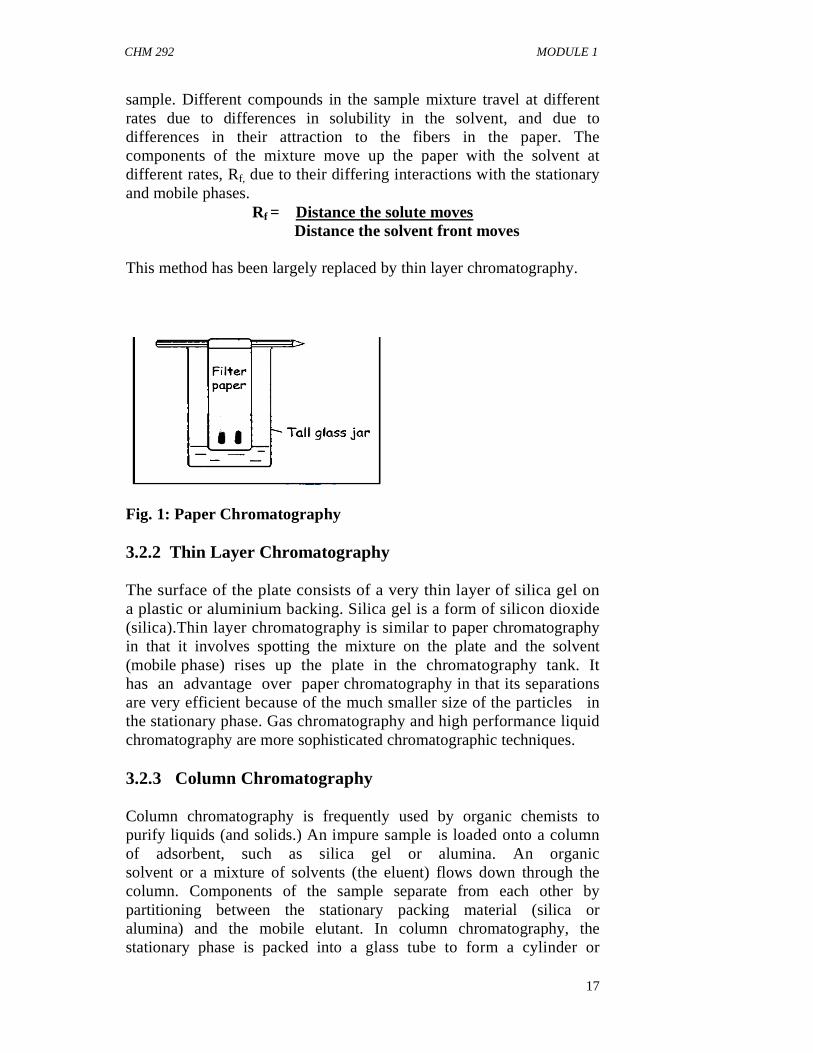
sample. Different compounds in the sample mixture travel at different rates due to differences in solubility in the solvent, and due to differences in their attraction to the fibers in the paper. The components of the mixture move up the paper with the solvent at different rates, Rf, due to their differing interactions with the stationary and mobile phases.
Rf = Distance the solute moves Distance the solvent front moves
This method has been largely replaced by thin layer chromatography.
Fig. 1: Paper Chromatography 3.2.2 Thin Layer Chromatography The surface of the plate consists of a very thin layer of silica gel on a plastic or aluminium backing. Silica gel is a form of silicon dioxide (silica).Thin layer chromatography is similar to paper chromatography in that it involves spotting the mixture on the plate and the solvent (mobile phase) rises up the plate in the chromatography tank. It has an advantage over paper chromatography in that its separations are very efficient because of the much smaller size of the particles in the stationary phase. Gas chromatography and high performance liquid chromatography are more sophisticated chromatographic techniques. 3.2.3 Column Chromatography Column chromatography is frequently used by organic chemists to purify liquids (and solids.) An impure sample is loaded onto a column of adsorbent, such as silica gel or alumina. An organic solvent or a mixture of solvents (the eluent) flows down through the column. Components of the sample separate from each other by partitioning between the stationary packing material (silica or alumina) and the mobile elutant. In column chromatography, the stationary phase is packed into a glass tube to form a cylinder or

CHM 292 PRACTICAL CHEMISTRY IV (ORGANIC & PHYSICAL)
18
column of granules. Solvent or buffer can flow freely between the granules. Stationary phase may be silica gel or ion exchange resin or a variety of other substances that may have particular affinity for amino acid molecules. The sample is applied with care as a layer on top of the stationary phase. Then solvent is added and flows through the column. Samples molecules move while they enter the flowing solvent. The stationary phase in polar compounds are attracted to the polar column packing by hydrogen bonding or dipole-dipole attractions, the more polar component interacts more strongly with the stationary phase. Polar compounds are move slowly. Non-polar compounds are going to come off the column first, while the polar compounds are going to come off the column last. Usually, one starts with a less polar solvent to remove the less polar compounds, and then slowly increase the polarity of the solvent to remove the more polar compounds. Molecules with different polarity partition to different extents, and therefore move through the column at different rates. The eluent is collected in fractions.
3.2.4 Gas Chromatography A gas is the mobile phase and the stationary phase can be either a solid or a non- volatile liquid. There are five basic GC components:

CHM 292 MODULE 1
19
1) Pneumatic system - gas supply (flow control and measurement). 2) Injection system - a heated injector port, where the sample is
vaporised if necessary. 3) Column - where the separation occurs. 4) Oven - the coiled column is wholly contained in a
thermostatically controlled oven. 5) Detector - integral detector or link to a mass spectrometer. 3.2.4.1 How does Gas Chromatography Work? 1) A carrier gas, examples of which are Helium and Neon flows
through the system. A valve controls the flow rate. 2) A sample of the volatile mixture is injected into the carrier gas.
The sample is vaporised in the heated injector port. 3) The carrier gas carries the vaporised sample into the column.
The columns are stainless steel or glass tubes. They can be up to 25 m in length and are of narrow bore (2-10 mm). Therefore the column is often wound into a coil. The packed columns contain porous support material. The sample mixture undergoes a series of interactions between the stationary and mobile phases as it is carried through the system by the carrier gas. Due to the wide choice of materials available for the stationary and mobile phases, it is possible to separate molecules that differ only slightly in their physical and chemical properties.
4) The coiled column is contained in the thermostatically controlled oven.
5) Separated components emerge in the order of increasing interaction with the stationary phase. The least retarded component comes through first. Separation is obtained when one compound is sufficiently retarded to prevent overlap with another component of the sample, as it emerges from the column.
6) Two types of detector can be used: (1) thermal conductivity detectors which respond to changes in the thermal conductivity

CHM 292 PRACTICAL CHEMISTRY IV (ORGANIC & PHYSICAL)
20
of the gas leaving the column and (2) flame ionisation detection (FID), which is more commonly used. In thermal conductivity, as the carrier gas leaves the column, it cools the detector. When a solute emerges with the carrier gas, it does not cool the detector to the same extent. Alternatively, samples can be passed from the oven directly into a mass spectrometer, where they are analysed.
Retention time is defined as the time taken for a component to go from injection to detection. This varies depending on: a) the nature of and the interactions between the solute and the
stationary and mobile phases b) the flow rate of the carrier gas c) the temperature of the column (shorter retention times are
obtained at higher temperatures) d) the length and diameter of the column. Once GC has separated a mixture, the components can be identified using known retention times. For unknown compounds the solutes are collected individually and analysed using another method, e.g. mass spectrometry. For each compound in a mixture one peak is observed on the chromatogram. In the particular set of operating conditions relating to the column, the retention time will increase with the size and polarity of the compound. To find the concentration of a particular compound, the peak height should be measured. 3.2.5 High Performance Liquid Chromatography Basic components: 1) Solvent reservoir. 2) The pump system controls the flow and measures the volume of
solvent (the mobile phase). The flow rates of HPLC columns are slow - often in the range of 0.5 - 5 cm3 min-1.
3) The injector system: The sample to be separated is injected into the liquid phase at this point.
4) The column is made of steel and packed usually with porous silica particles (the stationary phase). Different materials can be used depending on the nature of the liquid. A long column is not needed because separation in HPLC is very efficient. Columns are usually 10 -30 cm long, with an internal diameter of 4 mm. Different components of the sample are carried forward at

CHM 292 MODULE 1
21
different rates by the moving liquid phase, due to their differing interactions with the stationary and mobile phases.
5) The detector: When the components reach the end of the column they are analysed by a detector. The amounts passing through the column are small, so solutes are analysed as they leave the column. Therefore HPLC is usually linked to a spectrometer (e.g. ultra violet or mass spectrometry).
The length of time it takes for a compound to reach the detector allows the component to be identified. Like the GC, once the retention time of a solute has been established for a column using a particular set of operating conditions, the solute can be identified in a mixture. A chromatogram is obtained for the sample. 3.3 Applications of Chromatography Thin layer chromatography is particularly useful in forensic work, for example, in the separation of dyes from fibres. Gas chromatography is used to analyse blood samples for the presence of alcohol. It is also used to analyse samples taken from athletes to check for the presence of drugs. In each case, it separates the components of the mixture and indicates the concentrations of the components. Water companies test samples of water for pollutants using gas chromatography to separate the pollutants, and mass spectrometry to identify them. HPLC has many uses such as drug testing, testing for vitamins in food and growth promoters in meat. In each case components of the mixture are separated and detected. 4.0 CONCLUSION Various forms of chromatography are known analytical and separation techniques used in the laboratory by chemists, biologists and other natural scientists to determine the quality and quantity of particular substances in different mixtures. 5.0 SUMMARY In this unit, you have learnt the following: • In chromatography, the separation of two sample components is
based on their different distribution between two non-miscible phases.
• Gas chromatography, thin layer chromatography and high performance liquid chromatography are all types of

CHM 292 PRACTICAL CHEMISTRY IV (ORGANIC & PHYSICAL)
22
chromatography with various applications in the chemical industry.
6.0 TUTOR-MARKED ASSIGNMENT 1. Write short notes on the following:
a. Paper chromatography b. thin layer chromatography. 2. Compare and contrast thin layer chromatography with high
performance liquid chromatography. 3. The basis of the technique of chromatography for separating components of a mixture is ...
a. the absorption of infrared radiation by the components. b. the interaction of the components with both stationary and
mobile phases. c. the differing movement of particles of different mass in an
electric field. d. the deflection of charged particles in a magnetic field.
4. Substance A is made up of two components. O and P. A small sample of substance A was dotted onto chromatography paper, and a chromatogram was developed using an appropriate solvent. The result is shown below.
Component O is adsorbed? a. less strongly onto the stationary phase and has a larger Rf value
than component P. b. more strongly onto the stationary phase and has a smaller Rf
value than component P. c. more strongly onto the stationary phase and has a larger Rf value
than component P. d. less strongly onto the stationary phase and has a smaller Rf value
than component P. 7.0 REFERENCES/FURTHER READING http://cemca.org/andcollege/andcwebsite/subject01/CHEtext.htm http://chemistry.slss.ie/resources/downloads/ch_cw_chromatograp hy. www.academiya.org/sites/default/files/Chromatography%20MC Qs.doc

CHM 292 MODULE 1
23
UNIT 5 THIN LAYER CHROMATOGRAPHY CONTENTS 1.0 Introduction 2.0 Objectives 3.0 Main Content
3.1 Theory of Thin Layer Chromatography 3.2 Experimental Procedure 3.3 Specific Procedure
4.0 Conclusion 5.0 Summary 6.0 Tutor-Marked Assignment 7.0 References/Further Reading 1.0 INTRODUCTION Chromatographic separations take advantage of the fact that different substances are partitioned differently between two phases, a mobile phase and a stationary phase. In thin layer chromatography, or TLC, the mobile phase is a liquid and the stationary phase is a solid absorbent. Thin layer chromatography (TLC) is an easy, convenient and inexpensive way to determine how many components are in a mixture and, in many instances, can be used to identify the components as well. 2.0 OBJECTIVES At the end of this unit, you should be able to: • explain paper and thin layer chromatography • work with a variety of developing solvents • use several different techniques to visualise the spots of a
chromatogram. 3.0 MAIN CONTENT 3.1 Theory of Thin Layer Chromatography (TLC) In thin layer chromatography, a solid phase, the adsorbent, is coated onto a solid support as a thin layer (about 0.25 mm thick). In many cases, a small amount of a binder such as plaster of Paris is mixed with the absorbent to facilitate the coating. Many different solid supports are employed, including thin sheets of glass, plastic, and aluminum. The mixture (A plus B) to be separated is dissolved in a solvent and the resulting solution is spotted onto the thin layer plate near the bottom. A solvent, or mixture of solvents, called the eluent, is
CHM 292 PRACTICAL CHEMISTRY IV (ORGANIC & PHYSICAL)
24
allowed to flow up the plate by capillary action. At all times, the solid will adsorb a certain fraction of each component of the mixture and the remainder will be in solution. Any one of the molecules will spend part of the time sitting still on the adsorbent with the remainder will move up the plate with the solvent. A substance that is strongly adsorbed (say, A) will have a greater fraction of its molecules adsorbed at any one time, and thus any one molecule of A will spend more time sitting still and less time moving. In contrast, a weakly adsorbed substance (B) will have a smaller fraction of its molecules adsorbed at any one time, and hence any one molecule of B will spend less time sitting and more time moving. Thus, the more weakly a substance is adsorbed, the farther up the plate it will move. The more strongly a substance is adsorbed, the closer it will stay near the origin. Paper chromatography, which will be used to separate amino acids, is actually a form of partition chromatography. Water, a component of the developing solvent, forms hydrogen bonds with the fibers of the paper and serves as the stationary phase. The organic liquids that are also present in the developing solvent serve as the mobile phase. The components of the mixture are drawn up the paper to different heights, depending on their solubility in the mobile phase. The compounds that are more soluble in the organic liquid remain dissolved in the mobile phase longer than those that are less soluble and thus travel further up the paper. Proteins, large molecules found in all living organisms, serve a variety of functions in metabolism, such as catalysis, transport, storage, control of growth and immune protection. Amino acids are the building blocks of proteins. Every amino acid has an amino group, a carboxyl group and a distinctive side-chain. Nature uses twenty different amino acids to synthesise proteins. The four amino acids that you will separate by paper chromatography are alanine, leucine, lysine, and valine. TLC is useful because it is reproducible. For a particular adsorbent/solvent/compound combination, the ratio of the distance the compound travels to the distance the solvent travels remains constant. This ratio is called the Rf value.
distance traveled by substance Rf value =________________________________
distance traveled by solvent front)

CHM 292 MODULE 1
25
While having the same Rf value (under the same conditions) does not prove that two substances are the same, having different Rf values demonstrates that they are different. 3.2 Experimental Procedure In this experiment, you will separate some amino acids using paper chromatography. Amino acids are colourless compounds. In order to see the spots on the chromatogram, you will apply a solution of ninhydrin to the paper. Ninhydrin will react with the amino acid to produce a purple compound. Silica gel will serve as the stationary phase in the thin layer chromatography procedures. Finding a solvent or mixture of solvents that serve as an effective mobile phase is the most difficult part of TLC. Often several different combinations of solvents are tested before one is found that will separate the compounds of interest successfully. You will observe the effect that different solvent systems have on the separation of the pigments in food dyes. You will also use TLC to identify the active ingredient in an over-the-counter medicine tablet. The tablet you will test contains one of the following: acetylsalicylic acid (aspirin), acetaminophen (the active ingredient in paracetamol) and caffeine. Like the amino acids, the medicine tablet ingredients will not be visible after the plate has been developed. The spots will be illuminated when viewed under short-wave ultraviolet light. Some of the spots will also change colour when exposed to iodine vapours. 3.3 Specific Procedures Separating amino acids using paper chromatography Work with a partner. Obtain a sheet of 13 x 18.5 cm Whatman N0. 1 chromatography paper. When you handle this paper, hold it only on one of the long (18.5 cm) sides, which will be considered the “top” of the sheet. The amino acids from your fingers will contaminate the paper and lead to erroneous results if it is touched on the “bottom”. Lay the sheet of chromatography paper on a piece of notebook paper, and draw a line in pencil, not pen, 1.5 cm above the bottom. Make small marks along the line using the dimensions given in by your supervisor. Write labels at the top. Use the small capillary tubes provided to make four spots, one of each amino acid (alanine, leucine, lysine and valine), along the pencil line. Follow the labels written at the top of the sheet. Your supervisor will assign each of you an “unknown” sample
CHM 292 PRACTICAL CHEMISTRY IV (ORGANIC & PHYSICAL)
26
that contains one or more of these four amino acids. Spot this solution on the paper as well. For every spot you make, touch the capillary to the surface of the paper quickly and lightly so that the spot is approximately 2-3 mm in diameter. Allow the spot to dry, and then re-apply the solution at the exact same place, again touching the paper quickly and lightly. Allow the spot to dry, and repeat one more time. After all six solutions have been applied to the paper in this manner; allow the spots to dry for five minutes. Working together, roll the paper into a cylinder with the spots on the outside, and then staple it so that the edges do not overlap or touch. Pour 50 mL of the amino acid developing solution into a 1000 mL beaker. The developing solvent is comprised of a four-to-one mixture of 1-butanol and glacial acetic acid that has been saturated with water. Position the cylinder inside the beaker with the bottom edge immersed in the solvent. Make sure the paper does not touch the glass. Place a piece of aluminum foil over the mouth of the beaker. Allow the chromatogram to develop undisturbed for 60 to 75 minutes. Do not move the beaker while the chromatogram is developing! When you remove the paper from the beaker, mark the solvent front with a pencil. Set the cylinder on notebook paper, and allow it to dry. When the chromatogram is completely dry, remove the staples, and hang it from the clips in the fume hood. Wearing gloves evenly coat the paper using the ninhydrin spray. Do not allow the paper to become dripping wet. Place the chromatogram in an oven set at 80° for about 5 minutes. Circle the spots with a pencil. Measure the distance from the origin to the center of each spot and the distance from the origin to the solvent front. Later, you will attach this chromatogram to your Results and Calculations sheet. Optimising the developing solvent for the separation of food dye pigments Work on your own. Obtain two TLC plates with the dimensions of 5 cm x 6.7 cm. Draw a line in pencil, not pen, 1 cm from the bottom along the short (5 cm) side of each plate. Be careful not to disturb the silica gel as you draw these lines! Use the small capillary tube provided to spot four spots, one of each colour, along the line drawn on each of the plates. When spotting a TLC plate, touch the capillary to the surface of the plate quickly and lightly so the spot is very small. The spots will be highly coloured since the food dye solutions are quite concentrated. Oftentimes it is necessary to re-apply a dilute solution to the spot (allowing the spot to dry in between applications) until the spots are

CHM 292 MODULE 1
27
highly coloured, however this will not be necessary in this case. Line a 250 mL beaker with a piece of filter paper. Place a small amount of the 3:1 isopropanol: concentrated ammonia developing solvent in the beaker. The liquid should cover the bottom of the beaker to a depth of about 0.5 cm; however, the level of the liquid must be below the line when the plate is placed in the jar (that is, less than 1 cm in depth). The filter paper lining will saturate the atmosphere within the beaker with solvent fumes. Fit a piece of aluminum foil over the mouth of the beaker. Place one of the plates that you have spotted in the beaker, cover it with the foil and allow the solvent front to move up the plate until it is approximately 1 cm from the top (one hour maximum). Do not disturb the beaker while the chromatogram is developing! Remove the plate and mark the solvent front with a pencil. Allow the plate to dry for a few minutes, and then circle any visible spots with a pencil. Into a filter paper lined 400 mL beaker, pour either pure isopropanol or 1:1 isopropanol: concentrated ammonia to a depth of about 0.5 cm. Develop the second plate in the same manner as the first using the chosen solvent. Mark the solvent front and circle the spots. Observe the chromatogram of someone who used the other solvent for his or her second plate. Sketch diagrams of all three chromatograms in your notebook. Measure the distance from the origin to the center of each spot and the distance from the origin to the solvent front for each of the three chromatograms. Analysing a non-prescription medicine tablet with TLC Work on your own. Obtain a silica gel TLC plate with the dimensions of 6 cm x 6.7 cm. Draw a line in pencil 1 cm from the bottom along the short (6 cm) side of the plate. Be careful not to disturb the silica gel as you draw the line! Use the small capillary tube provided to spot 3 spots, one of each active ingredient solution (acetylsalicylic acid, acetaminophen and caffeine), along the line. Leave room for a fourth spot. Your supervisor will assign a non-prescription medicine tablet for you to analyse. Spot your TLC plate with the supernatant from a mixture of this crushed tablet and methanol. When applying these solutions to the plate, touch the capillary to the surface of the silica gel quickly and lightly so the spot is very small. In each case, reapply the spot, allowing it to dry in between applications, two more times. Place a small amount of the ethyl acetate developing solvent in a 400 mL beaker. The liquid should cover the bottom of the beaker to a depth of about 0.5 cm. Line the beaker with a piece of filter paper to saturate the atmosphere within. Fit a piece of aluminum
CHM 292 PRACTICAL CHEMISTRY IV (ORGANIC & PHYSICAL)
28
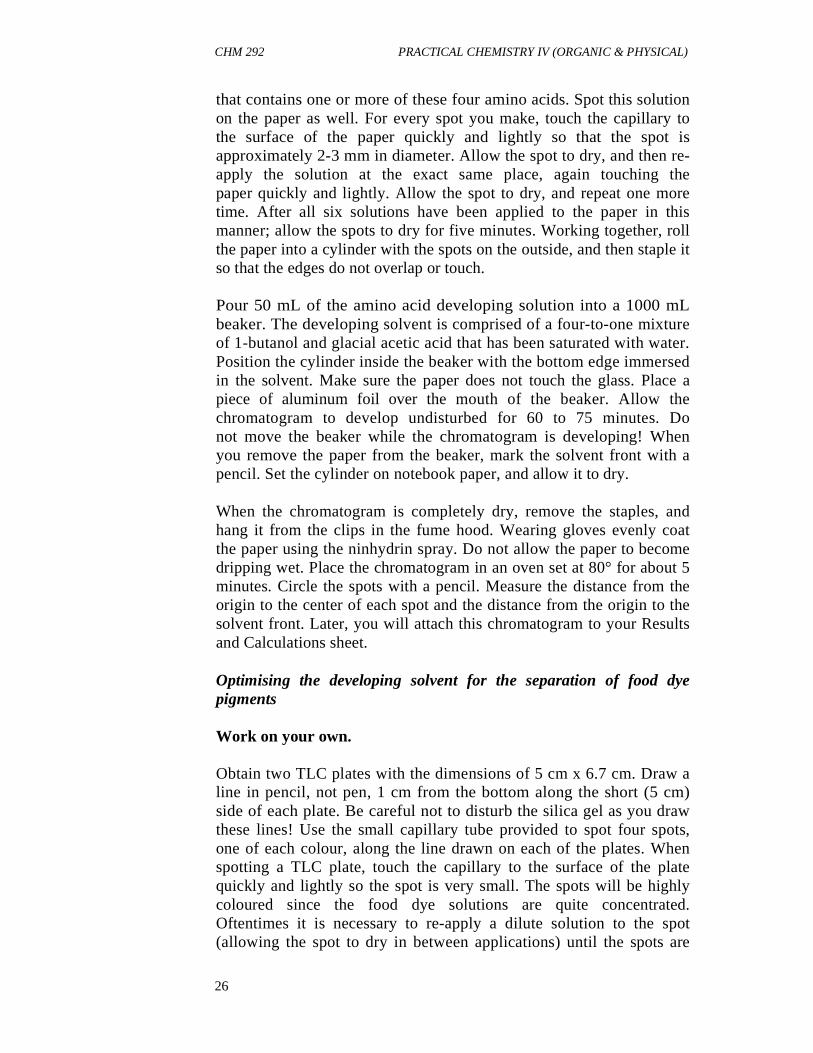
foil over the mouth of the beaker. Place the plate that you have spotted in the beaker, cover it with the foil, and allow the solvent front to move up the plate until it is approximately 1 cm from the top. Do not disturb the beaker while the chromatogram is developing! In this case, the solvent will travel up the silica gel plate very quickly and will reach the top in two to three minutes. Remove the plate and mark the solvent front with a pencil. Allow the plate to dry for a few minutes, then observe it under short-wave ultra-violet light. With a pencil, circle any spots that are illuminated. Write your initials in a corner of the plate, and place it in an iodine chamber. Position the plate so that the silica gel surface is completely exposed to the iodine vapors and is not covered by other plates in the chamber. Leave it there for 5-10 minutes. After removing the plate from the chamber, record in your notebook whether or not any coloured spots appeared as a result of exposure to the iodine vapors. If new spots appear, circle them with a pencil. Sketch a diagram of the chromatogram in your notebook. Measure the distance from the origin to the center of each spot and the distance from the origin to the solvent front.
Fig. 2: Analysis of a Non-Prescription Medicine Tablet with TLC
CHM 292 MODULE 1
29
4.0 CONCLUSION TLC is a simple, quick, and inexpensive procedure that gives the chemist a quick answer as to how many components are in a mixture. Thin layer chromatography is performed on a sheet of glass, plastic, or aluminum foil, which is coated with a thin layer of adsorbent material, usually silica gel, aluminum oxide, or cellulose (blotter paper). This layer of adsorbent is known as the stationary phase. After the sample has been applied on the plate, a solvent or solvent mixture (known as the mobile phase) is drawn up the plate via capillary action. 5.0 SUMMARY In this unit, attempts have been made to: • explain the theory of thin layer chromatography • describe the basic technique method of thin layer
chromatography • describe an experimental procedure of thin layer
chromatography. 6.0 TUTOR-MARKED ASSIGNMENT
1. What is the main advantage of thin layer chromatography over paper chromatography?
2. Explain how your observations of the paper chromatogram led to the identification of the components of the unknown amino acid mixture.
3. Thin layer chromatography can be used to distinguish between different amino acids. If a particular amino acid has low solubility in the mobile phase used, then the amino acid …...... a. will have a low Rf value. b. will spend more time dissolved in the mobile phase than
attached to the stationary phase. c. must have a high molecular mass. d. will move at a speed close to that of the solvent.

CHM 292 PRACTICAL CHEMISTRY IV (ORGANIC & PHYSICAL)
30
7.0 REFERENCES/FURTHER READING http://www.chem.wisc.edu/courses/342/Fall2004/TLC.pdf
http://www.bc.edu/schools/cas/chemistry/undergrad/org/fall/TLC.pdf
http://orgchem.colorado.edu/Technique/Procedures/TLC/TLC.html
http://www.google.com.ng/search?q=Experiment4%3AThin Layer Chromatography&ie=utf-8&oe=utf-8&aq=t&rls=org.mozilla:en-
US:official&client=firefox-a&source=hp&channel=np www.academiya.org/sites/default/files/Chromatography%20MCQs.doc

CHM 292 MODULE 1
31
UNIT 6 DEHYDRATION OF ALCOHOLS - DEHYDRATION OF CYCLOHEXANOL
CONTENTS 1.0 Introduction 2.0 Objective 3.0 Main Content
3.1 Equipment and Reagents 3.2 Experimental Procedure
4.0 Conclusion 5.0 Summary 6.0 Tutor-Marked Assignment 7.0 References/Further Reading 1.0 INTRODUCTION There are four basic types of chemical reactions in organic chemistry: combination, elimination, substitution, and rearrangement. The dehydration of alcohols to give alkenes is an important transformation and is an example of elimination reaction. Strong mineral acids such as sulphuric and phosphoric acid catalyse the reaction. Dehydration of an alcohol can follow either the E2 or the E1 mechanism. However, in each case, acid is required as a catalyst, because OH- is a strong base, it is a poor leaving group, but HOH is a weaker base, and a better leaving group. Adding a strong acid, such as H2SO4, to the mixture allows protonation of the -OH group to give water as a leaving group. Once this protonation occurs, the mechanism that is followed depends on the nature of the R group. As mentioned above, 1-pentanol (a 1° alcohol), dissociation of water would produce the very unstable 1° carbocation, so we would project that elimination via the E1 mechanism (with carbocation intermediate) will not occur. As a result, reaction would be expected to proceed via the E2 elimination mechanism. However, for 2-pentanol, dissociation of water produces the more stable 2° carbocation. Because water is not a very strong base, the competing E2 mechanism will be slow, which will allow the E1 mechanism to proceed faster for 2-pentanol. The mechanism below depicts reaction by E2 mechanism to product, in a single, concerted step, elimination, producing an alkene. The only product, via an E2 reaction mechanism, would be 1- pentene.

CHM 292 PRACTICAL CHEMISTRY IV (ORGANIC & PHYSICAL)
32
E1 mechanism for 2- propanol Step 1: An acid/base reaction. Protonation of the alcoholic
oxygen to make a better leaving group. This step is very fast and reversible. The lone pairs on the oxygen make it a Lewis base.
Step 2: Cleavage of the C-O bond allows the loss of the good leaving group, a neutral water molecule, to give a carbocation intermediate. This is the rate determining step (bond breaking is endothermic)
Step 3: An acid/base reaction. Deprotonation by a base (a water molecule) from a C atom adjacent to the carbocation center leads to the creation of the C=C.
2.0 OBJECTIVE At the end of this unit, you should be able to: • prepare cyclohexene through the acid catalysed elimination of
water fromcyclohexanol (dehydration). 3.0 MAIN CONTENT 3.1 Reagents and Chemicals cyclohexanol simple distillation set up 85% phosphoric acid, H3PO4 (or conc. H2SO4) beakers(150mL, 250mL) 10% NaHSO3 10-mL graduated cylinder cold 0.50 % KMnO4 Erlenmyer flask (50 mL) Br2/CCl4 round bottom flask (25 mL, 50 mL) Grease condenser ice thermometer CaCl2 (drying agent) separatory funnel Saturated NaCl solution rubber tubing (2)
Glass adaptor (2) thermometer adaptor heating mantle
3.2 Theory The dehydration reaction will be illustrated by the conversion of cyclohexanol to cyclohexene. The choice of cyclohexanol as starting material is based on the following considerations: a) Because of its structure, cyclohexene can give only one
alkene upon dehydration, normally cyclohexene. b) The rate of dehydration of cyclohexanol using 85%
phosphoric acid is conveniently fast. c) The product is easily purified by distillation at a readily

CHM 292 MODULE 1
33
accessible temperature, (83oC). d) When heated with strong acids catalysts (most commonly
H2SO4, H3PO4), alcohols typically undergo a 1,2-elimination reactions to generate an alkene and water. Also known as dehydration since it involves the removal of a molecule of water. Alcohol relative reactivity order: 3o > 2o > 1o
e) Regioselectivity: major product is usually the more highly substituted alkene (alkene stability) Zaitsev's Rule.
f) Stereoselectivity: trans Æ cis- again controlled by stability g) Reaction usually proceeds via an E1 mechanism which
proceeds via a carbocation intermediate, which can often undergo rearrangement.
h) Primary alcohols will proceed via an E2 mechanism since the primary carbocation is highly unfavorable.
i) Other common strong acids such as HCl, HBr or HI are less suitable catalysts as nucleophilic substitution reactions will probably interfere.
3.3 Experimental Procedure Safety note Caution: Cyclohexanol is a volatile and flammable liquid and is an irritant. No flames will be allowed in the lab. Wear gloves while handling these chemicals. Concentrated phosphoric acid (or sulphuric acid) is strongly corrosive and toxic -- wear gloves while handling it, and be sure to wash your gloves and your hands immediately after handling it. Sodium sulfate is an irritant -- gloves are recommended. Procedure - Set up a simple distillation as shown below. Add 8.00 ml (D = 0.96 g/ml) of cyclohexanol and 2 ml of concentrated sulphuric acid (or 5 ml of concentrated phosphoric acid) to a 50 -ml round-bottomed flask. Mix the content thoroughly by swirling before connecting the flask to the distillation setup. Add two boiling stones, and heat the flask gently so that the temperature of the distilling vapor does not exceed 100 0C. Continue the distillation until only a few milliliters (< 2 ml) of high-boiling residue remain in the flask. If white fumes appear near the end of the distillation, stop heating a once by lowering the heating mantle. (NOTE - these fumes are oxides of sulfur, SO2 , if sulphuric acid is being used).
CHM 292 PRACTICAL CHEMISTRY IV (ORGANIC & PHYSICAL)
34
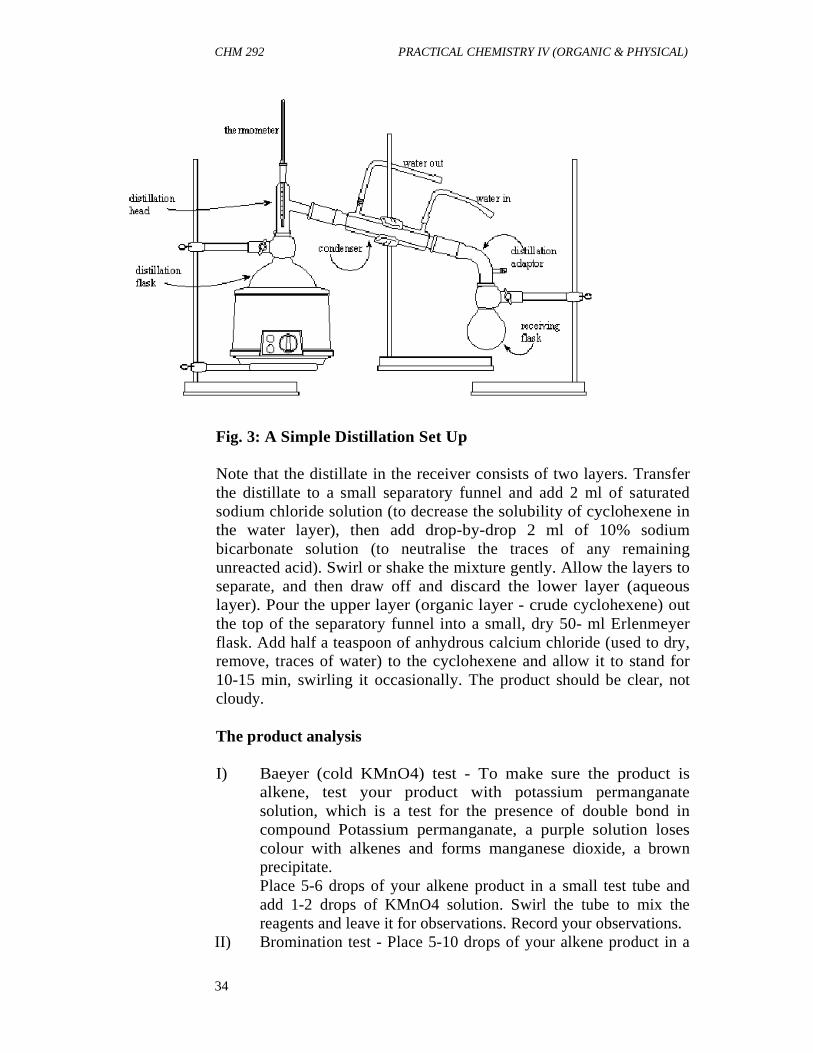
Fig. 3: A Simple Distillation Set Up Note that the distillate in the receiver consists of two layers. Transfer the distillate to a small separatory funnel and add 2 ml of saturated sodium chloride solution (to decrease the solubility of cyclohexene in the water layer), then add drop-by-drop 2 ml of 10% sodium bicarbonate solution (to neutralise the traces of any remaining unreacted acid). Swirl or shake the mixture gently. Allow the layers to separate, and then draw off and discard the lower layer (aqueous layer). Pour the upper layer (organic layer - crude cyclohexene) out the top of the separatory funnel into a small, dry 50- ml Erlenmeyer flask. Add half a teaspoon of anhydrous calcium chloride (used to dry, remove, traces of water) to the cyclohexene and allow it to stand for 10-15 min, swirling it occasionally. The product should be clear, not cloudy. The product analysis I) Baeyer (cold KMnO4) test - To make sure the product is
alkene, test your product with potassium permanganate solution, which is a test for the presence of double bond in compound Potassium permanganate, a purple solution loses colour with alkenes and forms manganese dioxide, a brown precipitate. Place 5-6 drops of your alkene product in a small test tube and add 1-2 drops of KMnO4 solution. Swirl the tube to mix the reagents and leave it for observations. Record your observations.
II) Bromination test - Place 5-10 drops of your alkene product in a

CHM 292 MODULE 1
35
small test tube and test with drop- wise bromine (decolouration) for observations. Record your observations.
4.0 CONCLUSION Dehydration of an alcohol is a common method of introducing unsaturation into an organic compound. This type of reaction belongs to the important class of organic reactions called elimination reactions. In the elimination of water from an alcohol, the more highly substituted alkene product are formed. 5.0 SUMMARY In this unit you have carried out an experiment in which an alkene was formed through the dehydration of alcohol. 6.0 TUTOR-MARKED ASSIGNMENT 1. If 0.138g of cyclohexene (C6H10) was obtained from 0.240g of
cyclohexanol (C6H120), what is the percentage yield of cyclohexene?
2. If in dehydration experiment of 20.0 mL Cyclohexanol, 12.0 g cyclohexene obtained, calculate the theoretical and percentage of cyclohexene.
7.0 REFERENCES/FURTHER READING http://www.thecatalyst.org/experiments/Miller/Miller.html http://swc2.hccs.edu/pahlavan/2425L5.pdf

CHM 292 PRACTICAL CHEMISTRY IV (ORGANIC & PHYSICAL)
36
UNIT 7 QUALITATIVE ANALYSIS OF COMMON FUNCTIONAL GROUPS
CONTENTS 1.0 Introduction 2.0 Objectives 3.0 Main Content
3.1 Functional Group Identification Tests 3.2 General Scheme of Analysis 3.3 Functional Group Classification Tests
4.0 Conclusion 5.0 Summary 6.0 Tutor-Marked Assignment 7.0 References/Further Reading 1.0 INTRODUCTION Qualitative organic analysis, the identification of organic compounds based on their physical and chemical properties, is analogous in some ways to the identification of plants and animals according to their taxonomy - their structural features and presumed natural relationships. To classify an organic compound into a given family requires first detecting a specific functional group (characteristic set of atoms) in the molecules of organic compounds. Because functional groups influence the physical, chemical, and spectral properties of an organic compound, a chemist can identify a compound's functional groups by measuring certain physical properties, observing its chemical behaviour with different classification reagents, and studying other spectral data. In your experiment, you will subject a series of organic compounds to specific chemical reactions in order to identify which class of functional group the substance belongs to.

CHM 292 MODULE 1
37
Table 2: Some Common Organic Functional Groups
*R, R', and R'' are general hydrocarbon groups. 2.0 OBJECTIVES At the end of this unit, you should be able to: • recognise functional groups • give examples of members of functional group families • predict the results of solubility tests of known compounds • use solubility test data to classify unknown compounds • perform simple chemical tests to identify some common
functional groups. 3.0 MAIN CONTENT 3.1 Functional Group Identification Tests Before outlining the general scheme, you should note one or two points of practical importance. (a) Quantities of substance for tests. For most tests about 0.1 g solid
or 0.1 - 0.2 mL (2 - 3 drops) of liquid material (NOT MORE ) should be used.
(b) Reagents likely to be met within organic analysis are on the reagent shelves. You are advised to develop a general knowledge of the physical characteristics of common

CHM 292 PRACTICAL CHEMISTRY IV (ORGANIC & PHYSICAL)
38
organic compounds. If in doubt about the expected result of a test between a certain compound and a reagent, carry out a trial test with a known compound and compare with the unknown: (c) Quantities of substance derivatives. Students have wasted much time and material in the past by taking too large a quantity of substance for preparation of a derivative. In general, 0.5 - 1 g (or 0.5 - 1 mL) of substance gives the most satisfactory results. If a practical book instructs one to use larger quantities (3 - 4 g or more), the quantities should be scaled down to 1 g or 1 mL of the unknown substance and corresponding quantities of reagents should be used. 3.2 General Scheme of Analysis A. Preliminary tests (a) Note physical characteristics - solid, liquid, colour and odour. (b) Perform an ignition test (heat small amount on metal spatula) to determine whether the compound is aliphatic or aromatic (i.e. luminous flame - aliphatic; sooty flame -aromatic). B. Physical constants Determine the boiling point or melting point. Distillation is recommended in the case of liquids. It serves the dual purpose of determining the b.p., as well as purification of the liquid for subsequent tests. C. Analysis for elements present The elements present will be told to you, but read up the method. D. Solubility tests Solubility classification The solubility of an organic compound in various solvents can give valuable information about the unknown. The general rule of “like dissolves like” or “polar compounds dissolve more readily in polar solvents” is useful. Also, organic acids (such as carboxylic acids and phenols) react with bases to form water soluble salts and organic bases (such as amines) react with acids to form water soluble salts. It should be noted that the polarity of an organic compound is increased by the kind and number of polar functional groups in the molecule and that the
CHM 292 MODULE 1
39
polarity decreases as the size of the non polar aliphatic group (define aliphatic group in a hyperlink) in the molecule increases. With this background, one begins the solubility classification by adding 3 drops or 3 mg of the unknown to 3 ml of water and shaking the mixture. If the unknown dissolves, it is a polar compound and in placed in solubility group S1. An unknown in class S1 is then tested as above using ether as the solvent. If it dissolved in both water and ether it is then placed in class S2. For unknowns that do not fall into either class S1 or S2, the unknown’s solubility in 5% sodium bicarbonate is determined. If it is soluble, the unknown is placed in class A1. If it is not soluble, the solubility in 5% sodium hydroxide is studied. If it is soluble at this point, the unknown belongs in class A2. If an unknown is insoluble to this point it is next tested for solubility in 5% hydrochloric acid. Compounds soluble in 5% hydrochloric acid are placed in solubility class B1. For compounds insoluble to this point the next solvent to try is concentrated sulphuric acid. Unknowns soluble in only this acid are placed in solubility class N1. A further distinction can be made for compounds soluble in concentrated sulphuric acid by testing their solubility in 85% phosphoric acid. Such compounds that are soluble in 85% phosphoric acid are placed in class N2. Finally, for compounds insoluble to this point are placed in class IN. These solubility classes and their consequences are summarised thus: S1 These are very polar compounds which consist of salts of
carboxylic acids or amines. It is also possible the compound is of low molecular weight and has many polar functional groups such as a carbohydrate.
S2 These compounds are low molecular weight (generally less than 5 carbons) with a polar functional group such as carboxylic acid, amine, alcohol, aldehyde, or ketone. A1 Higher molecular weight carboxylic acids fall into this class. A2 Phenols show this kind of solubility.
B1 Primary, secondary and tertiary amines fall into this class. However, if there are two or more phenyl groups on the nitrogen, the amine will probably not be basic enough to form the salt and will, thus, be insoluble.
N1 These are higher molecular weight compounds (generally more than 9 carbons) containing an oxygen atom.
N2 These are medium size molecules (generally containing from 5 to 9 carbons) containing an oxygen atom.
IN These are neutral compounds. Alkyl halides and alkanes fall into this class.
CHM 292 PRACTICAL CHEMISTRY IV (ORGANIC & PHYSICAL)
40
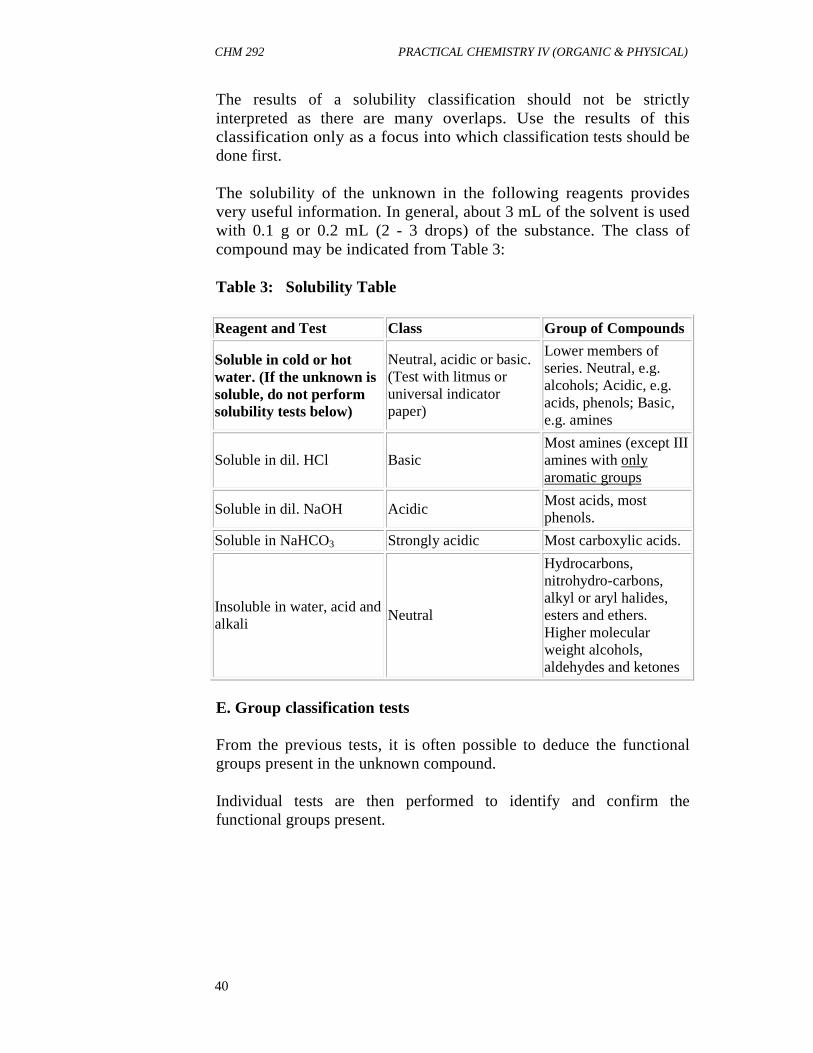
The results of a solubility classification should not be strictly interpreted as there are many overlaps. Use the results of this classification only as a focus into which classification tests should be done first. The solubility of the unknown in the following reagents provides very useful information. In general, about 3 mL of the solvent is used with 0.1 g or 0.2 mL (2 - 3 drops) of the substance. The class of compound may be indicated from Table 3: Table 3: Solubility Table
Reagent and Test Class Group of Compounds
Soluble in cold or hot water. (If the unknown is soluble, do not perform solubility tests below)
Neutral, acidic or basic. (Test with litmus or universal indicator paper)
Lower members of series. Neutral, e.g. alcohols; Acidic, e.g. acids, phenols; Basic, e.g. amines
Soluble in dil. HCl Basic Most amines (except III amines with only aromatic groups
Soluble in dil. NaOH Acidic Most acids, most phenols.
Soluble in NaHCO3 Strongly acidic Most carboxylic acids.
Insoluble in water, acid and alkali
Neutral
Hydrocarbons, nitrohydro-carbons, alkyl or aryl halides, esters and ethers. Higher molecular weight alcohols, aldehydes and ketones
E. Group classification tests From the previous tests, it is often possible to deduce the functional groups present in the unknown compound. Individual tests are then performed to identify and confirm the functional groups present.

CHM 292 MODULE 1
41
Note: 1. You are strongly advised against carrying out unnecessary tests,
since not only are they a waste of time but also increase the possibility of error. Thus, it is pointless to first test for alcohol or ketone in a basic compound containing nitrogen! Instead tests for amines, etc. should be done on such a compound.
2. A systematic approach cannot be over-emphasised in group classification tests to avoid confusion and error.
F. Consultation of literature Once the functional group has been identified, you are to make reference to tables in a book on organic analysis, for assessing possibilities and for the preparation of suitable solid derivatives. It should be noted that whilst two substances with the same functional group may sometimes have very similar boiling points (b.p.) or melting points (m.p.), solid derivatives can usually be chosen from the literature, with melting point differences of about 10 (or more), which distinguish between the two possibilities. Example: Compound B.P. Derivatives (M.P.) 2,4-DNPH
Semicarbazone
Diethyl ketone 102 156 139 Methyl n-propyl ketone 102 144 112
G. Preparation of derivatives The final characterisation of the unknown is made by the preparation of suitable solid derivatives. Select the derivative carefully and its melting point should preferably be between 90 -150 for ease of crystallisation and melting point determination. Attempt the preparation of one derivative. Purify the derivative by recrystallisation, dry and determine the melting point. Submit the derivatives correctly labeled for assessment together with the record. Recording of results Record the results in a systematic manner. Record results in the practical book at the time (not written up afterwards).

CHM 292 PRACTICAL CHEMISTRY IV (ORGANIC & PHYSICAL)
42
Make a record of every test carried out, no matter whether a negative result has been obtained. Test, observation and inference should be given. At the conclusion of the analysis, include a brief summary of results giving the name, b.p. or m.p., and formula of the analysed compound. Qualitative analysis for elements (for reference only) In organic compounds the elements commonly occurring along with carbon and hydrogen, are oxygen, nitrogen, sulphur, chlorine, bromine and iodine. The detection of these elements depends upon converting them to water-soluble ionic compounds and the application of specific tests. Lassaigne's sodium fusion test C, H, O, N, S, X NaX NaCN -> Na NaCN2S S Procedure Place a piece of clean sodium metal, about the size of a pea into a fusion tube. Add a little of the compound (50 mg or 2 - 3 drops). Heat the tube gently at first, allowing any distillate formed to drop back onto the molten sodium. When charring begins, heat the bottom of the tube to dull redness for about three minutes and finally plunge the tube, while still hot, into a clean dish containing cold distilled water (6 mL) and cover immediately with clean wire gauze. For liquids it is better to first melt the sodium add the liquid drop by drop. CAUTION: The tube shatters, and any residual sodium metal reacts with water. Stir the mixture, boil for 1 - 2 minutes, on a tripod and filter hot through a fluted paper. The 'fusion' filtrate which should be clear and colourless, is used for the specific tests described below: 1. To a portion (2 mL) of the 'fusion' filtrate add 0.2 g of powdered ferrous sulphate crystals. Boil the mixture for a half a minute, cool and acidify by adding dilute sulphuric acid drop wise. Formation of a
CHM 292 MODULE 1
43
bluish-green precipitate (Prussian blue) or a blue solution indicates that the original substance contains nitrogen. If no precipitate appears, allow to stand for 15 minutes, filter and inspect filter paper. 2. Sulphur (sulphide) To the cold 'fusion' filtrate (1 mL) add a few drops of cold, freshly prepared, dilute solution of sodium nitroprusside. The latter may be prepared by adding a small crystal of the solid to 2 mL of water. Production of a rich purple colour indicates that the original substance contains sulphur. This test is very sensitive. Only strong positive results are significant. 3. Halogens (halides) Acidify a portion (1 mL) of the 'fusion' filtrate with 2N nitric acid, and if nitrogen and/or sulphur are present, boil for 1 - 2 minutes.* Cool and add aqueous silver nitrate (1 mL), compare with a blank. Formation of a heavy, white or yellow precipitate of silver halide indicates halogen. If a positive result is obtained: acidify the remaining portion of the 'fusion' filtrate with dilute sulphuric acid, boil and cool. Add carbon tetrachloride (1 mL) and a few drops of freshly prepared chlorine water. Shake the mixture. (a) If the carbon tetrachloride layer remains colourless - indicates chlorine. (b) If the carbon tetrachloride layer is brown - indicates bromine. (c) If the carbon tetrachloride layer is violet - indicates iodine. If nitrogen and/or sulphur are also present, the addition of silver nitrate to the acidified 'fusion' solution will precipitate silver cyanide and/or silver sulphide in addition to the silver halides. The removal of hydrogen cyanide and/or hydrogen sulphide is effected by boiling the 'fusion' solution. Group classification tests Tests for unsaturation 1. Cold dilute potassium permanganate solution. 2. Solution of bromine in carbon tetrachloride.

CHM 292 PRACTICAL CHEMISTRY IV (ORGANIC & PHYSICAL)
44
Tests for compounds containing nitrogen 1. Amines (a) Nitrousacid (b) Confirmatory tests. 2. Compounds which give amines or ammonia on acid or alkaline
hydrolysis: amides, substituted amides, anilides, nitriles. 3. Compounds which give amines on reduction: nitro, nitroso, azo,
hydrazo, nitriles. Tests for compounds containing C, H and possibly oxygen 1. Carboxylic acids: Na2CO3 or NaHCO3 solution liberate carbon
dioxide. 2. Phenols (a) Sodium hydroxide solution (soluble). Insoluble in and no
CO2 from NaHCO3 (except when electron attracting groups present, e.g. 2,4-dinitrophenol).
(b) Ferric chloride solution. (c) Bromine water. 3. Aldehydes and Ketones (a) 2,4-dinitrophenylhydrazine (as Brady's reagent) for C=O. (b) Iodoform test for CH3CO-. 4. Aldehydes only (reducing properties) (a) Fehling's solution. (b) Tollen's reagent (ammoniacal AgNO3 solution). (c) Jones reagent. 5. Alcohols (a) Lucas' reagent to distinguish I, II and III alcohols. (b) Jones reagent. (c) Metallic sodium (use dry liquid and dry tube). 6. Sugars (a) Molisch's test. 7. Esters (a) Hydroxamic acid test. (b) Hydrolysis. 3.3 Functional Group Classification Tests Introduction to qualitative tests - The first test that should be done is a solubility test to determine the class or classes to which the unknown belongs. From the results of the solubility tests, some idea of the type of organic compound should be evident. If the solubility test results put the unknown substance in the ‘Neutral’ section, it is recommended that the classification tests be done in this order: aldehydes, ketones, alcohols, esters, amides, nitriles, ethers, alkenes

CHM 292 MODULE 1
45
and alkynes. Select a test from the list of tests that would help confirm the presence or absence of the suspected functional group class. Do as many tests that may be necessary to absolutely confirm the functional group to which the unknown belongs. Be careful to interpret correctly the test results for those unknowns that may contain two or more functional groups. At that point, proceed to the preparation of derivatives to identity the exact identity of the unknown. 2,4-Dinitrophenylhydrazine test (for aldehydes and ketones) - This test will be positive for an aldehyde or ketone as indicated by the formation of a yellow, orange or red precipitate which is called a 2,4-dinitrophenylhydrazone. This precipitate can also be used as a derivative for the unknown if its melting point is determined (see below for derivative use). The colour of the precipitate can help further identify the extent of conjugation for the carbonyl group. Highly conjugated aromatic aldehydes or ketones generally give red solids whereas non conjugated carbonyl compounds give yellow products. Acetyl chloride (for acidic hydrogen compounds) - This test will help identify carboxylic acids, phenols and alcohols. A positive test will be noted by the evolution of heat which may be hard to detect. So, this test may give false positive or negative tests depending on the expertise of the person doing the test. In some cases, a solid (usually white) may form. If this happens, the solid, if isolated and its melting point is determined, could be used as a derivative for the unknown. If water is present in the unknown, the test will probably give a false positive test as acetyl chloride reacts vigorously with water. Basic hydrolysis (for amides, esters and nitriles) - Amides and esters can be hydrolysed by heating in a sodium hydroxide solution. This reaction pH gives the acid as a water soluble carboxylate salt. Acidifying this solution with concentrated hydrochloric acid would result in a precipitate if the carboxylic acid is water insoluble. If this precipitate is formed, it should be filtered and used as a derivative for the unknown. Beilstein test (for halogenated compounds) - Placing a small amount of an organic compound on the end of a copper wire and heating it in the open flame of a Bunsen burner results in a transient green colour in the flame if the compound contains a halogen atom. If the unknown is volatile, it may evaporate before it burns resulting in a negative test. Benedict test (for aldehydes and sugars) - When easily oxidised organic compound (such as aldehydes and reducing sugars) is heated in

CHM 292 PRACTICAL CHEMISTRY IV (ORGANIC & PHYSICAL)
46
Benedict’s solution (which is a blue solution containing a complex copper (II) ion) a brick red precipitate of cuprous oxide forms. If the unknown is not soluble in the reagent a negative test may be observed due to the lack of a reaction. Bromine in carbon tetrachloride (for alkenes and alkynes) - When a solution bromine in carbon tetrachloride is added drop wise to an unknown compound, the brownish colour of elemental bromine disappears as the bromine adds to the unsaturated organic compound. Ceric nitrate (for alcohols and phenols) - Alcohol with 10 carbons or less will give a red colour with ceric nitrate solution whereas phenols will give a green-brown to brown precipitate. Easily oxidised compounds may destroy the ceric nitrate solution before the test may be observed. Chromic acid (for aldehydes, primary and secondary alcohols) - Easily oxidised compounds convert the red chromium (VI) ion to a green Chromium (III) precipitate. Combustion (for flammable or combustible organic compounds) - When a few milligrams of an organic liquid or solid are placed directly into a Bunsen burner flame they often burn. Note that highly halogenated organic compounds may not burn. Very volatile compounds may evaporate before burning or burn very rapidly. The manner in which a compound burns can give some information about its nature. Highly oxygenated compounds burn with a blue flame, aliphatic compounds give a yellow flame and aromatic compounds give a sooty flame. Ferric chloride (for phenols) - Some (but not all) phenols give a colour when ferric chloride solution is added. This test is not a definitive one and the results should be carefully evaluated. Ferric hydroxamate (for esters, acid chloride and anhydrides) - Esters of carboxylic acids give a magenta colour with this reagent. Acid chloride and anhydrides give a magenta or burgundy colour with the test reagent. Ferrous hydroxide (for nitro compounds) - Most compounds that contain a nitro group will give a brown to red-brown precipitate of ferric hydroxide by oxidation of ferrous hydroxide. Hinsberg test (to distinguish primary, secondary and tertiary amines) - Benzenesulfonyl chloride can be used to distinguish

CHM 292 MODULE 1
47
primary, secondary and tertiary amines. The amine functional group must be confirmed before this test can be performed as the test will give very confusing results with any other functional group. Primary amines give a solid benzenesulfonamide product that is soluble in 5% sodium hydroxide. Secondary amines give a solid benzenesulfonamide product that is insoluble in 5% sodium hydroxide. Tertiary amines do not react with benzenesulfonyl chloride. Hydroxylamine hydrochloride (for aldehydes and ketones) - Aldehydes and most ketones give a red colour when added to a solution of hydroxylamine hydrochloride in ethanol-water that has a universal indicator added. Iodoform test (for methyl carbonyl compounds) - This test is mainly used to identify methyl ketones. The iodoform regent iodinates the methyl group which they cleaves in the basic solution One should confirm the presence of a carbonyl group in the unknown before this test is done as misleading results could occur with other compounds. For example, acetaldehyde and alcohols that have a methyl group bonded to the C-OH group can also give a positive test since such an alcohol can be oxidised to a methyl ketone by the iodoform reagent. Lucas test (to distinguish primary, secondary and tertiary alcohols of six carbons or less) - A solution of zinc chloride in aqueous hydrochloric acid can be used to distinguish primary, secondary and tertiary alcohols. The unknown compound must be soluble in the reagent in order for the test to be valid. When a tertiary alcohol is added dropwise to the reagent, an immediate second layer or a liquid alkyl chloride is formed. Secondary alcohols form a second layer of the insoluble alkyl chloride in three to 5 minutes. Primary alcohols are unreactive with the Lucas reagent. Nitrous acid (to distinguish primary, secondary and tertiary amines) - Primary aromatic amines give nitrogen gas evolution with the nitrous acid reagent. Other aromatic amines can undergo coupling reactions to form coloured products. pH in ethanol (to distinguish low molecular weight acidic or basic compounds) -The pH of compounds that are soluble in water or aqueous alcohol can be measured. If the pH is in the acid range the compound can be a carboxylic acid, acid chloride or anhydride. If the pH is in the basic range, the compound may be an amine. Organic salts may hydrolyse in water which can lead to acidic or basic solutions.

CHM 292 PRACTICAL CHEMISTRY IV (ORGANIC & PHYSICAL)
48
Potassium permanganate (for compounds that can be oxidised) - Organic compounds that can be readily oxidised will convert the purple of the permanganate ion to a brown precipitate of manganese dioxide. Such organic compounds include: aldehydes, reducing sugars, primary or secondary alcohols and some alkenes and alkynes. Silver nitrate in ethanol (for alkyl halides that can undergo SN1 reactions) - Tertiary alkyl halides will give a white to yellow silver halide precipitate with this reagent. Some secondary halides will react more slowly. Aryl and vinyl halides do not react. Sodium fusion (for compounds that contain halogen, nitrogen or sulfur) - When an organic compound is placed in molten elemental sodium the molecules are violently destroyed. Any halogen, nitrogen or sulphur in the original molecule is converted to ionic materials which are then identified. The halide is identified by precipitation with silver ions. The sulfide ion is identified by precipitation with lead ions. The cyanide ion formed the nitrogen in the molecule is converted into Prussian blue by ferrous sulfate. Sodium iodide in acetone (for alkyl halides that can undergo Sn2 reactions) -Primary and some secondary alkyl chlorides or bromides will give a precipitate of sodium iodide in the reagent. Alkyl iodides will not give the precipitate. Aryl or vinyl halides do not react. Solubility (for general classification of organic compounds). See solubility classification section above. Tollen’s test (for aldehydes and reducing sugars) - Water soluble aldehydes and reducing sugars give a silver mirror or black precipitate of elemental silver with the Tollen’s reagent. General notes: Terms and techniques used in qualitative analysis 1. Mixing solutions After addition of any reagent to a solution, one must ensure proper mixing. To mix the reagent and the solution in a centrifuge tube, tap the bottom of the centrifuge tube against the table or snap it with your fingers while holding the upper part in the other hand. 2. Centrifuging Precipitates are separated from the supernatant solution by centrifuging. This is the process of separating more dense solid particles from less dense liquid (solution) by spinning (separation by
CHM 292 MODULE 1
49
means of centrifugal force). The apparatus used here is called a centrifuge. It must be balanced to properly function. Balancing is done by putting the centrifuge tube containing the reaction mixture (tightly capped) in a sleeved centrifuge slot, then placing a centrifuge tube with an equal volume of tap water in a slot across from the first tube. Make sure that the tubes are tightly capped before they are place d in the centrifuge. 3. Decanting The supernatant solution is transferred from above the precipitate to another tube by decanting. When a two-phase system (solid-liquid) is considered: after the solid settled to the bottom upon centrifuging, decanting is pouring the supernatant liquid out of the tube, leaving the solid behind. 4. Rinsing precipitates All precipitates, after they have been separated from the supernatant solution, must be rinsed with distilled water before proceeding to the identification of the cation present. This process must be done to remove any cations present in the supernatant solution adhering to the solid. The presence of these ions may cause confusing results in the process of further identification or separation. The solid remaining after the supernatant solution has been removed is mixed with 10 drops of distilled water and the tube is tapped to thoroughly mix the contents. The tube is centrifuged, rinse water decanted, and the process repeated one to two more times. 4.0 CONCLUSION The qualitative analysis is a general name for the methods used in the determination of the identity rather than the amount of chemical species (quantitative analysis). The qualitative process usually utilises the reaction(s) characteristic for the given chemical species and interprets the obtained results using a deductive thought process 5.0 SUMMARY In this unit, we have: • identified some functional groups and give examples of members
of functional group families. • learnt how to predict the results of solubility tests of known
compounds, and to use solubility test data to classify unknown compounds.

CHM 292 PRACTICAL CHEMISTRY IV (ORGANIC & PHYSICAL)
50
• performed simple chemical tests to identify some common functional groups.
6.0 TUTOR-MARKED ASSIGNMENT 1. Define the term qualitative analysis. 2. How do you differentiate between an aromatic and an aliphatic
hydrocarbon in the lab? 3. Which of the following alcohols will react most rapidly with the Lucas
reagent (HCl, ZnCl2)? a) (CH3)3COH b) CH3CH2CH2CH2OH c) (CH3)2CHCH2OH d) CH3CHOHCH2CH3 Clue: Find out what makes an alcohol primary, secondary or tertiary.
7.0 REFERENCES/FURTHER READING http://webs.anokaramsey.edu/chemistry/Chem1062/Labs/FunctionalGro
ups/1062-FunctionalGroups09.pdf http://www.xula.edu/chemistry/documents/orgleclab/25Qual2.pdf http://www.phobos.ramapo.edu/~bshine/org2lab/SimOrgHelp.doc-
United States.

CHM 292 MODULE 2
51
MODULE 2 PHYSICAL CHEMISTRY Unit 1 pH Measurements Unit 2 Determination of Relative Molar Mass from Colligative
Properties Unit 3 Demonstration of Partition Coefficient in Two Immiscible
Solvents Unit 4 Temperature Measurement and Heat of Dissolution Unit 5 Heat of Neutralisation Unit 6 Determination of Critical Solution Temperature of Water-
Phenol System Unit 7 Ideal Gas Law: Measuring the Molar Volume of a Gas and
the Universal Gas Constant UNIT 1 pH MEASUREMENTS CONTENTS 1.0 Introduction 2.0 Objectives 3.0 Main Content
3.1 Materials 3.2 How to Measure with pH Paper
4.0 Conclusion 5.0 Summary 6.0 Tutor-Marked Assignment 7.0 References/Further Reading 1.0 INTRODUCTION For most science experiments, you will need a pH indicator, such as wide-range litmus, pH paper, or pH meter. These pH indicators contain a chemical that changes colour when it comes in contact with acids or bases. For example, litmus and pH paper turn red in strong acids and blue in strong bases. Because only a few pH indicators measure pH over a wide range of pH values, you will need to find out the pH range of the indicator you use. Typically, the colour chart provided with each pH indicator kit will show the pH range of that indicator. Colour pH indicators provide only an approximate measure of the pH, or the strength of the acid or base. They are not as accurate as the expensive instruments scientists use to measure pH, but they are adequate for the experiments you need to do at this level.

CHM 292 PRACTICAL CHEMISTRY IV (ORGANIC & PHYSICAL)
52
2.0 OBJECTIVES At the end of this unit, you should be able to: • explain the essence of pH paper and pH indicator • measure the pH of common substance • calculate the pH and pOH of solutions • use litmus paper to measure pH. 3.0 MAIN CONTENT 3.1 Materials pH paper and colour chart (pH range 3 to 12) or pH meter, distilled water, white vinegar, household ammonia (or baking soda) spot plate test or 3 small test tubes, stirring rod solutions/fruits juice (lemon, lime, orange, or melon), beverages (cola, carbonated non-cola, milk) Indicators, in chemistry, are natural or synthetic substances that change colour in response to the nature of chemical environment. Litmus, for example, is a natural dye that turns red in most acidic solutions and blue in most basic solutions. Compounds that undergo colour changes when there is a pH change in the solutions in which they are contained are called indicators (Table 4). Indicators are used to provide information about the degree of acidity of a substance or the state of some chemical reactions within a solution being tested or analysed. 3.2 How to Measure with pH Paper When measuring pH with pH paper, dip the end of a strip of pH paper into each mixture you want to test. After about two seconds, remove the paper, and immediately compare the colour at the wet end of the paper with the colour chart provided with that pH indicator. When measuring pH with pH meter, dip the end of electrode of pH meter into each mixture you want to test. Write the pH value and colour. Always use a clean, unused strip of pH paper for each mixture that you test.

CHM 292 MODULE 2
53
Table 4: List of Indicators and their pH Range Indicators Acid (colour
change) Base (colour change)
pH range
Methyl orange Red Yellow 3.1-4.4
Methyl Red Red Yellow 4.2-6.3
Bromothymol Blue
Yellow Blue 6.0-7.8
Phenol Red Yellow Red 6.4-8.0
Phenolphthalein Colourless Pink 8.0-9.8
Thymol Blue Red Yellow 1.2-2.8
Alizarin Yellow Yellow Red 10.1-12.0
Example 1 - Vinegar is an acid, and in this experiment it will display
a pH of about 4. Vinegar at pH 4 turns pH paper yellow and most other pH indicators red.
Example 2 - Ammonia is a base and in this experiment it will display
a pH of about 12. Bases turn most pH indicators blue. Example 3 - Pure distilled water would have tested neutral, but pure
distilled water is not easily obtained because carbon dioxide in the air around us mixes, or dissolves, in the water, making it somewhat acidic. The pH of distilled water is between 5.6 and 7. Traditionally, solutions were labeled as being acidic or basic based on their taste and texture. Those that tasted sour were said to be acidic and solutions that tasted bitter and were slippery to touch were said to be basic. Thus, substances such as lemon juice and vinegar were identified as acids, and solutions of lye and caustic soda as bases. Several definitions have been proposed for acids and bases. Depending upon the situation, one or more definition is applicable.
In this case, the hydronium ion, H3O
+, forms when a proton, H+, is transferred from one H2O molecule to another. The other species that result from this process is the hydroxide ion, OH-. Thus while one water molecule, the proton acceptor, functions as the base; the other plays the role of the acid. The ability of one water molecule to accept a proton from another water molecule or any acid is due to the two lone pairs of electrons on the oxygen atom of water.

CHM 292 PRACTICAL CHEMISTRY IV (ORGANIC & PHYSICAL)
54
The autoionisation results in equal molar amounts of H3O+ ions and
OH−ions and hence the solution is neutral. In a sample of pure H2O, the concentrations of H3O
+ and OH−ions at 25 oC are 1.0 x 10⁻⁷ M. [H3O
+] = [OH‾] = 1.0 x 10⁻⁷ M The concentration of hydronium ion , [H3O
+], of a solution is commonly expressed in terms of the pH of the solution, which is defined as the negative logarithm of [H3O
+] or negative logarithm of [H+] in the solution; pH = - log [H3O
+] or pH = - log [H+] Thus the hydrogen ion concentration can be obtained from the pH of the solution as follows; [H3O
+] = 10 - pH
Similarly, the concentration of hydroxide ion, [OH-], of a solution is commonly expressed in terms of the pOH of the solution, which is defined as the negative logarithm of [OH-]. pOH = - log [OH ‾] The hydroxide ion concentration can be obtained from the pOH of the solution using the equation [OH‾] = 10 ‾pOH
Additionally, the pH and the pOH of any aqueous solution are related as are the hydrogen and the hydroxide ion concentrations. The relevant equations are; [H+] [OH‾] = 1.0 x 10 -14 pH + pOH = 14 Example (1) What is the pH and pOH of a solution that contains 3.50 x 10⁻⁵ M hydronium ions? pH = - log [H3O
+] = - log (3.50 x 10⁻⁵) = 4.46 pOH = 14 - pH = 14 - 4.46 = 9.54 Example (2) Calculate the hydronium ion and hydroxide ion concentrations of a solution that has a pOH of 4.40. pH = 14 - pOH = 14 - 4.40 = 9.60

CHM 292 MODULE 2
55
[H3O +] = 10 - pH = 10 - 9.60 = 2.51 x 10⁻¹⁰ M [OH−] = 10 - pOH = 10 - 4.40 = 3.98 x 10 -5 M In water, [H3O
+] is equal to 1.0 x 10⁻⁷ M, so the pH is 7.0. Because [H3O
+] = [OH−] in water, which is neither acid nor base. pH = 7.0 ( neutral) pH < 7.0 (acidic) pH > 7.0 (basic) The pH scale has a range of 0.0 to 14.0. A practical way to evaluate the relative acidity or basicity of solutions is to compare their effect on indicators. In this experiment, you will observe the properties of acids and bases with suitable indicators. By the end of this experiment, you will be able to determine the pH of various solutions such as some fruits, common beverages, and borax. Clorox and Borax are cleaning agent that some people add to their laundry detergent. Acids usually taste sour, and bases bitter. Household cleaners are poisons so you should never taste them. You will observe the colour of several indicators in these solutions and also using pH paper and pH meter. Procedure 1. Dip an unused strip of pH paper into solution. Leave until wet
(about 2 seconds). Immediately compare with the color chart. Write down the approximate pH value of the solution. If you’re using pH meter write down the approximate pH value of the solution.
2. Repeat the same process for the other solutions and record your observation in a table.
4.0 CONCLUSION A very important measurement in many liquid chemical processes (industrial, pharmaceutical, manufacturing, food production, etc.) is that of pH: the measurement of hydrogen ion concentration in a liquid solution. A solution with a low pH value is called an "acid," while one with a high pH is called a "caustic." The common pH scale extends from 0 (strong acid) to 14 (strong caustic), with 7 in the middle representing pure water (neutral).

CHM 292 PRACTICAL CHEMISTRY IV (ORGANIC & PHYSICAL)
56
5.0 SUMMARY In this unit, you have been: • exposed to the using litmus paper to measure pH • exposed to how to determined the pH of common substances
using litmus paper. 6.0 TUTOR-MARKED ASSIGNMENT 1. What is pH? 2. How can you measure pH in your lab? 3. The [H+] of an acid solution that has a pH of 3 is: 4. What is the pH of a solution whose pOH is 11.09? 5. The pH of a soft drink is determined to be 4.0. What is the [OH-] of the
drink? 7.0 REFERENCES/FURTHER READING http://swc2.hccs.edu/pahlavan/intro_labs/Exp_20_pH_of_Common_Sub
stances.pdf http://www.sciencegeek.net/Chemistry/taters/Unit8pH.htm
CHM 292 MODULE 2
57
UNIT 2 DETERMINATION OF RELATIVE MOLAR MASS FROM COLLIGATIVE PROPERTIES
CONTENTS 1.0 Introduction 2.0 Objectives 3.0 Main Content
3.1 Theory 3.2 Procedure
4.0 Conclusion 5.0 Summary 6.0 Tutor-Marked Assignment 7.0 References/Further Reading 1.0 INTRODUCTION The vapour pressure of a pure liquid at a given temperature is a characteristic property of that liquid. However, when a nonvolatile solute is dissolved in the liquid, the vapour pressure of the liquid is reduced. This lowering of the vapour pressure causes a change in the melting point, boiling point, and osmotic pressure of the liquid. The magnitude of the change in these properties depends upon the number of solute particles dissolved in a given amount of the solvent, but not upon the nature of the particles (their identity). Such properties are called colligative properties. The addition of ethylene glycol to the water in a car radiator in order to raise its boiling point, or the use of salt to lower the melting point of ice on a sidewalk is some everyday applications of colligative properties. 2.0 OBJECTIVES At the end of this unit, you should be able to: • investigate the phenomenon of freezing-point depression as
a colligative property • determine the molar mass of an unknown solute using freezing-
point depression. 3.0 MAIN CONTENT 3.1 Theory Most substances can exist as solid, liquid, or gas, depending upon the temperature and pressure. Whether a particular substance exists as a solid, liquid, or gas under conditions of standard temperature and

CHM 292 PRACTICAL CHEMISTRY IV (ORGANIC & PHYSICAL)
58
pressure is dependent upon the nature of the substance and includes such properties as the molecular weight of the substance or the intermolecular forces of attraction between molecules. If a substance that exists as a solid is heated, it will eventually melt to form a liquid. Suppose a substance that is a solid at room temperature is slowly heated. As energy is added to the solid, the temperature of the solid will begin to rise. Once the melting point of the solid is reached, however, the temperature of the solid-liquid mixture will remain constant until all the solid has been converted into a liquid. Only then will the temperature rise again. Does this make sense? If we are continuing to add heat to the sample, how can the temperature remain constant? The answer to this question is that the energy being added is used to bring about the phase change rather than to heat the sample. The process of melting involves a breakdown of the attractive forces between molecules and requires energy. A similar process occurs as a liquid sample is cooled. As heat is removed from the liquid, the temperature of the liquid will drop until the freezing point of the liquid is reached. Once the liquid begins to solidify, the temperature of the liquid-solid mixture remains constant until all of the liquid has solidified, and only then will the temperature begin to drop again. This is the reason oranges are sprayed with water if a freeze is expected; the temperature of a water-ice mixture cannot drop below the freezing point of water until all of the water has frozen. It is important to note that freezing and melting are really the same thing and occur at the same temperature for a particular substance. The freezing point of a liquid is depressed when it contains a dissolved solid. A solution of salt water, for example, will freeze lower than the normal freezing point of water. The freezing point depression, or the difference between the freezing points of the pure solvent and solution, depends upon the number of particles in solution. The greater the concentration of the solution, the greater will be the freezing point depression. For a given concentration, a solute that dissociates will also bring about a greater freezing point depression. For example, a solution of NaCl will have twice the freezing point depression of a solution of sucrose of the same concentration. The sucrose is a molecular substance that does not dissociate in solution, but the NaCl will dissociate into Na+ and Cl- ions in solution, giving twice as many particles in solution.

CHM 292 MODULE 2
59
The freezing point depression of a solution is represented by the following equation: ∆T = Kfm Where: ∆T = the freezing point depression K f = the freezomg point depression constant m= the molality of the solution, or the number of moles of solute per kilogram of solvent. The freezing point depression constant, Kf, is different from solvent to solvent. Therefore a given quantity of solute will not always bring about the same freezing point depression. Some typical values are listed in the table below. You can see from this table that, of the substances listed, napthalene has the largest value. What this means is that a 1.0 molal solution of a non-dissociating solute dissolved in naphthalene would freeze 6.8 degrees below the normal freezing point of napthalene. Solvent Kf (oC/m)
Water 1.86 Benzene 5.12 Napthalene 6.8 Chloroform 4.68 Cyclohexane 20.4 The equation listed above can be exploited in several ways. Suppose a known quantity of solute is dissolved in a known quantity of solvent and the freezing point depression is measured. If the molecular weight of the solute is known, the only unknown variable is the freezing point depression constant. If the freezing point depression constant is known, the equation can be solved for the number of moles of solute, from which the molar mass of the solute can be calculated. This is the approach to be taken in lab today. In the first part of the experiment, the freezing point of pure paradichlorobenzene will be determined. In the second part of the experiment, the freezing point depression constant for paradichlorobenzene will be determined by adding a known quantity of napthalene and measuring the freezing point of the resulting solution. In the last part of the experiment, the molar mass of an unknown solute will be determined based upon the freezing point of a solution.
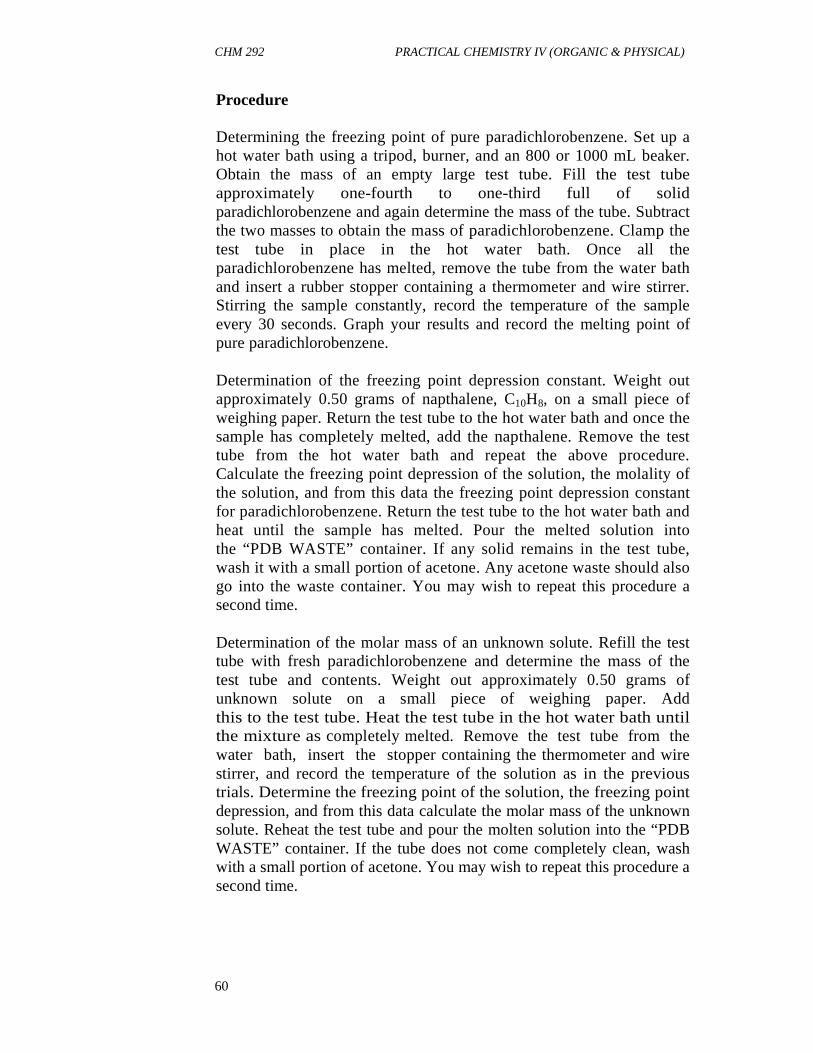
CHM 292 PRACTICAL CHEMISTRY IV (ORGANIC & PHYSICAL)
60
Procedure Determining the freezing point of pure paradichlorobenzene. Set up a hot water bath using a tripod, burner, and an 800 or 1000 mL beaker. Obtain the mass of an empty large test tube. Fill the test tube approximately one-fourth to one-third full of solid paradichlorobenzene and again determine the mass of the tube. Subtract the two masses to obtain the mass of paradichlorobenzene. Clamp the test tube in place in the hot water bath. Once all the paradichlorobenzene has melted, remove the tube from the water bath and insert a rubber stopper containing a thermometer and wire stirrer. Stirring the sample constantly, record the temperature of the sample every 30 seconds. Graph your results and record the melting point of pure paradichlorobenzene. Determination of the freezing point depression constant. Weight out approximately 0.50 grams of napthalene, C10H8, on a small piece of weighing paper. Return the test tube to the hot water bath and once the sample has completely melted, add the napthalene. Remove the test tube from the hot water bath and repeat the above procedure. Calculate the freezing point depression of the solution, the molality of the solution, and from this data the freezing point depression constant for paradichlorobenzene. Return the test tube to the hot water bath and heat until the sample has melted. Pour the melted solution into the “PDB WASTE” container. If any solid remains in the test tube, wash it with a small portion of acetone. Any acetone waste should also go into the waste container. You may wish to repeat this procedure a second time. Determination of the molar mass of an unknown solute. Refill the test tube with fresh paradichlorobenzene and determine the mass of the test tube and contents. Weight out approximately 0.50 grams of unknown solute on a small piece of weighing paper. Add this to the test tube. Heat the test tube in the hot water bath until the mixture as completely melted. Remove the test tube from the water bath, insert the stopper containing the thermometer and wire stirrer, and record the temperature of the solution as in the previous trials. Determine the freezing point of the solution, the freezing point depression, and from this data calculate the molar mass of the unknown solute. Reheat the test tube and pour the molten solution into the “PDB WASTE” container. If the tube does not come completely clean, wash with a small portion of acetone. You may wish to repeat this procedure a second time.
CHM 292 MODULE 2
61
For your reports: 1. Make three graphs - a cooling curve pure paradichlorobenzene
versus time, a coolingcurve of for the paradichlorobenzene-napthalene mixture versus time, and a cooling curve of the paradichlorobenzene - unknown solute mixture versus time.
2. Calculate the freezing point depression constant for paradichlorobenzene.
3. Calculate the molar mass of the unknown solute. 4.0 CONCLUSION Most substances can exist as solid, liquid, or gas, depending upon the temperature and pressure. Whether a particular substance exists as a solid, liquid, or gas under conditions of standard temperature and pressure is dependent upon the nature of the substance and includes such properties as the molecular weight of the substance or the intermolecular forces of attraction between molecules. 5.0 SUMMARY In this unit, you learnt how to: • investigate the phenomenon of freezing-point depression as a
colligative property • determine the molar mass of an unknown solute using freezing-point
depression.
6.0 TUTOR-MARKED ASSIGNMENT 1. What are colligative properties? 7.0 REFERENCES/FURTHER READING http://www.uncp.edu/home/mcclurem/courses/chm410/MPLAR_MASS http://web.centre.edu/miles/che135/che135labs/Colligative%20propertie
s.htm

CHM 292 PRACTICAL CHEMISTRY IV (ORGANIC & PHYSICAL)
62
UNIT 3 DEMONSTRATION OF PARTITION COEFFICIENT IN TWO IMMISCIBLE SOLVENTS
CONTENTS 1.0 Introduction 2.0 Objectives 3.0 Main Content
3.1 Determination of the Partition Coefficient for Benzoic Acid in CH2Cl2 and H2O
3.2 Microscale Partitioning of a Coloured Indicator 3.3 Macroscale Separation of Acid, Base, and Neutral
Compound 4.0 Conclusion 5.0 Summary 6.0 Tutor-Marked Assignment 7.0 References/Further Reading 1.0 INTRODUCTION This series of experiments will familiarise you with the common technique of liquid-liquid extraction. Extraction is an excellent way to separate the components of a mixture based on differential solubility in two immiscible solvents, normally water and an organic solvent. Separating a water-soluble compound from an organic-soluble compound is simply a matter of dissolving them in the solvent mixture and physically separating the two layers. This is an especially powerful technique for chemists who have a good command of acid-base properties (and pKas) and understand how solubility depends on polarity. One can often take advantage of acidity and basicity to move a compound from one layer to another as desired and effect a clean separation. 2.0 OBJECTIVES At the end of this unit, you should be able to: • examine the partitioning of benzoic acid between an organic and
an aqueous layer and separate it from a neutral organic compound
• examine the partitioning of an indicator, whose colour depends on the pH
• use what you have learnt to separate a three-component mixture.

CHM 292 MODULE 2
63
3.0 MAIN CONTENT 3.1 Experiment A: Determination of the partition coefficient
for benzoic acid in CH2Cl2 and H2O Equipment and supplies You need a centrifuge tube fitted with a cap and a couple Pasteur filter pipettes. Syringe pipettes will be provided for each solvent used in this part of the experiment. Your instructor will instruct you on how to use the syringe pipettes. The chemicals needed for this experiment are benzoic acid, methylene chloride, water and anhydrous sodium sulfate. CAUTION! Methylene chloride is a known carcinogen. When working with it, wear two sets of gloves (a blue pair over a white pair) and avoid breathing the fumes. Keep all containers and apparatus with methylene chloride in the hood at all times. Procedure Add 50 mg of benzoic acid followed by the addition of 1 ml of water and 1 ml of Methylene Chloride to a centrifuge tube. A syringe is supplied for each transfer (a syringe is attached to each solvent bottle). Cap the centrifuge tube and either carefully shake the contents of the vigorously for 30 seconds by hand or use a Vortex mixer. Remove the cap and allow the two layers to separate. Which solvent is the top layer? Which solvent is the bottom layer? What is a quick and simple technique/way to identify either layer? Carefully remove the organic phase using a Pasteur pipette, Transfer the methylene chloride layer to a dry conical vial and add about 50 mg of anhydrous sodium sulfate. As sodium sulfate is a drying agent (absorbs water) and removes trace of moist only, you might add some extra anhydrous sodium sulfate in order to dry the organic phase completely. Recap the vial and let the sodium sulfate dry the organic phase for 15 minutes. Transfer the dried organic phase via a dry Pasteur pipette to a tared and dry conical vial containing a boiling chip. Rinse the sodium sulfate with about 600 ∝ l of methylene chloride and combine the organic extracts. Why is a rinse performed? Evaporate the organic solvent in the fume hood using a warm sand bath and reheat the vial to remove the last traces of solvent (and water) until a constant weight of the solid is obtained. Turn in your dried product in a properly labeled plastic bag. Determine the amount of benzoic acid

CHM 292 PRACTICAL CHEMISTRY IV (ORGANIC & PHYSICAL)
64
recovered and calculate a value for the distribution coefficient (KD). 3.2 Experiment B: Microscale partitioning of a coloured
indicator In this experiment, we will use an indicator, 2,6- dichloroindophenol (In-OH), to see how acidity and basicity can be used to move a compound between organic and aqueous layers. Think about what's happening at each step of the procedure. The colours will help you keep track. Be sure to carefully record your observations at each step of the procedure. A solution of 25 mg of In-O - Na+ in 50 ml of 0.02 M NaOH will be provided. It should be BLUE; if it's not blue, don't use it, and don't just put it back either — hand it to your TA. Add 0.1 ml (100 ∝l) of the solution to a 2 ml pre- made mixture of 1:1 H2O-CH2Cl2 in a 5-ml conical vial. Note the appearance of the mixture. Shake the vial and note any change that occurs. Next, add 100∝ l of 0.05 M aq HCl and note the appearance of the mixture — what color is present, and where is it? Shake and observe. Finally, add 100∝ l of 0.1 M aq NaOH, then shake. How do you explain the observed changes? Repeat this entire experiment using diethyl ether in place of dichloromethane. 3.3 Experiment C: Macroscale separation of an acid, a base,
and a neutral compound In this experiment, you will take advantage of acidity and basicity to separate benzoic acid, benzocaine (ethyl p-aminobenzoate), and fluorenone. This experiment will be done on a larger scale than the previous experiments, so you'll need to use a separator funnel ("sep funnel").
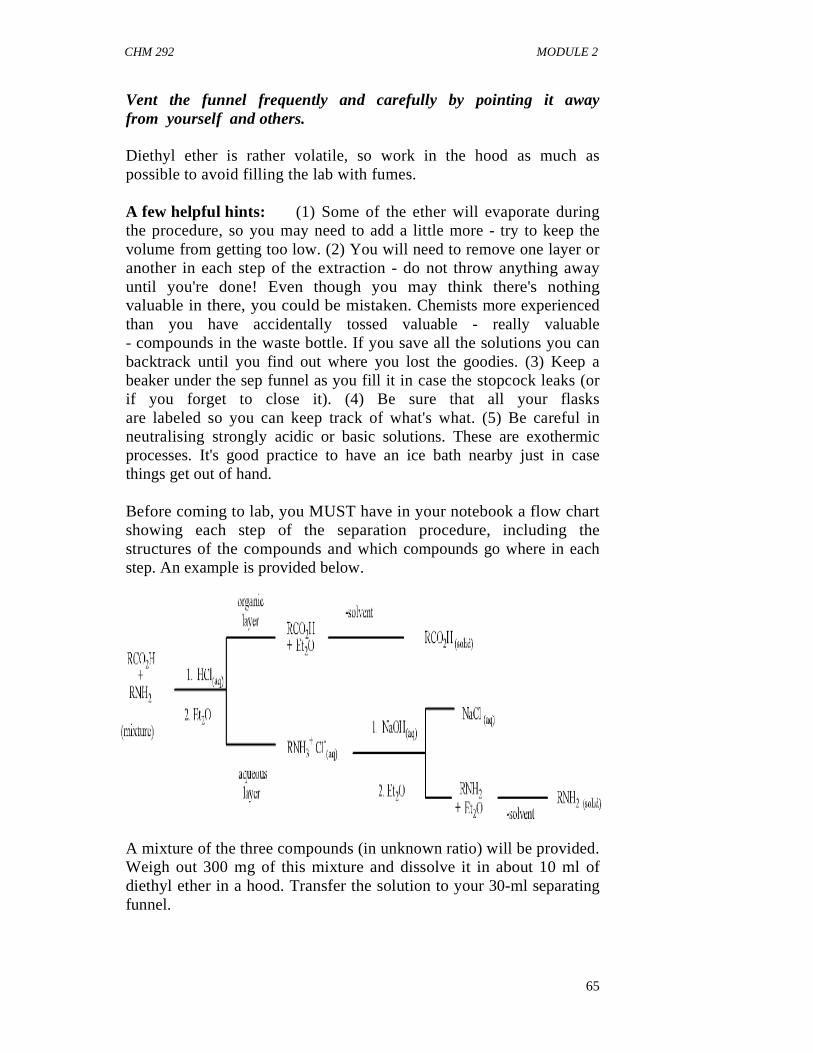
CHM 292 MODULE 2
65
Vent the funnel frequently and carefully by pointing it away from yourself and others. Diethyl ether is rather volatile, so work in the hood as much as possible to avoid filling the lab with fumes. A few helpful hints: (1) Some of the ether will evaporate during the procedure, so you may need to add a little more - try to keep the volume from getting too low. (2) You will need to remove one layer or another in each step of the extraction - do not throw anything away until you're done! Even though you may think there's nothing valuable in there, you could be mistaken. Chemists more experienced than you have accidentally tossed valuable - really valuable - compounds in the waste bottle. If you save all the solutions you can backtrack until you find out where you lost the goodies. (3) Keep a beaker under the sep funnel as you fill it in case the stopcock leaks (or if you forget to close it). (4) Be sure that all your flasks are labeled so you can keep track of what's what. (5) Be careful in neutralising strongly acidic or basic solutions. These are exothermic processes. It's good practice to have an ice bath nearby just in case things get out of hand. Before coming to lab, you MUST have in your notebook a flow chart showing each step of the separation procedure, including the structures of the compounds and which compounds go where in each step. An example is provided below. A mixture of the three compounds (in unknown ratio) will be provided. Weigh out 300 mg of this mixture and dissolve it in about 10 ml of diethyl ether in a hood. Transfer the solution to your 30-ml separating funnel.

CHM 292 PRACTICAL CHEMISTRY IV (ORGANIC & PHYSICAL)
66
Carefully add 4 ml of 3 M aqueous HCl, shake (remember to vent the funnel frequently!), allow the layers to separate, and remove the aqueous layer. Repeat this step with another 4-ml portion of 3 M aq HCl and combine this with the other aqueous layer. (Note that these directions can be shortened by saying: "extract the Et2O solution twice with 4 -ml portions of 3 M aq HCl", or "... with 2 x 4 ml 3 M aq HCl".) Add 6 M aq NaOH drop wise to the acidic aqueous solution until it is basic (use litmus paper). Cool the solution in ice for 10 - 15 min, isolate the solid by suction filtration, rinse it with two 2- ml portions of cold water, and allow it to air-dry. (What is this solid?) Extract the ether solution with 2 x 4-ml of 3 M aq NaOH. Set the combined aqueous layers aside. Wash the ether solution with 2 x 2 ml water followed by 2 ml of brine (saturated aq NaCl), and transfer it to a clean, dry Erlenmeyer flask. ("Wash" means basically the same thing as "extract". To "extract" is to obtain good stuff; to "wash" is to remove dirt, i.e. impurities.) Add about 0.5 - 1 g of anhydrous Na2SO4, stopper the flask, and set it aside. This drying agent soaks up any residual water. Most of the sodium sulfate should be free-flowing; if it's all clumped, add a little more. Take the basic aqueous solution from above and acidify it by drop wise addition of 6 M aq HCl. Cool the solution in ice, isolate the solid by suction filtration, rinse it with two 2-ml portions of cold water, and allow it to dry. (What is this solid?!) Filter the drying agent from the ether solution and rinse it with some mLs of ether. Evaporate the solvent with a stream of dry air in the hood. After all the solvent is gone, there should be a solid left. (What is it?) Determine the mass, % recovery, and melting points of the three solids, label them, and turn them in. 4.0 CONCLUSION If a solute is added to two immiscible solvents, A and B. in contact with each other, the solute distributes itself between the two and equilibrium is set up between the solute molecules in solvent A and the solute molecules in solvent B. The ratio of the concentration of the solute in the two solvents is: K =
where K is known as the partition coefficient or distribution coefficient.
Concentration of solute in solvent A Concentration of solute in solvent B

CHM 292 MODULE 2
67
5.0 SUMMARY In this unit, you have come in contact with three different experiments demonstrating partition coefficient: • The partitioning of benzoic acid between methylene chloride and
water • Using an indicator to see how acidity and basicity can be
used to move a compound between organic and aqueous layers • Take advantage of acidity and basicity to separate benzoic
acid, benzocaine (ethyl p-aminobenzoate), and fluorenone. 6.0 TUTOR-MARKED ASSIGNMENT 1. What do you understand by the term extraction? 2. What is distribution coefficient? 3. Given that, at 20o C only 0.24 g of an organic acid “A”
dissolves in 100 ml of water, but 2.70 g of the same acid dissolves in 100 ml of ether. Calculate the value of partition coefficient.
7.0 REFERENCES/FURTHER READING http://chemcourses.ucsd.edu/CoursePages/Uglabs/143AH_Weizman/ex
pt_2N.pdf http://llwuyy.com/PartitionCoefficient.doc http://swc2.hccs.edu/pahlavan/2423L6.pdf

CHM 292 PRACTICAL CHEMISTRY IV (ORGANIC & PHYSICAL)
68
UNIT 4 TEMPERATURE MEASUREMENTS AND HEAT OF DISSOLUTION
CONTENTS 1.0 Introduction 2.0 Objectives 3.0 Main Content
3.1 Procedure 4.0 Conclusion 5.0 Summary 6.0 Tutor-Marked Assignment 7.0 References/Further Reading 1.0 INTRODUCTION Temperature is a measure of how hot or cold an object is. Whenever there is a temperature difference, there will be a spontaneous heat flow from the object at higher temperature to the object at lower temperature. Thermometer is the instrument used to determine temperatures. Celsius and Kelvin scales are used for metric and SI units respectively while Fahrenheit scale is the choice for British units. These three scales are related by the following relationships: K = 0C + 273 0F = 9/5 (0 C) + 32 0C = 5/9 (0F - 32) Every change, physical or chemical, is associated with a change in energy, usually in the form of heat. The energy change of a reaction that occurs under a constant pressure is defined as the heat of the reaction or the enthalpy change. If heat is evolved during the change, the process is exothermic, and if heat is absorbed during the change, the process is considered to be endothermic. By convention, enthalpy change for an exothermic process has a negative value while that of an endothermic process has a positive value. We are familiar with different forms of energy. Heat energy, light energy, electrical energy, nuclear energy, chemical energy of the bonds in a molecule, are just a few examples of different forms of energy. From the law of conservation of energy, during any physical or chemical change: Energy lost = Energy gained
CHM 292 MODULE 2
69
In this experiment, you will become familiar with temperature measurements and record the temperature changes that occur when ammonium chloride and calcium chloride are dissolved in water. From this data, you will be able to calculate the heat energy given off or absorbed during this dissolution process (heat of dissolution). Heat absorbed/ evolved = (mass) (specific heat) (temperature change) The SI unit for heat is joule (J) while a non-SI unit calorie (cal) is widely used in scientific measurements. The relationship between these two units is: 1 cal = 4.184 J Specific Heat is the amount of heat required to raise the temperature of one gram of a substance by one degree Celsius. It can be expressed in cal / g.0C or Joules / kg Kelvin. Water has a relatively high specific heat of 1 cal /g.0C while metals usually have low specific heat. To calculate the heat of dissolution in water, specific heat of the aqueous solution will be considered to be that of pure water, 1 cal / g.0C. Calorimeter is an instrument used to measure heat flow in and out of a system. In this experiment, the calorimeter will consist of two Styrofoam cups, one nesting in the other. 2.0 OBJECTIVES At the end of this unit, you should be able to: • measure the enthalpy/heat flow as different solutes are dissolved
in aqueous solution • determine the heat of solution. 3.0 MAIN CONTENT 3.1 Procedure Materials: Beaker (100 mL), Thermometer, Hot Plate, Graduated Cylinder (50 mL), Ring Stand, Thermometer Clamp, Stirring Rod, Balance, Spatula, Styrofoam Cups (2), Cardboard Square, Sodium Chloride (NaCl), Calcium Chloride (CaCl2), Ammonium Chloride (NH4Cl), Ice.

CHM 292 PRACTICAL CHEMISTRY IV (ORGANIC & PHYSICAL)
70
A. Temperature measurement
1. Using thermometer, measure the temperature of 50 mL of water in a 100 mL beaker. Be sure that the bulb is steady during the measurement and not touching the glassware. The bulb needs to be fully immersed in the liquid.
2. Place a 100 mL beaker with 50 mL water on a hot plate. Place a thermometer in the water with the help of a stand and clamp. Bring the water to a boil indicated by steady stream of bubble formation from within the liquid. Once water starts to boil temperature is going to be steady until all of the water boils off. Measure the boiling point of water.
3. Make about 30 mL of an ice-water mixture in a 100 mL beaker. Stir the ice slush and measure the temperature.
4. Add three tea spoons full of table salt, sodium chloride, to the slush and stir. Measure the temperature of the mixture.
B. Heat of dissolution
1. Work in pairs for this section. 2. Weigh out about 10 grams of CaCl2. Be sure to record the exact
mass. Construct a calorimeter by nesting two Styrofoam cups, one inside the other. Add 50 mL of water to the calorimeter. Allow the water to stand for five minutes to reach a stable temperature. Place a small piece of card board to cover the cup. Make a small hole at the center of the card board and insert the thermometer through the hole. Make sure the thermometer bulb is under water. Measure the temperature of water. This is the initial temperature (Ti).
3. Holding the calorimeter steady, add all of the CaCl2 to water, place the cover, and stir rapidly with a thermometer. Be careful with the bulb of the thermometer while stirring.
4. After mixing, time - temperature data should be recorded. One partner should record the temperature while bother reads the time and keeps the record.
5. For five minutes, right from the start of mixing, take temperature at intervals of every 30 seconds. The highest temperature reached is the final temperature (Tf) of water.
6. Print the temperature versus time plot using the graph paper provided in the lab book.
7. After recording your data, wash contents of the cup down the sink with lots of water.
8. Repeat steps 1 - 7 using approximately 10 grams of ammonium chloride. The minimum temperature reached in this case is the final temperature (Tf).

CHM 292 MODULE 2
71
Report Sheet Part A - Temperature measurement Water at room temperature: _________ oC Boiling Water: _________ oC Ice water: _________ oC Ice water with salt: _________ oC Part B - Heat of Dissolution Heat gained by water during the dissolution of CaCl2: Mass of CaCl2: _________ g Mass of Water: __________ g Total Mass of Solution: _________ g Ti : _________ oC Tf : _________ oC Temperature change: _________ oC Heat of dissolution per gram of solute: ___________ cal/g. (show calculation) Dissolution of CaCl2 is exothermic or endothermic? ______________. CaCl2 can be used in hot packs or cold packs? ___________. Heat lost by water during the dissolution of NH4Cl: Mass of NH4Cl: _________ g Mass of Water: __________ g Total Mass of Solution: _________ g Ti : _________ oC Tf : _________ oC Temperature change: _________ oC Heat of dissolution per gram of solute: ___________ cal/g. (show calculation) Dissolution of NH4Cl is exothermic or endothermic? ______________. NH4Cl can be used in hot packs or cold packs? __________________. 4.0 CONCLUSION Temperature and heat of dissolution are quantities that can be measured in the laboratory. 5.0 SUMMARY In this unit, you have been able to: • demonstrate the enthalpy/heat flow as different solutes are
dissolved in aqueous solution • determine the heat of solution.

CHM 292 PRACTICAL CHEMISTRY IV (ORGANIC & PHYSICAL)
72
6.0 TUTOR-MARKED ASSIGNMENT 1. Aluminum metal melts at 660.37°C.What is the temperature in
Kelvin? 2. Define heat of solution. 7.0 REFERENCES/FURTHER READING http://swc2.hccs.edu/pahlavan/intro_labs/Exp_13_Heat_of_Dissolution.pdf
http://en.wikipedia.org/wiki/Enthalpy_change_of_solution
CHM 292 MODULE 2
73
UNIT 5 HEAT OF NEUTRALISATION CONTENTS 1.0 Introduction 2.0 Objectives 3.0 Main Content 3.1 Theory 3.2 Equipment 3.3 Procedure 4.0 Conclusion 5.0 Summary 6.0 Tutor-Marked Assignment 7.0 References/Further Reading
1.0 INTRODUCTION Energy changes always accompany chemical reactions. If energy, in the form of heat, is liberated the reaction is exothermic and if energy is absorbed the reaction is endothermic. Thermochemistry is concerned with the measurement of the amount of heat evolved or absorbed. The heat (or enthalpy) of neutralisation (∆H) is the heat evolved when an acid and a base react to form a salt plus water. We had started a discussion in the last unit on heat. You performed an experiment on heat of dissolution. You also studied able enthalpy (heat flow) as different solutes were dissolved in different solutions. In this unit we shall focus on another type of heat flow known as heat of neutralisation. 2.0 OBJECTIVES At the end of this unit, you should be able to: • explain the meaning of heat of neutralisation • perform an experiment on heat of neutralisation.
3.0 MAIN CONTENT 3.1 Theory Heat of neutralisation is defined as the constant quantity of heat liberated when one mole of strong acid is neutralised with one mole of strong base to produce one mole of water. As an example:

CHM 292 PRACTICAL CHEMISTRY IV (ORGANIC & PHYSICAL)
74
O
The reaction can be written as:
∆H =
13.733 cal/mol This indicates that the process is an exothermic reaction. Strictly speaking (aq) implies that the reaction is taking place in such dilute solution that the addition of further solvent causes no heat change, i.e. the heat of dilution is zero; this is exactly true, however, only at infinite dilution. The constant quantity of heat is equal to the heat of formation of one mole of undissociated water from combination of one mole of H+ and one mole of OH-, where
; ∆H = - 13.733 cal/mol
The neutralisation reactions of weak acid or weak base evolved not only heat of neutralisation but also heat of ionisation. So the quantity of heat of reaction Q will be either lower or higher than 13.733 cal/mol according to the endothermic or the exothermic ionisation process.
3.2 Equipment To determine the heat of neutralisation of hydrochloric acid and sodium hydroxide you shall need the following equipment: • Calorimeter • Beckmann thermometer • Graduated cylinder • Beaker (250 ml) • Distilled water • Burette • Pipette • Conical flask • Funnel • Spatula • Phenolphthalein -pH indicator.
3.3 Procedure 1. Prepare 500 ml of 5N HCI and 500 ml of NaOH, thermostat the
two solutions at room temperature T1. 2. Titrate 50 ml NaOH (in a flask) against 5N HCI by using
phenolphthalein as pH indicator, determine V1 (HCl).

CHM 292 MODULE 2
75
3. Weigh the empty calorimeter W1. 4. Place 50 ml of 5N NaOH in the calorimeter and record the
temperature at steady state T2. 5. Introduce quickly V1 (HCl) and justly record the temperature T3. 6. Weigh the calorimeter with its contents W2. 7. The weight of NaCl solution, W3 = W2 – W1.
Data recording
Cc CNaCl V1 W1 W2 W3 T1 T2 T3
Calculations: 1. Calculate ; T1may be = T2. 2. Calculate the heat absorbed by 5N NaCl solution where,
Consider ( = 3.895 cal) 3. The heat absorbed by the calorimeter;
= Note: The heat capacity of the calorimeter is given as:
= Q / Where Q the amount of heat absorbed by the calorimeter: the amount of heat lost by water: 4. Calculate heat of neutralisation where:
5. Calculate the number of water produced from neutralisation
reaction (undissociated water) where:
6. Calculate the molar heat of neutralisation;
Results Item Calculation Results

CHM 292 PRACTICAL CHEMISTRY IV (ORGANIC & PHYSICAL)
76
4.0 CONCLUSION The heat of neutralisation is the change in heat that occurs when one equivalent of an acid and one equivalent of a base undergo a neutralisation reaction to form water and a salt. It is defined as the energy released with the formation of 1 mole of water. 5.0 SUMMARY In this unit, you have learnt about the heat of neutralisation and you have also performed an experiment to determine the heat of neutralisation of a reaction involving hydrochloric acid and sodium hydroxide. 6.0 TUTOR-MARKED ASSIGNMENT 1. Define heat of neutralisation. 2. Mention four apparatus you can use to determine the heat of
neutralisation of an acid base reaction in you laboratory. 3. Write a balanced equation for the neutralisation reaction
involving hydrochloric acid and sodium hydroxide. 7.0 REFERENCES/FURTHER READING http://uqu.edu.sa/files2/tiny_mce/plugins/filemanager/files/4300412/Pra
ctical_Physical_Chemistry_course.pdf http://www.ccri.edu/chemistry/courses/chem_1100/wirkkala/labs/Enthal
py_of_Neutraliation.pdf http://en.wikipedia.org/wiki/Enthalpy_of_neutralization
CHM 292 MODULE 2
77
UNIT 6 DETERMINATION OF CRITICAL SOLUTION TEMPERATURE OF WATER-PHENOL SYSTEM
CONTENTS 1.0 Introduction 2.0 Objectives 3.0 Main Content 3.1 Theory 3.2 Procedure 4.0 Conclusion 5.0 Summary 6.0 Tutor-Marked Assignment 7.0 References/Further Reading 1.0 INTRODUCTION Two components system: When two liquids are mixed together, one of the following cases may arise: a. The two liquids are completely miscible at all proportions
yielding one homogeneous liquid phase, for example alcohol and water.
b. The two liquids are partially miscible yielding either one or two liquid phases, depending on the conditions, for example phenol and water.
c. The two liquids are practically immiscible yielding always two distinct phases under ordinary conditions, for example carbon disulphide and water.
2.0 OBJECTIVES At the end of this unit, you should be able to: • explain the meaning of critical solution temperature • perform an experiment to determine the critical solution
temperature of water-phenol system. 3.0 MAIN CONTENT 3.1 Theory The critical solution temperature is the temperature at which a mixture of two liquids, immiscible at ordinary temperatures, ceases to separate

CHM 292 PRACTICAL CHEMISTRY IV (ORGANIC & PHYSICAL)
78
into two phases. The upper critical solution temperature (UCST) is the critical temperature above which the components of a mixture are miscible in all proportions. The word upper indicates that the UCST is an upper bound to a temperature range of partial miscibility, or miscibility for certain compositions only. The lower critical solution temperature (LCST) is the critical temperature below which the components of a mixture are miscible for all compositions. The word lower indicates that the LCST is a lower bound to a temperature interval of partial miscibility, or miscibility for certain compositions only. The mutual solubility of partially miscible liquids usually increases with temperature. In this case, the solubility curve exhibits a maximum at the critical solution temperature above which the two liquids become completely miscible at all proportions. For some liquid pairs such as ether and water, however, the mutual solubility decreases with temperature, and the solubility curve shows a minimum at the critical solution temperature below which the two liquids become completely miscible at all proportions. Composition-temperature diagrams The temperature-composition diagram of the water-phenol system is given Figure 4. Outside the area bounded by the curve ABC, there occurs one unsaturated homogeneous liquid phase. Within that area, two liquid phases in equilibrium with each other coexist; one is water saturated with phenol and the other phenol saturated with water. Any point on the curve represents one saturated homogeneous phase; the existence of the saturating phase should be assumed. As the solubility curve is hardly affected by pressure, the system may be treated as a condensed one of two components. For condensed systems the phase rule may be expressed as: F = C - P + 1 where F is the number of degrees of freedom, C the number of components and P the number of phases. Outside the area enclosed by the curve, since P = 1, therefore the number of degrees of freedom F is 2, which means that the temperature and concentration, as variants, may be changed independently. For any point on the curve, P = 2, therefore F is 1, meaning that concentration must change with temperature. For the points enclosed within the curve, the situation is the same for any particular layer as for any point on the curve. Note: Phase is defined as any homogeneous and physically distinct part of a system which is separated from other parts of the system by definite bounding surfaces.

CHM 292 MODULE 2
79
The number of components in a system in equilibrium is the smallest number of independently variable constituents by means of which the composition of each phase present can be expressed either directly, or in the form of a chemical equation. The number of degrees of freedom or variance is the number of variable factors, such as temperature, pressure and concentration, which need to be fixed in order to completely define the conditions of a system in equilibrium.
Fig. 4: The Temperature-Composition Diagram of the Water-
Phenol System 3.2 Procedure 1. In a clean dry test tube (phenol tube) weigh accurately about 1 g phenol. 2. From a burette, add 0.5 ml of distilled water. Cover the tube with
a corkstopper carrying a thermometer and a stirrer, and then place in a beaker containing water to serve as bath.
3. Heat (or cool) gradually while the mixture is constantly stirred until the two layers disappear forming one homogeneous layer. The two temperatures (t1and t2), at which this occurs on passing from a lower (t1) to a higher (t2) temperature and the reverse, are recorded. These two temperatures should be nearly the same, and their mean gives the miscibility temperature of the mixture used.
4. To the same mixture add the necessary volumes of water (0.5, 1, 1.5,…) and heat gradually, then determine the miscibility temperature of the new mixture as described above.

CHM 292 PRACTICAL CHEMISTRY IV (ORGANIC & PHYSICAL)
80
Calculations: 1. Record the volume of water used for each composition. 2. Plot miscibility temperature against percentage water or phenol
for the various mixtures. 3. From the curve obtained find out the critical solution temperature
and the corresponding composition. 4.0 CONCLUSION The critical solution temperature is the temperature at which a mixture of two liquids, immiscible at ordinary temperatures, ceases to separate into two phases. In most experiments the temperature ranges between 670C- 680C for water-phenol system. What was your result? 5.0 SUMMARY In this unit, you have learnt about critical solution temperature and you have been able to carry out an experiment to determine the critical solution temperature of water-phenol system.
6.0 TUTOR-MARKED ASSIGNMENT 1. Explain the term critical solution temperature. 2. Explain the following terms in relation to this topic:
a. phase b. components c. degrees of freedom.
7.0 REFERENCES/FURTHER READING http://physicalpharmacy1424.blogspot.com/2013/06/practical-2-phase- diagram-mutual.html http://chemistry.niser.ac.in/labhandouts/C141%20%283%29.pdf http://uqu.edu.sa/files2/tiny_mce/plugins/filemanager/files/4300412/Pra ctical_Physical_Chemistry_course.pdf

CHM 292 MODULE 2
81
UNIT 7 IDEAL GAS LAW: MEASURING THE MOLAR VOLUME OF A GAS AND THE UNIVERSAL GAS CONSTANT
CONTENTS 1.0 Introduction 2.0 Objective 3.0 Main Content
3.1 Experimental Summary 3.2 Apparatus
4.0 Conclusion 5.0 Summary 6.0 Tutor-Marked Assignment 7.0 References/Further Reading 1.0 INTRODUCTION In this experiment, you will determine the volume that is occupied by one mole of gas. You will use the reaction of magnesium with hydrochloric acid to generate hydrogen according to the equation: Mg(s) + 2HCl(aq) →MgCl2(aq) + H2(g) Knowing the volume (V) of one mole (n = 1) at a temperature (T) and pressure (P) allows the calculation of the universal gas constant (R) in the ideal gas equation of state, commonly known as the ideal gas law: PV = nRT The value of R will differ depending on the units used for pressure and volume. When P is in atmospheres and V is in liters, the value of R is 0.08206 (L atm)/(mol K). This equation is useful because it allows one to calculate the pressure, volume, temperature or number of moles of a gas simply by knowing the other three variables and doing a little algebra. 2.0 OBJECTIVES At the end of this unit, you should be able to: • determine the volume occupied by one mole of a gas • apply the ideal gas law.

CHM 292 PRACTICAL CHEMISTRY IV (ORGANIC & PHYSICAL)
82
3.0 MAIN CONTENT 3.1 Experiment Summary About 10 mL of hydrogen can be generated by the reaction of approximately 9 mg (0.009 g) of magnesium with excess hydrochloric acid. It is impossible with the balances available in your lab to weigh such a small quantity to the three figure (±0.00001 g) accuracy that would be a reasonable target for this experiment. Instead, the length of magnesium ribbon taken can be used to calculate the mass with adequate accuracy - see the pre-lab question 1. The hydrogen gas will be collected by downward displacement of water in a measuring cylinder. The temperature and pressure at which the experiment will be performed are constant (room temperature and atmospheric pressure) and will be measured. Pre-laboratory assignment Read the procedure and answer the pre-laboratory questions before coming to the lab. The questions include the calculation of the length of magnesium ribbon to be used in the experiment. It is essential that you verify that your answer is correct before proceeding. Your demonstrator will inspect and collect in your pre lab before you are permitted to begin the experiment - keep a copy of it for yourself, and have the supervisor sign your receipt record. 3.2 Materials/Apparatus • Vernier caliper • 400 mL beaker • 10.0 mL graduated cylinder • 1-hole stopper to fit the cylinder • 10 - 15 cm of 22-gauge copper wire • Wash-bottle (with water) Reagents and materials • Magnesium ribbon (0.9 - 1.0 cm) cut carefully so that the ends
are "square" • 3 M hydrochloric acid • Sodium hydrogen carbonate (to neutralise the hydrochloric acid)
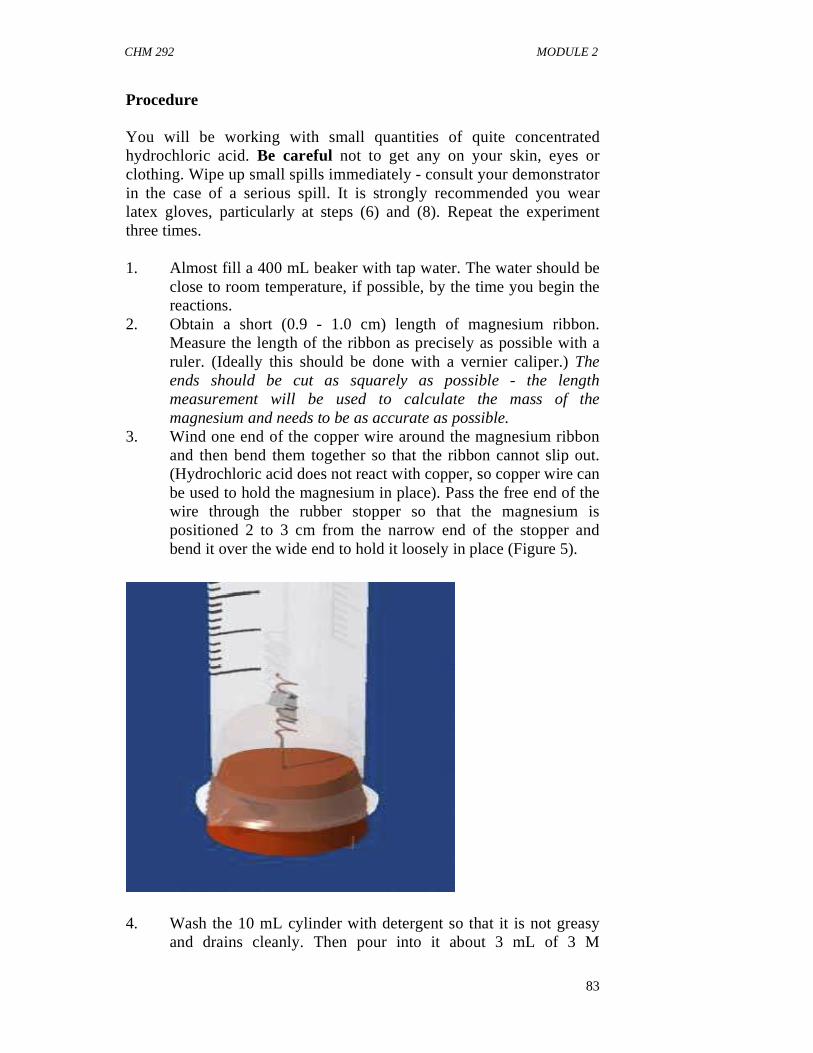
CHM 292 MODULE 2
83
Procedure You will be working with small quantities of quite concentrated hydrochloric acid. Be careful not to get any on your skin, eyes or clothing. Wipe up small spills immediately - consult your demonstrator in the case of a serious spill. It is strongly recommended you wear latex gloves, particularly at steps (6) and (8). Repeat the experiment three times. 1. Almost fill a 400 mL beaker with tap water. The water should be
close to room temperature, if possible, by the time you begin the reactions.
2. Obtain a short (0.9 - 1.0 cm) length of magnesium ribbon. Measure the length of the ribbon as precisely as possible with a ruler. (Ideally this should be done with a vernier caliper.) The ends should be cut as squarely as possible - the length measurement will be used to calculate the mass of the magnesium and needs to be as accurate as possible.
3. Wind one end of the copper wire around the magnesium ribbon and then bend them together so that the ribbon cannot slip out. (Hydrochloric acid does not react with copper, so copper wire can be used to hold the magnesium in place). Pass the free end of the wire through the rubber stopper so that the magnesium is positioned 2 to 3 cm from the narrow end of the stopper and bend it over the wide end to hold it loosely in place (Figure 5).
4. Wash the 10 mL cylinder with detergent so that it is not greasy
and drains cleanly. Then pour into it about 3 mL of 3 M
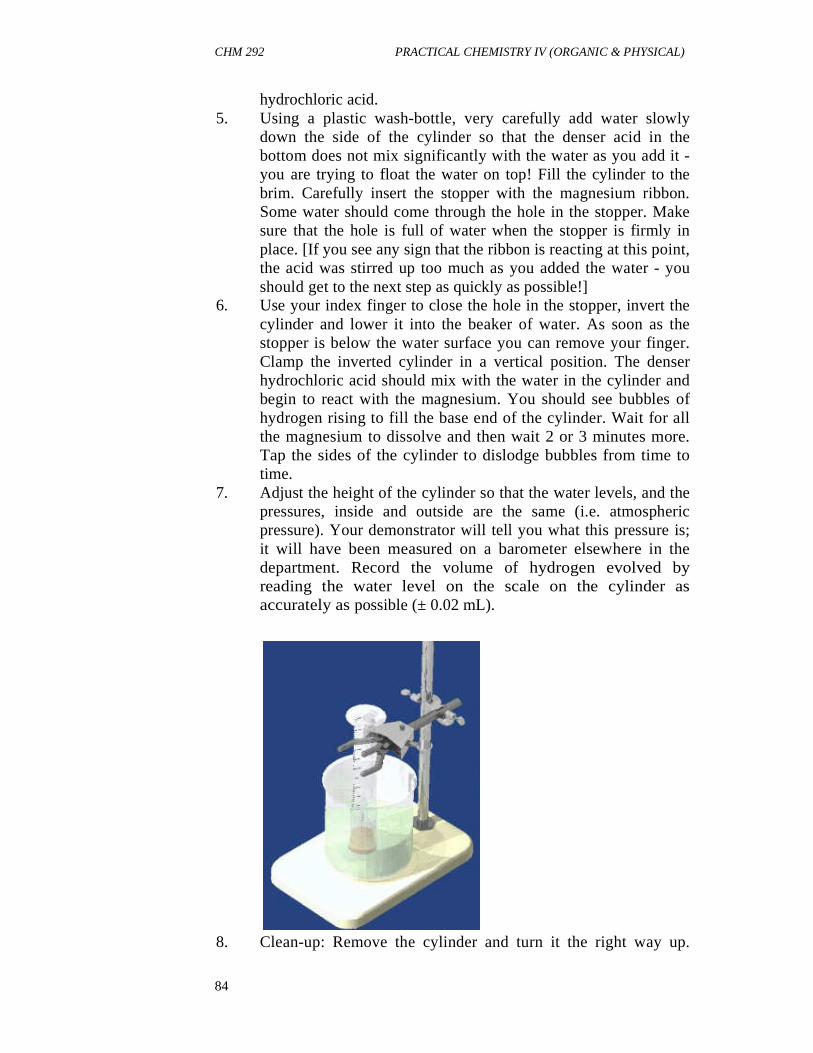
CHM 292 PRACTICAL CHEMISTRY IV (ORGANIC & PHYSICAL)
84
hydrochloric acid. 5. Using a plastic wash-bottle, very carefully add water slowly
down the side of the cylinder so that the denser acid in the bottom does not mix significantly with the water as you add it - you are trying to float the water on top! Fill the cylinder to the brim. Carefully insert the stopper with the magnesium ribbon. Some water should come through the hole in the stopper. Make sure that the hole is full of water when the stopper is firmly in place. [If you see any sign that the ribbon is reacting at this point, the acid was stirred up too much as you added the water - you should get to the next step as quickly as possible!]
6. Use your index finger to close the hole in the stopper, invert the cylinder and lower it into the beaker of water. As soon as the stopper is below the water surface you can remove your finger. Clamp the inverted cylinder in a vertical position. The denser hydrochloric acid should mix with the water in the cylinder and begin to react with the magnesium. You should see bubbles of hydrogen rising to fill the base end of the cylinder. Wait for all the magnesium to dissolve and then wait 2 or 3 minutes more. Tap the sides of the cylinder to dislodge bubbles from time to time.
7. Adjust the height of the cylinder so that the water levels, and the pressures, inside and outside are the same (i.e. atmospheric pressure). Your demonstrator will tell you what this pressure is; it will have been measured on a barometer elsewhere in the department. Record the volume of hydrogen evolved by reading the water level on the scale on the cylinder as accurately as possible (± 0.02 mL).
8. Clean-up: Remove the cylinder and turn it the right way up.
CHM 292 MODULE 2
85
Pour the water out of the beaker into the sink and then empty the cylinder into the beaker. Add sodium hydrogen carbonate to the acidic solution until the evolution of carbon dioxide stops. Then flush the mixture down the sink with plenty of water. Rinse the pieces of apparatus and repeat the experiment twice more.
Data and calculations Complete the data table below. The following notes refer to the entries in the Data column: i. Your demonstrator will probably give you the value of
atmospheric pressure read from the barometer in the lab in mm Hg (torr). Convert it to atmospheres using 1 atm = 760 mm Hg.
ii. Refer to the small table below to determine the vapour pressure of water at the temperature you are reporting. Convert it to atmospheres.
Vapour pressure of water at various temperatures Temperature (oC) 15 16 17 18 19 20 21 22 23 24 25 26 27 28 29 30 Pressure (mm Hg) 12.8 13.6 14.5 15.5 6.5 17.5 18.6 19.8 21.1 22.4 23.8 25.2 26.7 28.3 30. 31.8. iii. The actual hydrogen pressure will be the current atmospheric pressure (i) minus the vapour pressure of water from (ii). Experimental Data Run 1 Run 2 Run 3 i . Water temperature (oC) ii. Water temperature (K) iii. Atmospheric pressure (atm) iv. Vapour pressure of water (atm) v. Corrected pressure of hydrogen (atm) vi. Volume of gas collected (L) vii. Length of magnesium ribbon used (mm) viii. Mass of magnesium used (g) ix. Moles of magnesium used x. Theoretical moles of hydrogen produced xi. Volume hydrogen/moles hydrogen (L/mol) xii. Gas constant R. Average value of the gas constant R (with units!): _______________________
CHM 292 PRACTICAL CHEMISTRY IV (ORGANIC & PHYSICAL)
86
4.0 CONCLUSION Using the ideal gas law/equation, the volume of a gas can be determined in the laboratory. 5.0 SUMMARY In this unit, we were able to demonstrate how to determine the volume of a given mole of a gas. 6.0 TUTOR-MARKED ASSIGNMENT 1. Calculate the volume of exactly 1 mole of an ideal gas at STP
(Standard Temperature and Pressure, 0°C and 1 atm). Note: P = 1 atm n = 1 mol V = ? T = 0 °C = 273.15 K R = 0.08206 (L atm)/(mol K).
2 A 9.0 L volume of chlorine gas is heated from 300 K to 400 K at constant pressure. What is the final volume?
7.0 REFERENCES/FURTHER READING http://faculty.concordia.ca/bird/c206/labs/pdf/CHEM206_Expt1C_Mola
r_Volume.pd f http://swc2.hccs.edu/pahlavan/intro_labs/Exp_15_Molecular_Weight_D
etermination of_Vapor.pdf