Embed Size (px)
Citation preview
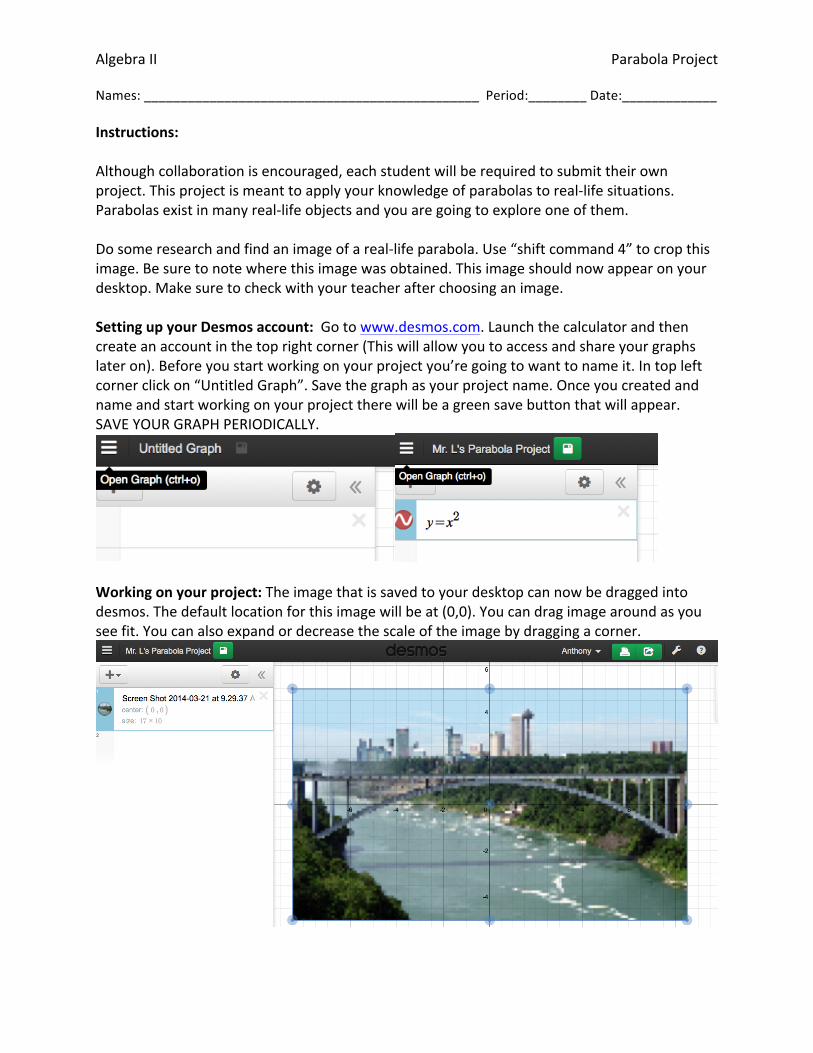
Algebra II Parabola Project Names: ______________________________________________ Period:________ Date:_____________ Instructions: Although collaboration is encouraged, each student will be required to submit their own project. This project is meant to apply your knowledge of parabolas to real-‐life situations. Parabolas exist in many real-‐life objects and you are going to explore one of them. Do some research and find an image of a real-‐life parabola. Use “shift command 4” to crop this image. Be sure to note where this image was obtained. This image should now appear on your desktop. Make sure to check with your teacher after choosing an image. Setting up your Desmos account: Go to www.desmos.com. Launch the calculator and then create an account in the top right corner (This will allow you to access and share your graphs later on). Before you start working on your project you’re going to want to name it. In top left corner click on “Untitled Graph”. Save the graph as your project name. Once you created and name and start working on your project there will be a green save button that will appear. SAVE YOUR GRAPH PERIODICALLY.
Working on your project: The image that is saved to your desktop can now be dragged into desmos. The default location for this image will be at (0,0). You can drag image around as you see fit. You can also expand or decrease the scale of the image by dragging a corner.

Algebra II Parabola Project Now the work begins. You are going to use your image and overlay all the parabolas, lines and other functions that correspond to your real-‐life object. All of your functions will be created and listed on the left-‐hand side. See the illustration below. YOU WILL NEED TO HAVE AT LEAST: 1 Horizontal Line, 1 Parabola, and 5 vertical lines.
You’re graph will contain as many functions as necessary to match your image. As seen above, all of the functions extend without restriction. The next task will be restricting your graphs so that only the segments appear that we need for your graph. In the illustration below I restrained the graph of the parabola so that it stopped at the right and left vertical lines that I created. The equation for my parabola was y = –.04x2 + 1 The new equation is y = {-‐8.5<x<8.5: –.04x2 + 1} The -‐8.5 and 8.5 are where the parabola intersects with the two vertical lines at the end. You will be using this similar “restricting” process to cut down all of the functions as you need to.

Algebra II Parabola Project When you have created all your functions and restricted them all as necessary you will be done recreating your image. To de-‐select your image click the circle next to the “Screen Shot” on the top left of your functions. You can center your graph by click the “wrench” button at the top right of your screen. DON’T FORGET TO SAVE YOUR PROJECT.
The last part of this project is to share it to your teacher. Next to your name there is a green icon for you to share your project. You can submit your project to your teacher by email. [email protected] or [email protected] Grading is as follows: Real-‐Life application of Image 25 points ______________
1 H-‐line, 1 Parabola, 5 V-‐line Minimum 25 points ______________
Restricting Functions 25 points ______________
Creativity 25 points ______________
Total 100 points ______________