Embed Size (px)
Citation preview

nada DocumentationRelease 40
IHSN
February 11 2014
Contents
i
ii
nada Documentation Release 40
NADA is an open source microdata cataloging system complaint with the Data Documentation Initiative (DDI) andDublin Corersquos RDF metadata standards It serves as a portal for researchers to browse search compare apply foraccess and download relevant census or survey datasets questionnaires reports and other information
Project home page httpwwwihsnorgnada
Documentation topics
Contents 1
nada Documentation Release 40
2 Contents
CHAPTER 1
Requirements
NADA requires PHP and a MySQL database at minimum
11 PHP requirements
The minimum required version is PHP 52 but we strongly recommend that you use PHP 53 or 54 The followingPHP extensions are required for NADA
bull xsl
bull xml
bull mbstring
bull mysql or sqlsrv
Note See section on PHP configurations for configuring your server for NADA
12 Web Server requirements
bull Apache 2x
bull IIS 67x
13 Supported Databases
bull MySQL 5x
bull Microsoft SQL Server with fulltext support
3
nada Documentation Release 40
4 Chapter 1 Requirements
CHAPTER 2
Installation guide
21 Requirements
NADA requires PHP and a MySQL database at minimum
211 PHP requirements
The minimum required version is PHP 52 but we strongly recommend that you use PHP 53 or 54 The followingPHP extensions are required for NADA
bull xsl
bull xml
bull mbstring
bull mysql or sqlsrv
Note See section on PHP configurations for configuring your server for NADA
212 Web Server requirements
bull Apache 2x
bull IIS 67x
213 Supported Databases
bull MySQL 5x
bull Microsoft SQL Server with fulltext support
22 Installation
221 Download the latest NADA
bull Download a copy of the NADA 4 software from the IHSN httpihsnorgnada
5
nada Documentation Release 40
bull Open and extract (unzip) the files to your local hard drive using an appropriate compression program If you donot already have such a compression program there are many open source compression programs available ForWindows use the built-in compression software wizard or alternatively the 7-ZIP File Manager which is a freecompression program On Linux systems the same tasks can be achieved from the command line or once againthrough the use of a separate program Mac OSX has a number of options - third party and built-in as well asfrom the command line
222 Setup application folder
bull Copy the files to a folder in the web server root folder If installing on a localhost - for example the computercurrently being working on ndash then copy and paste (or move) the files into the root folder (or a sub-folder) of theweb server If however the server is running on a remote host (such as an ISP) then this process will involvethe use of a FTP client program or file manager from the ISPrsquos Cpanel
Note The folder name chosen will in many cases become the URL for the catalog Examples for a folder name mightbe ndash data microdata catalog etc
bull The root folder is located in different places depending upon the operating systemdistribution and web serverpackage you are using and it might be called htdocs httpd or www On Windows servers this might be locatedin the inetpub directory and on Linux in the var directory Consult the documentation for the distribution beingused or contact the ISP if unsure where the root web folder is
223 Folder permissions
Change the permissions for the following folders and their contents to READWRITE and on Windows servers makesure the IUSR_ user has readwritedelete permissions on these folders
bull your-nada-web-folderdatafiles ndash this is the folder where the application will store the DDIlsquos documentationand data
6 Chapter 2 Installation guide
nada Documentation Release 40
Note For added security it is strongly recommended that the location of the datafiles directory be changed afterinstallation to a location outside your web root structure
bull your-nada-web-foldercache ndash this is where cached web pages will be stored
bull your-nada-web-folderlogs ndash this is where the log files will be stored
224 Configure MySQL database
1 Browse to the your-nada-web-folderapplicationconfig folder
22 Installation 7
nada Documentation Release 40
1 Open the databasephp file in a text editor like Notepad or Notepad ++ and change the database user name andpassword to match the database user name and password
2 Optional change the database name to use another name
3 Save the file
$db[rsquodefaultrsquo][rsquousernamersquo] = your-database-username$db[rsquodefaultrsquo][rsquopasswordrsquo] = your-database-password$db[rsquodefaultrsquo][rsquodatabasersquo] = nada4
Note Do NOT use the root username and password (MySQL) or SA Account (MSSQL) on your production serverCreate a separate user name and password for your NADA database This can be done either from your Cpanel orfrom PhpMyadmin MySQL Workbench
8 Chapter 2 Installation guide
nada Documentation Release 40
225 Create database user account
The goal being to avoid using Root for your NADA configuration
1 From the command line type
mysql -u root -p
2 Enter your root password you setup when installing MySQL
3 Now create a database for the NADA ndash in this example we call the database nada
mysqlgt CREATE DATABASE nada
4 Now create a user who can access the new nada database and give the user only the rights necessary to run theNADA
mysqlgt GRANT SELECT INSERT UPDATE DELETE CREATE DROP INDEX ALTER CREATE TEMPORARY TABLESLOCK TABLES ON nada TO rsquonadarsquorsquolocalhostrsquo IDENTIFIED BY rsquoyourpasswordrsquo
5 lsquoyourpasswordrsquo can be anything you choose lsquonadarsquo is the name of the database the user gets access to lsquolocal-hostrsquo is the location which gets access to your database
Note Remember this password you will need it to configure your NADA installer
6 Then exit MySQL console by typing exit
mysqlgt exit
226 Running the installer
Open web browser to the location of the NADA installation For example httpyour-domainnada-folder-name orlocalhostnada-folder-name
22 Installation 9
nada Documentation Release 40
Check that all settings are marked with a green tick and fix any that are not on your webserver before running theinstaller
Click on the Install Database button and complete the form to create an initial Site Administrator account
Note create a complex password at least 12 characters long with some uppercase punctuation and numbers to aidsecurity of your site Do not forget this username and password
10 Chapter 2 Installation guide
nada Documentation Release 40
Congratulations Launch the new site
22 Installation 11
nada Documentation Release 40
23 Installing NADA using Microsoft SQL Server
231 PHP database drivers (sqlsrv)
The new Microsoft SQL drivers for PHP are called SQLSRV and provide native support for connecting to a MicrosoftSQL Server database The drivers have been tested with NADA for SQL Server 2008 and 2012
The drivers are available for download from here httpwwwmicrosoftcomen-usdownloaddetailsaspxid=20098
232 NADA Microsoft SQL Requirements
To use Microsoft SQL Server database for NADA it is recommended to use SQL Server 2008 or later with Full-Textsupport enabled The full-text engine provides faster search than the normal SQL search
The default installation of SQL Server does not include the Full-Text engine so before continuing on to installingNADA please make sure you have full-text installed on your database server
233 Download drivers
Microsoft provides two versions of the SQLSRV drivers namely version 20 and 30 NADA has only been tested withversion 20 but should work with version 30 Requirements for using the drivers
bull Windows 7 Windows Server 2008 R2 Windows Server 2008 Service Pack 2 Windows Vista Service Pack 2
bull PHP 536 or PHP 54 For information about downloading and installing PHP visit PHP on Windows(httpwindowsphpnet)
bull Microsoft SQL Server 2012 Native Client available in the SQL Server 2012 Feature Pack (This is needed ifdatabase and web server are on different machines)
bull Any edition of SQL Server 2005 or later
12 Chapter 2 Installation guide
nada Documentation Release 40
234 The Microsoft SQL Client
Microsoft SQL Client is required for connecting to your SQL database using NADA The client is installed automati-cally if your database is hosted on the same machine as your web server If your SQL database is running on a differentmachine then you must install the latest version of the SQL Client on your web server to ensure NADA can connectto your database See section on installing Microsoft SQL Client
235 How to install the SQLSRV driver for PHP
The steps are for version 20 but the same applies to version 30
1 The drivers are available from the Microsoft website httpwwwmicrosoftcomdownloadsendetailsaspxFamilyID=80e44913-24b4-4113-8807-caae6cf2ca05
2 Download the drivers and run the setup file
3 The setup file will extract a number of dll files to your PHP extension folder
4 Browse to the PHP extension folder Eg cphpextNotice there are multiple dll files included all referencing_sqlsrv
1 To find out which driver library is suitable for your version of PHP create a php file using a text editor likeNotepad eg infophp and place this code inside it
ltphp phpinfo() gt
2 Save the file and copy it to your web server root folder Open your web browser and type the location andname of the file eg infophp into your browser URL The phpinfo() function prints your PHP version and otherconfiguration settings for PHP For Example localhostinfophp To select the right sqlsrv DLL yoursquoll need toknow
bull The version of PHP Eg 53
bull Which compiler is used eg either VC9 or VC6
bull Check whether Thread Safety is enabled or not
23 Installing NADA using Microsoft SQL Server 13
nada Documentation Release 40
1 With the above values you would choose the file php_sqlsrv_53_nts_vc9dll
ts=Thread safety nts=Non-thread safety
2 Once you know which dll file to use open the phpini file using a text editor and add the following entry at theend of your PHPINI file
extension=php_sqlsrv_53_nts_vc9dll
3 Save your phpini file and restart your web server
236 Testing the SQLSRV drivers and SQL Client
To make sure the driverextension is installed correctly Reload the phpinfo page and check if the extension SQLSRVis listed on the page
If the extension is not listed on the page recheck if the correct phpini file has been edited To locate the phpini filebeing used by PHP look at the output of the phpinfo page in the section shown below
14 Chapter 2 Installation guide
nada Documentation Release 40
This step is only required if SQL Server is not on the same server as your web server To check if the SQL Client isalready installed or not follow the steps below
1 Open Control Panel Administrative Tools on your server
2 Open ODBC and switch to the tab ldquoDriversrdquo
237 Download the Microsoft SQL Client
Note The instructions here are provided for Microsoft SQL Server 2008 if are running on a later version of MicrosoftSQL Server the latest drivers can be obtained from the Microsoft website The installation steps are the same
The SQL Client is available from the Microsoft website from here httpwwwmicrosoftcomen-usdownloaddetailsaspxid=16978
Download the appropriate package for the system being used ie (32bit64bit) and run the installer to install the client
Once the client is installed restart your computer and check again from ODBC above to confirm that the client hasbeen installed
23 Installing NADA using Microsoft SQL Server 15
nada Documentation Release 40
238 NADA Database configurations for SQLSRV
Create a database and the user account to use with NADA beforehand The permissions need to include - createaltertables indexes ( See the following reference from Microsoft for instructions on how to do this
bull Database - httpmsdnmicrosoftcomen-uslibraryms186312aspx
bull User - httpmsdnmicrosoftcomen-uslibraryaa337545aspx
Open the nada database configuration file your-nada-folderapplicationconfigdatabasephp file and look for the fol-lowing lines
$db[rsquosqlsrvrsquo][rsquohostnamersquo] = localhostsqlexpress$db[rsquosqlsrvrsquo][rsquousernamersquo] = db-user-name$db[rsquosqlsrvrsquo][rsquopasswordrsquo] = password$db[rsquosqlsrvrsquo][rsquodatabasersquo] = nada-database$db[rsquosqlsrvrsquo][rsquodbdriverrsquo] = sqlsrv$db[rsquosqlsrvrsquo][rsquodbprefixrsquo] = $db[rsquosqlsrvrsquo][rsquopconnectrsquo] = FALSE$db[rsquosqlsrvrsquo][rsquodb_debugrsquo] = FALSE$db[rsquosqlsrvrsquo][rsquocache_onrsquo] = FALSE$db[rsquosqlsrvrsquo][rsquocachedirrsquo] = $db[rsquosqlsrvrsquo][rsquochar_setrsquo] = utf8$db[rsquosqlsrvrsquo][rsquodbcollatrsquo] = utf8_general_ci
Fill in the database connection settings for the database created for NADA
Save the changes
239 Running the installer
bull Open a web browser to the location of the NADA installation For examplehttpyour-domainnada-folder-name or localhostnada-folder-name
bull If the Microsoft database connection is setup correctly you should see the nada installer
16 Chapter 2 Installation guide
nada Documentation Release 40
bull Check that all settings are marked with a green tick and fix any that are not on your webserver before runningthe installer
bull Click on the Install Database button and complete the form to create an initial Site Administrator account
Note Create a complex password of atleast 12 characters long with some uppercase punctuation and numbers to aidsecurity of your site Do not forget this username and password
23 Installing NADA using Microsoft SQL Server 17
nada Documentation Release 40
Congratulations Launch the new site
18 Chapter 2 Installation guide
nada Documentation Release 40
24 PHP settings
241 Finding the correct PHPINI
To make sure you are editing the correct PHPINI settings file create a PHP file (eg infophp) in your nada websitefolder with the following contents
ltphp phpinfo() gt
Open the phpinfo page in your web browser and you should see output similar to below screenshot Edit the phpinifile displayed by the setting Loaded Configuration File
24 PHP settings 19
nada Documentation Release 40
20 Chapter 2 Installation guide
nada Documentation Release 40
242 File upload limits
By default PHP allows uploads of 2MB which could be a problem if you have large DDIs and external resource filesTo change the settings
1 Edit the phpini file in notepad and look for the setting upload_max_filesize
2 The line should look like
Maximum allowed size for uploaded files httpphpnetupload-max-filesizeupload_max_filesize = 2M
3 Change it to the required file upload limit per your needs
upload_max_filesize = 50M
4 There is another setting that MUST be changed as well for the file upload limits to work Look for the configu-ration post_max_size and change it to match the value for upload_max_filesize
post_max_size = 50M
243 TimeZone settings
This is for setting the timezone for your application To findout what is the correct timezone for your website go tohttpphpnetmanualentimezonesphp and find your countrycity
Example
datetimezone = AmericaNew_York
244 Increase page executiontimeout
This setting controls the maximum execution time of a page in seconds
max_execution_time = 300
245 Increase PHP memory limit
It controls the memory available to PHP scripts
memory_limit = 128M
246 Enabledisable PHP extensions
NADA requires the following PHP extensions
bull xsl
bull mbstring
bull mysql or sqlsrv
To enable XSL extension add this line
24 PHP settings 21
nada Documentation Release 40
extension=php_xsldll
To enable mbstring
extension=php_mbstringdll
25 Configure Captcha
By default NADA version 41 comes with image captcha and user does not need to make any changes to use imagecaptcha To use Google Captcha please follow the steps given below
1 Open applicationconfigcaptchaphp in editor
2 Change line number 12 as shown in below image
3 Click on above URL to generate Public and Private key URL httpwwwgooglecomrecaptchawhyrecaptcha
4 Click on sign up now
5 Sign in using your Gmail account
6 After signed in you will have to enter your URL (Domain URL)
22 Chapter 2 Installation guide
nada Documentation Release 40
7 Click on ldquoenable globel key for all domain
8 Click on Create Key button
9 Copy public key and private key from Google Captcha website and inserte it on line number 51 and 52 respec-tively as shown in below image
10 To check the Google catpcha configuration go to register page and look for image as shown in below URLhighlighted in Red suqare
25 Configure Captcha 23
nada Documentation Release 40
26 Email configurations
For the NADA to function correctly it is important that this step be completed
Many of the functions within the NADA ndash such as registration and applying for access to datasets require that theNADA be able to send emails to users
There are two ways to setup your email configurations 1) Create a emailphp file in the applicationconfig folder 2)Edit email settings on the site configurations page
24 Chapter 2 Installation guide
nada Documentation Release 40
261 1 Configure email via email config file
1 Open the file applicationconfigemailphp in notepad
2 Fill in the section using SMTP server with authentication enabled highlighted in below image
3 For Gmail user will have to fill the gmail smtp section shown as below
26 Email configurations 25
nada Documentation Release 40
4 Save file
Note Using a file for email configuration disable the email configuration page from the site administration
1 Login to your NADA as an administrator
2 Go to Site administration click on the Settings menu and choose ldquoSettingsrdquo
3 Find the section ldquoSMTP settingsrdquo
26 Chapter 2 Installation guide
nada Documentation Release 40
4 If the PHPweb server is configured to send email using PHPrsquos MAIL function select the first option and donrsquotfill in anything else
If your organization has a mail server and has have a dedicated account that can be setup for NADA use the followingsettings Check the radio button ldquoUse SMTP Serverrdquo
5 Enter the host name for the server
6 Enter the port used by the server to send mail
7 If required enter the user name used to send mail on the server
8 Enter the password used to send mail on the server
If the organization does not own a mail server a Gmail account can be configured to be used with NADA
bull Check the radio button ldquoUse SMTP Serverrdquo
bull Host name sslsmtpgooglemailcom or sslsmtpgmailcom
bull SMTP port 465
bull Account username email-addressgmailcom
bull Account password password for the gmail account
Test the email settings
The quickest way to test if the email settings are working is to use the ldquoforgot passwordrdquo option from the user loginpage
bull Click on forgot password
26 Email configurations 27
nada Documentation Release 40
bull Enter the administrator or any other accounts email address
bull Check to the email account the mail was sent to
bull If no mail is received the settings are wrong and need to be corrected
28 Chapter 2 Installation guide
CHAPTER 3
Upgrading from previous versions
31 Upgrade from NADA 3
For users with an existing NADA 3x catalog an upgrade script is included that will update your NADA 3x databaseto NADA 4x The process involves modifying your NADA 3x database and thus carries some risks The script willadd new tables to the NADA 3x database All user accounts and survey information will be retained by the upgrade
Important Backup the NADA 3x database before doing anything
1 Follow the instructions on page 4 and set up a folder in the web root containing the NADA 4 files
2 Edit the databasephp file as instructed in the section above NADA database configurations for MySQL
3 Instead of entering a new database name user account name and password -fill in the details of the existingNADA 3x database
Note These can be found by looking at the existing NADA 3x databasephp file and entering the settings into theNADA 4 databasephp file
4 Save the file
5 Navigate to the URL for the NADA4 site Example httpyour-nada-sitenada4indexphpnada4_upgrade
6 The following page loads
29
nada Documentation Release 40
Take note of the warnings and make any necessary corrections before clicking the ldquoUpgrade database to NADA 4rdquobutton
Warning This step makes changes to your nada 3 database that are not undo-able so make sure you do make adatabase backup before this step
Click on the ldquoUpgrade database to NADA 4rdquo button and wait for the page to reload The output of the page will looksomething like below
The script will print number of messages about failed table updates This does not mean the script failed to upgradeIt just means some of the updates were not needed on your version of NADA 3 Different versions of NADA havedifferent numbers of fields in the database and the upgrade script tries to fix the missing fields for all these differentversions of NADA If the existing NADA 3 database already has that field then it reports it as an error
You can ignore the error messages that include the wording ldquoDuplicate column namerdquo or ldquoDuplicate entryrdquo
Now your database has been migrated to NADA version 41 We will have to run one more upgrade script to forNADA version 42
7 Navigate to the URL for the NADA42 site Example httpyour-nada-sitenada42indexphpnada42_upgrade
Warning This step makes changes to your nada 41 database that are not undo-able This page will not show anymessage on the screen You will be getting blank page Please do not repeat the process
8 To verify the database upgrade Open the NADA catalog page by going to http[your-nada4-site]indexphpcatalogpage and verify all studies from NADA 3 are listed
311 Linking your NADA 3 data files to NADA 4
The upgrade script has only upgraded the database It is now necessary to tell the NADA4 where to locate the datafilesthat were uploaded to the original NADA 3 site
There are two options available
Option 1 Copy the datafiles folder from NADA 3 to NADA 4 This works best if you have only a few studies and thedatafiles folder size is small enoughto be moved easily from one location to another
Option 2 If it is not possible to easily move the datafiles folder from NADA 3 to NADA 4 you can tell NADA 4 thelocation of the datafiles without moving the files Here are the steps
bull Use your NADA 3 administrator login credentials to login to your new NADA 4 site
bull Click on Site administration in the top right corner of the screen
bull Go to the ldquoSettingsrdquo menu and click on the ldquoSettingsrdquo sub-menu
30 Chapter 3 Upgrading from previous versions
nada Documentation Release 40
bull Under Site configurations expand the ldquoSurvey Catalog Settingsrdquo section
bull For the setting ldquoCatalog folderrdquo enter the relative or full path to where the NADA 3 datafiles folder is locatedFor example if the nada3 datafiles are located on cnada3datafiles enter that path here
bull Save the configurations by clicking on the update button If now errors are shown then you have successfullyupdated the folder path
bull Check your new NADA 4 site to make sure the migration was successful
ndash Check the user administration page from site administration to make sure the users from the nada3 sitewere migrated
ndash Check the ldquoData Catalogrdquo page and view the studies by clicking on the study title to make sure the studyinformation pages are correct
ndash Check the site menus are the same as the NADA 3 site
312 Refresh DDI
In NADA 4 more information is stored in the database from the DDI than in the NADA 3 To bring all these newfields into the imported studies it is necessary to refresh the DDIrsquos The refresh DDI feature in NADA updates thedatabase with metadata from the DDI without having re-uploading the DDIs To update the metadata for all studies inyour catalog
bull Open the following NADA 4 URL in your browser
http[your-nada-4-site]indexphpadmincatalogbatch_refresh
bull Select all studies
bull Click on the ldquoRefresh DDIrdquo button
313 Transferring ownership
NADA 4 has a collection management feature When studies are imported from the NADA3 catalog into NADA4 theyare put into a collection called DEFAULT They need to be moved from this default system collection to the Central
31 Upgrade from NADA 3 31
nada Documentation Release 40
Data Catalog of the NADA4
To do this
bull Go login to the Site Administration and navigate to the Studies Manage Studies Central Data Catalog page
bull Select all the studies by ticking the check boxes next to each study on the right
bull Click on the dropdown menu and select Transfer owner
bull From the Transfer study owner page Select Central Data Catalog and then click transfer
32 Chapter 3 Upgrading from previous versions
nada Documentation Release 40
314 Updating the Site themetemplate
You cannot use your NADA3 template in NADA4 without making some changes Here are general guidelines butsteps may differ depending on your nada site template
bull Copy your NADA3 template to the NADA4 themes folder
bull Edit the [nada4-root]configtemplatephp following the steps below
bull Look for the setting ldquotheme_namerdquo by default it is set to rdquowbrdquo
bull Change ldquowbrdquo to the theme name you want to use Theme name is the folder name you copied to[NADA4]themes[your-site-theme] from your nada3 site
bull Save the file
NB The template may need some adjusting to run properly on the new NADA 4 site This will involve editingthe layoutphp and other template files within the template folder which is now located in the NADA 4 themesfolder
32 Migrate MySQL to Microsoft SQL
TODO
32 Migrate MySQL to Microsoft SQL 33
nada Documentation Release 40
34 Chapter 3 Upgrading from previous versions
CHAPTER 4
User manual
41 Overview and core concepts
411 About NADA
NADA is a web-based cataloging application that allows for the creation of portals that allows users to browse searchcompare apply for access and download relevant census or survey information
It was originally developed to support the establishment of national survey data archives The application is used by adiverse and growing number of national regional and international organizations NADA as with other IHSN toolsuses the Data Documentation Initiative (DDI) XML-based international metadata standard
412 Concepts
CENTRAL DATA CATALOG
The default catalog created when a NADA instance is installed is the Central Data Catalog All studies uploaded to theNADA are visible searchable and accessible from the Central Data Catalog For many institutions the Central DataCatalog will remain the only catalog in their NADA instance For some institutions being able to divide the contentsof the Central Data Catalog into more refined collections will be desirable
COLLECTIONS
Collections are sub categories of the Central Data Catalog They allow administrators of a NADA instance to groupstudies into what can be thought of as sub-catalogs of the Central Data Catalog This has a number of benefitsboth from the user and the administrator perspective From the usersrsquo perspective being able to filter and viewgroups (collections) of studies that logically belong together makes finding what they are looking for easier From theadministratorsrsquo perspective the ability to create collections of studies that may logically belong together facilitates theability to decentralize the management of each collection of studies to specific administrators (for example collectionscan be managed by different departments in an institution)
NOTE The creation of collections will in general only be useful and necessary for large catalogs or for catalogs thatdesire more decentralized management of groups of studies by different departments
STUDIES
Studies are carried out to gather more knowledge about a subject Studies may gather information from a number ofdifferent sources in order to answer the questions asked The information gathered for a study will in the context of
35
nada Documentation Release 40
NADA catalogs usually come from either a census or a surveys It is therefore not uncommon to hear the terms surveyand study used interchangeably when listening to people talk about their NADA catalog
METADATA
Metadata are data about the data They are not the actual data collected from the survey but rather the information thatdescribes the survey process and the data The NADA uses the Data Documentation Initiative (DDI) ndash ddiallianceorgndash standard for the presentation of metadata for each study The DDI document (which is an XML document) isprepared outside the NADA application either manually or using a tool like the Nesstar Publisher ndash nesstarcom ndash andthen imported into the NADA The detailed information about the survey is searchable down to the variable level foreach survey in the catalog
DATA ACCESS TYPES
The NADA allows for the level of access to datasets for studies to be controlled at the study level In other words thelevel of restriction can differ from study to study and can be defined on a scale ranging from direct access with norestrictions to no access Briefly the available access types are
bull Data not available - data are not available for this study
bull Direct Access Data Files - data shared under this policy can be downloaded without any restrictions The useris not required to be logged into the site and no personal information is collected on the person downloading thedata
bull Public Use Data Files - data shared under this policy requires that the user be logged in and registered on thesite before they are able to download the data The user is required to agree to a terms of use of the data and theapplication keeps records of who downloads the data
bull Licensed Data Files - data shared under this policy requires that the user be logged in and registered on the siteUsers are also required to fill in and submit a detailed application form listing their reasons for wanting accessto the data Once the user submits the application form the system informs the system administrator that anapplication has been made In order for the person to get access to the data the system administrator needs toreview the application and approve it
bull Data available in an Enclave - under this policy no data is shared through the application Users submit anapplication to access the data at a secure facility physically located on the premises of the data producer or afacility nominated by the data producer
bull Data available from external repository ndash The NADA allows for studies and their metadata to be listed in aNADA catalog but for a link to be created to another site when the data for that study are available elsewhere
CITATIONS
Citations are references that can be included at the study level which point to published works that have used the datafrom a particular study In many cases this will be a reference to a Journal Article Working paper Newspaper articleetc Such resources are useful to researchers who are interested in seeing how the data have been used before Theyare also a good way of showing the funders of surveys that the data are being used for policy and research purposesand thus are an indicator of some of the impact a study has had
USERS
Users in the NADA can be defined according to three broad groups General Users ndash this is the normal user whoregisters on a NADA site from the user interface This user type has no access to the site administration It is requiredto register as a user when accessing public use and licensed data types Site Administrators (unlimited) ndash this user
36 Chapter 4 User manual
nada Documentation Release 40
has access to all functions and all collections within the Site Administration System wide access Limited Adminis-trators ndash these administrators have access to a limited set of functions within the Site Administration Examples wouldbe an administrator of a specific collections or licensed survey reviewer for all or only some collections or reportgenerator etc
413 Why do NADA administrators need to understand these concepts
Understanding these concepts is important as it
bull Is critical to understanding the new permissions and administrator types introduced in NADA 4 Administratorsare now able to create collections within their NADArsquos and assign different roles to administrators and moregranular levels of access to catalog administration at the collection level It is now possible for example to haveadministrators whorsquos lsquopowersrsquo range from being able to manage all parts of a collectionrsquos administration downto ones with more restrictive access such as ones whose only function is as licensed survey reviewer or reportgenerator or catalog reviewer or citation manager etc
bull Ensures that the correct level of permissions and access is assigned to users based on security policies within theinstitution Unlike previous versions of NADA not all users who have access to the Site Administration needhave the level of access of an ldquounlimited site administratorrdquo This limits security risks associated with havingtoo many ldquounlimited site administratorsrdquo managing a site
bull Assists in assigning an appropriate data access type to data based on institutional distribution polices
bull Makes it easier to explain more clearly to institutional managers what the capabilities of the NADA applicationare and to advise on how to best manage the allocation of responsibilities
42 The Dashboard
After logging in to the Site Administration with administrator credentials the user is taken to the dashboard
The Dashboard provides a quick glance summary for administrators to get an overall picture of what has been happen-ing on the site as well as what pending tasks are outstanding for the administrator
42 The Dashboard 37
nada Documentation Release 40
1 Menu link to the Dashboard
2 Menu link to the Study Management pages submenus include Manage Studies Licensed requests and ManageCollections
3 Menu link to the citations management pages
4 Menu link to the User management pages submenus include All users Add user and Impersonate User
5 Menu link to create menu pages for the site frontend
6 Menu link to generate usage reports
7 Menu Link to the settings pages submenus include Settings Coutries Regions and Vocabularies
8 Useful navigation links submenus include Change Password Log out Catalog Home Data catalog Citations
9 This section lists all collections in the catalog Within each collection a summary is given of the number ofstudies along with diagnostics related to the number of studies publishedunpublished missing questionnairesdata access types set but with no data attached as well as some buttin links to Manage the collections studiesusers and a History of changes made to the collection
10 Provides a summary of users registrations and number of users currently logged in
11 Show how many pages are being cached on the site with a link to clear the cache if need be
12 Show a list of recently added or updated studies Clicking on a study in the list takes you to the page to managethat study
38 Chapter 4 User manual
nada Documentation Release 40
43 Manage Collections
431 Collections
Collections are sub categories of the Central Data Catalog They allow administrators of a NADA instance to groupstudies into what can be thought of as sub-catalogs of the Central Data Catalog
Collections provide a number of benefits both from the user and the administrator perspective From the usersrsquo per-spective being able to filter and view groups (collections) of studies that logically belong together makes finding whatthey are looking for easier From the administratorsrsquo perspective the ability to create collections of studies that maylogically belong together facilitates the ability to decentralize the management of each collection of studies to specificadministrators (for example collections can be managed by different departments in an institution)
Note The creation of collections will in general only be useful and necessary for large catalogs or for catalogs thatdesire more decentralized management of groups of studies by different departments
432 Creating collections
bull Login to the Site administration using an administrator password
bull Collections are managed and created by going to the Studies Manage collections menu link
bull There are no collections defined in the default NADA 4 installation
bull To create a new collection click on the Create new collection button
43 Manage Collections 39
nada Documentation Release 40
1 Under Collection Identification provide a short name for the collection This will become the URL for thecollection so pick carefully For Title fill in the fill title for the collection This will be the name displayed atthe top of the collection page
B Fill in a 3 or four line short description of the collection This text will display on the front end in the collectionslist For examples see httpmicrodataworldbankorgindexphpcontributing-catalogs
C Fill in a more detailed description of the collection This will display on the About page for that collection Forexample see httpmicrodataworldbankorgindexphpcatalogdhsabout
To format the page and include images it is possible to enter HTML code into this box below is anexample piece of code that includes an image
ltimg src=rdquofilesdhs-fp-01jpgrdquo alt=rdquoHealth Surveys Imagerdquo class=rdquoabout-photordquogt lth2gt Health SurveysCollectionlth2gt ltp align=rdquojustifyrdquogtThe Health Surveys collection aims to provide frequent high qual-ity and timely health data needed by the decision makers when designing public health programsltpgtltpgtHealth surveys provide useful information on health status and health consumption and their determi-nantsltpgt
Copy any images to be displayed into the NADA ldquofilesrdquo folder on your server image imagesthumbnil-imagepng
4 Upload a file to display next to the collection as it is listed on the collection page NOTE This image should be82 X 82 pixels If the upload does not work automatically then copy the thumbnail image to the ldquofilesrdquo folder asshown above
40 Chapter 4 User manual
nada Documentation Release 40
E The Weight field determines in what order collections are shown in the collection list 0123 etc The Selectcollection type drop-down is a system value to distinguish between collections that should be viewed as internal tothe organization or external For example some collections may be made up entirely of studies from an organizationoutside the host catalog These collections can be designated as external The Section dropdown allows for thecategorization as either a collection based on a specialized collection (like health) or based on a regional breakdownSelecting Publish ndash publishes the collection
bull Click on Submit to save the changes
To view the results click on the Preview link on the far right
bull The new collection now also shows in the collection list on the Central Catalog About page (this is where thethumbnail and short description fields are displayed)
43 Manage Collections 41
nada Documentation Release 40
bull Visiting the Dashboard will now also show the new collection listed below the Central Data Catalog With anumber of green buttons as shortcut links to manage the studies on the collection assign administrators for thecollection a history of activity on the collection and a link to edit the collection as in the steps above
433 Manually adding studies to a collection
There are 2 ways to get studies into the new catalog
bull The first is to upload a DDI and all its resources to the collection in the same way as described in the earliersection ndash Uploading a Study Except instead of choosing Central Catalog chose the collection you want to
42 Chapter 4 User manual
nada Documentation Release 40
upload the study to
bull Click on the Add Study button and upload a DDI and RDF and all your resources as described in the earliersection ndash Uploading a Study
bull Once a study is added in this way it displays in the Manage Studies list Notice that the collection summaryfield shows that the study belongs to (is Owned By) the DHS collection (this was the Short name defined in theexample when the Health Surveys Collection was created)
All studies uploaded to collections will automatically be added to the Central Data Catalog in order to build a commonsearch portal for all studies
43 Manage Collections 43
nada Documentation Release 40
434 Copying studies from one collection to another
bull The second way to add a study to a collection is to Copy the study from another collection into the newcollection
bull To copy a study already in the catalog to display in the new collection first make sure to be in the Manage Studiessection for the collection you want to put studies into To do this either use the Studies ndash Manage studies menuon the top or simply click on the Switch link next to the Manage Studies [Collection Title] heading
bull Then Click on the Copy Studies blue button at the top right
bull A list of all studies available to copy to the new collection is listed Simply click on the Link button in green tocopy the study to the collection The button will turn red and say Unlink To reverse the process and click thenow red button
bull Going back to the Manage Studies page for the collection will show the newly copied studies in the collectionlist Also note that the Collection field now indicated DHS next to Central DHS is in grey to indicate it is notowned (it is a copy) by that collection and the Central is in blue to show it is owned by the Central Data CatalogAlso note that because the study is not owned by this catalog it cannot be edited from this catalog ndash hence thepublishunpublish green button is absent for the copied studies
44 Chapter 4 User manual
nada Documentation Release 40
435 Turning on the collection filter
The final step after creating the first collection is to enable the collection filter option in the Settings menus under SiteConfigurations ndash Survey catalog settings
436 Transferring study ownership
In the previous examples mention was made of studies uploaded to a catalog being owned by that catalog There maybe cases where transferring the ownership from one catalog to another will be desirable This will become clearerin the next section on user roles but for now the next steps show how transferring ownership from one collection toanother can be done
bull Transferring ownership from one collection to another has to be done by the owner of the collection and fromthe collection it is currently owned by
bull To transfer ownership Go to the Manage Studies screen and select the study to be transferred Open up the EditStudy page by clicking on the study Title
bull On the right hand side of the screen click on the Transfer study owner link
43 Manage Collections 45
nada Documentation Release 40
bull Select the collection to transfer from the dropdown box
bull Click Transfer
bull Note that when looking the study summary for the transferred study the Collection field now shows the studyto belong (owned by) to the DHS collection and not Central anymore Also note the option to Publish andunpublish is now active
bull To transfer ownership of a large number of studies all at once - from the Manage Studies page ndash select the studiesto be transferred (tick them in the box left of each study) and then from the top Batch Actions drop down selectTransfer owner ndash then apply
46 Chapter 4 User manual
nada Documentation Release 40
44 Manage Studies
There are 2 Options to get studies into the new catalog
441 Option 1
bull The first is to upload a DDI and all its resources to the collection in the same way as described in the earliersection ndash Uploading a Study Except instead of choosing Central Catalog chose the collection you want toupload the study to
bull Click on the Add Study button and upload a DDI and RDF and all your resources as described in the earliersection ndash Uploading a Study
bull Once a study is added in this way it displays in the Manage Studies list Notice that the collection summaryfield shows that the study belongs to (is Owned By) the DHS collection (this was the Short name defined in theexample when the Health Surveys Collection was created)
bull Also note that the new study also appears in the Central Data Catalog
All studies uploaded to collections will automatically be added to the Central Data Catalog in order to build a commonsearch portal for all studies
44 Manage Studies 47
nada Documentation Release 40
442 Option2
Copying studies from one collection to another
bull The second way to add a study to a collection is to Copy the study from another collection into the new collection
bull To copy a study already in the catalog to display in the new collection first make sure to be in the Manage Studiessection for the collection you want to put studies into To do this either use the Studies ndash Manage studies menuon the top or simply click on the Switch link next to the Manage Studies [Collection Title] heading
bull Then Click on the Copy Studies blue button at the top right
bull A list of all studies available to copy to the new collection is listed Simply click on the Link button in green tocopy the study to the collection The button will turn red and say Unlink To reverse the process and click thenow red button
bull Going back to the Manage Studies page for the collection will show the newly copied studies in the collectionlist Also note that the Collection field now indicated DHS next to Central DHS is in grey to indicate it is notowned (it is a copy) by that collection and the Central is in blue to show it is owned by the Central Data CatalogAlso note that because the study is not owned by this catalog it cannot be edited from this catalog ndash hence thepublishunpublish green button is absent for the copied studies
45 Managing Licensed Requests
Datasets that are assigned the Access Type Licensed require approval from the NADA administrator before the usercan get access to the data files From the site administration there are a number of ways to see if any licensed requestshave been received
bull Go to the dashboard Pending requests show up as red in the catalog quicj summary section Clicking on thislink goes to the Licensed Survey Requests management page
bull Or go to the Studies link on the top menu and select Licensed Requests from the submenu
48 Chapter 4 User manual
nada Documentation Release 40
The link shows a page with a list Licensed Requests received The status column indicated the Pending requests
bull Click on the Edit link for to process a request
The Request information tab shows a summary of the information provided by the applicant
bull To Approve or Deny or request further information for the request Click on the Process tab
45 Managing Licensed Requests 49
nada Documentation Release 40
bull Select Approve to approve the request (other options include Deny as well as Request more information fromthe applicant)
bull Select the files that the user will be authorized to download ndash it is also possible to enter a maximum number ofdownloads and expiry date for downloads
bull Enter any comments to be sent to the applicant
bull Select Notify user by email to notify them that the application has been processed
bull Select Update
bull The remaining tabs
ndash Communicate - provides a means to ask for more information from the applicant
ndash Monitor ndash allows the administrator to see when and how many times the applicant downloaded thedata
ndash Forward Request ndash provides a means to forward the request to another person for review
46 Manage Citations
The Citations section is where bibliographic references can be added for publications that use any of the studies in thecatalog These citations can be linked to particular studies in the catalog and are displayed to the users of the systemin the study information view of the relevant study
Citations are added from the Citations menu
50 Chapter 4 User manual
nada Documentation Release 40
bull To add a citation - click on All citations then click on the Add New Citation button at the top right
bull Compete the form including the indication as to whether the citation should be published or not
bull Then expand the Related studies link to tell the system which studies the citation ldquobelongsrdquo to
bull Click on the Attach studies link This reveals a list of all studies in the catalog
bull Select the relevant studies by clicking on the green Select button
bull Click on the apply filter button to save the changes The study now appears in the related studies box
bull Click on the submit button to save the citation
bull Note the flag keywords and notes fields can be used by administrators to place extra notes only visible to otheradministrators that might prove useful when there is uncertainty about a citations appropriateness or accuracy
bull It is also possible to import citations in common citation formats such as BibTex and EndNote (RIS)
bull To do this use the Import Citations link from the top menu
46 Manage Citations 51
nada Documentation Release 40
bull Paste the BibTex or RIS text into the form and then at the bottom of the screen click on Attach studies to linkthe citation to a particular study in the catalog
bull The citation now appears in the citation list as well as on the study information page for the relevant studies
52 Chapter 4 User manual
nada Documentation Release 40
47 Managing Users and account types
Users in the NADA can be defined according to three broad groups
General Usersndash this is the normal user who registers on a NADA site from the user interface This user type hasno access to the site administration It is required to register as a user before being granted access to public use andlicensed data types
Site Administrators (unlimited) ndash this user has access to all functions and all collections within the Site Administra-tion System wide access
Limited Administrators ndash these administrators have access to a limited set of functions within the Site Administra-tion Examples would be an administrator of a specific collections or licensed survey reviewer for all or only somecollections or report generator or citation manager etc
471 Creating User accounts
User accounts can be created in two ways
1 A General User account can be created by a user directly from the register screen from the login link on the userinterface of the application
The user created by this process has no access to the site administration This account can only be used to apply andgain access to public and licensed datasets
2 A user account can also be created by a Site Administrator
bull To do this login as a Site Administrator
bull Go to the site administration section of the application
47 Managing Users and account types 53
nada Documentation Release 40
bull Select Users ndash Add user from the top menu
bull Fill in the information for the user in the form and be sure to mark the account status as Active Then click theCreate button
54 Chapter 4 User manual
nada Documentation Release 40
47 Managing Users and account types 55
nada Documentation Release 40
bull Note that the user always starts off as a General User with no access permissions to the Site Administration Theuser group column displays as empty for users with only general user accounts
bull To see a list of all users in the system go to the Users ndash All Users menu item at the top of the screen
bull Note the new users created have no User group assigned (they are general users) Also note the Actions columnon the far right From these links an account can be edited (including changing the password and blocking anaccount) deleted and Permissions managed for the account
472 Managing User Account Permissions
User accounts permissions can be only be set and changed by a Site Administrator To change the permissions for anaccount
bull Click on the Permissions link next to the account to be changed All accounts start of as General users accounts
bull To change this user to a full site administrator who will have full system wide access to all parts and functionsof the NADA administration select the Site administrators (full access) option and tick the admin box as wellClick update to save the changes
56 Chapter 4 User manual
nada Documentation Release 40
473 Collection level administrators
bull To create a user who only has permissions to administer studies or administration functions for a particularcollection Select Site administrators (limited access)
47 Managing Users and account types 57
nada Documentation Release 40
bull It is then necessary to assign a role to this new limited administrator account To create a limited access ad-ministrator for a particular collection ndash select Site administrators (limited access) and then select Collectionadministrators Notice The form expands to reveal a list of collections in the system
bull Select the appropriate level of access that this account will have for this collection In the example below anadministrator is being created who can manage only licensed requests for the collection ndash Health Surveys Thisaccount will not be able to upload or publish studies The account will only be able to process licensed requestsfor the collection ndash Health Surveys
58 Chapter 4 User manual
nada Documentation Release 40
Other levels of access for Site administrators (limited access) ndash Collection administrators include
1 Accounts that are given full access to manage studies
2 Accounts that are given access to upload studies but not publish them
3 Accounts that are limited to reviewing studies
474 Global level Limited access accounts
Other types of limited access accounts include
1 Accounts that can only view system reports at a global level
2 Accounts that can only access the citations section and manage citations
3 Accounts that can only access the Licensed Request management system ndash at the global level for all collections
47 Managing Users and account types 59
nada Documentation Release 40
Impersonating a user
The system includes a function that allows a Site Administrator to impersonate (take on the role) a user created inthe system This is a useful testing tool when creating users and assigning permissions It essentially allows theadministrator to take on the role of another user temporarily
bull To access the Impersonate User feature go to the Users ndash Impersonat user menu at the top of the screen
bull A list of users to impersonate is shown
bull Select the user to impersonate and click on the impersonate button
bull The dashboard view for the impersonated user now shows
60 Chapter 4 User manual
nada Documentation Release 40
bull Note in the example above the account being impersonated is a Limited Account administrator with rights onlyto manage licensed requests for the Health Surveys Collection Note that all other dashboard menus are eitherhidden or clicking on any other function other than manage studies results in an access denied message
bull This is a good way to test if the roles assigned to a user account have the expected results
bull To exit the impersonate mode and return to the Site Administrator role ndash Click on the top right menu and selectExit impersonate mode
475 The Reviewer Limited access account
Sometimes it is desirable for catalog administrators to allow certain users to see a collection before it is published butwithout granting access to the site administration functions
This is useful for getting feedback on the correctness of information on collections or studies before publishing
To do this
bull First create an account for the user or get the user to create an account by using the register form on the loginscreen
bull Then edit the permissions for that user selecting Site Administrator (limited access) ndash Collection administrator
bull Then for the appropriate collection select Reviewer and click update to save the changes
47 Managing Users and account types 61
nada Documentation Release 40
bull The newly created reviewer account user can now view all studies in a collection even if the study or collectionis unpublished
48 Manage Site Pages and Menus
The NADA has a small content management component that allows for the creation of menu pages to appear on theuser interface
bull Examples of menus that might be useful for users of the site might be A page dealing with the disseminationpolicies of the organization or perhaps a page with contact information for the information
New menu items and pages can be created via the Menu- All pages menu link at the top of the Site Administrationpage
62 Chapter 4 User manual
nada Documentation Release 40
bull Select All pages from the menu
bull To add a new page click on the Add New Page button
bull Give the page a Title in the Title field
bull Clicking in the URL field will automatically suggest a name for the page in the URL
bull Enter the contents for the page in the Body section Plain text or HTML is accespted by this field
bull Then indicate if the page should be published or not in the Publish dropdown
bull The Weight field tells the NADA in what order this menu item should display Eg 0 would be first 1 secondand 2 third
bull Click on Update to save the changes
bull View the changes from the user interface In this Example a Contact Us page was created
bull It is also possible from the Menu Management screen to add a menu link that links to an existing page on anothersite (rather than creating a page itself)
bull To change the order in which the menu items display on the user interface use the Reorder Menu button on theMenu Management screen
48 Manage Site Pages and Menus 63
nada Documentation Release 40
49 The Site Settings Page
All settings for the application are controlled via the Settings menu at the top of the Site Administration page Thereare seven main settings sections See screenshot below
491 General Settings
1 Type the Title of the site here This will become the front page title of the NADA site In this case the Title isNADA
64 Chapter 4 User manual
nada Documentation Release 40
2 The footer text can be changed in this field This displays at the bottom of your site page
3 The initial page that loads when a user visits the NADA site can be set here In this case the catalog page is setto open by default
4 The name of the webmaster can be set here This is the name that will be used in system emails sent to users
5 Enter the webmaster email address here This should be the address that will be used in communication withusers Typically this is a general enquiries email set up by the organization and not a personal email address fora particular person Note to avoid mail systems rejecting mail as spam make sure to enter an address here thatis on the same domain as the server used in the email settings at setup
6 This field sets the location of the Cache folder The cache folder stores pre- generated pages of the site to allowfor faster browsing by the user By default it is set to cache This can be moved to another location if desiredbut must be writable The green tick indicates that the folder can be found and is set up correctly Enter eitherrelative or absolute paths to the folder location
7 Set the time that the Cache takes to expire By default it is set to 2 hours (in milli seconds)
8 If it is desired to turn off caching then select no here Sometimes it is useful to turn off caching when developingor updating a site so as to ensure that content changes become immediately visible on the front-end withouthaving to wait for the cache to expire and the new changes to show Turn this back on to speed up page loadingfor users
Click update to save all settings
Language
To change the language of the application expand the language section and choose the desired language Click updateto save and apply the setting
49 The Site Settings Page 65
nada Documentation Release 40
Enable or disable the HTML editor
A basic HTML editor is provided in the menu and page creating section of the application This setting allows this tobe turned on or off
Survey catalog settings
1 This is the folder where the files for the study are stored on the server This includes the DDI eternal resourcesand data files This folder can be moved to a location outside the web root as described in the installationinstructions in Chapter 1 Enter either relative or absolute paths to the folder location
2 This is the folder where DDIrsquos can be placed in order to use the bulk study import function in the NADA InNADA3 files had to be physically copied to this folder on the server but this is no longer necessary in NADA4 Files can now be directly uploaded to this folder from the Site Administration ndash Manage Studies page page
66 Chapter 4 User manual
nada Documentation Release 40
3 Select the vocabulary to use for the topic filter By default this is set to the CESSDA classification as recom-mended in the IHSN templates supplied at IHSNorg for the Nesstar Metadata Publisher
4 Enable or disable the Country filter on the user interface search page here If the catalog only contains studiesfor one country then turning this filter off is recommended
5 Enable or disable the Topic filter on the user interface search page here If no topics have been defined in theDDIrsquos being uploaded then it is recommended to turn this filter off (disable)
6 Enable or disable the Year filter on the user interface search page here
7 Enable or disable the Collection filter on the user interface search page here If no collections have been definedthen it is recommended to disable this filter
8 Enable or disable the Data access filter on the user interface search page here This filter is not needed if thereare very few studies in the catalog or if all studies hare set to the same access type
9 This section controls the order in which the filters appear on the search page Enter numbers here that rank theorder of the filters in the order they should be displayed
10 This setting determines how many studies are displayed by default to the user on the search page ndash catalog view
Site Login settings
1 To require that users login before being able to access the website set this option to Requires all users to loginto access the website
2 Determined how long a user will stay logged in After this time the user will be automatically logged out
3 Sets the minimum length for passwords created by the users at registration or for manual user creation
49 The Site Settings Page 67
nada Documentation Release 40
SMTP Settings
1 If the PHPweb server is configured to send email using PHPrsquos MAIL function select the first option and donrsquotfill in anything else
If your organization has a mail server and has have a dedicated account that can be setup for NADA use the followingsettings Check the radio button ldquoUse SMTP Serverrdquo
2 Enter the host name for the server
3 Enter the port used by the server to send mail
4 If required enter the user name used to send mail on the server
5 Enter the password used to send mail on the server
If the organization does not own a mail server a Gmail account can be configured to be used with NADA
bull Check the radio button ldquoUse SMTP Serverrdquo
bull Host name sslsmtpgooglemailcom or sslsmtpgmailcom
bull SMTP port 465
bull Account username email-addressgmailcom
bull Account password password for the gmail account
6 Test the email settings
The quickest way to test if the email settings are working is to use the ldquoforgot passwordrdquo option from the user loginpage If no mail is received when doing this test then go back and correct the mail settings Check with the ISP orserver administrator for the correct settings
Click on update to save all settings
68 Chapter 4 User manual
nada Documentation Release 40
492 Dashboard setting
Provides a means to automatically have content loaded into the dashboard via an RSS feed from a site The defaultsetting is set to receive updates and news from the IHSN website
49 The Site Settings Page 69
nada Documentation Release 40
70 Chapter 4 User manual
CHAPTER 5
Indices and tables
bull genindex
bull modindex
bull search
71

nada Documentation Release 40
NADA is an open source microdata cataloging system complaint with the Data Documentation Initiative (DDI) andDublin Corersquos RDF metadata standards It serves as a portal for researchers to browse search compare apply foraccess and download relevant census or survey datasets questionnaires reports and other information
Project home page httpwwwihsnorgnada
Documentation topics
Contents 1
nada Documentation Release 40
2 Contents
CHAPTER 1
Requirements
NADA requires PHP and a MySQL database at minimum
11 PHP requirements
The minimum required version is PHP 52 but we strongly recommend that you use PHP 53 or 54 The followingPHP extensions are required for NADA
bull xsl
bull xml
bull mbstring
bull mysql or sqlsrv
Note See section on PHP configurations for configuring your server for NADA
12 Web Server requirements
bull Apache 2x
bull IIS 67x
13 Supported Databases
bull MySQL 5x
bull Microsoft SQL Server with fulltext support
3
nada Documentation Release 40
4 Chapter 1 Requirements
CHAPTER 2
Installation guide
21 Requirements
NADA requires PHP and a MySQL database at minimum
211 PHP requirements
The minimum required version is PHP 52 but we strongly recommend that you use PHP 53 or 54 The followingPHP extensions are required for NADA
bull xsl
bull xml
bull mbstring
bull mysql or sqlsrv
Note See section on PHP configurations for configuring your server for NADA
212 Web Server requirements
bull Apache 2x
bull IIS 67x
213 Supported Databases
bull MySQL 5x
bull Microsoft SQL Server with fulltext support
22 Installation
221 Download the latest NADA
bull Download a copy of the NADA 4 software from the IHSN httpihsnorgnada
5
nada Documentation Release 40
bull Open and extract (unzip) the files to your local hard drive using an appropriate compression program If you donot already have such a compression program there are many open source compression programs available ForWindows use the built-in compression software wizard or alternatively the 7-ZIP File Manager which is a freecompression program On Linux systems the same tasks can be achieved from the command line or once againthrough the use of a separate program Mac OSX has a number of options - third party and built-in as well asfrom the command line
222 Setup application folder
bull Copy the files to a folder in the web server root folder If installing on a localhost - for example the computercurrently being working on ndash then copy and paste (or move) the files into the root folder (or a sub-folder) of theweb server If however the server is running on a remote host (such as an ISP) then this process will involvethe use of a FTP client program or file manager from the ISPrsquos Cpanel
Note The folder name chosen will in many cases become the URL for the catalog Examples for a folder name mightbe ndash data microdata catalog etc
bull The root folder is located in different places depending upon the operating systemdistribution and web serverpackage you are using and it might be called htdocs httpd or www On Windows servers this might be locatedin the inetpub directory and on Linux in the var directory Consult the documentation for the distribution beingused or contact the ISP if unsure where the root web folder is
223 Folder permissions
Change the permissions for the following folders and their contents to READWRITE and on Windows servers makesure the IUSR_ user has readwritedelete permissions on these folders
bull your-nada-web-folderdatafiles ndash this is the folder where the application will store the DDIlsquos documentationand data
6 Chapter 2 Installation guide
nada Documentation Release 40
Note For added security it is strongly recommended that the location of the datafiles directory be changed afterinstallation to a location outside your web root structure
bull your-nada-web-foldercache ndash this is where cached web pages will be stored
bull your-nada-web-folderlogs ndash this is where the log files will be stored
224 Configure MySQL database
1 Browse to the your-nada-web-folderapplicationconfig folder
22 Installation 7
nada Documentation Release 40
1 Open the databasephp file in a text editor like Notepad or Notepad ++ and change the database user name andpassword to match the database user name and password
2 Optional change the database name to use another name
3 Save the file
$db[rsquodefaultrsquo][rsquousernamersquo] = your-database-username$db[rsquodefaultrsquo][rsquopasswordrsquo] = your-database-password$db[rsquodefaultrsquo][rsquodatabasersquo] = nada4
Note Do NOT use the root username and password (MySQL) or SA Account (MSSQL) on your production serverCreate a separate user name and password for your NADA database This can be done either from your Cpanel orfrom PhpMyadmin MySQL Workbench
8 Chapter 2 Installation guide
nada Documentation Release 40
225 Create database user account
The goal being to avoid using Root for your NADA configuration
1 From the command line type
mysql -u root -p
2 Enter your root password you setup when installing MySQL
3 Now create a database for the NADA ndash in this example we call the database nada
mysqlgt CREATE DATABASE nada
4 Now create a user who can access the new nada database and give the user only the rights necessary to run theNADA
mysqlgt GRANT SELECT INSERT UPDATE DELETE CREATE DROP INDEX ALTER CREATE TEMPORARY TABLESLOCK TABLES ON nada TO rsquonadarsquorsquolocalhostrsquo IDENTIFIED BY rsquoyourpasswordrsquo
5 lsquoyourpasswordrsquo can be anything you choose lsquonadarsquo is the name of the database the user gets access to lsquolocal-hostrsquo is the location which gets access to your database
Note Remember this password you will need it to configure your NADA installer
6 Then exit MySQL console by typing exit
mysqlgt exit
226 Running the installer
Open web browser to the location of the NADA installation For example httpyour-domainnada-folder-name orlocalhostnada-folder-name
22 Installation 9
nada Documentation Release 40
Check that all settings are marked with a green tick and fix any that are not on your webserver before running theinstaller
Click on the Install Database button and complete the form to create an initial Site Administrator account
Note create a complex password at least 12 characters long with some uppercase punctuation and numbers to aidsecurity of your site Do not forget this username and password
10 Chapter 2 Installation guide
nada Documentation Release 40
Congratulations Launch the new site
22 Installation 11
nada Documentation Release 40
23 Installing NADA using Microsoft SQL Server
231 PHP database drivers (sqlsrv)
The new Microsoft SQL drivers for PHP are called SQLSRV and provide native support for connecting to a MicrosoftSQL Server database The drivers have been tested with NADA for SQL Server 2008 and 2012
The drivers are available for download from here httpwwwmicrosoftcomen-usdownloaddetailsaspxid=20098
232 NADA Microsoft SQL Requirements
To use Microsoft SQL Server database for NADA it is recommended to use SQL Server 2008 or later with Full-Textsupport enabled The full-text engine provides faster search than the normal SQL search
The default installation of SQL Server does not include the Full-Text engine so before continuing on to installingNADA please make sure you have full-text installed on your database server
233 Download drivers
Microsoft provides two versions of the SQLSRV drivers namely version 20 and 30 NADA has only been tested withversion 20 but should work with version 30 Requirements for using the drivers
bull Windows 7 Windows Server 2008 R2 Windows Server 2008 Service Pack 2 Windows Vista Service Pack 2
bull PHP 536 or PHP 54 For information about downloading and installing PHP visit PHP on Windows(httpwindowsphpnet)
bull Microsoft SQL Server 2012 Native Client available in the SQL Server 2012 Feature Pack (This is needed ifdatabase and web server are on different machines)
bull Any edition of SQL Server 2005 or later
12 Chapter 2 Installation guide
nada Documentation Release 40
234 The Microsoft SQL Client
Microsoft SQL Client is required for connecting to your SQL database using NADA The client is installed automati-cally if your database is hosted on the same machine as your web server If your SQL database is running on a differentmachine then you must install the latest version of the SQL Client on your web server to ensure NADA can connectto your database See section on installing Microsoft SQL Client
235 How to install the SQLSRV driver for PHP
The steps are for version 20 but the same applies to version 30
1 The drivers are available from the Microsoft website httpwwwmicrosoftcomdownloadsendetailsaspxFamilyID=80e44913-24b4-4113-8807-caae6cf2ca05
2 Download the drivers and run the setup file
3 The setup file will extract a number of dll files to your PHP extension folder
4 Browse to the PHP extension folder Eg cphpextNotice there are multiple dll files included all referencing_sqlsrv
1 To find out which driver library is suitable for your version of PHP create a php file using a text editor likeNotepad eg infophp and place this code inside it
ltphp phpinfo() gt
2 Save the file and copy it to your web server root folder Open your web browser and type the location andname of the file eg infophp into your browser URL The phpinfo() function prints your PHP version and otherconfiguration settings for PHP For Example localhostinfophp To select the right sqlsrv DLL yoursquoll need toknow
bull The version of PHP Eg 53
bull Which compiler is used eg either VC9 or VC6
bull Check whether Thread Safety is enabled or not
23 Installing NADA using Microsoft SQL Server 13
nada Documentation Release 40
1 With the above values you would choose the file php_sqlsrv_53_nts_vc9dll
ts=Thread safety nts=Non-thread safety
2 Once you know which dll file to use open the phpini file using a text editor and add the following entry at theend of your PHPINI file
extension=php_sqlsrv_53_nts_vc9dll
3 Save your phpini file and restart your web server
236 Testing the SQLSRV drivers and SQL Client
To make sure the driverextension is installed correctly Reload the phpinfo page and check if the extension SQLSRVis listed on the page
If the extension is not listed on the page recheck if the correct phpini file has been edited To locate the phpini filebeing used by PHP look at the output of the phpinfo page in the section shown below
14 Chapter 2 Installation guide
nada Documentation Release 40
This step is only required if SQL Server is not on the same server as your web server To check if the SQL Client isalready installed or not follow the steps below
1 Open Control Panel Administrative Tools on your server
2 Open ODBC and switch to the tab ldquoDriversrdquo
237 Download the Microsoft SQL Client
Note The instructions here are provided for Microsoft SQL Server 2008 if are running on a later version of MicrosoftSQL Server the latest drivers can be obtained from the Microsoft website The installation steps are the same
The SQL Client is available from the Microsoft website from here httpwwwmicrosoftcomen-usdownloaddetailsaspxid=16978
Download the appropriate package for the system being used ie (32bit64bit) and run the installer to install the client
Once the client is installed restart your computer and check again from ODBC above to confirm that the client hasbeen installed
23 Installing NADA using Microsoft SQL Server 15
nada Documentation Release 40
238 NADA Database configurations for SQLSRV
Create a database and the user account to use with NADA beforehand The permissions need to include - createaltertables indexes ( See the following reference from Microsoft for instructions on how to do this
bull Database - httpmsdnmicrosoftcomen-uslibraryms186312aspx
bull User - httpmsdnmicrosoftcomen-uslibraryaa337545aspx
Open the nada database configuration file your-nada-folderapplicationconfigdatabasephp file and look for the fol-lowing lines
$db[rsquosqlsrvrsquo][rsquohostnamersquo] = localhostsqlexpress$db[rsquosqlsrvrsquo][rsquousernamersquo] = db-user-name$db[rsquosqlsrvrsquo][rsquopasswordrsquo] = password$db[rsquosqlsrvrsquo][rsquodatabasersquo] = nada-database$db[rsquosqlsrvrsquo][rsquodbdriverrsquo] = sqlsrv$db[rsquosqlsrvrsquo][rsquodbprefixrsquo] = $db[rsquosqlsrvrsquo][rsquopconnectrsquo] = FALSE$db[rsquosqlsrvrsquo][rsquodb_debugrsquo] = FALSE$db[rsquosqlsrvrsquo][rsquocache_onrsquo] = FALSE$db[rsquosqlsrvrsquo][rsquocachedirrsquo] = $db[rsquosqlsrvrsquo][rsquochar_setrsquo] = utf8$db[rsquosqlsrvrsquo][rsquodbcollatrsquo] = utf8_general_ci
Fill in the database connection settings for the database created for NADA
Save the changes
239 Running the installer
bull Open a web browser to the location of the NADA installation For examplehttpyour-domainnada-folder-name or localhostnada-folder-name
bull If the Microsoft database connection is setup correctly you should see the nada installer
16 Chapter 2 Installation guide
nada Documentation Release 40
bull Check that all settings are marked with a green tick and fix any that are not on your webserver before runningthe installer
bull Click on the Install Database button and complete the form to create an initial Site Administrator account
Note Create a complex password of atleast 12 characters long with some uppercase punctuation and numbers to aidsecurity of your site Do not forget this username and password
23 Installing NADA using Microsoft SQL Server 17
nada Documentation Release 40
Congratulations Launch the new site
18 Chapter 2 Installation guide
nada Documentation Release 40
24 PHP settings
241 Finding the correct PHPINI
To make sure you are editing the correct PHPINI settings file create a PHP file (eg infophp) in your nada websitefolder with the following contents
ltphp phpinfo() gt
Open the phpinfo page in your web browser and you should see output similar to below screenshot Edit the phpinifile displayed by the setting Loaded Configuration File
24 PHP settings 19
nada Documentation Release 40
20 Chapter 2 Installation guide
nada Documentation Release 40
242 File upload limits
By default PHP allows uploads of 2MB which could be a problem if you have large DDIs and external resource filesTo change the settings
1 Edit the phpini file in notepad and look for the setting upload_max_filesize
2 The line should look like
Maximum allowed size for uploaded files httpphpnetupload-max-filesizeupload_max_filesize = 2M
3 Change it to the required file upload limit per your needs
upload_max_filesize = 50M
4 There is another setting that MUST be changed as well for the file upload limits to work Look for the configu-ration post_max_size and change it to match the value for upload_max_filesize
post_max_size = 50M
243 TimeZone settings
This is for setting the timezone for your application To findout what is the correct timezone for your website go tohttpphpnetmanualentimezonesphp and find your countrycity
Example
datetimezone = AmericaNew_York
244 Increase page executiontimeout
This setting controls the maximum execution time of a page in seconds
max_execution_time = 300
245 Increase PHP memory limit
It controls the memory available to PHP scripts
memory_limit = 128M
246 Enabledisable PHP extensions
NADA requires the following PHP extensions
bull xsl
bull mbstring
bull mysql or sqlsrv
To enable XSL extension add this line
24 PHP settings 21
nada Documentation Release 40
extension=php_xsldll
To enable mbstring
extension=php_mbstringdll
25 Configure Captcha
By default NADA version 41 comes with image captcha and user does not need to make any changes to use imagecaptcha To use Google Captcha please follow the steps given below
1 Open applicationconfigcaptchaphp in editor
2 Change line number 12 as shown in below image
3 Click on above URL to generate Public and Private key URL httpwwwgooglecomrecaptchawhyrecaptcha
4 Click on sign up now
5 Sign in using your Gmail account
6 After signed in you will have to enter your URL (Domain URL)
22 Chapter 2 Installation guide
nada Documentation Release 40
7 Click on ldquoenable globel key for all domain
8 Click on Create Key button
9 Copy public key and private key from Google Captcha website and inserte it on line number 51 and 52 respec-tively as shown in below image
10 To check the Google catpcha configuration go to register page and look for image as shown in below URLhighlighted in Red suqare
25 Configure Captcha 23
nada Documentation Release 40
26 Email configurations
For the NADA to function correctly it is important that this step be completed
Many of the functions within the NADA ndash such as registration and applying for access to datasets require that theNADA be able to send emails to users
There are two ways to setup your email configurations 1) Create a emailphp file in the applicationconfig folder 2)Edit email settings on the site configurations page
24 Chapter 2 Installation guide
nada Documentation Release 40
261 1 Configure email via email config file
1 Open the file applicationconfigemailphp in notepad
2 Fill in the section using SMTP server with authentication enabled highlighted in below image
3 For Gmail user will have to fill the gmail smtp section shown as below
26 Email configurations 25
nada Documentation Release 40
4 Save file
Note Using a file for email configuration disable the email configuration page from the site administration
1 Login to your NADA as an administrator
2 Go to Site administration click on the Settings menu and choose ldquoSettingsrdquo
3 Find the section ldquoSMTP settingsrdquo
26 Chapter 2 Installation guide
nada Documentation Release 40
4 If the PHPweb server is configured to send email using PHPrsquos MAIL function select the first option and donrsquotfill in anything else
If your organization has a mail server and has have a dedicated account that can be setup for NADA use the followingsettings Check the radio button ldquoUse SMTP Serverrdquo
5 Enter the host name for the server
6 Enter the port used by the server to send mail
7 If required enter the user name used to send mail on the server
8 Enter the password used to send mail on the server
If the organization does not own a mail server a Gmail account can be configured to be used with NADA
bull Check the radio button ldquoUse SMTP Serverrdquo
bull Host name sslsmtpgooglemailcom or sslsmtpgmailcom
bull SMTP port 465
bull Account username email-addressgmailcom
bull Account password password for the gmail account
Test the email settings
The quickest way to test if the email settings are working is to use the ldquoforgot passwordrdquo option from the user loginpage
bull Click on forgot password
26 Email configurations 27
nada Documentation Release 40
bull Enter the administrator or any other accounts email address
bull Check to the email account the mail was sent to
bull If no mail is received the settings are wrong and need to be corrected
28 Chapter 2 Installation guide
CHAPTER 3
Upgrading from previous versions
31 Upgrade from NADA 3
For users with an existing NADA 3x catalog an upgrade script is included that will update your NADA 3x databaseto NADA 4x The process involves modifying your NADA 3x database and thus carries some risks The script willadd new tables to the NADA 3x database All user accounts and survey information will be retained by the upgrade
Important Backup the NADA 3x database before doing anything
1 Follow the instructions on page 4 and set up a folder in the web root containing the NADA 4 files
2 Edit the databasephp file as instructed in the section above NADA database configurations for MySQL
3 Instead of entering a new database name user account name and password -fill in the details of the existingNADA 3x database
Note These can be found by looking at the existing NADA 3x databasephp file and entering the settings into theNADA 4 databasephp file
4 Save the file
5 Navigate to the URL for the NADA4 site Example httpyour-nada-sitenada4indexphpnada4_upgrade
6 The following page loads
29
nada Documentation Release 40
Take note of the warnings and make any necessary corrections before clicking the ldquoUpgrade database to NADA 4rdquobutton
Warning This step makes changes to your nada 3 database that are not undo-able so make sure you do make adatabase backup before this step
Click on the ldquoUpgrade database to NADA 4rdquo button and wait for the page to reload The output of the page will looksomething like below
The script will print number of messages about failed table updates This does not mean the script failed to upgradeIt just means some of the updates were not needed on your version of NADA 3 Different versions of NADA havedifferent numbers of fields in the database and the upgrade script tries to fix the missing fields for all these differentversions of NADA If the existing NADA 3 database already has that field then it reports it as an error
You can ignore the error messages that include the wording ldquoDuplicate column namerdquo or ldquoDuplicate entryrdquo
Now your database has been migrated to NADA version 41 We will have to run one more upgrade script to forNADA version 42
7 Navigate to the URL for the NADA42 site Example httpyour-nada-sitenada42indexphpnada42_upgrade
Warning This step makes changes to your nada 41 database that are not undo-able This page will not show anymessage on the screen You will be getting blank page Please do not repeat the process
8 To verify the database upgrade Open the NADA catalog page by going to http[your-nada4-site]indexphpcatalogpage and verify all studies from NADA 3 are listed
311 Linking your NADA 3 data files to NADA 4
The upgrade script has only upgraded the database It is now necessary to tell the NADA4 where to locate the datafilesthat were uploaded to the original NADA 3 site
There are two options available
Option 1 Copy the datafiles folder from NADA 3 to NADA 4 This works best if you have only a few studies and thedatafiles folder size is small enoughto be moved easily from one location to another
Option 2 If it is not possible to easily move the datafiles folder from NADA 3 to NADA 4 you can tell NADA 4 thelocation of the datafiles without moving the files Here are the steps
bull Use your NADA 3 administrator login credentials to login to your new NADA 4 site
bull Click on Site administration in the top right corner of the screen
bull Go to the ldquoSettingsrdquo menu and click on the ldquoSettingsrdquo sub-menu
30 Chapter 3 Upgrading from previous versions
nada Documentation Release 40
bull Under Site configurations expand the ldquoSurvey Catalog Settingsrdquo section
bull For the setting ldquoCatalog folderrdquo enter the relative or full path to where the NADA 3 datafiles folder is locatedFor example if the nada3 datafiles are located on cnada3datafiles enter that path here
bull Save the configurations by clicking on the update button If now errors are shown then you have successfullyupdated the folder path
bull Check your new NADA 4 site to make sure the migration was successful
ndash Check the user administration page from site administration to make sure the users from the nada3 sitewere migrated
ndash Check the ldquoData Catalogrdquo page and view the studies by clicking on the study title to make sure the studyinformation pages are correct
ndash Check the site menus are the same as the NADA 3 site
312 Refresh DDI
In NADA 4 more information is stored in the database from the DDI than in the NADA 3 To bring all these newfields into the imported studies it is necessary to refresh the DDIrsquos The refresh DDI feature in NADA updates thedatabase with metadata from the DDI without having re-uploading the DDIs To update the metadata for all studies inyour catalog
bull Open the following NADA 4 URL in your browser
http[your-nada-4-site]indexphpadmincatalogbatch_refresh
bull Select all studies
bull Click on the ldquoRefresh DDIrdquo button
313 Transferring ownership
NADA 4 has a collection management feature When studies are imported from the NADA3 catalog into NADA4 theyare put into a collection called DEFAULT They need to be moved from this default system collection to the Central
31 Upgrade from NADA 3 31
nada Documentation Release 40
Data Catalog of the NADA4
To do this
bull Go login to the Site Administration and navigate to the Studies Manage Studies Central Data Catalog page
bull Select all the studies by ticking the check boxes next to each study on the right
bull Click on the dropdown menu and select Transfer owner
bull From the Transfer study owner page Select Central Data Catalog and then click transfer
32 Chapter 3 Upgrading from previous versions
nada Documentation Release 40
314 Updating the Site themetemplate
You cannot use your NADA3 template in NADA4 without making some changes Here are general guidelines butsteps may differ depending on your nada site template
bull Copy your NADA3 template to the NADA4 themes folder
bull Edit the [nada4-root]configtemplatephp following the steps below
bull Look for the setting ldquotheme_namerdquo by default it is set to rdquowbrdquo
bull Change ldquowbrdquo to the theme name you want to use Theme name is the folder name you copied to[NADA4]themes[your-site-theme] from your nada3 site
bull Save the file
NB The template may need some adjusting to run properly on the new NADA 4 site This will involve editingthe layoutphp and other template files within the template folder which is now located in the NADA 4 themesfolder
32 Migrate MySQL to Microsoft SQL
TODO
32 Migrate MySQL to Microsoft SQL 33
nada Documentation Release 40
34 Chapter 3 Upgrading from previous versions
CHAPTER 4
User manual
41 Overview and core concepts
411 About NADA
NADA is a web-based cataloging application that allows for the creation of portals that allows users to browse searchcompare apply for access and download relevant census or survey information
It was originally developed to support the establishment of national survey data archives The application is used by adiverse and growing number of national regional and international organizations NADA as with other IHSN toolsuses the Data Documentation Initiative (DDI) XML-based international metadata standard
412 Concepts
CENTRAL DATA CATALOG
The default catalog created when a NADA instance is installed is the Central Data Catalog All studies uploaded to theNADA are visible searchable and accessible from the Central Data Catalog For many institutions the Central DataCatalog will remain the only catalog in their NADA instance For some institutions being able to divide the contentsof the Central Data Catalog into more refined collections will be desirable
COLLECTIONS
Collections are sub categories of the Central Data Catalog They allow administrators of a NADA instance to groupstudies into what can be thought of as sub-catalogs of the Central Data Catalog This has a number of benefitsboth from the user and the administrator perspective From the usersrsquo perspective being able to filter and viewgroups (collections) of studies that logically belong together makes finding what they are looking for easier From theadministratorsrsquo perspective the ability to create collections of studies that may logically belong together facilitates theability to decentralize the management of each collection of studies to specific administrators (for example collectionscan be managed by different departments in an institution)
NOTE The creation of collections will in general only be useful and necessary for large catalogs or for catalogs thatdesire more decentralized management of groups of studies by different departments
STUDIES
Studies are carried out to gather more knowledge about a subject Studies may gather information from a number ofdifferent sources in order to answer the questions asked The information gathered for a study will in the context of
35
nada Documentation Release 40
NADA catalogs usually come from either a census or a surveys It is therefore not uncommon to hear the terms surveyand study used interchangeably when listening to people talk about their NADA catalog
METADATA
Metadata are data about the data They are not the actual data collected from the survey but rather the information thatdescribes the survey process and the data The NADA uses the Data Documentation Initiative (DDI) ndash ddiallianceorgndash standard for the presentation of metadata for each study The DDI document (which is an XML document) isprepared outside the NADA application either manually or using a tool like the Nesstar Publisher ndash nesstarcom ndash andthen imported into the NADA The detailed information about the survey is searchable down to the variable level foreach survey in the catalog
DATA ACCESS TYPES
The NADA allows for the level of access to datasets for studies to be controlled at the study level In other words thelevel of restriction can differ from study to study and can be defined on a scale ranging from direct access with norestrictions to no access Briefly the available access types are
bull Data not available - data are not available for this study
bull Direct Access Data Files - data shared under this policy can be downloaded without any restrictions The useris not required to be logged into the site and no personal information is collected on the person downloading thedata
bull Public Use Data Files - data shared under this policy requires that the user be logged in and registered on thesite before they are able to download the data The user is required to agree to a terms of use of the data and theapplication keeps records of who downloads the data
bull Licensed Data Files - data shared under this policy requires that the user be logged in and registered on the siteUsers are also required to fill in and submit a detailed application form listing their reasons for wanting accessto the data Once the user submits the application form the system informs the system administrator that anapplication has been made In order for the person to get access to the data the system administrator needs toreview the application and approve it
bull Data available in an Enclave - under this policy no data is shared through the application Users submit anapplication to access the data at a secure facility physically located on the premises of the data producer or afacility nominated by the data producer
bull Data available from external repository ndash The NADA allows for studies and their metadata to be listed in aNADA catalog but for a link to be created to another site when the data for that study are available elsewhere
CITATIONS
Citations are references that can be included at the study level which point to published works that have used the datafrom a particular study In many cases this will be a reference to a Journal Article Working paper Newspaper articleetc Such resources are useful to researchers who are interested in seeing how the data have been used before Theyare also a good way of showing the funders of surveys that the data are being used for policy and research purposesand thus are an indicator of some of the impact a study has had
USERS
Users in the NADA can be defined according to three broad groups General Users ndash this is the normal user whoregisters on a NADA site from the user interface This user type has no access to the site administration It is requiredto register as a user when accessing public use and licensed data types Site Administrators (unlimited) ndash this user
36 Chapter 4 User manual
nada Documentation Release 40
has access to all functions and all collections within the Site Administration System wide access Limited Adminis-trators ndash these administrators have access to a limited set of functions within the Site Administration Examples wouldbe an administrator of a specific collections or licensed survey reviewer for all or only some collections or reportgenerator etc
413 Why do NADA administrators need to understand these concepts
Understanding these concepts is important as it
bull Is critical to understanding the new permissions and administrator types introduced in NADA 4 Administratorsare now able to create collections within their NADArsquos and assign different roles to administrators and moregranular levels of access to catalog administration at the collection level It is now possible for example to haveadministrators whorsquos lsquopowersrsquo range from being able to manage all parts of a collectionrsquos administration downto ones with more restrictive access such as ones whose only function is as licensed survey reviewer or reportgenerator or catalog reviewer or citation manager etc
bull Ensures that the correct level of permissions and access is assigned to users based on security policies within theinstitution Unlike previous versions of NADA not all users who have access to the Site Administration needhave the level of access of an ldquounlimited site administratorrdquo This limits security risks associated with havingtoo many ldquounlimited site administratorsrdquo managing a site
bull Assists in assigning an appropriate data access type to data based on institutional distribution polices
bull Makes it easier to explain more clearly to institutional managers what the capabilities of the NADA applicationare and to advise on how to best manage the allocation of responsibilities
42 The Dashboard
After logging in to the Site Administration with administrator credentials the user is taken to the dashboard
The Dashboard provides a quick glance summary for administrators to get an overall picture of what has been happen-ing on the site as well as what pending tasks are outstanding for the administrator
42 The Dashboard 37
nada Documentation Release 40
1 Menu link to the Dashboard
2 Menu link to the Study Management pages submenus include Manage Studies Licensed requests and ManageCollections
3 Menu link to the citations management pages
4 Menu link to the User management pages submenus include All users Add user and Impersonate User
5 Menu link to create menu pages for the site frontend
6 Menu link to generate usage reports
7 Menu Link to the settings pages submenus include Settings Coutries Regions and Vocabularies
8 Useful navigation links submenus include Change Password Log out Catalog Home Data catalog Citations
9 This section lists all collections in the catalog Within each collection a summary is given of the number ofstudies along with diagnostics related to the number of studies publishedunpublished missing questionnairesdata access types set but with no data attached as well as some buttin links to Manage the collections studiesusers and a History of changes made to the collection
10 Provides a summary of users registrations and number of users currently logged in
11 Show how many pages are being cached on the site with a link to clear the cache if need be
12 Show a list of recently added or updated studies Clicking on a study in the list takes you to the page to managethat study
38 Chapter 4 User manual
nada Documentation Release 40
43 Manage Collections
431 Collections
Collections are sub categories of the Central Data Catalog They allow administrators of a NADA instance to groupstudies into what can be thought of as sub-catalogs of the Central Data Catalog
Collections provide a number of benefits both from the user and the administrator perspective From the usersrsquo per-spective being able to filter and view groups (collections) of studies that logically belong together makes finding whatthey are looking for easier From the administratorsrsquo perspective the ability to create collections of studies that maylogically belong together facilitates the ability to decentralize the management of each collection of studies to specificadministrators (for example collections can be managed by different departments in an institution)
Note The creation of collections will in general only be useful and necessary for large catalogs or for catalogs thatdesire more decentralized management of groups of studies by different departments
432 Creating collections
bull Login to the Site administration using an administrator password
bull Collections are managed and created by going to the Studies Manage collections menu link
bull There are no collections defined in the default NADA 4 installation
bull To create a new collection click on the Create new collection button
43 Manage Collections 39
nada Documentation Release 40
1 Under Collection Identification provide a short name for the collection This will become the URL for thecollection so pick carefully For Title fill in the fill title for the collection This will be the name displayed atthe top of the collection page
B Fill in a 3 or four line short description of the collection This text will display on the front end in the collectionslist For examples see httpmicrodataworldbankorgindexphpcontributing-catalogs
C Fill in a more detailed description of the collection This will display on the About page for that collection Forexample see httpmicrodataworldbankorgindexphpcatalogdhsabout
To format the page and include images it is possible to enter HTML code into this box below is anexample piece of code that includes an image
ltimg src=rdquofilesdhs-fp-01jpgrdquo alt=rdquoHealth Surveys Imagerdquo class=rdquoabout-photordquogt lth2gt Health SurveysCollectionlth2gt ltp align=rdquojustifyrdquogtThe Health Surveys collection aims to provide frequent high qual-ity and timely health data needed by the decision makers when designing public health programsltpgtltpgtHealth surveys provide useful information on health status and health consumption and their determi-nantsltpgt
Copy any images to be displayed into the NADA ldquofilesrdquo folder on your server image imagesthumbnil-imagepng
4 Upload a file to display next to the collection as it is listed on the collection page NOTE This image should be82 X 82 pixels If the upload does not work automatically then copy the thumbnail image to the ldquofilesrdquo folder asshown above
40 Chapter 4 User manual
nada Documentation Release 40
E The Weight field determines in what order collections are shown in the collection list 0123 etc The Selectcollection type drop-down is a system value to distinguish between collections that should be viewed as internal tothe organization or external For example some collections may be made up entirely of studies from an organizationoutside the host catalog These collections can be designated as external The Section dropdown allows for thecategorization as either a collection based on a specialized collection (like health) or based on a regional breakdownSelecting Publish ndash publishes the collection
bull Click on Submit to save the changes
To view the results click on the Preview link on the far right
bull The new collection now also shows in the collection list on the Central Catalog About page (this is where thethumbnail and short description fields are displayed)
43 Manage Collections 41
nada Documentation Release 40
bull Visiting the Dashboard will now also show the new collection listed below the Central Data Catalog With anumber of green buttons as shortcut links to manage the studies on the collection assign administrators for thecollection a history of activity on the collection and a link to edit the collection as in the steps above
433 Manually adding studies to a collection
There are 2 ways to get studies into the new catalog
bull The first is to upload a DDI and all its resources to the collection in the same way as described in the earliersection ndash Uploading a Study Except instead of choosing Central Catalog chose the collection you want to
42 Chapter 4 User manual
nada Documentation Release 40
upload the study to
bull Click on the Add Study button and upload a DDI and RDF and all your resources as described in the earliersection ndash Uploading a Study
bull Once a study is added in this way it displays in the Manage Studies list Notice that the collection summaryfield shows that the study belongs to (is Owned By) the DHS collection (this was the Short name defined in theexample when the Health Surveys Collection was created)
All studies uploaded to collections will automatically be added to the Central Data Catalog in order to build a commonsearch portal for all studies
43 Manage Collections 43
nada Documentation Release 40
434 Copying studies from one collection to another
bull The second way to add a study to a collection is to Copy the study from another collection into the newcollection
bull To copy a study already in the catalog to display in the new collection first make sure to be in the Manage Studiessection for the collection you want to put studies into To do this either use the Studies ndash Manage studies menuon the top or simply click on the Switch link next to the Manage Studies [Collection Title] heading
bull Then Click on the Copy Studies blue button at the top right
bull A list of all studies available to copy to the new collection is listed Simply click on the Link button in green tocopy the study to the collection The button will turn red and say Unlink To reverse the process and click thenow red button
bull Going back to the Manage Studies page for the collection will show the newly copied studies in the collectionlist Also note that the Collection field now indicated DHS next to Central DHS is in grey to indicate it is notowned (it is a copy) by that collection and the Central is in blue to show it is owned by the Central Data CatalogAlso note that because the study is not owned by this catalog it cannot be edited from this catalog ndash hence thepublishunpublish green button is absent for the copied studies
44 Chapter 4 User manual
nada Documentation Release 40
435 Turning on the collection filter
The final step after creating the first collection is to enable the collection filter option in the Settings menus under SiteConfigurations ndash Survey catalog settings
436 Transferring study ownership
In the previous examples mention was made of studies uploaded to a catalog being owned by that catalog There maybe cases where transferring the ownership from one catalog to another will be desirable This will become clearerin the next section on user roles but for now the next steps show how transferring ownership from one collection toanother can be done
bull Transferring ownership from one collection to another has to be done by the owner of the collection and fromthe collection it is currently owned by
bull To transfer ownership Go to the Manage Studies screen and select the study to be transferred Open up the EditStudy page by clicking on the study Title
bull On the right hand side of the screen click on the Transfer study owner link
43 Manage Collections 45
nada Documentation Release 40
bull Select the collection to transfer from the dropdown box
bull Click Transfer
bull Note that when looking the study summary for the transferred study the Collection field now shows the studyto belong (owned by) to the DHS collection and not Central anymore Also note the option to Publish andunpublish is now active
bull To transfer ownership of a large number of studies all at once - from the Manage Studies page ndash select the studiesto be transferred (tick them in the box left of each study) and then from the top Batch Actions drop down selectTransfer owner ndash then apply
46 Chapter 4 User manual
nada Documentation Release 40
44 Manage Studies
There are 2 Options to get studies into the new catalog
441 Option 1
bull The first is to upload a DDI and all its resources to the collection in the same way as described in the earliersection ndash Uploading a Study Except instead of choosing Central Catalog chose the collection you want toupload the study to
bull Click on the Add Study button and upload a DDI and RDF and all your resources as described in the earliersection ndash Uploading a Study
bull Once a study is added in this way it displays in the Manage Studies list Notice that the collection summaryfield shows that the study belongs to (is Owned By) the DHS collection (this was the Short name defined in theexample when the Health Surveys Collection was created)
bull Also note that the new study also appears in the Central Data Catalog
All studies uploaded to collections will automatically be added to the Central Data Catalog in order to build a commonsearch portal for all studies
44 Manage Studies 47
nada Documentation Release 40
442 Option2
Copying studies from one collection to another
bull The second way to add a study to a collection is to Copy the study from another collection into the new collection
bull To copy a study already in the catalog to display in the new collection first make sure to be in the Manage Studiessection for the collection you want to put studies into To do this either use the Studies ndash Manage studies menuon the top or simply click on the Switch link next to the Manage Studies [Collection Title] heading
bull Then Click on the Copy Studies blue button at the top right
bull A list of all studies available to copy to the new collection is listed Simply click on the Link button in green tocopy the study to the collection The button will turn red and say Unlink To reverse the process and click thenow red button
bull Going back to the Manage Studies page for the collection will show the newly copied studies in the collectionlist Also note that the Collection field now indicated DHS next to Central DHS is in grey to indicate it is notowned (it is a copy) by that collection and the Central is in blue to show it is owned by the Central Data CatalogAlso note that because the study is not owned by this catalog it cannot be edited from this catalog ndash hence thepublishunpublish green button is absent for the copied studies
45 Managing Licensed Requests
Datasets that are assigned the Access Type Licensed require approval from the NADA administrator before the usercan get access to the data files From the site administration there are a number of ways to see if any licensed requestshave been received
bull Go to the dashboard Pending requests show up as red in the catalog quicj summary section Clicking on thislink goes to the Licensed Survey Requests management page
bull Or go to the Studies link on the top menu and select Licensed Requests from the submenu
48 Chapter 4 User manual
nada Documentation Release 40
The link shows a page with a list Licensed Requests received The status column indicated the Pending requests
bull Click on the Edit link for to process a request
The Request information tab shows a summary of the information provided by the applicant
bull To Approve or Deny or request further information for the request Click on the Process tab
45 Managing Licensed Requests 49
nada Documentation Release 40
bull Select Approve to approve the request (other options include Deny as well as Request more information fromthe applicant)
bull Select the files that the user will be authorized to download ndash it is also possible to enter a maximum number ofdownloads and expiry date for downloads
bull Enter any comments to be sent to the applicant
bull Select Notify user by email to notify them that the application has been processed
bull Select Update
bull The remaining tabs
ndash Communicate - provides a means to ask for more information from the applicant
ndash Monitor ndash allows the administrator to see when and how many times the applicant downloaded thedata
ndash Forward Request ndash provides a means to forward the request to another person for review
46 Manage Citations
The Citations section is where bibliographic references can be added for publications that use any of the studies in thecatalog These citations can be linked to particular studies in the catalog and are displayed to the users of the systemin the study information view of the relevant study
Citations are added from the Citations menu
50 Chapter 4 User manual
nada Documentation Release 40
bull To add a citation - click on All citations then click on the Add New Citation button at the top right
bull Compete the form including the indication as to whether the citation should be published or not
bull Then expand the Related studies link to tell the system which studies the citation ldquobelongsrdquo to
bull Click on the Attach studies link This reveals a list of all studies in the catalog
bull Select the relevant studies by clicking on the green Select button
bull Click on the apply filter button to save the changes The study now appears in the related studies box
bull Click on the submit button to save the citation
bull Note the flag keywords and notes fields can be used by administrators to place extra notes only visible to otheradministrators that might prove useful when there is uncertainty about a citations appropriateness or accuracy
bull It is also possible to import citations in common citation formats such as BibTex and EndNote (RIS)
bull To do this use the Import Citations link from the top menu
46 Manage Citations 51
nada Documentation Release 40
bull Paste the BibTex or RIS text into the form and then at the bottom of the screen click on Attach studies to linkthe citation to a particular study in the catalog
bull The citation now appears in the citation list as well as on the study information page for the relevant studies
52 Chapter 4 User manual
nada Documentation Release 40
47 Managing Users and account types
Users in the NADA can be defined according to three broad groups
General Usersndash this is the normal user who registers on a NADA site from the user interface This user type hasno access to the site administration It is required to register as a user before being granted access to public use andlicensed data types
Site Administrators (unlimited) ndash this user has access to all functions and all collections within the Site Administra-tion System wide access
Limited Administrators ndash these administrators have access to a limited set of functions within the Site Administra-tion Examples would be an administrator of a specific collections or licensed survey reviewer for all or only somecollections or report generator or citation manager etc
471 Creating User accounts
User accounts can be created in two ways
1 A General User account can be created by a user directly from the register screen from the login link on the userinterface of the application
The user created by this process has no access to the site administration This account can only be used to apply andgain access to public and licensed datasets
2 A user account can also be created by a Site Administrator
bull To do this login as a Site Administrator
bull Go to the site administration section of the application
47 Managing Users and account types 53
nada Documentation Release 40
bull Select Users ndash Add user from the top menu
bull Fill in the information for the user in the form and be sure to mark the account status as Active Then click theCreate button
54 Chapter 4 User manual
nada Documentation Release 40
47 Managing Users and account types 55
nada Documentation Release 40
bull Note that the user always starts off as a General User with no access permissions to the Site Administration Theuser group column displays as empty for users with only general user accounts
bull To see a list of all users in the system go to the Users ndash All Users menu item at the top of the screen
bull Note the new users created have no User group assigned (they are general users) Also note the Actions columnon the far right From these links an account can be edited (including changing the password and blocking anaccount) deleted and Permissions managed for the account
472 Managing User Account Permissions
User accounts permissions can be only be set and changed by a Site Administrator To change the permissions for anaccount
bull Click on the Permissions link next to the account to be changed All accounts start of as General users accounts
bull To change this user to a full site administrator who will have full system wide access to all parts and functionsof the NADA administration select the Site administrators (full access) option and tick the admin box as wellClick update to save the changes
56 Chapter 4 User manual
nada Documentation Release 40
473 Collection level administrators
bull To create a user who only has permissions to administer studies or administration functions for a particularcollection Select Site administrators (limited access)
47 Managing Users and account types 57
nada Documentation Release 40
bull It is then necessary to assign a role to this new limited administrator account To create a limited access ad-ministrator for a particular collection ndash select Site administrators (limited access) and then select Collectionadministrators Notice The form expands to reveal a list of collections in the system
bull Select the appropriate level of access that this account will have for this collection In the example below anadministrator is being created who can manage only licensed requests for the collection ndash Health Surveys Thisaccount will not be able to upload or publish studies The account will only be able to process licensed requestsfor the collection ndash Health Surveys
58 Chapter 4 User manual
nada Documentation Release 40
Other levels of access for Site administrators (limited access) ndash Collection administrators include
1 Accounts that are given full access to manage studies
2 Accounts that are given access to upload studies but not publish them
3 Accounts that are limited to reviewing studies
474 Global level Limited access accounts
Other types of limited access accounts include
1 Accounts that can only view system reports at a global level
2 Accounts that can only access the citations section and manage citations
3 Accounts that can only access the Licensed Request management system ndash at the global level for all collections
47 Managing Users and account types 59
nada Documentation Release 40
Impersonating a user
The system includes a function that allows a Site Administrator to impersonate (take on the role) a user created inthe system This is a useful testing tool when creating users and assigning permissions It essentially allows theadministrator to take on the role of another user temporarily
bull To access the Impersonate User feature go to the Users ndash Impersonat user menu at the top of the screen
bull A list of users to impersonate is shown
bull Select the user to impersonate and click on the impersonate button
bull The dashboard view for the impersonated user now shows
60 Chapter 4 User manual
nada Documentation Release 40
bull Note in the example above the account being impersonated is a Limited Account administrator with rights onlyto manage licensed requests for the Health Surveys Collection Note that all other dashboard menus are eitherhidden or clicking on any other function other than manage studies results in an access denied message
bull This is a good way to test if the roles assigned to a user account have the expected results
bull To exit the impersonate mode and return to the Site Administrator role ndash Click on the top right menu and selectExit impersonate mode
475 The Reviewer Limited access account
Sometimes it is desirable for catalog administrators to allow certain users to see a collection before it is published butwithout granting access to the site administration functions
This is useful for getting feedback on the correctness of information on collections or studies before publishing
To do this
bull First create an account for the user or get the user to create an account by using the register form on the loginscreen
bull Then edit the permissions for that user selecting Site Administrator (limited access) ndash Collection administrator
bull Then for the appropriate collection select Reviewer and click update to save the changes
47 Managing Users and account types 61
nada Documentation Release 40
bull The newly created reviewer account user can now view all studies in a collection even if the study or collectionis unpublished
48 Manage Site Pages and Menus
The NADA has a small content management component that allows for the creation of menu pages to appear on theuser interface
bull Examples of menus that might be useful for users of the site might be A page dealing with the disseminationpolicies of the organization or perhaps a page with contact information for the information
New menu items and pages can be created via the Menu- All pages menu link at the top of the Site Administrationpage
62 Chapter 4 User manual
nada Documentation Release 40
bull Select All pages from the menu
bull To add a new page click on the Add New Page button
bull Give the page a Title in the Title field
bull Clicking in the URL field will automatically suggest a name for the page in the URL
bull Enter the contents for the page in the Body section Plain text or HTML is accespted by this field
bull Then indicate if the page should be published or not in the Publish dropdown
bull The Weight field tells the NADA in what order this menu item should display Eg 0 would be first 1 secondand 2 third
bull Click on Update to save the changes
bull View the changes from the user interface In this Example a Contact Us page was created
bull It is also possible from the Menu Management screen to add a menu link that links to an existing page on anothersite (rather than creating a page itself)
bull To change the order in which the menu items display on the user interface use the Reorder Menu button on theMenu Management screen
48 Manage Site Pages and Menus 63
nada Documentation Release 40
49 The Site Settings Page
All settings for the application are controlled via the Settings menu at the top of the Site Administration page Thereare seven main settings sections See screenshot below
491 General Settings
1 Type the Title of the site here This will become the front page title of the NADA site In this case the Title isNADA
64 Chapter 4 User manual
nada Documentation Release 40
2 The footer text can be changed in this field This displays at the bottom of your site page
3 The initial page that loads when a user visits the NADA site can be set here In this case the catalog page is setto open by default
4 The name of the webmaster can be set here This is the name that will be used in system emails sent to users
5 Enter the webmaster email address here This should be the address that will be used in communication withusers Typically this is a general enquiries email set up by the organization and not a personal email address fora particular person Note to avoid mail systems rejecting mail as spam make sure to enter an address here thatis on the same domain as the server used in the email settings at setup
6 This field sets the location of the Cache folder The cache folder stores pre- generated pages of the site to allowfor faster browsing by the user By default it is set to cache This can be moved to another location if desiredbut must be writable The green tick indicates that the folder can be found and is set up correctly Enter eitherrelative or absolute paths to the folder location
7 Set the time that the Cache takes to expire By default it is set to 2 hours (in milli seconds)
8 If it is desired to turn off caching then select no here Sometimes it is useful to turn off caching when developingor updating a site so as to ensure that content changes become immediately visible on the front-end withouthaving to wait for the cache to expire and the new changes to show Turn this back on to speed up page loadingfor users
Click update to save all settings
Language
To change the language of the application expand the language section and choose the desired language Click updateto save and apply the setting
49 The Site Settings Page 65
nada Documentation Release 40
Enable or disable the HTML editor
A basic HTML editor is provided in the menu and page creating section of the application This setting allows this tobe turned on or off
Survey catalog settings
1 This is the folder where the files for the study are stored on the server This includes the DDI eternal resourcesand data files This folder can be moved to a location outside the web root as described in the installationinstructions in Chapter 1 Enter either relative or absolute paths to the folder location
2 This is the folder where DDIrsquos can be placed in order to use the bulk study import function in the NADA InNADA3 files had to be physically copied to this folder on the server but this is no longer necessary in NADA4 Files can now be directly uploaded to this folder from the Site Administration ndash Manage Studies page page
66 Chapter 4 User manual
nada Documentation Release 40
3 Select the vocabulary to use for the topic filter By default this is set to the CESSDA classification as recom-mended in the IHSN templates supplied at IHSNorg for the Nesstar Metadata Publisher
4 Enable or disable the Country filter on the user interface search page here If the catalog only contains studiesfor one country then turning this filter off is recommended
5 Enable or disable the Topic filter on the user interface search page here If no topics have been defined in theDDIrsquos being uploaded then it is recommended to turn this filter off (disable)
6 Enable or disable the Year filter on the user interface search page here
7 Enable or disable the Collection filter on the user interface search page here If no collections have been definedthen it is recommended to disable this filter
8 Enable or disable the Data access filter on the user interface search page here This filter is not needed if thereare very few studies in the catalog or if all studies hare set to the same access type
9 This section controls the order in which the filters appear on the search page Enter numbers here that rank theorder of the filters in the order they should be displayed
10 This setting determines how many studies are displayed by default to the user on the search page ndash catalog view
Site Login settings
1 To require that users login before being able to access the website set this option to Requires all users to loginto access the website
2 Determined how long a user will stay logged in After this time the user will be automatically logged out
3 Sets the minimum length for passwords created by the users at registration or for manual user creation
49 The Site Settings Page 67
nada Documentation Release 40
SMTP Settings
1 If the PHPweb server is configured to send email using PHPrsquos MAIL function select the first option and donrsquotfill in anything else
If your organization has a mail server and has have a dedicated account that can be setup for NADA use the followingsettings Check the radio button ldquoUse SMTP Serverrdquo
2 Enter the host name for the server
3 Enter the port used by the server to send mail
4 If required enter the user name used to send mail on the server
5 Enter the password used to send mail on the server
If the organization does not own a mail server a Gmail account can be configured to be used with NADA
bull Check the radio button ldquoUse SMTP Serverrdquo
bull Host name sslsmtpgooglemailcom or sslsmtpgmailcom
bull SMTP port 465
bull Account username email-addressgmailcom
bull Account password password for the gmail account
6 Test the email settings
The quickest way to test if the email settings are working is to use the ldquoforgot passwordrdquo option from the user loginpage If no mail is received when doing this test then go back and correct the mail settings Check with the ISP orserver administrator for the correct settings
Click on update to save all settings
68 Chapter 4 User manual
nada Documentation Release 40
492 Dashboard setting
Provides a means to automatically have content loaded into the dashboard via an RSS feed from a site The defaultsetting is set to receive updates and news from the IHSN website
49 The Site Settings Page 69
nada Documentation Release 40
70 Chapter 4 User manual
CHAPTER 5
Indices and tables
bull genindex
bull modindex
bull search
71
nada Documentation Release 40
2 Contents
CHAPTER 1
Requirements
NADA requires PHP and a MySQL database at minimum
11 PHP requirements
The minimum required version is PHP 52 but we strongly recommend that you use PHP 53 or 54 The followingPHP extensions are required for NADA
bull xsl
bull xml
bull mbstring
bull mysql or sqlsrv
Note See section on PHP configurations for configuring your server for NADA
12 Web Server requirements
bull Apache 2x
bull IIS 67x
13 Supported Databases
bull MySQL 5x
bull Microsoft SQL Server with fulltext support
3
nada Documentation Release 40
4 Chapter 1 Requirements
CHAPTER 2
Installation guide
21 Requirements
NADA requires PHP and a MySQL database at minimum
211 PHP requirements
The minimum required version is PHP 52 but we strongly recommend that you use PHP 53 or 54 The followingPHP extensions are required for NADA
bull xsl
bull xml
bull mbstring
bull mysql or sqlsrv
Note See section on PHP configurations for configuring your server for NADA
212 Web Server requirements
bull Apache 2x
bull IIS 67x
213 Supported Databases
bull MySQL 5x
bull Microsoft SQL Server with fulltext support
22 Installation
221 Download the latest NADA
bull Download a copy of the NADA 4 software from the IHSN httpihsnorgnada
5
nada Documentation Release 40
bull Open and extract (unzip) the files to your local hard drive using an appropriate compression program If you donot already have such a compression program there are many open source compression programs available ForWindows use the built-in compression software wizard or alternatively the 7-ZIP File Manager which is a freecompression program On Linux systems the same tasks can be achieved from the command line or once againthrough the use of a separate program Mac OSX has a number of options - third party and built-in as well asfrom the command line
222 Setup application folder
bull Copy the files to a folder in the web server root folder If installing on a localhost - for example the computercurrently being working on ndash then copy and paste (or move) the files into the root folder (or a sub-folder) of theweb server If however the server is running on a remote host (such as an ISP) then this process will involvethe use of a FTP client program or file manager from the ISPrsquos Cpanel
Note The folder name chosen will in many cases become the URL for the catalog Examples for a folder name mightbe ndash data microdata catalog etc
bull The root folder is located in different places depending upon the operating systemdistribution and web serverpackage you are using and it might be called htdocs httpd or www On Windows servers this might be locatedin the inetpub directory and on Linux in the var directory Consult the documentation for the distribution beingused or contact the ISP if unsure where the root web folder is
223 Folder permissions
Change the permissions for the following folders and their contents to READWRITE and on Windows servers makesure the IUSR_ user has readwritedelete permissions on these folders
bull your-nada-web-folderdatafiles ndash this is the folder where the application will store the DDIlsquos documentationand data
6 Chapter 2 Installation guide
nada Documentation Release 40
Note For added security it is strongly recommended that the location of the datafiles directory be changed afterinstallation to a location outside your web root structure
bull your-nada-web-foldercache ndash this is where cached web pages will be stored
bull your-nada-web-folderlogs ndash this is where the log files will be stored
224 Configure MySQL database
1 Browse to the your-nada-web-folderapplicationconfig folder
22 Installation 7
nada Documentation Release 40
1 Open the databasephp file in a text editor like Notepad or Notepad ++ and change the database user name andpassword to match the database user name and password
2 Optional change the database name to use another name
3 Save the file
$db[rsquodefaultrsquo][rsquousernamersquo] = your-database-username$db[rsquodefaultrsquo][rsquopasswordrsquo] = your-database-password$db[rsquodefaultrsquo][rsquodatabasersquo] = nada4
Note Do NOT use the root username and password (MySQL) or SA Account (MSSQL) on your production serverCreate a separate user name and password for your NADA database This can be done either from your Cpanel orfrom PhpMyadmin MySQL Workbench
8 Chapter 2 Installation guide
nada Documentation Release 40
225 Create database user account
The goal being to avoid using Root for your NADA configuration
1 From the command line type
mysql -u root -p
2 Enter your root password you setup when installing MySQL
3 Now create a database for the NADA ndash in this example we call the database nada
mysqlgt CREATE DATABASE nada
4 Now create a user who can access the new nada database and give the user only the rights necessary to run theNADA
mysqlgt GRANT SELECT INSERT UPDATE DELETE CREATE DROP INDEX ALTER CREATE TEMPORARY TABLESLOCK TABLES ON nada TO rsquonadarsquorsquolocalhostrsquo IDENTIFIED BY rsquoyourpasswordrsquo
5 lsquoyourpasswordrsquo can be anything you choose lsquonadarsquo is the name of the database the user gets access to lsquolocal-hostrsquo is the location which gets access to your database
Note Remember this password you will need it to configure your NADA installer
6 Then exit MySQL console by typing exit
mysqlgt exit
226 Running the installer
Open web browser to the location of the NADA installation For example httpyour-domainnada-folder-name orlocalhostnada-folder-name
22 Installation 9
nada Documentation Release 40
Check that all settings are marked with a green tick and fix any that are not on your webserver before running theinstaller
Click on the Install Database button and complete the form to create an initial Site Administrator account
Note create a complex password at least 12 characters long with some uppercase punctuation and numbers to aidsecurity of your site Do not forget this username and password
10 Chapter 2 Installation guide
nada Documentation Release 40
Congratulations Launch the new site
22 Installation 11
nada Documentation Release 40
23 Installing NADA using Microsoft SQL Server
231 PHP database drivers (sqlsrv)
The new Microsoft SQL drivers for PHP are called SQLSRV and provide native support for connecting to a MicrosoftSQL Server database The drivers have been tested with NADA for SQL Server 2008 and 2012
The drivers are available for download from here httpwwwmicrosoftcomen-usdownloaddetailsaspxid=20098
232 NADA Microsoft SQL Requirements
To use Microsoft SQL Server database for NADA it is recommended to use SQL Server 2008 or later with Full-Textsupport enabled The full-text engine provides faster search than the normal SQL search
The default installation of SQL Server does not include the Full-Text engine so before continuing on to installingNADA please make sure you have full-text installed on your database server
233 Download drivers
Microsoft provides two versions of the SQLSRV drivers namely version 20 and 30 NADA has only been tested withversion 20 but should work with version 30 Requirements for using the drivers
bull Windows 7 Windows Server 2008 R2 Windows Server 2008 Service Pack 2 Windows Vista Service Pack 2
bull PHP 536 or PHP 54 For information about downloading and installing PHP visit PHP on Windows(httpwindowsphpnet)
bull Microsoft SQL Server 2012 Native Client available in the SQL Server 2012 Feature Pack (This is needed ifdatabase and web server are on different machines)
bull Any edition of SQL Server 2005 or later
12 Chapter 2 Installation guide
nada Documentation Release 40
234 The Microsoft SQL Client
Microsoft SQL Client is required for connecting to your SQL database using NADA The client is installed automati-cally if your database is hosted on the same machine as your web server If your SQL database is running on a differentmachine then you must install the latest version of the SQL Client on your web server to ensure NADA can connectto your database See section on installing Microsoft SQL Client
235 How to install the SQLSRV driver for PHP
The steps are for version 20 but the same applies to version 30
1 The drivers are available from the Microsoft website httpwwwmicrosoftcomdownloadsendetailsaspxFamilyID=80e44913-24b4-4113-8807-caae6cf2ca05
2 Download the drivers and run the setup file
3 The setup file will extract a number of dll files to your PHP extension folder
4 Browse to the PHP extension folder Eg cphpextNotice there are multiple dll files included all referencing_sqlsrv
1 To find out which driver library is suitable for your version of PHP create a php file using a text editor likeNotepad eg infophp and place this code inside it
ltphp phpinfo() gt
2 Save the file and copy it to your web server root folder Open your web browser and type the location andname of the file eg infophp into your browser URL The phpinfo() function prints your PHP version and otherconfiguration settings for PHP For Example localhostinfophp To select the right sqlsrv DLL yoursquoll need toknow
bull The version of PHP Eg 53
bull Which compiler is used eg either VC9 or VC6
bull Check whether Thread Safety is enabled or not
23 Installing NADA using Microsoft SQL Server 13
nada Documentation Release 40
1 With the above values you would choose the file php_sqlsrv_53_nts_vc9dll
ts=Thread safety nts=Non-thread safety
2 Once you know which dll file to use open the phpini file using a text editor and add the following entry at theend of your PHPINI file
extension=php_sqlsrv_53_nts_vc9dll
3 Save your phpini file and restart your web server
236 Testing the SQLSRV drivers and SQL Client
To make sure the driverextension is installed correctly Reload the phpinfo page and check if the extension SQLSRVis listed on the page
If the extension is not listed on the page recheck if the correct phpini file has been edited To locate the phpini filebeing used by PHP look at the output of the phpinfo page in the section shown below
14 Chapter 2 Installation guide
nada Documentation Release 40
This step is only required if SQL Server is not on the same server as your web server To check if the SQL Client isalready installed or not follow the steps below
1 Open Control Panel Administrative Tools on your server
2 Open ODBC and switch to the tab ldquoDriversrdquo
237 Download the Microsoft SQL Client
Note The instructions here are provided for Microsoft SQL Server 2008 if are running on a later version of MicrosoftSQL Server the latest drivers can be obtained from the Microsoft website The installation steps are the same
The SQL Client is available from the Microsoft website from here httpwwwmicrosoftcomen-usdownloaddetailsaspxid=16978
Download the appropriate package for the system being used ie (32bit64bit) and run the installer to install the client
Once the client is installed restart your computer and check again from ODBC above to confirm that the client hasbeen installed
23 Installing NADA using Microsoft SQL Server 15
nada Documentation Release 40
238 NADA Database configurations for SQLSRV
Create a database and the user account to use with NADA beforehand The permissions need to include - createaltertables indexes ( See the following reference from Microsoft for instructions on how to do this
bull Database - httpmsdnmicrosoftcomen-uslibraryms186312aspx
bull User - httpmsdnmicrosoftcomen-uslibraryaa337545aspx
Open the nada database configuration file your-nada-folderapplicationconfigdatabasephp file and look for the fol-lowing lines
$db[rsquosqlsrvrsquo][rsquohostnamersquo] = localhostsqlexpress$db[rsquosqlsrvrsquo][rsquousernamersquo] = db-user-name$db[rsquosqlsrvrsquo][rsquopasswordrsquo] = password$db[rsquosqlsrvrsquo][rsquodatabasersquo] = nada-database$db[rsquosqlsrvrsquo][rsquodbdriverrsquo] = sqlsrv$db[rsquosqlsrvrsquo][rsquodbprefixrsquo] = $db[rsquosqlsrvrsquo][rsquopconnectrsquo] = FALSE$db[rsquosqlsrvrsquo][rsquodb_debugrsquo] = FALSE$db[rsquosqlsrvrsquo][rsquocache_onrsquo] = FALSE$db[rsquosqlsrvrsquo][rsquocachedirrsquo] = $db[rsquosqlsrvrsquo][rsquochar_setrsquo] = utf8$db[rsquosqlsrvrsquo][rsquodbcollatrsquo] = utf8_general_ci
Fill in the database connection settings for the database created for NADA
Save the changes
239 Running the installer
bull Open a web browser to the location of the NADA installation For examplehttpyour-domainnada-folder-name or localhostnada-folder-name
bull If the Microsoft database connection is setup correctly you should see the nada installer
16 Chapter 2 Installation guide
nada Documentation Release 40
bull Check that all settings are marked with a green tick and fix any that are not on your webserver before runningthe installer
bull Click on the Install Database button and complete the form to create an initial Site Administrator account
Note Create a complex password of atleast 12 characters long with some uppercase punctuation and numbers to aidsecurity of your site Do not forget this username and password
23 Installing NADA using Microsoft SQL Server 17
nada Documentation Release 40
Congratulations Launch the new site
18 Chapter 2 Installation guide
nada Documentation Release 40
24 PHP settings
241 Finding the correct PHPINI
To make sure you are editing the correct PHPINI settings file create a PHP file (eg infophp) in your nada websitefolder with the following contents
ltphp phpinfo() gt
Open the phpinfo page in your web browser and you should see output similar to below screenshot Edit the phpinifile displayed by the setting Loaded Configuration File
24 PHP settings 19
nada Documentation Release 40
20 Chapter 2 Installation guide
nada Documentation Release 40
242 File upload limits
By default PHP allows uploads of 2MB which could be a problem if you have large DDIs and external resource filesTo change the settings
1 Edit the phpini file in notepad and look for the setting upload_max_filesize
2 The line should look like
Maximum allowed size for uploaded files httpphpnetupload-max-filesizeupload_max_filesize = 2M
3 Change it to the required file upload limit per your needs
upload_max_filesize = 50M
4 There is another setting that MUST be changed as well for the file upload limits to work Look for the configu-ration post_max_size and change it to match the value for upload_max_filesize
post_max_size = 50M
243 TimeZone settings
This is for setting the timezone for your application To findout what is the correct timezone for your website go tohttpphpnetmanualentimezonesphp and find your countrycity
Example
datetimezone = AmericaNew_York
244 Increase page executiontimeout
This setting controls the maximum execution time of a page in seconds
max_execution_time = 300
245 Increase PHP memory limit
It controls the memory available to PHP scripts
memory_limit = 128M
246 Enabledisable PHP extensions
NADA requires the following PHP extensions
bull xsl
bull mbstring
bull mysql or sqlsrv
To enable XSL extension add this line
24 PHP settings 21
nada Documentation Release 40
extension=php_xsldll
To enable mbstring
extension=php_mbstringdll
25 Configure Captcha
By default NADA version 41 comes with image captcha and user does not need to make any changes to use imagecaptcha To use Google Captcha please follow the steps given below
1 Open applicationconfigcaptchaphp in editor
2 Change line number 12 as shown in below image
3 Click on above URL to generate Public and Private key URL httpwwwgooglecomrecaptchawhyrecaptcha
4 Click on sign up now
5 Sign in using your Gmail account
6 After signed in you will have to enter your URL (Domain URL)
22 Chapter 2 Installation guide
nada Documentation Release 40
7 Click on ldquoenable globel key for all domain
8 Click on Create Key button
9 Copy public key and private key from Google Captcha website and inserte it on line number 51 and 52 respec-tively as shown in below image
10 To check the Google catpcha configuration go to register page and look for image as shown in below URLhighlighted in Red suqare
25 Configure Captcha 23
nada Documentation Release 40
26 Email configurations
For the NADA to function correctly it is important that this step be completed
Many of the functions within the NADA ndash such as registration and applying for access to datasets require that theNADA be able to send emails to users
There are two ways to setup your email configurations 1) Create a emailphp file in the applicationconfig folder 2)Edit email settings on the site configurations page
24 Chapter 2 Installation guide
nada Documentation Release 40
261 1 Configure email via email config file
1 Open the file applicationconfigemailphp in notepad
2 Fill in the section using SMTP server with authentication enabled highlighted in below image
3 For Gmail user will have to fill the gmail smtp section shown as below
26 Email configurations 25
nada Documentation Release 40
4 Save file
Note Using a file for email configuration disable the email configuration page from the site administration
1 Login to your NADA as an administrator
2 Go to Site administration click on the Settings menu and choose ldquoSettingsrdquo
3 Find the section ldquoSMTP settingsrdquo
26 Chapter 2 Installation guide
nada Documentation Release 40
4 If the PHPweb server is configured to send email using PHPrsquos MAIL function select the first option and donrsquotfill in anything else
If your organization has a mail server and has have a dedicated account that can be setup for NADA use the followingsettings Check the radio button ldquoUse SMTP Serverrdquo
5 Enter the host name for the server
6 Enter the port used by the server to send mail
7 If required enter the user name used to send mail on the server
8 Enter the password used to send mail on the server
If the organization does not own a mail server a Gmail account can be configured to be used with NADA
bull Check the radio button ldquoUse SMTP Serverrdquo
bull Host name sslsmtpgooglemailcom or sslsmtpgmailcom
bull SMTP port 465
bull Account username email-addressgmailcom
bull Account password password for the gmail account
Test the email settings
The quickest way to test if the email settings are working is to use the ldquoforgot passwordrdquo option from the user loginpage
bull Click on forgot password
26 Email configurations 27
nada Documentation Release 40
bull Enter the administrator or any other accounts email address
bull Check to the email account the mail was sent to
bull If no mail is received the settings are wrong and need to be corrected
28 Chapter 2 Installation guide
CHAPTER 3
Upgrading from previous versions
31 Upgrade from NADA 3
For users with an existing NADA 3x catalog an upgrade script is included that will update your NADA 3x databaseto NADA 4x The process involves modifying your NADA 3x database and thus carries some risks The script willadd new tables to the NADA 3x database All user accounts and survey information will be retained by the upgrade
Important Backup the NADA 3x database before doing anything
1 Follow the instructions on page 4 and set up a folder in the web root containing the NADA 4 files
2 Edit the databasephp file as instructed in the section above NADA database configurations for MySQL
3 Instead of entering a new database name user account name and password -fill in the details of the existingNADA 3x database
Note These can be found by looking at the existing NADA 3x databasephp file and entering the settings into theNADA 4 databasephp file
4 Save the file
5 Navigate to the URL for the NADA4 site Example httpyour-nada-sitenada4indexphpnada4_upgrade
6 The following page loads
29
nada Documentation Release 40
Take note of the warnings and make any necessary corrections before clicking the ldquoUpgrade database to NADA 4rdquobutton
Warning This step makes changes to your nada 3 database that are not undo-able so make sure you do make adatabase backup before this step
Click on the ldquoUpgrade database to NADA 4rdquo button and wait for the page to reload The output of the page will looksomething like below
The script will print number of messages about failed table updates This does not mean the script failed to upgradeIt just means some of the updates were not needed on your version of NADA 3 Different versions of NADA havedifferent numbers of fields in the database and the upgrade script tries to fix the missing fields for all these differentversions of NADA If the existing NADA 3 database already has that field then it reports it as an error
You can ignore the error messages that include the wording ldquoDuplicate column namerdquo or ldquoDuplicate entryrdquo
Now your database has been migrated to NADA version 41 We will have to run one more upgrade script to forNADA version 42
7 Navigate to the URL for the NADA42 site Example httpyour-nada-sitenada42indexphpnada42_upgrade
Warning This step makes changes to your nada 41 database that are not undo-able This page will not show anymessage on the screen You will be getting blank page Please do not repeat the process
8 To verify the database upgrade Open the NADA catalog page by going to http[your-nada4-site]indexphpcatalogpage and verify all studies from NADA 3 are listed
311 Linking your NADA 3 data files to NADA 4
The upgrade script has only upgraded the database It is now necessary to tell the NADA4 where to locate the datafilesthat were uploaded to the original NADA 3 site
There are two options available
Option 1 Copy the datafiles folder from NADA 3 to NADA 4 This works best if you have only a few studies and thedatafiles folder size is small enoughto be moved easily from one location to another
Option 2 If it is not possible to easily move the datafiles folder from NADA 3 to NADA 4 you can tell NADA 4 thelocation of the datafiles without moving the files Here are the steps
bull Use your NADA 3 administrator login credentials to login to your new NADA 4 site
bull Click on Site administration in the top right corner of the screen
bull Go to the ldquoSettingsrdquo menu and click on the ldquoSettingsrdquo sub-menu
30 Chapter 3 Upgrading from previous versions
nada Documentation Release 40
bull Under Site configurations expand the ldquoSurvey Catalog Settingsrdquo section
bull For the setting ldquoCatalog folderrdquo enter the relative or full path to where the NADA 3 datafiles folder is locatedFor example if the nada3 datafiles are located on cnada3datafiles enter that path here
bull Save the configurations by clicking on the update button If now errors are shown then you have successfullyupdated the folder path
bull Check your new NADA 4 site to make sure the migration was successful
ndash Check the user administration page from site administration to make sure the users from the nada3 sitewere migrated
ndash Check the ldquoData Catalogrdquo page and view the studies by clicking on the study title to make sure the studyinformation pages are correct
ndash Check the site menus are the same as the NADA 3 site
312 Refresh DDI
In NADA 4 more information is stored in the database from the DDI than in the NADA 3 To bring all these newfields into the imported studies it is necessary to refresh the DDIrsquos The refresh DDI feature in NADA updates thedatabase with metadata from the DDI without having re-uploading the DDIs To update the metadata for all studies inyour catalog
bull Open the following NADA 4 URL in your browser
http[your-nada-4-site]indexphpadmincatalogbatch_refresh
bull Select all studies
bull Click on the ldquoRefresh DDIrdquo button
313 Transferring ownership
NADA 4 has a collection management feature When studies are imported from the NADA3 catalog into NADA4 theyare put into a collection called DEFAULT They need to be moved from this default system collection to the Central
31 Upgrade from NADA 3 31
nada Documentation Release 40
Data Catalog of the NADA4
To do this
bull Go login to the Site Administration and navigate to the Studies Manage Studies Central Data Catalog page
bull Select all the studies by ticking the check boxes next to each study on the right
bull Click on the dropdown menu and select Transfer owner
bull From the Transfer study owner page Select Central Data Catalog and then click transfer
32 Chapter 3 Upgrading from previous versions
nada Documentation Release 40
314 Updating the Site themetemplate
You cannot use your NADA3 template in NADA4 without making some changes Here are general guidelines butsteps may differ depending on your nada site template
bull Copy your NADA3 template to the NADA4 themes folder
bull Edit the [nada4-root]configtemplatephp following the steps below
bull Look for the setting ldquotheme_namerdquo by default it is set to rdquowbrdquo
bull Change ldquowbrdquo to the theme name you want to use Theme name is the folder name you copied to[NADA4]themes[your-site-theme] from your nada3 site
bull Save the file
NB The template may need some adjusting to run properly on the new NADA 4 site This will involve editingthe layoutphp and other template files within the template folder which is now located in the NADA 4 themesfolder
32 Migrate MySQL to Microsoft SQL
TODO
32 Migrate MySQL to Microsoft SQL 33
nada Documentation Release 40
34 Chapter 3 Upgrading from previous versions
CHAPTER 4
User manual
41 Overview and core concepts
411 About NADA
NADA is a web-based cataloging application that allows for the creation of portals that allows users to browse searchcompare apply for access and download relevant census or survey information
It was originally developed to support the establishment of national survey data archives The application is used by adiverse and growing number of national regional and international organizations NADA as with other IHSN toolsuses the Data Documentation Initiative (DDI) XML-based international metadata standard
412 Concepts
CENTRAL DATA CATALOG
The default catalog created when a NADA instance is installed is the Central Data Catalog All studies uploaded to theNADA are visible searchable and accessible from the Central Data Catalog For many institutions the Central DataCatalog will remain the only catalog in their NADA instance For some institutions being able to divide the contentsof the Central Data Catalog into more refined collections will be desirable
COLLECTIONS
Collections are sub categories of the Central Data Catalog They allow administrators of a NADA instance to groupstudies into what can be thought of as sub-catalogs of the Central Data Catalog This has a number of benefitsboth from the user and the administrator perspective From the usersrsquo perspective being able to filter and viewgroups (collections) of studies that logically belong together makes finding what they are looking for easier From theadministratorsrsquo perspective the ability to create collections of studies that may logically belong together facilitates theability to decentralize the management of each collection of studies to specific administrators (for example collectionscan be managed by different departments in an institution)
NOTE The creation of collections will in general only be useful and necessary for large catalogs or for catalogs thatdesire more decentralized management of groups of studies by different departments
STUDIES
Studies are carried out to gather more knowledge about a subject Studies may gather information from a number ofdifferent sources in order to answer the questions asked The information gathered for a study will in the context of
35
nada Documentation Release 40
NADA catalogs usually come from either a census or a surveys It is therefore not uncommon to hear the terms surveyand study used interchangeably when listening to people talk about their NADA catalog
METADATA
Metadata are data about the data They are not the actual data collected from the survey but rather the information thatdescribes the survey process and the data The NADA uses the Data Documentation Initiative (DDI) ndash ddiallianceorgndash standard for the presentation of metadata for each study The DDI document (which is an XML document) isprepared outside the NADA application either manually or using a tool like the Nesstar Publisher ndash nesstarcom ndash andthen imported into the NADA The detailed information about the survey is searchable down to the variable level foreach survey in the catalog
DATA ACCESS TYPES
The NADA allows for the level of access to datasets for studies to be controlled at the study level In other words thelevel of restriction can differ from study to study and can be defined on a scale ranging from direct access with norestrictions to no access Briefly the available access types are
bull Data not available - data are not available for this study
bull Direct Access Data Files - data shared under this policy can be downloaded without any restrictions The useris not required to be logged into the site and no personal information is collected on the person downloading thedata
bull Public Use Data Files - data shared under this policy requires that the user be logged in and registered on thesite before they are able to download the data The user is required to agree to a terms of use of the data and theapplication keeps records of who downloads the data
bull Licensed Data Files - data shared under this policy requires that the user be logged in and registered on the siteUsers are also required to fill in and submit a detailed application form listing their reasons for wanting accessto the data Once the user submits the application form the system informs the system administrator that anapplication has been made In order for the person to get access to the data the system administrator needs toreview the application and approve it
bull Data available in an Enclave - under this policy no data is shared through the application Users submit anapplication to access the data at a secure facility physically located on the premises of the data producer or afacility nominated by the data producer
bull Data available from external repository ndash The NADA allows for studies and their metadata to be listed in aNADA catalog but for a link to be created to another site when the data for that study are available elsewhere
CITATIONS
Citations are references that can be included at the study level which point to published works that have used the datafrom a particular study In many cases this will be a reference to a Journal Article Working paper Newspaper articleetc Such resources are useful to researchers who are interested in seeing how the data have been used before Theyare also a good way of showing the funders of surveys that the data are being used for policy and research purposesand thus are an indicator of some of the impact a study has had
USERS
Users in the NADA can be defined according to three broad groups General Users ndash this is the normal user whoregisters on a NADA site from the user interface This user type has no access to the site administration It is requiredto register as a user when accessing public use and licensed data types Site Administrators (unlimited) ndash this user
36 Chapter 4 User manual
nada Documentation Release 40
has access to all functions and all collections within the Site Administration System wide access Limited Adminis-trators ndash these administrators have access to a limited set of functions within the Site Administration Examples wouldbe an administrator of a specific collections or licensed survey reviewer for all or only some collections or reportgenerator etc
413 Why do NADA administrators need to understand these concepts
Understanding these concepts is important as it
bull Is critical to understanding the new permissions and administrator types introduced in NADA 4 Administratorsare now able to create collections within their NADArsquos and assign different roles to administrators and moregranular levels of access to catalog administration at the collection level It is now possible for example to haveadministrators whorsquos lsquopowersrsquo range from being able to manage all parts of a collectionrsquos administration downto ones with more restrictive access such as ones whose only function is as licensed survey reviewer or reportgenerator or catalog reviewer or citation manager etc
bull Ensures that the correct level of permissions and access is assigned to users based on security policies within theinstitution Unlike previous versions of NADA not all users who have access to the Site Administration needhave the level of access of an ldquounlimited site administratorrdquo This limits security risks associated with havingtoo many ldquounlimited site administratorsrdquo managing a site
bull Assists in assigning an appropriate data access type to data based on institutional distribution polices
bull Makes it easier to explain more clearly to institutional managers what the capabilities of the NADA applicationare and to advise on how to best manage the allocation of responsibilities
42 The Dashboard
After logging in to the Site Administration with administrator credentials the user is taken to the dashboard
The Dashboard provides a quick glance summary for administrators to get an overall picture of what has been happen-ing on the site as well as what pending tasks are outstanding for the administrator
42 The Dashboard 37
nada Documentation Release 40
1 Menu link to the Dashboard
2 Menu link to the Study Management pages submenus include Manage Studies Licensed requests and ManageCollections
3 Menu link to the citations management pages
4 Menu link to the User management pages submenus include All users Add user and Impersonate User
5 Menu link to create menu pages for the site frontend
6 Menu link to generate usage reports
7 Menu Link to the settings pages submenus include Settings Coutries Regions and Vocabularies
8 Useful navigation links submenus include Change Password Log out Catalog Home Data catalog Citations
9 This section lists all collections in the catalog Within each collection a summary is given of the number ofstudies along with diagnostics related to the number of studies publishedunpublished missing questionnairesdata access types set but with no data attached as well as some buttin links to Manage the collections studiesusers and a History of changes made to the collection
10 Provides a summary of users registrations and number of users currently logged in
11 Show how many pages are being cached on the site with a link to clear the cache if need be
12 Show a list of recently added or updated studies Clicking on a study in the list takes you to the page to managethat study
38 Chapter 4 User manual
nada Documentation Release 40
43 Manage Collections
431 Collections
Collections are sub categories of the Central Data Catalog They allow administrators of a NADA instance to groupstudies into what can be thought of as sub-catalogs of the Central Data Catalog
Collections provide a number of benefits both from the user and the administrator perspective From the usersrsquo per-spective being able to filter and view groups (collections) of studies that logically belong together makes finding whatthey are looking for easier From the administratorsrsquo perspective the ability to create collections of studies that maylogically belong together facilitates the ability to decentralize the management of each collection of studies to specificadministrators (for example collections can be managed by different departments in an institution)
Note The creation of collections will in general only be useful and necessary for large catalogs or for catalogs thatdesire more decentralized management of groups of studies by different departments
432 Creating collections
bull Login to the Site administration using an administrator password
bull Collections are managed and created by going to the Studies Manage collections menu link
bull There are no collections defined in the default NADA 4 installation
bull To create a new collection click on the Create new collection button
43 Manage Collections 39
nada Documentation Release 40
1 Under Collection Identification provide a short name for the collection This will become the URL for thecollection so pick carefully For Title fill in the fill title for the collection This will be the name displayed atthe top of the collection page
B Fill in a 3 or four line short description of the collection This text will display on the front end in the collectionslist For examples see httpmicrodataworldbankorgindexphpcontributing-catalogs
C Fill in a more detailed description of the collection This will display on the About page for that collection Forexample see httpmicrodataworldbankorgindexphpcatalogdhsabout
To format the page and include images it is possible to enter HTML code into this box below is anexample piece of code that includes an image
ltimg src=rdquofilesdhs-fp-01jpgrdquo alt=rdquoHealth Surveys Imagerdquo class=rdquoabout-photordquogt lth2gt Health SurveysCollectionlth2gt ltp align=rdquojustifyrdquogtThe Health Surveys collection aims to provide frequent high qual-ity and timely health data needed by the decision makers when designing public health programsltpgtltpgtHealth surveys provide useful information on health status and health consumption and their determi-nantsltpgt
Copy any images to be displayed into the NADA ldquofilesrdquo folder on your server image imagesthumbnil-imagepng
4 Upload a file to display next to the collection as it is listed on the collection page NOTE This image should be82 X 82 pixels If the upload does not work automatically then copy the thumbnail image to the ldquofilesrdquo folder asshown above
40 Chapter 4 User manual
nada Documentation Release 40
E The Weight field determines in what order collections are shown in the collection list 0123 etc The Selectcollection type drop-down is a system value to distinguish between collections that should be viewed as internal tothe organization or external For example some collections may be made up entirely of studies from an organizationoutside the host catalog These collections can be designated as external The Section dropdown allows for thecategorization as either a collection based on a specialized collection (like health) or based on a regional breakdownSelecting Publish ndash publishes the collection
bull Click on Submit to save the changes
To view the results click on the Preview link on the far right
bull The new collection now also shows in the collection list on the Central Catalog About page (this is where thethumbnail and short description fields are displayed)
43 Manage Collections 41
nada Documentation Release 40
bull Visiting the Dashboard will now also show the new collection listed below the Central Data Catalog With anumber of green buttons as shortcut links to manage the studies on the collection assign administrators for thecollection a history of activity on the collection and a link to edit the collection as in the steps above
433 Manually adding studies to a collection
There are 2 ways to get studies into the new catalog
bull The first is to upload a DDI and all its resources to the collection in the same way as described in the earliersection ndash Uploading a Study Except instead of choosing Central Catalog chose the collection you want to
42 Chapter 4 User manual
nada Documentation Release 40
upload the study to
bull Click on the Add Study button and upload a DDI and RDF and all your resources as described in the earliersection ndash Uploading a Study
bull Once a study is added in this way it displays in the Manage Studies list Notice that the collection summaryfield shows that the study belongs to (is Owned By) the DHS collection (this was the Short name defined in theexample when the Health Surveys Collection was created)
All studies uploaded to collections will automatically be added to the Central Data Catalog in order to build a commonsearch portal for all studies
43 Manage Collections 43
nada Documentation Release 40
434 Copying studies from one collection to another
bull The second way to add a study to a collection is to Copy the study from another collection into the newcollection
bull To copy a study already in the catalog to display in the new collection first make sure to be in the Manage Studiessection for the collection you want to put studies into To do this either use the Studies ndash Manage studies menuon the top or simply click on the Switch link next to the Manage Studies [Collection Title] heading
bull Then Click on the Copy Studies blue button at the top right
bull A list of all studies available to copy to the new collection is listed Simply click on the Link button in green tocopy the study to the collection The button will turn red and say Unlink To reverse the process and click thenow red button
bull Going back to the Manage Studies page for the collection will show the newly copied studies in the collectionlist Also note that the Collection field now indicated DHS next to Central DHS is in grey to indicate it is notowned (it is a copy) by that collection and the Central is in blue to show it is owned by the Central Data CatalogAlso note that because the study is not owned by this catalog it cannot be edited from this catalog ndash hence thepublishunpublish green button is absent for the copied studies
44 Chapter 4 User manual
nada Documentation Release 40
435 Turning on the collection filter
The final step after creating the first collection is to enable the collection filter option in the Settings menus under SiteConfigurations ndash Survey catalog settings
436 Transferring study ownership
In the previous examples mention was made of studies uploaded to a catalog being owned by that catalog There maybe cases where transferring the ownership from one catalog to another will be desirable This will become clearerin the next section on user roles but for now the next steps show how transferring ownership from one collection toanother can be done
bull Transferring ownership from one collection to another has to be done by the owner of the collection and fromthe collection it is currently owned by
bull To transfer ownership Go to the Manage Studies screen and select the study to be transferred Open up the EditStudy page by clicking on the study Title
bull On the right hand side of the screen click on the Transfer study owner link
43 Manage Collections 45
nada Documentation Release 40
bull Select the collection to transfer from the dropdown box
bull Click Transfer
bull Note that when looking the study summary for the transferred study the Collection field now shows the studyto belong (owned by) to the DHS collection and not Central anymore Also note the option to Publish andunpublish is now active
bull To transfer ownership of a large number of studies all at once - from the Manage Studies page ndash select the studiesto be transferred (tick them in the box left of each study) and then from the top Batch Actions drop down selectTransfer owner ndash then apply
46 Chapter 4 User manual
nada Documentation Release 40
44 Manage Studies
There are 2 Options to get studies into the new catalog
441 Option 1
bull The first is to upload a DDI and all its resources to the collection in the same way as described in the earliersection ndash Uploading a Study Except instead of choosing Central Catalog chose the collection you want toupload the study to
bull Click on the Add Study button and upload a DDI and RDF and all your resources as described in the earliersection ndash Uploading a Study
bull Once a study is added in this way it displays in the Manage Studies list Notice that the collection summaryfield shows that the study belongs to (is Owned By) the DHS collection (this was the Short name defined in theexample when the Health Surveys Collection was created)
bull Also note that the new study also appears in the Central Data Catalog
All studies uploaded to collections will automatically be added to the Central Data Catalog in order to build a commonsearch portal for all studies
44 Manage Studies 47
nada Documentation Release 40
442 Option2
Copying studies from one collection to another
bull The second way to add a study to a collection is to Copy the study from another collection into the new collection
bull To copy a study already in the catalog to display in the new collection first make sure to be in the Manage Studiessection for the collection you want to put studies into To do this either use the Studies ndash Manage studies menuon the top or simply click on the Switch link next to the Manage Studies [Collection Title] heading
bull Then Click on the Copy Studies blue button at the top right
bull A list of all studies available to copy to the new collection is listed Simply click on the Link button in green tocopy the study to the collection The button will turn red and say Unlink To reverse the process and click thenow red button
bull Going back to the Manage Studies page for the collection will show the newly copied studies in the collectionlist Also note that the Collection field now indicated DHS next to Central DHS is in grey to indicate it is notowned (it is a copy) by that collection and the Central is in blue to show it is owned by the Central Data CatalogAlso note that because the study is not owned by this catalog it cannot be edited from this catalog ndash hence thepublishunpublish green button is absent for the copied studies
45 Managing Licensed Requests
Datasets that are assigned the Access Type Licensed require approval from the NADA administrator before the usercan get access to the data files From the site administration there are a number of ways to see if any licensed requestshave been received
bull Go to the dashboard Pending requests show up as red in the catalog quicj summary section Clicking on thislink goes to the Licensed Survey Requests management page
bull Or go to the Studies link on the top menu and select Licensed Requests from the submenu
48 Chapter 4 User manual
nada Documentation Release 40
The link shows a page with a list Licensed Requests received The status column indicated the Pending requests
bull Click on the Edit link for to process a request
The Request information tab shows a summary of the information provided by the applicant
bull To Approve or Deny or request further information for the request Click on the Process tab
45 Managing Licensed Requests 49
nada Documentation Release 40
bull Select Approve to approve the request (other options include Deny as well as Request more information fromthe applicant)
bull Select the files that the user will be authorized to download ndash it is also possible to enter a maximum number ofdownloads and expiry date for downloads
bull Enter any comments to be sent to the applicant
bull Select Notify user by email to notify them that the application has been processed
bull Select Update
bull The remaining tabs
ndash Communicate - provides a means to ask for more information from the applicant
ndash Monitor ndash allows the administrator to see when and how many times the applicant downloaded thedata
ndash Forward Request ndash provides a means to forward the request to another person for review
46 Manage Citations
The Citations section is where bibliographic references can be added for publications that use any of the studies in thecatalog These citations can be linked to particular studies in the catalog and are displayed to the users of the systemin the study information view of the relevant study
Citations are added from the Citations menu
50 Chapter 4 User manual
nada Documentation Release 40
bull To add a citation - click on All citations then click on the Add New Citation button at the top right
bull Compete the form including the indication as to whether the citation should be published or not
bull Then expand the Related studies link to tell the system which studies the citation ldquobelongsrdquo to
bull Click on the Attach studies link This reveals a list of all studies in the catalog
bull Select the relevant studies by clicking on the green Select button
bull Click on the apply filter button to save the changes The study now appears in the related studies box
bull Click on the submit button to save the citation
bull Note the flag keywords and notes fields can be used by administrators to place extra notes only visible to otheradministrators that might prove useful when there is uncertainty about a citations appropriateness or accuracy
bull It is also possible to import citations in common citation formats such as BibTex and EndNote (RIS)
bull To do this use the Import Citations link from the top menu
46 Manage Citations 51
nada Documentation Release 40
bull Paste the BibTex or RIS text into the form and then at the bottom of the screen click on Attach studies to linkthe citation to a particular study in the catalog
bull The citation now appears in the citation list as well as on the study information page for the relevant studies
52 Chapter 4 User manual
nada Documentation Release 40
47 Managing Users and account types
Users in the NADA can be defined according to three broad groups
General Usersndash this is the normal user who registers on a NADA site from the user interface This user type hasno access to the site administration It is required to register as a user before being granted access to public use andlicensed data types
Site Administrators (unlimited) ndash this user has access to all functions and all collections within the Site Administra-tion System wide access
Limited Administrators ndash these administrators have access to a limited set of functions within the Site Administra-tion Examples would be an administrator of a specific collections or licensed survey reviewer for all or only somecollections or report generator or citation manager etc
471 Creating User accounts
User accounts can be created in two ways
1 A General User account can be created by a user directly from the register screen from the login link on the userinterface of the application
The user created by this process has no access to the site administration This account can only be used to apply andgain access to public and licensed datasets
2 A user account can also be created by a Site Administrator
bull To do this login as a Site Administrator
bull Go to the site administration section of the application
47 Managing Users and account types 53
nada Documentation Release 40
bull Select Users ndash Add user from the top menu
bull Fill in the information for the user in the form and be sure to mark the account status as Active Then click theCreate button
54 Chapter 4 User manual
nada Documentation Release 40
47 Managing Users and account types 55
nada Documentation Release 40
bull Note that the user always starts off as a General User with no access permissions to the Site Administration Theuser group column displays as empty for users with only general user accounts
bull To see a list of all users in the system go to the Users ndash All Users menu item at the top of the screen
bull Note the new users created have no User group assigned (they are general users) Also note the Actions columnon the far right From these links an account can be edited (including changing the password and blocking anaccount) deleted and Permissions managed for the account
472 Managing User Account Permissions
User accounts permissions can be only be set and changed by a Site Administrator To change the permissions for anaccount
bull Click on the Permissions link next to the account to be changed All accounts start of as General users accounts
bull To change this user to a full site administrator who will have full system wide access to all parts and functionsof the NADA administration select the Site administrators (full access) option and tick the admin box as wellClick update to save the changes
56 Chapter 4 User manual
nada Documentation Release 40
473 Collection level administrators
bull To create a user who only has permissions to administer studies or administration functions for a particularcollection Select Site administrators (limited access)
47 Managing Users and account types 57
nada Documentation Release 40
bull It is then necessary to assign a role to this new limited administrator account To create a limited access ad-ministrator for a particular collection ndash select Site administrators (limited access) and then select Collectionadministrators Notice The form expands to reveal a list of collections in the system
bull Select the appropriate level of access that this account will have for this collection In the example below anadministrator is being created who can manage only licensed requests for the collection ndash Health Surveys Thisaccount will not be able to upload or publish studies The account will only be able to process licensed requestsfor the collection ndash Health Surveys
58 Chapter 4 User manual
nada Documentation Release 40
Other levels of access for Site administrators (limited access) ndash Collection administrators include
1 Accounts that are given full access to manage studies
2 Accounts that are given access to upload studies but not publish them
3 Accounts that are limited to reviewing studies
474 Global level Limited access accounts
Other types of limited access accounts include
1 Accounts that can only view system reports at a global level
2 Accounts that can only access the citations section and manage citations
3 Accounts that can only access the Licensed Request management system ndash at the global level for all collections
47 Managing Users and account types 59
nada Documentation Release 40
Impersonating a user
The system includes a function that allows a Site Administrator to impersonate (take on the role) a user created inthe system This is a useful testing tool when creating users and assigning permissions It essentially allows theadministrator to take on the role of another user temporarily
bull To access the Impersonate User feature go to the Users ndash Impersonat user menu at the top of the screen
bull A list of users to impersonate is shown
bull Select the user to impersonate and click on the impersonate button
bull The dashboard view for the impersonated user now shows
60 Chapter 4 User manual
nada Documentation Release 40
bull Note in the example above the account being impersonated is a Limited Account administrator with rights onlyto manage licensed requests for the Health Surveys Collection Note that all other dashboard menus are eitherhidden or clicking on any other function other than manage studies results in an access denied message
bull This is a good way to test if the roles assigned to a user account have the expected results
bull To exit the impersonate mode and return to the Site Administrator role ndash Click on the top right menu and selectExit impersonate mode
475 The Reviewer Limited access account
Sometimes it is desirable for catalog administrators to allow certain users to see a collection before it is published butwithout granting access to the site administration functions
This is useful for getting feedback on the correctness of information on collections or studies before publishing
To do this
bull First create an account for the user or get the user to create an account by using the register form on the loginscreen
bull Then edit the permissions for that user selecting Site Administrator (limited access) ndash Collection administrator
bull Then for the appropriate collection select Reviewer and click update to save the changes
47 Managing Users and account types 61
nada Documentation Release 40
bull The newly created reviewer account user can now view all studies in a collection even if the study or collectionis unpublished
48 Manage Site Pages and Menus
The NADA has a small content management component that allows for the creation of menu pages to appear on theuser interface
bull Examples of menus that might be useful for users of the site might be A page dealing with the disseminationpolicies of the organization or perhaps a page with contact information for the information
New menu items and pages can be created via the Menu- All pages menu link at the top of the Site Administrationpage
62 Chapter 4 User manual
nada Documentation Release 40
bull Select All pages from the menu
bull To add a new page click on the Add New Page button
bull Give the page a Title in the Title field
bull Clicking in the URL field will automatically suggest a name for the page in the URL
bull Enter the contents for the page in the Body section Plain text or HTML is accespted by this field
bull Then indicate if the page should be published or not in the Publish dropdown
bull The Weight field tells the NADA in what order this menu item should display Eg 0 would be first 1 secondand 2 third
bull Click on Update to save the changes
bull View the changes from the user interface In this Example a Contact Us page was created
bull It is also possible from the Menu Management screen to add a menu link that links to an existing page on anothersite (rather than creating a page itself)
bull To change the order in which the menu items display on the user interface use the Reorder Menu button on theMenu Management screen
48 Manage Site Pages and Menus 63
nada Documentation Release 40
49 The Site Settings Page
All settings for the application are controlled via the Settings menu at the top of the Site Administration page Thereare seven main settings sections See screenshot below
491 General Settings
1 Type the Title of the site here This will become the front page title of the NADA site In this case the Title isNADA
64 Chapter 4 User manual
nada Documentation Release 40
2 The footer text can be changed in this field This displays at the bottom of your site page
3 The initial page that loads when a user visits the NADA site can be set here In this case the catalog page is setto open by default
4 The name of the webmaster can be set here This is the name that will be used in system emails sent to users
5 Enter the webmaster email address here This should be the address that will be used in communication withusers Typically this is a general enquiries email set up by the organization and not a personal email address fora particular person Note to avoid mail systems rejecting mail as spam make sure to enter an address here thatis on the same domain as the server used in the email settings at setup
6 This field sets the location of the Cache folder The cache folder stores pre- generated pages of the site to allowfor faster browsing by the user By default it is set to cache This can be moved to another location if desiredbut must be writable The green tick indicates that the folder can be found and is set up correctly Enter eitherrelative or absolute paths to the folder location
7 Set the time that the Cache takes to expire By default it is set to 2 hours (in milli seconds)
8 If it is desired to turn off caching then select no here Sometimes it is useful to turn off caching when developingor updating a site so as to ensure that content changes become immediately visible on the front-end withouthaving to wait for the cache to expire and the new changes to show Turn this back on to speed up page loadingfor users
Click update to save all settings
Language
To change the language of the application expand the language section and choose the desired language Click updateto save and apply the setting
49 The Site Settings Page 65
nada Documentation Release 40
Enable or disable the HTML editor
A basic HTML editor is provided in the menu and page creating section of the application This setting allows this tobe turned on or off
Survey catalog settings
1 This is the folder where the files for the study are stored on the server This includes the DDI eternal resourcesand data files This folder can be moved to a location outside the web root as described in the installationinstructions in Chapter 1 Enter either relative or absolute paths to the folder location
2 This is the folder where DDIrsquos can be placed in order to use the bulk study import function in the NADA InNADA3 files had to be physically copied to this folder on the server but this is no longer necessary in NADA4 Files can now be directly uploaded to this folder from the Site Administration ndash Manage Studies page page
66 Chapter 4 User manual
nada Documentation Release 40
3 Select the vocabulary to use for the topic filter By default this is set to the CESSDA classification as recom-mended in the IHSN templates supplied at IHSNorg for the Nesstar Metadata Publisher
4 Enable or disable the Country filter on the user interface search page here If the catalog only contains studiesfor one country then turning this filter off is recommended
5 Enable or disable the Topic filter on the user interface search page here If no topics have been defined in theDDIrsquos being uploaded then it is recommended to turn this filter off (disable)
6 Enable or disable the Year filter on the user interface search page here
7 Enable or disable the Collection filter on the user interface search page here If no collections have been definedthen it is recommended to disable this filter
8 Enable or disable the Data access filter on the user interface search page here This filter is not needed if thereare very few studies in the catalog or if all studies hare set to the same access type
9 This section controls the order in which the filters appear on the search page Enter numbers here that rank theorder of the filters in the order they should be displayed
10 This setting determines how many studies are displayed by default to the user on the search page ndash catalog view
Site Login settings
1 To require that users login before being able to access the website set this option to Requires all users to loginto access the website
2 Determined how long a user will stay logged in After this time the user will be automatically logged out
3 Sets the minimum length for passwords created by the users at registration or for manual user creation
49 The Site Settings Page 67
nada Documentation Release 40
SMTP Settings
1 If the PHPweb server is configured to send email using PHPrsquos MAIL function select the first option and donrsquotfill in anything else
If your organization has a mail server and has have a dedicated account that can be setup for NADA use the followingsettings Check the radio button ldquoUse SMTP Serverrdquo
2 Enter the host name for the server
3 Enter the port used by the server to send mail
4 If required enter the user name used to send mail on the server
5 Enter the password used to send mail on the server
If the organization does not own a mail server a Gmail account can be configured to be used with NADA
bull Check the radio button ldquoUse SMTP Serverrdquo
bull Host name sslsmtpgooglemailcom or sslsmtpgmailcom
bull SMTP port 465
bull Account username email-addressgmailcom
bull Account password password for the gmail account
6 Test the email settings
The quickest way to test if the email settings are working is to use the ldquoforgot passwordrdquo option from the user loginpage If no mail is received when doing this test then go back and correct the mail settings Check with the ISP orserver administrator for the correct settings
Click on update to save all settings
68 Chapter 4 User manual
nada Documentation Release 40
492 Dashboard setting
Provides a means to automatically have content loaded into the dashboard via an RSS feed from a site The defaultsetting is set to receive updates and news from the IHSN website
49 The Site Settings Page 69
nada Documentation Release 40
70 Chapter 4 User manual
CHAPTER 5
Indices and tables
bull genindex
bull modindex
bull search
71
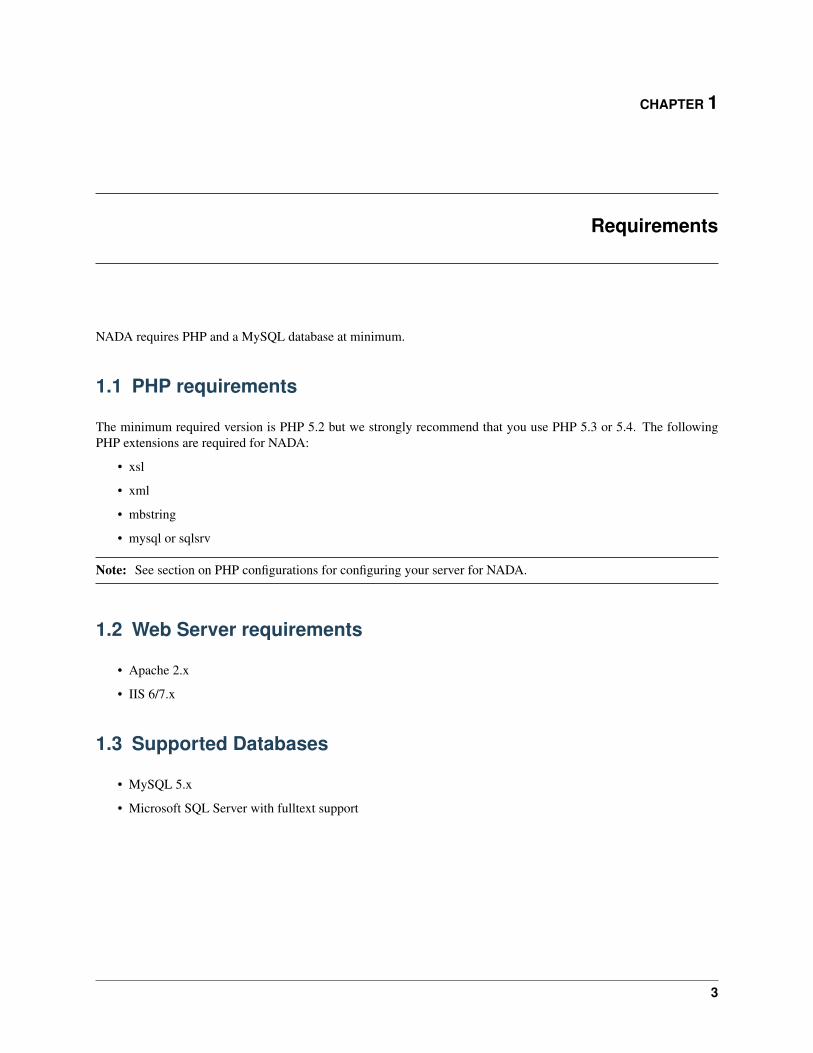
nada Documentation Release 40
4 Chapter 1 Requirements
CHAPTER 2
Installation guide
21 Requirements
NADA requires PHP and a MySQL database at minimum
211 PHP requirements
The minimum required version is PHP 52 but we strongly recommend that you use PHP 53 or 54 The followingPHP extensions are required for NADA
bull xsl
bull xml
bull mbstring
bull mysql or sqlsrv
Note See section on PHP configurations for configuring your server for NADA
212 Web Server requirements
bull Apache 2x
bull IIS 67x
213 Supported Databases
bull MySQL 5x
bull Microsoft SQL Server with fulltext support
22 Installation
221 Download the latest NADA
bull Download a copy of the NADA 4 software from the IHSN httpihsnorgnada
5
nada Documentation Release 40
bull Open and extract (unzip) the files to your local hard drive using an appropriate compression program If you donot already have such a compression program there are many open source compression programs available ForWindows use the built-in compression software wizard or alternatively the 7-ZIP File Manager which is a freecompression program On Linux systems the same tasks can be achieved from the command line or once againthrough the use of a separate program Mac OSX has a number of options - third party and built-in as well asfrom the command line
222 Setup application folder
bull Copy the files to a folder in the web server root folder If installing on a localhost - for example the computercurrently being working on ndash then copy and paste (or move) the files into the root folder (or a sub-folder) of theweb server If however the server is running on a remote host (such as an ISP) then this process will involvethe use of a FTP client program or file manager from the ISPrsquos Cpanel
Note The folder name chosen will in many cases become the URL for the catalog Examples for a folder name mightbe ndash data microdata catalog etc
bull The root folder is located in different places depending upon the operating systemdistribution and web serverpackage you are using and it might be called htdocs httpd or www On Windows servers this might be locatedin the inetpub directory and on Linux in the var directory Consult the documentation for the distribution beingused or contact the ISP if unsure where the root web folder is
223 Folder permissions
Change the permissions for the following folders and their contents to READWRITE and on Windows servers makesure the IUSR_ user has readwritedelete permissions on these folders
bull your-nada-web-folderdatafiles ndash this is the folder where the application will store the DDIlsquos documentationand data
6 Chapter 2 Installation guide
nada Documentation Release 40
Note For added security it is strongly recommended that the location of the datafiles directory be changed afterinstallation to a location outside your web root structure
bull your-nada-web-foldercache ndash this is where cached web pages will be stored
bull your-nada-web-folderlogs ndash this is where the log files will be stored
224 Configure MySQL database
1 Browse to the your-nada-web-folderapplicationconfig folder
22 Installation 7
nada Documentation Release 40
1 Open the databasephp file in a text editor like Notepad or Notepad ++ and change the database user name andpassword to match the database user name and password
2 Optional change the database name to use another name
3 Save the file
$db[rsquodefaultrsquo][rsquousernamersquo] = your-database-username$db[rsquodefaultrsquo][rsquopasswordrsquo] = your-database-password$db[rsquodefaultrsquo][rsquodatabasersquo] = nada4
Note Do NOT use the root username and password (MySQL) or SA Account (MSSQL) on your production serverCreate a separate user name and password for your NADA database This can be done either from your Cpanel orfrom PhpMyadmin MySQL Workbench
8 Chapter 2 Installation guide
nada Documentation Release 40
225 Create database user account
The goal being to avoid using Root for your NADA configuration
1 From the command line type
mysql -u root -p
2 Enter your root password you setup when installing MySQL
3 Now create a database for the NADA ndash in this example we call the database nada
mysqlgt CREATE DATABASE nada
4 Now create a user who can access the new nada database and give the user only the rights necessary to run theNADA
mysqlgt GRANT SELECT INSERT UPDATE DELETE CREATE DROP INDEX ALTER CREATE TEMPORARY TABLESLOCK TABLES ON nada TO rsquonadarsquorsquolocalhostrsquo IDENTIFIED BY rsquoyourpasswordrsquo
5 lsquoyourpasswordrsquo can be anything you choose lsquonadarsquo is the name of the database the user gets access to lsquolocal-hostrsquo is the location which gets access to your database
Note Remember this password you will need it to configure your NADA installer
6 Then exit MySQL console by typing exit
mysqlgt exit
226 Running the installer
Open web browser to the location of the NADA installation For example httpyour-domainnada-folder-name orlocalhostnada-folder-name
22 Installation 9
nada Documentation Release 40
Check that all settings are marked with a green tick and fix any that are not on your webserver before running theinstaller
Click on the Install Database button and complete the form to create an initial Site Administrator account
Note create a complex password at least 12 characters long with some uppercase punctuation and numbers to aidsecurity of your site Do not forget this username and password
10 Chapter 2 Installation guide
nada Documentation Release 40
Congratulations Launch the new site
22 Installation 11
nada Documentation Release 40
23 Installing NADA using Microsoft SQL Server
231 PHP database drivers (sqlsrv)
The new Microsoft SQL drivers for PHP are called SQLSRV and provide native support for connecting to a MicrosoftSQL Server database The drivers have been tested with NADA for SQL Server 2008 and 2012
The drivers are available for download from here httpwwwmicrosoftcomen-usdownloaddetailsaspxid=20098
232 NADA Microsoft SQL Requirements
To use Microsoft SQL Server database for NADA it is recommended to use SQL Server 2008 or later with Full-Textsupport enabled The full-text engine provides faster search than the normal SQL search
The default installation of SQL Server does not include the Full-Text engine so before continuing on to installingNADA please make sure you have full-text installed on your database server
233 Download drivers
Microsoft provides two versions of the SQLSRV drivers namely version 20 and 30 NADA has only been tested withversion 20 but should work with version 30 Requirements for using the drivers
bull Windows 7 Windows Server 2008 R2 Windows Server 2008 Service Pack 2 Windows Vista Service Pack 2
bull PHP 536 or PHP 54 For information about downloading and installing PHP visit PHP on Windows(httpwindowsphpnet)
bull Microsoft SQL Server 2012 Native Client available in the SQL Server 2012 Feature Pack (This is needed ifdatabase and web server are on different machines)
bull Any edition of SQL Server 2005 or later
12 Chapter 2 Installation guide
nada Documentation Release 40
234 The Microsoft SQL Client
Microsoft SQL Client is required for connecting to your SQL database using NADA The client is installed automati-cally if your database is hosted on the same machine as your web server If your SQL database is running on a differentmachine then you must install the latest version of the SQL Client on your web server to ensure NADA can connectto your database See section on installing Microsoft SQL Client
235 How to install the SQLSRV driver for PHP
The steps are for version 20 but the same applies to version 30
1 The drivers are available from the Microsoft website httpwwwmicrosoftcomdownloadsendetailsaspxFamilyID=80e44913-24b4-4113-8807-caae6cf2ca05
2 Download the drivers and run the setup file
3 The setup file will extract a number of dll files to your PHP extension folder
4 Browse to the PHP extension folder Eg cphpextNotice there are multiple dll files included all referencing_sqlsrv
1 To find out which driver library is suitable for your version of PHP create a php file using a text editor likeNotepad eg infophp and place this code inside it
ltphp phpinfo() gt
2 Save the file and copy it to your web server root folder Open your web browser and type the location andname of the file eg infophp into your browser URL The phpinfo() function prints your PHP version and otherconfiguration settings for PHP For Example localhostinfophp To select the right sqlsrv DLL yoursquoll need toknow
bull The version of PHP Eg 53
bull Which compiler is used eg either VC9 or VC6
bull Check whether Thread Safety is enabled or not
23 Installing NADA using Microsoft SQL Server 13
nada Documentation Release 40
1 With the above values you would choose the file php_sqlsrv_53_nts_vc9dll
ts=Thread safety nts=Non-thread safety
2 Once you know which dll file to use open the phpini file using a text editor and add the following entry at theend of your PHPINI file
extension=php_sqlsrv_53_nts_vc9dll
3 Save your phpini file and restart your web server
236 Testing the SQLSRV drivers and SQL Client
To make sure the driverextension is installed correctly Reload the phpinfo page and check if the extension SQLSRVis listed on the page
If the extension is not listed on the page recheck if the correct phpini file has been edited To locate the phpini filebeing used by PHP look at the output of the phpinfo page in the section shown below
14 Chapter 2 Installation guide
nada Documentation Release 40
This step is only required if SQL Server is not on the same server as your web server To check if the SQL Client isalready installed or not follow the steps below
1 Open Control Panel Administrative Tools on your server
2 Open ODBC and switch to the tab ldquoDriversrdquo
237 Download the Microsoft SQL Client
Note The instructions here are provided for Microsoft SQL Server 2008 if are running on a later version of MicrosoftSQL Server the latest drivers can be obtained from the Microsoft website The installation steps are the same
The SQL Client is available from the Microsoft website from here httpwwwmicrosoftcomen-usdownloaddetailsaspxid=16978
Download the appropriate package for the system being used ie (32bit64bit) and run the installer to install the client
Once the client is installed restart your computer and check again from ODBC above to confirm that the client hasbeen installed
23 Installing NADA using Microsoft SQL Server 15
nada Documentation Release 40
238 NADA Database configurations for SQLSRV
Create a database and the user account to use with NADA beforehand The permissions need to include - createaltertables indexes ( See the following reference from Microsoft for instructions on how to do this
bull Database - httpmsdnmicrosoftcomen-uslibraryms186312aspx
bull User - httpmsdnmicrosoftcomen-uslibraryaa337545aspx
Open the nada database configuration file your-nada-folderapplicationconfigdatabasephp file and look for the fol-lowing lines
$db[rsquosqlsrvrsquo][rsquohostnamersquo] = localhostsqlexpress$db[rsquosqlsrvrsquo][rsquousernamersquo] = db-user-name$db[rsquosqlsrvrsquo][rsquopasswordrsquo] = password$db[rsquosqlsrvrsquo][rsquodatabasersquo] = nada-database$db[rsquosqlsrvrsquo][rsquodbdriverrsquo] = sqlsrv$db[rsquosqlsrvrsquo][rsquodbprefixrsquo] = $db[rsquosqlsrvrsquo][rsquopconnectrsquo] = FALSE$db[rsquosqlsrvrsquo][rsquodb_debugrsquo] = FALSE$db[rsquosqlsrvrsquo][rsquocache_onrsquo] = FALSE$db[rsquosqlsrvrsquo][rsquocachedirrsquo] = $db[rsquosqlsrvrsquo][rsquochar_setrsquo] = utf8$db[rsquosqlsrvrsquo][rsquodbcollatrsquo] = utf8_general_ci
Fill in the database connection settings for the database created for NADA
Save the changes
239 Running the installer
bull Open a web browser to the location of the NADA installation For examplehttpyour-domainnada-folder-name or localhostnada-folder-name
bull If the Microsoft database connection is setup correctly you should see the nada installer
16 Chapter 2 Installation guide
nada Documentation Release 40
bull Check that all settings are marked with a green tick and fix any that are not on your webserver before runningthe installer
bull Click on the Install Database button and complete the form to create an initial Site Administrator account
Note Create a complex password of atleast 12 characters long with some uppercase punctuation and numbers to aidsecurity of your site Do not forget this username and password
23 Installing NADA using Microsoft SQL Server 17
nada Documentation Release 40
Congratulations Launch the new site
18 Chapter 2 Installation guide
nada Documentation Release 40
24 PHP settings
241 Finding the correct PHPINI
To make sure you are editing the correct PHPINI settings file create a PHP file (eg infophp) in your nada websitefolder with the following contents
ltphp phpinfo() gt
Open the phpinfo page in your web browser and you should see output similar to below screenshot Edit the phpinifile displayed by the setting Loaded Configuration File
24 PHP settings 19
nada Documentation Release 40
20 Chapter 2 Installation guide
nada Documentation Release 40
242 File upload limits
By default PHP allows uploads of 2MB which could be a problem if you have large DDIs and external resource filesTo change the settings
1 Edit the phpini file in notepad and look for the setting upload_max_filesize
2 The line should look like
Maximum allowed size for uploaded files httpphpnetupload-max-filesizeupload_max_filesize = 2M
3 Change it to the required file upload limit per your needs
upload_max_filesize = 50M
4 There is another setting that MUST be changed as well for the file upload limits to work Look for the configu-ration post_max_size and change it to match the value for upload_max_filesize
post_max_size = 50M
243 TimeZone settings
This is for setting the timezone for your application To findout what is the correct timezone for your website go tohttpphpnetmanualentimezonesphp and find your countrycity
Example
datetimezone = AmericaNew_York
244 Increase page executiontimeout
This setting controls the maximum execution time of a page in seconds
max_execution_time = 300
245 Increase PHP memory limit
It controls the memory available to PHP scripts
memory_limit = 128M
246 Enabledisable PHP extensions
NADA requires the following PHP extensions
bull xsl
bull mbstring
bull mysql or sqlsrv
To enable XSL extension add this line
24 PHP settings 21
nada Documentation Release 40
extension=php_xsldll
To enable mbstring
extension=php_mbstringdll
25 Configure Captcha
By default NADA version 41 comes with image captcha and user does not need to make any changes to use imagecaptcha To use Google Captcha please follow the steps given below
1 Open applicationconfigcaptchaphp in editor
2 Change line number 12 as shown in below image
3 Click on above URL to generate Public and Private key URL httpwwwgooglecomrecaptchawhyrecaptcha
4 Click on sign up now
5 Sign in using your Gmail account
6 After signed in you will have to enter your URL (Domain URL)
22 Chapter 2 Installation guide
nada Documentation Release 40
7 Click on ldquoenable globel key for all domain
8 Click on Create Key button
9 Copy public key and private key from Google Captcha website and inserte it on line number 51 and 52 respec-tively as shown in below image
10 To check the Google catpcha configuration go to register page and look for image as shown in below URLhighlighted in Red suqare
25 Configure Captcha 23
nada Documentation Release 40
26 Email configurations
For the NADA to function correctly it is important that this step be completed
Many of the functions within the NADA ndash such as registration and applying for access to datasets require that theNADA be able to send emails to users
There are two ways to setup your email configurations 1) Create a emailphp file in the applicationconfig folder 2)Edit email settings on the site configurations page
24 Chapter 2 Installation guide
nada Documentation Release 40
261 1 Configure email via email config file
1 Open the file applicationconfigemailphp in notepad
2 Fill in the section using SMTP server with authentication enabled highlighted in below image
3 For Gmail user will have to fill the gmail smtp section shown as below
26 Email configurations 25
nada Documentation Release 40
4 Save file
Note Using a file for email configuration disable the email configuration page from the site administration
1 Login to your NADA as an administrator
2 Go to Site administration click on the Settings menu and choose ldquoSettingsrdquo
3 Find the section ldquoSMTP settingsrdquo
26 Chapter 2 Installation guide
nada Documentation Release 40
4 If the PHPweb server is configured to send email using PHPrsquos MAIL function select the first option and donrsquotfill in anything else
If your organization has a mail server and has have a dedicated account that can be setup for NADA use the followingsettings Check the radio button ldquoUse SMTP Serverrdquo
5 Enter the host name for the server
6 Enter the port used by the server to send mail
7 If required enter the user name used to send mail on the server
8 Enter the password used to send mail on the server
If the organization does not own a mail server a Gmail account can be configured to be used with NADA
bull Check the radio button ldquoUse SMTP Serverrdquo
bull Host name sslsmtpgooglemailcom or sslsmtpgmailcom
bull SMTP port 465
bull Account username email-addressgmailcom
bull Account password password for the gmail account
Test the email settings
The quickest way to test if the email settings are working is to use the ldquoforgot passwordrdquo option from the user loginpage
bull Click on forgot password
26 Email configurations 27
nada Documentation Release 40
bull Enter the administrator or any other accounts email address
bull Check to the email account the mail was sent to
bull If no mail is received the settings are wrong and need to be corrected
28 Chapter 2 Installation guide
CHAPTER 3
Upgrading from previous versions
31 Upgrade from NADA 3
For users with an existing NADA 3x catalog an upgrade script is included that will update your NADA 3x databaseto NADA 4x The process involves modifying your NADA 3x database and thus carries some risks The script willadd new tables to the NADA 3x database All user accounts and survey information will be retained by the upgrade
Important Backup the NADA 3x database before doing anything
1 Follow the instructions on page 4 and set up a folder in the web root containing the NADA 4 files
2 Edit the databasephp file as instructed in the section above NADA database configurations for MySQL
3 Instead of entering a new database name user account name and password -fill in the details of the existingNADA 3x database
Note These can be found by looking at the existing NADA 3x databasephp file and entering the settings into theNADA 4 databasephp file
4 Save the file
5 Navigate to the URL for the NADA4 site Example httpyour-nada-sitenada4indexphpnada4_upgrade
6 The following page loads
29
nada Documentation Release 40
Take note of the warnings and make any necessary corrections before clicking the ldquoUpgrade database to NADA 4rdquobutton
Warning This step makes changes to your nada 3 database that are not undo-able so make sure you do make adatabase backup before this step
Click on the ldquoUpgrade database to NADA 4rdquo button and wait for the page to reload The output of the page will looksomething like below
The script will print number of messages about failed table updates This does not mean the script failed to upgradeIt just means some of the updates were not needed on your version of NADA 3 Different versions of NADA havedifferent numbers of fields in the database and the upgrade script tries to fix the missing fields for all these differentversions of NADA If the existing NADA 3 database already has that field then it reports it as an error
You can ignore the error messages that include the wording ldquoDuplicate column namerdquo or ldquoDuplicate entryrdquo
Now your database has been migrated to NADA version 41 We will have to run one more upgrade script to forNADA version 42
7 Navigate to the URL for the NADA42 site Example httpyour-nada-sitenada42indexphpnada42_upgrade
Warning This step makes changes to your nada 41 database that are not undo-able This page will not show anymessage on the screen You will be getting blank page Please do not repeat the process
8 To verify the database upgrade Open the NADA catalog page by going to http[your-nada4-site]indexphpcatalogpage and verify all studies from NADA 3 are listed
311 Linking your NADA 3 data files to NADA 4
The upgrade script has only upgraded the database It is now necessary to tell the NADA4 where to locate the datafilesthat were uploaded to the original NADA 3 site
There are two options available
Option 1 Copy the datafiles folder from NADA 3 to NADA 4 This works best if you have only a few studies and thedatafiles folder size is small enoughto be moved easily from one location to another
Option 2 If it is not possible to easily move the datafiles folder from NADA 3 to NADA 4 you can tell NADA 4 thelocation of the datafiles without moving the files Here are the steps
bull Use your NADA 3 administrator login credentials to login to your new NADA 4 site
bull Click on Site administration in the top right corner of the screen
bull Go to the ldquoSettingsrdquo menu and click on the ldquoSettingsrdquo sub-menu
30 Chapter 3 Upgrading from previous versions
nada Documentation Release 40
bull Under Site configurations expand the ldquoSurvey Catalog Settingsrdquo section
bull For the setting ldquoCatalog folderrdquo enter the relative or full path to where the NADA 3 datafiles folder is locatedFor example if the nada3 datafiles are located on cnada3datafiles enter that path here
bull Save the configurations by clicking on the update button If now errors are shown then you have successfullyupdated the folder path
bull Check your new NADA 4 site to make sure the migration was successful
ndash Check the user administration page from site administration to make sure the users from the nada3 sitewere migrated
ndash Check the ldquoData Catalogrdquo page and view the studies by clicking on the study title to make sure the studyinformation pages are correct
ndash Check the site menus are the same as the NADA 3 site
312 Refresh DDI
In NADA 4 more information is stored in the database from the DDI than in the NADA 3 To bring all these newfields into the imported studies it is necessary to refresh the DDIrsquos The refresh DDI feature in NADA updates thedatabase with metadata from the DDI without having re-uploading the DDIs To update the metadata for all studies inyour catalog
bull Open the following NADA 4 URL in your browser
http[your-nada-4-site]indexphpadmincatalogbatch_refresh
bull Select all studies
bull Click on the ldquoRefresh DDIrdquo button
313 Transferring ownership
NADA 4 has a collection management feature When studies are imported from the NADA3 catalog into NADA4 theyare put into a collection called DEFAULT They need to be moved from this default system collection to the Central
31 Upgrade from NADA 3 31
nada Documentation Release 40
Data Catalog of the NADA4
To do this
bull Go login to the Site Administration and navigate to the Studies Manage Studies Central Data Catalog page
bull Select all the studies by ticking the check boxes next to each study on the right
bull Click on the dropdown menu and select Transfer owner
bull From the Transfer study owner page Select Central Data Catalog and then click transfer
32 Chapter 3 Upgrading from previous versions
nada Documentation Release 40
314 Updating the Site themetemplate
You cannot use your NADA3 template in NADA4 without making some changes Here are general guidelines butsteps may differ depending on your nada site template
bull Copy your NADA3 template to the NADA4 themes folder
bull Edit the [nada4-root]configtemplatephp following the steps below
bull Look for the setting ldquotheme_namerdquo by default it is set to rdquowbrdquo
bull Change ldquowbrdquo to the theme name you want to use Theme name is the folder name you copied to[NADA4]themes[your-site-theme] from your nada3 site
bull Save the file
NB The template may need some adjusting to run properly on the new NADA 4 site This will involve editingthe layoutphp and other template files within the template folder which is now located in the NADA 4 themesfolder
32 Migrate MySQL to Microsoft SQL
TODO
32 Migrate MySQL to Microsoft SQL 33
nada Documentation Release 40
34 Chapter 3 Upgrading from previous versions
CHAPTER 4
User manual
41 Overview and core concepts
411 About NADA
NADA is a web-based cataloging application that allows for the creation of portals that allows users to browse searchcompare apply for access and download relevant census or survey information
It was originally developed to support the establishment of national survey data archives The application is used by adiverse and growing number of national regional and international organizations NADA as with other IHSN toolsuses the Data Documentation Initiative (DDI) XML-based international metadata standard
412 Concepts
CENTRAL DATA CATALOG
The default catalog created when a NADA instance is installed is the Central Data Catalog All studies uploaded to theNADA are visible searchable and accessible from the Central Data Catalog For many institutions the Central DataCatalog will remain the only catalog in their NADA instance For some institutions being able to divide the contentsof the Central Data Catalog into more refined collections will be desirable
COLLECTIONS
Collections are sub categories of the Central Data Catalog They allow administrators of a NADA instance to groupstudies into what can be thought of as sub-catalogs of the Central Data Catalog This has a number of benefitsboth from the user and the administrator perspective From the usersrsquo perspective being able to filter and viewgroups (collections) of studies that logically belong together makes finding what they are looking for easier From theadministratorsrsquo perspective the ability to create collections of studies that may logically belong together facilitates theability to decentralize the management of each collection of studies to specific administrators (for example collectionscan be managed by different departments in an institution)
NOTE The creation of collections will in general only be useful and necessary for large catalogs or for catalogs thatdesire more decentralized management of groups of studies by different departments
STUDIES
Studies are carried out to gather more knowledge about a subject Studies may gather information from a number ofdifferent sources in order to answer the questions asked The information gathered for a study will in the context of
35
nada Documentation Release 40
NADA catalogs usually come from either a census or a surveys It is therefore not uncommon to hear the terms surveyand study used interchangeably when listening to people talk about their NADA catalog
METADATA
Metadata are data about the data They are not the actual data collected from the survey but rather the information thatdescribes the survey process and the data The NADA uses the Data Documentation Initiative (DDI) ndash ddiallianceorgndash standard for the presentation of metadata for each study The DDI document (which is an XML document) isprepared outside the NADA application either manually or using a tool like the Nesstar Publisher ndash nesstarcom ndash andthen imported into the NADA The detailed information about the survey is searchable down to the variable level foreach survey in the catalog
DATA ACCESS TYPES
The NADA allows for the level of access to datasets for studies to be controlled at the study level In other words thelevel of restriction can differ from study to study and can be defined on a scale ranging from direct access with norestrictions to no access Briefly the available access types are
bull Data not available - data are not available for this study
bull Direct Access Data Files - data shared under this policy can be downloaded without any restrictions The useris not required to be logged into the site and no personal information is collected on the person downloading thedata
bull Public Use Data Files - data shared under this policy requires that the user be logged in and registered on thesite before they are able to download the data The user is required to agree to a terms of use of the data and theapplication keeps records of who downloads the data
bull Licensed Data Files - data shared under this policy requires that the user be logged in and registered on the siteUsers are also required to fill in and submit a detailed application form listing their reasons for wanting accessto the data Once the user submits the application form the system informs the system administrator that anapplication has been made In order for the person to get access to the data the system administrator needs toreview the application and approve it
bull Data available in an Enclave - under this policy no data is shared through the application Users submit anapplication to access the data at a secure facility physically located on the premises of the data producer or afacility nominated by the data producer
bull Data available from external repository ndash The NADA allows for studies and their metadata to be listed in aNADA catalog but for a link to be created to another site when the data for that study are available elsewhere
CITATIONS
Citations are references that can be included at the study level which point to published works that have used the datafrom a particular study In many cases this will be a reference to a Journal Article Working paper Newspaper articleetc Such resources are useful to researchers who are interested in seeing how the data have been used before Theyare also a good way of showing the funders of surveys that the data are being used for policy and research purposesand thus are an indicator of some of the impact a study has had
USERS
Users in the NADA can be defined according to three broad groups General Users ndash this is the normal user whoregisters on a NADA site from the user interface This user type has no access to the site administration It is requiredto register as a user when accessing public use and licensed data types Site Administrators (unlimited) ndash this user
36 Chapter 4 User manual
nada Documentation Release 40
has access to all functions and all collections within the Site Administration System wide access Limited Adminis-trators ndash these administrators have access to a limited set of functions within the Site Administration Examples wouldbe an administrator of a specific collections or licensed survey reviewer for all or only some collections or reportgenerator etc
413 Why do NADA administrators need to understand these concepts
Understanding these concepts is important as it
bull Is critical to understanding the new permissions and administrator types introduced in NADA 4 Administratorsare now able to create collections within their NADArsquos and assign different roles to administrators and moregranular levels of access to catalog administration at the collection level It is now possible for example to haveadministrators whorsquos lsquopowersrsquo range from being able to manage all parts of a collectionrsquos administration downto ones with more restrictive access such as ones whose only function is as licensed survey reviewer or reportgenerator or catalog reviewer or citation manager etc
bull Ensures that the correct level of permissions and access is assigned to users based on security policies within theinstitution Unlike previous versions of NADA not all users who have access to the Site Administration needhave the level of access of an ldquounlimited site administratorrdquo This limits security risks associated with havingtoo many ldquounlimited site administratorsrdquo managing a site
bull Assists in assigning an appropriate data access type to data based on institutional distribution polices
bull Makes it easier to explain more clearly to institutional managers what the capabilities of the NADA applicationare and to advise on how to best manage the allocation of responsibilities
42 The Dashboard
After logging in to the Site Administration with administrator credentials the user is taken to the dashboard
The Dashboard provides a quick glance summary for administrators to get an overall picture of what has been happen-ing on the site as well as what pending tasks are outstanding for the administrator
42 The Dashboard 37
nada Documentation Release 40
1 Menu link to the Dashboard
2 Menu link to the Study Management pages submenus include Manage Studies Licensed requests and ManageCollections
3 Menu link to the citations management pages
4 Menu link to the User management pages submenus include All users Add user and Impersonate User
5 Menu link to create menu pages for the site frontend
6 Menu link to generate usage reports
7 Menu Link to the settings pages submenus include Settings Coutries Regions and Vocabularies
8 Useful navigation links submenus include Change Password Log out Catalog Home Data catalog Citations
9 This section lists all collections in the catalog Within each collection a summary is given of the number ofstudies along with diagnostics related to the number of studies publishedunpublished missing questionnairesdata access types set but with no data attached as well as some buttin links to Manage the collections studiesusers and a History of changes made to the collection
10 Provides a summary of users registrations and number of users currently logged in
11 Show how many pages are being cached on the site with a link to clear the cache if need be
12 Show a list of recently added or updated studies Clicking on a study in the list takes you to the page to managethat study
38 Chapter 4 User manual
nada Documentation Release 40
43 Manage Collections
431 Collections
Collections are sub categories of the Central Data Catalog They allow administrators of a NADA instance to groupstudies into what can be thought of as sub-catalogs of the Central Data Catalog
Collections provide a number of benefits both from the user and the administrator perspective From the usersrsquo per-spective being able to filter and view groups (collections) of studies that logically belong together makes finding whatthey are looking for easier From the administratorsrsquo perspective the ability to create collections of studies that maylogically belong together facilitates the ability to decentralize the management of each collection of studies to specificadministrators (for example collections can be managed by different departments in an institution)
Note The creation of collections will in general only be useful and necessary for large catalogs or for catalogs thatdesire more decentralized management of groups of studies by different departments
432 Creating collections
bull Login to the Site administration using an administrator password
bull Collections are managed and created by going to the Studies Manage collections menu link
bull There are no collections defined in the default NADA 4 installation
bull To create a new collection click on the Create new collection button
43 Manage Collections 39
nada Documentation Release 40
1 Under Collection Identification provide a short name for the collection This will become the URL for thecollection so pick carefully For Title fill in the fill title for the collection This will be the name displayed atthe top of the collection page
B Fill in a 3 or four line short description of the collection This text will display on the front end in the collectionslist For examples see httpmicrodataworldbankorgindexphpcontributing-catalogs
C Fill in a more detailed description of the collection This will display on the About page for that collection Forexample see httpmicrodataworldbankorgindexphpcatalogdhsabout
To format the page and include images it is possible to enter HTML code into this box below is anexample piece of code that includes an image
ltimg src=rdquofilesdhs-fp-01jpgrdquo alt=rdquoHealth Surveys Imagerdquo class=rdquoabout-photordquogt lth2gt Health SurveysCollectionlth2gt ltp align=rdquojustifyrdquogtThe Health Surveys collection aims to provide frequent high qual-ity and timely health data needed by the decision makers when designing public health programsltpgtltpgtHealth surveys provide useful information on health status and health consumption and their determi-nantsltpgt
Copy any images to be displayed into the NADA ldquofilesrdquo folder on your server image imagesthumbnil-imagepng
4 Upload a file to display next to the collection as it is listed on the collection page NOTE This image should be82 X 82 pixels If the upload does not work automatically then copy the thumbnail image to the ldquofilesrdquo folder asshown above
40 Chapter 4 User manual
nada Documentation Release 40
E The Weight field determines in what order collections are shown in the collection list 0123 etc The Selectcollection type drop-down is a system value to distinguish between collections that should be viewed as internal tothe organization or external For example some collections may be made up entirely of studies from an organizationoutside the host catalog These collections can be designated as external The Section dropdown allows for thecategorization as either a collection based on a specialized collection (like health) or based on a regional breakdownSelecting Publish ndash publishes the collection
bull Click on Submit to save the changes
To view the results click on the Preview link on the far right
bull The new collection now also shows in the collection list on the Central Catalog About page (this is where thethumbnail and short description fields are displayed)
43 Manage Collections 41
nada Documentation Release 40
bull Visiting the Dashboard will now also show the new collection listed below the Central Data Catalog With anumber of green buttons as shortcut links to manage the studies on the collection assign administrators for thecollection a history of activity on the collection and a link to edit the collection as in the steps above
433 Manually adding studies to a collection
There are 2 ways to get studies into the new catalog
bull The first is to upload a DDI and all its resources to the collection in the same way as described in the earliersection ndash Uploading a Study Except instead of choosing Central Catalog chose the collection you want to
42 Chapter 4 User manual
nada Documentation Release 40
upload the study to
bull Click on the Add Study button and upload a DDI and RDF and all your resources as described in the earliersection ndash Uploading a Study
bull Once a study is added in this way it displays in the Manage Studies list Notice that the collection summaryfield shows that the study belongs to (is Owned By) the DHS collection (this was the Short name defined in theexample when the Health Surveys Collection was created)
All studies uploaded to collections will automatically be added to the Central Data Catalog in order to build a commonsearch portal for all studies
43 Manage Collections 43
nada Documentation Release 40
434 Copying studies from one collection to another
bull The second way to add a study to a collection is to Copy the study from another collection into the newcollection
bull To copy a study already in the catalog to display in the new collection first make sure to be in the Manage Studiessection for the collection you want to put studies into To do this either use the Studies ndash Manage studies menuon the top or simply click on the Switch link next to the Manage Studies [Collection Title] heading
bull Then Click on the Copy Studies blue button at the top right
bull A list of all studies available to copy to the new collection is listed Simply click on the Link button in green tocopy the study to the collection The button will turn red and say Unlink To reverse the process and click thenow red button
bull Going back to the Manage Studies page for the collection will show the newly copied studies in the collectionlist Also note that the Collection field now indicated DHS next to Central DHS is in grey to indicate it is notowned (it is a copy) by that collection and the Central is in blue to show it is owned by the Central Data CatalogAlso note that because the study is not owned by this catalog it cannot be edited from this catalog ndash hence thepublishunpublish green button is absent for the copied studies
44 Chapter 4 User manual
nada Documentation Release 40
435 Turning on the collection filter
The final step after creating the first collection is to enable the collection filter option in the Settings menus under SiteConfigurations ndash Survey catalog settings
436 Transferring study ownership
In the previous examples mention was made of studies uploaded to a catalog being owned by that catalog There maybe cases where transferring the ownership from one catalog to another will be desirable This will become clearerin the next section on user roles but for now the next steps show how transferring ownership from one collection toanother can be done
bull Transferring ownership from one collection to another has to be done by the owner of the collection and fromthe collection it is currently owned by
bull To transfer ownership Go to the Manage Studies screen and select the study to be transferred Open up the EditStudy page by clicking on the study Title
bull On the right hand side of the screen click on the Transfer study owner link
43 Manage Collections 45
nada Documentation Release 40
bull Select the collection to transfer from the dropdown box
bull Click Transfer
bull Note that when looking the study summary for the transferred study the Collection field now shows the studyto belong (owned by) to the DHS collection and not Central anymore Also note the option to Publish andunpublish is now active
bull To transfer ownership of a large number of studies all at once - from the Manage Studies page ndash select the studiesto be transferred (tick them in the box left of each study) and then from the top Batch Actions drop down selectTransfer owner ndash then apply
46 Chapter 4 User manual
nada Documentation Release 40
44 Manage Studies
There are 2 Options to get studies into the new catalog
441 Option 1
bull The first is to upload a DDI and all its resources to the collection in the same way as described in the earliersection ndash Uploading a Study Except instead of choosing Central Catalog chose the collection you want toupload the study to
bull Click on the Add Study button and upload a DDI and RDF and all your resources as described in the earliersection ndash Uploading a Study
bull Once a study is added in this way it displays in the Manage Studies list Notice that the collection summaryfield shows that the study belongs to (is Owned By) the DHS collection (this was the Short name defined in theexample when the Health Surveys Collection was created)
bull Also note that the new study also appears in the Central Data Catalog
All studies uploaded to collections will automatically be added to the Central Data Catalog in order to build a commonsearch portal for all studies
44 Manage Studies 47
nada Documentation Release 40
442 Option2
Copying studies from one collection to another
bull The second way to add a study to a collection is to Copy the study from another collection into the new collection
bull To copy a study already in the catalog to display in the new collection first make sure to be in the Manage Studiessection for the collection you want to put studies into To do this either use the Studies ndash Manage studies menuon the top or simply click on the Switch link next to the Manage Studies [Collection Title] heading
bull Then Click on the Copy Studies blue button at the top right
bull A list of all studies available to copy to the new collection is listed Simply click on the Link button in green tocopy the study to the collection The button will turn red and say Unlink To reverse the process and click thenow red button
bull Going back to the Manage Studies page for the collection will show the newly copied studies in the collectionlist Also note that the Collection field now indicated DHS next to Central DHS is in grey to indicate it is notowned (it is a copy) by that collection and the Central is in blue to show it is owned by the Central Data CatalogAlso note that because the study is not owned by this catalog it cannot be edited from this catalog ndash hence thepublishunpublish green button is absent for the copied studies
45 Managing Licensed Requests
Datasets that are assigned the Access Type Licensed require approval from the NADA administrator before the usercan get access to the data files From the site administration there are a number of ways to see if any licensed requestshave been received
bull Go to the dashboard Pending requests show up as red in the catalog quicj summary section Clicking on thislink goes to the Licensed Survey Requests management page
bull Or go to the Studies link on the top menu and select Licensed Requests from the submenu
48 Chapter 4 User manual
nada Documentation Release 40
The link shows a page with a list Licensed Requests received The status column indicated the Pending requests
bull Click on the Edit link for to process a request
The Request information tab shows a summary of the information provided by the applicant
bull To Approve or Deny or request further information for the request Click on the Process tab
45 Managing Licensed Requests 49
nada Documentation Release 40
bull Select Approve to approve the request (other options include Deny as well as Request more information fromthe applicant)
bull Select the files that the user will be authorized to download ndash it is also possible to enter a maximum number ofdownloads and expiry date for downloads
bull Enter any comments to be sent to the applicant
bull Select Notify user by email to notify them that the application has been processed
bull Select Update
bull The remaining tabs
ndash Communicate - provides a means to ask for more information from the applicant
ndash Monitor ndash allows the administrator to see when and how many times the applicant downloaded thedata
ndash Forward Request ndash provides a means to forward the request to another person for review
46 Manage Citations
The Citations section is where bibliographic references can be added for publications that use any of the studies in thecatalog These citations can be linked to particular studies in the catalog and are displayed to the users of the systemin the study information view of the relevant study
Citations are added from the Citations menu
50 Chapter 4 User manual
nada Documentation Release 40
bull To add a citation - click on All citations then click on the Add New Citation button at the top right
bull Compete the form including the indication as to whether the citation should be published or not
bull Then expand the Related studies link to tell the system which studies the citation ldquobelongsrdquo to
bull Click on the Attach studies link This reveals a list of all studies in the catalog
bull Select the relevant studies by clicking on the green Select button
bull Click on the apply filter button to save the changes The study now appears in the related studies box
bull Click on the submit button to save the citation
bull Note the flag keywords and notes fields can be used by administrators to place extra notes only visible to otheradministrators that might prove useful when there is uncertainty about a citations appropriateness or accuracy
bull It is also possible to import citations in common citation formats such as BibTex and EndNote (RIS)
bull To do this use the Import Citations link from the top menu
46 Manage Citations 51
nada Documentation Release 40
bull Paste the BibTex or RIS text into the form and then at the bottom of the screen click on Attach studies to linkthe citation to a particular study in the catalog
bull The citation now appears in the citation list as well as on the study information page for the relevant studies
52 Chapter 4 User manual
nada Documentation Release 40
47 Managing Users and account types
Users in the NADA can be defined according to three broad groups
General Usersndash this is the normal user who registers on a NADA site from the user interface This user type hasno access to the site administration It is required to register as a user before being granted access to public use andlicensed data types
Site Administrators (unlimited) ndash this user has access to all functions and all collections within the Site Administra-tion System wide access
Limited Administrators ndash these administrators have access to a limited set of functions within the Site Administra-tion Examples would be an administrator of a specific collections or licensed survey reviewer for all or only somecollections or report generator or citation manager etc
471 Creating User accounts
User accounts can be created in two ways
1 A General User account can be created by a user directly from the register screen from the login link on the userinterface of the application
The user created by this process has no access to the site administration This account can only be used to apply andgain access to public and licensed datasets
2 A user account can also be created by a Site Administrator
bull To do this login as a Site Administrator
bull Go to the site administration section of the application
47 Managing Users and account types 53
nada Documentation Release 40
bull Select Users ndash Add user from the top menu
bull Fill in the information for the user in the form and be sure to mark the account status as Active Then click theCreate button
54 Chapter 4 User manual
nada Documentation Release 40
47 Managing Users and account types 55
nada Documentation Release 40
bull Note that the user always starts off as a General User with no access permissions to the Site Administration Theuser group column displays as empty for users with only general user accounts
bull To see a list of all users in the system go to the Users ndash All Users menu item at the top of the screen
bull Note the new users created have no User group assigned (they are general users) Also note the Actions columnon the far right From these links an account can be edited (including changing the password and blocking anaccount) deleted and Permissions managed for the account
472 Managing User Account Permissions
User accounts permissions can be only be set and changed by a Site Administrator To change the permissions for anaccount
bull Click on the Permissions link next to the account to be changed All accounts start of as General users accounts
bull To change this user to a full site administrator who will have full system wide access to all parts and functionsof the NADA administration select the Site administrators (full access) option and tick the admin box as wellClick update to save the changes
56 Chapter 4 User manual
nada Documentation Release 40
473 Collection level administrators
bull To create a user who only has permissions to administer studies or administration functions for a particularcollection Select Site administrators (limited access)
47 Managing Users and account types 57
nada Documentation Release 40
bull It is then necessary to assign a role to this new limited administrator account To create a limited access ad-ministrator for a particular collection ndash select Site administrators (limited access) and then select Collectionadministrators Notice The form expands to reveal a list of collections in the system
bull Select the appropriate level of access that this account will have for this collection In the example below anadministrator is being created who can manage only licensed requests for the collection ndash Health Surveys Thisaccount will not be able to upload or publish studies The account will only be able to process licensed requestsfor the collection ndash Health Surveys
58 Chapter 4 User manual
nada Documentation Release 40
Other levels of access for Site administrators (limited access) ndash Collection administrators include
1 Accounts that are given full access to manage studies
2 Accounts that are given access to upload studies but not publish them
3 Accounts that are limited to reviewing studies
474 Global level Limited access accounts
Other types of limited access accounts include
1 Accounts that can only view system reports at a global level
2 Accounts that can only access the citations section and manage citations
3 Accounts that can only access the Licensed Request management system ndash at the global level for all collections
47 Managing Users and account types 59
nada Documentation Release 40
Impersonating a user
The system includes a function that allows a Site Administrator to impersonate (take on the role) a user created inthe system This is a useful testing tool when creating users and assigning permissions It essentially allows theadministrator to take on the role of another user temporarily
bull To access the Impersonate User feature go to the Users ndash Impersonat user menu at the top of the screen
bull A list of users to impersonate is shown
bull Select the user to impersonate and click on the impersonate button
bull The dashboard view for the impersonated user now shows
60 Chapter 4 User manual
nada Documentation Release 40
bull Note in the example above the account being impersonated is a Limited Account administrator with rights onlyto manage licensed requests for the Health Surveys Collection Note that all other dashboard menus are eitherhidden or clicking on any other function other than manage studies results in an access denied message
bull This is a good way to test if the roles assigned to a user account have the expected results
bull To exit the impersonate mode and return to the Site Administrator role ndash Click on the top right menu and selectExit impersonate mode
475 The Reviewer Limited access account
Sometimes it is desirable for catalog administrators to allow certain users to see a collection before it is published butwithout granting access to the site administration functions
This is useful for getting feedback on the correctness of information on collections or studies before publishing
To do this
bull First create an account for the user or get the user to create an account by using the register form on the loginscreen
bull Then edit the permissions for that user selecting Site Administrator (limited access) ndash Collection administrator
bull Then for the appropriate collection select Reviewer and click update to save the changes
47 Managing Users and account types 61
nada Documentation Release 40
bull The newly created reviewer account user can now view all studies in a collection even if the study or collectionis unpublished
48 Manage Site Pages and Menus
The NADA has a small content management component that allows for the creation of menu pages to appear on theuser interface
bull Examples of menus that might be useful for users of the site might be A page dealing with the disseminationpolicies of the organization or perhaps a page with contact information for the information
New menu items and pages can be created via the Menu- All pages menu link at the top of the Site Administrationpage
62 Chapter 4 User manual
nada Documentation Release 40
bull Select All pages from the menu
bull To add a new page click on the Add New Page button
bull Give the page a Title in the Title field
bull Clicking in the URL field will automatically suggest a name for the page in the URL
bull Enter the contents for the page in the Body section Plain text or HTML is accespted by this field
bull Then indicate if the page should be published or not in the Publish dropdown
bull The Weight field tells the NADA in what order this menu item should display Eg 0 would be first 1 secondand 2 third
bull Click on Update to save the changes
bull View the changes from the user interface In this Example a Contact Us page was created
bull It is also possible from the Menu Management screen to add a menu link that links to an existing page on anothersite (rather than creating a page itself)
bull To change the order in which the menu items display on the user interface use the Reorder Menu button on theMenu Management screen
48 Manage Site Pages and Menus 63
nada Documentation Release 40
49 The Site Settings Page
All settings for the application are controlled via the Settings menu at the top of the Site Administration page Thereare seven main settings sections See screenshot below
491 General Settings
1 Type the Title of the site here This will become the front page title of the NADA site In this case the Title isNADA
64 Chapter 4 User manual
nada Documentation Release 40
2 The footer text can be changed in this field This displays at the bottom of your site page
3 The initial page that loads when a user visits the NADA site can be set here In this case the catalog page is setto open by default
4 The name of the webmaster can be set here This is the name that will be used in system emails sent to users
5 Enter the webmaster email address here This should be the address that will be used in communication withusers Typically this is a general enquiries email set up by the organization and not a personal email address fora particular person Note to avoid mail systems rejecting mail as spam make sure to enter an address here thatis on the same domain as the server used in the email settings at setup
6 This field sets the location of the Cache folder The cache folder stores pre- generated pages of the site to allowfor faster browsing by the user By default it is set to cache This can be moved to another location if desiredbut must be writable The green tick indicates that the folder can be found and is set up correctly Enter eitherrelative or absolute paths to the folder location
7 Set the time that the Cache takes to expire By default it is set to 2 hours (in milli seconds)
8 If it is desired to turn off caching then select no here Sometimes it is useful to turn off caching when developingor updating a site so as to ensure that content changes become immediately visible on the front-end withouthaving to wait for the cache to expire and the new changes to show Turn this back on to speed up page loadingfor users
Click update to save all settings
Language
To change the language of the application expand the language section and choose the desired language Click updateto save and apply the setting
49 The Site Settings Page 65
nada Documentation Release 40
Enable or disable the HTML editor
A basic HTML editor is provided in the menu and page creating section of the application This setting allows this tobe turned on or off
Survey catalog settings
1 This is the folder where the files for the study are stored on the server This includes the DDI eternal resourcesand data files This folder can be moved to a location outside the web root as described in the installationinstructions in Chapter 1 Enter either relative or absolute paths to the folder location
2 This is the folder where DDIrsquos can be placed in order to use the bulk study import function in the NADA InNADA3 files had to be physically copied to this folder on the server but this is no longer necessary in NADA4 Files can now be directly uploaded to this folder from the Site Administration ndash Manage Studies page page
66 Chapter 4 User manual
nada Documentation Release 40
3 Select the vocabulary to use for the topic filter By default this is set to the CESSDA classification as recom-mended in the IHSN templates supplied at IHSNorg for the Nesstar Metadata Publisher
4 Enable or disable the Country filter on the user interface search page here If the catalog only contains studiesfor one country then turning this filter off is recommended
5 Enable or disable the Topic filter on the user interface search page here If no topics have been defined in theDDIrsquos being uploaded then it is recommended to turn this filter off (disable)
6 Enable or disable the Year filter on the user interface search page here
7 Enable or disable the Collection filter on the user interface search page here If no collections have been definedthen it is recommended to disable this filter
8 Enable or disable the Data access filter on the user interface search page here This filter is not needed if thereare very few studies in the catalog or if all studies hare set to the same access type
9 This section controls the order in which the filters appear on the search page Enter numbers here that rank theorder of the filters in the order they should be displayed
10 This setting determines how many studies are displayed by default to the user on the search page ndash catalog view
Site Login settings
1 To require that users login before being able to access the website set this option to Requires all users to loginto access the website
2 Determined how long a user will stay logged in After this time the user will be automatically logged out
3 Sets the minimum length for passwords created by the users at registration or for manual user creation
49 The Site Settings Page 67
nada Documentation Release 40
SMTP Settings
1 If the PHPweb server is configured to send email using PHPrsquos MAIL function select the first option and donrsquotfill in anything else
If your organization has a mail server and has have a dedicated account that can be setup for NADA use the followingsettings Check the radio button ldquoUse SMTP Serverrdquo
2 Enter the host name for the server
3 Enter the port used by the server to send mail
4 If required enter the user name used to send mail on the server
5 Enter the password used to send mail on the server
If the organization does not own a mail server a Gmail account can be configured to be used with NADA
bull Check the radio button ldquoUse SMTP Serverrdquo
bull Host name sslsmtpgooglemailcom or sslsmtpgmailcom
bull SMTP port 465
bull Account username email-addressgmailcom
bull Account password password for the gmail account
6 Test the email settings
The quickest way to test if the email settings are working is to use the ldquoforgot passwordrdquo option from the user loginpage If no mail is received when doing this test then go back and correct the mail settings Check with the ISP orserver administrator for the correct settings
Click on update to save all settings
68 Chapter 4 User manual
nada Documentation Release 40
492 Dashboard setting
Provides a means to automatically have content loaded into the dashboard via an RSS feed from a site The defaultsetting is set to receive updates and news from the IHSN website
49 The Site Settings Page 69
nada Documentation Release 40
70 Chapter 4 User manual
CHAPTER 5
Indices and tables
bull genindex
bull modindex
bull search
71

nada Documentation Release 40
225 Create database user account
The goal being to avoid using Root for your NADA configuration
1 From the command line type
mysql -u root -p
2 Enter your root password you setup when installing MySQL
3 Now create a database for the NADA ndash in this example we call the database nada
mysqlgt CREATE DATABASE nada
4 Now create a user who can access the new nada database and give the user only the rights necessary to run theNADA
mysqlgt GRANT SELECT INSERT UPDATE DELETE CREATE DROP INDEX ALTER CREATE TEMPORARY TABLESLOCK TABLES ON nada TO rsquonadarsquorsquolocalhostrsquo IDENTIFIED BY rsquoyourpasswordrsquo
5 lsquoyourpasswordrsquo can be anything you choose lsquonadarsquo is the name of the database the user gets access to lsquolocal-hostrsquo is the location which gets access to your database
Note Remember this password you will need it to configure your NADA installer
6 Then exit MySQL console by typing exit
mysqlgt exit
226 Running the installer
Open web browser to the location of the NADA installation For example httpyour-domainnada-folder-name orlocalhostnada-folder-name
22 Installation 9
nada Documentation Release 40
Check that all settings are marked with a green tick and fix any that are not on your webserver before running theinstaller
Click on the Install Database button and complete the form to create an initial Site Administrator account
Note create a complex password at least 12 characters long with some uppercase punctuation and numbers to aidsecurity of your site Do not forget this username and password
10 Chapter 2 Installation guide
nada Documentation Release 40
Congratulations Launch the new site
22 Installation 11
nada Documentation Release 40
23 Installing NADA using Microsoft SQL Server
231 PHP database drivers (sqlsrv)
The new Microsoft SQL drivers for PHP are called SQLSRV and provide native support for connecting to a MicrosoftSQL Server database The drivers have been tested with NADA for SQL Server 2008 and 2012
The drivers are available for download from here httpwwwmicrosoftcomen-usdownloaddetailsaspxid=20098
232 NADA Microsoft SQL Requirements
To use Microsoft SQL Server database for NADA it is recommended to use SQL Server 2008 or later with Full-Textsupport enabled The full-text engine provides faster search than the normal SQL search
The default installation of SQL Server does not include the Full-Text engine so before continuing on to installingNADA please make sure you have full-text installed on your database server
233 Download drivers
Microsoft provides two versions of the SQLSRV drivers namely version 20 and 30 NADA has only been tested withversion 20 but should work with version 30 Requirements for using the drivers
bull Windows 7 Windows Server 2008 R2 Windows Server 2008 Service Pack 2 Windows Vista Service Pack 2
bull PHP 536 or PHP 54 For information about downloading and installing PHP visit PHP on Windows(httpwindowsphpnet)
bull Microsoft SQL Server 2012 Native Client available in the SQL Server 2012 Feature Pack (This is needed ifdatabase and web server are on different machines)
bull Any edition of SQL Server 2005 or later
12 Chapter 2 Installation guide
nada Documentation Release 40
234 The Microsoft SQL Client
Microsoft SQL Client is required for connecting to your SQL database using NADA The client is installed automati-cally if your database is hosted on the same machine as your web server If your SQL database is running on a differentmachine then you must install the latest version of the SQL Client on your web server to ensure NADA can connectto your database See section on installing Microsoft SQL Client
235 How to install the SQLSRV driver for PHP
The steps are for version 20 but the same applies to version 30
1 The drivers are available from the Microsoft website httpwwwmicrosoftcomdownloadsendetailsaspxFamilyID=80e44913-24b4-4113-8807-caae6cf2ca05
2 Download the drivers and run the setup file
3 The setup file will extract a number of dll files to your PHP extension folder
4 Browse to the PHP extension folder Eg cphpextNotice there are multiple dll files included all referencing_sqlsrv
1 To find out which driver library is suitable for your version of PHP create a php file using a text editor likeNotepad eg infophp and place this code inside it
ltphp phpinfo() gt
2 Save the file and copy it to your web server root folder Open your web browser and type the location andname of the file eg infophp into your browser URL The phpinfo() function prints your PHP version and otherconfiguration settings for PHP For Example localhostinfophp To select the right sqlsrv DLL yoursquoll need toknow
bull The version of PHP Eg 53
bull Which compiler is used eg either VC9 or VC6
bull Check whether Thread Safety is enabled or not
23 Installing NADA using Microsoft SQL Server 13
nada Documentation Release 40
1 With the above values you would choose the file php_sqlsrv_53_nts_vc9dll
ts=Thread safety nts=Non-thread safety
2 Once you know which dll file to use open the phpini file using a text editor and add the following entry at theend of your PHPINI file
extension=php_sqlsrv_53_nts_vc9dll
3 Save your phpini file and restart your web server
236 Testing the SQLSRV drivers and SQL Client
To make sure the driverextension is installed correctly Reload the phpinfo page and check if the extension SQLSRVis listed on the page
If the extension is not listed on the page recheck if the correct phpini file has been edited To locate the phpini filebeing used by PHP look at the output of the phpinfo page in the section shown below
14 Chapter 2 Installation guide
nada Documentation Release 40
This step is only required if SQL Server is not on the same server as your web server To check if the SQL Client isalready installed or not follow the steps below
1 Open Control Panel Administrative Tools on your server
2 Open ODBC and switch to the tab ldquoDriversrdquo
237 Download the Microsoft SQL Client
Note The instructions here are provided for Microsoft SQL Server 2008 if are running on a later version of MicrosoftSQL Server the latest drivers can be obtained from the Microsoft website The installation steps are the same
The SQL Client is available from the Microsoft website from here httpwwwmicrosoftcomen-usdownloaddetailsaspxid=16978
Download the appropriate package for the system being used ie (32bit64bit) and run the installer to install the client
Once the client is installed restart your computer and check again from ODBC above to confirm that the client hasbeen installed
23 Installing NADA using Microsoft SQL Server 15
nada Documentation Release 40
238 NADA Database configurations for SQLSRV
Create a database and the user account to use with NADA beforehand The permissions need to include - createaltertables indexes ( See the following reference from Microsoft for instructions on how to do this
bull Database - httpmsdnmicrosoftcomen-uslibraryms186312aspx
bull User - httpmsdnmicrosoftcomen-uslibraryaa337545aspx
Open the nada database configuration file your-nada-folderapplicationconfigdatabasephp file and look for the fol-lowing lines
$db[rsquosqlsrvrsquo][rsquohostnamersquo] = localhostsqlexpress$db[rsquosqlsrvrsquo][rsquousernamersquo] = db-user-name$db[rsquosqlsrvrsquo][rsquopasswordrsquo] = password$db[rsquosqlsrvrsquo][rsquodatabasersquo] = nada-database$db[rsquosqlsrvrsquo][rsquodbdriverrsquo] = sqlsrv$db[rsquosqlsrvrsquo][rsquodbprefixrsquo] = $db[rsquosqlsrvrsquo][rsquopconnectrsquo] = FALSE$db[rsquosqlsrvrsquo][rsquodb_debugrsquo] = FALSE$db[rsquosqlsrvrsquo][rsquocache_onrsquo] = FALSE$db[rsquosqlsrvrsquo][rsquocachedirrsquo] = $db[rsquosqlsrvrsquo][rsquochar_setrsquo] = utf8$db[rsquosqlsrvrsquo][rsquodbcollatrsquo] = utf8_general_ci
Fill in the database connection settings for the database created for NADA
Save the changes
239 Running the installer
bull Open a web browser to the location of the NADA installation For examplehttpyour-domainnada-folder-name or localhostnada-folder-name
bull If the Microsoft database connection is setup correctly you should see the nada installer
16 Chapter 2 Installation guide
nada Documentation Release 40
bull Check that all settings are marked with a green tick and fix any that are not on your webserver before runningthe installer
bull Click on the Install Database button and complete the form to create an initial Site Administrator account
Note Create a complex password of atleast 12 characters long with some uppercase punctuation and numbers to aidsecurity of your site Do not forget this username and password
23 Installing NADA using Microsoft SQL Server 17
nada Documentation Release 40
Congratulations Launch the new site
18 Chapter 2 Installation guide
nada Documentation Release 40
24 PHP settings
241 Finding the correct PHPINI
To make sure you are editing the correct PHPINI settings file create a PHP file (eg infophp) in your nada websitefolder with the following contents
ltphp phpinfo() gt
Open the phpinfo page in your web browser and you should see output similar to below screenshot Edit the phpinifile displayed by the setting Loaded Configuration File
24 PHP settings 19
nada Documentation Release 40
20 Chapter 2 Installation guide
nada Documentation Release 40
242 File upload limits
By default PHP allows uploads of 2MB which could be a problem if you have large DDIs and external resource filesTo change the settings
1 Edit the phpini file in notepad and look for the setting upload_max_filesize
2 The line should look like
Maximum allowed size for uploaded files httpphpnetupload-max-filesizeupload_max_filesize = 2M
3 Change it to the required file upload limit per your needs
upload_max_filesize = 50M
4 There is another setting that MUST be changed as well for the file upload limits to work Look for the configu-ration post_max_size and change it to match the value for upload_max_filesize
post_max_size = 50M
243 TimeZone settings
This is for setting the timezone for your application To findout what is the correct timezone for your website go tohttpphpnetmanualentimezonesphp and find your countrycity
Example
datetimezone = AmericaNew_York
244 Increase page executiontimeout
This setting controls the maximum execution time of a page in seconds
max_execution_time = 300
245 Increase PHP memory limit
It controls the memory available to PHP scripts
memory_limit = 128M
246 Enabledisable PHP extensions
NADA requires the following PHP extensions
bull xsl
bull mbstring
bull mysql or sqlsrv
To enable XSL extension add this line
24 PHP settings 21
nada Documentation Release 40
extension=php_xsldll
To enable mbstring
extension=php_mbstringdll
25 Configure Captcha
By default NADA version 41 comes with image captcha and user does not need to make any changes to use imagecaptcha To use Google Captcha please follow the steps given below
1 Open applicationconfigcaptchaphp in editor
2 Change line number 12 as shown in below image
3 Click on above URL to generate Public and Private key URL httpwwwgooglecomrecaptchawhyrecaptcha
4 Click on sign up now
5 Sign in using your Gmail account
6 After signed in you will have to enter your URL (Domain URL)
22 Chapter 2 Installation guide
nada Documentation Release 40
7 Click on ldquoenable globel key for all domain
8 Click on Create Key button
9 Copy public key and private key from Google Captcha website and inserte it on line number 51 and 52 respec-tively as shown in below image
10 To check the Google catpcha configuration go to register page and look for image as shown in below URLhighlighted in Red suqare
25 Configure Captcha 23
nada Documentation Release 40
26 Email configurations
For the NADA to function correctly it is important that this step be completed
Many of the functions within the NADA ndash such as registration and applying for access to datasets require that theNADA be able to send emails to users
There are two ways to setup your email configurations 1) Create a emailphp file in the applicationconfig folder 2)Edit email settings on the site configurations page
24 Chapter 2 Installation guide
nada Documentation Release 40
261 1 Configure email via email config file
1 Open the file applicationconfigemailphp in notepad
2 Fill in the section using SMTP server with authentication enabled highlighted in below image
3 For Gmail user will have to fill the gmail smtp section shown as below
26 Email configurations 25
nada Documentation Release 40
4 Save file
Note Using a file for email configuration disable the email configuration page from the site administration
1 Login to your NADA as an administrator
2 Go to Site administration click on the Settings menu and choose ldquoSettingsrdquo
3 Find the section ldquoSMTP settingsrdquo
26 Chapter 2 Installation guide
nada Documentation Release 40
4 If the PHPweb server is configured to send email using PHPrsquos MAIL function select the first option and donrsquotfill in anything else
If your organization has a mail server and has have a dedicated account that can be setup for NADA use the followingsettings Check the radio button ldquoUse SMTP Serverrdquo
5 Enter the host name for the server
6 Enter the port used by the server to send mail
7 If required enter the user name used to send mail on the server
8 Enter the password used to send mail on the server
If the organization does not own a mail server a Gmail account can be configured to be used with NADA
bull Check the radio button ldquoUse SMTP Serverrdquo
bull Host name sslsmtpgooglemailcom or sslsmtpgmailcom
bull SMTP port 465
bull Account username email-addressgmailcom
bull Account password password for the gmail account
Test the email settings
The quickest way to test if the email settings are working is to use the ldquoforgot passwordrdquo option from the user loginpage
bull Click on forgot password
26 Email configurations 27
nada Documentation Release 40
bull Enter the administrator or any other accounts email address
bull Check to the email account the mail was sent to
bull If no mail is received the settings are wrong and need to be corrected
28 Chapter 2 Installation guide
CHAPTER 3
Upgrading from previous versions
31 Upgrade from NADA 3
For users with an existing NADA 3x catalog an upgrade script is included that will update your NADA 3x databaseto NADA 4x The process involves modifying your NADA 3x database and thus carries some risks The script willadd new tables to the NADA 3x database All user accounts and survey information will be retained by the upgrade
Important Backup the NADA 3x database before doing anything
1 Follow the instructions on page 4 and set up a folder in the web root containing the NADA 4 files
2 Edit the databasephp file as instructed in the section above NADA database configurations for MySQL
3 Instead of entering a new database name user account name and password -fill in the details of the existingNADA 3x database
Note These can be found by looking at the existing NADA 3x databasephp file and entering the settings into theNADA 4 databasephp file
4 Save the file
5 Navigate to the URL for the NADA4 site Example httpyour-nada-sitenada4indexphpnada4_upgrade
6 The following page loads
29
nada Documentation Release 40
Take note of the warnings and make any necessary corrections before clicking the ldquoUpgrade database to NADA 4rdquobutton
Warning This step makes changes to your nada 3 database that are not undo-able so make sure you do make adatabase backup before this step
Click on the ldquoUpgrade database to NADA 4rdquo button and wait for the page to reload The output of the page will looksomething like below
The script will print number of messages about failed table updates This does not mean the script failed to upgradeIt just means some of the updates were not needed on your version of NADA 3 Different versions of NADA havedifferent numbers of fields in the database and the upgrade script tries to fix the missing fields for all these differentversions of NADA If the existing NADA 3 database already has that field then it reports it as an error
You can ignore the error messages that include the wording ldquoDuplicate column namerdquo or ldquoDuplicate entryrdquo
Now your database has been migrated to NADA version 41 We will have to run one more upgrade script to forNADA version 42
7 Navigate to the URL for the NADA42 site Example httpyour-nada-sitenada42indexphpnada42_upgrade
Warning This step makes changes to your nada 41 database that are not undo-able This page will not show anymessage on the screen You will be getting blank page Please do not repeat the process
8 To verify the database upgrade Open the NADA catalog page by going to http[your-nada4-site]indexphpcatalogpage and verify all studies from NADA 3 are listed
311 Linking your NADA 3 data files to NADA 4
The upgrade script has only upgraded the database It is now necessary to tell the NADA4 where to locate the datafilesthat were uploaded to the original NADA 3 site
There are two options available
Option 1 Copy the datafiles folder from NADA 3 to NADA 4 This works best if you have only a few studies and thedatafiles folder size is small enoughto be moved easily from one location to another
Option 2 If it is not possible to easily move the datafiles folder from NADA 3 to NADA 4 you can tell NADA 4 thelocation of the datafiles without moving the files Here are the steps
bull Use your NADA 3 administrator login credentials to login to your new NADA 4 site
bull Click on Site administration in the top right corner of the screen
bull Go to the ldquoSettingsrdquo menu and click on the ldquoSettingsrdquo sub-menu
30 Chapter 3 Upgrading from previous versions
nada Documentation Release 40
bull Under Site configurations expand the ldquoSurvey Catalog Settingsrdquo section
bull For the setting ldquoCatalog folderrdquo enter the relative or full path to where the NADA 3 datafiles folder is locatedFor example if the nada3 datafiles are located on cnada3datafiles enter that path here
bull Save the configurations by clicking on the update button If now errors are shown then you have successfullyupdated the folder path
bull Check your new NADA 4 site to make sure the migration was successful
ndash Check the user administration page from site administration to make sure the users from the nada3 sitewere migrated
ndash Check the ldquoData Catalogrdquo page and view the studies by clicking on the study title to make sure the studyinformation pages are correct
ndash Check the site menus are the same as the NADA 3 site
312 Refresh DDI
In NADA 4 more information is stored in the database from the DDI than in the NADA 3 To bring all these newfields into the imported studies it is necessary to refresh the DDIrsquos The refresh DDI feature in NADA updates thedatabase with metadata from the DDI without having re-uploading the DDIs To update the metadata for all studies inyour catalog
bull Open the following NADA 4 URL in your browser
http[your-nada-4-site]indexphpadmincatalogbatch_refresh
bull Select all studies
bull Click on the ldquoRefresh DDIrdquo button
313 Transferring ownership
NADA 4 has a collection management feature When studies are imported from the NADA3 catalog into NADA4 theyare put into a collection called DEFAULT They need to be moved from this default system collection to the Central
31 Upgrade from NADA 3 31
nada Documentation Release 40
Data Catalog of the NADA4
To do this
bull Go login to the Site Administration and navigate to the Studies Manage Studies Central Data Catalog page
bull Select all the studies by ticking the check boxes next to each study on the right
bull Click on the dropdown menu and select Transfer owner
bull From the Transfer study owner page Select Central Data Catalog and then click transfer
32 Chapter 3 Upgrading from previous versions
nada Documentation Release 40
314 Updating the Site themetemplate
You cannot use your NADA3 template in NADA4 without making some changes Here are general guidelines butsteps may differ depending on your nada site template
bull Copy your NADA3 template to the NADA4 themes folder
bull Edit the [nada4-root]configtemplatephp following the steps below
bull Look for the setting ldquotheme_namerdquo by default it is set to rdquowbrdquo
bull Change ldquowbrdquo to the theme name you want to use Theme name is the folder name you copied to[NADA4]themes[your-site-theme] from your nada3 site
bull Save the file
NB The template may need some adjusting to run properly on the new NADA 4 site This will involve editingthe layoutphp and other template files within the template folder which is now located in the NADA 4 themesfolder
32 Migrate MySQL to Microsoft SQL
TODO
32 Migrate MySQL to Microsoft SQL 33
nada Documentation Release 40
34 Chapter 3 Upgrading from previous versions
CHAPTER 4
User manual
41 Overview and core concepts
411 About NADA
NADA is a web-based cataloging application that allows for the creation of portals that allows users to browse searchcompare apply for access and download relevant census or survey information
It was originally developed to support the establishment of national survey data archives The application is used by adiverse and growing number of national regional and international organizations NADA as with other IHSN toolsuses the Data Documentation Initiative (DDI) XML-based international metadata standard
412 Concepts
CENTRAL DATA CATALOG
The default catalog created when a NADA instance is installed is the Central Data Catalog All studies uploaded to theNADA are visible searchable and accessible from the Central Data Catalog For many institutions the Central DataCatalog will remain the only catalog in their NADA instance For some institutions being able to divide the contentsof the Central Data Catalog into more refined collections will be desirable
COLLECTIONS
Collections are sub categories of the Central Data Catalog They allow administrators of a NADA instance to groupstudies into what can be thought of as sub-catalogs of the Central Data Catalog This has a number of benefitsboth from the user and the administrator perspective From the usersrsquo perspective being able to filter and viewgroups (collections) of studies that logically belong together makes finding what they are looking for easier From theadministratorsrsquo perspective the ability to create collections of studies that may logically belong together facilitates theability to decentralize the management of each collection of studies to specific administrators (for example collectionscan be managed by different departments in an institution)
NOTE The creation of collections will in general only be useful and necessary for large catalogs or for catalogs thatdesire more decentralized management of groups of studies by different departments
STUDIES
Studies are carried out to gather more knowledge about a subject Studies may gather information from a number ofdifferent sources in order to answer the questions asked The information gathered for a study will in the context of
35
nada Documentation Release 40
NADA catalogs usually come from either a census or a surveys It is therefore not uncommon to hear the terms surveyand study used interchangeably when listening to people talk about their NADA catalog
METADATA
Metadata are data about the data They are not the actual data collected from the survey but rather the information thatdescribes the survey process and the data The NADA uses the Data Documentation Initiative (DDI) ndash ddiallianceorgndash standard for the presentation of metadata for each study The DDI document (which is an XML document) isprepared outside the NADA application either manually or using a tool like the Nesstar Publisher ndash nesstarcom ndash andthen imported into the NADA The detailed information about the survey is searchable down to the variable level foreach survey in the catalog
DATA ACCESS TYPES
The NADA allows for the level of access to datasets for studies to be controlled at the study level In other words thelevel of restriction can differ from study to study and can be defined on a scale ranging from direct access with norestrictions to no access Briefly the available access types are
bull Data not available - data are not available for this study
bull Direct Access Data Files - data shared under this policy can be downloaded without any restrictions The useris not required to be logged into the site and no personal information is collected on the person downloading thedata
bull Public Use Data Files - data shared under this policy requires that the user be logged in and registered on thesite before they are able to download the data The user is required to agree to a terms of use of the data and theapplication keeps records of who downloads the data
bull Licensed Data Files - data shared under this policy requires that the user be logged in and registered on the siteUsers are also required to fill in and submit a detailed application form listing their reasons for wanting accessto the data Once the user submits the application form the system informs the system administrator that anapplication has been made In order for the person to get access to the data the system administrator needs toreview the application and approve it
bull Data available in an Enclave - under this policy no data is shared through the application Users submit anapplication to access the data at a secure facility physically located on the premises of the data producer or afacility nominated by the data producer
bull Data available from external repository ndash The NADA allows for studies and their metadata to be listed in aNADA catalog but for a link to be created to another site when the data for that study are available elsewhere
CITATIONS
Citations are references that can be included at the study level which point to published works that have used the datafrom a particular study In many cases this will be a reference to a Journal Article Working paper Newspaper articleetc Such resources are useful to researchers who are interested in seeing how the data have been used before Theyare also a good way of showing the funders of surveys that the data are being used for policy and research purposesand thus are an indicator of some of the impact a study has had
USERS
Users in the NADA can be defined according to three broad groups General Users ndash this is the normal user whoregisters on a NADA site from the user interface This user type has no access to the site administration It is requiredto register as a user when accessing public use and licensed data types Site Administrators (unlimited) ndash this user
36 Chapter 4 User manual
nada Documentation Release 40
has access to all functions and all collections within the Site Administration System wide access Limited Adminis-trators ndash these administrators have access to a limited set of functions within the Site Administration Examples wouldbe an administrator of a specific collections or licensed survey reviewer for all or only some collections or reportgenerator etc
413 Why do NADA administrators need to understand these concepts
Understanding these concepts is important as it
bull Is critical to understanding the new permissions and administrator types introduced in NADA 4 Administratorsare now able to create collections within their NADArsquos and assign different roles to administrators and moregranular levels of access to catalog administration at the collection level It is now possible for example to haveadministrators whorsquos lsquopowersrsquo range from being able to manage all parts of a collectionrsquos administration downto ones with more restrictive access such as ones whose only function is as licensed survey reviewer or reportgenerator or catalog reviewer or citation manager etc
bull Ensures that the correct level of permissions and access is assigned to users based on security policies within theinstitution Unlike previous versions of NADA not all users who have access to the Site Administration needhave the level of access of an ldquounlimited site administratorrdquo This limits security risks associated with havingtoo many ldquounlimited site administratorsrdquo managing a site
bull Assists in assigning an appropriate data access type to data based on institutional distribution polices
bull Makes it easier to explain more clearly to institutional managers what the capabilities of the NADA applicationare and to advise on how to best manage the allocation of responsibilities
42 The Dashboard
After logging in to the Site Administration with administrator credentials the user is taken to the dashboard
The Dashboard provides a quick glance summary for administrators to get an overall picture of what has been happen-ing on the site as well as what pending tasks are outstanding for the administrator
42 The Dashboard 37
nada Documentation Release 40
1 Menu link to the Dashboard
2 Menu link to the Study Management pages submenus include Manage Studies Licensed requests and ManageCollections
3 Menu link to the citations management pages
4 Menu link to the User management pages submenus include All users Add user and Impersonate User
5 Menu link to create menu pages for the site frontend
6 Menu link to generate usage reports
7 Menu Link to the settings pages submenus include Settings Coutries Regions and Vocabularies
8 Useful navigation links submenus include Change Password Log out Catalog Home Data catalog Citations
9 This section lists all collections in the catalog Within each collection a summary is given of the number ofstudies along with diagnostics related to the number of studies publishedunpublished missing questionnairesdata access types set but with no data attached as well as some buttin links to Manage the collections studiesusers and a History of changes made to the collection
10 Provides a summary of users registrations and number of users currently logged in
11 Show how many pages are being cached on the site with a link to clear the cache if need be
12 Show a list of recently added or updated studies Clicking on a study in the list takes you to the page to managethat study
38 Chapter 4 User manual
nada Documentation Release 40
43 Manage Collections
431 Collections
Collections are sub categories of the Central Data Catalog They allow administrators of a NADA instance to groupstudies into what can be thought of as sub-catalogs of the Central Data Catalog
Collections provide a number of benefits both from the user and the administrator perspective From the usersrsquo per-spective being able to filter and view groups (collections) of studies that logically belong together makes finding whatthey are looking for easier From the administratorsrsquo perspective the ability to create collections of studies that maylogically belong together facilitates the ability to decentralize the management of each collection of studies to specificadministrators (for example collections can be managed by different departments in an institution)
Note The creation of collections will in general only be useful and necessary for large catalogs or for catalogs thatdesire more decentralized management of groups of studies by different departments
432 Creating collections
bull Login to the Site administration using an administrator password
bull Collections are managed and created by going to the Studies Manage collections menu link
bull There are no collections defined in the default NADA 4 installation
bull To create a new collection click on the Create new collection button
43 Manage Collections 39
nada Documentation Release 40
1 Under Collection Identification provide a short name for the collection This will become the URL for thecollection so pick carefully For Title fill in the fill title for the collection This will be the name displayed atthe top of the collection page
B Fill in a 3 or four line short description of the collection This text will display on the front end in the collectionslist For examples see httpmicrodataworldbankorgindexphpcontributing-catalogs
C Fill in a more detailed description of the collection This will display on the About page for that collection Forexample see httpmicrodataworldbankorgindexphpcatalogdhsabout
To format the page and include images it is possible to enter HTML code into this box below is anexample piece of code that includes an image
ltimg src=rdquofilesdhs-fp-01jpgrdquo alt=rdquoHealth Surveys Imagerdquo class=rdquoabout-photordquogt lth2gt Health SurveysCollectionlth2gt ltp align=rdquojustifyrdquogtThe Health Surveys collection aims to provide frequent high qual-ity and timely health data needed by the decision makers when designing public health programsltpgtltpgtHealth surveys provide useful information on health status and health consumption and their determi-nantsltpgt
Copy any images to be displayed into the NADA ldquofilesrdquo folder on your server image imagesthumbnil-imagepng
4 Upload a file to display next to the collection as it is listed on the collection page NOTE This image should be82 X 82 pixels If the upload does not work automatically then copy the thumbnail image to the ldquofilesrdquo folder asshown above
40 Chapter 4 User manual
nada Documentation Release 40
E The Weight field determines in what order collections are shown in the collection list 0123 etc The Selectcollection type drop-down is a system value to distinguish between collections that should be viewed as internal tothe organization or external For example some collections may be made up entirely of studies from an organizationoutside the host catalog These collections can be designated as external The Section dropdown allows for thecategorization as either a collection based on a specialized collection (like health) or based on a regional breakdownSelecting Publish ndash publishes the collection
bull Click on Submit to save the changes
To view the results click on the Preview link on the far right
bull The new collection now also shows in the collection list on the Central Catalog About page (this is where thethumbnail and short description fields are displayed)
43 Manage Collections 41
nada Documentation Release 40
bull Visiting the Dashboard will now also show the new collection listed below the Central Data Catalog With anumber of green buttons as shortcut links to manage the studies on the collection assign administrators for thecollection a history of activity on the collection and a link to edit the collection as in the steps above
433 Manually adding studies to a collection
There are 2 ways to get studies into the new catalog
bull The first is to upload a DDI and all its resources to the collection in the same way as described in the earliersection ndash Uploading a Study Except instead of choosing Central Catalog chose the collection you want to
42 Chapter 4 User manual
nada Documentation Release 40
upload the study to
bull Click on the Add Study button and upload a DDI and RDF and all your resources as described in the earliersection ndash Uploading a Study
bull Once a study is added in this way it displays in the Manage Studies list Notice that the collection summaryfield shows that the study belongs to (is Owned By) the DHS collection (this was the Short name defined in theexample when the Health Surveys Collection was created)
All studies uploaded to collections will automatically be added to the Central Data Catalog in order to build a commonsearch portal for all studies
43 Manage Collections 43
nada Documentation Release 40
434 Copying studies from one collection to another
bull The second way to add a study to a collection is to Copy the study from another collection into the newcollection
bull To copy a study already in the catalog to display in the new collection first make sure to be in the Manage Studiessection for the collection you want to put studies into To do this either use the Studies ndash Manage studies menuon the top or simply click on the Switch link next to the Manage Studies [Collection Title] heading
bull Then Click on the Copy Studies blue button at the top right
bull A list of all studies available to copy to the new collection is listed Simply click on the Link button in green tocopy the study to the collection The button will turn red and say Unlink To reverse the process and click thenow red button
bull Going back to the Manage Studies page for the collection will show the newly copied studies in the collectionlist Also note that the Collection field now indicated DHS next to Central DHS is in grey to indicate it is notowned (it is a copy) by that collection and the Central is in blue to show it is owned by the Central Data CatalogAlso note that because the study is not owned by this catalog it cannot be edited from this catalog ndash hence thepublishunpublish green button is absent for the copied studies
44 Chapter 4 User manual
nada Documentation Release 40
435 Turning on the collection filter
The final step after creating the first collection is to enable the collection filter option in the Settings menus under SiteConfigurations ndash Survey catalog settings
436 Transferring study ownership
In the previous examples mention was made of studies uploaded to a catalog being owned by that catalog There maybe cases where transferring the ownership from one catalog to another will be desirable This will become clearerin the next section on user roles but for now the next steps show how transferring ownership from one collection toanother can be done
bull Transferring ownership from one collection to another has to be done by the owner of the collection and fromthe collection it is currently owned by
bull To transfer ownership Go to the Manage Studies screen and select the study to be transferred Open up the EditStudy page by clicking on the study Title
bull On the right hand side of the screen click on the Transfer study owner link
43 Manage Collections 45
nada Documentation Release 40
bull Select the collection to transfer from the dropdown box
bull Click Transfer
bull Note that when looking the study summary for the transferred study the Collection field now shows the studyto belong (owned by) to the DHS collection and not Central anymore Also note the option to Publish andunpublish is now active
bull To transfer ownership of a large number of studies all at once - from the Manage Studies page ndash select the studiesto be transferred (tick them in the box left of each study) and then from the top Batch Actions drop down selectTransfer owner ndash then apply
46 Chapter 4 User manual
nada Documentation Release 40
44 Manage Studies
There are 2 Options to get studies into the new catalog
441 Option 1
bull The first is to upload a DDI and all its resources to the collection in the same way as described in the earliersection ndash Uploading a Study Except instead of choosing Central Catalog chose the collection you want toupload the study to
bull Click on the Add Study button and upload a DDI and RDF and all your resources as described in the earliersection ndash Uploading a Study
bull Once a study is added in this way it displays in the Manage Studies list Notice that the collection summaryfield shows that the study belongs to (is Owned By) the DHS collection (this was the Short name defined in theexample when the Health Surveys Collection was created)
bull Also note that the new study also appears in the Central Data Catalog
All studies uploaded to collections will automatically be added to the Central Data Catalog in order to build a commonsearch portal for all studies
44 Manage Studies 47
nada Documentation Release 40
442 Option2
Copying studies from one collection to another
bull The second way to add a study to a collection is to Copy the study from another collection into the new collection
bull To copy a study already in the catalog to display in the new collection first make sure to be in the Manage Studiessection for the collection you want to put studies into To do this either use the Studies ndash Manage studies menuon the top or simply click on the Switch link next to the Manage Studies [Collection Title] heading
bull Then Click on the Copy Studies blue button at the top right
bull A list of all studies available to copy to the new collection is listed Simply click on the Link button in green tocopy the study to the collection The button will turn red and say Unlink To reverse the process and click thenow red button
bull Going back to the Manage Studies page for the collection will show the newly copied studies in the collectionlist Also note that the Collection field now indicated DHS next to Central DHS is in grey to indicate it is notowned (it is a copy) by that collection and the Central is in blue to show it is owned by the Central Data CatalogAlso note that because the study is not owned by this catalog it cannot be edited from this catalog ndash hence thepublishunpublish green button is absent for the copied studies
45 Managing Licensed Requests
Datasets that are assigned the Access Type Licensed require approval from the NADA administrator before the usercan get access to the data files From the site administration there are a number of ways to see if any licensed requestshave been received
bull Go to the dashboard Pending requests show up as red in the catalog quicj summary section Clicking on thislink goes to the Licensed Survey Requests management page
bull Or go to the Studies link on the top menu and select Licensed Requests from the submenu
48 Chapter 4 User manual
nada Documentation Release 40
The link shows a page with a list Licensed Requests received The status column indicated the Pending requests
bull Click on the Edit link for to process a request
The Request information tab shows a summary of the information provided by the applicant
bull To Approve or Deny or request further information for the request Click on the Process tab
45 Managing Licensed Requests 49
nada Documentation Release 40
bull Select Approve to approve the request (other options include Deny as well as Request more information fromthe applicant)
bull Select the files that the user will be authorized to download ndash it is also possible to enter a maximum number ofdownloads and expiry date for downloads
bull Enter any comments to be sent to the applicant
bull Select Notify user by email to notify them that the application has been processed
bull Select Update
bull The remaining tabs
ndash Communicate - provides a means to ask for more information from the applicant
ndash Monitor ndash allows the administrator to see when and how many times the applicant downloaded thedata
ndash Forward Request ndash provides a means to forward the request to another person for review
46 Manage Citations
The Citations section is where bibliographic references can be added for publications that use any of the studies in thecatalog These citations can be linked to particular studies in the catalog and are displayed to the users of the systemin the study information view of the relevant study
Citations are added from the Citations menu
50 Chapter 4 User manual
nada Documentation Release 40
bull To add a citation - click on All citations then click on the Add New Citation button at the top right
bull Compete the form including the indication as to whether the citation should be published or not
bull Then expand the Related studies link to tell the system which studies the citation ldquobelongsrdquo to
bull Click on the Attach studies link This reveals a list of all studies in the catalog
bull Select the relevant studies by clicking on the green Select button
bull Click on the apply filter button to save the changes The study now appears in the related studies box
bull Click on the submit button to save the citation
bull Note the flag keywords and notes fields can be used by administrators to place extra notes only visible to otheradministrators that might prove useful when there is uncertainty about a citations appropriateness or accuracy
bull It is also possible to import citations in common citation formats such as BibTex and EndNote (RIS)
bull To do this use the Import Citations link from the top menu
46 Manage Citations 51
nada Documentation Release 40
bull Paste the BibTex or RIS text into the form and then at the bottom of the screen click on Attach studies to linkthe citation to a particular study in the catalog
bull The citation now appears in the citation list as well as on the study information page for the relevant studies
52 Chapter 4 User manual
nada Documentation Release 40
47 Managing Users and account types
Users in the NADA can be defined according to three broad groups
General Usersndash this is the normal user who registers on a NADA site from the user interface This user type hasno access to the site administration It is required to register as a user before being granted access to public use andlicensed data types
Site Administrators (unlimited) ndash this user has access to all functions and all collections within the Site Administra-tion System wide access
Limited Administrators ndash these administrators have access to a limited set of functions within the Site Administra-tion Examples would be an administrator of a specific collections or licensed survey reviewer for all or only somecollections or report generator or citation manager etc
471 Creating User accounts
User accounts can be created in two ways
1 A General User account can be created by a user directly from the register screen from the login link on the userinterface of the application
The user created by this process has no access to the site administration This account can only be used to apply andgain access to public and licensed datasets
2 A user account can also be created by a Site Administrator
bull To do this login as a Site Administrator
bull Go to the site administration section of the application
47 Managing Users and account types 53
nada Documentation Release 40
bull Select Users ndash Add user from the top menu
bull Fill in the information for the user in the form and be sure to mark the account status as Active Then click theCreate button
54 Chapter 4 User manual
nada Documentation Release 40
47 Managing Users and account types 55
nada Documentation Release 40
bull Note that the user always starts off as a General User with no access permissions to the Site Administration Theuser group column displays as empty for users with only general user accounts
bull To see a list of all users in the system go to the Users ndash All Users menu item at the top of the screen
bull Note the new users created have no User group assigned (they are general users) Also note the Actions columnon the far right From these links an account can be edited (including changing the password and blocking anaccount) deleted and Permissions managed for the account
472 Managing User Account Permissions
User accounts permissions can be only be set and changed by a Site Administrator To change the permissions for anaccount
bull Click on the Permissions link next to the account to be changed All accounts start of as General users accounts
bull To change this user to a full site administrator who will have full system wide access to all parts and functionsof the NADA administration select the Site administrators (full access) option and tick the admin box as wellClick update to save the changes
56 Chapter 4 User manual
nada Documentation Release 40
473 Collection level administrators
bull To create a user who only has permissions to administer studies or administration functions for a particularcollection Select Site administrators (limited access)
47 Managing Users and account types 57
nada Documentation Release 40
bull It is then necessary to assign a role to this new limited administrator account To create a limited access ad-ministrator for a particular collection ndash select Site administrators (limited access) and then select Collectionadministrators Notice The form expands to reveal a list of collections in the system
bull Select the appropriate level of access that this account will have for this collection In the example below anadministrator is being created who can manage only licensed requests for the collection ndash Health Surveys Thisaccount will not be able to upload or publish studies The account will only be able to process licensed requestsfor the collection ndash Health Surveys
58 Chapter 4 User manual
nada Documentation Release 40
Other levels of access for Site administrators (limited access) ndash Collection administrators include
1 Accounts that are given full access to manage studies
2 Accounts that are given access to upload studies but not publish them
3 Accounts that are limited to reviewing studies
474 Global level Limited access accounts
Other types of limited access accounts include
1 Accounts that can only view system reports at a global level
2 Accounts that can only access the citations section and manage citations
3 Accounts that can only access the Licensed Request management system ndash at the global level for all collections
47 Managing Users and account types 59
nada Documentation Release 40
Impersonating a user
The system includes a function that allows a Site Administrator to impersonate (take on the role) a user created inthe system This is a useful testing tool when creating users and assigning permissions It essentially allows theadministrator to take on the role of another user temporarily
bull To access the Impersonate User feature go to the Users ndash Impersonat user menu at the top of the screen
bull A list of users to impersonate is shown
bull Select the user to impersonate and click on the impersonate button
bull The dashboard view for the impersonated user now shows
60 Chapter 4 User manual
nada Documentation Release 40
bull Note in the example above the account being impersonated is a Limited Account administrator with rights onlyto manage licensed requests for the Health Surveys Collection Note that all other dashboard menus are eitherhidden or clicking on any other function other than manage studies results in an access denied message
bull This is a good way to test if the roles assigned to a user account have the expected results
bull To exit the impersonate mode and return to the Site Administrator role ndash Click on the top right menu and selectExit impersonate mode
475 The Reviewer Limited access account
Sometimes it is desirable for catalog administrators to allow certain users to see a collection before it is published butwithout granting access to the site administration functions
This is useful for getting feedback on the correctness of information on collections or studies before publishing
To do this
bull First create an account for the user or get the user to create an account by using the register form on the loginscreen
bull Then edit the permissions for that user selecting Site Administrator (limited access) ndash Collection administrator
bull Then for the appropriate collection select Reviewer and click update to save the changes
47 Managing Users and account types 61
nada Documentation Release 40
bull The newly created reviewer account user can now view all studies in a collection even if the study or collectionis unpublished
48 Manage Site Pages and Menus
The NADA has a small content management component that allows for the creation of menu pages to appear on theuser interface
bull Examples of menus that might be useful for users of the site might be A page dealing with the disseminationpolicies of the organization or perhaps a page with contact information for the information
New menu items and pages can be created via the Menu- All pages menu link at the top of the Site Administrationpage
62 Chapter 4 User manual
nada Documentation Release 40
bull Select All pages from the menu
bull To add a new page click on the Add New Page button
bull Give the page a Title in the Title field
bull Clicking in the URL field will automatically suggest a name for the page in the URL
bull Enter the contents for the page in the Body section Plain text or HTML is accespted by this field
bull Then indicate if the page should be published or not in the Publish dropdown
bull The Weight field tells the NADA in what order this menu item should display Eg 0 would be first 1 secondand 2 third
bull Click on Update to save the changes
bull View the changes from the user interface In this Example a Contact Us page was created
bull It is also possible from the Menu Management screen to add a menu link that links to an existing page on anothersite (rather than creating a page itself)
bull To change the order in which the menu items display on the user interface use the Reorder Menu button on theMenu Management screen
48 Manage Site Pages and Menus 63
nada Documentation Release 40
49 The Site Settings Page
All settings for the application are controlled via the Settings menu at the top of the Site Administration page Thereare seven main settings sections See screenshot below
491 General Settings
1 Type the Title of the site here This will become the front page title of the NADA site In this case the Title isNADA
64 Chapter 4 User manual
nada Documentation Release 40
2 The footer text can be changed in this field This displays at the bottom of your site page
3 The initial page that loads when a user visits the NADA site can be set here In this case the catalog page is setto open by default
4 The name of the webmaster can be set here This is the name that will be used in system emails sent to users
5 Enter the webmaster email address here This should be the address that will be used in communication withusers Typically this is a general enquiries email set up by the organization and not a personal email address fora particular person Note to avoid mail systems rejecting mail as spam make sure to enter an address here thatis on the same domain as the server used in the email settings at setup
6 This field sets the location of the Cache folder The cache folder stores pre- generated pages of the site to allowfor faster browsing by the user By default it is set to cache This can be moved to another location if desiredbut must be writable The green tick indicates that the folder can be found and is set up correctly Enter eitherrelative or absolute paths to the folder location
7 Set the time that the Cache takes to expire By default it is set to 2 hours (in milli seconds)
8 If it is desired to turn off caching then select no here Sometimes it is useful to turn off caching when developingor updating a site so as to ensure that content changes become immediately visible on the front-end withouthaving to wait for the cache to expire and the new changes to show Turn this back on to speed up page loadingfor users
Click update to save all settings
Language
To change the language of the application expand the language section and choose the desired language Click updateto save and apply the setting
49 The Site Settings Page 65
nada Documentation Release 40
Enable or disable the HTML editor
A basic HTML editor is provided in the menu and page creating section of the application This setting allows this tobe turned on or off
Survey catalog settings
1 This is the folder where the files for the study are stored on the server This includes the DDI eternal resourcesand data files This folder can be moved to a location outside the web root as described in the installationinstructions in Chapter 1 Enter either relative or absolute paths to the folder location
2 This is the folder where DDIrsquos can be placed in order to use the bulk study import function in the NADA InNADA3 files had to be physically copied to this folder on the server but this is no longer necessary in NADA4 Files can now be directly uploaded to this folder from the Site Administration ndash Manage Studies page page
66 Chapter 4 User manual
nada Documentation Release 40
3 Select the vocabulary to use for the topic filter By default this is set to the CESSDA classification as recom-mended in the IHSN templates supplied at IHSNorg for the Nesstar Metadata Publisher
4 Enable or disable the Country filter on the user interface search page here If the catalog only contains studiesfor one country then turning this filter off is recommended
5 Enable or disable the Topic filter on the user interface search page here If no topics have been defined in theDDIrsquos being uploaded then it is recommended to turn this filter off (disable)
6 Enable or disable the Year filter on the user interface search page here
7 Enable or disable the Collection filter on the user interface search page here If no collections have been definedthen it is recommended to disable this filter
8 Enable or disable the Data access filter on the user interface search page here This filter is not needed if thereare very few studies in the catalog or if all studies hare set to the same access type
9 This section controls the order in which the filters appear on the search page Enter numbers here that rank theorder of the filters in the order they should be displayed
10 This setting determines how many studies are displayed by default to the user on the search page ndash catalog view
Site Login settings
1 To require that users login before being able to access the website set this option to Requires all users to loginto access the website
2 Determined how long a user will stay logged in After this time the user will be automatically logged out
3 Sets the minimum length for passwords created by the users at registration or for manual user creation
49 The Site Settings Page 67
nada Documentation Release 40
SMTP Settings
1 If the PHPweb server is configured to send email using PHPrsquos MAIL function select the first option and donrsquotfill in anything else
If your organization has a mail server and has have a dedicated account that can be setup for NADA use the followingsettings Check the radio button ldquoUse SMTP Serverrdquo
2 Enter the host name for the server
3 Enter the port used by the server to send mail
4 If required enter the user name used to send mail on the server
5 Enter the password used to send mail on the server
If the organization does not own a mail server a Gmail account can be configured to be used with NADA
bull Check the radio button ldquoUse SMTP Serverrdquo
bull Host name sslsmtpgooglemailcom or sslsmtpgmailcom
bull SMTP port 465
bull Account username email-addressgmailcom
bull Account password password for the gmail account
6 Test the email settings
The quickest way to test if the email settings are working is to use the ldquoforgot passwordrdquo option from the user loginpage If no mail is received when doing this test then go back and correct the mail settings Check with the ISP orserver administrator for the correct settings
Click on update to save all settings
68 Chapter 4 User manual
nada Documentation Release 40
492 Dashboard setting
Provides a means to automatically have content loaded into the dashboard via an RSS feed from a site The defaultsetting is set to receive updates and news from the IHSN website
49 The Site Settings Page 69
nada Documentation Release 40
70 Chapter 4 User manual
CHAPTER 5
Indices and tables
bull genindex
bull modindex
bull search
71
nada Documentation Release 40
Check that all settings are marked with a green tick and fix any that are not on your webserver before running theinstaller
Click on the Install Database button and complete the form to create an initial Site Administrator account
Note create a complex password at least 12 characters long with some uppercase punctuation and numbers to aidsecurity of your site Do not forget this username and password
10 Chapter 2 Installation guide
nada Documentation Release 40
Congratulations Launch the new site
22 Installation 11
nada Documentation Release 40
23 Installing NADA using Microsoft SQL Server
231 PHP database drivers (sqlsrv)
The new Microsoft SQL drivers for PHP are called SQLSRV and provide native support for connecting to a MicrosoftSQL Server database The drivers have been tested with NADA for SQL Server 2008 and 2012
The drivers are available for download from here httpwwwmicrosoftcomen-usdownloaddetailsaspxid=20098
232 NADA Microsoft SQL Requirements
To use Microsoft SQL Server database for NADA it is recommended to use SQL Server 2008 or later with Full-Textsupport enabled The full-text engine provides faster search than the normal SQL search
The default installation of SQL Server does not include the Full-Text engine so before continuing on to installingNADA please make sure you have full-text installed on your database server
233 Download drivers
Microsoft provides two versions of the SQLSRV drivers namely version 20 and 30 NADA has only been tested withversion 20 but should work with version 30 Requirements for using the drivers
bull Windows 7 Windows Server 2008 R2 Windows Server 2008 Service Pack 2 Windows Vista Service Pack 2
bull PHP 536 or PHP 54 For information about downloading and installing PHP visit PHP on Windows(httpwindowsphpnet)
bull Microsoft SQL Server 2012 Native Client available in the SQL Server 2012 Feature Pack (This is needed ifdatabase and web server are on different machines)
bull Any edition of SQL Server 2005 or later
12 Chapter 2 Installation guide
nada Documentation Release 40
234 The Microsoft SQL Client
Microsoft SQL Client is required for connecting to your SQL database using NADA The client is installed automati-cally if your database is hosted on the same machine as your web server If your SQL database is running on a differentmachine then you must install the latest version of the SQL Client on your web server to ensure NADA can connectto your database See section on installing Microsoft SQL Client
235 How to install the SQLSRV driver for PHP
The steps are for version 20 but the same applies to version 30
1 The drivers are available from the Microsoft website httpwwwmicrosoftcomdownloadsendetailsaspxFamilyID=80e44913-24b4-4113-8807-caae6cf2ca05
2 Download the drivers and run the setup file
3 The setup file will extract a number of dll files to your PHP extension folder
4 Browse to the PHP extension folder Eg cphpextNotice there are multiple dll files included all referencing_sqlsrv
1 To find out which driver library is suitable for your version of PHP create a php file using a text editor likeNotepad eg infophp and place this code inside it
ltphp phpinfo() gt
2 Save the file and copy it to your web server root folder Open your web browser and type the location andname of the file eg infophp into your browser URL The phpinfo() function prints your PHP version and otherconfiguration settings for PHP For Example localhostinfophp To select the right sqlsrv DLL yoursquoll need toknow
bull The version of PHP Eg 53
bull Which compiler is used eg either VC9 or VC6
bull Check whether Thread Safety is enabled or not
23 Installing NADA using Microsoft SQL Server 13
nada Documentation Release 40
1 With the above values you would choose the file php_sqlsrv_53_nts_vc9dll
ts=Thread safety nts=Non-thread safety
2 Once you know which dll file to use open the phpini file using a text editor and add the following entry at theend of your PHPINI file
extension=php_sqlsrv_53_nts_vc9dll
3 Save your phpini file and restart your web server
236 Testing the SQLSRV drivers and SQL Client
To make sure the driverextension is installed correctly Reload the phpinfo page and check if the extension SQLSRVis listed on the page
If the extension is not listed on the page recheck if the correct phpini file has been edited To locate the phpini filebeing used by PHP look at the output of the phpinfo page in the section shown below
14 Chapter 2 Installation guide
nada Documentation Release 40
This step is only required if SQL Server is not on the same server as your web server To check if the SQL Client isalready installed or not follow the steps below
1 Open Control Panel Administrative Tools on your server
2 Open ODBC and switch to the tab ldquoDriversrdquo
237 Download the Microsoft SQL Client
Note The instructions here are provided for Microsoft SQL Server 2008 if are running on a later version of MicrosoftSQL Server the latest drivers can be obtained from the Microsoft website The installation steps are the same
The SQL Client is available from the Microsoft website from here httpwwwmicrosoftcomen-usdownloaddetailsaspxid=16978
Download the appropriate package for the system being used ie (32bit64bit) and run the installer to install the client
Once the client is installed restart your computer and check again from ODBC above to confirm that the client hasbeen installed
23 Installing NADA using Microsoft SQL Server 15
nada Documentation Release 40
238 NADA Database configurations for SQLSRV
Create a database and the user account to use with NADA beforehand The permissions need to include - createaltertables indexes ( See the following reference from Microsoft for instructions on how to do this
bull Database - httpmsdnmicrosoftcomen-uslibraryms186312aspx
bull User - httpmsdnmicrosoftcomen-uslibraryaa337545aspx
Open the nada database configuration file your-nada-folderapplicationconfigdatabasephp file and look for the fol-lowing lines
$db[rsquosqlsrvrsquo][rsquohostnamersquo] = localhostsqlexpress$db[rsquosqlsrvrsquo][rsquousernamersquo] = db-user-name$db[rsquosqlsrvrsquo][rsquopasswordrsquo] = password$db[rsquosqlsrvrsquo][rsquodatabasersquo] = nada-database$db[rsquosqlsrvrsquo][rsquodbdriverrsquo] = sqlsrv$db[rsquosqlsrvrsquo][rsquodbprefixrsquo] = $db[rsquosqlsrvrsquo][rsquopconnectrsquo] = FALSE$db[rsquosqlsrvrsquo][rsquodb_debugrsquo] = FALSE$db[rsquosqlsrvrsquo][rsquocache_onrsquo] = FALSE$db[rsquosqlsrvrsquo][rsquocachedirrsquo] = $db[rsquosqlsrvrsquo][rsquochar_setrsquo] = utf8$db[rsquosqlsrvrsquo][rsquodbcollatrsquo] = utf8_general_ci
Fill in the database connection settings for the database created for NADA
Save the changes
239 Running the installer
bull Open a web browser to the location of the NADA installation For examplehttpyour-domainnada-folder-name or localhostnada-folder-name
bull If the Microsoft database connection is setup correctly you should see the nada installer
16 Chapter 2 Installation guide
nada Documentation Release 40
bull Check that all settings are marked with a green tick and fix any that are not on your webserver before runningthe installer
bull Click on the Install Database button and complete the form to create an initial Site Administrator account
Note Create a complex password of atleast 12 characters long with some uppercase punctuation and numbers to aidsecurity of your site Do not forget this username and password
23 Installing NADA using Microsoft SQL Server 17
nada Documentation Release 40
Congratulations Launch the new site
18 Chapter 2 Installation guide
nada Documentation Release 40
24 PHP settings
241 Finding the correct PHPINI
To make sure you are editing the correct PHPINI settings file create a PHP file (eg infophp) in your nada websitefolder with the following contents
ltphp phpinfo() gt
Open the phpinfo page in your web browser and you should see output similar to below screenshot Edit the phpinifile displayed by the setting Loaded Configuration File
24 PHP settings 19
nada Documentation Release 40
20 Chapter 2 Installation guide
nada Documentation Release 40
242 File upload limits
By default PHP allows uploads of 2MB which could be a problem if you have large DDIs and external resource filesTo change the settings
1 Edit the phpini file in notepad and look for the setting upload_max_filesize
2 The line should look like
Maximum allowed size for uploaded files httpphpnetupload-max-filesizeupload_max_filesize = 2M
3 Change it to the required file upload limit per your needs
upload_max_filesize = 50M
4 There is another setting that MUST be changed as well for the file upload limits to work Look for the configu-ration post_max_size and change it to match the value for upload_max_filesize
post_max_size = 50M
243 TimeZone settings
This is for setting the timezone for your application To findout what is the correct timezone for your website go tohttpphpnetmanualentimezonesphp and find your countrycity
Example
datetimezone = AmericaNew_York
244 Increase page executiontimeout
This setting controls the maximum execution time of a page in seconds
max_execution_time = 300
245 Increase PHP memory limit
It controls the memory available to PHP scripts
memory_limit = 128M
246 Enabledisable PHP extensions
NADA requires the following PHP extensions
bull xsl
bull mbstring
bull mysql or sqlsrv
To enable XSL extension add this line
24 PHP settings 21
nada Documentation Release 40
extension=php_xsldll
To enable mbstring
extension=php_mbstringdll
25 Configure Captcha
By default NADA version 41 comes with image captcha and user does not need to make any changes to use imagecaptcha To use Google Captcha please follow the steps given below
1 Open applicationconfigcaptchaphp in editor
2 Change line number 12 as shown in below image
3 Click on above URL to generate Public and Private key URL httpwwwgooglecomrecaptchawhyrecaptcha
4 Click on sign up now
5 Sign in using your Gmail account
6 After signed in you will have to enter your URL (Domain URL)
22 Chapter 2 Installation guide
nada Documentation Release 40
7 Click on ldquoenable globel key for all domain
8 Click on Create Key button
9 Copy public key and private key from Google Captcha website and inserte it on line number 51 and 52 respec-tively as shown in below image
10 To check the Google catpcha configuration go to register page and look for image as shown in below URLhighlighted in Red suqare
25 Configure Captcha 23
nada Documentation Release 40
26 Email configurations
For the NADA to function correctly it is important that this step be completed
Many of the functions within the NADA ndash such as registration and applying for access to datasets require that theNADA be able to send emails to users
There are two ways to setup your email configurations 1) Create a emailphp file in the applicationconfig folder 2)Edit email settings on the site configurations page
24 Chapter 2 Installation guide
nada Documentation Release 40
261 1 Configure email via email config file
1 Open the file applicationconfigemailphp in notepad
2 Fill in the section using SMTP server with authentication enabled highlighted in below image
3 For Gmail user will have to fill the gmail smtp section shown as below
26 Email configurations 25
nada Documentation Release 40
4 Save file
Note Using a file for email configuration disable the email configuration page from the site administration
1 Login to your NADA as an administrator
2 Go to Site administration click on the Settings menu and choose ldquoSettingsrdquo
3 Find the section ldquoSMTP settingsrdquo
26 Chapter 2 Installation guide
nada Documentation Release 40
4 If the PHPweb server is configured to send email using PHPrsquos MAIL function select the first option and donrsquotfill in anything else
If your organization has a mail server and has have a dedicated account that can be setup for NADA use the followingsettings Check the radio button ldquoUse SMTP Serverrdquo
5 Enter the host name for the server
6 Enter the port used by the server to send mail
7 If required enter the user name used to send mail on the server
8 Enter the password used to send mail on the server
If the organization does not own a mail server a Gmail account can be configured to be used with NADA
bull Check the radio button ldquoUse SMTP Serverrdquo
bull Host name sslsmtpgooglemailcom or sslsmtpgmailcom
bull SMTP port 465
bull Account username email-addressgmailcom
bull Account password password for the gmail account
Test the email settings
The quickest way to test if the email settings are working is to use the ldquoforgot passwordrdquo option from the user loginpage
bull Click on forgot password
26 Email configurations 27
nada Documentation Release 40
bull Enter the administrator or any other accounts email address
bull Check to the email account the mail was sent to
bull If no mail is received the settings are wrong and need to be corrected
28 Chapter 2 Installation guide
CHAPTER 3
Upgrading from previous versions
31 Upgrade from NADA 3
For users with an existing NADA 3x catalog an upgrade script is included that will update your NADA 3x databaseto NADA 4x The process involves modifying your NADA 3x database and thus carries some risks The script willadd new tables to the NADA 3x database All user accounts and survey information will be retained by the upgrade
Important Backup the NADA 3x database before doing anything
1 Follow the instructions on page 4 and set up a folder in the web root containing the NADA 4 files
2 Edit the databasephp file as instructed in the section above NADA database configurations for MySQL
3 Instead of entering a new database name user account name and password -fill in the details of the existingNADA 3x database
Note These can be found by looking at the existing NADA 3x databasephp file and entering the settings into theNADA 4 databasephp file
4 Save the file
5 Navigate to the URL for the NADA4 site Example httpyour-nada-sitenada4indexphpnada4_upgrade
6 The following page loads
29
nada Documentation Release 40
Take note of the warnings and make any necessary corrections before clicking the ldquoUpgrade database to NADA 4rdquobutton
Warning This step makes changes to your nada 3 database that are not undo-able so make sure you do make adatabase backup before this step
Click on the ldquoUpgrade database to NADA 4rdquo button and wait for the page to reload The output of the page will looksomething like below
The script will print number of messages about failed table updates This does not mean the script failed to upgradeIt just means some of the updates were not needed on your version of NADA 3 Different versions of NADA havedifferent numbers of fields in the database and the upgrade script tries to fix the missing fields for all these differentversions of NADA If the existing NADA 3 database already has that field then it reports it as an error
You can ignore the error messages that include the wording ldquoDuplicate column namerdquo or ldquoDuplicate entryrdquo
Now your database has been migrated to NADA version 41 We will have to run one more upgrade script to forNADA version 42
7 Navigate to the URL for the NADA42 site Example httpyour-nada-sitenada42indexphpnada42_upgrade
Warning This step makes changes to your nada 41 database that are not undo-able This page will not show anymessage on the screen You will be getting blank page Please do not repeat the process
8 To verify the database upgrade Open the NADA catalog page by going to http[your-nada4-site]indexphpcatalogpage and verify all studies from NADA 3 are listed
311 Linking your NADA 3 data files to NADA 4
The upgrade script has only upgraded the database It is now necessary to tell the NADA4 where to locate the datafilesthat were uploaded to the original NADA 3 site
There are two options available
Option 1 Copy the datafiles folder from NADA 3 to NADA 4 This works best if you have only a few studies and thedatafiles folder size is small enoughto be moved easily from one location to another
Option 2 If it is not possible to easily move the datafiles folder from NADA 3 to NADA 4 you can tell NADA 4 thelocation of the datafiles without moving the files Here are the steps
bull Use your NADA 3 administrator login credentials to login to your new NADA 4 site
bull Click on Site administration in the top right corner of the screen
bull Go to the ldquoSettingsrdquo menu and click on the ldquoSettingsrdquo sub-menu
30 Chapter 3 Upgrading from previous versions
nada Documentation Release 40
bull Under Site configurations expand the ldquoSurvey Catalog Settingsrdquo section
bull For the setting ldquoCatalog folderrdquo enter the relative or full path to where the NADA 3 datafiles folder is locatedFor example if the nada3 datafiles are located on cnada3datafiles enter that path here
bull Save the configurations by clicking on the update button If now errors are shown then you have successfullyupdated the folder path
bull Check your new NADA 4 site to make sure the migration was successful
ndash Check the user administration page from site administration to make sure the users from the nada3 sitewere migrated
ndash Check the ldquoData Catalogrdquo page and view the studies by clicking on the study title to make sure the studyinformation pages are correct
ndash Check the site menus are the same as the NADA 3 site
312 Refresh DDI
In NADA 4 more information is stored in the database from the DDI than in the NADA 3 To bring all these newfields into the imported studies it is necessary to refresh the DDIrsquos The refresh DDI feature in NADA updates thedatabase with metadata from the DDI without having re-uploading the DDIs To update the metadata for all studies inyour catalog
bull Open the following NADA 4 URL in your browser
http[your-nada-4-site]indexphpadmincatalogbatch_refresh
bull Select all studies
bull Click on the ldquoRefresh DDIrdquo button
313 Transferring ownership
NADA 4 has a collection management feature When studies are imported from the NADA3 catalog into NADA4 theyare put into a collection called DEFAULT They need to be moved from this default system collection to the Central
31 Upgrade from NADA 3 31
nada Documentation Release 40
Data Catalog of the NADA4
To do this
bull Go login to the Site Administration and navigate to the Studies Manage Studies Central Data Catalog page
bull Select all the studies by ticking the check boxes next to each study on the right
bull Click on the dropdown menu and select Transfer owner
bull From the Transfer study owner page Select Central Data Catalog and then click transfer
32 Chapter 3 Upgrading from previous versions
nada Documentation Release 40
314 Updating the Site themetemplate
You cannot use your NADA3 template in NADA4 without making some changes Here are general guidelines butsteps may differ depending on your nada site template
bull Copy your NADA3 template to the NADA4 themes folder
bull Edit the [nada4-root]configtemplatephp following the steps below
bull Look for the setting ldquotheme_namerdquo by default it is set to rdquowbrdquo
bull Change ldquowbrdquo to the theme name you want to use Theme name is the folder name you copied to[NADA4]themes[your-site-theme] from your nada3 site
bull Save the file
NB The template may need some adjusting to run properly on the new NADA 4 site This will involve editingthe layoutphp and other template files within the template folder which is now located in the NADA 4 themesfolder
32 Migrate MySQL to Microsoft SQL
TODO
32 Migrate MySQL to Microsoft SQL 33
nada Documentation Release 40
34 Chapter 3 Upgrading from previous versions
CHAPTER 4
User manual
41 Overview and core concepts
411 About NADA
NADA is a web-based cataloging application that allows for the creation of portals that allows users to browse searchcompare apply for access and download relevant census or survey information
It was originally developed to support the establishment of national survey data archives The application is used by adiverse and growing number of national regional and international organizations NADA as with other IHSN toolsuses the Data Documentation Initiative (DDI) XML-based international metadata standard
412 Concepts
CENTRAL DATA CATALOG
The default catalog created when a NADA instance is installed is the Central Data Catalog All studies uploaded to theNADA are visible searchable and accessible from the Central Data Catalog For many institutions the Central DataCatalog will remain the only catalog in their NADA instance For some institutions being able to divide the contentsof the Central Data Catalog into more refined collections will be desirable
COLLECTIONS
Collections are sub categories of the Central Data Catalog They allow administrators of a NADA instance to groupstudies into what can be thought of as sub-catalogs of the Central Data Catalog This has a number of benefitsboth from the user and the administrator perspective From the usersrsquo perspective being able to filter and viewgroups (collections) of studies that logically belong together makes finding what they are looking for easier From theadministratorsrsquo perspective the ability to create collections of studies that may logically belong together facilitates theability to decentralize the management of each collection of studies to specific administrators (for example collectionscan be managed by different departments in an institution)
NOTE The creation of collections will in general only be useful and necessary for large catalogs or for catalogs thatdesire more decentralized management of groups of studies by different departments
STUDIES
Studies are carried out to gather more knowledge about a subject Studies may gather information from a number ofdifferent sources in order to answer the questions asked The information gathered for a study will in the context of
35
nada Documentation Release 40
NADA catalogs usually come from either a census or a surveys It is therefore not uncommon to hear the terms surveyand study used interchangeably when listening to people talk about their NADA catalog
METADATA
Metadata are data about the data They are not the actual data collected from the survey but rather the information thatdescribes the survey process and the data The NADA uses the Data Documentation Initiative (DDI) ndash ddiallianceorgndash standard for the presentation of metadata for each study The DDI document (which is an XML document) isprepared outside the NADA application either manually or using a tool like the Nesstar Publisher ndash nesstarcom ndash andthen imported into the NADA The detailed information about the survey is searchable down to the variable level foreach survey in the catalog
DATA ACCESS TYPES
The NADA allows for the level of access to datasets for studies to be controlled at the study level In other words thelevel of restriction can differ from study to study and can be defined on a scale ranging from direct access with norestrictions to no access Briefly the available access types are
bull Data not available - data are not available for this study
bull Direct Access Data Files - data shared under this policy can be downloaded without any restrictions The useris not required to be logged into the site and no personal information is collected on the person downloading thedata
bull Public Use Data Files - data shared under this policy requires that the user be logged in and registered on thesite before they are able to download the data The user is required to agree to a terms of use of the data and theapplication keeps records of who downloads the data
bull Licensed Data Files - data shared under this policy requires that the user be logged in and registered on the siteUsers are also required to fill in and submit a detailed application form listing their reasons for wanting accessto the data Once the user submits the application form the system informs the system administrator that anapplication has been made In order for the person to get access to the data the system administrator needs toreview the application and approve it
bull Data available in an Enclave - under this policy no data is shared through the application Users submit anapplication to access the data at a secure facility physically located on the premises of the data producer or afacility nominated by the data producer
bull Data available from external repository ndash The NADA allows for studies and their metadata to be listed in aNADA catalog but for a link to be created to another site when the data for that study are available elsewhere
CITATIONS
Citations are references that can be included at the study level which point to published works that have used the datafrom a particular study In many cases this will be a reference to a Journal Article Working paper Newspaper articleetc Such resources are useful to researchers who are interested in seeing how the data have been used before Theyare also a good way of showing the funders of surveys that the data are being used for policy and research purposesand thus are an indicator of some of the impact a study has had
USERS
Users in the NADA can be defined according to three broad groups General Users ndash this is the normal user whoregisters on a NADA site from the user interface This user type has no access to the site administration It is requiredto register as a user when accessing public use and licensed data types Site Administrators (unlimited) ndash this user
36 Chapter 4 User manual
nada Documentation Release 40
has access to all functions and all collections within the Site Administration System wide access Limited Adminis-trators ndash these administrators have access to a limited set of functions within the Site Administration Examples wouldbe an administrator of a specific collections or licensed survey reviewer for all or only some collections or reportgenerator etc
413 Why do NADA administrators need to understand these concepts
Understanding these concepts is important as it
bull Is critical to understanding the new permissions and administrator types introduced in NADA 4 Administratorsare now able to create collections within their NADArsquos and assign different roles to administrators and moregranular levels of access to catalog administration at the collection level It is now possible for example to haveadministrators whorsquos lsquopowersrsquo range from being able to manage all parts of a collectionrsquos administration downto ones with more restrictive access such as ones whose only function is as licensed survey reviewer or reportgenerator or catalog reviewer or citation manager etc
bull Ensures that the correct level of permissions and access is assigned to users based on security policies within theinstitution Unlike previous versions of NADA not all users who have access to the Site Administration needhave the level of access of an ldquounlimited site administratorrdquo This limits security risks associated with havingtoo many ldquounlimited site administratorsrdquo managing a site
bull Assists in assigning an appropriate data access type to data based on institutional distribution polices
bull Makes it easier to explain more clearly to institutional managers what the capabilities of the NADA applicationare and to advise on how to best manage the allocation of responsibilities
42 The Dashboard
After logging in to the Site Administration with administrator credentials the user is taken to the dashboard
The Dashboard provides a quick glance summary for administrators to get an overall picture of what has been happen-ing on the site as well as what pending tasks are outstanding for the administrator
42 The Dashboard 37
nada Documentation Release 40
1 Menu link to the Dashboard
2 Menu link to the Study Management pages submenus include Manage Studies Licensed requests and ManageCollections
3 Menu link to the citations management pages
4 Menu link to the User management pages submenus include All users Add user and Impersonate User
5 Menu link to create menu pages for the site frontend
6 Menu link to generate usage reports
7 Menu Link to the settings pages submenus include Settings Coutries Regions and Vocabularies
8 Useful navigation links submenus include Change Password Log out Catalog Home Data catalog Citations
9 This section lists all collections in the catalog Within each collection a summary is given of the number ofstudies along with diagnostics related to the number of studies publishedunpublished missing questionnairesdata access types set but with no data attached as well as some buttin links to Manage the collections studiesusers and a History of changes made to the collection
10 Provides a summary of users registrations and number of users currently logged in
11 Show how many pages are being cached on the site with a link to clear the cache if need be
12 Show a list of recently added or updated studies Clicking on a study in the list takes you to the page to managethat study
38 Chapter 4 User manual
nada Documentation Release 40
43 Manage Collections
431 Collections
Collections are sub categories of the Central Data Catalog They allow administrators of a NADA instance to groupstudies into what can be thought of as sub-catalogs of the Central Data Catalog
Collections provide a number of benefits both from the user and the administrator perspective From the usersrsquo per-spective being able to filter and view groups (collections) of studies that logically belong together makes finding whatthey are looking for easier From the administratorsrsquo perspective the ability to create collections of studies that maylogically belong together facilitates the ability to decentralize the management of each collection of studies to specificadministrators (for example collections can be managed by different departments in an institution)
Note The creation of collections will in general only be useful and necessary for large catalogs or for catalogs thatdesire more decentralized management of groups of studies by different departments
432 Creating collections
bull Login to the Site administration using an administrator password
bull Collections are managed and created by going to the Studies Manage collections menu link
bull There are no collections defined in the default NADA 4 installation
bull To create a new collection click on the Create new collection button
43 Manage Collections 39
nada Documentation Release 40
1 Under Collection Identification provide a short name for the collection This will become the URL for thecollection so pick carefully For Title fill in the fill title for the collection This will be the name displayed atthe top of the collection page
B Fill in a 3 or four line short description of the collection This text will display on the front end in the collectionslist For examples see httpmicrodataworldbankorgindexphpcontributing-catalogs
C Fill in a more detailed description of the collection This will display on the About page for that collection Forexample see httpmicrodataworldbankorgindexphpcatalogdhsabout
To format the page and include images it is possible to enter HTML code into this box below is anexample piece of code that includes an image
ltimg src=rdquofilesdhs-fp-01jpgrdquo alt=rdquoHealth Surveys Imagerdquo class=rdquoabout-photordquogt lth2gt Health SurveysCollectionlth2gt ltp align=rdquojustifyrdquogtThe Health Surveys collection aims to provide frequent high qual-ity and timely health data needed by the decision makers when designing public health programsltpgtltpgtHealth surveys provide useful information on health status and health consumption and their determi-nantsltpgt
Copy any images to be displayed into the NADA ldquofilesrdquo folder on your server image imagesthumbnil-imagepng
4 Upload a file to display next to the collection as it is listed on the collection page NOTE This image should be82 X 82 pixels If the upload does not work automatically then copy the thumbnail image to the ldquofilesrdquo folder asshown above
40 Chapter 4 User manual
nada Documentation Release 40
E The Weight field determines in what order collections are shown in the collection list 0123 etc The Selectcollection type drop-down is a system value to distinguish between collections that should be viewed as internal tothe organization or external For example some collections may be made up entirely of studies from an organizationoutside the host catalog These collections can be designated as external The Section dropdown allows for thecategorization as either a collection based on a specialized collection (like health) or based on a regional breakdownSelecting Publish ndash publishes the collection
bull Click on Submit to save the changes
To view the results click on the Preview link on the far right
bull The new collection now also shows in the collection list on the Central Catalog About page (this is where thethumbnail and short description fields are displayed)
43 Manage Collections 41
nada Documentation Release 40
bull Visiting the Dashboard will now also show the new collection listed below the Central Data Catalog With anumber of green buttons as shortcut links to manage the studies on the collection assign administrators for thecollection a history of activity on the collection and a link to edit the collection as in the steps above
433 Manually adding studies to a collection
There are 2 ways to get studies into the new catalog
bull The first is to upload a DDI and all its resources to the collection in the same way as described in the earliersection ndash Uploading a Study Except instead of choosing Central Catalog chose the collection you want to
42 Chapter 4 User manual
nada Documentation Release 40
upload the study to
bull Click on the Add Study button and upload a DDI and RDF and all your resources as described in the earliersection ndash Uploading a Study
bull Once a study is added in this way it displays in the Manage Studies list Notice that the collection summaryfield shows that the study belongs to (is Owned By) the DHS collection (this was the Short name defined in theexample when the Health Surveys Collection was created)
All studies uploaded to collections will automatically be added to the Central Data Catalog in order to build a commonsearch portal for all studies
43 Manage Collections 43
nada Documentation Release 40
434 Copying studies from one collection to another
bull The second way to add a study to a collection is to Copy the study from another collection into the newcollection
bull To copy a study already in the catalog to display in the new collection first make sure to be in the Manage Studiessection for the collection you want to put studies into To do this either use the Studies ndash Manage studies menuon the top or simply click on the Switch link next to the Manage Studies [Collection Title] heading
bull Then Click on the Copy Studies blue button at the top right
bull A list of all studies available to copy to the new collection is listed Simply click on the Link button in green tocopy the study to the collection The button will turn red and say Unlink To reverse the process and click thenow red button
bull Going back to the Manage Studies page for the collection will show the newly copied studies in the collectionlist Also note that the Collection field now indicated DHS next to Central DHS is in grey to indicate it is notowned (it is a copy) by that collection and the Central is in blue to show it is owned by the Central Data CatalogAlso note that because the study is not owned by this catalog it cannot be edited from this catalog ndash hence thepublishunpublish green button is absent for the copied studies
44 Chapter 4 User manual
nada Documentation Release 40
435 Turning on the collection filter
The final step after creating the first collection is to enable the collection filter option in the Settings menus under SiteConfigurations ndash Survey catalog settings
436 Transferring study ownership
In the previous examples mention was made of studies uploaded to a catalog being owned by that catalog There maybe cases where transferring the ownership from one catalog to another will be desirable This will become clearerin the next section on user roles but for now the next steps show how transferring ownership from one collection toanother can be done
bull Transferring ownership from one collection to another has to be done by the owner of the collection and fromthe collection it is currently owned by
bull To transfer ownership Go to the Manage Studies screen and select the study to be transferred Open up the EditStudy page by clicking on the study Title
bull On the right hand side of the screen click on the Transfer study owner link
43 Manage Collections 45
nada Documentation Release 40
bull Select the collection to transfer from the dropdown box
bull Click Transfer
bull Note that when looking the study summary for the transferred study the Collection field now shows the studyto belong (owned by) to the DHS collection and not Central anymore Also note the option to Publish andunpublish is now active
bull To transfer ownership of a large number of studies all at once - from the Manage Studies page ndash select the studiesto be transferred (tick them in the box left of each study) and then from the top Batch Actions drop down selectTransfer owner ndash then apply
46 Chapter 4 User manual
nada Documentation Release 40
44 Manage Studies
There are 2 Options to get studies into the new catalog
441 Option 1
bull The first is to upload a DDI and all its resources to the collection in the same way as described in the earliersection ndash Uploading a Study Except instead of choosing Central Catalog chose the collection you want toupload the study to
bull Click on the Add Study button and upload a DDI and RDF and all your resources as described in the earliersection ndash Uploading a Study
bull Once a study is added in this way it displays in the Manage Studies list Notice that the collection summaryfield shows that the study belongs to (is Owned By) the DHS collection (this was the Short name defined in theexample when the Health Surveys Collection was created)
bull Also note that the new study also appears in the Central Data Catalog
All studies uploaded to collections will automatically be added to the Central Data Catalog in order to build a commonsearch portal for all studies
44 Manage Studies 47
nada Documentation Release 40
442 Option2
Copying studies from one collection to another
bull The second way to add a study to a collection is to Copy the study from another collection into the new collection
bull To copy a study already in the catalog to display in the new collection first make sure to be in the Manage Studiessection for the collection you want to put studies into To do this either use the Studies ndash Manage studies menuon the top or simply click on the Switch link next to the Manage Studies [Collection Title] heading
bull Then Click on the Copy Studies blue button at the top right
bull A list of all studies available to copy to the new collection is listed Simply click on the Link button in green tocopy the study to the collection The button will turn red and say Unlink To reverse the process and click thenow red button
bull Going back to the Manage Studies page for the collection will show the newly copied studies in the collectionlist Also note that the Collection field now indicated DHS next to Central DHS is in grey to indicate it is notowned (it is a copy) by that collection and the Central is in blue to show it is owned by the Central Data CatalogAlso note that because the study is not owned by this catalog it cannot be edited from this catalog ndash hence thepublishunpublish green button is absent for the copied studies
45 Managing Licensed Requests
Datasets that are assigned the Access Type Licensed require approval from the NADA administrator before the usercan get access to the data files From the site administration there are a number of ways to see if any licensed requestshave been received
bull Go to the dashboard Pending requests show up as red in the catalog quicj summary section Clicking on thislink goes to the Licensed Survey Requests management page
bull Or go to the Studies link on the top menu and select Licensed Requests from the submenu
48 Chapter 4 User manual
nada Documentation Release 40
The link shows a page with a list Licensed Requests received The status column indicated the Pending requests
bull Click on the Edit link for to process a request
The Request information tab shows a summary of the information provided by the applicant
bull To Approve or Deny or request further information for the request Click on the Process tab
45 Managing Licensed Requests 49
nada Documentation Release 40
bull Select Approve to approve the request (other options include Deny as well as Request more information fromthe applicant)
bull Select the files that the user will be authorized to download ndash it is also possible to enter a maximum number ofdownloads and expiry date for downloads
bull Enter any comments to be sent to the applicant
bull Select Notify user by email to notify them that the application has been processed
bull Select Update
bull The remaining tabs
ndash Communicate - provides a means to ask for more information from the applicant
ndash Monitor ndash allows the administrator to see when and how many times the applicant downloaded thedata
ndash Forward Request ndash provides a means to forward the request to another person for review
46 Manage Citations
The Citations section is where bibliographic references can be added for publications that use any of the studies in thecatalog These citations can be linked to particular studies in the catalog and are displayed to the users of the systemin the study information view of the relevant study
Citations are added from the Citations menu
50 Chapter 4 User manual
nada Documentation Release 40
bull To add a citation - click on All citations then click on the Add New Citation button at the top right
bull Compete the form including the indication as to whether the citation should be published or not
bull Then expand the Related studies link to tell the system which studies the citation ldquobelongsrdquo to
bull Click on the Attach studies link This reveals a list of all studies in the catalog
bull Select the relevant studies by clicking on the green Select button
bull Click on the apply filter button to save the changes The study now appears in the related studies box
bull Click on the submit button to save the citation
bull Note the flag keywords and notes fields can be used by administrators to place extra notes only visible to otheradministrators that might prove useful when there is uncertainty about a citations appropriateness or accuracy
bull It is also possible to import citations in common citation formats such as BibTex and EndNote (RIS)
bull To do this use the Import Citations link from the top menu
46 Manage Citations 51
nada Documentation Release 40
bull Paste the BibTex or RIS text into the form and then at the bottom of the screen click on Attach studies to linkthe citation to a particular study in the catalog
bull The citation now appears in the citation list as well as on the study information page for the relevant studies
52 Chapter 4 User manual
nada Documentation Release 40
47 Managing Users and account types
Users in the NADA can be defined according to three broad groups
General Usersndash this is the normal user who registers on a NADA site from the user interface This user type hasno access to the site administration It is required to register as a user before being granted access to public use andlicensed data types
Site Administrators (unlimited) ndash this user has access to all functions and all collections within the Site Administra-tion System wide access
Limited Administrators ndash these administrators have access to a limited set of functions within the Site Administra-tion Examples would be an administrator of a specific collections or licensed survey reviewer for all or only somecollections or report generator or citation manager etc
471 Creating User accounts
User accounts can be created in two ways
1 A General User account can be created by a user directly from the register screen from the login link on the userinterface of the application
The user created by this process has no access to the site administration This account can only be used to apply andgain access to public and licensed datasets
2 A user account can also be created by a Site Administrator
bull To do this login as a Site Administrator
bull Go to the site administration section of the application
47 Managing Users and account types 53
nada Documentation Release 40
bull Select Users ndash Add user from the top menu
bull Fill in the information for the user in the form and be sure to mark the account status as Active Then click theCreate button
54 Chapter 4 User manual
nada Documentation Release 40
47 Managing Users and account types 55
nada Documentation Release 40
bull Note that the user always starts off as a General User with no access permissions to the Site Administration Theuser group column displays as empty for users with only general user accounts
bull To see a list of all users in the system go to the Users ndash All Users menu item at the top of the screen
bull Note the new users created have no User group assigned (they are general users) Also note the Actions columnon the far right From these links an account can be edited (including changing the password and blocking anaccount) deleted and Permissions managed for the account
472 Managing User Account Permissions
User accounts permissions can be only be set and changed by a Site Administrator To change the permissions for anaccount
bull Click on the Permissions link next to the account to be changed All accounts start of as General users accounts
bull To change this user to a full site administrator who will have full system wide access to all parts and functionsof the NADA administration select the Site administrators (full access) option and tick the admin box as wellClick update to save the changes
56 Chapter 4 User manual
nada Documentation Release 40
473 Collection level administrators
bull To create a user who only has permissions to administer studies or administration functions for a particularcollection Select Site administrators (limited access)
47 Managing Users and account types 57
nada Documentation Release 40
bull It is then necessary to assign a role to this new limited administrator account To create a limited access ad-ministrator for a particular collection ndash select Site administrators (limited access) and then select Collectionadministrators Notice The form expands to reveal a list of collections in the system
bull Select the appropriate level of access that this account will have for this collection In the example below anadministrator is being created who can manage only licensed requests for the collection ndash Health Surveys Thisaccount will not be able to upload or publish studies The account will only be able to process licensed requestsfor the collection ndash Health Surveys
58 Chapter 4 User manual
nada Documentation Release 40
Other levels of access for Site administrators (limited access) ndash Collection administrators include
1 Accounts that are given full access to manage studies
2 Accounts that are given access to upload studies but not publish them
3 Accounts that are limited to reviewing studies
474 Global level Limited access accounts
Other types of limited access accounts include
1 Accounts that can only view system reports at a global level
2 Accounts that can only access the citations section and manage citations
3 Accounts that can only access the Licensed Request management system ndash at the global level for all collections
47 Managing Users and account types 59
nada Documentation Release 40
Impersonating a user
The system includes a function that allows a Site Administrator to impersonate (take on the role) a user created inthe system This is a useful testing tool when creating users and assigning permissions It essentially allows theadministrator to take on the role of another user temporarily
bull To access the Impersonate User feature go to the Users ndash Impersonat user menu at the top of the screen
bull A list of users to impersonate is shown
bull Select the user to impersonate and click on the impersonate button
bull The dashboard view for the impersonated user now shows
60 Chapter 4 User manual
nada Documentation Release 40
bull Note in the example above the account being impersonated is a Limited Account administrator with rights onlyto manage licensed requests for the Health Surveys Collection Note that all other dashboard menus are eitherhidden or clicking on any other function other than manage studies results in an access denied message
bull This is a good way to test if the roles assigned to a user account have the expected results
bull To exit the impersonate mode and return to the Site Administrator role ndash Click on the top right menu and selectExit impersonate mode
475 The Reviewer Limited access account
Sometimes it is desirable for catalog administrators to allow certain users to see a collection before it is published butwithout granting access to the site administration functions
This is useful for getting feedback on the correctness of information on collections or studies before publishing
To do this
bull First create an account for the user or get the user to create an account by using the register form on the loginscreen
bull Then edit the permissions for that user selecting Site Administrator (limited access) ndash Collection administrator
bull Then for the appropriate collection select Reviewer and click update to save the changes
47 Managing Users and account types 61
nada Documentation Release 40
bull The newly created reviewer account user can now view all studies in a collection even if the study or collectionis unpublished
48 Manage Site Pages and Menus
The NADA has a small content management component that allows for the creation of menu pages to appear on theuser interface
bull Examples of menus that might be useful for users of the site might be A page dealing with the disseminationpolicies of the organization or perhaps a page with contact information for the information
New menu items and pages can be created via the Menu- All pages menu link at the top of the Site Administrationpage
62 Chapter 4 User manual
nada Documentation Release 40
bull Select All pages from the menu
bull To add a new page click on the Add New Page button
bull Give the page a Title in the Title field
bull Clicking in the URL field will automatically suggest a name for the page in the URL
bull Enter the contents for the page in the Body section Plain text or HTML is accespted by this field
bull Then indicate if the page should be published or not in the Publish dropdown
bull The Weight field tells the NADA in what order this menu item should display Eg 0 would be first 1 secondand 2 third
bull Click on Update to save the changes
bull View the changes from the user interface In this Example a Contact Us page was created
bull It is also possible from the Menu Management screen to add a menu link that links to an existing page on anothersite (rather than creating a page itself)
bull To change the order in which the menu items display on the user interface use the Reorder Menu button on theMenu Management screen
48 Manage Site Pages and Menus 63
nada Documentation Release 40
49 The Site Settings Page
All settings for the application are controlled via the Settings menu at the top of the Site Administration page Thereare seven main settings sections See screenshot below
491 General Settings
1 Type the Title of the site here This will become the front page title of the NADA site In this case the Title isNADA
64 Chapter 4 User manual
nada Documentation Release 40
2 The footer text can be changed in this field This displays at the bottom of your site page
3 The initial page that loads when a user visits the NADA site can be set here In this case the catalog page is setto open by default
4 The name of the webmaster can be set here This is the name that will be used in system emails sent to users
5 Enter the webmaster email address here This should be the address that will be used in communication withusers Typically this is a general enquiries email set up by the organization and not a personal email address fora particular person Note to avoid mail systems rejecting mail as spam make sure to enter an address here thatis on the same domain as the server used in the email settings at setup
6 This field sets the location of the Cache folder The cache folder stores pre- generated pages of the site to allowfor faster browsing by the user By default it is set to cache This can be moved to another location if desiredbut must be writable The green tick indicates that the folder can be found and is set up correctly Enter eitherrelative or absolute paths to the folder location
7 Set the time that the Cache takes to expire By default it is set to 2 hours (in milli seconds)
8 If it is desired to turn off caching then select no here Sometimes it is useful to turn off caching when developingor updating a site so as to ensure that content changes become immediately visible on the front-end withouthaving to wait for the cache to expire and the new changes to show Turn this back on to speed up page loadingfor users
Click update to save all settings
Language
To change the language of the application expand the language section and choose the desired language Click updateto save and apply the setting
49 The Site Settings Page 65
nada Documentation Release 40
Enable or disable the HTML editor
A basic HTML editor is provided in the menu and page creating section of the application This setting allows this tobe turned on or off
Survey catalog settings
1 This is the folder where the files for the study are stored on the server This includes the DDI eternal resourcesand data files This folder can be moved to a location outside the web root as described in the installationinstructions in Chapter 1 Enter either relative or absolute paths to the folder location
2 This is the folder where DDIrsquos can be placed in order to use the bulk study import function in the NADA InNADA3 files had to be physically copied to this folder on the server but this is no longer necessary in NADA4 Files can now be directly uploaded to this folder from the Site Administration ndash Manage Studies page page
66 Chapter 4 User manual
nada Documentation Release 40
3 Select the vocabulary to use for the topic filter By default this is set to the CESSDA classification as recom-mended in the IHSN templates supplied at IHSNorg for the Nesstar Metadata Publisher
4 Enable or disable the Country filter on the user interface search page here If the catalog only contains studiesfor one country then turning this filter off is recommended
5 Enable or disable the Topic filter on the user interface search page here If no topics have been defined in theDDIrsquos being uploaded then it is recommended to turn this filter off (disable)
6 Enable or disable the Year filter on the user interface search page here
7 Enable or disable the Collection filter on the user interface search page here If no collections have been definedthen it is recommended to disable this filter
8 Enable or disable the Data access filter on the user interface search page here This filter is not needed if thereare very few studies in the catalog or if all studies hare set to the same access type
9 This section controls the order in which the filters appear on the search page Enter numbers here that rank theorder of the filters in the order they should be displayed
10 This setting determines how many studies are displayed by default to the user on the search page ndash catalog view
Site Login settings
1 To require that users login before being able to access the website set this option to Requires all users to loginto access the website
2 Determined how long a user will stay logged in After this time the user will be automatically logged out
3 Sets the minimum length for passwords created by the users at registration or for manual user creation
49 The Site Settings Page 67
nada Documentation Release 40
SMTP Settings
1 If the PHPweb server is configured to send email using PHPrsquos MAIL function select the first option and donrsquotfill in anything else
If your organization has a mail server and has have a dedicated account that can be setup for NADA use the followingsettings Check the radio button ldquoUse SMTP Serverrdquo
2 Enter the host name for the server
3 Enter the port used by the server to send mail
4 If required enter the user name used to send mail on the server
5 Enter the password used to send mail on the server
If the organization does not own a mail server a Gmail account can be configured to be used with NADA
bull Check the radio button ldquoUse SMTP Serverrdquo
bull Host name sslsmtpgooglemailcom or sslsmtpgmailcom
bull SMTP port 465
bull Account username email-addressgmailcom
bull Account password password for the gmail account
6 Test the email settings
The quickest way to test if the email settings are working is to use the ldquoforgot passwordrdquo option from the user loginpage If no mail is received when doing this test then go back and correct the mail settings Check with the ISP orserver administrator for the correct settings
Click on update to save all settings
68 Chapter 4 User manual
nada Documentation Release 40
492 Dashboard setting
Provides a means to automatically have content loaded into the dashboard via an RSS feed from a site The defaultsetting is set to receive updates and news from the IHSN website
49 The Site Settings Page 69
nada Documentation Release 40
70 Chapter 4 User manual
CHAPTER 5
Indices and tables
bull genindex
bull modindex
bull search
71

nada Documentation Release 40
Congratulations Launch the new site
22 Installation 11
nada Documentation Release 40
23 Installing NADA using Microsoft SQL Server
231 PHP database drivers (sqlsrv)
The new Microsoft SQL drivers for PHP are called SQLSRV and provide native support for connecting to a MicrosoftSQL Server database The drivers have been tested with NADA for SQL Server 2008 and 2012
The drivers are available for download from here httpwwwmicrosoftcomen-usdownloaddetailsaspxid=20098
232 NADA Microsoft SQL Requirements
To use Microsoft SQL Server database for NADA it is recommended to use SQL Server 2008 or later with Full-Textsupport enabled The full-text engine provides faster search than the normal SQL search
The default installation of SQL Server does not include the Full-Text engine so before continuing on to installingNADA please make sure you have full-text installed on your database server
233 Download drivers
Microsoft provides two versions of the SQLSRV drivers namely version 20 and 30 NADA has only been tested withversion 20 but should work with version 30 Requirements for using the drivers
bull Windows 7 Windows Server 2008 R2 Windows Server 2008 Service Pack 2 Windows Vista Service Pack 2
bull PHP 536 or PHP 54 For information about downloading and installing PHP visit PHP on Windows(httpwindowsphpnet)
bull Microsoft SQL Server 2012 Native Client available in the SQL Server 2012 Feature Pack (This is needed ifdatabase and web server are on different machines)
bull Any edition of SQL Server 2005 or later
12 Chapter 2 Installation guide
nada Documentation Release 40
234 The Microsoft SQL Client
Microsoft SQL Client is required for connecting to your SQL database using NADA The client is installed automati-cally if your database is hosted on the same machine as your web server If your SQL database is running on a differentmachine then you must install the latest version of the SQL Client on your web server to ensure NADA can connectto your database See section on installing Microsoft SQL Client
235 How to install the SQLSRV driver for PHP
The steps are for version 20 but the same applies to version 30
1 The drivers are available from the Microsoft website httpwwwmicrosoftcomdownloadsendetailsaspxFamilyID=80e44913-24b4-4113-8807-caae6cf2ca05
2 Download the drivers and run the setup file
3 The setup file will extract a number of dll files to your PHP extension folder
4 Browse to the PHP extension folder Eg cphpextNotice there are multiple dll files included all referencing_sqlsrv
1 To find out which driver library is suitable for your version of PHP create a php file using a text editor likeNotepad eg infophp and place this code inside it
ltphp phpinfo() gt
2 Save the file and copy it to your web server root folder Open your web browser and type the location andname of the file eg infophp into your browser URL The phpinfo() function prints your PHP version and otherconfiguration settings for PHP For Example localhostinfophp To select the right sqlsrv DLL yoursquoll need toknow
bull The version of PHP Eg 53
bull Which compiler is used eg either VC9 or VC6
bull Check whether Thread Safety is enabled or not
23 Installing NADA using Microsoft SQL Server 13
nada Documentation Release 40
1 With the above values you would choose the file php_sqlsrv_53_nts_vc9dll
ts=Thread safety nts=Non-thread safety
2 Once you know which dll file to use open the phpini file using a text editor and add the following entry at theend of your PHPINI file
extension=php_sqlsrv_53_nts_vc9dll
3 Save your phpini file and restart your web server
236 Testing the SQLSRV drivers and SQL Client
To make sure the driverextension is installed correctly Reload the phpinfo page and check if the extension SQLSRVis listed on the page
If the extension is not listed on the page recheck if the correct phpini file has been edited To locate the phpini filebeing used by PHP look at the output of the phpinfo page in the section shown below
14 Chapter 2 Installation guide
nada Documentation Release 40
This step is only required if SQL Server is not on the same server as your web server To check if the SQL Client isalready installed or not follow the steps below
1 Open Control Panel Administrative Tools on your server
2 Open ODBC and switch to the tab ldquoDriversrdquo
237 Download the Microsoft SQL Client
Note The instructions here are provided for Microsoft SQL Server 2008 if are running on a later version of MicrosoftSQL Server the latest drivers can be obtained from the Microsoft website The installation steps are the same
The SQL Client is available from the Microsoft website from here httpwwwmicrosoftcomen-usdownloaddetailsaspxid=16978
Download the appropriate package for the system being used ie (32bit64bit) and run the installer to install the client
Once the client is installed restart your computer and check again from ODBC above to confirm that the client hasbeen installed
23 Installing NADA using Microsoft SQL Server 15
nada Documentation Release 40
238 NADA Database configurations for SQLSRV
Create a database and the user account to use with NADA beforehand The permissions need to include - createaltertables indexes ( See the following reference from Microsoft for instructions on how to do this
bull Database - httpmsdnmicrosoftcomen-uslibraryms186312aspx
bull User - httpmsdnmicrosoftcomen-uslibraryaa337545aspx
Open the nada database configuration file your-nada-folderapplicationconfigdatabasephp file and look for the fol-lowing lines
$db[rsquosqlsrvrsquo][rsquohostnamersquo] = localhostsqlexpress$db[rsquosqlsrvrsquo][rsquousernamersquo] = db-user-name$db[rsquosqlsrvrsquo][rsquopasswordrsquo] = password$db[rsquosqlsrvrsquo][rsquodatabasersquo] = nada-database$db[rsquosqlsrvrsquo][rsquodbdriverrsquo] = sqlsrv$db[rsquosqlsrvrsquo][rsquodbprefixrsquo] = $db[rsquosqlsrvrsquo][rsquopconnectrsquo] = FALSE$db[rsquosqlsrvrsquo][rsquodb_debugrsquo] = FALSE$db[rsquosqlsrvrsquo][rsquocache_onrsquo] = FALSE$db[rsquosqlsrvrsquo][rsquocachedirrsquo] = $db[rsquosqlsrvrsquo][rsquochar_setrsquo] = utf8$db[rsquosqlsrvrsquo][rsquodbcollatrsquo] = utf8_general_ci
Fill in the database connection settings for the database created for NADA
Save the changes
239 Running the installer
bull Open a web browser to the location of the NADA installation For examplehttpyour-domainnada-folder-name or localhostnada-folder-name
bull If the Microsoft database connection is setup correctly you should see the nada installer
16 Chapter 2 Installation guide
nada Documentation Release 40
bull Check that all settings are marked with a green tick and fix any that are not on your webserver before runningthe installer
bull Click on the Install Database button and complete the form to create an initial Site Administrator account
Note Create a complex password of atleast 12 characters long with some uppercase punctuation and numbers to aidsecurity of your site Do not forget this username and password
23 Installing NADA using Microsoft SQL Server 17
nada Documentation Release 40
Congratulations Launch the new site
18 Chapter 2 Installation guide
nada Documentation Release 40
24 PHP settings
241 Finding the correct PHPINI
To make sure you are editing the correct PHPINI settings file create a PHP file (eg infophp) in your nada websitefolder with the following contents
ltphp phpinfo() gt
Open the phpinfo page in your web browser and you should see output similar to below screenshot Edit the phpinifile displayed by the setting Loaded Configuration File
24 PHP settings 19
nada Documentation Release 40
20 Chapter 2 Installation guide
nada Documentation Release 40
242 File upload limits
By default PHP allows uploads of 2MB which could be a problem if you have large DDIs and external resource filesTo change the settings
1 Edit the phpini file in notepad and look for the setting upload_max_filesize
2 The line should look like
Maximum allowed size for uploaded files httpphpnetupload-max-filesizeupload_max_filesize = 2M
3 Change it to the required file upload limit per your needs
upload_max_filesize = 50M
4 There is another setting that MUST be changed as well for the file upload limits to work Look for the configu-ration post_max_size and change it to match the value for upload_max_filesize
post_max_size = 50M
243 TimeZone settings
This is for setting the timezone for your application To findout what is the correct timezone for your website go tohttpphpnetmanualentimezonesphp and find your countrycity
Example
datetimezone = AmericaNew_York
244 Increase page executiontimeout
This setting controls the maximum execution time of a page in seconds
max_execution_time = 300
245 Increase PHP memory limit
It controls the memory available to PHP scripts
memory_limit = 128M
246 Enabledisable PHP extensions
NADA requires the following PHP extensions
bull xsl
bull mbstring
bull mysql or sqlsrv
To enable XSL extension add this line
24 PHP settings 21
nada Documentation Release 40
extension=php_xsldll
To enable mbstring
extension=php_mbstringdll
25 Configure Captcha
By default NADA version 41 comes with image captcha and user does not need to make any changes to use imagecaptcha To use Google Captcha please follow the steps given below
1 Open applicationconfigcaptchaphp in editor
2 Change line number 12 as shown in below image
3 Click on above URL to generate Public and Private key URL httpwwwgooglecomrecaptchawhyrecaptcha
4 Click on sign up now
5 Sign in using your Gmail account
6 After signed in you will have to enter your URL (Domain URL)
22 Chapter 2 Installation guide
nada Documentation Release 40
7 Click on ldquoenable globel key for all domain
8 Click on Create Key button
9 Copy public key and private key from Google Captcha website and inserte it on line number 51 and 52 respec-tively as shown in below image
10 To check the Google catpcha configuration go to register page and look for image as shown in below URLhighlighted in Red suqare
25 Configure Captcha 23
nada Documentation Release 40
26 Email configurations
For the NADA to function correctly it is important that this step be completed
Many of the functions within the NADA ndash such as registration and applying for access to datasets require that theNADA be able to send emails to users
There are two ways to setup your email configurations 1) Create a emailphp file in the applicationconfig folder 2)Edit email settings on the site configurations page
24 Chapter 2 Installation guide
nada Documentation Release 40
261 1 Configure email via email config file
1 Open the file applicationconfigemailphp in notepad
2 Fill in the section using SMTP server with authentication enabled highlighted in below image
3 For Gmail user will have to fill the gmail smtp section shown as below
26 Email configurations 25
nada Documentation Release 40
4 Save file
Note Using a file for email configuration disable the email configuration page from the site administration
1 Login to your NADA as an administrator
2 Go to Site administration click on the Settings menu and choose ldquoSettingsrdquo
3 Find the section ldquoSMTP settingsrdquo
26 Chapter 2 Installation guide
nada Documentation Release 40
4 If the PHPweb server is configured to send email using PHPrsquos MAIL function select the first option and donrsquotfill in anything else
If your organization has a mail server and has have a dedicated account that can be setup for NADA use the followingsettings Check the radio button ldquoUse SMTP Serverrdquo
5 Enter the host name for the server
6 Enter the port used by the server to send mail
7 If required enter the user name used to send mail on the server
8 Enter the password used to send mail on the server
If the organization does not own a mail server a Gmail account can be configured to be used with NADA
bull Check the radio button ldquoUse SMTP Serverrdquo
bull Host name sslsmtpgooglemailcom or sslsmtpgmailcom
bull SMTP port 465
bull Account username email-addressgmailcom
bull Account password password for the gmail account
Test the email settings
The quickest way to test if the email settings are working is to use the ldquoforgot passwordrdquo option from the user loginpage
bull Click on forgot password
26 Email configurations 27
nada Documentation Release 40
bull Enter the administrator or any other accounts email address
bull Check to the email account the mail was sent to
bull If no mail is received the settings are wrong and need to be corrected
28 Chapter 2 Installation guide
CHAPTER 3
Upgrading from previous versions
31 Upgrade from NADA 3
For users with an existing NADA 3x catalog an upgrade script is included that will update your NADA 3x databaseto NADA 4x The process involves modifying your NADA 3x database and thus carries some risks The script willadd new tables to the NADA 3x database All user accounts and survey information will be retained by the upgrade
Important Backup the NADA 3x database before doing anything
1 Follow the instructions on page 4 and set up a folder in the web root containing the NADA 4 files
2 Edit the databasephp file as instructed in the section above NADA database configurations for MySQL
3 Instead of entering a new database name user account name and password -fill in the details of the existingNADA 3x database
Note These can be found by looking at the existing NADA 3x databasephp file and entering the settings into theNADA 4 databasephp file
4 Save the file
5 Navigate to the URL for the NADA4 site Example httpyour-nada-sitenada4indexphpnada4_upgrade
6 The following page loads
29
nada Documentation Release 40
Take note of the warnings and make any necessary corrections before clicking the ldquoUpgrade database to NADA 4rdquobutton
Warning This step makes changes to your nada 3 database that are not undo-able so make sure you do make adatabase backup before this step
Click on the ldquoUpgrade database to NADA 4rdquo button and wait for the page to reload The output of the page will looksomething like below
The script will print number of messages about failed table updates This does not mean the script failed to upgradeIt just means some of the updates were not needed on your version of NADA 3 Different versions of NADA havedifferent numbers of fields in the database and the upgrade script tries to fix the missing fields for all these differentversions of NADA If the existing NADA 3 database already has that field then it reports it as an error
You can ignore the error messages that include the wording ldquoDuplicate column namerdquo or ldquoDuplicate entryrdquo
Now your database has been migrated to NADA version 41 We will have to run one more upgrade script to forNADA version 42
7 Navigate to the URL for the NADA42 site Example httpyour-nada-sitenada42indexphpnada42_upgrade
Warning This step makes changes to your nada 41 database that are not undo-able This page will not show anymessage on the screen You will be getting blank page Please do not repeat the process
8 To verify the database upgrade Open the NADA catalog page by going to http[your-nada4-site]indexphpcatalogpage and verify all studies from NADA 3 are listed
311 Linking your NADA 3 data files to NADA 4
The upgrade script has only upgraded the database It is now necessary to tell the NADA4 where to locate the datafilesthat were uploaded to the original NADA 3 site
There are two options available
Option 1 Copy the datafiles folder from NADA 3 to NADA 4 This works best if you have only a few studies and thedatafiles folder size is small enoughto be moved easily from one location to another
Option 2 If it is not possible to easily move the datafiles folder from NADA 3 to NADA 4 you can tell NADA 4 thelocation of the datafiles without moving the files Here are the steps
bull Use your NADA 3 administrator login credentials to login to your new NADA 4 site
bull Click on Site administration in the top right corner of the screen
bull Go to the ldquoSettingsrdquo menu and click on the ldquoSettingsrdquo sub-menu
30 Chapter 3 Upgrading from previous versions
nada Documentation Release 40
bull Under Site configurations expand the ldquoSurvey Catalog Settingsrdquo section
bull For the setting ldquoCatalog folderrdquo enter the relative or full path to where the NADA 3 datafiles folder is locatedFor example if the nada3 datafiles are located on cnada3datafiles enter that path here
bull Save the configurations by clicking on the update button If now errors are shown then you have successfullyupdated the folder path
bull Check your new NADA 4 site to make sure the migration was successful
ndash Check the user administration page from site administration to make sure the users from the nada3 sitewere migrated
ndash Check the ldquoData Catalogrdquo page and view the studies by clicking on the study title to make sure the studyinformation pages are correct
ndash Check the site menus are the same as the NADA 3 site
312 Refresh DDI
In NADA 4 more information is stored in the database from the DDI than in the NADA 3 To bring all these newfields into the imported studies it is necessary to refresh the DDIrsquos The refresh DDI feature in NADA updates thedatabase with metadata from the DDI without having re-uploading the DDIs To update the metadata for all studies inyour catalog
bull Open the following NADA 4 URL in your browser
http[your-nada-4-site]indexphpadmincatalogbatch_refresh
bull Select all studies
bull Click on the ldquoRefresh DDIrdquo button
313 Transferring ownership
NADA 4 has a collection management feature When studies are imported from the NADA3 catalog into NADA4 theyare put into a collection called DEFAULT They need to be moved from this default system collection to the Central
31 Upgrade from NADA 3 31
nada Documentation Release 40
Data Catalog of the NADA4
To do this
bull Go login to the Site Administration and navigate to the Studies Manage Studies Central Data Catalog page
bull Select all the studies by ticking the check boxes next to each study on the right
bull Click on the dropdown menu and select Transfer owner
bull From the Transfer study owner page Select Central Data Catalog and then click transfer
32 Chapter 3 Upgrading from previous versions
nada Documentation Release 40
314 Updating the Site themetemplate
You cannot use your NADA3 template in NADA4 without making some changes Here are general guidelines butsteps may differ depending on your nada site template
bull Copy your NADA3 template to the NADA4 themes folder
bull Edit the [nada4-root]configtemplatephp following the steps below
bull Look for the setting ldquotheme_namerdquo by default it is set to rdquowbrdquo
bull Change ldquowbrdquo to the theme name you want to use Theme name is the folder name you copied to[NADA4]themes[your-site-theme] from your nada3 site
bull Save the file
NB The template may need some adjusting to run properly on the new NADA 4 site This will involve editingthe layoutphp and other template files within the template folder which is now located in the NADA 4 themesfolder
32 Migrate MySQL to Microsoft SQL
TODO
32 Migrate MySQL to Microsoft SQL 33
nada Documentation Release 40
34 Chapter 3 Upgrading from previous versions
CHAPTER 4
User manual
41 Overview and core concepts
411 About NADA
NADA is a web-based cataloging application that allows for the creation of portals that allows users to browse searchcompare apply for access and download relevant census or survey information
It was originally developed to support the establishment of national survey data archives The application is used by adiverse and growing number of national regional and international organizations NADA as with other IHSN toolsuses the Data Documentation Initiative (DDI) XML-based international metadata standard
412 Concepts
CENTRAL DATA CATALOG
The default catalog created when a NADA instance is installed is the Central Data Catalog All studies uploaded to theNADA are visible searchable and accessible from the Central Data Catalog For many institutions the Central DataCatalog will remain the only catalog in their NADA instance For some institutions being able to divide the contentsof the Central Data Catalog into more refined collections will be desirable
COLLECTIONS
Collections are sub categories of the Central Data Catalog They allow administrators of a NADA instance to groupstudies into what can be thought of as sub-catalogs of the Central Data Catalog This has a number of benefitsboth from the user and the administrator perspective From the usersrsquo perspective being able to filter and viewgroups (collections) of studies that logically belong together makes finding what they are looking for easier From theadministratorsrsquo perspective the ability to create collections of studies that may logically belong together facilitates theability to decentralize the management of each collection of studies to specific administrators (for example collectionscan be managed by different departments in an institution)
NOTE The creation of collections will in general only be useful and necessary for large catalogs or for catalogs thatdesire more decentralized management of groups of studies by different departments
STUDIES
Studies are carried out to gather more knowledge about a subject Studies may gather information from a number ofdifferent sources in order to answer the questions asked The information gathered for a study will in the context of
35
nada Documentation Release 40
NADA catalogs usually come from either a census or a surveys It is therefore not uncommon to hear the terms surveyand study used interchangeably when listening to people talk about their NADA catalog
METADATA
Metadata are data about the data They are not the actual data collected from the survey but rather the information thatdescribes the survey process and the data The NADA uses the Data Documentation Initiative (DDI) ndash ddiallianceorgndash standard for the presentation of metadata for each study The DDI document (which is an XML document) isprepared outside the NADA application either manually or using a tool like the Nesstar Publisher ndash nesstarcom ndash andthen imported into the NADA The detailed information about the survey is searchable down to the variable level foreach survey in the catalog
DATA ACCESS TYPES
The NADA allows for the level of access to datasets for studies to be controlled at the study level In other words thelevel of restriction can differ from study to study and can be defined on a scale ranging from direct access with norestrictions to no access Briefly the available access types are
bull Data not available - data are not available for this study
bull Direct Access Data Files - data shared under this policy can be downloaded without any restrictions The useris not required to be logged into the site and no personal information is collected on the person downloading thedata
bull Public Use Data Files - data shared under this policy requires that the user be logged in and registered on thesite before they are able to download the data The user is required to agree to a terms of use of the data and theapplication keeps records of who downloads the data
bull Licensed Data Files - data shared under this policy requires that the user be logged in and registered on the siteUsers are also required to fill in and submit a detailed application form listing their reasons for wanting accessto the data Once the user submits the application form the system informs the system administrator that anapplication has been made In order for the person to get access to the data the system administrator needs toreview the application and approve it
bull Data available in an Enclave - under this policy no data is shared through the application Users submit anapplication to access the data at a secure facility physically located on the premises of the data producer or afacility nominated by the data producer
bull Data available from external repository ndash The NADA allows for studies and their metadata to be listed in aNADA catalog but for a link to be created to another site when the data for that study are available elsewhere
CITATIONS
Citations are references that can be included at the study level which point to published works that have used the datafrom a particular study In many cases this will be a reference to a Journal Article Working paper Newspaper articleetc Such resources are useful to researchers who are interested in seeing how the data have been used before Theyare also a good way of showing the funders of surveys that the data are being used for policy and research purposesand thus are an indicator of some of the impact a study has had
USERS
Users in the NADA can be defined according to three broad groups General Users ndash this is the normal user whoregisters on a NADA site from the user interface This user type has no access to the site administration It is requiredto register as a user when accessing public use and licensed data types Site Administrators (unlimited) ndash this user
36 Chapter 4 User manual
nada Documentation Release 40
has access to all functions and all collections within the Site Administration System wide access Limited Adminis-trators ndash these administrators have access to a limited set of functions within the Site Administration Examples wouldbe an administrator of a specific collections or licensed survey reviewer for all or only some collections or reportgenerator etc
413 Why do NADA administrators need to understand these concepts
Understanding these concepts is important as it
bull Is critical to understanding the new permissions and administrator types introduced in NADA 4 Administratorsare now able to create collections within their NADArsquos and assign different roles to administrators and moregranular levels of access to catalog administration at the collection level It is now possible for example to haveadministrators whorsquos lsquopowersrsquo range from being able to manage all parts of a collectionrsquos administration downto ones with more restrictive access such as ones whose only function is as licensed survey reviewer or reportgenerator or catalog reviewer or citation manager etc
bull Ensures that the correct level of permissions and access is assigned to users based on security policies within theinstitution Unlike previous versions of NADA not all users who have access to the Site Administration needhave the level of access of an ldquounlimited site administratorrdquo This limits security risks associated with havingtoo many ldquounlimited site administratorsrdquo managing a site
bull Assists in assigning an appropriate data access type to data based on institutional distribution polices
bull Makes it easier to explain more clearly to institutional managers what the capabilities of the NADA applicationare and to advise on how to best manage the allocation of responsibilities
42 The Dashboard
After logging in to the Site Administration with administrator credentials the user is taken to the dashboard
The Dashboard provides a quick glance summary for administrators to get an overall picture of what has been happen-ing on the site as well as what pending tasks are outstanding for the administrator
42 The Dashboard 37
nada Documentation Release 40
1 Menu link to the Dashboard
2 Menu link to the Study Management pages submenus include Manage Studies Licensed requests and ManageCollections
3 Menu link to the citations management pages
4 Menu link to the User management pages submenus include All users Add user and Impersonate User
5 Menu link to create menu pages for the site frontend
6 Menu link to generate usage reports
7 Menu Link to the settings pages submenus include Settings Coutries Regions and Vocabularies
8 Useful navigation links submenus include Change Password Log out Catalog Home Data catalog Citations
9 This section lists all collections in the catalog Within each collection a summary is given of the number ofstudies along with diagnostics related to the number of studies publishedunpublished missing questionnairesdata access types set but with no data attached as well as some buttin links to Manage the collections studiesusers and a History of changes made to the collection
10 Provides a summary of users registrations and number of users currently logged in
11 Show how many pages are being cached on the site with a link to clear the cache if need be
12 Show a list of recently added or updated studies Clicking on a study in the list takes you to the page to managethat study
38 Chapter 4 User manual
nada Documentation Release 40
43 Manage Collections
431 Collections
Collections are sub categories of the Central Data Catalog They allow administrators of a NADA instance to groupstudies into what can be thought of as sub-catalogs of the Central Data Catalog
Collections provide a number of benefits both from the user and the administrator perspective From the usersrsquo per-spective being able to filter and view groups (collections) of studies that logically belong together makes finding whatthey are looking for easier From the administratorsrsquo perspective the ability to create collections of studies that maylogically belong together facilitates the ability to decentralize the management of each collection of studies to specificadministrators (for example collections can be managed by different departments in an institution)
Note The creation of collections will in general only be useful and necessary for large catalogs or for catalogs thatdesire more decentralized management of groups of studies by different departments
432 Creating collections
bull Login to the Site administration using an administrator password
bull Collections are managed and created by going to the Studies Manage collections menu link
bull There are no collections defined in the default NADA 4 installation
bull To create a new collection click on the Create new collection button
43 Manage Collections 39
nada Documentation Release 40
1 Under Collection Identification provide a short name for the collection This will become the URL for thecollection so pick carefully For Title fill in the fill title for the collection This will be the name displayed atthe top of the collection page
B Fill in a 3 or four line short description of the collection This text will display on the front end in the collectionslist For examples see httpmicrodataworldbankorgindexphpcontributing-catalogs
C Fill in a more detailed description of the collection This will display on the About page for that collection Forexample see httpmicrodataworldbankorgindexphpcatalogdhsabout
To format the page and include images it is possible to enter HTML code into this box below is anexample piece of code that includes an image
ltimg src=rdquofilesdhs-fp-01jpgrdquo alt=rdquoHealth Surveys Imagerdquo class=rdquoabout-photordquogt lth2gt Health SurveysCollectionlth2gt ltp align=rdquojustifyrdquogtThe Health Surveys collection aims to provide frequent high qual-ity and timely health data needed by the decision makers when designing public health programsltpgtltpgtHealth surveys provide useful information on health status and health consumption and their determi-nantsltpgt
Copy any images to be displayed into the NADA ldquofilesrdquo folder on your server image imagesthumbnil-imagepng
4 Upload a file to display next to the collection as it is listed on the collection page NOTE This image should be82 X 82 pixels If the upload does not work automatically then copy the thumbnail image to the ldquofilesrdquo folder asshown above
40 Chapter 4 User manual
nada Documentation Release 40
E The Weight field determines in what order collections are shown in the collection list 0123 etc The Selectcollection type drop-down is a system value to distinguish between collections that should be viewed as internal tothe organization or external For example some collections may be made up entirely of studies from an organizationoutside the host catalog These collections can be designated as external The Section dropdown allows for thecategorization as either a collection based on a specialized collection (like health) or based on a regional breakdownSelecting Publish ndash publishes the collection
bull Click on Submit to save the changes
To view the results click on the Preview link on the far right
bull The new collection now also shows in the collection list on the Central Catalog About page (this is where thethumbnail and short description fields are displayed)
43 Manage Collections 41
nada Documentation Release 40
bull Visiting the Dashboard will now also show the new collection listed below the Central Data Catalog With anumber of green buttons as shortcut links to manage the studies on the collection assign administrators for thecollection a history of activity on the collection and a link to edit the collection as in the steps above
433 Manually adding studies to a collection
There are 2 ways to get studies into the new catalog
bull The first is to upload a DDI and all its resources to the collection in the same way as described in the earliersection ndash Uploading a Study Except instead of choosing Central Catalog chose the collection you want to
42 Chapter 4 User manual
nada Documentation Release 40
upload the study to
bull Click on the Add Study button and upload a DDI and RDF and all your resources as described in the earliersection ndash Uploading a Study
bull Once a study is added in this way it displays in the Manage Studies list Notice that the collection summaryfield shows that the study belongs to (is Owned By) the DHS collection (this was the Short name defined in theexample when the Health Surveys Collection was created)
All studies uploaded to collections will automatically be added to the Central Data Catalog in order to build a commonsearch portal for all studies
43 Manage Collections 43
nada Documentation Release 40
434 Copying studies from one collection to another
bull The second way to add a study to a collection is to Copy the study from another collection into the newcollection
bull To copy a study already in the catalog to display in the new collection first make sure to be in the Manage Studiessection for the collection you want to put studies into To do this either use the Studies ndash Manage studies menuon the top or simply click on the Switch link next to the Manage Studies [Collection Title] heading
bull Then Click on the Copy Studies blue button at the top right
bull A list of all studies available to copy to the new collection is listed Simply click on the Link button in green tocopy the study to the collection The button will turn red and say Unlink To reverse the process and click thenow red button
bull Going back to the Manage Studies page for the collection will show the newly copied studies in the collectionlist Also note that the Collection field now indicated DHS next to Central DHS is in grey to indicate it is notowned (it is a copy) by that collection and the Central is in blue to show it is owned by the Central Data CatalogAlso note that because the study is not owned by this catalog it cannot be edited from this catalog ndash hence thepublishunpublish green button is absent for the copied studies
44 Chapter 4 User manual
nada Documentation Release 40
435 Turning on the collection filter
The final step after creating the first collection is to enable the collection filter option in the Settings menus under SiteConfigurations ndash Survey catalog settings
436 Transferring study ownership
In the previous examples mention was made of studies uploaded to a catalog being owned by that catalog There maybe cases where transferring the ownership from one catalog to another will be desirable This will become clearerin the next section on user roles but for now the next steps show how transferring ownership from one collection toanother can be done
bull Transferring ownership from one collection to another has to be done by the owner of the collection and fromthe collection it is currently owned by
bull To transfer ownership Go to the Manage Studies screen and select the study to be transferred Open up the EditStudy page by clicking on the study Title
bull On the right hand side of the screen click on the Transfer study owner link
43 Manage Collections 45
nada Documentation Release 40
bull Select the collection to transfer from the dropdown box
bull Click Transfer
bull Note that when looking the study summary for the transferred study the Collection field now shows the studyto belong (owned by) to the DHS collection and not Central anymore Also note the option to Publish andunpublish is now active
bull To transfer ownership of a large number of studies all at once - from the Manage Studies page ndash select the studiesto be transferred (tick them in the box left of each study) and then from the top Batch Actions drop down selectTransfer owner ndash then apply
46 Chapter 4 User manual
nada Documentation Release 40
44 Manage Studies
There are 2 Options to get studies into the new catalog
441 Option 1
bull The first is to upload a DDI and all its resources to the collection in the same way as described in the earliersection ndash Uploading a Study Except instead of choosing Central Catalog chose the collection you want toupload the study to
bull Click on the Add Study button and upload a DDI and RDF and all your resources as described in the earliersection ndash Uploading a Study
bull Once a study is added in this way it displays in the Manage Studies list Notice that the collection summaryfield shows that the study belongs to (is Owned By) the DHS collection (this was the Short name defined in theexample when the Health Surveys Collection was created)
bull Also note that the new study also appears in the Central Data Catalog
All studies uploaded to collections will automatically be added to the Central Data Catalog in order to build a commonsearch portal for all studies
44 Manage Studies 47
nada Documentation Release 40
442 Option2
Copying studies from one collection to another
bull The second way to add a study to a collection is to Copy the study from another collection into the new collection
bull To copy a study already in the catalog to display in the new collection first make sure to be in the Manage Studiessection for the collection you want to put studies into To do this either use the Studies ndash Manage studies menuon the top or simply click on the Switch link next to the Manage Studies [Collection Title] heading
bull Then Click on the Copy Studies blue button at the top right
bull A list of all studies available to copy to the new collection is listed Simply click on the Link button in green tocopy the study to the collection The button will turn red and say Unlink To reverse the process and click thenow red button
bull Going back to the Manage Studies page for the collection will show the newly copied studies in the collectionlist Also note that the Collection field now indicated DHS next to Central DHS is in grey to indicate it is notowned (it is a copy) by that collection and the Central is in blue to show it is owned by the Central Data CatalogAlso note that because the study is not owned by this catalog it cannot be edited from this catalog ndash hence thepublishunpublish green button is absent for the copied studies
45 Managing Licensed Requests
Datasets that are assigned the Access Type Licensed require approval from the NADA administrator before the usercan get access to the data files From the site administration there are a number of ways to see if any licensed requestshave been received
bull Go to the dashboard Pending requests show up as red in the catalog quicj summary section Clicking on thislink goes to the Licensed Survey Requests management page
bull Or go to the Studies link on the top menu and select Licensed Requests from the submenu
48 Chapter 4 User manual
nada Documentation Release 40
The link shows a page with a list Licensed Requests received The status column indicated the Pending requests
bull Click on the Edit link for to process a request
The Request information tab shows a summary of the information provided by the applicant
bull To Approve or Deny or request further information for the request Click on the Process tab
45 Managing Licensed Requests 49
nada Documentation Release 40
bull Select Approve to approve the request (other options include Deny as well as Request more information fromthe applicant)
bull Select the files that the user will be authorized to download ndash it is also possible to enter a maximum number ofdownloads and expiry date for downloads
bull Enter any comments to be sent to the applicant
bull Select Notify user by email to notify them that the application has been processed
bull Select Update
bull The remaining tabs
ndash Communicate - provides a means to ask for more information from the applicant
ndash Monitor ndash allows the administrator to see when and how many times the applicant downloaded thedata
ndash Forward Request ndash provides a means to forward the request to another person for review
46 Manage Citations
The Citations section is where bibliographic references can be added for publications that use any of the studies in thecatalog These citations can be linked to particular studies in the catalog and are displayed to the users of the systemin the study information view of the relevant study
Citations are added from the Citations menu
50 Chapter 4 User manual
nada Documentation Release 40
bull To add a citation - click on All citations then click on the Add New Citation button at the top right
bull Compete the form including the indication as to whether the citation should be published or not
bull Then expand the Related studies link to tell the system which studies the citation ldquobelongsrdquo to
bull Click on the Attach studies link This reveals a list of all studies in the catalog
bull Select the relevant studies by clicking on the green Select button
bull Click on the apply filter button to save the changes The study now appears in the related studies box
bull Click on the submit button to save the citation
bull Note the flag keywords and notes fields can be used by administrators to place extra notes only visible to otheradministrators that might prove useful when there is uncertainty about a citations appropriateness or accuracy
bull It is also possible to import citations in common citation formats such as BibTex and EndNote (RIS)
bull To do this use the Import Citations link from the top menu
46 Manage Citations 51
nada Documentation Release 40
bull Paste the BibTex or RIS text into the form and then at the bottom of the screen click on Attach studies to linkthe citation to a particular study in the catalog
bull The citation now appears in the citation list as well as on the study information page for the relevant studies
52 Chapter 4 User manual
nada Documentation Release 40
47 Managing Users and account types
Users in the NADA can be defined according to three broad groups
General Usersndash this is the normal user who registers on a NADA site from the user interface This user type hasno access to the site administration It is required to register as a user before being granted access to public use andlicensed data types
Site Administrators (unlimited) ndash this user has access to all functions and all collections within the Site Administra-tion System wide access
Limited Administrators ndash these administrators have access to a limited set of functions within the Site Administra-tion Examples would be an administrator of a specific collections or licensed survey reviewer for all or only somecollections or report generator or citation manager etc
471 Creating User accounts
User accounts can be created in two ways
1 A General User account can be created by a user directly from the register screen from the login link on the userinterface of the application
The user created by this process has no access to the site administration This account can only be used to apply andgain access to public and licensed datasets
2 A user account can also be created by a Site Administrator
bull To do this login as a Site Administrator
bull Go to the site administration section of the application
47 Managing Users and account types 53
nada Documentation Release 40
bull Select Users ndash Add user from the top menu
bull Fill in the information for the user in the form and be sure to mark the account status as Active Then click theCreate button
54 Chapter 4 User manual
nada Documentation Release 40
47 Managing Users and account types 55
nada Documentation Release 40
bull Note that the user always starts off as a General User with no access permissions to the Site Administration Theuser group column displays as empty for users with only general user accounts
bull To see a list of all users in the system go to the Users ndash All Users menu item at the top of the screen
bull Note the new users created have no User group assigned (they are general users) Also note the Actions columnon the far right From these links an account can be edited (including changing the password and blocking anaccount) deleted and Permissions managed for the account
472 Managing User Account Permissions
User accounts permissions can be only be set and changed by a Site Administrator To change the permissions for anaccount
bull Click on the Permissions link next to the account to be changed All accounts start of as General users accounts
bull To change this user to a full site administrator who will have full system wide access to all parts and functionsof the NADA administration select the Site administrators (full access) option and tick the admin box as wellClick update to save the changes
56 Chapter 4 User manual
nada Documentation Release 40
473 Collection level administrators
bull To create a user who only has permissions to administer studies or administration functions for a particularcollection Select Site administrators (limited access)
47 Managing Users and account types 57
nada Documentation Release 40
bull It is then necessary to assign a role to this new limited administrator account To create a limited access ad-ministrator for a particular collection ndash select Site administrators (limited access) and then select Collectionadministrators Notice The form expands to reveal a list of collections in the system
bull Select the appropriate level of access that this account will have for this collection In the example below anadministrator is being created who can manage only licensed requests for the collection ndash Health Surveys Thisaccount will not be able to upload or publish studies The account will only be able to process licensed requestsfor the collection ndash Health Surveys
58 Chapter 4 User manual
nada Documentation Release 40
Other levels of access for Site administrators (limited access) ndash Collection administrators include
1 Accounts that are given full access to manage studies
2 Accounts that are given access to upload studies but not publish them
3 Accounts that are limited to reviewing studies
474 Global level Limited access accounts
Other types of limited access accounts include
1 Accounts that can only view system reports at a global level
2 Accounts that can only access the citations section and manage citations
3 Accounts that can only access the Licensed Request management system ndash at the global level for all collections
47 Managing Users and account types 59
nada Documentation Release 40
Impersonating a user
The system includes a function that allows a Site Administrator to impersonate (take on the role) a user created inthe system This is a useful testing tool when creating users and assigning permissions It essentially allows theadministrator to take on the role of another user temporarily
bull To access the Impersonate User feature go to the Users ndash Impersonat user menu at the top of the screen
bull A list of users to impersonate is shown
bull Select the user to impersonate and click on the impersonate button
bull The dashboard view for the impersonated user now shows
60 Chapter 4 User manual
nada Documentation Release 40
bull Note in the example above the account being impersonated is a Limited Account administrator with rights onlyto manage licensed requests for the Health Surveys Collection Note that all other dashboard menus are eitherhidden or clicking on any other function other than manage studies results in an access denied message
bull This is a good way to test if the roles assigned to a user account have the expected results
bull To exit the impersonate mode and return to the Site Administrator role ndash Click on the top right menu and selectExit impersonate mode
475 The Reviewer Limited access account
Sometimes it is desirable for catalog administrators to allow certain users to see a collection before it is published butwithout granting access to the site administration functions
This is useful for getting feedback on the correctness of information on collections or studies before publishing
To do this
bull First create an account for the user or get the user to create an account by using the register form on the loginscreen
bull Then edit the permissions for that user selecting Site Administrator (limited access) ndash Collection administrator
bull Then for the appropriate collection select Reviewer and click update to save the changes
47 Managing Users and account types 61
nada Documentation Release 40
bull The newly created reviewer account user can now view all studies in a collection even if the study or collectionis unpublished
48 Manage Site Pages and Menus
The NADA has a small content management component that allows for the creation of menu pages to appear on theuser interface
bull Examples of menus that might be useful for users of the site might be A page dealing with the disseminationpolicies of the organization or perhaps a page with contact information for the information
New menu items and pages can be created via the Menu- All pages menu link at the top of the Site Administrationpage
62 Chapter 4 User manual
nada Documentation Release 40
bull Select All pages from the menu
bull To add a new page click on the Add New Page button
bull Give the page a Title in the Title field
bull Clicking in the URL field will automatically suggest a name for the page in the URL
bull Enter the contents for the page in the Body section Plain text or HTML is accespted by this field
bull Then indicate if the page should be published or not in the Publish dropdown
bull The Weight field tells the NADA in what order this menu item should display Eg 0 would be first 1 secondand 2 third
bull Click on Update to save the changes
bull View the changes from the user interface In this Example a Contact Us page was created
bull It is also possible from the Menu Management screen to add a menu link that links to an existing page on anothersite (rather than creating a page itself)
bull To change the order in which the menu items display on the user interface use the Reorder Menu button on theMenu Management screen
48 Manage Site Pages and Menus 63
nada Documentation Release 40
49 The Site Settings Page
All settings for the application are controlled via the Settings menu at the top of the Site Administration page Thereare seven main settings sections See screenshot below
491 General Settings
1 Type the Title of the site here This will become the front page title of the NADA site In this case the Title isNADA
64 Chapter 4 User manual
nada Documentation Release 40
2 The footer text can be changed in this field This displays at the bottom of your site page
3 The initial page that loads when a user visits the NADA site can be set here In this case the catalog page is setto open by default
4 The name of the webmaster can be set here This is the name that will be used in system emails sent to users
5 Enter the webmaster email address here This should be the address that will be used in communication withusers Typically this is a general enquiries email set up by the organization and not a personal email address fora particular person Note to avoid mail systems rejecting mail as spam make sure to enter an address here thatis on the same domain as the server used in the email settings at setup
6 This field sets the location of the Cache folder The cache folder stores pre- generated pages of the site to allowfor faster browsing by the user By default it is set to cache This can be moved to another location if desiredbut must be writable The green tick indicates that the folder can be found and is set up correctly Enter eitherrelative or absolute paths to the folder location
7 Set the time that the Cache takes to expire By default it is set to 2 hours (in milli seconds)
8 If it is desired to turn off caching then select no here Sometimes it is useful to turn off caching when developingor updating a site so as to ensure that content changes become immediately visible on the front-end withouthaving to wait for the cache to expire and the new changes to show Turn this back on to speed up page loadingfor users
Click update to save all settings
Language
To change the language of the application expand the language section and choose the desired language Click updateto save and apply the setting
49 The Site Settings Page 65
nada Documentation Release 40
Enable or disable the HTML editor
A basic HTML editor is provided in the menu and page creating section of the application This setting allows this tobe turned on or off
Survey catalog settings
1 This is the folder where the files for the study are stored on the server This includes the DDI eternal resourcesand data files This folder can be moved to a location outside the web root as described in the installationinstructions in Chapter 1 Enter either relative or absolute paths to the folder location
2 This is the folder where DDIrsquos can be placed in order to use the bulk study import function in the NADA InNADA3 files had to be physically copied to this folder on the server but this is no longer necessary in NADA4 Files can now be directly uploaded to this folder from the Site Administration ndash Manage Studies page page
66 Chapter 4 User manual
nada Documentation Release 40
3 Select the vocabulary to use for the topic filter By default this is set to the CESSDA classification as recom-mended in the IHSN templates supplied at IHSNorg for the Nesstar Metadata Publisher
4 Enable or disable the Country filter on the user interface search page here If the catalog only contains studiesfor one country then turning this filter off is recommended
5 Enable or disable the Topic filter on the user interface search page here If no topics have been defined in theDDIrsquos being uploaded then it is recommended to turn this filter off (disable)
6 Enable or disable the Year filter on the user interface search page here
7 Enable or disable the Collection filter on the user interface search page here If no collections have been definedthen it is recommended to disable this filter
8 Enable or disable the Data access filter on the user interface search page here This filter is not needed if thereare very few studies in the catalog or if all studies hare set to the same access type
9 This section controls the order in which the filters appear on the search page Enter numbers here that rank theorder of the filters in the order they should be displayed
10 This setting determines how many studies are displayed by default to the user on the search page ndash catalog view
Site Login settings
1 To require that users login before being able to access the website set this option to Requires all users to loginto access the website
2 Determined how long a user will stay logged in After this time the user will be automatically logged out
3 Sets the minimum length for passwords created by the users at registration or for manual user creation
49 The Site Settings Page 67
nada Documentation Release 40
SMTP Settings
1 If the PHPweb server is configured to send email using PHPrsquos MAIL function select the first option and donrsquotfill in anything else
If your organization has a mail server and has have a dedicated account that can be setup for NADA use the followingsettings Check the radio button ldquoUse SMTP Serverrdquo
2 Enter the host name for the server
3 Enter the port used by the server to send mail
4 If required enter the user name used to send mail on the server
5 Enter the password used to send mail on the server
If the organization does not own a mail server a Gmail account can be configured to be used with NADA
bull Check the radio button ldquoUse SMTP Serverrdquo
bull Host name sslsmtpgooglemailcom or sslsmtpgmailcom
bull SMTP port 465
bull Account username email-addressgmailcom
bull Account password password for the gmail account
6 Test the email settings
The quickest way to test if the email settings are working is to use the ldquoforgot passwordrdquo option from the user loginpage If no mail is received when doing this test then go back and correct the mail settings Check with the ISP orserver administrator for the correct settings
Click on update to save all settings
68 Chapter 4 User manual
nada Documentation Release 40
492 Dashboard setting
Provides a means to automatically have content loaded into the dashboard via an RSS feed from a site The defaultsetting is set to receive updates and news from the IHSN website
49 The Site Settings Page 69
nada Documentation Release 40
70 Chapter 4 User manual
CHAPTER 5
Indices and tables
bull genindex
bull modindex
bull search
71

nada Documentation Release 40
This step is only required if SQL Server is not on the same server as your web server To check if the SQL Client isalready installed or not follow the steps below
1 Open Control Panel Administrative Tools on your server
2 Open ODBC and switch to the tab ldquoDriversrdquo
237 Download the Microsoft SQL Client
Note The instructions here are provided for Microsoft SQL Server 2008 if are running on a later version of MicrosoftSQL Server the latest drivers can be obtained from the Microsoft website The installation steps are the same
The SQL Client is available from the Microsoft website from here httpwwwmicrosoftcomen-usdownloaddetailsaspxid=16978
Download the appropriate package for the system being used ie (32bit64bit) and run the installer to install the client
Once the client is installed restart your computer and check again from ODBC above to confirm that the client hasbeen installed
23 Installing NADA using Microsoft SQL Server 15
nada Documentation Release 40
238 NADA Database configurations for SQLSRV
Create a database and the user account to use with NADA beforehand The permissions need to include - createaltertables indexes ( See the following reference from Microsoft for instructions on how to do this
bull Database - httpmsdnmicrosoftcomen-uslibraryms186312aspx
bull User - httpmsdnmicrosoftcomen-uslibraryaa337545aspx
Open the nada database configuration file your-nada-folderapplicationconfigdatabasephp file and look for the fol-lowing lines
$db[rsquosqlsrvrsquo][rsquohostnamersquo] = localhostsqlexpress$db[rsquosqlsrvrsquo][rsquousernamersquo] = db-user-name$db[rsquosqlsrvrsquo][rsquopasswordrsquo] = password$db[rsquosqlsrvrsquo][rsquodatabasersquo] = nada-database$db[rsquosqlsrvrsquo][rsquodbdriverrsquo] = sqlsrv$db[rsquosqlsrvrsquo][rsquodbprefixrsquo] = $db[rsquosqlsrvrsquo][rsquopconnectrsquo] = FALSE$db[rsquosqlsrvrsquo][rsquodb_debugrsquo] = FALSE$db[rsquosqlsrvrsquo][rsquocache_onrsquo] = FALSE$db[rsquosqlsrvrsquo][rsquocachedirrsquo] = $db[rsquosqlsrvrsquo][rsquochar_setrsquo] = utf8$db[rsquosqlsrvrsquo][rsquodbcollatrsquo] = utf8_general_ci
Fill in the database connection settings for the database created for NADA
Save the changes
239 Running the installer
bull Open a web browser to the location of the NADA installation For examplehttpyour-domainnada-folder-name or localhostnada-folder-name
bull If the Microsoft database connection is setup correctly you should see the nada installer
16 Chapter 2 Installation guide
nada Documentation Release 40
bull Check that all settings are marked with a green tick and fix any that are not on your webserver before runningthe installer
bull Click on the Install Database button and complete the form to create an initial Site Administrator account
Note Create a complex password of atleast 12 characters long with some uppercase punctuation and numbers to aidsecurity of your site Do not forget this username and password
23 Installing NADA using Microsoft SQL Server 17
nada Documentation Release 40
Congratulations Launch the new site
18 Chapter 2 Installation guide
nada Documentation Release 40
24 PHP settings
241 Finding the correct PHPINI
To make sure you are editing the correct PHPINI settings file create a PHP file (eg infophp) in your nada websitefolder with the following contents
ltphp phpinfo() gt
Open the phpinfo page in your web browser and you should see output similar to below screenshot Edit the phpinifile displayed by the setting Loaded Configuration File
24 PHP settings 19
nada Documentation Release 40
20 Chapter 2 Installation guide
nada Documentation Release 40
242 File upload limits
By default PHP allows uploads of 2MB which could be a problem if you have large DDIs and external resource filesTo change the settings
1 Edit the phpini file in notepad and look for the setting upload_max_filesize
2 The line should look like
Maximum allowed size for uploaded files httpphpnetupload-max-filesizeupload_max_filesize = 2M
3 Change it to the required file upload limit per your needs
upload_max_filesize = 50M
4 There is another setting that MUST be changed as well for the file upload limits to work Look for the configu-ration post_max_size and change it to match the value for upload_max_filesize
post_max_size = 50M
243 TimeZone settings
This is for setting the timezone for your application To findout what is the correct timezone for your website go tohttpphpnetmanualentimezonesphp and find your countrycity
Example
datetimezone = AmericaNew_York
244 Increase page executiontimeout
This setting controls the maximum execution time of a page in seconds
max_execution_time = 300
245 Increase PHP memory limit
It controls the memory available to PHP scripts
memory_limit = 128M
246 Enabledisable PHP extensions
NADA requires the following PHP extensions
bull xsl
bull mbstring
bull mysql or sqlsrv
To enable XSL extension add this line
24 PHP settings 21
nada Documentation Release 40
extension=php_xsldll
To enable mbstring
extension=php_mbstringdll
25 Configure Captcha
By default NADA version 41 comes with image captcha and user does not need to make any changes to use imagecaptcha To use Google Captcha please follow the steps given below
1 Open applicationconfigcaptchaphp in editor
2 Change line number 12 as shown in below image
3 Click on above URL to generate Public and Private key URL httpwwwgooglecomrecaptchawhyrecaptcha
4 Click on sign up now
5 Sign in using your Gmail account
6 After signed in you will have to enter your URL (Domain URL)
22 Chapter 2 Installation guide
nada Documentation Release 40
7 Click on ldquoenable globel key for all domain
8 Click on Create Key button
9 Copy public key and private key from Google Captcha website and inserte it on line number 51 and 52 respec-tively as shown in below image
10 To check the Google catpcha configuration go to register page and look for image as shown in below URLhighlighted in Red suqare
25 Configure Captcha 23
nada Documentation Release 40
26 Email configurations
For the NADA to function correctly it is important that this step be completed
Many of the functions within the NADA ndash such as registration and applying for access to datasets require that theNADA be able to send emails to users
There are two ways to setup your email configurations 1) Create a emailphp file in the applicationconfig folder 2)Edit email settings on the site configurations page
24 Chapter 2 Installation guide
nada Documentation Release 40
261 1 Configure email via email config file
1 Open the file applicationconfigemailphp in notepad
2 Fill in the section using SMTP server with authentication enabled highlighted in below image
3 For Gmail user will have to fill the gmail smtp section shown as below
26 Email configurations 25
nada Documentation Release 40
4 Save file
Note Using a file for email configuration disable the email configuration page from the site administration
1 Login to your NADA as an administrator
2 Go to Site administration click on the Settings menu and choose ldquoSettingsrdquo
3 Find the section ldquoSMTP settingsrdquo
26 Chapter 2 Installation guide
nada Documentation Release 40
4 If the PHPweb server is configured to send email using PHPrsquos MAIL function select the first option and donrsquotfill in anything else
If your organization has a mail server and has have a dedicated account that can be setup for NADA use the followingsettings Check the radio button ldquoUse SMTP Serverrdquo
5 Enter the host name for the server
6 Enter the port used by the server to send mail
7 If required enter the user name used to send mail on the server
8 Enter the password used to send mail on the server
If the organization does not own a mail server a Gmail account can be configured to be used with NADA
bull Check the radio button ldquoUse SMTP Serverrdquo
bull Host name sslsmtpgooglemailcom or sslsmtpgmailcom
bull SMTP port 465
bull Account username email-addressgmailcom
bull Account password password for the gmail account
Test the email settings
The quickest way to test if the email settings are working is to use the ldquoforgot passwordrdquo option from the user loginpage
bull Click on forgot password
26 Email configurations 27
nada Documentation Release 40
bull Enter the administrator or any other accounts email address
bull Check to the email account the mail was sent to
bull If no mail is received the settings are wrong and need to be corrected
28 Chapter 2 Installation guide
CHAPTER 3
Upgrading from previous versions
31 Upgrade from NADA 3
For users with an existing NADA 3x catalog an upgrade script is included that will update your NADA 3x databaseto NADA 4x The process involves modifying your NADA 3x database and thus carries some risks The script willadd new tables to the NADA 3x database All user accounts and survey information will be retained by the upgrade
Important Backup the NADA 3x database before doing anything
1 Follow the instructions on page 4 and set up a folder in the web root containing the NADA 4 files
2 Edit the databasephp file as instructed in the section above NADA database configurations for MySQL
3 Instead of entering a new database name user account name and password -fill in the details of the existingNADA 3x database
Note These can be found by looking at the existing NADA 3x databasephp file and entering the settings into theNADA 4 databasephp file
4 Save the file
5 Navigate to the URL for the NADA4 site Example httpyour-nada-sitenada4indexphpnada4_upgrade
6 The following page loads
29
nada Documentation Release 40
Take note of the warnings and make any necessary corrections before clicking the ldquoUpgrade database to NADA 4rdquobutton
Warning This step makes changes to your nada 3 database that are not undo-able so make sure you do make adatabase backup before this step
Click on the ldquoUpgrade database to NADA 4rdquo button and wait for the page to reload The output of the page will looksomething like below
The script will print number of messages about failed table updates This does not mean the script failed to upgradeIt just means some of the updates were not needed on your version of NADA 3 Different versions of NADA havedifferent numbers of fields in the database and the upgrade script tries to fix the missing fields for all these differentversions of NADA If the existing NADA 3 database already has that field then it reports it as an error
You can ignore the error messages that include the wording ldquoDuplicate column namerdquo or ldquoDuplicate entryrdquo
Now your database has been migrated to NADA version 41 We will have to run one more upgrade script to forNADA version 42
7 Navigate to the URL for the NADA42 site Example httpyour-nada-sitenada42indexphpnada42_upgrade
Warning This step makes changes to your nada 41 database that are not undo-able This page will not show anymessage on the screen You will be getting blank page Please do not repeat the process
8 To verify the database upgrade Open the NADA catalog page by going to http[your-nada4-site]indexphpcatalogpage and verify all studies from NADA 3 are listed
311 Linking your NADA 3 data files to NADA 4
The upgrade script has only upgraded the database It is now necessary to tell the NADA4 where to locate the datafilesthat were uploaded to the original NADA 3 site
There are two options available
Option 1 Copy the datafiles folder from NADA 3 to NADA 4 This works best if you have only a few studies and thedatafiles folder size is small enoughto be moved easily from one location to another
Option 2 If it is not possible to easily move the datafiles folder from NADA 3 to NADA 4 you can tell NADA 4 thelocation of the datafiles without moving the files Here are the steps
bull Use your NADA 3 administrator login credentials to login to your new NADA 4 site
bull Click on Site administration in the top right corner of the screen
bull Go to the ldquoSettingsrdquo menu and click on the ldquoSettingsrdquo sub-menu
30 Chapter 3 Upgrading from previous versions
nada Documentation Release 40
bull Under Site configurations expand the ldquoSurvey Catalog Settingsrdquo section
bull For the setting ldquoCatalog folderrdquo enter the relative or full path to where the NADA 3 datafiles folder is locatedFor example if the nada3 datafiles are located on cnada3datafiles enter that path here
bull Save the configurations by clicking on the update button If now errors are shown then you have successfullyupdated the folder path
bull Check your new NADA 4 site to make sure the migration was successful
ndash Check the user administration page from site administration to make sure the users from the nada3 sitewere migrated
ndash Check the ldquoData Catalogrdquo page and view the studies by clicking on the study title to make sure the studyinformation pages are correct
ndash Check the site menus are the same as the NADA 3 site
312 Refresh DDI
In NADA 4 more information is stored in the database from the DDI than in the NADA 3 To bring all these newfields into the imported studies it is necessary to refresh the DDIrsquos The refresh DDI feature in NADA updates thedatabase with metadata from the DDI without having re-uploading the DDIs To update the metadata for all studies inyour catalog
bull Open the following NADA 4 URL in your browser
http[your-nada-4-site]indexphpadmincatalogbatch_refresh
bull Select all studies
bull Click on the ldquoRefresh DDIrdquo button
313 Transferring ownership
NADA 4 has a collection management feature When studies are imported from the NADA3 catalog into NADA4 theyare put into a collection called DEFAULT They need to be moved from this default system collection to the Central
31 Upgrade from NADA 3 31
nada Documentation Release 40
Data Catalog of the NADA4
To do this
bull Go login to the Site Administration and navigate to the Studies Manage Studies Central Data Catalog page
bull Select all the studies by ticking the check boxes next to each study on the right
bull Click on the dropdown menu and select Transfer owner
bull From the Transfer study owner page Select Central Data Catalog and then click transfer
32 Chapter 3 Upgrading from previous versions
nada Documentation Release 40
314 Updating the Site themetemplate
You cannot use your NADA3 template in NADA4 without making some changes Here are general guidelines butsteps may differ depending on your nada site template
bull Copy your NADA3 template to the NADA4 themes folder
bull Edit the [nada4-root]configtemplatephp following the steps below
bull Look for the setting ldquotheme_namerdquo by default it is set to rdquowbrdquo
bull Change ldquowbrdquo to the theme name you want to use Theme name is the folder name you copied to[NADA4]themes[your-site-theme] from your nada3 site
bull Save the file
NB The template may need some adjusting to run properly on the new NADA 4 site This will involve editingthe layoutphp and other template files within the template folder which is now located in the NADA 4 themesfolder
32 Migrate MySQL to Microsoft SQL
TODO
32 Migrate MySQL to Microsoft SQL 33
nada Documentation Release 40
34 Chapter 3 Upgrading from previous versions
CHAPTER 4
User manual
41 Overview and core concepts
411 About NADA
NADA is a web-based cataloging application that allows for the creation of portals that allows users to browse searchcompare apply for access and download relevant census or survey information
It was originally developed to support the establishment of national survey data archives The application is used by adiverse and growing number of national regional and international organizations NADA as with other IHSN toolsuses the Data Documentation Initiative (DDI) XML-based international metadata standard
412 Concepts
CENTRAL DATA CATALOG
The default catalog created when a NADA instance is installed is the Central Data Catalog All studies uploaded to theNADA are visible searchable and accessible from the Central Data Catalog For many institutions the Central DataCatalog will remain the only catalog in their NADA instance For some institutions being able to divide the contentsof the Central Data Catalog into more refined collections will be desirable
COLLECTIONS
Collections are sub categories of the Central Data Catalog They allow administrators of a NADA instance to groupstudies into what can be thought of as sub-catalogs of the Central Data Catalog This has a number of benefitsboth from the user and the administrator perspective From the usersrsquo perspective being able to filter and viewgroups (collections) of studies that logically belong together makes finding what they are looking for easier From theadministratorsrsquo perspective the ability to create collections of studies that may logically belong together facilitates theability to decentralize the management of each collection of studies to specific administrators (for example collectionscan be managed by different departments in an institution)
NOTE The creation of collections will in general only be useful and necessary for large catalogs or for catalogs thatdesire more decentralized management of groups of studies by different departments
STUDIES
Studies are carried out to gather more knowledge about a subject Studies may gather information from a number ofdifferent sources in order to answer the questions asked The information gathered for a study will in the context of
35
nada Documentation Release 40
NADA catalogs usually come from either a census or a surveys It is therefore not uncommon to hear the terms surveyand study used interchangeably when listening to people talk about their NADA catalog
METADATA
Metadata are data about the data They are not the actual data collected from the survey but rather the information thatdescribes the survey process and the data The NADA uses the Data Documentation Initiative (DDI) ndash ddiallianceorgndash standard for the presentation of metadata for each study The DDI document (which is an XML document) isprepared outside the NADA application either manually or using a tool like the Nesstar Publisher ndash nesstarcom ndash andthen imported into the NADA The detailed information about the survey is searchable down to the variable level foreach survey in the catalog
DATA ACCESS TYPES
The NADA allows for the level of access to datasets for studies to be controlled at the study level In other words thelevel of restriction can differ from study to study and can be defined on a scale ranging from direct access with norestrictions to no access Briefly the available access types are
bull Data not available - data are not available for this study
bull Direct Access Data Files - data shared under this policy can be downloaded without any restrictions The useris not required to be logged into the site and no personal information is collected on the person downloading thedata
bull Public Use Data Files - data shared under this policy requires that the user be logged in and registered on thesite before they are able to download the data The user is required to agree to a terms of use of the data and theapplication keeps records of who downloads the data
bull Licensed Data Files - data shared under this policy requires that the user be logged in and registered on the siteUsers are also required to fill in and submit a detailed application form listing their reasons for wanting accessto the data Once the user submits the application form the system informs the system administrator that anapplication has been made In order for the person to get access to the data the system administrator needs toreview the application and approve it
bull Data available in an Enclave - under this policy no data is shared through the application Users submit anapplication to access the data at a secure facility physically located on the premises of the data producer or afacility nominated by the data producer
bull Data available from external repository ndash The NADA allows for studies and their metadata to be listed in aNADA catalog but for a link to be created to another site when the data for that study are available elsewhere
CITATIONS
Citations are references that can be included at the study level which point to published works that have used the datafrom a particular study In many cases this will be a reference to a Journal Article Working paper Newspaper articleetc Such resources are useful to researchers who are interested in seeing how the data have been used before Theyare also a good way of showing the funders of surveys that the data are being used for policy and research purposesand thus are an indicator of some of the impact a study has had
USERS
Users in the NADA can be defined according to three broad groups General Users ndash this is the normal user whoregisters on a NADA site from the user interface This user type has no access to the site administration It is requiredto register as a user when accessing public use and licensed data types Site Administrators (unlimited) ndash this user
36 Chapter 4 User manual
nada Documentation Release 40
has access to all functions and all collections within the Site Administration System wide access Limited Adminis-trators ndash these administrators have access to a limited set of functions within the Site Administration Examples wouldbe an administrator of a specific collections or licensed survey reviewer for all or only some collections or reportgenerator etc
413 Why do NADA administrators need to understand these concepts
Understanding these concepts is important as it
bull Is critical to understanding the new permissions and administrator types introduced in NADA 4 Administratorsare now able to create collections within their NADArsquos and assign different roles to administrators and moregranular levels of access to catalog administration at the collection level It is now possible for example to haveadministrators whorsquos lsquopowersrsquo range from being able to manage all parts of a collectionrsquos administration downto ones with more restrictive access such as ones whose only function is as licensed survey reviewer or reportgenerator or catalog reviewer or citation manager etc
bull Ensures that the correct level of permissions and access is assigned to users based on security policies within theinstitution Unlike previous versions of NADA not all users who have access to the Site Administration needhave the level of access of an ldquounlimited site administratorrdquo This limits security risks associated with havingtoo many ldquounlimited site administratorsrdquo managing a site
bull Assists in assigning an appropriate data access type to data based on institutional distribution polices
bull Makes it easier to explain more clearly to institutional managers what the capabilities of the NADA applicationare and to advise on how to best manage the allocation of responsibilities
42 The Dashboard
After logging in to the Site Administration with administrator credentials the user is taken to the dashboard
The Dashboard provides a quick glance summary for administrators to get an overall picture of what has been happen-ing on the site as well as what pending tasks are outstanding for the administrator
42 The Dashboard 37
nada Documentation Release 40
1 Menu link to the Dashboard
2 Menu link to the Study Management pages submenus include Manage Studies Licensed requests and ManageCollections
3 Menu link to the citations management pages
4 Menu link to the User management pages submenus include All users Add user and Impersonate User
5 Menu link to create menu pages for the site frontend
6 Menu link to generate usage reports
7 Menu Link to the settings pages submenus include Settings Coutries Regions and Vocabularies
8 Useful navigation links submenus include Change Password Log out Catalog Home Data catalog Citations
9 This section lists all collections in the catalog Within each collection a summary is given of the number ofstudies along with diagnostics related to the number of studies publishedunpublished missing questionnairesdata access types set but with no data attached as well as some buttin links to Manage the collections studiesusers and a History of changes made to the collection
10 Provides a summary of users registrations and number of users currently logged in
11 Show how many pages are being cached on the site with a link to clear the cache if need be
12 Show a list of recently added or updated studies Clicking on a study in the list takes you to the page to managethat study
38 Chapter 4 User manual
nada Documentation Release 40
43 Manage Collections
431 Collections
Collections are sub categories of the Central Data Catalog They allow administrators of a NADA instance to groupstudies into what can be thought of as sub-catalogs of the Central Data Catalog
Collections provide a number of benefits both from the user and the administrator perspective From the usersrsquo per-spective being able to filter and view groups (collections) of studies that logically belong together makes finding whatthey are looking for easier From the administratorsrsquo perspective the ability to create collections of studies that maylogically belong together facilitates the ability to decentralize the management of each collection of studies to specificadministrators (for example collections can be managed by different departments in an institution)
Note The creation of collections will in general only be useful and necessary for large catalogs or for catalogs thatdesire more decentralized management of groups of studies by different departments
432 Creating collections
bull Login to the Site administration using an administrator password
bull Collections are managed and created by going to the Studies Manage collections menu link
bull There are no collections defined in the default NADA 4 installation
bull To create a new collection click on the Create new collection button
43 Manage Collections 39
nada Documentation Release 40
1 Under Collection Identification provide a short name for the collection This will become the URL for thecollection so pick carefully For Title fill in the fill title for the collection This will be the name displayed atthe top of the collection page
B Fill in a 3 or four line short description of the collection This text will display on the front end in the collectionslist For examples see httpmicrodataworldbankorgindexphpcontributing-catalogs
C Fill in a more detailed description of the collection This will display on the About page for that collection Forexample see httpmicrodataworldbankorgindexphpcatalogdhsabout
To format the page and include images it is possible to enter HTML code into this box below is anexample piece of code that includes an image
ltimg src=rdquofilesdhs-fp-01jpgrdquo alt=rdquoHealth Surveys Imagerdquo class=rdquoabout-photordquogt lth2gt Health SurveysCollectionlth2gt ltp align=rdquojustifyrdquogtThe Health Surveys collection aims to provide frequent high qual-ity and timely health data needed by the decision makers when designing public health programsltpgtltpgtHealth surveys provide useful information on health status and health consumption and their determi-nantsltpgt
Copy any images to be displayed into the NADA ldquofilesrdquo folder on your server image imagesthumbnil-imagepng
4 Upload a file to display next to the collection as it is listed on the collection page NOTE This image should be82 X 82 pixels If the upload does not work automatically then copy the thumbnail image to the ldquofilesrdquo folder asshown above
40 Chapter 4 User manual
nada Documentation Release 40
E The Weight field determines in what order collections are shown in the collection list 0123 etc The Selectcollection type drop-down is a system value to distinguish between collections that should be viewed as internal tothe organization or external For example some collections may be made up entirely of studies from an organizationoutside the host catalog These collections can be designated as external The Section dropdown allows for thecategorization as either a collection based on a specialized collection (like health) or based on a regional breakdownSelecting Publish ndash publishes the collection
bull Click on Submit to save the changes
To view the results click on the Preview link on the far right
bull The new collection now also shows in the collection list on the Central Catalog About page (this is where thethumbnail and short description fields are displayed)
43 Manage Collections 41
nada Documentation Release 40
bull Visiting the Dashboard will now also show the new collection listed below the Central Data Catalog With anumber of green buttons as shortcut links to manage the studies on the collection assign administrators for thecollection a history of activity on the collection and a link to edit the collection as in the steps above
433 Manually adding studies to a collection
There are 2 ways to get studies into the new catalog
bull The first is to upload a DDI and all its resources to the collection in the same way as described in the earliersection ndash Uploading a Study Except instead of choosing Central Catalog chose the collection you want to
42 Chapter 4 User manual
nada Documentation Release 40
upload the study to
bull Click on the Add Study button and upload a DDI and RDF and all your resources as described in the earliersection ndash Uploading a Study
bull Once a study is added in this way it displays in the Manage Studies list Notice that the collection summaryfield shows that the study belongs to (is Owned By) the DHS collection (this was the Short name defined in theexample when the Health Surveys Collection was created)
All studies uploaded to collections will automatically be added to the Central Data Catalog in order to build a commonsearch portal for all studies
43 Manage Collections 43
nada Documentation Release 40
434 Copying studies from one collection to another
bull The second way to add a study to a collection is to Copy the study from another collection into the newcollection
bull To copy a study already in the catalog to display in the new collection first make sure to be in the Manage Studiessection for the collection you want to put studies into To do this either use the Studies ndash Manage studies menuon the top or simply click on the Switch link next to the Manage Studies [Collection Title] heading
bull Then Click on the Copy Studies blue button at the top right
bull A list of all studies available to copy to the new collection is listed Simply click on the Link button in green tocopy the study to the collection The button will turn red and say Unlink To reverse the process and click thenow red button
bull Going back to the Manage Studies page for the collection will show the newly copied studies in the collectionlist Also note that the Collection field now indicated DHS next to Central DHS is in grey to indicate it is notowned (it is a copy) by that collection and the Central is in blue to show it is owned by the Central Data CatalogAlso note that because the study is not owned by this catalog it cannot be edited from this catalog ndash hence thepublishunpublish green button is absent for the copied studies
44 Chapter 4 User manual
nada Documentation Release 40
435 Turning on the collection filter
The final step after creating the first collection is to enable the collection filter option in the Settings menus under SiteConfigurations ndash Survey catalog settings
436 Transferring study ownership
In the previous examples mention was made of studies uploaded to a catalog being owned by that catalog There maybe cases where transferring the ownership from one catalog to another will be desirable This will become clearerin the next section on user roles but for now the next steps show how transferring ownership from one collection toanother can be done
bull Transferring ownership from one collection to another has to be done by the owner of the collection and fromthe collection it is currently owned by
bull To transfer ownership Go to the Manage Studies screen and select the study to be transferred Open up the EditStudy page by clicking on the study Title
bull On the right hand side of the screen click on the Transfer study owner link
43 Manage Collections 45
nada Documentation Release 40
bull Select the collection to transfer from the dropdown box
bull Click Transfer
bull Note that when looking the study summary for the transferred study the Collection field now shows the studyto belong (owned by) to the DHS collection and not Central anymore Also note the option to Publish andunpublish is now active
bull To transfer ownership of a large number of studies all at once - from the Manage Studies page ndash select the studiesto be transferred (tick them in the box left of each study) and then from the top Batch Actions drop down selectTransfer owner ndash then apply
46 Chapter 4 User manual
nada Documentation Release 40
44 Manage Studies
There are 2 Options to get studies into the new catalog
441 Option 1
bull The first is to upload a DDI and all its resources to the collection in the same way as described in the earliersection ndash Uploading a Study Except instead of choosing Central Catalog chose the collection you want toupload the study to
bull Click on the Add Study button and upload a DDI and RDF and all your resources as described in the earliersection ndash Uploading a Study
bull Once a study is added in this way it displays in the Manage Studies list Notice that the collection summaryfield shows that the study belongs to (is Owned By) the DHS collection (this was the Short name defined in theexample when the Health Surveys Collection was created)
bull Also note that the new study also appears in the Central Data Catalog
All studies uploaded to collections will automatically be added to the Central Data Catalog in order to build a commonsearch portal for all studies
44 Manage Studies 47
nada Documentation Release 40
442 Option2
Copying studies from one collection to another
bull The second way to add a study to a collection is to Copy the study from another collection into the new collection
bull To copy a study already in the catalog to display in the new collection first make sure to be in the Manage Studiessection for the collection you want to put studies into To do this either use the Studies ndash Manage studies menuon the top or simply click on the Switch link next to the Manage Studies [Collection Title] heading
bull Then Click on the Copy Studies blue button at the top right
bull A list of all studies available to copy to the new collection is listed Simply click on the Link button in green tocopy the study to the collection The button will turn red and say Unlink To reverse the process and click thenow red button
bull Going back to the Manage Studies page for the collection will show the newly copied studies in the collectionlist Also note that the Collection field now indicated DHS next to Central DHS is in grey to indicate it is notowned (it is a copy) by that collection and the Central is in blue to show it is owned by the Central Data CatalogAlso note that because the study is not owned by this catalog it cannot be edited from this catalog ndash hence thepublishunpublish green button is absent for the copied studies
45 Managing Licensed Requests
Datasets that are assigned the Access Type Licensed require approval from the NADA administrator before the usercan get access to the data files From the site administration there are a number of ways to see if any licensed requestshave been received
bull Go to the dashboard Pending requests show up as red in the catalog quicj summary section Clicking on thislink goes to the Licensed Survey Requests management page
bull Or go to the Studies link on the top menu and select Licensed Requests from the submenu
48 Chapter 4 User manual
nada Documentation Release 40
The link shows a page with a list Licensed Requests received The status column indicated the Pending requests
bull Click on the Edit link for to process a request
The Request information tab shows a summary of the information provided by the applicant
bull To Approve or Deny or request further information for the request Click on the Process tab
45 Managing Licensed Requests 49
nada Documentation Release 40
bull Select Approve to approve the request (other options include Deny as well as Request more information fromthe applicant)
bull Select the files that the user will be authorized to download ndash it is also possible to enter a maximum number ofdownloads and expiry date for downloads
bull Enter any comments to be sent to the applicant
bull Select Notify user by email to notify them that the application has been processed
bull Select Update
bull The remaining tabs
ndash Communicate - provides a means to ask for more information from the applicant
ndash Monitor ndash allows the administrator to see when and how many times the applicant downloaded thedata
ndash Forward Request ndash provides a means to forward the request to another person for review
46 Manage Citations
The Citations section is where bibliographic references can be added for publications that use any of the studies in thecatalog These citations can be linked to particular studies in the catalog and are displayed to the users of the systemin the study information view of the relevant study
Citations are added from the Citations menu
50 Chapter 4 User manual
nada Documentation Release 40
bull To add a citation - click on All citations then click on the Add New Citation button at the top right
bull Compete the form including the indication as to whether the citation should be published or not
bull Then expand the Related studies link to tell the system which studies the citation ldquobelongsrdquo to
bull Click on the Attach studies link This reveals a list of all studies in the catalog
bull Select the relevant studies by clicking on the green Select button
bull Click on the apply filter button to save the changes The study now appears in the related studies box
bull Click on the submit button to save the citation
bull Note the flag keywords and notes fields can be used by administrators to place extra notes only visible to otheradministrators that might prove useful when there is uncertainty about a citations appropriateness or accuracy
bull It is also possible to import citations in common citation formats such as BibTex and EndNote (RIS)
bull To do this use the Import Citations link from the top menu
46 Manage Citations 51
nada Documentation Release 40
bull Paste the BibTex or RIS text into the form and then at the bottom of the screen click on Attach studies to linkthe citation to a particular study in the catalog
bull The citation now appears in the citation list as well as on the study information page for the relevant studies
52 Chapter 4 User manual
nada Documentation Release 40
47 Managing Users and account types
Users in the NADA can be defined according to three broad groups
General Usersndash this is the normal user who registers on a NADA site from the user interface This user type hasno access to the site administration It is required to register as a user before being granted access to public use andlicensed data types
Site Administrators (unlimited) ndash this user has access to all functions and all collections within the Site Administra-tion System wide access
Limited Administrators ndash these administrators have access to a limited set of functions within the Site Administra-tion Examples would be an administrator of a specific collections or licensed survey reviewer for all or only somecollections or report generator or citation manager etc
471 Creating User accounts
User accounts can be created in two ways
1 A General User account can be created by a user directly from the register screen from the login link on the userinterface of the application
The user created by this process has no access to the site administration This account can only be used to apply andgain access to public and licensed datasets
2 A user account can also be created by a Site Administrator
bull To do this login as a Site Administrator
bull Go to the site administration section of the application
47 Managing Users and account types 53
nada Documentation Release 40
bull Select Users ndash Add user from the top menu
bull Fill in the information for the user in the form and be sure to mark the account status as Active Then click theCreate button
54 Chapter 4 User manual
nada Documentation Release 40
47 Managing Users and account types 55
nada Documentation Release 40
bull Note that the user always starts off as a General User with no access permissions to the Site Administration Theuser group column displays as empty for users with only general user accounts
bull To see a list of all users in the system go to the Users ndash All Users menu item at the top of the screen
bull Note the new users created have no User group assigned (they are general users) Also note the Actions columnon the far right From these links an account can be edited (including changing the password and blocking anaccount) deleted and Permissions managed for the account
472 Managing User Account Permissions
User accounts permissions can be only be set and changed by a Site Administrator To change the permissions for anaccount
bull Click on the Permissions link next to the account to be changed All accounts start of as General users accounts
bull To change this user to a full site administrator who will have full system wide access to all parts and functionsof the NADA administration select the Site administrators (full access) option and tick the admin box as wellClick update to save the changes
56 Chapter 4 User manual
nada Documentation Release 40
473 Collection level administrators
bull To create a user who only has permissions to administer studies or administration functions for a particularcollection Select Site administrators (limited access)
47 Managing Users and account types 57
nada Documentation Release 40
bull It is then necessary to assign a role to this new limited administrator account To create a limited access ad-ministrator for a particular collection ndash select Site administrators (limited access) and then select Collectionadministrators Notice The form expands to reveal a list of collections in the system
bull Select the appropriate level of access that this account will have for this collection In the example below anadministrator is being created who can manage only licensed requests for the collection ndash Health Surveys Thisaccount will not be able to upload or publish studies The account will only be able to process licensed requestsfor the collection ndash Health Surveys
58 Chapter 4 User manual
nada Documentation Release 40
Other levels of access for Site administrators (limited access) ndash Collection administrators include
1 Accounts that are given full access to manage studies
2 Accounts that are given access to upload studies but not publish them
3 Accounts that are limited to reviewing studies
474 Global level Limited access accounts
Other types of limited access accounts include
1 Accounts that can only view system reports at a global level
2 Accounts that can only access the citations section and manage citations
3 Accounts that can only access the Licensed Request management system ndash at the global level for all collections
47 Managing Users and account types 59
nada Documentation Release 40
Impersonating a user
The system includes a function that allows a Site Administrator to impersonate (take on the role) a user created inthe system This is a useful testing tool when creating users and assigning permissions It essentially allows theadministrator to take on the role of another user temporarily
bull To access the Impersonate User feature go to the Users ndash Impersonat user menu at the top of the screen
bull A list of users to impersonate is shown
bull Select the user to impersonate and click on the impersonate button
bull The dashboard view for the impersonated user now shows
60 Chapter 4 User manual
nada Documentation Release 40
bull Note in the example above the account being impersonated is a Limited Account administrator with rights onlyto manage licensed requests for the Health Surveys Collection Note that all other dashboard menus are eitherhidden or clicking on any other function other than manage studies results in an access denied message
bull This is a good way to test if the roles assigned to a user account have the expected results
bull To exit the impersonate mode and return to the Site Administrator role ndash Click on the top right menu and selectExit impersonate mode
475 The Reviewer Limited access account
Sometimes it is desirable for catalog administrators to allow certain users to see a collection before it is published butwithout granting access to the site administration functions
This is useful for getting feedback on the correctness of information on collections or studies before publishing
To do this
bull First create an account for the user or get the user to create an account by using the register form on the loginscreen
bull Then edit the permissions for that user selecting Site Administrator (limited access) ndash Collection administrator
bull Then for the appropriate collection select Reviewer and click update to save the changes
47 Managing Users and account types 61
nada Documentation Release 40
bull The newly created reviewer account user can now view all studies in a collection even if the study or collectionis unpublished
48 Manage Site Pages and Menus
The NADA has a small content management component that allows for the creation of menu pages to appear on theuser interface
bull Examples of menus that might be useful for users of the site might be A page dealing with the disseminationpolicies of the organization or perhaps a page with contact information for the information
New menu items and pages can be created via the Menu- All pages menu link at the top of the Site Administrationpage
62 Chapter 4 User manual
nada Documentation Release 40
bull Select All pages from the menu
bull To add a new page click on the Add New Page button
bull Give the page a Title in the Title field
bull Clicking in the URL field will automatically suggest a name for the page in the URL
bull Enter the contents for the page in the Body section Plain text or HTML is accespted by this field
bull Then indicate if the page should be published or not in the Publish dropdown
bull The Weight field tells the NADA in what order this menu item should display Eg 0 would be first 1 secondand 2 third
bull Click on Update to save the changes
bull View the changes from the user interface In this Example a Contact Us page was created
bull It is also possible from the Menu Management screen to add a menu link that links to an existing page on anothersite (rather than creating a page itself)
bull To change the order in which the menu items display on the user interface use the Reorder Menu button on theMenu Management screen
48 Manage Site Pages and Menus 63
nada Documentation Release 40
49 The Site Settings Page
All settings for the application are controlled via the Settings menu at the top of the Site Administration page Thereare seven main settings sections See screenshot below
491 General Settings
1 Type the Title of the site here This will become the front page title of the NADA site In this case the Title isNADA
64 Chapter 4 User manual
nada Documentation Release 40
2 The footer text can be changed in this field This displays at the bottom of your site page
3 The initial page that loads when a user visits the NADA site can be set here In this case the catalog page is setto open by default
4 The name of the webmaster can be set here This is the name that will be used in system emails sent to users
5 Enter the webmaster email address here This should be the address that will be used in communication withusers Typically this is a general enquiries email set up by the organization and not a personal email address fora particular person Note to avoid mail systems rejecting mail as spam make sure to enter an address here thatis on the same domain as the server used in the email settings at setup
6 This field sets the location of the Cache folder The cache folder stores pre- generated pages of the site to allowfor faster browsing by the user By default it is set to cache This can be moved to another location if desiredbut must be writable The green tick indicates that the folder can be found and is set up correctly Enter eitherrelative or absolute paths to the folder location
7 Set the time that the Cache takes to expire By default it is set to 2 hours (in milli seconds)
8 If it is desired to turn off caching then select no here Sometimes it is useful to turn off caching when developingor updating a site so as to ensure that content changes become immediately visible on the front-end withouthaving to wait for the cache to expire and the new changes to show Turn this back on to speed up page loadingfor users
Click update to save all settings
Language
To change the language of the application expand the language section and choose the desired language Click updateto save and apply the setting
49 The Site Settings Page 65
nada Documentation Release 40
Enable or disable the HTML editor
A basic HTML editor is provided in the menu and page creating section of the application This setting allows this tobe turned on or off
Survey catalog settings
1 This is the folder where the files for the study are stored on the server This includes the DDI eternal resourcesand data files This folder can be moved to a location outside the web root as described in the installationinstructions in Chapter 1 Enter either relative or absolute paths to the folder location
2 This is the folder where DDIrsquos can be placed in order to use the bulk study import function in the NADA InNADA3 files had to be physically copied to this folder on the server but this is no longer necessary in NADA4 Files can now be directly uploaded to this folder from the Site Administration ndash Manage Studies page page
66 Chapter 4 User manual
nada Documentation Release 40
3 Select the vocabulary to use for the topic filter By default this is set to the CESSDA classification as recom-mended in the IHSN templates supplied at IHSNorg for the Nesstar Metadata Publisher
4 Enable or disable the Country filter on the user interface search page here If the catalog only contains studiesfor one country then turning this filter off is recommended
5 Enable or disable the Topic filter on the user interface search page here If no topics have been defined in theDDIrsquos being uploaded then it is recommended to turn this filter off (disable)
6 Enable or disable the Year filter on the user interface search page here
7 Enable or disable the Collection filter on the user interface search page here If no collections have been definedthen it is recommended to disable this filter
8 Enable or disable the Data access filter on the user interface search page here This filter is not needed if thereare very few studies in the catalog or if all studies hare set to the same access type
9 This section controls the order in which the filters appear on the search page Enter numbers here that rank theorder of the filters in the order they should be displayed
10 This setting determines how many studies are displayed by default to the user on the search page ndash catalog view
Site Login settings
1 To require that users login before being able to access the website set this option to Requires all users to loginto access the website
2 Determined how long a user will stay logged in After this time the user will be automatically logged out
3 Sets the minimum length for passwords created by the users at registration or for manual user creation
49 The Site Settings Page 67
nada Documentation Release 40
SMTP Settings
1 If the PHPweb server is configured to send email using PHPrsquos MAIL function select the first option and donrsquotfill in anything else
If your organization has a mail server and has have a dedicated account that can be setup for NADA use the followingsettings Check the radio button ldquoUse SMTP Serverrdquo
2 Enter the host name for the server
3 Enter the port used by the server to send mail
4 If required enter the user name used to send mail on the server
5 Enter the password used to send mail on the server
If the organization does not own a mail server a Gmail account can be configured to be used with NADA
bull Check the radio button ldquoUse SMTP Serverrdquo
bull Host name sslsmtpgooglemailcom or sslsmtpgmailcom
bull SMTP port 465
bull Account username email-addressgmailcom
bull Account password password for the gmail account
6 Test the email settings
The quickest way to test if the email settings are working is to use the ldquoforgot passwordrdquo option from the user loginpage If no mail is received when doing this test then go back and correct the mail settings Check with the ISP orserver administrator for the correct settings
Click on update to save all settings
68 Chapter 4 User manual
nada Documentation Release 40
492 Dashboard setting
Provides a means to automatically have content loaded into the dashboard via an RSS feed from a site The defaultsetting is set to receive updates and news from the IHSN website
49 The Site Settings Page 69
nada Documentation Release 40
70 Chapter 4 User manual
CHAPTER 5
Indices and tables
bull genindex
bull modindex
bull search
71
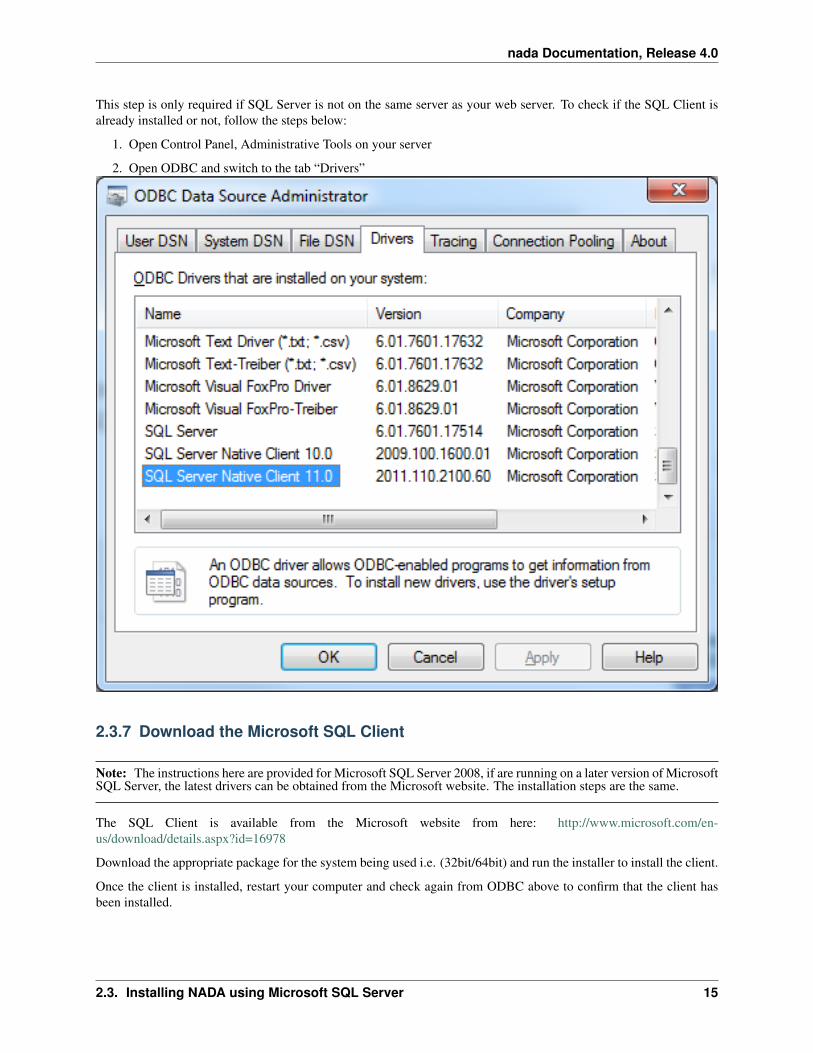
nada Documentation Release 40
238 NADA Database configurations for SQLSRV
Create a database and the user account to use with NADA beforehand The permissions need to include - createaltertables indexes ( See the following reference from Microsoft for instructions on how to do this
bull Database - httpmsdnmicrosoftcomen-uslibraryms186312aspx
bull User - httpmsdnmicrosoftcomen-uslibraryaa337545aspx
Open the nada database configuration file your-nada-folderapplicationconfigdatabasephp file and look for the fol-lowing lines
$db[rsquosqlsrvrsquo][rsquohostnamersquo] = localhostsqlexpress$db[rsquosqlsrvrsquo][rsquousernamersquo] = db-user-name$db[rsquosqlsrvrsquo][rsquopasswordrsquo] = password$db[rsquosqlsrvrsquo][rsquodatabasersquo] = nada-database$db[rsquosqlsrvrsquo][rsquodbdriverrsquo] = sqlsrv$db[rsquosqlsrvrsquo][rsquodbprefixrsquo] = $db[rsquosqlsrvrsquo][rsquopconnectrsquo] = FALSE$db[rsquosqlsrvrsquo][rsquodb_debugrsquo] = FALSE$db[rsquosqlsrvrsquo][rsquocache_onrsquo] = FALSE$db[rsquosqlsrvrsquo][rsquocachedirrsquo] = $db[rsquosqlsrvrsquo][rsquochar_setrsquo] = utf8$db[rsquosqlsrvrsquo][rsquodbcollatrsquo] = utf8_general_ci
Fill in the database connection settings for the database created for NADA
Save the changes
239 Running the installer
bull Open a web browser to the location of the NADA installation For examplehttpyour-domainnada-folder-name or localhostnada-folder-name
bull If the Microsoft database connection is setup correctly you should see the nada installer
16 Chapter 2 Installation guide
nada Documentation Release 40
bull Check that all settings are marked with a green tick and fix any that are not on your webserver before runningthe installer
bull Click on the Install Database button and complete the form to create an initial Site Administrator account
Note Create a complex password of atleast 12 characters long with some uppercase punctuation and numbers to aidsecurity of your site Do not forget this username and password
23 Installing NADA using Microsoft SQL Server 17
nada Documentation Release 40
Congratulations Launch the new site
18 Chapter 2 Installation guide
nada Documentation Release 40
24 PHP settings
241 Finding the correct PHPINI
To make sure you are editing the correct PHPINI settings file create a PHP file (eg infophp) in your nada websitefolder with the following contents
ltphp phpinfo() gt
Open the phpinfo page in your web browser and you should see output similar to below screenshot Edit the phpinifile displayed by the setting Loaded Configuration File
24 PHP settings 19
nada Documentation Release 40
20 Chapter 2 Installation guide
nada Documentation Release 40
242 File upload limits
By default PHP allows uploads of 2MB which could be a problem if you have large DDIs and external resource filesTo change the settings
1 Edit the phpini file in notepad and look for the setting upload_max_filesize
2 The line should look like
Maximum allowed size for uploaded files httpphpnetupload-max-filesizeupload_max_filesize = 2M
3 Change it to the required file upload limit per your needs
upload_max_filesize = 50M
4 There is another setting that MUST be changed as well for the file upload limits to work Look for the configu-ration post_max_size and change it to match the value for upload_max_filesize
post_max_size = 50M
243 TimeZone settings
This is for setting the timezone for your application To findout what is the correct timezone for your website go tohttpphpnetmanualentimezonesphp and find your countrycity
Example
datetimezone = AmericaNew_York
244 Increase page executiontimeout
This setting controls the maximum execution time of a page in seconds
max_execution_time = 300
245 Increase PHP memory limit
It controls the memory available to PHP scripts
memory_limit = 128M
246 Enabledisable PHP extensions
NADA requires the following PHP extensions
bull xsl
bull mbstring
bull mysql or sqlsrv
To enable XSL extension add this line
24 PHP settings 21
nada Documentation Release 40
extension=php_xsldll
To enable mbstring
extension=php_mbstringdll
25 Configure Captcha
By default NADA version 41 comes with image captcha and user does not need to make any changes to use imagecaptcha To use Google Captcha please follow the steps given below
1 Open applicationconfigcaptchaphp in editor
2 Change line number 12 as shown in below image
3 Click on above URL to generate Public and Private key URL httpwwwgooglecomrecaptchawhyrecaptcha
4 Click on sign up now
5 Sign in using your Gmail account
6 After signed in you will have to enter your URL (Domain URL)
22 Chapter 2 Installation guide
nada Documentation Release 40
7 Click on ldquoenable globel key for all domain
8 Click on Create Key button
9 Copy public key and private key from Google Captcha website and inserte it on line number 51 and 52 respec-tively as shown in below image
10 To check the Google catpcha configuration go to register page and look for image as shown in below URLhighlighted in Red suqare
25 Configure Captcha 23
nada Documentation Release 40
26 Email configurations
For the NADA to function correctly it is important that this step be completed
Many of the functions within the NADA ndash such as registration and applying for access to datasets require that theNADA be able to send emails to users
There are two ways to setup your email configurations 1) Create a emailphp file in the applicationconfig folder 2)Edit email settings on the site configurations page
24 Chapter 2 Installation guide
nada Documentation Release 40
261 1 Configure email via email config file
1 Open the file applicationconfigemailphp in notepad
2 Fill in the section using SMTP server with authentication enabled highlighted in below image
3 For Gmail user will have to fill the gmail smtp section shown as below
26 Email configurations 25
nada Documentation Release 40
4 Save file
Note Using a file for email configuration disable the email configuration page from the site administration
1 Login to your NADA as an administrator
2 Go to Site administration click on the Settings menu and choose ldquoSettingsrdquo
3 Find the section ldquoSMTP settingsrdquo
26 Chapter 2 Installation guide
nada Documentation Release 40
4 If the PHPweb server is configured to send email using PHPrsquos MAIL function select the first option and donrsquotfill in anything else
If your organization has a mail server and has have a dedicated account that can be setup for NADA use the followingsettings Check the radio button ldquoUse SMTP Serverrdquo
5 Enter the host name for the server
6 Enter the port used by the server to send mail
7 If required enter the user name used to send mail on the server
8 Enter the password used to send mail on the server
If the organization does not own a mail server a Gmail account can be configured to be used with NADA
bull Check the radio button ldquoUse SMTP Serverrdquo
bull Host name sslsmtpgooglemailcom or sslsmtpgmailcom
bull SMTP port 465
bull Account username email-addressgmailcom
bull Account password password for the gmail account
Test the email settings
The quickest way to test if the email settings are working is to use the ldquoforgot passwordrdquo option from the user loginpage
bull Click on forgot password
26 Email configurations 27
nada Documentation Release 40
bull Enter the administrator or any other accounts email address
bull Check to the email account the mail was sent to
bull If no mail is received the settings are wrong and need to be corrected
28 Chapter 2 Installation guide
CHAPTER 3
Upgrading from previous versions
31 Upgrade from NADA 3
For users with an existing NADA 3x catalog an upgrade script is included that will update your NADA 3x databaseto NADA 4x The process involves modifying your NADA 3x database and thus carries some risks The script willadd new tables to the NADA 3x database All user accounts and survey information will be retained by the upgrade
Important Backup the NADA 3x database before doing anything
1 Follow the instructions on page 4 and set up a folder in the web root containing the NADA 4 files
2 Edit the databasephp file as instructed in the section above NADA database configurations for MySQL
3 Instead of entering a new database name user account name and password -fill in the details of the existingNADA 3x database
Note These can be found by looking at the existing NADA 3x databasephp file and entering the settings into theNADA 4 databasephp file
4 Save the file
5 Navigate to the URL for the NADA4 site Example httpyour-nada-sitenada4indexphpnada4_upgrade
6 The following page loads
29
nada Documentation Release 40
Take note of the warnings and make any necessary corrections before clicking the ldquoUpgrade database to NADA 4rdquobutton
Warning This step makes changes to your nada 3 database that are not undo-able so make sure you do make adatabase backup before this step
Click on the ldquoUpgrade database to NADA 4rdquo button and wait for the page to reload The output of the page will looksomething like below
The script will print number of messages about failed table updates This does not mean the script failed to upgradeIt just means some of the updates were not needed on your version of NADA 3 Different versions of NADA havedifferent numbers of fields in the database and the upgrade script tries to fix the missing fields for all these differentversions of NADA If the existing NADA 3 database already has that field then it reports it as an error
You can ignore the error messages that include the wording ldquoDuplicate column namerdquo or ldquoDuplicate entryrdquo
Now your database has been migrated to NADA version 41 We will have to run one more upgrade script to forNADA version 42
7 Navigate to the URL for the NADA42 site Example httpyour-nada-sitenada42indexphpnada42_upgrade
Warning This step makes changes to your nada 41 database that are not undo-able This page will not show anymessage on the screen You will be getting blank page Please do not repeat the process
8 To verify the database upgrade Open the NADA catalog page by going to http[your-nada4-site]indexphpcatalogpage and verify all studies from NADA 3 are listed
311 Linking your NADA 3 data files to NADA 4
The upgrade script has only upgraded the database It is now necessary to tell the NADA4 where to locate the datafilesthat were uploaded to the original NADA 3 site
There are two options available
Option 1 Copy the datafiles folder from NADA 3 to NADA 4 This works best if you have only a few studies and thedatafiles folder size is small enoughto be moved easily from one location to another
Option 2 If it is not possible to easily move the datafiles folder from NADA 3 to NADA 4 you can tell NADA 4 thelocation of the datafiles without moving the files Here are the steps
bull Use your NADA 3 administrator login credentials to login to your new NADA 4 site
bull Click on Site administration in the top right corner of the screen
bull Go to the ldquoSettingsrdquo menu and click on the ldquoSettingsrdquo sub-menu
30 Chapter 3 Upgrading from previous versions
nada Documentation Release 40
bull Under Site configurations expand the ldquoSurvey Catalog Settingsrdquo section
bull For the setting ldquoCatalog folderrdquo enter the relative or full path to where the NADA 3 datafiles folder is locatedFor example if the nada3 datafiles are located on cnada3datafiles enter that path here
bull Save the configurations by clicking on the update button If now errors are shown then you have successfullyupdated the folder path
bull Check your new NADA 4 site to make sure the migration was successful
ndash Check the user administration page from site administration to make sure the users from the nada3 sitewere migrated
ndash Check the ldquoData Catalogrdquo page and view the studies by clicking on the study title to make sure the studyinformation pages are correct
ndash Check the site menus are the same as the NADA 3 site
312 Refresh DDI
In NADA 4 more information is stored in the database from the DDI than in the NADA 3 To bring all these newfields into the imported studies it is necessary to refresh the DDIrsquos The refresh DDI feature in NADA updates thedatabase with metadata from the DDI without having re-uploading the DDIs To update the metadata for all studies inyour catalog
bull Open the following NADA 4 URL in your browser
http[your-nada-4-site]indexphpadmincatalogbatch_refresh
bull Select all studies
bull Click on the ldquoRefresh DDIrdquo button
313 Transferring ownership
NADA 4 has a collection management feature When studies are imported from the NADA3 catalog into NADA4 theyare put into a collection called DEFAULT They need to be moved from this default system collection to the Central
31 Upgrade from NADA 3 31
nada Documentation Release 40
Data Catalog of the NADA4
To do this
bull Go login to the Site Administration and navigate to the Studies Manage Studies Central Data Catalog page
bull Select all the studies by ticking the check boxes next to each study on the right
bull Click on the dropdown menu and select Transfer owner
bull From the Transfer study owner page Select Central Data Catalog and then click transfer
32 Chapter 3 Upgrading from previous versions
nada Documentation Release 40
314 Updating the Site themetemplate
You cannot use your NADA3 template in NADA4 without making some changes Here are general guidelines butsteps may differ depending on your nada site template
bull Copy your NADA3 template to the NADA4 themes folder
bull Edit the [nada4-root]configtemplatephp following the steps below
bull Look for the setting ldquotheme_namerdquo by default it is set to rdquowbrdquo
bull Change ldquowbrdquo to the theme name you want to use Theme name is the folder name you copied to[NADA4]themes[your-site-theme] from your nada3 site
bull Save the file
NB The template may need some adjusting to run properly on the new NADA 4 site This will involve editingthe layoutphp and other template files within the template folder which is now located in the NADA 4 themesfolder
32 Migrate MySQL to Microsoft SQL
TODO
32 Migrate MySQL to Microsoft SQL 33
nada Documentation Release 40
34 Chapter 3 Upgrading from previous versions
CHAPTER 4
User manual
41 Overview and core concepts
411 About NADA
NADA is a web-based cataloging application that allows for the creation of portals that allows users to browse searchcompare apply for access and download relevant census or survey information
It was originally developed to support the establishment of national survey data archives The application is used by adiverse and growing number of national regional and international organizations NADA as with other IHSN toolsuses the Data Documentation Initiative (DDI) XML-based international metadata standard
412 Concepts
CENTRAL DATA CATALOG
The default catalog created when a NADA instance is installed is the Central Data Catalog All studies uploaded to theNADA are visible searchable and accessible from the Central Data Catalog For many institutions the Central DataCatalog will remain the only catalog in their NADA instance For some institutions being able to divide the contentsof the Central Data Catalog into more refined collections will be desirable
COLLECTIONS
Collections are sub categories of the Central Data Catalog They allow administrators of a NADA instance to groupstudies into what can be thought of as sub-catalogs of the Central Data Catalog This has a number of benefitsboth from the user and the administrator perspective From the usersrsquo perspective being able to filter and viewgroups (collections) of studies that logically belong together makes finding what they are looking for easier From theadministratorsrsquo perspective the ability to create collections of studies that may logically belong together facilitates theability to decentralize the management of each collection of studies to specific administrators (for example collectionscan be managed by different departments in an institution)
NOTE The creation of collections will in general only be useful and necessary for large catalogs or for catalogs thatdesire more decentralized management of groups of studies by different departments
STUDIES
Studies are carried out to gather more knowledge about a subject Studies may gather information from a number ofdifferent sources in order to answer the questions asked The information gathered for a study will in the context of
35
nada Documentation Release 40
NADA catalogs usually come from either a census or a surveys It is therefore not uncommon to hear the terms surveyand study used interchangeably when listening to people talk about their NADA catalog
METADATA
Metadata are data about the data They are not the actual data collected from the survey but rather the information thatdescribes the survey process and the data The NADA uses the Data Documentation Initiative (DDI) ndash ddiallianceorgndash standard for the presentation of metadata for each study The DDI document (which is an XML document) isprepared outside the NADA application either manually or using a tool like the Nesstar Publisher ndash nesstarcom ndash andthen imported into the NADA The detailed information about the survey is searchable down to the variable level foreach survey in the catalog
DATA ACCESS TYPES
The NADA allows for the level of access to datasets for studies to be controlled at the study level In other words thelevel of restriction can differ from study to study and can be defined on a scale ranging from direct access with norestrictions to no access Briefly the available access types are
bull Data not available - data are not available for this study
bull Direct Access Data Files - data shared under this policy can be downloaded without any restrictions The useris not required to be logged into the site and no personal information is collected on the person downloading thedata
bull Public Use Data Files - data shared under this policy requires that the user be logged in and registered on thesite before they are able to download the data The user is required to agree to a terms of use of the data and theapplication keeps records of who downloads the data
bull Licensed Data Files - data shared under this policy requires that the user be logged in and registered on the siteUsers are also required to fill in and submit a detailed application form listing their reasons for wanting accessto the data Once the user submits the application form the system informs the system administrator that anapplication has been made In order for the person to get access to the data the system administrator needs toreview the application and approve it
bull Data available in an Enclave - under this policy no data is shared through the application Users submit anapplication to access the data at a secure facility physically located on the premises of the data producer or afacility nominated by the data producer
bull Data available from external repository ndash The NADA allows for studies and their metadata to be listed in aNADA catalog but for a link to be created to another site when the data for that study are available elsewhere
CITATIONS
Citations are references that can be included at the study level which point to published works that have used the datafrom a particular study In many cases this will be a reference to a Journal Article Working paper Newspaper articleetc Such resources are useful to researchers who are interested in seeing how the data have been used before Theyare also a good way of showing the funders of surveys that the data are being used for policy and research purposesand thus are an indicator of some of the impact a study has had
USERS
Users in the NADA can be defined according to three broad groups General Users ndash this is the normal user whoregisters on a NADA site from the user interface This user type has no access to the site administration It is requiredto register as a user when accessing public use and licensed data types Site Administrators (unlimited) ndash this user
36 Chapter 4 User manual
nada Documentation Release 40
has access to all functions and all collections within the Site Administration System wide access Limited Adminis-trators ndash these administrators have access to a limited set of functions within the Site Administration Examples wouldbe an administrator of a specific collections or licensed survey reviewer for all or only some collections or reportgenerator etc
413 Why do NADA administrators need to understand these concepts
Understanding these concepts is important as it
bull Is critical to understanding the new permissions and administrator types introduced in NADA 4 Administratorsare now able to create collections within their NADArsquos and assign different roles to administrators and moregranular levels of access to catalog administration at the collection level It is now possible for example to haveadministrators whorsquos lsquopowersrsquo range from being able to manage all parts of a collectionrsquos administration downto ones with more restrictive access such as ones whose only function is as licensed survey reviewer or reportgenerator or catalog reviewer or citation manager etc
bull Ensures that the correct level of permissions and access is assigned to users based on security policies within theinstitution Unlike previous versions of NADA not all users who have access to the Site Administration needhave the level of access of an ldquounlimited site administratorrdquo This limits security risks associated with havingtoo many ldquounlimited site administratorsrdquo managing a site
bull Assists in assigning an appropriate data access type to data based on institutional distribution polices
bull Makes it easier to explain more clearly to institutional managers what the capabilities of the NADA applicationare and to advise on how to best manage the allocation of responsibilities
42 The Dashboard
After logging in to the Site Administration with administrator credentials the user is taken to the dashboard
The Dashboard provides a quick glance summary for administrators to get an overall picture of what has been happen-ing on the site as well as what pending tasks are outstanding for the administrator
42 The Dashboard 37
nada Documentation Release 40
1 Menu link to the Dashboard
2 Menu link to the Study Management pages submenus include Manage Studies Licensed requests and ManageCollections
3 Menu link to the citations management pages
4 Menu link to the User management pages submenus include All users Add user and Impersonate User
5 Menu link to create menu pages for the site frontend
6 Menu link to generate usage reports
7 Menu Link to the settings pages submenus include Settings Coutries Regions and Vocabularies
8 Useful navigation links submenus include Change Password Log out Catalog Home Data catalog Citations
9 This section lists all collections in the catalog Within each collection a summary is given of the number ofstudies along with diagnostics related to the number of studies publishedunpublished missing questionnairesdata access types set but with no data attached as well as some buttin links to Manage the collections studiesusers and a History of changes made to the collection
10 Provides a summary of users registrations and number of users currently logged in
11 Show how many pages are being cached on the site with a link to clear the cache if need be
12 Show a list of recently added or updated studies Clicking on a study in the list takes you to the page to managethat study
38 Chapter 4 User manual
nada Documentation Release 40
43 Manage Collections
431 Collections
Collections are sub categories of the Central Data Catalog They allow administrators of a NADA instance to groupstudies into what can be thought of as sub-catalogs of the Central Data Catalog
Collections provide a number of benefits both from the user and the administrator perspective From the usersrsquo per-spective being able to filter and view groups (collections) of studies that logically belong together makes finding whatthey are looking for easier From the administratorsrsquo perspective the ability to create collections of studies that maylogically belong together facilitates the ability to decentralize the management of each collection of studies to specificadministrators (for example collections can be managed by different departments in an institution)
Note The creation of collections will in general only be useful and necessary for large catalogs or for catalogs thatdesire more decentralized management of groups of studies by different departments
432 Creating collections
bull Login to the Site administration using an administrator password
bull Collections are managed and created by going to the Studies Manage collections menu link
bull There are no collections defined in the default NADA 4 installation
bull To create a new collection click on the Create new collection button
43 Manage Collections 39
nada Documentation Release 40
1 Under Collection Identification provide a short name for the collection This will become the URL for thecollection so pick carefully For Title fill in the fill title for the collection This will be the name displayed atthe top of the collection page
B Fill in a 3 or four line short description of the collection This text will display on the front end in the collectionslist For examples see httpmicrodataworldbankorgindexphpcontributing-catalogs
C Fill in a more detailed description of the collection This will display on the About page for that collection Forexample see httpmicrodataworldbankorgindexphpcatalogdhsabout
To format the page and include images it is possible to enter HTML code into this box below is anexample piece of code that includes an image
ltimg src=rdquofilesdhs-fp-01jpgrdquo alt=rdquoHealth Surveys Imagerdquo class=rdquoabout-photordquogt lth2gt Health SurveysCollectionlth2gt ltp align=rdquojustifyrdquogtThe Health Surveys collection aims to provide frequent high qual-ity and timely health data needed by the decision makers when designing public health programsltpgtltpgtHealth surveys provide useful information on health status and health consumption and their determi-nantsltpgt
Copy any images to be displayed into the NADA ldquofilesrdquo folder on your server image imagesthumbnil-imagepng
4 Upload a file to display next to the collection as it is listed on the collection page NOTE This image should be82 X 82 pixels If the upload does not work automatically then copy the thumbnail image to the ldquofilesrdquo folder asshown above
40 Chapter 4 User manual
nada Documentation Release 40
E The Weight field determines in what order collections are shown in the collection list 0123 etc The Selectcollection type drop-down is a system value to distinguish between collections that should be viewed as internal tothe organization or external For example some collections may be made up entirely of studies from an organizationoutside the host catalog These collections can be designated as external The Section dropdown allows for thecategorization as either a collection based on a specialized collection (like health) or based on a regional breakdownSelecting Publish ndash publishes the collection
bull Click on Submit to save the changes
To view the results click on the Preview link on the far right
bull The new collection now also shows in the collection list on the Central Catalog About page (this is where thethumbnail and short description fields are displayed)
43 Manage Collections 41
nada Documentation Release 40
bull Visiting the Dashboard will now also show the new collection listed below the Central Data Catalog With anumber of green buttons as shortcut links to manage the studies on the collection assign administrators for thecollection a history of activity on the collection and a link to edit the collection as in the steps above
433 Manually adding studies to a collection
There are 2 ways to get studies into the new catalog
bull The first is to upload a DDI and all its resources to the collection in the same way as described in the earliersection ndash Uploading a Study Except instead of choosing Central Catalog chose the collection you want to
42 Chapter 4 User manual
nada Documentation Release 40
upload the study to
bull Click on the Add Study button and upload a DDI and RDF and all your resources as described in the earliersection ndash Uploading a Study
bull Once a study is added in this way it displays in the Manage Studies list Notice that the collection summaryfield shows that the study belongs to (is Owned By) the DHS collection (this was the Short name defined in theexample when the Health Surveys Collection was created)
All studies uploaded to collections will automatically be added to the Central Data Catalog in order to build a commonsearch portal for all studies
43 Manage Collections 43
nada Documentation Release 40
434 Copying studies from one collection to another
bull The second way to add a study to a collection is to Copy the study from another collection into the newcollection
bull To copy a study already in the catalog to display in the new collection first make sure to be in the Manage Studiessection for the collection you want to put studies into To do this either use the Studies ndash Manage studies menuon the top or simply click on the Switch link next to the Manage Studies [Collection Title] heading
bull Then Click on the Copy Studies blue button at the top right
bull A list of all studies available to copy to the new collection is listed Simply click on the Link button in green tocopy the study to the collection The button will turn red and say Unlink To reverse the process and click thenow red button
bull Going back to the Manage Studies page for the collection will show the newly copied studies in the collectionlist Also note that the Collection field now indicated DHS next to Central DHS is in grey to indicate it is notowned (it is a copy) by that collection and the Central is in blue to show it is owned by the Central Data CatalogAlso note that because the study is not owned by this catalog it cannot be edited from this catalog ndash hence thepublishunpublish green button is absent for the copied studies
44 Chapter 4 User manual
nada Documentation Release 40
435 Turning on the collection filter
The final step after creating the first collection is to enable the collection filter option in the Settings menus under SiteConfigurations ndash Survey catalog settings
436 Transferring study ownership
In the previous examples mention was made of studies uploaded to a catalog being owned by that catalog There maybe cases where transferring the ownership from one catalog to another will be desirable This will become clearerin the next section on user roles but for now the next steps show how transferring ownership from one collection toanother can be done
bull Transferring ownership from one collection to another has to be done by the owner of the collection and fromthe collection it is currently owned by
bull To transfer ownership Go to the Manage Studies screen and select the study to be transferred Open up the EditStudy page by clicking on the study Title
bull On the right hand side of the screen click on the Transfer study owner link
43 Manage Collections 45
nada Documentation Release 40
bull Select the collection to transfer from the dropdown box
bull Click Transfer
bull Note that when looking the study summary for the transferred study the Collection field now shows the studyto belong (owned by) to the DHS collection and not Central anymore Also note the option to Publish andunpublish is now active
bull To transfer ownership of a large number of studies all at once - from the Manage Studies page ndash select the studiesto be transferred (tick them in the box left of each study) and then from the top Batch Actions drop down selectTransfer owner ndash then apply
46 Chapter 4 User manual
nada Documentation Release 40
44 Manage Studies
There are 2 Options to get studies into the new catalog
441 Option 1
bull The first is to upload a DDI and all its resources to the collection in the same way as described in the earliersection ndash Uploading a Study Except instead of choosing Central Catalog chose the collection you want toupload the study to
bull Click on the Add Study button and upload a DDI and RDF and all your resources as described in the earliersection ndash Uploading a Study
bull Once a study is added in this way it displays in the Manage Studies list Notice that the collection summaryfield shows that the study belongs to (is Owned By) the DHS collection (this was the Short name defined in theexample when the Health Surveys Collection was created)
bull Also note that the new study also appears in the Central Data Catalog
All studies uploaded to collections will automatically be added to the Central Data Catalog in order to build a commonsearch portal for all studies
44 Manage Studies 47
nada Documentation Release 40
442 Option2
Copying studies from one collection to another
bull The second way to add a study to a collection is to Copy the study from another collection into the new collection
bull To copy a study already in the catalog to display in the new collection first make sure to be in the Manage Studiessection for the collection you want to put studies into To do this either use the Studies ndash Manage studies menuon the top or simply click on the Switch link next to the Manage Studies [Collection Title] heading
bull Then Click on the Copy Studies blue button at the top right
bull A list of all studies available to copy to the new collection is listed Simply click on the Link button in green tocopy the study to the collection The button will turn red and say Unlink To reverse the process and click thenow red button
bull Going back to the Manage Studies page for the collection will show the newly copied studies in the collectionlist Also note that the Collection field now indicated DHS next to Central DHS is in grey to indicate it is notowned (it is a copy) by that collection and the Central is in blue to show it is owned by the Central Data CatalogAlso note that because the study is not owned by this catalog it cannot be edited from this catalog ndash hence thepublishunpublish green button is absent for the copied studies
45 Managing Licensed Requests
Datasets that are assigned the Access Type Licensed require approval from the NADA administrator before the usercan get access to the data files From the site administration there are a number of ways to see if any licensed requestshave been received
bull Go to the dashboard Pending requests show up as red in the catalog quicj summary section Clicking on thislink goes to the Licensed Survey Requests management page
bull Or go to the Studies link on the top menu and select Licensed Requests from the submenu
48 Chapter 4 User manual
nada Documentation Release 40
The link shows a page with a list Licensed Requests received The status column indicated the Pending requests
bull Click on the Edit link for to process a request
The Request information tab shows a summary of the information provided by the applicant
bull To Approve or Deny or request further information for the request Click on the Process tab
45 Managing Licensed Requests 49
nada Documentation Release 40
bull Select Approve to approve the request (other options include Deny as well as Request more information fromthe applicant)
bull Select the files that the user will be authorized to download ndash it is also possible to enter a maximum number ofdownloads and expiry date for downloads
bull Enter any comments to be sent to the applicant
bull Select Notify user by email to notify them that the application has been processed
bull Select Update
bull The remaining tabs
ndash Communicate - provides a means to ask for more information from the applicant
ndash Monitor ndash allows the administrator to see when and how many times the applicant downloaded thedata
ndash Forward Request ndash provides a means to forward the request to another person for review
46 Manage Citations
The Citations section is where bibliographic references can be added for publications that use any of the studies in thecatalog These citations can be linked to particular studies in the catalog and are displayed to the users of the systemin the study information view of the relevant study
Citations are added from the Citations menu
50 Chapter 4 User manual
nada Documentation Release 40
bull To add a citation - click on All citations then click on the Add New Citation button at the top right
bull Compete the form including the indication as to whether the citation should be published or not
bull Then expand the Related studies link to tell the system which studies the citation ldquobelongsrdquo to
bull Click on the Attach studies link This reveals a list of all studies in the catalog
bull Select the relevant studies by clicking on the green Select button
bull Click on the apply filter button to save the changes The study now appears in the related studies box
bull Click on the submit button to save the citation
bull Note the flag keywords and notes fields can be used by administrators to place extra notes only visible to otheradministrators that might prove useful when there is uncertainty about a citations appropriateness or accuracy
bull It is also possible to import citations in common citation formats such as BibTex and EndNote (RIS)
bull To do this use the Import Citations link from the top menu
46 Manage Citations 51
nada Documentation Release 40
bull Paste the BibTex or RIS text into the form and then at the bottom of the screen click on Attach studies to linkthe citation to a particular study in the catalog
bull The citation now appears in the citation list as well as on the study information page for the relevant studies
52 Chapter 4 User manual
nada Documentation Release 40
47 Managing Users and account types
Users in the NADA can be defined according to three broad groups
General Usersndash this is the normal user who registers on a NADA site from the user interface This user type hasno access to the site administration It is required to register as a user before being granted access to public use andlicensed data types
Site Administrators (unlimited) ndash this user has access to all functions and all collections within the Site Administra-tion System wide access
Limited Administrators ndash these administrators have access to a limited set of functions within the Site Administra-tion Examples would be an administrator of a specific collections or licensed survey reviewer for all or only somecollections or report generator or citation manager etc
471 Creating User accounts
User accounts can be created in two ways
1 A General User account can be created by a user directly from the register screen from the login link on the userinterface of the application
The user created by this process has no access to the site administration This account can only be used to apply andgain access to public and licensed datasets
2 A user account can also be created by a Site Administrator
bull To do this login as a Site Administrator
bull Go to the site administration section of the application
47 Managing Users and account types 53
nada Documentation Release 40
bull Select Users ndash Add user from the top menu
bull Fill in the information for the user in the form and be sure to mark the account status as Active Then click theCreate button
54 Chapter 4 User manual
nada Documentation Release 40
47 Managing Users and account types 55
nada Documentation Release 40
bull Note that the user always starts off as a General User with no access permissions to the Site Administration Theuser group column displays as empty for users with only general user accounts
bull To see a list of all users in the system go to the Users ndash All Users menu item at the top of the screen
bull Note the new users created have no User group assigned (they are general users) Also note the Actions columnon the far right From these links an account can be edited (including changing the password and blocking anaccount) deleted and Permissions managed for the account
472 Managing User Account Permissions
User accounts permissions can be only be set and changed by a Site Administrator To change the permissions for anaccount
bull Click on the Permissions link next to the account to be changed All accounts start of as General users accounts
bull To change this user to a full site administrator who will have full system wide access to all parts and functionsof the NADA administration select the Site administrators (full access) option and tick the admin box as wellClick update to save the changes
56 Chapter 4 User manual
nada Documentation Release 40
473 Collection level administrators
bull To create a user who only has permissions to administer studies or administration functions for a particularcollection Select Site administrators (limited access)
47 Managing Users and account types 57
nada Documentation Release 40
bull It is then necessary to assign a role to this new limited administrator account To create a limited access ad-ministrator for a particular collection ndash select Site administrators (limited access) and then select Collectionadministrators Notice The form expands to reveal a list of collections in the system
bull Select the appropriate level of access that this account will have for this collection In the example below anadministrator is being created who can manage only licensed requests for the collection ndash Health Surveys Thisaccount will not be able to upload or publish studies The account will only be able to process licensed requestsfor the collection ndash Health Surveys
58 Chapter 4 User manual
nada Documentation Release 40
Other levels of access for Site administrators (limited access) ndash Collection administrators include
1 Accounts that are given full access to manage studies
2 Accounts that are given access to upload studies but not publish them
3 Accounts that are limited to reviewing studies
474 Global level Limited access accounts
Other types of limited access accounts include
1 Accounts that can only view system reports at a global level
2 Accounts that can only access the citations section and manage citations
3 Accounts that can only access the Licensed Request management system ndash at the global level for all collections
47 Managing Users and account types 59
nada Documentation Release 40
Impersonating a user
The system includes a function that allows a Site Administrator to impersonate (take on the role) a user created inthe system This is a useful testing tool when creating users and assigning permissions It essentially allows theadministrator to take on the role of another user temporarily
bull To access the Impersonate User feature go to the Users ndash Impersonat user menu at the top of the screen
bull A list of users to impersonate is shown
bull Select the user to impersonate and click on the impersonate button
bull The dashboard view for the impersonated user now shows
60 Chapter 4 User manual
nada Documentation Release 40
bull Note in the example above the account being impersonated is a Limited Account administrator with rights onlyto manage licensed requests for the Health Surveys Collection Note that all other dashboard menus are eitherhidden or clicking on any other function other than manage studies results in an access denied message
bull This is a good way to test if the roles assigned to a user account have the expected results
bull To exit the impersonate mode and return to the Site Administrator role ndash Click on the top right menu and selectExit impersonate mode
475 The Reviewer Limited access account
Sometimes it is desirable for catalog administrators to allow certain users to see a collection before it is published butwithout granting access to the site administration functions
This is useful for getting feedback on the correctness of information on collections or studies before publishing
To do this
bull First create an account for the user or get the user to create an account by using the register form on the loginscreen
bull Then edit the permissions for that user selecting Site Administrator (limited access) ndash Collection administrator
bull Then for the appropriate collection select Reviewer and click update to save the changes
47 Managing Users and account types 61
nada Documentation Release 40
bull The newly created reviewer account user can now view all studies in a collection even if the study or collectionis unpublished
48 Manage Site Pages and Menus
The NADA has a small content management component that allows for the creation of menu pages to appear on theuser interface
bull Examples of menus that might be useful for users of the site might be A page dealing with the disseminationpolicies of the organization or perhaps a page with contact information for the information
New menu items and pages can be created via the Menu- All pages menu link at the top of the Site Administrationpage
62 Chapter 4 User manual
nada Documentation Release 40
bull Select All pages from the menu
bull To add a new page click on the Add New Page button
bull Give the page a Title in the Title field
bull Clicking in the URL field will automatically suggest a name for the page in the URL
bull Enter the contents for the page in the Body section Plain text or HTML is accespted by this field
bull Then indicate if the page should be published or not in the Publish dropdown
bull The Weight field tells the NADA in what order this menu item should display Eg 0 would be first 1 secondand 2 third
bull Click on Update to save the changes
bull View the changes from the user interface In this Example a Contact Us page was created
bull It is also possible from the Menu Management screen to add a menu link that links to an existing page on anothersite (rather than creating a page itself)
bull To change the order in which the menu items display on the user interface use the Reorder Menu button on theMenu Management screen
48 Manage Site Pages and Menus 63
nada Documentation Release 40
49 The Site Settings Page
All settings for the application are controlled via the Settings menu at the top of the Site Administration page Thereare seven main settings sections See screenshot below
491 General Settings
1 Type the Title of the site here This will become the front page title of the NADA site In this case the Title isNADA
64 Chapter 4 User manual
nada Documentation Release 40
2 The footer text can be changed in this field This displays at the bottom of your site page
3 The initial page that loads when a user visits the NADA site can be set here In this case the catalog page is setto open by default
4 The name of the webmaster can be set here This is the name that will be used in system emails sent to users
5 Enter the webmaster email address here This should be the address that will be used in communication withusers Typically this is a general enquiries email set up by the organization and not a personal email address fora particular person Note to avoid mail systems rejecting mail as spam make sure to enter an address here thatis on the same domain as the server used in the email settings at setup
6 This field sets the location of the Cache folder The cache folder stores pre- generated pages of the site to allowfor faster browsing by the user By default it is set to cache This can be moved to another location if desiredbut must be writable The green tick indicates that the folder can be found and is set up correctly Enter eitherrelative or absolute paths to the folder location
7 Set the time that the Cache takes to expire By default it is set to 2 hours (in milli seconds)
8 If it is desired to turn off caching then select no here Sometimes it is useful to turn off caching when developingor updating a site so as to ensure that content changes become immediately visible on the front-end withouthaving to wait for the cache to expire and the new changes to show Turn this back on to speed up page loadingfor users
Click update to save all settings
Language
To change the language of the application expand the language section and choose the desired language Click updateto save and apply the setting
49 The Site Settings Page 65
nada Documentation Release 40
Enable or disable the HTML editor
A basic HTML editor is provided in the menu and page creating section of the application This setting allows this tobe turned on or off
Survey catalog settings
1 This is the folder where the files for the study are stored on the server This includes the DDI eternal resourcesand data files This folder can be moved to a location outside the web root as described in the installationinstructions in Chapter 1 Enter either relative or absolute paths to the folder location
2 This is the folder where DDIrsquos can be placed in order to use the bulk study import function in the NADA InNADA3 files had to be physically copied to this folder on the server but this is no longer necessary in NADA4 Files can now be directly uploaded to this folder from the Site Administration ndash Manage Studies page page
66 Chapter 4 User manual
nada Documentation Release 40
3 Select the vocabulary to use for the topic filter By default this is set to the CESSDA classification as recom-mended in the IHSN templates supplied at IHSNorg for the Nesstar Metadata Publisher
4 Enable or disable the Country filter on the user interface search page here If the catalog only contains studiesfor one country then turning this filter off is recommended
5 Enable or disable the Topic filter on the user interface search page here If no topics have been defined in theDDIrsquos being uploaded then it is recommended to turn this filter off (disable)
6 Enable or disable the Year filter on the user interface search page here
7 Enable or disable the Collection filter on the user interface search page here If no collections have been definedthen it is recommended to disable this filter
8 Enable or disable the Data access filter on the user interface search page here This filter is not needed if thereare very few studies in the catalog or if all studies hare set to the same access type
9 This section controls the order in which the filters appear on the search page Enter numbers here that rank theorder of the filters in the order they should be displayed
10 This setting determines how many studies are displayed by default to the user on the search page ndash catalog view
Site Login settings
1 To require that users login before being able to access the website set this option to Requires all users to loginto access the website
2 Determined how long a user will stay logged in After this time the user will be automatically logged out
3 Sets the minimum length for passwords created by the users at registration or for manual user creation
49 The Site Settings Page 67
nada Documentation Release 40
SMTP Settings
1 If the PHPweb server is configured to send email using PHPrsquos MAIL function select the first option and donrsquotfill in anything else
If your organization has a mail server and has have a dedicated account that can be setup for NADA use the followingsettings Check the radio button ldquoUse SMTP Serverrdquo
2 Enter the host name for the server
3 Enter the port used by the server to send mail
4 If required enter the user name used to send mail on the server
5 Enter the password used to send mail on the server
If the organization does not own a mail server a Gmail account can be configured to be used with NADA
bull Check the radio button ldquoUse SMTP Serverrdquo
bull Host name sslsmtpgooglemailcom or sslsmtpgmailcom
bull SMTP port 465
bull Account username email-addressgmailcom
bull Account password password for the gmail account
6 Test the email settings
The quickest way to test if the email settings are working is to use the ldquoforgot passwordrdquo option from the user loginpage If no mail is received when doing this test then go back and correct the mail settings Check with the ISP orserver administrator for the correct settings
Click on update to save all settings
68 Chapter 4 User manual
nada Documentation Release 40
492 Dashboard setting
Provides a means to automatically have content loaded into the dashboard via an RSS feed from a site The defaultsetting is set to receive updates and news from the IHSN website
49 The Site Settings Page 69
nada Documentation Release 40
70 Chapter 4 User manual
CHAPTER 5
Indices and tables
bull genindex
bull modindex
bull search
71
nada Documentation Release 40
bull Check that all settings are marked with a green tick and fix any that are not on your webserver before runningthe installer
bull Click on the Install Database button and complete the form to create an initial Site Administrator account
Note Create a complex password of atleast 12 characters long with some uppercase punctuation and numbers to aidsecurity of your site Do not forget this username and password
23 Installing NADA using Microsoft SQL Server 17
nada Documentation Release 40
Congratulations Launch the new site
18 Chapter 2 Installation guide
nada Documentation Release 40
24 PHP settings
241 Finding the correct PHPINI
To make sure you are editing the correct PHPINI settings file create a PHP file (eg infophp) in your nada websitefolder with the following contents
ltphp phpinfo() gt
Open the phpinfo page in your web browser and you should see output similar to below screenshot Edit the phpinifile displayed by the setting Loaded Configuration File
24 PHP settings 19
nada Documentation Release 40
20 Chapter 2 Installation guide
nada Documentation Release 40
242 File upload limits
By default PHP allows uploads of 2MB which could be a problem if you have large DDIs and external resource filesTo change the settings
1 Edit the phpini file in notepad and look for the setting upload_max_filesize
2 The line should look like
Maximum allowed size for uploaded files httpphpnetupload-max-filesizeupload_max_filesize = 2M
3 Change it to the required file upload limit per your needs
upload_max_filesize = 50M
4 There is another setting that MUST be changed as well for the file upload limits to work Look for the configu-ration post_max_size and change it to match the value for upload_max_filesize
post_max_size = 50M
243 TimeZone settings
This is for setting the timezone for your application To findout what is the correct timezone for your website go tohttpphpnetmanualentimezonesphp and find your countrycity
Example
datetimezone = AmericaNew_York
244 Increase page executiontimeout
This setting controls the maximum execution time of a page in seconds
max_execution_time = 300
245 Increase PHP memory limit
It controls the memory available to PHP scripts
memory_limit = 128M
246 Enabledisable PHP extensions
NADA requires the following PHP extensions
bull xsl
bull mbstring
bull mysql or sqlsrv
To enable XSL extension add this line
24 PHP settings 21
nada Documentation Release 40
extension=php_xsldll
To enable mbstring
extension=php_mbstringdll
25 Configure Captcha
By default NADA version 41 comes with image captcha and user does not need to make any changes to use imagecaptcha To use Google Captcha please follow the steps given below
1 Open applicationconfigcaptchaphp in editor
2 Change line number 12 as shown in below image
3 Click on above URL to generate Public and Private key URL httpwwwgooglecomrecaptchawhyrecaptcha
4 Click on sign up now
5 Sign in using your Gmail account
6 After signed in you will have to enter your URL (Domain URL)
22 Chapter 2 Installation guide
nada Documentation Release 40
7 Click on ldquoenable globel key for all domain
8 Click on Create Key button
9 Copy public key and private key from Google Captcha website and inserte it on line number 51 and 52 respec-tively as shown in below image
10 To check the Google catpcha configuration go to register page and look for image as shown in below URLhighlighted in Red suqare
25 Configure Captcha 23
nada Documentation Release 40
26 Email configurations
For the NADA to function correctly it is important that this step be completed
Many of the functions within the NADA ndash such as registration and applying for access to datasets require that theNADA be able to send emails to users
There are two ways to setup your email configurations 1) Create a emailphp file in the applicationconfig folder 2)Edit email settings on the site configurations page
24 Chapter 2 Installation guide
nada Documentation Release 40
261 1 Configure email via email config file
1 Open the file applicationconfigemailphp in notepad
2 Fill in the section using SMTP server with authentication enabled highlighted in below image
3 For Gmail user will have to fill the gmail smtp section shown as below
26 Email configurations 25
nada Documentation Release 40
4 Save file
Note Using a file for email configuration disable the email configuration page from the site administration
1 Login to your NADA as an administrator
2 Go to Site administration click on the Settings menu and choose ldquoSettingsrdquo
3 Find the section ldquoSMTP settingsrdquo
26 Chapter 2 Installation guide
nada Documentation Release 40
4 If the PHPweb server is configured to send email using PHPrsquos MAIL function select the first option and donrsquotfill in anything else
If your organization has a mail server and has have a dedicated account that can be setup for NADA use the followingsettings Check the radio button ldquoUse SMTP Serverrdquo
5 Enter the host name for the server
6 Enter the port used by the server to send mail
7 If required enter the user name used to send mail on the server
8 Enter the password used to send mail on the server
If the organization does not own a mail server a Gmail account can be configured to be used with NADA
bull Check the radio button ldquoUse SMTP Serverrdquo
bull Host name sslsmtpgooglemailcom or sslsmtpgmailcom
bull SMTP port 465
bull Account username email-addressgmailcom
bull Account password password for the gmail account
Test the email settings
The quickest way to test if the email settings are working is to use the ldquoforgot passwordrdquo option from the user loginpage
bull Click on forgot password
26 Email configurations 27
nada Documentation Release 40
bull Enter the administrator or any other accounts email address
bull Check to the email account the mail was sent to
bull If no mail is received the settings are wrong and need to be corrected
28 Chapter 2 Installation guide
CHAPTER 3
Upgrading from previous versions
31 Upgrade from NADA 3
For users with an existing NADA 3x catalog an upgrade script is included that will update your NADA 3x databaseto NADA 4x The process involves modifying your NADA 3x database and thus carries some risks The script willadd new tables to the NADA 3x database All user accounts and survey information will be retained by the upgrade
Important Backup the NADA 3x database before doing anything
1 Follow the instructions on page 4 and set up a folder in the web root containing the NADA 4 files
2 Edit the databasephp file as instructed in the section above NADA database configurations for MySQL
3 Instead of entering a new database name user account name and password -fill in the details of the existingNADA 3x database
Note These can be found by looking at the existing NADA 3x databasephp file and entering the settings into theNADA 4 databasephp file
4 Save the file
5 Navigate to the URL for the NADA4 site Example httpyour-nada-sitenada4indexphpnada4_upgrade
6 The following page loads
29
nada Documentation Release 40
Take note of the warnings and make any necessary corrections before clicking the ldquoUpgrade database to NADA 4rdquobutton
Warning This step makes changes to your nada 3 database that are not undo-able so make sure you do make adatabase backup before this step
Click on the ldquoUpgrade database to NADA 4rdquo button and wait for the page to reload The output of the page will looksomething like below
The script will print number of messages about failed table updates This does not mean the script failed to upgradeIt just means some of the updates were not needed on your version of NADA 3 Different versions of NADA havedifferent numbers of fields in the database and the upgrade script tries to fix the missing fields for all these differentversions of NADA If the existing NADA 3 database already has that field then it reports it as an error
You can ignore the error messages that include the wording ldquoDuplicate column namerdquo or ldquoDuplicate entryrdquo
Now your database has been migrated to NADA version 41 We will have to run one more upgrade script to forNADA version 42
7 Navigate to the URL for the NADA42 site Example httpyour-nada-sitenada42indexphpnada42_upgrade
Warning This step makes changes to your nada 41 database that are not undo-able This page will not show anymessage on the screen You will be getting blank page Please do not repeat the process
8 To verify the database upgrade Open the NADA catalog page by going to http[your-nada4-site]indexphpcatalogpage and verify all studies from NADA 3 are listed
311 Linking your NADA 3 data files to NADA 4
The upgrade script has only upgraded the database It is now necessary to tell the NADA4 where to locate the datafilesthat were uploaded to the original NADA 3 site
There are two options available
Option 1 Copy the datafiles folder from NADA 3 to NADA 4 This works best if you have only a few studies and thedatafiles folder size is small enoughto be moved easily from one location to another
Option 2 If it is not possible to easily move the datafiles folder from NADA 3 to NADA 4 you can tell NADA 4 thelocation of the datafiles without moving the files Here are the steps
bull Use your NADA 3 administrator login credentials to login to your new NADA 4 site
bull Click on Site administration in the top right corner of the screen
bull Go to the ldquoSettingsrdquo menu and click on the ldquoSettingsrdquo sub-menu
30 Chapter 3 Upgrading from previous versions
nada Documentation Release 40
bull Under Site configurations expand the ldquoSurvey Catalog Settingsrdquo section
bull For the setting ldquoCatalog folderrdquo enter the relative or full path to where the NADA 3 datafiles folder is locatedFor example if the nada3 datafiles are located on cnada3datafiles enter that path here
bull Save the configurations by clicking on the update button If now errors are shown then you have successfullyupdated the folder path
bull Check your new NADA 4 site to make sure the migration was successful
ndash Check the user administration page from site administration to make sure the users from the nada3 sitewere migrated
ndash Check the ldquoData Catalogrdquo page and view the studies by clicking on the study title to make sure the studyinformation pages are correct
ndash Check the site menus are the same as the NADA 3 site
312 Refresh DDI
In NADA 4 more information is stored in the database from the DDI than in the NADA 3 To bring all these newfields into the imported studies it is necessary to refresh the DDIrsquos The refresh DDI feature in NADA updates thedatabase with metadata from the DDI without having re-uploading the DDIs To update the metadata for all studies inyour catalog
bull Open the following NADA 4 URL in your browser
http[your-nada-4-site]indexphpadmincatalogbatch_refresh
bull Select all studies
bull Click on the ldquoRefresh DDIrdquo button
313 Transferring ownership
NADA 4 has a collection management feature When studies are imported from the NADA3 catalog into NADA4 theyare put into a collection called DEFAULT They need to be moved from this default system collection to the Central
31 Upgrade from NADA 3 31
nada Documentation Release 40
Data Catalog of the NADA4
To do this
bull Go login to the Site Administration and navigate to the Studies Manage Studies Central Data Catalog page
bull Select all the studies by ticking the check boxes next to each study on the right
bull Click on the dropdown menu and select Transfer owner
bull From the Transfer study owner page Select Central Data Catalog and then click transfer
32 Chapter 3 Upgrading from previous versions
nada Documentation Release 40
314 Updating the Site themetemplate
You cannot use your NADA3 template in NADA4 without making some changes Here are general guidelines butsteps may differ depending on your nada site template
bull Copy your NADA3 template to the NADA4 themes folder
bull Edit the [nada4-root]configtemplatephp following the steps below
bull Look for the setting ldquotheme_namerdquo by default it is set to rdquowbrdquo
bull Change ldquowbrdquo to the theme name you want to use Theme name is the folder name you copied to[NADA4]themes[your-site-theme] from your nada3 site
bull Save the file
NB The template may need some adjusting to run properly on the new NADA 4 site This will involve editingthe layoutphp and other template files within the template folder which is now located in the NADA 4 themesfolder
32 Migrate MySQL to Microsoft SQL
TODO
32 Migrate MySQL to Microsoft SQL 33
nada Documentation Release 40
34 Chapter 3 Upgrading from previous versions
CHAPTER 4
User manual
41 Overview and core concepts
411 About NADA
NADA is a web-based cataloging application that allows for the creation of portals that allows users to browse searchcompare apply for access and download relevant census or survey information
It was originally developed to support the establishment of national survey data archives The application is used by adiverse and growing number of national regional and international organizations NADA as with other IHSN toolsuses the Data Documentation Initiative (DDI) XML-based international metadata standard
412 Concepts
CENTRAL DATA CATALOG
The default catalog created when a NADA instance is installed is the Central Data Catalog All studies uploaded to theNADA are visible searchable and accessible from the Central Data Catalog For many institutions the Central DataCatalog will remain the only catalog in their NADA instance For some institutions being able to divide the contentsof the Central Data Catalog into more refined collections will be desirable
COLLECTIONS
Collections are sub categories of the Central Data Catalog They allow administrators of a NADA instance to groupstudies into what can be thought of as sub-catalogs of the Central Data Catalog This has a number of benefitsboth from the user and the administrator perspective From the usersrsquo perspective being able to filter and viewgroups (collections) of studies that logically belong together makes finding what they are looking for easier From theadministratorsrsquo perspective the ability to create collections of studies that may logically belong together facilitates theability to decentralize the management of each collection of studies to specific administrators (for example collectionscan be managed by different departments in an institution)
NOTE The creation of collections will in general only be useful and necessary for large catalogs or for catalogs thatdesire more decentralized management of groups of studies by different departments
STUDIES
Studies are carried out to gather more knowledge about a subject Studies may gather information from a number ofdifferent sources in order to answer the questions asked The information gathered for a study will in the context of
35
nada Documentation Release 40
NADA catalogs usually come from either a census or a surveys It is therefore not uncommon to hear the terms surveyand study used interchangeably when listening to people talk about their NADA catalog
METADATA
Metadata are data about the data They are not the actual data collected from the survey but rather the information thatdescribes the survey process and the data The NADA uses the Data Documentation Initiative (DDI) ndash ddiallianceorgndash standard for the presentation of metadata for each study The DDI document (which is an XML document) isprepared outside the NADA application either manually or using a tool like the Nesstar Publisher ndash nesstarcom ndash andthen imported into the NADA The detailed information about the survey is searchable down to the variable level foreach survey in the catalog
DATA ACCESS TYPES
The NADA allows for the level of access to datasets for studies to be controlled at the study level In other words thelevel of restriction can differ from study to study and can be defined on a scale ranging from direct access with norestrictions to no access Briefly the available access types are
bull Data not available - data are not available for this study
bull Direct Access Data Files - data shared under this policy can be downloaded without any restrictions The useris not required to be logged into the site and no personal information is collected on the person downloading thedata
bull Public Use Data Files - data shared under this policy requires that the user be logged in and registered on thesite before they are able to download the data The user is required to agree to a terms of use of the data and theapplication keeps records of who downloads the data
bull Licensed Data Files - data shared under this policy requires that the user be logged in and registered on the siteUsers are also required to fill in and submit a detailed application form listing their reasons for wanting accessto the data Once the user submits the application form the system informs the system administrator that anapplication has been made In order for the person to get access to the data the system administrator needs toreview the application and approve it
bull Data available in an Enclave - under this policy no data is shared through the application Users submit anapplication to access the data at a secure facility physically located on the premises of the data producer or afacility nominated by the data producer
bull Data available from external repository ndash The NADA allows for studies and their metadata to be listed in aNADA catalog but for a link to be created to another site when the data for that study are available elsewhere
CITATIONS
Citations are references that can be included at the study level which point to published works that have used the datafrom a particular study In many cases this will be a reference to a Journal Article Working paper Newspaper articleetc Such resources are useful to researchers who are interested in seeing how the data have been used before Theyare also a good way of showing the funders of surveys that the data are being used for policy and research purposesand thus are an indicator of some of the impact a study has had
USERS
Users in the NADA can be defined according to three broad groups General Users ndash this is the normal user whoregisters on a NADA site from the user interface This user type has no access to the site administration It is requiredto register as a user when accessing public use and licensed data types Site Administrators (unlimited) ndash this user
36 Chapter 4 User manual
nada Documentation Release 40
has access to all functions and all collections within the Site Administration System wide access Limited Adminis-trators ndash these administrators have access to a limited set of functions within the Site Administration Examples wouldbe an administrator of a specific collections or licensed survey reviewer for all or only some collections or reportgenerator etc
413 Why do NADA administrators need to understand these concepts
Understanding these concepts is important as it
bull Is critical to understanding the new permissions and administrator types introduced in NADA 4 Administratorsare now able to create collections within their NADArsquos and assign different roles to administrators and moregranular levels of access to catalog administration at the collection level It is now possible for example to haveadministrators whorsquos lsquopowersrsquo range from being able to manage all parts of a collectionrsquos administration downto ones with more restrictive access such as ones whose only function is as licensed survey reviewer or reportgenerator or catalog reviewer or citation manager etc
bull Ensures that the correct level of permissions and access is assigned to users based on security policies within theinstitution Unlike previous versions of NADA not all users who have access to the Site Administration needhave the level of access of an ldquounlimited site administratorrdquo This limits security risks associated with havingtoo many ldquounlimited site administratorsrdquo managing a site
bull Assists in assigning an appropriate data access type to data based on institutional distribution polices
bull Makes it easier to explain more clearly to institutional managers what the capabilities of the NADA applicationare and to advise on how to best manage the allocation of responsibilities
42 The Dashboard
After logging in to the Site Administration with administrator credentials the user is taken to the dashboard
The Dashboard provides a quick glance summary for administrators to get an overall picture of what has been happen-ing on the site as well as what pending tasks are outstanding for the administrator
42 The Dashboard 37
nada Documentation Release 40
1 Menu link to the Dashboard
2 Menu link to the Study Management pages submenus include Manage Studies Licensed requests and ManageCollections
3 Menu link to the citations management pages
4 Menu link to the User management pages submenus include All users Add user and Impersonate User
5 Menu link to create menu pages for the site frontend
6 Menu link to generate usage reports
7 Menu Link to the settings pages submenus include Settings Coutries Regions and Vocabularies
8 Useful navigation links submenus include Change Password Log out Catalog Home Data catalog Citations
9 This section lists all collections in the catalog Within each collection a summary is given of the number ofstudies along with diagnostics related to the number of studies publishedunpublished missing questionnairesdata access types set but with no data attached as well as some buttin links to Manage the collections studiesusers and a History of changes made to the collection
10 Provides a summary of users registrations and number of users currently logged in
11 Show how many pages are being cached on the site with a link to clear the cache if need be
12 Show a list of recently added or updated studies Clicking on a study in the list takes you to the page to managethat study
38 Chapter 4 User manual
nada Documentation Release 40
43 Manage Collections
431 Collections
Collections are sub categories of the Central Data Catalog They allow administrators of a NADA instance to groupstudies into what can be thought of as sub-catalogs of the Central Data Catalog
Collections provide a number of benefits both from the user and the administrator perspective From the usersrsquo per-spective being able to filter and view groups (collections) of studies that logically belong together makes finding whatthey are looking for easier From the administratorsrsquo perspective the ability to create collections of studies that maylogically belong together facilitates the ability to decentralize the management of each collection of studies to specificadministrators (for example collections can be managed by different departments in an institution)
Note The creation of collections will in general only be useful and necessary for large catalogs or for catalogs thatdesire more decentralized management of groups of studies by different departments
432 Creating collections
bull Login to the Site administration using an administrator password
bull Collections are managed and created by going to the Studies Manage collections menu link
bull There are no collections defined in the default NADA 4 installation
bull To create a new collection click on the Create new collection button
43 Manage Collections 39
nada Documentation Release 40
1 Under Collection Identification provide a short name for the collection This will become the URL for thecollection so pick carefully For Title fill in the fill title for the collection This will be the name displayed atthe top of the collection page
B Fill in a 3 or four line short description of the collection This text will display on the front end in the collectionslist For examples see httpmicrodataworldbankorgindexphpcontributing-catalogs
C Fill in a more detailed description of the collection This will display on the About page for that collection Forexample see httpmicrodataworldbankorgindexphpcatalogdhsabout
To format the page and include images it is possible to enter HTML code into this box below is anexample piece of code that includes an image
ltimg src=rdquofilesdhs-fp-01jpgrdquo alt=rdquoHealth Surveys Imagerdquo class=rdquoabout-photordquogt lth2gt Health SurveysCollectionlth2gt ltp align=rdquojustifyrdquogtThe Health Surveys collection aims to provide frequent high qual-ity and timely health data needed by the decision makers when designing public health programsltpgtltpgtHealth surveys provide useful information on health status and health consumption and their determi-nantsltpgt
Copy any images to be displayed into the NADA ldquofilesrdquo folder on your server image imagesthumbnil-imagepng
4 Upload a file to display next to the collection as it is listed on the collection page NOTE This image should be82 X 82 pixels If the upload does not work automatically then copy the thumbnail image to the ldquofilesrdquo folder asshown above
40 Chapter 4 User manual
nada Documentation Release 40
E The Weight field determines in what order collections are shown in the collection list 0123 etc The Selectcollection type drop-down is a system value to distinguish between collections that should be viewed as internal tothe organization or external For example some collections may be made up entirely of studies from an organizationoutside the host catalog These collections can be designated as external The Section dropdown allows for thecategorization as either a collection based on a specialized collection (like health) or based on a regional breakdownSelecting Publish ndash publishes the collection
bull Click on Submit to save the changes
To view the results click on the Preview link on the far right
bull The new collection now also shows in the collection list on the Central Catalog About page (this is where thethumbnail and short description fields are displayed)
43 Manage Collections 41
nada Documentation Release 40
bull Visiting the Dashboard will now also show the new collection listed below the Central Data Catalog With anumber of green buttons as shortcut links to manage the studies on the collection assign administrators for thecollection a history of activity on the collection and a link to edit the collection as in the steps above
433 Manually adding studies to a collection
There are 2 ways to get studies into the new catalog
bull The first is to upload a DDI and all its resources to the collection in the same way as described in the earliersection ndash Uploading a Study Except instead of choosing Central Catalog chose the collection you want to
42 Chapter 4 User manual
nada Documentation Release 40
upload the study to
bull Click on the Add Study button and upload a DDI and RDF and all your resources as described in the earliersection ndash Uploading a Study
bull Once a study is added in this way it displays in the Manage Studies list Notice that the collection summaryfield shows that the study belongs to (is Owned By) the DHS collection (this was the Short name defined in theexample when the Health Surveys Collection was created)
All studies uploaded to collections will automatically be added to the Central Data Catalog in order to build a commonsearch portal for all studies
43 Manage Collections 43
nada Documentation Release 40
434 Copying studies from one collection to another
bull The second way to add a study to a collection is to Copy the study from another collection into the newcollection
bull To copy a study already in the catalog to display in the new collection first make sure to be in the Manage Studiessection for the collection you want to put studies into To do this either use the Studies ndash Manage studies menuon the top or simply click on the Switch link next to the Manage Studies [Collection Title] heading
bull Then Click on the Copy Studies blue button at the top right
bull A list of all studies available to copy to the new collection is listed Simply click on the Link button in green tocopy the study to the collection The button will turn red and say Unlink To reverse the process and click thenow red button
bull Going back to the Manage Studies page for the collection will show the newly copied studies in the collectionlist Also note that the Collection field now indicated DHS next to Central DHS is in grey to indicate it is notowned (it is a copy) by that collection and the Central is in blue to show it is owned by the Central Data CatalogAlso note that because the study is not owned by this catalog it cannot be edited from this catalog ndash hence thepublishunpublish green button is absent for the copied studies
44 Chapter 4 User manual
nada Documentation Release 40
435 Turning on the collection filter
The final step after creating the first collection is to enable the collection filter option in the Settings menus under SiteConfigurations ndash Survey catalog settings
436 Transferring study ownership
In the previous examples mention was made of studies uploaded to a catalog being owned by that catalog There maybe cases where transferring the ownership from one catalog to another will be desirable This will become clearerin the next section on user roles but for now the next steps show how transferring ownership from one collection toanother can be done
bull Transferring ownership from one collection to another has to be done by the owner of the collection and fromthe collection it is currently owned by
bull To transfer ownership Go to the Manage Studies screen and select the study to be transferred Open up the EditStudy page by clicking on the study Title
bull On the right hand side of the screen click on the Transfer study owner link
43 Manage Collections 45
nada Documentation Release 40
bull Select the collection to transfer from the dropdown box
bull Click Transfer
bull Note that when looking the study summary for the transferred study the Collection field now shows the studyto belong (owned by) to the DHS collection and not Central anymore Also note the option to Publish andunpublish is now active
bull To transfer ownership of a large number of studies all at once - from the Manage Studies page ndash select the studiesto be transferred (tick them in the box left of each study) and then from the top Batch Actions drop down selectTransfer owner ndash then apply
46 Chapter 4 User manual
nada Documentation Release 40
44 Manage Studies
There are 2 Options to get studies into the new catalog
441 Option 1
bull The first is to upload a DDI and all its resources to the collection in the same way as described in the earliersection ndash Uploading a Study Except instead of choosing Central Catalog chose the collection you want toupload the study to
bull Click on the Add Study button and upload a DDI and RDF and all your resources as described in the earliersection ndash Uploading a Study
bull Once a study is added in this way it displays in the Manage Studies list Notice that the collection summaryfield shows that the study belongs to (is Owned By) the DHS collection (this was the Short name defined in theexample when the Health Surveys Collection was created)
bull Also note that the new study also appears in the Central Data Catalog
All studies uploaded to collections will automatically be added to the Central Data Catalog in order to build a commonsearch portal for all studies
44 Manage Studies 47
nada Documentation Release 40
442 Option2
Copying studies from one collection to another
bull The second way to add a study to a collection is to Copy the study from another collection into the new collection
bull To copy a study already in the catalog to display in the new collection first make sure to be in the Manage Studiessection for the collection you want to put studies into To do this either use the Studies ndash Manage studies menuon the top or simply click on the Switch link next to the Manage Studies [Collection Title] heading
bull Then Click on the Copy Studies blue button at the top right
bull A list of all studies available to copy to the new collection is listed Simply click on the Link button in green tocopy the study to the collection The button will turn red and say Unlink To reverse the process and click thenow red button
bull Going back to the Manage Studies page for the collection will show the newly copied studies in the collectionlist Also note that the Collection field now indicated DHS next to Central DHS is in grey to indicate it is notowned (it is a copy) by that collection and the Central is in blue to show it is owned by the Central Data CatalogAlso note that because the study is not owned by this catalog it cannot be edited from this catalog ndash hence thepublishunpublish green button is absent for the copied studies
45 Managing Licensed Requests
Datasets that are assigned the Access Type Licensed require approval from the NADA administrator before the usercan get access to the data files From the site administration there are a number of ways to see if any licensed requestshave been received
bull Go to the dashboard Pending requests show up as red in the catalog quicj summary section Clicking on thislink goes to the Licensed Survey Requests management page
bull Or go to the Studies link on the top menu and select Licensed Requests from the submenu
48 Chapter 4 User manual
nada Documentation Release 40
The link shows a page with a list Licensed Requests received The status column indicated the Pending requests
bull Click on the Edit link for to process a request
The Request information tab shows a summary of the information provided by the applicant
bull To Approve or Deny or request further information for the request Click on the Process tab
45 Managing Licensed Requests 49
nada Documentation Release 40
bull Select Approve to approve the request (other options include Deny as well as Request more information fromthe applicant)
bull Select the files that the user will be authorized to download ndash it is also possible to enter a maximum number ofdownloads and expiry date for downloads
bull Enter any comments to be sent to the applicant
bull Select Notify user by email to notify them that the application has been processed
bull Select Update
bull The remaining tabs
ndash Communicate - provides a means to ask for more information from the applicant
ndash Monitor ndash allows the administrator to see when and how many times the applicant downloaded thedata
ndash Forward Request ndash provides a means to forward the request to another person for review
46 Manage Citations
The Citations section is where bibliographic references can be added for publications that use any of the studies in thecatalog These citations can be linked to particular studies in the catalog and are displayed to the users of the systemin the study information view of the relevant study
Citations are added from the Citations menu
50 Chapter 4 User manual
nada Documentation Release 40
bull To add a citation - click on All citations then click on the Add New Citation button at the top right
bull Compete the form including the indication as to whether the citation should be published or not
bull Then expand the Related studies link to tell the system which studies the citation ldquobelongsrdquo to
bull Click on the Attach studies link This reveals a list of all studies in the catalog
bull Select the relevant studies by clicking on the green Select button
bull Click on the apply filter button to save the changes The study now appears in the related studies box
bull Click on the submit button to save the citation
bull Note the flag keywords and notes fields can be used by administrators to place extra notes only visible to otheradministrators that might prove useful when there is uncertainty about a citations appropriateness or accuracy
bull It is also possible to import citations in common citation formats such as BibTex and EndNote (RIS)
bull To do this use the Import Citations link from the top menu
46 Manage Citations 51
nada Documentation Release 40
bull Paste the BibTex or RIS text into the form and then at the bottom of the screen click on Attach studies to linkthe citation to a particular study in the catalog
bull The citation now appears in the citation list as well as on the study information page for the relevant studies
52 Chapter 4 User manual
nada Documentation Release 40
47 Managing Users and account types
Users in the NADA can be defined according to three broad groups
General Usersndash this is the normal user who registers on a NADA site from the user interface This user type hasno access to the site administration It is required to register as a user before being granted access to public use andlicensed data types
Site Administrators (unlimited) ndash this user has access to all functions and all collections within the Site Administra-tion System wide access
Limited Administrators ndash these administrators have access to a limited set of functions within the Site Administra-tion Examples would be an administrator of a specific collections or licensed survey reviewer for all or only somecollections or report generator or citation manager etc
471 Creating User accounts
User accounts can be created in two ways
1 A General User account can be created by a user directly from the register screen from the login link on the userinterface of the application
The user created by this process has no access to the site administration This account can only be used to apply andgain access to public and licensed datasets
2 A user account can also be created by a Site Administrator
bull To do this login as a Site Administrator
bull Go to the site administration section of the application
47 Managing Users and account types 53
nada Documentation Release 40
bull Select Users ndash Add user from the top menu
bull Fill in the information for the user in the form and be sure to mark the account status as Active Then click theCreate button
54 Chapter 4 User manual
nada Documentation Release 40
47 Managing Users and account types 55
nada Documentation Release 40
bull Note that the user always starts off as a General User with no access permissions to the Site Administration Theuser group column displays as empty for users with only general user accounts
bull To see a list of all users in the system go to the Users ndash All Users menu item at the top of the screen
bull Note the new users created have no User group assigned (they are general users) Also note the Actions columnon the far right From these links an account can be edited (including changing the password and blocking anaccount) deleted and Permissions managed for the account
472 Managing User Account Permissions
User accounts permissions can be only be set and changed by a Site Administrator To change the permissions for anaccount
bull Click on the Permissions link next to the account to be changed All accounts start of as General users accounts
bull To change this user to a full site administrator who will have full system wide access to all parts and functionsof the NADA administration select the Site administrators (full access) option and tick the admin box as wellClick update to save the changes
56 Chapter 4 User manual
nada Documentation Release 40
473 Collection level administrators
bull To create a user who only has permissions to administer studies or administration functions for a particularcollection Select Site administrators (limited access)
47 Managing Users and account types 57
nada Documentation Release 40
bull It is then necessary to assign a role to this new limited administrator account To create a limited access ad-ministrator for a particular collection ndash select Site administrators (limited access) and then select Collectionadministrators Notice The form expands to reveal a list of collections in the system
bull Select the appropriate level of access that this account will have for this collection In the example below anadministrator is being created who can manage only licensed requests for the collection ndash Health Surveys Thisaccount will not be able to upload or publish studies The account will only be able to process licensed requestsfor the collection ndash Health Surveys
58 Chapter 4 User manual
nada Documentation Release 40
Other levels of access for Site administrators (limited access) ndash Collection administrators include
1 Accounts that are given full access to manage studies
2 Accounts that are given access to upload studies but not publish them
3 Accounts that are limited to reviewing studies
474 Global level Limited access accounts
Other types of limited access accounts include
1 Accounts that can only view system reports at a global level
2 Accounts that can only access the citations section and manage citations
3 Accounts that can only access the Licensed Request management system ndash at the global level for all collections
47 Managing Users and account types 59
nada Documentation Release 40
Impersonating a user
The system includes a function that allows a Site Administrator to impersonate (take on the role) a user created inthe system This is a useful testing tool when creating users and assigning permissions It essentially allows theadministrator to take on the role of another user temporarily
bull To access the Impersonate User feature go to the Users ndash Impersonat user menu at the top of the screen
bull A list of users to impersonate is shown
bull Select the user to impersonate and click on the impersonate button
bull The dashboard view for the impersonated user now shows
60 Chapter 4 User manual
nada Documentation Release 40
bull Note in the example above the account being impersonated is a Limited Account administrator with rights onlyto manage licensed requests for the Health Surveys Collection Note that all other dashboard menus are eitherhidden or clicking on any other function other than manage studies results in an access denied message
bull This is a good way to test if the roles assigned to a user account have the expected results
bull To exit the impersonate mode and return to the Site Administrator role ndash Click on the top right menu and selectExit impersonate mode
475 The Reviewer Limited access account
Sometimes it is desirable for catalog administrators to allow certain users to see a collection before it is published butwithout granting access to the site administration functions
This is useful for getting feedback on the correctness of information on collections or studies before publishing
To do this
bull First create an account for the user or get the user to create an account by using the register form on the loginscreen
bull Then edit the permissions for that user selecting Site Administrator (limited access) ndash Collection administrator
bull Then for the appropriate collection select Reviewer and click update to save the changes
47 Managing Users and account types 61
nada Documentation Release 40
bull The newly created reviewer account user can now view all studies in a collection even if the study or collectionis unpublished
48 Manage Site Pages and Menus
The NADA has a small content management component that allows for the creation of menu pages to appear on theuser interface
bull Examples of menus that might be useful for users of the site might be A page dealing with the disseminationpolicies of the organization or perhaps a page with contact information for the information
New menu items and pages can be created via the Menu- All pages menu link at the top of the Site Administrationpage
62 Chapter 4 User manual
nada Documentation Release 40
bull Select All pages from the menu
bull To add a new page click on the Add New Page button
bull Give the page a Title in the Title field
bull Clicking in the URL field will automatically suggest a name for the page in the URL
bull Enter the contents for the page in the Body section Plain text or HTML is accespted by this field
bull Then indicate if the page should be published or not in the Publish dropdown
bull The Weight field tells the NADA in what order this menu item should display Eg 0 would be first 1 secondand 2 third
bull Click on Update to save the changes
bull View the changes from the user interface In this Example a Contact Us page was created
bull It is also possible from the Menu Management screen to add a menu link that links to an existing page on anothersite (rather than creating a page itself)
bull To change the order in which the menu items display on the user interface use the Reorder Menu button on theMenu Management screen
48 Manage Site Pages and Menus 63
nada Documentation Release 40
49 The Site Settings Page
All settings for the application are controlled via the Settings menu at the top of the Site Administration page Thereare seven main settings sections See screenshot below
491 General Settings
1 Type the Title of the site here This will become the front page title of the NADA site In this case the Title isNADA
64 Chapter 4 User manual
nada Documentation Release 40
2 The footer text can be changed in this field This displays at the bottom of your site page
3 The initial page that loads when a user visits the NADA site can be set here In this case the catalog page is setto open by default
4 The name of the webmaster can be set here This is the name that will be used in system emails sent to users
5 Enter the webmaster email address here This should be the address that will be used in communication withusers Typically this is a general enquiries email set up by the organization and not a personal email address fora particular person Note to avoid mail systems rejecting mail as spam make sure to enter an address here thatis on the same domain as the server used in the email settings at setup
6 This field sets the location of the Cache folder The cache folder stores pre- generated pages of the site to allowfor faster browsing by the user By default it is set to cache This can be moved to another location if desiredbut must be writable The green tick indicates that the folder can be found and is set up correctly Enter eitherrelative or absolute paths to the folder location
7 Set the time that the Cache takes to expire By default it is set to 2 hours (in milli seconds)
8 If it is desired to turn off caching then select no here Sometimes it is useful to turn off caching when developingor updating a site so as to ensure that content changes become immediately visible on the front-end withouthaving to wait for the cache to expire and the new changes to show Turn this back on to speed up page loadingfor users
Click update to save all settings
Language
To change the language of the application expand the language section and choose the desired language Click updateto save and apply the setting
49 The Site Settings Page 65
nada Documentation Release 40
Enable or disable the HTML editor
A basic HTML editor is provided in the menu and page creating section of the application This setting allows this tobe turned on or off
Survey catalog settings
1 This is the folder where the files for the study are stored on the server This includes the DDI eternal resourcesand data files This folder can be moved to a location outside the web root as described in the installationinstructions in Chapter 1 Enter either relative or absolute paths to the folder location
2 This is the folder where DDIrsquos can be placed in order to use the bulk study import function in the NADA InNADA3 files had to be physically copied to this folder on the server but this is no longer necessary in NADA4 Files can now be directly uploaded to this folder from the Site Administration ndash Manage Studies page page
66 Chapter 4 User manual
nada Documentation Release 40
3 Select the vocabulary to use for the topic filter By default this is set to the CESSDA classification as recom-mended in the IHSN templates supplied at IHSNorg for the Nesstar Metadata Publisher
4 Enable or disable the Country filter on the user interface search page here If the catalog only contains studiesfor one country then turning this filter off is recommended
5 Enable or disable the Topic filter on the user interface search page here If no topics have been defined in theDDIrsquos being uploaded then it is recommended to turn this filter off (disable)
6 Enable or disable the Year filter on the user interface search page here
7 Enable or disable the Collection filter on the user interface search page here If no collections have been definedthen it is recommended to disable this filter
8 Enable or disable the Data access filter on the user interface search page here This filter is not needed if thereare very few studies in the catalog or if all studies hare set to the same access type
9 This section controls the order in which the filters appear on the search page Enter numbers here that rank theorder of the filters in the order they should be displayed
10 This setting determines how many studies are displayed by default to the user on the search page ndash catalog view
Site Login settings
1 To require that users login before being able to access the website set this option to Requires all users to loginto access the website
2 Determined how long a user will stay logged in After this time the user will be automatically logged out
3 Sets the minimum length for passwords created by the users at registration or for manual user creation
49 The Site Settings Page 67
nada Documentation Release 40
SMTP Settings
1 If the PHPweb server is configured to send email using PHPrsquos MAIL function select the first option and donrsquotfill in anything else
If your organization has a mail server and has have a dedicated account that can be setup for NADA use the followingsettings Check the radio button ldquoUse SMTP Serverrdquo
2 Enter the host name for the server
3 Enter the port used by the server to send mail
4 If required enter the user name used to send mail on the server
5 Enter the password used to send mail on the server
If the organization does not own a mail server a Gmail account can be configured to be used with NADA
bull Check the radio button ldquoUse SMTP Serverrdquo
bull Host name sslsmtpgooglemailcom or sslsmtpgmailcom
bull SMTP port 465
bull Account username email-addressgmailcom
bull Account password password for the gmail account
6 Test the email settings
The quickest way to test if the email settings are working is to use the ldquoforgot passwordrdquo option from the user loginpage If no mail is received when doing this test then go back and correct the mail settings Check with the ISP orserver administrator for the correct settings
Click on update to save all settings
68 Chapter 4 User manual
nada Documentation Release 40
492 Dashboard setting
Provides a means to automatically have content loaded into the dashboard via an RSS feed from a site The defaultsetting is set to receive updates and news from the IHSN website
49 The Site Settings Page 69
nada Documentation Release 40
70 Chapter 4 User manual
CHAPTER 5
Indices and tables
bull genindex
bull modindex
bull search
71
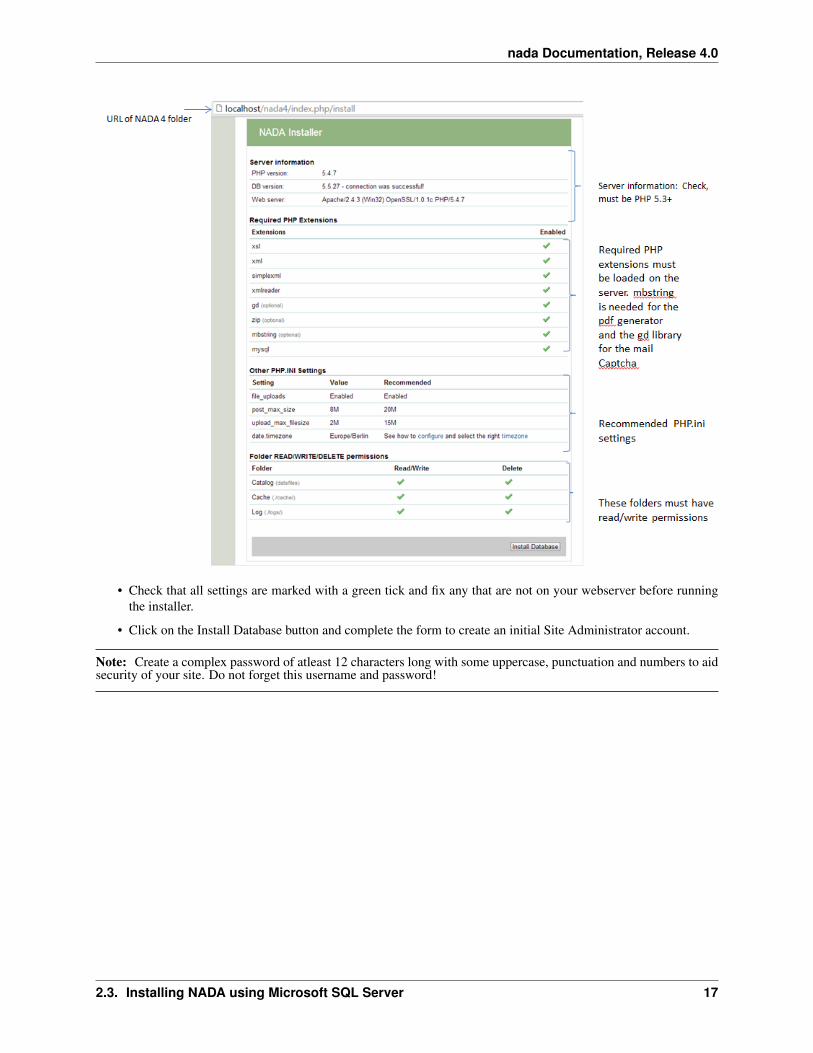
nada Documentation Release 40
Congratulations Launch the new site
18 Chapter 2 Installation guide
nada Documentation Release 40
24 PHP settings
241 Finding the correct PHPINI
To make sure you are editing the correct PHPINI settings file create a PHP file (eg infophp) in your nada websitefolder with the following contents
ltphp phpinfo() gt
Open the phpinfo page in your web browser and you should see output similar to below screenshot Edit the phpinifile displayed by the setting Loaded Configuration File
24 PHP settings 19
nada Documentation Release 40
20 Chapter 2 Installation guide
nada Documentation Release 40
242 File upload limits
By default PHP allows uploads of 2MB which could be a problem if you have large DDIs and external resource filesTo change the settings
1 Edit the phpini file in notepad and look for the setting upload_max_filesize
2 The line should look like
Maximum allowed size for uploaded files httpphpnetupload-max-filesizeupload_max_filesize = 2M
3 Change it to the required file upload limit per your needs
upload_max_filesize = 50M
4 There is another setting that MUST be changed as well for the file upload limits to work Look for the configu-ration post_max_size and change it to match the value for upload_max_filesize
post_max_size = 50M
243 TimeZone settings
This is for setting the timezone for your application To findout what is the correct timezone for your website go tohttpphpnetmanualentimezonesphp and find your countrycity
Example
datetimezone = AmericaNew_York
244 Increase page executiontimeout
This setting controls the maximum execution time of a page in seconds
max_execution_time = 300
245 Increase PHP memory limit
It controls the memory available to PHP scripts
memory_limit = 128M
246 Enabledisable PHP extensions
NADA requires the following PHP extensions
bull xsl
bull mbstring
bull mysql or sqlsrv
To enable XSL extension add this line
24 PHP settings 21
nada Documentation Release 40
extension=php_xsldll
To enable mbstring
extension=php_mbstringdll
25 Configure Captcha
By default NADA version 41 comes with image captcha and user does not need to make any changes to use imagecaptcha To use Google Captcha please follow the steps given below
1 Open applicationconfigcaptchaphp in editor
2 Change line number 12 as shown in below image
3 Click on above URL to generate Public and Private key URL httpwwwgooglecomrecaptchawhyrecaptcha
4 Click on sign up now
5 Sign in using your Gmail account
6 After signed in you will have to enter your URL (Domain URL)
22 Chapter 2 Installation guide
nada Documentation Release 40
7 Click on ldquoenable globel key for all domain
8 Click on Create Key button
9 Copy public key and private key from Google Captcha website and inserte it on line number 51 and 52 respec-tively as shown in below image
10 To check the Google catpcha configuration go to register page and look for image as shown in below URLhighlighted in Red suqare
25 Configure Captcha 23
nada Documentation Release 40
26 Email configurations
For the NADA to function correctly it is important that this step be completed
Many of the functions within the NADA ndash such as registration and applying for access to datasets require that theNADA be able to send emails to users
There are two ways to setup your email configurations 1) Create a emailphp file in the applicationconfig folder 2)Edit email settings on the site configurations page
24 Chapter 2 Installation guide
nada Documentation Release 40
261 1 Configure email via email config file
1 Open the file applicationconfigemailphp in notepad
2 Fill in the section using SMTP server with authentication enabled highlighted in below image
3 For Gmail user will have to fill the gmail smtp section shown as below
26 Email configurations 25
nada Documentation Release 40
4 Save file
Note Using a file for email configuration disable the email configuration page from the site administration
1 Login to your NADA as an administrator
2 Go to Site administration click on the Settings menu and choose ldquoSettingsrdquo
3 Find the section ldquoSMTP settingsrdquo
26 Chapter 2 Installation guide
nada Documentation Release 40
4 If the PHPweb server is configured to send email using PHPrsquos MAIL function select the first option and donrsquotfill in anything else
If your organization has a mail server and has have a dedicated account that can be setup for NADA use the followingsettings Check the radio button ldquoUse SMTP Serverrdquo
5 Enter the host name for the server
6 Enter the port used by the server to send mail
7 If required enter the user name used to send mail on the server
8 Enter the password used to send mail on the server
If the organization does not own a mail server a Gmail account can be configured to be used with NADA
bull Check the radio button ldquoUse SMTP Serverrdquo
bull Host name sslsmtpgooglemailcom or sslsmtpgmailcom
bull SMTP port 465
bull Account username email-addressgmailcom
bull Account password password for the gmail account
Test the email settings
The quickest way to test if the email settings are working is to use the ldquoforgot passwordrdquo option from the user loginpage
bull Click on forgot password
26 Email configurations 27
nada Documentation Release 40
bull Enter the administrator or any other accounts email address
bull Check to the email account the mail was sent to
bull If no mail is received the settings are wrong and need to be corrected
28 Chapter 2 Installation guide
CHAPTER 3
Upgrading from previous versions
31 Upgrade from NADA 3
For users with an existing NADA 3x catalog an upgrade script is included that will update your NADA 3x databaseto NADA 4x The process involves modifying your NADA 3x database and thus carries some risks The script willadd new tables to the NADA 3x database All user accounts and survey information will be retained by the upgrade
Important Backup the NADA 3x database before doing anything
1 Follow the instructions on page 4 and set up a folder in the web root containing the NADA 4 files
2 Edit the databasephp file as instructed in the section above NADA database configurations for MySQL
3 Instead of entering a new database name user account name and password -fill in the details of the existingNADA 3x database
Note These can be found by looking at the existing NADA 3x databasephp file and entering the settings into theNADA 4 databasephp file
4 Save the file
5 Navigate to the URL for the NADA4 site Example httpyour-nada-sitenada4indexphpnada4_upgrade
6 The following page loads
29
nada Documentation Release 40
Take note of the warnings and make any necessary corrections before clicking the ldquoUpgrade database to NADA 4rdquobutton
Warning This step makes changes to your nada 3 database that are not undo-able so make sure you do make adatabase backup before this step
Click on the ldquoUpgrade database to NADA 4rdquo button and wait for the page to reload The output of the page will looksomething like below
The script will print number of messages about failed table updates This does not mean the script failed to upgradeIt just means some of the updates were not needed on your version of NADA 3 Different versions of NADA havedifferent numbers of fields in the database and the upgrade script tries to fix the missing fields for all these differentversions of NADA If the existing NADA 3 database already has that field then it reports it as an error
You can ignore the error messages that include the wording ldquoDuplicate column namerdquo or ldquoDuplicate entryrdquo
Now your database has been migrated to NADA version 41 We will have to run one more upgrade script to forNADA version 42
7 Navigate to the URL for the NADA42 site Example httpyour-nada-sitenada42indexphpnada42_upgrade
Warning This step makes changes to your nada 41 database that are not undo-able This page will not show anymessage on the screen You will be getting blank page Please do not repeat the process
8 To verify the database upgrade Open the NADA catalog page by going to http[your-nada4-site]indexphpcatalogpage and verify all studies from NADA 3 are listed
311 Linking your NADA 3 data files to NADA 4
The upgrade script has only upgraded the database It is now necessary to tell the NADA4 where to locate the datafilesthat were uploaded to the original NADA 3 site
There are two options available
Option 1 Copy the datafiles folder from NADA 3 to NADA 4 This works best if you have only a few studies and thedatafiles folder size is small enoughto be moved easily from one location to another
Option 2 If it is not possible to easily move the datafiles folder from NADA 3 to NADA 4 you can tell NADA 4 thelocation of the datafiles without moving the files Here are the steps
bull Use your NADA 3 administrator login credentials to login to your new NADA 4 site
bull Click on Site administration in the top right corner of the screen
bull Go to the ldquoSettingsrdquo menu and click on the ldquoSettingsrdquo sub-menu
30 Chapter 3 Upgrading from previous versions
nada Documentation Release 40
bull Under Site configurations expand the ldquoSurvey Catalog Settingsrdquo section
bull For the setting ldquoCatalog folderrdquo enter the relative or full path to where the NADA 3 datafiles folder is locatedFor example if the nada3 datafiles are located on cnada3datafiles enter that path here
bull Save the configurations by clicking on the update button If now errors are shown then you have successfullyupdated the folder path
bull Check your new NADA 4 site to make sure the migration was successful
ndash Check the user administration page from site administration to make sure the users from the nada3 sitewere migrated
ndash Check the ldquoData Catalogrdquo page and view the studies by clicking on the study title to make sure the studyinformation pages are correct
ndash Check the site menus are the same as the NADA 3 site
312 Refresh DDI
In NADA 4 more information is stored in the database from the DDI than in the NADA 3 To bring all these newfields into the imported studies it is necessary to refresh the DDIrsquos The refresh DDI feature in NADA updates thedatabase with metadata from the DDI without having re-uploading the DDIs To update the metadata for all studies inyour catalog
bull Open the following NADA 4 URL in your browser
http[your-nada-4-site]indexphpadmincatalogbatch_refresh
bull Select all studies
bull Click on the ldquoRefresh DDIrdquo button
313 Transferring ownership
NADA 4 has a collection management feature When studies are imported from the NADA3 catalog into NADA4 theyare put into a collection called DEFAULT They need to be moved from this default system collection to the Central
31 Upgrade from NADA 3 31
nada Documentation Release 40
Data Catalog of the NADA4
To do this
bull Go login to the Site Administration and navigate to the Studies Manage Studies Central Data Catalog page
bull Select all the studies by ticking the check boxes next to each study on the right
bull Click on the dropdown menu and select Transfer owner
bull From the Transfer study owner page Select Central Data Catalog and then click transfer
32 Chapter 3 Upgrading from previous versions
nada Documentation Release 40
314 Updating the Site themetemplate
You cannot use your NADA3 template in NADA4 without making some changes Here are general guidelines butsteps may differ depending on your nada site template
bull Copy your NADA3 template to the NADA4 themes folder
bull Edit the [nada4-root]configtemplatephp following the steps below
bull Look for the setting ldquotheme_namerdquo by default it is set to rdquowbrdquo
bull Change ldquowbrdquo to the theme name you want to use Theme name is the folder name you copied to[NADA4]themes[your-site-theme] from your nada3 site
bull Save the file
NB The template may need some adjusting to run properly on the new NADA 4 site This will involve editingthe layoutphp and other template files within the template folder which is now located in the NADA 4 themesfolder
32 Migrate MySQL to Microsoft SQL
TODO
32 Migrate MySQL to Microsoft SQL 33
nada Documentation Release 40
34 Chapter 3 Upgrading from previous versions
CHAPTER 4
User manual
41 Overview and core concepts
411 About NADA
NADA is a web-based cataloging application that allows for the creation of portals that allows users to browse searchcompare apply for access and download relevant census or survey information
It was originally developed to support the establishment of national survey data archives The application is used by adiverse and growing number of national regional and international organizations NADA as with other IHSN toolsuses the Data Documentation Initiative (DDI) XML-based international metadata standard
412 Concepts
CENTRAL DATA CATALOG
The default catalog created when a NADA instance is installed is the Central Data Catalog All studies uploaded to theNADA are visible searchable and accessible from the Central Data Catalog For many institutions the Central DataCatalog will remain the only catalog in their NADA instance For some institutions being able to divide the contentsof the Central Data Catalog into more refined collections will be desirable
COLLECTIONS
Collections are sub categories of the Central Data Catalog They allow administrators of a NADA instance to groupstudies into what can be thought of as sub-catalogs of the Central Data Catalog This has a number of benefitsboth from the user and the administrator perspective From the usersrsquo perspective being able to filter and viewgroups (collections) of studies that logically belong together makes finding what they are looking for easier From theadministratorsrsquo perspective the ability to create collections of studies that may logically belong together facilitates theability to decentralize the management of each collection of studies to specific administrators (for example collectionscan be managed by different departments in an institution)
NOTE The creation of collections will in general only be useful and necessary for large catalogs or for catalogs thatdesire more decentralized management of groups of studies by different departments
STUDIES
Studies are carried out to gather more knowledge about a subject Studies may gather information from a number ofdifferent sources in order to answer the questions asked The information gathered for a study will in the context of
35
nada Documentation Release 40
NADA catalogs usually come from either a census or a surveys It is therefore not uncommon to hear the terms surveyand study used interchangeably when listening to people talk about their NADA catalog
METADATA
Metadata are data about the data They are not the actual data collected from the survey but rather the information thatdescribes the survey process and the data The NADA uses the Data Documentation Initiative (DDI) ndash ddiallianceorgndash standard for the presentation of metadata for each study The DDI document (which is an XML document) isprepared outside the NADA application either manually or using a tool like the Nesstar Publisher ndash nesstarcom ndash andthen imported into the NADA The detailed information about the survey is searchable down to the variable level foreach survey in the catalog
DATA ACCESS TYPES
The NADA allows for the level of access to datasets for studies to be controlled at the study level In other words thelevel of restriction can differ from study to study and can be defined on a scale ranging from direct access with norestrictions to no access Briefly the available access types are
bull Data not available - data are not available for this study
bull Direct Access Data Files - data shared under this policy can be downloaded without any restrictions The useris not required to be logged into the site and no personal information is collected on the person downloading thedata
bull Public Use Data Files - data shared under this policy requires that the user be logged in and registered on thesite before they are able to download the data The user is required to agree to a terms of use of the data and theapplication keeps records of who downloads the data
bull Licensed Data Files - data shared under this policy requires that the user be logged in and registered on the siteUsers are also required to fill in and submit a detailed application form listing their reasons for wanting accessto the data Once the user submits the application form the system informs the system administrator that anapplication has been made In order for the person to get access to the data the system administrator needs toreview the application and approve it
bull Data available in an Enclave - under this policy no data is shared through the application Users submit anapplication to access the data at a secure facility physically located on the premises of the data producer or afacility nominated by the data producer
bull Data available from external repository ndash The NADA allows for studies and their metadata to be listed in aNADA catalog but for a link to be created to another site when the data for that study are available elsewhere
CITATIONS
Citations are references that can be included at the study level which point to published works that have used the datafrom a particular study In many cases this will be a reference to a Journal Article Working paper Newspaper articleetc Such resources are useful to researchers who are interested in seeing how the data have been used before Theyare also a good way of showing the funders of surveys that the data are being used for policy and research purposesand thus are an indicator of some of the impact a study has had
USERS
Users in the NADA can be defined according to three broad groups General Users ndash this is the normal user whoregisters on a NADA site from the user interface This user type has no access to the site administration It is requiredto register as a user when accessing public use and licensed data types Site Administrators (unlimited) ndash this user
36 Chapter 4 User manual
nada Documentation Release 40
has access to all functions and all collections within the Site Administration System wide access Limited Adminis-trators ndash these administrators have access to a limited set of functions within the Site Administration Examples wouldbe an administrator of a specific collections or licensed survey reviewer for all or only some collections or reportgenerator etc
413 Why do NADA administrators need to understand these concepts
Understanding these concepts is important as it
bull Is critical to understanding the new permissions and administrator types introduced in NADA 4 Administratorsare now able to create collections within their NADArsquos and assign different roles to administrators and moregranular levels of access to catalog administration at the collection level It is now possible for example to haveadministrators whorsquos lsquopowersrsquo range from being able to manage all parts of a collectionrsquos administration downto ones with more restrictive access such as ones whose only function is as licensed survey reviewer or reportgenerator or catalog reviewer or citation manager etc
bull Ensures that the correct level of permissions and access is assigned to users based on security policies within theinstitution Unlike previous versions of NADA not all users who have access to the Site Administration needhave the level of access of an ldquounlimited site administratorrdquo This limits security risks associated with havingtoo many ldquounlimited site administratorsrdquo managing a site
bull Assists in assigning an appropriate data access type to data based on institutional distribution polices
bull Makes it easier to explain more clearly to institutional managers what the capabilities of the NADA applicationare and to advise on how to best manage the allocation of responsibilities
42 The Dashboard
After logging in to the Site Administration with administrator credentials the user is taken to the dashboard
The Dashboard provides a quick glance summary for administrators to get an overall picture of what has been happen-ing on the site as well as what pending tasks are outstanding for the administrator
42 The Dashboard 37
nada Documentation Release 40
1 Menu link to the Dashboard
2 Menu link to the Study Management pages submenus include Manage Studies Licensed requests and ManageCollections
3 Menu link to the citations management pages
4 Menu link to the User management pages submenus include All users Add user and Impersonate User
5 Menu link to create menu pages for the site frontend
6 Menu link to generate usage reports
7 Menu Link to the settings pages submenus include Settings Coutries Regions and Vocabularies
8 Useful navigation links submenus include Change Password Log out Catalog Home Data catalog Citations
9 This section lists all collections in the catalog Within each collection a summary is given of the number ofstudies along with diagnostics related to the number of studies publishedunpublished missing questionnairesdata access types set but with no data attached as well as some buttin links to Manage the collections studiesusers and a History of changes made to the collection
10 Provides a summary of users registrations and number of users currently logged in
11 Show how many pages are being cached on the site with a link to clear the cache if need be
12 Show a list of recently added or updated studies Clicking on a study in the list takes you to the page to managethat study
38 Chapter 4 User manual
nada Documentation Release 40
43 Manage Collections
431 Collections
Collections are sub categories of the Central Data Catalog They allow administrators of a NADA instance to groupstudies into what can be thought of as sub-catalogs of the Central Data Catalog
Collections provide a number of benefits both from the user and the administrator perspective From the usersrsquo per-spective being able to filter and view groups (collections) of studies that logically belong together makes finding whatthey are looking for easier From the administratorsrsquo perspective the ability to create collections of studies that maylogically belong together facilitates the ability to decentralize the management of each collection of studies to specificadministrators (for example collections can be managed by different departments in an institution)
Note The creation of collections will in general only be useful and necessary for large catalogs or for catalogs thatdesire more decentralized management of groups of studies by different departments
432 Creating collections
bull Login to the Site administration using an administrator password
bull Collections are managed and created by going to the Studies Manage collections menu link
bull There are no collections defined in the default NADA 4 installation
bull To create a new collection click on the Create new collection button
43 Manage Collections 39
nada Documentation Release 40
1 Under Collection Identification provide a short name for the collection This will become the URL for thecollection so pick carefully For Title fill in the fill title for the collection This will be the name displayed atthe top of the collection page
B Fill in a 3 or four line short description of the collection This text will display on the front end in the collectionslist For examples see httpmicrodataworldbankorgindexphpcontributing-catalogs
C Fill in a more detailed description of the collection This will display on the About page for that collection Forexample see httpmicrodataworldbankorgindexphpcatalogdhsabout
To format the page and include images it is possible to enter HTML code into this box below is anexample piece of code that includes an image
ltimg src=rdquofilesdhs-fp-01jpgrdquo alt=rdquoHealth Surveys Imagerdquo class=rdquoabout-photordquogt lth2gt Health SurveysCollectionlth2gt ltp align=rdquojustifyrdquogtThe Health Surveys collection aims to provide frequent high qual-ity and timely health data needed by the decision makers when designing public health programsltpgtltpgtHealth surveys provide useful information on health status and health consumption and their determi-nantsltpgt
Copy any images to be displayed into the NADA ldquofilesrdquo folder on your server image imagesthumbnil-imagepng
4 Upload a file to display next to the collection as it is listed on the collection page NOTE This image should be82 X 82 pixels If the upload does not work automatically then copy the thumbnail image to the ldquofilesrdquo folder asshown above
40 Chapter 4 User manual
nada Documentation Release 40
E The Weight field determines in what order collections are shown in the collection list 0123 etc The Selectcollection type drop-down is a system value to distinguish between collections that should be viewed as internal tothe organization or external For example some collections may be made up entirely of studies from an organizationoutside the host catalog These collections can be designated as external The Section dropdown allows for thecategorization as either a collection based on a specialized collection (like health) or based on a regional breakdownSelecting Publish ndash publishes the collection
bull Click on Submit to save the changes
To view the results click on the Preview link on the far right
bull The new collection now also shows in the collection list on the Central Catalog About page (this is where thethumbnail and short description fields are displayed)
43 Manage Collections 41
nada Documentation Release 40
bull Visiting the Dashboard will now also show the new collection listed below the Central Data Catalog With anumber of green buttons as shortcut links to manage the studies on the collection assign administrators for thecollection a history of activity on the collection and a link to edit the collection as in the steps above
433 Manually adding studies to a collection
There are 2 ways to get studies into the new catalog
bull The first is to upload a DDI and all its resources to the collection in the same way as described in the earliersection ndash Uploading a Study Except instead of choosing Central Catalog chose the collection you want to
42 Chapter 4 User manual
nada Documentation Release 40
upload the study to
bull Click on the Add Study button and upload a DDI and RDF and all your resources as described in the earliersection ndash Uploading a Study
bull Once a study is added in this way it displays in the Manage Studies list Notice that the collection summaryfield shows that the study belongs to (is Owned By) the DHS collection (this was the Short name defined in theexample when the Health Surveys Collection was created)
All studies uploaded to collections will automatically be added to the Central Data Catalog in order to build a commonsearch portal for all studies
43 Manage Collections 43
nada Documentation Release 40
434 Copying studies from one collection to another
bull The second way to add a study to a collection is to Copy the study from another collection into the newcollection
bull To copy a study already in the catalog to display in the new collection first make sure to be in the Manage Studiessection for the collection you want to put studies into To do this either use the Studies ndash Manage studies menuon the top or simply click on the Switch link next to the Manage Studies [Collection Title] heading
bull Then Click on the Copy Studies blue button at the top right
bull A list of all studies available to copy to the new collection is listed Simply click on the Link button in green tocopy the study to the collection The button will turn red and say Unlink To reverse the process and click thenow red button
bull Going back to the Manage Studies page for the collection will show the newly copied studies in the collectionlist Also note that the Collection field now indicated DHS next to Central DHS is in grey to indicate it is notowned (it is a copy) by that collection and the Central is in blue to show it is owned by the Central Data CatalogAlso note that because the study is not owned by this catalog it cannot be edited from this catalog ndash hence thepublishunpublish green button is absent for the copied studies
44 Chapter 4 User manual
nada Documentation Release 40
435 Turning on the collection filter
The final step after creating the first collection is to enable the collection filter option in the Settings menus under SiteConfigurations ndash Survey catalog settings
436 Transferring study ownership
In the previous examples mention was made of studies uploaded to a catalog being owned by that catalog There maybe cases where transferring the ownership from one catalog to another will be desirable This will become clearerin the next section on user roles but for now the next steps show how transferring ownership from one collection toanother can be done
bull Transferring ownership from one collection to another has to be done by the owner of the collection and fromthe collection it is currently owned by
bull To transfer ownership Go to the Manage Studies screen and select the study to be transferred Open up the EditStudy page by clicking on the study Title
bull On the right hand side of the screen click on the Transfer study owner link
43 Manage Collections 45
nada Documentation Release 40
bull Select the collection to transfer from the dropdown box
bull Click Transfer
bull Note that when looking the study summary for the transferred study the Collection field now shows the studyto belong (owned by) to the DHS collection and not Central anymore Also note the option to Publish andunpublish is now active
bull To transfer ownership of a large number of studies all at once - from the Manage Studies page ndash select the studiesto be transferred (tick them in the box left of each study) and then from the top Batch Actions drop down selectTransfer owner ndash then apply
46 Chapter 4 User manual
nada Documentation Release 40
44 Manage Studies
There are 2 Options to get studies into the new catalog
441 Option 1
bull The first is to upload a DDI and all its resources to the collection in the same way as described in the earliersection ndash Uploading a Study Except instead of choosing Central Catalog chose the collection you want toupload the study to
bull Click on the Add Study button and upload a DDI and RDF and all your resources as described in the earliersection ndash Uploading a Study
bull Once a study is added in this way it displays in the Manage Studies list Notice that the collection summaryfield shows that the study belongs to (is Owned By) the DHS collection (this was the Short name defined in theexample when the Health Surveys Collection was created)
bull Also note that the new study also appears in the Central Data Catalog
All studies uploaded to collections will automatically be added to the Central Data Catalog in order to build a commonsearch portal for all studies
44 Manage Studies 47
nada Documentation Release 40
442 Option2
Copying studies from one collection to another
bull The second way to add a study to a collection is to Copy the study from another collection into the new collection
bull To copy a study already in the catalog to display in the new collection first make sure to be in the Manage Studiessection for the collection you want to put studies into To do this either use the Studies ndash Manage studies menuon the top or simply click on the Switch link next to the Manage Studies [Collection Title] heading
bull Then Click on the Copy Studies blue button at the top right
bull A list of all studies available to copy to the new collection is listed Simply click on the Link button in green tocopy the study to the collection The button will turn red and say Unlink To reverse the process and click thenow red button
bull Going back to the Manage Studies page for the collection will show the newly copied studies in the collectionlist Also note that the Collection field now indicated DHS next to Central DHS is in grey to indicate it is notowned (it is a copy) by that collection and the Central is in blue to show it is owned by the Central Data CatalogAlso note that because the study is not owned by this catalog it cannot be edited from this catalog ndash hence thepublishunpublish green button is absent for the copied studies
45 Managing Licensed Requests
Datasets that are assigned the Access Type Licensed require approval from the NADA administrator before the usercan get access to the data files From the site administration there are a number of ways to see if any licensed requestshave been received
bull Go to the dashboard Pending requests show up as red in the catalog quicj summary section Clicking on thislink goes to the Licensed Survey Requests management page
bull Or go to the Studies link on the top menu and select Licensed Requests from the submenu
48 Chapter 4 User manual
nada Documentation Release 40
The link shows a page with a list Licensed Requests received The status column indicated the Pending requests
bull Click on the Edit link for to process a request
The Request information tab shows a summary of the information provided by the applicant
bull To Approve or Deny or request further information for the request Click on the Process tab
45 Managing Licensed Requests 49
nada Documentation Release 40
bull Select Approve to approve the request (other options include Deny as well as Request more information fromthe applicant)
bull Select the files that the user will be authorized to download ndash it is also possible to enter a maximum number ofdownloads and expiry date for downloads
bull Enter any comments to be sent to the applicant
bull Select Notify user by email to notify them that the application has been processed
bull Select Update
bull The remaining tabs
ndash Communicate - provides a means to ask for more information from the applicant
ndash Monitor ndash allows the administrator to see when and how many times the applicant downloaded thedata
ndash Forward Request ndash provides a means to forward the request to another person for review
46 Manage Citations
The Citations section is where bibliographic references can be added for publications that use any of the studies in thecatalog These citations can be linked to particular studies in the catalog and are displayed to the users of the systemin the study information view of the relevant study
Citations are added from the Citations menu
50 Chapter 4 User manual
nada Documentation Release 40
bull To add a citation - click on All citations then click on the Add New Citation button at the top right
bull Compete the form including the indication as to whether the citation should be published or not
bull Then expand the Related studies link to tell the system which studies the citation ldquobelongsrdquo to
bull Click on the Attach studies link This reveals a list of all studies in the catalog
bull Select the relevant studies by clicking on the green Select button
bull Click on the apply filter button to save the changes The study now appears in the related studies box
bull Click on the submit button to save the citation
bull Note the flag keywords and notes fields can be used by administrators to place extra notes only visible to otheradministrators that might prove useful when there is uncertainty about a citations appropriateness or accuracy
bull It is also possible to import citations in common citation formats such as BibTex and EndNote (RIS)
bull To do this use the Import Citations link from the top menu
46 Manage Citations 51
nada Documentation Release 40
bull Paste the BibTex or RIS text into the form and then at the bottom of the screen click on Attach studies to linkthe citation to a particular study in the catalog
bull The citation now appears in the citation list as well as on the study information page for the relevant studies
52 Chapter 4 User manual
nada Documentation Release 40
47 Managing Users and account types
Users in the NADA can be defined according to three broad groups
General Usersndash this is the normal user who registers on a NADA site from the user interface This user type hasno access to the site administration It is required to register as a user before being granted access to public use andlicensed data types
Site Administrators (unlimited) ndash this user has access to all functions and all collections within the Site Administra-tion System wide access
Limited Administrators ndash these administrators have access to a limited set of functions within the Site Administra-tion Examples would be an administrator of a specific collections or licensed survey reviewer for all or only somecollections or report generator or citation manager etc
471 Creating User accounts
User accounts can be created in two ways
1 A General User account can be created by a user directly from the register screen from the login link on the userinterface of the application
The user created by this process has no access to the site administration This account can only be used to apply andgain access to public and licensed datasets
2 A user account can also be created by a Site Administrator
bull To do this login as a Site Administrator
bull Go to the site administration section of the application
47 Managing Users and account types 53
nada Documentation Release 40
bull Select Users ndash Add user from the top menu
bull Fill in the information for the user in the form and be sure to mark the account status as Active Then click theCreate button
54 Chapter 4 User manual
nada Documentation Release 40
47 Managing Users and account types 55
nada Documentation Release 40
bull Note that the user always starts off as a General User with no access permissions to the Site Administration Theuser group column displays as empty for users with only general user accounts
bull To see a list of all users in the system go to the Users ndash All Users menu item at the top of the screen
bull Note the new users created have no User group assigned (they are general users) Also note the Actions columnon the far right From these links an account can be edited (including changing the password and blocking anaccount) deleted and Permissions managed for the account
472 Managing User Account Permissions
User accounts permissions can be only be set and changed by a Site Administrator To change the permissions for anaccount
bull Click on the Permissions link next to the account to be changed All accounts start of as General users accounts
bull To change this user to a full site administrator who will have full system wide access to all parts and functionsof the NADA administration select the Site administrators (full access) option and tick the admin box as wellClick update to save the changes
56 Chapter 4 User manual
nada Documentation Release 40
473 Collection level administrators
bull To create a user who only has permissions to administer studies or administration functions for a particularcollection Select Site administrators (limited access)
47 Managing Users and account types 57
nada Documentation Release 40
bull It is then necessary to assign a role to this new limited administrator account To create a limited access ad-ministrator for a particular collection ndash select Site administrators (limited access) and then select Collectionadministrators Notice The form expands to reveal a list of collections in the system
bull Select the appropriate level of access that this account will have for this collection In the example below anadministrator is being created who can manage only licensed requests for the collection ndash Health Surveys Thisaccount will not be able to upload or publish studies The account will only be able to process licensed requestsfor the collection ndash Health Surveys
58 Chapter 4 User manual
nada Documentation Release 40
Other levels of access for Site administrators (limited access) ndash Collection administrators include
1 Accounts that are given full access to manage studies
2 Accounts that are given access to upload studies but not publish them
3 Accounts that are limited to reviewing studies
474 Global level Limited access accounts
Other types of limited access accounts include
1 Accounts that can only view system reports at a global level
2 Accounts that can only access the citations section and manage citations
3 Accounts that can only access the Licensed Request management system ndash at the global level for all collections
47 Managing Users and account types 59
nada Documentation Release 40
Impersonating a user
The system includes a function that allows a Site Administrator to impersonate (take on the role) a user created inthe system This is a useful testing tool when creating users and assigning permissions It essentially allows theadministrator to take on the role of another user temporarily
bull To access the Impersonate User feature go to the Users ndash Impersonat user menu at the top of the screen
bull A list of users to impersonate is shown
bull Select the user to impersonate and click on the impersonate button
bull The dashboard view for the impersonated user now shows
60 Chapter 4 User manual
nada Documentation Release 40
bull Note in the example above the account being impersonated is a Limited Account administrator with rights onlyto manage licensed requests for the Health Surveys Collection Note that all other dashboard menus are eitherhidden or clicking on any other function other than manage studies results in an access denied message
bull This is a good way to test if the roles assigned to a user account have the expected results
bull To exit the impersonate mode and return to the Site Administrator role ndash Click on the top right menu and selectExit impersonate mode
475 The Reviewer Limited access account
Sometimes it is desirable for catalog administrators to allow certain users to see a collection before it is published butwithout granting access to the site administration functions
This is useful for getting feedback on the correctness of information on collections or studies before publishing
To do this
bull First create an account for the user or get the user to create an account by using the register form on the loginscreen
bull Then edit the permissions for that user selecting Site Administrator (limited access) ndash Collection administrator
bull Then for the appropriate collection select Reviewer and click update to save the changes
47 Managing Users and account types 61
nada Documentation Release 40
bull The newly created reviewer account user can now view all studies in a collection even if the study or collectionis unpublished
48 Manage Site Pages and Menus
The NADA has a small content management component that allows for the creation of menu pages to appear on theuser interface
bull Examples of menus that might be useful for users of the site might be A page dealing with the disseminationpolicies of the organization or perhaps a page with contact information for the information
New menu items and pages can be created via the Menu- All pages menu link at the top of the Site Administrationpage
62 Chapter 4 User manual
nada Documentation Release 40
bull Select All pages from the menu
bull To add a new page click on the Add New Page button
bull Give the page a Title in the Title field
bull Clicking in the URL field will automatically suggest a name for the page in the URL
bull Enter the contents for the page in the Body section Plain text or HTML is accespted by this field
bull Then indicate if the page should be published or not in the Publish dropdown
bull The Weight field tells the NADA in what order this menu item should display Eg 0 would be first 1 secondand 2 third
bull Click on Update to save the changes
bull View the changes from the user interface In this Example a Contact Us page was created
bull It is also possible from the Menu Management screen to add a menu link that links to an existing page on anothersite (rather than creating a page itself)
bull To change the order in which the menu items display on the user interface use the Reorder Menu button on theMenu Management screen
48 Manage Site Pages and Menus 63
nada Documentation Release 40
49 The Site Settings Page
All settings for the application are controlled via the Settings menu at the top of the Site Administration page Thereare seven main settings sections See screenshot below
491 General Settings
1 Type the Title of the site here This will become the front page title of the NADA site In this case the Title isNADA
64 Chapter 4 User manual
nada Documentation Release 40
2 The footer text can be changed in this field This displays at the bottom of your site page
3 The initial page that loads when a user visits the NADA site can be set here In this case the catalog page is setto open by default
4 The name of the webmaster can be set here This is the name that will be used in system emails sent to users
5 Enter the webmaster email address here This should be the address that will be used in communication withusers Typically this is a general enquiries email set up by the organization and not a personal email address fora particular person Note to avoid mail systems rejecting mail as spam make sure to enter an address here thatis on the same domain as the server used in the email settings at setup
6 This field sets the location of the Cache folder The cache folder stores pre- generated pages of the site to allowfor faster browsing by the user By default it is set to cache This can be moved to another location if desiredbut must be writable The green tick indicates that the folder can be found and is set up correctly Enter eitherrelative or absolute paths to the folder location
7 Set the time that the Cache takes to expire By default it is set to 2 hours (in milli seconds)
8 If it is desired to turn off caching then select no here Sometimes it is useful to turn off caching when developingor updating a site so as to ensure that content changes become immediately visible on the front-end withouthaving to wait for the cache to expire and the new changes to show Turn this back on to speed up page loadingfor users
Click update to save all settings
Language
To change the language of the application expand the language section and choose the desired language Click updateto save and apply the setting
49 The Site Settings Page 65
nada Documentation Release 40
Enable or disable the HTML editor
A basic HTML editor is provided in the menu and page creating section of the application This setting allows this tobe turned on or off
Survey catalog settings
1 This is the folder where the files for the study are stored on the server This includes the DDI eternal resourcesand data files This folder can be moved to a location outside the web root as described in the installationinstructions in Chapter 1 Enter either relative or absolute paths to the folder location
2 This is the folder where DDIrsquos can be placed in order to use the bulk study import function in the NADA InNADA3 files had to be physically copied to this folder on the server but this is no longer necessary in NADA4 Files can now be directly uploaded to this folder from the Site Administration ndash Manage Studies page page
66 Chapter 4 User manual
nada Documentation Release 40
3 Select the vocabulary to use for the topic filter By default this is set to the CESSDA classification as recom-mended in the IHSN templates supplied at IHSNorg for the Nesstar Metadata Publisher
4 Enable or disable the Country filter on the user interface search page here If the catalog only contains studiesfor one country then turning this filter off is recommended
5 Enable or disable the Topic filter on the user interface search page here If no topics have been defined in theDDIrsquos being uploaded then it is recommended to turn this filter off (disable)
6 Enable or disable the Year filter on the user interface search page here
7 Enable or disable the Collection filter on the user interface search page here If no collections have been definedthen it is recommended to disable this filter
8 Enable or disable the Data access filter on the user interface search page here This filter is not needed if thereare very few studies in the catalog or if all studies hare set to the same access type
9 This section controls the order in which the filters appear on the search page Enter numbers here that rank theorder of the filters in the order they should be displayed
10 This setting determines how many studies are displayed by default to the user on the search page ndash catalog view
Site Login settings
1 To require that users login before being able to access the website set this option to Requires all users to loginto access the website
2 Determined how long a user will stay logged in After this time the user will be automatically logged out
3 Sets the minimum length for passwords created by the users at registration or for manual user creation
49 The Site Settings Page 67
nada Documentation Release 40
SMTP Settings
1 If the PHPweb server is configured to send email using PHPrsquos MAIL function select the first option and donrsquotfill in anything else
If your organization has a mail server and has have a dedicated account that can be setup for NADA use the followingsettings Check the radio button ldquoUse SMTP Serverrdquo
2 Enter the host name for the server
3 Enter the port used by the server to send mail
4 If required enter the user name used to send mail on the server
5 Enter the password used to send mail on the server
If the organization does not own a mail server a Gmail account can be configured to be used with NADA
bull Check the radio button ldquoUse SMTP Serverrdquo
bull Host name sslsmtpgooglemailcom or sslsmtpgmailcom
bull SMTP port 465
bull Account username email-addressgmailcom
bull Account password password for the gmail account
6 Test the email settings
The quickest way to test if the email settings are working is to use the ldquoforgot passwordrdquo option from the user loginpage If no mail is received when doing this test then go back and correct the mail settings Check with the ISP orserver administrator for the correct settings
Click on update to save all settings
68 Chapter 4 User manual
nada Documentation Release 40
492 Dashboard setting
Provides a means to automatically have content loaded into the dashboard via an RSS feed from a site The defaultsetting is set to receive updates and news from the IHSN website
49 The Site Settings Page 69
nada Documentation Release 40
70 Chapter 4 User manual
CHAPTER 5
Indices and tables
bull genindex
bull modindex
bull search
71
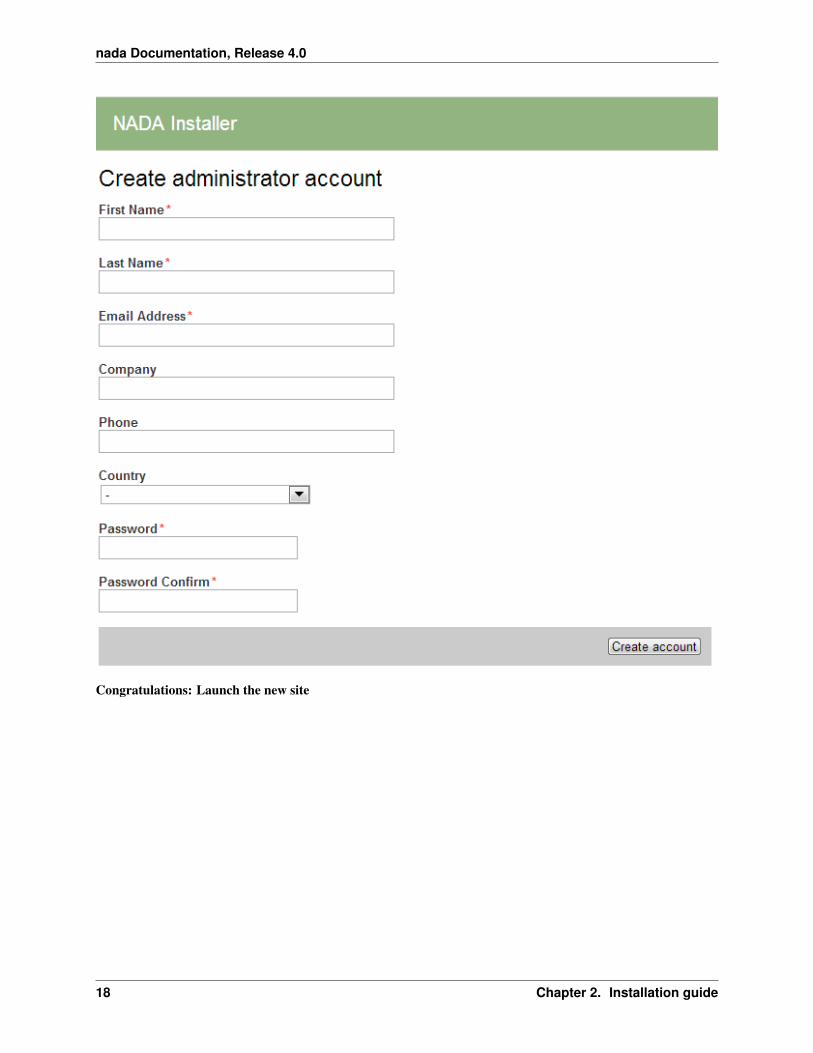
nada Documentation Release 40
24 PHP settings
241 Finding the correct PHPINI
To make sure you are editing the correct PHPINI settings file create a PHP file (eg infophp) in your nada websitefolder with the following contents
ltphp phpinfo() gt
Open the phpinfo page in your web browser and you should see output similar to below screenshot Edit the phpinifile displayed by the setting Loaded Configuration File
24 PHP settings 19
nada Documentation Release 40
20 Chapter 2 Installation guide
nada Documentation Release 40
242 File upload limits
By default PHP allows uploads of 2MB which could be a problem if you have large DDIs and external resource filesTo change the settings
1 Edit the phpini file in notepad and look for the setting upload_max_filesize
2 The line should look like
Maximum allowed size for uploaded files httpphpnetupload-max-filesizeupload_max_filesize = 2M
3 Change it to the required file upload limit per your needs
upload_max_filesize = 50M
4 There is another setting that MUST be changed as well for the file upload limits to work Look for the configu-ration post_max_size and change it to match the value for upload_max_filesize
post_max_size = 50M
243 TimeZone settings
This is for setting the timezone for your application To findout what is the correct timezone for your website go tohttpphpnetmanualentimezonesphp and find your countrycity
Example
datetimezone = AmericaNew_York
244 Increase page executiontimeout
This setting controls the maximum execution time of a page in seconds
max_execution_time = 300
245 Increase PHP memory limit
It controls the memory available to PHP scripts
memory_limit = 128M
246 Enabledisable PHP extensions
NADA requires the following PHP extensions
bull xsl
bull mbstring
bull mysql or sqlsrv
To enable XSL extension add this line
24 PHP settings 21
nada Documentation Release 40
extension=php_xsldll
To enable mbstring
extension=php_mbstringdll
25 Configure Captcha
By default NADA version 41 comes with image captcha and user does not need to make any changes to use imagecaptcha To use Google Captcha please follow the steps given below
1 Open applicationconfigcaptchaphp in editor
2 Change line number 12 as shown in below image
3 Click on above URL to generate Public and Private key URL httpwwwgooglecomrecaptchawhyrecaptcha
4 Click on sign up now
5 Sign in using your Gmail account
6 After signed in you will have to enter your URL (Domain URL)
22 Chapter 2 Installation guide
nada Documentation Release 40
7 Click on ldquoenable globel key for all domain
8 Click on Create Key button
9 Copy public key and private key from Google Captcha website and inserte it on line number 51 and 52 respec-tively as shown in below image
10 To check the Google catpcha configuration go to register page and look for image as shown in below URLhighlighted in Red suqare
25 Configure Captcha 23
nada Documentation Release 40
26 Email configurations
For the NADA to function correctly it is important that this step be completed
Many of the functions within the NADA ndash such as registration and applying for access to datasets require that theNADA be able to send emails to users
There are two ways to setup your email configurations 1) Create a emailphp file in the applicationconfig folder 2)Edit email settings on the site configurations page
24 Chapter 2 Installation guide
nada Documentation Release 40
261 1 Configure email via email config file
1 Open the file applicationconfigemailphp in notepad
2 Fill in the section using SMTP server with authentication enabled highlighted in below image
3 For Gmail user will have to fill the gmail smtp section shown as below
26 Email configurations 25
nada Documentation Release 40
4 Save file
Note Using a file for email configuration disable the email configuration page from the site administration
1 Login to your NADA as an administrator
2 Go to Site administration click on the Settings menu and choose ldquoSettingsrdquo
3 Find the section ldquoSMTP settingsrdquo
26 Chapter 2 Installation guide
nada Documentation Release 40
4 If the PHPweb server is configured to send email using PHPrsquos MAIL function select the first option and donrsquotfill in anything else
If your organization has a mail server and has have a dedicated account that can be setup for NADA use the followingsettings Check the radio button ldquoUse SMTP Serverrdquo
5 Enter the host name for the server
6 Enter the port used by the server to send mail
7 If required enter the user name used to send mail on the server
8 Enter the password used to send mail on the server
If the organization does not own a mail server a Gmail account can be configured to be used with NADA
bull Check the radio button ldquoUse SMTP Serverrdquo
bull Host name sslsmtpgooglemailcom or sslsmtpgmailcom
bull SMTP port 465
bull Account username email-addressgmailcom
bull Account password password for the gmail account
Test the email settings
The quickest way to test if the email settings are working is to use the ldquoforgot passwordrdquo option from the user loginpage
bull Click on forgot password
26 Email configurations 27
nada Documentation Release 40
bull Enter the administrator or any other accounts email address
bull Check to the email account the mail was sent to
bull If no mail is received the settings are wrong and need to be corrected
28 Chapter 2 Installation guide
CHAPTER 3
Upgrading from previous versions
31 Upgrade from NADA 3
For users with an existing NADA 3x catalog an upgrade script is included that will update your NADA 3x databaseto NADA 4x The process involves modifying your NADA 3x database and thus carries some risks The script willadd new tables to the NADA 3x database All user accounts and survey information will be retained by the upgrade
Important Backup the NADA 3x database before doing anything
1 Follow the instructions on page 4 and set up a folder in the web root containing the NADA 4 files
2 Edit the databasephp file as instructed in the section above NADA database configurations for MySQL
3 Instead of entering a new database name user account name and password -fill in the details of the existingNADA 3x database
Note These can be found by looking at the existing NADA 3x databasephp file and entering the settings into theNADA 4 databasephp file
4 Save the file
5 Navigate to the URL for the NADA4 site Example httpyour-nada-sitenada4indexphpnada4_upgrade
6 The following page loads
29
nada Documentation Release 40
Take note of the warnings and make any necessary corrections before clicking the ldquoUpgrade database to NADA 4rdquobutton
Warning This step makes changes to your nada 3 database that are not undo-able so make sure you do make adatabase backup before this step
Click on the ldquoUpgrade database to NADA 4rdquo button and wait for the page to reload The output of the page will looksomething like below
The script will print number of messages about failed table updates This does not mean the script failed to upgradeIt just means some of the updates were not needed on your version of NADA 3 Different versions of NADA havedifferent numbers of fields in the database and the upgrade script tries to fix the missing fields for all these differentversions of NADA If the existing NADA 3 database already has that field then it reports it as an error
You can ignore the error messages that include the wording ldquoDuplicate column namerdquo or ldquoDuplicate entryrdquo
Now your database has been migrated to NADA version 41 We will have to run one more upgrade script to forNADA version 42
7 Navigate to the URL for the NADA42 site Example httpyour-nada-sitenada42indexphpnada42_upgrade
Warning This step makes changes to your nada 41 database that are not undo-able This page will not show anymessage on the screen You will be getting blank page Please do not repeat the process
8 To verify the database upgrade Open the NADA catalog page by going to http[your-nada4-site]indexphpcatalogpage and verify all studies from NADA 3 are listed
311 Linking your NADA 3 data files to NADA 4
The upgrade script has only upgraded the database It is now necessary to tell the NADA4 where to locate the datafilesthat were uploaded to the original NADA 3 site
There are two options available
Option 1 Copy the datafiles folder from NADA 3 to NADA 4 This works best if you have only a few studies and thedatafiles folder size is small enoughto be moved easily from one location to another
Option 2 If it is not possible to easily move the datafiles folder from NADA 3 to NADA 4 you can tell NADA 4 thelocation of the datafiles without moving the files Here are the steps
bull Use your NADA 3 administrator login credentials to login to your new NADA 4 site
bull Click on Site administration in the top right corner of the screen
bull Go to the ldquoSettingsrdquo menu and click on the ldquoSettingsrdquo sub-menu
30 Chapter 3 Upgrading from previous versions
nada Documentation Release 40
bull Under Site configurations expand the ldquoSurvey Catalog Settingsrdquo section
bull For the setting ldquoCatalog folderrdquo enter the relative or full path to where the NADA 3 datafiles folder is locatedFor example if the nada3 datafiles are located on cnada3datafiles enter that path here
bull Save the configurations by clicking on the update button If now errors are shown then you have successfullyupdated the folder path
bull Check your new NADA 4 site to make sure the migration was successful
ndash Check the user administration page from site administration to make sure the users from the nada3 sitewere migrated
ndash Check the ldquoData Catalogrdquo page and view the studies by clicking on the study title to make sure the studyinformation pages are correct
ndash Check the site menus are the same as the NADA 3 site
312 Refresh DDI
In NADA 4 more information is stored in the database from the DDI than in the NADA 3 To bring all these newfields into the imported studies it is necessary to refresh the DDIrsquos The refresh DDI feature in NADA updates thedatabase with metadata from the DDI without having re-uploading the DDIs To update the metadata for all studies inyour catalog
bull Open the following NADA 4 URL in your browser
http[your-nada-4-site]indexphpadmincatalogbatch_refresh
bull Select all studies
bull Click on the ldquoRefresh DDIrdquo button
313 Transferring ownership
NADA 4 has a collection management feature When studies are imported from the NADA3 catalog into NADA4 theyare put into a collection called DEFAULT They need to be moved from this default system collection to the Central
31 Upgrade from NADA 3 31
nada Documentation Release 40
Data Catalog of the NADA4
To do this
bull Go login to the Site Administration and navigate to the Studies Manage Studies Central Data Catalog page
bull Select all the studies by ticking the check boxes next to each study on the right
bull Click on the dropdown menu and select Transfer owner
bull From the Transfer study owner page Select Central Data Catalog and then click transfer
32 Chapter 3 Upgrading from previous versions
nada Documentation Release 40
314 Updating the Site themetemplate
You cannot use your NADA3 template in NADA4 without making some changes Here are general guidelines butsteps may differ depending on your nada site template
bull Copy your NADA3 template to the NADA4 themes folder
bull Edit the [nada4-root]configtemplatephp following the steps below
bull Look for the setting ldquotheme_namerdquo by default it is set to rdquowbrdquo
bull Change ldquowbrdquo to the theme name you want to use Theme name is the folder name you copied to[NADA4]themes[your-site-theme] from your nada3 site
bull Save the file
NB The template may need some adjusting to run properly on the new NADA 4 site This will involve editingthe layoutphp and other template files within the template folder which is now located in the NADA 4 themesfolder
32 Migrate MySQL to Microsoft SQL
TODO
32 Migrate MySQL to Microsoft SQL 33
nada Documentation Release 40
34 Chapter 3 Upgrading from previous versions
CHAPTER 4
User manual
41 Overview and core concepts
411 About NADA
NADA is a web-based cataloging application that allows for the creation of portals that allows users to browse searchcompare apply for access and download relevant census or survey information
It was originally developed to support the establishment of national survey data archives The application is used by adiverse and growing number of national regional and international organizations NADA as with other IHSN toolsuses the Data Documentation Initiative (DDI) XML-based international metadata standard
412 Concepts
CENTRAL DATA CATALOG
The default catalog created when a NADA instance is installed is the Central Data Catalog All studies uploaded to theNADA are visible searchable and accessible from the Central Data Catalog For many institutions the Central DataCatalog will remain the only catalog in their NADA instance For some institutions being able to divide the contentsof the Central Data Catalog into more refined collections will be desirable
COLLECTIONS
Collections are sub categories of the Central Data Catalog They allow administrators of a NADA instance to groupstudies into what can be thought of as sub-catalogs of the Central Data Catalog This has a number of benefitsboth from the user and the administrator perspective From the usersrsquo perspective being able to filter and viewgroups (collections) of studies that logically belong together makes finding what they are looking for easier From theadministratorsrsquo perspective the ability to create collections of studies that may logically belong together facilitates theability to decentralize the management of each collection of studies to specific administrators (for example collectionscan be managed by different departments in an institution)
NOTE The creation of collections will in general only be useful and necessary for large catalogs or for catalogs thatdesire more decentralized management of groups of studies by different departments
STUDIES
Studies are carried out to gather more knowledge about a subject Studies may gather information from a number ofdifferent sources in order to answer the questions asked The information gathered for a study will in the context of
35
nada Documentation Release 40
NADA catalogs usually come from either a census or a surveys It is therefore not uncommon to hear the terms surveyand study used interchangeably when listening to people talk about their NADA catalog
METADATA
Metadata are data about the data They are not the actual data collected from the survey but rather the information thatdescribes the survey process and the data The NADA uses the Data Documentation Initiative (DDI) ndash ddiallianceorgndash standard for the presentation of metadata for each study The DDI document (which is an XML document) isprepared outside the NADA application either manually or using a tool like the Nesstar Publisher ndash nesstarcom ndash andthen imported into the NADA The detailed information about the survey is searchable down to the variable level foreach survey in the catalog
DATA ACCESS TYPES
The NADA allows for the level of access to datasets for studies to be controlled at the study level In other words thelevel of restriction can differ from study to study and can be defined on a scale ranging from direct access with norestrictions to no access Briefly the available access types are
bull Data not available - data are not available for this study
bull Direct Access Data Files - data shared under this policy can be downloaded without any restrictions The useris not required to be logged into the site and no personal information is collected on the person downloading thedata
bull Public Use Data Files - data shared under this policy requires that the user be logged in and registered on thesite before they are able to download the data The user is required to agree to a terms of use of the data and theapplication keeps records of who downloads the data
bull Licensed Data Files - data shared under this policy requires that the user be logged in and registered on the siteUsers are also required to fill in and submit a detailed application form listing their reasons for wanting accessto the data Once the user submits the application form the system informs the system administrator that anapplication has been made In order for the person to get access to the data the system administrator needs toreview the application and approve it
bull Data available in an Enclave - under this policy no data is shared through the application Users submit anapplication to access the data at a secure facility physically located on the premises of the data producer or afacility nominated by the data producer
bull Data available from external repository ndash The NADA allows for studies and their metadata to be listed in aNADA catalog but for a link to be created to another site when the data for that study are available elsewhere
CITATIONS
Citations are references that can be included at the study level which point to published works that have used the datafrom a particular study In many cases this will be a reference to a Journal Article Working paper Newspaper articleetc Such resources are useful to researchers who are interested in seeing how the data have been used before Theyare also a good way of showing the funders of surveys that the data are being used for policy and research purposesand thus are an indicator of some of the impact a study has had
USERS
Users in the NADA can be defined according to three broad groups General Users ndash this is the normal user whoregisters on a NADA site from the user interface This user type has no access to the site administration It is requiredto register as a user when accessing public use and licensed data types Site Administrators (unlimited) ndash this user
36 Chapter 4 User manual
nada Documentation Release 40
has access to all functions and all collections within the Site Administration System wide access Limited Adminis-trators ndash these administrators have access to a limited set of functions within the Site Administration Examples wouldbe an administrator of a specific collections or licensed survey reviewer for all or only some collections or reportgenerator etc
413 Why do NADA administrators need to understand these concepts
Understanding these concepts is important as it
bull Is critical to understanding the new permissions and administrator types introduced in NADA 4 Administratorsare now able to create collections within their NADArsquos and assign different roles to administrators and moregranular levels of access to catalog administration at the collection level It is now possible for example to haveadministrators whorsquos lsquopowersrsquo range from being able to manage all parts of a collectionrsquos administration downto ones with more restrictive access such as ones whose only function is as licensed survey reviewer or reportgenerator or catalog reviewer or citation manager etc
bull Ensures that the correct level of permissions and access is assigned to users based on security policies within theinstitution Unlike previous versions of NADA not all users who have access to the Site Administration needhave the level of access of an ldquounlimited site administratorrdquo This limits security risks associated with havingtoo many ldquounlimited site administratorsrdquo managing a site
bull Assists in assigning an appropriate data access type to data based on institutional distribution polices
bull Makes it easier to explain more clearly to institutional managers what the capabilities of the NADA applicationare and to advise on how to best manage the allocation of responsibilities
42 The Dashboard
After logging in to the Site Administration with administrator credentials the user is taken to the dashboard
The Dashboard provides a quick glance summary for administrators to get an overall picture of what has been happen-ing on the site as well as what pending tasks are outstanding for the administrator
42 The Dashboard 37
nada Documentation Release 40
1 Menu link to the Dashboard
2 Menu link to the Study Management pages submenus include Manage Studies Licensed requests and ManageCollections
3 Menu link to the citations management pages
4 Menu link to the User management pages submenus include All users Add user and Impersonate User
5 Menu link to create menu pages for the site frontend
6 Menu link to generate usage reports
7 Menu Link to the settings pages submenus include Settings Coutries Regions and Vocabularies
8 Useful navigation links submenus include Change Password Log out Catalog Home Data catalog Citations
9 This section lists all collections in the catalog Within each collection a summary is given of the number ofstudies along with diagnostics related to the number of studies publishedunpublished missing questionnairesdata access types set but with no data attached as well as some buttin links to Manage the collections studiesusers and a History of changes made to the collection
10 Provides a summary of users registrations and number of users currently logged in
11 Show how many pages are being cached on the site with a link to clear the cache if need be
12 Show a list of recently added or updated studies Clicking on a study in the list takes you to the page to managethat study
38 Chapter 4 User manual
nada Documentation Release 40
43 Manage Collections
431 Collections
Collections are sub categories of the Central Data Catalog They allow administrators of a NADA instance to groupstudies into what can be thought of as sub-catalogs of the Central Data Catalog
Collections provide a number of benefits both from the user and the administrator perspective From the usersrsquo per-spective being able to filter and view groups (collections) of studies that logically belong together makes finding whatthey are looking for easier From the administratorsrsquo perspective the ability to create collections of studies that maylogically belong together facilitates the ability to decentralize the management of each collection of studies to specificadministrators (for example collections can be managed by different departments in an institution)
Note The creation of collections will in general only be useful and necessary for large catalogs or for catalogs thatdesire more decentralized management of groups of studies by different departments
432 Creating collections
bull Login to the Site administration using an administrator password
bull Collections are managed and created by going to the Studies Manage collections menu link
bull There are no collections defined in the default NADA 4 installation
bull To create a new collection click on the Create new collection button
43 Manage Collections 39
nada Documentation Release 40
1 Under Collection Identification provide a short name for the collection This will become the URL for thecollection so pick carefully For Title fill in the fill title for the collection This will be the name displayed atthe top of the collection page
B Fill in a 3 or four line short description of the collection This text will display on the front end in the collectionslist For examples see httpmicrodataworldbankorgindexphpcontributing-catalogs
C Fill in a more detailed description of the collection This will display on the About page for that collection Forexample see httpmicrodataworldbankorgindexphpcatalogdhsabout
To format the page and include images it is possible to enter HTML code into this box below is anexample piece of code that includes an image
ltimg src=rdquofilesdhs-fp-01jpgrdquo alt=rdquoHealth Surveys Imagerdquo class=rdquoabout-photordquogt lth2gt Health SurveysCollectionlth2gt ltp align=rdquojustifyrdquogtThe Health Surveys collection aims to provide frequent high qual-ity and timely health data needed by the decision makers when designing public health programsltpgtltpgtHealth surveys provide useful information on health status and health consumption and their determi-nantsltpgt
Copy any images to be displayed into the NADA ldquofilesrdquo folder on your server image imagesthumbnil-imagepng
4 Upload a file to display next to the collection as it is listed on the collection page NOTE This image should be82 X 82 pixels If the upload does not work automatically then copy the thumbnail image to the ldquofilesrdquo folder asshown above
40 Chapter 4 User manual
nada Documentation Release 40
E The Weight field determines in what order collections are shown in the collection list 0123 etc The Selectcollection type drop-down is a system value to distinguish between collections that should be viewed as internal tothe organization or external For example some collections may be made up entirely of studies from an organizationoutside the host catalog These collections can be designated as external The Section dropdown allows for thecategorization as either a collection based on a specialized collection (like health) or based on a regional breakdownSelecting Publish ndash publishes the collection
bull Click on Submit to save the changes
To view the results click on the Preview link on the far right
bull The new collection now also shows in the collection list on the Central Catalog About page (this is where thethumbnail and short description fields are displayed)
43 Manage Collections 41
nada Documentation Release 40
bull Visiting the Dashboard will now also show the new collection listed below the Central Data Catalog With anumber of green buttons as shortcut links to manage the studies on the collection assign administrators for thecollection a history of activity on the collection and a link to edit the collection as in the steps above
433 Manually adding studies to a collection
There are 2 ways to get studies into the new catalog
bull The first is to upload a DDI and all its resources to the collection in the same way as described in the earliersection ndash Uploading a Study Except instead of choosing Central Catalog chose the collection you want to
42 Chapter 4 User manual
nada Documentation Release 40
upload the study to
bull Click on the Add Study button and upload a DDI and RDF and all your resources as described in the earliersection ndash Uploading a Study
bull Once a study is added in this way it displays in the Manage Studies list Notice that the collection summaryfield shows that the study belongs to (is Owned By) the DHS collection (this was the Short name defined in theexample when the Health Surveys Collection was created)
All studies uploaded to collections will automatically be added to the Central Data Catalog in order to build a commonsearch portal for all studies
43 Manage Collections 43
nada Documentation Release 40
434 Copying studies from one collection to another
bull The second way to add a study to a collection is to Copy the study from another collection into the newcollection
bull To copy a study already in the catalog to display in the new collection first make sure to be in the Manage Studiessection for the collection you want to put studies into To do this either use the Studies ndash Manage studies menuon the top or simply click on the Switch link next to the Manage Studies [Collection Title] heading
bull Then Click on the Copy Studies blue button at the top right
bull A list of all studies available to copy to the new collection is listed Simply click on the Link button in green tocopy the study to the collection The button will turn red and say Unlink To reverse the process and click thenow red button
bull Going back to the Manage Studies page for the collection will show the newly copied studies in the collectionlist Also note that the Collection field now indicated DHS next to Central DHS is in grey to indicate it is notowned (it is a copy) by that collection and the Central is in blue to show it is owned by the Central Data CatalogAlso note that because the study is not owned by this catalog it cannot be edited from this catalog ndash hence thepublishunpublish green button is absent for the copied studies
44 Chapter 4 User manual
nada Documentation Release 40
435 Turning on the collection filter
The final step after creating the first collection is to enable the collection filter option in the Settings menus under SiteConfigurations ndash Survey catalog settings
436 Transferring study ownership
In the previous examples mention was made of studies uploaded to a catalog being owned by that catalog There maybe cases where transferring the ownership from one catalog to another will be desirable This will become clearerin the next section on user roles but for now the next steps show how transferring ownership from one collection toanother can be done
bull Transferring ownership from one collection to another has to be done by the owner of the collection and fromthe collection it is currently owned by
bull To transfer ownership Go to the Manage Studies screen and select the study to be transferred Open up the EditStudy page by clicking on the study Title
bull On the right hand side of the screen click on the Transfer study owner link
43 Manage Collections 45
nada Documentation Release 40
bull Select the collection to transfer from the dropdown box
bull Click Transfer
bull Note that when looking the study summary for the transferred study the Collection field now shows the studyto belong (owned by) to the DHS collection and not Central anymore Also note the option to Publish andunpublish is now active
bull To transfer ownership of a large number of studies all at once - from the Manage Studies page ndash select the studiesto be transferred (tick them in the box left of each study) and then from the top Batch Actions drop down selectTransfer owner ndash then apply
46 Chapter 4 User manual
nada Documentation Release 40
44 Manage Studies
There are 2 Options to get studies into the new catalog
441 Option 1
bull The first is to upload a DDI and all its resources to the collection in the same way as described in the earliersection ndash Uploading a Study Except instead of choosing Central Catalog chose the collection you want toupload the study to
bull Click on the Add Study button and upload a DDI and RDF and all your resources as described in the earliersection ndash Uploading a Study
bull Once a study is added in this way it displays in the Manage Studies list Notice that the collection summaryfield shows that the study belongs to (is Owned By) the DHS collection (this was the Short name defined in theexample when the Health Surveys Collection was created)
bull Also note that the new study also appears in the Central Data Catalog
All studies uploaded to collections will automatically be added to the Central Data Catalog in order to build a commonsearch portal for all studies
44 Manage Studies 47
nada Documentation Release 40
442 Option2
Copying studies from one collection to another
bull The second way to add a study to a collection is to Copy the study from another collection into the new collection
bull To copy a study already in the catalog to display in the new collection first make sure to be in the Manage Studiessection for the collection you want to put studies into To do this either use the Studies ndash Manage studies menuon the top or simply click on the Switch link next to the Manage Studies [Collection Title] heading
bull Then Click on the Copy Studies blue button at the top right
bull A list of all studies available to copy to the new collection is listed Simply click on the Link button in green tocopy the study to the collection The button will turn red and say Unlink To reverse the process and click thenow red button
bull Going back to the Manage Studies page for the collection will show the newly copied studies in the collectionlist Also note that the Collection field now indicated DHS next to Central DHS is in grey to indicate it is notowned (it is a copy) by that collection and the Central is in blue to show it is owned by the Central Data CatalogAlso note that because the study is not owned by this catalog it cannot be edited from this catalog ndash hence thepublishunpublish green button is absent for the copied studies
45 Managing Licensed Requests
Datasets that are assigned the Access Type Licensed require approval from the NADA administrator before the usercan get access to the data files From the site administration there are a number of ways to see if any licensed requestshave been received
bull Go to the dashboard Pending requests show up as red in the catalog quicj summary section Clicking on thislink goes to the Licensed Survey Requests management page
bull Or go to the Studies link on the top menu and select Licensed Requests from the submenu
48 Chapter 4 User manual
nada Documentation Release 40
The link shows a page with a list Licensed Requests received The status column indicated the Pending requests
bull Click on the Edit link for to process a request
The Request information tab shows a summary of the information provided by the applicant
bull To Approve or Deny or request further information for the request Click on the Process tab
45 Managing Licensed Requests 49
nada Documentation Release 40
bull Select Approve to approve the request (other options include Deny as well as Request more information fromthe applicant)
bull Select the files that the user will be authorized to download ndash it is also possible to enter a maximum number ofdownloads and expiry date for downloads
bull Enter any comments to be sent to the applicant
bull Select Notify user by email to notify them that the application has been processed
bull Select Update
bull The remaining tabs
ndash Communicate - provides a means to ask for more information from the applicant
ndash Monitor ndash allows the administrator to see when and how many times the applicant downloaded thedata
ndash Forward Request ndash provides a means to forward the request to another person for review
46 Manage Citations
The Citations section is where bibliographic references can be added for publications that use any of the studies in thecatalog These citations can be linked to particular studies in the catalog and are displayed to the users of the systemin the study information view of the relevant study
Citations are added from the Citations menu
50 Chapter 4 User manual
nada Documentation Release 40
bull To add a citation - click on All citations then click on the Add New Citation button at the top right
bull Compete the form including the indication as to whether the citation should be published or not
bull Then expand the Related studies link to tell the system which studies the citation ldquobelongsrdquo to
bull Click on the Attach studies link This reveals a list of all studies in the catalog
bull Select the relevant studies by clicking on the green Select button
bull Click on the apply filter button to save the changes The study now appears in the related studies box
bull Click on the submit button to save the citation
bull Note the flag keywords and notes fields can be used by administrators to place extra notes only visible to otheradministrators that might prove useful when there is uncertainty about a citations appropriateness or accuracy
bull It is also possible to import citations in common citation formats such as BibTex and EndNote (RIS)
bull To do this use the Import Citations link from the top menu
46 Manage Citations 51
nada Documentation Release 40
bull Paste the BibTex or RIS text into the form and then at the bottom of the screen click on Attach studies to linkthe citation to a particular study in the catalog
bull The citation now appears in the citation list as well as on the study information page for the relevant studies
52 Chapter 4 User manual
nada Documentation Release 40
47 Managing Users and account types
Users in the NADA can be defined according to three broad groups
General Usersndash this is the normal user who registers on a NADA site from the user interface This user type hasno access to the site administration It is required to register as a user before being granted access to public use andlicensed data types
Site Administrators (unlimited) ndash this user has access to all functions and all collections within the Site Administra-tion System wide access
Limited Administrators ndash these administrators have access to a limited set of functions within the Site Administra-tion Examples would be an administrator of a specific collections or licensed survey reviewer for all or only somecollections or report generator or citation manager etc
471 Creating User accounts
User accounts can be created in two ways
1 A General User account can be created by a user directly from the register screen from the login link on the userinterface of the application
The user created by this process has no access to the site administration This account can only be used to apply andgain access to public and licensed datasets
2 A user account can also be created by a Site Administrator
bull To do this login as a Site Administrator
bull Go to the site administration section of the application
47 Managing Users and account types 53
nada Documentation Release 40
bull Select Users ndash Add user from the top menu
bull Fill in the information for the user in the form and be sure to mark the account status as Active Then click theCreate button
54 Chapter 4 User manual
nada Documentation Release 40
47 Managing Users and account types 55
nada Documentation Release 40
bull Note that the user always starts off as a General User with no access permissions to the Site Administration Theuser group column displays as empty for users with only general user accounts
bull To see a list of all users in the system go to the Users ndash All Users menu item at the top of the screen
bull Note the new users created have no User group assigned (they are general users) Also note the Actions columnon the far right From these links an account can be edited (including changing the password and blocking anaccount) deleted and Permissions managed for the account
472 Managing User Account Permissions
User accounts permissions can be only be set and changed by a Site Administrator To change the permissions for anaccount
bull Click on the Permissions link next to the account to be changed All accounts start of as General users accounts
bull To change this user to a full site administrator who will have full system wide access to all parts and functionsof the NADA administration select the Site administrators (full access) option and tick the admin box as wellClick update to save the changes
56 Chapter 4 User manual
nada Documentation Release 40
473 Collection level administrators
bull To create a user who only has permissions to administer studies or administration functions for a particularcollection Select Site administrators (limited access)
47 Managing Users and account types 57
nada Documentation Release 40
bull It is then necessary to assign a role to this new limited administrator account To create a limited access ad-ministrator for a particular collection ndash select Site administrators (limited access) and then select Collectionadministrators Notice The form expands to reveal a list of collections in the system
bull Select the appropriate level of access that this account will have for this collection In the example below anadministrator is being created who can manage only licensed requests for the collection ndash Health Surveys Thisaccount will not be able to upload or publish studies The account will only be able to process licensed requestsfor the collection ndash Health Surveys
58 Chapter 4 User manual
nada Documentation Release 40
Other levels of access for Site administrators (limited access) ndash Collection administrators include
1 Accounts that are given full access to manage studies
2 Accounts that are given access to upload studies but not publish them
3 Accounts that are limited to reviewing studies
474 Global level Limited access accounts
Other types of limited access accounts include
1 Accounts that can only view system reports at a global level
2 Accounts that can only access the citations section and manage citations
3 Accounts that can only access the Licensed Request management system ndash at the global level for all collections
47 Managing Users and account types 59
nada Documentation Release 40
Impersonating a user
The system includes a function that allows a Site Administrator to impersonate (take on the role) a user created inthe system This is a useful testing tool when creating users and assigning permissions It essentially allows theadministrator to take on the role of another user temporarily
bull To access the Impersonate User feature go to the Users ndash Impersonat user menu at the top of the screen
bull A list of users to impersonate is shown
bull Select the user to impersonate and click on the impersonate button
bull The dashboard view for the impersonated user now shows
60 Chapter 4 User manual
nada Documentation Release 40
bull Note in the example above the account being impersonated is a Limited Account administrator with rights onlyto manage licensed requests for the Health Surveys Collection Note that all other dashboard menus are eitherhidden or clicking on any other function other than manage studies results in an access denied message
bull This is a good way to test if the roles assigned to a user account have the expected results
bull To exit the impersonate mode and return to the Site Administrator role ndash Click on the top right menu and selectExit impersonate mode
475 The Reviewer Limited access account
Sometimes it is desirable for catalog administrators to allow certain users to see a collection before it is published butwithout granting access to the site administration functions
This is useful for getting feedback on the correctness of information on collections or studies before publishing
To do this
bull First create an account for the user or get the user to create an account by using the register form on the loginscreen
bull Then edit the permissions for that user selecting Site Administrator (limited access) ndash Collection administrator
bull Then for the appropriate collection select Reviewer and click update to save the changes
47 Managing Users and account types 61
nada Documentation Release 40
bull The newly created reviewer account user can now view all studies in a collection even if the study or collectionis unpublished
48 Manage Site Pages and Menus
The NADA has a small content management component that allows for the creation of menu pages to appear on theuser interface
bull Examples of menus that might be useful for users of the site might be A page dealing with the disseminationpolicies of the organization or perhaps a page with contact information for the information
New menu items and pages can be created via the Menu- All pages menu link at the top of the Site Administrationpage
62 Chapter 4 User manual
nada Documentation Release 40
bull Select All pages from the menu
bull To add a new page click on the Add New Page button
bull Give the page a Title in the Title field
bull Clicking in the URL field will automatically suggest a name for the page in the URL
bull Enter the contents for the page in the Body section Plain text or HTML is accespted by this field
bull Then indicate if the page should be published or not in the Publish dropdown
bull The Weight field tells the NADA in what order this menu item should display Eg 0 would be first 1 secondand 2 third
bull Click on Update to save the changes
bull View the changes from the user interface In this Example a Contact Us page was created
bull It is also possible from the Menu Management screen to add a menu link that links to an existing page on anothersite (rather than creating a page itself)
bull To change the order in which the menu items display on the user interface use the Reorder Menu button on theMenu Management screen
48 Manage Site Pages and Menus 63
nada Documentation Release 40
49 The Site Settings Page
All settings for the application are controlled via the Settings menu at the top of the Site Administration page Thereare seven main settings sections See screenshot below
491 General Settings
1 Type the Title of the site here This will become the front page title of the NADA site In this case the Title isNADA
64 Chapter 4 User manual
nada Documentation Release 40
2 The footer text can be changed in this field This displays at the bottom of your site page
3 The initial page that loads when a user visits the NADA site can be set here In this case the catalog page is setto open by default
4 The name of the webmaster can be set here This is the name that will be used in system emails sent to users
5 Enter the webmaster email address here This should be the address that will be used in communication withusers Typically this is a general enquiries email set up by the organization and not a personal email address fora particular person Note to avoid mail systems rejecting mail as spam make sure to enter an address here thatis on the same domain as the server used in the email settings at setup
6 This field sets the location of the Cache folder The cache folder stores pre- generated pages of the site to allowfor faster browsing by the user By default it is set to cache This can be moved to another location if desiredbut must be writable The green tick indicates that the folder can be found and is set up correctly Enter eitherrelative or absolute paths to the folder location
7 Set the time that the Cache takes to expire By default it is set to 2 hours (in milli seconds)
8 If it is desired to turn off caching then select no here Sometimes it is useful to turn off caching when developingor updating a site so as to ensure that content changes become immediately visible on the front-end withouthaving to wait for the cache to expire and the new changes to show Turn this back on to speed up page loadingfor users
Click update to save all settings
Language
To change the language of the application expand the language section and choose the desired language Click updateto save and apply the setting
49 The Site Settings Page 65
nada Documentation Release 40
Enable or disable the HTML editor
A basic HTML editor is provided in the menu and page creating section of the application This setting allows this tobe turned on or off
Survey catalog settings
1 This is the folder where the files for the study are stored on the server This includes the DDI eternal resourcesand data files This folder can be moved to a location outside the web root as described in the installationinstructions in Chapter 1 Enter either relative or absolute paths to the folder location
2 This is the folder where DDIrsquos can be placed in order to use the bulk study import function in the NADA InNADA3 files had to be physically copied to this folder on the server but this is no longer necessary in NADA4 Files can now be directly uploaded to this folder from the Site Administration ndash Manage Studies page page
66 Chapter 4 User manual
nada Documentation Release 40
3 Select the vocabulary to use for the topic filter By default this is set to the CESSDA classification as recom-mended in the IHSN templates supplied at IHSNorg for the Nesstar Metadata Publisher
4 Enable or disable the Country filter on the user interface search page here If the catalog only contains studiesfor one country then turning this filter off is recommended
5 Enable or disable the Topic filter on the user interface search page here If no topics have been defined in theDDIrsquos being uploaded then it is recommended to turn this filter off (disable)
6 Enable or disable the Year filter on the user interface search page here
7 Enable or disable the Collection filter on the user interface search page here If no collections have been definedthen it is recommended to disable this filter
8 Enable or disable the Data access filter on the user interface search page here This filter is not needed if thereare very few studies in the catalog or if all studies hare set to the same access type
9 This section controls the order in which the filters appear on the search page Enter numbers here that rank theorder of the filters in the order they should be displayed
10 This setting determines how many studies are displayed by default to the user on the search page ndash catalog view
Site Login settings
1 To require that users login before being able to access the website set this option to Requires all users to loginto access the website
2 Determined how long a user will stay logged in After this time the user will be automatically logged out
3 Sets the minimum length for passwords created by the users at registration or for manual user creation
49 The Site Settings Page 67
nada Documentation Release 40
SMTP Settings
1 If the PHPweb server is configured to send email using PHPrsquos MAIL function select the first option and donrsquotfill in anything else
If your organization has a mail server and has have a dedicated account that can be setup for NADA use the followingsettings Check the radio button ldquoUse SMTP Serverrdquo
2 Enter the host name for the server
3 Enter the port used by the server to send mail
4 If required enter the user name used to send mail on the server
5 Enter the password used to send mail on the server
If the organization does not own a mail server a Gmail account can be configured to be used with NADA
bull Check the radio button ldquoUse SMTP Serverrdquo
bull Host name sslsmtpgooglemailcom or sslsmtpgmailcom
bull SMTP port 465
bull Account username email-addressgmailcom
bull Account password password for the gmail account
6 Test the email settings
The quickest way to test if the email settings are working is to use the ldquoforgot passwordrdquo option from the user loginpage If no mail is received when doing this test then go back and correct the mail settings Check with the ISP orserver administrator for the correct settings
Click on update to save all settings
68 Chapter 4 User manual
nada Documentation Release 40
492 Dashboard setting
Provides a means to automatically have content loaded into the dashboard via an RSS feed from a site The defaultsetting is set to receive updates and news from the IHSN website
49 The Site Settings Page 69
nada Documentation Release 40
70 Chapter 4 User manual
CHAPTER 5
Indices and tables
bull genindex
bull modindex
bull search
71
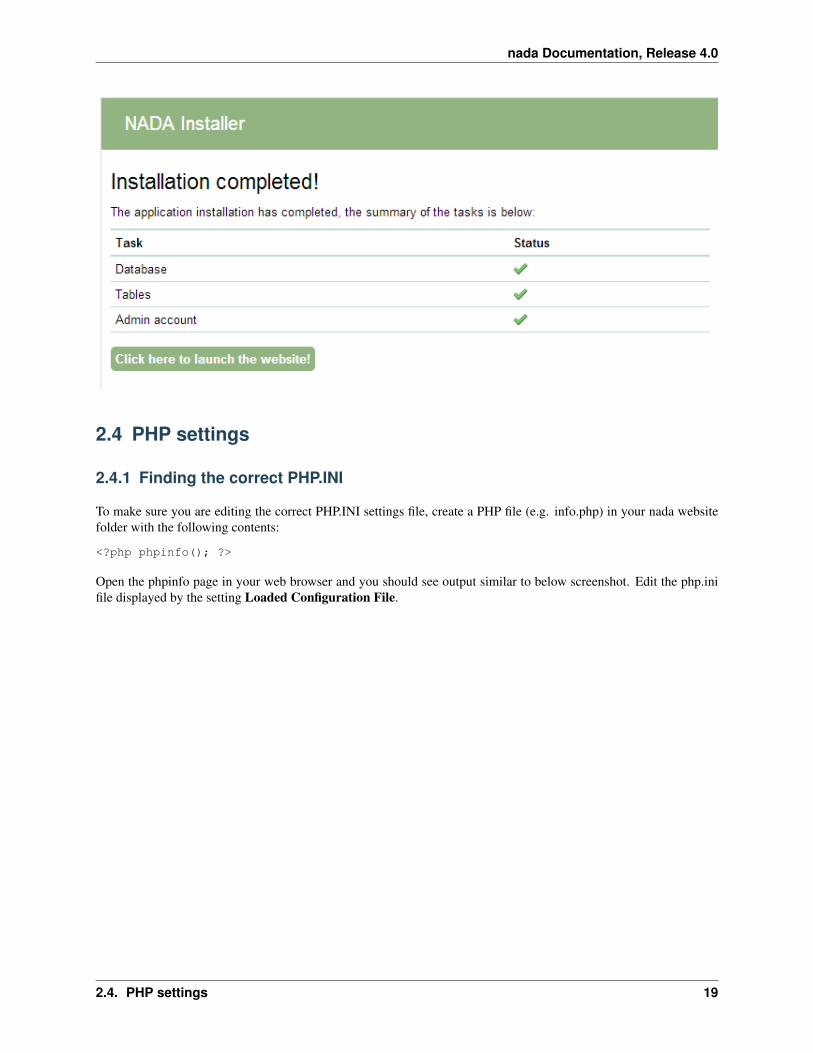
nada Documentation Release 40
20 Chapter 2 Installation guide
nada Documentation Release 40
242 File upload limits
By default PHP allows uploads of 2MB which could be a problem if you have large DDIs and external resource filesTo change the settings
1 Edit the phpini file in notepad and look for the setting upload_max_filesize
2 The line should look like
Maximum allowed size for uploaded files httpphpnetupload-max-filesizeupload_max_filesize = 2M
3 Change it to the required file upload limit per your needs
upload_max_filesize = 50M
4 There is another setting that MUST be changed as well for the file upload limits to work Look for the configu-ration post_max_size and change it to match the value for upload_max_filesize
post_max_size = 50M
243 TimeZone settings
This is for setting the timezone for your application To findout what is the correct timezone for your website go tohttpphpnetmanualentimezonesphp and find your countrycity
Example
datetimezone = AmericaNew_York
244 Increase page executiontimeout
This setting controls the maximum execution time of a page in seconds
max_execution_time = 300
245 Increase PHP memory limit
It controls the memory available to PHP scripts
memory_limit = 128M
246 Enabledisable PHP extensions
NADA requires the following PHP extensions
bull xsl
bull mbstring
bull mysql or sqlsrv
To enable XSL extension add this line
24 PHP settings 21
nada Documentation Release 40
extension=php_xsldll
To enable mbstring
extension=php_mbstringdll
25 Configure Captcha
By default NADA version 41 comes with image captcha and user does not need to make any changes to use imagecaptcha To use Google Captcha please follow the steps given below
1 Open applicationconfigcaptchaphp in editor
2 Change line number 12 as shown in below image
3 Click on above URL to generate Public and Private key URL httpwwwgooglecomrecaptchawhyrecaptcha
4 Click on sign up now
5 Sign in using your Gmail account
6 After signed in you will have to enter your URL (Domain URL)
22 Chapter 2 Installation guide
nada Documentation Release 40
7 Click on ldquoenable globel key for all domain
8 Click on Create Key button
9 Copy public key and private key from Google Captcha website and inserte it on line number 51 and 52 respec-tively as shown in below image
10 To check the Google catpcha configuration go to register page and look for image as shown in below URLhighlighted in Red suqare
25 Configure Captcha 23
nada Documentation Release 40
26 Email configurations
For the NADA to function correctly it is important that this step be completed
Many of the functions within the NADA ndash such as registration and applying for access to datasets require that theNADA be able to send emails to users
There are two ways to setup your email configurations 1) Create a emailphp file in the applicationconfig folder 2)Edit email settings on the site configurations page
24 Chapter 2 Installation guide
nada Documentation Release 40
261 1 Configure email via email config file
1 Open the file applicationconfigemailphp in notepad
2 Fill in the section using SMTP server with authentication enabled highlighted in below image
3 For Gmail user will have to fill the gmail smtp section shown as below
26 Email configurations 25
nada Documentation Release 40
4 Save file
Note Using a file for email configuration disable the email configuration page from the site administration
1 Login to your NADA as an administrator
2 Go to Site administration click on the Settings menu and choose ldquoSettingsrdquo
3 Find the section ldquoSMTP settingsrdquo
26 Chapter 2 Installation guide
nada Documentation Release 40
4 If the PHPweb server is configured to send email using PHPrsquos MAIL function select the first option and donrsquotfill in anything else
If your organization has a mail server and has have a dedicated account that can be setup for NADA use the followingsettings Check the radio button ldquoUse SMTP Serverrdquo
5 Enter the host name for the server
6 Enter the port used by the server to send mail
7 If required enter the user name used to send mail on the server
8 Enter the password used to send mail on the server
If the organization does not own a mail server a Gmail account can be configured to be used with NADA
bull Check the radio button ldquoUse SMTP Serverrdquo
bull Host name sslsmtpgooglemailcom or sslsmtpgmailcom
bull SMTP port 465
bull Account username email-addressgmailcom
bull Account password password for the gmail account
Test the email settings
The quickest way to test if the email settings are working is to use the ldquoforgot passwordrdquo option from the user loginpage
bull Click on forgot password
26 Email configurations 27
nada Documentation Release 40
bull Enter the administrator or any other accounts email address
bull Check to the email account the mail was sent to
bull If no mail is received the settings are wrong and need to be corrected
28 Chapter 2 Installation guide
CHAPTER 3
Upgrading from previous versions
31 Upgrade from NADA 3
For users with an existing NADA 3x catalog an upgrade script is included that will update your NADA 3x databaseto NADA 4x The process involves modifying your NADA 3x database and thus carries some risks The script willadd new tables to the NADA 3x database All user accounts and survey information will be retained by the upgrade
Important Backup the NADA 3x database before doing anything
1 Follow the instructions on page 4 and set up a folder in the web root containing the NADA 4 files
2 Edit the databasephp file as instructed in the section above NADA database configurations for MySQL
3 Instead of entering a new database name user account name and password -fill in the details of the existingNADA 3x database
Note These can be found by looking at the existing NADA 3x databasephp file and entering the settings into theNADA 4 databasephp file
4 Save the file
5 Navigate to the URL for the NADA4 site Example httpyour-nada-sitenada4indexphpnada4_upgrade
6 The following page loads
29
nada Documentation Release 40
Take note of the warnings and make any necessary corrections before clicking the ldquoUpgrade database to NADA 4rdquobutton
Warning This step makes changes to your nada 3 database that are not undo-able so make sure you do make adatabase backup before this step
Click on the ldquoUpgrade database to NADA 4rdquo button and wait for the page to reload The output of the page will looksomething like below
The script will print number of messages about failed table updates This does not mean the script failed to upgradeIt just means some of the updates were not needed on your version of NADA 3 Different versions of NADA havedifferent numbers of fields in the database and the upgrade script tries to fix the missing fields for all these differentversions of NADA If the existing NADA 3 database already has that field then it reports it as an error
You can ignore the error messages that include the wording ldquoDuplicate column namerdquo or ldquoDuplicate entryrdquo
Now your database has been migrated to NADA version 41 We will have to run one more upgrade script to forNADA version 42
7 Navigate to the URL for the NADA42 site Example httpyour-nada-sitenada42indexphpnada42_upgrade
Warning This step makes changes to your nada 41 database that are not undo-able This page will not show anymessage on the screen You will be getting blank page Please do not repeat the process
8 To verify the database upgrade Open the NADA catalog page by going to http[your-nada4-site]indexphpcatalogpage and verify all studies from NADA 3 are listed
311 Linking your NADA 3 data files to NADA 4
The upgrade script has only upgraded the database It is now necessary to tell the NADA4 where to locate the datafilesthat were uploaded to the original NADA 3 site
There are two options available
Option 1 Copy the datafiles folder from NADA 3 to NADA 4 This works best if you have only a few studies and thedatafiles folder size is small enoughto be moved easily from one location to another
Option 2 If it is not possible to easily move the datafiles folder from NADA 3 to NADA 4 you can tell NADA 4 thelocation of the datafiles without moving the files Here are the steps
bull Use your NADA 3 administrator login credentials to login to your new NADA 4 site
bull Click on Site administration in the top right corner of the screen
bull Go to the ldquoSettingsrdquo menu and click on the ldquoSettingsrdquo sub-menu
30 Chapter 3 Upgrading from previous versions
nada Documentation Release 40
bull Under Site configurations expand the ldquoSurvey Catalog Settingsrdquo section
bull For the setting ldquoCatalog folderrdquo enter the relative or full path to where the NADA 3 datafiles folder is locatedFor example if the nada3 datafiles are located on cnada3datafiles enter that path here
bull Save the configurations by clicking on the update button If now errors are shown then you have successfullyupdated the folder path
bull Check your new NADA 4 site to make sure the migration was successful
ndash Check the user administration page from site administration to make sure the users from the nada3 sitewere migrated
ndash Check the ldquoData Catalogrdquo page and view the studies by clicking on the study title to make sure the studyinformation pages are correct
ndash Check the site menus are the same as the NADA 3 site
312 Refresh DDI
In NADA 4 more information is stored in the database from the DDI than in the NADA 3 To bring all these newfields into the imported studies it is necessary to refresh the DDIrsquos The refresh DDI feature in NADA updates thedatabase with metadata from the DDI without having re-uploading the DDIs To update the metadata for all studies inyour catalog
bull Open the following NADA 4 URL in your browser
http[your-nada-4-site]indexphpadmincatalogbatch_refresh
bull Select all studies
bull Click on the ldquoRefresh DDIrdquo button
313 Transferring ownership
NADA 4 has a collection management feature When studies are imported from the NADA3 catalog into NADA4 theyare put into a collection called DEFAULT They need to be moved from this default system collection to the Central
31 Upgrade from NADA 3 31
nada Documentation Release 40
Data Catalog of the NADA4
To do this
bull Go login to the Site Administration and navigate to the Studies Manage Studies Central Data Catalog page
bull Select all the studies by ticking the check boxes next to each study on the right
bull Click on the dropdown menu and select Transfer owner
bull From the Transfer study owner page Select Central Data Catalog and then click transfer
32 Chapter 3 Upgrading from previous versions
nada Documentation Release 40
314 Updating the Site themetemplate
You cannot use your NADA3 template in NADA4 without making some changes Here are general guidelines butsteps may differ depending on your nada site template
bull Copy your NADA3 template to the NADA4 themes folder
bull Edit the [nada4-root]configtemplatephp following the steps below
bull Look for the setting ldquotheme_namerdquo by default it is set to rdquowbrdquo
bull Change ldquowbrdquo to the theme name you want to use Theme name is the folder name you copied to[NADA4]themes[your-site-theme] from your nada3 site
bull Save the file
NB The template may need some adjusting to run properly on the new NADA 4 site This will involve editingthe layoutphp and other template files within the template folder which is now located in the NADA 4 themesfolder
32 Migrate MySQL to Microsoft SQL
TODO
32 Migrate MySQL to Microsoft SQL 33
nada Documentation Release 40
34 Chapter 3 Upgrading from previous versions
CHAPTER 4
User manual
41 Overview and core concepts
411 About NADA
NADA is a web-based cataloging application that allows for the creation of portals that allows users to browse searchcompare apply for access and download relevant census or survey information
It was originally developed to support the establishment of national survey data archives The application is used by adiverse and growing number of national regional and international organizations NADA as with other IHSN toolsuses the Data Documentation Initiative (DDI) XML-based international metadata standard
412 Concepts
CENTRAL DATA CATALOG
The default catalog created when a NADA instance is installed is the Central Data Catalog All studies uploaded to theNADA are visible searchable and accessible from the Central Data Catalog For many institutions the Central DataCatalog will remain the only catalog in their NADA instance For some institutions being able to divide the contentsof the Central Data Catalog into more refined collections will be desirable
COLLECTIONS
Collections are sub categories of the Central Data Catalog They allow administrators of a NADA instance to groupstudies into what can be thought of as sub-catalogs of the Central Data Catalog This has a number of benefitsboth from the user and the administrator perspective From the usersrsquo perspective being able to filter and viewgroups (collections) of studies that logically belong together makes finding what they are looking for easier From theadministratorsrsquo perspective the ability to create collections of studies that may logically belong together facilitates theability to decentralize the management of each collection of studies to specific administrators (for example collectionscan be managed by different departments in an institution)
NOTE The creation of collections will in general only be useful and necessary for large catalogs or for catalogs thatdesire more decentralized management of groups of studies by different departments
STUDIES
Studies are carried out to gather more knowledge about a subject Studies may gather information from a number ofdifferent sources in order to answer the questions asked The information gathered for a study will in the context of
35
nada Documentation Release 40
NADA catalogs usually come from either a census or a surveys It is therefore not uncommon to hear the terms surveyand study used interchangeably when listening to people talk about their NADA catalog
METADATA
Metadata are data about the data They are not the actual data collected from the survey but rather the information thatdescribes the survey process and the data The NADA uses the Data Documentation Initiative (DDI) ndash ddiallianceorgndash standard for the presentation of metadata for each study The DDI document (which is an XML document) isprepared outside the NADA application either manually or using a tool like the Nesstar Publisher ndash nesstarcom ndash andthen imported into the NADA The detailed information about the survey is searchable down to the variable level foreach survey in the catalog
DATA ACCESS TYPES
The NADA allows for the level of access to datasets for studies to be controlled at the study level In other words thelevel of restriction can differ from study to study and can be defined on a scale ranging from direct access with norestrictions to no access Briefly the available access types are
bull Data not available - data are not available for this study
bull Direct Access Data Files - data shared under this policy can be downloaded without any restrictions The useris not required to be logged into the site and no personal information is collected on the person downloading thedata
bull Public Use Data Files - data shared under this policy requires that the user be logged in and registered on thesite before they are able to download the data The user is required to agree to a terms of use of the data and theapplication keeps records of who downloads the data
bull Licensed Data Files - data shared under this policy requires that the user be logged in and registered on the siteUsers are also required to fill in and submit a detailed application form listing their reasons for wanting accessto the data Once the user submits the application form the system informs the system administrator that anapplication has been made In order for the person to get access to the data the system administrator needs toreview the application and approve it
bull Data available in an Enclave - under this policy no data is shared through the application Users submit anapplication to access the data at a secure facility physically located on the premises of the data producer or afacility nominated by the data producer
bull Data available from external repository ndash The NADA allows for studies and their metadata to be listed in aNADA catalog but for a link to be created to another site when the data for that study are available elsewhere
CITATIONS
Citations are references that can be included at the study level which point to published works that have used the datafrom a particular study In many cases this will be a reference to a Journal Article Working paper Newspaper articleetc Such resources are useful to researchers who are interested in seeing how the data have been used before Theyare also a good way of showing the funders of surveys that the data are being used for policy and research purposesand thus are an indicator of some of the impact a study has had
USERS
Users in the NADA can be defined according to three broad groups General Users ndash this is the normal user whoregisters on a NADA site from the user interface This user type has no access to the site administration It is requiredto register as a user when accessing public use and licensed data types Site Administrators (unlimited) ndash this user
36 Chapter 4 User manual
nada Documentation Release 40
has access to all functions and all collections within the Site Administration System wide access Limited Adminis-trators ndash these administrators have access to a limited set of functions within the Site Administration Examples wouldbe an administrator of a specific collections or licensed survey reviewer for all or only some collections or reportgenerator etc
413 Why do NADA administrators need to understand these concepts
Understanding these concepts is important as it
bull Is critical to understanding the new permissions and administrator types introduced in NADA 4 Administratorsare now able to create collections within their NADArsquos and assign different roles to administrators and moregranular levels of access to catalog administration at the collection level It is now possible for example to haveadministrators whorsquos lsquopowersrsquo range from being able to manage all parts of a collectionrsquos administration downto ones with more restrictive access such as ones whose only function is as licensed survey reviewer or reportgenerator or catalog reviewer or citation manager etc
bull Ensures that the correct level of permissions and access is assigned to users based on security policies within theinstitution Unlike previous versions of NADA not all users who have access to the Site Administration needhave the level of access of an ldquounlimited site administratorrdquo This limits security risks associated with havingtoo many ldquounlimited site administratorsrdquo managing a site
bull Assists in assigning an appropriate data access type to data based on institutional distribution polices
bull Makes it easier to explain more clearly to institutional managers what the capabilities of the NADA applicationare and to advise on how to best manage the allocation of responsibilities
42 The Dashboard
After logging in to the Site Administration with administrator credentials the user is taken to the dashboard
The Dashboard provides a quick glance summary for administrators to get an overall picture of what has been happen-ing on the site as well as what pending tasks are outstanding for the administrator
42 The Dashboard 37
nada Documentation Release 40
1 Menu link to the Dashboard
2 Menu link to the Study Management pages submenus include Manage Studies Licensed requests and ManageCollections
3 Menu link to the citations management pages
4 Menu link to the User management pages submenus include All users Add user and Impersonate User
5 Menu link to create menu pages for the site frontend
6 Menu link to generate usage reports
7 Menu Link to the settings pages submenus include Settings Coutries Regions and Vocabularies
8 Useful navigation links submenus include Change Password Log out Catalog Home Data catalog Citations
9 This section lists all collections in the catalog Within each collection a summary is given of the number ofstudies along with diagnostics related to the number of studies publishedunpublished missing questionnairesdata access types set but with no data attached as well as some buttin links to Manage the collections studiesusers and a History of changes made to the collection
10 Provides a summary of users registrations and number of users currently logged in
11 Show how many pages are being cached on the site with a link to clear the cache if need be
12 Show a list of recently added or updated studies Clicking on a study in the list takes you to the page to managethat study
38 Chapter 4 User manual
nada Documentation Release 40
43 Manage Collections
431 Collections
Collections are sub categories of the Central Data Catalog They allow administrators of a NADA instance to groupstudies into what can be thought of as sub-catalogs of the Central Data Catalog
Collections provide a number of benefits both from the user and the administrator perspective From the usersrsquo per-spective being able to filter and view groups (collections) of studies that logically belong together makes finding whatthey are looking for easier From the administratorsrsquo perspective the ability to create collections of studies that maylogically belong together facilitates the ability to decentralize the management of each collection of studies to specificadministrators (for example collections can be managed by different departments in an institution)
Note The creation of collections will in general only be useful and necessary for large catalogs or for catalogs thatdesire more decentralized management of groups of studies by different departments
432 Creating collections
bull Login to the Site administration using an administrator password
bull Collections are managed and created by going to the Studies Manage collections menu link
bull There are no collections defined in the default NADA 4 installation
bull To create a new collection click on the Create new collection button
43 Manage Collections 39
nada Documentation Release 40
1 Under Collection Identification provide a short name for the collection This will become the URL for thecollection so pick carefully For Title fill in the fill title for the collection This will be the name displayed atthe top of the collection page
B Fill in a 3 or four line short description of the collection This text will display on the front end in the collectionslist For examples see httpmicrodataworldbankorgindexphpcontributing-catalogs
C Fill in a more detailed description of the collection This will display on the About page for that collection Forexample see httpmicrodataworldbankorgindexphpcatalogdhsabout
To format the page and include images it is possible to enter HTML code into this box below is anexample piece of code that includes an image
ltimg src=rdquofilesdhs-fp-01jpgrdquo alt=rdquoHealth Surveys Imagerdquo class=rdquoabout-photordquogt lth2gt Health SurveysCollectionlth2gt ltp align=rdquojustifyrdquogtThe Health Surveys collection aims to provide frequent high qual-ity and timely health data needed by the decision makers when designing public health programsltpgtltpgtHealth surveys provide useful information on health status and health consumption and their determi-nantsltpgt
Copy any images to be displayed into the NADA ldquofilesrdquo folder on your server image imagesthumbnil-imagepng
4 Upload a file to display next to the collection as it is listed on the collection page NOTE This image should be82 X 82 pixels If the upload does not work automatically then copy the thumbnail image to the ldquofilesrdquo folder asshown above
40 Chapter 4 User manual
nada Documentation Release 40
E The Weight field determines in what order collections are shown in the collection list 0123 etc The Selectcollection type drop-down is a system value to distinguish between collections that should be viewed as internal tothe organization or external For example some collections may be made up entirely of studies from an organizationoutside the host catalog These collections can be designated as external The Section dropdown allows for thecategorization as either a collection based on a specialized collection (like health) or based on a regional breakdownSelecting Publish ndash publishes the collection
bull Click on Submit to save the changes
To view the results click on the Preview link on the far right
bull The new collection now also shows in the collection list on the Central Catalog About page (this is where thethumbnail and short description fields are displayed)
43 Manage Collections 41
nada Documentation Release 40
bull Visiting the Dashboard will now also show the new collection listed below the Central Data Catalog With anumber of green buttons as shortcut links to manage the studies on the collection assign administrators for thecollection a history of activity on the collection and a link to edit the collection as in the steps above
433 Manually adding studies to a collection
There are 2 ways to get studies into the new catalog
bull The first is to upload a DDI and all its resources to the collection in the same way as described in the earliersection ndash Uploading a Study Except instead of choosing Central Catalog chose the collection you want to
42 Chapter 4 User manual
nada Documentation Release 40
upload the study to
bull Click on the Add Study button and upload a DDI and RDF and all your resources as described in the earliersection ndash Uploading a Study
bull Once a study is added in this way it displays in the Manage Studies list Notice that the collection summaryfield shows that the study belongs to (is Owned By) the DHS collection (this was the Short name defined in theexample when the Health Surveys Collection was created)
All studies uploaded to collections will automatically be added to the Central Data Catalog in order to build a commonsearch portal for all studies
43 Manage Collections 43
nada Documentation Release 40
434 Copying studies from one collection to another
bull The second way to add a study to a collection is to Copy the study from another collection into the newcollection
bull To copy a study already in the catalog to display in the new collection first make sure to be in the Manage Studiessection for the collection you want to put studies into To do this either use the Studies ndash Manage studies menuon the top or simply click on the Switch link next to the Manage Studies [Collection Title] heading
bull Then Click on the Copy Studies blue button at the top right
bull A list of all studies available to copy to the new collection is listed Simply click on the Link button in green tocopy the study to the collection The button will turn red and say Unlink To reverse the process and click thenow red button
bull Going back to the Manage Studies page for the collection will show the newly copied studies in the collectionlist Also note that the Collection field now indicated DHS next to Central DHS is in grey to indicate it is notowned (it is a copy) by that collection and the Central is in blue to show it is owned by the Central Data CatalogAlso note that because the study is not owned by this catalog it cannot be edited from this catalog ndash hence thepublishunpublish green button is absent for the copied studies
44 Chapter 4 User manual
nada Documentation Release 40
435 Turning on the collection filter
The final step after creating the first collection is to enable the collection filter option in the Settings menus under SiteConfigurations ndash Survey catalog settings
436 Transferring study ownership
In the previous examples mention was made of studies uploaded to a catalog being owned by that catalog There maybe cases where transferring the ownership from one catalog to another will be desirable This will become clearerin the next section on user roles but for now the next steps show how transferring ownership from one collection toanother can be done
bull Transferring ownership from one collection to another has to be done by the owner of the collection and fromthe collection it is currently owned by
bull To transfer ownership Go to the Manage Studies screen and select the study to be transferred Open up the EditStudy page by clicking on the study Title
bull On the right hand side of the screen click on the Transfer study owner link
43 Manage Collections 45
nada Documentation Release 40
bull Select the collection to transfer from the dropdown box
bull Click Transfer
bull Note that when looking the study summary for the transferred study the Collection field now shows the studyto belong (owned by) to the DHS collection and not Central anymore Also note the option to Publish andunpublish is now active
bull To transfer ownership of a large number of studies all at once - from the Manage Studies page ndash select the studiesto be transferred (tick them in the box left of each study) and then from the top Batch Actions drop down selectTransfer owner ndash then apply
46 Chapter 4 User manual
nada Documentation Release 40
44 Manage Studies
There are 2 Options to get studies into the new catalog
441 Option 1
bull The first is to upload a DDI and all its resources to the collection in the same way as described in the earliersection ndash Uploading a Study Except instead of choosing Central Catalog chose the collection you want toupload the study to
bull Click on the Add Study button and upload a DDI and RDF and all your resources as described in the earliersection ndash Uploading a Study
bull Once a study is added in this way it displays in the Manage Studies list Notice that the collection summaryfield shows that the study belongs to (is Owned By) the DHS collection (this was the Short name defined in theexample when the Health Surveys Collection was created)
bull Also note that the new study also appears in the Central Data Catalog
All studies uploaded to collections will automatically be added to the Central Data Catalog in order to build a commonsearch portal for all studies
44 Manage Studies 47
nada Documentation Release 40
442 Option2
Copying studies from one collection to another
bull The second way to add a study to a collection is to Copy the study from another collection into the new collection
bull To copy a study already in the catalog to display in the new collection first make sure to be in the Manage Studiessection for the collection you want to put studies into To do this either use the Studies ndash Manage studies menuon the top or simply click on the Switch link next to the Manage Studies [Collection Title] heading
bull Then Click on the Copy Studies blue button at the top right
bull A list of all studies available to copy to the new collection is listed Simply click on the Link button in green tocopy the study to the collection The button will turn red and say Unlink To reverse the process and click thenow red button
bull Going back to the Manage Studies page for the collection will show the newly copied studies in the collectionlist Also note that the Collection field now indicated DHS next to Central DHS is in grey to indicate it is notowned (it is a copy) by that collection and the Central is in blue to show it is owned by the Central Data CatalogAlso note that because the study is not owned by this catalog it cannot be edited from this catalog ndash hence thepublishunpublish green button is absent for the copied studies
45 Managing Licensed Requests
Datasets that are assigned the Access Type Licensed require approval from the NADA administrator before the usercan get access to the data files From the site administration there are a number of ways to see if any licensed requestshave been received
bull Go to the dashboard Pending requests show up as red in the catalog quicj summary section Clicking on thislink goes to the Licensed Survey Requests management page
bull Or go to the Studies link on the top menu and select Licensed Requests from the submenu
48 Chapter 4 User manual
nada Documentation Release 40
The link shows a page with a list Licensed Requests received The status column indicated the Pending requests
bull Click on the Edit link for to process a request
The Request information tab shows a summary of the information provided by the applicant
bull To Approve or Deny or request further information for the request Click on the Process tab
45 Managing Licensed Requests 49
nada Documentation Release 40
bull Select Approve to approve the request (other options include Deny as well as Request more information fromthe applicant)
bull Select the files that the user will be authorized to download ndash it is also possible to enter a maximum number ofdownloads and expiry date for downloads
bull Enter any comments to be sent to the applicant
bull Select Notify user by email to notify them that the application has been processed
bull Select Update
bull The remaining tabs
ndash Communicate - provides a means to ask for more information from the applicant
ndash Monitor ndash allows the administrator to see when and how many times the applicant downloaded thedata
ndash Forward Request ndash provides a means to forward the request to another person for review
46 Manage Citations
The Citations section is where bibliographic references can be added for publications that use any of the studies in thecatalog These citations can be linked to particular studies in the catalog and are displayed to the users of the systemin the study information view of the relevant study
Citations are added from the Citations menu
50 Chapter 4 User manual
nada Documentation Release 40
bull To add a citation - click on All citations then click on the Add New Citation button at the top right
bull Compete the form including the indication as to whether the citation should be published or not
bull Then expand the Related studies link to tell the system which studies the citation ldquobelongsrdquo to
bull Click on the Attach studies link This reveals a list of all studies in the catalog
bull Select the relevant studies by clicking on the green Select button
bull Click on the apply filter button to save the changes The study now appears in the related studies box
bull Click on the submit button to save the citation
bull Note the flag keywords and notes fields can be used by administrators to place extra notes only visible to otheradministrators that might prove useful when there is uncertainty about a citations appropriateness or accuracy
bull It is also possible to import citations in common citation formats such as BibTex and EndNote (RIS)
bull To do this use the Import Citations link from the top menu
46 Manage Citations 51
nada Documentation Release 40
bull Paste the BibTex or RIS text into the form and then at the bottom of the screen click on Attach studies to linkthe citation to a particular study in the catalog
bull The citation now appears in the citation list as well as on the study information page for the relevant studies
52 Chapter 4 User manual
nada Documentation Release 40
47 Managing Users and account types
Users in the NADA can be defined according to three broad groups
General Usersndash this is the normal user who registers on a NADA site from the user interface This user type hasno access to the site administration It is required to register as a user before being granted access to public use andlicensed data types
Site Administrators (unlimited) ndash this user has access to all functions and all collections within the Site Administra-tion System wide access
Limited Administrators ndash these administrators have access to a limited set of functions within the Site Administra-tion Examples would be an administrator of a specific collections or licensed survey reviewer for all or only somecollections or report generator or citation manager etc
471 Creating User accounts
User accounts can be created in two ways
1 A General User account can be created by a user directly from the register screen from the login link on the userinterface of the application
The user created by this process has no access to the site administration This account can only be used to apply andgain access to public and licensed datasets
2 A user account can also be created by a Site Administrator
bull To do this login as a Site Administrator
bull Go to the site administration section of the application
47 Managing Users and account types 53
nada Documentation Release 40
bull Select Users ndash Add user from the top menu
bull Fill in the information for the user in the form and be sure to mark the account status as Active Then click theCreate button
54 Chapter 4 User manual
nada Documentation Release 40
47 Managing Users and account types 55
nada Documentation Release 40
bull Note that the user always starts off as a General User with no access permissions to the Site Administration Theuser group column displays as empty for users with only general user accounts
bull To see a list of all users in the system go to the Users ndash All Users menu item at the top of the screen
bull Note the new users created have no User group assigned (they are general users) Also note the Actions columnon the far right From these links an account can be edited (including changing the password and blocking anaccount) deleted and Permissions managed for the account
472 Managing User Account Permissions
User accounts permissions can be only be set and changed by a Site Administrator To change the permissions for anaccount
bull Click on the Permissions link next to the account to be changed All accounts start of as General users accounts
bull To change this user to a full site administrator who will have full system wide access to all parts and functionsof the NADA administration select the Site administrators (full access) option and tick the admin box as wellClick update to save the changes
56 Chapter 4 User manual
nada Documentation Release 40
473 Collection level administrators
bull To create a user who only has permissions to administer studies or administration functions for a particularcollection Select Site administrators (limited access)
47 Managing Users and account types 57
nada Documentation Release 40
bull It is then necessary to assign a role to this new limited administrator account To create a limited access ad-ministrator for a particular collection ndash select Site administrators (limited access) and then select Collectionadministrators Notice The form expands to reveal a list of collections in the system
bull Select the appropriate level of access that this account will have for this collection In the example below anadministrator is being created who can manage only licensed requests for the collection ndash Health Surveys Thisaccount will not be able to upload or publish studies The account will only be able to process licensed requestsfor the collection ndash Health Surveys
58 Chapter 4 User manual
nada Documentation Release 40
Other levels of access for Site administrators (limited access) ndash Collection administrators include
1 Accounts that are given full access to manage studies
2 Accounts that are given access to upload studies but not publish them
3 Accounts that are limited to reviewing studies
474 Global level Limited access accounts
Other types of limited access accounts include
1 Accounts that can only view system reports at a global level
2 Accounts that can only access the citations section and manage citations
3 Accounts that can only access the Licensed Request management system ndash at the global level for all collections
47 Managing Users and account types 59
nada Documentation Release 40
Impersonating a user
The system includes a function that allows a Site Administrator to impersonate (take on the role) a user created inthe system This is a useful testing tool when creating users and assigning permissions It essentially allows theadministrator to take on the role of another user temporarily
bull To access the Impersonate User feature go to the Users ndash Impersonat user menu at the top of the screen
bull A list of users to impersonate is shown
bull Select the user to impersonate and click on the impersonate button
bull The dashboard view for the impersonated user now shows
60 Chapter 4 User manual
nada Documentation Release 40
bull Note in the example above the account being impersonated is a Limited Account administrator with rights onlyto manage licensed requests for the Health Surveys Collection Note that all other dashboard menus are eitherhidden or clicking on any other function other than manage studies results in an access denied message
bull This is a good way to test if the roles assigned to a user account have the expected results
bull To exit the impersonate mode and return to the Site Administrator role ndash Click on the top right menu and selectExit impersonate mode
475 The Reviewer Limited access account
Sometimes it is desirable for catalog administrators to allow certain users to see a collection before it is published butwithout granting access to the site administration functions
This is useful for getting feedback on the correctness of information on collections or studies before publishing
To do this
bull First create an account for the user or get the user to create an account by using the register form on the loginscreen
bull Then edit the permissions for that user selecting Site Administrator (limited access) ndash Collection administrator
bull Then for the appropriate collection select Reviewer and click update to save the changes
47 Managing Users and account types 61
nada Documentation Release 40
bull The newly created reviewer account user can now view all studies in a collection even if the study or collectionis unpublished
48 Manage Site Pages and Menus
The NADA has a small content management component that allows for the creation of menu pages to appear on theuser interface
bull Examples of menus that might be useful for users of the site might be A page dealing with the disseminationpolicies of the organization or perhaps a page with contact information for the information
New menu items and pages can be created via the Menu- All pages menu link at the top of the Site Administrationpage
62 Chapter 4 User manual
nada Documentation Release 40
bull Select All pages from the menu
bull To add a new page click on the Add New Page button
bull Give the page a Title in the Title field
bull Clicking in the URL field will automatically suggest a name for the page in the URL
bull Enter the contents for the page in the Body section Plain text or HTML is accespted by this field
bull Then indicate if the page should be published or not in the Publish dropdown
bull The Weight field tells the NADA in what order this menu item should display Eg 0 would be first 1 secondand 2 third
bull Click on Update to save the changes
bull View the changes from the user interface In this Example a Contact Us page was created
bull It is also possible from the Menu Management screen to add a menu link that links to an existing page on anothersite (rather than creating a page itself)
bull To change the order in which the menu items display on the user interface use the Reorder Menu button on theMenu Management screen
48 Manage Site Pages and Menus 63
nada Documentation Release 40
49 The Site Settings Page
All settings for the application are controlled via the Settings menu at the top of the Site Administration page Thereare seven main settings sections See screenshot below
491 General Settings
1 Type the Title of the site here This will become the front page title of the NADA site In this case the Title isNADA
64 Chapter 4 User manual
nada Documentation Release 40
2 The footer text can be changed in this field This displays at the bottom of your site page
3 The initial page that loads when a user visits the NADA site can be set here In this case the catalog page is setto open by default
4 The name of the webmaster can be set here This is the name that will be used in system emails sent to users
5 Enter the webmaster email address here This should be the address that will be used in communication withusers Typically this is a general enquiries email set up by the organization and not a personal email address fora particular person Note to avoid mail systems rejecting mail as spam make sure to enter an address here thatis on the same domain as the server used in the email settings at setup
6 This field sets the location of the Cache folder The cache folder stores pre- generated pages of the site to allowfor faster browsing by the user By default it is set to cache This can be moved to another location if desiredbut must be writable The green tick indicates that the folder can be found and is set up correctly Enter eitherrelative or absolute paths to the folder location
7 Set the time that the Cache takes to expire By default it is set to 2 hours (in milli seconds)
8 If it is desired to turn off caching then select no here Sometimes it is useful to turn off caching when developingor updating a site so as to ensure that content changes become immediately visible on the front-end withouthaving to wait for the cache to expire and the new changes to show Turn this back on to speed up page loadingfor users
Click update to save all settings
Language
To change the language of the application expand the language section and choose the desired language Click updateto save and apply the setting
49 The Site Settings Page 65
nada Documentation Release 40
Enable or disable the HTML editor
A basic HTML editor is provided in the menu and page creating section of the application This setting allows this tobe turned on or off
Survey catalog settings
1 This is the folder where the files for the study are stored on the server This includes the DDI eternal resourcesand data files This folder can be moved to a location outside the web root as described in the installationinstructions in Chapter 1 Enter either relative or absolute paths to the folder location
2 This is the folder where DDIrsquos can be placed in order to use the bulk study import function in the NADA InNADA3 files had to be physically copied to this folder on the server but this is no longer necessary in NADA4 Files can now be directly uploaded to this folder from the Site Administration ndash Manage Studies page page
66 Chapter 4 User manual
nada Documentation Release 40
3 Select the vocabulary to use for the topic filter By default this is set to the CESSDA classification as recom-mended in the IHSN templates supplied at IHSNorg for the Nesstar Metadata Publisher
4 Enable or disable the Country filter on the user interface search page here If the catalog only contains studiesfor one country then turning this filter off is recommended
5 Enable or disable the Topic filter on the user interface search page here If no topics have been defined in theDDIrsquos being uploaded then it is recommended to turn this filter off (disable)
6 Enable or disable the Year filter on the user interface search page here
7 Enable or disable the Collection filter on the user interface search page here If no collections have been definedthen it is recommended to disable this filter
8 Enable or disable the Data access filter on the user interface search page here This filter is not needed if thereare very few studies in the catalog or if all studies hare set to the same access type
9 This section controls the order in which the filters appear on the search page Enter numbers here that rank theorder of the filters in the order they should be displayed
10 This setting determines how many studies are displayed by default to the user on the search page ndash catalog view
Site Login settings
1 To require that users login before being able to access the website set this option to Requires all users to loginto access the website
2 Determined how long a user will stay logged in After this time the user will be automatically logged out
3 Sets the minimum length for passwords created by the users at registration or for manual user creation
49 The Site Settings Page 67
nada Documentation Release 40
SMTP Settings
1 If the PHPweb server is configured to send email using PHPrsquos MAIL function select the first option and donrsquotfill in anything else
If your organization has a mail server and has have a dedicated account that can be setup for NADA use the followingsettings Check the radio button ldquoUse SMTP Serverrdquo
2 Enter the host name for the server
3 Enter the port used by the server to send mail
4 If required enter the user name used to send mail on the server
5 Enter the password used to send mail on the server
If the organization does not own a mail server a Gmail account can be configured to be used with NADA
bull Check the radio button ldquoUse SMTP Serverrdquo
bull Host name sslsmtpgooglemailcom or sslsmtpgmailcom
bull SMTP port 465
bull Account username email-addressgmailcom
bull Account password password for the gmail account
6 Test the email settings
The quickest way to test if the email settings are working is to use the ldquoforgot passwordrdquo option from the user loginpage If no mail is received when doing this test then go back and correct the mail settings Check with the ISP orserver administrator for the correct settings
Click on update to save all settings
68 Chapter 4 User manual
nada Documentation Release 40
492 Dashboard setting
Provides a means to automatically have content loaded into the dashboard via an RSS feed from a site The defaultsetting is set to receive updates and news from the IHSN website
49 The Site Settings Page 69
nada Documentation Release 40
70 Chapter 4 User manual
CHAPTER 5
Indices and tables
bull genindex
bull modindex
bull search
71
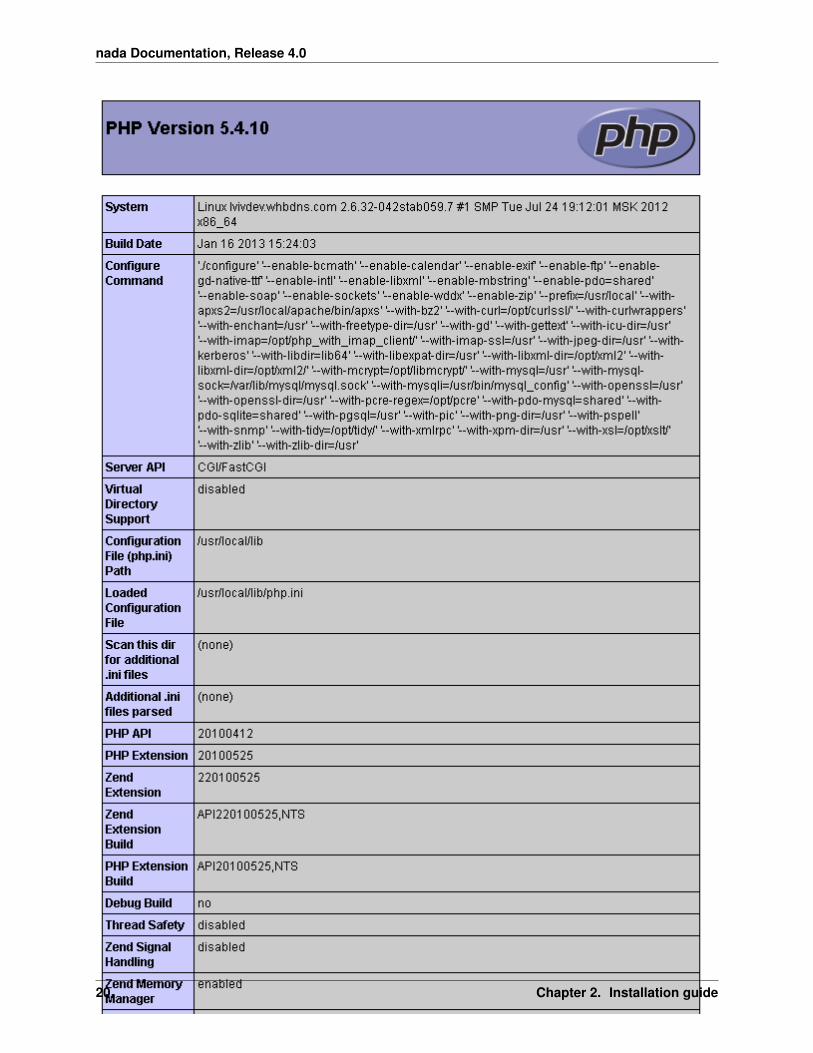
nada Documentation Release 40
extension=php_xsldll
To enable mbstring
extension=php_mbstringdll
25 Configure Captcha
By default NADA version 41 comes with image captcha and user does not need to make any changes to use imagecaptcha To use Google Captcha please follow the steps given below
1 Open applicationconfigcaptchaphp in editor
2 Change line number 12 as shown in below image
3 Click on above URL to generate Public and Private key URL httpwwwgooglecomrecaptchawhyrecaptcha
4 Click on sign up now
5 Sign in using your Gmail account
6 After signed in you will have to enter your URL (Domain URL)
22 Chapter 2 Installation guide
nada Documentation Release 40
7 Click on ldquoenable globel key for all domain
8 Click on Create Key button
9 Copy public key and private key from Google Captcha website and inserte it on line number 51 and 52 respec-tively as shown in below image
10 To check the Google catpcha configuration go to register page and look for image as shown in below URLhighlighted in Red suqare
25 Configure Captcha 23
nada Documentation Release 40
26 Email configurations
For the NADA to function correctly it is important that this step be completed
Many of the functions within the NADA ndash such as registration and applying for access to datasets require that theNADA be able to send emails to users
There are two ways to setup your email configurations 1) Create a emailphp file in the applicationconfig folder 2)Edit email settings on the site configurations page
24 Chapter 2 Installation guide
nada Documentation Release 40
261 1 Configure email via email config file
1 Open the file applicationconfigemailphp in notepad
2 Fill in the section using SMTP server with authentication enabled highlighted in below image
3 For Gmail user will have to fill the gmail smtp section shown as below
26 Email configurations 25
nada Documentation Release 40
4 Save file
Note Using a file for email configuration disable the email configuration page from the site administration
1 Login to your NADA as an administrator
2 Go to Site administration click on the Settings menu and choose ldquoSettingsrdquo
3 Find the section ldquoSMTP settingsrdquo
26 Chapter 2 Installation guide
nada Documentation Release 40
4 If the PHPweb server is configured to send email using PHPrsquos MAIL function select the first option and donrsquotfill in anything else
If your organization has a mail server and has have a dedicated account that can be setup for NADA use the followingsettings Check the radio button ldquoUse SMTP Serverrdquo
5 Enter the host name for the server
6 Enter the port used by the server to send mail
7 If required enter the user name used to send mail on the server
8 Enter the password used to send mail on the server
If the organization does not own a mail server a Gmail account can be configured to be used with NADA
bull Check the radio button ldquoUse SMTP Serverrdquo
bull Host name sslsmtpgooglemailcom or sslsmtpgmailcom
bull SMTP port 465
bull Account username email-addressgmailcom
bull Account password password for the gmail account
Test the email settings
The quickest way to test if the email settings are working is to use the ldquoforgot passwordrdquo option from the user loginpage
bull Click on forgot password
26 Email configurations 27
nada Documentation Release 40
bull Enter the administrator or any other accounts email address
bull Check to the email account the mail was sent to
bull If no mail is received the settings are wrong and need to be corrected
28 Chapter 2 Installation guide
CHAPTER 3
Upgrading from previous versions
31 Upgrade from NADA 3
For users with an existing NADA 3x catalog an upgrade script is included that will update your NADA 3x databaseto NADA 4x The process involves modifying your NADA 3x database and thus carries some risks The script willadd new tables to the NADA 3x database All user accounts and survey information will be retained by the upgrade
Important Backup the NADA 3x database before doing anything
1 Follow the instructions on page 4 and set up a folder in the web root containing the NADA 4 files
2 Edit the databasephp file as instructed in the section above NADA database configurations for MySQL
3 Instead of entering a new database name user account name and password -fill in the details of the existingNADA 3x database
Note These can be found by looking at the existing NADA 3x databasephp file and entering the settings into theNADA 4 databasephp file
4 Save the file
5 Navigate to the URL for the NADA4 site Example httpyour-nada-sitenada4indexphpnada4_upgrade
6 The following page loads
29
nada Documentation Release 40
Take note of the warnings and make any necessary corrections before clicking the ldquoUpgrade database to NADA 4rdquobutton
Warning This step makes changes to your nada 3 database that are not undo-able so make sure you do make adatabase backup before this step
Click on the ldquoUpgrade database to NADA 4rdquo button and wait for the page to reload The output of the page will looksomething like below
The script will print number of messages about failed table updates This does not mean the script failed to upgradeIt just means some of the updates were not needed on your version of NADA 3 Different versions of NADA havedifferent numbers of fields in the database and the upgrade script tries to fix the missing fields for all these differentversions of NADA If the existing NADA 3 database already has that field then it reports it as an error
You can ignore the error messages that include the wording ldquoDuplicate column namerdquo or ldquoDuplicate entryrdquo
Now your database has been migrated to NADA version 41 We will have to run one more upgrade script to forNADA version 42
7 Navigate to the URL for the NADA42 site Example httpyour-nada-sitenada42indexphpnada42_upgrade
Warning This step makes changes to your nada 41 database that are not undo-able This page will not show anymessage on the screen You will be getting blank page Please do not repeat the process
8 To verify the database upgrade Open the NADA catalog page by going to http[your-nada4-site]indexphpcatalogpage and verify all studies from NADA 3 are listed
311 Linking your NADA 3 data files to NADA 4
The upgrade script has only upgraded the database It is now necessary to tell the NADA4 where to locate the datafilesthat were uploaded to the original NADA 3 site
There are two options available
Option 1 Copy the datafiles folder from NADA 3 to NADA 4 This works best if you have only a few studies and thedatafiles folder size is small enoughto be moved easily from one location to another
Option 2 If it is not possible to easily move the datafiles folder from NADA 3 to NADA 4 you can tell NADA 4 thelocation of the datafiles without moving the files Here are the steps
bull Use your NADA 3 administrator login credentials to login to your new NADA 4 site
bull Click on Site administration in the top right corner of the screen
bull Go to the ldquoSettingsrdquo menu and click on the ldquoSettingsrdquo sub-menu
30 Chapter 3 Upgrading from previous versions
nada Documentation Release 40
bull Under Site configurations expand the ldquoSurvey Catalog Settingsrdquo section
bull For the setting ldquoCatalog folderrdquo enter the relative or full path to where the NADA 3 datafiles folder is locatedFor example if the nada3 datafiles are located on cnada3datafiles enter that path here
bull Save the configurations by clicking on the update button If now errors are shown then you have successfullyupdated the folder path
bull Check your new NADA 4 site to make sure the migration was successful
ndash Check the user administration page from site administration to make sure the users from the nada3 sitewere migrated
ndash Check the ldquoData Catalogrdquo page and view the studies by clicking on the study title to make sure the studyinformation pages are correct
ndash Check the site menus are the same as the NADA 3 site
312 Refresh DDI
In NADA 4 more information is stored in the database from the DDI than in the NADA 3 To bring all these newfields into the imported studies it is necessary to refresh the DDIrsquos The refresh DDI feature in NADA updates thedatabase with metadata from the DDI without having re-uploading the DDIs To update the metadata for all studies inyour catalog
bull Open the following NADA 4 URL in your browser
http[your-nada-4-site]indexphpadmincatalogbatch_refresh
bull Select all studies
bull Click on the ldquoRefresh DDIrdquo button
313 Transferring ownership
NADA 4 has a collection management feature When studies are imported from the NADA3 catalog into NADA4 theyare put into a collection called DEFAULT They need to be moved from this default system collection to the Central
31 Upgrade from NADA 3 31
nada Documentation Release 40
Data Catalog of the NADA4
To do this
bull Go login to the Site Administration and navigate to the Studies Manage Studies Central Data Catalog page
bull Select all the studies by ticking the check boxes next to each study on the right
bull Click on the dropdown menu and select Transfer owner
bull From the Transfer study owner page Select Central Data Catalog and then click transfer
32 Chapter 3 Upgrading from previous versions
nada Documentation Release 40
314 Updating the Site themetemplate
You cannot use your NADA3 template in NADA4 without making some changes Here are general guidelines butsteps may differ depending on your nada site template
bull Copy your NADA3 template to the NADA4 themes folder
bull Edit the [nada4-root]configtemplatephp following the steps below
bull Look for the setting ldquotheme_namerdquo by default it is set to rdquowbrdquo
bull Change ldquowbrdquo to the theme name you want to use Theme name is the folder name you copied to[NADA4]themes[your-site-theme] from your nada3 site
bull Save the file
NB The template may need some adjusting to run properly on the new NADA 4 site This will involve editingthe layoutphp and other template files within the template folder which is now located in the NADA 4 themesfolder
32 Migrate MySQL to Microsoft SQL
TODO
32 Migrate MySQL to Microsoft SQL 33
nada Documentation Release 40
34 Chapter 3 Upgrading from previous versions
CHAPTER 4
User manual
41 Overview and core concepts
411 About NADA
NADA is a web-based cataloging application that allows for the creation of portals that allows users to browse searchcompare apply for access and download relevant census or survey information
It was originally developed to support the establishment of national survey data archives The application is used by adiverse and growing number of national regional and international organizations NADA as with other IHSN toolsuses the Data Documentation Initiative (DDI) XML-based international metadata standard
412 Concepts
CENTRAL DATA CATALOG
The default catalog created when a NADA instance is installed is the Central Data Catalog All studies uploaded to theNADA are visible searchable and accessible from the Central Data Catalog For many institutions the Central DataCatalog will remain the only catalog in their NADA instance For some institutions being able to divide the contentsof the Central Data Catalog into more refined collections will be desirable
COLLECTIONS
Collections are sub categories of the Central Data Catalog They allow administrators of a NADA instance to groupstudies into what can be thought of as sub-catalogs of the Central Data Catalog This has a number of benefitsboth from the user and the administrator perspective From the usersrsquo perspective being able to filter and viewgroups (collections) of studies that logically belong together makes finding what they are looking for easier From theadministratorsrsquo perspective the ability to create collections of studies that may logically belong together facilitates theability to decentralize the management of each collection of studies to specific administrators (for example collectionscan be managed by different departments in an institution)
NOTE The creation of collections will in general only be useful and necessary for large catalogs or for catalogs thatdesire more decentralized management of groups of studies by different departments
STUDIES
Studies are carried out to gather more knowledge about a subject Studies may gather information from a number ofdifferent sources in order to answer the questions asked The information gathered for a study will in the context of
35
nada Documentation Release 40
NADA catalogs usually come from either a census or a surveys It is therefore not uncommon to hear the terms surveyand study used interchangeably when listening to people talk about their NADA catalog
METADATA
Metadata are data about the data They are not the actual data collected from the survey but rather the information thatdescribes the survey process and the data The NADA uses the Data Documentation Initiative (DDI) ndash ddiallianceorgndash standard for the presentation of metadata for each study The DDI document (which is an XML document) isprepared outside the NADA application either manually or using a tool like the Nesstar Publisher ndash nesstarcom ndash andthen imported into the NADA The detailed information about the survey is searchable down to the variable level foreach survey in the catalog
DATA ACCESS TYPES
The NADA allows for the level of access to datasets for studies to be controlled at the study level In other words thelevel of restriction can differ from study to study and can be defined on a scale ranging from direct access with norestrictions to no access Briefly the available access types are
bull Data not available - data are not available for this study
bull Direct Access Data Files - data shared under this policy can be downloaded without any restrictions The useris not required to be logged into the site and no personal information is collected on the person downloading thedata
bull Public Use Data Files - data shared under this policy requires that the user be logged in and registered on thesite before they are able to download the data The user is required to agree to a terms of use of the data and theapplication keeps records of who downloads the data
bull Licensed Data Files - data shared under this policy requires that the user be logged in and registered on the siteUsers are also required to fill in and submit a detailed application form listing their reasons for wanting accessto the data Once the user submits the application form the system informs the system administrator that anapplication has been made In order for the person to get access to the data the system administrator needs toreview the application and approve it
bull Data available in an Enclave - under this policy no data is shared through the application Users submit anapplication to access the data at a secure facility physically located on the premises of the data producer or afacility nominated by the data producer
bull Data available from external repository ndash The NADA allows for studies and their metadata to be listed in aNADA catalog but for a link to be created to another site when the data for that study are available elsewhere
CITATIONS
Citations are references that can be included at the study level which point to published works that have used the datafrom a particular study In many cases this will be a reference to a Journal Article Working paper Newspaper articleetc Such resources are useful to researchers who are interested in seeing how the data have been used before Theyare also a good way of showing the funders of surveys that the data are being used for policy and research purposesand thus are an indicator of some of the impact a study has had
USERS
Users in the NADA can be defined according to three broad groups General Users ndash this is the normal user whoregisters on a NADA site from the user interface This user type has no access to the site administration It is requiredto register as a user when accessing public use and licensed data types Site Administrators (unlimited) ndash this user
36 Chapter 4 User manual
nada Documentation Release 40
has access to all functions and all collections within the Site Administration System wide access Limited Adminis-trators ndash these administrators have access to a limited set of functions within the Site Administration Examples wouldbe an administrator of a specific collections or licensed survey reviewer for all or only some collections or reportgenerator etc
413 Why do NADA administrators need to understand these concepts
Understanding these concepts is important as it
bull Is critical to understanding the new permissions and administrator types introduced in NADA 4 Administratorsare now able to create collections within their NADArsquos and assign different roles to administrators and moregranular levels of access to catalog administration at the collection level It is now possible for example to haveadministrators whorsquos lsquopowersrsquo range from being able to manage all parts of a collectionrsquos administration downto ones with more restrictive access such as ones whose only function is as licensed survey reviewer or reportgenerator or catalog reviewer or citation manager etc
bull Ensures that the correct level of permissions and access is assigned to users based on security policies within theinstitution Unlike previous versions of NADA not all users who have access to the Site Administration needhave the level of access of an ldquounlimited site administratorrdquo This limits security risks associated with havingtoo many ldquounlimited site administratorsrdquo managing a site
bull Assists in assigning an appropriate data access type to data based on institutional distribution polices
bull Makes it easier to explain more clearly to institutional managers what the capabilities of the NADA applicationare and to advise on how to best manage the allocation of responsibilities
42 The Dashboard
After logging in to the Site Administration with administrator credentials the user is taken to the dashboard
The Dashboard provides a quick glance summary for administrators to get an overall picture of what has been happen-ing on the site as well as what pending tasks are outstanding for the administrator
42 The Dashboard 37
nada Documentation Release 40
1 Menu link to the Dashboard
2 Menu link to the Study Management pages submenus include Manage Studies Licensed requests and ManageCollections
3 Menu link to the citations management pages
4 Menu link to the User management pages submenus include All users Add user and Impersonate User
5 Menu link to create menu pages for the site frontend
6 Menu link to generate usage reports
7 Menu Link to the settings pages submenus include Settings Coutries Regions and Vocabularies
8 Useful navigation links submenus include Change Password Log out Catalog Home Data catalog Citations
9 This section lists all collections in the catalog Within each collection a summary is given of the number ofstudies along with diagnostics related to the number of studies publishedunpublished missing questionnairesdata access types set but with no data attached as well as some buttin links to Manage the collections studiesusers and a History of changes made to the collection
10 Provides a summary of users registrations and number of users currently logged in
11 Show how many pages are being cached on the site with a link to clear the cache if need be
12 Show a list of recently added or updated studies Clicking on a study in the list takes you to the page to managethat study
38 Chapter 4 User manual
nada Documentation Release 40
43 Manage Collections
431 Collections
Collections are sub categories of the Central Data Catalog They allow administrators of a NADA instance to groupstudies into what can be thought of as sub-catalogs of the Central Data Catalog
Collections provide a number of benefits both from the user and the administrator perspective From the usersrsquo per-spective being able to filter and view groups (collections) of studies that logically belong together makes finding whatthey are looking for easier From the administratorsrsquo perspective the ability to create collections of studies that maylogically belong together facilitates the ability to decentralize the management of each collection of studies to specificadministrators (for example collections can be managed by different departments in an institution)
Note The creation of collections will in general only be useful and necessary for large catalogs or for catalogs thatdesire more decentralized management of groups of studies by different departments
432 Creating collections
bull Login to the Site administration using an administrator password
bull Collections are managed and created by going to the Studies Manage collections menu link
bull There are no collections defined in the default NADA 4 installation
bull To create a new collection click on the Create new collection button
43 Manage Collections 39
nada Documentation Release 40
1 Under Collection Identification provide a short name for the collection This will become the URL for thecollection so pick carefully For Title fill in the fill title for the collection This will be the name displayed atthe top of the collection page
B Fill in a 3 or four line short description of the collection This text will display on the front end in the collectionslist For examples see httpmicrodataworldbankorgindexphpcontributing-catalogs
C Fill in a more detailed description of the collection This will display on the About page for that collection Forexample see httpmicrodataworldbankorgindexphpcatalogdhsabout
To format the page and include images it is possible to enter HTML code into this box below is anexample piece of code that includes an image
ltimg src=rdquofilesdhs-fp-01jpgrdquo alt=rdquoHealth Surveys Imagerdquo class=rdquoabout-photordquogt lth2gt Health SurveysCollectionlth2gt ltp align=rdquojustifyrdquogtThe Health Surveys collection aims to provide frequent high qual-ity and timely health data needed by the decision makers when designing public health programsltpgtltpgtHealth surveys provide useful information on health status and health consumption and their determi-nantsltpgt
Copy any images to be displayed into the NADA ldquofilesrdquo folder on your server image imagesthumbnil-imagepng
4 Upload a file to display next to the collection as it is listed on the collection page NOTE This image should be82 X 82 pixels If the upload does not work automatically then copy the thumbnail image to the ldquofilesrdquo folder asshown above
40 Chapter 4 User manual
nada Documentation Release 40
E The Weight field determines in what order collections are shown in the collection list 0123 etc The Selectcollection type drop-down is a system value to distinguish between collections that should be viewed as internal tothe organization or external For example some collections may be made up entirely of studies from an organizationoutside the host catalog These collections can be designated as external The Section dropdown allows for thecategorization as either a collection based on a specialized collection (like health) or based on a regional breakdownSelecting Publish ndash publishes the collection
bull Click on Submit to save the changes
To view the results click on the Preview link on the far right
bull The new collection now also shows in the collection list on the Central Catalog About page (this is where thethumbnail and short description fields are displayed)
43 Manage Collections 41
nada Documentation Release 40
bull Visiting the Dashboard will now also show the new collection listed below the Central Data Catalog With anumber of green buttons as shortcut links to manage the studies on the collection assign administrators for thecollection a history of activity on the collection and a link to edit the collection as in the steps above
433 Manually adding studies to a collection
There are 2 ways to get studies into the new catalog
bull The first is to upload a DDI and all its resources to the collection in the same way as described in the earliersection ndash Uploading a Study Except instead of choosing Central Catalog chose the collection you want to
42 Chapter 4 User manual
nada Documentation Release 40
upload the study to
bull Click on the Add Study button and upload a DDI and RDF and all your resources as described in the earliersection ndash Uploading a Study
bull Once a study is added in this way it displays in the Manage Studies list Notice that the collection summaryfield shows that the study belongs to (is Owned By) the DHS collection (this was the Short name defined in theexample when the Health Surveys Collection was created)
All studies uploaded to collections will automatically be added to the Central Data Catalog in order to build a commonsearch portal for all studies
43 Manage Collections 43
nada Documentation Release 40
434 Copying studies from one collection to another
bull The second way to add a study to a collection is to Copy the study from another collection into the newcollection
bull To copy a study already in the catalog to display in the new collection first make sure to be in the Manage Studiessection for the collection you want to put studies into To do this either use the Studies ndash Manage studies menuon the top or simply click on the Switch link next to the Manage Studies [Collection Title] heading
bull Then Click on the Copy Studies blue button at the top right
bull A list of all studies available to copy to the new collection is listed Simply click on the Link button in green tocopy the study to the collection The button will turn red and say Unlink To reverse the process and click thenow red button
bull Going back to the Manage Studies page for the collection will show the newly copied studies in the collectionlist Also note that the Collection field now indicated DHS next to Central DHS is in grey to indicate it is notowned (it is a copy) by that collection and the Central is in blue to show it is owned by the Central Data CatalogAlso note that because the study is not owned by this catalog it cannot be edited from this catalog ndash hence thepublishunpublish green button is absent for the copied studies
44 Chapter 4 User manual
nada Documentation Release 40
435 Turning on the collection filter
The final step after creating the first collection is to enable the collection filter option in the Settings menus under SiteConfigurations ndash Survey catalog settings
436 Transferring study ownership
In the previous examples mention was made of studies uploaded to a catalog being owned by that catalog There maybe cases where transferring the ownership from one catalog to another will be desirable This will become clearerin the next section on user roles but for now the next steps show how transferring ownership from one collection toanother can be done
bull Transferring ownership from one collection to another has to be done by the owner of the collection and fromthe collection it is currently owned by
bull To transfer ownership Go to the Manage Studies screen and select the study to be transferred Open up the EditStudy page by clicking on the study Title
bull On the right hand side of the screen click on the Transfer study owner link
43 Manage Collections 45
nada Documentation Release 40
bull Select the collection to transfer from the dropdown box
bull Click Transfer
bull Note that when looking the study summary for the transferred study the Collection field now shows the studyto belong (owned by) to the DHS collection and not Central anymore Also note the option to Publish andunpublish is now active
bull To transfer ownership of a large number of studies all at once - from the Manage Studies page ndash select the studiesto be transferred (tick them in the box left of each study) and then from the top Batch Actions drop down selectTransfer owner ndash then apply
46 Chapter 4 User manual
nada Documentation Release 40
44 Manage Studies
There are 2 Options to get studies into the new catalog
441 Option 1
bull The first is to upload a DDI and all its resources to the collection in the same way as described in the earliersection ndash Uploading a Study Except instead of choosing Central Catalog chose the collection you want toupload the study to
bull Click on the Add Study button and upload a DDI and RDF and all your resources as described in the earliersection ndash Uploading a Study
bull Once a study is added in this way it displays in the Manage Studies list Notice that the collection summaryfield shows that the study belongs to (is Owned By) the DHS collection (this was the Short name defined in theexample when the Health Surveys Collection was created)
bull Also note that the new study also appears in the Central Data Catalog
All studies uploaded to collections will automatically be added to the Central Data Catalog in order to build a commonsearch portal for all studies
44 Manage Studies 47
nada Documentation Release 40
442 Option2
Copying studies from one collection to another
bull The second way to add a study to a collection is to Copy the study from another collection into the new collection
bull To copy a study already in the catalog to display in the new collection first make sure to be in the Manage Studiessection for the collection you want to put studies into To do this either use the Studies ndash Manage studies menuon the top or simply click on the Switch link next to the Manage Studies [Collection Title] heading
bull Then Click on the Copy Studies blue button at the top right
bull A list of all studies available to copy to the new collection is listed Simply click on the Link button in green tocopy the study to the collection The button will turn red and say Unlink To reverse the process and click thenow red button
bull Going back to the Manage Studies page for the collection will show the newly copied studies in the collectionlist Also note that the Collection field now indicated DHS next to Central DHS is in grey to indicate it is notowned (it is a copy) by that collection and the Central is in blue to show it is owned by the Central Data CatalogAlso note that because the study is not owned by this catalog it cannot be edited from this catalog ndash hence thepublishunpublish green button is absent for the copied studies
45 Managing Licensed Requests
Datasets that are assigned the Access Type Licensed require approval from the NADA administrator before the usercan get access to the data files From the site administration there are a number of ways to see if any licensed requestshave been received
bull Go to the dashboard Pending requests show up as red in the catalog quicj summary section Clicking on thislink goes to the Licensed Survey Requests management page
bull Or go to the Studies link on the top menu and select Licensed Requests from the submenu
48 Chapter 4 User manual
nada Documentation Release 40
The link shows a page with a list Licensed Requests received The status column indicated the Pending requests
bull Click on the Edit link for to process a request
The Request information tab shows a summary of the information provided by the applicant
bull To Approve or Deny or request further information for the request Click on the Process tab
45 Managing Licensed Requests 49
nada Documentation Release 40
bull Select Approve to approve the request (other options include Deny as well as Request more information fromthe applicant)
bull Select the files that the user will be authorized to download ndash it is also possible to enter a maximum number ofdownloads and expiry date for downloads
bull Enter any comments to be sent to the applicant
bull Select Notify user by email to notify them that the application has been processed
bull Select Update
bull The remaining tabs
ndash Communicate - provides a means to ask for more information from the applicant
ndash Monitor ndash allows the administrator to see when and how many times the applicant downloaded thedata
ndash Forward Request ndash provides a means to forward the request to another person for review
46 Manage Citations
The Citations section is where bibliographic references can be added for publications that use any of the studies in thecatalog These citations can be linked to particular studies in the catalog and are displayed to the users of the systemin the study information view of the relevant study
Citations are added from the Citations menu
50 Chapter 4 User manual
nada Documentation Release 40
bull To add a citation - click on All citations then click on the Add New Citation button at the top right
bull Compete the form including the indication as to whether the citation should be published or not
bull Then expand the Related studies link to tell the system which studies the citation ldquobelongsrdquo to
bull Click on the Attach studies link This reveals a list of all studies in the catalog
bull Select the relevant studies by clicking on the green Select button
bull Click on the apply filter button to save the changes The study now appears in the related studies box
bull Click on the submit button to save the citation
bull Note the flag keywords and notes fields can be used by administrators to place extra notes only visible to otheradministrators that might prove useful when there is uncertainty about a citations appropriateness or accuracy
bull It is also possible to import citations in common citation formats such as BibTex and EndNote (RIS)
bull To do this use the Import Citations link from the top menu
46 Manage Citations 51
nada Documentation Release 40
bull Paste the BibTex or RIS text into the form and then at the bottom of the screen click on Attach studies to linkthe citation to a particular study in the catalog
bull The citation now appears in the citation list as well as on the study information page for the relevant studies
52 Chapter 4 User manual
nada Documentation Release 40
47 Managing Users and account types
Users in the NADA can be defined according to three broad groups
General Usersndash this is the normal user who registers on a NADA site from the user interface This user type hasno access to the site administration It is required to register as a user before being granted access to public use andlicensed data types
Site Administrators (unlimited) ndash this user has access to all functions and all collections within the Site Administra-tion System wide access
Limited Administrators ndash these administrators have access to a limited set of functions within the Site Administra-tion Examples would be an administrator of a specific collections or licensed survey reviewer for all or only somecollections or report generator or citation manager etc
471 Creating User accounts
User accounts can be created in two ways
1 A General User account can be created by a user directly from the register screen from the login link on the userinterface of the application
The user created by this process has no access to the site administration This account can only be used to apply andgain access to public and licensed datasets
2 A user account can also be created by a Site Administrator
bull To do this login as a Site Administrator
bull Go to the site administration section of the application
47 Managing Users and account types 53
nada Documentation Release 40
bull Select Users ndash Add user from the top menu
bull Fill in the information for the user in the form and be sure to mark the account status as Active Then click theCreate button
54 Chapter 4 User manual
nada Documentation Release 40
47 Managing Users and account types 55
nada Documentation Release 40
bull Note that the user always starts off as a General User with no access permissions to the Site Administration Theuser group column displays as empty for users with only general user accounts
bull To see a list of all users in the system go to the Users ndash All Users menu item at the top of the screen
bull Note the new users created have no User group assigned (they are general users) Also note the Actions columnon the far right From these links an account can be edited (including changing the password and blocking anaccount) deleted and Permissions managed for the account
472 Managing User Account Permissions
User accounts permissions can be only be set and changed by a Site Administrator To change the permissions for anaccount
bull Click on the Permissions link next to the account to be changed All accounts start of as General users accounts
bull To change this user to a full site administrator who will have full system wide access to all parts and functionsof the NADA administration select the Site administrators (full access) option and tick the admin box as wellClick update to save the changes
56 Chapter 4 User manual
nada Documentation Release 40
473 Collection level administrators
bull To create a user who only has permissions to administer studies or administration functions for a particularcollection Select Site administrators (limited access)
47 Managing Users and account types 57
nada Documentation Release 40
bull It is then necessary to assign a role to this new limited administrator account To create a limited access ad-ministrator for a particular collection ndash select Site administrators (limited access) and then select Collectionadministrators Notice The form expands to reveal a list of collections in the system
bull Select the appropriate level of access that this account will have for this collection In the example below anadministrator is being created who can manage only licensed requests for the collection ndash Health Surveys Thisaccount will not be able to upload or publish studies The account will only be able to process licensed requestsfor the collection ndash Health Surveys
58 Chapter 4 User manual
nada Documentation Release 40
Other levels of access for Site administrators (limited access) ndash Collection administrators include
1 Accounts that are given full access to manage studies
2 Accounts that are given access to upload studies but not publish them
3 Accounts that are limited to reviewing studies
474 Global level Limited access accounts
Other types of limited access accounts include
1 Accounts that can only view system reports at a global level
2 Accounts that can only access the citations section and manage citations
3 Accounts that can only access the Licensed Request management system ndash at the global level for all collections
47 Managing Users and account types 59
nada Documentation Release 40
Impersonating a user
The system includes a function that allows a Site Administrator to impersonate (take on the role) a user created inthe system This is a useful testing tool when creating users and assigning permissions It essentially allows theadministrator to take on the role of another user temporarily
bull To access the Impersonate User feature go to the Users ndash Impersonat user menu at the top of the screen
bull A list of users to impersonate is shown
bull Select the user to impersonate and click on the impersonate button
bull The dashboard view for the impersonated user now shows
60 Chapter 4 User manual
nada Documentation Release 40
bull Note in the example above the account being impersonated is a Limited Account administrator with rights onlyto manage licensed requests for the Health Surveys Collection Note that all other dashboard menus are eitherhidden or clicking on any other function other than manage studies results in an access denied message
bull This is a good way to test if the roles assigned to a user account have the expected results
bull To exit the impersonate mode and return to the Site Administrator role ndash Click on the top right menu and selectExit impersonate mode
475 The Reviewer Limited access account
Sometimes it is desirable for catalog administrators to allow certain users to see a collection before it is published butwithout granting access to the site administration functions
This is useful for getting feedback on the correctness of information on collections or studies before publishing
To do this
bull First create an account for the user or get the user to create an account by using the register form on the loginscreen
bull Then edit the permissions for that user selecting Site Administrator (limited access) ndash Collection administrator
bull Then for the appropriate collection select Reviewer and click update to save the changes
47 Managing Users and account types 61
nada Documentation Release 40
bull The newly created reviewer account user can now view all studies in a collection even if the study or collectionis unpublished
48 Manage Site Pages and Menus
The NADA has a small content management component that allows for the creation of menu pages to appear on theuser interface
bull Examples of menus that might be useful for users of the site might be A page dealing with the disseminationpolicies of the organization or perhaps a page with contact information for the information
New menu items and pages can be created via the Menu- All pages menu link at the top of the Site Administrationpage
62 Chapter 4 User manual
nada Documentation Release 40
bull Select All pages from the menu
bull To add a new page click on the Add New Page button
bull Give the page a Title in the Title field
bull Clicking in the URL field will automatically suggest a name for the page in the URL
bull Enter the contents for the page in the Body section Plain text or HTML is accespted by this field
bull Then indicate if the page should be published or not in the Publish dropdown
bull The Weight field tells the NADA in what order this menu item should display Eg 0 would be first 1 secondand 2 third
bull Click on Update to save the changes
bull View the changes from the user interface In this Example a Contact Us page was created
bull It is also possible from the Menu Management screen to add a menu link that links to an existing page on anothersite (rather than creating a page itself)
bull To change the order in which the menu items display on the user interface use the Reorder Menu button on theMenu Management screen
48 Manage Site Pages and Menus 63
nada Documentation Release 40
49 The Site Settings Page
All settings for the application are controlled via the Settings menu at the top of the Site Administration page Thereare seven main settings sections See screenshot below
491 General Settings
1 Type the Title of the site here This will become the front page title of the NADA site In this case the Title isNADA
64 Chapter 4 User manual
nada Documentation Release 40
2 The footer text can be changed in this field This displays at the bottom of your site page
3 The initial page that loads when a user visits the NADA site can be set here In this case the catalog page is setto open by default
4 The name of the webmaster can be set here This is the name that will be used in system emails sent to users
5 Enter the webmaster email address here This should be the address that will be used in communication withusers Typically this is a general enquiries email set up by the organization and not a personal email address fora particular person Note to avoid mail systems rejecting mail as spam make sure to enter an address here thatis on the same domain as the server used in the email settings at setup
6 This field sets the location of the Cache folder The cache folder stores pre- generated pages of the site to allowfor faster browsing by the user By default it is set to cache This can be moved to another location if desiredbut must be writable The green tick indicates that the folder can be found and is set up correctly Enter eitherrelative or absolute paths to the folder location
7 Set the time that the Cache takes to expire By default it is set to 2 hours (in milli seconds)
8 If it is desired to turn off caching then select no here Sometimes it is useful to turn off caching when developingor updating a site so as to ensure that content changes become immediately visible on the front-end withouthaving to wait for the cache to expire and the new changes to show Turn this back on to speed up page loadingfor users
Click update to save all settings
Language
To change the language of the application expand the language section and choose the desired language Click updateto save and apply the setting
49 The Site Settings Page 65
nada Documentation Release 40
Enable or disable the HTML editor
A basic HTML editor is provided in the menu and page creating section of the application This setting allows this tobe turned on or off
Survey catalog settings
1 This is the folder where the files for the study are stored on the server This includes the DDI eternal resourcesand data files This folder can be moved to a location outside the web root as described in the installationinstructions in Chapter 1 Enter either relative or absolute paths to the folder location
2 This is the folder where DDIrsquos can be placed in order to use the bulk study import function in the NADA InNADA3 files had to be physically copied to this folder on the server but this is no longer necessary in NADA4 Files can now be directly uploaded to this folder from the Site Administration ndash Manage Studies page page
66 Chapter 4 User manual
nada Documentation Release 40
3 Select the vocabulary to use for the topic filter By default this is set to the CESSDA classification as recom-mended in the IHSN templates supplied at IHSNorg for the Nesstar Metadata Publisher
4 Enable or disable the Country filter on the user interface search page here If the catalog only contains studiesfor one country then turning this filter off is recommended
5 Enable or disable the Topic filter on the user interface search page here If no topics have been defined in theDDIrsquos being uploaded then it is recommended to turn this filter off (disable)
6 Enable or disable the Year filter on the user interface search page here
7 Enable or disable the Collection filter on the user interface search page here If no collections have been definedthen it is recommended to disable this filter
8 Enable or disable the Data access filter on the user interface search page here This filter is not needed if thereare very few studies in the catalog or if all studies hare set to the same access type
9 This section controls the order in which the filters appear on the search page Enter numbers here that rank theorder of the filters in the order they should be displayed
10 This setting determines how many studies are displayed by default to the user on the search page ndash catalog view
Site Login settings
1 To require that users login before being able to access the website set this option to Requires all users to loginto access the website
2 Determined how long a user will stay logged in After this time the user will be automatically logged out
3 Sets the minimum length for passwords created by the users at registration or for manual user creation
49 The Site Settings Page 67
nada Documentation Release 40
SMTP Settings
1 If the PHPweb server is configured to send email using PHPrsquos MAIL function select the first option and donrsquotfill in anything else
If your organization has a mail server and has have a dedicated account that can be setup for NADA use the followingsettings Check the radio button ldquoUse SMTP Serverrdquo
2 Enter the host name for the server
3 Enter the port used by the server to send mail
4 If required enter the user name used to send mail on the server
5 Enter the password used to send mail on the server
If the organization does not own a mail server a Gmail account can be configured to be used with NADA
bull Check the radio button ldquoUse SMTP Serverrdquo
bull Host name sslsmtpgooglemailcom or sslsmtpgmailcom
bull SMTP port 465
bull Account username email-addressgmailcom
bull Account password password for the gmail account
6 Test the email settings
The quickest way to test if the email settings are working is to use the ldquoforgot passwordrdquo option from the user loginpage If no mail is received when doing this test then go back and correct the mail settings Check with the ISP orserver administrator for the correct settings
Click on update to save all settings
68 Chapter 4 User manual
nada Documentation Release 40
492 Dashboard setting
Provides a means to automatically have content loaded into the dashboard via an RSS feed from a site The defaultsetting is set to receive updates and news from the IHSN website
49 The Site Settings Page 69
nada Documentation Release 40
70 Chapter 4 User manual
CHAPTER 5
Indices and tables
bull genindex
bull modindex
bull search
71
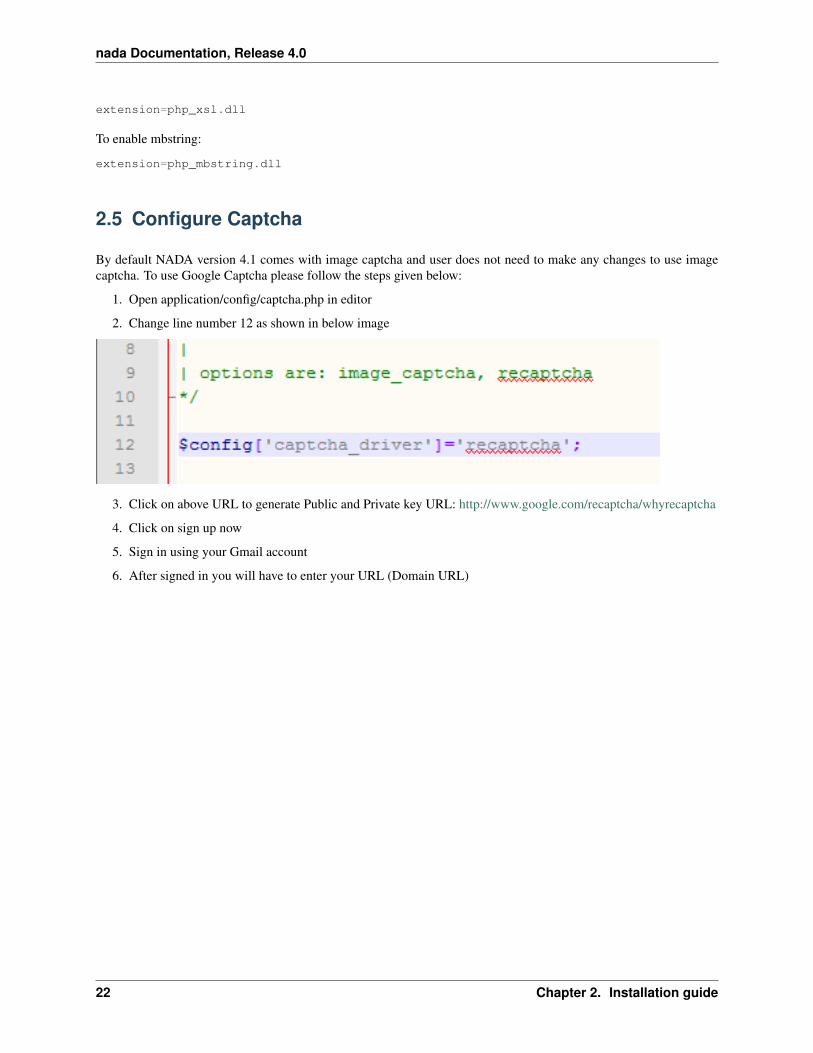
nada Documentation Release 40
26 Email configurations
For the NADA to function correctly it is important that this step be completed
Many of the functions within the NADA ndash such as registration and applying for access to datasets require that theNADA be able to send emails to users
There are two ways to setup your email configurations 1) Create a emailphp file in the applicationconfig folder 2)Edit email settings on the site configurations page
24 Chapter 2 Installation guide
nada Documentation Release 40
261 1 Configure email via email config file
1 Open the file applicationconfigemailphp in notepad
2 Fill in the section using SMTP server with authentication enabled highlighted in below image
3 For Gmail user will have to fill the gmail smtp section shown as below
26 Email configurations 25
nada Documentation Release 40
4 Save file
Note Using a file for email configuration disable the email configuration page from the site administration
1 Login to your NADA as an administrator
2 Go to Site administration click on the Settings menu and choose ldquoSettingsrdquo
3 Find the section ldquoSMTP settingsrdquo
26 Chapter 2 Installation guide
nada Documentation Release 40
4 If the PHPweb server is configured to send email using PHPrsquos MAIL function select the first option and donrsquotfill in anything else
If your organization has a mail server and has have a dedicated account that can be setup for NADA use the followingsettings Check the radio button ldquoUse SMTP Serverrdquo
5 Enter the host name for the server
6 Enter the port used by the server to send mail
7 If required enter the user name used to send mail on the server
8 Enter the password used to send mail on the server
If the organization does not own a mail server a Gmail account can be configured to be used with NADA
bull Check the radio button ldquoUse SMTP Serverrdquo
bull Host name sslsmtpgooglemailcom or sslsmtpgmailcom
bull SMTP port 465
bull Account username email-addressgmailcom
bull Account password password for the gmail account
Test the email settings
The quickest way to test if the email settings are working is to use the ldquoforgot passwordrdquo option from the user loginpage
bull Click on forgot password
26 Email configurations 27
nada Documentation Release 40
bull Enter the administrator or any other accounts email address
bull Check to the email account the mail was sent to
bull If no mail is received the settings are wrong and need to be corrected
28 Chapter 2 Installation guide
CHAPTER 3
Upgrading from previous versions
31 Upgrade from NADA 3
For users with an existing NADA 3x catalog an upgrade script is included that will update your NADA 3x databaseto NADA 4x The process involves modifying your NADA 3x database and thus carries some risks The script willadd new tables to the NADA 3x database All user accounts and survey information will be retained by the upgrade
Important Backup the NADA 3x database before doing anything
1 Follow the instructions on page 4 and set up a folder in the web root containing the NADA 4 files
2 Edit the databasephp file as instructed in the section above NADA database configurations for MySQL
3 Instead of entering a new database name user account name and password -fill in the details of the existingNADA 3x database
Note These can be found by looking at the existing NADA 3x databasephp file and entering the settings into theNADA 4 databasephp file
4 Save the file
5 Navigate to the URL for the NADA4 site Example httpyour-nada-sitenada4indexphpnada4_upgrade
6 The following page loads
29
nada Documentation Release 40
Take note of the warnings and make any necessary corrections before clicking the ldquoUpgrade database to NADA 4rdquobutton
Warning This step makes changes to your nada 3 database that are not undo-able so make sure you do make adatabase backup before this step
Click on the ldquoUpgrade database to NADA 4rdquo button and wait for the page to reload The output of the page will looksomething like below
The script will print number of messages about failed table updates This does not mean the script failed to upgradeIt just means some of the updates were not needed on your version of NADA 3 Different versions of NADA havedifferent numbers of fields in the database and the upgrade script tries to fix the missing fields for all these differentversions of NADA If the existing NADA 3 database already has that field then it reports it as an error
You can ignore the error messages that include the wording ldquoDuplicate column namerdquo or ldquoDuplicate entryrdquo
Now your database has been migrated to NADA version 41 We will have to run one more upgrade script to forNADA version 42
7 Navigate to the URL for the NADA42 site Example httpyour-nada-sitenada42indexphpnada42_upgrade
Warning This step makes changes to your nada 41 database that are not undo-able This page will not show anymessage on the screen You will be getting blank page Please do not repeat the process
8 To verify the database upgrade Open the NADA catalog page by going to http[your-nada4-site]indexphpcatalogpage and verify all studies from NADA 3 are listed
311 Linking your NADA 3 data files to NADA 4
The upgrade script has only upgraded the database It is now necessary to tell the NADA4 where to locate the datafilesthat were uploaded to the original NADA 3 site
There are two options available
Option 1 Copy the datafiles folder from NADA 3 to NADA 4 This works best if you have only a few studies and thedatafiles folder size is small enoughto be moved easily from one location to another
Option 2 If it is not possible to easily move the datafiles folder from NADA 3 to NADA 4 you can tell NADA 4 thelocation of the datafiles without moving the files Here are the steps
bull Use your NADA 3 administrator login credentials to login to your new NADA 4 site
bull Click on Site administration in the top right corner of the screen
bull Go to the ldquoSettingsrdquo menu and click on the ldquoSettingsrdquo sub-menu
30 Chapter 3 Upgrading from previous versions
nada Documentation Release 40
bull Under Site configurations expand the ldquoSurvey Catalog Settingsrdquo section
bull For the setting ldquoCatalog folderrdquo enter the relative or full path to where the NADA 3 datafiles folder is locatedFor example if the nada3 datafiles are located on cnada3datafiles enter that path here
bull Save the configurations by clicking on the update button If now errors are shown then you have successfullyupdated the folder path
bull Check your new NADA 4 site to make sure the migration was successful
ndash Check the user administration page from site administration to make sure the users from the nada3 sitewere migrated
ndash Check the ldquoData Catalogrdquo page and view the studies by clicking on the study title to make sure the studyinformation pages are correct
ndash Check the site menus are the same as the NADA 3 site
312 Refresh DDI
In NADA 4 more information is stored in the database from the DDI than in the NADA 3 To bring all these newfields into the imported studies it is necessary to refresh the DDIrsquos The refresh DDI feature in NADA updates thedatabase with metadata from the DDI without having re-uploading the DDIs To update the metadata for all studies inyour catalog
bull Open the following NADA 4 URL in your browser
http[your-nada-4-site]indexphpadmincatalogbatch_refresh
bull Select all studies
bull Click on the ldquoRefresh DDIrdquo button
313 Transferring ownership
NADA 4 has a collection management feature When studies are imported from the NADA3 catalog into NADA4 theyare put into a collection called DEFAULT They need to be moved from this default system collection to the Central
31 Upgrade from NADA 3 31
nada Documentation Release 40
Data Catalog of the NADA4
To do this
bull Go login to the Site Administration and navigate to the Studies Manage Studies Central Data Catalog page
bull Select all the studies by ticking the check boxes next to each study on the right
bull Click on the dropdown menu and select Transfer owner
bull From the Transfer study owner page Select Central Data Catalog and then click transfer
32 Chapter 3 Upgrading from previous versions
nada Documentation Release 40
314 Updating the Site themetemplate
You cannot use your NADA3 template in NADA4 without making some changes Here are general guidelines butsteps may differ depending on your nada site template
bull Copy your NADA3 template to the NADA4 themes folder
bull Edit the [nada4-root]configtemplatephp following the steps below
bull Look for the setting ldquotheme_namerdquo by default it is set to rdquowbrdquo
bull Change ldquowbrdquo to the theme name you want to use Theme name is the folder name you copied to[NADA4]themes[your-site-theme] from your nada3 site
bull Save the file
NB The template may need some adjusting to run properly on the new NADA 4 site This will involve editingthe layoutphp and other template files within the template folder which is now located in the NADA 4 themesfolder
32 Migrate MySQL to Microsoft SQL
TODO
32 Migrate MySQL to Microsoft SQL 33
nada Documentation Release 40
34 Chapter 3 Upgrading from previous versions
CHAPTER 4
User manual
41 Overview and core concepts
411 About NADA
NADA is a web-based cataloging application that allows for the creation of portals that allows users to browse searchcompare apply for access and download relevant census or survey information
It was originally developed to support the establishment of national survey data archives The application is used by adiverse and growing number of national regional and international organizations NADA as with other IHSN toolsuses the Data Documentation Initiative (DDI) XML-based international metadata standard
412 Concepts
CENTRAL DATA CATALOG
The default catalog created when a NADA instance is installed is the Central Data Catalog All studies uploaded to theNADA are visible searchable and accessible from the Central Data Catalog For many institutions the Central DataCatalog will remain the only catalog in their NADA instance For some institutions being able to divide the contentsof the Central Data Catalog into more refined collections will be desirable
COLLECTIONS
Collections are sub categories of the Central Data Catalog They allow administrators of a NADA instance to groupstudies into what can be thought of as sub-catalogs of the Central Data Catalog This has a number of benefitsboth from the user and the administrator perspective From the usersrsquo perspective being able to filter and viewgroups (collections) of studies that logically belong together makes finding what they are looking for easier From theadministratorsrsquo perspective the ability to create collections of studies that may logically belong together facilitates theability to decentralize the management of each collection of studies to specific administrators (for example collectionscan be managed by different departments in an institution)
NOTE The creation of collections will in general only be useful and necessary for large catalogs or for catalogs thatdesire more decentralized management of groups of studies by different departments
STUDIES
Studies are carried out to gather more knowledge about a subject Studies may gather information from a number ofdifferent sources in order to answer the questions asked The information gathered for a study will in the context of
35
nada Documentation Release 40
NADA catalogs usually come from either a census or a surveys It is therefore not uncommon to hear the terms surveyand study used interchangeably when listening to people talk about their NADA catalog
METADATA
Metadata are data about the data They are not the actual data collected from the survey but rather the information thatdescribes the survey process and the data The NADA uses the Data Documentation Initiative (DDI) ndash ddiallianceorgndash standard for the presentation of metadata for each study The DDI document (which is an XML document) isprepared outside the NADA application either manually or using a tool like the Nesstar Publisher ndash nesstarcom ndash andthen imported into the NADA The detailed information about the survey is searchable down to the variable level foreach survey in the catalog
DATA ACCESS TYPES
The NADA allows for the level of access to datasets for studies to be controlled at the study level In other words thelevel of restriction can differ from study to study and can be defined on a scale ranging from direct access with norestrictions to no access Briefly the available access types are
bull Data not available - data are not available for this study
bull Direct Access Data Files - data shared under this policy can be downloaded without any restrictions The useris not required to be logged into the site and no personal information is collected on the person downloading thedata
bull Public Use Data Files - data shared under this policy requires that the user be logged in and registered on thesite before they are able to download the data The user is required to agree to a terms of use of the data and theapplication keeps records of who downloads the data
bull Licensed Data Files - data shared under this policy requires that the user be logged in and registered on the siteUsers are also required to fill in and submit a detailed application form listing their reasons for wanting accessto the data Once the user submits the application form the system informs the system administrator that anapplication has been made In order for the person to get access to the data the system administrator needs toreview the application and approve it
bull Data available in an Enclave - under this policy no data is shared through the application Users submit anapplication to access the data at a secure facility physically located on the premises of the data producer or afacility nominated by the data producer
bull Data available from external repository ndash The NADA allows for studies and their metadata to be listed in aNADA catalog but for a link to be created to another site when the data for that study are available elsewhere
CITATIONS
Citations are references that can be included at the study level which point to published works that have used the datafrom a particular study In many cases this will be a reference to a Journal Article Working paper Newspaper articleetc Such resources are useful to researchers who are interested in seeing how the data have been used before Theyare also a good way of showing the funders of surveys that the data are being used for policy and research purposesand thus are an indicator of some of the impact a study has had
USERS
Users in the NADA can be defined according to three broad groups General Users ndash this is the normal user whoregisters on a NADA site from the user interface This user type has no access to the site administration It is requiredto register as a user when accessing public use and licensed data types Site Administrators (unlimited) ndash this user
36 Chapter 4 User manual
nada Documentation Release 40
has access to all functions and all collections within the Site Administration System wide access Limited Adminis-trators ndash these administrators have access to a limited set of functions within the Site Administration Examples wouldbe an administrator of a specific collections or licensed survey reviewer for all or only some collections or reportgenerator etc
413 Why do NADA administrators need to understand these concepts
Understanding these concepts is important as it
bull Is critical to understanding the new permissions and administrator types introduced in NADA 4 Administratorsare now able to create collections within their NADArsquos and assign different roles to administrators and moregranular levels of access to catalog administration at the collection level It is now possible for example to haveadministrators whorsquos lsquopowersrsquo range from being able to manage all parts of a collectionrsquos administration downto ones with more restrictive access such as ones whose only function is as licensed survey reviewer or reportgenerator or catalog reviewer or citation manager etc
bull Ensures that the correct level of permissions and access is assigned to users based on security policies within theinstitution Unlike previous versions of NADA not all users who have access to the Site Administration needhave the level of access of an ldquounlimited site administratorrdquo This limits security risks associated with havingtoo many ldquounlimited site administratorsrdquo managing a site
bull Assists in assigning an appropriate data access type to data based on institutional distribution polices
bull Makes it easier to explain more clearly to institutional managers what the capabilities of the NADA applicationare and to advise on how to best manage the allocation of responsibilities
42 The Dashboard
After logging in to the Site Administration with administrator credentials the user is taken to the dashboard
The Dashboard provides a quick glance summary for administrators to get an overall picture of what has been happen-ing on the site as well as what pending tasks are outstanding for the administrator
42 The Dashboard 37
nada Documentation Release 40
1 Menu link to the Dashboard
2 Menu link to the Study Management pages submenus include Manage Studies Licensed requests and ManageCollections
3 Menu link to the citations management pages
4 Menu link to the User management pages submenus include All users Add user and Impersonate User
5 Menu link to create menu pages for the site frontend
6 Menu link to generate usage reports
7 Menu Link to the settings pages submenus include Settings Coutries Regions and Vocabularies
8 Useful navigation links submenus include Change Password Log out Catalog Home Data catalog Citations
9 This section lists all collections in the catalog Within each collection a summary is given of the number ofstudies along with diagnostics related to the number of studies publishedunpublished missing questionnairesdata access types set but with no data attached as well as some buttin links to Manage the collections studiesusers and a History of changes made to the collection
10 Provides a summary of users registrations and number of users currently logged in
11 Show how many pages are being cached on the site with a link to clear the cache if need be
12 Show a list of recently added or updated studies Clicking on a study in the list takes you to the page to managethat study
38 Chapter 4 User manual
nada Documentation Release 40
43 Manage Collections
431 Collections
Collections are sub categories of the Central Data Catalog They allow administrators of a NADA instance to groupstudies into what can be thought of as sub-catalogs of the Central Data Catalog
Collections provide a number of benefits both from the user and the administrator perspective From the usersrsquo per-spective being able to filter and view groups (collections) of studies that logically belong together makes finding whatthey are looking for easier From the administratorsrsquo perspective the ability to create collections of studies that maylogically belong together facilitates the ability to decentralize the management of each collection of studies to specificadministrators (for example collections can be managed by different departments in an institution)
Note The creation of collections will in general only be useful and necessary for large catalogs or for catalogs thatdesire more decentralized management of groups of studies by different departments
432 Creating collections
bull Login to the Site administration using an administrator password
bull Collections are managed and created by going to the Studies Manage collections menu link
bull There are no collections defined in the default NADA 4 installation
bull To create a new collection click on the Create new collection button
43 Manage Collections 39
nada Documentation Release 40
1 Under Collection Identification provide a short name for the collection This will become the URL for thecollection so pick carefully For Title fill in the fill title for the collection This will be the name displayed atthe top of the collection page
B Fill in a 3 or four line short description of the collection This text will display on the front end in the collectionslist For examples see httpmicrodataworldbankorgindexphpcontributing-catalogs
C Fill in a more detailed description of the collection This will display on the About page for that collection Forexample see httpmicrodataworldbankorgindexphpcatalogdhsabout
To format the page and include images it is possible to enter HTML code into this box below is anexample piece of code that includes an image
ltimg src=rdquofilesdhs-fp-01jpgrdquo alt=rdquoHealth Surveys Imagerdquo class=rdquoabout-photordquogt lth2gt Health SurveysCollectionlth2gt ltp align=rdquojustifyrdquogtThe Health Surveys collection aims to provide frequent high qual-ity and timely health data needed by the decision makers when designing public health programsltpgtltpgtHealth surveys provide useful information on health status and health consumption and their determi-nantsltpgt
Copy any images to be displayed into the NADA ldquofilesrdquo folder on your server image imagesthumbnil-imagepng
4 Upload a file to display next to the collection as it is listed on the collection page NOTE This image should be82 X 82 pixels If the upload does not work automatically then copy the thumbnail image to the ldquofilesrdquo folder asshown above
40 Chapter 4 User manual
nada Documentation Release 40
E The Weight field determines in what order collections are shown in the collection list 0123 etc The Selectcollection type drop-down is a system value to distinguish between collections that should be viewed as internal tothe organization or external For example some collections may be made up entirely of studies from an organizationoutside the host catalog These collections can be designated as external The Section dropdown allows for thecategorization as either a collection based on a specialized collection (like health) or based on a regional breakdownSelecting Publish ndash publishes the collection
bull Click on Submit to save the changes
To view the results click on the Preview link on the far right
bull The new collection now also shows in the collection list on the Central Catalog About page (this is where thethumbnail and short description fields are displayed)
43 Manage Collections 41
nada Documentation Release 40
bull Visiting the Dashboard will now also show the new collection listed below the Central Data Catalog With anumber of green buttons as shortcut links to manage the studies on the collection assign administrators for thecollection a history of activity on the collection and a link to edit the collection as in the steps above
433 Manually adding studies to a collection
There are 2 ways to get studies into the new catalog
bull The first is to upload a DDI and all its resources to the collection in the same way as described in the earliersection ndash Uploading a Study Except instead of choosing Central Catalog chose the collection you want to
42 Chapter 4 User manual
nada Documentation Release 40
upload the study to
bull Click on the Add Study button and upload a DDI and RDF and all your resources as described in the earliersection ndash Uploading a Study
bull Once a study is added in this way it displays in the Manage Studies list Notice that the collection summaryfield shows that the study belongs to (is Owned By) the DHS collection (this was the Short name defined in theexample when the Health Surveys Collection was created)
All studies uploaded to collections will automatically be added to the Central Data Catalog in order to build a commonsearch portal for all studies
43 Manage Collections 43
nada Documentation Release 40
434 Copying studies from one collection to another
bull The second way to add a study to a collection is to Copy the study from another collection into the newcollection
bull To copy a study already in the catalog to display in the new collection first make sure to be in the Manage Studiessection for the collection you want to put studies into To do this either use the Studies ndash Manage studies menuon the top or simply click on the Switch link next to the Manage Studies [Collection Title] heading
bull Then Click on the Copy Studies blue button at the top right
bull A list of all studies available to copy to the new collection is listed Simply click on the Link button in green tocopy the study to the collection The button will turn red and say Unlink To reverse the process and click thenow red button
bull Going back to the Manage Studies page for the collection will show the newly copied studies in the collectionlist Also note that the Collection field now indicated DHS next to Central DHS is in grey to indicate it is notowned (it is a copy) by that collection and the Central is in blue to show it is owned by the Central Data CatalogAlso note that because the study is not owned by this catalog it cannot be edited from this catalog ndash hence thepublishunpublish green button is absent for the copied studies
44 Chapter 4 User manual
nada Documentation Release 40
435 Turning on the collection filter
The final step after creating the first collection is to enable the collection filter option in the Settings menus under SiteConfigurations ndash Survey catalog settings
436 Transferring study ownership
In the previous examples mention was made of studies uploaded to a catalog being owned by that catalog There maybe cases where transferring the ownership from one catalog to another will be desirable This will become clearerin the next section on user roles but for now the next steps show how transferring ownership from one collection toanother can be done
bull Transferring ownership from one collection to another has to be done by the owner of the collection and fromthe collection it is currently owned by
bull To transfer ownership Go to the Manage Studies screen and select the study to be transferred Open up the EditStudy page by clicking on the study Title
bull On the right hand side of the screen click on the Transfer study owner link
43 Manage Collections 45
nada Documentation Release 40
bull Select the collection to transfer from the dropdown box
bull Click Transfer
bull Note that when looking the study summary for the transferred study the Collection field now shows the studyto belong (owned by) to the DHS collection and not Central anymore Also note the option to Publish andunpublish is now active
bull To transfer ownership of a large number of studies all at once - from the Manage Studies page ndash select the studiesto be transferred (tick them in the box left of each study) and then from the top Batch Actions drop down selectTransfer owner ndash then apply
46 Chapter 4 User manual
nada Documentation Release 40
44 Manage Studies
There are 2 Options to get studies into the new catalog
441 Option 1
bull The first is to upload a DDI and all its resources to the collection in the same way as described in the earliersection ndash Uploading a Study Except instead of choosing Central Catalog chose the collection you want toupload the study to
bull Click on the Add Study button and upload a DDI and RDF and all your resources as described in the earliersection ndash Uploading a Study
bull Once a study is added in this way it displays in the Manage Studies list Notice that the collection summaryfield shows that the study belongs to (is Owned By) the DHS collection (this was the Short name defined in theexample when the Health Surveys Collection was created)
bull Also note that the new study also appears in the Central Data Catalog
All studies uploaded to collections will automatically be added to the Central Data Catalog in order to build a commonsearch portal for all studies
44 Manage Studies 47
nada Documentation Release 40
442 Option2
Copying studies from one collection to another
bull The second way to add a study to a collection is to Copy the study from another collection into the new collection
bull To copy a study already in the catalog to display in the new collection first make sure to be in the Manage Studiessection for the collection you want to put studies into To do this either use the Studies ndash Manage studies menuon the top or simply click on the Switch link next to the Manage Studies [Collection Title] heading
bull Then Click on the Copy Studies blue button at the top right
bull A list of all studies available to copy to the new collection is listed Simply click on the Link button in green tocopy the study to the collection The button will turn red and say Unlink To reverse the process and click thenow red button
bull Going back to the Manage Studies page for the collection will show the newly copied studies in the collectionlist Also note that the Collection field now indicated DHS next to Central DHS is in grey to indicate it is notowned (it is a copy) by that collection and the Central is in blue to show it is owned by the Central Data CatalogAlso note that because the study is not owned by this catalog it cannot be edited from this catalog ndash hence thepublishunpublish green button is absent for the copied studies
45 Managing Licensed Requests
Datasets that are assigned the Access Type Licensed require approval from the NADA administrator before the usercan get access to the data files From the site administration there are a number of ways to see if any licensed requestshave been received
bull Go to the dashboard Pending requests show up as red in the catalog quicj summary section Clicking on thislink goes to the Licensed Survey Requests management page
bull Or go to the Studies link on the top menu and select Licensed Requests from the submenu
48 Chapter 4 User manual
nada Documentation Release 40
The link shows a page with a list Licensed Requests received The status column indicated the Pending requests
bull Click on the Edit link for to process a request
The Request information tab shows a summary of the information provided by the applicant
bull To Approve or Deny or request further information for the request Click on the Process tab
45 Managing Licensed Requests 49
nada Documentation Release 40
bull Select Approve to approve the request (other options include Deny as well as Request more information fromthe applicant)
bull Select the files that the user will be authorized to download ndash it is also possible to enter a maximum number ofdownloads and expiry date for downloads
bull Enter any comments to be sent to the applicant
bull Select Notify user by email to notify them that the application has been processed
bull Select Update
bull The remaining tabs
ndash Communicate - provides a means to ask for more information from the applicant
ndash Monitor ndash allows the administrator to see when and how many times the applicant downloaded thedata
ndash Forward Request ndash provides a means to forward the request to another person for review
46 Manage Citations
The Citations section is where bibliographic references can be added for publications that use any of the studies in thecatalog These citations can be linked to particular studies in the catalog and are displayed to the users of the systemin the study information view of the relevant study
Citations are added from the Citations menu
50 Chapter 4 User manual
nada Documentation Release 40
bull To add a citation - click on All citations then click on the Add New Citation button at the top right
bull Compete the form including the indication as to whether the citation should be published or not
bull Then expand the Related studies link to tell the system which studies the citation ldquobelongsrdquo to
bull Click on the Attach studies link This reveals a list of all studies in the catalog
bull Select the relevant studies by clicking on the green Select button
bull Click on the apply filter button to save the changes The study now appears in the related studies box
bull Click on the submit button to save the citation
bull Note the flag keywords and notes fields can be used by administrators to place extra notes only visible to otheradministrators that might prove useful when there is uncertainty about a citations appropriateness or accuracy
bull It is also possible to import citations in common citation formats such as BibTex and EndNote (RIS)
bull To do this use the Import Citations link from the top menu
46 Manage Citations 51
nada Documentation Release 40
bull Paste the BibTex or RIS text into the form and then at the bottom of the screen click on Attach studies to linkthe citation to a particular study in the catalog
bull The citation now appears in the citation list as well as on the study information page for the relevant studies
52 Chapter 4 User manual
nada Documentation Release 40
47 Managing Users and account types
Users in the NADA can be defined according to three broad groups
General Usersndash this is the normal user who registers on a NADA site from the user interface This user type hasno access to the site administration It is required to register as a user before being granted access to public use andlicensed data types
Site Administrators (unlimited) ndash this user has access to all functions and all collections within the Site Administra-tion System wide access
Limited Administrators ndash these administrators have access to a limited set of functions within the Site Administra-tion Examples would be an administrator of a specific collections or licensed survey reviewer for all or only somecollections or report generator or citation manager etc
471 Creating User accounts
User accounts can be created in two ways
1 A General User account can be created by a user directly from the register screen from the login link on the userinterface of the application
The user created by this process has no access to the site administration This account can only be used to apply andgain access to public and licensed datasets
2 A user account can also be created by a Site Administrator
bull To do this login as a Site Administrator
bull Go to the site administration section of the application
47 Managing Users and account types 53
nada Documentation Release 40
bull Select Users ndash Add user from the top menu
bull Fill in the information for the user in the form and be sure to mark the account status as Active Then click theCreate button
54 Chapter 4 User manual
nada Documentation Release 40
47 Managing Users and account types 55
nada Documentation Release 40
bull Note that the user always starts off as a General User with no access permissions to the Site Administration Theuser group column displays as empty for users with only general user accounts
bull To see a list of all users in the system go to the Users ndash All Users menu item at the top of the screen
bull Note the new users created have no User group assigned (they are general users) Also note the Actions columnon the far right From these links an account can be edited (including changing the password and blocking anaccount) deleted and Permissions managed for the account
472 Managing User Account Permissions
User accounts permissions can be only be set and changed by a Site Administrator To change the permissions for anaccount
bull Click on the Permissions link next to the account to be changed All accounts start of as General users accounts
bull To change this user to a full site administrator who will have full system wide access to all parts and functionsof the NADA administration select the Site administrators (full access) option and tick the admin box as wellClick update to save the changes
56 Chapter 4 User manual
nada Documentation Release 40
473 Collection level administrators
bull To create a user who only has permissions to administer studies or administration functions for a particularcollection Select Site administrators (limited access)
47 Managing Users and account types 57
nada Documentation Release 40
bull It is then necessary to assign a role to this new limited administrator account To create a limited access ad-ministrator for a particular collection ndash select Site administrators (limited access) and then select Collectionadministrators Notice The form expands to reveal a list of collections in the system
bull Select the appropriate level of access that this account will have for this collection In the example below anadministrator is being created who can manage only licensed requests for the collection ndash Health Surveys Thisaccount will not be able to upload or publish studies The account will only be able to process licensed requestsfor the collection ndash Health Surveys
58 Chapter 4 User manual
nada Documentation Release 40
Other levels of access for Site administrators (limited access) ndash Collection administrators include
1 Accounts that are given full access to manage studies
2 Accounts that are given access to upload studies but not publish them
3 Accounts that are limited to reviewing studies
474 Global level Limited access accounts
Other types of limited access accounts include
1 Accounts that can only view system reports at a global level
2 Accounts that can only access the citations section and manage citations
3 Accounts that can only access the Licensed Request management system ndash at the global level for all collections
47 Managing Users and account types 59
nada Documentation Release 40
Impersonating a user
The system includes a function that allows a Site Administrator to impersonate (take on the role) a user created inthe system This is a useful testing tool when creating users and assigning permissions It essentially allows theadministrator to take on the role of another user temporarily
bull To access the Impersonate User feature go to the Users ndash Impersonat user menu at the top of the screen
bull A list of users to impersonate is shown
bull Select the user to impersonate and click on the impersonate button
bull The dashboard view for the impersonated user now shows
60 Chapter 4 User manual
nada Documentation Release 40
bull Note in the example above the account being impersonated is a Limited Account administrator with rights onlyto manage licensed requests for the Health Surveys Collection Note that all other dashboard menus are eitherhidden or clicking on any other function other than manage studies results in an access denied message
bull This is a good way to test if the roles assigned to a user account have the expected results
bull To exit the impersonate mode and return to the Site Administrator role ndash Click on the top right menu and selectExit impersonate mode
475 The Reviewer Limited access account
Sometimes it is desirable for catalog administrators to allow certain users to see a collection before it is published butwithout granting access to the site administration functions
This is useful for getting feedback on the correctness of information on collections or studies before publishing
To do this
bull First create an account for the user or get the user to create an account by using the register form on the loginscreen
bull Then edit the permissions for that user selecting Site Administrator (limited access) ndash Collection administrator
bull Then for the appropriate collection select Reviewer and click update to save the changes
47 Managing Users and account types 61
nada Documentation Release 40
bull The newly created reviewer account user can now view all studies in a collection even if the study or collectionis unpublished
48 Manage Site Pages and Menus
The NADA has a small content management component that allows for the creation of menu pages to appear on theuser interface
bull Examples of menus that might be useful for users of the site might be A page dealing with the disseminationpolicies of the organization or perhaps a page with contact information for the information
New menu items and pages can be created via the Menu- All pages menu link at the top of the Site Administrationpage
62 Chapter 4 User manual
nada Documentation Release 40
bull Select All pages from the menu
bull To add a new page click on the Add New Page button
bull Give the page a Title in the Title field
bull Clicking in the URL field will automatically suggest a name for the page in the URL
bull Enter the contents for the page in the Body section Plain text or HTML is accespted by this field
bull Then indicate if the page should be published or not in the Publish dropdown
bull The Weight field tells the NADA in what order this menu item should display Eg 0 would be first 1 secondand 2 third
bull Click on Update to save the changes
bull View the changes from the user interface In this Example a Contact Us page was created
bull It is also possible from the Menu Management screen to add a menu link that links to an existing page on anothersite (rather than creating a page itself)
bull To change the order in which the menu items display on the user interface use the Reorder Menu button on theMenu Management screen
48 Manage Site Pages and Menus 63
nada Documentation Release 40
49 The Site Settings Page
All settings for the application are controlled via the Settings menu at the top of the Site Administration page Thereare seven main settings sections See screenshot below
491 General Settings
1 Type the Title of the site here This will become the front page title of the NADA site In this case the Title isNADA
64 Chapter 4 User manual
nada Documentation Release 40
2 The footer text can be changed in this field This displays at the bottom of your site page
3 The initial page that loads when a user visits the NADA site can be set here In this case the catalog page is setto open by default
4 The name of the webmaster can be set here This is the name that will be used in system emails sent to users
5 Enter the webmaster email address here This should be the address that will be used in communication withusers Typically this is a general enquiries email set up by the organization and not a personal email address fora particular person Note to avoid mail systems rejecting mail as spam make sure to enter an address here thatis on the same domain as the server used in the email settings at setup
6 This field sets the location of the Cache folder The cache folder stores pre- generated pages of the site to allowfor faster browsing by the user By default it is set to cache This can be moved to another location if desiredbut must be writable The green tick indicates that the folder can be found and is set up correctly Enter eitherrelative or absolute paths to the folder location
7 Set the time that the Cache takes to expire By default it is set to 2 hours (in milli seconds)
8 If it is desired to turn off caching then select no here Sometimes it is useful to turn off caching when developingor updating a site so as to ensure that content changes become immediately visible on the front-end withouthaving to wait for the cache to expire and the new changes to show Turn this back on to speed up page loadingfor users
Click update to save all settings
Language
To change the language of the application expand the language section and choose the desired language Click updateto save and apply the setting
49 The Site Settings Page 65
nada Documentation Release 40
Enable or disable the HTML editor
A basic HTML editor is provided in the menu and page creating section of the application This setting allows this tobe turned on or off
Survey catalog settings
1 This is the folder where the files for the study are stored on the server This includes the DDI eternal resourcesand data files This folder can be moved to a location outside the web root as described in the installationinstructions in Chapter 1 Enter either relative or absolute paths to the folder location
2 This is the folder where DDIrsquos can be placed in order to use the bulk study import function in the NADA InNADA3 files had to be physically copied to this folder on the server but this is no longer necessary in NADA4 Files can now be directly uploaded to this folder from the Site Administration ndash Manage Studies page page
66 Chapter 4 User manual
nada Documentation Release 40
3 Select the vocabulary to use for the topic filter By default this is set to the CESSDA classification as recom-mended in the IHSN templates supplied at IHSNorg for the Nesstar Metadata Publisher
4 Enable or disable the Country filter on the user interface search page here If the catalog only contains studiesfor one country then turning this filter off is recommended
5 Enable or disable the Topic filter on the user interface search page here If no topics have been defined in theDDIrsquos being uploaded then it is recommended to turn this filter off (disable)
6 Enable or disable the Year filter on the user interface search page here
7 Enable or disable the Collection filter on the user interface search page here If no collections have been definedthen it is recommended to disable this filter
8 Enable or disable the Data access filter on the user interface search page here This filter is not needed if thereare very few studies in the catalog or if all studies hare set to the same access type
9 This section controls the order in which the filters appear on the search page Enter numbers here that rank theorder of the filters in the order they should be displayed
10 This setting determines how many studies are displayed by default to the user on the search page ndash catalog view
Site Login settings
1 To require that users login before being able to access the website set this option to Requires all users to loginto access the website
2 Determined how long a user will stay logged in After this time the user will be automatically logged out
3 Sets the minimum length for passwords created by the users at registration or for manual user creation
49 The Site Settings Page 67
nada Documentation Release 40
SMTP Settings
1 If the PHPweb server is configured to send email using PHPrsquos MAIL function select the first option and donrsquotfill in anything else
If your organization has a mail server and has have a dedicated account that can be setup for NADA use the followingsettings Check the radio button ldquoUse SMTP Serverrdquo
2 Enter the host name for the server
3 Enter the port used by the server to send mail
4 If required enter the user name used to send mail on the server
5 Enter the password used to send mail on the server
If the organization does not own a mail server a Gmail account can be configured to be used with NADA
bull Check the radio button ldquoUse SMTP Serverrdquo
bull Host name sslsmtpgooglemailcom or sslsmtpgmailcom
bull SMTP port 465
bull Account username email-addressgmailcom
bull Account password password for the gmail account
6 Test the email settings
The quickest way to test if the email settings are working is to use the ldquoforgot passwordrdquo option from the user loginpage If no mail is received when doing this test then go back and correct the mail settings Check with the ISP orserver administrator for the correct settings
Click on update to save all settings
68 Chapter 4 User manual
nada Documentation Release 40
492 Dashboard setting
Provides a means to automatically have content loaded into the dashboard via an RSS feed from a site The defaultsetting is set to receive updates and news from the IHSN website
49 The Site Settings Page 69
nada Documentation Release 40
70 Chapter 4 User manual
CHAPTER 5
Indices and tables
bull genindex
bull modindex
bull search
71
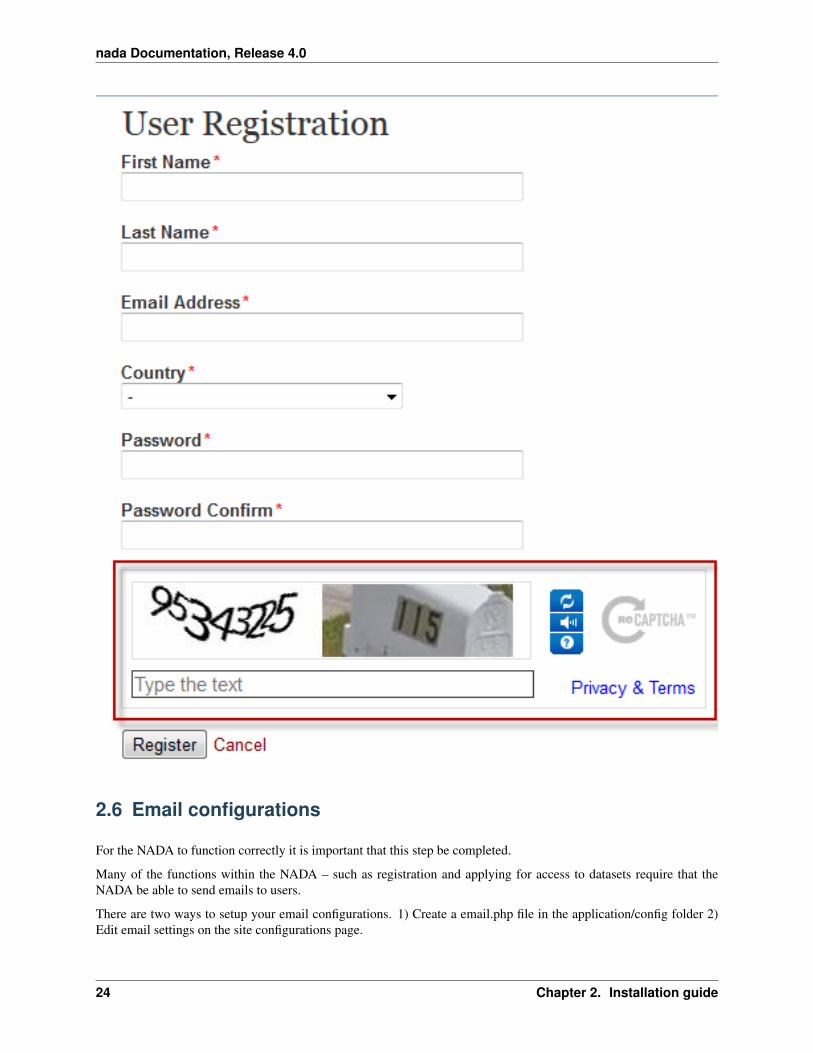
nada Documentation Release 40
261 1 Configure email via email config file
1 Open the file applicationconfigemailphp in notepad
2 Fill in the section using SMTP server with authentication enabled highlighted in below image
3 For Gmail user will have to fill the gmail smtp section shown as below
26 Email configurations 25
nada Documentation Release 40
4 Save file
Note Using a file for email configuration disable the email configuration page from the site administration
1 Login to your NADA as an administrator
2 Go to Site administration click on the Settings menu and choose ldquoSettingsrdquo
3 Find the section ldquoSMTP settingsrdquo
26 Chapter 2 Installation guide
nada Documentation Release 40
4 If the PHPweb server is configured to send email using PHPrsquos MAIL function select the first option and donrsquotfill in anything else
If your organization has a mail server and has have a dedicated account that can be setup for NADA use the followingsettings Check the radio button ldquoUse SMTP Serverrdquo
5 Enter the host name for the server
6 Enter the port used by the server to send mail
7 If required enter the user name used to send mail on the server
8 Enter the password used to send mail on the server
If the organization does not own a mail server a Gmail account can be configured to be used with NADA
bull Check the radio button ldquoUse SMTP Serverrdquo
bull Host name sslsmtpgooglemailcom or sslsmtpgmailcom
bull SMTP port 465
bull Account username email-addressgmailcom
bull Account password password for the gmail account
Test the email settings
The quickest way to test if the email settings are working is to use the ldquoforgot passwordrdquo option from the user loginpage
bull Click on forgot password
26 Email configurations 27
nada Documentation Release 40
bull Enter the administrator or any other accounts email address
bull Check to the email account the mail was sent to
bull If no mail is received the settings are wrong and need to be corrected
28 Chapter 2 Installation guide
CHAPTER 3
Upgrading from previous versions
31 Upgrade from NADA 3
For users with an existing NADA 3x catalog an upgrade script is included that will update your NADA 3x databaseto NADA 4x The process involves modifying your NADA 3x database and thus carries some risks The script willadd new tables to the NADA 3x database All user accounts and survey information will be retained by the upgrade
Important Backup the NADA 3x database before doing anything
1 Follow the instructions on page 4 and set up a folder in the web root containing the NADA 4 files
2 Edit the databasephp file as instructed in the section above NADA database configurations for MySQL
3 Instead of entering a new database name user account name and password -fill in the details of the existingNADA 3x database
Note These can be found by looking at the existing NADA 3x databasephp file and entering the settings into theNADA 4 databasephp file
4 Save the file
5 Navigate to the URL for the NADA4 site Example httpyour-nada-sitenada4indexphpnada4_upgrade
6 The following page loads
29
nada Documentation Release 40
Take note of the warnings and make any necessary corrections before clicking the ldquoUpgrade database to NADA 4rdquobutton
Warning This step makes changes to your nada 3 database that are not undo-able so make sure you do make adatabase backup before this step
Click on the ldquoUpgrade database to NADA 4rdquo button and wait for the page to reload The output of the page will looksomething like below
The script will print number of messages about failed table updates This does not mean the script failed to upgradeIt just means some of the updates were not needed on your version of NADA 3 Different versions of NADA havedifferent numbers of fields in the database and the upgrade script tries to fix the missing fields for all these differentversions of NADA If the existing NADA 3 database already has that field then it reports it as an error
You can ignore the error messages that include the wording ldquoDuplicate column namerdquo or ldquoDuplicate entryrdquo
Now your database has been migrated to NADA version 41 We will have to run one more upgrade script to forNADA version 42
7 Navigate to the URL for the NADA42 site Example httpyour-nada-sitenada42indexphpnada42_upgrade
Warning This step makes changes to your nada 41 database that are not undo-able This page will not show anymessage on the screen You will be getting blank page Please do not repeat the process
8 To verify the database upgrade Open the NADA catalog page by going to http[your-nada4-site]indexphpcatalogpage and verify all studies from NADA 3 are listed
311 Linking your NADA 3 data files to NADA 4
The upgrade script has only upgraded the database It is now necessary to tell the NADA4 where to locate the datafilesthat were uploaded to the original NADA 3 site
There are two options available
Option 1 Copy the datafiles folder from NADA 3 to NADA 4 This works best if you have only a few studies and thedatafiles folder size is small enoughto be moved easily from one location to another
Option 2 If it is not possible to easily move the datafiles folder from NADA 3 to NADA 4 you can tell NADA 4 thelocation of the datafiles without moving the files Here are the steps
bull Use your NADA 3 administrator login credentials to login to your new NADA 4 site
bull Click on Site administration in the top right corner of the screen
bull Go to the ldquoSettingsrdquo menu and click on the ldquoSettingsrdquo sub-menu
30 Chapter 3 Upgrading from previous versions
nada Documentation Release 40
bull Under Site configurations expand the ldquoSurvey Catalog Settingsrdquo section
bull For the setting ldquoCatalog folderrdquo enter the relative or full path to where the NADA 3 datafiles folder is locatedFor example if the nada3 datafiles are located on cnada3datafiles enter that path here
bull Save the configurations by clicking on the update button If now errors are shown then you have successfullyupdated the folder path
bull Check your new NADA 4 site to make sure the migration was successful
ndash Check the user administration page from site administration to make sure the users from the nada3 sitewere migrated
ndash Check the ldquoData Catalogrdquo page and view the studies by clicking on the study title to make sure the studyinformation pages are correct
ndash Check the site menus are the same as the NADA 3 site
312 Refresh DDI
In NADA 4 more information is stored in the database from the DDI than in the NADA 3 To bring all these newfields into the imported studies it is necessary to refresh the DDIrsquos The refresh DDI feature in NADA updates thedatabase with metadata from the DDI without having re-uploading the DDIs To update the metadata for all studies inyour catalog
bull Open the following NADA 4 URL in your browser
http[your-nada-4-site]indexphpadmincatalogbatch_refresh
bull Select all studies
bull Click on the ldquoRefresh DDIrdquo button
313 Transferring ownership
NADA 4 has a collection management feature When studies are imported from the NADA3 catalog into NADA4 theyare put into a collection called DEFAULT They need to be moved from this default system collection to the Central
31 Upgrade from NADA 3 31
nada Documentation Release 40
Data Catalog of the NADA4
To do this
bull Go login to the Site Administration and navigate to the Studies Manage Studies Central Data Catalog page
bull Select all the studies by ticking the check boxes next to each study on the right
bull Click on the dropdown menu and select Transfer owner
bull From the Transfer study owner page Select Central Data Catalog and then click transfer
32 Chapter 3 Upgrading from previous versions
nada Documentation Release 40
314 Updating the Site themetemplate
You cannot use your NADA3 template in NADA4 without making some changes Here are general guidelines butsteps may differ depending on your nada site template
bull Copy your NADA3 template to the NADA4 themes folder
bull Edit the [nada4-root]configtemplatephp following the steps below
bull Look for the setting ldquotheme_namerdquo by default it is set to rdquowbrdquo
bull Change ldquowbrdquo to the theme name you want to use Theme name is the folder name you copied to[NADA4]themes[your-site-theme] from your nada3 site
bull Save the file
NB The template may need some adjusting to run properly on the new NADA 4 site This will involve editingthe layoutphp and other template files within the template folder which is now located in the NADA 4 themesfolder
32 Migrate MySQL to Microsoft SQL
TODO
32 Migrate MySQL to Microsoft SQL 33
nada Documentation Release 40
34 Chapter 3 Upgrading from previous versions
CHAPTER 4
User manual
41 Overview and core concepts
411 About NADA
NADA is a web-based cataloging application that allows for the creation of portals that allows users to browse searchcompare apply for access and download relevant census or survey information
It was originally developed to support the establishment of national survey data archives The application is used by adiverse and growing number of national regional and international organizations NADA as with other IHSN toolsuses the Data Documentation Initiative (DDI) XML-based international metadata standard
412 Concepts
CENTRAL DATA CATALOG
The default catalog created when a NADA instance is installed is the Central Data Catalog All studies uploaded to theNADA are visible searchable and accessible from the Central Data Catalog For many institutions the Central DataCatalog will remain the only catalog in their NADA instance For some institutions being able to divide the contentsof the Central Data Catalog into more refined collections will be desirable
COLLECTIONS
Collections are sub categories of the Central Data Catalog They allow administrators of a NADA instance to groupstudies into what can be thought of as sub-catalogs of the Central Data Catalog This has a number of benefitsboth from the user and the administrator perspective From the usersrsquo perspective being able to filter and viewgroups (collections) of studies that logically belong together makes finding what they are looking for easier From theadministratorsrsquo perspective the ability to create collections of studies that may logically belong together facilitates theability to decentralize the management of each collection of studies to specific administrators (for example collectionscan be managed by different departments in an institution)
NOTE The creation of collections will in general only be useful and necessary for large catalogs or for catalogs thatdesire more decentralized management of groups of studies by different departments
STUDIES
Studies are carried out to gather more knowledge about a subject Studies may gather information from a number ofdifferent sources in order to answer the questions asked The information gathered for a study will in the context of
35
nada Documentation Release 40
NADA catalogs usually come from either a census or a surveys It is therefore not uncommon to hear the terms surveyand study used interchangeably when listening to people talk about their NADA catalog
METADATA
Metadata are data about the data They are not the actual data collected from the survey but rather the information thatdescribes the survey process and the data The NADA uses the Data Documentation Initiative (DDI) ndash ddiallianceorgndash standard for the presentation of metadata for each study The DDI document (which is an XML document) isprepared outside the NADA application either manually or using a tool like the Nesstar Publisher ndash nesstarcom ndash andthen imported into the NADA The detailed information about the survey is searchable down to the variable level foreach survey in the catalog
DATA ACCESS TYPES
The NADA allows for the level of access to datasets for studies to be controlled at the study level In other words thelevel of restriction can differ from study to study and can be defined on a scale ranging from direct access with norestrictions to no access Briefly the available access types are
bull Data not available - data are not available for this study
bull Direct Access Data Files - data shared under this policy can be downloaded without any restrictions The useris not required to be logged into the site and no personal information is collected on the person downloading thedata
bull Public Use Data Files - data shared under this policy requires that the user be logged in and registered on thesite before they are able to download the data The user is required to agree to a terms of use of the data and theapplication keeps records of who downloads the data
bull Licensed Data Files - data shared under this policy requires that the user be logged in and registered on the siteUsers are also required to fill in and submit a detailed application form listing their reasons for wanting accessto the data Once the user submits the application form the system informs the system administrator that anapplication has been made In order for the person to get access to the data the system administrator needs toreview the application and approve it
bull Data available in an Enclave - under this policy no data is shared through the application Users submit anapplication to access the data at a secure facility physically located on the premises of the data producer or afacility nominated by the data producer
bull Data available from external repository ndash The NADA allows for studies and their metadata to be listed in aNADA catalog but for a link to be created to another site when the data for that study are available elsewhere
CITATIONS
Citations are references that can be included at the study level which point to published works that have used the datafrom a particular study In many cases this will be a reference to a Journal Article Working paper Newspaper articleetc Such resources are useful to researchers who are interested in seeing how the data have been used before Theyare also a good way of showing the funders of surveys that the data are being used for policy and research purposesand thus are an indicator of some of the impact a study has had
USERS
Users in the NADA can be defined according to three broad groups General Users ndash this is the normal user whoregisters on a NADA site from the user interface This user type has no access to the site administration It is requiredto register as a user when accessing public use and licensed data types Site Administrators (unlimited) ndash this user
36 Chapter 4 User manual
nada Documentation Release 40
has access to all functions and all collections within the Site Administration System wide access Limited Adminis-trators ndash these administrators have access to a limited set of functions within the Site Administration Examples wouldbe an administrator of a specific collections or licensed survey reviewer for all or only some collections or reportgenerator etc
413 Why do NADA administrators need to understand these concepts
Understanding these concepts is important as it
bull Is critical to understanding the new permissions and administrator types introduced in NADA 4 Administratorsare now able to create collections within their NADArsquos and assign different roles to administrators and moregranular levels of access to catalog administration at the collection level It is now possible for example to haveadministrators whorsquos lsquopowersrsquo range from being able to manage all parts of a collectionrsquos administration downto ones with more restrictive access such as ones whose only function is as licensed survey reviewer or reportgenerator or catalog reviewer or citation manager etc
bull Ensures that the correct level of permissions and access is assigned to users based on security policies within theinstitution Unlike previous versions of NADA not all users who have access to the Site Administration needhave the level of access of an ldquounlimited site administratorrdquo This limits security risks associated with havingtoo many ldquounlimited site administratorsrdquo managing a site
bull Assists in assigning an appropriate data access type to data based on institutional distribution polices
bull Makes it easier to explain more clearly to institutional managers what the capabilities of the NADA applicationare and to advise on how to best manage the allocation of responsibilities
42 The Dashboard
After logging in to the Site Administration with administrator credentials the user is taken to the dashboard
The Dashboard provides a quick glance summary for administrators to get an overall picture of what has been happen-ing on the site as well as what pending tasks are outstanding for the administrator
42 The Dashboard 37
nada Documentation Release 40
1 Menu link to the Dashboard
2 Menu link to the Study Management pages submenus include Manage Studies Licensed requests and ManageCollections
3 Menu link to the citations management pages
4 Menu link to the User management pages submenus include All users Add user and Impersonate User
5 Menu link to create menu pages for the site frontend
6 Menu link to generate usage reports
7 Menu Link to the settings pages submenus include Settings Coutries Regions and Vocabularies
8 Useful navigation links submenus include Change Password Log out Catalog Home Data catalog Citations
9 This section lists all collections in the catalog Within each collection a summary is given of the number ofstudies along with diagnostics related to the number of studies publishedunpublished missing questionnairesdata access types set but with no data attached as well as some buttin links to Manage the collections studiesusers and a History of changes made to the collection
10 Provides a summary of users registrations and number of users currently logged in
11 Show how many pages are being cached on the site with a link to clear the cache if need be
12 Show a list of recently added or updated studies Clicking on a study in the list takes you to the page to managethat study
38 Chapter 4 User manual
nada Documentation Release 40
43 Manage Collections
431 Collections
Collections are sub categories of the Central Data Catalog They allow administrators of a NADA instance to groupstudies into what can be thought of as sub-catalogs of the Central Data Catalog
Collections provide a number of benefits both from the user and the administrator perspective From the usersrsquo per-spective being able to filter and view groups (collections) of studies that logically belong together makes finding whatthey are looking for easier From the administratorsrsquo perspective the ability to create collections of studies that maylogically belong together facilitates the ability to decentralize the management of each collection of studies to specificadministrators (for example collections can be managed by different departments in an institution)
Note The creation of collections will in general only be useful and necessary for large catalogs or for catalogs thatdesire more decentralized management of groups of studies by different departments
432 Creating collections
bull Login to the Site administration using an administrator password
bull Collections are managed and created by going to the Studies Manage collections menu link
bull There are no collections defined in the default NADA 4 installation
bull To create a new collection click on the Create new collection button
43 Manage Collections 39
nada Documentation Release 40
1 Under Collection Identification provide a short name for the collection This will become the URL for thecollection so pick carefully For Title fill in the fill title for the collection This will be the name displayed atthe top of the collection page
B Fill in a 3 or four line short description of the collection This text will display on the front end in the collectionslist For examples see httpmicrodataworldbankorgindexphpcontributing-catalogs
C Fill in a more detailed description of the collection This will display on the About page for that collection Forexample see httpmicrodataworldbankorgindexphpcatalogdhsabout
To format the page and include images it is possible to enter HTML code into this box below is anexample piece of code that includes an image
ltimg src=rdquofilesdhs-fp-01jpgrdquo alt=rdquoHealth Surveys Imagerdquo class=rdquoabout-photordquogt lth2gt Health SurveysCollectionlth2gt ltp align=rdquojustifyrdquogtThe Health Surveys collection aims to provide frequent high qual-ity and timely health data needed by the decision makers when designing public health programsltpgtltpgtHealth surveys provide useful information on health status and health consumption and their determi-nantsltpgt
Copy any images to be displayed into the NADA ldquofilesrdquo folder on your server image imagesthumbnil-imagepng
4 Upload a file to display next to the collection as it is listed on the collection page NOTE This image should be82 X 82 pixels If the upload does not work automatically then copy the thumbnail image to the ldquofilesrdquo folder asshown above
40 Chapter 4 User manual
nada Documentation Release 40
E The Weight field determines in what order collections are shown in the collection list 0123 etc The Selectcollection type drop-down is a system value to distinguish between collections that should be viewed as internal tothe organization or external For example some collections may be made up entirely of studies from an organizationoutside the host catalog These collections can be designated as external The Section dropdown allows for thecategorization as either a collection based on a specialized collection (like health) or based on a regional breakdownSelecting Publish ndash publishes the collection
bull Click on Submit to save the changes
To view the results click on the Preview link on the far right
bull The new collection now also shows in the collection list on the Central Catalog About page (this is where thethumbnail and short description fields are displayed)
43 Manage Collections 41
nada Documentation Release 40
bull Visiting the Dashboard will now also show the new collection listed below the Central Data Catalog With anumber of green buttons as shortcut links to manage the studies on the collection assign administrators for thecollection a history of activity on the collection and a link to edit the collection as in the steps above
433 Manually adding studies to a collection
There are 2 ways to get studies into the new catalog
bull The first is to upload a DDI and all its resources to the collection in the same way as described in the earliersection ndash Uploading a Study Except instead of choosing Central Catalog chose the collection you want to
42 Chapter 4 User manual
nada Documentation Release 40
upload the study to
bull Click on the Add Study button and upload a DDI and RDF and all your resources as described in the earliersection ndash Uploading a Study
bull Once a study is added in this way it displays in the Manage Studies list Notice that the collection summaryfield shows that the study belongs to (is Owned By) the DHS collection (this was the Short name defined in theexample when the Health Surveys Collection was created)
All studies uploaded to collections will automatically be added to the Central Data Catalog in order to build a commonsearch portal for all studies
43 Manage Collections 43
nada Documentation Release 40
434 Copying studies from one collection to another
bull The second way to add a study to a collection is to Copy the study from another collection into the newcollection
bull To copy a study already in the catalog to display in the new collection first make sure to be in the Manage Studiessection for the collection you want to put studies into To do this either use the Studies ndash Manage studies menuon the top or simply click on the Switch link next to the Manage Studies [Collection Title] heading
bull Then Click on the Copy Studies blue button at the top right
bull A list of all studies available to copy to the new collection is listed Simply click on the Link button in green tocopy the study to the collection The button will turn red and say Unlink To reverse the process and click thenow red button
bull Going back to the Manage Studies page for the collection will show the newly copied studies in the collectionlist Also note that the Collection field now indicated DHS next to Central DHS is in grey to indicate it is notowned (it is a copy) by that collection and the Central is in blue to show it is owned by the Central Data CatalogAlso note that because the study is not owned by this catalog it cannot be edited from this catalog ndash hence thepublishunpublish green button is absent for the copied studies
44 Chapter 4 User manual
nada Documentation Release 40
435 Turning on the collection filter
The final step after creating the first collection is to enable the collection filter option in the Settings menus under SiteConfigurations ndash Survey catalog settings
436 Transferring study ownership
In the previous examples mention was made of studies uploaded to a catalog being owned by that catalog There maybe cases where transferring the ownership from one catalog to another will be desirable This will become clearerin the next section on user roles but for now the next steps show how transferring ownership from one collection toanother can be done
bull Transferring ownership from one collection to another has to be done by the owner of the collection and fromthe collection it is currently owned by
bull To transfer ownership Go to the Manage Studies screen and select the study to be transferred Open up the EditStudy page by clicking on the study Title
bull On the right hand side of the screen click on the Transfer study owner link
43 Manage Collections 45
nada Documentation Release 40
bull Select the collection to transfer from the dropdown box
bull Click Transfer
bull Note that when looking the study summary for the transferred study the Collection field now shows the studyto belong (owned by) to the DHS collection and not Central anymore Also note the option to Publish andunpublish is now active
bull To transfer ownership of a large number of studies all at once - from the Manage Studies page ndash select the studiesto be transferred (tick them in the box left of each study) and then from the top Batch Actions drop down selectTransfer owner ndash then apply
46 Chapter 4 User manual
nada Documentation Release 40
44 Manage Studies
There are 2 Options to get studies into the new catalog
441 Option 1
bull The first is to upload a DDI and all its resources to the collection in the same way as described in the earliersection ndash Uploading a Study Except instead of choosing Central Catalog chose the collection you want toupload the study to
bull Click on the Add Study button and upload a DDI and RDF and all your resources as described in the earliersection ndash Uploading a Study
bull Once a study is added in this way it displays in the Manage Studies list Notice that the collection summaryfield shows that the study belongs to (is Owned By) the DHS collection (this was the Short name defined in theexample when the Health Surveys Collection was created)
bull Also note that the new study also appears in the Central Data Catalog
All studies uploaded to collections will automatically be added to the Central Data Catalog in order to build a commonsearch portal for all studies
44 Manage Studies 47
nada Documentation Release 40
442 Option2
Copying studies from one collection to another
bull The second way to add a study to a collection is to Copy the study from another collection into the new collection
bull To copy a study already in the catalog to display in the new collection first make sure to be in the Manage Studiessection for the collection you want to put studies into To do this either use the Studies ndash Manage studies menuon the top or simply click on the Switch link next to the Manage Studies [Collection Title] heading
bull Then Click on the Copy Studies blue button at the top right
bull A list of all studies available to copy to the new collection is listed Simply click on the Link button in green tocopy the study to the collection The button will turn red and say Unlink To reverse the process and click thenow red button
bull Going back to the Manage Studies page for the collection will show the newly copied studies in the collectionlist Also note that the Collection field now indicated DHS next to Central DHS is in grey to indicate it is notowned (it is a copy) by that collection and the Central is in blue to show it is owned by the Central Data CatalogAlso note that because the study is not owned by this catalog it cannot be edited from this catalog ndash hence thepublishunpublish green button is absent for the copied studies
45 Managing Licensed Requests
Datasets that are assigned the Access Type Licensed require approval from the NADA administrator before the usercan get access to the data files From the site administration there are a number of ways to see if any licensed requestshave been received
bull Go to the dashboard Pending requests show up as red in the catalog quicj summary section Clicking on thislink goes to the Licensed Survey Requests management page
bull Or go to the Studies link on the top menu and select Licensed Requests from the submenu
48 Chapter 4 User manual
nada Documentation Release 40
The link shows a page with a list Licensed Requests received The status column indicated the Pending requests
bull Click on the Edit link for to process a request
The Request information tab shows a summary of the information provided by the applicant
bull To Approve or Deny or request further information for the request Click on the Process tab
45 Managing Licensed Requests 49
nada Documentation Release 40
bull Select Approve to approve the request (other options include Deny as well as Request more information fromthe applicant)
bull Select the files that the user will be authorized to download ndash it is also possible to enter a maximum number ofdownloads and expiry date for downloads
bull Enter any comments to be sent to the applicant
bull Select Notify user by email to notify them that the application has been processed
bull Select Update
bull The remaining tabs
ndash Communicate - provides a means to ask for more information from the applicant
ndash Monitor ndash allows the administrator to see when and how many times the applicant downloaded thedata
ndash Forward Request ndash provides a means to forward the request to another person for review
46 Manage Citations
The Citations section is where bibliographic references can be added for publications that use any of the studies in thecatalog These citations can be linked to particular studies in the catalog and are displayed to the users of the systemin the study information view of the relevant study
Citations are added from the Citations menu
50 Chapter 4 User manual
nada Documentation Release 40
bull To add a citation - click on All citations then click on the Add New Citation button at the top right
bull Compete the form including the indication as to whether the citation should be published or not
bull Then expand the Related studies link to tell the system which studies the citation ldquobelongsrdquo to
bull Click on the Attach studies link This reveals a list of all studies in the catalog
bull Select the relevant studies by clicking on the green Select button
bull Click on the apply filter button to save the changes The study now appears in the related studies box
bull Click on the submit button to save the citation
bull Note the flag keywords and notes fields can be used by administrators to place extra notes only visible to otheradministrators that might prove useful when there is uncertainty about a citations appropriateness or accuracy
bull It is also possible to import citations in common citation formats such as BibTex and EndNote (RIS)
bull To do this use the Import Citations link from the top menu
46 Manage Citations 51
nada Documentation Release 40
bull Paste the BibTex or RIS text into the form and then at the bottom of the screen click on Attach studies to linkthe citation to a particular study in the catalog
bull The citation now appears in the citation list as well as on the study information page for the relevant studies
52 Chapter 4 User manual
nada Documentation Release 40
47 Managing Users and account types
Users in the NADA can be defined according to three broad groups
General Usersndash this is the normal user who registers on a NADA site from the user interface This user type hasno access to the site administration It is required to register as a user before being granted access to public use andlicensed data types
Site Administrators (unlimited) ndash this user has access to all functions and all collections within the Site Administra-tion System wide access
Limited Administrators ndash these administrators have access to a limited set of functions within the Site Administra-tion Examples would be an administrator of a specific collections or licensed survey reviewer for all or only somecollections or report generator or citation manager etc
471 Creating User accounts
User accounts can be created in two ways
1 A General User account can be created by a user directly from the register screen from the login link on the userinterface of the application
The user created by this process has no access to the site administration This account can only be used to apply andgain access to public and licensed datasets
2 A user account can also be created by a Site Administrator
bull To do this login as a Site Administrator
bull Go to the site administration section of the application
47 Managing Users and account types 53
nada Documentation Release 40
bull Select Users ndash Add user from the top menu
bull Fill in the information for the user in the form and be sure to mark the account status as Active Then click theCreate button
54 Chapter 4 User manual
nada Documentation Release 40
47 Managing Users and account types 55
nada Documentation Release 40
bull Note that the user always starts off as a General User with no access permissions to the Site Administration Theuser group column displays as empty for users with only general user accounts
bull To see a list of all users in the system go to the Users ndash All Users menu item at the top of the screen
bull Note the new users created have no User group assigned (they are general users) Also note the Actions columnon the far right From these links an account can be edited (including changing the password and blocking anaccount) deleted and Permissions managed for the account
472 Managing User Account Permissions
User accounts permissions can be only be set and changed by a Site Administrator To change the permissions for anaccount
bull Click on the Permissions link next to the account to be changed All accounts start of as General users accounts
bull To change this user to a full site administrator who will have full system wide access to all parts and functionsof the NADA administration select the Site administrators (full access) option and tick the admin box as wellClick update to save the changes
56 Chapter 4 User manual
nada Documentation Release 40
473 Collection level administrators
bull To create a user who only has permissions to administer studies or administration functions for a particularcollection Select Site administrators (limited access)
47 Managing Users and account types 57
nada Documentation Release 40
bull It is then necessary to assign a role to this new limited administrator account To create a limited access ad-ministrator for a particular collection ndash select Site administrators (limited access) and then select Collectionadministrators Notice The form expands to reveal a list of collections in the system
bull Select the appropriate level of access that this account will have for this collection In the example below anadministrator is being created who can manage only licensed requests for the collection ndash Health Surveys Thisaccount will not be able to upload or publish studies The account will only be able to process licensed requestsfor the collection ndash Health Surveys
58 Chapter 4 User manual
nada Documentation Release 40
Other levels of access for Site administrators (limited access) ndash Collection administrators include
1 Accounts that are given full access to manage studies
2 Accounts that are given access to upload studies but not publish them
3 Accounts that are limited to reviewing studies
474 Global level Limited access accounts
Other types of limited access accounts include
1 Accounts that can only view system reports at a global level
2 Accounts that can only access the citations section and manage citations
3 Accounts that can only access the Licensed Request management system ndash at the global level for all collections
47 Managing Users and account types 59
nada Documentation Release 40
Impersonating a user
The system includes a function that allows a Site Administrator to impersonate (take on the role) a user created inthe system This is a useful testing tool when creating users and assigning permissions It essentially allows theadministrator to take on the role of another user temporarily
bull To access the Impersonate User feature go to the Users ndash Impersonat user menu at the top of the screen
bull A list of users to impersonate is shown
bull Select the user to impersonate and click on the impersonate button
bull The dashboard view for the impersonated user now shows
60 Chapter 4 User manual
nada Documentation Release 40
bull Note in the example above the account being impersonated is a Limited Account administrator with rights onlyto manage licensed requests for the Health Surveys Collection Note that all other dashboard menus are eitherhidden or clicking on any other function other than manage studies results in an access denied message
bull This is a good way to test if the roles assigned to a user account have the expected results
bull To exit the impersonate mode and return to the Site Administrator role ndash Click on the top right menu and selectExit impersonate mode
475 The Reviewer Limited access account
Sometimes it is desirable for catalog administrators to allow certain users to see a collection before it is published butwithout granting access to the site administration functions
This is useful for getting feedback on the correctness of information on collections or studies before publishing
To do this
bull First create an account for the user or get the user to create an account by using the register form on the loginscreen
bull Then edit the permissions for that user selecting Site Administrator (limited access) ndash Collection administrator
bull Then for the appropriate collection select Reviewer and click update to save the changes
47 Managing Users and account types 61
nada Documentation Release 40
bull The newly created reviewer account user can now view all studies in a collection even if the study or collectionis unpublished
48 Manage Site Pages and Menus
The NADA has a small content management component that allows for the creation of menu pages to appear on theuser interface
bull Examples of menus that might be useful for users of the site might be A page dealing with the disseminationpolicies of the organization or perhaps a page with contact information for the information
New menu items and pages can be created via the Menu- All pages menu link at the top of the Site Administrationpage
62 Chapter 4 User manual
nada Documentation Release 40
bull Select All pages from the menu
bull To add a new page click on the Add New Page button
bull Give the page a Title in the Title field
bull Clicking in the URL field will automatically suggest a name for the page in the URL
bull Enter the contents for the page in the Body section Plain text or HTML is accespted by this field
bull Then indicate if the page should be published or not in the Publish dropdown
bull The Weight field tells the NADA in what order this menu item should display Eg 0 would be first 1 secondand 2 third
bull Click on Update to save the changes
bull View the changes from the user interface In this Example a Contact Us page was created
bull It is also possible from the Menu Management screen to add a menu link that links to an existing page on anothersite (rather than creating a page itself)
bull To change the order in which the menu items display on the user interface use the Reorder Menu button on theMenu Management screen
48 Manage Site Pages and Menus 63
nada Documentation Release 40
49 The Site Settings Page
All settings for the application are controlled via the Settings menu at the top of the Site Administration page Thereare seven main settings sections See screenshot below
491 General Settings
1 Type the Title of the site here This will become the front page title of the NADA site In this case the Title isNADA
64 Chapter 4 User manual
nada Documentation Release 40
2 The footer text can be changed in this field This displays at the bottom of your site page
3 The initial page that loads when a user visits the NADA site can be set here In this case the catalog page is setto open by default
4 The name of the webmaster can be set here This is the name that will be used in system emails sent to users
5 Enter the webmaster email address here This should be the address that will be used in communication withusers Typically this is a general enquiries email set up by the organization and not a personal email address fora particular person Note to avoid mail systems rejecting mail as spam make sure to enter an address here thatis on the same domain as the server used in the email settings at setup
6 This field sets the location of the Cache folder The cache folder stores pre- generated pages of the site to allowfor faster browsing by the user By default it is set to cache This can be moved to another location if desiredbut must be writable The green tick indicates that the folder can be found and is set up correctly Enter eitherrelative or absolute paths to the folder location
7 Set the time that the Cache takes to expire By default it is set to 2 hours (in milli seconds)
8 If it is desired to turn off caching then select no here Sometimes it is useful to turn off caching when developingor updating a site so as to ensure that content changes become immediately visible on the front-end withouthaving to wait for the cache to expire and the new changes to show Turn this back on to speed up page loadingfor users
Click update to save all settings
Language
To change the language of the application expand the language section and choose the desired language Click updateto save and apply the setting
49 The Site Settings Page 65
nada Documentation Release 40
Enable or disable the HTML editor
A basic HTML editor is provided in the menu and page creating section of the application This setting allows this tobe turned on or off
Survey catalog settings
1 This is the folder where the files for the study are stored on the server This includes the DDI eternal resourcesand data files This folder can be moved to a location outside the web root as described in the installationinstructions in Chapter 1 Enter either relative or absolute paths to the folder location
2 This is the folder where DDIrsquos can be placed in order to use the bulk study import function in the NADA InNADA3 files had to be physically copied to this folder on the server but this is no longer necessary in NADA4 Files can now be directly uploaded to this folder from the Site Administration ndash Manage Studies page page
66 Chapter 4 User manual
nada Documentation Release 40
3 Select the vocabulary to use for the topic filter By default this is set to the CESSDA classification as recom-mended in the IHSN templates supplied at IHSNorg for the Nesstar Metadata Publisher
4 Enable or disable the Country filter on the user interface search page here If the catalog only contains studiesfor one country then turning this filter off is recommended
5 Enable or disable the Topic filter on the user interface search page here If no topics have been defined in theDDIrsquos being uploaded then it is recommended to turn this filter off (disable)
6 Enable or disable the Year filter on the user interface search page here
7 Enable or disable the Collection filter on the user interface search page here If no collections have been definedthen it is recommended to disable this filter
8 Enable or disable the Data access filter on the user interface search page here This filter is not needed if thereare very few studies in the catalog or if all studies hare set to the same access type
9 This section controls the order in which the filters appear on the search page Enter numbers here that rank theorder of the filters in the order they should be displayed
10 This setting determines how many studies are displayed by default to the user on the search page ndash catalog view
Site Login settings
1 To require that users login before being able to access the website set this option to Requires all users to loginto access the website
2 Determined how long a user will stay logged in After this time the user will be automatically logged out
3 Sets the minimum length for passwords created by the users at registration or for manual user creation
49 The Site Settings Page 67
nada Documentation Release 40
SMTP Settings
1 If the PHPweb server is configured to send email using PHPrsquos MAIL function select the first option and donrsquotfill in anything else
If your organization has a mail server and has have a dedicated account that can be setup for NADA use the followingsettings Check the radio button ldquoUse SMTP Serverrdquo
2 Enter the host name for the server
3 Enter the port used by the server to send mail
4 If required enter the user name used to send mail on the server
5 Enter the password used to send mail on the server
If the organization does not own a mail server a Gmail account can be configured to be used with NADA
bull Check the radio button ldquoUse SMTP Serverrdquo
bull Host name sslsmtpgooglemailcom or sslsmtpgmailcom
bull SMTP port 465
bull Account username email-addressgmailcom
bull Account password password for the gmail account
6 Test the email settings
The quickest way to test if the email settings are working is to use the ldquoforgot passwordrdquo option from the user loginpage If no mail is received when doing this test then go back and correct the mail settings Check with the ISP orserver administrator for the correct settings
Click on update to save all settings
68 Chapter 4 User manual
nada Documentation Release 40
492 Dashboard setting
Provides a means to automatically have content loaded into the dashboard via an RSS feed from a site The defaultsetting is set to receive updates and news from the IHSN website
49 The Site Settings Page 69
nada Documentation Release 40
70 Chapter 4 User manual
CHAPTER 5
Indices and tables
bull genindex
bull modindex
bull search
71
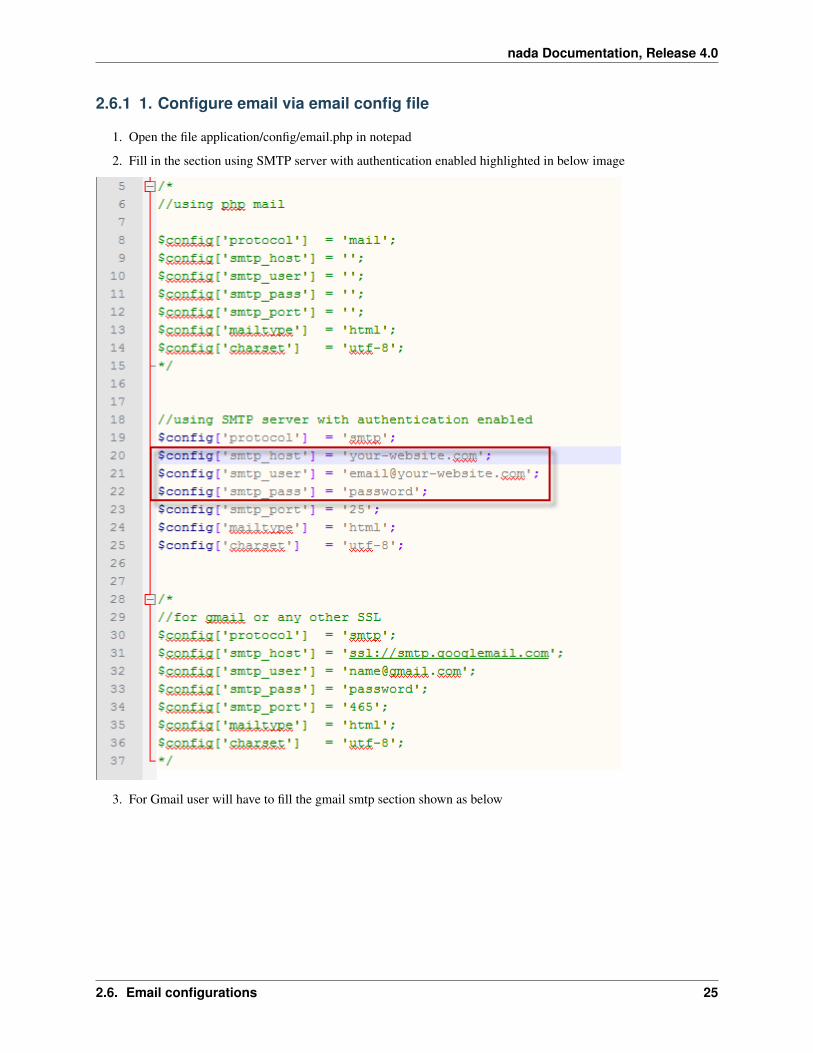
nada Documentation Release 40
bull Enter the administrator or any other accounts email address
bull Check to the email account the mail was sent to
bull If no mail is received the settings are wrong and need to be corrected
28 Chapter 2 Installation guide
CHAPTER 3
Upgrading from previous versions
31 Upgrade from NADA 3
For users with an existing NADA 3x catalog an upgrade script is included that will update your NADA 3x databaseto NADA 4x The process involves modifying your NADA 3x database and thus carries some risks The script willadd new tables to the NADA 3x database All user accounts and survey information will be retained by the upgrade
Important Backup the NADA 3x database before doing anything
1 Follow the instructions on page 4 and set up a folder in the web root containing the NADA 4 files
2 Edit the databasephp file as instructed in the section above NADA database configurations for MySQL
3 Instead of entering a new database name user account name and password -fill in the details of the existingNADA 3x database
Note These can be found by looking at the existing NADA 3x databasephp file and entering the settings into theNADA 4 databasephp file
4 Save the file
5 Navigate to the URL for the NADA4 site Example httpyour-nada-sitenada4indexphpnada4_upgrade
6 The following page loads
29
nada Documentation Release 40
Take note of the warnings and make any necessary corrections before clicking the ldquoUpgrade database to NADA 4rdquobutton
Warning This step makes changes to your nada 3 database that are not undo-able so make sure you do make adatabase backup before this step
Click on the ldquoUpgrade database to NADA 4rdquo button and wait for the page to reload The output of the page will looksomething like below
The script will print number of messages about failed table updates This does not mean the script failed to upgradeIt just means some of the updates were not needed on your version of NADA 3 Different versions of NADA havedifferent numbers of fields in the database and the upgrade script tries to fix the missing fields for all these differentversions of NADA If the existing NADA 3 database already has that field then it reports it as an error
You can ignore the error messages that include the wording ldquoDuplicate column namerdquo or ldquoDuplicate entryrdquo
Now your database has been migrated to NADA version 41 We will have to run one more upgrade script to forNADA version 42
7 Navigate to the URL for the NADA42 site Example httpyour-nada-sitenada42indexphpnada42_upgrade
Warning This step makes changes to your nada 41 database that are not undo-able This page will not show anymessage on the screen You will be getting blank page Please do not repeat the process
8 To verify the database upgrade Open the NADA catalog page by going to http[your-nada4-site]indexphpcatalogpage and verify all studies from NADA 3 are listed
311 Linking your NADA 3 data files to NADA 4
The upgrade script has only upgraded the database It is now necessary to tell the NADA4 where to locate the datafilesthat were uploaded to the original NADA 3 site
There are two options available
Option 1 Copy the datafiles folder from NADA 3 to NADA 4 This works best if you have only a few studies and thedatafiles folder size is small enoughto be moved easily from one location to another
Option 2 If it is not possible to easily move the datafiles folder from NADA 3 to NADA 4 you can tell NADA 4 thelocation of the datafiles without moving the files Here are the steps
bull Use your NADA 3 administrator login credentials to login to your new NADA 4 site
bull Click on Site administration in the top right corner of the screen
bull Go to the ldquoSettingsrdquo menu and click on the ldquoSettingsrdquo sub-menu
30 Chapter 3 Upgrading from previous versions
nada Documentation Release 40
bull Under Site configurations expand the ldquoSurvey Catalog Settingsrdquo section
bull For the setting ldquoCatalog folderrdquo enter the relative or full path to where the NADA 3 datafiles folder is locatedFor example if the nada3 datafiles are located on cnada3datafiles enter that path here
bull Save the configurations by clicking on the update button If now errors are shown then you have successfullyupdated the folder path
bull Check your new NADA 4 site to make sure the migration was successful
ndash Check the user administration page from site administration to make sure the users from the nada3 sitewere migrated
ndash Check the ldquoData Catalogrdquo page and view the studies by clicking on the study title to make sure the studyinformation pages are correct
ndash Check the site menus are the same as the NADA 3 site
312 Refresh DDI
In NADA 4 more information is stored in the database from the DDI than in the NADA 3 To bring all these newfields into the imported studies it is necessary to refresh the DDIrsquos The refresh DDI feature in NADA updates thedatabase with metadata from the DDI without having re-uploading the DDIs To update the metadata for all studies inyour catalog
bull Open the following NADA 4 URL in your browser
http[your-nada-4-site]indexphpadmincatalogbatch_refresh
bull Select all studies
bull Click on the ldquoRefresh DDIrdquo button
313 Transferring ownership
NADA 4 has a collection management feature When studies are imported from the NADA3 catalog into NADA4 theyare put into a collection called DEFAULT They need to be moved from this default system collection to the Central
31 Upgrade from NADA 3 31
nada Documentation Release 40
Data Catalog of the NADA4
To do this
bull Go login to the Site Administration and navigate to the Studies Manage Studies Central Data Catalog page
bull Select all the studies by ticking the check boxes next to each study on the right
bull Click on the dropdown menu and select Transfer owner
bull From the Transfer study owner page Select Central Data Catalog and then click transfer
32 Chapter 3 Upgrading from previous versions
nada Documentation Release 40
314 Updating the Site themetemplate
You cannot use your NADA3 template in NADA4 without making some changes Here are general guidelines butsteps may differ depending on your nada site template
bull Copy your NADA3 template to the NADA4 themes folder
bull Edit the [nada4-root]configtemplatephp following the steps below
bull Look for the setting ldquotheme_namerdquo by default it is set to rdquowbrdquo
bull Change ldquowbrdquo to the theme name you want to use Theme name is the folder name you copied to[NADA4]themes[your-site-theme] from your nada3 site
bull Save the file
NB The template may need some adjusting to run properly on the new NADA 4 site This will involve editingthe layoutphp and other template files within the template folder which is now located in the NADA 4 themesfolder
32 Migrate MySQL to Microsoft SQL
TODO
32 Migrate MySQL to Microsoft SQL 33
nada Documentation Release 40
34 Chapter 3 Upgrading from previous versions
CHAPTER 4
User manual
41 Overview and core concepts
411 About NADA
NADA is a web-based cataloging application that allows for the creation of portals that allows users to browse searchcompare apply for access and download relevant census or survey information
It was originally developed to support the establishment of national survey data archives The application is used by adiverse and growing number of national regional and international organizations NADA as with other IHSN toolsuses the Data Documentation Initiative (DDI) XML-based international metadata standard
412 Concepts
CENTRAL DATA CATALOG
The default catalog created when a NADA instance is installed is the Central Data Catalog All studies uploaded to theNADA are visible searchable and accessible from the Central Data Catalog For many institutions the Central DataCatalog will remain the only catalog in their NADA instance For some institutions being able to divide the contentsof the Central Data Catalog into more refined collections will be desirable
COLLECTIONS
Collections are sub categories of the Central Data Catalog They allow administrators of a NADA instance to groupstudies into what can be thought of as sub-catalogs of the Central Data Catalog This has a number of benefitsboth from the user and the administrator perspective From the usersrsquo perspective being able to filter and viewgroups (collections) of studies that logically belong together makes finding what they are looking for easier From theadministratorsrsquo perspective the ability to create collections of studies that may logically belong together facilitates theability to decentralize the management of each collection of studies to specific administrators (for example collectionscan be managed by different departments in an institution)
NOTE The creation of collections will in general only be useful and necessary for large catalogs or for catalogs thatdesire more decentralized management of groups of studies by different departments
STUDIES
Studies are carried out to gather more knowledge about a subject Studies may gather information from a number ofdifferent sources in order to answer the questions asked The information gathered for a study will in the context of
35
nada Documentation Release 40
NADA catalogs usually come from either a census or a surveys It is therefore not uncommon to hear the terms surveyand study used interchangeably when listening to people talk about their NADA catalog
METADATA
Metadata are data about the data They are not the actual data collected from the survey but rather the information thatdescribes the survey process and the data The NADA uses the Data Documentation Initiative (DDI) ndash ddiallianceorgndash standard for the presentation of metadata for each study The DDI document (which is an XML document) isprepared outside the NADA application either manually or using a tool like the Nesstar Publisher ndash nesstarcom ndash andthen imported into the NADA The detailed information about the survey is searchable down to the variable level foreach survey in the catalog
DATA ACCESS TYPES
The NADA allows for the level of access to datasets for studies to be controlled at the study level In other words thelevel of restriction can differ from study to study and can be defined on a scale ranging from direct access with norestrictions to no access Briefly the available access types are
bull Data not available - data are not available for this study
bull Direct Access Data Files - data shared under this policy can be downloaded without any restrictions The useris not required to be logged into the site and no personal information is collected on the person downloading thedata
bull Public Use Data Files - data shared under this policy requires that the user be logged in and registered on thesite before they are able to download the data The user is required to agree to a terms of use of the data and theapplication keeps records of who downloads the data
bull Licensed Data Files - data shared under this policy requires that the user be logged in and registered on the siteUsers are also required to fill in and submit a detailed application form listing their reasons for wanting accessto the data Once the user submits the application form the system informs the system administrator that anapplication has been made In order for the person to get access to the data the system administrator needs toreview the application and approve it
bull Data available in an Enclave - under this policy no data is shared through the application Users submit anapplication to access the data at a secure facility physically located on the premises of the data producer or afacility nominated by the data producer
bull Data available from external repository ndash The NADA allows for studies and their metadata to be listed in aNADA catalog but for a link to be created to another site when the data for that study are available elsewhere
CITATIONS
Citations are references that can be included at the study level which point to published works that have used the datafrom a particular study In many cases this will be a reference to a Journal Article Working paper Newspaper articleetc Such resources are useful to researchers who are interested in seeing how the data have been used before Theyare also a good way of showing the funders of surveys that the data are being used for policy and research purposesand thus are an indicator of some of the impact a study has had
USERS
Users in the NADA can be defined according to three broad groups General Users ndash this is the normal user whoregisters on a NADA site from the user interface This user type has no access to the site administration It is requiredto register as a user when accessing public use and licensed data types Site Administrators (unlimited) ndash this user
36 Chapter 4 User manual
nada Documentation Release 40
has access to all functions and all collections within the Site Administration System wide access Limited Adminis-trators ndash these administrators have access to a limited set of functions within the Site Administration Examples wouldbe an administrator of a specific collections or licensed survey reviewer for all or only some collections or reportgenerator etc
413 Why do NADA administrators need to understand these concepts
Understanding these concepts is important as it
bull Is critical to understanding the new permissions and administrator types introduced in NADA 4 Administratorsare now able to create collections within their NADArsquos and assign different roles to administrators and moregranular levels of access to catalog administration at the collection level It is now possible for example to haveadministrators whorsquos lsquopowersrsquo range from being able to manage all parts of a collectionrsquos administration downto ones with more restrictive access such as ones whose only function is as licensed survey reviewer or reportgenerator or catalog reviewer or citation manager etc
bull Ensures that the correct level of permissions and access is assigned to users based on security policies within theinstitution Unlike previous versions of NADA not all users who have access to the Site Administration needhave the level of access of an ldquounlimited site administratorrdquo This limits security risks associated with havingtoo many ldquounlimited site administratorsrdquo managing a site
bull Assists in assigning an appropriate data access type to data based on institutional distribution polices
bull Makes it easier to explain more clearly to institutional managers what the capabilities of the NADA applicationare and to advise on how to best manage the allocation of responsibilities
42 The Dashboard
After logging in to the Site Administration with administrator credentials the user is taken to the dashboard
The Dashboard provides a quick glance summary for administrators to get an overall picture of what has been happen-ing on the site as well as what pending tasks are outstanding for the administrator
42 The Dashboard 37
nada Documentation Release 40
1 Menu link to the Dashboard
2 Menu link to the Study Management pages submenus include Manage Studies Licensed requests and ManageCollections
3 Menu link to the citations management pages
4 Menu link to the User management pages submenus include All users Add user and Impersonate User
5 Menu link to create menu pages for the site frontend
6 Menu link to generate usage reports
7 Menu Link to the settings pages submenus include Settings Coutries Regions and Vocabularies
8 Useful navigation links submenus include Change Password Log out Catalog Home Data catalog Citations
9 This section lists all collections in the catalog Within each collection a summary is given of the number ofstudies along with diagnostics related to the number of studies publishedunpublished missing questionnairesdata access types set but with no data attached as well as some buttin links to Manage the collections studiesusers and a History of changes made to the collection
10 Provides a summary of users registrations and number of users currently logged in
11 Show how many pages are being cached on the site with a link to clear the cache if need be
12 Show a list of recently added or updated studies Clicking on a study in the list takes you to the page to managethat study
38 Chapter 4 User manual
nada Documentation Release 40
43 Manage Collections
431 Collections
Collections are sub categories of the Central Data Catalog They allow administrators of a NADA instance to groupstudies into what can be thought of as sub-catalogs of the Central Data Catalog
Collections provide a number of benefits both from the user and the administrator perspective From the usersrsquo per-spective being able to filter and view groups (collections) of studies that logically belong together makes finding whatthey are looking for easier From the administratorsrsquo perspective the ability to create collections of studies that maylogically belong together facilitates the ability to decentralize the management of each collection of studies to specificadministrators (for example collections can be managed by different departments in an institution)
Note The creation of collections will in general only be useful and necessary for large catalogs or for catalogs thatdesire more decentralized management of groups of studies by different departments
432 Creating collections
bull Login to the Site administration using an administrator password
bull Collections are managed and created by going to the Studies Manage collections menu link
bull There are no collections defined in the default NADA 4 installation
bull To create a new collection click on the Create new collection button
43 Manage Collections 39
nada Documentation Release 40
1 Under Collection Identification provide a short name for the collection This will become the URL for thecollection so pick carefully For Title fill in the fill title for the collection This will be the name displayed atthe top of the collection page
B Fill in a 3 or four line short description of the collection This text will display on the front end in the collectionslist For examples see httpmicrodataworldbankorgindexphpcontributing-catalogs
C Fill in a more detailed description of the collection This will display on the About page for that collection Forexample see httpmicrodataworldbankorgindexphpcatalogdhsabout
To format the page and include images it is possible to enter HTML code into this box below is anexample piece of code that includes an image
ltimg src=rdquofilesdhs-fp-01jpgrdquo alt=rdquoHealth Surveys Imagerdquo class=rdquoabout-photordquogt lth2gt Health SurveysCollectionlth2gt ltp align=rdquojustifyrdquogtThe Health Surveys collection aims to provide frequent high qual-ity and timely health data needed by the decision makers when designing public health programsltpgtltpgtHealth surveys provide useful information on health status and health consumption and their determi-nantsltpgt
Copy any images to be displayed into the NADA ldquofilesrdquo folder on your server image imagesthumbnil-imagepng
4 Upload a file to display next to the collection as it is listed on the collection page NOTE This image should be82 X 82 pixels If the upload does not work automatically then copy the thumbnail image to the ldquofilesrdquo folder asshown above
40 Chapter 4 User manual
nada Documentation Release 40
E The Weight field determines in what order collections are shown in the collection list 0123 etc The Selectcollection type drop-down is a system value to distinguish between collections that should be viewed as internal tothe organization or external For example some collections may be made up entirely of studies from an organizationoutside the host catalog These collections can be designated as external The Section dropdown allows for thecategorization as either a collection based on a specialized collection (like health) or based on a regional breakdownSelecting Publish ndash publishes the collection
bull Click on Submit to save the changes
To view the results click on the Preview link on the far right
bull The new collection now also shows in the collection list on the Central Catalog About page (this is where thethumbnail and short description fields are displayed)
43 Manage Collections 41
nada Documentation Release 40
bull Visiting the Dashboard will now also show the new collection listed below the Central Data Catalog With anumber of green buttons as shortcut links to manage the studies on the collection assign administrators for thecollection a history of activity on the collection and a link to edit the collection as in the steps above
433 Manually adding studies to a collection
There are 2 ways to get studies into the new catalog
bull The first is to upload a DDI and all its resources to the collection in the same way as described in the earliersection ndash Uploading a Study Except instead of choosing Central Catalog chose the collection you want to
42 Chapter 4 User manual
nada Documentation Release 40
upload the study to
bull Click on the Add Study button and upload a DDI and RDF and all your resources as described in the earliersection ndash Uploading a Study
bull Once a study is added in this way it displays in the Manage Studies list Notice that the collection summaryfield shows that the study belongs to (is Owned By) the DHS collection (this was the Short name defined in theexample when the Health Surveys Collection was created)
All studies uploaded to collections will automatically be added to the Central Data Catalog in order to build a commonsearch portal for all studies
43 Manage Collections 43
nada Documentation Release 40
434 Copying studies from one collection to another
bull The second way to add a study to a collection is to Copy the study from another collection into the newcollection
bull To copy a study already in the catalog to display in the new collection first make sure to be in the Manage Studiessection for the collection you want to put studies into To do this either use the Studies ndash Manage studies menuon the top or simply click on the Switch link next to the Manage Studies [Collection Title] heading
bull Then Click on the Copy Studies blue button at the top right
bull A list of all studies available to copy to the new collection is listed Simply click on the Link button in green tocopy the study to the collection The button will turn red and say Unlink To reverse the process and click thenow red button
bull Going back to the Manage Studies page for the collection will show the newly copied studies in the collectionlist Also note that the Collection field now indicated DHS next to Central DHS is in grey to indicate it is notowned (it is a copy) by that collection and the Central is in blue to show it is owned by the Central Data CatalogAlso note that because the study is not owned by this catalog it cannot be edited from this catalog ndash hence thepublishunpublish green button is absent for the copied studies
44 Chapter 4 User manual
nada Documentation Release 40
435 Turning on the collection filter
The final step after creating the first collection is to enable the collection filter option in the Settings menus under SiteConfigurations ndash Survey catalog settings
436 Transferring study ownership
In the previous examples mention was made of studies uploaded to a catalog being owned by that catalog There maybe cases where transferring the ownership from one catalog to another will be desirable This will become clearerin the next section on user roles but for now the next steps show how transferring ownership from one collection toanother can be done
bull Transferring ownership from one collection to another has to be done by the owner of the collection and fromthe collection it is currently owned by
bull To transfer ownership Go to the Manage Studies screen and select the study to be transferred Open up the EditStudy page by clicking on the study Title
bull On the right hand side of the screen click on the Transfer study owner link
43 Manage Collections 45
nada Documentation Release 40
bull Select the collection to transfer from the dropdown box
bull Click Transfer
bull Note that when looking the study summary for the transferred study the Collection field now shows the studyto belong (owned by) to the DHS collection and not Central anymore Also note the option to Publish andunpublish is now active
bull To transfer ownership of a large number of studies all at once - from the Manage Studies page ndash select the studiesto be transferred (tick them in the box left of each study) and then from the top Batch Actions drop down selectTransfer owner ndash then apply
46 Chapter 4 User manual
nada Documentation Release 40
44 Manage Studies
There are 2 Options to get studies into the new catalog
441 Option 1
bull The first is to upload a DDI and all its resources to the collection in the same way as described in the earliersection ndash Uploading a Study Except instead of choosing Central Catalog chose the collection you want toupload the study to
bull Click on the Add Study button and upload a DDI and RDF and all your resources as described in the earliersection ndash Uploading a Study
bull Once a study is added in this way it displays in the Manage Studies list Notice that the collection summaryfield shows that the study belongs to (is Owned By) the DHS collection (this was the Short name defined in theexample when the Health Surveys Collection was created)
bull Also note that the new study also appears in the Central Data Catalog
All studies uploaded to collections will automatically be added to the Central Data Catalog in order to build a commonsearch portal for all studies
44 Manage Studies 47
nada Documentation Release 40
442 Option2
Copying studies from one collection to another
bull The second way to add a study to a collection is to Copy the study from another collection into the new collection
bull To copy a study already in the catalog to display in the new collection first make sure to be in the Manage Studiessection for the collection you want to put studies into To do this either use the Studies ndash Manage studies menuon the top or simply click on the Switch link next to the Manage Studies [Collection Title] heading
bull Then Click on the Copy Studies blue button at the top right
bull A list of all studies available to copy to the new collection is listed Simply click on the Link button in green tocopy the study to the collection The button will turn red and say Unlink To reverse the process and click thenow red button
bull Going back to the Manage Studies page for the collection will show the newly copied studies in the collectionlist Also note that the Collection field now indicated DHS next to Central DHS is in grey to indicate it is notowned (it is a copy) by that collection and the Central is in blue to show it is owned by the Central Data CatalogAlso note that because the study is not owned by this catalog it cannot be edited from this catalog ndash hence thepublishunpublish green button is absent for the copied studies
45 Managing Licensed Requests
Datasets that are assigned the Access Type Licensed require approval from the NADA administrator before the usercan get access to the data files From the site administration there are a number of ways to see if any licensed requestshave been received
bull Go to the dashboard Pending requests show up as red in the catalog quicj summary section Clicking on thislink goes to the Licensed Survey Requests management page
bull Or go to the Studies link on the top menu and select Licensed Requests from the submenu
48 Chapter 4 User manual
nada Documentation Release 40
The link shows a page with a list Licensed Requests received The status column indicated the Pending requests
bull Click on the Edit link for to process a request
The Request information tab shows a summary of the information provided by the applicant
bull To Approve or Deny or request further information for the request Click on the Process tab
45 Managing Licensed Requests 49
nada Documentation Release 40
bull Select Approve to approve the request (other options include Deny as well as Request more information fromthe applicant)
bull Select the files that the user will be authorized to download ndash it is also possible to enter a maximum number ofdownloads and expiry date for downloads
bull Enter any comments to be sent to the applicant
bull Select Notify user by email to notify them that the application has been processed
bull Select Update
bull The remaining tabs
ndash Communicate - provides a means to ask for more information from the applicant
ndash Monitor ndash allows the administrator to see when and how many times the applicant downloaded thedata
ndash Forward Request ndash provides a means to forward the request to another person for review
46 Manage Citations
The Citations section is where bibliographic references can be added for publications that use any of the studies in thecatalog These citations can be linked to particular studies in the catalog and are displayed to the users of the systemin the study information view of the relevant study
Citations are added from the Citations menu
50 Chapter 4 User manual
nada Documentation Release 40
bull To add a citation - click on All citations then click on the Add New Citation button at the top right
bull Compete the form including the indication as to whether the citation should be published or not
bull Then expand the Related studies link to tell the system which studies the citation ldquobelongsrdquo to
bull Click on the Attach studies link This reveals a list of all studies in the catalog
bull Select the relevant studies by clicking on the green Select button
bull Click on the apply filter button to save the changes The study now appears in the related studies box
bull Click on the submit button to save the citation
bull Note the flag keywords and notes fields can be used by administrators to place extra notes only visible to otheradministrators that might prove useful when there is uncertainty about a citations appropriateness or accuracy
bull It is also possible to import citations in common citation formats such as BibTex and EndNote (RIS)
bull To do this use the Import Citations link from the top menu
46 Manage Citations 51
nada Documentation Release 40
bull Paste the BibTex or RIS text into the form and then at the bottom of the screen click on Attach studies to linkthe citation to a particular study in the catalog
bull The citation now appears in the citation list as well as on the study information page for the relevant studies
52 Chapter 4 User manual
nada Documentation Release 40
47 Managing Users and account types
Users in the NADA can be defined according to three broad groups
General Usersndash this is the normal user who registers on a NADA site from the user interface This user type hasno access to the site administration It is required to register as a user before being granted access to public use andlicensed data types
Site Administrators (unlimited) ndash this user has access to all functions and all collections within the Site Administra-tion System wide access
Limited Administrators ndash these administrators have access to a limited set of functions within the Site Administra-tion Examples would be an administrator of a specific collections or licensed survey reviewer for all or only somecollections or report generator or citation manager etc
471 Creating User accounts
User accounts can be created in two ways
1 A General User account can be created by a user directly from the register screen from the login link on the userinterface of the application
The user created by this process has no access to the site administration This account can only be used to apply andgain access to public and licensed datasets
2 A user account can also be created by a Site Administrator
bull To do this login as a Site Administrator
bull Go to the site administration section of the application
47 Managing Users and account types 53
nada Documentation Release 40
bull Select Users ndash Add user from the top menu
bull Fill in the information for the user in the form and be sure to mark the account status as Active Then click theCreate button
54 Chapter 4 User manual
nada Documentation Release 40
47 Managing Users and account types 55
nada Documentation Release 40
bull Note that the user always starts off as a General User with no access permissions to the Site Administration Theuser group column displays as empty for users with only general user accounts
bull To see a list of all users in the system go to the Users ndash All Users menu item at the top of the screen
bull Note the new users created have no User group assigned (they are general users) Also note the Actions columnon the far right From these links an account can be edited (including changing the password and blocking anaccount) deleted and Permissions managed for the account
472 Managing User Account Permissions
User accounts permissions can be only be set and changed by a Site Administrator To change the permissions for anaccount
bull Click on the Permissions link next to the account to be changed All accounts start of as General users accounts
bull To change this user to a full site administrator who will have full system wide access to all parts and functionsof the NADA administration select the Site administrators (full access) option and tick the admin box as wellClick update to save the changes
56 Chapter 4 User manual
nada Documentation Release 40
473 Collection level administrators
bull To create a user who only has permissions to administer studies or administration functions for a particularcollection Select Site administrators (limited access)
47 Managing Users and account types 57
nada Documentation Release 40
bull It is then necessary to assign a role to this new limited administrator account To create a limited access ad-ministrator for a particular collection ndash select Site administrators (limited access) and then select Collectionadministrators Notice The form expands to reveal a list of collections in the system
bull Select the appropriate level of access that this account will have for this collection In the example below anadministrator is being created who can manage only licensed requests for the collection ndash Health Surveys Thisaccount will not be able to upload or publish studies The account will only be able to process licensed requestsfor the collection ndash Health Surveys
58 Chapter 4 User manual
nada Documentation Release 40
Other levels of access for Site administrators (limited access) ndash Collection administrators include
1 Accounts that are given full access to manage studies
2 Accounts that are given access to upload studies but not publish them
3 Accounts that are limited to reviewing studies
474 Global level Limited access accounts
Other types of limited access accounts include
1 Accounts that can only view system reports at a global level
2 Accounts that can only access the citations section and manage citations
3 Accounts that can only access the Licensed Request management system ndash at the global level for all collections
47 Managing Users and account types 59
nada Documentation Release 40
Impersonating a user
The system includes a function that allows a Site Administrator to impersonate (take on the role) a user created inthe system This is a useful testing tool when creating users and assigning permissions It essentially allows theadministrator to take on the role of another user temporarily
bull To access the Impersonate User feature go to the Users ndash Impersonat user menu at the top of the screen
bull A list of users to impersonate is shown
bull Select the user to impersonate and click on the impersonate button
bull The dashboard view for the impersonated user now shows
60 Chapter 4 User manual
nada Documentation Release 40
bull Note in the example above the account being impersonated is a Limited Account administrator with rights onlyto manage licensed requests for the Health Surveys Collection Note that all other dashboard menus are eitherhidden or clicking on any other function other than manage studies results in an access denied message
bull This is a good way to test if the roles assigned to a user account have the expected results
bull To exit the impersonate mode and return to the Site Administrator role ndash Click on the top right menu and selectExit impersonate mode
475 The Reviewer Limited access account
Sometimes it is desirable for catalog administrators to allow certain users to see a collection before it is published butwithout granting access to the site administration functions
This is useful for getting feedback on the correctness of information on collections or studies before publishing
To do this
bull First create an account for the user or get the user to create an account by using the register form on the loginscreen
bull Then edit the permissions for that user selecting Site Administrator (limited access) ndash Collection administrator
bull Then for the appropriate collection select Reviewer and click update to save the changes
47 Managing Users and account types 61
nada Documentation Release 40
bull The newly created reviewer account user can now view all studies in a collection even if the study or collectionis unpublished
48 Manage Site Pages and Menus
The NADA has a small content management component that allows for the creation of menu pages to appear on theuser interface
bull Examples of menus that might be useful for users of the site might be A page dealing with the disseminationpolicies of the organization or perhaps a page with contact information for the information
New menu items and pages can be created via the Menu- All pages menu link at the top of the Site Administrationpage
62 Chapter 4 User manual
nada Documentation Release 40
bull Select All pages from the menu
bull To add a new page click on the Add New Page button
bull Give the page a Title in the Title field
bull Clicking in the URL field will automatically suggest a name for the page in the URL
bull Enter the contents for the page in the Body section Plain text or HTML is accespted by this field
bull Then indicate if the page should be published or not in the Publish dropdown
bull The Weight field tells the NADA in what order this menu item should display Eg 0 would be first 1 secondand 2 third
bull Click on Update to save the changes
bull View the changes from the user interface In this Example a Contact Us page was created
bull It is also possible from the Menu Management screen to add a menu link that links to an existing page on anothersite (rather than creating a page itself)
bull To change the order in which the menu items display on the user interface use the Reorder Menu button on theMenu Management screen
48 Manage Site Pages and Menus 63
nada Documentation Release 40
49 The Site Settings Page
All settings for the application are controlled via the Settings menu at the top of the Site Administration page Thereare seven main settings sections See screenshot below
491 General Settings
1 Type the Title of the site here This will become the front page title of the NADA site In this case the Title isNADA
64 Chapter 4 User manual
nada Documentation Release 40
2 The footer text can be changed in this field This displays at the bottom of your site page
3 The initial page that loads when a user visits the NADA site can be set here In this case the catalog page is setto open by default
4 The name of the webmaster can be set here This is the name that will be used in system emails sent to users
5 Enter the webmaster email address here This should be the address that will be used in communication withusers Typically this is a general enquiries email set up by the organization and not a personal email address fora particular person Note to avoid mail systems rejecting mail as spam make sure to enter an address here thatis on the same domain as the server used in the email settings at setup
6 This field sets the location of the Cache folder The cache folder stores pre- generated pages of the site to allowfor faster browsing by the user By default it is set to cache This can be moved to another location if desiredbut must be writable The green tick indicates that the folder can be found and is set up correctly Enter eitherrelative or absolute paths to the folder location
7 Set the time that the Cache takes to expire By default it is set to 2 hours (in milli seconds)
8 If it is desired to turn off caching then select no here Sometimes it is useful to turn off caching when developingor updating a site so as to ensure that content changes become immediately visible on the front-end withouthaving to wait for the cache to expire and the new changes to show Turn this back on to speed up page loadingfor users
Click update to save all settings
Language
To change the language of the application expand the language section and choose the desired language Click updateto save and apply the setting
49 The Site Settings Page 65
nada Documentation Release 40
Enable or disable the HTML editor
A basic HTML editor is provided in the menu and page creating section of the application This setting allows this tobe turned on or off
Survey catalog settings
1 This is the folder where the files for the study are stored on the server This includes the DDI eternal resourcesand data files This folder can be moved to a location outside the web root as described in the installationinstructions in Chapter 1 Enter either relative or absolute paths to the folder location
2 This is the folder where DDIrsquos can be placed in order to use the bulk study import function in the NADA InNADA3 files had to be physically copied to this folder on the server but this is no longer necessary in NADA4 Files can now be directly uploaded to this folder from the Site Administration ndash Manage Studies page page
66 Chapter 4 User manual
nada Documentation Release 40
3 Select the vocabulary to use for the topic filter By default this is set to the CESSDA classification as recom-mended in the IHSN templates supplied at IHSNorg for the Nesstar Metadata Publisher
4 Enable or disable the Country filter on the user interface search page here If the catalog only contains studiesfor one country then turning this filter off is recommended
5 Enable or disable the Topic filter on the user interface search page here If no topics have been defined in theDDIrsquos being uploaded then it is recommended to turn this filter off (disable)
6 Enable or disable the Year filter on the user interface search page here
7 Enable or disable the Collection filter on the user interface search page here If no collections have been definedthen it is recommended to disable this filter
8 Enable or disable the Data access filter on the user interface search page here This filter is not needed if thereare very few studies in the catalog or if all studies hare set to the same access type
9 This section controls the order in which the filters appear on the search page Enter numbers here that rank theorder of the filters in the order they should be displayed
10 This setting determines how many studies are displayed by default to the user on the search page ndash catalog view
Site Login settings
1 To require that users login before being able to access the website set this option to Requires all users to loginto access the website
2 Determined how long a user will stay logged in After this time the user will be automatically logged out
3 Sets the minimum length for passwords created by the users at registration or for manual user creation
49 The Site Settings Page 67
nada Documentation Release 40
SMTP Settings
1 If the PHPweb server is configured to send email using PHPrsquos MAIL function select the first option and donrsquotfill in anything else
If your organization has a mail server and has have a dedicated account that can be setup for NADA use the followingsettings Check the radio button ldquoUse SMTP Serverrdquo
2 Enter the host name for the server
3 Enter the port used by the server to send mail
4 If required enter the user name used to send mail on the server
5 Enter the password used to send mail on the server
If the organization does not own a mail server a Gmail account can be configured to be used with NADA
bull Check the radio button ldquoUse SMTP Serverrdquo
bull Host name sslsmtpgooglemailcom or sslsmtpgmailcom
bull SMTP port 465
bull Account username email-addressgmailcom
bull Account password password for the gmail account
6 Test the email settings
The quickest way to test if the email settings are working is to use the ldquoforgot passwordrdquo option from the user loginpage If no mail is received when doing this test then go back and correct the mail settings Check with the ISP orserver administrator for the correct settings
Click on update to save all settings
68 Chapter 4 User manual
nada Documentation Release 40
492 Dashboard setting
Provides a means to automatically have content loaded into the dashboard via an RSS feed from a site The defaultsetting is set to receive updates and news from the IHSN website
49 The Site Settings Page 69
nada Documentation Release 40
70 Chapter 4 User manual
CHAPTER 5
Indices and tables
bull genindex
bull modindex
bull search
71
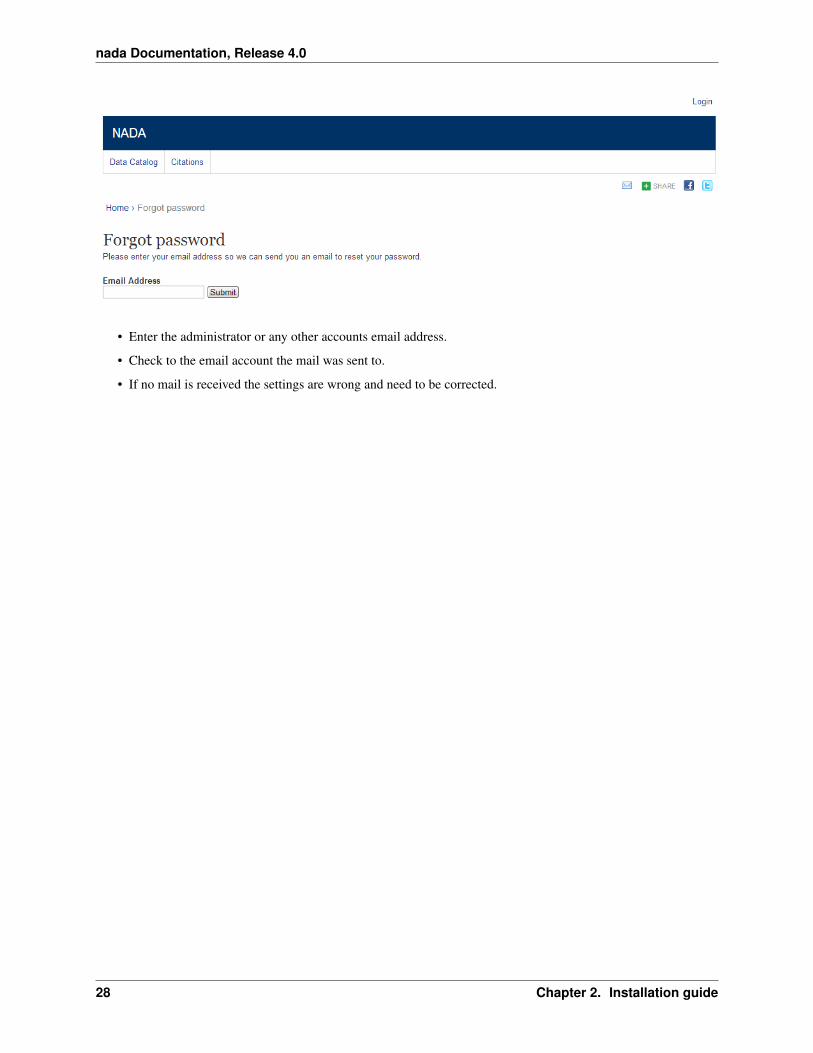
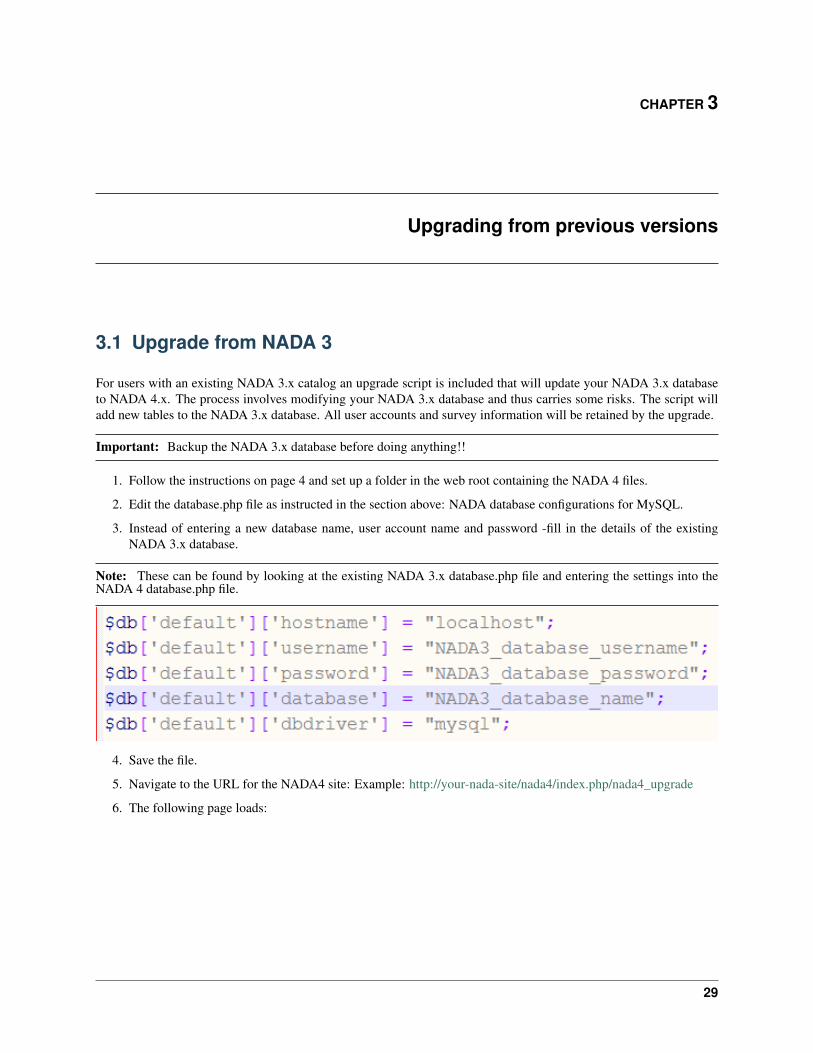
nada Documentation Release 40
bull Under Site configurations expand the ldquoSurvey Catalog Settingsrdquo section
bull For the setting ldquoCatalog folderrdquo enter the relative or full path to where the NADA 3 datafiles folder is locatedFor example if the nada3 datafiles are located on cnada3datafiles enter that path here
bull Save the configurations by clicking on the update button If now errors are shown then you have successfullyupdated the folder path
bull Check your new NADA 4 site to make sure the migration was successful
ndash Check the user administration page from site administration to make sure the users from the nada3 sitewere migrated
ndash Check the ldquoData Catalogrdquo page and view the studies by clicking on the study title to make sure the studyinformation pages are correct
ndash Check the site menus are the same as the NADA 3 site
312 Refresh DDI
In NADA 4 more information is stored in the database from the DDI than in the NADA 3 To bring all these newfields into the imported studies it is necessary to refresh the DDIrsquos The refresh DDI feature in NADA updates thedatabase with metadata from the DDI without having re-uploading the DDIs To update the metadata for all studies inyour catalog
bull Open the following NADA 4 URL in your browser
http[your-nada-4-site]indexphpadmincatalogbatch_refresh
bull Select all studies
bull Click on the ldquoRefresh DDIrdquo button
313 Transferring ownership
NADA 4 has a collection management feature When studies are imported from the NADA3 catalog into NADA4 theyare put into a collection called DEFAULT They need to be moved from this default system collection to the Central
31 Upgrade from NADA 3 31
nada Documentation Release 40
Data Catalog of the NADA4
To do this
bull Go login to the Site Administration and navigate to the Studies Manage Studies Central Data Catalog page
bull Select all the studies by ticking the check boxes next to each study on the right
bull Click on the dropdown menu and select Transfer owner
bull From the Transfer study owner page Select Central Data Catalog and then click transfer
32 Chapter 3 Upgrading from previous versions
nada Documentation Release 40
314 Updating the Site themetemplate
You cannot use your NADA3 template in NADA4 without making some changes Here are general guidelines butsteps may differ depending on your nada site template
bull Copy your NADA3 template to the NADA4 themes folder
bull Edit the [nada4-root]configtemplatephp following the steps below
bull Look for the setting ldquotheme_namerdquo by default it is set to rdquowbrdquo
bull Change ldquowbrdquo to the theme name you want to use Theme name is the folder name you copied to[NADA4]themes[your-site-theme] from your nada3 site
bull Save the file
NB The template may need some adjusting to run properly on the new NADA 4 site This will involve editingthe layoutphp and other template files within the template folder which is now located in the NADA 4 themesfolder
32 Migrate MySQL to Microsoft SQL
TODO
32 Migrate MySQL to Microsoft SQL 33
nada Documentation Release 40
34 Chapter 3 Upgrading from previous versions
CHAPTER 4
User manual
41 Overview and core concepts
411 About NADA
NADA is a web-based cataloging application that allows for the creation of portals that allows users to browse searchcompare apply for access and download relevant census or survey information
It was originally developed to support the establishment of national survey data archives The application is used by adiverse and growing number of national regional and international organizations NADA as with other IHSN toolsuses the Data Documentation Initiative (DDI) XML-based international metadata standard
412 Concepts
CENTRAL DATA CATALOG
The default catalog created when a NADA instance is installed is the Central Data Catalog All studies uploaded to theNADA are visible searchable and accessible from the Central Data Catalog For many institutions the Central DataCatalog will remain the only catalog in their NADA instance For some institutions being able to divide the contentsof the Central Data Catalog into more refined collections will be desirable
COLLECTIONS
Collections are sub categories of the Central Data Catalog They allow administrators of a NADA instance to groupstudies into what can be thought of as sub-catalogs of the Central Data Catalog This has a number of benefitsboth from the user and the administrator perspective From the usersrsquo perspective being able to filter and viewgroups (collections) of studies that logically belong together makes finding what they are looking for easier From theadministratorsrsquo perspective the ability to create collections of studies that may logically belong together facilitates theability to decentralize the management of each collection of studies to specific administrators (for example collectionscan be managed by different departments in an institution)
NOTE The creation of collections will in general only be useful and necessary for large catalogs or for catalogs thatdesire more decentralized management of groups of studies by different departments
STUDIES
Studies are carried out to gather more knowledge about a subject Studies may gather information from a number ofdifferent sources in order to answer the questions asked The information gathered for a study will in the context of
35
nada Documentation Release 40
NADA catalogs usually come from either a census or a surveys It is therefore not uncommon to hear the terms surveyand study used interchangeably when listening to people talk about their NADA catalog
METADATA
Metadata are data about the data They are not the actual data collected from the survey but rather the information thatdescribes the survey process and the data The NADA uses the Data Documentation Initiative (DDI) ndash ddiallianceorgndash standard for the presentation of metadata for each study The DDI document (which is an XML document) isprepared outside the NADA application either manually or using a tool like the Nesstar Publisher ndash nesstarcom ndash andthen imported into the NADA The detailed information about the survey is searchable down to the variable level foreach survey in the catalog
DATA ACCESS TYPES
The NADA allows for the level of access to datasets for studies to be controlled at the study level In other words thelevel of restriction can differ from study to study and can be defined on a scale ranging from direct access with norestrictions to no access Briefly the available access types are
bull Data not available - data are not available for this study
bull Direct Access Data Files - data shared under this policy can be downloaded without any restrictions The useris not required to be logged into the site and no personal information is collected on the person downloading thedata
bull Public Use Data Files - data shared under this policy requires that the user be logged in and registered on thesite before they are able to download the data The user is required to agree to a terms of use of the data and theapplication keeps records of who downloads the data
bull Licensed Data Files - data shared under this policy requires that the user be logged in and registered on the siteUsers are also required to fill in and submit a detailed application form listing their reasons for wanting accessto the data Once the user submits the application form the system informs the system administrator that anapplication has been made In order for the person to get access to the data the system administrator needs toreview the application and approve it
bull Data available in an Enclave - under this policy no data is shared through the application Users submit anapplication to access the data at a secure facility physically located on the premises of the data producer or afacility nominated by the data producer
bull Data available from external repository ndash The NADA allows for studies and their metadata to be listed in aNADA catalog but for a link to be created to another site when the data for that study are available elsewhere
CITATIONS
Citations are references that can be included at the study level which point to published works that have used the datafrom a particular study In many cases this will be a reference to a Journal Article Working paper Newspaper articleetc Such resources are useful to researchers who are interested in seeing how the data have been used before Theyare also a good way of showing the funders of surveys that the data are being used for policy and research purposesand thus are an indicator of some of the impact a study has had
USERS
Users in the NADA can be defined according to three broad groups General Users ndash this is the normal user whoregisters on a NADA site from the user interface This user type has no access to the site administration It is requiredto register as a user when accessing public use and licensed data types Site Administrators (unlimited) ndash this user
36 Chapter 4 User manual
nada Documentation Release 40
has access to all functions and all collections within the Site Administration System wide access Limited Adminis-trators ndash these administrators have access to a limited set of functions within the Site Administration Examples wouldbe an administrator of a specific collections or licensed survey reviewer for all or only some collections or reportgenerator etc
413 Why do NADA administrators need to understand these concepts
Understanding these concepts is important as it
bull Is critical to understanding the new permissions and administrator types introduced in NADA 4 Administratorsare now able to create collections within their NADArsquos and assign different roles to administrators and moregranular levels of access to catalog administration at the collection level It is now possible for example to haveadministrators whorsquos lsquopowersrsquo range from being able to manage all parts of a collectionrsquos administration downto ones with more restrictive access such as ones whose only function is as licensed survey reviewer or reportgenerator or catalog reviewer or citation manager etc
bull Ensures that the correct level of permissions and access is assigned to users based on security policies within theinstitution Unlike previous versions of NADA not all users who have access to the Site Administration needhave the level of access of an ldquounlimited site administratorrdquo This limits security risks associated with havingtoo many ldquounlimited site administratorsrdquo managing a site
bull Assists in assigning an appropriate data access type to data based on institutional distribution polices
bull Makes it easier to explain more clearly to institutional managers what the capabilities of the NADA applicationare and to advise on how to best manage the allocation of responsibilities
42 The Dashboard
After logging in to the Site Administration with administrator credentials the user is taken to the dashboard
The Dashboard provides a quick glance summary for administrators to get an overall picture of what has been happen-ing on the site as well as what pending tasks are outstanding for the administrator
42 The Dashboard 37
nada Documentation Release 40
1 Menu link to the Dashboard
2 Menu link to the Study Management pages submenus include Manage Studies Licensed requests and ManageCollections
3 Menu link to the citations management pages
4 Menu link to the User management pages submenus include All users Add user and Impersonate User
5 Menu link to create menu pages for the site frontend
6 Menu link to generate usage reports
7 Menu Link to the settings pages submenus include Settings Coutries Regions and Vocabularies
8 Useful navigation links submenus include Change Password Log out Catalog Home Data catalog Citations
9 This section lists all collections in the catalog Within each collection a summary is given of the number ofstudies along with diagnostics related to the number of studies publishedunpublished missing questionnairesdata access types set but with no data attached as well as some buttin links to Manage the collections studiesusers and a History of changes made to the collection
10 Provides a summary of users registrations and number of users currently logged in
11 Show how many pages are being cached on the site with a link to clear the cache if need be
12 Show a list of recently added or updated studies Clicking on a study in the list takes you to the page to managethat study
38 Chapter 4 User manual
nada Documentation Release 40
43 Manage Collections
431 Collections
Collections are sub categories of the Central Data Catalog They allow administrators of a NADA instance to groupstudies into what can be thought of as sub-catalogs of the Central Data Catalog
Collections provide a number of benefits both from the user and the administrator perspective From the usersrsquo per-spective being able to filter and view groups (collections) of studies that logically belong together makes finding whatthey are looking for easier From the administratorsrsquo perspective the ability to create collections of studies that maylogically belong together facilitates the ability to decentralize the management of each collection of studies to specificadministrators (for example collections can be managed by different departments in an institution)
Note The creation of collections will in general only be useful and necessary for large catalogs or for catalogs thatdesire more decentralized management of groups of studies by different departments
432 Creating collections
bull Login to the Site administration using an administrator password
bull Collections are managed and created by going to the Studies Manage collections menu link
bull There are no collections defined in the default NADA 4 installation
bull To create a new collection click on the Create new collection button
43 Manage Collections 39
nada Documentation Release 40
1 Under Collection Identification provide a short name for the collection This will become the URL for thecollection so pick carefully For Title fill in the fill title for the collection This will be the name displayed atthe top of the collection page
B Fill in a 3 or four line short description of the collection This text will display on the front end in the collectionslist For examples see httpmicrodataworldbankorgindexphpcontributing-catalogs
C Fill in a more detailed description of the collection This will display on the About page for that collection Forexample see httpmicrodataworldbankorgindexphpcatalogdhsabout
To format the page and include images it is possible to enter HTML code into this box below is anexample piece of code that includes an image
ltimg src=rdquofilesdhs-fp-01jpgrdquo alt=rdquoHealth Surveys Imagerdquo class=rdquoabout-photordquogt lth2gt Health SurveysCollectionlth2gt ltp align=rdquojustifyrdquogtThe Health Surveys collection aims to provide frequent high qual-ity and timely health data needed by the decision makers when designing public health programsltpgtltpgtHealth surveys provide useful information on health status and health consumption and their determi-nantsltpgt
Copy any images to be displayed into the NADA ldquofilesrdquo folder on your server image imagesthumbnil-imagepng
4 Upload a file to display next to the collection as it is listed on the collection page NOTE This image should be82 X 82 pixels If the upload does not work automatically then copy the thumbnail image to the ldquofilesrdquo folder asshown above
40 Chapter 4 User manual
nada Documentation Release 40
E The Weight field determines in what order collections are shown in the collection list 0123 etc The Selectcollection type drop-down is a system value to distinguish between collections that should be viewed as internal tothe organization or external For example some collections may be made up entirely of studies from an organizationoutside the host catalog These collections can be designated as external The Section dropdown allows for thecategorization as either a collection based on a specialized collection (like health) or based on a regional breakdownSelecting Publish ndash publishes the collection
bull Click on Submit to save the changes
To view the results click on the Preview link on the far right
bull The new collection now also shows in the collection list on the Central Catalog About page (this is where thethumbnail and short description fields are displayed)
43 Manage Collections 41
nada Documentation Release 40
bull Visiting the Dashboard will now also show the new collection listed below the Central Data Catalog With anumber of green buttons as shortcut links to manage the studies on the collection assign administrators for thecollection a history of activity on the collection and a link to edit the collection as in the steps above
433 Manually adding studies to a collection
There are 2 ways to get studies into the new catalog
bull The first is to upload a DDI and all its resources to the collection in the same way as described in the earliersection ndash Uploading a Study Except instead of choosing Central Catalog chose the collection you want to
42 Chapter 4 User manual
nada Documentation Release 40
upload the study to
bull Click on the Add Study button and upload a DDI and RDF and all your resources as described in the earliersection ndash Uploading a Study
bull Once a study is added in this way it displays in the Manage Studies list Notice that the collection summaryfield shows that the study belongs to (is Owned By) the DHS collection (this was the Short name defined in theexample when the Health Surveys Collection was created)
All studies uploaded to collections will automatically be added to the Central Data Catalog in order to build a commonsearch portal for all studies
43 Manage Collections 43
nada Documentation Release 40
434 Copying studies from one collection to another
bull The second way to add a study to a collection is to Copy the study from another collection into the newcollection
bull To copy a study already in the catalog to display in the new collection first make sure to be in the Manage Studiessection for the collection you want to put studies into To do this either use the Studies ndash Manage studies menuon the top or simply click on the Switch link next to the Manage Studies [Collection Title] heading
bull Then Click on the Copy Studies blue button at the top right
bull A list of all studies available to copy to the new collection is listed Simply click on the Link button in green tocopy the study to the collection The button will turn red and say Unlink To reverse the process and click thenow red button
bull Going back to the Manage Studies page for the collection will show the newly copied studies in the collectionlist Also note that the Collection field now indicated DHS next to Central DHS is in grey to indicate it is notowned (it is a copy) by that collection and the Central is in blue to show it is owned by the Central Data CatalogAlso note that because the study is not owned by this catalog it cannot be edited from this catalog ndash hence thepublishunpublish green button is absent for the copied studies
44 Chapter 4 User manual
nada Documentation Release 40
435 Turning on the collection filter
The final step after creating the first collection is to enable the collection filter option in the Settings menus under SiteConfigurations ndash Survey catalog settings
436 Transferring study ownership
In the previous examples mention was made of studies uploaded to a catalog being owned by that catalog There maybe cases where transferring the ownership from one catalog to another will be desirable This will become clearerin the next section on user roles but for now the next steps show how transferring ownership from one collection toanother can be done
bull Transferring ownership from one collection to another has to be done by the owner of the collection and fromthe collection it is currently owned by
bull To transfer ownership Go to the Manage Studies screen and select the study to be transferred Open up the EditStudy page by clicking on the study Title
bull On the right hand side of the screen click on the Transfer study owner link
43 Manage Collections 45
nada Documentation Release 40
bull Select the collection to transfer from the dropdown box
bull Click Transfer
bull Note that when looking the study summary for the transferred study the Collection field now shows the studyto belong (owned by) to the DHS collection and not Central anymore Also note the option to Publish andunpublish is now active
bull To transfer ownership of a large number of studies all at once - from the Manage Studies page ndash select the studiesto be transferred (tick them in the box left of each study) and then from the top Batch Actions drop down selectTransfer owner ndash then apply
46 Chapter 4 User manual
nada Documentation Release 40
44 Manage Studies
There are 2 Options to get studies into the new catalog
441 Option 1
bull The first is to upload a DDI and all its resources to the collection in the same way as described in the earliersection ndash Uploading a Study Except instead of choosing Central Catalog chose the collection you want toupload the study to
bull Click on the Add Study button and upload a DDI and RDF and all your resources as described in the earliersection ndash Uploading a Study
bull Once a study is added in this way it displays in the Manage Studies list Notice that the collection summaryfield shows that the study belongs to (is Owned By) the DHS collection (this was the Short name defined in theexample when the Health Surveys Collection was created)
bull Also note that the new study also appears in the Central Data Catalog
All studies uploaded to collections will automatically be added to the Central Data Catalog in order to build a commonsearch portal for all studies
44 Manage Studies 47
nada Documentation Release 40
442 Option2
Copying studies from one collection to another
bull The second way to add a study to a collection is to Copy the study from another collection into the new collection
bull To copy a study already in the catalog to display in the new collection first make sure to be in the Manage Studiessection for the collection you want to put studies into To do this either use the Studies ndash Manage studies menuon the top or simply click on the Switch link next to the Manage Studies [Collection Title] heading
bull Then Click on the Copy Studies blue button at the top right
bull A list of all studies available to copy to the new collection is listed Simply click on the Link button in green tocopy the study to the collection The button will turn red and say Unlink To reverse the process and click thenow red button
bull Going back to the Manage Studies page for the collection will show the newly copied studies in the collectionlist Also note that the Collection field now indicated DHS next to Central DHS is in grey to indicate it is notowned (it is a copy) by that collection and the Central is in blue to show it is owned by the Central Data CatalogAlso note that because the study is not owned by this catalog it cannot be edited from this catalog ndash hence thepublishunpublish green button is absent for the copied studies
45 Managing Licensed Requests
Datasets that are assigned the Access Type Licensed require approval from the NADA administrator before the usercan get access to the data files From the site administration there are a number of ways to see if any licensed requestshave been received
bull Go to the dashboard Pending requests show up as red in the catalog quicj summary section Clicking on thislink goes to the Licensed Survey Requests management page
bull Or go to the Studies link on the top menu and select Licensed Requests from the submenu
48 Chapter 4 User manual
nada Documentation Release 40
The link shows a page with a list Licensed Requests received The status column indicated the Pending requests
bull Click on the Edit link for to process a request
The Request information tab shows a summary of the information provided by the applicant
bull To Approve or Deny or request further information for the request Click on the Process tab
45 Managing Licensed Requests 49
nada Documentation Release 40
bull Select Approve to approve the request (other options include Deny as well as Request more information fromthe applicant)
bull Select the files that the user will be authorized to download ndash it is also possible to enter a maximum number ofdownloads and expiry date for downloads
bull Enter any comments to be sent to the applicant
bull Select Notify user by email to notify them that the application has been processed
bull Select Update
bull The remaining tabs
ndash Communicate - provides a means to ask for more information from the applicant
ndash Monitor ndash allows the administrator to see when and how many times the applicant downloaded thedata
ndash Forward Request ndash provides a means to forward the request to another person for review
46 Manage Citations
The Citations section is where bibliographic references can be added for publications that use any of the studies in thecatalog These citations can be linked to particular studies in the catalog and are displayed to the users of the systemin the study information view of the relevant study
Citations are added from the Citations menu
50 Chapter 4 User manual
nada Documentation Release 40
bull To add a citation - click on All citations then click on the Add New Citation button at the top right
bull Compete the form including the indication as to whether the citation should be published or not
bull Then expand the Related studies link to tell the system which studies the citation ldquobelongsrdquo to
bull Click on the Attach studies link This reveals a list of all studies in the catalog
bull Select the relevant studies by clicking on the green Select button
bull Click on the apply filter button to save the changes The study now appears in the related studies box
bull Click on the submit button to save the citation
bull Note the flag keywords and notes fields can be used by administrators to place extra notes only visible to otheradministrators that might prove useful when there is uncertainty about a citations appropriateness or accuracy
bull It is also possible to import citations in common citation formats such as BibTex and EndNote (RIS)
bull To do this use the Import Citations link from the top menu
46 Manage Citations 51
nada Documentation Release 40
bull Paste the BibTex or RIS text into the form and then at the bottom of the screen click on Attach studies to linkthe citation to a particular study in the catalog
bull The citation now appears in the citation list as well as on the study information page for the relevant studies
52 Chapter 4 User manual
nada Documentation Release 40
47 Managing Users and account types
Users in the NADA can be defined according to three broad groups
General Usersndash this is the normal user who registers on a NADA site from the user interface This user type hasno access to the site administration It is required to register as a user before being granted access to public use andlicensed data types
Site Administrators (unlimited) ndash this user has access to all functions and all collections within the Site Administra-tion System wide access
Limited Administrators ndash these administrators have access to a limited set of functions within the Site Administra-tion Examples would be an administrator of a specific collections or licensed survey reviewer for all or only somecollections or report generator or citation manager etc
471 Creating User accounts
User accounts can be created in two ways
1 A General User account can be created by a user directly from the register screen from the login link on the userinterface of the application
The user created by this process has no access to the site administration This account can only be used to apply andgain access to public and licensed datasets
2 A user account can also be created by a Site Administrator
bull To do this login as a Site Administrator
bull Go to the site administration section of the application
47 Managing Users and account types 53
nada Documentation Release 40
bull Select Users ndash Add user from the top menu
bull Fill in the information for the user in the form and be sure to mark the account status as Active Then click theCreate button
54 Chapter 4 User manual
nada Documentation Release 40
47 Managing Users and account types 55
nada Documentation Release 40
bull Note that the user always starts off as a General User with no access permissions to the Site Administration Theuser group column displays as empty for users with only general user accounts
bull To see a list of all users in the system go to the Users ndash All Users menu item at the top of the screen
bull Note the new users created have no User group assigned (they are general users) Also note the Actions columnon the far right From these links an account can be edited (including changing the password and blocking anaccount) deleted and Permissions managed for the account
472 Managing User Account Permissions
User accounts permissions can be only be set and changed by a Site Administrator To change the permissions for anaccount
bull Click on the Permissions link next to the account to be changed All accounts start of as General users accounts
bull To change this user to a full site administrator who will have full system wide access to all parts and functionsof the NADA administration select the Site administrators (full access) option and tick the admin box as wellClick update to save the changes
56 Chapter 4 User manual
nada Documentation Release 40
473 Collection level administrators
bull To create a user who only has permissions to administer studies or administration functions for a particularcollection Select Site administrators (limited access)
47 Managing Users and account types 57
nada Documentation Release 40
bull It is then necessary to assign a role to this new limited administrator account To create a limited access ad-ministrator for a particular collection ndash select Site administrators (limited access) and then select Collectionadministrators Notice The form expands to reveal a list of collections in the system
bull Select the appropriate level of access that this account will have for this collection In the example below anadministrator is being created who can manage only licensed requests for the collection ndash Health Surveys Thisaccount will not be able to upload or publish studies The account will only be able to process licensed requestsfor the collection ndash Health Surveys
58 Chapter 4 User manual
nada Documentation Release 40
Other levels of access for Site administrators (limited access) ndash Collection administrators include
1 Accounts that are given full access to manage studies
2 Accounts that are given access to upload studies but not publish them
3 Accounts that are limited to reviewing studies
474 Global level Limited access accounts
Other types of limited access accounts include
1 Accounts that can only view system reports at a global level
2 Accounts that can only access the citations section and manage citations
3 Accounts that can only access the Licensed Request management system ndash at the global level for all collections
47 Managing Users and account types 59
nada Documentation Release 40
Impersonating a user
The system includes a function that allows a Site Administrator to impersonate (take on the role) a user created inthe system This is a useful testing tool when creating users and assigning permissions It essentially allows theadministrator to take on the role of another user temporarily
bull To access the Impersonate User feature go to the Users ndash Impersonat user menu at the top of the screen
bull A list of users to impersonate is shown
bull Select the user to impersonate and click on the impersonate button
bull The dashboard view for the impersonated user now shows
60 Chapter 4 User manual
nada Documentation Release 40
bull Note in the example above the account being impersonated is a Limited Account administrator with rights onlyto manage licensed requests for the Health Surveys Collection Note that all other dashboard menus are eitherhidden or clicking on any other function other than manage studies results in an access denied message
bull This is a good way to test if the roles assigned to a user account have the expected results
bull To exit the impersonate mode and return to the Site Administrator role ndash Click on the top right menu and selectExit impersonate mode
475 The Reviewer Limited access account
Sometimes it is desirable for catalog administrators to allow certain users to see a collection before it is published butwithout granting access to the site administration functions
This is useful for getting feedback on the correctness of information on collections or studies before publishing
To do this
bull First create an account for the user or get the user to create an account by using the register form on the loginscreen
bull Then edit the permissions for that user selecting Site Administrator (limited access) ndash Collection administrator
bull Then for the appropriate collection select Reviewer and click update to save the changes
47 Managing Users and account types 61
nada Documentation Release 40
bull The newly created reviewer account user can now view all studies in a collection even if the study or collectionis unpublished
48 Manage Site Pages and Menus
The NADA has a small content management component that allows for the creation of menu pages to appear on theuser interface
bull Examples of menus that might be useful for users of the site might be A page dealing with the disseminationpolicies of the organization or perhaps a page with contact information for the information
New menu items and pages can be created via the Menu- All pages menu link at the top of the Site Administrationpage
62 Chapter 4 User manual
nada Documentation Release 40
bull Select All pages from the menu
bull To add a new page click on the Add New Page button
bull Give the page a Title in the Title field
bull Clicking in the URL field will automatically suggest a name for the page in the URL
bull Enter the contents for the page in the Body section Plain text or HTML is accespted by this field
bull Then indicate if the page should be published or not in the Publish dropdown
bull The Weight field tells the NADA in what order this menu item should display Eg 0 would be first 1 secondand 2 third
bull Click on Update to save the changes
bull View the changes from the user interface In this Example a Contact Us page was created
bull It is also possible from the Menu Management screen to add a menu link that links to an existing page on anothersite (rather than creating a page itself)
bull To change the order in which the menu items display on the user interface use the Reorder Menu button on theMenu Management screen
48 Manage Site Pages and Menus 63
nada Documentation Release 40
49 The Site Settings Page
All settings for the application are controlled via the Settings menu at the top of the Site Administration page Thereare seven main settings sections See screenshot below
491 General Settings
1 Type the Title of the site here This will become the front page title of the NADA site In this case the Title isNADA
64 Chapter 4 User manual
nada Documentation Release 40
2 The footer text can be changed in this field This displays at the bottom of your site page
3 The initial page that loads when a user visits the NADA site can be set here In this case the catalog page is setto open by default
4 The name of the webmaster can be set here This is the name that will be used in system emails sent to users
5 Enter the webmaster email address here This should be the address that will be used in communication withusers Typically this is a general enquiries email set up by the organization and not a personal email address fora particular person Note to avoid mail systems rejecting mail as spam make sure to enter an address here thatis on the same domain as the server used in the email settings at setup
6 This field sets the location of the Cache folder The cache folder stores pre- generated pages of the site to allowfor faster browsing by the user By default it is set to cache This can be moved to another location if desiredbut must be writable The green tick indicates that the folder can be found and is set up correctly Enter eitherrelative or absolute paths to the folder location
7 Set the time that the Cache takes to expire By default it is set to 2 hours (in milli seconds)
8 If it is desired to turn off caching then select no here Sometimes it is useful to turn off caching when developingor updating a site so as to ensure that content changes become immediately visible on the front-end withouthaving to wait for the cache to expire and the new changes to show Turn this back on to speed up page loadingfor users
Click update to save all settings
Language
To change the language of the application expand the language section and choose the desired language Click updateto save and apply the setting
49 The Site Settings Page 65
nada Documentation Release 40
Enable or disable the HTML editor
A basic HTML editor is provided in the menu and page creating section of the application This setting allows this tobe turned on or off
Survey catalog settings
1 This is the folder where the files for the study are stored on the server This includes the DDI eternal resourcesand data files This folder can be moved to a location outside the web root as described in the installationinstructions in Chapter 1 Enter either relative or absolute paths to the folder location
2 This is the folder where DDIrsquos can be placed in order to use the bulk study import function in the NADA InNADA3 files had to be physically copied to this folder on the server but this is no longer necessary in NADA4 Files can now be directly uploaded to this folder from the Site Administration ndash Manage Studies page page
66 Chapter 4 User manual
nada Documentation Release 40
3 Select the vocabulary to use for the topic filter By default this is set to the CESSDA classification as recom-mended in the IHSN templates supplied at IHSNorg for the Nesstar Metadata Publisher
4 Enable or disable the Country filter on the user interface search page here If the catalog only contains studiesfor one country then turning this filter off is recommended
5 Enable or disable the Topic filter on the user interface search page here If no topics have been defined in theDDIrsquos being uploaded then it is recommended to turn this filter off (disable)
6 Enable or disable the Year filter on the user interface search page here
7 Enable or disable the Collection filter on the user interface search page here If no collections have been definedthen it is recommended to disable this filter
8 Enable or disable the Data access filter on the user interface search page here This filter is not needed if thereare very few studies in the catalog or if all studies hare set to the same access type
9 This section controls the order in which the filters appear on the search page Enter numbers here that rank theorder of the filters in the order they should be displayed
10 This setting determines how many studies are displayed by default to the user on the search page ndash catalog view
Site Login settings
1 To require that users login before being able to access the website set this option to Requires all users to loginto access the website
2 Determined how long a user will stay logged in After this time the user will be automatically logged out
3 Sets the minimum length for passwords created by the users at registration or for manual user creation
49 The Site Settings Page 67
nada Documentation Release 40
SMTP Settings
1 If the PHPweb server is configured to send email using PHPrsquos MAIL function select the first option and donrsquotfill in anything else
If your organization has a mail server and has have a dedicated account that can be setup for NADA use the followingsettings Check the radio button ldquoUse SMTP Serverrdquo
2 Enter the host name for the server
3 Enter the port used by the server to send mail
4 If required enter the user name used to send mail on the server
5 Enter the password used to send mail on the server
If the organization does not own a mail server a Gmail account can be configured to be used with NADA
bull Check the radio button ldquoUse SMTP Serverrdquo
bull Host name sslsmtpgooglemailcom or sslsmtpgmailcom
bull SMTP port 465
bull Account username email-addressgmailcom
bull Account password password for the gmail account
6 Test the email settings
The quickest way to test if the email settings are working is to use the ldquoforgot passwordrdquo option from the user loginpage If no mail is received when doing this test then go back and correct the mail settings Check with the ISP orserver administrator for the correct settings
Click on update to save all settings
68 Chapter 4 User manual
nada Documentation Release 40
492 Dashboard setting
Provides a means to automatically have content loaded into the dashboard via an RSS feed from a site The defaultsetting is set to receive updates and news from the IHSN website
49 The Site Settings Page 69
nada Documentation Release 40
70 Chapter 4 User manual
CHAPTER 5
Indices and tables
bull genindex
bull modindex
bull search
71
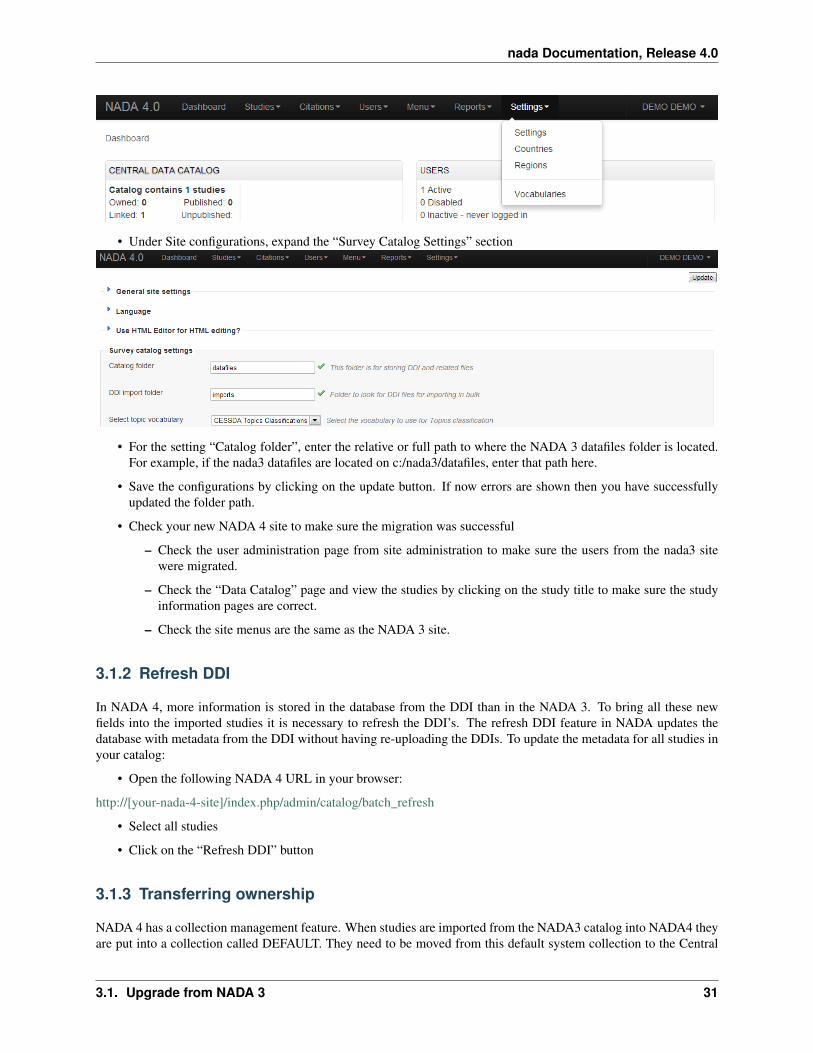
nada Documentation Release 40
314 Updating the Site themetemplate
You cannot use your NADA3 template in NADA4 without making some changes Here are general guidelines butsteps may differ depending on your nada site template
bull Copy your NADA3 template to the NADA4 themes folder
bull Edit the [nada4-root]configtemplatephp following the steps below
bull Look for the setting ldquotheme_namerdquo by default it is set to rdquowbrdquo
bull Change ldquowbrdquo to the theme name you want to use Theme name is the folder name you copied to[NADA4]themes[your-site-theme] from your nada3 site
bull Save the file
NB The template may need some adjusting to run properly on the new NADA 4 site This will involve editingthe layoutphp and other template files within the template folder which is now located in the NADA 4 themesfolder
32 Migrate MySQL to Microsoft SQL
TODO
32 Migrate MySQL to Microsoft SQL 33
nada Documentation Release 40
34 Chapter 3 Upgrading from previous versions
CHAPTER 4
User manual
41 Overview and core concepts
411 About NADA
NADA is a web-based cataloging application that allows for the creation of portals that allows users to browse searchcompare apply for access and download relevant census or survey information
It was originally developed to support the establishment of national survey data archives The application is used by adiverse and growing number of national regional and international organizations NADA as with other IHSN toolsuses the Data Documentation Initiative (DDI) XML-based international metadata standard
412 Concepts
CENTRAL DATA CATALOG
The default catalog created when a NADA instance is installed is the Central Data Catalog All studies uploaded to theNADA are visible searchable and accessible from the Central Data Catalog For many institutions the Central DataCatalog will remain the only catalog in their NADA instance For some institutions being able to divide the contentsof the Central Data Catalog into more refined collections will be desirable
COLLECTIONS
Collections are sub categories of the Central Data Catalog They allow administrators of a NADA instance to groupstudies into what can be thought of as sub-catalogs of the Central Data Catalog This has a number of benefitsboth from the user and the administrator perspective From the usersrsquo perspective being able to filter and viewgroups (collections) of studies that logically belong together makes finding what they are looking for easier From theadministratorsrsquo perspective the ability to create collections of studies that may logically belong together facilitates theability to decentralize the management of each collection of studies to specific administrators (for example collectionscan be managed by different departments in an institution)
NOTE The creation of collections will in general only be useful and necessary for large catalogs or for catalogs thatdesire more decentralized management of groups of studies by different departments
STUDIES
Studies are carried out to gather more knowledge about a subject Studies may gather information from a number ofdifferent sources in order to answer the questions asked The information gathered for a study will in the context of
35
nada Documentation Release 40
NADA catalogs usually come from either a census or a surveys It is therefore not uncommon to hear the terms surveyand study used interchangeably when listening to people talk about their NADA catalog
METADATA
Metadata are data about the data They are not the actual data collected from the survey but rather the information thatdescribes the survey process and the data The NADA uses the Data Documentation Initiative (DDI) ndash ddiallianceorgndash standard for the presentation of metadata for each study The DDI document (which is an XML document) isprepared outside the NADA application either manually or using a tool like the Nesstar Publisher ndash nesstarcom ndash andthen imported into the NADA The detailed information about the survey is searchable down to the variable level foreach survey in the catalog
DATA ACCESS TYPES
The NADA allows for the level of access to datasets for studies to be controlled at the study level In other words thelevel of restriction can differ from study to study and can be defined on a scale ranging from direct access with norestrictions to no access Briefly the available access types are
bull Data not available - data are not available for this study
bull Direct Access Data Files - data shared under this policy can be downloaded without any restrictions The useris not required to be logged into the site and no personal information is collected on the person downloading thedata
bull Public Use Data Files - data shared under this policy requires that the user be logged in and registered on thesite before they are able to download the data The user is required to agree to a terms of use of the data and theapplication keeps records of who downloads the data
bull Licensed Data Files - data shared under this policy requires that the user be logged in and registered on the siteUsers are also required to fill in and submit a detailed application form listing their reasons for wanting accessto the data Once the user submits the application form the system informs the system administrator that anapplication has been made In order for the person to get access to the data the system administrator needs toreview the application and approve it
bull Data available in an Enclave - under this policy no data is shared through the application Users submit anapplication to access the data at a secure facility physically located on the premises of the data producer or afacility nominated by the data producer
bull Data available from external repository ndash The NADA allows for studies and their metadata to be listed in aNADA catalog but for a link to be created to another site when the data for that study are available elsewhere
CITATIONS
Citations are references that can be included at the study level which point to published works that have used the datafrom a particular study In many cases this will be a reference to a Journal Article Working paper Newspaper articleetc Such resources are useful to researchers who are interested in seeing how the data have been used before Theyare also a good way of showing the funders of surveys that the data are being used for policy and research purposesand thus are an indicator of some of the impact a study has had
USERS
Users in the NADA can be defined according to three broad groups General Users ndash this is the normal user whoregisters on a NADA site from the user interface This user type has no access to the site administration It is requiredto register as a user when accessing public use and licensed data types Site Administrators (unlimited) ndash this user
36 Chapter 4 User manual
nada Documentation Release 40
has access to all functions and all collections within the Site Administration System wide access Limited Adminis-trators ndash these administrators have access to a limited set of functions within the Site Administration Examples wouldbe an administrator of a specific collections or licensed survey reviewer for all or only some collections or reportgenerator etc
413 Why do NADA administrators need to understand these concepts
Understanding these concepts is important as it
bull Is critical to understanding the new permissions and administrator types introduced in NADA 4 Administratorsare now able to create collections within their NADArsquos and assign different roles to administrators and moregranular levels of access to catalog administration at the collection level It is now possible for example to haveadministrators whorsquos lsquopowersrsquo range from being able to manage all parts of a collectionrsquos administration downto ones with more restrictive access such as ones whose only function is as licensed survey reviewer or reportgenerator or catalog reviewer or citation manager etc
bull Ensures that the correct level of permissions and access is assigned to users based on security policies within theinstitution Unlike previous versions of NADA not all users who have access to the Site Administration needhave the level of access of an ldquounlimited site administratorrdquo This limits security risks associated with havingtoo many ldquounlimited site administratorsrdquo managing a site
bull Assists in assigning an appropriate data access type to data based on institutional distribution polices
bull Makes it easier to explain more clearly to institutional managers what the capabilities of the NADA applicationare and to advise on how to best manage the allocation of responsibilities
42 The Dashboard
After logging in to the Site Administration with administrator credentials the user is taken to the dashboard
The Dashboard provides a quick glance summary for administrators to get an overall picture of what has been happen-ing on the site as well as what pending tasks are outstanding for the administrator
42 The Dashboard 37
nada Documentation Release 40
1 Menu link to the Dashboard
2 Menu link to the Study Management pages submenus include Manage Studies Licensed requests and ManageCollections
3 Menu link to the citations management pages
4 Menu link to the User management pages submenus include All users Add user and Impersonate User
5 Menu link to create menu pages for the site frontend
6 Menu link to generate usage reports
7 Menu Link to the settings pages submenus include Settings Coutries Regions and Vocabularies
8 Useful navigation links submenus include Change Password Log out Catalog Home Data catalog Citations
9 This section lists all collections in the catalog Within each collection a summary is given of the number ofstudies along with diagnostics related to the number of studies publishedunpublished missing questionnairesdata access types set but with no data attached as well as some buttin links to Manage the collections studiesusers and a History of changes made to the collection
10 Provides a summary of users registrations and number of users currently logged in
11 Show how many pages are being cached on the site with a link to clear the cache if need be
12 Show a list of recently added or updated studies Clicking on a study in the list takes you to the page to managethat study
38 Chapter 4 User manual
nada Documentation Release 40
43 Manage Collections
431 Collections
Collections are sub categories of the Central Data Catalog They allow administrators of a NADA instance to groupstudies into what can be thought of as sub-catalogs of the Central Data Catalog
Collections provide a number of benefits both from the user and the administrator perspective From the usersrsquo per-spective being able to filter and view groups (collections) of studies that logically belong together makes finding whatthey are looking for easier From the administratorsrsquo perspective the ability to create collections of studies that maylogically belong together facilitates the ability to decentralize the management of each collection of studies to specificadministrators (for example collections can be managed by different departments in an institution)
Note The creation of collections will in general only be useful and necessary for large catalogs or for catalogs thatdesire more decentralized management of groups of studies by different departments
432 Creating collections
bull Login to the Site administration using an administrator password
bull Collections are managed and created by going to the Studies Manage collections menu link
bull There are no collections defined in the default NADA 4 installation
bull To create a new collection click on the Create new collection button
43 Manage Collections 39
nada Documentation Release 40
1 Under Collection Identification provide a short name for the collection This will become the URL for thecollection so pick carefully For Title fill in the fill title for the collection This will be the name displayed atthe top of the collection page
B Fill in a 3 or four line short description of the collection This text will display on the front end in the collectionslist For examples see httpmicrodataworldbankorgindexphpcontributing-catalogs
C Fill in a more detailed description of the collection This will display on the About page for that collection Forexample see httpmicrodataworldbankorgindexphpcatalogdhsabout
To format the page and include images it is possible to enter HTML code into this box below is anexample piece of code that includes an image
ltimg src=rdquofilesdhs-fp-01jpgrdquo alt=rdquoHealth Surveys Imagerdquo class=rdquoabout-photordquogt lth2gt Health SurveysCollectionlth2gt ltp align=rdquojustifyrdquogtThe Health Surveys collection aims to provide frequent high qual-ity and timely health data needed by the decision makers when designing public health programsltpgtltpgtHealth surveys provide useful information on health status and health consumption and their determi-nantsltpgt
Copy any images to be displayed into the NADA ldquofilesrdquo folder on your server image imagesthumbnil-imagepng
4 Upload a file to display next to the collection as it is listed on the collection page NOTE This image should be82 X 82 pixels If the upload does not work automatically then copy the thumbnail image to the ldquofilesrdquo folder asshown above
40 Chapter 4 User manual
nada Documentation Release 40
E The Weight field determines in what order collections are shown in the collection list 0123 etc The Selectcollection type drop-down is a system value to distinguish between collections that should be viewed as internal tothe organization or external For example some collections may be made up entirely of studies from an organizationoutside the host catalog These collections can be designated as external The Section dropdown allows for thecategorization as either a collection based on a specialized collection (like health) or based on a regional breakdownSelecting Publish ndash publishes the collection
bull Click on Submit to save the changes
To view the results click on the Preview link on the far right
bull The new collection now also shows in the collection list on the Central Catalog About page (this is where thethumbnail and short description fields are displayed)
43 Manage Collections 41
nada Documentation Release 40
bull Visiting the Dashboard will now also show the new collection listed below the Central Data Catalog With anumber of green buttons as shortcut links to manage the studies on the collection assign administrators for thecollection a history of activity on the collection and a link to edit the collection as in the steps above
433 Manually adding studies to a collection
There are 2 ways to get studies into the new catalog
bull The first is to upload a DDI and all its resources to the collection in the same way as described in the earliersection ndash Uploading a Study Except instead of choosing Central Catalog chose the collection you want to
42 Chapter 4 User manual
nada Documentation Release 40
upload the study to
bull Click on the Add Study button and upload a DDI and RDF and all your resources as described in the earliersection ndash Uploading a Study
bull Once a study is added in this way it displays in the Manage Studies list Notice that the collection summaryfield shows that the study belongs to (is Owned By) the DHS collection (this was the Short name defined in theexample when the Health Surveys Collection was created)
All studies uploaded to collections will automatically be added to the Central Data Catalog in order to build a commonsearch portal for all studies
43 Manage Collections 43
nada Documentation Release 40
434 Copying studies from one collection to another
bull The second way to add a study to a collection is to Copy the study from another collection into the newcollection
bull To copy a study already in the catalog to display in the new collection first make sure to be in the Manage Studiessection for the collection you want to put studies into To do this either use the Studies ndash Manage studies menuon the top or simply click on the Switch link next to the Manage Studies [Collection Title] heading
bull Then Click on the Copy Studies blue button at the top right
bull A list of all studies available to copy to the new collection is listed Simply click on the Link button in green tocopy the study to the collection The button will turn red and say Unlink To reverse the process and click thenow red button
bull Going back to the Manage Studies page for the collection will show the newly copied studies in the collectionlist Also note that the Collection field now indicated DHS next to Central DHS is in grey to indicate it is notowned (it is a copy) by that collection and the Central is in blue to show it is owned by the Central Data CatalogAlso note that because the study is not owned by this catalog it cannot be edited from this catalog ndash hence thepublishunpublish green button is absent for the copied studies
44 Chapter 4 User manual
nada Documentation Release 40
435 Turning on the collection filter
The final step after creating the first collection is to enable the collection filter option in the Settings menus under SiteConfigurations ndash Survey catalog settings
436 Transferring study ownership
In the previous examples mention was made of studies uploaded to a catalog being owned by that catalog There maybe cases where transferring the ownership from one catalog to another will be desirable This will become clearerin the next section on user roles but for now the next steps show how transferring ownership from one collection toanother can be done
bull Transferring ownership from one collection to another has to be done by the owner of the collection and fromthe collection it is currently owned by
bull To transfer ownership Go to the Manage Studies screen and select the study to be transferred Open up the EditStudy page by clicking on the study Title
bull On the right hand side of the screen click on the Transfer study owner link
43 Manage Collections 45
nada Documentation Release 40
bull Select the collection to transfer from the dropdown box
bull Click Transfer
bull Note that when looking the study summary for the transferred study the Collection field now shows the studyto belong (owned by) to the DHS collection and not Central anymore Also note the option to Publish andunpublish is now active
bull To transfer ownership of a large number of studies all at once - from the Manage Studies page ndash select the studiesto be transferred (tick them in the box left of each study) and then from the top Batch Actions drop down selectTransfer owner ndash then apply
46 Chapter 4 User manual
nada Documentation Release 40
44 Manage Studies
There are 2 Options to get studies into the new catalog
441 Option 1
bull The first is to upload a DDI and all its resources to the collection in the same way as described in the earliersection ndash Uploading a Study Except instead of choosing Central Catalog chose the collection you want toupload the study to
bull Click on the Add Study button and upload a DDI and RDF and all your resources as described in the earliersection ndash Uploading a Study
bull Once a study is added in this way it displays in the Manage Studies list Notice that the collection summaryfield shows that the study belongs to (is Owned By) the DHS collection (this was the Short name defined in theexample when the Health Surveys Collection was created)
bull Also note that the new study also appears in the Central Data Catalog
All studies uploaded to collections will automatically be added to the Central Data Catalog in order to build a commonsearch portal for all studies
44 Manage Studies 47
nada Documentation Release 40
442 Option2
Copying studies from one collection to another
bull The second way to add a study to a collection is to Copy the study from another collection into the new collection
bull To copy a study already in the catalog to display in the new collection first make sure to be in the Manage Studiessection for the collection you want to put studies into To do this either use the Studies ndash Manage studies menuon the top or simply click on the Switch link next to the Manage Studies [Collection Title] heading
bull Then Click on the Copy Studies blue button at the top right
bull A list of all studies available to copy to the new collection is listed Simply click on the Link button in green tocopy the study to the collection The button will turn red and say Unlink To reverse the process and click thenow red button
bull Going back to the Manage Studies page for the collection will show the newly copied studies in the collectionlist Also note that the Collection field now indicated DHS next to Central DHS is in grey to indicate it is notowned (it is a copy) by that collection and the Central is in blue to show it is owned by the Central Data CatalogAlso note that because the study is not owned by this catalog it cannot be edited from this catalog ndash hence thepublishunpublish green button is absent for the copied studies
45 Managing Licensed Requests
Datasets that are assigned the Access Type Licensed require approval from the NADA administrator before the usercan get access to the data files From the site administration there are a number of ways to see if any licensed requestshave been received
bull Go to the dashboard Pending requests show up as red in the catalog quicj summary section Clicking on thislink goes to the Licensed Survey Requests management page
bull Or go to the Studies link on the top menu and select Licensed Requests from the submenu
48 Chapter 4 User manual
nada Documentation Release 40
The link shows a page with a list Licensed Requests received The status column indicated the Pending requests
bull Click on the Edit link for to process a request
The Request information tab shows a summary of the information provided by the applicant
bull To Approve or Deny or request further information for the request Click on the Process tab
45 Managing Licensed Requests 49
nada Documentation Release 40
bull Select Approve to approve the request (other options include Deny as well as Request more information fromthe applicant)
bull Select the files that the user will be authorized to download ndash it is also possible to enter a maximum number ofdownloads and expiry date for downloads
bull Enter any comments to be sent to the applicant
bull Select Notify user by email to notify them that the application has been processed
bull Select Update
bull The remaining tabs
ndash Communicate - provides a means to ask for more information from the applicant
ndash Monitor ndash allows the administrator to see when and how many times the applicant downloaded thedata
ndash Forward Request ndash provides a means to forward the request to another person for review
46 Manage Citations
The Citations section is where bibliographic references can be added for publications that use any of the studies in thecatalog These citations can be linked to particular studies in the catalog and are displayed to the users of the systemin the study information view of the relevant study
Citations are added from the Citations menu
50 Chapter 4 User manual
nada Documentation Release 40
bull To add a citation - click on All citations then click on the Add New Citation button at the top right
bull Compete the form including the indication as to whether the citation should be published or not
bull Then expand the Related studies link to tell the system which studies the citation ldquobelongsrdquo to
bull Click on the Attach studies link This reveals a list of all studies in the catalog
bull Select the relevant studies by clicking on the green Select button
bull Click on the apply filter button to save the changes The study now appears in the related studies box
bull Click on the submit button to save the citation
bull Note the flag keywords and notes fields can be used by administrators to place extra notes only visible to otheradministrators that might prove useful when there is uncertainty about a citations appropriateness or accuracy
bull It is also possible to import citations in common citation formats such as BibTex and EndNote (RIS)
bull To do this use the Import Citations link from the top menu
46 Manage Citations 51
nada Documentation Release 40
bull Paste the BibTex or RIS text into the form and then at the bottom of the screen click on Attach studies to linkthe citation to a particular study in the catalog
bull The citation now appears in the citation list as well as on the study information page for the relevant studies
52 Chapter 4 User manual
nada Documentation Release 40
47 Managing Users and account types
Users in the NADA can be defined according to three broad groups
General Usersndash this is the normal user who registers on a NADA site from the user interface This user type hasno access to the site administration It is required to register as a user before being granted access to public use andlicensed data types
Site Administrators (unlimited) ndash this user has access to all functions and all collections within the Site Administra-tion System wide access
Limited Administrators ndash these administrators have access to a limited set of functions within the Site Administra-tion Examples would be an administrator of a specific collections or licensed survey reviewer for all or only somecollections or report generator or citation manager etc
471 Creating User accounts
User accounts can be created in two ways
1 A General User account can be created by a user directly from the register screen from the login link on the userinterface of the application
The user created by this process has no access to the site administration This account can only be used to apply andgain access to public and licensed datasets
2 A user account can also be created by a Site Administrator
bull To do this login as a Site Administrator
bull Go to the site administration section of the application
47 Managing Users and account types 53
nada Documentation Release 40
bull Select Users ndash Add user from the top menu
bull Fill in the information for the user in the form and be sure to mark the account status as Active Then click theCreate button
54 Chapter 4 User manual
nada Documentation Release 40
47 Managing Users and account types 55
nada Documentation Release 40
bull Note that the user always starts off as a General User with no access permissions to the Site Administration Theuser group column displays as empty for users with only general user accounts
bull To see a list of all users in the system go to the Users ndash All Users menu item at the top of the screen
bull Note the new users created have no User group assigned (they are general users) Also note the Actions columnon the far right From these links an account can be edited (including changing the password and blocking anaccount) deleted and Permissions managed for the account
472 Managing User Account Permissions
User accounts permissions can be only be set and changed by a Site Administrator To change the permissions for anaccount
bull Click on the Permissions link next to the account to be changed All accounts start of as General users accounts
bull To change this user to a full site administrator who will have full system wide access to all parts and functionsof the NADA administration select the Site administrators (full access) option and tick the admin box as wellClick update to save the changes
56 Chapter 4 User manual
nada Documentation Release 40
473 Collection level administrators
bull To create a user who only has permissions to administer studies or administration functions for a particularcollection Select Site administrators (limited access)
47 Managing Users and account types 57
nada Documentation Release 40
bull It is then necessary to assign a role to this new limited administrator account To create a limited access ad-ministrator for a particular collection ndash select Site administrators (limited access) and then select Collectionadministrators Notice The form expands to reveal a list of collections in the system
bull Select the appropriate level of access that this account will have for this collection In the example below anadministrator is being created who can manage only licensed requests for the collection ndash Health Surveys Thisaccount will not be able to upload or publish studies The account will only be able to process licensed requestsfor the collection ndash Health Surveys
58 Chapter 4 User manual
nada Documentation Release 40
Other levels of access for Site administrators (limited access) ndash Collection administrators include
1 Accounts that are given full access to manage studies
2 Accounts that are given access to upload studies but not publish them
3 Accounts that are limited to reviewing studies
474 Global level Limited access accounts
Other types of limited access accounts include
1 Accounts that can only view system reports at a global level
2 Accounts that can only access the citations section and manage citations
3 Accounts that can only access the Licensed Request management system ndash at the global level for all collections
47 Managing Users and account types 59
nada Documentation Release 40
Impersonating a user
The system includes a function that allows a Site Administrator to impersonate (take on the role) a user created inthe system This is a useful testing tool when creating users and assigning permissions It essentially allows theadministrator to take on the role of another user temporarily
bull To access the Impersonate User feature go to the Users ndash Impersonat user menu at the top of the screen
bull A list of users to impersonate is shown
bull Select the user to impersonate and click on the impersonate button
bull The dashboard view for the impersonated user now shows
60 Chapter 4 User manual
nada Documentation Release 40
bull Note in the example above the account being impersonated is a Limited Account administrator with rights onlyto manage licensed requests for the Health Surveys Collection Note that all other dashboard menus are eitherhidden or clicking on any other function other than manage studies results in an access denied message
bull This is a good way to test if the roles assigned to a user account have the expected results
bull To exit the impersonate mode and return to the Site Administrator role ndash Click on the top right menu and selectExit impersonate mode
475 The Reviewer Limited access account
Sometimes it is desirable for catalog administrators to allow certain users to see a collection before it is published butwithout granting access to the site administration functions
This is useful for getting feedback on the correctness of information on collections or studies before publishing
To do this
bull First create an account for the user or get the user to create an account by using the register form on the loginscreen
bull Then edit the permissions for that user selecting Site Administrator (limited access) ndash Collection administrator
bull Then for the appropriate collection select Reviewer and click update to save the changes
47 Managing Users and account types 61
nada Documentation Release 40
bull The newly created reviewer account user can now view all studies in a collection even if the study or collectionis unpublished
48 Manage Site Pages and Menus
The NADA has a small content management component that allows for the creation of menu pages to appear on theuser interface
bull Examples of menus that might be useful for users of the site might be A page dealing with the disseminationpolicies of the organization or perhaps a page with contact information for the information
New menu items and pages can be created via the Menu- All pages menu link at the top of the Site Administrationpage
62 Chapter 4 User manual
nada Documentation Release 40
bull Select All pages from the menu
bull To add a new page click on the Add New Page button
bull Give the page a Title in the Title field
bull Clicking in the URL field will automatically suggest a name for the page in the URL
bull Enter the contents for the page in the Body section Plain text or HTML is accespted by this field
bull Then indicate if the page should be published or not in the Publish dropdown
bull The Weight field tells the NADA in what order this menu item should display Eg 0 would be first 1 secondand 2 third
bull Click on Update to save the changes
bull View the changes from the user interface In this Example a Contact Us page was created
bull It is also possible from the Menu Management screen to add a menu link that links to an existing page on anothersite (rather than creating a page itself)
bull To change the order in which the menu items display on the user interface use the Reorder Menu button on theMenu Management screen
48 Manage Site Pages and Menus 63
nada Documentation Release 40
49 The Site Settings Page
All settings for the application are controlled via the Settings menu at the top of the Site Administration page Thereare seven main settings sections See screenshot below
491 General Settings
1 Type the Title of the site here This will become the front page title of the NADA site In this case the Title isNADA
64 Chapter 4 User manual
nada Documentation Release 40
2 The footer text can be changed in this field This displays at the bottom of your site page
3 The initial page that loads when a user visits the NADA site can be set here In this case the catalog page is setto open by default
4 The name of the webmaster can be set here This is the name that will be used in system emails sent to users
5 Enter the webmaster email address here This should be the address that will be used in communication withusers Typically this is a general enquiries email set up by the organization and not a personal email address fora particular person Note to avoid mail systems rejecting mail as spam make sure to enter an address here thatis on the same domain as the server used in the email settings at setup
6 This field sets the location of the Cache folder The cache folder stores pre- generated pages of the site to allowfor faster browsing by the user By default it is set to cache This can be moved to another location if desiredbut must be writable The green tick indicates that the folder can be found and is set up correctly Enter eitherrelative or absolute paths to the folder location
7 Set the time that the Cache takes to expire By default it is set to 2 hours (in milli seconds)
8 If it is desired to turn off caching then select no here Sometimes it is useful to turn off caching when developingor updating a site so as to ensure that content changes become immediately visible on the front-end withouthaving to wait for the cache to expire and the new changes to show Turn this back on to speed up page loadingfor users
Click update to save all settings
Language
To change the language of the application expand the language section and choose the desired language Click updateto save and apply the setting
49 The Site Settings Page 65
nada Documentation Release 40
Enable or disable the HTML editor
A basic HTML editor is provided in the menu and page creating section of the application This setting allows this tobe turned on or off
Survey catalog settings
1 This is the folder where the files for the study are stored on the server This includes the DDI eternal resourcesand data files This folder can be moved to a location outside the web root as described in the installationinstructions in Chapter 1 Enter either relative or absolute paths to the folder location
2 This is the folder where DDIrsquos can be placed in order to use the bulk study import function in the NADA InNADA3 files had to be physically copied to this folder on the server but this is no longer necessary in NADA4 Files can now be directly uploaded to this folder from the Site Administration ndash Manage Studies page page
66 Chapter 4 User manual
nada Documentation Release 40
3 Select the vocabulary to use for the topic filter By default this is set to the CESSDA classification as recom-mended in the IHSN templates supplied at IHSNorg for the Nesstar Metadata Publisher
4 Enable or disable the Country filter on the user interface search page here If the catalog only contains studiesfor one country then turning this filter off is recommended
5 Enable or disable the Topic filter on the user interface search page here If no topics have been defined in theDDIrsquos being uploaded then it is recommended to turn this filter off (disable)
6 Enable or disable the Year filter on the user interface search page here
7 Enable or disable the Collection filter on the user interface search page here If no collections have been definedthen it is recommended to disable this filter
8 Enable or disable the Data access filter on the user interface search page here This filter is not needed if thereare very few studies in the catalog or if all studies hare set to the same access type
9 This section controls the order in which the filters appear on the search page Enter numbers here that rank theorder of the filters in the order they should be displayed
10 This setting determines how many studies are displayed by default to the user on the search page ndash catalog view
Site Login settings
1 To require that users login before being able to access the website set this option to Requires all users to loginto access the website
2 Determined how long a user will stay logged in After this time the user will be automatically logged out
3 Sets the minimum length for passwords created by the users at registration or for manual user creation
49 The Site Settings Page 67
nada Documentation Release 40
SMTP Settings
1 If the PHPweb server is configured to send email using PHPrsquos MAIL function select the first option and donrsquotfill in anything else
If your organization has a mail server and has have a dedicated account that can be setup for NADA use the followingsettings Check the radio button ldquoUse SMTP Serverrdquo
2 Enter the host name for the server
3 Enter the port used by the server to send mail
4 If required enter the user name used to send mail on the server
5 Enter the password used to send mail on the server
If the organization does not own a mail server a Gmail account can be configured to be used with NADA
bull Check the radio button ldquoUse SMTP Serverrdquo
bull Host name sslsmtpgooglemailcom or sslsmtpgmailcom
bull SMTP port 465
bull Account username email-addressgmailcom
bull Account password password for the gmail account
6 Test the email settings
The quickest way to test if the email settings are working is to use the ldquoforgot passwordrdquo option from the user loginpage If no mail is received when doing this test then go back and correct the mail settings Check with the ISP orserver administrator for the correct settings
Click on update to save all settings
68 Chapter 4 User manual
nada Documentation Release 40
492 Dashboard setting
Provides a means to automatically have content loaded into the dashboard via an RSS feed from a site The defaultsetting is set to receive updates and news from the IHSN website
49 The Site Settings Page 69
nada Documentation Release 40
70 Chapter 4 User manual
CHAPTER 5
Indices and tables
bull genindex
bull modindex
bull search
71
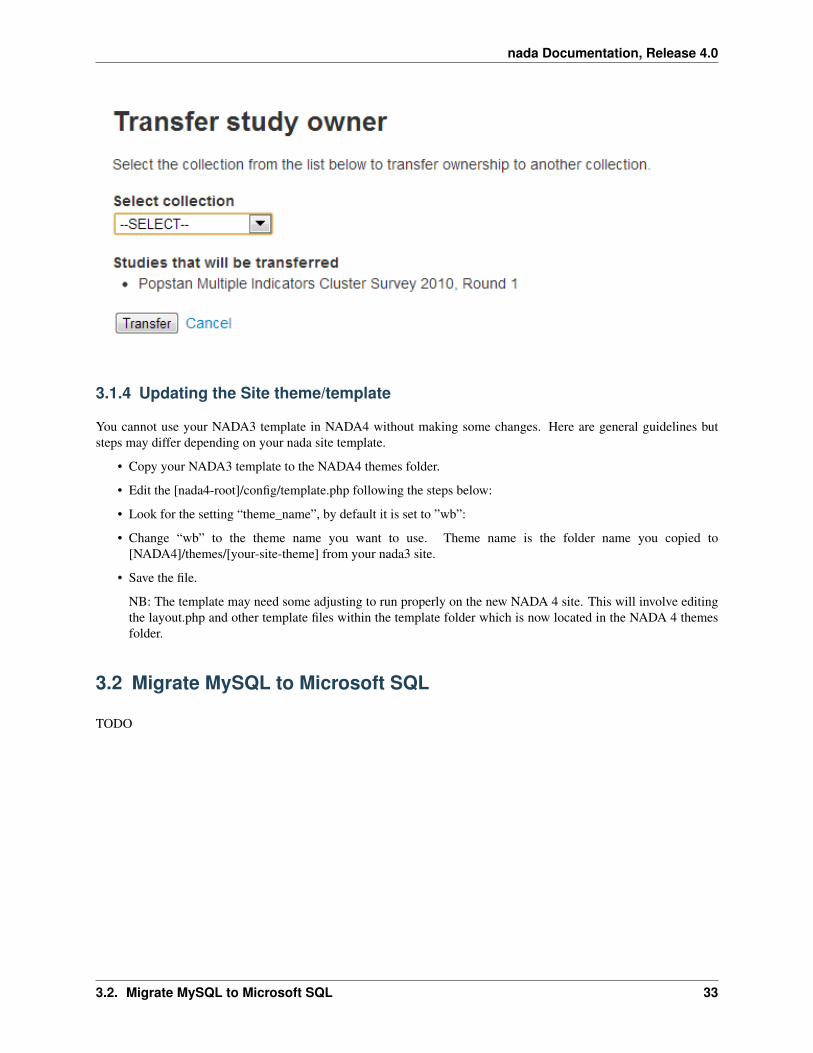
nada Documentation Release 40
34 Chapter 3 Upgrading from previous versions
CHAPTER 4
User manual
41 Overview and core concepts
411 About NADA
NADA is a web-based cataloging application that allows for the creation of portals that allows users to browse searchcompare apply for access and download relevant census or survey information
It was originally developed to support the establishment of national survey data archives The application is used by adiverse and growing number of national regional and international organizations NADA as with other IHSN toolsuses the Data Documentation Initiative (DDI) XML-based international metadata standard
412 Concepts
CENTRAL DATA CATALOG
The default catalog created when a NADA instance is installed is the Central Data Catalog All studies uploaded to theNADA are visible searchable and accessible from the Central Data Catalog For many institutions the Central DataCatalog will remain the only catalog in their NADA instance For some institutions being able to divide the contentsof the Central Data Catalog into more refined collections will be desirable
COLLECTIONS
Collections are sub categories of the Central Data Catalog They allow administrators of a NADA instance to groupstudies into what can be thought of as sub-catalogs of the Central Data Catalog This has a number of benefitsboth from the user and the administrator perspective From the usersrsquo perspective being able to filter and viewgroups (collections) of studies that logically belong together makes finding what they are looking for easier From theadministratorsrsquo perspective the ability to create collections of studies that may logically belong together facilitates theability to decentralize the management of each collection of studies to specific administrators (for example collectionscan be managed by different departments in an institution)
NOTE The creation of collections will in general only be useful and necessary for large catalogs or for catalogs thatdesire more decentralized management of groups of studies by different departments
STUDIES
Studies are carried out to gather more knowledge about a subject Studies may gather information from a number ofdifferent sources in order to answer the questions asked The information gathered for a study will in the context of
35
nada Documentation Release 40
NADA catalogs usually come from either a census or a surveys It is therefore not uncommon to hear the terms surveyand study used interchangeably when listening to people talk about their NADA catalog
METADATA
Metadata are data about the data They are not the actual data collected from the survey but rather the information thatdescribes the survey process and the data The NADA uses the Data Documentation Initiative (DDI) ndash ddiallianceorgndash standard for the presentation of metadata for each study The DDI document (which is an XML document) isprepared outside the NADA application either manually or using a tool like the Nesstar Publisher ndash nesstarcom ndash andthen imported into the NADA The detailed information about the survey is searchable down to the variable level foreach survey in the catalog
DATA ACCESS TYPES
The NADA allows for the level of access to datasets for studies to be controlled at the study level In other words thelevel of restriction can differ from study to study and can be defined on a scale ranging from direct access with norestrictions to no access Briefly the available access types are
bull Data not available - data are not available for this study
bull Direct Access Data Files - data shared under this policy can be downloaded without any restrictions The useris not required to be logged into the site and no personal information is collected on the person downloading thedata
bull Public Use Data Files - data shared under this policy requires that the user be logged in and registered on thesite before they are able to download the data The user is required to agree to a terms of use of the data and theapplication keeps records of who downloads the data
bull Licensed Data Files - data shared under this policy requires that the user be logged in and registered on the siteUsers are also required to fill in and submit a detailed application form listing their reasons for wanting accessto the data Once the user submits the application form the system informs the system administrator that anapplication has been made In order for the person to get access to the data the system administrator needs toreview the application and approve it
bull Data available in an Enclave - under this policy no data is shared through the application Users submit anapplication to access the data at a secure facility physically located on the premises of the data producer or afacility nominated by the data producer
bull Data available from external repository ndash The NADA allows for studies and their metadata to be listed in aNADA catalog but for a link to be created to another site when the data for that study are available elsewhere
CITATIONS
Citations are references that can be included at the study level which point to published works that have used the datafrom a particular study In many cases this will be a reference to a Journal Article Working paper Newspaper articleetc Such resources are useful to researchers who are interested in seeing how the data have been used before Theyare also a good way of showing the funders of surveys that the data are being used for policy and research purposesand thus are an indicator of some of the impact a study has had
USERS
Users in the NADA can be defined according to three broad groups General Users ndash this is the normal user whoregisters on a NADA site from the user interface This user type has no access to the site administration It is requiredto register as a user when accessing public use and licensed data types Site Administrators (unlimited) ndash this user
36 Chapter 4 User manual
nada Documentation Release 40
has access to all functions and all collections within the Site Administration System wide access Limited Adminis-trators ndash these administrators have access to a limited set of functions within the Site Administration Examples wouldbe an administrator of a specific collections or licensed survey reviewer for all or only some collections or reportgenerator etc
413 Why do NADA administrators need to understand these concepts
Understanding these concepts is important as it
bull Is critical to understanding the new permissions and administrator types introduced in NADA 4 Administratorsare now able to create collections within their NADArsquos and assign different roles to administrators and moregranular levels of access to catalog administration at the collection level It is now possible for example to haveadministrators whorsquos lsquopowersrsquo range from being able to manage all parts of a collectionrsquos administration downto ones with more restrictive access such as ones whose only function is as licensed survey reviewer or reportgenerator or catalog reviewer or citation manager etc
bull Ensures that the correct level of permissions and access is assigned to users based on security policies within theinstitution Unlike previous versions of NADA not all users who have access to the Site Administration needhave the level of access of an ldquounlimited site administratorrdquo This limits security risks associated with havingtoo many ldquounlimited site administratorsrdquo managing a site
bull Assists in assigning an appropriate data access type to data based on institutional distribution polices
bull Makes it easier to explain more clearly to institutional managers what the capabilities of the NADA applicationare and to advise on how to best manage the allocation of responsibilities
42 The Dashboard
After logging in to the Site Administration with administrator credentials the user is taken to the dashboard
The Dashboard provides a quick glance summary for administrators to get an overall picture of what has been happen-ing on the site as well as what pending tasks are outstanding for the administrator
42 The Dashboard 37
nada Documentation Release 40
1 Menu link to the Dashboard
2 Menu link to the Study Management pages submenus include Manage Studies Licensed requests and ManageCollections
3 Menu link to the citations management pages
4 Menu link to the User management pages submenus include All users Add user and Impersonate User
5 Menu link to create menu pages for the site frontend
6 Menu link to generate usage reports
7 Menu Link to the settings pages submenus include Settings Coutries Regions and Vocabularies
8 Useful navigation links submenus include Change Password Log out Catalog Home Data catalog Citations
9 This section lists all collections in the catalog Within each collection a summary is given of the number ofstudies along with diagnostics related to the number of studies publishedunpublished missing questionnairesdata access types set but with no data attached as well as some buttin links to Manage the collections studiesusers and a History of changes made to the collection
10 Provides a summary of users registrations and number of users currently logged in
11 Show how many pages are being cached on the site with a link to clear the cache if need be
12 Show a list of recently added or updated studies Clicking on a study in the list takes you to the page to managethat study
38 Chapter 4 User manual
nada Documentation Release 40
43 Manage Collections
431 Collections
Collections are sub categories of the Central Data Catalog They allow administrators of a NADA instance to groupstudies into what can be thought of as sub-catalogs of the Central Data Catalog
Collections provide a number of benefits both from the user and the administrator perspective From the usersrsquo per-spective being able to filter and view groups (collections) of studies that logically belong together makes finding whatthey are looking for easier From the administratorsrsquo perspective the ability to create collections of studies that maylogically belong together facilitates the ability to decentralize the management of each collection of studies to specificadministrators (for example collections can be managed by different departments in an institution)
Note The creation of collections will in general only be useful and necessary for large catalogs or for catalogs thatdesire more decentralized management of groups of studies by different departments
432 Creating collections
bull Login to the Site administration using an administrator password
bull Collections are managed and created by going to the Studies Manage collections menu link
bull There are no collections defined in the default NADA 4 installation
bull To create a new collection click on the Create new collection button
43 Manage Collections 39
nada Documentation Release 40
1 Under Collection Identification provide a short name for the collection This will become the URL for thecollection so pick carefully For Title fill in the fill title for the collection This will be the name displayed atthe top of the collection page
B Fill in a 3 or four line short description of the collection This text will display on the front end in the collectionslist For examples see httpmicrodataworldbankorgindexphpcontributing-catalogs
C Fill in a more detailed description of the collection This will display on the About page for that collection Forexample see httpmicrodataworldbankorgindexphpcatalogdhsabout
To format the page and include images it is possible to enter HTML code into this box below is anexample piece of code that includes an image
ltimg src=rdquofilesdhs-fp-01jpgrdquo alt=rdquoHealth Surveys Imagerdquo class=rdquoabout-photordquogt lth2gt Health SurveysCollectionlth2gt ltp align=rdquojustifyrdquogtThe Health Surveys collection aims to provide frequent high qual-ity and timely health data needed by the decision makers when designing public health programsltpgtltpgtHealth surveys provide useful information on health status and health consumption and their determi-nantsltpgt
Copy any images to be displayed into the NADA ldquofilesrdquo folder on your server image imagesthumbnil-imagepng
4 Upload a file to display next to the collection as it is listed on the collection page NOTE This image should be82 X 82 pixels If the upload does not work automatically then copy the thumbnail image to the ldquofilesrdquo folder asshown above
40 Chapter 4 User manual
nada Documentation Release 40
E The Weight field determines in what order collections are shown in the collection list 0123 etc The Selectcollection type drop-down is a system value to distinguish between collections that should be viewed as internal tothe organization or external For example some collections may be made up entirely of studies from an organizationoutside the host catalog These collections can be designated as external The Section dropdown allows for thecategorization as either a collection based on a specialized collection (like health) or based on a regional breakdownSelecting Publish ndash publishes the collection
bull Click on Submit to save the changes
To view the results click on the Preview link on the far right
bull The new collection now also shows in the collection list on the Central Catalog About page (this is where thethumbnail and short description fields are displayed)
43 Manage Collections 41
nada Documentation Release 40
bull Visiting the Dashboard will now also show the new collection listed below the Central Data Catalog With anumber of green buttons as shortcut links to manage the studies on the collection assign administrators for thecollection a history of activity on the collection and a link to edit the collection as in the steps above
433 Manually adding studies to a collection
There are 2 ways to get studies into the new catalog
bull The first is to upload a DDI and all its resources to the collection in the same way as described in the earliersection ndash Uploading a Study Except instead of choosing Central Catalog chose the collection you want to
42 Chapter 4 User manual
nada Documentation Release 40
upload the study to
bull Click on the Add Study button and upload a DDI and RDF and all your resources as described in the earliersection ndash Uploading a Study
bull Once a study is added in this way it displays in the Manage Studies list Notice that the collection summaryfield shows that the study belongs to (is Owned By) the DHS collection (this was the Short name defined in theexample when the Health Surveys Collection was created)
All studies uploaded to collections will automatically be added to the Central Data Catalog in order to build a commonsearch portal for all studies
43 Manage Collections 43
nada Documentation Release 40
434 Copying studies from one collection to another
bull The second way to add a study to a collection is to Copy the study from another collection into the newcollection
bull To copy a study already in the catalog to display in the new collection first make sure to be in the Manage Studiessection for the collection you want to put studies into To do this either use the Studies ndash Manage studies menuon the top or simply click on the Switch link next to the Manage Studies [Collection Title] heading
bull Then Click on the Copy Studies blue button at the top right
bull A list of all studies available to copy to the new collection is listed Simply click on the Link button in green tocopy the study to the collection The button will turn red and say Unlink To reverse the process and click thenow red button
bull Going back to the Manage Studies page for the collection will show the newly copied studies in the collectionlist Also note that the Collection field now indicated DHS next to Central DHS is in grey to indicate it is notowned (it is a copy) by that collection and the Central is in blue to show it is owned by the Central Data CatalogAlso note that because the study is not owned by this catalog it cannot be edited from this catalog ndash hence thepublishunpublish green button is absent for the copied studies
44 Chapter 4 User manual
nada Documentation Release 40
435 Turning on the collection filter
The final step after creating the first collection is to enable the collection filter option in the Settings menus under SiteConfigurations ndash Survey catalog settings
436 Transferring study ownership
In the previous examples mention was made of studies uploaded to a catalog being owned by that catalog There maybe cases where transferring the ownership from one catalog to another will be desirable This will become clearerin the next section on user roles but for now the next steps show how transferring ownership from one collection toanother can be done
bull Transferring ownership from one collection to another has to be done by the owner of the collection and fromthe collection it is currently owned by
bull To transfer ownership Go to the Manage Studies screen and select the study to be transferred Open up the EditStudy page by clicking on the study Title
bull On the right hand side of the screen click on the Transfer study owner link
43 Manage Collections 45
nada Documentation Release 40
bull Select the collection to transfer from the dropdown box
bull Click Transfer
bull Note that when looking the study summary for the transferred study the Collection field now shows the studyto belong (owned by) to the DHS collection and not Central anymore Also note the option to Publish andunpublish is now active
bull To transfer ownership of a large number of studies all at once - from the Manage Studies page ndash select the studiesto be transferred (tick them in the box left of each study) and then from the top Batch Actions drop down selectTransfer owner ndash then apply
46 Chapter 4 User manual
nada Documentation Release 40
44 Manage Studies
There are 2 Options to get studies into the new catalog
441 Option 1
bull The first is to upload a DDI and all its resources to the collection in the same way as described in the earliersection ndash Uploading a Study Except instead of choosing Central Catalog chose the collection you want toupload the study to
bull Click on the Add Study button and upload a DDI and RDF and all your resources as described in the earliersection ndash Uploading a Study
bull Once a study is added in this way it displays in the Manage Studies list Notice that the collection summaryfield shows that the study belongs to (is Owned By) the DHS collection (this was the Short name defined in theexample when the Health Surveys Collection was created)
bull Also note that the new study also appears in the Central Data Catalog
All studies uploaded to collections will automatically be added to the Central Data Catalog in order to build a commonsearch portal for all studies
44 Manage Studies 47
nada Documentation Release 40
442 Option2
Copying studies from one collection to another
bull The second way to add a study to a collection is to Copy the study from another collection into the new collection
bull To copy a study already in the catalog to display in the new collection first make sure to be in the Manage Studiessection for the collection you want to put studies into To do this either use the Studies ndash Manage studies menuon the top or simply click on the Switch link next to the Manage Studies [Collection Title] heading
bull Then Click on the Copy Studies blue button at the top right
bull A list of all studies available to copy to the new collection is listed Simply click on the Link button in green tocopy the study to the collection The button will turn red and say Unlink To reverse the process and click thenow red button
bull Going back to the Manage Studies page for the collection will show the newly copied studies in the collectionlist Also note that the Collection field now indicated DHS next to Central DHS is in grey to indicate it is notowned (it is a copy) by that collection and the Central is in blue to show it is owned by the Central Data CatalogAlso note that because the study is not owned by this catalog it cannot be edited from this catalog ndash hence thepublishunpublish green button is absent for the copied studies
45 Managing Licensed Requests
Datasets that are assigned the Access Type Licensed require approval from the NADA administrator before the usercan get access to the data files From the site administration there are a number of ways to see if any licensed requestshave been received
bull Go to the dashboard Pending requests show up as red in the catalog quicj summary section Clicking on thislink goes to the Licensed Survey Requests management page
bull Or go to the Studies link on the top menu and select Licensed Requests from the submenu
48 Chapter 4 User manual
nada Documentation Release 40
The link shows a page with a list Licensed Requests received The status column indicated the Pending requests
bull Click on the Edit link for to process a request
The Request information tab shows a summary of the information provided by the applicant
bull To Approve or Deny or request further information for the request Click on the Process tab
45 Managing Licensed Requests 49
nada Documentation Release 40
bull Select Approve to approve the request (other options include Deny as well as Request more information fromthe applicant)
bull Select the files that the user will be authorized to download ndash it is also possible to enter a maximum number ofdownloads and expiry date for downloads
bull Enter any comments to be sent to the applicant
bull Select Notify user by email to notify them that the application has been processed
bull Select Update
bull The remaining tabs
ndash Communicate - provides a means to ask for more information from the applicant
ndash Monitor ndash allows the administrator to see when and how many times the applicant downloaded thedata
ndash Forward Request ndash provides a means to forward the request to another person for review
46 Manage Citations
The Citations section is where bibliographic references can be added for publications that use any of the studies in thecatalog These citations can be linked to particular studies in the catalog and are displayed to the users of the systemin the study information view of the relevant study
Citations are added from the Citations menu
50 Chapter 4 User manual
nada Documentation Release 40
bull To add a citation - click on All citations then click on the Add New Citation button at the top right
bull Compete the form including the indication as to whether the citation should be published or not
bull Then expand the Related studies link to tell the system which studies the citation ldquobelongsrdquo to
bull Click on the Attach studies link This reveals a list of all studies in the catalog
bull Select the relevant studies by clicking on the green Select button
bull Click on the apply filter button to save the changes The study now appears in the related studies box
bull Click on the submit button to save the citation
bull Note the flag keywords and notes fields can be used by administrators to place extra notes only visible to otheradministrators that might prove useful when there is uncertainty about a citations appropriateness or accuracy
bull It is also possible to import citations in common citation formats such as BibTex and EndNote (RIS)
bull To do this use the Import Citations link from the top menu
46 Manage Citations 51
nada Documentation Release 40
bull Paste the BibTex or RIS text into the form and then at the bottom of the screen click on Attach studies to linkthe citation to a particular study in the catalog
bull The citation now appears in the citation list as well as on the study information page for the relevant studies
52 Chapter 4 User manual
nada Documentation Release 40
47 Managing Users and account types
Users in the NADA can be defined according to three broad groups
General Usersndash this is the normal user who registers on a NADA site from the user interface This user type hasno access to the site administration It is required to register as a user before being granted access to public use andlicensed data types
Site Administrators (unlimited) ndash this user has access to all functions and all collections within the Site Administra-tion System wide access
Limited Administrators ndash these administrators have access to a limited set of functions within the Site Administra-tion Examples would be an administrator of a specific collections or licensed survey reviewer for all or only somecollections or report generator or citation manager etc
471 Creating User accounts
User accounts can be created in two ways
1 A General User account can be created by a user directly from the register screen from the login link on the userinterface of the application
The user created by this process has no access to the site administration This account can only be used to apply andgain access to public and licensed datasets
2 A user account can also be created by a Site Administrator
bull To do this login as a Site Administrator
bull Go to the site administration section of the application
47 Managing Users and account types 53
nada Documentation Release 40
bull Select Users ndash Add user from the top menu
bull Fill in the information for the user in the form and be sure to mark the account status as Active Then click theCreate button
54 Chapter 4 User manual
nada Documentation Release 40
47 Managing Users and account types 55
nada Documentation Release 40
bull Note that the user always starts off as a General User with no access permissions to the Site Administration Theuser group column displays as empty for users with only general user accounts
bull To see a list of all users in the system go to the Users ndash All Users menu item at the top of the screen
bull Note the new users created have no User group assigned (they are general users) Also note the Actions columnon the far right From these links an account can be edited (including changing the password and blocking anaccount) deleted and Permissions managed for the account
472 Managing User Account Permissions
User accounts permissions can be only be set and changed by a Site Administrator To change the permissions for anaccount
bull Click on the Permissions link next to the account to be changed All accounts start of as General users accounts
bull To change this user to a full site administrator who will have full system wide access to all parts and functionsof the NADA administration select the Site administrators (full access) option and tick the admin box as wellClick update to save the changes
56 Chapter 4 User manual
nada Documentation Release 40
473 Collection level administrators
bull To create a user who only has permissions to administer studies or administration functions for a particularcollection Select Site administrators (limited access)
47 Managing Users and account types 57
nada Documentation Release 40
bull It is then necessary to assign a role to this new limited administrator account To create a limited access ad-ministrator for a particular collection ndash select Site administrators (limited access) and then select Collectionadministrators Notice The form expands to reveal a list of collections in the system
bull Select the appropriate level of access that this account will have for this collection In the example below anadministrator is being created who can manage only licensed requests for the collection ndash Health Surveys Thisaccount will not be able to upload or publish studies The account will only be able to process licensed requestsfor the collection ndash Health Surveys
58 Chapter 4 User manual
nada Documentation Release 40
Other levels of access for Site administrators (limited access) ndash Collection administrators include
1 Accounts that are given full access to manage studies
2 Accounts that are given access to upload studies but not publish them
3 Accounts that are limited to reviewing studies
474 Global level Limited access accounts
Other types of limited access accounts include
1 Accounts that can only view system reports at a global level
2 Accounts that can only access the citations section and manage citations
3 Accounts that can only access the Licensed Request management system ndash at the global level for all collections
47 Managing Users and account types 59
nada Documentation Release 40
Impersonating a user
The system includes a function that allows a Site Administrator to impersonate (take on the role) a user created inthe system This is a useful testing tool when creating users and assigning permissions It essentially allows theadministrator to take on the role of another user temporarily
bull To access the Impersonate User feature go to the Users ndash Impersonat user menu at the top of the screen
bull A list of users to impersonate is shown
bull Select the user to impersonate and click on the impersonate button
bull The dashboard view for the impersonated user now shows
60 Chapter 4 User manual
nada Documentation Release 40
bull Note in the example above the account being impersonated is a Limited Account administrator with rights onlyto manage licensed requests for the Health Surveys Collection Note that all other dashboard menus are eitherhidden or clicking on any other function other than manage studies results in an access denied message
bull This is a good way to test if the roles assigned to a user account have the expected results
bull To exit the impersonate mode and return to the Site Administrator role ndash Click on the top right menu and selectExit impersonate mode
475 The Reviewer Limited access account
Sometimes it is desirable for catalog administrators to allow certain users to see a collection before it is published butwithout granting access to the site administration functions
This is useful for getting feedback on the correctness of information on collections or studies before publishing
To do this
bull First create an account for the user or get the user to create an account by using the register form on the loginscreen
bull Then edit the permissions for that user selecting Site Administrator (limited access) ndash Collection administrator
bull Then for the appropriate collection select Reviewer and click update to save the changes
47 Managing Users and account types 61
nada Documentation Release 40
bull The newly created reviewer account user can now view all studies in a collection even if the study or collectionis unpublished
48 Manage Site Pages and Menus
The NADA has a small content management component that allows for the creation of menu pages to appear on theuser interface
bull Examples of menus that might be useful for users of the site might be A page dealing with the disseminationpolicies of the organization or perhaps a page with contact information for the information
New menu items and pages can be created via the Menu- All pages menu link at the top of the Site Administrationpage
62 Chapter 4 User manual
nada Documentation Release 40
bull Select All pages from the menu
bull To add a new page click on the Add New Page button
bull Give the page a Title in the Title field
bull Clicking in the URL field will automatically suggest a name for the page in the URL
bull Enter the contents for the page in the Body section Plain text or HTML is accespted by this field
bull Then indicate if the page should be published or not in the Publish dropdown
bull The Weight field tells the NADA in what order this menu item should display Eg 0 would be first 1 secondand 2 third
bull Click on Update to save the changes
bull View the changes from the user interface In this Example a Contact Us page was created
bull It is also possible from the Menu Management screen to add a menu link that links to an existing page on anothersite (rather than creating a page itself)
bull To change the order in which the menu items display on the user interface use the Reorder Menu button on theMenu Management screen
48 Manage Site Pages and Menus 63
nada Documentation Release 40
49 The Site Settings Page
All settings for the application are controlled via the Settings menu at the top of the Site Administration page Thereare seven main settings sections See screenshot below
491 General Settings
1 Type the Title of the site here This will become the front page title of the NADA site In this case the Title isNADA
64 Chapter 4 User manual
nada Documentation Release 40
2 The footer text can be changed in this field This displays at the bottom of your site page
3 The initial page that loads when a user visits the NADA site can be set here In this case the catalog page is setto open by default
4 The name of the webmaster can be set here This is the name that will be used in system emails sent to users
5 Enter the webmaster email address here This should be the address that will be used in communication withusers Typically this is a general enquiries email set up by the organization and not a personal email address fora particular person Note to avoid mail systems rejecting mail as spam make sure to enter an address here thatis on the same domain as the server used in the email settings at setup
6 This field sets the location of the Cache folder The cache folder stores pre- generated pages of the site to allowfor faster browsing by the user By default it is set to cache This can be moved to another location if desiredbut must be writable The green tick indicates that the folder can be found and is set up correctly Enter eitherrelative or absolute paths to the folder location
7 Set the time that the Cache takes to expire By default it is set to 2 hours (in milli seconds)
8 If it is desired to turn off caching then select no here Sometimes it is useful to turn off caching when developingor updating a site so as to ensure that content changes become immediately visible on the front-end withouthaving to wait for the cache to expire and the new changes to show Turn this back on to speed up page loadingfor users
Click update to save all settings
Language
To change the language of the application expand the language section and choose the desired language Click updateto save and apply the setting
49 The Site Settings Page 65
nada Documentation Release 40
Enable or disable the HTML editor
A basic HTML editor is provided in the menu and page creating section of the application This setting allows this tobe turned on or off
Survey catalog settings
1 This is the folder where the files for the study are stored on the server This includes the DDI eternal resourcesand data files This folder can be moved to a location outside the web root as described in the installationinstructions in Chapter 1 Enter either relative or absolute paths to the folder location
2 This is the folder where DDIrsquos can be placed in order to use the bulk study import function in the NADA InNADA3 files had to be physically copied to this folder on the server but this is no longer necessary in NADA4 Files can now be directly uploaded to this folder from the Site Administration ndash Manage Studies page page
66 Chapter 4 User manual
nada Documentation Release 40
3 Select the vocabulary to use for the topic filter By default this is set to the CESSDA classification as recom-mended in the IHSN templates supplied at IHSNorg for the Nesstar Metadata Publisher
4 Enable or disable the Country filter on the user interface search page here If the catalog only contains studiesfor one country then turning this filter off is recommended
5 Enable or disable the Topic filter on the user interface search page here If no topics have been defined in theDDIrsquos being uploaded then it is recommended to turn this filter off (disable)
6 Enable or disable the Year filter on the user interface search page here
7 Enable or disable the Collection filter on the user interface search page here If no collections have been definedthen it is recommended to disable this filter
8 Enable or disable the Data access filter on the user interface search page here This filter is not needed if thereare very few studies in the catalog or if all studies hare set to the same access type
9 This section controls the order in which the filters appear on the search page Enter numbers here that rank theorder of the filters in the order they should be displayed
10 This setting determines how many studies are displayed by default to the user on the search page ndash catalog view
Site Login settings
1 To require that users login before being able to access the website set this option to Requires all users to loginto access the website
2 Determined how long a user will stay logged in After this time the user will be automatically logged out
3 Sets the minimum length for passwords created by the users at registration or for manual user creation
49 The Site Settings Page 67
nada Documentation Release 40
SMTP Settings
1 If the PHPweb server is configured to send email using PHPrsquos MAIL function select the first option and donrsquotfill in anything else
If your organization has a mail server and has have a dedicated account that can be setup for NADA use the followingsettings Check the radio button ldquoUse SMTP Serverrdquo
2 Enter the host name for the server
3 Enter the port used by the server to send mail
4 If required enter the user name used to send mail on the server
5 Enter the password used to send mail on the server
If the organization does not own a mail server a Gmail account can be configured to be used with NADA
bull Check the radio button ldquoUse SMTP Serverrdquo
bull Host name sslsmtpgooglemailcom or sslsmtpgmailcom
bull SMTP port 465
bull Account username email-addressgmailcom
bull Account password password for the gmail account
6 Test the email settings
The quickest way to test if the email settings are working is to use the ldquoforgot passwordrdquo option from the user loginpage If no mail is received when doing this test then go back and correct the mail settings Check with the ISP orserver administrator for the correct settings
Click on update to save all settings
68 Chapter 4 User manual
nada Documentation Release 40
492 Dashboard setting
Provides a means to automatically have content loaded into the dashboard via an RSS feed from a site The defaultsetting is set to receive updates and news from the IHSN website
49 The Site Settings Page 69
nada Documentation Release 40
70 Chapter 4 User manual
CHAPTER 5
Indices and tables
bull genindex
bull modindex
bull search
71

nada Documentation Release 40
NADA catalogs usually come from either a census or a surveys It is therefore not uncommon to hear the terms surveyand study used interchangeably when listening to people talk about their NADA catalog
METADATA
Metadata are data about the data They are not the actual data collected from the survey but rather the information thatdescribes the survey process and the data The NADA uses the Data Documentation Initiative (DDI) ndash ddiallianceorgndash standard for the presentation of metadata for each study The DDI document (which is an XML document) isprepared outside the NADA application either manually or using a tool like the Nesstar Publisher ndash nesstarcom ndash andthen imported into the NADA The detailed information about the survey is searchable down to the variable level foreach survey in the catalog
DATA ACCESS TYPES
The NADA allows for the level of access to datasets for studies to be controlled at the study level In other words thelevel of restriction can differ from study to study and can be defined on a scale ranging from direct access with norestrictions to no access Briefly the available access types are
bull Data not available - data are not available for this study
bull Direct Access Data Files - data shared under this policy can be downloaded without any restrictions The useris not required to be logged into the site and no personal information is collected on the person downloading thedata
bull Public Use Data Files - data shared under this policy requires that the user be logged in and registered on thesite before they are able to download the data The user is required to agree to a terms of use of the data and theapplication keeps records of who downloads the data
bull Licensed Data Files - data shared under this policy requires that the user be logged in and registered on the siteUsers are also required to fill in and submit a detailed application form listing their reasons for wanting accessto the data Once the user submits the application form the system informs the system administrator that anapplication has been made In order for the person to get access to the data the system administrator needs toreview the application and approve it
bull Data available in an Enclave - under this policy no data is shared through the application Users submit anapplication to access the data at a secure facility physically located on the premises of the data producer or afacility nominated by the data producer
bull Data available from external repository ndash The NADA allows for studies and their metadata to be listed in aNADA catalog but for a link to be created to another site when the data for that study are available elsewhere
CITATIONS
Citations are references that can be included at the study level which point to published works that have used the datafrom a particular study In many cases this will be a reference to a Journal Article Working paper Newspaper articleetc Such resources are useful to researchers who are interested in seeing how the data have been used before Theyare also a good way of showing the funders of surveys that the data are being used for policy and research purposesand thus are an indicator of some of the impact a study has had
USERS
Users in the NADA can be defined according to three broad groups General Users ndash this is the normal user whoregisters on a NADA site from the user interface This user type has no access to the site administration It is requiredto register as a user when accessing public use and licensed data types Site Administrators (unlimited) ndash this user
36 Chapter 4 User manual
nada Documentation Release 40
has access to all functions and all collections within the Site Administration System wide access Limited Adminis-trators ndash these administrators have access to a limited set of functions within the Site Administration Examples wouldbe an administrator of a specific collections or licensed survey reviewer for all or only some collections or reportgenerator etc
413 Why do NADA administrators need to understand these concepts
Understanding these concepts is important as it
bull Is critical to understanding the new permissions and administrator types introduced in NADA 4 Administratorsare now able to create collections within their NADArsquos and assign different roles to administrators and moregranular levels of access to catalog administration at the collection level It is now possible for example to haveadministrators whorsquos lsquopowersrsquo range from being able to manage all parts of a collectionrsquos administration downto ones with more restrictive access such as ones whose only function is as licensed survey reviewer or reportgenerator or catalog reviewer or citation manager etc
bull Ensures that the correct level of permissions and access is assigned to users based on security policies within theinstitution Unlike previous versions of NADA not all users who have access to the Site Administration needhave the level of access of an ldquounlimited site administratorrdquo This limits security risks associated with havingtoo many ldquounlimited site administratorsrdquo managing a site
bull Assists in assigning an appropriate data access type to data based on institutional distribution polices
bull Makes it easier to explain more clearly to institutional managers what the capabilities of the NADA applicationare and to advise on how to best manage the allocation of responsibilities
42 The Dashboard
After logging in to the Site Administration with administrator credentials the user is taken to the dashboard
The Dashboard provides a quick glance summary for administrators to get an overall picture of what has been happen-ing on the site as well as what pending tasks are outstanding for the administrator
42 The Dashboard 37
nada Documentation Release 40
1 Menu link to the Dashboard
2 Menu link to the Study Management pages submenus include Manage Studies Licensed requests and ManageCollections
3 Menu link to the citations management pages
4 Menu link to the User management pages submenus include All users Add user and Impersonate User
5 Menu link to create menu pages for the site frontend
6 Menu link to generate usage reports
7 Menu Link to the settings pages submenus include Settings Coutries Regions and Vocabularies
8 Useful navigation links submenus include Change Password Log out Catalog Home Data catalog Citations
9 This section lists all collections in the catalog Within each collection a summary is given of the number ofstudies along with diagnostics related to the number of studies publishedunpublished missing questionnairesdata access types set but with no data attached as well as some buttin links to Manage the collections studiesusers and a History of changes made to the collection
10 Provides a summary of users registrations and number of users currently logged in
11 Show how many pages are being cached on the site with a link to clear the cache if need be
12 Show a list of recently added or updated studies Clicking on a study in the list takes you to the page to managethat study
38 Chapter 4 User manual
nada Documentation Release 40
43 Manage Collections
431 Collections
Collections are sub categories of the Central Data Catalog They allow administrators of a NADA instance to groupstudies into what can be thought of as sub-catalogs of the Central Data Catalog
Collections provide a number of benefits both from the user and the administrator perspective From the usersrsquo per-spective being able to filter and view groups (collections) of studies that logically belong together makes finding whatthey are looking for easier From the administratorsrsquo perspective the ability to create collections of studies that maylogically belong together facilitates the ability to decentralize the management of each collection of studies to specificadministrators (for example collections can be managed by different departments in an institution)
Note The creation of collections will in general only be useful and necessary for large catalogs or for catalogs thatdesire more decentralized management of groups of studies by different departments
432 Creating collections
bull Login to the Site administration using an administrator password
bull Collections are managed and created by going to the Studies Manage collections menu link
bull There are no collections defined in the default NADA 4 installation
bull To create a new collection click on the Create new collection button
43 Manage Collections 39
nada Documentation Release 40
1 Under Collection Identification provide a short name for the collection This will become the URL for thecollection so pick carefully For Title fill in the fill title for the collection This will be the name displayed atthe top of the collection page
B Fill in a 3 or four line short description of the collection This text will display on the front end in the collectionslist For examples see httpmicrodataworldbankorgindexphpcontributing-catalogs
C Fill in a more detailed description of the collection This will display on the About page for that collection Forexample see httpmicrodataworldbankorgindexphpcatalogdhsabout
To format the page and include images it is possible to enter HTML code into this box below is anexample piece of code that includes an image
ltimg src=rdquofilesdhs-fp-01jpgrdquo alt=rdquoHealth Surveys Imagerdquo class=rdquoabout-photordquogt lth2gt Health SurveysCollectionlth2gt ltp align=rdquojustifyrdquogtThe Health Surveys collection aims to provide frequent high qual-ity and timely health data needed by the decision makers when designing public health programsltpgtltpgtHealth surveys provide useful information on health status and health consumption and their determi-nantsltpgt
Copy any images to be displayed into the NADA ldquofilesrdquo folder on your server image imagesthumbnil-imagepng
4 Upload a file to display next to the collection as it is listed on the collection page NOTE This image should be82 X 82 pixels If the upload does not work automatically then copy the thumbnail image to the ldquofilesrdquo folder asshown above
40 Chapter 4 User manual
nada Documentation Release 40
E The Weight field determines in what order collections are shown in the collection list 0123 etc The Selectcollection type drop-down is a system value to distinguish between collections that should be viewed as internal tothe organization or external For example some collections may be made up entirely of studies from an organizationoutside the host catalog These collections can be designated as external The Section dropdown allows for thecategorization as either a collection based on a specialized collection (like health) or based on a regional breakdownSelecting Publish ndash publishes the collection
bull Click on Submit to save the changes
To view the results click on the Preview link on the far right
bull The new collection now also shows in the collection list on the Central Catalog About page (this is where thethumbnail and short description fields are displayed)
43 Manage Collections 41
nada Documentation Release 40
bull Visiting the Dashboard will now also show the new collection listed below the Central Data Catalog With anumber of green buttons as shortcut links to manage the studies on the collection assign administrators for thecollection a history of activity on the collection and a link to edit the collection as in the steps above
433 Manually adding studies to a collection
There are 2 ways to get studies into the new catalog
bull The first is to upload a DDI and all its resources to the collection in the same way as described in the earliersection ndash Uploading a Study Except instead of choosing Central Catalog chose the collection you want to
42 Chapter 4 User manual
nada Documentation Release 40
upload the study to
bull Click on the Add Study button and upload a DDI and RDF and all your resources as described in the earliersection ndash Uploading a Study
bull Once a study is added in this way it displays in the Manage Studies list Notice that the collection summaryfield shows that the study belongs to (is Owned By) the DHS collection (this was the Short name defined in theexample when the Health Surveys Collection was created)
All studies uploaded to collections will automatically be added to the Central Data Catalog in order to build a commonsearch portal for all studies
43 Manage Collections 43
nada Documentation Release 40
434 Copying studies from one collection to another
bull The second way to add a study to a collection is to Copy the study from another collection into the newcollection
bull To copy a study already in the catalog to display in the new collection first make sure to be in the Manage Studiessection for the collection you want to put studies into To do this either use the Studies ndash Manage studies menuon the top or simply click on the Switch link next to the Manage Studies [Collection Title] heading
bull Then Click on the Copy Studies blue button at the top right
bull A list of all studies available to copy to the new collection is listed Simply click on the Link button in green tocopy the study to the collection The button will turn red and say Unlink To reverse the process and click thenow red button
bull Going back to the Manage Studies page for the collection will show the newly copied studies in the collectionlist Also note that the Collection field now indicated DHS next to Central DHS is in grey to indicate it is notowned (it is a copy) by that collection and the Central is in blue to show it is owned by the Central Data CatalogAlso note that because the study is not owned by this catalog it cannot be edited from this catalog ndash hence thepublishunpublish green button is absent for the copied studies
44 Chapter 4 User manual
nada Documentation Release 40
435 Turning on the collection filter
The final step after creating the first collection is to enable the collection filter option in the Settings menus under SiteConfigurations ndash Survey catalog settings
436 Transferring study ownership
In the previous examples mention was made of studies uploaded to a catalog being owned by that catalog There maybe cases where transferring the ownership from one catalog to another will be desirable This will become clearerin the next section on user roles but for now the next steps show how transferring ownership from one collection toanother can be done
bull Transferring ownership from one collection to another has to be done by the owner of the collection and fromthe collection it is currently owned by
bull To transfer ownership Go to the Manage Studies screen and select the study to be transferred Open up the EditStudy page by clicking on the study Title
bull On the right hand side of the screen click on the Transfer study owner link
43 Manage Collections 45
nada Documentation Release 40
bull Select the collection to transfer from the dropdown box
bull Click Transfer
bull Note that when looking the study summary for the transferred study the Collection field now shows the studyto belong (owned by) to the DHS collection and not Central anymore Also note the option to Publish andunpublish is now active
bull To transfer ownership of a large number of studies all at once - from the Manage Studies page ndash select the studiesto be transferred (tick them in the box left of each study) and then from the top Batch Actions drop down selectTransfer owner ndash then apply
46 Chapter 4 User manual
nada Documentation Release 40
44 Manage Studies
There are 2 Options to get studies into the new catalog
441 Option 1
bull The first is to upload a DDI and all its resources to the collection in the same way as described in the earliersection ndash Uploading a Study Except instead of choosing Central Catalog chose the collection you want toupload the study to
bull Click on the Add Study button and upload a DDI and RDF and all your resources as described in the earliersection ndash Uploading a Study
bull Once a study is added in this way it displays in the Manage Studies list Notice that the collection summaryfield shows that the study belongs to (is Owned By) the DHS collection (this was the Short name defined in theexample when the Health Surveys Collection was created)
bull Also note that the new study also appears in the Central Data Catalog
All studies uploaded to collections will automatically be added to the Central Data Catalog in order to build a commonsearch portal for all studies
44 Manage Studies 47
nada Documentation Release 40
442 Option2
Copying studies from one collection to another
bull The second way to add a study to a collection is to Copy the study from another collection into the new collection
bull To copy a study already in the catalog to display in the new collection first make sure to be in the Manage Studiessection for the collection you want to put studies into To do this either use the Studies ndash Manage studies menuon the top or simply click on the Switch link next to the Manage Studies [Collection Title] heading
bull Then Click on the Copy Studies blue button at the top right
bull A list of all studies available to copy to the new collection is listed Simply click on the Link button in green tocopy the study to the collection The button will turn red and say Unlink To reverse the process and click thenow red button
bull Going back to the Manage Studies page for the collection will show the newly copied studies in the collectionlist Also note that the Collection field now indicated DHS next to Central DHS is in grey to indicate it is notowned (it is a copy) by that collection and the Central is in blue to show it is owned by the Central Data CatalogAlso note that because the study is not owned by this catalog it cannot be edited from this catalog ndash hence thepublishunpublish green button is absent for the copied studies
45 Managing Licensed Requests
Datasets that are assigned the Access Type Licensed require approval from the NADA administrator before the usercan get access to the data files From the site administration there are a number of ways to see if any licensed requestshave been received
bull Go to the dashboard Pending requests show up as red in the catalog quicj summary section Clicking on thislink goes to the Licensed Survey Requests management page
bull Or go to the Studies link on the top menu and select Licensed Requests from the submenu
48 Chapter 4 User manual
nada Documentation Release 40
The link shows a page with a list Licensed Requests received The status column indicated the Pending requests
bull Click on the Edit link for to process a request
The Request information tab shows a summary of the information provided by the applicant
bull To Approve or Deny or request further information for the request Click on the Process tab
45 Managing Licensed Requests 49
nada Documentation Release 40
bull Select Approve to approve the request (other options include Deny as well as Request more information fromthe applicant)
bull Select the files that the user will be authorized to download ndash it is also possible to enter a maximum number ofdownloads and expiry date for downloads
bull Enter any comments to be sent to the applicant
bull Select Notify user by email to notify them that the application has been processed
bull Select Update
bull The remaining tabs
ndash Communicate - provides a means to ask for more information from the applicant
ndash Monitor ndash allows the administrator to see when and how many times the applicant downloaded thedata
ndash Forward Request ndash provides a means to forward the request to another person for review
46 Manage Citations
The Citations section is where bibliographic references can be added for publications that use any of the studies in thecatalog These citations can be linked to particular studies in the catalog and are displayed to the users of the systemin the study information view of the relevant study
Citations are added from the Citations menu
50 Chapter 4 User manual
nada Documentation Release 40
bull To add a citation - click on All citations then click on the Add New Citation button at the top right
bull Compete the form including the indication as to whether the citation should be published or not
bull Then expand the Related studies link to tell the system which studies the citation ldquobelongsrdquo to
bull Click on the Attach studies link This reveals a list of all studies in the catalog
bull Select the relevant studies by clicking on the green Select button
bull Click on the apply filter button to save the changes The study now appears in the related studies box
bull Click on the submit button to save the citation
bull Note the flag keywords and notes fields can be used by administrators to place extra notes only visible to otheradministrators that might prove useful when there is uncertainty about a citations appropriateness or accuracy
bull It is also possible to import citations in common citation formats such as BibTex and EndNote (RIS)
bull To do this use the Import Citations link from the top menu
46 Manage Citations 51
nada Documentation Release 40
bull Paste the BibTex or RIS text into the form and then at the bottom of the screen click on Attach studies to linkthe citation to a particular study in the catalog
bull The citation now appears in the citation list as well as on the study information page for the relevant studies
52 Chapter 4 User manual
nada Documentation Release 40
47 Managing Users and account types
Users in the NADA can be defined according to three broad groups
General Usersndash this is the normal user who registers on a NADA site from the user interface This user type hasno access to the site administration It is required to register as a user before being granted access to public use andlicensed data types
Site Administrators (unlimited) ndash this user has access to all functions and all collections within the Site Administra-tion System wide access
Limited Administrators ndash these administrators have access to a limited set of functions within the Site Administra-tion Examples would be an administrator of a specific collections or licensed survey reviewer for all or only somecollections or report generator or citation manager etc
471 Creating User accounts
User accounts can be created in two ways
1 A General User account can be created by a user directly from the register screen from the login link on the userinterface of the application
The user created by this process has no access to the site administration This account can only be used to apply andgain access to public and licensed datasets
2 A user account can also be created by a Site Administrator
bull To do this login as a Site Administrator
bull Go to the site administration section of the application
47 Managing Users and account types 53
nada Documentation Release 40
bull Select Users ndash Add user from the top menu
bull Fill in the information for the user in the form and be sure to mark the account status as Active Then click theCreate button
54 Chapter 4 User manual
nada Documentation Release 40
47 Managing Users and account types 55
nada Documentation Release 40
bull Note that the user always starts off as a General User with no access permissions to the Site Administration Theuser group column displays as empty for users with only general user accounts
bull To see a list of all users in the system go to the Users ndash All Users menu item at the top of the screen
bull Note the new users created have no User group assigned (they are general users) Also note the Actions columnon the far right From these links an account can be edited (including changing the password and blocking anaccount) deleted and Permissions managed for the account
472 Managing User Account Permissions
User accounts permissions can be only be set and changed by a Site Administrator To change the permissions for anaccount
bull Click on the Permissions link next to the account to be changed All accounts start of as General users accounts
bull To change this user to a full site administrator who will have full system wide access to all parts and functionsof the NADA administration select the Site administrators (full access) option and tick the admin box as wellClick update to save the changes
56 Chapter 4 User manual
nada Documentation Release 40
473 Collection level administrators
bull To create a user who only has permissions to administer studies or administration functions for a particularcollection Select Site administrators (limited access)
47 Managing Users and account types 57
nada Documentation Release 40
bull It is then necessary to assign a role to this new limited administrator account To create a limited access ad-ministrator for a particular collection ndash select Site administrators (limited access) and then select Collectionadministrators Notice The form expands to reveal a list of collections in the system
bull Select the appropriate level of access that this account will have for this collection In the example below anadministrator is being created who can manage only licensed requests for the collection ndash Health Surveys Thisaccount will not be able to upload or publish studies The account will only be able to process licensed requestsfor the collection ndash Health Surveys
58 Chapter 4 User manual
nada Documentation Release 40
Other levels of access for Site administrators (limited access) ndash Collection administrators include
1 Accounts that are given full access to manage studies
2 Accounts that are given access to upload studies but not publish them
3 Accounts that are limited to reviewing studies
474 Global level Limited access accounts
Other types of limited access accounts include
1 Accounts that can only view system reports at a global level
2 Accounts that can only access the citations section and manage citations
3 Accounts that can only access the Licensed Request management system ndash at the global level for all collections
47 Managing Users and account types 59
nada Documentation Release 40
Impersonating a user
The system includes a function that allows a Site Administrator to impersonate (take on the role) a user created inthe system This is a useful testing tool when creating users and assigning permissions It essentially allows theadministrator to take on the role of another user temporarily
bull To access the Impersonate User feature go to the Users ndash Impersonat user menu at the top of the screen
bull A list of users to impersonate is shown
bull Select the user to impersonate and click on the impersonate button
bull The dashboard view for the impersonated user now shows
60 Chapter 4 User manual
nada Documentation Release 40
bull Note in the example above the account being impersonated is a Limited Account administrator with rights onlyto manage licensed requests for the Health Surveys Collection Note that all other dashboard menus are eitherhidden or clicking on any other function other than manage studies results in an access denied message
bull This is a good way to test if the roles assigned to a user account have the expected results
bull To exit the impersonate mode and return to the Site Administrator role ndash Click on the top right menu and selectExit impersonate mode
475 The Reviewer Limited access account
Sometimes it is desirable for catalog administrators to allow certain users to see a collection before it is published butwithout granting access to the site administration functions
This is useful for getting feedback on the correctness of information on collections or studies before publishing
To do this
bull First create an account for the user or get the user to create an account by using the register form on the loginscreen
bull Then edit the permissions for that user selecting Site Administrator (limited access) ndash Collection administrator
bull Then for the appropriate collection select Reviewer and click update to save the changes
47 Managing Users and account types 61
nada Documentation Release 40
bull The newly created reviewer account user can now view all studies in a collection even if the study or collectionis unpublished
48 Manage Site Pages and Menus
The NADA has a small content management component that allows for the creation of menu pages to appear on theuser interface
bull Examples of menus that might be useful for users of the site might be A page dealing with the disseminationpolicies of the organization or perhaps a page with contact information for the information
New menu items and pages can be created via the Menu- All pages menu link at the top of the Site Administrationpage
62 Chapter 4 User manual
nada Documentation Release 40
bull Select All pages from the menu
bull To add a new page click on the Add New Page button
bull Give the page a Title in the Title field
bull Clicking in the URL field will automatically suggest a name for the page in the URL
bull Enter the contents for the page in the Body section Plain text or HTML is accespted by this field
bull Then indicate if the page should be published or not in the Publish dropdown
bull The Weight field tells the NADA in what order this menu item should display Eg 0 would be first 1 secondand 2 third
bull Click on Update to save the changes
bull View the changes from the user interface In this Example a Contact Us page was created
bull It is also possible from the Menu Management screen to add a menu link that links to an existing page on anothersite (rather than creating a page itself)
bull To change the order in which the menu items display on the user interface use the Reorder Menu button on theMenu Management screen
48 Manage Site Pages and Menus 63
nada Documentation Release 40
49 The Site Settings Page
All settings for the application are controlled via the Settings menu at the top of the Site Administration page Thereare seven main settings sections See screenshot below
491 General Settings
1 Type the Title of the site here This will become the front page title of the NADA site In this case the Title isNADA
64 Chapter 4 User manual
nada Documentation Release 40
2 The footer text can be changed in this field This displays at the bottom of your site page
3 The initial page that loads when a user visits the NADA site can be set here In this case the catalog page is setto open by default
4 The name of the webmaster can be set here This is the name that will be used in system emails sent to users
5 Enter the webmaster email address here This should be the address that will be used in communication withusers Typically this is a general enquiries email set up by the organization and not a personal email address fora particular person Note to avoid mail systems rejecting mail as spam make sure to enter an address here thatis on the same domain as the server used in the email settings at setup
6 This field sets the location of the Cache folder The cache folder stores pre- generated pages of the site to allowfor faster browsing by the user By default it is set to cache This can be moved to another location if desiredbut must be writable The green tick indicates that the folder can be found and is set up correctly Enter eitherrelative or absolute paths to the folder location
7 Set the time that the Cache takes to expire By default it is set to 2 hours (in milli seconds)
8 If it is desired to turn off caching then select no here Sometimes it is useful to turn off caching when developingor updating a site so as to ensure that content changes become immediately visible on the front-end withouthaving to wait for the cache to expire and the new changes to show Turn this back on to speed up page loadingfor users
Click update to save all settings
Language
To change the language of the application expand the language section and choose the desired language Click updateto save and apply the setting
49 The Site Settings Page 65
nada Documentation Release 40
Enable or disable the HTML editor
A basic HTML editor is provided in the menu and page creating section of the application This setting allows this tobe turned on or off
Survey catalog settings
1 This is the folder where the files for the study are stored on the server This includes the DDI eternal resourcesand data files This folder can be moved to a location outside the web root as described in the installationinstructions in Chapter 1 Enter either relative or absolute paths to the folder location
2 This is the folder where DDIrsquos can be placed in order to use the bulk study import function in the NADA InNADA3 files had to be physically copied to this folder on the server but this is no longer necessary in NADA4 Files can now be directly uploaded to this folder from the Site Administration ndash Manage Studies page page
66 Chapter 4 User manual
nada Documentation Release 40
3 Select the vocabulary to use for the topic filter By default this is set to the CESSDA classification as recom-mended in the IHSN templates supplied at IHSNorg for the Nesstar Metadata Publisher
4 Enable or disable the Country filter on the user interface search page here If the catalog only contains studiesfor one country then turning this filter off is recommended
5 Enable or disable the Topic filter on the user interface search page here If no topics have been defined in theDDIrsquos being uploaded then it is recommended to turn this filter off (disable)
6 Enable or disable the Year filter on the user interface search page here
7 Enable or disable the Collection filter on the user interface search page here If no collections have been definedthen it is recommended to disable this filter
8 Enable or disable the Data access filter on the user interface search page here This filter is not needed if thereare very few studies in the catalog or if all studies hare set to the same access type
9 This section controls the order in which the filters appear on the search page Enter numbers here that rank theorder of the filters in the order they should be displayed
10 This setting determines how many studies are displayed by default to the user on the search page ndash catalog view
Site Login settings
1 To require that users login before being able to access the website set this option to Requires all users to loginto access the website
2 Determined how long a user will stay logged in After this time the user will be automatically logged out
3 Sets the minimum length for passwords created by the users at registration or for manual user creation
49 The Site Settings Page 67
nada Documentation Release 40
SMTP Settings
1 If the PHPweb server is configured to send email using PHPrsquos MAIL function select the first option and donrsquotfill in anything else
If your organization has a mail server and has have a dedicated account that can be setup for NADA use the followingsettings Check the radio button ldquoUse SMTP Serverrdquo
2 Enter the host name for the server
3 Enter the port used by the server to send mail
4 If required enter the user name used to send mail on the server
5 Enter the password used to send mail on the server
If the organization does not own a mail server a Gmail account can be configured to be used with NADA
bull Check the radio button ldquoUse SMTP Serverrdquo
bull Host name sslsmtpgooglemailcom or sslsmtpgmailcom
bull SMTP port 465
bull Account username email-addressgmailcom
bull Account password password for the gmail account
6 Test the email settings
The quickest way to test if the email settings are working is to use the ldquoforgot passwordrdquo option from the user loginpage If no mail is received when doing this test then go back and correct the mail settings Check with the ISP orserver administrator for the correct settings
Click on update to save all settings
68 Chapter 4 User manual
nada Documentation Release 40
492 Dashboard setting
Provides a means to automatically have content loaded into the dashboard via an RSS feed from a site The defaultsetting is set to receive updates and news from the IHSN website
49 The Site Settings Page 69
nada Documentation Release 40
70 Chapter 4 User manual
CHAPTER 5
Indices and tables
bull genindex
bull modindex
bull search
71
nada Documentation Release 40
has access to all functions and all collections within the Site Administration System wide access Limited Adminis-trators ndash these administrators have access to a limited set of functions within the Site Administration Examples wouldbe an administrator of a specific collections or licensed survey reviewer for all or only some collections or reportgenerator etc
413 Why do NADA administrators need to understand these concepts
Understanding these concepts is important as it
bull Is critical to understanding the new permissions and administrator types introduced in NADA 4 Administratorsare now able to create collections within their NADArsquos and assign different roles to administrators and moregranular levels of access to catalog administration at the collection level It is now possible for example to haveadministrators whorsquos lsquopowersrsquo range from being able to manage all parts of a collectionrsquos administration downto ones with more restrictive access such as ones whose only function is as licensed survey reviewer or reportgenerator or catalog reviewer or citation manager etc
bull Ensures that the correct level of permissions and access is assigned to users based on security policies within theinstitution Unlike previous versions of NADA not all users who have access to the Site Administration needhave the level of access of an ldquounlimited site administratorrdquo This limits security risks associated with havingtoo many ldquounlimited site administratorsrdquo managing a site
bull Assists in assigning an appropriate data access type to data based on institutional distribution polices
bull Makes it easier to explain more clearly to institutional managers what the capabilities of the NADA applicationare and to advise on how to best manage the allocation of responsibilities
42 The Dashboard
After logging in to the Site Administration with administrator credentials the user is taken to the dashboard
The Dashboard provides a quick glance summary for administrators to get an overall picture of what has been happen-ing on the site as well as what pending tasks are outstanding for the administrator
42 The Dashboard 37
nada Documentation Release 40
1 Menu link to the Dashboard
2 Menu link to the Study Management pages submenus include Manage Studies Licensed requests and ManageCollections
3 Menu link to the citations management pages
4 Menu link to the User management pages submenus include All users Add user and Impersonate User
5 Menu link to create menu pages for the site frontend
6 Menu link to generate usage reports
7 Menu Link to the settings pages submenus include Settings Coutries Regions and Vocabularies
8 Useful navigation links submenus include Change Password Log out Catalog Home Data catalog Citations
9 This section lists all collections in the catalog Within each collection a summary is given of the number ofstudies along with diagnostics related to the number of studies publishedunpublished missing questionnairesdata access types set but with no data attached as well as some buttin links to Manage the collections studiesusers and a History of changes made to the collection
10 Provides a summary of users registrations and number of users currently logged in
11 Show how many pages are being cached on the site with a link to clear the cache if need be
12 Show a list of recently added or updated studies Clicking on a study in the list takes you to the page to managethat study
38 Chapter 4 User manual
nada Documentation Release 40
43 Manage Collections
431 Collections
Collections are sub categories of the Central Data Catalog They allow administrators of a NADA instance to groupstudies into what can be thought of as sub-catalogs of the Central Data Catalog
Collections provide a number of benefits both from the user and the administrator perspective From the usersrsquo per-spective being able to filter and view groups (collections) of studies that logically belong together makes finding whatthey are looking for easier From the administratorsrsquo perspective the ability to create collections of studies that maylogically belong together facilitates the ability to decentralize the management of each collection of studies to specificadministrators (for example collections can be managed by different departments in an institution)
Note The creation of collections will in general only be useful and necessary for large catalogs or for catalogs thatdesire more decentralized management of groups of studies by different departments
432 Creating collections
bull Login to the Site administration using an administrator password
bull Collections are managed and created by going to the Studies Manage collections menu link
bull There are no collections defined in the default NADA 4 installation
bull To create a new collection click on the Create new collection button
43 Manage Collections 39
nada Documentation Release 40
1 Under Collection Identification provide a short name for the collection This will become the URL for thecollection so pick carefully For Title fill in the fill title for the collection This will be the name displayed atthe top of the collection page
B Fill in a 3 or four line short description of the collection This text will display on the front end in the collectionslist For examples see httpmicrodataworldbankorgindexphpcontributing-catalogs
C Fill in a more detailed description of the collection This will display on the About page for that collection Forexample see httpmicrodataworldbankorgindexphpcatalogdhsabout
To format the page and include images it is possible to enter HTML code into this box below is anexample piece of code that includes an image
ltimg src=rdquofilesdhs-fp-01jpgrdquo alt=rdquoHealth Surveys Imagerdquo class=rdquoabout-photordquogt lth2gt Health SurveysCollectionlth2gt ltp align=rdquojustifyrdquogtThe Health Surveys collection aims to provide frequent high qual-ity and timely health data needed by the decision makers when designing public health programsltpgtltpgtHealth surveys provide useful information on health status and health consumption and their determi-nantsltpgt
Copy any images to be displayed into the NADA ldquofilesrdquo folder on your server image imagesthumbnil-imagepng
4 Upload a file to display next to the collection as it is listed on the collection page NOTE This image should be82 X 82 pixels If the upload does not work automatically then copy the thumbnail image to the ldquofilesrdquo folder asshown above
40 Chapter 4 User manual
nada Documentation Release 40
E The Weight field determines in what order collections are shown in the collection list 0123 etc The Selectcollection type drop-down is a system value to distinguish between collections that should be viewed as internal tothe organization or external For example some collections may be made up entirely of studies from an organizationoutside the host catalog These collections can be designated as external The Section dropdown allows for thecategorization as either a collection based on a specialized collection (like health) or based on a regional breakdownSelecting Publish ndash publishes the collection
bull Click on Submit to save the changes
To view the results click on the Preview link on the far right
bull The new collection now also shows in the collection list on the Central Catalog About page (this is where thethumbnail and short description fields are displayed)
43 Manage Collections 41
nada Documentation Release 40
bull Visiting the Dashboard will now also show the new collection listed below the Central Data Catalog With anumber of green buttons as shortcut links to manage the studies on the collection assign administrators for thecollection a history of activity on the collection and a link to edit the collection as in the steps above
433 Manually adding studies to a collection
There are 2 ways to get studies into the new catalog
bull The first is to upload a DDI and all its resources to the collection in the same way as described in the earliersection ndash Uploading a Study Except instead of choosing Central Catalog chose the collection you want to
42 Chapter 4 User manual
nada Documentation Release 40
upload the study to
bull Click on the Add Study button and upload a DDI and RDF and all your resources as described in the earliersection ndash Uploading a Study
bull Once a study is added in this way it displays in the Manage Studies list Notice that the collection summaryfield shows that the study belongs to (is Owned By) the DHS collection (this was the Short name defined in theexample when the Health Surveys Collection was created)
All studies uploaded to collections will automatically be added to the Central Data Catalog in order to build a commonsearch portal for all studies
43 Manage Collections 43
nada Documentation Release 40
434 Copying studies from one collection to another
bull The second way to add a study to a collection is to Copy the study from another collection into the newcollection
bull To copy a study already in the catalog to display in the new collection first make sure to be in the Manage Studiessection for the collection you want to put studies into To do this either use the Studies ndash Manage studies menuon the top or simply click on the Switch link next to the Manage Studies [Collection Title] heading
bull Then Click on the Copy Studies blue button at the top right
bull A list of all studies available to copy to the new collection is listed Simply click on the Link button in green tocopy the study to the collection The button will turn red and say Unlink To reverse the process and click thenow red button
bull Going back to the Manage Studies page for the collection will show the newly copied studies in the collectionlist Also note that the Collection field now indicated DHS next to Central DHS is in grey to indicate it is notowned (it is a copy) by that collection and the Central is in blue to show it is owned by the Central Data CatalogAlso note that because the study is not owned by this catalog it cannot be edited from this catalog ndash hence thepublishunpublish green button is absent for the copied studies
44 Chapter 4 User manual
nada Documentation Release 40
435 Turning on the collection filter
The final step after creating the first collection is to enable the collection filter option in the Settings menus under SiteConfigurations ndash Survey catalog settings
436 Transferring study ownership
In the previous examples mention was made of studies uploaded to a catalog being owned by that catalog There maybe cases where transferring the ownership from one catalog to another will be desirable This will become clearerin the next section on user roles but for now the next steps show how transferring ownership from one collection toanother can be done
bull Transferring ownership from one collection to another has to be done by the owner of the collection and fromthe collection it is currently owned by
bull To transfer ownership Go to the Manage Studies screen and select the study to be transferred Open up the EditStudy page by clicking on the study Title
bull On the right hand side of the screen click on the Transfer study owner link
43 Manage Collections 45
nada Documentation Release 40
bull Select the collection to transfer from the dropdown box
bull Click Transfer
bull Note that when looking the study summary for the transferred study the Collection field now shows the studyto belong (owned by) to the DHS collection and not Central anymore Also note the option to Publish andunpublish is now active
bull To transfer ownership of a large number of studies all at once - from the Manage Studies page ndash select the studiesto be transferred (tick them in the box left of each study) and then from the top Batch Actions drop down selectTransfer owner ndash then apply
46 Chapter 4 User manual
nada Documentation Release 40
44 Manage Studies
There are 2 Options to get studies into the new catalog
441 Option 1
bull The first is to upload a DDI and all its resources to the collection in the same way as described in the earliersection ndash Uploading a Study Except instead of choosing Central Catalog chose the collection you want toupload the study to
bull Click on the Add Study button and upload a DDI and RDF and all your resources as described in the earliersection ndash Uploading a Study
bull Once a study is added in this way it displays in the Manage Studies list Notice that the collection summaryfield shows that the study belongs to (is Owned By) the DHS collection (this was the Short name defined in theexample when the Health Surveys Collection was created)
bull Also note that the new study also appears in the Central Data Catalog
All studies uploaded to collections will automatically be added to the Central Data Catalog in order to build a commonsearch portal for all studies
44 Manage Studies 47
nada Documentation Release 40
442 Option2
Copying studies from one collection to another
bull The second way to add a study to a collection is to Copy the study from another collection into the new collection
bull To copy a study already in the catalog to display in the new collection first make sure to be in the Manage Studiessection for the collection you want to put studies into To do this either use the Studies ndash Manage studies menuon the top or simply click on the Switch link next to the Manage Studies [Collection Title] heading
bull Then Click on the Copy Studies blue button at the top right
bull A list of all studies available to copy to the new collection is listed Simply click on the Link button in green tocopy the study to the collection The button will turn red and say Unlink To reverse the process and click thenow red button
bull Going back to the Manage Studies page for the collection will show the newly copied studies in the collectionlist Also note that the Collection field now indicated DHS next to Central DHS is in grey to indicate it is notowned (it is a copy) by that collection and the Central is in blue to show it is owned by the Central Data CatalogAlso note that because the study is not owned by this catalog it cannot be edited from this catalog ndash hence thepublishunpublish green button is absent for the copied studies
45 Managing Licensed Requests
Datasets that are assigned the Access Type Licensed require approval from the NADA administrator before the usercan get access to the data files From the site administration there are a number of ways to see if any licensed requestshave been received
bull Go to the dashboard Pending requests show up as red in the catalog quicj summary section Clicking on thislink goes to the Licensed Survey Requests management page
bull Or go to the Studies link on the top menu and select Licensed Requests from the submenu
48 Chapter 4 User manual
nada Documentation Release 40
The link shows a page with a list Licensed Requests received The status column indicated the Pending requests
bull Click on the Edit link for to process a request
The Request information tab shows a summary of the information provided by the applicant
bull To Approve or Deny or request further information for the request Click on the Process tab
45 Managing Licensed Requests 49
nada Documentation Release 40
bull Select Approve to approve the request (other options include Deny as well as Request more information fromthe applicant)
bull Select the files that the user will be authorized to download ndash it is also possible to enter a maximum number ofdownloads and expiry date for downloads
bull Enter any comments to be sent to the applicant
bull Select Notify user by email to notify them that the application has been processed
bull Select Update
bull The remaining tabs
ndash Communicate - provides a means to ask for more information from the applicant
ndash Monitor ndash allows the administrator to see when and how many times the applicant downloaded thedata
ndash Forward Request ndash provides a means to forward the request to another person for review
46 Manage Citations
The Citations section is where bibliographic references can be added for publications that use any of the studies in thecatalog These citations can be linked to particular studies in the catalog and are displayed to the users of the systemin the study information view of the relevant study
Citations are added from the Citations menu
50 Chapter 4 User manual
nada Documentation Release 40
bull To add a citation - click on All citations then click on the Add New Citation button at the top right
bull Compete the form including the indication as to whether the citation should be published or not
bull Then expand the Related studies link to tell the system which studies the citation ldquobelongsrdquo to
bull Click on the Attach studies link This reveals a list of all studies in the catalog
bull Select the relevant studies by clicking on the green Select button
bull Click on the apply filter button to save the changes The study now appears in the related studies box
bull Click on the submit button to save the citation
bull Note the flag keywords and notes fields can be used by administrators to place extra notes only visible to otheradministrators that might prove useful when there is uncertainty about a citations appropriateness or accuracy
bull It is also possible to import citations in common citation formats such as BibTex and EndNote (RIS)
bull To do this use the Import Citations link from the top menu
46 Manage Citations 51
nada Documentation Release 40
bull Paste the BibTex or RIS text into the form and then at the bottom of the screen click on Attach studies to linkthe citation to a particular study in the catalog
bull The citation now appears in the citation list as well as on the study information page for the relevant studies
52 Chapter 4 User manual
nada Documentation Release 40
47 Managing Users and account types
Users in the NADA can be defined according to three broad groups
General Usersndash this is the normal user who registers on a NADA site from the user interface This user type hasno access to the site administration It is required to register as a user before being granted access to public use andlicensed data types
Site Administrators (unlimited) ndash this user has access to all functions and all collections within the Site Administra-tion System wide access
Limited Administrators ndash these administrators have access to a limited set of functions within the Site Administra-tion Examples would be an administrator of a specific collections or licensed survey reviewer for all or only somecollections or report generator or citation manager etc
471 Creating User accounts
User accounts can be created in two ways
1 A General User account can be created by a user directly from the register screen from the login link on the userinterface of the application
The user created by this process has no access to the site administration This account can only be used to apply andgain access to public and licensed datasets
2 A user account can also be created by a Site Administrator
bull To do this login as a Site Administrator
bull Go to the site administration section of the application
47 Managing Users and account types 53
nada Documentation Release 40
bull Select Users ndash Add user from the top menu
bull Fill in the information for the user in the form and be sure to mark the account status as Active Then click theCreate button
54 Chapter 4 User manual
nada Documentation Release 40
47 Managing Users and account types 55
nada Documentation Release 40
bull Note that the user always starts off as a General User with no access permissions to the Site Administration Theuser group column displays as empty for users with only general user accounts
bull To see a list of all users in the system go to the Users ndash All Users menu item at the top of the screen
bull Note the new users created have no User group assigned (they are general users) Also note the Actions columnon the far right From these links an account can be edited (including changing the password and blocking anaccount) deleted and Permissions managed for the account
472 Managing User Account Permissions
User accounts permissions can be only be set and changed by a Site Administrator To change the permissions for anaccount
bull Click on the Permissions link next to the account to be changed All accounts start of as General users accounts
bull To change this user to a full site administrator who will have full system wide access to all parts and functionsof the NADA administration select the Site administrators (full access) option and tick the admin box as wellClick update to save the changes
56 Chapter 4 User manual
nada Documentation Release 40
473 Collection level administrators
bull To create a user who only has permissions to administer studies or administration functions for a particularcollection Select Site administrators (limited access)
47 Managing Users and account types 57
nada Documentation Release 40
bull It is then necessary to assign a role to this new limited administrator account To create a limited access ad-ministrator for a particular collection ndash select Site administrators (limited access) and then select Collectionadministrators Notice The form expands to reveal a list of collections in the system
bull Select the appropriate level of access that this account will have for this collection In the example below anadministrator is being created who can manage only licensed requests for the collection ndash Health Surveys Thisaccount will not be able to upload or publish studies The account will only be able to process licensed requestsfor the collection ndash Health Surveys
58 Chapter 4 User manual
nada Documentation Release 40
Other levels of access for Site administrators (limited access) ndash Collection administrators include
1 Accounts that are given full access to manage studies
2 Accounts that are given access to upload studies but not publish them
3 Accounts that are limited to reviewing studies
474 Global level Limited access accounts
Other types of limited access accounts include
1 Accounts that can only view system reports at a global level
2 Accounts that can only access the citations section and manage citations
3 Accounts that can only access the Licensed Request management system ndash at the global level for all collections
47 Managing Users and account types 59
nada Documentation Release 40
Impersonating a user
The system includes a function that allows a Site Administrator to impersonate (take on the role) a user created inthe system This is a useful testing tool when creating users and assigning permissions It essentially allows theadministrator to take on the role of another user temporarily
bull To access the Impersonate User feature go to the Users ndash Impersonat user menu at the top of the screen
bull A list of users to impersonate is shown
bull Select the user to impersonate and click on the impersonate button
bull The dashboard view for the impersonated user now shows
60 Chapter 4 User manual
nada Documentation Release 40
bull Note in the example above the account being impersonated is a Limited Account administrator with rights onlyto manage licensed requests for the Health Surveys Collection Note that all other dashboard menus are eitherhidden or clicking on any other function other than manage studies results in an access denied message
bull This is a good way to test if the roles assigned to a user account have the expected results
bull To exit the impersonate mode and return to the Site Administrator role ndash Click on the top right menu and selectExit impersonate mode
475 The Reviewer Limited access account
Sometimes it is desirable for catalog administrators to allow certain users to see a collection before it is published butwithout granting access to the site administration functions
This is useful for getting feedback on the correctness of information on collections or studies before publishing
To do this
bull First create an account for the user or get the user to create an account by using the register form on the loginscreen
bull Then edit the permissions for that user selecting Site Administrator (limited access) ndash Collection administrator
bull Then for the appropriate collection select Reviewer and click update to save the changes
47 Managing Users and account types 61
nada Documentation Release 40
bull The newly created reviewer account user can now view all studies in a collection even if the study or collectionis unpublished
48 Manage Site Pages and Menus
The NADA has a small content management component that allows for the creation of menu pages to appear on theuser interface
bull Examples of menus that might be useful for users of the site might be A page dealing with the disseminationpolicies of the organization or perhaps a page with contact information for the information
New menu items and pages can be created via the Menu- All pages menu link at the top of the Site Administrationpage
62 Chapter 4 User manual
nada Documentation Release 40
bull Select All pages from the menu
bull To add a new page click on the Add New Page button
bull Give the page a Title in the Title field
bull Clicking in the URL field will automatically suggest a name for the page in the URL
bull Enter the contents for the page in the Body section Plain text or HTML is accespted by this field
bull Then indicate if the page should be published or not in the Publish dropdown
bull The Weight field tells the NADA in what order this menu item should display Eg 0 would be first 1 secondand 2 third
bull Click on Update to save the changes
bull View the changes from the user interface In this Example a Contact Us page was created
bull It is also possible from the Menu Management screen to add a menu link that links to an existing page on anothersite (rather than creating a page itself)
bull To change the order in which the menu items display on the user interface use the Reorder Menu button on theMenu Management screen
48 Manage Site Pages and Menus 63
nada Documentation Release 40
49 The Site Settings Page
All settings for the application are controlled via the Settings menu at the top of the Site Administration page Thereare seven main settings sections See screenshot below
491 General Settings
1 Type the Title of the site here This will become the front page title of the NADA site In this case the Title isNADA
64 Chapter 4 User manual
nada Documentation Release 40
2 The footer text can be changed in this field This displays at the bottom of your site page
3 The initial page that loads when a user visits the NADA site can be set here In this case the catalog page is setto open by default
4 The name of the webmaster can be set here This is the name that will be used in system emails sent to users
5 Enter the webmaster email address here This should be the address that will be used in communication withusers Typically this is a general enquiries email set up by the organization and not a personal email address fora particular person Note to avoid mail systems rejecting mail as spam make sure to enter an address here thatis on the same domain as the server used in the email settings at setup
6 This field sets the location of the Cache folder The cache folder stores pre- generated pages of the site to allowfor faster browsing by the user By default it is set to cache This can be moved to another location if desiredbut must be writable The green tick indicates that the folder can be found and is set up correctly Enter eitherrelative or absolute paths to the folder location
7 Set the time that the Cache takes to expire By default it is set to 2 hours (in milli seconds)
8 If it is desired to turn off caching then select no here Sometimes it is useful to turn off caching when developingor updating a site so as to ensure that content changes become immediately visible on the front-end withouthaving to wait for the cache to expire and the new changes to show Turn this back on to speed up page loadingfor users
Click update to save all settings
Language
To change the language of the application expand the language section and choose the desired language Click updateto save and apply the setting
49 The Site Settings Page 65
nada Documentation Release 40
Enable or disable the HTML editor
A basic HTML editor is provided in the menu and page creating section of the application This setting allows this tobe turned on or off
Survey catalog settings
1 This is the folder where the files for the study are stored on the server This includes the DDI eternal resourcesand data files This folder can be moved to a location outside the web root as described in the installationinstructions in Chapter 1 Enter either relative or absolute paths to the folder location
2 This is the folder where DDIrsquos can be placed in order to use the bulk study import function in the NADA InNADA3 files had to be physically copied to this folder on the server but this is no longer necessary in NADA4 Files can now be directly uploaded to this folder from the Site Administration ndash Manage Studies page page
66 Chapter 4 User manual
nada Documentation Release 40
3 Select the vocabulary to use for the topic filter By default this is set to the CESSDA classification as recom-mended in the IHSN templates supplied at IHSNorg for the Nesstar Metadata Publisher
4 Enable or disable the Country filter on the user interface search page here If the catalog only contains studiesfor one country then turning this filter off is recommended
5 Enable or disable the Topic filter on the user interface search page here If no topics have been defined in theDDIrsquos being uploaded then it is recommended to turn this filter off (disable)
6 Enable or disable the Year filter on the user interface search page here
7 Enable or disable the Collection filter on the user interface search page here If no collections have been definedthen it is recommended to disable this filter
8 Enable or disable the Data access filter on the user interface search page here This filter is not needed if thereare very few studies in the catalog or if all studies hare set to the same access type
9 This section controls the order in which the filters appear on the search page Enter numbers here that rank theorder of the filters in the order they should be displayed
10 This setting determines how many studies are displayed by default to the user on the search page ndash catalog view
Site Login settings
1 To require that users login before being able to access the website set this option to Requires all users to loginto access the website
2 Determined how long a user will stay logged in After this time the user will be automatically logged out
3 Sets the minimum length for passwords created by the users at registration or for manual user creation
49 The Site Settings Page 67
nada Documentation Release 40
SMTP Settings
1 If the PHPweb server is configured to send email using PHPrsquos MAIL function select the first option and donrsquotfill in anything else
If your organization has a mail server and has have a dedicated account that can be setup for NADA use the followingsettings Check the radio button ldquoUse SMTP Serverrdquo
2 Enter the host name for the server
3 Enter the port used by the server to send mail
4 If required enter the user name used to send mail on the server
5 Enter the password used to send mail on the server
If the organization does not own a mail server a Gmail account can be configured to be used with NADA
bull Check the radio button ldquoUse SMTP Serverrdquo
bull Host name sslsmtpgooglemailcom or sslsmtpgmailcom
bull SMTP port 465
bull Account username email-addressgmailcom
bull Account password password for the gmail account
6 Test the email settings
The quickest way to test if the email settings are working is to use the ldquoforgot passwordrdquo option from the user loginpage If no mail is received when doing this test then go back and correct the mail settings Check with the ISP orserver administrator for the correct settings
Click on update to save all settings
68 Chapter 4 User manual
nada Documentation Release 40
492 Dashboard setting
Provides a means to automatically have content loaded into the dashboard via an RSS feed from a site The defaultsetting is set to receive updates and news from the IHSN website
49 The Site Settings Page 69
nada Documentation Release 40
70 Chapter 4 User manual
CHAPTER 5
Indices and tables
bull genindex
bull modindex
bull search
71

nada Documentation Release 40
43 Manage Collections
431 Collections
Collections are sub categories of the Central Data Catalog They allow administrators of a NADA instance to groupstudies into what can be thought of as sub-catalogs of the Central Data Catalog
Collections provide a number of benefits both from the user and the administrator perspective From the usersrsquo per-spective being able to filter and view groups (collections) of studies that logically belong together makes finding whatthey are looking for easier From the administratorsrsquo perspective the ability to create collections of studies that maylogically belong together facilitates the ability to decentralize the management of each collection of studies to specificadministrators (for example collections can be managed by different departments in an institution)
Note The creation of collections will in general only be useful and necessary for large catalogs or for catalogs thatdesire more decentralized management of groups of studies by different departments
432 Creating collections
bull Login to the Site administration using an administrator password
bull Collections are managed and created by going to the Studies Manage collections menu link
bull There are no collections defined in the default NADA 4 installation
bull To create a new collection click on the Create new collection button
43 Manage Collections 39
nada Documentation Release 40
1 Under Collection Identification provide a short name for the collection This will become the URL for thecollection so pick carefully For Title fill in the fill title for the collection This will be the name displayed atthe top of the collection page
B Fill in a 3 or four line short description of the collection This text will display on the front end in the collectionslist For examples see httpmicrodataworldbankorgindexphpcontributing-catalogs
C Fill in a more detailed description of the collection This will display on the About page for that collection Forexample see httpmicrodataworldbankorgindexphpcatalogdhsabout
To format the page and include images it is possible to enter HTML code into this box below is anexample piece of code that includes an image
ltimg src=rdquofilesdhs-fp-01jpgrdquo alt=rdquoHealth Surveys Imagerdquo class=rdquoabout-photordquogt lth2gt Health SurveysCollectionlth2gt ltp align=rdquojustifyrdquogtThe Health Surveys collection aims to provide frequent high qual-ity and timely health data needed by the decision makers when designing public health programsltpgtltpgtHealth surveys provide useful information on health status and health consumption and their determi-nantsltpgt
Copy any images to be displayed into the NADA ldquofilesrdquo folder on your server image imagesthumbnil-imagepng
4 Upload a file to display next to the collection as it is listed on the collection page NOTE This image should be82 X 82 pixels If the upload does not work automatically then copy the thumbnail image to the ldquofilesrdquo folder asshown above
40 Chapter 4 User manual
nada Documentation Release 40
E The Weight field determines in what order collections are shown in the collection list 0123 etc The Selectcollection type drop-down is a system value to distinguish between collections that should be viewed as internal tothe organization or external For example some collections may be made up entirely of studies from an organizationoutside the host catalog These collections can be designated as external The Section dropdown allows for thecategorization as either a collection based on a specialized collection (like health) or based on a regional breakdownSelecting Publish ndash publishes the collection
bull Click on Submit to save the changes
To view the results click on the Preview link on the far right
bull The new collection now also shows in the collection list on the Central Catalog About page (this is where thethumbnail and short description fields are displayed)
43 Manage Collections 41
nada Documentation Release 40
bull Visiting the Dashboard will now also show the new collection listed below the Central Data Catalog With anumber of green buttons as shortcut links to manage the studies on the collection assign administrators for thecollection a history of activity on the collection and a link to edit the collection as in the steps above
433 Manually adding studies to a collection
There are 2 ways to get studies into the new catalog
bull The first is to upload a DDI and all its resources to the collection in the same way as described in the earliersection ndash Uploading a Study Except instead of choosing Central Catalog chose the collection you want to
42 Chapter 4 User manual
nada Documentation Release 40
upload the study to
bull Click on the Add Study button and upload a DDI and RDF and all your resources as described in the earliersection ndash Uploading a Study
bull Once a study is added in this way it displays in the Manage Studies list Notice that the collection summaryfield shows that the study belongs to (is Owned By) the DHS collection (this was the Short name defined in theexample when the Health Surveys Collection was created)
All studies uploaded to collections will automatically be added to the Central Data Catalog in order to build a commonsearch portal for all studies
43 Manage Collections 43
nada Documentation Release 40
434 Copying studies from one collection to another
bull The second way to add a study to a collection is to Copy the study from another collection into the newcollection
bull To copy a study already in the catalog to display in the new collection first make sure to be in the Manage Studiessection for the collection you want to put studies into To do this either use the Studies ndash Manage studies menuon the top or simply click on the Switch link next to the Manage Studies [Collection Title] heading
bull Then Click on the Copy Studies blue button at the top right
bull A list of all studies available to copy to the new collection is listed Simply click on the Link button in green tocopy the study to the collection The button will turn red and say Unlink To reverse the process and click thenow red button
bull Going back to the Manage Studies page for the collection will show the newly copied studies in the collectionlist Also note that the Collection field now indicated DHS next to Central DHS is in grey to indicate it is notowned (it is a copy) by that collection and the Central is in blue to show it is owned by the Central Data CatalogAlso note that because the study is not owned by this catalog it cannot be edited from this catalog ndash hence thepublishunpublish green button is absent for the copied studies
44 Chapter 4 User manual
nada Documentation Release 40
435 Turning on the collection filter
The final step after creating the first collection is to enable the collection filter option in the Settings menus under SiteConfigurations ndash Survey catalog settings
436 Transferring study ownership
In the previous examples mention was made of studies uploaded to a catalog being owned by that catalog There maybe cases where transferring the ownership from one catalog to another will be desirable This will become clearerin the next section on user roles but for now the next steps show how transferring ownership from one collection toanother can be done
bull Transferring ownership from one collection to another has to be done by the owner of the collection and fromthe collection it is currently owned by
bull To transfer ownership Go to the Manage Studies screen and select the study to be transferred Open up the EditStudy page by clicking on the study Title
bull On the right hand side of the screen click on the Transfer study owner link
43 Manage Collections 45
nada Documentation Release 40
bull Select the collection to transfer from the dropdown box
bull Click Transfer
bull Note that when looking the study summary for the transferred study the Collection field now shows the studyto belong (owned by) to the DHS collection and not Central anymore Also note the option to Publish andunpublish is now active
bull To transfer ownership of a large number of studies all at once - from the Manage Studies page ndash select the studiesto be transferred (tick them in the box left of each study) and then from the top Batch Actions drop down selectTransfer owner ndash then apply
46 Chapter 4 User manual
nada Documentation Release 40
44 Manage Studies
There are 2 Options to get studies into the new catalog
441 Option 1
bull The first is to upload a DDI and all its resources to the collection in the same way as described in the earliersection ndash Uploading a Study Except instead of choosing Central Catalog chose the collection you want toupload the study to
bull Click on the Add Study button and upload a DDI and RDF and all your resources as described in the earliersection ndash Uploading a Study
bull Once a study is added in this way it displays in the Manage Studies list Notice that the collection summaryfield shows that the study belongs to (is Owned By) the DHS collection (this was the Short name defined in theexample when the Health Surveys Collection was created)
bull Also note that the new study also appears in the Central Data Catalog
All studies uploaded to collections will automatically be added to the Central Data Catalog in order to build a commonsearch portal for all studies
44 Manage Studies 47
nada Documentation Release 40
442 Option2
Copying studies from one collection to another
bull The second way to add a study to a collection is to Copy the study from another collection into the new collection
bull To copy a study already in the catalog to display in the new collection first make sure to be in the Manage Studiessection for the collection you want to put studies into To do this either use the Studies ndash Manage studies menuon the top or simply click on the Switch link next to the Manage Studies [Collection Title] heading
bull Then Click on the Copy Studies blue button at the top right
bull A list of all studies available to copy to the new collection is listed Simply click on the Link button in green tocopy the study to the collection The button will turn red and say Unlink To reverse the process and click thenow red button
bull Going back to the Manage Studies page for the collection will show the newly copied studies in the collectionlist Also note that the Collection field now indicated DHS next to Central DHS is in grey to indicate it is notowned (it is a copy) by that collection and the Central is in blue to show it is owned by the Central Data CatalogAlso note that because the study is not owned by this catalog it cannot be edited from this catalog ndash hence thepublishunpublish green button is absent for the copied studies
45 Managing Licensed Requests
Datasets that are assigned the Access Type Licensed require approval from the NADA administrator before the usercan get access to the data files From the site administration there are a number of ways to see if any licensed requestshave been received
bull Go to the dashboard Pending requests show up as red in the catalog quicj summary section Clicking on thislink goes to the Licensed Survey Requests management page
bull Or go to the Studies link on the top menu and select Licensed Requests from the submenu
48 Chapter 4 User manual
nada Documentation Release 40
The link shows a page with a list Licensed Requests received The status column indicated the Pending requests
bull Click on the Edit link for to process a request
The Request information tab shows a summary of the information provided by the applicant
bull To Approve or Deny or request further information for the request Click on the Process tab
45 Managing Licensed Requests 49
nada Documentation Release 40
bull Select Approve to approve the request (other options include Deny as well as Request more information fromthe applicant)
bull Select the files that the user will be authorized to download ndash it is also possible to enter a maximum number ofdownloads and expiry date for downloads
bull Enter any comments to be sent to the applicant
bull Select Notify user by email to notify them that the application has been processed
bull Select Update
bull The remaining tabs
ndash Communicate - provides a means to ask for more information from the applicant
ndash Monitor ndash allows the administrator to see when and how many times the applicant downloaded thedata
ndash Forward Request ndash provides a means to forward the request to another person for review
46 Manage Citations
The Citations section is where bibliographic references can be added for publications that use any of the studies in thecatalog These citations can be linked to particular studies in the catalog and are displayed to the users of the systemin the study information view of the relevant study
Citations are added from the Citations menu
50 Chapter 4 User manual
nada Documentation Release 40
bull To add a citation - click on All citations then click on the Add New Citation button at the top right
bull Compete the form including the indication as to whether the citation should be published or not
bull Then expand the Related studies link to tell the system which studies the citation ldquobelongsrdquo to
bull Click on the Attach studies link This reveals a list of all studies in the catalog
bull Select the relevant studies by clicking on the green Select button
bull Click on the apply filter button to save the changes The study now appears in the related studies box
bull Click on the submit button to save the citation
bull Note the flag keywords and notes fields can be used by administrators to place extra notes only visible to otheradministrators that might prove useful when there is uncertainty about a citations appropriateness or accuracy
bull It is also possible to import citations in common citation formats such as BibTex and EndNote (RIS)
bull To do this use the Import Citations link from the top menu
46 Manage Citations 51
nada Documentation Release 40
bull Paste the BibTex or RIS text into the form and then at the bottom of the screen click on Attach studies to linkthe citation to a particular study in the catalog
bull The citation now appears in the citation list as well as on the study information page for the relevant studies
52 Chapter 4 User manual
nada Documentation Release 40
47 Managing Users and account types
Users in the NADA can be defined according to three broad groups
General Usersndash this is the normal user who registers on a NADA site from the user interface This user type hasno access to the site administration It is required to register as a user before being granted access to public use andlicensed data types
Site Administrators (unlimited) ndash this user has access to all functions and all collections within the Site Administra-tion System wide access
Limited Administrators ndash these administrators have access to a limited set of functions within the Site Administra-tion Examples would be an administrator of a specific collections or licensed survey reviewer for all or only somecollections or report generator or citation manager etc
471 Creating User accounts
User accounts can be created in two ways
1 A General User account can be created by a user directly from the register screen from the login link on the userinterface of the application
The user created by this process has no access to the site administration This account can only be used to apply andgain access to public and licensed datasets
2 A user account can also be created by a Site Administrator
bull To do this login as a Site Administrator
bull Go to the site administration section of the application
47 Managing Users and account types 53
nada Documentation Release 40
bull Select Users ndash Add user from the top menu
bull Fill in the information for the user in the form and be sure to mark the account status as Active Then click theCreate button
54 Chapter 4 User manual
nada Documentation Release 40
47 Managing Users and account types 55
nada Documentation Release 40
bull Note that the user always starts off as a General User with no access permissions to the Site Administration Theuser group column displays as empty for users with only general user accounts
bull To see a list of all users in the system go to the Users ndash All Users menu item at the top of the screen
bull Note the new users created have no User group assigned (they are general users) Also note the Actions columnon the far right From these links an account can be edited (including changing the password and blocking anaccount) deleted and Permissions managed for the account
472 Managing User Account Permissions
User accounts permissions can be only be set and changed by a Site Administrator To change the permissions for anaccount
bull Click on the Permissions link next to the account to be changed All accounts start of as General users accounts
bull To change this user to a full site administrator who will have full system wide access to all parts and functionsof the NADA administration select the Site administrators (full access) option and tick the admin box as wellClick update to save the changes
56 Chapter 4 User manual
nada Documentation Release 40
473 Collection level administrators
bull To create a user who only has permissions to administer studies or administration functions for a particularcollection Select Site administrators (limited access)
47 Managing Users and account types 57
nada Documentation Release 40
bull It is then necessary to assign a role to this new limited administrator account To create a limited access ad-ministrator for a particular collection ndash select Site administrators (limited access) and then select Collectionadministrators Notice The form expands to reveal a list of collections in the system
bull Select the appropriate level of access that this account will have for this collection In the example below anadministrator is being created who can manage only licensed requests for the collection ndash Health Surveys Thisaccount will not be able to upload or publish studies The account will only be able to process licensed requestsfor the collection ndash Health Surveys
58 Chapter 4 User manual
nada Documentation Release 40
Other levels of access for Site administrators (limited access) ndash Collection administrators include
1 Accounts that are given full access to manage studies
2 Accounts that are given access to upload studies but not publish them
3 Accounts that are limited to reviewing studies
474 Global level Limited access accounts
Other types of limited access accounts include
1 Accounts that can only view system reports at a global level
2 Accounts that can only access the citations section and manage citations
3 Accounts that can only access the Licensed Request management system ndash at the global level for all collections
47 Managing Users and account types 59
nada Documentation Release 40
Impersonating a user
The system includes a function that allows a Site Administrator to impersonate (take on the role) a user created inthe system This is a useful testing tool when creating users and assigning permissions It essentially allows theadministrator to take on the role of another user temporarily
bull To access the Impersonate User feature go to the Users ndash Impersonat user menu at the top of the screen
bull A list of users to impersonate is shown
bull Select the user to impersonate and click on the impersonate button
bull The dashboard view for the impersonated user now shows
60 Chapter 4 User manual
nada Documentation Release 40
bull Note in the example above the account being impersonated is a Limited Account administrator with rights onlyto manage licensed requests for the Health Surveys Collection Note that all other dashboard menus are eitherhidden or clicking on any other function other than manage studies results in an access denied message
bull This is a good way to test if the roles assigned to a user account have the expected results
bull To exit the impersonate mode and return to the Site Administrator role ndash Click on the top right menu and selectExit impersonate mode
475 The Reviewer Limited access account
Sometimes it is desirable for catalog administrators to allow certain users to see a collection before it is published butwithout granting access to the site administration functions
This is useful for getting feedback on the correctness of information on collections or studies before publishing
To do this
bull First create an account for the user or get the user to create an account by using the register form on the loginscreen
bull Then edit the permissions for that user selecting Site Administrator (limited access) ndash Collection administrator
bull Then for the appropriate collection select Reviewer and click update to save the changes
47 Managing Users and account types 61
nada Documentation Release 40
bull The newly created reviewer account user can now view all studies in a collection even if the study or collectionis unpublished
48 Manage Site Pages and Menus
The NADA has a small content management component that allows for the creation of menu pages to appear on theuser interface
bull Examples of menus that might be useful for users of the site might be A page dealing with the disseminationpolicies of the organization or perhaps a page with contact information for the information
New menu items and pages can be created via the Menu- All pages menu link at the top of the Site Administrationpage
62 Chapter 4 User manual
nada Documentation Release 40
bull Select All pages from the menu
bull To add a new page click on the Add New Page button
bull Give the page a Title in the Title field
bull Clicking in the URL field will automatically suggest a name for the page in the URL
bull Enter the contents for the page in the Body section Plain text or HTML is accespted by this field
bull Then indicate if the page should be published or not in the Publish dropdown
bull The Weight field tells the NADA in what order this menu item should display Eg 0 would be first 1 secondand 2 third
bull Click on Update to save the changes
bull View the changes from the user interface In this Example a Contact Us page was created
bull It is also possible from the Menu Management screen to add a menu link that links to an existing page on anothersite (rather than creating a page itself)
bull To change the order in which the menu items display on the user interface use the Reorder Menu button on theMenu Management screen
48 Manage Site Pages and Menus 63
nada Documentation Release 40
49 The Site Settings Page
All settings for the application are controlled via the Settings menu at the top of the Site Administration page Thereare seven main settings sections See screenshot below
491 General Settings
1 Type the Title of the site here This will become the front page title of the NADA site In this case the Title isNADA
64 Chapter 4 User manual
nada Documentation Release 40
2 The footer text can be changed in this field This displays at the bottom of your site page
3 The initial page that loads when a user visits the NADA site can be set here In this case the catalog page is setto open by default
4 The name of the webmaster can be set here This is the name that will be used in system emails sent to users
5 Enter the webmaster email address here This should be the address that will be used in communication withusers Typically this is a general enquiries email set up by the organization and not a personal email address fora particular person Note to avoid mail systems rejecting mail as spam make sure to enter an address here thatis on the same domain as the server used in the email settings at setup
6 This field sets the location of the Cache folder The cache folder stores pre- generated pages of the site to allowfor faster browsing by the user By default it is set to cache This can be moved to another location if desiredbut must be writable The green tick indicates that the folder can be found and is set up correctly Enter eitherrelative or absolute paths to the folder location
7 Set the time that the Cache takes to expire By default it is set to 2 hours (in milli seconds)
8 If it is desired to turn off caching then select no here Sometimes it is useful to turn off caching when developingor updating a site so as to ensure that content changes become immediately visible on the front-end withouthaving to wait for the cache to expire and the new changes to show Turn this back on to speed up page loadingfor users
Click update to save all settings
Language
To change the language of the application expand the language section and choose the desired language Click updateto save and apply the setting
49 The Site Settings Page 65
nada Documentation Release 40
Enable or disable the HTML editor
A basic HTML editor is provided in the menu and page creating section of the application This setting allows this tobe turned on or off
Survey catalog settings
1 This is the folder where the files for the study are stored on the server This includes the DDI eternal resourcesand data files This folder can be moved to a location outside the web root as described in the installationinstructions in Chapter 1 Enter either relative or absolute paths to the folder location
2 This is the folder where DDIrsquos can be placed in order to use the bulk study import function in the NADA InNADA3 files had to be physically copied to this folder on the server but this is no longer necessary in NADA4 Files can now be directly uploaded to this folder from the Site Administration ndash Manage Studies page page
66 Chapter 4 User manual
nada Documentation Release 40
3 Select the vocabulary to use for the topic filter By default this is set to the CESSDA classification as recom-mended in the IHSN templates supplied at IHSNorg for the Nesstar Metadata Publisher
4 Enable or disable the Country filter on the user interface search page here If the catalog only contains studiesfor one country then turning this filter off is recommended
5 Enable or disable the Topic filter on the user interface search page here If no topics have been defined in theDDIrsquos being uploaded then it is recommended to turn this filter off (disable)
6 Enable or disable the Year filter on the user interface search page here
7 Enable or disable the Collection filter on the user interface search page here If no collections have been definedthen it is recommended to disable this filter
8 Enable or disable the Data access filter on the user interface search page here This filter is not needed if thereare very few studies in the catalog or if all studies hare set to the same access type
9 This section controls the order in which the filters appear on the search page Enter numbers here that rank theorder of the filters in the order they should be displayed
10 This setting determines how many studies are displayed by default to the user on the search page ndash catalog view
Site Login settings
1 To require that users login before being able to access the website set this option to Requires all users to loginto access the website
2 Determined how long a user will stay logged in After this time the user will be automatically logged out
3 Sets the minimum length for passwords created by the users at registration or for manual user creation
49 The Site Settings Page 67
nada Documentation Release 40
SMTP Settings
1 If the PHPweb server is configured to send email using PHPrsquos MAIL function select the first option and donrsquotfill in anything else
If your organization has a mail server and has have a dedicated account that can be setup for NADA use the followingsettings Check the radio button ldquoUse SMTP Serverrdquo
2 Enter the host name for the server
3 Enter the port used by the server to send mail
4 If required enter the user name used to send mail on the server
5 Enter the password used to send mail on the server
If the organization does not own a mail server a Gmail account can be configured to be used with NADA
bull Check the radio button ldquoUse SMTP Serverrdquo
bull Host name sslsmtpgooglemailcom or sslsmtpgmailcom
bull SMTP port 465
bull Account username email-addressgmailcom
bull Account password password for the gmail account
6 Test the email settings
The quickest way to test if the email settings are working is to use the ldquoforgot passwordrdquo option from the user loginpage If no mail is received when doing this test then go back and correct the mail settings Check with the ISP orserver administrator for the correct settings
Click on update to save all settings
68 Chapter 4 User manual
nada Documentation Release 40
492 Dashboard setting
Provides a means to automatically have content loaded into the dashboard via an RSS feed from a site The defaultsetting is set to receive updates and news from the IHSN website
49 The Site Settings Page 69
nada Documentation Release 40
70 Chapter 4 User manual
CHAPTER 5
Indices and tables
bull genindex
bull modindex
bull search
71
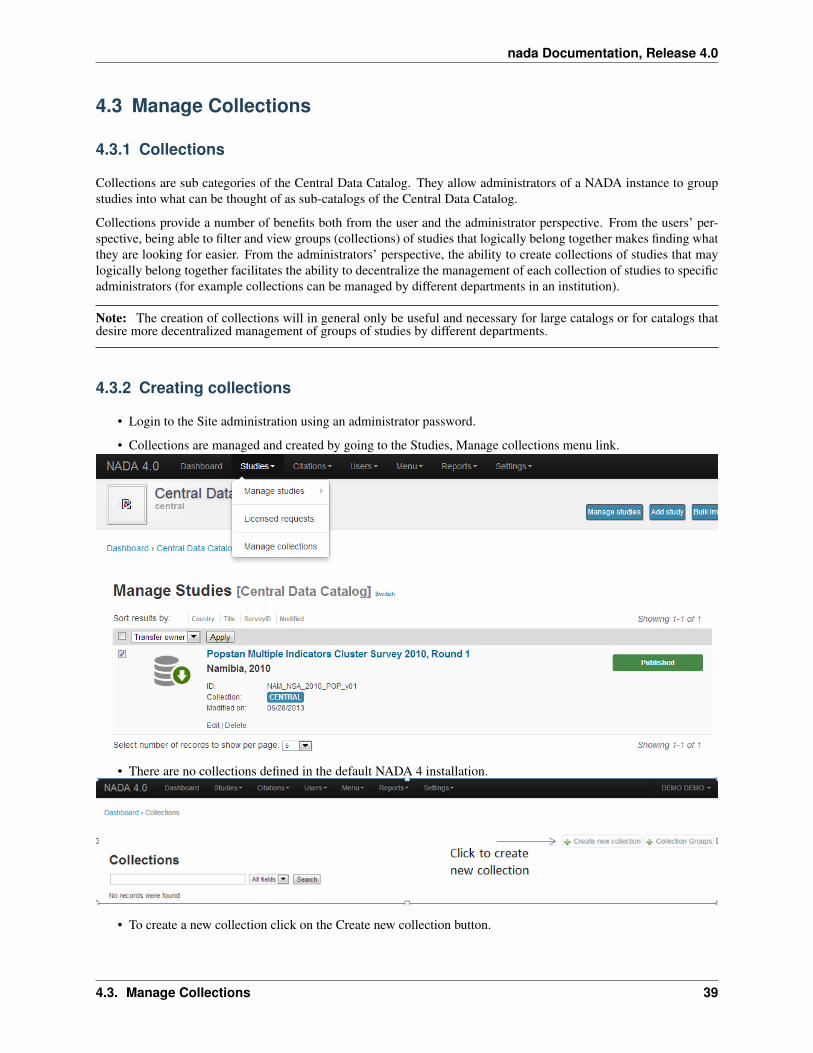
nada Documentation Release 40
bull Visiting the Dashboard will now also show the new collection listed below the Central Data Catalog With anumber of green buttons as shortcut links to manage the studies on the collection assign administrators for thecollection a history of activity on the collection and a link to edit the collection as in the steps above
433 Manually adding studies to a collection
There are 2 ways to get studies into the new catalog
bull The first is to upload a DDI and all its resources to the collection in the same way as described in the earliersection ndash Uploading a Study Except instead of choosing Central Catalog chose the collection you want to
42 Chapter 4 User manual
nada Documentation Release 40
upload the study to
bull Click on the Add Study button and upload a DDI and RDF and all your resources as described in the earliersection ndash Uploading a Study
bull Once a study is added in this way it displays in the Manage Studies list Notice that the collection summaryfield shows that the study belongs to (is Owned By) the DHS collection (this was the Short name defined in theexample when the Health Surveys Collection was created)
All studies uploaded to collections will automatically be added to the Central Data Catalog in order to build a commonsearch portal for all studies
43 Manage Collections 43
nada Documentation Release 40
434 Copying studies from one collection to another
bull The second way to add a study to a collection is to Copy the study from another collection into the newcollection
bull To copy a study already in the catalog to display in the new collection first make sure to be in the Manage Studiessection for the collection you want to put studies into To do this either use the Studies ndash Manage studies menuon the top or simply click on the Switch link next to the Manage Studies [Collection Title] heading
bull Then Click on the Copy Studies blue button at the top right
bull A list of all studies available to copy to the new collection is listed Simply click on the Link button in green tocopy the study to the collection The button will turn red and say Unlink To reverse the process and click thenow red button
bull Going back to the Manage Studies page for the collection will show the newly copied studies in the collectionlist Also note that the Collection field now indicated DHS next to Central DHS is in grey to indicate it is notowned (it is a copy) by that collection and the Central is in blue to show it is owned by the Central Data CatalogAlso note that because the study is not owned by this catalog it cannot be edited from this catalog ndash hence thepublishunpublish green button is absent for the copied studies
44 Chapter 4 User manual
nada Documentation Release 40
435 Turning on the collection filter
The final step after creating the first collection is to enable the collection filter option in the Settings menus under SiteConfigurations ndash Survey catalog settings
436 Transferring study ownership
In the previous examples mention was made of studies uploaded to a catalog being owned by that catalog There maybe cases where transferring the ownership from one catalog to another will be desirable This will become clearerin the next section on user roles but for now the next steps show how transferring ownership from one collection toanother can be done
bull Transferring ownership from one collection to another has to be done by the owner of the collection and fromthe collection it is currently owned by
bull To transfer ownership Go to the Manage Studies screen and select the study to be transferred Open up the EditStudy page by clicking on the study Title
bull On the right hand side of the screen click on the Transfer study owner link
43 Manage Collections 45
nada Documentation Release 40
bull Select the collection to transfer from the dropdown box
bull Click Transfer
bull Note that when looking the study summary for the transferred study the Collection field now shows the studyto belong (owned by) to the DHS collection and not Central anymore Also note the option to Publish andunpublish is now active
bull To transfer ownership of a large number of studies all at once - from the Manage Studies page ndash select the studiesto be transferred (tick them in the box left of each study) and then from the top Batch Actions drop down selectTransfer owner ndash then apply
46 Chapter 4 User manual
nada Documentation Release 40
44 Manage Studies
There are 2 Options to get studies into the new catalog
441 Option 1
bull The first is to upload a DDI and all its resources to the collection in the same way as described in the earliersection ndash Uploading a Study Except instead of choosing Central Catalog chose the collection you want toupload the study to
bull Click on the Add Study button and upload a DDI and RDF and all your resources as described in the earliersection ndash Uploading a Study
bull Once a study is added in this way it displays in the Manage Studies list Notice that the collection summaryfield shows that the study belongs to (is Owned By) the DHS collection (this was the Short name defined in theexample when the Health Surveys Collection was created)
bull Also note that the new study also appears in the Central Data Catalog
All studies uploaded to collections will automatically be added to the Central Data Catalog in order to build a commonsearch portal for all studies
44 Manage Studies 47
nada Documentation Release 40
442 Option2
Copying studies from one collection to another
bull The second way to add a study to a collection is to Copy the study from another collection into the new collection
bull To copy a study already in the catalog to display in the new collection first make sure to be in the Manage Studiessection for the collection you want to put studies into To do this either use the Studies ndash Manage studies menuon the top or simply click on the Switch link next to the Manage Studies [Collection Title] heading
bull Then Click on the Copy Studies blue button at the top right
bull A list of all studies available to copy to the new collection is listed Simply click on the Link button in green tocopy the study to the collection The button will turn red and say Unlink To reverse the process and click thenow red button
bull Going back to the Manage Studies page for the collection will show the newly copied studies in the collectionlist Also note that the Collection field now indicated DHS next to Central DHS is in grey to indicate it is notowned (it is a copy) by that collection and the Central is in blue to show it is owned by the Central Data CatalogAlso note that because the study is not owned by this catalog it cannot be edited from this catalog ndash hence thepublishunpublish green button is absent for the copied studies
45 Managing Licensed Requests
Datasets that are assigned the Access Type Licensed require approval from the NADA administrator before the usercan get access to the data files From the site administration there are a number of ways to see if any licensed requestshave been received
bull Go to the dashboard Pending requests show up as red in the catalog quicj summary section Clicking on thislink goes to the Licensed Survey Requests management page
bull Or go to the Studies link on the top menu and select Licensed Requests from the submenu
48 Chapter 4 User manual
nada Documentation Release 40
The link shows a page with a list Licensed Requests received The status column indicated the Pending requests
bull Click on the Edit link for to process a request
The Request information tab shows a summary of the information provided by the applicant
bull To Approve or Deny or request further information for the request Click on the Process tab
45 Managing Licensed Requests 49
nada Documentation Release 40
bull Select Approve to approve the request (other options include Deny as well as Request more information fromthe applicant)
bull Select the files that the user will be authorized to download ndash it is also possible to enter a maximum number ofdownloads and expiry date for downloads
bull Enter any comments to be sent to the applicant
bull Select Notify user by email to notify them that the application has been processed
bull Select Update
bull The remaining tabs
ndash Communicate - provides a means to ask for more information from the applicant
ndash Monitor ndash allows the administrator to see when and how many times the applicant downloaded thedata
ndash Forward Request ndash provides a means to forward the request to another person for review
46 Manage Citations
The Citations section is where bibliographic references can be added for publications that use any of the studies in thecatalog These citations can be linked to particular studies in the catalog and are displayed to the users of the systemin the study information view of the relevant study
Citations are added from the Citations menu
50 Chapter 4 User manual
nada Documentation Release 40
bull To add a citation - click on All citations then click on the Add New Citation button at the top right
bull Compete the form including the indication as to whether the citation should be published or not
bull Then expand the Related studies link to tell the system which studies the citation ldquobelongsrdquo to
bull Click on the Attach studies link This reveals a list of all studies in the catalog
bull Select the relevant studies by clicking on the green Select button
bull Click on the apply filter button to save the changes The study now appears in the related studies box
bull Click on the submit button to save the citation
bull Note the flag keywords and notes fields can be used by administrators to place extra notes only visible to otheradministrators that might prove useful when there is uncertainty about a citations appropriateness or accuracy
bull It is also possible to import citations in common citation formats such as BibTex and EndNote (RIS)
bull To do this use the Import Citations link from the top menu
46 Manage Citations 51
nada Documentation Release 40
bull Paste the BibTex or RIS text into the form and then at the bottom of the screen click on Attach studies to linkthe citation to a particular study in the catalog
bull The citation now appears in the citation list as well as on the study information page for the relevant studies
52 Chapter 4 User manual
nada Documentation Release 40
47 Managing Users and account types
Users in the NADA can be defined according to three broad groups
General Usersndash this is the normal user who registers on a NADA site from the user interface This user type hasno access to the site administration It is required to register as a user before being granted access to public use andlicensed data types
Site Administrators (unlimited) ndash this user has access to all functions and all collections within the Site Administra-tion System wide access
Limited Administrators ndash these administrators have access to a limited set of functions within the Site Administra-tion Examples would be an administrator of a specific collections or licensed survey reviewer for all or only somecollections or report generator or citation manager etc
471 Creating User accounts
User accounts can be created in two ways
1 A General User account can be created by a user directly from the register screen from the login link on the userinterface of the application
The user created by this process has no access to the site administration This account can only be used to apply andgain access to public and licensed datasets
2 A user account can also be created by a Site Administrator
bull To do this login as a Site Administrator
bull Go to the site administration section of the application
47 Managing Users and account types 53
nada Documentation Release 40
bull Select Users ndash Add user from the top menu
bull Fill in the information for the user in the form and be sure to mark the account status as Active Then click theCreate button
54 Chapter 4 User manual
nada Documentation Release 40
47 Managing Users and account types 55
nada Documentation Release 40
bull Note that the user always starts off as a General User with no access permissions to the Site Administration Theuser group column displays as empty for users with only general user accounts
bull To see a list of all users in the system go to the Users ndash All Users menu item at the top of the screen
bull Note the new users created have no User group assigned (they are general users) Also note the Actions columnon the far right From these links an account can be edited (including changing the password and blocking anaccount) deleted and Permissions managed for the account
472 Managing User Account Permissions
User accounts permissions can be only be set and changed by a Site Administrator To change the permissions for anaccount
bull Click on the Permissions link next to the account to be changed All accounts start of as General users accounts
bull To change this user to a full site administrator who will have full system wide access to all parts and functionsof the NADA administration select the Site administrators (full access) option and tick the admin box as wellClick update to save the changes
56 Chapter 4 User manual
nada Documentation Release 40
473 Collection level administrators
bull To create a user who only has permissions to administer studies or administration functions for a particularcollection Select Site administrators (limited access)
47 Managing Users and account types 57
nada Documentation Release 40
bull It is then necessary to assign a role to this new limited administrator account To create a limited access ad-ministrator for a particular collection ndash select Site administrators (limited access) and then select Collectionadministrators Notice The form expands to reveal a list of collections in the system
bull Select the appropriate level of access that this account will have for this collection In the example below anadministrator is being created who can manage only licensed requests for the collection ndash Health Surveys Thisaccount will not be able to upload or publish studies The account will only be able to process licensed requestsfor the collection ndash Health Surveys
58 Chapter 4 User manual
nada Documentation Release 40
Other levels of access for Site administrators (limited access) ndash Collection administrators include
1 Accounts that are given full access to manage studies
2 Accounts that are given access to upload studies but not publish them
3 Accounts that are limited to reviewing studies
474 Global level Limited access accounts
Other types of limited access accounts include
1 Accounts that can only view system reports at a global level
2 Accounts that can only access the citations section and manage citations
3 Accounts that can only access the Licensed Request management system ndash at the global level for all collections
47 Managing Users and account types 59
nada Documentation Release 40
Impersonating a user
The system includes a function that allows a Site Administrator to impersonate (take on the role) a user created inthe system This is a useful testing tool when creating users and assigning permissions It essentially allows theadministrator to take on the role of another user temporarily
bull To access the Impersonate User feature go to the Users ndash Impersonat user menu at the top of the screen
bull A list of users to impersonate is shown
bull Select the user to impersonate and click on the impersonate button
bull The dashboard view for the impersonated user now shows
60 Chapter 4 User manual
nada Documentation Release 40
bull Note in the example above the account being impersonated is a Limited Account administrator with rights onlyto manage licensed requests for the Health Surveys Collection Note that all other dashboard menus are eitherhidden or clicking on any other function other than manage studies results in an access denied message
bull This is a good way to test if the roles assigned to a user account have the expected results
bull To exit the impersonate mode and return to the Site Administrator role ndash Click on the top right menu and selectExit impersonate mode
475 The Reviewer Limited access account
Sometimes it is desirable for catalog administrators to allow certain users to see a collection before it is published butwithout granting access to the site administration functions
This is useful for getting feedback on the correctness of information on collections or studies before publishing
To do this
bull First create an account for the user or get the user to create an account by using the register form on the loginscreen
bull Then edit the permissions for that user selecting Site Administrator (limited access) ndash Collection administrator
bull Then for the appropriate collection select Reviewer and click update to save the changes
47 Managing Users and account types 61
nada Documentation Release 40
bull The newly created reviewer account user can now view all studies in a collection even if the study or collectionis unpublished
48 Manage Site Pages and Menus
The NADA has a small content management component that allows for the creation of menu pages to appear on theuser interface
bull Examples of menus that might be useful for users of the site might be A page dealing with the disseminationpolicies of the organization or perhaps a page with contact information for the information
New menu items and pages can be created via the Menu- All pages menu link at the top of the Site Administrationpage
62 Chapter 4 User manual
nada Documentation Release 40
bull Select All pages from the menu
bull To add a new page click on the Add New Page button
bull Give the page a Title in the Title field
bull Clicking in the URL field will automatically suggest a name for the page in the URL
bull Enter the contents for the page in the Body section Plain text or HTML is accespted by this field
bull Then indicate if the page should be published or not in the Publish dropdown
bull The Weight field tells the NADA in what order this menu item should display Eg 0 would be first 1 secondand 2 third
bull Click on Update to save the changes
bull View the changes from the user interface In this Example a Contact Us page was created
bull It is also possible from the Menu Management screen to add a menu link that links to an existing page on anothersite (rather than creating a page itself)
bull To change the order in which the menu items display on the user interface use the Reorder Menu button on theMenu Management screen
48 Manage Site Pages and Menus 63
nada Documentation Release 40
49 The Site Settings Page
All settings for the application are controlled via the Settings menu at the top of the Site Administration page Thereare seven main settings sections See screenshot below
491 General Settings
1 Type the Title of the site here This will become the front page title of the NADA site In this case the Title isNADA
64 Chapter 4 User manual
nada Documentation Release 40
2 The footer text can be changed in this field This displays at the bottom of your site page
3 The initial page that loads when a user visits the NADA site can be set here In this case the catalog page is setto open by default
4 The name of the webmaster can be set here This is the name that will be used in system emails sent to users
5 Enter the webmaster email address here This should be the address that will be used in communication withusers Typically this is a general enquiries email set up by the organization and not a personal email address fora particular person Note to avoid mail systems rejecting mail as spam make sure to enter an address here thatis on the same domain as the server used in the email settings at setup
6 This field sets the location of the Cache folder The cache folder stores pre- generated pages of the site to allowfor faster browsing by the user By default it is set to cache This can be moved to another location if desiredbut must be writable The green tick indicates that the folder can be found and is set up correctly Enter eitherrelative or absolute paths to the folder location
7 Set the time that the Cache takes to expire By default it is set to 2 hours (in milli seconds)
8 If it is desired to turn off caching then select no here Sometimes it is useful to turn off caching when developingor updating a site so as to ensure that content changes become immediately visible on the front-end withouthaving to wait for the cache to expire and the new changes to show Turn this back on to speed up page loadingfor users
Click update to save all settings
Language
To change the language of the application expand the language section and choose the desired language Click updateto save and apply the setting
49 The Site Settings Page 65
nada Documentation Release 40
Enable or disable the HTML editor
A basic HTML editor is provided in the menu and page creating section of the application This setting allows this tobe turned on or off
Survey catalog settings
1 This is the folder where the files for the study are stored on the server This includes the DDI eternal resourcesand data files This folder can be moved to a location outside the web root as described in the installationinstructions in Chapter 1 Enter either relative or absolute paths to the folder location
2 This is the folder where DDIrsquos can be placed in order to use the bulk study import function in the NADA InNADA3 files had to be physically copied to this folder on the server but this is no longer necessary in NADA4 Files can now be directly uploaded to this folder from the Site Administration ndash Manage Studies page page
66 Chapter 4 User manual
nada Documentation Release 40
3 Select the vocabulary to use for the topic filter By default this is set to the CESSDA classification as recom-mended in the IHSN templates supplied at IHSNorg for the Nesstar Metadata Publisher
4 Enable or disable the Country filter on the user interface search page here If the catalog only contains studiesfor one country then turning this filter off is recommended
5 Enable or disable the Topic filter on the user interface search page here If no topics have been defined in theDDIrsquos being uploaded then it is recommended to turn this filter off (disable)
6 Enable or disable the Year filter on the user interface search page here
7 Enable or disable the Collection filter on the user interface search page here If no collections have been definedthen it is recommended to disable this filter
8 Enable or disable the Data access filter on the user interface search page here This filter is not needed if thereare very few studies in the catalog or if all studies hare set to the same access type
9 This section controls the order in which the filters appear on the search page Enter numbers here that rank theorder of the filters in the order they should be displayed
10 This setting determines how many studies are displayed by default to the user on the search page ndash catalog view
Site Login settings
1 To require that users login before being able to access the website set this option to Requires all users to loginto access the website
2 Determined how long a user will stay logged in After this time the user will be automatically logged out
3 Sets the minimum length for passwords created by the users at registration or for manual user creation
49 The Site Settings Page 67
nada Documentation Release 40
SMTP Settings
1 If the PHPweb server is configured to send email using PHPrsquos MAIL function select the first option and donrsquotfill in anything else
If your organization has a mail server and has have a dedicated account that can be setup for NADA use the followingsettings Check the radio button ldquoUse SMTP Serverrdquo
2 Enter the host name for the server
3 Enter the port used by the server to send mail
4 If required enter the user name used to send mail on the server
5 Enter the password used to send mail on the server
If the organization does not own a mail server a Gmail account can be configured to be used with NADA
bull Check the radio button ldquoUse SMTP Serverrdquo
bull Host name sslsmtpgooglemailcom or sslsmtpgmailcom
bull SMTP port 465
bull Account username email-addressgmailcom
bull Account password password for the gmail account
6 Test the email settings
The quickest way to test if the email settings are working is to use the ldquoforgot passwordrdquo option from the user loginpage If no mail is received when doing this test then go back and correct the mail settings Check with the ISP orserver administrator for the correct settings
Click on update to save all settings
68 Chapter 4 User manual
nada Documentation Release 40
492 Dashboard setting
Provides a means to automatically have content loaded into the dashboard via an RSS feed from a site The defaultsetting is set to receive updates and news from the IHSN website
49 The Site Settings Page 69
nada Documentation Release 40
70 Chapter 4 User manual
CHAPTER 5
Indices and tables
bull genindex
bull modindex
bull search
71
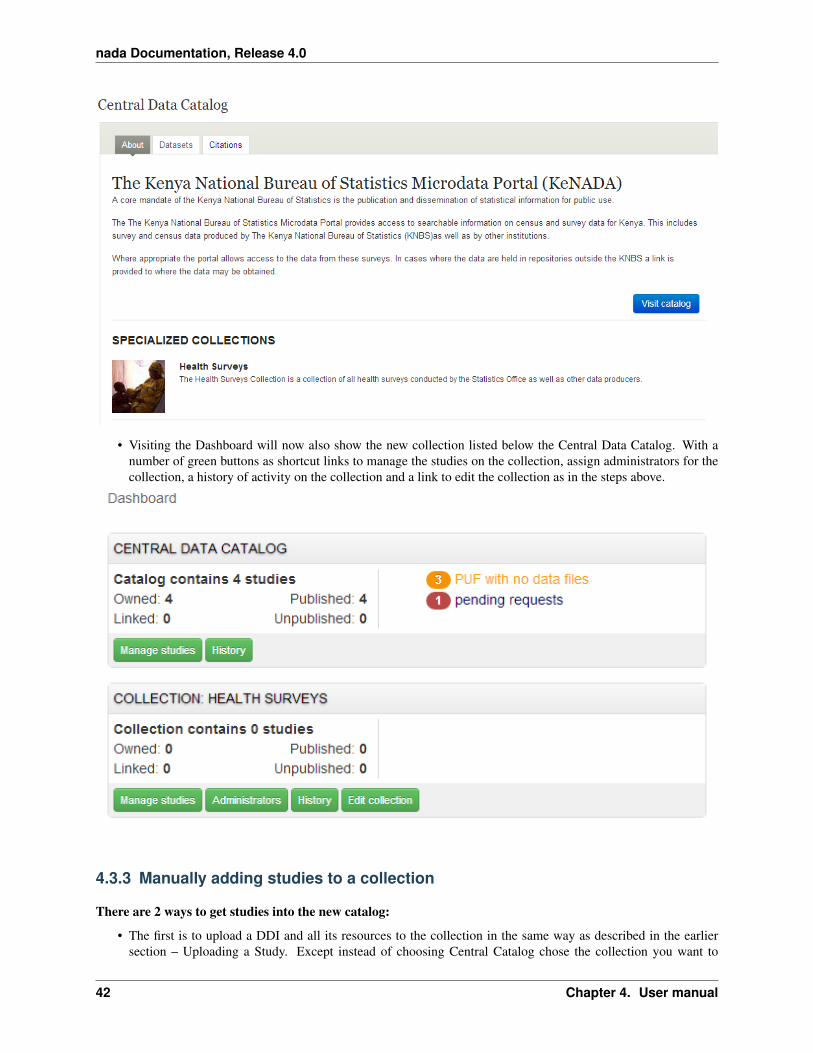
nada Documentation Release 40
upload the study to
bull Click on the Add Study button and upload a DDI and RDF and all your resources as described in the earliersection ndash Uploading a Study
bull Once a study is added in this way it displays in the Manage Studies list Notice that the collection summaryfield shows that the study belongs to (is Owned By) the DHS collection (this was the Short name defined in theexample when the Health Surveys Collection was created)
All studies uploaded to collections will automatically be added to the Central Data Catalog in order to build a commonsearch portal for all studies
43 Manage Collections 43
nada Documentation Release 40
434 Copying studies from one collection to another
bull The second way to add a study to a collection is to Copy the study from another collection into the newcollection
bull To copy a study already in the catalog to display in the new collection first make sure to be in the Manage Studiessection for the collection you want to put studies into To do this either use the Studies ndash Manage studies menuon the top or simply click on the Switch link next to the Manage Studies [Collection Title] heading
bull Then Click on the Copy Studies blue button at the top right
bull A list of all studies available to copy to the new collection is listed Simply click on the Link button in green tocopy the study to the collection The button will turn red and say Unlink To reverse the process and click thenow red button
bull Going back to the Manage Studies page for the collection will show the newly copied studies in the collectionlist Also note that the Collection field now indicated DHS next to Central DHS is in grey to indicate it is notowned (it is a copy) by that collection and the Central is in blue to show it is owned by the Central Data CatalogAlso note that because the study is not owned by this catalog it cannot be edited from this catalog ndash hence thepublishunpublish green button is absent for the copied studies
44 Chapter 4 User manual
nada Documentation Release 40
435 Turning on the collection filter
The final step after creating the first collection is to enable the collection filter option in the Settings menus under SiteConfigurations ndash Survey catalog settings
436 Transferring study ownership
In the previous examples mention was made of studies uploaded to a catalog being owned by that catalog There maybe cases where transferring the ownership from one catalog to another will be desirable This will become clearerin the next section on user roles but for now the next steps show how transferring ownership from one collection toanother can be done
bull Transferring ownership from one collection to another has to be done by the owner of the collection and fromthe collection it is currently owned by
bull To transfer ownership Go to the Manage Studies screen and select the study to be transferred Open up the EditStudy page by clicking on the study Title
bull On the right hand side of the screen click on the Transfer study owner link
43 Manage Collections 45
nada Documentation Release 40
bull Select the collection to transfer from the dropdown box
bull Click Transfer
bull Note that when looking the study summary for the transferred study the Collection field now shows the studyto belong (owned by) to the DHS collection and not Central anymore Also note the option to Publish andunpublish is now active
bull To transfer ownership of a large number of studies all at once - from the Manage Studies page ndash select the studiesto be transferred (tick them in the box left of each study) and then from the top Batch Actions drop down selectTransfer owner ndash then apply
46 Chapter 4 User manual
nada Documentation Release 40
44 Manage Studies
There are 2 Options to get studies into the new catalog
441 Option 1
bull The first is to upload a DDI and all its resources to the collection in the same way as described in the earliersection ndash Uploading a Study Except instead of choosing Central Catalog chose the collection you want toupload the study to
bull Click on the Add Study button and upload a DDI and RDF and all your resources as described in the earliersection ndash Uploading a Study
bull Once a study is added in this way it displays in the Manage Studies list Notice that the collection summaryfield shows that the study belongs to (is Owned By) the DHS collection (this was the Short name defined in theexample when the Health Surveys Collection was created)
bull Also note that the new study also appears in the Central Data Catalog
All studies uploaded to collections will automatically be added to the Central Data Catalog in order to build a commonsearch portal for all studies
44 Manage Studies 47
nada Documentation Release 40
442 Option2
Copying studies from one collection to another
bull The second way to add a study to a collection is to Copy the study from another collection into the new collection
bull To copy a study already in the catalog to display in the new collection first make sure to be in the Manage Studiessection for the collection you want to put studies into To do this either use the Studies ndash Manage studies menuon the top or simply click on the Switch link next to the Manage Studies [Collection Title] heading
bull Then Click on the Copy Studies blue button at the top right
bull A list of all studies available to copy to the new collection is listed Simply click on the Link button in green tocopy the study to the collection The button will turn red and say Unlink To reverse the process and click thenow red button
bull Going back to the Manage Studies page for the collection will show the newly copied studies in the collectionlist Also note that the Collection field now indicated DHS next to Central DHS is in grey to indicate it is notowned (it is a copy) by that collection and the Central is in blue to show it is owned by the Central Data CatalogAlso note that because the study is not owned by this catalog it cannot be edited from this catalog ndash hence thepublishunpublish green button is absent for the copied studies
45 Managing Licensed Requests
Datasets that are assigned the Access Type Licensed require approval from the NADA administrator before the usercan get access to the data files From the site administration there are a number of ways to see if any licensed requestshave been received
bull Go to the dashboard Pending requests show up as red in the catalog quicj summary section Clicking on thislink goes to the Licensed Survey Requests management page
bull Or go to the Studies link on the top menu and select Licensed Requests from the submenu
48 Chapter 4 User manual
nada Documentation Release 40
The link shows a page with a list Licensed Requests received The status column indicated the Pending requests
bull Click on the Edit link for to process a request
The Request information tab shows a summary of the information provided by the applicant
bull To Approve or Deny or request further information for the request Click on the Process tab
45 Managing Licensed Requests 49
nada Documentation Release 40
bull Select Approve to approve the request (other options include Deny as well as Request more information fromthe applicant)
bull Select the files that the user will be authorized to download ndash it is also possible to enter a maximum number ofdownloads and expiry date for downloads
bull Enter any comments to be sent to the applicant
bull Select Notify user by email to notify them that the application has been processed
bull Select Update
bull The remaining tabs
ndash Communicate - provides a means to ask for more information from the applicant
ndash Monitor ndash allows the administrator to see when and how many times the applicant downloaded thedata
ndash Forward Request ndash provides a means to forward the request to another person for review
46 Manage Citations
The Citations section is where bibliographic references can be added for publications that use any of the studies in thecatalog These citations can be linked to particular studies in the catalog and are displayed to the users of the systemin the study information view of the relevant study
Citations are added from the Citations menu
50 Chapter 4 User manual
nada Documentation Release 40
bull To add a citation - click on All citations then click on the Add New Citation button at the top right
bull Compete the form including the indication as to whether the citation should be published or not
bull Then expand the Related studies link to tell the system which studies the citation ldquobelongsrdquo to
bull Click on the Attach studies link This reveals a list of all studies in the catalog
bull Select the relevant studies by clicking on the green Select button
bull Click on the apply filter button to save the changes The study now appears in the related studies box
bull Click on the submit button to save the citation
bull Note the flag keywords and notes fields can be used by administrators to place extra notes only visible to otheradministrators that might prove useful when there is uncertainty about a citations appropriateness or accuracy
bull It is also possible to import citations in common citation formats such as BibTex and EndNote (RIS)
bull To do this use the Import Citations link from the top menu
46 Manage Citations 51
nada Documentation Release 40
bull Paste the BibTex or RIS text into the form and then at the bottom of the screen click on Attach studies to linkthe citation to a particular study in the catalog
bull The citation now appears in the citation list as well as on the study information page for the relevant studies
52 Chapter 4 User manual
nada Documentation Release 40
47 Managing Users and account types
Users in the NADA can be defined according to three broad groups
General Usersndash this is the normal user who registers on a NADA site from the user interface This user type hasno access to the site administration It is required to register as a user before being granted access to public use andlicensed data types
Site Administrators (unlimited) ndash this user has access to all functions and all collections within the Site Administra-tion System wide access
Limited Administrators ndash these administrators have access to a limited set of functions within the Site Administra-tion Examples would be an administrator of a specific collections or licensed survey reviewer for all or only somecollections or report generator or citation manager etc
471 Creating User accounts
User accounts can be created in two ways
1 A General User account can be created by a user directly from the register screen from the login link on the userinterface of the application
The user created by this process has no access to the site administration This account can only be used to apply andgain access to public and licensed datasets
2 A user account can also be created by a Site Administrator
bull To do this login as a Site Administrator
bull Go to the site administration section of the application
47 Managing Users and account types 53
nada Documentation Release 40
bull Select Users ndash Add user from the top menu
bull Fill in the information for the user in the form and be sure to mark the account status as Active Then click theCreate button
54 Chapter 4 User manual
nada Documentation Release 40
47 Managing Users and account types 55
nada Documentation Release 40
bull Note that the user always starts off as a General User with no access permissions to the Site Administration Theuser group column displays as empty for users with only general user accounts
bull To see a list of all users in the system go to the Users ndash All Users menu item at the top of the screen
bull Note the new users created have no User group assigned (they are general users) Also note the Actions columnon the far right From these links an account can be edited (including changing the password and blocking anaccount) deleted and Permissions managed for the account
472 Managing User Account Permissions
User accounts permissions can be only be set and changed by a Site Administrator To change the permissions for anaccount
bull Click on the Permissions link next to the account to be changed All accounts start of as General users accounts
bull To change this user to a full site administrator who will have full system wide access to all parts and functionsof the NADA administration select the Site administrators (full access) option and tick the admin box as wellClick update to save the changes
56 Chapter 4 User manual
nada Documentation Release 40
473 Collection level administrators
bull To create a user who only has permissions to administer studies or administration functions for a particularcollection Select Site administrators (limited access)
47 Managing Users and account types 57
nada Documentation Release 40
bull It is then necessary to assign a role to this new limited administrator account To create a limited access ad-ministrator for a particular collection ndash select Site administrators (limited access) and then select Collectionadministrators Notice The form expands to reveal a list of collections in the system
bull Select the appropriate level of access that this account will have for this collection In the example below anadministrator is being created who can manage only licensed requests for the collection ndash Health Surveys Thisaccount will not be able to upload or publish studies The account will only be able to process licensed requestsfor the collection ndash Health Surveys
58 Chapter 4 User manual
nada Documentation Release 40
Other levels of access for Site administrators (limited access) ndash Collection administrators include
1 Accounts that are given full access to manage studies
2 Accounts that are given access to upload studies but not publish them
3 Accounts that are limited to reviewing studies
474 Global level Limited access accounts
Other types of limited access accounts include
1 Accounts that can only view system reports at a global level
2 Accounts that can only access the citations section and manage citations
3 Accounts that can only access the Licensed Request management system ndash at the global level for all collections
47 Managing Users and account types 59
nada Documentation Release 40
Impersonating a user
The system includes a function that allows a Site Administrator to impersonate (take on the role) a user created inthe system This is a useful testing tool when creating users and assigning permissions It essentially allows theadministrator to take on the role of another user temporarily
bull To access the Impersonate User feature go to the Users ndash Impersonat user menu at the top of the screen
bull A list of users to impersonate is shown
bull Select the user to impersonate and click on the impersonate button
bull The dashboard view for the impersonated user now shows
60 Chapter 4 User manual
nada Documentation Release 40
bull Note in the example above the account being impersonated is a Limited Account administrator with rights onlyto manage licensed requests for the Health Surveys Collection Note that all other dashboard menus are eitherhidden or clicking on any other function other than manage studies results in an access denied message
bull This is a good way to test if the roles assigned to a user account have the expected results
bull To exit the impersonate mode and return to the Site Administrator role ndash Click on the top right menu and selectExit impersonate mode
475 The Reviewer Limited access account
Sometimes it is desirable for catalog administrators to allow certain users to see a collection before it is published butwithout granting access to the site administration functions
This is useful for getting feedback on the correctness of information on collections or studies before publishing
To do this
bull First create an account for the user or get the user to create an account by using the register form on the loginscreen
bull Then edit the permissions for that user selecting Site Administrator (limited access) ndash Collection administrator
bull Then for the appropriate collection select Reviewer and click update to save the changes
47 Managing Users and account types 61
nada Documentation Release 40
bull The newly created reviewer account user can now view all studies in a collection even if the study or collectionis unpublished
48 Manage Site Pages and Menus
The NADA has a small content management component that allows for the creation of menu pages to appear on theuser interface
bull Examples of menus that might be useful for users of the site might be A page dealing with the disseminationpolicies of the organization or perhaps a page with contact information for the information
New menu items and pages can be created via the Menu- All pages menu link at the top of the Site Administrationpage
62 Chapter 4 User manual
nada Documentation Release 40
bull Select All pages from the menu
bull To add a new page click on the Add New Page button
bull Give the page a Title in the Title field
bull Clicking in the URL field will automatically suggest a name for the page in the URL
bull Enter the contents for the page in the Body section Plain text or HTML is accespted by this field
bull Then indicate if the page should be published or not in the Publish dropdown
bull The Weight field tells the NADA in what order this menu item should display Eg 0 would be first 1 secondand 2 third
bull Click on Update to save the changes
bull View the changes from the user interface In this Example a Contact Us page was created
bull It is also possible from the Menu Management screen to add a menu link that links to an existing page on anothersite (rather than creating a page itself)
bull To change the order in which the menu items display on the user interface use the Reorder Menu button on theMenu Management screen
48 Manage Site Pages and Menus 63
nada Documentation Release 40
49 The Site Settings Page
All settings for the application are controlled via the Settings menu at the top of the Site Administration page Thereare seven main settings sections See screenshot below
491 General Settings
1 Type the Title of the site here This will become the front page title of the NADA site In this case the Title isNADA
64 Chapter 4 User manual
nada Documentation Release 40
2 The footer text can be changed in this field This displays at the bottom of your site page
3 The initial page that loads when a user visits the NADA site can be set here In this case the catalog page is setto open by default
4 The name of the webmaster can be set here This is the name that will be used in system emails sent to users
5 Enter the webmaster email address here This should be the address that will be used in communication withusers Typically this is a general enquiries email set up by the organization and not a personal email address fora particular person Note to avoid mail systems rejecting mail as spam make sure to enter an address here thatis on the same domain as the server used in the email settings at setup
6 This field sets the location of the Cache folder The cache folder stores pre- generated pages of the site to allowfor faster browsing by the user By default it is set to cache This can be moved to another location if desiredbut must be writable The green tick indicates that the folder can be found and is set up correctly Enter eitherrelative or absolute paths to the folder location
7 Set the time that the Cache takes to expire By default it is set to 2 hours (in milli seconds)
8 If it is desired to turn off caching then select no here Sometimes it is useful to turn off caching when developingor updating a site so as to ensure that content changes become immediately visible on the front-end withouthaving to wait for the cache to expire and the new changes to show Turn this back on to speed up page loadingfor users
Click update to save all settings
Language
To change the language of the application expand the language section and choose the desired language Click updateto save and apply the setting
49 The Site Settings Page 65
nada Documentation Release 40
Enable or disable the HTML editor
A basic HTML editor is provided in the menu and page creating section of the application This setting allows this tobe turned on or off
Survey catalog settings
1 This is the folder where the files for the study are stored on the server This includes the DDI eternal resourcesand data files This folder can be moved to a location outside the web root as described in the installationinstructions in Chapter 1 Enter either relative or absolute paths to the folder location
2 This is the folder where DDIrsquos can be placed in order to use the bulk study import function in the NADA InNADA3 files had to be physically copied to this folder on the server but this is no longer necessary in NADA4 Files can now be directly uploaded to this folder from the Site Administration ndash Manage Studies page page
66 Chapter 4 User manual
nada Documentation Release 40
3 Select the vocabulary to use for the topic filter By default this is set to the CESSDA classification as recom-mended in the IHSN templates supplied at IHSNorg for the Nesstar Metadata Publisher
4 Enable or disable the Country filter on the user interface search page here If the catalog only contains studiesfor one country then turning this filter off is recommended
5 Enable or disable the Topic filter on the user interface search page here If no topics have been defined in theDDIrsquos being uploaded then it is recommended to turn this filter off (disable)
6 Enable or disable the Year filter on the user interface search page here
7 Enable or disable the Collection filter on the user interface search page here If no collections have been definedthen it is recommended to disable this filter
8 Enable or disable the Data access filter on the user interface search page here This filter is not needed if thereare very few studies in the catalog or if all studies hare set to the same access type
9 This section controls the order in which the filters appear on the search page Enter numbers here that rank theorder of the filters in the order they should be displayed
10 This setting determines how many studies are displayed by default to the user on the search page ndash catalog view
Site Login settings
1 To require that users login before being able to access the website set this option to Requires all users to loginto access the website
2 Determined how long a user will stay logged in After this time the user will be automatically logged out
3 Sets the minimum length for passwords created by the users at registration or for manual user creation
49 The Site Settings Page 67
nada Documentation Release 40
SMTP Settings
1 If the PHPweb server is configured to send email using PHPrsquos MAIL function select the first option and donrsquotfill in anything else
If your organization has a mail server and has have a dedicated account that can be setup for NADA use the followingsettings Check the radio button ldquoUse SMTP Serverrdquo
2 Enter the host name for the server
3 Enter the port used by the server to send mail
4 If required enter the user name used to send mail on the server
5 Enter the password used to send mail on the server
If the organization does not own a mail server a Gmail account can be configured to be used with NADA
bull Check the radio button ldquoUse SMTP Serverrdquo
bull Host name sslsmtpgooglemailcom or sslsmtpgmailcom
bull SMTP port 465
bull Account username email-addressgmailcom
bull Account password password for the gmail account
6 Test the email settings
The quickest way to test if the email settings are working is to use the ldquoforgot passwordrdquo option from the user loginpage If no mail is received when doing this test then go back and correct the mail settings Check with the ISP orserver administrator for the correct settings
Click on update to save all settings
68 Chapter 4 User manual
nada Documentation Release 40
492 Dashboard setting
Provides a means to automatically have content loaded into the dashboard via an RSS feed from a site The defaultsetting is set to receive updates and news from the IHSN website
49 The Site Settings Page 69
nada Documentation Release 40
70 Chapter 4 User manual
CHAPTER 5
Indices and tables
bull genindex
bull modindex
bull search
71
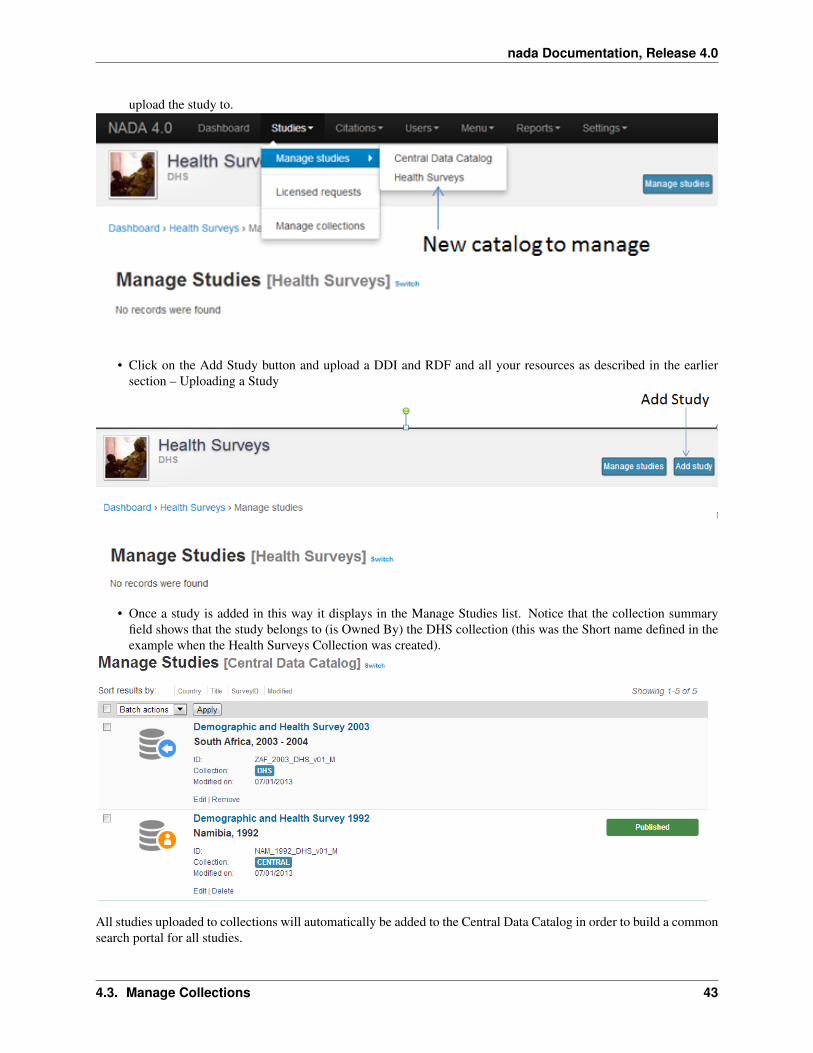
nada Documentation Release 40
434 Copying studies from one collection to another
bull The second way to add a study to a collection is to Copy the study from another collection into the newcollection
bull To copy a study already in the catalog to display in the new collection first make sure to be in the Manage Studiessection for the collection you want to put studies into To do this either use the Studies ndash Manage studies menuon the top or simply click on the Switch link next to the Manage Studies [Collection Title] heading
bull Then Click on the Copy Studies blue button at the top right
bull A list of all studies available to copy to the new collection is listed Simply click on the Link button in green tocopy the study to the collection The button will turn red and say Unlink To reverse the process and click thenow red button
bull Going back to the Manage Studies page for the collection will show the newly copied studies in the collectionlist Also note that the Collection field now indicated DHS next to Central DHS is in grey to indicate it is notowned (it is a copy) by that collection and the Central is in blue to show it is owned by the Central Data CatalogAlso note that because the study is not owned by this catalog it cannot be edited from this catalog ndash hence thepublishunpublish green button is absent for the copied studies
44 Chapter 4 User manual
nada Documentation Release 40
435 Turning on the collection filter
The final step after creating the first collection is to enable the collection filter option in the Settings menus under SiteConfigurations ndash Survey catalog settings
436 Transferring study ownership
In the previous examples mention was made of studies uploaded to a catalog being owned by that catalog There maybe cases where transferring the ownership from one catalog to another will be desirable This will become clearerin the next section on user roles but for now the next steps show how transferring ownership from one collection toanother can be done
bull Transferring ownership from one collection to another has to be done by the owner of the collection and fromthe collection it is currently owned by
bull To transfer ownership Go to the Manage Studies screen and select the study to be transferred Open up the EditStudy page by clicking on the study Title
bull On the right hand side of the screen click on the Transfer study owner link
43 Manage Collections 45
nada Documentation Release 40
bull Select the collection to transfer from the dropdown box
bull Click Transfer
bull Note that when looking the study summary for the transferred study the Collection field now shows the studyto belong (owned by) to the DHS collection and not Central anymore Also note the option to Publish andunpublish is now active
bull To transfer ownership of a large number of studies all at once - from the Manage Studies page ndash select the studiesto be transferred (tick them in the box left of each study) and then from the top Batch Actions drop down selectTransfer owner ndash then apply
46 Chapter 4 User manual
nada Documentation Release 40
44 Manage Studies
There are 2 Options to get studies into the new catalog
441 Option 1
bull The first is to upload a DDI and all its resources to the collection in the same way as described in the earliersection ndash Uploading a Study Except instead of choosing Central Catalog chose the collection you want toupload the study to
bull Click on the Add Study button and upload a DDI and RDF and all your resources as described in the earliersection ndash Uploading a Study
bull Once a study is added in this way it displays in the Manage Studies list Notice that the collection summaryfield shows that the study belongs to (is Owned By) the DHS collection (this was the Short name defined in theexample when the Health Surveys Collection was created)
bull Also note that the new study also appears in the Central Data Catalog
All studies uploaded to collections will automatically be added to the Central Data Catalog in order to build a commonsearch portal for all studies
44 Manage Studies 47
nada Documentation Release 40
442 Option2
Copying studies from one collection to another
bull The second way to add a study to a collection is to Copy the study from another collection into the new collection
bull To copy a study already in the catalog to display in the new collection first make sure to be in the Manage Studiessection for the collection you want to put studies into To do this either use the Studies ndash Manage studies menuon the top or simply click on the Switch link next to the Manage Studies [Collection Title] heading
bull Then Click on the Copy Studies blue button at the top right
bull A list of all studies available to copy to the new collection is listed Simply click on the Link button in green tocopy the study to the collection The button will turn red and say Unlink To reverse the process and click thenow red button
bull Going back to the Manage Studies page for the collection will show the newly copied studies in the collectionlist Also note that the Collection field now indicated DHS next to Central DHS is in grey to indicate it is notowned (it is a copy) by that collection and the Central is in blue to show it is owned by the Central Data CatalogAlso note that because the study is not owned by this catalog it cannot be edited from this catalog ndash hence thepublishunpublish green button is absent for the copied studies
45 Managing Licensed Requests
Datasets that are assigned the Access Type Licensed require approval from the NADA administrator before the usercan get access to the data files From the site administration there are a number of ways to see if any licensed requestshave been received
bull Go to the dashboard Pending requests show up as red in the catalog quicj summary section Clicking on thislink goes to the Licensed Survey Requests management page
bull Or go to the Studies link on the top menu and select Licensed Requests from the submenu
48 Chapter 4 User manual
nada Documentation Release 40
The link shows a page with a list Licensed Requests received The status column indicated the Pending requests
bull Click on the Edit link for to process a request
The Request information tab shows a summary of the information provided by the applicant
bull To Approve or Deny or request further information for the request Click on the Process tab
45 Managing Licensed Requests 49
nada Documentation Release 40
bull Select Approve to approve the request (other options include Deny as well as Request more information fromthe applicant)
bull Select the files that the user will be authorized to download ndash it is also possible to enter a maximum number ofdownloads and expiry date for downloads
bull Enter any comments to be sent to the applicant
bull Select Notify user by email to notify them that the application has been processed
bull Select Update
bull The remaining tabs
ndash Communicate - provides a means to ask for more information from the applicant
ndash Monitor ndash allows the administrator to see when and how many times the applicant downloaded thedata
ndash Forward Request ndash provides a means to forward the request to another person for review
46 Manage Citations
The Citations section is where bibliographic references can be added for publications that use any of the studies in thecatalog These citations can be linked to particular studies in the catalog and are displayed to the users of the systemin the study information view of the relevant study
Citations are added from the Citations menu
50 Chapter 4 User manual
nada Documentation Release 40
bull To add a citation - click on All citations then click on the Add New Citation button at the top right
bull Compete the form including the indication as to whether the citation should be published or not
bull Then expand the Related studies link to tell the system which studies the citation ldquobelongsrdquo to
bull Click on the Attach studies link This reveals a list of all studies in the catalog
bull Select the relevant studies by clicking on the green Select button
bull Click on the apply filter button to save the changes The study now appears in the related studies box
bull Click on the submit button to save the citation
bull Note the flag keywords and notes fields can be used by administrators to place extra notes only visible to otheradministrators that might prove useful when there is uncertainty about a citations appropriateness or accuracy
bull It is also possible to import citations in common citation formats such as BibTex and EndNote (RIS)
bull To do this use the Import Citations link from the top menu
46 Manage Citations 51
nada Documentation Release 40
bull Paste the BibTex or RIS text into the form and then at the bottom of the screen click on Attach studies to linkthe citation to a particular study in the catalog
bull The citation now appears in the citation list as well as on the study information page for the relevant studies
52 Chapter 4 User manual
nada Documentation Release 40
47 Managing Users and account types
Users in the NADA can be defined according to three broad groups
General Usersndash this is the normal user who registers on a NADA site from the user interface This user type hasno access to the site administration It is required to register as a user before being granted access to public use andlicensed data types
Site Administrators (unlimited) ndash this user has access to all functions and all collections within the Site Administra-tion System wide access
Limited Administrators ndash these administrators have access to a limited set of functions within the Site Administra-tion Examples would be an administrator of a specific collections or licensed survey reviewer for all or only somecollections or report generator or citation manager etc
471 Creating User accounts
User accounts can be created in two ways
1 A General User account can be created by a user directly from the register screen from the login link on the userinterface of the application
The user created by this process has no access to the site administration This account can only be used to apply andgain access to public and licensed datasets
2 A user account can also be created by a Site Administrator
bull To do this login as a Site Administrator
bull Go to the site administration section of the application
47 Managing Users and account types 53
nada Documentation Release 40
bull Select Users ndash Add user from the top menu
bull Fill in the information for the user in the form and be sure to mark the account status as Active Then click theCreate button
54 Chapter 4 User manual
nada Documentation Release 40
47 Managing Users and account types 55
nada Documentation Release 40
bull Note that the user always starts off as a General User with no access permissions to the Site Administration Theuser group column displays as empty for users with only general user accounts
bull To see a list of all users in the system go to the Users ndash All Users menu item at the top of the screen
bull Note the new users created have no User group assigned (they are general users) Also note the Actions columnon the far right From these links an account can be edited (including changing the password and blocking anaccount) deleted and Permissions managed for the account
472 Managing User Account Permissions
User accounts permissions can be only be set and changed by a Site Administrator To change the permissions for anaccount
bull Click on the Permissions link next to the account to be changed All accounts start of as General users accounts
bull To change this user to a full site administrator who will have full system wide access to all parts and functionsof the NADA administration select the Site administrators (full access) option and tick the admin box as wellClick update to save the changes
56 Chapter 4 User manual
nada Documentation Release 40
473 Collection level administrators
bull To create a user who only has permissions to administer studies or administration functions for a particularcollection Select Site administrators (limited access)
47 Managing Users and account types 57
nada Documentation Release 40
bull It is then necessary to assign a role to this new limited administrator account To create a limited access ad-ministrator for a particular collection ndash select Site administrators (limited access) and then select Collectionadministrators Notice The form expands to reveal a list of collections in the system
bull Select the appropriate level of access that this account will have for this collection In the example below anadministrator is being created who can manage only licensed requests for the collection ndash Health Surveys Thisaccount will not be able to upload or publish studies The account will only be able to process licensed requestsfor the collection ndash Health Surveys
58 Chapter 4 User manual
nada Documentation Release 40
Other levels of access for Site administrators (limited access) ndash Collection administrators include
1 Accounts that are given full access to manage studies
2 Accounts that are given access to upload studies but not publish them
3 Accounts that are limited to reviewing studies
474 Global level Limited access accounts
Other types of limited access accounts include
1 Accounts that can only view system reports at a global level
2 Accounts that can only access the citations section and manage citations
3 Accounts that can only access the Licensed Request management system ndash at the global level for all collections
47 Managing Users and account types 59
nada Documentation Release 40
Impersonating a user
The system includes a function that allows a Site Administrator to impersonate (take on the role) a user created inthe system This is a useful testing tool when creating users and assigning permissions It essentially allows theadministrator to take on the role of another user temporarily
bull To access the Impersonate User feature go to the Users ndash Impersonat user menu at the top of the screen
bull A list of users to impersonate is shown
bull Select the user to impersonate and click on the impersonate button
bull The dashboard view for the impersonated user now shows
60 Chapter 4 User manual
nada Documentation Release 40
bull Note in the example above the account being impersonated is a Limited Account administrator with rights onlyto manage licensed requests for the Health Surveys Collection Note that all other dashboard menus are eitherhidden or clicking on any other function other than manage studies results in an access denied message
bull This is a good way to test if the roles assigned to a user account have the expected results
bull To exit the impersonate mode and return to the Site Administrator role ndash Click on the top right menu and selectExit impersonate mode
475 The Reviewer Limited access account
Sometimes it is desirable for catalog administrators to allow certain users to see a collection before it is published butwithout granting access to the site administration functions
This is useful for getting feedback on the correctness of information on collections or studies before publishing
To do this
bull First create an account for the user or get the user to create an account by using the register form on the loginscreen
bull Then edit the permissions for that user selecting Site Administrator (limited access) ndash Collection administrator
bull Then for the appropriate collection select Reviewer and click update to save the changes
47 Managing Users and account types 61
nada Documentation Release 40
bull The newly created reviewer account user can now view all studies in a collection even if the study or collectionis unpublished
48 Manage Site Pages and Menus
The NADA has a small content management component that allows for the creation of menu pages to appear on theuser interface
bull Examples of menus that might be useful for users of the site might be A page dealing with the disseminationpolicies of the organization or perhaps a page with contact information for the information
New menu items and pages can be created via the Menu- All pages menu link at the top of the Site Administrationpage
62 Chapter 4 User manual
nada Documentation Release 40
bull Select All pages from the menu
bull To add a new page click on the Add New Page button
bull Give the page a Title in the Title field
bull Clicking in the URL field will automatically suggest a name for the page in the URL
bull Enter the contents for the page in the Body section Plain text or HTML is accespted by this field
bull Then indicate if the page should be published or not in the Publish dropdown
bull The Weight field tells the NADA in what order this menu item should display Eg 0 would be first 1 secondand 2 third
bull Click on Update to save the changes
bull View the changes from the user interface In this Example a Contact Us page was created
bull It is also possible from the Menu Management screen to add a menu link that links to an existing page on anothersite (rather than creating a page itself)
bull To change the order in which the menu items display on the user interface use the Reorder Menu button on theMenu Management screen
48 Manage Site Pages and Menus 63
nada Documentation Release 40
49 The Site Settings Page
All settings for the application are controlled via the Settings menu at the top of the Site Administration page Thereare seven main settings sections See screenshot below
491 General Settings
1 Type the Title of the site here This will become the front page title of the NADA site In this case the Title isNADA
64 Chapter 4 User manual
nada Documentation Release 40
2 The footer text can be changed in this field This displays at the bottom of your site page
3 The initial page that loads when a user visits the NADA site can be set here In this case the catalog page is setto open by default
4 The name of the webmaster can be set here This is the name that will be used in system emails sent to users
5 Enter the webmaster email address here This should be the address that will be used in communication withusers Typically this is a general enquiries email set up by the organization and not a personal email address fora particular person Note to avoid mail systems rejecting mail as spam make sure to enter an address here thatis on the same domain as the server used in the email settings at setup
6 This field sets the location of the Cache folder The cache folder stores pre- generated pages of the site to allowfor faster browsing by the user By default it is set to cache This can be moved to another location if desiredbut must be writable The green tick indicates that the folder can be found and is set up correctly Enter eitherrelative or absolute paths to the folder location
7 Set the time that the Cache takes to expire By default it is set to 2 hours (in milli seconds)
8 If it is desired to turn off caching then select no here Sometimes it is useful to turn off caching when developingor updating a site so as to ensure that content changes become immediately visible on the front-end withouthaving to wait for the cache to expire and the new changes to show Turn this back on to speed up page loadingfor users
Click update to save all settings
Language
To change the language of the application expand the language section and choose the desired language Click updateto save and apply the setting
49 The Site Settings Page 65
nada Documentation Release 40
Enable or disable the HTML editor
A basic HTML editor is provided in the menu and page creating section of the application This setting allows this tobe turned on or off
Survey catalog settings
1 This is the folder where the files for the study are stored on the server This includes the DDI eternal resourcesand data files This folder can be moved to a location outside the web root as described in the installationinstructions in Chapter 1 Enter either relative or absolute paths to the folder location
2 This is the folder where DDIrsquos can be placed in order to use the bulk study import function in the NADA InNADA3 files had to be physically copied to this folder on the server but this is no longer necessary in NADA4 Files can now be directly uploaded to this folder from the Site Administration ndash Manage Studies page page
66 Chapter 4 User manual
nada Documentation Release 40
3 Select the vocabulary to use for the topic filter By default this is set to the CESSDA classification as recom-mended in the IHSN templates supplied at IHSNorg for the Nesstar Metadata Publisher
4 Enable or disable the Country filter on the user interface search page here If the catalog only contains studiesfor one country then turning this filter off is recommended
5 Enable or disable the Topic filter on the user interface search page here If no topics have been defined in theDDIrsquos being uploaded then it is recommended to turn this filter off (disable)
6 Enable or disable the Year filter on the user interface search page here
7 Enable or disable the Collection filter on the user interface search page here If no collections have been definedthen it is recommended to disable this filter
8 Enable or disable the Data access filter on the user interface search page here This filter is not needed if thereare very few studies in the catalog or if all studies hare set to the same access type
9 This section controls the order in which the filters appear on the search page Enter numbers here that rank theorder of the filters in the order they should be displayed
10 This setting determines how many studies are displayed by default to the user on the search page ndash catalog view
Site Login settings
1 To require that users login before being able to access the website set this option to Requires all users to loginto access the website
2 Determined how long a user will stay logged in After this time the user will be automatically logged out
3 Sets the minimum length for passwords created by the users at registration or for manual user creation
49 The Site Settings Page 67
nada Documentation Release 40
SMTP Settings
1 If the PHPweb server is configured to send email using PHPrsquos MAIL function select the first option and donrsquotfill in anything else
If your organization has a mail server and has have a dedicated account that can be setup for NADA use the followingsettings Check the radio button ldquoUse SMTP Serverrdquo
2 Enter the host name for the server
3 Enter the port used by the server to send mail
4 If required enter the user name used to send mail on the server
5 Enter the password used to send mail on the server
If the organization does not own a mail server a Gmail account can be configured to be used with NADA
bull Check the radio button ldquoUse SMTP Serverrdquo
bull Host name sslsmtpgooglemailcom or sslsmtpgmailcom
bull SMTP port 465
bull Account username email-addressgmailcom
bull Account password password for the gmail account
6 Test the email settings
The quickest way to test if the email settings are working is to use the ldquoforgot passwordrdquo option from the user loginpage If no mail is received when doing this test then go back and correct the mail settings Check with the ISP orserver administrator for the correct settings
Click on update to save all settings
68 Chapter 4 User manual
nada Documentation Release 40
492 Dashboard setting
Provides a means to automatically have content loaded into the dashboard via an RSS feed from a site The defaultsetting is set to receive updates and news from the IHSN website
49 The Site Settings Page 69
nada Documentation Release 40
70 Chapter 4 User manual
CHAPTER 5
Indices and tables
bull genindex
bull modindex
bull search
71
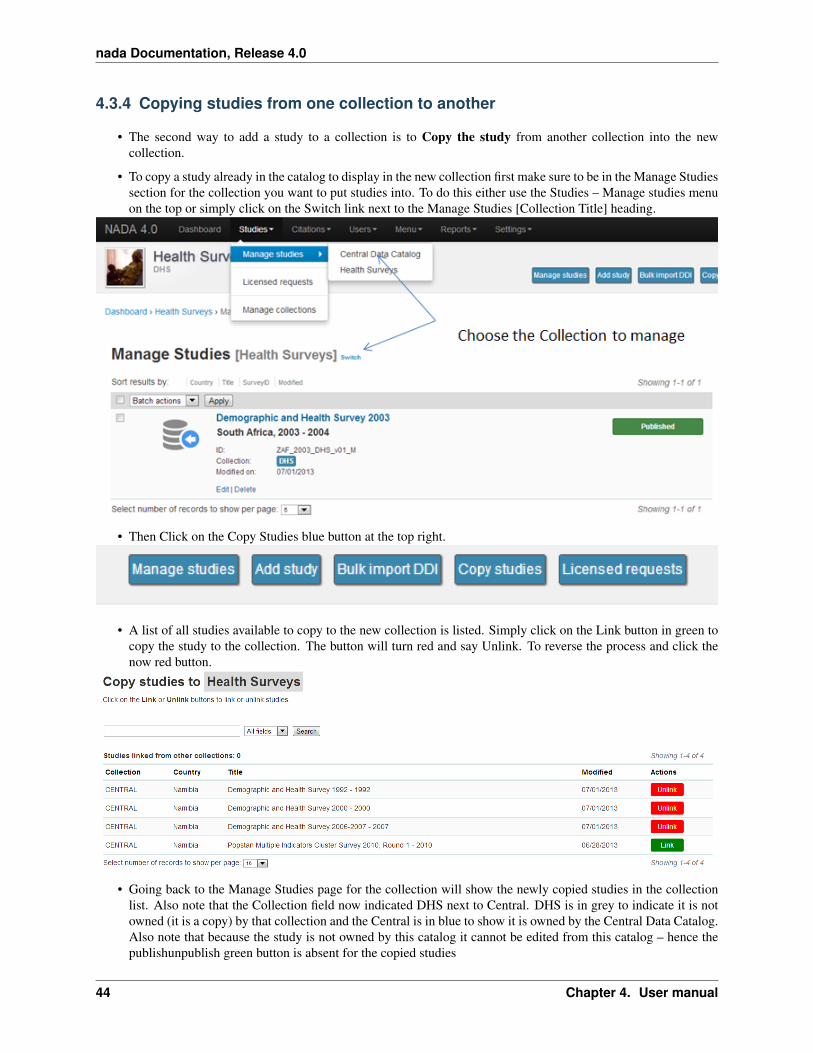
nada Documentation Release 40
435 Turning on the collection filter
The final step after creating the first collection is to enable the collection filter option in the Settings menus under SiteConfigurations ndash Survey catalog settings
436 Transferring study ownership
In the previous examples mention was made of studies uploaded to a catalog being owned by that catalog There maybe cases where transferring the ownership from one catalog to another will be desirable This will become clearerin the next section on user roles but for now the next steps show how transferring ownership from one collection toanother can be done
bull Transferring ownership from one collection to another has to be done by the owner of the collection and fromthe collection it is currently owned by
bull To transfer ownership Go to the Manage Studies screen and select the study to be transferred Open up the EditStudy page by clicking on the study Title
bull On the right hand side of the screen click on the Transfer study owner link
43 Manage Collections 45
nada Documentation Release 40
bull Select the collection to transfer from the dropdown box
bull Click Transfer
bull Note that when looking the study summary for the transferred study the Collection field now shows the studyto belong (owned by) to the DHS collection and not Central anymore Also note the option to Publish andunpublish is now active
bull To transfer ownership of a large number of studies all at once - from the Manage Studies page ndash select the studiesto be transferred (tick them in the box left of each study) and then from the top Batch Actions drop down selectTransfer owner ndash then apply
46 Chapter 4 User manual
nada Documentation Release 40
44 Manage Studies
There are 2 Options to get studies into the new catalog
441 Option 1
bull The first is to upload a DDI and all its resources to the collection in the same way as described in the earliersection ndash Uploading a Study Except instead of choosing Central Catalog chose the collection you want toupload the study to
bull Click on the Add Study button and upload a DDI and RDF and all your resources as described in the earliersection ndash Uploading a Study
bull Once a study is added in this way it displays in the Manage Studies list Notice that the collection summaryfield shows that the study belongs to (is Owned By) the DHS collection (this was the Short name defined in theexample when the Health Surveys Collection was created)
bull Also note that the new study also appears in the Central Data Catalog
All studies uploaded to collections will automatically be added to the Central Data Catalog in order to build a commonsearch portal for all studies
44 Manage Studies 47
nada Documentation Release 40
442 Option2
Copying studies from one collection to another
bull The second way to add a study to a collection is to Copy the study from another collection into the new collection
bull To copy a study already in the catalog to display in the new collection first make sure to be in the Manage Studiessection for the collection you want to put studies into To do this either use the Studies ndash Manage studies menuon the top or simply click on the Switch link next to the Manage Studies [Collection Title] heading
bull Then Click on the Copy Studies blue button at the top right
bull A list of all studies available to copy to the new collection is listed Simply click on the Link button in green tocopy the study to the collection The button will turn red and say Unlink To reverse the process and click thenow red button
bull Going back to the Manage Studies page for the collection will show the newly copied studies in the collectionlist Also note that the Collection field now indicated DHS next to Central DHS is in grey to indicate it is notowned (it is a copy) by that collection and the Central is in blue to show it is owned by the Central Data CatalogAlso note that because the study is not owned by this catalog it cannot be edited from this catalog ndash hence thepublishunpublish green button is absent for the copied studies
45 Managing Licensed Requests
Datasets that are assigned the Access Type Licensed require approval from the NADA administrator before the usercan get access to the data files From the site administration there are a number of ways to see if any licensed requestshave been received
bull Go to the dashboard Pending requests show up as red in the catalog quicj summary section Clicking on thislink goes to the Licensed Survey Requests management page
bull Or go to the Studies link on the top menu and select Licensed Requests from the submenu
48 Chapter 4 User manual
nada Documentation Release 40
The link shows a page with a list Licensed Requests received The status column indicated the Pending requests
bull Click on the Edit link for to process a request
The Request information tab shows a summary of the information provided by the applicant
bull To Approve or Deny or request further information for the request Click on the Process tab
45 Managing Licensed Requests 49
nada Documentation Release 40
bull Select Approve to approve the request (other options include Deny as well as Request more information fromthe applicant)
bull Select the files that the user will be authorized to download ndash it is also possible to enter a maximum number ofdownloads and expiry date for downloads
bull Enter any comments to be sent to the applicant
bull Select Notify user by email to notify them that the application has been processed
bull Select Update
bull The remaining tabs
ndash Communicate - provides a means to ask for more information from the applicant
ndash Monitor ndash allows the administrator to see when and how many times the applicant downloaded thedata
ndash Forward Request ndash provides a means to forward the request to another person for review
46 Manage Citations
The Citations section is where bibliographic references can be added for publications that use any of the studies in thecatalog These citations can be linked to particular studies in the catalog and are displayed to the users of the systemin the study information view of the relevant study
Citations are added from the Citations menu
50 Chapter 4 User manual
nada Documentation Release 40
bull To add a citation - click on All citations then click on the Add New Citation button at the top right
bull Compete the form including the indication as to whether the citation should be published or not
bull Then expand the Related studies link to tell the system which studies the citation ldquobelongsrdquo to
bull Click on the Attach studies link This reveals a list of all studies in the catalog
bull Select the relevant studies by clicking on the green Select button
bull Click on the apply filter button to save the changes The study now appears in the related studies box
bull Click on the submit button to save the citation
bull Note the flag keywords and notes fields can be used by administrators to place extra notes only visible to otheradministrators that might prove useful when there is uncertainty about a citations appropriateness or accuracy
bull It is also possible to import citations in common citation formats such as BibTex and EndNote (RIS)
bull To do this use the Import Citations link from the top menu
46 Manage Citations 51
nada Documentation Release 40
bull Paste the BibTex or RIS text into the form and then at the bottom of the screen click on Attach studies to linkthe citation to a particular study in the catalog
bull The citation now appears in the citation list as well as on the study information page for the relevant studies
52 Chapter 4 User manual
nada Documentation Release 40
47 Managing Users and account types
Users in the NADA can be defined according to three broad groups
General Usersndash this is the normal user who registers on a NADA site from the user interface This user type hasno access to the site administration It is required to register as a user before being granted access to public use andlicensed data types
Site Administrators (unlimited) ndash this user has access to all functions and all collections within the Site Administra-tion System wide access
Limited Administrators ndash these administrators have access to a limited set of functions within the Site Administra-tion Examples would be an administrator of a specific collections or licensed survey reviewer for all or only somecollections or report generator or citation manager etc
471 Creating User accounts
User accounts can be created in two ways
1 A General User account can be created by a user directly from the register screen from the login link on the userinterface of the application
The user created by this process has no access to the site administration This account can only be used to apply andgain access to public and licensed datasets
2 A user account can also be created by a Site Administrator
bull To do this login as a Site Administrator
bull Go to the site administration section of the application
47 Managing Users and account types 53
nada Documentation Release 40
bull Select Users ndash Add user from the top menu
bull Fill in the information for the user in the form and be sure to mark the account status as Active Then click theCreate button
54 Chapter 4 User manual
nada Documentation Release 40
47 Managing Users and account types 55
nada Documentation Release 40
bull Note that the user always starts off as a General User with no access permissions to the Site Administration Theuser group column displays as empty for users with only general user accounts
bull To see a list of all users in the system go to the Users ndash All Users menu item at the top of the screen
bull Note the new users created have no User group assigned (they are general users) Also note the Actions columnon the far right From these links an account can be edited (including changing the password and blocking anaccount) deleted and Permissions managed for the account
472 Managing User Account Permissions
User accounts permissions can be only be set and changed by a Site Administrator To change the permissions for anaccount
bull Click on the Permissions link next to the account to be changed All accounts start of as General users accounts
bull To change this user to a full site administrator who will have full system wide access to all parts and functionsof the NADA administration select the Site administrators (full access) option and tick the admin box as wellClick update to save the changes
56 Chapter 4 User manual
nada Documentation Release 40
473 Collection level administrators
bull To create a user who only has permissions to administer studies or administration functions for a particularcollection Select Site administrators (limited access)
47 Managing Users and account types 57
nada Documentation Release 40
bull It is then necessary to assign a role to this new limited administrator account To create a limited access ad-ministrator for a particular collection ndash select Site administrators (limited access) and then select Collectionadministrators Notice The form expands to reveal a list of collections in the system
bull Select the appropriate level of access that this account will have for this collection In the example below anadministrator is being created who can manage only licensed requests for the collection ndash Health Surveys Thisaccount will not be able to upload or publish studies The account will only be able to process licensed requestsfor the collection ndash Health Surveys
58 Chapter 4 User manual
nada Documentation Release 40
Other levels of access for Site administrators (limited access) ndash Collection administrators include
1 Accounts that are given full access to manage studies
2 Accounts that are given access to upload studies but not publish them
3 Accounts that are limited to reviewing studies
474 Global level Limited access accounts
Other types of limited access accounts include
1 Accounts that can only view system reports at a global level
2 Accounts that can only access the citations section and manage citations
3 Accounts that can only access the Licensed Request management system ndash at the global level for all collections
47 Managing Users and account types 59
nada Documentation Release 40
Impersonating a user
The system includes a function that allows a Site Administrator to impersonate (take on the role) a user created inthe system This is a useful testing tool when creating users and assigning permissions It essentially allows theadministrator to take on the role of another user temporarily
bull To access the Impersonate User feature go to the Users ndash Impersonat user menu at the top of the screen
bull A list of users to impersonate is shown
bull Select the user to impersonate and click on the impersonate button
bull The dashboard view for the impersonated user now shows
60 Chapter 4 User manual
nada Documentation Release 40
bull Note in the example above the account being impersonated is a Limited Account administrator with rights onlyto manage licensed requests for the Health Surveys Collection Note that all other dashboard menus are eitherhidden or clicking on any other function other than manage studies results in an access denied message
bull This is a good way to test if the roles assigned to a user account have the expected results
bull To exit the impersonate mode and return to the Site Administrator role ndash Click on the top right menu and selectExit impersonate mode
475 The Reviewer Limited access account
Sometimes it is desirable for catalog administrators to allow certain users to see a collection before it is published butwithout granting access to the site administration functions
This is useful for getting feedback on the correctness of information on collections or studies before publishing
To do this
bull First create an account for the user or get the user to create an account by using the register form on the loginscreen
bull Then edit the permissions for that user selecting Site Administrator (limited access) ndash Collection administrator
bull Then for the appropriate collection select Reviewer and click update to save the changes
47 Managing Users and account types 61
nada Documentation Release 40
bull The newly created reviewer account user can now view all studies in a collection even if the study or collectionis unpublished
48 Manage Site Pages and Menus
The NADA has a small content management component that allows for the creation of menu pages to appear on theuser interface
bull Examples of menus that might be useful for users of the site might be A page dealing with the disseminationpolicies of the organization or perhaps a page with contact information for the information
New menu items and pages can be created via the Menu- All pages menu link at the top of the Site Administrationpage
62 Chapter 4 User manual
nada Documentation Release 40
bull Select All pages from the menu
bull To add a new page click on the Add New Page button
bull Give the page a Title in the Title field
bull Clicking in the URL field will automatically suggest a name for the page in the URL
bull Enter the contents for the page in the Body section Plain text or HTML is accespted by this field
bull Then indicate if the page should be published or not in the Publish dropdown
bull The Weight field tells the NADA in what order this menu item should display Eg 0 would be first 1 secondand 2 third
bull Click on Update to save the changes
bull View the changes from the user interface In this Example a Contact Us page was created
bull It is also possible from the Menu Management screen to add a menu link that links to an existing page on anothersite (rather than creating a page itself)
bull To change the order in which the menu items display on the user interface use the Reorder Menu button on theMenu Management screen
48 Manage Site Pages and Menus 63
nada Documentation Release 40
49 The Site Settings Page
All settings for the application are controlled via the Settings menu at the top of the Site Administration page Thereare seven main settings sections See screenshot below
491 General Settings
1 Type the Title of the site here This will become the front page title of the NADA site In this case the Title isNADA
64 Chapter 4 User manual
nada Documentation Release 40
2 The footer text can be changed in this field This displays at the bottom of your site page
3 The initial page that loads when a user visits the NADA site can be set here In this case the catalog page is setto open by default
4 The name of the webmaster can be set here This is the name that will be used in system emails sent to users
5 Enter the webmaster email address here This should be the address that will be used in communication withusers Typically this is a general enquiries email set up by the organization and not a personal email address fora particular person Note to avoid mail systems rejecting mail as spam make sure to enter an address here thatis on the same domain as the server used in the email settings at setup
6 This field sets the location of the Cache folder The cache folder stores pre- generated pages of the site to allowfor faster browsing by the user By default it is set to cache This can be moved to another location if desiredbut must be writable The green tick indicates that the folder can be found and is set up correctly Enter eitherrelative or absolute paths to the folder location
7 Set the time that the Cache takes to expire By default it is set to 2 hours (in milli seconds)
8 If it is desired to turn off caching then select no here Sometimes it is useful to turn off caching when developingor updating a site so as to ensure that content changes become immediately visible on the front-end withouthaving to wait for the cache to expire and the new changes to show Turn this back on to speed up page loadingfor users
Click update to save all settings
Language
To change the language of the application expand the language section and choose the desired language Click updateto save and apply the setting
49 The Site Settings Page 65
nada Documentation Release 40
Enable or disable the HTML editor
A basic HTML editor is provided in the menu and page creating section of the application This setting allows this tobe turned on or off
Survey catalog settings
1 This is the folder where the files for the study are stored on the server This includes the DDI eternal resourcesand data files This folder can be moved to a location outside the web root as described in the installationinstructions in Chapter 1 Enter either relative or absolute paths to the folder location
2 This is the folder where DDIrsquos can be placed in order to use the bulk study import function in the NADA InNADA3 files had to be physically copied to this folder on the server but this is no longer necessary in NADA4 Files can now be directly uploaded to this folder from the Site Administration ndash Manage Studies page page
66 Chapter 4 User manual
nada Documentation Release 40
3 Select the vocabulary to use for the topic filter By default this is set to the CESSDA classification as recom-mended in the IHSN templates supplied at IHSNorg for the Nesstar Metadata Publisher
4 Enable or disable the Country filter on the user interface search page here If the catalog only contains studiesfor one country then turning this filter off is recommended
5 Enable or disable the Topic filter on the user interface search page here If no topics have been defined in theDDIrsquos being uploaded then it is recommended to turn this filter off (disable)
6 Enable or disable the Year filter on the user interface search page here
7 Enable or disable the Collection filter on the user interface search page here If no collections have been definedthen it is recommended to disable this filter
8 Enable or disable the Data access filter on the user interface search page here This filter is not needed if thereare very few studies in the catalog or if all studies hare set to the same access type
9 This section controls the order in which the filters appear on the search page Enter numbers here that rank theorder of the filters in the order they should be displayed
10 This setting determines how many studies are displayed by default to the user on the search page ndash catalog view
Site Login settings
1 To require that users login before being able to access the website set this option to Requires all users to loginto access the website
2 Determined how long a user will stay logged in After this time the user will be automatically logged out
3 Sets the minimum length for passwords created by the users at registration or for manual user creation
49 The Site Settings Page 67
nada Documentation Release 40
SMTP Settings
1 If the PHPweb server is configured to send email using PHPrsquos MAIL function select the first option and donrsquotfill in anything else
If your organization has a mail server and has have a dedicated account that can be setup for NADA use the followingsettings Check the radio button ldquoUse SMTP Serverrdquo
2 Enter the host name for the server
3 Enter the port used by the server to send mail
4 If required enter the user name used to send mail on the server
5 Enter the password used to send mail on the server
If the organization does not own a mail server a Gmail account can be configured to be used with NADA
bull Check the radio button ldquoUse SMTP Serverrdquo
bull Host name sslsmtpgooglemailcom or sslsmtpgmailcom
bull SMTP port 465
bull Account username email-addressgmailcom
bull Account password password for the gmail account
6 Test the email settings
The quickest way to test if the email settings are working is to use the ldquoforgot passwordrdquo option from the user loginpage If no mail is received when doing this test then go back and correct the mail settings Check with the ISP orserver administrator for the correct settings
Click on update to save all settings
68 Chapter 4 User manual
nada Documentation Release 40
492 Dashboard setting
Provides a means to automatically have content loaded into the dashboard via an RSS feed from a site The defaultsetting is set to receive updates and news from the IHSN website
49 The Site Settings Page 69
nada Documentation Release 40
70 Chapter 4 User manual
CHAPTER 5
Indices and tables
bull genindex
bull modindex
bull search
71
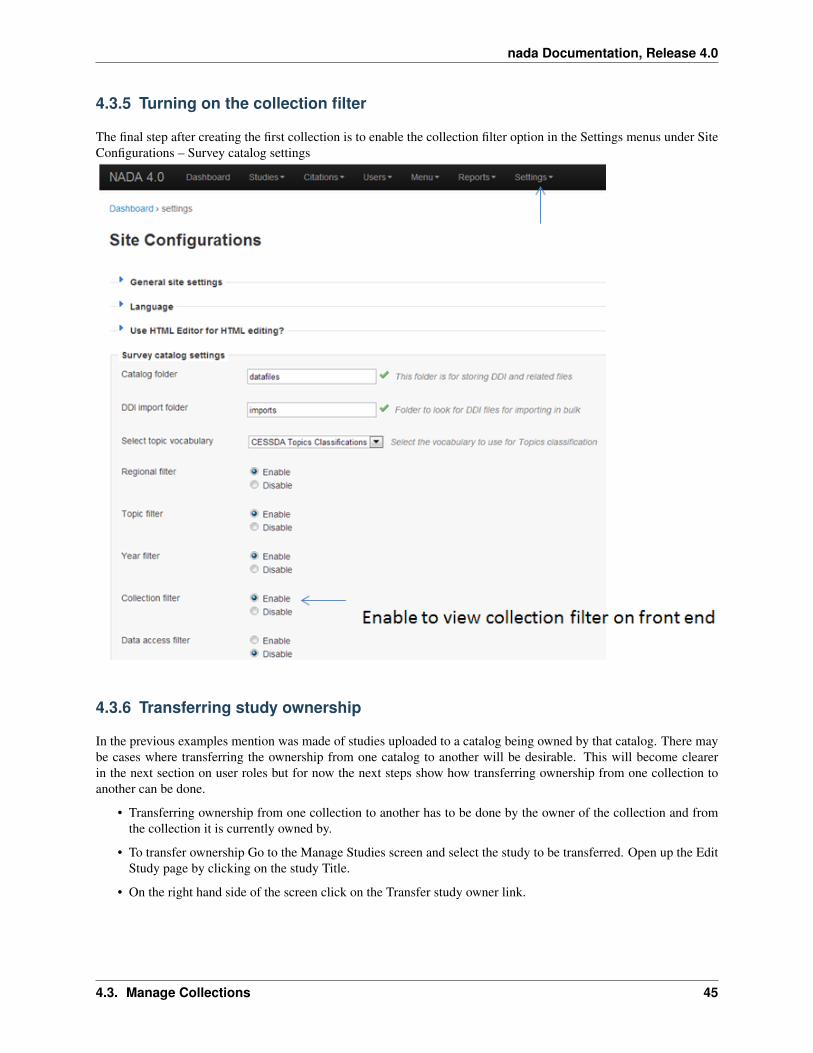
nada Documentation Release 40
44 Manage Studies
There are 2 Options to get studies into the new catalog
441 Option 1
bull The first is to upload a DDI and all its resources to the collection in the same way as described in the earliersection ndash Uploading a Study Except instead of choosing Central Catalog chose the collection you want toupload the study to
bull Click on the Add Study button and upload a DDI and RDF and all your resources as described in the earliersection ndash Uploading a Study
bull Once a study is added in this way it displays in the Manage Studies list Notice that the collection summaryfield shows that the study belongs to (is Owned By) the DHS collection (this was the Short name defined in theexample when the Health Surveys Collection was created)
bull Also note that the new study also appears in the Central Data Catalog
All studies uploaded to collections will automatically be added to the Central Data Catalog in order to build a commonsearch portal for all studies
44 Manage Studies 47
nada Documentation Release 40
442 Option2
Copying studies from one collection to another
bull The second way to add a study to a collection is to Copy the study from another collection into the new collection
bull To copy a study already in the catalog to display in the new collection first make sure to be in the Manage Studiessection for the collection you want to put studies into To do this either use the Studies ndash Manage studies menuon the top or simply click on the Switch link next to the Manage Studies [Collection Title] heading
bull Then Click on the Copy Studies blue button at the top right
bull A list of all studies available to copy to the new collection is listed Simply click on the Link button in green tocopy the study to the collection The button will turn red and say Unlink To reverse the process and click thenow red button
bull Going back to the Manage Studies page for the collection will show the newly copied studies in the collectionlist Also note that the Collection field now indicated DHS next to Central DHS is in grey to indicate it is notowned (it is a copy) by that collection and the Central is in blue to show it is owned by the Central Data CatalogAlso note that because the study is not owned by this catalog it cannot be edited from this catalog ndash hence thepublishunpublish green button is absent for the copied studies
45 Managing Licensed Requests
Datasets that are assigned the Access Type Licensed require approval from the NADA administrator before the usercan get access to the data files From the site administration there are a number of ways to see if any licensed requestshave been received
bull Go to the dashboard Pending requests show up as red in the catalog quicj summary section Clicking on thislink goes to the Licensed Survey Requests management page
bull Or go to the Studies link on the top menu and select Licensed Requests from the submenu
48 Chapter 4 User manual
nada Documentation Release 40
The link shows a page with a list Licensed Requests received The status column indicated the Pending requests
bull Click on the Edit link for to process a request
The Request information tab shows a summary of the information provided by the applicant
bull To Approve or Deny or request further information for the request Click on the Process tab
45 Managing Licensed Requests 49
nada Documentation Release 40
bull Select Approve to approve the request (other options include Deny as well as Request more information fromthe applicant)
bull Select the files that the user will be authorized to download ndash it is also possible to enter a maximum number ofdownloads and expiry date for downloads
bull Enter any comments to be sent to the applicant
bull Select Notify user by email to notify them that the application has been processed
bull Select Update
bull The remaining tabs
ndash Communicate - provides a means to ask for more information from the applicant
ndash Monitor ndash allows the administrator to see when and how many times the applicant downloaded thedata
ndash Forward Request ndash provides a means to forward the request to another person for review
46 Manage Citations
The Citations section is where bibliographic references can be added for publications that use any of the studies in thecatalog These citations can be linked to particular studies in the catalog and are displayed to the users of the systemin the study information view of the relevant study
Citations are added from the Citations menu
50 Chapter 4 User manual
nada Documentation Release 40
bull To add a citation - click on All citations then click on the Add New Citation button at the top right
bull Compete the form including the indication as to whether the citation should be published or not
bull Then expand the Related studies link to tell the system which studies the citation ldquobelongsrdquo to
bull Click on the Attach studies link This reveals a list of all studies in the catalog
bull Select the relevant studies by clicking on the green Select button
bull Click on the apply filter button to save the changes The study now appears in the related studies box
bull Click on the submit button to save the citation
bull Note the flag keywords and notes fields can be used by administrators to place extra notes only visible to otheradministrators that might prove useful when there is uncertainty about a citations appropriateness or accuracy
bull It is also possible to import citations in common citation formats such as BibTex and EndNote (RIS)
bull To do this use the Import Citations link from the top menu
46 Manage Citations 51
nada Documentation Release 40
bull Paste the BibTex or RIS text into the form and then at the bottom of the screen click on Attach studies to linkthe citation to a particular study in the catalog
bull The citation now appears in the citation list as well as on the study information page for the relevant studies
52 Chapter 4 User manual
nada Documentation Release 40
47 Managing Users and account types
Users in the NADA can be defined according to three broad groups
General Usersndash this is the normal user who registers on a NADA site from the user interface This user type hasno access to the site administration It is required to register as a user before being granted access to public use andlicensed data types
Site Administrators (unlimited) ndash this user has access to all functions and all collections within the Site Administra-tion System wide access
Limited Administrators ndash these administrators have access to a limited set of functions within the Site Administra-tion Examples would be an administrator of a specific collections or licensed survey reviewer for all or only somecollections or report generator or citation manager etc
471 Creating User accounts
User accounts can be created in two ways
1 A General User account can be created by a user directly from the register screen from the login link on the userinterface of the application
The user created by this process has no access to the site administration This account can only be used to apply andgain access to public and licensed datasets
2 A user account can also be created by a Site Administrator
bull To do this login as a Site Administrator
bull Go to the site administration section of the application
47 Managing Users and account types 53
nada Documentation Release 40
bull Select Users ndash Add user from the top menu
bull Fill in the information for the user in the form and be sure to mark the account status as Active Then click theCreate button
54 Chapter 4 User manual
nada Documentation Release 40
47 Managing Users and account types 55
nada Documentation Release 40
bull Note that the user always starts off as a General User with no access permissions to the Site Administration Theuser group column displays as empty for users with only general user accounts
bull To see a list of all users in the system go to the Users ndash All Users menu item at the top of the screen
bull Note the new users created have no User group assigned (they are general users) Also note the Actions columnon the far right From these links an account can be edited (including changing the password and blocking anaccount) deleted and Permissions managed for the account
472 Managing User Account Permissions
User accounts permissions can be only be set and changed by a Site Administrator To change the permissions for anaccount
bull Click on the Permissions link next to the account to be changed All accounts start of as General users accounts
bull To change this user to a full site administrator who will have full system wide access to all parts and functionsof the NADA administration select the Site administrators (full access) option and tick the admin box as wellClick update to save the changes
56 Chapter 4 User manual
nada Documentation Release 40
473 Collection level administrators
bull To create a user who only has permissions to administer studies or administration functions for a particularcollection Select Site administrators (limited access)
47 Managing Users and account types 57
nada Documentation Release 40
bull It is then necessary to assign a role to this new limited administrator account To create a limited access ad-ministrator for a particular collection ndash select Site administrators (limited access) and then select Collectionadministrators Notice The form expands to reveal a list of collections in the system
bull Select the appropriate level of access that this account will have for this collection In the example below anadministrator is being created who can manage only licensed requests for the collection ndash Health Surveys Thisaccount will not be able to upload or publish studies The account will only be able to process licensed requestsfor the collection ndash Health Surveys
58 Chapter 4 User manual
nada Documentation Release 40
Other levels of access for Site administrators (limited access) ndash Collection administrators include
1 Accounts that are given full access to manage studies
2 Accounts that are given access to upload studies but not publish them
3 Accounts that are limited to reviewing studies
474 Global level Limited access accounts
Other types of limited access accounts include
1 Accounts that can only view system reports at a global level
2 Accounts that can only access the citations section and manage citations
3 Accounts that can only access the Licensed Request management system ndash at the global level for all collections
47 Managing Users and account types 59
nada Documentation Release 40
Impersonating a user
The system includes a function that allows a Site Administrator to impersonate (take on the role) a user created inthe system This is a useful testing tool when creating users and assigning permissions It essentially allows theadministrator to take on the role of another user temporarily
bull To access the Impersonate User feature go to the Users ndash Impersonat user menu at the top of the screen
bull A list of users to impersonate is shown
bull Select the user to impersonate and click on the impersonate button
bull The dashboard view for the impersonated user now shows
60 Chapter 4 User manual
nada Documentation Release 40
bull Note in the example above the account being impersonated is a Limited Account administrator with rights onlyto manage licensed requests for the Health Surveys Collection Note that all other dashboard menus are eitherhidden or clicking on any other function other than manage studies results in an access denied message
bull This is a good way to test if the roles assigned to a user account have the expected results
bull To exit the impersonate mode and return to the Site Administrator role ndash Click on the top right menu and selectExit impersonate mode
475 The Reviewer Limited access account
Sometimes it is desirable for catalog administrators to allow certain users to see a collection before it is published butwithout granting access to the site administration functions
This is useful for getting feedback on the correctness of information on collections or studies before publishing
To do this
bull First create an account for the user or get the user to create an account by using the register form on the loginscreen
bull Then edit the permissions for that user selecting Site Administrator (limited access) ndash Collection administrator
bull Then for the appropriate collection select Reviewer and click update to save the changes
47 Managing Users and account types 61
nada Documentation Release 40
bull The newly created reviewer account user can now view all studies in a collection even if the study or collectionis unpublished
48 Manage Site Pages and Menus
The NADA has a small content management component that allows for the creation of menu pages to appear on theuser interface
bull Examples of menus that might be useful for users of the site might be A page dealing with the disseminationpolicies of the organization or perhaps a page with contact information for the information
New menu items and pages can be created via the Menu- All pages menu link at the top of the Site Administrationpage
62 Chapter 4 User manual
nada Documentation Release 40
bull Select All pages from the menu
bull To add a new page click on the Add New Page button
bull Give the page a Title in the Title field
bull Clicking in the URL field will automatically suggest a name for the page in the URL
bull Enter the contents for the page in the Body section Plain text or HTML is accespted by this field
bull Then indicate if the page should be published or not in the Publish dropdown
bull The Weight field tells the NADA in what order this menu item should display Eg 0 would be first 1 secondand 2 third
bull Click on Update to save the changes
bull View the changes from the user interface In this Example a Contact Us page was created
bull It is also possible from the Menu Management screen to add a menu link that links to an existing page on anothersite (rather than creating a page itself)
bull To change the order in which the menu items display on the user interface use the Reorder Menu button on theMenu Management screen
48 Manage Site Pages and Menus 63
nada Documentation Release 40
49 The Site Settings Page
All settings for the application are controlled via the Settings menu at the top of the Site Administration page Thereare seven main settings sections See screenshot below
491 General Settings
1 Type the Title of the site here This will become the front page title of the NADA site In this case the Title isNADA
64 Chapter 4 User manual
nada Documentation Release 40
2 The footer text can be changed in this field This displays at the bottom of your site page
3 The initial page that loads when a user visits the NADA site can be set here In this case the catalog page is setto open by default
4 The name of the webmaster can be set here This is the name that will be used in system emails sent to users
5 Enter the webmaster email address here This should be the address that will be used in communication withusers Typically this is a general enquiries email set up by the organization and not a personal email address fora particular person Note to avoid mail systems rejecting mail as spam make sure to enter an address here thatis on the same domain as the server used in the email settings at setup
6 This field sets the location of the Cache folder The cache folder stores pre- generated pages of the site to allowfor faster browsing by the user By default it is set to cache This can be moved to another location if desiredbut must be writable The green tick indicates that the folder can be found and is set up correctly Enter eitherrelative or absolute paths to the folder location
7 Set the time that the Cache takes to expire By default it is set to 2 hours (in milli seconds)
8 If it is desired to turn off caching then select no here Sometimes it is useful to turn off caching when developingor updating a site so as to ensure that content changes become immediately visible on the front-end withouthaving to wait for the cache to expire and the new changes to show Turn this back on to speed up page loadingfor users
Click update to save all settings
Language
To change the language of the application expand the language section and choose the desired language Click updateto save and apply the setting
49 The Site Settings Page 65
nada Documentation Release 40
Enable or disable the HTML editor
A basic HTML editor is provided in the menu and page creating section of the application This setting allows this tobe turned on or off
Survey catalog settings
1 This is the folder where the files for the study are stored on the server This includes the DDI eternal resourcesand data files This folder can be moved to a location outside the web root as described in the installationinstructions in Chapter 1 Enter either relative or absolute paths to the folder location
2 This is the folder where DDIrsquos can be placed in order to use the bulk study import function in the NADA InNADA3 files had to be physically copied to this folder on the server but this is no longer necessary in NADA4 Files can now be directly uploaded to this folder from the Site Administration ndash Manage Studies page page
66 Chapter 4 User manual
nada Documentation Release 40
3 Select the vocabulary to use for the topic filter By default this is set to the CESSDA classification as recom-mended in the IHSN templates supplied at IHSNorg for the Nesstar Metadata Publisher
4 Enable or disable the Country filter on the user interface search page here If the catalog only contains studiesfor one country then turning this filter off is recommended
5 Enable or disable the Topic filter on the user interface search page here If no topics have been defined in theDDIrsquos being uploaded then it is recommended to turn this filter off (disable)
6 Enable or disable the Year filter on the user interface search page here
7 Enable or disable the Collection filter on the user interface search page here If no collections have been definedthen it is recommended to disable this filter
8 Enable or disable the Data access filter on the user interface search page here This filter is not needed if thereare very few studies in the catalog or if all studies hare set to the same access type
9 This section controls the order in which the filters appear on the search page Enter numbers here that rank theorder of the filters in the order they should be displayed
10 This setting determines how many studies are displayed by default to the user on the search page ndash catalog view
Site Login settings
1 To require that users login before being able to access the website set this option to Requires all users to loginto access the website
2 Determined how long a user will stay logged in After this time the user will be automatically logged out
3 Sets the minimum length for passwords created by the users at registration or for manual user creation
49 The Site Settings Page 67
nada Documentation Release 40
SMTP Settings
1 If the PHPweb server is configured to send email using PHPrsquos MAIL function select the first option and donrsquotfill in anything else
If your organization has a mail server and has have a dedicated account that can be setup for NADA use the followingsettings Check the radio button ldquoUse SMTP Serverrdquo
2 Enter the host name for the server
3 Enter the port used by the server to send mail
4 If required enter the user name used to send mail on the server
5 Enter the password used to send mail on the server
If the organization does not own a mail server a Gmail account can be configured to be used with NADA
bull Check the radio button ldquoUse SMTP Serverrdquo
bull Host name sslsmtpgooglemailcom or sslsmtpgmailcom
bull SMTP port 465
bull Account username email-addressgmailcom
bull Account password password for the gmail account
6 Test the email settings
The quickest way to test if the email settings are working is to use the ldquoforgot passwordrdquo option from the user loginpage If no mail is received when doing this test then go back and correct the mail settings Check with the ISP orserver administrator for the correct settings
Click on update to save all settings
68 Chapter 4 User manual
nada Documentation Release 40
492 Dashboard setting
Provides a means to automatically have content loaded into the dashboard via an RSS feed from a site The defaultsetting is set to receive updates and news from the IHSN website
49 The Site Settings Page 69
nada Documentation Release 40
70 Chapter 4 User manual
CHAPTER 5
Indices and tables
bull genindex
bull modindex
bull search
71
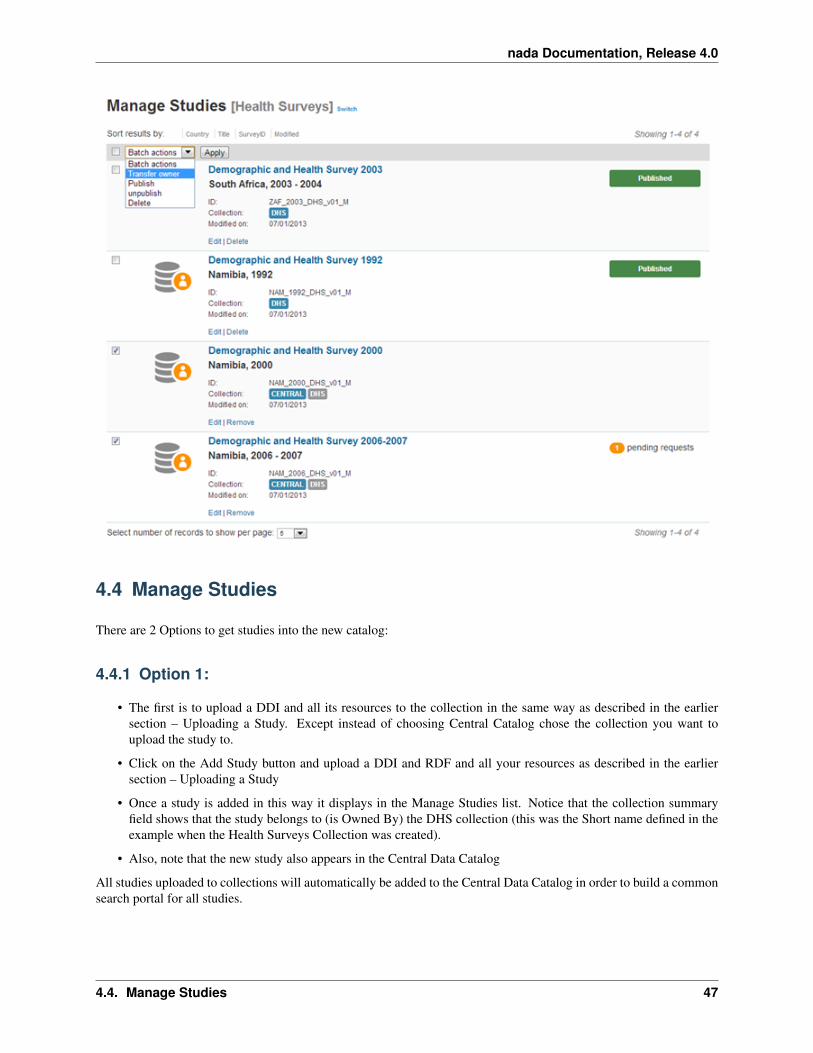
nada Documentation Release 40
The link shows a page with a list Licensed Requests received The status column indicated the Pending requests
bull Click on the Edit link for to process a request
The Request information tab shows a summary of the information provided by the applicant
bull To Approve or Deny or request further information for the request Click on the Process tab
45 Managing Licensed Requests 49
nada Documentation Release 40
bull Select Approve to approve the request (other options include Deny as well as Request more information fromthe applicant)
bull Select the files that the user will be authorized to download ndash it is also possible to enter a maximum number ofdownloads and expiry date for downloads
bull Enter any comments to be sent to the applicant
bull Select Notify user by email to notify them that the application has been processed
bull Select Update
bull The remaining tabs
ndash Communicate - provides a means to ask for more information from the applicant
ndash Monitor ndash allows the administrator to see when and how many times the applicant downloaded thedata
ndash Forward Request ndash provides a means to forward the request to another person for review
46 Manage Citations
The Citations section is where bibliographic references can be added for publications that use any of the studies in thecatalog These citations can be linked to particular studies in the catalog and are displayed to the users of the systemin the study information view of the relevant study
Citations are added from the Citations menu
50 Chapter 4 User manual
nada Documentation Release 40
bull To add a citation - click on All citations then click on the Add New Citation button at the top right
bull Compete the form including the indication as to whether the citation should be published or not
bull Then expand the Related studies link to tell the system which studies the citation ldquobelongsrdquo to
bull Click on the Attach studies link This reveals a list of all studies in the catalog
bull Select the relevant studies by clicking on the green Select button
bull Click on the apply filter button to save the changes The study now appears in the related studies box
bull Click on the submit button to save the citation
bull Note the flag keywords and notes fields can be used by administrators to place extra notes only visible to otheradministrators that might prove useful when there is uncertainty about a citations appropriateness or accuracy
bull It is also possible to import citations in common citation formats such as BibTex and EndNote (RIS)
bull To do this use the Import Citations link from the top menu
46 Manage Citations 51
nada Documentation Release 40
bull Paste the BibTex or RIS text into the form and then at the bottom of the screen click on Attach studies to linkthe citation to a particular study in the catalog
bull The citation now appears in the citation list as well as on the study information page for the relevant studies
52 Chapter 4 User manual
nada Documentation Release 40
47 Managing Users and account types
Users in the NADA can be defined according to three broad groups
General Usersndash this is the normal user who registers on a NADA site from the user interface This user type hasno access to the site administration It is required to register as a user before being granted access to public use andlicensed data types
Site Administrators (unlimited) ndash this user has access to all functions and all collections within the Site Administra-tion System wide access
Limited Administrators ndash these administrators have access to a limited set of functions within the Site Administra-tion Examples would be an administrator of a specific collections or licensed survey reviewer for all or only somecollections or report generator or citation manager etc
471 Creating User accounts
User accounts can be created in two ways
1 A General User account can be created by a user directly from the register screen from the login link on the userinterface of the application
The user created by this process has no access to the site administration This account can only be used to apply andgain access to public and licensed datasets
2 A user account can also be created by a Site Administrator
bull To do this login as a Site Administrator
bull Go to the site administration section of the application
47 Managing Users and account types 53
nada Documentation Release 40
bull Select Users ndash Add user from the top menu
bull Fill in the information for the user in the form and be sure to mark the account status as Active Then click theCreate button
54 Chapter 4 User manual
nada Documentation Release 40
47 Managing Users and account types 55
nada Documentation Release 40
bull Note that the user always starts off as a General User with no access permissions to the Site Administration Theuser group column displays as empty for users with only general user accounts
bull To see a list of all users in the system go to the Users ndash All Users menu item at the top of the screen
bull Note the new users created have no User group assigned (they are general users) Also note the Actions columnon the far right From these links an account can be edited (including changing the password and blocking anaccount) deleted and Permissions managed for the account
472 Managing User Account Permissions
User accounts permissions can be only be set and changed by a Site Administrator To change the permissions for anaccount
bull Click on the Permissions link next to the account to be changed All accounts start of as General users accounts
bull To change this user to a full site administrator who will have full system wide access to all parts and functionsof the NADA administration select the Site administrators (full access) option and tick the admin box as wellClick update to save the changes
56 Chapter 4 User manual
nada Documentation Release 40
473 Collection level administrators
bull To create a user who only has permissions to administer studies or administration functions for a particularcollection Select Site administrators (limited access)
47 Managing Users and account types 57
nada Documentation Release 40
bull It is then necessary to assign a role to this new limited administrator account To create a limited access ad-ministrator for a particular collection ndash select Site administrators (limited access) and then select Collectionadministrators Notice The form expands to reveal a list of collections in the system
bull Select the appropriate level of access that this account will have for this collection In the example below anadministrator is being created who can manage only licensed requests for the collection ndash Health Surveys Thisaccount will not be able to upload or publish studies The account will only be able to process licensed requestsfor the collection ndash Health Surveys
58 Chapter 4 User manual
nada Documentation Release 40
Other levels of access for Site administrators (limited access) ndash Collection administrators include
1 Accounts that are given full access to manage studies
2 Accounts that are given access to upload studies but not publish them
3 Accounts that are limited to reviewing studies
474 Global level Limited access accounts
Other types of limited access accounts include
1 Accounts that can only view system reports at a global level
2 Accounts that can only access the citations section and manage citations
3 Accounts that can only access the Licensed Request management system ndash at the global level for all collections
47 Managing Users and account types 59
nada Documentation Release 40
Impersonating a user
The system includes a function that allows a Site Administrator to impersonate (take on the role) a user created inthe system This is a useful testing tool when creating users and assigning permissions It essentially allows theadministrator to take on the role of another user temporarily
bull To access the Impersonate User feature go to the Users ndash Impersonat user menu at the top of the screen
bull A list of users to impersonate is shown
bull Select the user to impersonate and click on the impersonate button
bull The dashboard view for the impersonated user now shows
60 Chapter 4 User manual
nada Documentation Release 40
bull Note in the example above the account being impersonated is a Limited Account administrator with rights onlyto manage licensed requests for the Health Surveys Collection Note that all other dashboard menus are eitherhidden or clicking on any other function other than manage studies results in an access denied message
bull This is a good way to test if the roles assigned to a user account have the expected results
bull To exit the impersonate mode and return to the Site Administrator role ndash Click on the top right menu and selectExit impersonate mode
475 The Reviewer Limited access account
Sometimes it is desirable for catalog administrators to allow certain users to see a collection before it is published butwithout granting access to the site administration functions
This is useful for getting feedback on the correctness of information on collections or studies before publishing
To do this
bull First create an account for the user or get the user to create an account by using the register form on the loginscreen
bull Then edit the permissions for that user selecting Site Administrator (limited access) ndash Collection administrator
bull Then for the appropriate collection select Reviewer and click update to save the changes
47 Managing Users and account types 61
nada Documentation Release 40
bull The newly created reviewer account user can now view all studies in a collection even if the study or collectionis unpublished
48 Manage Site Pages and Menus
The NADA has a small content management component that allows for the creation of menu pages to appear on theuser interface
bull Examples of menus that might be useful for users of the site might be A page dealing with the disseminationpolicies of the organization or perhaps a page with contact information for the information
New menu items and pages can be created via the Menu- All pages menu link at the top of the Site Administrationpage
62 Chapter 4 User manual
nada Documentation Release 40
bull Select All pages from the menu
bull To add a new page click on the Add New Page button
bull Give the page a Title in the Title field
bull Clicking in the URL field will automatically suggest a name for the page in the URL
bull Enter the contents for the page in the Body section Plain text or HTML is accespted by this field
bull Then indicate if the page should be published or not in the Publish dropdown
bull The Weight field tells the NADA in what order this menu item should display Eg 0 would be first 1 secondand 2 third
bull Click on Update to save the changes
bull View the changes from the user interface In this Example a Contact Us page was created
bull It is also possible from the Menu Management screen to add a menu link that links to an existing page on anothersite (rather than creating a page itself)
bull To change the order in which the menu items display on the user interface use the Reorder Menu button on theMenu Management screen
48 Manage Site Pages and Menus 63
nada Documentation Release 40
49 The Site Settings Page
All settings for the application are controlled via the Settings menu at the top of the Site Administration page Thereare seven main settings sections See screenshot below
491 General Settings
1 Type the Title of the site here This will become the front page title of the NADA site In this case the Title isNADA
64 Chapter 4 User manual
nada Documentation Release 40
2 The footer text can be changed in this field This displays at the bottom of your site page
3 The initial page that loads when a user visits the NADA site can be set here In this case the catalog page is setto open by default
4 The name of the webmaster can be set here This is the name that will be used in system emails sent to users
5 Enter the webmaster email address here This should be the address that will be used in communication withusers Typically this is a general enquiries email set up by the organization and not a personal email address fora particular person Note to avoid mail systems rejecting mail as spam make sure to enter an address here thatis on the same domain as the server used in the email settings at setup
6 This field sets the location of the Cache folder The cache folder stores pre- generated pages of the site to allowfor faster browsing by the user By default it is set to cache This can be moved to another location if desiredbut must be writable The green tick indicates that the folder can be found and is set up correctly Enter eitherrelative or absolute paths to the folder location
7 Set the time that the Cache takes to expire By default it is set to 2 hours (in milli seconds)
8 If it is desired to turn off caching then select no here Sometimes it is useful to turn off caching when developingor updating a site so as to ensure that content changes become immediately visible on the front-end withouthaving to wait for the cache to expire and the new changes to show Turn this back on to speed up page loadingfor users
Click update to save all settings
Language
To change the language of the application expand the language section and choose the desired language Click updateto save and apply the setting
49 The Site Settings Page 65
nada Documentation Release 40
Enable or disable the HTML editor
A basic HTML editor is provided in the menu and page creating section of the application This setting allows this tobe turned on or off
Survey catalog settings
1 This is the folder where the files for the study are stored on the server This includes the DDI eternal resourcesand data files This folder can be moved to a location outside the web root as described in the installationinstructions in Chapter 1 Enter either relative or absolute paths to the folder location
2 This is the folder where DDIrsquos can be placed in order to use the bulk study import function in the NADA InNADA3 files had to be physically copied to this folder on the server but this is no longer necessary in NADA4 Files can now be directly uploaded to this folder from the Site Administration ndash Manage Studies page page
66 Chapter 4 User manual
nada Documentation Release 40
3 Select the vocabulary to use for the topic filter By default this is set to the CESSDA classification as recom-mended in the IHSN templates supplied at IHSNorg for the Nesstar Metadata Publisher
4 Enable or disable the Country filter on the user interface search page here If the catalog only contains studiesfor one country then turning this filter off is recommended
5 Enable or disable the Topic filter on the user interface search page here If no topics have been defined in theDDIrsquos being uploaded then it is recommended to turn this filter off (disable)
6 Enable or disable the Year filter on the user interface search page here
7 Enable or disable the Collection filter on the user interface search page here If no collections have been definedthen it is recommended to disable this filter
8 Enable or disable the Data access filter on the user interface search page here This filter is not needed if thereare very few studies in the catalog or if all studies hare set to the same access type
9 This section controls the order in which the filters appear on the search page Enter numbers here that rank theorder of the filters in the order they should be displayed
10 This setting determines how many studies are displayed by default to the user on the search page ndash catalog view
Site Login settings
1 To require that users login before being able to access the website set this option to Requires all users to loginto access the website
2 Determined how long a user will stay logged in After this time the user will be automatically logged out
3 Sets the minimum length for passwords created by the users at registration or for manual user creation
49 The Site Settings Page 67
nada Documentation Release 40
SMTP Settings
1 If the PHPweb server is configured to send email using PHPrsquos MAIL function select the first option and donrsquotfill in anything else
If your organization has a mail server and has have a dedicated account that can be setup for NADA use the followingsettings Check the radio button ldquoUse SMTP Serverrdquo
2 Enter the host name for the server
3 Enter the port used by the server to send mail
4 If required enter the user name used to send mail on the server
5 Enter the password used to send mail on the server
If the organization does not own a mail server a Gmail account can be configured to be used with NADA
bull Check the radio button ldquoUse SMTP Serverrdquo
bull Host name sslsmtpgooglemailcom or sslsmtpgmailcom
bull SMTP port 465
bull Account username email-addressgmailcom
bull Account password password for the gmail account
6 Test the email settings
The quickest way to test if the email settings are working is to use the ldquoforgot passwordrdquo option from the user loginpage If no mail is received when doing this test then go back and correct the mail settings Check with the ISP orserver administrator for the correct settings
Click on update to save all settings
68 Chapter 4 User manual
nada Documentation Release 40
492 Dashboard setting
Provides a means to automatically have content loaded into the dashboard via an RSS feed from a site The defaultsetting is set to receive updates and news from the IHSN website
49 The Site Settings Page 69
nada Documentation Release 40
70 Chapter 4 User manual
CHAPTER 5
Indices and tables
bull genindex
bull modindex
bull search
71
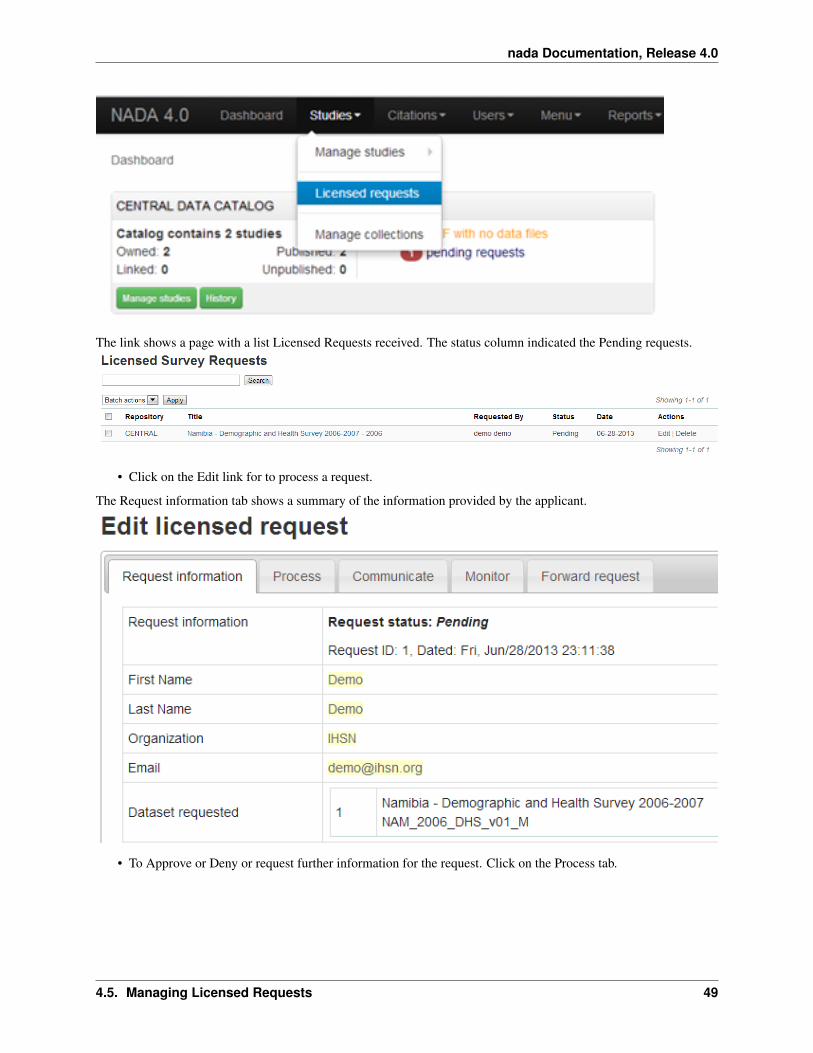
nada Documentation Release 40
bull Select Approve to approve the request (other options include Deny as well as Request more information fromthe applicant)
bull Select the files that the user will be authorized to download ndash it is also possible to enter a maximum number ofdownloads and expiry date for downloads
bull Enter any comments to be sent to the applicant
bull Select Notify user by email to notify them that the application has been processed
bull Select Update
bull The remaining tabs
ndash Communicate - provides a means to ask for more information from the applicant
ndash Monitor ndash allows the administrator to see when and how many times the applicant downloaded thedata
ndash Forward Request ndash provides a means to forward the request to another person for review
46 Manage Citations
The Citations section is where bibliographic references can be added for publications that use any of the studies in thecatalog These citations can be linked to particular studies in the catalog and are displayed to the users of the systemin the study information view of the relevant study
Citations are added from the Citations menu
50 Chapter 4 User manual
nada Documentation Release 40
bull To add a citation - click on All citations then click on the Add New Citation button at the top right
bull Compete the form including the indication as to whether the citation should be published or not
bull Then expand the Related studies link to tell the system which studies the citation ldquobelongsrdquo to
bull Click on the Attach studies link This reveals a list of all studies in the catalog
bull Select the relevant studies by clicking on the green Select button
bull Click on the apply filter button to save the changes The study now appears in the related studies box
bull Click on the submit button to save the citation
bull Note the flag keywords and notes fields can be used by administrators to place extra notes only visible to otheradministrators that might prove useful when there is uncertainty about a citations appropriateness or accuracy
bull It is also possible to import citations in common citation formats such as BibTex and EndNote (RIS)
bull To do this use the Import Citations link from the top menu
46 Manage Citations 51
nada Documentation Release 40
bull Paste the BibTex or RIS text into the form and then at the bottom of the screen click on Attach studies to linkthe citation to a particular study in the catalog
bull The citation now appears in the citation list as well as on the study information page for the relevant studies
52 Chapter 4 User manual
nada Documentation Release 40
47 Managing Users and account types
Users in the NADA can be defined according to three broad groups
General Usersndash this is the normal user who registers on a NADA site from the user interface This user type hasno access to the site administration It is required to register as a user before being granted access to public use andlicensed data types
Site Administrators (unlimited) ndash this user has access to all functions and all collections within the Site Administra-tion System wide access
Limited Administrators ndash these administrators have access to a limited set of functions within the Site Administra-tion Examples would be an administrator of a specific collections or licensed survey reviewer for all or only somecollections or report generator or citation manager etc
471 Creating User accounts
User accounts can be created in two ways
1 A General User account can be created by a user directly from the register screen from the login link on the userinterface of the application
The user created by this process has no access to the site administration This account can only be used to apply andgain access to public and licensed datasets
2 A user account can also be created by a Site Administrator
bull To do this login as a Site Administrator
bull Go to the site administration section of the application
47 Managing Users and account types 53
nada Documentation Release 40
bull Select Users ndash Add user from the top menu
bull Fill in the information for the user in the form and be sure to mark the account status as Active Then click theCreate button
54 Chapter 4 User manual
nada Documentation Release 40
47 Managing Users and account types 55
nada Documentation Release 40
bull Note that the user always starts off as a General User with no access permissions to the Site Administration Theuser group column displays as empty for users with only general user accounts
bull To see a list of all users in the system go to the Users ndash All Users menu item at the top of the screen
bull Note the new users created have no User group assigned (they are general users) Also note the Actions columnon the far right From these links an account can be edited (including changing the password and blocking anaccount) deleted and Permissions managed for the account
472 Managing User Account Permissions
User accounts permissions can be only be set and changed by a Site Administrator To change the permissions for anaccount
bull Click on the Permissions link next to the account to be changed All accounts start of as General users accounts
bull To change this user to a full site administrator who will have full system wide access to all parts and functionsof the NADA administration select the Site administrators (full access) option and tick the admin box as wellClick update to save the changes
56 Chapter 4 User manual
nada Documentation Release 40
473 Collection level administrators
bull To create a user who only has permissions to administer studies or administration functions for a particularcollection Select Site administrators (limited access)
47 Managing Users and account types 57
nada Documentation Release 40
bull It is then necessary to assign a role to this new limited administrator account To create a limited access ad-ministrator for a particular collection ndash select Site administrators (limited access) and then select Collectionadministrators Notice The form expands to reveal a list of collections in the system
bull Select the appropriate level of access that this account will have for this collection In the example below anadministrator is being created who can manage only licensed requests for the collection ndash Health Surveys Thisaccount will not be able to upload or publish studies The account will only be able to process licensed requestsfor the collection ndash Health Surveys
58 Chapter 4 User manual
nada Documentation Release 40
Other levels of access for Site administrators (limited access) ndash Collection administrators include
1 Accounts that are given full access to manage studies
2 Accounts that are given access to upload studies but not publish them
3 Accounts that are limited to reviewing studies
474 Global level Limited access accounts
Other types of limited access accounts include
1 Accounts that can only view system reports at a global level
2 Accounts that can only access the citations section and manage citations
3 Accounts that can only access the Licensed Request management system ndash at the global level for all collections
47 Managing Users and account types 59
nada Documentation Release 40
Impersonating a user
The system includes a function that allows a Site Administrator to impersonate (take on the role) a user created inthe system This is a useful testing tool when creating users and assigning permissions It essentially allows theadministrator to take on the role of another user temporarily
bull To access the Impersonate User feature go to the Users ndash Impersonat user menu at the top of the screen
bull A list of users to impersonate is shown
bull Select the user to impersonate and click on the impersonate button
bull The dashboard view for the impersonated user now shows
60 Chapter 4 User manual
nada Documentation Release 40
bull Note in the example above the account being impersonated is a Limited Account administrator with rights onlyto manage licensed requests for the Health Surveys Collection Note that all other dashboard menus are eitherhidden or clicking on any other function other than manage studies results in an access denied message
bull This is a good way to test if the roles assigned to a user account have the expected results
bull To exit the impersonate mode and return to the Site Administrator role ndash Click on the top right menu and selectExit impersonate mode
475 The Reviewer Limited access account
Sometimes it is desirable for catalog administrators to allow certain users to see a collection before it is published butwithout granting access to the site administration functions
This is useful for getting feedback on the correctness of information on collections or studies before publishing
To do this
bull First create an account for the user or get the user to create an account by using the register form on the loginscreen
bull Then edit the permissions for that user selecting Site Administrator (limited access) ndash Collection administrator
bull Then for the appropriate collection select Reviewer and click update to save the changes
47 Managing Users and account types 61
nada Documentation Release 40
bull The newly created reviewer account user can now view all studies in a collection even if the study or collectionis unpublished
48 Manage Site Pages and Menus
The NADA has a small content management component that allows for the creation of menu pages to appear on theuser interface
bull Examples of menus that might be useful for users of the site might be A page dealing with the disseminationpolicies of the organization or perhaps a page with contact information for the information
New menu items and pages can be created via the Menu- All pages menu link at the top of the Site Administrationpage
62 Chapter 4 User manual
nada Documentation Release 40
bull Select All pages from the menu
bull To add a new page click on the Add New Page button
bull Give the page a Title in the Title field
bull Clicking in the URL field will automatically suggest a name for the page in the URL
bull Enter the contents for the page in the Body section Plain text or HTML is accespted by this field
bull Then indicate if the page should be published or not in the Publish dropdown
bull The Weight field tells the NADA in what order this menu item should display Eg 0 would be first 1 secondand 2 third
bull Click on Update to save the changes
bull View the changes from the user interface In this Example a Contact Us page was created
bull It is also possible from the Menu Management screen to add a menu link that links to an existing page on anothersite (rather than creating a page itself)
bull To change the order in which the menu items display on the user interface use the Reorder Menu button on theMenu Management screen
48 Manage Site Pages and Menus 63
nada Documentation Release 40
49 The Site Settings Page
All settings for the application are controlled via the Settings menu at the top of the Site Administration page Thereare seven main settings sections See screenshot below
491 General Settings
1 Type the Title of the site here This will become the front page title of the NADA site In this case the Title isNADA
64 Chapter 4 User manual
nada Documentation Release 40
2 The footer text can be changed in this field This displays at the bottom of your site page
3 The initial page that loads when a user visits the NADA site can be set here In this case the catalog page is setto open by default
4 The name of the webmaster can be set here This is the name that will be used in system emails sent to users
5 Enter the webmaster email address here This should be the address that will be used in communication withusers Typically this is a general enquiries email set up by the organization and not a personal email address fora particular person Note to avoid mail systems rejecting mail as spam make sure to enter an address here thatis on the same domain as the server used in the email settings at setup
6 This field sets the location of the Cache folder The cache folder stores pre- generated pages of the site to allowfor faster browsing by the user By default it is set to cache This can be moved to another location if desiredbut must be writable The green tick indicates that the folder can be found and is set up correctly Enter eitherrelative or absolute paths to the folder location
7 Set the time that the Cache takes to expire By default it is set to 2 hours (in milli seconds)
8 If it is desired to turn off caching then select no here Sometimes it is useful to turn off caching when developingor updating a site so as to ensure that content changes become immediately visible on the front-end withouthaving to wait for the cache to expire and the new changes to show Turn this back on to speed up page loadingfor users
Click update to save all settings
Language
To change the language of the application expand the language section and choose the desired language Click updateto save and apply the setting
49 The Site Settings Page 65
nada Documentation Release 40
Enable or disable the HTML editor
A basic HTML editor is provided in the menu and page creating section of the application This setting allows this tobe turned on or off
Survey catalog settings
1 This is the folder where the files for the study are stored on the server This includes the DDI eternal resourcesand data files This folder can be moved to a location outside the web root as described in the installationinstructions in Chapter 1 Enter either relative or absolute paths to the folder location
2 This is the folder where DDIrsquos can be placed in order to use the bulk study import function in the NADA InNADA3 files had to be physically copied to this folder on the server but this is no longer necessary in NADA4 Files can now be directly uploaded to this folder from the Site Administration ndash Manage Studies page page
66 Chapter 4 User manual
nada Documentation Release 40
3 Select the vocabulary to use for the topic filter By default this is set to the CESSDA classification as recom-mended in the IHSN templates supplied at IHSNorg for the Nesstar Metadata Publisher
4 Enable or disable the Country filter on the user interface search page here If the catalog only contains studiesfor one country then turning this filter off is recommended
5 Enable or disable the Topic filter on the user interface search page here If no topics have been defined in theDDIrsquos being uploaded then it is recommended to turn this filter off (disable)
6 Enable or disable the Year filter on the user interface search page here
7 Enable or disable the Collection filter on the user interface search page here If no collections have been definedthen it is recommended to disable this filter
8 Enable or disable the Data access filter on the user interface search page here This filter is not needed if thereare very few studies in the catalog or if all studies hare set to the same access type
9 This section controls the order in which the filters appear on the search page Enter numbers here that rank theorder of the filters in the order they should be displayed
10 This setting determines how many studies are displayed by default to the user on the search page ndash catalog view
Site Login settings
1 To require that users login before being able to access the website set this option to Requires all users to loginto access the website
2 Determined how long a user will stay logged in After this time the user will be automatically logged out
3 Sets the minimum length for passwords created by the users at registration or for manual user creation
49 The Site Settings Page 67
nada Documentation Release 40
SMTP Settings
1 If the PHPweb server is configured to send email using PHPrsquos MAIL function select the first option and donrsquotfill in anything else
If your organization has a mail server and has have a dedicated account that can be setup for NADA use the followingsettings Check the radio button ldquoUse SMTP Serverrdquo
2 Enter the host name for the server
3 Enter the port used by the server to send mail
4 If required enter the user name used to send mail on the server
5 Enter the password used to send mail on the server
If the organization does not own a mail server a Gmail account can be configured to be used with NADA
bull Check the radio button ldquoUse SMTP Serverrdquo
bull Host name sslsmtpgooglemailcom or sslsmtpgmailcom
bull SMTP port 465
bull Account username email-addressgmailcom
bull Account password password for the gmail account
6 Test the email settings
The quickest way to test if the email settings are working is to use the ldquoforgot passwordrdquo option from the user loginpage If no mail is received when doing this test then go back and correct the mail settings Check with the ISP orserver administrator for the correct settings
Click on update to save all settings
68 Chapter 4 User manual
nada Documentation Release 40
492 Dashboard setting
Provides a means to automatically have content loaded into the dashboard via an RSS feed from a site The defaultsetting is set to receive updates and news from the IHSN website
49 The Site Settings Page 69
nada Documentation Release 40
70 Chapter 4 User manual
CHAPTER 5
Indices and tables
bull genindex
bull modindex
bull search
71
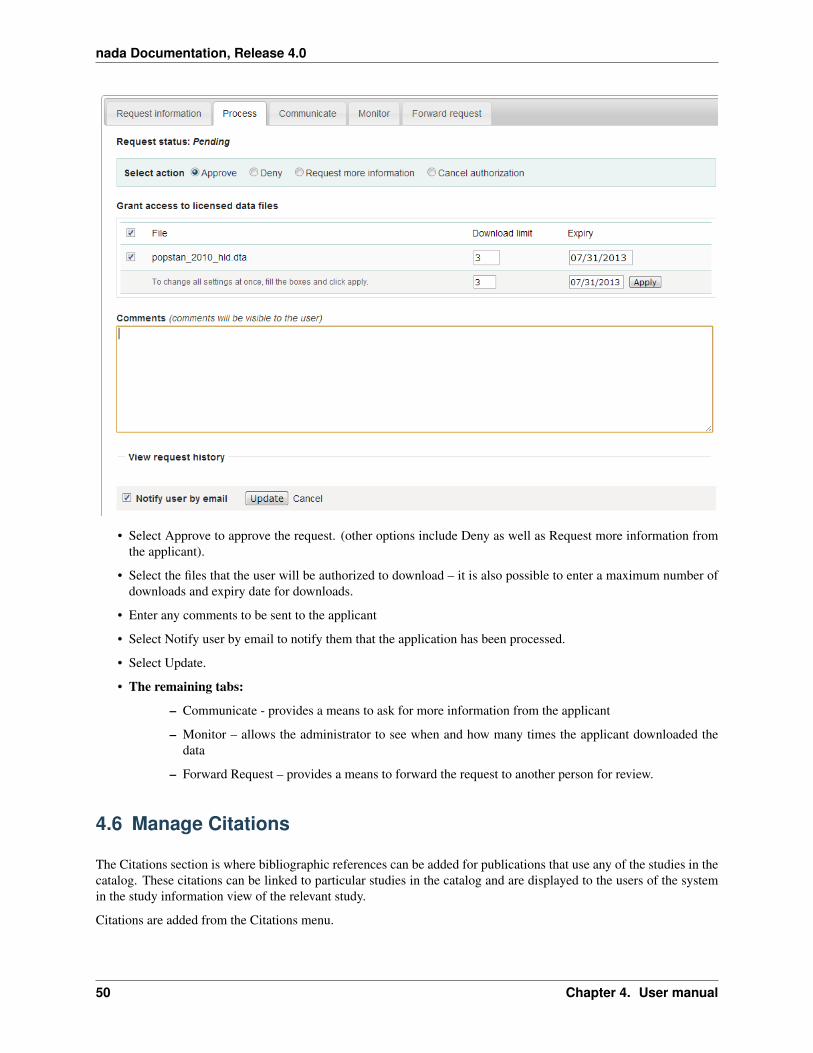
nada Documentation Release 40
bull Paste the BibTex or RIS text into the form and then at the bottom of the screen click on Attach studies to linkthe citation to a particular study in the catalog
bull The citation now appears in the citation list as well as on the study information page for the relevant studies
52 Chapter 4 User manual
nada Documentation Release 40
47 Managing Users and account types
Users in the NADA can be defined according to three broad groups
General Usersndash this is the normal user who registers on a NADA site from the user interface This user type hasno access to the site administration It is required to register as a user before being granted access to public use andlicensed data types
Site Administrators (unlimited) ndash this user has access to all functions and all collections within the Site Administra-tion System wide access
Limited Administrators ndash these administrators have access to a limited set of functions within the Site Administra-tion Examples would be an administrator of a specific collections or licensed survey reviewer for all or only somecollections or report generator or citation manager etc
471 Creating User accounts
User accounts can be created in two ways
1 A General User account can be created by a user directly from the register screen from the login link on the userinterface of the application
The user created by this process has no access to the site administration This account can only be used to apply andgain access to public and licensed datasets
2 A user account can also be created by a Site Administrator
bull To do this login as a Site Administrator
bull Go to the site administration section of the application
47 Managing Users and account types 53
nada Documentation Release 40
bull Select Users ndash Add user from the top menu
bull Fill in the information for the user in the form and be sure to mark the account status as Active Then click theCreate button
54 Chapter 4 User manual
nada Documentation Release 40
47 Managing Users and account types 55
nada Documentation Release 40
bull Note that the user always starts off as a General User with no access permissions to the Site Administration Theuser group column displays as empty for users with only general user accounts
bull To see a list of all users in the system go to the Users ndash All Users menu item at the top of the screen
bull Note the new users created have no User group assigned (they are general users) Also note the Actions columnon the far right From these links an account can be edited (including changing the password and blocking anaccount) deleted and Permissions managed for the account
472 Managing User Account Permissions
User accounts permissions can be only be set and changed by a Site Administrator To change the permissions for anaccount
bull Click on the Permissions link next to the account to be changed All accounts start of as General users accounts
bull To change this user to a full site administrator who will have full system wide access to all parts and functionsof the NADA administration select the Site administrators (full access) option and tick the admin box as wellClick update to save the changes
56 Chapter 4 User manual
nada Documentation Release 40
473 Collection level administrators
bull To create a user who only has permissions to administer studies or administration functions for a particularcollection Select Site administrators (limited access)
47 Managing Users and account types 57
nada Documentation Release 40
bull It is then necessary to assign a role to this new limited administrator account To create a limited access ad-ministrator for a particular collection ndash select Site administrators (limited access) and then select Collectionadministrators Notice The form expands to reveal a list of collections in the system
bull Select the appropriate level of access that this account will have for this collection In the example below anadministrator is being created who can manage only licensed requests for the collection ndash Health Surveys Thisaccount will not be able to upload or publish studies The account will only be able to process licensed requestsfor the collection ndash Health Surveys
58 Chapter 4 User manual
nada Documentation Release 40
Other levels of access for Site administrators (limited access) ndash Collection administrators include
1 Accounts that are given full access to manage studies
2 Accounts that are given access to upload studies but not publish them
3 Accounts that are limited to reviewing studies
474 Global level Limited access accounts
Other types of limited access accounts include
1 Accounts that can only view system reports at a global level
2 Accounts that can only access the citations section and manage citations
3 Accounts that can only access the Licensed Request management system ndash at the global level for all collections
47 Managing Users and account types 59
nada Documentation Release 40
Impersonating a user
The system includes a function that allows a Site Administrator to impersonate (take on the role) a user created inthe system This is a useful testing tool when creating users and assigning permissions It essentially allows theadministrator to take on the role of another user temporarily
bull To access the Impersonate User feature go to the Users ndash Impersonat user menu at the top of the screen
bull A list of users to impersonate is shown
bull Select the user to impersonate and click on the impersonate button
bull The dashboard view for the impersonated user now shows
60 Chapter 4 User manual
nada Documentation Release 40
bull Note in the example above the account being impersonated is a Limited Account administrator with rights onlyto manage licensed requests for the Health Surveys Collection Note that all other dashboard menus are eitherhidden or clicking on any other function other than manage studies results in an access denied message
bull This is a good way to test if the roles assigned to a user account have the expected results
bull To exit the impersonate mode and return to the Site Administrator role ndash Click on the top right menu and selectExit impersonate mode
475 The Reviewer Limited access account
Sometimes it is desirable for catalog administrators to allow certain users to see a collection before it is published butwithout granting access to the site administration functions
This is useful for getting feedback on the correctness of information on collections or studies before publishing
To do this
bull First create an account for the user or get the user to create an account by using the register form on the loginscreen
bull Then edit the permissions for that user selecting Site Administrator (limited access) ndash Collection administrator
bull Then for the appropriate collection select Reviewer and click update to save the changes
47 Managing Users and account types 61
nada Documentation Release 40
bull The newly created reviewer account user can now view all studies in a collection even if the study or collectionis unpublished
48 Manage Site Pages and Menus
The NADA has a small content management component that allows for the creation of menu pages to appear on theuser interface
bull Examples of menus that might be useful for users of the site might be A page dealing with the disseminationpolicies of the organization or perhaps a page with contact information for the information
New menu items and pages can be created via the Menu- All pages menu link at the top of the Site Administrationpage
62 Chapter 4 User manual
nada Documentation Release 40
bull Select All pages from the menu
bull To add a new page click on the Add New Page button
bull Give the page a Title in the Title field
bull Clicking in the URL field will automatically suggest a name for the page in the URL
bull Enter the contents for the page in the Body section Plain text or HTML is accespted by this field
bull Then indicate if the page should be published or not in the Publish dropdown
bull The Weight field tells the NADA in what order this menu item should display Eg 0 would be first 1 secondand 2 third
bull Click on Update to save the changes
bull View the changes from the user interface In this Example a Contact Us page was created
bull It is also possible from the Menu Management screen to add a menu link that links to an existing page on anothersite (rather than creating a page itself)
bull To change the order in which the menu items display on the user interface use the Reorder Menu button on theMenu Management screen
48 Manage Site Pages and Menus 63
nada Documentation Release 40
49 The Site Settings Page
All settings for the application are controlled via the Settings menu at the top of the Site Administration page Thereare seven main settings sections See screenshot below
491 General Settings
1 Type the Title of the site here This will become the front page title of the NADA site In this case the Title isNADA
64 Chapter 4 User manual
nada Documentation Release 40
2 The footer text can be changed in this field This displays at the bottom of your site page
3 The initial page that loads when a user visits the NADA site can be set here In this case the catalog page is setto open by default
4 The name of the webmaster can be set here This is the name that will be used in system emails sent to users
5 Enter the webmaster email address here This should be the address that will be used in communication withusers Typically this is a general enquiries email set up by the organization and not a personal email address fora particular person Note to avoid mail systems rejecting mail as spam make sure to enter an address here thatis on the same domain as the server used in the email settings at setup
6 This field sets the location of the Cache folder The cache folder stores pre- generated pages of the site to allowfor faster browsing by the user By default it is set to cache This can be moved to another location if desiredbut must be writable The green tick indicates that the folder can be found and is set up correctly Enter eitherrelative or absolute paths to the folder location
7 Set the time that the Cache takes to expire By default it is set to 2 hours (in milli seconds)
8 If it is desired to turn off caching then select no here Sometimes it is useful to turn off caching when developingor updating a site so as to ensure that content changes become immediately visible on the front-end withouthaving to wait for the cache to expire and the new changes to show Turn this back on to speed up page loadingfor users
Click update to save all settings
Language
To change the language of the application expand the language section and choose the desired language Click updateto save and apply the setting
49 The Site Settings Page 65
nada Documentation Release 40
Enable or disable the HTML editor
A basic HTML editor is provided in the menu and page creating section of the application This setting allows this tobe turned on or off
Survey catalog settings
1 This is the folder where the files for the study are stored on the server This includes the DDI eternal resourcesand data files This folder can be moved to a location outside the web root as described in the installationinstructions in Chapter 1 Enter either relative or absolute paths to the folder location
2 This is the folder where DDIrsquos can be placed in order to use the bulk study import function in the NADA InNADA3 files had to be physically copied to this folder on the server but this is no longer necessary in NADA4 Files can now be directly uploaded to this folder from the Site Administration ndash Manage Studies page page
66 Chapter 4 User manual
nada Documentation Release 40
3 Select the vocabulary to use for the topic filter By default this is set to the CESSDA classification as recom-mended in the IHSN templates supplied at IHSNorg for the Nesstar Metadata Publisher
4 Enable or disable the Country filter on the user interface search page here If the catalog only contains studiesfor one country then turning this filter off is recommended
5 Enable or disable the Topic filter on the user interface search page here If no topics have been defined in theDDIrsquos being uploaded then it is recommended to turn this filter off (disable)
6 Enable or disable the Year filter on the user interface search page here
7 Enable or disable the Collection filter on the user interface search page here If no collections have been definedthen it is recommended to disable this filter
8 Enable or disable the Data access filter on the user interface search page here This filter is not needed if thereare very few studies in the catalog or if all studies hare set to the same access type
9 This section controls the order in which the filters appear on the search page Enter numbers here that rank theorder of the filters in the order they should be displayed
10 This setting determines how many studies are displayed by default to the user on the search page ndash catalog view
Site Login settings
1 To require that users login before being able to access the website set this option to Requires all users to loginto access the website
2 Determined how long a user will stay logged in After this time the user will be automatically logged out
3 Sets the minimum length for passwords created by the users at registration or for manual user creation
49 The Site Settings Page 67
nada Documentation Release 40
SMTP Settings
1 If the PHPweb server is configured to send email using PHPrsquos MAIL function select the first option and donrsquotfill in anything else
If your organization has a mail server and has have a dedicated account that can be setup for NADA use the followingsettings Check the radio button ldquoUse SMTP Serverrdquo
2 Enter the host name for the server
3 Enter the port used by the server to send mail
4 If required enter the user name used to send mail on the server
5 Enter the password used to send mail on the server
If the organization does not own a mail server a Gmail account can be configured to be used with NADA
bull Check the radio button ldquoUse SMTP Serverrdquo
bull Host name sslsmtpgooglemailcom or sslsmtpgmailcom
bull SMTP port 465
bull Account username email-addressgmailcom
bull Account password password for the gmail account
6 Test the email settings
The quickest way to test if the email settings are working is to use the ldquoforgot passwordrdquo option from the user loginpage If no mail is received when doing this test then go back and correct the mail settings Check with the ISP orserver administrator for the correct settings
Click on update to save all settings
68 Chapter 4 User manual
nada Documentation Release 40
492 Dashboard setting
Provides a means to automatically have content loaded into the dashboard via an RSS feed from a site The defaultsetting is set to receive updates and news from the IHSN website
49 The Site Settings Page 69
nada Documentation Release 40
70 Chapter 4 User manual
CHAPTER 5
Indices and tables
bull genindex
bull modindex
bull search
71
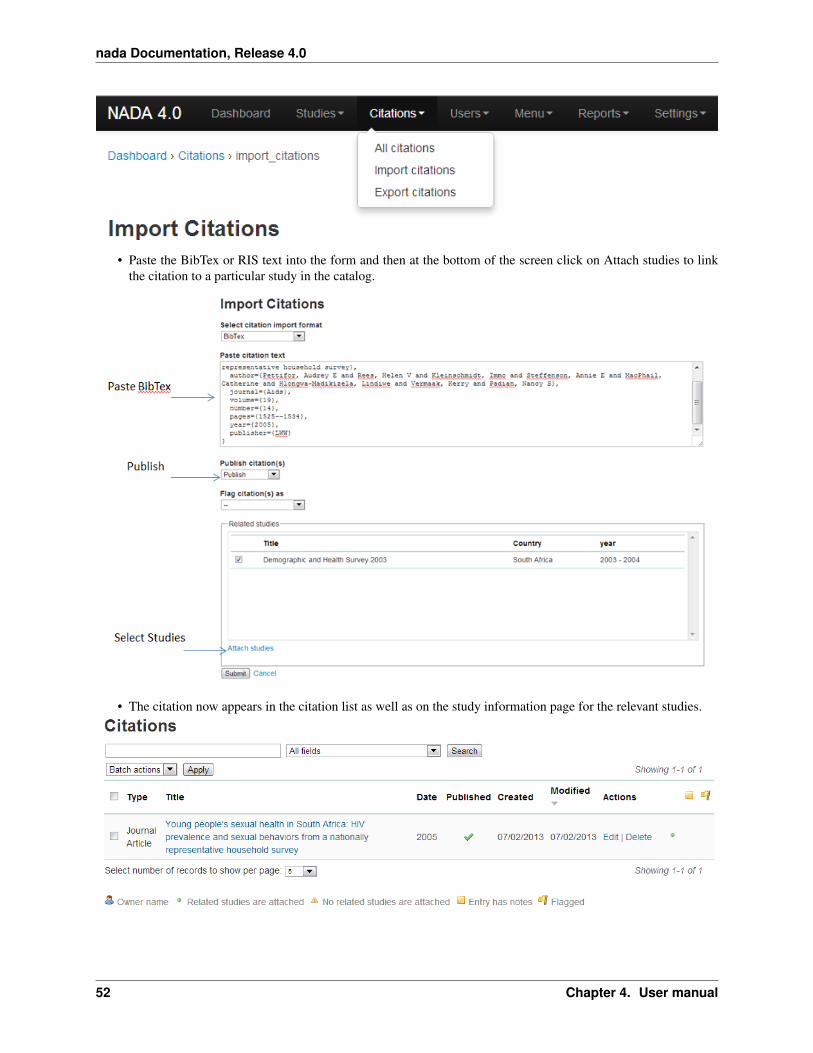
nada Documentation Release 40
47 Managing Users and account types
Users in the NADA can be defined according to three broad groups
General Usersndash this is the normal user who registers on a NADA site from the user interface This user type hasno access to the site administration It is required to register as a user before being granted access to public use andlicensed data types
Site Administrators (unlimited) ndash this user has access to all functions and all collections within the Site Administra-tion System wide access
Limited Administrators ndash these administrators have access to a limited set of functions within the Site Administra-tion Examples would be an administrator of a specific collections or licensed survey reviewer for all or only somecollections or report generator or citation manager etc
471 Creating User accounts
User accounts can be created in two ways
1 A General User account can be created by a user directly from the register screen from the login link on the userinterface of the application
The user created by this process has no access to the site administration This account can only be used to apply andgain access to public and licensed datasets
2 A user account can also be created by a Site Administrator
bull To do this login as a Site Administrator
bull Go to the site administration section of the application
47 Managing Users and account types 53
nada Documentation Release 40
bull Select Users ndash Add user from the top menu
bull Fill in the information for the user in the form and be sure to mark the account status as Active Then click theCreate button
54 Chapter 4 User manual
nada Documentation Release 40
47 Managing Users and account types 55
nada Documentation Release 40
bull Note that the user always starts off as a General User with no access permissions to the Site Administration Theuser group column displays as empty for users with only general user accounts
bull To see a list of all users in the system go to the Users ndash All Users menu item at the top of the screen
bull Note the new users created have no User group assigned (they are general users) Also note the Actions columnon the far right From these links an account can be edited (including changing the password and blocking anaccount) deleted and Permissions managed for the account
472 Managing User Account Permissions
User accounts permissions can be only be set and changed by a Site Administrator To change the permissions for anaccount
bull Click on the Permissions link next to the account to be changed All accounts start of as General users accounts
bull To change this user to a full site administrator who will have full system wide access to all parts and functionsof the NADA administration select the Site administrators (full access) option and tick the admin box as wellClick update to save the changes
56 Chapter 4 User manual
nada Documentation Release 40
473 Collection level administrators
bull To create a user who only has permissions to administer studies or administration functions for a particularcollection Select Site administrators (limited access)
47 Managing Users and account types 57
nada Documentation Release 40
bull It is then necessary to assign a role to this new limited administrator account To create a limited access ad-ministrator for a particular collection ndash select Site administrators (limited access) and then select Collectionadministrators Notice The form expands to reveal a list of collections in the system
bull Select the appropriate level of access that this account will have for this collection In the example below anadministrator is being created who can manage only licensed requests for the collection ndash Health Surveys Thisaccount will not be able to upload or publish studies The account will only be able to process licensed requestsfor the collection ndash Health Surveys
58 Chapter 4 User manual
nada Documentation Release 40
Other levels of access for Site administrators (limited access) ndash Collection administrators include
1 Accounts that are given full access to manage studies
2 Accounts that are given access to upload studies but not publish them
3 Accounts that are limited to reviewing studies
474 Global level Limited access accounts
Other types of limited access accounts include
1 Accounts that can only view system reports at a global level
2 Accounts that can only access the citations section and manage citations
3 Accounts that can only access the Licensed Request management system ndash at the global level for all collections
47 Managing Users and account types 59
nada Documentation Release 40
Impersonating a user
The system includes a function that allows a Site Administrator to impersonate (take on the role) a user created inthe system This is a useful testing tool when creating users and assigning permissions It essentially allows theadministrator to take on the role of another user temporarily
bull To access the Impersonate User feature go to the Users ndash Impersonat user menu at the top of the screen
bull A list of users to impersonate is shown
bull Select the user to impersonate and click on the impersonate button
bull The dashboard view for the impersonated user now shows
60 Chapter 4 User manual
nada Documentation Release 40
bull Note in the example above the account being impersonated is a Limited Account administrator with rights onlyto manage licensed requests for the Health Surveys Collection Note that all other dashboard menus are eitherhidden or clicking on any other function other than manage studies results in an access denied message
bull This is a good way to test if the roles assigned to a user account have the expected results
bull To exit the impersonate mode and return to the Site Administrator role ndash Click on the top right menu and selectExit impersonate mode
475 The Reviewer Limited access account
Sometimes it is desirable for catalog administrators to allow certain users to see a collection before it is published butwithout granting access to the site administration functions
This is useful for getting feedback on the correctness of information on collections or studies before publishing
To do this
bull First create an account for the user or get the user to create an account by using the register form on the loginscreen
bull Then edit the permissions for that user selecting Site Administrator (limited access) ndash Collection administrator
bull Then for the appropriate collection select Reviewer and click update to save the changes
47 Managing Users and account types 61
nada Documentation Release 40
bull The newly created reviewer account user can now view all studies in a collection even if the study or collectionis unpublished
48 Manage Site Pages and Menus
The NADA has a small content management component that allows for the creation of menu pages to appear on theuser interface
bull Examples of menus that might be useful for users of the site might be A page dealing with the disseminationpolicies of the organization or perhaps a page with contact information for the information
New menu items and pages can be created via the Menu- All pages menu link at the top of the Site Administrationpage
62 Chapter 4 User manual
nada Documentation Release 40
bull Select All pages from the menu
bull To add a new page click on the Add New Page button
bull Give the page a Title in the Title field
bull Clicking in the URL field will automatically suggest a name for the page in the URL
bull Enter the contents for the page in the Body section Plain text or HTML is accespted by this field
bull Then indicate if the page should be published or not in the Publish dropdown
bull The Weight field tells the NADA in what order this menu item should display Eg 0 would be first 1 secondand 2 third
bull Click on Update to save the changes
bull View the changes from the user interface In this Example a Contact Us page was created
bull It is also possible from the Menu Management screen to add a menu link that links to an existing page on anothersite (rather than creating a page itself)
bull To change the order in which the menu items display on the user interface use the Reorder Menu button on theMenu Management screen
48 Manage Site Pages and Menus 63
nada Documentation Release 40
49 The Site Settings Page
All settings for the application are controlled via the Settings menu at the top of the Site Administration page Thereare seven main settings sections See screenshot below
491 General Settings
1 Type the Title of the site here This will become the front page title of the NADA site In this case the Title isNADA
64 Chapter 4 User manual
nada Documentation Release 40
2 The footer text can be changed in this field This displays at the bottom of your site page
3 The initial page that loads when a user visits the NADA site can be set here In this case the catalog page is setto open by default
4 The name of the webmaster can be set here This is the name that will be used in system emails sent to users
5 Enter the webmaster email address here This should be the address that will be used in communication withusers Typically this is a general enquiries email set up by the organization and not a personal email address fora particular person Note to avoid mail systems rejecting mail as spam make sure to enter an address here thatis on the same domain as the server used in the email settings at setup
6 This field sets the location of the Cache folder The cache folder stores pre- generated pages of the site to allowfor faster browsing by the user By default it is set to cache This can be moved to another location if desiredbut must be writable The green tick indicates that the folder can be found and is set up correctly Enter eitherrelative or absolute paths to the folder location
7 Set the time that the Cache takes to expire By default it is set to 2 hours (in milli seconds)
8 If it is desired to turn off caching then select no here Sometimes it is useful to turn off caching when developingor updating a site so as to ensure that content changes become immediately visible on the front-end withouthaving to wait for the cache to expire and the new changes to show Turn this back on to speed up page loadingfor users
Click update to save all settings
Language
To change the language of the application expand the language section and choose the desired language Click updateto save and apply the setting
49 The Site Settings Page 65
nada Documentation Release 40
Enable or disable the HTML editor
A basic HTML editor is provided in the menu and page creating section of the application This setting allows this tobe turned on or off
Survey catalog settings
1 This is the folder where the files for the study are stored on the server This includes the DDI eternal resourcesand data files This folder can be moved to a location outside the web root as described in the installationinstructions in Chapter 1 Enter either relative or absolute paths to the folder location
2 This is the folder where DDIrsquos can be placed in order to use the bulk study import function in the NADA InNADA3 files had to be physically copied to this folder on the server but this is no longer necessary in NADA4 Files can now be directly uploaded to this folder from the Site Administration ndash Manage Studies page page
66 Chapter 4 User manual
nada Documentation Release 40
3 Select the vocabulary to use for the topic filter By default this is set to the CESSDA classification as recom-mended in the IHSN templates supplied at IHSNorg for the Nesstar Metadata Publisher
4 Enable or disable the Country filter on the user interface search page here If the catalog only contains studiesfor one country then turning this filter off is recommended
5 Enable or disable the Topic filter on the user interface search page here If no topics have been defined in theDDIrsquos being uploaded then it is recommended to turn this filter off (disable)
6 Enable or disable the Year filter on the user interface search page here
7 Enable or disable the Collection filter on the user interface search page here If no collections have been definedthen it is recommended to disable this filter
8 Enable or disable the Data access filter on the user interface search page here This filter is not needed if thereare very few studies in the catalog or if all studies hare set to the same access type
9 This section controls the order in which the filters appear on the search page Enter numbers here that rank theorder of the filters in the order they should be displayed
10 This setting determines how many studies are displayed by default to the user on the search page ndash catalog view
Site Login settings
1 To require that users login before being able to access the website set this option to Requires all users to loginto access the website
2 Determined how long a user will stay logged in After this time the user will be automatically logged out
3 Sets the minimum length for passwords created by the users at registration or for manual user creation
49 The Site Settings Page 67
nada Documentation Release 40
SMTP Settings
1 If the PHPweb server is configured to send email using PHPrsquos MAIL function select the first option and donrsquotfill in anything else
If your organization has a mail server and has have a dedicated account that can be setup for NADA use the followingsettings Check the radio button ldquoUse SMTP Serverrdquo
2 Enter the host name for the server
3 Enter the port used by the server to send mail
4 If required enter the user name used to send mail on the server
5 Enter the password used to send mail on the server
If the organization does not own a mail server a Gmail account can be configured to be used with NADA
bull Check the radio button ldquoUse SMTP Serverrdquo
bull Host name sslsmtpgooglemailcom or sslsmtpgmailcom
bull SMTP port 465
bull Account username email-addressgmailcom
bull Account password password for the gmail account
6 Test the email settings
The quickest way to test if the email settings are working is to use the ldquoforgot passwordrdquo option from the user loginpage If no mail is received when doing this test then go back and correct the mail settings Check with the ISP orserver administrator for the correct settings
Click on update to save all settings
68 Chapter 4 User manual
nada Documentation Release 40
492 Dashboard setting
Provides a means to automatically have content loaded into the dashboard via an RSS feed from a site The defaultsetting is set to receive updates and news from the IHSN website
49 The Site Settings Page 69
nada Documentation Release 40
70 Chapter 4 User manual
CHAPTER 5
Indices and tables
bull genindex
bull modindex
bull search
71
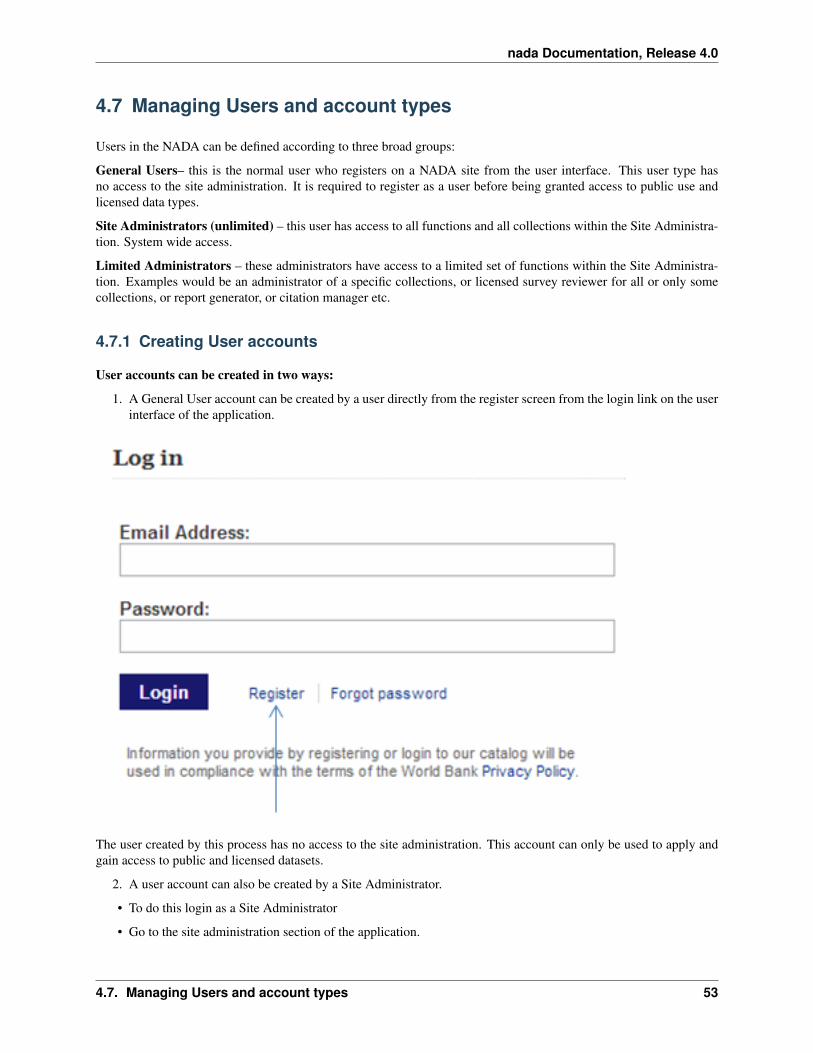
nada Documentation Release 40
bull Select Users ndash Add user from the top menu
bull Fill in the information for the user in the form and be sure to mark the account status as Active Then click theCreate button
54 Chapter 4 User manual
nada Documentation Release 40
47 Managing Users and account types 55
nada Documentation Release 40
bull Note that the user always starts off as a General User with no access permissions to the Site Administration Theuser group column displays as empty for users with only general user accounts
bull To see a list of all users in the system go to the Users ndash All Users menu item at the top of the screen
bull Note the new users created have no User group assigned (they are general users) Also note the Actions columnon the far right From these links an account can be edited (including changing the password and blocking anaccount) deleted and Permissions managed for the account
472 Managing User Account Permissions
User accounts permissions can be only be set and changed by a Site Administrator To change the permissions for anaccount
bull Click on the Permissions link next to the account to be changed All accounts start of as General users accounts
bull To change this user to a full site administrator who will have full system wide access to all parts and functionsof the NADA administration select the Site administrators (full access) option and tick the admin box as wellClick update to save the changes
56 Chapter 4 User manual
nada Documentation Release 40
473 Collection level administrators
bull To create a user who only has permissions to administer studies or administration functions for a particularcollection Select Site administrators (limited access)
47 Managing Users and account types 57
nada Documentation Release 40
bull It is then necessary to assign a role to this new limited administrator account To create a limited access ad-ministrator for a particular collection ndash select Site administrators (limited access) and then select Collectionadministrators Notice The form expands to reveal a list of collections in the system
bull Select the appropriate level of access that this account will have for this collection In the example below anadministrator is being created who can manage only licensed requests for the collection ndash Health Surveys Thisaccount will not be able to upload or publish studies The account will only be able to process licensed requestsfor the collection ndash Health Surveys
58 Chapter 4 User manual
nada Documentation Release 40
Other levels of access for Site administrators (limited access) ndash Collection administrators include
1 Accounts that are given full access to manage studies
2 Accounts that are given access to upload studies but not publish them
3 Accounts that are limited to reviewing studies
474 Global level Limited access accounts
Other types of limited access accounts include
1 Accounts that can only view system reports at a global level
2 Accounts that can only access the citations section and manage citations
3 Accounts that can only access the Licensed Request management system ndash at the global level for all collections
47 Managing Users and account types 59
nada Documentation Release 40
Impersonating a user
The system includes a function that allows a Site Administrator to impersonate (take on the role) a user created inthe system This is a useful testing tool when creating users and assigning permissions It essentially allows theadministrator to take on the role of another user temporarily
bull To access the Impersonate User feature go to the Users ndash Impersonat user menu at the top of the screen
bull A list of users to impersonate is shown
bull Select the user to impersonate and click on the impersonate button
bull The dashboard view for the impersonated user now shows
60 Chapter 4 User manual
nada Documentation Release 40
bull Note in the example above the account being impersonated is a Limited Account administrator with rights onlyto manage licensed requests for the Health Surveys Collection Note that all other dashboard menus are eitherhidden or clicking on any other function other than manage studies results in an access denied message
bull This is a good way to test if the roles assigned to a user account have the expected results
bull To exit the impersonate mode and return to the Site Administrator role ndash Click on the top right menu and selectExit impersonate mode
475 The Reviewer Limited access account
Sometimes it is desirable for catalog administrators to allow certain users to see a collection before it is published butwithout granting access to the site administration functions
This is useful for getting feedback on the correctness of information on collections or studies before publishing
To do this
bull First create an account for the user or get the user to create an account by using the register form on the loginscreen
bull Then edit the permissions for that user selecting Site Administrator (limited access) ndash Collection administrator
bull Then for the appropriate collection select Reviewer and click update to save the changes
47 Managing Users and account types 61
nada Documentation Release 40
bull The newly created reviewer account user can now view all studies in a collection even if the study or collectionis unpublished
48 Manage Site Pages and Menus
The NADA has a small content management component that allows for the creation of menu pages to appear on theuser interface
bull Examples of menus that might be useful for users of the site might be A page dealing with the disseminationpolicies of the organization or perhaps a page with contact information for the information
New menu items and pages can be created via the Menu- All pages menu link at the top of the Site Administrationpage
62 Chapter 4 User manual
nada Documentation Release 40
bull Select All pages from the menu
bull To add a new page click on the Add New Page button
bull Give the page a Title in the Title field
bull Clicking in the URL field will automatically suggest a name for the page in the URL
bull Enter the contents for the page in the Body section Plain text or HTML is accespted by this field
bull Then indicate if the page should be published or not in the Publish dropdown
bull The Weight field tells the NADA in what order this menu item should display Eg 0 would be first 1 secondand 2 third
bull Click on Update to save the changes
bull View the changes from the user interface In this Example a Contact Us page was created
bull It is also possible from the Menu Management screen to add a menu link that links to an existing page on anothersite (rather than creating a page itself)
bull To change the order in which the menu items display on the user interface use the Reorder Menu button on theMenu Management screen
48 Manage Site Pages and Menus 63
nada Documentation Release 40
49 The Site Settings Page
All settings for the application are controlled via the Settings menu at the top of the Site Administration page Thereare seven main settings sections See screenshot below
491 General Settings
1 Type the Title of the site here This will become the front page title of the NADA site In this case the Title isNADA
64 Chapter 4 User manual
nada Documentation Release 40
2 The footer text can be changed in this field This displays at the bottom of your site page
3 The initial page that loads when a user visits the NADA site can be set here In this case the catalog page is setto open by default
4 The name of the webmaster can be set here This is the name that will be used in system emails sent to users
5 Enter the webmaster email address here This should be the address that will be used in communication withusers Typically this is a general enquiries email set up by the organization and not a personal email address fora particular person Note to avoid mail systems rejecting mail as spam make sure to enter an address here thatis on the same domain as the server used in the email settings at setup
6 This field sets the location of the Cache folder The cache folder stores pre- generated pages of the site to allowfor faster browsing by the user By default it is set to cache This can be moved to another location if desiredbut must be writable The green tick indicates that the folder can be found and is set up correctly Enter eitherrelative or absolute paths to the folder location
7 Set the time that the Cache takes to expire By default it is set to 2 hours (in milli seconds)
8 If it is desired to turn off caching then select no here Sometimes it is useful to turn off caching when developingor updating a site so as to ensure that content changes become immediately visible on the front-end withouthaving to wait for the cache to expire and the new changes to show Turn this back on to speed up page loadingfor users
Click update to save all settings
Language
To change the language of the application expand the language section and choose the desired language Click updateto save and apply the setting
49 The Site Settings Page 65
nada Documentation Release 40
Enable or disable the HTML editor
A basic HTML editor is provided in the menu and page creating section of the application This setting allows this tobe turned on or off
Survey catalog settings
1 This is the folder where the files for the study are stored on the server This includes the DDI eternal resourcesand data files This folder can be moved to a location outside the web root as described in the installationinstructions in Chapter 1 Enter either relative or absolute paths to the folder location
2 This is the folder where DDIrsquos can be placed in order to use the bulk study import function in the NADA InNADA3 files had to be physically copied to this folder on the server but this is no longer necessary in NADA4 Files can now be directly uploaded to this folder from the Site Administration ndash Manage Studies page page
66 Chapter 4 User manual
nada Documentation Release 40
3 Select the vocabulary to use for the topic filter By default this is set to the CESSDA classification as recom-mended in the IHSN templates supplied at IHSNorg for the Nesstar Metadata Publisher
4 Enable or disable the Country filter on the user interface search page here If the catalog only contains studiesfor one country then turning this filter off is recommended
5 Enable or disable the Topic filter on the user interface search page here If no topics have been defined in theDDIrsquos being uploaded then it is recommended to turn this filter off (disable)
6 Enable or disable the Year filter on the user interface search page here
7 Enable or disable the Collection filter on the user interface search page here If no collections have been definedthen it is recommended to disable this filter
8 Enable or disable the Data access filter on the user interface search page here This filter is not needed if thereare very few studies in the catalog or if all studies hare set to the same access type
9 This section controls the order in which the filters appear on the search page Enter numbers here that rank theorder of the filters in the order they should be displayed
10 This setting determines how many studies are displayed by default to the user on the search page ndash catalog view
Site Login settings
1 To require that users login before being able to access the website set this option to Requires all users to loginto access the website
2 Determined how long a user will stay logged in After this time the user will be automatically logged out
3 Sets the minimum length for passwords created by the users at registration or for manual user creation
49 The Site Settings Page 67
nada Documentation Release 40
SMTP Settings
1 If the PHPweb server is configured to send email using PHPrsquos MAIL function select the first option and donrsquotfill in anything else
If your organization has a mail server and has have a dedicated account that can be setup for NADA use the followingsettings Check the radio button ldquoUse SMTP Serverrdquo
2 Enter the host name for the server
3 Enter the port used by the server to send mail
4 If required enter the user name used to send mail on the server
5 Enter the password used to send mail on the server
If the organization does not own a mail server a Gmail account can be configured to be used with NADA
bull Check the radio button ldquoUse SMTP Serverrdquo
bull Host name sslsmtpgooglemailcom or sslsmtpgmailcom
bull SMTP port 465
bull Account username email-addressgmailcom
bull Account password password for the gmail account
6 Test the email settings
The quickest way to test if the email settings are working is to use the ldquoforgot passwordrdquo option from the user loginpage If no mail is received when doing this test then go back and correct the mail settings Check with the ISP orserver administrator for the correct settings
Click on update to save all settings
68 Chapter 4 User manual
nada Documentation Release 40
492 Dashboard setting
Provides a means to automatically have content loaded into the dashboard via an RSS feed from a site The defaultsetting is set to receive updates and news from the IHSN website
49 The Site Settings Page 69
nada Documentation Release 40
70 Chapter 4 User manual
CHAPTER 5
Indices and tables
bull genindex
bull modindex
bull search
71
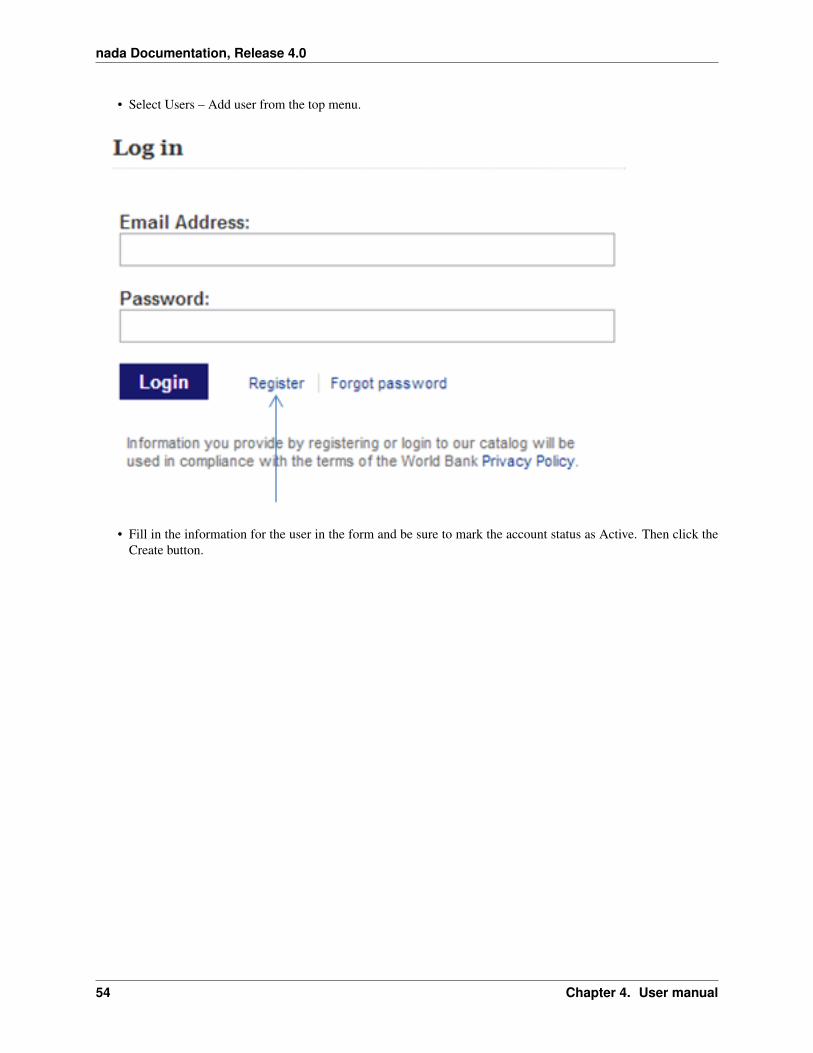
nada Documentation Release 40
bull Note that the user always starts off as a General User with no access permissions to the Site Administration Theuser group column displays as empty for users with only general user accounts
bull To see a list of all users in the system go to the Users ndash All Users menu item at the top of the screen
bull Note the new users created have no User group assigned (they are general users) Also note the Actions columnon the far right From these links an account can be edited (including changing the password and blocking anaccount) deleted and Permissions managed for the account
472 Managing User Account Permissions
User accounts permissions can be only be set and changed by a Site Administrator To change the permissions for anaccount
bull Click on the Permissions link next to the account to be changed All accounts start of as General users accounts
bull To change this user to a full site administrator who will have full system wide access to all parts and functionsof the NADA administration select the Site administrators (full access) option and tick the admin box as wellClick update to save the changes
56 Chapter 4 User manual
nada Documentation Release 40
473 Collection level administrators
bull To create a user who only has permissions to administer studies or administration functions for a particularcollection Select Site administrators (limited access)
47 Managing Users and account types 57
nada Documentation Release 40
bull It is then necessary to assign a role to this new limited administrator account To create a limited access ad-ministrator for a particular collection ndash select Site administrators (limited access) and then select Collectionadministrators Notice The form expands to reveal a list of collections in the system
bull Select the appropriate level of access that this account will have for this collection In the example below anadministrator is being created who can manage only licensed requests for the collection ndash Health Surveys Thisaccount will not be able to upload or publish studies The account will only be able to process licensed requestsfor the collection ndash Health Surveys
58 Chapter 4 User manual
nada Documentation Release 40
Other levels of access for Site administrators (limited access) ndash Collection administrators include
1 Accounts that are given full access to manage studies
2 Accounts that are given access to upload studies but not publish them
3 Accounts that are limited to reviewing studies
474 Global level Limited access accounts
Other types of limited access accounts include
1 Accounts that can only view system reports at a global level
2 Accounts that can only access the citations section and manage citations
3 Accounts that can only access the Licensed Request management system ndash at the global level for all collections
47 Managing Users and account types 59
nada Documentation Release 40
Impersonating a user
The system includes a function that allows a Site Administrator to impersonate (take on the role) a user created inthe system This is a useful testing tool when creating users and assigning permissions It essentially allows theadministrator to take on the role of another user temporarily
bull To access the Impersonate User feature go to the Users ndash Impersonat user menu at the top of the screen
bull A list of users to impersonate is shown
bull Select the user to impersonate and click on the impersonate button
bull The dashboard view for the impersonated user now shows
60 Chapter 4 User manual
nada Documentation Release 40
bull Note in the example above the account being impersonated is a Limited Account administrator with rights onlyto manage licensed requests for the Health Surveys Collection Note that all other dashboard menus are eitherhidden or clicking on any other function other than manage studies results in an access denied message
bull This is a good way to test if the roles assigned to a user account have the expected results
bull To exit the impersonate mode and return to the Site Administrator role ndash Click on the top right menu and selectExit impersonate mode
475 The Reviewer Limited access account
Sometimes it is desirable for catalog administrators to allow certain users to see a collection before it is published butwithout granting access to the site administration functions
This is useful for getting feedback on the correctness of information on collections or studies before publishing
To do this
bull First create an account for the user or get the user to create an account by using the register form on the loginscreen
bull Then edit the permissions for that user selecting Site Administrator (limited access) ndash Collection administrator
bull Then for the appropriate collection select Reviewer and click update to save the changes
47 Managing Users and account types 61
nada Documentation Release 40
bull The newly created reviewer account user can now view all studies in a collection even if the study or collectionis unpublished
48 Manage Site Pages and Menus
The NADA has a small content management component that allows for the creation of menu pages to appear on theuser interface
bull Examples of menus that might be useful for users of the site might be A page dealing with the disseminationpolicies of the organization or perhaps a page with contact information for the information
New menu items and pages can be created via the Menu- All pages menu link at the top of the Site Administrationpage
62 Chapter 4 User manual
nada Documentation Release 40
bull Select All pages from the menu
bull To add a new page click on the Add New Page button
bull Give the page a Title in the Title field
bull Clicking in the URL field will automatically suggest a name for the page in the URL
bull Enter the contents for the page in the Body section Plain text or HTML is accespted by this field
bull Then indicate if the page should be published or not in the Publish dropdown
bull The Weight field tells the NADA in what order this menu item should display Eg 0 would be first 1 secondand 2 third
bull Click on Update to save the changes
bull View the changes from the user interface In this Example a Contact Us page was created
bull It is also possible from the Menu Management screen to add a menu link that links to an existing page on anothersite (rather than creating a page itself)
bull To change the order in which the menu items display on the user interface use the Reorder Menu button on theMenu Management screen
48 Manage Site Pages and Menus 63
nada Documentation Release 40
49 The Site Settings Page
All settings for the application are controlled via the Settings menu at the top of the Site Administration page Thereare seven main settings sections See screenshot below
491 General Settings
1 Type the Title of the site here This will become the front page title of the NADA site In this case the Title isNADA
64 Chapter 4 User manual
nada Documentation Release 40
2 The footer text can be changed in this field This displays at the bottom of your site page
3 The initial page that loads when a user visits the NADA site can be set here In this case the catalog page is setto open by default
4 The name of the webmaster can be set here This is the name that will be used in system emails sent to users
5 Enter the webmaster email address here This should be the address that will be used in communication withusers Typically this is a general enquiries email set up by the organization and not a personal email address fora particular person Note to avoid mail systems rejecting mail as spam make sure to enter an address here thatis on the same domain as the server used in the email settings at setup
6 This field sets the location of the Cache folder The cache folder stores pre- generated pages of the site to allowfor faster browsing by the user By default it is set to cache This can be moved to another location if desiredbut must be writable The green tick indicates that the folder can be found and is set up correctly Enter eitherrelative or absolute paths to the folder location
7 Set the time that the Cache takes to expire By default it is set to 2 hours (in milli seconds)
8 If it is desired to turn off caching then select no here Sometimes it is useful to turn off caching when developingor updating a site so as to ensure that content changes become immediately visible on the front-end withouthaving to wait for the cache to expire and the new changes to show Turn this back on to speed up page loadingfor users
Click update to save all settings
Language
To change the language of the application expand the language section and choose the desired language Click updateto save and apply the setting
49 The Site Settings Page 65
nada Documentation Release 40
Enable or disable the HTML editor
A basic HTML editor is provided in the menu and page creating section of the application This setting allows this tobe turned on or off
Survey catalog settings
1 This is the folder where the files for the study are stored on the server This includes the DDI eternal resourcesand data files This folder can be moved to a location outside the web root as described in the installationinstructions in Chapter 1 Enter either relative or absolute paths to the folder location
2 This is the folder where DDIrsquos can be placed in order to use the bulk study import function in the NADA InNADA3 files had to be physically copied to this folder on the server but this is no longer necessary in NADA4 Files can now be directly uploaded to this folder from the Site Administration ndash Manage Studies page page
66 Chapter 4 User manual
nada Documentation Release 40
3 Select the vocabulary to use for the topic filter By default this is set to the CESSDA classification as recom-mended in the IHSN templates supplied at IHSNorg for the Nesstar Metadata Publisher
4 Enable or disable the Country filter on the user interface search page here If the catalog only contains studiesfor one country then turning this filter off is recommended
5 Enable or disable the Topic filter on the user interface search page here If no topics have been defined in theDDIrsquos being uploaded then it is recommended to turn this filter off (disable)
6 Enable or disable the Year filter on the user interface search page here
7 Enable or disable the Collection filter on the user interface search page here If no collections have been definedthen it is recommended to disable this filter
8 Enable or disable the Data access filter on the user interface search page here This filter is not needed if thereare very few studies in the catalog or if all studies hare set to the same access type
9 This section controls the order in which the filters appear on the search page Enter numbers here that rank theorder of the filters in the order they should be displayed
10 This setting determines how many studies are displayed by default to the user on the search page ndash catalog view
Site Login settings
1 To require that users login before being able to access the website set this option to Requires all users to loginto access the website
2 Determined how long a user will stay logged in After this time the user will be automatically logged out
3 Sets the minimum length for passwords created by the users at registration or for manual user creation
49 The Site Settings Page 67
nada Documentation Release 40
SMTP Settings
1 If the PHPweb server is configured to send email using PHPrsquos MAIL function select the first option and donrsquotfill in anything else
If your organization has a mail server and has have a dedicated account that can be setup for NADA use the followingsettings Check the radio button ldquoUse SMTP Serverrdquo
2 Enter the host name for the server
3 Enter the port used by the server to send mail
4 If required enter the user name used to send mail on the server
5 Enter the password used to send mail on the server
If the organization does not own a mail server a Gmail account can be configured to be used with NADA
bull Check the radio button ldquoUse SMTP Serverrdquo
bull Host name sslsmtpgooglemailcom or sslsmtpgmailcom
bull SMTP port 465
bull Account username email-addressgmailcom
bull Account password password for the gmail account
6 Test the email settings
The quickest way to test if the email settings are working is to use the ldquoforgot passwordrdquo option from the user loginpage If no mail is received when doing this test then go back and correct the mail settings Check with the ISP orserver administrator for the correct settings
Click on update to save all settings
68 Chapter 4 User manual
nada Documentation Release 40
492 Dashboard setting
Provides a means to automatically have content loaded into the dashboard via an RSS feed from a site The defaultsetting is set to receive updates and news from the IHSN website
49 The Site Settings Page 69
nada Documentation Release 40
70 Chapter 4 User manual
CHAPTER 5
Indices and tables
bull genindex
bull modindex
bull search
71
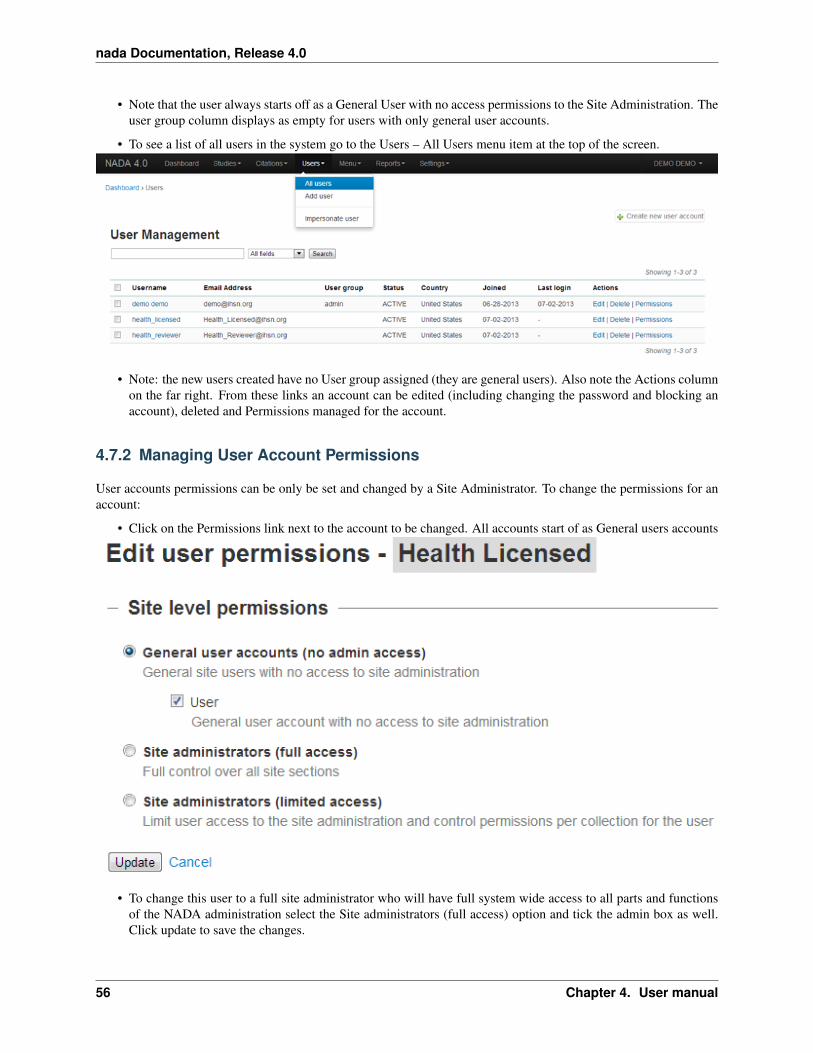
nada Documentation Release 40
473 Collection level administrators
bull To create a user who only has permissions to administer studies or administration functions for a particularcollection Select Site administrators (limited access)
47 Managing Users and account types 57
nada Documentation Release 40
bull It is then necessary to assign a role to this new limited administrator account To create a limited access ad-ministrator for a particular collection ndash select Site administrators (limited access) and then select Collectionadministrators Notice The form expands to reveal a list of collections in the system
bull Select the appropriate level of access that this account will have for this collection In the example below anadministrator is being created who can manage only licensed requests for the collection ndash Health Surveys Thisaccount will not be able to upload or publish studies The account will only be able to process licensed requestsfor the collection ndash Health Surveys
58 Chapter 4 User manual
nada Documentation Release 40
Other levels of access for Site administrators (limited access) ndash Collection administrators include
1 Accounts that are given full access to manage studies
2 Accounts that are given access to upload studies but not publish them
3 Accounts that are limited to reviewing studies
474 Global level Limited access accounts
Other types of limited access accounts include
1 Accounts that can only view system reports at a global level
2 Accounts that can only access the citations section and manage citations
3 Accounts that can only access the Licensed Request management system ndash at the global level for all collections
47 Managing Users and account types 59
nada Documentation Release 40
Impersonating a user
The system includes a function that allows a Site Administrator to impersonate (take on the role) a user created inthe system This is a useful testing tool when creating users and assigning permissions It essentially allows theadministrator to take on the role of another user temporarily
bull To access the Impersonate User feature go to the Users ndash Impersonat user menu at the top of the screen
bull A list of users to impersonate is shown
bull Select the user to impersonate and click on the impersonate button
bull The dashboard view for the impersonated user now shows
60 Chapter 4 User manual
nada Documentation Release 40
bull Note in the example above the account being impersonated is a Limited Account administrator with rights onlyto manage licensed requests for the Health Surveys Collection Note that all other dashboard menus are eitherhidden or clicking on any other function other than manage studies results in an access denied message
bull This is a good way to test if the roles assigned to a user account have the expected results
bull To exit the impersonate mode and return to the Site Administrator role ndash Click on the top right menu and selectExit impersonate mode
475 The Reviewer Limited access account
Sometimes it is desirable for catalog administrators to allow certain users to see a collection before it is published butwithout granting access to the site administration functions
This is useful for getting feedback on the correctness of information on collections or studies before publishing
To do this
bull First create an account for the user or get the user to create an account by using the register form on the loginscreen
bull Then edit the permissions for that user selecting Site Administrator (limited access) ndash Collection administrator
bull Then for the appropriate collection select Reviewer and click update to save the changes
47 Managing Users and account types 61
nada Documentation Release 40
bull The newly created reviewer account user can now view all studies in a collection even if the study or collectionis unpublished
48 Manage Site Pages and Menus
The NADA has a small content management component that allows for the creation of menu pages to appear on theuser interface
bull Examples of menus that might be useful for users of the site might be A page dealing with the disseminationpolicies of the organization or perhaps a page with contact information for the information
New menu items and pages can be created via the Menu- All pages menu link at the top of the Site Administrationpage
62 Chapter 4 User manual
nada Documentation Release 40
bull Select All pages from the menu
bull To add a new page click on the Add New Page button
bull Give the page a Title in the Title field
bull Clicking in the URL field will automatically suggest a name for the page in the URL
bull Enter the contents for the page in the Body section Plain text or HTML is accespted by this field
bull Then indicate if the page should be published or not in the Publish dropdown
bull The Weight field tells the NADA in what order this menu item should display Eg 0 would be first 1 secondand 2 third
bull Click on Update to save the changes
bull View the changes from the user interface In this Example a Contact Us page was created
bull It is also possible from the Menu Management screen to add a menu link that links to an existing page on anothersite (rather than creating a page itself)
bull To change the order in which the menu items display on the user interface use the Reorder Menu button on theMenu Management screen
48 Manage Site Pages and Menus 63
nada Documentation Release 40
49 The Site Settings Page
All settings for the application are controlled via the Settings menu at the top of the Site Administration page Thereare seven main settings sections See screenshot below
491 General Settings
1 Type the Title of the site here This will become the front page title of the NADA site In this case the Title isNADA
64 Chapter 4 User manual
nada Documentation Release 40
2 The footer text can be changed in this field This displays at the bottom of your site page
3 The initial page that loads when a user visits the NADA site can be set here In this case the catalog page is setto open by default
4 The name of the webmaster can be set here This is the name that will be used in system emails sent to users
5 Enter the webmaster email address here This should be the address that will be used in communication withusers Typically this is a general enquiries email set up by the organization and not a personal email address fora particular person Note to avoid mail systems rejecting mail as spam make sure to enter an address here thatis on the same domain as the server used in the email settings at setup
6 This field sets the location of the Cache folder The cache folder stores pre- generated pages of the site to allowfor faster browsing by the user By default it is set to cache This can be moved to another location if desiredbut must be writable The green tick indicates that the folder can be found and is set up correctly Enter eitherrelative or absolute paths to the folder location
7 Set the time that the Cache takes to expire By default it is set to 2 hours (in milli seconds)
8 If it is desired to turn off caching then select no here Sometimes it is useful to turn off caching when developingor updating a site so as to ensure that content changes become immediately visible on the front-end withouthaving to wait for the cache to expire and the new changes to show Turn this back on to speed up page loadingfor users
Click update to save all settings
Language
To change the language of the application expand the language section and choose the desired language Click updateto save and apply the setting
49 The Site Settings Page 65
nada Documentation Release 40
Enable or disable the HTML editor
A basic HTML editor is provided in the menu and page creating section of the application This setting allows this tobe turned on or off
Survey catalog settings
1 This is the folder where the files for the study are stored on the server This includes the DDI eternal resourcesand data files This folder can be moved to a location outside the web root as described in the installationinstructions in Chapter 1 Enter either relative or absolute paths to the folder location
2 This is the folder where DDIrsquos can be placed in order to use the bulk study import function in the NADA InNADA3 files had to be physically copied to this folder on the server but this is no longer necessary in NADA4 Files can now be directly uploaded to this folder from the Site Administration ndash Manage Studies page page
66 Chapter 4 User manual
nada Documentation Release 40
3 Select the vocabulary to use for the topic filter By default this is set to the CESSDA classification as recom-mended in the IHSN templates supplied at IHSNorg for the Nesstar Metadata Publisher
4 Enable or disable the Country filter on the user interface search page here If the catalog only contains studiesfor one country then turning this filter off is recommended
5 Enable or disable the Topic filter on the user interface search page here If no topics have been defined in theDDIrsquos being uploaded then it is recommended to turn this filter off (disable)
6 Enable or disable the Year filter on the user interface search page here
7 Enable or disable the Collection filter on the user interface search page here If no collections have been definedthen it is recommended to disable this filter
8 Enable or disable the Data access filter on the user interface search page here This filter is not needed if thereare very few studies in the catalog or if all studies hare set to the same access type
9 This section controls the order in which the filters appear on the search page Enter numbers here that rank theorder of the filters in the order they should be displayed
10 This setting determines how many studies are displayed by default to the user on the search page ndash catalog view
Site Login settings
1 To require that users login before being able to access the website set this option to Requires all users to loginto access the website
2 Determined how long a user will stay logged in After this time the user will be automatically logged out
3 Sets the minimum length for passwords created by the users at registration or for manual user creation
49 The Site Settings Page 67
nada Documentation Release 40
SMTP Settings
1 If the PHPweb server is configured to send email using PHPrsquos MAIL function select the first option and donrsquotfill in anything else
If your organization has a mail server and has have a dedicated account that can be setup for NADA use the followingsettings Check the radio button ldquoUse SMTP Serverrdquo
2 Enter the host name for the server
3 Enter the port used by the server to send mail
4 If required enter the user name used to send mail on the server
5 Enter the password used to send mail on the server
If the organization does not own a mail server a Gmail account can be configured to be used with NADA
bull Check the radio button ldquoUse SMTP Serverrdquo
bull Host name sslsmtpgooglemailcom or sslsmtpgmailcom
bull SMTP port 465
bull Account username email-addressgmailcom
bull Account password password for the gmail account
6 Test the email settings
The quickest way to test if the email settings are working is to use the ldquoforgot passwordrdquo option from the user loginpage If no mail is received when doing this test then go back and correct the mail settings Check with the ISP orserver administrator for the correct settings
Click on update to save all settings
68 Chapter 4 User manual
nada Documentation Release 40
492 Dashboard setting
Provides a means to automatically have content loaded into the dashboard via an RSS feed from a site The defaultsetting is set to receive updates and news from the IHSN website
49 The Site Settings Page 69
nada Documentation Release 40
70 Chapter 4 User manual
CHAPTER 5
Indices and tables
bull genindex
bull modindex
bull search
71
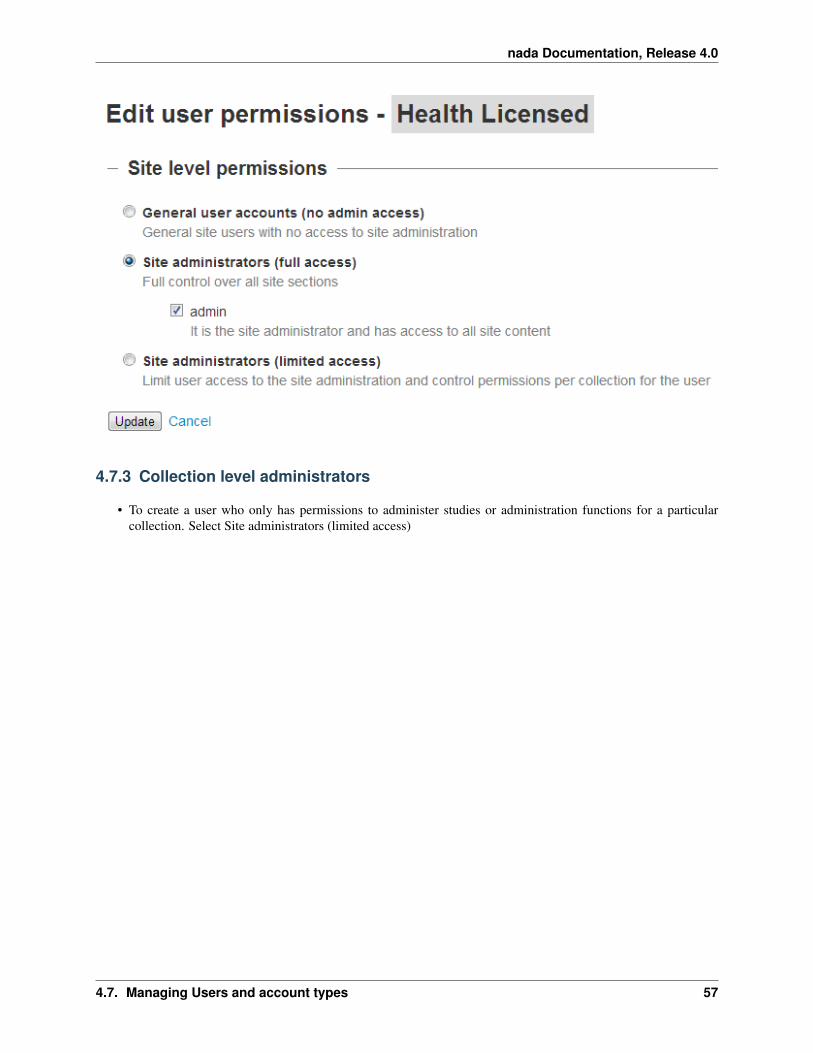
nada Documentation Release 40
bull It is then necessary to assign a role to this new limited administrator account To create a limited access ad-ministrator for a particular collection ndash select Site administrators (limited access) and then select Collectionadministrators Notice The form expands to reveal a list of collections in the system
bull Select the appropriate level of access that this account will have for this collection In the example below anadministrator is being created who can manage only licensed requests for the collection ndash Health Surveys Thisaccount will not be able to upload or publish studies The account will only be able to process licensed requestsfor the collection ndash Health Surveys
58 Chapter 4 User manual
nada Documentation Release 40
Other levels of access for Site administrators (limited access) ndash Collection administrators include
1 Accounts that are given full access to manage studies
2 Accounts that are given access to upload studies but not publish them
3 Accounts that are limited to reviewing studies
474 Global level Limited access accounts
Other types of limited access accounts include
1 Accounts that can only view system reports at a global level
2 Accounts that can only access the citations section and manage citations
3 Accounts that can only access the Licensed Request management system ndash at the global level for all collections
47 Managing Users and account types 59
nada Documentation Release 40
Impersonating a user
The system includes a function that allows a Site Administrator to impersonate (take on the role) a user created inthe system This is a useful testing tool when creating users and assigning permissions It essentially allows theadministrator to take on the role of another user temporarily
bull To access the Impersonate User feature go to the Users ndash Impersonat user menu at the top of the screen
bull A list of users to impersonate is shown
bull Select the user to impersonate and click on the impersonate button
bull The dashboard view for the impersonated user now shows
60 Chapter 4 User manual
nada Documentation Release 40
bull Note in the example above the account being impersonated is a Limited Account administrator with rights onlyto manage licensed requests for the Health Surveys Collection Note that all other dashboard menus are eitherhidden or clicking on any other function other than manage studies results in an access denied message
bull This is a good way to test if the roles assigned to a user account have the expected results
bull To exit the impersonate mode and return to the Site Administrator role ndash Click on the top right menu and selectExit impersonate mode
475 The Reviewer Limited access account
Sometimes it is desirable for catalog administrators to allow certain users to see a collection before it is published butwithout granting access to the site administration functions
This is useful for getting feedback on the correctness of information on collections or studies before publishing
To do this
bull First create an account for the user or get the user to create an account by using the register form on the loginscreen
bull Then edit the permissions for that user selecting Site Administrator (limited access) ndash Collection administrator
bull Then for the appropriate collection select Reviewer and click update to save the changes
47 Managing Users and account types 61
nada Documentation Release 40
bull The newly created reviewer account user can now view all studies in a collection even if the study or collectionis unpublished
48 Manage Site Pages and Menus
The NADA has a small content management component that allows for the creation of menu pages to appear on theuser interface
bull Examples of menus that might be useful for users of the site might be A page dealing with the disseminationpolicies of the organization or perhaps a page with contact information for the information
New menu items and pages can be created via the Menu- All pages menu link at the top of the Site Administrationpage
62 Chapter 4 User manual
nada Documentation Release 40
bull Select All pages from the menu
bull To add a new page click on the Add New Page button
bull Give the page a Title in the Title field
bull Clicking in the URL field will automatically suggest a name for the page in the URL
bull Enter the contents for the page in the Body section Plain text or HTML is accespted by this field
bull Then indicate if the page should be published or not in the Publish dropdown
bull The Weight field tells the NADA in what order this menu item should display Eg 0 would be first 1 secondand 2 third
bull Click on Update to save the changes
bull View the changes from the user interface In this Example a Contact Us page was created
bull It is also possible from the Menu Management screen to add a menu link that links to an existing page on anothersite (rather than creating a page itself)
bull To change the order in which the menu items display on the user interface use the Reorder Menu button on theMenu Management screen
48 Manage Site Pages and Menus 63
nada Documentation Release 40
49 The Site Settings Page
All settings for the application are controlled via the Settings menu at the top of the Site Administration page Thereare seven main settings sections See screenshot below
491 General Settings
1 Type the Title of the site here This will become the front page title of the NADA site In this case the Title isNADA
64 Chapter 4 User manual
nada Documentation Release 40
2 The footer text can be changed in this field This displays at the bottom of your site page
3 The initial page that loads when a user visits the NADA site can be set here In this case the catalog page is setto open by default
4 The name of the webmaster can be set here This is the name that will be used in system emails sent to users
5 Enter the webmaster email address here This should be the address that will be used in communication withusers Typically this is a general enquiries email set up by the organization and not a personal email address fora particular person Note to avoid mail systems rejecting mail as spam make sure to enter an address here thatis on the same domain as the server used in the email settings at setup
6 This field sets the location of the Cache folder The cache folder stores pre- generated pages of the site to allowfor faster browsing by the user By default it is set to cache This can be moved to another location if desiredbut must be writable The green tick indicates that the folder can be found and is set up correctly Enter eitherrelative or absolute paths to the folder location
7 Set the time that the Cache takes to expire By default it is set to 2 hours (in milli seconds)
8 If it is desired to turn off caching then select no here Sometimes it is useful to turn off caching when developingor updating a site so as to ensure that content changes become immediately visible on the front-end withouthaving to wait for the cache to expire and the new changes to show Turn this back on to speed up page loadingfor users
Click update to save all settings
Language
To change the language of the application expand the language section and choose the desired language Click updateto save and apply the setting
49 The Site Settings Page 65
nada Documentation Release 40
Enable or disable the HTML editor
A basic HTML editor is provided in the menu and page creating section of the application This setting allows this tobe turned on or off
Survey catalog settings
1 This is the folder where the files for the study are stored on the server This includes the DDI eternal resourcesand data files This folder can be moved to a location outside the web root as described in the installationinstructions in Chapter 1 Enter either relative or absolute paths to the folder location
2 This is the folder where DDIrsquos can be placed in order to use the bulk study import function in the NADA InNADA3 files had to be physically copied to this folder on the server but this is no longer necessary in NADA4 Files can now be directly uploaded to this folder from the Site Administration ndash Manage Studies page page
66 Chapter 4 User manual
nada Documentation Release 40
3 Select the vocabulary to use for the topic filter By default this is set to the CESSDA classification as recom-mended in the IHSN templates supplied at IHSNorg for the Nesstar Metadata Publisher
4 Enable or disable the Country filter on the user interface search page here If the catalog only contains studiesfor one country then turning this filter off is recommended
5 Enable or disable the Topic filter on the user interface search page here If no topics have been defined in theDDIrsquos being uploaded then it is recommended to turn this filter off (disable)
6 Enable or disable the Year filter on the user interface search page here
7 Enable or disable the Collection filter on the user interface search page here If no collections have been definedthen it is recommended to disable this filter
8 Enable or disable the Data access filter on the user interface search page here This filter is not needed if thereare very few studies in the catalog or if all studies hare set to the same access type
9 This section controls the order in which the filters appear on the search page Enter numbers here that rank theorder of the filters in the order they should be displayed
10 This setting determines how many studies are displayed by default to the user on the search page ndash catalog view
Site Login settings
1 To require that users login before being able to access the website set this option to Requires all users to loginto access the website
2 Determined how long a user will stay logged in After this time the user will be automatically logged out
3 Sets the minimum length for passwords created by the users at registration or for manual user creation
49 The Site Settings Page 67
nada Documentation Release 40
SMTP Settings
1 If the PHPweb server is configured to send email using PHPrsquos MAIL function select the first option and donrsquotfill in anything else
If your organization has a mail server and has have a dedicated account that can be setup for NADA use the followingsettings Check the radio button ldquoUse SMTP Serverrdquo
2 Enter the host name for the server
3 Enter the port used by the server to send mail
4 If required enter the user name used to send mail on the server
5 Enter the password used to send mail on the server
If the organization does not own a mail server a Gmail account can be configured to be used with NADA
bull Check the radio button ldquoUse SMTP Serverrdquo
bull Host name sslsmtpgooglemailcom or sslsmtpgmailcom
bull SMTP port 465
bull Account username email-addressgmailcom
bull Account password password for the gmail account
6 Test the email settings
The quickest way to test if the email settings are working is to use the ldquoforgot passwordrdquo option from the user loginpage If no mail is received when doing this test then go back and correct the mail settings Check with the ISP orserver administrator for the correct settings
Click on update to save all settings
68 Chapter 4 User manual
nada Documentation Release 40
492 Dashboard setting
Provides a means to automatically have content loaded into the dashboard via an RSS feed from a site The defaultsetting is set to receive updates and news from the IHSN website
49 The Site Settings Page 69
nada Documentation Release 40
70 Chapter 4 User manual
CHAPTER 5
Indices and tables
bull genindex
bull modindex
bull search
71
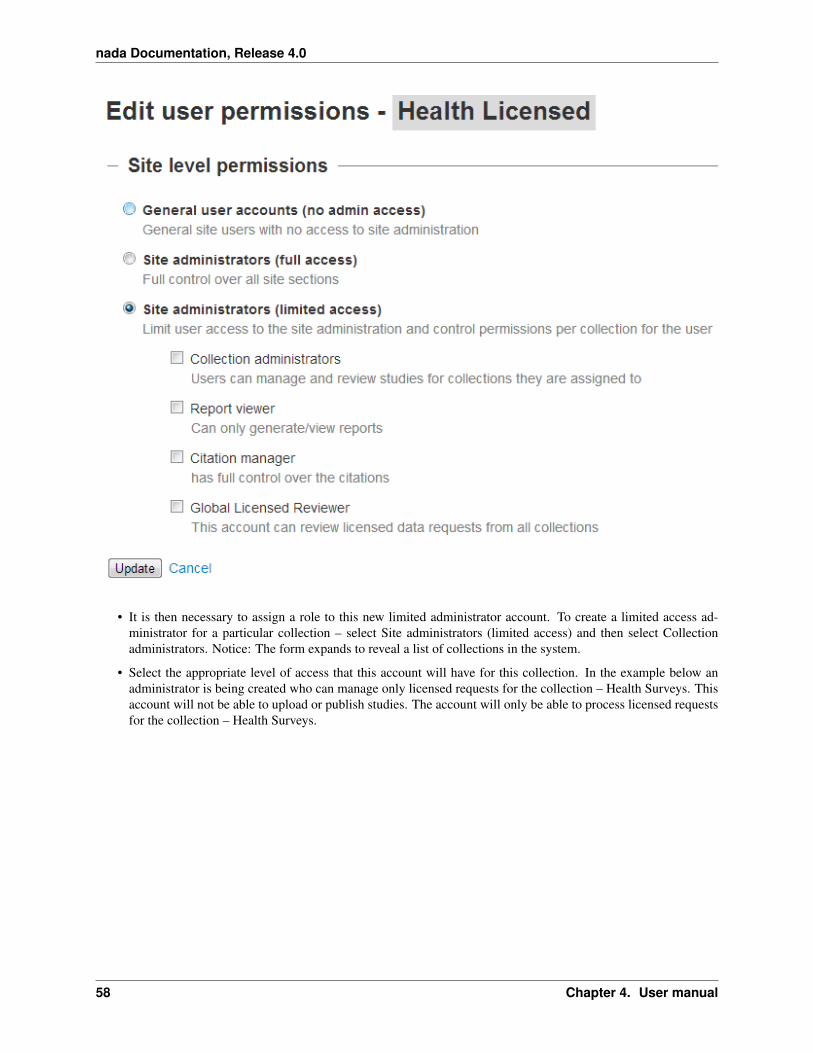
nada Documentation Release 40
bull Note in the example above the account being impersonated is a Limited Account administrator with rights onlyto manage licensed requests for the Health Surveys Collection Note that all other dashboard menus are eitherhidden or clicking on any other function other than manage studies results in an access denied message
bull This is a good way to test if the roles assigned to a user account have the expected results
bull To exit the impersonate mode and return to the Site Administrator role ndash Click on the top right menu and selectExit impersonate mode
475 The Reviewer Limited access account
Sometimes it is desirable for catalog administrators to allow certain users to see a collection before it is published butwithout granting access to the site administration functions
This is useful for getting feedback on the correctness of information on collections or studies before publishing
To do this
bull First create an account for the user or get the user to create an account by using the register form on the loginscreen
bull Then edit the permissions for that user selecting Site Administrator (limited access) ndash Collection administrator
bull Then for the appropriate collection select Reviewer and click update to save the changes
47 Managing Users and account types 61
nada Documentation Release 40
bull The newly created reviewer account user can now view all studies in a collection even if the study or collectionis unpublished
48 Manage Site Pages and Menus
The NADA has a small content management component that allows for the creation of menu pages to appear on theuser interface
bull Examples of menus that might be useful for users of the site might be A page dealing with the disseminationpolicies of the organization or perhaps a page with contact information for the information
New menu items and pages can be created via the Menu- All pages menu link at the top of the Site Administrationpage
62 Chapter 4 User manual
nada Documentation Release 40
bull Select All pages from the menu
bull To add a new page click on the Add New Page button
bull Give the page a Title in the Title field
bull Clicking in the URL field will automatically suggest a name for the page in the URL
bull Enter the contents for the page in the Body section Plain text or HTML is accespted by this field
bull Then indicate if the page should be published or not in the Publish dropdown
bull The Weight field tells the NADA in what order this menu item should display Eg 0 would be first 1 secondand 2 third
bull Click on Update to save the changes
bull View the changes from the user interface In this Example a Contact Us page was created
bull It is also possible from the Menu Management screen to add a menu link that links to an existing page on anothersite (rather than creating a page itself)
bull To change the order in which the menu items display on the user interface use the Reorder Menu button on theMenu Management screen
48 Manage Site Pages and Menus 63
nada Documentation Release 40
49 The Site Settings Page
All settings for the application are controlled via the Settings menu at the top of the Site Administration page Thereare seven main settings sections See screenshot below
491 General Settings
1 Type the Title of the site here This will become the front page title of the NADA site In this case the Title isNADA
64 Chapter 4 User manual
nada Documentation Release 40
2 The footer text can be changed in this field This displays at the bottom of your site page
3 The initial page that loads when a user visits the NADA site can be set here In this case the catalog page is setto open by default
4 The name of the webmaster can be set here This is the name that will be used in system emails sent to users
5 Enter the webmaster email address here This should be the address that will be used in communication withusers Typically this is a general enquiries email set up by the organization and not a personal email address fora particular person Note to avoid mail systems rejecting mail as spam make sure to enter an address here thatis on the same domain as the server used in the email settings at setup
6 This field sets the location of the Cache folder The cache folder stores pre- generated pages of the site to allowfor faster browsing by the user By default it is set to cache This can be moved to another location if desiredbut must be writable The green tick indicates that the folder can be found and is set up correctly Enter eitherrelative or absolute paths to the folder location
7 Set the time that the Cache takes to expire By default it is set to 2 hours (in milli seconds)
8 If it is desired to turn off caching then select no here Sometimes it is useful to turn off caching when developingor updating a site so as to ensure that content changes become immediately visible on the front-end withouthaving to wait for the cache to expire and the new changes to show Turn this back on to speed up page loadingfor users
Click update to save all settings
Language
To change the language of the application expand the language section and choose the desired language Click updateto save and apply the setting
49 The Site Settings Page 65
nada Documentation Release 40
Enable or disable the HTML editor
A basic HTML editor is provided in the menu and page creating section of the application This setting allows this tobe turned on or off
Survey catalog settings
1 This is the folder where the files for the study are stored on the server This includes the DDI eternal resourcesand data files This folder can be moved to a location outside the web root as described in the installationinstructions in Chapter 1 Enter either relative or absolute paths to the folder location
2 This is the folder where DDIrsquos can be placed in order to use the bulk study import function in the NADA InNADA3 files had to be physically copied to this folder on the server but this is no longer necessary in NADA4 Files can now be directly uploaded to this folder from the Site Administration ndash Manage Studies page page
66 Chapter 4 User manual
nada Documentation Release 40
3 Select the vocabulary to use for the topic filter By default this is set to the CESSDA classification as recom-mended in the IHSN templates supplied at IHSNorg for the Nesstar Metadata Publisher
4 Enable or disable the Country filter on the user interface search page here If the catalog only contains studiesfor one country then turning this filter off is recommended
5 Enable or disable the Topic filter on the user interface search page here If no topics have been defined in theDDIrsquos being uploaded then it is recommended to turn this filter off (disable)
6 Enable or disable the Year filter on the user interface search page here
7 Enable or disable the Collection filter on the user interface search page here If no collections have been definedthen it is recommended to disable this filter
8 Enable or disable the Data access filter on the user interface search page here This filter is not needed if thereare very few studies in the catalog or if all studies hare set to the same access type
9 This section controls the order in which the filters appear on the search page Enter numbers here that rank theorder of the filters in the order they should be displayed
10 This setting determines how many studies are displayed by default to the user on the search page ndash catalog view
Site Login settings
1 To require that users login before being able to access the website set this option to Requires all users to loginto access the website
2 Determined how long a user will stay logged in After this time the user will be automatically logged out
3 Sets the minimum length for passwords created by the users at registration or for manual user creation
49 The Site Settings Page 67
nada Documentation Release 40
SMTP Settings
1 If the PHPweb server is configured to send email using PHPrsquos MAIL function select the first option and donrsquotfill in anything else
If your organization has a mail server and has have a dedicated account that can be setup for NADA use the followingsettings Check the radio button ldquoUse SMTP Serverrdquo
2 Enter the host name for the server
3 Enter the port used by the server to send mail
4 If required enter the user name used to send mail on the server
5 Enter the password used to send mail on the server
If the organization does not own a mail server a Gmail account can be configured to be used with NADA
bull Check the radio button ldquoUse SMTP Serverrdquo
bull Host name sslsmtpgooglemailcom or sslsmtpgmailcom
bull SMTP port 465
bull Account username email-addressgmailcom
bull Account password password for the gmail account
6 Test the email settings
The quickest way to test if the email settings are working is to use the ldquoforgot passwordrdquo option from the user loginpage If no mail is received when doing this test then go back and correct the mail settings Check with the ISP orserver administrator for the correct settings
Click on update to save all settings
68 Chapter 4 User manual
nada Documentation Release 40
492 Dashboard setting
Provides a means to automatically have content loaded into the dashboard via an RSS feed from a site The defaultsetting is set to receive updates and news from the IHSN website
49 The Site Settings Page 69
nada Documentation Release 40
70 Chapter 4 User manual
CHAPTER 5
Indices and tables
bull genindex
bull modindex
bull search
71
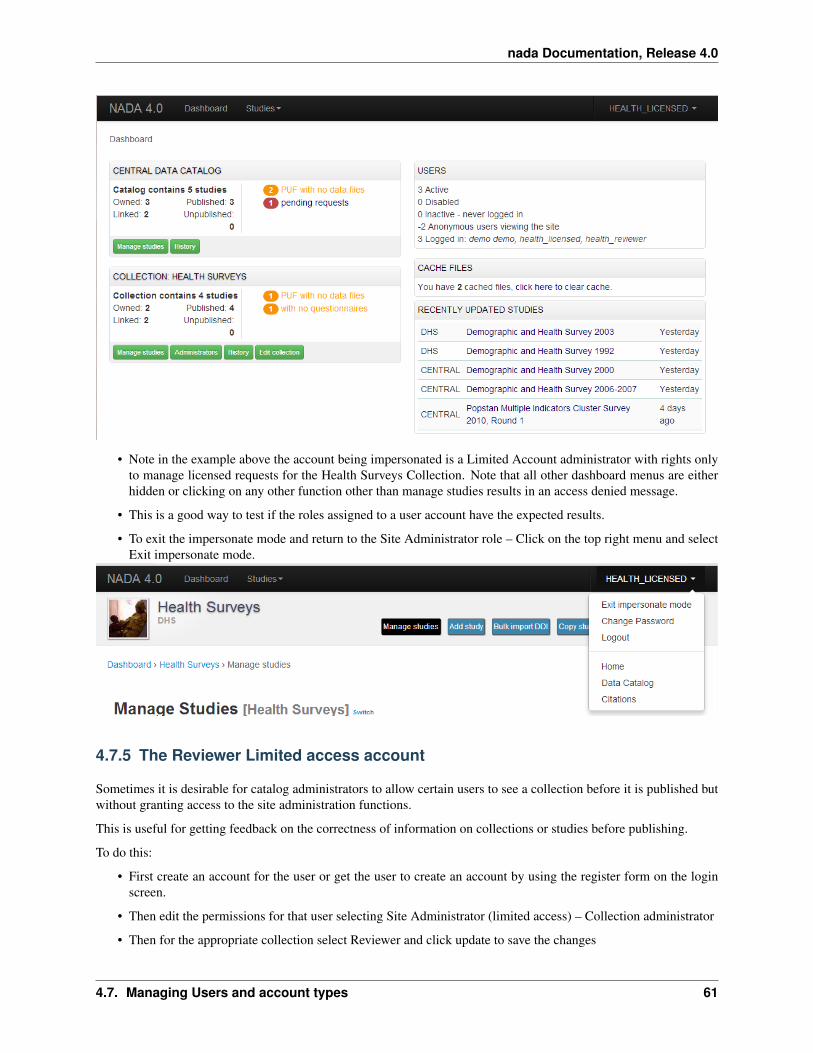
nada Documentation Release 40
49 The Site Settings Page
All settings for the application are controlled via the Settings menu at the top of the Site Administration page Thereare seven main settings sections See screenshot below
491 General Settings
1 Type the Title of the site here This will become the front page title of the NADA site In this case the Title isNADA
64 Chapter 4 User manual
nada Documentation Release 40
2 The footer text can be changed in this field This displays at the bottom of your site page
3 The initial page that loads when a user visits the NADA site can be set here In this case the catalog page is setto open by default
4 The name of the webmaster can be set here This is the name that will be used in system emails sent to users
5 Enter the webmaster email address here This should be the address that will be used in communication withusers Typically this is a general enquiries email set up by the organization and not a personal email address fora particular person Note to avoid mail systems rejecting mail as spam make sure to enter an address here thatis on the same domain as the server used in the email settings at setup
6 This field sets the location of the Cache folder The cache folder stores pre- generated pages of the site to allowfor faster browsing by the user By default it is set to cache This can be moved to another location if desiredbut must be writable The green tick indicates that the folder can be found and is set up correctly Enter eitherrelative or absolute paths to the folder location
7 Set the time that the Cache takes to expire By default it is set to 2 hours (in milli seconds)
8 If it is desired to turn off caching then select no here Sometimes it is useful to turn off caching when developingor updating a site so as to ensure that content changes become immediately visible on the front-end withouthaving to wait for the cache to expire and the new changes to show Turn this back on to speed up page loadingfor users
Click update to save all settings
Language
To change the language of the application expand the language section and choose the desired language Click updateto save and apply the setting
49 The Site Settings Page 65
nada Documentation Release 40
Enable or disable the HTML editor
A basic HTML editor is provided in the menu and page creating section of the application This setting allows this tobe turned on or off
Survey catalog settings
1 This is the folder where the files for the study are stored on the server This includes the DDI eternal resourcesand data files This folder can be moved to a location outside the web root as described in the installationinstructions in Chapter 1 Enter either relative or absolute paths to the folder location
2 This is the folder where DDIrsquos can be placed in order to use the bulk study import function in the NADA InNADA3 files had to be physically copied to this folder on the server but this is no longer necessary in NADA4 Files can now be directly uploaded to this folder from the Site Administration ndash Manage Studies page page
66 Chapter 4 User manual
nada Documentation Release 40
3 Select the vocabulary to use for the topic filter By default this is set to the CESSDA classification as recom-mended in the IHSN templates supplied at IHSNorg for the Nesstar Metadata Publisher
4 Enable or disable the Country filter on the user interface search page here If the catalog only contains studiesfor one country then turning this filter off is recommended
5 Enable or disable the Topic filter on the user interface search page here If no topics have been defined in theDDIrsquos being uploaded then it is recommended to turn this filter off (disable)
6 Enable or disable the Year filter on the user interface search page here
7 Enable or disable the Collection filter on the user interface search page here If no collections have been definedthen it is recommended to disable this filter
8 Enable or disable the Data access filter on the user interface search page here This filter is not needed if thereare very few studies in the catalog or if all studies hare set to the same access type
9 This section controls the order in which the filters appear on the search page Enter numbers here that rank theorder of the filters in the order they should be displayed
10 This setting determines how many studies are displayed by default to the user on the search page ndash catalog view
Site Login settings
1 To require that users login before being able to access the website set this option to Requires all users to loginto access the website
2 Determined how long a user will stay logged in After this time the user will be automatically logged out
3 Sets the minimum length for passwords created by the users at registration or for manual user creation
49 The Site Settings Page 67
nada Documentation Release 40
SMTP Settings
1 If the PHPweb server is configured to send email using PHPrsquos MAIL function select the first option and donrsquotfill in anything else
If your organization has a mail server and has have a dedicated account that can be setup for NADA use the followingsettings Check the radio button ldquoUse SMTP Serverrdquo
2 Enter the host name for the server
3 Enter the port used by the server to send mail
4 If required enter the user name used to send mail on the server
5 Enter the password used to send mail on the server
If the organization does not own a mail server a Gmail account can be configured to be used with NADA
bull Check the radio button ldquoUse SMTP Serverrdquo
bull Host name sslsmtpgooglemailcom or sslsmtpgmailcom
bull SMTP port 465
bull Account username email-addressgmailcom
bull Account password password for the gmail account
6 Test the email settings
The quickest way to test if the email settings are working is to use the ldquoforgot passwordrdquo option from the user loginpage If no mail is received when doing this test then go back and correct the mail settings Check with the ISP orserver administrator for the correct settings
Click on update to save all settings
68 Chapter 4 User manual
nada Documentation Release 40
492 Dashboard setting
Provides a means to automatically have content loaded into the dashboard via an RSS feed from a site The defaultsetting is set to receive updates and news from the IHSN website
49 The Site Settings Page 69
nada Documentation Release 40
70 Chapter 4 User manual
CHAPTER 5
Indices and tables
bull genindex
bull modindex
bull search
71
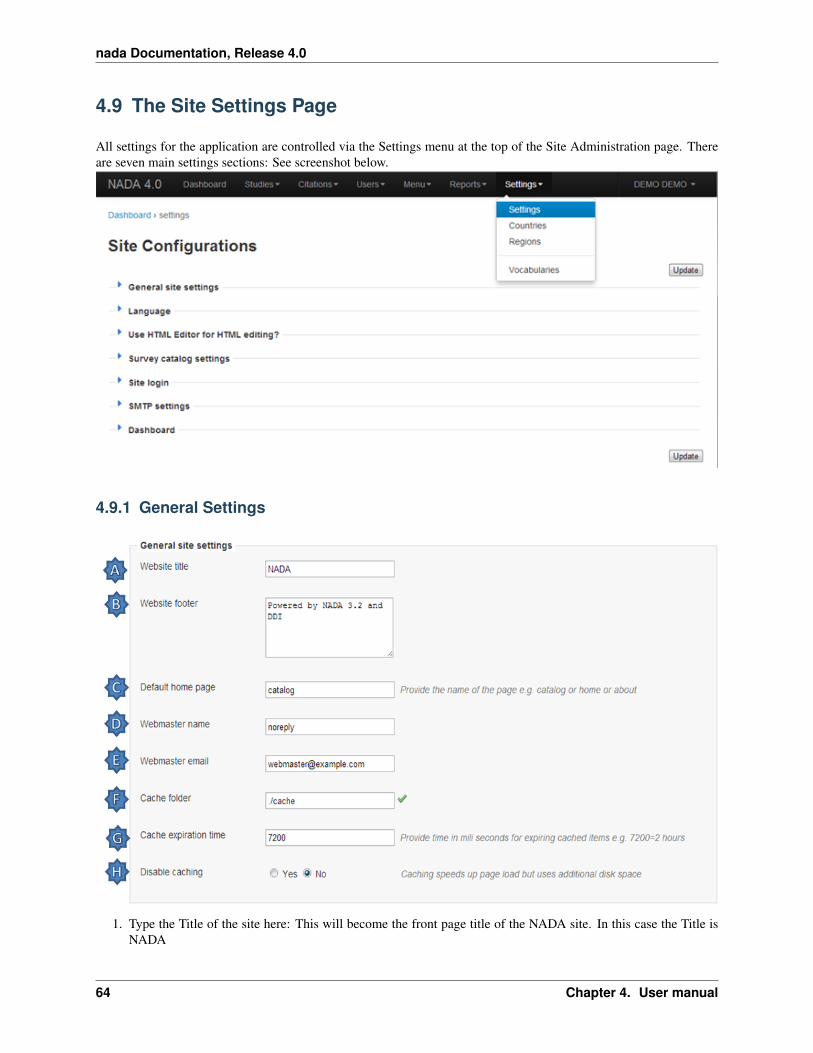
nada Documentation Release 40
Enable or disable the HTML editor
A basic HTML editor is provided in the menu and page creating section of the application This setting allows this tobe turned on or off
Survey catalog settings
1 This is the folder where the files for the study are stored on the server This includes the DDI eternal resourcesand data files This folder can be moved to a location outside the web root as described in the installationinstructions in Chapter 1 Enter either relative or absolute paths to the folder location
2 This is the folder where DDIrsquos can be placed in order to use the bulk study import function in the NADA InNADA3 files had to be physically copied to this folder on the server but this is no longer necessary in NADA4 Files can now be directly uploaded to this folder from the Site Administration ndash Manage Studies page page
66 Chapter 4 User manual
nada Documentation Release 40
3 Select the vocabulary to use for the topic filter By default this is set to the CESSDA classification as recom-mended in the IHSN templates supplied at IHSNorg for the Nesstar Metadata Publisher
4 Enable or disable the Country filter on the user interface search page here If the catalog only contains studiesfor one country then turning this filter off is recommended
5 Enable or disable the Topic filter on the user interface search page here If no topics have been defined in theDDIrsquos being uploaded then it is recommended to turn this filter off (disable)
6 Enable or disable the Year filter on the user interface search page here
7 Enable or disable the Collection filter on the user interface search page here If no collections have been definedthen it is recommended to disable this filter
8 Enable or disable the Data access filter on the user interface search page here This filter is not needed if thereare very few studies in the catalog or if all studies hare set to the same access type
9 This section controls the order in which the filters appear on the search page Enter numbers here that rank theorder of the filters in the order they should be displayed
10 This setting determines how many studies are displayed by default to the user on the search page ndash catalog view
Site Login settings
1 To require that users login before being able to access the website set this option to Requires all users to loginto access the website
2 Determined how long a user will stay logged in After this time the user will be automatically logged out
3 Sets the minimum length for passwords created by the users at registration or for manual user creation
49 The Site Settings Page 67
nada Documentation Release 40
SMTP Settings
1 If the PHPweb server is configured to send email using PHPrsquos MAIL function select the first option and donrsquotfill in anything else
If your organization has a mail server and has have a dedicated account that can be setup for NADA use the followingsettings Check the radio button ldquoUse SMTP Serverrdquo
2 Enter the host name for the server
3 Enter the port used by the server to send mail
4 If required enter the user name used to send mail on the server
5 Enter the password used to send mail on the server
If the organization does not own a mail server a Gmail account can be configured to be used with NADA
bull Check the radio button ldquoUse SMTP Serverrdquo
bull Host name sslsmtpgooglemailcom or sslsmtpgmailcom
bull SMTP port 465
bull Account username email-addressgmailcom
bull Account password password for the gmail account
6 Test the email settings
The quickest way to test if the email settings are working is to use the ldquoforgot passwordrdquo option from the user loginpage If no mail is received when doing this test then go back and correct the mail settings Check with the ISP orserver administrator for the correct settings
Click on update to save all settings
68 Chapter 4 User manual
nada Documentation Release 40
492 Dashboard setting
Provides a means to automatically have content loaded into the dashboard via an RSS feed from a site The defaultsetting is set to receive updates and news from the IHSN website
49 The Site Settings Page 69
nada Documentation Release 40
70 Chapter 4 User manual
CHAPTER 5
Indices and tables
bull genindex
bull modindex
bull search
71
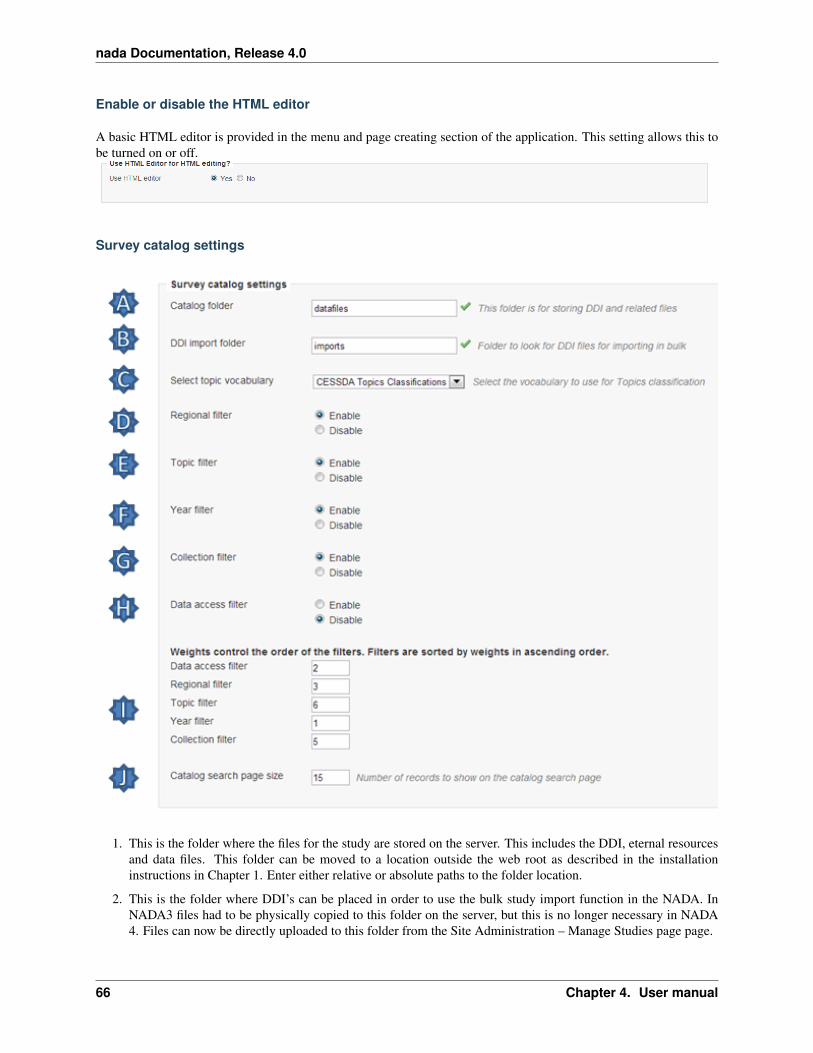
nada Documentation Release 40
3 Select the vocabulary to use for the topic filter By default this is set to the CESSDA classification as recom-mended in the IHSN templates supplied at IHSNorg for the Nesstar Metadata Publisher
4 Enable or disable the Country filter on the user interface search page here If the catalog only contains studiesfor one country then turning this filter off is recommended
5 Enable or disable the Topic filter on the user interface search page here If no topics have been defined in theDDIrsquos being uploaded then it is recommended to turn this filter off (disable)
6 Enable or disable the Year filter on the user interface search page here
7 Enable or disable the Collection filter on the user interface search page here If no collections have been definedthen it is recommended to disable this filter
8 Enable or disable the Data access filter on the user interface search page here This filter is not needed if thereare very few studies in the catalog or if all studies hare set to the same access type
9 This section controls the order in which the filters appear on the search page Enter numbers here that rank theorder of the filters in the order they should be displayed
10 This setting determines how many studies are displayed by default to the user on the search page ndash catalog view
Site Login settings
1 To require that users login before being able to access the website set this option to Requires all users to loginto access the website
2 Determined how long a user will stay logged in After this time the user will be automatically logged out
3 Sets the minimum length for passwords created by the users at registration or for manual user creation
49 The Site Settings Page 67
nada Documentation Release 40
SMTP Settings
1 If the PHPweb server is configured to send email using PHPrsquos MAIL function select the first option and donrsquotfill in anything else
If your organization has a mail server and has have a dedicated account that can be setup for NADA use the followingsettings Check the radio button ldquoUse SMTP Serverrdquo
2 Enter the host name for the server
3 Enter the port used by the server to send mail
4 If required enter the user name used to send mail on the server
5 Enter the password used to send mail on the server
If the organization does not own a mail server a Gmail account can be configured to be used with NADA
bull Check the radio button ldquoUse SMTP Serverrdquo
bull Host name sslsmtpgooglemailcom or sslsmtpgmailcom
bull SMTP port 465
bull Account username email-addressgmailcom
bull Account password password for the gmail account
6 Test the email settings
The quickest way to test if the email settings are working is to use the ldquoforgot passwordrdquo option from the user loginpage If no mail is received when doing this test then go back and correct the mail settings Check with the ISP orserver administrator for the correct settings
Click on update to save all settings
68 Chapter 4 User manual
nada Documentation Release 40
492 Dashboard setting
Provides a means to automatically have content loaded into the dashboard via an RSS feed from a site The defaultsetting is set to receive updates and news from the IHSN website
49 The Site Settings Page 69
nada Documentation Release 40
70 Chapter 4 User manual
CHAPTER 5
Indices and tables
bull genindex
bull modindex
bull search
71
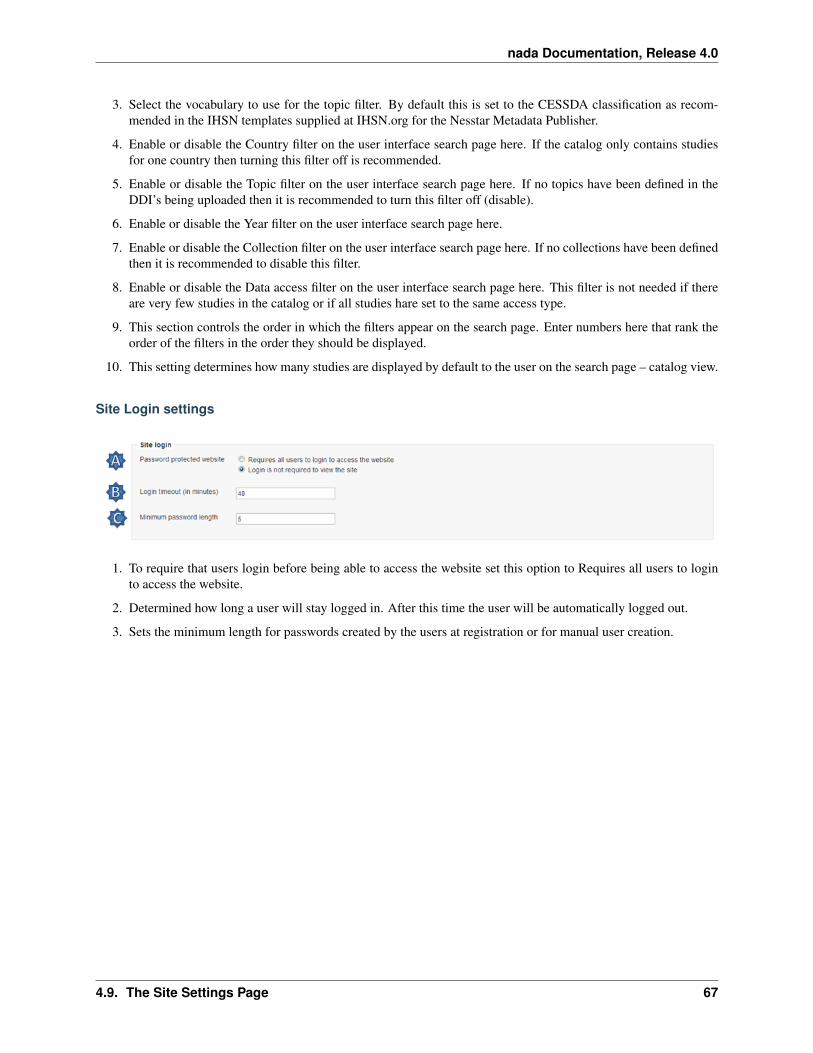
nada Documentation Release 40
70 Chapter 4 User manual
CHAPTER 5
Indices and tables
bull genindex
bull modindex
bull search
71
CHAPTER 5
Indices and tables
bull genindex
bull modindex
bull search
71