Embed Size (px)
Citation preview

MyFourWalls
�User Guide
Documentation: Johannes Eichler, Gero Baier

Table of contents 1. Welcome to MyFourWalls 6.........................................
1.1 About this user guide 6...................................................................
1.2 Chart of used symbols and conventions 6...................................
2. Introduction 7...............................................................
2.1 System Requirements 7..................................................................
2.2 Install MyFourWalls 7.....................................................................
2.3 Uninstall MyFourWalls 7.................................................................
2.4 Registration 8..................................................................................App Store 8Registering MyFourWalls, when you bought it outside the Mac App Store 9
2.5 Updating MyFourWalls 9.................................................................Updating MyFourWalls via the Mac App Store 9Updating MyFourWalls when you bought it outside the Mac App Store 9Automatic update notification 9
3. The MyFourWalls User Interface 11............................
3.1 Finding you way around the user interface 11.............................
3.2 Customizing the user interface 12.................................................GUI Layout Preferences 122D View Preferences 132D View Modes 133D View Preferences 13Levels Preferences 14Change the screen layout 14
4. Camera Control 15.......................................................
4.1 Basic camera movement 15...........................................................

4.2 Tutorial: Camera Modes in 3D View 16..........................................
4.3 The Walk Mode 16...........................................................................Controls in Walk Mode 17
4.4 The Fly Mode 17..............................................................................Controls in Fly Mode 18
4.5 Focus Mode 18................................................................................
4.6 Further View Settings 18................................................................
5. Building your house 20...............................................
5.1 Creating rooms 20...........................................................................Additional rooms 21Wall thickness and orientation 21Room segmentation22Snapping 22Resizing 22
5.2 Selecting objects 23........................................................................Rectangle Selection23Selecting multiple objects 23
5.3 Adding windows and doors 23.......................................................Window tool and Door tool 23Additional window and door shapes 24
5.4 Adding furniture objects 24............................................................Edit individual areas of large furniture objects. 26
5.5 Adding floors and stairs 26............................................................Using the Floor Editor 26Adding Stairs28
5.6 Edit roof slopes and floors 30........................................................Creating roof slopes30Precise adjustment of roof slopes 31Adjusting floor level 32
5.7 Materials 33......................................................................................Adjust Building properties 33The Material Gallery 34Change materials 35Create and edit materials in the Material Gallery. 35
� / �3 39

5.8 Import. 37.........................................................................................Import custom textures 37Importing blueprints 38Import 3D models 38
� / �4 39

� / �5 39

1. Welcome to MyFourWalls
1. Welcome to MyFourWalls1.1 About this user guide
This user guide will provide all the information you need to build your dream house with MyFourWalls. If you are already used to similar interior design software, you can dive right into MyFourWalls and consult the manual whenever you have a specific question. If you are a beginner, you can also read this guide from start to finish as a detailed tutorial
1.2 Chart of used symbols and conventionsItem/Symbol Description
Text marked with this symbol contains warning, hints or other useful information.
Text following this symbol contains step-by-step instructions.
Keyboard Commands If you need to press keys on the keyboard, the keys are indicated in capital letters, e.g.
DELETE: refers to the Delete Key
CMD + Z: press Command Key and the letter Z
Menu Commands If you need to select menu commands or buttons, these look like this:• Select Edit -> Undo ... • Select MyFourWalls -> Preferences -> General
Preferences
Menu Areas Menu areas are written in blue and in italics.• e.g Toolbar
� / �6 39

2. Introduction
2. Introduction2.1 System Requirements
MyFourWalls requires a Mac with Mac OS X 10.5 Leopard or higher.
2.2 Install MyFourWalls
The following chapter does only apply, if you bought MyFourWalls in the Synium online store. If you bought it on the Mac App Store, it will be installed automatically after download.
Double-click the installer file after the download has finished. This installation window will open:
�
Please drag and drop MyFourWalls (the armchair icon) in your Applications folder in any case. This is mandatory for MyFourWalls to work properly. If instead you open the installer file every time and launch MyFourWalls from there, you might encounter problems during operation.You need Administrator privileges in order to install software. If you do, please enter your user name and system password.
2.3 Uninstall MyFourWallsIn case you’re hesitant to drop MyFourWalls in your Applications folderhere’s instructions on how to completely remove it if necessary. After that, there
� / �7 39
2. Introduction
will be no traces left of MyFourWalls on your system, just as if it had never been installed.
How to completely remove MyFourWalls from your system:
1. Go to your Applications folder and delete the file "MyFourWalls.app" Right Click -> "Move to Trash"
2. Go to your Preferences folder and delete the file "de.synium.MyFourWalls.plistTo open the Preferences folder, open the Finder go to the top menu bar, select the entry Go ->"Go to Folder…" and enter the path of the Preferences folder ("~/Library/Preferences")
3. Delete the file “de.synium.MyFourWalls.LSSharedFileList.plist” in the same folder
4. Delete the installer file you downloaded from the internet.
2.4 RegistrationYou can either buy MyFourWalls on the App Store or on our web shop (at www.syniumsoftware.com). The App Store has another licensing model then the versions bought outside the App Store therefore entering a serial number for registration is not necessary for App Store purchases.
App StoreIf you purchased MyFourWalls on the Mac App Store, a registration is not necessary for the Mac with which you originally downloaded the application. If you run your copy of MyFourWalls on another Mac, you must enter your Apple ID and your password for registration, when you first use it.
� / �8 39

2. Introduction
Registering MyFourWalls, when you bought it outside the Mac App StoreTo register your copy of MyFourWalls bought outside the Mac App Store you must enter the serial number. The serial number for purchases in our partner stores is usually submitted by the order confirmation email.
2.5 Updating MyFourWallsSoftware updates contain important improvements and bug fixes. We recommend to always keep MyFourWalls updated to the current version.
Just as the licensing model of MyFourWalls, the update procedure differs according to, whether MyFourWalls was bought in- or outside the MacAppStore.
Updating MyFourWalls via the Mac App StoreWhen you bought MyFourWalls on the Mac App Store, you will be automatically notified by the Mac App Store when a new update is being released.
To update MyFourWalls via the Mac App Store just click at the Update icon in the head section of the Mac App Store.
Updating MyFourWalls when you bought it outside the Mac App StoreWhen you bought MyFourWalls on our Website, MyFourWalls automatically checks for updates, but you can also check for updates manually, if you would like to make sure by yourself, that you have the latest update installed.
Automatic update notificationMyFourWalls regularly checks for updates over the Internet. Once an update becomes available, you’ll be informed.
A window will open, informing you of the update and detailing all improvements this update brings. The Updater lets you:
Cancel: The update will not be installed, but you will be reminded the next time you launch MyFourWalls.
Skip version: The update will not be installed, you’ll be notified as soon as the succeeding update is available.
� / �9 39
Please enter the entire Serial Number, including “ROOM” and all the hyphens which looks similar to the following pattern:
SYN-ROOM-1234-ABCD-1234-ABCD-1234-ABCD-123

2. Introduction
Download: The update is downloaded and installed.
The actual updating is fairly easy. Simply click Update as soon as the download is completed. The update will be installed and the new version of MyFourWalls will launch.
Checking for updates manually
If you want to check for the availability of software updates yourself, go to the Application Menu MyFourWalls and choose Check For Updates….
Either you’ll see the update window open or the following message, telling you that your current installation of MyFourWalls is OK and does not need to be updated.
� / �10 39

3.The MyFourWalls User Interface
3. The MyFourWalls User Interface3.1 Finding you way around the user interface
�The default layout of the MyFourWalls user interface:
5
1
2
3
4
6
Menu Area Description
1. Toolbar The Toolbar provides quick access to the general building features and tools.
2. Library Tab The Library Tab gives access to all the available objects. In this menu objects like furniture can be selected and edited.
3. 2D View The 2D View of the house. In the 2D View you can Zoom in and out with CMD + "+"/"-"
4. 3D View The 3D View of the house
5. 3D View Settings The View Settings of the 3D View
6. Inspector Tab The Inspector Tab gives access to all properties of a selected object. Here you can adjust values like geometry or name of a selected furniture object and edit the material settings.
� / �11 39

3.The MyFourWalls User Interface
3.2 Customizing the user interfaceThe user interface can be customized to your likings. General layout and measurements of the user interface can be accessed via the "Preferences" menu. To open the preferences go to the menu bar at the top of the screen and select:
MyFourWalls -> Preferences...
In the "Preferences" pane you can find several settings to adjust the layout of the user interface.
GUI Layout Preferences
The GUI Layout menu let’s you adjust the position of the Library Tab.
If both tabs are on the right side, you can also enable and disable the automatic switching between the Furniture Tab (when no furniture item is selected) and the Inspector Tab (when an object is selected). If the Furniture Tab is on the left, this option is greyed out.
�
� / �12 39

3.The MyFourWalls User Interface
2D View Preferences
In the 2D View Preferences you can adjust the units of measurement for the 2D View.
You can also move objects with the arrow keys (this is especially convenient if your project requires very precise positioning), The "Arrow keys move objects by..." selection field lets you adjust the distance the object moves each step (Each time you push the respective arrow key).
�
2D View Modes
In the 2D View Modes you can adjust the 2D View to your likings. You can also select between different 2D View Modes.
The CAD View Mode displays your apartment in a schematic view, which is common for CAD (Computer Aided Design).
The Detail View Mode displays textures and colors as well.
The Standard View does display colors but no detailed textures.
�
2D View Modes can also be changed in the Toolbar by the 2D View Mode selection button.
3D View Preferences
� / �13 39

3.The MyFourWalls User Interface
In the 3D View you can adjust the camera sensitivity (More about the camera can be found in chapter 4) and the material display in the "Materials" section of the Inspector Tab. This option does only alter the display in the user interface, it has no influence on the actual material properties.
Furthermore the item size of the furniture and material icons in the Material Gallery can be adjusted.
�
Levels Preferences
MyFourWalls is capable of creating multiple level houses.
�
Change the screen layout
The screen layout can be switched between three different modes.
Within the Main View, MyFourWalls can either display 2D (blueprint), 3D or both at the same time. Click the corresponding buttons in the Toolbar, in order to switch between the three modes.
� / �14 39
Select screen layout

4. Camera Control
4. Camera Control4.1 Basic camera movement
In MyFourWalls there different ways to move and control the camera. You can move the camera from the 2D View and from the 3D View. Furthermore the Inspector Tab gives you additional options to control the camera.
In the 2D View the camera can be turned around by moving the little arrow handles around the camera
When the camera is selected further options appear in the Inspector Tab at the right side:
Option Description
"Camera height" The height of the camera, as measured from the base. This option can only be adjusted in Fly Mode.
"Look down/up" The down or up angle of the camera focus. The middle of the slider stands for a a horizontal position.
"Rotation" Turning the "Rotation" knob has the same effect as moving the little arrow handles around the camera icon.
� / �15 39
Left click and hold to move
camera around
Move handle to rotate camera

4. Camera Control
4.2 Tutorial: Camera Modes in 3D ViewThe camera mode buttons in the 3D View Settings let you switch between three different camera modes for the camera control in the 3D View.
To familiarize yourself with the different camera modes, we recommend to follow the tutorial below, which goes through every available camera mode.
4.3 The Walk ModeFor your first steps, activate the Walk Mode by clicking the Walk Mode button in the 3D View Settings:
Now move the mouse pointer over the 3D View. The walk mode controls will be displayed.
It is also possible to move with the W.A.S.D keys (resembling the directions ↑, ←, ↓, ➝)
By using the W.A.S.D keys you can intuitively move through your house. You can also adjust the view by moving the mouse while holding down the left mouse button.
Camera Modes
1. Walk Mode
2. Fly Mode
3. Focus mode
� / �16 39
3

4. Camera Control
Controls in Walk Mode
1.Walk forward and backwards in viewing direction, as well as rotate left and right.
2. Move sideways
3. Tilt the camera up and down or return it to horizontal with the right-hand button.
4. Move back the camera to the center of the wall which is at the bottom of the 2D view
5. If an object is selected: circle around that object
6. If an object is selected: focus the camera on the object
4.4 The Fly ModeWhile the Walk Mode keeps you with both feet on the ground and at eye level, the Fly Mode allows you to sit both on the ground as well as look down on the scene from 27 ft. above.
Activate the Fly Mode by clicking the bird button in the 3D View Settings.
The controls in the 3D View are different from those in the Walk Mode:
� / �17 39
13
2
4 65

4. Camera Control
Controls in Fly Mode
1. Move forward, backwards, left and right
2. Turn left and right, tilt the camera up and down
3. Duck to the ground or levitate above ground. The right hand buttons get you either flying 27 ft. above the ground facing down or on human eye level.
4. Move back the camera to the center of the wall which is at the bottom of the 2D view
5. If an object is selected: circle around that object
6. If an object is selected: focus the camera on the object
4.5 Focus ModeThis mode can only be used if an object (a wall, door, window or furniture) is selected. The best way to select an object is by clicking it in the 2D view.
The controls then let you circle around that selected object. Clicking the right-hand button will rotate the camera around that object indefinitely. Click the button again to stop it.
4.6 Further View SettingsIn the bottom left corner, you’ll find the view options for the 3D View:
� / �18 39
1 2
3
5 6

4. Camera Control
Now that you know how to move around in an apartment in MyFourWalls, let’s go create our first own room.
View Option Description
1. Lighting Settings Toggle between night and day
2. Wall Opacity Toggle opaque and semi transparent outer walls
� / �19 39

5. Building your house
5. Building your house5.1 Creating rooms
Like in real-world construction work, the first thing to do is erect walls of the right dimensions.
How to build walls:
1. Select the Wall tool from the Toolbar:
�
2. Activate the 2D View and click on a place in the 2D View to create the first corner. Span a wall by moving your mouse and make sure the correct length is displayed between the two arrows. Right click to set an end mark.
�
If your wall is too long to fit into the window at the current zoom level, you can zoom in and out of the 2D-View by holding down CMD while moving the mouse wheel when the cursor is in the 2D View
3. Adjust the correct angle for the following wall. The speech bubbles at the in- and outside of the corner display the current outer and inner angles of the wall.
�
4. Repeat these steps untill you have finished the room. You can leave the building procedure any time by pushing ESC. The building mode will be finished automatically when you have created a closed room.
The size of the first wall will automatically be the internal dimension, every succeeding wall will state both the internal and external dimensions. So while you’re busy working your tape measure, make sure these are the internal dimensions in your draft.
Outer and inner angle
� / �20 39

5. Building your house
Don’t want any snapping? You can disable or adjust the snapping in the MyFourWalls Preferences.
Every click in the 2D View marks a new corner while MyFourWalls helps you get right angles, 45 degree angles, as well as parallel walls right by snapping into place. Closing the wall path will automatically turn the walls into a room by adding floor, ceiling and light sources.
Additional roomsAdd adjacent rooms by selecting the wall tool again and clicking anywhere on the walls for the first corner. To complete an adjacent room, simply end on the same wall as you started. You don’t have to return to your starting point here.
Wall thickness and orientationWhen creating walls of your first room, the wall thickness is usually added to the outside of the wall, so that your internal measures are just right even when increasing wall thickness.
When you have build an adjacent room and closed the walls of this room. Two blue arrows let you choose if you would like to add the wall thickness outside or inside of the room.
Wall thickness can be adjusted in the Inspector Tab. Just select the walls you would like to readjust and go to the Inspector Tab to adjust wall thickness and orientation. Like in other applications holding down CMD lets you add objects to your selection.
Holding down CMD while selecting objects with the left mouse button lets you add Objects to your selection. This is especially convenient, when you would like to assign equal values to several objects.
� / �21 39
Add wall thickness outside
Add wall thickness inside

5. Building your house
Room segmentationRooms can be divided by invisible walls. This is especially useful, if a room has two different floor materials or different wall papers. As an added benefit, you’ll see the partial floor spaces and can name them - mark both the couch area and dining area, for example.
You’ll also need these invisible walls to include roof slopes.
Please use the Partition tool in the upper left tool bar. Partitions behave much the same as regular walls.
�
How to segment a room with the Partition tool.
1. Select the Partition tool in the Toolbar.
2. Left click on a wall to set the start position of the segmentation border line.
3. Left click on a wall to set the end position of the segmentation border line.
SnappingMyFourWalls provides different snapping options. Per default all these snapping options are enabled.
The Snapping settings can be accessed via the Preferences menu. To open the preferences go to the top menu bar and select:
MyFourWalls -> Preferences...->Snapping
If in a particular case the snapping works against you by not allowing you to create a wall close to but not exactly on a snapping point, keep SHIFT pressed while moving. This will temporarily deactivate snapping.
ResizingRooms can be resized by clicking and dragging a wall or the corners of a room. Parallel walls will be extended automatically. Walls can be easily removed by selecting and pressing BACKSPACE or DEL on your keyboard. To move an inside wall, delete the old wall and draw a new one.
� / �22 39

5. Building your house
5.2 Selecting objectsSelect the Drag tool on the Toolbar to select existing objects.
�
Select individual objects by left clicking on an object. When an object is selected all available properties appear in the Inspector Tab.
Rectangle SelectionLeft click somewhere on a blank space in the 2D View, and hold the mouse button to draw a rectangle, to select all objects within the rectangle.
Selecting multiple objectsHold down CMD or SHIFT while selecting objects with the left mouse button to select multiple objects and rooms.
5.3 Adding windows and doorsDoors and Windows can either be added by using the Window and Door tools, or by drag-and-dropping them from the Furniture Tab onto a wall in the 2D View.
Window tool and Door toolHow to use the Window and Door tools
1. Select the window or door tool from the Toolbar. The mouse pointer changes to the respective tool and when you touch a wall, you’ll see the exact measures so you can fit in the window or door. Windows and doors can only be added to a solid wall, please don’t leave blank spaces, intending to add windows or doors later on.
2. Adjust the object’s dimensions and attributes in the Inspector Tab.
�
� / �23 39

5. Building your house
3. Remember you’re measuring the internal dimensions with your tape measure. So make sure to use the displayed internal dimensions in your draft.
Additional window and door shapesAdditional window and door shapes are available in the Furniture Tab. Drag them from the Inspector onto a wall just like with the Window Tool. Once attached to a wall, they behave exactly like the standard window. Wall breakthroughs are a unique item in the furniture collection, too. Please see the Doors category for the breakthrough object.
5.4 Adding furniture objectsFurniture Objects can be added by drag-and-dropping them from the Furniture Tab. MyFourWalls already brings a vast selection of objects.
How to add and edit a furniture object
1. Go to the Furniture Tab and drag the furniture object into the 2D or 3D view pane.
�
2. Adjust size and rotation by dragging the respective handles around the selected object. Use the arrow keys for precise positioning of the furniture object.
� / �24 39
Draw handle to adjust size
Drag handle to rotate

5. Building your house
3. Enter a name for the object in the Inspector Tab. Of course, you can also take the name generated by default.
4. Go to the "Geometry" section of the Inspector Tab. Here you can precisely adjust the geometry of your furniture object by entering numerical values or by moving the sliders.The "Proportional" selection lets you lock various aspect ratios of width, height and depth. Select one of the three Proportional options if you want to preserve the respective proportions. Not Proportional lets you freely scale the object.
�
5. If necessary, adjust the "Position" and "Distance to floor" in the "Position" section. (e.g. if you have placed a lamp under a table, you can change the "Position" settings to Stack on other objects, to place the lamp on the table.)
If object does A not stack properly on object B, please make sure the "Position" settings of object B are not set to the same value.as object A. In this case object B must be set to "On Floor" and object A must be set to Stack on other objects
6. Go to the "Attributes section" of the Inspector Tab to further adjust Style and Appearance of the furniture object.Play a little bit around with the sliders to get a feeling, how these properties can be adjusted.
� / �25 39

5. Building your house
Edit individual areas of large furniture objects.Some furniture objects, like large shelf or wall units for example, have multiple areas, which can be edited separately.
Currently selected areas will be marked with a blue background in the Area Map of the Inspector Tab. Just select the areas you want to edit and adjust its properties and appearance in the "Attributes" section.
�
The "Content of Selected Area" option gives you various content types to fill the area with content like doors, drawers or racks.
The available options in the "Attributes" section will differ, depending on the selected content. If you have selected Drawers for example you can choose between different drawer styles. If you have selected Racks the number of racks can be adjusted etc.
5.5 Adding floors and stairsIn MyFourWalls you can create multiple floor houses. The easiest way to add and edit floors is to use the MyFourWalls Floor Editor.
Using the Floor Editor How to edit and add floors with the Floor Editor
1. Create the first floor.(like mentioned in the chapter 5.1 "Creating rooms").
� / �26 39

5. Building your house
2. Click on the Levels button in the Toolbar and select Edit Levels to open the Floor Editor.
3. Adjust level height and ceiling panel thickness by either moving the sliders in the "Ground Floor" pane, or by entering exact numeric values into the respective input fields. If you like you can also give a name to the floor.
4. Click the Duplicate button below the preview screen A new level is added and the property pane for this level appears above the pane of the previous level. You can go to a level by clicking on the little triangle icon on the left side of the level pane. The Move down and Move up buttons let you change the order of the levels.
� / �27 39
5. Building your house
5. Adjust the level properties like described in step 3.
6. Repeat the procedure to add and edit additional levels. Click Delete to remove the currently selected level.
Adding StairsHow to add stairs
1. Click the Levels button on the Toolbar and select the level, where the stairs should start.
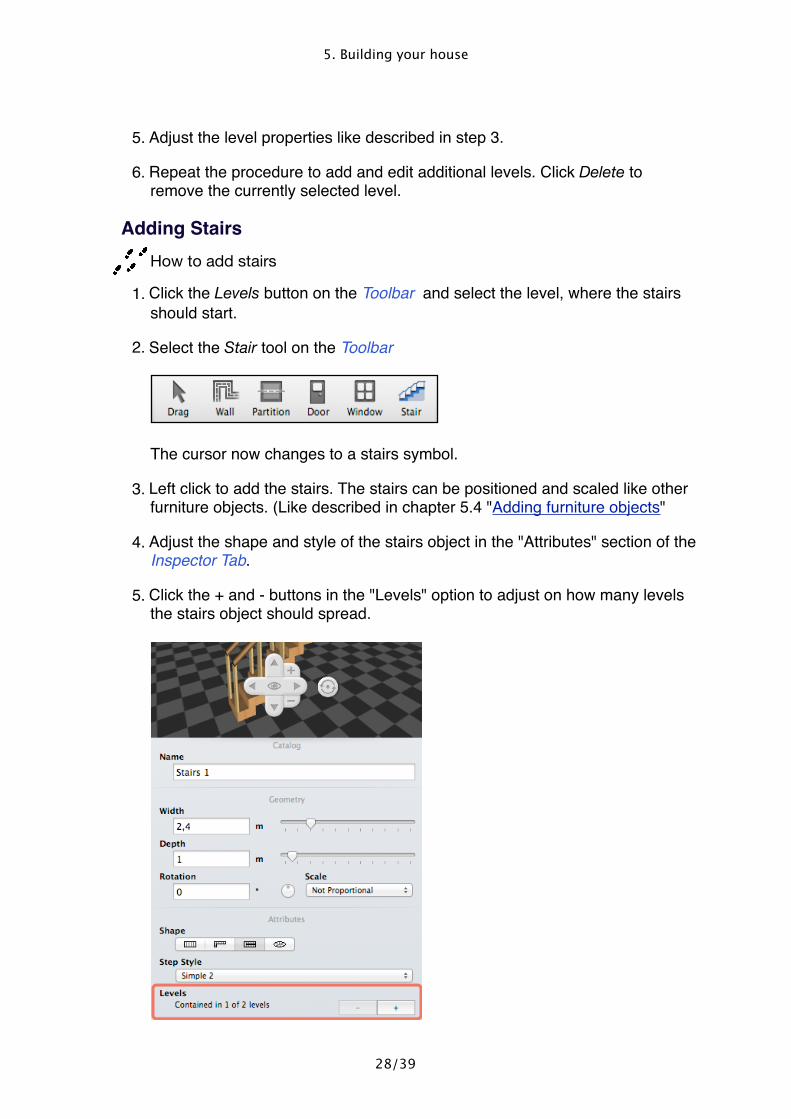
2. Select the Stair tool on the Toolbar
� The cursor now changes to a stairs symbol.
3. Left click to add the stairs. The stairs can be positioned and scaled like other furniture objects. (Like described in chapter 5.4 "Adding furniture objects"
4. Adjust the shape and style of the stairs object in the "Attributes" section of the Inspector Tab.
5. Click the + and - buttons in the "Levels" option to adjust on how many levels the stairs object should spread.
�
� / �28 39

5. Building your house
6. If necessary, you can also manually edit the number of steps. Switch the "Step count" option to "Manual", to make the slider and input field of the step count available for editing.
�
7. Go to the "Banister" section to adjust the style and depth (thickness) of the banisters. Note that you can adjust different styles for left and right.
�
8. If you selected a stair shape with a middle section, you can also edit the width and height of the section in the "Special Attributes" section.
The stairs object has a large variety of settings ranging from width, depth and rotation to the shape, number and style of the steps. Although the variety of settings might seem a little overwhelming at first, please feel free to play around with the settings and sliders in the Inspector Tab. This is probably the best way to get a feel for what the various settings do with the stairs object. You will surely grasp the concept very quickly.
� / �29 39

5. Building your house
5.6 Edit roof slopes and floorsCreating roof slopesWhen you measure the low point and high point in a roof slope, please note down these measures and their distance at ground level to the nearby walls. That way, you can model them with the Partition tool and the Roof Editor.
How to create roof slopes
1. Go to the level, where the roof should be added.
2. Use the Partition tool to add a partition
�
3. Click the Roof button in the Toolbar. The Floor and Ceiling Editor will open.
�
4. Make sure Ceiling is selected. Floor would allow you to adjust each room segment’s floor level but that’s described later on.
�
5. Select one of the room segments. You always have to select either a room segment or a wall to be able to adjust anything.
6. Now click and select three points. The points (1) and (2) mark the top of the roof. Point (3) marks the start of the roof slope.
� / �30 39
5. Building your house
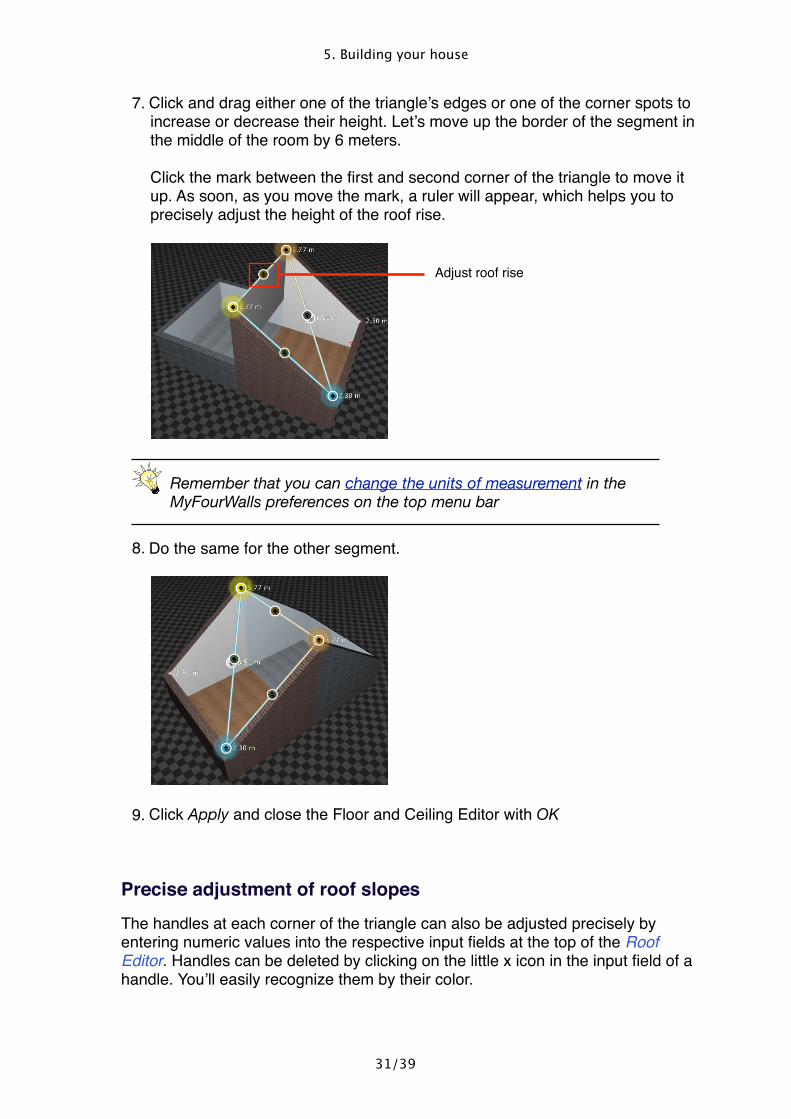
7. Click and drag either one of the triangle’s edges or one of the corner spots to increase or decrease their height. Let’s move up the border of the segment in the middle of the room by 6 meters.Click the mark between the first and second corner of the triangle to move it up. As soon, as you move the mark, a ruler will appear, which helps you to precisely adjust the height of the roof rise.
�
Remember that you can change the units of measurement in the MyFourWalls preferences on the top menu bar
8. Do the same for the other segment.
�
9. Click Apply and close the Floor and Ceiling Editor with OK
Precise adjustment of roof slopesThe handles at each corner of the triangle can also be adjusted precisely by entering numeric values into the respective input fields at the top of the Roof Editor. Handles can be deleted by clicking on the little x icon in the input field of a handle. You’ll easily recognize them by their color.
Adjust roof rise
� / �31 39
5. Building your house
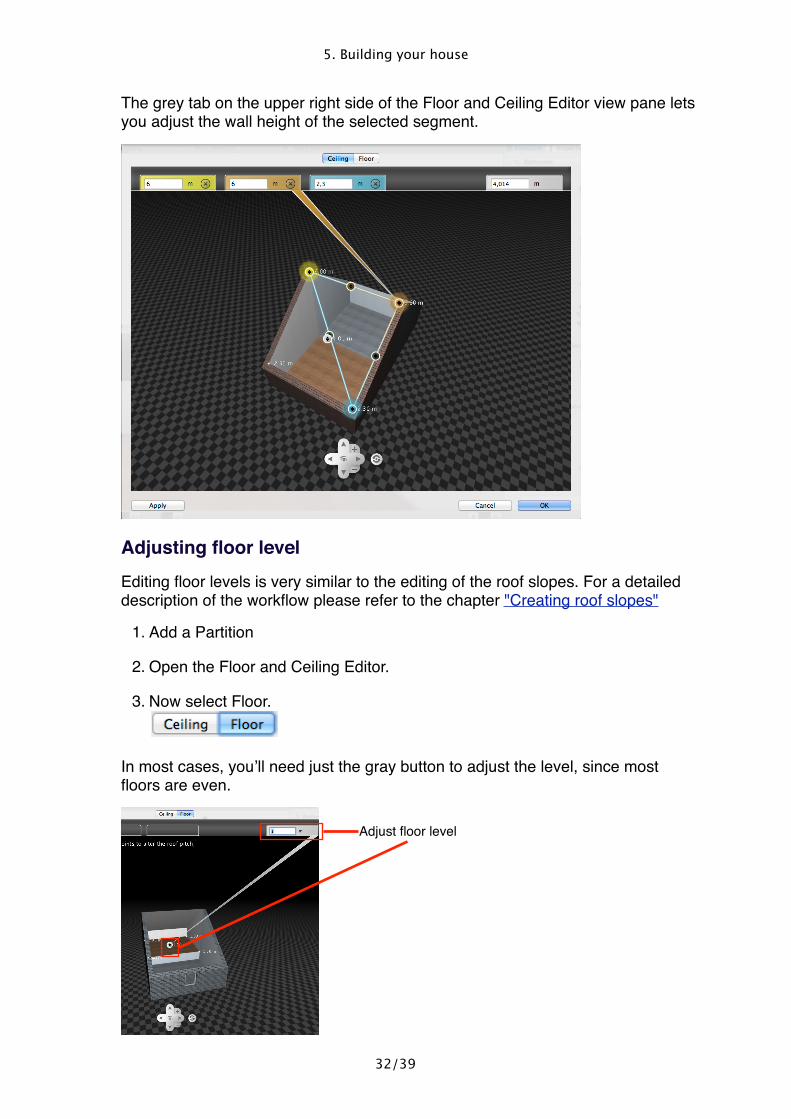
The grey tab on the upper right side of the Floor and Ceiling Editor view pane lets you adjust the wall height of the selected segment.
�
Adjusting floor levelEditing floor levels is very similar to the editing of the roof slopes. For a detailed description of the workflow please refer to the chapter "Creating roof slopes"
1. Add a Partition
2. Open the Floor and Ceiling Editor.
3. Now select Floor.
�
In most cases, you’ll need just the gray button to adjust the level, since most floors are even.
�
Adjust floor level
� / �32 39

5. Building your house
If your floor isn’t, either call a pro to fix this or select three corners in the editor and adjust the level like you did for the roof.
5.7 MaterialsAdjust Building propertiesIn the building settings you can adjust the default materials for existing walls, floor and ceiling as well as the default wall thickness.
We recommend to adjust the general building settings before you add specific details by adding materials to certain areas.
The building settings are accessible at the Building Settings button on the Toolbar.
�
� / �33 39

5. Building your house
The Material GalleryThe Material Gallery gives you quick access to all available materials. Just click Edit ->Manage Materials to open it.
Menu Area/ Button Description
1. Category Selection Box
Selects the material category.
2. Material List Lets you browse through the selected material category.
3. Options Gives access to the Material Gallery options and preferences. Here you can also add a new material.
4. Search Field Enter a material name to search for a certain material.
5. Delete Removes the material
6. Duplicate Here you can duplicate a material to create an exact clone. This is especially useful, if you would like to create a similar material with some variations.
7. Edit Opens the material in the Material Editor
� / �34 39
Available, when moving the mouse
over an item

5. Building your house
Change materialsMyFourWalls comes with a vast selection of materials and textures. Materials can be assigned to walls, floors and even to surfaces of furniture objects.
How to change materials assigned to an object.
1. Select the Drag tool and select an object.
2. Go to the "Materials" section in the Inspector and select the material, you want to change.
� The Material Gallery appears.
3. Select a material category and a material. A preview of the selected object with the current material settings will be also displayed in the preview window of the Inspector.
�
Create and edit materials in the Material Gallery.If you can’t find a suitable material, the Material Gallery gives you further editing options to either tweak a material to fit your needs, or even import your own textures to create your own materials.
How to create new materials
1. Go to the top menu bar and select Edit -> Manage Materials to open the Material Gallery.
� / �35 39

5. Building your house
2. Click on the little cog wheel icon at the bottom of the Material Gallery and select Add new material.
A new entry with the name "New material" will appear in the Material Gallery
�
3. Hover the mouse over the new material until three little buttons pop up. and click on the Edit button (pen icon),
� The new material opens in the Material Editor.
4. Give your material a meaningful name.
5. If you want to assign a new texture, you can either select an available "Surface image" via the respective selection field or import an image file for use as a texture.
6. Let’s say we would like to assign the material to the floor of our room. Set the preview of the material to "Cube", as our floor has flat surface and a "Cube" represents this surface in the best way.
�
� / �36 39
5. Building your house
7. Scale the size of the assigned texture to your liking by moving the "Scale" slider, or by entering a numeric value into the respective input field. The larger the size, the fewer seams are visible, but a large size could also make the texture more "blurred".
8. Adjust the rotation by turning the little "Rotation" control knob, or by entering a numeric value. You can also move the position of the texture tiles by adjusting the horizontal and vertical translation sliders.
9. Adjust the visual properties "Reflection", "Diffusion", "Opacity" and "Specular reflection" to values which resemble the desired material the most.
Please note that reflection values have currently only influence on floors. Other surfaces like walls or furniture objects do not have reflection values.
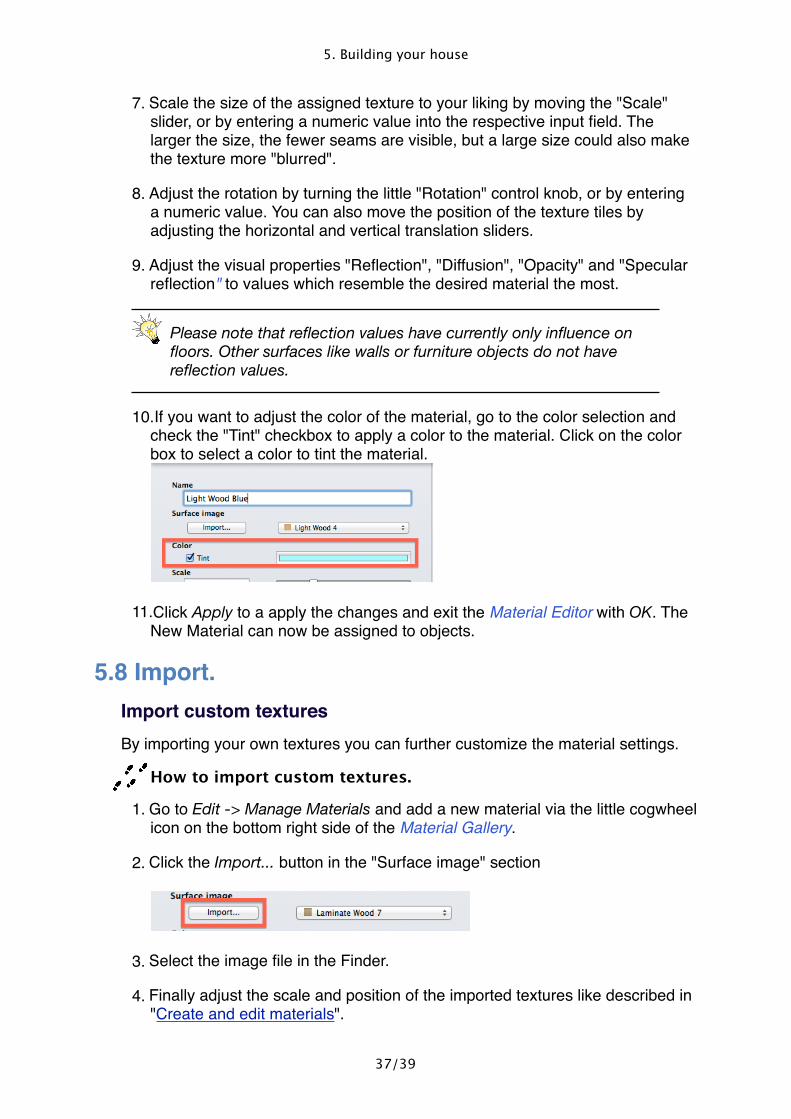
10.If you want to adjust the color of the material, go to the color selection and check the "Tint" checkbox to apply a color to the material. Click on the color box to select a color to tint the material.
�
11.Click Apply to a apply the changes and exit the Material Editor with OK. The New Material can now be assigned to objects.
5.8 Import.Import custom texturesBy importing your own textures you can further customize the material settings.
How to import custom textures.
1. Go to Edit -> Manage Materials and add a new material via the little cogwheel icon on the bottom right side of the Material Gallery.
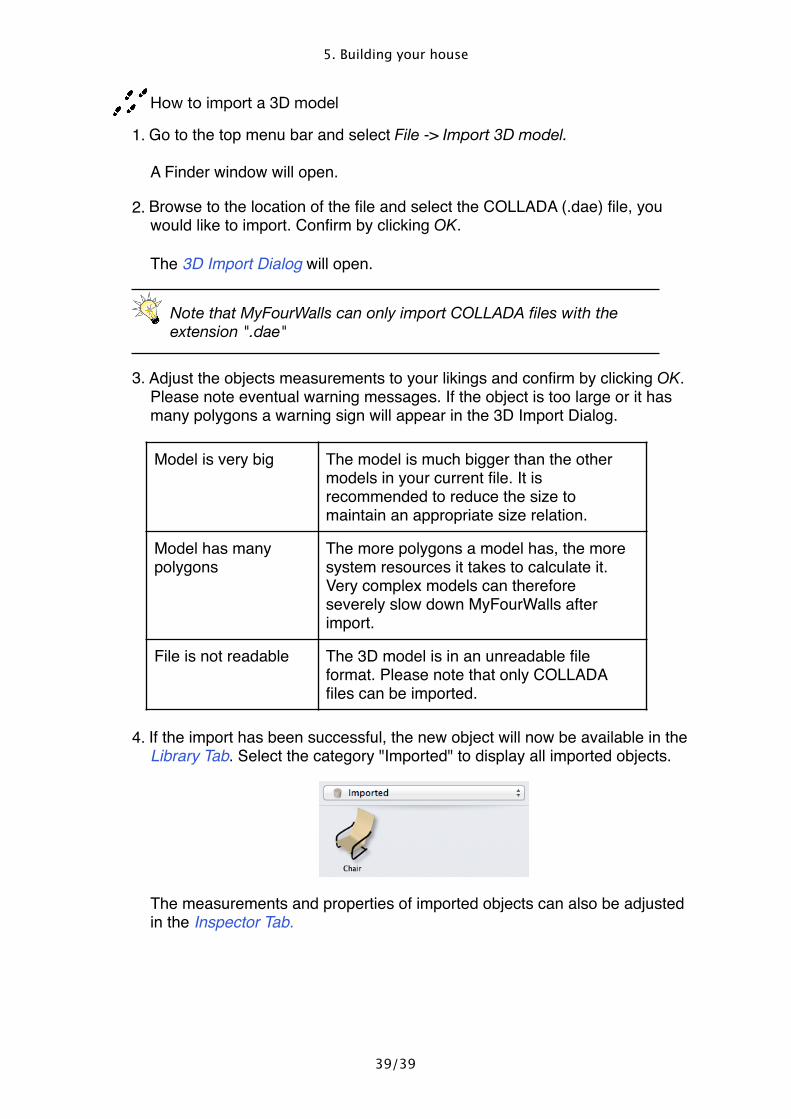
2. Click the Import... button in the "Surface image" section
�
3. Select the image file in the Finder.
4. Finally adjust the scale and position of the imported textures like described in "Create and edit materials".
� / �37 39

5. Building your house
Importing blueprintsIf you want to create a house or apartment with exact measurements, you can import a blueprint as background image in the 2D-View and use it as reference for your room layout.
The Blueprint Editor provides various options for importing and scaling blueprints. It can be opened from the top menu bar, by clicking Edit -> Blueprints.
The Blueprint Editor:
�
How to import a blueprint
1. Go to the top menu bar and select Edit -> Edit Blueprints.The Blueprint Editor opens. Per default existing objects are displayed in the Blueprint Editor‘s preview window. Above the preview window there is a Zoom Level Selection (2) and a Display Filter (3) for the Preview Window (1).In the Display Filter (3) selection field you can adjust the display to only display the blueprint or display the existing walls and furnitures as well.
2. Click on the Level Selection (4) and Select the level you would like to add the blueprint to.
3. Go to the Scaling Menu (5) and adjust the blueprints properties to your requirements.
4. Click OK to confirm. The blueprint will now be displayed in the background of the selected level and can be used as a guideline for your work.
Import 3D modelsMyFourWalls lets you import 3D-Objects in the widespread COLLADA file format.
(1) Preview Window
(2) Zoom Level Selection
(3) Display Filter
(4) Level Selection
(5) Scaling Menu
� / �38 39
5. Building your house
How to import a 3D model
1. Go to the top menu bar and select File -> Import 3D model.A Finder window will open.
2. Browse to the location of the file and select the COLLADA (.dae) file, you would like to import. Confirm by clicking OK. The 3D Import Dialog will open.
Note that MyFourWalls can only import COLLADA files with the extension ".dae"
3. Adjust the objects measurements to your likings and confirm by clicking OK. Please note eventual warning messages. If the object is too large or it has many polygons a warning sign will appear in the 3D Import Dialog.
4. If the import has been successful, the new object will now be available in the Library Tab. Select the category "Imported" to display all imported objects.
The measurements and properties of imported objects can also be adjusted in the Inspector Tab.
Model is very big The model is much bigger than the other models in your current file. It is recommended to reduce the size to maintain an appropriate size relation.
Model has many polygons
The more polygons a model has, the more system resources it takes to calculate it. Very complex models can therefore severely slow down MyFourWalls after import.
File is not readable The 3D model is in an unreadable file format. Please note that only COLLADA files can be imported.
� / �39 39