Embed Size (px)
Citation preview
Pasco Munis® End User, Version 10.1 Page 1
Munis Financials End User ______________________________________________________
Procedural Documentation for
Pasco County School District, FL
Revised September 30, 2012 For more information, visit www.tylertech.com.

Pasco Munis® End User, Version 10.1 Page 2
Table of Contents 1.0 Purpose........................................................................................................................................... 6
2.0 Revisions History ............................................................................................................................ 6
3.0 GENERAL LEDGER END USER PROCESSES ............................................................................. 7
Persons Affected ............................................................................................................................... 8
Definitions ......................................................................................................................................... 8
Responsibilities ................................................................................................................................. 9
3.1 General Journal Entry Process ................................................................................................. 10
3.2 General Journal Entry/Proof ..................................................................................................... 11
3.2.1 Updating a Journal Entry Prior to Releasing to Workflow ................................................ 18
3.2.2 Verifying Posted Journals ............................................................................................... 20
3.3 General Journal Approvals ....................................................................................................... 24
3.4 Account Inquiry ......................................................................................................................... 30
3.5 GL Account Central .................................................................................................................. 43
3.6 Expenditure Central .................................................................................................................. 47
3.7 Year to Date Budget Report ..................................................................................................... 55
3.8 GL Journal Source Code Reference ......................................................................................... 64
4.0 BUDGET END USER PROCESSES ............................................................................................. 69
Persons Affected ............................................................................................................................. 70
Definitions ....................................................................................................................................... 70
Responsibilities ............................................................................................................................... 70
4.1 Budget Process ........................................................................................................................ 71
4.2 Next Year Budget Entry ............................................................................................................ 72
4.2.1 Detail Entry ..................................................................................................................... 72
4.2.2 Quick Entry ..................................................................................................................... 80
4.2.3 Send Notification of Budget Changes ............................................................................. 83
4.3 Next Year Budget Reports ........................................................................................................ 85
4.4 Budget Transfer and Amendment Process ............................................................................... 90
4.5 Budget Transfers and Amendments ......................................................................................... 91
4.5.1 Retrieving a Budget Transfer, not yet Released to Workflow .......................................... 98
4.6 Budget Transfers and Amendments Approval ........................................................................ 100
5.0 ACCOUNTS PAYABLE END USER PROCESSES ..................................................................... 104
Persons Affected ........................................................................................................................... 105
Definitions ..................................................................................................................................... 105
Responsibilities ............................................................................................................................. 105
5.1 Accounts Payable Process ..................................................................................................... 106
5.2 Invoice Entry .......................................................................................................................... 107

Pasco Munis® End User, Version 10.1 Page 3
5.2.1 Request for Payment .................................................................................................... 108
5.3 Invoice Approval ..................................................................................................................... 115
5.4 Vendor Inquiry ......................................................................................................................... 121
5.5 Vendor Central ....................................................................................................................... 143
5.6 Invoice Central ....................................................................................................................... 154
5.7 Invoice History by GL Account ................................................................................................ 156
5.8 Invoice Open Report .............................................................................................................. 161
5.9 Vendor Fiscal Year Summary ................................................................................................. 163
5.10 Vendor Invoice Lists ............................................................................................................. 166
6.0 REQUISITIONS & PURCHASING END USER PROCESSES .................................................... 171
Persons Affected ........................................................................................................................... 172
Definitions ..................................................................................................................................... 172
Responsibilities ............................................................................................................................. 172
6.1 Requisition and Purchasing Process ...................................................................................... 174
6.2 Requisition Entry .................................................................................................................... 175
6.2.1 Reactivating a Rejected Requisition ............................................................................. 191
6.3 Requisition Approval .............................................................................................................. 192
6.4 Purchase Order Receiving ..................................................................................................... 198
6.4.1 Using Quick Receipt Entry ............................................................................................ 202
6.5 Purchase Order Change Orders ............................................................................................. 209
6.6 Change Order Approval.......................................................................................................... 216
6.7 Purchase Order Inquiry ........................................................................................................... 221
6.8 Purchase Order Central.......................................................................................................... 232
7.0 PURCHASING CONTRACT MANAGEMENT END USER PROCESSES ................................... 235
Persons Affected ........................................................................................................................... 236
Definitions ..................................................................................................................................... 236
Responsibilities ............................................................................................................................. 236
7.1 Purchasing Contracts Process ............................................................................................... 237
7.2 Entering a Basic Contract ....................................................................................................... 238
7.3 Creating Contracts Using the Encumbered Accounts Enforcement Method ........................... 254
7.4 Creating a Contract Using the Not to Exceed Enforcement Method........................................ 265
7.5 Creating a Contract Using the Nonencumbered Accounts Enforcement Method .................... 276
7.6 Creating a Contract Using the Amounts by Segments Enforcement Method .......................... 287
7.7 Creating a Contract Using the Item/Quantity/Cost/Discount Enforcement Method .................. 299
7.8 Contract Approvals ................................................................................................................. 311
7.9 Contract Change Orders ........................................................................................................ 314
7.10 Contracts Central ................................................................................................................. 321

Pasco Munis® End User, Version 10.1 Page 4
8.0 FIXED ASSETS END USER PROCESSES ................................................................................ 323
Persons Affected ........................................................................................................................... 324
Definitions ..................................................................................................................................... 324
Responsibilities ............................................................................................................................. 324
8.1 Fixed Asset Process – Entry & Adjustments ......................................................................... 325
8.2 Transferring a Fixed Asset ..................................................................................................... 326
8.3 Fixed Assets Central .............................................................................................................. 330
8.4 Fixed Asset Inquiry and Reports ............................................................................................. 333
8.4.1 Asset Inquiry ................................................................................................................. 333
8.4.2 Asset List by Location/Class ......................................................................................... 335
8.4.3 Activity (History) List ..................................................................................................... 336
Appendix A: Using Munis .................................................................................................................. 337
A.1 Permissions and Security ........................................................................................................ 337
A.2 Munis Menus .......................................................................................................................... 337
A.3 Standard Screen Features ...................................................................................................... 338
A.3.1 Help, Settings, and Enhancements ............................................................................... 340
A.4 Ribbon and Menu Options ...................................................................................................... 341
A.4.1 Ribbon ........................................................................................................................... 341
A.4.2 Other Options ................................................................................................................ 344
A.5 Finding Records in Munis ....................................................................................................... 344
A.5.1 Using Wildcard Card Characters in Searches ................................................................ 344
A.5.2 Using Query (Advanced Find) ....................................................................................... 347
A.5.3 Managing Selected Records ......................................................................................... 348
A.5.4 Browsing Records ......................................................................................................... 349
A.5.5 Exporting Records ......................................................................................................... 350
A.5.6 Filtering Records ........................................................................................................... 350
A.6 My Programs .......................................................................................................................... 351
A.7 Reports ................................................................................................................................... 352
A.8 Munis Scheduler ..................................................................................................................... 352
A.9 Tyler Content Manager for Munis ............................................................................................ 354
A.10 Saved Reports ...................................................................................................................... 355
A.11 Excel, and Word.................................................................................................................... 357
A.11.1 Excel ........................................................................................................................... 357
A.11.2 Word ........................................................................................................................... 358
Pasco Munis® End User, Version 10.1 Page 5
Disclaimer
Tyler Technologies, Inc. Consultant believes that the information described in this manual is accurate and reliable, and much care has been taken in its preparation. However, no responsibility, financial or otherwise, can be accepted for any consequences arising out of the use of this material, including loss of profit and indirect, special, or consequential damages. No warranties extend beyond the program specification.
The client should exercise care to assure that use of the software and related documentation is in full compliance with the laws, rules, and regulations of the jurisdictions in which it is used. These materials are confidential, unpublished works of Consultant. Consultant grants to the Client a royalty-free nonexclusive license to use anything created or developed by Consultant for Client contained in this manual. The license shall have a perpetual term and Client may not transfer it. Consultant shall retain all copyrights, patent rights and other intellectual property rights to this manual. The information contained herein is subject to change. Consultant assumes no responsibility to advise clients of changes or additions.

Pasco Munis® End User, Version 10.1 Page 6
1.0 Purpose This document provides the decentralized End Users of the School District of Pasco County, Florida, with the information and instructions necessary to perform the processes within the Munis ERP system for their applicable position within the District.
2.0 Revisions History
Date Revision Number
Change Reference Section
08/24/2012 1.0 Initial All
09/30/2012 2.0 Addition of additional processes All

Pasco Munis® End User, Version 10.1 Page 30
3.4 Account Inquiry
Objective This document provides instructions on how to use the Account Inquiry program.
Overview
The Account Inquiry program provides both summarized and detail history for a selected set of accounts, with a focus on current available budget. You cannot modify data in this program; you can view data and create reports of the collected data.
There are options in the Account Inquiry program for consolidating the data into a report-like format, but if you want to report on many accounts in a report format, it may be best to use the YTD Budget Report.
The information in the fields displayed throughout the program depends upon your user permissions, which are established in the System Administration General Ledger Roles program.
Prerequisites Before you can successfully use this feature, you must ensure that the necessary permissions and settings are in place. If permissions or settings are not set up properly, or if the required programs are not available on the Munis menu, contact the system administrator. Confirm the following:
• You have permissions to view accounts.
• The chart of accounts (COA) is established.
.

Pasco Munis® End User, Version 10.1 Page 31
Procedure To view accounts:
1. Open the Account Inquiry program. (This program can be found in several locations on your menu; how you access the program is determined by your menu options.)
Financials > General Ledger > Inquiries and Reports > Account Inquiry -or- Departmental Functions > Account Inquiry
2. Click Find on the toolbar bar or click Seg Find on the menu. When you click Find, complete one or more of the fields to define your search criteria, and then
click Accept . When you click Seg Find, the program displays the Find by Segment screen. Complete the fields on
this screen according to the following table, and then click Accept . For either search method, the program creates an active set of all accounts matching your search criteria.
Field Description
Fund This box contains the first account segment to include in the report. Segment 1 is always Fund.
Click the field help button to select the fund from a list of available funds, or type the fund code directly in the box.

Pasco Munis® End User, Version 10.1 Page 32
Field Description
Segments 2 through 8
These boxes contain specific account segments to include in the report. Organizational labels for account segments are determined in the General Ledger Settings program. Examples for common segment labels are program, department, grade, and so on.
Click the field help button in each box to select a segment code from a list of available codes, or type the segment code directly in the box
Org This box contains the org code for the account. Click the field help button to select the org code from a list of available codes, or type the org code directly in the box.
Object This box contains the object code for the account. Click the field help button to select the object code from a list of available codes, or type the object code directly in the box.
Project This box contains the project code for the account, if applicable. Project codes are applicable if your organization used Munis® Project Accounting. Click the field help button to select the object code from a list of available codes, or type the object code directly in the box.
Character Code This box identifies the character code. Click the field help button to search a list of available character codes.
Account Type This list indicates the type of account. Account types are expense, revenue, or balance. The blank option includes accounts of all types. Select the appropriate account type from the list.
Account Status This list indicates the account status: Active or Inactive. The blank option includes accounts with all status codes.
Fiscal Years These boxes contain the minimum percentage used in the fiscal year. For whole percentages, you do not need to include decimal points; for percentages less than one, use decimal points. For example, for 25%, type 25; type 25.5 for 25½%.
3. Click Browse to view a list of the accounts in the active set of records.
4. Double-click an account to view the details.
Account Inquiry On the Account Inquiry screen, the first section provides the basic details for the account (that is, account segments, type, status, and so on).
Field Description
Fund This box identifies the fund (or account segment 1) to query. Click the field help
button to select the fund from a list of available funds. Org This box specifies the org code for the account to query. Click the field help button to
select the org code from a list of available codes.

Pasco Munis® End User, Version 10.1 Page 33
Field Description
Object This box specifies the object code for the account to query. Click the field help button to select the object code from a list of available codes.
Project This box specifies the project code for the account to query. Click the field help button to select the project code from a list of available codes. The project code applies if your organization uses Munis Project Accounts.
Acct This box displays the full general ledger account number. Each segment is typically separated with a dash. There is no access to this field.
Acct Name This box displays the name of the account. There is no access to this box. Account Type
This list specifies the type of account: balance sheet, expense, revenue, or statistic. Select the blank option to select all account types.
Status This list identifies the account status. An account's status determines whether it appears on reports and if transactions can be posted to it. The status is updated using the either Account Master or Account Mass Change/Reset program. Status indicators are: Active – This is the most common status for accounts. Active accounts can appear on all reports displaying account information and are generally available for posting (according to your defined permissions). Next Year – This status indicates that a particular account is only available for next year budget entries and reports. No transactions posted to this account are allowed in the current year. The status of the account automatically changes once the Year End Close is processed. Inactive -- This status prevents all posting to an account without proper permissions. If you have Amount Maintenance on Accounts permission granted in the Roles – General Ledger program, you have the ability to post transactions to an Inactive account. The Inactive account prints on all reports (provided you have adequate authorization). An account can be rendered inactive at any time in the fiscal year, regardless of the presence of current year transactions. The account can be reactivated at any time. Closed -- This status indicates that an account is completely closed to all input and only prints on those reports offering the option to print closed accounts. No transactions may be entered against it. An account will be designated as Closed if there has been no activity - other than budget activity if the fund is a multiyear fund - posted to it in the current year.
Multi Yr Fund This check box, if selected, indicates that the account is a multiyear fund. This check box is not accessible.
Budget Rollup Group
The Budget Rollup Group button identifies accounts included in budget rollup groups. If the account displayed is included in a budget rollup group, the folder icon on the button is highlighted. Click this button to select and view rollup group records.
Account Notes
The Account Notes button allows you to view notes associated with the selected account. If notes exist for the selected account, the folder icon on the button is highlighted. Click this button to view notes; you cannot add or update notes when accessing this option from Accounts Inquiry.

Pasco Munis® End User, Version 10.1 Page 34
4 Year Comparison Tab This tab shows the current fiscal year, the previous two fiscal years, and the next fiscal year.
Field Description
Original Budget The adopted budget at the beginning of the Fiscal Year, as determined by the Budget Completion Journal.
Transfers In Any budget transfers increasing budget if the account. View account detail by selecting the yellow folder.
Transfers Out Any budget transfers decreasing the budget from the account. View account detail by clicking the folder button.
Revised Budget The sum of the Original Budget plus Transfers In less Transfers out. Actual (Memo) The general ledger balance that includes posted and unposted transactions.
View account detail by clicking the folder button. Encumbrances The sum total of all open purchase orders for the account. View account detail
by clicking the folder button. Requisitions The total amount of requisitions in status 4-Allocated, 6-Released, and 8-
Apporved. View account detail by clicking the folder button. Available The budgeted amount remaining in the account. Percent Used The percent of the budget that has been spent, transferred out, or
encumbered. When you are using this field as Find criteria, enter the smallest percent used you wish to find. For example, if you enter 10, the program finds 10 and everything up to 100 percent.

Pasco Munis® End User, Version 10.1 Page 35
Current Year Tab This tab displays the Current Year, Carry Forward, and GAAP, if carry forward monies exist. If there are no carry forward monies, the columns display as Current Year and Last Year. The Current Year column shows the current year, as determined by the General Ledger Settings. The Carry Forward column shows any purchase orders that have been carried forward from a previous year. The GAAP totals show the combined totals of the Current Year and Carry Forward. The fields change according to the type of account you are viewing.
Account Descriptions The following tables provide descriptions for the account types that display on the Current Year tab. Balance Sheet Account
Field Description
Starting Balance The balance at the beginning of the current fiscal year and last year. Activity The sum of the activity for the current fiscal year and last year. Ending Balance The most recent account balance, calculated as follows: Starting Balance –
Activity. Memo Balance The general ledger memo balance that includes posted and unposted items.
Expense Account
Field Description
Original Approp The starting budget in the current fiscal year and last year. Amendments The sum of any budget transfers in and/or out for the current fiscal year and last
year. Revised Budget The current revised budget, calculated as follows: Original Approp +/-
Amendments. YTD Actual The actual balance at the end of the fiscal period or year.
Pasco Munis® End User, Version 10.1 Page 36
Field Description
Encumbrance The sum total of all open purchase orders as of the current fiscal year and last year.
Requisitions The sum total of all requisitions (status 4, 6, and 8) in the current fiscal year and last year.
Incep to Date The sum total of activity since the inception of the account to the current date. This is only populated for multiyear type 1 accounts.
Available Budget The remaining available budget, calculated as follows: Revised Budget- YTD Actual – Encumbrance – Requisition (- Incept to Date, if multiyear).
% Used The percent of the revised budget that has been used to date. Revenue Account
Field Description
Original Est Rev The estimated amount of the original budget for current fiscal year and last year.
Est Rev Adjusted The sum of any budget transfers or amendments for current fiscal year and last year.
Rev Est Rev The revised estimated revenue, calculated as follows: Original Est Rev +/- Est Rev Adjusted.
Incep to Date The sum total of revenue since the inception of the account to the current date. This is only populated for multiyear type 2 accounts.
Actual YTD Rev The actual revenue collected for the identified accounting period. Remaining Rev The amount of revenue remaining to be collected for the current fiscal year and
last year. Percent Collected The percent of revenue already collected.
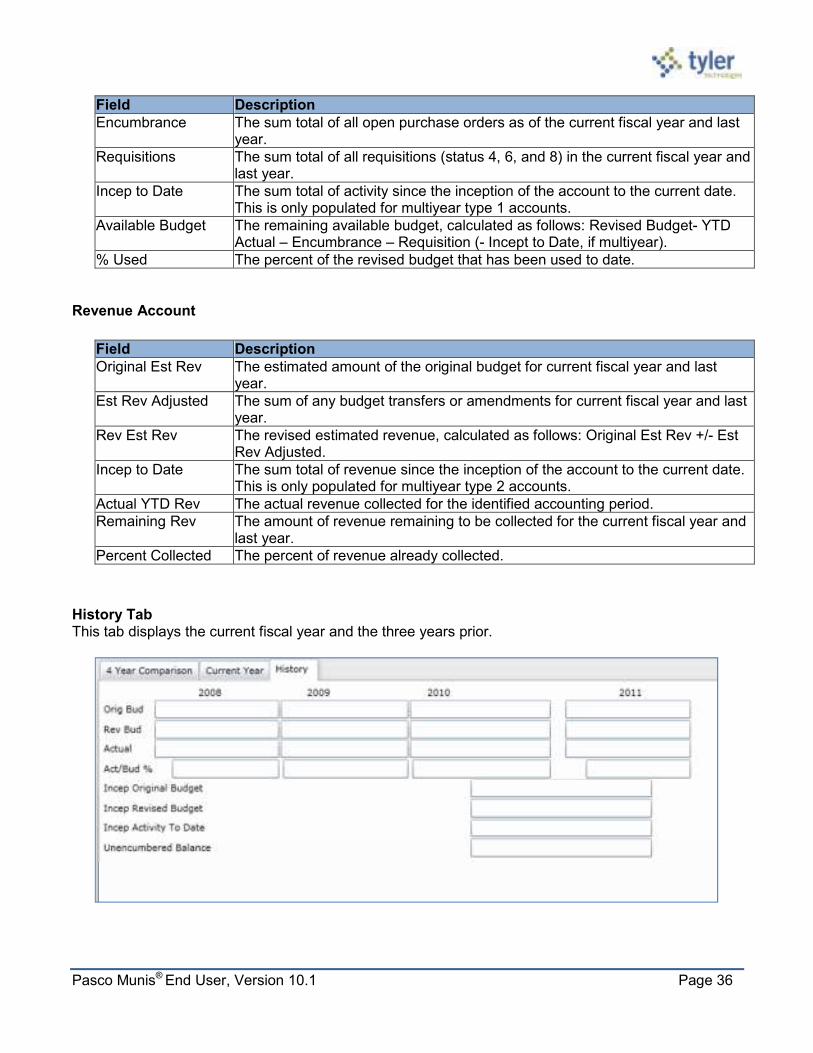
History Tab This tab displays the current fiscal year and the three years prior.

Pasco Munis® End User, Version 10.1 Page 37
Field Description
Orig Bud The original budget for the given year. Rev Bud The revised budget for the year, calculated as follows: Original Budget +/-
budget transfers in or out. Actual The actual amount expended for the given year. Act/Bud % Percentage of budget to actual expended. Inception Original Budget
Used for multiyear accounts to represent the original multiyear budget.
Inception Revised Budget
For multiyear funds, the multiyear budget as revised.
Inception Activity To Date
For multiyear funds, the inception to start of year balance, plus the actual balance in the account, plus the amount in the encumbrance balance.
Unencumbered Balance
The Inception Revised Budget less the Inception Activity to Date.
Note: Expense accounts in multiyear funds that have a budget projection method of 2 have a new budget each year that is the remaining available budget from the previous year. This causes the budget for these accounts to remain in the current year, while all other multiyear account budgets represent the budget from inception.
When calculating the percent used on Multiyear 2 accounts, the Incep to SOY field, which contains money spent from the inception of the account, must be ignored in order to get an accurate percentage. For Multiyear 2 accounts only, the program ignores amounts in the Incep to SOY box when calculating the value of the Percent Used box. This is true even when you click the Totals option.
Options The Account Inquiry screen provides several options for viewing additional information.

Pasco Munis® End User, Version 10.1 Page 38
If there are notes associated with this account, the Account Notes button is highlighted; click Account Notes to view the note content.
Detail
Click Detail to search for transactions that have been posted to an account. When you click Detail, the program provides a Journal Selection Criteria screen.
Enter the search criteria you would like to use, and then click Accept to submit the search. You can search by date range, year/period, source of the journal, or any of the reference fields. If you select the Include Unposted Journals check box, any general ledger journal entries still in the proof file are included.

Pasco Munis® End User, Version 10.1 Page 39
The Account Detail screen displays the results. Click Detail or Journal on for more information on a specific entry.
Detail displays the single entry from this account in the journal. The Detail varies according to the journal entry source type. For example, invoice entries display the Invoice Data Inquiry screen.
Pasco Munis® End User, Version 10.1 Page 40
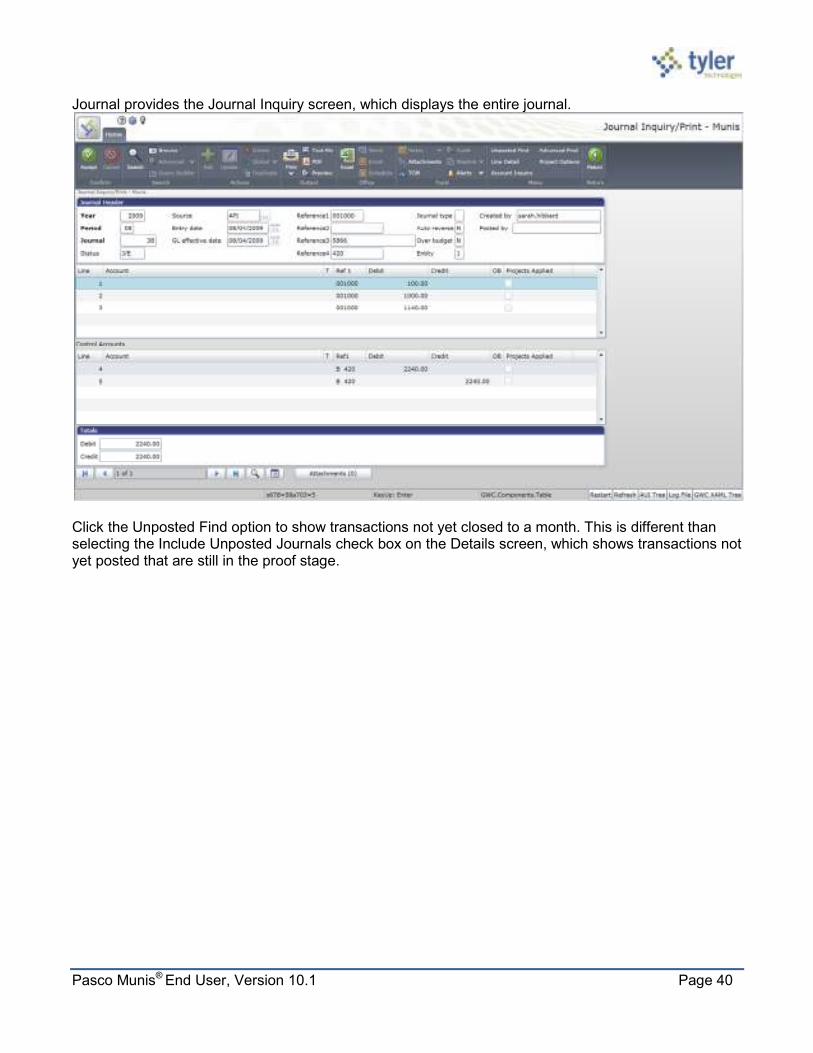
Journal provides the Journal Inquiry screen, which displays the entire journal.
Click the Unposted Find option to show transactions not yet closed to a month. This is different than selecting the Include Unposted Journals check box on the Details screen, which shows transactions not yet posted that are still in the proof stage.

Pasco Munis® End User, Version 10.1 Page 41
Months
Click Months on the Account Inquiry screen to show a monthly view of all journal transactions that have been closed to a period. If the transactions have not been through a month-end process, they are not included in the monthly data. However, you can view transactions not yet closed in the current month detail. Transactions that are in journal entry/proof and not yet posted are not visible in any screen
Click Curr Month Detail to show you all of the posted activity (that has been closed to a period). Click Monthly totals to show the totals all of the posted activity (that has been closed to a period) for the accounts in the active set by month for the current year.

Pasco Munis® End User, Version 10.1 Page 42
Totals
Click Totals on the Account Inquiry screen to show the combined totals for all accounts in the active set for transactions in closed and unclosed periods. Click Exit on the File menu to return to the previous screen.
2 Year Amounts This option is available if your organization uses biennial budgeting. Click 2 Year Amounts to show biennial budgeting details. If the biennial year is set to one (1), the current year and next year are summed; otherwise, the current year and last year are totaled.
GL Impact The general ledger is not affected by this program, as it is inquiry only.

Pasco Munis® End User, Version 10.1 Page 55
3.7 Year to Date Budget Report
Objective This document provides instructions for generating a Year-to-Date Budget report. The Year-to-Date (YTD) Budget report serves as a primary monthly budget report, but its flexible definition makes it suitable for special analysis purposes.
Overview The YTD Budget Report can be run for the following purposes:
• Report revenues collected to a specific period.
• Report expenses to a specific period.
• Report encumbrances to a specific period.
• Report current budget, expenditures versus carry forward budget, expenditures, and encumbrances.
• Report available budget from posted transactions or available budget from pending transactions.
• Report on fund balance position.
• Proof budget, encumbrance, expenditure, and revenue balances.
• Proof chart of accounts (COA) conversions and account balance conversions.
This report can also be run for the following years and periods:
• Three years prior to current fiscal year for periods 1-13.
• Two years prior to current fiscal year for periods 1-13.
• Previous fiscal year for periods 1-13 and for 99 (memo balance).
• Current fiscal year for periods 1-13 and for 99 (memo balance).
• Next fiscal year for periods 1-13 and 99 (memo balance).
This document covers the available options and how they affect the presentation of the displayed report.

Pasco Munis® End User, Version 10.1 Page 56
Procedure To create a year-to-date budget report:
1. Open the Year to Date Budget program. Financials > General Ledger > Inquiries and Reports > YTD Budget Report -or- Departmental Functions> YTD Budget Report
2. Click Search on the toolbar or use the Advanced/Segment Search option to identify accounts for the YTD Budget Report.
If you click Search, complete the fields according to the following table, and then click Accept on the toolbar.
Field Description
Account These boxes contain the org, object, and project (if applicable) codes for the general ledger account number for which to create a report.
Rollup Code This box stores the budget rollup code for the specified account. To search on a range of budget rollup codes, insert a colon (:) between the first and last codes in the search range. Use the asterisk (*) wildcard character to find all codes.
Rollup Year This box stores the fiscal year to include in the rollup. Rollup Program This list identifies the budget rollup program code. Account Type This list indicates the type of account: revenue or expense. You can select the
blank option to include all account types. Account Status This list determines the account status: active or inactive. You can select the blank
option to include both active and inactive accounts.

Pasco Munis® End User, Version 10.1 Page 57
If you click Advanced/Segment Find, complete the fields on the Segment Find screen, and then
click Accept on the toolbar.
For either search method, the program displays the number of records found.

Pasco Munis® End User, Version 10.1 Page 58
3. Click Report Options. The program displays the Report Options screen.
4. Complete the fields according to the following table to define the report settings.
Field Description
Execute This Report
This list allows you to use Munis Scheduler to process the report. • If you select Now to process the report immediately, click the Display, PDF,
Print, or Save button to view, print, or save the report. • If you select In Background (now) to process the report a single time using the
event log and e-mail notification features, or if you select At a Scheduled Time to establish a specific time when the report runs, the program uses Munis Scheduler.
Field # (Sequence 1 to 4)
These lists establish a particular component (segment, org, and object) of the account structure as a sort key for the print sequence. Sequence 1 is the primary sort key for all accounts on the report. Sequence 2 is the secondary sort, and so on. The default sort is by fund, org, character, and object. Object does not need to be defined if it is the lowest level of the report.
Total This check box, if selected, causes the report to print a subtotal line whenever the sequence changes. For example, org code may have been selected as part of the sort sequence so that the system prints a total whenever the org changes. If this check box is not selected, Sequence 1 Total Revenues and Total Expenses are suppressed for this level. If this check box is selected in Sequence 1 and in Sequence 4, there is no label on the last level.

Pasco Munis® End User, Version 10.1 Page 59
Field Description
Page Break This check box, if selected, causes the program to start a new page whenever the particular sequence changes. If this check box is not selected in Sequence 1, there is no label in the page header and this level has a header label like all other sequence levels.
Report Title These boxes contain the title for the YTD report. The default value for the first line of the title is Year-to Date Budget Report, but you can change this. You can enter up to 40 characters of text on the two lines of text. The title centers automatically when the report prints.
Print Options Tab
Field Description
Include Only Accounts That Used _% or Greater of Budget
This option indicates which accounts to include based on the percent of the budget used. For example, if you type 100 in this box, the report includes accounts with a percent used greater than or equal to 100. This includes accounts that have used the entire budget or have exceeded the budget. If the value of this box is 0 or greater, up to 100, the percent used is set to and prints on the report as 100% when the account has a zero revised budget and actual or encumbrance activity. Type a percent or leave this box blank to include all accounts.
Totals Only This check box, if selected, causes the report to print totals as described in the Field # Sequence selections. This means that the report does not include any accounts that are not entered in the Sequence boxes and does not include transaction detail. If none of the four sequence groups is selected, the report includes only a Grand Total.
Account Description
This list determines the description that prints next to the account: full or short. The full description contains up to 30 characters; the short description contains 10.
Print Full GL Account
This check box, if selected, directs the report to print the full account number with each segment separated by a dash. This prints instead of the org/object/project codes. This option is only accessible when the Totals Only check box is not selected.
Format Type This list determines the detail format option: Standard or Cents in Budget Amount. When you select Cents in Budget Amount, the Transfers/Adjustments and Revised Budget columns display cents.
Double Space This check box, if selected, causes the report to print in double-spaced format. This option is only accessible when the Totals Only check box is not selected.

Pasco Munis® End User, Version 10.1 Page 60
Field Description
Suppress Zero Balance Accounts
This check box, if selected, directs the report to exclude accounts that meet the following conditions: zero original budget, zero budget transfers, zero revised budget, zero actual, zero month-to-date actual, zero encumbrances, zero available budget, and if detail is selected, no detail for the reporting period.
Year/Period This list indicates the time period for which information for the budget report is selected. If you select Within Year/Period, you must complete the following boxes with a specific fiscal year and period. For the fiscal year, you can enter the current, next year (which must be period 99), the last year, last year 2, or last year 3. For the fiscal period, you can enter periods 1-13 and 99 (memo balance, which includes posted and pending transactions). For the current, next or last year, the report may be run for any period other than 00 (start-of-year), including memo balance (99). For 2 and 3 years prior, the report may only be run for periods 1-13. The default value for the period populates from the Current Year/Period field in Roll Accounting Period, but you can enter any period. Notes: • Any period includes entries for that period that have not been closed using
Month-End Processing. • Period 99 retrieves up-to-the-minute totals, using the Memo Balance field for
actuals, the Encumbrances field for encumbrances, and the Revised Budget field for Budget. Choosing Period 99 aligns the report to Account Inquiry reporting.
• Last fiscal year retrieves last-year figures. • Next fiscal year retrieves next-year actuals and encumbrances. If Post to
Master for Reports on the Budget menu has been run, next fiscal year also includes next year adopted budget.
• If the fund is a multiyear fund, the program calculates and displays the three budget field amounts (original appropriation, transfers/adjustment, and revised budget) as if the period selected were 99.
• If last year and period 13 is requested, current year carry forward budget is used for the encumbrance amount.
Print MTD Version This check box, if selected, causes the report to print a month-to-date column on the report. The MTD column is either MTD Expended or Actual MTD Revenue. If the MTD option is chosen, the Transfers/Adjustments column is omitted.
Roll Projects to Object
This check box, if selected, with project accounting is in use, causes to program to summarize all general ledger accounts that have a project code under their common org and object. Instead of each project account printing with its own descriptions, it is included under the org/object.
Carry Forward This list defines the report output as: • Totals (GAAP) - includes current year and carry forward activity. • Current year only - excludes activity related to encumbrance carry forward. • Carry forward only - Includes only activity related to encumbrance carry
forward. The default value is Totals (GAAP), but you can change this option for any period in the entered year.
Print Report Options
This check box, if selected, causes the program to append the Search criteria and report option settings at the end of the report.

Pasco Munis® End User, Version 10.1 Page 61
Additional Options Tab
Field Description
Include Requisition Amounts
This check box, if selected, causes the program to add requisition amounts to the report and to rename the Encumbrances column to Enc/Req to reflect this. This check box is accessible for only current year and next year reporting and when period 99 is chosen. The Available Budget column is affected as it uses the encumbrance amount in its calculation.
Print Revenues - Version Headings
This check box, if selected, causes the program to print the revenue-related column headings versus the standard column headings. Select this check box to print revenues-version headings. There is no encumbrances column.
Print Revenue as Credit
This check box, if selected, causes the report to print revenue accounts as credits. This check box is available when the report is being run for just revenue accounts. If not selected, the report prints revenue account balances without the minus sign.
Print Revenue Budgets as Zero
This check box, if selected, indicates to the program that revenue budget amounts should print as zero.
Include Fund Balance
This check box, if selected, indicates to the program that fund balance summary information is included. If you select this option, the fund balance summary prints at the end of each fund. This check box is only accessible if there are both revenue and expense accounts in the active set and the Field # in Sequence 1 is Fund.
Sort/Total Budget Rollup
This check box, if selected, causes the program to display the budget rollup code totals in the report. This check box is only accessible if the Rollup field is completed on the main YTD Budget Report screen.
Print Journal Detail This report, if selected, causes the program to extract detail transactions from the GL Journal Hold and GL History tables and prints these detail lines for each account. When printing journal entry detail, SOY entries are treated like purchase order entries. These SOY entries are the encumbrance entries for purchase orders carried over into the current year from last year. To include the SOY journal entries, you must use a starting period of 0.
Include Budget Entries
This check box, if selected, causes transaction type 5 journal entries to be included in the detail of the report.
Include Encumb/Liq Entries
This check box, if selected, causes transaction type 4 (encumbrance) journal entries to be included in the detail of the report.
Sort Option This options determines the sort order if the Print Journal Detail check box is selected; sort options are journal entries or purchase orders.
Pasco Munis® End User, Version 10.1 Page 62
Field Description
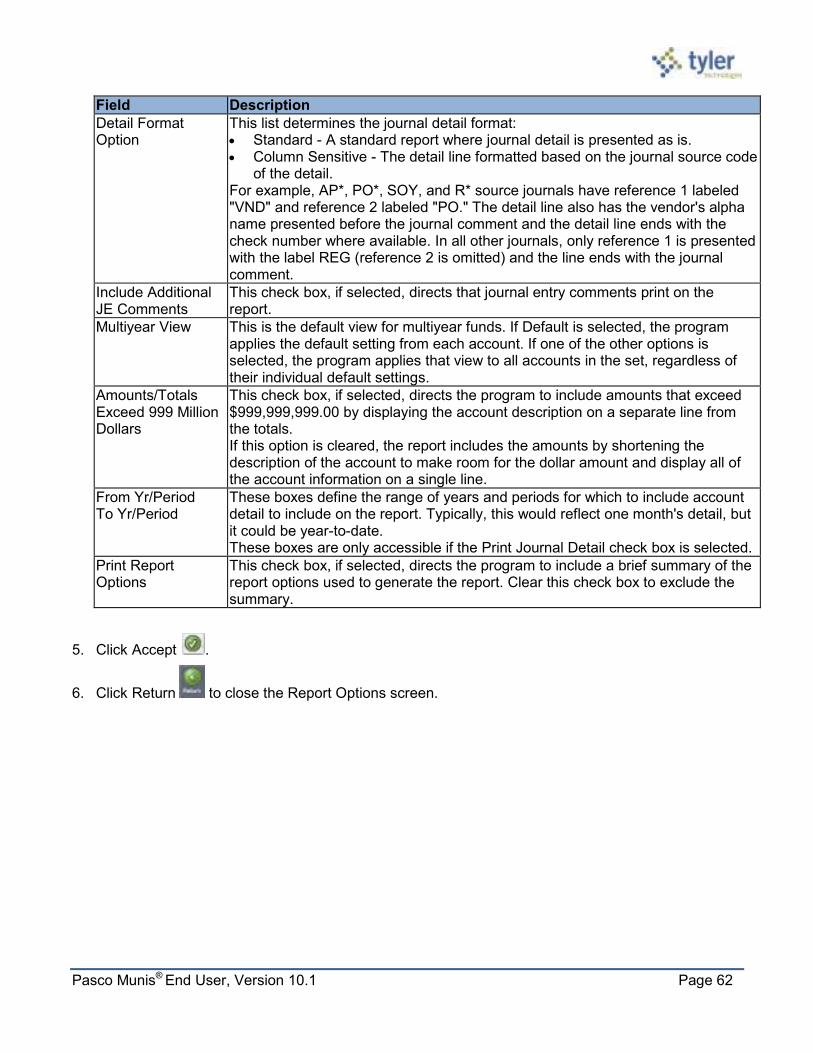
Detail Format Option
This list determines the journal detail format: • Standard - A standard report where journal detail is presented as is. • Column Sensitive - The detail line formatted based on the journal source code
of the detail. For example, AP*, PO*, SOY, and R* source journals have reference 1 labeled "VND" and reference 2 labeled "PO." The detail line also has the vendor's alpha name presented before the journal comment and the detail line ends with the check number where available. In all other journals, only reference 1 is presented with the label REG (reference 2 is omitted) and the line ends with the journal comment.
Include Additional JE Comments
This check box, if selected, directs that journal entry comments print on the report.
Multiyear View This is the default view for multiyear funds. If Default is selected, the program applies the default setting from each account. If one of the other options is selected, the program applies that view to all accounts in the set, regardless of their individual default settings.
Amounts/Totals Exceed 999 Million Dollars
This check box, if selected, directs the program to include amounts that exceed $999,999,999.00 by displaying the account description on a separate line from the totals. If this option is cleared, the report includes the amounts by shortening the description of the account to make room for the dollar amount and display all of the account information on a single line.
From Yr/Period To Yr/Period
These boxes define the range of years and periods for which to include account detail to include on the report. Typically, this would reflect one month's detail, but it could be year-to-date. These boxes are only accessible if the Print Journal Detail check box is selected.
Print Report Options
This check box, if selected, directs the program to include a brief summary of the report options used to generate the report. Clear this check box to exclude the summary.
5. Click Accept .
6. Click Return to close the Report Options screen.

Pasco Munis® End User, Version 10.1 Page 63
7. On the main screen, click PDF or Display to display your report. Note: report can be saved or printed from pdf.
Your report displays according to the report options that you selected.
Results You can now analyze what transactions have occurred within your search and sequence settings, confirm that a budget was posted correctly, proof your chart of accounts, or look at transactions for a specific period.
GL Impact The general ledger is not affected by this action.

Pasco Munis® End User, Version 10.1 Page 175
6.2 Requisition Entry
Objective This document provides instruction on how to enter a requisition into the Munis Requisition Entry program. This document is intended for all users responsible for entering requisitions.
Overview By entering a requisition, you are requesting funds to make a purchase. As soon as the requisition is entered, the funds for the purchase are set aside, or pre-encumbered, for the specified general ledger expense account. When the requisition is released, it moves through the approval process, after which it is converted into a purchase order. All requisitions will be reviewed and approved by the appropriate authority prior to being converted to a purchase order. Invoices will be entered against the PO and will liquidate the funds set aside, creating an actual expense.
Procedure NOTE: When you choose “Switch Form” there are several options, and your choice should be based on the type of Requisition you are processing. The available fields will vary depending on the form you use, but all fields are listed below for the purposes of this document.
o A-VENDOR to be used for Vendor Purchases o B-WHSE to be used to request Inventory Items o C-FNS to be used by Food Service to order off contracts

Pasco Munis® End User, Version 10.1 Page 176
To create a requisition:
1. Open the Requisition Entry program. Financials > Purchasing > Purchase Order Processing > Requisition Entry -or- Departmental Functions > Requisition Entry
2. Click Add on the ribbon.

Pasco Munis® End User, Version 10.1 Page 177
3. Complete the fields, as required, to define the requisition details. Refer to the following table for specific field information.
Field Description Pasco County School District, FL
Main Information
Dept/Loc This box contains the department or location responsible for the requisition.
This will default based on the user setup but can be overridden if necessary to assign the requisition to the correct department.
Fiscal Year Current or Next
The box identifies the fiscal year in which the requisition is created. This option can be the current or next year; the program automatically highlights Current or Next when you type the four-digit year.
Accept the current year default or manually key the four digit year to indicate this is a next year requisition. Permissions will control whether a user is eligible to enter a year other than current.
Requisition Number This box identifies the requisition number.
The District will set requisition numbers globally, starting with number one and will increment sequentially.
General Commodity This box specifies the general (type 2) commodity for the requisition. Press Tab to leave this box blank if your organization does not use commodity codes. Codes entered in this box must exist in the Commodities program.
Required by PCS Select the general (type 2) commodity for the requisition.
General Description This box contains a general description for the order. The description can contain up to 50 alphanumeric characters.
General description will default based on selected commodity.
Status This list indicates the current status of the selected requisition. This box is accessible when you click Search to locate a record.
Displays the current status of the selected requisition. This field is only accessible when you click the search button.
Entered This box displays the date that the requisition is created.
Displays the date that the requisition is created.
By This box displays the user ID of the person who enters the requisition. When you are adding or updating a record, the program completes this box automatically, and you cannot change the entry. This box is accessible when during the Search process; type a user ID to find only those requisitions entered by that specific user.
Displays the user ID of the person who enters the requisition
Project Accounts Applied This check box indicates that project account strings have been applied to the requisition.
Check this box if project account strings should be applied to the requisition.

Pasco Munis® End User, Version 10.1 Page 178
Field Description Pasco County School District, FL
Three Way Match Required
This check box, if selected, indicates that a three-way match will be required for the purchase order that will be created from this requisition. This check box does not have any actual effect at the requisition level, but affects payment on the subsequent Invoice.
This check box will default as checked based on Accounts Payable settings. Three way match will be required for all purchase orders, except Blanket Purchase Orders.
The General Notes can be used for entering notes relating to the Requisition
PCS will use General Notes for the entry of Internal Notes, and they will not print on the Vendor’s Purchase Order. Note: upon entry of notes, the folder will be yellow, indicating notes are available for review.
Vendor Information
Vendor This box identifies the vendor from whom you are requesting the requisition items. You can type a vendor number, or you can click the
field help button to select a vendor. If the Enforce Bid Defaults check box in Bid Management Roles is selected, only awarded vendors can be entered. The Committed Vendor check box, if selected, indicates that the vendor is designated as a sole source for the commodity. The information in Vendors provides the default value for this box, and you cannot change this.
Select the vendor from whom you are requesting the requisition items. You can type a vendor number, or you can
click the field help button to select a vendor. Enforce Bid Defaults will not be applicable until the District implements the Munis Bid module.
Committed This check box indicates that the selected vendor is a committed vendor, either because of a bid, or a contract. The check box is automatically selected or cleared based on the vendor and commodity code and cannot be manually updated.
This check box indicates that the selected vendor is a committed vendor, either because of a bid, or a contract.
Name This is the vendor's name, which is automatically entered based on the vendor number selected.
Vendor's name is automatically entered based on the vendor number selected.

Pasco Munis® End User, Version 10.1 Page 179
Field Description Pasco County School District, FL
PO Mailing This box identifies the vendor's address to be used for mailing purchase orders.
Confirm you have selected the correct PO Mailing address as multiple addresses can be stored for each vendor. To select an address different from default, enter the remit address number that should be used for PO mailing.
Delivery Method This is the desired delivery method for the completed purchase order. The default values of these check boxes are drawn from the vendor record. The E-Procurement option indicates that the purchase order will be submitted via the vendor's online shopping interface. This option is only available if your organization has selected the Use Individual Vendor's Settings check box in Purchase Order Settings.
The desired delivery method for the completed purchase order will default from the Vendor record. The E-Procurement option will not be applicable until the District implements the Munis E-Procurement process.
Remit This box specifies the address to which payments should be sent. The default value is zero if the vendor does not have any remit addresses on record; otherwise the default value is one. Values are zero or any existing remit address number for that vendor. When liquidating a purchase order in the Invoice Entry program, if the remit address number is greater than 0, the remit address entered in this field is the default value on the invoice.
If you know, select the address to which payments should be sent. If not, the system will default a value of 0 (PO Mailing Address) if the vendor does not have any remit addresses on record; otherwise the default value is one (first Vendor Remit Address on the Vendor record.)
PCS will enter notes intended for the
Vendor, and click so they will print on the Vendor’s copy of the Purchase Order. Note: upon entry of notes, the folder will be yellow, indicating notes are available for review.
PCS will not use Vendor Quotes.
Shipping Information
Ship To This is the location to which the item should be delivered.
Ship To will default based on the department entered but can be overridden if necessary.

Pasco Munis® End User, Version 10.1 Page 180
Field Description Pasco County School District, FL
Email This is the contact e-mail address for the shipping location.
Shipping contact email address will default from the department’s Ship To settings based on the department code entered but can be overridden if necessary.
Reference This is the name to reference on the vendor's shipping document. You can enter up to 30 characters in the box.
Optional, but recommend entering the name of the individual the order is for.
Terms
Discount % This is the vendor's standard discount percent, if applicable. The default value is the percent established in Vendors, but you can change this according to current arrangements.
Enter the vendor’s standard discount if applicable to the entire requisition.
Freight % This is the percentage of the order that the vendor charges for shipping, if applicable. If the selected vendor has a standard freight percent identified in Vendors that is the default value; otherwise it is 0.
Enter the % of freight, and Munis will calculate the freight amount applicable for each line entered. Note: If Freight is an amount, and not a %, that amount must be entered on the individual line item on the Line Detail.
Miscellaneous
Review This list determines the requisition's review process.
Select the appropriate review code, if applicable: • BD Board Approval • PP Pre-paid Requisition • RV Return Vendor Copy of PO
Type This list identifies the type of requisition: • Normal - Purchase order for
specific goods or services. • Blanket - A purchase order that is
intended to be used over a long period of time.
• Dept/Emergency - Purchase order that must be rushed.
• RFP/Bid - A request for proposal or bid.
Select the requisition type: • Normal - Purchase order for specific
goods or services. • Blanket - A purchase order that is
intended to be used over a long period of time.
• Dept/Emergency - Purchase order that must be rushed. (With the appropriate permissions)

Pasco Munis® End User, Version 10.1 Page 181
Field Description Pasco County School District, FL
Notify Originator When Converted to PO
This check box, if selected, directs the program to send an e-mail to the employee who entered the requisition that it has been successfully converted to a purchase order. If the Notify Originator When Requisition is Rejected or Converted to a PO check box in Department Codes is selected, this option is selected as well, but you can change this.
PCS will check this box to notify originator when converted to a purchase order.
Notify Originator of Overages
This check box, if selected, causes the program to notify the requester when a requisition has liquidations greater than the specified amount.
PCS will check this box to notify originator when purchase order liquidations are greater than the specified amount.

Pasco Munis® End User, Version 10.1 Page 182
Contract
Number This box contains the contract number associated with the selected commodity. When a commodity with a posted contract number is entered, the contract number is the default value for the Contract box in Requisition Entry and PO Entry. The general ledger accounts entered must be the same as the accounts entered on the contract. You can enter a contract that has an existing change order. If the change order decreases the contract amount, you cannot exceed the open amount for the account on the change order. If you try, the program displays a message with the dollar amount that you cannot exceed. If a rejected requisition is reactivated, the program checks the contract open amounts for each general ledger allocation. If the contract has a change order against it and the change order is decreasing the contract amount, the program checks the change order open amount for each allocation. If a requisition allocation exceeds the contract or change order open amount, the program marks the allocation with an X and you must either modify the requisition line to a lesser amount or modify the contract. If you change the Year/Per value in the Contract Change Orders program from next year to the current year, the program updates the corresponding requisition year, allowing you to process current year contracts.
Enter a Munis contract number if it should be associated with this requisition.
4. Click Accept to save the header information. The program displays the Line Detail screen.

Pasco Munis® End User, Version 10.1 Page 183
5. Begin entering the line detail information for your requested line item. Press Tab to move through the fields.
Field Description Pasco County School District, FL
Requisition
Fiscal Year This box indicates the fiscal year in which the requisition was entered. The year is display only.
Defaults
Number This box displays the requisition number entered on the main Requisition Entry screen. This number is display only.
Defaults
Line This box provides the item's sequence in the requisition. This number is assigned by the program and you cannot change it.
Defaults
Detail
Quantity This box specifies the order quantity for a single line item in the requisition. The program multiplies the number entered here by the unit price of the line item to calculate the net cost. The default quantity value is 1, but you can change this.
Enter correct quantity for line item.

Pasco Munis® End User, Version 10.1 Page 184
Field Description Pasco County School District, FL
Commodity This box identifies the detail (type 4) commodity code for the item. Press Tab to leave this box blank if your organization does not use commodity codes. The default value for the commodity code is based on the inventory item entered provided that an item/commodity relationship exists and that the commodity code box was initially left blank. If there is a default value for the commodity code, there are default values for the unit price and UOM as well.
Click the field help button , highlight the appropriate Detail Commodity Code, and then click
Accept .
Inventory Item This box specifies the item number. If it is an inventory item, the default value is entered from the Inventory Items program. If you add an inventory item to a requisition that is to become a pick ticket, if the inventory method is first-in/first-out, and there is insufficient quantity-on-hand of that item to calculate the unit price, the program estimates the unit price according to one of the following: If the quantity on hand is zero, the program estimates the unit price based on the last purchase cost of the time at the entered location. If the quantity on hand is greater than 0 but less than the order quantity, the program estimates the cost based on the current quantity on hand.
If the requisition should become a pick ticket, enter the inventory item number. INVENTORY REQS ONLY
Inventory Location
This box indicates the location of the inventory item. The Location box allows for the entry of an inventory item location and is required if you enter an inventory item. When an entry is made in the Location box, the first location code for the selected inventory item displays. The location code (if applicable) displays on printed pick tickets.
The location of the inventory item will default. INVENTORY REQS ONLY
Type This option determines the item type: pick ticket or purchase order. Depending on this selection, the line becomes either a purchase order line item or an inventory pick ticket.
Depending on this selection, the Requisition becomes either a purchase order line item or an inventory pick ticket.

Pasco Munis® End User, Version 10.1 Page 185
Field Description Pasco County School District, FL
Unit Price This box contains the unit price of the goods or services specified on the line item. The program multiplies this amount by the quantity to calculate the line item total. For pick ticket lines, the unit price is entered from Inventory Items. The program uses the default value from the commodity code, which you can only override if you have been assigned permission to do so in Requisition Roles.
Enter the unit price of the goods or services specified on the line item.
UOM This box indicates the unit of measure to be printed for the line item. The value of this box does not affect the calculation of the Item Total. The default value for the UOM displays from the Commodities program for purchase order items; for pick ticket lines, UOM is entered from the Inventory Items program.
Enter the unit of measure to be printed for the line item. If applicable, the default value for the UOM displays from the Commodities program for purchase order items; for pick ticket lines, UOM is entered from the Inventory Items program.
Freight This box indicates the freight charge, if applicable. The amount entered is automatically added to the item total. The value of this box prints on the requisition and resulting purchase order.
Enter the Freight Amount for this line item, if applicable.
Discount Percent
This box identifies the vendor discount for this line item, if applicable. The program calculates the discount and reduces the item total by that amount. The discount prints on the requisition and resulting purchase order.
Enter the vendor discount for this line item, if applicable.
Credit This box records a trade-in or credit. When you enter an amount, the program reduces the line item total by the credit amount. You can enter a credit of up to 9,999.99 or until the line item total is reduced to zero. This credit prints on the requisition and resulting purchase order. Enter reasons for the credit in the Description box.
PCS will use this field to enter flat $ amount discounts, when a % discount is not applicable.
Line Item Total This box displays the total amount for the current line item. This amount is display only.
Displays the total amount for the current line item.

Pasco Munis® End User, Version 10.1 Page 186
Field Description Pasco County School District, FL
Description This box provides an item description. The description can contain up to 210 alphanumeric characters. Click the Add’l Desc Notes button to add more information.
This description should be specific to the line item being requested. This could be a catalogue number or a manufacturer item number. The Description will default from the Commodity Code, if applicable; however, Mfg/Product # must still be entered.
Miscellaneous
Vendor This box identifies the vendor from which to order the commodity.
This is the primary vendor from the requisition header. Note: will be left blank for a Warehouse order.
Email This box displays the selected vendor's default contact e-mail address. This address defaults from the vendor record.
Defaults if on vendor record.
1099 Box This list specifies the 1099 Box code. If the 1099 Default box for the Object Code segment the Chart of Account Segments program has been completed, the program completes the value. If the 1099 Default box in the Chart of Account Segments program is blank, the default value for this box displays from the Vendors program.
PCS End Users will make no changes to this field.
Bid This box identifies the bid number, if applicable. To update bid details, including the commodity, click the folder button to open the Create Bid Master program. If the Enforce Bid Defaults check box in Bid Management Roles program is selected, any information previously entered on the bid (such as unit price or discount) cannot be changed.
Bids will not be applicable until the District implements the Munis Bid module.

Pasco Munis® End User, Version 10.1 Page 187
Field Description Pasco County School District, FL
Dept/Loc This box indicates the department/location code of the requesting department. The default value is entered according to the department code associated with your user ID, but you can change this if you are authorized to order items for more than one department. If the department code is changed while adding or updating a requisition, the program displays a replacement confirmation message. Click Yes to replace the current data with the new department's defaults. To enter an inventory location, you must have full permissions to do so; permissions are granted in the Inventory Roles program. You must have either full permissions or pick ticket-only permissions to create a pick ticket from a requisition. When you complete the location code, the program displays a message that indicates if a location is restricted to pick tickets only. If you enter an inventory location for which you have Create Pick Tickets from Reqs Only permissions, the default value for Type is Pick Ticket and you cannot change this.
The default value is entered according to the department code associated with your user ID, but you can change this if you are authorized to order items for more than one department.
Required By This box specifies the date by which the goods or services in this requisition are needed.
PCS will not use.
Requested By This box contains the user ID of the person who requested the item. The value of this box must be a Munis user.
Optional. Enter the user ID of the person who requested the item.
Fixed Asset This list indicates if the item is a fixed asset (Y), a master fixed asset (M), or not a fixed asset (N). If the Fixed Asset check box in the Chart of Account Segments program for the Object Code segment is selected and the entry amount is equal to or greater than the value of the Fixed Asset Amount in Chart of Account Segments, Yes is the default value for this box when you are adding or updating a record. Otherwise, the default value is No. If the fixed asset amount value from Chart of Account Segments does not apply, Yes or No carries forward from the Commodities program, but you can change this. The value of this box is based on the object code entered if the Commodity box is blank.
Indicates if the item is a fixed asset (Y), a master fixed asset (M), or not a fixed asset (N). Flag will default based on GL object code.

Pasco Munis® End User, Version 10.1 Page 188
Field Description Pasco County School District, FL
WO Number This box specifies a work order number, which is applicable only if the line detail item is for a work order. The program automatically allocates the line detail to the work order. Work order numbers apply if your organization uses Munis Work Order, Fleet, and Facilities.
WO Number is not applicable until the District implements the Munis Work Order module.
WO Task This box indicates the task code from the associated work order. Work order tasks apply if your organization uses Munis Work Order, Fleet, and Facilities.
WO Task is not applicable until the District implements the Munis Work Order module.
Notify Buyer This check box, if selected, directs the program to notify the buyer when the item is received. If an inventory item number is entered and the type is a Pick Ticket (I), there is no access to the Notify Buyer check box. To use the notification functionality, there must be an accurate e-mail address in the E-mail Address box in User Attributes.
Optional. PCS will not check this box.
Once you have entered the required line detail information, press Tab to move to the GL Allocation section on the Line Detail screen. This section contains the general ledger expense accounts that are to be charged for the specific line items.
Field Description Pasco County School District, FL
Seq This box displays is the sequence number assigned to the line item by the program.
Display only
Project Account This box contains the project account number, if applicable.
Enter the project ledger account if applicable, or Click the field help button
, highlight the appropriate Project
Account, and then click Accept .
Account These boxes provide the org, object, and project codes for the general ledger account number for the requisition. The program completes the account description when you enter an account number.
Enter the general ledger account number for the requisition, or click the field help
button , highlight the appropriate general ledger account, and then click
Accept .
Amount This box contains the total value of the line item. This calculation assumes the cost of the line item is being allocated to a single expense account. Adjust this to distribute the cost over multiple allocation lines (for example, expense accounts), if desired, but the total of the allocation lines must equal the line item total.
The total line item amount will default, manually adjust if you are allocating to multiple lines.

Pasco Munis® End User, Version 10.1 Page 189
Field Description Pasco County School District, FL
PA Bud This box indicates the project account status for the line item, if applicable.
Defaults after budget checking against the account.
GL Bud This box indicates the budget status for the line item. A budget allocation code of A indicates that the line item is approved, regardless of budget level. A value of U indicates that the account is under budget.
Defaults after budget checking against the account.
6. Enter the general ledger expense accounts to which to charge the item. You can either type
account number or click the field help button in each box to select the appropriate account.
7. To allocate the line item amount to more than one general ledger account, enter the amount to expense to the first general ledger expense account, and then press Tab to move through the remaining fields for the current line, and then to the next account line, where you can enter another expense account and amount. Repeat these steps as many times as needed, until the total amount allocated to expense accounts equals the total cost for the line item. Note: Requisitions for Inventory Items can only be charged to one account. Should you need to purchase Inventory Items from a different account for a different department, a separate Requisition must be entered.
8. When all general ledger accounts are added, click Accept to save the detail.
9. If you have additional items to order, repeat the process for each item that you add to the
requisition. Note: You can use the function to copy a previously entered line item, and updating it.
10. Once you have completed adding all of your requested items, click Return to return to the main Requisition Entry screen.
11. Click the Release option in the ribbon to submit the requisition and initiate the approval process.
12. Once you have released the requisition for approval, you will be able to view the requisition, but will not be able to make any further changes to it unless it is rejected through the approval process.

Pasco Munis® End User, Version 10.1 Page 190
Results Approval Status
1- Rejected: The requisition has been rejected by an approver. Click the Approvers button to view the rejection comments. To update a rejected requisition, click the Activate button.
2- Created: The requisition header (general) details have been entered, but general ledger (GL)
details have not been entered, or, the requisition has header and GL detail, but does not have the appropriate budget to move it to a Status 4. In this case, a budget transfer must be made and posted, after which, you can click the Allocate option to move the requisition to a status 4–Allocated.
4- Allocated: The requisition has been entered and has been allocated (charged) to a general
ledger account, therefore money is being taken from available budget. The requisition has not been released into Workflow. A requisition must be in a status 4–Allocated to be released into Workflow; click Release to initiate the Workflow process.
6- Released: The requisition has been released into Workflow and is awaiting approval. Click the
Approvers button to see the current approval status. 8- Approved: The requisition has been fully approved in Workflow and is ready to be converted to
a purchase order. 0- Converted: The requisition has been converted to a purchase order. The number is included
on the Terms/Miscellaneous tab in Requisition Entry.
Status Change With Workflow in place, a released requisition has a status of 6–Released. To see the approval process at any point, click the Approvers button on the Workflow group of the Requisition Entry screen.
Requisitions must be successfully approved by all approvers prior to being converted to into a purchase order. Once a requisition is approved, it is eligible to be converted into a purchase order. When your requisition has been converted to a purchase order, you receive a confirming e-mail.
GL Impact At the time a general ledger account is allocated to a line item in a requisition, the available budget for that account is reduced by the corresponding amount.
What’s Next? The requisitions will go through an approval process and must be successfully approved by all approvers prior to being converted to into a purchase order.

Pasco Munis® End User, Version 10.1 Page 192
6.3 Requisition Approval
Objective This document provides instruction for approving released requisitions. It is intended for personnel responsible for approving requisitions.
Overview The Workflow Detail Web part, in conjunction with the Workflow business rules, establishes an electronic approval process for requisitions. When a requisition is released in Munis, the requisition is submitted to an approval process. The requisition must be approved by all necessary approvers in order for it to be converted into a purchase order or contract. This document describes the approval process using the Tyler Dashboard Workflow Detail Web part.
Procedure To process a single requisition:
1. Open the Tyler Dashboard. On the My Workflow Detail Web part, the Approvals image indicates if approvals are required.

Pasco Munis® End User, Version 10.1 Page 193
2. In the Requisitions Pending Approvals group, click the Viewer button for the requisition to approve.
The program opens the Requisition Entry program, with the selected requisition as the active record.
3. Review the requisition, paying careful attention to details included in the General Notes and Vendor Sourcing Notes. Note: all Vendor Sourcing Notes should be flagged to “Print on PO”. To view the line detail for each line item, click the Line Detail option.
4. When you have completed the requisition review, close the Requisition Entry program and return to the Tyler Dashboard.
5. Click the Information button to view additional workflow details for the item.

Pasco Munis® End User, Version 10.1 Page 194
The program displays the Work Flow – Additional Information screen.
6. Click Update to complete workflow action for the item.
The program displays the WorkFlow Update screen.
7. Select the appropriate action, and then click OK.
Option Description
Approve Approve the requisition. Select Approve and click OK. This approves the requisition as recommended and forwards to the next approver. When all approvers have approved, Purchasing personnel are notified.
Reject Change the status of the requisition to Rejected. Munis requires that you add a comment for your action. When you click OK to save your comment and reject the requisition, the program notifies the originator of the rejection and the reason.
Forward Forward the requisition to another Workflow approver. The program prompts you to provide a comment for your action. To complete the forward, select the Workflow approver from the list and then provide a comment in Comment box. When you click OK to save the forwarding information, the program forwards the requisition to the new approver.

Pasco Munis® End User, Version 10.1 Page 195
Option Description
Hold Allows you to keep the requisition in your approval queue. A comment is required for this action. To place a requisition on hold, enter a comment and then click OK to hold the approval process. The held requisition will remain in the Workflow Requisition Approval folder until action is taken.
The program displays an approval confirmation.
To approve multiple requisitions using the Tyler Dashboard:
1. Click the Viewer button for each item to view the requisition details in the Requisition Entry program.
2. Once all the requisition records are reviewed, select the Action check box for each item for which to complete a workflow action.

Pasco Munis® End User, Version 10.1 Page 196
3. Click the Update button.
The program displays the Workflow Update grid.
4. Select the applicable action for each item, and then click OK. If you select Reject, Forward, or Hold for any of the items, the program requires that you enter a reason for the action.
5. Enter the reason, and then click OK again. The status of rejected requisitions is changed from 6–Released to 1–Rejected. The status of approved requisitions remains at 6–Released until the approval of the final step in the approval process. At that time, the status changes to 8–Approved. Requisitions with a status of 8–Approved are eligible for conversion to purchase orders. Rejected requisitions may be corrected by the originators, and resubmitted to the approval process.
Results The requisition has completed the approval process.

Pasco Munis® End User, Version 10.1 Page 197
Status Change The status of rejected requisitions is changed from 6–Released to 1–Rejected. The status of approved requisitions remain at 6–Released until the approval of the final step in the approval process. At that time, the status changes to 8–Approved.
What’s Next? Requisitions with a status of 8–Approved are eligible for conversion to purchase orders.
Rejected requisitions may be corrected by the originators and resubmitted to the approval process.

Pasco Munis® End User, Version 10.1 Page 198
6.4 Purchase Order Receiving
Objective This document provides instructions on how to record the receipt of items using the Munis Purchase Order Receiving program.
Overview The purpose of creating a receiving record is to document that goods that have been ordered have been received before invoices are paid. Entering these records allows Accounts Payable personnel to match the purchase order, purchase order receiving record, and the accounts payable invoice to ensure that all pieces match prior to payment to the vendor. You may receive each item individually or you may receive all items at one time. Departments should scan packing slips and attach the document to the PO Receiving record using the Munis camera (TCM) functionality. PCS will require that PO Receiving records exist for all invoices that are presented for payment prior to processing.
Procedure To receive individual lines (partial receipt) of a purchase order:
1. Open the Munis Purchase Order Receiving program. Financials > Purchasing > Purchase Order Processing > Purchase Order Receiving
2. To add a new receiving record, click .

Pasco Munis® End User, Version 10.1 Page 199
3. Complete the following fields in order to create a PO Receiving Record.
Field Description Pasco County School District, FL
Purchase Order
PO Fiscal Year This box identifies the fiscal year associated with the open purchase order. When you are adding entries, the default value is the current year, but you can change this for next year purchase orders. You cannot change this value when updating a record.
The default value is the current year, but you can change this for next year purchase orders.
PO Number This box specifies the open purchase order against which orders will be received. You can type a specific purchase order number or
click the field help button to select a purchase order from a list of open purchase orders.
Enter specific purchase order number or click the field help button
to select a purchase order from a list of open purchase orders. Users will be restricted by departments.
Line # This box specifies the detail line number representing the received material or service. You can type a specific line number for the purchase order or click the field help button to select a purchase line from a list.
Enter a specific line number for the purchase order or click the field help button to select a purchase line from a list.
Vendor This box contains the number for the purchase order vendor, which comes from the selected purchase order. There is no access to this box when you are adding a record.
There is no access to this box when you are adding a record.
Vendor Alpha This box identifies the purchase order vendor by name. There is no access to this box when you are adding a record.
There is no access to this box when you are adding a record.
Item This box contains the inventory item number for the item being received. There is no access to this box when you are adding a record.
There is no access to this box when you are adding a record.
Bid # This box identifies the number of the bid associated with the purchase order. If a bid exists, the program completes this box when you enter a purchase order number. There is no access to this box when you are adding a record.
Non- Applicable
Description This box displays the purchase order description as entered in Purchase Order Entry. The program displays the description when you enter the purchase order number. There is no access to this box when you are adding a record.
The program displays the description when you enter the purchase order number.

Pasco Munis® End User, Version 10.1 Page 200
Quantity
Ordered, Received to Date, Remaining, Invoiced
These fields indicate the total quantity of items ordered, received to date, remaining, and invoiced for this purchase order. There is no access to these boxes when you are adding a record.
These fields indicate the total quantity of items ordered, received to date, remaining, and invoiced for this purchase order.
Received Tab
Received Details
Quantity This is the quantity of the commodity that has been received. If the Enforce Invoice Variance Amounts in PO Receiving option is selected in Purchase Order Settings, the program will not allow you to enter a quantity that falls outside the defined variance threshold. The variance amount is defined in Accounts Payable Settings.
Enter the quantity received If entering receipts on a Blanket PO with a quantity of 1, tab pass quantity and enter the dollar value for the amount received.
Dollar Amount This is the dollar amount of the received quantity. You can leave the default value, which comes from the selected purchase order, or type a dollar amount.
These fields indicate the total quantity of items ordered, received to date, remaining, and invoiced for this purchase order.
Date This is the date the commodity was received. You can type the date in the box, click the calendar button to select the date, or leave the default date, which is the current date.
Enter the date the items were received. You can type the date in the box, click the calendar button to select the date, or leave the default date, which is the current date.
Packing Slip # This is a packing slip number for each purchase order line number received.
Enter the packing slip number for each purchase order line number received, if available.
Fixed Asset # This is the fixed asset number for each purchase order line number received, if applicable.
Optional
By (user id) This box indicates the user ID of person who created the receiving record. The program completes this value; this is a display-only field.
The program completes this value; this is a display-only field.
Comments These are internal comments about the commodity you have received. For example, “Order is not completely received. Waiting on 10 more items.” These comments do not print on the invoice liquidation proof or the check stub.
Optional- Enter internal comments about the items received.

Pasco Munis® End User, Version 10.1 Page 201
Quantity Invoiced This is the quantity that is returned. Returned items are expected to be reshipped at a later date. The returned quantity does not affect the open purchase order. If using Munis 3-way match, the program may supply a default value when the invoice is entered. No access to this box.
No access to this box.
Fully Invoiced If this check box is selected, it indicates that the quantity is fully invoiced. If using Munis three-way match, the program may update this check box with the default status (selected or cleared) when the invoice is entered. The program completes this check box; it is not accessible.
The program completes this check box; it is not accessible.
Close PO This check box indicates that the purchase order has been completely fulfilled, and that the purchase order should be closed after the invoice associated with this receiving record has been paid
Check this box if you wish to close the purchase order after the invoice associated with this receiving record is paid.
Returned Tab
Quantity This box indicates the quantity that is returned if items were returned. Returned items are expected to be reshipped at a later date. The returned quantity does not affect the open purchase order. The quantity is for informational purposes only.
Informational only- The program completes this check box; it is not accessible.
Comments This box contains any internal comments explaining why the order was returned.
Optional- enter any internal comments explaining why the order was returned.
4. Click Accept when complete to save the record.

Pasco Munis® End User, Version 10.1 Page 202
6.4.1 Using Quick Receipt Entry If you have a purchase order that has many lines and you wish to receive against all or most of the lines at the same time, use the Quick Receipt option:
1. Open the Munis Purchase Order Receiving program. Financials > Purchasing > Purchase Order Processing > Purchase Order Receiving
2. Click Quick Receipt. The program opens the Purchase Order Receiving Quick Receipt screen.
3. Type the fiscal year, purchase order number, or both, for the open purchase orders, and then click
Accept .

Pasco Munis® End User, Version 10.1 Page 209
6.5 Purchase Order Change Orders
Objective This document provides instructions on how to process a purchase order change order using the Purchase Order Change Orders program.
Overview This program allows users to process PO change orders. A purchase order change order allows for change requests to be made with workflow approvals. The changes are not reflected on the purchase order until approved. Purchase Order maintenance requests ("change orders") will be decentralized with the appropriate workflow. PCS change orders primarily will be used for items discontinued & to add shipping.
Prerequisites Before you can successfully complete this process, you must ensure that roles granting the necessary permissions have been assigned to your user account. If the roles have not been established, contact the system administrator to have them updated or added into the Munis system. Confirm the following:
• The Allow Workflow in PO Change Orders check box is selected in the Purchase Order Settings program.
Procedure The purchase order change order process includes cancelling and closing purchase orders.
Changing a Purchase Order To enter a change order:
1. Open the Purchase Order Change Orders program. Purchasing > Purchase Order Processing > Purchase Order Change Orders
2. Click Search on the ribbon and enter the PO number and Fiscal Year of the PO to be modified.
3. Click Accept .

Pasco Munis® End User, Version 10.1 Page 210
4. The program displays the selected purchase order. The status for the Change Order option is N-None.
5. Click Update on the ribbon to make any required changes on the PO header screen.
6. Click Accept to save the changes.
7. Click the Line Detail option on update the details.

Pasco Munis® End User, Version 10.1 Page 211
8. The program displays the Line Detail screen.
9. Click Update and make changes to the quantity, amount, or account lines as needed.
10. Click Accept to save the changes.

Pasco Munis® End User, Version 10.1 Page 212
11. Click Exit on the File menu to return to the PO Header screen. The Change Order status is C-Created.
12. Click Release to move the change order to the Workflow process. The Change Order status is P-Pending.

Pasco Munis® End User, Version 10.1 Page 213
Canceling a Purchase Order To cancel a purchase order:
1. Within the Purchase Order Change Orders program, find the PO to cancel.
2. Click Cancel PO. The program displays the Journal Information screen where journal information can be entered to post the PO liquidation.
3. Enter the fiscal year, period, effective date, and a brief description of why the purchase order is being canceled.
4. Click Accept . The program displays a confirmation message: “Are you sure you want to cancel the selected PO(s)?”.
5. Click Yes. The program displays the Output screen.
6. Enter the output type and settings for the proof report.
7. Click OK.
8. Review the report. The purchase order is canceled; canceled purchase orders do not go through the Workflow process.

Pasco Munis® End User, Version 10.1 Page 214
Closing a Purchase Order To close a purchase order:
1. Within the Purchase Order Change Orders program, find the purchase order to close. Only POs that have a zero open dollar amount with a status of 8-Printed can be closed.
2. Click Close PO. The program displays a close confirmation message.
3. Click Yes to close the purchase order. The PO status changes to 0-Closed.
Closed POs do not go through the Workflow process.

Pasco Munis® End User, Version 10.1 Page 215
Results The purchase order is not affected by the change until the change has been approved and posted. The exceptions are closed and canceled POs; these changes do not require workflow approvals.
GL Impact The general ledger will not be affected until the change order is approved and posted. The exception is with canceled purchase orders; these purchase orders liquidate their encumbrances when posted to the general ledger.
What’s Next? The purchase order change order can be approved and posted to the general ledger.

Pasco Munis® End User, Version 10.1 Page 337
Appendix A: Using Munis Using Munis describes the features of the Munis screen, ribbon, and standard menu options. It also provides keyboard shortcuts, and provides an overview of several of the features that enable you to efficiently manage information within Munis programs.
A.1 Permissions and Security Permissions and security settings determine the programs and options available to individual Munis users. User permissions and security settings are typically determined by a user’s responsibilities as they relate to using the Munis system. For example, a payroll entry person does not necessarily require permissions to access the Tax Billing programs. Permissions and security settings are maintained by system administrators using the Roles and User Attributes programs.
A.2 Munis Menus In Munis, menus are available according to the security permissions granted to your user roles. Typically, permissions are granted according to need. For example, if your primary job is to enter timesheets in Payroll, you may not be able to see the System, Financials, General Revenues, or other menu options.

Pasco Munis® End User, Version 10.1 Page 338
Menus are divided by Munis products, and then by applications within those products. For example, Financials is a product, and Accounts Payable is an application within that product. Within an application, there are many programs.
A.3 Standard Screen Features The standard Munis program screen contains several working sections, including a banner, a ribbon, menu options, and a navigation bar. At the top of the screen, the banner includes the Help, Settings, and Enhancement buttons.
Directly under the banner is the Munis ribbon. This ribbon contains groups of related buttons that allow you to perform various actions throughout Munis programs.

Pasco Munis® End User, Version 10.1 Page 339
The work area for a Munis program is centered on the screen; the work area contains the fields required to complete program actions. Often, if there are numerous fields, the work area is divided into tabs, which sort the fields by intended use or purpose.
The navigation bar at the bottom of the screen allows you to move through an active set of records one record at a time, to move to the first or last record of the set, or to open attachments. You can also open a browse screen that lists all of the records in the active set. The Menu group in the ribbon provides the program-specific actions available for a program. These options differ according to program as they may display additional screens for the selected program or they open other related programs. For programs that have multiple options, click the More arrow to view the complete list. On-screen buttons provide access to information that is specifically related to the active record. For example, in the Vendors program, the Remittances, Comments, Performance, and Commodity buttons all provide access to details specific to the selected vendor record.

Pasco Munis® End User, Version 10.1 Page 340
A.3.1 Help, Settings, and Enhancements In the program banner, the Munis Help, Settings, and Enhancements buttons are available. These buttons provide options specific to the active program.
Option Description
Help
Help provides access to the Munis online help content, displays the Munis KnowledgeBase search screen with a list of documents related to the active program, and provides About Munis details. Munis online help provides screen-level help for programs and subprograms throughout the Munis applications. Each help screen includes an overview, field descriptions table, list of procedures, and a resource table. About Munis accesses program, system, and environment information, which is useful when initiating a phone call to Munis Technical Support. A technical support specialist may ask you to click this button to identify the version of the software you are using. Munis programs operate differently, or have different features, depending on which version you are using. Knowing which version of the software you are currently using enables Munis Technical Support to tailor solutions to your specific needs. This option is only available on the Help menu.
Settings
Settings provide the Customizable Field Label and View Database Column options:
• Customizable Field Labels allows system administration personnel to customize the text and tool tips found on standard Munis screens. This option is only available if the Customize Munis Screen Forms check box on the Munis System Roles screen is selected for at least one role assigned to your user ID.
• View Database Columns allows you to view the database headers for the fields on the screens. This option is only available if the Allowed to View Database Detail check box in Munis System Roles is selected for at least one role assigned to your user ID.
Munis Enhancements
Munis Enhancements provides a link to current enhancement notes that are applicable to the active program. This feature is controlled by the Release Administration/Application Enhancements settings on the Site Settings screen of the System Settings program.

Pasco Munis® End User, Version 10.1 Page 341
A.4 Ribbon and Menu Options The ribbon is your primary resource for performing actions within each program. In addition to the ribbon, there are menu and keyboard options available to help you use Munis programs efficiently.
A.4.1 Ribbon The following table provides descriptions for the Munis ribbon groups and buttons. If a button is grayed out, the selection is not available.
Image Description
Confirm
Accept
Accept saves information after you have created or updated a record. This button is often highlighted when adding, updating, or searching for records.
Cancel
Cancel ends an operation, such as adding or updating a record.
Search
Search
Search finds records in a program. Search is often used to create an active set of records before proceeding to another step, such as printing a report, purging records, or posting invoices. In many cases, you can use wildcard characters to further define a search.
Browse
Browse is available when an active set of records exists, or after an active set is created using the Search or Define buttons. The browse screen displays a list of all the records in the active set. You can sort, view, or export data from the browse screen. On a browse screen, the Excel button exports the data directly to a Microsoft® Excel spreadsheet. This functionality requires that you have Microsoft Excel 2002 or later on your workstation.
Advanced
Advanced provides advanced searching options. Click the down arrow to access the advanced options available in the active program.
Query Builder
Query creates a query based on an expression or mathematical equation. This option assists in finding records that meet very specific criteria, but that cannot be defined by entering data directly into a field. When you click Query, the Query Wizard screen (similar to the expression builders found in Microsoft Excel or Microsoft Access) allows you to create an expression based on the fields in the active program.
Actions
Add
Add enters a new record into the database. When you click Add, entry fields become available with the cursor positioned in the first field. The program may place default values in fields to save you keystrokes, but typically you can replace the defaults. You can move from field-to-field by pressing Tab or by selecting a field with the mouse. When the cursor is in a field, helpful information often displays at the bottom of the screen. Some fields have an additional help button that lists available field entries.

Pasco Munis® End User, Version 10.1 Page 342
Image Description
Update
Update adds data or changes existing data in a record. You can change data in any active field. Fields that are not active typically are part of the record key. The key is the field or combination of fields that uniquely identifies the record from all other records. If you need to change data in an key field, you must delete the record and enter it again.
Delete
Delete removes the record currently displayed from the program. If the record is being used by another process, you cannot delete it. Once you delete a record, you cannot recover it.
Global
Global provides the option for updating or deleting multiple records at one time. Click the down arrow to access the global options available in the active program.
Duplicate
Duplicate creates a copy of data and creates a new record in the same program using the original data as a base. Once you duplicate data, you can modify the new record.
Output
Preview
Preview allows you to immediately view a report on the screen.
PDF creates the report in PDF format. The program opens the document in the installed PDF reader. Note: The PDF button is only accessible if the Output to PDF permission is granted in Munis System Roles for at least one role assigned to your user ID.
Text File
Text File saves a report to a file in the Munis spool directory. After saving, you can display or print the report from the Saved Reports program. You can access Saved Reports by clicking Reports on the My menu or by clicking Saved Reports in the Departmental Functions group of the Munis Application Menu. To use the spool function from the File menu in a specific program, click Output and then select File under Output Type.
Office
Excel
Excel exports the active set of records to a Microsoft® Excel spreadsheet. • If you click Excel from a browse screen, the program immediately exports
the data and opens the Microsoft Excel application. This functionality does not require Munis Office, but you must have Microsoft Excel 2002 or higher installed on your workstation.
• If you click Excel from a master program or subprogram screen, the program displays the Export Filter screen. Use this screen to specify the data field values to export to Microsoft Excel. When you click Save and Exit, the program opens Microsoft Excel with the selected data in the active worksheet.
In each case, the program inserts hyperlinks to the individual Munis records. The file created during export is automatically saved in the directory where the Munis software is installed; use the Save As feature in Excel to save the file to a new location.
Word
Word creates an active set of records to export into Microsoft® Word. It is especially useful for spooled reports. This option enables you to format the report in Microsoft Word prior to printing.
Email creates an e-mail message that contains a hyperlink to the active record. When the e-mail recipient clicks the hyperlink, Tyler Dashboard opens, and in turn opens the Munis program with the linked record as the current record. Note: This feature requires that the Tyler Dashboard be enabled.

Pasco Munis® End User, Version 10.1 Page 343
Image Description
Schedule
Schedule displays the Appointments screen, which allows you to schedule meetings that are associated with the active record. When you click Add on the Appointments screen, the program creates an e-mail message containing meeting start and end times, and a meeting description. You can define the meeting times and modify the description, as appropriate. When the e-mail recipient accepts the meeting, it is automatically added to his or her Exchange calendar.
Tools
Notes
Notes provide the option to add or update notes for the selected record. Click the down arrow to select the applicable notes option and add or update a note using the Text Editor program.
Attachments
Attachments allow you to view, add, or delete documentation related to the current record. Once a file is attached, it is copied and stored with the Munis program. If you change the original document, the attachment is not automatically updated. To keep attachments current, you must update the original documents and manually attach the updated files. Note: You can also view, add, or delete documentation for the current record by clicking Attachments to the right of the navigation bar on the screen. The number in parentheses indicates the number of documents attached to the record.
Image
Image opens Tyler Content Manager for Munis or Laserfiche®. These options provide content management capability specific to Munis programs.
Audit
Audit provides the audit history for the selected record.
MapLink
MapLink allows integration of map data sources with Munis programs. The Web-based version of MapLink is an inquiry-only version. The MapLink application is not launched as an interactive application; however, you are able to view a data set in Munis that has been modified during a MapLink session. Click the down arrow for MapLink options.
Alerts
Alerts allow you to add or view all reminder alerts or reminder alerts for the current record. Reminder alerts distribute e-mails at specified dates as a reminder of upcoming events or activities that require attention. Reminder alerts are established using the Alert Administration programs on the System Administration menu. The Alert programs are not available for use with all Munis programs. Click the down arrow to manage alerts.
Menu
The Menu group provides options specific to managing data in the active program and options for accessing related programs. The options in this group vary by program; for programs with multiple options, click the More arrow to view the complete list.
Return
Return closes the current screen.

Pasco Munis® End User, Version 10.1 Page 344
A.4.2 Other Options Other shortcuts available within Munis programs include the following:
Press Tab to move forward to the next available field; press Shift+Tab to move back to a previous field.
Press Spacebar to clear or select check boxes.
Press Spacebar to view options in a list. Use the Up and Down arrows to move through the options; press Enter to select an option.
Press Ctrl+[arrow] to move through the records in an active set:
Press Ctrl+Down Arrow to the move to the next record.
Press Ctrl+Up Arrow to move to the previous record.
Press Ctrl+Right Arrow to move to the last record in the active set
Press Ctrl+Left Arrow to move to the first record in the active set.
A.5 Finding Records in Munis There are several ways to find existing records in Munis programs. Most commonly, click Search on the ribbon, complete available fields as desired to narrow your search, and then click Accept to create an active set of records that match the search criteria. If you click Search, leave all the fields blank, and then click Accept, you create an active set of all records stored for that program. For the most efficient search, be sure to complete the Key or Required fields on the screen. (Key and required fields are identified by boldface labels.)
A.5.1 Using Wildcard Card Characters in Searches Wildcard characters are symbols that you can use to refine your search criteria or to substitute for unknown values. You can include wildcard characters in boxes where you can type characters or numerals. For example, in a Name field, using a wildcard character such as an asterisk allows you to find all names that begin with “J”.

Pasco Munis® End User, Version 10.1 Page 345
In this case, the program displays the first record in the active set of records matching the search criteria. Click Browse in the Search group of the ribbon to view a list of all results.
In programs such as the Bank Codes program, you can enter *Bank* in the Name field to find all records with the word “Bank” in the name. Using the asterisk before and after the word finds all banks, including those that begin with the word “Bank” (for example, Bank of America) and those that end with the word “Bank” (such National Bank). The greater than and less than symbols are often used in date boxes when you are trying to find records before or after a certain date. For example, to find all records that have been added to a program on or since January 1, 2005, type >=01/01/2005 in the date box. The following table provides a list of wildcard characters and their descriptions.
Symbol Description
= is null Use to find records that have a NULL in a field.
= or == equal to Use to find records that are equal to the value typed in the box. For example, typing =ME in the State box finds records where the value equals ME.
< less than Use to find records with a value less than the data typed in the box. For example, typing <L finds data from A–K.
<= less than or equal to Use to find records with a value less than or equal to the data typed in the box. For example, typing <=L finds data from A–L.
> greater than Use to find records with a value greater than the data typed in the box. For example, typing >L finds data from M–Z.
>= greater than or equal to Use to find records with a value greater than or equal to the data typed in the box. For example, typing >=L finds data from L–Z.
<> or != not equal Use to find records with values not equal to the data typed in the box. For example, typing <>1 finds all records where the value is not equal to 1.

Pasco Munis® End User, Version 10.1 Page 346
Symbol Description
<! less than ASCII (33) Use to find records that have a space in a field.
: or .. range Use to find records based on data between and including two limiting characters. For example, typing A:C finds Alabama, Bermuda, California. Typing a:c finds apple, banana, coconut.
| or Use to find records with this value or that value. For example, typing Cash|Charge finds all records where the value equals Cash, if it exists, and all records where the value equals Charge, if it exists.
* wildcard Use to find all records with the same sequential character string that begins, includes, or ends with an asterisk (*). For example, typing ARL* finds all records starting with ARL, such as ARLBERG, ARLINGTON, ARLON, and so on. Typing *H finds all records ending with H such as SMITH, WORTH, and so on.
? single-character wildcard Use to finds all records with the same sequential character string where only a single-character differs. For example, typing A?C finds all records where the value equals ABC, ADC, ACC, AEC, and so on.
[c] a set of characters Use to find all codes, as follows: Start with N or T: [NT]* Start in lowercase: [a-z]* Start in uppercase: [A-Z]* Use to find all two-character codes, as follows: Start in lowercase: [a-z]? Start in uppercase: [A-Z]?

Pasco Munis® End User, Version 10.1 Page 347
A.5.2 Using Query (Advanced Find) Query creates a query based on the fields in the active program. It enables you to create queries in fields in which you cannot perform a simple search, such as fields with multiple selections. The Query button is available in the Search group; it is only accessible after you click Search.
List expressions are formatted by inserting a vertical bar (|) between each item. Range expressions are formatted by inserting a colon (:) or two periods (..) between two values, or by using greater than (>), less than (<), equal to (=), or a combination of these symbols (for example =>10 returns all values equal to or greater than 10). The Load tab stores queries for specific programs so that you can use them again. For screens that allow for multiple Finds, use concise descriptions for saved queries in order to make it clear which queries are appropriate for each Find. When you save a query, click Accept on the ribbon prior to executing the query, then type a description of the query in the prompt that the program displays. By default, saved queries are available to all users, by default. If the Make Public check box is not selected on the Save As screen, then only the user who created the query may access it. To create a query:
Click the Query button on the ribbon. The program opens the Query Wizard program with the Fields tab displaying the fields and the type of fields in the active program.
Type an expression directly into the Expression column or click the Format option to open the Edit Assistant, Dropdown Assistant, or Date Assistant tab. Query Wizard opens the appropriate assistant for the type of field that you are querying.

Pasco Munis® End User, Version 10.1 Page 348
Build an expression:
List expression. Add items to include in your list expression.
Range expression. Select the low value and high value for the range. Click the Switch option to change between the range expression and the list expression.
Click Format again. The list or range expression you created appears in the Field tab.
Click Execute to display the new active set of records created by the query.
To save a query for use at a later time, click Save As from the Field tab or one of the Assistant tabs. Once you have created a query, you can view or select them using the Load tab. To remove an item from the Select List of Items on the Dropdown Assistant tab, double-click the item or press Enter to remove the item from the list. Note: When you save a query, the program checks the entered description to see if it matches one that you have already entered. (This check is not case-sensitive.) If the descriptions are the same, the program allows you to save the new query in place of the old one. You cannot save a public or private query with a description that another user has already used for a public query.
A.5.3 Managing Selected Records An active set consists of records with information matching your search criteria. You create an active set when you complete a search that produces multiple records that you can navigate and view. At the bottom of a program screen, a navigation bar displays the number of the record that you are currently viewing, the total number of records, and options to assist you with navigation. You can view records in the active set one at a time or you can click Browse on the navigation bar to view a list of all records in the active set. In the following example, you are viewing record 1 of 5, and there is one document attached to the record.

Pasco Munis® End User, Version 10.1 Page 349
To navigate the active set of records: • Click First to view the first record in the active set (record 1). • Click Previous to view record 1 of 5. • Click Next to view record 2 of 5. • Click Last to view the last record in the active set (record 5). • Click Search to create a new active set of records. • Click Browse to view a list of all records in the active set.
The active set remains active until you perform another search or close the program.
A.5.4 Browsing Records Once you have created an active set of records within a Munis program, click Browse to display the collected data in a table format. You can sort the data, view or hide columns, export the data, or filter the data to create a more specific data set.
To view or hide columns, right-click the column headings. Select the columns containing data you wish to view; clear those columns that you wish to hide. Click outside the heading list to display your selections in the revised format. When you create an output file or report from a browse screen, the output does not include columns that you have hidden on the screen display.
To sort the data, click on the column heading that you want to use as the sort key; the data sorts in ascending order. If you click the column header again, the data sorts in descending order.
To resize columns, position your pointer at the bar between column headings and hold the mouse button down while you drag the bar to the right or left.
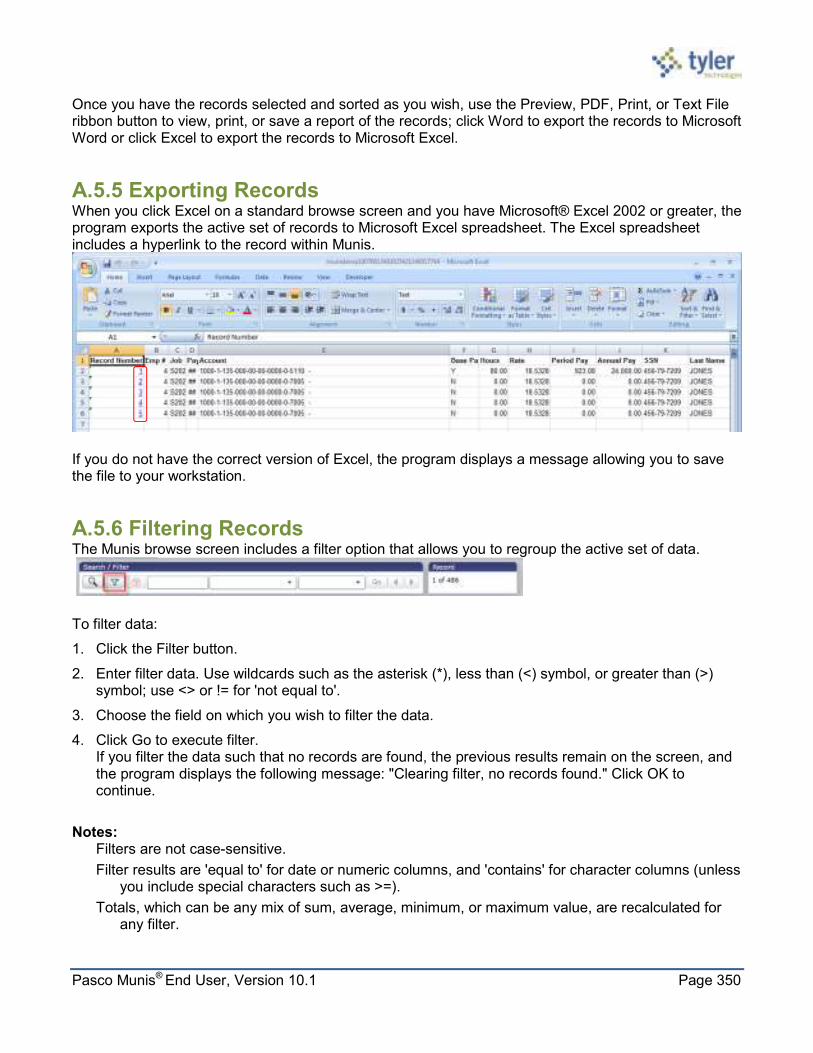
Pasco Munis® End User, Version 10.1 Page 350
Once you have the records selected and sorted as you wish, use the Preview, PDF, Print, or Text File ribbon button to view, print, or save a report of the records; click Word to export the records to Microsoft Word or click Excel to export the records to Microsoft Excel.
A.5.5 Exporting Records When you click Excel on a standard browse screen and you have Microsoft® Excel 2002 or greater, the program exports the active set of records to Microsoft Excel spreadsheet. The Excel spreadsheet includes a hyperlink to the record within Munis.
If you do not have the correct version of Excel, the program displays a message allowing you to save the file to your workstation.
A.5.6 Filtering Records The Munis browse screen includes a filter option that allows you to regroup the active set of data.
To filter data:
1. Click the Filter button.
2. Enter filter data. Use wildcards such as the asterisk (*), less than (<) symbol, or greater than (>) symbol; use <> or != for 'not equal to'.
3. Choose the field on which you wish to filter the data.
4. Click Go to execute filter. If you filter the data such that no records are found, the previous results remain on the screen, and the program displays the following message: "Clearing filter, no records found." Click OK to continue.
Notes: Filters are not case-sensitive.
Filter results are 'equal to' for date or numeric columns, and 'contains' for character columns (unless you include special characters such as >=).
Totals, which can be any mix of sum, average, minimum, or maximum value, are recalculated for any filter.

Pasco Munis® End User, Version 10.1 Page 351
Format strings may obscure a column's true value, especially with 'float' types. For example, the true value might be 345.67, but the column might only show '345'. If you created a filter '=345', this record would not be included because the filter would see the true 345.67 value, even though the user would not, because of a format string with no decimals showing.
The asterisk (*) wildcard character can be used with character columns. Using wildcards with numeric or date columns is allowed, but may lead to unpredictable results.
A.6 My Programs My Programs provides easy access to programs that you use frequently. Rather than find these programs on the Munis menus every time you want to use them, you can store them for quick-access on the Programs tab of the Tyler Dashboard. To add a program to the Programs tab, find the program in the menu and right-click on the program name. Click Add to My Programs to add the program to the Programs tab.
Click the Programs tab and the program is available. If the program you select is the first program in a Munis product that you have selected, the program creates a category for the program.

Pasco Munis® End User, Version 10.1 Page 352
As you add more programs from different products, the program categorizes them as well.
A.7 Reports In many Munis programs, you can create reports by searching for records and then using the Output ribbon button (Preview, PDF, Print, or Text File) to view, print, or save the report. If the Word or Excel buttons are active within a program, you can also export the report to a Microsoft Word document or Microsoft Excel spreadsheet. If you select Preview, the program provides the report in HTML format with no page breaks.
A.8 Munis Scheduler From the Inquiries and Reports menus, and from within many Munis programs, you can create reports of stored data and records. The Munis Scheduler program works with the reporting features to allow you to process reports at scheduled times. In order to use Scheduler, the Enable Scheduling check box must be selected in the Scheduler Engine program, and Scheduler privileges must be assigned by your system administrator. To receive e-mail alerts, a correct e-mail address must be included in the user record. Munis Scheduler saves a copy of the import, export, or report criteria established at the time specified for the scheduled import, export, or report. Jobs scheduled to run on the thirty-first of each month run on months with 31 days. To schedule a job to run at the end of every month, select Daily, Monthly, or similar options from the date lists in programs. If your organization uses Tyler Content Manager for Munis, you can store reports in the Tyler Content Manager database. If you have the appropriate permissions, you can also include a link to the document in the notification e-mail. You must have the TylerCM Single Document Viewer installed in order to include document links in notification e-mails. Once the system administrator has enabled Scheduler privileges for you, programs that are enabled to work with Scheduler display the Execute This Report list. The Execute This Report list has three options: Now, In the Background (now), and At a Scheduled Time.

Pasco Munis® End User, Version 10.1 Page 353
To create a report without using Munis Scheduler, select Now from the Execute This Report list, and then use the Output ribbon buttons to create the report in the appropriate format. To create the report using Munis Scheduler, select In Background (Now) or At a Scheduled Time from the Execute This Report list.
When you select In Background (Now) or At a Scheduled Time, the program displays the Munis Scheduler screen:
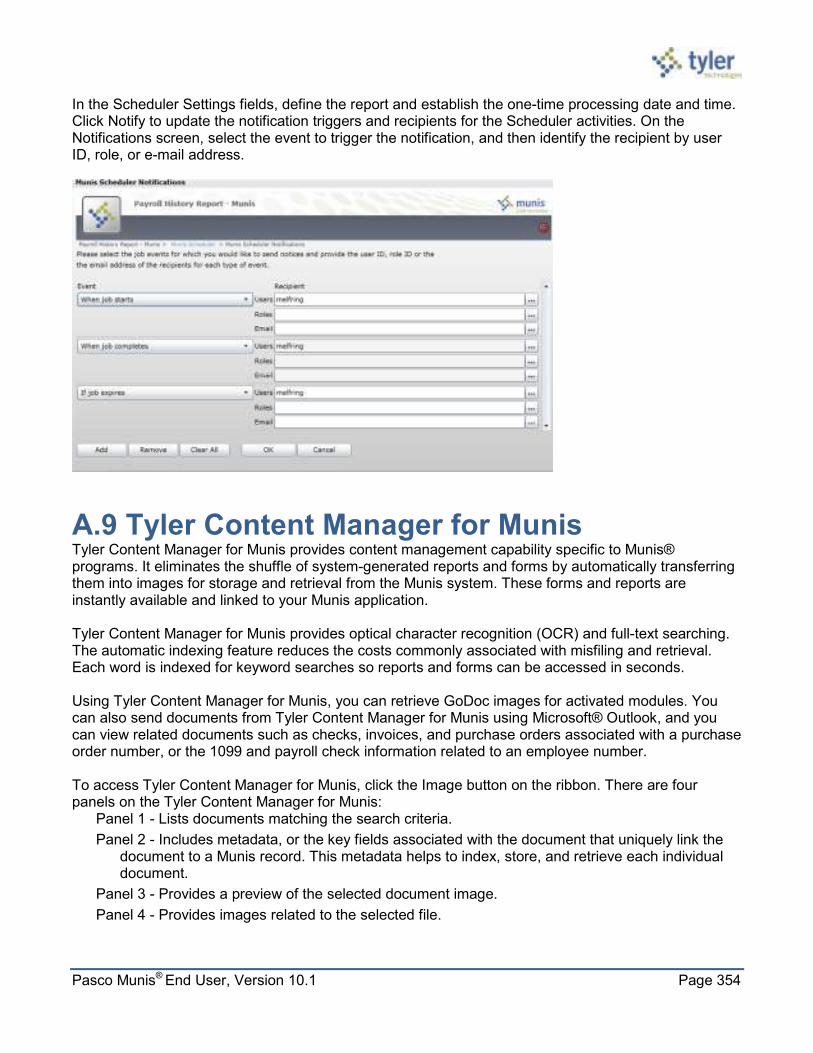
Pasco Munis® End User, Version 10.1 Page 354
In the Scheduler Settings fields, define the report and establish the one-time processing date and time. Click Notify to update the notification triggers and recipients for the Scheduler activities. On the Notifications screen, select the event to trigger the notification, and then identify the recipient by user ID, role, or e-mail address.
A.9 Tyler Content Manager for Munis Tyler Content Manager for Munis provides content management capability specific to Munis® programs. It eliminates the shuffle of system-generated reports and forms by automatically transferring them into images for storage and retrieval from the Munis system. These forms and reports are instantly available and linked to your Munis application. Tyler Content Manager for Munis provides optical character recognition (OCR) and full-text searching. The automatic indexing feature reduces the costs commonly associated with misfiling and retrieval. Each word is indexed for keyword searches so reports and forms can be accessed in seconds. Using Tyler Content Manager for Munis, you can retrieve GoDoc images for activated modules. You can also send documents from Tyler Content Manager for Munis using Microsoft® Outlook, and you can view related documents such as checks, invoices, and purchase orders associated with a purchase order number, or the 1099 and payroll check information related to an employee number. To access Tyler Content Manager for Munis, click the Image button on the ribbon. There are four panels on the Tyler Content Manager for Munis:
Panel 1 - Lists documents matching the search criteria.
Panel 2 - Includes metadata, or the key fields associated with the document that uniquely link the document to a Munis record. This metadata helps to index, store, and retrieve each individual document.
Panel 3 - Provides a preview of the selected document image.
Panel 4 - Provides images related to the selected file.

Pasco Munis® End User, Version 10.1 Page 355
You can resize each panel by sliding the column indicators to the right or left. To retrieve a document, find the record in the Munis program to which the content is attached, and
then click the image button. Tyler Content Manager for Munis displays a list of documents associated with the record.
To send a document, select the document from the list in panel four and then drag the document to the Microsoft® Outlook icon on your Quick Launch tool bar. Microsoft Outlook displays an untitled message with the document attached. The document is in PDF format. Note: Do not drag and drop the file to a minimized Microsoft Outlook session; the files will not attach.
To view a related document, click View Related Document or View Related Web. If you click View Related Document, the document related to the purchase order displays in panel four. If you click View Related Web, related documents display in a graph format. Right-click a document identifier for additional options such as Preview Document or Open.
If your organization uses a Laserfiche® content manager, the program retrieves a laserfiche document when you click the Image button.
A.10 Saved Reports The Saved Reports program manages reports that have been directed to the Munis spool directory. With the print spooler, you can hold, reprint, or delete Munis reports. You can also print specific ranges of a report.

Pasco Munis® End User, Version 10.1 Page 356
If your organization uses the Tyler Content Manager for Munis or the Laserfiche® content management system, you can use the Saved Reports program to submit or retrieve documents from these systems. The Saved Reports program provides content submittal and retrieval using Tyler Content Manager for Munis or Laserfiche®, according to the settings applied in the System Settings program. If your organization uses Tyler Content Manager for Munis, the Submit - TylerCM and Retrieve - TylerCM options are available. If your organization uses a Laserfiche content manager, the Submit - Laserfiche and Retrieve - Laserfiche options are available. When you open the Saved Reports program, click Search to create a list of all the files available in the spool directory.
Click Display Reports to view a selected file or files; the report displays a Display Options box. In this box, select No Filter to view all the files, select Use Page Ranges to view only specific pages, or Use Line Ranges to view only specific lines. Select the files to display. If you selected Use Page Ranges or Use File Ranges, complete the Start and End boxes with the page or line numbers that you want to view for each file. You can click Select All to select all of the files; you can click Select None to clear all of your selections. To display PDF files, click Text as PDF. When the program displays a list of files, click Select All to select all reports in the list, or select the individual check boxes for those reports to view. You can click Select None to clear all of the check boxes. To print reports, find the report or reports to print, and then click Print Reports. The program provides print options, for example, you can print whole documents, specific page ranges, or specific line ranges. You can also define the number of copies to print, the format (landscape or portrait), and the printer.

Pasco Munis® End User, Version 10.1 Page 357
Click Select All to selects all the reports in the list, or click Select None to clear the check boxes.
A.11 Excel, and Word The Word and Excel options allow you to export Munis data to a Microsoft Word document or Microsoft Excel spreadsheet. The options must be activated by your system administrator in order to be available. You must also have Microsoft Word and or Microsoft Excel installed on your computer to use those two functions, and Internet Explorer 9.
A.11.1 Excel The Excel option that is available through the Munis master programs provides different options than the Excel export accessed from the Munis browse screens. When you create a report within a program, or when you are completing a specific report or inquiry program, the Excel ribbon button allows you to export collected data into Excel columns, where you can manipulate the data according to your requirements. The program provides an Export Filter where you can select the values to export. For example, if you create an active set of data in the Employee Deductions program and click Excel, the program displays the Export Filter, with a list of all the available fields.

Pasco Munis® End User, Version 10.1 Page 358
Select or clear the check boxes for the fields to include in the export, and then click Save and Exit to export the files and open Microsoft Excel. The program opens Microsoft Excel with the exported records as the active file. The file includes hyperlinks to the records in Munis.
A.11.2 Word
Word exports the active set of records into Microsoft® Word Mail Merge. When Mail Merge opens, the Template Options tab is active. On this tab, you can select a template to use for a specific report. The Template Library option is available on the Template Options tab. This option allows you to view starter templates associated with the program. These templates are stored in the Munis KnowledgeBase and are not available for every program. When you click Template Library, the Munis KnowledgeBase opens and displays a list of all of the templates available for the program. The Use TCM Merge button is available on the Template Options tab when your organization uses Tyler Content Manager for Munis (TCM) and a Microsoft® Windows® Server. When you click this button, the program displays the Defined Maps screen, which allows you to use a TCM template for the document and to archive the document to TCM. To export records directly into a Microsoft Word document:
1. Select No Template (Raw Data) from the Template to Use list on the Template Options tab.
2. Click Use. Microsoft Word opens with the selected report as the active document.
Note: The file created during export is automatically saved in the directory where the Munis software is installed. Click Save As from the File menu to save the file to another directory.