Embed Size (px)
Citation preview
User Manual
Corporate HeadquartersInvitrogen Corporation1600 Faraday AvenueCarlsbad, CA 92008T: 1 760 603 7200F: 1 760 602 6500E: [email protected]
For country-specific contact information visit our web site at www.invitrogen.com
Multi-Copy Pichia Expression Kit For the Isolation and Expression of Recombinant Proteins from Pichia pastoris Strains Containing Multiple Copies of a Particular Gene
Cat. no. K1750-01
Revision date: 07 September 2010
Manual part no. 25-0170
MAN0000041

ii

Table of Contents
Kit Contents and Storage................................................................................................................................... v
Accessory Products .........................................................................................................................................viii
Introduction ................................................................................................................... 1
Overview ..............................................................................................................................................................1
Experimental Outline..........................................................................................................................................4
Methods ......................................................................................................................... 8
Pichia Strains.........................................................................................................................................................8
E. coli Strains.......................................................................................................................................................11
Selecting a Pichia Expression Vector ...............................................................................................................12
pPIC3.5K.............................................................................................................................................................14
pPIC9K................................................................................................................................................................15
pAO815 ...............................................................................................................................................................16
Cloning into the Pichia Multi-Copy Expression Vectors ..............................................................................17
Transformation into E. coli ...............................................................................................................................23
In Vitro Multimerization Protocol ...................................................................................................................24
Preparing Transforming DNA.........................................................................................................................32
Growth of Pichia for Spheroplasting...............................................................................................................36
Preparing Spheroplasts.....................................................................................................................................38
Transformation of Pichia...................................................................................................................................40
In Vivo Screening of Multiple Inserts..............................................................................................................42
Screening for Mut+ and MutS Transformants ................................................................................................47
Expression of Recombinant Pichia Strains......................................................................................................50
Analysis by SDS-Polyacrylamide Gel Electrophoresis.................................................................................54
Optimizing Pichia Protein Expression ............................................................................................................57
Scale-up of Expression......................................................................................................................................59
Protein Purification and Glycosylation ..........................................................................................................62
iii

Table of Contents, continued
Appendix...................................................................................................................... 64
E. coli Media Recipes .........................................................................................................................................64
Pichia Media Recipes .........................................................................................................................................65
Proteins Expressed in Pichia.............................................................................................................................72
Recombination and Integration in Pichia .......................................................................................................74
Electroporation of Pichia ...................................................................................................................................78
PEG 1000 Transformation Method for Pichia.................................................................................................79
Lithium Chloride Transformation Method....................................................................................................81
PCR Analysis of Pichia Integrants ...................................................................................................................83
Direct PCR Screening of Pichia Clones ...........................................................................................................85
Isolating Total DNA from Pichia .....................................................................................................................86
Determining the Copy Number of Multiple Integrants...............................................................................88
Procedure for Total RNA Isolation from Pichia.............................................................................................91
-Galactosidase Assay ......................................................................................................................................92
Technical Support..............................................................................................................................................94
Purchaser Notification ......................................................................................................................................96
References...........................................................................................................................................................99
iv

Kit Contents and Storage
Kit Contents The Multi-Copy Pichia Expression Kit is shipped at room temperature and
contains the following components.
Spheroplast Module (Box 1). Store at room temperature.
Reagent Amount Components
SOS medium 20 ml 1 M Sorbitol 0.3X YPD 10 mM CaCl2
Sterile Water 2 125 ml Autoclaved, deionized water
SE 2 125 ml 1 M Sorbitol 25 mM EDTA, pH 8.0
SCE 2 125 ml 1 M Sorbitol 10 mM Sodium citrate buffer, pH 5.8 1 mM EDTA
1 M Sorbitol 2 125 ml --
CaS 2 60 ml 1 M Sorbitol 10 mM Tris-HCl, pH 7.5; 10 mM CaCl2
40% PEG 25 ml 40% (w/v) PEG 3350 (Reagent grade) in water
CaT 25 ml 20 mM Tris-HCl, pH 7.5 20 mM CaCl2
Spheroplast Module (Box 2). Store at –20°C.
Reagent Amount Components
Zymolyase 10 20 μl 3 mg/ml Zymolyase in water (100,000 units/g lytic activity)
1 M DTT 10 1 ml 1 M dithiothreitol in water Stab Vials: Pichia and E. coli stabs. Store at 4°C.
Strain Amount Genotype Phenotype (Pichia only)
GS115 1 stab his4 Mut+ KM71 1 stab arg4 his4 aox1::ARG4 MutS, Arg+ GS115 Albumin
1 stab HIS4 MutS
GS115 -Gal 1 stab HIS4 Mut+ TOP10F´ 1 stab F´ {proAB, lacI
q, lacZM15, Tn10 (TetR)} mcrA,
(mrr-hsdRMS-mcrBC), 80lacZM15, lacX74, deoR, recA1, – araD139, (ara-leu)7697, galU, galK, rpsL(StrR), endA1, nupG
Continued on next page
v

Materials, continued
Kit Contents, continued
Vectors. Store at –20°C.
Reagent Description
pAO815 20 μg, lyophilized
Vector for creation of multi-copy genes in vitro and intracellular expression in Pichia
pPIC3.5K 20 μg, 40 μl at 0.5 μg/μl in TE buffer, pH 8.0
Vector for in vivo isolation of multi-copy genes and intracellular expression in Pichia
pPIC9K 20 μg, 40 μl at 0.5 μg/μl in TE buffer, pH 8.0
Vector for in vivo isolation of multi-copy genes and secreted expression in Pichia Uses the -factor signal sequence
Primers. Store at –20°C. 5´ AOX1 sequencing primer 2 μg (312 pmoles), lyophilized
5´-GACTGGTTCCAATTGACAAGC-3´
3´ AOX1 sequencing primer 2 μg (314 pmoles), lyophilized
5´-GCAAATGGCATTCTGACATCC-3´
-Factor sequencing primer
2 μg (315 pmoles), lyophilized
5´-TACTATTGCCAGCATTGCTGC-3´
Media The following prepackaged media is included for your convenience. Instructions
for use are provided on the package. Store at room temperature.
Media Amount Yield
YP Base Medium 2 pouches 2 liters of YP medium
YP Base Agar Medium 2 pouches 2 liters of YP medium
Yeast Nitrogen Base 1 pouch 500 ml of 10X YNB
Continued on next page
vi
Materials, continued
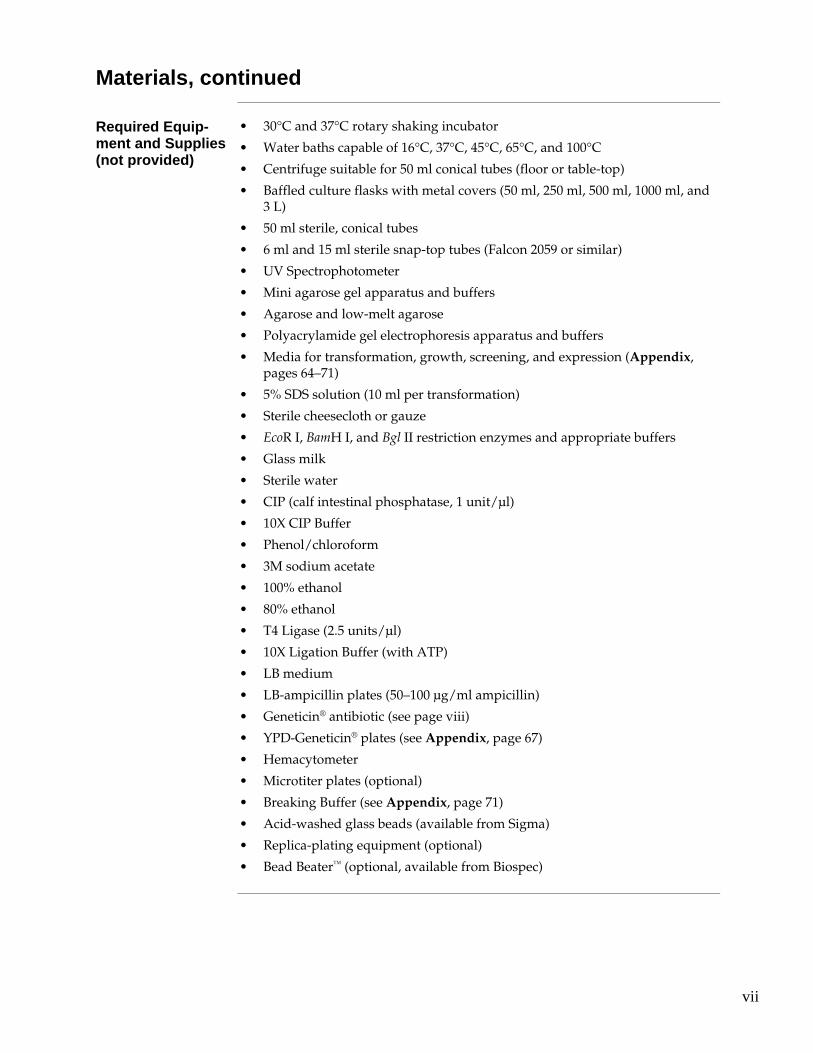
Required Equip-ment and Supplies (not provided)
• 30°C and 37°C rotary shaking incubator
• Water baths capable of 16°C, 37°C, 45°C, 65°C, and 100°C
• Centrifuge suitable for 50 ml conical tubes (floor or table-top)
• Baffled culture flasks with metal covers (50 ml, 250 ml, 500 ml, 1000 ml, and 3 L)
• 50 ml sterile, conical tubes
• 6 ml and 15 ml sterile snap-top tubes (Falcon 2059 or similar)
• UV Spectrophotometer
• Mini agarose gel apparatus and buffers
• Agarose and low-melt agarose
• Polyacrylamide gel electrophoresis apparatus and buffers
• Media for transformation, growth, screening, and expression (Appendix, pages 64–71)
• 5% SDS solution (10 ml per transformation)
• Sterile cheesecloth or gauze
• EcoR I, BamH I, and Bgl II restriction enzymes and appropriate buffers
• Glass milk
• Sterile water
• CIP (calf intestinal phosphatase, 1 unit/μl)
• 10X CIP Buffer
• Phenol/chloroform
• 3M sodium acetate
• 100% ethanol
• 80% ethanol
• T4 Ligase (2.5 units/μl)
• 10X Ligation Buffer (with ATP)
• LB medium
• LB-ampicillin plates (50–100 μg/ml ampicillin)
• Geneticin® antibiotic (see page viii)
• YPD-Geneticin® plates (see Appendix, page 67)
• Hemacytometer
• Microtiter plates (optional)
• Breaking Buffer (see Appendix, page 71)
• Acid-washed glass beads (available from Sigma)
• Replica-plating equipment (optional)
• Bead Beater™ (optional, available from Biospec)
vii
Accessory Products
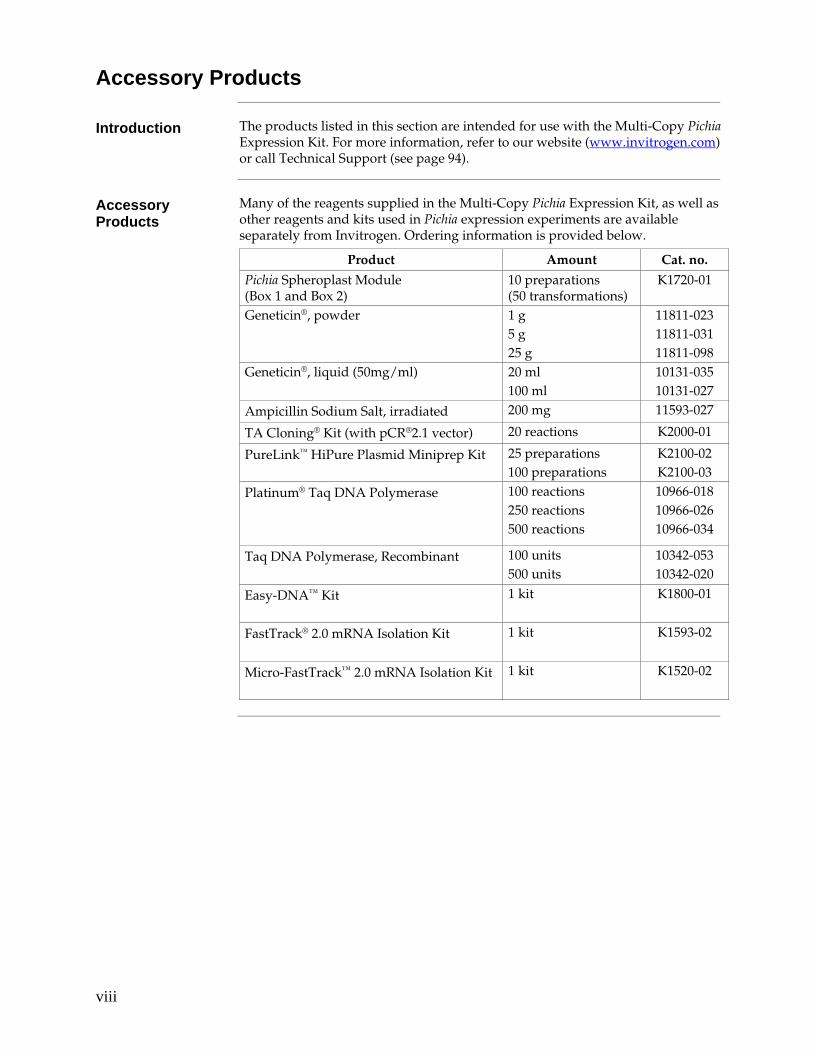
Introduction The products listed in this section are intended for use with the Multi-Copy Pichia
Expression Kit. For more information, refer to our website (www.invitrogen.com) or call Technical Support (see page 94).
Accessory Products
Many of the reagents supplied in the Multi-Copy Pichia Expression Kit, as well as other reagents and kits used in Pichia expression experiments are available separately from Invitrogen. Ordering information is provided below.
Product Amount Cat. no.
Pichia Spheroplast Module (Box 1 and Box 2)
10 preparations (50 transformations)
K1720-01
Geneticin®, powder 1 g 5 g 25 g
11811-023 11811-031 11811-098
Geneticin®, liquid (50mg/ml) 20 ml 100 ml
10131-035 10131-027
Ampicillin Sodium Salt, irradiated 200 mg 11593-027
TA Cloning® Kit (with pCR®2.1 vector) 20 reactions K2000-01
PureLink™ HiPure Plasmid Miniprep Kit 25 preparations 100 preparations
K2100-02 K2100-03
Platinum® Taq DNA Polymerase 100 reactions 250 reactions 500 reactions
10966-018 10966-026 10966-034
Taq DNA Polymerase, Recombinant 100 units 500 units
10342-053 10342-020
Easy-DNA™ Kit 1 kit K1800-01
FastTrack® 2.0 mRNA Isolation Kit 1 kit K1593-02
Micro-FastTrack™ 2.0 mRNA Isolation Kit 1 kit K1520-02
viii

Introduction Overview
Review Articles The information presented here is designed to give you a concise overview of the
Pichia pastoris expression system. It is by no means exhaustive. For further information, read the articles cited in the text along with the following review articles (Buckholz & Gleeson, 1991; Cregg & Higgins, 1995; Cregg et al., 1993; Nico-Farber et al., 1995; Romanos, 1995; Sreekrishna et al., 1988; Wegner, 1990). A general review of foreign gene expression in yeast is also available (Romanos et al., 1992).
General Characteristics of Pichia pastoris
As a eukaryote, Pichia pastoris has many of the advantages of higher eukaryotic expression systems such as protein processing, protein folding, and posttranslational modification, while being as easy to manipulate as E. coli or Saccharomyces cerevisiae. It is faster, easier, and less expensive to use than other eukaryotic expression systems such as baculovirus or mammalian tissue culture, and generally gives higher expression levels. As a yeast, it shares the advantages of molecular and genetic manipulations with Saccharomyces, and it has the added advantage of 10- to 100-fold higher heterologous protein expression levels. These features make Pichia very useful as a protein expression system.
Similarity to Saccharomyces
Many of the techniques developed for Saccharomyces may be applied to Pichia. These include: • Transformation by complementation • Gene disruption • Gene replacement
In addition, the genetic nomenclature used for Saccharomyces has been applied to Pichia. For example, the HIS4 gene in both Saccharomyces and Pichia encodes histidinol dehydrogenase. There is also cross-complementation between gene products in both Saccharomyces and Pichia. Several wild-type genes from Saccharomyces complement comparable mutant genes in Pichia. Genes such as HIS4, LEU2, ARG4, TRP1, and URA3 all complement their respective mutant genes in Pichia.
Pichia pastoris as a Methylotrophic Yeast
Pichia pastoris is a methylotrophic yeast, capable of metabolizing methanol as its sole carbon source. The first step in the metabolism of methanol is the oxidation of methanol to formaldehyde using molecular oxygen by the enzyme alcohol oxidase. In addition to formaldehyde, this reaction generates hydrogen peroxide. To avoid hydrogen peroxide toxicity, methanol metabolism takes place within a specialized cell organelle, called the peroxisome, which sequesters toxic by-products away from the rest of the cell. Alcohol oxidase has a poor affinity for O2, and Pichia pastoris compensates by generating large amounts of the enzyme. The promoter regulating the production of alcohol oxidase is the one used to drive heterologous protein expression in Pichia.
Continued on next page
1

Overview, continued
Two Alcohol Oxidase Proteins
Two genes in Pichia pastoris code for alcohol oxidase–AOX1 and AOX2. The AOX1 gene product accounts for the majority of alcohol oxidase activity in the cell. Expression of the AOX1 gene is tightly regulated and induced by methanol to very high levels, typically 30% of the total soluble protein in cells grown on methanol. The AOX1 gene has been isolated and a plasmid-borne version of the AOX1 promoter is used to drive expression of the gene of interest encoding the desired heterologous protein (Ellis et al., 1985; Koutz et al., 1989; Tschopp et al., 1987a). While AOX2 is about 97% homologous to AOX1, growth on methanol is much slower than with AOX1. This slow growth on methanol allows isolation of MutS strains (aox1) (Cregg et al., 1989; Koutz et al., 1989).
Expression Expression of the AOX1 gene is controlled at the level of transcription. In methanol-
grown cells approximately 5% of the polyA+ RNA is from the AOX1 gene. The regulation of the AOX1 gene is a two step process: a repression/derepression mechanism plus an induction mechanism (e.g., GAL1 gene in Saccharomyces (Johnston, 1987)). Briefly, growth on glucose represses transcription, even in the presence of the inducer methanol. For this reason, growth on glycerol is recommended for optimal induction with methanol. Note that growth on glycerol only (derepression) is not sufficient to generate even minute levels of expression from the AOX1 gene. The inducer, methanol, is necessary for even detectable levels of AOX1 expression (Ellis et al., 1985; Koutz et al., 1989; Tschopp et al., 1987a).
Phenotype of aox1 mutants
Loss of the AOX1 gene, and thus a loss of most of the cell's alcohol oxidase activity, results in a strain that is phenotypically MutS (Methanol utilization slow). This has in the past been referred to as Mut–. The MutS designation has been chosen to accurately describe the phenotype of these mutants. This results in a reduction in the cells' ability to metabolize methanol. The cells, therefore, exhibit poor growth on methanol medium. Mut+ (Methanol utilization plus) refers to the wild type ability of strains to metabolize methanol as the sole carbon source. These two phenotypes are used when evaluating Pichia transformants for integration of your gene (Experimental Outline, page 6).
Intracellular and Secretory Protein Expression
Heterologous expression in Pichia pastoris can be intracellular or secreted. Secretion requires the presence of a signal sequence on the expressed protein to target it to the secretory pathway. While several different secretion signal sequences have been used successfully, including the native secretion signal present on some heterologous proteins, success has been variable. The secretion signal sequence from the Saccharomyces cerevisiae factor prepro peptide has been used with the most success (Cregg et al., 1993; Scorer et al., 1993).
The major advantage of expressing heterologous proteins as secreted proteins is that Pichia pastoris secretes very low levels of native proteins. Since there is very low amount of protein in the minimal Pichia growth medium, this means that the secreted heterologous protein comprises the vast majority of the total protein in the medium and serves as the first step in purification of the protein (Barr et al., 1992) . However, that if there are recognized glycosylation sites (Asn-X-Ser/Thr) in your protein's primary sequence, glycosylation may occur at these sites.
Continued on next page
2
Overview, continued
Posttranslational Modifications
In comparison to Saccharomyces cerevisiae, Pichia may have an advantage in the glycosylation of secreted proteins because it may not hyperglycosylate. Both Saccharomyces cerevisiae and Pichia pastoris have a majority of N-linked glycosylation of the high-mannose type; however, the length of the oligosaccharide chains added posttranslationally to proteins in Pichia (average 8–14 mannose residues per side chain) is much shorter than those in Saccharomyces cerevisiae (50–150 mannose residues) (Grinna and Tschopp, 1989; Tschopp et al., 1987b). Very little O-linked glycosylation has been observed in Pichia.
In addition, Saccharomyces cerevisiae core oligosaccharides have terminal 1,3 glycan linkages whereas Pichia pastoris does not. It is believed that the 1,3 glycan linkages in glycosylated proteins produced from Saccharomyces cerevisiae are primarily responsible for the hyper-antigenic nature of these proteins making them particularly unsuitable for therapeutic use. Although not yet proven, this is predicted to be less of a problem for glycoproteins generated in Pichia pastoris, because it may resemble the glycoprotein structure of higher eukaryotes (Cregg et al., 1993).
3

Experimental Outline
Selecting Vector to Generate Multi-Copy Integrants
Multiple copy integration of recombinant genes in Pichia has been demonstrated to increase expression of the desired protein in some cases (Brierley et al., 1994; Clare et al., 1991a; Cregg et al., 1993; Romanos et al., 1991; Scorer et al., 1993; Scorer et al., 1994; Thill et al., 1990; Vedvick et al., 1991). The three vectors included in this kit allow isolation and generation of multicopy inserts by in vivo (pPIC3.5K, pPIC9K) or in vitro methods (pAO815), and to test whether increasing the copy number of your recombinant gene will lead to a subsequent increase in protein expression. The in vivo method utilizes hyper-resistance to Geneticin® (G-418) to screen for possible multi-copy inserts, while the in vitro method produces tandem inserts of your gene by ligation. pAO815 and pPIC3.5K are used for intracellular expression, while pPIC9K is used for secreted expression. All vectors utilize the AOX1 promoter for inducible, high-level expression. For more information on these vectors, see pages 12–16.
Frequency of Multicopy Inserts
Multiple plasmid integration events occur spontaneously in Pichia at a frequency between 1 and 10% of all His+ transformants. The in vivo method allows you to screen for the His+ transformants that may have multiple inserts of your gene. The in vitro method allows you to construct multimers by ligation. When His+ transformants are selected, they will have a high probability of containing the multimers that you constructed in vitro.
Generating Multicopy Inserts in vivo
pPIC3.5K and pPIC9K contain the bacterial kanamycin gene (kan from Tn903) that confers resistance to Geneticin® in Pichia. Note that kan does not confer resistance to kanamycin in Pichia. The level of Geneticin® resistance roughly depends on the number of kanamycin genes integrated. A single copy of pPIC3.5K or pPIC9K integrated into the Pichia genome confers resistance to Geneticin® to a level of ~0.25 mg/ml. Multiple integrated copies of either vector can increase the Geneticin® resistance level from 0.5 mg/ml (1–2 copies) up to 4 mg/ml (7–12 copies). Because of the genetic linkage between the kanamycin gene and the "expression cassette" (PAOX1 and your gene of interest), one can infer from Geneticin® hyper-resistance that the clone in question contains multiple copies of your gene. Protein expression may increase because of a gene dosage effect. Thus, the presence of the kan gene can be used as a tool to detect transformants that harbor multiple copies of your gene. The graphic below shows multiple insertion and linkage of the kan gene to your expression cassette.
�������� �������������� ��� �� ����
�� ������ �� ������ �� �������
��� ����������������
����
�� ����
�����������������
��� ���������������
����������������������
���� ���� ���
� �
� �
��� ����������������
������������� ��� ��
�� ������ �� ������ �� �������
���
��������
��������
���
�������
��
Continued on next page
4
Experimental Outline, continued
Screening on Geneticin®
Direct selection of Geneticin® resistance in yeast does not work well because newly transformed cells need time to express sufficient amounts of the resistance factor. Since yeast grows much more slowly than bacteria, significant numbers of recombinant yeast are killed before they accumulate enough of the resistance factor to survive direct plating on antibiotic. The most efficient procedure to generate Geneticin® resistant and hyper-resistant clones requires an initial selection of His+ transformants followed by screening for varying levels of Geneticin® resistance.
While direct selection of Geneticin® resistant colonies using electroporation is possible (Scorer et al., 1994), secondary selection on Geneticin® results in clones with a greater chance of higher copy number, i.e., secondary selection yields some clones with 5 to 9 copies; direct selection after electroporation yields clones with an average of 1 to 3 copies. Direct selection of Geneticin® colonies is not possible with spheroplast transformation.
Generating Multicopy Inserts in vitro
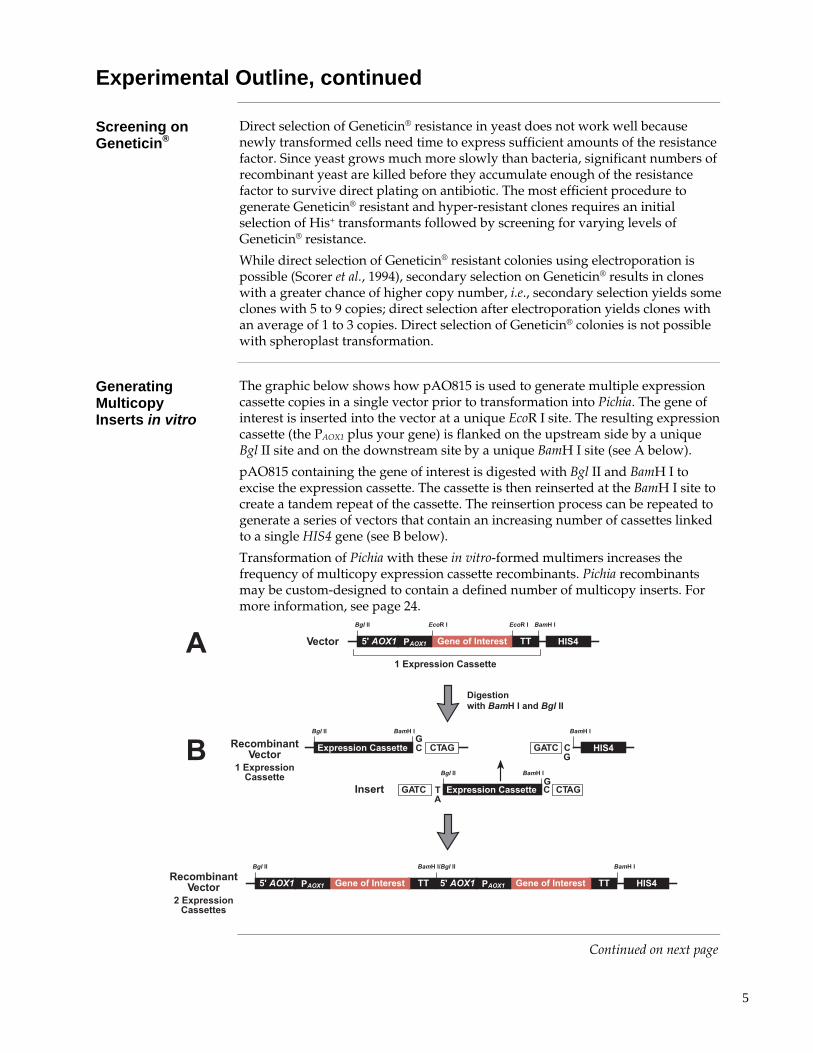
The graphic below shows how pAO815 is used to generate multiple expression cassette copies in a single vector prior to transformation into Pichia. The gene of interest is inserted into the vector at a unique EcoR I site. The resulting expression cassette (the PAOX1 plus your gene) is flanked on the upstream side by a unique Bgl II site and on the downstream site by a unique BamH I site (see A below).
pAO815 containing the gene of interest is digested with Bgl II and BamH I to excise the expression cassette. The cassette is then reinserted at the BamH I site to create a tandem repeat of the cassette. The reinsertion process can be repeated to generate a series of vectors that contain an increasing number of cassettes linked to a single HIS4 gene (see B below).
Transformation of Pichia with these in vitro-formed multimers increases the frequency of multicopy expression cassette recombinants. Pichia recombinants may be custom-designed to contain a defined number of multicopy inserts. For more information, see page 24.
�� !"�����#� �
�$��
��$�
��� ��������������
������� !��
������������ ���������� �����
������ ��"���
��"���� !��
��� ��������������
��"���� !��
�$
��
�
�
���� �
� !��
������������ ���������� �����
��"���%� !���
������������ ���������� �����
��"���
��$�
�$��
#� �
&�'�����(��)���"������*�� !���
�
�
����� �������������
����
����
����� ��������������
��"���
����
�� !"�����#� �
����� ��������������
$
+
Continued on next page
5
Experimental Outline, continued
Transformation and Integration
Two different phenotypic classes of His+ recombinant strains can be generated: Mut+ and MutS (see page 2). Transformation of strain GS115 can yield both classes of transformants, His+ Mut+ and His+ MutS, depending on where the plasmid DNA is linearized (see below). KM71 yields only His+ MutS since the strain itself is MutS. Both Mut+ and MutS recombinants are useful to have as one phenotype may favor better expression of your protein than the other may. Ideally, you should test between 6–10 recombinants per phenotype. There is no way to predict beforehand which construct or isolate will better express your protein. It is strongly recommended that Pichia recombinants be analyzed by PCR to confirm integration of your construct (see page 83).
Once you have successfully cloned your gene downstream of the AOX1 promoter, you will linearize your plasmid to stimulate recombination when the plasmid is transformed into Pichia. The table below describes the types of recombinants you will get by selective digestion of your expression plasmid.
Restriction
Enzyme Integration Event GS115 Phenotype KM71 Phenotype
Sal I or Stu I Insertion at his4 His+ Mut+ His+ MutS
Sac I (cannot be used with multi-copy constructs in pAO815)
Insertion at 5´ AOX1 region
His+ Mut+ His+ MutS
Bgl II Replacement at AOX1 locus
His+ MutS His+ MutS (not recommended, see page 8)
Expression and Scale-up
After confirming your Pichia recombinants by PCR, you will test expression of both His+ Mut+ and His+ MutS recombinants. This involves growing a small culture of each recombinant, inducing with methanol, and taking time points. If looking for intracellular expression, analyze the cell pellet from each time point by SDS polyacrylamide gel electrophoresis (SDS-PAGE). If looking for secreted expression, analyze both the cell pellet and supernatant from each time point. We recommend that you analyze your SDS-PAGE gels by both Coomassie staining and western blot, if you have an antibody to your protein. We also suggest checking for protein activity by assay, if one is available. Not all proteins express to the level of grams per liter, so it is advisable to check by western blot or activity assay, and not just by Coomassie staining of SDS-PAGE gels for production of your protein.
Choose the Pichia recombinant strain that best expresses your protein and optimize induction based on the suggestions on pages 57–58. Once expression is optimized, scale-up your expression protocol to produce more protein.
Continued on next page
6

Experimental Outline, continued
Experimental Process
A flow chart is provided below to help you understand the process.
������������������������� ��������� � ���������
�� ���� ������ �������� ������������������������������
�� ���������������������� ������������� !"#��������$�%��$&������$��'�
�������� ������ ���� (����)� �*)������ ����)���
�� �����$���(� ��+���+������ ��� �*(���%������� )�*(���%����(� ��������
#�����,*�-���� ���������(�$���(� ��+���� )����������.������� �
#�����(��(�����.����������������*��� ����(�/����/��������� ����
#���� ���� ������ ����� ��� � ���������������������� ������� �0�������� �� ������ ����
"1����#�������� ������ ���2��(�(��(��(������������ ������"1���
7

Methods
Pichia Strains
Introduction Pichia pastoris is quite similar to Saccharomyces cerevisiae as far as general growth
conditions and handling. You should be familiar with basic microbiological and sterile techniques before attempting to grow and manipulate any microorganism. You should also be familiar with basic molecular biology and protein chemistry. Some general references to consult are Guide to Yeast Genetics and Molecular Biology (Guthrie & Fink, 1991), Current Protocols in Molecular Biology (Ausubel et al., 1994), Molecular Cloning: A Laboratory Manual (Sambrook et al., 1989), Protein Methods (Bollag et al., 1996), and Guide to Protein Purification (Deutscher, 1990).
Genotype of Pichia Strain
The Pichia host strains GS115 and KM71 have a mutation in the histidinol dehydrogenase gene (his4) that prevents them from synthesizing histidine. All expression plasmids carry the HIS4 gene that complements his4 in the host, so transformants are selected for their ability to grow on histidine-deficient medium. Spontaneous reversion of GS115 and KM71 to His+ prototrophy is less than 1 out of 108.
The parent strain of KM71 has a mutation in the argininosuccinate lyase gene (arg4) that prevents the strain from growing in the absence of arginine. The wild-type ARG4 gene was used to disrupt AOX1, creating KM71, a MutS, Arg+, His– strain.
Both GS115 and KM71 will grow on complex medium such as YPD (also known as YEPD) and on minimal media supplemented with histidine. Until transformed, neither GS115 nor KM71 will grow on minimal medium alone as they are His–.
Note: MutS (Methanol utilization slow) phenotype has in the past been referred to as Mut–. The MutS designation has been chosen to accurately describe the phenotype of these mutants.
Construction of KM71
The ARG4 gene (~2 kb) was inserted into the cloned, wild-type AOX1 gene between the BamH I site (codons 15/16 of AOX1) and the Sal I site (codons 227/228 of AOX1). ARG4 replaces codons 16 through 227 of AOX1. This construct was transformed into the parent strain of KM71 (arg4 his4) and Arg+ transformants were isolated and analyzed for the MutS phenotype. Genetic analysis of Arg+ transformants showed that the wild-type AOX1 gene was replaced by the aox1::ARG4 construct.
�!� ����
The advantage of using KM71 is that there is no need to screen for the Mut phenotype on methanol minimal medium. All transformants will be MutS. Secondly, since the AOX1 locus was not completely deleted, it is theoretically possible to replace aox1::ARG4 with your construct by gene replacement. The phenotype of this strain would be His+ MutS Arg–. This means the recombinant strain would require arginine in the medium to grow. Unfortunately, simple inclusion of arginine does not totally alleviate the effects of the arg4 mutation, and arg4 strains do not grow well on minimal medium supplemented with arginine. Therefore, we do not recommend that you generate His+ transformants in KM71 by replacing the aox1::ARG4 construct.
Continued on next page
8

Pichia Strains, continued
Control Expression Strains
GS115/His+ MutS Albumin: This strain is a control for secreted expression and the MutS phenotype when screening Pichia transformants (page 47). The gene for serum albumin was cloned with its native secretion signal, then integrated into Pichia at the AOX1 locus. This strain secretes albumin (67 kDa) into the medium at levels > 1 gram/liter.
GS115/His+ Mut+ -galactosidase: This strain is a control for intracellular expression and the Mut+ phenotype when screening Pichia transformants (page 47). The gene for -galactosidase (lacZ) was integrated into Pichia at the his4 locus. This strain expresses -galactosidase (117 kDa) at levels that can be detected by visualization on Coomassie-stained SDS-PAGE (see pages 54–56) or assay using ONPG (see page 92–93).
Growth of Pichia Strains
The growth temperature of Pichia pastoris is 28–30°C for liquid cultures, plates, and slants. Growth above 32°C during induction can be detrimental to protein expression and can even lead to cell death. Other important facts:
• Doubling time of log phase Mut+ or MutS Pichia in YPD is ~2 hours
• Mut+ and MutS strains do not differ in growth rates unless grown on methanol
• Doubling time of log phase Mut+ Pichia in methanol medium (MM) is 4–6 hours
• Doubling time of log phase MutS Pichia in MM is ~18 hours
• One OD600 = ~5 107 cells/ml
Note that growth characteristics may vary depending on the recombinant strain.
Growth on Methanol
When plates or medium containing methanol are used as growth medium, it is advisable to add methanol every day to compensate for loss due to evaporation or consumption.
• For plates add 100 μl of 100% methanol to the lid of the inverted plate.
• For liquid medium add 100% methanol to a final concentration of 0.5%.
Some researchers have had success adding methanol to 1% every day for MutS strains and up to 3% for Mut+ without any negative effect to their liquid culture.
Continued on next page
9

Pichia Strains, continued
����
�����
���
Make frozen stocks for long-term storage of all three Pichia strains included in this kit (see below).
Storage of Pichia Strains
To store cells for weeks to months, use YPD medium or YPD agar slants (see page 57).
1. Streak for single colonies of the desired strain on YPD.
2. Transfer one colony to a YPD stab and grow for 2 days at 30°C.
3. You can store the cells on YPD for several weeks at 4°C.
To store cells for months to years, store frozen at –80°C.
1. Culture a single colony of the desired strain overnight in YPD.
2. Harvest the cells and suspend in YPD containing 15% glycerol at a final OD600 of 50–100 (approximately 2.5 109–5.0 109 cells/ml).
3. Freeze the cells in liquid nitrogen or a dry ice/ethanol bath, and store at –80°C.
After extended storage at 4°C or –80°C, we recommend checking the His+ transformants for correct genotype and viability by streaking on MM, MD or MGY plates before using again.
10

E. coli Strains
Genotype of E. coli Strain
The E. coli strain, TOP10F´ is provided in case no suitable E. coli strain is available. Other strains which may be suitable are TOP10, DH5F´, JM109, or any other strain which is recombination deficient (recA) and deficient in endonuclease A (endA). F´ {proAB, lacI
q, lacZM15, Tn10 (TetR)} mcrA, (mrr-hsdRMS-mcrBC),
80lacZM15, lacX74, recA1, – araD139, (ara-leu)7697, galU, galK, rpsL(StrR), endA1, nupG
Note: If you do not plan to perform single-stranded DNA rescue, E. coli strains that do not carry the F´ episome are also suitable for use.
����
�����
���
We recommend that you make a frozen stock of TOP10F´ to keep on hand.
1. Culture TOP10F´ in 5 ml LB with 10 μg/ml tetracycline. Grow overnight.
2. Mix thoroughly 0.85 ml of culture with 0.15 ml sterile glycerol.
3. Transfer to a freezer vial and freeze in liquid nitrogen or a dry ice/ethanol bath.
4. Store at –80°C.
11

Selecting a Pichia Expression Vector
Selecting a Vector
If your protein is cytosolic and non-glycosylated, you may elect to express the protein intracellularly.
If your protein is normally secreted, glycosylated, or directed to an intracellular organelle, you may wish to try secreting your protein. We recommend that you try both the native secretion signal (using pPIC3.5K or pAO815) and the -factor signal sequence (in pPIC9K) in order to secrete your protein.
����
�����
���
We recommend trying in vivo and in vitro methods to generate or isolate multicopy inserts of your gene. It is difficult to predict beforehand which method will work for your protein. A summary of the advantages and disadvantages of each method is presented in the lists below.
In vitro Method (pAO815)
Advantages Disadvantages
Quantitative--construction of a defined number of multimers
More work up front to clone defined number of multimers
Most of the His+ transformants will contain the proper, defined number of inserts
Size of the vector may become quite large depending on the size of your gene and the number of copies you create
Isolation of recombinants with multiple inserts is easy because most of the His+ transformants will contain multiple copies of your gene
Rearrangements in E. coli may occur
In vitro construction allows step-wise analysis of copy number effects on protein expression
Multiple inserts are located at a single locus
No need for a second drug resistance marker in the vector
In vivo Method (pPIC3.5K and pPIC9K)
Advantages Disadvantages
Easy to initiate experiment because only one copy of your gene is cloned into the vector before transforming into Pichia
Qualitative screen–Geneticin® resistance may not necessarily correlate with the number of copies of your gene.
Identifies the 1–10% of spontaneous His+ transformants that have multiple inserts
Screening His+ transformants may involve more work because you will need thousands of His+ transformants to generate enough Geneticin® resistant colonies to test
Average size of vector is similar to other Pichia expression vectors
The number of multiple inserts is unknown (although this can be determined through Southern or dot blot analysis)
Multiple inserts are located at a single locus Screening on Geneticin® is sensitive to the density of the cells and may result in the isolation of false positives
Continued on next page
12

Selecting a Pichia Expression Vector, continued
Features The table below describes the general and optional features of the Pichia multi-
copy expression vectors.
Feature Description Benefit
5´ AOX1 A ~1000 bp fragment containing the AOX1 promoter
Allows methanol-inducible high level expression in Pichia
Targets plasmid integration to the AOX1 locus.
-factor signal sequence
269 bp fragment encoding the -factor signal sequence for secretion in Pichia (pPIC9K only)
Allows secretion of desired protein into the medium
MCS Multiple Cloning Site Allows insertion of your gene into the expression vector
TT Native transcription termination and polyadenylation signal from AOX1 gene (~260 bp)
Permits efficient transcription termination and polyadenylation of the mRNA
HIS4 Pichia wild-type gene coding for histidinol dehydrogenase (~2.4 kb) and used to complement Pichia his4 strains
Provides a selectable marker to isolate Pichia recombinant strains
3´ AOX1 Sequences from the AOX1 gene that are further 3´ to the TT sequences (~650 bp)
Targets plasmid integration at the AOX1 gene
Amp
pBR322 origin
Ampicillin resistance gene
E. coli origin of replication
Allows selection, replication, and maintenance in E. coli
BamH I Bgl II Not I Sac I Sal I Stu I
Unique restriction sites
(Note: Stu I is not unique to pPIC3.5K or pPIC9K. )
Permits linearization of vector for efficient integration into the Pichia genome and generation of either Mut+ or MutS recombinants
kan Kanamycin resistance gene from Tn903 which confers resistance to Geneticin® in Pichia and kanamycin resistance in E. coli
(for pPIC3.5K and pPIC9K)
Allows in vivo screening for multicopy inserts by increased resistance to Geneticin®
Also allows selection for kanamycin resistance in E. coli
There is no yeast origin of replication in any of the Pichia expression vectors included in this kit. His+ transformants can only be isolated if recombination occurs between the plasmid and the Pichia genome.
13

pPIC3.5K
Description pPIC3.5K is a plasmid designed to allow you to identify in vivo multiple
integrations of your gene in the Pichia genome. Other details about pPIC3.5K are provided below:
• 9004 bp vector • Five unique restriction sites in the multiple cloning site: BamH I, SnaB I,
EcoR I, Avr II, Not I • Intracellular expression of your gene • Requires an initiating ATG codon in a Kozak consensus sequence for proper
translation initiation of your gene (Cavener & Stuart, 1991; Kozak, 1987; Kozak, 1990)
• HIS4 selection in Pichia • For insertion at AOX1 in GS115 or KM71, linearize with Sac I (generates
His+ Mut+ in GS115 and His+ MutS in KM71) • For insertion at HIS4, linearize with Sal I (generates His+ Mut+ in GS115 and
His+ MutS in KM71)
• For a gene replacement at AOX1 in GS115, linearize with Bgl II (generates His+ MutS)
See page 34 for alternate restriction sites if your insert DNA has a Bgl II, Sac I, or Sal I site.
Map of pPIC3.5K The figure below shows the map of pPIC3.5K. Details of the multiple cloning site
are shown on page 20. The sequence of pPIC3.5K is available from our website (www.invitrogen.com) or from Technical Support (page 94).
����������� ����������������������
������������������ ����������������������������������������������������������� ��������������������������������������������������������������� ����������������!""#����������������������������$����%&'��������$($(�����)����* ��������� � ����������$���$�������������� ��������������������+&�((���� �������������������,��� ������������ � ������������$����$
� �����������
+��
-�.
���
+�.
/ �
&�.
,0��..
1��.
����.
��� !"#$$%
&�'��
���������
�� �.
�( � !"
�( � !"�)�)�*
���
$$
+��/�.
�+,�--
14
pPIC9K
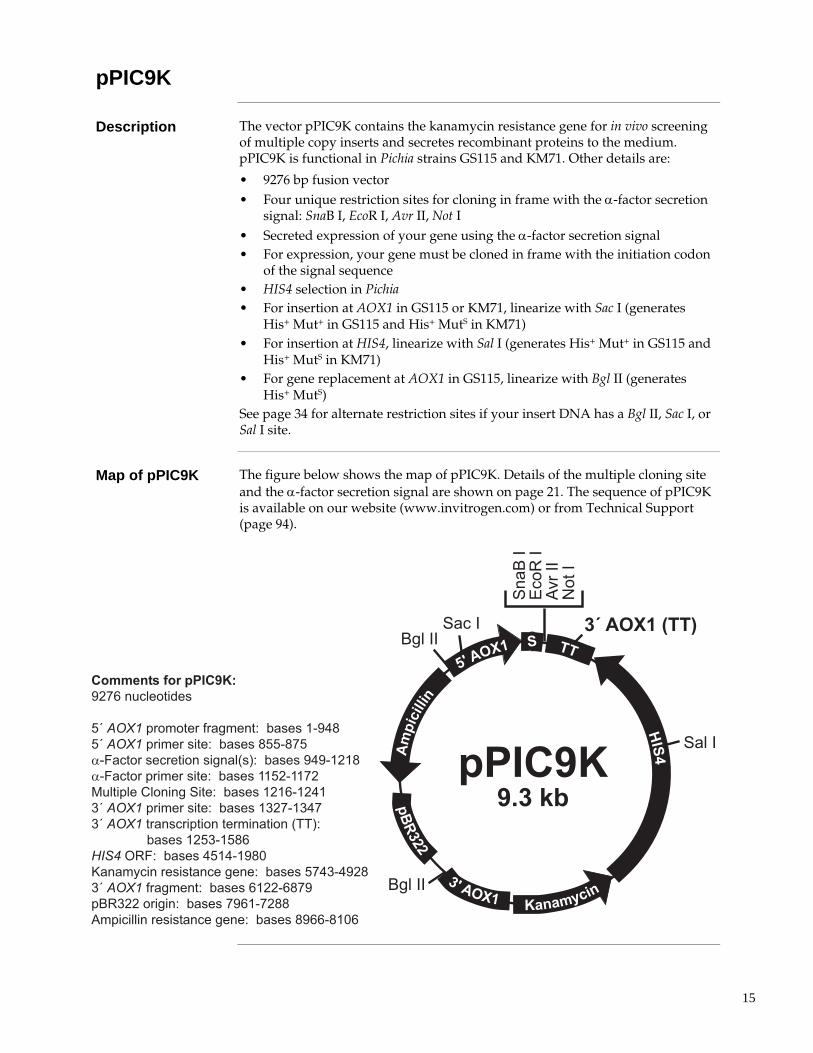
Description The vector pPIC9K contains the kanamycin resistance gene for in vivo screening
of multiple copy inserts and secretes recombinant proteins to the medium. pPIC9K is functional in Pichia strains GS115 and KM71. Other details are:
• 9276 bp fusion vector • Four unique restriction sites for cloning in frame with the -factor secretion
signal: SnaB I, EcoR I, Avr II, Not I • Secreted expression of your gene using the -factor secretion signal • For expression, your gene must be cloned in frame with the initiation codon
of the signal sequence • HIS4 selection in Pichia • For insertion at AOX1 in GS115 or KM71, linearize with Sac I (generates
His+ Mut+ in GS115 and His+ MutS in KM71) • For insertion at HIS4, linearize with Sal I (generates His+ Mut+ in GS115 and
His+ MutS in KM71) • For gene replacement at AOX1 in GS115, linearize with Bgl II (generates
His+ MutS) See page 34 for alternate restriction sites if your insert DNA has a Bgl II, Sac I, or Sal I site.
Map of pPIC9K The figure below shows the map of pPIC9K. Details of the multiple cloning site
and the -factor secretion signal are shown on page 21. The sequence of pPIC9K is available on our website (www.invitrogen.com) or from Technical Support (page 94).
����������� ������(����� ���2�
������������������ �������������$����������������������������������'� ���� ������� ���!�#���������$���(����'� ����������������������(����(������������� ������������(����($���������������������������(����$������������� ����������������!""#����������������������(�����������%&'��������$��$�����)����* ��������� � �����������$��$�(������������ ������������((������+&�((���� ����������������(��,��� ������������ � ������������������
����������
+ ��..
� ���������
���
+�.
/ �
&�.
,0��..
1��.
����.
��� !"#$$%
+ ��..
&�'�
'�� �.
�( � !"
�( � !" �)�)�*���
$$
�+,�--
15

pAO815
Description pAO815 is a plasmid designed for in vitro generation of multimers of your gene
for integration into the Pichia genome. Other details about pAO815 are provided below:
• 7709 bp vector • One unique restriction site: EcoR I • Intracellular expression of your gene • Requires an initiating ATG codon in a Kozak consensus sequence for proper
translation initiation of your gene (Cavener & Stuart, 1991; Kozak, 1987; Kozak, 1990)
• HIS4 selection in Pichia • For insertion at HIS4, linearize with Sal I or Stu I (generates His+ Mut+ in
GS115 and His+ MutS in KM71)
• For a gene replacement at AOX1 in GS115, linearize with Bgl II (generates His+ MutS)
See page 34 for alternate restriction sites if your insert DNA has a Bgl II, Stu I, or Sal I site.
Map of pAO815 The figure below shows the map of pAO815. Details of the multiple cloning site
are shown on page 22. The sequence of pAO815 is available on our website (www.invitrogen.com) or from Technical Support (page 94).
�!!����� ��$,-��.���������� ��
���������������������������������������������� ���� ����������������������� �����������!����!��������� ���� �����������"������!�������������� �� ������ ��� ���#$$%��������������������������"�����&�'��������������((�!����������������������������!���)�!""��� � ���������(!�������*�� � ���� �����������������!���(�!�
�$,-��/0/�1"
+�����
���
���$,2�����3
����
����
�� $,2�
�� $,2�
)��,����
$!�� �44��
)����
)����
�+����
16

Cloning into the Pichia Multi-Copy Expression Vectors
Introduction Below are some guidelines to consider when developing a cloning strategy for
these vectors. The multiple cloning sites for each vector are presented on the following pages for your convenience. If you are using pPIC9K, it is important to clone your gene in frame with the -factor signal sequence.
����
�����
���
We recommend that you transform the three supercoiled Pichia expression vectors into E. coli, so that you have a permanent stock.
• Dilute 1 μl of each plasmid to 10–100 pg/μl using sterile water or TE buffer. • Transform competent E. coli with 1–2 μl of the diluted plasmid and select on
LB with 50–100 μg/ml ampicillin (LB-Amp).
General Considerations
The following are some general considerations applicable to pAO815, pPIC3.5K, and pPIC9K.
• The codon usage in Pichia is believed to be the same as Saccharomyces cerevisiae and many Saccharomyces genes have proven to be cross-functional in Pichia.
• Plasmid constructions should be maintained in a recA, endA mutant E. coli strain such as TOP10F´.
• The native 5´ end of the AOX1 mRNA is noted in each multiple cloning site. This is needed to calculate the size of the expressed mRNA of the gene of interest if you need to analyze mRNA for any reason.
• Translation termination is determined by either stop codons in the gene of interest or in the 3´ AOX1 sequence. The stop codons in the 3´ AOX1 sequence are noted in each figure on the following pages.
• The premature termination of transcripts because of "AT rich regions" has been observed in Pichia and other eukaryotic systems (Henikoff & Cohen, 1984; Irniger et al., 1991; Scorer et al., 1993; Zaret & Sherman, 1984). If you have problems expressing your gene, check for premature termination and AT rich regions. It may be necessary to change the sequence in order to express your gene (Scorer et al., 1993).
• The predicted protease cleavage sites for the -factor signal sequence in pPIC9K are indicated in the figure (page 21).
• You must clone the open reading frame (ORF) of the mature gene of interest in frame and downstream of the -factor signal sequence in pPIC9K.
Continued on next page
17

Cloning into the Pichia Multi-Copy Expression Vectors, continued
General Cloning Strategies
Strategies generally fall into three different categories:
1. Ligation of a compatible restriction fragment:
a) Forced (directional) insertion involving the use of two different sites in the multiple cloning site.
b) Ligation of the fragment with the same restriction end on both ends into a single, compatible site.
2. PCR amplification of the fragment containing the gene of interest in such a way that compatible restriction ends are generated for ligation into the appropriate vector.
3. Direct cloning of an amplified fragment containing the gene of interest via the TA Cloning® Kit (see page viii), followed by subcloning of a compatible fragment into the vector of choice.
Cloning Procedures
Refer to (Ausubel et al., 1994), pages 3.16.1 to 3.17.3. or (Sambrook et al., 1989), pages 5.10 to 5.13. for help with cloning.
If your insert has an EcoR I site and you are trying to clone into the EcoR I site of pAO815, we recommend the following:
1. An enzyme like Bsa I has the following restriction recognition site: 5´-GGTCTCNˇ 3´-CCAGAGNNNNNˆ
2. An EcoR I site may be engineered into the recognition site for Bsa I. 5´-GGTCTCGˇAATTC..... 3´-CCAGAGCTTAAˆG.....
3. You may add this sequence to your DNA fragment by integrating it into your PCR primer or create in vitro as an adaptor to another restriction site.
4. Digest your PCR or adapted ligation product with Bsa I. This will generate EcoR I overhangs on both ends of your fragment without digesting with EcoR I. 5´- AATTC......
3´-G......
5. Ligate into dephosphorylated pAO815. Other enzymes that may be used are BsmA I or BsmB I.
Continued on next page
18

Cloning into the Pichia Multi-Copy Expression Vectors, continued
Signal Sequence Processing
The processing of the -factor mating signal sequence in pPIC9K occurs in two steps:
1. The preliminary cleavage of the signal sequence by the KEX2 gene product, with the final Kex2 cleavage occurring between arginine and glutamine in the sequence Glu-Lys-Arg * Glu-Ala-Glu-Ala, where * is the site of cleavage.
2. The STE13 gene product further cleaves the Glu-Ala repeats.
Optimizing Signal Cleavage
In Saccharomyces cerevisiae, it has been noted that the Glu-Ala repeats are not necessary for cleavage by Kex2, but cleavage after Glu-Lys-Arg may be more efficient when followed by Glu-Ala repeats. A number of amino acids are tolerated at site X instead of Glu in the sequence Glu-Lys-Arg-X. These amino acids include the aromatic amino acids, small amino acids, and histidine. Proline, however, will inhibit Kex2 cleavage. For more information on Kex2 cleavage, see (Brake et al., 1984).
There are some cases where Ste13 cleavage of Glu-Ala repeats is not efficient, and Glu-Ala repeats are left on the N-terminus of the expressed protein of interest. This is generally dependent on the protein of interest.
Bacterial Transformation
Once you have decided on a cloning strategy, you will need to prepare competent E. coli cells for transformation before setting up your ligation reactions. See Current Protocols in Molecular Biology (Ausubel et al., 1994) or Molecular Biology: A Laboratory Manual (Sambrook et al., 1989) for preparation of electrocompetent or chemically competent E. coli or use your laboratory's procedure.
Continued on next page
19

Cloning into the Pichia Multi-Copy Expression Vectors, continued
PAOX1 and Multiple Cloning Site of pPIC3.5K
The sequence below shows the detail of the multiple cloning site and surrounding sequences. Potential stop codons are underlined.
������������������������������������������������������
������������������������������������������������������
������������������������������������������������������
������������������������������������������������������
������������������������������������������������������
������������������������������������������������������
����������������������������������������
���� ��� �� ��� �����
���� � ������ � � � ��
�� ��� � ������ ���� ������ ��
!� ��� � ������ ���� ��"����" ��
���� ��� !� ��� ����#�
���$ �
���
� �
%��
% �
�"��
�" �
����
Special Considerations
• For pPIC3.5K, the fragment containing the gene of interest should have a Kozak consensus sequence for proper translation initiation, although this requirement is not as stringent in yeast. For example, ACC ATG G is a Kozak consensus sequence, where the ATG corresponds to the initiating ATG for your gene of interest (Cavener & Stuart, 1991; Kozak, 1987; Kozak, 1990).
• Be sure to analyze the 5´ untranslated region of the mRNA for secondary structure formation. Secondary structure in the mRNA may have a negative effect on expression of the recombinant protein.
• If you are digesting with BamH I and SnaB I or SnaB I and EcoR I, digest with SnaB I first. If you digest with BamH I or EcoR I first, the SnaB I site will be too close to the end of the DNA and will not be digested properly.
Continued on next page
20

Cloning into the Pichia Multi-Copy Expression Vectors, continued
PAOX1 and Multiple Cloning Site of pPIC9K
The sequence below shows the detail of the multiple cloning site and surrounding sequences. Potential stop codons are shown underlined.
�����������������������������������������������������
�������������������������������������������������������
�������������������������������������������������������
�������������������������������������������������������
�������������������������������������������������������
�������������������������������������������������������
�������������������������������������������������������
��������������������������������������������������
������������������������������������������������������
������������������������������������������������������
������������������������������������� �����������
� ��� �������������� �������������������������������
������������ �� �� �������������� ���������������
��������������������������������������������������� �
������������������������ ������������� ������������
��������� ����������� �� ���������������������������
����������������������������������������������������
��������� ���������������������������
���� ��� �&��� �����
�����
������ �� � ��
�& ���� '����� (��� ������ ��
)�*� (�+�,- .-�,/,+�
!& ��� � '����� (��� ��!� ��!� �
��0,.�1� ��+�,- ��23��.���,�� �%�%�
���� ��� !& ��� ������
��0,.�1� '����� (��� �������� ��
������������������������������������������������������
������������������������������������������������������
������������������������������������������������������
����������
��
��
��
��
!!
!"
!�
#
�
�
�"
#!
#"
$!
����! (�+�,- .-�,/,+�
Special Considerations
• The fragment containing the gene of interest must be cloned in frame with the secretion signal open reading frame.
• An initiating ATG is provided by the signal sequence. Translation will initiate at the ATG closest to the 5´ end of the mRNA.
• If your insert has a Bgl II site, see page 34 for alternate restriction sites to linearize your plasmid for Pichia transformation.
Continued on next page
21

Cloning into the Pichia Multi-Copy Expression Vectors, continued
PAOX1 and Multiple Cloning Site of pAO815
The sequence below shows the detail of the multiple cloning site and surrounding sequences.
������������������������������������������������������
������������������������������������������������������
������������������������������������������������������
������������������������������������������������������
������������������������������������������������������
������������������������������������������������������
���� ��� �� ��� �����
�� � �
�� ��� � '����� (��� ������ ��
!� ��� � '����� (��� ��"����"���
���� ��� !� ��� ������
��
��
��
��
!�
!�
Special Considerations
• For in vitro multimerization, you need to analyze your insert for BamH I and Bgl II restriction sites. If your insert has a BamH I or Bgl II site, we recommend that you use the in vivo method (pPIC3.5K) to isolate multiple inserts of your gene.
• For pAO815, the fragment containing the gene of interest should have a Kozak consensus sequence for proper translation initiation, although this requirement is not as stringent in yeast. For example, ACC ATG G is a Kozak consensus sequence, where the ATG corresponds to the initiating ATG for your gene of interest (Cavener & Stuart, 1991; Kozak, 1987; Kozak, 1990).
• Be sure to analyze the 5´ untranslated region of the mRNA for secondary structure formation. Secondary structure in the mRNA has a negative effect on expression of the recombinant protein.
22

Transformation into E. coli
Introduction At this point you have ligation reactions that you will transform by chemical
means or electroporation into competent E. coli cells (TOP10F´ or equivalent). For procedures to prepare competent cells, see Current Protocols in Molecular Biology (Ausubel et al., 1994) or Molecular Biology: A Laboratory Manual (Sambrook et al., 1989).
Analysis of Transformants
1. After transformation, plate the transformation mix onto LB plates with 50–100 μg/ml ampicillin (see Appendix, page 64) and select ampicillin resistant colonies.
2. Pick 10 ampicillin resistant transformants and inoculate into LB medium with 50–100 μg/ml ampicillin. Grow overnight at 37°C with shaking.
3. Isolate plasmid DNA by miniprep for restriction analysis and sequencing (see below). To sequence pAO815 or pPIC3.5K, use the 5´ AOX1 and the 3´ AOX1 Sequencing primers. To sequence pPIC9K, use the -Factor primer and the 3´ AOX1 Sequencing primers. Resuspend the primers in 20 μl sterile water to prepare a 0.1 μg/μl solution.
4. Make a glycerol stock of your desired clone for safekeeping by combining 0.85 ml of an overnight bacterial culture with 0.15 ml of sterile glycerol. Mix by vortexing and transfer to a labeled storage tube. Freeze the tube in liquid nitrogen or a dry ice/ethanol bath and store at –70°C.
5. Once your construct is confirmed by sequencing, proceed to Preparing Transforming DNA, page 32.
Sequencing Recombinant Clones
We strongly recommend that you sequence your construct before transforming into Pichia to confirm the following:
• The correct reading frame (for secretion)
• An ATG in the proper context for eukaryotic translation initiation
Use the primers mentioned above to sequence your constructs. For the location of the priming sites, see pages 20–22.
For sequencing protocols, refer to Unit 7 in Current Protocols in Molecular Biology (Ausubel et al., 1994) or Chapter 13 in Molecular Cloning: A Laboratory Manual (Sambrook et al., 1989).
After Cloning Your Gene
After you have cloned your gene into pAO815, you are ready to construct in vitro multimers using the protocol on the next page.
If you cloned your gene into pPIC3.5K or pPIC9K, you are ready to prepare plasmid DNA for transformation into Pichia. Refer to page 32 for more information.
23

In Vitro Multimerization Protocol
Introduction At this point you have your gene cloned into the EcoR I site of pAO815
(recombinant pAO815). To create in vitro multimers, you will first generate a Bgl II-BamH I expression cassette consisting of the AOX1 promoter and your gene. Second, you will linearize the vector using BamH I to allow cloning of multiple copies of the Bgl II-BamH I expression cassette. Note that the linearized vector already contains one copy of your expression cassette. To generate multiple copies of your expression cassette, follow the general steps below. Details are provided on pages 25–31. 1. Treat your Bgl II-BamH I expression cassette with ligase in vitro. Note that
Bgl II and BamH I share 4 bases in common between their recognition sites.
2. Generate head-to-tail, head-to-head, and tail-to-tail multimers (Head-to-tail ligation, which is the correct orientation for expression, will destroy both the BamH I and Bgl II sites).
3. Treat the ligation mix with BamH I and Bgl II to eliminate head-to-head and tail-to-tail multimers.
4. Ligate into BamH I-linearized recombinant pAO815.
5. Transform into E. coli and analyze recombinant plasmids for copy number by digesting with Bgl II and BamH I.
Alternative Procedure
You may wish to build each desired multimer in increments by ligating each additional expression cassette one (or two) at a time into pAO815. For example: 1 Digest pAO815 with one copy of your gene using BamH I.
2 Ligate a single copy of the Bgl II-BamH I expression cassette into the vector.
3 Transform E. coli and analyze the transformants for the vector with 2 copies of your insert.
4 Isolate and digest this vector (with 2 copies of your gene) with BamH I and Bgl II to isolate a cassette with 2 copies of your gene (optional).
5 Digest the vector with 2 copies of your gene with BamH I and ligate 1 or 2 copies (see Step 4) of the expression cassette into the vector.
6 Transform E. coli and analyze the transformants for the vector with 3 or 4 copies of your insert.
7 Repeat until the desired multimer is reached.
Continued on next page
24

In Vitro Multimerization Protocol, continued
Before Starting You will need the following materials:
• Electrocompetent or chemically competent E. coli (must be recA, endA) for transformation. You will need 3–4 tubes of competent cells per experiment. Use your favorite protocol or refer Current Protocols in Molecular Biology (Ausubel et al., 1994) or Molecular Biology: A Laboratory Manual (Sambrook et al., 1989) for a protocol to prepare competent E. coli
• EcoR I, BamH I, and Bgl II restriction enzymes and appropriate buffers • Low-melt agarose • Glass milk • Sterile water • CIP (calf intestinal alkaline phosphatase, 1 unit/μl) • 10X CIP Buffer • Phenol/chloroform • 3M sodium acetate • 100% ethanol • 80% ethanol • T4 Ligase (2.5 units/μl) • 10X Ligation Buffer (with ATP) • LB-Amp plates (50–100 μg/ml ampicillin) • 16°C, 37°C, and 65°C water baths or temperature block
Controls To evaluate your transformants and expression data later on, we recommend
transforming Pichia with pAO815 (the parent vector) and pAO815 containing one copy of your expression gene. This allows you to compare expression levels to see if multiple copies significantly increase the amount of protein produced. Also, if you elect to determine how many copies of your gene are in a recombinant by dot or Southern blot, the strain with the parent vector will control for background hybridization and the strain with the single copy gene will provide a signal to normalize your data.
Continued on next page
25

In Vitro Multimerization Protocol, continued
Digesting Recombinant pAO815
Set up two separate digestions of recombinant pAO815 containing one copy of your gene:
1. Double digest 1–2 μg recombinant pAO815 with 10 units each of Bgl II and BamH I. Use a 20 μl reaction volume and digest for 1–2 hours at 37°C to release your expression cassette. Proceed to Producing of Expression Cassettes for Multimerization, below.
2. Digest 2 μg recombinant pAO815 with 10 units of BamH I only. Use a 20 μl reaction volume and digest for 1–2 hours at 37°C to linearize recombinant pAO815. Proceed to Dephosphorylation of Vector, below.
Producing Expression Cassettes for Multimerization
1. Load all of the Bgl II/BamH I digestion on a 1% low melt agarose gel and electrophorese to separate fragments. Stain the gel with ethidium bromide.
2. Cut out the band containing the expression cassette and place into a microcentrifuge tube. Note that the size of the fragment depends on the size of your gene. The vector backbone will be digested into 2 fragments:
• 4.0 kb BamH I–Bgl II fragment (contains HIS4 and 3´ AOX1 sequences)
• 2.4 Bgl II fragment (contains the pBR322 origin and ampicillin resistance marker).
3. Isolate DNA from the agarose using the method of choice.
4. Ethanol precipitate the DNA with 1/10 volume 3 M sodium acetate and 2 volumes 100% ethanol.
5. Resuspend the Bgl II–BamH I digested expression cassette in 15 μl sterile water. Store on ice if proceeding immediately to Ligation and Digestion of Expression Cassette, next page. Store at –20°C for long-term storage.
Dephosphory-lation of Vector
Dephosphorylation is necessary to prevent self-ligation of the vector.
1. Take your digest from Digestion of Recombinant pAO815, Step 2, above, and phenol extract, then ethanol precipitate the DNA. Resuspend in 17 μl of sterile water.
2. Set up the dephosphorylation reaction in a microcentrifuge tube as follows:
BamH I digested recombinant pAO815 17 μl
10X CIP Buffer 2 μl
CIP (1 Unit/μl) 1 μl
Total volume 20 μl
3. Incubate at 37°C for 15 minutes.
4. Add 30 μl of sterile water to the reaction to make a final volume of 50 μl.
5. Add 50 μl of phenol/chloroform and extract your DNA solution. Transfer the aqueous solution to a new tube.
6. Precipitate the DNA by adding 5 μl of 3 M sodium acetate and 110 μl 100% ethanol. Incubate on ice for 30 minutes.
7. Resuspend pellet in 8 μl sterile water. Save on ice if you plan to ligate your insert immediately (see Ligation and Digestion of Expression Cassette, next page) or store at –20°C.
Continued on next page
26

In Vitro Multimerization Protocol, continued
Ligation and Digestion of Expression Cassette
Ligation of the expression cassette generates head-to-tail, head-to-head, and tail-to-tail multimers. Creation of head-to-tail multimers will be in the correct orientation for expression and will destroy both the BamH I and Bgl II sites between the expression cassettes. Digestion of the multimers with BamH I and Bgl II will eliminate those multimers with tail-to-tail and head-to-head orientation. After digestion with these two restriction enzymes, you will have a mixture of multimers containing 1, 2, 3, etc. copies of your gene that can be ligated into BamH I-linearized, recombinant pAO815.
1. Set up a 20 μl ligation reactions as follows:
Bgl II–BamH I digested expression cassette 15 μl Sterile water 2 μl 10X Ligation Buffer (with ATP) 2 μl T4 DNA Ligase (2.5 units/μl) 1 μl
2. Incubate at 16°C for 2.5 hours.
3. Heat inactivate the ligase by incubating at 65°C for 20 minutes.
4. Add the following reagents for restriction enzyme digestion (cut-back). Note that BamH I and Bgl II may be used with the same restriction buffer:
Sterile water 23 μl 10X restriction enzyme buffer 5 μl Bgl II (10 units/ml) 1 μl BamH I (10 units/ml) 1 μl
5. Incubate the reaction at 37°C for 2 hours.
6. Add 50 μl of phenol/chloroform and extract the restriction enzyme digestion to remove the enzymes. Transfer the aqueous solution to a new microcentrifuge tube.
7. Ethanol precipitate the DNA using 5 μl 3 M sodium acetate and 110 μl 100% ethanol.
8. Resuspend pellet in 4 μl sterile water. Save on ice if you plan to ligate your insert immediately or you can store at –20°C. Proceed to Ligating Multimers into Linearized Vector, next page.
Continued on next page
27

In Vitro Multimerization Protocol, continued
You may wish to combine the ligation reaction with the restriction enzyme digestion. T4 ligase will retain most of its activity in all of the four New England BioLabs buffers. Remember to add 1 mM ATP to the reaction in order to ensure ligase activity.
Ligating Multimers into Linearized Vector
You are now ready to ligate the mixture of multimers generated in Step 10, page 27, into dephosphorylated, linearized vector.
1. Set up the following ligation reactions: Dephosphorylated vector (page 26, Step 7) 4 μl Expression cassette multimers (page 27, Step 8,) 4 μl 10X Ligation Buffer 1 μl T4 DNA Ligase (2.5 units/μl) 1 μl Total volume 10 μl
For the vector only control: Dephosphorylated vector 4 μl Sterile water 4 μl 10X Ligation Buffer 1 μl T4 DNA Ligase (2.5 units/μl) 1 μl Total volume 10 μl 2. Incubate overnight at 16°C.
3. You may store the ligation reactions at –20°C until ready to use, or transform 1 to 10 μl of each ligation mix into competent E. coli. Note that too much of the ligation mixture may cause arcing when transforming electrocompetent cells.
Transformation into E. coli
Remember to include the "vector only" and "cells only" controls to evaluate your experiment. The "vector only" control will indicate whether your vector was dephosphorylated. Since the CIP reaction is not 100% and because you often get degradation of the ends, there might be a few colonies on this plate. The "cells only" plate should have no colonies at all.
1. Transform competent E. coli by your method of choice.
2. After adding medium to the transformed cells and allowing them to recover, plate 10 μl and 100 μl of each transformation mix onto LB plates with 50–100 μg/ml ampicillin. Save the remainder of your transformation mix at 4°C.
3. Incubate overnight at 37°C. If you do not get transformants or very few transformants, plate out the remainder of the transformation mix onto LB-ampicillin plates.
Continued on next page
28

In Vitro Multimerization Protocol, continued
Analyzing Transformants
1. Pick 20 transformants and inoculate 2 ml LB containing 50–100 μg/ml ampicillin. Grow overnight at 37°C.
2. Isolate plasmid DNA and digest with Bgl II and BamH I to release any multimers from pAO815.
(Be sure to include Bgl II–BamH I digested pAO815 as a control. It is possible to get vector rearrangements and deletions with large vectors in E. coli. Including Bgl II–BamH I digested pAO815 will allow you to detect these rearrangements-deletions in the vector backbone.)
3. Analyze your digests on a 1% agarose gel. You should see bands corresponding to 1 copy, 2 copies, 3 copies, etc. of your expression cassette, plus the vector backbone.
(The number of copies you obtain may depend on how well a large vector is tolerated by the E. coli host strain.)
4. Once you have identified plasmids with multiple copies of your expression cassette, be sure to purify the original colony by streaking for single colonies and confirming your construct. If you have difficulties, see the next page.
5. Prepare frozen glycerol stocks of E. coli containing each of your multimeric constructs. Prepare 5–10 μg of each plasmid for transformation into Pichia. Proceed to Preparing Transforming DNA, page 32.
Continued on next page
29

In Vitro Multimerization Protocol, continued
Trouble-shooting
The table below will help you optimize formation and isolation of multimers in Pichia.
Problem Possible Reason Solution
No multimers or low number of multimers in your vector after transformation into E. coli
CIP defective Use fresh CIP
Add more CIP. Add 1 unit of CIP and incubate 15 more minutes at 37°C. This is somewhat risky as CIP can degrade the ends of your DNA.
Not enough insert DNA to ligate
Digest more pAO815 containing 1 copy of your expression cassette.
Construct is unstable in E. coli
Use the in vivo method to isolate multimers (see page 4).
Multimers are too long to ligate efficiently
Try ligating each expression cassette separately.
Recombinant vector rearranges and deletions are detected
Construct is unstable in E. coli
Use the in vivo method to isolate multimers (see page 4).
Pichia His+ transformants do not have multimers
Vector was linearized with the wrong enzyme (Restriction enzymes in the 5´ AOX1 region are duplicated when multimers are created)
Linearize your construct with Sal I or Stu I to insert the construct into his4.
Analyze your construct for other unique restriction sites in the vector backbone that are near the 5´ AOX1 region or the 3´ AOX1 region. These sites will preserve your multimers and allow recombination with AOX1.
Continued on next page
30
In Vitro Multimerization Protocol, continued
For More Information
There are a number references in the literature you can consult to optimize synthesis of in vitro multimers. A partial list is provided below:
Cohen, B. and Carmichael, G. G. (1986) A Method for Constructing Multiple Tandem Repeats of Specific DNA Fragments. DNA 5: 339–343.
Eisenberg, S., Francesconi, S. C., Civalier, C. and Walker, S. S. (1990) Purification of DNA-Binding Proteins by Site-specific DNA Affinity Chromatography. Methods Enzymol. 182: 521–529.
Graham, G. J. and Maio, J. J. (1992) A Rapid and Reliable Method to Create Tandem Arrays of Short DNA Sequences. BioTechniques 13: 780–789.
Rudert, W. A. and Trucco, M. (1990) DNA Polymers of Protein Binding Sequences Generated by Polymerase Chain Reaction. Nucleic Acids Res. 18: 6460.
Simpson, R. T., Thoma, F. and Brubaker, J. M. (1985) Chromatin Reconstituted from Tandemly-repeated Cloned DNA Fragments and Core Histones: A Model System for the Study of Higher-order Structure. Cell 42: 799–808.
Takeshita, S., Tezuka, K.- i., Takahashi, M., Honkawa, H., Matsuo, A., Matsuishi, T. and Hashimoto-Gotoh, T. (1988) Tandem Gene Amplification in vitro for Rapid and Efficient Expression in Animal Cells. Gene 71: 9–18.
Taylor, W. H. and Hagerman, P. J. (1987) A General Method for Cloning DNA Fragments in Multiple Copies. Gene 53: 139–144.
31
Preparing Transforming DNA
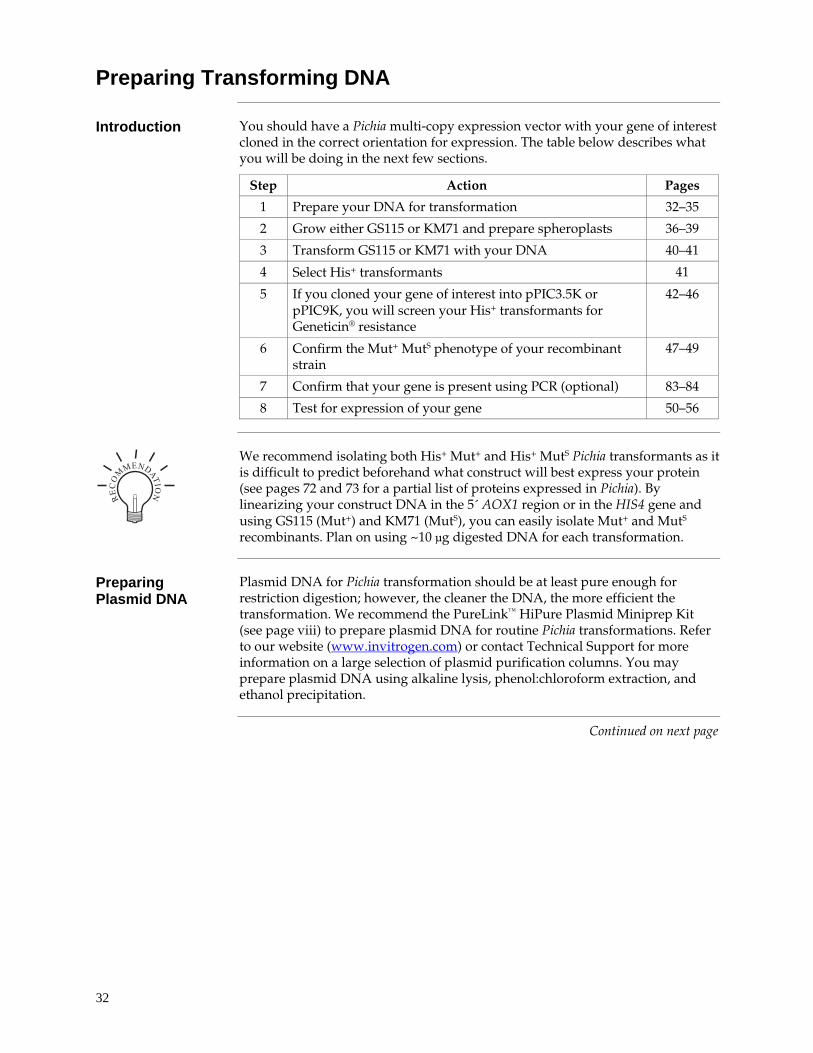
Introduction You should have a Pichia multi-copy expression vector with your gene of interest
cloned in the correct orientation for expression. The table below describes what you will be doing in the next few sections.
Step Action Pages
1 Prepare your DNA for transformation 32–35
2 Grow either GS115 or KM71 and prepare spheroplasts 36–39
3 Transform GS115 or KM71 with your DNA 40–41
4 Select His+ transformants 41
5 If you cloned your gene of interest into pPIC3.5K or pPIC9K, you will screen your His+ transformants for Geneticin® resistance
42–46
6 Confirm the Mut+ MutS phenotype of your recombinant strain
47–49
7 Confirm that your gene is present using PCR (optional) 83–84
8 Test for expression of your gene 50–56
����
�����
���
We recommend isolating both His+ Mut+ and His+ MutS Pichia transformants as it is difficult to predict beforehand what construct will best express your protein (see pages 72 and 73 for a partial list of proteins expressed in Pichia). By linearizing your construct DNA in the 5´ AOX1 region or in the HIS4 gene and using GS115 (Mut+) and KM71 (MutS), you can easily isolate Mut+ and MutS recombinants. Plan on using ~10 μg digested DNA for each transformation.
Preparing Plasmid DNA
Plasmid DNA for Pichia transformation should be at least pure enough for restriction digestion; however, the cleaner the DNA, the more efficient the transformation. We recommend the PureLink™ HiPure Plasmid Miniprep Kit (see page viii) to prepare plasmid DNA for routine Pichia transformations. Refer to our website (www.invitrogen.com) or contact Technical Support for more information on a large selection of plasmid purification columns. You may prepare plasmid DNA using alkaline lysis, phenol:chloroform extraction, and ethanol precipitation.
Continued on next page
32
Preparing Transforming DNA, continued
Linearizing Plasmid DNA
We recommend that you linearize your vector in such a manner to generate both Mut+ and MutS recombinants. It is possible that one phenotype will express your multicopy integrant better than the other will. Use strain KM71 if you only want MutS recombinants. It is much easier and more efficient to generate MutS recombinant strains using single crossover events than double crossover events (e.g., insertions at AOX1 or his4 as opposed to gene replacement at AOX1). If your insert contains any of the restriction sites listed below, see page 34 for alternate sites.
1. If you cloned your insert into pPIC3.5K, linearize with:
• Sac I for insertion at AOX1 (GS115, Mut+ or KM71, MutS)
• Sal I for insertion at HIS4 (GS115, Mut+ or KM71, MutS)
2. If you cloned your insert into pAO815, linearize with:
• Sal I or Stu I for insertion at HIS4 (GS115, Mut+ or KM71, MutS)
Note that multiple Sac I sites are formed if there are 2 or more multimers in pAO815.
3. If you cloned your insert into pPIC9K, linearize with:
• Sac I for insertion at AOX1 (GS115, Mut+ or KM71, MutS)
• Sal I for insertion at HIS4 (GS115, Mut+ or KM71, MutS)
Procedure 1. Digest both your construct and the parent vector. You will transform GS115
and/or KM71 with the parent vector as a background control for expression.
2. Analyze a small portion of your digest by agarose gel electrophoresis to confirm complete digestion of your fragment. The number of transformants and frequency of targeting will be reduced if digestion is not complete.
3. Extract the digest with phenol:chloroform:isoamyl alcohol (25:24:1) and ethanol precipitate the digested DNA. Resuspend DNA pellet in 10–20 μl of TE buffer. It is not necessary to purify the fragment containing your gene away from the rest of the plasmid.
4. Store at –20°C until ready to transform.
Continued on next page
33

Preparing Transforming DNA, continued
Alternate Restriction Sites
The table below describes alternate restriction sites for linearizing your construct before transformation into Pichia. pPIC3.5K. Note that an additional Stu I site was added with the inclusion of the kan gene, so that the Stu I site in HIS4 is no longer unique.
Restriction Enzyme
5´ AOX1 3´ AOX1 Vector backbone HIS4 gene
Sac I 209 -- -- --
Pme I 414 -- -- --
Bpu 1102 I 589 -- -- --
Xcm I 699 -- -- --
Bgl II† 2 6616 -- --
Dra I† 414 6454 6596, 7787, 7806 --
Sal I -- -- -- 2919
BspE I -- -- -- 3580 pAO815. Note that if more than one expression cassette is created in pAO815, the unique sites in the 5´ AOX1 region are now duplicated and no longer unique.
Restriction Enzyme
5´ AOX1 3´ AOX1 Vector backbone HIS4 gene
Bgl II† 2 5307 -- --
Sal I -- -- -- 2863
Stu I -- -- -- 2948
BspE I -- -- -- 3580 †Restriction sites are used to generate gene replacements at AOX1 in GS115 only
pPIC9K. Note that an additional Stu I site was added with the inclusion of the kan gene, eliminating the unique Stu I site in HIS4.
Restriction Enzyme
5´ AOX1 3´ AOX1 Vector backbone HIS4 gene
Sac I 209 -- -- --
Pme I 414 -- -- --
Bpu 1102 I 589 -- -- --
Xcm I 699 -- -- --
Bgl II† 2 6875 -- --
Dra I† 414 6713 6855, 8046, 8065, 8757
--
Sal I -- -- -- 3178
BspE I -- -- -- 3845 †Restriction sites are used to generate gene replacements at AOX1 in GS115 only.
Continued on next page
34

Preparing Transforming DNA, continued
Controls We recommend that you include the following controls when transforming Pichia.
• The parent vector linearized in the same manner as your construct. Use this as a control to confirm integration via PCR (page 83) and as control for background for the expression analysis and the quantitative dot blots or Southern analysis.
• pPIC3.5K, pAO815, or pPIC9K containing one copy of your expression cassette. Be sure to linearize pAO815 in the same manner as your multimer. Most of the His+ transformants created by transforming with recombinant pPIC3.5K or pPIC9K will only have one copy. Make sure that the transformant you pick is only resistant to 0.25 mg/ml Geneticin®. The single copy controls created using pPIC3.5K, pAO815, and pPIC9K should have the same Mut phenotype as the putative multimeric recombinants you are testing. Use these recombinants as a control to compare expression levels with multiple copies of your expression cassette and as a single copy control for quantitative dot blot or Southern analysis. This is a very important control as increasing the copy number of the desired gene does not always lead to increased expression of recombinant protein.
35

Growth of Pichia for Spheroplasting
Introduction In general, spheroplasting and electroporation (page 78) provide the highest
efficiency of transformation for most researchers (103 to 104 transformants per μg DNA). Pichia can also be transformed using PEG 1000 (page 79) or lithium chloride (page 81). These two protocols, particularly lithium chloride, do not perform as well as spheroplasting or electroporation. If you do not have an electroporation device, we recommend spheroplasting or using the PEG 1000 method. Transformation in Pichia is less efficient than for Saccharomyces. For references on general yeast transformation, see (Cregg et al., 1985; Hinnen et al., 1978).
Explanation of Spheroplasting
The cell wall of yeast prevents uptake of DNA. To enable yeast to take up DNA, it is necessary to partially remove the cell wall. Zymolyase is a -glucanase that hydrolyzes the glucose polymers with 1,3 linkages in the cell wall. Addition of Zymolyase partially digests the cell wall. It is critical not to overdigest the cell wall as doing so will cause the cells to die. Zymolyase digestion is monitored by the sensitivity of the cells to SDS. Aliquots of cells are added to SDS, lysing the spheroplasts. This causes a clearing of the solution that is monitored by the absorbance (light-scattering) at 800 nm. It has been empirically determined that when 70% spheroplasting has been achieved, digestion is optimal. Cells are then washed with an isotonic solution to remove the enzyme and incubated with DNA. The cells are resuspended in sorbitol to facilitate cell wall regeneration and plated.
Preparing Media Prepare the following media several days in advance and store at 4°C (see
Appendix, pages 66–69 for details):
YPD (Yeast extract Peptone Dextrose) medium, 1 liter YPD plates, 1 liter RDB (Regeneration Dextrose Base) plates, 1 liter RDHB (Regeneration Dextrose Histidine Base) plates, 1 liter
Prepare the following solution on the day of transformation and maintain at 45°C:
5% SDS solution in water RD (Regeneration Dextrose), molten agarose, 100 ml
Solutions Spheroplasting and Transformation Reagents
Provided:
1 M Sorbitol SE: 1 M sorbitol, 25 mM EDTA, pH 8.0 DTT: 1 M DTT in water SCE: 1 M sorbitol, 1 mM EDTA and 10 mM sodium citrate buffer, pH 5.8 CaS: 1 M sorbitol, 10 mM Tris-HCl, pH 7.5, 10 mM CaCl2 Zymolyase: 3 mg/ml in water 40% PEG: 40% (w/v) PEG 3350 (Reagent grade) in water CaT: 20 mM Tris, pH 7.5 and 20 mM CaCl2 SOS: 1 M sorbitol, 0.3X YPD, 10 mM CaCl2
Prepared fresh for each transformation:
SED: 19 ml of SE and 1 ml of 1 M DTT (see page 38) PEG/CaT: 1:1 mixture of 40% PEG and CaT (see page 40)
Continued on next page
36

Growth of Pichia for Spheroplasting, continued
Procedure 1. Streak GS115 or KM71 onto a YPD plate such that isolated, single colonies
will grow. Incubate the plate at 28–30°C for 2 days.
2. Inoculate 10 ml of YPD in a 50 ml conical tube or 100 ml shake flask with a single colony of GS115 or KM71 from the YPD plate and grow overnight at 28–30°C with vigorous shaking (250–300 rpm). You may store this culture at 4°C for several days.
3. Place 200 ml of YPD in each of three 500 ml culture flasks. Inoculate the flasks with 5, 10, and 20 μl of cells from the culture made in Step 2 and incubate them overnight with vigorous shaking (250–300 rpm) at 28–30°C.
4. The next morning, bring the transformation solutions (SE, SCE, Sterile Water, SOS, PEG, CaS, CaT, 1 M sorbitol) provided in the kit, the RDB plates (for plating transformants), and the RDHB plates (for viability control) to room temperature.
5. Check the OD600 of each of the three culture flasks.
6. Harvest the cells from the culture that has an OD600 between 0.2 and 0.3. Centrifuge the cells at room temperature for 5–10 minutes at 1,500 g. Decant the supernatant and discard the other cultures. Proceed to Preparing Spheroplasts, page 38.
Note: If the cultures are all over 0.3, choose one of the cultures and dilute (1:4) with fresh medium and incubate at 28–30°C until the OD600 is between 0.2 and 0.3 (2–4 hours). Harvest the cells and proceed as in Step 6, above.
37

Preparing Spheroplasts
Before Starting You should have a cell pellet from Step 6, page 37.
• Prepare 100 ml of molten RD agarose and keep at 45°C (see Appendix, page 69)
• Thaw one tube of 1 M DTT (provided in the kit)
• Prepare fresh SED for one batch of spheroplasts as follows:
Using sterile technique, transfer 19 ml of SE (provided) to an appropriate sterile container (e.g. 50 ml conical tube). Add 1 ml of 1 M DTT and mix well. For best results this solution of SED should be made and used immediately.
The quality and freshness of DTT is critical for a successful spheroplast preparation. The 1 M DTT provided is analytical reagent grade and must be stored at –20°C.
Washing the Cells
1. Wash the cells from Step 6, page 37 by resuspending the pellet in 20 ml of sterile water (provided). Resuspend the pellet by swirling the tube. Transfer to a sterile, 50 ml conical tube.
2. Pellet the cells by centrifugation at 1,500 g for 5 minutes at room temperature. Decant and discard the supernatant. The cell pellet will be used to prepare spheroplasts.
3. Wash the cell pellet once by resuspending in 20 ml of fresh SED, prepared above and centrifuge at 1,500 g for 5 minutes at room temperature.
4. Wash the cells once with 20 ml of 1 M sorbitol and centrifuge as described in Step 2.
5. Resuspend the cells by swirling in 20 ml of SCE buffer and divide the suspension into two 50 ml conical tubes (~10 ml each).
6. Remove one tube of Zymolyase from –20°C and place it on ice. Mix well by flicking the tube several times. Zymolyase is provided as a slurry and does not go into solution. It is important to mix the slurry thoroughly before each use to ensure addition of a consistent amount of Zymolyase.
Adding Zymolyase
You will use one tube of cells prepared above to determine the optimal time of digestion with Zymolyase to make spheroplasts. Once the optimal time is determined, the other tube of cells will be used to make spheroplasts.
Zymolyase digests the cell wall and makes the cells extremely fragile. Handle the sample gently. The moment after addition of Zymolyase, the digestion of the cell wall begins.
• Prepare at least 20 ml of a 5% SDS solution (not provided) for use below.
• Set your UV-Vis spectrophotometer to 800 nm and blank with 800 μl 5% SDS and 200 μl SCE.
• Set up 17 sterile microcentrifuge tubes and label them 0, 2, 4, 5, 6, 7, 8, 9, 10, 15, 20, 25, 30, 35, 40, 45, and 50. Add 800 μl of 5% SDS to each tube.
Continued on next page
38

Preparing Spheroplasts , continued
Adding Zymolyase, continued
1. From one tube of cells (Step 5, page 38), withdraw 200 μl cells and add to the tube marked "0". This is your zero time point. Set the tube aside on ice.
2. Add 7.5 μl of Zymolyase to the same tube of cells, mix it gently by inversion, and incubate the cells at 30°C. Do not shake the sample. This sample will be used to establish the incubation time for optimal spheroplasting as described below. Keep the second tube of cells at room temperature for use in Step 6 below. Keep the remainder of the Zymolyase on ice.
3. Monitor the formation of the spheroplasts as follows: At time 2 minutes, withdraw 200 μl of cells (from the suspension in Step 2) and add to the tube marked "2". Repeat at time t= 4, 5, 6, 7, 8, 9, 10, 15, 20, 25, 30, 35, 40, 45, and 50 minutes after adding Zymolyase. Read the OD800 for all samples.
4. Determine the percent of spheroplasting for each time point using the equation:
% Spheroplasting = 100 – [(OD800 at time t/ OD800 at time 0) 100]
For example: At time t = 0, the OD800 = 0.256 At time t = 15, the OD800 = 0.032
Calculation: % spheroplasting = 100 – [(0.032/0.256) 100] = 100 - [(0.125) 100] = 100 – 12.5 = 87.5%
5. Determine the time of incubation that results in approximately 70% spheroplasting. This time of incubation is variable due to differences in lots of Zymolyase. In Invitrogen labs, it takes approximately 15–40 minutes of Zymolyase treatment to achieve optimal spheroplasting.
Note: It is important to establish the minimum time required for the desired amount of spheroplasting. Prolonged incubation with Zymolyase is deleterious to spheroplasts and will result in lower transformation efficiency.
6. Add 7.5 μl Zymolyase to the remaining tube of cells as described in Step 1 above. Incubate the tube at 30°C for the time that was established in Step 5 to obtain the optimal level (70%) of spheroplasting.
7. Harvest the spheroplasts by centrifugation at 750 g for 10 minutes at room temperature. Decant and discard the supernatant.
8. Wash the spheroplasts once with 10 ml of 1 M sorbitol (gently disperse the pellet by tapping the tube, do not vortex). Collect the spheroplasts by centrifugation at 750 g for 10 minutes at room temperature.
9. Wash the spheroplasts once with 10 ml of CaS and centrifuge as in Step 7. Gently resuspend the spheroplasts in 0.6 ml of CaS. The spheroplasts must be used immediately (up to 30 minutes) for transformation (page 40). They cannot be stored for much longer. This preparation yields enough spheroplasts for six transformations.
39

Transformation of Pichia
Before Starting Make sure your RDB plates are at room temperature and that you have molten
RD top agarose available. Thaw your linearized DNA and keep on ice. You should have the following:
• Your construct linearized with Sal I, Stu I, or Sac I to favor isolation of His+ Mut+ recombinants in GS115
• Your construct linearized with Sal I, Stu I, or Sac I to favor isolation of His+ MutS recombinants in KM71
• Parent plasmid linearized with same restriction enzyme
Controls should include no DNA or linearized pBR322 DNA and plasmid only (no cells) to check for contamination.
Procedure 1. For each transformation, dispense 100 μl of the spheroplast preparation from
Step 9 (previous page) into a sterile 15 ml snap-top Falcon 2059 tube (or equivalent).
2. Add 10 μg of DNA and incubate the tube at room temperature for 10 minutes.
3. During the 10 minute incubation, make a fresh PEG/CaT solution. Since each transformation requires 1.0 ml of the PEG/CaT solution, calculate the amount you need and prepare this volume by adding together equal volumes of 40% PEG and CaT (a 1:1 solution).
4. Add 1.0 ml of fresh PEG/CaT solution to the cells and DNA, mix gently, and incubate at room temperature for 10 minutes.
5. Centrifuge the tube at 750 g for 10 minutes at room temperature and carefully aspirate the PEG/CaT solution. Invert the tube and tap it gently to drain the excess PEG/CaT solution.
6. Resuspend the pellet of transformed cells in 150 μl of SOS medium and incubate it at room temperature for 20 minutes.
7. Add 850 μl of 1 M sorbitol. Proceed to Plating, below.
Plating Pichia spheroplasts need to be plated in top agarose or agar to protect them from
lysis prior to selection.
1. Mix together 100–300 μl of each spheroplast-DNA solution from Step 7, above, with 10 ml of molten RD agarose and pour on RDB plates. Allow the top agarose to harden. Note there is enough of the spheroplast-DNA solution to plate duplicate and triplicate plates.
2. Invert plates and incubate at 28–30°C. Transformants should appear in 4–6 days.
3. For cell viability: Mix 100 μl of spheroplasts with 900 μl of 1 M sorbitol.
4. Mix 100 μl of this diluted sample with 10 ml of molten RDH and pour on a RDHB plate. Allow top agarose to harden.
5. Invert plates and incubate at 28–30°C. Appearance of colonies after 4–6 days demonstrates that the spheroplasts can regenerate into dividing cells.
Continued on next page
40

Transformation of Pichia, continued
Analyzing His+ Transformants
If you transformed Pichia with constructs based on pPIC3.5K or pPIC9K, proceed to In Vivo Screening of Multiple Inserts, page 42.
If you transformed Pichia with constructs based on pAO815, proceed to Screening for Mut+ and MutS Transformants, page 47.
Evaluating Your Transformation Experiment
Transformation efficiency is generally 103 to 104 His+ transformants/μg of DNA using the spheroplast method. There should be no colonies on the "No DNA" or pBR322 plate or the plasmid only (no cells) plate.
Screening by Functional Assay
Some researchers have used a functional assay to directly test for high expressing Pichia recombinant clones without first screening for MutS or Mut+ phenotypes. After testing for high expression, be sure to also check the Mut phenotype. This will help you optimize expression of your recombinant clone.
41

In Vivo Screening of Multiple Inserts
Introduction You will need as many His+ transformants as you can conveniently generate.
Recall that statistically 1–10% of the His+ transformants will have more than one insert. This means that if the frequency of multicopy inserts is 1%, you will have to screen 1000 His+ transformants to get 10 Geneticin® hyper-resistant colonies to test. This may require 1–5 plates containing His+ transformants. It is not unusual to screen thousands of colonies. Once you have Geneticin® resistant colonies, you can then test them for expression of your recombinant protein (page 50) or characterize them for the Mut phenotype (page 47).
Methods to Screen for Geneticin® Resistant Transformants
There are two methods used to screen His+ transformants for Geneticin® resistance. Method 1 is technically easier and screens a greater number of clones, but is less reliable. After initial selection of His+ transformants, they are pooled and plated on YPD-Geneticin® plates containing increasing concentrations of Geneticin®. Method 1 is applicable to spheroplast or electroporation transformation methods. Method 2 is technically more difficult and screens fewer numbers of clones but is more reliable. It involves growing clones in microtiter plates until all clones are at the same density. The cultures are then spotted on the YPD-Geneticin® plates and scored for Geneticin® resistance.
There is a tendency to isolate false positives when screening with Geneticin®. It is very important to purify your putative Geneticin® resistant clones by streaking for single colonies on YPD and then confirming Geneticin® resistance on YPD-Geneticin® plates. We do not recommend replica-plating as a method to screen for Geneticin® resistance. If you do elect to replica-plate, be sure to confirm Geneticin® resistance.
Continued on next page
42

In Vivo Screening of Multiple Inserts, continued
Before Starting Prepare 4 YPD plates of each of the following concentrations of Geneticin®:
0, 0.25, 0.5, 0.75, 1.0, 1.5, 1.75, 2.0, 3.0, and 4.0 mg/ml (see Appendix, page 67).
Method 1, (Spheroplasts)
Use this procedure if you transformed Pichia spheroplasts. Start with plates containing His+ transformants. 1. Using a sterile spreader, remove the top layer of the soft agar containing the
His+ transformants and place into a sterile, 50 ml conical centrifuge tube.
2. Add 10 to 20 ml of sterile water. There should be a 2X volume of water above the settled agar. Vortex vigorously for 1 to 2 minutes.
3. Set the centrifuge tube upright on the bench and letthe agar pieces settle (about 1 minute).
4. Determine the cell density of the supernatant by using a hemacytometer. You need at least 5 105 cells/ml so you can plate ~105 cells in 200 μl or less. (If the cells are too dilute, transfer the liquid to a fresh tube and centrifuge the cells. Resuspend the cell pellet in sterile water in a volume sufficient to give 5 105 cells/ml.)
5. Plate 105 cells YPD-Geneticin® plates containing Geneticin® at a final concentration of 0.25, 0.5, 0.75, 1.0, 1.5, 1.75, 2.0, 3.0, and 4.0 mg/ml. Use four plates for each concentration. (You may want to confirm the titer of the cells on the YPD plates without Geneticin® in order to calculate the percent of Geneticin® resistant colonies you obtain for each Geneticin® concentration and determine whether you are getting multimers at 1–10% of the transformants plated. Prepare 10–5, 10–6, and 10–7 dilutions of the pooled transformants using sterile water. Plate 100 to 200 μl per plate.)
6. Incubate plates at 30°C and check daily. Geneticin®-resistant colonies will take 2 to 5 days to appear while cells plated on YPD without Geneticin® will take 2–3 days. Proceed to Analysis of Results, page 45.
Continued on next page
43

In Vivo Screening of Multiple Inserts, continued
Method 1, (Electroporation)
Use this procedure if electroporation was used to transform Pichia. Transformants will not be plated in top agar. Start with plates containing His+ transformants.
1. Pipette 1 to 2 ml sterile water over the His+ transformants on each plate. Use all the plates that have His+ transformants.
2. Resuspend the His+ transformants into the water by using a sterile spreader and running it across the top of the agar. Be careful not to tear the agar.
3. Transfer and pool the cell suspension into a sterile, 50 ml conical centrifuge tube and vortex briefly (5 to 10 seconds).
4. Determine cell density using a spectrophotometer (1 OD600 = 5 107 cells/ml). Note: any agar present will interfere with a spectrophotometer reading.
5. Plate 105 cells on YPD plates containing Geneticin® at a final concentration of 0.25, 0.5, 0.75, 1.0, 1.5, 1.75, 2.0, 3.0, and 4.0 mg/ml.
(You may want to confirm the titer of the cells on the YPD plates without Geneticin® in order to calculate the percent of Geneticin® resistant colonies you obtain for each Geneticin® concentration and determine whether you are getting multimers at 1–10% of the transformants plated. Prepare 10–5, 10–6, and 10–7 dilutions of the pooled transformants using sterile water. Plate 100 to 200 μl per plate.)
6. Incubate plates at 30°C and check daily. Geneticin®-resistant colonies will take 2 to 5 days to appear while cells plated on YPD will take 2–3 days. Proceed to Analysis of Results, page 45.
If you do not plate all of the cell suspension from either method above, add sterile glycerol to 15% and freeze in convenient aliquots at –80°C. You may thaw the aliquots and analyze for Geneticin® resistant colonies at a later date.
Continued on next page
44

In Vivo Screening of Multiple Inserts, continued
Method 2 You will need three sets of two microtiter plates (6 total) to screen ~180 His+
recombinants. It is important to grow your clones to approximately the same cell density by successive inoculations to ensure that equivalent numbers of cells are spotted on Geneticin® plates. If you plated your transformants in top agar, it may be necessary to extract them from the agarose and re-plate them on minus histidine plates (see page 48) in order to pick colonies. Remember to include controls for strain background and one copy of your gene. For every 180 colonies, you can expect to isolate 1–10 Geneticin® resistant colonies.
1. Using sterile technique, add 200 μl YPD to each microtiter well.
2. Inoculate each well of the first set of plates with a single His+ transformant using a sterile toothpick and stirring to resuspend cells.
3. Cover the microtiter plate and incubate at 30°C for 2 days (shaking not required).
4. After 2 days, take new microtiter plates and add 190 μl of YPD to each well.
5. Inoculate the second set of microtiter plates with 10 μl from the first set of microtiter plates by using a multi-channel pipette. Make sure the second set of plates is marked and oriented in such a way that you can keep track of wells.
6. Cover and incubate the second set of plates overnight at 30°C.
7. The next day, repeat Steps 5 and 6, creating a third set of microtiter plates.
Note: Successive growth and passage of the clones will bring them all to the same cell density.
8. After incubation, take the third set of plates and resuspend the cells in each well by pipetting up and down with a multi-channel pipette set on 100 μl volume.
9. Spot 10 μl from each well on YPD plates containing Geneticin® at a final concentration of 0, 0.25, 0.5, 0.75, 1.0, 1.5, 1.75, 2.0, 3.0, and 4.0 mg/ml. Spot in a regular pattern using the multi-channel pipette or a grid underneath the plate.
10. Let the liquid soak in, then incubate plates at 30°C, and check after 2, 3, 4, or 5 days for Geneticin® resistant clones. Proceed to Analyzing Results, below.
Analyzing Results
There may be only a few Geneticin® resistant colonies, and they may be of different sizes, but the colony morphology should be the same. Pick all Geneticin® resistant colonies and purify by streaking for single colonies. Be sure to confirm the observed level of Geneticin® resistance.
You may not find colonies resistant to 2.0, 3.0, or 4.0 mg/ml Geneticin®. "Jackpot" clones resistant to these high levels of Geneticin® are very rare. You may have to screen thousands of His+ transformants in order to isolate colonies resistant to 2–4 mg/ml Geneticin®.
Since there is no guarantee that multiple copies will actually increase the amount of protein expressed, most people elect to proceed directly to expression to see if any of these colonies overexpress their protein. Be sure to include a single copy insert as a control. Test all your Geneticin® resistant colonies for their Mut phenotype (page 47) so that you induce expression properly.
Continued on next page
45

In Vivo Screening of Multiple Inserts, continued
����
�����
���
Be sure to purify your clones by streaking for single colonies and making frozen, glycerol stocks of all your Geneticin® resistant colonies. Always initiate expression studies from frozen stocks, not old plates.
Determining Copy Number
If you find that your Geneticin®-resistant His+ recombinants significantly overexpress your protein, you may wish to quantify the copy number of your gene. Copy number may be analyzed by Southern or quantitative dot (slot) blots. See page 88 for information on these techniques. It is very important to include genomic DNA isolated from Pichia recombinants transformed with vector alone and recombinant vector with a single copy of your gene as controls in order to evaluate your experiment.
Trouble-shooting
Since there is a tendency to isolate false positives (colonies that appear to be Geneticin® hyper-resistant, but are not), it is very important to purify your putative Geneticin® resistant colonies and confirm the observed level of Geneticin® resistance before proceeding further.
The other most common problem with the in vivo method is that very few Geneticin® resistant colonies are isolated. This usually means that more His+ transformants need to be screened. Remember that you are isolating spontaneous, multiple integration events. These occur at a frequency of 1–10% that may mean that you need to screen thousands of His+ transformants as opposed to hundreds. In addition, to isolate recombinants with the most copies of your gene inserted, you may have to screen additional His+ transformants. Successive multiple insertions are simply more rare.
If you find that your transformation efficiency is low, try electroporation instead of spheroplasting. This may increase the transformation efficiency and help you isolate more His+ transformants.
46
Screening for Mut+ and MutS Transformants
Introduction At this point, you may wish to score your His+ transformants for Mut+ and MutS
phenotype. Included in the kit are two strains that will provide examples of Mut+ and MutS phenotypes. GS115 Albumin is MutS and GS115 -Gal is Mut+. His+ KM71 recombinants do not need to be screened for their Mut phenotype as they all will be MutS.
Remember also to isolate two control strains for background protein expression in Pichia. One control is the parent plasmid linearized in such a way to generate His+ MutS transformants. The other control is the parent plasmid linearized to generate His+ Mut+ transformants.
Screening for His+ Mut+ in GS115
Transformation of GS115 with Sal I- or Stu I-linearized constructs favor recombination at the HIS4 locus. Most of the transformants should be Mut+; however, with the presence of AOX1 sequences in the plasmid, there is a chance that recombination will occur at the AOX1 locus, disrupting the wild-type AOX1 gene and creating His+ MutS transformants (page 74). Again, testing on MD and MM plates will allow you to confirm His+ Mut+ transformants (see next page).
His+ MutS in KM71
All His+ transformants in KM71 will be MutS because of the disruption of the AOX1 gene (aox1::ARG4). There is no need to test recombinants for the Mut phenotype; all recombinants will be MutS. Transformation of KM71 with Sal I- or Stu I-linearized plasmid constructions favor recombination at the HIS4 locus while Sac I-linearized plasmid constructions favor recombination at the 5´ region of the AOX1 gene. His+ transformants need to be purified on minimal plates without histidine to ensure pure clonal isolates before testing for expression (see page 50).
Preparation The following can be prepared several days in advance and stored at 4°C.
Minimal Dextrose (MD) agar plates, 1 liter (see page 69) Minimal Methanol (MM) agar plates, 1 liter (see page 69) Sterile toothpicks and Scoring Templates (see page 49)
Streak out the strains GS115 Albumin (His+ MutS) and GS115 -Gal (His+ Mut+) on an MD or MGY plate as controls for Mut+ and MutS growth on MD and MM plates.
His+ MutS or His+ Mut+ in GS115
Use the plates containing the His+ transformants and screen for the Mut+ and MutS phenotype as described below.
1. Using a sterile toothpick, pick one colony and streak or patch one His+ transformant in a regular pattern on both an MM plate and an MD plate, making sure to patch the MM plate first.
2. Use a new toothpick for each transformant, continuing until 100 transformants have been patched (2–3 plates).
3. To differentiate Mut+ from MutS, make one patch for each of the controls (GS115/His+ MutS Albumin and GS115/His+ Mut+ -Gal) onto the MD and MM plates.
4. Incubate the plates at 30°C for 2 days. 5. After 2 days or longer at 30°C, score the plates. Look for patches that grow
normally on the MD plates but show little or no growth on the MM plates.
Continued on next page
47

Screening for Mut+ and MutS Transformants, continued
We recommend purifying your His+ transformants to ensure pure clonal isolates. You may do this before or after testing for the Mut phenotype.
Replica-Plating Procedure
This procedure gives a lower rate of misclassifications, but it increases the overall Mut+/MutS screening procedure by 2 days. You will need equipment to replica-plate.
1. Using sterile toothpicks, patch 100 His+ transformant on MD plates (2–3 plates). For controls, make one patch from each of the strains GS115/His+ MutS Albumin and GS115/His+ Mut+ -Gal onto the MD plates.
2. Incubate the plates at 28–30°C for 2 days.
3. After 2 days, replica-plate the patches from the MD plates onto fresh MM and MD plates to screen for MutS transformants.
4. Incubate the replica plates at 28–30°C for 2 days.
5. After 2 days at 28–30°C, score the replica plates. Look for patches that grow normally on the MD replica plates but show little or no growth on the MM replica plates. Including His+ Mut+ and His+ MutS control patches on each plate will provide examples of Mut+ and MutS phenotypes.
Easier Selection of Transformants
Because of plating in top agarose, transformants can be on top or imbedded in the top agarose making it difficult to pick and patch colonies in the next section. The following protocol allows you to collect the transformants and re-plate them directly onto plates without top agarose.
1. Scrape the agarose containing the His+ transformants with a sterile spreader into a sterile, 50 ml, conical centrifuge tube and mix with 20 ml sterile deionized water. Vortex the suspension vigorously to separate the cells from the agarose.
2. Filter the suspension through 4 folds of sterile cheesecloth. Centrifuge the filtrate at 1,500 g for 5 minutes at room temperature. This will pellet the cells on the bottom of the tube and any remaining agarose will pellet on top of the cells.
3. Remove the agarose pellet carefully from the top of the cells by gently shaking the tube to disperse only the agarose pellet into the water. Decant the supernatant with the agarose pellet.
4. Resuspend the cell pellet in 5 ml of sterile deionized water and sonicate for 10 seconds using a microtip and 20–30% power. Sonicate to get the cells into solution and not to lyse the cells.
5. Dilute cells by 104 and plate 50 μl and 100 μl onto MD plates. Incubate overnight at 30°C. Screen for the Mut phenotype using the method of choice.
Continued on next page
48

Screening for Mut+ and MutS Transformants, continued
Scoring Templates
"�
�-
.�
/0
"�".
"�"�
�"�
"-"0
"""/
-"-�
-�--
-�-�
"�-.
-��-
�"��
-/��
-0��
�0��
���/
�.�"
���-
���0
�.��
���/
���-
�"��
"�
�-
.�
/0
"�".
"�"�
�"�
"-"0
"""/
-"-�
-�--
-�-�
"�-.
-��-
�"��
-/��
-0��
�0��
���/
�.�"
���-
���0
�.��
���/
���-
�"��
49

Expression of Recombinant Pichia Strains
Introduction The purpose of this section is to determine the optimal method and conditions
for expression of your gene. Below are some factors and guidelines that need to be considered before starting expression in Pichia pastoris. As with any expression system, optimal expression conditions are dependent on the characteristics of the protein being expressed.
Media You will need BMGY/BMMY (buffered complex glycerol or methanol medium),
BMG/BMM (buffered minimal glycerol or methanol medium), or MGY/MM (minimal glycerol or minimal methanol medium) for expression (see Appendix, pages 68–70). BMG, BMM, BMGY, and BMMY are usually used for the expression of secreted proteins, particularly if pH is important for the activity of your protein. Unlike MGY and MM, they are all buffered media. Because these media are buffered with phosphate buffer, you may use a wide range of pH values to optimize production of your protein. BMGY/BMMY contain yeast extract and peptone which may help stabilize secreted proteins and prevent or decrease proteolysis of secreted proteins. Inclusion of yeast extract and peptone act as a "mixed feed" allowing better growth and biomass accumulation.
Proteases There are some proteins specifically susceptible to proteases that have optimal
activity at neutral pH. If this is the case, expression using MGY and MM media may be indicated. As Pichia expression progresses in an unbuffered medium such as MM, the pH drops to 3 or below, inactivating many neutral pH proteases (Brierley et al., 1994). Pichia is resistant to low pH, so the low pH will not affect growth. In contrast, it has been reported that by including 1% Casamino acids (Difco) and buffering the medium at pH 6.0, extracellular proteases were inhibited, increasing the yield of mouse epidermal growth factor (Clare et al., 1991b). If you know your protein of interest is especially susceptible to neutral pH proteases, you may want to do your expressions in an unbuffered medium (MM). If there is no evidence that your secreted protein of interest is susceptible to proteases at neutral pH, we recommend you do your initial expressions in BMMY. If the expressed protein is degraded, you may then try expression in an unbuffered medium. If the above options fail to protect your protein from degradation, you may wish to transform your gene into SMD1168. This strain genotype is his4 pep4 and is deficient in proteinase A activity. You can use the same procedures for transforming and expressing GS115 with SMD1168. You can also use this strain in large-scale fermentation.
Aeration The most important parameter for efficient expression in Pichia is adequate
aeration during methanol induction. As a general rule when inducing expression, never allow cultures to be more than 10–30% of your total flask volume. We strongly recommend that you use baffled flasks. See Appendix, page 71 for suppliers of baffled flasks. Cover the flasks with cheesecloth (2–3 layers) or another loose fitting cover. Never use tight fitting covers. (Aeration is not as critical when generating biomass before induction.)
Continued on next page
50

Expression of Recombinant Pichia Strains, continued
Kinetics of Growth
Note that while Mut+ and MutS strains will grow at essentially the same rate in YPD or glycerol media, Mut+ will grow faster than MutS when both are grown on methanol because of the presence of the AOX1 gene product.
Temperature and Shaking
Perform expression at 30°C, in a shaking incubator. It is critical that the temperature does not exceed 30°C. If your incubator temperature fluctuates, set the temperature at 28°C. If using a floor shaking incubator, shake at 225–250 rpm. If using a table-top shaker that sits inside an incubator, shake at 250–300 rpm.
Before Starting You should have verified recombinants in GS115 or KM71 as well as a control
recombinant of GS115 or KM71/Vector (no insert and 1 copy). When performing your expression, it is important to run the proper controls so that you will be able to interpret your expression results. You should use the following expression controls:
GS115/His+ MutS albumin MutS- Secretion control GS115/His+ Mut+ -Gal Mut+- Intracellular control GS115 or KM71/Vector (no insert) Background control GS115 or KM71/Vector (1 copy) Expression level due to one copy of gene
Recombination can occur in many different ways that can affect expression. We recommend that you screen 6–10 verified recombinant clones for expression levels. Start with colonies from the freshest plates available. Colony viability drops over time, so if you have any doubts, it is better to streak out your strain. (You may also start the cultures with a small sample from a frozen glycerol stock that was generated from a single colony.)
Guidelines for Expression
The following information is designed to get you started with expression. You may have to change the conditions to optimize expression for your particular protein. Use bottom or side baffled flasks whenever possible (see page 71). If you are analyzing a number of recombinants, you can try 50 ml conical tubes. Be sure that the medium is well-aerated by increasing the rate of shaking or placing the tubes at an angle in the shaker.
Continued on next page
51

Expression of Recombinant Pichia Strains, continued
Mut+ Intracellular or Secreted
You can test the effectiveness of your expression conditions by growing GS115 -Gal (Mut+) which expresses -Galactosidase intracellularly. Include GS115 or KM71 transformed with the parent vector as a control for background intracellular expression.
1. Using a single colony, inoculate 25 ml of MGY, BMG, or BMGY in a 250 ml baffled flask. Grow at 28–30°C in a shaking incubator (250–300 rpm) until culture reaches an OD600 = 2–6 (log-phase growth, approximately 16–18 hours).
2. Harvest the cells by centrifuging at 1,500–3,000 g for 5 minutes at room temperature. Decant supernatant and resuspend cell pellet to an OD600 of 1.0 in MM, BMM, or BMMY medium to induce expression (approximately 100–200 ml).
3. Place culture in a 1 liter baffled flask. Cover the flask with 2 layers of sterile gauze or cheesecloth and return to incubator to continue growth.
4. Add 100% methanol to a final concentration of 0.5% methanol every 24 hours to maintain induction. Be sure to check the volume of the culture and add methanol accordingly. Evaporation may reduce culture volume.
5. At each of the times indicated below, transfer 1 ml of the expression culture to a 1.5 ml microcentrifuge tube. These samples will be used to analyze expression levels and determine the optimal time post-induction to harvest. Centrifuge at maximum speed in a tabletop microcentrifuge for 2–3 minutes at room temperature.
Time points (hours): 0, 6, 12, 24 (1 day), 36, 48 (2 days), 60, 72 (3 days), 84, and 96 (4 days).
6. For secreted expression, transfer the supernatant to a separate tube. Store the supernatant and the cell pellets at –80°C until ready to assay. Freeze quickly in liquid N2 or a dry ice/alcohol bath.
For intracellular expression, decant the supernatant and store just the cell pellets at
–80°C until ready to assay. Freeze quickly in liquid N2 or a dry ice/alcohol bath.
7. Analyze the supernatants and cell pellets for protein expression by Coomassie-stained SDS-PAGE and western blot or functional assay (see Analysis by SDS-Polyacrylamide Gel Electrophoresis, page 54).
Continued on next page
52

Expression of Recombinant Pichia Strains, continued
MutS Intracellular or Secreted
You can test the effectiveness of your expression conditions by growing GS115, which is MutS and secretes albumin to the medium. Remember to include GS115 or KM71 transformed with the parent vector as a control for background intracellular expression.
1. Using a single colony, inoculate 100 ml of MGY, BMG, or BMGY in a 1 liter baffled flask. Grow at 28–30°C in a shaking incubator (250–300 rpm) until the culture reaches an OD600 = 2–6 (approximately 16–18 hours.).
2. Harvest the cells by centrifuging at 1,500–3,000 g for 5 minutes at room temperature. To induce expression, decant the supernatant and resuspend cell pellet in MM, BMM, or BMMY medium using 1/5 to 1/10 of the original culture volume (approximately 10–20 ml).
3. Place in a 100 ml baffled flask. Cover the flask with 2 layers of sterile gauze or cheesecloth and return to incubator to continue to grow.
4. Add 100% methanol to a final concentration of 0.5% every 24 hours to maintain induction.
5. At each of the times indicated below transfer 1 ml of the expression culture to a 1.5 ml microcentrifuge tube. These samples will be used to analyze expression levels and determine the optimal time post-induction to harvest. Centrifuge at maximum speed in a tabletop microcentrifuge for 2–3 minutes at room temperature.
Time points (hours): 0, 24 (1 day), 48 (2 days), 72 (3 days), 96 (4 days), 120 (5 days), and 144 (6 days).
6. For secreted expression, transfer the supernatant to a separate tube. Store the supernatant and the cell pellets at –80°C until ready to assay. Freeze quickly in liquid N2 or a dry ice/alcohol bath.
For intracellular expression, decant the supernatant and store just the cell pellets at –80°C until ready to assay. Freeze quickly in liquid N2 or a dry ice/alcohol bath.
7. Analyze the cell pellets for protein expression by Coomassie-stained SDS-PAGE and western blot or functional assay (see Analysis by SDS-Polyacrylamide Gel Electrophoresis, next page).
53

Analysis by SDS-Polyacrylamide Gel Electrophoresis
Introduction This section provides guidelines to prepare and analyze your samples using SDS
polyacrylamide gel electrophoresis.
Polyacrylamide Gel Electrophoresis
Invitrogen offers a wide range of pre-cast NuPAGE® and Tris-Glycine polyacrylamide gels and electrophoresis apparatus. The patented NuPAGE® Gel System avoids the protein modifications associated with Laemmli-type SDS-PAGE, ensuring optimal separation for protein analysis. In addition, Invitrogen carries a large selection of molecular weight protein standards and staining kits. For more information about the appropriate gels, standards, and stains to use, refer to our website (www.invitrogen.com) or contact Technical Support (page 94).
If you are pouring your own gels, note that any standard SDS-polyacrylamide gel apparatus and protocol will work, for example, a 12% polyacrylamide gel with a 5% stacking gel is recommended for proteins ranging in size from 40–100 kDa. For other recommendations, see standard texts such as Current Protocols in Molecular Biology (Ausubel et al., 1994) or Molecular Biology: A Laboratory Manual (Sambrook et al., 1989), Guide to Protein Purification (Deutscher, 1990), or Protein Methods (Bollag et al., 1996).
Preparing Samples
You will need to prepare Breaking Buffer (see page 71) and have acid-washed 0.5 mm glass beads on hand.
Preparing of cell pellets (Intracellular and Secreted Expression):
1. Thaw cell pellets quickly and place on ice.
2. For each 1 ml sample, add 100 μl Breaking Buffer to the cell pellet and resuspend.
3. Add an equal volume of acid-washed glass beads (size 0.5 mm). Estimate equal volume by displacement.
4. Vortex 30 seconds, then incubate on ice for 30 seconds. Repeat for a total of 8 cycles.
5. Centrifuge at maximum speed for 10 minutes at 4°C. Transfer the clear supernatant to a fresh microcentrifuge tube.
6. Take 50 μl of supernatant (cell lysate) and mix with an appropriate volume of denaturing PAGE Gel Loading buffer (Sample Buffer).
7. Heat the sample as recommended and load 10–20 μl per well. Thickness of the gel and number of wells will determine volume loaded. You may store the remaining sample at –20°C for western blots, if necessary. You may store the cell lysates at –80°C for further analysis.
Continued on next page
54

Analysis by SDS-Polyacrylamide Gel Electrophoresis, continued
Preparing Samples, continued
Preparing of supernatant (Secreted Expression only):
1. Thaw supernatants and place on ice.
2. Mix 50 μl of the supernatant with an appropriate volume of denaturing PAGE Gel Loading buffer.
3. Heat the sample as recommended; then load 10–30 μl onto the gel. Remaining sample may be stored at –20°C for western blots, if necessary. Supernatants may be stored at –80°C for further analysis.
4. Analyze Coomassie-stained gel and western blot (if necessary) for your protein.
5. If no protein is seen by Coomassie or by western blot, then concentrate the supernatant 5–10 fold and analyze samples again by western blot. Centricon and Centriprep filters (Millipore) are very useful for this purpose.
Protein Concentration
Lowry, BCA (Pierce) or Bradford protein determinations can be performed to quantify the amounts of protein in the cell lysates and medium supernatants. In general, Pichia cell lysates contain 5–10 μg/μl protein. Pichia medium supernatants will vary in protein concentration primarily due to the amount of your secreted protein. Pichia secretes very few native proteins. If the protein concentration of the medium is >50 μg/ml, 10 μl of medium will give a faint band on a Coomassie-stained SDS-PAGE gel.
Continued on next page
55

Analysis by SDS-Polyacrylamide Gel Electrophoresis, continued
Controls Include the following samples as controls on your SDS-PAGE:
• Molecular weight standards appropriate for your desired protein
• A sample of your protein as a standard (if available)
• A sample of GS115 or KM71 with the parent plasmid transformed into it. This shows the background of native Pichia proteins that are present intracellularly. Inclusion of this sample will help you differentiate your protein from background if you express it intracellularly.
• Analyze the GS115 -Gal and Albumin controls also as they should indicate any problems with the media or expression conditions
����
�����
���
In addition to Coomassie-stained SDS-PAGE, we strongly recommend performing a western blot or another more sensitive assay to detect your protein. Visualization of the expressed protein will depend on several factors, including its expression level, its solubility, its molecular weight, and whether an abundant cellular protein of the same size will mask it. Western blot analysis, enzymatic activities, or a defined purification profile, if available, may help to identify the expressed protein among the native Pichia cellular proteins.
Analyzing Protein Expression
Inspection of your Coomassie-stained SDS-PAGE should reveal the induction over time of your protein co-migrating with your standard. If there is no recombinant protein visible, then perform either a western blot or a functional assay if you have one.
If you detect low expression of your recombinant protein, see Optimizing Pichia Protein Expression, page 57, for guidelines to optimize expression.
Test your expression conditions with the one of the two control strains included in the kit (GS115 -Gal or Albumin).
If there is no indication of expression at all, perform a northern analysis to see if and how much full-length mRNA is induced. See page 91 for an RNA isolation protocol.
56

Optimizing Pichia Protein Expression
Introduction Based on available data, there is approximately a 75% chance of expressing your
protein of interest in Pichia pastoris at reasonable levels. The biggest hurdle seems to be generating initial success–i.e., expression of your protein at any level. While there are relatively few examples of expression of ≥10 grams/liter, there are many examples of expression in the ≥1 gram/liter range, making the Pichia pastoris expression system one of the most productive eukaryotic expression systems available. Likewise, there are several examples of proteins that have been successfully expressed in Pichia pastoris that were completely unsuccessful in baculovirus or Saccharomyces cerevisiae, suggesting that the Pichia pastoris system is an important alternative to have available. If you obtain no or low protein expression in your initial expression experiment, use the following guidelines to optimize expression.
Proteolysis or Degradation
• Do a time course study of expression. Check to see if there is a time point that yields a larger percentage of full-length protein.
• If secreting your protein, check to see if your protein is susceptible to neutral pH proteases by expressing in unbuffered medium (MM). In addition, try 1% Casamino acids with buffered medium to inhibit extracellular proteases.
• Try using SMD1168 (proteinase A-deficient) for expression (see Proteases, page 50).
Low Secreted Expression Levels
• Check cell pellet to see if overall expression is low or if the protein did not secrete. If it did not secrete, try a different signal sequence (e.g., a native or -factor signal sequence).
• Concentrate your supernatant by ammonium sulfate precipitation or ultrafiltration (see page 61).
• For Mut+, induce expression with a higher density culture.
Low Expression Levels
• Check both Mut+ and MutS recombinants for increased expression. Some proteins express better in one type of genetic background than another.
• If secreting your protein, try intracellular expression. The protein may not be processed correctly and fail to secrete. Be sure you check your cell pellets for evidence of expression. If you are having problems with intracellular expression, try secreting your protein. It probably will glycosylate, which may be desirable or not. If glycosylation is undesirable, oligosaccharides can be removed with Peptide:N-Glycosidase F (New England Biolabs, page 63).
• Scale up to fermentation (page 61). Pichia is a yeast and is particularly well suited to fermentation.
Continued on next page
57

Optimizing Pichia Protein Expression, continued
No Expression Be sure to try some of the easier things listed on the previous page as no
expression can be the same thing as very low expression. If none of these things improve protein expression, perform a northern blot analysis to check for transcription of your gene. There is a protocol in the Appendix for RNA isolation from Pichia (see page 91).
Analyze for the presence of your insert by PCR (see page 83). You can reasonably analyze 12–20 transformants by PCR. Remember to include the vector only and original (one copy) construct controls in order to analyze your PCR experiment.
If you see premature transcriptional termination, check the AT content of your gene. In Saccharomyces, there are a few consensus sequences that promote premature termination. One of these, TTTTTATA, resembles a sequence in HIV-1 gp120, ATTATTTTAT AAA, which when expressed in Pichia gave premature termination of the mRNA. When this sequence was changed, longer transcripts were found (Scorer et al., 1993).
Hyper-glycosylation
If your protein is hyperglycosylated:
• Try intracellular expression as your protein will not go through the secretion pathway and therefore, not be modified.
• Try deglycosylating the protein with Peptide:N-Glycosidase F or other enzymes (see page 62).
• Engineer gene to remove N-linked glycosylation sites.
58

Scale-up of Expression
Guidelines for Expression
Once expression is optimized, scale-up your expression protocol to produce more protein by increasing the culture volume using larger baffled flasks (below) or by fermentation. Use the guidelines below to scale-up your expression protocol. To purify your protein, see the references listed on page 62.
Mut+ Intracellular or Secreted
1. Using a single colony, inoculate 25 ml of MGYH, BMGH, or BMGY in a 250 ml baffled flask. Grow at 28–30°C in a shaking incubator (250–300 rpm) until culture reaches an OD600 = 2–6 (approximately 16–18 hours).
2. Use this 25 ml culture to inoculate 1 liter of MGYH, BMGH, or BMGY in a 3 or 4 liter baffled flask and grow at 28–30°C with vigorous shaking (250–300 rpm) until the culture reaches log phase growth (OD600 = 2–6).
3. Harvest the cells using sterile centrifuge bottles by centrifuging at 1,500–3,000 g for 5 minutes at room temperature. To induce expression, decant the supernatant and resuspend cell pellet to an OD600 = 1.0 (2–6 liters) in MMH, BMMH, or BMMY medium to start induction.
4. Aliquot the culture between several 3 or 4 liter baffled flask. Cover the flasks with 2 layers of sterile gauze or cheesecloth and return to incubator. Continue to grow at 28–30°C with shaking.
5. Add 100% methanol to 0.5% every 24 hours until the optimal time of induction is reached as determined from the time course study.
6. Harvest cells by centrifuging at 1,500–3,000 g for 5 minutes at room temperature.
7. For intracellular expression, decant the supernatant and store the cell pellets at –80°C until ready to process. For secreted expression, save the supernatant, chill to 4°C, and concentrate it down if desired (see page 61). Proceed directly to purification (page 62) or store the supernatant at –80°C until ready to process further.
Continued on next page
59

Scale-up of Expression, continued
MutS Intracellular or Secreted
1. Using a single colony, inoculate 10 ml of MGYH, BMGH, or BMGY in a 100 ml baffled flask. Grow at 28–30°C in a shaking incubator (250–300 rpm) until the culture reaches an OD600 = 2–6 (approximately 16–18 hours).
2. Use this 10 ml culture to inoculate 1 liter of MGYH, BMGH, or BMGY in a 3 or 4 liter baffled flask and grow at 28–30°C with vigorous shaking (250–300 rpm) until the culture reaches log phase growth (OD600 = 2–6).
3. Harvest the cells by centrifuging at 1,500–3,000 g for 5 minutes at room temperature. To induce expression, decant the supernatant and resuspend cell pellet in 1/5 to 1/10 of the original culture volume of MMH, BMMH, or BMMY medium (approximately 100–200 ml).
4. Place the culture in a 1 liter baffled flask. Cover the flask with 2 layers of sterile gauze or cheesecloth and return to incubator. Continue to grow at 28–30°C with shaking.
5. Add 100% methanol to 0.5% every 24 hours until the optimal time of induction is reached.
6. Harvest cells by centrifuging at 1,500–3,000 g for 5 minutes at room temperature.
7. For intracellular expression, decant the supernatant and store the cell pellets at –80°C until ready to process. For secreted expression, save the supernatant, chill to 4°C, and concentrate it down if desired (see next page). Proceed directly to purification (page 62) or store the supernatant at –80°C until ready to process further.
To increase the amount of cells for MutS recombinants, increase the number of flasks, put 200–300 ml in a 3 liter flask, or try fermentation.
Continued on next page
60

Scale-up of Expression, continued
Concentration of Proteins
Proteins secreted into the media are usually >50% homogeneous and will require some additional purification. It is optimal to concentrate the protein if the expression level is not particularly high. There are several general methods to concentrate proteins secreted from Pichia. These general methods include:
• Ammonium sulfate precipitation
• Dialysis
• Centrifuge concentrator for small volumes (e.g., Centricon or Centriprep devices available from Millipore)
• Pressurized cell concentrators for large volumes (e.g., Amicon ultrafiltration devices available from Millipore)
• Lyophilization
A general guide to protein techniques is Protein Methods (Bollag et al., 1996).
Cell Lysis A general procedure for cell lysis using glass beads is provided on the next page.
There is also a cell lysis protocol in Current Protocols in Molecular Biology, page 13.13.4. (Ausubel et al., 1994) and in Guide to Protein Purification (Deutscher, 1990). We also recommend lysis by French Press (follow the manufacturer's suggestions for yeast).
Fermentation Basic guidelines are available for fermentation of Pichia from Invitrogen. We
recommend that only those with fermentation experience or those who have access to people with experience attempt fermentation. Contact Technical Support for more information (page 94).
61

Protein Purification and Glycosylation
Introduction At this point, you have an optimized protocol for expressing your protein and a
method to scale-up production of your protein for large-scale purification. You may already have a method to purify your protein. Since every protein is different, it is difficult to recommend specific techniques for purification. For an overview of methods for purification see (Deutscher, 1990) or (Ausubel et al., 1994).
Some Protein Purification Techniques
Some techniques are listed below and are discussed thoroughly in Guide to Protein Purification (Deutscher, 1990). Be sure to perform all steps from cell lysis to purified protein at 4°C.
Ion-Exchange Chromatography Gel Filtration Affinity Chromatography Chromatofocusing Isoelectric Focusing Immunoprecipitation Solubilization (Membrane Proteins) Lectin Affinity Chromatography
Procedure for Cell Lysis
Prepare Breaking Buffer (BB) as described in Appendix, page 71.
1. Wash cells once in BB by resuspending them and centrifuging 5–10 minutes at 3,000 g at 4°C.
2. Resuspend the cells to an OD600 of 50–100 in BB.
3. Add an equal volume of acid-washed glass beads (0.5 mm). Estimate volume by displacement.
4. Vortex the mixture 30 seconds, then incubate on ice for 30 seconds. Repeat 7 more times. Alternating vortexing with cooling keeps the cell extracts cold and reduces denaturation of your protein.
5. Centrifuge the sample at 4°C for 5–10 minutes at 12,000 g.
6. Transfer the clear supernatant to a fresh container and analyze for your protein. The total protein concentration should be around 5–10 mg/ml.
7. Save the pellet and extract with 6 M urea or 1% Triton X-100 to check for insoluble protein.
����
�����
���
Biospec (Bartlesville, OK) makes a Bead Beater™ that can handle 5–200 ml volumes of cell suspension.
Analysis of Glycoproteins
When expressing and purifying a glycosylated protein in a heterologous expression system, it is desirable to quickly determine whether the protein is glycosylated properly. Recently, some protocols for carbohydrate analysis of proteins have been published to allow the molecular biologist to characterize glycosylated proteins of interest (Ausubel et al., 1994), Unit 17. Further information about glycosylation in eukaryotes is available in a review (Varki & Freeze, 1994).
62

Protein Purification and Glycosylation, continued
Enzymes for Analyzing Glycoproteins
These are just a few of the enzymes available for carbohydrate analysis. Abbreviations are as follows: Asn - Asparagine, Gal - Galactose, GlcNAc - N-acetylglucosamine, GalNAc - N-acetylgalactosamine, and NeuAc - N-acetylneuraminic acid.
Enzyme Type of enzyme
Specificity
Endoglycosidase D Endo Cleaves various high mannose glycans
Endoglycosidase F Endo Cleaves various high mannose glycans
Endoglycosidase H Endo Cleaves various high mannose glycans
-galactosidase Exo Removes terminal galactosides from Gal-1,3-GlcNAc, Gal-1,4-GlcNAc or Gal-1,3-GalNAc.
Peptide:N-Glycosidase F Endo Glycoproteins between Asn and GlcNAc (removes oligosaccharides)
Sialidases (Neuraminidases)
Vibrio cholerae Clostridium perfringens Arthobacter ureafaciens Newcastle disease virus
Exo NeuAc-2,6-Gal, NeuAc-2,6-GlcNAc or NeuAc-2,3-Gal
Commercial Carbohydrate Analysis
There are a number of commercial vendors who will contract to analyze proteins for glycosylation. A number of companies also supply kits and reagents for researchers to do carbohydrate analysis in their own laboratories. A partial list is provided below:
Company Type of Service Contact
Glyko Kits for Carbohydrate Analysis
Reagents
Contract Services
1-800-334-5956
www.prozyme.com
New England BioLabs Reagents 1-800-632-5227
www.neb.com
63
Appendix E. coli Media Recipes
Introduction You select transformants containing pAO815, pPIC3K, or pPIC9K on LB agar
containing 50 to 100 μg/ml ampicillin.
LB (Luria-Bertani) Medium
1% Tryptone 0.5% Yeast Extract 1% NaCl pH 7.0
1. For 1 liter, dissolve the following in 950 ml deionized water 10 g tryptone 5 g yeast extract 10 g NaCl
2. Adjust the pH of the solution to 7.0 with NaOH and bring the volume up to 1 liter.
3. Autoclave for 20 minutes at 15 lbs/sq. in. Let cool to ~55°C and add desired antibiotics at this point.
4. Store at room temperature or at 4°C.
LB agar plates 1. Make LB Medium above and add 15 g/liter agar before autoclaving.
2. Autoclave for 20 minutes at 15 lbs/sq. in.
3. Let cool to ~55°C and add desired antibiotics at this point. Pour into 10 cm petri plates. Let the plates harden, invert, and store at 4°C.
64

Pichia Media Recipes
Introduction The expression of recombinant proteins in Pichia pastoris requires the preparation
of several different media. Recipes for these media are included in this section. In addition, Yeast Nitrogen Base is available from Invitrogen (see below for ordering information).
Item Amount Cat. no.
67 g pouch
Each pouch contains reagents to prepare 500 ml of a 10X YNB solution
Q300-07 Yeast Nitrogen Base
–with ammonium sulfate
–without amino acids
500 g Q300-09
Stock Solutions 10X YNB (13.4% Yeast Nitrogen Base with Ammonium Sulfate without amino
acids)
1. Dissolve 134 g of yeast nitrogen base (YNB) with ammonium sulfate and without amino acids in 1,000 ml of water. Heat the solution to dissolve YNB completely in water.
2. Alternatively, use 34 g of YNB without ammonium sulfate and amino acids and 100 g of ammonium sulfate.
3. Filter sterilize and store at 4°C.
The shelf life of this solution is approximately one year. If you are using the YNB pouch included in the kit, follow the directions on the pouch.
Note: Pichia cells exhibit optimal growth with higher YNB concentrations, therefore, the amount of YNB used in this kit is twice as concentrated as YNB formulations for Saccharomyces.
500X B (0.02% Biotin)
1. Dissolve 20 mg biotin in 100 ml of water and filter sterilize.
2. Store at 4°C.
The shelf life of this solution is approximately one year.
100X H (0.4% Histidine)
1. Dissolve 400 mg of L-histidine in 100 ml of water. Heat the solution, if necessary, to no greater than 50°C in order to dissolve.
2. Filter sterilize and store at 4°C.
The shelf life of this solution is approximately one year.
10X D (20% Dextrose)
1. Dissolve 200 g of D-glucose in 1,000 ml of water.
2. Autoclave for 15 minutes or filter sterilize.
The shelf life of this solution is approximately one year.
Continued on next page
65
Pichia Media Recipes, continued
Stock Solutions, continued
10X M (5% Methanol)
1. Mix 5 ml of methanol with 95 ml of water.
2. Filter sterilize and store at 4°C.
The shelf life of this solution is approximately two months.
10X GY (10% Glycerol)
1. Mix 100 ml of glycerol with 900 ml of water.
2. Sterilize either by filtering or autoclaving. Store at room temperature.
The shelf life of this solution is greater than one year.
100X AA (0.5% of each Amino Acid)
1. Dissolve 500 mg each of L-glutamic acid, L-methionine, L-lysine, L-leucine, and L-isoleucine in 100 ml of water.
2. Filter sterilize and store at 4°C.
The shelf life of this solution is approximately one year.
1 M potassium phosphate buffer, pH 6.0:
1. Combine 132 ml of 1 M K2HPO4, 868 ml of 1 M KH2PO4 and confirm that the pH = 6.0 ± 0.1 (if the pH needs to be adjusted, use phosphoric acid or KOH).
2. Sterilize by autoclaving and store at room temperature.
The shelf life of this solution is greater than one year.
YPD or YEPD Yeast Extract Peptone Dextrose Medium (1 liter)
1% yeast extract 2% peptone 2% dextrose (glucose)
Note: If you are using the YP Base Medium or the YP Base Agar medium pouches included with the Multi-Copy Pichia Expression Kit, follow the directions on the pouch.
1. Dissolve 10 g yeast extract and 20 g of peptone in 900 ml of water. Note: Add 20 g of agar if making YPD slants or plates.
2. Autoclave for 20 minutes on liquid cycle.
3. Add 100 ml of 10X D.
Store the liquid medium at room temperature. Store the YPD slants or plates at 4°C. The shelf life is several months.
Continued on next page
66

Pichia Media Recipes, continued
YPD-Geneticin® plates
Yeast Extract Peptone Dextrose Medium
1% yeast extract 2% peptone 2% dextrose (glucose) 2% agar Variable amounts of Geneticin® (see page viii for ordering information)
Use 50 mg/ml Geneticin® stock solution to make YPD plates containing Geneticin® at final concentrations of 0.25, 0.5, 0.75, 1.0, 1.5, 1.75, 2.0, 3.0, and 4.0 mg/ml.
For 250 ml (8 to 10 plates of a single Geneticin® concentration):
1. Combine 2.5 g yeast extract, 5 g peptone, and 5 g agar in 225 ml deionized water.
2. Autoclave for 20 minutes on liquid cycle.
3. Add 25 ml of 10X D and mix well.
4. Cool YPD to approximately 55–60°C and add appropriate volume of Geneticin® stock (see chart below). Remember to also make several YPD plates without Geneticin®.
5. Mix well by swirling, but be careful to minimize bubble formation.
6. Pour agar solution into 10 cm petri plates. Let plates harden, invert, and store bagged at 4°C. Plates are stable for at least 6 months.
Final [Geneticin®] (mg/ml)
ml Geneticin® stock per 250 ml YPD
0.25 1.25 0.50 2.5 0.75 3.75 1.00 5.0 1.50 7.5 1.75 8.75 2.00 10.0 3.00 15.0 4.00 20.0
Continued on next page
67

Pichia Media Recipes, continued
MGY and MGYH Minimal Glycerol Medium + Histidine (1 liter)
1.34% YNB 1% glycerol 4 10-5% biotin + 0.004% histidine
1. Combine aseptically 800 ml autoclaved water with 100 ml of 10X YNB, 2 ml of 500X B, and 100 ml of 10X GY.
2. For growth of his4 strains in this medium, a version can be made that contains histidine (called MGYH) by adding 10 ml of 100X H stock solution.
Store at 4°C. The shelf life of this solution is approximately two months.
RD and RDH Liquid Media
Regeneration Dextrose Medium + Histidine (1 liter)
1 M sorbitol 2% dextrose 1.34% YNB 4 x 10⁻⁵% biotin 0.005% amino acids + 0.004% histidine
1. Dissolve 186 g of sorbitol in 700 ml of water and proceed to Step 2.
2. Autoclave 20 minutes on liquid cycle.
3. Cool and maintain the liquid medium in a 45°C water bath.
4. Prepare a prewarmed (45°C) mixture of the following stock solutions:
100 ml of 10X D
100 ml of 10X YNB
2 ml of 500X B
10 ml of 100X AA
88 ml of sterile water
Add to sorbitol solution.
5. For growth of his4 strains you must add histidine to the media. Add 10 ml of 100X H (histidine) to the prewarmed mixture in Step 4. Store liquid medium at 4°C. Media should last for several months.
RDB and RDHB Agar Plates
1. Dissolve 186 g of sorbitol in 700 ml of water and add 20 g of agar.
2. Autoclave 20 minutes on liquid cycle.
3. Place the autoclaved solution in a 60°C water bath prior to addition of prewarmed mixture of stock solutions. This will keep the medium from becoming too thick to mix reagents.
4. Prepare the prewarmed (45°C) mixture from RD and RDH Liquid Media, Step 4, above. Add to sorbitol/agar solution. If you are selecting for His+ transformants, do not add histidine.
5. Pour the plates immediately after mixing the solutions in Step 4. Store the plates at 4°C. Shelf life is several months.
Continued on next page
68
Pichia Media Recipes, continued
RD and RDH Top Agar
1. Dissolve 186 g of sorbitol in 700 ml of water and add 10 g of agar or agarose.
2. Autoclave 20 minutes on liquid cycle.
3. Place the autoclaved solution in a 60°C water bath prior to addition of prewarmed mixture of stock solutions. This will keep the medium from becoming too thick to mix reagents.
4. Prepare the prewarmed (45°C) mixture from RD and RDH Liquid Media, Step 4, previous page. Add to sorbitol/agar solution. If you are selecting for His+ transformants, do not add histidine.
5. Place the solution to 45°C after adding the solutions in Step 4. During transformation, use as a molten solution at 45°C.
6. Store top agar at 4°C. Shelf life is several months.
MD and MDH Minimal Dextrose Medium + Histidine (1 liter)
1.34% YNB 4 x 10⁻⁵ % biotin 2% dextrose
1. For medium, autoclave 800 ml of water for 20 minutes on liquid cycle.
2. Cool to about 60°C and then add:
100 ml of 10X YNB
2 ml of 500X B
100 ml of 10X D
3. To make MDH, add 10 ml of 100X H stock solution. Mix and store at 4°C.
4. For plates, add 15 g agar to the water in Step 1 and proceed.
5. If preparing plates, pour the plates immediately. MD stores well for several months at 4°C.
MM and MMH Minimal Methanol + Histidine (1 liter)
1.34% YNB 4 x 10⁻⁵% biotin 0.5% methanol
1. For medium, autoclave 800 ml of water for 20 minutes on liquid cycle
2. Cool autoclaved water to 60°C and add:
100 ml of 10X YNB
2 ml of 500X B
100 ml of 10X M
3. To make MMH, add 10 ml of 100X H stock solution. Mix and store at 4°C.
4. For plates, add 15 g agar to the water in Step 1 and proceed.
5. After mixing, pour the plates immediately. MM and MMH stores well for several months at 4°C.
Continued on next page
69

Pichia Media Recipes, continued
BMG and BMM Buffered Minimal Glycerol
Buffered Minimal Methanol (1 liter)
100 mM potassium phosphate, pH 6.0 1.34% YNB 4 x 10⁻⁵% biotin 1% glycerol or 0.5% methanol
1. Autoclave 700 ml water for 20 minutes on liquid cycle.
2. Cool to room temperature, then add the following and mix well:
100 ml 1 M potassium phosphate buffer, pH 6.0 100 ml 10X YNB 2 ml 500X B 100 ml 10X GY
4. For BMM, add 100 ml 10X M instead of glycerol.
5. Store media at 4°C. The shelf life of this solution is approximately two months.
BMGY and BMMY
Buffered Glycerol-complex Medium Buffered Methanol-complex Medium (1 liter)
1% yeast extract 2% peptone 100 mM potassium phosphate, pH 6.0 1.34% YNB 4 x 10⁻⁵% biotin 1% glycerol or 0.5% methanol
1. Dissolve 10 g of yeast extract, 20 g peptone in 700 ml water.
2. Autoclave 20 minutes on liquid cycle.
3. Cool to room temperature, then add the following and mix well:
100 ml 1 M potassium phosphate buffer, pH 6.0 100 ml 10X YNB 2 ml 500X B 100 ml 10X GY
4. For BMMY, add 100 ml 10X M instead of glycerol.
5. Store media at 4°C. The shelf life of this solution is approximately two months.
Continued on next page
70

Pichia Media Recipes, continued
Breaking Buffer 50 mM sodium phosphate, pH 7.4
1 mM PMSF (phenylmethylsulfonyl fluoride or other protease inhibitors) 1 mM EDTA 5% glycerol
1. Prepare a stock solution of your desired protease inhibitors and store appropriately. Follow manufacturer's recommendations.
2. For 1 liter, dissolve in 900 ml deionized water: 6 g sodium phosphate (monobasic), 372 mg EDTA, and 50 ml glycerol
3. Use NaOH to adjust pH and bring up the volume to 1 liter. Store at 4°C.
4. Right before use, add the protease inhibitors.
Vendors for Baffled Flasks
Bellco (1-800-257-7043) has a wide variety of baffled flasks from 50 to 2,000 ml.
Wheaton (1-609-825-1100) only sells side baffle flasks.
71

Proteins Expressed in Pichia
Table The table below provides a partial list of references documenting successful
expression of heterologous proteins in Pichia pastoris. Note that both Mut+ and MutS phenotypes were used successfully as well as secreted and intracellular expression.
Protein Expression Levels
grams/liter
Where Expressed
How Expressed
Reference
Enzymes
Invertase 2.3 Secreted
Mut+
(Tschopp et al., 1987b)
Bovine Lysozyme c2 0.55 Secreted
Mut+
(Digan et al., 1989)
Streptokinase (active)
0.08 Intracellular *
(Hagenson et al., 1989)
Alpha amylase 2.5 Secreted MutS
(Paifer et al., 1994)
Pectate Lyase 0.004 Secreted MutS
(Guo et al., 1995)
Spinach Phospho-ribulokinase
0.1 Intracellular MutS
(Brandes et al., 1996)
Antigens
Hepatitis B surface antigen
0.4 Intracellular MutS
(Cregg et al., 1987)
Pertussis Antigen P69
3.0 Intracellular MutS
(Romanos et al., 1991)
Tetanus Toxin Fragment C
12.0 Intracellular
Mut+/MutS
(Clare et al., 1991a)
HIV-1 gp120 1.25 Intracellular
Mut+
(Scorer et al., 1993)
Tick Anticoagulant protein
1.7 Secreted MutS
(Laroche et al., 1994)
Bm86 Tick Gut Glycoprotein
1.5 Secreted *
(Rodriguez et al., 1994)
Regulatory Proteins
Tumor Necrosis Factor (TNF)
10.0 Intracellular MutS
(Sreekrishna et al., 1989)
Mouse Epidermal Growth Factor (EGF)
0.45 Secreted MutS
(Clare et al., 1991b)
2b Human Interferon (IFN)
0.4 Intracellular MutS
(Garcia et al., 1995)
Continued on next page
72

Proteins Expressed in Pichia, continued
Table, continued
Protein Expression Levels
grams/liter
Where Expressed
How Expressed
Reference
Membrane Proteins
Human CD38 (soluble portion)
0.05 Secreted
MutS
(Fryxell et al., 1995)
Mouse Serotonin Receptor
0.001 Secreted
Mut+
(Weiss et al., 1995)
Proteases and Protease
Inhibitors
Carboxypeptidase B 0.8 Secreted
Mut+/MutS
(Despreaux & Manning, 1993)
Enterokinase 0.021 Secreted
Mut+
(Vozza et al., 1996)
Ghilanten 0.01 Secreted
Mut+
(Brankamp et al., 1995)
Kunitz protease inhibitor
1.0 Secreted
*
(Wagner et al., 1992)
Human Proteinase Inhibitor 6
0.05 Intracellular
Mut+
(Sun et al., 1995)
Antibodies
Rabbit Single Chain Antibody
>0.1 Secreted
MutS
(Ridder et al., 1995)
*Mut phenotype was not described in the paper.
73

Recombination and Integration in Pichia
Introduction Like Saccharomyces cerevisiae, linear DNA can generate stable transformants of
Pichia pastoris via homologous recombination between the transforming DNA and regions of homology within the genome (Cregg et al., 1985; Cregg et al., 1989). Such integrants show extreme stability in the absence of selective pressure even when present as multiple copies. The most commonly used expression vectors carry the HIS4 gene for selection. These vectors are designed to be linearized with a restriction enzyme such that His+ recombinants are generated by recombination at the AOX1 locus (see below) or at the his4 locus (see next page). Note that single crossover events (insertions) are much more likely to happen than double crossover events (replacements). Multiple insertion events occur spontaneously at about 1–10% of the single insertion events.
Gene Insertion at AOX1 or aox1::ARG4
Gene insertion events at the AOX1 (GS115) or aox1::ARG4 (KM71) loci arise from a single crossover event between the loci and any of the three AOX1 regions on the vector: the AOX1 promoter, the AOX1 transcription termination region (TT), or sequences even further downstream of AOX1 (3´ AOX1). This results in the insertion of one or more copies of the vector upstream or downstream of the AOX1 or the aox1::ARG4 genes. The phenotype of such a transformant is His+ Mut+ (GS115) or His+ MutS (KM71). By linearizing the recombinant vector at a restriction enzyme site located in the 5´ or 3´ AOX1 regions, Mut+ or MutS recombinants can be conveniently generated depending on the host strain used.
The figure below shows the result of an insertion of the plasmid 3´ to the intact AOX1 locus (Mut+) and the gain of PAOX1, your gene of interest, and HIS4 (expression cassette). This event could also happen at the 5´ AOX1 regions of the plasmid and genome with the resulting insertion positioned 5´ to an intact AOX1 locus. This also occurs with non-linearized plasmid and plasmid that religates, although at a lower frequency.
��
����
�����
�� ���
�� ���1�����# ���%
����1������������ �(���
�������������������
$$
�� $$���������������� ��
$$ �� �( ���
1��� � ��������
$$
����������������
Continued on next page
74

Recombination and Integration in Pichia, continued
Gene Insertion Events at his4
In either GS115 (Mut+) or KM71 (MutS), gene insertion events at the his4 locus arise from a single crossover event between the his4 locus in the chromosome and the HIS4 gene on the vector. This results in the insertion of one or more copies of the vector at the his4 locus. Since the genomic AOX1 or aox1::ARG4 loci are not involved in this recombination event, the phenotype of such a His+ transformant has the same Mut phenotype as the parent strain. By linearizing the recombinant vector at a restriction enzyme site located in HIS4 gene, Mut+ or MutS recombinants can be conveniently generated depending on the host strain used. The figure below shows the result of an insertion of the plasmid between duplicated copies of the HIS4/his4 genes, one still mutant, the other wild-type.
���� ����
����
����
�� ���1�����# ���%
1������������$$
��
�(���
&��2 &��3
�( ���
3�������
�� ���1���
� ��������$$
Continued on next page
75

Recombination and Integration in Pichia, continued
Multiple Gene Insertion Events
Multiple gene insertion events at a single locus in a cell do occur spontaneously with a low, but detectable frequency–between 1 and 10% of all selected His+ transformants. Multi-copy events can occur as gene insertions either at the AOX1, aox1::ARG4, or his4 loci. This results in a Mut+ phenotype in GS115 and a MutS phenotype in KM71. Quantitative dot blot analysis, Southern blot analysis, and differential hybridization can detect multiple gene insertion events. See page 88 for a protocol to screen for multiple inserts.
�(���# #����1������������ $$ �)�#
�� $$���������������� �� �(���
45���������)������"
&�'�
�� ���
��������������� ���
45���������)������"
!�������������� ���"����#
1��� � ��������
# #
# #
45���������)������-
����1������������ $$
�� $$���������������� �� �(���
�)�
�( ���
�( ���
�)�
�� ���
$$
Continued on next page
76

Recombination and Integration in Pichia, continued
Gene Replacement at AOX1 in GS115
In a his4 strain such as GS115, a gene replacement (omega insertion) event arises from a double crossover event between the AOX1 promoter and 3´ AOX1 regions of the vector and genome. This results in the complete removal of the AOX1 coding region (i.e., gene replacement). The resulting phenotype is His+ MutS. His+ transformants can be readily and easily screened for their Mut phenotype, with MutS serving as a phenotypic indicator of integration via gene replacement at the AOX1 locus. The net result of this type of gene replacement is a loss of the AOX1 locus (MutS) and the gain of an expression cassette containing PAOX1, your gene of interest, and HIS4. The figure below shows a gene replacement event at the AOX1 locus.
Gene replacement (double-crossover event) are less likely to happen than insertions (single-crossover events). In general, we recommend linearizing your plasmid DNA to create Pichia recombinants by single-crossover events. By using GS115 or KM71, the Mut phenotype of the recombinant will be the same as the parent strain.
�� ���
�� $$��� ��
����
�� ��� 1������������ $$ ���� �����
����� 6���)��7����)����
�� ��8�����# ���%
�)��������8�)�������8�����
1������������
$$
77

Electroporation of Pichia
Introduction This method does not require the generation and maintenance of spheroplasts,
making it a very convenient method for generating Pichia transformants. Efficiencies run about the same as spheroplasting (Scorer et al., 1994).
Preparing Cells 1. Grow 5 ml of Pichia pastoris in YPD (page 66) in a 50 ml conical at 30°C
overnight.
2. Inoculate 500 ml of fresh medium in a 2 liter flask with 0.1–0.5 ml of the overnight culture. Grow overnight again to an OD600 = 1.3–1.5.
3. Centrifuge the cells at 1,500 g for 5 minutes at 4°C. Resuspend the pellet with 500 ml of ice-cold, sterile water.
4. Centrifuge the cells as in Step 3, and resuspend the pellet with 250 ml of ice-cold, sterile water.
5. Centrifuge the cells as in Step 3 and resuspend the pellet in 20 ml of ice-cold 1 M sorbitol.
6. Centrifuge the cells as in Step 3 and resuspend the pellet in 1 ml of ice-cold 1 M sorbitol for a final volume of approximately 1.5 ml.
Note: You may freeze the electrocompetent cells in 80 μl aliquots; however the transformation efficiencies will decrease significantly.
Transformation 1. Mix 80 μl of the cells from Step 6 (above) with 5–20 μg of linearized DNA
(in 5–10 μl TE Buffer) and transfer them to an ice-cold 0.2 cm electroporation cuvette.
2. Incubate the cuvette with the cells on ice for 5 minutes.
3. Pulse the cells according to the parameters for yeast (Saccharomyces cerevisiae) suggested by the manufacturer of the specific electroporation device being used.
4. Immediately add 1 ml of ice-cold 1 M sorbitol to the cuvette. Transfer the cuvette contents to a sterile microcentrifuge tube.
5. Spread 200–600 μl aliquots on MD or RDB plates.
6. Incubate the plates at 30°C until colonies appear. Screen for Mut+/MutS phenotypes as indicated on page 47.
78

PEG 1000 Transformation Method for Pichia
Introduction It is thought that a PEG procedure is better than LiCl, but not as good as
spheroplasting or electroporation for transformation. It is convenient for people who do not have an electroporation device. The efficiency is 102 to 103 transformants per μg of DNA.
Required Solutions
Buffer A: 1.0 M Sorbitol (Fisher), 10 mM Bicine, pH 8.35 (Sigma), 3% (v/v) ethylene glycol (Merck)
Buffer B: 40% (w/v) Polyethylene glycol 1000 (Sigma), 0.2 M Bicine, pH 8.35
Buffer C: 0.15 M NaCl, 10 mM Bicine, pH 8.35
Filter sterilize and store at –20°C.
Fresh, reagent grade DMSO that is from an unopened bottle or made fresh and stored at –70°C until use.
�!� ����
Cell competence decreases very rapidly after the cells thaw even when held on ice. It is critical to add DNA to frozen cell samples. To perform multiple transformations, it is recommended to process them in groups of six at a time.
Preparing Competent Cells
1. Streak Pichia pastoris strain for single colonies on a YPD plate and incubate the plate at 30°C for two days.
2. Inoculate a 10 ml YPD culture with a single colony from the plate and grow the culture overnight at 30°C with shaking.
3. In the morning, use an aliquot of the overnight culture to inoculate a 100 ml YPD culture to a starting OD600 of 0.1 and grow at 30°C to an OD600 of 0.5 to 0.8.
4. Harvest the culture by centrifugation at 3,000 g at room temperature and wash cells once in 50 ml of Buffer A.
5. Resuspend cells in 4 ml of Buffer A and distribute in 0.2 ml aliquots to sterile 1.5 ml microcentrifuge tubes. Add 11 μl of DMSO to each tube, mix, and quickly freeze cells in a bath of liquid nitrogen.
6. Store frozen tubes at –70°C.
Continued on next page
79
PEG 1000 Transformation Method for Pichia, continued
Transformation 1. Use up to 50 μg of each DNA sample in no more than 20 μl total volume.
Add the DNA directly to a still-frozen tube of competent cells. Carrier DNA (40 μg of denatured and sonicated salmon sperm DNA) should be included with < 1 μg DNA samples for maximum transformation frequencies.
2. Incubate all sample tubes in a 37°C water bath for five minutes. Mix samples once or twice during this incubation period.
3. Remove tubes from the bath and add 1.5 ml of Buffer B to each. Mix contents thoroughly.
4. Incubate tubes in a 30°C water bath for 1 hour.
5. Centrifuge sample tubes at 2,000 g for 10 minutes at room temperature. Decant supernatant and resuspend the cells in 1.5 ml Buffer C.
6. Centrifuge samples a second time and resuspend the cell pellet gently in 0.2 ml of Buffer C.
7. Spread entire contents of each tube on an agar plate containing selective growth medium and incubate plates at 30°C for 3 to 4 days. Screen for Mut phenotype (page 47) or select hyper-resistant Geneticin® colonies (page 42).
80

Lithium Chloride Transformation Method
Introduction This is a modified version of the procedure described for S. cerevisiae (Gietz &
Schiestl, 1996). This protocol is provided as an alternative to transformation by electroporation. Transformation efficiency is between 102 to 103 cfu/μg linearized DNA.
Preparing Solutions
Lithium acetate does not work with Pichia pastoris. Use only lithium chloride.
1 M LiCl in distilled, deionized water. Filter sterilize. Dilute as needed with sterile water.
50% polyethylene glycol (PEG-3350) in distilled, deionized water. Filter sterilize. Store in a tightly capped bottle.
2 mg/ml denatured, fragmented salmon sperm DNA in TE (10 mM Tris-HCl, pH 8.0, 1.0 mM EDTA). Store at –20°C.
Preparing Cells 1. Grow a 50 ml culture of Pichia pastoris in YPD at 30°C with shaking to an
OD600 of 0.8 to 1.0 (approximately 108 cells/ml).
2. Harvest the cells and wash with 25 ml of sterile water and centrifuge at 1,500 g for 10 minutes at room temperature.
3. Decant the water and resuspend the cells in 1 ml of 100 mM LiCl.
4. Transfer the cell suspension to a 1.5 ml microcentrifuge tube.
5. Pellet the cells at maximum speed for 15 seconds and remove the LiCl with a pipet.
6. Resuspend the cells in 400 μl of 100 mM LiCl.
7. Dispense 50 μl of the cell suspension into a 1.5 ml microcentrifuge tube for each transformation and use immediately. Do not store on ice or freeze at –20°C.
Continued on next page
81

Lithium Chloride Transformation Method, continued
Transformation 1. Boil a 1 ml sample of single-stranded DNA for five minutes, then quickly
chill in ice water. Keep on ice. Note: It is neither necessary nor desirable to boil the carrier DNA prior to each use. Store a small aliquot at –20°C and boil every 3–4 times the DNA is thawed.
2. Centrifuge the LiCl-cell solution from Step 7, previous page. Remove the LiCl with a pipet.
3. For each transformation sample, add the following reagents in the order given to the cells. PEG shields the cells from the detrimental effects of the high concentration of LiCl.
240 μl 50% PEG 36 μl 1 M LiCl 25 μll 2 mg/ml single-stranded DNA Plasmid DNA (5–10 μg) in 50 μl sterile water
4. Vortex each tube vigorously until the cell pellet is completely mixed (~1 minute).
5. Incubate the tube at 30°C for 30 minutes without shaking.
6. Heat shock in a water bath at 42°C for 20–25 minutes.
7. Centrifuge the tubes at 6,000 to 8,000 rpm and remove the transformation solution with a pipet.
8. Gently resuspend the pellet in 1 ml of sterile water.
9. Plate 25 to 100 μl on RDB or MD plates. Incubate the plates for 2–4 days at 30°C. Screen for Mut phenotype (page 47) or select hyper-resistant Geneticin® colonies (page 42).
82

PCR Analysis of Pichia Integrants
Introduction The following protocol is designed to allow you to analyze Pichia integrants to
determine if the gene of interest has integrated into the Pichia genome. Isolate genomic DNA from 6–10 MutS or Mut+ Pichia clones using the protocol on page 86. Isolate DNA from the strain transformed with the parent plasmid. After isolating your DNA, use the procedure below to identify integrants. Amplification of the gene of interest is carried out either with the -factor primer (for pPIC9 only) or 5´ AOX1 primer paired with the 3´ AOX1 primer included in the kit. This protocol is useful for confirming integration of the gene of interest but will not provide information on the site of integration.
A more direct method for PCR screening is available on the page 85.
Analysis by PCR 1. Set up PCR reactions as follows:
10X PCR Buffer 5 μl Genomic DNA (~1 μg) 5 μl 100 mM dNTPs (25 mM each) 1 μl 5´ AOX1 Primer (0.1 μg/μl) 5 μl* 3´ AOX1 Primer (0.1 μg/μl) 5 μl* Sterile water to 50 μl Taq Polymerase (5 U/μl) 0.25 μl
*Resuspend the primers in 20 μl sterile water to prepare a 0.1 μg/μl solution. The amount of primer may be decreased if desired. For ~20 pmoles primer, use 2 μl of each primer.
For amplification controls, use 100 ng of recombinant plasmid (positive control) and 100 ng of the appropriate plasmid without insert (negative control).
2. Load thermocycler and run the following program:
Step Temperature Time Cycle
Hot Start 94°C 2 minutes 1X
Denaturation 94°C 1 minute
Annealing 55°C 1 minute 25–35X
Extension 72°C 1 minute
Final Extension 72°C 7 minutes 1X
3. Analyze 10 μl on a 1X TAE, 0.8 % agarose gel.
Continued on next page
83

PCR Analysis of Pichia Integrants, continued
Interpreting PCR If screening Mut+ integrants, you should see two bands. One will correspond to
the size of your gene of interest, the other to the AOX1 gene (approximately 2.2 kb). If screening MutS integrants in GS115, you should see only the band that corresponds to the gene of interest. In KM71, because of the ARG4 insert in AOX1, the PCR product is 3.6 kb. Parent plasmids will produce the following sized PCR products. Add these fragments to the size of your insert to interpret your PCR results.
Vector PCR Product
pPIC3.5K 220 bp pAO815 189 bp pPIC9K (using the 5´ AOX1 primer) 492 bp
pPIC9K (using the -Factor primer) 195 bp
�!� ����
If you use the -factor primer as a PCR primer, you will not see a band with GS115 or KM71. This is because there is no -factor signal associated with the chromosomal AOX1 gene.
Sometimes there will be ghost bands appearing in your PCR. These do not seem to be significant as they have not been shown to be a problem.
Example of PCR Analysis
The figure below shows the results of a typical PCR analysis using the procedure on page 83. Genomic DNA was isolated from Pichia recombinants and from appropriate controls. Ten microliter samples from each PCR were run on a 0.8% agarose gel.
Lane 1 contains a 1 kb + 100 bp ladder. Lane 2 shows the wild-type AOX1 gene (2.2 kb) and a 2.4 kb product containing the gene of interest (GOI, 1.9 kb) and 492 bp of flanking AOX1 sequence from GS115/pPIC9K/GOI. Lane 3 shows the wild-type AOX1 gene alone from GS115.
$3 � 4
��-
4�-
��-1�-��-
/�
The Easy-DNA™ Kit, available separately from Invitrogen, provides a fast and easy method to isolate genomic DNA from Pichia pastoris. See page viii for ordering information.
84

Direct PCR Screening of Pichia Clones
Introduction A simple protocol has been reported in the literature to directly test Pichia clones
for insertion of your gene by PCR (Linder et al., 1996). Briefly, the cells are lysed by a combined enzyme, freezing, and heating treatment. You may use the genomic DNA directly as a PCR template.
Before Starting You will need the following reagents and equipment on hand:
• A culture or single colony of a Pichia transformant
• 1.5 ml microcentrifuge tube
• 5 U/μl solution of Lyticase (Sigma)
• 30°C water bath or heat block
• Liquid nitrogen
• Reagents for PCR
Procedure 1. Place 10 μl of a Pichia pastoris culture into a 1.5 ml microcentrifuge tube. For
relatively dense cultures, dilute 1 μl of the culture into 9 μl water. Alternatively, pick a single colony and resuspend in 10 μl of water.
2. Add 5 μl of a 5 U/μl solution of lyticase and incubate at 30°C for 10 minutes.
3. Freeze the sample at –80°C for 10 minutes or immerse in liquid nitrogen for 1 minute.
4. Set up a 50 μl PCR for a hot start:
10X Reaction Buffer 5 μl 25 mM MgCl2 5 μl 25 mM dNTPs 1 μl 5´ AOX1 primer (10 pmol/μl) 1 μl 3´ AOX1 primer (10 pmol/μl) 1 μl Sterile water 27 μl Cell lysate 5 μl Total Volume 45 μl
5. Place the solution in the thermocycler and incubate at 95°C for 5 minutes.
6. Add 5 μl of a 0.16 U/μl solution of Taq polymerase (0.8 units).
7. Cycle 30 times using the following parameters:
Step Temperature Time
Denaturation 95°C 1 minute
Annealing 54°C 1 minute
Extension 72°C 1 minute
Include a final extension of 7 minutes at 72°C.
8. Analyze a 10 μl aliquot by agarose gel electrophoresis.
85

Isolating Total DNA from Pichia
Introduction The protocol below allows you to isolate DNA from the desired His+ recombinant
and the untransformed GS115 or KM71 which is suitable for Southern blot analysis, dot/slot blot analysis or genomic PCR. See Current Protocols in Molecular Biology, pages 13.11.1 to 13.11.4 (Ausubel et al., 1994), Guide to Yeast Genetics and Molecular Biology, pages 322–323 (Strathern and Higgins, 1991), or (Holm et al., 1986).
Solutions You will need to make the following solutions. There is not enough of some of
these reagents in the kit to perform this experiment.
Minimal Medium (MD, MGYH) Sterile water SCED (1 M sorbitol, 10 mM sodium citrate, pH 7.5, 10 mM EDTA, 10 mM DTT) Zymolyase, 3 mg/ml stock solution in water (Seikagaku America, Inc.,
1-800-237-4512) 1% SDS in water 5 M potassium acetate, pH 8.9 TE buffer, pH 7.4 (10 mM Tris-HCl, pH 7.4, 1 mM EDTA, pH 8.0) 7.5 M ammonium acetate, pH 7.5 Phenol:chloroform (1:1 v/v)
Preparing Cells 1. Grow at 30°C the recombinant strain and the parent strain to an OD600 of
5–10 in 10 ml of minimal media such as MD or MGY (recombinant) or MDH or MGYH (GS115 or KM71).
2. Collect the cells by centrifugation at 1500 g for 5–10 minutes at room temperature.
3. Wash the cells with 10 ml sterile water by centrifugation as in Step 2.
Spheroplasting and Lysis
1. Resuspend the cells in 2 ml of SCED buffer, pH 7.5. Make this solution fresh.
2. Add 0.1–0.3 mg of Zymolyase (mix well before adding to the cells). Incubate at 37°C for 50 minutes to achieve < 80% spheroplasting (monitor the percent spheroplasting using the procedure on pages 38–39).
3. Add 2 ml of 1% SDS, mix gently and set on ice (0 to 4°C) for 5 minutes.
4. Add 1.5 ml of 5 M potassium acetate, pH 8.9, and mix gently.
5. Centrifuge at 10,000 g for 5–10 minutes at 4°C and save the supernatant.
Continued on next page
86

Isolating Total DNA from Pichia, continued
DNA Precipitation
1. Transfer the supernatant from Step 5, the previous page, and add 2 volumes of ethanol to the supernatant. Incubate at room temperature for 15 minutes.
2. Centrifuge at 10,000 g for 20 minutes at 4°C.
3. Resuspend the pellet gently in 0.7 ml of TE buffer, pH 7.4 and transfer to a microcentrifuge tube.
4. Gently extract with an equal volume of phenol:chloroform (1:1 v/v) followed by an equal volume of chloroform:isoamyl alcohol (24:1). Split the aqueous layer into two microcentrifuge tubes.
5. Add 1/2 volume of 7.5 M ammonium acetate, pH 7.5, and 2 volumes of ethanol to each tube. Place on dry ice for 10 minutes or at –20°C for 60 minutes.
6. Centrifuge at 10,000 g for 20 minutes at 4°C and wash the pellets once with 1 ml of 70% ethanol. Briefly air dry the pellets and resuspend each one in 50 μl of TE buffer, pH 7.5.
7. Determine the concentration of the DNA sample. You can store the samples at –20°C separately or combined until ready for use.
87

Determining the Copy Number of Multiple Integrants
Introduction You may use quantitative dot blots or Southern hybridization to analyze gene copy
number (i.e., the actual number of gene copies in your Pichia recombinant) (Brierley, et al., 1994; Clare, et al., 1991a; Romanos, et al., 1991; Scorer, et al., 1993; Scorer, et al., 1994). This requires isolating genomic DNA from Pichia recombinants transformed with the parent vector (0 copies of your gene), pAO815 or pPIC3.5K containing 1 copy of your gene (single copy control), and the Pichia recombinants containing multiple copies of your gene. Use the protocol detailed on page 86 to isolate genomic DNA.
Quantitative Dot Blot Solutions
You will need the following solutions, 10–15 ml of each for each dot blot. 50 mM EDTA, 2.5% -mercaptoethanol pH 9 1 mg/ml Zymolyase 100T in water (Seikagaku America, Inc., 1-800-237-4512) 0.1 N NaOH, 1.5 M NaCl 2X SSC You will also need 3MM paper.
Quantitative Dot Blot Procedure
The following protocol is a summary of a rapid DNA dot blot technique to detect multiple integrants (Romanos, et al., 1991). It is very important to spot equivalent numbers of cells onto filters in order to quantify copy number. Alternatively, genomic DNA may be isolated and spotted directly onto nitrocellulose or nylon, fixed, and analyzed.
1. Grow Mut+ or MutS transformants in individual wells of a 96-well microtiter plate in 200 μl of YPD broth at 30°C until all wells have approximately the same density. This may necessitate several passages.
Alternatively, you may grow individual transformants in culture tubes and normalize the absorbance at 600 nm by adding medium.
2. Filter 50 μl of each sample onto a nitrocellulose or nylon filter placed into a dot (slot) blot apparatus using multi-channel pipettor. Air dry filters.
3. To lyse the cells on the filter, treat the filter with four solutions as follows: place two sheets of 3 MM paper in a tray and soak with 10–15 ml of 50 mM EDTA, 2.5% -mercaptoethanol pH 9. Make sure that the paper is uniformly soaked and that there are no puddles. Place the nitrocellulose filter face down on the treated 3MM paper. Incubate for 15 minutes at room temperature.
4. Remove the nitrocellulose filter from the 3MM paper and replace the 3MM paper with two new sheets. Soak with 10–15 ml of 1 mg/ml Zymolyase 100T as described in Step 3. Place the nitrocellulose filter face down on the 3MM paper and incubate for 4 hours at 37°C.
Continued on next page
88

Determining the Copy Number of Multiple Integrants, continued
Quantitative Dot Blot Procedure, continued
5. Remove the nitrocellulose filter from the paper and replace the paper with two new sheets. Soak with 10–15 ml of 0.1 N NaOH, 1.5 M NaCl. Place the nitrocellulose filter face down on the paper and incubate for 5 minutes at room temperature.
6. Remove the nitrocellulose filter and replace with two new 3MM sheets. Soak with 10–15 ml of 2X SSC. Place the nitrocellulose filter face down on the 3MM paper and incubate for 5 minutes at room temperature. Repeat.
7. Bake nitrocellulose filters at 80°C or UV-crosslink DNA to nylon. The filters may be probed with a nonradioactive-labeled or random-primed, 32P-labeled probe complementary to your gene.
You can identify multi-copy integrants by a strong hybridization signal relative to the single copy control. You can then quantify dot blots for copy number by densitometry of the film or blot, or by using a -scanner (if radiolabeled).
Southern Blot Analysis
For a detailed description of this technique as applied to Pichia pastoris, see (Clare, et al., 1991a). It is very important to digest your DNA with the right restriction enzyme(s) to generate a blot of digested and gel-separated genomic DNA. It is also important to understand that your strategy will be different if you use pPIC3.5K versus pAO815 to generate your multiple copies. Digesting DNA from Pichia recombinants containing multiple copies will produce a band that will vary in intensity depending on the number of copies of your gene. It is very important to include a control to show the intensity of a single copy gene. You can quantify the band intensities using densitometry to estimate relative gene dosage.
Controls It is very important to include DNA from the host strain alone (GS115 or KM71),
the host strain transformed with the parent vector (pPIC3.5K or pAO815), and the host strain transformed with a vector containing one copy of your gene. It is also a very good idea to make a probe to the HIS4 gene as an internal control for single copy in addition to a probe to your gene. Note that if your gene inserts into his4, two copies of the HIS4 gene are created, one mutant and the other wild-type (see Recombination and Integration in Pichia, Pichia Expression Kit manual).
Continued on next page
89

Determining the Copy Number of Multiple Integrants, continued
General Guidelines
Use standard procedures and solutions for Southern blotting as outlined in Molecular Cloning: A Laboratory Manual (Sambrook, et al., 1989), pages 9.31–9.58.
Isolate genomic DNA and quantify using fluorometry. Be sure to eliminate RNA. It is very important to load the same amount of DNA into each lane to accurately determine copy number.
Probe your Southern blot with probes to both HIS4 and your gene. Note that the point mutation in the his4 gene in the host strain will not interfere with hybridization if you make the probe complementary to the wild-type gene.
If you used pPIC3.5K to generate multimers, use Bgl II to digest your DNA (Clare, et al., 1991a). Note that if you used pPIC3.5K that all multimers are NOT necessarily in a head-to-tail configuration. Some multimers may be head-to-head and others tail-to-tail. We recommend that you think about what products may be produced. An expression cassette in the opposite orientation may produce a different band. The number of multiple copies will cause one or two bands (depending on orientation) in the Southern blot to increase in intensity once you are >2 copies.
If you used pAO815 to generate multimers, use Bgl II and BamH I to digest the genomic DNA and release the multimer. The molecular weight of the band should allow you to determine the number of multimers. If this multimer is too large, you may wish to digest with an enzyme like Sac I. This will collapse the multimer into single fragments containing your gene. These will produce a band that will be quite intense. The relative intensity of this band versus a band containing a single copy of your gene will allow you to determine the copy number.
Bgl II digested DNA from GS115 and GS115 transformed with pPIC3.5K or pAO815 will produce a bands of 2.8 kb (the genomic copy of HIS4), and ~6.7 kb (the vector derived copy of HIS4), respectively, when probed with a complementary fragment to HIS4.
90

Procedure for Total RNA Isolation from Pichia
Introduction This protocol is designed to isolate 60–300 μg total RNA (Schmitt et al., 1990) from
Pichia which is suitable for mRNA isolation using Invitrogen's FastTrack® 2.0 or Micro FastTrack™ 2.0 mRNA Isolation Kit. If you wish to use another protocol, you should scale-up the reaction to yield about 2 mg of total RNA per time point. The mRNA is for Northern blot analysis of Pichia recombinants to determine if the gene of interest is being induced and transcribed. RNA isolation should be done from induced cultures using an uninduced culture as a negative control.
Solutions You will need the following solutions. Remember to use DEPC-treated water and
to use equipment free of RNase.
MGYH or BMGY medium DEPC-treated water 3 M sodium acetate, pH 5.3 Buffered phenol 10% SDS in DEPC treated water Phenol:chloroform (1:1) Chloroform:isoamyl alcohol (24:1) 65°C water bath AE buffer (50 mM sodium acetate, pH 5.3, 1 mM EDTA)
Growing Cells 1. Grow up two cultures (100–200 ml in MGY or BMGY), but induce only one
of them. Use the same protocol for induction that you used in the Expression section.
2. Take 10 ml time points at 1, 2, 3, 4, and 6 days.
3. Harvest the cells from each time point by centrifugation at 1500 g for 10 minutes at room temperature.
4. Resuspend cell pellet in 400 μl AE buffer and transfer to a microcentrifuge tube.
Lysing Cells 1. Add 40 μl 10% SDS and vortex for ~20 seconds.
2. Add an equal volume (450–500 μl) of buffer saturated phenol and vortex for ~20 seconds.
3. Incubate at 65°C for 4 minutes.
4. Incubate in a dry ice/ethanol bath until crystals show (~1 minute). Centrifuge at maximum speed for 2 minutes at 4°C.
5. Transfer aqueous phase to new centrifuge tube and add an equal volume of phenol/chloroform and vortex for ~20 seconds. Centrifuge at maximum speed for 2 minutes at 4°C.
6. Remove upper phase to a new tube and add 40 μl of 3 M sodium acetate, pH 5.3 and 2.5 volumes of 100% ethanol (–20°C). Centrifuge at maximum speed for 15 minutes at 4°C. Remove ethanol.
7. Wash pellet with 80% ethanol and air dry briefly. Resuspend total RNA in 20 μl DEPC-treated water and store at –80°C. Yield is 60–300 μg total RNA.
mRNA Isolation and Northern Analysis
See (Ausubel et al., 1994) for a protocol for mRNA isolation and Northern analysis. The FastTrack® 2.0 mRNA Kit (Cat. no. K1593-02; 6 reactions) is designed to isolate mRNA from 0.2 to 1 mg total RNA. The Micro-FastTrack™ 2.0 Kit (Cat. no. K1520-02; 20 reactions) is designed to isolate mRNA from ~100 μg total RNA. You will need ~1–5 μg mRNA per time point.
91

-Galactosidase Assay
Introduction The GS115 -Gal strain is provided as a His+ Mut+ intracellular expression
control. Growth of the strain during Mut+ expression provides a positive control for expression conditions. The cell-free -galactosidase assay provided below can also be found in (Miller, 1972), page 403 and can be used to evaluate expression of -galactosidase.
Preparing Solutions
You will need to prepare the following:
• A fresh crude cell lysate of GS115 -Gal (see page 54)
• Z buffer
• ONPG solution
• 1 M sodium carbonate solution
Recipes for the solutions are below.
Z Buffer 60 mM Na2HPO4-7H2O
40 mM NaH2PO4-H2O 10 mM KCl 1 mM MgSO4-7H2O 50 mM -mercaptoethanol pH 7.0
1. Dissolve the following in 950 ml deionized water:
Na2HPO4-7H2O 16.1 g NaH2PO4-H2O 5.5 g KCl 0.75 g MgSO4-7H2O 0.246 g -mercaptoethanol 2.7 ml
2. Adjust pH to 7.0 with either NaOH or HCl and bring the volume up to 1 liter with water.
3. Do not autoclave! Store at 4C.
ONPG Solution 4 mg/ml in 100 mM phosphate buffer, pH 7.0
1. Dissolve the following in 90 ml deionized water:
Na2HPO4-7H2O 1.61 g NaH2PO4-H2O 0.55 g
2. Adjust pH to 7.0 with either NaOH or HCl
3. Add 400 mg ONPG. Stir to dissolve and bring the volume up to 100 ml with water.
4 Store at 4C away from light.
1 M Sodium Carbonate
Dissolve 12.4 g sodium carbonate in 100 ml of deionized water. Store at room temperature.
Continued on next page
92

-Galactosidase Assay, continued
Procedure 1. Determine protein concentration of your lysate by Lowry, Bradford, or BCA
assay.
2. Equilibrate Z buffer, ONPG solution, and sodium carbonate solution to 28C.
3. Add 10–50 μl of your crude assay to 1 ml of Z buffer and equilibrate at 28C. As a control for spontaneous hydrolysis of ONPG, add an aliquot of your lysis buffer to 1 ml of Z buffer.
4. To initiate the reaction, add 0.2 ml 4 mg/ml ONPG to each of the tubes in Step 3.
5. Incubate the samples and the control at 28C until a faint yellow color develops. This should occur at least 10 minutes after the start of the assay to ensure accurate data. Note that the tube with no lysate may not change color.
6. Stop the reaction by adding 0.5 ml of 1 M sodium carbonate to each tube. Record the length of incubation for each sample.
7. Read the OD420 against the control containing buffer alone.
8. Determine the protein concentration of your lysate in mg/ml.
If the reaction turns yellow too quickly, you need to dilute your lysate. Try successive 10-fold dilutions of the lysate using your lysis buffer until the reaction starts turning yellow after 10 minutes. This is to ensure that you are measuring a true initial rate.
Determining Specific Activity
Use the following formula to determine the specific activity of the -galactosidase in units/mg total protein:
OD420 380 -galactosidase units/mg total protein =
minutes at 28°C mg protein in reaction
Remember to take into account the volume of lysate added to the reaction and any dilutions made to the lysate when calculating the amount of protein in the reaction. The number 380 is the constant used to convert the OD420 reading into units. One unit is defined as the amount of enzyme that will hydrolyze 1 nmole of ONPG per minute at 28°C. The molar extinction coefficient of ONPG under these conditions is 4,500. For a sample calculation, See below.
Sample Calculation
Here is a sample calculation: Extract concentration = 10 mg/ml Assay 10 μl of a 1/100 dilution Time = 10 minutes OD420 = 0.4
The amount of protein in the reaction = 0.01 ml 0.01 (dilution factor) 10 mg/ml = 0.001 mg protein in the reaction
The specific activity = 0.400 380 = 15,200 units/mg protein 10 0.001 mg
Pure -galactosidase has an activity of 300,000 units/mg protein.
93
Technical Support
Web Resources
Visit the Invitrogen website at www.invitrogen.com for:
Technical resources, including manuals, vector maps and sequences, application notes, MSDSs, FAQs, formulations, citations, handbooks, etc.
Complete technical support contact information
Access to the Invitrogen Online Catalog
Additional product information and special offers
Contact Us For more information or technical assistance, call, write, fax, or email. Additional
international offices are listed on our website (www.invitrogen.com).
Corporate Headquarters: 5791 Van Allen Way Carlsbad, CA 92008 USA Tel: 1 760 603 7200 Tel (Toll Free): 1 800 955 6288 Fax: 1 760 602 6500 E-mail: [email protected]
Japanese Headquarters: LOOP-X Bldg. 6F 3-9-15, Kaigan Minato-ku, Tokyo 108-0022 Tel: 81 3 5730 6509 Fax: 81 3 5730 6519 E-mail: [email protected]
European Headquarters: Inchinnan Business Park 3 Fountain Drive Paisley PA4 9RF, UK Tel: +44 (0) 141 814 6100 Tech Fax: +44 (0) 141 814 6117 E-mail: [email protected]
MSDS MSDSs (Material Safety Data Sheets) are available on our website at
www.invitrogen.com/msds.
Certificate of Analysis
The Certificate of Analysis (CofA) provides detailed quality control information for each product. The CofA for each product is available on our website at www.invitrogen.com/cofa, and is searchable by product lot number, which is printed on each box.
Continued on next page
94

Technical Support, continued
Limited Warranty Invitrogen (a part of Life Technologies Corporation) is committed to providing
our customers with high-quality goods and services. Our goal is to ensure that every customer is 100% satisfied with our products and our service. If you should have any questions or concerns about an Invitrogen product or service, contact our Technical Support Representatives. All Invitrogen products are warranted to perform according to specifications stated on the certificate of analysis. The Company will replace, free of charge, any product that does not meet those specifications. This warranty limits the Company’s liability to only the price of the product. No warranty is granted for products beyond their listed expiration date. No warranty is applicable unless all product components are stored in accordance with instructions. The Company reserves the right to select the method(s) used to analyze a product unless the Company agrees to a specified method in writing prior to acceptance of the order. Invitrogen makes every effort to ensure the accuracy of its publications, but realizes that the occasional typographical or other error is inevitable. Therefore the Company makes no warranty of any kind regarding the contents of any publications or documentation. If you discover an error in any of our publications, please report it to our Technical Support Representatives. Life Technologies Corporation shall have no responsibility or liability for any special, incidental, indirect or consequential loss or damage whatsoever. The above limited warranty is sole and exclusive. No other warranty is made, whether expressed or implied, including any warranty of merchantability or fitness for a particular purpose.
95
Purchaser Notification
Limited Use Label License No.74: Pichia Pastoris Expression Sys-tem
The Pichia Expression System is based on the yeast Pichia pastoris. Pichia pastoris was developed into an expression system by scientists at Salk Institute Biotechnology/ Industry Associates (SIBIA) and Phillips Petroleum for high-level expression of recombinant proteins. All patents for Pichia pastoris and licenses for its use as an expression system are owned by Research Corporation Technologies (RCT), Inc., Tucson, Arizona. Life Technologies has an exclusive license to sell Pichia expression kits and vectors to scientists for research purposes only, under the terms described below. Use of Pichia pastoris by commercial entities for any commercial purpose requires the user to obtain a commercial license as detailed below. Before using any Pichia expression product, please read the following license agreement. If you do not agree to be bound by its terms, contact Life Technologies within 10 days for authorization to return the unused Pichia expression products and to receive a full refund. If you do agree to the terms of this license agreement, please complete the User Regis-tration Card and return it to Life Technologies before using the product. Life Technologies Corporation (”Life Technologies”) grants you a non-exclusive license to use the enclosed Pichia expression vectors (”Expression Vector”) for academic research or for evaluation purposes only. The Expression Vectors are being transferred to you in furtherance of, and reliance on, such license. You may not use the Expression Vectors for any commercial purpose without a license for such purpose from Research Corporation Technologies, Inc., Tucson, Arizona. Commercial purposes include: any use of Expression Products or Expression Vectors in a Commercial Product; any use of Expression Products or Expression Vectors in the manufacture of a Commercial Product; any sale of Expression Products; any use of Expression Products or the Expression Kit to facilitate or advance research or development directed to a Commercial Product; and any use of Expression Products or the Expression Kit to facilitate or advance any research or development program the results of which will be directly applied to the development or manufacture of a Commercial Product. “Expression Products” means products expressed with the Expression Kit, or with the use of any Pichia expression vectors (including the Expression Vector) or host strains. “Commercial Product” means any product intended for sale or commercial use. Commercial entities may conduct their evaluation for one year at which time this license automatically terminates. Commercial entities will be contacted by Research Corporation Technologies during the evaluation period regarding their desire for a commercial license. Access to the Expression Kit and Vector must be limited solely to those officers, employees and students of your institution who need access to perform the above-described research or evaluation. You must inform each such officer, employee and student of the provisions of this license agreement and require them to agree, in writing, to be bound by the provisions of this license agreement. You may not distribute any Expression Vector or host strain contained herein or in the Expression Kit to others, even those within your own institution. You may only transfer modified, altered, or original material from the Expression Kit or Vector to a third party following written notification of, and written approval from, Life Technologies so that the recipient can be licensed. You may not assign, sub-license, rent, lease or otherwise transfer this license agreement or any of the rights or obligation there under, except as expressly permitted by Life Technolo-gies and RCT.
Continued on next page
96

Purchaser Notification, continued
Limited Use Label License No. 74: Pichia Pastoris Expression Sys-tem, continued
This license agreement is effective until terminated. You may terminate it at any time by destroying all Pichia Expression products in your control. It will also terminate automatically if you fail to comply with the terms and conditions of the license agreement. You shall, upon termination of the license agreement, destroy all Pichia Expression products in your control, and so notify Life Techno-logies in writing. You may contact Research Corporation Technologies at the following address: Bennett Cohen, Ph.D., Research Corporation Technologies, 101 North Wilmot Road, Suite 600, Tucson, Arizona 85711-3335. Tel: 520-748-4443, Fax: 520-748-0025.
97

References
Ausubel, F. M., Brent, R., Kingston, R. E., Moore, D. D., Seidman, J. G., Smith, J. A., and Struhl, K. (1994) Current Protocols in Molecular Biology, Greene Publishing Associates and Wiley-Interscience, New York
Barr, K. A., Hopkins, S. A., and Sreekrishna, K. (1992) Protocol for Efficient Secretion of HSA Developed from Pichia pastoris. Pharm. Eng. 12, 48-51
Bollag, D. M., M. D., R., and Edelstein, S. J. (1996) Protein Methods, Second Ed., Wiley-Liss, New York Brake, A. J., Merryweather, J. P., Coit, D. G., Heberlein, U. A., Masiarz, G. R., Mullenbach, G. T., Urdea,
M. S., Valenzuela, P., and Barr, P. J. (1984) a-Factor-Directed Synthesis and Secretion of Mature Foreign Proteins in Saccharomyces cerevisiae. Proc. Natl. Acad. Sci. USA 81, 4642-4646
Brandes, H. K., Hartman, F. C., Lu, T.-Y. S., and Larimer, F. W. (1996) Efficient Expression of the Gene for Spinach Phosphoribulokinase in Pichia pastoris and Utilization of the Recombinant Enzyme to Explore the Role of Regulatory Cysteinyl Residues by Site-directed Mutagenesis. J. Biol. Chem. 271, 6490-6496
Brankamp, R. G., Sreekrishna, K., Smith, P. L., Blankenship, D. T., and Cardin, A. D. (1995) Expression of a Synthetic Gene Encoding the Anticoagulant-Antimetastatic Protein Ghilanten by the Methylotropic Yeast Pichia pastoris. Protein Expression and Purification 6, 813-820
Brierley, R. A., Davis, G. R., and Holtz, G. C. (1994) Production of Insulin-Like Growth Factor-1 in Methylotrophic Yeast Cells. United States Patent 5,324,639
Buckholz, R. G., and Gleeson, M. A. G. (1991) Yeast Systems for the Commercial Production of Heterologous Protein. Bio/Technology 9, 1067-1072
Cavener, D. R., and Stuart, C. R. (1991) Eukaryotic Start and Stop Translation Sites. Nucleic Acids Res. 19, 3185-3192
Clare, J. J., Rayment, F. B., Ballantine, S. P., Sreekrishna, K., and Romanos, M. A. (1991a) High-level Expression of Tetanus Toxin Fragment c in Pichia pastoris Strains Containing Multiple Tandem Integrations of the Gene. Bio/Technology 9, 455-460
Clare, J. J., Romanos, M. A., Rayment, F. B., Rowedder, J. E., Smith, M. A., Payne, M. M., Sreekrishna, K., and Henwood, C. A. (1991b) Production of Epidermal Growth Factor in Yeast: High-Level Secretion Using Pichia pastoris Strains Containing Multiple Gene Copies. Gene 105, 205-212
Cregg, J. M., Barringer, K. J., and Hessler, A. Y. (1985) Pichia pastoris as a Host System for Transformations. Mol. Cell. Biol. 5, 3376-3385
Cregg, J. M., and Higgins, D. R. (1995) Production of Foreign Proteins in the Yeast Pichia pastoris. Canadian J. Botany Supp. 73, 5981-5987
Cregg, J. M., Madden, K. R., Barringer, K. J., Thill, G., and Stillman, C. A. (1989) Functional Characterization of the Two Alcohol Oxidase Genes from the Yeast, Pichia pastoris. Mol. Cell. Biol. 9, 1316-1323
Cregg, J. M., Tschopp, J. F., Stillman, C., Siegel, R., Akong, M., Craig, W. S., Buckholz, R. G., Madden, K. R., Kellaris, P. A., Davis, G. R., Smiley, B. L., Cruze, J., Torregrossa, R., Velicelebi, G., and Thill, G. P. (1987) High-Level Expression and Efficient Assembly of Hepatitis B Surface Antigen in the Methylotrophic Yeast Pichia pastoris. Bio/Technology 5, 479-485
Cregg, J. M., Vedvick, T. S., and Raschke, W. C. (1993) Recent Advances in the Expression of Foreign Genes in Pichia pastoris. Bio/Technology 11, 905-910
Despreaux, C. W., and Manning, R. F. (1993) The dacA Gene of Bacillus stearothermophilus Coding for D-Alanine carboxypeptidase: Cloning, Structure, and Expression in Escherichia coli and Pichia pastoris. Gene 131, 35-41
Continued on next page
98

References, continued
Deutscher, M. P. (ed) (1990) Guide to Protein Purification Vol. 182. Methods in Enzymology. Edited by Abelson, J. N., and Simon, M. I., Academic Press, San Diego, CA.
Digan, M. E., Lair, S. V., Brierley, R. A., Siegel, R. S., Williams, M. E., Ellis, S. B., Kellaris, P. A., Provow, S. A., Craig, W. S., Velicelebi, G., Harpold, M. M., and Thill, G. P. (1989) Continuous Production of a Novel Lysozyme via Secretion from the Yeast Pichia pastoris. Bio/Technology 7, 160-164
Ellis, S. B., Brust, P. F., Koutz, P. J., Waters, A. F., Harpold, M. M., and Gingeras, T. R. (1985) Isolation of Alcohol Oxidase and Two other Methanol Regulatable Genes from the Yeast, Pichia pastoris. Mol. Cell. Biol. 5, 1111-1121
Fryxell, K. B., O'Donoghue, K., Graeff, R. M., Lee, H. C., and Branton, W. D. (1995) Functional Expression of Soluble Forms of Human CD38 in Escherichia coli and Pichia pastoris. Protein Expression and Purification 6, 329-336
Garcia, J. N., Aguiar, J. A., Gill, M., Alvarez, A., Morales, J., Ferrero, J., Gonzalez, B., Padron, G., and Menendez, A. (1995) High Level Expression of Human IFN-a2b in Pichia pastoris. Biotecnologia Aplicada 12, 152-155
Gietz, R. D., and Schiestl, R. H. (1996) in Methods in Molecular Biology (Evans, I. H., ed), Humana Press, Totowa, NJ
Guo, W., Gonzalez-Candelas, L., and Kolattukudy, P. E. (1995) Cloning of a New Pectate Lyase Gene pelC from Fusarium solani f. sp. pisi (Nectria haematococca, Mating Type VI) and Characterization of the Gene Product Expressed in Pichia pastoris. Arch. Biochem. Biophys 323, 352-360
Guthrie, C., and Fink, G. R. (eds) (1991) Guide to Yeast Genetics and Molecular Biology Vol. 194. Methods in Enzymology. Edited by Abelson, J. N., and Simon, M. I., Academic Press, San Diego, CA
Hagenson, M. J., Holden, K. A., Parker, K. A., Wood, P. J., Cruze, J. A., Fuke, M., Hopkins, T. R., and Stroman, D. W. (1989) Expression of Streptokinase in Pichia pastoris Yeast. Enzyme Microbiol. Technol. 11, 650-656
Henikoff, S., and Cohen, E. H. (1984) Sequences Responsible for Transcription Termination on a Gene Segment in Saccharomyces cerevisiae. Mol. Cell. Biol. 4, 1515-1520
Hinnen, A., Hicks, J. B., and Fink, G. R. (1978) Transformation of Yeast Cells. Proc. Natl. Acad. Sci. USA 75, 1292-1293
Irniger, S., Egli, C. M., and Braus, G. H. (1991) Different Classes of Polyadenylation Sites in the Yeast Saccharomyces cerevisiae. Mol. Cell. Bio. 11, 3060-3069
Johnston, M. (1987) A Model Fungal Gene Regulatory Mechanism: the GAL Genes of Saccharomyces Cerevisiae. Microbiol. Rev 51, 458-476
Koutz, P. J., Davis, G. R., Stillman, C., Barringer, K., Cregg, J. M., and Thill, G. (1989) Structural Comparison of the Pichia pastoris Alcohol Oxidase Genes. Yeast 5, 167-177
Kozak, M. (1987) An Analysis of 5´-Noncoding Sequences from 699 Vertebrate Messenger RNAs. Nucleic Acids Res. 15, 8125-8148
Kozak, M. (1990) Downstream Secondary Structure Facilitates Recognition of Initiator Codons by Eukaryotic Ribosomes. Proc. Natl. Acad. Sci. USA 87, 8301-8305
Laroche, Y., Storme, V., Meutter, J. D., Messens, J., and Lauwereys, M. (1994) High-Level Secretion and Very Efficient Isotopic Labeling of Tick Anticoagulant Peptide (TAP) Expressed in the Methylotrophic Yeast, Pichia pastoris. Bio/Technology 12, 1119-1124
Linder, S., Schliwa, M., and Kube-Granderath, E. (1996) Direct PCR Screening of Pichia pastoris Clones. BioTechniques 20, 980-982
Nico-Farber, K., Harder, W., Ab, G., and Veenhuis, M. (1995) Review: Methylotrophic Yeasts as Factories for the Production of Foreign Proteins. Yeast 11, 1331-1344
Continued on next page
99

References, continued
Paifer, E., Margolles, E., Cremata, J., Montesino, R., Herrera, L., and Delgado, J. M. (1994) Efficient Expression and Secretion of Recombinant Alpha Amylase in Pichia pastoris Using Two Different Signal Sequences. Yeast 10, 1415-1419
Ridder, R., Schmitz, R., Legay, F., and Gram, H. (1995) Generation of Rabbit Monoclonal Antibody Fragments from a Combinatorial Phage Display Library and Their Production in the Yeast Pichia pastoris. Bio/Technology 13, 255-260
Rodriguez, M., Rubiera, R., Penichet, M., Montesinos, R., Cremata, J., Falcon, V., Sanchez, G., Bringas, R., Cordoves, C., Valdes, M., Lleonart, R., Herrera, L., and delaFuente, J. (1994) High Level Expression of the B. microplus Bm86 Antigen in the Yeast Pichia pastoris Forming Highly Immunogenic Particles for Cattle. J. Biotechnol. 33, 135-146
Romanos, M. (1995) Advances in the Use of Pichia pastoris for High-Level Expression. Curr. Opin. Biotech. 6, 527-533
Romanos, M. A., Clare, J. J., Beesley, K. M., Rayment, F. B., Ballantine, S. P., Makoff, A. J., Dougan, G., Fairweather, N. F., and Charles, I. G. (1991) Recombinant Bordetella pertussis Pertactin p69 from the Yeast Pichia pastoris High Level Production and Immunological Properties. Vaccine 9, 901-906
Romanos, M. A., Scorer, C. A., and Clare, J. J. (1992) Foreign Gene Expression in Yeast: A Review. Yeast 8, 423-488
Sambrook, J., Fritsch, E. F., and Maniatis, T. (1989) Molecular Cloning: A Laboratory Manual, Second Ed., Cold Spring Harbor Laboratory Press, Plainview, New York
Scorer, C. A., Buckholz, R. G., Clare, J. J., and Romanos, M. A. (1993) The Intracellular Production and Secretion of HIV-1 Envelope Protein in the Methylotrophic Yeast Pichia pastoris. Gene 136, 111-119
Scorer, C. A., Clare, J. J., McCombie, W. R., Romanos, M. A., and Sreekrishna, K. (1994) Rapid Selection Using G418 of High Copy Number Transformants of Pichia pastoris for High-level Foreign Gene Expression. Bio/Technology 12, 181-184
Sreekrishna, K., Nelles, L., Potenz, R., Cruse, J., Mazzaferro, P., Fish, W., Fuke, M., Holden, K., Phelps, D., Wood, P., and Parker, K. (1989) High Level Expression, Purification, and Characterization of Recombinant Human Tumor Necrosis Factor Synthesized in the Methylotrophic Yeast Pichia pastoris. Biochemistry 28, 4117-4125
Sreekrishna, K., Potenz, R. H. B., Cruze, J. A., McCombie, W. R., Parker, K. A., Nelles, L., Mazzaferro, P. K., Holden, K. A., Harrison, R. G., Wood, P. J., Phelps, D. A., Hubbard, C. E., and Fuke, M. (1988) High Level Expression of Heterologous Proteins in Methylotrophic Yeast Pichia pastoris. J. Basic Microbiol. 28, 265-278
Sun, J., Coughlin, P., Salem, H. H., and Bird, P. (1995) Production and Characterization of Recombinant Human Proteinase Inhibitor 6 Expressed in Pichia pastoris. Biochim. Biophys. ACTA 1252, 28-34
Thill, G. P., Davis, G. R., Stillman, C., Holtz, G., Brierley, R., Engel, M., Buckholz, R., Kinney, J., Provow, S., Vedvick, T., and Siegel, R. S. (1990) in International Symposium on the Genetics of Microorganisms Vol. 2, pp. 477-490
Tschopp, J. F., Brust, P. F., Cregg, J. M., Stillman, C., and Gingeras, T. R. (1987a) Expression of the lacZ Gene from Two Methanol Regulated Promoters in Pichia pastoris. Nucleic Acids Res. 15, 3859-3876
Tschopp, J. F., Sverlow, G., Kosson, R., Craig, W., and Grinna, L. (1987b) High Level Secretion of Glycosylated Invertase in the Methylotrophic Yeast Pichia pastoris. Bio/Technology 5, 1305-1308
Continued on next page
100

References, continued
Varki, A., and Freeze, H. H. (1994) The Major Glycosylation Pathways of Mammalian Membranes. A Summary. Subcell. Biochem. 22, 71-100
Vedvick, T., Buckholz, R. G., Engel, M., Urcan, M., Kinney, J., Provow, S., Siegel, R. S., and Thill, G. P. (1991) High-level Secretion of Biologically Active Aprotonin from the Yeast Pichia pastoris. J. Ind. Microbiol. 7, 197-201
Vozza, L. A., Wittwer, L., Higgins, D. R., Purcell, T. J., Bergseid, M., Collins-Racie, L. A., LaVallie, E. R., and Hoeffler, J. P. (1996) Production of a Recombinant Bovine Enterokinase Catalytic Subunit in the Methylotrophic Yeast Pichia pastoris. Bio/Technology 14, 77-81
Wagner, S. L., Siegel, R. S., Vedvick, T. S., Raschke, W. C., and VanNostrand, W. E. (1992) High-level Expression, Purification, and Characterization of the Kunitz-type Protease Inhibitor Domain of Protease Nixin-2/amyloid b-Protein Precursor. Biochem. Biophys. Res. Commun. 186, 1138-1145
Wegner, G. H. (1990) Emerging Applications of the Methylotrophic Yeasts. FEMS Microbiology Reviews 87, 279-284
Weiss, H. M., Haase, W., Michel, H., and Reilander, H. (1995) Expression of Functional Mouse 5-HT5A Serotonin Receptor in the Methylotrophic Yeast Pichia pastoris: Pharmacological Characterization and Localization. FEBS 377, 451-456
Zaret, K. S., and Sherman, F. (1984) Mutationally Altered 3´ Ends of Yeast CYC1 mRNA Affect Transcript Stability and Translational Efficiency. J. Mol. Biol. 177, 107-136
©2009 Life Technologies Corporation. All rights reserved. For research use only. Not intended for any animal or human therapeutic or diagnostic use.
101

User Manual
Corporate HeadquartersInvitrogen Corporation5791 Van Allen WayCarlsbad, CA 92008T: 1 760 603 7200F: 1 760 602 6500E: [email protected]
For country-specific contact information, visit our web site at www.invitrogen.com