Embed Size (px)
Citation preview

Straumann® Bone Level Tapered Implant
More than primary stability.
The new tapered standard.
Casebook
Table of contents
DR. EDOUARD CHOUFANI, ABU DHABI 26
Anterior maxillary rehabilitation
DR. AKIF ESKAN, TURKEY 29
The rehabilitation of edentulous maxillae with four immediately loaded implants using the Straumann® Pro Arch concept
DR. MARK DIACONO, MALTA 33
PRO-ARCH BRIDGE - restoration of maxilla with four Straumann® Roxolid® SLA Bone Level Tapered (BLT) implants and fixed bridge using a CARES frame
DR. MARK DIACONO, MALTA 37
Restoration of maxilla with six immediately placed and immediately loaded Straumann® Roxolid® SLA Bone Level Tapered (BLT) implants and fixed bridge using CARES frame
DR. KRZYSZTOF CHMIELEWSKI, POLAND 5
Immediate implant placement and restoration using a Straumann® Bone Level Tapered (BLT) implant
DR. ALEKSANDRS LAVROVS, LATVIA 8
Replacement of a maxillary central incisor with a single-tooth implant-supported crown, using an early loading protocol
DR. SOTIRIOS VASTARDIS, GREECE 11
A Straumann® Bone Level Tapered (BLT) implant for esthetically demanding cases.
DR. KRZYSZTOF CHMIELEWSKI, POLAND 14
Immediate implantation and loading of a screw-retained bridge in the esthetic region
DR. FOTIS BOUZANIS, GREECE 17
Immediate implant placement in the posterior maxilla with a Straumann® Bone Level Tapered (BLT) implant.
DR EDWARD SAMMUT, MALTA 21
Immediate implant placement and loading in the anterior maxilla using Straumann® Bone Level Tapered (BLT) implants.
2 3

Immediate implant placement and restoration using a Straumann® Bone Level Tapered (BLT) implant Dr. Krzysztof Chmielewski, Poland
INITIAL SITUATION
This 59-year-old healthy male patient had experienced tooth mobility of the upper right central incisor in the maxilla. Clinical and radiological examination revealed a horizontal fracture line in the coronal third of the root with severe tooth resorption. The CBCT cross section shows the initial situation before treatment (FIG. 1). There were no signs of inflamma-tion on intraoral examination, and no swelling, fistula or bleeding (FIG. 2) were seen.
(FIG. 1)
(FIG. 4)
(FIG. 7)
(FIG. 2)
(FIG. 5)
(FIG. 8)
(FIG. 3)
(FIG. 6)
(FIG. 9)
(FIG. 11)(FIG. 10) (FIG. 12)
ON THIS CASEBOOK
In January 2015 at the Basel headquarters in Switzerland, Straumann organized a pre-launch event of the Straumann® Bone Level Tapered Implant (BLT) dedicated to European, Middle East and African countries, where Straumann is present with official distributor organizations. 27 clinical educators, speakers and key clinicians from 10 countries were invited to gain first-hand insights into the clinical advantages and applications of the new product, followed by a visit to Straumann’s production site in Villeret, Switzerland. This clinical casebook contains a selection of outstanding BLT cases processed by participants at this event.
On this occasion we would like to express our warmest gratitude to the contributors for their work and superb collaboration.
I wish you an enjoyable read.
Raffaele PeraroHead of Sales Distributors Europe/Africa
ON THE STRAUMANN® BONE LEVEL TAPERED IMPLANT
The Straumann® Bone Level Tapered Implant offers excellent primary stability in soft bone and fresh extraction sockets. The tapered form adequately compresses the underprepared oste-otomy. It can also cope effectively with a patient’s anatomical shortcomings, such as facial undercut, converging root tips, concave jaw structure or narrow atrophied ridges. Building on the clinically proven features of the Straumann® Bone Level Implant, the Straumann® Bone Level Tapered Implant introduces the powerful combination of Roxolid®, SLActive®, Bone Control Design™, CrossFit® connection, prosthetic diversity, plus a tapered implant body.
4 5

PROSTHETIC PROCEDURE
After 6 months a CBCT examination was carried out to check the healing and status of the hard tissue around the implant. The CBCT cross-section showed stable bone conditions around the implant, with 2 mm thickness of the hard tissue complex at the vestibular aspect (FIG. 10). No signs or symptoms of inflammation or problems were observed in the close-up view. After removal of the provisional crown the soft tissue showed stable volume around the collar of the abutment and looked healthy. The adjacent teeth were prepared for crowns for a better esthetic result (FIG. 11). After impressions had been taken, the final crowns were prepared in the laboratory and put in place (FIG. 12).
FINAL RESULT
The final result of treatment shows a stable result at soft-tissue level, with a better coronal position in comparison with the initial situation. A treatment protocol involving gentle tooth extraction, flapless surgery, soft-tissue augmentation, and post-extraction augmentation of the vestibular part of the socket with xenograft were crucial factors for this success.
» CONCLUSION
A one-time abutment approach is an interesting option for treatment with high esthetic requirements. Minimal irritation of the soft tissue interface by avoiding healing abutments and impressions can influence more stable soft-tissue behavior in the vestibular and proximal aspects, which will lead to a more pleasing final result. Long-term observation will verify this conclusion; however, stable bone volume visible on the CBCT after 6 months provides a positive foundation for prediction of long-term stability of the treatment.
TREATMENT PLANNING
Immediate implantation with couture augmentation of the vestibular volume of the socket with xenogenic bone-graft material and connective-tissue grafting was considered, based on radiological examination. Immediate placement of the final abutment after tooth extraction was chosen to support the soft-tissue architecture and shorten treatment time. The primary plan was for immediate non-functional loading. An adhesive bridge was “plan B” in case of non-sufficient primary stability and to secure delivery of a temporary solution immediately after implantation.
SURGICAL PROCEDURE
Before tooth extraction an impression was taken with transparent silicone (FIG. 3). After administration of the local anesthetic and a releasing incision in the sulcus, the coronal part of the tooth was removed with forceps. After tooth extraction the alveolar socket was checked with a probe. The mesial vestibular wall was intact and there was no fenestration (FIG. 4). Based on CBCT a Straumann® Bone Level Tapered (BLT) SLA 4.1/12 implant was selected. Implant-bed preparation was performed without flap elevation to minimize trauma. The drilling axis was moved to the palatal direction to achieve better primary stability and a better implant position (along the palatal axis). The implant was placed (FIG. 5), including a surgical unit and an insertion torque of 19Ncm. Immediate non-functional loading of the implant with the temporary crown on the final abutment was performed. For esthetic reasons a RC Straumann® Anatomic IPS e.max GH3.5 mm, MO1, zirconia abutment was selected. The occlusal adjustment of the coronal part of the abutment was carried out with the diamond cylinder (FIG. 6) on a high-speed turbine with intensive water-cooling. A temporary crown was created from light-cured enamel HFO composite with transparent silicone index (FIG. 7). The abutment was placed as a first step, to create the temporary crown, but augmentation of the socket was not yet performed to avoid infiltration of material / composite. When the crown was finished (chair-side), the abutment was unscrewed and replaced with the Loxim® for insertion of the biomaterial. The abutment and crown were placed back in position after this. Vestibular tunneling was carried out to create a space for connective tissue graft (CTG) from the palate. The CTG was fixed with a suture and augmentation of the space between the implant and vestibular bone plate of the socket was carried out with a xenograft mate-rial (Cerabone®) (FIG. 8). After completion of this step, the final abutment was placed. The access to the fixing screw was closed with Teflon tape. The crown was made out composite and was light-cured on the prefabricated abutment. As a temporary solution, this allowed placement of the crown on the abutment without cement because of the extremely tight fit. Chlorhexidine gel was used to lubricate the surface of the abutment during insertion of the crown to enable easy positioning. A sling suture technique for multiple recession was used to stabilize the coronal position of the vestibular soft tissue mobilized by tunneling (FIG. 9). The sutures were removed after 2 weeks.
6 7

Replacement of a maxillary central incisor with a single-tooth implant-supported crown, using an early loading protocol Dr. Aleksandrs Lavrovs, Latvia INITIAL SITUATION
The patient was a 22-year-old non-smoking male, whose chief requirement was restoration of masticatory function and closure of the tooth gap in position 11. The patient’s esthetic demands were considered moderate to high, but he displayed a low smile line. (FIG. 1) The second requirement concerned the pronounced retrusion of the teeth from the maxil-lary right canine to the maxillary left canine; however, the patient declined orthodontic treatment due to time limitations for all planned procedures (orthodontic, surgical, and prosthodontic).
TREATMENT PLANNING
The patient expressed the desire to improve the esthetic appearance using the safe tech-niques available in modern dentistry, and by using minimally invasive surgery to replace his missing central incisor. He also asked about the possibility of a brighter tooth color in the final outcome. General medical status indicated that the patient was healthy, with no apparent medical risk factors and generally disease-free. The patient had healthy dentition; however, one tooth became loose 2 years previously following a sports accident, which resulted in bone resorption of the buccal wall and a narrow space mesially and distally to the tooth gap. Although the patient favored implant treatment, he was informed of alter-native treatment options such as a traditional prosthetic reconstruction with a three-unit fixed dental prosthesis, orthodontic treatment and formation of sufficient space followed by implantation treatment, and bone augmentation by using a bone block or the bone ring technique with orthodontic treatment and formation of sufficient tooth gap following fabri-cation of a conventional removable partial denture.
SURGICAL PROCEDURE
A prosthetically driven planning approach was used to define the esthetic parameters of the final reconstruction (FIG. 2). The hard tissue was analyzed radiographically and the decision was made to use a Straumann® Roxolid® SLA Bone Level Tapered (BLT) 3.3 mm implant of 14 mm length. An antibiotic, amoksiklav 1000 mg, was given orally 1 hour before surgery. The same prophylactic antibiotic was given orally for 7 days after the operation. During this time the patient was advised to rinse with 0,2% chlorhexidine digluconate solution for 1 minute three times a day. To minimize scaring of the soft tissue, an intrasulcular incision was performed around teeth #21 and 12, slightly palatal over the crest of position 11, with a single releasing incision between the papilla apex and the zenith of the emergence profile of tooth 13 (FIG. 3). Due to the thin nature of the crestal bone, particularly on the buccal wall, it was decided to perform bone splitting using the Piezzo technic (FIG. 4). Following this, the final implant osteotomy was prepared with the recommended surgical drills for the Straumann
(FIG. 1)
(FIG. 4)
(FIG. 7)
(FIG. 10)
(FIG. 13)
(FIG. 2)
(FIG. 5)
(FIG. 8)
(FIG. 11)
(FIG. 14)
(FIG. 3)
(FIG. 6)
(FIG. 9)
(FIG. 12)
8 9

» CONCLUSION
The wishes and expectations of the patient were fulfilled and he was very pleased with the final outcome (FIG. 14).
BLT 3.3 implant. (Ø2.2 mm and Ø2.8 mm) (FIG. 5). There was ample bone height available at the site, which allowed for a 14 mm long implant to be place as an additional factor for reaching optimal primary stability in this relatively soft bone site. (FIG. 6) Thanks to its conical apex, the BLT implant prevented an apical fenestration of the buccal wall and achieved a high degree of primary stability (FIG. 7). In order to obtain suitable contouring of the buccal bone for the final esthetic result, an augmentation procedure was performed with bone graft material and covered with a collagen membrane (FIG. 8). The Loxim™ implant carrier was cut down (outside the patient’s mouth) and used as a supportive device for the augmen-tation material during the initial healing phase. It should be noted that this procedure is not part of the standard procedure recommended by Straumann, and was changed to the NC healing abutment (diameter 3,6 mm, height 5 mm) 1 week after surgical procedure. Closure of the flaps was performed with a non-resorbable 5.0 nylon suture. (FIG. 9) The patient was instructed wait 3 weeks after the implant placement to start thoroughly brushing his teeth, in order to ensure adequate plaque control and minimize the risk for soft tissue recession.
PROSTHETIC PROCEDURE
The patient returned for a status control 6 weeks after the placement of the BLT dental implant. The soft tissue was in a good state, but was lacking sufficient volume. Otherwise, the keratinized soft tissue around the implant was very stable and immovable. The patient declined improvement of soft-tissue volume, because this area is not visible due to his low smile line (FIG. 10). The BLT implant was considered stable after 8 weeks, as verified with the Osstell device (Implant Stability quotient of 86) and the decision was taken to start the soft-tissue contouring with a single-tooth implant-supported provisional composite crown on the full zirconia abutment. The temporary restoration was carried out via direct technique in the mouth of patient. The final contouring of the emergence profile was achieved after 13 weeks, and the final impression was taken with an open-tray impression technique in order to make the final prosthesis (FIGS.11,12).
FINAL RESULT
The final abutment was torqued to 35 Ncm without incident 14 weeks later (FIG.13) and the final ceramic prosthesis was permanently luted using Multilink implant cement. The final position of the emergence profile of tooth 11 matches that of tooth #21, and although the papilla between teeth # 13 and 12 is not symmetrical to that of the tooth #21 and 22 the result was very pleasing and well achieved.
A Straumann® Bone Level Tapered (BLT) implant for esthetically demanding cases. Dr. Sotirios Vastardis, Greece
(FIG. 1)
(FIG. 4)
(FIG. 7)
(FIG. 10)
(FIG. 2)
(FIG. 5)
(FIG. 8)
(FIG. 11)
(FIG. 3)
(FIG. 6)
(FIG. 9)
(FIG. 12)
INITIAL SITUATION
A 34-year-old female presented with a missing upper right lateral incisor (tooth #12). The tooth had been extracted 6 months earlier, and a removable prosthesis had been used (FIG. 1). Prior to the extraction, the tooth had a history of apical pathology and had been treated with an apicectomy and subsequent connective tissue graft to increase thick-ness of the mucosa. The residual ridge exhibited moderate atrophy after the loss of the tooth (FIG. 2).
10 11

TREATMENT PLANNING
A deficiency was observed in the buccal aspect, and a CBCT radiograph was taken. No signs of remaining apical pathology were observed. The treatment options were discussed with the patient and included a Maryland bridge, a 3-unit bridge, and a dental implant. After the patient had chosen the dental implant option, it was decided that a fixed provisional restoration during the healing period would be better than a removable partial denture.
SURGICAL PROCEDURE
A full thickness mucoperiosteal flap was raised on the buccal aspect (without vertical releasing incisions) and a facial bony undercut was detected. A Bone Level Tapered (BLT) SLActive Roxolid® implant was inserted (FIG. 3) and an ISQ value of 64-65 was recorded (FIG. 4). A mix of autogenous bone chips (harvested during drilling of the implant site) mixed with allograft bone particles (C+TBA allograft) was placed in the buccal defect, without the use of a membrane. A radiograph confirmed the satisfactory position of the BLT implant (FIG. 5). Primary closure was achieved and the implant was allowed to heal as a two-stage procedure. A resin-splinted tooth was fabricated and cemented as a temporary prosthesis (FIGS. 6, 7).
After 8 weeks of healing, the temporary prosthesis was removed (FIG. 8) and the implant was uncovered using a mucosal punch without raising a flap. An ISQ value of 73-74 was recorded. A provisional screw-retained crown was fabricated chair-side using the Regular CrossFit® (RC) temporary abutment (FIGS. 9,10). In the following 3 weeks, the provisional restoration was modified so as to optimize the shape and contour of the soft tissues and emergence profile (FIGS. 11-14).
PROSTHETIC PROCEDURE
Following maturation of the soft tissues, impressions were taken using polyvinyl siloxane. A standard angulated abut-ment (RC angled 15° 2 mmGH abutment), which was minimally modified, was used (FIG. 15) and a zirconia cemented restoration was fabricated (FIG. 16).
FINAL RESULT
The patient’s smile and function were restored and the she was satisfied with the final result (FIG. 17). » CONCLUSION
In this esthetically demanding case, the tapered design of the BLT implant allowed for implant placement in the presence of a bony undercut with minimal bone augmentation, achieving high initial stability and satisfactory ISQ values. The surgical procedure was simple, intuitive, and efficient, and implant treatment was well accepted by the patient (FIG. 18).
(FIG. 13)
(FIG. 16)
(FIG. 14)
(FIG. 17)
(FIG. 15)
(FIG. 18)
12 13

Immediate implantation and loading of a screw-retained bridge in the esthetic region Dr. Krzysztof Chmielewski, Poland INITIAL SITUATION
A 63-year-year-old female presented with severe vertical bone deficiency as the result of periodontal disease. On clinical examination the front teeth were splinted to limit mobility; however, there were a few cracks present in the splint (FIG. 1). Bone loss over 5 mm was visible on the CBCT, and the angulation between the prosthetic axis of the tooth and axis of the alveolar ridge was close to 30°. The ridge was narrow at the position of tooth #22 and limited the choice of implant diameter (FIG. 2). The main complaints from the patient were recurring inflammation in the area of teeth #11, 21, and 22 and problems with eating.
TREATMENT PLANNING
The extraction of 3 incisors (11, 21,and 22) and immediate implantation of two implants in position of tooth #11 and 22 was discussed with the patient. Immediate non-functional loading with a temporary screw-retained bridge was considered.
SURGICAL PROCEDURE
An impression was taken with transparent silicone before extracting the teeth. The teeth were extracted under local anesthesia (FIG. 3). After checking the post-extraction sockets I decided to place the implants without flap elevation. Following visual inspection supported by CBCT pictures, two NC 3.3/14 mm Straumann® Bone Level Tapered (BLT) Roxolid® SLA implants were placed (FIG. 4). The depth of implant insertion was calculated with respect to the palatal bone level of the alveolar ridge. The insertion torque was over 30Ncm. The axis of the implant faced in vestibular direction Two NC screw-retained abutments for the bridge with an angulation of 30° and a gingival height of 2.5 mm (FIG. 5) and two NC/RC copings for screw-retained abutments with a platform diameter 4.6 mm (FIG. 6) were selected. The cylin-ders were covered with thin opaque layer of composite to cover the silver color of the metal. From the initial silicone index a temporary bridge was created (FIG. 7) with an ovate pontic design in the position of the missing tooth #21. Access to the fixing screw was perfectly posi-tioned on the palatal side of the restoration and was closed with the Teflon tape and layer of flow composite (FIG. 8). There was no need to use sutures. A control CBCT was taken after surgery. Perfect positioning was visible, illustrating the great advantage of the Bone Level Transplant (BLT) implant design, especially in the position of the missing tooth #22 where a narrow alveolar ridge was present (FIG. 9). Immediate non-functional loading required elim-ination of the occlusal contact points. After correcting the palatal surface of the bridge the patient was sent home with the instruction to avoid biting and chewing in contact with the bridge.
(FIG. 1)
(FIG. 4)
(FIG. 7)
(FIG. 10)
(FIG. 2)
(FIG. 5)
(FIG. 8)
(FIG. 11)
(FIG. 3)
(FIG. 6)
(FIG. 9)
(FIG. 12)
14 15

» CONCLUSION
This case shows the advantages of the BLT implant in conjunction with the new line of angulated abutments for screw-retained restorations. The long-term observation will prove how the hard and soft tissue behave around the implants and abutments. The final abutments were placed immediately after extraction of the teeth and never unscrewed again. This case, therefore, belongs to the group treated with one-time-abutment concept. The patient was very happy with the final result and the minimally invasive approach was highly appreciated.
PROSTHETIC PROCEDURE
The emergence profile of the soft tissue was shaped with the temporary bridge (FIG. 10). After 3 months of uneventful healing the bridge was unscrewed to check the status of the soft tissue. The healthy condition of the soft tissue allowed for the final prosthetic restoration. A screw-retained restoration based on the Prettau® structure was created. An impression was taken (abutment level) and sent to the laboratory. After a few days the Prettau® construction was checked in the mouth (FIG. 11). The final shape of the bridge was a compromise between the available soft tissue level and the minimalistic approach required by the patient. The bridge was a screw-retained reconstruction with the access to the screws on the palatal side. The tunnels were closed with Teflon tape and sealed with flow composite.
FINAL RESULT
The final treatment result (FIG. 12) shows acceptable aesthetics, especially when compared with the initial situation. The symmetry of the soft tissue level and the crown shape should be changed to achieve better results; however, the length of the crown #11 and the ovate pontic #21 is almost the same and we can expect remodeling of the soft tissue position in this area within the next 1-2 years.
Immediate implant placement in the posterior maxilla with a Straumann® Bone Level Tapered (BLT) implant. Dr. Fotis Bouzanis, Greece
(FIG. 1)
(FIG. 4)
(FIG. 7)
(FIG. 2)
(FIG. 5)
(FIG. 8)
(FIG. 3)
(FIG. 6)
(FIG. 9)
INITIAL SITUATION
A 60-year-old male patient presented with multiple decayed teeth and root remnants in the upper right and left, and lower left quadrants (FIGS. 1-3).
The patient’s wish was to remove all the unrestorable teeth and roots, and restore the gaps with dental implants. He had no significant medical history; he was not on any daily medication and was a smoker (10 cigarettes per day). His oral hygiene was mediocre.
16 17

The patient reported having implants placed on the lower right quadrant 8 years ago. Following clinical examination of the area, the implants presented with peri-implant muco-sitis which resolved following non-surgical debridement and oral hygiene instructions prior to any other treatment. All available baseline X-rays were requested from the surgeon responsible for the placement of those implants. The bone levels observed on the panoramic X-ray on sites #44 and 45 were almost stable compared with previous X-rays and are prob-ably related to the surgical protocol followed at that time.
TREATMENT PLANNING
After all available options and alternatives were discussed with the patient, the definitive treatment plan included extraction of all hopeless teeth, followed by restoration with dental-implant-supported fixed prostheses. The patient was advised that a course of peri-odontal treatment would be required first, before the start of implant treatment. His oral hygiene had to be improved and a recall examination every 4 months would be necessary after completion of the treatment. The patient requested to begin treatment with the upper right quadrant (FIGS. 4,5) as he already had restorations on the lower quadrant of that side. Extraction of teeth #15, 16, and 17 was planned (FIG. 6), to be followed by immediate implant placement in the extraction sockets of #15 and 17.
SURGICAL PROCEDURE
Chlorhexidine mouthwash 0,12% twice daily was prescribed in the week prior to the surgical procedure. 2g of amoxicillin was given 1 hour before surgery, and continued at a dose of 1g every 12 hours for 7 days. Extractions were performed in an atraumatic manner, and great caution was taken to preserve the integrity of the buccal plate during the procedure. The extraction sockets were carefully debrided and rinsed with sterile saline and chlorhexidine solution. As the buccal alveolar plate was intact without any dehiscense or fenestrations, the decision was taken to continue with immediate implant placement in sites #15 and 17. The implant osteotomies were performed in the center of both sockets. Due to the soft bone quality (D3) in both sites, the osteotomies were underprepared with the Ø3,5 mm BLT drill and profile drilling was not carried out. Two BLT SLA Roxolid Ø4,1x12 mm implants were inserted (FIG. 7). In this case the recommended surgical protocol was modified, taking into consideration the immediate placement procedure and the soft bone quality of the sites. As a result, the implants were placed with the insertion torque values of 40Ncm for implant #15 and 30N/cm for implant #17. Regular CrossFit® (RC) healing abutments with gingival height of 2 mm were placed, and small particles of bovine bone graft (Cerabone®, botiss) were used to fill the gaps between the implant surface and bony socket walls (FIG. 8). A collagen fleece (Jason® fleece, botiss) was applied over the surgical area to protect the xenograft and promote blood-clot stabilization during transmucosal wound healing. Synthetic resorbable
sutures made of polyglycolic acid (Vicryl® 5/0) were placed as both horizontal mattress and single interrupted sutures. Sutures were removed 10 days later and complete healing of the implant site was uneventful (FIGS. 9, 10) (14 weeks post-surgery).
PROSTHETIC PROCEDURE
The healing abutments were removed after 14 weeks to carry out an implant-level open-tray impression with polyvinyl siloxane (PVS) material. A screw-retained porcelain-fused-to-metal (PFM) 3-unit bridge was fabricated with the Straumann® RC MultiBase abutments (dental laboratory George Neochoritis, Athens Greece) (FIG. 11).
FINAL RESULT
A try-in of the framework was done before the final restoration was delivered in order to check whether the components fitted well and to adjust the occlusal surfaces. The Multi-Base abutments were torqued at 35Ncm and the bridge at 15N/cm following the Straumann prosthetic protocol and a composite filling was placed in the screw access holes (FIGS. 12-14).
(FIG. 10)
(FIG. 13)
(FIG. 11)
(FIG. 14)
(FIG. 12)
18 19

Immediate implant placement and loading in the anterior maxilla using Straumann® Bone Level Tapered (BLT) implants. Dr Edward Sammut, Malta
(FIG. 1) (FIG. 2) (FIG. 3)
» CONCLUSION
When indicated and possible, immediate implant placement can be a good and viable treatment option for the patient to reduce the overall treatment time and morbidity of a two-stage procedure. The posterior maxilla usually presents with poor bone quality (soft or very soft bone) and adequate primary stability can be difficult to achieve when performing such procedures. The Straumann® Bone Level Tapered (BLT) implant is an ideal implant, combining an SLA surface that promotes predictable osseo-integration with the Roxolid® material which demonstrates excellent mechanical properties. The design of the implant incorporates platform-switching and a precise CrossFit® prosthetic connec-tion, to help preserve interproximal bone. The thread design and tapered self-tapping apex of the implant ensured good primary stability, even in the posterior maxillary alveolar bone with poor bone density.
Extractions were performed on the upper and lower left side 1 week after prosthesis insertion. Due to the bone topography of the extraction sockets presenting dehiscence and fenestration defects, as well as the possible need for some kind of sinus augmentation on the upper left molar site, the treatment plan included delayed implant placement.
Upon prosthetic rehabilitation on the right side, and although the restoration of the left side was still in progress, the patient reported being very satisfied in terms of function and esthetics and also commented that it was easy for him to accomplish satisfactory oral hygiene on the implant-supported bridge area as instructed.
Approximately 4 months after the surgical procedure the patient was referred for a maxillary CBCT scan in order to evaluate the upper-left side and the possible need for a sinus augmentation proce-dure. The right-side implants could also be assessed at the scan, showing proper ridge dimensions with minimal post extraction resorption and successful implants and bone graft integration.
(FIG. 4)
(FIG. 7)
(FIG. 10)
(FIG. 5)
(FIG. 8)
(FIG. 11)
(FIG. 6)
(FIG. 9)
(FIG. 12)
20 21

A cone beam CT scan was taken and used to visualize the maxillary ridge in cross section and to plan implant placement (FIG. 5). The severe root resorption had resulted in formation of bone where the root would normally be found. Planned implants in positions 13, 21 and 23 were anticipated, to achieve an average to good level of primary stability; on account of the fact that although they were going to be placed immediately after extraction, they would be placed mainly in contact bone. Immediate placement and an immediate loading protocol was, therefore, suggested. The CT scan data showed significant undercut of the maxillary ridge and implants were planned for placement at an angle that would necessi-tate the use of custom abutments for cementation of the bridge or angle-correction multi-unit abutments for a screw-retained restoration. In addition to this, there was some degree of concern over the level of lip support once the proclined maxillary teeth were removed. To address this, a contour augmentation with bovine bone substitute material and a GBR membrane was suggested and accepted by the patient.
INITIAL SITUATION
A 45-year-old female patient with a medical history that included allergy to penicillin presented with a failing minimal-preparation bridge, replacing tooth #11. She requested a fixed-tooth replacement that was not dependent on the adjacent teeth. She also expressed a lack of satisfaction in her dental appearance, stating that the teeth were individually too large and that the teeth were too prominent in the face. On examination it was noted that the smile line was high, displaying the full gingival tissues around the maxillary anterior teeth (FIG. 1). The smile was broad, displaying the mesial surfaces of the upper first molars. Both the maxillary and mandibular anterior teeth were proclined and the mandibular ante-rior teeth were crowded. There was a mild degree of periodontal inflammation and attach-ment loss. A metal-ceramic resin-retained bridge was present, replacing tooth #11 (FIG. 2).
Routine dental radiographic examination was carried out, and revealed the presence of considerable root resorption of the maxillary anterior teeth. The following diagnoses were made:1. Missing tooth #11, replaced with a failing resin-retained bridge2. Severe root resorption of teeth #13, 12, 21, 22, and 233. Bimaxillary proclination4. Crowding of the lower anterior teeth5. Dissatisfaction with dental appearance on grounds of tooth dimensions and angulation.
TREATMENT PLANNING
Following diagnosis, various treatment options were discussed with the patient. Periodontal therapy including instruction and motivation in self-performed plaque control as well as scaling and root surface debridement was commenced. On account of the resorption of the roots of the maxillary anterior teeth it was decided that orthodontics would not be possible for repositioning these teeth and that teeth #12, 21, and 22 had a poor prognosis while teeth #13 and 23 had a guarded or indeterminate prognosis. The patient did not wish to retain teeth of a dubious prognosis, and the future prosthodontics treatment plan was, therefore, to include the replacement of teeth #12, 11, 21, 22, 23, and 13, by means of an implant-supported fixed prosthesis. The patient was referred to a specialist in orthodontics and it was decided that the mandibular arch could be treated by means of extraction of the lower first premolars and fixed appliance therapy to retract, align and redistribute the teeth (FIG. 3). Tooth movements in the lower jaw would be anticipated to result in a Class II div. I malocclusion, at least as far as the incisor relationship was concerned. It was suggested that the future implant supported prosthesis could correct this malocclusion by using smaller teeth in accordance with the patient’s wishes. Study casts were taken after 12 months of orthodontic treatment; after removal of teeth #12, 11, 21, 22, and 23 from the model, a wax/tooth setup was fabricated to illustrate the proposed dental reconstruction (FIG. 4). The patient was satisfied with the proposed teeth sizes and arrangement.
(FIG. 13)
(FIG. 16)
(FIG. 19)
(FIG. 14)
(FIG. 17)
(FIG. 20)
(FIG. 15)
(FIG. 18)
22 23

SURGICAL PROCEDURE
Surgery was performed under infiltration local analgesia with a mixture of lidocaine hydro-chloride 2% with 1:80,000 adrenaline and articaine hydrochloride 4% with 1:100,000 adren-aline. Before surgery the patient commenced a 3-day course of antibiotic prophylaxis with azithromycin 500 mg once daily. A 0.2% chlorhexidine digluconate mouthwash was used for 1 minute pre-operatively and twice daily for 10 days following surgery.
Crevicular incisions were performed around teeth #13, 12, 21, 22, and 23 and the teeth were extracted with forceps (FIG. 6). Due to logistics, a surgical stent was not available and one was fabricated chair-side using temporary crown and bridge material on the tooth/wax set-up (FIG. 7). Full thickness flaps were elevated (FIG. 8). Buccal and palatal for ridge visualization and osteotomies were carried out in positions 13, 21, and 23 according to the Bone Level Tapered (BLT) drilling protocol as indicated by Straumann. The bone was judged to be Type II. Two 4.1 x 12 mm Roxolid® SLA BLT implants were placed in positions 13 and 23 and one 3.3 x 12 mm Roxolid® SLA BLT implant was placed in position 21 (FIG. 9-11). 13 and 21 achieved 25Ncm of terminal torque while 23 achieved 15Ncm of terminal torque. The implants were countersunk by 2 mm to allow for ridge dimensional changes following the extraction of the teeth and to allow sufficient restorative height for the planned screw-retained restoration. The buccal aspect of the ridge was augmented with a bovine bone substitute (Cerabone®, Botiss) and covered with a porcine pericardium membrane (Jason®, Botiss) (FIG. 12). Wound closure with resorbable sutures (Vicryl Rapide, Johnson & Johnson) was carried out prior to abutment seating as the abutments were not supplied sterile and avoidance of possible infection of the augmentation material was desirable.
An attempt was made to seat 17 degree 4 mm high screw retained abutments at all three sites but these did not fit due to the emergence of the abutment seating against the bone at the countersunk implant sites. The implants were protected with cover screws, and bone removal was carried out with burs through the wound margins. The abutments were seated and an abutment level impression was made for production of a plastic provisional implant supported bridge (FIGS. 13,14).
Surgery was carried out before a holiday and a weekend; the laboratory production time was, therefore, extended to 7 days from the usual 3 days. The patient elected not to use a removable denture during this time until delivery of the provisional bridge. The sutures were removed 7 days after surgery. A provisional bridge constructed from a milled plastic material adhesively bonded to temporary titanium cylinders was tried in and found to be passively fitting. Temporary cylinder screws were tightened to 15Ncm with the torque wrench and the patient was given instructions for cleaning around it.
RESULT OF IMMEDIATE LOADING
The patient was reviewed 4 weeks after surgery and was satisfied with the outcome to date (FIG. 15). The tooth sizes and positions were agreeable and the lip support was not compro-mised. Clinically, there was no mobility or component looseness, and the tissues were pink and healthy. 1 mm of recession was noted at tooth #13, together with a moderate degree of papillary volume loss between the #13 implant and #12 pontic. The patient was reassured that on production of the definitive bridge this recession could be compensated for by using a 2.5 mm high multi-unit abutment if necessary.
PROSTHETIC PROCEDURE
Radiographs were taken 5 months after surgery to confirm favorable bone conditions around the implants (FIG. 16). The 4 mm height screw retained abutments placed at surgery were exchanged with 2.5 mm height abutments at positions 13, 21 so as to place the bridge-abut-ment junction 1.5 mm below the gingival margin (FIG. 17). This decision was taken to allow for a small degree of future tissue recession without aesthetic detriment. An abutment level impression was taken and a screw retained bridge framework was produced using CAD-CAM milling (CARES) and subsequently veneered with ceramic (Mr Raoul Stocchi, Shoenitz Dental Laboratory, Northwood Hills, UK). The final bridge was fitted to manufacturer screw torque recommendations and the access holes were closed with composite (FIGS. 18-20).
» CONCLUSION
The BLT implant was well suited to this case as it aims to develop high levels of primary stability for immediate loading situations. The buccal plate undercut in the anterior maxilla is frequently a limiting factor in placement of parallel walled implants; the taper allows for better implant positioning within the available bone. In this case, the terminal torques achieved were rather low considering the implant design, and it may be necessary to review the drilling protocol to allow for more leeway in stepping back on the length of the final drill and in shallower insertion of the cortical profile drill. Notwithstanding this, the implants integrated well, even in the presence of near-immediate loading. During the restorative phase, the flexibility offered by the possibility of altering the gingival height of the screw-retained abutment was essential in the creation of an esthetic restoration, while at the same time avoiding the use of cement in a sub-gingival situation. The Straumann® BLT system and its restorative components provided this patient with convenience, predictability, and esthetics without compromising biological principles.
24 25

INITIAL SITUATION
The patient, a 30-year-old female, with a low smile line with the lip covering all the soft tissues during smiling, presented to the clinic complaining of pain and discomfort when chewing on the upper front teeth and requested a check of her 10-year-old failing fixed partial denture on the maxillary front teeth #12 and 21. Radiological investigations confirmed the clinical findings, and after removal of the mobile prosthesis, we found that both abutments of the restoration were not restorable; root #21 was fractured exactly in the middle (FIG. 1), and root #12 was totally subgingival and not restorable either. The adjacent teeth were deemed in good condition: tooth #13 was healthy and free of decay, and tooth #22 is an implant-borne restoration with healthy surrounding soft tissues and good radiological appearance (FIG. 2). The patient had a class I occlusion.
TREATMENT PLANNING
After explanation and discussion with the patient, the opted treatment plan was to remove the non-restorable retained roots #12 and 21,and immediately replace them with implants with probable grafting procedure to augment the buccal bony plate around the implants. After the surgical procedure we decided to wait 2 months for osseo-integartion of the two implants before proceeding with the restorative phase, to provide the patient with a screw-retained 3-unit fixed porcelain bridge.
SURGICAL PROCEDURE
After administering local anesthesia with idocaine 2%, a large surgical flap was raised with a vertical release incision on the side of the right cuspid in order not to jeopardize the existing 10-year-old implant replacing tooth #22. The fractured retained roots #12 and 21 were elevated and extracted in such a way as not to disturb the buccal bony plate. Both sockets were debrided; the drilling sequence was: 1.4 mm round burr at 800 rpm, 2.3 mm at 800 rpm, pilot drill 2.2 mm at 800 rpm, and finally pilot drill 2.8 mm at 800 rpm. Bone density was class 2 ,bone type was found to be closer to Cl II; (FIG. 3).
Two implants were placed immediately: a Straumann® Roxolid® SLA 3.3 x14 mm Bone Level Tapered (BLT) implant to replace tooth #12, and a Straumann® Roxolid® SLActive 3.3 x 12 mm BLT implant to replace tooth #21. The insertion torque was around 35 N/cm (FIG. 4).
Special care was taken in order to secure a prosthetically usable direction of both implants and to ensure a good primary stability. Extra care was taken that the apex of the implant #21 did not touch the present implant replacing tooth #22, which had an exaggerated mesial direction. This was made easier due to the tapered shape of the apical half of the implant
Anterior maxillary rehabilitation Dr. Edouard Choufani, Abu Dhabi
(FIG. 1)
(FIG. 4)
(FIG. 7)
(FIG. 10)
(FIG. 2)
(FIG. 5)
(FIG. 8)
(FIG. 11)
(FIG. 3)
(FIG. 6)
(FIG. 9)
(FIG. 12)
26 27

The rehabilitation of edentulous maxillae with four immediately loaded implants using the Straumann® Pro Arch concept Dr. Akif Eskan, Turkey
(FIG. 1)
(FIG. 4)
(FIG. 7)
(FIG. 10)
(FIG. 2)
(FIG. 5)
(FIG. 8)
(FIG. 11)
(FIG. 3)
(FIG. 6)
(FIG. 9)
(FIG. 12)
» CONCLUSION
The patient was served well with a fixed replacement of the hopeless retained roots. The BLT implant allowed the insertion direction and allowed for primary stability in the socket without damaging the adjacent 10-year-old implant (considering the extreme proximity of the apex of the old implant to the apex of the newly placed implant) and allowed for good primary stability (35 N/cm)of the immediate implant. The final result was satisfactory.
body, allowing us to avoid contact with the adjacent implant and at the same time ensuring good primary stability by engaging the bone beyond the apex of the empty socket without having to perforate the apical bony plate buccally. After miniature bone fenestrations, the thin buccal plates of the implants were augmented using bone substitute (biphasic calcium phosphate: 60% hydroxylapatite and 40 % BTCP) and covered with a collagen membrane in order to contain and protect the grafting material (FIG. 5-6). The surgical flap was readapted, repositioned and secured with 4.0 vicryl sutures. Both implants were completely covered by the collagen membrane and the flap (FIG. 7). Post-operative X-rays showed good direction of the implants and good vertical positions (FIG. 8). Post-operative instructions were given to the patient, with dietary modifications and antibiotic prescriptions (combination of amoxi-cillin and clavulanic acid,1g twice daily) and anti-inflammatories (ibuprofen 400 mg, 3 times daily). A transitional acrylic resin partial denture was fitted and adjusted, and instructions given to patient on use and care of the temporary prosthesis.
PROSTHETIC PROCEDURE
2 months post surgically the implants #12 and 21 were surgically exposed and transmucosal healing abutments were fitted (FIG. 9-10). The patient was seen 3 weeks later for final impres-sion. The impression copings fitted on the implants; X-ray control was used to confirm the good fit over the implants and final impressions were taken with polyether for upper arch and alginates for the opposite lower arch, with bite registration, facebow record, and shade selection.
FINAL RESULT
The screw-retained porcelain 3-units bridge (teeth #12, 11, and 21), was fitted 1 week later, and the X-ray confirmed good fit of the prosthesis. The patient was happy with the shade and shape, and the screw holes were filled with teflon and composite filling. The patient is satisfied with the result (FIG. 11-12).
28 29

SURGICAL PROCEDURE
The surgical procedures were carried out under local anesthesia with articain hydrochloride (40 mg/ml in 1.7 ml). The patient was prescribed an antibiotic (amoxicillin + clavunic acid) 1 day before surgery, continuing for 1 week. A NSAID (ibuprofen, 800 mg) was given on the day of surgery and daily for 3 days postoperatively. A transgingival incision was made to remove all inflamed tissues at the interproximal surfaces (FIG. 5). Following elevation of a full thickness flap and extraction of the upper teeth (FIG. 6), all granulation tissue was removed (FIG. 7). One of the most critical steps was to manage interocclusal space. Inadequate bone removal could result in an esthetic issue during the prosthetic procedures. For this reason we made a surgical guide from a clear acrylic, which helped us to see whether there was sufficient, i.e. at least 8 mm, interocclusal space (FIG. 8). A small window was opened to the sinus with a round bur to locate the medial sinus wall (FIG. 9). Countersinking, when needed, was performed to secure both buccal and lingual cortical bone contact at the implant collar in the thin bone crest. Care was taken in the selection of the axial implant length to avoid a conflict with the posterior implants. The axial anterior implant length was mostly shorter than the tilted implants. The posterior implant was placed with about 45°-30° of inclina-tion and 30° angulated screw retained abutments were placed on the posterior implant, correcting the angulation for immediate prosthetic rehabilitation. For the anterior axial
PURPOSE
The aim of this case was to retrospectively report the clinical application of a novel implant design in the fixed rehabilitation of edentulous jaws in combination with an immediate loading protocol.
INITIAL SITUATION
A 42-year-old male patient in good physical health required dental treatment. He reported that he was a former smoker and was not taking any medication. Following clinical (FIG. 1) and radiological examination (FIG. 2), the prognosis for the remaining upper teeth was judged hopeless. Prognosis was also hopeless for teeth #32-42, 44, and 47 in the lower jaw. Prognosis for the remaining lower teeth was fair. Plaque, and gingival index were 90% and 2.5, respec-tively. On radiological examination more than 70% of horizontal bone loss was observed in the maxilla and in positions 32-42 in the mandible (FIG. 2). Furthermore, CBCT analysis showed that there was a rounded and dome-like lesion in the left maxillary sinus (FIG. 3). Following a consultation with an ENT surgeon, this was diagnosed as a retention cyst of the maxillary sinus, which may show 17% to 38% spontaneous regression and disappearance.
TREATMENT PLAN
Due to the hopeless prognosis of the remaining teeth maxillary, extraction was planned for all upper teeth. The patient had never tolerated a removable prosthesis in the maxilla at any time during treatment, and requested fixed restoration throughout treatment. In order to fulfil the patient’s request and shorten the treatment time, we planned to use a screw-re-tained provisional prosthesis following extractions and to implant the placements in the maxilla at the same time. The plan was to place four implants, of which the two posterior implants were tilted, in the maxilla. Since our goal was to load the implants immediately, the implant primary stability had to be established to ensure immediate function; however, primary stability may become an issue, especially in the soft bone. This can be tackled by using a macroscopic implant design, such as a tapered implant tip (FIG. 4) (Straumann® Roxolid® SLA Bone Level Tapered [BLT] implant). This modification may result in enhanced mechanical anchorage of the implant at the placement, leading to immediate loading.
(FIG. 13)
(FIG. 16)
(FIG. 19)
(FIG. 14)
(FIG. 17)
(FIG. 20)
(FIG. 15)
(FIG. 18)
30 31

implants, 0° screw retained abutments were placed and the wound was sutured using an resorbable suture (FIG. 10). The inserted implant position was then roughly transferred onto the temporary prosthesis using a bite registration material (ImprintTM, Bite 3M ESPE) (FIG. 11). The opened holes were checked (FIG. 12) before attachment of the temporary abut-ments to the provisional prosthesis. A provisional full acrylic complete-arch prosthesis with temporary titanium copings was delivered on the day of surgery. The provisional prosthesis was screwed into the patient’s mouth, his smile was checked (FIG. 13), and an OPG was taken (FIG. 14). In terms of oral hygiene, the patient was instructed to use cholorhexine for the first week then recommended to use an oral bath. The patient also instructed to maintain a soft diet for the first 6 weeks post-operatively.
PROSTHETIC PHASE
After 4 months healing time, the provisional prosthesis was removed (FIG. 15). The implants and soft tissues were evaluated. All implants fulfilled the following criteria: they were stable when tested manually and showed no sign of peri-implantitis on clinical and radiolog-ical examination. The impression copings were checked radiographically before taking an impression to check whether they fitted precisely on the MUAs All implants were splinted to each other using pattern resin (GC, America Inc.) (FIG. 16) to avoid any unpredictable distor-tion. An open tray impression was then taken using polyether siloxane (3M ESPE) (FIG. 17), which has been shown to be more reliable than polyvinyl siloxane. After making a plaster model, the provisional prosthesis was seated on the model to see if the impression had been taken correctly. As the patient was happy with the esthetic appearance of the provisional prosthesis, it was scanned (FIG. 18) for the CAD / CAM framework. The prosthesis was deliv-ered following all try-ins, including metal and porcelain (FIG. 19).
FINAL RESULTS
The overall functional and esthetic outcome of the treatment was judged excellent by the patient. A final X-ray showed that the prosthesis fitted precisely on the MUAs (FIG. 20).
» CONCLUSION
This case report showed that a resorbed edentulous maxilla with varying bone quality could be restored to good function and esthetic appearance by using immediately loaded implants featuring an apical taper and demonstrating favorable marginal bone levels maintained by the inserted implants.
PRO-ARCH BRIDGE - restoration of maxilla with four Straumann® Roxolid® SLA Bone Level Tapered (BLT) implants and fixed bridge using a CARES frame Dr. Mark Diacono, Malta
(FIG. 1)
(FIG. 4)
(FIG. 7)
(FIG. 10)
(FIG. 2)
(FIG. 5)
(FIG. 8)
(FIG. 11)
(FIG. 3)
(FIG. 6)
(FIG. 9)
(FIG. 12)
32 33
INITIAL SITUATION
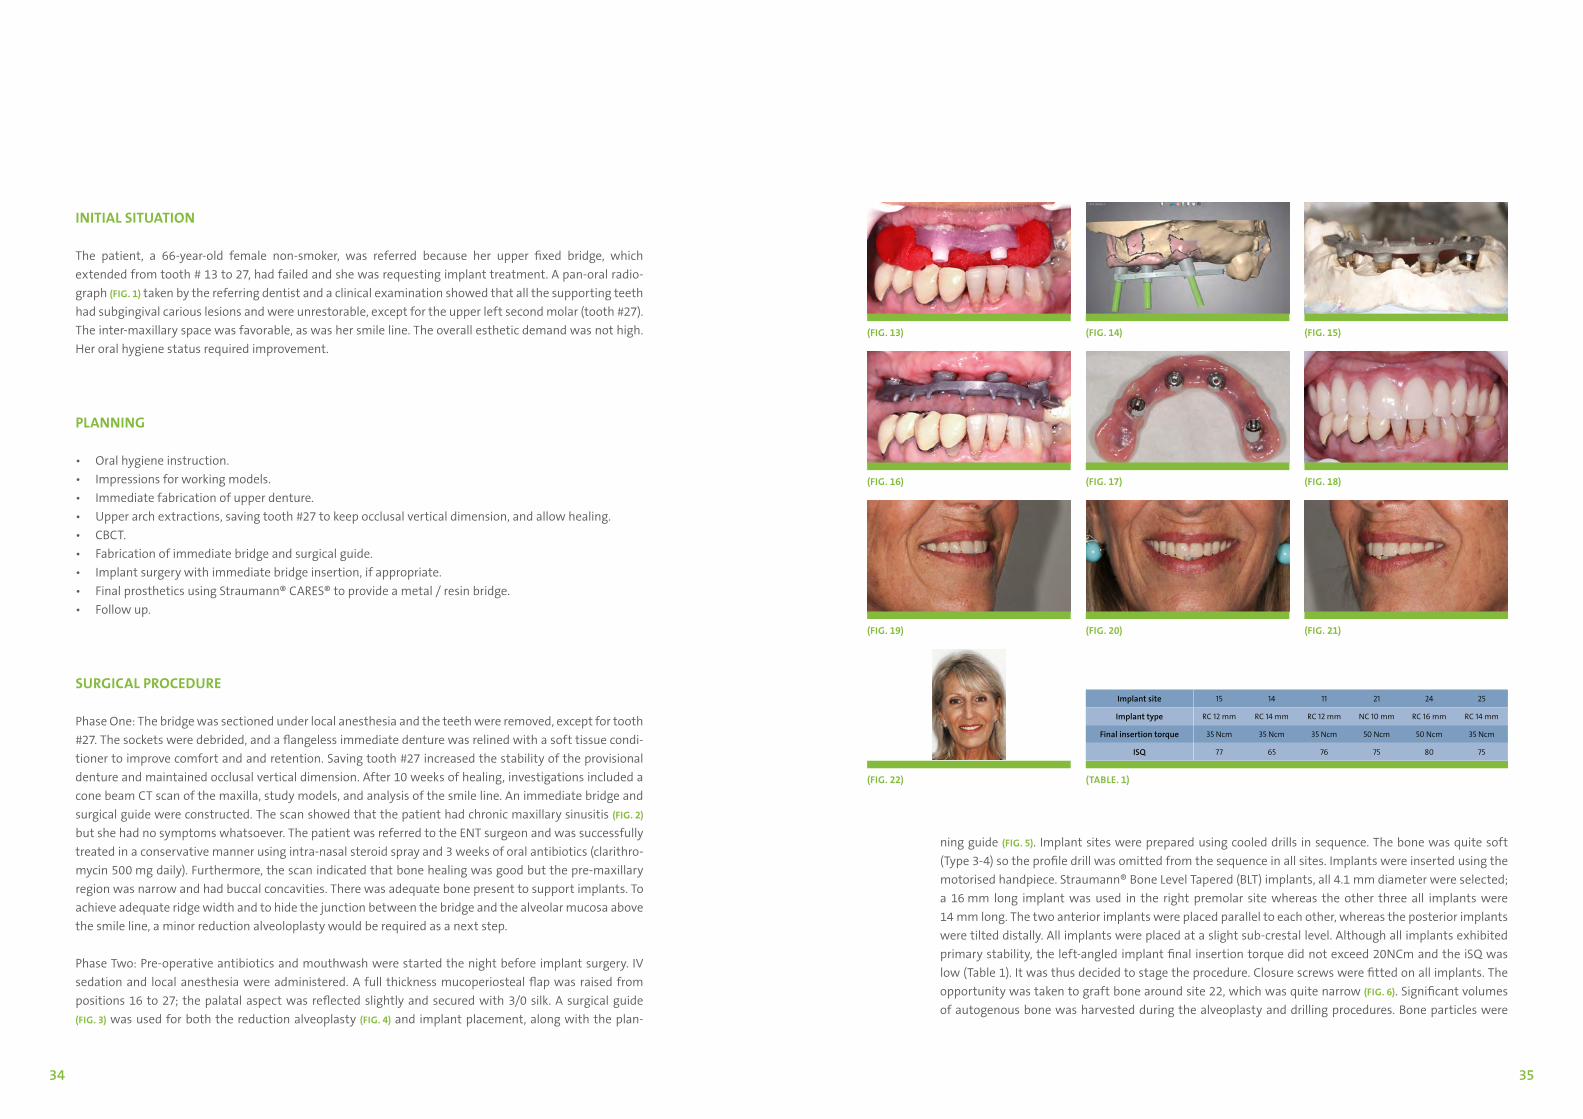
The patient, a 66-year-old female non-smoker, was referred because her upper fixed bridge, which extended from tooth # 13 to 27, had failed and she was requesting implant treatment. A pan-oral radio-graph (FIG. 1) taken by the referring dentist and a clinical examination showed that all the supporting teeth had subgingival carious lesions and were unrestorable, except for the upper left second molar (tooth #27). The inter-maxillary space was favorable, as was her smile line. The overall esthetic demand was not high. Her oral hygiene status required improvement.
PLANNING
• Oral hygiene instruction.• Impressions for working models.• Immediate fabrication of upper denture.• Upper arch extractions, saving tooth #27 to keep occlusal vertical dimension, and allow healing.• CBCT.• Fabrication of immediate bridge and surgical guide.• Implant surgery with immediate bridge insertion, if appropriate.• Final prosthetics using Straumann® CARES® to provide a metal / resin bridge.• Follow up.
SURGICAL PROCEDURE
Phase One: The bridge was sectioned under local anesthesia and the teeth were removed, except for tooth #27. The sockets were debrided, and a flangeless immediate denture was relined with a soft tissue condi-tioner to improve comfort and and retention. Saving tooth #27 increased the stability of the provisional denture and maintained occlusal vertical dimension. After 10 weeks of healing, investigations included a cone beam CT scan of the maxilla, study models, and analysis of the smile line. An immediate bridge and surgical guide were constructed. The scan showed that the patient had chronic maxillary sinusitis (FIG. 2) but she had no symptoms whatsoever. The patient was referred to the ENT surgeon and was successfully treated in a conservative manner using intra-nasal steroid spray and 3 weeks of oral antibiotics (clarithro-mycin 500 mg daily). Furthermore, the scan indicated that bone healing was good but the pre-maxillary region was narrow and had buccal concavities. There was adequate bone present to support implants. To achieve adequate ridge width and to hide the junction between the bridge and the alveolar mucosa above the smile line, a minor reduction alveoloplasty would be required as a next step.
Phase Two: Pre-operative antibiotics and mouthwash were started the night before implant surgery. IV sedation and local anesthesia were administered. A full thickness mucoperiosteal flap was raised from positions 16 to 27; the palatal aspect was reflected slightly and secured with 3/0 silk. A surgical guide (FIG. 3) was used for both the reduction alveoplasty (FIG. 4) and implant placement, along with the plan-
(FIG. 13)
(FIG. 16)
(FIG. 19)
(FIG. 22) (TABLE. 1)
(FIG. 14)
(FIG. 17)
(FIG. 20)
(FIG. 15)
(FIG. 18)
(FIG. 21)
ning guide (FIG. 5). Implant sites were prepared using cooled drills in sequence. The bone was quite soft (Type 3-4) so the profile drill was omitted from the sequence in all sites. Implants were inserted using the motorised handpiece. Straumann® Bone Level Tapered (BLT) implants, all 4.1 mm diameter were selected; a 16 mm long implant was used in the right premolar site whereas the other three all implants were 14 mm long. The two anterior implants were placed parallel to each other, whereas the posterior implants were tilted distally. All implants were placed at a slight sub-crestal level. Although all implants exhibited primary stability, the left-angled implant final insertion torque did not exceed 20NCm and the iSQ was low (Table 1). It was thus decided to stage the procedure. Closure screws were fitted on all implants. The opportunity was taken to graft bone around site 22, which was quite narrow (FIG. 6). Significant volumes of autogenous bone was harvested during the alveoplasty and drilling procedures. Bone particles were
Implant site 15 14 11 21 24 25
Implant type RC 12 mm RC 14 mm RC 12 mm NC 10 mm RC 16 mm RC 14 mm
Final insertion torque 35 Ncm 35 Ncm 35 Ncm 50 Ncm 50 Ncm 35 Ncm
ISQ 77 65 76 75 80 75
34 35

» CONCLUSION
BLT implants were successfully used to rehabilitate this patient’s maxillary arch. The Straumann® CARES® software provided a totally passive titanium framework which will reduce the risk of pros-thetic complications at a later stage.
placed around the implant both labially and palatally (FIG. 7) and protected with a collagen membrane (Bio-Gide®, Geistlich Pharma AG, Switzerland) using a bilayered approach (FIG. 8), prior to tension-free closure with a continuous horizontal mattress. The temporary denture was adjusted, using a soft tissue conditioner, and fitted immediately after implant surgery. The patient was followed up 1, 3, and 6 weeks after surgery, making an uneventful recovery. After 10 weeks, the implants were exposed under local anesthesia; ISQ values were now higher (Table 1). Straumann® screw-retained abutments were torqued at 35 Ncm as recom-mended. 1 mm high straight abutments were placed in the anterior region and 2.5 mm high, 17° angulated abutments posteriorly. Soft tissues were closed with 5/0 resorbable polygly-colic sutures and a temporary acrylic bridge was fitted (FIG. 9).
PROSTHETIC PROCEDURE
Soft tissues around the implants were shaped with the emergence profile of the temporary bridge to allow easy access for cleaning. The bridge was removed to assess healing 3 weeks after exposure (FIG. 10) and the interior fitting surface was cleaned and polished. Impres-sions were taken in silicone putty 4 weeks later, (FIG. 11); the accuracy of the impression and working model was checked with a resin jig (FIG. 12), followed by occlusal registration (FIG. 13) and try-in of the wax-up. The master model, which included a soft tissue mask, was scanned using the Straumann® CARES® software. A wrap-around framework was designed (FIG. 14) and milled. (FIG. 15) The framework was tried in the patient’s mouth and was passive (FIG. 16). The acrylic / metal bridge was fabricated (FIG. 17) and fitted on the screw-retained abut-ments, torqueing the prosthetics screws to 15Ncm. Screw holes were sealed with PTFE tape and pink / white resin (FIGS. 18-21).
FINAL RESULT
The bridge was removed at follow-up 4 weeks after fitting; oral hygiene was excellent and there were no signs of any inflammation or pocketing. The bridge was cleaned and reseated, torquing the prosthetics screws to 15NCm as recommended. The patient was extremely happy with the outcome (FIG. 22).
Restoration of maxilla with six immediately placed and immediately loaded Straumann® Roxolid® SLA Bone Level Tapered (BLT) implants and fixed bridge using CARES frame Dr. Mark Diacono, Malta
(FIG. 1)
(FIG. 4)
(FIG. 7)
(FIG. 2)
(FIG. 5)
(FIG. 8)
(FIG. 3)
(FIG. 6)
(FIG. 9)
INITIAL SITUATION
A 62-year-old female was referred to us as her upper fixed bridge had failed. Radiographs and clinical examination showed that all the supporting teeth had carious lesions below the margins to such an extent that they could not be saved and the adjacent premolars on both sides were also non-restorable; oral hygiene was moderate (FIG. 1). Her medical history was complex (supraventricular tachycardia, transient ischemic attacks, hypertension) but controlled, and a severe pharyngeal (gag) reflex made dental treatment without sedation impossible. The overall esthetic demand was not high and the smile line was favorable.
36 37

» CONCLUSION
BLT implants were successfully used to rehabilitate this patient’s maxillary and mandibular arches, despite the complexity of the case. The immediate stability achieved, even within the sockets, was so high that the temporary bridge could be fitted as planned. The CARES® software provided a totally passive titanium framework using a polished metal fitting surface. Cleaning with the power-wash should be easy and at follow-up there was no sign of any debris collecting around the implants (FIGS. 13, 14).
TREATMENT PLANNING
It was decided that as the patient’s dentition had failed due to recurrent caries and that she would be unable to tolerate a denture, her best option would be to replace the failed teeth with a fixed bridge on implants, provided that access for cleaning with the power-wash was easy. All treatment sessions would require IV sedation (oral sedation proved to be inadequate). The patient was duly warned about the complexity and risks involved. A plan was drawn up as follows:
• Full medical review with consultant cardiologist and consultant anesthetic team.• Impressions for working models (wax-up, immediate bridge, surgical guide) • CBCT.• Upper arch extractions, saving teeth #16 and 26 to keep occlusal vertical dimension; insert implants,
bone graft into sockets and fit immediate temporary bridge.• Allow healing, then final prosthetics using Straumann® CARES® to provide a metal / resin bridge in the
maxilla and implant retained crowns in the lower jaw.• Follow-up.
The CBCT confirmed that adequate bone was present in all implant sites in both jaws. The medical team concluded that it was safe to proceed with multiple IV sessions, bearing in mind that the clinic is based within a large hospital setting.
SURGICAL PROCEDURE
Phase One: The bridge was sectioned and teeth removed, except teeth #16 and 26. The sockets were debrided. (FIG. 2). The implant sites were prepared following the prosthetic guidance of the surgical stent keeping the preparation in a palatal position within the sockets (FIG. 3). Straumann® RC Bone Level Tapered (BLT) SLA implants were inserted, keeping the crest below both the buccal and palatal socket wall level (FIG. 4). All implants had good final insertion torques and a high ISQ (TABLE 1, PAGE 35). Bone particles from the drills were saved during the preparation process and placed on the exposed implant surfaces within the sockets. A xenograft material was also used for the scaffolding of the remaining bone sockets. Screw-re-tained abutments were fitted and torqued to 35NCm. Titanium non-engaging temporary copings were secured onto the abutments, and the flap was closed with 4/0 Velosorb®. BLT implants were also inserted into the mandible, one NC (35) and RC (36 and 46), as torques were high (FIG. 5).; healing abutments were immediately connected to the implants prior to flap closure
PROSTHETIC PROCEDURE
The hollowed out temporary bridge was seated over the titanium copings and the two were fused together with self-curing resin (FIGS. 6, 7). Soft tissues around the implants were shaped with the emergence profile of the temporary bridge to allow easy access for cleaning The bridge was removed 3 weeks after expo-
(FIG. 10)
(FIG. 13)
(FIG. 11)
(FIG. 14)
(FIG. 12)
sure to assess healing, and the intaglio surface was cleaned and polished. Soft tissues were healing well and there was no sign of infection. Impressions were taken in silicone putty (Elite HD®) 8 weeks later. The accuracy of the impression and working model was checked with a resin jig, followed by occlusal registration and try-in of the maxillary bridge wax-up (FIGS. 8, 9). The upper master model, which included Gingicast®, was scanned using the Straumann® CARES® software (FIG. 10). A stepped frame was designed and fabricated, with a polished fitting surface to aid cleaning (FIG. 11). The fit was totally passive and the fabricated acrylic/metal bridge was fitted, torquing the prosthetics screws to 15NCm (FIG. 11). Screw holes were sealed with PTFE tape and pink/white resin. The lower implants were restored with ceramic fused to cast precious-metal substructures.
FINAL RESULT
At follow up, oral hygiene was good, with no signs of inflammation. The patient was extremely happy with the outcome.
38 39

International Headquarters Institut Straumann AG Peter Merian-Weg 12 CH-4002 Basel, Switzerland Phone +41 (0)61 965 11 11 Fax +41 (0)61 965 11 01 www.straumann.com
© Institut Straumann AG, 2016.
All rights reserved. Straumann® and/or other trademarks and logos from Straumann® mentioned herein are the trademarks or registered trademarks of Straumann Holding AG and/or its associates. All rights reserved.
10/1
6