Embed Size (px)
Citation preview

1
Monotube™ Triax™Unilateral External Fixation
Opening Wedge Osteotomy of theTibia for Medial Arthritis of the KneeStephen J. Barr, MD
Operative Technique

2
Contributing Surgeon
Stephen J. Barr, MDMaine Orthopaedic Center, PAPortland, ME
This publication sets forth detailed recommended procedures for using StrykerOsteosynthesis devices and instruments. It offers guidance that you should heed,but, as with any such technical guide, each surgeon must consider the particularneeds of each patient and make appropriate adjustments when and as required.
A training workshop is required prior to first surgery.
Opening Wedge Osteotomy of the Tibia for Medial Arthritis of the Knee
Introduction

3
Introduction
Preface
High tibial osteotomy (HTO) for thetreatment of medial compartmentgonarthrosis represents a proven andeffective way to relieve pain andimprove overall function in the moreactive patient unsuited for a total kneereplacement. Sir Robert Jones (1855-1933) of the Liverpool School, inEngland, is credited with performingthe first HTO distal to the tibialtubercle at the turn of the 19thcentury. MB Coventry is largelyresponsible for the popularity of aclosing lateral wedge osteotomy in theUS, and good results are welldocumented1, 3.
Careful selection of patientspreoperatively may lead to high successrates of HTO with 80% survival at 10year follow-up.10 HTO can result inactive patients returning to runningand jumping which could lead tofailure of a total knee replacement(TKR) quickly.9 Patients who fail toachieve lasting relief often require TKRto alleviate symptoms. Post HTO TKRhas shown slightly poorer results in anumber of series when compared withprimary TKR8, which gives a surgeonpause when recommending HTO to apatient who may well require TKR as alater procedure. Others have found noreal difference in the ultimate outcomeof the post HTO TKR, but did findsome challenges with total kneereconstruction including valgusalignment, patella infera, and decreasedbone stock in the proximal tibia12.
Recently, promising results have beenreported following opening medialwedge hemicallostasis, or distractionosteogenesis, for medial compartmentgonarthrosis2, 5, 6, 7. Gavriil Ilizarov iscredited for underlying the principles of distraction osteogenesis following acorticotomy with the use of the thinwire external fixator which bears hisname. Because this is a reconstructiveprocedure, actually increasing bonestock medially instead of removing alateral wedge of the tibia, TKRfollowing hemicallostasis may showimproved results when compared tothe standard closing lateral wedgeosteotomies of the tibia.
Rationale
The drawbacks of lateral closing wedgeosteotomies include significant loss ofbone in the lateral tibial plateau withshortening of the leg, patella bajasecondary to anterior fat padadhesions, alteration in patellofemoralbiomechanics, increased chance of peroneal nerve injury, difficultexposure, constricting skin incisions,retained hardware, and the difficultiesinherent in post HTO TKR.
Alternatively, hemicallostasis offersincreased bone stock medially on thetibia, less chance for patellar tendonadhesions and patella baja, no fibularimpingement, less patellofemoralbiomechanical disruption, decreasedrisk of peroneal nerve injury, a simpletechnique, longitudinal incisions basedmedially, and no retained hardware.Also, post hemicallostasis TKR maywell be technically easier anddemonstrate results similar to primaryTKR. Furthermore, this techniqueusually allows immediate weightbearing as tolerated with pinpointcontrol of correction. Hemicallostasisadheres to all five of Coventry’sguiding principles as outlined in hisJBJS article4, including that theosteotomy should:
1. Fully correct and, in fact, slightlyreverse the varus or valgus deformity
2. Be near the site of the deformity3. Involve bone that will heal rapidly4. Allow early motion of the joint and
early bearing of weight5. Present no undue technical
difficulties
Patient Selection
Ideal candidates are patients who wish to maintain an active lifestyle, havereasonable expectations of theoutcome, and should be able to bothunderstand the surgery and cooperatewith the postoperative care, whichrequires meticulous daily pin care.

4
Operative Technique
Align the Monotube™ Triax™ DynamicTube parallel to the axis of the tibialshaft. The Dynamic Tube should beclosed down so the measuring device on the tube measures 5.0mm, with the dynamization collar in the staticposition, and the biospring adjustmentnut set to full tension. Use a surgicalpen to mark two longitudinal incisionsalong the medial slope of the tibial shaft referencing off the pin clamp, andplace the two distal 5.0mm pins in ananteromedial to posterolateraldirection. Take care to position thestandard Triax™ pin clamp anterior tothe Dynamic Tube so as to avoidinadvertent extension of the osteotomy during hemicallostasis.Tighten all nuts on the Dynamic Tube and pin clamps (Figure 2).
Placement of the Monotube™Triax™ External Fixator
Position the patient supine on aradiolucent table with a tourniquet high on the thigh, prepping the leg freeas if for a TKR. C-arm radiography isessential to the procedure.
Pre-assemble the Monotube™ Triax™device as outlined under “FrameAssembly” on pages 11 and 12 ofthis technique.
Place the 6.0mm proximal pins 1.5cmfrom the joint line so as to avoidinadvertent intrasynovial pin placementdue to the reflection of the joint capsule.Two pins should be placed parallel to thejoint each through a longitudinal 1cmincision. Place the more difficultposteromedial pin first, approximately1cm anterior to the posterior cortex(with the C-arm showing a lateral viewof the proximal tibia) allows easyreferencing off the pin clamp for theanterior pin, after which the Triax™ T-clamp is attached (Figures 1a, 1b).
Figure 1b
Figure 2Alignment of Monotube™ parallel to tibial axis.
Figure 1aOrientation of 6.0mm Apex® Pins.
5
Osteotomy
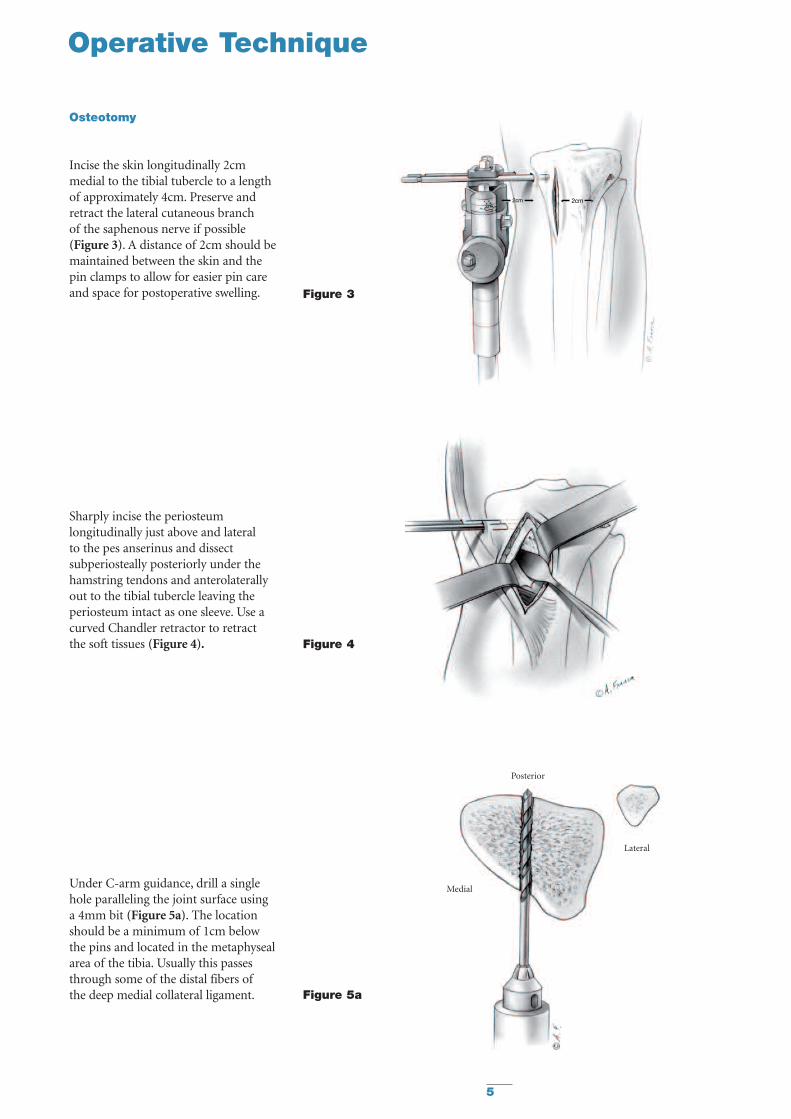
Incise the skin longitudinally 2cmmedial to the tibial tubercle to a lengthof approximately 4cm. Preserve andretract the lateral cutaneous branch of the saphenous nerve if possible (Figure 3). A distance of 2cm should bemaintained between the skin and thepin clamps to allow for easier pin careand space for postoperative swelling.
Sharply incise the periosteumlongitudinally just above and lateral to the pes anserinus and dissectsubperiosteally posteriorly under thehamstring tendons and anterolaterallyout to the tibial tubercle leaving theperiosteum intact as one sleeve. Use acurved Chandler retractor to retract the soft tissues (Figure 4).
Under C-arm guidance, drill a singlehole paralleling the joint surface using a 4mm bit (Figure 5a). The locationshould be a minimum of 1cm below the pins and located in the metaphysealarea of the tibia. Usually this passesthrough some of the distal fibers ofthe deep medial collateral ligament.
Figure 3
Figure 4
Operative Technique
Posterior
Medial
Lateral
Figure 5a

6
Figure 7After 2-3mm of distraction,connect drill holes with an osteotome.
Posterior
Medial
Lateral
Posterior
Medial
Lateral
Change the 4.0mm drill bit to a 2.8mmdrill bit. With the goal of leaving thelateral 30% of the tibial cortex intact,begin drilling a series of holes in theposterior tibial cortex, each parallel tothe joint surface, using the previouslymade 4.0mm perforation as a window(Figure 5b). An oscillating drill may be used to reduce the chance of softtissue damage.
Finish perforating the remaining intactanterior tibial cortex under directvisualization parallel to the jointsurface and continuing in a lateraldirection through the tibial tubercleand the distal insertion of the patellartendon fibers (Figure 6).
Distract the Dynamic Tube 2-3mm topre-stress the osteotomy site. Carefullyconnect the drill holes using a 1/2 inchstraight osteotome and mallet, takingcare not to plunge into the posteriorsoft tissues (Figure 7). Often one willfeel or hear an audible crack as theosteotomy is completed.
Figure 5b
Figure 6Anterior cortex perforations with 2.8mm drill bit.
Operative Technique

7
Distraction
Under C-arm guidance the Monotube™Triax™ fixator is slowly distracted,gradually opening up the medialosteotomy (Figure 8). After the fixatormeasures 0.5 to 1.0cm of distractionrelease the tension on the “T” nut. Thiswill allow the pin-fixator subtendedangle to relax with respect to theopening osteotomy causing a forcevector more suited to opening theosteotomy like a book, and not straightlongitudinal distraction. Retighten the“T” nut in its new position andcontinue distraction until the desiredcorrection is obtained both clinicallyand radiographically. One can palpatethe femoral head and evaluate thecorrection off a plumb line from thehip to the foot, or use a bovie cord and C-arm.11
Pauses throughout the distractionprocess allow the lateral cortex sometime to bend and undergo plasticdeformation rather than fracturing.It is important to make sure the entirecorrection needed can be obtainedintraoperatively, and that the finaldistraction measurement is noted anddocumented. Release tight skin aroundpin sites as necessary. Depending on thedistance of the fixator from the centerof rotation of the tibia, the preexistingvarus of the tibial shaft, and the sizeMonotube™ Triax™ System used, thedistraction distance needed will vary.After completion of the correction,the fixator is compressed down to theoriginal starting point closing theosteotomy site. Do not release the “T” nut at this time; allow the pins tobend in reverse as the monotube iscompressed. Dress the pin sites withcotton gauze and place an acecompression bandage to reducepostoperative swelling.
T-nut
Operative Technique
Figure 8After 0.5-1.0cm of distraction,release tension on “T” nut.Then retighten “T” nut.

8
Postoperative Care
Most of these cases may be done in anoutpatient surgical setting with follow-up 5-7 days postoperatively. This isample time to allow the fracturehematoma to consolidate prior tobeginning distraction osteogenesis.A patient instruction form, included at the end of this technique, can bephotocopied and individualized for thepatient by the surgeon with specificinstructions and phone number.
Pin Care
Pin care remains crucial to the successof the procedure and avoidance of themain complication, pin site infection.Twice a day pin care with 1/2 saline 1/2hydrogen peroxide solution soaked Q-tips coupled with one warm showera day to reduce the risk of infection.During showering an old soft bristletoothbrush with soap is helpful toscrub the interface between the pin andskin. Direct application of cotton gauze pads around each pin site followed byan elastic compression bandage workswell to aide in debridement. Patientsshould be cautioned that infectionsusually develop when the skin is allowed to heal around and seal offthe pin, thus promoting subcutaneousabscesses and possible deep infection.
Hemicallostasis
The patient is given a wrench to distractthe Dynamic Tube the appropriatenumber of turns so as to arrive at thedesired correction over a two weekperiod. This usually means one and ahalf turns a day, as one full turn equals1mm on the Dynamic Tube. Thepatients can break this up into a fullturn in the morning and one half turnat night. Follow-up radiographs at threeweeks post-operatively should confirmappropriate correction. Patients shouldbe cautioned that distraction may bepainful, producing a deep “toothache”type of pain which should resolve afteran hour or so. If this becomes toopainful the patient can decrease thenumber of turns a day, but this willresult in prolonging the time until fullcorrection. Four weeks followingcompletion of correction, release thedynamization bolt to the number onesetting from the zero setting. This willallow micromotion at the osteotomysite and hasten bony union. Four weeksafter dynamization, or 8-10 weeksfollowing the operative procedure, afinal radiograph is taken. Early unionshould be apparent at the osteotomysite. The fixator may then be removedin the operating room underintravenous sedation, or underintramuscular medication in the office.A small wick of cotton gauze or tapeshould be placed deep into the existingpin site after removal of each of the fourpins. The dressing may be removed 48hours later and pin site care resumeduntil the pin sites are fully healed.This will help to avoid prematureclosure of the wound and possiblesubcutaneous infection.
Physical Therapy
Weight bearing status will depend on the type of surgery performed.If biological regenerative techniquessuch as microfracture, osteochondralautograft transfer, or meniscalallograft replacement are used inconjunction with hemicallostasis,weight bearing may be partial for 6weeks, otherwise weight bearing astolerated with crutches may beinstituted from the start. Range ofmotion exercises and quadriceps muscle strengthening supervised by a therapist are helpful. A homecontinuous passive motion machine(CPM) is not usually needed.

9
Fixator Assisted OpeningWedge Osteotomy
Using Autologous Iliac CrestBone Graft
Instead of utilizing hemicallostasis tocreate new medial tibial bone stockand realign the anatomic axis to anoverall valgus position, two wedges ofiliac crest autologous graft may beplaced at the time of the operativeosteotomy. This obviates the need forlong term use of the Monotube™Triax™ fixator and may reduce thechance of deep infection from the pinsites. Its drawbacks include the needfor a second incision to harvest thebone graft, supplemental medialhardware, and the need for protectedweightbearing for 6-8 weeks as thegraft begins to consolidate. Thetechnique proceeds exactly as above,but when the osteotomy site isdistracted appropriately to provideadequate clinical correction of thetibial anatomic axis into valgus, twotricortical wedges of iliac crest graft areplaced and impacted in with a bonetamp medial to lateral. The grafts arepositioned so as to support theosteotomy with the outer cortex of thegrafts flush with the osteotomizedcortex of the tibial metaphysis. Voids inthe tibial osteotomy site can be packedwith currettings of cancellous bonegraft. After the distraction is releasedon the Dynamic Tube, supplementalfixation may be used to hold theosteotomy site closed down and thegrafts in place on the medial side. Asmall three hole semi-tubular platefrom a standard small fragment set isusually adequate, fixing the proximalhole with a fully threaded 6.5cancellous screw, and the distal holewith a large fragment 4.5 corticalscrew. The mechanical advantage ofthe Monotube™ Triax™ System allowsa more controlled osteotomy and theadded advantage of an intact lateralcortex and periosteal sleeve.Assessment of clinical correction iseasier, and one can measure thethickness of tricortical graft neededmore precisely.
Contra-indications include a patientwho is unable to properly care for thepin sites of the fixator or patientsprone to deep infections, such as thosewith diabetes. Patients may also begiven the choice of either openingwedge technique. Results at two yearfollow-up have shown no difference inunion rate, overall correction, rate ofcomplication, or final result asmeasured prospectively with the SF-36outcomes scores between openingwedge osteotomy utilizinghemicallostasis or fixator assisted withinterpositional tricortical iliac crestgraft.13
Operative Technique
10
Clinical Cases
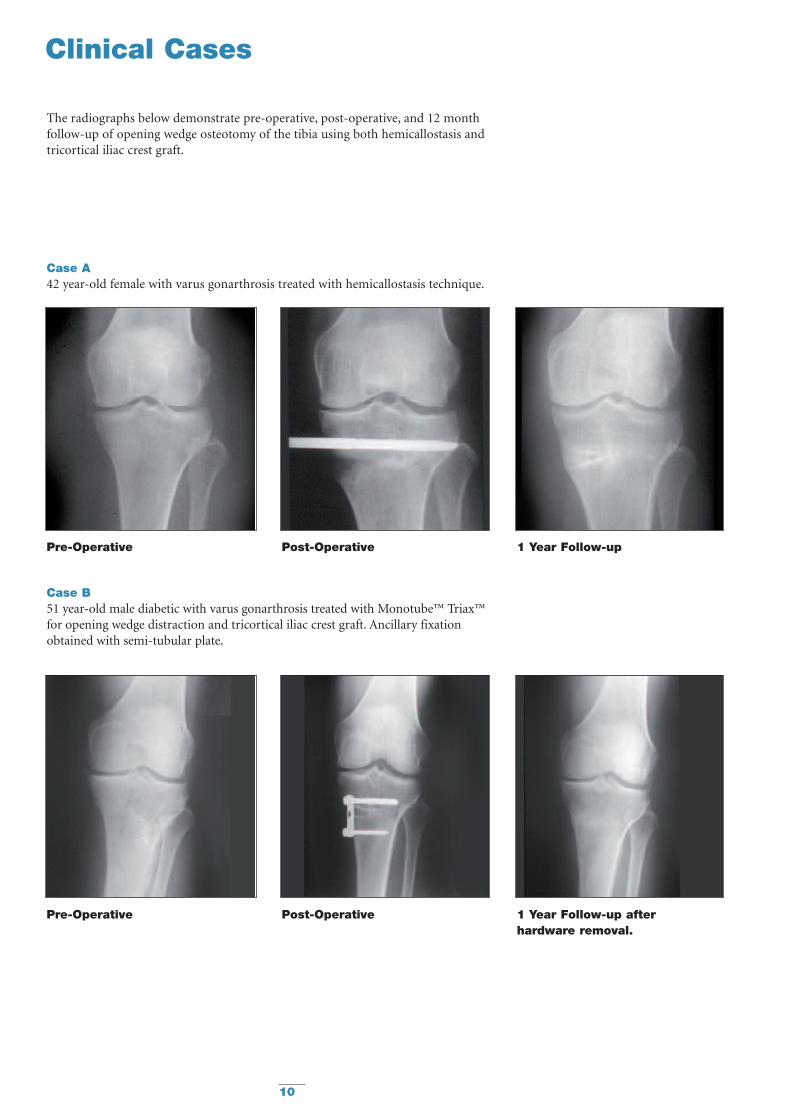
The radiographs below demonstrate pre-operative, post-operative, and 12 monthfollow-up of opening wedge osteotomy of the tibia using both hemicallostasis andtricortical iliac crest graft.
Case A42 year-old female with varus gonarthrosis treated with hemicallostasis technique.
Pre-Operative Post-Operative 1 Year Follow-up
Pre-Operative Post-Operative 1 Year Follow-up after hardware removal.
Case B51 year-old male diabetic with varus gonarthrosis treated with Monotube™ Triax™for opening wedge distraction and tricortical iliac crest graft. Ancillary fixationobtained with semi-tubular plate.

11
Ordering Infomation
REF Description
For Hemicallostasis, the typical setup includes:
Components
5150-0-470 Monotube™ Triax™ Dynamic Tube - Blue (1)
5150-3-070 Monotube™ Triax™ Pin Clamp - Blue (2)
5150-4-070 Monotube™ Triax™ T-Adaptor - Blue (1)
5020- Series Ø 5mm Blunt Apex® 1/2 Pins (2 each)5019- Series Ø 6mm Blunt Apex® 1/2 Pins (2 each)
OR5018- Series Ø 5mm Self-Drilling Apex® 1/2 Pins (2 each)5021- Series Ø 6mm Self-Drilling Apex® 1/2 Pins (2 each)
Instruments
5057-5- Series Ø 5mm Drill Sleeve Assemblies for 5mm 1/2 Pins - (2 each)5057-6- Series Ø 6mm Drill Sleeve Assemblies for 6mm 1/2 Pins - (2 each)
5235-x-824 Series Ø 4.0mm Drill Bits 4mm & 2.8mm (2 each)5255-x-250 Series Ø 2.8mm Drill Bits 4mm & 2.8mm (2 each)
5150-9-270 Monotube™ Triax™ Torque Wrench - Blue (1)
5150-9-120 Monotube™ Triax™ Dynamization Wrench - Blue (1)
5054-3-005 T-Handle Wrench (1)

12
Frame Assembly
Monotube™ T-Adaptor Assembly
Standard Monotube™ Triax™ Clampscan be converted to T-clamps utilizingthe T-adaptor.
Assembly Instructions
1. Select the T-adaptor and matchingStandard Pin Clamp (Figure 9).
2. Remove body screw andcompression sleeve for T-adaptorwith Monotube™ wrench (Figure 10).
3. Remove body screw andcompression sleeve from Standard Pin Clamp. Separate pin connector from the tubecoupling (Figure 11).
4. Insert tube coupling into the T-adaptor and replace compressionsleeve (Figure 12). Body screwsshould be introduced through therecessed portion of the clamp untilfully seated and finger tight.
5. Insert pin connector onto T-adaptorand replace compression sleeve(Figure 13). Body screws should beintroduced through the recessedportion of the clamp until fullyseated and finger tight.
NOTE: Body screws and compressionsleeves are exactly alike and will fit ineither position. However, if body screwsare not introduced from the recessedside of the clamp, they will not fullyseat. In addition, the T-adaptor shouldalways be connected to the tubecoupling before the pin connector.
6. The T-clamp assembly is now readyfor use (Figure 14).
Fig 9 BodyScrews
T-AdaptorStandardPin Clamp
CompressionSleeve
PinConnector
BodyScrew
TubeCoupling
Fig 10
Fig 11
Fig 12
Fig 13 Fig 14

13
Frame Assembly
Monotube™ Triax™ Dynamic Tube
Dynamic Tubes include an internalcompression/distraction mechanismwhich is useful in lengtheningprocedures and to “fine-tune” fracturereductions. The long portion of the tube is referenced as the LengtheningSegment. The shorter portion is called the Dynamization Segment, andincludes two adjustable dynamizationfeatures: biocompression and variable biospring.
Turn compression/distractionadjustment nut (A) to display 5mm of distraction on tube (B). Closedynamization collar (C) to staticposition (Figure 15).
Turn biospring adjustment nutclockwise (D) until spring is under full tension (Figure 16).
To prepare for application of the frame,remove “O”-Rings, and place selectedclamps on the tube. Once the clampsare in place, replace the “O”-Rings toprevent the clamps from sliding off theframe during the procedure (Figure 17).
COMPRESSION/DISTRACTIONADJUSTMENT NUT
Collar Open(Dynamic)
Collar Closed(Static)
Released
Full Tension
(A)
(B) (C)
(D)
DYNAMIZATIONCOLLAR
BIOSPRING ADJUSTMENT NUT
“O”-RING
DYNAMIZATIONSEGMENT
“O”-RINGLENGTHENING SEGMENT
LENGTH SCALE
Fig 15
Fig 16
Fig 17

14
References
1. Billings A, Scott DF, Camargo MP,Hofmann AA.: High TibialOsteotomy with a CalibratedOsteotomy Guide, Rigid InternalFixation, and Early Motion.JBJS 82-A, No. 1, Jan. 2000.
2. Calista F, Pegreffi P.: High TibialOsteotomy: Osteotomy in Minusor Hemicallostasis with MonoaxialExternal Fixator? Chir Organi Mov81(2), April 1996.
3. Coventry MB.: Proximal TibialOsteotomy: A Critical Long TermStudy of Eighty Seven Cases. JBJS75-A, No. 2, Feb. 1993.
4. Coventry MB.: Osteotomy of theUpper Portion of the Tibia forDegenerative Arthritis of the Knee.CORR. Number 248, Nov. 1989.
5. De Pablos J, Herranz PG, BarriosC.: Progressive Opening -WedgeOsteotomy for Severe Tibia Vara inAdults. Orthopedics, Vol 21, No12, Dec. 1998.
6. Elting JJ, Hubbell, JC.: UnilateralFrame Distraction: Proximal TibialValgus Osteotomy for MedialGonarthritis. ContemporaryOrthopaedics, 27, Nov. 1993.
7. Kramer AS, Raab DJ, Kelikian AS,Goldstein WM.: New Techniquefor High Tibial Osteotomy:Distraction Valgus Osteotomy withExternal Fixator. Scientific Exhibit,64th Annual Meeting AAOS, SanFrancisco, Feb. 1997.
8. Mont MA, Alexander N, KrakowKA, Hungerford DS.: Total KneeArthroplasty after failed HighTibial Osteotomy. Orthop ClinNorth Am Vol 25, No. 3, July 1994.
9. Nagel A, Insall JN, Scuderi GR.:Proximal Tibial Osteotomy: ASubjective Outcome Study. JBJS78-A, No. 9, Sept. 1996.
10. Naudie D, Bourne RB, RorabeckCH, Bourne TJ.: Survivorship ofthe High Tibial Valgus Osteotomy:A 10 to 22 Year Follow-up Study.CORR No 367, Oct. 1999.
11. Price CT.: Unilateral Fixators andMechanical Axis Realignment.Orthop Clin North Am, Vol 25,No 3, July 1994.
12. Meding JB, Keating EM, RitterMA, Faris PM: Total KneeArthoplasty After High TibialOsteotomy. JBJS 82-A, No. 9,Sept. 2000.
13. Barr SJ.: Opening Medial WedgeHigh Tibial Osteotomy:Hemicallostasis vs. Tricortical IliacCrest Graft. Poster PF 450, AAOS68th Annual Meeting, Feb. 2001.

15
Pin Care
This is very important to the successof the procedure. Please follow theguidelines below.
Weeks 0 - 3Clean the pins twice a day with Q-tips,hydrogen peroxide and saline mix.The solution should be roughly 1/2hydrogen peroxide and 1/2 saline. Useas many Q-tips as needed until theentire pin is clean of dried blood anddebris.
I recommend showering once a day,letting the water run over the fixator.This will also help keep the pin sitesclean, and make cleaning them with a Q-tip easier. After you are done,cut a cotton gauze dressing, slide it around the pin, and wrap it with an ace bandage.
Weeks 3 - 10Please get a soft bristled toothbrushand scrub each pin site in the showerwith soap until clean. Then dress witha cotton gauze pad and ace wrap.
Weight Bearing Status
You may be weight bearing astolerated with crutches initially. As youstart to feel better later on in thetreatment you may use a cane ornothing at all. Make sure you moveyour knee as much as possible to keepfull range of motion.If you are having trouble with this letme know.
Distraction
This is how you grow your own boneto change the alignment of your leg.You will need to turn the fixator anumber of times during the day whichI will figure out for you. This processcan be painful and may require you totake more pain medicine. This onlylasts for two weeks, so hang in there!
Turn the fixator
______ 1/2 turns in the morning and______ 1/2 turns in the evening for______ days to arrive at a total
distraction distance of______ as measured off of the blue
Monotube™ Triax™ distractor.
Try to develop a schedule that you canremember easily so you won’t forget!You can follow your progress on themarkers of the blue Monotube™distractor. You will come back to see me in the office on ____/____/____ at ____:____. At that time we willcheck an X-ray to see if the correction is enough.
Infection
Redness around the pin sites is normal,and is usually about the size of a dime.If this gets larger, or yellow drainagestarts, or if you develop a fever, it couldmean you have an early infection. Pleasecall me and I’ll see you in the office.
Patient Instructions
Patient Name: ________________________________________________________________________
Place Your Info Here
After Opening Wedge Osteotomy of Tibia

Stryker Trauma AGBohnackerweg 1CH-2545 SelzachSwitzerland
www.osteosynthesis.stryker.com
The information presented in this brochure is intended to demonstrate a Stryker product. Always refer to the packageinsert, product label and/or user instructions before using any Stryker product. Surgeons must always rely on their ownclinical judgment when deciding which products and techniques to use with their patients. Products may not be availablein all markets. Product availability is subject to the regulatory or medical practices that govern individual markets. Pleasecontact your Stryker representative if you have questions about the availability of Stryker products in your area.
Stryker Corporation or its subsidiary owns the registered trademark: StrykerStryker Corporation or its subsidiary owns, uses or has applied for the following trademarks: Monotube™ Triax™
Literature Number: 5075-2-504LOT A2806
Copyright © 2006 StrykerPrinted in Switzerland
Biologics
Surgical Products
Neuro & ENT
Trauma, Extremities & Deformities
Biologics
Surgical Products
Neuro & ENT
Trauma, Extremities & Deformities