Embed Size (px)
Citation preview

Installation and Configuration of Aadhaar Enrolment Client
Version: 2.0.0.2 Release date: 27-11-2012
UIDAI
Unique Identification Authority of India
Unique Identification Authority of India
i
Installation and Configuration of Aadhaar Enrolment Client
Preface This training manual contains the detailed steps for carrying out the installation and configuration of the Aadhaar Enrolment Client. This manual also describes the process of importing master data after downloading it from the UIDAI Admin Portal. Finally you will find the process of on-boarding of Operators, Supervisors and Introducers into the Aadhaar Enrolment Client.
Target Audience
• Registrar’s Supervisor
• Enrolment Agency Supervisors
• Technical Administrator
Dependent or Related Modules To read this manual, you should have a prior knowledge on the following module:
• UIDAI and Aadhaar
• Aadhaar Enrolment Process

Unique Identification Authority of India
ii
Installation and Configuration of Aadhaar Enrolment Client
Table of Contents
Objectives ............................................................................................................................................... 1
User Management ................................................................................................................................... 2 Addition of Operator/Supervisor by Enrolment Agency Administrator ................................................... 3
Installation and Un-installation of Aadhaar Enrolment Client ............................................................. 4 Prerequisites ......................................................................................................................................... 4 Full / Fresh Installation ......................................................................................................................... 5 Aadhaar Enrolment Client – Steps for a fresh Installation ...................................................................... 5 Un-installation of Aadhaar Enrolment Client ....................................................................................... 29
Configuring the Aadhaar Enrolment Client ........................................................................................ 31 Database Management ........................................................................................................................ 31 Client Security .................................................................................................................................... 33 Client Identity ..................................................................................................................................... 35 Demographics Screen ......................................................................................................................... 37
Local Enrolment / On-Board ................................................................................................................ 40

Unique Identification Authority of India
1
Installation and Configuration of Aadhaar Enrolment Client
Objectives At the end of this module, you will learn
• To manage the registrations of the users (different types of Registrar and Enrolment Agency personnel) with UIDAI
• The installation and un-installation process of Aadhaar Enrolment Client (AEC)
• The steps to configure AEC
• The process to on-board the Operator, Supervisor and Introducer

Unique Identification Authority of India
2
Installation and Configuration of Aadhaar Enrolment Client
User Management UIDAI provides a portal (called the UIDAI Admin Portal) to help Registrars and Enrolment Agencies (Administrators) to manage their personnel; managing personnel includes registrations of the users with UIDAI. The URL of the UIDAI Admin Portal is "http://portal.uidai.gov.in".
Certain representatives from Registrars and Enrolment Agencies will be provided access to portions of the portal. These representatives will have to be registered as users on the portal, so that they can be authenticated while performing certain operations.
Figure 1: Home Page of UIDAI Admin Portal
Users may be broadly classified as Introducers and Non-Introducers. Non-Introducers comprise of:
• Registrar Administrators
• Enrolment Agency Administrators
• Enrolment Agency Supervisors
• Enrolment Agency Operators
Beside many other tasks, Enrolment Agency administrators can perform the following in the UIDAI Admin Portal:
• Add enrolment agency users (Operators & Supervisors)
• Download Master Data
• Download Registrar Data
• Download User Credential

Unique Identification Authority of India
3
Installation and Configuration of Aadhaar Enrolment Client
Addition of Operator/Supervisor by Enrolment Agency Administrator
• Enrolment Agency Administrator needs to validate and activate
o Operator on the UIDAI Admin Portal from the Operator > Add menu.
o Supervisor on the UIDAI Admin Portal from the Supervisor > Add menu.
Figure 2: Form to Add Operator
Note: Pre-requisite to Add Operator/Supervisor • Operator/Supervisor needs to go through the UIDAI enrolment process and obtain an
Aadhaar
• Operator/Supervisor needs to get certified by passing an on-line test conducted by Sify and MeritTrac
Unique Identification Authority of India
4
Installation and Configuration of Aadhaar Enrolment Client
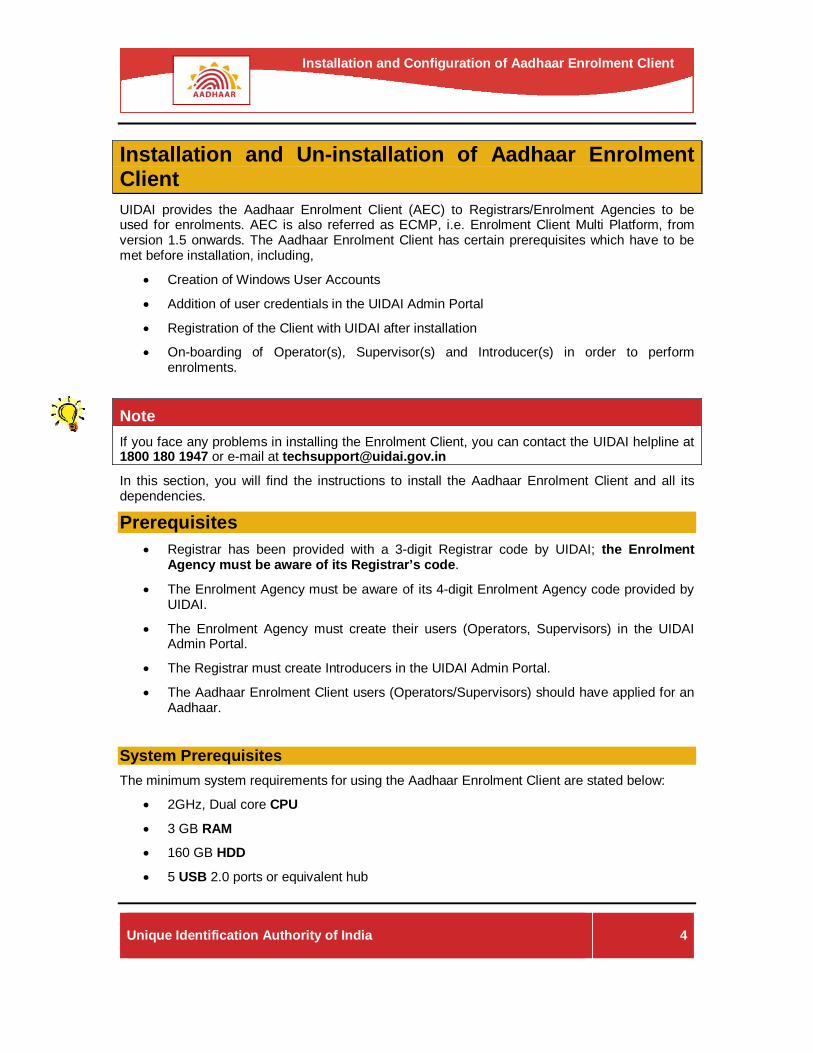
Installation and Un-installation of Aadhaar Enrolment Client UIDAI provides the Aadhaar Enrolment Client (AEC) to Registrars/Enrolment Agencies to be used for enrolments. AEC is also referred as ECMP, i.e. Enrolment Client Multi Platform, from version 1.5 onwards. The Aadhaar Enrolment Client has certain prerequisites which have to be met before installation, including,
• Creation of Windows User Accounts
• Addition of user credentials in the UIDAI Admin Portal
• Registration of the Client with UIDAI after installation
• On-boarding of Operator(s), Supervisor(s) and Introducer(s) in order to perform enrolments.
Note If you face any problems in installing the Enrolment Client, you can contact the UIDAI helpline at 1800 180 1947 or e-mail at [email protected]
In this section, you will find the instructions to install the Aadhaar Enrolment Client and all its dependencies.
Prerequisites • Registrar has been provided with a 3-digit Registrar code by UIDAI; the Enrolment
Agency must be aware of its Registrar’s code.
• The Enrolment Agency must be aware of its 4-digit Enrolment Agency code provided by UIDAI.
• The Enrolment Agency must create their users (Operators, Supervisors) in the UIDAI Admin Portal.
• The Registrar must create Introducers in the UIDAI Admin Portal.
• The Aadhaar Enrolment Client users (Operators/Supervisors) should have applied for an Aadhaar.
System Prerequisites The minimum system requirements for using the Aadhaar Enrolment Client are stated below:
• 2GHz, Dual core CPU
• 3 GB RAM
• 160 GB HDD
• 5 USB 2.0 ports or equivalent hub
Unique Identification Authority of India
5
Installation and Configuration of Aadhaar Enrolment Client
• 100Mbps Network Interface Card (if not built-in to the mother board)
• 32-bit Operating System: Windows XP Professional (SP3) or Windows 7 Professional / Enterprise Version
PLEASE NOTE: Windows Vista cannot be used
• Recommended monitor resolution setting: 1024 x 768
• Biometric devices: Iris scanner, digital photograph camera, Slap Finger Print Scanner
• Machine should not have any pending Windows update. (Windows updates are performed automatically by connecting to Internet and selecting live windows update)
• System should be connected to Internet.
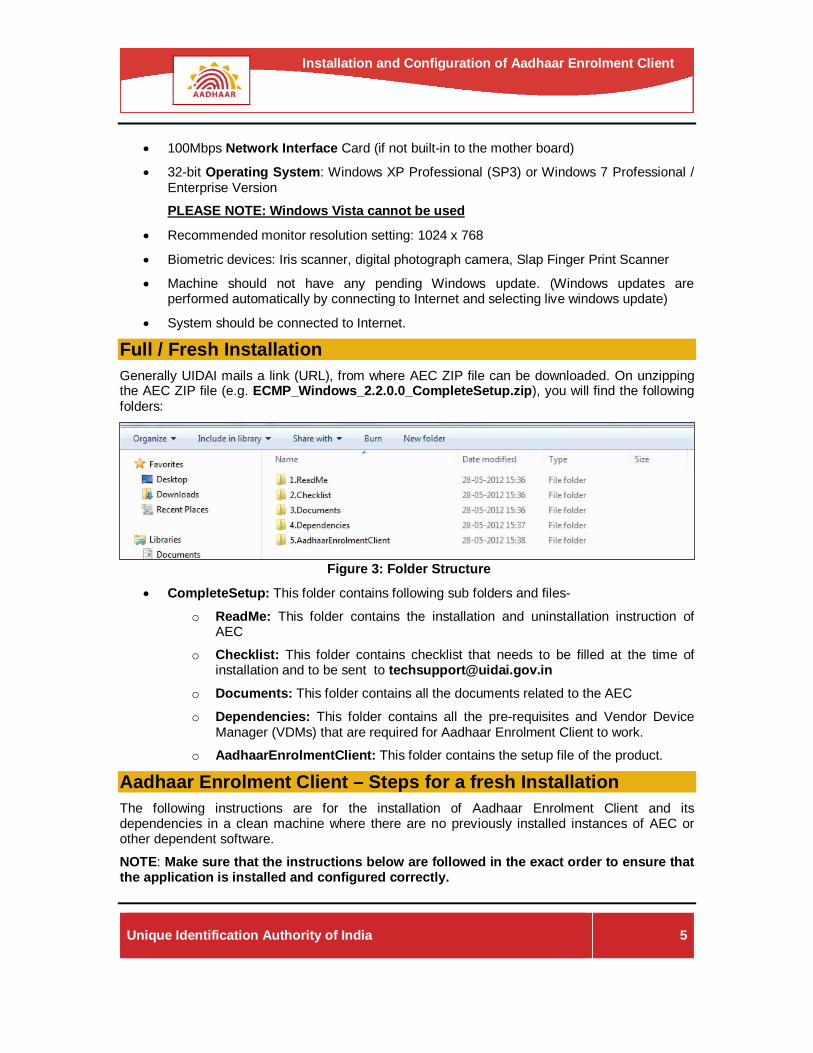
Full / Fresh Installation Generally UIDAI mails a link (URL), from where AEC ZIP file can be downloaded. On unzipping the AEC ZIP file (e.g. ECMP_Windows_2.2.0.0_CompleteSetup.zip), you will find the following folders:
Figure 3: Folder Structure
• CompleteSetup: This folder contains following sub folders and files-
o ReadMe: This folder contains the installation and uninstallation instruction of AEC
o Checklist: This folder contains checklist that needs to be filled at the time of installation and to be sent to [email protected]
o Documents: This folder contains all the documents related to the AEC
o Dependencies: This folder contains all the pre-requisites and Vendor Device Manager (VDMs) that are required for Aadhaar Enrolment Client to work.
o AadhaarEnrolmentClient: This folder contains the setup file of the product.
Aadhaar Enrolment Client – Steps for a fresh Installation The following instructions are for the installation of Aadhaar Enrolment Client and its dependencies in a clean machine where there are no previously installed instances of AEC or other dependent software.
NOTE: Make sure that the instructions below are followed in the exact order to ensure that the application is installed and configured correctly.

Unique Identification Authority of India
6
Installation and Configuration of Aadhaar Enrolment Client
1. Log in as Windows Administrator
2. Create Windows Users (e.g. subodh_operator, roshni_supervisor)
3. Installation of Aadhaar Enrolment Client (by using one click installer).
4. Vendor Device Software Installation
Note: There is no need to install the application for every user. One installation will make the application available to all System users.
1. Log in as Windows Administrator Log in the system as Windows Administrator.
Note that your computer has default Administrator User. This user account gets created while installing the operating system.
2. Create Windows Users It is mandatory to create a separate Windows User Account for each user who is supposed to use the Aadhaar Enrolment Client such as Technical Administrator, Operators, and Supervisors.
It is mandatory for the user who installs the Aadhaar Enrolment Client to have administrative privileges.
Note Windows has a default Administrator User. This user account gets created, automatically, while installing the operating system.
The administrator has to create user accounts (non-administrative) for Operators and Supervisors to log in. How to create users and granting administrative privilege is discussed below.
Creating User in Windows XP / Windows 7
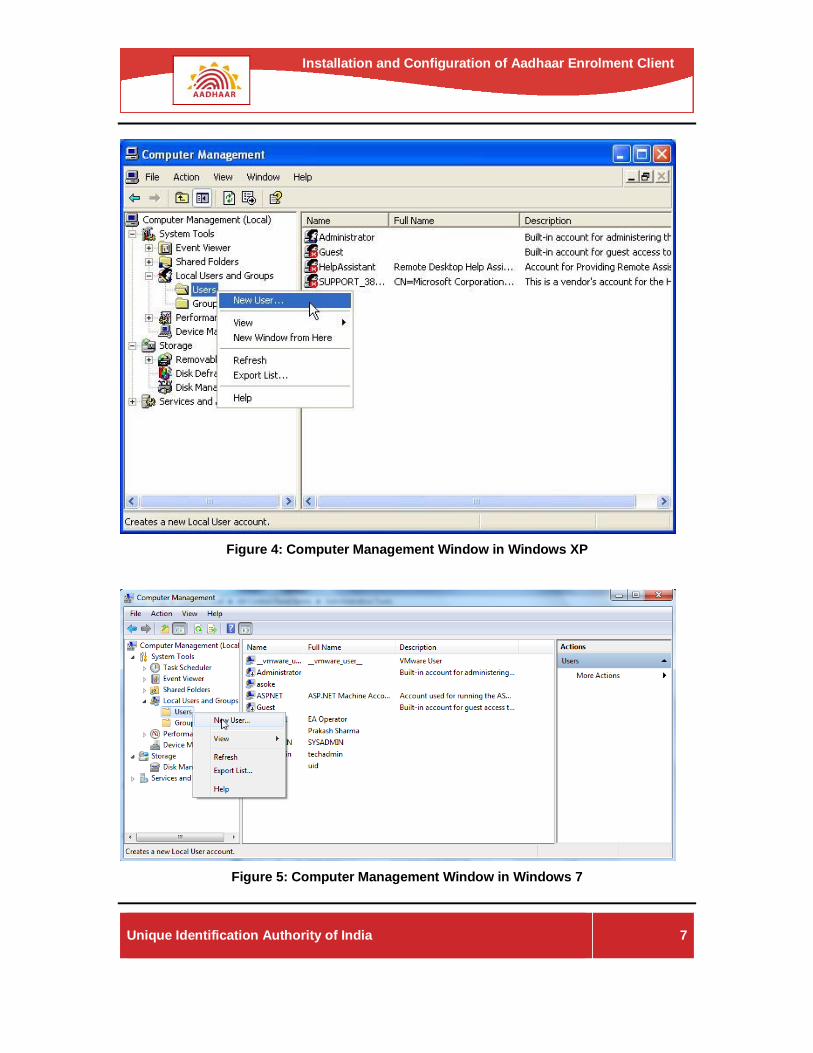
Follow the steps below to create users in Windows XP / Windows 7:
• Log in as Windows XP / Windows 7 Administrator
• Open Computer Management by using any one of the following two methods:
1. On the Desktop, select My Computer (in Windows XP) / Computer (in Windows 7) icon. Right-click the mouse and select Manage to open Computer Management window.
2. Open Control Panel > Administrative Tools > Computer Management.
• In the Computer Management window, expand the Local Users and Groups.
• Right-click on Users folder and select New User option.
Unique Identification Authority of India
7
Installation and Configuration of Aadhaar Enrolment Client
Figure 4: Computer Management Window in Windows XP
Figure 5: Computer Management Window in Windows 7

Unique Identification Authority of India
8
Installation and Configuration of Aadhaar Enrolment Client
• New User window is displayed for creating the new user.
Figure 6: New User Window
• In the User name field, type a name for the new account e.g. ram_admin, subodh_operator, roshni_supervisor etc.
• Enter the password in the Password field and confirm the password by typing it once again in the Confirm password field.
• Uncheck the User must change password at next logon box if you don’t want to reset the user password at next logon.
• Click the Create button to create the user. Note that by default this will create non-administrative user.
Check System Administrator Privileges of the User
If the user is already created, but doesn’t have system administrator privilege, then you must give the user administrative privileges.
To find out whether the user has System Administrator privileges (in Windows 7):
• Open Computer Management in the same way as discussed above.
• Expand Local Users and Groups.
• Select the Users folder and then select the user you wish to check the system administrator privileges.

Unique Identification Authority of India
9
Installation and Configuration of Aadhaar Enrolment Client
Figure 7: Computer Management – Displaying Users
• After selecting the user, right-click the mouse and select Properties option to open the property window of the user.
• Select the Member Of tab.
Figure 8: User Properties Window – Member Of Tab
• Under the Member Of tab if Administrators is displayed, then the user has the administrator privileges.

Unique Identification Authority of India
10
Installation and Configuration of Aadhaar Enrolment Client
Grant System Administrator Privileges to the User, if required Follow the steps below to grant the system administrator privileges to the user:
• Open Computer Management in the same way as discussed above.
• Expand Local Users and Groups.
• Select the Users folder and then select the user you wish to check the system administrator privileges.
• After selecting the user, right-click the mouse and select Properties option to open the property window of the user.
• Select the Member Of tab.
Figure 9: Member Of Tab
• Click the Add button. The Select Groups window appears.
Figure 10: Select Groups Window
Type Administrators
here

Unique Identification Authority of India
11
Installation and Configuration of Aadhaar Enrolment Client
• Type Administrators in the Enter the object names to select section and click the Check Names button.
Figure 11: Select Groups Window
• Click the OK button.
Figure 12: User Properties Window – Member Of Tab
• Now the Administrators group is added in the Member Of tab.
• Click the OK button to close the Properties window of the user.

Unique Identification Authority of India
12
Installation and Configuration of Aadhaar Enrolment Client
3. Installation of Aadhaar Enrolment Client Follow the steps below to install the Aadhaar Enrolment Client.
• Double-click the Setup_Aadhaar_Enrolment_Client_v2.2.0.0.exe file located directly under 5.AadhaarEnrolmentClient folder.
To install the Aadhaar Enrolment Client you should have administrator privilege.
• The Aadhaar Installer screen appears.
Figure 13: Aadhaar Enrolment Client Setup Screen
• Click Next to start the installation. The License Agreement page appears.
Figure 14: Aadhaar Enrolment Client Setup – License Agreement Screen

Unique Identification Authority of India
13
Installation and Configuration of Aadhaar Enrolment Client
• Click the I Agree button. The Choose Installation Location screen appears.
Figure 15: Aadhaar Enrolment Client Setup – Choose Install Location Screen
• Click the Install button to start the installation. The installer installs all the components automatically, and prompts after successful installation.
Figure 16: Aadhaar Enrolment Client Setup – Successfully Installed Screen
Unique Identification Authority of India
14
Installation and Configuration of Aadhaar Enrolment Client
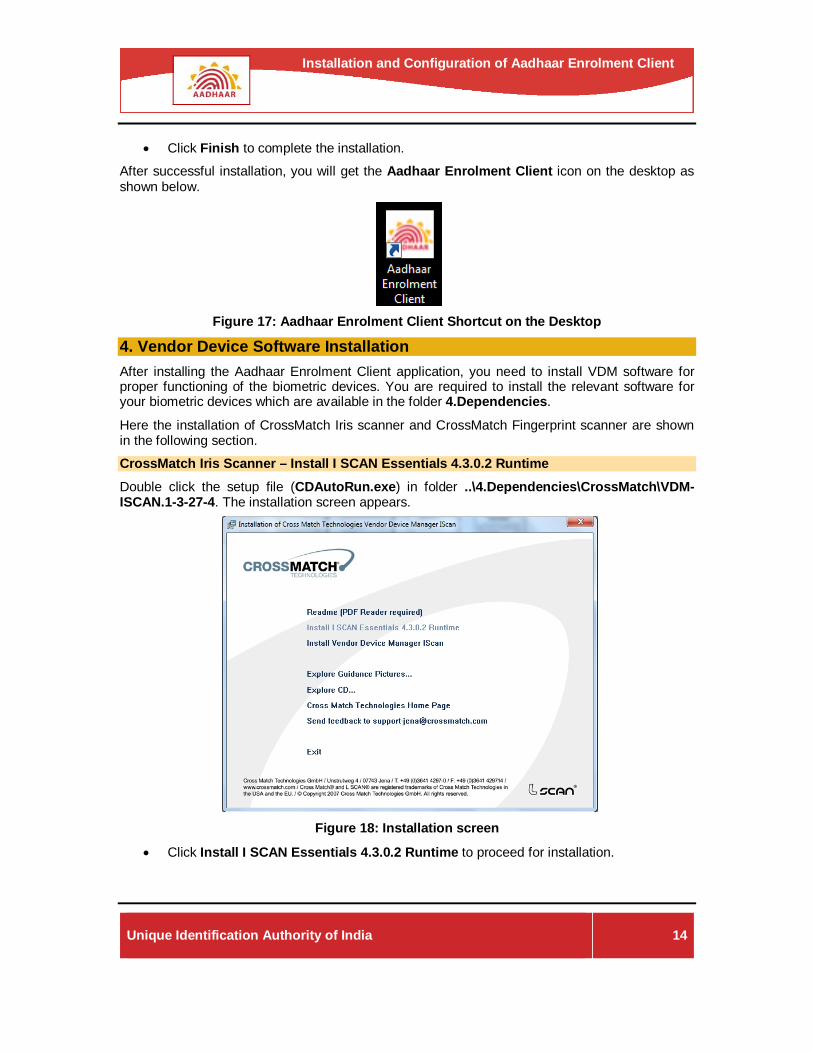
• Click Finish to complete the installation.
After successful installation, you will get the Aadhaar Enrolment Client icon on the desktop as shown below.
Figure 17: Aadhaar Enrolment Client Shortcut on the Desktop
4. Vendor Device Software Installation After installing the Aadhaar Enrolment Client application, you need to install VDM software for proper functioning of the biometric devices. You are required to install the relevant software for your biometric devices which are available in the folder 4.Dependencies.
Here the installation of CrossMatch Iris scanner and CrossMatch Fingerprint scanner are shown in the following section.
CrossMatch Iris Scanner – Install I SCAN Essentials 4.3.0.2 Runtime Double click the setup file (CDAutoRun.exe) in folder ..\4.Dependencies\CrossMatch\VDM-ISCAN.1-3-27-4. The installation screen appears.
Figure 18: Installation screen
• Click Install I SCAN Essentials 4.3.0.2 Runtime to proceed for installation.
Unique Identification Authority of India
15
Installation and Configuration of Aadhaar Enrolment Client
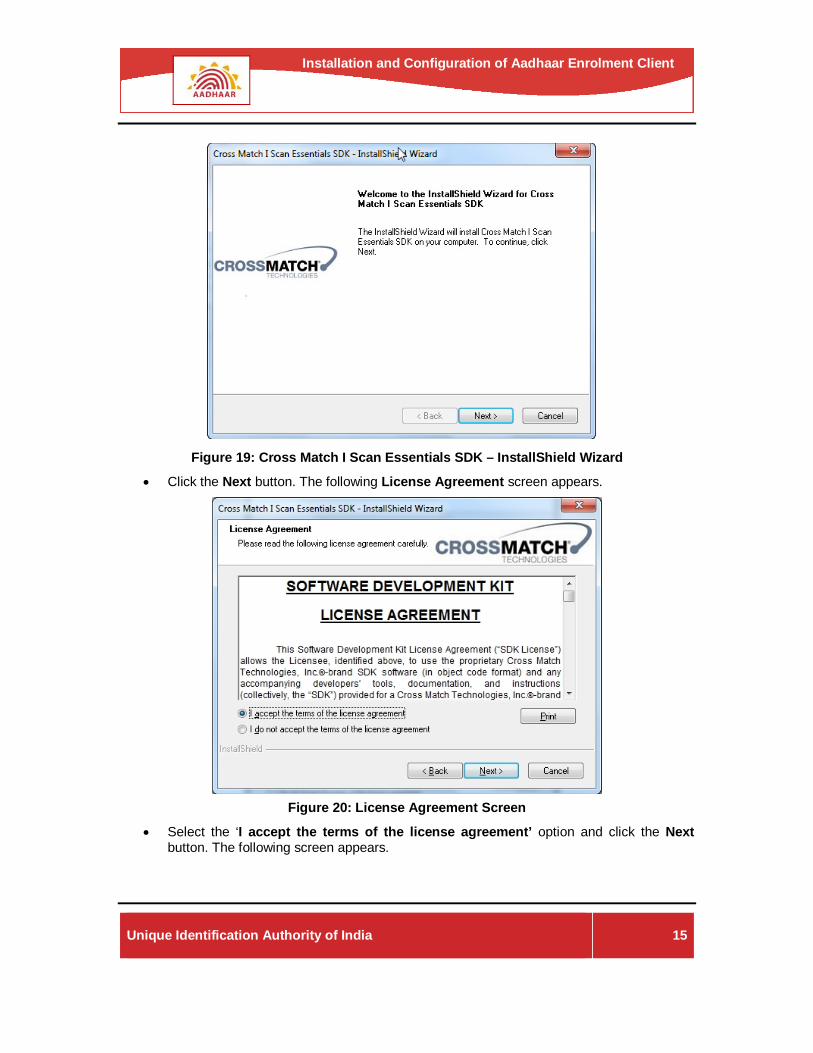
Figure 19: Cross Match I Scan Essentials SDK – InstallShield Wizard
• Click the Next button. The following License Agreement screen appears.
Figure 20: License Agreement Screen
• Select the ‘I accept the terms of the license agreement’ option and click the Next button. The following screen appears.
Unique Identification Authority of India
16
Installation and Configuration of Aadhaar Enrolment Client
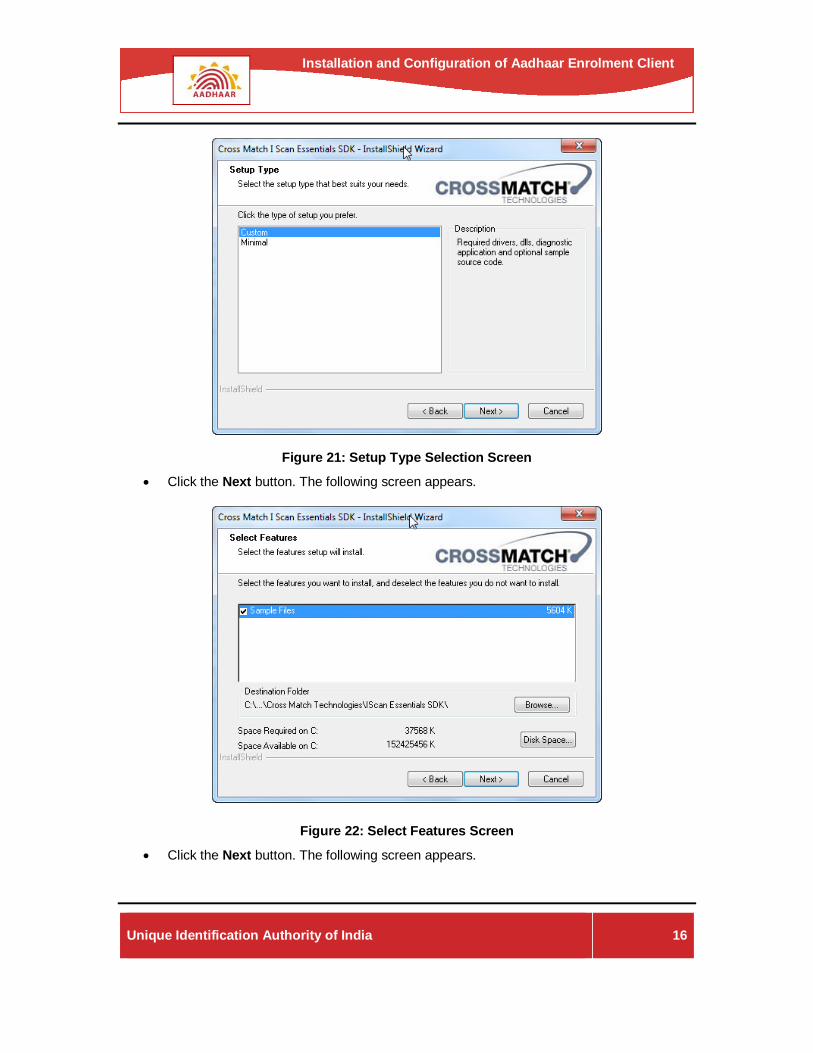
Figure 21: Setup Type Selection Screen
• Click the Next button. The following screen appears.
Figure 22: Select Features Screen
• Click the Next button. The following screen appears.

Unique Identification Authority of India
17
Installation and Configuration of Aadhaar Enrolment Client
Figure 23: Ready to Install the Program Screen
• Click the Install button. The following screen appears.
Figure 24: InstallShield Wizard Complete Screen
• Click the Finish button.

Unique Identification Authority of India
18
Installation and Configuration of Aadhaar Enrolment Client
CrossMatch Iris Scanner – Install Vendor Device Manager IScan Double click the setup file (CDAutoRun.exe) in folder ..\4.Dependencies\CrossMatch\VDM-ISCAN.1-3-27-4. The installation screen appears.
Figure 25: Installation screen
• Click Install Vendor Device Manager IScan to proceed for installation.
Figure 26: Cross Match Vendor Device Manager IScan – Setup Wizard

Unique Identification Authority of India
19
Installation and Configuration of Aadhaar Enrolment Client
• Click the Next button
Figure 27: Cross Match Vendor Device Manager IScan – License Agreement screen
• Select the I Agree radio button and then click the Next button.
Figure 28: Connection to Device Manager screen
• Click the Next button.

Unique Identification Authority of India
20
Installation and Configuration of Aadhaar Enrolment Client
Figure 29: Select Installation Folder screen
• Click the Next button.
Figure 30: Confirm Installation screen
• Click the Next button to start the installation.

Unique Identification Authority of India
21
Installation and Configuration of Aadhaar Enrolment Client
Figure 31: Installation Complete screen
• The above screen shows that the installation is successfully completed. Click the Close button to exit.
CrossMatch Fingerprint Scanner – Install L SCAN Essentials 6.5.1.1 Runtime Double click the setup file (CDAutoRun.exe) in folder ..\4.Dependencies\CrossMatch\VDM-LSCAN.1-3-27-4. The installation screen appears.
Figure 32: Installation screen
Unique Identification Authority of India
22
Installation and Configuration of Aadhaar Enrolment Client
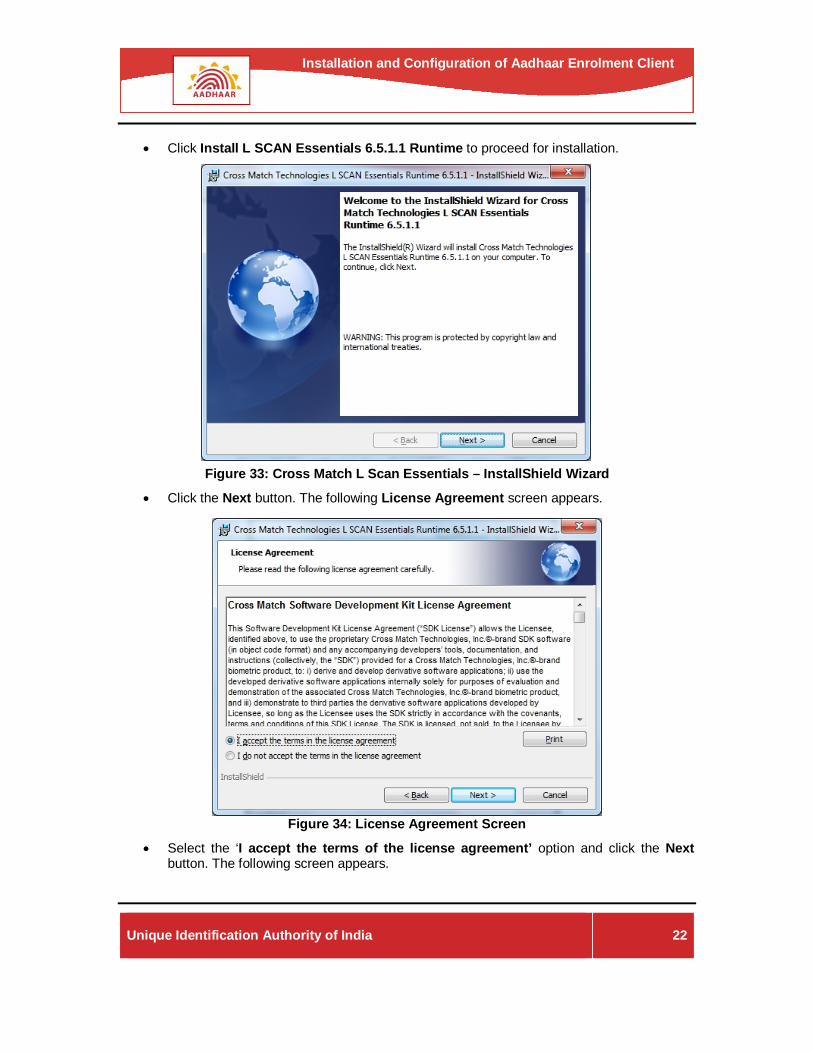
• Click Install L SCAN Essentials 6.5.1.1 Runtime to proceed for installation.
Figure 33: Cross Match L Scan Essentials – InstallShield Wizard
• Click the Next button. The following License Agreement screen appears.
Figure 34: License Agreement Screen
• Select the ‘I accept the terms of the license agreement’ option and click the Next button. The following screen appears.

Unique Identification Authority of India
23
Installation and Configuration of Aadhaar Enrolment Client
Figure 35: Customer Information screen
• Enter User Name and Organization and click Next to go to the following screen.
Figure 36: Setup Type screen
• Select setup type as Complete and click Next.

Unique Identification Authority of India
24
Installation and Configuration of Aadhaar Enrolment Client
Figure 37: Ready to Install screen
• Click Install to begin installation.
Figure 38: InstallShield Wizard Complete Screen
• Click the Finish button.

Unique Identification Authority of India
25
Installation and Configuration of Aadhaar Enrolment Client
CrossMatch Fingerprint Sacnner – Install Vendor Device Manager LScan Double click the setup file (CDAutoRun.exe) in folder ..\4.Dependencies\CrossMatch\VDM-LSCAN.1-3-27-4. The installation screen appears.
Figure 39: Installation screen
• Click Install Vendor Device Manager LScan to proceed for installation.
Figure 40: Cross Match Vendor Device Manager LScan

Unique Identification Authority of India
26
Installation and Configuration of Aadhaar Enrolment Client
• Click the Next button
Figure 41: Cross Match Vendor Device Manager LScan – License Agreement screen
• Select the I Agree radio button and then click the Next.
Figure 42: Connection to Device Manager screen
• Click the Next button.

Unique Identification Authority of India
27
Installation and Configuration of Aadhaar Enrolment Client
Figure 43: Select Installation Folder screen
• Click the Next button.
Figure 44: Confirm Installation screen
• Click Next to start the installation.

Unique Identification Authority of India
28
Installation and Configuration of Aadhaar Enrolment Client
Figure 45: Installation Complete screen
• The above screen shows that the installation is successfully completed. Click the Close button to exit.
End of Installation Once all the components are installed, reboot your computer. The application can be started from the desktop shortcut OR from “Start All Programs UID Authority of India Aadhaar Enrolment Client Aadhaar Enrolment Client”.
Unique Identification Authority of India
29
Installation and Configuration of Aadhaar Enrolment Client
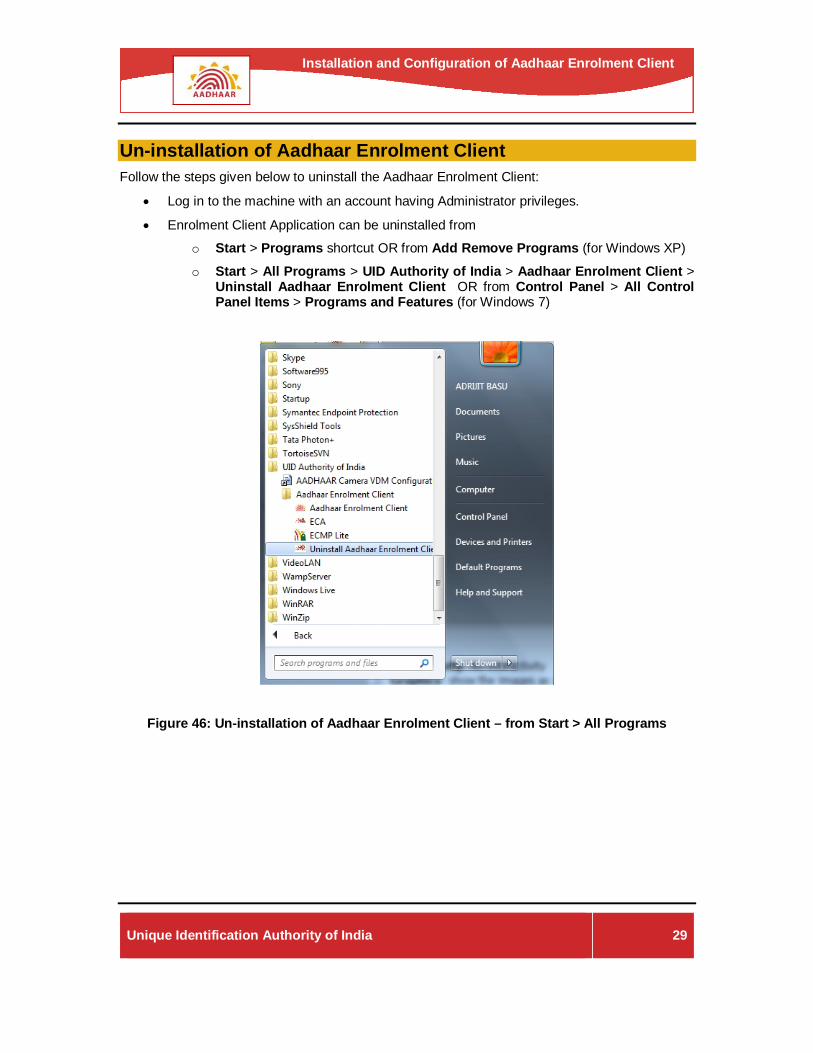
Un-installation of Aadhaar Enrolment Client Follow the steps given below to uninstall the Aadhaar Enrolment Client:
• Log in to the machine with an account having Administrator privileges.
• Enrolment Client Application can be uninstalled from
o Start > Programs shortcut OR from Add Remove Programs (for Windows XP)
o Start > All Programs > UID Authority of India > Aadhaar Enrolment Client > Uninstall Aadhaar Enrolment Client OR from Control Panel > All Control Panel Items > Programs and Features (for Windows 7)
Figure 46: Un-installation of Aadhaar Enrolment Client – from Start > All Programs

Unique Identification Authority of India
30
Installation and Configuration of Aadhaar Enrolment Client
Figure 47: Un-installation of Aadhaar Enrolment Client – from Control Panel
• You need to follow the vendor instructions to uninstall the VDM Software
Unique Identification Authority of India
31
Installation and Configuration of Aadhaar Enrolment Client
Configuring the Aadhaar Enrolment Client The Aadhaar Enrolment Client application needs to be configured by the Technical Administrator of the Enrolment Agency. This registration needs to be done before the actual enrolment process starts. The registration of the client with the server requires connectivity between the server and the client. The client is expected to get registered with the server before the actual enrolment process starts.
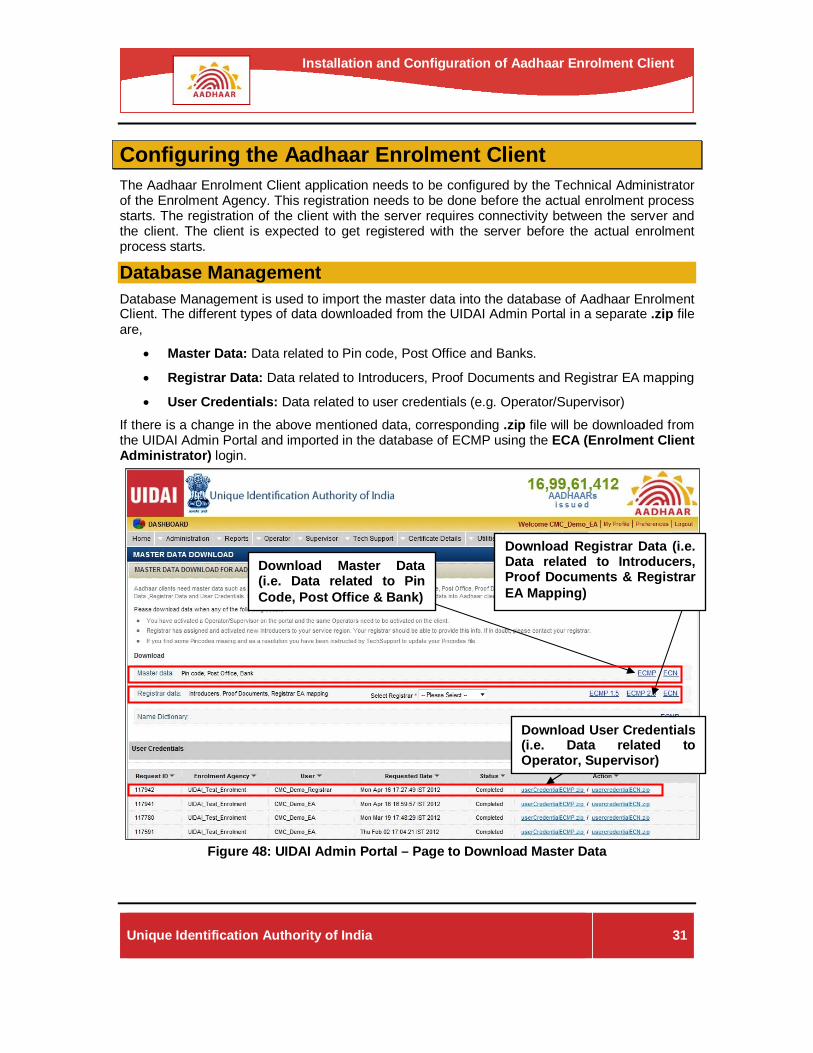
Database Management Database Management is used to import the master data into the database of Aadhaar Enrolment Client. The different types of data downloaded from the UIDAI Admin Portal in a separate .zip file are,
• Master Data: Data related to Pin code, Post Office and Banks.
• Registrar Data: Data related to Introducers, Proof Documents and Registrar EA mapping
• User Credentials: Data related to user credentials (e.g. Operator/Supervisor)
If there is a change in the above mentioned data, corresponding .zip file will be downloaded from the UIDAI Admin Portal and imported in the database of ECMP using the ECA (Enrolment Client Administrator) login.
Figure 48: UIDAI Admin Portal – Page to Download Master Data
Download Master Data (i.e. Data related to Pin Code, Post Office & Bank)
Download Registrar Data (i.e. Data related to Introducers, Proof Documents & Registrar EA Mapping)
Download User Credentials (i.e. Data related to Operator, Supervisor)
Unique Identification Authority of India
32
Installation and Configuration of Aadhaar Enrolment Client
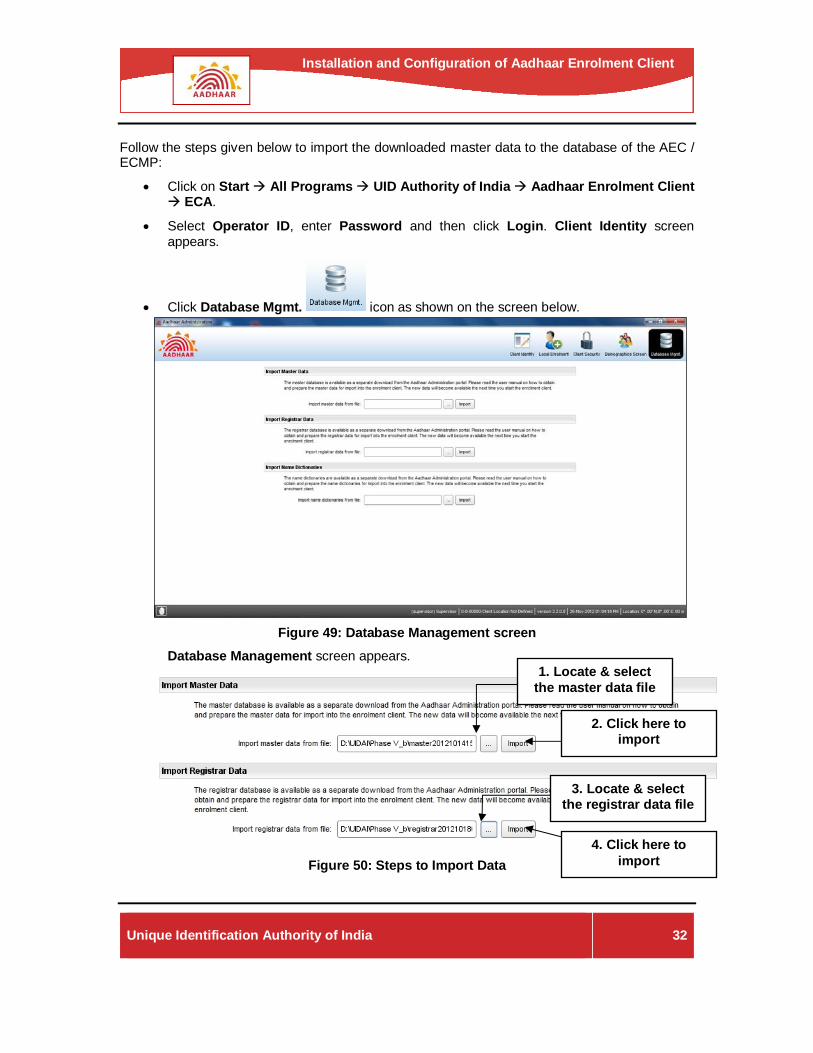
Follow the steps given below to import the downloaded master data to the database of the AEC / ECMP:
• Click on Start All Programs UID Authority of India Aadhaar Enrolment Client ECA.
• Select Operator ID, enter Password and then click Login. Client Identity screen appears.
• Click Database Mgmt. icon as shown on the screen below.
Figure 49: Database Management screen Database Management screen appears.
Figure 50: Steps to Import Data
1. Locate & select the master data file
2. Click here to import
3. Locate & select the registrar data file
4. Click here to import

Unique Identification Authority of India
33
Installation and Configuration of Aadhaar Enrolment Client
• Go to Import Master Data section and click . Locate the downloaded file, select it and click Import.
• Go to Import Registrar Data section and click . Locate the downloaded file, select it and click Import.
• The Name Dictionaries are available as a separate download from the Aadhaar Administration portal. Download the file from the portal. Go to Import Name Dictionaries
section and click . Locate the downloaded file, select it and click Import.
Client Security The following functionalities are available in Client Security screen:
• Import User Credentials
• External Encryption and Decryption
Import User Credentials User Credential file is required to activate operator / supervisor for Aadhaar Enrolment Client. Follow the steps to add the user credential.
1. User has to download the User Credential file (.xml) from the portal as (.zip) format as shown in the above section.
2. On unzipping the (.zip) file, you will get (.xml) file. The user-credential (.xml) file is digitally signed and user will not be able to edit.
3. Click on Client Security icon to get the screen as shown below.
Figure 51: Client Security screen

Unique Identification Authority of India
34
Installation and Configuration of Aadhaar Enrolment Client
Figure 52: Import User Credentials
• Go to Import User Credentials section and click . Locate the downloaded file, select it and click Import.
External Encryption and Decryption Some registrars involved in enrolment, may require KYR+ data in encrypted format. Similarly some registrars may use encrypted pre-enrolment data files for importing pre-enrolment data to enrolment client.
In both scenarios, the encryption and decryption engine has to be provided by registrars and the administrator has to set the configurations for these engines in this section of the Client Security screen.
The steps for configuring the external encryption and decryption are as follows:
• Place the encryption / decryption engine to be used in the following folder where Aadhaar enrolment client is installed.
"..\..\UID Authority of India\Aadhaar Enrolment Client\bin\<enc/dec engine>"
• Enter command line parameters and password for the encryption engine in the given field.
• Enter command line parameters and password for the decryption engine in the given field.
• Enter password for KYR+ data encryption in the given field.
• Click the Save Preferences button.
Figure 53: External Encryption and Decryption
1. Locate & select the User Credentials file
2. Click here to import
Unique Identification Authority of India
35
Installation and Configuration of Aadhaar Enrolment Client
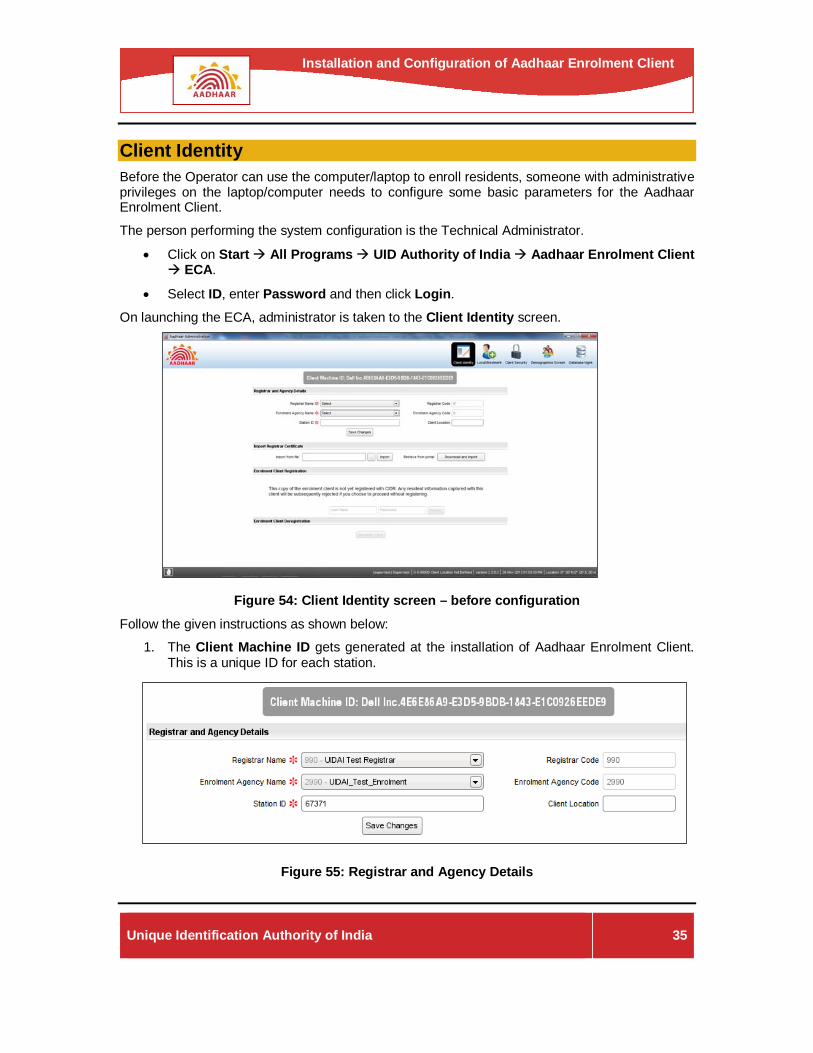
Client Identity Before the Operator can use the computer/laptop to enroll residents, someone with administrative privileges on the laptop/computer needs to configure some basic parameters for the Aadhaar Enrolment Client.
The person performing the system configuration is the Technical Administrator.
• Click on Start All Programs UID Authority of India Aadhaar Enrolment Client ECA.
• Select ID, enter Password and then click Login.
On launching the ECA, administrator is taken to the Client Identity screen.
Figure 54: Client Identity screen – before configuration
Follow the given instructions as shown below:
1. The Client Machine ID gets generated at the installation of Aadhaar Enrolment Client. This is a unique ID for each station.
Figure 55: Registrar and Agency Details

Unique Identification Authority of India
36
Installation and Configuration of Aadhaar Enrolment Client
Note • Registrar has been provided with a 3-digit Registrar code by UIDAI; the Enrolment
Agency must be aware of its Registrar’s code.
• The Enrolment Agency must be aware of its 4-digit Enrolment Agency code provided by UIDAI.
2. In the Registrar and Agency Details section, there are three mandatory fields:
• Registrar Name – Select the Registrar Name from the drop-down list.
• Enrolment Agency Name – Select the Enrolment Agency Name from the drop-down list.
• Station ID – Enter the valid five digit station Id in this field.
3. Once the mandatory fields are entered, click Save Changes. A pop up dialog box will be displayed.
4. Click OK to confirm.
Figure 56: Import Registrar Certificate section
5. There are two ways to import Registrar Certificate:
• Locate and select the downloaded file by clicking on the icon. Click the Import button.
• Click the Download and Import button if the certificate is not downloaded before.
Figure 57: Enrolment Client Registration
6. In the Enrolment Client Registration section, there are two fields available:
• User Name – Enter valid Enrolment Agency portal user id
• Password – Enter valid Enrolment Agency portal password.

Unique Identification Authority of India
37
Installation and Configuration of Aadhaar Enrolment Client
7. Click Register button to register the Client with CIDR.
The message displays that the Aadhaar Enrolment Client is registered with CIDR.
Figure 58: Client Identity screen – after configuration Enrolment client can be deregistered using the Deregister Client button.
Demographics Screen Once you have completed the entry in “Client Identity” screen, Click Demographics Screen icon and the screen given below is displayed.
The screen has two sections:
• Local Language Settings
• Demographics Form Settings
Figure 59: Demographics screen

Unique Identification Authority of India
38
Installation and Configuration of Aadhaar Enrolment Client
Local Language Settings The Local Language Settings section has a Local Language dropdown field with 16 Indian languages.
Figure 60: Local Language Settings
• Select the language to be configured as local language.
• Select the Change for the whole application check box to change the label, menu items, and messages to the local language.
• Click the Save Changes button.
Note Local language changes are not applicable for administration module. Changes will be reflected only in the enrolment client.
Demographic Form Settings If required, administrator can change the label names displayed on the address section of the demographic screen in enrolment client. Administrator can give the desired label name in English and in the local language selected. The same label will reflect on the ECMP Lite and Standard editions. The same label shall be communicated in the KYR+ file as well as Acknowledgement receipts.
Figure 61: Demographics Form Settings

Unique Identification Authority of India
39
Installation and Configuration of Aadhaar Enrolment Client
• Enter the appropriate label, in English, in the given field.
• Enter the label, in the local language, in the given field. (Press Ctrl + K to get the on screen local language keyboard as shown in the figure below.)
Figure 62: Demographics Form Settings – Local Language Keyboard
• Click on ‘Save Changes’ to accept the changed label name

Unique Identification Authority of India
40
Installation and Configuration of Aadhaar Enrolment Client
Local Enrolment / On-Board Before enrolment can start, operators, supervisors and introducer must be on-boarded in the Aadhaar Enrolment Client application by providing fingerprints of all ten fingers. This process is known as Local Enrolment. This is a onetime process and performed after installing Aadhaar Enrolment Client. Enrolment Agency Supervisor / Enrolment Agency Administrator carries out Local Enrolment. Before on-boarding the users, the user credential file should be downloaded from the portal and imported into the application.
By default all the users (operator, supervisors, and introducers) imported into the application will be displayed in this screen. The list can be filtered by type of users, by selecting the appropriate radio button above the screen and clicking on the Reload / Refresh button.
Follow the steps given below to perform local biometric enrolment:
• Click Start All Programs UID Authority of India Aadhaar Enrolment Client ECA; “ECA Login” window appears
• Select ID, enter Password and then click Login; “Client Identity” screen appears
• Click Local Enrolment icon; “Local Enrolment” (On-Board) screen appears
Figure 63: Local Enrolment / On-Board
Unique Identification Authority of India
41
Installation and Configuration of Aadhaar Enrolment Client
In the above screen you will find the following three radio buttons, using which, you can filter the category of users:
• Operator
• Supervisor
• Introducer
By default, All Users radio button is selected.
Note: Status The following are the different types of Status:
• Enrolled: Displayed if user’s biometric verification has been successfully completed and stored in local database.
• Not Enrolled: Displayed if user needs to be on-boarded. If user’s biometric verification has not been successfully completed and stored in the local database, status will appear as ‘Not Enrolled’.
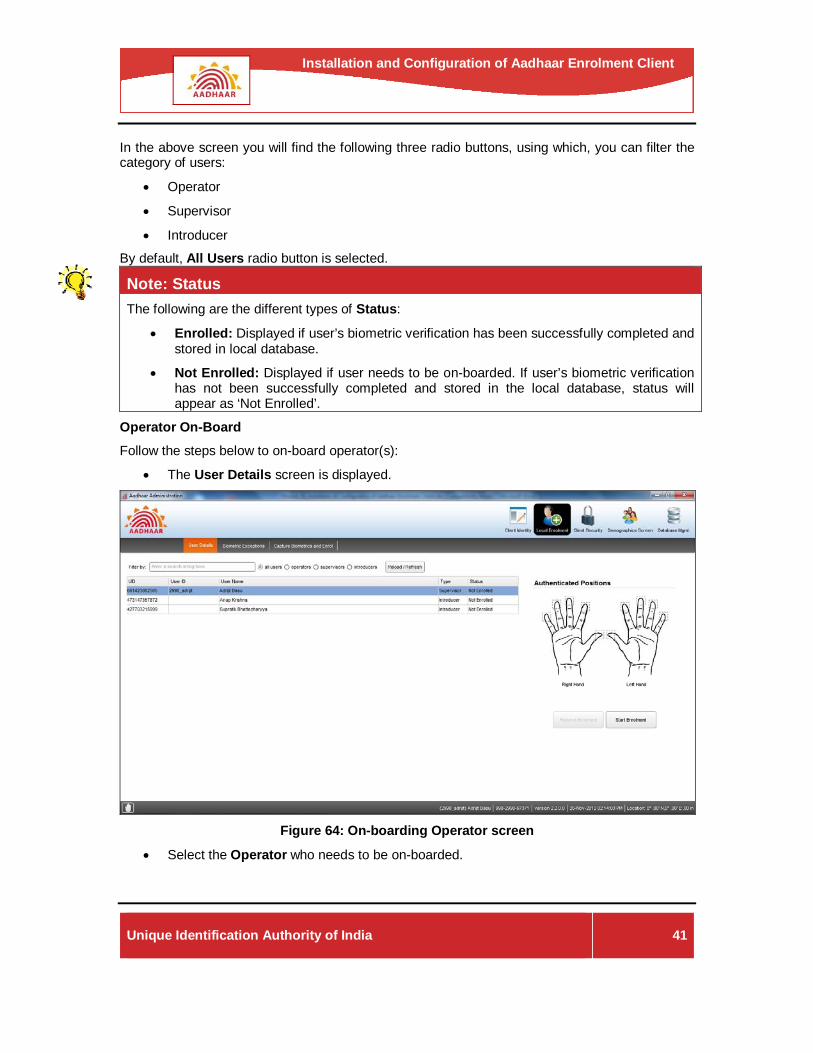
Operator On-Board
Follow the steps below to on-board operator(s):
• The User Details screen is displayed.
Figure 64: On-boarding Operator screen
• Select the Operator who needs to be on-boarded.

Unique Identification Authority of India
42
Installation and Configuration of Aadhaar Enrolment Client
• Click Start Enrolment; Biometric Exception screen is displayed.
Figure 65: Biometric Exception screen
• Select Biometric Exception if the operator has any missing finger.
• Click Capture Biometrics.
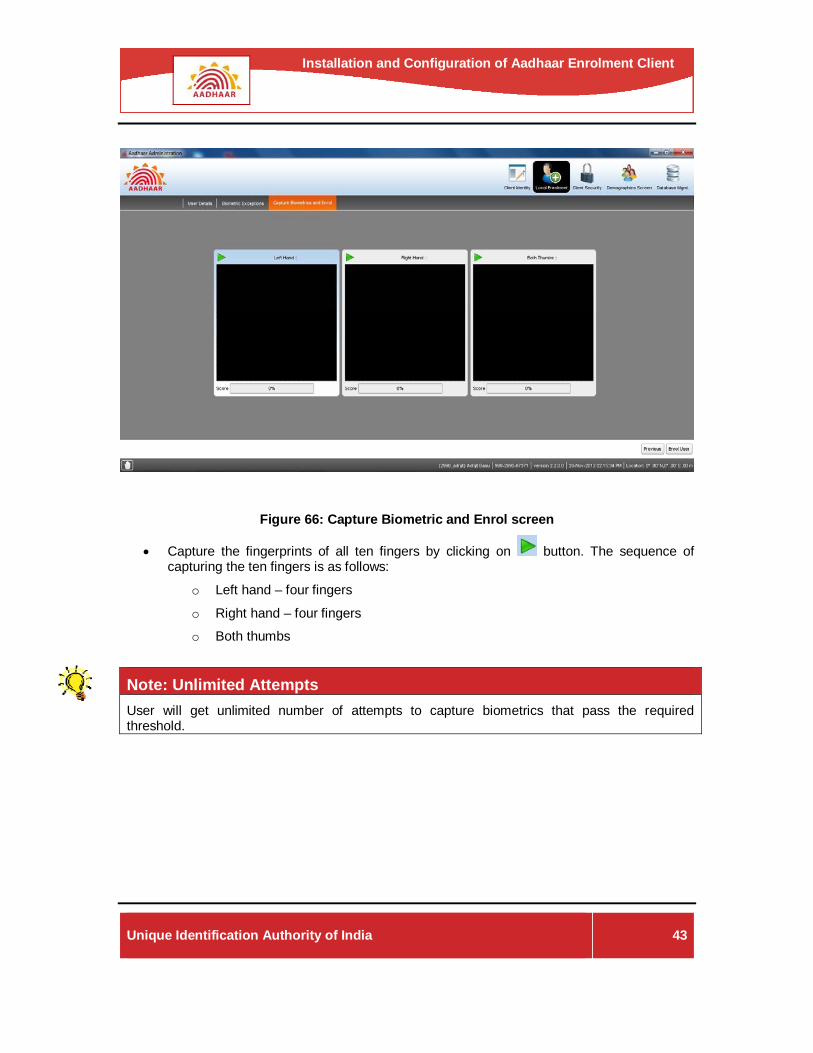
• Capture Biometric and Enrol screen is displayed.
Unique Identification Authority of India
43
Installation and Configuration of Aadhaar Enrolment Client
Figure 66: Capture Biometric and Enrol screen
• Capture the fingerprints of all ten fingers by clicking on button. The sequence of capturing the ten fingers is as follows:
o Left hand – four fingers
o Right hand – four fingers
o Both thumbs
Note: Unlimited Attempts User will get unlimited number of attempts to capture biometrics that pass the required threshold.

Unique Identification Authority of India
44
Installation and Configuration of Aadhaar Enrolment Client
Figure 67: Capture Biometric and Enrol screen – Fingerprint captured
• Click the Enrol User button.
Successful message will be displayed. Operators will be shown as Enrolled in the User Details screen.
Supervisor and Introducer On-Board
Follow the same procedure to on-board the Supervisor and Introducer.
Note For Introducer On-boarding Local Biometric Verification is not mandatory.
Unique Identification Authority of India
45
Installation and Configuration of Aadhaar Enrolment Client
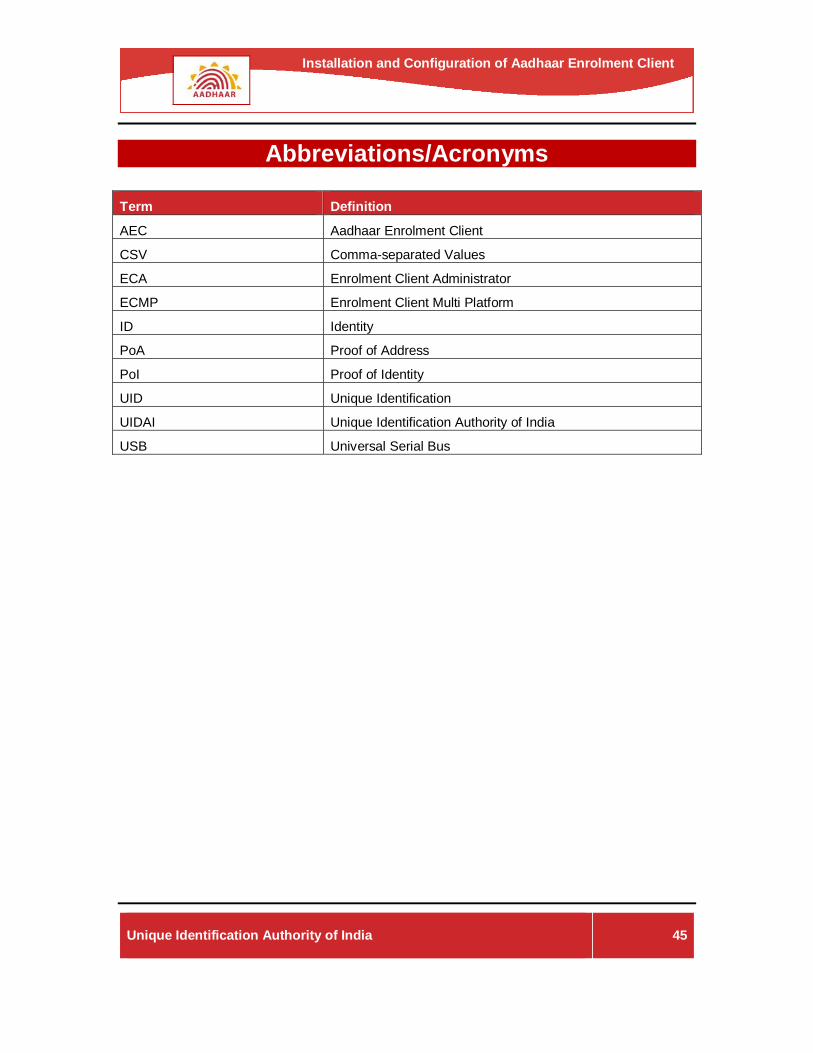
Abbreviations/Acronyms
Term Definition
AEC Aadhaar Enrolment Client
CSV Comma-separated Values
ECA Enrolment Client Administrator
ECMP Enrolment Client Multi Platform
ID Identity
PoA Proof of Address
PoI Proof of Identity
UID Unique Identification
UIDAI Unique Identification Authority of India
USB Universal Serial Bus