Embed Size (px)
Citation preview

USB Microscope
Model No. DMS-USB2
Instructions for Use
www.atp-instrumentation.co.uk
General Notes To Read Before Use Prior to use the user should read the following instructions and familiarise themselves with the functions and operation of the microscope. The microscope is covered by a 1 year warranty against any manufacture defects. When not in use the microscope should be kept in its box to prevent damage. Never open or try to repair the microscope. Never use the microscope for medical purposes. Do not dispose of the product into industrial or consumer waste. ATP Instrumentation Ltd is registered under the WEEE directive for disposal of electronic waste. Please contact ATP’s technical support department for details about disposal and costs applicable. Supplied in the box Before connecting the microscope to your computer please be sure to check that the contents of the box are all present:
USB microscope with a USB connection cable and protective lens cap Chrome Support Stand CD containing image processing software and drivers Instructions for use
The ATP microscope is a multipurpose digital microscope which utilises a USB interface. The microscope provides visual magnification with the ability to view, capture and store still and video images. Adjustable Light intensity, and magnification offer clear and sharp images. The advantage of a direct USB connection means that it is simple to save files directly to a computer or network drive ready for sharing or use in reports.
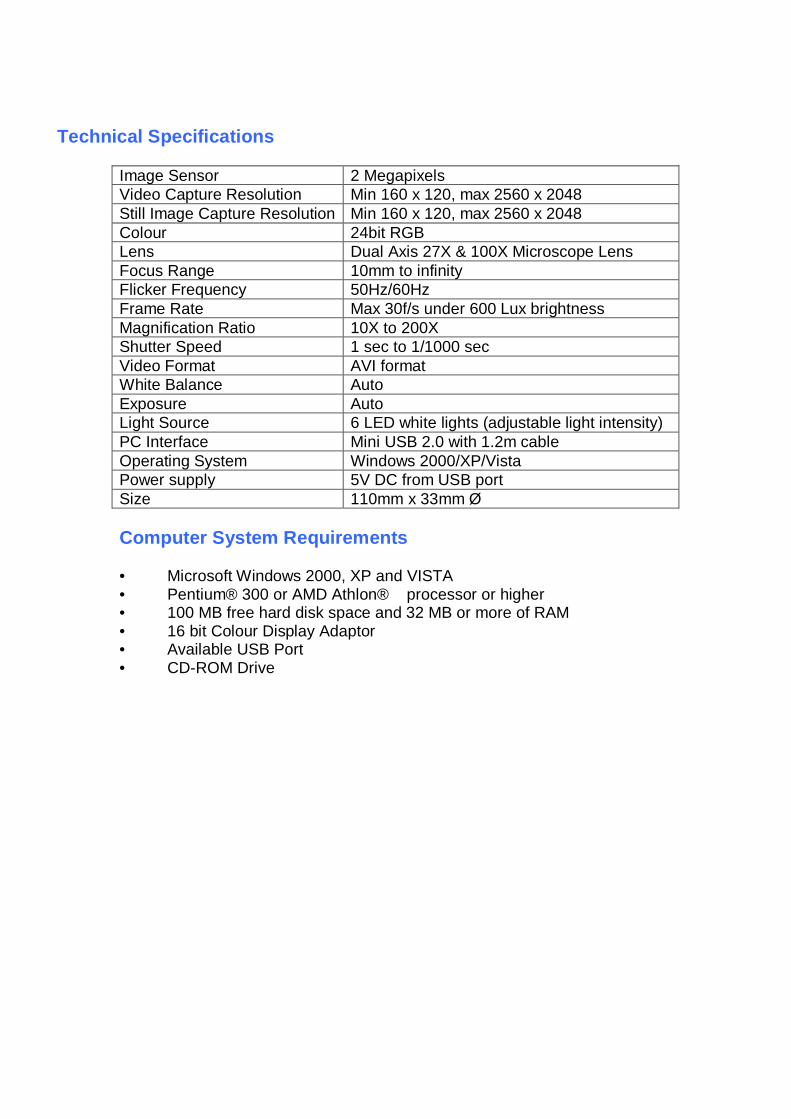
Technical Specifications Image Sensor 2 Megapixels Video Capture Resolution Min 160 x 120, max 2560 x 2048 Still Image Capture Resolution Min 160 x 120, max 2560 x 2048 Colour 24bit RGB Lens Dual Axis 27X & 100X Microscope Lens Focus Range 10mm to infinity Flicker Frequency 50Hz/60Hz Frame Rate Max 30f/s under 600 Lux brightness Magnification Ratio 10X to 200X Shutter Speed 1 sec to 1/1000 sec Video Format AVI format White Balance Auto Exposure Auto Light Source 6 LED white lights (adjustable light intensity) PC Interface Mini USB 2.0 with 1.2m cable Operating System Windows 2000/XP/Vista Power supply 5V DC from USB port Size 110mm x 33mm Ø Computer System Requirements • Microsoft Windows 2000, XP and VISTA • Pentium® 300 or AMD Athlon® processor or higher • 100 MB free hard disk space and 32 MB or more of RAM • 16 bit Colour Display Adaptor • Available USB Port • CD-ROM Drive

Software Installation
1. Place the mini disc supplied with the microscope into your CD/DVD drive on your computer. If a window called ‘Digital Microscope Application Setup Wizard’ does not appear automatically please use the following instructions.
2. Go to ‘Start’ on your desktop’s tool bar and click on ‘Run…’ This will bring up
a window that will allow you to search for the software you are trying to install. Go to browse, my computer and double click on . If this is not showing in ‘my computer’, try removing the disc and start again.
3. In ‘ ’ there is an icon called ‘Digital Microscope Application
Installation’. Double click on this icon to enter ‘Digital Microscope Application Setup Wizard’ to install the software. Make sure all applications other than the installation window are closed, as this could affect the installation process.
4. Follow the instructions on the ‘Digital Microscope Application Setup
Wizard’. Once this has finished, this icon will appear on your desktop. If not the program will be found in “Start > All Programs” under the name ‘digi view’.
5. To complete the installation another window ‘Vimicro USB 2.0 UVC PC
Camera InstallShield Wizard’ will appear. At this point the microscope needs to be connected to your computer to aid the installation. Follow the instructions.
6. The installation should happen automatically,
but before installation is complete, a window called ‘Software Installation’ will appear with the following message opposite. Please press ‘Continue Anyway’, as it has been tested and is safe to use.
7. Press ‘Finish’ on the ‘InstallShield Wizard’
and this icon should appear on your desktop. Connection and Hardware Installation The hardware for this device is installed at the same time as the software. This means that as soon as the installation is complete for both programs, the meter and software are ready to use straight away.
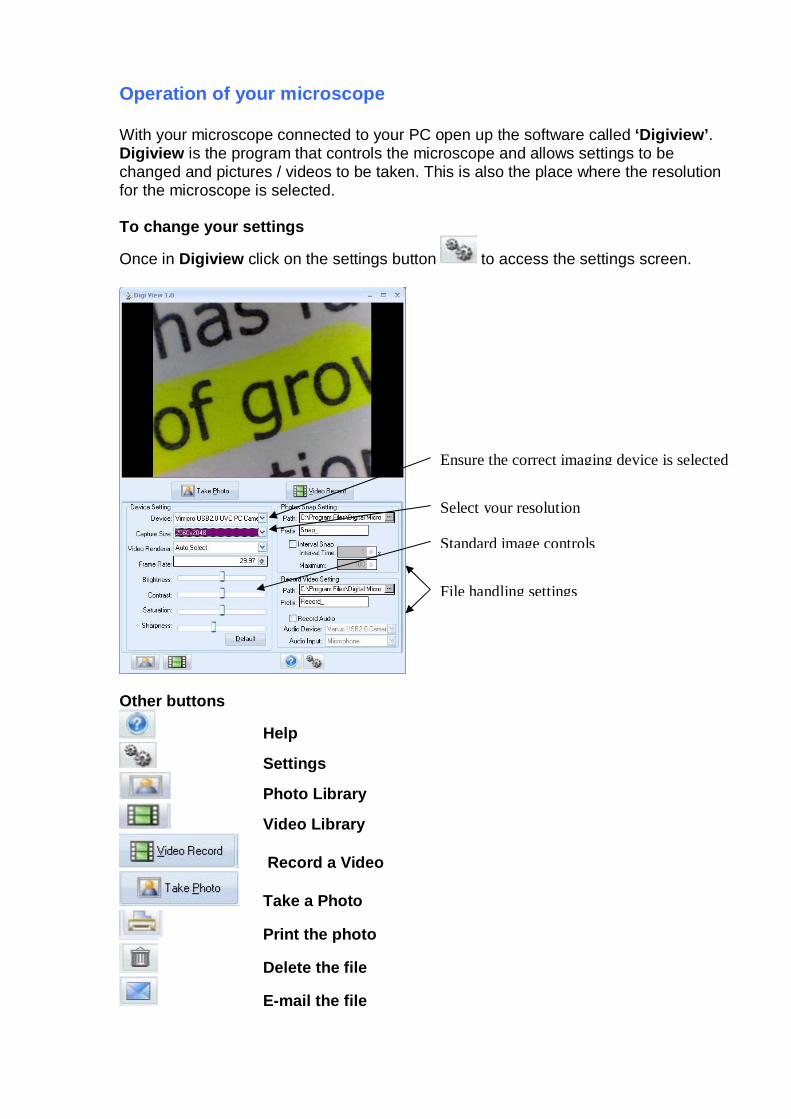
Operation of your microscope With your microscope connected to your PC open up the software called ‘Digiview’. Digiview is the program that controls the microscope and allows settings to be changed and pictures / videos to be taken. This is also the place where the resolution for the microscope is selected. To change your settings
Once in Digiview click on the settings button to access the settings screen.
Other buttons
Help
Settings
Photo Library
Video Library
Record a Video
Take a Photo
Print the photo
Delete the file
E-mail the file
Ensure the correct imaging device is selected
Select your resolution
Standard image controls
File handling settings

To take a photo, press and a jpeg file will appear underneath in the photo library.
To record a video, press and a video will appear in the video library. Trouble Shooting 1. The picture is not clear. Clean the camera lens with a soft and dry cloth. 2. There are black bars on the picture. Delete anything that could be affecting the camera. 3. The picture is too bright or too dark and has very low contrast. Adjust the settings to change the contrast, brightness, etc until it meets your preference. 4. The computer does not detect the USB-Device. Please try the following:
1. Check that the device is turned on. If a blue light is not shining out of the microscope lens, there is no power going through the meter.
2. Check that the computer meets the correct system requirements to use this meter.
3. If there is no window that says ‘new removable device’, check the USB device.
4. Try disconnecting the device, rebooting the system and trying again. 5. If you have connected the meter to a USB hub, please try connecting the
microscope directly to the computer. 6. Check that your USB port provides enough energy to power the unit. If not try
connecting it through a USB hub or if you have a ‘y’ cable try connecting the meter into two USB ports to provide more power.
7. Check that the correct driver is installed in your control panel. 8. Make sure that the USB device is connected to the same USB port used
during installation of the hardware. 9. If this is still unsuccessful try uninstalling the hardware and installing again. 10. Check that the USB port is still functioning correctly. 11. Check that the USB port is activated in the BIOS (Basic Input/Output System)
of your computer. 12. Deactivate the ‘Legacy USB’ function in BIOS. 13. If a USB device is not used for a while, windows will deactivate it. Reconnect
the device and try again. 14. If windows has a problem recognising the USB port when your motherboard
uses an AMD 754 chipset. Please install the ‘Bus Master Drivers’. 5. Each time you connect the device using the USB port, windows tries to re-install it again. 1. Check that you’re using the correct hardware driver. 2. Make sure that you are using the same USB port that you used when installing the hardware. 3. Uninstall the hardware driver and try again.
6. The file transfer is running low
1. Check that the USB port supports USB 2. You need the following service packs for USB 2.0: Windows XP: Service pack 1 or higher. Windows 2000: Service pack 4 or higher.
2. Make sure that you just use one USB device at a time to transfer the files. 3. Check that USB 2.0 is activated in the BIOS settings.
7. The computer does not start anymore or works very slowly. The more USB devices you connect to your computer, the more time it needs to start and load up. Wait until the boot process is finished before you connect the USB device. You can not transfer files on the USB-device.
1. Check that there is enough memory free on your USB device. Delete files that you no longer need or transfer them to your computer to free up the memory.
2. Re-format the USB device with FAT32. (Please note that doing this will delete all saved files).
Technical Support If you are still having problems and you require support with your device please contact us using the details listed below: Tel: 01530 566804 E-mail: [email protected]

ATP Instrumentation Ltd Tournament Way Ivanhoe Ind Est
Ashby De La Zouch Leicestershire
LE65 2UU
Sales: 01530 566800 [email protected]
Technical: 01530 566804
www.atp-instrumentation.co.uk