Embed Size (px)
Citation preview

EVM—setting a standard for the vaccine supply chain
EVM Model Standard Operating Procedures
Consolidated version, with user guide
Effective Vaccine Management Initiative
Version 3 June 2013

Model SOP-guide-v3 2 of 12 03 June 2013
Contents 1. EVM and quality management ........................................................................ 3 2. SOP overview................................................................................................... 4
2.1 SOP content .............................................................................................. 4 2.2 Who should write an SOP? ........................................................................ 5 2.3 Guideline for SOP writing ........................................................................... 5 2.4 How should SOPs be used? ...................................................................... 6
3. Managing SOPs ............................................................................................... 6 3.1 Managing SOPs at national level ............................................................... 7 3.2 Managing SOPs in the workplace .............................................................. 7 3.3 The role of SOPs for training and supervision ............................................ 7 3.4 Reviewing SOPs ........................................................................................ 7 3.5 Revising SOPs ........................................................................................... 7 3.6 SOP management ..................................................................................... 7
4. Using the EVM Model SOPs ............................................................................ 7 4.1 Organization of the Model SOPs ................................................................ 8 4.2 Adapting the Model SOPs .......................................................................... 9 4.3 Writing a new SOP based on the model SOP format ................................. 9
5. Sources of information and advice .............................................................. 10 Revision history .................................................................................................... 11 Annex – Model SOPs............................................................................................. 12

Model SOP-guide-v3 3 of 12 03 June 2013
1. EVM and quality management One of the major goals of the Effective Vaccine Management (EVM) initiative is to help countries to strengthen their quality management (QM) practices because a high standard of quality management is an essential element of an effective vaccine supply chain. A major component of QM is the systematic introduction and effective use of Standard Operating Procedures (SOPs). With this in mind, the EVM team has drafted a set of Model SOPs which countries can to use as a basis for developing their own context-specific documents. This document describes how these model SOPs can be used, how SOPs should be written and managed, and how SOPs in general form a central part of an effective quality management system. A QM system has three pillars: 1. A Quality Plan: This document describes the specific quality practices,
resources and sequence of activities needed to perform a particular service. An example is the WHO/UNICEF EVSM Model Quality Plan1.
2. Quality control (QC): Day-to-day quality control verifies that products and services are of acceptable quality and that they are complete and correct. An example of this is the UNICEF Vaccine Arrival Reporting process. This process is designed to ensure that only vaccine that has been correctly handled during international shipment is received into national vaccine supply chains.
3. Quality assurance (QA): A QM system is only complete if there is systematic monitoring and evaluation to ensure that standards of quality are being met. An example of QA is temperature monitoring. When combined with good cold chain equipment and high quality equipment maintenance, comprehensive temperature monitoring and high quality record-keeping and reporting procedures, enable the immunization programme to demonstrate to an inspector that vaccine has been kept at the correct temperature throughout the supply chain.
Figure 1 shows how SOPs fit into the quality management system for a national vaccine supply chain. On the left hand side in the grey boxes are some of the external standards and drivers within which the QM system must operate. This includes international quality management standards such a ISO 9001; local regulatory requirements such as those that may be imposed by the National Regulatory Authority (NRA); WHO equipment standards, and guidance and the requirements of donor agencies such as GAVI and UNICEF. On the right hand side we have the overall Ministry of Health immunization-related objectives and a national supply chain quality plan which describes the way in which these objectives should be delivered. The grey boxes show the components of the quality plan, as follows: • The detailed standards and policies needed to deliver the overall objective set by
the Ministry of Health. • Specific overall tasks that have to be routinely performed. • Detailed instructions describing how to carry out these tasks – these are the
SOPs.
1 WHO/IVB/04/16-20. WHO/UNICEF Effective Vaccine Store Management Initiative: Modules 1-4. This document was developed for the Effective Vaccine Store Management initiative, a precursor to EVM. Although it does not fully align with EVM, it is still relevant.

Model SOP-guide-v3 4 of 12 03 June 2013
• Finally, a record-keeping system which can be used to demonstrate that each task has been carried out correctly – this is quality assurance.
SOPs are a key component of an effective QM system because they capture specific institutional knowledge. They provide the detailed instructions that employees need to carry out routine activities correctly and consistently. Finally, they can be used for training purposes to teach new employees how to carry out the tasks described correctly. Figure 1 – Elements of a QM system for a national vaccine supply chain
2. SOP overview An SOP is a set of written instructions that describes a routine or repetitive activity. It provides the information needed to perform a task correctly and consistently and it captures institutional knowledge and passes this on to new employees. An SOP is directed at a specific task or a very limited group of tasks, it is NOT a general planning or policy document (e.g. Introduction of a new vaccine), or a general description of a large group of tasks (e.g. Vaccine management) Some SOPs are universal – for example the procedures for conducting the Shake Test should not vary in any way, wherever the test is performed. Others are a mixture of common and context-specific elements – for example, stock control systems should all share common elements, but detailed procedures will vary from country to country. A few SOPs may be almost entirely context-specific – for example, transporting vaccine in boats on an inland waterway.
2.1 SOP content An SOP should be a well-focussed document. It should not contain material that is irrelevant to the target audience. For example, an SOP on looking after provincial level refrigerators should only include information about the particular type(s) of refrigerators used at that level in the supply chain; it is irrelevant to include details about kerosene, gas or solar refrigerators if only mains-electric ice-lined refrigerators are used at the province level.
Ministry of Health policies and objectives e.g. ‘Deliver routine vaccines to all children’
International standards e.g. ISO 9001
National standards e.g. NRA requirements
WHO standards & guidance - PQS for equipment & vaccines - EVM for supply chain - Guidance documents
Donors e.g. GAVI requirements
National supply chain quality plan
Establish detailed policies to achieve MoH objectives
Detailed standards & policies - Equipment standards - Replacement policies
Identify the component tasks required
General procedures - Equipment purchase - Equipment maintenance
Describe how each task is to be safely performed and who should do it
SOPs - Temperature monitoring - Refrigerator maintenance
Maintain records to prove that each task has been carried out correctly
Records, forms and aids - VARs - Temperature records - Training records
Model SOP-guide-v3 5 of 12 03 June 2013
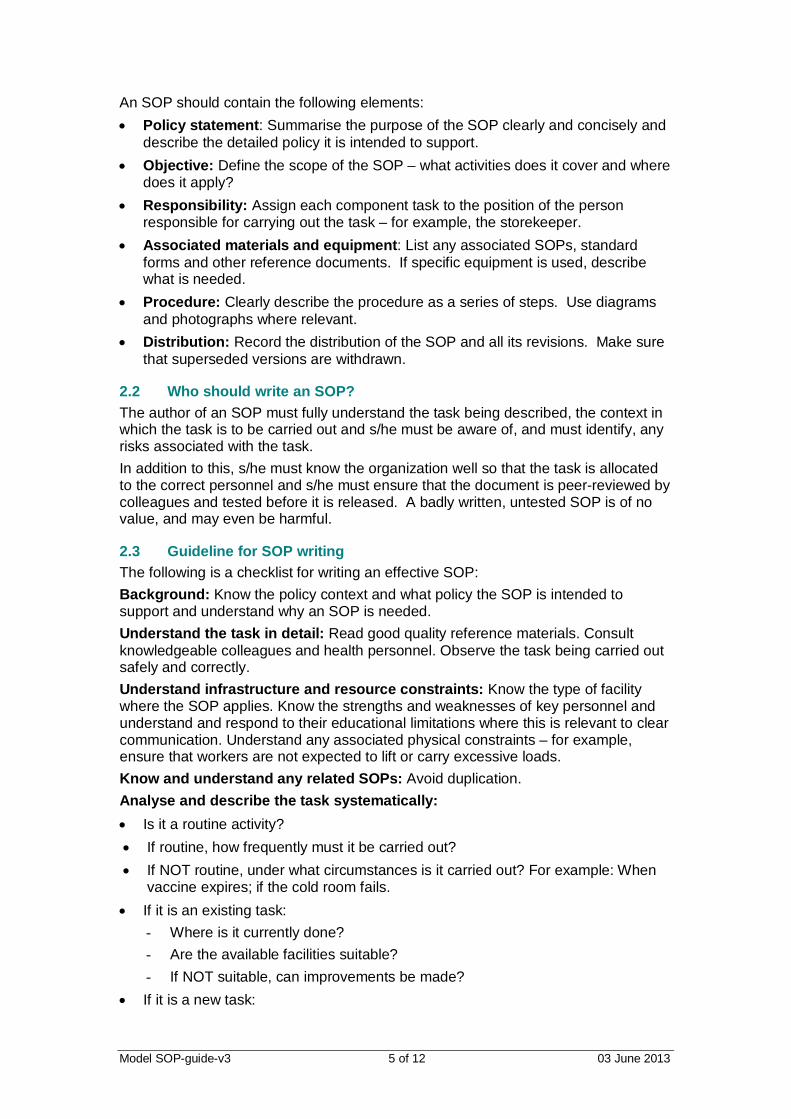
An SOP should contain the following elements: • Policy statement: Summarise the purpose of the SOP clearly and concisely and
describe the detailed policy it is intended to support. • Objective: Define the scope of the SOP – what activities does it cover and where
does it apply? • Responsibility: Assign each component task to the position of the person
responsible for carrying out the task – for example, the storekeeper. • Associated materials and equipment: List any associated SOPs, standard
forms and other reference documents. If specific equipment is used, describe what is needed.
• Procedure: Clearly describe the procedure as a series of steps. Use diagrams and photographs where relevant.
• Distribution: Record the distribution of the SOP and all its revisions. Make sure that superseded versions are withdrawn.
2.2 Who should write an SOP? The author of an SOP must fully understand the task being described, the context in which the task is to be carried out and s/he must be aware of, and must identify, any risks associated with the task. In addition to this, s/he must know the organization well so that the task is allocated to the correct personnel and s/he must ensure that the document is peer-reviewed by colleagues and tested before it is released. A badly written, untested SOP is of no value, and may even be harmful.
2.3 Guideline for SOP writing The following is a checklist for writing an effective SOP: Background: Know the policy context and what policy the SOP is intended to support and understand why an SOP is needed. Understand the task in detail: Read good quality reference materials. Consult knowledgeable colleagues and health personnel. Observe the task being carried out safely and correctly. Understand infrastructure and resource constraints: Know the type of facility where the SOP applies. Know the strengths and weaknesses of key personnel and understand and respond to their educational limitations where this is relevant to clear communication. Understand any associated physical constraints – for example, ensure that workers are not expected to lift or carry excessive loads. Know and understand any related SOPs: Avoid duplication. Analyse and describe the task systematically: • Is it a routine activity? • If routine, how frequently must it be carried out? • If NOT routine, under what circumstances is it carried out? For example: When
vaccine expires; if the cold room fails. • If it is an existing task:
- Where is it currently done? - Are the available facilities suitable? - If NOT suitable, can improvements be made?
• If it is a new task:
Model SOP-guide-v3 6 of 12 03 June 2013
- Is there a suitable location for the task to be carried out correctly? - If NOT, what needs to be done to arrange a suitable location?
Break the task down into sub-tasks: Assign responsible personnel to each sub-task. Describe how to perform each sub-task. Be precise and use photographs or drawings where appropriate. Record-keeping: Describe any associated record-keeping. Give examples of forms to be used and show how they should be completed. Risk assessment: If there are risks associated with the task, describe how these can be mitigated and set out the correct safety procedures. Training: If training is required, give details.
2.4 How should SOPs be used? If it is to be useful, an SOP must be readily accessible in the work area(s) where it is designed to be used. Target personnel must also know that the document exists and where to find it. Supervisors must ensure that new employees are trained to follow all the SOPs that apply to their allocated duties. Supervisors must also check that SOPs are being followed and, if not, must enforce their use.
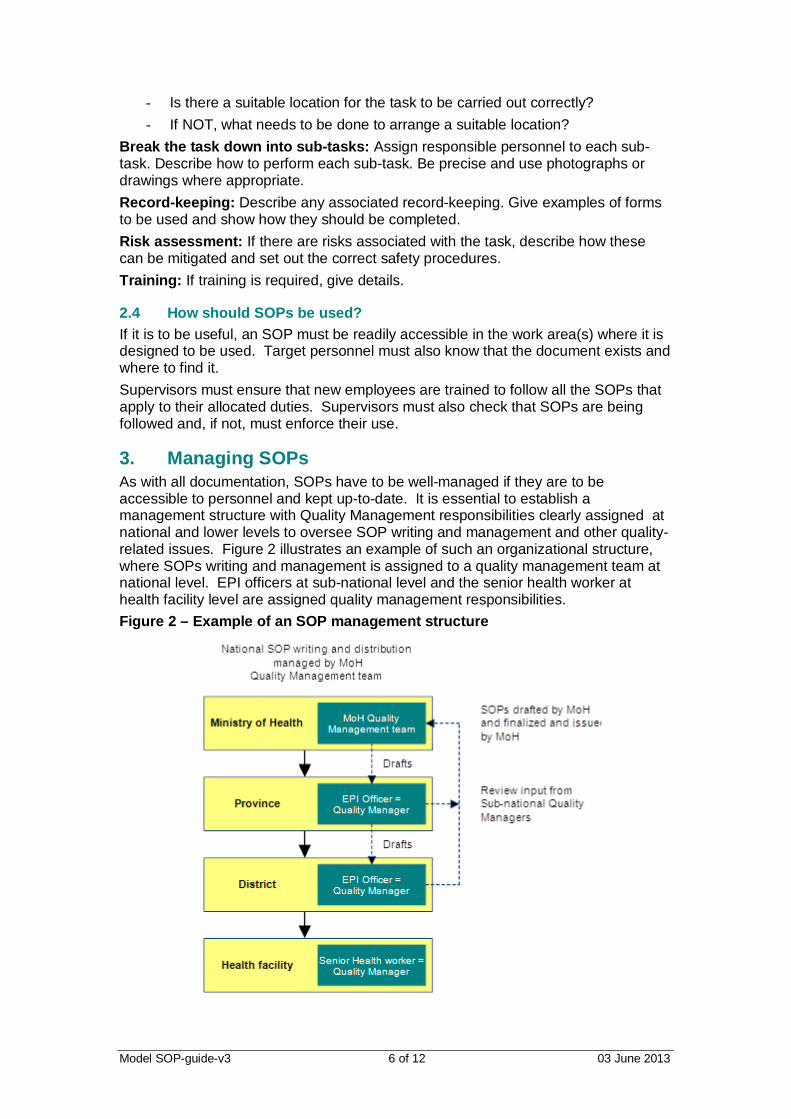
3. Managing SOPs As with all documentation, SOPs have to be well-managed if they are to be accessible to personnel and kept up-to-date. It is essential to establish a management structure with Quality Management responsibilities clearly assigned at national and lower levels to oversee SOP writing and management and other quality-related issues. Figure 2 illustrates an example of such an organizational structure, where SOPs writing and management is assigned to a quality management team at national level. EPI officers at sub-national level and the senior health worker at health facility level are assigned quality management responsibilities. Figure 2 – Example of an SOP management structure

Model SOP-guide-v3 7 of 12 03 June 2013
3.1 Managing SOPs at national level Whenever a new SOP is issued: • Keep the master copy at national level • Distribute copies to every facility which will use it • Record the issue in national and facility level registers
3.2 Managing SOPs in the workplace An SOP is useless unless relevant personnel know that it exists and that it is relates to their responsibilities. Consequently it is essential to ensure that all SOPs are logically filed and positioned where they are needed. It must be possible to access a hard copy of the document during working hours at the place of work.
3.3 The role of SOPs for training and supervision An SOP describes, step-by-step, how a task should be carried out correctly. Accordingly, relevant personnel must receive appropriate training based on the SOP. SOPs are also needed to remind personnel what to do should they forget and they can be used by supervisors to monitor working practices.
3.4 Reviewing SOPs Every SOP must be periodically reviewed to see that it is still relevant and checked to see that the procedures described comply with current best practice and current management needs. Revisions should be made as and when needed if there is a change in policy or practice. There should be a full annual SOP review once a year.
3.5 Revising SOPs Whenever an SOP is updated, the changes must be peer-reviewed and formally approved. The revision history must record details of the changes and the revision number and effective date must be changed.
3.6 SOP management Whenever an SOP is revised or withdrawn it is essential that correct procedures are followed to avoid confusion between new and old or superseded versions. A master copy of the new version must be kept at national level and every copy of the previous revision must be withdrawn at the same time that it is replaced with the new version. The issue and withdrawal process must be recorded in the national and facility level SOP registers.
4. Using the EVM Model SOPs The EVM model SOPs are intended to provide detailed guidance on good practice for many of the routine tasks encountered in immunization logistics and to provide general guidance on writing and managing SOPs. The model documents are a guide to good practice, but they MUST be adapted and translated to suit local needs; they are NOT intended to be used uncritically exactly as they are written. The model SOPs are written and classified so that they fit into the nine EVM criteria. Accordingly, there are groups of SOPs relating to temperature monitoring, maintenance, stock control and so forth. Below is the full list, together with their file names, classified against the nine EVM criteria.

Model SOP-guide-v3 8 of 12 03 June 2013
Table 1 – List of model SOPs
EVM criterion/filename Title
E1-01.1-clear vaccine Clearing vaccines and other supplies through customsE1-02.1-vaccine arrival Vaccine arrival proceduresE1-03.1-consumables arrival Consumables arrival procedures
E2-01.1-temp monitoring Monitoring vaccine storage temperatures at fixed storage locationsE2-02.1-temp accuracy Checking the accuracy of temperature monitoring devicesE2-03.1-correct storage temps Correct storage temperatures for vaccines and diluents
E3-01.1-store emergencies Responding to emergencies in fixed storage locationsE3-02.1-fire drills Fire drills
E4-01.1-CR safe working Safe working in cold rooms and freezer rooms
E5-01.1-store maintenance Looking after store buildingsE5-02.1-CR maintenance Looking after cold rooms and freezer rooms E5-03.1-fridge maintenance Installing and looking after vaccine refrigerators and freezers E5-04.1-generator maintenance Looking after standby generatorsE5-05.1-voltage reg maintenance Looking after voltage regulatorsE5-06.1-fire-equip-maintenance Routine inspection and maintenance of fire safety installations
E6-01.1-computer stock mgt Using computerized stock management systemsE6-02.1-diluent mgt Managing diluents in the supply chainE6-03.1-stock count Conducting a physical stock countE6-04.1-vaccine disposal Safe disposal of expired or damaged vaccine and diluentsE6-05.1-CR storage Storing vaccines and water packs in cold rooms and freezer roomsE6-06.1-fridge storage Storing vaccines and water packs in refrigerators and freezersE6-07.1-dry storage Storing goods in dry storesE6-08.1-fires-safety-housekeeping Fire safety housekeeping routines
E7-01.1-transport temperatures Monitoring temperature exposure during vaccine transport E7-02.1-pack cold box Packing vaccine and diluents for transport, using cold boxesE7-03.1-pack vax carrier Packing vaccine and diluents in vaccine carriersE7-04.1-condition ice packs Conditioning frozen ice packsE7-05.1-refrigerated vehicles Loading and operating refrigerated vehiclesE7-06.1-transport emergencies Responding to emergencies during vaccine transport operations
E8-01.1-shake test When and how to conduct the Shake TestE8-02.1-using VVMs Using Vaccine Vial Monitors
E9-01.1-write SOPs How to write and revise an SOPE9-02.1-manage SOPs How to manage and distribute SOPsEVM-SOP-template.1 EVM SOP template
E7: Distribution
E8: Vaccine management
E9: General programme management
E1: Vaccine arrival
E3: Storage capacity
E4: Buildings, equipment and transport
E5: Maintenance
E2: temperature monitoring
E6: Stock control
All these documents can be downloaded from the EVM website. The EVM initiative is a collaborative effort, so countries are encouraged to comment on the documents and to share examples of SOPs that they themselves have developed.
4.1 Organization of the Model SOPs The content of the model SOPs is organized as described in Section 2.1. General guidance notes are given in grey boxes. These guidance notes are not intended to be included in a country-specific version of the SOP, although country-specific guidance notes may be useful in some cases. The content of some the SOPs will not have to be varied to suit the country context. For example: When and how to conduct the Shake Test is universally applicable.

Model SOP-guide-v3 9 of 12 03 June 2013
Several of the SOPs provide a range of options. For example, Installing and looking after vaccine refrigerators and freezers covers several types of refrigerator: ice-lined, gas, kerosene and solar. Only some of these options are likely to be relevant in a specific country and only one of them may be relevant at a particular supply chain level within that country. You will need to delete all the irrelevant material to make a useful and focused SOP. A few SOPs reference specific named equipment; for example: Looking after voltage regulators refers to a particular model of regulator. With this example, you will have to write a version of the SOP which applies to the specific equipment you have installed, using the model SOP as a content guideline. Finally, some of the SOPs only provide a guidance framework. For example: Clearing vaccines and other supplies through customs consists largely of guidance notes. A country-specific version will need to be drafted which takes account of local procedures and agreements. Before adapting the ‘technical’ SOPs for country use (E1 to E8 in Table 1), users are strongly advised first to read the two ‘management’ SOPs in E9 (How to write and revise an SOP and How to manage and distribute SOPs). Modify these two documents and the EVM SOP template to meet your own requirements and use the final format you have agreed with your colleagues as a basis for all your SOPs.
4.2 Adapting the Model SOPs Once you have chosen an SOP to adapt, proceed as follows: • Read the model SOP carefully:
- Identify sections which already match country requirements. - Identify sections which need to be added, deleted or amended. - Discuss with colleagues.
• Adapt the model SOP: - Make agreed changes. - Describe the person responsible for each step in the procedure by his or her
position; DO NOT name specific individuals, because personnel may change. • Have revisions peer-reviewed by colleagues. • Field-test the SOP to make sure that it correctly describes the intended task and
that is fully understood by the target audience. Make any necessary changes. • Obtain final approval before distribution.
4.3 Writing a new SOP based on the model SOP format Use the model SOP template – adapt this as necessary to suit your local needs and procedures and then draft the new SOP as follows: • Describe the procedure in clearly identified steps: • Use clear, unambiguous language. • State who is responsible for each step in the procedure by his or her position; DO
NOT name specific individuals, because personnel may change. • Check that the draft completely describes the process from start to finish. • Add diagrams and pictures as necessary. • Include examples of relevant records or forms. • Cross-refer to related SOPs. • Have the draft peer-reviewed by colleagues.

Model SOP-guide-v3 10 of 12 03 June 2013
• Field-test the SOP and make necessary changes. • Obtain final approval before distribution.
5. Sources of information and advice If you want to translate a Model SOP for preliminary review purposes, try using Google Translate and select the ‘Translate document’ option. Automatic translations need careful checking, but they can be a useful starting point. Set out below are some useful sources of background information which may give you access to helpful information for drafting or revising SOPs. WHO websites: • EVM website :
http://www.who.int/immunization_delivery/systems_policy/logistics/en/index6.html • IVB document centre:
http://www.who.int/immunization/documents/en/ • PQS products catalogue:
http://www.who.int/immunization_standards/vaccine_quality/pqs/en/ TechNet21 e-forum : http://www.technet21.org Path Vaccine Resource Library: www.path.org/vaccineresources John Snow, Inc: http://www.jsi.com/JSIInternet/Resources/publications.cfm Management Sciences for Health: http://www.msh.org

Model SOP-guide-v3 11 of 12 03 June 2013
Revision history Date Change summary Reason for change Approved
10 Oct 2011 Original
25 Apr 2011 Annex added For consolidated pdf document
03 Jun 2013 Table 1 updated. SOPs E3-02.1, E5-06.1 and E6-08.1 added.
New material

Model SOP-guide-v3 12 of 12 03 June 2013
Annex – Model SOPs The complete current set of model SOPs follows. Microsoft Word versions of the individual SOPs are available as separate downloads. These can be used as the basis fro country-specific documents.

Title: Clearing vaccines and other products through customs
Code: EVM-SOP-E1-01 Version number: 1
Effective date: 07 Oct 2011 Page: 1 of 5
E1-01.1-clear vaccine
Standard Operating Procedure Clearing vaccines and other products
through customs
Approvals Name Date Signature
Authorized by:
Reviewed by:
Revised by:
Original author:
Version history
No Date Description of change Reason for change
1 07 Oct 2011 Original
2
3
4
5
Disclaimer: This is a model standard operating procedure. It incorporates generic guidance only. Countries are encouraged to adapt it as necessary to suit local requirements. Queries or comments may be addressed to [email protected]

Title: Clearing vaccines and other products through customs
Code: EVM-SOP-E1-01 Version number: 1
Effective date: 07 Oct 2011 Page: 2 of 5
E1-01.1-clear vaccine
Table of content Distribution .................................................................................................................2 1. Policy and objectives.........................................................................................3
1.1 Policy............................................................................................................3 1.2 Objectives.....................................................................................................3
2. Responsibility.....................................................................................................4 3. Associated materials and equipment...............................................................4 4. Procedure............................................................................................................4
4.1 Preparatory tasks .........................................................................................4 4.2 Procedure for vaccines.................................................................................4 4.3 Procedure for syringes and safety boxes .....................................................4 4.4 Procedure for other immunization supplies ..................................................4 4.5 Training ........................................................................................................5
5. Related documents and SOPs ..........................................................................5
Distribution Distribute this SOP to the following:
Facility type Position(s)

Title: Clearing vaccines and other products through customs
Code: EVM-SOP-E1-01 Version number: 1
Effective date: 07 Oct 2011 Page: 3 of 5
E1-01.1-clear vaccine
1. Policy and objectives
1.1 Policy The arrival of vaccines, syringes, safety boxes and other immunization supplies in country, their subsequent clearance through customs and their transport to the primary vaccine store are the most critical stages in a vaccine shipment. Experience shows that this is often the time when mistakes are made and delays occur. Damage to the shipment is often the result. The smooth arrival and handling of vaccine shipments depends on the manner in which each element in the delivery process is performed. Given the number of parties involved, (for example the UNICEF Supply Division, the manufacturer, the forwarder, the airline, the UNICEF field office, custom authorities, clearing agents, the EPI Unit, etc), and the need to communicate accurate, time-sensitive information, it is essential that strict guidelines are in place to determine and assign responsibilities for every step of the process. These responsibilities are described in the terms and conditions of the tender documents, and are further detailed in the individual contracts, with specific conditions depending on the country of destination. Responsible personnel should discuss and agree standard clearance and contingency arrangements with the customs authorities. Ensure that baggage handlers and customs personnel are adequately trained to handle vaccines and similar temperature-sensitive products. Ensure that arrangements will be followed whenever the vaccine arrives - including weekends and holidays. If it is possible to do so, draw up a Memorandum of Understanding (MoU) between the parties. The MoU should also establish contingency arrangements in the event of cold room, air-conditioning or heating failure. These procedures should be reviewed whenever problems arise and, in all cases, at least once a year. The risk of vaccine being mishandled is significantly reduced if the customs authorities will allow the shipment to be taken directly to the primary store before it has been formally cleared. Under this arrangement the vaccine is temporarily held ‘in bond’ at the primary store, and cannot be used until a customs officer has visited the store to clear the shipment. If there is any doubt about the quality of the cold storage facilities at the port of entry, this option should be negotiated as part of the MoU. Vaccines must be cleared through customs so that the shipment can be transported to the primary store, checked and unpacked within 24 hours of flight arrival. All other immunization supplies must be cleared through customs as rapidly as possible so as to avoid disruption to the immunization programme.
1.2 Objectives This SOP sets out the procedures that must be followed to meet the policy requirements set out above. Note: This SOP covers the immediate handling and customs clearance procedures that must be followed by baggage handling and customs personnel when vaccines and other commodities arrive at the airport, sea port or border crossing. Identify the procedures that are appropriate for your own context. Make sure that these are negotiated with, and agreed by, the port management and by the customs department.
Title: Clearing vaccines and other products through customs
Code: EVM-SOP-E1-01 Version number: 1
Effective date: 07 Oct 2011 Page: 4 of 5
E1-01.1-clear vaccine
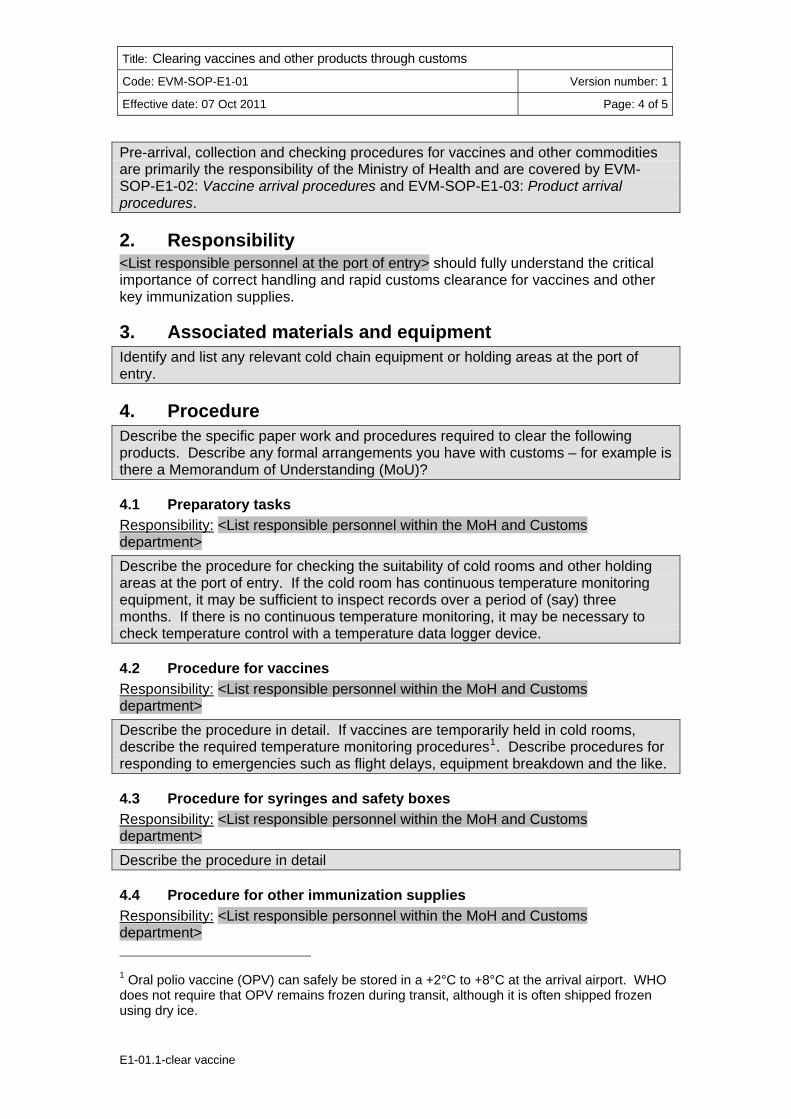
Pre-arrival, collection and checking procedures for vaccines and other commodities are primarily the responsibility of the Ministry of Health and are covered by EVM-SOP-E1-02: Vaccine arrival procedures and EVM-SOP-E1-03: Product arrival procedures.
2. Responsibility <List responsible personnel at the port of entry> should fully understand the critical importance of correct handling and rapid customs clearance for vaccines and other key immunization supplies.
3. Associated materials and equipment Identify and list any relevant cold chain equipment or holding areas at the port of entry.
4. Procedure Describe the specific paper work and procedures required to clear the following products. Describe any formal arrangements you have with customs – for example is there a Memorandum of Understanding (MoU)?
4.1 Preparatory tasks Responsibility: <List responsible personnel within the MoH and Customs department> Describe the procedure for checking the suitability of cold rooms and other holding areas at the port of entry. If the cold room has continuous temperature monitoring equipment, it may be sufficient to inspect records over a period of (say) three months. If there is no continuous temperature monitoring, it may be necessary to check temperature control with a temperature data logger device.
4.2 Procedure for vaccines Responsibility: <List responsible personnel within the MoH and Customs department> Describe the procedure in detail. If vaccines are temporarily held in cold rooms, describe the required temperature monitoring procedures1. Describe procedures for responding to emergencies such as flight delays, equipment breakdown and the like.
4.3 Procedure for syringes and safety boxes Responsibility: <List responsible personnel within the MoH and Customs department> Describe the procedure in detail
4.4 Procedure for other immunization supplies Responsibility: <List responsible personnel within the MoH and Customs department> 1 Oral polio vaccine (OPV) can safely be stored in a +2°C to +8°C at the arrival airport. WHO does not require that OPV remains frozen during transit, although it is often shipped frozen using dry ice.

Title: Clearing vaccines and other products through customs
Code: EVM-SOP-E1-01 Version number: 1
Effective date: 07 Oct 2011 Page: 5 of 5
E1-01.1-clear vaccine
Describe the procedure in detail
4.5 Training Responsibility: <List responsible personnel within the MoH and Customs department> Baggage handling and customs personnel require training in correct handling of vaccines. Ensure that procedures are in place to repeat the training when new personnel are employed.
5. Related documents and SOPs EVM-SOP-E1-02: Vaccine arrival procedures. EVM-SOP-E1-03: Product arrival procedures.

Title: Vaccine arrival procedures
Code: EVM-SOP-E1-02 Version number: 1
Effective date: 07 Oct 2011 Page: 1 of 22
E1-02.1-vaccine arrival
Standard Operating Procedure Vaccine arrival procedures
Approvals Name Date Signature
Authorized by:
Reviewed by:
Revised by:
Original author:
Version history
No Date Description of change Reason for change
1 07 Oct 2011 Original
2
3
4
5
Disclaimer: This is a model standard operating procedure. It incorporates generic guidance only. Countries are encouraged to adapt it as necessary to suit local requirements. Queries or comments may be addressed to [email protected]

Title: Vaccine arrival procedures
Code: EVM-SOP-E1-02 Version number: 1
Effective date: 07 Oct 2011 Page: 2 of 22
E1-02.1-vaccine arrival
Table of content Distribution .................................................................................................................2 1. Policy and objectives.........................................................................................3
1.1 Policy............................................................................................................3 1.2 Objectives.....................................................................................................3
2. Responsibility.....................................................................................................3 3. Associated materials and equipment...............................................................3 4. Procedures..........................................................................................................4
4.1 Procedure for vaccines purchased through UNICEF ...................................4 4.1.1 Check advance notice documentation and prepare for the arrival .......4 4.1.2 Collect vaccine from the <name port of entry>.....................................4 4.1.3 Inspect the shipment ............................................................................5 4.1.4 Stock the shipment ...............................................................................5 4.1.5 Report problems ...................................................................................6 4.1.6 Follow-up action ...................................................................................6
4.2 Procedure for vaccines purchased from other sources................................6 4.2.1 Check advance notice documentation and prepare for the arrival .......7 4.2.2 Collect the vaccine from the airport ......................................................7 4.2.3 Inspect the shipment ............................................................................7 4.2.4 Report problems ...................................................................................7 4.2.5 Stock the shipment ...............................................................................7 4.2.6 Follow-up action ...................................................................................7
4.3 Record-keeping ............................................................................................7 5. Related documents and SOPs ..........................................................................7 Annex 1: UNICEF VAR guidelines ............................................................................8
Distribution Distribute this SOP to the following:
Facility type Position(s)

Title: Vaccine arrival procedures
Code: EVM-SOP-E1-02 Version number: 1
Effective date: 07 Oct 2011 Page: 3 of 22
E1-02.1-vaccine arrival
1. Policy and objectives
1.1 Policy The vaccine arrival process is a critical stage in the management of the supply chain because this is the point at which ownership of the vaccine is transferred from the vaccine supplier to the Ministry of Health. The integrity of vaccines on arrival in the country of destination must be checked by verifying that the cold chain has been properly maintained throughout the period of transport as confirmed by the temperature-monitoring devices contained in the shipment. This check is most conveniently recorded on a standard Vaccine Arrival Report (VAR). Responsible personnel must ensure that all vaccines, including those received from UN sources, are licensed for use in their country.
a. All vaccine shipments received from UNICEF Supply Division and from other vaccine suppliers must be thoroughly checked as soon as they arrive to ensure that the cold chain has been correctly maintained during transport.
b. All accompanying paperwork must be inspected to ensure that the required lot release procedures have been followed.
Any problems that are identified must be resolved in accordance with agreed procedures.
1.2 Objectives This SOP describes how to check an incoming vaccine shipment so as to ensure that the vaccine is in good condition and has been supplied with all relevant paperwork before it is accepted into the national vaccine supply chain.
2. Responsibility <List all personnel responsible for vaccine arrival>. In the case of shipments received from UNICEF Supply Division, the MoH is responsible for reporting back to UNICEF Supply Division in Copenhagen via the UNICEF country office. Supply Division will be responsible for record keeping, for follow-up with manufacturers, freight forwarders and WHO, and for providing timely feedback to countries. <Define responsibilities for vaccines procured from other sources. If the MoH is procuring, the vaccine manufacturer should be contacted; if a donor is procuring the donor needs to be contacted>.
3. Associated materials and equipment <Describe vehicles used to transport vaccine from the port of entry or to collect from local manufacturers>.

Title: Vaccine arrival procedures
Code: EVM-SOP-E1-02 Version number: 1
Effective date: 07 Oct 2011 Page: 4 of 22
E1-02.1-vaccine arrival
4. Procedures
4.1 Procedure for vaccines purchased through UNICEF Note: This section describes the procedures that should be followed for vaccines procured through UNICEF Supply Division. There may be exceptions to the procedures described below – for example in the case of emergency outbreaks. These exceptions should be set out in the SOP. If the local National Regulatory Authority (NRA) requires UNICEF-procured vaccines to be cleared by the NRA, specify the additional procedures required. The procedures follow those set out in The UNICEF Vaccine Arrival Report: Guidelines for completion, January 2007 version – see Annex 1. The current version of the UNICEF Vaccine Arrival Report (VAR) must be completed for all UNICEF-supplied vaccines. See Section 4.2 for the procedure to follow for vaccines received from other sources.
4.1.1 Check advance notice documentation and prepare for the arrival
Responsibility: <List the personnel responsible> a. Inform UNICEF-SD well in advance which week days are acceptable for
scheduling arrivals. b. Between five, and not more than ten days before the vaccine arrives, you
should receive the following documents by email or fax1: - Shipping notification from UNICEF’s freight forwarding agent - Copy of airway bill (AWB) - Copy of packing list - Copy of invoice - Copy of release certificate Check these documents and file them in the vaccine arrival file.
c. Record the flight arrival details and notify the personnel who will collect the vaccine from the airport.
d. Inform customs of the flight arrival details. e. Confirm readiness to receive vaccines by telephone or email if the airline
requires you to do so as a condition of delivery. f. Make arrangements for the <describe type of vehicle used> to be at the
airport in time to collect the vaccine.
4.1.2 Collect vaccine from the <name port of entry>
Responsibility: <List the personnel responsible> a. Clear the shipment through customs within <state maximum allowable
period – preferably less than 24 hours> of flight arrival. b. Transport the vaccine to the primary store by <describe type of vehicle
used> and unload the vehicle immediately upon arrival.
1 Mailing original shipping documents before the shipment is unworkable and risky. Emailed or faxed copies are acceptable.

Title: Vaccine arrival procedures
Code: EVM-SOP-E1-02 Version number: 1
Effective date: 07 Oct 2011 Page: 5 of 22
E1-02.1-vaccine arrival
4.1.3 Inspect the shipment
Responsibility: <List the personnel responsible> a. Inspect the shipment when it arrives at the CMS and check for physical
damage or missing items. b. Open each shipping container, and stop the electronic shipping indicators
(Q-Tag or similar) where these are included in the shipment. Mark the indicator with the unique ID of the container from which it comes so that you know to which container it belongs.
c. Check that the following documents accompany the shipment; - Invoice - Packing list - Release certificate (Note: this is the Lot Release certificate from the
NRA in the country of origin) - Vaccine Arrival Report
d. Check the status of the electronic shipping indicators. Record the details of any alarms on the Electronic Device Alarm Report form. You must complete this form for every indicator device which shows an alarm. Make a photocopy or scan of the electronic indicator screen showing the alarm condition(s).
e. If there are no electronic shipping indicators, check the status of the CCM cards and record any colour changes on the CCM card. Make a photocopy or scan of the card recording the colour change details.
f. Record all required details for each vaccine in the shipment on the Vaccine Arrival Report (VAR) form supplied for that vaccine. Note: Do not record details of more than one vaccine type on a VAR. A separate VAR form must be completed for each vaccine – e.g. one for OPV, one for BCG, etc. The VAR must be signed by <List the people responsible. Two people should sign the form – the person who did the inspection and the Store Manager or EPI Manager >
g. Hand a copy of the VAR, the Electronic Device Alarm Report form and/or the CCM card record to the UNICEF country office within 48 hours of the flight arrival. The country office will forward a copy to UNICEF Supply Division.
4.1.4 Stock the shipment
Responsibility: <List the personnel responsible> a. Vaccine accepted: If no problems are identified and the vaccine is
accepted, unpack the shipping containers and place the vaccine in the cold chain (cold room, freezer room, refrigerator or freezer). Place the diluents in the diluent dry store. Immediately record the arrival in the stock control system.
b. Vaccine rejected: If problems are identified, do not unpack the vaccine until the problem is resolved. Instead, stack the affected shipping container(s) together with the temperature monitoring device(s) on pallets in a designated area of the cold room or freezer room, as appropriate. Clearly mark each container “DO NOT USE”. Place any associated diluents in a designated area of the diluent dry store. Clearly mark each

Title: Vaccine arrival procedures
Code: EVM-SOP-E1-02 Version number: 1
Effective date: 07 Oct 2011 Page: 6 of 22
E1-02.1-vaccine arrival
container “DO NOT USE”. DO NOT record the arrival in the stock control system.
4.1.5 Report problems
Responsibility: <List the personnel responsible> In accordance with the procedure shown below, report the problems identified to the UNICEF country office, UNICEF Supply Division and the Ministry of Health. .
Arrival of vaccines and customs clearance. ↓
Inspection at central cold store. Vaccine Arrival Report (VAR) filled and signed. ↓
Copy of VAR (including copy of device screen) sent to UNICEF Country Office ↓
Copy of VAR (including copy of device screen) sent to Ministry of Health ↓
Copy of VAR (including copy of device screen) sent to UNICEF Supply Division, Copenhagen (SD) ↓
INDICATOR OK DEFECTIVE
Advance notification Recorded SD to follow-up with forwarder
Vaccine type/expiry Recorded SD to follow-up with manufacturer Eventual report to WHO/IVB/QSS for
further investigation if necessary
Shipping Documents Recorded SD to follow-up with forwarder or manufacturer
Eventual report to WHO/IVB of problems related to release certificate
Quantities received Recorded SD to follow-up with forwarder/manufacturer
Status of temperature indicators Recorded SD to report to WHO/IVB, investigation to be carried out
4.1.6 Follow-up action
Responsibility: <List the personnel responsible> If problems have been reported, carry out follow-up activities as agreed with UNICEF.
4.2 Procedure for vaccines purchased from other sources Note: Procedures for vaccines purchased direct from the vaccine manufacturer must be defined by the country. Set out below are the suggested headings. It is recommended that, wherever possible, the procedure should follow the UNICEF arrangements. Be sure to specify all actions needed for Lot Release, including actions by the local National Regulatory Authority (NRA). Include exceptions – for example in the case of emergency outbreaks.

Title: Vaccine arrival procedures
Code: EVM-SOP-E1-02 Version number: 1
Effective date: 07 Oct 2011 Page: 7 of 22
E1-02.1-vaccine arrival
4.2.1 Check advance notice documentation and prepare for the arrival
Responsibility: <List the personnel responsible>
4.2.2 Collect the vaccine from the airport
Responsibility: <List the personnel responsible>
4.2.3 Inspect the shipment
Responsibility: <List the personnel responsible>
4.2.4 Report problems
Responsibility: <List the personnel responsible>
4.2.5 Stock the shipment
Responsibility: <List the personnel responsible>
4.2.6 Follow-up action
Responsibility: <List the personnel responsible>
4.3 Record-keeping Retain VARs and all correspondence relating to unsatisfactory shipments or procedures for a minimum period of <state period> years.
5. Related documents and SOPs EVM-SOP-E1-01: Clearing vaccine and other products through customs
EVM-SOP-E1-03: Product arrival procedures
EVM-SOP-E6-02: Managing diluents in vaccine stores
EVM-SOP-E7-05: Loading and operating refrigerated vehicles
EVM-SOP-E8-02: Using Vaccine Vial Monitors Book G: Chapter 09, Section 7 – Coordinating, Receiving and Inspecting
Vaccine Supplies. UNICEF, 2009.

Title: Vaccine arrival procedures
Code: EVM-SOP-E1-02 Version number: 1
Effective date: 07 Oct 2011 Page: 8 of 22
E1-02.1-vaccine arrival
Annex 1: UNICEF VAR guidelines Refer to the following pages for guidance on completing the UNICEF VAR form.

THE UNICEF VACCINE ARRIVAL REPORT
Guidelines for completion
VAR Guidelines January 2007

Table of Contents Introduction...................................................................................................................... 3 Completing the Vaccine Arrival Report ......................................................................... 3 Heading............................................................................................................................................4 Advance notice ................................................................................................................................4 Flight arrival .....................................................................................................................................4 Shipments details.............................................................................................................................5 Documents packed with the shipment .............................................................................................6 Coolant and shipping indicators.......................................................................................................6 General comments...........................................................................................................................9 Name and signature on behalf of consignee ...................................................................................9 Returning the Vaccine Arrival Report ............................................................................ 9
VAR Guidelines January 2007
2

Introduction The purpose of the Vaccine Arrival Report (VAR) is to contribute to efforts to ensure vaccine security. The VAR is designed to:
Monitor cold chain conditions during transport; Monitor compliance with shipping instructions; Ensure adequate record keeping; Serve as a basis for documenting claims or initiating corrective action if problems occur.
Inspection of vaccines upon arrival is carried out so as to:
Assure security of the vaccines at the point of delivery; Record shipment details; Provide indicators for monitoring vaccine delivery performance.
The consignee receiving the vaccines is responsible for the inspection and acceptance of each shipment, and should complete the VAR. In those cases where UNICEF is not the consignee, it is the responsibility of UNICEF Country Offices to assist in the implementation of the VAR.
UNICEF Country Offices are responsible for reporting back to UNICEF Supply Division in Copenhagen, which will be responsible for record keeping, for follow-up with manufacturers, freight forwarders and WHO, and for providing timely feedback to countries.
The following procedure must be adhered to immediately upon arrival of vaccine shipments:
a) Customs clearance; b) Thorough inspection of all vaccines, and of all diluent or droppers; c) VAR to be completed and signed; d) VAR to be sent to UNICEF Country Office within 24 hours of vaccine arrival; e) Copy of VAR to be sent to UNICEF Supply Division, Copenhagen by e-mail or fax.
Completing the VAR A separate VAR must be completed for every vaccine shipment. Therefore in the case of split delivery of the same purchase order, a separate VAR must be completed for each delivery.
Due to differences between vaccines in temperature sensitivity and packaging, only one type of vaccine should be recorded on each VAR. Therefore in the case of combined deliveries, a separate VAR should be completed for each vaccine in the shipment. For deliveries of DTP-HepB+Hib, one VAR should be used for DTP-HepB and another VAR for Hib, again due to differences in temperature sensitivity and packaging.
Diluent and droppers must be detailed on the same VAR as the vaccines with which they have been shipped.
In the event of short shipment (quantity received does not match quantity on packing list) of vaccine, diluents or droppers, where the quantity that was short-shipped is delivered at a later date, separate VARs must be completed for each delivery.
All sections of the VAR must be completed.
VAR Guidelines January 2007
3

HEADING
The following information should be detailed in the heading of the VAR:
Recipient country; Date of report; Report number the report number is for internal record keeping purposes, and should follow the format
COUNTRY CODE-YEAR-REPORT NUMBER, e.g. BUR-2003-001 (in the case of Burundi). In the event of short shipment, the report numbers for each delivery should follow the format BUR-2003-001.1, BUR-2003-001.2, etc.;
Place, date and time of inspection; Date and time of entry of vaccines into cold store.
ADVANCE NOTICE
The following information must be provided in this section:
Date on which copies of shipping documents were received by fax or e-mail; Confirmation that the aforementioned fax or e-mail comprised of the pre-advice (cover sheet stating delivery details),
air waybill (AWB), invoice and packing list highlight either YES or NO for each document to indicate whether or not each was received.
Although shipping documents are always sent to the consignee, it is the responsibility of UNICEF Country Offices to ensure that all relevant parties in the recipient country have a copy of the shipping documents immediately upon receipt of the documents by the Country Office.
Figure 1: Advance notice – in this example the documents were received by fax and/or e-mail on 13th January 2003
FLIGHT ARRIVAL
The following information must be provided in this section:
AWB number; Destination airport; Scheduled estimated time of arrival (ETA) the estimated arrival date and time as stated on the initial pre-advice; Actual time of arrival this is the date and time when the aircraft delivering the shipment actually arrives at the
destination.
Figure 2: Flight arrival – in this example the shipment was scheduled to arrive in Bujumbura at 1100 local time on 20th January 2003, but
was slightly delayed and arrived at 1430 local time on 20th January 2003
VAR Guidelines January 2007
4

SHIPMENT DETAILS
The following general information must be provided:
Number of the purchase order issued by UNICEF Supply Division this number is in the format 450xxxxx; Generic name of vaccine being delivered (not the brand name); Number of doses per vial most vaccines supplied by UNICEF contain either 1, 2, 5, 6, 10, 20 or 50 doses in each
vial; Name of manufacturer of vaccine being delivered.
The following information must be provided regarding the actual quantity of vaccine received:
Batch numbers; Quantity of shipping cartons per batch; Quantity of vials per batch; Expiry date of each batch; Total quantity of shipping cartons; Total quantity of vials; (In the event of short shipment, also state total quantity of shipping cartons and vials that has not been delivered).
The following information must be provided regarding the actual quantity of diluent or droppers received:
Batch numbers; Quantity of shipping cartons per batch; Quantity of vials or droppers per batch; Expiry date of each batch; Total quantity of shipping cartons; Total quantity of vials or droppers; (In the event of short shipment, also state total quantity of shipping cartons and vials/droppers that has not been
delivered).
Continue on a separate page if necessary.
Figure 3: Shipment details – in this example the 47 shipping cartons of Hepatitis B vaccine came from two batches and contained the full total of 72,500 10-dose vials, as did the 37 shipping cartons of diluent
VAR Guidelines January 2007
5

DOCUMENTS PACKED WITH THE SHIPMENT
The following information must be provided in this section:
Confirmation that the invoice, packing list and release certificate are packed with the shipment highlight either YES or NO for each document to indicate whether or not each was included;
Details of any other documents packed with the shipment.
The shipping carton containing the documents (often carton number one) should be indicated on the packing list. If the documents are delivered by other means, for example by courier, please indicate this under GENERAL COMMENTS at the bottom of the page.
Figure 4: Documents packed with the shipment – in this example the invoice, packing list and release certificate were packed with the
shipment as required
COOLANT AND SHIPPING INDICATORS
The following general information must be provided:
Number of shipping cartons that have been inspected (this should equal the total number of shipping cartons in the shipment);
Type of coolant used mark x in the box next to DRY ICE and/or ICE PACKS; Type of temperature monitors used mark x in the box next to VVM and/or COLD CHAIN CARD and/or
ELECTRONIC DEVICE. For ELECTRONIC DEVICE specify TYPE (e.g., Q-TAG, 3M, SPYTEMP, etc.)
If electronic temperature monitoring devices have been used, you must open all cartons to remove the devices. This has to be done one-by-one.
Each device has a bar code. Box number 1 should contain, along with shipping documents, a list of box numbers with the bar code\serial number of corresponding devices included in each box. When you open a box and remove the electronic device, you must also write down the box number on the backing card for easy reference.
Currently there are three types of 10-day electronic temperature monitoring devices that are listed in the Product Information Sheets (PIS): Q-tag® 2 plus, Spytemp® II OMS, and 3M temperature logger TX® 01/02.
Figure 5: Stopping the device
STOPPING THE DEVICE
Open ALL shipping cartons and repeat the following steps for each electronic device:
Q-tag® 2 plus
Spytemp® II OMS
3M TX®
VAR Guidelines January 2007
6

PRESS the STOP button for 3 seconds. When stopped,
run signal at the right bottom corner should disappear and stop sign should appear at the left bottom corner of the
screen.
PRESS buttons 1 and 2 together for 3 seconds.
When stopped, ◄ symbol pointing to ON at the bottom
left corner of the screen should disappear.
PRESS the STOP button for 3 seconds. When stopped, ►
symbol indicating running status should disappear and symbol should appear at the right bottom
corner of the screen.
When stopped the screen looks as follows:
Q-tag® 2 plus
See stop sign on the left
bottom corner of the screen.
Spytemp® II OMS
There is no ◄ symbol pointing to ON at the bottom
left corner of the screen.
3M TX®
See symbol at the right bottom
corner of the screen.
Figure 6: Interpreting the device indicators
After stopping the devices, you need to check the alarm status of each one. The "OK" screen is displayed as follows:
Q-tag® 2 plus
OK sign is seen in the middle of the screen.
Spytemp® II OMS
▼ sign is pointing to OK at the bottom right of the
screen.
3M TX®
OK sign is seen at the bottom left corner of the screen.
If there are any ALARMS the ALARM screen is displayed as follows:
Q-tag® 2 plus
ALARM sign is seen in the middle of the screen. ◄ symbol indicating the type of alarm also appears on the left side of the screen pointing to the types of alarms. The ◄ symbol closest to the left edge indicates the
first alarm, while all later alarms are indicated in the "next"
column.
Spytemp® II OMS
▼ sign is seen pointing to alarm conditions at the
bottom of the screen. More than one ▼ sign will appear
if more than one alarm condition has been violated.
3M TX®
Crossed-out OK in a circle is displayed at the bottom of the
screen. The numbers 1, 2 and/or 3 on the top right side of the screen indicate which alarms have been triggered, and in addition indicate
the sequence of the alarms (e.g. 1 = first alarm triggered).
VAR Guidelines January 2007
7
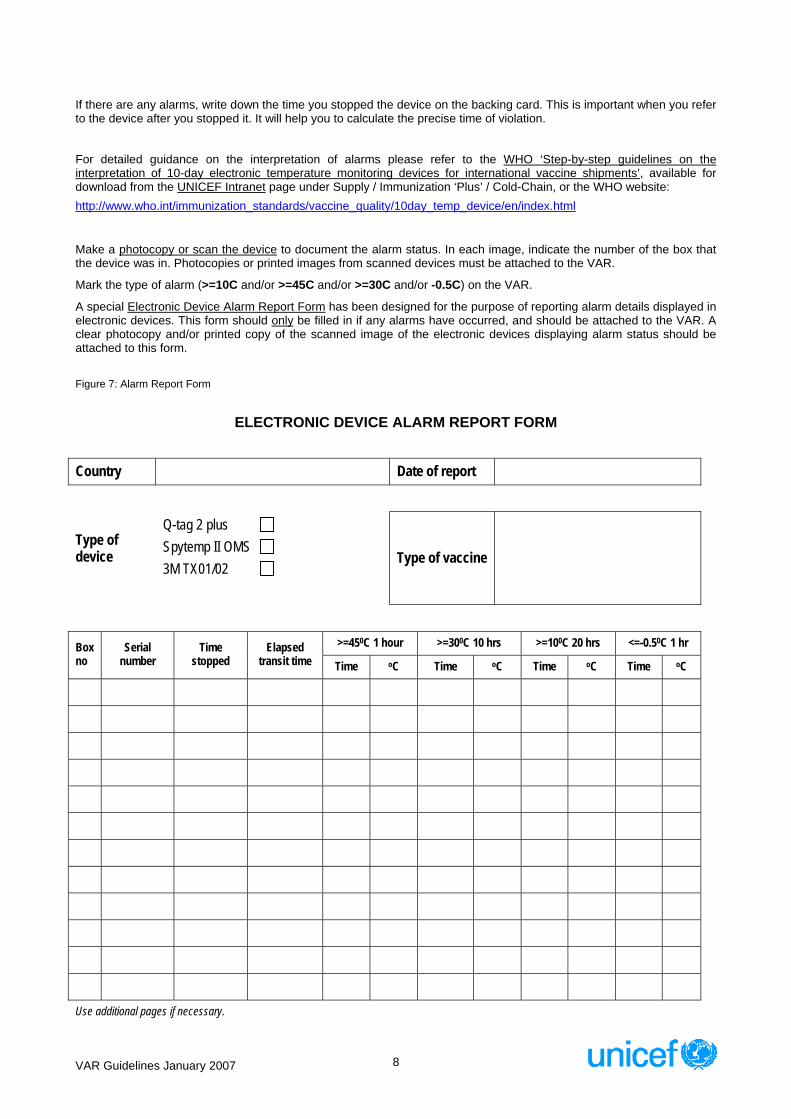
If there are any alarms, write down the time you stopped the device on the backing card. This is important when you refer to the device after you stopped it. It will help you to calculate the precise time of violation.
For detailed guidance on the interpretation of alarms please refer to the WHO ‘Step-by-step guidelines on the interpretation of 10-day electronic temperature monitoring devices for international vaccine shipments’, available for download from the UNICEF Intranet page under Supply / Immunization ‘Plus’ / Cold-Chain, or the WHO website: http://www.who.int/immunization_standards/vaccine_quality/10day_temp_device/en/index.html
Make a photocopy or scan the device to document the alarm status. In each image, indicate the number of the box that the device was in. Photocopies or printed images from scanned devices must be attached to the VAR.
Mark the type of alarm (>=10C and/or >=45C and/or >=30C and/or -0.5C) on the VAR.
A special Electronic Device Alarm Report Form has been designed for the purpose of reporting alarm details displayed in electronic devices. This form should only be filled in if any alarms have occurred, and should be attached to the VAR. A clear photocopy and/or printed copy of the scanned image of the electronic devices displaying alarm status should be attached to this form.
Figure 7: Alarm Report Form
ELECTRONIC DEVICE ALARM REPORT FORM
Country Date of report
Type of device
Q-tag 2 plus
Spytemp II OMS
3M TX01/02
Type of vaccine
>=450C 1 hour >=300C 10 hrs >=100C 20 hrs <=-0.50C 1 hr Box no
Serial number
Time stopped
Elapsed transit time Time oC Time oC Time oC Time oC
Use additional pages if necessary.
VAR Guidelines January 2007
8
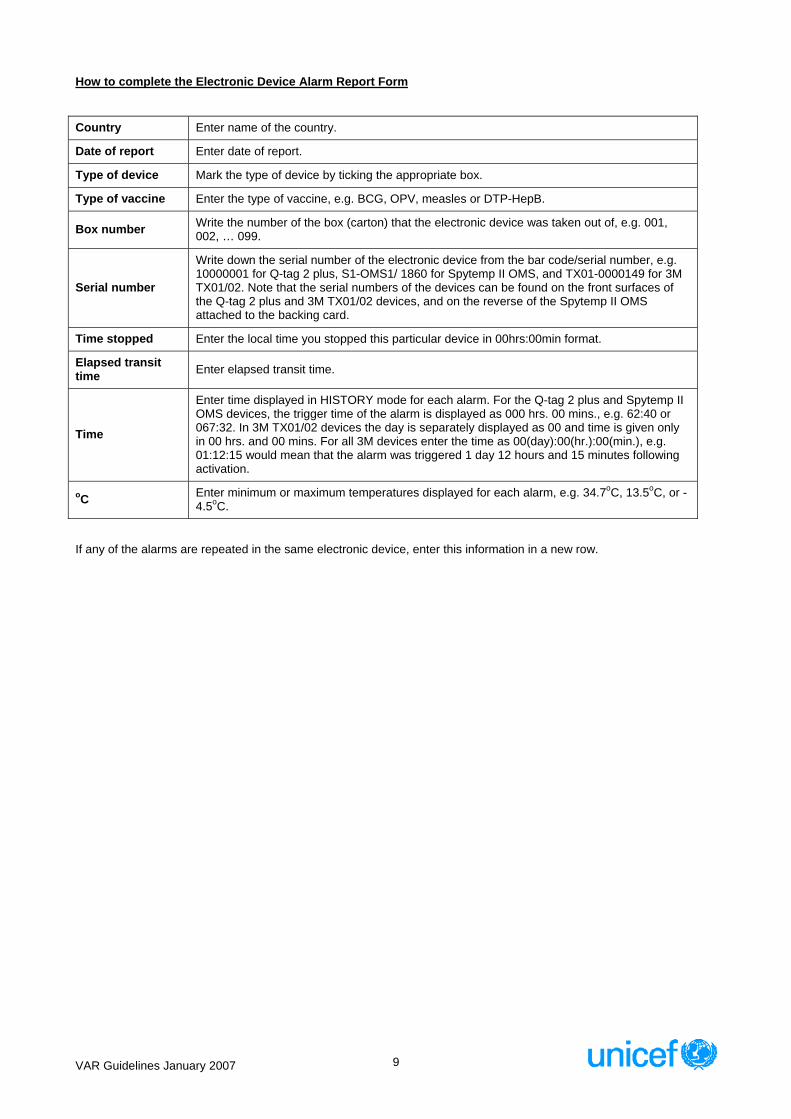
How to complete the Electronic Device Alarm Report Form
Country Enter name of the country.
Date of report Enter date of report.
Type of device Mark the type of device by ticking the appropriate box.
Type of vaccine Enter the type of vaccine, e.g. BCG, OPV, measles or DTP-HepB.
Box number Write the number of the box (carton) that the electronic device was taken out of, e.g. 001, 002, … 099.
Serial number
Write down the serial number of the electronic device from the bar code/serial number, e.g. 10000001 for Q-tag 2 plus, S1-OMS1/ 1860 for Spytemp II OMS, and TX01-0000149 for 3M TX01/02. Note that the serial numbers of the devices can be found on the front surfaces of the Q-tag 2 plus and 3M TX01/02 devices, and on the reverse of the Spytemp II OMS attached to the backing card.
Time stopped Enter the local time you stopped this particular device in 00hrs:00min format.
Elapsed transit time Enter elapsed transit time.
Time
Enter time displayed in HISTORY mode for each alarm. For the Q-tag 2 plus and Spytemp II OMS devices, the trigger time of the alarm is displayed as 000 hrs. 00 mins., e.g. 62:40 or 067:32. In 3M TX01/02 devices the day is separately displayed as 00 and time is given only in 00 hrs. and 00 mins. For all 3M devices enter the time as 00(day):00(hr.):00(min.), e.g. 01:12:15 would mean that the alarm was triggered 1 day 12 hours and 15 minutes following activation.
oC Enter minimum or maximum temperatures displayed for each alarm, e.g. 34.7oC, 13.5oC, or -4.5oC.
If any of the alarms are repeated in the same electronic device, enter this information in a new row.
VAR Guidelines January 2007
9

Simulation You have received a DTP-HepB shipment accompanied by electronic devices. In box Number 5 the device displayed ALARM status. Different alarm situations will be given in the following pages with explanations on how to carry this information on to the reporting form. Figure 8: Simulation
Country <enter name of the country> Date of report <enter date>
10
Type of device
Q-tag 2 plus
Spytemp II OMS
3M TX01/02
Type of vaccine DTP-HepB
>=450C 1 hour >=300C 10 hrs >=100C 20 hrs <=-0.50C 1 hr Box no
Serial number
Time stopped
Elapsed transit time Time oC Time oC Time oC Time oC
HISTORY mode displaying the time of alarm triggering.
HISTORY mode displaying the maximum temperature recorded during violation.
HISTORY mode displaying the time of alarm triggering.
HISTORY mode displaying the minimum temperature recorded during violation.
VAR Guidelines January 2007

VAR Guidelines January 2007
Country <enter name of the country> Date of report <enter date>
Type of device
Q-tag 2 plus
Spytemp II OMS
3M TX01/02
Type of vaccine DTP-HepB
>=450C 1 hour >=300C 10 hrs >=100C 20 hrs <=-0.50C 1 hr Box no
Serial number Time stopped
Elapsed transit time Time oC Time oC Time oC Time oC
11
HISTORY mode displaying the time of alarm triggering and maximum temperature recorded during violation
HISTORY mode displaying the time of alarm triggering and maximum temperature recorded during violation
HISTORY mode displaying the time of alarm triggering and maximum temperature recorded during violation.
HISTORY mode displaying the time of alarm triggering and minimum temperature recorded during violation.
Country <enter name of the country> Date of report <enter date>
Type of device
Q-tag 2 plus
Spytemp II OMS
3M TX01/02
Type of vaccine DTP-HepB
>=450C 1 hour >=300C 10 hrs >=100C 20 hrs <=-0.50C 1 hr Box no
Serial number
Time stopped
Elapsed transit time Time oC Time oC Time oC Time oC
STOPPED mode displaying the elapsed transit time.

Example of completed reporting form with repeating alarms in the same device
Country <enter name of the country> Date of report <enter date>
Type of device
Q-tag 2 plus
Spytemp II OMS
3M TX01/02
Type of vaccine DTP-HepB
>=450C 1 hour >=300C 10 hrs >=10
12
Wherever electronic temperature monitoring devices may not be included in the shipment (e.g., in case of shipments with dry ice), Cold Chain Monitors continue to be used.
0C 20 hrs <=-0.50C 1 hr Box number
Serial number Ti oC Ti oC Ti oC Ti oC
The Cold Chain Monitors in all shipping cartons should be checked (there should be one Cold Chain Monitor in each shipping carton, unless electronic devices have been used) and, if any windows on any of the monitors have changed colour, the following information must be provided:
Details of the shipping cartons that contain Cold Chain Monitors whose windows have changed colour; Batch numbers of the vaccines located in the shipping cartons that contain Cold Chain Monitors whose windows
have changed colour; Details of the windows that have changed colour on the affected Cold Chain Monitors mark x in the box(es)
underneath A, B, C or D.
Continue on a separate page if necessary.
Figure 9: Vaccine Cold Chain Monitor (CCM) and instructions for use
VAR Guidelines January 2007
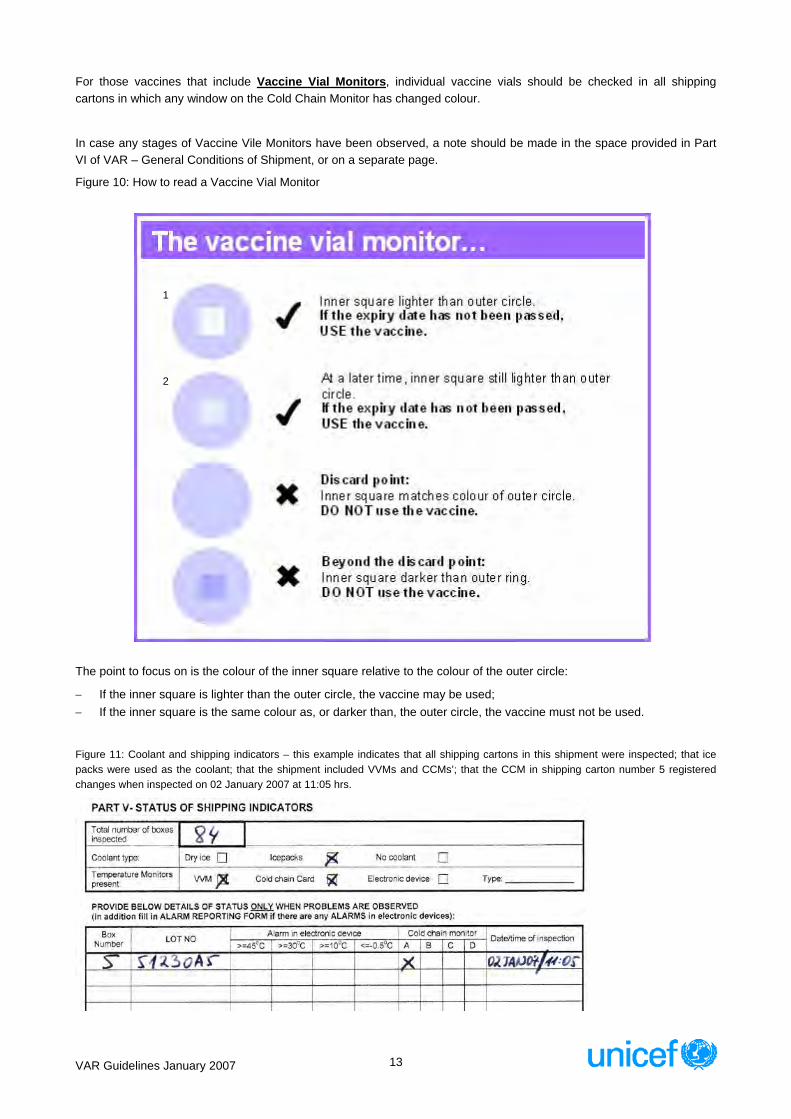
For those vaccines that include Vaccine Vial Monitors, individual vaccine vials should be checked in all shipping cartons in which any window on the Cold Chain Monitor has changed colour.
In case any stages of Vaccine Vile Monitors have been observed, a note should be made in the space provided in Part VI of VAR – General Conditions of Shipment, or on a separate page.
Figure 10: How to read a Vaccine Vial Monitor
1
2 2
1
The point to focus on is the colour of the inner square relative to the colour of the outer circle:
If the inner square is lighter than the outer circle, the vaccine may be used; If the inner square is the same colour as, or darker than, the outer circle, the vaccine must not be used.
Figure 11: Coolant and shipping indicators – this example indicates that all shipping cartons in this shipment were inspected; that ice packs were used as the coolant; that the shipment included VVMs and CCMs’; that the CCM in shipping carton number 5 registered changes when inspected on 02 January 2007 at 11:05 hrs.
VAR Guidelines January 2007
13
VAR Guidelines January 2007
14
For all vaccines that may have been damaged by exposure to inappropriate temperatures:
Store the vaccines separately in the cold store and report to UNICEF Country Office immediately; Any indication of exposure to temperatures that may affect the quality of the vaccine will be reported to WHO for
further investigation; Do not discard the vaccine until assessment is complete.
GENERAL COMMENTS
This section is designed for any comments about the shipment, for example:
The condition of the shipping cartons, inner boxes, vials and droppers; The labelling on the shipping cartons – this should include a warning regarding the temperature-sensitive nature of
vaccines and the shipment details (purchase order number, consignee information and shipping carton number); The labelling on the inner boxes and vials; Observations on any stages of Vaccine Vial Monitors; The general condition of the shipment; Comments related to any previous sections of the VAR, such as documentation, delays, short shipment or shipping
indicators.
NAME AND SIGNATURE ON BEHALF OF CONSIGNEE
Both the authorised person responsible for inspection of the shipment and the Central Store manager or EPI manager should print their names, sign and date the VAR.
Returning the VAR The VAR should be completed, signed and returned to the UNICEF Country Office within 24 hours of vaccine arrival. A copy of the VAR should then immediately be forwarded to the Immunization Team at UNICEF Supply Division in Copenhagen either by e-mail or by fax.
It is not necessary for either originals or copies to be sent by post or pouch.

Title: Product arrival procedures
Code: EVM-SOP-E1-03 Version number: 1
Effective date: 07 Oct 2011 Page: 1 of 13
E1-03.1-product arrival
Standard Operating Procedure Product arrival procedures
Approvals Name Date Signature
Authorized by:
Reviewed by:
Revised by:
Original author:
Version history
No Date Description of change Reason for change
1 07 Oct 2011 Original
2
3
4
5
Disclaimer: This is a model standard operating procedure. It incorporates generic guidance only. Countries are encouraged to adapt it as necessary to suit local requirements. Queries or comments may be addressed to [email protected]

Title: Product arrival procedures
Code: EVM-SOP-E1-03 Version number: 1
Effective date: 07 Oct 2011 Page: 2 of 13
E1-03.1-product arrival
Table of content Distribution .................................................................................................................2 1. Policy and objectives.........................................................................................3
1.1 Policy............................................................................................................3 1.2 Objectives.....................................................................................................3
2. Responsibility.....................................................................................................3 3. Associated materials and equipment...............................................................3 Procedures .................................................................................................................4
3.1 Procedure for products purchased through UNICEF....................................4 3.1.1 Check advance notice documentation and prepare for the arrival .......4 3.1.2 Collect shipment from the port of entry.................................................4 3.1.3 Inspect the shipment ............................................................................4 3.1.4 Stock and distribute the shipment ........................................................5 3.1.5 Report problems ...................................................................................6 3.1.6 Follow-up action ...................................................................................6
3.2 Procedure for products purchased from other sources ................................6 3.2.1 Check advance notice documentation and prepare for the arrival .......6 3.2.2 Collect the shipment from the port of entry...........................................6 3.2.3 Inspect the shipment ............................................................................6 3.2.4 Report problems ...................................................................................7 3.2.5 Stock the shipment ...............................................................................7 3.2.6 Follow-up action ...................................................................................7
3.3 Record-keeping ............................................................................................7 4. Related documents and SOPs ..........................................................................7 Annex 1: PAR form ....................................................................................................8 Annex 2: PAR guidance notes ................................................................................10
Distribution Distribute this SOP to the following:
Facility type Position(s)

Title: Product arrival procedures
Code: EVM-SOP-E1-03 Version number: 1
Effective date: 07 Oct 2011 Page: 3 of 13
E1-03.1-product arrival
1. Policy and objectives
1.1 Policy There must be effective arrangements for receiving and checking syringes, safety boxes, refrigerators, cold boxes, vaccine carriers, temperature monitoring devices and other non-vaccine products when they are received into the supply chain. The product arrival process is a critical stage in the management of the supply chain because this is the point at which ownership is transferred from the supplier to the Ministry of Health. Responsible personnel must ensure that all such products, including those received from UN sources, meet the following requirements:
a. Products meet the specifications set out in the original order. b. Products have been supplied in the correct quantities and with correct
paperwork. c. Products are in good condition.
Any problems that are identified must be resolved in accordance with agreed procedures.
1.2 Objectives This SOP describes how to check incoming shipments of syringes, safety boxes, refrigerators, cold boxes, vaccine carriers, temperature monitoring devices and other immunization-related products so as to ensure that the products are in good condition and have been supplied with all relevant paperwork before they are accepted into the national supply chain. Note: This SOP will need to be developed to follow local procedures.
2. Responsibility <List all personnel responsible for commodity arrival>. In the case of shipments received from UNICEF Supply Division, the MoH is responsible for reporting back to UNICEF Supply Division in Copenhagen via the UNICEF country office. Supply Division will be responsible for record keeping, for follow-up with manufacturers, freight forwarders and WHO, and for providing timely feedback to countries. <Define responsibilities for products procured from other sources>.
3. Associated materials and equipment <Describe vehicles used to transport products from the port of entry or to collect from local manufacturers>.

Title: Product arrival procedures
Code: EVM-SOP-E1-03 Version number: 1
Effective date: 07 Oct 2011 Page: 4 of 13
E1-03.1-product arrival
Procedures
3.1 Procedure for products purchased through UNICEF Note: This section describes the procedures that should be followed for products procured through UNICEF Supply Division. Bulk products such as syringes may be sent by sea or road, so the term ‘port of entry’ is used to cover docks and border crossings as well as airports. Products sent by road are likely to be delivered direct to the primary store or warehouse. Sea and air shipments may have to be collected from the port of entry. This SOP is adapted from the UNICEF vaccine arrival procedure. It is NOT officially approved by UNICEF. However, it has been reviewed by UNICEF Supply Division and countries wishing to adopt it or adapt it should liaise with the UNICEF country office.
3.1.1 Check advance notice documentation and prepare for the arrival
Responsibility: <List the personnel responsible> a. Inform UNICEF-SD well in advance which week days are acceptable for
scheduling arrivals. b. Between five, and not more than ten days before the shipment arrives,
you should receive the following documents by email or fax: - Shipping notification from UNICEF’s freight forwarding agent - Copy of airway bill (AWB) - Copy of packing list - Copy of invoice Check these documents and file them in the product arrival file.
c. Record the shipment arrival details and notify the personnel who will collect the product from the port of entry.
d. Inform customs of the details. e. Make arrangements for the <describe type of vehicle used> to be at the
port of entry in time to collect the shipment.
3.1.2 Collect shipment from the port of entry
Responsibility: <List the personnel responsible> a. Clear the shipment through customs within <specify maximum acceptable
period> of arrival. b. Transport the products to the <name of store or warehouse> in the
<describe type of vehicle used> and unload the vehicle immediately.
3.1.3 Inspect the shipment
Responsibility: <List the personnel responsible> a. Inspect the shipment when it arrives at the <name of store or warehouse>
and check for physical damage or missing items. b. Check that the following documents accompany the shipment;
- Invoice - Packing list

Title: Product arrival procedures
Code: EVM-SOP-E1-03 Version number: 1
Effective date: 07 Oct 2011 Page: 5 of 13
E1-03.1-product arrival
- Copy of certificate(s) of conformity (if required)1. c. Syringes: Check the lot numbers, expiry dates and/or manufacturing dates
and confirm that they comply with the order requirements. d. Safety boxes: Check a sample of the products to confirm that they comply
with the order requirements. e. Single use electronic devices: This category includes freeze indicators
and 30-day refrigerator temperature loggers. Check the lot numbers, expiry dates and/or manufacturing dates and confirm that they comply with the order requirements.
f. Refrigerators and freezers: Check that the model numbers comply with the order requirements and that all loose components such as vaccine baskets and spare parts have been supplied.
g. Cold boxes and vaccine carriers: Check that the model numbers comply with the order requirements and that the correct number and type(s) of water packs has also been supplied.
h. Record all required details for each product in the shipment on the Product Arrival Report (PAR) form (see Annex 1 and Annex 2). Note: Do not record details of more than one product type on the arrival report. A separate PAR form must be completed for each product type in the shipment – e.g. one for syringes, one for safety boxes, one for refrigerators, etc. The arrival report must be signed by <List the people responsible. Two people should sign the form – the person who did the inspection and the Store Manager or EPI Manager >
i. Hand a copy of the PAR to the UNICEF country office within 24 hours of the arrival at the store. The country office will forward a copy to UNICEF Supply Division.
3.1.4 Stock and distribute the shipment
Responsibility: <List the personnel responsible> a. Shipment accepted: If no problems are identified and the product(s) are
accepted, transport them to the correct store or warehouse. b. Syringes: Record the arrival in the stock control system, including
manufacturer’s name, lot number(s) and expiry date(s). Stock and distribute in Earliest-Expiry-First-Out (EEFO) order to prevent expiry in stock.
c. Safety boxes: Record the arrival in the stock control system, including manufacturer’s name and capacity. Stock and distribute in First-in-First-Out (FIFO) order to ensure stock rotation.
d. Single use electronic devices: Record the arrival in the stock control system, including manufacturer’s name, lot number, expiry date and/or production date as shown below. Stock and distribute in Earliest-Expiry-First-Out (EEFO) order to prevent premature battery failure in stock or in use.
1 For syringes this would most likely be a certified copy of the manufacturer’s current ISO 13485 certificate: Medical devices -- Quality management systems -- Requirements for regulatory purposes. This may have to be submitted to the NRA.

Title: Product arrival procedures
Code: EVM-SOP-E1-03 Version number: 1
Effective date: 07 Oct 2011 Page: 6 of 13
E1-03.1-product arrival
e. Refrigerators and freezers: Record the arrival in the stock control system, including manufacturer’s name, model and serial number. At the same time, record the required product details in the national cold chain equipment inventory. If a unique labelling system is used in the country, fix ID tags to each product before onward distribution.
f. Cold boxes and vaccine carriers: Record the arrival in the stock control system, including manufacturer’s name, model and serial number. At the same time, record the required product details in the national cold chain equipment inventory. If a unique labelling system is used in the country, fix ID tags to each product before onward distribution.
g. Shipment rejected: If problems are identified, stack the unopened shipment on pallets or shelves in a designated area. Clearly mark the shipment “DO NOT USE”.
3.1.5 Report problems
Responsibility: <List the personnel responsible> Report the problems identified to the UNICEF country office, UNICEF Supply Division and the Ministry of Health.
3.1.6 Follow-up action
Responsibility: <List the personnel responsible> If problems have been reported, carry out follow-up activities as agreed with UNICEF.
3.2 Procedure for products purchased from other sources Note: Procedures for products purchased direct from the product manufacturer must be defined by the country. Set out below are the suggested headings. It is recommended that, wherever possible, the procedure should follow the arrangements described in 3.1.
3.2.1 Check advance notice documentation and prepare for the arrival
Responsibility: <List the personnel responsible>
3.2.2 Collect the shipment from the port of entry
Responsibility: <List the personnel responsible>
3.2.3 Inspect the shipment
Responsibility: <List the personnel responsible>

Title: Product arrival procedures
Code: EVM-SOP-E1-03 Version number: 1
Effective date: 07 Oct 2011 Page: 7 of 13
E1-03.1-product arrival
3.2.4 Report problems
Responsibility: <List the personnel responsible>
3.2.5 Stock the shipment
Responsibility: <List the personnel responsible>
3.2.6 Follow-up action
Responsibility: <List the personnel responsible>
3.3 Record-keeping Retain PARs and all correspondence relating to unsatisfactory shipments or procedures for a minimum period of <state period> years.
4. Related documents and SOPs EVM-SOP-E1-01: Clearing vaccines and other products through customs.
EVM-SOP-E1-02: Vaccine arrival procedures.

Title: Product arrival procedures
Code: EVM-SOP-E1-03 Version number: 1
Effective date: 07 Oct 2011 Page: 8 of 13
E1-03.1-product arrival
Annex 1: PAR form RETURN TO (agency) COUNTRY OFFICE FOR FORWARDING TO (supplying agency)
PRODUCT ARRIVAL REPORT (PAR) COUNTRY
REPORT No Date of report
Place of inspection Date and time Name of store and date and time product entered into store
PART I - ADVANCE NOTICE
Date received by fax/ email
Pre-advice Copy Airway Bill (AWB) or Bill of Lading (BOL) Copy of Invoice Copy of Packing List
Yes No Yes No Yes No Yes No
Other documents requested (give description)
Yes No
PART II - ARRIVAL DETAILS
ETA as per notification Actual time of arrival AWB number or BOL number
Airport/ sea port or border crossing of
destination
Flight No Vessel or Vehicle No Day Time Day Time
NAME OF CLEARING AGENT: _____________________________ ON BEHALF OF: _______________________________
PART III - DETAILS OF SHIPMENT
Procurement agency
Purchase Order No.
Consignee Product description Manufacturer Country
Product details Lot or model number Number of boxes Number of items Expiry date or manufacturing date (as
applicable)
(Please continue overleaf if necessary)
Was quantity received as per shipping notification? Yes No
If not, were details of short-shipment provided prior to product arrival? Yes No

Title: Product arrival procedures
Code: EVM-SOP-E1-03 Version number: 1
Effective date: 07 Oct 2011 Page: 9 of 13
E1-03.1-product arrival
PART IV - DOCUMENTS ACCOMPANYING THE SHIPMENT
Copy of invoice Copy of packing list Copy of Certificate of Conformity (where required)
Other (specify)
Yes No Yes No Yes No N/A Yes No
PART V - GENERAL CONDITION OF SHIPMENT
What was the condition of boxes on arrival?
Were necessary labels attached to shipping boxes?
Other comments:
PART VI - NAME AND SIGNATURE ___________________________ ________ _______________________ __________ Authorized Inspection Supervisor DATE Primary Store or EPI Manager DATE

Title: Product arrival procedures
Code: EVM-SOP-E1-03 Version number: 1
Effective date: 07 Oct 2011 Page: 10 of 13
E1-03.1-product arrival
Annex 2: PAR guidance notes Introduction The purpose of the Product Arrival Report (PAR) is to ensure that products such as cold chain equipment and immunization consumables such as syringes, safety boxes and disposable electronic temperature monitoring devices are properly inspected before they are accepted into the national supply chain. The PAR is designed to:
Monitor compliance with shipping instructions; Ensure adequate record keeping; Serve as a basis for documenting claims or initiating corrective action if problems occur.
Inspection of products upon arrival is carried out so as to:
Assure security of the products at the point of delivery; Record shipment details; Provide indicators for monitoring product delivery performance.
The consignee receiving the products is responsible for the inspection and acceptance of each shipment, and should complete the PAR. In those cases where UNICEF is not the consignee, it is the responsibility of UNICEF Country Offices to assist in the implementation of the PAR.
UNICEF Country Offices are responsible for reporting back to UNICEF Supply Division in Copenhagen, which will be responsible for record keeping, for follow-up with manufacturers, freight forwarders and WHO, and for providing timely feedback to countries.
The following procedure must be adhered to immediately upon arrival of vaccine shipments:
a) Customs clearance; b) Thorough inspection of all products; c) PAR to be completed and signed; d) PAR to be sent to UNICEF Country Office within 48 hours of product arrival; e) Copy of PAR to be sent to UNICEF Supply Division, Copenhagen by e-mail or fax.
Completing the PAR A separate PAR must be completed for every shipment of immunization-related products. Therefore in the case of split delivery of the same purchase order, a separate PAR must be completed for each delivery.
In the case of combined deliveries, a separate PAR should be completed for each type of product in the shipment – for example one for syringes and one for safety boxes.
In the event of short shipment (quantity received does not match quantity on packing list) of a product, where the quantity that was short-shipped is delivered at a later date, separate PARs must be completed for each delivery.
All sections of the PAR must be completed.

Title: Product arrival procedures
Code: EVM-SOP-E1-03 Version number: 1
Effective date: 07 Oct 2011 Page: 11 of 13
E1-03.1-product arrival
HEADING
The following information should be detailed in the heading of the PAR:
Recipient country; Date of report; Report number the report number is for internal record keeping purposes, and should follow the
format COUNTRY CODE-YEAR-REPORT NUMBER, e.g. BUR-2003-001 (in the case of Burundi). In the event of short shipment, the report numbers for each delivery should follow the format BUR-
2003-001.1, BUR-2003-001.2, etc.; Place, date and time of inspection; Date and time of entry of vaccines into cold store.
ADVANCE NOTICE
The following information must be provided in this section:
Date on which copies of shipping documents were received by fax or e-mail; Confirmation that the aforementioned fax or e-mail comprised of the pre-advice (cover sheet stating
delivery details), air waybill (AWB), invoice and packing list highlight either YES or NO for each document to indicate whether or not each was received.
Although shipping documents are always sent to the consignee, it is the responsibility of UNICEF Country Offices to ensure that all relevant parties in the recipient country have a copy of the shipping documents immediately upon receipt of the documents by the Country Office.
Figure 1: Advance notice – in this example the documents were received by fax and/or e-mail on 13th October 2011
Date received by fax/ email
Pre-advice Copy Airway Bill (AWB) or Bill of Lading (BOL) Copy of Invoice Copy of Packing List
13 Oct 2011 Yes No Yes No Yes No Yes No
FLIGHT, VESSEL OR VEHICLE ARRIVAL
The following information must be provided in this section:
AWB number; Destination airport, sea port or border crossing; Scheduled estimated time of arrival (ETA) the estimated arrival date and time as stated on the
initial pre-advice; Actual time of arrival this is the date and time when the aircraft delivering the shipment actually
arrives at the destination.
Figure 2: Flight arrival – in this example the shipment was scheduled to arrive in Ulaanbaatar at 1100 local time on 20th October 2011, but was slightly delayed and arrived at 1430 local time on 21st October 2011
ETA as per notification Actual time of arrival AWB number or BOL number
Airport/ sea port or border crossing of
destination
Flight No Vessel or Vehicle No Day Time Day Time
123-4567 Ulaanbaatar CA 123 20/10/11 1100 21/10/11 1430

Title: Product arrival procedures
Code: EVM-SOP-E1-03 Version number: 1
Effective date: 07 Oct 2011 Page: 12 of 13
E1-03.1-product arrival
SHIPMENT DETAILS
The following general information must be provided:
Number of the purchase order issued by UNICEF Supply Division this number is in the format 450xxxxx;
Generic name of product being delivered (not the brand name). For example: AD syringes, 0.5ml; Name of manufacturer of the product being delivered.
The following information must be provided regarding the actual quantity of product received:
Batch numbers; Quantity of shipping cartons (per batch, for products such as syringes which are manufactured by
batch); Expiry date of each batch where relevant; Total quantity of shipping cartons; Total number of units received. For example: 1,000,000 syringes; (In the event of short shipment, also state total quantity of shipping cartons and products that have
not been delivered).
Continue on a separate page if necessary.
Figure 3: Shipment details
Procurement agency
Purchase Order No.
Consignee Product description Manufacturer Country
UNICEF 345xxx MoH AD syringes 0.5ml BD Spain
Product details Lot or model number Number of boxes Number of items Expiry date or manufacturing date (as
applicable)
8954-xxx 250 250,000 Exp: 1/2015
8934-yyy 250 250,000 Exp 2/2015
(Please continue overleaf if necessary)
Was quantity received as per shipping notification? Yes No
If not, were details of short-shipment provided prior to product arrival? Yes No
DOCUMENTS ACCOMPANYING THE SHIPMENT
The following information must be provided in this section:
Confirmation that the invoice, packing list and release certificate are packed with the shipment highlight either YES or NO for each document to indicate whether or not each was included;
Details of any other documents packed with the shipment.
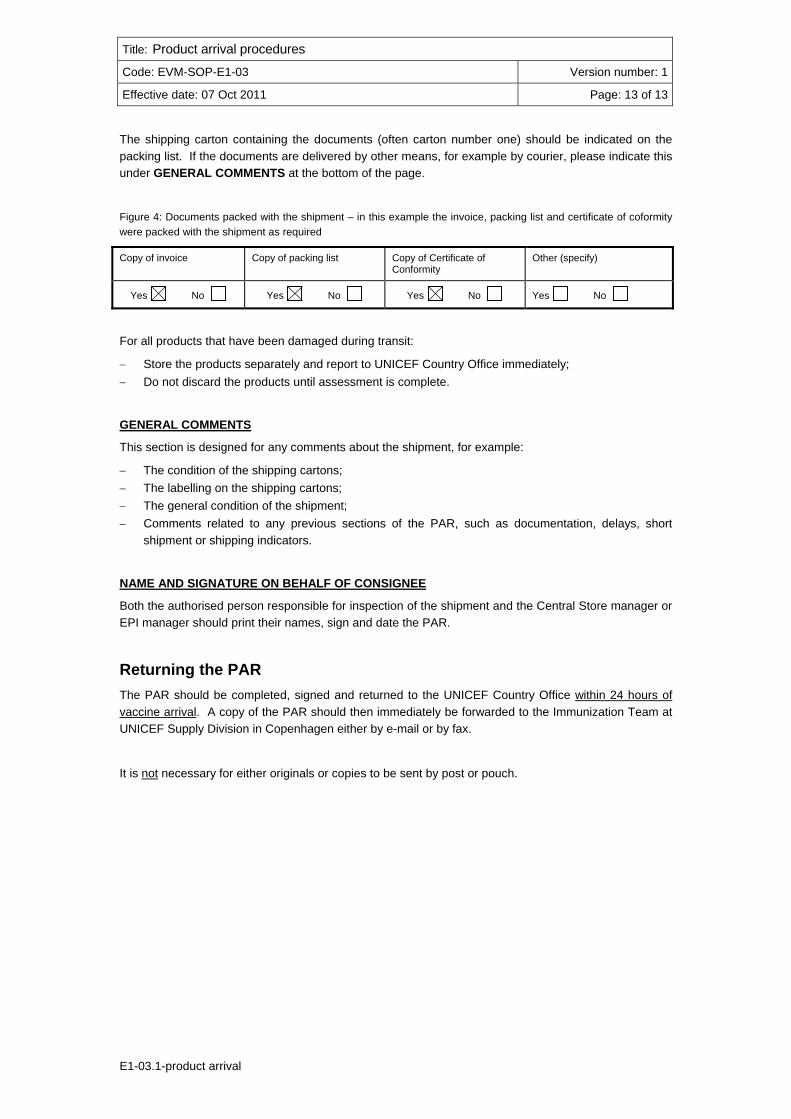
Title: Product arrival procedures
Code: EVM-SOP-E1-03 Version number: 1
Effective date: 07 Oct 2011 Page: 13 of 13
E1-03.1-product arrival
The shipping carton containing the documents (often carton number one) should be indicated on the packing list. If the documents are delivered by other means, for example by courier, please indicate this under GENERAL COMMENTS at the bottom of the page.
Figure 4: Documents packed with the shipment – in this example the invoice, packing list and certificate of coformity were packed with the shipment as required
Copy of invoice Copy of packing list Copy of Certificate of Conformity
Other (specify)
Yes No Yes No Yes No Yes No
For all products that have been damaged during transit:
Store the products separately and report to UNICEF Country Office immediately; Do not discard the products until assessment is complete.
GENERAL COMMENTS
This section is designed for any comments about the shipment, for example:
The condition of the shipping cartons; The labelling on the shipping cartons; The general condition of the shipment; Comments related to any previous sections of the PAR, such as documentation, delays, short
shipment or shipping indicators.
NAME AND SIGNATURE ON BEHALF OF CONSIGNEE
Both the authorised person responsible for inspection of the shipment and the Central Store manager or EPI manager should print their names, sign and date the PAR.
Returning the PAR The PAR should be completed, signed and returned to the UNICEF Country Office within 24 hours of vaccine arrival. A copy of the PAR should then immediately be forwarded to the Immunization Team at UNICEF Supply Division in Copenhagen either by e-mail or by fax.
It is not necessary for either originals or copies to be sent by post or pouch.

Title: Monitoring vaccine storage temperatures at fixed storage locations
Code: EVM-SOP-E2-01 Version number: 1
Effective date: 07 Oct 2011 Page: 1 of 16
E2-01.1-temp monitoring
Standard Operating Procedure Monitoring vaccine storage temperatures
at fixed storage locations
Approvals Name Date Signature
Authorized by:
Reviewed by:
Revised by:
Original author:
Version history
No Date Description of change Reason for change
1 07 Oct 2011 Original
2
3
4
5
Disclaimer: This is a model standard operating procedure. It incorporates generic guidance only. Countries are encouraged to adapt it as necessary to suit local requirements. Queries or comments may be addressed to [email protected]

Title: Monitoring vaccine storage temperatures at fixed storage locations
Code: EVM-SOP-E2-01 Version number: 1
Effective date: 07 Oct 2011 Page: 2 of 16
E2-01.1-temp monitoring
Table of content Distribution .................................................................................................................3 1. Policy and objectives.........................................................................................4
1.1 Policy............................................................................................................4 1.2 Objectives.....................................................................................................4
2. Responsibility.....................................................................................................4 3. Associated materials and equipment...............................................................4 4. Procedure............................................................................................................5
4.1 Training ........................................................................................................5 4.2 Where to place temperature monitoring devices ..........................................6
4.2.1 Freezer rooms ......................................................................................6 4.2.2 Cold rooms ...........................................................................................6 4.2.3 Vaccine freezers...................................................................................6 4.2.4 Vaccine refrigerators ............................................................................6
4.3 How to read a dial or stem thermometer ......................................................6 4.4 How to maintain the temperature record charts and reports ........................6 4.5 What to do if temperatures are out of range.................................................7
4.5.1 Cold rooms and vaccine refrigerators...................................................7 4.5.2 Freezer rooms and vaccine freezers ....................................................8
4.6 Daily tasks ....................................................................................................8 4.6.1 Freezer rooms in primary and sub-national stores ...............................8 4.6.2 Cold rooms in primary and sub-national stores ....................................8 4.6.3 Vaccine freezers in primary stores and large sub-national stores........8 4.6.4 Vaccine refrigerators in primary stores and large sub-national stores..9 4.6.5 Vaccine freezers in small sub-national stores ......................................9 4.6.6 Vaccine refrigerators in small sub-national stores and health facilities 9
4.7 Weekly tasks (stores with continuous temperature monitoring) ...................9 4.8 Monthly tasks .............................................................................................10 4.9 End of year tasks........................................................................................10 4.10 Record keeping ..........................................................................................10
5. Related documents and SOPs ........................................................................10 Annex 1 – Temperature chart for electronic recording devices ..........................11 Annex 2 – Monthly temperature review report ......................................................13 Annex 3 – Annual temperature review report........................................................15

Title: Monitoring vaccine storage temperatures at fixed storage locations
Code: EVM-SOP-E2-01 Version number: 1
Effective date: 07 Oct 2011 Page: 3 of 16
E2-01.1-temp monitoring
Distribution Distribute this SOP to the following:
Facility type Position(s)

Title: Monitoring vaccine storage temperatures at fixed storage locations
Code: EVM-SOP-E2-01 Version number: 1
Effective date: 07 Oct 2011 Page: 4 of 16
E2-01.1-temp monitoring
1. Policy and objectives
1.1 Policy Personnel who are responsible for looking after vaccines should know how to operate and interpret the temperature monitoring devices that are used in their workplace. They should also know how to keep daily temperature records and how to carry out periodic temperature reviews. It is essential that the temperature monitoring process is not purely mechanical. Personnel must be made responsible for their actions and must know how to react effectively to problems as soon as they arise
1.2 Objectives This document explains the daily, weekly and monthly procedures for monitoring vaccine storage temperatures at fixed storage locations throughout the vaccine supply chain. The objective is to use the temperature records for three purposes:
a. To verify whether the storage temperature is within the acceptable temperature ranges of +2°C to +8°C in cold rooms and vaccine refrigerators and - 25°C to -15°C in the freezer room and freezers.
b. To detect temperature alarm conditions1 which may have caused vaccine damage and to take appropriate action.
c. To assess the performance over time of vaccine handling at each link of the cold chain and to monitor the performance of cold chain equipment.
The document also describes the emergency actions to take in the event of a breakdown in the continuous temperature monitoring equipment. Contingency action to take in the event of cold chain equipment failure is described in: EVM-SOP-E3-01: Responding to emergencies in fixed storage locations
2. Responsibility All storekeepers and health workers who are responsible for monitoring and recording temperatures in the cold chain equipment at fixed storage locations throughout the vaccine supply chain.
3. Associated materials and equipment The table below shows the recommended temperature monitoring devices for the fixed storage locations in a typical vaccine supply chain.
1 WHO pre-qualified electronic temperature monitoring devices for refrigerators and cold rooms have the following standard alarm settings: - Low alarm setting: Exposure to -0.5°C or below for 60 minutes. - High alarm setting: Exposure to a +8°C or above for 10 hours.

Title: Monitoring vaccine storage temperatures at fixed storage locations
Code: EVM-SOP-E2-01 Version number: 1
Effective date: 07 Oct 2011 Page: 5 of 16
E2-01.1-temp monitoring
Temperature monitoring devices Cold chain equipment
Recommended devices Minimum requirement Freezer rooms in primary or sub-national stores
External digital thermometer or gas/vapour pressure dial thermometer
Electronic continuous temperature monitoring system
Temperature alarm system with auto-dialer
External digital thermometer or gas/vapour pressure dial thermometer
Pen recording thermometer Temperature alarm system
Cold rooms in primary or sub-national stores
External digital thermometer or gas/vapour pressure dial thermometer
Electronic continuous temperature monitoring system
Temperature alarm system with auto-dialer
External digital thermometer or gas/vapour pressure dial thermometer
Pen recording thermometer Temperature alarm system
Vaccine freezers in primary stores and large sub-national stores
Electronic continuous temperature monitoring system
Temperature alarm system with auto-dialer
Alcohol stem thermometer **
Vaccine refrigerators in primary stores and large sub-national stores
Electronic continuous temperature monitoring system
Temperature alarm system with auto-dialer
Electronic freeze indicators
Alcohol stem thermometer ** 30-day electronic refrigerator
temperature logger
Vaccine freezers in small sub-national stores
Alcohol stem thermometer ** Alcohol stem thermometer **
Vaccine refrigerators in small sub-national stores and health facilities
Alcohol stem thermometer ** 30-day electronic refrigerator
temperature logger
Alcohol stem thermometer ** Electronic freeze indicator
** Bi-metallic dial thermometers are not recommended because they quickly loose their calibration.
Note: Modify this table to match the equipment that is actually used.
4. Procedure Note: Modify this procedure to suit the specific temperature monitoring equipment used.
4.1 Training Responsibility: <list responsible personnel> Conduct training on the use and interpretation of electronic temperature monitoring devices.

Title: Monitoring vaccine storage temperatures at fixed storage locations
Code: EVM-SOP-E2-01 Version number: 1
Effective date: 07 Oct 2011 Page: 6 of 16
E2-01.1-temp monitoring
4.2 Where to place temperature monitoring devices Responsibility: Storekeeper or Health worker.
4.2.1 Freezer rooms
The sensor for the dial or digital thermometer and the sensors for the continuous temperature monitoring equipment are fixed by the cold room installer and should not be moved.
4.2.2 Cold rooms
The sensor for the dial or digital thermometer and the sensors for the continuous temperature monitoring equipment are fixed by the cold room installer and should not be moved. A minimum of four electronic freeze indicators (FreezeTag®, FreezeAlert® or similar) should be placed on the cold room shelves in front of the vaccine in places where the lowest temperatures are found. Try to cover the positions where temperatures are consistently lower than the average reading shown by the continuous temperature monitoring device. Use an electronic thermometer to find the coldest places in the room where vaccine is stored. In a typical cold room up to 40m³:
a. Place one device on the shelf which is closest to the evaporator air stream from each of the refrigeration units.
b. Place two more devices on the shelves in the centre of the cold room, one on the middle shelf and one on the bottom shelf.
Use additional devices in cold rooms larger than 40m³.
4.2.3 Vaccine freezers
Place the thermometer on top of the vaccine where is can easily be read.
4.2.4 Vaccine refrigerators
Place the temperature monitoring devices (30-day refrigerator temperature logger, sensors for computerized temperature monitoring systems, thermometer and freeze indicator) on top of the vaccine where the devices can easily be read.
4.3 How to read a dial or stem thermometer Responsibility: Storekeeper or Health worker. When you read the temperature on a dial or stem thermometer you must look at the device with your eyes at right angles to the instrument. If you read the instrument at an acute angle, the temperature you observe on the scale will be incorrect by as much as ±1°C.
4.4 How to maintain the temperature record charts and reports Responsibility: Storekeeper or Health worker. Ensure that every freezer room, cold room, vaccine freezer and vaccine refrigerator has a current chart on which to record the twice daily temperature readings. File the charts and replace them with a new one every <state period>2. Annex 1 shows a 2 Some countries use weekly charts, some use monthly charts and some use booklets which are replaced once a year.
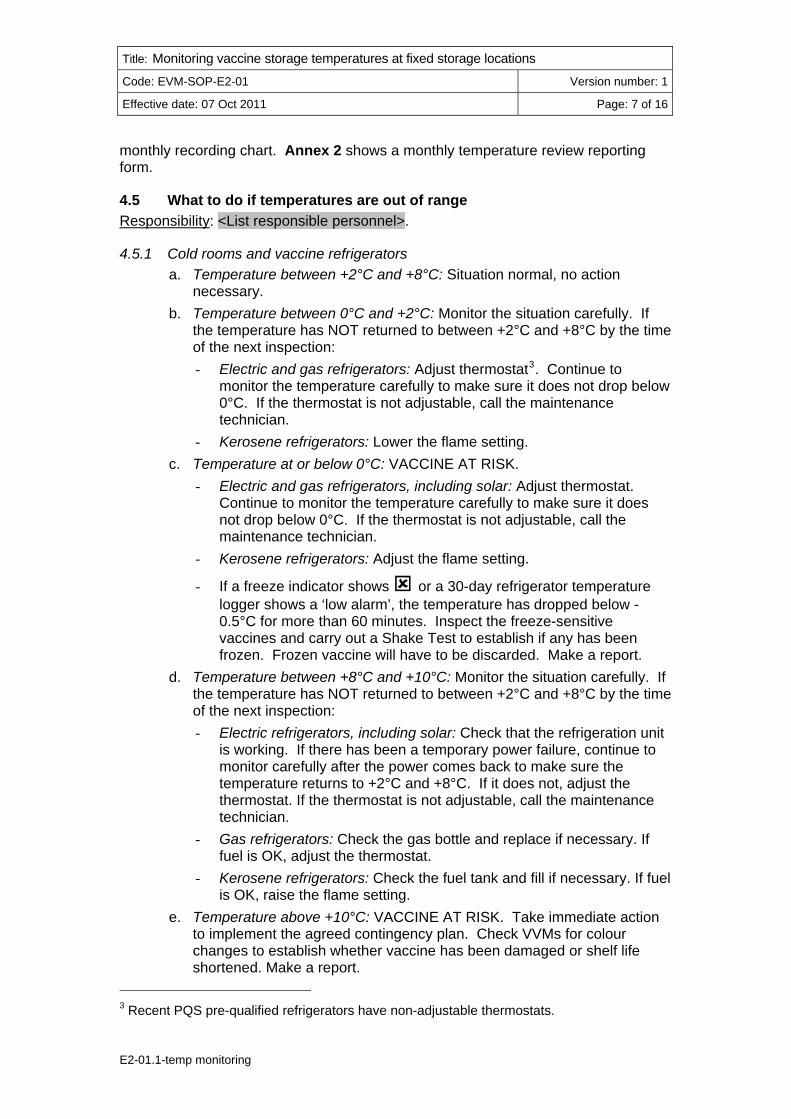
Title: Monitoring vaccine storage temperatures at fixed storage locations
Code: EVM-SOP-E2-01 Version number: 1
Effective date: 07 Oct 2011 Page: 7 of 16
E2-01.1-temp monitoring
monthly recording chart. Annex 2 shows a monthly temperature review reporting form.
4.5 What to do if temperatures are out of range Responsibility: <List responsible personnel>.
4.5.1 Cold rooms and vaccine refrigerators
a. Temperature between +2°C and +8°C: Situation normal, no action necessary.
b. Temperature between 0°C and +2°C: Monitor the situation carefully. If the temperature has NOT returned to between +2°C and +8°C by the time of the next inspection: - Electric and gas refrigerators: Adjust thermostat3. Continue to
monitor the temperature carefully to make sure it does not drop below 0°C. If the thermostat is not adjustable, call the maintenance technician.
- Kerosene refrigerators: Lower the flame setting. c. Temperature at or below 0°C: VACCINE AT RISK.
- Electric and gas refrigerators, including solar: Adjust thermostat. Continue to monitor the temperature carefully to make sure it does not drop below 0°C. If the thermostat is not adjustable, call the maintenance technician.
- Kerosene refrigerators: Adjust the flame setting.
- If a freeze indicator shows or a 30-day refrigerator temperature logger shows a ‘low alarm’, the temperature has dropped below -0.5°C for more than 60 minutes. Inspect the freeze-sensitive vaccines and carry out a Shake Test to establish if any has been frozen. Frozen vaccine will have to be discarded. Make a report.
d. Temperature between +8°C and +10°C: Monitor the situation carefully. If the temperature has NOT returned to between +2°C and +8°C by the time of the next inspection: - Electric refrigerators, including solar: Check that the refrigeration unit
is working. If there has been a temporary power failure, continue to monitor carefully after the power comes back to make sure the temperature returns to +2°C and +8°C. If it does not, adjust the thermostat. If the thermostat is not adjustable, call the maintenance technician.
- Gas refrigerators: Check the gas bottle and replace if necessary. If fuel is OK, adjust the thermostat.
- Kerosene refrigerators: Check the fuel tank and fill if necessary. If fuel is OK, raise the flame setting.
e. Temperature above +10°C: VACCINE AT RISK. Take immediate action to implement the agreed contingency plan. Check VVMs for colour changes to establish whether vaccine has been damaged or shelf life shortened. Make a report.
3 Recent PQS pre-qualified refrigerators have non-adjustable thermostats.

Title: Monitoring vaccine storage temperatures at fixed storage locations
Code: EVM-SOP-E2-01 Version number: 1
Effective date: 07 Oct 2011 Page: 8 of 16
E2-01.1-temp monitoring
4.5.2 Freezer rooms and vaccine freezers
a. Temperature between -25°C and -15°C: Situation normal, no action necessary.
b. Temperature below -25°C: Adjust thermostat4. Check that the temperature is within the normal range at the time of the next inspection.
c. Temperature above -15°C: If there has been a temporary power failure, no further action is necessary. A temporary rise to +10°C is permissible following an extended power cut. Check that the refrigeration unit is working, monitor the situation closely and take appropriate action if conditions are not normal at the time of the next inspection.
d. Temperature above +10°C: VACCINE AT RISK. Take immediate action to implement the agreed contingency plan, and make a report.
4.6 Daily tasks
4.6.1 Freezer rooms in primary and sub-national stores
Responsibility: <List responsible personnel>. a. Read the temperatures shown on the external dial or digital thermometers
twice daily, 7 days a week. Take readings at <state time in the morning> and <state time in the afternoon>. Check that the readings are between -15°C to -25°C.
b. Check that the readings on the chart recorder or electronic continuous temperature monitoring system have been between -15°C to -25°C. throughout the previous 24 hours.
c. For each freezer room, record the results of the twice daily readings on the temperature chart.
4.6.2 Cold rooms in primary and sub-national stores
Responsibility: <List responsible personnel>. a. Read the temperatures shown on the external dial or digital thermometers
twice daily, 7 days a week. Take readings at <time in the morning> and <time in the afternoon>. Check that the readings are between +2°C to +8°C.
b. Check that the readings on the chart recorder or electronic continuous temperature monitoring system have been between +2°C to +8°C. throughout the previous 24 hours.
c. Check the status of the electronic freeze indicator(s). d. For each cold room, record the results on the temperature chart.
4.6.3 Vaccine freezers in primary stores and large sub-national stores
Responsibility: <List responsible personnel>. a. Read the temperatures shown on the dial or digital thermometer stored
with the vaccine twice daily, 7 days a week. Take readings at <time in the morning> and <time in the afternoon>. Check that the readings are between -15°C to -25°C.
4 Recent PQS pre-qualified freezers have non-adjustable thermostats.

Title: Monitoring vaccine storage temperatures at fixed storage locations
Code: EVM-SOP-E2-01 Version number: 1
Effective date: 07 Oct 2011 Page: 9 of 16
E2-01.1-temp monitoring
b. IF INSTALLED: Check that the readings on the electronic continuous temperature monitoring system have been between -15°C to -25°C. throughout the previous 24 hours.
c. For each vaccine freezer, record the results on the temperature chart.
4.6.4 Vaccine refrigerators in primary stores and large sub-national stores
Responsibility: <List responsible personnel>. a. Read the temperatures shown on the dial or digital thermometer stored
with the vaccine twice daily, 7 days a week. Take readings at <time in the morning> and <time in the afternoon>. Check that the readings are between +2°C to +8°C.
b. Check that the readings on the electronic continuous temperature monitoring system or 30-day electronic refrigerator temperature logger have been between +2°C to +8°C throughout the previous 24 hours.
c. Check the status of the electronic freeze indicator(s). d. For each vaccine refrigerator, record the results on the temperature chart.
4.6.5 Vaccine freezers in small sub-national stores
Responsibility: <List responsible personnel>. a. Read the temperatures shown on the dial or digital thermometer stored
with the vaccine twice daily, 7 days a week. Take readings at <time in the morning> and <time in the afternoon>. Check that the readings are between -15°C to -25°C.
b. For each vaccine freezer, record the results on the temperature chart.
4.6.6 Vaccine refrigerators in small sub-national stores and health facilities
Responsibility: <List responsible personnel>. a. EITHER: Check that the readings on the electronic continuous
temperature monitoring system or 30-day electronic refrigerator temperature logger have been between +2°C to +8°C throughout the previous 24 hours.
b. OR: Read the temperatures shown on the dial or digital thermometer stored with the vaccine twice daily, at least 5 days, and preferably 7 days a week. Take readings at <time in the morning> and <time in the afternoon>. Check that the readings are between +2°C to +8°C. Check the status of the electronic freeze indicator(s).
c. For each vaccine refrigerator, record the results on the temperature chart.
4.7 Weekly tasks (stores with continuous temperature monitoring) Responsibility: <List responsible personnel>.
a. Electronic continuous monitoring: Print out the weekly charts for all connected cold chain equipment in the store. Check whether there have been any excursions outside the acceptable temperature ranges. Mark these on the chart and discuss with your supervisor any action that needs to be taken. File the chart in weekly order in the current year’s temperature record file.

Title: Monitoring vaccine storage temperatures at fixed storage locations
Code: EVM-SOP-E2-01 Version number: 1
Effective date: 07 Oct 2011 Page: 10 of 16
E2-01.1-temp monitoring
b. Chart recorder: Change the disc at the end of each week. Write the start date on the new chart. Write the finish date on the old chart and file it in the temperature record file. Check the pens and replace if necessary.
c. File the charts and/or discs in weekly order in the current year’s temperature record file.
4.8 Monthly tasks Responsibility: <List responsible personnel>.
a. Hold a meeting to review the past month’s temperature records. b. Identify any systematic temperature trends which may indicate cold chain
equipment problems. c. Discuss and agree any remedial action needed. d. Record results of the meeting on the monthly temperature review form
and file the form in the monthly temperature record file. See Annex 1.
4.9 End of year tasks Responsibility: <List responsible personnel>.
a. Start new files for the daily and weekly temperature records and for the monthly temperature review reports.
b. Store all the previous year’s temperature records and files as described in 4.8.
c. Prepare an annual storage temperature report based on the previous year’s records. See Annex 3.
4.10 Record keeping Responsibility: <List responsible personnel>.
a. File temperature records and monthly temperature review records in date order.
b. Retain records for a minimum of <three/five> years. c. Store the previous year’s records in <specify a location>.
5. Related documents and SOPs EVM-SOP-E2-02: Checking the accuracy of temperature monitoring
devices.
EVM-SOP-E3-01: Responding to emergencies in fixed storage locations.
EVM-SOP-E8-01: When and how to conduct the Shake Test.

Title: Monitoring vaccine storage temperatures at fixed storage locations
Code: EVM-SOP-E2-01 Version number: 1
Effective date: 07 Oct 2011 Page: 11 of 16
E2-01.1-temp monitoring
Annex 1 – Temperature chart for electronic recording devices Cold room/refrigerator number : Start date: <dd/mmm/yyyy> Key: FI = freeze indicator (status OK or X)Equipment model : : Location:
1 2 3 4 5 6 7 8 9 10 11 12 13 14 15 16 17 18 19 20 21 22 23 24 25 26 27 28 29° C am pm am pm am pm am pm am pm am pm am pm am pm am pm am pm am pm am pm am pm am pm am pm am pm am pm am pm am pm am pm am pm am pm am pm am pm am pm am pm am pm am pm am pm
+16+15 +14+13+12+11+10+9+8+7+6+5+4+3+2+10-1-2-3-4-5
Once every 24 hours, enter high alarm status and maximum temperature recorded by the continuous temperature monitoring device
Once every 24 hours, enter low alarm status and minimum temperature recorded by the continuous temperature monitoring device
Month: Remarks:Year: Supervisor:Health centre:
Day
Tem
pera
ture
cha
rt
Initials:
Alarm time or OKMin °C
Province:District:
FI (X or OK)>+8 °C alarmAlarm time or OK
Maximum °C< -0.5 °C alarm

E2-01.1-temp monitoring
Example
Cold room/refrigerator number : ILR # 1 Start date: <dd/mmm/yyyy> 03 Oct 2011 Key: FI = freeze indicator (status OK or X)Equipment model : : RCW 42 EG Location: Erehwon HC
1 2 3 4 5 6 7 8 9 10 11 12 13 14 15 16 17 18 19 20 21 22 23 24 25 26 27 28 29° C am pm am pm am pm am pm am pm am pm am pm am pm am pm am pm am pm am pm am pm am pm am pm am pm am pm am pm am pm am pm am pm am pm am pm am pm am pm am pm am pm am pm am pm
+16+15 +14+13+12+11+10+9+8+7 x x+6 x x x x x+5 x x x x x x x+4 x x x x x x x x+3 x x x x+2 x+1 x x x0 x-1 x x x-2-3-4-5
Once every 24 hours, enter high alarm status and maximum temperature recorded by the continuous temperature monitoring deviceOK OK OK OK OK OK OK OK OK OK OK OK OK OK OK OK OK
+7.5 +6.5 +6.3 +4.5 +5.2 +3.3 +3.0 +1.8 +0.2 -0.8 -0.5 +5.2 +5.4 +5.3 +6.1 +5.5 +6.1Once every 24 hours, enter low alarm status and minimum temperature recorded by the continuous temperature monitoring device
OK OK OK OK OK OK OK OK X X OK OK OK OK OK OK OK+5.8 +5.4 +4.8 +3.5 +3.6 +2.8 +1.7 +0.8 -0.5 -1.5 -1.3 +0.9 +3.5 +3.8 +3.6 +4.6 +3.9
JWL
JWL
JWL
JWL
JWL
JWL
FC FC FC FC FC FC FC FC FC FC FC JWL
JWL
JWL
JWL
JWL
JWL
JWL
JWL
JWL
JWL
JWL
JWL
JWL
JWL
JWL
JWL
JWL
Month: Remarks:Year: Supervisor:
>+8 °C alarmAlarm or OKMaximum °C
< -0.5 °C alarm
Thermostat incorrected adjusted by temporary health worker. Con 12 Oct
Health centre:
Day
Tem
pera
ture
cha
rt
Initials:
Alarm or OKMin °C
Province:District:
FI (X or OK)
JazirDistrict 9Erehwon AG
October 2011
Effective date: 07 Oct 2011 Page: 12 of 16
Code: EVM-SOP-E2-01 Version number: 1
Title: Monitoring vaccine storage temperatures at fixed storage locations

Title: Monitoring vaccine storage temperatures at fixed storage locations
Code: EVM-SOP-E2-01 Version number: 1
Effective date: 07 Oct 2011 Page: 13 of 16
E2-01.1-temp monitoring
Annex 2 – Monthly temperature review report Location: Serial no:
Review period:
Reviewers:
Date:
Enter all vaccine losses during the review period which are formally recorded on loss/adjustment reports.
Equipment Date L/A report # Affected vaccine
Doses lost
Record all instances during the review period when storage temperature was outside recommended limits.
Equipment Date Temperature Vaccine at risk?
Action taken at time of event
Narrative:
Recommendations:
Original copy Copy 1 Copy 2 Copy 3

Title: Monitoring vaccine storage temperatures at fixed storage locations
Code: EVM-SOP-E2-01 Version number: 1
Effective date: 07 Oct 2011 Page: 14 of 16
E2-01.1-temp monitoring
Example
Location: National Vaccine Store Serial no: MR11/06
Review period:
1/6/11 to 31/6/11
Reviewers: A. Store. Manager, A Storekeeper
Date: 8/7/11
Enter all vaccine losses during the review period which are formally recorded on loss/adjustment reports.
Equipment Date L/A report # Affected vaccine
Doses lost
Cold room # 1 3/6/11 L/A02/01 HepB 9,500
Cold room # 1 3/6/11 L/A02/01 DTP 5,500
Etc. Record all instances during the review period when storage temperature was outside recommended limits.
Equipment Date Temperature Vaccine at risk?
Action taken at time of event
Cold room # 1 1/6/11 -1° C Yes None
Cold room # 1 2/6/11 -2° C Yes None
Cold room # 1 3/6/11 -6° C Yes Engineer called L/A # 02/02 raised
Narrative: Cold room #1 had a defective thermostat sensor between 1st and 3rd June, resulting in an unacceptable loss of vaccine. On enquiry I found that the duty staff did not know that HepB freezes at -0.5° C, so they ignored the sub-zero temperatures on 1st and 2nd June and only notified the storekeeper that there was a problem on 3rd June. The cold room has not yet been fitted with a temperature alarm, although this has been on order since April. No other problems were noted during the period.
Recommendations: Duty staff should receive additional training in temperature monitoring. Until this has been done, the storekeeper should monitor temperatures each day. Temperature alarms should be fitted to cold rooms 1, 2 and 3 and to the three vaccine freezers before 21st July.
Original copy Copy 1 Copy 2 Copy 3
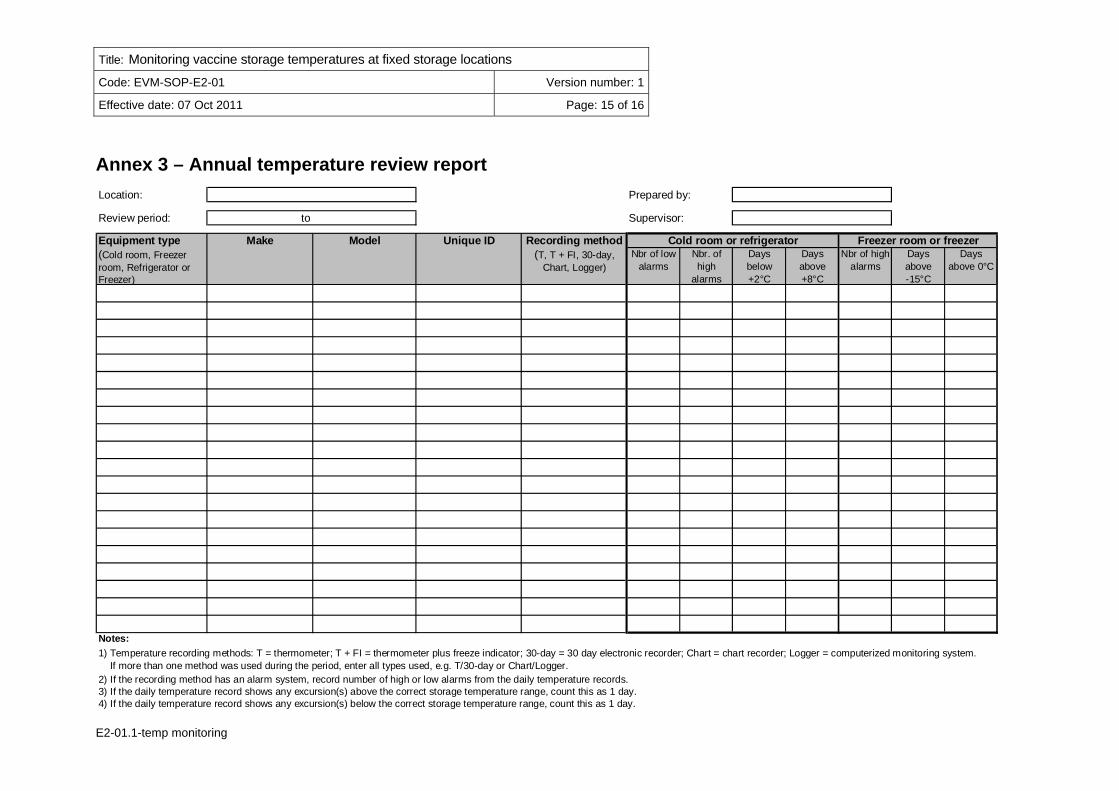
Title: Monitoring vaccine storage temperatures at fixed storage locations
Code: EVM-SOP-E2-01 Version number: 1
Effective date: 07 Oct 2011 Page: 15 of 16
E2-01.1-temp monitoring
Annex 3 – Annual temperature review report Location: Prepared by:
Review period: to Supervisor:
Cold room or refrigerator Freezer room or freezerNbr of low
alarmsNbr. of high
alarms
Days below +2°C
Days above +8°C
Nbr of high alarms
Days above -15°C
Days above 0°C
Notes:
2) If the recording method has an alarm system, record number of high or low alarms from the daily temperature records.3) If the daily temperature record shows any excursion(s) above the correct storage temperature range, count this as 1 day.4) If the daily temperature record shows any excursion(s) below the correct storage temperature range, count this as 1 day.
Recording method(T, T + FI, 30-day,
Chart, Logger)
1) Temperature recording methods: T = thermometer; T + FI = thermometer plus freeze indicator; 30-day = 30 day electronic recorder; Chart = chart recorder; Logger = computerized monitoring system. If more than one method was used during the period, enter all types used, e.g. T/30-day or Chart/Logger.
Equipment type (Cold room, Freezer room, Refrigerator or Freezer)
Make Model Unique ID
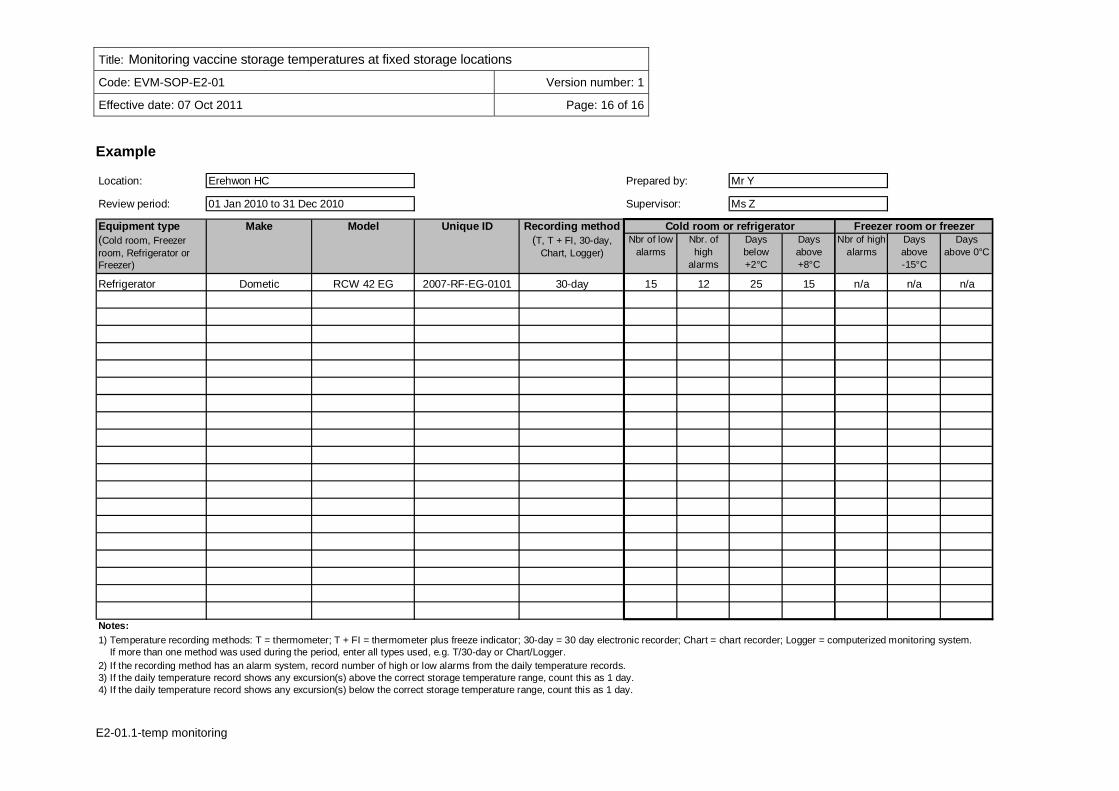
E2-01.1-temp monitoring
Location: Erehwon HC Prepared by: Mr Y
Review period: 01 Jan 2010 to 31 Dec 2010 Supervisor: Ms Z
Cold room or refrigerator Freezer room or freezerNbr of low
alarmsNbr. of high
alarms
Days below +2°C
Days above +8°C
Nbr of high alarms
Days above -15°C
Days above 0°C
Refrigerator Dometic RCW 42 EG 2007-RF-EG-0101 30-day 15 12 25 15 n/a n/a n/a
Notes:
2) If the recording method has an alarm system, record number of high or low alarms from the daily temperature records.3) If the daily temperature record shows any excursion(s) above the correct storage temperature range, count this as 1 day.4) If the daily temperature record shows any excursion(s) below the correct storage temperature range, count this as 1 day.
Recording method(T, T + FI, 30-day,
Chart, Logger)
1) Temperature recording methods: T = thermometer; T + FI = thermometer plus freeze indicator; 30-day = 30 day electronic recorder; Chart = chart recorder; Logger = computerized monitoring system. If more than one method was used during the period, enter all types used, e.g. T/30-day or Chart/Logger.
Equipment type (Cold room, Freezer room, Refrigerator or Freezer)
Make Model Unique ID
Effective date: 07 Oct 2011 Page: 16 of 16
Code: EVM-SOP-E2-01 Version number: 1
Title: Monitoring vaccine storage temperatures at fixed storage locations
Example

Title: Checking the accuracy of temperature monitoring devices
Code: EVM-SOP-E2-02 Version number: 1
Effective date: 07 Oct 2011 Page: 1 of 8
E2-02.1-temp accuracy
Standard Operating Procedure Checking the accuracy of temperature
monitoring devices
Approvals Name Date Signature
Authorized by:
Reviewed by:
Revised by:
Original author:
Version history
No Date Description of change Reason for change
1 07 Oct 2011 Original
2
3
4
5
Disclaimer: This is a model standard operating procedure. It incorporates generic guidance only. Countries are encouraged to adapt it as necessary to suit local requirements. Queries or comments may be addressed to [email protected]

Title: Checking the accuracy of temperature monitoring devices
Code: EVM-SOP-E2-02 Version number: 1
Effective date: 07 Oct 2011 Page: 2 of 8
E2-02.1-temp accuracy
Table of content Distribution .................................................................................................................2 1. Policy and objectives.........................................................................................3
1.1 Policy............................................................................................................3 1.2 Objectives.....................................................................................................3
2. Responsibility.....................................................................................................3 3. Associated materials and equipment...............................................................3
3.1 Calibrated thermometer................................................................................3 3.2 Gas or vapour pressure thermometer ..........................................................4 3.3 MULTiLOG ...................................................................................................4
4. Procedure............................................................................................................4 4.1 Alcohol stem thermometers and bi-metallic dial thermometers....................4 4.2 Disposable electronic temperature monitoring devices ................................4 4.3 Gas or vapour pressure dial thermometer (Rueger TFV100BI or similar)....5 4.4 MULTiLOG ...................................................................................................5
5. Related documents and SOPs ..........................................................................6 Annex 1 – Generic temperature accuracy check form ...........................................7 Annex 2 – MULTiLOG temperature accuracy check form......................................8
Distribution Distribute this SOP to the following:
Facility type Position(s)
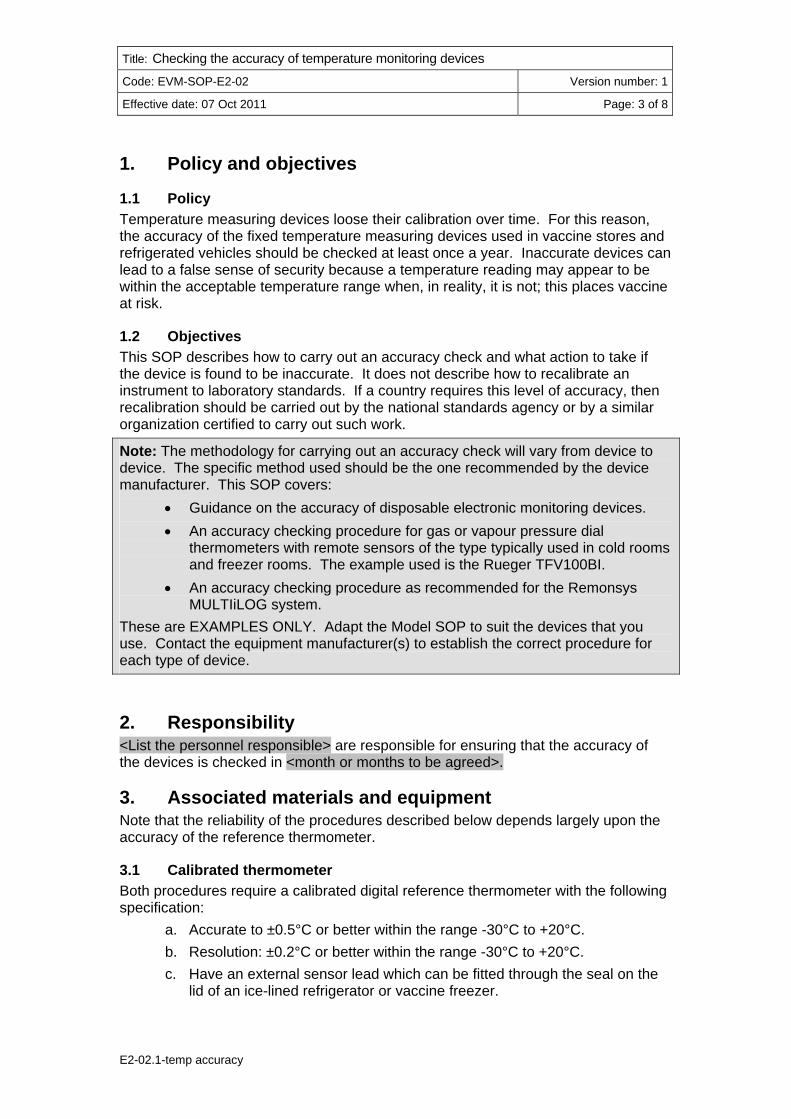
Title: Checking the accuracy of temperature monitoring devices
Code: EVM-SOP-E2-02 Version number: 1
Effective date: 07 Oct 2011 Page: 3 of 8
E2-02.1-temp accuracy
1. Policy and objectives
1.1 Policy Temperature measuring devices loose their calibration over time. For this reason, the accuracy of the fixed temperature measuring devices used in vaccine stores and refrigerated vehicles should be checked at least once a year. Inaccurate devices can lead to a false sense of security because a temperature reading may appear to be within the acceptable temperature range when, in reality, it is not; this places vaccine at risk.
1.2 Objectives This SOP describes how to carry out an accuracy check and what action to take if the device is found to be inaccurate. It does not describe how to recalibrate an instrument to laboratory standards. If a country requires this level of accuracy, then recalibration should be carried out by the national standards agency or by a similar organization certified to carry out such work.
Note: The methodology for carrying out an accuracy check will vary from device to device. The specific method used should be the one recommended by the device manufacturer. This SOP covers:
Guidance on the accuracy of disposable electronic monitoring devices. An accuracy checking procedure for gas or vapour pressure dial
thermometers with remote sensors of the type typically used in cold rooms and freezer rooms. The example used is the Rueger TFV100BI.
An accuracy checking procedure as recommended for the Remonsys MULTIiLOG system.
These are EXAMPLES ONLY. Adapt the Model SOP to suit the devices that you use. Contact the equipment manufacturer(s) to establish the correct procedure for each type of device.
2. Responsibility <List the personnel responsible> are responsible for ensuring that the accuracy of the devices is checked in <month or months to be agreed>.
3. Associated materials and equipment Note that the reliability of the procedures described below depends largely upon the accuracy of the reference thermometer.
3.1 Calibrated thermometer Both procedures require a calibrated digital reference thermometer with the following specification:
a. Accurate to ±0.5°C or better within the range -30°C to +20°C. b. Resolution: ±0.2°C or better within the range -30°C to +20°C. c. Have an external sensor lead which can be fitted through the seal on the
lid of an ice-lined refrigerator or vaccine freezer.

Title: Checking the accuracy of temperature monitoring devices
Code: EVM-SOP-E2-02 Version number: 1
Effective date: 07 Oct 2011 Page: 4 of 8
E2-02.1-temp accuracy
d. Have a valid calibration certificate1 issued by an ISO/IEC 17025 accredited testing laboratory or by NIST2.
Note: The reference thermometer will require regular re-calibration by an accredited laboratory.
3.2 Gas or vapour pressure thermometer This procedure requires the following materials and equipment:
a. Insulated container (approximately 0.5 litre capacity) filled with crushed ice3.
b. Distilled water c. Record sheet as shown in Annex 1
3.3 MULTiLOG This procedure requires the following materials and equipment:
a. Wristwatch with second hand. b. Roll of electrical insulation tape. c. Clipboard and pen. d. Record sheet as shown in Annex 2. e. Spare MULTiLOG sensors.
4. Procedure
4.1 Alcohol stem thermometers and bi-metallic dial thermometers No action is required to check the accuracy of this type of device. Alcohol stem thermometers have no moving parts and are unlikely to use their calibration in normal use. Bi-metallic dial thermometers can easily loose their calibration if they are dropped or corroded by high humidity. For this reason their use is no longer recommended by WHO.
4.2 Disposable electronic temperature monitoring devices No action is required to check the accuracy of this type of device. Freeze indicators such as the FreezeTag® or FreezeAlert®, and 30-day refrigerator temperature logger FridgeTag® or LogTag® Temperature Recorder are designed to be disposed of when their batteries fail. The calibration of these devices is maintained throughout their design life4.
1 A ‘valid calibration certificate’ means a certificate which demonstrates that the instrument has been correctly calibrated and that the period of certification has not expired. 2 NIST: United States National Institute of Standards and Technology. 3 For example: an insulated ice bucket. 4 There will be some loss of accuracy over time, but this is not likely to be significant.
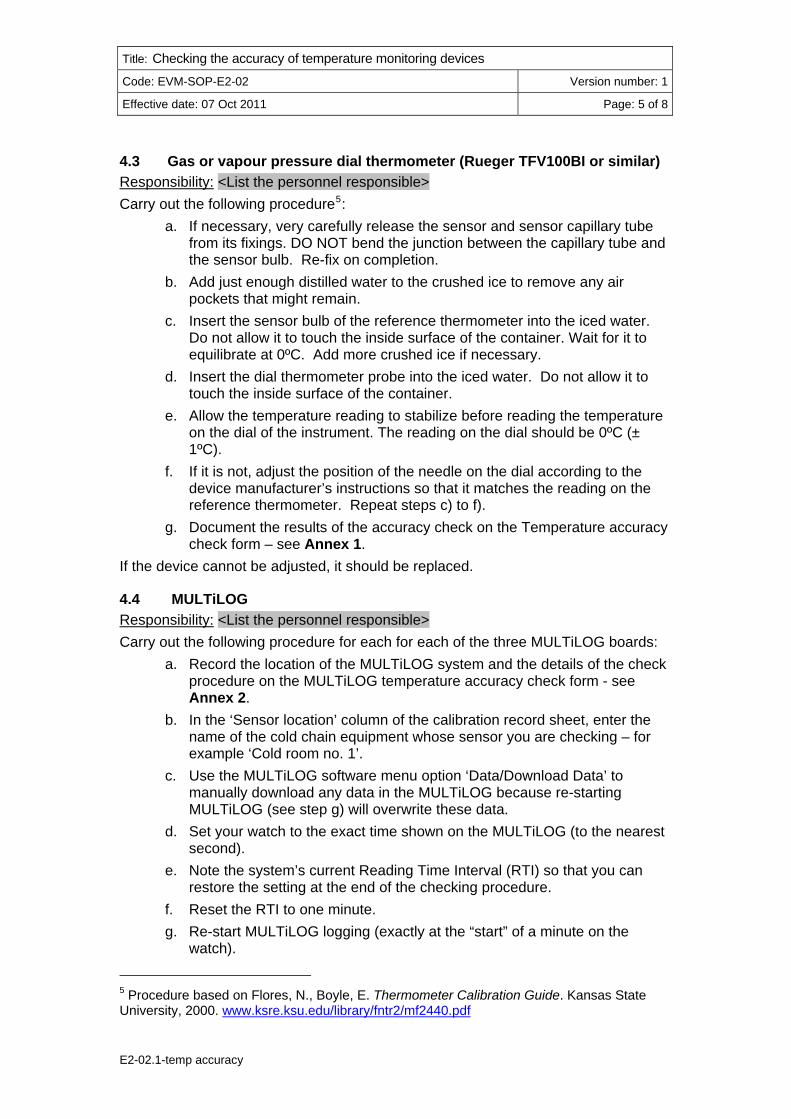
Title: Checking the accuracy of temperature monitoring devices
Code: EVM-SOP-E2-02 Version number: 1
Effective date: 07 Oct 2011 Page: 5 of 8
E2-02.1-temp accuracy
4.3 Gas or vapour pressure dial thermometer (Rueger TFV100BI or similar) Responsibility: <List the personnel responsible> Carry out the following procedure5:
a. If necessary, very carefully release the sensor and sensor capillary tube from its fixings. DO NOT bend the junction between the capillary tube and the sensor bulb. Re-fix on completion.
b. Add just enough distilled water to the crushed ice to remove any air pockets that might remain.
c. Insert the sensor bulb of the reference thermometer into the iced water. Do not allow it to touch the inside surface of the container. Wait for it to equilibrate at 0ºC. Add more crushed ice if necessary.
d. Insert the dial thermometer probe into the iced water. Do not allow it to touch the inside surface of the container.
e. Allow the temperature reading to stabilize before reading the temperature on the dial of the instrument. The reading on the dial should be 0ºC (± 1ºC).
f. If it is not, adjust the position of the needle on the dial according to the device manufacturer’s instructions so that it matches the reading on the reference thermometer. Repeat steps c) to f).
g. Document the results of the accuracy check on the Temperature accuracy check form – see Annex 1.
If the device cannot be adjusted, it should be replaced.
4.4 MULTiLOG Responsibility: <List the personnel responsible> Carry out the following procedure for each for each of the three MULTiLOG boards:
a. Record the location of the MULTiLOG system and the details of the check procedure on the MULTiLOG temperature accuracy check form - see Annex 2.
b. In the ‘Sensor location’ column of the calibration record sheet, enter the name of the cold chain equipment whose sensor you are checking – for example ‘Cold room no. 1’.
c. Use the MULTiLOG software menu option ‘Data/Download Data’ to manually download any data in the MULTiLOG because re-starting MULTiLOG (see step g) will overwrite these data.
d. Set your watch to the exact time shown on the MULTiLOG (to the nearest second).
e. Note the system’s current Reading Time Interval (RTI) so that you can restore the setting at the end of the checking procedure.
f. Reset the RTI to one minute. g. Re-start MULTiLOG logging (exactly at the “start” of a minute on the
watch).
5 Procedure based on Flores, N., Boyle, E. Thermometer Calibration Guide. Kansas State University, 2000. www.ksre.ksu.edu/library/fntr2/mf2440.pdf

Title: Checking the accuracy of temperature monitoring devices
Code: EVM-SOP-E2-02 Version number: 1
Effective date: 07 Oct 2011 Page: 6 of 8
E2-02.1-temp accuracy
h. At each sensor location for this board: a. Position the sensor of the digital thermometer as close as possible to
the MULTiLOG sensor and tape the two leads together with electrical insulation tape so that the sensors are as close together as possible. DO NOT cover the sensors with tape. If the sensor is located in a vaccine refrigerator or freezer, close the lid of the appliance and read the thermometer whilst standing next to the appliance. If the sensor is located in a cold room or freezer room, record the temperature whilst standing inside the room.
b. Take the first reading with the digital thermometer, record temperature and time on the record sheet.
c. Wait exactly one minute. Take the second reading and record it in the same way.
d. Wait exactly one minute. Take and record the third reading. i. Download the MULTiLOG readings. Match the times with those you have
written on the record sheet, and compare the manual and logged readings at each location.
j. If the mean difference between the three thermometer readings and the three MULTiLOG reading is greater than ±1.0°C, replace the MULTiLOG sensor with a new one and repeat the checking procedure for the new sensor.
k. Restore the original RTI and re-start MULTiLOG. l. Repeat the procedure from step (a) for every MULTiLOG board in the
same computer.
5. Related documents and SOPs EVM-SOP-E2-01: Monitoring vaccine storage temperatures at fixed
storage locations. EVM-SOP-E4-01: Safe working in cold rooms and freezer rooms.

Title: Checking the accuracy of temperature monitoring devices
Code: EVM-SOP-E2-02 Version number: 1
Effective date: 07 Oct 2011 Page: 7 of 8
E2-02.1-temp accuracy
Annex 1 – Generic temperature accuracy check form Store location: …………………………………………………………………………...... Form start date: ………………………………………………………………………….... Form finish date: .…………………………………………………………………………..
Date Device description
Device location
Reference thermometer
Check method
Reference temperature
Difference from reference
Initials Comments Verified by/ date
12 Dec 2010
Rueger TFH 100 Cold room # 1 XYZ 500 Ice point 0°C +2°C AG Adjusted and rechecked - OK
SJ 15 Dec2010

Title: Checking the accuracy of temperature monitoring devices
Code: EVM-SOP-E2-02 Version number: 1
Effective date: 07 Oct 2011 Page: 8 of 8
E2-02.1-temp accuracy
Annex 2 – MULTiLOG temperature accuracy check form Date of inspection: ………………………………………………………………………….. Name of inspector: …………………………………………………………………………. Store location: ………………………………………………………………………………. No. Sensor location: Time
Temp
°C Comments
1
2
3
4
5
6
7
8
9
10
11
12
13
14
15
16
Title: Correct storage temperatures for vaccines and diluents at fixed locations
Code: EVM-SOP-E2-03 Version number: 1
Effective date: 07 Oct 2011 Page: 1 of 5
E2-03.1-correct storage temps
Standard Operating Procedure Correct storage temperatures for
vaccines and diluents at fixed locations
Approvals Name Date Signature
Authorized by:
Reviewed by:
Revised by:
Original author:
Version history
No Date Description of change Reason for change
1 07 Oct 2011 Original
2
3
4
5
Disclaimer: This is a model standard operating procedure. It incorporates generic guidance only. Countries are encouraged to adapt it as necessary to suit local requirements. Queries or comments may be addressed to [email protected]

Title: Correct storage temperatures for vaccines and diluents at fixed locations
Code: EVM-SOP-E2-03 Version number: 1
Effective date: 07 Oct 2011 Page: 2 of 5
E2-03.1-correct storage temps
Table of content Distribution .................................................................................................................2 1. Policy and objectives.........................................................................................3
1.1 Policy............................................................................................................3 1.2 Objectives.....................................................................................................3
2. Responsibility.....................................................................................................3 3. Associated materials and equipment...............................................................3 4. Procedure............................................................................................................3
4.1 Routine storage of vaccines .........................................................................3 4.1.1 Store at -15°C to -25°C in freezer room or vaccine freezers ................3 4.1.2 Store at +2°C to +8°C in cold rooms or vaccine refrigerators...............4
4.2 Storing vaccines in emergency ....................................................................4 4.3 Storing diluents.............................................................................................4
5. Related documents and SOPs ..........................................................................4 Annex 1 – WHO recommended storage temperatures ...........................................5
Distribution Distribute this SOP to the following:
Facility type Position(s)

Title: Correct storage temperatures for vaccines and diluents at fixed locations
Code: EVM-SOP-E2-03 Version number: 1
Effective date: 07 Oct 2011 Page: 3 of 5
E2-03.1-correct storage temps
1. Policy and objectives
1.1 Policy Responsible personnel must know the correct storage temperature for every vaccine, diluent and vaccine/diluent combination. This knowledge should cover any non-EPI vaccines or pharmaceuticals that are kept in the vaccine supply chain. Personnel should also know which products are damaged by freezing.
1.2 Objectives This SOP lists the products kept in the vaccine supply chain and states the temperatures at which they should be stored at fixed sites. It does not cover temperatures during transport operations.
2. Responsibility The Storekeeper or Health worker has day-to-day responsibility for ensuring that vaccine and diluents are stored at the correct temperatures. <List responsible positions> have supervisory duties.
3. Associated materials and equipment None
4. Procedure
4.1 Routine storage of vaccines Responsibility: Storekeeper or Health worker All vaccines must be stored at the correct temperature as set out in the tables below.
Note: Complete the following tables for all vaccines and other products and all applicable levels in the supply chain. Some non-EPI products may not be delivered to peripheral health facilities. If this is the case, enter ‘—‘ or ‘n/a’. The tables may be modified to suit country circumstances and policies.
4.1.1 Store at -15°C to -25°C in freezer rooms or vaccine freezers
Vaccine Primary store <level> <level> <level> Health facility
OPV X

Title: Correct storage temperatures for vaccines and diluents at fixed locations
Code: EVM-SOP-E2-03 Version number: 1
Effective date: 07 Oct 2011 Page: 4 of 5
E2-03.1-correct storage temps
4.1.2 Store at +2°C to +8°C in cold rooms or vaccine refrigerators
Vaccine Primary store <level> <level> <level> Health facility
4.2 Storing vaccines in emergency Responsibility: Storekeeper or health worker If the freezer room or a vaccine freezer breaks down, OPV and all the lyophilized vaccines can safely be stored temporarily at +2°C to +8°C. All other vaccines must only be stored at +2°C to +8°C – they MUST NOT be frozen.
4.3 Storing diluents Responsibility: Storekeeper or health worker Except at health facility level, all diluents should be stored at room temperature unless they are packed with the vaccine. Diluents MUST NEVER be frozen. In health facilities, ALL diluents must be stored at +2°C to +8°C.
5. Related documents and SOPs EVM-SOP-E2-01: Monitoring vaccine storage temperature at fixed
storage locations. EVM-SOP-E6-02: Managing diluents in vaccine stores. EVM-SOP-E6-05: Storing vaccine in cold rooms and freezer rooms. EVM-SOP-E6-06: Storing vaccine in refrigerators and freezers.

Title: Correct storage temperatures for vaccines and diluents at fixed locations
Code: EVM-SOP-E2-03 Version number: 1
Effective date: 07 Oct 2011 Page: 5 of 5
E2-03.1-correct storage temps
Annex 1 – WHO recommended storage temperatures Sub-national Primary
Province District
Health Facility
Health Post
Maximum storage period Maximum storage period
Vaccine
6-12 months 3 months 1 month 1 month According to session plan
OPV Store at -15°C to -25°C
OPV is the only vaccine that can safely be frozen and unfrozen
repeatedly
Store at +2oC to +8oC
BCG
Hib lyophilized
JE
Measles
Meningitis
MMR
MR
Yellow Fever
Store these lyophilized vaccines at +2°C to +8°C. Under exceptional circumstances they can be temporarily stored at -15°C to -25°C (e.g. if there is a temporary shortage of storage space. Never freeze diluent.
Cholera DT/TT/Td Store at +2°C to +8°C DTP DO NOT FREEZE DTP-HepB DTP-HepB+Hib lyo DTP-HepB-Hib liquid DTP-Hib Hepatitis B Hib liquid HPV Influenza IPV Pneumoccocal Rabies Rotavirus Diluent: If diluent is included in the vaccine packaging, store it between +2°C and +8°C. However, if diluent is supplied separately, it can be stored outside the cold chain but must be cooled before use, preferably for a day or for a period of time sufficient to ensure that the vaccine and diluent are both at temperatures between +2°C and +8°C when they are reconstituted. Never freeze diluent. Note that diluent/adjuvant for some pandemic influenza vaccines must be stored in the cold chain.
Source: WHO/IVB/08.01: Training for mid-level managers: Module 1 - Cold chain, vaccines and safe-injection equipment management. Updated in April 2011 by WHO/IVB/QSS to include additional vaccines.

Title: Responding to emergencies in fixed storage locations
Code: EVM-SOP-E3-01 Version number: 1
Effective date: 07 Oct 2011 Page: 1 of 8
E3-01.1-store emergencies
Standard Operating Procedure Responding to emergencies in fixed
storage locations
Approvals Name Date Signature
Authorized by:
Reviewed by:
Revised by:
Original author:
Version history
No Date Description of change Reason for change
1 07 Oct 2011 Original
2
3
4
5
Disclaimer: This is a model standard operating procedure. It incorporates generic guidance only. Countries are encouraged to adapt it as necessary to suit local requirements. Queries or comments may be addressed to [email protected]

Title: Responding to emergencies in fixed storage locations
Code: EVM-SOP-E3-01 Version number: 1
Effective date: 07 Oct 2011 Page: 2 of 8
E3-01.1-store emergencies
Table of content Distribution .................................................................................................................2 1. Policy and objectives.........................................................................................3
1.1 Policy............................................................................................................3 1.2 Objectives.....................................................................................................3
2. Responsibility.....................................................................................................4 3. Associated materials and equipment...............................................................4 4. Procedure............................................................................................................4
4.1 Contact details..............................................................................................4 4.2 Emergency responses in primary and sub-national stores...........................5
4.2.1 Temperature alarm activated................................................................5 4.2.2 Mains power failure – generator not starting ........................................5 4.2.3 Fire .......................................................................................................6 4.2.4 Major emergency, including action following a fire ...............................6
4.3 Emergency response at lowest delivery and service delivery levels ............6 4.3.1 Refrigerator failure................................................................................7
5. Related documents and SOPs ..........................................................................7 Annex 1 – WHO recommended storage temperatures ...........................................8
Distribution Distribute this SOP to the following:
Facility type Position(s)

Title: Responding to emergencies in fixed storage locations
Code: EVM-SOP-E3-01 Version number: 1
Effective date: 07 Oct 2011 Page: 3 of 8
E3-01.1-store emergencies
1. Policy and objectives
1.1 Policy All responsible personnel should know when and how to respond in the event of cold chain equipment breakdown or a major power supply failure. Junior personnel may simply be required to report to their supervisor. More senior personnel should know and understand the emergency response plans and should be able to implement then effectively if the need arises.
1.2 Objectives This SOP describes the actions that should be taken in response to some commonly occurring emergencies in primary and sub-national stores where large quantities of vaccine are kept. The SOP also covers emergency responses in lowest delivery level stores and health facilities.
Note: This model SOP provides advice on preparing an emergency response (contingency) plan. It gives some specific examples of emergencies and details the actions to be taken in response. Amend and extend the list of to suit specific country conditions. Every facility that stores vaccine must have a written emergency response plan so that responsible personnel know what to do in an emergency. In particular it is essential to identify alternative places where vaccine can safely be stored in a cold room or refrigerator. If this option is not available, then you should identify places where ice can be obtained at short notice. Reach an agreement with these providers so that they are willing and able to help if an emergency does occur. The table below gives some general guidance on preparing a emergency response plan for a primary store or large sub-national store. Elements of an emergency response plan for a primary store or large sub-national store
Ensure that all personnel know how to follow safe storage rules in an emergency
Freeze-sensitive vaccines: Maintain vaccines at +2°C to +8°C – see Annex 1.
OPV and freeze-dried vaccines: Maintain vaccines at +2°C to +8°C – see Annex 1.
Diluents: Store at room temperature, unless packed with the vaccine1.
Identify a range of emergency response options (the following are four examples)
Move the vaccine to another public service cold store.
Borrow or hire a refrigerated vehicle.
Move the vaccine to a private sector cold store.
1 At service delivery level, diluent should always be stored at +2°C to +8°C, even during an emergency.
Title: Responding to emergencies in fixed storage locations
Code: EVM-SOP-E3-01 Version number: 1
Effective date: 07 Oct 2011 Page: 4 of 8
E3-01.1-store emergencies
Obtain ice from a commercial ice maker and store this inside the cold room, freezer room, refrigerator or freezer in plastic or metal containers. Closely monitor the storage temperature and keep the ice supply replenished until repairs are carried out. Never use dry ice. Dry ice may lower the temperature of the cold room to below 0°C. In addition when it evaporates it gives off carbon dioxide gas. This may build up in the cold room and could suffocate anybody who enters the room.
Prepare and maintain at least two emergency response plans based upon these options.
Whatever plans you choose, make sure they are discussed and agreed beforehand with your staff, and with all the other parties involved.
Confirm the plan in writing. Keep a copy in the vaccine store. Make sure responsible personnel know where it is.
Check alternative stores to ensure that they are in good condition, have adequate space and are capable of maintaining vaccine at the correct temperature. There is no point moving stock to another cold room only to find that all your freeze-sensitive vaccine is frozen and destroyed.
Do not wait until an emergency occurs. Rehearse2 the plans before they are needed.
Prepare a list of emergency contact names, addresses and telephone numbers and post a copy of the list in the vaccine store. Keep the list up to date.
Make sure that emergency contacts can be made both inside and outside normal working hours.
Source: WHO/IVB/04.16-20. EVSM Model Quality Plan
2. Responsibility All personnel who have responsibility for looking after vaccines in fixed storage locations, including security guards who provide out-of-hours cover.
3. Associated materials and equipment None
4. Procedure
4.1 Contact details Every vaccine store and health facility must post emergency contact details on a notice board and in a place where it can be read outside of working hours. The emergency details must include:
a. Names of the responsible personnel member(s), with office and personal telephone number(s).
b. Name of the maintenance engineer or maintenance contractor, with office and personal telephone number(s).
2 Vaccine should not be physically moved during rehearsals, but all key procedures should be simulated.

Title: Responding to emergencies in fixed storage locations
Code: EVM-SOP-E3-01 Version number: 1
Effective date: 07 Oct 2011 Page: 5 of 8
E3-01.1-store emergencies
4.2 Emergency responses in primary and sub-national stores This section describes the immediate actions to take in the case of foreseeable emergencies. In the case of an unforeseen event, all responsible personnel must be contacted and they must meet as soon as possible to decide on the specific action to be taken.
4.2.1 Temperature alarm activated
Initial response outside working hours: Responsibility: <List responsible personnel, including security guards>.
a. Telephone the emergency contact numbers until one person answers and agrees to respond.
b. Wait until the responsible person arrives to investigate and provide assistance as requested.
Follow-up response: Responsibility: <List personnel responsible for looking after vaccine, maintenance engineer or maintenance contractor>.
a. Locate the source: Identify the equipment which is generating the alarm. b. Door or lid open: Check to see if the alarm is caused by an open door or
open lid. If it is, close the door or lid and wait to see if the temperature returns to normal.
c. Check the power supply: Check whether the power supply to the equipment has been disconnected or switched off. If it has, reconnect the equipment and wait to see whether the temperature returns to normal.
d. Cold room or freezer room refrigeration unit not working or not cooling: Switch over to the standby unit. Call the <maintenance engineer or maintenance contractor>.
e. Freezer not working: Move the vaccine to another freezer. If there is insufficient space available, move the vaccine to a cold room or to a vaccine refrigerator. Call the <maintenance engineer or maintenance contractor>. Record the new location of the vaccine in the stock control system.
f. Cold room or refrigerator not working: Move the vaccine to another cold room or to another vaccine refrigerator. Call the <maintenance engineer or maintenance contractor>. Record the new location of the vaccine in the stock control system.
4.2.2 Mains power failure – generator not starting
Initial response outside working hours: Responsibility: <List responsible personnel, including security guards>.
a. If the mains power supply returns within one hour, report the generator failure to the responsible person on the next working day so that the <maintenance engineer or maintenance contractor> can be called.
b. If the mains power supply does not return within one hour, telephone the responsible members of personnel and the <maintenance engineer or maintenance contractor>.
Title: Responding to emergencies in fixed storage locations
Code: EVM-SOP-E3-01 Version number: 1
Effective date: 07 Oct 2011 Page: 6 of 8
E3-01.1-store emergencies
c. Wait until the responsible person arrives to investigate and provide assistance as requested.
Follow-up response: Responsibility: <List responsible personnel, including maintenance engineer or maintenance contractor>
a. Minor defect: Rectify the defect within 24 hours and test the generator. b. Major defect: Notify the electricity supply company that the standby
generator is not working and that power cuts lasting more than two hours in 24 hours will place the vaccine at risk. Rectify the defect within seven days.
c. Major breakdown requiring generator replacement: Rent a mobile generator from <xyz hire company> and make the necessary temporary connections to the control panel. Order a permanent replacement and install it when it arrives.
Note: Establish a list of companies that can supply mobile generators of the correct capacity.
4.2.3 Fire
Responsibility: <List responsible personnel, including security guards>. DO NOT place yourself at risk.
a. If the fire is small, try to extinguish it using the nearest available fire extinguisher.
b. Immediately contact the fire service. OTHERWISE:
c. Leave the building. d. Immediately contact the fire service.
4.2.4 Major emergency, including action following a fire
Responsibility: <List responsible personnel> a. Call an emergency meeting to agree the action plan. b. Enter the store only if it is safe to do so. Inspect the stock and establish
which vaccines and other supplies are physically undamaged. Check VVM status. Safely dispose of any vaccines that have reached the discard point.
c. Move the vaccines and other supplies as quickly as possible to a safe alternative location.
d. Conduct a physical count of the salvaged vaccine and other supplies. Note: Prepare a emergency response plan to deal with this situation. Two possible options include moving vaccine to another store or storing vaccine temporarily in refrigerated vehicles.
4.3 Emergency response at lowest delivery and service delivery levels Lower level vaccine stores and health facilities are particularly vulnerable if there is a cold chain failure. There may be limited opportunities to safeguard the vaccine and these facilities are often unattended outside working hours.

Title: Responding to emergencies in fixed storage locations
Code: EVM-SOP-E3-01 Version number: 1
Effective date: 07 Oct 2011 Page: 7 of 8
E3-01.1-store emergencies
4.3.1 Refrigerator failure
Initial response: Responsibility: <List responsible personnel>.
a. Electrical refrigerators: Check whether there is a power cut. If the mains power supply is on, check whether the power supply to the equipment has been disconnected or switched off. If it has, reconnect the equipment and wait to see whether the temperature returns to normal.
b. Gas or kerosene refrigerators: Check the fuel supply; if empty, replace the gas bottle or refill the tank. Check the burner; trim and adjust the wick if necessary (kerosene refrigerators).
c. Solar refrigerators with battery pack: Check that the battery pack is charged. If not, try to identify the cause of the problem.
Follow-up response: a. Report the problem: Contact your supervisor as soon as possible and
report the problem. Ask for the maintenance engineer to be called. b. Use another refrigerator: If you have access to another refrigerator in the
health facility or in the community, move the vaccine and the temperature monitoring equipment (thermometer or electronic device). Monitor storage temperatures twice a day in the new location.
c. Use a cold box: If you have a supply of frozen icepacks, condition the icepacks and place them in a cold box with the vaccine. If you have no icepacks, try to obtain ice from a local source. Place the ice in plastic bags in a cold box with the vaccine. If you do not have a cold box, place the ice in plastic bags in the bottom of the refrigerator. Monitor the icepacks or ice supply and renew when melted.
d. Check the VVMs: Before using the vaccine, check the VVM status. Safely dispose of any vaccines that have reached the discard point.
5. Related documents and SOPs EVM-SOP-E2-03: Correct storage temperatures for vaccines and diluents EVM-SOP-E5-02: Looking after cold rooms and freezer rooms EVM-SOP-E5-03: Looking after vaccine refrigerators and freezers
EVM-SOP-E5-04: Looking after standby generators EVM-SOP-E5-05: Looking after voltage regulators EVM-SOP-E6-04: Safe disposal of expired or damaged vaccine and
diluents EVM-SOP-E7-04: Conditioning frozen icepacks EVM-SOP-E8-02: Using Vaccine Vial Monitors
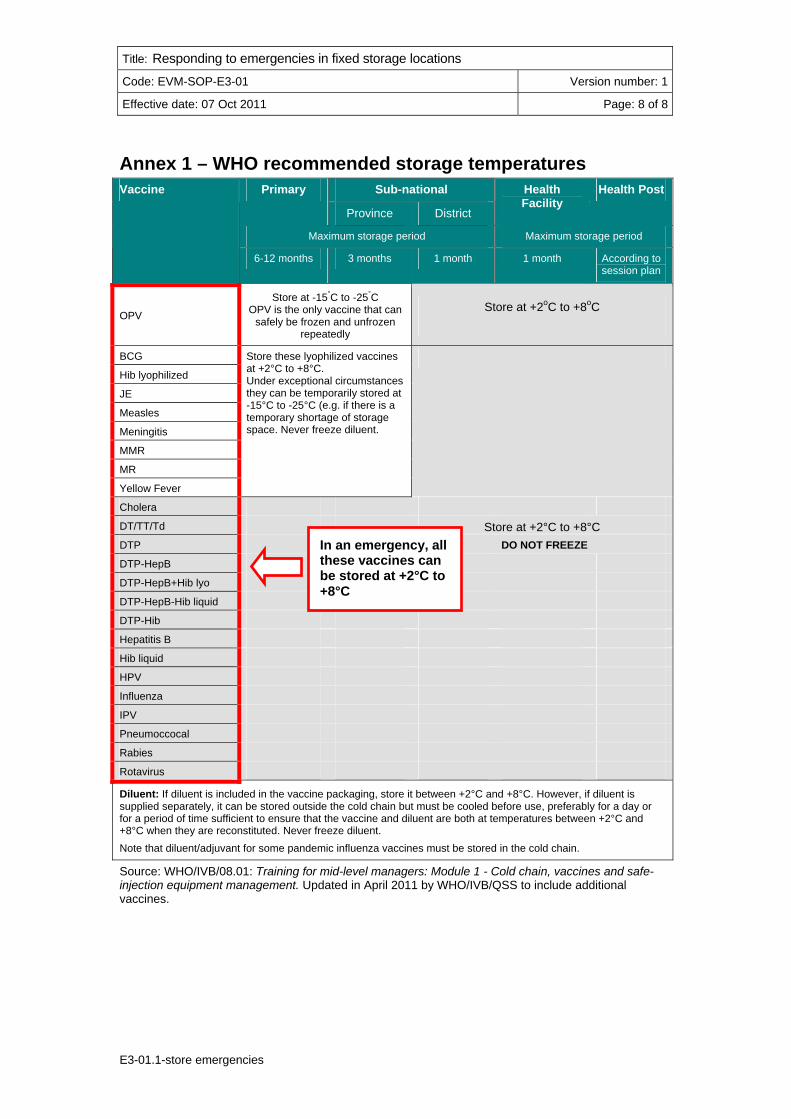
Title: Responding to emergencies in fixed storage locations
Code: EVM-SOP-E3-01 Version number: 1
Effective date: 07 Oct 2011 Page: 8 of 8
E3-01.1-store emergencies
Annex 1 – WHO recommended storage temperatures Sub-national Primary
Province District
Health Facility
Health Post
Maximum storage period Maximum storage period
Vaccine
6-12 months 3 months 1 month 1 month According to session plan
OPV Store at -15°C to -25°C
OPV is the only vaccine that can safely be frozen and unfrozen
repeatedly
Store at +2oC to +8oC
BCG
Hib lyophilized
JE
Measles
Meningitis
MMR
MR
Yellow Fever
Store these lyophilized vaccines at +2°C to +8°C. Under exceptional circumstances they can be temporarily stored at -15°C to -25°C (e.g. if there is a temporary shortage of storage space. Never freeze diluent.
Cholera DT/TT/Td Store at +2°C to +8°C DTP DO NOT FREEZE DTP-HepB DTP-HepB+Hib lyo DTP-HepB-Hib liquid DTP-Hib Hepatitis B Hib liquid HPV Influenza IPV Pneumoccocal Rabies Rotavirus
Diluent: If diluent is included in the vaccine packaging, store it between +2°C and +8°C. However, if diluent is supplied separately, it can be stored outside the cold chain but must be cooled before use, preferably for a day or for a period of time sufficient to ensure that the vaccine and diluent are both at temperatures between +2°C and +8°C when they are reconstituted. Never freeze diluent. Note that diluent/adjuvant for some pandemic influenza vaccines must be stored in the cold chain.
In an emergency, all these vaccines can be stored at +2°C to +8°C
Source: WHO/IVB/08.01: Training for mid-level managers: Module 1 - Cold chain, vaccines and safe-injection equipment management. Updated in April 2011 by WHO/IVB/QSS to include additional vaccines.

Title: Fire drills
Code: EVM-SOP-E3-02 Version number: 1
Effective date: 03 June 2013 Page: 1 of 4
E3-02.1-fire drills
Standard Operating Procedure Fire drills
Approvals Name Date Signature
Authorized by:
Reviewed by:
Revised by:
Original author: Dr Clare Barker
Version history
No Date Description of change Reason for change
1 03 Jun 2013 Original
2
3
4
5
Disclaimer: This is a model standard operating procedure. It incorporates generic guidance only. Countries are encouraged to adapt it as necessary to suit local requirements. Queries or comments may be addressed to [email protected] Acknowledgement: This EVM Model SOP was written by Dr Clare Barker, Principal Consultant, Fire Engineering Europe, Exova Warringtonfire, UK.

Title: Fire drills
Code: EVM-SOP-E3-02 Version number: 1
Effective date: 03 June 2013 Page: 2 of 4
E3-02.1-fire drills
Table of content Distribution ................................................................................................................. 2 1. Policy and objectives ......................................................................................... 3
1.1 Policy ............................................................................................................. 3 1.2 Objectives ...................................................................................................... 3
2. Responsibility ..................................................................................................... 3 3. Associated materials and equipment ............................................................... 3 4. Procedure............................................................................................................ 3
4.1 Conducting test evacuations .......................................................................... 3 5. Related documents and SOPs .......................................................................... 4
Distribution Distribute this SOP to the following:
Facility type Position(s)

Title: Fire drills
Code: EVM-SOP-E3-02 Version number: 1
Effective date: 03 June 2013 Page: 3 of 4
E3-02.1-fire drills
1. Policy and objectives
1.1 Policy In order to protect property and life, standard operating policies should be followed for fire prevention, detection and control.
1.2 Objectives This SOP describes the procedure to be followed when conducting fire drills to ensure that the building can be evacuated quickly and safely in the event of a genuine fire.
2. Responsibility The Fire Safety Manager has day-to-day responsibility for the prevention of fires and the management procedures related to fire safety. Note: It is essential to designate a Fire Safety Manager to oversee the activities described in this SOP.
3. Associated materials and equipment Stop-watch.
4. Procedure
4.1 Conducting test evacuations Responsibility: Fire Safety Manager
a. Evacuation procedures should be tested at least once, preferably twice, per year.
b. A full evacuation of the entire building should be carried out at least once a year.
c. Any deficiencies observed in the fire safety management should be remedied and, if necessary, the written instructions should be amended.
d. The fire safety manager must identify the purpose of the test evacuation and explain it to the staff so that it can be assessed.
e. The objectives of a test evacuation is as follows: To test management procedures; To provide practical training to staff; To establish if training is satisfactory; To identify weaknesses in emergency communications procedures
and systems; To identify positive and negative reactions of staff with designated
responsibilities; To assess the reliability of equipment; To rehearse joint action with the fire and rescue service.
f. Test evacuations should not be carried out at regular times; otherwise staff may become prepared for them.

Title: Fire drills
Code: EVM-SOP-E3-02 Version number: 1
Effective date: 03 June 2013 Page: 4 of 4
E3-02.1-fire drills
g. Each test evacuation should presume a different scenario so that different situations can be dealt with.
h. Prior notice of test evacuations should only be given to those who have designated responsibilities for monitoring the test (e.g. persons witnessing the exercise and reporting on the positive and negative aspects) so that they are as realistic as possible. People undertaking this monitoring task should not be otherwise involved in the evacuation (e.g. should not be given fire marshal duties).
i. Continuous monitoring of the evacuation is essential, by video recording if possible, to allow a detailed comparison between planned and actual activity and to assist with training.
j. Where possible test evacuations should include the procedures for evacuating disabled persons.
k. Fire safety systems should be employed as part of a test evacuation in order to check whether such systems are creating unforeseen difficulties and whether software controlled procedures (i.e. those used to switch on fans, open vents, release doors and sound alarms, etc.) are operating as intended.
l. Carry out a full de-brief at the end of the exercise so that lessons can be learned and changes made to the evacuation procedures if necessary.
5. Related documents and SOPs BS 9999: 2008. Code of practice for fire safety in the design, management
and use of buildings. EVM-SOP-E3.01: Responding to emergencies in fixed storage locations. EVM-SOP-E5.06: Routine inspection and maintenance of fire safety
installations. EVM-SOP-E6.08: Fire safety housekeeping routines.

Title: Safe working in cold rooms and freezer rooms
Code: EVM-SOP-E4-01 Version number: 1
Effective date: 07 Oct 2011 Page: 1 of 4
E4-01.1-CR safe working
Standard Operating Procedure Safe working in cold rooms and freezer
rooms
Approvals Name Date Signature
Authorized by:
Reviewed by:
Revised by:
Original author:
Version history
No Date Description of change Reason for change
1 07 Oct 2011 Original
2
3
4
5
Disclaimer: This is a model standard operating procedure. It incorporates generic guidance only. Countries are encouraged to adapt it as necessary to suit local requirements. Queries or comments may be addressed to [email protected]
Title: Safe working in cold rooms and freezer rooms
Code: EVM-SOP-E4-01 Version number: 1
Effective date: 07 Oct 2011 Page: 2 of 4
E4-01.1-CR safe working
Table of content Distribution .................................................................................................................2 1. Policy and objectives.........................................................................................3
1.1 Policy............................................................................................................3 1.2 Objectives.....................................................................................................3
2. Responsibility.....................................................................................................3 3. Associated materials and equipment...............................................................3 4. Procedure............................................................................................................3
4.1 Training ........................................................................................................3 4.2 General safety rules .....................................................................................3 4.3 Personal safety.............................................................................................4
5. Related documents and SOPs ..........................................................................4
Distribution Distribute this SOP to the following:
Facility type Position(s)

Title: Safe working in cold rooms and freezer rooms
Code: EVM-SOP-E4-01 Version number: 1
Effective date: 07 Oct 2011 Page: 3 of 4
E4-01.1-CR safe working
1. Policy and objectives
1.1 Policy Responsible personnel should understand that working in cold rooms and freezer rooms can be dangerous and there is a risk from hypothermia if workers are not properly trained and warmly clothed. This is particularly the case in hot climates where people generally wear thin clothes and may have no experience of intense cold. All personnel should be trained in safe working practices and should be supplied with suitable clothing.
1.2 Objectives This SOP sets out the safety rules which must be observed by all personnel who have access to cold rooms or freezer rooms.
2. Responsibility The <list the personnel responsible> are responsible for ensuring that they, together with any temporary workers, follow correct procedures when work takes place in cold rooms and freezer rooms.
3. Associated materials and equipment Thermal clothing, including thermal trousers, jackets, gloves and hats must be available for the use of all personnel whose duties require them to work in cold rooms or freezer rooms.
4. Procedure
4.1 Training Responsibility: <List the training personnel responsible>
a. Familiarize all temporary workers on the safe working procedures set out in this SOP. ‘Temporary workers’ in this context includes supervisory personnel, maintenance personnel and those who assist with the routine stock counts.
b. Make sure that all people who work in the store know that the must wear suitable cold weather clothing. Suitable clothing for a cold room includes long trousers, thermal jacket and gloves. Suitable clothing for a freezer room includes thermal trousers, a thermal jacket, gloves and a hat.
4.2 General safety rules Responsibility: <List the supervisory personnel responsible>
a. Clothing: Do not allow anybody to enter the cold room for periods of more than five minutes without wearing suitable clothing. A person who is not wearing warm clothing must be accompanied at all times. Do not allow anybody to enter the freezer room unless they are wearing suitable clothing.
b. Keys: Make sure all cold room and freezer room keys are kept in a safe place and are accounted for at the end of each working day. Have one active key for each room and keep spare keys separately.

Title: Safe working in cold rooms and freezer rooms
Code: EVM-SOP-E4-01 Version number: 1
Effective date: 07 Oct 2011 Page: 4 of 4
E4-01.1-CR safe working
c. Dry ice: Internationally shipped vaccines may be packed in dry ice. Dry ice changes into carbon dioxide gas when it evaporates. If carbon dioxide accumulates in a confined space it can cause suffocation. If you receive large quantities of vaccine in international shipping containers, do not place the containers in the cold rooms or freezer room until the dry ice has been removed.
4.3 Personal safety Responsibility: All personnel who work in cold rooms or freezer rooms
a. Tell a colleague what you are doing: Do not enter a cold room or freezer room on your own without informing a colleague first. If you become trapped in the room you may suffer from hypothermia and you could die.
b. Check the lock: Before you enter, check that you have the key and that the door was locked by the last user. Keep the key with you so that you cannot be locked in the room by mistake.
c. Check the door: Before anyone enters a cold room or freezer room, check that the door can be opened from the inside.
d. Cold rooms: Do not work for more than five minutes in a cold room unless you are wearing suitable clothing.
e. Freezer rooms: Never enter a freezer room without wearing suitable clothing. Never remain inside on your own for more than a few minutes; you may become chilled and your reactions may become slow.
f. Check the people: When you enter a cold store with more than one other colleague, count the people before they go in and count them again when they come out. Make sure no one is left behind.
g. Lock the door when you leave: Lock the door and put the key in a safe place.
5. Related documents and SOPs WHO/V&B/02.31. User’s handbook for vaccine cold rooms and freezer rooms
http://whqlibdoc.who.int/hq/2002/WHO_V&B_02.31.pdf

Title: Looking after store buildings
Code: EVM-SOP-E5-01 Version number: 1
Effective date: 07 Oct 2011 Page: 1 of 6
E5-01.1-store maintenance
Standard Operating Procedure Looking after store buildings
Approvals Name Date Signature
Authorized by:
Reviewed by:
Revised by:
Original author:
Version history
No Date Description of change Reason for change
1 07 Oct 2011 Original
2
3
4
5
Disclaimer: This is a model standard operating procedure. It incorporates generic guidance only. Countries are encouraged to adapt it as necessary to suit local requirements. Queries or comments may be addressed to [email protected]
Title: Looking after store buildings
Code: EVM-SOP-E5-01 Version number: 1
Effective date: 07 Oct 2011 Page: 2 of 6
E5-01.1-store maintenance
Table of content Distribution .................................................................................................................2 1. Policy and objectives.........................................................................................3
1.1 Policy............................................................................................................3 1.2 Objectives.....................................................................................................3
2. Responsibility.....................................................................................................3 3. Associated materials and equipment...............................................................4 4. Procedure............................................................................................................4
4.1 Routine maintenance ...................................................................................4 4.1.1 Daily tasks ............................................................................................4 4.1.2 Weekly tasks ........................................................................................4 4.1.3 Monthly tasks........................................................................................4 4.1.4 Annual tasks .........................................................................................4 4.1.5 Every five years, starting in <state year when cycle starts>.................5
4.2 Emergency maintenance..............................................................................5 5. Related documents and SOPs ..........................................................................5 Annex 1 – Building layout .........................................................................................6
Distribution Distribute this SOP to the following:
Facility type Position(s)

Title: Looking after store buildings
Code: EVM-SOP-E5-01 Version number: 1
Effective date: 07 Oct 2011 Page: 3 of 6
E5-01.1-store maintenance
1. Policy and objectives
1.1 Policy If building maintenance is the responsibility of a specialist property services department, responsible personnel will need to know whom to liaise with in this department. If building maintenance is a programme responsibility, then responsible personnel should know how to inspect simple buildings, how to instruct and supervise basic building work and how to plan and control a maintenance budget. Ideally there should be a five year maintenance plan for the building which should be updated at least once a year. The plan should include the following elements:
An itemised maintenance plan, based upon a thorough inspection of the buildings. The plan should cover the following items: major renewal work that can be foreseen, such as re-roofing; periodic external redecoration; periodic internal redecoration; routine annual maintenance of mechanical equipment such as heating systems, air-conditioning units and ventilation fans; periodic maintenance of drainage systems, including cleaning of drainage ditches, septic tanks and the like.
A maintenance budget based upon the requirements of the maintenance plan.
A financial control and costing system to ensure that funds are disbursed correctly.
A plan of work which will achieve the targets set in the maintenance plan. An effective reporting system.
Routine maintenance must be carried out to ensure that the building(s) remain in good condition. Arrangements must also be in place to ensure that emergency maintenance takes place out in a timely manner so that vaccines and other immunization supplies are protected from damage.
1.2 Objectives This SOP describes the daily, weekly, monthly, annual and five-yearly tasks needed to ensure that the store building(s) are kept fully operational. It also covers emergency maintenance procedures. Note: Section 4 sets out typical procedures. Modify the tasks described to suit local requirements
2. Responsibility <List the personnel responsible> is in charge of coordinating the annual maintenance report and updating the long-term maintenance plan. The <list the personnel responsible> has general responsibility for ensuring that maintenance takes place and for making any necessary maintenance arrangements with other government departments. The <list the personnel responsible> has immediate responsibility for instructing and supervising maintenance work on a day-to-day basis.

Title: Looking after store buildings
Code: EVM-SOP-E5-01 Version number: 1
Effective date: 07 Oct 2011 Page: 4 of 6
E5-01.1-store maintenance
3. Associated materials and equipment Consumables, cleaning supplies, ladders and other access equipment
4. Procedure
4.1 Routine maintenance
4.1.1 Daily tasks
Responsibility: <List the personnel responsible> a. Clean the toilet and wash basins and replenish soap and toilet paper. b. Remove and dispose of redundant packing materials and other rubbish. c. Replace broken light bulbs and strip lights as and when needed.
4.1.2 Weekly tasks
Responsibility: <List the personnel responsible> a. Sweep and wash floors. Dust and wipe down other surfaces, including the
tops and sides of refrigerators and freezers.
4.1.3 Monthly tasks
Responsibility: <List the personnel responsible> a. Clean the store windows. b. Check for signs of pest activity. If pest activity is found, arrange for
appropriate pest control measures to be carried out. c. Check the stock of consumables (cleaning products, soap, toilet paper,
light bulbs, etc.) and make arrangements to re-stock items as necessary. d. Check that the supplies in the first aid kit are sufficient and that items have
not expired. Replenish or replace items as necessary.
4.1.4 Annual tasks
Timing: <Choose an appropriate time of year. For example, this might be the month before the start of the rainy season> Responsibility: <List the personnel responsible>
a. Carry out a general inspection of the building, including the roof, and repair any defects that require immediate attention. Record non-critical defects so that they can be included in the five yearly repair cycle.
b. Check the rainwater disposal system and clear all roof outlets and rainwater pipes. Remove leaves and other debris from the roof because this may cause blockages.
c. Check the underground drainage system, including the septic tank serving the toilet.
d. Check the mechanical ventilation system and ensure that it is operating correctly. Clean fan filters and air inlet and outlet grilles.
e. Check the <heating and/or air-conditioning system> and ensure that it is operating correctly.

Title: Looking after store buildings
Code: EVM-SOP-E5-01 Version number: 1
Effective date: 07 Oct 2011 Page: 5 of 6
E5-01.1-store maintenance
f. Service and re-certify the fire extinguishers1. g. Prepare an annual maintenance report, listing all significant routine
maintenance and emergency repair works carried out. Highlight any outstanding items that require immediate or longer term attention and funding. Update the long term maintenance plan. Submit the report and updated plan to <state who should receive the report> as part of the annual funding request.
4.1.5 Every five years, starting in <state year when cycle starts>
Responsibility: <List the personnel responsible> a. Rectify defects that have not been repaired following previous annual
inspections. b. Carry out a full safety inspection of the electrical system, including circuits
in the generator room, repair any defects and re-certify the system for the next five years.
c. Carry out a full inspection of the mechanical ventilation system and rectify any defects.
d. Carry out a full inspection of the heating/air conditioning system and rectify any defects.
e. Redecorate the exterior of the building. f. Redecorate the interior of the building.
4.2 Emergency maintenance Follow these emergency maintenance procedures when an unexpected event occurs, such as a leaking roof or blocked drainage. Responsibility: <List the personnel responsible>
a. If vaccine and/or immunization supplies are at immediate risk from the emergency, make temporary arrangements to protect the vaccine – see EVM-SOP-E3-01: Responding to emergencies in fixed storage locations.
b. Carry out emergency repairs as rapidly as possible, preferably within seven days.
c. If emergency repairs are only temporary, make arrangements for permanent repairs to be carried out as soon as possible.
5. Related documents and SOPs EVM-SOP-E3-01: Responding to emergencies in fixed storage locations.
1 Fire extinguishers should be labelled to show that they have been tested and/or recharged. The label should give the date of the inspection and the due date of the next inspection.

Title: Looking after store buildings
Code: EVM-SOP-E5-01 Version number: 1
Effective date: 07 Oct 2011 Page: 6 of 6
E5-01.1-store maintenance
Annex 1 – Building layout Ideally the SOP should include a plan of the building.

Title: Looking after cold rooms and freezer rooms
Code: EVM-SOP-E5-02 Version number: 1
Effective date: 07 Oct 2011 Page: 1 of 13
E5-02.1-CR maintenance
Standard Operating Procedure Looking after cold rooms and freezer
rooms
Approvals Name Date Signature
Authorized by:
Reviewed by:
Revised by:
Original author:
Version history
No Date Description of change Reason for change
1 07 Oct 2011 Original
2
3
4
5
Disclaimer: This is a model standard operating procedure. It incorporates generic guidance only. Countries are encouraged to adapt it as necessary to suit local requirements. Queries or comments may be addressed to [email protected]

Title: Looking after cold rooms and freezer rooms
Code: EVM-SOP-E5-02 Version number: 1
Effective date: 07 Oct 2011 Page: 2 of 13
E5-02.1-CR maintenance
Table of content Distribution .................................................................................................................2 1. Policy and objectives.........................................................................................3
1.1 Policy............................................................................................................3 1.2 Objectives.....................................................................................................3
2. Responsibility.....................................................................................................3 3. Associated materials and equipment...............................................................3 4. Procedure............................................................................................................3
4.1 Training ........................................................................................................3 4.2 Routine maintenance ...................................................................................4
4.2.1 Daily tasks ............................................................................................4 4.2.2 Weekly tasks ........................................................................................4 4.2.3 Monthly tasks........................................................................................5 4.2.4 Annual tasks .........................................................................................5
4.3 Emergency maintenance..............................................................................5 5. Related documents and SOPs ..........................................................................6 Annex 1 – Troubleshooting check lists ...................................................................7
Distribution Distribute this SOP to the following:
Facility type Position(s)

Title: Looking after cold rooms and freezer rooms
Code: EVM-SOP-E5-02 Version number: 1
Effective date: 07 Oct 2011 Page: 3 of 13
E5-02.1-CR maintenance
1. Policy and objectives
1.1 Policy Responsible personnel should know how to operate the refrigeration, temperature monitoring and alarm equipment, know when routine maintenance is required, and know how to recognize common faults. They should also understand the principles of planned preventive maintenance and routine equipment replacement and their importance for the maintenance of a reliable cold chain. If equipment maintenance is contracted-out, responsible personnel should ensure that an effective and enforceable contract is in place, and that the service response is acceptable.
1.2 Objectives This SOP covers routine and emergency maintenance of the cold rooms and freezer rooms. This equipment is a critical component of the national immunization programme. Any mechanical failure which places the vaccine at risk is unacceptable and the preventive maintenance regime described in this SOP must be strictly followed. If a mechanical failure does occur, the problem must be rectified within a maximum target periods stated in this SOP. It is essential that a sufficient stock of spare parts is maintained to ensure that these targets can be met. Note: Modify this SOP as necessary to suit the specific equipment installed and local procedures.
2. Responsibility Responsibility for routine non-mechanical maintenance, simple troubleshooting and initial emergency responses rests with <list responsible personnel>. Responsibility for mechanical inspections, routine servicing and emergency repairs rests with <list responsible maintenance personnel or maintenance contractor>. These tasks are outside the scope of this SOP.
3. Associated materials and equipment Tools and spare parts.
4. Procedure The procedures set out below do not cover temperature monitoring tasks. For these tasks, refer to EVM-SOP-E2-01: Monitoring vaccine storage temperatures at fixed storage locations.
4.1 Training Responsibility: <list responsible personnel> All personnel who are responsible for looking after cold rooms and freezer rooms should receive appropriate hands-on training to ensure that they are capable of carrying out all of the tasks set out in this SOP.

Title: Looking after cold rooms and freezer rooms
Code: EVM-SOP-E5-02 Version number: 1
Effective date: 07 Oct 2011 Page: 4 of 13
E5-02.1-CR maintenance
4.2 Routine maintenance
4.2.1 Daily tasks
Responsibility: <list responsible personnel> a. Listen to the cooling equipment. If you notice any unusual noise, or if the
unit seems to be running for longer than normal, refer to the checklists in Annex 1. Contact the <list responsible maintenance personnel> immediately if you are unable to resolve the problem.
b. Check inside the room. - Is the airflow from the evaporator normal? - Is the evaporator fan running quietly? - Is there water on the floor? If there is, the evaporator drainpipe may
be blocked. c. At the end of the day. Make sure that:
- All lights in the room are switched off. - There is nobody inside the room. - The door to the room is closed and locked.
4.2.2 Weekly tasks
Responsibility: <list responsible personnel> a. Check the liquid sight glasses. If the cooling units have accessible sight
glasses, check that both are filled with liquid and show “dry” conditions. If you see bubbles, there may be a leak of refrigerant. If the moisture indicator shows “wet”, the filter-drier probably needs changing. Ask the <list responsible maintenance personnel> to check and replace it if necessary.
b. Check ice build-up on the evaporator. Check the ice formation on the evaporators. Look at the pipes and fins. Most modern cooling units have an automatic defrosting system. If they are coated with ice more than 6 mm thick the evaporator needs defrosting and there could be a defect in the defrosting system. Ask the <list responsible maintenance personnel> to check.
c. Check the duty-sharing system. Check that the automatic duty-sharing system is working.
d. Check the temperature monitoring system: Check that the temperature monitoring system is operating correctly. If chart recorders are fitted, check the pens and replace the paper discs. Refer to EVM-SOP-E2-01: Monitoring vaccine storage temperatures at fixed storage locations.
e. Check the alarm system. Press the test button. The alarm should sound. If it does not, the alarm may be faulty. Ask the <list responsible maintenance personnel> to check it immediately.
f. Check the store. In addition to the daily checks: - Is the vaccine correctly stacked? - Are the vaccines and diluents correctly organized? - In the freezer room, make sure there is no build-up of ice on the floor,
walls or shelves.

Title: Looking after cold rooms and freezer rooms
Code: EVM-SOP-E5-02 Version number: 1
Effective date: 07 Oct 2011 Page: 5 of 13
E5-02.1-CR maintenance
- Clean the floor as recommended by the installer.
4.2.3 Monthly tasks
Responsibility: <list responsible personnel> a. Check the room enclosures. Carry out the following checks:
- Check the bottoms of the panels to see if there are any signs of rust. Rust may occur if the panel coating is damaged and if water left after the floor has been washed collects under the floor panels.
- Inspect the panel joints internally and externally. There should be no evidence of movement along the joint lines and no sign of condensation or ice build-up1.
- Inspect the area around the evaporator. This is the coldest part of the room. If there is significant ice build-up on the panels, it needs to be removed. A temporary shut-down may be needed.
b. Check the locks. Check that the door locks are working properly and that all keys are accounted for.
c. Check the doors. Go inside the room and ask a colleague to close the door from outside. - Test the action of the internal safety release handle. Does it work
properly? If not, call the <list responsible maintenance personnel>. - The freezer room has an electrically heated door seal. If the door seal
heater is not working the door may freeze shut. If the door is difficult to open and there is ice around the door seal, the heater may not be working. Call the <list responsible maintenance personnel>.
d. Check the strip curtain. If it is damaged, instruct the <list responsible maintenance personnel> to replace it.
e. Pressure freezer room pressure release vent: The freezer room is fitted with a pressure release vent. If the door is difficult to open, check the release vent2 to see if it is iced up. Remove the ice if you can. If you cannot do this, call the <list responsible maintenance personnel>.
4.2.4 Annual tasks
Responsibility: <list responsible personnel> a. Check the spare parts inventory. Check that the stock of cold
room/freezer room spare parts is adequate. If it is not, make sure that low or missing inventory is replenished.
4.3 Emergency maintenance Follow these emergency maintenance procedures whenever an unexpected event occurs, such as a broken down refrigeration unit. Refer also to EVM-SOP-E3-01: Responding to emergencies in fixed storage locations.
1 If the joints are not tight and well sealed the panels can absorb moisture. This reduces the efficiency of insulation. Moisture can also freeze inside the joints and force the panels apart. 2 Each time you enter the freezer room you let in a certain amount of warm air. When this cools it contracts and draws air in through the pressure release vent; this ensures that the door can still be opened easily. If the vent is blocked, the door will be very difficult to open.

Title: Looking after cold rooms and freezer rooms
Code: EVM-SOP-E5-02 Version number: 1
Effective date: 07 Oct 2011 Page: 6 of 13
E5-02.1-CR maintenance
Responsibility: <list responsible personnel> a. If vaccine is at immediate risk. Make temporary arrangements to protect
the vaccine by moving it to another location in the store. b. If both refrigeration units fail. Carry out emergency repairs to at least one
of the two units within 24 hours. c. If a single refrigeration unit fails. Carry out emergency repairs within seven
days. d. Temporary repairs. If emergency repairs are only temporary, make
arrangements for permanent repairs to be carried out as soon as possible. e. Spare parts. If spare parts have been used, update the spare parts
inventory and order replacements as needed.
5. Related documents and SOPs EVM-SOP-E2-01: Monitoring vaccine storage temperatures at fixed storage
locations.
EVM-SOP-E3-01: Responding to emergencies in fixed storage locations. MOG-SOP-E3-05: Looking after voltage stabilizers. EVM-SOP-E6-05: Storing vaccines in cold rooms and freezer rooms This SOP uses material from the WHO/V&B/02.31. User’s handbook for
vaccine cold rooms and freezer rooms http://whqlibdoc.who.int/hq/2002/WHO_V&B_02.31.pdf
<Manufacturers’ cold room and freezer room instruction and maintenance manuals, including maintenance instructions for the temperature monitoring equipment>.

Title: Looking after cold rooms and freezer rooms
Code: EVM-SOP-E5-02 Version number: 1
Effective date: 07 Oct 2011 Page: 7 of 13
E5-02.1-CR maintenance
Annex 1 – Troubleshooting check lists The following generic checklists are taken from WHO/V&B/02.31. User’s handbook for vaccine cold rooms and freezer rooms. The checklists do not replace the specific instructions given in the manufacturer’s maintenance manuals. Do not carry out any of the work shown in the shaded boxes unless you have been trained to do so.

Title: Looking after cold rooms and freezer rooms
Code: EVM-SOP-E5-02 Version number: 1
Effective date: 07 Oct 2011 Page: 8 of 13
E5-02.1-CR maintenance

Title: Looking after cold rooms and freezer rooms
Code: EVM-SOP-E5-02 Version number: 1
Effective date: 07 Oct 2011 Page: 9 of 13
E5-02.1-CR maintenance

Title: Looking after cold rooms and freezer rooms
Code: EVM-SOP-E5-02 Version number: 1
Effective date: 07 Oct 2011 Page: 10 of 13
E5-02.1-CR maintenance

Title: Looking after cold rooms and freezer rooms
Code: EVM-SOP-E5-02 Version number: 1
Effective date: 07 Oct 2011 Page: 11 of 13
E5-02.1-CR maintenance
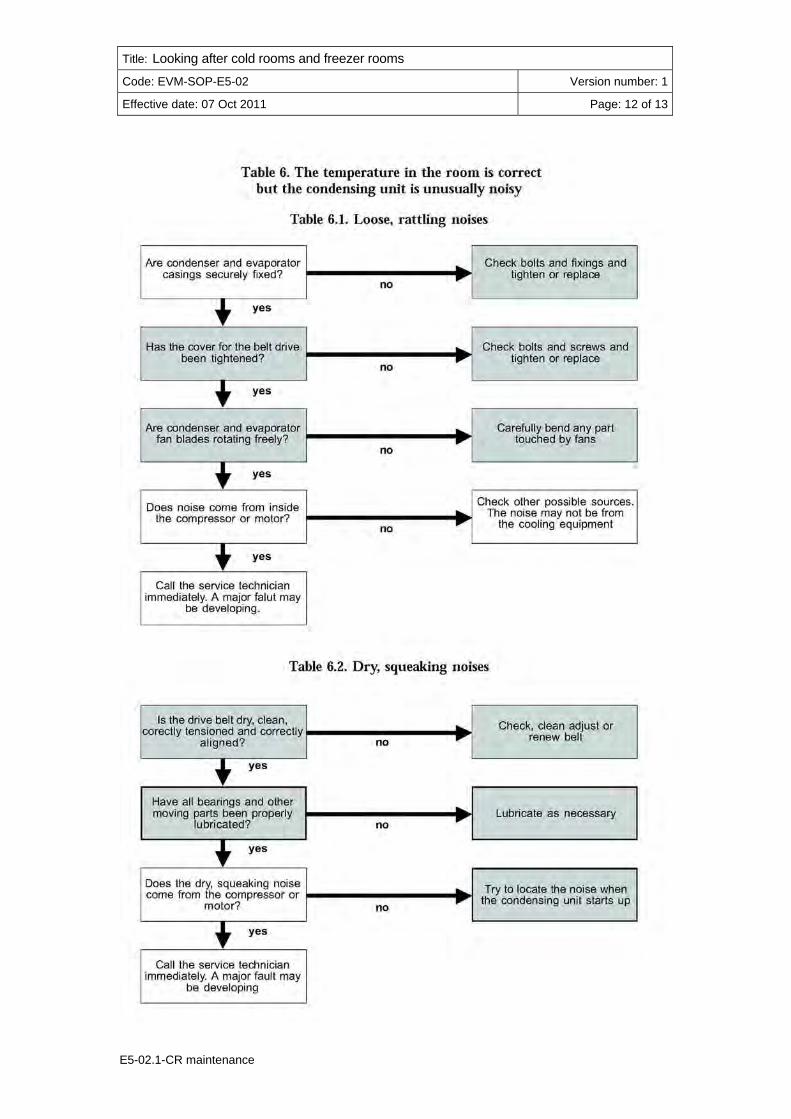
Title: Looking after cold rooms and freezer rooms
Code: EVM-SOP-E5-02 Version number: 1
Effective date: 07 Oct 2011 Page: 12 of 13
E5-02.1-CR maintenance

Title: Looking after cold rooms and freezer rooms
Code: EVM-SOP-E5-02 Version number: 1
Effective date: 07 Oct 2011 Page: 13 of 13
E5-02.1-CR maintenance

Title: Installing and looking after vaccine refrigerators and freezers
Code: EVM-SOP-E5-03 Version number: 1
Effective date: 07 Oct 2011 Page: 1 of 31
E5-03.1-fridge maintenance
Standard Operating Procedure Installing and looking after vaccine
refrigerators and freezers
Approvals Name Date Signature
Authorized by:
Reviewed by:
Revised by:
Original author:
Version history
No Date Description of change Reason for change
1 07 Oct 2011 Original
2
3
4
5
Disclaimer: This is a model standard operating procedure. It incorporates generic guidance only. Countries are encouraged to adapt it as necessary to suit local requirements. Queries or comments may be addressed to [email protected]

Title: Installing and looking after vaccine refrigerators and freezers
Code: EVM-SOP-E5-03 Version number: 1
Effective date: 07 Oct 2011 Page: 2 of 31
E5-03.1-fridge maintenance
Table of content Distribution .................................................................................................................3 1. Policy and objectives.........................................................................................4
1.1 Policy............................................................................................................4 1.2 Objectives.....................................................................................................4
2. Responsibility.....................................................................................................4 3. Associated materials and equipment...............................................................4 4. Procedure............................................................................................................4
4.1 Training ........................................................................................................4 4.2 General installation instructions for refrigerators and freezers .....................5
4.2.1 Installing mains electric refrigerators and freezers ...............................6 4.2.2 Installing gas and kerosene refrigerators and freezers.........................7 4.2.3 Installing solar refrigerators and freezers .............................................8
4.3 Routine use and maintenance for all refrigerators and freezers...................9 4.3.1 Routine use ..........................................................................................9 4.3.2 Daily tasks ............................................................................................9 4.3.3 Monthly tasks........................................................................................9 4.3.4 Annual tasks .......................................................................................11
4.4 Specific maintenance for gas refrigerators and freezers ............................11 4.4.1 Daily tasks ..........................................................................................11 4.4.2 Weekly tasks ......................................................................................11 4.4.3 Monthly tasks......................................................................................11 4.4.4 Periodic tasks .....................................................................................12
4.5 Specific maintenance for kerosene refrigerators and freezers ...................12 4.5.1 Daily tasks ..........................................................................................12 4.5.2 Weekly tasks ......................................................................................12 4.5.3 Periodic tasks .....................................................................................13
4.6 Specific maintenance for solar refrigerators and freezers ..........................13 4.6.1 Daily tasks ..........................................................................................13 4.6.2 Monthly or periodic tasks....................................................................13 4.6.3 Annual tasks .......................................................................................14
4.7 Emergency maintenance............................................................................14 5. Related documents and SOPs ........................................................................14 Annex 1 – Notice for ice-lined refrigerators ..........................................................16 Annex 2 – How to check gas bottles ......................................................................17 Annex 3 – Mains electric refrigerator troubleshooting.........................................18 Annex 4 – Gas/electric refrigerator troubleshooting ............................................21 Annex 5 – Kerosene/electric refrigerator troubleshooting ..................................24 Annex 6 – Solar refrigerator troubleshooting .......................................................28

Title: Installing and looking after vaccine refrigerators and freezers
Code: EVM-SOP-E5-03 Version number: 1
Effective date: 07 Oct 2011 Page: 3 of 31
E5-03.1-fridge maintenance
Distribution Distribute this SOP to the following:
Facility type Position(s)

Title: Installing and looking after vaccine refrigerators and freezers
Code: EVM-SOP-E5-03 Version number: 1
Effective date: 07 Oct 2011 Page: 4 of 31
E5-03.1-fridge maintenance
1. Policy and objectives
1.1 Policy Responsible personnel should know how to operate the refrigeration, temperature monitoring and alarm equipment, know when routine maintenance is required, and know how to recognize common faults. They should also understand the principles of planned preventive maintenance and routine equipment replacement and their importance for the maintenance of a reliable cold chain. If equipment maintenance is contracted-out, responsible personnel should ensure that an effective and enforceable contract is in place, and that the service response is acceptable.
1.2 Objectives This SOP tells you how to install new vaccine refrigerators and freezers and covers routine non-mechanical maintenance and responses to emergency maintenance. This equipment is a critical component of the national immunization programme. Any mechanical failure which places the vaccine at risk is unacceptable and the preventive maintenance regime described in this SOP must be strictly followed. If a mechanical failure does occur, the problem must be rectified within a maximum target periods stated in this SOP by a trained maintenance technician. It is essential that a sufficient stock of spare parts is maintained to ensure that these targets can be met. Note: Adapt this SOP as necessary to suit the specific equipment installed and local procedures.
2. Responsibility Responsibility for routine non-mechanical maintenance, simple troubleshooting and initial emergency responses rests with <list responsible personnel>. Responsibility for mechanical repairs rests with <list responsible maintenance personnel or maintenance contractor>. These tasks are outside the scope of this SOP.
3. Associated materials and equipment Cleaning materials, tools and spare parts.
4. Procedure The procedures set out below do not cover temperature monitoring tasks. For these tasks, refer to EVM-SOP-E2-01: Monitoring vaccine storage temperatures at fixed storage locations.
4.1 Training Responsibility: <list responsible personnel> All personnel who are responsible for looking after vaccine refrigerators and freezers should receive appropriate hands-on training to ensure that they are capable of carrying out all of the tasks set out in this SOP.

Title: Installing and looking after vaccine refrigerators and freezers
Code: EVM-SOP-E5-03 Version number: 1
Effective date: 07 Oct 2011 Page: 5 of 31
E5-03.1-fridge maintenance
4.2 General installation instructions for refrigerators and freezers It is essential that refrigerators and freezers are installed correctly. Follow the procedures set out below whenever new equipment is installed and whenever existing equipment is moved to a new location. Responsibility: <list responsible personnel>
a. Temperature zones: WHO pre-qualified equipment is supplied with a temperature zone sticker of the type shown below. Before installation, make sure that the equipment is correctly rated for the maximum and minimum ambient room temperatures at the installation site. One of three standard maximum ambient temperatures is used during laboratory testing. For refrigerators, the minimum safe ambient operating temperature is also tested; this temperature varies from product to product. If the ambient room temperature is too high or, for refrigerators, is too low, the equipment will not maintain the correct vaccine storage temperature.
Hot zone Temperate zone Moderate zone
±noC
+43oC
Refrigerators
+32oC
±noC
+27oC
±noC
Maximum ambient
Minimum ambient
+43oC
Freezers
+32oC
+27oC
Maximum ambient
No minimum ambient set
b. Unpacking:
- Check the packing case. If there is damage, notify the supplier before unpacking. Otherwise, unpack the equipment carefully and remove all packing materials.
- Check the equipment. If there is damage, notify the supplier. c. Manual: Read the manufacturer’s installation and operating instructions
and follow them exactly. When you have finished the installation and commissioning, file the instruction manual in a safe place. Alternatively, put the manual into a heavy duty plastic wallet and fix the wallet with double-sided tape to the door or the side of the equipment.
d. Choose a suitable location. Make sure the room is well-ventilated and the floor is level, dry and clean. Choose the coolest location available; DO NOT place equipment in direct sunlight. DO NOT place equipment close to a radiator. For mains electric units, choose a location close to an electrical socket.
e. Position the equipment correctly: Position the equipment so that it is easily accessible and is spaced away from adjacent walls furniture and other equipment. Make sure you can open the lid or door completely.

Title: Installing and looking after vaccine refrigerators and freezers
Code: EVM-SOP-E5-03 Version number: 1
Effective date: 07 Oct 2011 Page: 6 of 31
E5-03.1-fridge maintenance
Comply with the minimum clearances specified in the equipment manual. If the manual is not available, leave 30 cm clearance behind the unit, 30 cm clearance on both sides of the unit and at least 40 cm above the unit.
f. Level the equipment. Some manufacturers provide plumb bob to check that the unit is level. Otherwise, place a spirit level or saucer full of water on top of the unit to ensure that it is level. Adjust the feet or use packing pieces as necessary. Unless the equipment has wheels or a stand, place the feet of the unit on wooden blocks about 5 cm thick x 10cm wide as shown below. This ensures that the equipment is kept clear of the floor so that it is not damaged by floor washing. It also allows the floor to be cleaned underneath the equipment.
40 cm minimum
20 cm
5 x 10 cm wood blocks (except kerosene refrigerators and units with their own stand.)
g. Allow refrigerant to settle: If the equipment has just been delivered, or has been stored on its side, leave it in its final position for 24 hours before turning it on to allow the refrigerant to settle. Check the manufacturer’s installation instructions.
4.2.1 Installing mains electric refrigerators and freezers Responsibility: <list responsible personnel>
a. Ice-lined refrigerators. If they are empty, fill the ice-lining container(s) with clean tap water and install the vaccine baskets exactly as shown in the instruction manual1.
b. Connect the equipment to a voltage regulator. Plug the equipment into a voltage regulator. DO NOT use adaptors to connect more than one piece of equipment to a single regulator. If the power lead is too long DO NOT coil it up2. Lay the cable out in long loops on the floor behind the unit, or ask a qualified electrician to shorten the lead.
c. Connect the voltage regulator to the power supply. Plug the regulator into the nearest wall socket. Only connect one regulator to each wall socket. NEVER use extension leads or adaptors.
1 A few manufacturers provide a container of ice-lining fluid with the product. In such cases, use the fluid supplied. 2 If you do this, the coil will heat up and may cause a fire.

Title: Installing and looking after vaccine refrigerators and freezers
Code: EVM-SOP-E5-03 Version number: 1
Effective date: 07 Oct 2011 Page: 7 of 31
E5-03.1-fridge maintenance
d. Ice-lined refrigerators with adjustable thermostats: Ice-lined refrigerators with adjustable thermostats3 may freeze vaccines if not correctly set up. If there is an adjustable thermostat set it to ‘2’ or ‘MEDIUM’ and put adhesive tape over the thermostat dial so that it does not get changed. If after three days, the temperature is less than +2°C at any time, reduce the thermostat to ‘1’ or ‘MINIMUM’ setting and re-tape the thermostat. See Annex 1. Set the ice-lining switch to ‘off’. Turn the equipment on and leave for at least 24 hours. The temperature should stabilize within the correct range (+2°C to +8°C). DO NOT adjust the thermostat again, even if the power goes off, or if the temperature occasionally rises above +8°C.
e. Conventional refrigerators and freezers: Turn the equipment on4. Leave the temperature to stabilize for at least 24 hours. Check that the temperature is within the correct range (+2°C to +8°C for vaccine refrigerators and -15°C or below for vaccine or icepack freezers). If there is an adjustable thermostat, change the setting as necessary. DO NOT put vaccine into the equipment until you are sure that the temperature is correct.
4.2.2 Installing gas and kerosene refrigerators and freezers Responsibility: <list responsible personnel>
a. Keep clear of draughts: Do not place the unit close to doors or windows.b. Access to kerosene tank: Make sure there is space all round to access
the kerosene tank. If the tank is at the back, you may have to pull the unit forward on its wheels to do this. If the tank is at the side, allow space to access it.
c. Burner and flue components: Make sure all the burner and flue components are correctly installed.
Flue top Flue top
Flue baffle BurnerGas valve
Flue baffle BurnerTank
Gas refrigerator Kerosene refrigerator
3 This task has become unnecessary with the latest PQS pre-qualified mains and solar electric compression refrigerators and freezers. Since 2009, these units have been fitted with non-adjustable thermostats, 4 If the equipment has just been delivered, you may have to leave it for a period of time to allow the refrigerant to settle. Check the manufacturer’s installation instructions.

Title: Installing and looking after vaccine refrigerators and freezers
Code: EVM-SOP-E5-03 Version number: 1
Effective date: 07 Oct 2011 Page: 8 of 31
E5-03.1-fridge maintenance
d. Gas units: Ensure that the burner supplied with the unit is the correct one
for locally available gas bottles (propane or butane). If not, change the burner. Ensure that a qualified technician connects the equipment to the gas bottle and tests for leaks. Gas leaks are dangerous.
e. Kerosene units: Fill the tank with kerosene and allow the wick to soak for at least three hours before lighting. Unless the kerosene is guaranteed to be of high quality, always filter the fuel before putting it in the tank.
Fuel level
Clean cloth filter over funnel
f. Dual fuel units: If the unit is supplied with an electrical connection, NEVER operate the equipment using gas or kerosene when the electrical supply is connected. Make sure that electrical supply is unplugged from the wall socket before lighting the burner.
g. Check equipment operation (gas or kerosene). Light the burner. Check that the flame colour is as described in the manual. Leave the temperature to stabilize for at least 24 hours. Check that the temperature is within the correct range (+2°C to +8°C for vaccine refrigerators and -5°C or below for vaccine or icepack freezers). Adjust the burner or thermostat setting as necessary. DO NOT put vaccine into the equipment until you are satisfied that the temperature is correct.
h. Check equipment operation (electricity): If you have a dual fuel unit and an effective electrical supply, make sure you also test the unit using electricity. You may need to change from one fuel source to another and it is essential to know that unit operates correctly on both. - Extinguish the burner and connect the unit to the electricity supply. - Use a voltage regulator of a type suitable for absorption refrigerators. - Check that the temperature is within the correct range (+2°C to +8°C
for vaccine refrigerators and -5°C or below for vaccine or icepack freezers). Adjust the thermostat setting as necessary.
- DO NOT put vaccine into the equipment until you are sure that the temperature is correct.
4.2.3 Installing solar refrigerators and freezers
Solar refrigerators and solar power systems MUST be installed and commissioned by a trained solar technician. Detailed installation and commissioning checklists are given in WHO/PQS/PV01-VP2.2: Solar power system for compression-cycle vaccine refrigerator or combined refrigerator and water-pack freezer – on-site checklists for completed installations. For battery-powered systems, make sure that the battery is enclosed in a locked and ventilated enclosure to prevent tampering.

Title: Installing and looking after vaccine refrigerators and freezers
Code: EVM-SOP-E5-03 Version number: 1
Effective date: 07 Oct 2011 Page: 9 of 31
E5-03.1-fridge maintenance
Warning: Never connect other equipment, such as lights, radios or cell phone chargers, to the solar power system. The system is designed to operate the refrigerator/freezer only5.
4.3 Routine use and maintenance for all refrigerators and freezers
4.3.1 Routine use
Responsibility: <list responsible personnel> a. DO NOT use vaccine a refrigerator or freezer to store food and drink.
Personal use of a vaccine refrigerator is absolutely prohibited. b. DO NOT place vials or boxes of vaccine in contact with the walls of the
refrigerator or freezer. Leave spaces between boxes to allow for air circulation.
c. AVOID over-stocking a refrigerator or freezer – this will prevent it from cooling properly.
4.3.2 Daily tasks
Responsibility: <list responsible personnel> d. Check temperatures as described in EVM-SOP-E2-01: Monitoring
vaccine storage temperatures at fixed storage locations. e. Only adjust the thermostat or flame control setting if the temperature of
the vaccine storage compartment is outside the correct temperature range. The correct temperature ranges are: ALL vaccine refrigerators: +2°C to +8°C; Main electric compression cycle freezers: -15°C to -25°C; Gas, kerosene or electric absorption cycle freezers: -5°C or below. NOTE: Refrigerators pre-qualified by WHO since 2009 have non-adjustable thermostats fixed at the correct temperature. If the temperature in one of these products is not in the correct range, contact your supervisor. AVOID frequent adjustments. If you do need to adjust the thermostat or flame setting, check carefully over the next few days that the new setting is correct. DO NOT adjust the thermostat to a higher setting when a new vaccine delivery arrives. This could freeze the vaccines. DO NOT adjust the adjustable thermostat on an ice-lined refrigerator once the thermostat has been correctly set and taped in position (see 4.2.1d). DO NOT adjust the thermostat on any type of appliance when the power is restored after a power cut.
4.3.3 Monthly tasks
Responsibility: <list responsible personnel>
5 Unless the facility has a centralised solar power system. In which case, the vaccine refrigerator or freezer must be on a priority demand circuit.

Title: Installing and looking after vaccine refrigerators and freezers
Code: EVM-SOP-E5-03 Version number: 1
Effective date: 07 Oct 2011 Page: 10 of 31
E5-03.1-fridge maintenance
a. Check that the condenser and cooling unit on the back of the unit is clean. Remove any dirt or dust with a soft brush. The equipment will not work correctly if these components are clogged with dust.
Mains electric compression (including ice-lined and solar
units)
Gas absorption Kerosene absorption
b. Clean the outside of the unit with a damp cloth. c. Clean the lid or door gasket with soap and water. d. Defrost the unit as described in the box below. You should defrost the
unit once a month, or whenever the ice on the inside lining is thicker than 5mm. Check for ice formation on the inside lining. If the unit needs defrosting more than once a month, check whether the door or lid gasket is damaged and check that the door or lid is closing correctly. If there is a problem, ask the maintenance technician to carry out repairs.
Defrosting a refrigerator or freezer: Step 1: Transfer the existing contents to a safe place:Remove the most heat-sensitive vaccines (<list heat-sensitive vaccines in schedule>). EITHER transfer them to a cold box lined with frozen ice-packs, OR transfer these vaccines to another vaccine refrigerator or freezer. Remove the freeze-sensitive vaccines (<list freeze-sensitive vaccines in schedule>) and diluents. EITHER transfer them to a cold box lined with conditioned ice-packs, OR Transfer these vaccines to another vaccine refrigerator. Transfer any frozen ice packs to a cold box or to another freezer. Transfer any cool water packs or water bottles or to a cold box or to another refrigerator. Step 2: Turn off the power supply to the refrigerator or freezer, or extinguish the burner. Step 3: Leave the lid or door open and wait for the ice to melt. Do not try to remove the ice with a knife or other sharp object. Doing this can permanently damage the lining. If you want to speed up the process, you can place a pan of boiling water inside and close the lid or door. Step 4: Clean and dry the inside of the appliance. Step 5: Turn the refrigerator on again, or re-light the burner. Step 6: Return contents to their original places:REFRIGERATORS: When the temperature in the main section falls to +8°C or lower (but not less than +2°C), return the vaccines, diluents, and/or cool water
Coolingunit
Title: Installing and looking after vaccine refrigerators and freezers
Code: EVM-SOP-E5-03 Version number: 1
Effective date: 07 Oct 2011 Page: 11 of 31
E5-03.1-fridge maintenance
packs or water bottles. FREEZERS: When the temperature falls to -5°C or lower, return the vaccines, diluents, and/or ice-packs.
4.3.4 Annual tasks
Responsibility: <list responsible personnel> a. Check the door or lid gasket. Replace it if it is damaged. b. Check the outside of the cabinet for damaged paintwork or rust. If there
are signs of damage, clean the affected surfaces and remove all rust. Treat the bare metal with a rust inhibitor, apply a coat of metal primer and repaint the damaged surface with enamel paint.
c. Check the inside of the cabinet for signs of damage, including corrosion to shelves or the wire baskets in ice-lined refrigerators. Carry out repair work as necessary.
d. Review your stock of spare parts and consumables, such as wicks, lamp glasses, battery electrolyte, etc. Restock all items that are out of stock or in short supply.
4.4 Specific maintenance for gas refrigerators and freezers
4.4.1 Daily tasks
Responsibility: <list responsible personnel> a. Burner flame: Check the burner flame is blue. If it is not, clean the gas
burner and gas jet as described in the equipment manual. Adjust the thermostat or flame control setting as necessary.
b. Gas bottle: Make sure there is enough gas in the bottle. If there is not, change the bottle. Annex 2 describes how to check whether a gas bottle is empty and how long a full bottle will last.
c. Note: ALWAYS change the bottle before it is completely empty. ALWAYS keep a spare bottle.
4.4.2 Weekly tasks
Responsibility: <list responsible personnel> a. Check the fuel supply: Check that you have enough gas for at least
another week. If not, obtain a new supply immediately.
4.4.3 Monthly tasks
Responsibility: <list responsible personnel> a. Check the gas line connections for leaks. Brush soapy water onto the
connections. If bubbles form, there is a leak. Gas leaks are dangerous. Call the maintenance technician unless you have been trained to repair leaks yourself.

Title: Installing and looking after vaccine refrigerators and freezers
Code: EVM-SOP-E5-03 Version number: 1
Effective date: 07 Oct 2011 Page: 12 of 31
E5-03.1-fridge maintenance
Check for bubbles
4.4.4 Periodic tasks
Carry out these tasks at least once a year. Always clean the flue if the flame has been smoking. Responsibility: <list responsible personnel>
a. Clean the flue: Clean the flue and baffle as described in the equipment manual.
b. Clean the gas burner and gas jet: Clean the gas burner and gas jet as described in the equipment manual.
4.5 Specific maintenance for kerosene refrigerators and freezers
4.5.1 Daily tasks
Responsibility: <list responsible personnel> a. Fill the tank: Fill the tank with clean kerosene. See 4.1.2 d. b. Burner flame: Check that the flame height and colour is correct for the
type of burner fitted. If the flame smokes, turn it down a bit. If it still smokes, clean or trim the wick, burner, flue and baffle as shown in the instruction manual. ALWAYS clean the flue if the flame has been smoking.
c. Note: ALWAYS fill the tank before it is completely empty. ALWAYS keep enough spare kerosene to ensure you never run out. NEVER use any other fuel (e.g. diesel or gasoline)
4.5.2 Weekly tasks
Responsibility: <list responsible personnel> a. Clean the burner, flue and baffle: Clean the burner, flue and baffle as
shown in the instruction manual. b. Trim the wick: Trim the wick as shown in the instruction manual. Use a
wick trimmer if possible. c. Check the fuel supply: Check that you have enough kerosene for at least
another week. If not, replenish the supply immediately.

Title: Installing and looking after vaccine refrigerators and freezers
Code: EVM-SOP-E5-03 Version number: 1
Effective date: 07 Oct 2011 Page: 13 of 31
E5-03.1-fridge maintenance
4.5.3 Periodic tasks
Responsibility: <list responsible personnel> a. Clean the tank: Check the fuel tank to see if there is sediment at the
bottom. If there is, blow out the burner and remove the tank. Remove the burner from the tank. Empty out the dirty kerosene. Flush the tank with a little clean kerosene. Wipe the outside of the tank with a clean cloth dipped in kerosene. Replace the burner and refill the tank.
b. Replace the wick: Replace the wick when you cannot turn it up any more to trim it. Use the correct type of wick and follow the instruction manual. ALWAYS keep two spare wicks in a safe place.
4.6 Specific maintenance for solar refrigerators and freezers
4.6.1 Daily tasks
Responsibility: <list responsible personnel> a. Check refrigerator/freezer control panel status: Check the status of the
control panel display. Take appropriate action as described in the instruction manual if status is not normal.
b. Check battery charge status (battery systems only): Check the indicator lights on the battery charge regulator. DO NOT freeze water packs if the low battery warning light is on. Move vaccine to a safe location if the load-disconnect warning light or alarm sounder is activated. l
4.6.2 Monthly or periodic tasks
Responsibility: <list responsible personnel> a. Check battery electrolyte (flooded battery systems only): Check
electrolyte levels and top up at the intervals given in the user manual. Use distilled water ONLY. You MUST wear hand, eye and clothing protection when carrying out this task and follow the manufacturer’s recommended safety precautions.
b. Clean dust or snow off the solar array: Clean the solar array periodically to remove accumulated dust which will reduce performance. The frequency at which this needs to be done will vary. In very dusty areas, clean the array weekly. Remove any snow accumulation as soon as possible. - DO NOT attempt to carry out this task unless you have the correct
access and safety equipment and have received training in safe working at height. Make sure you have somebody to help you and to hold the ladder.
- NEVER stand on corrugated roof sheets or tiles – use a properly designed roof ladder.
- Clean the array in the early morning or evening when the sun is weak. - Use a soft cloth wetted with water. Wipe gently, starting at the top
and working downwards. - Do not lean or stand on the array panels because you may damage
them. - Report any damage to wiring or hardware to your supervisor.

Title: Installing and looking after vaccine refrigerators and freezers
Code: EVM-SOP-E5-03 Version number: 1
Effective date: 07 Oct 2011 Page: 14 of 31
E5-03.1-fridge maintenance
4.6.3 Annual tasks
Responsibility: <list responsible personnel> a. Check array shading: Make sure that the solar panels are not shaded by
trees, plants, new buildings or overhead cables between 9.00 am or 3.00 pm. If there is shading from vegetation, arrange for the vegetation to be cut back. If there is shading from newly constructed buildings or new overhead cables, contact your supervisor. The solar array may have to be moved or increased in capacity.
b. Inspect electrical cables: Inspect the electric cables between the solar array, the charge regulator, the batteries and the refrigerator. Inspect grounding /lightning protection. Replace any cables that are damaged.
4.7 Emergency maintenance Follow these emergency maintenance procedures whenever an unexpected event occurs, such as a compressor failure or refrigerant leak. Refer also to EVM-SOP-E3-01: Responding to emergencies in fixed storage locations.
Refer to Annex 3 to 6 for troubleshooting checklists. Responsibility: <list responsible personnel>
a. If vaccine is at immediate risk: Protect the vaccine by temporarily moving it to another location within the store.
b. If the equipment is repairable: Repair the refrigerator or freezer within seven days.
c. If the equipment is beyond economic repair: Make arrangements to obtain a replacement refrigerator or freezer as soon as possible. Dispose of the broken unit in a responsible manner. As a minimum: - Remove doors or lids from refrigerators or freezers to prevent children
becoming trapped. - Recycle lead-acid batteries to prevent health hazards. - Recycle CFC, HCFC and HFC refrigerants.
d. Spare parts: If spare parts have been used, update the spare parts inventory and order replacements as needed.
5. Related documents and SOPs EVM-SOP-E2-01: Monitoring vaccine storage temperatures at fixed storage
locations EVM-SOP-E3-01: Responding to emergencies in fixed storage locations
EVM-SOP-E3-05: Looking after voltage regulators EVM-SOP-E6-06: Storing vaccine in refrigerators and freezers WHO/PQS/PV01-VP2.2: Solar power system for compression-cycle vaccine
refrigerator or combined refrigerator and water-pack freezer – on-site checklists for completed installations. http://www.who.int/entity/immunization_standards/vaccine_quality/pqs_e03_pv_vp2.2.pdf
Logistics and cold chain for primary health care. This series of guidance documents is now very old, but contains valuable and detailed material. In particular, refer to:

Title: Installing and looking after vaccine refrigerators and freezers
Code: EVM-SOP-E5-03 Version number: 1
Effective date: 07 Oct 2011 Page: 15 of 31
E5-03.1-fridge maintenance
- No. 15: User’s handbook for compression refrigerators - No. 17: User’s handbook for kerosene and electric operated
absorption refrigerators - No. 19: User’s handbook for gas and electric refrigerators - No. 20: How to keep stocks of spare parts The guides are available on the PATH website at: http://www.path.org/vaccineresources/files/FridgeRp.htm
<Refrigerator and freezer operating and maintenance manuals>.

Title: Installing and looking after vaccine refrigerators and freezers
Code: EVM-SOP-E5-03 Version number: 1
Effective date: 07 Oct 2011 Page: 16 of 31
E5-03.1-fridge maintenance
Annex 1 – Notice for ice-lined refrigerators A notice similar to this should be fixed to older ice-lined refrigerators fitted with adjustable thermostats. It does not apply to newer appliances with non-adjustable thermostats.
Source: WHO/IVB/04.06: Immunization in practice - Module 3: The Cold Chain

Title: Installing and looking after vaccine refrigerators and freezers
Code: EVM-SOP-E5-03 Version number: 1
Effective date: 07 Oct 2011 Page: 17 of 31
E5-03.1-fridge maintenance
Annex 2 – How to check gas bottles If you are unsure whether a gas bottle is empty, compare its weight with an empty bottle using weighing scales. If you measure the loss of weight over 7 days you can also calculate how long the bottle will last.
Weighing scales
Step 1: Weigh a completely full bottle in kg Step 2: Weigh a completely empty bottle in kg Step 3: Total weight of gas in a bottle in kg = weight of full bottle minus weight of empty bottle Step 4: Weigh bottle at start of 7 day period Step 5: Weigh bottle at end of 7 day period Step 6: Gas used per week = weight of bottle at start of week minus weight of bottle at end of week Step 7: Gas used per day = gas used per week divided by 7 Step 8: Total days supply in a bottle = total weight of gas divided by gas used per day
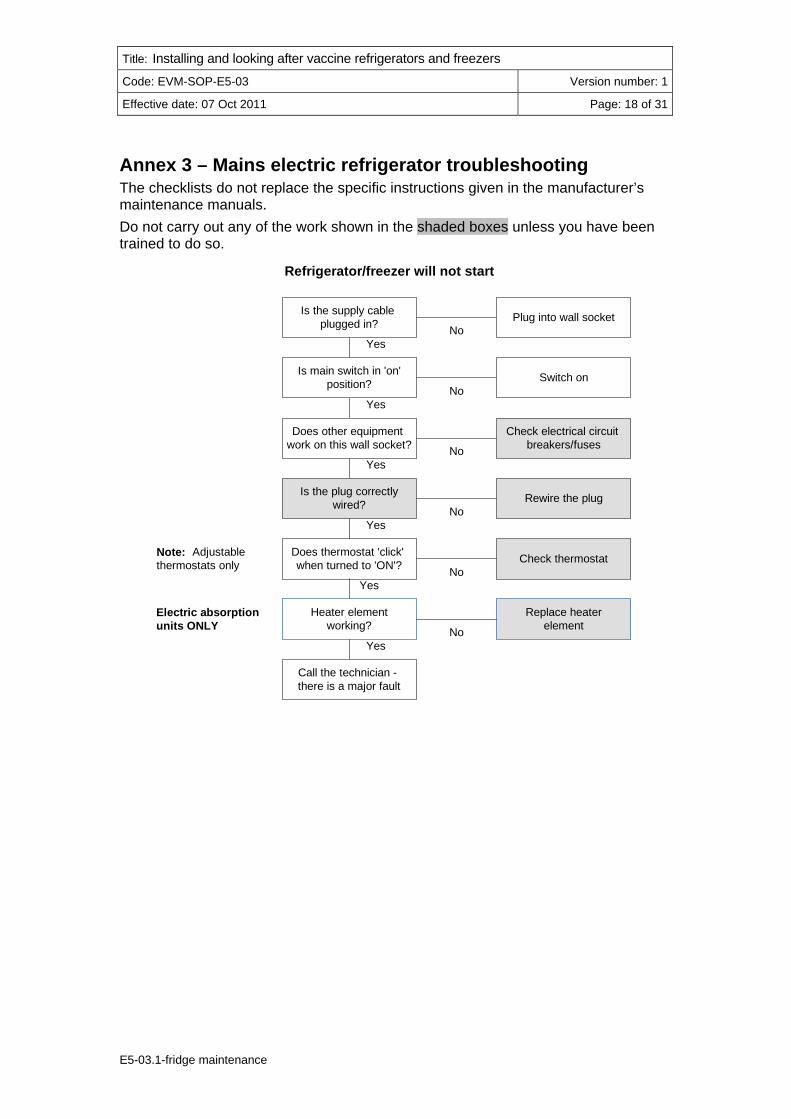
Title: Installing and looking after vaccine refrigerators and freezers
Code: EVM-SOP-E5-03 Version number: 1
Effective date: 07 Oct 2011 Page: 18 of 31
E5-03.1-fridge maintenance
Annex 3 – Mains electric refrigerator troubleshooting The checklists do not replace the specific instructions given in the manufacturer’s maintenance manuals. Do not carry out any of the work shown in the shaded boxes unless you have been trained to do so.
NoYes
NoYes
NoYes
NoYes
Is the supply cable plugged in? Plug into wall socket
Is main switch in 'on'position? Switch on
Rewire the plugIs the plug correctlywired?
Does other equipment work on this wall socket?
Check electrical circuit breakers/fuses
Refrigerator/freezer will not start
No
Does thermostat 'click' when turned to 'ON'? Check thermostat
Heater elementworking?
Replace heaterelementNo
Yes
Yes
Call the technician - there is a major fault
Note: Adjustable thermostats only
Electric absorptionunits ONLY

Title: Installing and looking after vaccine refrigerators and freezers
Code: EVM-SOP-E5-03 Version number: 1
Effective date: 07 Oct 2011 Page: 19 of 31
E5-03.1-fridge maintenance
Yes
Yes
No
No
Yes
Yes
Yes
Yes
No
No
No
Normal load of icepacks?
Door closingproperly?
Good air circulation inside & around unit?
Less than 6-10mm ice on evaporator? More than
6-10mm
Defrost
Remove some icepacks
Rearrange vaccineand/or move unit
Check door gasketand/or adjust door
Yes
Thermostat knob incold position?
Condenser free from dust? Clean condenser
Check the thermostatIs the thermostatworking?
Call the technician
Note: Adjustablethermostats only
Note: Adjustablethermostats only
Adjust thermostat tocolder settingNo
NoYes
Appliance in sunlightor near a radiator
Move appliance into shade or clear of radiator
Refrigerator/freezer not cold enough
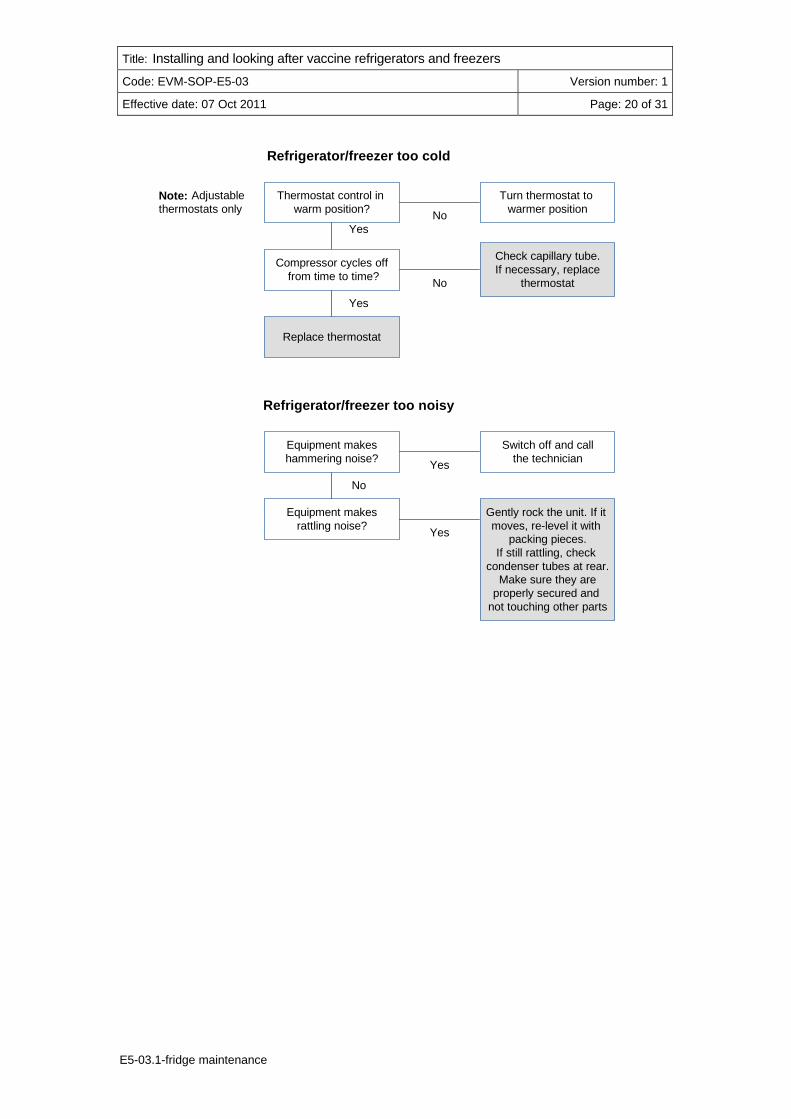
Title: Installing and looking after vaccine refrigerators and freezers
Code: EVM-SOP-E5-03 Version number: 1
Effective date: 07 Oct 2011 Page: 20 of 31
E5-03.1-fridge maintenance
Yes
Turn thermostat to warmer positionNo
Note: Adjustablethermostats only
Thermostat control in warm position?
Yes
No
Check capillary tube.If necessary, replace
thermostat
Compressor cycles off from time to time?
Replace thermostat
Equipment makesrattling noise?
Equipment makeshammering noise?
Switch off and callthe technician
Gently rock the unit. If it moves, re-level it with
packing pieces.If still rattling, check
condenser tubes at rear.Make sure they are
properly secured and not touching other parts
Refrigerator/freezer too cold
Refrigerator/freezer too noisy
No
Yes
Yes

Title: Installing and looking after vaccine refrigerators and freezers
Code: EVM-SOP-E5-03 Version number: 1
Effective date: 07 Oct 2011 Page: 21 of 31
E5-03.1-fridge maintenance
Annex 4 – Gas/electric refrigerator troubleshooting The checklists do not replace the specific instructions given in the manufacturer’s maintenance manuals. Do not carry out any of the work shown in the shaded boxes unless you have been trained to do so. For electrical operation issues, refer to Annex 3.
Flame burning?
Is flame burning blue?
Flame burning for at least 6 hours? Wait and see
Flue baffle in position? Hang flue baffle in position
Turn thermostat upto colder setting
Thermostat knob in cold position?
Ventilation around cooling unit OK?
Move unit for betterventilation
Equipment correctlylevelled? Level unit correctly
Flame reduces when thermostat is turned from
max to min ?
Check gas supply and light burner
If burner does not light, clean burner
If burner does not stay litcheck thermo-element
and flame failure deviceYes
Yes
Yes
Yes
Yes
Yes
Yes
Yes
No
No
No
No
No
No
No
NoReplace cooling unit
Replace thermostat
Refrigerator not cooling at all
Clean gas burnerand gas jet

Title: Installing and looking after vaccine refrigerators and freezers
Code: EVM-SOP-E5-03 Version number: 1
Effective date: 07 Oct 2011 Page: 22 of 31
E5-03.1-fridge maintenance
Yes
Yes
Yes
Yes
Yes
Yes
Yes
No
No
No
No
No
Thermostat in cold position?
Normal load of icepacks?
Door closingproperly?
Good air circulation inside & around unit?
Equipment correctlylevelled?
Condenser & coolingunit free from dust?
Flue baffle in position?
Yes
Turn thermostat to colder position
Less than 6-10mm ice on evaporator? More than
6-10mm
Defrost
Remove some icepacks
Rearrange vaccineand/or move unit
Level unit correctly
Clean condenserand cooling unitNo
Flame reduces when thermostat is turned from
max to min ?
Yes
Replace thermostat
No
NoReplace cooling unit
Check door gasketand/or adjust door
Yes
Flame burning blue? Clean gas burnerand gas jet
Hang flue baffle inposition
NoYes
Appliance in sunlightor near a radiator
Move appliance into shade or clear of radiator
Refrigerator not cold enough

Title: Installing and looking after vaccine refrigerators and freezers
Code: EVM-SOP-E5-03 Version number: 1
Effective date: 07 Oct 2011 Page: 23 of 31
E5-03.1-fridge maintenance
Yes
Refrigerator too cold
Thermostat in warmposition?
Turn thermostat to warmer position
Yes
NoReplace gas thermostat
Does replacement of bypass screw or burner
jet make it warmer?
Capillary tube end correctly fitted to
evaporator ? No
No
Fasten capillary tube correctly
Note: In low room temperatures, it may be difficult to maintain the correct storage temperature
In this case, use water bottles to increase the load inthe refrigerator. This should raise the inside temperature.

Title: Installing and looking after vaccine refrigerators and freezers
Code: EVM-SOP-E5-03 Version number: 1
Effective date: 07 Oct 2011 Page: 24 of 31
E5-03.1-fridge maintenance
Annex 5 – Kerosene/electric refrigerator troubleshooting The checklists do not replace the specific instructions given in the manufacturer’s maintenance manuals. Do not carry out any of the work shown in the shaded boxes unless you have been trained to do so. For electrical operation issues, refer to Annex 3.
Flame burning for at least 6 hours? Wait and see
Flue baffle in position? Hang flue baffle in position
Ventilation around cooling unit OK?
Move unit for betterventilation
Equipment correctlylevelled? Level unit correctly
Yes
Yes
Yes
Yes
Yes
Yes
No
No
No
No
No
NoReplace cooling unit
Flame burning?No
Refrigerator not cooling at all
Yes
Light the burner. If it does not stay lit,
clean the burner & wick
Highest flame used? Adjust flame to higherposition
If possible, try electricoperation.
Does it work?
Repeat starting procedureusing kerosene

Title: Installing and looking after vaccine refrigerators and freezers
Code: EVM-SOP-E5-03 Version number: 1
Effective date: 07 Oct 2011 Page: 25 of 31
E5-03.1-fridge maintenance
Yes
Yes
Yes
Yes
No
No
No
No
Normal load of icepacks?
Door closingproperly?
Good air circulation inside & around unit?
Equipment correctlylevelled?
Less than 6-10mm ice on evaporator? More than
6-10mm
Defrost
Remove some icepacks
Rearrange vaccineand/or move unit
Level unit correctly
Check door gasketand/or adjust door
Yes
Flame correctly adjusted?
Yes
Condenser & coolingunit free from dust?
Clean condenserand cooling unitNo
Yes
No
Hang flue baffle inposition
Yes
Check everything again
Flue baffle in position?
GO TO: flowchart for burner type (Aladdin or
Kosmos)
Refrigerator not cold enough
NoYes
Appliance in sunlightor near a radiator
Move appliance into shade or clear of radiator
Yes
Refrigerator too cold
No
Lift the flue baffle 10 cm,or remove itFlame too high?
Turn flame down

Title: Installing and looking after vaccine refrigerators and freezers
Code: EVM-SOP-E5-03 Version number: 1
Effective date: 07 Oct 2011 Page: 26 of 31
E5-03.1-fridge maintenance
YesNo
Aladdin type burner (blue flame)
Lighting correctlycarried out?
Return to generalflowchart
Flame steady?No
Yes
NoYes
Defrost
Clean tank and refill
Flame blue and clear?- Clean flue and baffle- Check lamp glass insert seals against flue- Check that kerosene is clean- Clean the burner- Trim the wick
Glass flue
Flame spreader
Gallery
Outer wick tube
Wick cleaner
Burner base
Wick & wick carrier
Tank sleeve
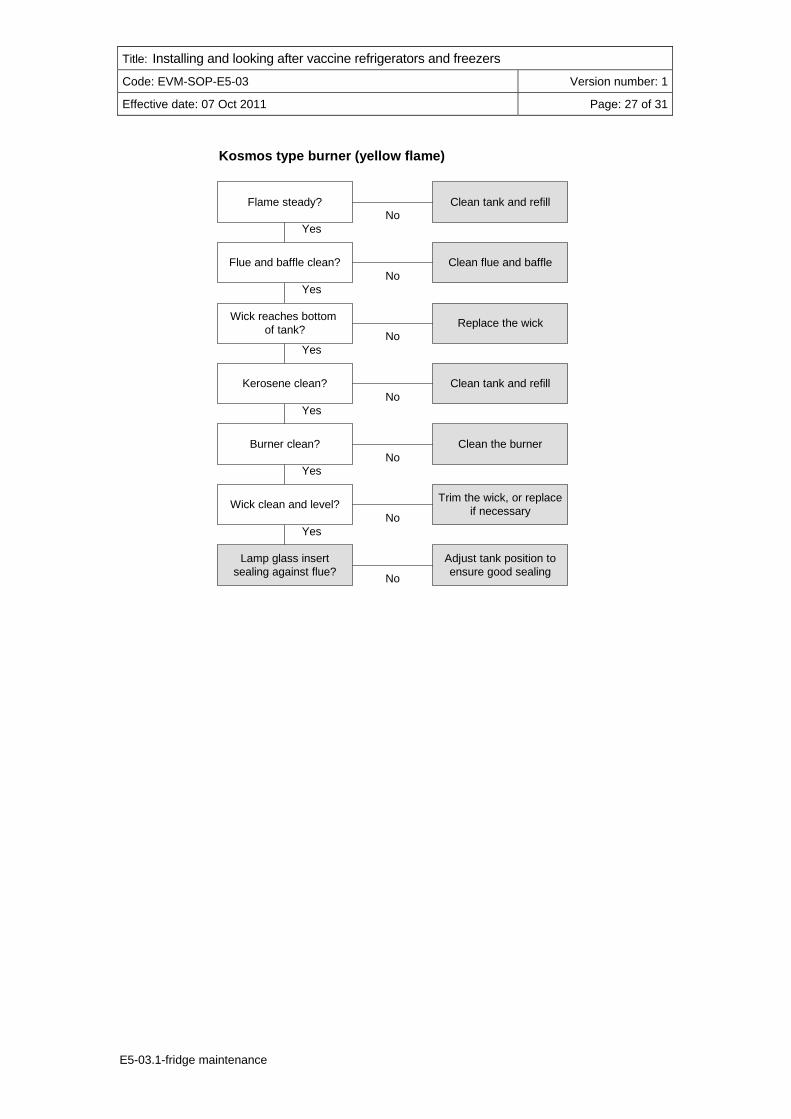
Title: Installing and looking after vaccine refrigerators and freezers
Code: EVM-SOP-E5-03 Version number: 1
Effective date: 07 Oct 2011 Page: 27 of 31
E5-03.1-fridge maintenance
Kosmos type burner (yellow flame)
Flame steady?No
Yes
NoYes
Flue and baffle clean?
Clean tank and refill
Clean flue and baffle
NoReplace the wick
Yes
NoYes
NoYes
NoYes
No
Kerosene clean?
Burner clean? Clean the burner
Wick clean and level? Trim the wick, or replaceif necessary
Lamp glass insertsealing against flue?
Adjust tank position toensure good sealing
Clean tank and refill
Wick reaches bottom of tank?

Title: Installing and looking after vaccine refrigerators and freezers
Code: EVM-SOP-E5-03 Version number: 1
Effective date: 07 Oct 2011 Page: 28 of 31
E5-03.1-fridge maintenance
Annex 6 – Solar refrigerator troubleshooting These checklists do not replace the specific instructions given in the manufacturer’s maintenance manuals. It applies to standalone systems only. It does not apply to large scale photovoltaic installations designed to supply other equipment. Do not carry out any of the work shown in the shaded boxes unless you have been trained to do so.
No
No
Refrigerator/freezer will not start
Is main switch in 'on'position? Switch on
Is the supply cable connected?
Reset breaker orreplace burnt out fuse.
If breaker trips again or fuse burns out again,
switch off and contact supervisor or technician.
Battery controlindicator light is green?
No
No
Note: Adjustable thermostats only
Check thermostat
If appliance will not come on, contact
supervisor or technician
Connect cable
Does thermostat work?
YesNo
Note: Battery systems onlySome controllershave an LCD displayinstead of lights
If no light is on, contact supervisor or technician.
Yellow or red light meansbattery is low and appliance may be
temporarily disconnectedfrom battery. DO NOTfreeze icepacks until green light returns.
If red or yellow lightdoes not change afterseveral sunny days, contact supervisor or
technician.
Yes
Lights or other electricalloads added to circuit?
No
Yes
Yes
Yes
Are all fuses and circuitbreakers OK?
Yes
Contact supervisor
YesClean terminalsBattery terminals
corroded?Call technicianNo

Title: Installing and looking after vaccine refrigerators and freezers
Code: EVM-SOP-E5-03 Version number: 1
Effective date: 07 Oct 2011 Page: 29 of 31
E5-03.1-fridge maintenance
YesNo
Note: Batterysystems only
See: 'Refrigerator/freezer will not start'
Yellow or red light meansbattery is low and appliance may be
temporarily disconnectedfrom battery. DO NOTfreeze ice packs untilgreen light returns.
If red or yellow light doesnot change after several
sunny days, contactsupervisor or technician
Yes
Battery control indicatorlight is green? No
Yes
Thermostat knob incold position?
Adjust thermostat tocolder settingNo
Note: Adjustablethermostats only
Yes
Yes
No
Yes
Yes
Yes
Yes
No
No
No
Normal load of icepacks?
Door closingproperly?
Good air circulation inside & around unit?
Less than 6-10mm ice on evaporator? More than
6-10mm
Defrost
Remove some icepacks
Rearrange vaccineand/or move unit
Check door gasketand/or adjust door
Condenser free from dust? Clean condenser
Check the thermostatIs the thermostatworking?
Note: Adjustablethermostats only
Battery indicatorlights are on?
NoYes
Refrigerator/freezer not cold enough
Appliance in sunlightor near a radiator
Move appliance into shade or clear of radiator
YesContact supervisorLights or other electrical
loads added to circuit?
No
NoCall technician

Title: Installing and looking after vaccine refrigerators and freezers
Code: EVM-SOP-E5-03 Version number: 1
Effective date: 07 Oct 2011 Page: 30 of 31
E5-03.1-fridge maintenance

Title: Installing and looking after vaccine refrigerators and freezers
Code: EVM-SOP-E5-03 Version number: 1
Effective date: 07 Oct 2011 Page: 31 of 31
E5-03.1-fridge maintenance
Yes
Turn thermostat to warmer position
Yes
No
No
Note: Adjustablethermostats only
Thermostat control in warm position?
Check capillary tube.If necessary, replace
thermostat
Compressor cycles off from time to time?
Replace thermostat
Refrigerator/freezer too cold
Yes
No
No
Equipment makesrattling noise?
Equipment makeshammering noise?
Switch off and callthe technician
Gently rock the unit. If it moves, re-level it with
packing pieces.If still rattling, check
condenser tubes at rear.Make sure they are
properly secured and not touching other parts
Refrigerator/freezer too noisy
Solar power system checklist
Solar modules dusty, dirty or covered in snow?
Clean modulesWORK SAFELY!
NoYes
Solar modules have brown or discoloured
patches? Yes
Insulation to exposed cables cracked or
damaged
Call technician(Power may be reducedand cables may need
replacing)
Call technician(Cables may need replacement. Roof penetrations need
sealing)
Water running down cables through roof
penetrations?
No
Yes
No
Yes
Call technician(Power may be reducedand modules may need
replacing)
NoYes
Battery plates coveredwith liquid?
Add distilled water ONLYto fill line

Title: Looking after standby generators
Code: EVM-SOP-E5-04 Version number: 1
Effective date: 07 Oct 2011 Page: 1 of 12
E5-04.1-generator maintenance
Standard Operating Procedure Looking after standby generators
Approvals Name Date Signature
Authorized by:
Reviewed by:
Revised by:
Original author:
Version history
No Date Description of change Reason for change
1 07 Oct 2011 Original
2
3
4
5
Disclaimer: This is a model standard operating procedure. It incorporates generic guidance only. Countries are encouraged to adapt it as necessary to suit local requirements. Queries or comments may be addressed to [email protected]

Title: Looking after standby generators
Code: EVM-SOP-E5-04 Version number: 1
Effective date: 07 Oct 2011 Page: 2 of 12
E5-04.1-generator maintenance
Table of content Distribution .................................................................................................................2 1. Policy and objectives.........................................................................................3
1.1 Policy............................................................................................................3 1.2 Objectives.....................................................................................................3
2. Responsibility.....................................................................................................3 3. Associated materials and equipment...............................................................3 4. Procedure............................................................................................................3
4.1 Routine maintenance ...................................................................................3 4.1.1 Record keeping ....................................................................................4 4.1.2 <Daily/weekly> testing..........................................................................4 4.1.3 <Daily/weekly> engine inspection ........................................................5 4.1.4 <Daily/weekly> alternator inspection ....................................................5 4.1.5 <Daily/weekly> generator room cleaning .............................................5 4.1.6 After every 125 hours running ..............................................................5 4.1.7 After every 250 hours running ..............................................................5 4.1.8 After every 500 hours running ..............................................................6 4.1.9 After every 1,000 hours running ...........................................................6 4.1.10 After every 2,000 hours running ...........................................................6 4.1.11 After every 6,000 hours running ...........................................................6 4.1.12 Annual tasks .........................................................................................6 4.1.13 Every five years, starting in <enter year> .............................................6
4.2 Emergency maintenance..............................................................................6 5. Related documents and SOPs ..........................................................................7 Annex 1– Generator run-time form...........................................................................8 Annex 2 – Troubleshooting checklists ....................................................................9
Distribution Distribute this SOP to the following:
Facility type Position(s)
Title: Looking after standby generators
Code: EVM-SOP-E5-04 Version number: 1
Effective date: 07 Oct 2011 Page: 3 of 12
E5-04.1-generator maintenance
1. Policy and objectives
1.1 Policy A standby generator is a critical piece of equipment in primary and large sub-national vaccine stores. Any mechanical failure which places the vaccine at risk is unacceptable and the preventive maintenance regime described in this SOP must be strictly followed. If a mechanical failure does occur, the problem must be rectified within a maximum target periods stated in this SOP. It is essential that a sufficient stock of spare parts is maintained to ensure that these targets can be met. All responsible personnel must know how to manage and operate the standby generator in their store.
1.2 Objectives This SOP covers routine and emergency maintenance of fixed diesel standby generator sets. It does not cover portable models.
2. Responsibility Responsibility for routine maintenance rests with the <list responsible personnel>. Responsibility for mechanical inspections, routine servicing and emergency repairs rests with <list responsible maintenance personnel or maintenance contractor>.
3. Associated materials and equipment Tools, spare parts and fuel. Standard form for recording generator run-time.
4. Procedure
4.1 Routine maintenance Note: This generic guidance is adapted from Intermediate Technology Publications. Engineering in emergencies: A practical guide for relief workers, 2001 edition. The diagram below shows the layout of a typical generator room as recommended in that document. The procedures set out here should be modified to follow the specific guidance contained in the generator set manufacturer’s handbook. Depending upon the intensity of use of the generator, the tasks in 4.1.2 and 4.1.3 could be carried out daily or weekly. The tasks from 4.1.6 onwards must only be carried out by a competent mechanic. Store personnel must receive training in the tasks from 4.1.1 to 4.1.5.

Title: Looking after standby generators
Code: EVM-SOP-E5-04 Version number: 1
Effective date: 07 Oct 2011 Page: 4 of 12
E5-04.1-generator maintenance
Figure 1 – Typical generator room layout
4.1.1 Record keeping
Responsibility: <list responsible store personnel>. a. Keep daily records of hours run to monitor usage and to plan servicing
and maintenance schedules. See Annex 1. If the generator has an hours counter, you can use the counter instead of a paper record.
b. Keep records of fuel used and periodically calculate fuel consumption in litres per hour. Compare this figure with the manufacturer’s rated fuel consumption. Note: If the fuel consumption is consistently higher than the rated consumption, there may be a problem with the engine.
4.1.2 <Daily/weekly> testing
Responsibility: <list responsible store personnel>. a. Warn store personnel that a generator test will take place. Turn off the
mains power supply to the store. - Automatic start generators: Wait for the generator to start
automatically and check that it is operating correctly. - Manual start generators: Isolate the mains power supply. ALWAYS
start the generator ‘off-load’. The generator engine should be started with the alternator isolator switch in the OFF position.
b. Run the unit for five minutes - Automatic start generators: Turn the mains power supply back on.
Check that the generator stops correctly.

Title: Looking after standby generators
Code: EVM-SOP-E5-04 Version number: 1
Effective date: 07 Oct 2011 Page: 5 of 12
E5-04.1-generator maintenance
- Manual start generators: Turn the generator off. Turn on the mains power supply.
4.1.3 <Daily/weekly> engine inspection
Responsibility: <list responsible store personnel>. a. Check fuel and oil levels. Fill up as necessary. b. Water-cooled engines only: Check coolant levels. Fill up as necessary. c. Check the battery water level if applicable. d. Check for loose nuts and bolts. e. Check the fan belt tension, if applicable. f. Drain water from the fuel filter/agglomerator g. Very dusty conditions: Empty dust cap/bowl of dry air cleaners
4.1.4 <Daily/weekly> alternator inspection
Responsibility: <list responsible store personnel>. a. Keep alternator ventilation openings clear. Use a dry air supply to clean
internally. b. Grease alternator bearings as required. c. Check the functioning and condition of switchgear: Relays, contactors and
protection devices. d. Check and tighten all machinery nuts and bolts, and terminals. e. Check the condition of the mountings and frame. f. Brush type generators: Check the brushes and slip rings for wear and
replace if necessary.
4.1.5 <Daily/weekly> generator room cleaning
Responsibility: <list responsible store personnel>. a. Sweep the floor of the generator room and remove all rubbish.
4.1.6 After every 125 hours running
Responsibility: <list responsible maintenance personnel or maintenance contractor>. a. Check the battery condition (if fitted). b. Water-cooled units: Check for coolant leaks. c. Moderately dusty conditions: Empty the dust cap/bowl and clean or
replace the air cleaner element. d. High ambient temperatures (>35°C): Change the engine oil and oil filter.
4.1.7 After every 250 hours running
Responsibility: <list responsible maintenance personnel or maintenance contractor>. a. Change the engine oil and oil filter. b. Check valve clearances. c. Clean or replace the injectors if the exhaust smoke is black. d. Replace the fuel filter element if using dirty fuel. e. Check the condition or tension of drive belts (alternator, fan, etc.).

Title: Looking after standby generators
Code: EVM-SOP-E5-04 Version number: 1
Effective date: 07 Oct 2011 Page: 6 of 12
E5-04.1-generator maintenance
4.1.8 After every 500 hours running
Responsibility: <list responsible maintenance personnel or maintenance contractor>. a. Replace the air filter element. b. Replace the fuel filter element. c. Check the exhaust and air intake for leaks, damage or restrictions. d. Check the battery charging system, if applicable. e. Replace the fan belt if applicable.
4.1.9 After every 1,000 hours running
Responsibility: <list responsible maintenance personnel or maintenance contractor>. a. De-carbonize the engine if engine performance is poor. b. Clean the wire gauze in the engine breather, where applicable.
4.1.10 After every 2,000 hours running
Responsibility: <list responsible maintenance personnel or maintenance contractor>. a. De-carbonize the engine. b. Check the fuel injection timing. c. Check the lubricating oil pressure.
4.1.11 After every 6,000 hours running
Responsibility: <list responsible maintenance personnel or maintenance contractor>. a. Carry out a major overhaul.
4.1.12 Annual tasks
Carry out this task at least once a year at the nearest service interval. Responsibility: <list responsible maintenance personnel or maintenance contractor>.
a. Water cooled engines: Drain, flush and re-fill the cooling system.
4.1.13 Every five years, starting in <enter year>
Responsibility: <list responsible personnel>. a. At the same time as the general safety inspection described in EVM-SOP-
E5-01: Looking after store buildings, carry out a full safety inspection of the electrical system in the generator room, repair any defects and re-certify the system for the next five years.
4.2 Emergency maintenance Follow these emergency maintenance procedures when an unexpected event occurs. See troubleshooting checklists in Annex 2. Refer also to EVM-SOP-E3-01: Responding to emergencies in fixed storage locations.
Responsibility: <list responsible personnel>. a. Minor defect: Rectify the defect within 24 hours and test the generator. b. Major defect: Notify the electricity supply company that the standby
generator is not working and that power cuts lasting more than two hours in 24 hours will place the vaccine at risk. Rectify the defect within seven days.

Title: Looking after standby generators
Code: EVM-SOP-E5-04 Version number: 1
Effective date: 07 Oct 2011 Page: 7 of 12
E5-04.1-generator maintenance
c. Major breakdown requiring generator replacement: Rent a mobile generator from <enter name of hire company(s)> and make the necessary temporary connections to the control panel. Order a permanent replacement and install it when it arrives.
5. Related documents and SOPs EVM-SOP-E3-01: Responding to emergencies in fixed storage locations.
EVM-SOP-E5-01: Looking after store buildings.
<Generator set maintenance manual>.

Title: Looking after standby generators
Code: EVM-SOP-E5-04 Version number: 1
Effective date: 07 Oct 2011 Page: 8 of 12
E5-04.1-generator maintenance
Annex 1– Generator run-time form Generator run-time form Sheet no: 8
Location: Central Medical Stores Inventory ID: GEN10
Model: Stamford 140 kVA Year installed: 2006
125
250
375
500
625
750
875
1000
1125
1250
1375
1500
1625
17
50
2000
2125
2250
2375
2500
2675
2750
28
75
3000
Service interval table (hours run):
3125
3250
3375
3500
3625
3750
4000
4125
4250
4375
4500
4675
4750
48
75
5000
5125
5250
5375
5500
5675
5750
58
75
6000
Hours run at time of last service: 2005
Hours brought forward: 2065.0 Next service due (see service interval table): 2125
Date Hours run
Cumulative hours run
Comments Initials
3 Jun 2011 1.5 2066.5 Mains failure EB
5 Jun 2010 0.5 2067.0 Weekly test FC
Hours carried forward:
Note: Use comments column to record reason for running and routine and emergency service and repair actions. Use service interval hours table to identify time of next service.

Title: Looking after standby generators
Code: EVM-SOP-E5-04 Version number: 1
Effective date: 07 Oct 2011 Page: 9 of 12
E5-04.1-generator maintenance
Annex 2 – Troubleshooting checklists Larger generators often come with a control panel for auto-start, either designed independently of the actual generator set, or procured with it. Defects caused by the failure of control panel electronics (fuses, relays, internal clocks, etc.) are not specifically covered by the checklists below – for this type of fault, refer to the panel manufacturer’s instructions and wiring diagrams. Checklist 1: Generator problems
Symptom Possible causes
No generator output Faulty or loose terminals, disconnected wiring or dirty contacts
Blown fuse or tripped circuit breaker caused by: - Overloaded generator - Short circuit due to breakdown in cable insulation
Break in stator output coil Demagnetized permanent magnet A faulty automatic voltage regulator (AVR) Brush type generators only: Worn or dirty brushes and slip
rings. Output voltage is very low (only a few volts)
A faulty AVR Brush type generators only:
- Disconnected rotor coil - Worn brushes or faulty contact
Output voltage is low but more than a few volts
Engine speed too low – adjust Short circuit in a coil A faulty AVR
Output voltage is high at normal engine speed
A faulty AVR
Output voltage is normal when the generator set is cold, but varies when the set warms up
A faulty AVR
Generator trips out, or rated generator output is not available and the speed of the engine fluctuates significantly (>10%) between no-load and load conditions
Excessive initial current at start up: reduce load by: - Starting higher loads first - Fitting reduced voltage starting equipment
Output of engine is below rated engine power: service and/or repair the engine.
Faulty engine governor
Engine problems See Checklist 2 and 3. Warning: DO NOT change fuses or re-set circuit breakers without first isolating the supply,
stopping the generator and correcting the fault. DO NOT attempt to start a generator with an electrical load connected.
Source: Intermediate Technology Publications. Engineering in emergencies: A practical guide for relief workers. 2001 edition. Table 14.3.
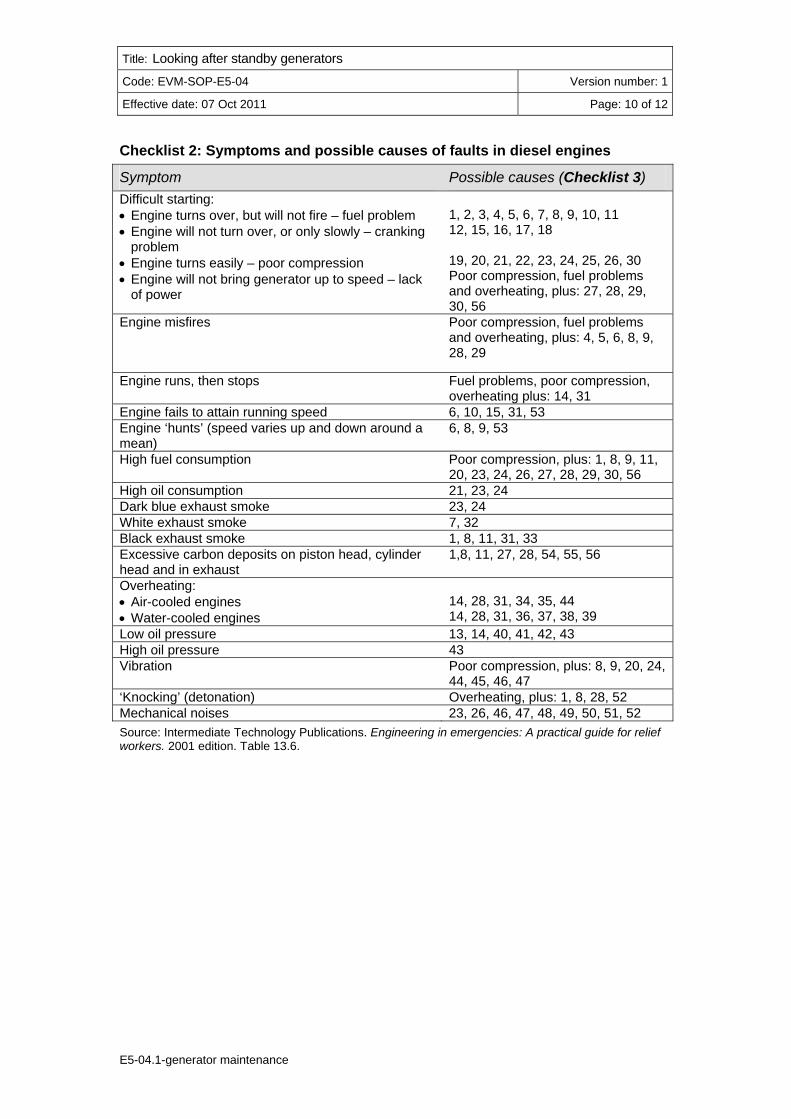
Title: Looking after standby generators
Code: EVM-SOP-E5-04 Version number: 1
Effective date: 07 Oct 2011 Page: 10 of 12
E5-04.1-generator maintenance
Checklist 2: Symptoms and possible causes of faults in diesel engines
Symptom Possible causes (Checklist 3)
Difficult starting: Engine turns over, but will not fire – fuel problem Engine will not turn over, or only slowly – cranking
problem Engine turns easily – poor compression Engine will not bring generator up to speed – lack
of power
1, 2, 3, 4, 5, 6, 7, 8, 9, 10, 11 12, 15, 16, 17, 18 19, 20, 21, 22, 23, 24, 25, 26, 30 Poor compression, fuel problems and overheating, plus: 27, 28, 29, 30, 56
Engine misfires Poor compression, fuel problems and overheating, plus: 4, 5, 6, 8, 9, 28, 29
Engine runs, then stops Fuel problems, poor compression, overheating plus: 14, 31
Engine fails to attain running speed 6, 10, 15, 31, 53 Engine ‘hunts’ (speed varies up and down around a mean)
6, 8, 9, 53
High fuel consumption Poor compression, plus: 1, 8, 9, 11, 20, 23, 24, 26, 27, 28, 29, 30, 56
High oil consumption 21, 23, 24 Dark blue exhaust smoke 23, 24 White exhaust smoke 7, 32 Black exhaust smoke 1, 8, 11, 31, 33 Excessive carbon deposits on piston head, cylinder head and in exhaust
1,8, 11, 27, 28, 54, 55, 56
Overheating: Air-cooled engines Water-cooled engines
14, 28, 31, 34, 35, 44 14, 28, 31, 36, 37, 38, 39
Low oil pressure 13, 14, 40, 41, 42, 43 High oil pressure 43 Vibration Poor compression, plus: 8, 9, 20, 24,
44, 45, 46, 47 ‘Knocking’ (detonation) Overheating, plus: 1, 8, 28, 52 Mechanical noises 23, 26, 46, 47, 48, 49, 50, 51, 52 Source: Intermediate Technology Publications. Engineering in emergencies: A practical guide for relief workers. 2001 edition. Table 13.6.

Title: Looking after standby generators
Code: EVM-SOP-E5-04 Version number: 1
Effective date: 07 Oct 2011 Page: 11 of 12
E5-04.1-generator maintenance
Checklist 3: Possible causes and remedies of faults in diesel engines
Possible causes (see Checklist 2) Possible remedies
1 Incorrect grade, or poor quality fuel
Change fuel
2 Fuel tank empty Fill tank and bleed fuel system of air 3 Stop/start lever in wrong position Adjust 4 Choked fuel filter – visually
inspect Poor servicing – change filter
5 Faulty fuel lift pump Inspect and repair 6 Air in fuel system Bleed air from system 7 Water in fuel system Drain fuel system, including filter bowl,
agglomerator and tank 8 Faulty injector nozzle Test spray and clean or change nozzle 9 Faulty fuel injection pump Have pump checked by competent workshop 10 Retarded injection Check and adjust 11 Choked air filter Poor servicing – clean or replace 12 Lubricating oil too heavy Change oil 13 Lubricating oil too thin Change oil 14 Lubricating oil level low Poor servicing – top up 15 Engine started under load Disengage load at clutch 16 Battery not charged (electric start) Charge battery, or ‘jump-start’ 17 Loose or corroded battery
terminals Check, clean and tighten
18 Faulty starter motor (electric start) Check terminals, solenoid switch, starter gear, brushes
19 Loose injector Check and tighten 20 Valves leaking or sticking Clean and re-grind. Reset tappets 21 Valve guides worn Replace guides 22 Broken or defective valve spring Replace spring 23 Worn cylinder bore: excessive
piston clearance gives a continuous ‘slapping’ noise
Re-bore and fit with oversized piston and rings
24 Broken, worn or sticking piston rings
Clean and free rings. Check cylinder liner is not scored
25 Incorrect decompressor clearance Inspect and adjust 26 Incorrect tappet clearance Check and adjust 27 Choked exhaust system Clear or replace 28 Incorrect injection pump timing Check and re-time 29 Incorrect valve timing Re-set valve timing 30 Cylinder head gasket leaking Check and replace 31 Engine overloaded Reduce load 32 Water leaking from the cooling
system into the cylinder combustion area
Check and replace gasket
33 Inlet air temperature high Improve ventilation to engine housing and airflow to and from the engine
34 Poor circulation of cooling air Re-circulated cooling air Air inlet and/or outlet obstructed
As 33 above
35 Cylinder cooling fins blocked Clean 36 Water cooling thermostat faulty Check and replace 37 Cooling water level too low Top up 38 Slack water pump drive belt Inspect drive belt for wear. Tighten or replace

Title: Looking after standby generators
Code: EVM-SOP-E5-04 Version number: 1
Effective date: 07 Oct 2011 Page: 12 of 12
E5-04.1-generator maintenance
Possible causes (see Checklist 2) Possible remedies
39 Blockage in water cooling system Clear with cleaning fluid additive 40 Choke oil strainer or filter Clean strainer or change filter 41 Badly worn bearings Overhaul 42 Worn oil pump or damaged drive Check and replace 43 Defective oil pressure relief valve Repair or replace 44 Piston seizure Stop engine immediately 45 Damaged cooling fan Reshape or replace 46 Loose or damaged engine
mountings Inspect, tighten or change
47 Loose flywheel – intermittent ‘thuds’
Check and tighten
48 Worn connecting rod bush or bearing – low pitched ‘knock’
Overhaul
49 Worn gudgeon pin or small end bearing – high pitched ‘tap’
Overhaul
50 Main bearing worn – low pitched ‘thud’
Overhaul
51 Crankshaft end play – intermittent ‘thuds’
Adjust
52 Excessive carbon build-up on piston
De-carbonize
53 Incorrectly adjusted governor or tight governor linkages
Adjust
54 Continuous idling Shut down instead of idle 55 Regular running on low load Match engine to load by choosing a lower
powered generator set. 56 Low temperature running Check sizing and operation of cooling system –
especially water-cooled engines. Source: Intermediate Technology Publications. Engineering in emergencies: A practical guide for relief workers. 2001 edition. Table 13.7.

Title: Looking after voltage stabilizers
Code: EVM-SOP-E5-05 Version number: 1
Effective date: 07 Oct 2011 Page: 1 of 8
E5-05.1-voltage reg maintenance
Standard Operating Procedure Looking after voltage regulators
Approvals Name Date Signature
Authorized by:
Reviewed by:
Revised by:
Original author:
Version history
No Date Description of change Reason for change
1 07 Oct 2011 Original
2
3
4
5
Disclaimer: This is a model standard operating procedure. It incorporates generic guidance only. Countries are encouraged to adapt it as necessary to suit local requirements. Queries or comments may be addressed to [email protected]

Title: Looking after voltage stabilizers
Code: EVM-SOP-E5-05 Version number: 1
Effective date: 07 Oct 2011 Page: 2 of 8
E5-05.1-voltage reg maintenance
Table of content Distribution .................................................................................................................2 1. Policy and objectives.........................................................................................3
1.1 Policy............................................................................................................3 1.2 Objectives.....................................................................................................3
2. Responsibility.....................................................................................................3 3. Associated materials and equipment...............................................................3 4. Procedure............................................................................................................3
4.1 Training ........................................................................................................3 4.2 Manuals........................................................................................................3 4.3 Daily checks .................................................................................................3
4.3.1 Three-phase voltage regulators for cold rooms and freezer room........3 4.3.2 Single-phase refrigerator and freezer voltage regulators .....................4
4.4 Troubleshooting the Electrogard units..........................................................4 5. Related documents and SOPs ..........................................................................4 Annex 1 – Electrogard troubleshooting checklist ..................................................6
Distribution Distribute this SOP to the following:
Facility type Position(s)

Title: Looking after voltage stabilizers
Code: EVM-SOP-E5-05 Version number: 1
Effective date: 07 Oct 2011 Page: 3 of 8
E5-05.1-voltage reg maintenance
1. Policy and objectives
1.1 Policy Responsible personnel should know how to obtain advice on the stability of the power supply. This advice can be obtained from the power authority or from a competent electrical engineer. Voltage regulators are essential wherever voltage fluctuations exceed ± 15%, or exceed the tolerance allowed by the refrigeration equipment manufacturer. If regulators are not fitted, the refrigeration equipment will suffer permanent damage and vaccine may be lost.
1.2 Objectives This SOP tells you how to carry out routine checks on the three-phase voltage regulators that are connected to the cold rooms and freezer rooms. It also tells you how to check whether the single-phase voltage regulators connected to individual vaccine refrigerators and freezers are working. Note: This SOP describes how to check one particular model of three-phase voltage regulator (Electrogard Servo Voltage Stabilizer). The procedure must be adapted to suit the specific characteristics of the equipment installed in each facility. For example, the ±1% control tolerance describe in section 4.1.1 is a characteristic of the Electrogard equipment described. Other products may be different.
2. Responsibility <List responsible personnel> should carry out daily checks. <List responsible maintenance personnel> has primary responsibility for servicing the 3-phase units.
3. Associated materials and equipment Tools and spare parts.
4. Procedure
4.1 Training Responsibility: <list responsible personnel> All personnel who are responsible for looking after voltage regulation equipment should receive appropriate hands-on training to ensure that they are capable of carrying out all of the tasks set out in this SOP.
4.2 Manuals Responsibility: <list responsible personnel> Read the manufacturer’s operating instructions and follow them exactly. File the instruction manuals in a safe place.
4.3 Daily checks Carry out the checks described below at the same time as the morning temperature monitoring check. See EVM-SOP-E2-01: Monitoring vaccine storage temperatures at fixed storage locations.
4.3.1 Three-phase voltage regulators for cold rooms and freezer room
Responsibility: <List responsible personnel>

Title: Looking after voltage stabilizers
Code: EVM-SOP-E5-05 Version number: 1
Effective date: 07 Oct 2011 Page: 4 of 8
E5-05.1-voltage reg maintenance
a. Check that the 3-phase meter is reading 400 volts ±1% (396-404 volts) and check that the three individual phase meters on the lower panel are all reading 230 volts ±1% (228-232 volts). If they are not, call the <list responsible maintenance personnel>.
3-phase meter
individual phase meters
Output & input indicator lights
b. Check that all three red yellow and green ‘output’ phase indicator lights and all three red yellow and green ‘input’ phase indicator lights are on. If they are not, call the <list responsible maintenance personnel>.
c. Listen to the units. If you hear a ‘chattering’ sound, call the <list responsible maintenance personnel>.
4.3.2 Single-phase refrigerator and freezer voltage regulators
Responsibility: <List responsible personnel> a. Make sure that the correct type of unit is connected the refrigerator or
freezer. Electric compression cycle equipment requires one type of unit. b. Check that the input and output indicator lights on each of the units are
showing correctly. c. If the unit is defective, replace it as soon as possible.
4.4 Troubleshooting the Electrogard units Responsibility: <List responsible personnel>
a. If problems are reported, follow the Electrogard troubleshooting checklists shown in Annex 1 and consult the Electrogard installation manual. Take suitable electrical safety precautions whilst carrying out this work.
b. If spare parts are required, or spare parts have been used – for example, carbon brushes, request the <list responsible personnel>to order replacements.
5. Related documents and SOPs EVM-SOP-E2-01: Monitoring vaccine storage temperatures at fixed
storage locations.

Title: Looking after voltage stabilizers
Code: EVM-SOP-E5-05 Version number: 1
Effective date: 07 Oct 2011 Page: 5 of 8
E5-05.1-voltage reg maintenance
<Product installation and maintenance manuals>.

Title: Looking after voltage stabilizers
Code: EVM-SOP-E5-05 Version number: 1
Effective date: 07 Oct 2011 Page: 6 of 8
E5-05.1-voltage reg maintenance
Annex 1 – Electrogard troubleshooting checklist The following notes and troubleshooting tables have been supplied by Electrogard. The work shown on the troubleshooting tables must only be carried out by a qualified electrician. Control panel indicators and switches 1. Each phase voltage can be selected by turning the yellow rotary switch mounted
just below the main voltmeter on the top left hand corner of the front panel. This enables R-Y, Y-B and B-R voltages to be read on the voltmeter. These voltages should always be 400 volts ±1% (396-404 volts). In addition, the individual Phase to Neutral voltage is shown on the three single phase meters behind the central glass panel. Each Phase to Neutral voltage should be 230 volts±1% (228-232 volts).
2. Three input indicators - Red, Yellow and Green - indicate availability of three phases from the mains commercial supply to the regulator. If any one of the phases is missing, the indicator of that phase will switch-off and the regulator will trip and show zero output voltage. In such a case, your electrician needs to check and ensure that all the three phases are made available to the regulator from the commercial supply and that nothing is wrong with the regulator.
3. Three output indicators - Red, Yellow and Green indicate availability of all the three phases, properly stabilized, to the cold room or freezer room. If the regulator trips due to any fault, these three output indicators will switch-off simultaneously. This could be due to excessively high input voltage in one or more of the phases, or any phase missing, or a fault with the regulator.
4. These regulators are protected against high voltages and single phasing resulting in output voltage trip in both the cases. The overloading/ short circuit protection is provided by an MCB in the input circuit and located on the right side panel.

Title: Looking after voltage stabilizers
Code: EVM-SOP-E5-05 Version number: 1
Effective date: 07 Oct 2011 Page: 7 of 8
E5-05.1-voltage reg maintenance

Title: Looking after voltage stabilizers
Code: EVM-SOP-E5-05 Version number: 1
Effective date: 07 Oct 2011 Page: 8 of 8
E5-05.1-voltage reg maintenance

Title: Routine inspection and maintenance of fire safety installations
Code: EVM-SOP-E5-06 Version number: 1
Effective date: 03 June 2013 Page: 1 of 7
E5-06.1-fire-equip-maintenance
Standard Operating Procedure Routine inspection and maintenance of
fire safety installations
Approvals Name Date Signature
Authorized by:
Reviewed by:
Revised by:
Original author:
Version history
No Date Description of change Reason for change
1 03 Jun 2013 Original
2
3
4
5
Disclaimer: This is a model standard operating procedure. It incorporates generic guidance only. Countries are encouraged to adapt it as necessary to suit local requirements. Queries or comments may be addressed to [email protected] Acknowledgement: This EVM model SOP was written by Dr Clare Barker, Principal Consultant, Fire Engineering (Europe), Exova Warringtonfire.

Title: Routine inspection and maintenance of fire safety installations
Code: EVM-SOP-E5-06 Version number: 1
Effective date: 03 June 2013 Page: 2 of 7
E5-06.1-fire-equip-maintenance
Table of content Distribution ................................................................................................................. 2 1. Policy and objectives ......................................................................................... 3
1.1 Policy ............................................................................................................. 3 1.2 Objectives ...................................................................................................... 3
2. Responsibility ..................................................................................................... 3 3. Associated materials and equipment ............................................................... 3 4. Procedure............................................................................................................ 3
4.1 Daily Inspections ............................................................................................ 3 4.2 Weekly Inspections ........................................................................................ 4 4.3 Monthly Inspections ....................................................................................... 5 4.4 Three-monthly Inspections ............................................................................ 6 4.5 Six-monthly Inspections ................................................................................. 6 4.6 Yearly Inspections ......................................................................................... 6
5. Related documents and SOPs .......................................................................... 7
Distribution Distribute this SOP to the following:
Facility type Position(s)
Title: Routine inspection and maintenance of fire safety installations
Code: EVM-SOP-E5-06 Version number: 1
Effective date: 03 June 2013 Page: 3 of 7
E5-06.1-fire-equip-maintenance
1. Policy and objectives
1.1 Policy In order to protect property and life, standard operating policies should be followed for fire prevention, detection and control.
1.2 Objectives This SOP describes the routine inspections that should be carried out on any fire safety installations provided in the building. The fire safety equipment provided within the building, including passive fire protection provisions, should be inspected frequently. Most of the inspection can be undertaken by suitably trained personnel; however if installations such as automatic sprinkler systems and smoke ventilation systems are provided then a formal Service Level Agreement (SLA) should be made with the installer to provide regular inspection and testing in accordance with the applicable standards.
2. Responsibility The Fire Safety Manager has day-to-day responsibility for the prevention of fires. Note: It is essential to designate a Fire Safety Manager to oversee the activities described in this SOP.
3. Associated materials and equipment None
4. Procedure
4.1 Daily Inspections Responsibility: Fire Safety Manager
a. Check automatic fire detection and alarm systems to ensure that: The control panel indicates normal operation; If a fault is indicated it should be logged and action taken to rectify it; Any fault recorded on the previous day has received attention.
b. Check emergency and escape lighting systems to ensure that: Every lamp is lit, if it is a maintained system1; The control panel for any central battery system or generator indicates
normal operation; Any fault found is logged and action taken to rectify it.
c. Check sprinkler system to ensure that:
1 In a maintained emergency lighting system, the lighting lamps are on at all times. In a non-maintained system, the emergency lights only come on when there is a power failure. Non-maintained is the typical mode in a workplace in which artificial lighting is normally deployed while the premises are occupied.

Title: Routine inspection and maintenance of fire safety installations
Code: EVM-SOP-E5-06 Version number: 1
Effective date: 03 June 2013 Page: 4 of 7
E5-06.1-fire-equip-maintenance
There is continuity of the connections between the alarm switch and the control unit and between the control unit and the fire and rescue service;
The water level and air pressure are correct in any pressure tank that provides a duplicate supply;
Any corrective actions are taken. d. Fire doors that are held open by automatic release mechanisms should be
released daily. e. Check every point where a portable fire extinguisher or hose reel is
usually located. Missing or damaged fire extinguishers or hose reels should be replaced or repaired immediately. Any extinguishers used in a fire, or for training, or which are otherwise discharged, should be recharged immediately.
4.2 Weekly Inspections Responsibility: Fire Safety Manager
a. Check automatic fire detection and alarm systems to ensure that: The control equipment is able to receive a fire signal and to initiate the
evacuation procedure, recording which trigger device has been used; Any standby batteries are in good condition and the fuel, oil and
coolant levels of any standby generators are correct and topped up if necessary.
b. Check the sprinkler system to ensure that: Water and air pressure gauge readings on installations, trunk mains
and pressure tanks, and water levels in elevated private reservoirs, rivers, canals, lakes, water storage tanks, etc., meet the design criteria and that all gauge readings and levels are recorded;
Each water motor alarm has been sounded for at least 30 seconds; Automatic pumps start when the water pressure is reduced to the
specified level; For automated pumps powered by a diesel engine:
– The fuel and oil levels of the engine meet the design and/or manufacturer’s specification;
– The oil pressure, flow of cooling water through open-circuit cooling systems, or the water level in the primary circuit of closed-circuit cooling systems, all meet the design and/or manufacturer’s specification;
– The engine restarts using the manual start test button; The electrolyte level and density of all lead acid cells meet the design
and/or manufacturer’s specification. If the density is low the battery charger should be checked for efficient operation and if the charger is working correctly the affected cells should be replaced;
The stop valves which control the flow of water to the sprinkler systems from the water supply are in the correct position and any monitoring systems are working correctly;

Title: Routine inspection and maintenance of fire safety installations
Code: EVM-SOP-E5-06 Version number: 1
Effective date: 03 June 2013 Page: 5 of 7
E5-06.1-fire-equip-maintenance
There is continuity of connection between the alarm switch and the control unit and between the control unit and the fire and rescue service for alarm systems which are automatically monitored by the emergency service provider;
Trace heating systems provided to prevent freezing in the sprinkler systems are functioning correctly.
c. Check any smoke control systems provided for means of escape by simulating actuation of the system. Ensure that any fans and powered exhaust ventilators operate correctly, smoke dampers close, natural exhaust ventilators open, automatic smoke curtains move into position, etc.
d. Check fire hydrants once a week to ensure that there are no obstructions which may impede access, that the indicator plates are in position and visible and that the isolating valves are locked open.
4.3 Monthly Inspections Responsibility: Fire Safety Manager
a. Check the fire detection and alarm system by carrying out the following actions: simulate failure of the normal power supply and start up the standby
generator, allow it to energize the system for at least one hour and monitor the system for any malfunctioning caused by use of the generator;
Restore the normal power supply and then test the charging arrangements for the generator starting battery. If they are not functioning correctly then appropriate action should be taken;
Top up oil and coolant levels and fill the fuel tanks. b. Check the emergency lighting system by carrying out the following actions:
Simulate failure of the supply to the normal lighting and inspect all luminaires and exit signs to ensure they are functioning correctly.
If the standby supply is from a generator with back-up batteries, a test should be carried out to determine whether all luminaires and exit signs function correctly, even if the generator is prevented from starting.
Repair or replace any luminaires or exit signs that do not function correctly.
Restore supply to the normal lighting and ensure that: – Indicator lamps or devices to self-contained luminaires or internally
illuminated exit signs show that the normal supply has been restored; – Indicator lamps or devices to central battery systems show that the
normal supply has been restored, and that the charging arrangements are functioning correctly;
– The charging arrangements for any battery for starting a generator are functioning correctly;
– Oil and coolant levels are topped up and fuel tanks filled. c. Check hose reels visually once a month to ensure there are no leaks and that
drum assemblies are free to rotate on their spindles.

Title: Routine inspection and maintenance of fire safety installations
Code: EVM-SOP-E5-06 Version number: 1
Effective date: 03 June 2013 Page: 6 of 7
E5-06.1-fire-equip-maintenance
d. Check the operation of fail-safe mechanisms on automatic opening doors, either by “breaking out” the doorset, i.e. pushing it open manually, or simulating failure of the mains supply. Record the results of the test and repair or replace any faulty doors.
e. Check doors on hold-open devices by simulating failure of the mains power supply or operation of the fire alarm system. Record the results of the test and repair or replace any faulty hold open devices.
f. Check all emergency and panic escape devices on escape doors (especially on external doors not used for other purposes) to ensure ease of operation and opening of the door, as the door and frame relationship can be affected by weather conditions.
4.4 Three-monthly Inspections Responsibility: Fire Safety Manager
a. Check the smoke control system by simulating actuation, testing each zone separately.
b. Ensure that all fans and powered exhaust ventilators operate correctly, and that smoke dampers close.
4.5 Six-monthly Inspections Responsibility: Fire Safety Manager
a. Inspections and tests should be carried out by competent persons on the following: Fire detection and alarm system; Sprinkler system (if provided); Emergency and escape lighting systems;
b. Log any defects, take any remedial action and obtain test certificates. c. Check fire doors to ensure the following:
Heat-activated seals and smoke seals are undamaged; Door leaves are not structurally damaged or excessively bowed/deformed; Gaps between the door leaf and frame are not so small as to be likely to
bind, or so large as to prevent effective fire and smoke sealing; Hanging devices, securing devices, self-closing devices and automatic
release mechanisms are operating correctly.
4.6 Yearly Inspections Responsibility: Fire Safety Manager
a. Inspections and tests should be carried out by competent persons on the following: Fire detection and alarm systems; Self-contained luminaires with sealed batteries, if more than 3 years old; Sprinkler systems; Smoke ventilators and smoke control systems; Fire hydrants;

Title: Routine inspection and maintenance of fire safety installations
Code: EVM-SOP-E5-06 Version number: 1
Effective date: 03 June 2013 Page: 7 of 7
E5-06.1-fire-equip-maintenance
Portable fire extinguishers – apply dated stickers to confirm extinguishers have been checked;
Hose reels. b. Log any defects, take any remedial action and obtain test certificates.
5. Related documents and SOPs BS 5266-1: 2011: Emergency lighting. Code of practice for the
emergency escape lighting of premises. BS 5306-1: 2006: Code of practice for fire extinguishing installations and
equipment on premises. Hose reels and foam inlets. BS 5306-3: 2009: Fire extinguishing installations and equipment on
premises. Commissioning and maintenance of portable fire extinguishers. Code of practice.
BS 5839-1: 2002 +A2: 2008: Fire detection and fire alarm systems for buildings. Code of practice for system design, installation, commissioning and maintenance.
BS 7036 series: 1996: Code of practice for safety at powered doors for pedestrian use.
BS 7273-4: 2007: Code of practice for the operation of fire protection measures. Actuation of release mechanisms for doors.
BS 8214: 2008: Code of practice for fire door assemblies.
BS 9990: 2006: Code of practice for non-automatic fire-fighting systems in buildings.
BS EN 12101: Smoke and heat control systems.
BS EN 12845: 2004 +A2: 2009. Fixed firefighting systems. Automatic sprinkler systems. Design, installation and maintenance.
Note: The references above relate to standards and practices in the United Kingdom. Where other standards apply, adapt the references accordingly.
NFPA 13 Automatic sprinkler systems, 2013 Edition. NFPA 72 National fire alarm and signalling code, 2013 Edition. EVM-SOP-E3.02: Fire drills EVM-SOP-E6.08: Fire safety housekeeping routines.

Title: Using computerized stock management systems
Code: EVM-SOP-E6-01 Version number: 1
Effective date: 07 Oct 2011 Page: 1 of 8
E6-01.1-computer-stock-mgt
Standard Operating Procedure Using computerized stock management
systems
Approvals Name Date Signature
Authorized by:
Reviewed by:
Revised by:
Original author:
Version history
No Date Description of change Reason for change
1 07 Oct 2011 Original
2
3
4
5
Disclaimer: This is a model standard operating procedure. It incorporates generic guidance only. Countries are encouraged to adapt it as necessary to suit local requirements. Queries or comments may be addressed to [email protected]

Title: Using computerized stock management systems
Code: EVM-SOP-E6-01 Version number: 1
Effective date: 07 Oct 2011 Page: 2 of 8
E6-01.1-computer-stock-mgt
Table of content Distribution .................................................................................................................2 1. Policy and objectives.........................................................................................3
1.1 Policy............................................................................................................3 1.2 Objectives.....................................................................................................3
2. Responsibility.....................................................................................................3 3. Associated materials and equipment...............................................................3 4. Procedure............................................................................................................3
4.1 Managing and protecting the stock control computer system ......................3 4.2 Data to be recorded......................................................................................4 4.3 Every day .....................................................................................................5 4.4 Every month .................................................................................................6 4.5 Every <enter frequency: e.g. three months> ................................................7 4.6 Vaccine losses caused by expiry or damage ...............................................7 4.7 Every year on <set date> .............................................................................7 4.8 Every <set number> years ...........................................................................7
5. Related documents and SOPs ..........................................................................8
Distribution Distribute this SOP to the following:
Facility type Position(s)

Title: Using computerized stock management systems
Code: EVM-SOP-E6-01 Version number: 1
Effective date: 07 Oct 2011 Page: 3 of 8
E6-01.1-computer-stock-mgt
1. Policy and objectives
1.1 Policy Where a computerized stock control system is used, the software and computer equipment must be suitable for the task and well-maintained and responsible personnel must know how to use the system. In particular:
a. The computer system running the software must be kept free of computer viruses.
b. Data files must be backed up on a daily basis and the backup media must be kept in a safe place.
c. Stock records must be accurate and up-to-date. d. Programme managers must receive regular reports on the status of
vaccines and other immunization supplies.
1.2 Objectives This SOP describes how to achieve these policy requirements. It does not describe the detailed use of the stock control software. This is covered by the software manual and the associated training course.
2. Responsibility <List responsible personnel. This must include the appropriate IT officer or department>.
3. Associated materials and equipment Computer system, software and peripherals required to run the stock control program.
4. Procedure
4.1 Managing and protecting the stock control computer system Responsibility: <List responsible personnel>.
a. The computer system must be fitted with a voltage regulator and an uninterrupted power supply (UPS) device1.
b. The computer system must have a broadband internet connection which is password-protected and permanently connected during working hours.
c. A high quality anti-virus and malware package must be installed and the subscription(s) for updates must be fully funded and paid for as routine recurrent expenditure. The software must be configured to download updates whenever the computer is connected to the internet, and to carry out automatic anti-virus and anti-spyware scanning on a <daily or weekly> basis.
d. The system administrator must ensure that the system firewall is properly configured. All ports not commonly used to browse the internet should be
1 If a laptop is used, the UPS function could be performed by the laptop battery. However, the use of laptops raises other security issues.

Title: Using computerized stock management systems
Code: EVM-SOP-E6-01 Version number: 1
Effective date: 07 Oct 2011 Page: 4 of 8
E6-01.1-computer-stock-mgt
blocked; preferably only those ports that essential for managing the stock management process should be enabled.
e. Only the following software packages which are directly related to the task of managing the vaccine store may be loaded onto the computer: - <list acceptable software: e.g. temperature monitoring software>.
f. The computer must be password-protected. Only the <designated IT officer> should have administrative privileges and be allowed to install software and software updates (excluding automatic anti-virus updates).
g. Change the default password supplied with the stock control software. Update the password at least once a year, and whenever there is a change of store personnel.
h. Ensure that ‘strong’ passwords are used: for example Hello is a ‘weak’ password; combinations of letters and numbers such as Hello4352 are better; random characters such as 45%hk^!d4f7 are ‘strong’.
i. Always use an agreed date format – e.g. mm/dd/yyyy, dd/mm/yyyy, or yyyy/mm/dd.
j. Virus propagation and general security breaches can be reduced by disabling Internet Explorer and using Mozilla Firefox as the default web browser.
k. Only officially authorized backup devices may be attached to the computer. No unauthorized USB key (flash drive device), CD, DVD or external hard disc should be used at any time. Only the <designated IT officer> should be able to authorize the use of these devices. If a request is made for an electronic copy of the stock control database or reports, these must be sent by email.
l. Keep the software installation CD in a safe place and NOT in the vaccine store. Preferably keep the CD in a fire-proof box.
m. Configure the stock control software so that it produces routine reports in a format that meets the needs of the EPI team.
Reasons: To ensure that the computer system is fully protected against power failure and
computer viruses. To prevent unauthorized access.
4.2 Data to be recorded Responsibility: <List responsible personnel>. The following mandatory information must be registered in the stock control system whenever a shipment of vaccine or other immunization supplies is received: Vaccines:
a. Type of vaccine. b. Manufacturer of the vaccine. c. Vial presentation (doses per vial). d. Batch number(s). e. Expiry date. f. Number of doses received.
Title: Using computerized stock management systems
Code: EVM-SOP-E6-01 Version number: 1
Effective date: 07 Oct 2011 Page: 5 of 8
E6-01.1-computer-stock-mgt
g. VVM stage. h. Name of cold chain equipment where the vaccine is kept – for example:
Cold Room # 1. Diluents:
a. Type of vaccine for which the diluent is intended. b. Manufacturer of the diluent. c. Vial presentation (doses per vial). d. Batch number(s). e. Expiry date. f. Number of doses received. g. Name of store where the diluent is kept.
Syringes:
a. Type description. b. Manufacturer of the syringe. c. Batch number(s). d. Expiry date. e. Quantity received. f. Name of store where the syringes are kept.
Other supplies:
a. Type description. b. Manufacturer of the product. c. Batch number(s) if applicable. d. Production date or expiry date, if applicable2. e. Quantity received. f. Name of store where the item is kept.
4.3 Every day Responsibility: <List responsible personnel>.
a. Process all stock arrivals and dispatches using the stock control software. No transactions may be made outside the stock control system and no supplies must leave the store without an Issue Voucher generated by the stock control software.
b. Ensure that full details of all transactions are completely entered immediately they occur.
c. Backup the database at the end of each working day. Use two separate flash drives, clearly marked ‘Backup A’ and ‘Backup B’ as follows: On DAY 1, use flash drive ‘A’. On DAY 2, use flash drive ‘B’. On DAY 3, use flash drive ‘A’ again and overwrite the existing file from Day 1. Repeat the cycle ‘A’, ‘B’, ‘A, ‘B’, etc. ALWAYS click on the Windows ‘Safely Remove Hardware’ function before removing the flash drive from the
2 For example, FridgeTag™ devices have a production date on the back and must be distributed and activated within one year of this date.
Title: Using computerized stock management systems
Code: EVM-SOP-E6-01 Version number: 1
Effective date: 07 Oct 2011 Page: 6 of 8
E6-01.1-computer-stock-mgt
USB port. ONLY use these flash drives for stock control backups; do not use them for any other purpose.
d. Keep the two flash drives in a locked drawer or cupboard. Preferably keep the flash drives in a fire-proof box.
e. Email a copy of the backup to <name of person who should receive backup> at the end of each working week.
f. Respond immediately to all anti-virus software update instructions.
Reasons: To ensure that stock records are always up-to-date. To ensure that backups are never more than two working days old, even if one of
the flash drives fails. To ensure that the anti-virus software is up-to-date.
4.4 Every month Responsibility: <List responsible personnel>. Print the following reports from stock control system and send them to your supervisor on the first working day of each month:
a. Current stock reports for all vaccines, diluents, sera and all other supplies.
b. Stockout date report estimating how long current stocks will last. c. Monthly dispatches report for the previous month for all items kept in the
store. d. Vaccine by Recipient/Activity report for the previous month. e. Keep hard copies of all these reports in the filing system.
Note: The names of these reports vary from system to system – amend the list to include the relevant reports for the system installed. Responsibility: <List responsible management personnel>. Review the monthly reports and check the following:
a. The stock level for each product is between its maximum stock and safety stock level.
b. Products with short expiry dates are distributed in a manner that ensures, wherever possible, that they will be used before the expiry date is reached.
Reasons: To ensure that programme managers are fully informed about the current stock
position. To ensure that programme managers are able to adjust the delivery timetable for
future supplies to avoid stockouts or over-stocking.

Title: Using computerized stock management systems
Code: EVM-SOP-E6-01 Version number: 1
Effective date: 07 Oct 2011 Page: 7 of 8
E6-01.1-computer-stock-mgt
4.5 Every <enter frequency: e.g. three months> Responsibility: <List responsible personnel>.
a. Carry out a physical stock count of all vaccines, diluents and immunization supplies. See EVM-SOP-E6-03: Conducting a physical stock count.
b. Adjust the stock records as necessary to match the stock count. Record the reasons for the adjustment in the stock control system. Refer to the software User Guide.
c. Submit a stock adjustment report to <list responsible personnel> showing the physical count for each product next to the figure recorded in the stock control system.
Responsibility: <List responsible management personnel>.
a. Check the stock adjustment report. b. If the physical stock count for each item is greater than ±1% of the figure
recorded in the stock control system, investigate the reason for the discrepancy.
Reason: To verify that stock records are correct and record and assess the reason for any adjustments and discrepancies.
4.6 Vaccine losses caused by expiry or damage Responsibility: <List responsible personnel>.
a. Follow the procedures set out in EVM-SOP-E6-04: Safe disposal of expired or damaged vaccine and diluents. Record the losses in the stock control system.
4.7 Every year on <set date> Responsibility: <List responsible personnel>.
a. Check for software updates. If there is a new version, obtain a copy of the CD and install the update.
b. At least one month before the expiry of the current subscription, check that the annual subscription for the anti-virus software has been paid and that all updates have been installed.
c. Create an archive file on CD and store it in a safe place.
4.8 Every <set number> years Responsibility: <List responsible personnel>.
a. Create an Archive file as described in the software User Guide. b. Backup the archive on a CD, label it as a stock control archive and store it
in a safe place.
Reason: To reduce the size of the database file. To remove data on supplies that have been consumed and are no longer in the
supply chain. To ensure that these data are still available in case there is an AEFI that needs to

Title: Using computerized stock management systems
Code: EVM-SOP-E6-01 Version number: 1
Effective date: 07 Oct 2011 Page: 8 of 8
E6-01.1-computer-stock-mgt
be investigated.
5. Related documents and SOPs EVM-SOP-E6-03: Conducting a physical stock count EVM-SOP-E6-04: Safe disposal of expired or damaged vaccine and
diluents <Stock control software user guide>

Title: Managing diluents in the supply chain
Code: EVM-SOP-E6-02 Version number: 1
Effective date: 07 Oct 2011 Page: 1 of 5
E6-02.1-diluent mgt
Standard Operating Procedure Managing diluents in the supply chain
Approvals Name Date Signature
Authorized by:
Reviewed by:
Revised by:
Original author:
Version history
No Date Description of change Reason for change
1 07 Oct 2011 Original
2
3
4
5
Disclaimer: This is a model standard operating procedure. It incorporates generic guidance only. Countries are encouraged to adapt it as necessary to suit local requirements. Queries or comments may be addressed to [email protected]

Title: Managing diluents in the supply chain
Code: EVM-SOP-E6-02 Version number: 1
Effective date: 07 Oct 2011 Page: 2 of 5
E6-02.1-diluent mgt
Table of content Distribution .................................................................................................................2 1. Policy and objectives.........................................................................................3
1.1 Policy............................................................................................................3 1.2 Objectives.....................................................................................................3
2. Responsibility.....................................................................................................3 3. Associated materials and equipment...............................................................3 4. Procedure............................................................................................................3
4.1 Record diluent arrivals in the stock records..................................................3 4.2 Record outgoing diluent in the dispatch records ..........................................4 4.3 Issue diluents correctly.................................................................................4 Pack and transport diluents correctly .......................................................................4 4.4 Store diluents correctly at primary and sub-national levels ..........................4 4.5 Store diluents correctly at health facility level...............................................5
5. Related documents and SOPs ..........................................................................5
Distribution Distribute this SOP to the following:
Facility type Position(s)

Title: Managing diluents in the supply chain
Code: EVM-SOP-E6-02 Version number: 1
Effective date: 07 Oct 2011 Page: 3 of 5
E6-02.1-diluent mgt
1. Policy and objectives
1.1 Policy Responsible personnel should know that all vaccines and diluents have an expiry date, after which they must not be used. Vaccine manufacturers formulate diluents to suit the needs of their own vaccines. They are not interchangeable with diluents supplied by other manufacturers, even if the type of vaccine is the same. Diluents may appear to be plain water-for-injection but they usually contain additives. Responsible personnel should understand that freeze-dried vaccines must always be issued with the correct diluents in matching quantities. Health workers should know that freeze-dried vaccines must always be reconstituted using the specific diluent provided by the manufacturer for each type and batch of vaccine, and that both vaccine and diluent must be within their labelled expiry dates.
1.2 Objectives This SOP describes how diluent stocks should be managed throughout the supply chain so that vaccine and diluent stocks always match one another closely1 and health workers are always able to reconstitute freeze-dried vaccine with the correct diluent.
2. Responsibility All personnel who have responsibility for vaccines and diluents in vaccine stores, health facilities, and during transport.
3. Associated materials and equipment Packing materials.
4. Procedure
4.1 Record diluent arrivals in the stock records Responsibility: <List responsible positions> All stores must record the following minimum information for vaccine diluents when they are received in the store from the vaccine manufacturer or from a higher level storage facility:
a. Type of vaccine for which the diluent is intended. b. Manufacturer of the diluent. c. Vial presentation (doses per vial). d. Batch number(s). e. Expiry date. f. Number of doses received.
1 Some discrepancies will occur because vaccine manufacturers typically over-supply diluents to compensate for the risk of breakage. Consequently, there should never be a reason for under-supplying diluent to any store or health facility.

Title: Managing diluents in the supply chain
Code: EVM-SOP-E6-02 Version number: 1
Effective date: 07 Oct 2011 Page: 4 of 5
E6-02.1-diluent mgt
4.2 Record outgoing diluent in the dispatch records Responsibility: <List responsible positions> All stores must record the following minimum information for vaccine diluents when they are dispatched by the store to a lower level facility:
a. Type of vaccine for which the diluent is intended. b. Manufacturer of the diluent. c. Vial presentation (doses per vial). d. Batch number(s). e. Expiry date. f. Number of doses issued.
4.3 Issue diluents correctly Responsibility: <List responsible positions> All outgoing freeze-dried vaccines must be accompanied by diluents which meet the following requirements:
a. The correct diluent (same manufacturer, same vaccine type and same vial/ampoule size).
b. The number of diluent vials issued must exactly match the number of vaccine vials, even if the lower level store or health facility reports unequal quantities of vaccine and diluent in its requisition form2.
c. Compatible expiry date to the vaccine3.
Pack and transport diluents correctly Responsibility: <List responsible positions> Diluent ampoules are fragile. The lightweight inner cartons must be packed in outer cartons with sufficient padding material to prevent movement. Diluents must not be exposed to temperatures below 0°C during transport.
4.4 Store diluents correctly at primary and sub-national levels Responsibility: <List responsible positions>
a. Diluents which are supplied already packed with the vaccine must be kept in the cold chain at +2°C to +8°C 4.
b. Diluents which are supplied separately from the vaccine must be stored in a clearly marked area of the store, arranged by vaccine type, vaccine manufacturer and date of expiry.
2 Failure to observe this rule means that lower levels stores and health facilities will have increasingly unbalanced stocks of vaccine and diluent. Attempts to adjust for this will cause shortages of diluent and/or vaccine. 3 The diluent may not have the same expiry date as the vaccine. It may be shorter or longer. If it is shorter, then the expiry date of the diluent will determine the last date on which the vaccine can be used. 4 For example, DTP-HepB+Hib vaccine comes as a two vial combination with DTP-HepB as the ‘diluent’ and Hib as the freeze-dried component.

Title: Managing diluents in the supply chain
Code: EVM-SOP-E6-02 Version number: 1
Effective date: 07 Oct 2011 Page: 5 of 5
E6-02.1-diluent mgt
c. Diluent which are supplied separately from the vaccine must be protected from physical damage, moisture, excessive heat and temperatures below 0°C5.
4.5 Store diluents correctly at health facility level Responsibility: <List responsible positions> At health facility level, and during outreach sessions, all diluents must be stored in the cold chain at +2°C to +8°C.
5. Related documents and SOPs EVM-SOP-E6-01: Using computerized stock management systems
5 If diluents are frozen, the ampoules are likely to break.

Title: Conducting a physical stock count
Code: EVM-SOP-E6-03 Version number: 1
Effective date: 07 Oct 2011 Page: 1 of 8
E6-03.1-stock count
Standard Operating Procedure Conducting a physical stock count
Approvals Name Date Signature
Authorized by:
Reviewed by:
Revised by:
Original author:
Version history
No Date Description of change Reason for change
1 07 Oct 2011 Original
2
3
4
5
Disclaimer: This is a model standard operating procedure. It incorporates generic guidance only. Countries are encouraged to adapt it as necessary to suit local requirements. Queries or comments may be addressed to [email protected]

Title: Conducting a physical stock count
Code: EVM-SOP-E6-03 Version number: 1
Effective date: 07 Oct 2011 Page: 2 of 8
E6-03.1-stock count
Table of content Distribution .................................................................................................................2 1. Policy and objectives.........................................................................................3
1.1 Policy............................................................................................................3 1.2 Objectives.....................................................................................................3
2. Responsibility.....................................................................................................3 3. Associated materials and equipment...............................................................3 4. Procedure............................................................................................................3
4.1 Plan the count ..............................................................................................4 4.2 Prepare for the count....................................................................................4 4.3 Conduct the count ........................................................................................4
4.3.1 Preparatory tasks .................................................................................4 4.3.2 First count.............................................................................................5 4.3.3 Second count........................................................................................5 4.3.4 Reconciliation .......................................................................................5
4.4 Ancillary supplies count ................................................................................5 5. Related documents and SOPs ..........................................................................6 Annex 1 – Count sheets ............................................................................................6
Distribution Distribute this SOP to the following:
Facility type Position(s)

Title: Conducting a physical stock count
Code: EVM-SOP-E6-03 Version number: 1
Effective date: 07 Oct 2011 Page: 3 of 8
E6-03.1-stock count
1. Policy and objectives
1.1 Policy Responsible personnel should know how to carry out a systematic physical stock count and how to reconcile any errors found in the stock records. Errors can occur when counting and recording the quantities of vaccines, diluents and other immunization supplies entering or leaving a store. A regular physical check is the only way to ensure that stock records and running balances are accurate and complete.
1.2 Objectives If stock records are inaccurate, it is likely that stockouts or over-stocking will occur in the supply chain. For this reason, the physical stock must be counted regularly to ensure that the stock levels recorded in the stock control system are correct.
a. Primary stores should conduct a physical stock count of all vaccines diluents, syringes and safety boxes every three months.
b. Sub-national stores and health facilities should conduct a stock count at the time when they order vaccine from their supplying store.
c. Stock records must be corrected immediately after the stock count has been completed. A valid reason for every adjustment must be recorded in the stock control system.
An inaccurate count is a waste of time, so every physical count must be carried out systematically and accurately. This SOP describes the correct procedure.
2. Responsibility <List responsible personnel>. Temporary workers may be needed to carry out the count in larger stores and these people must be instructed clearly how to proceed. <List responsible personnel> will be responsible for the spare parts count.
3. Associated materials and equipment Stock count sheets and electronic calculators.
4. Procedure a. Count frequency at primary store level: Stock counts for vaccines, diluents,
syringes and safety boxes will take place in <list target dates or week numbers>. A stock count for cold chain equipment spare parts will take place once a year in <month>.
b. Count frequency at <name of level>: Stock counts for vaccines, diluents, syringes and safety boxes will take place in <list target dates or week numbers>. A stock count for cold chain equipment spare parts will take place once a year in <month>.
c. Repeat for all applicable levels: ……………………………..

Title: Conducting a physical stock count
Code: EVM-SOP-E6-03 Version number: 1
Effective date: 07 Oct 2011 Page: 4 of 8
E6-03.1-stock count
4.1 Plan the count Responsibility: <List responsible personnel>.
a. Date: Set the date for each count well in advance. Choose a day when no supplies are scheduled to arrive and there are no planned distributions.
b. Assistants: Make firm arrangements with all the people who will help with the count. In stores which have cold rooms and/or freezer rooms, provide all count assistants with the correct type of warm clothing.
c. Notify lower level stores: If the stock count will disrupt normal operations, advise lower level stores and health facilities that no supplies will be issued on the day of the count.
d. Items to be counted: Decide what items you are going to count. A typical routine count should cover vaccines, diluents, droppers, syringes and safety boxes. Ancillary supplies also need to be counted at least once a year so that they can be replenished. These supplies will include spare parts, stationary and disposable electronic temperature monitoring devices such as freeze indicators and 30-day refrigerator temperature loggers.
4.2 Prepare for the count Responsibility: <List responsible personnel>. Complete the following tasks in the week leading up to the stock count:
a. Cold rooms and freezer rooms: Ensure that vaccines are neatly arranged on shelves or pallets, organized by batch number and expiry date.
b. Refrigerators and freezers: Ensure that the vaccine is neatly arranged in refrigerators and freezers, organized by batch number and expiry date.
c. Diluent dry store: Ensure that diluents are neatly arranged in the dry store by batch number and expiry date.
d. Syringe store: Ensure that syringes are neatly arranged in the dry store by batch number and that safety boxes are neatly arranged by size.
e. Count sheets: Print sufficient count sheets – at least one will be needed for each cold room, freezer room, refrigerator, freezer and dry store (see Annex 1).
f. Stock level report: On the day of the count, prepare a current stock level report1.
4.3 Conduct the count Responsibility: <List responsible personnel> and counting assistants.
4.3.1 Preparatory tasks
a. Close transactions: Close all transactions in the store until the count is finished. DO NOT issue any further supplies until the count has been completed and reconciled.
b. Incoming stock: If you have incoming stock which has not yet been entered into the stock records, DO NOT include it in the stock count.
1 If you have a computerized stock control system, print a current stock report for every cold room, freezer room, refrigerator, freezer and dry store.

Title: Conducting a physical stock count
Code: EVM-SOP-E6-03 Version number: 1
Effective date: 07 Oct 2011 Page: 5 of 8
E6-03.1-stock count
c. Outgoing stock: If you have previously prepared a draft dispatch which has not yet left the store, and you have already entered the transaction in the stock records, you MUST put this stock to one side. DO NOT include it in the stock count.
d. Instructions: Review counting instructions with the counting assistants before they begin. Demonstrate how to identify product types, the number of doses per vial, lot number, expiry date, etc. Demonstrate an actual count. Explain the complete process, including the reason for the count and how to complete and double check a count sheet.
e. Safe working: In stores with cold rooms and/or freezer rooms, explain safe working practices – see EVM-SOP E4-01: Safe working in cold rooms and freezer rooms. Explain the need to work fast and accurately when counting the stock in refrigerators and freezers in order to minimize the exposure of vaccines to room temperature.
f. Count order: Describe the order in which the count will be carried out – for example Cold Room no. 1, Cold Room no. 2, Freezer Room, Refrigerator no. 1, etc. Prepare a separate set of count sheets for each location.
g. Equipment: Provide each counting team with an electronic calculator.
4.3.2 First count
a. Work in teams of two2. One person will count the item. The second person will record the count and the relevant information about the item on the count sheet.
b. Once a team has completed its assignment for the first count, the supervisor will assign the team to a different location to verify the results of the first count.
4.3.3 Second count
a. Each team will check the results of another team’s first count. If there is only one team, the person who counted in the first count should change places with the person who previously recorded the results.
b. If any discrepancy is found between the two counts, notify the count supervisor.
4.3.4 Reconciliation
a. Compare the finally agreed stock count for each item in each location in each store against the current stock level report you have previously printed.
b. Update the stock records as necessary to show the correct data for all items. If the difference for any item is greater than ±1%, investigate the reason. See SOP EVM-E6-01: Using computerized stock management systems.
4.4 Ancillary supplies count Responsibility: <List responsible personnel>.
2 Try to work in teams of two in all facilities, however small. This is more efficient and it ensures that the count is always checked by another person.

Title: Conducting a physical stock count
Code: EVM-SOP-E6-03 Version number: 1
Effective date: 07 Oct 2011 Page: 6 of 8
E6-03.1-stock count
Carry out a count of ancillary supplies following the procedure described above. Identify all items that need to be replenished. Pay close attention to the expiry dates where these apply. This includes syringes and single use electronic temperature monitoring devices (freeze indicators and 30-day refrigerator loggers).
5. Related documents and SOPs EVM-SOP-E4-01: Safe working in cold rooms and freezer rooms
EVM-SOP-E6-01: Using computerized stock management systems
E6-05.1-count-sheets.xls
Annex 1 – Count sheets The following two pages show blank count sheets for vaccines and other supplies. These can be printed out. Alternatively, use the Excel file.

E6-03.1-stock count
Stock count sheet for vaccines and diluentsDate: Location: Sheet no:
First count team:
Second count team:Count no.
Item description Number of vials (A) Doses per vial (B)
Total doses(A x B)
Lot no. Expiry date Notes
1
2
1
2
1
2
1
2
1
2
1
2
1
2
1
2
1
2
1
2
1
2

E6-03.1-stock count
Stock count sheet for syringes, safety boxes and other productsDate: Location: Sheet no:
First count team:
Second count team:Count no.
Item description Pack type (A) Units per pack (B)
Total units(A x B)
Lot no.(where applicable)
Expiry date(where applicable)
Notes
1
2
1
2
1
2
1
2
1
2
1
2
1
2
1
2
1
2
1
2
1
2

Title: Safe disposal of expired or damaged vaccine and diluents
Code: EVM-SOP-E6-04 Version number: 1
Effective date: 07 Oct 2011 Page: 1 of 7
E6-04.1-vaccine disposal
Standard Operating Procedure Safe disposal of expired or damaged
vaccine and diluents
Approvals Name Date Signature
Authorized by:
Reviewed by:
Revised by:
Original author:
Version history
No Date Description of change Reason for change
1 07 Oct 2011 Original
2
3
4
5
Disclaimer: This is a model standard operating procedure. It incorporates generic guidance only. Countries are encouraged to adapt it as necessary to suit local requirements. Queries or comments may be addressed to [email protected]

Title: Safe disposal of expired or damaged vaccine and diluents
Code: EVM-SOP-E6-04 Version number: 1
Effective date: 07 Oct 2011 Page: 2 of 7
E6-04.1-vaccine disposal
Table of content Distribution .................................................................................................................2 1. Policy and objectives.........................................................................................3
1.1 Policy............................................................................................................3 1.2 Objectives.....................................................................................................3
2. Responsibility.....................................................................................................3 3. Associated materials and equipment...............................................................3 4. Procedure............................................................................................................3
4.1 Managing expired vaccines and diluents .....................................................3 4.1.1 At <list store types with computerized stock control>...........................3 4.1.2 At <list store types with manual stock control>.....................................4
4.2 Managing damaged vaccines and diluents ..................................................4 4.2.1 Physical damage ..................................................................................4 4.2.2 Heat exposure (VVM colour change) ...................................................5 4.2.3 Exposure to freezing.............................................................................5 4.2.4 Frozen Shake Test control samples .....................................................5
4.3 Final disposal procedures ............................................................................5 5. Related documents and SOPs ..........................................................................6 Annex 1 – Loss and adjustment report....................................................................7
Distribution Distribute this SOP to the following:
Facility type Position(s)

Title: Safe disposal of expired or damaged vaccine and diluents
Code: EVM-SOP-E6-04 Version number: 1
Effective date: 07 Oct 2011 Page: 3 of 7
E6-04.1-vaccine disposal
1. Policy and objectives
1.1 Policy Responsible personnel should know the correct procedures for storing, writing off and safely disposing of expired or damaged vaccine and diluents.
1.2 Objectives A fundamental objective of supply chain management is to eliminate the vaccine wastage during storage. However, cases may arise where vaccine has been damaged or has exceeded its expiry date. When this occurs, the affected vaccine and any associated diluents must be clearly identified and isolated from other vaccines and diluents. Correct procedures must then be followed to account for the loss of the vaccines and to make sure that they are disposed of safely. This SOP covers the management and disposal of damaged and expired vaccine in unopened vials. It does NOT apply to vaccine vials that have been opened for use at health facilities.
2. Responsibility <List responsible personnel> are responsible for identifying and isolating damaged or expired vaccine. <List responsible personnel> are responsible for accounting and disposal procedures.
3. Associated materials and equipment Protective gloves and disinfectant are required if vials or ampoules are broken.
4. Procedure
4.1 Managing expired vaccines and diluents Lyophilized vaccines and their associated diluents may not have the same expiry dates. Therefore, it is possible for a vaccine to expire before the diluent to which it belongs; it is also possible for the diluent to expire before the vaccine. If this occurs, it is essential that the associated vaccine or diluent is also withdrawn from stock. If it is not, there will be an imbalance between vaccine and diluent stocks and this will cause confusion. If the diluent is the first to expire, consider ordering new diluents in order to avoid wasting the vaccine. Note: Modify the following sections to take account of specific requirements at each level in the supply chain – for example higher level stores may have computerized stock control, whereas lower level stores may have manual stock ledgers. Although it is preferable to keep damaged and expired vaccines completely outside the cold chain, many countries may not allow this until Property Survey Board procedures have been completed. The clauses below assume that this situation applies. Modify as necessary if this is not the case.
4.1.1 At <list store types with computerized stock control>
Responsibility: <List responsible personnel>. The <name of computerized stock control system> provides alerts when vaccines or diluents are close to expiry. Use these alerts to manage the stock so as to avoid expiry. If expiry does occur, proceed as follows:

Title: Safe disposal of expired or damaged vaccine and diluents
Code: EVM-SOP-E6-04 Version number: 1
Effective date: 07 Oct 2011 Page: 4 of 7
E6-04.1-vaccine disposal
a. Use the expired items report to identify the items. b. Locate the items. Place them in a container clearly marked: ‘EXPIRED
VACCINE FOR DISPOSAL – DO NOT USE’. Store the container in a cold room or vaccine refrigerator until permission is given to take it out of the cold chain.
c. If diluents also need to be removed from stock, place them in a container clearly marked ‘EXPIRED DILUENT FOR DISPOSAL– DO NOT USE’. Store the container in a safe place in the dry store.
d. Record the expired vaccine and/or diluents in the stock control system. Prepare a Loss and adjustment report – see Annex 1.
e. As soon as permission is given to dispose of the vaccine, move the container to a safe place outside the cold chain.
4.1.2 At <list store types with manual stock control>
Responsibility: <List responsible personnel>. a. Use the stock control system to identify the expired items. b. Locate the items. Place them in a container clearly marked: ‘EXPIRED
VACCINE FOR DISPOSAL– DO NOT USE’. Store the container in a cold room or vaccine refrigerator until permission is given to take it out of the cold chain.
c. If diluents also need to be removed from stock, place them in a container clearly marked ‘EXPIRED DILUENT FOR DISPOSAL– DO NOT USE’. Store the container in a safe place in the dry store.
d. Record the expired vaccine and/or diluents in the stock control system and prepare a Loss and adjustment report – see Annex 1.
e. As soon as permission is given to dispose of the vaccine, move the container to a safe place outside the cold chain.
4.2 Managing damaged vaccines and diluents
4.2.1 Physical damage
Responsibility: <List responsible personnel>. It is unlikely that vaccine vials will suffer from physical damage because glass vials are very robust. However, vaccine and diluents supplied in ampoules can break quite easily if they are dropped. If breakage occurs, wear protective gloves and proceed as follows:
a. Write down the number and type of broken vials or ampoules and the batch number(s) and put them to one side.
b. If vials or ampoules have been contaminated with spilled vaccine, write down the number and type affected. Place the broken and contaminated vials or ampoules in a closed leak-proof plastic container and treat the contents with disinfectant.
c. If vaccine has been spilled, carefully collect all broken glass and clean the area of the spillage with disinfectant.
d. Clearly mark the container: ‘DAMAGED VACCINE FOR DISPOSAL– DO NOT USE’’ and store it in a safe place outside the cold chain.

Title: Safe disposal of expired or damaged vaccine and diluents
Code: EVM-SOP-E6-04 Version number: 1
Effective date: 07 Oct 2011 Page: 5 of 7
E6-04.1-vaccine disposal
e. Record the breakages in the stock control system1.
4.2.2 Heat exposure (VVM colour change)
Responsibility: <List responsible personnel>. If the VVM shows that vaccine has reached the discard point, proceed as follows:
a. Write down the number and type of damaged vials and their batch numbers and place them in a closed plastic container or carton.
b. Clearly mark the container: ‘DAMAGED VACCINE FOR DISPOSAL– DO NOT USE’’ and store it in a cold room or vaccine refrigerator until permission is given to take it out of the cold chain.
c. Record the damaged vaccine in the stock control system and prepare a Loss and adjustment report – see Annex 1.
d. As soon as permission is given to dispose of the vaccine, move the container to a safe place outside the cold chain.
4.2.3 Exposure to freezing
Responsibility: <List responsible personnel>. If you suspect that vaccine has been frozen, you must carry out the Shake Test as described in EVM-SOP-E8-01: When and how to conduct the Shake Test. If you discover freeze-damaged vaccine, proceed as follows:
a. Write down the number and type of damaged vials and their batch numbers and place them in a closed plastic container or carton.
b. Clearly mark the container: ‘DAMAGED VACCINE FOR DISPOSAL– DO NOT USE’’. Store the container in a cold room or vaccine refrigerator until permission is given to take it out of the cold chain.
c. Record the damaged vaccine in the stock control system and prepare a Loss and adjustment report – see Annex 1.
d. As soon as permission is given to dispose of the vaccine, move the container to a safe place outside the cold chain.
4.2.4 Frozen Shake Test control samples
Responsibility: <List responsible personnel>. Ensure that the frozen control samples from Shake Tests are also safely disposed of. See EVM-SOP-E8-01: When and how to conduct the Shake Test.
4.3 Final disposal procedures Responsibility: <List responsible personnel>.
a. Obtain approval for disposal: <Describe the local procedure for obtaining approval for final disposal, including Property Survey Board procedures where these apply>.
1 In the case of a large diluent breakage consider whether an equivalent amount of vaccine should be withdrawn from stock, otherwise there will be an imbalance between vaccine and diluent. Alternatively, additional diluent of the correct type can be ordered from the vaccine supplier.

Title: Safe disposal of expired or damaged vaccine and diluents
Code: EVM-SOP-E6-04 Version number: 1
Effective date: 07 Oct 2011 Page: 6 of 7
E6-04.1-vaccine disposal
b. Final disposal: <Describe the local procedure for safe destruction or disposal of vaccines and diluents. This may vary from level to level in the supply chain, depending upon the quantities involved. Warning: Never place full or empty vials in an incinerator or a fire because they often explode and may cause damage or injury>.
5. Related documents and SOPs EVM-SOP-E6-01: Using computerized stock management systems. EVM-SOP-E8-01: When and how to conduct the Shake Test. WHO/EDM/PAR/99.2. Guidelines for Safe Disposal of Unwanted
Pharmaceuticals in and after Emergencies. http://www.who.int/water_sanitation_health/medicalwaste/unwantpharm.pdf

Title: Safe disposal of expired or damaged vaccine and diluents
Code: EVM-SOP-E6-04 Version number: 1
Effective date: 07 Oct 2011 Page: 7 of 7
E6-04.1-vaccine disposal
Annex 1 – Loss and adjustment report Note: Adapt this form to suit local requirements
Title: Storing vaccines and water packs in cold rooms and freezer rooms
Code: EVM-SOP-E6-05 Version number: 1
Effective date: 07 Oct 2011 Page: 1 of 7
E6-05.1-CR storage
Standard Operating Procedure Storing vaccines and water packs in cold
rooms and freezer rooms
Approvals Name Date Signature
Authorized by:
Reviewed by:
Revised by:
Original author:
Version history
No Date Description of change Reason for change
1 07 Oct 2011 Original
2
3
4
5
Disclaimer: This is a model standard operating procedure. It incorporates generic guidance only. Countries are encouraged to adapt it as necessary to suit local requirements. Queries or comments may be addressed to [email protected]

Title: Storing vaccines and water packs in cold rooms and freezer rooms
Code: EVM-SOP-E6-05 Version number: 1
Effective date: 07 Oct 2011 Page: 2 of 7
E6-05.1-CR storage
Table of content Distribution .................................................................................................................2 1. Policy and objectives.........................................................................................3
1.1 Policy............................................................................................................3 1.2 Objectives.....................................................................................................3
2. Responsibility.....................................................................................................3 3. Associated materials and equipment...............................................................3 4. Procedure............................................................................................................3
4.1 General procedures......................................................................................3 4.1.1 Cold rooms: checking safe storage areas on the shelves ....................4 4.1.2 Cold rooms: checking the safe floor storage area ................................4 4.1.3 Cold rooms and freezer room: marking the pallet areas ......................4
4.2 Storing vaccine on shelves...........................................................................5 4.3 Storing vaccines on pallets...........................................................................6 4.4 Freezing or cooling water packs...................................................................6
5. Related documents and SOPs ..........................................................................6 Annex 1 – Sensor data recording sheet...................................................................7
Distribution Distribute this SOP to the following:
Facility type Position(s)

Title: Storing vaccines and water packs in cold rooms and freezer rooms
Code: EVM-SOP-E6-05 Version number: 1
Effective date: 07 Oct 2011 Page: 3 of 7
E6-05.1-CR storage
1. Policy and objectives
1.1 Policy Responsible personnel must know how to store vaccine correctly in the cold rooms and freezer room. Correct storage practice ensures that:
a. All vaccines are clearly identifiable and accessible and can easily be located and distributed in Earliest-Expiry-First-Out (EEFO) order.
b. Freeze-sensitive vaccines are stored in areas where there is no risk of freezing.
c. Cold air can flow freely around the stock. d. Vaccine for supplementary activities can be stored temporarily without
preventing access to routine stock. e. Vaccine marked for disposal is kept separate from the remaining stock.
1.2 Objectives This SOP describes how to identify the safe storage areas in cold rooms, how to store vaccine on shelves and how to store vaccine on pallets. Note: This SOP is intended for cold rooms and freezer rooms where vaccine is stored on shelves which can be reached from floor level, or on floor standing pallets. High rise pallet stores requiring forklift trucks are not covered.
2. Responsibility <List responsible personnel> have responsibility for vaccine storage. <List responsible personnel> have supervisory duties.
3. Associated materials and equipment Electronic 30-day refrigerator temperature logger or temperature data logger, plastic pallets, duct tape or floor paint.
4. Procedure Store all vaccines at the correct temperature. Refer to EVM-SOP-E2-03: Correct storage temperatures for vaccines and diluents.
4.1 General procedures Responsibility: <List responsible personnel>
a. Cold rooms: DO NOT store vaccine in the air stream close to the evaporator units. Freeze-sensitive vaccine placed in this zone may be at risk of freezing. Check the limits of the safe storage zone using an activated electronic 30-day refrigerator temperature logger or temperature data logger device1.
b. Supplementary vaccines: Vaccine for supplementary activities is usually stored on the floor of the cold rooms or freezer rooms. Vaccine stored in this way must always be stacked on pallets. This ensures that air
1 For suitable devices, refer to section E006 in the PQS catalogue on the WHO website.
Title: Storing vaccines and water packs in cold rooms and freezer rooms
Code: EVM-SOP-E6-05 Version number: 1
Effective date: 07 Oct 2011 Page: 4 of 7
E6-05.1-CR storage
circulates freely. It also keeps the vaccine off the floor, which may be dirty or damp.
c. Hygiene: ALWAYS wash hands thoroughly before handling vaccine cartons and vaccine vials.
4.1.1 Cold rooms: checking safe storage areas on the shelves
a. Place the temperature recording device on the shelf closest to the evaporator unit. Leave the device for a minimum of 48 hours and then check the maximum and minimum temperature readings.
b. If all the readings are between +2°C and +8°C, the area should be safe for storing vaccine. Otherwise, mark the area as unsafe and move the device further along the shelf.
c. Repeat the test procedure on all the shelves close to the evaporator until you have established the limits of the safe storage zone.
d. Record results of the temperature mapping exercise on the sensor data recording sheet. See Annex 1.
e. Clearly mark the front of the shelf units in the danger zones using coloured tape. Do not use these areas for storing freeze-sensitive vaccines2.
Repeat this check whenever a refrigeration unit is replaced.
4.1.2 Cold rooms: checking the safe floor storage area
a. Place a pile of empty cartons about 150 cm high at the nearest point to the refrigeration unit3 and within the area where you want to store vaccine on pallets. Place the temperature recording device on top of the cartons. Leave the device for a minimum of 48 hours and then check the maximum and minimum temperature readings.
b. If all the readings are between +2°C and +8°C, the area should be safe for storing freeze-sensitive vaccine. Otherwise, change the position of the marked area and carry out another test until you have established the limits of the safe storage zone.
c. Record results of the temperature mapping exercise on the sensor data recording sheet. See Annex 1.
Repeat this check whenever a refrigeration unit is replaced.
4.1.3 Cold rooms and freezer room: marking the pallet areas
a. Obtain the required number of plastic pallets and stack them in a dry place in the store for use when required. Plastic pallets should be used because wooden pallets can become contaminated with fungal spores.
b. Mark out an area on the floor of the cold rooms and freezer room where supplementary vaccines can safely be stored. In the cold rooms, make sure that this is area is entirely within the safe storage zone. Use paint or duct tape for the markings and make sure that the marked area matches
2 Freeze-dried vaccines such as BCG, Measles and MMR, which are not damaged by freezing can safely be stored in the danger zone. 3 You must choose an area close to an active refrigeration unit.

Title: Storing vaccines and water packs in cold rooms and freezer rooms
Code: EVM-SOP-E6-05 Version number: 1
Effective date: 07 Oct 2011 Page: 5 of 7
E6-05.1-CR storage
the dimensions of the pallets. Leave a space of at least 10 cm between the pallets for air circulation. For example, a space for two 120 x 80 cm pallets should be either 120 x 170 cm or 250 x 80 cm. Leave a minimum margin of 80-90 cm between the marked area and the adjacent shelf units to allow access to the shelves.
4.2 Storing vaccine on shelves Responsibility: <List responsible personnel>
a. Place the vaccine cartons on the shelves so that air can freely circulate. Leave a 5 cm clear space between the cartons and the walls of the room. Do not place cartons closer that 10 cm to the ceiling. Do not store vaccine on the floor below the bottom shelf.
b. Group the vaccine cartons on the shelves of the cold rooms and freezer room by vaccine type, batch number and expiry date. Leave 5 cm vertical spaces between each group for identification purposes and to allow for air circulation. Make sure that the printed labels on the cartons are visible. Fix a label to the edge of the shelves to show the vaccine type, manufacturer, presentation, batch number and expiry date.
c. Some vaccines are supplied in tertiary outer cartons. Store these vaccines in the outer cartons until you need to open them to remove the smaller secondary cartons. This makes stock management and stock counting easier.
Tertiary outer carton
Secondary inner cartons

Title: Storing vaccines and water packs in cold rooms and freezer rooms
Code: EVM-SOP-E6-05 Version number: 1
Effective date: 07 Oct 2011 Page: 6 of 7
E6-05.1-CR storage
4.3 Storing vaccines on pallets Responsibility: <List responsible personnel>
a. Place the required number of pallets within the marked area. b. Stack vaccine on the pallets. Do not stack higher than about 150 cm.
Make sure that the load does not overlap the edges of the pallets. c. If the vaccine on the pallet is for supplementary activities label the stack
to show the vaccine type, manufacturer, presentation, batch number and expiry date.
d. If the vaccine is marked for disposal, clearly label the contents. e. Remove the pallets from the cold room or freezer room when they are no
longer required. Unused pallets limit access and are a trip hazard.
4.4 Freezing or cooling water packs Responsibility: <List responsible personnel> You may use a freezer room to freeze ice packs or use a cold room to chill cool water packs provided you observe the following rules:
a. Freezer rooms: If the freezer room contains vaccine, DO NOT allow water packs to touch the vaccines. DO NOT allow the temperature of the room to rise above -15°C during the water pack freezing process.
b. Cold rooms: If the cold room contains vaccine, DO NOT allow water packs to touch the vaccines. DO NOT allow the temperature of the room to rise above +8°C during the water pack cooling process.
5. Related documents and SOPs EVM-SOP-E2-03: Correct storage temperatures for vaccines and
diluents EVM-SOP-E6-01: Using computerized stock management systems EVM-SOP-E6-03: Conducting a physical stock count EVM-SOP-E6-04: Safe disposal of expired or damaged vaccine and
diluents
EVM-SOP-E6-06: Storing vaccine and water packs in refrigerators and freezers
EVM-SOP-E7-02: Packing vaccine and diluents for transport, using cold boxes.

Title: Storing vaccines and water packs in cold rooms and freezer rooms
Code: EVM-SOP-E6-05 Version number: 1
Effective date: 07 Oct 2011 Page: 7 of 7
E6-05.1-CR storage
Annex 1 – Sensor data recording sheet Store name: Cold room ID: Temperature set point: °C
Test start date: Test finish date: Name of tester:
# Sensor location Start (dd:hh:mm)
Finish (dd:hh:mm)
Min temp (°C)
Max temp(°C)
Average (°C)
Pass/Fail? (must be +2°C to +8°C)
1
2
3
4
5
6
7
8
9
10
11
12
13
14
15
Comments:

Title: Storing vaccine and water packs in refrigerators and freezers
Code: EVM-SOP-E6-06 Version number: 1
Effective date: 07 Oct 2011 Page: 1 of 8
E6-06.1-fridge storage
Standard Operating Procedure Storing vaccine and water packs in
refrigerators and freezers
Approvals Name Date Signature
Authorized by:
Reviewed by:
Revised by:
Original author:
Version history
No Date Description of change Reason for change
1 07 Oct 2011 Original
2
3
4
5
Disclaimer: This is a model standard operating procedure. It incorporates generic guidance only. Countries are encouraged to adapt it as necessary to suit local requirements. Queries or comments may be addressed to [email protected]

Title: Storing vaccine and water packs in refrigerators and freezers
Code: EVM-SOP-E6-06 Version number: 1
Effective date: 07 Oct 2011 Page: 2 of 8
E6-06.1-fridge storage
Table of content Distribution .................................................................................................................2 1. Policy and objectives.........................................................................................3
1.1 Policy............................................................................................................3 1.2 Objectives.....................................................................................................3
2. Responsibility.....................................................................................................3 3. Associated materials and equipment...............................................................3 4. Procedure............................................................................................................3
4.1 General procedures......................................................................................3 4.2 Storing vaccine and water packs in ice-lined refrigerators ...........................4 4.3 Storing vaccines and water packs in top opening refrigerators ....................5 4.4 Storing vaccine and water packs in front-opening refrigerators ...................6 4.5 Storing vaccine in chest freezers..................................................................7 4.6 Freezing and storing water packs.................................................................7
5. Related documents and SOPs ..........................................................................8
Distribution Distribute this SOP to the following:
Facility type Position(s)

Title: Storing vaccine and water packs in refrigerators and freezers
Code: EVM-SOP-E6-06 Version number: 1
Effective date: 07 Oct 2011 Page: 3 of 8
E6-06.1-fridge storage
1. Policy and objectives
1.1 Policy Responsible personnel must know how to store vaccine and water packs correctly in refrigerators and freezers. Correct storage practice ensures that:
a. All vaccines are clearly identifiable and accessible and can easily be located and distributed in Earliest-Expiry-First-Out (EEFO) order.
b. Freeze-sensitive vaccines are stored in areas where there is no risk of freezing.
c. Cold air can flow freely around the stock. d. Vaccine marked for disposal is kept separate from the remaining stock.
1.2 Objectives This SOP describes how to store vaccine in refrigerators and freezers.
2. Responsibility <List responsible personnel> have responsibility for vaccine storage. <List responsible personnel> have supervisory duties.
3. Associated materials and equipment None
4. Procedure Store all vaccines at the correct temperature. Refer to EVM-SOP-E2-03: Correct storage temperatures for vaccines and diluents.
4.1 General procedures Responsibility: <List responsible personnel>
a. Arrange stock: Arrange vaccines and diluents (where diluents are stored in refrigerators) by type, batch number and expiry date so that they can be accessed in Earliest-Expiry-First-Out (EEFO) order.
b. Primary or sub-national stores: If there is more than one vaccine refrigerator and/or vaccine freezer: - Try to store one type of vaccine only in each appliance. - Print a contents list and attach it to the lid or door of the appliance.
The list must show vaccine type, manufacturer, presentation, batch number and expiry date. Replace the list with an updated version whenever vaccine is removed from stock or additional vaccine is added.
- DO NOT store diluents in the refrigerator. c. In health facility and all service delivery refrigerators:
- Store vaccine AND diluents in the refrigerator. If there is insufficient space, for all the diluent make sure you keep enough diluent in the refrigerator for the next immunization session.

Title: Storing vaccine and water packs in refrigerators and freezers
Code: EVM-SOP-E6-06 Version number: 1
Effective date: 07 Oct 2011 Page: 4 of 8
E6-06.1-fridge storage
- DO NOT store expired vaccines, reconstituted vials with doses remaining after an immunization session, and vials with VVMs that have reached or are beyond their discard point.
- Keep vials with VVMs showing more heat exposure than others in the box labelled ‘use first’. Use these vials first in the next session.
- <If MDVP is adopted> Keep opened vials of <list MDVP vaccines> vaccines, marked with the date of opening and place in the ‘USE FIRST’ box for first use during the next session.
d. Cooling and freezing water packs: - DO NOT use a refrigerator that contains vaccine to prepare cool water
packs unless the appliance is specifically designed for this purpose. In all other cases, use a separate refrigerator.
- DO NOT freeze water packs in a freezer that contains vaccine unless the appliance has a separate ice pack freezing compartment.
- Try to store unfrozen water packs upright to reduce the risk of leakage. Frozen water packs may be stored flat.
e. Hygiene: ALWAYS wash hands thoroughly before handling vaccine cartons and vaccine vials.
4.2 Storing vaccine and water packs in ice-lined refrigerators Responsibility: <List responsible personnel>
a. Place vaccine and diluent cartons (where diluents are stored in the refrigerator) in the wire baskets provided with the refrigerator. NEVER remove the baskets to create additional storage space. Leave a vertical space between stacks of cartons to allow air to circulate
b. Place the <thermometer and freeze indicator device or 30-day electronic temperature data logger1> on the top of the stock, with the freeze-sensitive vaccines, so that it can easily be read.
c. If there is a separate freezing compartment, use this to freeze water packs. DO NOT exceed the maximum number and weight of water packs stated in the refrigerator manufacturer’s instructions.
d. NEVER cool water packs in a refrigerator that contains vaccine. ALWAYS use a separate refrigerator that has been designated for this purpose.
e. Arrange vaccines and diluents as shown in the diagram below. The left hand side shows and arrangement with mixed vaccine stored at health facility level. The right hand side shows an arrangement for bulk vaccine storage at sub-national level. Note that older ILRs with adjustable thermostats may experience low temperatures if the thermostat is not correctly adjusted. Correct adjustment is critical. Placing a layer of unfrozen water packs at the bottom of the unit also helps to reduce the risk of freezing in such units.
1 For suitable devices, refer to section E006 in the PQS catalogue on the WHO website.

Title: Storing vaccine and water packs in refrigerators and freezers
Code: EVM-SOP-E6-06 Version number: 1
Effective date: 07 Oct 2011 Page: 5 of 8
E6-06.1-fridge storage
Storing vaccine in an ice-lined refrigerator
Source: WHO/EPELA (adapted)
4.3 Storing vaccines and water packs in top opening refrigerators Responsibility: <List responsible personnel>
a. Place the <thermometer and freeze indicator device or 30-day electronic temperature data logger2> on the top of the stock, with the freeze-sensitive vaccines, so that it can easily be read.
b. If there is a separate freezing compartment, use this to freeze water packs. DO NOT exceed the maximum number and weight of water packs stated in the manufacturer’s instructions.
c. NEVER cool water packs in a refrigerator that contains vaccine. ALWAYS use a separate refrigerator that has been designated for this purpose.
d. Arrange vaccines and diluents as shown in the diagram below.
2 For suitable devices, refer to section E006 in the PQS catalogue on the WHO website.
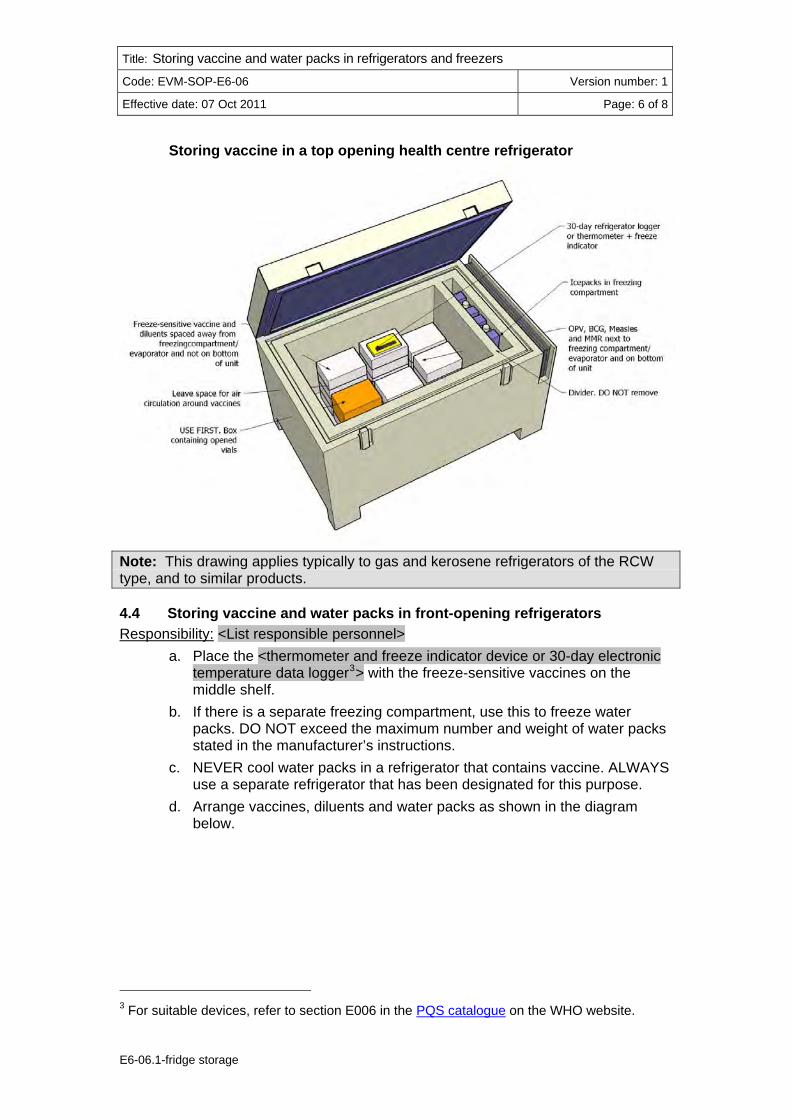
Title: Storing vaccine and water packs in refrigerators and freezers
Code: EVM-SOP-E6-06 Version number: 1
Effective date: 07 Oct 2011 Page: 6 of 8
E6-06.1-fridge storage
Storing vaccine in a top opening health centre refrigerator
Note: This drawing applies typically to gas and kerosene refrigerators of the RCW type, and to similar products.
4.4 Storing vaccine and water packs in front-opening refrigerators Responsibility: <List responsible personnel>
a. Place the <thermometer and freeze indicator device or 30-day electronic temperature data logger3> with the freeze-sensitive vaccines on the middle shelf.
b. If there is a separate freezing compartment, use this to freeze water packs. DO NOT exceed the maximum number and weight of water packs stated in the manufacturer’s instructions.
c. NEVER cool water packs in a refrigerator that contains vaccine. ALWAYS use a separate refrigerator that has been designated for this purpose.
d. Arrange vaccines, diluents and water packs as shown in the diagram below.
3 For suitable devices, refer to section E006 in the PQS catalogue on the WHO website.

Title: Storing vaccine and water packs in refrigerators and freezers
Code: EVM-SOP-E6-06 Version number: 1
Effective date: 07 Oct 2011 Page: 7 of 8
E6-06.1-fridge storage
Storing vaccine in front-opening refrigerator
Note: This applies typically to gas and kerosene front opening refrigerators and to domestic refrigerators.
4.5 Storing vaccine in chest freezers Responsibility: <List responsible personnel>
a. Place vaccine cartons in the freezer compartment. b. Place the thermometer on the top of the cartons so that it is easily
accessible. c. NEVER freeze water packs in a freezer that contains vaccine. ALWAYS
use a separate freezer that has been designated for this purpose. d. NEVER store diluent in a freezer.
4.6 Freezing and storing water packs Responsibility: <List responsible personnel>
a. Upright ice pack fast freezers: Stack water packs on the shelves and wait for them to freeze. Once they are frozen they can either be kept in the fast freezer or moved to a chest freezer for storage purposes.

Title: Storing vaccine and water packs in refrigerators and freezers
Code: EVM-SOP-E6-06 Version number: 1
Effective date: 07 Oct 2011 Page: 8 of 8
E6-06.1-fridge storage
b. Chest freezers with separate freezing compartment: If the freezer has a separate freezing compartment, use this to freeze ice packs. If there is a fast freeze switch, activate the switch. Once the packs are frozen, move them to the storage compartment and freeze a further batch of water packs in the freezing compartment.
c. Chest freezers with a single compartment: Place unfrozen water packs evenly around the inner walls of the appliance. Once the packs are frozen, lay them on the bottom of the compartment and freeze a further batch.
5. Related documents and SOPs EVM-SOP-E2-03: Correct storage temperatures for vaccines and diluents. EVM-SOP-E5-03: Looking after vaccine refrigerators and freezers. EVM-SOP-E6-03: Conducting a physical stock count. EVM-SOP-E6-04: Safe disposal of expired or damaged vaccine and
diluents. EVM-SOP-E6-05: Storing vaccines and water packs in cold rooms and
freezer rooms. EVM-SOP-E7-03: Packing vaccine and diluents for transport, using cold
boxes.

Title: Storing goods in the dry stores
Code: EVM-SOP-E6-07 Version number: 1
Effective date: 07 Oct 2011 Page: 1 of 6
E6-07.1-dry storage
Standard Operating Procedure Storing goods in the dry stores
Approvals Name Date Signature
Authorized by:
Reviewed by:
Revised by:
Original author:
Version history
No Date Description of change Reason for change
1 07 Oct 2011 Original
2
3
4
5
Disclaimer: This is a model standard operating procedure. It incorporates generic guidance only. Countries are encouraged to adapt it as necessary to suit local requirements. Queries or comments may be addressed to [email protected]

Title: Storing goods in the dry stores
Code: EVM-SOP-E6-07 Version number: 1
Effective date: 07 Oct 2011 Page: 2 of 6
E6-07.1-dry storage
Table of content Distribution .................................................................................................................2 1. Policy and objectives.........................................................................................3
1.1 Policy............................................................................................................3 1.2 Objectives.....................................................................................................3
2. Responsibility.....................................................................................................3 3. Associated materials and equipment...............................................................3 4. Procedure............................................................................................................3
4.1 General procedures......................................................................................3 4.2 Storing diluents, syringes and safety boxes .................................................4 4.3 Storing expired or damaged vaccines, diluents and syringes ......................4 4.4 Storing electronic devices with non-replaceable batteries............................4 4.5 Storing spare parts, stationary and other items............................................4
5. Related documents and SOPs ..........................................................................5 Annex 1 – Pallet and aisle width data ......................................................................6
Distribution Distribute this SOP to the following:
Facility type Position(s)

Title: Storing goods in the dry stores
Code: EVM-SOP-E6-07 Version number: 1
Effective date: 07 Oct 2011 Page: 3 of 6
E6-07.1-dry storage
1. Policy and objectives
1.1 Policy Diluents, syringes, safety boxes, spare parts and other immunization supplies must be stored correctly in the dry stores. Correct storage practice ensures that:
a. All products are safely stored within the temperature and humidity levels specified for the product type.
b. Diluents, syringes and other products with a limited shelf life, such as electronic 30-day refrigerator temperature logger devices and electronic freeze indicators with non-replaceable batteries, can easily be located and distributed in Earliest-Expiry-First-Out (EEFO) order.
c. Products without an expiry date, such as safety boxes, can easily be located and distributed in First-In-First-Out (FIFO) order.
d. Expired or damaged products marked for disposal are kept separate from useable stock.
1.2 Objectives This SOP describes the preparatory activities needed to establish a well-organized dry store. It also describes how to manage the store effectively.
2. Responsibility <List responsible personnel> has day-to-day responsibility for dry goods storage generally. <List responsible maintenance personnel> has joint responsibility for the spare parts store. <List responsible personnel> have supervisory duties.
3. Associated materials and equipment Pallets, duct tape or floor paint.
4. Procedure
4.1 General procedures Diluents, syringes and safety boxes are supplied in cardboard cartons. These should be stacked on pallets in the dry storage area. This keeps the cartons off the floor, which may be dirty or damp. Responsibility: <List responsible personnel>
a. Obtain the required number of pallets and stack them in a dry place in the store for use when required. Pallets must be clean, dry and in good condition.
b. Mark out an area for each pallet bay on the floor of the dry store. Use paint or duct tape for the markings and make sure that the marked area matches the dimensions of the pallets. Leave a space of at least 10 cm between each pallet. Number each bay so that product locations can be assigned and products can be located easily. Allow sufficient aisle width to permit the use of the available pallet handling equipment. See Annex 1.

Title: Storing goods in the dry stores
Code: EVM-SOP-E6-07 Version number: 1
Effective date: 07 Oct 2011 Page: 4 of 6
E6-07.1-dry storage
4.2 Storing diluents, syringes and safety boxes Responsibility: <List responsible personnel>
a. Stack all diluents, syringes and safety boxes on pallets, in pre-assigned pallet bays.
b. Stack diluents by batch number and expiry date. Clearly label the cartons to show the name of the vaccine with which the diluent was supplied and the manufacturer, presentation, batch number and expiry date.
c. Stack syringes by type and by expiry date. Clearly label the cartons to show syringe type, syringe capacity, syringe manufacturer and expiry date.
d. Stack safety boxes by arrival date and by size so that they can be distributed on a First-In-First-Out (FIFO) basis. Clearly label the safety boxes by size (e.g. 5 litres).
4.3 Storing expired or damaged vaccines, diluents and syringes Responsibility: <List responsible personnel>
a. Assign a separate well-ventilated room1 for these products. Clearly mark the assigned storage bay(s): ‘PRODUCTS FOR DISPOSAL’ so that items placed here cannot be confused with useable stock.
b. Store products until they can be removed from the store for final disposal.
4.4 Storing electronic devices with non-replaceable batteries Responsibility: <List responsible personnel>
a. Store these products on shelves in a locked room. Label the products by type and by production date or by expiry date2.
b. Distribute products by expiry date or by production date. Ensure that all devices are distributed for final use within 12 months of arrival in the store3.
c. Ensure that replacement stocks are obtained so as to avoid stockouts.
4.5 Storing spare parts, stationary and other items Responsibility: <List responsible personnel>
a. Store these products on shelves in a locked room. Label the products by type.
b. Distribute products as needed. Ensure that replacement stocks are obtained so as to avoid stockouts. In the case of spare parts, the <list responsible maintenance personnel> are responsible for requesting replacement items.
1 Used syringes are smelly. 2 For example, FreezeTag® devices have an expiry date and lot number printed on the front of the unit. FridgeTag® devices have a production date on the label on the back of the unit. 3 FridgeTag® has a two year battery life after a maximum of 12 months after manufacture. FreezeTag® has a three year battery life from date of manufacture.

Title: Storing goods in the dry stores
Code: EVM-SOP-E6-07 Version number: 1
Effective date: 07 Oct 2011 Page: 5 of 6
E6-07.1-dry storage
5. Related documents and SOPs EVM-SOP-E6-01: Using computerized stock management systems. EVM-SOP-E6-03: Conducting a physical stock count. EVM-SOP-E6-04: Safe disposal of expired or damaged vaccine and
diluents.

Title: Storing goods in the dry stores
Code: EVM-SOP-E6-07 Version number: 1
Effective date: 07 Oct 2011 Page: 6 of 6
E6-07.1-dry storage
Annex 1 – Pallet and aisle width data
Pallet type Length Depth
Working aisle width (hand
truck)
Working aisle width
(ride-on truck)
Working aisle width
(tiller truck)
Working aisle width (long side)
Working aisle width (short side)
EUR 2 or 3: 1.2m x 1.0m 1.20 1.00 1.90 2.60 2.90 2.70 2.90EUR 6: 0.8m x 0.6m 0.80 0.60 1.50 2.20 2.50 2.50 2.60EUR pool: 1.2m x 0.8m 1.20 0.80 1.90 2.60 2.90 2.70 2.90ISO: 1.067m x 1.067m 1.07 1.07 1.90 2.60 2.90 2.85 2.85ISO: 1.1m x 1.1m 1.10 1.10 1.90 2.60 2.90 2.85 2.85ISO: 1.14m x 1.14m 1.14 1.14 1.90 2.60 2.90 2.90 2.90ISO: 1.219m x 1.016m 1.22 1.02 1.90 2.60 2.90 2.75 2.90All dimensions in metres
Notes:
3) In all cases, the aisle widths given assume that the pallet truck has access to the short side of the pallet. 4) Aisle widths are for planning purposes only and are based on requirements for typical pallet trucks. Check the actual requirements for the available equipment.
Pallet standing (note 1) Pallet racking (note 2)
1) The first column gives data for hand pallet trucks. The second column is for powered ride-on or sit-on units. Aisle widths assume that pallets are accessed from their short side. Special equipment is required to access from the long side.2) Pallet racking aisle width data are based on the use of reach trucks. Stacker trucks give narrower aisle widths, but the equipment is more specialized.

Title: Fire safety housekeeping routines
Code: EVM-SOP-E6-08 Version number: 1
Effective date: 03 June 2013 Page: 1 of 5
E6-08.1-fire-safety-housekeeping
Standard Operating Procedure Fire safety housekeeping routines
Approvals Name Date Signature
Authorized by:
Reviewed by:
Revised by:
Original author:
Version history
No Date Description of change Reason for change
1 03 Jun 2013 Original
2
3
4
5
Disclaimer: This is a model standard operating procedure. It incorporates generic guidance only. Countries are encouraged to adapt it as necessary to suit local requirements. Queries or comments may be addressed to [email protected] Acknowledgement: This EVM model SOP was written by Dr Clare Barker, Principal Consultant, Fire Engineering (Europe), Exova Warringtonfire.
Title: Fire safety housekeeping routines
Code: EVM-SOP-E6-08 Version number: 1
Effective date: 03 June 2013 Page: 2 of 5
E6-08.1-fire-safety-housekeeping
Table of content Distribution ................................................................................................................. 2 1. Policy and objectives ......................................................................................... 3
1.1 Policy ............................................................................................................. 3 1.2 Objectives ...................................................................................................... 3
2. Responsibility ..................................................................................................... 3 3. Associated materials and equipment ............................................................... 3 4. Procedure............................................................................................................ 3
4.1 Reducing ignition sources .............................................................................. 3 4.2 Reducing fuel load ......................................................................................... 4 4.3 Maintenance of fire protection measures ....................................................... 4
5. Related documents and SOPs .......................................................................... 5
Distribution Distribute this SOP to the following:
Facility type Position(s)

Title: Fire safety housekeeping routines
Code: EVM-SOP-E6-08 Version number: 1
Effective date: 03 June 2013 Page: 3 of 5
E6-08.1-fire-safety-housekeeping
1. Policy and objectives
1.1 Policy In order to protect property and life, standard operating policies should be followed for fire prevention, detection and control.
1.2 Objectives This SOP describes the housekeeping routines that should be followed in order to manage fire safety and to prevent fires from occurring within the building.
2. Responsibility The Fire Safety Manager has day-to-day responsibility for the prevention of fires. Note: It is essential to designate a Fire Safety Manager to oversee the activities described in this SOP.
3. Associated materials and equipment None.
4. Procedure
4.1 Reducing ignition sources Identify and control potential ignition sources. Responsibility: Fire Safety Manager
a. Smoking. Smoking is not permitted in any areas of the building. Control illicit smoking by appropriate management, or consider providing smoking areas outside the building, provided with fire safe ash-trays and bins.
b. Naked flames, e.g. candles, or heaters using naked flames are not permitted.
c. Hot works1 will only be carried out after a permit to work has been issued. d. Food and drink preparation and consumption will only be carried out in
rest areas designated for this purpose. e. Misused or faulty electrical equipment should be reported immediately
and replaced or removed. f. Overheated or worn cables should be repaired or replaced. g. Lighting displays, e.g. halogen lights, should not be placed near
flammable material. h. In areas where flammable, volatile or explosive materials are stored,
ensure that electrical fittings are suitable for the risk classification2.
1 Hot work is any process that can be a source of ignition when flammable material is present or can be a fire hazard, regardless of the presence of flammable material in the workplace. Common hot work processes are welding, soldering, cutting and brazing. When flammable materials are present, processes such as grinding and drilling become hot work processes. 2 See: http://en.wikipedia.org/wiki/Electrical_equipment_in_hazardous_areas

Title: Fire safety housekeeping routines
Code: EVM-SOP-E6-08 Version number: 1
Effective date: 03 June 2013 Page: 4 of 5
E6-08.1-fire-safety-housekeeping
i. All equipment should be installed, maintained, used and managed in the appropriate manner by competent persons. This should be supported by staff training.
4.2 Reducing fuel load The amount of combustible material should be reduced, or stored more safely. Responsibility: Fire Safety Manager
a. Reduce the fire load. For example replace bottled gas heating with electric heating sources, or reduce the amount of bottled gas stored within the building.
b. Store goods in an appropriate manner, e.g. in dedicated store rooms. c. Store and use highly flammable substances safely, and store in
appropriate storage containers. d. Control the amount of rubbish and how it is stored. Store rubbish in a
safe location away from buildings, preferably in a designated area. Rubbish bins within the building should be emptied on a daily basis.
e. Remove redundant services from voids as these can constitute a significant fire load.
4.3 Maintenance of fire protection measures Check regularly that fire protection measures are available at all times and able to carry out their function in a fire. Responsibility: Fire Safety Manager
a. Keep escape routes clear at all times. Goods and equipment must not be stored on escape routes or allowed to block exits, as this provides an unwanted fire load and a potential ignition source and constitutes a life safety risk.
b. Maintain door locks, panic bars and automatic door release mechanisms so that they open easily in an emergency.
c. Do not obstruct fire alarm call points, portable fire extinguishers or fire hydrants with stored goods, machinery or parked vehicles.
d. Maintain and test all fire safety equipment (fire alarms, emergency lighting, and fire extinguishers) in accordance with the relevant standard by competent persons – see companion SOP: Routine inspection and maintenance of fire safety installations.
e. Certain parts of the building may contain flammable elements which can contribute to fire spread, such as insulated core panels surrounding cold rooms and other temperature controlled areas. Panels should be checked regularly and any damaged panels repaired.
f. Goods should not be stored close to windows. If the building has a sprinkler system, goods should not be stacked higher than the maximum height recommended in the applicable standard.
Title: Fire safety housekeeping routines
Code: EVM-SOP-E6-08 Version number: 1
Effective date: 03 June 2013 Page: 5 of 5
E6-08.1-fire-safety-housekeeping
5. Related documents and SOPs BS 5266-1: 2011: Emergency lighting. Code of practice for the
emergency escape lighting of premises. BS 5306-3: 2009: Fire extinguishing installations and equipment on
premises. Commissioning and maintenance of portable fire extinguishers. Code of practice.
BS 5839-1: 2002 +A2: 2008: Fire detection and fire alarm systems for buildings. Code of practice for system design, installation, commissioning and maintenance.
BS EN 12845: 2004 +A2: 2009: Fixed fire-fighting systems. Automatic sprinkler systems. Design, installation and maintenance.
NFPA 13: Automatic sprinkler systems, 2013 Edition. NFPA 72: National fire alarm and signalling code, 2013 Edition.
Note: The references above relate to standards and practices in the United Kingdom. Where other standards apply, adapt the references accordingly.
EVM-SOP-E5-06: Routine inspection and maintenance of fire safety installations.

Title: Monitoring temperature exposure during vaccine transport
Code: EVM-SOP-E7-01 Version number: 1
Effective date: 07 Oct 2011 Page: 1 of 12
E7-01.1-transport temperatures
Standard Operating Procedure Monitoring temperature exposure during
vaccine transport
Approvals Name Date Signature
Authorized by:
Reviewed by:
Revised by:
Original author:
Version history
No Date Description of change Reason for change
1 07 Oct 2011 Original
2
3
4
5
Disclaimer: This is a model standard operating procedure. It incorporates generic guidance only. Countries are encouraged to adapt it as necessary to suit local requirements. Queries or comments may be addressed to [email protected]

Title: Monitoring temperature exposure during vaccine transport
Code: EVM-SOP-E7-01 Version number: 1
Effective date: 07 Oct 2011 Page: 2 of 12
E7-01.1-transport temperatures
Table of content Distribution .................................................................................................................2 1. Policy and objectives.........................................................................................3
1.1 Policy............................................................................................................3 1.2 Objectives.....................................................................................................3
2. Responsibility.....................................................................................................3 3. Associated materials and equipment...............................................................3 4. Procedure............................................................................................................3
4.1 Reading and managing freeze indicators .....................................................4 4.2 Placing freeze indicators in cold boxes ........................................................5 4.3 Placing freeze indicators in refrigerated vehicles .........................................6 4.4 Monitoring temperatures in refrigerated vehicles .........................................6 4.5 Arrival checks and reporting procedures......................................................7 4.6 Returning the Requisition and Issue Voucher and the freeze indicators......7
5. Related documents and SOPs ..........................................................................8 Annex 1 – Requisition and Issue Voucher...............................................................9 Annex 2 – Trip record form .....................................................................................11
Distribution Distribute this SOP to the following:
Facility type Position(s)

Title: Monitoring temperature exposure during vaccine transport
Code: EVM-SOP-E7-01 Version number: 1
Effective date: 07 Oct 2011 Page: 3 of 12
E7-01.1-transport temperatures
1. Policy and objectives
1.1 Policy The aim of vaccine distribution management is to ensure that vaccines are transported within the correct temperature range in order to eliminate vaccine losses due to freezing and/or excessive heat exposure. Records must be kept to ensure that this policy is being achieved.
Where freeze-sensitive vaccine is transported in cold boxes or vaccine carriers, at least one freeze indicator must accompany every delivery.
Freeze indicators are not required in cold boxes, packed with fully frozen or conditioned icepacks, when these are used to transport OPV and lyophilized vaccines that are not damaged by freezing.
Refrigerated vehicles, used for transporting vaccine, must be equipped with cab-mounted continuous temperature recording equipment and alarm systems. In addition, at least one freeze indicator device must also accompany every shipment.
The freeze indicator device(s) should be placed with the most freeze-sensitive vaccine in the shipment at the time when the vaccine is packed in the issuing store.
The status of the freeze indicator(s) and of the Vaccine Vial Monitors (VVMs) must be checked at the time of arrival in the receiving store and details must be recorded on the Requisition and Issue Voucher form. Where refrigerated vehicles are used, temperature alarm events must be reported to the receiving store(s) so that additional checks can be carried out. Note: Many countries continue to operate refrigerated vehicles without cab-mounted continuous temperature monitoring equipment and the SOP takes account of this. However, countries are strongly recommended to retrofit such vehicles with continuous temperature monitoring and alarm systems wherever possible.
1.2 Objectives This SOP applies to vaccine deliveries in cold boxes and vaccine carriers and to vaccine deliveries sent by refrigerated vehicle. It describes how to read freeze indicators, how to pack them with a vaccine shipment and how record freeze indicator and VVM status on the Requisition and Issue Voucher form. Refer also to SOP-E7-05: Loading and operating refrigerated vehicles.
2. Responsibility Responsibility for day-to-day implementation rests with <list responsible personnel at each applicable level in the supply chain>.
3. Associated materials and equipment Passive or electronic freeze indicator devices, VVMs and Requisition and Issue Voucher forms.
4. Procedure Freeze indicators should be placed with the most freeze-sensitive vaccine in each shipment. Typically this will be either the HepB or the pentavalent DTP-HepB-Hib or

Title: Monitoring temperature exposure during vaccine transport
Code: EVM-SOP-E7-01 Version number: 1
Effective date: 07 Oct 2011 Page: 4 of 12
E7-01.1-transport temperatures
DTP-HepB+Hib vaccine. Freeze indicators DO NOT need to be placed in cold boxes which only contain BCG, OPV, Measles, MR or MMR because these vaccines are not damaged by freezing. Note: Modify this list of vaccines to include those that are relevant in the country context.
4.1 Reading and managing freeze indicators Responsibility: <List responsible personnel at issuing store and receiving stores>
a. Reading passive freeze indicators: Passive freeze indicators contain a capsule of coloured liquid. If the temperature drops below the threshold temperature of -0.5°C for an hour or more the liquid freezes, the capsule breaks. When the temperature rises, the liquid stains the paper behind the capsule and this shows that freezing has occurred. Once it has been triggered, the indicator cannot be used again.
FreezeWatch™ device
b. Reading electronic freeze indicators: If the freeze indicator shows or OK it has not been exposed to freezing temperatures. If it shows X it has been exposed to a temperature of -0.5°C or below for more than 60 minutes. Once it has been triggered, the device cannot be used again. Two WHO pre-qualified types are shown below:
FreezeTag® device

Title: Monitoring temperature exposure during vaccine transport
Code: EVM-SOP-E7-01 Version number: 1
Effective date: 07 Oct 2011 Page: 5 of 12
E7-01.1-transport temperatures
FreezeAlert® device
c. Reuse of freeze indicators: An indicator may be used many times, until either the battery expires or the device is triggered.
d. Storing freeze indicators: Freeze indicators must never be exposed to temperatures below freezing during storage. If they are, the indicator will trigger an alarm. Electronic freeze indicators are activated in the factory. They have a design life of up to five years.
e. Controlling freeze indicator stocks: All freeze indicators should be issued for use on an Earliest-Expiry-First-Out (EEFO) basis. Use the manufacturing date as a basis for issuing the device; this is printed on the device.
f. Safe disposal of electronic indicators: Once an electronic freeze indicator has been triggered it should be disposed of in accordance with local regulations for the safe disposal of batteries and old electronic equipment.
4.2 Placing freeze indicators in cold boxes Responsibility: <List responsible personnel at issuing store>
a. Pack one freeze indicator for each location: Choose at least one cold box in each shipment which contains freeze-sensitive vaccine. If a single vehicle is delivering vaccine to more than one receiving store, then the vaccine should be packed so that each receiving store receives at least one freeze indicator. Alternatively, if a single cold box is being used to deliver to more than one location, the storekeeper at the receiving store must be able to inspect the freeze indicator to check its status at the time when the vaccine is received1.
b. Placing the indicator: Place the freeze indicator in the cold box on top of the vaccine. Fix it to a secondary vaccine carton with adhesive tape or put it in a clear plastic bag and tape the bag in position. This will prevent the device from moving during transport. DO NOT place the device in direct contact with conditioned ice packs, cool water packs or warm water packs.
1 This situation may arise if a single cold box is being used to deliver small quantities of vaccine to more than one health facility.

Title: Monitoring temperature exposure during vaccine transport
Code: EVM-SOP-E7-01 Version number: 1
Effective date: 07 Oct 2011 Page: 6 of 12
E7-01.1-transport temperatures
4.3 Placing freeze indicators in refrigerated vehicles Responsibility: <List responsible personnel at issuing store>
a. Pack one freeze indicator for each location: Choose at least one carton or reusable shipping container2 in each shipment which contains freeze-sensitive vaccine. If the refrigerated vehicle is delivering vaccine to more than one receiving store, then the vaccine should be packed so that each receiving store receives at least one freeze indicator.
b. Placing the indicator: Place the freeze indicator in the carton or reusable shipping container on top of the vaccine. Fix it to a secondary vaccine carton with adhesive tape or put it in a clear plastic bag and tape the bag in position. This will prevent the device from moving during transport.
4.4 Monitoring temperatures in refrigerated vehicles Responsibility: <List responsible personnel at supplying store>
a. Vehicle without electronic temperature recorder: The driver or co-driver must keep a Trip Record Form as shown in Annex 2. Read the temperature of the refrigerated compartment once an hour from the dashboard-mounted thermometer and mark it on the Trip Record Form when the vehicle is stopped3.
b. Vehicle equipped with data logger or electronic temperature recorder: Complete the Trip Record Form as shown in Annex 2. At the end of each trip, download and print out the temperature trace and attach it to the Trip Record Form.
c. Vehicle with electronic temperature recorder and integrated printer: If the vehicle has an electronic temperature recorder with an on-board temperature trace printer of the type shown below, provide the receiving store(s) with a copy of the trace so that this can be attached to the Requisition and Issue voucher. Electronic temperature recorder with integrated printer
Source: Transcan
2 A ‘reusable shipping container’ is a reusable plastic or foam box or similar container which is used to hold vaccine when it is transported in the refrigerated vehicle. 3 If there is a co-driver, the co-driver can complete the form en-route.

Title: Monitoring temperature exposure during vaccine transport
Code: EVM-SOP-E7-01 Version number: 1
Effective date: 07 Oct 2011 Page: 7 of 12
E7-01.1-transport temperatures
d. Centralised tracking systems: <Describe the procedure> Note: SMS and satellite tracking systems are available for refrigerated vehicles, which allow for centralised monitoring. System-specific procedures need to be written for this type of equipment. e. Alarms: During the course of each trip, respond immediately and
appropriately to all high and low alarm events. Notify the receiving store(s) if such an event occurs so that vaccine can be double-checked for exposure to freezing or excessive heat during the arrival inspection.
f. Investigate unexplained excursions outside the +2°C to +8°C range4. Instruct the maintenance contractor or maintenance engineer to investigate and carry out necessary adjustments and/or repairs.
g. File the temperature record and the completed Trip Record Form and keep the records for a minimum of <three years>.
4.5 Arrival checks and reporting procedures Responsibility: <List responsible personnel at receiving stores>
a. Check freeze indicator(s): Check the status of the freeze indicator(s) as soon as the vaccine arrives in the store. If the indicator has triggered, carry out the Shake Test as described in EVM-SOP-E8-01: When and how to conduct the Shake Test.
b. Check VVMs: Inspect a sample vial for every vaccine and every batch in the shipment; check the VVM status. See EVM-SOP-E8-02: Using Vaccine Vial Monitors.
c. Complete the Requisition and Issue Voucher: Complete the temperature monitoring section of the Requisition and Issue Voucher form. Return one copy to the issuing store. The quantity and condition of vaccines received and the freeze indicator and VVM status must be checked and recorded. Annex 1 shows an example of a blank form and a completed form.
Note: Adapt the form as necessary to suit country needs.
4.6 Returning the Requisition and Issue Voucher and the freeze indicators Responsibility: <List responsible personnel at receiving stores>
a. Return the completed Requisition and Issue Voucher: Receiving stores should return a copy of the completed Requisition and Issue Voucher to the issuing store. <Describe the procedure for returning forms>.
b. Return the freeze indicators: Store freeze indicators at room temperature. Return devices to the issuing store as soon as possible. Receiving stores which collect vaccine from a issuing store should return the devices at the time when the next shipment is collected. Stores which receive vaccine should <describe procedure for returning devices>.
c. Re-stock un-activated freeze indicators: Re-stock freeze indicators that have not been triggered. Continue to use them until they have been triggered or the battery (if any) has expired.
4 Some excursions during loading and unloading can be expected because the door will be opened.

Title: Monitoring temperature exposure during vaccine transport
Code: EVM-SOP-E7-01 Version number: 1
Effective date: 07 Oct 2011 Page: 8 of 12
E7-01.1-transport temperatures
Note: The procedures for returning devices forms and devices will be country-dependent.
5. Related documents and SOPs EVM-SOP-E7-03: Packing vaccine and diluents for transport, using cold
boxes EVM-SOP-E7-05: Loading and operating refrigerated vehicles EVM-SOP-E8-01: When and how to conduct the Shake Test EVM-SOP-E8-02: Using Vaccine Vial Monitors WHO/IVB/06.12: Vaccine stock management: Guidelines for immunization
programme and vaccine store managers

Title: Monitoring temperature exposure during vaccine transport
Code: EVM-SOP-E7-01 Version number: 1
Effective date: 07 Oct 2011 Page: 9 of 12
E7-01.1-transport temperatures
Annex 1 – Requisition and Issue Voucher
Source: WHO/IVB/06.12: Vaccine stock management. Figure 10.

Title: Monitoring temperature exposure during vaccine transport
Code: EVM-SOP-E7-01 Version number: 1
Effective date: 07 Oct 2011 Page: 10 of 12
E7-01.1-transport temperatures
Example of completed Requisition and Issue Voucher
This SOP covers the completion of these three columns only
Source: WHO/IVB/06.12: Vaccine stock management. Figure 26.

Title: Monitoring temperature exposure during vaccine transport
Code: EVM-SOP-E7-01 Version number: 1
Effective date: 07 Oct 2011 Page: 11 of 12
E7-01.1-transport temperatures
Annex 2 – Trip record form Refrigerated vehicle trip record formVehicle registration number: Trip start date: <dd/mmm/yyyy> Sheet number:Name of supplying store: Trip end date: <dd/mmm/yyyy> Nbr of sheets
Enter DATE: Remarks1 2 3 4 5 6 7 8 9 10 11 12 13 14 15 16 17 18 19 20 21 22 23 24 1 2 3 4 5 6 7 8 9 10 11 12 13 14 15 16 17 18 19 20 21 22 23 24
+16+15 +14+13+12+11+10+9+8+7+6+5+4+3+2+10-1-2-3-4-5
Enter time for each event - to the nearest hourPacking completeStart of tripArrive at storeDepart storeArrive at overnightDepart overnightEnd of trip
Truck location
Event record
Hour
Tem
pera
ture
cha
rt (°
C)
Initials:

E7-01.1-transport temperatures
Refrigerated vehicle trip record form (example)Vehicle registration number: LYC 123 F Trip start date: <dd/mmm/yyyy> Sheet number: 1
Name of supplying store: Central medical stores Trip end date: <dd/mmm/yyyy> Nbr of sheets 3
Enter DATE: Remarks1 2 3 4 5 6 7 8 9 10 11 12 13 14 15 16 17 18 19 20 21 22 23 24 1 2 3 4 5 6 7 8 9 10 11 12 13 14 15 16 17 18 19 20 21 22 23 24 Refrigeration breakdown at Province C
+16 Vaccine unloaded into cold room+15 Maintenance engineer called+14+13+12 X+11 X+10 X+9 X X+8 X X+7 X X X X+6 X X X X X X+5 X X X X X X X X X X X X X+4 X X X X X X X X X X X+3+2+10-1-2-3-4-5
Enter time for each event - to the nearest hourPacking complete X
Start of trip X
Arrive at store X X X
Depart store X X X
Arrive at overnight X X
Depart overnight X
End of trip
Truck location
CM
S
CM
S
Trav
ellin
g
Trav
ellin
g
Trav
ellin
g
Trav
ellin
g
Trav
ellin
g
Prov
ince
A
Prov
ince
A
Prov
ince
A
Ditt
o
Ditt
o
Ditt
o
Ditt
o
Ditt
o
Ditt
o
Ditt
o
Ditt
o
Ditt
o
Ditt
o
Ditt
o
Ditt
o
Ditt
o
Ditt
o
Trav
ellin
g
Trav
ellin
g
Trav
ellin
g
Prov
ince
B
Prov
ince
B
Prov
ince
B
Trav
ellin
g
Trav
ellin
g
Trav
ellin
g
Prov
ince
C
Prov
ince
C
Prov
ince
C
Ditt
o
Ditt
o
Ditt
o
Ditt
o
Ditt
o
JG JG JG JG JG JG JG JG JG JG JG JG JG JG JG JG JG JG JG JG JG JG JG JG JG JG JG JG JG JG JG JG JG JG JG JG JG JG JG JG JG
10 October 2011
14 October 2011
10 October 2011 11 October 2011
Event record
Hour
Tem
pera
ture
cha
rt (°
C)
Initials:
Effective date: 07 Oct 2011 Page: 12 of 12
Code: EVM-SOP-E7-01 Version number: 1
Title: Monitoring temperature exposure during vaccine transport
Title: Packing vaccine and diluents for transport, using cold boxes
Code: EVM-SOP-E7-02 Version number: 1
Effective date: 07 Oct 2011 Page: 1 of 9
E7-02.1-pack cold box
Standard Operating Procedure Packing vaccine and diluents for
transport, using cold boxes
Approvals Name Date Signature
Authorized by:
Reviewed by:
Revised by:
Original author:
Version history
No Date Description of change Reason for change
1 07 Oct 2011 Original
2
3
4
5
Disclaimer: This is a model standard operating procedure. It incorporates generic guidance only. Countries are encouraged to adapt it as necessary to suit local requirements. Queries or comments may be addressed to [email protected]

Title: Packing vaccine and diluents for transport, using cold boxes
Code: EVM-SOP-E7-02 Version number: 1
Effective date: 07 Oct 2011 Page: 2 of 9
E7-02.1-pack cold box
Table of content Distribution .................................................................................................................2 1. Policy and objectives.........................................................................................3
1.1 Policy............................................................................................................3 1.2 Objectives.....................................................................................................3
2. Responsibility.....................................................................................................3 3. Associated materials and equipment...............................................................3 4. Procedure............................................................................................................3
4.1 Preparatory activities....................................................................................3 4.1.1 Train temporary workers.......................................................................3 4.1.2 Prepare ice packs/cool water packs/warm water packs .......................4 4.1.3 Pre-condition cold boxes for cool water or warm water packs..............4 4.1.4 Observe hand hygiene .........................................................................5
4.2 Packing vaccines that are not damaged by freezing....................................5 4.3 Packing freeze-sensitive vaccines using conditioned ice packs...................6 4.4 Packing freeze-sensitive vaccines using cool water packs ..........................6 4.5 Packing freeze-sensitive vaccines using warm water packs ........................7 4.6 Packing diluents ...........................................................................................8
5. Related documents and SOPs ..........................................................................8 Annex 1 – Packing area .............................................................................................9
Distribution Distribute this SOP to the following:
Facility type Position(s)

Title: Packing vaccine and diluents for transport, using cold boxes
Code: EVM-SOP-E7-02 Version number: 1
Effective date: 07 Oct 2011 Page: 3 of 9
E7-02.1-pack cold box
1. Policy and objectives
1.1 Policy If vaccines are not correctly handled, they can be damaged by exposure to excessive heat or cold. Evidence from many countries has shown that transport between vaccine stores, and for outreach sessions, are the most vulnerable stages in the supply chain. The most common cause of exposure to freezing temperatures is the failure to correctly condition ice packs prior to transport. Deep-frozen ice packs can reach temperatures as low as -20°C. The practice of immediately placing unconditioned ice packs in well-insulated cold boxes places freeze-sensitive vaccines at the greatest risk. Responsible personnel should ensure that the packing area is correctly organized to process the maximum daily throughput of vaccine and to accommodate the number of personnel employed to pack vaccine for dispatch.
1.2 Objectives This SOP describes how vaccines should be packed into cold boxes in order to minimize the risk of damage during transport. It does not include procedures for packing of vaccines in refrigerated vehicles; this is covered by EVM-SOP-E7-05: Loading and operating refrigerated vehicles.
2. Responsibility Responsibility for day-to-day implementation rests with the <list responsible personnel>.
3. Associated materials and equipment Cold boxes, water packs and packing materials.
4. Procedure Note: The generic procedures described below may be used as a basis for developing a country-specific SOP. Countries are urged to validate the method(s) they use to transport vaccine by carrying out a systematic temperature monitoring study, using temperature data loggers, over a number of representative distribution routes. If there are significant seasonal temperature differences, the study should be repeated at representative times of the year. This methodology should also be used to validate the number of ice packs, cool water packs or warm water packs required for each route and season combination. The validation exercise should follow the methodology described in WHO/IVB/05.01: Study protocol for temperature monitoring in the vaccine cold chain.
4.1 Preparatory activities
4.1.1 Train temporary workers
Note: Some countries use temporary workers to pack cold boxes. It is essential that these workers receive sufficient training to carry out their assigned tasks correctly, and that they are well-supervised. Responsibility: <list responsible personnel>.

Title: Packing vaccine and diluents for transport, using cold boxes
Code: EVM-SOP-E7-02 Version number: 1
Effective date: 07 Oct 2011 Page: 4 of 9
E7-02.1-pack cold box
a. Define tasks: Agree the task(s) that temporary workers will be assigned to carry out.
b. Provide training: Provide training covering the assigned tasks. Do not allow any temporary workers to handle or pack vaccines unless they have been trained to do so.
4.1.2 Prepare ice packs/cool water packs/warm water packs
Note: Clearly define which cold chain equipment is to be used to freeze or cool water packs. Clearly define where warm water packs are to be prepared. Responsibility: <list responsible personnel>.
a. Establish requirement: Calculate the number of ice packs/cool water packs/warm water packs needed for each delivery. Calculate how long it will take to prepare these. If ice packs or cool water packs are needed every working day, there must be two complete sets of ice packs; one set in use and the other set being prepared for the following day.
b. Prepare ice packs: Place the required number of water packs in a freezer room or freezer which is kept at a temperature between -5°C and -25°C. Leave them until they are fully frozen. If an ice pack fast freezer1 is used to freeze the ice packs, move the fully frozen ice packs to a conventional freezer or to cold boxes for storage purposes.
c. Prepare cool water packs: Place the required number of water packs in a cold room or refrigerator which is kept at a temperature between +2°C and +8°C. Leave them to stabilise for a minimum of 12 hours.
- Cold rooms: DO NOT allow the temperature of the cold room to rise above +8°C during the cooling process. DO NOT allow water packs to touch the vaccines.
- Refrigerators: Use a dedicated refrigerator. DO NOT cool water packs in a refrigerator which contains vaccine.
d. Prepare warm water packs: Place the required number of water packs in a room which is kept at a temperature between +10°C and +24°C. Leave them to stabilise for a minimum of 12 hours.
4.1.3 Pre-condition cold boxes for cool water or warm water packs
Note: When cool water packs or warm water packs are used, it is good practice to ‘pre-conditioned’ the cold boxes before the vaccine is packed because this significantly extends the cold life or warm life of the box. This procedure can only be carried out in primary or sub-national facilities that have a cold room. Pre-conditioning is NOT required when fully frozen or conditioned ice packs are used. Responsibility: <list responsible personnel>.
a. Pre-conditioning cold boxes for cool water packs: Place the cold boxes in a cold room at +2°C to +8°C for a minimum of four hours before packing with vaccine. If a cold room is not available, place the cold boxes in an air-conditioned room for a minimum of four hours before packing with vaccine.
1 Ice pack fast freezers can more efficiently be used if the ice packs are transferred to a conventional freezer as soon as they are frozen. This allows the fast freezer to be re-loaded with unfrozen water packs. Cold boxes can also be used for short-term storage.

Title: Packing vaccine and diluents for transport, using cold boxes
Code: EVM-SOP-E7-02 Version number: 1
Effective date: 07 Oct 2011 Page: 5 of 9
E7-02.1-pack cold box
If there is no cold room and no air-conditioning, always store the cold boxes in the coolest room available.
b. Pre-conditioning cold boxes for warm water packs: Place the cold boxes in a heated room at +15°C to +24°C for a minimum of 4 hours before packing with vaccine.
4.1.4 Observe hand hygiene
Responsibility: Supervisory personnel and all workers responsible for handling vaccine.
a. Wash hands thoroughly before handling vaccine cartons and vaccine vials.
4.2 Packing vaccines that are not damaged by freezing Note: OPV must ALWAYS be transported using fully frozen or conditioned ice packs. BCG, Measles, MR and MMR vaccine can be transported safely in cold boxes using cool water packs. In order to avoid confusion, it is essential that countries specify clearly how these latter vaccines are to be transported. For example, the national policy might be to transport ALL vaccines using conditioned ice packs in order to avoid the risk of using fully frozen ice packs with freeze-sensitive vaccines. The following vaccines are NOT damaged by freezing. They can safely be packed and transported using fully frozen ice packs at all times of the year.
OPV BCG MMR Measles <Extend or modify this list to suit the schedule>
Responsibility: <list responsible personnel>. a. Use the correct size and number of ice pack for the chosen cold box. Line
the cold box exactly as described on the instructions on the inside of the cold box lid.
b. Pack the vaccine cartons in the cold box with the vial caps uppermost. c. Use newspaper or other loose packing to ensure that the load cannot shift
during transport. d. Place a packing list in the box on top of the contents. e. Label the box with the final destination. f. Temporary workers: Have the pack out checked by your supervisor. g. Close the lid and engage the catch. h. Keep the cold box in the packing room, or in a covered holding area, until
all other boxes in the consignment have been packed. i. Keep the cold box away from direct sunlight during transport.
Note: Item e) is not essential if there is a single delivery to a single destination. It is essential if the delivery vehicle is visiting more than one destination.
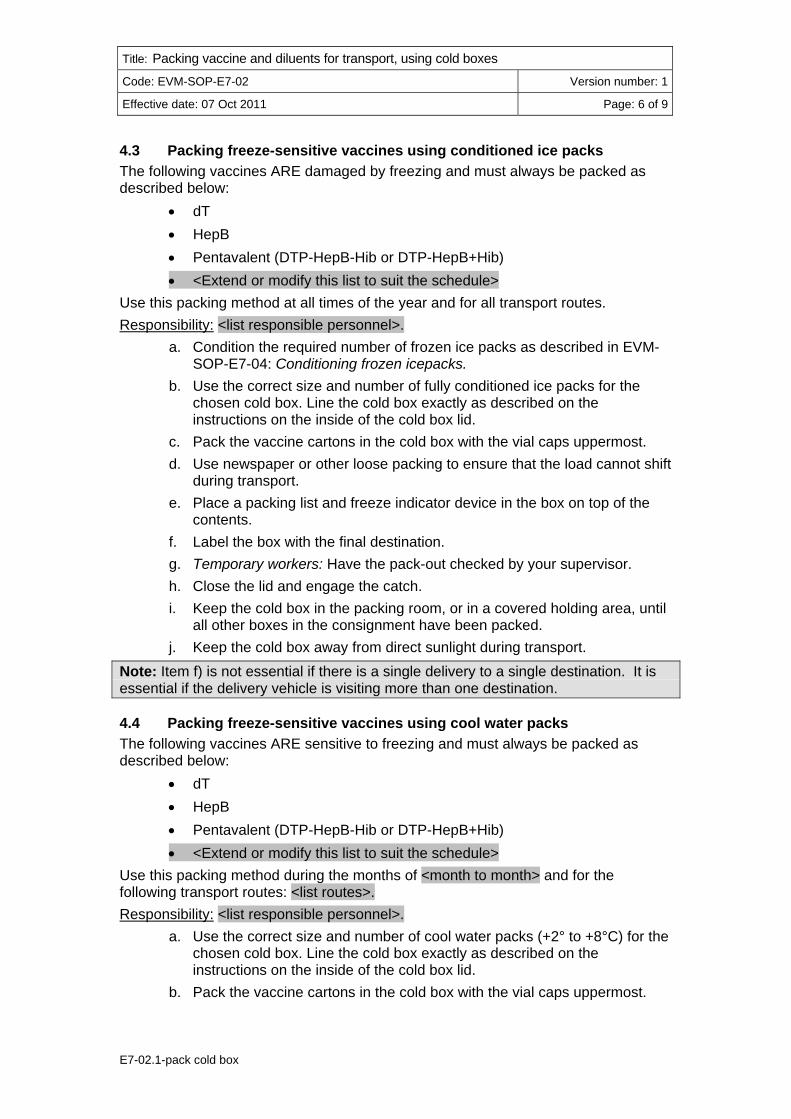
Title: Packing vaccine and diluents for transport, using cold boxes
Code: EVM-SOP-E7-02 Version number: 1
Effective date: 07 Oct 2011 Page: 6 of 9
E7-02.1-pack cold box
4.3 Packing freeze-sensitive vaccines using conditioned ice packs The following vaccines ARE damaged by freezing and must always be packed as described below:
dT HepB Pentavalent (DTP-HepB-Hib or DTP-HepB+Hib) <Extend or modify this list to suit the schedule>
Use this packing method at all times of the year and for all transport routes. Responsibility: <list responsible personnel>.
a. Condition the required number of frozen ice packs as described in EVM-SOP-E7-04: Conditioning frozen icepacks.
b. Use the correct size and number of fully conditioned ice packs for the chosen cold box. Line the cold box exactly as described on the instructions on the inside of the cold box lid.
c. Pack the vaccine cartons in the cold box with the vial caps uppermost. d. Use newspaper or other loose packing to ensure that the load cannot shift
during transport. e. Place a packing list and freeze indicator device in the box on top of the
contents. f. Label the box with the final destination. g. Temporary workers: Have the pack-out checked by your supervisor. h. Close the lid and engage the catch. i. Keep the cold box in the packing room, or in a covered holding area, until
all other boxes in the consignment have been packed. j. Keep the cold box away from direct sunlight during transport.
Note: Item f) is not essential if there is a single delivery to a single destination. It is essential if the delivery vehicle is visiting more than one destination.
4.4 Packing freeze-sensitive vaccines using cool water packs The following vaccines ARE sensitive to freezing and must always be packed as described below:
dT HepB Pentavalent (DTP-HepB-Hib or DTP-HepB+Hib) <Extend or modify this list to suit the schedule>
Use this packing method during the months of <month to month> and for the following transport routes: <list routes>. Responsibility: <list responsible personnel>.
a. Use the correct size and number of cool water packs (+2° to +8°C) for the chosen cold box. Line the cold box exactly as described on the instructions on the inside of the cold box lid.
b. Pack the vaccine cartons in the cold box with the vial caps uppermost.

Title: Packing vaccine and diluents for transport, using cold boxes
Code: EVM-SOP-E7-02 Version number: 1
Effective date: 07 Oct 2011 Page: 7 of 9
E7-02.1-pack cold box
c. Use newspaper or other loose packing to ensure that the load cannot shift during transport.
d. Place a packing list and freeze indicator device in the box on top of the contents.
e. Label the box with the final destination. f. Temporary workers: Have the pack-out checked by your supervisor. g. Close the lid and engage the catch. h. Keep the cold box in the packing room, or in a covered holding area, until
all other boxes in the consignment have been packed. i. Keep the cold box away from direct sunlight during transport.
Note: Item e) is not essential if there is a single delivery to a single destination. It is essential if the delivery vehicle is visiting more than one destination.
4.5 Packing freeze-sensitive vaccines using warm water packs Note: Conditioned icepacks or cool water packs may be suitable for winter transport of freeze-sensitive vaccine in very cold climates, but only if the cold boxes can be kept in a well heated vehicle at all times. Otherwise use warm water packs. Warm packs heated to temperatures between +10°C to +24°C are safe for journeys up to eight hours long. If the journey is longer than this, consider alternative approaches to protecting the vaccine. The following vaccines ARE sensitive to freezing and must always be packed as described below:
dT HepB Pentavalent (DTP-HepB-Hib or DTP-HepB+Hib) <Extend or modify this list to suit the schedule>
Use this packing method during the months of <month to month> and for the following transport routes: <list routes>. Responsibility: <list responsible personnel>.
a. Use the correct size and number of warm water packs (+10° to +24°C) for the chosen cold box. Line the cold box exactly as described on the instructions on the inside of the cold box lid.
b. Pack the vaccine cartons in the cold box with the vial caps uppermost. c. Use newspaper or other loose packing to ensure that the load cannot shift
during transport. d. Place a packing list and freeze indicator device in the box on top of the
contents. e. Label the box with the final destination. f. Temporary workers: Have the pack-out checked by your supervisor. g. Close the lid and engage the catch. h. Keep the cold box in the packing room, or in a covered holding area, until
all other boxes in the consignment have been packed. i. Keep the cold box away from direct sunlight during transport.

Title: Packing vaccine and diluents for transport, using cold boxes
Code: EVM-SOP-E7-02 Version number: 1
Effective date: 07 Oct 2011 Page: 8 of 9
E7-02.1-pack cold box
Note: Item e) is not essential if there is a single delivery to a single destination. It is essential if the delivery vehicle is visiting more than one destination.
4.6 Packing diluents Responsibility: <list responsible personnel>.
a. Pack inner diluent cartons in stout cardboard boxes or plastic crates. b. Use newspaper or other loose packing to ensure that the load cannot
shift during transport. c. Place a packing list in the box on top of the contents. d. Label the carton with the final destination. e. Temporary workers: Have the pack-out checked by your supervisor. f. Keep diluent cartons away from direct sunlight during transport.
Note: If diluents are frozen, the glass ampoule is likely to break, so must never exposed to temperatures below 0°C. In cold climates they should therefore be packed in cold boxes with cool water or warm water packs in the same way as freeze-sensitive vaccines.
5. Related documents and SOPs EVM-SOP-E7-01: Using freeze indicator devices during vaccine transport EVM-SOP-E7-03: Packing vaccine and diluents in vaccine carriers
EVM-SOP-E7-04: Conditioning frozen icepacks EVM-SOP-E7-05: Loading and operating refrigerated vehicles WHO/IVB/05.01: Study protocol for temperature monitoring in the vaccine
cold chain. whqlibdoc.who.int/hq/2005/WHO_IVB_05.01.pdf
P Carrasco, PAHO/WHO, Washington, DC; C Herrera, D Rancruel, M Rosillo, Universidad del Valle, Cali, Colombia. Protection of vaccines from freezing in extremely cold environments. Canada Communicable Disease Report 21:11, page 97-101 (1995)

Title: Packing vaccine and diluents for transport, using cold boxes
Code: EVM-SOP-E7-02 Version number: 1
Effective date: 07 Oct 2011 Page: 9 of 9
E7-02.1-pack cold box
Annex 1 – Packing area The vaccine packing area should connect to a direct route between the vaccine store and the vehicle loading area. Ensure that the space is large enough to process the maximum anticipated daily throughput of vaccine and to accommodate the maximum number of personnel employed to pack vaccine for dispatch. Provide curtains or blinds as necessary to exclude direct sunlight2. Ensure that the area can be kept cool (15° to 25° C) when vaccine packing is taking place. The packing area should be laid out so as to encourage a logical flow of work. Vaccines should be moved as little as possible in order to minimize the risk of breakage. There should be a sink in the packing area for hand-washing and provision for hygienic hand-drying. The diagram below shows a typical arrangement for a small store. The layout can be adjusted to suit local demand3.
2 If you are packing individual vials, do not use fluorescent lighting. Both sunlight and fluorescent fittings emit ultraviolet light and this can damage vaccines such as BCG, Measles, MR, MMR and Rubella. Exposure to ultraviolet light also accelerates the reaction of all four types of VVM. 3 Taken from WHO/V&B/02.34: Guideline for establishing or improving primary and intermediate vaccine stores – section 5.4

Title: Packing vaccine and diluents in vaccine carriers
Code: EVM-SOP-E7-03 Version number: 1
Effective date: 07 Oct 2011 Page: 1 of 5
E7-03.1-pack vax carrier
Standard Operating Procedure Packing vaccine and diluents in vaccine
carriers
Approvals Name Date Signature
Authorized by:
Reviewed by:
Revised by:
Original author:
Version history
No Date Description of change Reason for change
1 07 Oct 2011 Original
2
3
4
5
Disclaimer: This is a model standard operating procedure. It incorporates generic guidance only. Countries are encouraged to adapt it as necessary to suit local requirements. Queries or comments may be addressed to [email protected]

Title: Packing vaccine and diluents in vaccine carriers
Code: EVM-SOP-E7-03 Version number: 1
Effective date: 07 Oct 2011 Page: 2 of 5
E7-03.1-pack vax carrier
Table of content Distribution .................................................................................................................2 1. Policy and objectives.........................................................................................3
1.1 Policy............................................................................................................3 1.2 Objectives.....................................................................................................3
2. Responsibility.....................................................................................................3 3. Associated materials and equipment...............................................................3 4. Procedure............................................................................................................3
4.1 Preparatory activities....................................................................................3 4.1.1 Prepare ice packs/cool water packs .....................................................3 4.1.2 Observe hand hygiene .........................................................................4
4.2 Packing vaccines and diluents using conditioned ice packs ........................4 4.3 Packing vaccines and diluents using cool water packs ................................5
5. Related documents and SOPs ..........................................................................5
Distribution Distribute this SOP to the following:
Facility type Position(s)

Title: Packing vaccine and diluents in vaccine carriers
Code: EVM-SOP-E7-03 Version number: 1
Effective date: 07 Oct 2011 Page: 3 of 5
E7-03.1-pack vax carrier
1. Policy and objectives
1.1 Policy If vaccines are not correctly handled, they can be damaged by exposure to excessive heat or cold. Evidence from many countries has shown that transport between vaccine stores, and for outreach sessions, are the most vulnerable stages in the supply chain. The most common cause of exposure to freezing temperatures is the failure to correctly condition ice packs prior to transport. Deep-frozen ice packs can reach temperatures as low as -20°C. The practice of immediately placing unconditioned ice packs in well-insulated cold boxes places freeze-sensitive vaccines at the greatest risk.
1.2 Objectives This SOP describes how vaccines should be packed into vaccine carriers in order to minimize the risk of damage during fixed immunization and outreach sessions.
2. Responsibility Responsibility for day-to-day implementation rests with the <list responsible personnel>.
3. Associated materials and equipment Vaccine carriers, water packs and packing materials.
4. Procedure Note: The generic procedures described below may be used as a basis for developing a country-specific SOP. In particular, countries are urged to validate the method(s) they use to transport vaccine for extended outreach sessions by carrying out a systematic temperature monitoring study, using temperature data loggers, over a number of representative routes. If there are significant seasonal temperature differences, the study should be repeated at representative times of the year. This methodology should also be used to validate the number of conditioned ice packs or cool water packs required for each route and season combination. The validation exercise should follow the methodology described in WHO/IVB/05.01: Study protocol for temperature monitoring in the vaccine cold chain.
4.1 Preparatory activities
4.1.1 Prepare ice packs/cool water packs
Note: Clearly define which cold chain equipment is to be used to freeze or cool water packs. Responsibility: <list responsible personnel>.
a. Establish requirement: Calculate the number of <ice packs/cool water packs> needed for each session. Calculate how long it will take to prepare these.
b. Prepare ice packs: Place the required number of water packs in freezer or freezing compartment which is kept at a temperature between -5°C and -25°C. Leave them until they are fully frozen.

Title: Packing vaccine and diluents in vaccine carriers
Code: EVM-SOP-E7-03 Version number: 1
Effective date: 07 Oct 2011 Page: 4 of 5
E7-03.1-pack vax carrier
c. Prepare cool water packs: Place the required number of water packs in a dedicated refrigerator which is kept at a temperature between +2°C and +8°C. Leave the water packs to stabilise for a minimum of 12 hours. DO NOT cool water packs in a refrigerator which contains vaccine.
4.1.2 Observe hand hygiene
Responsibility: <list responsible personnel>. a. Wash hands thoroughly before handling vaccine cartons and vaccine vials.
4.2 Packing vaccines and diluents using conditioned ice packs Note: If the national policy is to use ice packs for vaccine transport, including outreach, you MUST use conditioned ice packs at all times. The only exception is for Polio campaigns, where ONLY OPV is being transported. In this case it is safe to use fully frozen icepacks. The reason for this is that freeze-sensitive vaccine and diluents which are damaged by freezing are often packed in vaccine carriers, together with OPV and other vaccines that are not damaged by freezing. Using correctly conditioned ice packs greatly reduces the risk that the freeze-sensitive vaccines and diluents will be exposed to freezing temperatures. The following vaccines are NOT damaged by freezing.
OPV BCG MMR Measles <Extend or modify this list to suit the schedule>
The following vaccines ARE damaged by freezing: dT HepB Pentavalent (DTP-HepB-Hib or DTP-HepB+Hib) <Extend or modify this list to suit the schedule>
Diluent ampoules can also be damaged by freezing. Responsibility: <list responsible personnel>.
a. Condition the required number of frozen ice packs as described in EVM-SOP-E7-04: Conditioning frozen icepacks.
b. Use the correct size and number of fully conditioned ice packs for the chosen vaccine carrier. Line the vaccine carrier exactly as described on the instructions on the inside of the vaccine carrier lid.
c. Pack the vaccine vials and diluent ampoules in the carrier. Pack so that the vial caps are uppermost.
d. For outreach sessions: Use the foam pad provided to ensure that the load cannot shift during transport and to hold the vaccine during the immunization session.
e. Close the lid and engage the catch.

Title: Packing vaccine and diluents in vaccine carriers
Code: EVM-SOP-E7-03 Version number: 1
Effective date: 07 Oct 2011 Page: 5 of 5
E7-03.1-pack vax carrier
f. Wherever possible, keep the vaccine carrier in the shade during transport. ALWAYS keep it in the shade during an immunization session.
4.3 Packing vaccines and diluents using cool water packs Note: If the national policy is to use cool water packs for vaccine transport, including outreach, you can safely transport all vaccines in this way. The following vaccines are NOT damaged by freezing.
OPV BCG MMR Measles <Extend or modify this list to suit the schedule>
The following vaccines ARE damaged by freezing: dT HepB Pentavalent (DTP-HepB-Hib or DTP-HepB+Hib) <Extend or modify this list to suit the schedule>
Diluent ampoules can also be damaged by freezing. Responsibility: <list responsible personnel>.
a. Use the correct size and number of cool water packs (+2° to +8°C) for the chosen vaccine carrier. Line the carrier exactly as described on the instructions on the inside of the vaccine carrier lid.
b. Pack the vaccine vials and diluent ampoules in the carrier. Pack so that the vial caps are uppermost.
c. For outreach sessions: Use the foam pad provided to ensure that the load cannot shift during transport and to hold the vaccine during the immunization session.
d. Close the lid and engage the catch. e. Wherever possible, keep the vaccine carrier in the shade during transport.
ALWAYS keep it in the shade during an immunization session.
5. Related documents and SOPs EVM-SOP-E7-02: Packing vaccine and diluents for transport, using cold
boxes
EVM-SOP-E7-04: Conditioning frozen icepacks WHO/IVB/05.01: Study protocol for temperature monitoring in the vaccine
cold chain. whqlibdoc.who.int/hq/2005/WHO_IVB_05.01.pdf

Title: Conditioning frozen icepacks
Code: EVM-SOP-E7-04 Version number: 1
Effective date: 07 Oct 2011 Page: 1 of 5
E7-04.1-condition ice packs
Standard Operating Procedure Conditioning frozen icepacks
Approvals Name Date Signature
Authorized by:
Reviewed by:
Revised by:
Original author:
Version history
No Date Description of change Reason for change
1 07 Oct 2011 Original
2
3
4
5
Disclaimer: This is a model standard operating procedure. It incorporates generic guidance only. Countries are encouraged to adapt it as necessary to suit local requirements. Queries or comments may be addressed to [email protected]

Title: Conditioning frozen icepacks
Code: EVM-SOP-E7-04 Version number: 1
Effective date: 07 Oct 2011 Page: 2 of 5
E7-04.1-condition ice packs
Table of content Distribution .................................................................................................................2 1. Policy and objectives.........................................................................................3
1.1 Policy............................................................................................................3 1.2 Objectives.....................................................................................................3
2. Responsibility.....................................................................................................3 3. Associated materials and equipment...............................................................3 4. Procedure............................................................................................................3
4.1 What is a conditioned icepack?....................................................................3 4.2 How do I know when an icepack is conditioned? .........................................3 4.3 When to use conditioned icepacks...............................................................3 4.4 How to condition icepacks............................................................................4 4.5 Training ........................................................................................................4
5. Related documents and SOPs ..........................................................................4 Annex 1 – Icepack conditioning learning guide......................................................5
Distribution Distribute this SOP to the following:
Facility type Position(s)

Title: Conditioning frozen icepacks
Code: EVM-SOP-E7-04 Version number: 1
Effective date: 07 Oct 2011 Page: 3 of 5
E7-04.1-condition ice packs
1. Policy and objectives
1.1 Policy Responsible personnel should know how to pack vaccine for transport and should understand the importance of keeping vaccines at the correct temperature throughout the journey. When frozen icepacks are used to line cold boxes or vaccine carriers that contain freeze-sensitive vaccines, they must always be ‘conditioned’ beforehand to minimize the risk of damage to the vaccine.
1.2 Objectives This SOP describes how icepack conditioning should be carried out and when conditioned icepacks should be used. It includes a learning guide for training purposes.
2. Responsibility Store Managers, Storekeepers and Health Workers responsible for packing vaccine.
3. Associated materials and equipment Frozen icepacks. Large table or other work surface on which to lay out the icepacks.
4. Procedure
4.1 What is a conditioned icepack? When an icepack is removed from the icepack freezer, its temperature may be as low as -20°C. If you use these icepacks immediately there is a risk that you will damage freeze-sensitive vaccines. A ‘conditioned’ icepack is an icepack that has been left outside the freezer for long enough to stabilize at 0°C. This point is reached when the ice inside the icepack begins to melt.
4.2 How do I know when an icepack is conditioned? An icepack is conditioned as soon as the ice core inside the pack is surrounded by a small amount of liquid water. You can check this by shaking the icepack. If you can feel the ice moving inside the pack, it is fully conditioned. This process takes time – up to 30 minutes or more, depending upon the temperature of the room.
4.3 When to use conditioned icepacks Note: This section will need to be modified in countries that use cool water packs for transporting freeze-sensitive and other vaccines. OPV which should always be transported with fully frozen or conditioned icepacks, except in the case of outreach sessions. Conditioned icepacks must ALWAYS be used whenever you pack the following freeze-sensitive vaccines in a cold box or vaccine carrier:
<list freeze sensitive vaccines in your schedule, e.g.: dT, DTP-HepB-Hib>
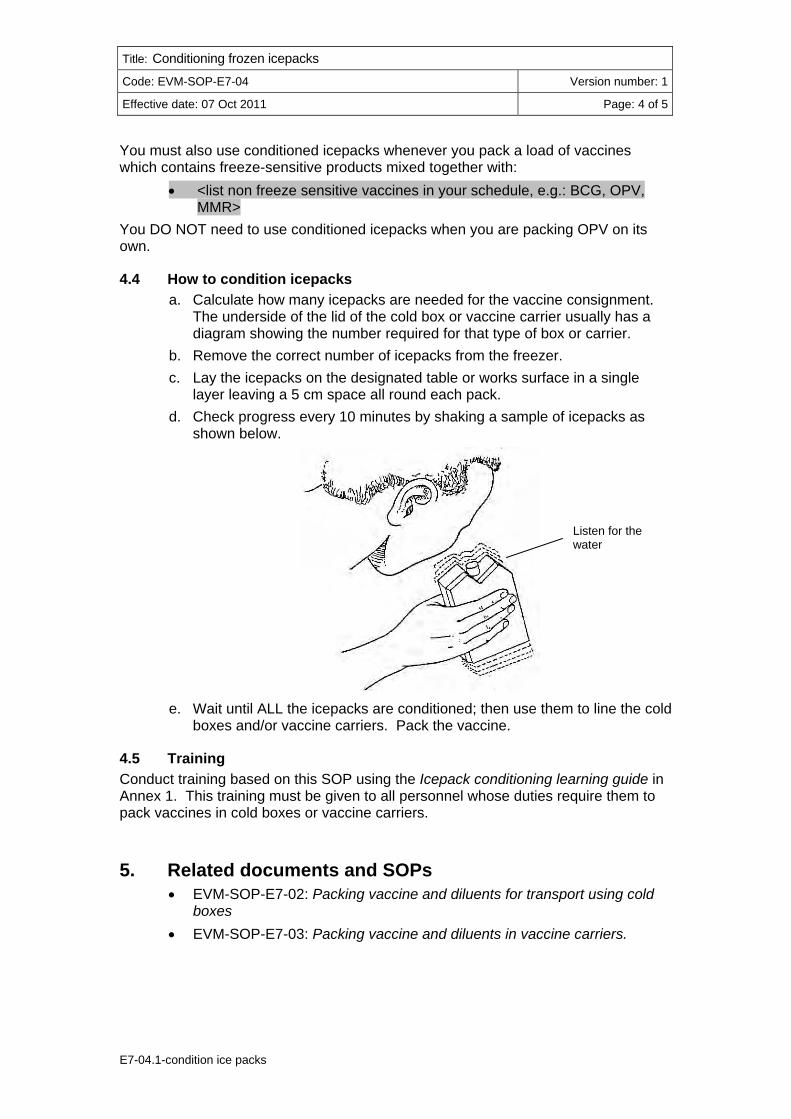
Title: Conditioning frozen icepacks
Code: EVM-SOP-E7-04 Version number: 1
Effective date: 07 Oct 2011 Page: 4 of 5
E7-04.1-condition ice packs
You must also use conditioned icepacks whenever you pack a load of vaccines which contains freeze-sensitive products mixed together with:
<list non freeze sensitive vaccines in your schedule, e.g.: BCG, OPV, MMR>
You DO NOT need to use conditioned icepacks when you are packing OPV on its own.
4.4 How to condition icepacks a. Calculate how many icepacks are needed for the vaccine consignment.
The underside of the lid of the cold box or vaccine carrier usually has a diagram showing the number required for that type of box or carrier.
b. Remove the correct number of icepacks from the freezer. c. Lay the icepacks on the designated table or works surface in a single
layer leaving a 5 cm space all round each pack. d. Check progress every 10 minutes by shaking a sample of icepacks as
shown below.
Listen for the water
e. Wait until ALL the icepacks are conditioned; then use them to line the cold boxes and/or vaccine carriers. Pack the vaccine.
4.5 Training Conduct training based on this SOP using the Icepack conditioning learning guide in Annex 1. This training must be given to all personnel whose duties require them to pack vaccines in cold boxes or vaccine carriers.
5. Related documents and SOPs EVM-SOP-E7-02: Packing vaccine and diluents for transport using cold
boxes EVM-SOP-E7-03: Packing vaccine and diluents in vaccine carriers.

Title: Conditioning frozen icepacks
Code: EVM-SOP-E7-04 Version number: 1
Effective date: 07 Oct 2011 Page: 5 of 5
E7-04.1-condition ice packs
Annex 1 – Icepack conditioning learning guide 1. Prepare frozen icepacks a day before the training. Make sure that you have
minimum of one icepack for each participant. Store them in a cold box immediately you remove them from the freezer.
2. Explain what a ‘conditioned’ icepack is. 3. Explain which vaccines must be packed with conditioned icepacks. 4. Distribute one icepack to each participant. 5. Ask each participant to mark one of the icepacks with a sign that they can
recognize, using a permanent marker pen.
Pattern A: 4 icepacks, 5 cm apart from each other on each side
Pattern B: icepacks stacked together
6. Ask participants to place the icepacks on the table top as shown in the
diagram above. 7. Twice, during the course of the session, ask the participants to go and check
their icepacks. The second check should only be carried when all the icepacks in the Pattern A arrangement are fully conditioned. The trainer should check that conditioning is complete before inviting the participants to check for themselves.
8. Make sure that every participant handles a fully conditioned icepack and understands that there must always be some liquid water inside the pack.
9. When the exercise is over, explain to participants that conditioning takes time and requires patience and that the time required depends upon room temperature.
10. Make sure that all participants fully understand the process and know which vaccines must always be packed with conditioned icepacks.

Title: Loading and operating refrigerated vehicles
Code: EVM-SOP-E7-05 Version number: 1
Effective date: 07 Oct 2011 Page: 1 of 13
E7-05.1-refrigerated vehicles
Standard Operating Procedure Loading and operating refrigerated
vehicles
Approvals Name Date Signature
Authorized by:
Reviewed by:
Revised by:
Original author:
Version history
No Date Description of change Reason for change
1 07 Oct 2011 Original
2
3
4
5
Disclaimer: This is a model standard operating procedure. It incorporates generic guidance only. Countries are encouraged to adapt it as necessary to suit local requirements. Queries or comments may be addressed to [email protected]

Title: Loading and operating refrigerated vehicles
Code: EVM-SOP-E7-05 Version number: 1
Effective date: 07 Oct 2011 Page: 2 of 13
E7-05.1-refrigerated vehicles
Table of content Distribution .................................................................................................................2 1. Policy and objectives.........................................................................................3
1.1 Policy............................................................................................................3 1.2 Objectives.....................................................................................................3
2. Responsibility.....................................................................................................4 3. Associated materials and equipment...............................................................4 4. Procedure............................................................................................................4
4.1 Preparatory tasks .........................................................................................4 4.1.1 Plan the delivery schedule....................................................................4 4.1.2 Prepare the refrigerated compartment and shipping containers ..........5 4.1.3 Pre-cool the refrigerated compartment.................................................6
4.2 Packing vaccine and diluents .......................................................................6 4.3 Loading the vehicle at the supplying store ...................................................6 4.4 Operating the vehicle ...................................................................................7 4.5 Unloading the vehicle at the receiving store.................................................7 4.6 Overnight stops ............................................................................................8 4.7 Review temperature records for each trip ....................................................8
5. Related documents and SOPs ..........................................................................8 Annex 1 – Guidance on loading a refrigerated vehicle ..........................................9 Annex 2 – Trip record form .....................................................................................12
Distribution Distribute this SOP to the following:
Facility type Position(s)

Title: Loading and operating refrigerated vehicles
Code: EVM-SOP-E7-05 Version number: 1
Effective date: 07 Oct 2011 Page: 3 of 13
E7-05.1-refrigerated vehicles
1. Policy and objectives
1.1 Policy Refrigerated vehicles require specialized facilities and training if they are to be used safely and effectively for the transport of vaccines. In particular, responsible personnel must ensure that drivers know how to ensure their vehicle is road worthy, how to operate the vehicle and its equipment and how to safeguard the vaccine throughout the journey. Details of all journeys must be recorded by the driver in the vehicle log book/route report. All vehicles must be suitable for the local climate, road and general operating conditions. In cold climates the refrigerated compartment must be fitted with a low temperature heater circuit to provide protection for the vaccine against freezing temperatures. There should be sufficient space in the supplying store to stack delivery crates where these are used to pack vaccines before loading into the vehicle.
1.2 Objectives This SOP describes loading and operating procedures for two common types of refrigerated vehicle:
Vehicles with an independently diesel powered refrigeration unit, with or without an electrical backup power lead for use during stops.
Vehicles with a direct drive refrigeration unit, powered by the vehicle’s engine, with or without an electrical backup power lead for use during stops.
It covers the actions that should be taken when vehicles are loaded and unloaded, during transit, during overnight stops, and at the end of each trip. Note 1: The SOP does not cover cryogenic systems, which use a tank of liquefied gas as a coolant, or eutectic systems where the refrigerated compartment is pre-cooled before the journey using mains electric power. Note 2: WHO recommends that all refrigerated vehicles should be equipped with a continuous temperature monitoring device which allows trip data to be downloaded and printed out. There should also be a cab-mounted temperature display, and a temperature alarm system with both visual and audible alarm indicators. Preferably, the continuous temperature monitoring equipment should have a hard-copy printout device because this allows the driver to issue a temperature trace at the time of delivery to each store. Note 3: Many countries continue to operate refrigerated vehicles without effective monitoring equipment. These countries are strongly recommended to retrofit their vehicles with continuous temperature monitoring and alarm equipment, otherwise vaccine is placed at unnecessary risk. Note 4: As an absolute minimum requirement, refrigerated vehicles MUST be fitted with an in-cab thermometer so that the driver can check the temperature of the refrigerated compartment, together with a portable electronic temperature data logger device which can be checked once the journey is complete.

Title: Loading and operating refrigerated vehicles
Code: EVM-SOP-E7-05 Version number: 1
Effective date: 07 Oct 2011 Page: 4 of 13
E7-05.1-refrigerated vehicles
2. Responsibility Responsibility for operating and maintaining the vehicle rests with <list responsible personnel>. Responsibility for day-to-day planning of the vehicle’s use lies with <list responsible personnel>. The vehicle driver is responsible for checking the vehicle is roadworthy before and after loading (tyres, axle weights, mirrors, oil, fuel, wipers, air-conditioning, refrigeration unit, etc,), and for the correct operation of the vehicle during transit.
3. Associated materials and equipment Refrigerated vehicle; reusable shipping pallets or containers or cartons; packaging materials and restraining devices; vehicle log book.
4. Procedure
4.1 Preparatory tasks
4.1.1 Plan the delivery schedule
Responsibility: <List responsible personnel> a. Plan deliveries to make optimum use of the refrigerated vehicle(s). The
planning process should take account of normal scheduled deliveries but also allow for urgent deliveries when these are required.
b. Estimate the number of reusable shipping containers1 or disposable cartons which will be required for each delivery2.
Note: The following images show some examples of reusable containers. Containers should stack when they are full and ‘nest’ together or fold when they are empty, because nested or folding containers take up much less space in the store. They also take less space in the refrigerated vehicle after they have been emptied. This is an essential requirement if the vehicle is delivering vaccines to more than one store at a time. The empty containers have to be returned to the supplying store for re-use and must not prevent access to the remaining full containers when these are delivered at the next drop-off point. Perforated containers allow air to circulate freely through the load. Pallet boxes are good for distributing large quantities of vaccine, provided suitable pallet handling equipment is available. Both rigid and collapsible versions are available.
1 A ‘reusable shipping container’ is a reusable plastic or foam box or similar container which is used to hold vaccine when it is transported in the refrigerated vehicle. 2 Rosendo S. Rapusas, R., Rolle, R. Management of reusable plastic crates in fresh produce supply chains: A technical guide. FAO 2009, provides some useful advice. See: http://www.fao.org/docrep/012/i0930e/i0930e00.htm

Title: Loading and operating refrigerated vehicles
Code: EVM-SOP-E7-05 Version number: 1
Effective date: 07 Oct 2011 Page: 5 of 13
E7-05.1-refrigerated vehicles
Attached lid container – NOT suitable for
multi-store deliveries
Stacking/nesting container
Folding container with lid
Collapsible pallet box
c. Loading the vehicle in the correct sequence is essential. If the vehicle is delivering to more than one store, plan load layouts so that loading takes place on a first-out-last-in basis.
d. Schedule deliveries to arrive at designated times during working hours and notify receiving stores of the intended times of arrival.
4.1.2 Prepare the refrigerated compartment and shipping containers
Responsibility: <List responsible personnel> a. Thoroughly clean the interior of the refrigerated compartment before each
delivery. If the vehicle has been used for purposes other than the transport of vaccines or pharmaceuticals, disinfect the interior.
b. Clean reusable shipping containers before each delivery. c. Maintain cleaning records for vehicles and reusable shipping containers
to demonstrate compliance. Note: Air must be able to circulate underneath the load. Refrigerated vehicles can be supplied with a ‘corrugated’ or ‘inverted T floor’ to allow for floor level air circulation. However, if the refrigerated compartment has a smooth floor it is essential to place plastic pallets on the floor before loading the vaccine containers. If vaccine is being shipped on pallets or in pallet boxes, this is not necessary, because the pallet itself will allow air to circulate. The diagrams in Annex 1 show how air should circulate through the load

Title: Loading and operating refrigerated vehicles
Code: EVM-SOP-E7-05 Version number: 1
Effective date: 07 Oct 2011 Page: 6 of 13
E7-05.1-refrigerated vehicles
4.1.3 Pre-cool the refrigerated compartment
Responsibility: <List responsible personnel> a. Park the vehicle in the shade, and preferably under cover. b. Close the doors and pre-cool the refrigerated compartment to +2°C to
+8°C before loading vaccine. Use mains electricity to power the refrigeration unit if this option is available.
c. Vehicles with continuous temperature monitoring: Switch on the on-board continuous temperature monitoring equipment. Record the time of activation on the Trip Record Form – see Annex 2.
d. Vehicles without continuous temperature monitoring: Securely attach an activated temperature data logger device in the refrigerated compartment as shown in Annex 1: Figure 1. Record the time of activation on the Trip Record Form – see Annex 2.
4.2 Packing vaccine and diluents Responsibility: <List responsible personnel>
a. Wash your hands and use clean gloves. b. Pack the vaccine and diluent cartons in the shipping containers or cartons
with the vial caps uppermost. c. Use newspaper or other loose packing to ensure that the load cannot shift
during transport. d. Place a packing list in the container/carton on top of the contents. e. Place a freeze indicator into at least one container/carton per destination
as described in EVM-SOP-E7-01: Using freeze indicator devices during vaccine transport.
f. Label the container/carton with the final destination. g. Temporary workers: Have the pack-out checked by your supervisor. h. If there is a lid: Close the lid or seal the carton with packing tape. i. Keep the shipping containers/cartons in a cold room (+2°C to +8°C) until
the vehicle is ready to load. Alternatively, load them into the pre-cooled vehicle immediately after packing.
4.3 Loading the vehicle at the supplying store Responsibility: <List responsible personnel>
a. During the loading operation, keep the loading door open for the minimum time possible3.
b. Use clean gloves. c. Load the vehicle so that shipping containers can be unpacked at the
receiving stores on a first-out-last-in basis. This means that the containers which are to be delivered to the first store on the delivery round should be packed last, containers for the second store next to last, and so forth.
3 Ideally, the door opening should be fitted with a strip curtain to reduce loss of cold air.

Title: Loading and operating refrigerated vehicles
Code: EVM-SOP-E7-05 Version number: 1
Effective date: 07 Oct 2011 Page: 7 of 13
E7-05.1-refrigerated vehicles
d. Stack containers so as to encourage the even flow of cool air through the load. See Annex 1 for guidance principles.
e. Stack the containers so as to ensure even weight distribution. f. Restrain the load securely with straps or netting. DO NOT cover the load
with tarpaulin or other impermeable material – this will restrict air flow. g. Lock the doors to the refrigerated compartment: give key to driver. h. Record the time when loading is complete on the Trip Record Form – see
Annex 2. i. Brief the driver on the route, planned delivery times, details of special or
urgent deliveries, mobile phone numbers and any areas of concern on the route.
4.4 Operating the vehicle Responsibility: <List responsible personnel>
a. Check physical integrity of vehicle. b. Drive smoothly and carefully. c. Maintain contact with the supplying store by telephone at regular
intervals. d. Vehicles with continuous temperature monitoring: Check the temperature
of the refrigerated compartment at least once an hour using the in-cab thermometer display.
e. Vehicles witouth continuous temperature monitoring: Check the temperature of the refrigerated compartment at least once an hour using the in-cab thermometer display. Record the temperature on the Trip Record Form only when stationary– see Annex 2.
f. Take appropriate action if the temperature alarm sounds and/or the temperature display is outside +2°C to +8°C.
4.5 Unloading the vehicle at the receiving store Responsibility: <List responsible personnel>
a. Park the vehicle in the shade, as close as possible to the loading bay. b. Continue to run the refrigeration unit throughout the unloading operation.
Use mains electricity to power the refrigeration unit if this option is available.
c. During the unloading operation, keep the loading door open for the minimum time possible
d. Use clean gloves. e. Take the shipping containers into the store immediately. Check and
unpack the containers as rapidly as possible and place the vaccines in the appropriate cold storage. If a cold room is available, unpack and check the shipment in the cold room. See EVM-SOP-E7-01: Monitoring temperature exposure during vaccine transport.
f. Stack empty shipping containers in the refrigerated compartment. Restrain the containers securely. Ensure that exposed areas of T-floor or pallets are covered with cardboard to maintain even air flow through the remaining load as shown in Annex 1: Figure 3.

Title: Loading and operating refrigerated vehicles
Code: EVM-SOP-E7-05 Version number: 1
Effective date: 07 Oct 2011 Page: 8 of 13
E7-05.1-refrigerated vehicles
g. Record the time of arrival and departure on the Trip Record Form – see Annex 2. Notify the supplying store by telephone once the delivery has been completed and report any problems.
h. Lock the doors to the refrigerated compartment. i. Check the condition of the vehicle and refrigeration unit before departure.
4.6 Overnight stops Responsibility: <List responsible personnel>
a. Always park in a secure compound, in the shade. b. Ensure that the refrigerated compartment and driver’s cab is kept locked. c. Ensure that one person remains with the vehicle at all times. d. Continue to run the refrigeration unit throughout the overnight stop. Use
mains electricity to power the refrigeration unit if this option is available. e. Monitor the temperature of the refrigerated compartment at least once an
hour using the in-cab thermometer. Record the temperature on the Trip Record Form – see Annex 2.
f. Take appropriate action if the temperature goes outside +2°C to +8°C. Refer to EVM-SOP-E7-01: Responding to emergencies during vaccine transport operations.
g. Record the time of arrival and departure at the overnight stop on the Trip Record Form – see Annex 2. Notify the supplying store by telephone when you depart in the morning.
4.7 Review temperature records for each trip Responsibility: <List responsible personnel>
a. At the end of each trip complete the log book/route report. b. Download and print out the data from the on-board temperature recorder
or temperature data logger and check the temperature record. Complete the Trip Record Form as described in EVM-SOP-E7-01: Monitoring temperature exposure during vaccine transport.
c. Investigate unexplained excursions outside the +2°C to +8°C range4. Instruct the maintenance contractor or maintenance engineer to investigate and carry out necessary adjustments and/or repairs.
d. File the temperature record and the completed Trip Record Form and keep the records for a minimum of <three years>.
5. Related documents and SOPs EVM-SOP-E7-01: Monitoring temperature exposure during vaccine
transport. EVM-SOP-E7-01: Responding to emergencies during vaccine transport
operations.
4 Some excursions during loading and unloading can be expected because the door will be opened.

Title: Loading and operating refrigerated vehicles
Code: EVM-SOP-E7-05 Version number: 1
Effective date: 07 Oct 2011 Page: 9 of 13
E7-05.1-refrigerated vehicles
Annex 1 – Guidance on loading a refrigerated vehicle Source: www.horizonlines.com Figure 1 – Side view of refrigerated compartment showing air flow through load Refrigeration unit Air space above load Air flow Rear door
T-floor or pallets End of T-floor or pallets
Data logger
Containers this end unloaded last
Containers this end unloaded first
Figure 2 – End view of refrigerated compartment showing air flow through load
No containers above load line
T-floor or pallets

Title: Loading and operating refrigerated vehicles
Code: EVM-SOP-E7-05 Version number: 1
Effective date: 07 Oct 2011 Page: 10 of 13
E7-05.1-refrigerated vehicles
Figure 3 – Top view showing correct and incorrect packing
Optimal loading – Top view In order to force air up and through the load, the entire floor should be covered. Cover the floor from the front bulkhead to the end of the T-floor or pallet base. Where the load does not cover the floor completely, lay cardboard or other filler material over the T-floor or pallet base. Do not load past the end of the T-floor or pallet base.
Top view 1
Top view 2
Top view 3
Top view 4
Top view 5
Refrigeration unit Filler material Pallet

Title: Loading and operating refrigerated vehicles
Code: EVM-SOP-E7-05 Version number: 1
Effective date: 07 Oct 2011 Page: 11 of 13
E7-05.1-refrigerated vehicles
Figure 4 – How to load a pallet Place cartons on the pallets so that air can freely flow up into the cartons Fully support the corners of each carton on the pallet – do not allow them to
overhang If pallets are wrapped with plastic film, DO NOT cover the top or bottom of the
cartons – only wrap the sides.
Key:
1. Carton arrangement for unrestricted airflow 2. Strength of cartons in the corners 3. Corners of cartons supported

Title: Loading and operating refrigerated vehicles
Code: EVM-SOP-E7-05 Version number: 1
Effective date: 07 Oct 2011 Page: 12 of 13
E7-05.1-refrigerated vehicles
Annex 2 – Trip record form Refrigerated vehicle trip record formVehicle registration number: Trip start date: <dd/mmm/yyyy> Sheet number:Name of supplying store: Trip end date: <dd/mmm/yyyy> Nbr of sheets
Enter DATE: Remarks1 2 3 4 5 6 7 8 9 10 11 12 13 14 15 16 17 18 19 20 21 22 23 24 1 2 3 4 5 6 7 8 9 10 11 12 13 14 15 16 17 18 19 20 21 22 23 24
+16+15 +14+13+12+11+10+9+8+7+6+5+4+3+2+10-1-2-3-4-5
Enter time for each event - to the nearest hourPacking completeStart of tripArrive at storeDepart storeArrive at overnightDepart overnightEnd of trip
Truck location
Event record
Hour
Tem
pera
ture
cha
rt (°
C)
Initials:

E7-05.1-refrigerated vehicles
Refrigerated vehicle trip record form (example)Vehicle registration number: LYC 123 F Trip start date: <dd/mmm/yyyy> Sheet number: 1
Name of supplying store: Central medical stores Trip end date: <dd/mmm/yyyy> Nbr of sheets 3
Enter DATE: Remarks1 2 3 4 5 6 7 8 9 10 11 12 13 14 15 16 17 18 19 20 21 22 23 24 1 2 3 4 5 6 7 8 9 10 11 12 13 14 15 16 17 18 19 20 21 22 23 24 Refrigeration breakdown at Province C
+16 Vaccine unloaded into cold room+15 Maintenance engineer called+14+13+12 X+11 X+10 X+9 X X+8 X X+7 X X X X+6 X X X X X X+5 X X X X X X X X X X X X X+4 X X X X X X X X X X X+3+2+10-1-2-3-4-5
Enter time for each event - to the nearest hourPacking complete X
Start of trip X
Arrive at store X X X
Depart store X X X
Arrive at overnight X X
Depart overnight X
End of trip
Truck location
CM
S
CM
S
Trav
ellin
g
Trav
ellin
g
Trav
ellin
g
Trav
ellin
g
Trav
ellin
g
Prov
ince
A
Prov
ince
A
Prov
ince
A
Ditt
o
Ditt
o
Ditt
o
Ditt
o
Ditt
o
Ditt
o
Ditt
o
Ditt
o
Ditt
o
Ditt
o
Ditt
o
Ditt
o
Ditt
o
Ditt
o
Trav
ellin
g
Trav
ellin
g
Trav
ellin
g
Prov
ince
B
Prov
ince
B
Prov
ince
B
Trav
ellin
g
Trav
ellin
g
Trav
ellin
g
Prov
ince
C
Prov
ince
C
Prov
ince
C
Ditt
o
Ditt
o
Ditt
o
Ditt
o
Ditt
o
JG JG JG JG JG JG JG JG JG JG JG JG JG JG JG JG JG JG JG JG JG JG JG JG JG JG JG JG JG JG JG JG JG JG JG JG JG JG JG JG JG
10 October 2011
14 October 2011
10 October 2011 11 October 2011
Event record
Hour
Tem
pera
ture
cha
rt (°
C)
Initials:
Effective date: 07 Oct 2011 Page: 13 of 13
Code: EVM-SOP-E7-05 Version number: 1
Title: Loading and operating refrigerated vehicles

Title: Responding to emergencies during vaccine transport operations
Code: EVM-SOP-E7-06 Version number: 1
Effective date: 07 Oct 2011 Page: 1 of 8
E7-06.1-transport emergencies
Standard Operating Procedure Responding to emergencies during
vaccine transport operations
Approvals Name Date Signature
Authorized by:
Reviewed by:
Revised by:
Original author:
Version history
No Date Description of change Reason for change
1 07 Oct 2011 Original
2
3
4
5
Disclaimer: This is a model standard operating procedure. It incorporates generic guidance only. Countries are encouraged to adapt it as necessary to suit local requirements. Queries or comments may be addressed to [email protected]

Title: Responding to emergencies during vaccine transport operations
Code: EVM-SOP-E7-06 Version number: 1
Effective date: 07 Oct 2011 Page: 2 of 8
E7-06.1-transport emergencies
Table of content Distribution .................................................................................................................2 1. Policy and objectives.........................................................................................3
1.1 Policy............................................................................................................3 1.2 Objectives.....................................................................................................3
2. Responsibility.....................................................................................................4 3. Associated materials and equipment...............................................................4 4. Procedure............................................................................................................4
4.1 Preparatory tasks .........................................................................................4 4.1.1 Distribution planning .............................................................................4 4.1.2 Vehicles and ancillary equipment .........................................................5 4.1.3 Vehicle maintenance ............................................................................5 4.1.4 Driver training .......................................................................................5
4.2 Emergency responses..................................................................................6 4.2.1 Road traffic accident.............................................................................6 4.2.2 Vehicle breakdown ...............................................................................6 4.2.3 Refrigerated vehicle – refrigeration unit failure.....................................7
4.3 Safeguard the vaccine..................................................................................7 5. Related documents and SOPs ..........................................................................8
Distribution Distribute this SOP to the following:
Facility type Position(s)

Title: Responding to emergencies during vaccine transport operations
Code: EVM-SOP-E7-06 Version number: 1
Effective date: 07 Oct 2011 Page: 3 of 8
E7-06.1-transport emergencies
1. Policy and objectives
1.1 Policy All responsible personnel should know when and how to respond to emergencies during vaccine transport operations. Junior personnel may simply be required to report to their supervisor. More senior personnel should know and understand the emergency response plans and should be able to implement then effectively if the need arises.
1.2 Objectives This SOP describes the actions that should be taken in response to some commonly occurring transport emergencies.
Note: This model SOP provides advice on preparing an emergency response (contingency) plan. It gives some specific examples of emergencies and details the actions to be taken in response. Amend and extend the list of to suit specific country conditions. Every facility that delivers or collects vaccine must have a written transport emergency plan so that responsible personnel know what to do. In particular it is essential to identify facilities on each delivery route where vaccine can be stored temporarily in the event of a breakdown or accident. Reach an agreement with these facilities so that they are willing and able to help if an emergency does occur. The table below gives some general guidance on preparing a plan. Elements of a transport emergency plan
Ensure that all personnel know how to follow safe storage rules in an emergency:
Freeze-sensitive vaccines: Maintain vaccines at +2°C to +8°C.
OPV and freeze-dried vaccines: Maintain vaccines at +2°C to +8°C.
Diluents: Store at room temperature unless packed with the vaccine.
Identify a range of emergency response options (these are three examples)
Transfer the vaccine to another vehicle.
Send a tow truck.
Transfer the vaccine to a public or private sector cold store.
Prepare and maintain at least two emergency response plans based upon these options.
Whatever plans you choose, make sure they are discussed and agreed beforehand with your staff, and with all the other parties involved.
Confirm the plan in writing. Keep a copy in both the supplying store and the receiving stores. Make sure responsible personnel know where it is.
Check emergency facilities to ensure that they are in good condition, have adequate

Title: Responding to emergencies during vaccine transport operations
Code: EVM-SOP-E7-06 Version number: 1
Effective date: 07 Oct 2011 Page: 4 of 8
E7-06.1-transport emergencies
space and are capable of maintaining vaccine at the correct temperature. There is no point moving stock to a temporary store only to find that all your freeze-sensitive vaccine is frozen and destroyed.
Do not wait until an emergency occurs. Rehearse1 the plans before they are needed.
Prepare a list of emergency contact names and radio call signs or telephone numbers and provide each store and each vehicle with a copy. Keep the list up to date..
Make sure that the driver has a radio or mobile phone so that s/he can contact the supplying store and/or receiving store during transit.
Make sure that emergency contacts can be made both inside and outside normal working hours.
2. Responsibility All personnel who have responsibility for looking after vaccines in fixed storage locations, including security guards who provide out-of-hours cover.
3. Associated materials and equipment None
4. Procedure
4.1 Preparatory tasks The frequency of transport emergencies can be reduced greatly by careful planning, good quality, well maintained vehicles and appropriate training. Good planning will also reduce the risk of vaccine damage if an emergency does occur.
4.1.1 Distribution planning
Responsibility: <List responsible personnel>. a. Identify locations on every delivery route where vaccine can be stored
temporarily should a transport emergency occur. b. Identify and contact breakdown service providers on each delivery route.
Establish whether they have the necessary equipment to tow the delivery vehicle(s). Record the contact details of suitable providers.
c. Refrigerated vehicles with mains electric connection leads: Identify and contact private and public sector refrigerated vehicle operators on each delivery route. Establish the types of vehicle used and the location of compatible external mains power supply for refrigerated vehicle operation (single-phase or three-phase). Record the contact details of suitable providers.
d. Identify the planned re-fuelling points on all routes. e. Plan routes so as to minimise travel on rough or hazardous roads.
1 Vaccine should not be physically moved during rehearsals, but all key procedures should be simulated.

Title: Responding to emergencies during vaccine transport operations
Code: EVM-SOP-E7-06 Version number: 1
Effective date: 07 Oct 2011 Page: 5 of 8
E7-06.1-transport emergencies
f. Where there are security risks, plan delivery schedules so as to avoid night-time driving.
g. Plan overnight stops so that vehicles can always park in a secure compound.
h. Ensure that a co-driver or other responsible person is allocated to accompany every delivery2.
4.1.2 Vehicles and ancillary equipment
Responsibility: <List responsible personnel>. a. Procure vehicles that are suitable for local conditions. b. If routine overnight stops are required, procure vehicles with on-board
sleeping compartments. c. Ensure that every vehicle is fitted with a fire extinguisher and make sure
that these are checked every year and re-filled if necessary. d. Ensure that every vehicle is equipped with a first aid kit and a tool kit. e. Ensure that every vehicle/driver is equipped with two way radio
communications and/or a mobile phone. f. Ensure that every vehicle carries a list of radio call signs and/or emergency
contact numbers. These numbers should include the supplying and receiving stores, suitable breakdown service providers and (if applicable) suitable providers of electrical power supply points for refrigerated vehicles.
g. Where the number of re-fuelling stops is limited, ensure that vehicles have an adequate supply of spare fuel and lubricants for all trips.
4.1.3 Vehicle maintenance
Responsibility: <List responsible personnel>. a. Follow the principles of planned preventive maintenance and ensure that
vehicles are well maintained. b. Ensure that tyres, including spare tyres are in good condition and kept at
the correct pressures.
4.1.4 Driver training
Responsibility: <List responsible personnel>. a. Train drivers in safe driving techniques. b. Train drivers to carry out daily maintenance checks and emergency
repairs. c. Instruct drivers to make routine radio or telephone reports during transit so
that the location of the vehicle and estimated time of arrival is known by the supplying and receiving stores.
d. Instruct drivers never to leave vehicles unattended and to lock doors at all times.
2 A second person may not be necessary on short routes or for small deliveries.

Title: Responding to emergencies during vaccine transport operations
Code: EVM-SOP-E7-06 Version number: 1
Effective date: 07 Oct 2011 Page: 6 of 8
E7-06.1-transport emergencies
e. Train drivers on how to respond to emergencies. Ensure that they know that the correct emergency storage temperature range for vaccines is +2°C to +8°C and that they know how to condition ice packs.
4.2 Emergency responses This section describes the immediate actions to take in the case of foreseeable emergencies. In the case of an unforeseen event, all responsible personnel must be contacted and they must agree the specific actions to be taken. The first response to an emergency should always be to move the vaccine as rapidly as possible to a safe place where suitable cold chain equipment is available – see 4.3. Note: Below are three typical examples.
4.2.1 Road traffic accident
Responsibility: <List responsible personnel>. Immediate action by vehicle crew (assuming no major injuries):
a. Ensure safety of vehicle crew and others involved in the accident. b. If appropriate or necessary, carry out first aid. c. Check vaccine containers for damage. d. Refrigerated vehicle: Check operation of refrigeration equipment. e. Contact the relevant emergency numbers and provide a situation report. f. Co-operate with the police, if attending the accident. Advise them of the
urgent need to safeguard the vaccines. Vehicle damaged but driveable: a. Drive to the nearest vaccine store or emergency cold store. b. Safeguard the vaccine at the stopping point (see 4.3). c. Organize a replacement vehicle and transfer the vaccine to the
replacement vehicle. Vehicle not driveable: a. Organize a replacement vehicle and transfer the vaccine to the
replacement vehicle at the road side. b. Drive to the nearest vaccine store or emergency cold store. c. Safeguard the vaccine at the stopping point (see 4.3).
4.2.2 Vehicle breakdown
Responsibility: <List responsible personnel>. Immediate action by vehicle crew: a. Park the vehicle safely. b. Contact the relevant emergency numbers and provide a situation report. c. Check whether the vehicle is repairable at the roadside. If so, carry out
emergency repairs. Vehicle driveable: d. Drive to the nearest vaccine store or emergency cold store. e. Safeguard the vaccine at the stopping point (see 4.3).

Title: Responding to emergencies during vaccine transport operations
Code: EVM-SOP-E7-06 Version number: 1
Effective date: 07 Oct 2011 Page: 7 of 8
E7-06.1-transport emergencies
f. If necessary, organize a replacement vehicle and transfer the vaccine to the replacement vehicle. Otherwise obtain permission to continue the delivery.
Vehicle not driveable: a. Organize a replacement vehicle and transfer the vaccine to the
replacement vehicle. b. Drive to the nearest vaccine store or emergency cold store. c. Safeguard the vaccine at the stopping point (see 4.3).
4.2.3 Refrigerated vehicle – refrigeration unit failure
Responsibility: <List responsible personnel, including security guards>. Refrigerated compartment above +8°C: a. Contact the relevant emergency numbers and provide a situation report. b. DO NOT open the door to the refrigerated compartment. Drive to the
nearest vaccine store or emergency cold store. If the refrigeration unit fan is still working, keep it running to maintain air circulation.
c. Safeguard the vaccine at the stopping point (see 4.3). Refrigerated compartment below +2°C: a. Contact the relevant emergency numbers and provide a situation report. b. Manually cycle the refrigeration unit off and on to maintain the correct
storage temperature range. Drive to the nearest vaccine store or emergency cold store.
c. Safeguard the vaccine at the stopping point (see 4.3).
4.3 Safeguard the vaccine Once the vaccine has been taken to a safe place, the vaccine should be safeguarded until it can be transported onwards to its final destination(s). Note: Below are four possible options. Responsibility: <List responsible personnel>.
Vaccine transported in cold boxes: a. Option 1 – replace coolant: Move the cold boxes inside the store building,
(in hot climates, preferably to an air-conditioned room). Check internal temperature of a sample of cold boxes. If the temperature exceeds +8°C, replace the existing water packs with new conditioned ice packs or cool water packs.
b. Option 2 – store in a cold room: Move the cold boxes inside the store building. Wait until the interior of the cold boxes reach +8°C and all ice packs are fully melted3. Place the cold boxes in the cold room at +2°C to +8°C.
3 If you place the cold boxes in a cold room when there is still ice in the ice packs, there is a risk that the vaccine will freeze.

Title: Responding to emergencies during vaccine transport operations
Code: EVM-SOP-E7-06 Version number: 1
Effective date: 07 Oct 2011 Page: 8 of 8
E7-06.1-transport emergencies
Vaccine transported in a refrigerated vehicle: a. Option 1 – refrigeration unit still working: Continue to run the refrigeration
unit. If the unit has an electrical power lead and there is a compatible mains power outlet at the store, run the unit on mains power.
b. Option 2 – refrigeration unit not working; cold room available: Place shipping containers in the cold room at +2°C to +8°C.
5. Related documents and SOPs EVM-SOP-E2-03: Correct storage temperatures for vaccines and diluents EVM-SOP-E7-04: Conditioning frozen icepacks EVM-SOP-E7-05: Loading and operating refrigerated vehicles

Title: When and how to conduct the Shake Test
Code: EVM-SOP-E8-01 Version number: 1
Effective date: 07 Oct 2011 Page: 1 of 10
E8-01.1-shake test
Standard Operating Procedure When and how to conduct the Shake Test
Approvals Name Date Signature
Authorized by:
Reviewed by:
Revised by:
Original author:
Version history
No Date Description of change Reason for change
1 07 Oct 2011 Original
2
3
4
5
Disclaimer: This is a model standard operating procedure. It incorporates generic guidance only. Countries are encouraged to adapt it as necessary to suit local requirements. Queries or comments may be addressed to [email protected]

Title: When and how to conduct the Shake Test
Code: EVM-SOP-E8-01 Version number: 1
Effective date: 07 Oct 2011 Page: 2 of 10
E8-01.1-shake test
Table of content Distribution .................................................................................................................2 1. Policy and objectives.........................................................................................3
1.1 Policy............................................................................................................3 1.2 Objectives.....................................................................................................3
2. Responsibility.....................................................................................................3 3. Associated materials and equipment...............................................................3 4. Procedure............................................................................................................3
4.1 Training ........................................................................................................3 4.2 Applicability ..................................................................................................3 4.3 When and how to do a Shake Test ..............................................................4 4.4 Sampling methodologies ..............................................................................4
4.4.1 Sampling incoming shipments from the vaccine supplier .....................4 4.4.2 Sampling vaccine that is already in the supply chain ...........................5
4.5 Disposal of freeze-damaged vaccine and frozen control samples ...............5 5. Related documents and SOPs ..........................................................................6 Annex 1: Shake test protocol....................................................................................7 Annex 2: Sampling method.......................................................................................8
Distribution Distribute this SOP to the following:
Facility type Position(s)

Title: When and how to conduct the Shake Test
Code: EVM-SOP-E8-01 Version number: 1
Effective date: 07 Oct 2011 Page: 3 of 10
E8-01.1-shake test
1. Policy and objectives
1.1 Policy The Shake Test is designed to determine whether aluminium adsorbed vaccines have been frozen. Whenever it is suspected that vaccine has been frozen, at least one member of the duty personnel in every facility that stores vaccine should know how to perform and interpret the test reliably and correctly. Vaccine which fails the Shake Test should not be distributed or administered.
1.2 Objectives This SOP explains when to do the Shake Test and what to do if you find vaccine that has been damaged by freezing. The Shake Test protocol is attached as Annex 1 and must not be altered – there is only one correct way to conduct this test.
2. Responsibility All personnel who have responsibility for looking after vaccine and for checking its condition.
3. Associated materials and equipment Access to a refrigerator with freezing compartment, or a freezer is essential. The test cannot be carried out in facilities that are only equipped with a refrigerator without a freezing compartment.
4. Procedure
4.1 Training All staff responsible for looking after vaccine must be trained to conduct the Shake Test correctly.
4.2 Applicability The Shake Test currently applies to the following vaccines: <Choose the applicable vaccines used in your country from this list>
DT DTP DTP-HepB DTP-HepB+Hib lyophilised DTP-HepB-Hib liquid DTP-Hib Hepatitis B Hib liquid HPV Pneumoccocal Td TT
After freezing, the bonds between the aluminium adsorbent and the antigen in a vaccine are broken. Separated adsorbent tends to form larger, heavier granules that gradually settle at the bottom of the vial when this is shaken. Sedimentation occurs
Title: When and how to conduct the Shake Test
Code: EVM-SOP-E8-01 Version number: 1
Effective date: 07 Oct 2011 Page: 4 of 10
E8-01.1-shake test
faster in a vaccine vial which has been frozen than in a vaccine vial from the same manufacturer which has never been frozen. When carried out correctly the Shake Test has been shown to have 100% sensitivity and 100% specificity and 100% positive predictive value1.
4.3 When and how to do a Shake Test If a freeze indicator or other temperature monitoring device shows a freeze alarm, or if you suspect that freezing has occurred, then the shake test must be done to confirm the status of the vaccine. Follow the Shake Test Protocol exactly as described in Annex 1. Individual batches of vaccine may behave differently from one another. Therefore the procedure should be repeated with all suspect batches. Follow the appropriate sampling methodology as set out in Section 4.4 to ensure that all of the damaged vaccine is identified and that none of this damaged vaccine is distributed or used. The Shake Test need NOT be conducted under the following circumstances:
When solid frozen vaccine vial(s) have been found. With DTP vial(s) when a homogeneous solution CANNOT be obtained
after vigorous shaking. In such cases, the white lumps or sediment cannot be separated from the walls of the glass vial. This happens only with DTP vials that have been exposed to sub-zero temperatures, but without freezing occurring.
4.4 Sampling methodologies The method for selecting the test sample depends upon two factors:
1. The number of vials you suspect have been frozen. 2. Whether the vaccine has been accepted from the vaccine supplier and
has entered the country supply chain.
4.4.1 Sampling incoming shipments from the vaccine supplier
When vaccine arrives from the vaccine supplier it must be inspected and approved before it can be accepted into the country supply chain. International shipments arranged by UNICEF Supply Division will always have an electronic shipping indicator in each and every shipping container. Shipments ordered direct from an international or in-country manufacturer or supplier may not contain electronic or other freeze indicators. Proceed as follows:
CASE 1: When there is a shipping indicator in every container: a. Mark and isolate any shipping container(s) where the electronic shipping
indicator shows a freeze alarm.. Keep the shipping containers in the cold chain.
b. Inspect each suspect container individually following the sampling procedure described in Annex 1. Draw the correct number of sample vials from locations throughout the suspect container(s), including the
1 Kartoğlu, Ü, et al. Validation of the shake test for detecting freeze damage to adsorbed vaccines. Bulletin of the World Health Organization, 2010; 88:624-631 http://www.who.int/bulletin/volumes/88/8/08-056879/en

Title: When and how to conduct the Shake Test
Code: EVM-SOP-E8-01 Version number: 1
Effective date: 07 Oct 2011 Page: 5 of 10
E8-01.1-shake test
middle of the container(s). Remember to prepare a frozen control sample for each individual vaccine batch.
c. Send the shake test results to the vaccine supplier. In the case of UNICEF-procured or donated vaccine, supply the shake test results to UNICEF or to the donor for a final decision on what to do with the consignment.
d. If the decision is taken to dispose of the vaccine, discard all vaccine in the affected container(s).
CASE 2: When there are no shipping indicators in the shipment, or if shipping indicators are not supplied in every container: a. Mark and isolate the entire shipment but keep it in the cold chain. b. Follow the sampling procedure described in Annex 1 for all vaccine in the
shipment. Draw the correct number of sample vials from locations throughout the suspect shipment, including the middle of the container(s). Remember to prepare a frozen control sample for each individual vaccine batch.
c. Send the shake test results to the vaccine supplier. d. If the decision is taken to dispose of the vaccine, discard all vaccine in the
shipment.
4.4.2 Sampling vaccine that is already in the supply chain
a. Small numbers, single batch: If there are only a small number of vials to be tested, and these are all from the same batch, then you should test all the vials against the control sample. A typical example would be a single refrigerator or cold box where freezing is suspected. In this case, discard all vials that fail the test and keep those which pass the test.
b. Small numbers, more than one batch: If there are a small number of vials to be tested, but there is more than one batch or more than one type of freeze-sensitive vaccine, then you will need to repeat the shake test for each batch and for each vaccine. In this case, discard all vials that fail the test and keep those which pass the test. Remember: you must also prepare a frozen control sample for each batch and for each vaccine.
c. Large numbers: If there are a large number of suspect vials, for example, in a cold room or a large refrigerator, you should follow the sampling procedure described in MIL-STD-105E or, a similar sampling standard, in order to establish the extent of the problem. See Annex 2. Draw the correct number of sample vials from locations evenly distributed throughout the suspect load. If any vials in the sample fail the Shake Test, all the suspect vials must be discarded, including those that have not been tested.
4.5 Disposal of freeze-damaged vaccine and frozen control samples After you have completed the test(s) described above, discard all freeze-damaged vials and all control samples as described in EVM-SOP-E6-04: Safe disposal of damaged or expired vaccine. You should never issue a vaccine vial that has deliberately been frozen as a control sample for a Shake Test; these vials must always be kept separated from the general stock. There are two cases to consider.

Title: When and how to conduct the Shake Test
Code: EVM-SOP-E8-01 Version number: 1
Effective date: 07 Oct 2011 Page: 6 of 10
E8-01.1-shake test
CASE 1: You may want to keep the control sample and use it for further tests. This only applies while you still hold stocks of the same batch of the same vaccine. CASE 2: If the control sample batch has all been issued, the sample must be set aside for final disposal.
Proceed as follows: a. Use the stock control system to ‘issue’ the control sample(s) for the shake
test. This ensures that the vials are properly accounted for. b. If the control sample is to be kept for further tests: Place the control
sample in a closed plastic container in a cold room or vaccine refrigerator, clearly marked: ‘CURRENT SHAKE TEST CONTROL SAMPLES’.
c. If the control sample batch has all been issued: Place the control sample in a closed plastic container outside the cold room, clearly marked: ‘SHAKE TEST CONTROL SAMPLES FOR DISPOSAL– DO NOT USE’’.
5. Related documents and SOPs EVM-SOP-E6-04: Safe disposal of damaged or expired vaccine. Military Standard: sampling procedures and tables for inspection by
attributes MIL-STD-105E

Title: When and how to conduct the Shake Test
Code: EVM-SOP-E8-01 Version number: 1
Effective date: 07 Oct 2011 Page: 7 of 10
E8-01.1-shake test
Annex 1: Shake test protocol
NOTES: 1) This protocol must not be altered. There is only one correct way to conduct a Shake Test. 2) The test procedure described below should be repeated with all suspect batches. In the case of international arrivals, the shake test should be conducted on a random sample of vaccine. However, if there is more than one lot in the shipment, the random sample must include a vial taken from each and every lot.
1. Take a vial of vaccine of the same type and batch number as the vaccine you want to test, and made by the same manufacturer.
2. Clearly mark the vial as “FROZEN.”
3. Freeze the vial in a freezer or the freezing compartment of a refrigerator until the contents are completely solid.
4. Let it thaw. Do NOT heat it!
5. Take your “TEST” vial from the batch that you suspect has been frozen.
6. Hold the “FROZEN” vial and the “TEST” vial together in one hand.
7. Shake both vials vigorously for 10-15 seconds.
8. Place both vials on a flat surface side-by-side and start continuous observation of the vials until test is finished.
(NOTE: If the vials have large labels, which conceal the vial contents, turn both vials upside down and observe sedimentation in the neck of the vial.)
Use an adequate source of light to compare the sedimentation rates between vials. IF,
9. The TEST vial sediments slower than the FROZEN vial,
THEN,
10. Sedimentation is similar in both vials
OR The TEST vial sediments faster than the FROZEN vial
THEN,
11. Use the vaccine batch. 11. Vaccine damaged: Notify your supervisor. Set aside all affected vaccine in a container marked “DAMAGED VACCINE FOR DISPOSAL– DO NOT USE’’
12. Discard all affected vaccine once you have received permission to do so.
13. Fill in the Loss/Adjustment Form.

Title: When and how to conduct the Shake Test
Code: EVM-SOP-E8-01 Version number: 1
Effective date: 07 Oct 2011 Page: 8 of 10
E8-01.1-shake test
Annex 2: Sampling method Any pharmaceutical system should have a quality control plan in place which describes the sampling procedure to be used in cases such as the one given in the example below. This annex shows how to use a quality control sampling system such as MIL-STD-105D or E2. This USA military standard has been used for many years as a sampling procedure. Other similar systems are also described by ANSI and ISO. Example: A batch of Hepatitis B Vaccine is held at the central store. The temperature records show that the vaccine may have been frozen during storage. The batch consists of 15,000 vials. It is impossible to do the shake test on all the vials and a representative sample must therefore be tested. How many vials should be tested in order to indicate the status of the batch? Notes on sampling: 1. It is assumed that a ‘normal’ inspection level will be adequate. 2. For freeze sensitive vaccines, freezing is a critical defect and therefore the
acceptance/rejection criteria will always be 0 and 1. This means that you can accept the shipment if zero vials in the sample fail the test, but you must reject the shipment if one or more vials in the sample fails.
2 MIL-STD-105D has been superseded by MIL-STD-105E which in turn has been superseded by MIL-STD-1916.

Title: When and how to conduct the Shake Test
Code: EVM-SOP-E8-01 Version number: 1
Effective date: 07 Oct 2011 Page: 9 of 10
E8-01.1-shake test
Step 1: Refer to Table 1 on page 13 of the Standard. Find the appropriate size range for the shipment in the Lot or batch size column as shown in the example below. Step 2: Find the matching sample size code in the General Inspection Levels column II as shown in the example.
Step 2: ‘Normal’ inspection level needed A shipment of 15,000 vials requires inspection level ‘M’
Step 1: Shipment size
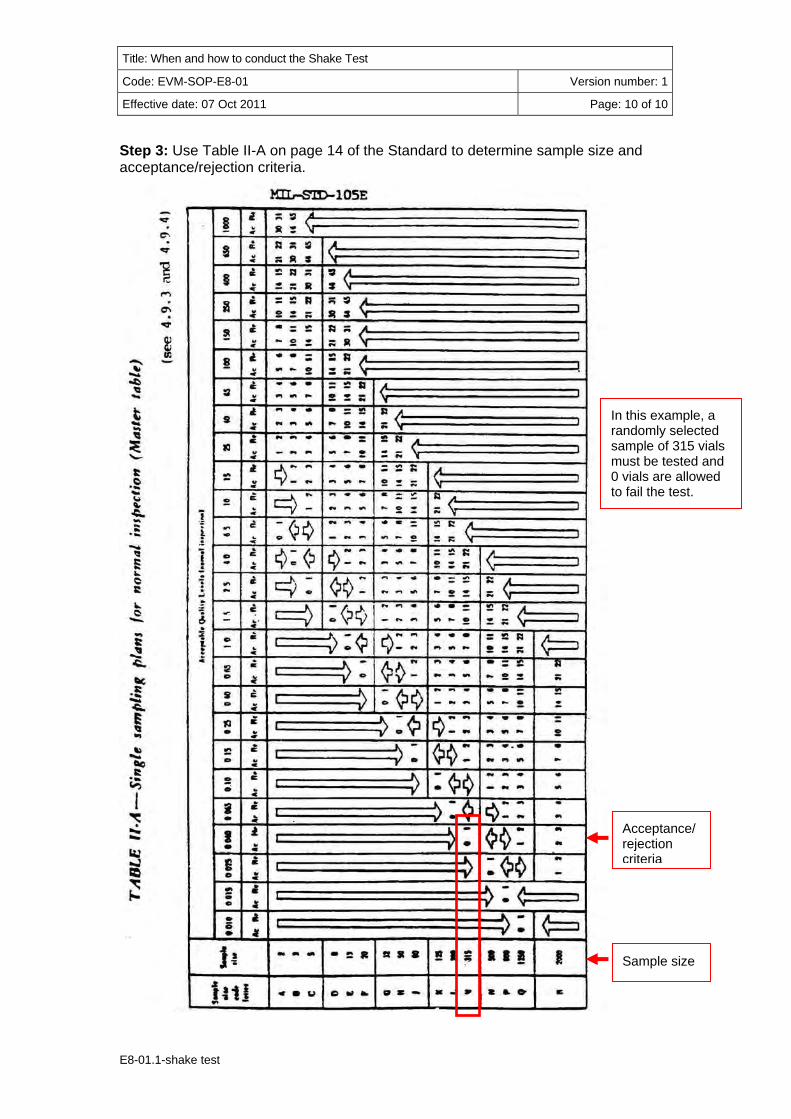
Title: When and how to conduct the Shake Test
Code: EVM-SOP-E8-01 Version number: 1
Effective date: 07 Oct 2011 Page: 10 of 10
E8-01.1-shake test
Step 3: Use Table II-A on page 14 of the Standard to determine sample size and acceptance/rejection criteria.
Acceptance/ rejection criteria
Sample size
In this example, a randomly selected sample of 315 vials must be tested and 0 vials are allowed to fail the test.
Title: Using Vaccine Vial Monitors
Code: EVM-SOP-E8-02 Version number: 1
Effective date: 07 Oct 2011 Page: 1 of 6
E8-02.1-using VVMs
Standard Operating Procedure Using Vaccine Vial Monitors
Approvals Name Date Signature
Authorized by:
Reviewed by:
Revised by:
Original author:
Version history
No Date Description of change Reason for change
1 07 Oct 2011 Original
2
3
4
5
Disclaimer: This is a model standard operating procedure. It incorporates generic guidance only. Countries are encouraged to adapt it as necessary to suit local requirements. Queries or comments may be addressed to [email protected]

Title: Using Vaccine Vial Monitors
Code: EVM-SOP-E8-02 Version number: 1
Effective date: 07 Oct 2011 Page: 2 of 6
E8-02.1-using VVMs
Table of content Distribution .................................................................................................................2 1. Policy and objectives.........................................................................................3
1.1 Policy............................................................................................................3 1.2 Objectives.....................................................................................................3
2. Responsibility.....................................................................................................3 3. Associated materials and equipment...............................................................3 4. Procedure............................................................................................................3
4.1 Training ........................................................................................................3 4.2 Using VVMs..................................................................................................3
4.2.1 When vaccines are received at the primary store ................................3 4.2.2 When vaccines are issued by a store...................................................3 4.2.3 When vaccines are received by a lower level store..............................4 4.2.4 When vaccines are administered .........................................................4
5. Related documents and SOPs ..........................................................................4 Annex 1 – Understanding VVMs ...............................................................................5
A1.1 What is a VVM?............................................................................................5 A1.2 How does it work? ....................................................................................5 A1.3 What are its limitations? ...............................................................................5 A1.4 What are the VVM stages? ..........................................................................5 A1.5 Why are VVMs important? ...........................................................................6 A1.6 What types of VVM are available and how are they used?..........................6 A1.7 Where is the VVM located?..........................................................................6
Distribution Distribute this SOP to the following:
Facility type Position(s)

Title: Using Vaccine Vial Monitors
Code: EVM-SOP-E8-02 Version number: 1
Effective date: 07 Oct 2011 Page: 3 of 6
E8-02.1-using VVMs
1. Policy and objectives
1.1 Policy WHO requires that all WHO pre-qualified vaccines are supplied with the appropriate Vaccine Vial Monitor (VVM) applied to the vaccine vial or ampoule. Countries that order vaccine through a UN procurement agency such as UNICEF Supply Division will receive vaccines supplied with VVMs. Countries that order vaccines direct from vaccine manufacturers are encouraged to include a requirement to supply VVMs1 as part of their procurement specifications.
1.2 Objectives Storekeepers and health workers who are responsible for handling vaccines at all levels of the supply chain must know how to read, interpret VVM colour changes and how to act correctly when a colour change is observed.
2. Responsibility All personnel who have responsibility for looking after vaccine and for checking its condition.
3. Associated materials and equipment VVM poster.
4. Procedure
4.1 Training Conduct training based on this SOP for all personnel responsible for managing or administering vaccines – see Annex 1.
4.2 Using VVMs VVM status should be checked at the following times:
4.2.1 When vaccines are received at the primary store
Location: Primary store Responsibility: Storekeeper
a. Check VVM status and complete the Vaccine Arrival Report as described in EVM-SOP-E1-02: Vaccine arrival procedures.
4.2.2 When vaccines are issued by a store
Location: All stores which issue vaccine to lower level stores Responsibility: Storekeeper
1 WHO/IVB/07.04. WHO-UNICEF policy statement on the implementation of vaccine vial monitors.

Title: Using Vaccine Vial Monitors
Code: EVM-SOP-E8-02 Version number: 1
Effective date: 07 Oct 2011 Page: 4 of 6
E8-02.1-using VVMs
a. Check VVM status and expiry dates for each type and batch of vaccine during preparation of the issue voucher. Generally make sure that any vaccine which shows the most VVM exposure is issued first2.
b. Record VVM status for each vaccine and each batch on the issue voucher.
4.2.3 When vaccines are received by a lower level store
Location: Lower level stores and health facilities Responsibility: Storekeeper
a. Check a sample of each batch of each vaccine received. Record VVM status on the arrival voucher. Compare the observed VVM status with the VVM status recorded on the issue voucher and report any differences to the supplying store.
b. Ensure that vaccine which shows the most VVM exposure is clearly identified so that it can be issued as soon as possible to lower level stores or health facilities.
4.2.4 When vaccines are administered
Location: Health facility immunization session or outreach session Responsibility: Health worker
a. Immediately before opening the vial, check that the VVM status is usable and check that the expiry date has not passed. If both these checks are OK, use the vaccine.
b. If the VVM status is unusable OR the expiry date has passed, DO NOT use the vaccine. Put it to one side until the end of the session and then dispose of it safely.
5. Related documents and SOPs EVM-SOP-E1-02: Vaccine arrival procedures EVM-SOP-E6-04: Safe disposal of expired or damaged vaccine and
diluents.
2 The goal is to avoid vaccine wastage during storage either due to VVM exposure or due to expiry date. You have to use your judgement here to make the correct decision.

Title: Using Vaccine Vial Monitors
Code: EVM-SOP-E8-02 Version number: 1
Effective date: 07 Oct 2011 Page: 5 of 6
E8-02.1-using VVMs
Annex 1 – Understanding VVMs
A1.1 What is a VVM? A VVM is a heat sensitive label which is placed on a vaccine vial to register cumulative heat exposure over time. The VVM is a circle with a small square inside it. The square contains a heat-sensitive dye.
A1.2 How does it work? The combined effects of time and temperature cause the inner square of the VVM to darken, gradually and irreversibly: - The lower the temperature, the more slowly the inner square changes colour. - The higher the temperature, the faster the inner square changes colour.
A1.3 What are its limitations? The VVM does not directly measure vaccine potency but it does give information about the main factor that affects potency: heat exposure over a period of time. Many liquid vaccines are also damaged by exposure to freezing. The VVM does not register information about freezing.
A1.4 What are the VVM stages? There are only two VVM stages. The usable stage is where the square is lighter than the circle. The unusable stage is where the square matches the colour of the circle, or is darker. The point at which the colour of the square exactly matches the colour of the circle is called the end point. How to read a VVM
Usable stage Unusable stage
The square is lighter than the circle.
If the expiry date is not passed, USE the vaccine
The square matches or is darker than the circle.
DO NOT USE the vaccine Inform your supervisor

Title: Using Vaccine Vial Monitors
Code: EVM-SOP-E8-02 Version number: 1
Effective date: 07 Oct 2011 Page: 6 of 6
E8-02.1-using VVMs
A1.5 Why are VVMs important? The VVM shows whether the vaccine vial has been exposed to excessive heat over time and it indicates whether the vaccine is likely to have been damaged by this exposure. Once the indicator reaches the end point, the vaccine should no longer be used.
A1.6 What types of VVM are available and how are they used? Some vaccines are more sensitive to heat than others. For this reason there are currently four different types of VVM designed to match vaccines with differing heat stability. For example, VVM 2 is used with OPV because this is the most heat-sensitive vaccine; this VVM reaches its discard point after only 2 days at 37°C. In contrast, hepatitis B vaccine is very heat-stable and the VVM 30 is used; it takes 30 days to reach its discard point at 37°C. The table below describes the four VVM reaction rates by category of heat stability. VVM reaction rates by category of heat stability
Category Time to end point at +37°C
Time to end point at +25°C
Time to end point at +5°C
VVM 30 High stability
30 days 193 days > 4 years
VVM 14 Medium stability
14 days 90 days > 3 years
VVM 7 Moderate stability
7 days 45 days > 2 years
VVM 2 Least stable
2 days Not applicable 225 days
Note that vaccines made by different manufacturers can have different heat stability characteristics and will be assigned to different VVM categories by WHO. For example, one manufacturer’s BCG might use a VVM 30 while another type of BCG may need a VVM14.
A1.7 Where is the VVM located? VVMs are fixed to the vial or ampoule label of liquid vaccines which can be used in subsequent sessions under the Multi-dose Vial Policy (MDVP). Where the vaccine cannot be used in subsequent sessions – for example, lyophilized vaccines such as MMR – the VVM is fixed to the vial cap or the neck of the ampoule. The VVM may also be fixed to the cap of mono-dose vials.

Title: How to write and revise an SOP
Code: EVM-SOP-E9-01 Version number: 1
Effective date: 07 Oct 2011 Page: 1 of 7
E9-01.1-write SOPs
Standard Operating Procedure How to write and revise an SOP
Approvals Name Date Signature
Authorized by:
Reviewed by:
Revised by:
Original author:
Version history
No Date Description of change Reason for change
1 07 Oct 2011 Original
2
3
4
5
Disclaimer: This is a model standard operating procedure. It incorporates generic guidance only. Countries are encouraged to adapt it as necessary to suit local requirements. Queries or comments may be addressed to [email protected] New SOP: Assign a unique code to the SOP. Enter the name of the original author and the date when the document was completed. Enter the name of the reviewer and the name of the supervisor who will approve the document. Enter the review data and approval date and obtain the necessary signatures. Revised SOP: Enter the name of the reviser and the names of the reviewer and supervisor who have checked and approved the changes.

Title: How to write and revise an SOP
Code: EVM-SOP-E9-01 Version number: 1
Effective date: 07 Oct 2011 Page: 2 of 7
E9-01.1-write SOPs
Table of content Distribution .................................................................................................................2 1. Policy and objectives.........................................................................................3
1.1 Policy............................................................................................................3 1.2 Objectives.....................................................................................................3
2. Responsibility.....................................................................................................3 3. Associated materials and equipment...............................................................4 4. Procedure............................................................................................................4
4.1 SOP coding and file naming conventions.....................................................4 4.2 Creating a new SOP.....................................................................................4
4.2.1 Overview...............................................................................................4 4.2.2 Setting up a new SOP ..........................................................................5 4.2.3 Writing, reviewing and distributing the SOP .........................................6
4.3 Revising an SOP ..........................................................................................6 5. Related documents and SOPs ..........................................................................7 Annexes ......................................................................................................................7
Distribution Distribute this SOP to the following:
Facility type Position(s)
List all the facility types where the SOP applies. Within each facility type, list the positions of the personnel who are responsible for the task described in the SOP.

Title: How to write and revise an SOP
Code: EVM-SOP-E9-01 Version number: 1
Effective date: 07 Oct 2011 Page: 3 of 7
E9-01.1-write SOPs
1. Policy and objectives
1.1 Policy For each SOP, clearly and briefly state the policy which the SOP is intended to support. This policy may be taken from the national quality plan or from other national guidance documents1. The next paragraph describes the policy which this SOP is intended to implement. Clearly written standard operating procedures are an integral component of a national immunization supply chain strategy. SOPs form the basis for personnel training so that key tasks are carried out correctly and consistently. SOPs also help to ensure that quality and consistency is maintained when there are personnel changes. An SOP must:
provide personnel with all the health, safety, environmental and operational information needed to perform a task correctly;
ensure that operations are performed consistently in order to maintain quality control;
ensure that processes continue uninterrupted and are completed within the required timeframe;
ensure that no failures occur that could harm anyone; ensure that approved activities are followed in compliance with policies,
procedures and/or legislation; serve as a training document, e.g. for a new stores assistant or vaccinator serve as a historical record of the how, why and when of steps in an
existing process; serve as an explanation of steps in a process so they can be reviewed in
the event of an incident investigation; be formally authorized, distributed, implemented and maintained.
1.2 Objectives Clearly state the objectives of the current SOP. The next paragraph describes the objectives of this SOP. This document explains the procedure for setting up a new SOP file using the standard SOP template. It describes document coding and file-naming conventions. It outlines the SOP writing, peer-review and approval process and it describes how to make subsequent revisions to the document.
2. Responsibility Describe and list the people (preferably by job title) responsible for performing each of the activities listed in the SOP. In some cases, the tasks in an SOP will be carried out by a single staff member. In other cases the tasks will be carried out by more than one person.
1 Many of the policy statements in the EVM Model SOPs are taken from WHO/IVB/04.16-20. WHO-UNICEF Effective Vaccine Store Management Initiative - Module 2: Model Quality Plan.
Title: How to write and revise an SOP
Code: EVM-SOP-E9-01 Version number: 1
Effective date: 07 Oct 2011 Page: 4 of 7
E9-01.1-write SOPs
3. Associated materials and equipment Describe any special materials or equipment which will be needed to perform the procedure described. For example: a freezer or freezing compartment is needed to conduct the Shake Test and warm clothing is needed to work in a cold room or freezer room.
4. Procedure
4.1 SOP coding and file naming conventions Responsibility: <List personnel responsible> SOPs must be coded and named in a consistent manner. A coding system based on the WHO Effective Vaccine Management (EVM) criteria numbering has been adopted for these Model SOPs because it helps to classify the subject area of each SOP. The EVM criteria headings are as follows:
E1: Vaccine arrival E2: Temperature monitoring E3: Storage and transport capacity E4: Buildings equipment and transport E5: Maintenance E6: Stock management E7: Distribution E8: Vaccine Management E9: Management systems
File names based on this approach should be structured as follows: <Country code>-SOP-<EVM code>-<unique number>-<revision number>
This file is EVM-SOP-E9-01-1 because it is the first SOP in the E9: Management Systems category. The country code is optional, but may be useful when SOPs are shared with other countries using a similar coding system.
4.2 Creating a new SOP
4.2.1 Overview
Responsibility: <List personnel responsible> The steps below outline the general procedure to follow when writing an SOP.
a. Describe the procedure as a series of clearly identified steps. b. Use clear, unambiguous language. c. Where a procedure is carried out by more than one person, name the
position of the responsible person next to the action step for which s/he is responsible. For example: Responsibility: Store Manager
d. When complete, read the SOP to check whether it completely describes all the steps to be followed from the start of the process to the end.
e. Have the draft document reviewed by a colleague who is unfamiliar with the procedure to see whether s/he can understand and follow the steps required.

Title: How to write and revise an SOP
Code: EVM-SOP-E9-01 Version number: 1
Effective date: 07 Oct 2011 Page: 5 of 7
E9-01.1-write SOPs
f. If one step relates to another SOP, then make reference to that SOP in the relevant step.
g. If the SOP requires any records to be kept, attach an example of the required format as a numbered annex. Give a clear example of the correct way to complete the form.
h. Have the SOP peer-reviewed by a knowledgeable colleague and make changes as necessary.
i. Field-test the SOP to make sure it is understood by the target audience. Make further changes to clarify any misunderstandings.
j. Forward the SOP to the supervisor or person responsible for documentation and quality assurance. Make further changes as necessary
k. Obtain final approvals from your reviewer and supervisor. Distribute the completed SOP as described in EVM-SOP-E9-02: How to manage and distribute SOPs
4.2.2 Setting up a new SOP
Responsibility: <List personnel responsible> In Word 2003, proceed as follows:
a. Open the file named EVM-SOP-template-<latest revision>. This is a ‘read-only’ file.
b. Enter the document title as follows. Go to File/Properties/Summary and enter the name of the title in the Title box as shown below.
The title you enter will automatically appear in the document headers. You can change it later by repeating Step 2, but you will then have to go to the header, click on the title and select Update Field.
c. Save the file using File/Save As. The file name should be structured as follows: EVM-<Code>-<Version no>. For example, the original version of

Title: How to write and revise an SOP
Code: EVM-SOP-E9-01 Version number: 1
Effective date: 07 Oct 2011 Page: 6 of 7
E9-01.1-write SOPs
this document is EVM-SOP-E9-01-1; the first revision will be EVM-SOP-E9-01-2. You should add a draft number to keep track of changes made during the drafting process and to show that the document has not been released – for example: EVM-SOP-E9-01-2-D2. Make sure you delete the draft number when the document is finally approved.
d. Go to the document header and enter the date in the Date of current revision box. Use a consistent date format on all SOPs – for example dd.mmm.yyyy or yyyy.mmm.dd.
4.2.3 Writing, reviewing and distributing the SOP
Responsibility: <List personnel responsible> a. Write the draft SOP. In the Distribution section, after the Table of content,
make sure that you list all the Facility types and Positions to which the SOP applies – for example:
Facility type Position(s)
National Vaccine Store Store Manager Storekeeper
Regional vaccine store Store Manager Storekeeper
b. If you include references to external documents in Section 5, try to find the document on-line and include a hyperlink so that readers with internet access can find it, even if they only have a hard copy of the SOP. For example, the reference to the WHO MDVP policy statement should be cited as: WHO Policy Statement: The use of opened multi-dose vials of vaccine in subsequent immunization sessions http://www.who.int/vaccines-documents/DocsPDF99/www9924.pdf
c. Have the draft peer-reviewed by colleagues and make any necessary changes.
d. Enter your name and position in the Original author: section on the first page. You should sign the final version when it is fully approved. If you have written the document with somebody else, just enter the name of the principal author.
e. Have the final version approved by your reviewer and your supervisor. They should enter name, position and signature in the Reviewed by and Approved by section of the first page. Make sure that the Effective date in the header is the date of final approval.
f. Distribute the SOP to the relevant locations. Refer to EVM-SOP-E9-02: Managing and distributing SOPs.
Reasons: This procedure ensures that all document headers are correctly titled, that file naming is consistent and that all SOPs are peer-reviewed and approved before distribution.
4.3 Revising an SOP Responsibility: <List personnel responsible> Proceed as follows:

Title: How to write and revise an SOP
Code: EVM-SOP-E9-01 Version number: 1
Effective date: 07 Oct 2011 Page: 7 of 7
E9-01.1-write SOPs
a. Save the existing file using File/Save As. Update the file name by changing the Version number at the end of the existing file name. For example, if we update this file, EVM-SOP-E9-01-1 will become EVM-SOP-E9-01-2.
b. Revise the document Version number in the document header. c. Change the document text as required. You should add a draft number to
keep track of changes made during the revision process and to show that the document has not been released – for example: EVM-SOP-E9-01-2-D2. Make sure you delete the draft number when the document is finally approved.
d. Record the changes you have made in the Version history table on the first page. You may have to do this more than once to keep track of changes made following peer-review.
e. Review the document distribution table on page 2. Does the list need to be changed?
f. Have the draft peer-reviewed by colleagues and make any necessary changes.
g. Enter your name and position in the Revised by: row at the top of the first page. You should sign the final version when it is fully approved.
h. Have the revisions approved by your reviewer and supervisor. They should enter a signature in the Reviewed by: and Authorized by: rows at the top of the first page. Make sure that you update the document header to the new Effective date and the new Version number.
i. Distribute the revised SOP to the relevant locations and withdraw previous versions. Refer to EVM-SOP-E1-02: Managing and distributing SOPs.
Reason: This procedure ensures that all SOP revisions are approved and authorized, correctly versioned and dated, and that file naming is consistent.
5. Related documents and SOPs SOP template file: EVM-SOP-template.doc EVM-SOP-E9-02: How to manage and distribute SOPs
Annexes Use numbered annexes (Annex 1, Annex 2, etc.) for additional background material, standard forms, etc.

Title: How to manage and distribute SOPs
Code: EVM-SOP-E9-02 Version no: 1
Effective date: 07 Oct 2011 Page: 1 of 5
E9-02.1-manage SOPs
Standard Operating Procedure How to manage and distribute SOPs
Approvals Name Date Signature
Authorized by:
Reviewed by:
Revised by:
Original author:
Version history
No Date Description of change Reason for change
1 07 Oct 2011 Original
2
3
4
5
Disclaimer: This is a model standard operating procedure. It incorporates generic guidance only. Countries are encouraged to adapt it as necessary to suit local requirements. Queries or comments may be addressed to [email protected]

Title: How to manage and distribute SOPs
Code: EVM-SOP-E9-02 Version no: 1
Effective date: 07 Oct 2011 Page: 2 of 5
E9-02.1-manage SOPs
Table of content Distribution .................................................................................................................2 1. Policy and objectives.........................................................................................3
1.1 Policy............................................................................................................3 1.2 Objectives.....................................................................................................3
2. Responsibility.....................................................................................................3 3. Associated materials and equipment...............................................................3 4. Procedure............................................................................................................3
4.1 Responsibility ...............................................................................................3 4.2 SOP format...................................................................................................3 4.3 Accessibility..................................................................................................4 4.4 Informing, training and supervising personnel..............................................4 4.5 Record keeping and SOP version management ..........................................4
5. Related documents and SOPs ..........................................................................4 Annex 1: Distribution forms......................................................................................5
Distribution Distribute this SOP to the following:
Facility type Position(s)

Title: How to manage and distribute SOPs
Code: EVM-SOP-E9-02 Version no: 1
Effective date: 07 Oct 2011 Page: 3 of 5
E9-02.1-manage SOPs
1. Policy and objectives
1.1 Policy Responsible personnel should ensure that every facility which stores or uses vaccine and other immunization supplies has current copies of the SOPs that are relevant to that facility. A system should be in place to ensure that the SOPs can be updated easily and reliably.
1.2 Objectives This document explains how to manage and distribute SOPs. It is essential to follow the correct procedure to ensure the following:
a. Every SOP is distributed in a timely fashion to all personnel who need to read and follow it.
b. Revised SOPs are correctly distributed and the relevant personnel are informed about the changes made.
c. Superseded versions of SOPs are collected and withdrawn.
2. Responsibility All personnel who are responsible for managing SOPs.
3. Associated materials and equipment Computer-based or paper records for tracking SOP circulation. Note: Decide whether to use a spreadsheet for this or to maintain a paper record. For example, you might have a spreadsheet at central level and paper records at lower levels.
4. Procedure
4.1 Responsibility A National Quality Manager should be appointed at central level. This person will be responsible for day-to-day management of SOPs and other quality management documents. One person in each facility should be designated as the Facility Quality Manager and made formally responsible for managing SOP record keeping, distribution and updating and for other quality management issues. Reason: The appointment of the central level National Quality Manager and the Facility Quality Managers represents an important commitment towards the implementation of quality management principles and thinking.
4.2 SOP format Responsibility: National Quality Manager An SOP can be distributed electronically, but the file must be in PDF format. Documents in Word format can easily be amended without authorization. At facility level, every SOP must be printed on paper so that it is readily accessible to the personnel who need to use it.

Title: How to manage and distribute SOPs
Code: EVM-SOP-E9-02 Version no: 1
Effective date: 07 Oct 2011 Page: 4 of 5
E9-02.1-manage SOPs
4.3 Accessibility Responsibility: National Quality Manager At central level, keep a master copy of the Central SOP manual. This should contain the original printed, signed and approved version of each SOP, filed in logical order. It should also contain all signed and approved revisions. At the facility level, a reference copy of the SOP should be filed in a logical order in a loose-leaf hard backed folder – the Facility SOP Manual. The folder must be readily accessible to all personnel during working hours. In larger facilities, it may be necessary to have more than one SOP file.
4.4 Informing, training and supervising personnel Responsibility: Facility Quality Managers When a new or revised SOP is received, the Facility Quality Manager must issue a personal copy of the document to each of the responsible personnel. The manager must also ensure that the document is read and fully understood. Where specific training is needed, this should be arranged. After the SOP has been issued, personnel should be monitored to ensure that the new procedures are being followed.
4.5 Record keeping and SOP version management Responsibility: National Quality Manager and Facility Quality Managers At central level, record the facilities to which SOPs and SOP revisions have been distributed. An example of a central level distribution record is given In Annex 1 – Table 1. At facility level, record SOP receipt, SOP circulation, and retrieval of superseded SOPs. Ensure that superseded SOPs are always replaced by the latest version. An example of a facility level receipt and distribution record is also given in Annex 1 – Table 2. Reasons: These procedures are intended to ensure that a well-designed system is put in place to manage SOPs and other quality-related documents at central and lower levels. It is essential that relevant personnel are informed about SOPs, receive suitable training in their management and day-to-day use and follow the procedures described. Correct use of SOP registers will help ensure that a complete record is kept of SOP distribution history and that out-of-date versions are withdrawn.
5. Related documents and SOPs EVM-SOP-E9-01: How to write and revise an SOP.

Title: How to manage and distribute SOPs
Code: EVM-SOP-E9-02 Version no: 1
Effective date: 07 Oct 2011 Page: 5 of 5
E9-02.1-manage SOPs
Annex 1: Distribution forms Table 1 Location: National EPI SOP CENTRAL DISTRIBUTION REGISTER
SOP ref Version Title Issue date Issued to By
MOG-SOP-E9-02-1 1 How to manage and distribute SOPs
2010.11.10
Facility A Facility B Facility C
EB
Table 2 Location: Facility A SOP RECEIPT REGISTER
SOP DISTRIBUTION REGISTER
SOP ref Version Title Arrival date From By Issued to
Issue date By Previous version withdrawn?
MOG-SOP-E9-02-1
1 How to manage and distribute SOPs
2010.11.20 NCCD SM EPI manager Storekeeper
16 Apr 2010
SM Y N n/a
Y N n/a
Y N n/a
Note: The Facility Quality Manager within each facility must ensure that all copies of superseded versions are located and withdrawn.


![Vibration Motorssumeendustri.com › img › K-VIBROMOTOR › KEMP_KATALOG.pdfIndex EVM [ 3-10 ] EVM-M [ 11-12 ] EVM-D [ 13-14 ] PSV-P [ 15 ] EVM-DC [ 16 ] Mv2 [ 17 ] Standart Ürünler](https://img.dokumen.tips/doc/110x75/5f207ac83dd46b6785391bd4/vibration-a-img-a-k-vibromotor-a-kempkatalogpdf-index-evm-3-10-evm-m.jpg)