Embed Size (px)
Citation preview

Unified Communicator Mobile Client Handset User GuideRelease 2.0
MITEL
Unified Communicator Mobile

NOTICE
The information contained in this document is believed to be accurate in all respects but is not warranted by Mitel Networks™ Corporation (MITEL®). The information is subject to change without notice and should not be construed in any way as a commitment by Mitel or any of its affiliates or subsidiaries. Mitel and its affiliates and subsidiaries assume no responsibility for any errors or omissions in this document. Revisions of this document or new editions of it may be issued to incorporate such changes.
No part of this document can be reproduced or transmitted in any form or by any means - electronic or mechanical - for any purpose without written permission from Mitel Networks Corporation.
Trademarks
Mitel is registered trademark of Mitel Networks Corporation.
Unified Communicator is registered trademark of Mitel Networks Corporation
Windows, and Windows Mobile are trademarks of Microsoft Corporation.
Part of the software embedded in this product is gSOAP software.
Portions created by gSOAP are Copyright © 2001-2004 Robert A. van Engelen, Genivia Inc. All Rights Reserved.The software in this product was in part provided by Genivia Inc. and any express or implied warranties, including, but not limited to, the implied warranties of merchantability and fitness for a particular purpose are disclaimed. In no event shall the author be liable for any direct, indirect, incidental, special, exemplary, or consequential damages (including, but not limited to, procurement of substitute goods or services; loss of use, data, or profits; or business interruption) however caused and on any theory of liability, whether in contract, strict liability, or tort (including negligence or otherwise) arising in any way out of the use of this software, even if advised of the possibility of such damage.
Other product names mentioned in this document may be trademarks of their respective companies and are hereby acknowledged.
Unified Communicator Mobile Client Handset User GuideRelease 2.0
November, 2009
®,™ Trademark of Mitel Networks Corporation© Copyright 2009, Mitel Networks Corporation
All rights reserved

Table of Contents
iii
Chapter 1: Introduction
About Mitel Unified Communicator Mobile Client . . . . . . . . . . . . . . . . . . . . . . . . . . . . . . . . . . . . . . 3
Product Naming . . . . . . . . . . . . . . . . . . . . . . . . . . . . . . . . . . . . . . . . . . . . . . . . . . . . . . . . . . . . . . 3
Supported Handsets . . . . . . . . . . . . . . . . . . . . . . . . . . . . . . . . . . . . . . . . . . . . . . . . . . . . . . . . . . 4
About the Documentation Set. . . . . . . . . . . . . . . . . . . . . . . . . . . . . . . . . . . . . . . . . . . . . . . . . . . . . 4Access Product Documentation . . . . . . . . . . . . . . . . . . . . . . . . . . . . . . . . . . . . . . . . . . . . . . . 4
Chapter 2: Windows Mobile Handsets
Installing UC Mobile Client on Windows Mobile Handsets . . . . . . . . . . . . . . . . . . . . . . . . . . . . . . . 7
Provisioning . . . . . . . . . . . . . . . . . . . . . . . . . . . . . . . . . . . . . . . . . . . . . . . . . . . . . . . . . . . . . . . . . 8
Using UC Mobile Client. . . . . . . . . . . . . . . . . . . . . . . . . . . . . . . . . . . . . . . . . . . . . . . . . . . . . . . . . 10
Starting the UC Mobile Client Application . . . . . . . . . . . . . . . . . . . . . . . . . . . . . . . . . . . . . . . . . 10
UC Mobile Connection Status . . . . . . . . . . . . . . . . . . . . . . . . . . . . . . . . . . . . . . . . . . . . . . . . . . 10
Stopping the UC Mobile Client application . . . . . . . . . . . . . . . . . . . . . . . . . . . . . . . . . . . . . . . . 11
Settings . . . . . . . . . . . . . . . . . . . . . . . . . . . . . . . . . . . . . . . . . . . . . . . . . . . . . . . . . . . . . . . . . . . 11Login Details . . . . . . . . . . . . . . . . . . . . . . . . . . . . . . . . . . . . . . . . . . . . . . . . . . . . . . . . . . . . . 12User Profile . . . . . . . . . . . . . . . . . . . . . . . . . . . . . . . . . . . . . . . . . . . . . . . . . . . . . . . . . . . . . . 13Scheduling . . . . . . . . . . . . . . . . . . . . . . . . . . . . . . . . . . . . . . . . . . . . . . . . . . . . . . . . . . . . . . 15
Application Options . . . . . . . . . . . . . . . . . . . . . . . . . . . . . . . . . . . . . . . . . . . . . . . . . . . . . . . . . . 17Call Voicemail . . . . . . . . . . . . . . . . . . . . . . . . . . . . . . . . . . . . . . . . . . . . . . . . . . . . . . . . . . . . 17OfficeLink . . . . . . . . . . . . . . . . . . . . . . . . . . . . . . . . . . . . . . . . . . . . . . . . . . . . . . . . . . . . . . . 18Settings . . . . . . . . . . . . . . . . . . . . . . . . . . . . . . . . . . . . . . . . . . . . . . . . . . . . . . . . . . . . . . . . . 18
Placing a Call . . . . . . . . . . . . . . . . . . . . . . . . . . . . . . . . . . . . . . . . . . . . . . . . . . . . . . . . . . . . . . . 18Call Options . . . . . . . . . . . . . . . . . . . . . . . . . . . . . . . . . . . . . . . . . . . . . . . . . . . . . . . . . . . . . 19
Chapter 3: Nokia Mobile Handsets
Installing the UC Mobile Client on Nokia Mobile Handsets. . . . . . . . . . . . . . . . . . . . . . . . . . . . . . 23
Using UC Mobile Client. . . . . . . . . . . . . . . . . . . . . . . . . . . . . . . . . . . . . . . . . . . . . . . . . . . . . . . . . 26
Starting the UC Mobile Client Application . . . . . . . . . . . . . . . . . . . . . . . . . . . . . . . . . . . . . . . . . 26
Status . . . . . . . . . . . . . . . . . . . . . . . . . . . . . . . . . . . . . . . . . . . . . . . . . . . . . . . . . . . . . . . . . . . . . 26
Stopping the UC Mobile Client Application . . . . . . . . . . . . . . . . . . . . . . . . . . . . . . . . . . . . . . . . 27
Settings . . . . . . . . . . . . . . . . . . . . . . . . . . . . . . . . . . . . . . . . . . . . . . . . . . . . . . . . . . . . . . . . . . . 28Scheduling . . . . . . . . . . . . . . . . . . . . . . . . . . . . . . . . . . . . . . . . . . . . . . . . . . . . . . . . . . . . . . 33
Application Options . . . . . . . . . . . . . . . . . . . . . . . . . . . . . . . . . . . . . . . . . . . . . . . . . . . . . . . . . . 35Office Link . . . . . . . . . . . . . . . . . . . . . . . . . . . . . . . . . . . . . . . . . . . . . . . . . . . . . . . . . . . . . . . 35Voicemail . . . . . . . . . . . . . . . . . . . . . . . . . . . . . . . . . . . . . . . . . . . . . . . . . . . . . . . . . . . . . . . 35

UC Mobile Client Handset User Guide
iv
Change access point . . . . . . . . . . . . . . . . . . . . . . . . . . . . . . . . . . . . . . . . . . . . . . . . . . . . . .36
Placing a Call . . . . . . . . . . . . . . . . . . . . . . . . . . . . . . . . . . . . . . . . . . . . . . . . . . . . . . . . . . . . . . .36Call Options . . . . . . . . . . . . . . . . . . . . . . . . . . . . . . . . . . . . . . . . . . . . . . . . . . . . . . . . . . . . .37
Setting up Active Standby . . . . . . . . . . . . . . . . . . . . . . . . . . . . . . . . . . . . . . . . . . . . . . . . . . . . .39
Chapter 4: Troubleshooting
Troubleshooting . . . . . . . . . . . . . . . . . . . . . . . . . . . . . . . . . . . . . . . . . . . . . . . . . . . . . . . . . . . . . . 45

Chapter 1
Introduction

UC Mobile Client Handset User Guide
2

About Mitel Unified Communicator Mobile Client
3
About Mitel Unified Communicator Mobile Client
The Mitel® Unified Communicator® (UC) Mobile Client is an application on a mobile handset that communicates with the UC Mobile service. The UC Mobile Client application allows you to make calls from your mobile handset through your corporate telephone system.
UC Mobile unites the corporate and cellular communication domains, providing you with access to a common set of rich corporate-based communications services.
With UC Mobile, your cell phone acts as an extension or "twin" of your desk phone, and provides you with the core telecommunication features of your company while mobile. The result is that you avoid missed calls and gain personal productivity.
You have access to one common set of utilities inside and outside of the office to establish everyday communications functions such as call transfer and conferencing. This gives you the flexibility of choice, taking a call that was directed to your desk phone and having it simultaneously ring your mobile phone while away from your desk. Upon the arrival to the office you can transfer the call from your mobile device to your desk phone, taking advantage of additional functionality that may be available, as well as ensuring cost saving as calls are no longer on the mobile network.
With the addition of UC Mobile Client, you now truly have a single identity: your office-based extension. Only one number to call to be reached, and only one number being communicated outwards on calls originated on your mobile device. While on a call, whether inbound to the mobile or outbound from the mobile, you can simply and intuitively use your corporate telephone system’s capabilities through a Graphical User Interface on your mobile device.
The UC Mobile Client application makes the following features available to you on your mobile handset:
• OfficeLink; the capability to make a call from anywhere through your corporate phone system
• Time of day scheduling, allowing you to schedule when the UC Mobile service is available
• Setting the twinned phone number
• Enabling/disabling the UC Mobile service
• Enabling/disabling Answer Confirmation
Product Naming
In previous releases, the Unified Communicator Mobile product was named Mobile Extension. Some of the client screens in the graphical user interface still display "Mobile Extension" and "ME Client". You should interpret these product names as follows:
• "Mobile Extension" is equivalent to "Unified Commuicator Mobile"
• "ME Client" is equivalent to "UC Mobile Client".
UC Mobile Client Handset User Guide
4
Supported Handsets
The following mobile handsets are supported by the UC Mobile Client application:
• Nokia E-Series
• Windows® Mobile 6.0
About the Documentation Set
To access the documentation pages at Mitel OnLine, go to http://edocs.mitel.com. You require a Mitel Online username and password to access the documents on this web site.
Mitel UC Mobile:
MAS Administrator Portal Online Help, provides administration and programming procedures for the UC Mobile software.
My Unified Communications Portal Online Help, provides instructions for personalizing and customizing some of the UC Mobile and UC Mobile Client Application features.
UC Mobile Quick Reference Guide, provides quick reference information about using UC Mobile with your handset.
UC Mobile Client:
UC Mobile Client Handset User Guide (this guide), provides information about installing and using the UC Mobile Client application on your handset.
Access Product Documentation
To access Product Documentation:
1. Log on to Mitel OnLine.
2. Move the pointer over Support.
3. Click Product Documentation.
4. To access application documentation, place your mouse cursor over Applications and Solutions.
5. Select your application name from the drop-down list.
To access Mitel Knowledge Base articles
1. Log on to Mitel OnLine.
2. Move the pointer over Technical.
3. Under Related Links, click Knowledge Base. The Knowledge Base search engine opens.
4. From the Product list, select your application name and click Search.

Chapter 2
Windows Mobile Handsets

UC Mobile Client Handset User Guide
6

Installing UC Mobile Client on Windows Mobile Handsets
7
Installing UC Mobile Client on Windows Mobile Handsets
You will receive a text message on your handset notifying you that the UC Mobile Client application is ready to be downloaded. Do not delete this message from your Inbox, it will be removed later as part of the setup procedure.
Before opening the message you should ensure you have a GPRS or WiFi access point configured. You will need to have a data service enabled on your mobile device.
Installation involves downloading the application, provisioning the handset, and ensuring that your login credentials and user profile settings are established.
To install the UC Mobile Client application on your handset:
1. Open the Messaging application and then the text message.
2. Click the web link to in the message to begin downloading the UC Mobile Client application.
3. The Download screen appears. Select Yes.
4. You may be prompted to update the UC Mobile Client application. You will be asked to confirm replacing the existing file. Select OK to continue.
5. The UC Mobile Client application will now download and begin installing auto-matically. If asked to confirm the installation select Yes.

UC Mobile Client Handset User Guide
8
6. If you have a storage card in your hand-set, you will be asked to select a location to which you wish to install the applica-tion (otherwise the location will automatically be chosen as device):
a. Scroll Left or Right to select the location.
b. Select Install.
7. When installation is complete, you will be prompted to reboot your device. Select Yes. After re-booting, the UC Mobile icon displays on the main screen.
8. Setup your account as described in “Pro-visioning” on page 8.
Provisioning
When the UC Mobile Client application runs for the first time, it will attempt to provision your mobile handset as follows:
• download and configure all of your re-quired personalized settings automatically, including:
- your login details- your user profile settings- any optional features as setup by
your administrator
• remove the original text message notice from your inbox
To begin provisioning, launch the UC Mobile Client application:
1. From the main screen, select the Mitel ME Client.OR
2. Open the Start Menu.
3. Select Mitel ME Client.

Installing UC Mobile Client on Windows Mobile Handsets
9
4. When provisioning is complete, enter your Passcode when prompted to do so.
5. The Ready screen displays.
You are now ready to use the UC Mobile Client application. See “Using UC Mobile Client” on page 10.

UC Mobile Client Handset User Guide
10
Using UC Mobile Client
The UC Mobile Client is an application accessible from the Start menu on your Windows Mobile handset.
Starting the UC Mobile Client Application
Open the Start menu and select Mitel ME Client. The Ready screen displays.
The UC Mobile Client application is also accessible directly from the main screen display, as shown in the screen on the right. Navigate to highlight and then select the UC Mobile Client icon.
UC Mobile Connection Status
There are a number of status indications identifying whether or not outgoing calls are routed through the Mitel UC Mobile Server and your office telephone system, and if settings are turned on or off.
The two icons located at the bottom of the Ready screen indicate the status of the UC Mobile Client as follows:
Note: During a UC Mobile Client call, the Call Waiting feature (available from your network provider) is not supported with this release of UC Mobile Client.

Using UC Mobile Client
11
OfficeLink: This icon indicates if call are being routed through your office telephone system. If this is greyed-out, then calls are not being routed through your office telephone system.
Twinning: This icon indicates if your desk phone is "twinned" with another telephone number, for example your mobile phone. When a call comes to your desk phone, your mobile phone will ring simultaneously. If this icon is greyed-out, then twinning is turned off.
The UC Mobile Client will not intercept calls when there is a connection problem or when the Twinning setting is off.
OfficeLink and Twinning are related in determining the behavior of incoming and outgoing calls. See “Twinning” on page 13 for more information.
To make calls or change settings, UC Mobile must be connected. See “Settings” on page 11 to change any of these settings.
To make calls or change settings, UC Mobile must be connected. See “Settings” on page 11 to change any of these settings.
Stopping the UC Mobile Client application
To stop the UC Mobile Client application:
1. Select Options.
2. Select Exit.
Use the Home key to have the UC Mobile Client application run in the background and continue receiving your office desk-based calls on your mobile handset.
When the application is active in the background, its connection status is displayed as described above.
Settings
Settings provides you with the status of the following features of the Mitel UC Mobile Client application:
• Login
• Passcode
• Twinning
• OfficeLink
Note: By selecting Exit, you will not receive any of your office desk-based calls on your mobile handset.

UC Mobile Client Handset User Guide
12
• Twin Number
• Answer Confirmation
• Direct Numbers
You can change some of the UC Mobile Client Settings on your handset. You must be connected to the UC Mobile service to change any settings.
To access the Settings on your Windows Mobile handset:
1. Select Options.
2. Select Settings.
3. Select the settings you wish to change by scrolling up or down and pressing the Action key, or by using the numerical shortcuts.
Login Details
Login settings should all be set appropriately when the phone is first provisioned.
The Login settings screen displays your Login and Passcode information.
Login
Refers to your account name, normally your office desk phone number. It is a non-editable field and is set during provisioning (you may need to confirm the values if requesting support for the application). If you have any problems with your login, contact your administrator.
Passcode
The Passcode is your private code that is used when connecting to the UC Mobile service.

Using UC Mobile Client
13
To change the passcode, navigate to the field using the direction keys, and make changes as necessary.
You can change your passcode at any time but be aware that setting this incorrectly will stop UC Mobile from working correctly. If you are unsure of your passcode do not change it. Contact your administrator to reset the passcode.
User Profile
When you open the User profile setting, all options will initially be greyed out while the settings are downloaded from the server. This will take a few moments and once the settings are populated you will be able to make changes.
To change the User profile settings:
1. Navigate to the appropriate setting.
2. Press the Action key to change the setting.
Twinning
Twinning allows calls arriving at your desk phone to ring simultaneously at another phone, either a desk phone or a mobile phone. With Twinning turned on, all calls to your desk phone will also ring on the other desk phone or your mobile handset.
Twin Number informs the UC Mobile Server of the number it should dial in addition to your desk phone if Twinning is turned on.
To set a Twin Number:
1. Navigate to the Twin Number textbox field in User profile settings.
2. Edit the number using the text keys.
3. Select Done when all your changes are complete.
Contact your Mitel Administrator if you are unsure of changing this setting.
In the screen example pictured above, the initial "9" is the number that is dialed when placing an external call from the corporate phone system (your actual external dialing number may be different; check with your administrator). In the box below the Twin Number field, you can retrieve the most recently used twin numbers, using the Left and Right navigation arrows.
Note: If Twinning is turned off, you will not be able to use the OfficeLink feature.

UC Mobile Client Handset User Guide
14
Twinning and OfficeLink directly affect the way in which outgoing/incoming calls are handled by the UC Mobile Client application. The following table describes the various settings and their impact on incoming and outgoing calls.
Table 1: Twinning/OfficeLink Settings Impact on Calls
Twinning OfficeLink Impact on Calls Settings Display UC Mobile Main Screen Display
On On Both incoming calls to your desk-phone and outgoing calls will be routed via the UC Mobile Server. Both left (OfficeLink) and right (Twinning) icons are blue.
On Off Incoming calls to your desk-phone will be routed via the UC Mobile Server. Outgoing calls will not be routed via the UC Mobile Server and go directly to the cellular network. The left (OfficeLink) icon appears grey and the right (Twinning) icon is blue.
Off On Incoming calls to the desk-phone will not be routed to the device. Outgoing calls will not be routed via the UC Mobile Server; they will be placed on the cellular network as normal. Both left (OfficeLink) and right (Twinning) icons appear grey.
Off Off Incoming calls to the desk-phone will not be routed to the device. Outgoing calls will not be routed via the UC Mobile Server; they will be placed on the cellular network as normal. Both left (OfficeLink) and right (Twinning) icons appear grey.

Using UC Mobile Client
15
Answer Confirmation
When the Answer Confirmation is enabled, all twinned calls are preceded by a prompt instructing you to "Press * to accept call". You have the following choices:
• Press * and accept the call on your twin device.
• Ignore the prompt and let the call proceed to your desk phone voice mail system.
This feature is especially useful in situations where you have twinned your desk phone to the desk phone of a co-worker. With Answer Confirmation disabled, an unanswered twin call for you may be directed to your co-worker's voice mail. When Answer Confirmation is enabled, the unanswered or declined twin call is always directed to your own desk phone voice mail.
It is recommended that Answer Confirmation be set to ON, and controlled from within the UC Mobile Client application on your mobile handset. This setting is also accessible from the User Web GUI, and should match the setting in the UC Mobile Client application.
Direct Numbers
The list of Direct Numbers can be used to specify numbers that should be ignored by Mitel UC Mobile Client. Calls to these numbers will go directly to the cellular network and not through the Mitel UC Mobile Server.
To add numbers to the Direct Numbers list:
1. Select Options, then Settings.
1. Navigate to Direct Numbers using the direction keys.
2. Press the central Select button on the handset. The cursor flashes in the empty number-en-try field.
3. Enter the number you wish UC Mobile Client to ignore.
4. Choose Add Number.
5. Select OK.
6. Select Done.
Scheduling
By default, Mitel UC Mobile will always ring both your desk phone and your twinned number. Time of day scheduling allows you to schedule when the UC Mobile service is on or off.
Note: The User Web GUI provides settings for both Inbound and Outbound Answer Confirmation. If Answer Confirmation is set to ON in the UC Mobile Client application, then both the Inbound and Outbound settings in the User Web GUI should be set to ON also.

UC Mobile Client Handset User Guide
16
A pop-up will display while the settings are downloaded from the provisioning server. After a few moments the settings will be become active and you can change them as you wish. If not, you can still proceed to enable scheduling.
To enable Time of day scheduling:
1. Select Options.
2. Select Settings.
3. Select Scheduling.
4. Select the Time of day scheduling checkbox.
5. Enter a Start and Stop time for you UC Mobile service:
a. In the highlighted Start field, press the Action key and select a time from the list.
b. Navigate to a Stop field using the Up and Down arrows on the Navigation key.
c. Press the Action key and select a time from the list.
For example, to start service on Monday morning and disable it Friday evening, enter a Start time for Monday and a Stop time for Friday. UC Mobile service is now enabled 24 hours per day for each weekday.

Using UC Mobile Client
17
You can also enter a start and stop time for individual days. For example, to enable UC Mobile service only during the evening, enter a start time of 8:00 AM and a stop time of 10:00 PM.
Application Options
The following options are available from the options menu when no call is in progress:
• Call Voicemail
• OfficeLink
• Settings
Call Voicemail
Initiates a call to your office-based voicemail number.
1. Choose Options.
2. Select Call Voicemail.
3. Follow the prompts to access your office-based voice mail system.
Note: Time of day scheduling overrides the Twinning setting, turning it ON and OFF according to your preset schedule. You can, however, override the preset Time of day scheduling by manually changing the Twinning setting. Your manual change overrides the current scheduling and maintains its setting until the next Time of Day "start" is scheduled. For example, you enable UC Mobile service for weekdays from 8:00 AM to 6:00 PM, and then on Monday afternoon, you manually set Twinning to OFF. Your UC Mobile service is disabled and remains disabled until Tuesday morning at 8:00 AM, when Time of day scheduling turns it back on. To turn UC Mobile service off and have it remain OFF, regardless of Time of day scheduling, you must set both Twinning and Time of day scheduling to OFF.
Note: If you select the Time of day scheduling checkbox, and all start/stop times are set to "None", then UC Mobile service is governed by the Twinning setting.
Note: Time of day scheduling takes effect at the first available future "start" or "stop" time. (For example, if, at 3:00 PM on Tuesday you set Time of day scheduling to start at 8:00 AM on weekdays, it will start at 8:00 AM on Wednesday.)

UC Mobile Client Handset User Guide
18
OfficeLink
This feature allows you to make calls from anywhere through your corporate telephone system. You will need to configure this through the UC Mobile User Web Interface. See your administrator for access.
Selecting this option brings up a number entry dialog box.
1. Choose Options.
2. Select OfficeLink. The Number to call: dialog displays.
3. Enter the number you wish to call.
4. Press Make Call.
Settings
Allows you to setup your login details, user profile, time of day scheduling, and direct numbers. See “Settings” on page 11.
Placing a Call
Once the UC Mobile Client application is started, connected, and Twinning turned on, any call initiated from the handset will be re-routed through your office telephone system.
From the application's main screen select Call or press the Green call button. The Windows Mobile dialer screen appears.
To start a call:
1. Select a contact or number from the list, or enter the digits of the number you wish to dial.
2. Press the Call key.
The UC Mobile Client will then initialize and proceed to connect the call.
If at any point you wish to terminate the call select the Cancel Call button.
Tip: This option is usually quicker than dialling the number, or using the call log or phonebook.
Note: Emergency calls will be routed directly through the cellular network, and not through your office telephone switch.
Note: You can also dial the number while the UC Mobile Client application is running in the background.
Using UC Mobile Client
19
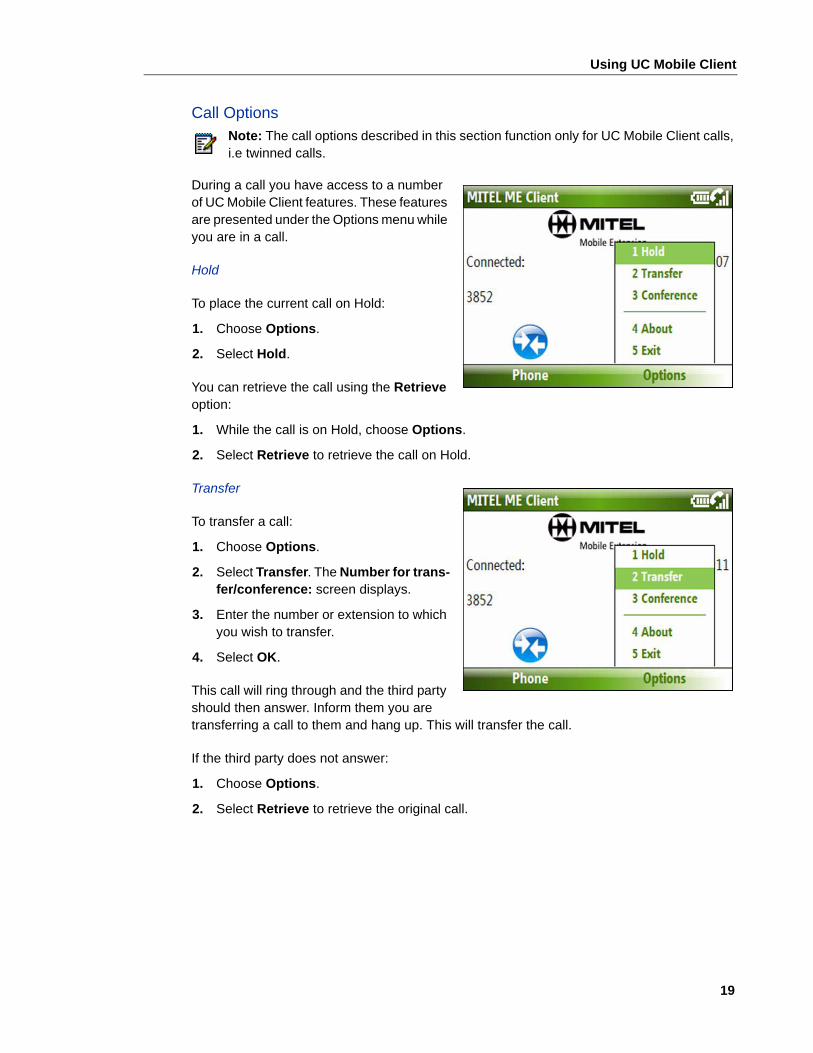
Call Options
During a call you have access to a number of UC Mobile Client features. These features are presented under the Options menu while you are in a call.
Hold
To place the current call on Hold:
1. Choose Options.
2. Select Hold.
You can retrieve the call using the Retrieve option:
1. While the call is on Hold, choose Options.
2. Select Retrieve to retrieve the call on Hold.
Transfer
To transfer a call:
1. Choose Options.
2. Select Transfer. The Number for trans-fer/conference: screen displays.
3. Enter the number or extension to which you wish to transfer.
4. Select OK.
This call will ring through and the third party should then answer. Inform them you are transferring a call to them and hang up. This will transfer the call.
If the third party does not answer:
1. Choose Options.
2. Select Retrieve to retrieve the original call.
Note: The call options described in this section function only for UC Mobile Client calls, i.e twinned calls.
UC Mobile Client Handset User Guide
20
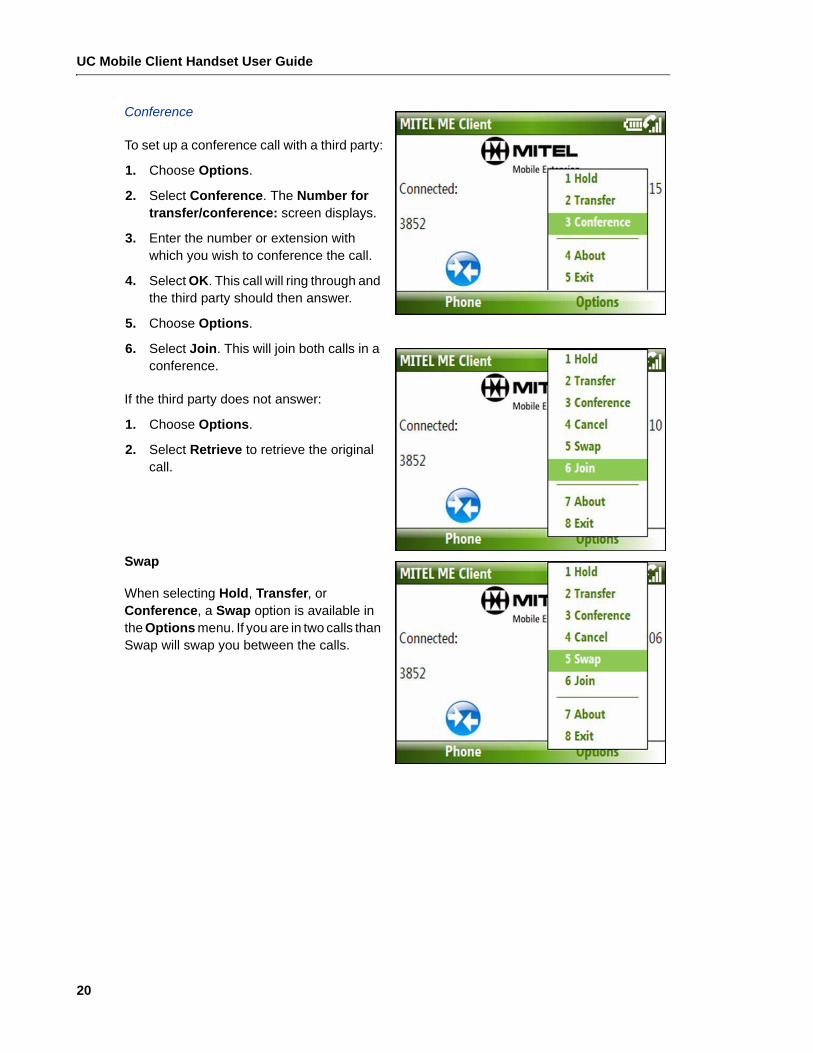
Conference
To set up a conference call with a third party:
1. Choose Options.
2. Select Conference. The Number for transfer/conference: screen displays.
3. Enter the number or extension with which you wish to conference the call.
4. Select OK. This call will ring through and the third party should then answer.
5. Choose Options.
6. Select Join. This will join both calls in a conference.
If the third party does not answer:
1. Choose Options.
2. Select Retrieve to retrieve the original call.
Swap
When selecting Hold, Transfer, or Conference, a Swap option is available in the Options menu. If you are in two calls than Swap will swap you between the calls.

Chapter 3
Nokia Mobile Handsets

UC Mobile Client Handset User Guide
22

Installing the UC Mobile Client on Nokia Mobile Handsets
23
Installing the UC Mobile Client on Nokia Mobile Handsets
A text message arriving on your handset (below) is the start of the installation procedure. Do not delete this message from your Inbox, it will be removed later as part of the setup procedure.
Installation involves downloading the application, provisioning the handset, and ensuring that your login credentials and user profile settings are established.
To install the UC Mobile Client application on your handset:
1. Open the Messaging application and then the text message.
2. Use the downward directional arrow to highlight the link.
3. Choose Options and Open link. Your handset will make a connection to the Internet and begin to down-load the UC Mobile Client application.
4. The Download Details screen appears, showing progress of the download. The download may take a few minutes depending on your connection.

UC Mobile Client Handset User Guide
24
5. The Install Mitel ME Client? prompt appears. Select Yes.
6. The Details dialog appears. Select Continue.
7. The Installation Progress displays, and when com-pleted, you will be prompted to select an Access Point.
Note: You may be prompted to update the UC Mobile Client application. You will be asked to confirm replacing the existing file. Select OK to continue.

Installing the UC Mobile Client on Nokia Mobile Handsets
25
8. The Provisioning Progress displays, and you will be prompted to enter your Passcode.
9. When Provisioning is complete, the Status Ready screen displays.
During provisioning the following personalized settings are automatically downloaded:
• your login details
• your user profile settings
• any optional features as setup by your administrator
Provisioning also removes the original text message from your inbox.
If the there is a problem with the connection, an error message will display. In this case you can select a different access point by selecting Options and then Change access point.... Once the new access point is selected the provisioning process will restart.
If the application is unable to connect via the same access point used to download (e.g. because the Mitel UC Mobile Server is accessible only via an internal Wi-Fi access point) an error message will be shown. Select Options and then Change access point... to choose the access point to use to connect to the UC Mobile Server.
The Change access point... option is available after provisioning is complete to change, if necessary, the access point used to connect to the UC Mobile Server.
UC Mobile Client Handset User Guide
26
Using UC Mobile Client
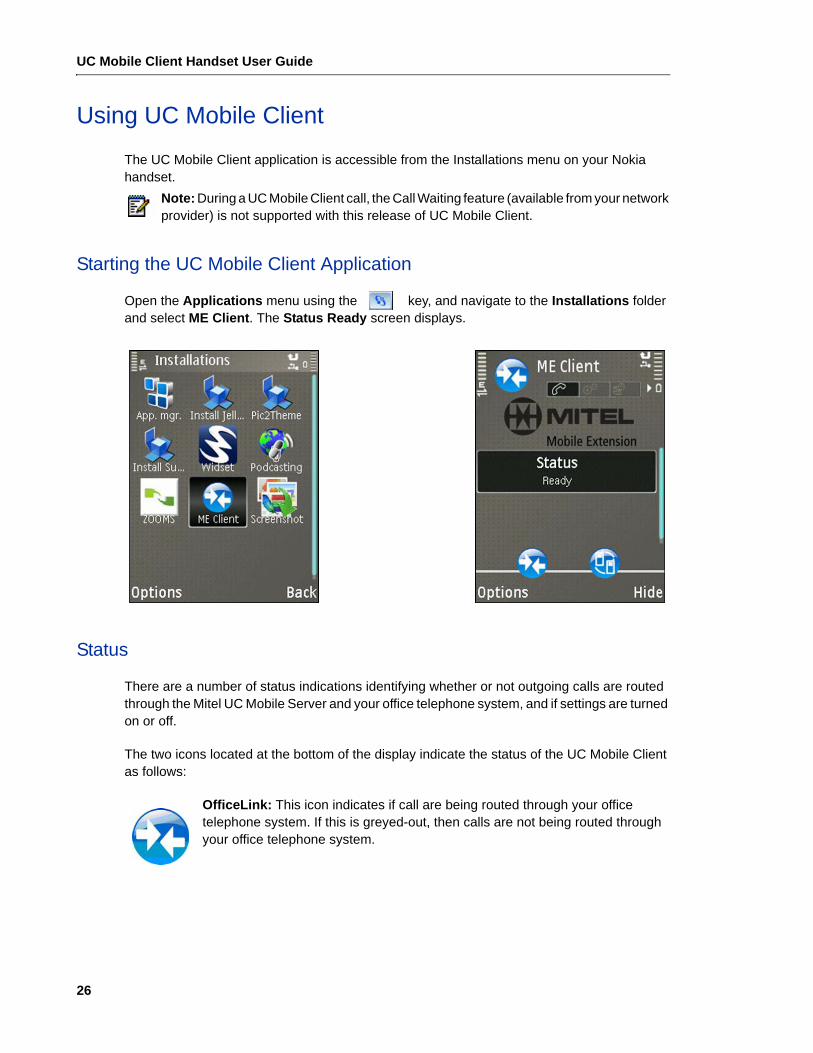
The UC Mobile Client application is accessible from the Installations menu on your Nokia handset.
Starting the UC Mobile Client Application
Open the Applications menu using the key, and navigate to the Installations folder and select ME Client. The Status Ready screen displays.
Status
There are a number of status indications identifying whether or not outgoing calls are routed through the Mitel UC Mobile Server and your office telephone system, and if settings are turned on or off.
The two icons located at the bottom of the display indicate the status of the UC Mobile Client as follows:
OfficeLink: This icon indicates if call are being routed through your office telephone system. If this is greyed-out, then calls are not being routed through your office telephone system.
Note: During a UC Mobile Client call, the Call Waiting feature (available from your network provider) is not supported with this release of UC Mobile Client.

Using UC Mobile Client
27
Twinning: This icon indicates if your desk phone is "twinned" with another telephone number, for example your mobile phone. When a call comes to your desk phone, your mobile phone will ring simultaneously. If this icon is greyed-out, then twinning is turned off.
OfficeLink and Twinning are related in determining the behavior of incoming and outgoing calls. See “Twinning” on page 29 for more information.
When the UC Mobile Client is active in the background, its status can be tracked without bringing it to the foreground. The icon at the bottom of the screen, in the centre (shown highlighted in red in the diagram at the right), shows the state of the UC Mobile Client as follows:
• A Blue icon means Mitel UC Mobile Client will route calls through your office telephone system.
• An Grey icon means the calls will be made using the standard cellular network, without your office telephone system.
The UC Mobile Client will not intercept calls when there is a connection problem or when the Twinning setting is off.
To make calls or change settings, UC Mobile must be connected. See “Settings” on page 28 to change any of these settings.
Stopping the UC Mobile Client Application
To stop the UC Mobile Client application:
1. Select Options.
2. Select Exit.
Use the Hide Option to have the UC Mobile Client application run in the background and continue receiving your office desk-based calls on your mobile handset.
When the application is active in the background, its connection status is displayed as described above.
Note: By selecting Exit, you will not receive any of your office desk-based calls on your mobile handset.

UC Mobile Client Handset User Guide
28
Settings
Settings provides you with the status of the following features of the Mitel UC Mobile Client application:
• Twinning
• OfficeLink
• Twinned Number
• Answer Confirmation
• Login
• Passcode
• Direct Numbers
Settings are tabbed as part of the main user page, and shown circled in the image at the right. Settings are retrieved automatically from the Mitel UC Mobile Server every two minutes.
You can change some of the UC Mobile Client Settings on your handset. You must be connected to the UC Mobile service to change any settings.
To access the settings on your Nokia handset:
1. Access the Mitel UC Mobile Client application.
1. Press the right navigation key. The Settings screen appears.
2. Press the right navigation key again. The Scheduling screen appears.
3. Press the left navigation key to take you back through the previous screens.
As with the main screen, a grey icon indicates the option is turned off (or that it is a server setting and that the application is not currently connected to the UC Mobile server). If the application is not connected, the setting will show disconnected instead of the actual setting value (see “Using UC Mobile Client” on page 26).

Using UC Mobile Client
29
You can change those settings that have a circular white marking inside their icon, as shown in the diagram on the right. You cannot change settings with a solid blue icon (as shown for Login in the diagram below); these are set during provisioning. You must re-provision the phone to change these settings.
To change a setting (based on the criteria above):
1. Navigate to the Settings screen using the vertical di-rectional keys.
2. Select an item by using the horizontal direction keys.
3. Press the central Select button on the handset.
You can turn some settings On and Off. Other settings will open a new dialog for you to input information.
When you open Settings, all options will initially be greyed out while the settings are downloaded from the server. This will take a few moments and once the settings are populated you will be able to make changes. If the value for any given setting is not available, then Unavailable will be shown in place of the value.
Twinning
Twinning allows calls arriving at your desk phone to ring simultaneously at another phone, either a desk phone or a mobile phone. With Twinning turned on, all calls to your desk phone will also ring on the other desk phone or your mobile handset.
Twinned Number informs the UC Mobile Server of the number it should dial in addition to your desk phone if Twinning is turned on.
To set a Twinned number:
1. Navigate to the Twinned Number setting using the vertical directional keys.
2. Press the central Select button on the handset.
3. Enter the number with which you wish to twin your desk phone.
4. Select OK.

UC Mobile Client Handset User Guide
30
Twinning and OfficeLink directly affect the way in which outgoing/incoming calls are handled by the Mitel UC Mobile Client application. The following table describes the various settings and their impact on incoming and outgoing calls.
A grey icon beside the setting indicates that this setting is turned off. A blue icon beside the setting indicates that this setting is turned on.
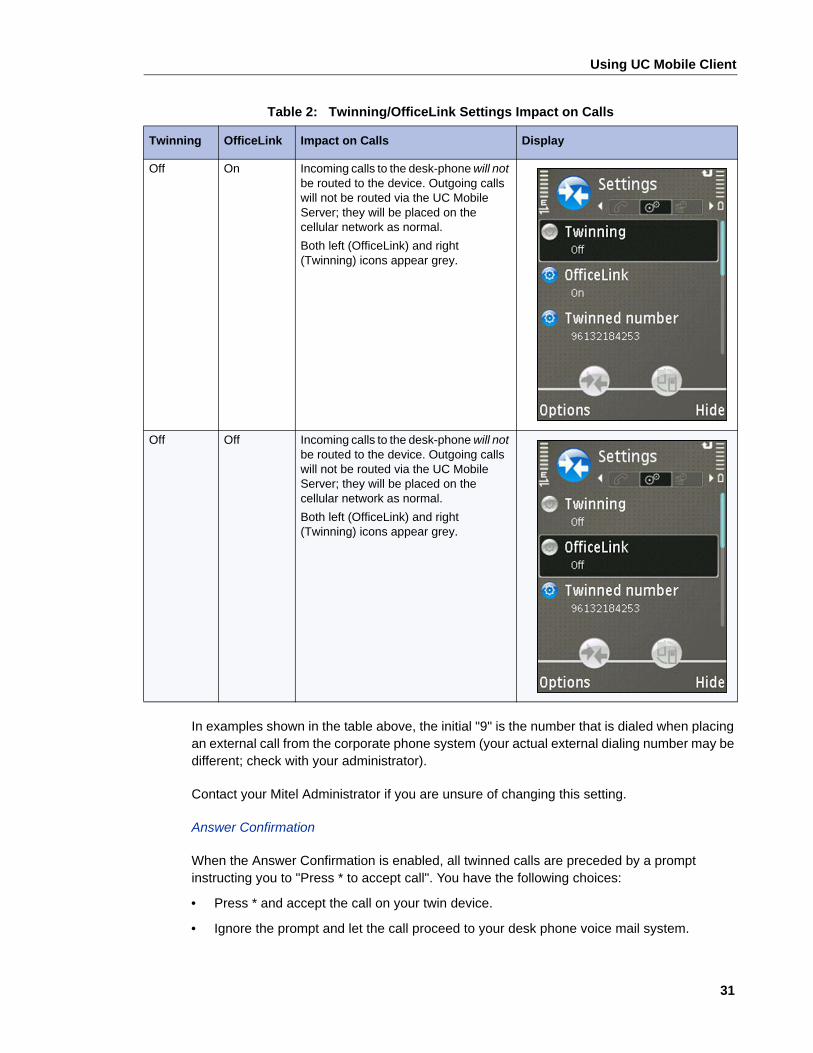
Table 2: Twinning/OfficeLink Settings Impact on Calls
Twinning OfficeLink Impact on Calls Display
On On Both incoming calls to your desk-phone and outgoing calls will be routed via the UC Mobile Server.Both left (OfficeLink) and right (Twinning) icons are blue.
On Off Incoming calls to your desk-phone will be routed via the UC Mobile Server. Outgoing calls will not be routed via the UC Mobile Server and go directly to the cellular network.The left (OfficeLink) icon appears grey and the right (Twinning) icon is blue.
Using UC Mobile Client
31
In examples shown in the table above, the initial "9" is the number that is dialed when placing an external call from the corporate phone system (your actual external dialing number may be different; check with your administrator).
Contact your Mitel Administrator if you are unsure of changing this setting.
Answer Confirmation
When the Answer Confirmation is enabled, all twinned calls are preceded by a prompt instructing you to "Press * to accept call". You have the following choices:
• Press * and accept the call on your twin device.
• Ignore the prompt and let the call proceed to your desk phone voice mail system.
Off On Incoming calls to the desk-phone will not be routed to the device. Outgoing calls will not be routed via the UC Mobile Server; they will be placed on the cellular network as normal.Both left (OfficeLink) and right (Twinning) icons appear grey.
Off Off Incoming calls to the desk-phone will not be routed to the device. Outgoing calls will not be routed via the UC Mobile Server; they will be placed on the cellular network as normal.Both left (OfficeLink) and right (Twinning) icons appear grey.
Table 2: Twinning/OfficeLink Settings Impact on Calls
Twinning OfficeLink Impact on Calls Display

UC Mobile Client Handset User Guide
32
This feature is especially useful in situations where you have twinned your desk phone to the desk phone of a co-worker. With Answer Confirmation disabled, an unanswered twin call for you may be directed to your co-worker's voice mail. When Answer Confirmation is enabled, the unanswered or declined twin call is always directed to your own desk phone voice mail.
It is recommended that Answer Confirmation be set to ON, and controlled from within the UC Mobile Client application on your mobile handset. This setting is also accessible from the User Web GUI, and should match the setting in the UC Mobile Client application.
Login
Refers to your account name, normally your office desk phone number. It is a non-editable field and is set during provisioning (you may need to confirm the values if requesting support for the application). If you have any problems with your login, contact your administrator.
Passcode
The Passcode is your private code that is used when connecting to the UC Mobile service.
To change the passcode:
1. Navigate to the field using the direction keys.
2. Make the necessary changes.
Caution:You can change your passcode at any time but be aware that setting this incorrectly will stop UC Mobile from working correctly. If you are unsure of your passcode do not change it. Contact your administrator to reset the passcode.
Direct Numbers
The list of Direct Numbers can be used to specify numbers that should be ignored by Mitel UC Mobile Client. Calls to these numbers will go directly to the cellular network and not through the Mitel UC Mobile Server.
To add numbers to the Direct Numbers list:
1. Navigate to Direct Numbers using the direction keys.
2. Press the central Select button on the handset. The New number... field is highlighted.
3. Choose Select.
Note: The User Web GUI provides settings for both Inbound and Outbound Answer Confirmation. If Answer Confirmation is set to ON in the UC Mobile Client application, then both the Inbound and Outbound settings in the User Web GUI should be set to ON also.

Using UC Mobile Client
33
4. Enter a phone number in the Enter number: field.
5. Select OK.
6. Select Done.
Scheduling
By default, Mitel UC Mobile will always ring both your desk phone and your twinned number. Scheduling allows you to schedule when the UC Mobile service is on or off.
To enable Scheduling:
1. Press the right navigation key once or twice (depend-ing which tab are you currently viewing) to select the Scheduling tab.
2. Press Select with the Scheduling: item selected. Scheduling is now On.
To disable Scheduling:
1. If not in the Scheduling view, press the right navigation key once or twice (depending which tab are you cur-rently viewing) to select the Scheduling tab.
2. Press select again to turn Off Scheduling.
To adjust a specific day's scheduling:
1. Navigate to the day you wish to change.
2. Press Select.
3. Navigate to Start time.

UC Mobile Client Handset User Guide
34
4. Press Select (or Options → Change).
5. Scroll to the desired time.
6. Press Select.
7. Repeat Steps 3 - 6 for the Stop time.
8. Select Back to return to the Scheduling view, and ad-just another day’s scheduling if desired.
If you wish to start service on Monday morning and disable it Friday evening, enter a Start time for Monday and a Stop time for Friday. UC Mobile service is now enabled 24 hours per day for each weekday.
If you wish to disable the UC Mobile service on a particular day select None (found at the top of the list) for either Start or Stop time.
Note: Scheduling overrides the Twinning setting, turning it ON and OFF according to your preset schedule. You can, however, override the preset Scheduling setting by manually changing the Twinning setting. Your manual change overrides the current scheduling and maintains its setting until the next Time of Day "start" is scheduled. For example, you enable UC Mobile service for weekdays from 8:00 AM to 6:00 PM, and then on Monday afternoon, you manually set Twinning to OFF. Your UC Mobile service is disabled and remains disabled until Tuesday morning at 8:00 AM, when Scheduling turns it back on. To turn UC Mobile service off and have it remain OFF, regardless of Scheduling setting, you must set both Twinning and Scheduling to OFF.
Note: If you enable Scheduling, and all start/stop times are set to "None", then UC Mobile service is governed by the Twinning setting.
Note: Scheduling takes effect at the first available future "start" or "stop" time. (For example, if, at 3:00 PM on Tuesday you set Scheduling to start at 8:00 AM on weekdays, it will start at 8:00 AM on Wednesday.)

Using UC Mobile Client
35
Application Options
The following options are available from the options menu when no call is in progress:
• Office Link
• Voicemail
• Change access point
Office Link
This feature allows you to make calls from anywhere through your corporate telephone system. You will need to configure this through the UC Mobile User Web Interface. See your administrator for access.
Selecting this option brings up a number entry dialog box.
1. Choose Options.
2. Select OfficeLink. . .. The Number to call: dialog displays.
3. Enter the number you wish to call.
4. Press OK.
Voicemail
Initiates a call to your office-based voicemail number.
1. Choose Options.
2. Select Voicemail.
3. Follow the prompts to access your office-based voice mail system.
Tip: This option is usually quicker than dialling the number, or using the call log or phonebook.

UC Mobile Client Handset User Guide
36
Change access point
Allows you to change the access point used to connect to the UC Mobile Server.
1. Choose Options.
2. Select Change access point. . ..The Select access point: dialog displays.
3. Select an access point from the list available to your handset.
4. Press OK.
Placing a Call
Once the UC Mobile Client application is started, connected, and Twinning and OfficeLink turned on, any call initiated from the handset will be re-routed through your office telephone switch. This includes starting calls from the Active Standby Screen (on S60 models), Contacts, and the Call Log.
It is also possible to place a call from the UC Mobile Client application screen:
1. Press any numerical key when the UC Mobile Client main screen is visible. The Active Standby screen displays.
2. Enter the number and press Dial (the green button). The Calling progress dialog is displayed.
If you wish to cancel the call, press the red End Key while the Calling progress dialog is displayed.
On successfully setting up a call you will hear a series of ascending tones and the Mitel UC Mobile Client will be brought to the foreground. Details of the current call are displayed and the Mitel UC Mobile Client will show a Connected status. In case of a call failure, you will hear an alternate series of ending tones.
Note: Emergency calls will be routed directly through the cellular network, and not through your office telephone switch.
Note: Depending on when you decide to cancel the call, it’s progress may be too far along to do so.
Using UC Mobile Client
37
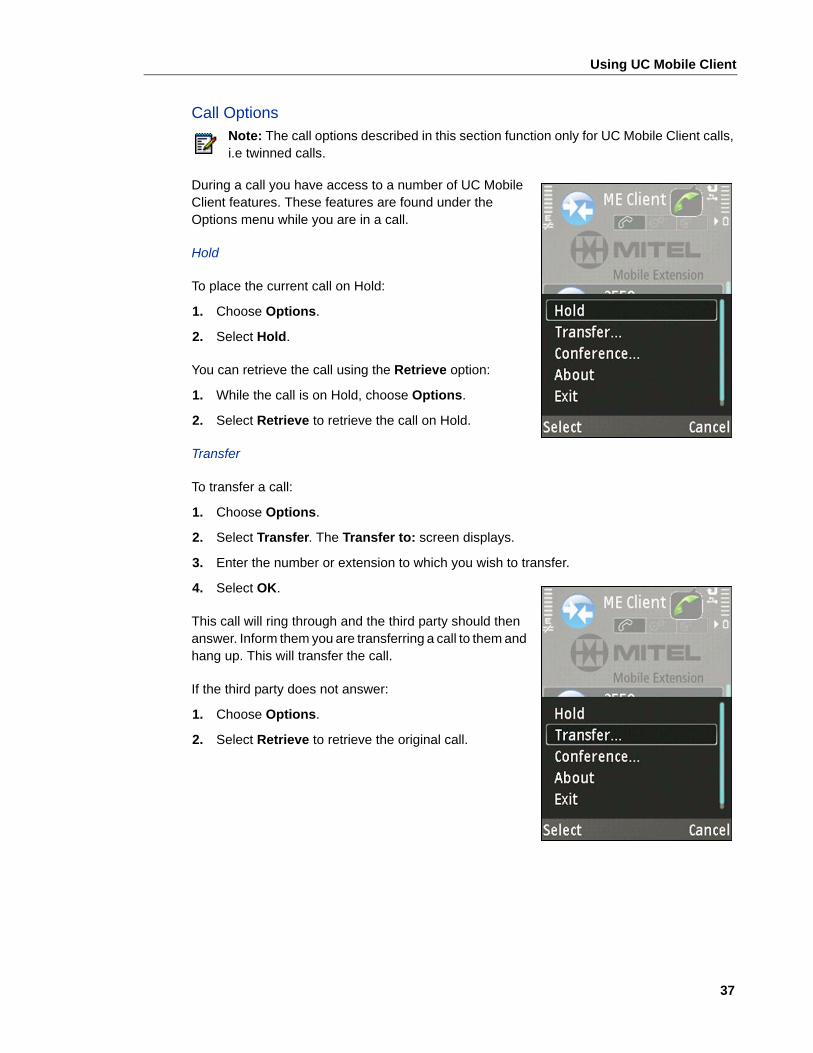
Call Options
During a call you have access to a number of UC Mobile Client features. These features are found under the Options menu while you are in a call.
Hold
To place the current call on Hold:
1. Choose Options.
2. Select Hold.
You can retrieve the call using the Retrieve option:
1. While the call is on Hold, choose Options.
2. Select Retrieve to retrieve the call on Hold.
Transfer
To transfer a call:
1. Choose Options.
2. Select Transfer. The Transfer to: screen displays.
3. Enter the number or extension to which you wish to transfer.
4. Select OK.
This call will ring through and the third party should then answer. Inform them you are transferring a call to them and hang up. This will transfer the call.
If the third party does not answer:
1. Choose Options.
2. Select Retrieve to retrieve the original call.
Note: The call options described in this section function only for UC Mobile Client calls, i.e twinned calls.

UC Mobile Client Handset User Guide
38
Conference
To set up a conference call with a third party:
1. Choose Options.
2. Select Conference. The Conference with: screen displays.
3. Enter the number or extension with which you wish to conference the call.
4. Select OK. This call will ring through and the third party should then answer.
5. Choose Options.
6. Select Join. This will join both calls in a conference.
If the third party does not answer:
1. Choose Options.
2. Select Retrieve to retrieve the original call.
Swap
When selecting Hold, Transfer, or Conference, a Swap option is available in the Options menu. If you are in two calls than Swap will swap you between the calls.
Using UC Mobile Client
39
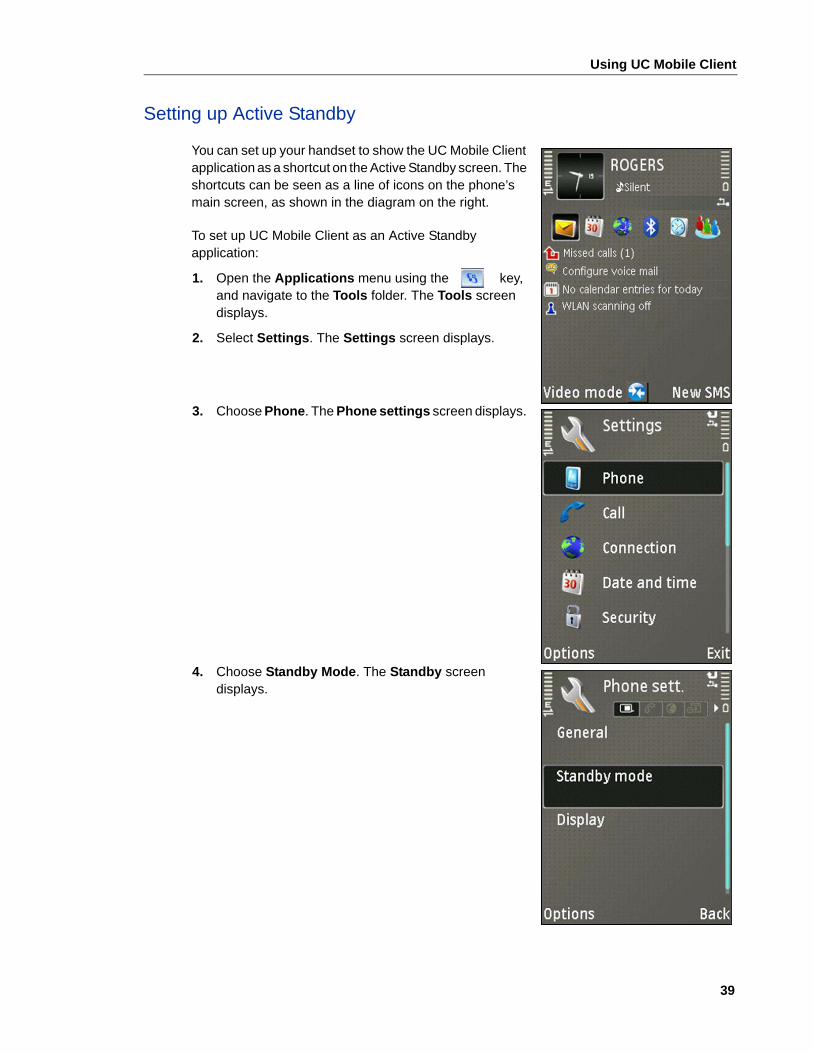
Setting up Active Standby
You can set up your handset to show the UC Mobile Client application as a shortcut on the Active Standby screen. The shortcuts can be seen as a line of icons on the phone’s main screen, as shown in the diagram on the right.
To set up UC Mobile Client as an Active Standby application:
1. Open the Applications menu using the key, and navigate to the Tools folder. The Tools screen displays.
2. Select Settings. The Settings screen displays.
3. Choose Phone. The Phone settings screen displays.
4. Choose Standby Mode. The Standby screen displays.

UC Mobile Client Handset User Guide
40
5. Select Active standby apps. The Standby apps screen displays.
6. Choose a Shortcut # to which you want to add the UC Mobile Client application. The Shortcut screen dis-plays with a list of applications.
7. Select ME Client from the list of applications.
Note: At this point you can choose to add the application to the Left or Right soft keys. Selecting Left selection key or Right selection key will take you straight to the UC Mobile Client application. It is recommended that you set up UC Mobile Client by selecting Active Standby apps.

Using UC Mobile Client
41
8. Select OK.Select Options, then select Exit.The UC Mobile Client application shortcut appears in the Active Standby screen (highlighted in the red rect-angle in the image on the right).

UC Mobile Client Handset User Guide
42

Chapter 4
Troubleshooting

UC Mobile Client Handset User Guide
44

Troubleshooting
45
Troubleshooting
In the event that a problem occurs whilst using the Mitel UC Mobile application, error messages will be provided in the form of a pop-up dialog consisting of a single error message or error message text with an associated error code.
The majority of errors can be resolved by checking the connection between the Mitel UC Mobile-provisioned handset and the access point providing a connection to the office telephone switch.
A description of the different types of dialog that might be presented along with a description of each is provided below:
If you cannot resolve the problem, make note of the error and any associated error code, and notify your administrator or support group.
Error Description Possible Cause Action
Connection error. Please choose an access point to connect to the Internet, to download settings(<error_code>)
Occurs when there is problem with device->Access Point connection prior to provisioning
WiFi authentication failure.
Device is outside the range of selected access point.
Check WiFi connection between device and Access Point
Move device within WiFi access point range
Connection error. Please choose an access point that can connect to your PBX. (<error_code>)
Occurs when there is problem with device->Access Point connection after provisioning
WiFi authentication failure.
Device is outside the range of selected access point.
Check WiFi connection between device and Access Point
Move device within WiFi access point range
Invalid_Username_Or_Password
Invalid PBX setting Invalid password entered on PBX/login details screen
For Nokia, select PBX settings tab (section 2.6.1.1)For Windows Mobile, select Login settings from options menu (section 2.6.2)Check and if necessary re-enter correct passcode.
<System Error> (<error code>)
General System error reported by device that is not specific to the application.
Non-Specific Notify support with error message and error code

UC Mobile Client Handset User Guide
46