Embed Size (px)
Citation preview
Mike Bellm's Instructions for Disassembly & Reassembly
of the Thompson/Center Encore and G2 Frames,
Installation of Bellm Custom Trigger/Sear Springs,
and Complete Trigger Job
Updated June 2004 Version
Copyright 2000 by Dennis M. "Mike" Bellm
Hi, I'm Mike Bellm, sitting here ready to take you through all the steps necessary to successfully disassemble yourThompson/Center (tm) Encore (tm) frame and reassemble it with a Bellm Custom Encore trigger/sear spring installed inyour choice one of 7 different tensions that will give you the trigger pull weight you want to better suite your shootingactivities than the heavy factory stock pull weight.
I have been customizing TC's for over 20 years, but no amount of customizing can make up for a heavy, rough triggerpull. The Encore and G2's unique design is easy to work with and can produce an excellent trigger pull in minutes.........I'll show you how.
You will learn the sequence of parts removal, the orientations of the parts to each other, and how they work together.There will be tips along the way to "flatten out the learning curve" for you, as well as important function checks necessaryfor the safe operation of your Encore.
You can enjoy the benefits of a good trigger while saving time and money. Or, if you are an FFL holder you can makemoney doing badly needed Encore trigger jobs and also enhance sales of this wonderful, more politically correct firearmwhen customers discover how good the Encore's trigger pull can be.
After we've gone through making the trigger pull lighter, we'll then go back and hone those parts that need smoothing upif you care to go this next step to complete a trigger job. And, by the way, the Encore & G2 triggers can be some of thesmoothest triggers you will ever experience.
You can do it. Ready? Let's Have Some Fun............
* This manual is taken from the 2000 edition, and addresses primarily the Encore, but the G2 mechanism is fundamentally the same. Minor differences between the two will be noted by ( * ).
"UPDATES" from the 2000 edition have been inserted.
Pg1

WARNING
It is entirely possible that you may make a mistake working on your Encore frame that may result in an unsafe firearm that could accidentally dodamage to property or cause injury or death to yourself or others. It is imperative that you heed all warnings wherever they are given in theinstructions that follow, and that you understand these warnings may not cover every situation that may arise. I will exercise due diligence inexplaining important safety checks you must perform, but ultimately, you are the one responsible for the outcome of the work you do on Encoreand G2 frames.
DISCLAIMER
Before we begin the fun parts, I must make it clear that since I have no control over how you perceive or use thisinformation, neither I nor the parties who distribute this information assume any responsibility for the results you obtain, orfor any damages, losses, or injuries you or others might incur resulting from your use of this information. It is also assumedthat if you read past this DISCLAIMER paragraph and use any of the following information, you agree to assume allresponsibility for your own actions.
That said, let's take the Encore frame apart 40 seconds later
Reassembly time: 3 min. 10 seconds.
Ok, I'll slow down. My military marksmanship instructor/armorer "past life" is showing through. But you get the point, it is arather quick process.
You need a 3/32 pin punch, a screw driver that fits the slotted pin shown on the right side of the frame, and a smallhammer, but, since the forces involved are minimal, the handle of the screwdriver will do for a hammer. Put the bighammer away. You will also need a good pair of needle nose pliers whose gripping surfaces in the jaws are not roundedsmooth.
UPDATES: . 1 Bellm TC's, Nowhttp://www.bellmtcs.com/store/index.php?cid=63
supplies specally forged pliers for spring installation in both the Encore and G2.
. 2 For Pull weights
below
about
2 1/2
pounds.
A
triangular
hard
Arkansas
stone
is
needed
and
a
diamond
lap
with
sides
less than
90
degrees
or
thin
such
as
the
EZLap
No.
LF
FOREWORD
The extensive photos in this instructional material may make this seem like a long process, and for some the first goaround may be just that. But after taking your frame apart and putting it back together a couple times, you will find it isprobably one of the easiest guns of its type to work with.
For example, I can take Ruger No. 1's apart and put them together in my sleep. Might even be able to do it blindfolded. Butthe Encore is much, much quicker and easier in my opinion, and it is partly for this reason that I made the Encore thesubject of my first attempt at this type of instructional material. I have tried to cover every minute detail that could causeyou difficulty.
And while it may be boringly detailed for "whizzes" at this stuff, it should also be basic enough for the most rank noviceneeding a basis from which to start.
Pg2

Unscrew the trigger guard pivot pin until it is free and the head protrudessome from the frame. Apply light upward pressure on the trigger guardwhile you pull the pin out, or you can apply light pressure from the left
side and push it out with the pin punch at the risk of marring the end ofthe pin.
Remove the trigger guard and note its return spring and strut at the rear.
With the frame upside down, note where the trigger/sear spring endappears through the hole in the trigger. Remember this.
Removal of the next three pins is from smallest to largest. Push thesmallest pin out. This is the trigger pivot pin. Now remove the trigger.
Pg3

Note that the "L" shaped arm of the trigger/sear spring points to the rear.Remember this.
Push out the next larger pin, the sear pivot pin, but hold the punch in thehole for a minute as you turn the frame so that its right side is down asin the next photo. Look inside on the bottom side (right side) of frame,and note the plate about 1/8" thick with its angular end pointing to the
front of the frame. This is the interlock. Remember it is on the right sideof the frame. This is the part that prevents the hammer from cocking and
the gun from firing when the barrel is not fully locked up.
Now, holding the frame level, pull the punch out. Reach in with yourindex finger and slide out the interlock, sear, and trigger/sear spring as a
unit.
Don't worry yet about which parts are which; it's everything that freelycomes out. Keep them together and note that the bottom arm of the
sear, the wide part that is "L" shaped, points to the rear, and the otherarm of the "L" points to the top of the frame (when it is in its normal
upright position).
Note the orientation of the "L" shaped sear sitting on the interlock.Remember this.
Pg4

Here is a clearer view of the interlock and sear. Note that the open yokeon the right side straddles the hammer pivot pin when it comes time toput it back in, and that the two parts get reassembled together, just likeyou see it. This is actually as far as you need to go to just change out
the trigger/sear spring, but we will complete the disassembly process sothat you can at least see how the system functions. If you elect to stophere, you must read the warning that follows in the section "About The
Bellm Custom Encore Trigger/Sear Springs."
Push out the largest pin, the hammer pivot pin.
The trigger guard return spring strut now falls out.
Note that the hammer pivot pin goes through the eye of the trigger guardreturn spring strut.
The hammer drops down inside the frame and is removed out thebottom of the frame. You may have to "jockey" it a little.
* Note that the selector lever on the top of the G2 hammer prevents it from droppingthrough the frame. Instead, part of the G2 hammer pivot was replaced by a spacerwasher on the right side so the G2 hammer can be pulled out the top of the frame.
Pg5

Turn the frame over and the hammer spring and its "T" shaped strutcomes out the top opening of the frame once the hammer is out ofthe way. Now is a good time to note that there are variations fromframe to frame on the hammer spring strut. Some struts have asmall washer pressed onto the strut positioned between the springand the top arm of the "T."
SAFETY WARNING:
When a lighter spring is installed giving a pull weight, usually at around 2pounds or less, sometimes it is necessary to remove this washer. The washerhas the effect of lengthening the hammer spring and maintains too much tensionon the hammer in its forward position to permit the trigger/sear spring to reliablyrebound the hammer to half cock when your finger is removed from the triggerafter pulling it. The danger is that in the event the hammer is lowered without
firing a round and the hammer does not rebound off the firing pin, a blow to the hammer resulting from dropping the gun or partiallywithdrawing the hammer and releasing it, as in snagging it in a gun case for example, can cause the gun to fire. This is one of the main safetyfeatures of the Encore, and you must make certain that it works reliably. This warning will be repeated later on also.
On the assumption you will want to dry fire the frame when you put itback together, remove this allen socket head screw, same size as theallen screw heads on Redfield scope mounts by the way, 7/64".
This screw can be removed and reinstalled with or without the hammerin place. With the screw removed, push on the firing pin from thehammer side to help remove the round plug in the breech face thathouses the firing pin. Note: If you dry fire the frame without removing thebreech plug and firing pin, you will promptly compress the firing pinreturn spring and it will not retract the firing pin from the indent it makesin primers when fired. Thus the firing pin will hang up in the primer whenyou attempt to open the frame. Force it, and you will bend the firing pin.Not a good thing. The cost is minimal, but you may put your Encore outof operation waiting for another spring to arrive from Thompson/Center.
So if you intend to dry fire even one time, REMOVE THE PLUG. It beats wanting to eat a box of rat poison or slammingthe door on your fingers for your stupidity when you proceed to ruin that delicate little cone shaped spring and bend thefiring pin the next time you shoot your Encore.This also apples to the G2
Just for grins and your own edification, let's take a look at how thetrigger, sear, and hammer all relate. Note how my index finger is on theoutside of the frame, and the next finger is positioned inside the frame.What I am doing is using the middle finger to hold each of the pivot pinsso they don't slip inside the frame while I position each of the parts on itsrespective pivot pin. When and if it comes time for you to do any honing,you will want to re-examine the points where each part comes in contactwith the next.
Important Note: Unless you want to rediscover the source of the variouscommon names for "E" clips, DO NOT REMOVE THE BIG HEADED, SPRING
LOADED PIN you can see plainly here inserted through the trigger. Thereis no reason to remove it. It is best left alone unless you just can't resistthe challenge of finding it when it flies off into the great expanse of spacelike "E" clips love to do.
Pg6

CONGRATULATIONS: You now have the frame completely apart. Wasn't so hard was it? The mechanism is quite simple,yet works so well.
Fork in the road:
If you propose to do any honing and smoothing of parts, move ahead to the advanced part for tips on what to work onand what to do.
If you are only installing a lighter spring, continue reading below.
About The Bellm Custom Encore Trigger/Sear Springs.
In all the Encore trigger jobs I have done, I find a fairly wide discrepancy in the actual pull weight with the same spring inany given frame. While my study may not be thorough enough, I have also noted that there is about a 1pound to almost a1 1/2 pound variation in pull weights in factory stock frames. They normally range from a low of about 4 1/2 pounds tonearly 6 pounds.
UPDATE: I am finding some stock frames with pull weights as low as 2 3/4 pounds.
Custom springs will vary about the same amount from frame to frame. Thus it is difficult to accurately predict what weightof pull you will get. Also, any stoning you do can also give quite different results.
To give you a better range of pull weights with minimal or no stoning, we have expanded the range of springs to 7different grades of tension, from #1 with the least reduction in pull weight to #7 giving the lightest pull weight.
* G2 springs are about 1/16' shorter in the upper arm. Our springs are now made shorter to work with both Encore's & G2's.
1 1/2 pound pull is the lightest pull weight I recommend for the Encore or G2. Below this pull weight, the trigger/searspring may not have enough tension to rebound the hammer to half cock when you remove your finger from the triggerafter lowering the hammer. If the hammer is lowered with a live round in the chamber and the hammer does not reboundto half cock, it will be resting on the firing pin, and thus the primer as well.
In this condition, a blow to the hammer, as in dropping it, can cause the gun to fire.
THUS IT IS ABSOLUTELY IMPERATIVE THAT YOU CHECK TO MAKE SURE THE HAMMER REBOUNDS TO HALF COCK, SAFELY UP
OFF OF THE FIRING PIN, WHEN YOU REMOVE YOUR FINGER FROM THE TRIGGER, ESPECIALLY AFTER LOWERING THE HAMMER
ON A LIVE ROUND IN THE CHAMBER.
Normally all Encores I have done trigger jobs on will reliably rebound the hammer if the pull weight is at least 1 3/4pound. I have had some that would not rebound with a 1 1/2 pound pull weight, yet I have had some that would reboundok at 13 oz. Thus to be safe, I recommend never going below 1 1/2 pound and no matter the pull weight, MAKE SURE
THAT HAMMER REBOUNDS. It is your responsibility since you are the one physically making the change in the gun, and youhave been warned of the inherent danger, as well as being advised to increase the pull weight sufficiently to insure thegun is safe.
ADVISORY NOTE: I have found a few springs that are just a little too long on the curved, top end where they push on theupper arm of the sear. Check to be sure the upper end of the spring does not touch the frame itself. You can see it whenyou pull the hammer back a little.
* Previous Encore springs can be cut back about 1/16' for use in G2's. If you have Encore springs already, shorten them and use them in G2's
Are you ready to put it back together?
Here goes.
Pg7

Slip the hammer spring and its "T" headed strut into its hole in thegrip/buttstock tenon. If you got the two struts and two springs mixed up,the hammer spring is the stiffer, heavier spring, and its strut is NOT theone with the eye in the end. The correct strut has the "T" or cloverleaf
shaped end.
UPDATE: If the hammer does not rebound to half-cock reliably when you remove
your finger from the trigger, cut approximately 1/2 coil from the hammer spring or asneeded to give about 1/8' of hammer free travel before it hits the back of the breech.
The lighter the trigger/sear spring, the shorter the hammer spring needs to be.
Insert the hammer up into the frame. As with removing it, you may haveto jockey it a little, but it freely slips up into its opening in the top of the
frame.
* For G2's, slip the spacer washer into place, on the right side of the frame. Inserthammer pivot pin to hold it in position as the hammer is inserted through the TOP of
the frame.
Once you have the hammer up in position, make sure the top of thehammer spring strut is positioned in the slot in the bottom of the
hammer. The head of the strut will be oriented lengthwise with theframe.
Line up the hole in the hammer with the hole in the largest pin hole inthe frame and insert the largest pin. Note: With the pin in place, makesure the hammer strut head is securely in its position in the bottom of
the hammer. If it isn't, you may get the frame completely assembled andthen hate life when you can't cock the hammer. Don't reach for the rat
poison. Just make sure the strut is in its slot.
Did we forget something, like the strut with the eye in it that fits on thehammer pivot pin? Nope. You don't need it for now. It will just be in the
way, and it is easy to install just before you install the trigger guard.Forget it. We'll put it in later.
Pg8

This skeletonized gizmo, again, is the interlock. It is lying there orientedin the right direction. With the frame lying on its side, the interlock will lieflat inside the frame. The open yoke to the right straddles the hammer
pivot area. The dangly little spring is what holds the interlock in itsforward position until the barrel's locking bolts push it to the rear. On
your own, lay the sear on the interlock and you will see how the interlockengages the cut away pivot area of the sear to prevent its movementwhen the interlock is forward, or frees it to move when the interlock is
pushed to the rear by the barrel's locking bolts.
This shows the correct position of the sear on the interlock, ready to beslipped into the frame. One leg of the "L" shaped sear points to the top
of the frame (away from you with the frame on its side), and the other legpoints to the rear.
UPDATE: On both Encore and G2's, there is often a sharp burr where that "Dangly"
spring is staked in. The sear rubs against this area and the burrs give a "Creep"sensation. Stone/Polish down the staked areas as needed.
Set the sear and interlock inside the frame with the frame still with itsright side down. Note how the tip of my finger is moving the two parts
into place together.
Use the tip of your index finger to line up the hole in the sear with themiddle size pin hole in the frame. Then insert the sear pivot pin.
Pg9

Set the frame on its top and use the pin punch to push out the sear pivotpin just far enough for it to clear the opening where the trigger/sear
spring goes. Now back the punch out so it clears the same opening.
UPDATE: Needle nose pliers and hemastats work for spring installation (Shown in
next frame) But, the specially forged Bellm spring pliers give full control of the springfor absolute ease of installation.
Remember the fun I said we were going to have. This is it. I was notcompletely honest with you. Everything is pretty sanitary up to this point,
but expletives have been known to foul the air while installing thetrigger/sear spring shown here held by a hemastat with grooves groundinto the jaws. However, needle nose pliers with good sharp edges in the
jaws work well also. No matter which is your tool of choice, the springhas a strong propensity for taking unannounced flights into the unknown.
Some are never seen again once they take flight. Sells more springs.But cheat me, be careful, and avoid doing this in an area where the
spring can land in a good hiding place if you can.
WEARING GLASSES OR SAFETY GLASSES IS RECOMMENDED ALSO, NOT
ONLY FOR YOU, BUT FOR ANY OBSERVERS OF THIS PROCESS. Note the "L"
shaped leg of the spring points to the rear of the frame, and the curvedend just goes down there in the chasm below.
This is the position for getting it all together, but I left out one step. Firstpush the loops of the spring down inline with the sear pivot pin hole, andcatch it with the pin punch. It is during this phase the spring wants to join
NASA.
UPDATE: To make sure the sear is in the correct position for installing the spring,
push the interlock back, pull the hammer back slightly, then push down on thesmooth end of the sear you are looking at in this photo.
Once you have the spring loops captured by the pin punch, use the pinpunch to pry the loops of the spring back so that you can tap the sear
pivot pin through the loops and through the opposite side of the sear andframe. I'll do a time out while you catch up. It may take several tries.Once you get the spring installed, you are home free. Note that all
current springs have 3 loops. One reason for this is to make it easier tohold onto the springs while you install them. One and two coil springs
can be hard to hold onto. The added coil also helps the spring maintainit's strength longer.
Pg10

With the trigger/sear spring installed, slip the hole in the trigger over theend of the spring, and pull the trigger forward and down just enough to
allow inserting the smallest pin.
Part of the benefit of pictures like this is showing how to manipulatethings. In this case steadying the frame while pulling against the springto line up the holes. You can look inside the frame and tell pretty wellhow close you are to matching up the holes. Light pressure on the pin
scores a hit when the trigger is lined up with it.
The trigger pivot pin slides in easily until it contacts the trigger/searspring. Tap it past the spring with your striking instrument, hammer,
screwdriver handle or.....
It is dark in there, but the hammer pivot pin has been pushed out farenough to allow inserting the trigger guard return spring strut, the one
with the eye in one end. Insert the strut and gently tap the pin in,"jockeying" the strut until the hole lines up with the pin.
Pg11

Install the trigger guard return spring onto its strut.
Start the trigger into its opening in the trigger guard while lining up thestrut with its opening at the rear of the trigger guard.
Note how I am holding the frame so as to hold the trigger guard inagainst its return spring tension and align the holes for insertion of the
trigger guard pivot pin. START THE PIVOT PIN IN ONLY FAR ENOUGHTO ENGAGE HOLES ON ONE SIDE............. DO NOT FORCE IT. Notethe black tip of the return spring strut projecting through its hole in the
trigger guard next to my thumb.
Look down inside the frame and you will see the large-headed pin in thetrigger sticking up in the way of the trigger guard pivot pin. Push it downwhile pushing the pivot pin in further, over the top of the pin's head, until
the threaded end of the trigger guard pivot pin's threads engage, thentighten with screwdriver.
* In place of the headed pin shown in the Encore frame, the G2 has a small delicatespring that must be depressed for the trigger guard pivot pin to be installed in the
same manner as shown here for the Encore.
Pg12

This is what it looks like with the headed pin in the trigger depressedbelow the trigger guard pivot pin. Now, except for the breech face plug
and contents you are done. Congratulations again.
.* Again, If you are working on a G2, the small spring in the trigger should have it'slooped end below the trigger guard pivot pin from this view.
Since you will likely be dry firing, we'll leave the plug out so we don'tdamage the firing pin return spring. But before you can dry fire, you
have to be able to cock the hammer. You now know where the mysticalinterlock is, on the right side of the frame, so slip a finger down inside
and push back on the interlock until you can cock the hammer. Surprise.The mechanism works. If it doesn't, recheck to make sure that the
hammer spring strut is in its slot in the back of the hammer.
Checking the trigger pull weight. Note that the trigger guard is notinstalled, on the chance that the frame needs to be taken apart to
change out the trigger/sear spring or hone parts. Note also two morethings. One, the breech plug is still out and two, a rag is positioned so
that it will cushion the blow of the hammer against the back of the frameand prevent battering it. With the trigger guard out, you may find an
ounce or two difference in pull weight due to the absence of pressure ofthe big headed pin in the trigger pushing the trigger back. You can insert
the trigger guard pivot pin to restore this pressure if you like.
SAFETY FUNCTION CHECKS. THESE CHECKS MUST BE PERFORMED
WHETHER YOU DO ANY HONING OR NOT, BUT ARE DOUBLY IMPORTANT IF
YOU DO HONE THE SEAR AND/OR HAMMER.
Testing for "push off."
Note I am gripping the frame pretty firmly while pushing forward on thehammer with my thumb to see if it will push off. Push off is not likely to
occur unless you do some honing on the sear. Nonetheless, it is asafety check you should make. You don't need to break the hammerspur off pushing on it, but neither should the hammer go forward with
moderate pressure on it.
(Note, for target applications under well controlled conditions, push offfrom a moderate amount of pressure is tolerable, but not advised for
general use. There is risk of accidental discharge, especially if the gun isbumped, jarred, falls over when left sitting on the rest, or any other dumb
thing that can happen.)
Pg13

Testing to make sure the hammer rebounds. If you cock the hammer,and then pull the trigger, ie., dry fire it, while the trigger is held back the
hammer remains resting on the firing pin.
When you remove your finger from the trigger, the hammer mustrebound back off of the firing pin and be locked in this position. In otherwords, push forward on the hammer and it must still stay backed off ofthe firing pin. If it doesn't, then a stiffer trigger/sear spring is needed to
lock the hammer back, AND/OR IT MAY BE NECESSARY TO EITHER
REMOVE THAT WASHER WE TALKED ABOUT EARLIER PRESSED ONTO THE
HAMMER SPRING STRUT in some frames ( easily tapped off with ahammer) OR THE SPRING MAY NEED TO BE SHORTENED BY GRINDING OFF
ONE END JUST A LITTLE AT A TIME UNTIL THE HAMMER WILL LOCK BACK IN
THE REBOUND POSITION AUTOMATICALLY.
((Note: It is entirely possible to defeat the hammer block safety using avery light trigger/sear spring, and for target use under controlled
conditions (or shooting prairie dogs and ground squirrels) I wouldconsider it myself, BUT to ever permit a situation to exist where someone else might use it in this condition and cause
damage, injury, or death is totally irresponsible. Therefore, my recommendation is, don't do it. But if you must, then installa heavier spring before selling that frame or permitting someone else to use it.))
As this updated version is being prepared, we are developing a stronger hammer spring that we will soon supply.
Pg14

WE NOW HAVE TWO ITEMS LEFT TO ATTEND TO:1) Adjusting the over travel screw, and2) Finally reinstalling the breech plug.
With the hammer cocked and the trusty shop rag ready to cushion thehammer when it falls, turn the overtravel spring in until it touches the
back of the trigger. Apply firm pressure to the trigger while backing outthe over travel screw until the hammer falls. Then back the screw out
another 1/4 turn and dry fire it several more times. If it shows anyhesitation to release the hammer, back the screw out another 1/4 turn or
more as needed. It is important that there is no hesitation. It is highlypossible to pull the trigger back to the stop, wonder why it did not fire,
then have the gun fire unexpectedly. Not a good thing. So while we wantthe minimum of overtravel, don't set it so close as to cause a problem.Remember also that when temperatures change, things move around,and it is conceiveable you could set the overtravel in July and have thegun not fire in freezing temperatures when you pull down on that 8 point
bull elk. I normally Loctite the overtravel screw in place rather thandepending solely on the friction paint on it to keep it from changing
adjustment.
If you are done dry firing the Encore, reinstall the breech face plug, firingpin, and firing pin return spring. Check the firing pin return spring tomake sure it has enough tension to retract the firing pin completely
inside the plug. If it doesn't, either stretch it back out, or buy another onefrom Thompson/Center.
In case you may have separated the return spring and firing pin from theplug, the pointed end of the cone shaped spring should be to the rear,against the flange on the firing pin. Note also that you can access the
allen socket screw with the hammer installed. Handy that way.
* The plug must be installed with the hammmer removed from the G2 frames.
TIPS: . 1 Sometimes a longer over travel screw is needed. Obtain a 4 x 40 x 1/4" screw from Bellm TC's or from the"Fasteners" cabinet at your local hardware or automotive store.
. 2 To test for adequate clearence once the over travel screw is set, I like to place two thicknesses ofpaper(such as this is printed on) between the over travel screw and the back of the trigger. The papershould not prevent the hammer from releasing.
Pg15

ADVANCED SECTIONHONING AND SMOOTHING PARTS FOR A COMPLETE TRIGGER JOB
SECOND WARNING: AS WITH ANY WORK YOU PERFORM ON ANY FIREARM, YOU CAN PRODUCE RESULTS THAT ARE UNSAFE.
I am as serious as a heart attack. If the work you do does not pass at least the safety function checks I detailed earlier, you will have createdan unsafe firearm and are responsible for taking steps to correct unsafe conditions. I am not trying to be a "heavy," but while the work isrelatively easy to perform correctly, people come with all sorts of capabilities and even more means of perceiving the same thing. Some ofyou are already adept at what follows and will take it as merely a guide. For others, this will be a first time attempt. What comes natural toone person is virtually impossible to the next. I will attempt to do the best I can for both extremes and everyone else in between....... did Ileave anyone out?
BEFORE YOU START
Worst case scenario......... you really make a mess of things. What to do.
One "fix" if you cannot fix it yourself, is to send it to Thompson/Center who will restore it to factory spec. Muchof what they do under warranty is at no charge. However, there may be a charge from them.
Another is to ship it to the dealer I specify and have me do it for you. Currently (June, 2004) the charge for acomplete Premium trigger job is $80. "Botchalism Repair" will be $80 plus costs for parts if needed. Add $5.95shipping and handling. So far, in 3 1/2 years no parts have had to be replaced!
Enough of the "gravity of the situation." You understand the work is not to be taken lightly, and you know youhave a back up if worse comes to worse. I encourage everyone to at least try the work themselves, and I amalso available by eMail and phone for tech support.
LET'S PROCEED.
While power tools can be used judiciously, you will note that I do not use them at all. My advice is to put the Dremeltool away and unplug the bench grinder. One article I have seen in a gunsmith publication says to whip out the Dremeltool. Don't.
While other methods can produce the same results, I use and recommend the following:
. 1 fine cut Diamond EZE Lap, No.IIF is shown, But, No.LF lets you alter the sear angle.
. 2 Hard Arkansas type of stone in good condition, ie., flat surfaces and sharp corners, not rounded and brokendown.I inherited a box full of various stones from P.O. Ackley, but what I like best is what a gent named Jerry Prohaskacalls a "Wyoming Stone." What it is, I don't know. I just know they are the best I have found for trigger jobs. Theycut fast, leave nearly a polished finish, and do not break down easily.
. 3 If you alter the sear angle, you will also need a triangular hard Arkansas stone, fine cut
Pg16

You have seen this view before, but here it is again for quick referenceto help show you the contact points and where you need to smooth
things up.
Let's start with the bottom arm of the sear. You can see the rough partline cast into the sear left unfinished from the factory. Referring to thephoto before this one, you can see that the trigger cams against this
surface which is quite rough. You will also note a bright wear spotindicating the only point the trigger is contacting the sear arm. While fullcontact is not mandatory for an exceptionally smooth Encore trigger pull,
more contact is better. So focus on high spots such as this one whenyou do your honing. Do not change the angle of this flat. If you want to
check for contact after honing, ink the surfaces with a felt tip pen, installthem in the frame, work it a few times, and then inspect the part to seewhere the ink has been rubbed off. Do not attempt to rely on positioningparts on the side of the frames to do this since you cannot maintain the
same exact realtionship as when the parts are installed.
Note I am NOT using a vise to hold the sear while working it down with aDiamond EZE Lap. The most important skill you must use is your "feel"for when the hone is flat on the surface you are working on. It may be
necessary to stop after every stroke to feel if you are in fact holding thehone flat on the surface. Watch with each stroke you take and note
where the blueing is being removed by that stroke. This will tell you farmore than I can with words.
See what I mean? I have taken just a few strokes, but it is apparent fromthe areas where the blueing is cut away that the surface is badly uneven
and rough.
Pg17

The results. Note that you can have too much of a good thing, and that Istopped working down the rough areas before completely removing the
last flaw in the middle of the top edge. Follow the Diamond EZE Lapwork with a hard, smooth stone to polish it.
Next look at the actual sear notch that holds the hammer back at fullcock. Note that it is rather rough and does not contact evenly as
indicated by the points where the blueing is worn off.
UPDATE: The angle formed by the sear notch is 90° and you may need to change
this angle to less than 90° if you reduce the pull weight below about 2 1/2 pounds forthe hammer to cock securely. Use the LF EZLap or Triangular EZLap
As with trigger jobs on most any other firearm, work on the sear surfacesis the most critical part of the whole trigger job. Shortest advice here isthat if you make the angle more vertical than it is from the factory, thehammer will be more prone to "push off" as discussed earlier. On the
other hand, making the angle slightly more horizontal reduces thetendency for "push off." So if you are going to err, err on the more
horizontal plane. Horizontal and vertical here are with reference to thesear when it is installed in the frame and the frame held in a normal
shooting position.
Make certain that you keep the surface flat. Don't "see saw" left to rightand make the surface arched. Keep it flat.
NOTE: We will be supplying the 1/4' No.IIF EZE Lap shown with, in this orentation,the top side altered to less than 90°.
Examine your work as you go. Watch where the blueing is beingremoved. Change the angle at which you are holding the sear relative to
the diamond lap as needed. Remove only enough material to smooththis surface. Ie., it does not take a lot, so don't over do it. It is far better
to put it together, try it , and take it apart alot, but hone just a little.Follow the diamond lap with the hard smooth stone to polish what you
just did.
You will notice that I am not suggesting just stoning. You will do a betterjob, I feel, using the fast cutting diamond lap, and then just smoothing up
afterwards by stoning.
In fact I put so much emphasis on the diamond lap that we neglected toeven include photos of stoning! Nonetheless, all parts were stoned for
the final smoooooth finish.
Pg18
This is the top of the trigger. I don't know how it was finished at thefactory, but you can see how uneven the surface is where the blue is
worn off. Levelling this surface of course gives more contact area, whichequals less pressure per square inch of surface and an easier pull. Donot change the shape of this surface, only even out the high and low
spots, and polish smooth.
Tip: As with the bottom of the sear, lap and stone in the same directionthe parts travel in relationship to each other where possible. No matterhow smooth a surface looks, it is actually a series of peaks and valleyscut by the stone or lap. It is better these peaks and valleys are running
parallel to each other rather than across each other.
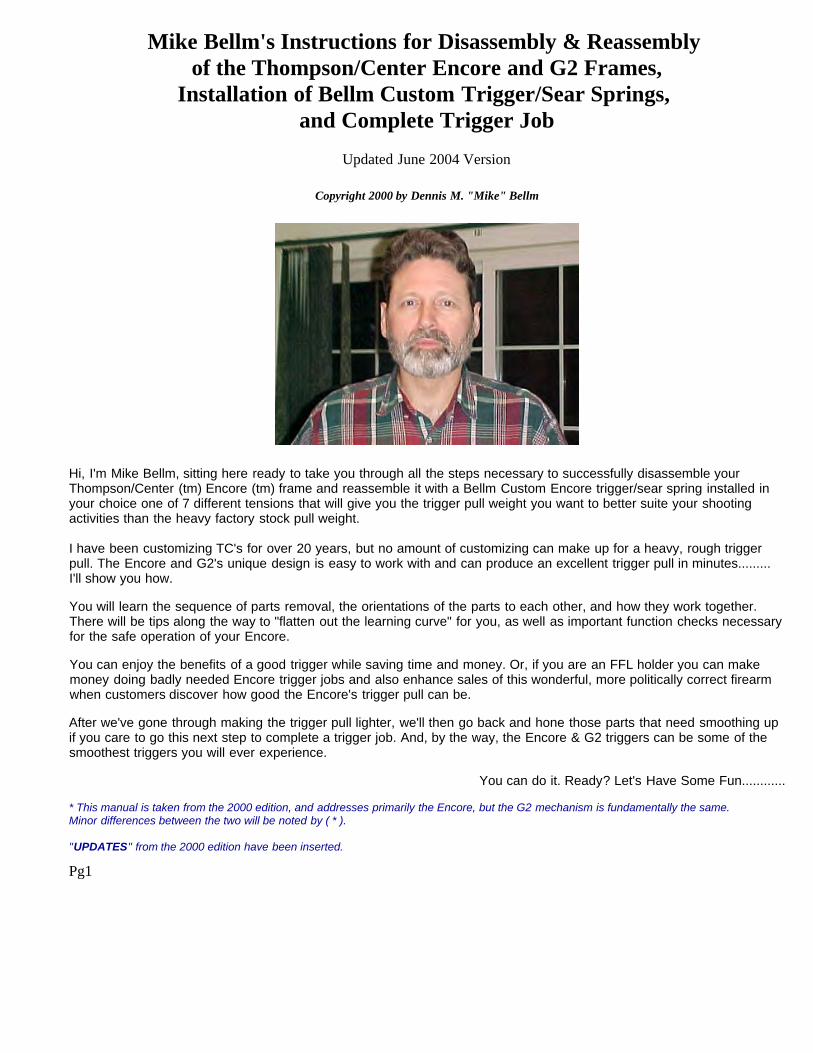
Top of trigger smoothed and evened up. Radius on top maintained.Again, smooth it enough, but not so much that you lose its shape in the
process.
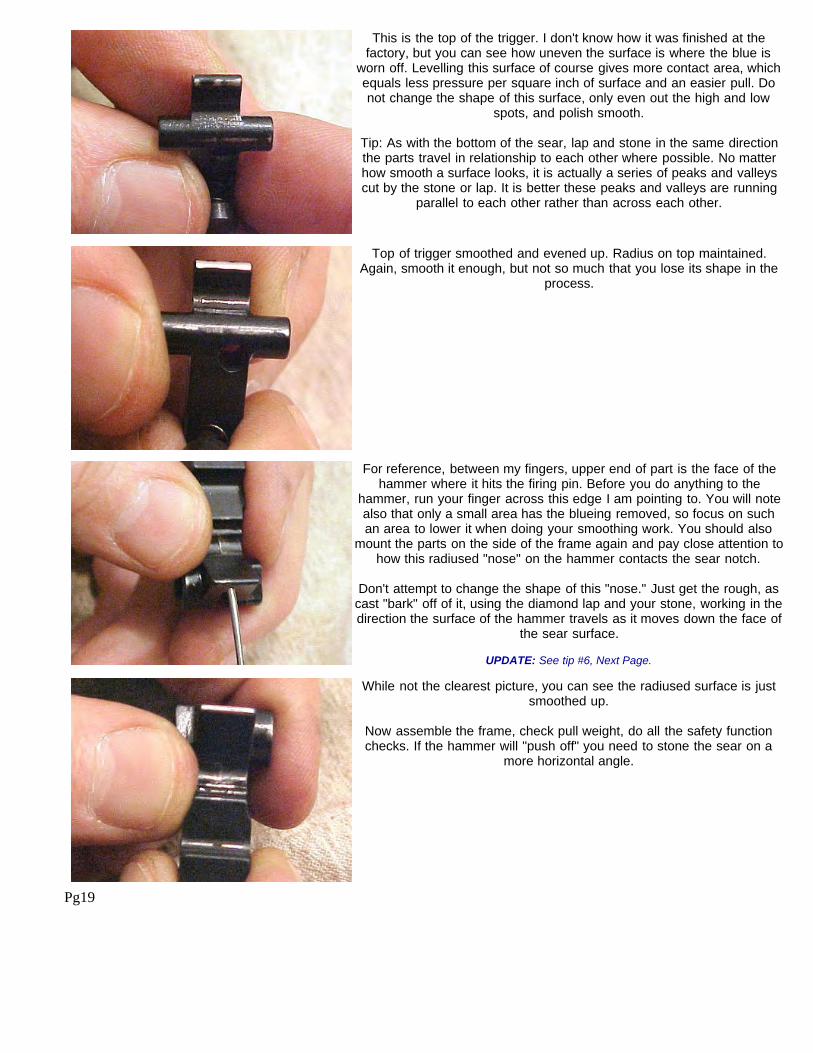
For reference, between my fingers, upper end of part is the face of thehammer where it hits the firing pin. Before you do anything to the
hammer, run your finger across this edge I am pointing to. You will notealso that only a small area has the blueing removed, so focus on suchan area to lower it when doing your smoothing work. You should also
mount the parts on the side of the frame again and pay close attention tohow this radiused "nose" on the hammer contacts the sear notch.
Don't attempt to change the shape of this "nose." Just get the rough, ascast "bark" off of it, using the diamond lap and your stone, working in thedirection the surface of the hammer travels as it moves down the face of
the sear surface.
UPDATE: See tip #6, Next Page.
While not the clearest picture, you can see the radiused surface is justsmoothed up.
Now assemble the frame, check pull weight, do all the safety functionchecks. If the hammer will "push off" you need to stone the sear on a
more horizontal angle.
Pg19

TIPS: . 1 You will also find that just a little stoning of the sear surface can change the pull weight as much as a pound +or -.
. 2 Stoning minutely changes the travel distances of the parts, so save setting the overtravel until the very lastwhen everything else is done EXCEPT for installing the breech face plug. Remember, if you Loctite thethreads on the overtravel screw, you are going to have to overcome it with that puny little allen wrench whichloves to strip out. That is its favorite thing to do. So, next tip,
. 3 If the overtravel screw socket does strip out, remove the trigger guard, get about a No. 50 or 1/16" drill bit andstart drilling in the socket of the screw. This will usually drive it on through the hole. Much easier thanswallowing rat poison, and much more fruitful.
. 4 NEVER grind back the sear notch to shorten engagement. It creates a hazardous condition when the hammeris not securely cocked. I find I often must increase engagement so the hammer will not readilly push off.
. 5 If you keep the contact surfaces between the 'trigger and sear' and 'sear and hammer' centered with eachother (ie. not bearing on just one side) and polish contacts to a smooth finish, you will sense no travel at allwith this mechanism -- Only pressure on your finger.
Hint, a short engagement is one way to cover up a rough travel. Smooth things up and the length of theengagement isn't an issue.
. 6 Stoning the bottom side of the hammer nose (Where it engages the sear notch) flat can effectively increaseengagement. removing material opposite this surface on the top side of the hammer nose also increasesengagement. Just remember this when you get a nice, light pull but the hammer won't stay cocked!
. 7 Changing the sear notch to less than 90° by bringing the contact surface up to a more horizontal planeincreases the pull weight, making it necessary to go to a lighter trigger/sear spring. A lighter trigger/sear springin turn may not rebound the hammer to half-cock, thus making it necessary to further shorten the hammerspring so the hammer will rebound properly.
. 8 Shortening the hammer spring weakens it. Shorten it too much, and you get misfires.
. 9 If you need to shorten the hammer spring and don't want to tear the entire frame down again, Yes, the hexnut on the grip/buttstock tenon DOES unscrew. Remove the hex nut to remove the hammer spring and strut.
. 10 If the hammer won't cock, chamfer the edges of the hole in the upper end of the grip/buttstock hex nut tenon. Ihave found several instances where the hammer spring strut caught on the hex nut and prevented cockingthe hammer. I have also found severe burrs inside the hammer spring hole that prevented the hammer springfrom moving.
. 11 If the hammer hesitates when rebounding or does not go to its second half-cock position (Yes, there are twonotches it goes through), slightly smoothing the contact area between the upper end of the sear and the faceof the hammer it rubs against may reduce the amount you have to cut off the hammer spring to get thehammer to rebound reliably.
. 12 If after smoothing the contact surfaces shown in the instructions, you still get "creep", Ink the surfaces with afelt tip pen, assemble the frame, cock the hammer and release it a few times, then check where the ink ismarred to see how the contact points meet. You do not have to have 100% contact for a smooth pull, BUT,the contacts must be fairly well centered. Contact on just the end of a surface puts things in a bind that showsup as creep.
. 13 If you still get creep, look for burrs around the pivot pin holes inside the frame and also at the ends of the pivotpin holes inside the frame and also at the ends of the pivot pin holes through the trigger and sear.
Your comments are welcome.