Embed Size (px)
Citation preview

Microsoft Word Using the “Track Changes” Feature
Last Updated: 2/15/2008
Page 1 of 7 Prepared by… Debbie Gilsdorf, Dennis Topel and Crystabelle Lopez
Introduction
This document is meant to be guide for using Word’s Track Changes feature. Instructions for both Word 2003 and Word 2007 are included in this document.
What is the “Track Changes” feature?
Microsoft Word’s Track Changes feature allows you and others to make and view changes and comments in your documents. The Track Changes feature is not automatic, it must be turned on.
What are the benefits of using Track Changes?
1. You can have people reviewing your document make changes electronically. These changes include deleting, inserting, and moving text and graphics.
2. In addition to making changes electronically, reviewers can also add comments to further facilitate conversation about a certain section of the document.
3. And, using the Track Changes feature allows you to see who suggested changes to the document, and allows you to either accept or reject changes. This is especially helpful, as using Track Changes allows you to still see the original text you wrote prior to the editing.
Word 2007
Word 2003
Microsoft Word Using the “Track Changes” Feature
Last Updated: 2/15/2008
Page 2 of 7 Prepared by… Debbie Gilsdorf, Dennis Topel and Crystabelle Lopez
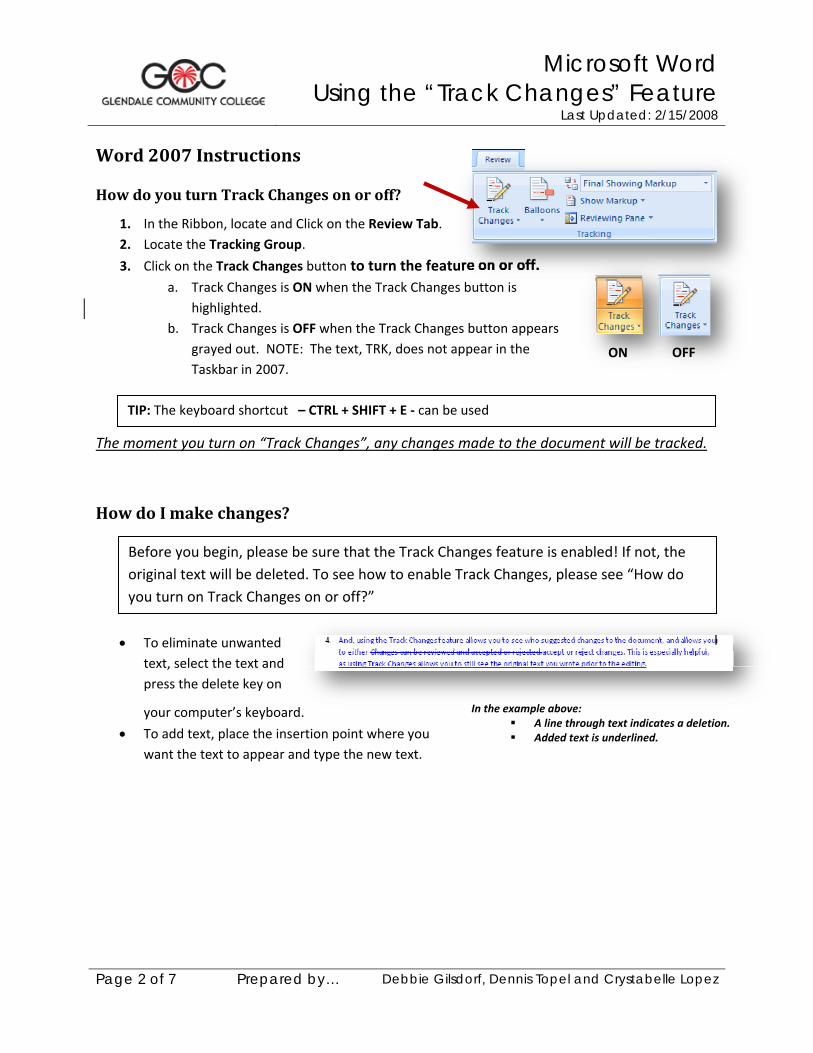
In the example above: A line through text indicates a deletion. Added text is underlined.
TIP: The keyboard shortcut – CTRL + SHIFT + E ‐ can be used
Word 2007 Instructions
How do you turn Track Changes on or off?
1. In the Ribbon, locate and Click on the Review Tab. 2. Locate the Tracking Group.
3. Click on the Track Changes button to turn the feature on or off. a. Track Changes is ON when the Track Changes button is
highlighted. b. Track Changes is OFF when the Track Changes button appears
grayed out. NOTE: The text, TRK, does not appear in the Taskbar in 2007.
The moment you turn on “Track Changes”, any changes made to the document will be tracked.
How do I make changes?
• To eliminate unwanted text, select the text and press the delete key on
your computer’s keyboard.
• To add text, place the insertion point where you want the text to appear and type the new text.
ON OFF
Before you begin, please be sure that the Track Changes feature is enabled! If not, the original text will be deleted. To see how to enable Track Changes, please see “How do you turn on Track Changes on or off?”
Microsoft Word Using the “Track Changes” Feature
Last Updated: 2/15/2008
Page 3 of 7 Prepared by… Debbie Gilsdorf, Dennis Topel and Crystabelle Lopez
What are “Comments” and how do I add or delete a comment?
Comments are used to insert information without altering the original document. The comments feature can be used to ask a question, draw the author’s attention to an area of the document needing attention. Comments are placed in “balloons.” See the example above.
To add a comment:
1. Click the New Comment button located in the Comments group under the Review tab. 2. Or, the keyboard shortcut CTRL + ALT + M can be used.
To delete a comment:
1. Click somewhere in the Comment box. 2. Click the right mouse button. 3. A shortcut menu appears. Select Delete Comment.
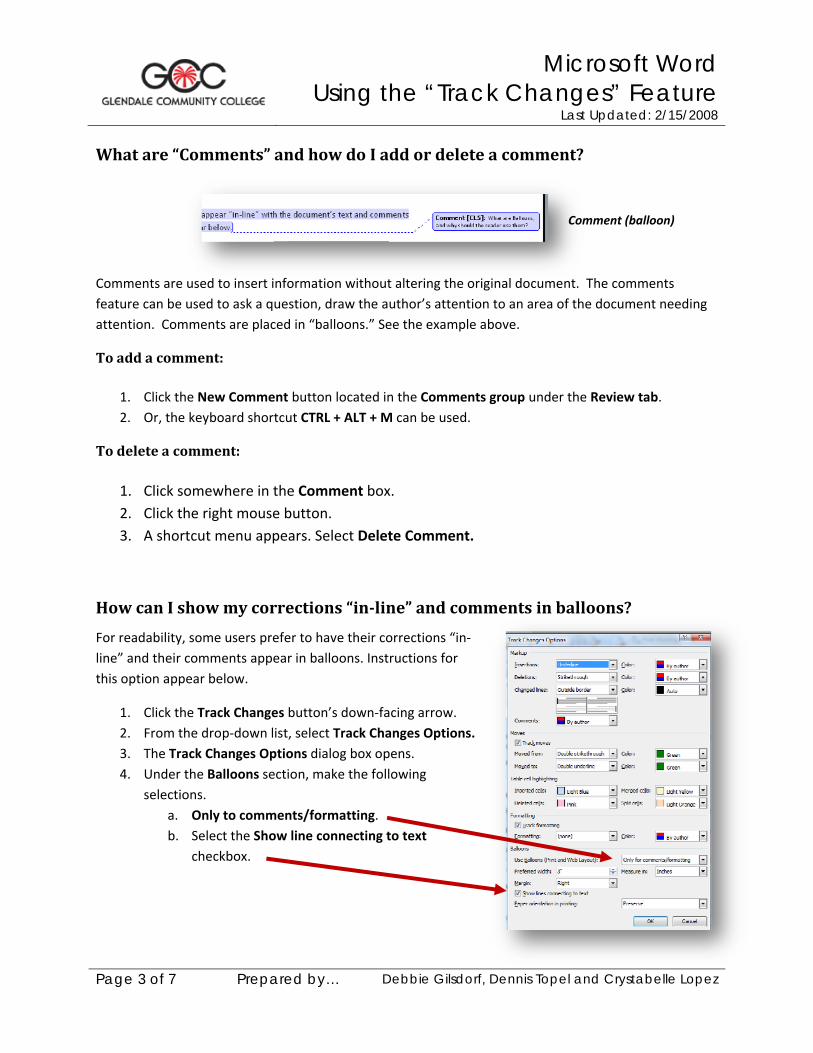
How can I show my corrections “inline” and comments in balloons?
For readability, some users prefer to have their corrections “in‐line” and their comments appear in balloons. Instructions for this option appear below.
1. Click the Track Changes button’s down‐facing arrow. 2. From the drop‐down list, select Track Changes Options. 3. The Track Changes Options dialog box opens. 4. Under the Balloons section, make the following
selections. a. Only to comments/formatting. b. Select the Show line connecting to text
checkbox.
Comment (balloon)

Microsoft Word Using the “Track Changes” Feature
Last Updated: 2/15/2008
Page 4 of 7 Prepared by… Debbie Gilsdorf, Dennis Topel and Crystabelle Lopez
In this example, Final Showing Markup appears in the Display for Review textbox.
How do I view changes made by myself or others?
1. To select the Final Showing Markup option, click the down facing arrow to the left of the Display for Review textbox.
2. Select Final Showing Markup from the drop‐down list.
3. Use the Previous or Next button located in the Changes group to review changes.
How do I accept or reject changes?
To accept or reject one change at a time:
1. Select the Review Tab. 2. Locate the Changes group. 3. Make sure the desired Change is selected. 4. Click either the Accept or Reject button.
To accept all changes:
1. Select the Accept button’s down‐facing arrow. 2. From the drop‐down list, select Accept All Changes in
Document.
To reject all changes:
1. Select the Reject button’s down‐facing arrow. 2. From the drop‐down list, select Reject All Changes in Document.
TIP: The Original Showing Markup option displays the text of the original document. The Final Showing Markup option displays the final version of the document. Both show changes as markups.
TIP: Use the keyboard shortcut – CTRL + HOME – to move to the beginning of your document before starting the review process.

Microsoft Word Using the “Track Changes” Feature
Last Updated: 2/15/2008
Page 5 of 7 Prepared by… Debbie Gilsdorf, Dennis Topel and Crystabelle Lopez
In the example above: A line through text indicates a deletion. Added text is underlined.
TIP: The keyboard shortcut – CTRL + SHIFT + E ‐ can be used
Before you begin, please be sure that the Track Changes feature is enabled! If not, the original text will be deleted. To see how to enable Track Changes, please see “How do you turn on Track Changes on or off?”
Word 2003
How do you turn Track Changes on or off? 1. From the File Menu, select the View menu. 2. Point to the Toolbars menu item. 3. Select Reviewing from the drop‐down list. 4. The Reviewing Toolbar appears. 5. To turn Track Changes on or off, click the Track Changes
button. a. Track Changes is ON when the Track Changes
button has a blue border surrounding it and the text, TRK, appears highlighted on the Taskbar.
b. Track Changes is OFF when both the Track Changes button and TRK appear grayed out.
The moment you turn on “Track Changes”, any changes made to the document will be tracked.
How do I make changes?
• To eliminate unwanted text, select the text and press the delete key on your computer’s keyboard.
• To add text, place the insertion point where you want the text to appear and type the new text.

Microsoft Word Using the “Track Changes” Feature
Last Updated: 2/15/2008
Page 6 of 7 Prepared by… Debbie Gilsdorf, Dennis Topel and Crystabelle Lopez
What are “Comments”, and how do I add or delete a comment?
Comments are used to insert information without altering the original document. The comments feature can be used to ask a question, draw the author’s attention to an area of the document needing attention. Comments are placed in “balloons.” See the example above.
To add a comment:
1. Click the Insert Comment button located on the Review toolbar. 2. Or, the keyboard shortcut CTRL + ALT + M can be used.
To delete a comment:
1. Click somewhere in the comment box. 2. Click the right mouse button. 3. A shortcut menu appears. Select Delete Comment.
How can I show my corrections “inline” and comments in balloons?
For readability, some users prefer to have their corrections “in‐line” and their comments appear in balloons. Instructions for this option appear below.
1. Click the Track Changes button’s down‐facing arrow.
2. Click the Show button’s down‐facing arrow.
3. The Show menu appears. Point your mouse to Balloons.
4. From the cascading menu, select Only for Comments/Formatting.
Comment (balloon)

Microsoft Word Using the “Track Changes” Feature
Last Updated: 2/15/2008
Page 7 of 7 Prepared by… Debbie Gilsdorf, Dennis Topel and Crystabelle Lopez
How do I view changes made by myself or others?
In this example, Final Showing Markup, appears in the Display for Review textbox.
1. Click the down‐facing arrow to the left of the Show button. 2. Select Final Showing Markup from the drop‐down list. 3. Use the Previous or Next button located on the Reviewing Toolbar to review changes.
How do I accept or reject changes?
To accept or reject one change at a time:
1. Make sure the desired Change is selected. 2. Click either the Accept or Reject button on the Track
Changes toolbar.
To accept all changes:
1. Select the Accept button’s down‐facing arrow. 2. From the drop‐down list, select Accept All Changes in Document.
To reject all changes:
1. Select the Reject button’s down‐facing arrow. 2. From the drop‐down list, select Reject All Changes in Document.
Accept Reject
TIP: The Original Showing Markup option displays the text of the original document. The Final Showing Markup option displays the final version of the document. Both show changes as markups.
TIP: Use the keyboard shortcut – CTRL + HOME – to move to the beginning of your document before starting the review process.


![Word 2010 Unit D [Read-Only]profesor.uprb.edu/mvelez/cursos/sici3017/Word2010UnitD.pdfInserting Citations • Use the Word References feature to keep track of reference sources •](https://img.dokumen.tips/doc/110x75/602c0f5a7ad600134f7d39f5/word-2010-unit-d-read-only-inserting-citations-a-use-the-word-references-feature.jpg)