Embed Size (px)
Citation preview
Microsoft Dynamics® GPRapidStart Services
January 31, 2013
Copyright Copyright © 2013 Microsoft. All rights reserved.
Limitation of liability This document is provided “as-is”. Information and views expressed in this document, including URL and other Internet Web site references, may change without notice. You bear the risk of using it.
Some examples depicted herein are provided for illustration only and are fictitious. No real association or connection is intended or should be inferred.
Intellectual property This document does not provide you with any legal rights to any intellectual property in any Microsoft product.
You may copy and use this document for your internal, reference purposes.
Trademarks Microsoft, Excel, Microsoft Dynamics, SQL Server, Visual Studio, Windows, Windows Server, and Windows Vista are trademarks of the Microsoft group of companies. FairCom and c-tree Plus are trademarks of FairCom Corporation and are registered in the United States and other countries.
All other trademarks are property of their respective owners.
Warranty disclaimer Microsoft Corporation disclaims any warranty regarding the sample code contained in this documentation, including the warranties of merchantability and fitness for a particular purpose.
License agreement Use of this product is covered by a license agreement provided with the software product. If you have any questions, please call the Microsoft Dynamics GP Customer Assistance Department at 800-456-0025 (in the U.S. or Canada) or +1-701-281-6500.
Publication date January 2013
R A P I D S T A R T S E R V I C E S i
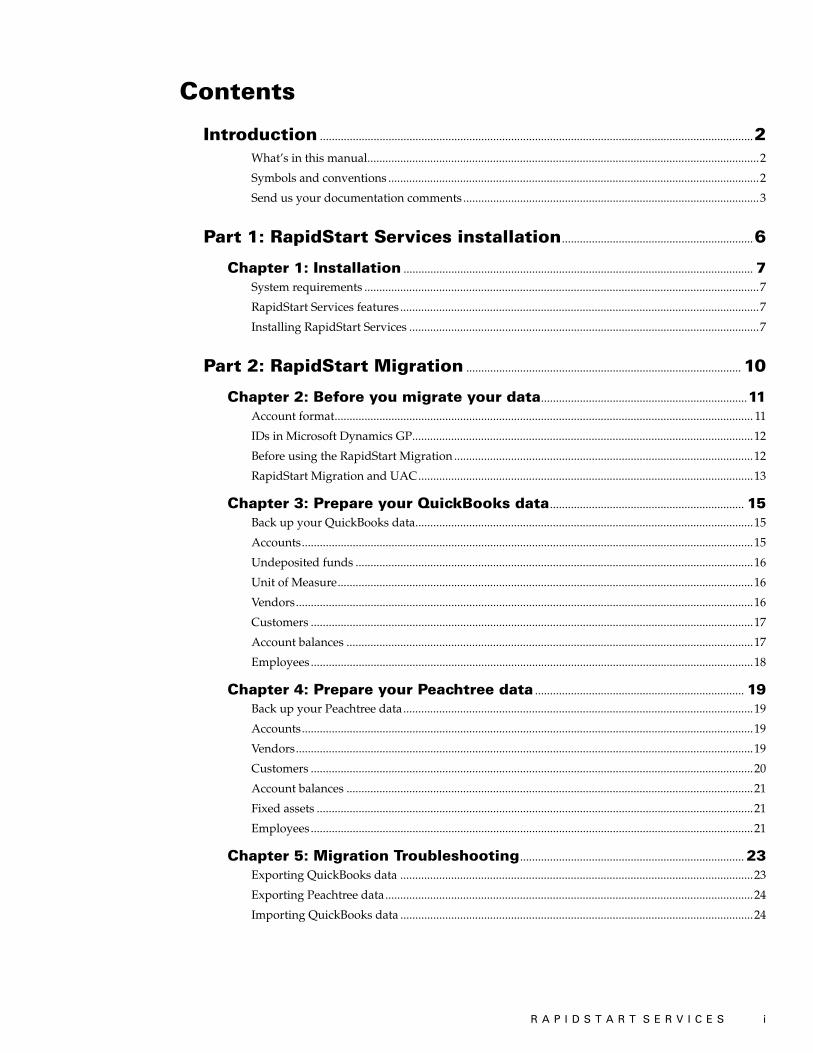
Contents
Introduction .................................................................................................................................................2What’s in this manual...................................................................................................................................2
Symbols and conventions ............................................................................................................................2
Send us your documentation comments ...................................................................................................3
Part 1: RapidStart Services installation................................................................6
Chapter 1: Installation ..................................................................................................................... 7System requirements ....................................................................................................................................7
RapidStart Services features........................................................................................................................7
Installing RapidStart Services .....................................................................................................................7
Part 2: RapidStart Migration ............................................................................................ 10
Chapter 2: Before you migrate your data.....................................................................11Account format............................................................................................................................................ 11
IDs in Microsoft Dynamics GP..................................................................................................................12
Before using the RapidStart Migration ....................................................................................................12
RapidStart Migration and UAC................................................................................................................13
Chapter 3: Prepare your QuickBooks data................................................................. 15Back up your QuickBooks data.................................................................................................................15
Accounts.......................................................................................................................................................15
Undeposited funds .....................................................................................................................................16
Unit of Measure...........................................................................................................................................16
Vendors.........................................................................................................................................................16
Customers ....................................................................................................................................................17
Account balances ........................................................................................................................................17
Employees....................................................................................................................................................18
Chapter 4: Prepare your Peachtree data ...................................................................... 19Back up your Peachtree data.....................................................................................................................19
Accounts.......................................................................................................................................................19
Vendors.........................................................................................................................................................19
Customers ....................................................................................................................................................20
Account balances ........................................................................................................................................21
Fixed assets ..................................................................................................................................................21
Employees....................................................................................................................................................21
Chapter 5: Migration Troubleshooting........................................................................... 23Exporting QuickBooks data ......................................................................................................................23
Exporting Peachtree data...........................................................................................................................24
Importing QuickBooks data ......................................................................................................................24

ii R A P I D S T A R T S E R V I C E S
C O N T E N T S
Chapter 6: After you migrate ................................................................................................. 27Company tasks ............................................................................................................................................27
Financial tasks .............................................................................................................................................29
Inventory tasks ............................................................................................................................................31
Sales tasks.....................................................................................................................................................32
Purchasing tasks..........................................................................................................................................36
Part 3: RapidStart Configuration ...............................................................................42
Chapter 7: Before you configure your data............................................................... 43Back up company data ...............................................................................................................................43
Multicurrency Management and configuration.....................................................................................43
Using RapidStart Configuration with UAC activated ..........................................................................44
Chapter 8: After you configure your data .................................................................. 45Back up your company data......................................................................................................................45
Register Microsoft Dynamics GP..............................................................................................................45
Assign access to currencies........................................................................................................................46
Assign a functional currency to a company............................................................................................46
Check links...................................................................................................................................................46
Create a unit of measure schedule............................................................................................................47
Define an inventory site .............................................................................................................................48
Specify document type IDs for Sales Order Processing transactions..................................................48
Part 4: Configurations for Microsoft Dynamics GP..........................52
Chapter 9: Working with configurations ..................................................................... 53Configuration overview.............................................................................................................................53
Software requirements ...............................................................................................................................54
How you can use configurations..............................................................................................................54
Tips and troubleshooting ...........................................................................................................................55
Editing RapidStart Migration configurations .........................................................................................57
RapidStart Configuration worksheet reference......................................................................................58
Index ...................................................................................................................................................................61

INT
RO
DU
CT
ION
2 R A P I D S T A R T S E R V I C E S
IntroductionYou can use the RapidStart Services for Microsoft Dynamics® GP to shorten deployment time and to reduce the time to perform for routine implementation tasks. When you install RapidStart Services, you install the RapidStart Migration and the RapidStart Configuration tools.
• The RapidStart Configuration allows you to enter basic setup information (configuration) and to import the information into a Microsoft Dynamics GP company database.
• The RapidStart Migration allows you to import and convert Intuit QuickBooks or Sage Peachtree data to use with Microsoft Dynamics GP.
This introduction is divided into the following sections:
• What’s in this manual• Symbols and conventions• Send us your documentation comments
What’s in this manual
This manual provides guidelines for installing and using the RapidStart Services. The manual is divided into the following parts:
• Part 1, RapidStart Services installation, describes how to install RapidStart Services for Microsoft Dynamics GP.
• Part 2, RapidStart Migration, describes how to prepare your data and tasks you must perform before you migrate your data. Tasks that you need to perform after you migrate your data are also described.
• Part 3, RapidStart Configuration, describes the steps you need to perform before and after you configure your data
• Part 4, Configurations for Microsoft Dynamics GP, describes how to create, modify, and save configurations for RapidStart Services.
Symbols and conventions
This documentation uses the following symbols and conventions to make specific types of information stand out.
Symbol Description
The light bulb symbol indicates helpful tips, shortcuts and suggestions.
The warning symbol indicates situations you should be especially aware of when completing tasks.
R A P I D S T A R T S E R V I C E S 3
I N T R O D U C T I O N
Send us your documentation comments
We welcome comments regarding the usefulness of the Microsoft Dynamics GP documentation. If you have specific suggestions or find any errors in this manual, send your comments by e-mail to the following address: [email protected].
To send comments about specific topics from within Help, click the Documentation Feedback link, which is located at the bottom of each Help topic.
Note: By offering any suggestions to Microsoft, you give Microsoft full permission to use them freely.

4 R A P I D S T A R T S E R V I C E S

PA
RT
1: R
AP
IDS
TA
RT
SE
RV
ICE
S IN
ST
ALLA
TIO
N

6 R A P I D S T A R T S E R V I C E S
Part 1: RapidStart Services installationThis part contains information about how to install the RapidStart Services for Microsoft Dynamics GP. When you install RapidStart Services, you install the RapidStart Migration and the RapidStart Configuration tools.
The following information is discussed.
• Chapter 1, “Installation,” provides instructions for installing RapidStart Services.
R A P I D S T A R T S E R V I C E S 7
Chapter 1: InstallationUse this information to install the RapidStart Services for Microsoft Dynamics GP. When you install RapidStart Services, you install the RapidStart Migration and the RapidStart Configuration tools.
You must uninstall your previous version of the RapidStart Services before installing the latest version of the tool.
The information is divided into the following sections.
• System requirements• RapidStart Services features• Installing RapidStart Services
System requirements
For current system requirements for RapidStart Services, see http//go.microsoft.com/fwlink/?LinkID=111820.
If you want to install RapidStart Services to edit configurations only using RapidStart Migration Excel Template Generator, SQL Server and Microsoft Dynamics GP don’t need to be installed on the computer you are working with.
Depending on the operating system you are using, you can use the Add or Remove Programs control panel or the Programs and Features control panel to verify whether required components are installed on your computer. If a component isn’t installed, you can download the component from http://www.microsoft.com.
RapidStart Services features
When you install RapidStart Services, you can install the following features.
RapidStart Services Plug-in for Microsoft Office Helps you edit data in Microsoft Office Excel.
RapidStart Configuration Allows you to enter basic setup information (configuration) and to import the information into a Microsoft Dynamics GP company.
RapidStart Migration Allows you to import and convert Intuit QuickBooks or Peachtree data to use with Microsoft Dynamics GP. The RapidStart Migration tool uses eConnect for Microsoft Dynamics GP to transfer data during a migration.
Installing RapidStart Services
Use the following procedure to install RapidStart Services. If you are using the RapidStart Migration, be sure to install RapidStart Services on the same computer that has Microsoft Dynamics GP, QuickBooks, or Peachtree installed on it.
You must uninstall your previous version of RapidStart Services before installing the latest version of the tool.
P A R T 1 R A P I D S T A R T S E R V I C E S I N S T A L L A T I O N
8 R A P I D S T A R T S E R V I C E S
To install RapidStart Services:1. Download the RapidStartServices_GP2013.exe from http://go.microsoft.com/
fwlink/?LinkID=111820.
2. In the folder that you saved it, double-click the setup.exe file.
3. Select a destination folder for the RapidStart Services installation files, and then click Install.
4. The RapidStart Bootstrappper Setup window opens if the following components are not installed on your computer.
• Windows Installer 4.5• Microsoft .NET Framework 4.0• Visual Studio 2010 Tools for the Office Runtime
5. You can install the missing component or components. After all the components are installed, the installation of RapidStart Services continues.
6. Follow the instructions in the window to accept the software license agreement. To install RapidStart Services, you must accept this agreement and click Next.
7. Specify the folder where you want RapidStart Services installed. The default folder is C:\Program Files\Microsoft Dynamics\RapidStart. To select a different folder, click Browse.
After you have specified the installation folder, click Next.
8. In the Ready to Install window, click Install.
A progress window appears, where you can view the status of the installation.
9. In the Installation Complete window, click Exit.

PA
RT
2: R
AP
IDS
TA
RT
MIG
RA
TIO
N
10 R A P I D S T A R T S E R V I C E S
Part 2: RapidStart MigrationThe RapidStart Migration tool simplifies the migration of Intuit QuickBooks or Sage Peachtree data to Microsoft Dynamics GP. You can migrate master records, transactions, and key configuration settings such as shipping methods and payment terms. You also can review and edit information before you complete the migration.
The following topics are discussed:
• Chapter 3, “Prepare your QuickBooks data,” describes the steps to prepare your QuickBooks data for migration.
• Chapter 4, “Prepare your Peachtree data,” describes the steps to prepare your Peachtree data for migration.
• Chapter 2, “Before you migrate your data,” describes the steps you need to perform before you migrate your QuickBooks or Peachtree data.
• Chapter 5, “Migration Troubleshooting,” provides troubleshooting information.
• Chapter 6, “After you migrate,” describes the tasks you need to perform after you migrate your QuickBooks or Peachtree data.

R A P I D S T A R T S E R V I C E S 11
Chapter 2: Before you migrate your dataWe recommend that you review the following information and complete the following tasks before you migrate your existing accounting system’s data to a Microsoft Dynamics GP company database.
• Account format• IDs in Microsoft Dynamics GP• Before using the RapidStart Migration• RapidStart Migration and UAC
Account format
When you install Microsoft Dynamics GP, you’ll specify an account format. It’s important that the account format be designed to meet both the current and future needs of the company you’re migrating, since the changes you can make to the account format after you’ve started using Microsoft Dynamics GP are limited.
You should plan the different categories of information you want each segment of the account to represent. For example, if you want to use one segment each for the location, department, account, subaccount, and detail, you can set up the account format to include five segments. The location might identify an individual store within the company, and the department might represent the departmental divisions within the company. The main account segment should identify the type of account: an asset account, an expense account, and so on.
QuickBooksDuring the migration to Microsoft Dynamics GP, you can convert your QuickBooks account number to segments in the account format in Microsoft Dynamics GP. If you used sub-accounts in QuickBooks, you can use segments to represent the sub-accounts’ relationship to the former parent accounts.
PeachtreeDuring the migration to Microsoft Dynamics GP, you can convert your Peachtree account number to segments in the account format in Microsoft Dynamics GP. If your Peachtree account numbers used hyphens to separate segments, these are interpreted as separate segments by the RapidStart Migration tool.
Be sure that the maximum segment length for the first two account segments in the Microsoft Dynamics GP account framework is greater than the maximum account length in QuickBooks. If the maximum segment length for the first two account segments in the Microsoft Dynamics GP account framework is smaller than the maximum account length in QuickBooks, you must uninstall and reinstall Microsoft Dynamics GP and create an account framework that uses at least seven characters for each segment. When you uninstall Microsoft Dynamics GP, you must delete the system database and your company databases from Microsoft SQL Server before you reinstall Microsoft Dynamics GP.
Max length of first two account segments has to be equal or greater as max QB account length. Reason for this is that QB account can be split only to two segments.

P A R T 2 R A P I D S T A R T M I G R A T I O N
12 R A P I D S T A R T S E R V I C E S
IDs in Microsoft Dynamics GP
In Microsoft Dynamics GP, each master record needs to have a unique alphanumeric ID, which is used to retrieve and sort records. (The ID is separate from the name.) When your existing customers, employees, and vendors are exported to Excel workbooks, the RapidStart Migration tool assigns an ID based on the name. For example, customer “John Smith” is assigned customer ID “JOHNSMITH001”. You can modify the IDs in the Excel workbooks to have a more suitable and consistent format, such as SMITH0001, SMITH0002, and so forth before you import the records to Microsoft Dynamics GP. You cannot change an ID after you have completed the migration.
Before you edit the IDs during the migration, consider how best to arrange your current and future information. You should use a consistent number of characters in each ID to help to produce consistent results when printing reports and using lookup windows.
IDs are sorted alphanumerically. The characters are sorted from left to right and numbers take priority over letters. Characters such as # or * take priority over both numbers and letters. To obtain consistent results when sorting records, it’s necessary to use the same number of characters in each one. The following table illustrates a simple example of alphanumeric sorting.
Be aware that if you delete or modify master records that are referenced by other master records or transactions, you may have to use the RapidStart Migration tool’s Deleted Records window to designate replacements for the records you deleted or modified. For example, if you change Smith, John to SMITH0001, you have to map the records that reference Smith, John to SMITH0001. You also can use this window to restore deleted records.
Before using the RapidStart Migration
1. Back up your system database and all company databases in Microsoft Dynamics GP.
2. You should make at least one complete backup of your existing accounting system’s data.
3. Be sure that all the other companies in your existing accounting system are closed except the company that you are migrating data from.
4. If you are migrating from QuickBooks, you must keep your existing accounting system open to migrate data, but close any open windows in your accounting system.
Expected order Sort results Sort results when using consistent numbering
A5 A10 A005
A10 A100 A010
A50 A5 A050
A100 A50 A100
B5 B10 B005
B10 B5 B010

R A P I D S T A R T S E R V I C E S 13
C H A P T E R 2 B E F O R E Y O U M I G R A T E Y O U R D A T A
If you are migrating from Peachtree, Peachtree can be open and running with the company you are migrating. However, for improved performance, we recommend that you close Peachtree.
RapidStart Migration and UAC
User Account Control (UAC) is an enhanced security feature in Windows Vista, Windows 7, Windows 8, Windows Server 2008, Windows 2008 R2, and Windows Server 2012. UAC is activated by default. To migrate your data on a computer when UAC is active, use one of the following methods:
• Start the RapidStart Migration tool. You will be prompted to run the program as a user with administrative privileges. Refer to your operating system's documentation for more information.
• Start the RapidStart Migration tool before you start your existing accounting system. When you reach the Company and Profile Selection window in the tool, select the company, profile, and the location of the company file. Start your existing accounting system and select the company you want to migrate. Then, click Next to continue with the migration.
We recommend that you deactivate UAC before you migrate QuickBooks data.

14 R A P I D S T A R T S E R V I C E S
R A P I D S T A R T S E R V I C E S 15
Chapter 3: Prepare your QuickBooks dataWe recommend that you review the following information and complete the following tasks necessary to prepare your Intuit QuickBooks data for migration to a Microsoft Dynamics GP company database.
• Back up your QuickBooks data• Accounts• Undeposited funds• Unit of Measure• Vendors• Customers• Account balances• Employees
Back up your QuickBooks data
You should make at least one complete backup before and after you prepare your QuickBooks data for the migration. It’s a good idea to name each backup differently from your other backups.
Accounts
All accounts must have account numbers, including accounts with zero balances. If you’ve manually added accounts to the chart of accounts, those accounts won’t have account numbers. To add account numbers to your accounts, be sure that you are using account numbers as a company-wide preference (Edit menu >> Preferences >> Accounting >> Company Preferences).
Account numbers are automatically assigned to accounts without account numbers during the migration. We recommend that you assign your own account numbers to the accounts without account numbers before you migrate your data.
You should review your accounts by printing the Account Listing report for the following issues. These issues prevent you from exporting data from QuickBooks.
• Account numbers that use special characters.
• Account numbers assigned to more than one account.
• The Sales Tax Payable account isn’t in your chart of accounts and you are using sales tax.
• The Inventory Asset account isn’t in your chart of accounts and you are tracking the current value of your inventory.
If you found issues with your account numbers, use the Edit Account window to correct those issues. If you need to add the Sales Tax Payable account and the Inventory Asset account, use the Add New Account window. Be sure to use Sales Tax Payable and Inventory Asset as the names of those accounts.
When assigning new account numbers, we recommend that you leave at least ten numbers between each of the accounts that you set up to allow you to add accounts as your business expands. For example, if you have income accounts 45050 and 45100, you later can add account 45060.
P A R T 2 R A P I D S T A R T M I G R A T I O N
16 R A P I D S T A R T S E R V I C E S
Undeposited funds
When you receive payments from customers using QuickBooks, typically the Undeposited Funds account is debited. Once you deposit the payment, the Undeposited Funds account is credited and the cash account associated with the deposit is debited. An Undeposited Funds account isn’t used in Microsoft Dynamics GP. The checkbook or cash account is debited directly for cash receipts.
We recommend that you deposit as many receipts as possible. If you can’t deposit receipts, you will need to clear the Undeposited Funds account by entering a journal entry. The entry must credit the Undeposited Funds account for its balance and debit the cash account. You can enter the journal entry in QuickBooks before you migrate or Microsoft Dynamics GP after you migrate.
Unit of Measure
Be sure to disable the Unit of Measure option as a company-wide preference (Edit menu >> Preferences >> Items & Inventory >> Company Preferences).
Vendors
You should process as many open transactions as possible, such as paying outstanding bills and closing open purchase orders.
Be sure that transactions don’t have negative amounts. If a negative document amount exists, an error occurs when importing data to a Microsoft Dynamics GP company.
Purchase ordersIn QuickBooks, you can receive against a drop-ship purchase order, but you don’t have to invoice against it at the same time. In Microsoft Dynamics GP, you can’t receive against a drop-ship purchase order. You can only invoice against a drop-ship purchase order.
Drop-ship purchase orders with items received, but not billed aren’t migrated. A purchase order won’t be migrated if a drop-ship item has been billed and another drop-ship item hasn’t been billed. For example, a purchase order has ten line items. You won’t be able to migrate the purchase order if you received four items, but haven’t billed for the those items. If you have received four items and billed for those items, you can migrate the purchase order.
You will have to reenter a drop-ship purchase order and its associated receipts if a purchase order was partially received. You’ll use the Purchase Order Entry window and the Purchasing Invoice Entry window in Microsoft Dynamics GP to enter the drop-ship purchase order and its receipts.
Be sure that vendors are assigned to purchase orders and that the items assigned to the purchase orders don’t have negative rates (costs).
Sales tax transactionsThe balances for vendors assigned to the Tax agency type in QuickBooks aren’t migrated to Microsoft Dynamics GP. A transaction for a tax agency vendor is created for the appropriate tax collection service when an invoice with sales tax is saved. For each tax agency vendor, you’ll need to enter an invoice for the sales tax using the Payables Transaction Entry window in Microsoft Dynamics GP.
R A P I D S T A R T S E R V I C E S 17
C H A P T E R 3 P R E P A R E Y O U R Q U I C K B O O K S D A T A
You should print the Sales Tax Summary report so you can create an invoice in Microsoft Dynamics GP to debit the Sales Tax Payable account and credit the Accounts Receivable account.
Customers
You should process as many open transactions as possible, such as applying payments to invoices and depositing payments. Payments received, but not applied against invoices aren’t migrated.
Be sure that transactions don’t have negative amounts. If a negative document amount exists, an error occurs when importing data to a Microsoft Dynamics GP company.
PaymentsIf you can’t apply or deposit payments, you must enter these payments as cash receipts in Receivables Management. Since the account balances for the corresponding transactions will be already posted, you can’t post the cash receipts to General Ledger.
Finance chargesFinance charges that you have entered for customers aren’t migrated to Microsoft Dynamics GP. You should print a report, such as the Custom Transaction Detail report, to list the outstanding finance charges that you’ll have to enter in Microsoft Dynamics GP after you migrate.
Statement chargesStatement charges aren’t migrated to Microsoft Dynamics GP. You should print a report, such as the Statement Charges for All Customers report, to list the outstanding statement charges that you’ll have to enter in Microsoft Dynamics GP after you migrate.
Credit card numbersCredit card numbers that you have assigned to your customers are masked during the migration. For example, a customer has a credit card number of 23456678. That number is displayed as xxxx6678 after you migrate to Microsoft Dynamics GP. You will need to reenter credit card numbers using the Customer Maintenance Options window in Microsoft Dynamics GP.
Account balances
Reconcile bank accounts and statements before migrating. The current amounts for credit cards, cash, and checkbooks are migrated.

P A R T 2 R A P I D S T A R T M I G R A T I O N
18 R A P I D S T A R T S E R V I C E S
Employees
You should review your employees by printing the Employee Contact List report for the following issues. These issues prevent you from exporting data from QuickBooks.
• Employees that don’t have first names.
• Employees that don’t have last names.
• Employees that don’t have Social Security numbers.
R A P I D S T A R T S E R V I C E S 19
Chapter 4: Prepare your Peachtree dataWe recommend that you review the following information and complete the following tasks necessary to prepare your Peachtree data for migration to a Microsoft Dynamics GP company database.
• Back up your Peachtree data• Accounts• Vendors• Customers• Account balances• Fixed assets• Employees
Back up your Peachtree data
You should make at least one complete backup before and after you prepare your Peachtree data for the migration. It’s a good idea to name each backup differently from your other backups.
Accounts
You should review your accounts by printing the Chart of Accounts report for the following issues. These issues prevent you from exporting data from Peachtree.
• Account numbers that use special characters.
• Account numbers assigned to more than one account.
• The Sales Tax Payable account isn’t in your chart of accounts and you are using sales tax.
• The Inventory Asset account isn’t in your chart of accounts and you are tracking the current value of your inventory.
If you found issues with your account numbers, use the View and Edit Accounts option to correct those issues. If you need to add the Sales Tax Payable account and the Inventory Asset account, select New to open the Maintain Chart of Accounts window. Be sure to use Sales Tax Payable and Inventory Asset as the names of those accounts.
When assigning new account numbers, we recommend that you leave at least ten numbers between each of the accounts that you set up to allow you to add accounts as your business expands. For example, if you have income accounts 45050 and 45100, you later can add account 45060.
Vendors
You should close as many open transactions as possible, such as paying outstanding bills and closing open purchase orders.
Be sure that transactions don’t have negative amounts. If a negative document amount exists, an error occurs when importing data to a Microsoft Dynamics GP company.

P A R T 2 R A P I D S T A R T M I G R A T I O N
20 R A P I D S T A R T S E R V I C E S
Purchase ordersYou should complete and process as many posted purchase orders with open items on them as possible. If you have drop-ship purchase orders, they must have a customer order assigned to them. Otherwise the drop-ship purchase orders will not be migrated.
Be sure that vendors are assigned to purchase orders and that the items assigned to the purchase orders don’t have negative rates (costs).
In Peachtree, you can receive against a drop-ship purchase order, but you don't have to invoice against it at the same time. In Microsoft Dynamics GP, you can't receive against a drop-ship purchase order. You can only invoice against a drop-ship purchase order.
Partially completed purchase orders are treated as two separate transactions. The remaining open items will be migrated to Microsoft Dynamics GP, while the remaining fulfilled items will be considered closed and not migrated. In some cases in which perpetual costing is used, you might need to modify the document manually to make the costing values match.
Customers
You should process as many open transactions as possible, such as applying payments to invoices and depositing payments. Payments that are received but not applied against invoices aren’t migrated.
Be sure that transactions don’t have negative amounts. If a negative document amount exists, an error occurs when importing data to a Microsoft Dynamics GP company.
Finance chargesFinance charges that you have entered for customers aren’t migrated to Microsoft Dynamics GP. You should print a report, such as the Customer Ledgers report, to list the outstanding finance charges that you’ll have to enter in Microsoft Dynamics GP after you migrate.
Credit limitsCustomer credit limits aren't migrated. You should print a Customer Management Detail report so you can enter these limits into Microsoft Dynamics GP after you migrate.
Credit card numbersCredit card numbers that you have assigned to your customers are not migrated. You will need to reenter credit card numbers using the Customer Maintenance Options window in Microsoft Dynamics GP.
Sales documentsOpen sales documents (invoices and orders) are migrated from Peachtree to Microsoft Dynamics GP. Proposals and Sales Quotes are not migrated.
Sales order items must be shipped before they can be migrated to Microsoft Dynamics GP. If you can't ship an item before you migrate, enter a sales order for the item in Microsoft Dynamics GP after the migration is completed.

R A P I D S T A R T S E R V I C E S 21
C H A P T E R 4 P R E P A R E Y O U R P E A C H T R E E D A T A
Account balances
Deposit and apply all undeposited funds. Reconcile bank accounts and statements before migrating. The current amounts for credit cards, cash, and checkbooks are migrated.
Fixed assets
Migration of fixed assets data is not supported by the RapidStart Migration.
Employees
You should review your employees by printing the Employee List report for the following issues. These issues prevent you from exporting data from Peachtree. All employees must have a Social Security number. Payroll data is not migrated.
• Employees that don’t have first names.
• Employees that don’t have last names.
• Employees that don’t have Social Security numbers.

22 R A P I D S T A R T S E R V I C E S

R A P I D S T A R T S E R V I C E S 23
Chapter 5: Migration TroubleshootingThe following are issues that prevent your existing accounting system data from being exported or imported. You may need to close the RapidStart Migration tool and correct errors in your existing accounting system. After the corrections are completed, start the RapidStart Migration tool and select the profile to continue the migration.
• Exporting QuickBooks data• Exporting Peachtree data• Importing QuickBooks data
Exporting QuickBooks data
The following are issues that prevent QuickBooks data from being exported. You might need to close the RapidStart Migration tool and correct errors in QuickBooks. After the corrections are completed, start the RapidStart Migration tool and select the profile to continue the migration.
Account issues You should review your accounts by printing the Account Listing report for the following issues. These issues prevent you from exporting data from QuickBooks.
• Accounts with invalid account numbers.
• Account numbers that use special characters.
• Account numbers assigned to more than one account.
• The Sales Tax Payable account isn’t in your chart of accounts and you are using sales tax.
• The Inventory Asset account isn’t in your chart of accounts and you are tracking the current value of your inventory.
If you found issues with your account numbers, use the Edit Account window to correct those issues.
If you need to add the Sales Tax Payable account, use the Add New Account window. Be sure to enter Sales Tax Payable as the name of the account. If you need to add the Inventory Asset account, use the Add New Account window. Be sure to enter Inventory Asset as the name of the account.
When assigning new account numbers, we recommend that you leave at least ten numbers between each of the accounts that you set up to allow you to add accounts as your business expands. For example, if you have income accounts 45050 and 45100, you later can add account 45060.

P A R T 2 R A P I D S T A R T M I G R A T I O N
24 R A P I D S T A R T S E R V I C E S
Employee issuesYou should review your employees by printing the Employee Contact List report for the following issues. These issues prevent you from exporting data from QuickBooks.
• Employees that don’t have first names.
• Employees that don’t have last names.
• Employees that don’t have Social Security numbers.
Double-click an employee in the report to open the Edit Employee window, where you can modify the employee record as necessary.
Purchase order issuesYou should review your purchase orders in QuickBooks by printing the Open Purchase Orders report. If a vendor isn’t assigned to a purchase order, double-click the purchase order in report to open the Create Purchase Order window.
If a purchase order has a negative rate (cost), you print the Open Purchase Orders report and double-click purchase orders in the report to find the negative rate.
Exporting Peachtree data
The following are issues that prevent Peachtree data from being exported. You might need to close the RapidStart Migration tool and correct errors in Peachtree. After the corrections are completed, start the RapidStart Migration tool and select the profile to continue the migration.
Employee issuesYou should review your employees by printing the Employee List report for the following issues. These issues prevent you from exporting data from Peachtree.
• Employees that don’t have first names.
• Employees that don’t have last names.
• Employees that don’t have Social Security numbers.
Double-click an employee in the report to open the Edit Employee window, where you can modify the employee record as needed.
Importing QuickBooks data
The following issue prevents QuickBooks data from being imported to a Microsoft Dynamics GP company. After completing the corrections, start the RapidStart Migration tool and select the profile to continue the migration.
COM Exception occurred during use of eConnect. Most probable reason is insufficient rights on SQL Server.eConnect is used to transfer data when you migrate. If you changed your computer password, you also need to change the password for eConnect.

R A P I D S T A R T S E R V I C E S 25
C H A P T E R 5 M I G R A T I O N T R O U B L E S H O O T I N G
1. Open the Component Services.(Control Panel >> Administrative Tools >> Component Services)
2. Select eConnect <release number> for Microsoft Dynamics GP.(Expand Component Services >> Computers >> My Computer >> COM+ Applications >> eConnect <release > for Microsoft Dynamics GP)
3. Right-click eConnect <release > for Microsoft Dynamics GP and select Properties.
4. Click the Identity tab and enter the password that you changed for your computer.

26 R A P I D S T A R T S E R V I C E S

R A P I D S T A R T S E R V I C E S 27
Chapter 6: After you migrateWe recommend that you complete the following tasks in Microsoft Dynamics GP after you migrate your data to a Microsoft Dynamics GP company database. Depending on the data that you have migrated, you might not have to perform each task.
• Company tasks• Financial tasks• Inventory tasks• Sales tasks• Purchasing tasks
Company tasks
Complete the following company tasks after you migrate data.
Back up your company dataOnly a system administrator can open the Back Up Company window to make backups.
1. Open the Back Up Company window.(Microsoft Dynamics GP menu >> Maintenance >> Backup)
2. Select the company you want to back up.
3. The path and file name of the backup file are displayed. You can modify the path and file name as needed.
4. Click OK to make the backup. The window will close, and a message will appear when the backup is complete.
Check links for the Multicurrency Setup tableChecking links examines tables, checking corresponding information in related tables and, if possible, changing damaged data to match the corresponding data in an undamaged table. Use this routine to help verify the integrity of the imported migration data.
1. Be sure that no one is using Microsoft Dynamics GP.
2. Make a backup, if you haven’t made a backup already.
3. Open the Check Links window. (Microsoft Dynamics GP menu >> Maintenance >> Check Links)
4. Select Financial as the series.
5. Highlight Multicurrency Setup in the Logical Tables list.
6. Click Insert.
7. Click OK to check links and print the Check Links Report.
P A R T 2 R A P I D S T A R T M I G R A T I O N
28 R A P I D S T A R T S E R V I C E S
The Report Destination window appears, and you can specify where the Check Links Report should be printed. If you mark File, select the appropriate file format and enter the report file name.
The Check Links Report displays any information that was re-created.
We recommend that you send the Check Links Report to the screen, and then print it if necessary, because it may be very large. Each report can only be printed once, so it’s a good idea to send the report to a file as well.
Assign default posting accountsYou must assign default posting accounts to use if you didn’t assign default accounts when you configured your migration data. You should set up a default posting account for every type of account that could be posted to when you post. For instance, when you post a sales transaction, amounts may need to be posted to a cash account, an accounts receivable account, a cost of goods sold account, and so on.
1. Open the Posting Accounts Setup window. (Microsoft Dynamics GP menu >> Tools >> Setup >> Posting >> Posting Accounts)
2. From the Display list, select an individual series to assign default posting accounts for, or select All to display all posting accounts in the Posting Account column.
3. Place the pointer in the Accounts column of the row containing the posting account you want to assign an account for.
4. Enter an account, or select one from the lookup window. (To display the lookup window, click the lookup button next to the Accounts heading.)
5. Repeat steps 3 and 4 until you’ve assigned default posting accounts for each account description in the scrolling window.
To print a Posting Accounts Report showing a list of the default posting accounts that have been assigned, choose File >> Print. You also can print this report using the Company Setup Report Options window.
6. Click OK to save the information and close the window.
Set up additional fiscal yearsThe current fiscal year was migrated for the company. You must enter additional fiscal years if there are migrated transactions that were entered in years other than the current year. You can’t post a transactions if the fiscal period that contains the posting dates for the transaction has not been set up.
1. Open the Fiscal Periods Setup window.(Microsoft Dynamics GP menu >> Tools >> Setup >> Company >> Fiscal Periods)
2. Enter the year.
3. Enter the first day and last day of the fiscal year. The fiscal year can be any length; it isn’t limited to the length of a calendar year.

R A P I D S T A R T S E R V I C E S 29
C H A P T E R 6 A F T E R Y O U M I G R A T E
4. If you’re entering fiscal periods for a historical year, mark the Historical Year check box.
5. Enter the number of fiscal periods in the fiscal year. For example, if your fiscal periods are quarterly, enter 4; if they’re monthly, enter 12.
6. Click Calculate to calculate each period’s first day and last day.
The beginning date of each period appears in the scrolling window. You can reenter information and recalculate the periods as many times as necessary.
7. Using the Date column, review the beginning dates of periods and make changes if necessary.
8. Using the Period Name column, change the period names to names that reflect the needs of your business. For example, you might enter Ending 1/31/2009 or Quarter 1 for Period 1.
9. Click OK to save the fiscal period information you’ve entered and close the window.
Set up company address informationYou must enter the main address for your company. The main address entered for your company appears on all documents, such as invoices and checks.
1. Open the Company Setup window.(Microsoft Dynamics GP menu >> Tools >> Setup >> Company >> Company)
2. In the Address ID field, enter an ID for the company’s main address.
3. In the Address ID field, enter a short name for the location, department or contact.
4. Enter the address information.
5. Click Save to save the address.
Financial tasks
Complete the following financial tasks for the company after you migrate data.
Print the General Transaction Edit ListPrint the General Transaction Edit List to verify the accuracy of the transactions in the QB_BALANCES or PTBALANCE batch. Posting the batch creates your account balances.
1. Open the Batch Entry window.(Transactions >> Financial >> Batches)
2. Click the Batch ID lookup button to open the Batch IDs window.
3. If you are migrating from QuickBooks, select the QB_BALANCES batch and click the Select button.

P A R T 2 R A P I D S T A R T M I G R A T I O N
30 R A P I D S T A R T S E R V I C E S
If you are migrating from Peachtree, select the PTBALANCE batch and click the Select button.
4. Choose File >> Print or click the printer icon button in the Batch Entry window to verify your entries with a General Transaction Edit List before posting.
5. If there are errors on the edit list, see Correct unposted General Ledger transactions.
If there are no errors on the edit list, see Create account balances.
Correct unposted General Ledger transactions1. Open the Transaction Entry window.
(Transactions >> Financial >> Transaction Entry)
2. Enter or select the journal entry number. (You can find the journal entry number on the General Transaction Edit List you used to find the error.)
3. Replace the incorrect information with correct information.
4. Click Save.
5. To print the General Transaction Edit List, choose File >> Print.
6. You can post the QB_BALANCES or PTBALANCE batch once you resolved the transaction errors. See Create account balances.
Create account balances1. Open the Batch Entry window.
(Transactions >> Financial >> Batches)
2. Select the QB_BALANCES or PTBALANCE batch.
3. Enter a batch comment, such as “Beginning balance for FY10.”
4. Be sure that Single Use is the batch frequency.
5. Click Post.
Clear the Undeposited Funds accountIf you couldn’t deposit receipts before migrating your transaction data, you must clear the Undeposited Funds account by entering a journal entry. You can use the Transaction Entry window to enter a standard transaction. The transaction must credit the Undeposited Funds account for its balance and debit the cash account.
When you receive payments from customers using QuickBooks, typically the Undeposited Funds account is debited. An Undeposited Funds account isn’t used in Microsoft Dynamics GP. The checkbook or cash account is debited directly for cash receipts.
For additional information about entering a journal entry, see the Microsoft Dynamics GP help. Click the Index tab and enter the keywords “standard transactions, entering”.

R A P I D S T A R T S E R V I C E S 31
C H A P T E R 6 A F T E R Y O U M I G R A T E
Inventory tasks
Complete the following inventory tasks for the company after you migrate data.
Print the Transaction Edit ListPrint the Transaction Edit List to verify the accuracy of the transactions in the QB_INV_MIGRATE or PTBALANCE batch. Posting the batch creates your beginning quantities for items.
1. Open the Inventory Batch Entry window.(Transactions >> Inventory >> Batches)
2. Click the Batch ID lookup button to open the Inventory Batch IDs window.
3. If you are migrating from QuickBooks, select the QB_INV_MIGRATE batch and click the Select button.
If you are migrating from Peachtree, select the PTBALANCE batch and click the Select button.
4. Choose File >> Print or click the printer icon button in the Inventory Batch Entry window to verify your entries with a Transaction Edit List before posting.
5. If there are errors on the edit list, see Correct unposted inventory transactions.
If there are no errors on the edit list, see Create beginning quantities for items.
Correct unposted inventory transactions1. Open the Item Transaction Entry window.
(Transactions >> Inventory >> Transaction Entry)
2. Enter or select the document number. (You can find the document number on the Transaction Edit List you used to find the error.)
3. Replace the incorrect information with correct information.
If the errors on the edit list involve distributions, click the Distributions button. The Item Transaction Distribution Entry window opens, where you can distribute transaction amounts to posting accounts. Click OK to return to the Item Transaction Entry window.
4. Click Save.
5. To print the Transaction Edit List, choose File >> Print.
6. You can post the QB_INV_MIGRATE or PTBALANCE batch once you resolved the transaction errors. See Create beginning quantities for items.
Create beginning quantities for itemsBefore you begin this procedure, be sure the inventory site has been defined and items have been assigned to it. If you’re using multiple bins, you also should have created bins.

P A R T 2 R A P I D S T A R T M I G R A T I O N
32 R A P I D S T A R T S E R V I C E S
1. Open the Inventory Batch Entry window.(Transactions >> Inventory >> Batches)
2. Select the QB_INV_MIGRATE or PTBALANCE batch.
3. Enter a batch comment, such as “Beginning quantities for FY10.”
4. Unmark the Post to General Ledger option so any transactions that have been accounted for in General Ledger won’t be duplicated.
5. Be sure that the batch frequency is Single Use.
6. Click Post.
Sales tasks
Complete the following sales tasks for the company after you migrate data.
Print the Sales Edit ListPrint the Sales Edit List to verify the accuracy of the transactions in the GP_SOP_BATCH or PT_SOP_POSTED batch. Posting the batch updates your inventory items and your customer balances.
1. Open the Sales Batch Entry window.(Transactions >> Sales >> Sales Batches)
2. Click the Batch ID lookup button to open the Batch IDs window.
3. If you are migrating from QuickBooks, select the GP_SOP_BATCH batch and click the Select button.
If you are migrating from Peachtree, select the PT_SOP_POSTED batch and click the Select button.
4. Choose File >> Print or click the printer icon button in the Sales Batch Entry window to open the Sales Document Print Options window.
5. In the Print field, select Edit List.
6. Click Print.
7. If there are errors on the edit list, see Correct unposted sales transactions.
If there are no errors on the edit list, see Post the Sales Order Processing batch.
Correct unposted sales transactions1. Open the Sales Transaction Entry window.
(Transactions >> Sales >> Sales Transaction Entry)
2. Enter or select the document number. (You can find the document number on the Sales Edit List you used to find the error.)
3. Replace the incorrect information with correct information.
R A P I D S T A R T S E R V I C E S 33
C H A P T E R 6 A F T E R Y O U M I G R A T E
If the errors on the edit list involve distributions, click the Distributions button. The Sales Distribution Entry window opens, where you can distribute transaction amounts to posting accounts. Click OK to return to the Sales Transaction Entry window.
4. Click Save.
5. To print the Sales Edit List, choose File >> Print.
6. You can post the GP_SOP_BATCH or PT_SOP_POSTED batch once you resolved the transaction errors. See Post the Sales Order Processing batch.
Post the Sales Order Processing batch1. Open the Posting Setup window.
(Microsoft Dynamics GP menu >> Tools >> Setup >> Posting >> Posting)
2. Select Sales as the series and Sales Transaction Entry as the origin.
3. Unmark Post to General Ledger. Repeat this for the origin of Sales Deposit.
The accounts in General Ledger might be overstated if you don’t unmark this posting option.
4. Open the Sales Batch Entry window.(Transactions >> Sales >> Sales Batches)
5. Select GP_SOP_BATCH or PT_SOP_POSTED as the batch ID.
6. Enter a batch comment.
7. Be sure that Single Use is the batch frequency.
8. Click Post to post your transactions.
9. Open the Posting Setup window.(Microsoft Dynamics GP menu >> Tools >> Setup >> Posting >> Posting)
10. Select Sales as the series and Sales Transaction Entry as the origin.
11. Mark Post to General Ledger. Repeat this for the origin of Sales Deposit.
The GP_SOP_BATCH or PT_SOP_POSTED batch may contain quotes and orders after you post.
Enter sales orders for unshipped items (Peachtree only)If you couldn’t ship items on a sales order before you migrated, you must enter these item on a sales order using the Sales Transaction Entry window in Sales Order Processing.
For additional information about entering sales orders, see the Microsoft Dynamics GP help. Click the Index tab and enter the keywords “sales order, entering”.

P A R T 2 R A P I D S T A R T M I G R A T I O N
34 R A P I D S T A R T S E R V I C E S
Print the Transaction Edit ListPrint the Transaction Edit List to verify the accuracy of the transactions in the QB_CRMEMO or PT_RECEIVABLE batch. Posting the batch updates your customer balances.
1. Open the Receivables Batch Entry window.(Transactions >> Sales >> Receivables Batches)
2. Click the Batch ID lookup button to open the Batch IDs window.
3. If you are migrating from QuickBooks, select the QB_CRMEMO batch and click the Select button.
If you are migrating from Peachtree, select the PT_RECEIVABLE batch and click the Select button.
4. Choose File >> Print or click the printer icon button in the Receivables Batch Entry window to verify your entries with a Transaction Edit List before posting.
5. If there are errors on the edit list, see Correct unposted receivables transactions.
If there are no errors on the edit list, see Post the Receivables Management batch.
Correct unposted receivables transactions1. Open the Receivables Transaction Entry window.
(Transactions >> Sales >> Transaction Entry)
2. Enter or select the document number. (You can find the document number on the Sales Edit List you used to find the error.)
3. Replace the incorrect information with correct information.
If the errors on the edit list involve distributions, click the Distributions button. The Sales Transaction Distribution Entry window opens, where you can distribute transaction amounts to posting accounts. Click OK to return to the Receivables Transaction Entry window.
4. Click Save.
5. To print the Transaction Edit List, choose File >> Print.
6. You can post the QB_CRMEMO or PT_RECEIVABLE batch once you resolved the transaction errors. See Post the Receivables Management batch.
Post the Receivables Management batch1. Open the Posting Setup window.
(Microsoft Dynamics GP menu >> Tools >> Setup >> Posting >> Posting)
2. Select Sales as the series and Receivables Sales Entry as the origin.
3. Unmark Post to General Ledger.
The accounts in General Ledger might be overstated if you don’t unmark this posting option.

R A P I D S T A R T S E R V I C E S 35
C H A P T E R 6 A F T E R Y O U M I G R A T E
4. Open the Receivables Batch Entry window.(Transactions >> Sales >> Receivables Batches)
5. Select QB_CRMEMO or PT_RECEIVABLE as the batch ID.
6. Enter a batch comment.
7. Be sure that Single Use is the batch frequency.
8. Click Post to post your transactions.
9. Open the Posting Setup window.(Microsoft Dynamics GP menu >> Tools >> Setup >> Posting >> Posting)
10. Select Sales as the series and Receivables Sales Entry as the origin.
11. Mark Post to General Ledger.
Clear receipts from depositsYou can have duplicate receipts in Bank Reconciliation if Sales Order Processing transactions that have deposits entered for them were posted. You’ll have to clear the receipts from the deposits.
1. Open the Bank Deposit Entry window.(Transactions >> Financial >> Bank Deposits)
2. Select Enter/Edit as the option.
3. Select Clear Unused Receipts as the type.
4. Click the Mark All button.
5. Click Post. If you post a deposit, the Bank Deposit Posting Journal is printed when you close the Bank Deposit Entry window, depending on your selections in the Posting Setup window. The posting journal displays deposit information and all receipts marked for each deposit posted since you opened the window.
Delete unposted Receivables Management cash receiptsYou will need to delete any unposted cash receipts.
1. Open the Cash Receipts Entry window.(Transactions >> Sales >> Cash Receipts)
2. Enter or select the receipt to delete.
3. To delete the cash receipt, click Delete. Any applied amounts also are unapplied.
Enter finance chargesFinance charges that have you entered for customers aren’t migrated. You can use the Receivables Transaction Entry window to enter finance charges. Print a report in QuickBooks, such as the Custom Transaction Detail report, to list the outstanding finance charges that you’ll have to enter in Receivables Management.

P A R T 2 R A P I D S T A R T M I G R A T I O N
36 R A P I D S T A R T S E R V I C E S
For additional information about entering finance charges, see the Microsoft Dynamics GP help. Click the Index tab and enter the keywords “finance charges, entering”.
Enter debit memosEnter debit memos for the statement charges with outstanding balances that weren’t migrated to Microsoft Dynamics GP. Print a report in QuickBooks, such as the Statement Charges for All Customers report, to list the outstanding statement charges that you’ll have to enter in Microsoft Dynamics GP after you migrate.
For additional information about entering debit memos, see the Microsoft Dynamics GP help. Click the Index tab and enter the keywords “debit memos, entering transactions”.
Enter cash receiptsIf you couldn’t apply or deposit payments before you migrated, you must enter these payments as cash receipts using the Receivables Transaction Entry window in Receivables Management.
Since the account balances for the corresponding transactions will be already posted, you can’t post the cash receipts to General Ledger. In the Posting Setup window, you must unmark the Post to General Ledger option for the Receivables Sales Entry origin.
For additional information about entering cash receipts, see the Microsoft Dynamics GP help. Click the Index tab and enter the keywords “cash receipts, entering”.
Enter customer credit card numbersIf you assigned credit card numbers to your customers in QuickBooks or Peachtree, you’ll need to reenter those numbers in Microsoft Dynamics GP. For example, assume that a customer record in your existing accounting system has a credit card number of 23456678. If you are migrating from QuickBooks, that number is displayed as xxxx6678 after you migrate to Microsoft Dynamics GP. You should review your customer records by printing the Customer Setup List in detail and then reenter credit card numbers using the Customer Maintenance Options window in Microsoft Dynamics GP.
For additional information about printing reports, see the Microsoft Dynamics GP help. Click the Index tab and enter the keywords “reports in Receivables Management, creating options”.
For additional information about editing customer records, see the Microsoft Dynamics GP help. Click the Index tab and enter the keywords “Customer Maintenance Options window, setting up credit, payment, and history options”.
Purchasing tasks
Complete the following purchasing tasks for the company after you migrate data.
Print the Receivings Edit ListPrint the Receivings Edit List to verify the accuracy of the transactions in the QB_POP_RECEIPTS or PT_TRANSACTIONS batch. Posting the batch updates your inventory items and your vendor balances.

R A P I D S T A R T S E R V I C E S 37
C H A P T E R 6 A F T E R Y O U M I G R A T E
1. Open the Purchasing Batch Entry window.(Transactions >> Purchasing >> Purchasing Batches)
2. Click the Batch ID lookup button to open the Batch IDs window.
3. If you’re migrating from QuickBooks, select the QB_POP_RECEIPTS batch and click the Select button.
If you’re migrating from Peachtree, select the PT_TRANSACTIONS batch and click the Select button.
4. Click File >> Print or the printer icon button in the Purchasing Batch Entry window to verify your entries with a Receivings Edit List before posting.
5. If there are errors on the edit list, see Correct unposted receipts.
If there are no errors on the edit list, see Post the Purchase Order Processing batch.
Correct unposted receipts1. Open the Receivings Transaction Entry window.
(Transactions >> Purchasing >> Receivings Transaction Entry)
2. Enter or select the receipt. (You can find the receipt number on the Receivings Edit List you used to find the error.)
3. Replace the incorrect information with correct information.
If the errors on the edit list involve distributions, click the Distributions button. The Purchasing Distribution Entry window opens, where you can distribute transaction amounts to posting accounts. Click OK to return to the Receivings Transaction Entry window.
4. Click Save.
5. To print the Receivings Edit List, choose File >> Print.
6. You can post the QB_POP_RECEIPTS or PT_TRANSACTIONS batch once you resolved the transaction errors. See Post the Purchase Order Processing batch.
Post the Purchase Order Processing batch1. Open the Posting Setup window.
(Microsoft Dynamics GP menu >> Tools >> Setup >> Posting >> Posting)
2. Select Purchasing as the series and Receivings Trx Entry as the origin.
3. Unmark Post to General Ledger.
The accounts in General Ledger might be overstated if you don’t unmark this posting option.
4. Open the Purchasing Batch Entry window.(Transactions >> Purchasing >> Purchasing Batches)
5. Select QB_POP_RECEIPTS or PT_TRANSACTIONS as the batch ID.

P A R T 2 R A P I D S T A R T M I G R A T I O N
38 R A P I D S T A R T S E R V I C E S
6. Enter a batch comment.
7. Be sure that Single Use is the batch frequency.
8. Click Post to post your transactions.
9. Open the Posting Setup window.(Microsoft Dynamics GP menu >> Tools >> Setup >> Posting >> Posting)
10. Select Purchasing as the series and Receivings Trx Entry as the origin.
11. Mark Post to General Ledger.
Enter partially received drop-ship purchase ordersDrop-ship purchase orders with items received, but not billed aren’t migrated. You should use the Purchase Order Entry window and the Purchasing Invoice Entry window to reenter a partially received drop-ship purchase order and its associated invoice receipts.
In QuickBooks, you can receive against a drop-ship purchase order, but you don’t have to invoice against it at the same time. In Microsoft Dynamics GP, you can’t receive against a drop-ship purchase order. You can only invoice against a drop-ship purchase order.
For additional information about entering drop-ship purchase orders, see the Microsoft Dynamics GP help. Click the Index tab and enter the keywords “purchase orders, entering drop-ship”.
For additional information about entering invoice receipts, see the Microsoft Dynamics GP help. Click the Index tab and enter the keywords “invoice receipts, entering”.
Print the Payables Transaction Edit ListPrint the Payables Transaction Edit List to verify the accuracy of the transactions in the QBPAYABLES or PT_PAYABLE batch. Posting the batch updates your vendor balances.
1. Open the Payables Batch Entry window.(Transactions >> Purchasing >> Purchasing Batches)
2. Click the Batch ID lookup button to open the Batch IDs window.
3. If you’re migrating from QuickBooks, select the QBPAYABLES batch and click the Select button.
If you’re migrating from Peachtree, select the PT_PAYABLE batch and click the Select button.
4. Choose File >> Print or click the printer icon button in the Payables Batch Entry window to open the Sales Document Print Options window.
5. If there are errors on the edit list, see Correct unposted payables transactions.
If there are no errors on the edit list, see Post the Payables Management batch.

R A P I D S T A R T S E R V I C E S 39
C H A P T E R 6 A F T E R Y O U M I G R A T E
Correct unposted payables transactionsErrors are easily identified on the Payables Transaction Edit List.
1. Open the Payables Transaction Entry window.(Transactions >> Purchasing >> Transaction Entry)
2. Enter or select the voucher number. (You can find the voucher number on the Payables Transaction Edit List you used to find the error.)
3. Replace the incorrect information with correct information.
If the errors on the edit list involve distributions, click the Distributions button. The Payables Transaction Entry Distribution window opens, where you can distribute transaction amounts to posting accounts. Click OK to return to the Payables Transaction Entry window.
4. Click Save.
5. To print the Payables Transaction Edit List, choose File >> Print.
6. You can post the QBPAYABLES or PT_PAYABLE batch once you resolved the transaction errors. See Post the Payables Management batch.
Post the Payables Management batch1. Open the Posting Setup window.
(Microsoft Dynamics GP menu >> Tools >> Setup >> Posting >> Posting)
2. Select Purchasing as the series and Payables Trx Entry as the origin.
3. Unmark Post to General Ledger.
The accounts in General Ledger might be overstated if you don’t unmark this posting option.
4. Open the Payables Batch Entry window.(Transactions >> Purchasing >> Batches)
5. Select QBPAYABLES or PT_PAYABLE as the batch ID.
6. Enter a batch comment.
7. Be sure that Single Use is the batch frequency.
8. Open the Posting Setup window.(Microsoft Dynamics GP menu >> Tools >> Setup >> Posting >> Posting)
9. Select Purchasing as the series and Payables Trx Entry as the origin.
10. Mark Post to General Ledger.
P A R T 2 R A P I D S T A R T M I G R A T I O N
40 R A P I D S T A R T S E R V I C E S
Enter adjusting transactions for vendors assigned to the Tax agency typeThe balances for vendors assigned with the Tax agency type in QuickBooks aren’t migrated to Microsoft Dynamics GP. You’ll need to enter adjusting transactions using the Payables Transaction Entry window. You should print the State Tax Liability report to find the vendor balance for the adjusting transaction.

PA
RT
3: R
AP
IDS
TA
RT
CO
NFIG
UR
AT
ION

42 R A P I D S T A R T S E R V I C E S
Part 3: RapidStart ConfigurationThe RapidStart Configuration tool helps you enter the basic setup information required for Microsoft Dynamics GP. With the RapidStart Configuration tool, you can start with a standard industry configuration, modify the configuration data, and then import the data into Microsoft Dynamics GP. Or, you can import a configuration from a Microsoft Office Excel workbook prepared by a Microsoft Dynamics GP partner or business consultant.
The following topics are discussed.
• Chapter 7, “Before you configure your data,” describes the steps you need to perform before you configure your data.
• Chapter 8, “After you configure your data,” describes the steps you need to perform after you import your configuration data.
R A P I D S T A R T S E R V I C E S 43
Chapter 7: Before you configure your dataThe RapidStart Configuration tool helps you enter a configuration—basic setup information—for a Microsoft Dynamics GP company. You can use the tool in one of the following ways.
• Select one of the standard industry configurations provided by Microsoft Dynamics GP, modify the configuration, and then import the data into Microsoft Dynamics GP.
• Import a configuration from a Microsoft Office Excel® workbook prepared by a Microsoft Dynamics GP partner or business consultant. When you import a configuration, you also can use the tool to modify the configuration.
• Export an existing Microsoft Dynamics GP company’s setup information and use it as a template when setting up other companies.
We recommend that you review the following information and complete the following tasks before you configure your data and import it to a Microsoft Dynamics GP company database.
• Back up company data• Multicurrency Management and configuration• Using RapidStart Configuration with UAC activated
Back up company data
Before you use the tool, back up your system database and all company databases in Microsoft Dynamics GP. Only a system administrator can open the Back Up Company window to make backups.
1. Open the Back Up Company window.(Microsoft Dynamics GP menu >> Maintenance >> Backup)
2. Select the company you want to back up, or select System Database to back up the system database.
3. The path and file name of the backup file are displayed. You can modify the path and file name as needed.
4. Click OK to make the backup. The window closes, and a message appears when the backup is complete.
Multicurrency Management and configuration
Your configurations can include multicurrency information only if the Multicurrency Management module in Microsoft Dynamics GP is registered. After importing a configuration that contains multicurrency information, you will have to perform additional steps such as granting company access to currencies and specifying a functional currency for the company.
For more information, see Assign access to currencies on page 46 and Assign a functional currency to a company on page 46.
P A R T 3 R A P I D S T A R T C O N F I G U R A T I O N
44 R A P I D S T A R T S E R V I C E S
If Multicurrency Management isn’t registered in Microsoft Dynamics GP, don’t import a configuration that includes multicurrency information, and don’t enter multicurrency information in the Excel workbooks that make up the configuration.
Using RapidStart Configuration with UAC activated
User Account Control (UAC) is an enhanced security feature in Windows Vista, Windows 7, WIndows 8, Windows Server 2008, Windows Server 2008 R2, and Windows Server 2012. UAC is activated by default. To migrate your data on a computer when UAC is active, start the RapidStart Configuration tool as a user that has administrative privileges on the local computer. To do this, right-click on the RapidStart Configuration shortcut and choose Run as administrator.

R A P I D S T A R T S E R V I C E S F O R M I C R O S O F T D Y N A M I C S G P 45
Chapter 8: After you configure your dataWe recommend that you complete the following tasks in Microsoft Dynamics GP after you import your configuration data to a Microsoft Dynamics GP company database.
• Back up your company data• Register Microsoft Dynamics GP• Assign access to currencies• Assign a functional currency to a company• Check links• Create a unit of measure schedule• Define an inventory site• Specify document type IDs for Sales Order Processing transactions
Back up your company data
Back up your system database and all company databases in Microsoft Dynamics GP. Only a system administrator can open the Back Up Company window to make backups.
1. Open the Back Up Company window.(Microsoft Dynamics GP menu >> Maintenance >> Backup)
2. Select the company you want to back up.
3. The path and file name of the backup file are displayed. You can modify the path and file name as needed.
4. Click OK to make the backup. The window closes, and a message appears when the backup is complete.
Register Microsoft Dynamics GP
You must register Microsoft Dynamics GP before you can use it. Enter your site name and registration keys exactly as they appear on your registration document. If you don’t register a module before you begin to use it, you won’t be able to open any transaction entry window. Modules in the sample company, Fabrikam, Inc., are registered and you can use the sample company to practice procedures.
You can enter your site name and registration keys for Microsoft Dynamics GP in the Registration window (Microsoft Dynamics GP menu >> Tools >> Setup >> System >> Registration).
Be sure to register the Multicurrency Management module if your configurations include multicurrency information.
After you’ve registered Microsoft Dynamics GP, you won’t need to register additional companies that you add. To verify that a module has been registered, open the Microsoft Dynamics GP Options window (Help >> About Microsoft Dynamics GP >> Options). Registered modules have a check mark in the Registered column.

P A R T 3 R A P I D S T A R T C O N F I G U R A T I O N
46 R A P I D S T A R T S E R V I C E S F O R M I C R O S O F T D Y N A M I C S G P
Assign access to currencies
If you imported a configuration that contains multicurrency information, you need to grant each company access to currencies.
1. Open the Multicurrency Access Setup window. (Microsoft Dynamics GP menu >> Tools >> Setup >> System >> Multicurrency Access)
2. Select a currency ID.
3. Mark Access for each company that will use the selected currency.
4. Click File >> Print to verify your entries with a Multicurrency Access Report.
5. Click OK to save the entries.
6. After completing this procedure, specify a functional currency for each company. See Assign a functional currency to a company on page 46.
Assign a functional currency to a company
Perform this procedure if you imported a configuration that contains multicurrency information. You already should have granted company access to currencies. See Assign access to currencies on page 46.
1. Open the Multicurrency Setup window. (Microsoft Dynamics GP menu >> Tools >> Setup >> Financial >> Multicurrency)
2. Enter or select the functional currency ID. The functional currency is the primary currency that the company uses for maintaining accounting records. Typically, the functional currency is the currency for the country/region where the company is located.
3. Select default transaction rate types.
4. If you’ve already entered transactions, when you enter the functional currency you’ll be prompted to use the check links procedure to update the currency ID for existing transactions. For more information on checking links, refer to your System Administrator’s Guide (Help >> Contents >> select System Administration).
Check links
Checking links examines tables, checking corresponding information in related tables and, if possible, changing the damaged data to match the corresponding data in an undamaged table. Use this routine to help verify the integrity of the imported configuration data.
1. Be sure that no one is using Microsoft Dynamics GP.
2. Make a backup, if you haven’t made a backup already.
R A P I D S T A R T S E R V I C E S F O R M I C R O S O F T D Y N A M I C S G P 47
C H A P T E R 8 A F T E R Y O U C O N F I G U R E Y O U R D A T A
3. Open the Check Links window. (Microsoft Dynamics GP menu >> Maintenance >> Check Links)
4. Select a series. You should check links for the following series: financial, sales, purchasing, inventory, system, and company.
5. Click All to select all the tables in the series.
6. To insert tables from another series, repeat steps 4 and 5.
7. Click OK to check links and print the Check Links Report.
The Report Destination window appears, and you can specify where the Check Links Report should be printed. If you mark File, select the appropriate table format and enter the report file name.
The Check Links Report displays any information that was re-created.
We recommend that you send the Check Links Report to the screen, and then print it if necessary, because it may be very large. Each report can only be printed once each time you check links, so it’s a good idea to send the report to a file as well.
Create a unit of measure schedule
If you used a standard configuration for your industry, you must create at least one unit of measure schedule. A unit of measure schedule must be assigned to every inventoried item.
1. Open the Unit of Measure Schedule Setup window.(Microsoft Dynamics GP menu >> Tools >> Setup >> Inventory >> Unit of Measure Schedule)
2. Enter an identifier and a description for the unit of measure schedule.
3. Enter or select the number of the decimal places for the quantities you plan to enter on this unit of measure schedule.
The number of decimal places for entering and displaying quantity information for the item and for the unit of measure must match. You might need to create several unit of measure schedules that are the same except for the number of decimal places displayed.
4. Enter a base unit of measure. This should be the smallest unit available for the item. When you move out of the field, a base equivalency—an equivalency that states that the smallest unit is equal to itself—automatically will be created in the first line of the scrolling window.
Even if you purchase and sell an item in only one unit of measure, you need to set up a unit of measure schedule with the base equivalency information.
5. Set up the quantities, equivalents, and descriptions for each unit of measure you plan to use, relative to the base unit of measure.

P A R T 3 R A P I D S T A R T C O N F I G U R A T I O N
48 R A P I D S T A R T S E R V I C E S F O R M I C R O S O F T D Y N A M I C S G P
For example, if you’re selling cans of soft drinks and your base unit of measure is “can,” you could set up equivalents as follows:
6. When you’ve finished defining all units of measure for a schedule, click Save.
Define an inventory site
If you used a standard configuration for your industry, you must define at least one inventory site.
1. Open the Site Maintenance window.(Cards >> Inventory >> Site)
2. Enter an identifier and a brief description for the site.
3. You can enter the address information, if you like.
4. If you have a specific account site segment set up in General Ledger and want to track currency amounts for this site, enter the account segment ID. Otherwise, leave this field blank.
5. You can enter phone and fax number information, if you like.
6. Select tax schedules that apply to merchandise sold at this site, and to merchandise delivered to this site.
The sales tax schedule you select appears as the default tax schedule in the Sales Order Processing module when the item is sold with a shipping method of Pickup. The tax schedule you select for purchases appears as the default tax schedule in the Purchase Order Processing module when the item purchased has a shipping method of Delivery.
7. Click Save.
Specify document type IDs for Sales Order Processing transactions
If you plan to use the Sales Order Processing module to enter quotes, orders, invoices, back orders, fulfillment orders, and returns, and you used a standard configuration for your industry, you must set up at least one document type ID for each Sales Order Processing document type. Document type IDs are set up in the individual document type setup windows.
Unit of measure Quantity Equivalent
Can 1 Can
Six-pack 6 Can
12-pack 12 Can
Case 24 Can
Case 4 Six-pack
Document type Window
Quote Sales Quote Setup window
Order Sales Order Setup window
Invoice Sales Invoice Setup window

R A P I D S T A R T S E R V I C E S F O R M I C R O S O F T D Y N A M I C S G P 49
C H A P T E R 8 A F T E R Y O U C O N F I G U R E Y O U R D A T A
1. Open the setup window for the document type.(Microsoft Dynamics GP menu >> Tools >> Setup >> Sales >> Sales Order Processing >> Sales Document Setup button >> select the Quote, Order, Back Order, Fulfillment Order/Invoice, or Return option)
2. Enter a document ID.
3. Enter a document next number.
4. For additional information about setting up document types, refer to the “Document setup in Sales Order Processing” topic in the Microsoft Dynamics GP help (Help >> Contents >> Sales Order Processing >> Sales Setup).
5. Click Save to save the information you’ve entered.
Back orders Sales Back Order Setup window
Fulfillment orders Sales Fulfillment Order/Invoice Setup window
Returns Sales Return Setup window
Document type Window

50 R A P I D S T A R T S E R V I C E S F O R M I C R O S O F T D Y N A M I C S G P

PA
RT
4: C
ON
FIGU
RA
TIO
NS
FOR
MIC
RO
SO
FT D
YN
AM
ICS
GP
52 R A P I D S T A R T S E R V I C E S F O R M I C R O S O F T D Y N A M I C S G P
Part 4: Configurations for Microsoft Dynamics GPA configuration is a set of Microsoft® Office Excel .xlsx workbook files that contain basic setup or master record information for a Microsoft Dynamics GP company. Configurations are intended to be used in conjunction with the RapidStart Services (RapidStart Configuration and RapidStart Migration) for Microsoft Dynamics GP.
The following topic is discussed.
• Chapter 9, “Working with configurations,” describes how to create, modify, and save configurations for RapidStart Services.

R A P I D S T A R T S E R V I C E S F O R M I C R O S O F T D Y N A M I C S G P 53
Chapter 9: Working with configurationsUse this information to help you understand how to create, modify, and save configurations for the RapidStart Services for Microsoft Dynamics GP.
This information is intended for a Microsoft partner or experienced user who has knowledge of the Microsoft Dynamics GP system and its setup requirements.
Information is divided into the following topics:
• Configuration overview• Software requirements• How you can use configurations• Tips and troubleshooting• Editing RapidStart Migration configurations• RapidStart Configuration worksheet reference
Configuration overview
A configuration is a set of Microsoft Office Excel.xlsx workbook files that contain basic setup or master record information for a Microsoft Dynamics GP company. Configurations are intended to be used in conjunction with the RapidStart Services (RapidStart Configuration and RapidStart Migration) for Microsoft Dynamics GP.
A “company” can be any type of organizational entity, including a business, a nonprofit organization, a government department, and so forth. The term is used in this document for the sake of simplicity.
A configuration is generated in one of several ways:
• When you use the RapidStart Migration for Microsoft Dynamics GP, a limited configuration is created that contains master records from the QuickBooks company file or the Peachtree company file that is being migrated to Microsoft Dynamics GP.
• When you choose to use the RapidStart Configuration tool to quickly set up a new company in Microsoft Dynamics GP, a complete configuration is created to contain the settings you enter using the tool.
• When you use the RapidStart Configuration tool to export an existing Microsoft Dynamics GP company’s setup information, a complete configuration is created that you can use as a template when setting up other companies.
Configurations are stored in Excel workbook files so that you can quickly and easily modify setup information using the familiar spreadsheet interface. For workbooks generated by the RapidStart Configuration tool, you don’t need to have Microsoft Dynamics GP or even the RapidStart Configuration tool on your computer.
Entry cells in the spreadsheet files are formatted and labeled to help you enter appropriate values. The tools also validate entries before you import configuration information into Microsoft Dynamics GP, preventing many types of errors.
When modifying configurations, it is possible to make inappropriate entries that still pass validation tests. We recommend that you review all setup information after it has been imported into Microsoft Dynamics GP, and print relevant setup reports.
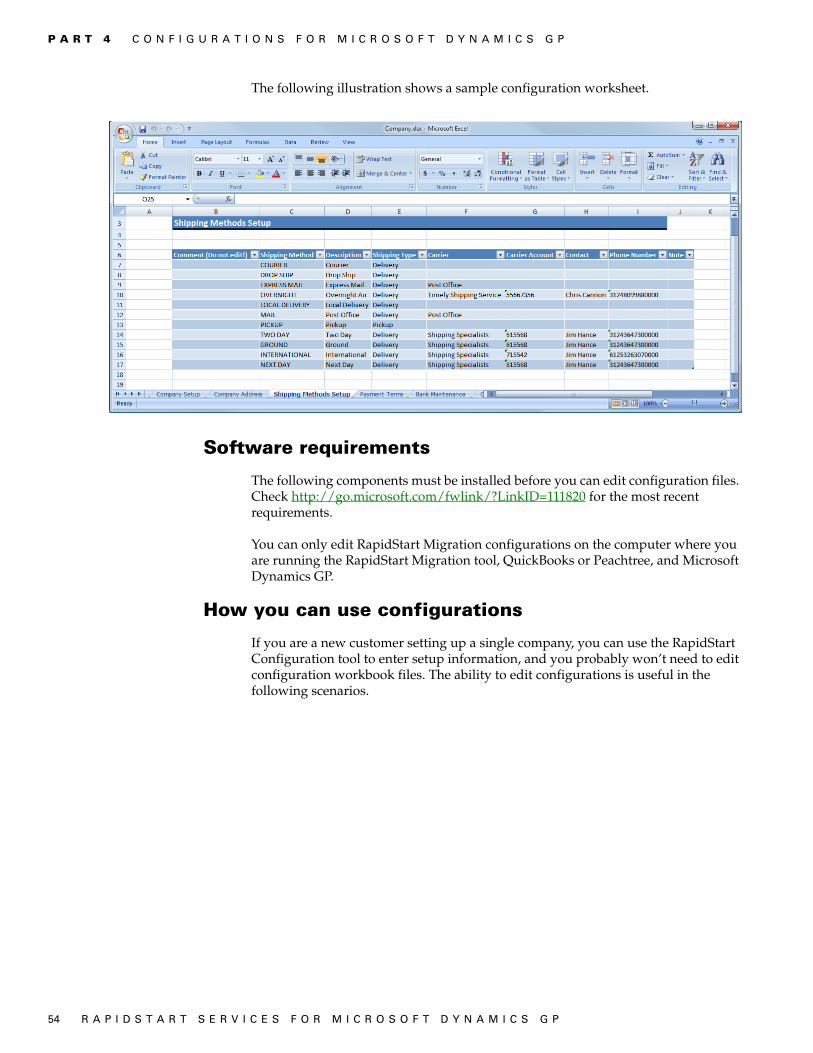
P A R T 4 C O N F I G U R A T I O N S F O R M I C R O S O F T D Y N A M I C S G P
54 R A P I D S T A R T S E R V I C E S F O R M I C R O S O F T D Y N A M I C S G P
The following illustration shows a sample configuration worksheet.
Software requirements
The following components must be installed before you can edit configuration files. Check http://go.microsoft.com/fwlink/?LinkID=111820 for the most recent requirements.
You can only edit RapidStart Migration configurations on the computer where you are running the RapidStart Migration tool, QuickBooks or Peachtree, and Microsoft Dynamics GP.
How you can use configurations
If you are a new customer setting up a single company, you can use the RapidStart Configuration tool to enter setup information, and you probably won’t need to edit configuration workbook files. The ability to edit configurations is useful in the following scenarios.
R A P I D S T A R T S E R V I C E S F O R M I C R O S O F T D Y N A M I C S G P 55
C H A P T E R 9 W O R K I N G W I T H C O N F I G U R A T I O N S
Setting up many similar companies If you are a partner or customer who needs to set up many companies that have a similar structure, you can enter setup information for the first company and use it as a template. When you’ve finished entering setup information in the template company, use the RapidStart Configuration tool to export the configuration to Excel. Edit the configuration file, using either Excel or the RapidStart Configuration tool. Finally, import the configuration into the new Microsoft Dynamics GP company database.
Creating or modifying standard industry configurations Microsoft Dynamics GP provides 13 standard industry configurations with the RapidStart Configuration tool. If you are a Partner serving a different industry or business type, you can modify the standard configurations or create new ones. For information about the charts of accounts included with each industry type, see http://go.microsoft.com/fwlink/?LinkId=89042.
We don’t recommend attempting to create your own configuration from scratch, because of the possibility of entering incomplete, inconsistent, or non-valid information. Always start with an existing company setup or one of the standard industry configurations supplied with the RapidStart Configuration tool.
Tips and troubleshooting
Configuration file locations Configuration files generated by the RapidStart Configuration tool are stored at the following default locations, depending upon your operating system.
QuickBooksFor Windows Vista, Windows 7, Windows Server 2008, and Windows Server 2008 R2, the files are stored at:C:\Users\<user>\AppData\Local
PeachtreeFor Windows Vista, Windows 7, Windows Server 2008, and Windows Server 2008 R2, the files are stored at:C:\Users\<user>\AppData\Local\RapidStart Migration Tool\PT\<companyname>\Configurator
You can choose a different location in the RapidStart Configuration tool’s Configuration Selection window; however, the folder you specify must already exist, and it must be a folder to which your user account has permissions to write files.

P A R T 4 C O N F I G U R A T I O N S F O R M I C R O S O F T D Y N A M I C S G P
56 R A P I D S T A R T S E R V I C E S F O R M I C R O S O F T D Y N A M I C S G P
Navigating workbooks The first worksheet in each workbook is a “Table of contents” listing each worksheet or tab in the workbook. You can click a link to go to the named worksheet. The following illustration shows the Inventory workbook’s table of contents worksheet.
Workbook dependencies Some workbooks reference values stored in other workbooks. The workbook’s table of contents worksheet lists all the workbooks that the current workbook depends on. To make sure that the current workbook displays the referenced values when you are making edits, you should open all the referenced workbooks, as well. You can open the workbooks simply by clicking the links in the table of contents worksheet. The referenced values typically appear as selections in drop-down lists. See the following item for more details.
Editing cells that have predefined values Some cells accept only predefined values. When you click on one of these cells in a worksheet, a drop-down arrow appears beside the cell. Click the arrow to choose one of the predefined values. The following illustration shows such a cell.
Copying and pasting When copying and pasting from a separate spreadsheet, be careful not to change the format of cells or the order of columns.
Generating a standard industry configuration To generate one of the standard industry configurations, start the RapidStart Configuration tool and in the Welcome to RapidStart for Microsoft Dynamics GP window select the Industry option. In the Create New Project window, select the appropriate business ownership and industry type. At any point thereafter you can exit the tool. The workbooks containing data for the industry you selected will be generated in the default file location.

R A P I D S T A R T S E R V I C E S F O R M I C R O S O F T D Y N A M I C S G P 57
C H A P T E R 9 W O R K I N G W I T H C O N F I G U R A T I O N S
Multicurrency precautions You can enter multicurrency information in your configurations if Multicurrency Management in Microsoft Dynamics GP is registered. After importing your configuration, you will have to perform additional steps such as granting company access to currencies and specifying a functional currency for the company.
If you aren’t using Multicurrency Management, don’t enter multicurrency information in the Excel workbooks, and be sure that Multicurrency Management in Microsoft Dynamics GP isn’t registered.
Credit card precautions In the Credit Card Setup worksheet of the Company.xlsx workbook file, you can only enter bank cards, charge cards, and check cards. To set up credit cards, use the Credit Card Setup window in Microsoft Dynamics GP.
Fixing validation issues In the RapidStart Configuration tool, the Validation window shows whether your configuration settings are valid. Items appearing in the window have issues that you must correct. Double-click an item to open an Excel configuration worksheet to the page where a setting needs to be corrected.
Editing RapidStart Migration configurations
When you use the RapidStart Migration for Microsoft Dynamics GP, a limited configuration is created that contains master records from the QuickBooks company file or the Peachtree company file that is being migrated to Microsoft Dynamics GP. You can edit this configuration in much the same way as you would edit configurations generated by the RapidStart Configuration tool; however, be aware of the following differences.
Record types includedThe RapidStart Migration tool’s configuration consists of a single workbook file (QB_Master_Records.xlsx) that includes the following record types.
• Vendors• Vendor addresses• Customers• Customer addresses• Inventory items• Employees
Configuration file locationsThe RapidStart Migration tool’s configuration file is created in one of the following locations, depending upon your operating system. Separate configuration files are created for each company you migrate to. In the following paths, <user> represents the Windows user account name, and <company> represents the company name.

P A R T 4 C O N F I G U R A T I O N S F O R M I C R O S O F T D Y N A M I C S G P
58 R A P I D S T A R T S E R V I C E S F O R M I C R O S O F T D Y N A M I C S G P
QuickBooksFor Windows Vista, Windows 7, Windows Server 2008, and Windows Server 2008 R2, the files are stored at: C:\Users\<user>\AppData\Local\RapidStart Migration\<company>\Export\ MasterData
PeachtreeFor Windows Vista, Windows 7, Windows Server 2008, and Windows Server 2008 R2, the files are stored at:C:\Users\<user>\AppData\Local\Rapid Migration Tool\PT\<companyname>\Configurator
Common configuration editsWhen migrating to a new business management system, you have the opportunity to correct errors, omissions, or inconsistencies in your legacy business records. You also can adapt those records to take advantage of the more robust capabilities of Microsoft Dynamics GP. The following are some of the most common changes you might need to make to configurations when migrating from QuickBooks or Peachtree.
Modifying IDs In Microsoft Dynamics GP, each master record needs to have a unique alphanumeric ID, which is used to retrieve and sort records. The ID is separate from the name. When QuickBooks or Peachtree items, customers, employees, and vendors are migrated to Microsoft Dynamics GP, the RapidStart Migration tool assigns an ID based on the name. For example, customer “John Smith” is assigned customer ID “Smith, John”. You may want to assign IDs that have a more suitable and consistent format, such as SMITH0001, SMITH0002, and so forth. For more information about IDs, refer to the RapidStart Migration help.
Fixing incomplete records You can add information to master records that are incomplete. For example, you can add missing details for customers or vendors, or update address and contact information.
Editing precautionsBecause RapidStart Migration tool workbook needs to maintain connection to the data files, the workbook must be edited on the same computer where you are running the RapidStart Migration tool, QuickBooks or Peachtree, and Microsoft Dynamics GP. Editing on a separate computer is not supported.
When you edit a workbook, you can modify records, but not add new ones. Add new master records only in Microsoft Dynamics GP.
Be aware that if you delete or modify master records that are referenced by other master records or transactions, you may have to use the RapidStart Migration tool’s Deleted Records window to designate replacements for the records you deleted or modified. You also can use this window to restore deleted records.
RapidStart Configuration worksheet reference
A configuration generated by the RapidStart Configuration tool consists of several Excel workbook (.xlsx) files, each containing a different type information. Each configuration workbook contains a number of worksheets (spreadsheets). This section lists each workbook, the types of information you can edit on each worksheet, and the windows in Microsoft Dynamics GP where you can enter or edit the same information. You can refer to the windows and their online help in Microsoft Dynamics GP if you have questions about a specific entry.

R A P I D S T A R T S E R V I C E S F O R M I C R O S O F T D Y N A M I C S G P 59
C H A P T E R 9 W O R K I N G W I T H C O N F I G U R A T I O N S
The RapidStart Migration tool generates a limited configuration containing only master records. For additional details, refer to Editing RapidStart Migration configurations on page 57.
Workbook name Worksheet name Microsoft Dynamics GP window
Company.xlsx Account Format Account Format Setup
Account Account Maintenance
Currency Setup Currency Setup
Fiscal Periods Headers Fiscal Period Setup
Fiscal Periods Lines Fiscal Period Setup
Tax Details Tax Detail Maintenance
Tax Details Address Tax Detail Address
Tax Schedule Maintenance Tax Schedule Maintenance
Company Setup Company SetupCompany Setup Options
Company Address Company Address Setup
Shipping Methods Setup Shipping Methods Setup
Payment Terms Payment Terms Setup
Bank Maintenance Bank Maintenance
Credit Cards Setup Credit Card Setup
Financial.xlsx General Ledger General Ledger Setup
Checkbook Checkbook Maintenance
Bank Reconciliation Bank Reconciliation Setup
Fixed_Assets.xlsx Company Fixed Assets Company SetupDefault AccountsExpand User Fields
Account Group Account Group Setup
Book Book Setup
Class Class Setup
Book Class Book Class Setup
Insurance Insurance Setup
Location Location Setup
Physical Location Physical Location Setup
Purchasing Posting Accounts Fixed Assets Purchases Posting Accounts Setup
Quarter Quarter Setup
Build Calendar Build Fixed Assets Fiscal Calendar
Retirement Retirement Setup
Structure Structure Setup
Inventory.xlsx Inventory Control Inventory Control Setup
Units of Measure Schedule Hdr Unit of Measure Schedule Setup
Units of Measure Schedule Lines Unit of Measure Schedule Setup
Site Setup Site Maintenance
Site Default Bins Site Default Bins
Price Level Price Level Setup
Item Class Item Class Setup
Item Class Accounts Item Class Accounts Setup
Bill of Materials Setup Bill of Materials Setup
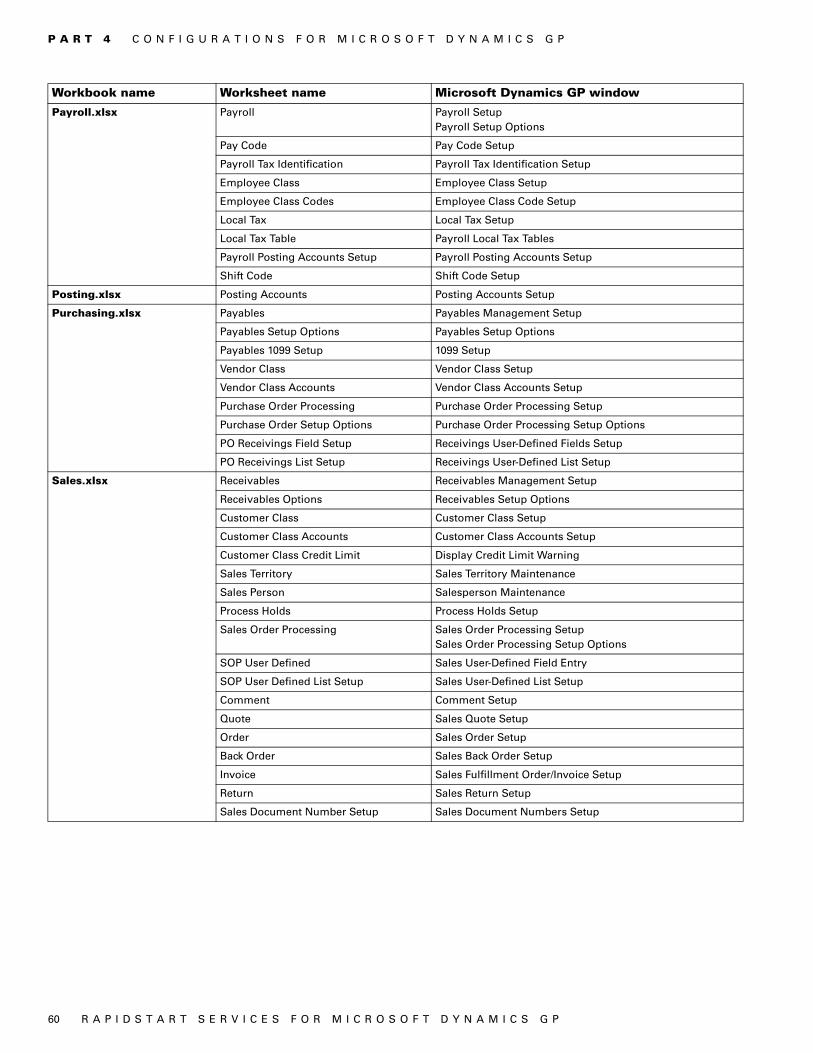
P A R T 4 C O N F I G U R A T I O N S F O R M I C R O S O F T D Y N A M I C S G P
60 R A P I D S T A R T S E R V I C E S F O R M I C R O S O F T D Y N A M I C S G P
Payroll.xlsx Payroll Payroll SetupPayroll Setup Options
Pay Code Pay Code Setup
Payroll Tax Identification Payroll Tax Identification Setup
Employee Class Employee Class Setup
Employee Class Codes Employee Class Code Setup
Local Tax Local Tax Setup
Local Tax Table Payroll Local Tax Tables
Payroll Posting Accounts Setup Payroll Posting Accounts Setup
Shift Code Shift Code Setup
Posting.xlsx Posting Accounts Posting Accounts Setup
Purchasing.xlsx Payables Payables Management Setup
Payables Setup Options Payables Setup Options
Payables 1099 Setup 1099 Setup
Vendor Class Vendor Class Setup
Vendor Class Accounts Vendor Class Accounts Setup
Purchase Order Processing Purchase Order Processing Setup
Purchase Order Setup Options Purchase Order Processing Setup Options
PO Receivings Field Setup Receivings User-Defined Fields Setup
PO Receivings List Setup Receivings User-Defined List Setup
Sales.xlsx Receivables Receivables Management Setup
Receivables Options Receivables Setup Options
Customer Class Customer Class Setup
Customer Class Accounts Customer Class Accounts Setup
Customer Class Credit Limit Display Credit Limit Warning
Sales Territory Sales Territory Maintenance
Sales Person Salesperson Maintenance
Process Holds Process Holds Setup
Sales Order Processing Sales Order Processing SetupSales Order Processing Setup Options
SOP User Defined Sales User-Defined Field Entry
SOP User Defined List Setup Sales User-Defined List Setup
Comment Comment Setup
Quote Sales Quote Setup
Order Sales Order Setup
Back Order Sales Back Order Setup
Invoice Sales Fulfillment Order/Invoice Setup
Return Sales Return Setup
Sales Document Number Setup Sales Document Numbers Setup
Workbook name Worksheet name Microsoft Dynamics GP window
61 R A P I D S T A R T S E R V I C E S F O R M I C R O S O F T D Y N A M I C S G P
IndexAaccount balances
preparing for Peachtree migration 21preparing for QuickBooks migration
17account format, designing 11accounts
preparing for migration 19preparing for QuickBooks migration
15
Bbackups
before configuring data 43before migrating Peachtree data 19before migrating QuickBooks data 15
Cchart of accounts
preparing for Peachtree migration 19preparing for QuickBooks migration
15check links, for configuration 46COM Exception error, eConnect password
error 24companies
assigning access to currencies 46assigning functional currency 46back up after configuring 45back up before configuring 43registering 45
company tasks, after you migrate 27configurations
checking links 46described 53editing for migration 57generating 53Multicurrency Management 43troubleshooting 55UAC is active 44using 54worksheet reference 58
currencies, assigning access 46customers
preparing for Peachtree migration 20preparing for QuickBooks migration
17
Ddocument type IDs, for Sales Order
Processing 48documentation, symbols and conventions
2
EeConnect, COM Exception error 24employees
preparing for Peachtree migration 21
employees (continued)preparing for QuickBooks migration
18
Ffinancial tasks, after you migrate 29functional currency, assigning to a
company 46
Iicons, used in manual 2IDs
described 12editing during migration 12
inventory sites, defining 48inventory tasks, after you migrate 31
Mmigrations
after you migrate 27-40before using the RapidStart Migration
12preparing Peachtree data 19preparing QuickBooks data 15troubleshooting 23UAC is active 13
Multicurrency Management, configuring 43
PPeachtree
account format 11preparing data before you migrate 19preparing your account balances 21preparing your accounts 19preparing your customer records 20preparing your employee records 21preparing your vendor records 19
purchasing tasks, after you migrate 36
QQuickBooks
account format 11preparing data before you migrate 15preparing your account balances 17preparing your accounts 15preparing your customer records 17preparing your employee records 18preparing your undeposited funds 16preparing your vendor records 16
RRapidStart Migration, before using 12registration, Microsoft Dynamics GP 45
Ssales tasks, after you migrate 32sites, defining 48symbols, used in manual 2system requirements, editing
configurations 54
Ttroubleshooting
configurations 55exporting Peachtree data 24exporting QuickBooks data 23importing QuickBooks data 24
Uundeposited funds, preparing for
QuickBooks migration 16unit of measure schedules
creating 47example 47
Vvendors
preparing for Peachtree migration 19preparing for QuickBooks migration
16