Embed Size (px)
Citation preview

8/9/2019 MELJUN CORTES's - JAVA GUI Source Code & Handouts
http://slidepdf.com/reader/full/meljun-cortess-java-gui-source-code-handouts 1/22
An Introduction to Java GUI Programmingimport javax.swing.*;import java.awt.Color;import java.awt.event.ActionListener;import java.awt.event.ActionEvent;
public class MELJUN_Button implements ActionListener{ // Definition of global values and items that are part of the GUI.
int redScoreAmount = 0;
int blueScoreAmount = 0;
JPanel titlePanel, scorePanel, buttonPanel;JLabel redLabel, blueLabel, redScore, blueScore;JButton redButton, blueButton, resetButton;
public JPanel createContentPane (){ // We create a bottom JPanel to place everything on.
JPanel totalGUI = new JPanel();totalGUI.setLayout(null);
// Creation of a Panel to contain the title labels
titlePanel = new JPanel();titlePanel.setLayout(null);titlePanel.setLocation(10, 0);
titlePanel.setSize(250, 30);totalGUI.add(titlePanel);
redLabel = new JLabel("Red Team");redLabel.setLocation(0, 0);redLabel.setSize(120, 30);redLabel.setHorizontalAlignment(0);redLabel.setForeground(Color.red);titlePanel.add(redLabel);
blueLabel = new JLabel("Blue Team");blueLabel.setLocation(130, 0);blueLabel.setSize(120, 30);blueLabel.setHorizontalAlignment(0);blueLabel.setForeground(Color.blue);
titlePanel.add(blueLabel);
// Creation of a Panel to contain the score labels.
scorePanel = new JPanel();scorePanel.setLayout(null);scorePanel.setLocation(10, 40);scorePanel.setSize(260, 30);totalGUI.add(scorePanel);
redScore = new JLabel(""+redScoreAmount);redScore.setLocation(0, 0);redScore.setSize(120, 30);redScore.setHorizontalAlignment(0);scorePanel.add(redScore);
blueScore = new JLabel(""+blueScoreAmount);blueScore.setLocation(130, 0);blueScore.setSize(120, 30);blueScore.setHorizontalAlignment(0);scorePanel.add(blueScore);
// Creation of a Panel to contain all the JButtons.
buttonPanel = new JPanel();buttonPanel.setLayout(null);buttonPanel.setLocation(10, 80);buttonPanel.setSize(260, 70);totalGUI.add(buttonPanel);
// We create a button and manipulate it using the syntax we have
// used before. Now each button has an ActionListener which posts
// its action out when the button is pressed.
Filename/Class Name: MELJUN_Button
Project Name: MELJUN_Button

8/9/2019 MELJUN CORTES's - JAVA GUI Source Code & Handouts
http://slidepdf.com/reader/full/meljun-cortess-java-gui-source-code-handouts 2/22
redButton = new JButton("Red Score!");redButton.setLocation(0, 0);redButton.setSize(120, 30);redButton.addActionListener(this);buttonPanel.add(redButton);
blueButton = new JButton("Blue Score!");blueButton.setLocation(130, 0);blueButton.setSize(120, 30);blueButton.addActionListener(this);buttonPanel.add(blueButton);
resetButton = new JButton("Reset Score");resetButton.setLocation(0, 40);resetButton.setSize(250, 30);resetButton.addActionListener(this);buttonPanel.add(resetButton);
totalGUI.setOpaque(true);
return totalGUI;}
// This is the new ActionPerformed Method.
// It catches any events with an ActionListener attached.
// Using an if statement, we can determine which button was pressed
// and change the appropriate values in our GUI.
public void actionPerformed(ActionEvent e) { if(e.getSource() == redButton)
{redScoreAmount = redScoreAmount + 1;redScore.setText(""+redScoreAmount);
} else if(e.getSource() == blueButton)
{blueScoreAmount = blueScoreAmount + 1;blueScore.setText(""+blueScoreAmount);
} else if(e.getSource() == resetButton)
{redScoreAmount = 0;blueScoreAmount = 0;redScore.setText(""+redScoreAmount);blueScore.setText(""+blueScoreAmount);
}}
private static void createAndShowGUI() {
JFrame.setDefaultLookAndFeelDecorated(true);JFrame frame = new JFrame("[=] JButton Scores! [=]");
//Create and set up the content pane.
MELJUN_Button demo = new MELJUN_Button(); frame.setContentPane(demo.createContentPane());frame.setDefaultCloseOperation(JFrame.EXIT_ON_CLOSE);frame.setSize(280, 190);frame.setVisible(true);
}
public static void main(String[] args) { //Schedule a job for the event-dispatching thread:
//creating and showing this application's GUI.
SwingUtilities.invokeLater(new Runnable() { public void run() {
createAndShowGUI();}
});}
}

8/9/2019 MELJUN CORTES's - JAVA GUI Source Code & Handouts
http://slidepdf.com/reader/full/meljun-cortess-java-gui-source-code-handouts 3/22
An Introduction to Java GUI Programming
Beginner into the world of Java GUI programming
Java GUI programming involves two packages: the original abstract windows kit (AWT) and the newerSwing toolkit. Swing components have the prefix J to distinguish them from the original AWT ones
(e.g. JFrame instead of Frame). To include Swing components and methods in your project, you must
import the java.awt.*, java.awt.event.*, and javax.swing.* packages. Displayable frames are top-level
containers such as JFrame,JWindows, JDialog, and JApplet, which interface with the operating system
window manager. Non-displaying content panes are intermediate containers suchas JPanel, JOptionsPane, JScrollPane, and JSplitPane. Containers are therefore widgets or GUI
controls that are used to hold and group other widgets such as text boxes, check boxes, radio buttons, et a
In .NET the main UI, called the Windows Form, holds the controls that are dragged and dropped onto thecontrol surface. Every GUI starts with a window meant to display things. In Swing, there are three types o
windows: the Applet, the Dialog, and the Frame. These interface with the windows manager. In swing,a frame object is called a JFrame. A JFrame is considered the top most container. These are also called
displayable frames. Non-displaying content panes are intermediate containers suchas JPanel,JScrollPane, JLayeredPane, JSplitPane and JTabbedPane which organize the layout
structure when multiple controls are being used. Stated simply, the content pane is where we place out texfields are other widgets, so to add and display GUI controls, we need to specify that it is the content pane
that we are adding to. The content pane is then at the top of a containment hierarchy, in which this tree-li
hierarchy has a top-level container (in our case JFrame). Working down the tree, we would find other toplevel containers like JPanel to hold the components. Here is the code that produces a simple frame upo
to build on:
import java.awt.*;import java.awt.event.*;import javax.swing.*; //notice javax
public class Frame1 extends JFrame{JPanel pane = new JPanel();Frame1() // the frame constructor method
{ super("My Simple Frame"); setBounds(100,100,300,100);
setDefaultCloseOperation(JFrame.EXIT_ON_CLOSE);
Container con = this.getContentPane(); // inherit main framecon.add(pane); // add the panel to frame
// customize panel here
// pane.add(someWidget);
setVisible(true); // display this frame
} public static void main(String args[]) {new Frame1();}}

8/9/2019 MELJUN CORTES's - JAVA GUI Source Code & Handouts
http://slidepdf.com/reader/full/meljun-cortess-java-gui-source-code-handouts 4/22
If you have never compiled Java code, then consider this basic code in order to show the compilation andinterpretation process. As .NET compilers emit IL code and metadata, where the metadata tables are read
by the CLR to verify type safety (that is, that the correct data types are passed to the correct methods), th
JIT compiler converts the IL code into native code for execution. There is no interpretation as there is withthe Java Virtual Machine. The Java platform is defined by the APIs (collections of compiled libraries for use
programs and the JVM (which is similar to the CLR). A Java source code file is compiled into byte code
wherein a class file is generated that functions as a blueprint for the runtime execution. Here is an exampl
import java.util.*;public class Sys {public static void main(String[] args) {System.out.println
(“This is a string passed to the print line method of the System class”);}}
c:\Sun\SDK\jdk\bin>java.exe Sys // the java.exe interprets the byte code file// (in the same directory where the class file is.
This is a string passed to the print line method of the System class.
Here is code that show a GUI with a button.
The button, however, does nothing when pressed:
import java.awt.*;import java.awt.event.*;import javax.swing.*;public class Frame2 extends JFrame{
JPanel pane = new JPanel();JButton pressme = new JButton("Press Me");Frame2() // the frame constructor
{ super("JPrompt Demo"); setBounds(100,100,300,200);
setDefaultCloseOperation(JFrame.EXIT_ON_CLOSE);Container con = this.getContentPane(); // inherit main frame
con.add(pane); // JPanel containers default to FlowLayout
pressme.setMnemonic('P'); // associate hotkey to button
pane.add(pressme); pressme.requestFocus();setVisible(true); // make frame visible
} public static void main(String args[]) {new Frame2();}}
C:\...\bin>Javac.exe Frame2.java
C:\...\bin>Java.exe Frame2
8/9/2019 MELJUN CORTES's - JAVA GUI Source Code & Handouts
http://slidepdf.com/reader/full/meljun-cortess-java-gui-source-code-handouts 5/22
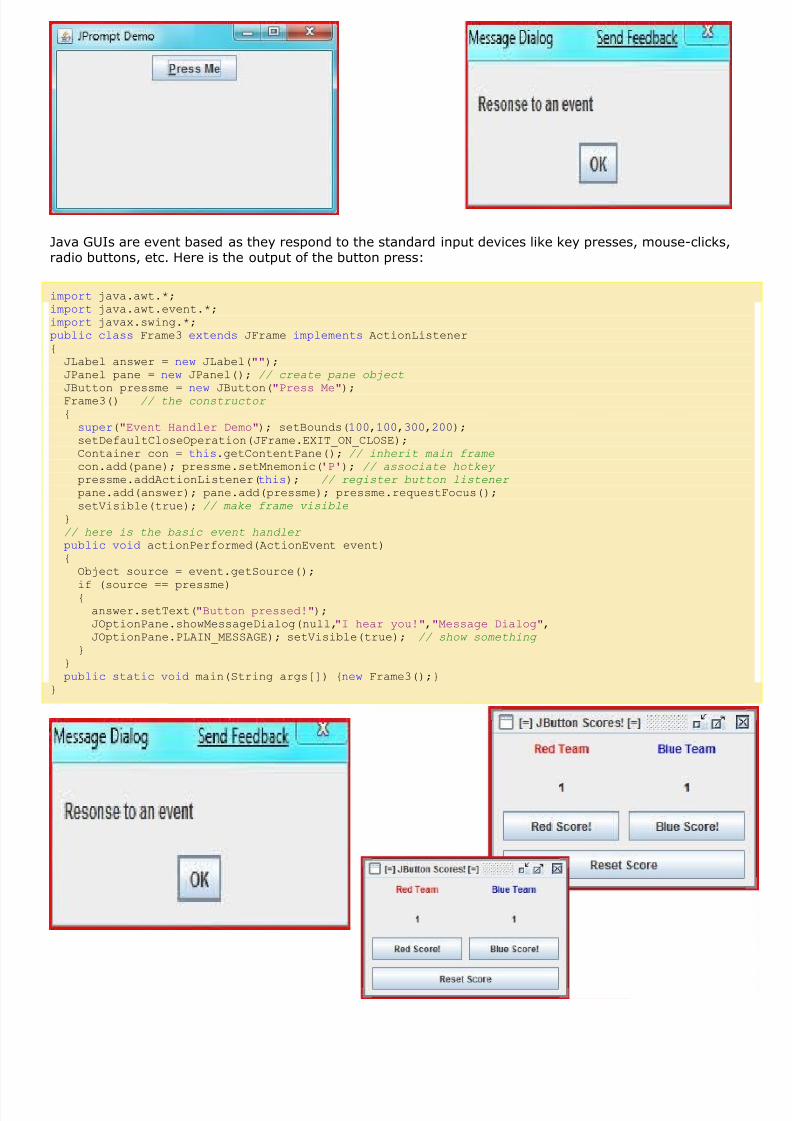
Java GUIs are event based as they respond to the standard input devices like key presses, mouse-clicks,radio buttons, etc. Here is the output of the button press:
import java.awt.*;import java.awt.event.*;import javax.swing.*;public class Frame3 extends JFrame implements ActionListener{JLabel answer = new JLabel("");JPanel pane = new JPanel(); // create pane object
JButton pressme = new JButton("Press Me");Frame3() // the constructor
{ super("Event Handler Demo"); setBounds(100,100,300,200);
setDefaultCloseOperation(JFrame.EXIT_ON_CLOSE);Container con = this.getContentPane(); // inherit main frame
con.add(pane); pressme.setMnemonic('P'); // associate hotkey
pressme.addActionListener(this); // register button listener
pane.add(answer); pane.add(pressme); pressme.requestFocus();setVisible(true); // make frame visible
} // here is the basic event handler
public void actionPerformed(ActionEvent event){Object source = event.getSource();
if (source == pressme){answer.setText("Button pressed!");JOptionPane.showMessageDialog(null,"I hear you!","Message Dialog",JOptionPane.PLAIN_MESSAGE); setVisible(true); // show something
}}
public static void main(String args[]) {new Frame3();}}

8/9/2019 MELJUN CORTES's - JAVA GUI Source Code & Handouts
http://slidepdf.com/reader/full/meljun-cortess-java-gui-source-code-handouts 6/22
8/9/2019 MELJUN CORTES's - JAVA GUI Source Code & Handouts
http://slidepdf.com/reader/full/meljun-cortess-java-gui-source-code-handouts 7/22
// used before.
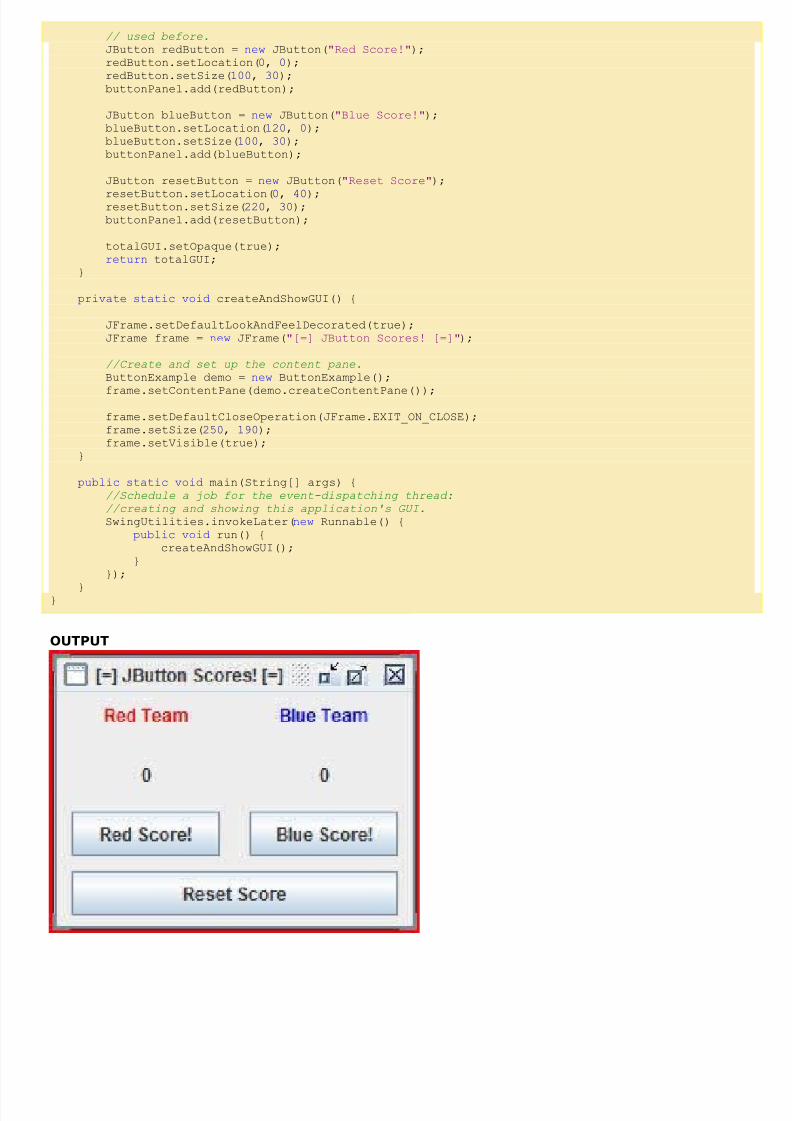
JButton redButton = new JButton("Red Score!");redButton.setLocation(0, 0);redButton.setSize(100, 30);buttonPanel.add(redButton);
JButton blueButton = new JButton("Blue Score!");blueButton.setLocation(120, 0);blueButton.setSize(100, 30);buttonPanel.add(blueButton);
JButton resetButton = new JButton("Reset Score");
resetButton.setLocation(0, 40);resetButton.setSize(220, 30);buttonPanel.add(resetButton);
totalGUI.setOpaque(true); return totalGUI;
}
private static void createAndShowGUI() {
JFrame.setDefaultLookAndFeelDecorated(true);JFrame frame = new JFrame("[=] JButton Scores! [=]");
//Create and set up the content pane.
ButtonExample demo = new ButtonExample();
frame.setContentPane(demo.createContentPane());
frame.setDefaultCloseOperation(JFrame.EXIT_ON_CLOSE);frame.setSize(250, 190);frame.setVisible(true);
}
public static void main(String[] args) { //Schedule a job for the event-dispatching thread:
//creating and showing this application's GUI.
SwingUtilities.invokeLater(new Runnable() { public void run() {
createAndShowGUI();}
});
}}
OUTPUT

8/9/2019 MELJUN CORTES's - JAVA GUI Source Code & Handouts
http://slidepdf.com/reader/full/meljun-cortess-java-gui-source-code-handouts 8/22
Nothing will happen when the buttons are pressed as the event listener is needed:
import javax.swing.*;import java.awt.Color;import java.awt.event.ActionListener;import java.awt.event.ActionEvent;
public class ButtonDemo_Extended implements ActionListener{
// Definition of global values and items that are part of the GUI.
int redScoreAmount = 0; int blueScoreAmount = 0;
JPanel titlePanel, scorePanel, buttonPanel;JLabel redLabel, blueLabel, redScore, blueScore;JButton redButton, blueButton, resetButton;
public JPanel createContentPane (){
// We create a bottom JPanel to place everything on.
JPanel totalGUI = new JPanel();totalGUI.setLayout(null);
// Creation of a Panel to contain the title labels
titlePanel = new JPanel();titlePanel.setLayout(null);titlePanel.setLocation(10, 0);titlePanel.setSize(250, 30);totalGUI.add(titlePanel);
redLabel = new JLabel("Red Team");redLabel.setLocation(0, 0);redLabel.setSize(120, 30);redLabel.setHorizontalAlignment(0);redLabel.setForeground(Color.red);titlePanel.add(redLabel);
blueLabel = new JLabel("Blue Team");blueLabel.setLocation(130, 0);blueLabel.setSize(120, 30);blueLabel.setHorizontalAlignment(0);blueLabel.setForeground(Color.blue);titlePanel.add(blueLabel);
// Creation of a Panel to contain the score labels.
scorePanel = new JPanel();scorePanel.setLayout(null);scorePanel.setLocation(10, 40);scorePanel.setSize(260, 30);totalGUI.add(scorePanel);
redScore = new JLabel(""+redScoreAmount);redScore.setLocation(0, 0);redScore.setSize(120, 30);redScore.setHorizontalAlignment(0);scorePanel.add(redScore);
blueScore = new JLabel(""+blueScoreAmount);blueScore.setLocation(130, 0);blueScore.setSize(120, 30);blueScore.setHorizontalAlignment(0);scorePanel.add(blueScore);
// Creation of a Panel to contain all the JButtons.
buttonPanel = new JPanel();buttonPanel.setLayout(null);buttonPanel.setLocation(10, 80);

8/9/2019 MELJUN CORTES's - JAVA GUI Source Code & Handouts
http://slidepdf.com/reader/full/meljun-cortess-java-gui-source-code-handouts 9/22
buttonPanel.setSize(260, 70);totalGUI.add(buttonPanel);
// We create a button and manipulate it using the syntax we have
// used before. Now each button has an ActionListener which posts
// its action out when the button is pressed.
redButton = new JButton("Red Score!");redButton.setLocation(0, 0);redButton.setSize(120, 30);redButton.addActionListener(this);buttonPanel.add(redButton);
blueButton = new JButton("Blue Score!");blueButton.setLocation(130, 0);blueButton.setSize(120, 30);blueButton.addActionListener(this);buttonPanel.add(blueButton);
resetButton = new JButton("Reset Score");resetButton.setLocation(0, 40);resetButton.setSize(250, 30);resetButton.addActionListener(this);buttonPanel.add(resetButton);
totalGUI.setOpaque(true);
return totalGUI;
} // This is the new ActionPerformed Method.
// It catches any events with an ActionListener attached.
// Using an if statement, we can determine which button was pressed
// and change the appropriate values in our GUI.
public void actionPerformed(ActionEvent e) { if(e.getSource() == redButton)
{redScoreAmount = redScoreAmount + 1;redScore.setText(""+redScoreAmount);
} else if(e.getSource() == blueButton)
{blueScoreAmount = blueScoreAmount + 1;blueScore.setText(""+blueScoreAmount);
} else if(e.getSource() == resetButton)
{redScoreAmount = 0;blueScoreAmount = 0;redScore.setText(""+redScoreAmount);blueScore.setText(""+blueScoreAmount);
}}
private static void createAndShowGUI() {
JFrame.setDefaultLookAndFeelDecorated(true);JFrame frame = new JFrame("[=] JButton Scores! [=]");
//Create and set up the content pane.
ButtonDemo_Extended demo = new ButtonDemo_Extended();frame.setContentPane(demo.createContentPane());
frame.setDefaultCloseOperation(JFrame.EXIT_ON_CLOSE);frame.setSize(280, 190);frame.setVisible(true);
} public static void main(String[] args) { //Schedule a job for the event-dispatching thread:
//creating and showing this application's GUI.
SwingUtilities.invokeLater(new Runnable() { public void run() {
createAndShowGUI();}
8/9/2019 MELJUN CORTES's - JAVA GUI Source Code & Handouts
http://slidepdf.com/reader/full/meljun-cortess-java-gui-source-code-handouts 10/22
});}
}
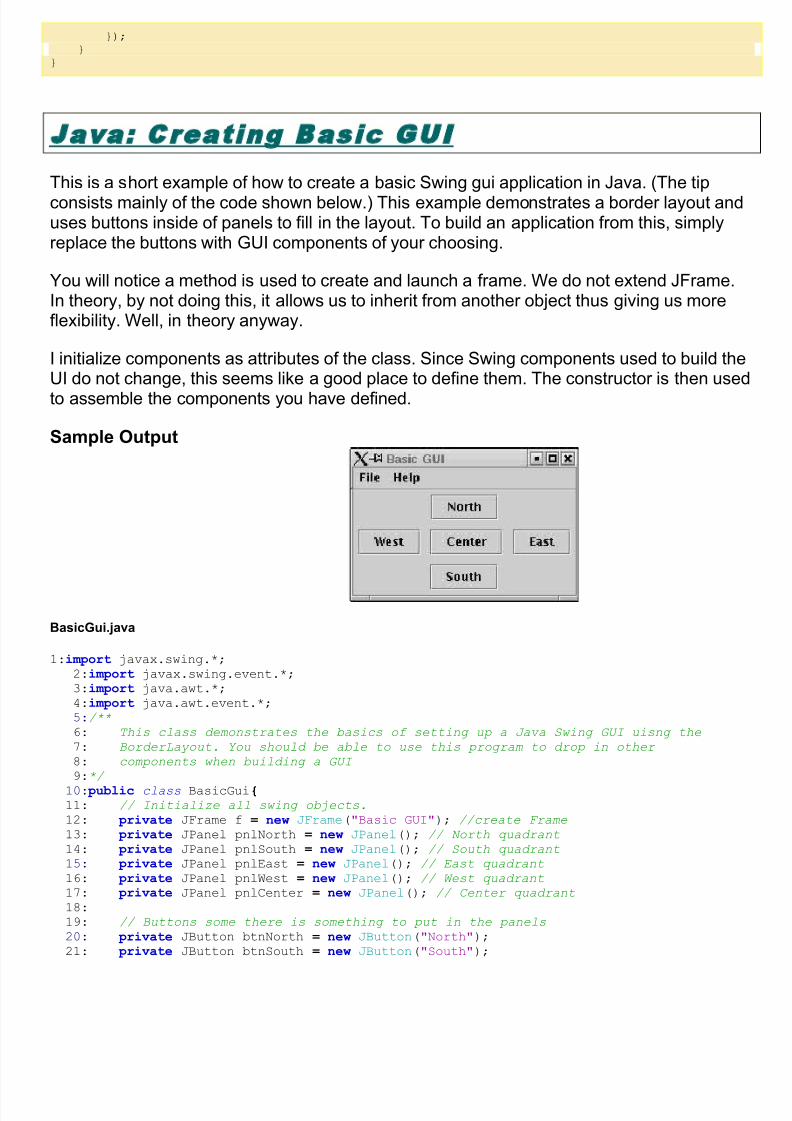
Jav a : C r ea t ing B as i c G U I
This is a short example of how to create a basic Swing gui application in Java. (The tip
consists mainly of the code shown below.) This example demonstrates a border layout anduses buttons inside of panels to fill in the layout. To build an application from this, simplyreplace the buttons with GUI components of your choosing.
You will notice a method is used to create and launch a frame. We do not extend JFrame.In theory, by not doing this, it allows us to inherit from another object thus giving us moreflexibility. Well, in theory anyway.
I initialize components as attributes of the class. Since Swing components used to build theUI do not change, this seems like a good place to define them. The constructor is then use
to assemble the components you have defined.
Sample Output
BasicGui.java
1:import javax.swing.*;2:import javax.swing.event.*;3:import java.awt.*;4:import java.awt.event.*;5:/**6: This class demonstrates the basics of setting up a Java Swing GUI uisng the
7: BorderLayout. You should be able to use this program to drop in other
8: components when building a GUI
9:*/ 10: public class BasicGui{11: // Initialize all swing objects.
12: private JFrame f = new JFrame("Basic GUI"); //create Frame
13: private JPanel pnlNorth = new JPanel(); // North quadrant
14: private JPanel pnlSouth = new JPanel(); // South quadrant
15: private JPanel pnlEast = new JPanel(); // East quadrant
16: private JPanel pnlWest = new JPanel(); // West quadrant
17: private JPanel pnlCenter = new JPanel(); // Center quadrant
18:19: // Buttons some there is something to put in the panels
20: private JButton btnNorth = new JButton("North");21: private JButton btnSouth = new JButton("South");

8/9/2019 MELJUN CORTES's - JAVA GUI Source Code & Handouts
http://slidepdf.com/reader/full/meljun-cortess-java-gui-source-code-handouts 11/22
22: private JButton btnEast = new JButton("East");23: private JButton btnWest = new JButton("West");24: private JButton btnCenter = new JButton("Center");25:26: // Menu
27: private JMenuBar mb = new JMenuBar(); // Menubar
28: private JMenu mnuFile = new JMenu("File"); // File Entry on Menu bar
29: private JMenuItem mnuItemQuit = new JMenuItem("Quit"); // Quit sub item
30: private JMenu mnuHelp = new JMenu("Help"); // Help Menu entry
31: private JMenuItem mnuItemAbout = new JMenuItem("About"); // About Entry
32:
33: /** Constructor for the GUI */ 34: public BasicGui(){35: // Set menubar
36: f.setJMenuBar(mb);37:38: //Build Menus
39: mnuFile.add(mnuItemQuit); // Create Quit line
40: mnuHelp.add(mnuItemAbout); // Create About line
41: mb.add(mnuFile); // Add Menu items to form
42: mb.add(mnuHelp);43:44: // Add Buttons
45: pnlNorth.add(btnNorth);46: pnlSouth.add(btnSouth);
47: pnlEast.add(btnEast);48: pnlWest.add(btnWest);49: pnlCenter.add(btnCenter);50: 51: // Setup Main Frame
52: f.getContentPane().setLayout(new BorderLayout());53: f.getContentPane().add(pnlNorth, BorderLayout.NORTH);54: f.getContentPane().add(pnlSouth, BorderLayout.SOUTH);55: f.getContentPane().add(pnlEast, BorderLayout.EAST);56: f.getContentPane().add(pnlWest, BorderLayout.WEST);57: f.getContentPane().add(pnlCenter, BorderLayout.CENTER);58:59: // Allows the Swing App to be closed
60: f.addWindowListener(new ListenCloseWdw());61:62: //Add Menu listener
63: mnuItemQuit.addActionListener(new ListenMenuQuit());64: }
65: 66: public class ListenMenuQuit implements ActionListener{67: public void actionPerformed(ActionEvent e){68: System.exit(0);69: }
70: }
71:72: public class ListenCloseWdw extends WindowAdapter{73: public void windowClosing(WindowEvent e){
74: System.exit(0);75: }
76: }
77: public void launchFrame(){79: // Display Frame
80: f.setDefaultCloseOperation(JFrame.EXIT_ON_CLOSE);81: f.pack(); //Adjusts panel to components for display
82: f.setVisible(true);83: }
84:85: public static void main(String args[]){86: BasicGui gui = new BasicGui();87: gui.launchFrame();

8/9/2019 MELJUN CORTES's - JAVA GUI Source Code & Handouts
http://slidepdf.com/reader/full/meljun-cortess-java-gui-source-code-handouts 12/22
88: }
89:}
Tutorial for JFrameBuilder 3.3.1
Table of contents:
1.How to make a simple JFrame/JDialog.
2. Familiarize the auto-generated Java code.
3. Other exam ples.
Make a simple JFrame/JDialog
Step1 : New Java Class
Pull down the File menu and click New to display the New Java Class dialog box. Fill up the option items (Class name and Base class).
(Don't select using BorderLayout manager for ContentPane at this time) Click OK.
The simulated JFrame will appear.

8/9/2019 MELJUN CORTES's - JAVA GUI Source Code & Handouts
http://slidepdf.com/reader/full/meljun-cortess-java-gui-source-code-handouts 13/22
Step2 : Add Components into simulated JFrame
Choose any component you want to add from Component Toolbar by clicking it. Click anywhere in the contentPane or click the contentPane node in the Structure Panel to add it.
8/9/2019 MELJUN CORTES's - JAVA GUI Source Code & Handouts
http://slidepdf.com/reader/full/meljun-cortess-java-gui-source-code-handouts 14/22
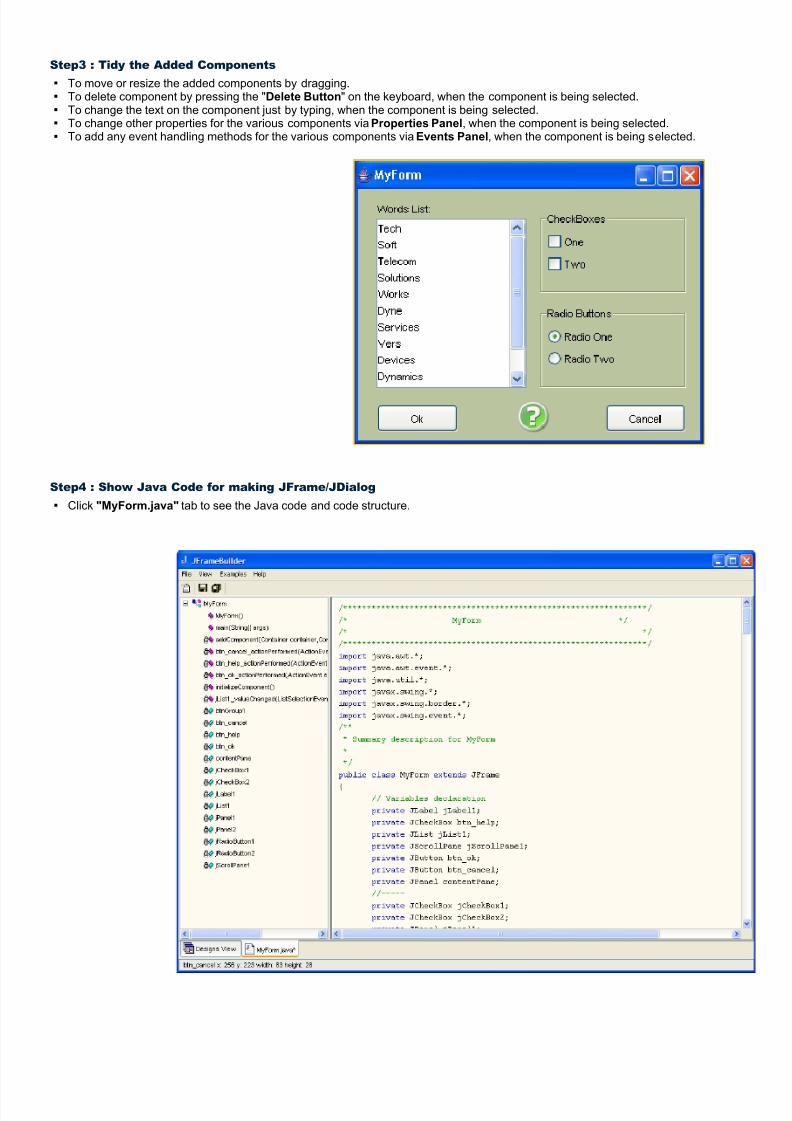
Step3 : Tidy the Added Components
To move or resize the added components by dragging. To delete component by pressing the "Delete Button" on the keyboard, when the component is being selected. To change the text on the component just by typing, when the component is being selected. To change other properties for the various components via Properties Panel, when the component is being selected. To add any event handling methods for the various components via Events Panel, when the component is being selected.
Step4 : Show Java Code for making JFrame/JDialog
Click "MyForm.java" tab to see the Java code and code structure.

8/9/2019 MELJUN CORTES's - JAVA GUI Source Code & Handouts
http://slidepdf.com/reader/full/meljun-cortess-java-gui-source-code-handouts 15/22
Step5 : Add a few statements into appropriate place to meet your particular needs
Pull down the File menu and click Save to save the code. Open Notepad or whatever text edit tool, then just add a few statements into appropriate place to meet your particular needs. (Refer
to Familiarize the auto-generated Java code)
Step6 : Get it
Run javac.exe to compile the improved code, you will get it.
Familiarize the auto-generated Java code
Let's have a look at the auto-generated Java code below.
/****************************************************************/
/* MyForm */
/* */ /**************************************************************/ import java.awt.*; import java.awt.event.*; import java.util.*; import javax.swing.*; import javax.swing.border.*; import javax.swing.event.*; /*** Summary description for MyForm
**/ public class MyForm extends JFrame{ // Variables declaration private JLabel jLabel1; private JCheckBox btn_help; private JList jList1; private JScrollPane jScrollPane1; private JButton btn_ok; private JButton btn_cancel; private JPanel contentPane; //----- private JCheckBox jCheckBox1; private JCheckBox jCheckBox2; private JPanel jPanel1; //-----
private JRadioButton jRadioButton1; private JRadioButton jRadioButton2; private JPanel jPanel2; //----- private ButtonGroup btnGroup1; // End of variables declaration
public MyForm(){
super();initializeComponent();
// // TODO: Add any constructor code after initializeComponent call
Variables DeclarationConstructorVariables AssignmentSettingthe properties for each component.Event Handling Methodshave been done here.Just need add a few statements into right methods.User may add any particular methods to meet their needs inthis area.Main Method provided is just for testing this class.

8/9/2019 MELJUN CORTES's - JAVA GUI Source Code & Handouts
http://slidepdf.com/reader/full/meljun-cortess-java-gui-source-code-handouts 16/22
//
this.setVisible(true);}
/*** This method is called from within the constructor to initialize the form.* WARNING: Do NOT modify this code. The content of this method is always regenerated* by the Windows Form Designer. Otherwise, retrieving design might not work properly.* Tip: If you must revise this method, please backup this GUI file for JFrameBuilder* to retrieve your design properly in future, before revising this method.*/
private void initializeComponent(){
ArrayList arr;
jLabel1 = new JLabel();btn_help = new JCheckBox();jList1 = new JList();jScrollPane1 = new JScrollPane();btn_ok = new JButton();btn_cancel = new JButton();contentPane = (JPanel)this.getContentPane();
//-----
jCheckBox1 = new JCheckBox();jCheckBox2 = new JCheckBox();jPanel1 = new JPanel();
//-----jRadioButton1 = new JRadioButton();jRadioButton2 = new JRadioButton();jPanel2 = new JPanel();
//-----btnGroup1 = new ButtonGroup();
// // jLabel1 //
jLabel1.setText("Words List:"); // // btn_help //
btn_help.setHorizontalAlignment(SwingConstants.CENTER);btn_help.setIcon(new ImageIcon("C:\\Examples\\Query.png"));btn_help.setOpaque(false);btn_help.setToolTipText("Help");btn_help.setSelected(true);btn_help.addActionListener(new ActionListener() {
public void actionPerformed(ActionEvent e){
btn_help_actionPerformed(e);}
}); // // jList1 //
arr = new ArrayList();arr.add("Tech");arr.add("Soft");arr.add("Telecom");arr.add("Solutions");arr.add("Works");arr.add("Dyne");arr.add("Services");arr.add("Vers");arr.add("Devices");arr.add("Dynamics");arr.add("Net");arr.add("System");jList1.setListData(arr.toArray());jList1.setSelectionBackground( new Color(162, 196, 136));jList1.addListSelectionListener( new ListSelectionListener() {

8/9/2019 MELJUN CORTES's - JAVA GUI Source Code & Handouts
http://slidepdf.com/reader/full/meljun-cortess-java-gui-source-code-handouts 17/22
public void valueChanged(ListSelectionEvent e){
jList1_valueChanged(e);}
}); // // jScrollPane1 //
jScrollPane1.setViewportView(jList1); // // btn_ok //
btn_ok.setOpaque(false);btn_ok.setText("Ok");btn_ok.addActionListener(new ActionListener() {
public void actionPerformed(ActionEvent e){
btn_ok_actionPerformed(e);}
}); // // btn_cancel //
btn_cancel.setOpaque(false);btn_cancel.setText("Cancel");btn_cancel.addActionListener(new ActionListener() {
public void actionPerformed(ActionEvent e){
btn_cancel_actionPerformed(e);}
}); // // contentPane //
contentPane.setLayout(null);contentPane.setBackground(new Color(187, 198, 161));addComponent(contentPane, jLabel1, 20,11,84,18);addComponent(contentPane, btn_help, 163,218,38,38);addComponent(contentPane, jScrollPane1, 19,31,155,175);addComponent(contentPane, btn_ok, 20,223,83,28);addComponent(contentPane, btn_cancel, 256,223,83,28);addComponent(contentPane, jPanel1, 187,22,155,88);addComponent(contentPane, jPanel2, 187,120,155,88);
// // jCheckBox1 //
jCheckBox1.setOpaque(false);jCheckBox1.setText("One");
// // jCheckBox2 //
jCheckBox2.setOpaque(false);jCheckBox2.setText("Two");
// // jPanel1 //
jPanel1.setLayout(new BoxLayout(jPanel1, BoxLayout.Y_AXIS));jPanel1.add(jCheckBox1, 0);jPanel1.add(jCheckBox2, 1);jPanel1.setBorder(new TitledBorder("CheckBoxes"));jPanel1.setBackground(new Color(187, 198, 161));
// // jRadioButton1 //
jRadioButton1.setOpaque(false);jRadioButton1.setText("Radio One");jRadioButton1.setSelected(true);
// // jRadioButton2 //

8/9/2019 MELJUN CORTES's - JAVA GUI Source Code & Handouts
http://slidepdf.com/reader/full/meljun-cortess-java-gui-source-code-handouts 18/22
jRadioButton2.setOpaque(false);jRadioButton2.setText("Radio Two");
// // jPanel2 //
jPanel2.setLayout(new BoxLayout(jPanel2, BoxLayout.Y_AXIS));jPanel2.add(jRadioButton1, 0);jPanel2.add(jRadioButton2, 1);jPanel2.setBorder(new TitledBorder("Radio Buttons"));jPanel2.setBackground(new Color(187, 198, 161));
// // btnGroup1 //
btnGroup1.add(jRadioButton1);
btnGroup1.add(jRadioButton2); // // MyForm //
this.setTitle("MyForm"); this.setLocation(new Point(1, 1)); this.setSize(new Dimension(364, 295)); this.setDefaultCloseOperation(WindowConstants.EXIT_ON_CLOSE); this.setResizable(false);
}
/** Add Component Without a Layout Manager (Absolute Positioning) */ private void addComponent(Container container,Component c,int x,int y,int width,int height)
{c.setBounds(x,y,width,height);container.add(c);
}
// // TODO: Add any appropriate code in the following Event Handling Methods // private void btn_help_actionPerformed(ActionEvent e)
{System.out.println("\nbtn_help_actionPerformed(ActionEvent e) called.");
// TODO: Add any handling code here
}
private void jList1_valueChanged(ListSelectionEvent e){
System.out.println("\njList1_valueChanged(ListSelectionEvent e) called."); if(!e.getValueIsAdjusting())
{Object o = jList1.getSelectedValue();System.out.println(">>" + ((o==null)? "null" : o.toString()) + " is selected.");
// TODO: Add any handling code here for the particular object being selected
}}
private void btn_ok_actionPerformed(ActionEvent e){
System.out.println("\nbtn_ok_actionPerformed(ActionEvent e) called."); // TODO: Add any handling code here
}
private void btn_cancel_actionPerformed(ActionEvent e){
System.out.println("\nbtn_cancel_actionPerformed(ActionEvent e) called."); // TODO: Add any handling code here
}
// // TODO: Add any method code to meet your needs in the following area //
//============================= Testing ================================// //= =// //= The following main method is just for testing this class you built.=// //= After testing,you may simply delete it. =// //======================================================================// public static void main(String[] args)

8/9/2019 MELJUN CORTES's - JAVA GUI Source Code & Handouts
http://slidepdf.com/reader/full/meljun-cortess-java-gui-source-code-handouts 19/22
{JFrame.setDefaultLookAndFeelDecorated( true);JDialog.setDefaultLookAndFeelDecorated( true);
try{
UIManager.setLookAndFeel("com.sun.java.swing.plaf.windows.WindowsLookAndFeel" );}
catch (Exception ex){
System.out.println("Failed loading L&F: ");System.out.println(ex);
} new MyForm();
}
//= End of Testing =
}
Other examples
The examples below use nested simple layout managers instead of GridBagLayout.
Example1 :
•
See the auto-generated Java code for this example.
• Get the Java file and required image files for this example- to compile and run it, or - to retrieve this GUI design to JFrameBuilder.

8/9/2019 MELJUN CORTES's - JAVA GUI Source Code & Handouts
http://slidepdf.com/reader/full/meljun-cortess-java-gui-source-code-handouts 20/22

8/9/2019 MELJUN CORTES's - JAVA GUI Source Code & Handouts
http://slidepdf.com/reader/full/meljun-cortess-java-gui-source-code-handouts 21/22
Example2 :
• See the auto-generated Java code for this example.
• Get the Java file and required image files for this example- to compile and run it, or - to retrieve this GUI design to JFrameBuilder.

8/9/2019 MELJUN CORTES's - JAVA GUI Source Code & Handouts
http://slidepdf.com/reader/full/meljun-cortess-java-gui-source-code-handouts 22/22
Example3 :
• See the auto-generated Java code for this example.
• Get the Java file for this example- to compile and run it, or - to retrieve this GUI design to JFrameBuilder.