Embed Size (px)
Citation preview

Meridian Administration Tools
Station AdministrationUser Guide
Document Number: P0906946Document Release: Standard Date: April 2000
Year Publish FCC TM
© 1997, 2000All rights reserved
Printed in the United States of America
Information is subject to change without notice. Nortel Networks reserves the right to make changes in design or components as progress in engineering and manufacturing may warrant. This equipment has been tested and found to comply with the limits for a Class A digital device pursuant to Part 15 of the FCC rules, and the radio interference regulations of Industry Canada. These limits are designed to provide reasonable protection against harmful interference when the equipment is operated in a commercial environment. This equipment generates, uses and can radiate radio frequency energy, and if not installed and used in accordance with the instruction manual, may cause harmful interference to radio communications. Operation of this equipment in a residential area is likely to cause harmful interference in which case the user will be required to correct the interference at their own expense.
SL-1 and Meridian 1 are trademarks of Nortel Networks.
MAT Station Administration User Guide

ii
P0906946 Standard April 2000

iii
Revision history
Date Document Version Product Release
April 2000 Standard 6.6
June 1999 Standard 6.5
March 1999 Standard 6.4
December 1998 Standard 6.1
July 1998 Standard 6
October 1997 Standard 5.7
April 1997 Standard 5.6
September 1996 Standard 5.0
July 1996 Standard 4.0
January 1996 Standard 3.5
December 1994 Standard 2.0
June 1994 Standard 1.1
MAT Station Administration User Guide

iv
P0906946 Standard April 2000

v
Contents
Introduction . . . . . . . . . . . . . . . . . . . . . . . . . . . . . . . 25Overview . . . . . . . . . . . . . . . . . . . . . . . . . . . . . . . . . . . . . . . . . . . . . . . 25
MAT Users . . . . . . . . . . . . . . . . . . . . . . . . . . . . . . . . . . . . . . . . . . . . . . 26
Conventions used in this manual . . . . . . . . . . . . . . . . . . . . . . . . . . . . . 26
Getting started . . . . . . . . . . . . . . . . . . . . . . . . . . . . . 27Ensure site and system information is defined . . . . . . . . . . . . . . . . . . . 27
Update the system data . . . . . . . . . . . . . . . . . . . . . . . . . . . . . . . . . . . . . 28
Retrieve customer station data . . . . . . . . . . . . . . . . . . . . . . . . . . . . . . . 28
Retrieve Reserve Unit TNs . . . . . . . . . . . . . . . . . . . . . . . . . . . . . . . . . 29
Retrieve CPND configuration . . . . . . . . . . . . . . . . . . . . . . . . . . . . . . . 29
Retrieve CPND names . . . . . . . . . . . . . . . . . . . . . . . . . . . . . . . . . . . . . 29
Additional considerations . . . . . . . . . . . . . . . . . . . . . . . . . . . . . . . . . . . 29
Station Administration . . . . . . . . . . . . . . . . . . . . . . 31Overview . . . . . . . . . . . . . . . . . . . . . . . . . . . . . . . . . . . . . . . . . . . . . . . 31
Station Data Considerations . . . . . . . . . . . . . . . . . . . . . . . . . . . . . . . . . 32Location . . . . . . . . . . . . . . . . . . . . . . . . . . . . . . . . . . . . . . . . . . . . . . 32DES . . . . . . . . . . . . . . . . . . . . . . . . . . . . . . . . . . . . . . . . . . . . . . . . . 32Sync Status . . . . . . . . . . . . . . . . . . . . . . . . . . . . . . . . . . . . . . . . . . . 33Synchronization Considerations . . . . . . . . . . . . . . . . . . . . . . . . . . . 34Reports and Text Files . . . . . . . . . . . . . . . . . . . . . . . . . . . . . . . . . . . 34Parsing Retrieved Data . . . . . . . . . . . . . . . . . . . . . . . . . . . . . . . . . . 34Multi-Tenant . . . . . . . . . . . . . . . . . . . . . . . . . . . . . . . . . . . . . . . . . . 35System Hardware . . . . . . . . . . . . . . . . . . . . . . . . . . . . . . . . . . . . . . . 35
MAT Station Administration User Guide

vi Contents
Station Administration window . . . . . . . . . . . . . . . . . . . . . . . . . . . . . . 35File Menu . . . . . . . . . . . . . . . . . . . . . . . . . . . . . . . . . . . . . . . . . . . . 36Edit Menu . . . . . . . . . . . . . . . . . . . . . . . . . . . . . . . . . . . . . . . . . . . . 37View Menu . . . . . . . . . . . . . . . . . . . . . . . . . . . . . . . . . . . . . . . . . . . 37Synchronize Menu . . . . . . . . . . . . . . . . . . . . . . . . . . . . . . . . . . . . . 38Forms Menu . . . . . . . . . . . . . . . . . . . . . . . . . . . . . . . . . . . . . . . . . . 39Options Menu . . . . . . . . . . . . . . . . . . . . . . . . . . . . . . . . . . . . . . . . . 39Help Menu . . . . . . . . . . . . . . . . . . . . . . . . . . . . . . . . . . . . . . . . . . . . 39
Accessing Station Data . . . . . . . . . . . . . . . . . . . . . . . . . . . . . . . . . . . . 39The Template View . . . . . . . . . . . . . . . . . . . . . . . . . . . . . . . . . . . . . 40The Hardware View . . . . . . . . . . . . . . . . . . . . . . . . . . . . . . . . . . . . 41
New Stations . . . . . . . . . . . . . . . . . . . . . . . . . . . . . . . . . . . . . . . . . . . . 41Station Template . . . . . . . . . . . . . . . . . . . . . . . . . . . . . . . . . . . . . . . 41
Add Stations . . . . . . . . . . . . . . . . . . . . . . . . . . . . . . . . . . . . . . . . . . . . . 41Adding a Single Station . . . . . . . . . . . . . . . . . . . . . . . . . . . . . . . . . 42Adding a Phantom Station . . . . . . . . . . . . . . . . . . . . . . . . . . . . . . . 43Adding Multiple Stations . . . . . . . . . . . . . . . . . . . . . . . . . . . . . . . . 43Adding the Stations . . . . . . . . . . . . . . . . . . . . . . . . . . . . . . . . . . . . . 44
Deleting Stations . . . . . . . . . . . . . . . . . . . . . . . . . . . . . . . . . . . . . . . . . 45
Adding a Station Template . . . . . . . . . . . . . . . . . . . . . . . . . . . . . . . . . 45
Managing Station Data . . . . . . . . . . . . . . . . . . . . . . . . . . . . . . . . . . . . 46
Updating Stations . . . . . . . . . . . . . . . . . . . . . . . . . . . . . . . . . . . . . . . . . 47Station Data . . . . . . . . . . . . . . . . . . . . . . . . . . . . . . . . . . . . . . . . . . . 47Key Assignments . . . . . . . . . . . . . . . . . . . . . . . . . . . . . . . . . . . . . . 50Directory Number Assignment . . . . . . . . . . . . . . . . . . . . . . . . . . . . 51Terminal Number Assignment . . . . . . . . . . . . . . . . . . . . . . . . . . . . 53Reserve TN Feature . . . . . . . . . . . . . . . . . . . . . . . . . . . . . . . . . . . . 56Features Button . . . . . . . . . . . . . . . . . . . . . . . . . . . . . . . . . . . . . . . . 58Administration . . . . . . . . . . . . . . . . . . . . . . . . . . . . . . . . . . . . . . . . 62
Designation Strips . . . . . . . . . . . . . . . . . . . . . . . . . . . . . . . . . . . . . . . . 63Designating Directory Numbers . . . . . . . . . . . . . . . . . . . . . . . . . . . 63Display of Designation Strips . . . . . . . . . . . . . . . . . . . . . . . . . . . . . 64
Station Data Validation . . . . . . . . . . . . . . . . . . . . . . . . . . . . . . . . . . . . 65Validating the Data . . . . . . . . . . . . . . . . . . . . . . . . . . . . . . . . . . . . . 66
P0906946 Standard April 2000

Contents vii
CPND . . . . . . . . . . . . . . . . . . . . . . . . . . . . . . . . . . . . 67CPND Overview . . . . . . . . . . . . . . . . . . . . . . . . . . . . . . . . . . . . . . . . . 67
CPND Data Considerations . . . . . . . . . . . . . . . . . . . . . . . . . . . . . . . . . 67CPND Names vs. Station Names . . . . . . . . . . . . . . . . . . . . . . . . . . 68CPND Synchronization . . . . . . . . . . . . . . . . . . . . . . . . . . . . . . . . . . 68
The CPND Module . . . . . . . . . . . . . . . . . . . . . . . . . . . . . . . . . . . . . . . . 69
Accessing CPND Data . . . . . . . . . . . . . . . . . . . . . . . . . . . . . . . . . . . . . 69CPND Administration View . . . . . . . . . . . . . . . . . . . . . . . . . . . . . . 70CPND Name View . . . . . . . . . . . . . . . . . . . . . . . . . . . . . . . . . . . . . 70Recommended Usage . . . . . . . . . . . . . . . . . . . . . . . . . . . . . . . . . . . 71CPND Data Change . . . . . . . . . . . . . . . . . . . . . . . . . . . . . . . . . . . . . 72Updating the Customer Configuration Data . . . . . . . . . . . . . . . . . . 72Updating the Name Display Data . . . . . . . . . . . . . . . . . . . . . . . . . . 73
Corporate Directory . . . . . . . . . . . . . . . . . . . . . . . . 75Overview . . . . . . . . . . . . . . . . . . . . . . . . . . . . . . . . . . . . . . . . . . . . . . . 75
Using Corporate Directory . . . . . . . . . . . . . . . . . . . . . . . . . . . . . . . . . . 75Accessing Corporate Directory . . . . . . . . . . . . . . . . . . . . . . . . . . . . 75Corporate Directory Window . . . . . . . . . . . . . . . . . . . . . . . . . . . . . 77Working with the Corporate Directory window . . . . . . . . . . . . . . . 78
Generating Reports . . . . . . . . . . . . . . . . . . . . . . . . . . . . . . . . . . . . . . . . 84Generate reports now . . . . . . . . . . . . . . . . . . . . . . . . . . . . . . . . . . . . 85Generate reports by schedule . . . . . . . . . . . . . . . . . . . . . . . . . . . . . . 86Report properties . . . . . . . . . . . . . . . . . . . . . . . . . . . . . . . . . . . . . . . 88Predefined reports . . . . . . . . . . . . . . . . . . . . . . . . . . . . . . . . . . . . . . 94Customized reports . . . . . . . . . . . . . . . . . . . . . . . . . . . . . . . . . . . . . 95
Supported Data Fields . . . . . . . . . . . . . . . . . . . . . . . . . . . . . . . . . . . . . 96
List Manager . . . . . . . . . . . . . . . . . . . . . . . . . . . . . . 103Summary of List Manager . . . . . . . . . . . . . . . . . . . . . . . . . . . . . . . . . . 103
Open List Manager . . . . . . . . . . . . . . . . . . . . . . . . . . . . . . . . . . . . . 104Download list data from the Meridian 1 . . . . . . . . . . . . . . . . . . . . . 105
Synchronization Considerations . . . . . . . . . . . . . . . . . . . . . . . . . . . . . . 105Synchronization Status . . . . . . . . . . . . . . . . . . . . . . . . . . . . . . . . . . 107Change Synchronization Status . . . . . . . . . . . . . . . . . . . . . . . . . . . . 107
MAT Station Administration User Guide

viii Contents
Station Synchronization vs. List Synchronization . . . . . . . . . . . . . 108Synchronize List Manager with the System . . . . . . . . . . . . . . . . . . 108
List Manager Window . . . . . . . . . . . . . . . . . . . . . . . . . . . . . . . . . . . . . 109The List View . . . . . . . . . . . . . . . . . . . . . . . . . . . . . . . . . . . . . . . . . 110The Template View . . . . . . . . . . . . . . . . . . . . . . . . . . . . . . . . . . . . . 111List Manager Menus . . . . . . . . . . . . . . . . . . . . . . . . . . . . . . . . . . . . 111Toolbar . . . . . . . . . . . . . . . . . . . . . . . . . . . . . . . . . . . . . . . . . . . . . . 113
Work with List Manager . . . . . . . . . . . . . . . . . . . . . . . . . . . . . . . . . . . 114Create a New List . . . . . . . . . . . . . . . . . . . . . . . . . . . . . . . . . . . . . . 114Create a List Template . . . . . . . . . . . . . . . . . . . . . . . . . . . . . . . . . . 116Create Multiple Lists . . . . . . . . . . . . . . . . . . . . . . . . . . . . . . . . . . . . 117Delete Lists . . . . . . . . . . . . . . . . . . . . . . . . . . . . . . . . . . . . . . . . . . . 119Manage List Data . . . . . . . . . . . . . . . . . . . . . . . . . . . . . . . . . . . . . . 120
Work with Stations . . . . . . . . . . . . . . . . . . . . . . . . . . . . . . . . . . . . . . . 124Assign Stations . . . . . . . . . . . . . . . . . . . . . . . . . . . . . . . . . . . . . . . . 125Modify Feature Key Properties . . . . . . . . . . . . . . . . . . . . . . . . . . . . 127Remove Station Assignment . . . . . . . . . . . . . . . . . . . . . . . . . . . . . . 128
Work with Pilot DNs . . . . . . . . . . . . . . . . . . . . . . . . . . . . . . . . . . . . . . 128Assign a Pilot DN . . . . . . . . . . . . . . . . . . . . . . . . . . . . . . . . . . . . . . 128Associate Pilot DN to a Group Hunt list . . . . . . . . . . . . . . . . . . . . . 130
Copy and Paste Lists . . . . . . . . . . . . . . . . . . . . . . . . . . . . . . . . . . . . . . 130Duplicate a List . . . . . . . . . . . . . . . . . . . . . . . . . . . . . . . . . . . . . . . . 130Copy a List from One System to Another . . . . . . . . . . . . . . . . . . . . 131
Set Global List Options . . . . . . . . . . . . . . . . . . . . . . . . . . . . . . . . . . . . 131
Work with Reports . . . . . . . . . . . . . . . . . . . . . . . . . . . . . . . . . . . . . . . . 133Reports and Text Files . . . . . . . . . . . . . . . . . . . . . . . . . . . . . . . . . . 133Generate Reports . . . . . . . . . . . . . . . . . . . . . . . . . . . . . . . . . . . . . . . 134Predefined Reports . . . . . . . . . . . . . . . . . . . . . . . . . . . . . . . . . . . . . 134
Voice Mailbox . . . . . . . . . . . . . . . . . . . . . . . . . . . . . 137Overview . . . . . . . . . . . . . . . . . . . . . . . . . . . . . . . . . . . . . . . . . . . . . . . 137
VMB Data Considerations . . . . . . . . . . . . . . . . . . . . . . . . . . . . . . . 137
Administering VMB . . . . . . . . . . . . . . . . . . . . . . . . . . . . . . . . . . . . . . 138Adding/Changing Stations . . . . . . . . . . . . . . . . . . . . . . . . . . . . . . . 138Deleting Stations . . . . . . . . . . . . . . . . . . . . . . . . . . . . . . . . . . . . . . . 139
P0906946 Standard April 2000

Contents ix
14141141
143
144144147147148149
149150
151152152
52153
157158
159159
161162164164165
170
170
Changing DNs . . . . . . . . . . . . . . . . . . . . . . . . . . . . . . . . . . . . . . . . . 140
VMB Data Synchronization . . . . . . . . . . . . . . . . . . . . . . . . . . . . . . . . . 141Example 1—Deleting Stations . . . . . . . . . . . . . . . . . . . . . . . . . . . . Example 2—Adding a Mailbox . . . . . . . . . . . . . . . . . . . . . . . . . . . . 1Example 3—Changing a DN . . . . . . . . . . . . . . . . . . . . . . . . . . . . . .
Global Update . . . . . . . . . . . . . . . . . . . . . . . . . . . . . 143Overview . . . . . . . . . . . . . . . . . . . . . . . . . . . . . . . . . . . . . . . . . . . . . . .
Selecting Data Items . . . . . . . . . . . . . . . . . . . . . . . . . . . . . . . . . . . . . . . Define Selection Criteria . . . . . . . . . . . . . . . . . . . . . . . . . . . . . . . . . Example Expressions . . . . . . . . . . . . . . . . . . . . . . . . . . . . . . . . . . . . Example 1 . . . . . . . . . . . . . . . . . . . . . . . . . . . . . . . . . . . . . . . . . . . . Example 2 . . . . . . . . . . . . . . . . . . . . . . . . . . . . . . . . . . . . . . . . . . . . Example 3 . . . . . . . . . . . . . . . . . . . . . . . . . . . . . . . . . . . . . . . . . . . .
Specify the Change . . . . . . . . . . . . . . . . . . . . . . . . . . . . . . . . . . . . . . . . Select the Field to Change . . . . . . . . . . . . . . . . . . . . . . . . . . . . . . . .
Perform the Global Change . . . . . . . . . . . . . . . . . . . . . . . . . . . . . . . . . Change Confirmation . . . . . . . . . . . . . . . . . . . . . . . . . . . . . . . . . . . Change Completion . . . . . . . . . . . . . . . . . . . . . . . . . . . . . . . . . . . . .
Global Update—Wildcards, Matching, and Allowed Fields . . . . . . . . 1Global Update—Examples . . . . . . . . . . . . . . . . . . . . . . . . . . . . . . .
Communicating with Meridian 1 . . . . . . . . . . . . . . 157Overview . . . . . . . . . . . . . . . . . . . . . . . . . . . . . . . . . . . . . . . . . . . . . . .
Communications Considerations . . . . . . . . . . . . . . . . . . . . . . . . . . .
The Communications Task . . . . . . . . . . . . . . . . . . . . . . . . . . . . . . . . . . Synchronization . . . . . . . . . . . . . . . . . . . . . . . . . . . . . . . . . . . . . . . .
Download . . . . . . . . . . . . . . . . . . . . . . . . . . . . . . . . . . . . . . . . . . . . . . . Retrieving All Data . . . . . . . . . . . . . . . . . . . . . . . . . . . . . . . . . . . . . Selecting Data to Retrieve . . . . . . . . . . . . . . . . . . . . . . . . . . . . . . . . Retrieve Since Option . . . . . . . . . . . . . . . . . . . . . . . . . . . . . . . . . . . Specifying Data to Retrieve . . . . . . . . . . . . . . . . . . . . . . . . . . . . . . .
Synchronization status and Retrieval . . . . . . . . . . . . . . . . . . . . . . . . . .
Upload . . . . . . . . . . . . . . . . . . . . . . . . . . . . . . . . . . . . . . . . . . . . . . . . .
MAT Station Administration User Guide

x Contents
Selecting Data to Transmit . . . . . . . . . . . . . . . . . . . . . . . . . . . . . . . 170
Communications Logs . . . . . . . . . . . . . . . . . . . . . . . . . . . . . . . . . . . . . 171
Viewing large log files . . . . . . . . . . . . . . . . . . . . . . . . . . . . . . . . . . . . . 172
Transmission errors during retrieval . . . . . . . . . . . . . . . . . . . . . . . . . . 173
Reconcile TN Feature . . . . . . . . . . . . . . . . . . . . . . . . . . . . . . . . . . . . . 174
Conversion utility . . . . . . . . . . . . . . . . . . . . . . . . . . 175Overview . . . . . . . . . . . . . . . . . . . . . . . . . . . . . . . . . . . . . . . . . . . . . . . 175
Starting the Conversion utility . . . . . . . . . . . . . . . . . . . . . . . . . . . . . . . 175File Menu . . . . . . . . . . . . . . . . . . . . . . . . . . . . . . . . . . . . . . . . . . . . 176Rebuild File Menu . . . . . . . . . . . . . . . . . . . . . . . . . . . . . . . . . . . . . 176Help Menu . . . . . . . . . . . . . . . . . . . . . . . . . . . . . . . . . . . . . . . . . . . . 177
Rebuilding Files . . . . . . . . . . . . . . . . . . . . . . . . . . . . . . . . . . . . . . . . . . 177Accessing the Files . . . . . . . . . . . . . . . . . . . . . . . . . . . . . . . . . . . . . 177Monitor Rebuilding Files . . . . . . . . . . . . . . . . . . . . . . . . . . . . . . . . 177
Importing Station Data . . . . . . . . . . . . . . . . . . . . . . . . . . . . . . . . . . . . . 178Considerations When Merging Key Values and Features . . . . . . . 178Select a Data File . . . . . . . . . . . . . . . . . . . . . . . . . . . . . . . . . . . . . . 179Select a Field File . . . . . . . . . . . . . . . . . . . . . . . . . . . . . . . . . . . . . . 179Perform the Merge . . . . . . . . . . . . . . . . . . . . . . . . . . . . . . . . . . . . . 179Example of Import Data . . . . . . . . . . . . . . . . . . . . . . . . . . . . . . . . . 180
Generating Reports . . . . . . . . . . . . . . . . . . . . . . . . 181Overview . . . . . . . . . . . . . . . . . . . . . . . . . . . . . . . . . . . . . . . . . . . . . . . 181
Reports Considerations . . . . . . . . . . . . . . . . . . . . . . . . . . . . . . . . . . 181
Starting the Reports Function . . . . . . . . . . . . . . . . . . . . . . . . . . . . . . . 181File Menu . . . . . . . . . . . . . . . . . . . . . . . . . . . . . . . . . . . . . . . . . . . . 182Forms Menu . . . . . . . . . . . . . . . . . . . . . . . . . . . . . . . . . . . . . . . . . . 183Reports Menu . . . . . . . . . . . . . . . . . . . . . . . . . . . . . . . . . . . . . . . . . 183
Running Reports . . . . . . . . . . . . . . . . . . . . . . . . . . . . . . . . . . . . . . . . . 183Select a Report . . . . . . . . . . . . . . . . . . . . . . . . . . . . . . . . . . . . . . . . 183Select a Destination . . . . . . . . . . . . . . . . . . . . . . . . . . . . . . . . . . . . . 184
Print Report . . . . . . . . . . . . . . . . . . . . . . . . . . . . . . . . . . . . . . . . . . . . . 185
View Report . . . . . . . . . . . . . . . . . . . . . . . . . . . . . . . . . . . . . . . . . . . . . 185
P0906946 Standard April 2000

Contents xi
Export Report . . . . . . . . . . . . . . . . . . . . . . . . . . . . . . . . . . . . . . . . . . . . 187
The MAT File Viewer . . . . . . . . . . . . . . . . . . . . . . . . 189Overview . . . . . . . . . . . . . . . . . . . . . . . . . . . . . . . . . . . . . . . . . . . . . . . 189
Viewing a File . . . . . . . . . . . . . . . . . . . . . . . . . . . . . . . . . . . . . . . . . . . 189Viewer File Menu . . . . . . . . . . . . . . . . . . . . . . . . . . . . . . . . . . . . . . 189Viewer Search Menu . . . . . . . . . . . . . . . . . . . . . . . . . . . . . . . . . . . . 191
Changing Viewed Data . . . . . . . . . . . . . . . . . . . . . . . . . . . . . . . . . . . . 191Browsing the File . . . . . . . . . . . . . . . . . . . . . . . . . . . . . . . . . . . . . . 191Save As . . . . . . . . . . . . . . . . . . . . . . . . . . . . . . . . . . . . . . . . . . . . . . 191Display a File Summary . . . . . . . . . . . . . . . . . . . . . . . . . . . . . . . . . 192Print from the Viewer . . . . . . . . . . . . . . . . . . . . . . . . . . . . . . . . . . . 193Search the File . . . . . . . . . . . . . . . . . . . . . . . . . . . . . . . . . . . . . . . . . 193Printer Setup . . . . . . . . . . . . . . . . . . . . . . . . . . . . . . . . . . . . . . . . . . 194Exit the Viewer . . . . . . . . . . . . . . . . . . . . . . . . . . . . . . . . . . . . . . . . 195
Designing Report Forms . . . . . . . . . . . . . . . . . . . . 197Overview . . . . . . . . . . . . . . . . . . . . . . . . . . . . . . . . . . . . . . . . . . . . . . . 197
Form Section Concepts . . . . . . . . . . . . . . . . . . . . . . . . . . . . . . . . . . . . 197
The Forms Editor . . . . . . . . . . . . . . . . . . . . . . . . . . . . . . . . . . . . . . . . . 198File Menu . . . . . . . . . . . . . . . . . . . . . . . . . . . . . . . . . . . . . . . . . . . . . 199Edit Menu . . . . . . . . . . . . . . . . . . . . . . . . . . . . . . . . . . . . . . . . . . . . 200Section Menu . . . . . . . . . . . . . . . . . . . . . . . . . . . . . . . . . . . . . . . . . . 200Field Menu . . . . . . . . . . . . . . . . . . . . . . . . . . . . . . . . . . . . . . . . . . . . 201Options Menu . . . . . . . . . . . . . . . . . . . . . . . . . . . . . . . . . . . . . . . . . 202Fonts Menu . . . . . . . . . . . . . . . . . . . . . . . . . . . . . . . . . . . . . . . . . . . 202
Changing Sections . . . . . . . . . . . . . . . . . . . . . . . . . . . . . . . . . . . . . . . . 202Insert a Section . . . . . . . . . . . . . . . . . . . . . . . . . . . . . . . . . . . . . . . . 203Define Section Parameters . . . . . . . . . . . . . . . . . . . . . . . . . . . . . . . 204
Edit a Form . . . . . . . . . . . . . . . . . . . . . . . . . . . . . . . . . . . . . . . . . . . . . . 206Insert a Field . . . . . . . . . . . . . . . . . . . . . . . . . . . . . . . . . . . . . . . . . . 206Insert Data Field . . . . . . . . . . . . . . . . . . . . . . . . . . . . . . . . . . . . . . . 207Insert Calculation Field . . . . . . . . . . . . . . . . . . . . . . . . . . . . . . . . . . 207Insert System Field . . . . . . . . . . . . . . . . . . . . . . . . . . . . . . . . . . . . . 207
Edit Field Attributes . . . . . . . . . . . . . . . . . . . . . . . . . . . . . . . . . . . . . . . 208
MAT Station Administration User Guide

xii Contents
Edit Text Field Attributes . . . . . . . . . . . . . . . . . . . . . . . . . . . . . . . . 208Edit Numeric Field Attributes . . . . . . . . . . . . . . . . . . . . . . . . . . . . . 209Edit Date Field Attributes . . . . . . . . . . . . . . . . . . . . . . . . . . . . . . . . 210Edit Calculation Field Expression . . . . . . . . . . . . . . . . . . . . . . . . . . 211
Setting Report Parameters . . . . . . . . . . . . . . . . . . . . . . . . . . . . . . . . . . 211
Character Formatting . . . . . . . . . . . . . . . . . . . . . . . . . . . . . . . . . . . . . . 212Font Selection . . . . . . . . . . . . . . . . . . . . . . . . . . . . . . . . . . . . . . . . . 213
Report Criteria . . . . . . . . . . . . . . . . . . . . . . . . . . . . . . . . . . . . . . . . . . . 214
Building a Report in the MAT Report Generator - Form Editor . . . . . 214Decide what information needs to be displayed on the report . . . . 215Select the Report view that best provides the information . . . . . . . 216Place the individual data fields on the report . . . . . . . . . . . . . . . . . 217Decide if the report lines should be sorted . . . . . . . . . . . . . . . . . . . 221Specify any special printer considerations for this report . . . . . . . . 223Apply the finishing touches . . . . . . . . . . . . . . . . . . . . . . . . . . . . . . 224Save the report and test the results . . . . . . . . . . . . . . . . . . . . . . . . . 227Some Special Techniques . . . . . . . . . . . . . . . . . . . . . . . . . . . . . . . . 228
Power User Tool . . . . . . . . . . . . . . . . . . . . . . . . . . . 231Concepts for the Power User tool . . . . . . . . . . . . . . . . . . . . . . . . . . . . 231
Forms and templates . . . . . . . . . . . . . . . . . . . . . . . . . . . . . . . . . . . . 231Filters . . . . . . . . . . . . . . . . . . . . . . . . . . . . . . . . . . . . . . . . . . . . . . . 232
Using the power user Forms interface . . . . . . . . . . . . . . . . . . . . . . . . . 233Forms interface window buttons . . . . . . . . . . . . . . . . . . . . . . . . . . . 233Forms interface message bar . . . . . . . . . . . . . . . . . . . . . . . . . . . . . . 233Keyboard shortcuts . . . . . . . . . . . . . . . . . . . . . . . . . . . . . . . . . . . . . 233Adding a single station or template . . . . . . . . . . . . . . . . . . . . . . . . . 234Updating a single station (or template) . . . . . . . . . . . . . . . . . . . . . . 236Adding multiple stations . . . . . . . . . . . . . . . . . . . . . . . . . . . . . . . . . 238
Validating station data . . . . . . . . . . . . . . . . . . . . . . . . . . . . . . . . . . . . . 240Field validation . . . . . . . . . . . . . . . . . . . . . . . . . . . . . . . . . . . . . . . . 240Station validation . . . . . . . . . . . . . . . . . . . . . . . . . . . . . . . . . . . . . . 240Validating the numbering plan and hardware . . . . . . . . . . . . . . . . . 240
Station fields . . . . . . . . . . . . . . . . . . . . . . . . . . . . . . . . . . . . . . . . . . . . 241On-line Help . . . . . . . . . . . . . . . . . . . . . . . . . . . . . . . . . . . . . . . . . . 241
P0906946 Standard April 2000

Contents xiii
Types of Station field . . . . . . . . . . . . . . . . . . . . . . . . . . . . . . . . . . . 241Class of service field . . . . . . . . . . . . . . . . . . . . . . . . . . . . . . . . . . . . 241Mutli-line keys . . . . . . . . . . . . . . . . . . . . . . . . . . . . . . . . . . . . . . . . . 242Single line FTR’s . . . . . . . . . . . . . . . . . . . . . . . . . . . . . . . . . . . . . . . 242Prompts . . . . . . . . . . . . . . . . . . . . . . . . . . . . . . . . . . . . . . . . . . . . . . 243
DN and TN fields . . . . . . . . . . . . . . . . . . . . . . . . . . . . . . . . . . . . . . . . . 243TN fields . . . . . . . . . . . . . . . . . . . . . . . . . . . . . . . . . . . . . . . . . . . . . 243DN fields . . . . . . . . . . . . . . . . . . . . . . . . . . . . . . . . . . . . . . . . . . . . . 244CPND Parameter Fields . . . . . . . . . . . . . . . . . . . . . . . . . . . . . . . . . 248
Designing forms and templates using the forms editor . . . . . . . . . . . . 251Creating a new form . . . . . . . . . . . . . . . . . . . . . . . . . . . . . . . . . . . . 251Editing an existing form . . . . . . . . . . . . . . . . . . . . . . . . . . . . . . . . . 252
MAT Station Administration User Guide

xiv Contents
P0906946 Standard April 2000

xv
List of figuresFigure 1Update system data dialog box . . . . . . . . . . . . . . . . . . . . . . . . . . . . . . . 28
Figure 2Station Administration window . . . . . . . . . . . . . . . . . . . . . . . . . . . . . . 35
Figure 3Add Station dialog . . . . . . . . . . . . . . . . . . . . . . . . . . . . . . . . . . . . . . . . 42
Figure 4Multiple Station Add dialog . . . . . . . . . . . . . . . . . . . . . . . . . . . . . . . . . 44
Figure 5Add Template dialog . . . . . . . . . . . . . . . . . . . . . . . . . . . . . . . . . . . . . . 46
Figure 6Station Data dialog . . . . . . . . . . . . . . . . . . . . . . . . . . . . . . . . . . . . . . . . 48
Figure 7Key Assignments dialog . . . . . . . . . . . . . . . . . . . . . . . . . . . . . . . . . . . . 50
Figure 8Directory Numbers dialog . . . . . . . . . . . . . . . . . . . . . . . . . . . . . . . . . . 52
Figure 9Terminal Numbers window . . . . . . . . . . . . . . . . . . . . . . . . . . . . . . . . . 54
Figure 10The Reserved Units button in the Hardware Configuration window . . 57
Figure 11Assigning values in the Reserved Units dialog box . . . . . . . . . . . . . . . 58
Figure 12Features dialog . . . . . . . . . . . . . . . . . . . . . . . . . . . . . . . . . . . . . . . . . . . 59
MAT Station Administration User Guide

xvi List of figures
Figure 13Feature dialog (example) . . . . . . . . . . . . . . . . . . . . . . . . . . . . . . . . . . . 60
Figure 14Key Features Edit dialog . . . . . . . . . . . . . . . . . . . . . . . . . . . . . . . . . . . 61
Figure 15Administration dialog . . . . . . . . . . . . . . . . . . . . . . . . . . . . . . . . . . . . . 62
Figure 16Strip Selection dialog . . . . . . . . . . . . . . . . . . . . . . . . . . . . . . . . . . . . . . 64
Figure 17CPND Administration window . . . . . . . . . . . . . . . . . . . . . . . . . . . . . . 69
Figure 18Call Party Name Display dialog . . . . . . . . . . . . . . . . . . . . . . . . . . . . . 72
Figure 19CPND Name dialog . . . . . . . . . . . . . . . . . . . . . . . . . . . . . . . . . . . . . . . 73
Figure 20Accessing Corporate Directory . . . . . . . . . . . . . . . . . . . . . . . . . . . . . . 76
Figure 21Corporate Directory main window . . . . . . . . . . . . . . . . . . . . . . . . . . . 77
Figure 22Corporate Directory tool bar . . . . . . . . . . . . . . . . . . . . . . . . . . . . . . . . 80
Figure 23Filter tool bar . . . . . . . . . . . . . . . . . . . . . . . . . . . . . . . . . . . . . . . . . . . . 82
Figure 24Pop-up menu . . . . . . . . . . . . . . . . . . . . . . . . . . . . . . . . . . . . . . . . . . . . 83
Figure 25Typical report format . . . . . . . . . . . . . . . . . . . . . . . . . . . . . . . . . . . . . . 84
Figure 26Generate Report Now dialog box . . . . . . . . . . . . . . . . . . . . . . . . . . . . 85
Figure 27Generate Report Schedule dialog box . . . . . . . . . . . . . . . . . . . . . . . . . 87
Figure 28Scheduling window . . . . . . . . . . . . . . . . . . . . . . . . . . . . . . . . . . . . . . . 87
P0906946 Standard April 2000

List of figures xvii
Figure 29General tab in the Report Properties sheet . . . . . . . . . . . . . . . . . . . . . . 89
Figure 30Data Fields tab in the Report Properties sheet . . . . . . . . . . . . . . . . . . . 91
Figure 31Output tab in the Report Properties sheet . . . . . . . . . . . . . . . . . . . . . . . 93
Figure 32MAT System Window . . . . . . . . . . . . . . . . . . . . . . . . . . . . . . . . . . . . . 104
Figure 33List Manager Sync window . . . . . . . . . . . . . . . . . . . . . . . . . . . . . . . . . 106
Figure 34List Manager window . . . . . . . . . . . . . . . . . . . . . . . . . . . . . . . . . . . . . . 109
Figure 35Speed Call List Properties (General) . . . . . . . . . . . . . . . . . . . . . . . . . . 115
Figure 36New Template dialog . . . . . . . . . . . . . . . . . . . . . . . . . . . . . . . . . . . . . . 116
Figure 37Create multiple lists . . . . . . . . . . . . . . . . . . . . . . . . . . . . . . . . . . . . . . . 117
Figure 38Speed Call List Properties (List Entries) . . . . . . . . . . . . . . . . . . . . . . . 123
Figure 39Speed Call List Properties (Associated Stations) . . . . . . . . . . . . . . . . . 124
Figure 40Add Stations dialog . . . . . . . . . . . . . . . . . . . . . . . . . . . . . . . . . . . . . . . 126
Figure 41Modify Station dialog (Speed Call) . . . . . . . . . . . . . . . . . . . . . . . . . . . 127
Figure 42Speed Call list properties (Pilot DNs) . . . . . . . . . . . . . . . . . . . . . . . . . 129
Figure 43VMB data entry dialog . . . . . . . . . . . . . . . . . . . . . . . . . . . . . . . . . . . . . 138
Figure 44Record Selection Criteria dialog . . . . . . . . . . . . . . . . . . . . . . . . . . . . . 144
MAT Station Administration User Guide

xviii List of figures
Figure 45Select Data Field dialog . . . . . . . . . . . . . . . . . . . . . . . . . . . . . . . . . . . . 145
Figure 46Select System Field dialog . . . . . . . . . . . . . . . . . . . . . . . . . . . . . . . . . . 146
Figure 47Select Function dialog . . . . . . . . . . . . . . . . . . . . . . . . . . . . . . . . . . . . . 146
Figure 48Operators dialog . . . . . . . . . . . . . . . . . . . . . . . . . . . . . . . . . . . . . . . . . . 147
Figure 49Global Change Specification dialog . . . . . . . . . . . . . . . . . . . . . . . . . . 150
Figure 50Global Change dialog . . . . . . . . . . . . . . . . . . . . . . . . . . . . . . . . . . . . . 151
Figure 51Synchronization dialog . . . . . . . . . . . . . . . . . . . . . . . . . . . . . . . . . . . . 160
Figure 52Station Retrieve All dialog . . . . . . . . . . . . . . . . . . . . . . . . . . . . . . . . . 162
Figure 53CPND Name Retrieve dialog . . . . . . . . . . . . . . . . . . . . . . . . . . . . . . . . 163
Figure 54Station Retrieve Since dialog . . . . . . . . . . . . . . . . . . . . . . . . . . . . . . . . 164
Figure 55Station Retrieve Specify dialog . . . . . . . . . . . . . . . . . . . . . . . . . . . . . . 165
Figure 56CPND Retrieve dialog . . . . . . . . . . . . . . . . . . . . . . . . . . . . . . . . . . . . . 167
Figure 57Name Retrieve Specify . . . . . . . . . . . . . . . . . . . . . . . . . . . . . . . . . . . . 168
Figure 58Viewing the log file . . . . . . . . . . . . . . . . . . . . . . . . . . . . . . . . . . . . . . . 174
Figure 59Conversion utility window . . . . . . . . . . . . . . . . . . . . . . . . . . . . . . . . . . 175
Figure 60Report Generation window . . . . . . . . . . . . . . . . . . . . . . . . . . . . . . . . . 182
P0906946 Standard April 2000

List of figures xix
Figure 61Select a Form File dialog . . . . . . . . . . . . . . . . . . . . . . . . . . . . . . . . . . . 183
Figure 62Output Device dialog . . . . . . . . . . . . . . . . . . . . . . . . . . . . . . . . . . . . . . 185
Figure 63Example Report in the Viewer . . . . . . . . . . . . . . . . . . . . . . . . . . . . . . . 186
Figure 64Export File Name dialog . . . . . . . . . . . . . . . . . . . . . . . . . . . . . . . . . . . 187
Figure 65File Viewer window . . . . . . . . . . . . . . . . . . . . . . . . . . . . . . . . . . . . . . . 190
Figure 66Save As dialog . . . . . . . . . . . . . . . . . . . . . . . . . . . . . . . . . . . . . . . . . . . 192
Figure 67File Summary dialog . . . . . . . . . . . . . . . . . . . . . . . . . . . . . . . . . . . . . . 192
Figure 68Find Text dialog . . . . . . . . . . . . . . . . . . . . . . . . . . . . . . . . . . . . . . . . . . 193
Figure 69Printer Selection dialog . . . . . . . . . . . . . . . . . . . . . . . . . . . . . . . . . . . . 194
Figure 70Select a Form File dialog . . . . . . . . . . . . . . . . . . . . . . . . . . . . . . . . . . . 198
Figure 71Example blank report form . . . . . . . . . . . . . . . . . . . . . . . . . . . . . . . . . 203
Figure 72Select New Section dialog . . . . . . . . . . . . . . . . . . . . . . . . . . . . . . . . . . 204
Figure 73Edit Section Info dialog . . . . . . . . . . . . . . . . . . . . . . . . . . . . . . . . . . . . 204
Figure 74Calculation Field Name dialog . . . . . . . . . . . . . . . . . . . . . . . . . . . . . . . 207
Figure 75Text Field Parameters . . . . . . . . . . . . . . . . . . . . . . . . . . . . . . . . . . . . . . 208
Figure 76Numeric Field Parameters dialog . . . . . . . . . . . . . . . . . . . . . . . . . . . . . 210
MAT Station Administration User Guide

xx List of figures
Figure 77Date Field Edit dialog . . . . . . . . . . . . . . . . . . . . . . . . . . . . . . . . . . . . . 211
Figure 78Report Parameters dialog . . . . . . . . . . . . . . . . . . . . . . . . . . . . . . . . . . . 212
Figure 79Font Selection dialog . . . . . . . . . . . . . . . . . . . . . . . . . . . . . . . . . . . . . . 213
Figure 80Empty Report Form . . . . . . . . . . . . . . . . . . . . . . . . . . . . . . . . . . . . . . . 215
Figure 81Select Report view . . . . . . . . . . . . . . . . . . . . . . . . . . . . . . . . . . . . . . . . 216
Figure 82Inserting Data Field in the Details section . . . . . . . . . . . . . . . . . . . . . . 218
Figure 83Select Data Field dialog . . . . . . . . . . . . . . . . . . . . . . . . . . . . . . . . . . . . 220
Figure 84Naming a Calculation field . . . . . . . . . . . . . . . . . . . . . . . . . . . . . . . . . 220
Figure 85Defining a Calculation field . . . . . . . . . . . . . . . . . . . . . . . . . . . . . . . . . 221
Figure 86System Field list . . . . . . . . . . . . . . . . . . . . . . . . . . . . . . . . . . . . . . . . . . 221
Figure 87Select New Section . . . . . . . . . . . . . . . . . . . . . . . . . . . . . . . . . . . . . . . 222
Figure 88Select Data Field . . . . . . . . . . . . . . . . . . . . . . . . . . . . . . . . . . . . . . . . . 222
Figure 89Adding summary information in the Sort Header section . . . . . . . . . . 223
Figure 90Selecting a printer . . . . . . . . . . . . . . . . . . . . . . . . . . . . . . . . . . . . . . . . 224
Figure 91Deleting a blank line from the Detail section . . . . . . . . . . . . . . . . . . . 225
Figure 92Specifying the records to be included in the report . . . . . . . . . . . . . . . 226
P0906946 Standard April 2000

List of figures xxi
Figure 93Choosing the example form . . . . . . . . . . . . . . . . . . . . . . . . . . . . . . . . . 227
Figure 94Example Report . . . . . . . . . . . . . . . . . . . . . . . . . . . . . . . . . . . . . . . . . . 229
Figure 95Select Form dialog . . . . . . . . . . . . . . . . . . . . . . . . . . . . . . . . . . . . . . . . 234
Figure 96Add station dialog . . . . . . . . . . . . . . . . . . . . . . . . . . . . . . . . . . . . . . . . 235
Figure 97Add Template dialog . . . . . . . . . . . . . . . . . . . . . . . . . . . . . . . . . . . . . . 236
Figure 98Single station add form . . . . . . . . . . . . . . . . . . . . . . . . . . . . . . . . . . . . 237
Figure 99Multiple station add form (default form) . . . . . . . . . . . . . . . . . . . . . . . 239
Figure 100Mode dialog . . . . . . . . . . . . . . . . . . . . . . . . . . . . . . . . . . . . . . . . . . . . . 241
Figure 101TN value list . . . . . . . . . . . . . . . . . . . . . . . . . . . . . . . . . . . . . . . . . . . . . 243
Figure 102DN value list . . . . . . . . . . . . . . . . . . . . . . . . . . . . . . . . . . . . . . . . . . . . . 245
Figure 103CPND parameter fields . . . . . . . . . . . . . . . . . . . . . . . . . . . . . . . . . . . . 248
Figure 104VMB fields . . . . . . . . . . . . . . . . . . . . . . . . . . . . . . . . . . . . . . . . . . . . . . 249
Figure 105FormEdit window for a new form . . . . . . . . . . . . . . . . . . . . . . . . . . . . 252
Figure 106Select Form dialog . . . . . . . . . . . . . . . . . . . . . . . . . . . . . . . . . . . . . . . . 253
Figure 107FormEdit window (M2xxx and M3xxx data stations) . . . . . . . . . . . . . 254
MAT Station Administration User Guide

xxii List of figures
P0906946 Standard April 2000

xxiii
List of tablesTable 1File menu selections . . . . . . . . . . . . . . . . . . . . . . . . . . . . . . . . . . . . . . . 78
Table 2Edit menu selections . . . . . . . . . . . . . . . . . . . . . . . . . . . . . . . . . . . . . . . 79
Table 3View menu selections . . . . . . . . . . . . . . . . . . . . . . . . . . . . . . . . . . . . . . 79
Table 4Configuration menu selections . . . . . . . . . . . . . . . . . . . . . . . . . . . . . . . 79
Table 5Help menu selections . . . . . . . . . . . . . . . . . . . . . . . . . . . . . . . . . . . . . . 80
Table 6Toolbar buttons (Part 1 of 2) . . . . . . . . . . . . . . . . . . . . . . . . . . . . . . . . 81
Table 7Generate Report Now dialog box controls . . . . . . . . . . . . . . . . . . . . . . 86
Table 8Supported Data Fields (Part 1 of 6) . . . . . . . . . . . . . . . . . . . . . . . . . . . 96
Table 10List Entries buttons . . . . . . . . . . . . . . . . . . . . . . . . . . . . . . . . . . . . . . . . 122
MAT Station Administration User Guide

xxiv List of tables
P0906946 Standard April 2000

Page 25 of 254
254
IntroductionThe Meridian Administration Tools (MAT) provide the Meridian 1 system administrator with powerful tools for maintaining and updating the Meridian 1 system. The MAT system consists of MAT Common Services and several MAT applications, each of which provides specific system management capabilities. This User Guide describes the MAT Station Administration application.
OverviewThe Station Administration application helps administer databases that define end-user stations (telephones) on Northern Telecom Meridian 1 systems. The Station Administration application contains the following modules:
Station AdministrationThis module allows you to change station data on an individual or selected group basis.
CPNDUse this module to manage Call Party Name Display (CPND) data.
List ManagerUse this module to manage data for Speed Call, Group Call, and Group Hunt lists.
Report GeneratorThis module allows you to create and produce standard or customized reports.
Conversion UtilityThis module provides import and file rebuild capabilities.
MAT Station Administration User Guide

Page 26 of 254 Introduction
.
angle ,
nds
CommunicationsThis module synchronizes MAT and Meridian 1 data (copies MAT data to Meridian 1 or copies Meridian 1 data to MAT).
MAT UsersThe MAT system is designed for managers of telecommunications equipment and authorized Northern Telecom distributors. This guide is intended for users who have a working knowledge of Meridian 1 systems and general telecommunications concepts.
This guide assumes you are familiar with PC systems and the Microsoft
WindowsTM environment. You should be familiar with the Windows environment before attempting to use the MAT system.
Conventions used in this manualThis manual uses the following terms:
• Computer system refers to the hardware and software of an IBM-PC™ or 100% IBM compatible PC.
• Disk refers to a high capacity hard disk, required by the MAT system
• Windows refers to the Microsoft family of graphical user interface (GUI)-based operating systems.
• Mouse refers to any standard PC pointing device. Common mouse actions include point, click, and double-click.
• Standard Windows terminology includes icon, window, dialog box, and menu.
This manual uses the following typographical conventions:
• Angle brackets denote a single keyboard key. For example, <Esc> denotes the Escape key, labeled Esc on PC keyboards. A series of brackets denote keyboard keys to use simultaneously. For example<Ctrl><Alt><Del> denotes the key sequence for rebooting a PC.
• This font is used to designate menu selections, buttons, and commato enter.
P0906946 Standard April 2000

Page 27 of 254
254
re to
le
que
er rties
Getting started Before you can start using MAT Station Administration, you must retrieve station, customer, and other associated data files from the Meridian 1. The following summarizes the steps to follow before you can use MAT Station Administration.
Ensure site and system information is definedThe properties of sites and systems must be defined before you can use Station Administration. See the Common Services User Guide for detailed procedures.
• Define site properties in the New Site Properties sheet.
• Define system properties in the System Properties dialog box. Be sucompletely define information in the following tabs
— General tab: include system name and short name
— Communications tab: include at least one communications profi
— Applications tab: be sure to enable the Station Administration application and a corresponding communication profile
— Customers tab: be sure to add at least one customer (usually Customer 0) and define this customer’s properties to include a customer name, user ID, and password. You’ll have to define uninames, IDs and passwords for each customer added.
— Numbering Plans tab: define a numbering plan for each customusing the Numbering Plans tab found under the Customer Propesheet. Station Administration uses information entered here to provide a list of available extensions (DNs) and will validate theextensions against the applicable feature (e.g., ACD DN).
MAT Station Administration User Guide

Page 28 of 254 Getting started
Once defined, sites and systems appear as icons in the MAT Navigator and System windows.
Update the system dataOpen the System window. Click on the system icon and choose Update System Data. The following dialog box appears. See Figure 1.
Click OK to update the system data.
Retrieve customer station dataOpen the System window. View the applications available for the system you have defined and open the Station Administration application under the Stations icon. With the Station Administration window open, retrieve station data for each customer on the system. Choose Synchronize-Retrieve-All from the menu bar.
Repeat this step for each customer on the system.
Figure 1Update system data dialog box
P0906946 Standard April 2000
Getting started Page 29 of 254
fect n sers m’s
Retrieve Reserve Unit TNsWith the Station Administration window open, retrieve Reserve Unit TN information. Choose Synchronize-Retrieve-Reserve Unit TNs. The Synchronization window appears. Click OK to begin retrieval.
Retrieve CPND configurationOpen the System window. View the applications available for the system you have defined and open the CPND application under the Stations icon. The CPND Name window appears listing names of users on the system. Choose View-CPND from the menu bar. The CPND window appears.
Choose Synchronize-Retrieve-Specify from the menu bar. The Call Party Name Display Retrieve window appears. Enter the customer number. Click OK. The Synchronization window appears. Click OK to begin retrieval.
Retrieve CPND namesWith the CPND window open, choose View-CPND Name. The CPND Name window appears. With the CPND Name window open, retrieve CPND data for each customer on the system. Choose Synchronize-Retrieve-All from the menu bar. The Synchronization window appears. Click OK to begin retrieval.
Repeat this step for each customer on the system.
Additional considerationsWhile getting started with Station Administration, you will be communicating with the Meridian 1 system. For further information, see “Communicating with Meridian 1” on page 157.
Retrieving information from large systems can be time consuming and afnegatively system performance. You can use the Scheduler utility to plawhen to perform these tasks, usually during hours when the number of uon the system are low, to minimize the effect of this operation on the systeperformance.
MAT Station Administration User Guide

Page 30 of 254 Getting started
P0906946 Standard April 2000

Page 31 of 254
254
Station AdministrationBefore using MAT Station Administration, you must install and configure the software. Refer to MAT Common Services User Guide for installation instructions.
OverviewMAT Station Administration supports creation, maintenance, change, and reporting of single and multi-line station data and Call Party Name Display (CPND) information. Station data defines the setup for each user (telephone) connected to the Meridian 1 system.
Station data can be collected from the Meridian 1 system, or can be created within MAT. You can change this data within MAT and upload it to update the Meridian 1 database.
Each system has a number of stations. You can set up each station individually. In practice, many stations will have features in common. All features of any station can be set individually, or in groups with common criteria. The Station Administration module lets you create many stations with identical features using templates. However, those features that can be considered unique for a station (such as DN, TN, name, and location) are accessible through a dialog that graphically represents the appearance of the instrument at that station. All other features are accessible from this dialog through function buttons.
MAT Station Administration User Guide

Page 32 of 254 Station Administration
d
om
to
1. ue
In n the s,
f ny ata
Station Data ConsiderationsYou should be aware of the following considerations when operating the Station Administration module:
LocationThe MAT application uses one field (Location) in the station database to identify and index a station record. Station data records are stored and retrieved by the value in this field. Since this is the primary identifier for a station within MAT, each station must be assigned a unique Location value. A new station cannot be created in MAT until you assign a unique Location value. Furthermore, Location is the only station record field that is required by MAT—see “DES” below. MAT validates this field during data entry anwill not allow non-unique values or no value.
The Location field is not stored in the Meridian 1 system. Data retrieved frMeridian 1 containing stations not currently defined in MAT will have thefully qualified Terminal Number field value (with dashes for separators instead of blanks) assigned to the Location field. You can edit this valueconform with your Location value rules.
DESThe DES field is a required field for station data residing on the MeridianIt is possible to create station data within MAT that has no DES field val(This 1-6 character designator value can be assigned through the Administration feature of the Features function in Station Administration).such cases, MAT attempts to assign the first 6 characters of the Locatiovalue to DES. If this value contains non-alphanumeric values MAT leavesDES field blank (Location can contain all Windows-acceptable characterbut DES can have only letters and numbers).
Any station with no DES value will cause an error during transmission oMAT data to the Meridian 1. The Validation utility checks the DES and aother field values that can cause transmission failures. Refer to “Station DValidation” on page 65.
Meridian 1 station data retrieved from a system will always have a DES value.
P0906946 Standard April 2000

Station Administration Page 33 of 254
d to
m. the e
ase e
a ion
on
may
Ted
Sync StatusThe Station list includes the current Synchronization status. Values include:
• NEW: a station that has been created on MAT but not yet transmittethe Meridian 1 system.
• TRN: a station that has been synchronized with the Meridian 1 systeThe MAT software has determined that the version of this station in MAT PC database is consistent with the version of this station on thMeridian 1 system.
• CHG, or RPL: a station that has been changed (or marked for replacement) on the Meridian 1 system. The MAT system has determined that the station has been updated on the MAT PC databand that the version on the Meridian 1 system does not yet reflect thMAT update activity.
• OUT: a station that has been marked for deletion on the MAT PC database. It will not be deleted from the MAT PC database until the station has been OUTed (deleted) on the Meridian 1 system during Synchronization/Transmit operation. A MAT user may update a statmarked OUT. The MAT system will ask whether the station is to be restored before allowing you to update the station.
The MAT Delete or Cut operation works slightly differently depending on the station’s synchronization status. A station marked NEW can be deleted immediately from the MAT PC database, since it has not been configuredthe Meridian 1 system. A station with any other status is marked OUT, since the station must be OUTed on the Meridian 1 system before the station actually be deleted from the MAT PC database. A station marked OUT will continue to appear in the list of stations until it has been successfully OUfrom the Meridian 1 system. A station with a status of OUT on the MAT PC database on which you apply Edit - Cut or Edit - Delete will continue to be marked OUT until it has been successfully synchronized.
MAT Station Administration User Guide

Page 34 of 254 Station Administration
the with
are em lace
Synchronization ConsiderationsIf the Station Administration module is in Maintenance mode (set from Options - Mode in Station Administration module), you are prompted to schedule data transmission to Meridian 1 when any modifications are made to the data stored in MAT.
You can schedule synchronization when prompted, or schedule later.
Reports and Text FilesAll log report activity is performed, by default, in the current working directory for the System (the system subdirectory in your PC system). Other reports are sent to the PC directory of your choice. Here is a list of text files with the appropriate extension found in the working directory:
• Report Forms (filename.FRM)
• Reports (filename.TXT)
• Validation Data (you provide the extension)
• Designation Strips (you provide the extension)
• Communications Logs (filename.LOG)
You need only supply the filename when prompted to save these files—MATautomatically supplies the appropriate extension.
Parsing Retrieved DataMeridian 1 data retrieval is actually a two-stage task. MAT first retrieves data to a file in the system subdirectory, then parses the file to conform the MAT database rules.
The switch connection is only required during the retrieval stage. If you connected to the switch through a modem, MAT will disconnect the modimmediately after the retrieval and before the parse. The parsing takes pon the PC only. If you interrupt the parse, for example by turning off or rebooting the PC, it can be restarted by using Synchronization Retrieve - Parse Only.
P0906946 Standard April 2000

Station Administration Page 35 of 254
Multi-TenantIf the TENA package is equipped, you must supply a tenant number (TEN).
System HardwareDuring station data retrieval, the system hardware information is updated with cards that will support the type of stations being retrieved. This might not actually match the hardware used (although it will be compatible). If an exact match is required, you must manually update the hardware data in the Station Hardware view.
Station Administration windowWhen you start Station Administration, the MAT Station Administration window opens, allowing access to station data for a single Meridian 1 system. Here is the MAT Station Administration window as first displayed:
Figure 2Station Administration window
MAT Station Administration User Guide

Page 36 of 254 Station Administration
data. ws:
to a
from
The MAT security system allows the system administrator to make functions available on a user-by-user basis. Those menu items that are not available to you are shown dimmed. The menu bar contains the following drop-down menus:
• File
• Edit
• View
• Synchronize
• Forms
• Options
• Help
File MenuUse the File menu to access the station data of a selected system.
Reports: Lets you design and generate reports based on existing station This item includes the Report Generator and two existing reports, as follo
• Bridges: a list of bridges on the system
• Multiple appearances: a list of multiple-appearance stations
Desig. Strip: Sends data for labeling buttons and keys on an instrument MAT viewer where you can browse and print the data.
Print: Sends the station list to a MAT viewer (described in “Generating Reports” on page 181) where you can browse and print the data. Choosethe following display formats:
• Short Format: one-page abbreviated list of station data
• By Feature Group: station data by Feature Group
• By Field Mnemonic: station data by Meridian 1 field mnemonic
P0906946 Standard April 2000

Station Administration Page 37 of 254
sion
as ore
w. nu
ned.
that
Validate: Validates field values (all or partial, selectable in a submenu) for selected station records:
• Partial: checks station records that, if incorrect, can cause a transmisfailure during synchronization
• Full: checks all station records
Conversion Utility: Launches the conversion utility, used to update MATdata. For more information, see the Conversion Utility chapter.
Close: Closes Station Administration and returns to the Meridian Administration Tools window. MAT automatically saves station updates they are made. This means that you need not close an open system befquitting the application.
Edit MenuUse the Edit menu to change data within an open system. Refer to the Common Services User Guide for details on Undo and Cut / Copy / Paste. The MAT-specific actions include:
Add / Delete / Update: Adds/removes/modifies stations for the currently open system.
Global Update / Select / Select All: Allows you to modify selected fields in a group of selected stations.
User Field Names: Assigns names for the 10 user-defined fields for the current system.
View MenuUse the View menu to choose the station data parameters you wish to vieThe currently selected view is indicated by a check-mark against the meselection and is displayed in the status bar of the main window.
Station: This option displays a list of all stations defined for this system. When you choose an Edit function, the highlighted station record is opeIf none are defined, you can only choose Edit - Add.
Template: This option accesses templates that contain station definitions the open system may use frequently.
MAT Station Administration User Guide

Page 38 of 254 Station Administration
1 n of ting
s for y
ions
Hardware: This option displays line cards used in the system. The Reserve TN feature adds new fields in this view to reserve units on the supported card types.
Sort: This option only appears when the Station view is selected. The list can be sorted by a criterion selected from a submenu that appears when you choose this item. The criteria include:
• Name
• Directory Number
• Location
• Terminal Number
• Instrument (telephone) Type
• Sync Status
Note: Sorting only affects the displayed list. It does not change the actual order of the station records within the database.
Synchronize MenuUse the Synchronize menu to schedule communications with the Meridiansystem. The Synchronize menu lets you set up reception or transmissiostation data using the MAT communications functions. See “Communicawith Meridian 1” on page 157.
Retrieve: Allows selection of station data for retrieval from the Meridian 1system into the station database. You can define criteria to select stationdownload from the Meridian 1 system. Retrieve also allows a Parse Onloption that formats retrieved data for MAT.
Transmit: Allows selection of station data for transmission to Meridian 1.
Reconcile: Compares discrepancies between station data and the MAT database and deletes invalid set information from the MAT database. Information about deleted sets is recorded in a log file. See “CommunicatLogs” on page 171.
Note: Before using Reconcile, be sure to Retrieve the latest station datafirst. This ensures the station data is compared to the latest MAT database.
P0906946 Standard April 2000

Station Administration Page 39 of 254
of
ex
Forms MenuUse the Forms menu to configure form-based station administration.
Forms Interface: Enable or disable form-based station administration.
Select Form: Select which form to be used by form-based station administration.
Edit Custom Form: Run the station form editor.
Options MenuUse the Options menu to configure options which affect the operation of the Station Administration and CPND Administration modules.
Mode: Invoke the mode function to configure the operational mode and optional station data validations.
Help MenuUse the Help menu to display documentation to help you understand and use the application.
Contents: Displays the Contents page of the on-line documentation system.
Search Help On: Allows you to type in key words and select a topic of interest from the list of Help topics.
How to Use Help: Provides basic instructions about using the on-line documentation system.
About MAT: Displays copyright and version information about the current release of the MAT Station Administration application.
Accessing Station DataChoose View - Station to display the list of stations defined for the system. Each line in the list contains the following information for one station. Refer to “Managing Station Data” on page 46 for a more complete description these fields.
Location: A unique station identifier. MAT uses the value here as an indto the station.
MAT Station Administration User Guide

Page 40 of 254 Station Administration
s
tify ibed
e tion e Add
Type: The instrument defined for the station.
Sync Status: An indication of whether Meridian 1 data and the data in MAT are synchronized. The following list defines the synchronization status for station data:
• NEW: A station defined in MAT that has never been uploaded to theMeridian 1.
• TRN: The station is synchronized with the Meridian 1.
• CHG: The station has been modified in MAT but not in Meridian 1.
• RPL: A station defined in MAT to replace synchronized station data.
• OUT: A synchronized station deleted from MAT but not yet from the Meridian 1.
Prime DN: The prime directory number.
Terminal Number: The station terminal number, representing the addreswithin the Meridian 1 system (Loop # - Shelf # - Card # - Unit#).
Last/First Name: The station user's name.
Department: The department in which the station is used.
This represents part of the data record for a station so that you can identhat station in the listing. The rest of the station data is available as descrin “Managing Station Data” on page 46.
The Template ViewChoose View - Template to display a list of station templates defined for thsystem. The list contains the same information for a template as the Staview contains for a station. The value of the Location field in the list is thactual name of the template as displayed in the template list field of the Station dialog.
P0906946 Standard April 2000

Station Administration Page 41 of 254
ingle data
ons fined tion
The Hardware ViewChoose View - Hardware to display a list of line cards, for station TN assignment. If Hardware Validation is active, then the TN added to each set will be validated against the TN card type. The cards defined under the hardware view are also used for automatic TN assignment.
The Reserve TN dialog is accessed through the Hardware Configuration dialog box. Click on the Reserve Units button.
New StationsYou can add new stations to the list in the Station Administration view. Use a template that defines data for the station or stations that you are adding, or add each station individually. You must give each new station a unique Location field value.
If MAT is in Maintenance mode, you are prompted to schedule communication with Meridian 1 whenever you add new stations in MAT. You can synchronize the system data now, schedule a time for synchronization, or cancel the prompt and schedule synchronization later. See “Communicating with Meridian 1” on page 157.
Station TemplateData that is common to many stations can be stored in a template. In a soperation, using a template, you can define multiple stations which have in common. The only data that must be added to stations defined with atemplate is the Location field value, so that each station added using thetemplate can be identified in the list and by the Station Administration module. A template can contain all or part of a station definition and statidefined using templates can be changed in the same way as stations deindividually. You can change template data in exactly the same way as stadata.
Add StationsTo add new stations, choose Edit - Add from the Station Administration window Station view. The Add Station dialog appears.
Note: The Instrument field and the Template field are mutually exclusive. An instrument would be defined in the template. If an instrument is selected, there can be no selected template.
MAT Station Administration User Guide

Page 42 of 254 Station Administration
At any time, you can click Cancel to return to the Station list window without adding stations.
When the data for this dialog is complete, click OK to display one of the two dialogs below.
Adding a Single StationIf you are adding a single station, the dialog for the selected set is displayed. You can update the station data now or just give it a unique identifier in the Location field and click OK to accept the current data and update later if required (see “Managing Station Data” on page 46).
Figure 3Add Station dialog
P0906946 Standard April 2000

Station Administration Page 43 of 254
Adding a Phantom StationTo add a phantom station, a phantom loop must be defined first. Phantom stations can only be added to existing phantom loops. Use Overlay 17 to create a phantom loop. Retrieving station data from a system with existing phantom stations preserves the phantom loops defined for those phantom stations. Phantom loops can only contain phantom stations.
Choose View-Hardware from the Station Administration window Station view. The Hardware view appears. Choose Edit-Add. The Hardware Configuration view appears. Select the phantom card from the drop down list. If you do not enter values, MAT enters the next available loop-shelf-card information not used by the selected card into the appropriate fields. Click OK to return to the Hardware Configuration view.
Note: Cards must have unique loop-shelf-card combinations.
Choose View-Station to return to the Station view. Choose Edit-Add. The Add Station dialog box appears. In the Instrument field, select an analog type set. For example, the 500 set. Click on the Phantom check box. Click OK. The Station Data dialog box appears.
Note: Phantom TNs can only be assigned to analog sets.
Enter the terminal number for the station in the Terminal Number field. Each station must have a unique TN. Double-clicking in Terminal Number field displays the Terminal Numbers window listing available terminal numbers associated with this loop. If no phantom cards are defined, this window is blank. Double-click on an available terminal number on the list to enter that value into the Terminal Number field in the Station Data dialog box.
Adding Multiple StationsIf you are adding more than one station, the Multiple Station Add dialog is displayed. This dialog lets you define some aspects of each station to be added. If you used a template for station definition, much of the station data may already be defined.
The dialog contains an updatable list box containing the stations. The following data fields allow you to define or update the stations in the list.
MAT Station Administration User Guide

Page 44 of 254 Station Administration
et up
Adding the StationsWhen you have defined the station or stations that you wish to add, click OK in the dialog. If the Location field for one or more of the stations is not unique, an error box appears. Click OK in the error box to return to the previous dialog to make the correction.
MAT adds the accepted station or stations to the MAT station database. If MAT is in maintenance mode you are prompted, in a Synchronization dialog, to set up communication with the Meridian 1 system. See “Communicating with Meridian 1” on page 157.
Click Cancel in the Synchronization dialog to return to the Station Administration list. The new stations are added with a status of NEW. In this case, you can use the Synchronize menu at a more convenient time to scommunications.
Figure 4Multiple Station Add dialog
P0906946 Standard April 2000
Station Administration Page 45 of 254
that
1
e an be ync
le
m.
if it
Deleting StationsYou can select stations for deletion from the Station list view. Use one of the following methods to remove them from the MAT database:
• Press the Delete key
• Choose Edit - Delete
• Choose Edit - Cut
Each method displays a Yes/ No confirmation prompt before removing the stations. If you click Yes, MAT removes the stations from the MAT stationdatabase.
There are special considerations to bear in mind when deleting stations contain references to Voice Mailbox directory numbers. Refer to “Voice Mailbox” on page 137 for more information.
If the stations to be deleted have never been synchronized with Meridian(Sync status is NEW) they are removed from the list in the window. In thiscase you can bring the stations back by choosing Edit - Undo Delete. This undelete is only available until you perform another edit function on the station list.
If the Sync status is not NEW, deleted stations are marked for deletion fromMeridian 1 at sync time by setting the sync status to OUT. These stations will not be deleted from the list until synchronization. If you attempt to changsuch stations, you are prompted to bring them back before the update cperformed. If you do bring them back, the status is reset to the original sstatus. Attempts to delete stations with sync status OUT are ignored.
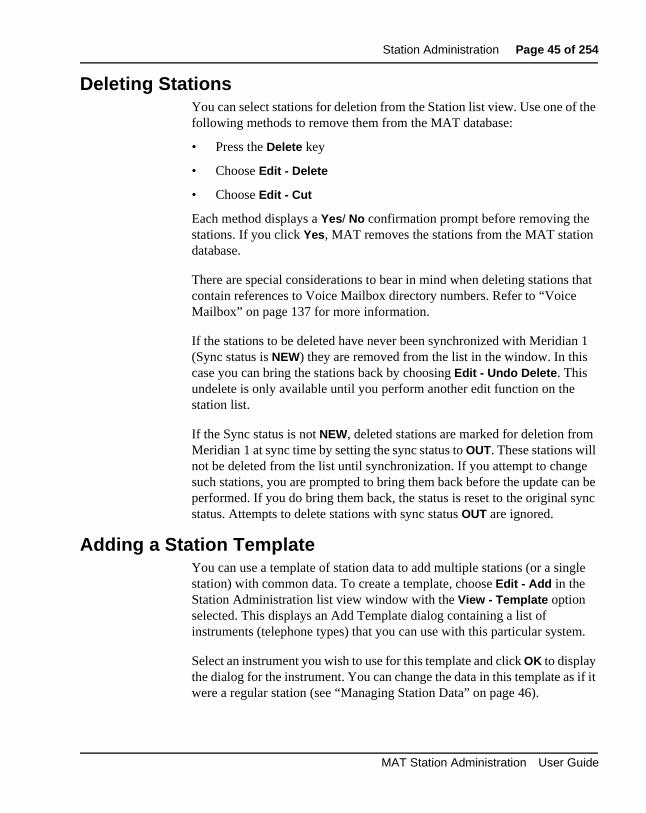
Adding a Station TemplateYou can use a template of station data to add multiple stations (or a singstation) with common data. To create a template, choose Edit - Add in the Station Administration list view window with the View - Template option selected. This displays an Add Template dialog containing a list of instruments (telephone types) that you can use with this particular syste
Select an instrument you wish to use for this template and click OK to display the dialog for the instrument. You can change the data in this template aswere a regular station (see “Managing Station Data” on page 46).
MAT Station Administration User Guide
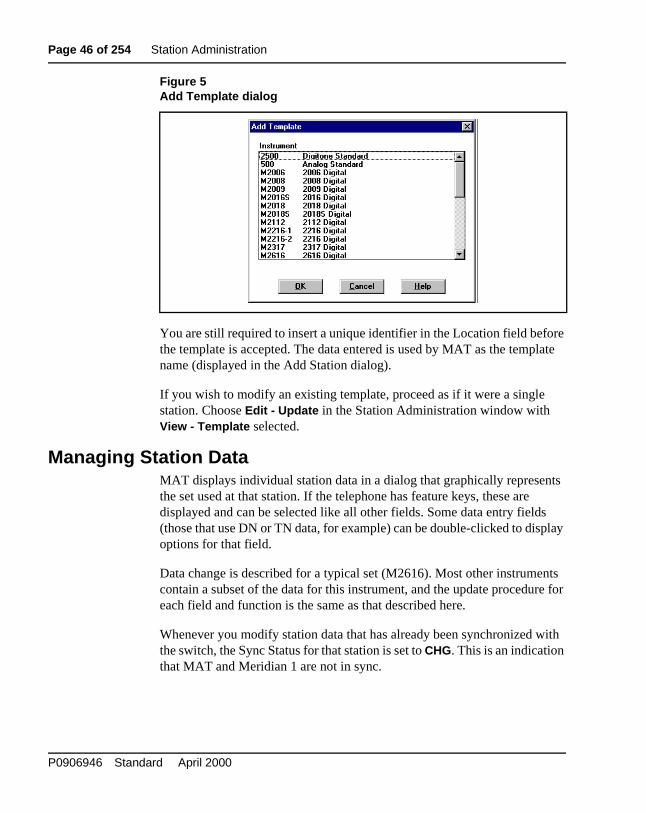
Page 46 of 254 Station Administration
You are still required to insert a unique identifier in the Location field before the template is accepted. The data entered is used by MAT as the template name (displayed in the Add Station dialog).
If you wish to modify an existing template, proceed as if it were a single station. Choose Edit - Update in the Station Administration window with View - Template selected.
Managing Station DataMAT displays individual station data in a dialog that graphically represents the set used at that station. If the telephone has feature keys, these are displayed and can be selected like all other fields. Some data entry fields (those that use DN or TN data, for example) can be double-clicked to display options for that field.
Data change is described for a typical set (M2616). Most other instruments contain a subset of the data for this instrument, and the update procedure for each field and function is the same as that described here.
Whenever you modify station data that has already been synchronized with the switch, the Sync Status for that station is set to CHG. This is an indication that MAT and Meridian 1 are not in sync.
Figure 5Add Template dialog
P0906946 Standard April 2000

Station Administration Page 47 of 254
s.
og d
62,
s to s”
t you 0
tion n.
If MAT is in maintenance mode, you are prompted to set up communication with the Meridian 1 system. You can synchronize the data at this time, schedule a time for synchronization or cancel the prompt and schedule synchronization later. See “Communicating with Meridian 1” on page 157.
Updating StationsMAT displays a list of stations for the selected system in the Station Administration module when you choose View - Station. You can update the data for any station by selecting the desired station and choosing Edit - Update. This displays the dialog for the set that the station currently useYou can update multiple stations at one time. See “Global Update” on page 143.
Station DataThe dialog shown above is for an “M” series digital set. Typically, the dialassociated with a particular set will contain a subset of the data fields anfunctions listed here for the M3904 set.
In addition to the normal OK, Cancel and Help buttons, the set dialog can have other function buttons such as Features and Admin. These functions are described in “Features Button” on page 58 and “Administration” on pagerespectively.
Functions and options assignment is described in “Key Assignments” onpage 50. An additional Key Features Edit field is displayed for analog setallow you to assign key functions. This field is described in “Key Featureon page 60.
The data fields for an instrument are a subset of the following:
First Name / Last NameThe First Name can contain up to 15 characters (the display shows 8 bucan scroll horizontally to see up to 15) that could be the last name of theperson associated with this station. The Last Name can contain up to 2characters (12 only are displayed). This data is used for administrative purposes only and is not stored in Meridian 1. Note that the CPND funccan access this as the displayed name for the DN assigned to this statio
MAT Station Administration User Guide

Page 48 of 254 Station Administration
CustomerYou can select one of a drop down list that contains the customers associated with the site.
Location (Required)The Location is a unique identifying code for this station, up to 12 characters. MAT does not let you assign a code that is already in use for this site.
Note that, if you have not defined DES (MAT data only), then MAT assigns the first six alphanumeric characters of the Location field when you synchronize MAT data with Meridian 1.
Figure 6Station Data dialog
P0906946 Standard April 2000

Station Administration Page 49 of 254
Note also that, on receiving data that is not defined in MAT from Meridian 1, the Location field is assigned the full TN value, including hyphen separators, of the station.
DepartmentYou can use the Department field to define the department where this station is used. The field displays 14 characters but you can scroll horizontally to show up to 31 characters.
Terminal NumberThis field contains up to four separate numeric fields that represent the Meridian 1 address (the full terminal number contains values for Loop, Shelf, Card and Unit) that this station uses.
Hunt to / External Hunt toYou can enter a DN in these fields that will receive calls if this station is busy. Note that you can use any telephone number, even one that is external to this site. However, you can double-click this field to display the DN list defined in the Customer’s Number Plan for this site and choose one of those. The External Hunt is for incoming calls that are not from a DN in the Numbering Plan.
Call Forward to / External Call Forward toYou can enter a DN in these fields that will receive calls if there is no answer at this station after a pre-determined number of rings. These fields operate in the same way as the Hunt to and External Hunt to fields (see DN Assignment)
In addition to these fields, a station may have feature/option keys or key lamps. Some sets can have additional keys as add-on modules. In such cases, one of the following fields is available in the dialog:
Key Based Access/Add on ModulesThis field allows you to program key features for add-on key modules. You can enter a number in the range 0-2, which indicates the number of add-on modules attached to the set. Additional function buttons (for example, Add On 1) may appear on the dialog, based on the entry in this field.
You can click these additional buttons to display a dialog that graphically represents the keys of the add on module. You assign features to the add-on modules the same way that you assign features to keys on the set.
MAT Station Administration User Guide

Page 50 of 254 Station Administration
tach
The ation
ey on rrent t to
rrow
For sets that do not have keys or key lamps, the available features assignment dialog is displayed within the set dialog itself.
For sets that do not have keys or key lamps, the available features are displayed within the set dialog itself. The assignment procedure is as described in “Key Assignments” on page 50.
Key AssignmentsIn addition to the data fields, the set may have keys to which you can atfeature functions. When you select a key, a Key Assignments dialog containing a single-selection scrollable list of Key Features is displayed. features listed are defined for this set using the Features button on the stdata dialog.
In addition to the usual OK, Cancel and Help buttons, the dialog has a Clear button that you can use to remove any feature attached to the selected kthe set (to assign a different feature, it is not necessary to first clear the cufeature). You may also enter the first letter of the Key Feature of interesmove to that section in the list.
The dialog contains a single-selection Key Features list. The currently selected feature is highlighted. Select using the mouse or the up/down akeys.
Figure 7Key Assignments dialog
P0906946 Standard April 2000

Station Administration Page 51 of 254
ring
ust
be
o
ring
Click Cancel at any time to return to the station data dialog without changing the current key assignment. Click OK to assign the selected feature to the key.
Some of the features require you to enter additional information. When you select one of these, text entry boxes are displayed in the dialog. You can double-click on a DN text entry box to display the list of DNs in the customer’s Numbering Plan that are available to the selected feature (see “Directory Number Assignment” on page 51).
Directory Number AssignmentThere are three kinds of DNs:
1 A DN assigned to the station. This must be in the customer's NumbePlan as defined for the system.
2 A DN referred to by this station (message center, for example) that mbe in this customer's Numbering Plan.
3 A DN referred to by this station (Call Forward, for example) that can the number for any station—external or within the Numbering Plan.
To enter a DN for a selected station, you can type the number into the Directory Number field or double-click within the Directory Number field tselect from a list of DNs used in the Numbering Plan for the customer.
A manually entered number for DN categories 1 and 2 above will not beaccepted if it is not contained in the Numbering Plan, unless the NumbePlan validation has been turned off (Option - Mode).
MAT Station Administration User Guide

Page 52 of 254 Station Administration
t the ent.
o on.
he
If you are assigning a DN to this station (versus referring to the DN of another station as in forwarding or hunting options) the dialog allows functions in addition to the usual Cancel, Help and OK buttons:
• Assign: assigns the highlighted DN to the key.
• MARP: If the assigned DN is being used by another station you can assign incoming calls to that DN to this station with the Multiple Appearance Redirection Prime (MARP) button. To assign incoming calls to the other station, you must update the other station and selecMARP function here. This button toggles the current MARP assignm
• CPND: A Call Party Name Display (CPND) display dialog allows you tdefine how calls from this station are displayed to the receiving statiSee “CPND Data Considerations” on page 67.
• VMB: A Voice Mailbox (VMB) display dialog allows data associated with a DN (which serves as a mailbox ID) rather than a TN. You canmodify the VMB data from any station which has an appearance of tmailbox DN. Refer to “Voice Mailbox” on page 137.
Figure 8Directory Numbers dialog
P0906946 Standard April 2000

Station Administration Page 53 of 254
The dialog contains a single-selection list of DNs defined in the numbering plan for this system. Those numbers that are already assigned also have MARP and Location data listed. The currently selected DN is highlighted. If you are assigning a DN to this station, the dialog also contains a display-only box with the current DN assignment entered.
At any time, click Cancel to return to the previous window without changing the current assignment. Click OK to assign the DN and return to the previous window.
Terminal Number AssignmentThe Terminal Number (TN) is the full hardware address of the port to which this station is attached. If the Terminal Number field requires an entry, you can type the number into the Terminal Number field or you can double click within the field and select from a list of available TNs. The data entry must be in the format:
lll s cc nn
Where:lll = The number of the Meridian 1 loop.s = The number of the system shelf.cc = The number of the shelf card position.nn = The number of the card circuit (port).
The range of numbers available depends on the hardware configuration and software release in use at the system.
The list shows the Location for all TNs that are already assigned. See Figure 9.
MAT Station Administration User Guide

Page 54 of 254 Station Administration
Figure 9Terminal Numbers window
P0906946 Standard April 2000

Station Administration Page 55 of 254
The dialog contains a single-selection list of TNs defined in the Station Hardware view that permit access to the set defined for this station. The current selection is highlighted.
At any time, click Cancel to return to the previous window (Set dialog) without changing the current assignment. Select a TN and click OK to assign the TN and return to the set dialog. The MAT system validates the TN for availability and permissibility using the Hardware assignments stored under the Station Hardware view, and assigns the TN.
Note: Automatic TN Assignment will not assign any units in the Hardware View that are marked as a RUT. See “Reserve TN Feature” onpage 56.
MAT Station Administration User Guide

Page 56 of 254 Station Administration
ring
he and the e
Reserve TN FeatureThis feature allows users to assign TNs to support instrument types on a station line card and mark these units as reserved for a given unit type. These types, referred to as Reserve Unit Type (RUT) include:
• ATT (Attendant Console)
• 1250 (1250 Digital Attendant Console)
• 2250 ( 2250 Digital Attendant Console)
• R232 (RS232C Units)
• R422 (RS422 Units)
• OOSSLT (Out of Service Single Line Terminal)
• OOSMLT (Out of Service Multiple Line Terminal)
• PWR (Power for Attendant Console)
• OTHER (as defined by the user)
When a unit is reserved as one of these types, it will not be assigned duAutomatic TN Assignment and will appear in the TN Selection List Box accordingly. The Automatic TN Assignment will not assign any units in tHardware View that are marked as a RUT. RUTs are validated at the fieldglobal levels. RUTs are marked by the user in the Hardware View and byStation Retrieval Module. The Reserve TN feature shows existing UsagFields at the card level in the Hardware view.
Note: Reserved Units TNs are skipped during Automatic Terminal Assignment.
P0906946 Standard April 2000

Station Administration Page 57 of 254
Access the Reserve Units dialog box through the Reserve Units button in the Hardware Configuration dialog box. See Figure 10.
The Station Retrieval Module recognizes RUTs and updates the Reserved Units fields in the Hardware View with the RUT value during an initial retrieval. Discrepancies are handled in the same way as other retrieved fields with the Meridian 1 value overwriting the MAT database value. RUTs are not displayed in the Retrieval Specify by Type field since they are not treated as Station Types.
Figure 10The Reserved Units button in the Hardware Configuration window
MAT Station Administration User Guide

Page 58 of 254 Station Administration
ies.
Use the Reserve Units dialog box to assign RUTs. See Figure 11.
Features Button The Features button on the station data dialog lets you examine and update station features and options defined for your system. This is the function you use to assign a value to the DES field in MAT. It allows you to set feature key assignments. The Features button displays a list box containing a single-selection scrollable list of features or feature groups. See Figure 12.
Select the appropriate radio button to sort by either Features or Feature Groups. “Features” sorts the features alphabetically by Meridian 1 mnemonic. “Feature Groups” organizes the features into related categor
Figure 11Assigning values in the Reserved Units dialog box
P0906946 Standard April 2000

Station Administration Page 59 of 254
u
res.
The dialog contains Select, Done and Help function buttons. Help displays on-line help for this dialog. Done returns to the station data dialog and Select displays a dialog associated with the selected feature that lets you define appropriate parameters for that feature, and perhaps assign the feature to a key.
Use one of the following methods to select a feature:
• Select a single feature with a mouse click.
• Use the arrow keys to move the highlight bar to the desired feature.
• Type the first letters of the feature mnemonic (for example, SCR).
• Click and drag the highlight bar to the desired feature.
Use the Page Up and Page Down keys to browse the feature list.
When you click Select, MAT displays a dialog for the selected feature. Yocan enter data in the dialog. When you click OK, MAT modifies the feature based on your input, and returns to the Features list.
While the Features list is open, you can examine and modify other featuWhen you finish modifying features, click Done to return to the Station Datadialog. The keys that you assigned are labeled appropriately.
Figure 12Features dialog
MAT Station Administration User Guide

Page 60 of 254 Station Administration
of
ith y for
When you are finished defining or examining features, choose Done to return to the station data dialog. If you have assigned keys, the appropriate keys are labeled in the station data dialog.
Feature Group categoryWhen you select Search by Feature Group and choose Select in the Features dialog, a dialog that defines the selected feature appears. The dialog shown in Figure 13 is for the Call Pickup feature. The other dialogs are similar in appearance.
The dialog contains fields (usually text boxes associated with drop-down selection lists) that define the functionality of the feature. If the feature can be assigned to a key, the dialog also contains a Key Features list of functions that can be assigned to a key for this feature.
Forced targetsSome entries in the Feature dialog box will force a change in the class of service (CLS) of the selected station. For example, filling in the “FlexibleCall Forward No Answer DN (FDN)” field of call redirection forces “Call Forward No Answer (FNA) to “Allowed”. This target enforcement occursonly as the feature dialog is exited. There may be a noticeable flickeringthe screen as the values are forced and the dialog exits.
Key FeaturesThe Key Features field is a single-selection list of features associated wthis feature group. You can assign the function selected in this list to a kethe selected station.
Figure 13Feature dialog (example)
P0906946 Standard April 2000
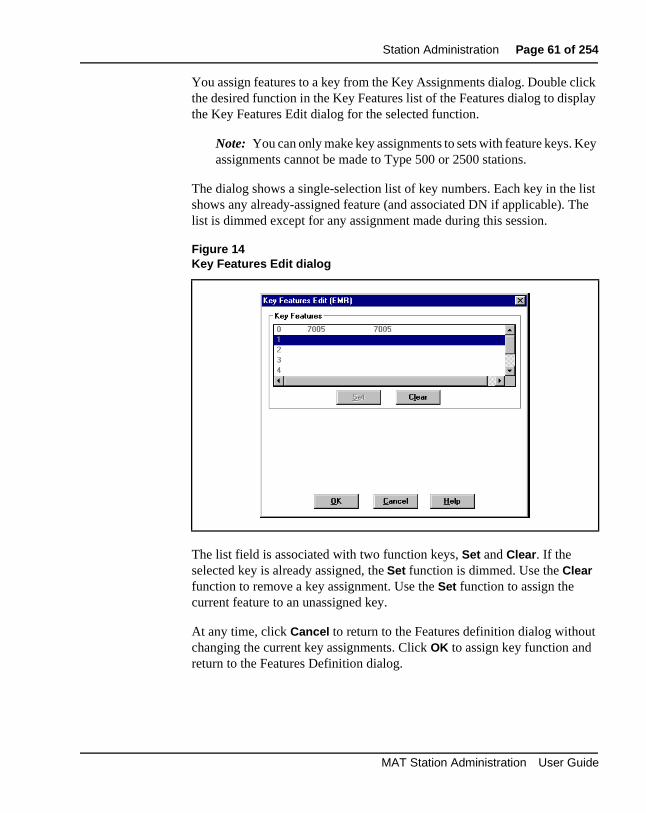
Station Administration Page 61 of 254
You assign features to a key from the Key Assignments dialog. Double click the desired function in the Key Features list of the Features dialog to display the Key Features Edit dialog for the selected function.
Note: You can only make key assignments to sets with feature keys. Key assignments cannot be made to Type 500 or 2500 stations.
The dialog shows a single-selection list of key numbers. Each key in the list shows any already-assigned feature (and associated DN if applicable). The list is dimmed except for any assignment made during this session.
The list field is associated with two function keys, Set and Clear. If the selected key is already assigned, the Set function is dimmed. Use the Clear function to remove a key assignment. Use the Set function to assign the current feature to an unassigned key.
At any time, click Cancel to return to the Features definition dialog without changing the current key assignments. Click OK to assign key function and return to the Features Definition dialog.
Figure 14Key Features Edit dialog
MAT Station Administration User Guide

Page 62 of 254 Station Administration
AdministrationChoose Admin in the station data dialog to display the Administration dialog. The Administration dialog allows you to assign values to fields that MAT uses in classifying and administering station data. These fields are not part of the Meridian 1 data block. The user fields and their labels are assigned using Edit - User Field Names. These headings allow you to define values for your own situation. This option contains text boxes so that you can assign specific values to these fields for this station.
The data entry fields in this dialog include:
Category: A drop-down list of line connection types for this station
Color: A drop-down list of colors available for this instrument.
Pwr Fail TN: A text box for the TN used if the system power fails.
LDN Index: Radio buttons to define which of three indexes contains the DN for this station. A DN index is set up at the system level when the Numbering Plan is defined. The index is used while viewing and printing designation strips for this instrument.
Figure 15Administration dialog
P0906946 Standard April 2000

Station Administration Page 63 of 254
Admin Fields: The Admin fields are used by the Call Accounting Billing Database for billing purposes and other types of cost allocation. Refer to the MAT Call Accounting User Guide Database menu section for details.
Designation StripsA telephone can have many features and services available by function buttons (keys) and indicators. A Designation Strip is a printout of labels that can be attached to the telephone to indicate the function of the various buttons and indicators on the set (and also the DN of the station using the set). You can create files that let you examine and print Designation Strips created from the data defining the stations using File - Desig. Strip.
A Designation Strip will typically contain the directory number for a single line set. In addition, sets with key caps that designate a DN (for multi-line sets) or reference other DNs also appear in the Strip.
Designating Directory NumbersA Meridian 1 system can have up to three listed directory numbers (LDN). The system Numbering Plan defines whether ranges of directory numbers (DN) are set for direct inward dialed (DID) or not. Typically, a station DN, as defined for the Designation Strip, is a regular 10 digit telephone number with an extension:
(aaa) xxx-aaaa Ext bbbb
Where:
The Designation Strip utility examines the System Configuration Customer data to determine the LDN used by the station. The utility determines whether the station DN is in a DID range defined in the system Numbering Plan. The following are the two possible results:
Non-DID number: The Strip prints the LDN and uses the station DN for the extension.
aaa represents the area code
xxx represents the exchange
aaaa represents the number
bbbb represents the extension
MAT Station Administration User Guide
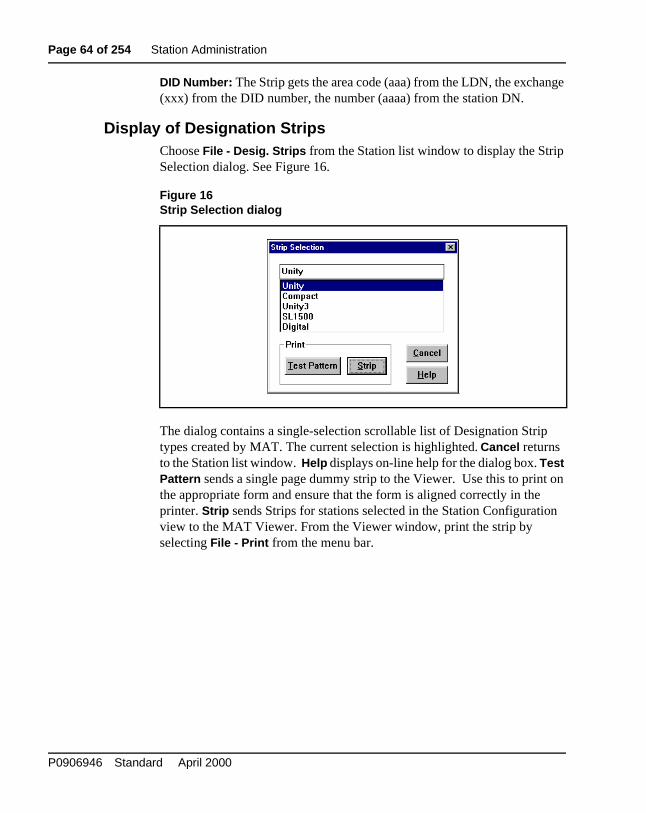
Page 64 of 254 Station Administration
DID Number: The Strip gets the area code (aaa) from the LDN, the exchange (xxx) from the DID number, the number (aaaa) from the station DN.
Display of Designation StripsChoose File - Desig. Strips from the Station list window to display the Strip Selection dialog. See Figure 16.
The dialog contains a single-selection scrollable list of Designation Strip types created by MAT. The current selection is highlighted. Cancel returns to the Station list window. Help displays on-line help for the dialog box. Test Pattern sends a single page dummy strip to the Viewer. Use this to print on the appropriate form and ensure that the form is aligned correctly in the printer. Strip sends Strips for stations selected in the Station Configuration view to the MAT Viewer. From the Viewer window, print the strip by selecting File - Print from the menu bar.
Figure 16Strip Selection dialog
P0906946 Standard April 2000

Station Administration Page 65 of 254
ith t key.
alues atures at
ks tion
the
e ries tion
Designation Strips are printed on special forms. The following separate form layouts are used by MAT:
• Unity for Unity 1 and Unity 2 sets
• Unity 3 for Unity 3 sets
• Compact for older SL-1 type sets
• SL-1/500 for normal SL-1 type sets
• Digital for M2000 series digital sets (not M3000 series)
Note: All other sets would use the SL-1/500 Strip layout. Stations wACD keys will have both the ACD DN and the Position ID printed. Iwould be up to the user to attach the desired label to the appropriate
Station Data ValidationThe station database contains one record per station. Some of the field vin a record depend on the system properties, the instrument used, and feand options enabled. In addition, the MAT application contains “rules” thdefine possible values, sizes, and ranges for the fields.
The Station Administration module includes a Validation utility that checthat the values assigned to certain fields are compatible with the configuraand the MAT data rules.
The Validation function checks the currently selected station records in Station list view before uploading to the Meridian 1. There are two options—partial and full validation. Full validation checks every field andmight require considerable time.
Note: You can validate the data for each station individually using thValidate function key on the set dialog. This button examines the entfor the current open station only. Any errors are noted. Perform a StaValidation to capture any data entry issues that may result in a transmission error when synchronizing with the Meridian 1.
MAT Station Administration User Guide
Page 66 of 254 Station Administration
ion
om
Validating the DataSelect the stations for validation in the Station list view and choose File - Validate to display a cascading submenu. Choose Partial (checks the values defined previously) or Full (checks all field values) to start the Validation check.
While MAT performs the checks, a status box indicates progress in single record increments. At any time, click Cancel in the status box to halt the task.
Note: Clicking Cancel discards the validations already completed.
When the task is complete, the MAT Viewer displays the validation data. You can save this to a text file (in a user-defined file name and location), print it, or simply browse and discard it (see “Generating Reports” on page 181 for adescription of the Viewer).
When the task is complete, you should send all the new or modified statand CPND information to the Meridian 1 system. You may select all the NEW or CHG stations, for example. You should apply the Validation process frthe File menu to the selected stations to ensure that the entered data is consistent across all stations. See “Communicating with Meridian 1” on page 157.
P0906946 Standard April 2000

Page 67 of 254
254
CPNDCPND Overview
Call Party Name Display (CPND) displays the name of the calling party of an incoming call to the called station user. The CPND data is associated with a DN, and not with any particular station. If CPND data is assigned to a DN, it may be associated with multiple stations.
The CPND Administration module is separate from the Station Administration module. CPND Administration lets you create, maintain, change, and report on single and multi-line CPND information. CPND Administration data defines the setup for each customer’s CPND configuration and CPND Name data defines the display parameters for DNs used by a particular customer. Station configuration data and CPND data are separate within Meridian 1 and are treated as separate files within MAT.
CPND data for a station is accessible through the Station Administration module. The CPND button in the DN list of the Station module allows you to maintain CPND information directly from the DN list. This is particularly convenient if several DNs are to be linked back to the name for this station.
CPND is provided as a separate module to allow you to directly enter CPND data for DNs, Dial Intercom Groups, or DNIS IDC. The display of MAT CPND records shows the synchronization status and can be used to selectively synchronize this data with the Meridian 1 system.
CPND Data ConsiderationsYou should be aware of the following considerations when using the CPND Administration function of Station Administration.
MAT Station Administration User Guide
Page 68 of 254 CPND
ld
ian 1 e
e
ame e rom
rom
5 s,
y D
.
nce st
CPND Names vs. Station NamesThe name defined for CPND need not necessarily be the same as that defined for a station end user on the face of the station graphic. The Station Configuration Name is only maintained in MAT and is not stored in the Meridian 1. The name stored by MAT is the CPND associated with a particular DN.
In most cases, the name on the station graphic is also the name associated with a DN of the station. MAT can automatically link the name on the graphic with one or more of the DNs on the station. To link the name on the graphic with a DN, fill in the location code of the set in the “get name from location” fieon the Name dialog.
The Station Retrieve module automatically parses and updates the MerdCPND Name information. The module automatically sets the value for th“get name from location” field in the CPND Name dialog box to match changes in the Referenced Location values. Changes to the name on thstation will not affect the station’s Sync Status but will update any CPNDname entry to RPL.
If the name data is linked in this manner, the first and last names in the ndialog will be filled in and grayed. The data can only be changed from thstation graphic. In order to remove the linkage, delete the location code fthe “get name from location” field in the Name dialog.
The CPND Name information is accessed in either the Station module (fa CPND function button in the DN list dialog) or the CPND module. All CPND data is synchronized with the Meridian 1 system using Overlay 9(and not with the CPND prompt in Overlays 10 or 11 as in recent versionRelease 19, of the Meridian 1 system).
CPND SynchronizationCPND and Station synchronization are separate functions. They are onlconnected if CPND data is defined from the Station DN list, or if the CPNname is taken from the Name field of the Station Administration module
In some cases, MAT is aware of such a connection. If MAT is in Maintenamode, the system automatically attempts to synchronize the new CPNDinformation when the station is transmitted. In installation mode, you musynchronize CPND data separately from within the CPND module.
P0906946 Standard April 2000

CPND Page 69 of 254
The CPND ModuleThe MAT CPND Administration module allows access to the CPND data for a single Meridian 1 system. When you open the CPND module, a list of name data contained within MAT is displayed. If the data has not yet been retrieved from the Meridian 1 or added to the MAT database, the window contains no data.
Figure 17 shows the MAT CPND Administration window as first displayed.
Accessing CPND DataThe MAT CPND Administration window allows you to configure CPND blocks. After CPND blocks are configured, you can configure Name data for DNs.
From the View menu, the following list views for CPND data are available:
• Customer Configuration list (CPND Administration).
• Name display list (CPND Name)
Figure 17CPND Administration window
MAT Station Administration User Guide

Page 70 of 254 CPND
tion.
n the
n
s data
n the
ess
The CPND list view contains only a few items (just one in many cases). This view lists the CPND blocks configured on this system. The Name view might have many items, probably more than will fit in the current window. This is the scrollable list of names whose display parameters are defined for CPND.
CPND Administration ViewWith View - CPND selected, the CPND Administration window displays the list of CPND blocks configured for the system. The following information is displayed for each customer:
• Customer: The customer number as defined in the system configura
• Sync Status: The synchronization status of the station’s data betweeMeridian 1 and MAT. See CPND Name view for more detail.
The data in the window is part of the CPND Administration data stored iMAT. The complete configuration data for this system is available as described in the CPND Data Change section of this document.
CPND Name ViewWith View - CPND Name selected, the CPND Administration window showa list of names defined in the system. The following headings define the for each station displayed:
• Customer: The customer number that uses this DN.
• Sync Status: The synchronization status of the station’s data betweeMeridian 1 and MAT.
• Number: The DN using the CPND data.
• Name: The defined CPND name (not the name of a station user unlcalled for in the Location field).
• Location: The optional unique station Location Code for the CPND name source.
P0906946 Standard April 2000

CPND Page 71 of 254
he
sent
ed
he
ND
y t ot
this
. ck
ieve
Sync Status: An indication of whether Meridian 1 data and the data in MAT are synchronized. The following list defines the status for CPND data:
• NEW: CPND data defined in MAT that has never been uploaded to tMeridian 1.
• TRN: The CPND data is synchronized with Meridian 1.
• CHG: Data has been changed in MAT but the change has not been to the Meridian 1.
• RPL: Data defined in MAT to replace synchronized name data.
• OUT: Synchronized CPND data deleted from MAT but not yet removfrom the Meridian 1.
The data in the window is part of the name display data stored in MAT. Tcomplete name data is available as described in CPND Data Change.
CPND records can be sorted and displayed a number of ways. In the CPAdministration window, select View-Sort-.... Records can be sorted by:
• Directory Name
• Last Name
• First Name
• Sync Status
Note: When upgrading from a previous release of MAT to MAT 6, anCPND name that is linked by location to a station will not sort by firsname and last name since names linked to stations in this way are nstored in the CPND database. Perform a station retrieval to resolve discrepancy.
Recommended UsageYou cannot build CPND Name data until the CPND data block is definedFirst you must configure (or retrieve from Meridian 1) the CPND data blofor the selected customer.
When the customer's CPND data block is defined, you can create (or retrfrom Meridian 1) the CPND Name display information.
MAT Station Administration User Guide

Page 72 of 254 CPND
CPND Data ChangeYou can change the data associated with the selected CPND view. The selected item in the list view is highlighted. Select an item using a mouse click or use the up/down arrow keys to highlight the desired item. You can also double-click the desired item.
Choose Edit - Delete to remove the selected CPND list item. Choose Edit - Update or Edit - Add to display a dialog that allows you to update the data fields for the selected view.
Updating the Customer Configuration DataWith View - CPND selected, you can change the selected customer’s CPND data. The selected CPND block is highlighted in the customer list window.
Choose Edit - Update to display the Call Party Name Display dialog:
Figure 18Call Party Name Display dialog
P0906946 Standard April 2000

CPND Page 73 of 254
Updating the Name Display DataChoose Edit - Update in the CPND Name view window (or double-click the item in the list) to display the CPND Name dialog for the selected station name. See Figure 19.
Figure 19CPND Name dialog
MAT Station Administration User Guide

Page 74 of 254 CPND
P0906946 Standard April 2000

Page 75 of 254
254
ce
on
Corporate DirectoryOverview
The enhanced Corporate Directory feature introduces added capabilities to view, manage, and generate reports using available station information from systems configured with at least one user. To use this feature, you will need the Station Administration application installed and configured correctly as well as Microsoft® Excel 95® or later.
Using Corporate DirectoryThe enhanced Corporate Directory feature uses a graphical user interfa(GUI). Use the convenient menu selections, toolbars, and windows to complete your tasks.
Accessing Corporate DirectoryBe sure to have MAT 6 or higher with the Station Administration applicatiinstalled and configured correctly. Start MAT and from the Navigator window, select Utilities-Corporate Directory. See Figure 20.
MAT Station Administration User Guide

Page 76 of 254 Corporate Directory
Figure 20Accessing Corporate Directory
P0906946 Standard April 2000

Corporate Directory Page 77 of 254
l see ory
rty
Corporate Directory WindowThe Corporate Directory main window presents a graphical way to work with station information. Use this window’s commands from the drop down menus or the toolbar to view, manage and generate your reports. You wila list of predefined report formats the first time the main Corporate Directwindow is launched. See Figure 21.
Each report format has the following attributes, as noted by the column headers.
• Report Name - names of available reports
• Type - notes if the report is either predefined or customized
• Number of systems - number of systems for which the report will begenerated
• Number of Data Fields - number of data fields in the report
• Last Generated - date and time when the report was last generated
Note: Double-clicking on a report name displays that report’s propesheet. See “Report properties” on page 88.
Figure 21Corporate Directory main window
MAT Station Administration User Guide

Page 78 of 254 Corporate Directory
to
us.
Working with the Corporate Directory windowUse this window’s commands from the drop down menus or the toolbar view, manage and generate your reports.
Menu selectionsCommands in Corporate Directory are available from the pull down menThe tables below describe the available commands.
Table 1File menu selections
Selection Description
Generate Report/ Now
Shows a dialog box where the user selects a display method for the report. A report may be displayed on screen in a spreadsheet, printed to a default printer, or saved to a text file.
Generate Report/ Schedule
Shows a dialog box where the user selects a report destination and a specific date and time and other scheduling properties for the report.
Generate Report/Open
Opens a previously generated and saved report for the selected item and displays it in a spreadsheet format. If no such report is available, a message box appears asking the user to verify the path and file name of the export file or regenerate the report.
Properties Opens the property sheet for the selected report and allows the user to configure the report.
Close Saves the window’s current settings and exits the application.
P0906946 Standard April 2000

Corporate Directory Page 79 of 254
Table 2Edit menu selections
Selection Description
Undelete Report Recovers the last deleted user-customized report.
Delete Report Removes the selected user-customized report. Predefined reports cannot be deleted.
Table 3View menu selections
Selection Description
Toolbar Displays or hides the tool bar. The menu shows a checkmark next to the item when the toolbar is displayed.
Status Bar Displays or hides the status bar. The menu shows a checkmark next to the item when the status bar is displayed.
Filter Toolbar Displays or hides the filter bar. The menu shows a checkmark next to the item when the filter bar is displayed.
Table 4Configuration menu selections
Selection Description
Add Report Displays a new report property sheet. Use this to create a customized report.
Column Name Displays a dialog box where the user defines column names for data fields.
MAT Station Administration User Guide

Page 80 of 254 Corporate Directory
Toolbar
The toolbar provides another way of executing menu commands. Common tasks are available from the tool bar. See Figure 22.
Table 5Help menu selections
Selection Description
Help Topics Displays the index of help topics.
What’s This Provides context-sensitive help on the next item you select. Clicking anywhere else takes you to the first topic in the help topic list.
About Corporate Directory
Displays information about the application.
Figure 22Corporate Directory tool bar
P0906946 Standard April 2000

Corporate Directory Page 81 of 254
The following table describes the function of each button.
Table 6Toolbar buttons (Part 1 of 2)
Button Description
Add Report
Open Report
Generate Report
Schedule Report
Delete Report
Undelete Report
MAT Station Administration User Guide

Page 82 of 254 Corporate Directory
Filter BarUse the filter bar to show reports in the Corporate Directory window, based on their type. The default setting displays all reports. See Figure 23.
The available settings are:
• All Reports: displays all reports, predefined and customized
• Predefined: displays only the predefined reports
• Customized: displays only the customized reports
Properties: Displays information about the application
Help Topics: Displays the index of help topics
Context Help: Provides context-sensitive help on the next item you select. Clicking anywhere else takes you to the first topic in the help topic list.
Figure 23Filter tool bar
Table 6Toolbar buttons (Part 2 of 2)
P0906946 Standard April 2000

Corporate Directory Page 83 of 254
Pop-up menusPop-up menus show the available commands for a selection. Pop-up menus are activated by clicking the right-mouse button while the cursor is in the report list portion of the Corporate Directory window. Unavailable commands are dimmed. Menu items from the pop-up menu behave identically to the menu items in the pull down menus. See Figure 24.
Figure 24Pop-up menu
MAT Station Administration User Guide

Page 84 of 254 Corporate Directory
Generating ReportsThe Corporate Directory feature lets you view, manage, and generate reports using available station information from systems configured with at least one user. Reports can be viewed on screen, printed, or saved to a file. Report layout and formatting is done through Microsoft Excel. See figure 25 for an example of a typical report format.
Figure 25Typical report format
P0906946 Standard April 2000

Corporate Directory Page 85 of 254
You can either generate a report immediately or with a defined schedule with specific dates, times, and intervals. Generated reports use the data extracted from the MAT database. These reports are automatically saved with a system default name to the default location unless you specify another name or location. A total of ten reports can be automatically saved in this manner. Subsequent saved reports overwrite the earliest ones saved as the system recycles through its default names.
Generate reports nowTo generate a report immediately, select the report name from the window and click on the Generate Report Now tool bar button. This displays the Generate Report dialog box. Select one of the three destination options. Click OK to start the report generation process or Cancel to abort the process. See Figure 26.
Figure 26Generate Report Now dialog box
MAT Station Administration User Guide

Page 86 of 254 Corporate Directory
Generate reports by scheduleSelect the report name from the window and click on the Schedule Report tool bar button. This displays the Schedule Report Generation dialog box. Use this dialog box to select one of two destination options. See Figure 27.
Click Schedule... button in this window to show the Scheduling window. Use this window to specify when and how often to generate the report. See Figure 28.
Table 7Generate Report Now dialog box controls
Control Description
Generate report and display in MS Excel
Generates a new report and displays it in MS Excel.
Note: You must have MS Excel installed and configured to use this option.
Generate report and send to printer
Generates a new report and sends it to a specified printer
Generate report only Generates a report and saves it to disk.
OK Starts the report generation process and closes the window
Cancel Exits the dialog box without generating a report
Help Displays the online help topic associated with this dialog box.
P0906946 Standard April 2000

Corporate Directory Page 87 of 254
Figure 27Generate Report Schedule dialog box
Figure 28Scheduling window
MAT Station Administration User Guide

Page 88 of 254 Corporate Directory
on
e
e l be box o ta
ered
ype”
s
Report propertiesEach report shows a specific set of station data. Corporate Directory provides a set of reports whose properties are already defined. See “Predefined reports” on page 94. You can create customized reports for your specificneeds. See “Customized reports” on page 95.
View report properties by double-clicking or clicking the right-mouse buttand selecting Properties on an available report in the Corporate Directorywindow. This presents a property sheet with three tabs titled General, Data Fields, and Output. The property sheet contains information specific to thselected report.
There are four buttons common to each property sheet:
• OK - saves any changes and exits the property sheet
• Cancel - exits the property sheet without saving any changes
• Apply - saves the changes without exiting the property sheet
• Help - displays help topics for the property sheet
General tabUse the General tab to view or define a report name. Additionally, use thGeneral tab to specify multiple sites and systems for which the report wilgenerated. All available sites and systems are listed. Click on the checknext to an entry to include it in the report. Click on a marked check box tdeselect it and exclude it from the report. Reports are generated with dafrom all included sites and systems. See Figure 29.
Controls in the General tab include:
• Report Name - displays the report name. New report names are enthere. Users are limited to report names of up to 100 characters.
• Save As - saves the current report as a new customized report. The “tnotation automatically changes from “PREDEFINED” to “CUSTOMIZED” as needed.
Note: The new report name must be unique. Otherwise, the Save Acommand fails.
P0906946 Standard April 2000
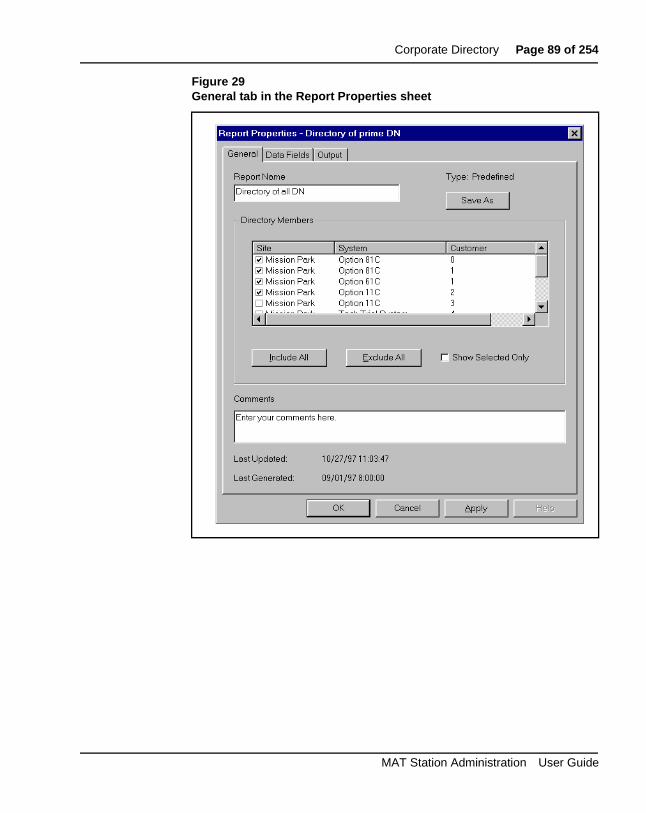
Corporate Directory Page 89 of 254
Figure 29General tab in the Report Properties sheet
MAT Station Administration User Guide

Page 90 of 254 Corporate Directory
mes. rt
ted
ized
rt
ld is
ta
ch e
• Directory Members
— Sites/System/Customer - displays available sites and system naCheck boxes indicate if the site or system is included in the repo
— Include All - selects all sites and systems; all boxes are checked
— Exclude All - deselects all sites and systems; all boxes are unchecked
— Show Selected Only check box - toggles the list to display selecitems only or all items
• Comments - accepts user comments up to 256 characters for customreports only
• Last Updated - displays when the last change was made to the repo
• Last Generated - displays when the report was last generated; this fieempty if the report has never been generated
Data Fields tabUse the Data Fields tab to configure the report’s data fields and columnnames. Supported station data fields are displayed. See “Supported DaFields” on page 96.
Click on the check box to include that particular field in the report. For eadata field, you can specify a column name; otherwise the report uses thdefault mnemonic. See Figure 30.
P0906946 Standard April 2000

Corporate Directory Page 91 of 254
Figure 30Data Fields tab in the Report Properties sheet
MAT Station Administration User Guide

Page 92 of 254 Corporate Directory
r all
lds
tion
ft to e e
tion
port
for
Controls in the Data Fields tab include:
• Data Fields - lists all the available station data fields at the corporatelevel. Use the check box to select or deselect a data field.
• Include All - selects all data fields; all boxes are checked
• Exclude All - deselects all data fields; all boxes are unchecked
• Show Selected Only - toggles the list to display selected items only oitems
• Edit - displays a dialog box to edit the column names for the data fie
Output tabUse the Output tab to define the report’s output format and export destinafor the results. See Figure 31.
The Output page displays the order the columns appear in the report (leright). Additionally, it displays the file and path name to be used when threport is generated and saved to a file. Type the path and filename or usBrowse to navigate the directory structure to find the desired file.
Controls in the Output tab include:
• Move Up - moves the selected column name up the list by one posi
• Move Down - moves the selected column name down the list by oneposition
• File Name - allows the user to enter the path and file name for the exfile
• Browse - allows the user to navigate the directory structure to searcha path and file name
P0906946 Standard April 2000

Corporate Directory Page 93 of 254
Figure 31Output tab in the Report Properties sheet
MAT Station Administration User Guide

Page 94 of 254 Corporate Directory
Predefined reportsCorporate Directory includes four commonly generated reports as predefined reports. These are listed below along with their data fields and column names.
• Automatic Call Distribution Stations report
— ACS - Position IDT
— CLS - Trunk/Call Type Access Restriction
— SPID - Supervisor Position ID
— LOC - Location
— TN - Terminal Name
— LNAME - Last Name
• Telephone Directory report
— LNAME - Last Name
— FNAME -First Name
— PRIMEDN - Directory Number
— DEPT - Department
• Directory of Prime DNs report
— PRIMEDN - Directory Number
— INST - Intrument Type
— TN - Terminal Number
— LOC - Location
— LNAME - Last Name
— FNAME - First Name
P0906946 Standard April 2000

Corporate Directory Page 95 of 254
s for
at. re to
if this
• Listing of Used DNs report
— PRIMEDN - Directory Number
— LNAME - Last Name
— FNAME -First Name
— LOC - Location
— TN - Terminal Number
Customized reportsUse Corporate Directory to create new report formats for your specific reporting needs. On the Report Properties dialog box, select the data fieldthe sites and systems.
You can create a customized report by starting with an existing report formUse the Report Properties dialog box to revise the existing report. Be susave the customized report with a new name.
Click Add Report to create a new report. This command displays a blankReport Properties dialog box with all options set to “off” by default. The Report Name field is mandatory. The screen presents an error message field is left empty when you click OK or Apply.
MAT Station Administration User Guide

Page 96 of 254 Corporate Directory
Supported Data FieldsThe table below lists the acronym and data fields supported by Corporate Directory.
Table 8Supported Data Fields (Part 1 of 6)
Data Fields Description
LNAME Last Name
FNAME First Name
INST Instrument
LOC Location
DEPT Department
CNUM Customer Number
PRIMEDN Prime DN
CAT Category
USER0
USER1
USER2
USER3
USER4
USER5
USER6
USER7
USER8
USER9
Comment
P0906946 Standard April 2000

Corporate Directory Page 97 of 254
EQUIPMENT Equipment
SSTAT Sync Status
AOM Number of Add on Modules
ECOST Equipment Cost
COSTID Cost ID
DIV Division
DIGS Dial Intercom Groups
ACDS Key Assigned to Automatic Call Distribution (ACD)
ADN All Directory Numbers
EHTK External Hunt DN
EFDK External Forward DN
AAA Automatic Answer Back
AEFD Alternate External Flexible Call Forward
AEHT Alternate External Hunt DN
AGTA ACD Agent Analog Telephone
AHNT Alternate Hunt DN
ALDR M3000 Directory Lock - Discontinued
AOS observation of Supervisor
AUTU Station Specific Authcodes
CCSA Controlled Guest Telephone
CDEN Card Density
CFHA Call Forward/Hunt Override
Table 8Supported Data Fields (Part 2 of 6)
MAT Station Administration User Guide

Page 98 of 254 Corporate Directory
CFTA Call Forward by Call Type
CFXA Call Forward External
CLS Trunk/Call Type Access Restriction
CNDA Call Party Name Display
CNIA Call Number Information
CRCS Flexible Code Restriction Class
CWA Call Waiting - from Incoming Trunk
CWNA ACD Call Waiting Notification Set
DDGA Present/Restrict Calling Number
DDS Digit Display
DELA Dealer Allowed
DES 1-6 Character Designator
DIG Dial Intercom Group<space>Member
DN Station Directory Number
DNDA Dialed Number Name Display
DPUA Directory Number Pickup
EFD CFNA DN for External Calls with CFTA
EHT Hunt DN for External Calls with CFTA
FBA Call Forward Busy for DID Calls
FCAR Force Charge Account
FDN Flexible Call Forward No Ans DN
FNA Call Forward No Answer
GPUA Group Pickup
Table 8Supported Data Fields (Part 3 of 6)
P0906946 Standard April 2000

Corporate Directory Page 99 of 254
HBTA Hunt by DID Call Type
HFA Hands Free
HSPA Hospital Room with DID Management
HTA Hunting
HUNT Hunt DN - All Calls, or Internal Calls Forward
IAMA Intercept Computer Answering Machine
ICT Intercept Computer Terminal/Printer
IPNA Intercept Position
IRGA Intercept Computer Interrogation Set
LANG Language for Automatic Wake Up
LDN Departmental LDN
LHK Last Hunt Key for Short Hunt
LNA Last Number Redial
LPA Message Waiting Lamp
MCRA Multiple Call Arrangement DN
MCTA Malicious Call Trace
MLWU_LANG Language for Automatic Wake Up
MRA Message Registration
MTA Maintenance Set
MWA Message Waiting at Message Service
NAMA Present/Restrict Calling Name
NCOS Network Class of Service
Table 8Supported Data Fields (Part 4 of 6)
MAT Station Administration User Guide

Page 100 of 254 Corporate Directory
PDN Calling Line ID from Prime DN
PRI ACD Agent Priority Level
PUA Call Pickup
RCC Restricted from Receiving Collect Call
RNPG Ringing Number Pick-up Group
RTDA Call Redirection by Time of Day
SCPW Station Control Password
SFA Second Level CFNA
SFDN Secretarial Forwarding DN
SFLT Secretarial Filtering Boss/Secretary
SGRP Scheduled Access Restriction Group
SPID Supervisor Position ID
SPV ACD Supervisor/Agent
SSU System Speed Call List Number
TEN Multi-Tenant Number
Table 8Supported Data Fields (Part 5 of 6)
P0906946 Standard April 2000

Corporate Directory Page 101 of 254
TENA Tenant Service
TGAR Trunk Group Access Restriction
TN Terminal Number
TSA Three Party Service
USMA Meridian 911 Position
VISI Visiting Portable
VMA Virtual Message Agent
WRLS Wireless
XLST Pretranslation
XRA Ring Again
Table 8Supported Data Fields (Part 6 of 6)
MAT Station Administration User Guide

Page 102 of 254 Corporate Directory
P0906946 Standard April 2000

Page 103 of 254
254
a d as
ext ting
t to
List ManagerThis section contains information about how to use List Manager. The List Manager module allows you to work with the following list types:
• Speed Call and System Speed Call—allows a user to place a call totelephone number by dialing a short code. These codes are manageentries in a Speed Call list.
• Group Call—allows a user to place a call to a list of DNs at the same time by pressing the Group Call key.
• Group Hunt—allows the system to route an unanswered call to the nidle DN in a prearranged hunt chain (or list), based on the Group HunPilot DN linked with the station’s Prime DN.
Summary of List ManagerList Manager allows you to perform the following functions:
• Create and modify lists
• Create multiple lists with one operation
• Copy and paste lists from one system to another
• Work with list templates
• Set default properties for all lists of a given type
• Assign a station to a list (In the Stations module you can assign a lisa station)
• Assign a Pilot DN to a list
• Print reports on list usage
MAT Station Administration User Guide

Page 104 of 254 List Manager
Open List ManagerFigure 32 shows where to access List Manager from within the System Window.
To open List Manager for a system:
1 From the MAT Navigator, open the system window for the selected system.
2 In the System window tree control, open Stations.
3 Double-click the List Manager icon.
The List Manager window opens.
Figure 32MAT System Window
P0906946 Standard April 2000

List Manager Page 105 of 254
t
ge:
e .
irst on e
. data o
Download list data from the Meridian 1If list data is present on the system, download the list data to MAT the first time you open List Manager. You can synchronize each list type separately or synchronize all list types at once.
To download list data from the Meridian 1 system:
1 Select a list type in the List Type view or select the item called “List Manager” to download data for all list types.
2 Choose menu Synchronize - Retrieve - Now. The List Manager Sync window appears (Figure 33).
List Manager automatically logs in to an idle TTY port and downloads lisdata to the MAT PC.
3 Wait until the Synchronization Status section displays the following messa
Logged out from the switch
4 Click Close.
Synchronization ConsiderationsYou can transmit data to program a Meridian 1 system with relevant list data defined in MAT’s List Manager application. List Manager can also retrievlist data from a Meridian 1 system, where it can be viewed and modified
If you have a Meridian 1 with list data already programmed, you should fdownload the data to MAT (See “Download list data from the Meridian 1” page 105.). Then you can modify the data and upload the changes to thMeridian 1 system.
Use the Synchronize menu to schedule communications with the systemSynchronization is a task that ensures the list data in MAT matches the on the Meridian 1 system. Synchronization can be achieved in one of twways, as follows:
• Retrieve data from the Meridian 1 to MAT (download)
• Transmit data from MAT to the Meridian 1 (upload). Note: Generally, you should transmit list data before transmitting station data. This ensures that the list is present on the system before Station Administration assigns feature key access to the list.
MAT Station Administration User Guide

Page 106 of 254 List Manager
Figure 33List Manager Sync window
P0906946 Standard April 2000

List Manager Page 107 of 254
een
ata
or n
nges tion
Synchronization StatusWhen MAT performs a data retrieval, the synchronization status of each list determines whether the data is updated. The following status indicators define how the list is affected during a synchronization:
• NEW: Data has been defined, but not uploaded to the Meridian 1.
• TRN (transmit): Data is synchronized with the Meridian 1.
• OUT: Data is removed from MAT and will be deleted from the Meridian 1 during the next synchronization.
• CHG (change): Data has been changed, but the changes have not buploaded to the Meridian 1.
• RPL (replace): Data in the Meridian 1 system is replaced with new dduring the next synchronization.
List Manager automatically sets the synchronization status of each list. Fexample, if you modify parameters of an existing list, the synchronizatiostatus is set to CHG (change).
Change Synchronization StatusYou can change the synchronization status of each list in List Manager. For example, if you change parameters for a list, but do not want the chato take affect on the system right away, you can change the synchronizastatus of the list to TRN.
To change the synchronization status of a list in List Manager:
1 Select a list.
2 Choose menu Edit - Change Status to and choose a new status from the available choices.
MAT Station Administration User Guide

Page 108 of 254 List Manager
nt on
ch,”
to
ch,”
Station Synchronization vs. List SynchronizationList Manager synchronization is a separate task from Station Administration synchronization. After you synchronize list data, you should synchronize station data.
Synchronize list data before synchronizing station data. Some List Manager settings make changes in MAT’s Station Administration module (for example, feature key assignment). You must ensure the list data is presethe system so that station validation does not fail.
Synchronize List Manager with the SystemYou must periodically synchronize List Manager data with data on the Meridian 1 system.
UploadTo upload data from MAT List Manager to the Meridian 1 system:
1 In the List Type view, select the list type that you want to synchronize or select “List Manager” to synchronize all list types.
2 Choose menu Synchronize - Transmit - Now. The List Manager Sync window appears (see Figure 33).
3 When the Synchronization status area displays “Logged out from the switclick Close.
The selected list type is synchronized with the Meridian 1 system.
DownloadTo download data from the Meridian 1 system to MAT List Manager:
1 Select the list type that you want to synchronize or select “List Manager”synchronize all list types.
2 Choose menu Synchronize - Receive - Now. The List Manager Sync window appears (see Figure 33).
3 When the Synchronization Status area displays “Logged out from the switclick Close.
The selected list type is synchronized with the Meridian 1 system.
P0906946 Standard April 2000
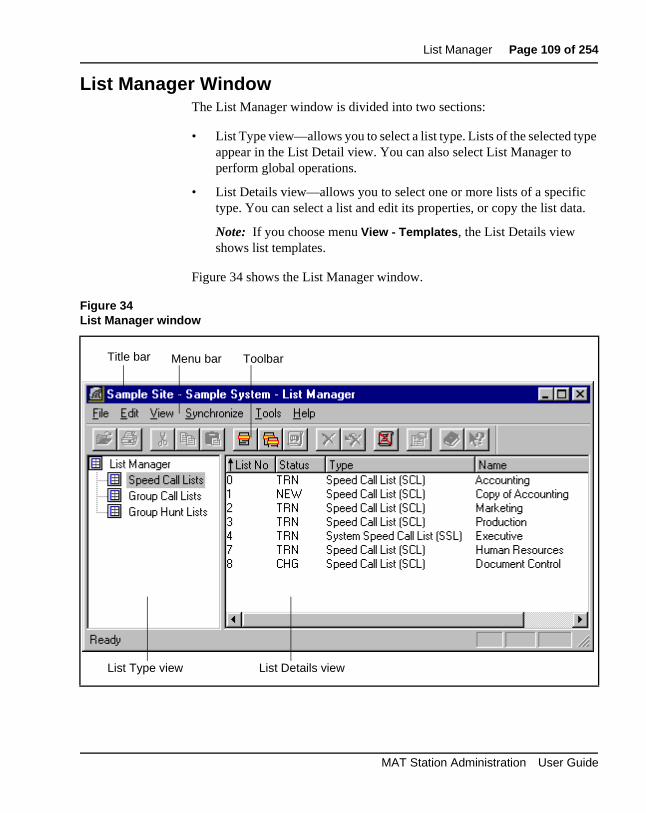
List Manager Page 109 of 254
pe
a.
List Manager WindowThe List Manager window is divided into two sections:
• List Type view—allows you to select a list type. Lists of the selected tyappear in the List Detail view. You can also select List Manager to perform global operations.
• List Details view—allows you to select one or more lists of a specifictype. You can select a list and edit its properties, or copy the list dat
Note: If you choose menu View - Templates, the List Details view shows list templates.
Figure 34 shows the List Manager window.
Figure 34List Manager window
List Type view List Details view
Title bar Menu bar Toolbar
MAT Station Administration User Guide
Page 110 of 254 List Manager
ns
all,
T
Figure 34 calls out the following List Manager components:
• Title Bar—Identifies the system and contains standard Windows controls to minimize, maximize, and close the window.
• Menu Bar—Provides easy access to List Manager commands
• Toolbar—Provides easy access to List Manager commands
• List Type view—Allows you to select which type of list to access
• List Details view—Displays all lists of the selected type, including thelist number, synchronization status, list type, and list name
The List ViewChoose View - Lists to display lists defined for the system. Each list contaithe following information:
List Number: Unique number used to identify the list on the system
Type: Type of list, based on the Meridian 1 feature it supports (Speed CSystem Speed Call, Group Call, Group Hunt).
Sync Status: An indication of whether Meridian 1 data and the data in MAare synchronized. The following information defines the synchronizationstatus for each list:
• NEW: List data defined in MAT, but not uploaded to the Meridian 1.
• TRN: List data is synchronized with the Meridian 1.
• CHG: List data has been modified in MAT but not in Meridian 1.
• RPL: List data defined in MAT to replace synchronized station data.
• OUT: A synchronized list deleted from MAT but not yet from the Meridian 1.
Name: A name entered in List Manager, used to identify this list.
P0906946 Standard April 2000

List Manager Page 111 of 254
.
y
s
The Template ViewChoose menu View - Templates to display list templates defined for the system. The display contains the same information for a template as the List view contains for a list.
Templates provide data that is common among many individual lists. In a single operation, using a template, you can define multiple lists which have data in common. A template can contain all or part of a list definition. You can change template data in exactly the same way as station data.
List Manager MenusList Manager’s menus consist of the following:
• File
— Open: Display the property sheet of the selected list or template
— New:
— List: Create a new list. Displays the New List propertsheet.
— Multiple Lists: Create more than one new list. Displaythe Multiple List Creation dialog.
— Template: Create a new template. Displays the New Template property sheet.
— Print Setup...: Select a printer and a printer connection
— Reports: Select a Report
— Properties: Display the property sheet of the selected list or template.
— Close: Close the List Manager window.
MAT Station Administration User Guide

Page 112 of 254 List Manager
ard.
w.
ed to
ed e
ed
ed e
ed n.
• Edit
— Undo : Reverse the most recent command.
— Cut: Remove the selected list(s) or text and place it on the clipbo
— Copy: Place a copy of the selected list(s) on the clipboard.
— Paste: Insert a copied list into the List Details view.
— Delete: Remove the selected list(s) from the List Manager windo
— Select All: Selects all lists in the List Manager Display View.
— Change Status to:
— NEW: Change the synchronization status of the selectlist to NEW. Data has been defined, but not uploadedthe Meridian 1.
— TRN: Change the synchronization status of the selectlist to TRN (transmitted). Data is synchronized with thMeridian 1.
— OUT: Change the synchronization status of the selectlist to OUT. Data is removed from MAT and will be deleted from the Meridian 1 during the next synchronization.
— CHG: Change the synchronization status of the selectlist to CHG (change). Data has been changed, but thchanges have not been uploaded to the Meridian 1.
— RPL: Change the synchronization status of the selectlist to RPL (replace). Data in the Meridian 1 system isreplaced with new data during the next synchronizatio
• View
— Toolbar: Displays or hides the Toolbar.
— Status Bar: Displays or hides the Status Bar.
— Lists: Change the display view to show lists.
— Templates: Change the display view to show templates.
P0906946 Standard April 2000

List Manager Page 113 of 254
f r the ds
• Synchronize
— Transmit:
— Now: Transmit data from MAT to the Meridian 1.
— Schedule: Schedule a transmission of data from MATto the Meridian 1.
— View Last Transmit: Display a log file showing results of the last data transmission.
— Retrieve:
— Now: Retrieve data from the Meridian 1 to MAT.
— Schedule: Schedule a retrieval of data from the Meridian 1 to MAT.
— View Last Retrieve: Display a log file showing results of the last data retrieval.
• Tools
— Delete Unused Lists: Display the Delete Unused Lists dialog.
— Options: Displays the Options dialog.
• Help
— Help Topics: Display the list of Help topics.
— What’s This : Provides context-sensitive help on the next item you select. Clicking anywhere else takes you to the first topic in the help topic list.
— About List Manager: Display release information for the List Manager window.
ToolbarThe List Manager toolbar includes several useful buttons. The function oeach button in the toolbar appears when you hold the mouse cursor ovebutton. Toolbar buttons provide shortcuts to some of the same commanfound in the menus.
MAT Station Administration User Guide

Page 114 of 254 List Manager
Work with List ManagerThis section provides procedures to help you use List Manager to perform common tasks.
Create a New ListYou can create a new list in List Manager and upload the data to the Meridian 1. The synchronization status of the new list is NEW. You must transmit the list data to the Meridian 1 for the new list to become active.
To create a list:
1 In the List Type view, select the type of list you want to create.
2 Choose File - New - List. The New List (General) property sheet appears.
Note 1: The New List property sheet for each list type is the same as the standard property sheet for that list type. Some default values for the new list are automatically entered.
Note 2: You can edit some of the default values for a new list. To edit the list number, the option for Auto List Number Allocation (Tools - Options) must be unchecked.
3 Select either a template or an existing list to use as a basis from which to create the new list.
4 Enter a list name (up to 50 characters, alphanumeric).
5 Select the list type.
6 Click OK or Apply. Click Apply if you want to modify list parameters. Click the tabs along the top of the property sheet to view various parameters.
P0906946 Standard April 2000

List Manager Page 115 of 254
Figure 35Speed Call List Properties (General)
MAT Station Administration User Guide

Page 116 of 254 List Manager
Create a List TemplateYou can create a list template or modify an existing template. Templates provide data that is common among many individual lists. A template allows you to define multiple lists that share common elements.
To create a list template:
1 Choose menu View - Templates.
2 Choose menu File - New - Template. The New Template (General) dialog appears.
3 Select either a template or list to use as a basis from which to create the new template.
4 Enter a template name (up to 50 characters, alphanumeric).
Note: The List Number field does not apply when creating a template.
5 Select the list type to which this template applies.
6 Click OK or Apply.
Figure 36New Template dialog
P0906946 Standard April 2000

List Manager Page 117 of 254
Create Multiple ListsYou can create multiple lists with a single operation. You must have a valid template that corresponds to the list type that you want to create. After creating the lists, you should modify each list to provide its unique parameters.
Figure 37 shows the Multiple List Creation dialog.
Figure 37Create multiple lists
MAT Station Administration User Guide

Page 118 of 254 List Manager
To create multiple lists:
1 Choose menu View - Lists.
2 Choose menu File - New - Multiple Lists. The Multiple List Creation dialog appears (Figure 37).
3 Select a template or click New to create a template on which to base the new lists. The template will provide common data shared among the lists.
4 Set the number of lists to create.
5 Select the list numbers of the lists to create. Select a range of numbers in the Available Lists field and click the right arrow.
List Manager will place the correct number of lists into the Selected Lists field.
Note 1: In the Available List field and the Selected List field, list numbers are represented as ranges. For example, a range of list numbers from 11 to 20 is represented as follows:
11...20
If you want to create 25 lists and you select the above range, you must still select 15 more list numbers. Select another range to continue adding list numbers to the Selected Lists field. List Manager automatically stops adding list numbers when you reach the correct number, as set in the Number of Lists field.
Note 2: You can select a subset of a list range. After moving a range, use the right mouse button to double-click on the selected range. You can edit the range to select a subset of the range. For example, if the selected range is 2...10, you can enter 2...9 or 3...8 (but not 1...11).
6 If there are not enough list numbers available in the selected range, select another range and click the right arrow. Continue until you reach the correct number of lists to create.
7 Click OK.
P0906946 Standard April 2000

List Manager Page 119 of 254
Delete ListsYou can select a list or a template and delete it from the system. You can delete all unused lists from the system with one command. The next time you synchronize List Manager lists, the deleted lists are removed from the system.
To delete a list from the system:
1 Choose menu View - Lists.
2 In the List Type view, select the list type. In the List Details view, select the list.
3 Choose menu Edit - Delete. A confirmation box appears, stating,
"Are you sure you want to delete the list(s)/template(s)".
4 Click Yes.
To delete a template from List Manager:
1 Choose menu View - Templates.
2 In the List Type view, select the list type. In the List Details view, select the template.
3 Choose menu Edit - Delete. A confirmation box appears, stating,
"Are you sure you want to delete the list(s)/template(s)".
4 Click Yes.
To delete all unused lists of a specific type from the system:
1 In the List Type view, select the list type.
2 Choose menu Tools - Delete Unused Lists. The Delete Unused Lists dialog appears. All unused Speed Call lists are displayed.
3 Select the lists you want to delete.
4 Click OK.
The synchronization status of the deleted lists is changed to OUT.
MAT Station Administration User Guide

Page 120 of 254 List Manager
Manage List DataMAT displays list data in a property sheet that graphically represents the list data. You can manage individual list entries. Data change is described for a typical list. Most lists contain a subset of the data for this example, and the update procedure for each field and function is the same as that described here.
Whenever you modify list data that has already been synchronized with the switch, the Sync Status for that list is set to CHG. This is an indication that MAT and Meridian 1 are not in sync.
View and modify list (or template) detailsEach list has various properties that define the list. Some properties are shared among all lists of a given type; some properties are unique to a specific list. List Manager property sheets allow you to view and modify all of the various list properties.
To view list details and modify list details:
1 Choose menu View - Lists.
Note: You can choose menu View - Templates to work with List Manager templates.
2 In the List Type view, select a list type.
3 In the List Details view, double-click a specific list. The property sheet for the selected list appears.
4 Make changes as desired. Click the various tabs to view and modify different list parameters.
5 Modify data in the appropriate fields. If you make changes, click Apply before you move from one tab to the next.
6 When you have completed the changes, click OK.
Set Advanced PropertiesYou can change advanced properties for a specific list. Most of the advanced properties have default values that are set in the Options dialog (see “Set Global List Options” on page 131).
P0906946 Standard April 2000

List Manager Page 121 of 254
To set advanced properties for a list (Speed Call and Group Hunt):
1 Select a list and choose menu File - Properties. The property sheet for the selected list appears.
2 On the property sheet General tab, click Advanced Properties. The Advanced Properties dialog appears (Table 9).
3 Make change as necessary.
4 Click OK.
Table 9Advanced properties for Speed Call lists and Group Hunt lists
Field Description
Network Class of Service
Select a Network Class of Service, as defined on the Meridian 1 (applies to System Speed Call lists).
Max. DN Size Select the maximum length of DNs in the list. The default value is set in the Options dialog (Tools - Options).
Max. List Size Select the maximum number of entries allowed in the list. The default value is set in the Options dialog (Tools - Options).
Memory Usage - in Words
Free Memory Available
Indicates how much Meridian 1 system memory is available for all lists, as of the last synchronization.
Used by List Meridian 1 system memory required for this list.
MAT Station Administration User Guide

Page 122 of 254 List Manager
Modify List EntriesYou can view and modify list entries within each list.
To modify list entries:
1 Choose menu View - Lists.
2 In the List Type view, select a list type.
3 In the List Details view, double-click a specific list. The property sheet for the selected list appears.
4 Click the List Entries tab. The List Entries tab lets you modify parameters for each list entry number.
5 Use the List Entries buttons to modify list entries, as shown in Table 10:
6 Click OK or Apply.
Table 10List Entries buttons
Button Description
Add Add a new entry to the list.
Modify Modify the selected list entry.
Clear Clear the selected list entry.
Move UpMove Down
Use these buttons to change the entry number of the selected entry.
CAUTION: Be careful when you make changes to list entry numbers. This operation re-orders the entry numbers in a list. For example, if you move entry number 10 up to number 2, then entry number 2 becomes number 3, number 3 becomes number 4, and so on.
For Speed Call lists, these changes affect the short key used to dial each list entry.
For Group Hunt lists, these changes affect the order of the hunt chain.
P0906946 Standard April 2000

List Manager Page 123 of 254
Figure 38Speed Call List Properties (List Entries)
MAT Station Administration User Guide

Page 124 of 254 List Manager
Work with StationsUse the List Properties (Associate Stations) dialog to assign a feature and its associated list to one or more stations (telephones).
Note: This operation modifies the entries in the Station Administration module. You must synchronize stations from Station Administration to change these settings on the Meridian 1 system.
Figure 39 shows the Associated Stations tab for Speed Call Lists.
Figure 39Speed Call List Properties (Associated Stations)
P0906946 Standard April 2000

List Manager Page 125 of 254
n
Assign StationsTo change feature key assignments for stations:
1 Select a list and choose File - Properties. The List Properties (General) dialog appears.
2 Choose the Associated Stations tab. Any stations displayed have the feature assigned.
3 Click Add. The Add Stations dialog appears.
4 In the Select Stations list, select the station(s) and feature key(s) you want to assign the feature and its associated list.
Note: List Manager sets the feature key assignment in MAT’s Station Administration module. Therefore, you must transmit the data from StatioAdministration for the feature key assignment to take effect.
5 Click Add. The selected stations are moved from the Select Stations list(bottom) to the Selected Stations list (top).
6 Click OK.
MAT Station Administration User Guide

Page 126 of 254 List Manager
Figure 40Add Stations dialog
P0906946 Standard April 2000

List Manager Page 127 of 254
n
Modify Feature Key PropertiesTo change the feature key properties for a station:
1 Select a list and choose File - Properties. The List Properties (General) dialog appears.
2 Choose the Associated Stations tab. Any stations displayed have the feature assigned.
3 Select a station and click Modify. The Modify Station Details dialog appears.
4 Select a new key number, if desired. For Speed Call, select either User or Controller to change the access type, if desired.
Note: List Manager sets the feature key assignment in MAT’s Station Administration module. Therefore, you must transmit the data from StatioAdministration for the feature key assignment to take effect.
5 Click OK.
Figure 41Modify Station dialog (Speed Call)
MAT Station Administration User Guide

Page 128 of 254 List Manager
Remove Station AssignmentTo remove the feature associated with this list from a station:
1 Select a list and choose File - Properties. The List Properties (General) dialog appears.
2 Choose the Associated Stations tab. Any stations displayed have the feature assigned.
3 Select a station or stations and click Remove.
4 Click OK.
Work with Pilot DNsPilot DNs provide access to Speed Call Lists. A Pilot DN can also activate Group Hunting.
Assign a Pilot DNTo assign a Pilot DN to a list:
1 Select a Speed Call list and choose menu File - Properties. The property sheet for the selected list appears.
2 Click the Pilot DNs tab (Figure 42).
3 Use the buttons to Add, Modify, or remove Pilot DNs associated with this list.
Note: Pilot DNs must conform to the customer Numbering Plan. To check the customer Numbering Plan:
– In the Navigator, select the system and choose menu File - Properties.
– Click the Customers tab. – Select the customer and click Properties. – Click the Numbering Plans tab.
4 Click OK or Apply.
P0906946 Standard April 2000

List Manager Page 129 of 254
Figure 42Speed Call list properties (Pilot DNs)
MAT Station Administration User Guide

Page 130 of 254 List Manager
Associate Pilot DN to a Group Hunt listTo associate a Pilot DN with a Group Hunt list:
1 Select a Group Hunt list and choose menu File - Properties. The property sheet for the selected list appears.
2 On the property sheet General tab, enter the pilot DN into the Pilot DN field.
3 Click OK or Apply.
Copy and Paste ListsYou can use the copy and paste commands to duplicate a list. Then you can modify the new list to make it unique. You can also paste the list into the List Manager window for a different system.
When you copy and paste a list, the synchronization status of the new list is set to NEW. The new list is added to the system during the next synchronization.
Duplicate a ListTo duplicate a list:
1 Choose menu View - Lists.
2 Select a list and choose menu Edit - Copy.
The list data is saved to the PC clipboard.
3 Choose menu Edit - Paste.
CAUTION: A confirmation dialog asks if you want to overwrite the current list with the copied list. Normally, you do not want to overwrite the current list.
3.1 Click Change Properties and give the pasted list a new list number.
3.2 Make any other changes that are appropriate.
3.3 Click OK.
P0906946 Standard April 2000

List Manager Page 131 of 254
m, e
Copy a List from One System to AnotherTo copy a list and paste it to another system:
1 Choose menu View - Lists.
2 Select one or more lists and choose menu Edit - Copy.
The list data is saved to the PC clipboard.
3 Open another system’s List Manager application.
4 Choose menu View - Lists.
5 In the List Type view, select the appropriate list type.
6 Choose menu Edit - Paste.
CAUTION: If the list number of the list you copied is present on this systea confirmation dialog asks if you want to overwrite the current list with thcopied list. Normally, you do not want to overwrite the current list.
6.1 Click Change Properties and give the pasted list a new list number.
6.2 Make any other changes that are appropriate.
6.3 Click OK.
Set Global List OptionsUse the Options dialog to set general parameters that apply to all lists of a specific type. To display the Options dialog, choose menu Tools - Options.
The Options dialog has separate tabs for Speed Call, Group Call, and Group Hunt lists. Some options apply only to lists of a specific type.
List Manager options apply when you create new lists. For a specific list, you can override most of these options. Click Advanced Properties on the property sheet (General) tab.
MAT Station Administration User Guide
Page 132 of 254 List Manager
k
of
t
w
e
w ed).
ou
ou tal
and
Default OptionsDefault options allow you to manage list allocation efficiently.
— List size—default number of entries created for a new list
— Network Class of Service (System Speed Call)—default NetworClass of Service associated with entries in a new list
— DN size—Default maximum length of Directory Numbers associated with entries in a new list
— Originator Control over list (Group Call)—determines if the originator of the Group Call can terminate the call
— Max. length of queue (Group Hunt)—Default maximum number calls that can be queued against the Pilot DN for new lists
— Call Forward All Calls (Group Hunt)—Check to allow Group Hunto terminate at a station that has Call Forward All Calls allowed.
Memory OptimizationThe following options help you manage system memory on the Meridian 1. These options allow you to restrict the amount of systemmemory required to support the lists.
— Maximum List Size—Maximum number of entries allowed in a nelist.
— Memory Water Mark—Memory threshold. When the system memory used by lists is at or above the Memory Water Mark, thAuto Increase List Size checkbox is set to Off.
— Auto Increase List Size—When checked, lists are allowed to groas new entries are added (until the Memory Water Mark is reach
— Read Only Auto List Number—When checked, List Manager allows you to edit the automatically generated list numbers as ycreate new lists.
Available List NumbersOptions for Speed Call and Group Hunt lists include controls where ycan set the available list ranges. These options let you restrict the tonumber of lists allowed for the system. Enter the starting list number ending list number in the range.
P0906946 Standard April 2000

List Manager Page 133 of 254
t of
ther iles
Work with ReportsList Manager lets you view, manage, and generate reports using list data from systems configured in MAT. You can view each report on screen, print the report, or save the report to a file. Report layout and formatting is done through Microsoft Excel.
You can generate a report immediately. You can schedule report generation with specific dates, times, and intervals. Generated reports use the data extracted from the MAT database. These reports are automatically saved with a system default name to the default location unless you specify otherwise.
Each report format has the following attributes, as noted by the column headers.
• Report Name - names of available reports
• Type - notes if the report is either predefined or customized
• Number of systems - number of systems for which the report will begenerated
• Number of Data Fields - number of data fields in the report
• Last Generated - date and time when the report was last generated
Each report shows a specific set of list data. List Manager provides a sereports whose properties are predefined.
Reports and Text FilesAll log report activity is performed, by default, in the current working directory for the System (the system subdirectory in your PC system). Oreports are sent to the PC directory of your choice. Here is a list of text fwith the appropriate extension found in the working directory:
• Reports (filename.TXT)
• Communications logs (filename.LOG)
You need only supply the filename when prompted to save these files—MATautomatically supplies the appropriate extension.
MAT Station Administration User Guide

Page 134 of 254 List Manager
List
Generate ReportsYou can generate a report and display it immediately, send it to a printer, or save it to a file. You can schedule report generation to take place at predefined intervals.
To generate a report:
1 Choose menu File - Reports. The Reports window appears.
2 Select a report in the window display.
3 Click one of the following buttons:
• Print—Print the report to the selected printer.
• Print Preview—View the report on the MAT PC.
• Print Setup—Select a printer to print reports.
• Schedule—Display the Schedule window. Use this window to specify when and how often to generate the report.
To save a report to a file:
1 Choose menu File - Reports. The Reports window appears.
2 Select a report in the window display.
3 Check Print to File.
4 Click Print. The Export dialog appears.
5 Select a file format and destination type.
6 When the Choose Export File dialog appears, enter a file name (or use the default name) and select a directory to place the file.
7 Click Save. List Manager saves the report to the file name and location specified.
Predefined ReportsList Manager includes several predefined reports. These are listed belowalong with a short description of each report type. You cannot customize Manager reports.
P0906946 Standard April 2000

List Manager Page 135 of 254
List Manager provides the following report forms:
Group Call
• Group Call lists—Group Call lists, sorted by list number
• Group Call lists by name—Group Call lists, sorted by list name
• Group Call lists with entries—Group Call lists including information about their entries.
• Group Call lists with associated DNs—Group Call lists including information about their associated DNs
Group Hunt
• Group Hunt lists—Group Hunt lists, sorted by list number
• Group Hunt lists by name—Group Hunt lists, sorted by list name
• Group Hunt lists with entries—Group Hunt lists including information about their entries
Options
• List Manager Options—List options for each list type
Speed Call
• Speed Call list by name—Speed Call lists, sorted by list name
• Speed Call lists—Speed Call lists, sorted by list number
• Speed Call lists by list type—Speed Call lists, sorted by list type (Speed Call or System Speed Call)
• Speed Call lists by SYNC status—Speed Call lists, sorted by synchronization status
• Speed Call lists with associated DNs—Speed Call lists including information about their associated DNs
• Speed Call lists with entries—Speed Call lists including information about their entries
MAT Station Administration User Guide

Page 136 of 254 List Manager
P0906946 Standard April 2000

Page 137 of 254
254
n
1.
Voice MailboxOverview
Voice Mailbox (VMB) data is similar to CPND in that it exists as a separate entity within MAT. However, it is associated with a Directory Number (which serves as a mailbox ID), and modifications to the VMB data can be made from any station which has an appearance of the mailbox DN. The station provides a means of access to data which is not a part of the station itself.
Voice mailbox differs from CPND in that it does not have a dedicated overlay. CPND information can be modified using overlay 95 as well as overlays 10 and 11 (MAT uses overlay 95). Voice mailbox information is only accessible from overlays 10 and 11.
VMB Data ConsiderationsVMB data is accessible from the Station Administration module (DN list dialog). VMB data is retrieved and transmitted with station data. There is no separate VMB communications task as there is for CPND.
When you delete a station which has one or more single appearance DNs with associated mailboxes, you are prompted to delete the mailbox(es) on the Meridian Mail system. This information is used to respond to a VMB prompt when the station is OUT’ed on the system.
VMB data can be modified at the Meridian 1 system through the MeridiaMail interface. MAT synchronization is a two step process, as follows:
1 The Meridian 1 database must be synchronized by uploading the information from Meridian Mail using overlay 48.
2 A station retrieval synchronizes the MAT database with the MeridianSee “Communicating with Meridian 1” on page 157.
MAT Station Administration User Guide
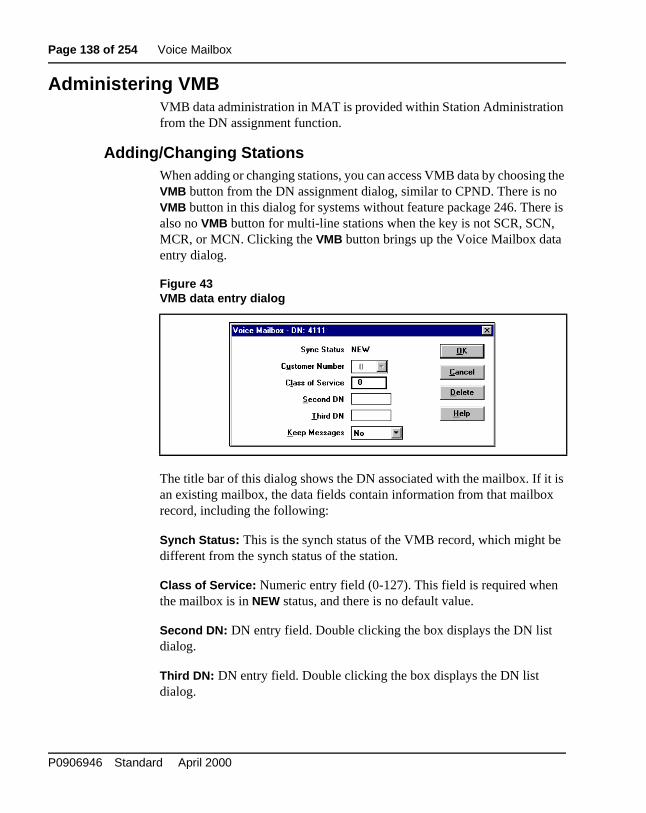
Page 138 of 254 Voice Mailbox
Administering VMBVMB data administration in MAT is provided within Station Administration from the DN assignment function.
Adding/Changing StationsWhen adding or changing stations, you can access VMB data by choosing the VMB button from the DN assignment dialog, similar to CPND. There is no VMB button in this dialog for systems without feature package 246. There is also no VMB button for multi-line stations when the key is not SCR, SCN, MCR, or MCN. Clicking the VMB button brings up the Voice Mailbox data entry dialog.
The title bar of this dialog shows the DN associated with the mailbox. If it is an existing mailbox, the data fields contain information from that mailbox record, including the following:
Synch Status: This is the synch status of the VMB record, which might be different from the synch status of the station.
Class of Service: Numeric entry field (0-127). This field is required when the mailbox is in NEW status, and there is no default value.
Second DN: DN entry field. Double clicking the box displays the DN list dialog.
Third DN: DN entry field. Double clicking the box displays the DN list dialog.
Figure 43VMB data entry dialog
P0906946 Standard April 2000

Voice Mailbox Page 139 of 254
ch a
be T , to
t it
any
Keep Messages: Drop-down listbox containing YES and NO (NO is default). This field is only available when the VMB synch status is NEW.
The VMB synch status indicates which operation is required at the VMB prompt in overlay 10 or 11.
• NEW: VMB does not exist on Meridian 1 and will be added at uploadtime.
• CHG: VMB exists on Meridian 1 and will be changed.
• OUT: VMB exists on Meridian 1 and will be removed.
• TRN: VMB exists on Meridian 1 and no update is required.
Use the Remove button to change the VMB synch status to OUT. This operation is confirmed with a message box. When a VMB is in OUT status, no further updates are allowed (except for UNDO).
If a VMB is modified or added from an existing station, that station’s synstatus becomes CHG in order to allow the VMB update to occur as part of station update.
Deleting StationsWhen you remove a station that has a single appearance DN with an associated mailbox, you are prompted to determine if the mailbox shoulddeleted on Meridian Mail as well. In order to respond to this prompt, MAalso prompts you for this information when you delete stations. Howeveravoid possible synchronization problems, a different method is used.
When you delete stations in MAT, the delete confirmation dialog is displayed. On systems with VMB, this dialog contains a Delete VMB checkbox that defaults to checked (YES).
Your YES or NO response is used to continue or cancel the deletion. Thedelete VMB information is stored as part of the delete transaction, so thaapplies to all affected stations. MAT uses this information to respond to DELETE_VMB prompts presented during transmission of the deleted stations.
MAT Station Administration User Guide

Page 140 of 254 Voice Mailbox
ing ever
will f a
last e
and pts e
DN, ay 10
oved ou
or ntire the te.
se are of
The implications of this approach are as follows:
• You are prompted for this information even if none of the stations bedeleted has a single appearance DN. In this case, the information is nused.
• If you wish to delete two stations but give different responses to DELETE_VMB for those stations, two separate Edit - Delete operations are required.
This guarantees that the correct information is stored in the station that actually get the DELETE_VMB prompt. In cases where all occurrences omultiple appearance DN are deleted within the MAT database, only the station transmitted will receive the DELETE_VMB prompt. Since it is notpossible to know which station will be transmitted last in all situations, thDELETE_VMB information must be stored with all the stations.
This procedure prevents accidental deletion of mailboxes when the MAT Meridian 1 databases are not completely synchronized. Since MAT promyou on any deletion (even if no single appearance DN’s are involved), thDELETE_VMB information is available if the Meridian 1 prompts for it unexpectedly. For example: The MAT database has two appearances of abut the Meridian 1 database has only one (due to a change done in overlor 11).
Changing DNsWhen you change a DN on a station, its associated mailbox must be remfrom the VMB file if the DN prior to the change was single appearance. Yshould delete the VMB record when you commit to the station update byclicking OK on the Station dialog. In order to warn you when a mailbox record is to be deleted, a confirmation dialog appears.
The confirmation dialog appears when a station change will result in onemore mailboxes being deleted. If you choose to cancel at this point, the estation update is canceled. If you choose to continue with the operation,mailbox can be restored later by performing an undo of the station upda
Because a single mailbox can be updated from multiple stations and thostations can be transmitted to the Meridian 1 system in any order, theresome synchronization issues which can not be resolved by MAT. Somethese issues are described in the examples below.
P0906946 Standard April 2000

Voice Mailbox Page 141 of 254
All of the following examples involve two transactions, which, by default, are transmitted on a first-come-first-served basis. The ambiguities described below only occur if you schedule the second transaction to be transmitted before the first.
VMB Data SynchronizationConsider the following examples when scheduling synchronizing station data associated with Voice Mailbox data:
Example 1—Deleting StationsStation A and Station B have the only two appearances of DN 2000, which has an associated voice mailbox.
1 Delete station A and respond YES to the Delete VMB dialog.
2 Delete station B and respond NO to the Delete VMB dialog.
If station A is scheduled before station B, the mailbox is deleted on Meridian Mail. If station B is scheduled first, the mailbox will not be deleted.
Example 2—Adding a MailboxStation A has single appearance of DN 2000, which has an associated voice mailbox in TRN status.
1 Change DN on station A to 2001 (this deletes the VMB record for 2000).
2 Add station B with DN 2000 and create a new voice mailbox for it.
If station B is scheduled before station A, the transmit will fail when it attempts to create a new mailbox for DN 2000. It will exist on the system until station A is transmitted.
Example 3—Changing a DNStation A and station B both have an appearance of DN 2000, which has an associated voice mailbox. Station B is in TRN status.
1 Update the mailbox via station A.
2 Before transmitting station A, change DN 2000 to 2001 on station A.
When station A is transmitted, the updates to the voice mailbox are not made, because station A no longer has an appearance of DN 2000.
MAT Station Administration User Guide

Page 142 of 254 Voice Mailbox
P0906946 Standard April 2000
Page 143 of 254
254
Global UpdateOverview
The Global Update function is available in both the Station Administration and the CPND Administration modules. It lets you change common data values in each of selected items in the main application window (Station list or CPND list) either directly or through a confirmation option.
The Global Update procedure involves the following steps:
1 Select those list items that you wish to update. You can use the Select feature to select stations based on specific criteria.
2 Select a field for update.
3 Define the update or updates to perform on a selected field in the selected items.
4 Execute the change.
You can perform the update on all selected items directly, or you can do it through a confirmation option on an item-by-item basis.
If you are running in Installation mode, you are prompted to set up communication with Meridian 1 whenever you modify a data record. You can synchronize the data now, schedule a time for synchronization, or cancel the prompt and schedule synchronization later. See “Communicating with Meridian 1” on page 157
MAT Station Administration User Guide
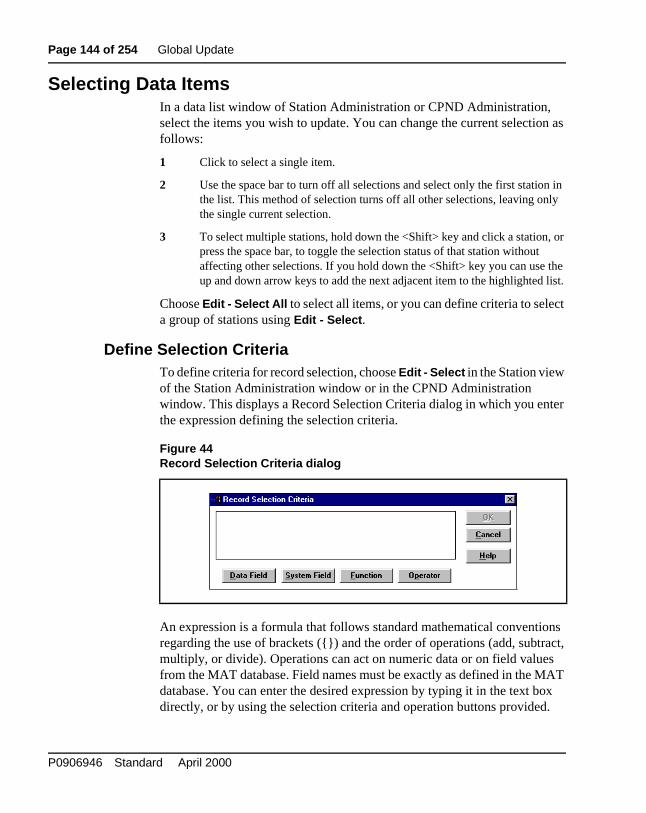
Page 144 of 254 Global Update
Selecting Data ItemsIn a data list window of Station Administration or CPND Administration, select the items you wish to update. You can change the current selection as follows:
1 Click to select a single item.
2 Use the space bar to turn off all selections and select only the first station in the list. This method of selection turns off all other selections, leaving only the single current selection.
3 To select multiple stations, hold down the <Shift> key and click a station, or press the space bar, to toggle the selection status of that station without affecting other selections. If you hold down the <Shift> key you can use the up and down arrow keys to add the next adjacent item to the highlighted list.
Choose Edit - Select All to select all items, or you can define criteria to select a group of stations using Edit - Select.
Define Selection CriteriaTo define criteria for record selection, choose Edit - Select in the Station view of the Station Administration window or in the CPND Administration window. This displays a Record Selection Criteria dialog in which you enter the expression defining the selection criteria.
An expression is a formula that follows standard mathematical conventions regarding the use of brackets ({}) and the order of operations (add, subtract, multiply, or divide). Operations can act on numeric data or on field values from the MAT database. Field names must be exactly as defined in the MAT database. You can enter the desired expression by typing it in the text box directly, or by using the selection criteria and operation buttons provided.
Figure 44Record Selection Criteria dialog
P0906946 Standard April 2000

Global Update Page 145 of 254
t
You er.
.
The dialog has buttons that allow you to select fields, operators, and functions to build a valid expression. You may have to modify the position of brackets when completing the expression.
When you have finished creating a valid expression, click OK to display the Station Administration window. Those items which fit the criteria are highlighted. You can still modify this selection as described in “Selecting Data Items” on page 144.
Select Data FieldWhen you choose Data Field, a list of available fields is displayed in a SelecData Field dialog.
Select the desired station or CPND field name and click OK to paste the field into the Select Criteria expression text box at the current cursor position. can type a letter to scroll the listing to the next item starting with that lett
Select System FieldWhen you choose System Field, a list of available fields is displayed in aSelect System Field dialog.
Select the desired field name and click OK to paste the selected field name into the Select Criteria expression text box at the current cursor position
Figure 45Select Data Field dialog
MAT Station Administration User Guide

Page 146 of 254 Global Update
Select FunctionA function can generate a value on its own, or it may act on the field directly after it in the expression to produce a value that depends on that field value. When you choose Function, a list of available functions is displayed in a Select Function dialog.
Select the desired field name and click OK to paste the selected function name into the Select Criteria expression text box at the current cursor position.
Figure 46Select System Field dialog
Figure 47Select Function dialog
P0906946 Standard April 2000

Global Update Page 147 of 254
Select OperatorAn operator causes a mathematical combination of field values (arithmetic, Boolean, conditional, and so on). When you choose Operator, a list of available operators is displayed in an Operators dialog.
Select the desired operator and click OK to paste it into the Select Criteria expression text box at the current cursor position.
Selecting the Items for ChangeWhen you have completed the selection criteria expression, click OK to return to the Administration list window. All items that meet the defined criteria are highlighted.
Example ExpressionsBelow are examples of selection expressions to help you understand the Select feature.
Example 1Select all stations that have been changed in the MAT database since the last transmission to the switch.
Figure 48Operators dialog
MAT Station Administration User Guide

Page 148 of 254 Global Update
ion
The SYNCH field shows synchronization for the sets in relation to the Meridian 1 database. If the synch status of the set is TRN (for transmitted) then all changes have been transmitted to the switch and the data is synchronized with the switch. Any other status (NEW, OUT, CHG, RPL) identifies a set that has been changed on MAT and needs to be transmitted to the switch (see the Sync Status section for details.)
In order to select all stations that need to be transmitted, you can either select all stations in NEW, OUT, CHG or RPL status or you can simply select all sets that are not in TRN status. The selection will be the same in either case. For this example, we’ll choose all sets that are not in TRN status:
1 Choose Edit - Select.
2 From the Data Field list choose SSTAT.
3 Click <> (not equal to) from the Operator list (or simply type in <>).
4 Type in “TRN” (Note: all strings must be enclosed in quotes. Column 2 in the Data Field List identifies the field as either a string or numeric).
The complete command in the Record Selection Criteria edit box is as follows:
STATION->SSTAT<>”TRN”
Note that instead of following steps 2-4 you can simply type in the expressabove.
5 Click OK.
All stations will be selected except those in TRN status.
Example 2Select all stations with a prime DN between 4000 and 5000.
To select all stations within this range, select all sets with PRIMEDN>4000 and PRIMEDN<5000. MAT will allow you to do this by following these steps:
1 Choose Edit - Select.
2 Select PRIMEDN from the Data Field list.
3 Select > from the Operator list (or simply type in >).
4 Type in “4000” .
P0906946 Standard April 2000

Global Update Page 149 of 254
5 From the Operator list select .AND.
6 Select PRIMEDN from the Data Field list.
7 Select < from the Operator list (or simply type in <).
8 Type in “5000 ”.
The complete command is as follows:
STATION->PRIMEDN>”4000”.AND.STATION->PRIMEDN<“5000”
9 Click OK.
All stations that have a prime DN between 4000 and 5000 will be selected.
Example 3Select all M2616 sets with class of service CFXA.
1 Choose Edit - Select.
2 Select INST from the Data Field list.
3 Select = from the Operator list (or simply type it in).
4 Type “M2616” (criteria is case sensitive; make sure you use a capital M).
5 Select .AND. from the Operator list.
6 Select CFXA from the Data Field List (the mnemonic CFXA represents Call Forward which can be either allowed “CFXA” or denied “CFD”).
7 Type in “= CFXA”.
8 Click OK.
All M2616 type stations with Call Forward External Allowed (CFXA) will be selected.
Specify the ChangeYou can perform a global update on a single field in each item selected in the list window. Once you have selected the desired items for update, you select the field to change.
MAT Station Administration User Guide

Page 150 of 254 Global Update
field list
lues For
Select the Field to ChangeWhen you choose Edit - Global Update, the Select Data Field dialog list appears. The fields listed include only those that can be changed globally. For example, the Instrument (INST) field is not included in this list because some of the fields and their values in the record depend on the instrument.
When you have selected the field to change, click OK to display the Global Change Specification dialog. The selected field name is displayed in the Mnemonic box. The example below shows the entries required to change all selected station departments to “Dept_X”.
The Global Change Values edit list box lets you set up the changes in thevalues of the field indicated by the Mnemonic box. The list box contains aof changes that you define by entering values in the Old Value and NewValue fields.
Note: The Old and New Value text boxes are case-sensitive. The vamust be entered in the same case as is used in the MAT database. example, “Dept._ B” and “Dept._b” are not the same values.
Figure 49Global Change Specification dialog
P0906946 Standard April 2000

Global Update Page 151 of 254
s
not.
Perform the Global ChangeWhen you click OK in the Global Change Specification dialog, the Global Change dialog appears. This dialog is a status dialog only (you cannot edit any of the fields).
The dialog contains a Station Definition area to identify the station currently being changed. The Change area displays the Old and New Values.
If you are not using change confirmation, a “percentage done” bar informyou of the progress of the changes.
While the change is in progress, the dialog displays the Cancel and Help buttons. Help displays help for this dialog and Cancel halts the change task.
WARNINGIf you click Cancel, there is no way of controlling which records are changed and which are
When the task is complete, the Cancel button is replaced by an OK button.
Figure 50Global Change dialog
MAT Station Administration User Guide

Page 152 of 254 Global Update
e he
rder
ox
.
hange
red,
Change ConfirmationIf you elected to confirm changes, a Confirmation dialog asks you whether to “Change this record?”, for each station record in turn. The Global Changdialog contains Station identification and Change identification data for tcurrent field.
You can move this dialog in the same way as other Windows dialogs in oto see the progress bar and function buttons in the Global Change box.
The Confirmation dialog displays the following buttons:
• Change: Perform the change indicated in the Global Change data band proceed to the next station.
• Skip: Proceed to the next station without changing the current one.
• Change All: Proceed with all remaining changes without confirmation
• Cancel: Cancel all remaining changes.
During the change process, the progress bar changes and the Global Cdata area is updated.
Change CompletionWhen the Global Change task is complete, the Confirmation box is cleathe Global Change box indicates 100% completion, and the Cancel button is replaced by an OK button.
Click OK in the Global Change dialog to return to the list window.
Global Update—Wildcards, Matching, and Allowed FieldsIf you choose Edit - Global Update, you build a list of changes for a single field on the selected records. The list of changes is built by adding requests to change Old Value to New Value for the chosen field. To improve efficiency and to shorten the list of changes, you can use * (asterisk), the wildcard character. The wildcard matches any value in the field.
Wildcard matches that you specify are always done after the other Old Value matches have failed. Otherwise, matches are attempted in order. For each selected record, the first change request that matches the Old Value is implemented.
P0906946 Standard April 2000

Global Update Page 153 of 254
Key* allows you to update a feature when the key on which the feature resides is unknown. For example, suppose you wish to update the Conference key on all sets to No Hold Conference/Autodial. The Conference key may exist on any key of the selected station(s). Key* allows you to update the key feature without knowing the key number. MAT searches for the first occurrence of the feature specified, and updates that key per the instructions. See “Global Update—Examples” on page 153 for more detail.
Certain fields on the station may not be changed with the Global updatefacility:
• Location must be unique for each station, so Global update is not permitted.
• Station type may not be changed with global update.
• Certain administrative features of a station, including color and typecannot be changed.
Global Update—ExamplesA few examples are provided below to help you use the Select and Global Update features. These examples provide the basic steps for selecting stations based on certain criteria and updating common fields. These methods can be applied to a variety of Global Update situations.
Example 1Suppose you wish to change all DNs in the range 4000-4999 to a 5 digit 54000-54999. You wish to apply this change to all stations for Customer 1.
1 Global Update is applied to selected stations only. You should therefore select all stations for Customer 1. Choose Edit - Select. Click on Data Field and choose the Customer Number field to build the expression STATION->CNUM = 1. (The STATION->CNUM portion is provided automatically when you select Customer Number from the list of Data Fields).
If there is only one customer on the Meridian 1 system, use Edit - Select All to select all the stations for this DN change.
MAT Station Administration User Guide

Page 154 of 254 Global Update
T e
y
f
lick s ox
e. A
at
hoose
ey
ith
2 Choose Edit - Global Update to specify the DN change.
• Specify the field to be changed in the Select Data Field dialog. MAprovides a special field called All Directory Numbers. You can movthe highlight in the Select Data Field dialog until the All DirectoryNumbers field is highlighted. Click on OK to select the All DirectorNumber field.
• In the Global Change Specification, you are asked to build a list oeach old value and the new value with which to replace it. The Mnemonic field shows that we are working with the field All Directory Numbers (ADN).
Enter the DN range 4000-4999 in the Old Value box. Move to theNew Value box and enter 54000-54999. To enable this change, cAdd. The requested change appears in the Global Change Valuebox. (You can Update or Delete each entry in the Global Values bby clicking the appropriate button.)
When you are satisfied with this change request, click OK.
• MAT examines each station to see if any changes need to be madmeter marks MAT’s progress through the stations. Click Cancel to halt the updating process.
For any applicable station, the Global Change dialog displays identifying information for the station and the old and new values thare to be modified.
Example 2Suppose you wish to change all Conference keys (A03) on all stations to No Hold Conference/Autodial keys (CA). Conference may currently be configured on any key on the selected stations.
1 Select the stations to be updated. Since all stations need to be changed, cEdit - Select All.
2 Choose Edit - Global Update to specify the desired change. Choose Key from the Select Data Field window. (You can move immediately to the Kmnemonic by typing in the first letter of the mnemonic, K.) The Global Update window appears. A list box allows you to specify which key to change. Since you are not sure which key on each station is equipped wConference, use KEY*, the default for this list, to update the feature regardless of the key number.
P0906946 Standard April 2000

Global Update Page 155 of 254
3 Enter the existing value of the key to be changed in the Old Value box, A03 and TAB. (If the key you wish to change has parameters, tabbing brings up the parameter fields.) Conference does not have parameters, so tab moves you to the New Value box. Enter the mnemonic of the new feature (in this case, CA for No Hold Conference Autodial). Press <Tab> to display edit boxes for the parameters associated with the new feature. Enter the appropriate data in the parameter fields.
4 You can choose to confirm each change. Once you click OK, MAT begins the updates. MAT searches each selected station for the first occurrence of A03. If A03 is encountered, MAT changes the key to the new value: CA. Note that if the station contains multiple Conference keys, only the first will be changed. You can run a second global update to change the second appearance of a feature.
Example 3Suppose you wish to add a feature to the first blank key on each set, but the first blank key may be a different key number on each set.
The choice of Key* for your Global Update criteria will tell MAT to look for the first occurrence of a particular feature on each set selected. When MAT encounters that specified feature it will change that first occurrence to the specified new feature and then proceed to the next set. In this example, the feature we are looking for is a blank feature. Perform the following steps:
1 Select all the stations you wish to change.
2 Select Edit - Global Update.
3 Choose KEYGUPD (Key Global Update) from the criteria list.
4 Choose the key number KEY* (this is the default).
5 Enter nothing (blank) in the Old Value, enter the new feature mnemonic and appropriate parameters in the new value. Select Add to add to the Global Update list.
6 Click OK. All stations selected will have the new feature added to the first blank key. If a selected set does not have any blank keys, the feature will not be added to that particular set.
MAT Station Administration User Guide

Page 156 of 254 Global Update
P0906946 Standard April 2000

Page 157 of 254
254
Communicating with Meridian 1Overview
A Meridian 1 system can be programmed with relevant station data, list data, and CPND data from the MAT application. The MAT application can also retrieve data from a Meridian 1 system. For example, you can create a MAT database for a system and then upload relevant data to program a Meridian 1. You can make modifications within MAT and upload these to the system. At any time, you can download system data to MAT for record-keeping or verification purposes. If you have a Meridian 1 system and wish to start using MAT to administer the data, you would download the data from the system and update the data in MAT to include all MAT administrative and record-keeping data.
Your PC uses a modem to communicate, through normal telephone wires, with a modem in the Meridian 1. MAT Release 5.0 and higher can also use an Ethernet connection if it is available on the Meridian 1. The communications protocols must be predefined for each system. From the MAT Navigator window, select the desired system. Choose File - Properties to display the System Properties window. Select the Communications tab to define the appropriate communications protocols for this system.
Station Administration, CPND, and List Manager use the Synchronize menu to schedule communications with the system.
MAT Station Administration User Guide

Page 158 of 254 Communicating with Meridian 1
ion data
Communications ConsiderationsRetrieving data is a two-stage process. The Meridian 1 data is first downloaded and stored in the current working directory (the MAT system subdirectory). Parsing converts the data into the MAT data format. This new data overwrites (synchronizes) the MAT database for the system with the data from the Meridian 1. The Meridian 1 data can be parsed at any time after retrieval.
MAT requests a customer number for all data retrievals in order to enforce the Meridian 1 Limited Access to Overlays (LAPW) restrictions. If the login password associated with the entered customer number is restricted from the print routines needed for synchronization, the data will not be retrieved.
Station Synchronization vs. List SynchronizationList Manager synchronization is a separate task from Station synchronization. Synchronize list data before synchronizing station data.
Some List Manager settings make changes in MAT’s Station Administratmodule (for example, feature key assignment). You must ensure the list is present on the system so that station validation does not fail.
Station Retrieval—TTY Port ConfigurationDuring the synchronization retrieval operation, MAT requests a print of the information on the Meridian 1 through the SDI port. The port used for Mat data retrieval should be configured only as a Service Change port. The MAT System Terminal application can be used to access Overlay 17 to temporarily configure the TTY port as SCH only (not required for Ethernet connections). If the port is configured for other data such as Traffic or Maintenance messages, MAT will attempt to distinguish this data from relevant station data. The retrieval log will give errors when data is not recognized as station data.
Data Retrieval—Log WindowDuring data retrieval, the amount of activity in other Windows tasks should be limited.
During long data retrievals, or if there is enough activity in other Windows processes, the capacity of the communications buffer can be exceeded. This condition will terminate the retrieval process to prevent erroneous data from being entered into the MAT database.
P0906946 Standard April 2000

Communicating with Meridian 1 Page 159 of 254
t g
val m
val,
to the he
n of
data
g
for
e
AT or
a
To prevent this occurrence, the Log Window will automatically minimize itself. The icon will be labeled “Log Window:” and will contain the currensite and system names. You should wait momentarily and restore the LoWindow to check the progress of the retrieval.
The Log Window remains on the screen longer if you resize it to containfewer lines. The amount of window resizing and moving during data retrieshould be limited, since these activities will prevent the retrieval activity froprocessing incoming characters.
If the capacity of the communications buffer is exceeded during the retrienecessary data is being lost. The MAT software displays a message andterminates if the buffer is exceeded. In this case, stations are not added MAT PC database. The message is printed to the log file, warning that tdata has been lost.
Repeat the retrieval to add the new data. It is possible to retrieve a portiothe stations on the Meridian 1 by choosing Synchronize - Retrieve - Specify.
The Communications TaskSynchronization is a task that ensures that the MAT database reflects theon the Meridian 1 system. The task can be achieved in two ways:
• Retrieve Meridian 1 data to the MAT database (download).
• Transmit MAT data to Meridian 1 (upload).
Note: It is recommended that you turn off all TTY messages (includinbug messages) during download or upload.
Whenever you require access to a Meridian 1 that is defined as a systemMAT, use the Synchronize menu of the MAT module you are currently using (StationAdministration, CPND, or List Manager). You can use thismenu to schedule upload or download of selected data, or you can defincriteria to download or upload specific data. Whenever you modify the Mdatabase, you are prompted to set up a transmit task to upload the newmodified data to the Meridian 1.
SynchronizationWhenever a communication task has been defined, you are prompted inSynchronize dialog box to set up a schedule for the task.
MAT Station Administration User Guide

Page 160 of 254 Communicating with Meridian 1
The following data can be entered to schedule a task:
Priority
The Priority drop-down list box contains the numbers 1 through 10, representing the priority level for the task. The number 1 represents High, 6 represents Medium and 10 represents Low. The default is Medium. Change the priority by selecting an item, or enter the number in the text box.
The Priority number determines where, in the current communications task queue, this task is placed.
Hold Till
Hold Till is made of two text box fields that determine when this task is sent to the communications queue.
Date
The date for the task in the format MM/DD/YY, where MM is the two digit month in the range 01-12, DD is the two digit day in the range 01-31, and YY is the two-digit year. The default entry is the current date (leading zeroes are dropped when the input is validated).
Figure 51Synchronization dialog
P0906946 Standard April 2000

Communicating with Meridian 1 Page 161 of 254
n. The o the
lick
n 1. you
Time
The time for the task in the format HH:MMXX, where HH is the two-digit hour in the range 01-12, MM is the two-digit minutes in the range 00-59 and XX is AM or PM representing before or after 12:00 noon. The default entry is the current time.
Description
Station Update - Station Transmit
CPND Name Update - CPND Name transmit
CPND Update - Configuration transmit
Change as replace
This field is only available if MAT is in Maintenance mode. See “Station Administration” on page 31.
If you accept the default entries, the task is scheduled immediately.
Click OK to send the task to the Scheduler module of the MAT applicatioIf the task is not immediate, the Scheduler runs iconized on the desktop.Scheduler must be running at the scheduled time for the task to be sent tcommunications task queue.
You are not required to schedule a task at any particular time. You can cCancel in this dialog and use the Synchronize menu at any time to schedulea task.
DownloadThis task updates the MAT database with selected data from the MeridiaYou can select data items in the current list window (Station or CPND) or can define criteria for system data to be retrieved.
MAT Station Administration User Guide

Page 162 of 254 Communicating with Meridian 1
When you choose Synchronize - Retrieve, a submenu allows you to select criteria for downloading selected station data. The submenu contains the following items:
All: All data for stations or CPND in the system
Selected: Only items selected in the current list of CPND or stations
Since: Only stations on the system that have changed since a specified date (not applicable to CPND)
Specify: Define criteria for stations or CPND data on the system for download
Parse Only: Parse previously retrieved data
Log: View or clear a log of communications activity
Retrieving All DataYou can set up communications with the system to retrieve all data (station or CPND) that pertains to a single customer in the Meridian 1 system.
Station Retrieve AllChoose Synchronize - Retrieve - All of the Station Administration module to display the Station Retrieve All dialog.
Figure 52Station Retrieve All dialog
P0906946 Standard April 2000
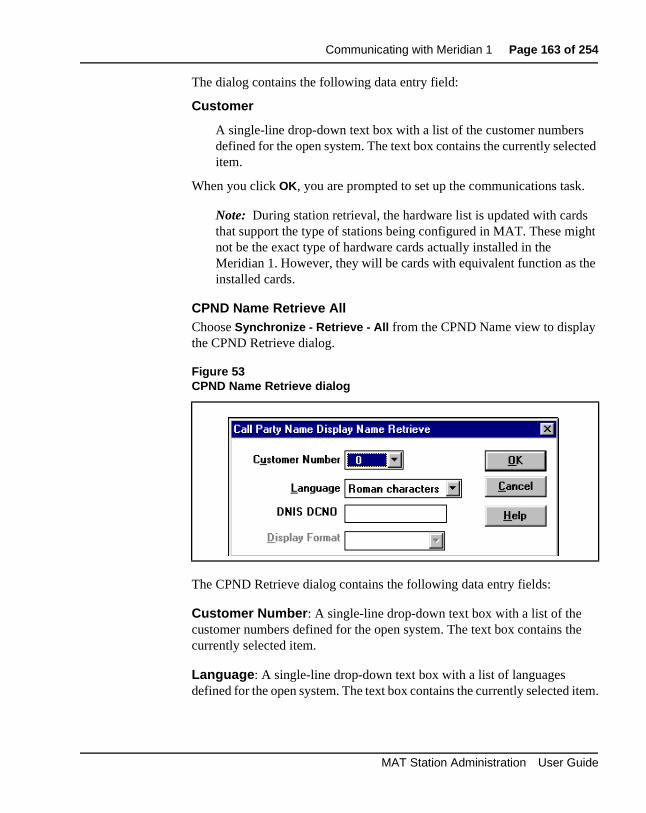
Communicating with Meridian 1 Page 163 of 254
The dialog contains the following data entry field:
Customer
A single-line drop-down text box with a list of the customer numbers defined for the open system. The text box contains the currently selected item.
When you click OK, you are prompted to set up the communications task.
Note: During station retrieval, the hardware list is updated with cards that support the type of stations being configured in MAT. These might not be the exact type of hardware cards actually installed in the Meridian 1. However, they will be cards with equivalent function as the installed cards.
CPND Name Retrieve AllChoose Synchronize - Retrieve - All from the CPND Name view to display the CPND Retrieve dialog.
The CPND Retrieve dialog contains the following data entry fields:
Customer Number: A single-line drop-down text box with a list of the customer numbers defined for the open system. The text box contains the currently selected item.
Language: A single-line drop-down text box with a list of languages defined for the open system. The text box contains the currently selected item.
Figure 53CPND Name Retrieve dialog
MAT Station Administration User Guide

Page 164 of 254 Communicating with Meridian 1
for
he
DNIS IDC: A text box in which you can enter the DNIS IDC for this group of CPND entries.
Display Format: A single-line drop-down text box with a list of the CPND name display formats defined for the open system. The text box contains the currently selected item.
When you click OK, you are prompted to set up the communications task.
Selecting Data to RetrieveYou can select items in the Station list or CPND list window that you want to download from the Meridian 1. See “Global Update” on page 143. Meridian 1 data overwrites the data currently stored in the MAT databasethe selected items. When you choose Synchronize - Retrieve - Selected, you are prompted to set up the communications task.
Retrieve Since OptionIn the Station Administration module, choose Synchronize - Retrieve - Since to display the Retrieve Since dialog.
The dialog contains a single field:
Date: This text box contains the date in the format MM/DD/YY, where MM is the two digit month in the range 01-12, DD is the two digit day in the range 01-31, and YY is the two-digit year.
When you click OK, you are prompted to set up the communications task. Ttask retrieves all data that has changed since the specified date.
Figure 54Station Retrieve Since dialog
P0906946 Standard April 2000

Communicating with Meridian 1 Page 165 of 254
Note: During the Synchronization Retrieval operation, MAT requests a print of the information on the system through the SDI port. MAT attempts to distinguish relevant data from other messages that might also be passed through the same port. Examples include traffic and maintenance messages. You might find that it helps the accuracy of the MAT retrieval process to temporarily disable other uses of this port.
Specifying Data to RetrieveAdvanced users can specify stations or CPND (Name or Administration) or Reserved Unit Type (RUT) data with a one-to-one correspondence of data in certain fields for retrieval.
Note: When you retrieve Station Data, CPND names are also retrieved, and the Station View is updated accordingly.
Station Retrieve SpecifyChoose Synchronize - Retrieve - Specify option in the Station module to display the Station Retrieve Specify dialog. Enter the data pertinent to those stations on the system that you wish to download. By default, all fields in the dialog are blank. All stations are downloaded if no data is specified.
Criteria you can set for station selection include:
Figure 55Station Retrieve Specify dialog
MAT Station Administration User Guide

Page 166 of 254 Communicating with Meridian 1
s
g
e
ype
ns.
Customer
A single-line drop-down text box with a list of the customer numbers defined for the open system. The text box contains the currently selected item.
Type
A single-line drop-down text box with a list of the instrument types (telephones) available for the open system. The text box contains the currently selected item.
Note: Station Retrieval—Using Type = 2000
You can use this Meridian 1 feature to retrieve all 2000 type setfrom the Meridian 1 system. In the Retrieve Specify dialog, move to the Type box. You can type 2000, although it does not appear inthe list box. MAT will correctly respond to the Type prompt durinretrieval.
Terminal Number
Enter a TN or partial TN to retrieve only those stations attached to thpart of the Terminal Number entered.
Card Density
This single-line text box allows you to enter the card type. The card tvalue is associated with the terminal number.
Designator
Enter a designator value in this field to retrieve all stations with this Designator.
Tenant
Enter a Tenant value in this field to retrieve all of that Tenant's statio
Date
This field accepts a date in the format MM/DD/YY, where MM is the month in the range 01-12, DD is the day in the range 01-31, and YY is the two-digit year. This retrieves all stations modified after the specifieddate.
P0906946 Standard April 2000

Communicating with Meridian 1 Page 167 of 254
Note 1: If you request a retrieval from a large Meridian 1 system, using Specify and the Type, it could spend a long time selecting the appropriate stations. If the time-out period (set in system properties) is not long enough, MAT will determine that no more information is being sent by the Meridian 1 and halt the retrieval.
The number of stations retrieved is stated in the Retrieval Log. The time-out parameter can be lengthened to give the Meridian 1 sufficient time to find the appropriate stations to transmit. However, a long time-out period also lengthens the time required by MAT to correctly identify that the Meridian 1 has no more information to send. You need to be patient if you extend the time out period beyond the default values.
Note 2: MAT is able to retrieve selected stations from a Meridian 1 Option 11. You can also retrieve all stations on an Option 11, or choose Synchronize - Retrieve - Specify, using a partial TN.
CPND Administration Retrieve SpecifyYou can retrieve customer-specific CPND Administration data from the Meridian 1. Choose Retrieve - Specify in the CPND Administration view window to display the CPND Retrieve Specify dialog.
There is a single field in this dialog:
Customer Number: A single-line drop-down text box with a list of customer numbers defined for the open system. The text box contains the currently selected item.
Figure 56CPND Retrieve dialog
MAT Station Administration User Guide

Page 168 of 254 Communicating with Meridian 1
5), he he
y if r led
CPND Name Retrieve SpecifyIf you want to define the CPND name data for downloading, choose Retrieve - Specify in the CPND Name view window to display the CPND Name Retrieve dialog.
Note: CPND Name Retrieval—Synchronization prompt
When retrieving CPND names from the Meridian 1 (using Overlay 9MAT prompts you for additional information necessary for retrieval. Tadditional information differs depending on the software release of tMeridian 1.
Display Format: before Release 19 of the Meridian 1, the Display Format was required for name retrieval. Beginning with Release 19,Display Format can be part of each CPND entry. Therefore, for Meridian 1 systems previous to Release 19, you are prompted for Display Format during name retrieval. For Meridian 1 systems beginning with Release 19, you are prompted for Display Format onlMAT does not find a valid Display Format. If MAT does not prompt fothe Display Format, the applicable format is displayed, but not enabfor modification.
Figure 57Name Retrieve Specify
P0906946 Standard April 2000

Communicating with Meridian 1 Page 169 of 254
y ntly
or
C
.
ed,
The criteria you can set for CPND name selection include the following:
Customer Number
A single-line drop-down text box with a list of the customer numbers defined for the open system. The text box contains the currently selected item.
Language
A single-line drop-down text box with a list of languages you can use for the display. The text box contains the currently selected item.
Directory Number
A numeric field that accepts up to 9 digits that represents the DN for this station. You can double click this field to display the list of currently assigned numbers in the numbering plan for the open system. You can select the number for this station in the Directory Numbers dialog. This is described in “Directory Number Assignment” on page 51.
Display Format
A single-line drop-down text box with a list of the CPND name displaformats defined for the open system. The text box contains the curreselected item.
Entry Type
A selection field containing three radio buttons for the type of entry fthis station. The choices include:
Directory Number: required to enter Directory Number
Dial Intercom Group: required to enter Group Member
DNIS IDC: required to enter DNIS IDC table number and DNIS ID
When you click OK, you are prompted to set up the communications task
Note: When you retrieve Station Data, CPND names are also retrievand the Station View is updated accordingly.
MAT Station Administration User Guide

Page 170 of 254 Communicating with Meridian 1
em
he on
time
AT r
The
the
s.
Synchronization status and RetrievalIf MAT performs a retrieval, including station and CPND name, the Synchronization Status determines whether the MAT data is updated. In all cases, the Retrieval log contains a record of the retrieval and the results of any comparisons with an existing Meridian 1 system.
• NEW: The data for this station should not exist on the Meridian 1 systand the station will not be updated.
• TRN: The data for this station in MAT should agree with the data in tMeridian 1. The MAT data is updated to reflect the current configuration the Meridian 1.
• CHG, RPL: The data for this station have been changed since the last the MAT and Meridian 1 have been synchronized. The station is notupdated.
• OUT: The MAT user has marked this station for deletion, the current configuration of the station on the Meridian 1 is not relevant.
UploadThis task updates the Meridian 1 data block with selected data from the Mdatabase. You can select data items in the current list window (Station oCPND).
When you choose Synchronize - Transmit in the Station or CPND module,a submenu allows you to select criteria for uploading data to Meridian 1. submenu contains the following items:
Selected: Upload only selected items in the current list of CPND or stations.
Log: View or clear a log of communications activity.
Selecting Data to TransmitYou can select items in the Station list or CPND list window to upload to Meridian 1 (refer to “Global Update” on page 143). The MAT data overwrites the data currently residing in Meridian 1 for the selected itemWhen you choose Synchronize - Transmit - Selected, you are prompted to set up the communications task.
P0906946 Standard April 2000

Communicating with Meridian 1 Page 171 of 254
og t the
oes
it e
y
the the
Communications LogsAll communications activity is recorded in log files that are stored in the current working directory of your MAT administration modules. There are five separate log files. The names follow normal PC conventions, as follows:
• RTRSTN.LOG: Station data retrieve
• TRNSTN.LOG: Station data transmit
• RTRNAME.LOG: CPND data retrieve
• TRNNAME.LOG: CPND data transmit
• OVL81RTR.LOG: Reconcile data transmit noting deleted sets information
Each of these logs is accessed from the Log menu in the appropriate module'sSynchronization - Transmit or Receive menu.
When you choose Log, a submenu provides the following items:
View: Sends the log file to the viewer so you can browse or print the log. Lactivity is appended to the end of the file, so the most recent activity is abottom of the viewer. See “The MAT File Viewer” on page 189.
Clear: Clears the log file. You should do this occasionally so that the file dnot get too large.
Note 1: There is no limit to the size of the log files, but there is a limto the size of log files that the viewer can handle. There is a 100-paglimit on log files for viewing from Synchronize - Log - View.
Note 2: During station retrieval, you should limit the amount of activitin other Windows tasks. During long station retrievals, or if there is sufficient activity in other Windows processes, the capacity of the communications buffer can be exceeded. This condition terminates retrieval process to prevent erroneous data from being entered into station database.
MAT Station Administration User Guide

Page 172 of 254 Communicating with Meridian 1
You might notice that the Log window minimizes itself to prevent this occurrence. As the communications buffer starts to fill excessively, the Log window is minimized to allow faster processing of the incoming data. You should wait momentarily and restore the Log window to check the progress of the retrieval.
The Log window will remain on the screen longer if you resize it to contain fewer lines. Similarly, you should minimize the amount of window resizing and moving during station retrieval, since these activities momentarily prevent retrieval activity from processing the incoming characters.
If the capacity of the communications buffer is exceeded, necessary data is lost to MAT. MAT displays a message and terminates the station retrieval process. You will notice that the stations were not added to the MAT PC database.
You can repeat the retrieval to add the new station data. Alternatively, you can choose Synchronization - Parse Only to add the downloaded data to the MAT PC database, and continue the retrieval process from where it stopped. It is possible to retrieve a portion of the stations on the system by choosing Station Retrieve - Specify.
Viewing large log filesThere is currently a 100-page limit on the size of log files and reports that can be displayed on the screen. This limit affects Synchronization - View - Log and Reports menu items. A message appears to warn you that the file is too large to be viewed in its entirety, and only the first 100 pages are displayed.
P0906946 Standard April 2000

Communicating with Meridian 1 Page 173 of 254
the
in st
e
r
.
ht be
of
into re ed
You can avoid this limit by:
• Periodically using Synchronization Log - Clear to prevent text from old retrievals or transmissions from unnecessarily adding to the size of log file.
• Testing large reports on a portion of the data, using the Filter featurethe Report Form menu. For example, you can limit the report to the fir200 records by opening the report form and selecting the Options - Report Filter. To limit the number of records, click the System Fieldsbutton, select the REC_COUNT field and build the expression SYS->REC_COUNT <= 200. If a Report Filter already exists, this clauscan be added using the .AND. operator.
• Viewing large files with another program. These files are too large fothe Windows Notepad, however.
Transmission errors during retrievalYou should inspect the Retrieval Log after performing a synchronizationThis log reports the number of stations added, the number of stations compared, and the number of stations with discrepancies from that comparison. In addition, the Retrieval Log might contain warnings from unrecognized data during the transmission. The unrecognized data migthe result of transmission problems.
Compare the expected number of stations to be retrieved to the numberstations actually retrieved. If too few stations were retrieved, look for warnings in the log file that indicate that not enough data was correctly received to recognize the station.
You should also note the number of compared stations. The first retrievalthe MAT PC database should only be adding stations. If any stations wecompared, it might indicate a transmission error in the TN field that causMAT to treat this station as an update to an existing station, instead of creating a new station.
MAT Station Administration User Guide

Page 174 of 254 Communicating with Meridian 1
rting
Reconcile TN FeatureThis tool corrects synchronization problems that may arise when changes are made to station data outside of MAT. These changes may include Set Removal, Set Relocation done through a TTY using Overlays 10 or 11. The switch database is changed but the MAT database on the local PC is left unchanged.
MAT users launch the Reconcile TN feature from the Synchronize menu in the Station Administration window. MAT compares the listed sets information with information in the MAT database against the switch database to determine which TNs are valid. Invalid TNs are removed. All removed TNs noted in a log file viewable under the Synchronize - Reconcile - Log - View menu. See Figure 58.
Note: The Reconcile TN feature requires some time to complete its function and can degrade system performance. Do this task when switch traffic is low or after hours to minimize the effect on the system’s performance. User should back up the existing database before stathis function.
Figure 58Viewing the log file
P0906946 Standard April 2000

Page 175 of 254
254
ed t
Conversion utilityOverview
The MAT Conversion utility provides two functions:
• Rebuild of station data to the current MAT file structure. You might neto run this conversion if you have copied system data to your currenrelease directories that was built in an earlier release.
• Import of station data from other applications.
Starting the Conversion utilityWhen you choose File - Conversion utility in the Station Administration module, the MAT Conversion utility window opens.
Figure 59Conversion utility window
MAT Station Administration User Guide

Page 176 of 254 Conversion utility
nt
n you
ith
d
nd
ent
d
The window initially contains no data in the workspace. The menu bar contains the following drop-down menus:
• File
• Rebuild File
• Help
You can select the desired menu using the mouse (Click) or keyboard (Alt+Bold Character) in the normal way.
File MenuThe File menu provides the following functions:
Import: Lets you insert station data from another database into the curresystem.
Close: Quits the Conversion utility.
Rebuild File MenuMAT administration can change the file structure of certain files. This cacause file errors during system maintenance. The Rebuild Files menu letscheck the individual files of system data and convert them to conform wthe current file structure being used by MAT, if necessary:
All Systems: This option automatically searches the PC system for MATsystems and transforms selected files, if necessary.
Auto: This option automatically checks and transforms all files for each system, if necessary.
Select Files: This option lets you select MAT data files that will be checkefor all systems, and transformed, if necessary.
Current System: This option checks selected files of the current system atransforms them if necessary:
Auto: This option automatically checks and transforms all files for the currsystem, if necessary.
Select Files: This option lets you select MAT data files that will be checkeand transformed for the current system
P0906946 Standard April 2000

Conversion utility Page 177 of 254
Help MenuThe Help menu provides on-line help for the Conversion utility.
Rebuilding FilesThe MAT administrator can modify the file structure used in MAT. This can result in File Errors during MAT processing. When this occurs, you can use the Conversion utility to rebuild the files, making their structure correspond with the current MAT file structure. In practice, the Conversion utility would check the structure of selected files and rebuild only if necessary.
Accessing the FilesTo access the MAT data files for the Rebuild option, choose Rebuild File - All Systems or Rebuild File - Current System. Each option displays a cascading secondary menu that lets you choose to automatically detect files that require rebuilding or to manually select files for rebuild.
If you choose to select files, a Select Files dialog is displayed. This dialog contains a multi-selection list of files that comprise the MAT data. Selected files are indicated by highlight bars. Use the Windows vertical scroll bar to browse the entire list of files. Mouse click an item to toggle its selection status.
Click OK in the Select File dialog to start the rebuilding task for the selected files of all systems or the current systems as required.
Monitor Rebuilding FilesThe Conversion utility checks all the selected files in each system and rebuilds all files it finds that require rebuilding. During this task, a status dialog is displayed that informs you of the progress of the task.
Upon completion, a status of Success is displayed. At any time you can click Cancel in the Status dialog to halt the rebuilding task. This might result in some files not being rebuilt. Another attempt at Rebuilding Files would now complete the task.
MAT Station Administration User Guide

Page 178 of 254 Conversion utility
d in
ntry
Importing Station DataStation data is stored in accordance with the file structure and database rules defined in the MAT application. The Conversion utility provides a merge function (Import) that lets you update station data, and add new stations, from a data source other than a Meridian 1 (data defined in DBASE or CPLUS, for example).
Note that the merge function uses the DN as the key so that any imported data must include a DN field. Also note that, if the supplied DN is not currently used in the open system, the record will not be added unless a valid unique Location field (LOC) value is supplied. This means that to create a new record you must supply both a currently unused DN and a unique Location.
Data for import must have a Fields Definition file (default but not limited to files with.FLD extension) as well as a comma delimited data file (default but not limited to files with .TXT extension). The field file will identify which items in the data file belong to which MAT fields.
Note that the Fields Definition file must have the exact field names as defined in MAT. These can be found in the Select Data Field dialog in the Global Update function. The fields will be in the order in which the data is listed in the data file.
Considerations When Merging Key Values and FeaturesIf you want to add or modify features for a particular record you must identify a “FTR” field for each feature being modified. The values must be as useMeridian 1 as identified in the Features dialog when accessing multi-linetelephone sets. For example, Call Forward when the forward DN is a four-digit number would be CFW 4 in Meridian 1.
If you want to add or modify key functions to a single line telephone, youmust identify the key as KEY n, where n is the key number (include the space). If the value represents a Single Call Ringing key, then the field ewould be SCR nnnn, where “nnnn” is the selected DN.
P0906946 Standard April 2000

Conversion utility Page 179 of 254
Select a Data FileTo select data to import, choose File - Import in the Conversion utility to display the Select an Import Text File dialog. The Text File Selection dialog lets you select the location and file name of the desired data file. By default, the dialog tries to locate files with .TXT extension, but you can actually use any extension in the File Name text box.
Click OK in this dialog to accept the data file name selection and display the Field File Selection dialog.
Select a Field FileClick OK in the Select an Import Text File dialog to display the Select an Import Field File dialog. The Field File Selection dialog lets you select the location and file name of the desired field definition file. By default, the dialog tries to locate files with .FLD extension, but you can actually use any extension in the File Name text box.
Click OK in this dialog to initiate the merge function.
Perform the MergeWhen you have completed selection of the data and field files for merging to the current system data, click OK in the Select an Import Field File dialog to initiate the merge function and display a progress status message box that has a percent completion bar. This dialog has a Cancel button that will stop the merge before completion. When the progress bar indicates 100%, the Cancel button changes to OK. Click OK to return to the Conversion utility window.
The data is now part of the system and is available through the Station Administration module.
MAT Station Administration User Guide

Page 180 of 254 Conversion utility
file,
data y
Example of Import DataA typical import file might contain the following data:
• “3452”,”Robert”,”Williams”,”Accounting”
• “3497”,”Marie”,”Astor”,”Marketing”
• “8732”,”Lee”,”Smith”,”Accounting”
• “8743”,”Arthur”,”McKinley”,Facilities”
• “3469”,”Mary”,”Owens”,”Marketing”
where each record has four fields which would be defined in a separateas follows:
• DN
• FNAME
• LNAME
• DEPT
Note that the merge function uses the DN as the key so that any importedmust include a DN field. Also note that, if the supplied DN is not currentlused in the system, the record will not be added unless a valid unique Location field (LOC) is supplied.
P0906946 Standard April 2000

Page 181 of 254
254
m n. iven
Generating ReportsOverview
The Report Generator module lets you create, view, print, and change custom reports. Access the Report Generator module by choosing File - Reports in the CPND and Station Administration modules.
MAT supplies several standard report forms for reporting MAT data. In addition, the Reports Generator module contains a form editor that lets you create custom report forms or edit existing forms. It also contains a viewer that lets you print reports or browse reports on the screen. A report executor lets you run the reports to the viewer for screen display, to a file, or to a printer. Custom selectable criteria allow you to tailor the report listing.
Reports ConsiderationsAll report activity is performed in the current working directory—the systesubdirectory. All forms are stored in this directory with a “.FRM” extensioExported reports are also saved in this directory and are automatically ga “.TXT” extension. This means that you need supply only the filename (up to eight characters) when prompted to save a report to a file.
The MAT Report Generator requires that a printer be configured in the Windows software environment, although it is not necessary for the PC running MAT to be equipped with a printer.
Starting the Reports FunctionChoose File - Reports - Report Generator in the Station or CPND module todisplay the MAT Report Generation window appears.
MAT Station Administration User Guide

Page 182 of 254 Generating Reports
There is no data in the work area when the window is first displayed. The window contains a menu bar with drop-down menus that let you perform global actions within the Report Generator:
• File Menu
• Form Menu
• Report Menu
• Help Menu
File MenuThe only function available from this menu is the following:
Close: Closes the Report Generator.
Figure 60Report Generation window
P0906946 Standard April 2000

Generating Reports Page 183 of 254
Forms MenuThis menu lets you choose a current report form or create a new form.
New Report Format...: Lets you design a new form for a report.
Open Existing Report Format...: Lets you open a predefined form for the selected data in the system.
Reports MenuThis menu allows access to the report executor.
Run Report...: Displays a dialog that lets you access a report form that you can run (to the screen, to a printer, or to a file).
Running ReportsRunning a report involves selecting a report to run and selecting a destination for the report. Selection criteria for the records you wish to choose are contained within the report form. If you desire different criteria, you can edit the form or create a new one. See “Report Criteria” on page 214. You can send a report to a viewer for screen display, to a file, or to a printer.
Select a ReportSelect a report to run by choosing Report - Run Report in the Report Generator. Run Report displays a Select a Form File dialog with a single-choice scrollable list of report forms on your system.
Figure 61Select a Form File dialog
MAT Station Administration User Guide

Page 184 of 254 Generating Reports
rt.
on
Some reports in the list may be reports you have defined or modified for your needs. Default reports supplied with MAT include:
• Automatic Call Distribution Stations
• Class of Service
• Dial Intercom Group
• List of Power Failure Phones
• Message Centers
• Private Line
• Ringing Number Pickup Group
• Speed Call Groups
• System Speed Call Group
• Telephone Directory by Department
• Telephone Directory by Directory Number
• Telephone Directory by Location
• Telephone Directory by TN
• Telephone Directory by Name
The currently selected form is highlighted. Select a form and click OK to run a report using the currently selected form.
Select a DestinationWhen you have selected a form and have chosen Report - Run Report, an Output Device dialog provides a list of possible destinations for the repo
The dialog displays a list of destinations for the report. See “View Report”page 185.
• Screen
• Printer
• Export File
Select a destination and click OK to run the selected report.
P0906946 Standard April 2000

Generating Reports Page 185 of 254
rt port
Print ReportIf you selected Printer for the report destination, the MAT Report Generator uses the Windows print function to direct the report to its default printer. The default printer for the report is identified in the form when it is created or edited. If you want to check or change the printer destination or setup you must do this from the Form editor before you run the report. Alternately, you can send the report to the screen and print from the viewer.
During printing, a Printing status box is displayed. You can stop the print job by clicking the Cancel button. A Report Viewer status box alerts you when the job is finished. Click OK to return to the Report Generator.
View ReportIf you select Screen for the report destination, a viewer appears with the report in the work area.
This Viewer has the following menus:
File: lets you display a report summary, print the report, or exit the viewer.
Search: lets you find text contained in the report.
Help: lets you access on-line help for the viewer.
See “The MAT File Viewer” on page 189.
You can print the report from the viewer to the printer defined in the repoform, or to a printer you choose from the Viewer. You can also save the reto a file selected from the Viewer.
Figure 62Output Device dialog
MAT Station Administration User Guide

Page 186 of 254 Generating Reports
Figure 63Example Report in the Viewer
P0906946 Standard April 2000

Generating Reports Page 187 of 254
Export ReportIf you chose Export File for the report destination, the report output can be saved in a comma-delimited ASCII file. Export File displays a dialog that lets you choose a name for the report file.
You can enter a filename up to eight characters. Click OK to send the report to the Viewer. See “View Report” on page 185. Filename.TXT, a comma-delimited text file with the Filename as entered in the text box, is saved to the current PC directory.
Figure 64Export File Name dialog
MAT Station Administration User Guide

Page 188 of 254 Generating Reports
P0906946 Standard April 2000

Page 189 of 254
254
ata not
m.
The MAT File ViewerOverview
The Viewer lets you browse, print, and save MAT files accessed during Station Administration tasks. You cannot access the Viewer as a separate module. It is invoked when you attempt to print or display files created during MAT database administration. The files that can be viewed include:
• Reports
• Designation Strips
• Station Validation Log
• Communication Logs
• Station and CPND Administration list views
Viewing a FileWhen the File Viewer starts, the scrolling Viewer window contains the dfrom a file created during MAT database administration. The Viewer doesallow editing, so the viewed data is in a fixed format.
You can browse and print the data using the menus, as follows:
Viewer File MenuThe File menu lets you display a file summary, save the file to a selecteddirectory, print the file, or exit the viewer.
Save as: Lets you save the displayed data as a text file to your PC syste
Summary: Displays a file summary of the displayed data.
MAT Station Administration User Guide
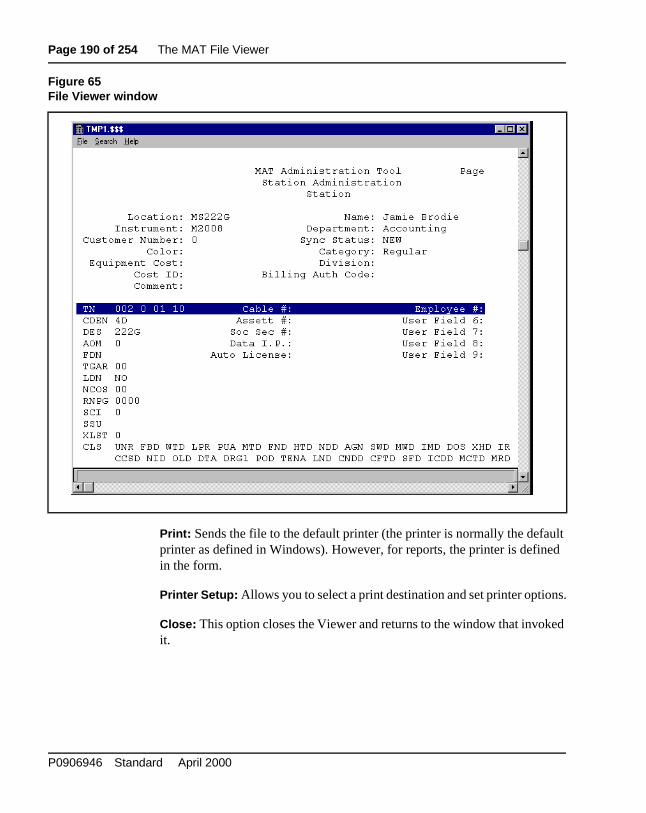
Page 190 of 254 The MAT File Viewer
Print: Sends the file to the default printer (the printer is normally the default printer as defined in Windows). However, for reports, the printer is defined in the form.
Printer Setup: Allows you to select a print destination and set printer options.
Close: This option closes the Viewer and returns to the window that invoked it.
Figure 65File Viewer window
P0906946 Standard April 2000

The MAT File Viewer Page 191 of 254
Viewer Search MenuThe Search menu lets you find a text string that might be contained in the displayed data.
Find: Lets you define a text string to find. The Find function is not case sensitive.
Find Again: Lets you find the next occurrence of the currently defined string. This option is dimmed until you have searched for a string.
Changing Viewed DataThe data displayed in the viewer is in a fixed format, defined in MAT, for the file being viewed.
Browsing the FileThe MAT Viewer is a line viewer with the current line highlighted. You can use the arrow keys or <Page Up> and <Page Down> to move the highlight one line or one screen at a time. You can also use the Windows vertical scroll bars to scroll the report, moving the highlight bar as you scroll. The Windows horizontal scroll bar lets you browse entire lines when the lines are too long for the window.
Use the Search menu to find selected text. A successful Find highlights the line containing the search text.
Save AsThe file is displayed in the Viewer with a default file name in the title bar. You can save the data as an ASCII text file. Choose File - Save As to save the current file with a different name or location
Select a File NameThe Save As dialog is the standard window used to specify the file name and file location (for a full description of this dialog, refer to your Windows documentation). The dialog contains a single-selection scrollable drop-down list of disks that your PC can access. Select a disk to display the list of directories on the disk in a single-selection scrollable Directories list field. Select a directory to display a single-selection scrollable list of files in that directory. Select an item from the File Name list or type in a file name.
MAT Station Administration User Guide

Page 192 of 254 The MAT File Viewer
At any time, click Cancel to return to the Viewer without saving the file. Click OK to save the file with the specified file name.
The saved file uses the current default Windows font for character formatting. Any character formatting in the original file (from a Report, for example) is not saved.
Display a File SummaryChoose File - Summary to display a File Summary status box.
The summary gives the number of lines for a text file (or number of records for a database report file) and the number of pages in the file. Click OK in the status box to return to the Viewer.
Figure 66Save As dialog
Figure 67File Summary dialog
P0906946 Standard April 2000

The MAT File Viewer Page 193 of 254
ion s
s ult
to a
to ata.
lick
Print from the ViewerYou can print the file (exactly as displayed) to a default printer directly or you can select another printer for the task. Choose File - Print to print the contents of the Viewer to one of the following destinations:
• If the Viewer is displaying a report, the print destination is the destinatdefined in the report. If your PC cannot find this printer, MAT displaya status message. Click OK in the Status message box to return to theViewer.
• If no printer is defined in the file being viewed, the print destination ithe current printer defined in Windows. This can be the Windows defaor a printer selected in the File - Print Setup option of the Viewer.
A progress status message is displayed while the file is printing (or sentprint spooler if applicable). Click Cancel in the Status box to stop printing. When the task is complete, MAT returns to the Viewer window.
Search the FileChoose Search - Find to display a dialog that lets you enter text you wish find. If Find Again is available, the dialog contains the previous search d
Click OK to accept the data in the dialog and proceed with the search. CCancel to return to the Viewer window. Click Help to display on-line help for this dialog.
The text box accepts any input. The find function is not case sensitive.
The Viewer highlights the line containing the first occurrence of the Find text. The Find function always starts at the top of the report, regardless of thecurrent cursor position.
Figure 68Find Text dialog
MAT Station Administration User Guide

Page 194 of 254 The MAT File Viewer
When the first search is complete, Search - Find Again is available. If you choose this item, the highlight bar moves to the next occurrence of the text. You can repeat this until a status message indicates that are no more occurrences. Click OK in this status box to return to the Viewer.
When you finish searching, click Cancel to return to the Viewer.
Printer SetupTo define the printer destination and setup from the Viewer, choose File - Print Setup.
The Printer Selection dialog contains a single-selection scrollable list of printers accessible to your PC. Click OK to accept the selected printer and return to the Viewer window. Click Cancel to return to the Viewer window. Click Help to display on-line help for this dialog.
The Setup button opens the standard Windows printer setup dialog for the currently selected printer. Refer to your Windows documentation for information on Print Setup.
Figure 69Printer Selection dialog
P0906946 Standard April 2000

The MAT File Viewer Page 195 of 254
Click Cancel in the Print Selection dialog to return to the Viewer without changing the Print setup. Select a printer and click OK to set the selected printer as the Viewer default and return to the Viewer. This new printer destination is only valid for this viewer session. The report form still retains the original print setup.
Exit the ViewerChoose File - Close to close the Viewer and return to the Report Generation window.
MAT Station Administration User Guide

Page 196 of 254 The MAT File Viewer
P0906946 Standard April 2000

Page 197 of 254
254
ction
the
Designing Report FormsOverview
The MAT application includes several pre-designed forms you can use to run the most common reports. MAT also includes a Report Generator module that includes a Forms editor. The editor lets you modify existing forms or create your own forms for customized reports.
The Forms editor lets you generate a customized layout for a report by piecing together predefined report sections.
Form Section ConceptsThe Report Generator organizes a report by sections. A report form can contain one or more sections:
• Report Header
• Page Header
• Sort Header(s)
• Detail Section
• Page Footer
• Sort Footer(s)
Each of these sections is optional, but a form must contain at least one seand can have only one of each type. Each section allows an internal freelayout of data. The only restriction is the position a section occupies on report in relation to the other sections.
MAT Station Administration User Guide

Page 198 of 254 Designing Report Forms
you
of
When you insert a new section in a form, it automatically positions itself correctly relative to other sections. This position is indicated in the Editor window by a line with the section title printed on it. This line is not part of the form, it merely serves as the top boundary of the section it indicates. The list above indicates the order in which the sections will appear in the form.
Arranging sections within a form is described in “Validating the Data” on page 66.
The Forms EditorThe Forms Editor is an application within the Report Generator that lets design and customize a report using the current database.
Choose Form - New Report Format to display the Forms Editor, with a blank form in the working area. Choose Form - Open Existing Report Format to display a dialog that lets you select from a list of forms for the current system database.
The currently selected form is highlighted. Select a form from the list andclick OK to invoke the Forms Editor. The Forms Editor contains a menu actions to perform.
Figure 70Select a Form File dialog
P0906946 Standard April 2000

Designing Report Forms Page 199 of 254
File MenuThis menu contains commands for saving the current report file and specifying the report parameters.
Select Report View: Lets you select the key selection criteria that determine the content of the report at runtime.
Save: Store the current report form to a file. If it is a new form, you are prompted for a filename (up to eight characters followed by a period and an extension of up to three characters).
Save As...: Store the current report form to a file. Report form files must be stored in the common data directory. MAT will not allow changes to the path for these files.
Printer Setup: The Windows default printer is automatically assigned to the current form when you save it. This selection lets you select a different printer and printer configuration to be associated with the current form from a list of installed printers.
The printer options that you select here determine the width and height of the report. The width of the report is indicated by the length of the section separation lines in the form editor window.
Exit: Close the Forms Editor and return to the Report Generation window. If the current form has not been saved since the last change, you are prompted to save it before exiting the editor.
MAT Station Administration User Guide

Page 200 of 254 Designing Report Forms
n on
Edit MenuThis menu contains miscellaneous edit and cursor navigation functions:
Insert Line After/Before: Puts a blank line following/preceding the current cursor position.
Delete Line: Removes the current line, moving all successive lines up.
Highlight Off: Turns off any highlighting in the current form (lets you deselect text and fields).
Beginning/End of Line: Moves the cursor to the left/right end of the current line.
Next/Previous Word: Moves the cursor to the beginning of the next/previous word or field in the form, going to the next/previous line if necessary.
Section MenuThis menu contains commands to insert, edit, and delete report sections.
New...: Lets you add a section to the current form. Sections include:
• Report Header: Appears at the top of the report only
• Page Header: Appears at the top of each page of the report
• Detail Section: Defines data to be reported
• Page Footer: Appears at the bottom of each page of the report
• Sort n Header: The nth sort criterion field for the report (n = 1 - 9)
The section title is displayed at the current position of the selected sectiothe form. This line indicates the Forms Editor cursor location. It will not appear on the printed form.
P0906946 Standard April 2000

Designing Report Forms Page 201 of 254
ld. ield.
.
r
,
Edit Current...: Lets you define the layout of the section in which the Forms Editor cursor is currently positioned. Displays a dialog containing check-boxes for defining section layout at runtime. Choices include:
• Start new page before this section
• Start new page after this section
• Do not include blank lines
• Suppress trailing (or leading) blanks in a field
• Titles on every page of the report
Delete Current...: Removes the section in which the cursor is currently positioned.
Sort Field...: Lets you change the current sort field selection. This selection is not available unless the form has sort fields defined (use the Section New function to insert sort fields).
Break Field...: In a typical report, the break field is the same as the sort fieThis selection lets you define a field for a section break that is not a sort f
Field MenuThis menu contains options to insert, modify, delete, and maintain fields
Insert New Field: Displays a submenu that lets you choose a field type foinsertion into the form at the cursor position. Field types include:
• Data Field: Displays a list of data fields in a record of the system database
• Calculation Field: Displays a box for entering a formula for the field
• System Field: Displays a list of MAT system fields
Edit Current Field...: Lets you modify attributes for the current field.
Edit Field Expression...: If you have a calculated field at the cursor positionthis selection lets you modify the formula.
MAT Station Administration User Guide

Page 202 of 254 Designing Report Forms
t. cord le, if
d
lds. eful
are
Options MenuThis menu lets you define the appearance of the report and select data records for inclusion in the report.
Report Parameters...: Brings up a dialog that allows you to specify certain report parameters:
• Name of the report (This is not the Windows filename.)
• Margins for the printed page
• Output of some trial records for form layout adjustment
• Default date format for input and during execution
Report Filter...: This option allows you to enter a filter criteria for the reporEach data record is tested with the expression that you provide here. A reis selected only if this expression evaluates to a TRUE value. For exampthe expression was DN->amount>1000, then only records with a DN higherthan 1000 are included in the report.
Fonts MenuThis menu contains formatting commands for highlighted characters (anfield values) at runtime.
Normal: Removes character formatting, if any)
Formatting: Normal, Bold, Underline, Italic, Superscript
, Subscript
,
Strike.
Fonts: Lets you select font and size for highlighted characters and fieThe report generator allows only fixed space fonts. You should be carthat columnar text uses the same font size and spacing to maintain column alignment.
Changing SectionsHere is an example of a blank form with all sections in place. The sectionsdivided by a line labeled with the section name. These lines are place indicators only and will not appear on the printed report.
The Section menu lets you change the sections as described below.
P0906946 Standard April 2000

Designing Report Forms Page 203 of 254
Insert a SectionTo insert a section in a form, choose Sections - New with the cursor anywhere in the Forms Editor window. This displays a Select New Section dialog with a list of available sections (all sections that do not appear in the form).
The currently selected Section is highlighted. Select a section and click OK to insert the section in the current form.
At insertion time, each section contains one blank line. Use the Edit - Insert Line After/Before functions to change the section size at any time while the cursor is in the work area of the section (below the section title line and above the next section title line).
Figure 71Example blank report form
MAT Station Administration User Guide

Page 204 of 254 Designing Report Forms
Define Section ParametersYou can set runtime parameters for the section at the current cursor position. Choose Section - Edit Current to display an Edit Section Info dialog with check-boxes that let you set or clear section parameters.
Figure 72Select New Section dialog
Figure 73Edit Section Info dialog
P0906946 Standard April 2000

Designing Report Forms Page 205 of 254
the
ed
ld d to
e
er is e
xt and
the age). any , and ld
eak. ext report.
cted
Select the appropriate check box to toggle parameter selection. The parameters include:
• Advance Page Before Printing the Section: The section is printed attop of the next page.
• Advance Page After Printing the Section: Causes a printer Form Feafter this section.
• Suppress Blank Lines: Causes blank lines not to be printed.
• Trim Extra Spaces from Fields: If a field value is shorter than the fiemaximum length, this selection causes the field length to be truncatethe length of the value.
Note: If you are using a columnar format, this parameter might causmisalignment of columns.
Report Header / FooterThese are printed only once, at the beginning/end of the report. The headgenerally used as a title and description of the report. The footer might bused as a report summary. A report header and footer can contain free tefields such as System Date and Time.
Page Header / FooterThese are printed at the top/bottom of every page in the report (beneathReport Header on the first page and above the report footer on the last pThe header might contain text such as Report title, column headers andother pertinent text as well as fields such as System Page Number, Dateso on. The footer might be used for page numbers and page by page fietotals or other pertinent data or text.
Sort Header / FooterEach of these sections indicate a field that the report will use for a sort brThe field you choose is not printed. You can place text or fields or both tand fields at these section breaks to describe the sorts being used in the
Detail HeaderThis section contains a list of data for each record of the database, seleand sorted according to defined criteria.
MAT Station Administration User Guide

Page 206 of 254 Designing Report Forms
hen ld.
” s
duce eld t field
Edit a FormText and data are added at the current position of the cursor within the form. Move the cursor using the mouse or the keyboard arrow keys. The status line at the bottom of the window gives the cursor position by line (row) down and character (column) across. The <Ins> key toggles the insert/overtype mode. The status line indicates INS for insert mode (text moves everything to the right of the cursor to the right) or OT for overtype mode (text replaces existing text at the cursor position).
Type to insert text. There is no automatic line wrapping. If you insert a carriage return (<Enter>), the cursor is returned to the beginning of a new blank line.
You can use the Edit menu to move the cursor within a line, as follows:
• Start of Line: left end of line
• End of Line: right of the last character on the line
• Next Word: first letter of the word to the right of the cursor
• Previous Word: first letter of the word to the left of the cursor.
To insert and edit a field at the current cursor position, use the Field menu.
Insert a FieldChoose Field - Insert New Field to display a submenu with a list of data fieldtypes to paste at the current cursor location. This option is not available wthe cursor is positioned on a section separation line or on an existing fie
The selected field appears at the current cursor location as a series of “xsymbols that represent the maximum number of characters in the field, adefined in the database. You can delete any number of field symbols to rethe field length. To increase the field length, position the cursor on any fisymbol except the first one, and type spaces. You can change the currenattributes by choosing Field - Edit Current Field.
P0906946 Standard April 2000

Designing Report Forms Page 207 of 254
ach o be
.
box
or 44.
te, in W
ield d
Insert Data FieldA data field is one field in each record of the current database. If you choose Field - Insert New Field - Data Field, a list of data fields is displayed in a Select Data Field dialog. See “Select Data Field” on page 145 for further details.
Click OK to paste the selected field into the form at the current cursor position.
Insert Calculation FieldA Calculation field contains an expression that is a combination of data,functions, and operators. At runtime, the expression result is output for erecord. You must supply a name for the field as well as the expression tevaluated. The Field - Insert New Field - Calculation Field option first prompts you for the name of the field in a Calculation Field Name dialog
You can enter up to 48 alphanumeric characters (not blanks) in the text to represent the calculated field name.
Click OK to enter an expression for the calculated field. The procedure fexpression entry is the same as for “Define Selection Criteria” on page 1
Insert System FieldA System field contains MAT system-dependent information, such as datime, report page number, and record count. This information is typicallythe report or page header or footer. One System field, WRAP_OVERFLOallows a data field to overflow to the next line or lines. For example, a comment field of 30 characters could contain 10 characters in the data fitself and ten in each of two WRAP_OVERFLOW fields (generally placedirectly under the data field itself).
Figure 74Calculation Field Name dialog
MAT Station Administration User Guide

Page 208 of 254 Designing Report Forms
ar of fied
s
t)
the
If you choose Field - Insert New Field - System Field, a list of System fields is displayed in a Select System Field dialog. The procedure is the same as in “Select Data Field” on page 145.
Click OK to paste the current highlighted field in the form at the cursor position.
Edit Field AttributesThis option, available by choosing Field - Edit Current Field, is used to edit the attributes for the current field. This option is available only when the cursor is positioned on a field. The field name is displayed in the status bthe form window. The option displays a set of attributes that can be modifor the current field. You can modify the field attributes as needed.
The attributes that you can modify depend on the type of field. Field typeinclude:
• Text (alphanumeric characters)
• Numeric (numbers, including thousand separators and decimal poin
• Date (date in predefined formats)
Edit Text Field AttributesIf the cursor is located within a text field and you choose Field - Edit Current Field, a Text Field Parameters dialog displaying the current attributes forfield appears.
Figure 75Text Field Parameters
P0906946 Standard April 2000

Designing Report Forms Page 209 of 254
The following parameters can be modified:
Field Alignment: By default, text data at runtime is left-aligned. You can use the radio buttons to select left, center, or right alignment.
Wrap: If the field length on the form is too short to accommodate the data at runtime, you can select a wrap option to run the text to a WRAP_OVERFLOW System field that you have already defined. The Wrap option breaks at the end of the current field, and the Word Wrap option breaks at the end of the last word before the end of the field. The default attribute has no wrap option selected.
Capitalization: By default, all text in the data field is printed as stored in the database. You can change this to all capitals, leading capitals, or all lower case, by selecting the appropriate check-box.
Trim Extra Spaces: This check-box trims the field length to the length of the data that is entered at runtime.
Note: If you are using columns, this option might cause columns to become misaligned.
Edit Numeric Field AttributesIf the cursor is located within a numeric field and you choose Field - Edit Current Field, a Numeric Field Parameters dialog displaying the current attributes for the field appears.
The following attributes can be modified:
Field Alignment: By default, numbers are left-aligned at runtime. You can use the radio buttons to select left, center, or right alignment.
Number of Decimal Places: If the field contains a real number, this option lets you select the number of digits printed to the right of the decimal point.
Currency Symbol: If the field represents money, you can use this option to define the currency symbol.
Sign Representation: This option lets you select how to represent negative and positive number values. You can enter a character for prefix and suffix for both positive and negative numbers.
MAT Station Administration User Guide

Page 210 of 254 Designing Report Forms
ld
Zero Values: Check the Suppress Zero Values check-box to suppress printing this field if it contains a value of zero. Check the Pad with Zeroes check-box if you wish to align the number to the right of the field and fill with leading zeroes. Check the Use Comma Format check-box to insert a comma between thousand values in the field.
In addition to these attributes, you can edit the following attributes for fields that are located in the footer section of the report:
Summarization Type: A numeric field in the footer could require the report to print a summary value. This option is a function selector that displays a list of possible summary values, such as total, average, maximum, minimum, or count. You can also print the actual value for the field by selecting Value.
Retain Value After Printing: If the footer is a page footer, you can check this option to print “running” values instead of the value for each page.
Edit Date Field AttributesIf the cursor is located within a Date field and you choose Field - Edit Current Field, a Field Name Edit dialog displaying the current attributes for the fieappears.
Figure 76Numeric Field Parameters dialog
P0906946 Standard April 2000

Designing Report Forms Page 211 of 254
se
You have a choice of four formats for the Date output, selectable by radio button:
MMDDYYDDMMYYMMDDYYYYMMMDDYYYY
You can also define the date delimiter by entering a required one-character delimiter in the Date Delimiter text box (/ or - , for example).
Edit Calculation Field ExpressionThis option is available only when the cursor is positioned on a calculation field and you choose Field - Edit Field Expression, or when you are first inserting a calculation field in the form. The option shows the existing calculation expression, if any, in a dialog and allows you to make modifications. The action of this dialog is the same as that for “Define Selection Criteria” on page 144.
Setting Report ParametersThe Forms Editor Options menu lets you set parameters for the report. Theparameters are stored with the form and will be operative at runtime.
The parameters are defined in a dialog when you choose Options - Report Parameters in the Forms Editor. Parameters include the following:
Figure 77Date Field Edit dialog
MAT Station Administration User Guide

Page 212 of 254 Designing Report Forms
Report Name: A text box that lets you enter up to 36 contiguous alphanumeric characters. This name is used in the MAT system as the name for the report and the form. This is not the same as the Windows filename.
Default Date Format: A pair of radio buttons that lets you define the format in which dates are printed at runtime. The two formats are MM/DD/YY or DD/MM/YY.
Print Trial Records: Run the report with just a few records. This enables you to check that the form generates a report with a suitable appearance and layout.
Margins: Four text boxes that let you set the page margins. Enter numeric data only, and ensure that the page layout is valid.
Character FormattingYou can set the appearance of printed text using the Fonts menu. By default, text and fields are output in the Windows default font with Normal (unmodified) attributes.
A selection from this menu acts on the selected data. To highlight data (text and fields) place the cursor at one end of the data to be highlighted, hold down the left mouse button and move the cursor to the other end of the data. To turn off highlighting, click anywhere in the form that is not highlighted.
Figure 78Report Parameters dialog
P0906946 Standard April 2000

Designing Report Forms Page 213 of 254
Use the Fonts menu to display a list of character enhancements. Select one to print the highlighted text with that enhancement. Enhancements include the following:
Normal, Bold, Underline, Italic, Superscript
, Subscript
, Strike.
When you apply an enhancement, highlighting is removed. If you desire more that one enhancement for any text, you must highlight the text again and select another enhancement. To remove an enhancement, highlight the text and choose Font - Normal.
Font SelectionChoosing Fonts - Fonts... brings up the Font Selection dialog box, from which you can select a font for the selected text.
The Face Name box contains the name of the font for the selected text. A list box shows available fonts with the current font highlighted. Click the desired font to change the current font in the Face Name box. Use the arrows to help find the desired size, and click to select the font size.
Click OK to set the highlighted text to the currently selected font and size.
To use a single font for the entire report, select the font face and click the Default Font check-box. This becomes the Normal enhancement selection.
Figure 79Font Selection dialog
MAT Station Administration User Guide

Page 214 of 254 Designing Report Forms
e ns t ed
n
ent
s you you
Report CriteriaThe Forms Editor Options menu lets you select criteria for record selection in the report. The criteria cannot be set at runtime, and are stored with the form in which the selection is made. The criteria are defined in an expression that displays in a Select Record Criteria dialog when you choose Options - Record Criteria. The action of this dialog is the same as for “Define Selection Criteria” on page 144.
Building a Report in the MAT Report Generator - Form Editor
Reports in MAT are built using report forms. The report form contains thinformation that allows the same report to be run repeatedly with new orupdated data. The report form stores information that fully describes thereport to the MAT software. A report form is comprised of several sectiothat describe different aspects of the report. A number of standard reporforms are provided with the MAT software to provide some commonly usreports.
This section describes a typical session to build a new report form. As aillustration, it produces a modified version of one of the MAT standard reports: Telephone Directory by Department. The report will print the department name once and print the station information for each departmunderneath the department heading.
This section describes a step-by-step process to produce a report form. Abecome more proficient using the Report Generator, you might find that use a different series of steps to build or modify reports. Perform the following steps to build a report form:
1 Decide what information needs to be displayed on the report.
2 Select the Report View that best provides the information.
3 Place the individual data fields on the report.
4 Decide if the report lines should be sorted.
5 Specify any special printer considerations for this report.
6 Apply the finishing touches.
7 Save the report and test the results.
P0906946 Standard April 2000

Designing Report Forms Page 215 of 254
To work with Report Forms, start the Report Generator (choose File - Reports - Report Generator). Choose Form - New Report Format. This example shows how to create a new form. The report generator places an empty report form on the screen.
Decide what information needs to be displayed on the reportAs we will see in the next section, information in MAT is organized Into several logical databases. A report can use any one of these logical databases. There is also MAT system-dependant data that can appear on a report. This data includes date, system name, page number. Reports also can contain fixed text, typically headings or other constant text information.
Figure 80Empty Report Form
MAT Station Administration User Guide

Page 216 of 254 Designing Report Forms
In this example, we are using station information (as distinguished from CPND or VMB information). We can sketch out a rough picture of the report as a guide to what will fit on the page and how much heading information will be included.
The basic model of the Report Generator is to read each record in the logical database, decide if it should be included in the report (according to the Report Filter). Some reports sort the records (according to the Sort Header sections). Finally, the records are printed. Some reports print out a line for each record included in the report (specified in the Detail section). Some reports print out summary information (specified in the Sort Header or Sort Footer section), such as the total number of particular instrument types. Some reports combine the detail and summary information
Select the Report view that best provides the informationAfter deciding to build a report focusing on station data, pick an appropriate Report View. Views provide alternative ways of looking at the data. Some of the report views describes the type of data. If the report describes CPND configuration information, then choose the CPND view; for CPND Name information (by Directory Number or Group) use the CPND Name view; for VMB information (by Directory Number) use the VMB view.
Figure 81Select Report view
P0906946 Standard April 2000

Designing Report Forms Page 217 of 254
s.)
user. g ut cords
rt has
yed
of gs
each
ata
r
how ry
ader ered rt 2
Station data is provided with some alternative views. If the report should print one line for each station, then choose the Station view. If the report should print one line for each Assigned Directory Number, then choose the Station DN view. If the report should print one line for each station key, then use the Station Key view. (In the Station Key view, single line information is included by assigning “pseudo key numbers” to the single line key featureThe SysSpdCall view is a special view primarily designed for the SystemSpeed Call Report. It provides one record for each system speed call list If the report is selecting only certain records from the database or printinonly summary data, then it will not actually print a line for each record, bthe view describes how the selecting and sorting process examines the rein the database.
Place the individual data fields on the reportOnce the Report View has been chosen and the basic design of the repobeen defined, it is time to place the data on the report page. The ReportGenerator Forms Editor shows the current form broken into its logical sections. Initially the Page Header section and the Detail section are displayed. As other sections are incorporated into the form, they are displaas well. In this example, the report contains the following sections:
Page Header: This section contains the information displayed at the topeach page. Typically, it would contain the report title, the column headinover the data, the page number, the system name.
Detail: The detail section describes the data items that would appear on line in the body of the report. Typically, it would contain data from each record in the database that is included in the report. The data might be ditems from the record or calculated fields built from the data fields. Calculations allow the report to create specially formatted names or othespecial expressions.
Sort Header: The sort header sections (there can be several) describe the lines in the report will be ordered. Sort 1 Header describes the primasort, if two records have the same value for the sort field, then Sort 2 Hecan be used to refine the order of the report. A report that should be ordby name, might specify LastName in Sort 1 Header and FirstName in SoHeader.
MAT Station Administration User Guide

Page 218 of 254 Designing Report Forms
It is often easier to design the report by specifying the Detail section first. This allows you to lay out the data on the page before placing the column headers. Treat the screen as a blank report page and position the cursor in the Detail section where the field should be placed. Choose Field - Insert New Field - Data Field to see a list of available data items.
Figure 82Inserting Data Field in the Details section
P0906946 Standard April 2000
Designing Report Forms Page 219 of 254
sion
uilt
o c or
Choosing Field - Insert New Field - Data Field displays a list of the fields that apply to this report view. This Select Data Field list will also appear in other situations where you need to select a field. Several data fields have been added specially to help produce reports and some fields have special meanings that affect their use in reports. Some examples of special reporting data fields include:
ADN - All Directory Numbers: a list of all the Directory Numbers assigned to the station. This field creates a text field with the DNs separated by a space.
ACDS: Keys Assigned to Automatic Call Distribution, showing both the ACD DN and Position ID.
DN: This the Directory Number assigned to a single line station. The PRIMEDN field contains the Directory Number assigned to a single line station and the Directory Number assigned to Key 0 on multi-line station.
Key features should be reported from the Station Key view and not from KEYGUPD or FTRGUPD.
Use a calculated data field to tailor the information from the data record. To use a calculated field in a report, choose Field - Insert New Field - Calculation Field. A dialog appears, prompting you to name the newly calculated field.
The Field Name dialog is followed by a dialog that allows you to construct an expression that performs the calculation. It can be built from existing data fields, functions, and operators. The following example constructs a field that contains “Last Name, First Name”.
Note that the TRIM function is used to remove extra spaces and the “+”operator is used to concatenate the two fields. You can type the expresdirectly in the box or you can select the fields (from the Data Field or System Field buttons), the functions, and the operators. The expression will be bas the pieces are selected.
Note that some functions apply to text fields and some functions apply tnumeric fields. The Select Data Field list shows whether a field is numeritext. In general, functions should not be applied to the System fields.
MAT Station Administration User Guide

Page 220 of 254 Designing Report Forms
After the detail section has been specified, you can design the Page Header section. The text for the column labels can be placed over the appropriate data. The Page Header section often uses the System data fields: page number, system name, date, and time. Choose Field - Insert New Field - System Field to select one of these data fields.
Figure 83Select Data Field dialog
Figure 84Naming a Calculation field
P0906946 Standard April 2000

Designing Report Forms Page 221 of 254
tion
om
The Page, Date, Time, and System_Name fields are commonly used in the Page Header section. We will discuss the other system fields in later in the section titled “Some Special Techniques”.
Decide if the report lines should be sortedMany reports require the data to be sorted. Since there is no sort informaon a new report form, choose Section - New Section and select Sort 1 Headerfrom the dialog. This will add a sort section to the report.
The first sort section specifies the data field that provides the primary ordering of the data. The data value to use for sorting will be selected frthe list of data fields.
Figure 85Defining a Calculation field
Figure 86System Field list
MAT Station Administration User Guide

Page 222 of 254 Designing Report Forms
Other sort sections will be applied only to provide secondary order levels within the primary ordering. To order a report by alphabetizing the names of people in a department, the report should use Department for Sort 1 Header, LastName for Sort 2 Header, and FirstName for Sort 3 Header.
To modify a Sort Header after it has been specified, choose Section - Sort Field. (It will only be available if the cursor is positioned in a Sort Header.) From this dialog, the Sort Field button again displays the familiar list of data fields.
Figure 87Select New Section
Figure 88Select Data Field
P0906946 Standard April 2000

Designing Report Forms Page 223 of 254
Summary information can be specified in the Sort Fields, as well. On a report sorted by department, it is possible to print each department name once, by specifying the Department field in the Sort Header section (and not in the Detail section).
The Sort Header section will print only when the Sort Header’s field value changes. It uses the data field on the first record in the new sort group. Typically, the data field chosen to print in the Sort Header should be the same field on which the data are being sorted.
Specify any special printer considerations for this reportThe Report Generator allows each report form to contain special printer information. Some reports might be designed to print in landscape mode, while others should print in portrait mode. Some reports might require a special printer, an impact printer with special forms, for example.
Figure 89Adding summary information in the Sort Header section
MAT Station Administration User Guide

Page 224 of 254 Designing Report Forms
Choose File - Printer Setup to select a printer and the Setup button to specify special information about the printer.
This information is stored with the form so that it applies each time the report is printed. When the Report Generator actually builds the report from the form and the data, you can override this printer information.
Apply the finishing touchesThe Form Editor provides some additional capabilities to tailor the report. As you examine the almost complete report, you might wish to modify the appearance of the report.
Figure 90Selecting a printer
P0906946 Standard April 2000

Designing Report Forms Page 225 of 254
Lengthening and Shortening Data FieldsYou can adjust the width of the data fields in the report. The area for each data field is marked on the form with the small letter ’x’. The data will be printed in that marked area. If the actual data are longer, they will be truncated to fit in the area; if they are shorter, the rest of the marked area will be filled with blanks. In the example report, you must lengthen the area set aside for the calculated field which holds the name. You might want to shorten a field in order to try to squeeze another field onto the report.
To adjust the width of a data field, place the cursor in the marked area. To shorten the field, press <Delete> or <Backspace>. To widen the field, press any other key. It will appear on the form as the small letter ’x’.
Adding and Deleting Blank LinesThe Form Editor allows you to add and delete blank lines on the report. On a new form, the data in the Detail section is, by default, double spaced. To make a single-space report, position the cursor on the extra blank line and choose Edit - Delete Line.
Other items in the Edit menu allow you to insert blank lines either above or below the line on which the cursor currently rests.
Figure 91Deleting a blank line from the Detail section
MAT Station Administration User Guide

Page 226 of 254 Designing Report Forms
Report ParametersThere are a few more options available to complete the report. Choose Options - Report Parameters to specify the name of the report as it will appear in the list of available reports. It also allows you to specify margins and other report -wide options.
The Print Trial Records is used for reports that require that the paper be correctly aligned in the printer. It has no effect until you send the report to the printer. At that time, the Report Generator will ask whether it should print a Trial Report. The Trial Report contains the Header and Footer sections and a single line from the Detail Section. Each data field is replaced with a string of the letter ’X’ of the appropriate length. You will be asked to print the Trial Report until you click No. This allows you to adjust the paper in the printer until it is properly aligned. Then the full report can be printed.
Report FilterThe Report Filter selects which records are to be included in the report. Choosing Options - Report Filter displays the Record Selection Criteria dialog. This dialog helps you to build an expression, typically from the data fields. As the Report Generator reads each record in the database, it evaluates the expression. When the expression is true, the record will be included in the report.
Figure 92Specifying the records to be included in the report
P0906946 Standard April 2000

Designing Report Forms Page 227 of 254
e
by he
to he
m
The Record Selection Criteria dialog operates very much like the Calculation Field dialog. However, you should build an expression, usually including a comparison operator (=, >, <, <>). In the example, we are selecting all records for which there is a PrimeDN. The expression tests whether the PrimeDN field is not equal (<>) to blank (“ “).
Modifying fieldsAs part of the final tuning, you might want to specify more exactly how thfields are to be displayed. Choose Field - Edit Current Field.
The Alignment options operate within the area of the data field, marked the letter 'x'. The Wrap options should apply when the field will not fit in tarea allowed. The section on “Some Special Techniques” discusses howwrap text. Similar display options, like whether to use commas, control tprinting of numeric fields.
Save the report and test the resultsWith the initial specification of the form complete, it is time to save the forand test it with the data from the system. Choose File - Save or File - Save As to save the form. Choosing File - Exit returns control to the Report Generator. To test the form, choose Report - Run Report to select the report form you wish to run.
Figure 93Choosing the example form
MAT Station Administration User Guide

Page 228 of 254 Designing Report Forms
The Select a Form File list uses the report names specified in the Form Editor’s Option/Report Parameters dialog. If you did not specify a name for a new form, this list will display the file name. If you modified an existing form and saved it with a new file name but did not change the Report Name, that Report Name will appear twice. (You should go back into the Form Editor to give your modified report a new Report Name.)
As you run the report, you might find that you wish to modify the form. From the Report Generator choose Form - Open Existing Report Format to return to the Form Editor and modify the form.
Some Special TechniquesThe following are a few special techniques available in the Form Editor to help you customize your reports:
Sort Header section /Break FieldIf the cursor is placed in a Sort Header section, the Section - Break Field menu item is enabled. The Break Field is a data field that causes the Sort Header section and the Sort Footer section to print. By default (and almost always) the Break Field is the same as the Sort Field that was specified when the Sort Header section was created.
Word WrapIf the data field will not fit in the area allowed for it on the form, you can specify that the field should wrap. By default, data which will not fit in the allotted space will be truncated. Wrapping is especially useful for a field like ADN (the list of all Directory Numbers assigned to a station), which can be either quite long or quite short.
Wrapping the data field requires two steps:
1 Mark the field as one that should be wrapped using the Field/Edit Current Field dialog. (Wrapping only applies to text fields.) Choose the Wrap Text box to cause the field to wrap at a word.
2 Specify where to position the wrapped portion of the field. Position the cursor directly below the field that is to be wrapped and choose Field - Insert New Field - System Field.
P0906946 Standard April 2000

Designing Report Forms Page 229 of 254
You can include several overflow areas directly below each other. If you wish to include the line for the overflow only if it is needed, choose Section - Edit Current Section. This dialog includes an option to Suppress Blank Lines that will only print the line with the Wrap_Overflow field if it is used.
Modifying a standard reportIf you choose to modify one of the standard reports distributed with MAT, you will notice that there are numbers in the headers, instead of text. These numbers allow the reports to translate automatically to another language.
To see the actual text within the Form Editor, position the cursor on the octothorp character (#) and choose Field - View Field Translation. A box will display the text that will appear on the printed report.
Figure 94Example Report
MAT Station Administration User Guide

Page 230 of 254 Designing Report Forms
A quick description of some section types not used in the exampleSort Footer Section: Data fields placed in the Sort Footer section can be used like summary data in the Sort Header section. The fields in the Sort Footer section are only printed if the value changes (except that it prints after the detail lines). In addition, Sort Footer data can contain totals and other summary statistics. After placing a data field in the Sort Footer, you are prompted with a list that contains Value (to print the value from the last record in the group) or various summary statistics (include Total, Average, Count, Max, Min). These summary statistics also can be specified by choosing Field - Edit Current Field in the Footer Field box.
Report Header, Report Footer: These sections can be used to specify data that should print only once at the beginning or the end of the report.
P0906946 Standard April 2000

Page 231 of 254
254
s t nly ant
te a
Power User ToolThe standard MAT Station Administration window allows you to easily add or modify a few stations at a time. However, creating or maintaining large groups of stations quickly (as when establishing a new system) is better handled using the Power User tool.
The Power User Forms window minimizes the actions required to add a station, eliminates up-front configuration of line cards and numbering plan, and allows you to create specialized installation forms that include only the station fields that you decide you need to configure stations.
Note: At any time while using the Forms window, you can press <F1> for on-line reference information on the current field.
Concepts for the Power User toolThe concepts of forms, templates, and filters are important to understand before using the Power User tool.
Forms and templatesA form (a file that you can design) acts as a filter to determine which fields (of the hundreds possible) are displayed in the Power User Forms window for you to edit. When it’s time to use the form, you fill in the station values aneeded for the first station, save them, and move to the form for the nexstation in the group that you are adding. You create a form file (a list of othose station-definition fields you wish to see in the order in which you wto see them) using the Forms Editor.
A template places default values in some of these fields to save you the repetitive task of adding the same value to station after station. You createmplate file (a partially filled-in station) using the template view in the Station Administration module.
MAT Station Administration User Guide

Page 232 of 254 Power User Tool
e
d in
w.
n. re
but ms,
'S a
Note: The function of templates is identical in the standard Graphical User Interface and the Forms Interface.
This means that a form, used in conjunction with a template, provides you with a station-definition window including only those fields that you wish to edit, and with many fields already configured by the template with values of your choosing.
To lessen clutter on the screen, the fields configured by the template are not displayed. This means that you work with only those fields which must be “personalized” for this station. You do not waste time moving through already-configured fields.
You view and edit these station-configuration fields in the Forms Interfacwindow.
FiltersThere are hundreds of fields for a station, yet you are probably interesteonly a few. The Form File that you define acts as a filter to allow only thefields of interest to appear in the forms interface station definition windo
MAT automatically performs a second filtering to determine which of thestation fields defined in the Form File actually apply to the current statioThis applicability filter is based upon Meridian 1 system data (X11 softwarelease, option packages, customer options) and the type of the currentstation.
There are two important benefits to this applicability filter, as follows:
• Form files are independent of systems, and, therefore, X11 softwarerelease, options packages, and customer options
For example, a form file might contain fields that apply to release 20,not to release 19. You can safely use this form with release 19 systesince the release 20 fields will not be displayed.
• Form Files are independent of station types
A single Form File can include both single line FTR's and multi-line keys. If the form is used to display a single line station, then the FTR(but not the keys) are displayed. If the same form is used to display multi-line station, then the keys (but not the FTR's) are displayed.
P0906946 Standard April 2000

Power User Tool Page 233 of 254
tes.
the
ns
his
all for
anel ext ists
.
Using the power user Forms interfaceYou use the Forms interface to add one or many stations to a system, as described in this section. “Designing forms and templates using the forms editor” on page 251 describes the process of creating forms and templa
Forms interface window buttonsThe following buttons appear at the top of the Forms interface window:
• OK: (Single station adds only) Saves the current station and closes window.
• Next: (Multiple station adds only) Saves the current station, and opethe next blank station form.
• Previous: (Multiple station adds only) Saves the current station and opens the previously-created station.
• Cancel: Cancels any changes to the current station and closes the window. Any stations created before the current station while using tform are still in place.
• Validate: Validates all current station values.
• Print: Prints a a short form for the current station. This printout showsvalues in the station, not just those on the form. (This is a quick wayyou to check the value of a field not on the form.)
• Help: Opens Windows Help.
Forms interface message barThe message bar at the bottom of the window has two panels. The left pprovides a description of the current field. The right panel displays hint tfor the current field. For example, the hot keys to invoke the DN and TN lwhere appropriate.
Keyboard shortcutsIn the procedures that follow, keyboard shortcuts are shown in brackets
MAT Station Administration User Guide

Page 234 of 254 Power User Tool
u .
ick
Adding a single station or template
1 Choose Forms - Forms Interface. <INS>
This is a toggled menu item. Clicking it places a checkmark next to the name (selects it), and clicking again removes the checkmark (deselects it).
2 Choose Forms - Select Form. <Alt>O-S
The Select Form dialog appears. This is a standard Windows file open dialog.
MAT provides the following example forms for you to use in creating forms that meet your needs:
• ARIESDTA.SFM: designed for M2xxx and M3xxx data stations
• VOICE.SFM: designed for all types of voice stations (single and multi-line)
• Default form: A general-purpose form that includes most station fields. This is a good starting point for a form with many fields. Yochoose to use this form by selecting the Default Form check box
3 Select the form from the list box or select the Default Form check box. ClOK.
Figure 95Select Form dialog
P0906946 Standard April 2000

Power User Tool Page 235 of 254
lt
ed.
4 Choose View - Station to add a station or select Template to add a template. <Alt>V-S
The existing stations (or templates) for the system appear in the MAT Station Administration window.
5 Choose Edit - Add. <Ins>
The Add Station dialog (or Add Template dialog) appears.
6 If you are adding stations, follow these steps:
• Enter “1” in the Number of Stations to Add field.
• Select the Customer Number in the pull-down box.
• Choose a template or instrument.
If you choose a template, some fields will be filled in with the defauvalues that you chose when designing the template.
• Click the check boxes to automatically assign DN or TN, as desir
7 If you are adding a template, select a template from the list.
Figure 96Add station dialog
MAT Station Administration User Guide

Page 236 of 254 Power User Tool
lick
me
8 Click OK to open the Forms Interface window.
The single station add form appears.
9 Fill in the fields as described in “Station fields” on page 241.
10 When you have entered all desired values, click OK.
This saves the station and closes the forms interface window.
11 For stations: If MAT is in Maintenance mode, the synchronization dialog appears. Fill in the dialog in the same way as with the standard interface. COK.
To invoke synchronization manually if you are in Installation mode, use the Synch menu.
Updating a single station (or template)
1 Choose Forms - Forms Interface. <Alt>O-F
This is a toggled menu item. Clicking it places a checkmark next to the na(selects it), and clicking again removes the checkmark (deselects it).
Figure 97Add Template dialog
P0906946 Standard April 2000

Power User Tool Page 237 of 254
2 Choose View - Station. <Alt>V-S
(To modify a template, select Template. <Alt>V-T
The existing stations (or templates) for the system appear in the MAT Station Administration window.
3 In the MAT Station Administration window, double-click the station (or template) of interest.
The single station add form (or the template add form) appears.
4 Modify the fields as needed.
5 Click OK.
Figure 98Single station add form
MAT Station Administration User Guide

Page 238 of 254 Power User Tool
s. se
n ou orm”
ick
6 For stations: If MAT is in Maintenance mode, the synchronization dialog appears. Fill in the dialog in the same way as with the standard interface. Click OK.
To invoke synchronization manually if you are in Installation mode, use the Synch menu.
Adding multiple stations
1 Choose Forms - Forms Interface. <Alt>O-F
This is a toggled menu item. Clicking it places a checkmark next to the name (selects it), and clicking again removes the checkmark (deselects it).
2 Choose Forms - Select Form. <Alt>O-S
The Select Form dialog appears. This is a standard Windows file open dialog. See Figure 95.
MAT provides the following pre-defined forms:
• ARIESDTA.SFM: designed for M2xxx and M3xxx data stations
• VOICE.SFM: designed for all types of voice stations (single and multi-line)
• Default form: A general-purpose form that includes all station fieldThis is a good starting point for a form with many fields. You chooto use this form by selecting the Default Form check box.
Note: MAT provides these pre-defined forms as starting points for your owspecial-purpose forms. You can create forms that include just the fields yneed, and templates that set values that you define. See “Creating a new fon page 251 and “Editing an existing form” on page 252.
3 Select the form from the list box or select the Default Form check box. ClOK.
4 Choose View - Station. <Alt>V-S
The existing stations for the system appear in the MAT Station Administration window.
5 Choose Edit - Add. <Ins>
The Add Station dialog appears.
6 Enter the number of stations that you wish to add.
7 Select the Customer Number in the pull-down box.
P0906946 Standard April 2000

Power User Tool Page 239 of 254
8 Choose a template or instrument.
If you choose a template, some fields will be filled in with the default values that you chose when designing the template.
9 Click the check boxes to automatically assign DN or TN, as desired.
10 Click OK to open the Forms Interface window.
The multiple station add form appears.
11 Fill in the fields as described in “Station fields” on page 241.
Figure 99Multiple station add form (default form)
MAT Station Administration User Guide

Page 240 of 254 Power User Tool
ot
h
he
12 When you have entered all desired values, Click Next.
This saves the station and opens the next blank station form. The Next button changes to a Finish button while you edit the last station in the group. The Finish button saves the station and closes the forms interface window.
13 If MAT is in Maintenance mode, the synchronization dialog appears. Fill in the dialog in the same way as with the standard interface. Click OK.
To invoke synchronization manually if you are in Installation mode, use the Synch menu.
Validating station dataYou can validate by field or by station, same as the standard interface. In addition, you have the option to relax numbering plan and hardware validations to ease the process of adding multiple stations at one time.
Field validationThe current field is automatically validated when you move to another field. If the validation fails, an error message appears, and the focus returns to the erroneous field.
Station validationIn the Forms Interface window, click Validate to validate all values for the station. This performs the same operation as when you choose File - Validation.
Validating the numbering plan and hardwareYou can relax the numbering plan and hardware validations as follows:
• Turn off numbering plan validation. This allows you to assign a DN ndefined in the numbering plan, without generating an error.
• Turn off hardware validation. This allows you to assign a TN for whicthere is no corresponding circuit card, without generating an error.
Note: These validation settings affect both the forms interface and tstandard interface.
P0906946 Standard April 2000

Power User Tool Page 241 of 254
in S
Station fieldsThis section provides detail on the station fields that you fill in using the Forms Interface.
On-line HelpAt any time while using the Forms window, you can press <F1> for on-line reference information on the current field.
Types of Station fieldThe following basic types of station fields can appear in the Forms Interface:
• Class of service
• Mutli-line keys
• Single line FTR's
• Prompts: These are all fields which do not fall into one of the abovecategories (for examples, TN, NCOS, and TGAR)
Class of service fieldThe Class of service control appears as a CLS text box which can contamultiple values (the approach taken by overlays 10 and 11). Enter all CLmnemonics for this station in the CLS text box.
Figure 100Mode dialog
MAT Station Administration User Guide

Page 242 of 254 Power User Tool
You can enter multiple mnemonics for the same class of service in the CLS text box (for example, CFXA and CFXD). In this case, whichever mnemonic appears last (furthest to the right) takes precedence. This is consistent with the operation of overlays 10 and 11.
The values of some Class of service fields might not be visible on the form when it appears. Instead, the form shows only those classes of service which are not equal to default values. You can modify this partial configuration by adding new mnemonics or changing existing ones.
Press <Fl> while within any class of service field for a complete list of class of service mnemonics in Windows Help format.
Printing the class of service configurationThe Print button on the form window allows you to print a short form which shows the complete class of service configuration.
Mutli-line keysKeys for multi-line stations appear as drop-down boxes containing all key mnemonics. As you move through the list of mnemonics, the key description appears in the message bar at the bottom of the window. Additional parameter controls appear automatically if a mnemonic requires them (and for FTRs set to Yes).
You can also type a mnemonic directly into the box. MAT tracks your typing and automatically enters the first matching key (and any associated parameter controls).
Alternately, type the first letter of the mnemonic, followed by the down arrow key. The selection moves to the mnemonic starting with that letter. Press the down arrow key again to scroll down the list starting at that point.
Single line FTR’sFTRs appear as drop-down boxes containing the choices Yes and No. You can also type directly into the box. Additional parameter fields appear automatically if you set an FTR to Yes. When you move the cursor into a parameter field, the parameter description appears in the message bar at the bottom of the window.
P0906946 Standard April 2000

Power User Tool Page 243 of 254
PromptsPrompt fields appear as either drop-down lists or as edit boxes, depending on the type of the field. Fields with a small number of predefined values appear as drop-down lists (for example, FCAR and DTR). Numeric fields and other fields with a wide range of possible values appear as edit boxes (for example, DES and FDN).
DN and TN fieldsDN and TN fields allow you to use lists of values to fill in the fields. In addition, extra fields appear as needed to allow you to enter parameter values.
TN fieldsWhen you edit a fields with a TN type value, press <Ctrl>T (or double-click in the field) for a list of TNs compatible with the current station type.
Figure 101TN value list
MAT Station Administration User Guide
Page 244 of 254 Power User Tool
re, n a s.
rd late. any
f ns ar
DN fieldsIn addition to station fields, you need to modify fields that are not directly associated with the current station, but which are associated with DNs that appear on the station. You can use the following DN fields in the forms interface:
• MARP
• CPND
• VMB
Note: DN data is applicable to stations only, not templates. Therefothe MARP, CPND, and VMB controls described below appear only oform when operating on stations. Templates do not actually have DNEven if a template is configured with a fully specified DN, no DN recowill be added to the database until a station is created using the tempTherefore, at the time a template is created, there is no way to storeDN data.
Press <Ctrl> D while in a DN field (or double-click in the field) for a list oDNs. In the standard interface, MARP, CPND, and VMB appear as buttoon the DN list dialog. In the forms interface, MARP, CPND, and VMB appeas fields on the main form.
P0906946 Standard April 2000

Power User Tool Page 245 of 254
Figure 102DN value list
MAT Station Administration User Guide

Page 246 of 254 Power User Tool
r to 3. A s
MARPThe MARP drop-down list appears below the DN field with which it is associated. Multiple appearance DNs can have values of Yes or No. Single appearance DNs can have a value of Yes. The MARP field appears below the DN field of a single-line station and below the following multi-line keys:
• MCN
• MCR
• PVN
• PVR
• SCN
• SCR
• HOT_L_2WAY
• HOT_D_2WAY
Note: The following Meridian 1 releases do not support MARP, therefore MARP does not appear on their forms:
• North American releases 14 and 17
• International release 16.9X G
CPNDThe CPND name field is a single drop-down list (additional fields appeathe right if you choose a CPND value that requires them). See Figure 10CPND field appears below the DN field of a single line station, as well abelow the following multi-line keys:
• MCN
• MCR
• SCN
• SCR.
P0906946 Standard April 2000

Power User Tool Page 247 of 254
t for
You can choose one of the following values from the drop-down list:
• None: Performs no CPND operation
• Add: Creates a new CPND name (appears only if no name exists yethe DN)
• Delete: Removes an existing CPND name
• Update: Modifies an existing CPND name
MAT Station Administration User Guide

Page 248 of 254 Power User Tool
nch n
m.
CPND Parameter FieldsAs you move the cursor into a parameter field, the parameter description appears in the message bar at the bottom of the window. The following parameter fields appear to the right of the CPND field when you choose a value other than None:
• Get from location: drop-down list containing Yes and No
• First name: text box
• Last name: text box
• Expected length: text box. This field is only added if the name has SyStatus NEW, and static allocation is enabled in the CPND Administratiomodule.
• Format: drop-down list containing FIRS and LAST
• Language: drop-down list containing ROM and KAT. This field appears only if package 211 (Multi-language CPND) is enabled for the syste
Figure 103CPND parameter fields
P0906946 Standard April 2000

Power User Tool Page 249 of 254
e irst
d d,
ill
Some additional attributes of the name controls follow:
• If the Get From Location field is Yes, then the First Name and Last Namcontrols are dimmed and disabled, and contain the name from the FName and Last Name fields of the station.
• If the operation is Delete, then the additional name controls are dimmeand disabled. This allows you to view the name which is to be deletebut not to modify it.
Note: CPND depends on package 95 (Call Party Name Display). If package 95 is not enabled for a Meridian 1 system, the CPND field wnot appear on the form.
VMBVMB appears initially as a drop-down list (additional fields appear as needed).
Figure 104VMB fields
MAT Station Administration User Guide

Page 250 of 254 Power User Tool
ws
N)
in
t the f a
).
A VMB appears below the DN field of a single line station, and below the following multi-line keys:
• MCN
• MCR
• SCN
• SCR
The drop-down list contains the VMB operation to be performed, and allothe following values:
• None: Perform no VMB operation
• Add: Create a new VMB (appears only if no VMB exists yet for the D
• Delete: Remove an existing VMB (appears only if a VMB does exist)
• Update: Modify an existing VMB (appears only if a VMB does exist)
If you select an operation other than None, then additional fields appear to theright of the VMB field. The additional fields are listed below in the order which they will appear from left to right.
• Class of service (text edit field)
• Second DN (text edit field)
• Third DN (text edit field)
• Keep messages (drop-down list containing No and Yes). This control is only added if the voice mailbox has Synch Status NEW.
As you select a VMB field, the description appears in the message bar abottom of the window. Additional parameter fields appear automatically iVMB requires them.
If the VMB operation is Delete, then the additional fields are dimmed. Thisallows you to view the VMB which is to be deleted, but not to modify it.
Note: VMB depends on package 246 (Voice Mailbox AdministrationIf this package is not enabled for a Meridian 1 system, then the VMBfields do not appear on the form.
P0906946 Standard April 2000

Power User Tool Page 251 of 254
s.
Designing forms and templates using the forms editorThe MAT application assumes that station Form Files are located in the Common Data subdirectory, using a “.SFM” file extension. You can, however, place these form files anywhere you wish.
MAT provides the following pre-defined forms:
• ARIESDTA.SFM: designed for M2xxx and M3xxx data stations
• VOICE.SFM: designed for all types of voice stations (single and multi-line)
• Default form: A general-purpose form that includes most station fieldThis is a good starting point for a form with many fields. Instead of selecting this form in the file-selection box, you select this form by selecting the Default Form check box.
Creating a new formTo create a form, perform the following steps:
1 Choose Forms - Forms Interface. <Alt>O-F
2 Choose Forms - Edit Custom Form. <Alt>O-E
The FormEdit dialog appears.
3 Choose File - New to open a new form.<Alt>F-N
The FormEdit window appears with no fields in the Form Fields list.
4 From the Available Fields list, select the first field you wish to include in the form, and click Add.
The field moves to the Form Fields list.
Alternately, you can select one or several fields to drag from the Available Fields list to the Form Fields list.
5 Move all the desired fields to the Form Fields list.
To change the order of the fields, click and drag items up or down in the list.
To remove an item from the list, click and drag from the Form Fields list to the Available Fields list, or select the item and click Remove.
MAT Station Administration User Guide

Page 252 of 254 Power User Tool
e.
r a
fore
6 When the Form Fields includes all the desired fields in the correct order, type a descriptive phrase in the Form Description text box.
This is a phrase to help you remember the form’s usage, not the filenam
7 Choose File - Save to save the form file. <Alt>F-S
The Save As window appears, allowing you to name the new form. Entefilename and click OK.
Alternately, to exit the forms editor without saving the form, choose File - Close. A warning box prompts whether you wish to save the changes beexiting the editor.
Editing an existing formTo edit an existing form, follow these steps:
1 Choose Forms - Forms Interface. <Alt>O-F
2 Choose Forms - Edit Custom Form. <Alt>O-E
The FormEdit dialog appears.
Figure 105FormEdit window for a new form
P0906946 Standard April 2000

Power User Tool Page 253 of 254
u .
e it, es, nd
m,
e
3 Choose File - Open to install a form. <Alt>F-O
The Select Form dialog appears.
MAT provides the following pre-defined forms:
• ARIESDTA.SFM: designed for M2xxx and M3xxx data stations
• VOICE.SFM: designed for all types of voice stations (single and multi-line)
• Default form: A general-purpose form that includes most station fields. This is a good starting point for a form with many fields. Yochoose to use this form by selecting the Default Form check box
Note: The sample forms provided with MAT are a good starting point formany forms you might create. Be sure to rename the form when you savhowever. Subsequent versions of MAT will use the same default filenamso any files you create using the default file names will be overwritten, athus lost.
4 Select the form from the list box. Click OK.
The FormEdit dialog opens.
5 From the Available Fields list, select the field you wish to include in the forand click Add.
The field moves to the Form Fields list.
Alternately, you can select one or several fields to click and drag to movfrom the Available Fields list to the Form Fields list.
Figure 106Select Form dialog
MAT Station Administration User Guide

Page 254 of 254 Power User Tool
es
6 Move all the desired fields to the Form Fields list.
To change the order of the fields, click and drag the item up or down in the list.
To remove an item from the list, click and drag from the Form Fields list to the Available Fields list, or select the item and click Remove.
7 When the Form Fields includes all the desired fields in the correct order, type a descriptive phrase in the Form Description text box.
Note: This is a phrase to help you remember the form’s usage, not the filename.
8 Choose File - Save As to save the modified form file. <Alt>F-A
Alternately, to exit the forms editor without saving the form, choose File - Close. A warning box prompts whether you wish to save the changbefore exiting the editor.
Figure 107FormEdit window (M2xxx and M3xxx data stations)
P0906946 Standard April 2000


Family Product Manual Contacts Copyright FCC notice Trademarks Document number Product release Document release Date Publish
Meridian Administration Tools
Station AdministrationUser Guide
© 1997, 2000 Nortel NetworksAll rights reservedInformation is subject to change without notice. Nortel Networks reserves the right to make changes in design or components as progress in engineering and manufacturing may warrant. This equipment has been tested and found to comply with the limits for a Class A digital device pursuant to Part 15 of the FCC rules, and the radio interference regulations of Industry Canada. These limits are designed to provide reasonable protection against harmful interference when the equipment is operated in a commercial environment. This equipment generates, uses and can radiate radio frequency energy, and if not installed and used in accordance with the instruction manual, may cause harmful interference to radio communications. Operation of this equipment in a residential area is likely to cause harmful interference in which case the user will be required to correct the interference at their own expense.SL-1 and Meridian 1 are trademarks of Nortel Networks.Publication number: P0906946Document release: StandardDate: April 2000Printed in the United States of America


![[XLS] for the month Apr... · Web viewMargin MarketType MarketType MarketType MarketType MarketType_Text MarketType_Text Mast Mast Mat Mat Mat Mat Mat Mat Mat Mat Mat Mat Mat Match1](https://img.dokumen.tips/doc/110x75/5ab4774c7f8b9a2f438b92c4/xls-for-the-month-aprweb-viewmargin-markettype-markettype-markettype-markettype.jpg)