Embed Size (px)
Citation preview

Part Marking Awareness Session
Mark It and Mark It Right!

2
Dot Peen Marking
Keys to creating legible Dot Peen Marks:
• Maintain your machines– Perform daily walk-arounds
– Check and, if necessary, clean stylus– Check rigidity of parts in fixtures and
rigidity of fixtures on table
• Always use diamond-tipped stylus’
• Inspect your work

3
Maintain Your Machines - Do your Daily Walk-Arounds!
4
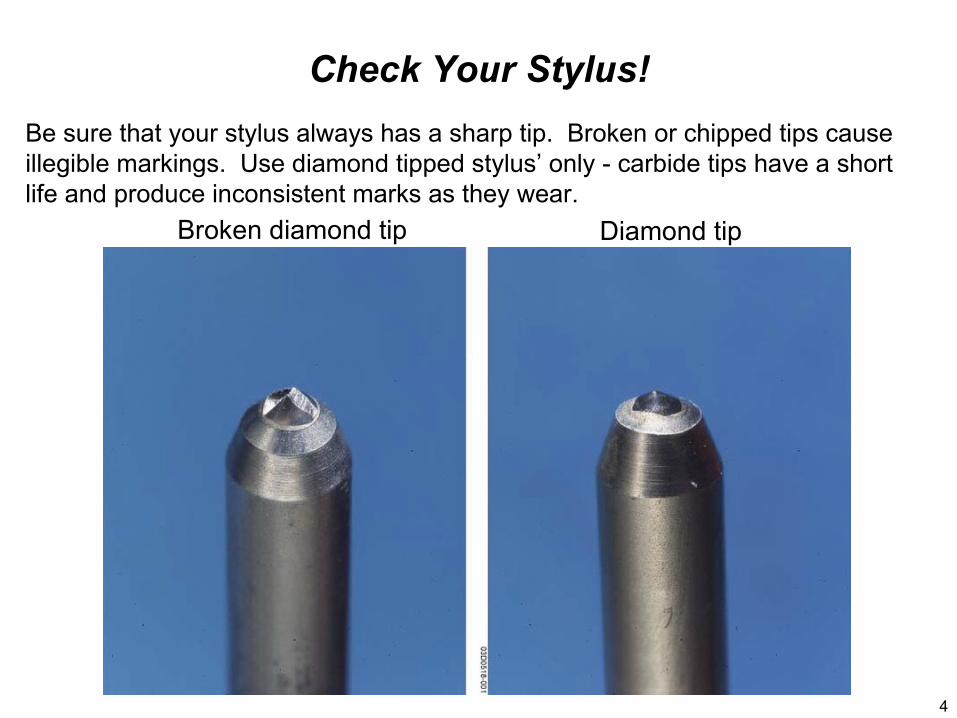
Check Your Stylus!
Be sure that your stylus always has a sharp tip. Broken or chipped tips cause illegible markings. Use diamond tipped stylus’ only - carbide tips have a short life and produce inconsistent marks as they wear.
Broken diamond tip Diamond tip

5
IUID Marking Parameters
The parameters that are used for marking are:
Electro-mechanical marker- DAPRA/Pryor
Dot Spacing 0.010” - 0.011”
Force 3-5 (7-9 for nickels)
Initial Gap 0.050” – 0.060”
Speed Slow
Tip Angle (indenter) 120 degrees
Tip Radius (indenter) 0.005”
Air-driven marker - Telesis
Dot Spacing 0.010” - 0.012”
Force 80psi drive 20psi return
Initial Gap 0.050” – 0.060”
Speed Slow
Tip Angle (indenter) 120 degrees
Tip Radius (indenter) 0.005”

6
Check Your Clamps!
Check for loose clamps on base plates and fixtures. If your part is NOT secured in its fixture and your fixture is NOT secured on the table, illegible markings and machine wear will result.
Loose clamp
Sturdy clamp

7
Check Your Clamps!
Always use the clamps provided to mark your parts. Every clamp and fixture that you need to mark your parts should be provided to you. If you do not have the tooling that you need, or the tooling that you have is wearing, contact your cell leader or M.E. immediately to replace it. Worn or poorly maintained tooling will eventually result in illegible marks!
Unusable Clamp - wrapped in tape

8
Inspect Your Dot Peen Mark!
Check Depth, Location, Legibility, that the Correct Mark was applied and verify with MQI’s
Missing dots are results of bent, dirty or worn stylus’ and will affect legibility.
Skewed letters are results of loose fixtures, loose parts, or machine wear. Legibility will suffer due to these problems.

9
Inspect Your Dot Peen Mark!
Check to ensure that your markings maintain a consistent depth. Markings that are not deep enough will be “erased” or illegible after shot peen.

10
Inspect Your Dot Peen Mark!
0.125” 0.125”
0.634”0.534”
Be sure to check the location of your mark also. If you dot peen your mark in the wrong area, you may have taken space to be used for other markings downstream in the process! Use MQI’s to verify locations.

11
Good!Rework...
Inconsistent depth
Skewed Letters
Dot Peen Examples

12
Remember...
Our customers do not want to pay for rework and scrap due to Part Marking nonconformances!