Embed Size (px)
Citation preview

Product Documentation PUBLICSAP Business ByDesign February 2017
Marketing


Table Of Contents
1 Marketing . . . . . . . . . . . . . . . . . . . . . . . . . . . . . . . . . . . . . . . . . . . . . . . . . . . . . . . . . . . . . . 5
2 . . . . . . . . . . . . . . . . . . . . . . . . . . . . . . . . . . . . . . . . . . . . . . . . . . . . . . . . . . . . . . . . . . . . . . . . 6
3 Business Background . . . . . . . . . . . . . . . . . . . . . . . . . . . . . . . . . . . . . . . . . . . . . . . . . . . . 83.1 Target Groups and Campaign Management . . . . . . . . . . . . . . . . . . . . . . . . . . . . . . . . . . . . . . . . 83.2 Lead Processing . . . . . . . . . . . . . . . . . . . . . . . . . . . . . . . . . . . . . . . . . . . . . . . . . . . . . . . . . . . . 133.3 Opportunity Processing . . . . . . . . . . . . . . . . . . . . . . . . . . . . . . . . . . . . . . . . . . . . . . . . . . . . . . 153.4 Activity Management . . . . . . . . . . . . . . . . . . . . . . . . . . . . . . . . . . . . . . . . . . . . . . . . . . . . . . . . 183.5 Marketing-to-Opportunity Business Scenario . . . . . . . . . . . . . . . . . . . . . . . . . . . . . . . . . . . . . . . 21
4 Leads View . . . . . . . . . . . . . . . . . . . . . . . . . . . . . . . . . . . . . . . . . . . . . . . . . . . . . . . . . . . . . 254.1 Quick Guide for Leads (in Marketing) . . . . . . . . . . . . . . . . . . . . . . . . . . . . . . . . . . . . . . . . . . . . . 254.2 Tasks . . . . . . . . . . . . . . . . . . . . . . . . . . . . . . . . . . . . . . . . . . . . . . . . . . . . . . . . . . . . . . . . . . . 29
Create Leads Using Microsoft Excel® . . . . . . . . . . . . . . . . . . . . . . . . . . . . . . . . . . . . . . . . . . . 29Export Business Data Using Microsoft Excel® . . . . . . . . . . . . . . . . . . . . . . . . . . . . . . . . . . . . . 31
5 Market Information View . . . . . . . . . . . . . . . . . . . . . . . . . . . . . . . . . . . . . . . . . . . . . . . . . 335.1 Market Information Quick Guide . . . . . . . . . . . . . . . . . . . . . . . . . . . . . . . . . . . . . . . . . . . . . . . . 335.2 Business Background . . . . . . . . . . . . . . . . . . . . . . . . . . . . . . . . . . . . . . . . . . . . . . . . . . . . . . . . 35
Document Center . . . . . . . . . . . . . . . . . . . . . . . . . . . . . . . . . . . . . . . . . . . . . . . . . . . . . . . . . 35
6 Competitors View . . . . . . . . . . . . . . . . . . . . . . . . . . . . . . . . . . . . . . . . . . . . . . . . . . . . . . . 366.1 Competitors Quick Guide . . . . . . . . . . . . . . . . . . . . . . . . . . . . . . . . . . . . . . . . . . . . . . . . . . . . . 366.2 Business Background . . . . . . . . . . . . . . . . . . . . . . . . . . . . . . . . . . . . . . . . . . . . . . . . . . . . . . . . 38
Overviews of Business Partners . . . . . . . . . . . . . . . . . . . . . . . . . . . . . . . . . . . . . . . . . . . . . . . 38
7 Competitor Products View . . . . . . . . . . . . . . . . . . . . . . . . . . . . . . . . . . . . . . . . . . . . . . . 407.1 Competitor Products Quick Guide . . . . . . . . . . . . . . . . . . . . . . . . . . . . . . . . . . . . . . . . . . . . . . . 40
8 Target Groups View . . . . . . . . . . . . . . . . . . . . . . . . . . . . . . . . . . . . . . . . . . . . . . . . . . . . . 438.1 Target Groups Quick Guide . . . . . . . . . . . . . . . . . . . . . . . . . . . . . . . . . . . . . . . . . . . . . . . . . . . . 438.2 Tasks . . . . . . . . . . . . . . . . . . . . . . . . . . . . . . . . . . . . . . . . . . . . . . . . . . . . . . . . . . . . . . . . . . . 45
Create a Target Group . . . . . . . . . . . . . . . . . . . . . . . . . . . . . . . . . . . . . . . . . . . . . . . . . . . . . 45Create a Target Group Using Microsoft Excel® . . . . . . . . . . . . . . . . . . . . . . . . . . . . . . . . . . . . . 48Edit a Target Group . . . . . . . . . . . . . . . . . . . . . . . . . . . . . . . . . . . . . . . . . . . . . . . . . . . . . . . . 50
SAP Business ByDesign February 2017Table Of Contents P U B L I C • © 2017 SAP SE or an SAP affiliate company. All rights reserved. 3
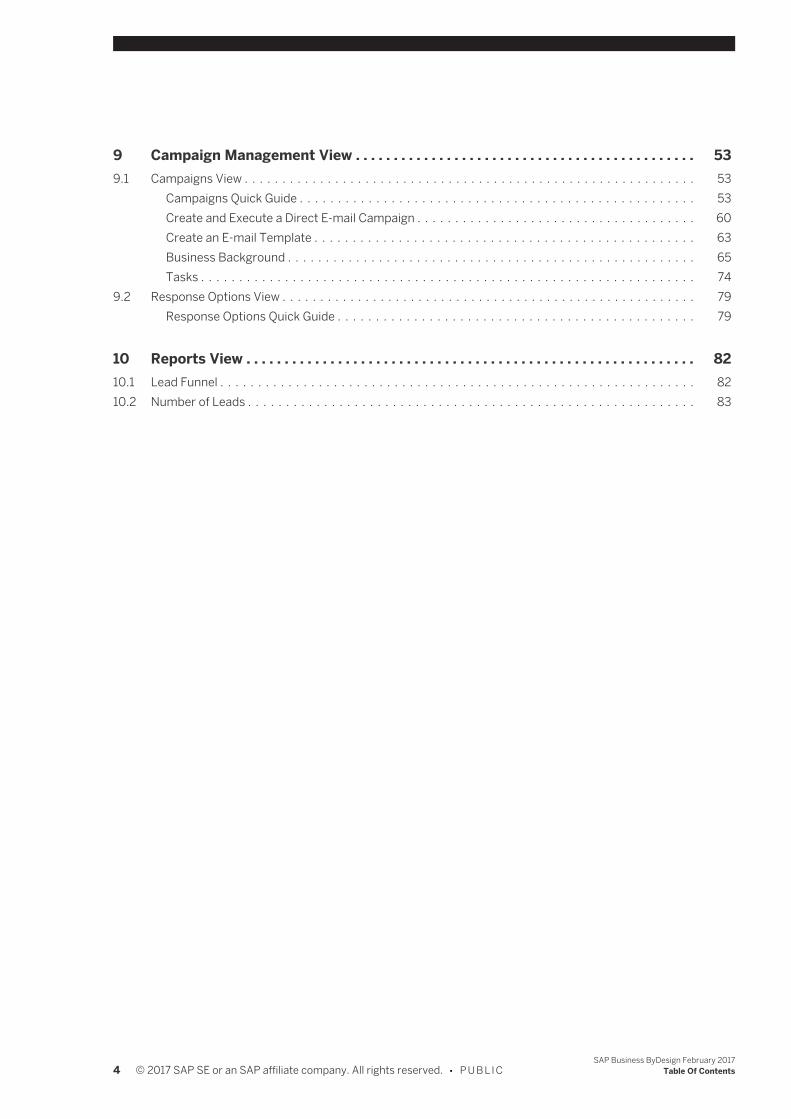
9 Campaign Management View . . . . . . . . . . . . . . . . . . . . . . . . . . . . . . . . . . . . . . . . . . . . . 539.1 Campaigns View . . . . . . . . . . . . . . . . . . . . . . . . . . . . . . . . . . . . . . . . . . . . . . . . . . . . . . . . . . . . 53
Campaigns Quick Guide . . . . . . . . . . . . . . . . . . . . . . . . . . . . . . . . . . . . . . . . . . . . . . . . . . . . 53Create and Execute a Direct E-mail Campaign . . . . . . . . . . . . . . . . . . . . . . . . . . . . . . . . . . . . . 60Create an E-mail Template . . . . . . . . . . . . . . . . . . . . . . . . . . . . . . . . . . . . . . . . . . . . . . . . . . 63Business Background . . . . . . . . . . . . . . . . . . . . . . . . . . . . . . . . . . . . . . . . . . . . . . . . . . . . . . 65Tasks . . . . . . . . . . . . . . . . . . . . . . . . . . . . . . . . . . . . . . . . . . . . . . . . . . . . . . . . . . . . . . . . . 74
9.2 Response Options View . . . . . . . . . . . . . . . . . . . . . . . . . . . . . . . . . . . . . . . . . . . . . . . . . . . . . . . 79Response Options Quick Guide . . . . . . . . . . . . . . . . . . . . . . . . . . . . . . . . . . . . . . . . . . . . . . . 79
10 Reports View . . . . . . . . . . . . . . . . . . . . . . . . . . . . . . . . . . . . . . . . . . . . . . . . . . . . . . . . . . . 8210.1 Lead Funnel . . . . . . . . . . . . . . . . . . . . . . . . . . . . . . . . . . . . . . . . . . . . . . . . . . . . . . . . . . . . . . . 8210.2 Number of Leads . . . . . . . . . . . . . . . . . . . . . . . . . . . . . . . . . . . . . . . . . . . . . . . . . . . . . . . . . . . 83
4 © 2017 SAP SE or an SAP affiliate company. All rights reserved. • P U B L I CSAP Business ByDesign February 2017
Table Of Contents

1 Marketing
OverviewBy helping you better manage your marketing and presales activities including market development, campaign andlead management, the SAP Business ByDesign solution gives you more control of your sales and service deals.Because SAP Business ByDesign keeps track of relevant prospect and customer information, your sales team hasall the information it needs at any time during the sales process.
RelevanceThe Marketing business area is relevant if you need support for:
● Market development ● Campaign management
Benefits ● Your managers can prepare highly effective sales and marketing strategies.
The SAP Business ByDesign solution makes it easy to build up comprehensive knowledge of your competitorsand their products, services, and pricing. Using a central repository of market information in SAP BusinessByDesign, you and your staff can store and manage in-depth information about markets, customers, andcompetitors. As a result, your organization can precisely target its sales and marketing activities. Your salesteam can use this information to fine-tune its sales tactics and better position your products and services.
● Seamless process integration makes information gathered during lead generation available for all othermarketing and sales activities.Because of tight integration between your marketing and sales processes in SAP Business ByDesign, all theinformation collected during lead generation is automatically passed on to your sales force. Your marketingprofessionals can determine the number and quality of leads and the eventual number of opportunities andsales that result. With this information, your marketers can fine-tune the targeting and messaging ofmarketing activities.
SAP Business ByDesign February 2017Marketing P U B L I C • © 2017 SAP SE or an SAP affiliate company. All rights reserved. 5

2
About this documentThe Lead Deletion Runs view of the New Business and Marketing work center enables you to create and schedulemass data runs for deletion of leads. The run will be triggered based on the selection criteria at the scheduled time.In the Background Jobs view of the Application and User Management work center, you can monitor and rescheduleMDR jobs that are created by users in other work centers.
Mass Data Run (MDR)A Mass Data Run (MDR) is the automatic mass processing of a task or a business transaction. MDRs enable massprocessing of business data and are used in business processes, for example, invoice runs, payment authorizationruns, or balance confirmation runs. When a user schedules an MDR, the system represents it as a background job.During scoping, it is possible to provide default variants of the MDRs.MDRs are created and maintained in the work centers. Using the Job Scheduler, users schedule the run to executeonce or regularly at specified times.For more information, see Mass Data Runs.
TasksCreate a Lead Deletion RunProcedure
1. In the New Business or Marketing work center, on the Lead Deletion Runs view, click New to open the NewLead Deletion Run screen.
2. General DataEnter a Run ID and, if required, a description for the run in Run Description.You can further filter the leads considered for the run based on:1. Select by Account2. Select by Qualification3. Select by Creation Date
If you choose Select by Account, you can specify Inclusion/Exclusion, Interval Definition, Account From andAccount To. If you choose Select by Qualification, you can specify Inclusion/Exclusion and Qualification, forexample, Hot, Warm or Cold. If you choose Select by Creation Date, you can specify Inclusion/Exclusion,Interval definition, Date From and Date To.You can add further rows by clicking Add Row or remove any existing by clicking Remove.
3. ReviewReview the details of the lead deletion run and click Save .
4. ConfirmationClick Save .
You can also activate the run by clicking Set to Active .
6 © 2017 SAP SE or an SAP affiliate company. All rights reserved. • P U B L I C SAP Business ByDesign February 2017

Schedule a Lead Deletion Run1. In the New Business work center, on the Lead Deletion Runs view, select the saved run and then click
Actions and select Set to Active, to activate the run.2. Click Schedule to open the Schedule Job screen.3. Choose one of the following options as required:
● Choose Start Immediately to execute the run immediately. ● Choose Run After Job and select a job.
The run will then be executed immediately after the specified job. ● Choose Single Run to define a date and time for the run. ● If you want to execute the run at regular time intervals, choose Recurrence and choose a recurrence for
the run, for example, by the minute, hourly, daily, weekly, or monthly.4. To save the run and return to the Lead Deletion Runs view, click Save and Close .
The run has been scheduled and will be executed as specified.5. You can view the application logs for each run on the Lead Deletion Runs screen, by selecting the required
run.
Setting status for a RunIn the Lead Deletion Runs view, under Actions you can set the status as:
● Set to Active will set the run to Active status ● Set to Obsolete sets the active run to Obsolete status ● Undo Obsolete sets the obsolete run to In Revision status and has to be activated again to set it to Active
status.
See Also
SAP Business ByDesign February 2017 P U B L I C • © 2017 SAP SE or an SAP affiliate company. All rights reserved. 7

3 Business Background
3.1 Target Groups and Campaign Management
OverviewTarget Groups and Campaign Management provide an effective way for sales and marketing professionals withinyour company to target specific prospects or customer groups in order to generate new business or strengthenrelationships.A key strategy in successful marketing is the ability to query your customer database and create different targetgroups, thus enabling you to target your customers more effectively during your marketing campaigns. Targetgroups are lists of accounts and contacts that have at least one search parameter in common. It is also possible tomanually add accounts and contacts that do not match the search parameters, but still need to be included in thetarget group.Your company can then assign a target group to a campaign in order to plan, execute and measure the campaignresults from within SAP Business ByDesign. Campaign execution generates a Microsoft Excel® template that caneither be distributed to a marketing agency which then contacts the target group members, or as an input source inMicrosoft mail merge or other mailing systems.
BenefitsTarget Groups and Campaign Management is relevant for all sales and marketing companies, whose employees canuse this function to segment their market and target the right customers or prospects.Target Groups and Campaign Management enables you to:
● Create new target groups in an easy step-by-step approach by selecting accounts and contacts based ondifferent search parameters or based on response information
● Check addressability of your target group members for different communication channels ● Search, view, create, edit, and execute campaigns ● Automatically create activities for account and contact history from a campaign ● Create and add responses to a campaign or use response codes to easily capture campaign responses ● Monitor campaign key performance indicators (KPIs) and check at a glance who has been contacted, who
has not been contacted and why, who has responded using which channel, and who has not yet responded
PrerequisitesThe following prerequisites apply:
● Campaign management is enabled in your solution configuration. ● For creating automatic campaign responses via e-mail synchronization, office and desktop integration must
be enabled.
Configuration settings are usually performed by an administrator. If you do not have the requiredauthorization, contact your administrator.
8 © 2017 SAP SE or an SAP affiliate company. All rights reserved. • P U B L I CSAP Business ByDesign February 2017
Business Background

To find these business options, go to the Business Configuration work center and choose the ImplementationProjects view. Select your implementation project and click Edit Project Scope . In the Scoping step of the project,ensure that the following packages are selected:
● Campaign Management within Marketing ● Office and Desktop Integration within Communication and Information Exchange
FeaturesTarget Groups and Campaign Management consists of the following steps:
Planning a CampaignBefore creating a campaign, you typically define a target group to contact during the campaign. You create targetgroups in the Target Groups view in the Marketing work center or by choosing New Target Group under CommonTasks.Target groups are created by drawing on your existing customer and prospect database in SAP Business ByDesignusing different selection criteria. You specify the target group members by clicking Maintain Members, selecting therelevant query in the Show field, and entering the required selection criteria.If you want to create target groups of accounts or accounts with contacts based on selection criteria that are notavailable in the standard SAP Business ByDesign system, extension fields can be created and added these to theaccount or contact screens. For example, you want to create a target group based on the number of employees ofa corporate account. To enable you to do this, an administrator first creates the extension field Number ofEmployees for the Account screens where your company wants to use it (for example, New Corporate Account,Corporate Account Overview). After that the administrator makes this extension field available also in the selectioncriteria used for creating target groups. The following steps outline in brief how the administrator can make theextension field visible in the selection criteria for a particular query:
1. In the Target Groups view, click New , then choose Target Group.2. From the Adapt menu, select Enter Adaptation Mode.3. In the guided activity, click Next to go to Step 2: Select Members.4. On the Select Members screen, in the Show field, choose the query that should contain this extension field.5. Click Adapt, then choose Edit Screen.6. In the adaptation panel that opens, click Extension Fields.7. Select the section for which the extension field is relevant.8. Select the Visible checkbox next to the Number of Employees extension field to make it visible on the current
screen.9. You can now try out the field while still in adaptation mode and, if satisfied, publish your changes to all users.10. If you need this field in other queries that you use for creating new target groups, repeat these steps.
For more information, see the following document: Extension Fields Quick Guide..You can also create target groups in the following ways:
● Upload a new target group using Microsoft Excel®You can create a target group by entering accounts and contacts in a predefined Microsoft Excel templateand uploading this list to the SAP Business ByDesign system.
● Based on a worklistIn some work center views you can create a target group based on a worklist. For example, you can create atarget group based on a worklist of service orders that have been completed, in order to send an e-mail to thetarget group members and ask them whether they are satisfied with the service that they have received.You can create target groups from worklists in the following work center views:
SAP Business ByDesign February 2017Business Background P U B L I C • © 2017 SAP SE or an SAP affiliate company. All rights reserved. 9

Work Center View Work Center
Accounts Account Management
Activities Account Management
Contacts Account Management
Leads MarketingNew Business
Opportunities New Business
Sales Quotes New Business
Sales Orders Sales Orders
Returns Sales Orders
Registered Products Service Entitlements
Contracts Service Entitlements
Service Requests Service Desk
Service Order Processing Service Orders
First you prepare your worklist by selecting the relevant query in the Show field, or by clicking Advanced andentering the relevant search criteria. Then you create the target group from this worklist by clicking
Export followed by To Target Group. The target group will then contain all accounts and contacts that matchthis search and are shown as search results in the worklist.
● Based on a reportIn some reports you can create a target group based on the results of the report. For example, you can createa target group that contains all accounts with whom you have achieved more than $50,000 revenue for aspecific product within the last six months.You can create target groups from the following reports:
● Activity History ● Number of Leads ● Opportunity Pipeline ● Opportunity Volume ● Won/Lost Opportunities ● Sales Quote Volume ● Sales Order Volume ● Sales Pipeline ● Service Order Statistics ● Service Categories Analysis ● Return Sales Rate
First you call up a report and add the Account characteristic to the rows or columns. Then you click on anaccount ID or an account name, click on the arrow that appears next to the ID or name, and select Export allAccounts to new Target Group in the dropdown menu. The target group will then contain all accounts that areshown in the report. In addition, the system automatically determines the main contacts of these accounts,based on the account master data, and includes these in the target group. If the master data for a particularaccount does not have a main contact, then only the account is included in the target group.
10 © 2017 SAP SE or an SAP affiliate company. All rights reserved. • P U B L I CSAP Business ByDesign February 2017
Business Background

Note that the system determines the main contacts that are currently entered in the master data ofthe accounts. Therefore it is possible that some contacts in the target group differ from the contactsshown in the report.
● Based on response optionsYou can create a new target group of all accounts and contacts that have responded with a specific responseoption to your campaign . When you select members for the target group, choose Campaign Responses inthe Show field. For more information on response options, see below.
Before creating your campaign, you can check in the target group itself whether all members can be contacted bya certain communication channel.On the Contact Overview screen under Target Groups, it is possible to see in which target groups the contact is amember.
Creating a new Campaign
Campaigns can be created by going to Campaign Management Campaigns , or by clicking Common Tasks andchoosing New Campaign. You can also create a campaign directly from a specific target group as a follow-up action.In this way, this target group is assigned automatically to the campaign.You can then enter a campaign description and specify a campaign type. Available campaign types are E-mail, Letter,Phone Call, and Fax campaigns.You can also enter a start date to specify when the campaign is planned to be active, and an end date to specify whenthe campaign is planned to be finished. You can use these dates to help plan your campaigns.Then you assign an existing target group at whom this campaign is aimed, or you can create a new target group.Optionally you can decide whether to enable the automatic creation of activities from the campaign itself for accountand contact history, to include blocked accounts or contacts, or whether to use the personal address of contactsfor letter campaigns.If you need to specify how target group members can respond to a campaign, you can assign response options toit. You first define the response options in the Campaign Management view by clicking New on one of the followingscreens:
● In the Response Options view, in the worklist ● In the Campaigns view, directly in the campaign itself, on the Response Options tab of the campaign
These response options are then assigned automatically to your campaign. For example, you can define the followingresponse options:
● Yes ● No ● Not sure
You can also define more specific response options, such as: ● Will attend ● Will attend with 2 people ● Will not attend
You can classify response options as positive, negative, or neutral responses.After you have defined the response options, you can assign them to the campaign on the Response Options tab ofthe campaign.
Executing a CampaignBefore a campaign can be executed, a target group must be assigned to it, and a campaign type must be selected.
SAP Business ByDesign February 2017Business Background P U B L I C • © 2017 SAP SE or an SAP affiliate company. All rights reserved. 11

Campaign execution generates a Microsoft Excel template containing all addressable target group members. ThisMicrosoft Excel file can either be distributed to a marketing agency that then contacts the target group members,or used as an input source in Microsoft mail merge or other mailing systems.All addressable target group members are exported to the Microsoft Excel file, depending on the campaign type thathas been assigned to the campaign. A member is addressable if the following conditions are met:
● The member can be contacted by the selected campaign type. For example, for the E-mail campaign type, alltarget group members for whom e-mail addresses have been maintained are addressable by e-mail and aretherefore exported to the Microsoft Excel file.
● The status of the target group member is set to Active. ● The member is allowed to be contacted; that is, the Contact Permission field is set to Allowed or is blank.
In addition to the address data of the members, the Microsoft Excel file includes response codes. These are uniquecodes that have been generated automatically for each target group member. The use of response codes can speedup the manual creation of campaign responses; they determine which accounts/contacts have responded, and towhich campaign they have responded.After you have executed a campaign you can immediately check who has been contacted successfully, and also whocould not be contacted and the reason why contact was not possible.
Contacted in this sense means the members who have been exported to the Microsoft Excel file to be usedfor campaign execution, and are therefore ready to be contacted by whichever communication channel ischosen.
Managing Campaign ResponsesYou capture responses by creating activities of the type e-mail, letter, fax, or phone call, and assigning a campaignto them.SAP Business ByDesign provides several methods of creating responses, depending on whether they are createdmostly by marketing or sales employees. Marketing employees can create responses in the following ways:
● Manually by selecting a campaign in the Campaigns worklist, and clicking Add Response followed by e-mail,fax, letter, or phone call
● Manually by adding a response in the campaign itself
In both cases, the relevant activity opens. The campaign description is proposed automatically in the Campaign field.All you need to do is to enter the person who has responded.Sales or other employees can create responses in the following ways:
● Manually in the Activities view by creating an activity of the type e-mail, fax, letter, or phone call, and assigninga campaign to it
● Automatically using Microsoft Outlook® Integration. Responses received via e-mail in your personal inbox canbe assigned to a campaign and synchronized with SAP Business ByDesign.
When you create a response manually, you can enter one of the following: ● Campaign ID
You then need to manually add the person who has responded. ● Response code
The campaign and the person who has responded are determined automatically.
If response options have been assigned to the campaign, you can select the appropriate response from a dropdownlist in the Response Options field in the activity. This field is visible if a valid campaign has been entered in theCampaign field.
12 © 2017 SAP SE or an SAP affiliate company. All rights reserved. • P U B L I CSAP Business ByDesign February 2017
Business Background

The Campaign Overview screen displays all the important information, such as the campaign execution date, thecampaign key performance indicators (KPIs), the number of members contacted, and the number of non-responders.From the Campaign Overview screen you can navigate directly to the execution and response details, such as whohas responded and who has not. This information can be easily used, for example, to trigger follow-up actions likecontacting all responders via a new campaign. To help you access such information quickly, you can use the AdvancedSearch in a campaign to search for:
● Members of a campaign who have not been contactedThe search results can then be exported to a new target group or campaign, for example, and be used forfurther processing. Click Execution Details and choose Members Not Contacted in the Show field.
● Particular responses to a campaignFor example, you wish to see who would like to participate at an upcoming event. Click Response Details , andchoose Responses in the Show field.
On the Account Overview and Contact Overview screens it is possible to display all campaigns in which an accountor a contact has been contacted. On the Contact Overview screen you can also see the response that the contacthas given to a particular campaign and the response classification. You can view this information in the AccountManagement work center:
● Choose Accounts and open an account. On the Account Overview screen click Sales . ● Choose Contacts and open a contact.
The details are displayed under Campaigns.
See AlsoTarget Groups Quick Guide [page 43]Campaigns Quick Guide [page 53]Response Options Quick Guide [page 79]
3.2 Lead Processing
OverviewLead processing is used to describe, store, update, manage, and qualify a business partner’s potential interest in aparticular product or service. It is also used to handle and record all interactions with business partners based ontheir interest in a product or service over a period of time. The creation of a lead document can be the starting pointwithin the Marketing-to-Opportunity scenario, with the objective of transforming this lead into an opportunity.You can create leads when you participate in trade fairs or conduct e-mail marketing, for example. Lead processinghelps to automate the presales process, enabling sales representatives to focus on the most promising prospectsand opportunities. It also accelerates the stages from a business partner’s initial interest in a product or service tothe subsequent selling of that product or service.Depending on the way your business is run, you specify in scoping whether leads should be created by the marketingdepartment, and subsequently handed over to the sales department for further processing, or whether leads shouldbe created and processed by the sales department only.
SAP Business ByDesign February 2017Business Background P U B L I C • © 2017 SAP SE or an SAP affiliate company. All rights reserved. 13

RelevanceLead processing establishes and subsequently influences the potential interest of a business partner in your productor service. It also enables you to transform a qualified lead into an opportunity, thereby directly impacting the revenueof your company. It offers your sales representatives a pre-filtered database of open leads. Lead generation andqualification is the first step of a structured and well-defined sales cycle.
Prerequisites
Configuration settings are usually performed by an administrator. If you do not have the requiredauthorization, contact your administrator.
Lead Generation and/or Lead Management is enabled in your solution configuration, depending on whether youcreate leads in marketing or sales . To find these business options, go to the Business Configuration work center andchoose the Implementation Projects view. Select your implementation project and click Edit Project Scope . In theScoping step of the project, one of the following business packages must be selected:
● To create leads in marketing and hand them over to sales:Ensure that Campaign Management is selected within Marketing. Then choose Lead Generation.
The Lead Management business topic under Sales New Business is selected automatically.
● To create leads in sales (without handing leads over):Ensure that New Business is selected within Sales. Then choose Lead Management.
The Lead Generation business topic under Marketing Campaign Management should not beselected.
Under Questions you can see whether lead processing has been selected to work with or without handoverfrom marketing to sales. To do this, select All Elements in the Show field, then navigate to Sales NewBusiness Lead Management . The following business options are displayed:
● Lead Processing With Handover from Marketing ● Lead Processing Without Handover from Marketing
For the active business option, Yes has been selected automatically.
You can display and work on all leads for which you are responsible. If you are working in the New Business workcenter, and you need to work on leads that are assigned to colleagues, you need to request authorization from anadministrator.
FeaturesDepending on how your solution has been scoped, leads are created and processed as follows:
● If Lead Processing With Handover From Marketing has been scoped for your solution, leads are created in theMarketing work center. The leads are qualified as cold, warm, and hot by the marketing department. Once alead has been qualified as warm or hot, it can be handed over to the sales department. A task is then sentautomatically to the sales representative. The responsible sales representative accepts or rejects the leads
14 © 2017 SAP SE or an SAP affiliate company. All rights reserved. • P U B L I CSAP Business ByDesign February 2017
Business Background

that have been handed over to him or her. If a lead is accepted, the sales representative can create a follow-up opportunity or a sales quote.
● If Lead Processing Without Handover from Marketing has been scoped for your solution, leads are created inthe New Business work center. The responsible sales representative qualifies the leads, accepts or rejectsthem, and can create a follow-up opportunity or a sales quote for accepted leads.
When you create a lead, you classify it by selecting a category in the Category field, and specify its origin in theSource field. If a Lead is created as a follow-up document to a campaign, the Source field will automatically be filledwith the value Campaign. You can also qualify it by selecting a qualification in the Qualification field. After the leadhas been worked on, you accept or reject it and enter a reason why it has been accepted or rejected. The standardsystem has been preconfigured with sources, qualifications, categories, and reasons, but you can define your ownin fine-tuning for Leads. In addition to manually creating leads, you can upload leads using a Microsoft Excel®template.
Process FlowThe following steps explain the typical process flow based on the standard process, which gradually progresses intoopportunity management. However, variants of the standard process are also possible.
1. A lead is identified as a result of your company’s marketing attempts. For example, a sales representative ormarketing employee can generate leads from a marketing campaign or a trade fair.
2. After repeated business interactions, the sales representative creates a detailed lead for the interestedbusiness partner. You can also create maintain the details of a lead without creating an account for thebusiness partner.
3. Over a period of time, the lead is followed repeatedly with a view to establish and improve the level of interest.The lead is qualified as either cold, warm, or hot.
4. If a lead reaches a certain qualification level, such as warm or hot, it can be handed over to the sales departmentfor further business activities.
5. The sales representative uses the information gained in the lead to decide whether to generate a follow-upopportunity.
See AlsoQuick Guide for Leads (in Marketing) [page 25]Quick Guide for Leads (in New Business)Leads — Configuration Guide
3.3 Opportunity Processing
OverviewOpportunity Processing allows you to identify and follow through on the possibility of selling goods or services to aparticular customer. The opportunity can store all relevant information to help you win, such as the account and allrelevant communication, products and prices, members of the sales team and your sales partners who are workingon the opportunity, and competitors for this opportunity. In addition, you can classify your opportunity by setting apriority and specifying the source (for example, a trade fair).
SAP Business ByDesign February 2017Business Background P U B L I C • © 2017 SAP SE or an SAP affiliate company. All rights reserved. 15

RelevanceOpportunity processing is relevant if:
● You have long sales cycles ● The expected sales volume is high ● You want to monitor sales cycles and track stalled opportunities
Prerequisites
Configuration settings are usually performed by an administrator. If you do not have the requiredauthorization, contact your administrator.
You have enabled Opportunities in your system configuration. To find this business option, go to the BusinessConfiguration work center and choose the Implementation Projects view. Select your implementation project andclick Edit Project Scope . In the Scoping step of the project, ensure that New Business is selected within Sales.In the Questions step, expand the Sales scoping element and select New Business. Select Opportunities and answerthe question related to Sales Methodology.You can define settings for opportunities, sales cycles, and sales phases. For your implementation project click
Open Activity List . Select the Fine-Tune phase, then select the Opportunities and Sales Cycles and Phases activitiesfrom the activity list.You can display and work on all opportunities for which you are responsible. If you need to work on opportunitiesthat are assigned to colleagues, you need to request authorization from an administrator.
FeaturesAn opportunity can be created with or without reference to a lead or a campaign, and can be followed up by a servicequote, a sales quote, a sales order or a sales quote for contract. The relevant parties involved and items are copiedfrom the opportunity into the service quote, sales quote, sales order or sales quote for contract. If an Opportunityis created as a follow-up document to a campaign, the Source field will automatically be filled with the valueCampaign.If you enter a product in an opportunity for which a price list exists, the price will be determined automatically, basedon the price list master data. Discount lists and surcharges defined as master data will also be considered for theprice determination. If required, you can overwrite the price that has been determined. Note, however, that no pricinginformation is copied to sales quotes or sales orders when you create them as follow-up documents from anopportunity. Instead, pricing is carried out again in the sales quote or sales order.In an opportunity you can also enter a product that does not exist as master data in your system. You simply entera text for a product description. If required, you can also enter a price. However, these product descriptions andprices are not copied to follow-up sales quotes or sales orders.As with other business documents, involved parties are proposed automatically in an opportunity. In fine-tuning forOpportunities, you can define new party roles and influence how some of the party roles are determined in theopportunity. For more information, see Party Processing.An opportunity runs through a sales cycle that is typically broken down into sales phases where specific salesactivities are carried out. To ensure consistent company-wide reporting, sales phases used throughout the companycan be assigned to analysis phases that are used exclusively for reporting.A sales cycle is broken down into sales phases. In the standard system, the General opportunity sales cycle consistsof the following sales phases:
16 © 2017 SAP SE or an SAP affiliate company. All rights reserved. • P U B L I CSAP Business ByDesign February 2017
Business Background

Sales Phases
001 Identify opportunity
002 Qualify opportunity
003 Develop value proposition
004 Quotation
005 Decision
006 Close
The system keeps track of how many days an opportunity is in a certain phase. In fine-tuning for Sales Cycles andPhases, you can specify for each sales phase after how many days an opportunity is said to be making slow progressor has stalled when no updates have been saved in this opportunity. The system then determines whether theopportunity is On Track, Slow, or Stalled. A traffic light icon visualizes this. In addition, the number of days thatthe opportunity has remained in a particular phase is displayed in the Days in Phase field.When you change the sales phase in the opportunity, the value in the Days in Phase field is reset to zero. If anopportunity is stalled, a notification can be sent automatically to the manager of the employee responsible of thisopportunity.In addition, when you choose the next sales phase of an opportunity, your chance of success of winning thisopportunity increases. That is, the percentage value in the Chance of Success field increases automatically,depending on settings in fine-tuning.In fine-tuning you can also specify a default value to be proposed in the opportunity as the chance of success. Inaddition, you can specify in the opportunity whether it should be taken into account for forecasts.You can enter activities that need to be carried out for this opportunity. For appointments, you can enter visit reportsusing a predefined template. If the Sales Assistant has been scoped for your solution, then a set of suggestedactivities is proposed for each phase of the opportunity. You can then select the activities you require for thisparticular opportunity, and carry them out. For more information, see Sales Assistant.You can set a status for the opportunity and track its progress. The following statuses are provided in the standardsystem:
Statuses
Open This status is proposed when you create an opportunity.
In Process You must set this status manually. It enables you to set all subsequent statuses.
Won You must set this status manually, and provide a reason why this opportunity has been won.
Lost You must set this status manually, and provide a reason why this opportunity has been lost.
Stopped You must set this status manually.
These statuses are preconfigured and cannot be changed.You end an opportunity by specifying whether it has been won or lost, and providing a reason as to why it has beenwon or lost. For example, an opportunity is lost, and you find out that the reason was because a competitor hadoffered a better price. You then change the status of the opportunity to Lost, and set the Reason field to Lost due toPrice. In fine-tuning for Opportunities, you can define your own reasons and assign them to the Won or Lost statusas required.The Opportunity Pipeline provides you with a graphical representation of the opportunities that have been woncompared with those that you still expect to win. You can simulate certain changes to your opportunities such as
SAP Business ByDesign February 2017Business Background P U B L I C • © 2017 SAP SE or an SAP affiliate company. All rights reserved. 17

the chance of success or the expected value, directly in the Opportunity Pipeline, and then decide to save or cancelthese changes.
Process FlowThe following steps explain the typical process flow:
1. In the New Business work center, create the opportunity in one of the following ways: ● As a follow-up to a lead in the Leads view. The system copies details from the lead to the new opportunity. ● Without reference to a lead, in the Opportunities view.
2. The sales cycle and sales phase are proposed automatically, depending on settings in fine-tuning, The chanceof success is also proposed automatically, depending on the sales cycle. You can overwrite these details, ifrequired.
3. Enter details such as the account, the products or product descriptions, the expected value, and whether ornot the opportunity should be taken into account for forecasts.
4. You can navigate to the Involved Parties tab to display your sales team and external parties that are dealingwith the opportunity.
5. If the Sales Assistant has been configured for your system, you can navigate to the Sales Activities tab andselect the activities to be carried out for each phase.
6. When you save the opportunity, it has the status Open. You can change this status to In Process, Stopped,Won, or Lost, according to the actual progression of the opportunity. If you have set the status of theopportunity to Won or Lost, you can enter a reason as to why it was won or lost.
7. If an opportunity is successful, you can create a follow-up service quote, sales quote, sales order or salesquote for contract.
See AlsoOpportunities Quick GuideOpportunities – Configuration GuideSales Cycles and Phases – Configuration GuideSales Cycles and PhasesSales AssistantParty Processing
3.4 Activity Management
OverviewAs part of your daily work you need to deal with various activities throughout the day, such as tasks, appointments,phone calls, letters, faxes, or e-mails. To ensure productivity and efficiency, Activity Management enables you tooptimize all activities relating to Customer Relationship Management and ensures that you do not spend too muchprecious sales time on coordinating routine tasks and activities.With Activity Management you can create and keep track of activities such as appointments or e-mails, eitherindependently or related to your business transactions and business partners. It provides you with a structured viewof all activities as well as a complete interaction history between your company and your company's businesspartners. Sales representatives, for example, can view the outcome of a telephone call with a business partner, andsales managers can gain an overview of all the activities that have taken place in their department during a certain
18 © 2017 SAP SE or an SAP affiliate company. All rights reserved. • P U B L I CSAP Business ByDesign February 2017
Business Background

period of time. Activity Management ensures that every employee of a company has the same information about abusiness partner, so that issues related to the business partner can be processed in an optimal way. ActivityManagement can increase your sales volume since it is fully integrated in all business transactions and can thereforebe used at any time.The system can automatically determine the account and the main contact of this account. For example, for an e-mail activity, these parties are determined based on the sender or the recipient of the e-mail, depending on whetherit is an inbound or outbound e-mail.If your company works with opportunities, you can use the Sales Assistant, a tool to support pre-sales processes.The Sales Assistant provides sales persons with a checklist of recommended activities or tasks that should beexecuted in each phase of an opportunity.For more information, see Sales Assistant.Microsoft Outlook® Integration (Groupware) allows you to exchange information between Microsoft Outlook and theCRM application of your system. You can synchronize your contacts, e-mails, appointments, and tasks to and fromOutlook; create service requests in the system from incoming e-mails; and associate e-mails, tasks andappointments with SAP Business ByDesign accounts, campaigns, opportunities, and leads.For more information, see Quick Guide for Microsoft Outlook Integration [page 65].
Prerequisites
Configuration settings are usually performed by an administrator. If you do not have the requiredauthorization, contact your administrator.
Activity Management is enabled in your solution configuration. To find this business option, go to the BusinessConfiguration work center and choose the Implementation Projects view. Select your implementation project andclick Edit Project Scope . In the Scoping step of the project, ensure that Account and Activity Management is selectedin Sales.In the Questions step, expand the Sales scoping element and select Account and Activity Management, and answerthe questions related to Activity Management.This enables the Activity Categories and Visit Reports fine-tuning activities. To find these activities, click
Open Activity List in your implementation project. Select the Fine Tune phase, then select the Activity Categoriesand Visit Reports activities from the activity list.
Features
Activity TypesActivity Management covers the following activity types:
● E-mailE-mail enables you to record business correspondence through electronic mail. The activity is createdautomatically when you send an e-mail from the system. E-mail activities can include text and attachments,and automatic sending of e-mails to different groups. You can also synchronize e-mails using MicrosoftOutlook.
● AppointmentAppointment enables you to plan and track your customer-related appointments, such as sales calls andmeetings. Information is maintained regarding accounts and contacts involved, as well as the date andlocation of the appointment. You can display your appointment activities in a Calendar or synchronize yourappointments using Microsoft Outlook. You can also assign a visit report to the relevant appointments. Theinformation in the visit report may or may not be product-related.
SAP Business ByDesign February 2017Business Background P U B L I C • © 2017 SAP SE or an SAP affiliate company. All rights reserved. 19

● TaskTask enables you to record information about activities that one or more employees need to perform by adue date. Task activities can cover a wide range of possibilities, such as the preparation of a customerpresentation or a reminder to send a birthday card. You can also synchronize tasks using Microsoft Outlook.
● LetterLetter enables you to record and track information about incoming and outgoing written businesscorrespondence. You need to scan inbound letters in order to store them in the system as attachments toyour letter activity. For outbound letters, you click a button in the letter activity to open Microsoft Word. Detailsof the letter activity such as account, address, subject, and notes are copied into a template that you can edit,store locally, and print out. The notes that you write in the letter activity are used for the body of the letter.You save the letter locally on your computer, and then add it to the letter activity as an attachment.
● FaxFax enables you to record business correspondence through the fax channel. The activity is createdautomatically when you send a fax from the system.
● Phone callPhone call enables you to record all business exchange through telecommunication. This activity is integratedin the system and is created automatically when you make a phone call from the system.
ViewsActivity Management covers the following views within the Account Management work center:
● OverviewYou can prioritize Account Management tasks by gaining access to a work list of open tasks with predefinedfilters.
● ActivitiesYou can manage all your account related activities and effectively manage and prioritize your time and tasks.You can create activities and maintain important information, such as date, time, location, status, and priority.
● ReportsYou can access your activity history to validate the impact and effectiveness of your sales activities.
Process FlowActivity Management helps you to manage and control sales projects. The following steps show how ActivityManagement can assist in turning a qualified lead into a sales opportunity and improve sales volume.
1. Create appointment activityYour customer shows interest in a product or service and calls you requesting a personal visit anddemonstration. Your sales person creates an appointment activity to visit the customer, and invites a salesassistant to come along. When the sales person enters the attendee in the appointment activity, the systemdetermines the account and contact details automatically.
2. Create task list, gather information, and prepare visitYour sales person creates a task list for preparing the meeting. The presentation and marketing collateralhave already been made, and product and service information is available. The sales person attaches thesedocuments to the task activity.
3. Visit customerYour sales person visits the customer and demonstrates the product or service. The customer shows interestin your product or service and asks for a quotation.
4. Create and send quotationBack in the office, your sales person creates a quotation as a follow-up document to the appointment, andsends the quotation to the customer.
20 © 2017 SAP SE or an SAP affiliate company. All rights reserved. • P U B L I CSAP Business ByDesign February 2017
Business Background

5. Write visit report and create follow-up activityThe sales person writes the visit report. He or she also creates a follow-up activity for the customer, forexample, a letter.
6. Analyze activitiesYour sales manager finally reviews all sales activities.
You can also create an activity as a follow-up document to a business document such as an opportunity. An activityas a follow-up document can also be created automatically if an e-mail, appointment, or task has been associatedto the opportunity using Microsoft Outlook Integration. This information is displayed in the Document Flow tab ofboth the activity and the business document. Note that for the business document you need to select ExtendedView in the Show field. In some business documents, this information is also displayed in other places. For example,for an opportunity, the follow-up activity is displayed under Sales Activities; for a lead it is displayed under RelatedActivities.
3.5 Marketing-to-Opportunity Business Scenario
OverviewThe Marketing-to-Opportunity business scenario enables you to manage marketing and pre-sales activities with thegoal of generating new business for customers and prospects. You can run campaigns, capture responses, generateleads, manage opportunities, and initiate and track related sales activities. Alternatively, you can use this businessscenario without campaigns, which means that no marketing department is involved, and leads and opportunitiescan be created without using a campaign.There is also an enhanced function for Microsoft Outlook® integration that allows you to directly assign e-mails tospecific campaigns in Outlook and synchronize this information with the SAP Business ByDesign system. In addition,the pipeline simulation feature provides an interactive combination of graphic and table list of the opportunities. TheWhat-if analysis simulates how changes would affect your pipeline.For more information, see here.
Process Flow
1. Creating Target GroupThe Creating Target Group business process enables you to create a target group based on search criteria,reports, or transactional data. The search results can then be added to your new target group. In addition,you can also manually add accounts and contacts that do not match the search parameters, but that alsoneed to be included in the target group. Before assigning your target group to a campaign, you can checkwhether all members in the target group can be contacted using one particular channel of communication.1. Define and Maintain Target Group
When creating a new target group, you query your customer and prospect database by using differentsearch criteria. The search results can be added to your new target group. In addition you can alsomanually add accounts and contacts that do not match the search parameters, but need to be includedin the target group as well. Before assigning your target group to a campaign, you can check in the targetgroup itself whether all members can be contacted by a certain communication channel.
SAP Business ByDesign February 2017Business Background P U B L I C • © 2017 SAP SE or an SAP affiliate company. All rights reserved. 21

2. Creating and Executing CampaignThe Creating and Executing Campaign business process enables you as a marketing employee to create acampaign, assign the newly created target group, and select a campaign type. In addition, you can decidewhether to automatically create activities out of the campaign for account and contact history. Following this,the campaign can be executed. The campaign is executed by exporting to a Microsoft Excel® template alltarget group members who are addressable according to the selected campaign type.1. Create Campaign
The marketing employee creates a campaign, assigns the newly created target group, and selects acampaign type. In addition, he can decide whether to automatically create activities out of the campaignfor account and contact history or not. He can also add response options to a campaign to track howcustomers have responded. Now the campaign is ready to be executed.
2. Execute and Monitor CampaignTo execute a campaign, the marketing employee carries out a Microsoft Excel export of all target groupmembers who are addressable according to the selected campaign type. A target group member isaddressable if the required communication data is maintained, the target group member is allowed tobe contacted, and the status is Active. The Excel template contains all addressable target groupmembers and their address data as well as a personalized response code per member. The personalizedresponse code is generated by the system and is a unique identifier that helps to easily create campaignresponses later. After campaign execution, the status of the campaign changes automatically to Active.The execution details of the campaign show which target group members could be contacted and whichones could not, and why they could not be contacted. Contacted in this case means which target groupmembers could be exported to Excel and are now available to be contacted.
3. Contact Target Group MembersThe marketing employee takes care of contacting the exported target group members; this happensoutside the system. Here the marketing employee has several options. For example, he can eitherdistribute the Excel template to an external marketing agency or call center who then contacts the targetgroup members. Or he can contact them by himself by using the Excel template as an input source, forexample for Microsoft mail merge or other mailing systems, to create mass mailings or e-mails.
4. Capture Campaign ResponsesThe marketing employee captures the campaign responses by assigning an activity, a lead, anopportunity, a sales quote, or a sales order to a campaign, either by selecting the campaign or by usinga response code where the system automatically determines the campaign, the account and the contact.If response options have been assigned to the campaign to capture specific responses, these responseoptions can be selected in the activity as well. The supported activity types are e-mail, phone call, fax,and letter.
5. Finalize and Check Campaign ResultsTo finish a campaign the marketing employee sets the status to Finished. The campaign overview showsall campaign related key performance indicators that help to measure the campaign result. All capturedresponses can be monitored in the campaign as well. This information can be easily used, for example,to trigger follow-up actions like contacting all responders or non-responders once again.
3. Creating Lead — Lead Generation by Marketing and Hand Over to Sales1. Create Lead
The marketing employee can create a lead as a follow-up document of a campaign response. A lead canalso be created without any preceeding document.
2. Qualify LeadThe marketing employee needs to qualify the lead.
3. Hand Over LeadIf the lead is qualified as warm or hot the marketing employee can hand it over to a sales colleague toinitiate the sales process.
22 © 2017 SAP SE or an SAP affiliate company. All rights reserved. • P U B L I CSAP Business ByDesign February 2017
Business Background

4. Accept or Reject LeadThe sales employee finds the handed over lead in his work inbox and can either accept or reject it. Whenaccepting or rejecting the lead, the sales employee must maintain a reason. The marketing employee isinformed if a lead has been rejected.
Optional: Creating Lead — Lead Generation by SalesThe Creating Lead - Lead Generation by Sales process variant enables you to create leads by the salesdepartment. A lead can be created by a sales employee as a follow up document of a campaign response. Alead can also be created without any preceding document. The sales employee can start working directly onthe lead and can qualify it. There is no handover process from a marketing department.
4. Creating and Developing OpportunityThe Creating and Developing Opportunity business process enables you to create an opportunity as a follow-up document to a lead. Opportunity Management helps to proactively manage the process of closing sales,and allows sales employees to get a comprehensive view of an opportunity from the initial phase of creatingan opportunity to managing opportunity related activities, maintaining opportunities, and trackingopportunities. While working on a opportunity, a couple of activities have to be performed to ensure that anopportunity is realized and results in a sales order; the sales assistant in Opportunity Management supportsthis feature. In addition, you are provided with a large number of reports that you can run to see, for instance,the number of opportunities and their current status as well as the expected value of the sum of all theopportunities.1. Create Opportunity
The sales employee can create an opportunity as a follow up document from a lead. All relevantinformation from the lead is taken over to the opportunity automatically. An opportunity can also becopied from an existing opportunity or created without any preceding document. Opportunities offer theability to have multiple sales cycles. Each sales cycle defines phases. The phases help to track thedevelopment of the opportunity. Depending on the phases, the chance of success can increase.
2. Manage OpportunityThe sales employee can manage and capture a large variety of data within the opportunity; he or she canadd products, documents, or links related to the opportunity; all contacts related to the opportunity areavailable, and any known competitors can be assigned. If the opportunity should be tracked in theforecast, it can be marked as relevant for forecast.
3. Plan and Track Sales ActivitiesEach sales phase in an opportunity can be mapped to a couple of activities that have to be performed toensure that this opportunity will be won and will result in the end in a sales order. To schedule theappropriate activities, the sales assistant helps to work in a structured way and to assign the activitiesto the appropriate team members.
4. Monitor PipelineThe opportunity pipeline provides an interactive combination of graphical representation and table listview of opportunities. The marketing employee can perform a so-called What-if analysis by changingsome opportunity data to check how the simulated results would affect the pipeline. The changes caneither be saved and applied, or canceled.
5. Finalize OpportunityIf an opportunity is in the final sales phase, and the customer wants to place an order, the status can beset to won, and a follow-up quote or order can be created as a follow-up document. In case the opportunitycould not be won, the status must be set to Lost. A reason must be maintained for the opportunity,regardless of whether it has been won or lost. An opportunity can also be set to Stopped if no furtherworking on this opportunity is needed. All of the specific information is used in a large number of reportsthat can provide management with business information such as the number of opportunities and theircurrent stage of progress, as well as the current expected value of all opportunities.
SAP Business ByDesign February 2017Business Background P U B L I C • © 2017 SAP SE or an SAP affiliate company. All rights reserved. 23

See AlsoMarketing-to-Opportunity business scenario
24 © 2017 SAP SE or an SAP affiliate company. All rights reserved. • P U B L I CSAP Business ByDesign February 2017
Business Background

4 Leads View
4.1 Quick Guide for Leads (in Marketing)
The Leads view in the Marketing work center allows you as a marketing employee to manage your leads efficiently,enabling you to maintain relationships with your customers and prospects and to close sales. In this view you cancreate, manage, and qualify your leads, and hand them over to sales.You can create leads on the basis of phone calls or campaign responses, for example. You can also create your leadsusing a predefined Microsoft Excel® template and upload them to the SAP Business ByDesign system. In addition,you can specify the source of your leads, classify them according to a particular interest, and qualify them as cold,warm, or hot. Afterwards you can view them, and track and analyze their success over a certain time frame.After you have qualified a lead, you hand it over to a sales employee to initiate the sales process. This builds afoundation for the further development of a lead into an opportunity or another follow-up document such as a salesquote or a sales order.
If the Lead Processing With Handover from Marketing business option has been selected for your solution,then an employee working in marketing creates leads in the Leads view in the Marketing work center andsubsequently hands them over to sales. An employee working in sales then processes the leads further in theLeads view in the New Business work center. In this case it is not possible to create leads in the New Businesswork center.If the Lead Processing Without Handover from Marketing business option has been selected for your solution,then an employee working in sales creates leads in the Leads view in the New Business work center. In thiscase, the Leads view is not visible in the Marketing work center.
You can display data in a Leads worklist as a chart using the analytical view function. This function helps you to geta quick overview of all data in the worklist.
Business Background
Lead ProcessingLead processing is used to describe, store, update, manage, and qualify a business partner’s potential interest in aparticular product or service. It is also used to handle and record all interactions with business partners based ontheir interest in a product or service over a period of time. The creation of a lead document can be the starting pointwithin the Marketing-to-Opportunity scenario, with the objective of transforming this lead into an opportunity.
For more information, see Lead Processing [page 13].
Target Groups and Campaign ManagementTarget Groups and Campaign Management provide an effective way for sales and marketing professionals withinyour company to target specific prospects or customer groups in order to generate new business or strengthenrelationships.For more information, see Target Groups and Campaign Management [page 8].
SAP Business ByDesign February 2017Leads View P U B L I C • © 2017 SAP SE or an SAP affiliate company. All rights reserved. 25

Opportunity ProcessingOpportunity Processing allows you to identify and follow through on the possibility of selling goods or services to aparticular customer. The opportunity can store all relevant information to help you win, such as the account and allrelevant communication, products and prices, members of the sales team and your sales partners who are workingon the opportunity, and competitors for this opportunity. In addition, you can classify your opportunity by setting apriority and specifying the source (for example, a trade fair).For more information, see Opportunity Processing [page 15].
Activity ManagementAs part of your daily work you need to deal with various activities throughout the day, such as tasks, appointments,phone calls, letters, faxes, or e-mails. To ensure productivity and efficiency, Activity Management enables you tooptimize all activities relating to Customer Relationship Management and ensures that you do not spend too muchprecious sales time on coordinating routine tasks and activities.For more information, see Activity Management [page 18].
Business Scenario: Marketing-to-OpportunityThe Marketing-to-Opportunity business scenario enables you to manage marketing and pre-sales activities with thegoal of generating new business for customers and prospects. You can run campaigns, capture responses, generateleads, manage opportunities, and initiate and track related sales activities. Alternatively, you can use this businessscenario without campaigns, which means that no marketing department is involved, and leads and opportunitiescan be created without using a campaign.There is also an enhanced function for Microsoft Outlook® integration that allows you to directly assign e-mails tospecific campaigns in Outlook and synchronize this information with the SAP Business ByDesign system. In addition,the pipeline simulation feature provides an interactive combination of graphic and table list of the opportunities. TheWhat-if analysis simulates how changes would affect your pipeline.For more information, see Marketing-to-Opportunity.
Tasks
Create a Lead1. Click New , then choose Lead.
You can also click Common Tasks in the taskbar and choose New Lead.
2. Under Account, enter details of the account associated with the lead. In the Name field,enter the account name or ID. If necessary, you can search for an account or click
New to create a new account.The system will automatically display the related master data.You can maintain address details for a lead without an account by clicking on AddressDetails.
3. Enter details of the lead such as the description and, if necessary, overwrite the startand end dates. You can enter the prospect's interests under Notes. In particular, qualifyand classify the lead by selecting the appropriate entries in the Qualification,Category, and Source fields.
26 © 2017 SAP SE or an SAP affiliate company. All rights reserved. • P U B L I CSAP Business ByDesign February 2017
Leads View

The system proposes the Employee Responsible – Marketing and EmployeeResponsible – Sales automatically, based on system settings.
4. Under Contacts, enter the contacts associated with the lead as follows: ● To assign an existing contact to the lead, click Add Row . Enter the contact, or
search for it.The system automatically displays the related contact information.
● If you need to create a new contact, click New . In the New Contact editor, fill inall contact details, then click Save and Close .The new contact is automatically taken over into the lead.
5. Save the lead.The new lead is saved to the system and added to the list in the Leads view. To openthe lead from this list, click on the link of the relevant lead.
You can also create leads by entering them in a predefined Microsoft Excel templateand uploading them to the SAP Business ByDesign system. For more information, seeCreate Leads Using Microsoft Excel [page 29].
Create Leads Using Microsoft Excel®You can create leads by entering them in a predefined Microsoft Excel template and uploadingthem to the SAP Business ByDesign system. For information on this task, see here[page 29].
Edit a Lead
Certain restrictions apply when editing leads that have been accepted or rejected: ● Leads that have been accepted or rejected by a sales employee in the New
Business work center can no longer be edited by a marketing employee in theMarketing work center. However, if required, a sales employee can edit such alead in the New Business work center.
● Leads that have been rejected by a marketing employee in the Marketing workcenter can no longer be edited.
1. In the Leads view, select the lead that you want to change and click Edit .2. You can then do the following:
● Change details of the lead ● Hand the lead over to sales by clicking Hand Over
● Reject the lead by clicking Reject
3. Save your changes.
You can see more details, for example Document Flow , by selecting View All .
Hand a Lead Over to SalesAfter you have qualified your lead, you can hand it over to the employee responsible in sales.
1. In the list of leads, check whether the lead to be handed over has the status Qualified.
SAP Business ByDesign February 2017Leads View P U B L I C • © 2017 SAP SE or an SAP affiliate company. All rights reserved. 27

2. Select the lead and click Hand Over . Alternatively, you can open the lead to view thedetails, and then click Hand Over in the lead itself.After the lead has been handed over, its status changes to Handed Over. The systemsends a task to the employee responsible in sales, requesting that the lead be acceptedor rejected.
Delete a Lead1. In the list of leads, select the lead to be deleted.2. Click Delete .
Display a Graphical Analysis of a Leads Worklist1. In the worklist, from the Group By dropdown list, choose a criterion by which to group
data.2. To view all data from the worklist in the Analytical View section, click the chart icon next
to the filter icon.3. In the Analytical View section, choose a chart type to display the data.4. Double-click a data section in the chart to filter the original worklist.
You can clear the filter by clicking Back to Full Chart in the Analytical Viewsection or deleting the filter content in the worklist.
For some worklists, such as the Opportunities worklist in the Opportunity List view inthe New Business work center, you can aggregate the grouped data using differentcriterion (for example, expected value). You can then select different analysis methods(for example, count, sum, average, maximum, or minimum) to sort the data, and choosedifferent chart types to present the data from the worklist.
Export Leads to Microsoft ExcelYou can export leads to Microsoft Excel. For more information, see Export Business Data UsingMicrosoft Excel [page 31].
Create a Target Group from a Leads WorklistFor marketing purposes you can create a target group of accounts listed in a worklist. To dothis:
1. Call up the required worklist, and modify it to your needs.2. Click Export followed by To Target Group.
The New Target Group screen opens.3. Check the details and save the target group.
Generate Leads Automatically from Campaign Response Upload TemplateYou can generate leads automatically through campaigns using campaign response uploadtemplate.The leads are generated automatically when the Response Option ID is enabled for leadgeneration or the response type is Lead in the template.For more information, see Importing Campaign Responses using Microsoft Excel andResponse Options Quick Guide [page 79].
28 © 2017 SAP SE or an SAP affiliate company. All rights reserved. • P U B L I CSAP Business ByDesign February 2017
Leads View

4.2 Tasks
4.2.1 Create Leads Using Microsoft Excel®
OverviewYou can create leads by entering them in a predefined Microsoft Excel template and uploading them to the SAPBusiness ByDesign system.
PrerequisitesYou have installed the latest Add-In for Microsoft Excel. Depending on your solution set-up, you can do this from theSelf Services Overview in the Home work center, from the Download Center in the Application and UserManagement work center, or from the Download link that is available directly on the user interface.Also, the settings for your browser must be set correctly. You can check this by clicking Check My ComputerSettings on the logon screen.
If the Lead Processing With Handover from Marketing business option has been selected for your solution,then an employee working in marketing creates leads in the Leads view in the Marketing work center andsubsequently hands them over to sales. An employee working in sales then processes the leads further in theLeads view in the New Business work center. In this case it is not possible to create leads in the New Businesswork center.If the Lead Processing Without Handover from Marketing business option has been selected for your solution,then an employee working in sales creates leads in the Leads view in the New Business work center. In thiscase, the Leads view is not visible in the Marketing work center.
StepsIn the SAP Business ByDesign system, in the Leads view of the Marketing or New Business work center, click
New and Leads from Microsoft Excel.Get the Template
1. Select the template.Choose the template in the required language and click Download.
You can choose any language that you have selected during scoping. If you have selected only onelanguage during scoping, you will not get a selection of language versions to choose from.
2. Decide what you want to do with the template. Choose one of the following options: ● If you want to use the template only once, you can open the template without saving it. Click Open. ● If you want to save the template so that you can use it again, choose a location to save the file to, enter
an appropriate file name, and click Save. Then click Open.
If you have previously downloaded and saved this template on your computer, navigate to the location whereyou have saved the template, and open it.
SAP Business ByDesign February 2017Leads View P U B L I C • © 2017 SAP SE or an SAP affiliate company. All rights reserved. 29

Log on to the solution from Microsoft Excel1. In the SAP Add-In ribbon in Microsoft Excel, click Logon.
If the SAP Add-In ribbon is not displayed, check to make sure that the Add-In for Microsoft Excel hasbeen installed correctly (see Prerequisites in this document).
A dialog box opens where you can enter the logon details. The system URL is proposed automatically. Thesystem URL is the URL of the system that you are working with.
2. Enter your user ID and your password, and click Logon.
After initial logon to the system, the ribbon text is changed from SAP Add-In to the name of yoursolution.
Enter Details in the Microsoft Excel Template
Note the following: ● The Microsoft Excel template is presented with a number of rows where you can enter or copy your
data. If you need more, add the number of rows you need before you start entering or copying yourdata.
● Ensure that mandatory fields (those marked with an asterisk) are filled. ● To help you fill in the details:
○ Some fields have dropdown lists. ○ In some fields you can search the system for data, for example, countries. Place the cursor on the
field, and click Lookup in your solution's tool bar or ribbon to search the system. A search field isavailable in the Lookup dialog box that appears. When you start to type text in the search field, therelevant entries are filtered in the ID and Description columns, meaning that you do not have toscroll through the whole list. If the Lookup button is not active in the ribbon or toolbar, then it isnot possible to perform a search.
Enter the leads into the rows, and in the appropriate columns. You can also enter leads without account.Save Your Data
1. After you have finished entering all the data, save the Microsoft Excel file.2. Click Save Data to .
A dialog box opens, informing you that the data is being saved to the solution.After the upload, a message informs you that your data has been saved in the solution.
If you do not provide all the required information, or if you provide incorrect information, somerecords will not be saved. Error messages will highlight the problems so that you can correct themand save the data again.
3. You can then log off by clicking Logoff .
ResultThe new leads are saved in the SAP Business ByDesign system and added to the list in the Leads view.If you need to make changes to these leads, you must change them directly in the system.
30 © 2017 SAP SE or an SAP affiliate company. All rights reserved. • P U B L I CSAP Business ByDesign February 2017
Leads View

4.2.2 Export Business Data Using Microsoft Excel®
OverviewYou can export reports and worklists to Microsoft Excel® documents. You can use these documents for furtheranalysis, and in some cases, edit and upload them to the solution.You can export data from a report or from a worklist.
Prerequisites ● You have installed the latest Add-In for Microsoft Excel®. Depending on your solution set-up, you can do this
from the: ○ Self Services Overview in the Home work center ○ Download Center in the Application and User Management work center ○ Download link that is available directly on the user interface
● The settings for your browser must be set correctly. You can review the information about computer settingsby clicking Check My Computer Settings on the logon screen.
● You must be authorized to perform an export to Microsoft Excel®.
Procedure1. Go to the screen with the data you want to export.2. Depending on the type of data, choose one of these options:
● For a report, you can either export a chart or a table. To do so, select the report, and click Switch toChart or Switch to Table.
● For a worklist, select the worklist and click Go.3. Click Export , then choose To Microsoft Excel.4. Optional: Personalizing your excel export
1. To select the columns in your exported excel, do the following:a. In the title bar, click Personalize This screen b. In the side panel, select Display Settings.c. In the Display Settings dialog box, you can export all the columns in the view by selecting All in
the Export Columns field
The default value for this field is Visible, which exports only the currently displayed columns.
2. To select the language for your excel export, do the followinga. In the Display Settings dialog box, set the Language Selection field to Show and click OK
b. Click Save .c. Click Export , then choose To Microsoft Excel®d. Select a language in the dialog box that opens.
SAP Business ByDesign February 2017Leads View P U B L I C • © 2017 SAP SE or an SAP affiliate company. All rights reserved. 31

The column selection preference in this dialog box allows you to override the personalizedsetting. This selection is valid for the current export only.
5. Select the template in the dialog box that is displayed.
● If there is only one template that has the logged in language variant, then the export will beperformed in the logged in language, and no user interaction is required.
● If there is only one template in the system for this export scenario, but the logged in languagevariant is not available, then export will be performed in the English language.
● If there is more than one template in the system for this export scenario, the Template List dialogbox is displayed. In this dialog, you can select the Microsoft Excel template that you want to usefor the export. The template will dictate how your exported data will be formatted. The MicrosoftExcel version that is relevant for each template is displayed.
6. Click Download.7. A message shows that you can open or save the file which contains the data that you have just exported from
the solution. Click Open or Save depending on what you want to do with the exported data.Depending on whether you click Open or Save, there are two possible results:
● If you click Open, a worksheet opens with the data in Microsoft Excel. The file has a temporary name,but it is not saved. You can use all the functions of Microsoft Excel to organize the data and to savethat worksheet.
● If you click Save, a Save As dialog box opens. You can specify an appropriate file name and a locationto save the exported Microsoft Excel file to. A message will inform you when the download hascompleted successfully.You can later navigate to the location where you have saved the template and open it .
32 © 2017 SAP SE or an SAP affiliate company. All rights reserved. • P U B L I CSAP Business ByDesign February 2017
Leads View

5 Market Information View
5.1 Market Information Quick Guide
The Market Information view enables you to store documents centrally, and to upload, search, and view external andinternal documents. You can access this view from the Marketing work center.This view allows you to manage unstructured content and have access to up-to-date information about yourcompany, the market in which you operate, your products, and your competitors. This information can help youdevelop a marketing or sales strategy, or prepare for a meeting with a customer, for example.
Business Background
Document CenterYou use the Document Center to upload and store documents, pictures, or other file types directly in your workcenter. Files uploaded to the document center can be viewed, edited, and deleted by anyone from directly within thework center. The document center ensures that your documents are up to date by offering exclusive editing rightsusing a check-in/check-out policy.For more information, see Document Center. [page 35]
Business Scenario: Marketing-to-OpportunityThe Marketing-to-Opportunity business scenario enables you to manage marketing and pre-sales activities with thegoal of generating new business for customers and prospects. You can run campaigns, capture responses, generateleads, manage opportunities, and initiate and track related sales activities. Alternatively, you can use this businessscenario without campaigns, which means that no marketing department is involved, and leads and opportunitiescan be created without using a campaign.There is also an enhanced function for Microsoft Outlook® integration that allows you to directly assign e-mails tospecific campaigns in Outlook and synchronize this information with the SAP Business ByDesign system. In addition,the pipeline simulation feature provides an interactive combination of graphic and table list of the opportunities. TheWhat-if analysis simulates how changes would affect your pipeline.For more information, see Marketing-to-Opportunity.
Tasks
Upload a Document1. Choose New
2. Choose Browse and locate the document you wish to upload.3. Enter the Document Name. To enable versioning of the file, select the Versioning
Enabled checkbox.4. Enter a Detailed Description or any additional information that is required, such as the
Author, the Document Language, or any relevant Keywords.5. Select Save and Close .
SAP Business ByDesign February 2017Market Information View P U B L I C • © 2017 SAP SE or an SAP affiliate company. All rights reserved. 33

Edit a Document1. If versioning is enabled for the document you wish to edit, select the document and
choose Check Out . If versioning is not enabled, select the document and chooseDownload .
To edit only the document properties, such as the Detailed Description,Author, Document Language, or Keywords, select Edit Properties .
2. The system prompts you to download the document for editing on your local computer.Choose Save to save the document to your computer for editing.
To edit the document, you must have the necessary editing software installedon your local computer.
3. When you have finished editing the document, save your changes, select the documentyou have checked out in the document center, and choose Check In .
4. Choose Browse and locate the document on your local computer.If versioning is enabled for this document, select the Version Type based on the scopeof your revisions. If your changes are major and significant, select Major Revision. Thisrevision will then be represented as an increase in the first number of the versionnumber, for example, Version 2.0. For minor changes, select Minor Revision. Minorchanges are represented in the second number of the version number, for example,version 2.1.
5. Select OK to save your changes and upload the new version of the document.
Search for a Document1. Enter a search term in the Find field and click Go
You can find documents using the Group By criteria. This option allows you toquickly display a list of documents sorted by various basic criteria, such as thefile type, as well as by keywords that you can define. You can create keywordsfor documents by editing the document properties.
When you enter a search term, the system searches both the document titlesand document content for the entered term and displays the results in the list.
2. To use the advanced search option, choose Advanced. You can enter search criteriasuch as the Author, Changed On (date), Document Language, or specific Keywords.
Newly uploaded documents are first processed by the system and cannot beimmediately found via the search function. This process takes approximatelyfive minutes.
34 © 2017 SAP SE or an SAP affiliate company. All rights reserved. • P U B L I CSAP Business ByDesign February 2017
Market Information View
5.2 Business Background
5.2.1 Document Center
OverviewYou use the Document Center to upload and store documents, pictures, or other file types directly in your workcenter. Files uploaded to the document center can be viewed, edited, and deleted by anyone from directly within thework center. The document center ensures that your documents are up to date by offering exclusive editing rightsusing a check-in/check-out policy.If you want to collaborate with your colleagues on the document, or if you wish to store the history of the changesto a file, select Versioning Enabled in the document properties. When versioning is enabled, A major revision isrepresented by an increase of the first digit in the version number of the document. Within a major version of adocument, there can be several minor versions, which are represented by the second digit in the version number.For example, the first draft of a product specification would be version 1.0. Minor changes to this document madeby colleagues while the product is still in the planning stages would be marked as versions 1.1, 1.2, etc. Major changessuch as corrections after production has started justify a new version number, for example 2.0.The typical use of the Document Center is described in the steps below:
1. A new document is uploaded to the Document Center. To enable collaboration with colleagues and to trackthe version history of the document, the person uploading the document selects Versioning Enabled from thedocument properties.
2. The document is shared with colleagues using link to the document from.3. To edit the document, a colleague first checks out the document by clicking Check Out .4. After editing and saving the document, the colleague checks in the new version of the document by clicking
Check In and uploading the new version of the document.
SAP Business ByDesign February 2017Market Information View P U B L I C • © 2017 SAP SE or an SAP affiliate company. All rights reserved. 35

6 Competitors View
6.1 Competitors Quick Guide
The Competitors view enables you to store and view competitor information, such as the Web site, the classification,and the products of a competitor. This information allows you to make informed decisions that help you to competesuccessfully in your market.You can access the Competitors view from the Marketing work center.
Since your company has selected the Buy, Sell, and Administrate implementation focus, there will be slightdifferences between your solution and the standard as outlined below. For more information, see WhatWorks Differently in Buy, Sell, and Administrate.If your system has not been deployed, all information is shown because there is no scoping-relevant filter.
Business Background
Target Groups and Campaign ManagementTarget Groups and Campaign Management provide an effective way for sales and marketing professionals withinyour company to target specific prospects or customer groups in order to generate new business or strengthenrelationships.For more information, see Target Groups and Campaign Management [page 8]
Lead ProcessingLead processing is used to describe, store, update, manage, and qualify a business partner’s potential interest in aparticular product or service. It is also used to handle and record all interactions with business partners based ontheir interest in a product or service over a period of time. The creation of a lead document can be the starting pointwithin the Marketing-to-Opportunity scenario, with the objective of transforming this lead into an opportunity.For more information, see Lead Processing [page 13]
Business Scenario: Marketing-to-OpportunityThe Marketing-to-Opportunity business scenario enables you to manage marketing and pre-sales activities with thegoal of generating new business for customers and prospects. You can run campaigns, capture responses, generateleads, manage opportunities, and initiate and track related sales activities. Alternatively, you can use this businessscenario without campaigns, which means that no marketing department is involved, and leads and opportunitiescan be created without using a campaign.There is also an enhanced function for Microsoft Outlook® integration that allows you to directly assign e-mails tospecific campaigns in Outlook and synchronize this information with the SAP Business ByDesign system. In addition,the pipeline simulation feature provides an interactive combination of graphic and table list of the opportunities. TheWhat-if analysis simulates how changes would affect your pipeline.For more information, see Marketing-to-Opportunity.
36 © 2017 SAP SE or an SAP affiliate company. All rights reserved. • P U B L I CSAP Business ByDesign February 2017
Competitors View

Tasks
Create and Edit a Competitor1. In the worklist of the Competitors view, click New , then choose Competitor.
You can also create a new competitor by clicking Common Tasks in the taskbarand choosing New Competitor.
2. Enter the competitor’s name, address, and communication details and othercompetitor-specific data, such as the classification.
You can check if a competitor already exists in the system if you have chosenthis option during scoping. When you enter the details of a competitor, click
Check For Duplicates . The system also notifies you of potential duplicates whenyou save the details of a new competitor. You can view the potential duplicateslisted.
3. To enter additional information about the competitor, click View All to open the editor.
You can also add more information to a particular competitor by selecting thecompetitor in the worklist and clicking Edit .
4. Click Save to save the new competitor.
Maintain Competitor Products for a Competitor1. In the editor of the Competitors view, click Competitor Products .2. Click Add Row to enter the competitor product.3. Enter the product description and, if required, the list price and the currency.4. Under Details in the Product Comparison field, select how the competitor product
compares to your product, if required.5. Under Own Product in the Product ID field, enter the product ID of your product.
You can search for the product ID using the value help.6. Save the competitor product details.
The competitor product ID will be added once the data has been saved.
Export Competitors Using Microsoft ExcelFor more information, see Export Business Data Using Microsoft Excel [page 31].
See AlsoOverviews of Business Partners [page 38]
SAP Business ByDesign February 2017Competitors View P U B L I C • © 2017 SAP SE or an SAP affiliate company. All rights reserved. 37

6.2 Business Background
6.2.1 Overviews of Business Partners
OverviewThe overview provides a summary of essential data for a selected business partner.It includes general information, such as address data, relationships, and further business partner details dependingon the type of business partner.The overview also shows all business partner interactions in sales, service, and financial processes. For example,you can display open sales orders and open invoicing documents for an account, and other information for sales,service, and financials. You can also run reports related to the particular business partner.To go to the overview of a business partner, you have to select the business partner in the worklist of the relevantbusiness partner view.You can restrict the display of documents in the overviews of the following views in the Account Management andMarketing work centers:
● Accounts ● Contacts ● Partners ● Competitors in the Marketing work center
Prerequisites
Configuration Settings
Configuration settings are usually performed by an administrator. If you do not have the requiredauthorization, contact your administrator.
To restrict the display of documents in the overviews of accounts, contacts, partners, and competitors, you haveenabled the restriction of the overviews for account management in your solution configuration. To find this businessoption, go to the Business Configuration work center and choose the Implementation Projects view. Select yourimplementation project and click Edit Project Scope . In the Scoping step of the project, ensure that Account andActivity Management is selected within Sales.In the Questions step, expand the Sales scoping element and select Account and Activity Management. SelectAccount Management and answer the question related to the overviews.
Access Rights and Restrictions in Overviews of Account Management andMarketingA user can view different information in the overviews for corporate and private accounts, contacts, partners, andcompetitors, depending on the access rights assigned to that user and on what you select during scoping.These restrictions apply if the user opens the overview from the respective view in the Account Management,Business Partner Data, or Marketing work center or from any other work center view, such as the Sales Orders view.These restrictions affect the following information:
38 © 2017 SAP SE or an SAP affiliate company. All rights reserved. • P U B L I CSAP Business ByDesign February 2017
Competitors View

● Private or corporate account overview: ○ Reports under General
○ All data under Sales , Service , and Financials ● Contact overview:
○ Campaigns and activities ● Partner overview:
○ Activities ● Competitor overview:
○ Related opportunities
The user can view the following data: ● If you do not restrict the data displayed in the overview, all general data and all documents related to a specific
account, contact, partner, or competitor will be displayed in the overview regardless of a user’s access rights.You do not have to assign access rights to the user for the work center views required for these documents.
● If you restrict what is displayed in the overview, the user will see the following: ○ All account, contact, partner, or competitor data if the user has been given at least read access for the
relevant view ○ All documents related to those work center views for which the user has been assigned the corresponding
access rights.
The documents will be displayed according to the access restrictions that have been defined forthe relevant work center view.
SAP Business ByDesign February 2017Competitors View P U B L I C • © 2017 SAP SE or an SAP affiliate company. All rights reserved. 39

7 Competitor Products View
7.1 Competitor Products Quick Guide
The Competitor Products view enables you to create new competitor products and store and view detailedinformation on competitor products. You can access this view from the Marketing work center.In this view, you can compare competitor products with your products. This information is beneficial in positioningyour products against the competitor. For example, if you are trying to sell a product to a customer you can determinehow your product is performing against the competition and develop presentations and demonstrations thathighlight the benefits of your products over the competition
Business Background
Target Groups and Campaign ManagementTarget Groups and Campaign Management provide an effective way for sales and marketing professionals withinyour company to target specific prospects or customer groups in order to generate new business or strengthenrelationships.For more information, see Target Groups and Campaign Management [page 8]
Lead ProcessingLead processing is used to describe, store, update, manage, and qualify a business partner’s potential interest in aparticular product or service. It is also used to handle and record all interactions with business partners based ontheir interest in a product or service over a period of time. The creation of a lead document can be the starting pointwithin the Marketing-to-Opportunity scenario, with the objective of transforming this lead into an opportunity.For more information, see Lead Processing [page 13]
Business Scenario: Marketing-to-OpportunityThe Marketing-to-Opportunity business scenario enables you to manage marketing and pre-sales activities with thegoal of generating new business for customers and prospects. You can run campaigns, capture responses, generateleads, manage opportunities, and initiate and track related sales activities. Alternatively, you can use this businessscenario without campaigns, which means that no marketing department is involved, and leads and opportunitiescan be created without using a campaign.There is also an enhanced function for Microsoft Outlook® integration that allows you to directly assign e-mails tospecific campaigns in Outlook and synchronize this information with the SAP Business ByDesign system. In addition,the pipeline simulation feature provides an interactive combination of graphic and table list of the opportunities. TheWhat-if analysis simulates how changes would affect your pipeline.For more information, see Marketing-to-Opportunity.
40 © 2017 SAP SE or an SAP affiliate company. All rights reserved. • P U B L I CSAP Business ByDesign February 2017
Competitor Products View

Tasks
Create a Competitor Product1. Click New , then choose Competitor Product to open the New Competitor Product
quick activity.
You can also open the New Competitor Product quick activity by clicking NewCompetitor Product under Common Tasks.
2. Under Competitor Product, enter an ID and description for the competitor product.
You can leave the ID field empty and when you save the competitor product thesystem with automatically assign an ID to the competitor product.
3. Enter the product category ID. If necessary, click the Open Select Dialog icon to searchfor the product category ID.The system automatically enters the product category description.
4. Enter the price and currency of the product as well as the base quantity type and unitof measure. Indicate whether the competitor product is the competitor’s top sellingproduct.
5. Enter the competitor ID.The system automatically enters the competitor name.
6. Enter your product ID. If necessary, click the Open Select Dialog icon to search for theproduct ID.The system automatically enters the product description, category ID, and categorydescription.
7. Choose the product comparison, rating your product in relation to the competitor.8. To save the new competitor product, click Save .
To return to the Competitor Products view, click Close .To open the competitor product from this list, click the appropriate competitor productID link.
Each entry for a competitor product has only one product comparison. If you want tocompare several of your products with one competitor product you must create anindividual competitor product entry for each comparison.
Update a Competitor Product1. In the Competitor Products view, select the competitor product that you want to update,
then click Edit .
You can also open the Competitor Product editor by clicking the competitorproduct ID link.
2. In the General view under Competitor Product, update the product description.The system automatically updates the product description in the Product Comparisonview.
3. Under Details, enter information, for example, from an article you read comparing yourproduct with the competitor’s product.
SAP Business ByDesign February 2017Competitor Products View P U B L I C • © 2017 SAP SE or an SAP affiliate company. All rights reserved. 41
4. Under Own Product in the Product Comparison field, select how the competitor productcompares to your product.
5. In the Attachments view, click New , then choose File to upload the attachment.6. To save the updated competitor product, click Save , then click Close to return to
the Competitor Products view.The updated competitor product details are saved to the system. To open thecompetitor product from the list of competitor products in the Competitor Productsview, click the appropriate competitor product ID link.
42 © 2017 SAP SE or an SAP affiliate company. All rights reserved. • P U B L I CSAP Business ByDesign February 2017
Competitor Products View

8 Target Groups View
8.1 Target Groups Quick Guide
A key strategy in successful marketing is the ability to query your customer database and create different targetgroups, thus enabling you to target your customers more effectively during your campaigns. The Target Groups viewenables you to create target groups that you can assign to marketing campaigns in order to plan and executecampaigns and measure campaign results. You can access this view from the Marketing work center.You create target groups in an easy step-by-step approach by selecting accounts and contacts based on differentsearch criteria. You can enter the search criteria manually, or use predefined queries. Set operations such as add,intersect, and subtract allow you to select your target group members from several search results quickly andefficiently. You can also manually add accounts and contacts that do not match any common search criteria. Inaddition, you can upload target groups to the SAP Business ByDesign system by using a predefined Microsoft Excel®template.After you have selected your target group members, you can run an addressability check to see whether your targetgroup members can be contacted via a specific communication channel such as e-mail or letter.
Business Background
Target Groups and Campaign ManagementTarget Groups and Campaign Management provide an effective way for sales and marketing professionals withinyour company to target specific prospects or customer groups in order to generate new business or strengthenrelationships.For more information, see Target Groups and Campaign Management [page 8].
Lead ProcessingLead processing is used to describe, store, update, manage, and qualify a business partner’s potential interest in aparticular product or service. It is also used to handle and record all interactions with business partners based ontheir interest in a product or service over a period of time. The creation of a lead document can be the starting pointwithin the Marketing-to-Opportunity scenario, with the objective of transforming this lead into an opportunity.For more information, see Lead Processing [page 13].
Opportunity ProcessingOpportunity Processing allows you to identify and follow through on the possibility of selling goods or services to aparticular customer. The opportunity can store all relevant information to help you win, such as the account and allrelevant communication, products and prices, members of the sales team and your sales partners who are workingon the opportunity, and competitors for this opportunity. In addition, you can classify your opportunity by setting apriority and specifying the source (for example, a trade fair).For more information, see Opportunity Processing [page 15].
Business Scenario: Marketing-to-OpportunityThe Marketing-to-Opportunity business scenario enables you to manage marketing and pre-sales activities with thegoal of generating new business for customers and prospects. You can run campaigns, capture responses, generate
SAP Business ByDesign February 2017Target Groups View P U B L I C • © 2017 SAP SE or an SAP affiliate company. All rights reserved. 43

leads, manage opportunities, and initiate and track related sales activities. Alternatively, you can use this businessscenario without campaigns, which means that no marketing department is involved, and leads and opportunitiescan be created without using a campaign.There is also an enhanced function for Microsoft Outlook® integration that allows you to directly assign e-mails tospecific campaigns in Outlook and synchronize this information with the SAP Business ByDesign system. In addition,the pipeline simulation feature provides an interactive combination of graphic and table list of the opportunities. TheWhat-if analysis simulates how changes would affect your pipeline.For more information, see Marketing-to-Opportunity.
Tasks
Create a Target GroupYou can create a target group with members and use it in a campaign. For information aboutthis task, see here [page 45].
Create a Target Group Using Microsoft Excel®You can create a target group by entering it in a predefined Microsoft Excel template anduploading it to the SAP Business ByDesign system. For information about this task, see here
[page 48].
Edit a Target GroupFor information about this task, see here [page 50].
Change Status of a Target GroupYou can change the status of a target group in the work list or when you edit a target group.
1. In the Target Groups work list, select a target group or edit it.2. Click Change Status and choose the required status as follows:
● Choose Active to activate a target group for use in campaigns.An active target group can be edited without restrictions, but it cannot be deleted.
● Choose Block to block a target group for use in campaigns.A blocked target group can be edited without restrictions, but it cannot be deleted.
● Choose Obsolete to discontinue use of a target group in campaigns.An obsolete target group cannot be edited, but it can be deleted.
3. The status changes in the Status field.
Delete a Target GroupYou can delete only those target groups that have the status Obsolete.
1. In the Target Groups work list, select a target group that has the status Obsolete andclick Delete .The system displays a message, asking you whether you want to delete the selectedrecord.
2. Confirm the message by clicking Delete .3. The target group is removed from your work list, and a system message confirms that
your entries have been saved.
44 © 2017 SAP SE or an SAP affiliate company. All rights reserved. • P U B L I CSAP Business ByDesign February 2017
Target Groups View

Create a Campaign From a Target Group1. If a target group has the status Active, then you can create a follow-up campaign for
this target group in one of the following ways:a. After you have finished creating a target group, click Create new Campaign Using
Target Group.b. In the Target Groups work list, select a target group that has the status Active and
click Follow Up followed by Campaign.c. In the Target Group Overview screen or when you edit a target group, click You can
also followed by New Campaign using Target Group.
The target group is assigned automatically to the campaign. On the New Campaignscreen, the Target Group field is filled automatically with the target group name.
2. Enter the details for the campaign, such as the campaign type, and start and end dates.3. Save the campaign.4. Click Execute if you want to start the campaign.
For more information on campaigns, see the Campaigns Quick Guide [page 53].
8.2 Tasks
8.2.1 Create a Target Group
OverviewYou can create a target group with members in the Marketing work center, under Target Groups.It is also possible to create a target group based on:
● A worklist in another view such as the Sales Orders view ● The results of a report such as Sales Order Volume
For details on which worklists and views can be used to create a target group, see Target Group and CampaignManagement [page 8].
Steps1. In the Marketing work center, under Target Groups, click New and choose Target Group.
You can also click Common Tasks in the taskbar and choose New Target Group.
2. In Step 1 Define Properties, enter the following details:a. A target group ID is automatically provided by the system. Enter a description for the target group. You
can also enter a note.b. The status of the target group is automatically set to Active. If you do not want the target group to be
used immediately for further processing in a campaign, click Change Status and choose Block.c. Click Next to continue.
SAP Business ByDesign February 2017Target Groups View P U B L I C • © 2017 SAP SE or an SAP affiliate company. All rights reserved. 45

3. In Step 2 Select Members, select your target group members.From the Show list, choose one of the following queries:
● Corporate Accounts with Contacts (corporate accounts and their contacts, where a contactrelationship exists between the account and the contact)
● Corporate Accounts (all corporate accounts) ● Private Accounts (all private accounts) ● Campaign Responses (accounts and contacts that have responded to a specific campaign) ● Target Groups (all target groups that have been created) ● Target Group Members (all members of a specific target group) ● Leads (all leads)
Depending on the query you have chosen, different search parameters are displayed to allow you to queryyour database of customers and prospects.
4. You can now enter extensive search criteria in these fields to search for prospective target group members.You can also narrow down your search in a particular field (to specify a range of postal codes, for example),by clicking the More Options icon next to the field. For information on More Options, see Searching in Worklists.
5. Click Go to start the search.The search results are displayed in the first table (the Found table).
6. Click Add and then All or Selected to add all or selected accounts and contacts to the second table (SelectedTarget Group Members).
7. You can repeat this process as often as required; that is, you can extend your target group by entering newselection criteria or selecting another query. You can then add these accounts and contacts to the secondtable (Selected Target Group Members) using one of the following options:
● Click Add to add all or selected entries of the Found table to the Selected Target Group Memberstable.
If you want to select several accounts manually before clicking Add , press the Ctrl-key whenyou select the entries.
● Click Intersect to intersect the entries of the Found table with the entries of the Selected Target GroupMembers table. This means the system keeps the entries that are common to both tables and removesthe entries that are not common.
● Click Subtract to subtract the entries in the Found table from the Selected Target Group Memberstable. This means the system keeps the entries that are not common to both tables and removes theentries that are common.
If required, you can also remove all or selected entries from the Selected Target Group Members tablemanually by clicking Remove and then All or Selected.
8. After you have added all required target group members to the Target Group Members table, click Next tocontinue.
9. In Step 3 Review Member Details, you can review the target group member details.To check the addressability of your target group members, click Check Addressability . Then select one of theavailable communication channels such as e-mail or telephone number.The system checks whether data for the selected communication channel has been maintained in the masterdata for the target group members, and displays the following status lights in the Addressability Status columnfor each target group member:
● A green status light indicates that the member can be contacted using the selected communicationchannel.
46 © 2017 SAP SE or an SAP affiliate company. All rights reserved. • P U B L I CSAP Business ByDesign February 2017
Target Groups View

● A red status light indicates that the member cannot be contacted using this communication channel.The address data may be missing, the contact permission is disallowed or requires a check, or thestatus of either the account or the contact is blocked or obsolete.
In addition, a message is displayed at the top of the screen providing a summary of how many target groupmembers cannot be contacted via the communication channel you selected and why.
To undo an addressability check, click Check Addressability followed by Reset.
You can then do the following: ● Sort the list in either ascending or descending order.
Click in the header row above the column that you wish to sort. ● Maintain missing data.
Navigate directly to an account or contact with a red status light by clicking on the hyperlink of theaccount or contact. Change the data and save your changes directly in the account of contact.On the Target Groups screen you can then update the addressability status in the target group byclicking Refresh . The status lights for the target group members change to green if the informationis complete.
● Remove single target group members manually.Select the entry or entries that you wish to remove, and click Remove .
● Export the target group member list to a Microsoft Excel file.Click Export followed by To Microsoft Excel. A Microsoft Excel sheet is opened and the document canbe stored or distributed for review, for example, to your sales department.
10. Once you are satisfied that the target group details are correct, click Finish to confirm and save the targetgroup.
11. In Step 4 Confirmation, the system confirms that the target group is saved. Click Close to finish or chooseone of the following: ● Edit Target Group: You can edit the details of the newly created target group. ● Create new Campaign Using Target Group. You can create a new campaign. The system automatically
assigns the newly created target group to the campaign. ● Create a new Campaign as a Follow-Up: You can create a campaign as a follow-up from a selected target
group. You can do this by selecting a target group and clicking Follow Up New Campaign Using . This requires some initial configuration.
Configuration settings are normally performed by an administrator. If you do not have the requiredauthorization, contact your administrator.You can create a campaign as a follow-up from a target group only if you have scopedResponsibilities for Contacts in business configuration.To find this business option, go to the Business Configuration work center and choose theImplementation Projects view. Select your implementation project and click Edit Project Scope .In the Scoping step of the project, ensure that Business Partners is selected within GeneralBusiness Data.In the Questions step, expand the General Business Data scoping element and select BusinessPartners. Select Handling of Business Partners and answer the questions related toResponsibilities for Contacts.
● Create new Target Group: You can create another target group.
SAP Business ByDesign February 2017Target Groups View P U B L I C • © 2017 SAP SE or an SAP affiliate company. All rights reserved. 47

ResultIf the target group has the status Active, you can use it in a campaign. After you have received responses to acampaign, you can create a new target group based on the responding target group members and use it to sendthem more detailed information, for example. When you create the target group, click Maintain Members and selectCampaign Responses in the Show field.
8.2.2 Create a Target Group Using Microsoft Excel®
OverviewYou can create a target group by entering it in a predefined Microsoft Excel template and uploading it to the SAPBusiness ByDesign system.
PrerequisitesYou have installed the latest Add-In for Microsoft Excel. Depending on your solution set-up, you can do this from theSelf Services Overview in the Home work center, from the Download Center in the Application and UserManagement work center, or from the Download link that is available directly on the user interface.Also, the settings for your browser must be set correctly. You can check this by clicking Check My ComputerSettings on the logon screen.
StepsIn the Target Groups view of the Marketing work center, click New , then choose Target Groups from MicrosoftExcel.Get the Template
1. Select the template.Choose the template in the required language and click Download.
You can choose any language that you have selected during scoping. If you have selected only onelanguage during scoping, you will not get a selection of language versions to choose from.
2. Decide what you want to do with the template. Choose one of the following options: ● If you want to use the template only once, you can open the template without saving it. Click Open. ● If you want to save the template so that you can use it again, choose a location to save the file to, enter
an appropriate file name, and click Save. Then click Open.
If you have previously downloaded and saved this template on your computer, navigate to the location whereyou have saved the template, and open it.
Log on to the solution from Microsoft Excel1. In the SAP Add-In ribbon in Microsoft Excel, click Logon.
48 © 2017 SAP SE or an SAP affiliate company. All rights reserved. • P U B L I CSAP Business ByDesign February 2017
Target Groups View

If the SAP Add-In ribbon is not displayed, check to make sure that the Add-In for Microsoft Excel hasbeen installed correctly (see Prerequisites in this document).
A dialog box opens where you can enter the logon details. The system URL is proposed automatically. Thesystem URL is the URL of the system that you are working with.
2. Enter your user ID and your password, and click Logon.
After initial logon to the system, the ribbon text is changed from SAP Add-In to the name of yoursolution.
Enter Details in the Microsoft Excel Template
Note the following: ● The Microsoft Excel template is presented with a number of rows where you can enter or copy your
data. If you need more, add the number of rows you need before you start entering or copying yourdata.
● Ensure that mandatory fields (those marked with an asterisk) are filled. ● To help you fill in the details:
○ Some fields have dropdown lists. ○ In some fields you can search the system for data, for example, countries. Place the cursor on the
field, and click Lookup in your solution's tool bar or ribbon to search the system. A search field isavailable in the Lookup dialog box that appears. When you start to type text in the search field, therelevant entries are filtered in the ID and Description columns, meaning that you do not have toscroll through the whole list. If the Lookup button is not active in the ribbon or toolbar, then it isnot possible to perform a search.
You can then do the following: ● Enter a description for your target group. ● Select the appropriate status. If you do not select a status, it will be set automatically to Active when you
upload your target group to the SAP Business ByDesign system. ● Enter notes. ● Enter or copy the account and contact IDs into the rows, and in the appropriate columns. Note that you can
enter an account without a contact. However, if you enter a contact, you must also enter an account.
Save Your Data1. After you have finished entering all the data, save the Microsoft Excel file.2. Click Save Data to .
A dialog box opens, informing you that the data is being saved to the solution.After the upload, a message informs you that your data has been saved in the solution.
If you do not provide all the required information, or if you provide incorrect information, somerecords will not be saved. Error messages will highlight the problems so that you can correct themand save the data again.
3. You can then log off by clicking Logoff .
ResultThe new target group is saved in the SAP Business ByDesign system and added to the list in the Target Groups view.
SAP Business ByDesign February 2017Target Groups View P U B L I C • © 2017 SAP SE or an SAP affiliate company. All rights reserved. 49

If you need to make changes to this target group, you must change it directly in the system.
8.2.3 Edit a Target Group
OverviewYou can edit a target group with members in the Marketing work center, under Target Groups.
PrerequisitesYou can edit a target group as long as it does not have the status Obsolete.
Steps1. In the Target Groups view, select the target group that you want to change and click Edit .
You can add or remove members, perform an addressability check, and click Maintain Members to modifyyour target group. In addition, you can change the status of your target group, copy the existing target group,and export the target group members list to Microsoft Excel®.
2. You can then edit your target group as follows: ● Change Signee
In the Members table, you can change the signee responsible. You can view or edit the Signee columnonly if you have scoped Responsibilities for Contacts in business configuration.
Configuration settings are normally performed by an administrator. If you do not have the requiredauthorization, contact your administrator.To find this business option, go to the Business Configuration work center and choose theImplementation Projects view. Select your implementation project and click Edit Project Scope .In the Scoping step of the project, ensure that Business Partners is selected within GeneralBusiness Data.In the Questions step, expand the General Business Data scoping element and select BusinessPartners. Select Handling of Business Partners and answer the questions related toResponsibilities for Contacts.
● Add Members Using Detailed Searcha. Click Maintain Members to add new members to your target group by performing a new search on
your customer and prospect database.b. From the Show list, choose one of the following queries:
● Corporate Accounts with Contacts (corporate accounts and their contacts, where a contactrelationship exists between the account and the contact)
● Corporate Accounts (all corporate accounts) ● Private Accounts (all private accounts) ● Campaign Responses (accounts and contacts that have responded to a specific campaign) ● Target Groups (all target groups that have been created) ● Target Group Members (all members of a specific target group) ● Leads (all leads)
50 © 2017 SAP SE or an SAP affiliate company. All rights reserved. • P U B L I CSAP Business ByDesign February 2017
Target Groups View

Depending on the query you have chosen, different search parameters are displayed to allow youto query your database of customers and prospects.
c. You can now enter extensive search criteria in these fields to search for prospective target groupmembers.You can also narrow down your search in a particular field, for example, to specify a range of postalcodes. To do this, click on the More Options icon next to a search field, and select an operator suchas = equal to, > greater than, or ... between.
d. Choose Go to start the search.The search results are displayed in the first table (the Found table).
e. Click Add and then All or Selected to add all or selected accounts and contacts to the second table(Selected Target Group Members).
f. You can repeat this process as often as required; that is, you can extend your target group byentering new selection criteria or selecting another query. You can then add these accounts andcontacts to the second table (Selected Target Group Members) using one of the following options:
● Click Add to add all or selected entries of the Found table to the Selected Target GroupMembers table.
If you want to select several accounts manually before clicking Add , press the Ctrl-key when you select the entries.
● Click Intersect to intersect the entries of the Found table with the entries of the SelectedTarget Group Members table. This means the system keeps the entries that are common toboth tables and removes the entries that are not common.
● Click Subtract to subtract the entries in the Found table from the Selected Target GroupMembers table. This means the system keeps the entries that are not common to both tablesand removes the entries that are common.
If required, you can also remove all or selected entries from the Selected Target Group Memberstable manually by clicking Remove and then All or Selected.
g. After you have added all required target group members to the Found table, clickReturn to Target Group to copy the target group members to the target group and navigate back to
the Edit Target Group screen.Your changes are displayed in the target group.
h. Save your changes. ● Add New Members Manually
Click Add Member to add new members manually to your target group that, for example, did not matchyour previous selection criteria. A dialog box is displayed where you can select an account, a contact, orboth, to add to your target group.
If you select an account, and then want to select a contact, only the contacts for that particularaccount will be displayed in the value help of the contact field. The same applies if you select acontact.
Members are added to the end of the list. You can sort this list, if required. ● Remove Members
Click Remove to remove target group members. You can select one or more target group members tobe removed.
● Check Addressability of MembersTo check the addressability of your target group members, click Check Addressability . Then select oneof the available communication channels such as e-mail or telephone number.
SAP Business ByDesign February 2017Target Groups View P U B L I C • © 2017 SAP SE or an SAP affiliate company. All rights reserved. 51

The system checks whether data for the selected communication channel has been maintained in themaster data for the target group members, and displays the following status lights in the AddressabilityStatus column for each target group member:
● A green status light indicates that the member can be contacted using the selectedcommunication channel.
● A red status light indicates that the member cannot be contacted using this communicationchannel. The address data may be missing, the contact permission is disallowed or requires acheck, or the status of either the account or the contact is blocked or obsolete.
In addition, a message is displayed at the top of the screen providing a summary of how many targetgroup members cannot be contacted via the communication channel you selected and why.
To undo an addressability check, click Check Addressability followed by Reset.
You can then do the following: ● Sort the list in either ascending or descending order.
Click in the header row above the column that you wish to sort. ● Maintain missing data.
Navigate directly to an account or contact with a red status light by clicking on the hyperlink ofthe account or contact. Change the data and save your changes directly in the account of contact.On the Target Groups screen you can then update the addressability status in the target groupby clicking Refresh . The status lights for the target group members change to green if theinformation is complete.
● Remove single target group members manually.Select the entry or entries that you wish to remove, and click Remove .
● Export the target group member list to a Microsoft Excel file.Click Export followed by To Microsoft Excel. A Microsoft Excel sheet is opened and the documentcan be stored or distributed for review, for example, to your sales department.
ResultThe changes in the target group are taken into account when you use it in your next campaign.
52 © 2017 SAP SE or an SAP affiliate company. All rights reserved. • P U B L I CSAP Business ByDesign February 2017
Target Groups View

9 Campaign Management View
9.1 Campaigns View
9.1.1 Campaigns Quick Guide
The Campaigns view enables you as a marketing representative to plan, create, and execute campaigns. You canaccess this view from the Marketing work center under Campaign Management.The following campaign types are possible: e-mail, fax, phone call, and letter campaigns. You can assign an existingtarget group to a campaign, or you can create a new target group within the campaign itself.If you want to classify responses that you capture, you can create response options in the Response Options subview,and assign these to the campaign in the Campaigns subview. Alternatively, you can create response options directlyin the campaign .When you execute a campaign, the system creates a Microsoft Excel® file that includes the addressable target groupmembers and their address data required to contact them. This file can either be distributed to a marketing agencywhich then contacts the target group members, or used as an input source in Microsoft mail merge or other mailingsystems. In addition, personalized response codes are generated automatically in this file for each target groupmember, to identify the campaign as well as the account and contact. These response codes can be used later toquickly create campaign responses. After you have executed a campaign, you can immediately check who has beencontacted successfully, as well as who has not been contacted and why.In addition, you can check who has responded and which communication channel has been used, and who has notyet responded. You can also monitor some campaign key figures such as the number of target group members thathave been contacted or the number of non-responders.You can display data in the Campaigns worklist as a chart using the analytical view function. This function helps youto get a quick overview of all data in the worklist.
Business Background
Target Groups and Campaign ManagementTarget Groups and Campaign Management provide an effective way for sales and marketing professionals withinyour company to target specific prospects or customer groups in order to generate new business or strengthenrelationships.For more information, see Target Groups and Campaign Management [page 8].
Lead ProcessingLead processing is used to describe, store, update, manage, and qualify a business partner’s potential interest in aparticular product or service. It is also used to handle and record all interactions with business partners based ontheir interest in a product or service over a period of time. The creation of a lead document can be the starting pointwithin the Marketing-to-Opportunity scenario, with the objective of transforming this lead into an opportunity.For more information, see Lead Processing [page 13].
SAP Business ByDesign February 2017Campaign Management View P U B L I C • © 2017 SAP SE or an SAP affiliate company. All rights reserved. 53

Opportunity ProcessingOpportunity Processing allows you to identify and follow through on the possibility of selling goods or services to aparticular customer. The opportunity can store all relevant information to help you win, such as the account and allrelevant communication, products and prices, members of the sales team and your sales partners who are workingon the opportunity, and competitors for this opportunity. In addition, you can classify your opportunity by setting apriority and specifying the source (for example, a trade fair).For more information, see Opportunity Processing [page 15].
Activity ManagementAs part of your daily work you need to deal with various activities throughout the day, such as tasks, appointments,phone calls, letters, faxes, or e-mails. To ensure productivity and efficiency, Activity Management enables you tooptimize all activities relating to Customer Relationship Management and ensures that you do not spend too muchprecious sales time on coordinating routine tasks and activities.For more information, see Activity Management [page 18].
Business Scenario: Marketing-to-OpportunityThe Marketing-to-Opportunity business scenario enables you to manage marketing and pre-sales activities with thegoal of generating new business for customers and prospects. You can run campaigns, capture responses, generateleads, manage opportunities, and initiate and track related sales activities. Alternatively, you can use this businessscenario without campaigns, which means that no marketing department is involved, and leads and opportunitiescan be created without using a campaign.There is also an enhanced function for Microsoft Outlook® integration that allows you to directly assign e-mails tospecific campaigns in Outlook and synchronize this information with the SAP Business ByDesign system. In addition,the pipeline simulation feature provides an interactive combination of graphic and table list of the opportunities. TheWhat-if analysis simulates how changes would affect your pipeline.For more information, see Marketing-to-Opportunity.
Quick Guide for Microsoft Outlook IntegrationThis quick guide provides information about Microsoft Outlook Integration functions in Customer RelationshipManagement (CRM).For more information, see the Quick Guide for Microsoft Outlook Integration [page 65].
Tasks
Create a Campaign1. Click New , then choose Campaign.
You can also click Common Tasks in the taskbar and choose New Campaign.
2. Enter details as follows: ● Enter a Campaign Description for your campaign. ● Select a Campaign Type from the drop-down list: E-Mail using file export, Fax using
file export, Letter using file export, and Phone Call using file export.
54 © 2017 SAP SE or an SAP affiliate company. All rights reserved. • P U B L I CSAP Business ByDesign February 2017
Campaign Management View

You can also select Direct E-mail campaign type, to send personalized HTML e-mails in marketing campaigns directly from Business ByDesign system while thecampaign is executed. This feature needs to be enabled from BusinessConfiguration work center. For information see, Create an Execute Direct E-mailCampaign [page 60].You can create new campaign types in addition to the default campaign types inthe solution from Campaign Type activity in Business Configuration work center.To find this activity, go to Business Configuration, Implementation Projects view.Select your implementation project and click Open Activity List . Select the Fine-Tune phase, then select the Campaign Type activity from the activity list.The campaign types created from the fine-tuning activity will be displayed in theCampaign Type drop-down list in Campaigns view.
The campaign types determine: ● The addressability check during campaign execution. For example,
if you have selected the campaign type E-mail Campaign, the systemchecks the following: ○ The contact permission and the status of a target group
member ○ Which members have an e-mail address maintained in their
master data
● You can enter a start date to specify when your campaign is planned to be active,and an end date to specify when your campaign is planned to be finished.
● Select an existing target group, or create a new target group directly from thisscreen by clicking New .For more information on target groups, see the Target Groups Quick Guide[page 43].
● Enter any Additional Information that you want to save in your campaign. ● Under Attachments you can add any documents to your campaign that might be
necessary, for example, marketing brochures.3. If you are using response options, click View All , and select Response Options or click
Add Response Option link on the New Campaign quick activity.You can add new or existing response options, for information, see Response OptionsQuick Guide [page 79].
4. Save your campaign.The status of the campaign is set automatically to Planned.
5. You can now execute the campaign by clicking Execute .The status of the campaign changes to Active.
After the status of the campaign changes to Active, you cannot make anychanges to the campaign fields.
Execute a CampaignAfter you have created a campaign, and assigned a campaign type and a target group to it,you can execute it.
1. In the Campaigns work list select a campaign and click Edit .2. Click Execute .
SAP Business ByDesign February 2017Campaign Management View P U B L I C • © 2017 SAP SE or an SAP affiliate company. All rights reserved. 55

A dialog box is displayed, asking you whether you want to download the Microsoft Excelfile to your computer.
If this dialog box is not displayed, check whether the settings for your browserhave been set correctly. You can find information about computer settings in theCheck My Computer Settings help document.For more information, see Export Business Data Using Microsoft Excel[page 31].
3. Click Yes and save the Microsoft Excel file locally, or open it directly.A Microsoft Excel file is generated, containing all addressable target group memberswith their address data and their personalized response code.
A member is addressable if the following criteria are fulfilled: ● The member is allowed to be contacted (contact permission is not
disallowed) ● The member’s status is not obsolete or blocked ● The member has the necessary address data maintained. For example,
if your campaign has the campaign type E-mail campaign, members musthave an e-mail address maintained in master data.
Additionally, you can also view the Signee responsible in the downloaded MicrosoftExcel only if you have scoped Responsibilities for Contacts in business configuration.
Configuration settings are normally performed by an administrator. If you do nothave the required authorization, contact your administrator.To find this business option, go to the Business Configuration work center andchoose the Implementation Projects view. Select your implementation projectand click Edit Project Scope . In the Scoping step of the project, ensure thatBusiness Partners is selected within General Business Data.In the Questions step, expand the General Business Data scoping element andselect Business Partners. Select Handling of Business Partners and answer thequestions related to Responsibilities for Contacts.
4. The data in the Microsoft Excel file can now be used to contact the target groupmembers. For example, you can use it as an input source in Microsoft mail merge oranother mailing system, or you can distribute it to an external marketing agency whowill contact the members for you.
If you have not saved the Microsoft Excel file or have deleted it, you can clickRestore Export File to download it again. This button is visible when you clickEdit or View All in an active campaign.
After you have executed the campaign, the status changes to Active and the accountand contact fact sheets are updated with information on the campaign under theCampaigns section. In this way you can see in which campaigns an account or a contactis involved.
After the status of the campaign changes to Active, you cannot make anychanges to the campaign fields.
56 © 2017 SAP SE or an SAP affiliate company. All rights reserved. • P U B L I CSAP Business ByDesign February 2017
Campaign Management View

Capture Responses to a CampaignAfter you have executed a campaign, you can capture responses from the target groupmembers. For information about this task, see here [page 74].
View Campaign Execution Details1. In the Campaigns work list, click on the Campaign Description of the campaign you want
to view, choose View All , and then click Execution Details .You can view execution details such as which target group members have been or havenot been contacted. Contacted in this sense means that they have been exported to aMicrosoft Excel file for further processing.
2. To view target group members who have been contacted, select Members Contactedin the Show field.
You can display extra fields on the screen under Personalize ThisScreen . For example, to display the response codes that were used to captureresponses, you can display the Response Code field on the Execution Details tabwhen you choose Members Contacted. For more information, seePersonalization Quick Guide.
3. Under Campaigns you can also see all campaigns in which the account or contact is atarget group member and was contacted successfully.
4. To view target group members who have not been contacted, Members NotContacted in the Show field.The results show all target group members who could notbe contacted via the campaign, because they were not addressable. These target groupmembers have neither been exported to Microsoft Excel, nor have activities beencreated in their interaction history.
5. To analyze why these target group members were not addressable, you can group theresults according to reason. To do this, click on Reason in the column header.
You can narrow down the results by choosing Advanced and entering search criteria.You can then copy this list into a new target group, or a new target group and campaignby clicking Export followed by Into Target Group or Into Target Group andCampaign.You can also export this list to a Microsoft Excel file. For example, you can create aMicrosoft Excel file for target group members that could not be contacted, and thendistribute it to your sales department, to let them know that some communication datais missing for certain accounts. The sales department can then update the master data,so that the accounts can be contacted in future campaigns.
View Response Details in a CampaignYou can see which accounts and contacts have responded to a campaign. You can also checkwhich of your target group members have not responded yet.
1. In the Campaigns work list, click the Campaign Description of the campaign you wantto view.The campaign overview opens showing you the Response Key Figures.One of the response key figures is the response rate. It shows the percentage ofaccounts and contacts that have already responded, compared to how many targetgroup members could be contacted.
SAP Business ByDesign February 2017Campaign Management View P U B L I C • © 2017 SAP SE or an SAP affiliate company. All rights reserved. 57

2. Click More next to Response Key Figures.Alternatively, you can click View All and then click Response Details .
3. In the Show field, you can then select the following: ● Responses
This displays all responses for this specific campaign. If an account or contact hasresponded more than once, this is also displayed. You can use additional searchcriteria for this list by choosing Advanced. This is particularly helpful if you useresponse options; you can then search for all positive responses, for example.
● RespondersThis displays all accounts and contacts who have responded to your campaign. Ifan account and contact has responded several times, this account and contact islisted only once.
● Non-RespondersThis displays all target group members who have been contacted but who havenot responded yet.
● You can copy this list into a new target group, or a new target group andcampaign by clicking Export followed by Into Target Group or IntoTarget Group and Campaign.
● You can also export this list to a Microsoft Excel file. For example, you cancreate a Microsoft Excel file for all responders or non-responders, andthen distribute it to your sales department for information or furtherprocessing.
● You can display extra fields on the screen under Personalize ThisScreen . For example, to see who has created responses on the Response Details tab, you can choose to display the Created By field whenyou choose Responses. To see how target group members haveresponded, you can choose to display the Response Option field. For moreinformation, see Personalization Quick Guide.
Finish a CampaignTo finish a campaign, you need to set the status of the campaign manually to Finished.
1. In the Campaigns work list, select a campaign, click Change Status and chooseFinished.
You can also click Edit to view the campaign details first, and then clickChange Status followed by Finished
2. Save your changes.
The status of the campaign is changed to Finished, and a system message confirms that yourentries have been saved.The Add Response button is now deactivated. However, it is still possible to create responsesby creating an activity and entering the campaign ID. Note, however, that the default settingsof the value selection in the activity displays only the active campaigns, but you could alsosearch for finished campaigns by using the advanced search parameters.If required, you can reactivate the campaign by resetting the status to Active.
58 © 2017 SAP SE or an SAP affiliate company. All rights reserved. • P U B L I CSAP Business ByDesign February 2017
Campaign Management View

Cancel a CampaignIf a campaign has already started, and you do not want to continue using it, you can cancel it.
1. In the Campaigns work list, select a campaign that has the status Active and then clickChange Status followed by Canceled.
You can also click Edit to view the campaign details first, and then clickChange Status followed by Canceled.
2. Save your changes.
The status of the campaign is changed to Canceled, and a system message confirms that yourentries have been saved.The Add Response button is now deactivated. However, it is still possible to create responsesby creating an activity and entering the campaign ID. Note, however, that the default settingsof the value selection in the activity displays only the active campaigns, but you could alsosearch for canceled campaigns by using the advanced search parameters.If required, you can reactivate the campaign by resetting the status to Active.
Delete a CampaignYou can delete only those campaigns that have the status Planned.
1. In the Campaigns work list, select the required campaign. Ensure that it has the statusPlanned and click Delete .The system displays a message, asking you whether you want to delete the selectedrecord.
2. Confirm the message by clicking Delete .The campaign is removed from your work list, and a system message confirms thatyour entries have been saved.
Display a Graphical Analysis of a Campaigns Worklist1. In the worklist, from the Group By dropdown list, choose a criterion by which to group
data.2. To view all data from the worklist in the Analytical View section, click the chart icon next
to the filter icon.3. In the Analytical View section, choose a chart type to display the data.4. Double-click a data section in the chart to filter the original worklist.
You can clear the filter by clicking Back to Full Chart in the Analytical Viewsection or deleting the filter content in the worklist.
For some worklists, such as the Opportunities worklist in the Opportunity List view inthe New Business work center, you can aggregate the grouped data using differentcriterion (for example, expected value). You can then select different analysis methods(for example, count, sum, average, maximum, or minimum) to sort the data, and choosedifferent chart types to present the data from the worklist.
Export Campaigns to Microsoft ExcelYou can export campaigns to Microsoft Excel. For more information, see Export Business DataUsing Microsoft Excel [page 31].
SAP Business ByDesign February 2017Campaign Management View P U B L I C • © 2017 SAP SE or an SAP affiliate company. All rights reserved. 59

9.1.2 Create and Execute a Direct E-mail Campaign
OverviewYou can send personalized HTML e-mail in marketing campaigns directly from the SAP Business ByDesign systemwhile the campaign is executed. Each account or contact of the assigned target group will receive a personalized e-mail if he or she is allowed to be contacted and has a valid e-mail address. The execution can be scheduled to bestarted immediately or in the future at a certain date and time. For this personalization, HTML e-mail templates areused. A template contains the mail content and placeholders, such as the formatted name of the account or contact.These placeholders will be filled with the information of the contacted account or contact while the e-mail is createdand before it is sent.
Prerequisites
ScopingDirect Campaign Execution using E-mail is enabled in your solution configuration.To find this business option, go to the Business Configuration work center and choose the ImplementationProjects view. Select your implementation project and click Edit Project Scope . In the Scoping step of the project,ensure that Campaign Management is selected within Marketing.In the Questions step, expand the Marketing scoping element and select Campaign Management. Select CampaignExecution and answer the questions related to Direct Campaign Execution using E-mail.
Fine-Tuning PrerequisitesYou have configured the settings for Direct E-mail campaigns.To find this business option, go to the Business Configuration work center and choose the ImplementationProjects view. Select your implementation project and click Open Activity List . Select the Communication andInformation Exchange activity group, then select the E-mail and Fax Settings activity from the activity list.In E-mail and Fax Settings check the following:Under Allowed Sender E-Mail Domains, you can see which domains of the sender e-mail addresses are allowed. Thisinformation is necessary since in the Campaign screen you have to enter a sender e-mail address, such [email protected]. If your sender e-mail address uses a domain that is not listed here, you will get acorresponding error message in the Campaign screen.Under E-Mail and Fax Delivery in a Non-Productive System, Send all e-mails to business partners option must beselected. Otherwise the campaign execution is not possible and will raise an error message.Go through the documentation about activation of mass email by clicking on Read Documentation for Activation ofMass E-Mail. In Activation of Mass E-Mail, follow the steps mentioned in the on-screen help.
Procedure1. Create an E-mail Template
You can use an e-mail template for creating personalized e-mails. For information see, Create an E-mailTemplate [page 63].
2. Create and Execute Direct E-mail Campaign1. Choose Marketing Campaign Management Campaigns .
60 © 2017 SAP SE or an SAP affiliate company. All rights reserved. • P U B L I CSAP Business ByDesign February 2017
Campaign Management View

2. Click New , then choose Campaign. You can also click New Campaign under Common Tasks.3. Enter details for the direct e-mail campaign in addition to the standard entries:
a. Select Direct E-Mail from the Campaign Type drop-down list.b. Enter an e-mail subject for your campaign.c. To add a template, click Add . Select the prepared e-mail template from your hard drive and click
Open .
The system uploads the template and checks the HTML code for viruses, HTML syntax,code page, and the used placeholders. In case of any errors, the system does not uploadthe file.
The language for the first template is pre-set with your logon language but you can change thisafter the upload. To change the language, click Show additional languages. In E-Mail Templates you can change the language of the template.
d. To add more languages, click Show additional languages and add the templates for the differentlanguages that are required for your target group as follows:1. Click Add Row .2. Select a language suitable to the template you want to upload.3. Enter an e-mail subject in the corresponding language.4. Click Add to upload the additional template.5. Deselect the Default flag if you want another template to be used as the default template.
You can assign several e-mail templates to your campaign, but only one for eachlanguage. Exactly one e-mail template has to be selected as default template. Duringthe campaign execution, the communication language of the target group member istaken in order to use the corresponding e-mail template. For example, an account hasthe communication language German and so the German e-mail template is used tocreate the e-mail. In case no communication language is selected, the default e-mailtemplate is used. Also some placeholders such as title and form of address arelanguage-dependent.
6. Under Execution Options check the Sender E-Mail Address and the Reply-To E-MailAddress.
7. Enter your target group.4. By clicking on the hyperlink of the e-mail template name a preview windows opens. It shows the content
of the uploaded e-mail template and fills the placeholders.5. If you use response options, click View All , and select Response Options . Click Add Row and select
a response option from the drop down list, or click New Response Option to create a new responseoption. Repeat this step for each response option that you require.
Once you have executed a campaign, you can no longer add or delete response options.
6. Save your campaign.7. To test your campaign, click Send Test E-Mail , enter at least the e-mail address of the recipient, for
example, your own email address, and click OK . For each template assigned to the campaign, exactlyone test e-mail will be created and sent. If you use placeholders in the e-mail template, you can enteran account and a contact person. In this case, the placeholders in the e-mail will be filled with thecorresponding values of the account and contact person.
SAP Business ByDesign February 2017Campaign Management View P U B L I C • © 2017 SAP SE or an SAP affiliate company. All rights reserved. 61

The system can only confirm that the e-mail has been sent but not that is has been received bythe sender.
8. You can now execute the campaign by clicking Execute . The Schedule Execution pop-up opens.9. Here you can either enter a date and time for the future execution in case you do not want to send out
the e-mails immediately, or you can start the campaign immediately and the system triggers thesending of the e-mails.
10. Then click OK . The status of the campaign changes to Active and, in General , you can see theexecution status. You can obtain the most current execution status by clicking on the refresh icon inthe status line. This might be helpful in case you want to check if the campaign is running or evenfinished in case of an immediate execution.
● If a campaign execution has the status Finished with Errors or Failed, it can be restarted.This means you can schedule it again. If a restarted campaign is executed, it will sent e-mails only to those accounts that have not been processed before. Accounts that havebeen processed during a previous execution and that cannot be contacted, for example,because they have no e-mail address, will not be processed again. The campaign hasalready created a tracking record for such accounts and they will be shown in campaignon Execution Details where the Members Not Contacted are listed.
● If a campaign execution has the status Finished with Errors or Failed, you can click on thehyperlink of this status in order to open the application log in a separate window. Itcontains detailed messages explaining the reason why the execution was not successful.
● To re-schedule or cancel the campaign, click Re-Schedule . This button disappears whenthe scheduled date and time is reached and the Execution Status has been changed toRunning, Finished or Failed.
3. Delivery Status NotificationIn case of invalid e-mail addresses of the target group members, the e-mail server will return a delivery statusnotification (DSN) that the e-mail cannot be delivered.The incoming DSN is processed automatically by the SAP Business ByDesign system and will lead to thefollowing updates:
● Campaign management tracks all contacted business partners, a DSN will update the tracking recordand set a status value. In Execution Details of the campaign, you can see in the list Members NotContacted that the related business partner appears with reason E-Mail Address Invalid.
● The e-mail address of the related business partner will be set to E-Mail Address Invalid. You can seethis indicator in the view where you can edit the account (private or corporate) or the contact person.As long as the indicator E-Mail Address Invalid is set, the e-mail address will not be used in futurecampaigns and the business partner will not get any e-mails.You can correct the e-mail address and remove the indicator manually in order to contact the businesspartner in future campaigns.
4. Withdraw Marketing E-Mail ConsentThere are legal requirements that allow recipients of marketing e-mails to request from the originator of themarketing action (the sender of the e-mail) not to send any marketing e-mails in future. The recipient canwithdraw his or her consent to marketing e-mails. This means the recipient will not receive any marketing e-mail once the consent has been withdrawn.You can create an e-mail template with the place holder /FormCampaignExecutionPlaceholder/MailingPermissionDenyMailToURI, which offers a MailTo link in the final personalized e-mail. The recipient of
62 © 2017 SAP SE or an SAP affiliate company. All rights reserved. • P U B L I CSAP Business ByDesign February 2017
Campaign Management View

the marketing e-mail can click on this MailTo link in order to generate a new e-mail. This generated e-mail isprefilled with a recipient address and a personalized subject.This rejection e-mail will be processed automatically in the SAP Business ByDesign system without any userinteraction. A new inbound e-mail activity with a relation to the campaign will be created. This activity can beseen in Responses list under Response Details in the campaign.Future campaigns will not send any e-mails to those business partners that have withdrawn the consent bysending this rejection e-mail.
See AlsoCampaigns Quick Guide [page 53]
9.1.3 Create an E-mail Template
OverviewAn e-mail template is used for the creation of personalized e-mails. It contains the mail body as HTML andplaceholders. During the creation of the personalized e-mails the placeholders will be filled with attributes of accountor contact, for example, Account’s Formatted Name.The subject of the personalized e-mail is not part of the e-mail template. It will be entered in the Campaigns view foreach e-mail template.E-mail templates must be defined outside the SAP Business ByDesign system with the help of a third-party software.Once the definition is finished, they have to be stored as text file. The file can be uploaded to the Campaigns view.An e-mail template must contain valid HTML code that is encoded in UTF-8. Otherwise it will be rejected duringupload. The e-mail template can contain placeholders in a certain notation.
Like any other files, e-mail templates are checked for viruses during upload. In addition, all outgoing e-mailsthat are generated from the e-mail template are scanned for viruses. Because not every JavaScript virus canbe found, it is recommended that only dedicated users should have access to e-mail template authoring. Theseusers are supposed to have basic HTML knowledge such that they can assess the consequences of usingJavaScript.
Procedure1. Create an e-mail template containing mail body as HTML source code and encoded in UTF-8.
You can use a third-party software to create the e-mail template and save it as HTML file with encoding UTF-8.2. Encode file content in UTF-8.
To encode the file content in UTF-8, set the META-Tag to the value utf-8.
For HTML 4: <meta content="text/html; charset=utf-8">For HTML 5: <meta charset="UTF-8">
To save the HTML in UTF-8, open the document, for example, in Microsoft Notepad and choose File SaveAs and select Encoding: to UTF-8. Then save the file.
3. You can display images in HTML e-mail.
SAP Business ByDesign February 2017Campaign Management View P U B L I C • © 2017 SAP SE or an SAP affiliate company. All rights reserved. 63

If you want the HTML e-mail to display images, save the images on an image server and address them usingthe <img> tag.
<img width="20" height="450" id="_x0000_i1031" src="http://www.sap.com/global/ui/images/emails/holidaycard/2011/emails-holidaycard-illustration-273558-01.gif" alt="SAPMerry Christmas">
4. You can include placeholders in HTML e-mail template.The placeholders are used to merge the data from the target group members with the template to apersonalized e-mail. The placeholders are directly connected to the single fields of the accounts.Enter the placeholders in the HTML e-mail template within a SPAN-tag with the following syntax:<span class="variable"><Name of valid placeholder></span>
<span class="variable">/FormCampaignExecutionPlaceholder/Customer/FormattedName</span>
You can enter the same placeholder several times in the HTML.During campaign execution, the value of the SPAN-Tag is replaced by the corresponding information of thebusiness partner who will receive this personalized e-mail.<span class="variable">Mr. Freddy Tester</span>
Ensure that you always use straight quotation marks (") in the template.
Here are the available placeholders:1. Additional Name in case the target group member is a corporate account and Last Name in case of a
private account: /FormCampaignExecutionPlaceholder/Customer/AdditionalNameOrLastName2. First name of the contact person in case the target group member is a corporate account with a contact
person: /FormCampaignExecutionPlaceholder/ContactPerson/FirstName3. Last name of the contact person in case the target group member is a corporate account with a contact
person: /FormCampaignExecutionPlaceholder/ContactPerson/LastName4. Formatted name of the contact person in case the target group member is a corporate account with
a contact person: /FormCampaignExecutionPlaceholder/ContactPerson/FormattedName5. The contact person's title, for example, Mr. or Mrs., in case the target group member is a corporate
account with a contact person: /FormCampaignExecutionPlaceholder/ContactPerson/FormOfAddressName
6. The contact person's academic title, for example, Dr. or Prof., in case the target group member is acorporate account with a contact person: /FormCampaignExecutionPlaceholder/ContactPerson/AcademicTitleName
7. Name of the function from the business card, for example, Product Manager, of the contact person incase the target group member is a corporate account with a contact person: /FormCampaignExecutionPlaceholder/ContactPerson/BusinessCardFunctionName
64 © 2017 SAP SE or an SAP affiliate company. All rights reserved. • P U B L I CSAP Business ByDesign February 2017
Campaign Management View

8. Name of the department from the business card, for example, Development, of the contact person incase the target group member is a corporate account with a contact person: /FormCampaignExecutionPlaceholder/ContactPerson/BusinessCardDepartmentName
9. ID of response code which is generated for each target group member during the execution of thecampaign: /FormCampaignExecutionPlaceholder/ResponseCodeID
5. You can include Withdraw Marketing E-mail Consent placeholder.There is a special placeholder that can be used to allow the recipient of a marketing mail to withdraw his orher consent to marketing e-mails in future:/FormCampaignExecutionPlaceholder/MailingPermissionDenyMailToURIYou can include this placeholder in the HTML e-mail template, which can be used to create a mailto-link withinthe e-mail. It must be put inside the value of the HREF attribute of the anchor tag.
<a href="mailto:{/ FormCampaignExecutionPlaceholder/MailingPermissionDenyMailToURI}">Click here to reject marketing e-mail consent.</a>
Ensure that you always use straight quotation marks (") in the template.
In the sent e-mail, the anchor tag will look like this:<a href="mailto:unsubscribe.marketing.mailing@asl-cust004.mail.dev.sapbydesign.com?subject=RejectMailingConsent6B7DF34541279407D4EFD1C24E6BC393867CDDA8">Click here to rejectmarketing e-mail consent.</a>
See AlsoCampaigns Quick Guide [page 53]Create and Execute Direct E-mail Campaign [page 60]
9.1.4 Business Background
9.1.4.1 Quick Guide for Microsoft Outlook® Integration
Microsoft Outlook® Integration (Groupware) allows you to exchange information between Microsoft Outlook and theCRM application of your system. You can synchronize your contacts, e-mails, appointments, and tasks to and fromOutlook; create service requests in the system from incoming e-mails; and associate e-mails, tasks andappointments with SAP Business ByDesign accounts, campaigns, opportunities, and leads.Microsoft Outlook Integration supports Microsoft Outlook 2007, 2010 and 2013.
Business Background
Microsoft Outlook Integration Security Advice and Troubleshooting GuideFor more information, see the Microsoft Outlook Integration Security Advice and Troubleshooting Guide.
SAP Business ByDesign February 2017Campaign Management View P U B L I C • © 2017 SAP SE or an SAP affiliate company. All rights reserved. 65

Activity ManagementAs part of your daily work you need to deal with various activities throughout the day, such as tasks, appointments,phone calls, letters, faxes, or e-mails. To ensure productivity and efficiency, Activity Management enables you tooptimize all activities relating to Customer Relationship Management and ensures that you do not spend too muchprecious sales time on coordinating routine tasks and activities.For more information, see the Activities Quick Guide and Activity Management [page 18].
Tasks
Pre-Installation ActivitiesBefore you can install and use the Microsoft Outlook Integration functions, you must be granted authorization to theAccount Management work center where all data relevant to Microsoft Outlook Integration is maintained. For furtherinformation on this work center, refer to documentation available in the Help Center.Ensure that an administrator makes the following settings in Business Configuration:
1. Activate Microsoft Outlook Integration.In the standard system, Microsoft Outlook Integration is not in scope. Activate this function in the scopingphase by selecting Communication and Information Exchange then the Office and Desktop Integrationbusiness option. Select the Outlook Integration check box. Microsoft Outlook Integration with ActivityManagement, Account Synchronization to Microsoft Outlook and Account Synchronization from MicrosoftOutlook are now automatically included in your scope.Answer the related scoping questions for synchronizing accounts and contacts to and from Outlook. Two-way synchronization is proposed as default. The settings here are valid for all Microsoft Outlook Integrationusers.
2. Select Service Request Management.This step is optional. You can enable manual or automatic creation of service requests from incoming e-mailsby going to scoping for Service Customer Care and selecting Service Request Management. Answerthe related scoping questions under E-Mail Integration with Service Request Management and AutomaticCreation of Service Requests.
3. Assign accounts to Microsoft Outlook Integration users.In order to synchronize an account, or associate activities to that account, the user must be the employeeresponsible. For this step, there is an optional fine-tuning activity as well as a required activity for assigningaccounts to users.Optional — If you want to assign accounts without using or changing normal employee responsibledetermination, go to fine-tuning for Sales Party Role Definition (Business Option Sales: Account andActivity Management: Account Management: Party Role Definition). Create a new party role withresponsibility role, ensuring that the description indicates that it is specifically for Microsoft OutlookIntegration users.Required — There are two ways to assign an account. ● Create a responsibility rule (recommended)
Go to the Task Distribution view (Application and User Management work center). In Employee WorkDistribution, mark the Account Responsibility by Party Role line and click Edit . Add a rule for eachresponsibility role relevant to Microsoft Outlook Integration.
● Edit the responsibility directly in the accountGo to the Accounts view in the Account Management work center. Click Edit then select Contacts. Onthe Relationships and Responsibilities tab, add a new row in the Responsibilities section. Select a
66 © 2017 SAP SE or an SAP affiliate company. All rights reserved. • P U B L I CSAP Business ByDesign February 2017
Campaign Management View

responsibility type, enter the user ID of the user for whom this account should appear in My Accounts,and set the Direct Responsible checkbox.
Finally, you must maintain a business e-mail address in the Home work center ( Home Self Service Edit MyContact Data ).
Ensure that this e-mail address is assigned to one and only one user.
Install and Log On to the SAP Business ByDesign Add-In for Microsoft Outlook Integration1. Install the add-in.
Go to Home > Self Services. Under My Computer, you can check your computer settings to ensure you havethe minimum requirements, and install the add-in.
2. Restart Outlook.Restart Outlook to activate the add-in. When you restart Outlook, the SAP Business ByDesign tool bar is addedto your Outlook screen. This tool bar contains buttons for logging in and out of the Business ByDesign system,adding activities, creating service requests, and for accessing the SAP Business ByDesign Help Center.
3. Log on to the SAP Business ByDesign system.From Outlook, log on to the SAP Business ByDesign system by clicking Log on in the SAP tool bar.The logon is certificate-based and runs automatically in the background.If there is a problem with the certificate for your user, or if you are not working with certificates, a dialog boxopens where you can enter your user ID and password. Enter your URL in the SAP System URL field, leavingout the /irj/portal/ portion. For example, you log on with URL http://Test.sap.corp:7000 and not http://Test.sap.corp:7000/irj/portal.
When you are working offline and cannot log on to the system, any changes to relevant e-mails,appointments, and tasks, or new items for synchronization to the SAP Business ByDesign system arekept in a pool in Outlook. Actual synchronization of these items occurs automatically as soon as youlog on to the SAP Business ByDesign system via the add-in.
If you are logged on to the SAP Business ByDesign system via the add-in for many hours withoutany action, you may receive an authorization error when trying to use a Microsoft OutlookIntegration function. In this case, your user cookies may have expired. Simply log off and log onagain.
4. Check the SAP Business ByDesign folder locationsFrom the Outlook menu, choose Tools > SAP Business ByDesign Settings in Outlook 2007, or click on theAdd-Ins ribbon then SAP Business ByDesign Settings in Outlook 2010.Here, the add-in automatically creates the folders used for synchronization, including the: ● Default folder:
This is the main SAP Business ByDesign folder, where error and conflict information is stored. ● Accounts folder:
This folder contains the accounts downloaded from the SAP Business ByDesign system. ● Contacts folder
This folder contains the contacts downloaded from the SAP Business ByDesign system.
To change any of these folders, click on the folder link, choose a new folder, and click OK .5. In the Advanced Settings section, set the following:
SAP Business ByDesign February 2017Campaign Management View P U B L I C • © 2017 SAP SE or an SAP affiliate company. All rights reserved. 67

a. Flag the Display Synchronization Notifications checkbox if you want the system to displaysynchronization related notifications in a message pop-up in the Microsoft Windows task bar.
b. Flag the Display Synchronization Errors checkbox if you want the system to display synchronizationrelated errors in a message pop-up in the Microsoft Windows task bar.
c. Flag the Enable automatic account filtering for Emails checkbox if you want the system to display onlythose active accounts which are associated with email addresses of the sender and recipients of an email.
6. Click Download Contacts to perform an initial synchronization.The system synchronizes only accounts in your direct responsibility, so you must ensure that, for the contactsyou wish to synchronize, the relevant accounts are listed in My Accounts in the Accounts view (AccountManagement work center).Hereafter, accounts and their contacts in your direct responsibility are synchronized automatically to Outlookwhen added or changed.
Downloading contacts may not work when there is a high load of contacts and accounts in thesystem due to memory constraint issues. We recommend you synchronize only those contactsthat are needed in Outlook, for example by ensuring that proper responsibilities are assigned.
Right click on the SAP Business ByDesign Add-In icon in the Microsoft toolbar. Here, you can displaysynchronization errors and notifications directly, access the error and conflict folders, open theactivities list, and send meeting requests.
Synchronize ContactsThe system synchronizes to and from Outlook those contacts that have been assigned to your accounts in the SAPBusiness ByDesign system.To synchronize a contact to Outlook do the following:
1. In the Account Management work center, go to the Contacts view and show All Contacts.2. Click on the required account and select View All .3. Go to Relationships tab.4. In the Responsibilities section, add a row.5. Enter a party role.
You may want to choose a role that is specific to Microsoft Outlook Integration.6. Enter your employee ID.7. Save and refresh.
This contact and the account associated with it will now show in My Contacts and My Accounts. The systemsynchronizes the account and contact, as well as any attachments, to Outlook where you can find them in thecontact list under Contacts SAP Business ByDesign Accounts or SAP Business ByDesign Contacts. Anyfuture changes to this contact in the system are synchronized automatically.. However there is no automatic synchronization if you change a contact in Outlook that has already beensynchronized. In this case, you must add it again from the plug-in to trigger synchronization to the system.
To subscribe to groupware synchronization of contacts to Outlook, do the following:
68 © 2017 SAP SE or an SAP affiliate company. All rights reserved. • P U B L I CSAP Business ByDesign February 2017
Campaign Management View

Configuration settings are normally performed by an administrator. If you do not have the requiredauthorization, contact your administrator.You can subscribe to groupware synchronization of contacts in Outlook only if Responsibilities for Contactsbusiness option is selected in your solution configuration. To find this business option, go to the BusinessConfiguration work center and choose the Implementation Projects view. Select your implementation projectand click Edit Project Scope . In the Scoping step of the project, ensure that Business Partners is selectedwithin General Business Data.In the Questions step, expand the General Business Data scoping element and select Business Partners. SelectHandling of Business Partners and answer the questions related to Responsibilities for Contacts.
If you have scoped for Contact Management for the synchronization of contacts to Outlook, you will have todownload the latest installer of the SAP Business ByDesign Add-In for Microsoft Outlook Integration from theSelf Services view.
1. In the Account Management work center, go to the Contacts view and repeat all the steps for synchronizinga contact to Outlook.
2. Select the Groupware Synchronization checkbox for all the contacts you want synchronized to Outlook.3. Save and refresh.
To synchronize a contact to the system, do the following:1. Select a contact in the contact list view in Outlook and click Add Contact .
You can select multiple contacts for synchronization.
2. Associate the contact to an account.3. Click Submit .
Synchronization information for this contact is displayed In the bottom frame of the contact in Outlook.Simply select the Click here for more details link to open a CRM system session navigated directly to theselected contact.
To unsubscribe a contact from the system, select a contact in the contact list view in Outlook and click UnsubscribeContact.You can also unsubscribe a contact by unchecking the Groupware Synchronization check box in the Contacts viewof the Account Management work centerOnce the contact is unsubscribed, synchronization between Outlook and SAP Business ByDesign , and vice-versa,will not happen further. The contact will be removed from Outlook.
Only contacts subscribed for Groupware synchronization will be shown in Outlook.
To create a contact or account for synchronization to the system do the following:1. Create a new contact, for example by selecting SAP Business ByDesign Contacts in the Outlook contacts list
view. Right click and choose New Contact.2. Enter your data, save and select the SAP Business ByDesign tab directly in the contact screen. Click
Add Contact .3. In the Add Contact pop-up, you can associate the contact to an existing account by clicking Associate With
and selecting an account from the list, or entering a search term to find a specific account.
SAP Business ByDesign February 2017Campaign Management View P U B L I C • © 2017 SAP SE or an SAP affiliate company. All rights reserved. 69

If the account does not exist in your system, you can create a new one from Outlook by clicking Create thenAccount .
Enter your details and click Create . Associate the contact with this new account.The new contact and new account are synchronized to the system. Any future changes to the contact oraccount in the system are synchronized automatically.However the changes done to the contact in Outlook needs to be synchronized from the plug-in. Updating anaccount from Outlook and synchronizing to the system is not possible.
Contacts must be assigned to an account in order to synchronize.The ability to create and synchronize accounts and contacts depends on your system authorizations, as wellas your synchronization settings. Contact an administrator if you have any questions or difficulties.The user who creates and synchronizes a new account from Outlook is automatically the employeeresponsible for that account.Although it is possible to delete a contact in Outlook the deletion is not synchronized. To remove the contact,the contact should be removed from the assigned responsibility in the system, this would trigger delete in theOutlook.After you synchronize contacts from Business ByDesign to Outlook, the street number may appear beforethe street address.
For shared contact synchronization do the following:
Only contacts subscribed for Groupware synchronization will be shown in Outlook.
1. From your Outlook click SAP Business ByDesign Contacts , select Share and then select Share Contacts. Amail giving sharing rights for contacts opens. Send the mail to the required user. The contacts in your Outlookare now visible to all the users in the Shared Contacts section.
2. The user with whom you have shared your contact list, can now add a contact to your contact list; you will beresponsible for these new contacts.The user adding the contacts to you contact list can view this contact in his Shared Contacts folder.
3. You will also be responsible for the account created under the Shared Contact section, by a user with whomyou have shared your contact list.
4. You can manage the subscription of contacts for a user who has shared his contact list with you.To do this:a. Select the shared contact folderb. In the SAP Business ByDesign tab, click c. Click Manage Subscriptions
In the Manage Subscription screen (for the shared contact) that opens, you can subscribe or unsubscribecontacts for synchronization.
Synchronize E-MailsYou can designate any e-mail for two-way synchronization between the SAP Business ByDesign system andMicrosoft Outlook.To add an e-mail for synchronization, do the following in Outlook:
1. Select and open the e-mail in your inbox.2. Click Add E-mail in the SAP Business ByDesign Add-In toolbar.
70 © 2017 SAP SE or an SAP affiliate company. All rights reserved. • P U B L I CSAP Business ByDesign February 2017
Campaign Management View

Note that you can add an e-mail directly, without opening it. Right click on the e-mail in your inbox, and chooseAdd E-mail from the displayed options. Or simply select the e-mail or multiple e-mails in the list and click
Add E-mail .3. Associate an account if desired.4. Click Submit .
An e-mail activity is created in the SAP Business ByDesign system based on information in the Outlook e-mail.
To open an e-mail activity in the system that was added from Outlook, go to the Account Management work centerand choose the Activities view.To view your synchronized e-mails in the fact sheet of the relevant account:
1. Go to the Account Management work center and choose the Accounts view.2. Select the account of the contact whose e-mail you want to review.3. Click on View All , then You Can Also Open Overview .
You can find the e-mail in the Activities section.
E-mails in the system contain information taken directly from the Outlook e-mail header and body, and includeattachments. They are ordered by date. Filter and search options are available.
To create an e-mail activity in the system for synchronization to Outlook, do the following:1. Go to the Account Management work center.2. Click on Common Tasks and select New E-Mail.3. Fill in the required and optional fields and save.
Your new e-mail activity is synchronized to Outlook.
Synchronize AppointmentsYou can designate any calendar appointment for two-way synchronization between the SAP Business ByDesignsystem and Microsoft Outlook.To add an appointment for synchronization, do the following in Outlook:
1. Select and open the appointment in your calendar.2. Click Add Appointment .
Note that you can add an appointment directly, without opening it. Right click on the appointment in yourcalendar, and choose Add Appointment from the displayed options. Or simply select the appointment ormultiple appointments and click Add Appointment .
3. Associate an account if desired.4. Click Submit .
An appointment activity is created in the system based on information in the Outlook appointment.
To open an appointment activity in the system that was added from Outlook, go to the Account Management workcenter and choose the Activities view.Synchronized appointments can also be viewed in the fact sheet of the respective account:
1. Go to the Account Management work center and choose the Accounts view.2. Select the account of the contact whose appointment you want to review.3. Click on View All , then You Can Also Open Overview .
You can find the appointment in the Activities section.
To create an appointment activity in the system for synchronization to Outlook, do the following:1. Go to the Account Management work center.
SAP Business ByDesign February 2017Campaign Management View P U B L I C • © 2017 SAP SE or an SAP affiliate company. All rights reserved. 71

2. Click on Common Tasks and select New Appointment.3. Fill in the required and optional fields
If you maintain attendees in this appointment, once the a meeting request is synchronized toOutlook, you can send invites to the attendees, either manually or by using the ByDesign icon in thesystem tray and choosing the Send Meeting Requests to Attendees option from Outlook when theappointment is synchronized.
4. Save.Your new appointment activity is synchronized to Outlook.
It is not possible to synchronize recurring appointments.
Any future changes to the appointment in the system are synchronized automatically.However any changes in Outlook are not automatically synchronized and need to be synchronized from theplug-in.To deactivate synchronization, click Untrack in the SAP Business ByDesign Add-In tool-bar in Outlook.To delete the appointment entirely, click Remove in the SAP Business ByDesign Add-In tool-bar in Outlook.
Synchronize TasksYou can designate any task for two-way synchronization between the SAP Business ByDesign system and MicrosoftOutlook.To add a task for synchronization, do the following in Outlook:
1. Select and open the task in your To-Do List.2. Click Add Task .
Note that you can add a task directly, without opening it. Right click on the task in your task list and chooseAdd Task from the displayed options. Or simply select the task or multiple tasks and click Add Task .
3. Associate an account if desired.4. Click Submit .
A task activity is created in the system based on information in the Outlook appointment.
To open a task activity in the system that was added from Outlook, go to the Account Management work center andchoose the Activities view.To view synchronized tasks in the fact sheet of the respective account:
1. Go to the Account Management work center and choose the Accounts view.2. Select the account of the contact whose task you want to review.3. Click on View All , then You Can Also Open Overview ..
You can find the task in the Activities section.
To create a task activity in the system for synchronization to Outlook, do the following:1. Go to the Account Management work center.2. Click on Common Tasks and select New Task.3. Fill in the required and optional fields and save.
Your new task activity is synchronized to Outlook.
72 © 2017 SAP SE or an SAP affiliate company. All rights reserved. • P U B L I CSAP Business ByDesign February 2017
Campaign Management View

If you change a task in the system, the changes are automatically synchronized to Outlook. However, there isno automatic synchronization if you change a task in Outlook that has already been synchronized! In this case,you must add it again to trigger synchronization to the system.To deactivate synchronization, click Untrack in the SAP Business ByDesign Add-In tool-bar in Outlook.To delete the task entirely, click Remove in the SAP Business ByDesign Add-In tool-bar in Outlook.
Associate ActivitiesYou can associate e-mails, appointments and tasks to any of your Business ByDesign accounts, campaigns,opportunities, or leads.To associate an activity to an account (in this example, an e-mail activity), do the following:
1. Click Add E-mail in Outlook to synchronize an incoming e-mail to the system.2. In the following pop-up, click on Associate With and choose Account. Here you can search for the account
that you want to associate with the email.
If Enable automatic account filtering for Emails checkbox is enabled in the Settings, the system displaysonly those active accounts which are associated with email addresses of the sender and recipients ofan email.
3. Click Associate Account to link the selected account to the e-mail, or choose another account from the list.4. An e-mail activity is created automatically in the system for the account that you choose. The system derives
the contact for this e-mail activity from the e-mail address.
To associate an activity to a business document (in this example, an e-mail activity), do the following:1. Click Add E-mail in Outlook to synchronize an incoming e-mail to the system.2. Associate the e-mail to an account if desired.3. Click Associate With .
Choose the type of business document, for example campaign, opportunity, or lead, and select the relevantdocument ID from the resulting list. Or enter a search term to find a specific document.
4. An e-mail activity is created automatically in the system as a follow-up document to the campaign,opportunity, or lead that you have selected.
Synchronization information is displayed In the bottom frame of the activity in Outlook. Simply select theClick here for more details link to open a CRM system session navigated directly to the selected document.
Create Activities for an OpportunityYou can create, update, and synchronize activities for an opportunity. This can be done from your system, as outlinedin this example, or from Outlook.
1. In the New Business work center, go to the Opportunity List view, select an opportunity and click Edit .2. On the Sales Activities tab, create a new task, for example, or add one from Suggested Activities if proposed
by the system.3. Save the activity.
Your new activity is automatically synchronized to Outlook with an association to the opportunity.
For more information on creating activities in an opportunity, see the Opportunities Quick Guide.
SAP Business ByDesign February 2017Campaign Management View P U B L I C • © 2017 SAP SE or an SAP affiliate company. All rights reserved. 73

Create Service Requests from E-MailsIf your system has been configured for this function, you can create a service request directly from an e-mail inMicrosoft Outlook. The details from the e-mail are added to a new service request and a new e-mail activity in thesystem.To create a service request, do the following:
1. From your Outlook inbox, identify the e-mail that you want to follow-up with a service request.2. Select and open the e-mail.3. Click Create Service Request .
Note that you can create a service request directly, without opening the e-mail. Right click on the e-mail inyour inbox, and choose Create Service Request from the displayed options. Or simply select the e-mail ormultiple e-mails and click Create Service Request .
4. An activity and service request are synchronized to the system, and associated to each other. You can checkthis association in the document flow.Details in the e-mail activity and service request are taken from the Outlook e-mail: ● The title of the e-mail activity is taken from the subject of the Outlook e-mail. ● The notes of the e-mail activity are taken from the body text of the Outlook e-mail. ● The incident description of the service request is taken from the body text of the Outlook e-mail.
To open a service request, go to the Service Requests view of the Service Desk work center.You can also open the document in the fact sheet of the relevant account.
1. Go to the Account Management work center and choose the Accounts view.2. Filter and select the relevant account.3. Click on View All , then You Can Also Open Overview , and navigate to the Services tab.
See AlsoBusiness Configuration for Microsoft Outlook IntegrationBusiness Configuration for Automatic Creation of Service Requests
9.1.5 Tasks
9.1.5.1 Capture Responses to a Campaign
OverviewA response is an activity of the type e-mail, letter, fax, phone call; or a lead, opportunity, sales quote, or sales orderthat is related to a campaign. You can capture responses to campaigns in the following ways:
● In the Marketing work center, Campaign Management view, Campaigns subview ● In the campaign itself when you edit it ● Response Activities using Multiple Responses ● In the Account Management work center under Activities
74 © 2017 SAP SE or an SAP affiliate company. All rights reserved. • P U B L I CSAP Business ByDesign February 2017
Campaign Management View

● Using Microsoft Outlook® Integration to synchronize e-mail responses with the SAP Business ByDesignsystem
● Adding the campaign to a lead, opportunity, sales quote, or sales order
PrerequisitesYou have created and executed a campaign.If you want to capture responses using Microsoft Outlook® Integration, then you need to install the Add-In forMicrosoft Outlook®. To do this, go to My Computer in the Self-Services Overview view in the Home work center.
StepsYou can capture responses in the following ways:Capture a Response in the Campaigns ViewIf most of your responses are received by a marketing employee, you can create the responses directly in a campaign.
1. Go to Marketing Campaign Management Campaigns .2. In the Campaigns worklist, select the campaign you want to create responses for and click Add Response
followed by the relevant activity type.
Alternatively, you can first select the campaign and click Edit .
3. A new activity opens. The campaign description is proposed in the Subject field, and the campaign ID isproposed in the Campaign field. Enter the person who responded in the From field (for e-mail, fax, letter) orin the Call Participant field (for phone call).
4. If response options are assigned to this campaign, select the relevant response option from the dropdownlist in the Response Option field.
5. Save the activity. It is now captured as a campaign response.6. Click Close to return to the campaign.
If the Execution Details or Response Details tab was active when you clicked Add Response , you can nowclick Refresh to update the list of members or accounts and contacts as well as the key performanceindicators.
7. Save the campaign.
Capture a Response in the Campaigns View using Multiple Responses1. Go to Marketing Campaign Management Campaigns .2. In the Campaigns worklist, select the campaign you want to create responses for and click
Multiple Responses .
Alternatively, you can select Multiple Responses from the Common Tasks .
3. A new activity opens. The selected campaign is proposed in the Campaign field, and the response type (fax,e-mail, letter, phone call).
4. If response options are assigned to this campaign, select the relevant response option from the dropdownlist in the Response Option field for defaulting.
SAP Business ByDesign February 2017Campaign Management View P U B L I C • © 2017 SAP SE or an SAP affiliate company. All rights reserved. 75

Upon selecting Enter , the selected values are proposed in the table below. However, they can be overwritten.Additional information such as the response code, account, contact, response description, and responsenotes can be added.
The response description is assigned the activity subject. In case you do not maintain a responsedescription, the campaign description will be used. The response notes is assigned the activity notes.
In case you enter a response code, the Account, Contact, and Campaign fields will be filled accordingly.
By selecting Check the table entry is checked for consistency and completeness . Untouched lines (no iconin first column) will be ignored. The check result is indicated using an icon in the first column. In case of anerror, detailed error messages will be displayed by clicking on the icon.
New lines will be automatically added to allow fast maintenance. Untouched lines (no additional datamaintained) will be ignored during creation.
5. Click Create and the respective activities are created.6. Click Close to return to the campaign.
Capture a Response in the Activities ViewIf some responses are received by sales employees, you can create a response by assigning a campaign to an activity.You can do this for the following activity types: E-mail, Letter, Fax, and Phone Call.
1. Go to Account Management Activities .2. Click New and choose the activity type from the dropdown list.3. You can enter the campaign ID or campaign description to which this response belongs to in the Campaign
field or search for the campaign.When you enter the campaign ID, the campaign is identified and the subject of the activity is automaticallyfilled with the campaign description. You only have to fill in the account or contact who responded manuallyin the From field (or into the Call Participant field for phone call).If the account or contact who responds to your campaign knows his personalized response code, you canenter this in the Campaign field instead of manually searching for the campaign or entering the campaign ID.When you enter such a response code, the system automatically determines the account and contact whohas responded as well as the campaign. The subject of the activity is also automatically filled with the campaigndescription.
4. If response options are assigned to this campaign, select the relevant response option from the dropdownlist in the Response Option field.
5. Save the activity.The activity is captured as a campaign response, and the campaign can be displayed in the document flow ofthe activity.
Capture Responses by Synchronizing E-mail Responses with SAP Business ByDesignIf you use Microsoft Outlook Integration, you can also capture responses automatically by synchronizing responsesthat have been received by e-mail with the SAP Business ByDesign system.
1. In your personal e-mail inbox, select one or several e-mails.2. Click Add E-Mail to synchronize these e-mails with the SAP Business ByDesign system.
A dialog box is displayed.3. Click Associate and choose With Campaign.4. Click Go to search for all campaigns.
You can search for your campaign by status or campaign description.
76 © 2017 SAP SE or an SAP affiliate company. All rights reserved. • P U B L I CSAP Business ByDesign February 2017
Campaign Management View

5. Select the right campaign from the list and click Associate .6. Click Submit .
A message confirms that the e-mails have been synchronized successfully. E-mail activities for the identifiedaccounts and contacts are created automatically in the SAP Business ByDesign system.Capture a Response using the Lead, Opportunity, Sales Quote, or Sales Order UI
1. Click Add Response in the respective screen, and choose the appropriate document type, for example, Lead,from the dropdown list.You can enter either the campaign ID, or the campaign description in the Campaign field, or search for thecampaign.When you enter the campaign ID, the campaign is identified. You only have to fill in the account or contactinformation.If the account or contact who responds to your campaign knows his personalized response code, you canenter this in the Campaign field instead of manually searching for the campaign – or entering the campaignID. When you enter such a response code, the system automatically determines the account and contact whohas responded as well as the campaign itself.
2. Save the document.The document is captured as a campaign response, and the campaign can be displayed in the Document Flow .
Import Campaign Responses Using Microsoft Excel TemplateFor more information, see Importing Campaign Responses Using Microsoft ExcelView Campaign Responses
1. Go to Marketing Campaign Management Campaigns .2. In the Campaigns worklist, click on a campaign, then click View All .3. Click Response Details .4. In the Show field, choose responses or responders.5. Click on either the response description or the response ID of a response to view additional details.
See AlsoCampaigns Quick Guide [page 53]Activities Quick GuideQuick Guide for Microsoft Outlook Integration [page 65]
9.1.5.2 Export Business Data Using Microsoft Excel®
OverviewYou can export reports and worklists to Microsoft Excel® documents. You can use these documents for furtheranalysis, and in some cases, edit and upload them to the solution.You can export data from a report or from a worklist.
SAP Business ByDesign February 2017Campaign Management View P U B L I C • © 2017 SAP SE or an SAP affiliate company. All rights reserved. 77
Prerequisites ● You have installed the latest Add-In for Microsoft Excel®. Depending on your solution set-up, you can do this
from the: ○ Self Services Overview in the Home work center ○ Download Center in the Application and User Management work center ○ Download link that is available directly on the user interface
● The settings for your browser must be set correctly. You can review the information about computer settingsby clicking Check My Computer Settings on the logon screen.
● You must be authorized to perform an export to Microsoft Excel®.
Procedure1. Go to the screen with the data you want to export.2. Depending on the type of data, choose one of these options:
● For a report, you can either export a chart or a table. To do so, select the report, and click Switch toChart or Switch to Table.
● For a worklist, select the worklist and click Go.3. Click Export , then choose To Microsoft Excel.4. Optional: Personalizing your excel export
1. To select the columns in your exported excel, do the following:a. In the title bar, click Personalize This screen b. In the side panel, select Display Settings.c. In the Display Settings dialog box, you can export all the columns in the view by selecting All in
the Export Columns field
The default value for this field is Visible, which exports only the currently displayed columns.
2. To select the language for your excel export, do the followinga. In the Display Settings dialog box, set the Language Selection field to Show and click OK
b. Click Save .c. Click Export , then choose To Microsoft Excel®d. Select a language in the dialog box that opens.
The column selection preference in this dialog box allows you to override the personalizedsetting. This selection is valid for the current export only.
5. Select the template in the dialog box that is displayed.
78 © 2017 SAP SE or an SAP affiliate company. All rights reserved. • P U B L I CSAP Business ByDesign February 2017
Campaign Management View

● If there is only one template that has the logged in language variant, then the export will beperformed in the logged in language, and no user interaction is required.
● If there is only one template in the system for this export scenario, but the logged in languagevariant is not available, then export will be performed in the English language.
● If there is more than one template in the system for this export scenario, the Template List dialogbox is displayed. In this dialog, you can select the Microsoft Excel template that you want to usefor the export. The template will dictate how your exported data will be formatted. The MicrosoftExcel version that is relevant for each template is displayed.
6. Click Download.7. A message shows that you can open or save the file which contains the data that you have just exported from
the solution. Click Open or Save depending on what you want to do with the exported data.Depending on whether you click Open or Save, there are two possible results:
● If you click Open, a worksheet opens with the data in Microsoft Excel. The file has a temporary name,but it is not saved. You can use all the functions of Microsoft Excel to organize the data and to savethat worksheet.
● If you click Save, a Save As dialog box opens. You can specify an appropriate file name and a locationto save the exported Microsoft Excel file to. A message will inform you when the download hascompleted successfully.You can later navigate to the location where you have saved the template and open it .
9.2 Response Options View
9.2.1 Response Options Quick Guide
In the Response Options view you can create and edit response options for the purpose of assigning them tocampaigns. You can access this view from the Marketing work center under Campaign Management.You can classify your response options as being positive, negative, and neutral. Using response options enables youto capture detailed responses to a campaign, so that you can measure its success.After you have created your response options, you can assign them to a campaign in the Campaigns view underCampaign Management.
Business Background
Target Groups and Campaign ManagementTarget Groups and Campaign Management provide an effective way for sales and marketing professionals withinyour company to target specific prospects or customer groups in order to generate new business or strengthenrelationships.For more information, see Target Groups and Campaign Management [page 8].
Business Scenario: Marketing-to-OpportunityThe Marketing-to-Opportunity business scenario enables you to manage marketing and pre-sales activities with thegoal of generating new business for customers and prospects. You can run campaigns, capture responses, generate
SAP Business ByDesign February 2017Campaign Management View P U B L I C • © 2017 SAP SE or an SAP affiliate company. All rights reserved. 79

leads, manage opportunities, and initiate and track related sales activities. Alternatively, you can use this businessscenario without campaigns, which means that no marketing department is involved, and leads and opportunitiescan be created without using a campaign.There is also an enhanced function for Microsoft Outlook® integration that allows you to directly assign e-mails tospecific campaigns in Outlook and synchronize this information with the SAP Business ByDesign system. In addition,the pipeline simulation feature provides an interactive combination of graphic and table list of the opportunities. TheWhat-if analysis simulates how changes would affect your pipeline.For more information, see Marketing-to-Opportunity.
Tasks
Create a Response Option1. In the Response Options subview, click New followed by Response Option.
You can also create a response option when you create a campaign, in theCampaigns subview. For more information, see Create a Campaign in theCampaigns Quick Guide [page 53].
2. In the Response Option Description field, enter a description.This description will be displayed in the dropdown list in an activity such as an e-mailor phone call, when you capture a response to a campaign.
Via Available Languages you can maintain the response option description forseveral languages.
3. In the Classification field, specify whether the response option is positive, negative, orneutral.
4. If required, you can select Generate Leads indicator, which will generate leadsautomatically from the campaign response upload template using this response option.For more information on uploading campaign responses using the Microsoft Exceltemplate, see Importing Campaign Responses Using Microsoft Excel.
Leads are generated automatically from the campaign responses usingresponse options only when the campaign responses are uploaded to the systemthrough the pre-defined Microsoft Excel® template. For more information, seeGenerate Leads Automatically from Campaign Response Upload Template inQuick Guide for Leads [page 25].
5. If required, enter a note.6. Save the response option.
When you save a response option, its status is set automatically to Active.
Change the Status of a Response Optionif you do not need a response option anymore, you can set its status to Obsolete.
1. In the Response Options subview, select the required response option from the worklist.If required, you can view the response option.
2. Click Change Status followed by Obsolete.
80 © 2017 SAP SE or an SAP affiliate company. All rights reserved. • P U B L I CSAP Business ByDesign February 2017
Campaign Management View

Note the following: ● If you have set the status of a response option to Obsolete by mistake, you can
change it back to Active. ● You cannot change the status of a response option if it has been assigned to a
campaign.
Delete a Response OptionYou can delete only those response options that have the status Obsolete.
1. In the Response Options worklist, select the required response option from the worklist.Ensure that it has the status Obsolete.The system displays a message, asking you whether you want to delete the selectedrecord.
2. Click Delete in the worklist.The system displays a message, asking you whether you want to delete the selectedrecord.
3. Confirm the message by clicking Delete .
The response option is removed from your work list, and a system message confirms that yourentries have been saved.
Export Response Options to Microsoft ExcelYou can export response options to Microsoft Excel. For more information, see ExportBusiness Data Using Microsoft Excel [page 31].
SAP Business ByDesign February 2017Campaign Management View P U B L I C • © 2017 SAP SE or an SAP affiliate company. All rights reserved. 81

10 Reports View
10.1 Lead Funnel
OverviewThis report shows the leads the user is responsible for, and the opportunities, quotes, and orders that originate,either directly or indirectly, from these leads.This report is also available as a mobile report. For more information, see the documentation about working withmobile reports.
ViewsThe following views are available with this report:
● Lead Funnel by SourceShows the lead funnel by source
● Lead Funnel Values by SourceShows the lead funnel values by source
● Lead Funnel by NumberShows the lead funnel by number
Features
Running the ReportBefore running the report, you can specify the data you want to see by selecting specific variables. You must specifya value for all mandatory variables. In the system, mandatory variables are indicated by an asterisk (*).
Analyzing the ReportThe default report displays the source and number of all the leads, and the number of opportunities, quotes, andsales orders that have been created on the basis of these leads.The data in this report is initially displayed in table format. You can also display the report as a chart.To analyze the data in this report:
● Use the filters to manipulate the display of the data in the content pane.For this report, you can add these key figures: ○ Item Value of Opportunities ○ Expected Value of Opportunities ○ Net Value of Sales Orders ○ Number of Leads ○ Number of Opportunities ○ Number of Sales Quote Items
82 © 2017 SAP SE or an SAP affiliate company. All rights reserved. • P U B L I CSAP Business ByDesign February 2017
Reports View

○ Number of Sales Quotes ○ Number of Sales Order Items ○ Number of Sales Orders ○ Net Value of Sales Orders
● Drag and drop characteristics to add or remove data from the content pane.To further analyze data in this report, you can drag characteristics to rows and columns.
Characteristics indicating periods such as Calendar Year or Calender Year/Month aggregate by leadstart date.
From this report, you can navigate to the account.
See AlsoReports ViewOverview of Reports in Customer Relationship Management
10.2 Number of Leads
OverviewThis report shows the number of leads accepted by sales as well as the number of leads rejected by marketing orsales. This report lists those leads for which the user is the employee responsible.This report is also available as a mobile report. For more information, see the documentation about working withmobile reports.
ViewsThe following views are available with this report:
● Number of LeadsShows the number of leads
● Number of Leads by SourceShows the number of leads by source
Features
Running the ReportBefore running the report, you can specify the data you want to see by selecting specific variables. You must specifya value for all mandatory variables. In the system, mandatory variables are indicated by an asterisk (*).
Analyzing the ReportTo analyze the data in this report:
● Use the filters to manipulate the display of data in the content pane.For this report, you can add these key figures:
SAP Business ByDesign February 2017Reports View P U B L I C • © 2017 SAP SE or an SAP affiliate company. All rights reserved. 83

○ Number of Accepted Leads by Sales ○ Number of Rejected Leads by Sales ○ Number of Rejected Leads by Marketing ○ Total Number of Closed Leads
Number of Closed Leads = Number of Accepted Leads + Number of Rejected Leads
● To further analyze data in this report, you can drag characteristics to rows and columns.
Characteristics indicating periods such as Calendar Year or Calendar Year/Month aggregate by the lead startdate.
From this report, you can navigate to: ● Account ● Lead ID
For marketing purposes you can create a target group of the accounts listed in this report. To do this:1. Call up the report and select the criteria according to your needs.2. Add the Account characteristic to Rows.3. Click on an account ID or an account name, then click on the arrow that appears next to the ID or name, and
select Export all Accounts to new Target Group in the dropdown menu.The Target Group screen opens. The target group contains all accounts that are shown in the report. Inaddition, the system automatically determines the main contacts of these accounts, based on the accountmaster data, and includes these in the target group. If the master data for a particular account does not havea main contact, then only the account is included in the target group.
Note that the system determines the main contacts that are currently entered in the master data ofthe accounts. Therefore it is possible that some contacts in the target group differ from the contactsshown in the report.
4. Check the details and save the target group.
Note that if you copy a report, it is not possible to create a target group based on the new report.
See AlsoReports ViewOverview of Reports in Customer Relationship Management
84 © 2017 SAP SE or an SAP affiliate company. All rights reserved. • P U B L I CSAP Business ByDesign February 2017
Reports View

www.sap.com/contactsap
© 2017 SAP SE or an SAP affiliate company. All rightsreserved.No part of this publication may be reproduced ortransmitted in any form or for any purpose without theexpress permission of SAP SE or an SAP affiliatecompany.The information contained herein may be changedwithout prior notice. Some software productsmarketed by SAP SE and its distributors containproprietary software components of other softwarevendors. National product specifications may vary.These materials are provided by SAP SE or an SAPaffiliate company for informational purposes only,without representation or warranty of any kind, andSAP or its affiliated companies shall not be liable forerrors or omissions with respect to the materials. Theonly warranties for SAP or SAP affiliate companyproducts and services are those that are set forth inthe express warranty statements accompanying suchproducts and services, if any. Nothing herein should beconstrued as constituting an additional warranty.SAP and other SAP products and services mentionedherein as well as their respective logos are trademarksor registered trademarks of SAP SE (or an SAP affiliatecompany) in Germany and other countries. All otherproduct and service names mentioned are thetrademarks of their respective companies. Please seehttp://www.sap.com/corporate-en/legal/copyright/index.epx for additional trademark information andnotices.
icon courtesy of W3C, see http://creativecommons.org/licenses/by/3.0/ .


![Lamp Marketing [Helping Small Businesses Grow]](https://img.dokumen.tips/doc/110x75/58a569d71a28ab20528b636b/lamp-marketing-helping-small-businesses-grow.jpg)