Embed Size (px)
Citation preview
1
Making and Editing a Table in Microsoft Word 2007
Table of Contents
Introduction .................................................................................................................................... 2
Creating a Table .............................................................................................................................. 2
1. Finding the "Table" button ................................................................................................. 2
2. Methods for making a table ................................................................................................ 3
Editing Table Dimensions ................................................................................................................ 4
1. Resizing the table ................................................................................................................ 4
2. Resizing individual columns and rows ................................................................................ 5
3. Merging cells ....................................................................................................................... 6
4. Deleting cells ....................................................................................................................... 7
5. Splitting cells ....................................................................................................................... 9
6. Adding cells ....................................................................................................................... 10
Editing Borders .............................................................................................................................. 12
1. The "Borders and Shading..." button ................................................................................ 12
2. Changing border styles ..................................................................................................... 13
3. Changing border width ..................................................................................................... 14
4. Changing border color ...................................................................................................... 14
5. Adding and removing borders .......................................................................................... 15
Formulas ....................................................................................................................................... 16
1. Making a formula .............................................................................................................. 16
2. Addition ............................................................................................................................. 17
3. Subtraction ........................................................................................................................ 18
4. Multiplication .................................................................................................................... 19
5. Division .............................................................................................................................. 19
6. Averages ............................................................................................................................ 20

2
Introduction
Microsoft Office Word is more than just a word processor; you can also create tables with
customizable dimensions, borders and formulas. You can enter text, numbers or both into
tables and use them for a variety of purposes (tracking and calculating expenses, logging data,
bookkeeping, etc.).
Creating a Table
1. Click the "Insert" tab in the top left corner of your screen, then find the "Table" button.
Figure 1a (above): This is the
toolbar for Microsoft Word. When
you first open the program, the
Home tab will be selected. The
Insert tab will be just to the right of
it.
Figure 1b (left): The Insert tab is
now selected, and the Table button
is highlighted by the cursor. When
a button under the toolbar is
highlighted, a description box
appears with more information
about the feature.

3
2. Click the "Table" button and select a method of creating your table.
Method 1- Drag your cursor across the grid to make a table of up to 10x8 cells.
Figure 2a: The cursor is dragged over the square tiles, which causes a table with the
corresponding dimensions to appear. Clicking while the tiles are highlighted will add the table to
your document.
Method 2- Click the "Insert Table" button, select a number of rows and columns, then
click "OK."
Figure 2b (left): The "Insert Table" button is located just under the square tiles.
Figure 2c (right): Clicking "Insert Table" will produce this window where you can enter the
desired number of columns and rows for your table.

4
Editing Table Dimensions
Once you have created a table, you can stretch and resize it, and add, split, merge and remove
cells as needed.
1. To change the size of a table, locate the small, clear box at the bottom right corner of the
table. Click and drag the box to stretch the dotted border to your liking; when you release the
mouse, your table will be resized to fit the area of the dotted border with the same number of
cells.
Figure 3a: Click and drag this small box to resize your table.
Figure 3b: Dragging the box causes this dotted line to appear.
Figure 3c: Releasing your mouse will cause your table to resize along the borders of the dotted
line.
5
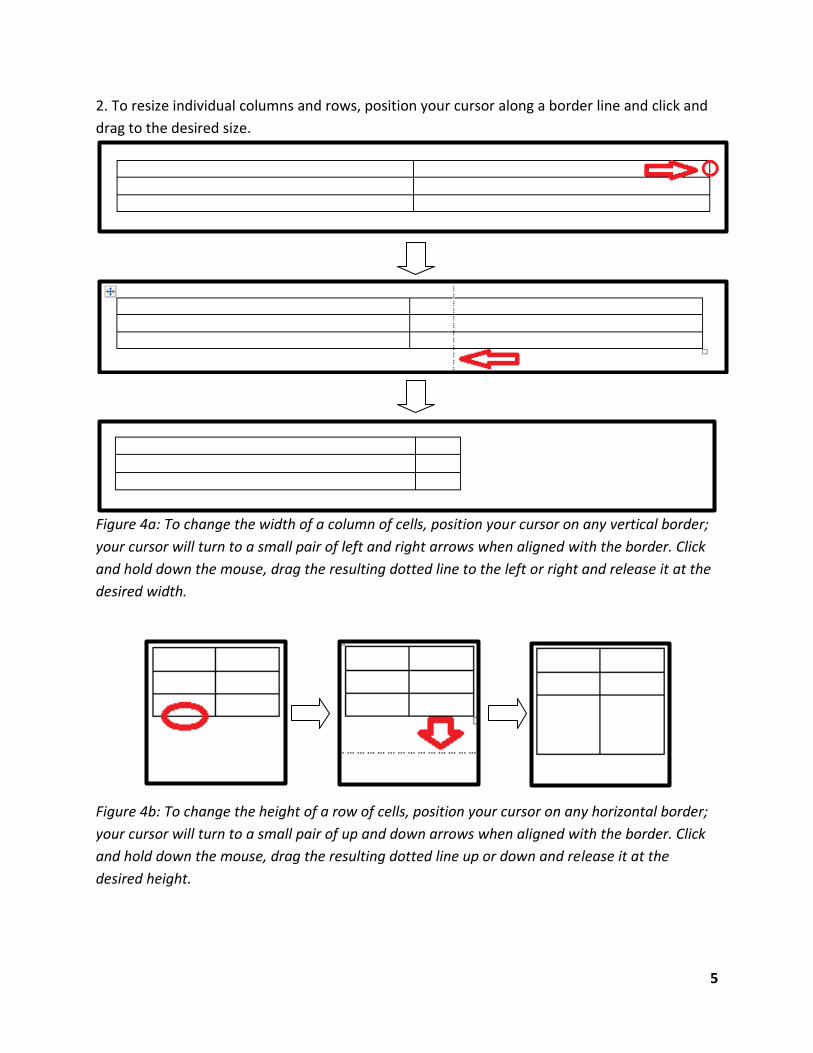
2. To resize individual columns and rows, position your cursor along a border line and click and
drag to the desired size.
Figure 4a: To change the width of a column of cells, position your cursor on any vertical border;
your cursor will turn to a small pair of left and right arrows when aligned with the border. Click
and hold down the mouse, drag the resulting dotted line to the left or right and release it at the
desired width.
Figure 4b: To change the height of a row of cells, position your cursor on any horizontal border;
your cursor will turn to a small pair of up and down arrows when aligned with the border. Click
and hold down the mouse, drag the resulting dotted line up or down and release it at the
desired height.

6
3. To merge cells, highlight the cells you wish to merge by clicking and dragging across them.
Right-click on the highlighted selection and click "Merge Cells" from the menu.
Figure 5a: Clicking this will merge the highlighted cells into one cell.
The top row of cells is currently highlighted.
Figure 5b: The top row of cells has been merged into one.
7
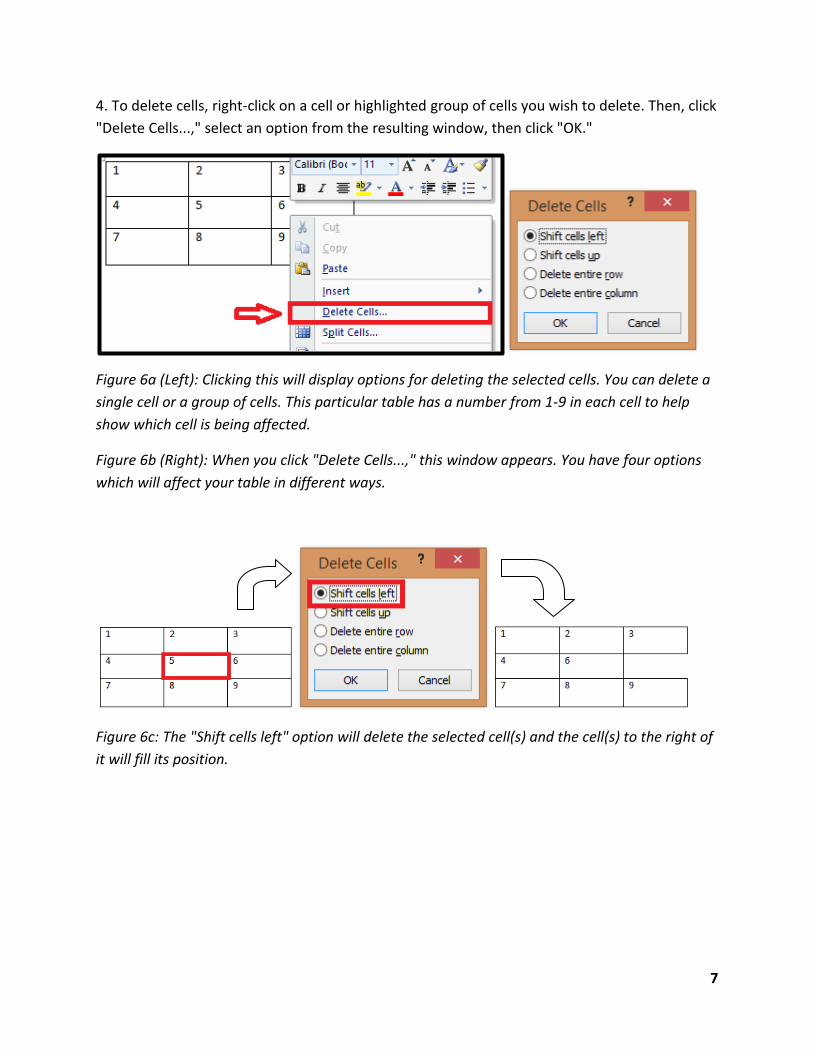
4. To delete cells, right-click on a cell or highlighted group of cells you wish to delete. Then, click
"Delete Cells...," select an option from the resulting window, then click "OK."
Figure 6a (Left): Clicking this will display options for deleting the selected cells. You can delete a
single cell or a group of cells. This particular table has a number from 1-9 in each cell to help
show which cell is being affected.
Figure 6b (Right): When you click "Delete Cells...," this window appears. You have four options
which will affect your table in different ways.
Figure 6c: The "Shift cells left" option will delete the selected cell(s) and the cell(s) to the right of
it will fill its position.
8
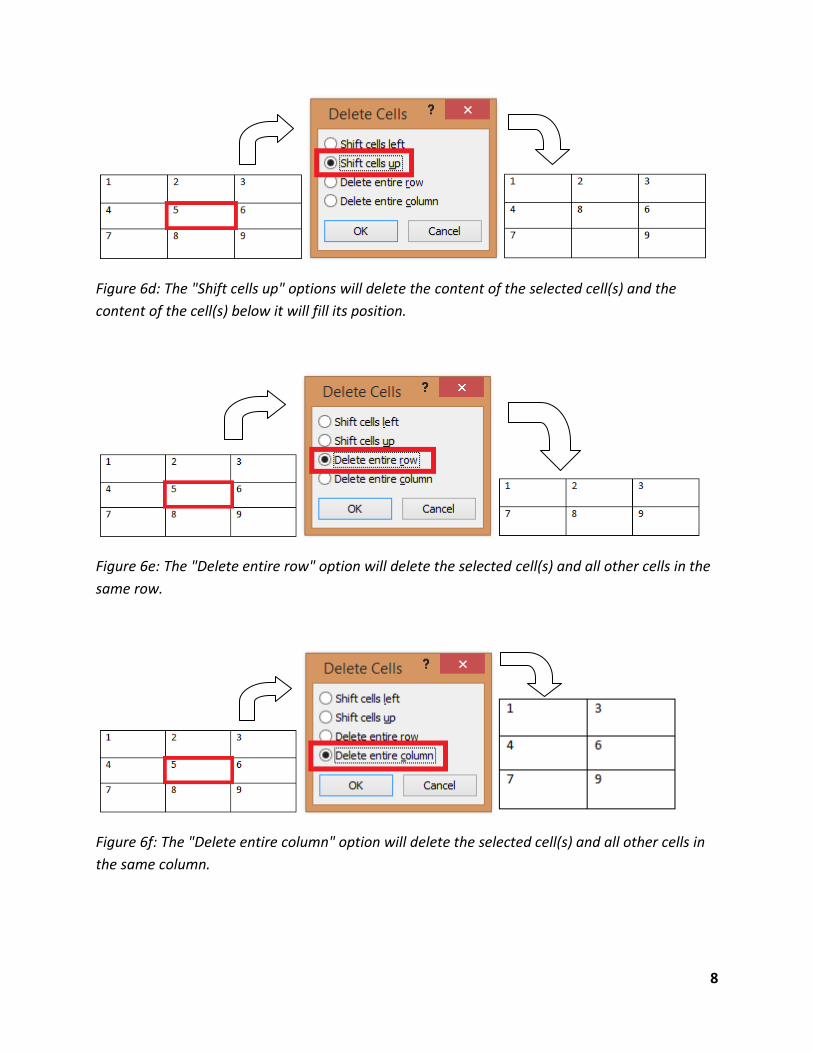
Figure 6d: The "Shift cells up" options will delete the content of the selected cell(s) and the
content of the cell(s) below it will fill its position.
Figure 6e: The "Delete entire row" option will delete the selected cell(s) and all other cells in the
same row.
Figure 6f: The "Delete entire column" option will delete the selected cell(s) and all other cells in
the same column.

9
5. To split a cell, right-click on a single cell and click the "Split Cells..." button from the menu.
Select how many rows and columns to split your cell into, then click "OK."
Figure 7a (Left): This is the "Split Cells..." button. Clicking this will display more detailed options
for splitting a cell.
Figure 7b (Right): Clicking the "Split Cells..." button produces this window. Here, you can select
how many columns and rows to split a cell into.
Figure 7c: The middle cell in this table has been split into 3 columns and 3 rows of smaller cells.
Notice how the content of the original cell is moved to the top left cell in the new group of cells.

10
6. To add cells, right-click on a selected cell(s) and click on the "Insert" button. You will be able
to insert single cells or entire rows or columns around your selection.
Figure 8a (Left): Hovering your cursor over the "Insert" button will cause the menu on the right
to appear. You will have the option to insert a new row of cells above or below your selection, a
column to the left or right of your selection, or a single cell that will shift your selection down or
to the right.
Figure 8b (Right): Clicking the "Insert Cells..." button will produce this window. You will have
four options for inserting new cells. Click the circle of your desired choice, then click "OK." The
"Insert entire row" and "Insert entire column" options have the same effect as the "Insert Rows
Above" and "Insert Columns to the Left" options shown in Figure 8a.
Figure 8c: The "Shift cells right" option fills a new, single cell in the position of the selected cell,
moving the cells to the right of it further right by one cell.

11
Figure 8d: The "Shift cells down" option fills a new, single cell in the position of the selected cell,
moving the cells below it further down by one cell.
Figure 8e: The "Insert Columns to the Left" option will insert a column of new cells to the left of
your selection. Conversely, "Insert Columns to the Right" will insert a column to the right.
Figure 8f: The "Insert Rows Above" option will insert a row of new cells above your selection.
Conversely, "Insert Rows Below" will insert a row below your selection.
12
Editing borders
You can customize the internal and external borders of your table; you can change their colors,
width, length, style, etc.
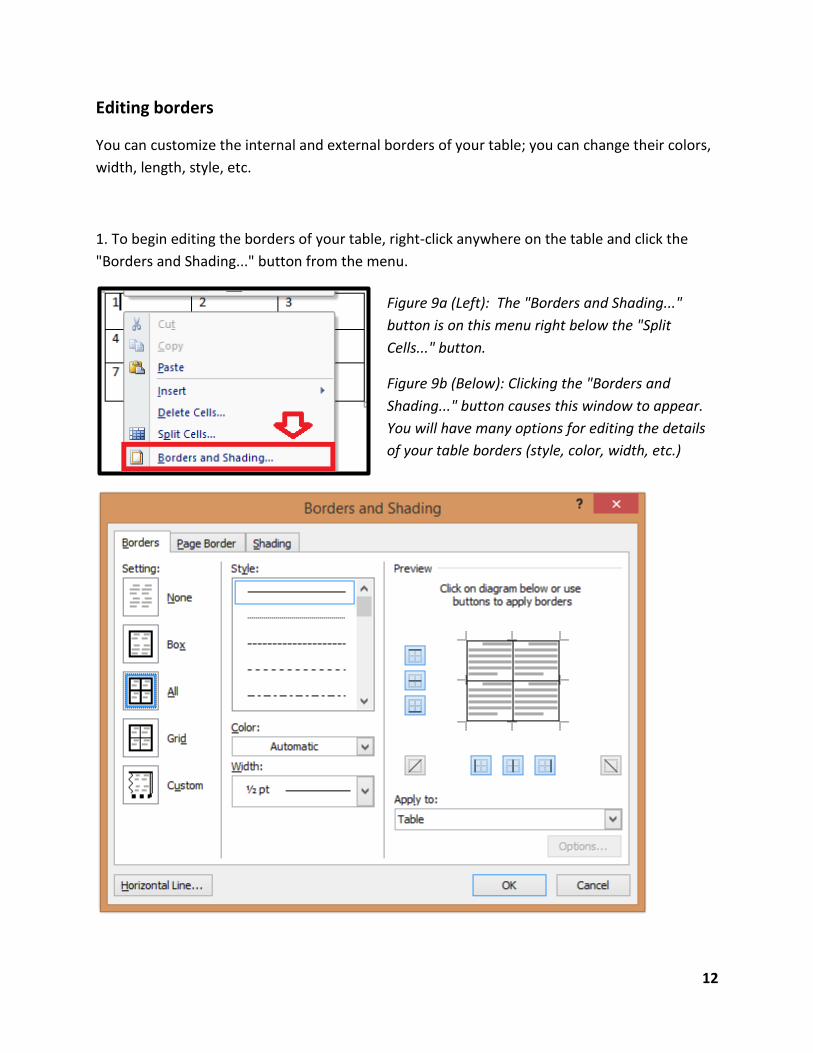
1. To begin editing the borders of your table, right-click anywhere on the table and click the
"Borders and Shading..." button from the menu.
Figure 9a (Left): The "Borders and Shading..."
button is on this menu right below the "Split
Cells..." button.
Figure 9b (Below): Clicking the "Borders and
Shading..." button causes this window to appear.
You will have many options for editing the details
of your table borders (style, color, width, etc.)

13
2. To change the style of the border lines, select an option from the "Style:" menu under the
"Borders" tab, then click "OK."
Figure 10: A double-wave border style was selected and applied to the entire table. You have the
option to apply settings to the entire table, a single cell or content within a cell.
14
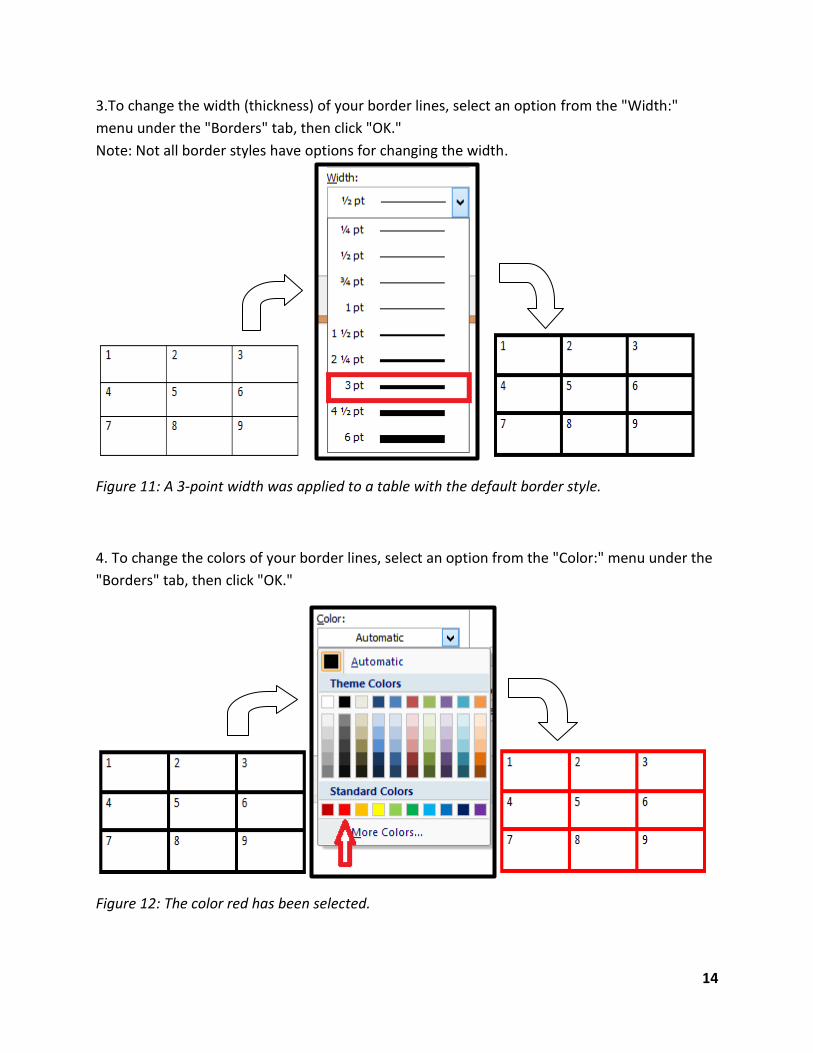
3.To change the width (thickness) of your border lines, select an option from the "Width:"
menu under the "Borders" tab, then click "OK."
Note: Not all border styles have options for changing the width.
Figure 11: A 3-point width was applied to a table with the default border style.
4. To change the colors of your border lines, select an option from the "Color:" menu under the
"Borders" tab, then click "OK."
Figure 12: The color red has been selected.
15
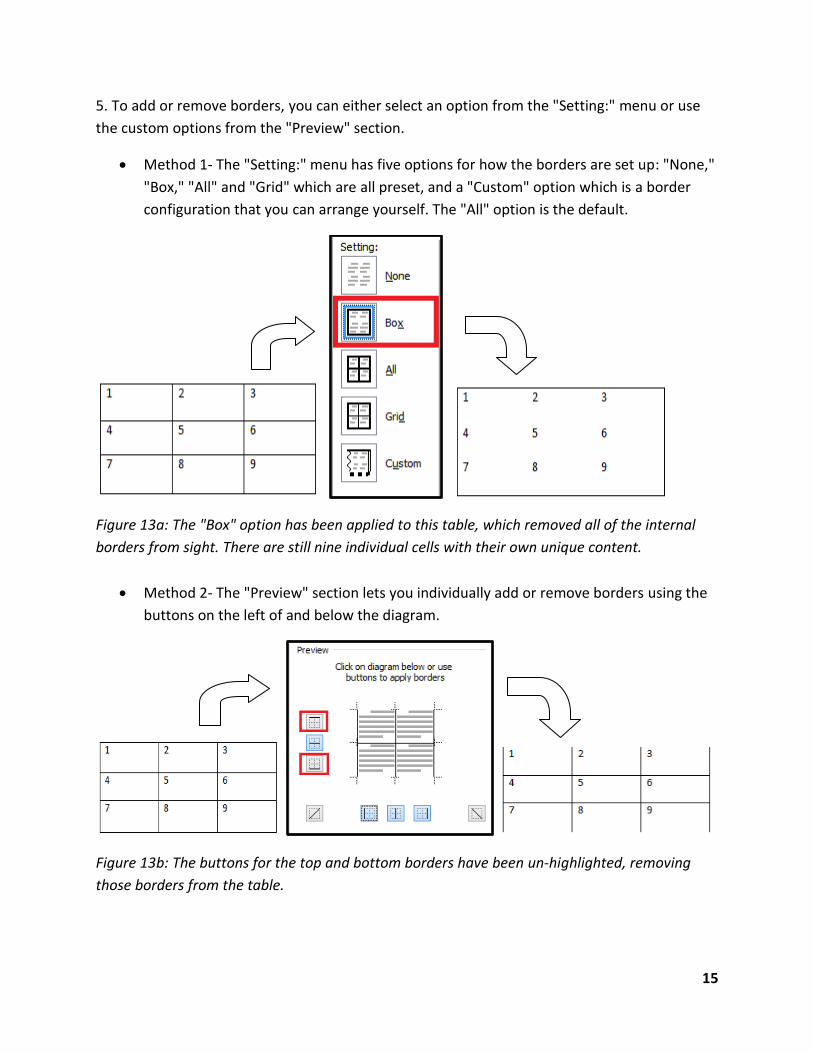
5. To add or remove borders, you can either select an option from the "Setting:" menu or use
the custom options from the "Preview" section.
Method 1- The "Setting:" menu has five options for how the borders are set up: "None,"
"Box," "All" and "Grid" which are all preset, and a "Custom" option which is a border
configuration that you can arrange yourself. The "All" option is the default.
Figure 13a: The "Box" option has been applied to this table, which removed all of the internal
borders from sight. There are still nine individual cells with their own unique content.
Method 2- The "Preview" section lets you individually add or remove borders using the
buttons on the left of and below the diagram.
Figure 13b: The buttons for the top and bottom borders have been un-highlighted, removing
those borders from the table.
16
Formulas
Numerical data can be implemented into formulas; they can be used to calculate data for other
cells. For instance, if you made a table that included a list of expenses for an upcoming trip, one
cell could contain a formula for the sum of all of your expenses (so long as your expenses are all
entered in numerical form).
To use formulas, you need to know how cells are notated. Columns are notated by letters
(A,B,C and so on), while rows are notated by numbers (1,2,3 and so on). Each individual cell is
notated as the intersection of its row and column (A1, A2, B1, B2, etc.).
Figure 14: The cells in this table are all labeled with their notations.
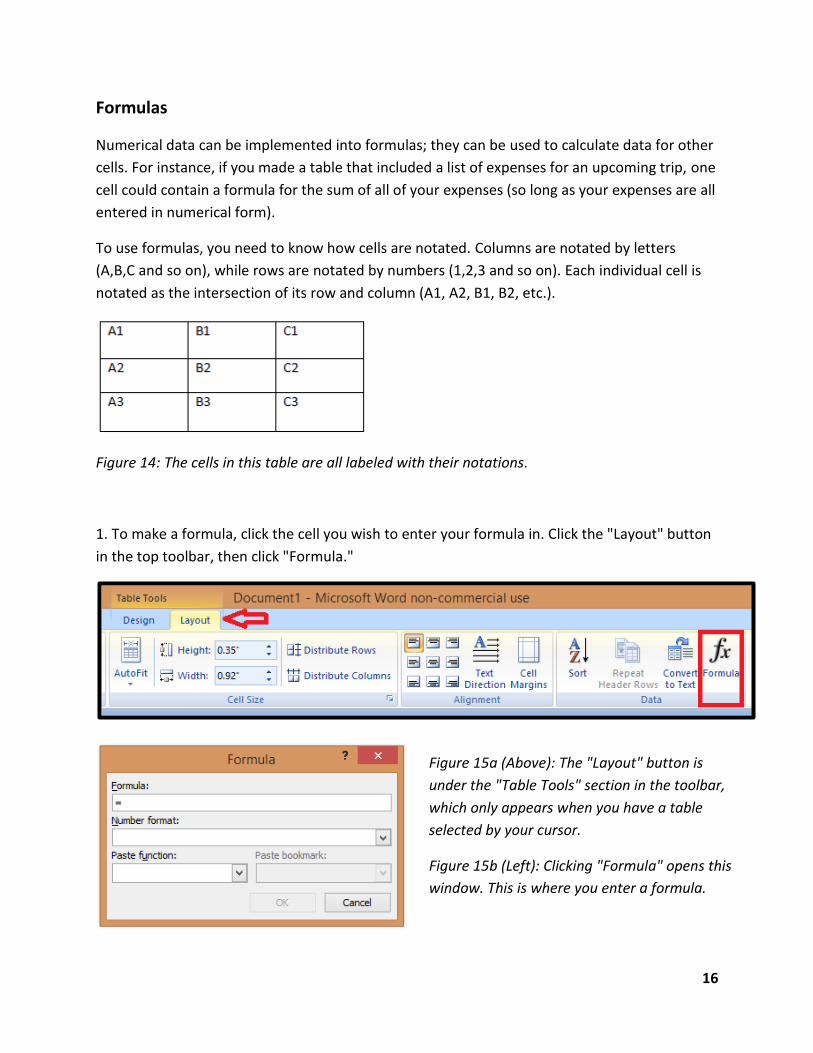
1. To make a formula, click the cell you wish to enter your formula in. Click the "Layout" button
in the top toolbar, then click "Formula."
Figure 15a (Above): The "Layout" button is
under the "Table Tools" section in the toolbar,
which only appears when you have a table
selected by your cursor.
Figure 15b (Left): Clicking "Formula" opens this
window. This is where you enter a formula.
17
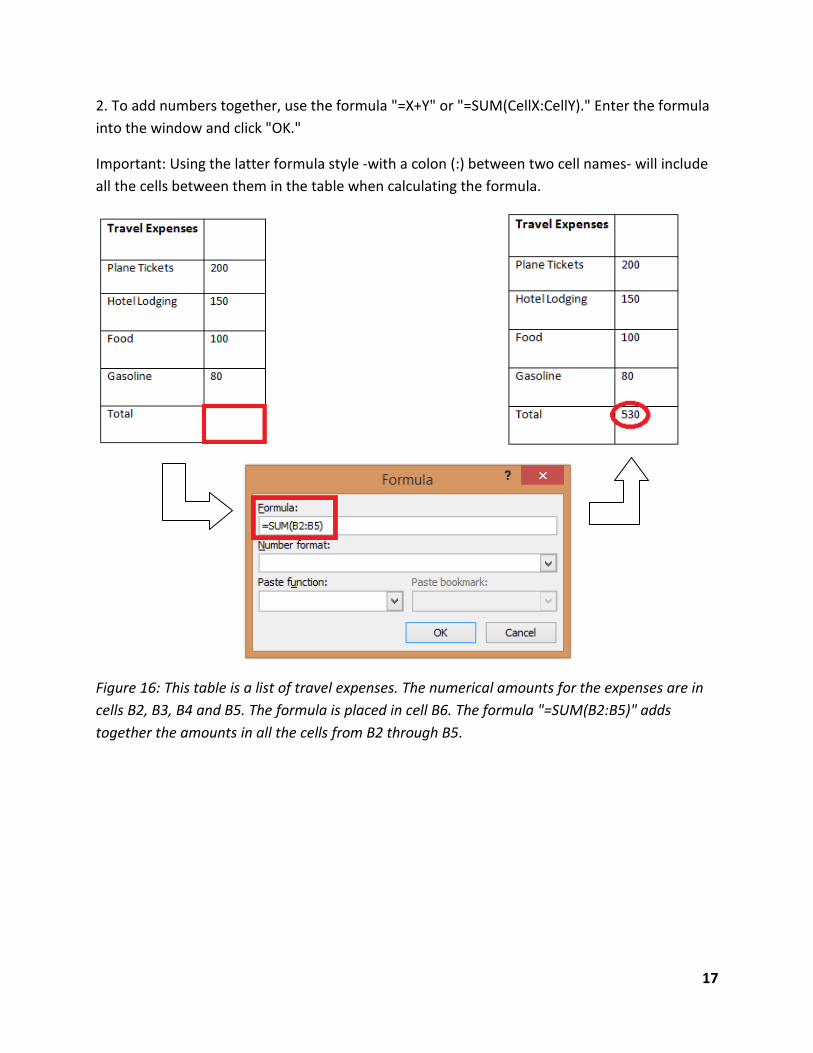
2. To add numbers together, use the formula "=X+Y" or "=SUM(CellX:CellY)." Enter the formula
into the window and click "OK."
Important: Using the latter formula style -with a colon (:) between two cell names- will include
all the cells between them in the table when calculating the formula.
Figure 16: This table is a list of travel expenses. The numerical amounts for the expenses are in
cells B2, B3, B4 and B5. The formula is placed in cell B6. The formula "=SUM(B2:B5)" adds
together the amounts in all the cells from B2 through B5.
18
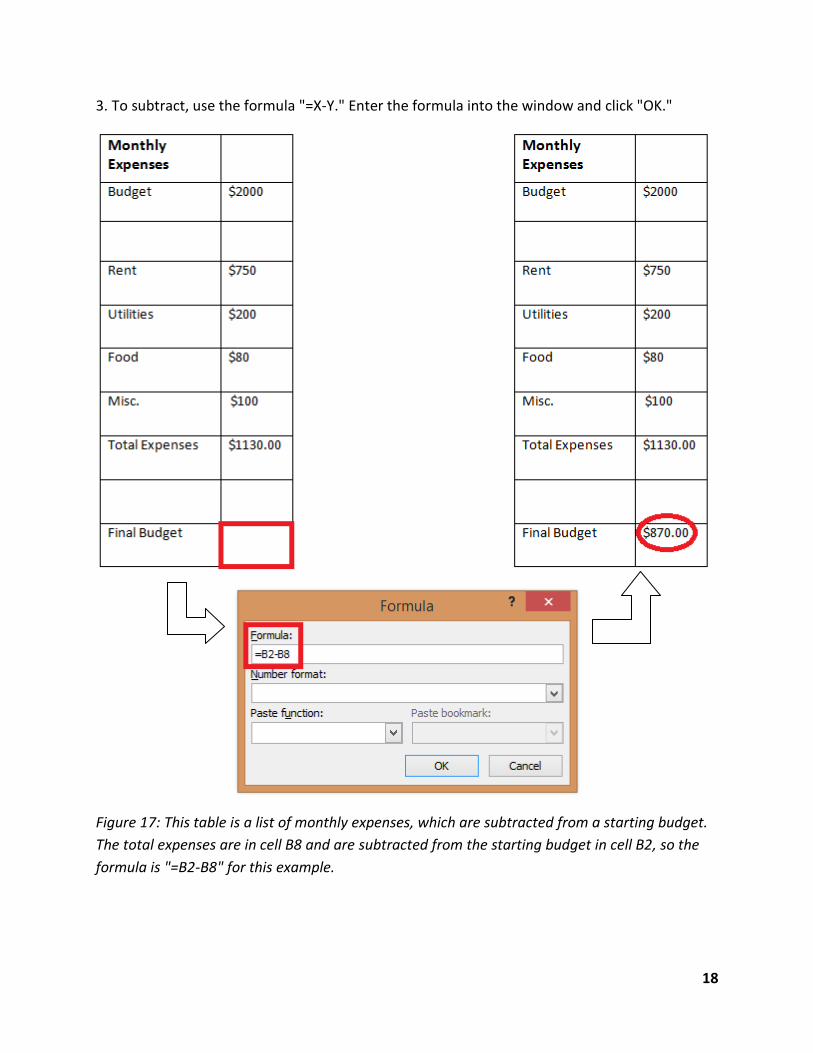
3. To subtract, use the formula "=X-Y." Enter the formula into the window and click "OK."
Figure 17: This table is a list of monthly expenses, which are subtracted from a starting budget.
The total expenses are in cell B8 and are subtracted from the starting budget in cell B2, so the
formula is "=B2-B8" for this example.
19
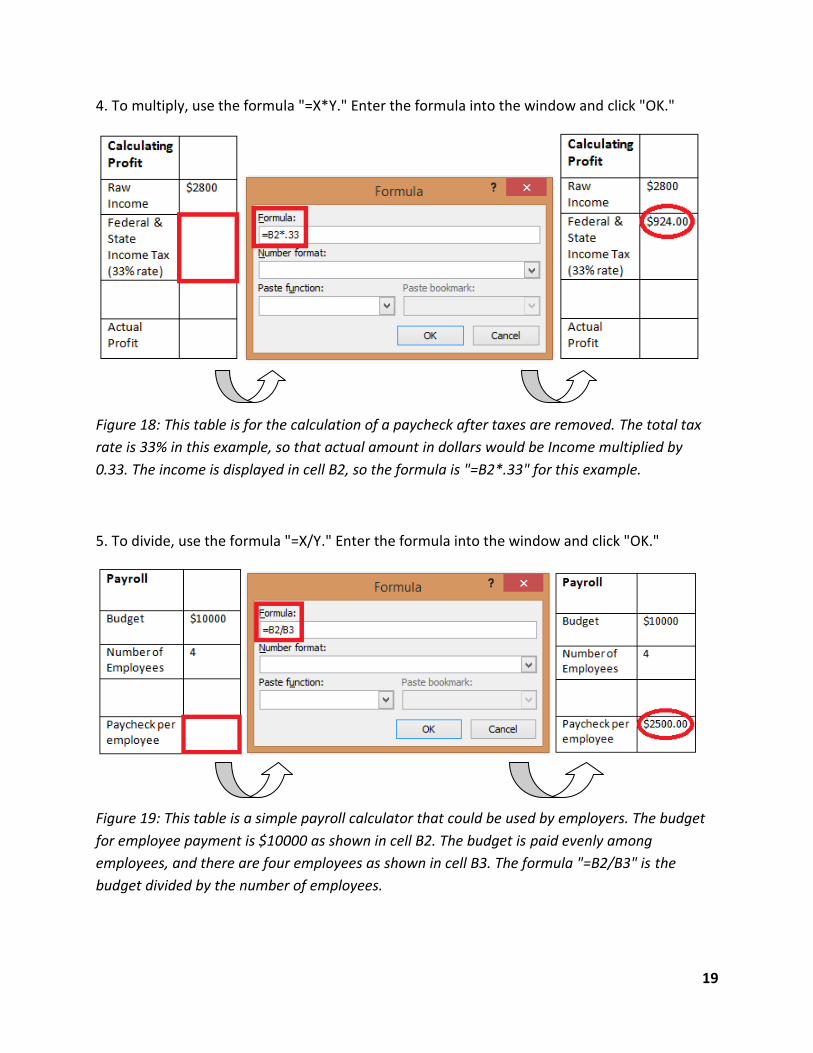
4. To multiply, use the formula "=X*Y." Enter the formula into the window and click "OK."
Figure 18: This table is for the calculation of a paycheck after taxes are removed. The total tax
rate is 33% in this example, so that actual amount in dollars would be Income multiplied by
0.33. The income is displayed in cell B2, so the formula is "=B2*.33" for this example.
5. To divide, use the formula "=X/Y." Enter the formula into the window and click "OK."
Figure 19: This table is a simple payroll calculator that could be used by employers. The budget
for employee payment is $10000 as shown in cell B2. The budget is paid evenly among
employees, and there are four employees as shown in cell B3. The formula "=B2/B3" is the
budget divided by the number of employees.

20
6. To find the average of a series of numbers, use the formula "=AVERAGE(CellX:CellY)." Enter
the formula into the window and click "OK."
Figure 20: This table shows the average amount of time taken for a specific individual to run a
mile. The amount of minutes spent running is logged for Monday through Friday in cells B2, B3,
B4, B5 and B6. The formula "=AVERAGE(B2:B6)" is used to calculate the average running time
based on this five-day period.