Embed Size (px)
Citation preview

M
1
anua
l

2
Table of Contents
1. Installation………………………………………………………………………………………..……………………………3
2. Registration………………………………………………………………………………………..………………………….6
3. Configuration of Custom Tables……………………………………………………………………….…………….8
4. Template Setup in Adobe Designer………………………………………………………………………………11
5. KCI Setup………………………………………………………………………………………………………………………18
6. PDF Merge……………………………………………………………………………………………………………………20
7. Index…………………………………………………………………………………………………………………………….21

1. Inst*N
1) Ple2) If Rduring3) If R
A. Click o
B. SelectDefau
C:\Ac
SelectEveryoMysel Click “
tallationNOTES ase clos
Running g install (Running
on “Setup.ex
t the installatlt Path: \ProgramFilectforWindow
t who to instone (defaultf
“Next”
n
se ACT! bWindowUAC) TWindow
xe”
tion folder
es\ACT\ ws\Plugins
tall for: t)
before stws 7 TurnThis can bws 7 right
3
tarting thn off Usebe turne click an
he installr Accound back o
nd run as
ation nt Controon after is Adminis
ol Settingnstallatiostrator
gs on

C. Confir“Next”
rm Installatio”
on by clicking
4

D. Click “
System R
1. ACfo
2. M3. PD
*NOTE –
“Close” to fin
Requirement
CT! 2009 , ACr minimum sicrosoft OffiDF software
There are s
nish
ts:
CT! 2010, ACsystem requce XP througcapable of c
ome limitati
CT! 2011, or uirements fogh Office 20creating PDF
ions with us
5
ACT! 2012 br ACT!) 10 forms
ing Outlook
by Sage (PC m
2002/XP for
must meet S
r emailing
Sage’s guide
lines

2. Reg A. In
B. C
gistratio
n the menu b
Click on “Help
on – In A
bar under “T
p” and selec
ACT!
Tools” select
ct “About”
6
“PDF Mergee Setup”

C. C
D. A
E. F
Note: Enthat was Once a li
Click on “Unlo
Answer “Yes”
ill in the form
ter the emaiemailed at t
icense numb
ock”
” to the ques
m and select
il address ofthe time of pber has been
stion that you
t “Activate”
f the person purchase. Ean activated,
7
u have the e
the license ach license nit cannot be
email addres
is assigned number can
e used again
ss and licens
to and the lionly be use.
se no.
icense numbed one time.
ber

3. Con
*NOTEneed to
Pre-confA. C
12
Creating A. OB. In
C. A
345N
nfigurat
E - These o be done
iguration tasCreate 2 new
. Single us
. Network u
Tables Open ACT! n the menu b
A prompt will . This will c. This will o. The layou
Note: PDF M
ion of C
steps aree once
sks w Folders: “Pers create ousers create
bar under “T
display askcreate the neonly need to ut may flickeerge will NO
Custom T
to be com
PDF work” anon local C:drie on a shared
Tools” select
ing to createecessary Tabe run oncer during this
OT run until t
8
Tables –
mpleted b
nd “PDF Temive d network dr
“PDFMerge
e the custombles in the de per databas process the custom t
– In ACT
by the Adm
mplate”
rive
e Setup”
m Tables. Clidatabase to ase
tables have
T!
ministrato
ick “Yes”. run PDFMer
been create
r and only
rge
ed
y

D. C
E. C
F. C
G. C
lick “Yes”
lick “OK”
lick “Yes”
lick “OK”
9
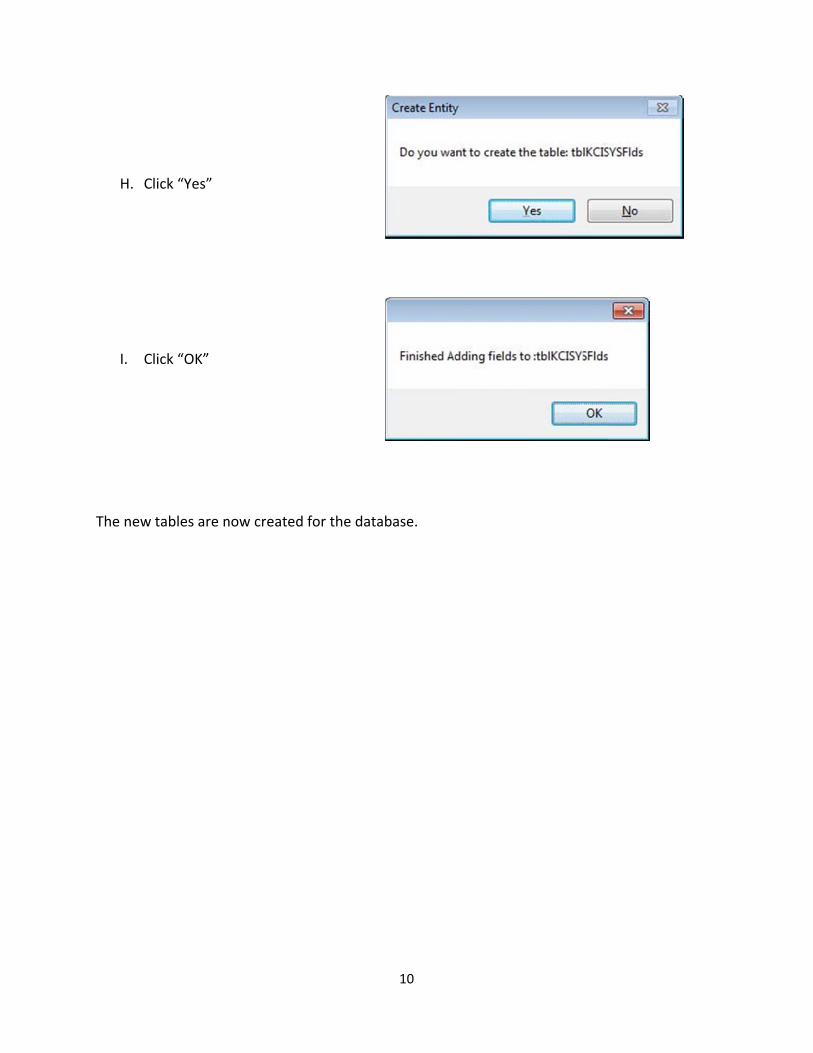
H. C
I. C
The new
lick “Yes”
lick “OK”
tables are nnow created for the data
10
abase.

4. Tem
Note:PDF Desig
A. OB. InC. S
thaFA
D. A
mplate S
: The templaforms. The fgner.
Open the PDn the upper r
Select “Makehe form is locnd save it asillable Form
Adobe Desig
A box will pop
Setup in
ate can be sefollowing are
F form you wright corner o
e Form Fillabcked. One ws a PDF. No” becomes aner.
p up, select
Adobe
etup in any Pe directions o
would like toof Adobe, cl
ble in Adobe way around ote: After thiavailable for
“OK”
11
Designe
PDF editing on how to se
o merge ick on “FormDesigner” Nthis is to pris option hasselection an
er
software caetup the tem
ms” Note: This opnt the form, s been selecnd is a much
apable of cremplate in Ado
ption will notscan it to yo
cted the first h faster way
eating fillableobe
t be availablour computetime, “Edit to get into
e
e if er,

E. Aw
F. Sd
After about 15will pop up. D
Select either escriptions b
5 seconds (dDouble check
“Maintain Edbefore makin
depending ok that the for
ditability” or ng your choi
12
on your comrm you want
“Preserve Aice. Then se
puter) the Nt to merge is
Appearance”elect “Next”
New Form Ass specified a
”. Please rea
ssistant windand select “N
ad the
dow Next”

G. S
H. S
Select “Fill th
Select “Finish
en Print” as
h”
the Return
13
Method and select “Nexxt”

I. A
J. AIf nbfo
A Conversion
A Missing Fof this windowext to it. Seleen selected
ont which wi
n Summary b
nts window w appears, dect an availad, click “OK”ll be availab
box will pop
will pop up iouble click oable font to r”. Note: whele on everyo
14
up, Select “
f the fonts aon each of threplace the on choosing a
one’s compu
“OK”
are not availahe fonts withoriginal font.a font, it is b
uter.
able in the Ah a yellow ex. After all th
best to choos
Adobe Desigxclamation phe fonts havese a commo
ner. point e on

K. Cp
L. Cfie
Check the enlace.
Click on “Texeld. Note: KC
ntire docume
xt Field” in thCI PDF Mer
ent and adjus
e menu on trge supports
15
st any blue t
the right and check boxe
text boxes w
d drag it to wes, text boxe
which are not
where you woes, and drop
t in the corre
ould like a tedown lists.
ect
ext

M. Dle
N. C
m
Delete the woeft. Resize a
Click on the “matched with
ords “Text Fnd position t
“Binding” tabh a field in AC
ield” out of tthe box to yo
b in the menuCT!.
16
he box and our preferen
u on the righ
slide the orance.
ht and renam
ange line all
me the box s
the way to t
so it can be
the

O. RO
Repeat stepsOnce the form
s l through n m is complet
until all the te, save the
17
fields have bfile and this
been insertewill be your
ed, resized, ar template to
and named.o merge in A
ACT!

5. KCI
A. In
B. S
“FNea
I Setup –
n the menu b
Select the preField Mappin
Note: If the Averyone whodministrator
– In ACT
bar under “T
eferences yong Setup”. S
ACT! Adminiso has PDF Mr.
T!
Tools” select
ou would likeSee the indestrator is selMerge install
18
“PDF Merge
e and find thex for explanected, the Pled on their c
e Setup”
he PDF Worknations of a
PDF templatecomputer, a
k Directory. all options ae will be ava
and has the s
Then click oand terms.
ailable for same ACT
on

C. SAte
D. S
Select the temACT Field anemplate.
Select “Exit”
mplate you wd then click
would like to“Save Field
19
o setup. Sele”. Repeat th
ect the PDF is step for a
Field Name,ll the fields o
, match it to on the PDF
the

E. S
6. PDF
A. In
Select “Exit”
F Merge
n the menu b
e – In AC
bar under “W
CT!
Write” select
20
“PDF Mergee”

B. Sfo
C. A
Select your por explanati
A window wil
preferences, ions of all o
l popup tellin
find the PDFoptions and
ng you that t
21
F form to med terms.
the merge w
erge, and cli
was successf
ick “Merge”.
ful. Click “OK
See the ind
K”
dex

6. Ind
PDF Me
ACT! Ad
Attach PMerge
Create C
Create E
ex
erge Setup:
dministrator
PDF to Histo
Custom Tab
Email with A
ory Tab on
bles
Attachment
Setup thPDF Me
If the admeveryonetemplateis selectetemplate
The merinformatitab in AC
The creaneeded ipreferensettings
An emaiform (coan attach
22
e PDF temprge.
ministrator oe who uses Ae being setuped, only that
e being setup
rged PDF forion in ACT!) CT!.
ate custom Tin your ACTces, mappinthat are requ
l to the contampleted usinhment to the
plates and de
of the ACT! dACT! will hap. If a user ot user will hap.
rm (complet will be attac
Tables butto! software th
ngs for the Puired to use
act will be crng the contae email.
efault prefer
database is ave access tother than thave access t
ed using theched to the c
n will createhat are requiPDF merge, the softwar
reated with tact's informa
rences for th
selected, o the PDF
he administrato the PDF
e contact's contact's His
e the tables ired to storeand other e.
the merged ation in ACT!
he
ator
story
user
PDF !) as

23
Create New Folder on Each Merge in the PDF Merge Directory
When the ACT! data is merged into a PDF template the document is saved in the work directory. From this directory the program will retrieve the filled out document based on the options the user specified. Ex. Email, Open after Merge, Attach to history. To make it easier from a management standpoint we give you the option to create a folder each time a merge occurs so that this directory is neatly maintained. If this box is checked a folder will be created with the document name and the date and time stamp of the merge. The folder will contain all the documents that were merged based on the users selection of current lookup, current contact, all contacts.
Default Mass Email Process
If "Create Email with Attachment" is selected, then the default email process selected in the PDF Merge Setup will appear as the default in the PDF Merge window as the "Mass Email Process".
Display Email
If "Create Email with Attachment" is selected, then the email will display with the merged PDF form attached (completed using the contact's information in ACT!). This option is not ideal when sending out multiple emails as the computer will be overwhelmed by several windows trying to popup at once.
Exit Exit PDF Merge Setup.
Field Mapping Setup Setup the PDF template by matching the fields in the PDF form to the fields in ACT!.
Load Enhancement Even though the enhancment is installed the user can turn off the enhancment and prevent it from loading in ACT!. If this checkbox is checked the enhancment is enabled.
Log Events
For troubleshooting measures every event that would be needed to trouble shoot the software can be logged into the windows event viewer. Normally this box is not checked, but in a trouble shooting situation KCI may ask you to check this box so we can gather important information regarding the events that occurred in the software.
Open PDF After Merge The merged PDF form (completed using the contact's information in ACT!) will open after the merge is complete.

24
PDF Work Directory
Every merge performed with our software needs to be saved so that the document can be emailed, attached to a contact record, and/or opened upon completion. The directory can be a local directcory, which is recommened, but in a network environment the folder could be on a shared drive that everyone has access to view. The user must have full control for permissions to this folder. This directory can be set to the Windows Temporary folder if you would like windows to handle the purging of the folder periodically. This folder is only used temporarly and most users would be attaching the pdf to the contact record and can retrieve the document here.
Save Email As Draft
If "Create Email with Attachment" is selected, then the email will be saved as a draft in Outlook with the merged PDF form attached (completed using the contact's information in ACT!). This option is best used when sending out multiple emails which you would like to view before sending.
Send Email
If "Create Email with Attachment" is selected, then the email will be sent with the merged PDF form attached (completed using the contact's information in ACT!) without displaying the email first. If you would like to proof read the email and check it for mistakes before sending it, do not select this option.
Show Splash Screen If this box is checked the user will see the PDF merge splash screen everytime they open ACT!. This can be disabled by unchecking this box.

Field Ma
ACT Fie
Add New
Clear Fo
Delete F
Delete F
Exit
apping:
eld
w Form
orm
Field
Form
Map the contain t
The field
Add a neit can be
Clear or
This will bottom o
This procentire forfirst be pform. If Yand are be promdelete thget the foselect "Awithout d
Exiting fr"PDF Me
25
fields in thethe data you
d name withi
ew PDF fillabe setup and t
unselect the
delete the sof the window
cess will delrm complete
prompted if yYes, this will listed in the pted if you w
he form fromorm back int
Add New Fordeleting the f
rom the "Fieerge Setup".
e PDF form tu would like t
n the ACT! d
ble form to tthe fields ca
e PDF Field
selected mapw. The fields
lete all mappely. After selyou want to d clear all fielbottom part
want to delet the PDF Meto the softwarm". The maform comple
eld Mapping".
o the fields ito use to fill
database.
he PDF Mern be mappe
Name and A
pped field fros can then b
pings for theecting "Deledelete all malds that have of the windote the form. erge softwarare once delapping can betely.
" will take yo
in ACT! whicin the form.
rge Softwareed.
ACT Field
om the list ae remapped
e form and/oete Form" yoapping for the been mappow. Next yoIf Yes, this wre. In order tleted, you m
be deleted
ou back to th
ch
e so
at the d.
r the ou will his ped u will will to
must
he

26
Filter PDF Field Names
If this is selected, once the PDF field has been mapped/saved it will be removed from the drop-down list of "PDF Field Names". This is a great tool to use when mapping a form with many fields.
Form Name The name of the PDF form you would like to map the fields for.
PDF Field Name The field name within the PDF fillable form.
Reset Form
This process will scan the document selected for all PDF variables and reset them to the correct ACT! field, provided the field in ACT! is the same name as the one in the PDF form. After selecting Reset Form you will be prompted to make sure you want to complete the process. The main reason for performing this routine would be if a database was restored in ACT! using the restore as functionality built into the sage software product.
Save Field
Save the PDF Field Name and ACT field which have been matched. After being saved, they will appear in the list at the bottom of the window. The PDF field has now been "mapped".
System Fields
Some word templates may not map correctly when doing a merge to email. To account for this we provide this area to map a variable in the Word ADT template to the ACT! field if it doesn't map automatically. By default this should not need to be manipulated, however in some cases where extreme customization of the software has occurrred, this is required to get the merge to function correctly.
Use My Record The user's information will be put in the field instead of the contact's information.

System
ACT Fie
Clear Fo
Delete F
Exit
Reset
Save Fie
System
Fields:
eld
orm
Field
eld
Field Namee
Some womerge tomap a vait doesn'need to bextreme required
The field
Remove
Deletes titem in th
Exiting frMapping
There arword ADthat are sissues odefaults.
Saves thand disp
The fieldcorrectly
27
ord templateo email. To ariable in thet map autombe manipulacustomizatito get the m
d name withi
s all data fro
the system fhe grid.
rom the "Sysg".
re several fieDT templates
setup and aut of the box
he ACT! fieldplays the info
d name from y when gene
es may not maccount for e Word ADT
matically. Byated, howeveon of the so
merge to func
n the ACT! d
om the entry
field mappin
stem Fields"
elds that ares. The resetdd in all the x. This butto
d and systemormation in t
the word doerating an em
map correctlthis we prov
T template toy default thiser in some c
oftware has oction correct
database.
y fields and r
ng for the cur
" will take yo
e known to bt button will rfields that w
on resets to
m field namethe grid.
ocument thamail.
y when doinvide this areao the ACT! fis should not cases whereoccurrred, thtly.
reloads the g
rrently selec
ou back to "F
e issues witremove all fi
we know cauthe factory
e to the syste
at is not map
ng a a to eld if
his is
grid.
cted
Field
h ields use
em
pping

PDF Me
All Cont
Attach PMerge
Create E
Current
Current
Display
erge:
tacts
PDF to Histo
Email with A
Contact
Lookup
ory Tab on
Attachment
Merge th
A PDF foACT! datdatabasewith a dif
The merinformatitab in AC
An emaiform (coan attachmust als
A PDF foin ACT!.
A PDF folookup. IPDF formcontact's
If "Createwill displusing theideal whebe overwonce.
28
he PDF form
orm will be mtabase. If the, 200 PDF ffferent conta
rged PDF forion in ACT!) CT!.
l to the contampleted usinhment to theo select the
orm will be m
orm will merf there are 1
ms will be ms information
e Email withay with the me contact's inen sending o
whelmed by
m using the c
merged for eere are 200 forms will beact's informa
rm (complet will be attac
act will be crng the contae email. Whe
"Mass Ema
merged for th
rge for each 10 contacts
merged each n from ACT!.
h Attachmenmerged PDFnformation inout multiple several wind
contact data
each contactcontacts in
e merged eaation from AC
ed using theched to the c
reated with tact's informaen selecting ail Process".
he current c
contact in thin the currencompleted w.
t" is selectedF form attachn ACT!). Themails as th
dows trying
in ACT!.
t within the ethe ACT!
ach completeCT!.
e contact's contact's His
the merged ation in ACT!
this option,
ontact displa
he current nt lookup, 10with a differe
d, then the ehed (comple
his option is he computerto popup at
entire
ed
story
PDF !) as you
ayed
0 ent
email eted not r will
29
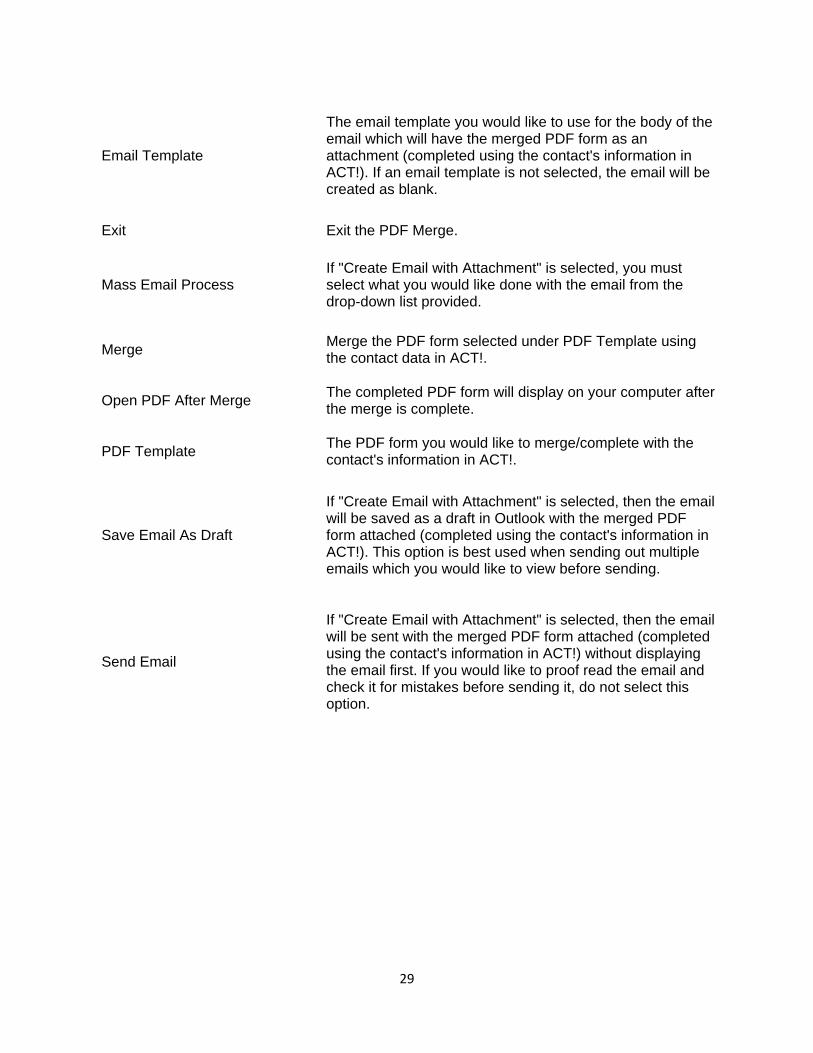
Email Template
The email template you would like to use for the body of the email which will have the merged PDF form as an attachment (completed using the contact's information in ACT!). If an email template is not selected, the email will be created as blank.
Exit Exit the PDF Merge.
Mass Email Process If "Create Email with Attachment" is selected, you must select what you would like done with the email from the drop-down list provided.
Merge Merge the PDF form selected under PDF Template using the contact data in ACT!.
Open PDF After Merge The completed PDF form will display on your computer after the merge is complete.
PDF Template The PDF form you would like to merge/complete with the contact's information in ACT!.
Save Email As Draft
If "Create Email with Attachment" is selected, then the email will be saved as a draft in Outlook with the merged PDF form attached (completed using the contact's information in ACT!). This option is best used when sending out multiple emails which you would like to view before sending.
Send Email
If "Create Email with Attachment" is selected, then the email will be sent with the merged PDF form attached (completed using the contact's information in ACT!) without displaying the email first. If you would like to proof read the email and check it for mistakes before sending it, do not select this option.