Embed Size (px)
Citation preview

I.D.OLOGY
Lookup LightningROD® Software
5678 C
User’s Guide VERSON V4 V8
5.19
www.id-ology.com
MADE IN THE U.S.A.

2
TABLE OF CONTENTS
About theReader……………………………3 Operating the Reader………………………4 LCD Display Messages…………………….6 About the USB Bluetooth………………….10 About the Reader Software……………….11 Install Reader Software……………………12 Loading the Reader with Tags……………19 Saving the Database List………………….27 Appendix……………………………………36 Helpful Hints………………………………..40 Contact Us………………………………….42

3
About the Lookup LightningROD® Reader
The Lookup LightningROD is a Radio Frequency Identification (RFID) reader that conforms to the ISO 11784 and 11785 electronic identification standards for international use with livestock. The Lookup LightningROD is unlike any other ISO RFID reader in the livestock industry. Not only can users preload a lookup list of animal IDs to be found for a certain treatment or breeding event into the reader’s memory, but it also indicates transponder reads, and whether or not the scanned ID is in the work list, through different vibration intervals of its handle. When an animal ID that is in the reader’s memory (lookup list) is scanned, the handle vibrates for a full one second and the animal’s visible ear tag number, the event to perform, and the group (pen or string) assignment are displayed on the large LCD display of the Lookup LightningROD. If the animal that is scanned is not to be worked (in the lookup list), the reader will only vibrate for ½ second and the words “ID Not Found” is displayed on the reader. This functionality eliminates the need for the operator to carry either a paper and clipboard or a handheld computer when performing many tasks like giving a shot or restringing the herd. The benefit of not being required to update the herd management software database, data entry errors caused by workers can be greatly reduced, while at the same time significantly increasing the speed of record keeping.

4
Operating the Lookup LightningROD Reader
LED Status Indicators
The Lookup LightningROD reader has four LED indicators that illuminate to indicate the status of the reader.
A. Green – Power On This will remain lit as long as the reader is turned on and has adequate battery power.
B. Red – ID Found in List The LED will light for one second when an ID tag that is in the reader’s lookup list is scanned. This light will not turn on when an ID tag that is not in the reader’s lookup list is scanned.
C. Red/Green Bicolor – Recharge This LED will only illuminate when the recharge power supply is connected to the reader. This LED will shine red when the recharge power supply is attached to the reader’s recharge connector to indicate that the reader is in “Fast Charge” mode. When the reader’s internal batteries recharge to approximately 90% of their recharge capacity (in about 90 minutes if batteries are completely dead), this light
B
C
A
D

5
will turn green to indicate that the reader has entered “Trickle Charge” mode. The trickle charge mode will continue until the recharge power supply is disconnected from the reader.
NOTE: Fully recharging batteries that are completely discharged (dead) will take about 90 minutes in fast charge and then about 90 minutes in trickle charge.
D. Blue – Communication Link This LED will be lit for as long as an active Bluetooth communication link is active between the reader and a host PC or PDA.
2. Multifunction Pushbutton
The pushbutton on the Lookup LightningROD is used to turn the reader on, activate the reader to scan for a tag, as well as change the reader mode to allow the review of the list of animals remaining to be found. Turn reader on
Press and release the pushbutton once to turn the reader on. The green LED and the LCD display will turn on to indicate that the reader is powered on.
Scan for IDs To scan an RFID tag, press and hold the pushbutton to activate the reader’s antenna. When the tag is read and the reader’s handle vibrates, release the pushbutton.
NOTE: the reader will only scan for tags when the pushbutton is pressed. Unless you have a maintain pushbutton.
Review IDs Not Found Press and release the pushbutton 3 times in less than 2 seconds, without reading an RFID tag, to place the reader into “Review Mode”. The LCD screen will indicate when this mode is entered.
NOTE: If an RFID tag is detected by the reader while the pushbutton is being pressed and released 3 times, the reader will disregard the

6
multiple button presses and will not enter the review mode.
Once in review mode, pressing and releasing the pushbutton will cycle through and display the IDs in the readers not found list.
NOTE: While in the “Review Not Found” mode, the reader will not scan for tags. You must first exit the “Review Not Found” mode by pressing and holding the pushbutton for longer than 5 seconds before the reader will scan for RFID tags.
Turn Reader Off
If no Bluetooth link is active with the reader, the reader will turn itself off after 3 minutes of not being used. If a Bluetooth link is active with the reader, the reader assumes that work is still being performed and will not turn itself off, no matter how long it has been since the last ID scan. In this instance, the USB Bluetooth adapter for the reader must be unplugged from the PC to drop the link. The reader will turn itself off 3 minutes after the active Bluetooth link is dropped.
LCD Display and Messages
The Lookup LightningROD reader has an LCD display that is large and easy to read. High contrast and built in back light ensures that the display can be seen in bright sunlight or in no light at all. NOTE: Only the last 12 digits of the RFID number are displayed on the LCD when an RFID tag is scanned. However, the ISO 15-digit RFID number is transmitted to the PC if an active Bluetooth link is available.
The LCD display has two lines that are used to display information related to a scanned RFID tag. The top line will display the 4 digit “Not Found” count followed by the last 12 digits of the last ID scanned. The second line will display the words “ID Not Found” if a scanned ID is not in

7
memory. If a scanned ID is in memory, the second line will display the ear tag number, event to perform (optional) and pen assignment (optional) of the animal will be displayed.
Reader First Turned On
When the Lookup LightningROD is first turned on, the display will display the “Not Found” count on the first line. Since no ID has been scanned, no other information is displayed.
RFID Is Scanned & Not Found in Memory
When an ID is scanned and not found in the lookup list in the reader’s memory, the first line will display the “Not Found” count (which will not count down for this scan) and the last 12 digits of the scanned RFID number. The reader then displays the words “ID not found” in the second line to indicate that the scanned ID was not found in the lookup list.
4 Digit Not Found
Count
Last 12 Digits Of Scanned
RFID
Lookup List Search Result
4 Digit Not Found
Count

8
NOTE: the reader will vibrate its handle for ½ second in this example.
RFID Is Scanned & Is Found in Memory
When an RFID tag is scanned, and is found in the reader’s lookup list, the first line will display the not found count (decremented for the ID just scanned) and the RFID number. The second line will display additional information regarding the animal just scanned.
NOTE: the reader will vibrate its handle for a full second in this example.
Reviewing Reader’s Not Found List
The following series of instructions cover the sequence of operator actions and display indications when reviewing the not found list on the reader’s display.
1) With no RFID tag in read range, press and release
the reader’s pushbutton three times in less than 2 seconds. This will prompt the reader to enter the review not found list mode. The LCD display will indicate when this mode is entered.
4 Digit Not Found
Count
Last 12 Digits Of Scanned
RFID
5 Digit Visible Ear
Tag Number
8 Character Event
Message
2 Digit Pen/String Number

9
2) Press and release the pushbutton ONCE to view the first ID in the readers not found list.
3) While in the “Review” mode, each time the pushbutton is pressed and released, the LCD will index to display the next ID in the readers not found list.
4) When the end of the “Not Found” list is reached, the words “End of list” are displayed.
5) Pressing and releasing the pushbutton again will loop the list back to again display the first ID in the readers not found list.
6) Exit the “Review” mode by pressing and holding the
pushbutton for more than five seconds. The reader will exit the “Review” mode and display the “Not Found” count on its display.

10
7) The reader is now in “Scan Mode” and will resume normal tag scanning operation.
About the USB Bluetooth Adapter
A piece of computer hardware, called a “USB Bluetooth Adapter”, is supplied with the Lookup LightningROD software. It allows wireless communications between a Lookup LightningROD Reader and a computer. This is merely a small blue device the size of a pack of gum that plugs into a computer’s USB port.
The USB Bluetooth adapter supplied with the Lookup LightningROD Reader has a special feature called “Smart Cable”. This feature allows the USB BT adapter to be configured to automatically call and establish a Bluetooth link with a reader as soon as it is plugged into a USB port. The Bluetooth link with the reader will be connected regardless of whether or not a software program on the PC accesses the virtual com port of the USB BT adapter. This removes the need for operators to spend time configuring the Bluetooth connection with each reader used. The USB BT adapters are factory configured to automatically discover and link with the Lookup LightningROD with which the adapter is shipped.
!!! WARNING!!! Do not unplug the USB BT adapter when any software is using its com port. Doing so will cause any program using that com port to crash and possibly loose unsaved data. Wireless USB com ports are virtual com ports and disappear if the USB device is unplugged. Most software programs cannot handle having a com port that is in use just disappear without warning.

11
NOTE: The USB BT adapter must be plugged into a USB port of the PC before the reader interface program is launched. If not, the program will not properly discover the com port of the USB BT adapter and may indicate a com port error.
Since the Smart Cable feature of the USB BT adapter handles all the Bluetooth configuration and communication linking automatically, the adapter can be used in conjunction with a “keyboard wedge utility” software program to allow scanning of RFID numbers directly into other software packages. This includes even those programs not capable of directly using “built in” wireless Bluetooth drivers on PCs or PDAs, like Microsoft Word or Excel.
About the Reader Software
Before the USB Bluetooth Adapter can be used, it must have its Windows Drivers installed and a communications port (com port) created. This can be done in conjunction with the I.D.ology software.
The Lookup LightningROD Interface program handles communications with a Lookup LightningROD for storing up to 5000 animal IDs and associated ear tag numbers as well as optional group numbers and health, breeding or shot event in the RFID reader’s internal memory for lookup reference when scanning RFID tags.
The purpose of the software is to communicate with an ISO LightningROD reader for the purpose of writing lookup lists into and reading lists from the reader’s internal memory.
This software is not required if using the Lookup LightningROD reader to scan RFID numbers directly into herd management software designed to accept scanned IDs directly from an RFID scanner. This software is only required when sending data to or reading data from the Lookup LightningROD memory storage.

12
To send data to the reader, a lookup list must first be imported or generated. The program is capable of reading data files that contain animal data with comma separated fields. It can read lists exported out of most herd management software programs, or those created in Microsoft Excel. Once the lookup list is generated and saved to the software program’s database, it can then be sent to the reader for storage in the reader’s internal memory.
INSTALL THE READER SOFTWARE:
The LCD-Lookup LightningROD software and Bluetooth Adapter installation should (depending on operating system), automatically begin when the CD drive drawer is closed. Some operating systems will install differently. Follow your operating system instructions if you do not see this first screen. The images below are based on a Windows 10 operating system. On some computers, you will see a flag appear in the lower right side of the screen briefly that will need to be clicked on.
Your first screen: Select Yes

13
Click: Next Click: Next
Click: Next Click: Install

14
Click: Yes
THE NEXT SET OF SCREENS WILL INSTALL THE BLUETOOTH DRIVER:
Click: Finish Click: Next

15
Click: Next Click: Finish You should now have installed both I.D.ology software and USB Bluetooth Dongle Software. You should now be able to remove your disk and put it in a safe place. If your computer has built in Bluetooth: You may be able to use your built-in Bluetooth by opening Devices menu and locating Bluetooth. Once there search for Bluetooth Devices. (Make sure your reader is on.) When you see the reader icon, click on it to pair. Some computers ask for a pairing code. Use 1111 for our reader. This should link your reader with Bluetooth and you can now open your reader software.
Plug in USB Bluetooth Adapter After you have installed the Bluetooth Adapter and I.D.ology software you can now plug the USB BT-Dongle in. Note: The USB Bluetooth Dongle must be inserted into a USB port of the computer before the reader interface program is started. If not, the program will not properly discover the com port of the USB BT adapter and may indicate a com port error.

16
Start the software Push the green button on the reader to turn reader on. Start the reader software that you just installed. To locate the software: On your PC, Click on start>All Programs>I.D.ology>Lookup LightningROD The software when installed created a folder in your documents called I.D.ology. This is where your software is stored.
When the software is first launched, it will discover available com ports on your device. After the available communications ports are discovered, the program prompts for the selection of the PC communication port that is currently linked with the LCD-LightningROD Reader.
.
Click on the selection button. It will expand to display a select list of available communications ports. Click on the communications port that has an active Bluetooth link with the LCD-LightningROD reader.
ONCE YOU HAVE SELECTED THE COMMUNICATION PORT,
CLICK ON THE RED NO LINK BOX.

17
This will start your communication between the reader and the software. You will see the below box appear as it is working. Once done this box will disappear.
Once the box disappears you will see your software will now be linked. It should look like the image below.
LOADING THE READER WITH TAG IDS:

18
View Existing Lookup List Database If a list of IDs is already saved to the lookup list database, click on the “View Current Lookup List Database” button.
A pop-up progress bar will appear. The lookup list database will be read first, and then the data read will be sorted into visible Ear Tag# in ascending order. When these processes are complete, the “Lookup List Database” screen will appear.
The table on this screen displays the ID list currently saved in the lookup list database. A “List Count” field below the table indicates the total number of IDs in the list.

19
Now, you may delete one or several ID’S in the list if needed. This can be done by clicking on the ID you would like to delete and pressing the delete selected slots.
When finished viewing the lookup list database, click on the “Return to Main Screen” button.
Add IDs to Lookup List Database
If you choose to add tag ID’S to the list, click on the “Add ID’s” to the Lookup List Database.
The “Add IDs to Lookup List Database” screen will be displayed.
This screen is used to add RFID and visible ear tag numbers to the lookup list database before the list is sent to the LightningROD reader.

20
There are two ways to add animals to the lookup list, manually scanning and typing IDs or by importing a file that contains the ID list.
Manually Add IDs to the Lookup List
IDs can be added to the current lookup list of the program “manually” by scanning the RFID of an animal and then, with the keyboard, type in up to 5 numeric digits of the visible ear tag of the animal that was scanned. The manual entry of RFID and visible ear tags is best used when adding animals to a herd and the visible ear tag and RFID tag are assigned to the animals after they are unloaded from a truck. The reader is used to scan the RFID number that is assigned to an animal, and then the operator types in the 1 to 5-digit visible ear tag assigned to that animal. The program will log these IDs and, if desired, save them to a data text file (comma separated values) that can be imported into the main herd management software database. To manually add IDs to the table display: Verify that there is an active BT link with the Lookup LightningROD reader. An active Bluetooth link with the RFID reader is indicated at the bottom center of the main screen.
Click on Add IDs to Lookup List Database. This will bring you to Added IDs page.
Scan the RFID tag that will be assigned to an animal. When the program receives the scanned RFID number, it will display it in the “RFID Number Scanned” field.
21
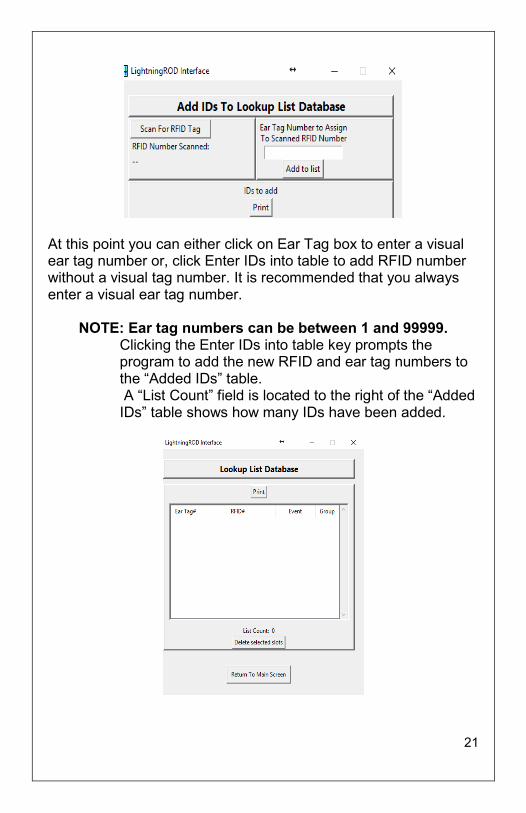
At this point you can either click on Ear Tag box to enter a visual ear tag number or, click Enter IDs into table to add RFID number without a visual tag number. It is recommended that you always enter a visual ear tag number.
NOTE: Ear tag numbers can be between 1 and 99999. Clicking the Enter IDs into table key prompts the program to add the new RFID and ear tag numbers to the “Added IDs” table. A “List Count” field is located to the right of the “Added IDs” table shows how many IDs have been added.

22
NOTE: If the RFID or ear tag number entered is already in the lookup list database or in the “Added IDs” table, a pop-up screen will appear to inform the user of this. The user is then given the option to overwrite (delete) or keep the existing ID in the lookup list database.
Correct a Manual Entry in the Added IDs Table To correct a mistake when manually entering IDs to the “Added IDs” table, simply rescan the RFID transponder and type in the correct ear tag number for that transponder. When the pop-up window appears warning that the RFID number is already in the list to be added, select the option to overwrite the existing entry and the list will update to show the correction.
Read a List of IDs from Herd Management Software
A list of IDs can be “read” from a data file that has been exported from herd management software. Most herd management software programs have this feature built in.
The Lookup LightningROD Reader can, on its built-in LCD, display a scanned animal’s 1 to 5-digit ear tag number, 15-digit ISO RFID number, 0 to 8-character text message of event to perform, and a 0 to 2-digit group number.
The data text file can contain all four pieces of data for each animal, but only the visible ear tag and RFID numbers are required to import a lookup list of animals. The pieces of data for a given animal are arranged in specific order and separated by commas, with each line of text containing the data for one animal.
NOTE: The file exported from a herd management software must have the data

23
arranged in the following order: [EAR TAG#], [RFID#], [Event], [Group#] NOTE: The RFID field is the only unique identifier and is used in all verification processes, so this field must contain a 15 digit ISO RFID tag. If this field does not contain a 15-digit ISO RFID number (as scanned from the transponder), the reader will not properly find scanned IDs in its lookup list.
The following is an example of lines from a text data file that contains the minimum required RFID and ear tag numbers:
4673,999000000762525 251,999000000639263 14322,999000000016394
The following is an example of lines from a text data file that contains all four pieces of data:
4281,999000000065814 ,SHOT-1,2 1842,999000000096526 ,BST-2,2 9483,999000000083265 EVENT-3,2
NOTE: With the exception of the RFID field, any data fields that contain more or less characters than required will be shortened (right truncated) or lengthened (with spaces) by the program.
Import a List of IDs into Lookup List Database
The following steps outline the procedure for importing a list of IDs: Click on the “Import ID from File” button below and to the left of the added IDs table.
This will open a Windows browser to allow the user to navigate to the folder on the PCs hard drive

24
where the exported herd management ID lists are located.
Click on the desired ID list filename to highlight it. Then click on the “Open” button located at the bottom-right corner of the browser window. This will begin the data importing process.
The browser window will close and a small progress bar pop-up window will be displayed.
When the file import is completed, the progress bar pop-up will disappear, and the “Added IDs” table will update to show the data that was imported. The “List Count” field will also display the number of records imported.
Clear Added IDs Table Without Saving
The “Added IDs” table can be cleared without saving or printing by clicking on the “Clear Added ID Table without saving” button.

25
Save Added ID Table to Text File for Herd Software The “Added IDs” table can be saved to a text file that can be read into most herd management software programs. The program creates a file using the same format as is used for reading in lists of IDs. The first line of the created text file is the header line containing text field names descriptions. Click on the “Save Added ID Table to Text File” button.
A file browser window will open to allow the user to select the folder in which to create the “Added IDs” text file. The name of the file to save defaults to “IDs Added to Herd <Date (yymmdd)>.txt. If desired, the filename can be changed by the user.
After the destination folder and filename are selected, click on the “Save” button to create the text file containing the added IDs. After the text file is created, the browser window closes and the “Added IDs” table is not cleared.

26
Print Added ID Table to Default Printer
The “Added IDs” table can be printed to the default printer of the computer that is running the software. Locate saved file in documents. The printed sheet will contain records having the fields [RFID], [Ear Tag], [Event], and [Group] listed.
Save Added ID Table to Lookup List Database
Before the list of added IDs can be transmitted to a Lookup LightningROD, they have to be organized and saved to a database. By placing the “Added IDs” list in the program’s lookup list database, the program can efficiently organize the lookup list that is to be sent to a LightningROD reader’s memory. This allows the fastest and most reliable transfer of the lookup list to the reader.
To save the “Added IDs” table to the program’s lookup list database:
Click on the “Save Added IDs to Lookup List Database” button.
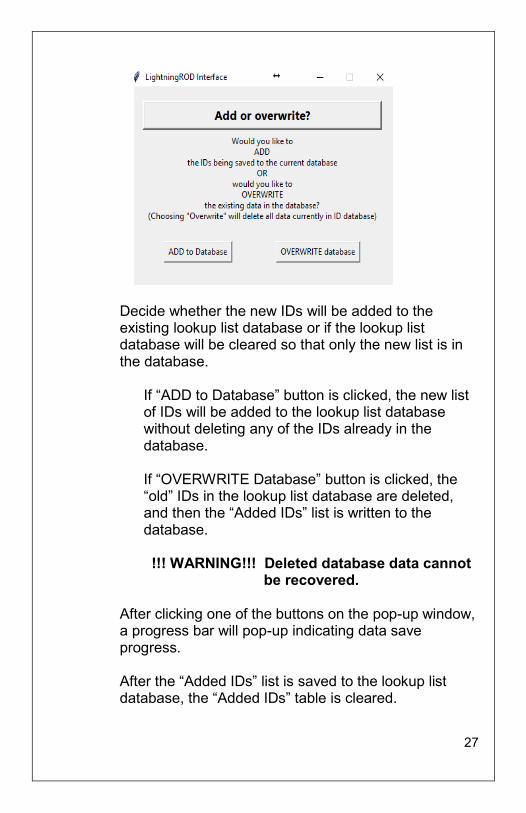
A prompt will pop-up asking whether to “ADD to Database” or “OVERWRITE Database”
27
Decide whether the new IDs will be added to the existing lookup list database or if the lookup list database will be cleared so that only the new list is in the database.
If “ADD to Database” button is clicked, the new list of IDs will be added to the lookup list database without deleting any of the IDs already in the database. If “OVERWRITE Database” button is clicked, the “old” IDs in the lookup list database are deleted, and then the “Added IDs” list is written to the database. !!! WARNING!!! Deleted database data cannot
be recovered.
After clicking one of the buttons on the pop-up window, a progress bar will pop-up indicating data save progress.
After the “Added IDs” list is saved to the lookup list database, the “Added IDs” table is cleared.

28
Return to Main Screen When finished adding IDs, click on the “Return to Main Screen” button to return to the main screen.
Save Lookup List Database to File for Herd Software
This function allows the contents of the lookup list database to be saved to a text file that can then be imported into a herd management software.
Click on the “Export Lookup List Database to File” button located on the Main Screen.
A file browser window will open to allow the user to select the folder and filename where the lookup list database will be written. The name of the file to save defaults to “EID Reader Herd ID List<Date (yymmdd)>.txt”. If desired, the filename can be changed by the user.
After selecting the folder and filename for the data file, click on the “Save” button of the browser window.
A progress bar will pop-up indicating the file save progress. When the file saves are complete, the Main Screen will be displayed.

29
Send Lookup List to LightningROD Reader After an ID list is saved to the lookup list database on the PC, the lookup list must then be stored in the LightningROD reader’s memory.
To send the lookup list to the reader, an active communications link is required between the computer and the Lookup LightningROD reader.
NOTE: When a lookup list is sent to the reader, the reader’s memory is first cleared, and then the list is written to the reader’s memory. The old list currently in the reader’s memory will be lost!
Click on the “Send Lookup List to LightningROD Reader” button of the Main Screen. The display field below this button shows the date and time of the last lookup list transfer to a reader.
After the lookup list is read from the database, it is then transmitted to the reader. The progress bar of the pop-up window will change to indicate a new progress bar

30
indicating the number of IDs being written to the reader’s memory.
On the LightningROD reader’s LCD display, the first 4 digits of the top line will reset to zero, and then increment as each ID is written to the reader’s memory.
The program will then return to the Main Menu screen.
Get Found and Not Found Lists from LightningROD Reader
When an animal is scanned and its ID number is in the lookup list of the reader’s memory, the reader decrements the “Not Found Count” on its LCD display and flag the list entry in memory for that animal to mark it as being “Found”. Any animals that are in the reader’s memory and have not been scanned will have a “Not Found” flag entered in memory.
NOTE: By default, when a lookup list is initially sent from the PC to the reader, all ID entries in the reader’s memory will be flagged as “Not Found”.
To retrieve the “Found” and “Not Found” lists from the reader’s memory:
Click on the “Get ‘Found’ and ‘Not Found’ Lists from Reader Memory”.
NOTE: For convenience, a “Reset Reader’s ‘Not Found’ List”
button is provided. Clicking this will reset all IDs in the reader’s memory lookup list as being “Not Found”. This allows the entire lookup list IDs in the reader’s memory to be reset to “Not Found”
without having to resend the list to the reader.

31
A pop-up window will appear to display the progress of the list download from the reader.
After the reader’s memory list is downloaded, it is sorted into “Found” and “Not Found” lists. These lists are then displayed on the “Downloaded Reader List” screen.
A “Count” field is located next to each table to indicate the total number of IDs in the list.
Save Found or Not Found List to File for Herd Software
Either of the tables can be saved to a text file that can be read into most herd management software programs.

32
The program creates a file using the same format as is used for reading in lists of IDs. The first line of the created text file is the header line containing text field names descriptions. Click on either the “Save Found List to Text File” or the “Save NF List to Text File” button.
A file browser window will open to allow the user to select the folder in which to create the “Added IDs” text file. The name of the file to save defaults to either “List
of Animals Found<Date (yymmdd)>.txt” or “List of Animals Not Found<Date (yymmdd)>.txt”. If desired,
the filename can be changed by the user.
After the destination folder and filename are selected, click on the “Save” button to create the text file containing the selected table of IDs.
After the text file is created, the browser window closes and the selected table is not cleared.
Print Found or Not Found List to Default Printer
Either of the tables can be printed to the default printer of the computer that is running the software. The printed sheet will contain records having the fields [Ear Tag], [RFID], [Event], and [Group] listed.
Return to the Main Menu
When finished with the lists, click on the “Return to Main Menu” button to return to the Main Menu screen.

33
NOTE: The IDs in the table are not saved to the PC when the “Downloaded Reader List” screen is exited. The lookup list in the reader memory, however, is not deleted and can be downloaded again.
Clear Reader Memory without Sending List
The reader’s internal memory can be cleared by clicking on the “Clear Reader Memory” button located on the Main Screen.
Exit Program Click on the “Exit Program” button when finished preparing, sending and receiving lists to a reader.
Appendix
Lookup LightningROD Reader Bluetooth Passkey
When using PC built in Bluetooth radios or USB Bluetooth adapters not supplied by I.D.ology to call the Lookup LightningROD reader, when prompted, enter the passkey:
1111 Features
ISO RFID Reader – Reads all Animal ISO 11784 and 11785 compatible tags.
Long Read Distance – 13 to 16 inches dependent on RFID tag quality.
Large Memory Capacity – stores 5000 animals to internal lookup list.
Indicator Lights – show power, battery, communication and tag read status.
Vibrating Handle – provides tactile indication of read for noisy environments.
Large, High Contrast, Back Lit Tag Display – visible in sunlight or complete darkness.

34
Keeps Count – Flags lookup list IDs in memory as they are scanned and displays the count of IDs remaining in the list to be found.
Rugged Construction – spun fiberglass pipe shell; sealed from rain or dust.
Long battery life – Approximately 12 to 18 hours of operation with over 50,000 tags scanned.
Ni Metal Hydride Batteries – Can be recharged thousands of times without losing operational charge time.
No Shock Wrist Strap – Tethers reader to operator preventing accidental reader dropping. Strap will release from reader in the event the reader gets snagged and violently pulled.
Specifications
Operating Frequency – 134.2 kHz
RFID Tag Protocol - ISO 11784 & ISO 11785 Compliant tags both FDX-B and HDX
Reader RF Power – Approx. 1.75 Watts
Physical Characteristics Length = 24” standard or 36” optional Width = 3.5” Height = 2.25” Weight = 28 oz. for the 24” standard size
unit
Environmental Characteristics Operating Temperature –10º C to 65º C (14º to +149º F) Storage Temperature -20º to 65º C (-40º to +149º F) Rain & Dust Resistance – equivalent to IP-67 standards
Power – Battery – Ni Metal Hydride 6.0v
Maximum Recharging Time (batteries completely discharged): 90 minutes’ fast charge to 90% of battery capacity; 90 minutes’ additional time to trickle charge remaining 10% battery capacity.

35
Note: This equipment has been tested and found to comply with the limits for a Class B digital device, pursuant to Part 15 of the FCC Rules. These limits
are designed to provide reasonable protection against harmful interference in a residential installation. This equipment generates uses and can radiate
radio frequency energy and, if not installed and used in accordance with the instructions, may cause harmful interference to radio communications.
However, there is no guarantee that interference will not occur in a particular installation. If this equipment does cause harmful interference to radio or
television reception, which can be determined by turning the equipment off and on, the user is encouraged to try to correct the interference by one or
more of the following measures: - Reorient or relocate the receiving antenna.
- Increase the separation between the equipment and receiver. - Connect the equipment into an output on a circuit different from that
to which the receiver is connected. - Consult the dealer or an experienced radio/TV technician for help.
This product complies with FCC radiation exposure limits set forth for an uncontrolled environment.
Regulatory Approvals
FFC Part 15 Class B SYAICR04
Industry Canada RSS-210 Certification 5678A-ICR04
USB Bluetooth Adapter
Features
Class 2 radio; high-performance connections up to 30 m.
High-security 128-bit encryption.
Automatic, self-connecting “Smart Wire” wireless Bluetooth communications with Lookup LightningROD Reader.
Regulatory Approvals
FCC ID: S22BTMODULE-CL1
Operation is subject to the following two conditions: (1) this device may not cause harmful interference. (2) This device must accept any interference received, including interference that may cause undesired operation.

36
Contact Info: I.D.ology
1324 W. Clairemont Ave. Eau Claire, WI 54701
715-834-9922 Office 715-834-9886 Fax
[email protected] - Email www.ID-ology.com - Website
Changes not expressly approved by I.D.ology could void the
user's authority to operate this equipment.
In accordance with FCC Part 15, the USB Bluetooth adapter distributed with the Lookup LightningROD readers is listed as a Modular Transmitter device. In support of the Modular Transmitter Approval, the following is stated:
- The USB adapter does have its own RF shielding. - The USB adapter does have buffered modulation / data inputs. - The USB adapter does regulate its own power supply. - The USB adapter does have a permanently attached antenna. - The USB adapter can be tested as a stand-alone device. - The USB adapter is labeled with the proper FCC ID. - The USB adapter does have instruction for proper use. - The USB adapter does meet the FCC RF regulations.
This USB module has been tested and found to comply with the FCC Part15 Rules. These limits are designed to provide reasonable protection against harmful interference in approved installations. This equipment generates, uses, and can radiate radio frequency energy and, if not installed and used in accordance the instructions, may cause harmful interference to radio Communications. However, there is no guarantee that interference will not occur in a particular installation. This device complies with part 15 of the FCC Rules. Operation is subject to the following two conditions: (1) This device may not cause harmful interference, and (2) this device must accept any interference received, including interference that may cause undesired operation.
Modifications or changes to this equipment not expressly approved
by I.D.ology may void the user’s authority to operate this equipment.


![[i Am the Lightning Rod of Hate] [Fin]](https://img.dokumen.tips/doc/110x75/577d38011a28ab3a6b96df10/i-am-the-lightning-rod-of-hate-fin.jpg)