Embed Size (px)
Citation preview

Load Balancing IBM Watson Health iConnect Enterprise Archive & MergePACSDeployment Guide
v1.1.0
Contents1. About this Guide................................................................................................................................................................................................................................................................ 32. Loadbalancer.org Appliances Supported................................................................................................................................................................................................... 33. Loadbalancer.org Software Versions Supported................................................................................................................................................................................. 34. IBM Watson Health iConnect Enterprise Archive & MergePACS Software Versions Supported.........................................................35. Load Balancing iConnect Enterprise Archive & MergePACS................................................................................................................................................. 3
Port Requirements.....................................................................................................................................................................................................................................................................4Deployment Concept...............................................................................................................................................................................................................................................................4Virtual Service (VIP) Requirements............................................................................................................................................................................................................................6Deployment Mode......................................................................................................................................................................................................................................................................6
6. Loadbalancer.org Appliance – the Basics.................................................................................................................................................................................................. 7Virtual Appliance Download & Deployment.......................................................................................................................................................................................................7Initial Network Configuration............................................................................................................................................................................................................................................7Accessing the Web User Interface (WebUI)......................................................................................................................................................................................................7HA Clustered Pair Configuration...................................................................................................................................................................................................................................9
7. Appliance, iConnect Enterprise Archive & MergePACS Configuration......................................................................................................................... 10Appliance Configuration.....................................................................................................................................................................................................................................................10
Network Configuration................................................................................................................................................................................................................................... 10Floating IP Configuration (For The iConnect Enterprise Archive's Default Gateway)........................................................................... 10Configuring VIP1 – All VNA Services.................................................................................................................................................................................................. 11Configuring VIP2 – All PACS Services............................................................................................................................................................................................. 14
iConnect Enterprise Archive Server Configuration...................................................................................................................................................................................16MergePACS Server Configuration............................................................................................................................................................................................................................17
8. Testing & Verification................................................................................................................................................................................................................................................ 20Automatic Failover..................................................................................................................................................................................................................................................................20Manual Failover..........................................................................................................................................................................................................................................................................20Client Connection Tests......................................................................................................................................................................................................................................................21
9. Technical Support.......................................................................................................................................................................................................................................................... 2110. Additional Documentation................................................................................................................................................................................................................................... 2111. Conclusion........................................................................................................................................................................................................................................................................... 2112. Appendix............................................................................................................................................................................................................................................................................ 22
1 – Clustered Pair Configuration – Adding a Slave Unit.....................................................................................................................................................................22
13. Document Revision History.............................................................................................................................................................................................................................. 24
2
© Copyright Loadbalancer.org • www.loadbalancer.org • [email protected]
1. About this GuideThis guide details the steps required to configure a highly available IBM Watson Heath iConnect Enterprise Archive & MergePACS environment utilizing Loadbalancer.org appliances. It covers the configuration of the load balancers and also any iConnect Enterprise Archive & MergePACS configuration changes that are required.
For more information about initial appliance deployment, network configuration and using the Web User Interface (WebUI), please also refer to the Administration Manual.
2. Loadbalancer.org Appliances SupportedAll our products can be used for load balancing IBM Watson Health iConnect Enterprise Archive & MergePACS. The complete list of models is shown below:
Discontinued Models Current Models *
Enterprise R16 Enterprise R20
Enterprise VA R16 Enterprise MAX
Enterprise VA Enterprise 10G
Enterprise R320 Enterprise 40G
Enterprise Ultra
Enterprise VA R20
Enterprise VA MAX
Enterprise AWS **
Enterprise AZURE **
* For full specifications of these models please refer to: http://www.loadbalancer.org/products/hardware
** Some features may not be supported, please check with Loadbalancer.org support
3. Loadbalancer.org Software Versions Supported
• v8.3.6 and later
4. IBM Watson Health iConnect Enterprise Archive & MergePACS Software Versions Supported
• IBM Watson Health iConnect Enterprise Archive – all versions
• IBM Watson Health MergePACS – all versions
5. Load Balancing iConnect Enterprise Archive & MergePACSFor high availability, IBM Watson Health recommend that a load balancer is used to enable rapid failover to the
3
© Copyright Loadbalancer.org • www.loadbalancer.org • [email protected]

secondary iConnect Enterprise Cluster / MergePACS Cluster should the Primary Cluster become unavailable.
Port RequirementsThe following table shows the ports used by iConnect Enterprise Archive. The load balancer must be configured to listen on the same ports.
Port Protocols System Use
12000 TCP VNA DICOM
12100 TCP VNA DICOM Proxy
12200 TCP VNA DICOM Work List
12300 & 12301 TCP VNA VNA Admin
12950 TCP VNA VNA Stream
12800 TCP VNA VNA HL7
104 TCP PACS DICOM
80,8080,443,8443 TCP PACS HTTP & HTTPS
5222 TCP PACS Instant Messenger
1001 TCP PACS PACS HL7
Deployment Concept
iConnect Enterprise Archive
When iConnect Enterprise Archive is deployed with the load balancer, clients connect to the Virtual Service (VIP) on theload balancer rather than connecting directly to one of the iConnect Enterprise Archive Clusters. Under normal conditions, these connections are then forwarded to the Primary Cluster.
MergePACS
4
© Copyright Loadbalancer.org • www.loadbalancer.org • [email protected]

When MergePACS is deployed with the load balancer, clients connect to the Virtual Service (VIP) on the load balancer rather than connecting directly to one of the MergePACS Clusters. Under normal conditions, these connections are then forwarded to the Primary Cluster.
Note: VIP1 (VNA) and VIP2 (PACS) are configured on a single clustered par of load balancers.
Note: The load balancer can be deployed as a single unit, although Loadbalancer.org recommends a clustered pair for resilience & high availability. Please refer to section 1 in the appendix on page 22 for more details on configuring a clustered pair.
Should the Primary Cluster become unavailable, failover to the Secondary Cluster can be handled in either of the following ways:
• Automatically – In this case, health checks are configured at 30 second intervals. Should there be 10 consecutive health check failures, failover to the Secondary Cluster occurs.
• Manually – In this case, failover to the Secondary Cluster must be triggered manually using the 'Halt' feature in the load balancer’s WebUI. Please refer to page 20 for more details.
Note: The way the Virtual Service’s health check is configured determines which of these failover methods is used.
5
© Copyright Loadbalancer.org • www.loadbalancer.org • [email protected]
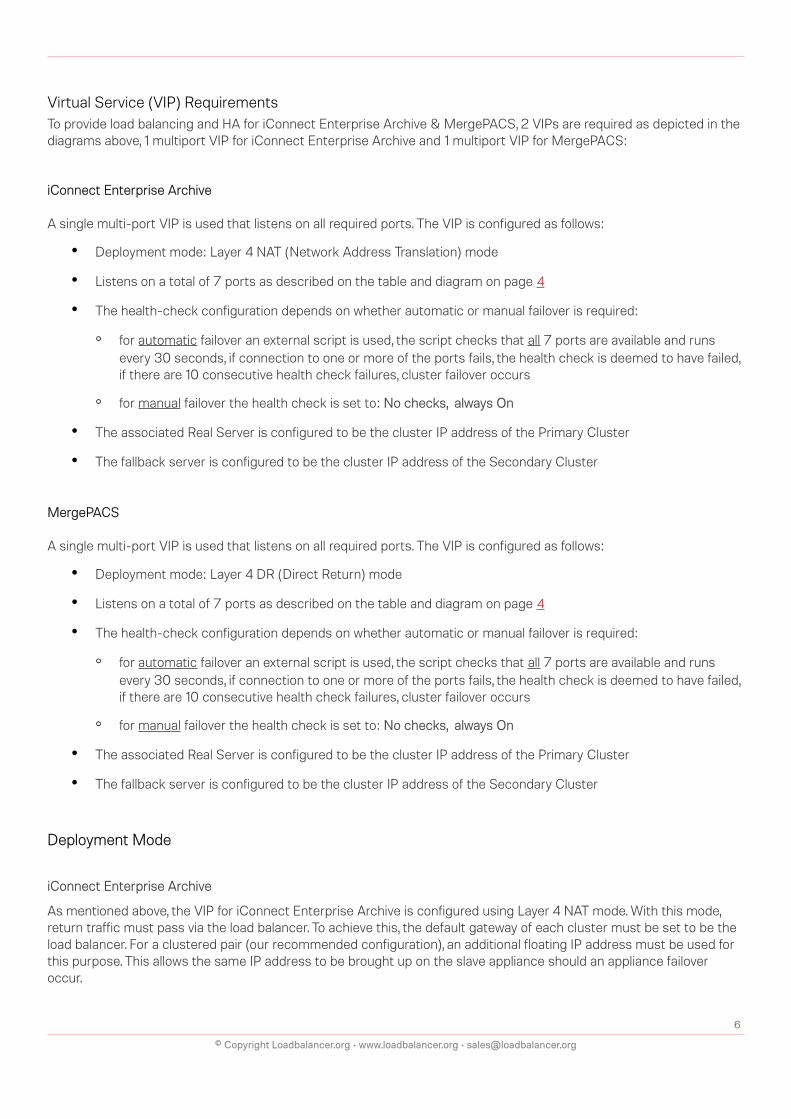
Virtual Service (VIP) RequirementsTo provide load balancing and HA for iConnect Enterprise Archive & MergePACS, 2 VIPs are required as depicted in the diagrams above, 1 multiport VIP for iConnect Enterprise Archive and 1 multiport VIP for MergePACS:
iConnect Enterprise Archive
A single multi-port VIP is used that listens on all required ports. The VIP is configured as follows:
• Deployment mode: Layer 4 NAT (Network Address Translation) mode
• Listens on a total of 7 ports as described on the table and diagram on page 4
• The health-check configuration depends on whether automatic or manual failover is required:
◦ for automatic failover an external script is used, the script checks that all 7 ports are available and runs every 30 seconds, if connection to one or more of the ports fails, the health check is deemed to have failed, if there are 10 consecutive health check failures, cluster failover occurs
◦ for manual failover the health check is set to: No checks, always On
• The associated Real Server is configured to be the cluster IP address of the Primary Cluster
• The fallback server is configured to be the cluster IP address of the Secondary Cluster
MergePACS
A single multi-port VIP is used that listens on all required ports. The VIP is configured as follows:
• Deployment mode: Layer 4 DR (Direct Return) mode
• Listens on a total of 7 ports as described on the table and diagram on page 4
• The health-check configuration depends on whether automatic or manual failover is required:
◦ for automatic failover an external script is used, the script checks that all 7 ports are available and runs every 30 seconds, if connection to one or more of the ports fails, the health check is deemed to have failed, if there are 10 consecutive health check failures, cluster failover occurs
◦ for manual failover the health check is set to: No checks, always On
• The associated Real Server is configured to be the cluster IP address of the Primary Cluster
• The fallback server is configured to be the cluster IP address of the Secondary Cluster
Deployment Mode
iConnect Enterprise Archive
As mentioned above, the VIP for iConnect Enterprise Archive is configured using Layer 4 NAT mode. With this mode, return traffic must pass via the load balancer. To achieve this, the default gateway of each cluster must be set to be the load balancer. For a clustered pair (our recommended configuration), an additional floating IP address must be used for this purpose. This allows the same IP address to be brought up on the slave appliance should an appliance failover occur.
6
© Copyright Loadbalancer.org • www.loadbalancer.org • [email protected]

MergePACS
As mentioned above, the VIP for MergePACS is configured using Layer 4 DR (Direct Return) mode. This mode offers thebest possible performance since replies go directly from the MergePACS Cluster to the client, and not via the load balancer. To use this mode, the “ARP Problem” must be solved on each MergePACS server as explained on page 16.
6. Loadbalancer.org Appliance – the Basics
Virtual Appliance Download & DeploymentA fully featured, fully supported 30 day trial is available if you are conducting a PoC (Proof of Concept) deployment. The VA is currently available for VMware, Virtual Box, Hyper-V, KVM and XEN and has been optimized for each Hypervisor. Bydefault, the VA is allocated 1 CPU, 2GB of RAM and has an 8GB virtual disk. The Virtual Appliance can be downloaded here.
Note: The same download is used for the licensed product, the only difference is that a license key file(supplied by our sales team when the product is purchased) must be applied using the appliance's WebUI.
Note: Please refer to the Administration Manual and the ReadMe.txt text file included in the VA download for more detailed information on deploying the VA using various Hypervisors.
Initial Network ConfigurationThe IP address, subnet mask, default gateway and DNS settings can be configured in several ways as detailed below:
Method 1 - Using the Network Setup Wizard at the console
After boot up, follow the instructions on the console to configure the IP address, subnet mask, default gateway and DNSsettings.
Method 2 - Using the WebUI
Using a browser, connect to the WebUI on the default IP address/port: https://192.168.2.21:9443
To set the IP address & subnet mask, use: Local Configuration > Network Interface Configuration
To set the default gateway, use: Local Configuration > Routing
To configure DNS settings, use: Local Configuration > Hostname & DNS
Accessing the Web User Interface (WebUI)
1. Browse to the following URL: https://192.168.2.21:9443/lbadmin/
7
© Copyright Loadbalancer.org • www.loadbalancer.org • [email protected]

(replace with your IP address if it's been changed)
* Note the port number → 9443
2. Login to the WebUI:
Username: loadbalancer
Password: loadbalancer
Note: To change the password , use the WebUI menu option: Maintenance > Passwords.
Once logged in, the WebUI will be displayed as shown below:
8
© Copyright Loadbalancer.org • www.loadbalancer.org • [email protected]
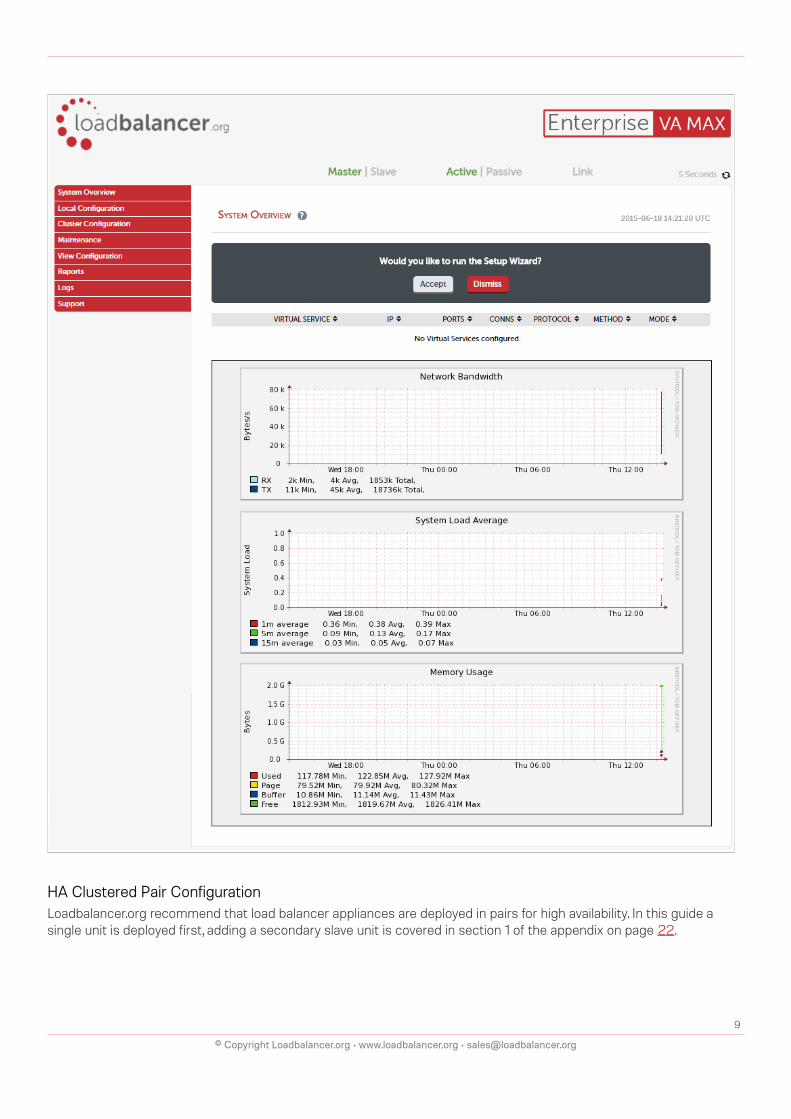
HA Clustered Pair ConfigurationLoadbalancer.org recommend that load balancer appliances are deployed in pairs for high availability. In this guide a single unit is deployed first, adding a secondary slave unit is covered in section 1 of the appendix on page 22.
9
© Copyright Loadbalancer.org • www.loadbalancer.org • [email protected]

7. Appliance, iConnect Enterprise Archive & MergePACS Configuration
Appliance Configuration
Network ConfigurationWhen using Layer 4 NAT mode (for load balancing iConnect Enterprise Archive), two Interfaces are required, this can beachieved by using two network adapters, or by creating VLAN's on a single adapter. The following configuration uses 2 separate network adapters, one for each subnet.
To Configure network settings using eth0 & eth1 :
1. Using the WebUI, navigate to: Local Configuration > Network Interface Configuration
2. Enter an IP address/mask in the subnet where the iConnect Enterprise Archive's are located, e.g. 192.168.100.1/24
3. Enter an IP address/mask in the subnet where the VIP & clients are located, e.g. 192.168.200.1/24
4. Click Configure Interfaces
Note: There are no restrictions on which interface is used for each requirement.
Floating IP Configuration (For The IConnect Enterprise Archive's Default Gateway)As mentioned on page 6, when using Layer 4 NAT mode and a clustered pair of load balancers, a floating IP address must be configured on the load balancer for use as the iConnect Enterprise Archive Server's default gateway.
1. Using the WebUI, navigate to: Cluster Configuration > Floating IP's
10
© Copyright Loadbalancer.org • www.loadbalancer.org • [email protected]

2. Enter the IP address you'd like to use as the default gateway. e.g. 192.168.100.254
3. Click Add Floating IP
Configuring VIP1 – All VNA Services
a) Setting up the Virtual Service (VIP)
1. Using the WebUI, navigate to: Cluster Configuration > Layer 4 – Virtual Services and click Add a new Virtual Service
2. Enter the following details:
3. Enter an appropriate label (name) for the VIP, e.g. VNA
4. Set the Virtual Service IP address field to the required IP address, e.g. 192.168.200.100
5. Set the Virtual Service Ports field to 12000,12100,12200,12300,12301,12950,12800
6. Leave Protocol set to TCP
7. Set the Forwarding Method to NAT
8. Click Update
9. Now click Modify next to the newly created VIP
10. Configure health check settings:
For automatic failover:
▪ Create the following file: /var/lib/loadbalancer.org/check/IBM-WHI-iConnect-Enterprise-Archive
11
© Copyright Loadbalancer.org • www.loadbalancer.org • [email protected]

▪ Set file permissions to 755
▪ Edit the file and copy / paste the following script:
#!/bin/bash
########################################################### ## IBM Watson Health Imaging - iConnect Enterprise Archive ## ## (c) Loadbalancer.org 2019 ## ## 2019-07-31 - Initial write - Aaron West <[email protected]> ## ###########################################################
## Variables
# Space separated port list to check using a TCP half opencheck (SYN Scan)HALF_OPEN_RPT="12800"
# Space separated port list to check using a full 3 way handshake (Connect to port)FULL_3WAY_RPT="12000 12100 12200 12300 12301 12950"
# $3 represents the real server address as passed by the load balancerRIP="${3}"
# Timeout for checking each portTIMEOUT="3"
### Shouldn't need to edit below here
PATH=/usr/local/sbin:/usr/local/bin:/sbin:/bin:/usr/sbin:/usr/bin
for i in ${HALF_OPEN_RPT}; do timeout ${TIMEOUT} nmap -sS -p ${i} ${RIP} 2>&1 | grep -q 'open' ec=$? if [ $ec -ne "0" ]; then exit $ec fi
12
© Copyright Loadbalancer.org • www.loadbalancer.org • [email protected]

done
for i in ${FULL_3WAY_RPT}; do nc -w ${TIMEOUT} -zvn ${RIP} $i &>/dev/null ec=$? if [ $ec -ne "0" ]; then exit $ec fidone
▪ Save the file
▪ In the Health Checks section set the Check Type to External Script
▪ Set the External Script drop-down to IBM-WHI-iConnect-Enterprise-Archive (the script just created)
▪ Click Update
For manual failover:
▪ Set the Check Type to No checks, Always On
▪ Click Update
11. Set the Fallback Server IP Address field to the IP address of the Secondary iConnect Enterprise Archive Cluster
12. Set the Fallback Server Port field to 0 (numerical zero) , this ensures that the fallback server (i.e. the Secondary Cluster) can receive connections on all required ports
13. Enable (check) the MASQ Fallback checkbox
14. Click Update
b) Setting up the Real Server (RIP)
1. Using the WebUI, navigate to: Cluster Configuration > Layer 4 – Real Servers and click Add a new Real Server next to the newly created VNA VIP
2. Enter the following details:
13
© Copyright Loadbalancer.org • www.loadbalancer.org • [email protected]

3. Enter an appropriate label (name) for the RIP, e.g. PrimaryCluster
4. Set the Real Server IP Address field to the IP address of the Primary iConnect Enterprise Archive Cluster
5. Leave the Real Server Port field blank
6. Click Update
Configuring VIP2 – All PACS Services
a) Setting up the Virtual Service (VIP)
1. Using the WebUI, navigate to Cluster Configuration > Layer 4 – Virtual Services and click Add a new Virtual Service
2. Enter the following details:
3. Enter an appropriate label (name) for the VIP, e.g. PACS
4. Set the Virtual Service IP address field to the required IP address, e.g. 192.168.100.100
5. Set the Virtual Service Ports field to 104,80,8080,443,8443,5222,1001
6. Leave Protocol set to TCP
7. Leave Forwarding Method set to Direct Routing
8. Click Update
9. Now click Modify next to the newly created VIP
10. Configure health check settings:
For automatic failover:
▪ Create the following file: /var/lib/loadbalancer.org/check/IBM-WHI-MergePACS
▪ Set file permissions to 755
▪ Edit the file and copy / paste the following script:
14
© Copyright Loadbalancer.org • www.loadbalancer.org • [email protected]

#!/bin/bash
######################################################## IBM Watson Health Imaging - Merge PACS healthcheck## (c) Loadbalancer.org 2019## 2019-07-31 - Initial write - Aaron West <[email protected]>#######################################################
### Variables
# Space separated port list to check using a TCP half open check (SYN Scan)HALF_OPEN_RPT="1000"
# Space separated port list to check using a full 3 way handshake (Connect to port)FULL_3WAY_RPT="104 80 8080 443 8443 5222"
# $3 represents the real server address as passed by the load balancerRIP="${3}"
# Timeout for checking each portTIMEOUT="3"
### Shouldn't need to edit below here
PATH=/usr/local/sbin:/usr/local/bin:/sbin:/bin:/usr/sbin:/usr/bin
for i in ${HALF_OPEN_RPT}; do timeout ${TIMEOUT} nmap -sS -p ${i} ${RIP} 2>&1 | grep -q 'open' ec=$? if [ $ec -ne "0" ]; then exit $ec fidone
for i in ${FULL_3WAY_RPT}; do nc -w ${TIMEOUT} -zvn ${RIP} $i &>/dev/null ec=$? if [ $ec -ne "0" ]; then exit $ec fidone
▪ Save the file
15
© Copyright Loadbalancer.org • www.loadbalancer.org • [email protected]

▪ In the Health Checks section set the Check Type to External Script
▪ Set the External Script drop-down to IBM-WHI-MergePACS (the script just created)
▪ Click Update
For manual failover:
▪ Set the Check Type to No checks, Always On
▪ Click Update
11. Set the Fallback Server IP Address field to the IP address of the Secondary MergePACS Cluster
12. Set the Fallback Server Port field to 0 (numerical zero) - this ensures that the fallback server (i.e. the SecondaryCluster) can receive connections on all required ports
13. Enable (check) the MASQ Fallback checkbox
14. Click Update
b) Setting up the Real Servers (RIPs)
1. Using the WebUI, navigate to Cluster Configuration > Layer 4 – Real Servers and click Add a new Real Server next to the newly created PACS VIP
2. Enter the following details:
3. Enter an appropriate label (name) for the RIP, e.g. PrimaryCluster
4. Set the Real Server IP Address field to the IP address of the Primary MergePACS Cluster
5. Click Update
iConnect Enterprise Archive Server ConfigurationAs mentioned on page 6, when using Layer 4 NAT mode and a clustered pair of load balancers, a floating IP address must be configured for use as the default gateway. Set the default gateway of each iConnect Enterprise Archive to be this IP address.
16
© Copyright Loadbalancer.org • www.loadbalancer.org • [email protected]
MergePACS Server ConfigurationAs mentioned on page 6, when using Layer 4 DR mode, the ARP problem must be solved. This involves configuring eachMergePACS Server to be able to receive traffic destined for the VIP, and ensuring that each Server does not respond to ARP requests for the VIP address – only the load balancer should do this.
Note: The steps below are for Windows 2012 / 2016 IPv4 addresses, for other versions of Windows & IPv6 configuration steps, please refer to chapter 6 in the Administration Manual.
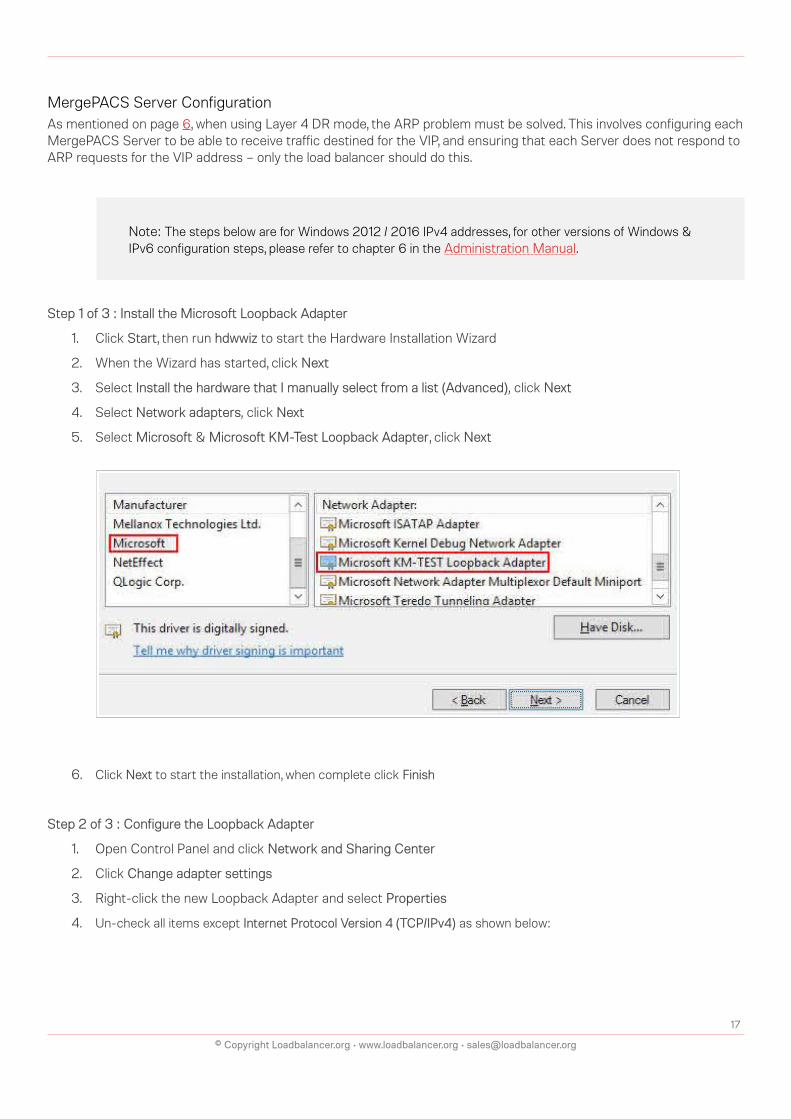
Step 1 of 3 : Install the Microsoft Loopback Adapter
1. Click Start, then run hdwwiz to start the Hardware Installation Wizard
2. When the Wizard has started, click Next
3. Select Install the hardware that I manually select from a list (Advanced), click Next
4. Select Network adapters, click Next
5. Select Microsoft & Microsoft KM-Test Loopback Adapter, click Next
6. Click Next to start the installation, when complete click Finish
Step 2 of 3 : Configure the Loopback Adapter
1. Open Control Panel and click Network and Sharing Center
2. Click Change adapter settings
3. Right-click the new Loopback Adapter and select Properties
4. Un-check all items except Internet Protocol Version 4 (TCP/IPv4) as shown below:
17
© Copyright Loadbalancer.org • www.loadbalancer.org • [email protected]

5. For IPv4 addresses, select Internet Protocol Version (TCP/IPv4), click Properties and configure the IP address to be the same as the address you've used for the Virtual Service (VIP) with a subnet mask of 255.255.255.255 , e.g. 192.168.100.100/255.255.255.255 as shown below:
18
© Copyright Loadbalancer.org • www.loadbalancer.org • [email protected]
6. Click OK on TCP/IP Properties, then click Close on the Interface Properties to save and apply the new settings
Step 3 of 3 : Configure the strong/weak host behavior
Windows Server 2000 and Windows Server 2003 use the weak host model for sending and receiving for all IPv4 interfaces and the strong host model for sending and receiving for all IPv6 interfaces. You cannot configure this behavior. The Next Generation TCP/IP stack in Windows 2008 and later supports strong host sends and receives for both IPv4 and IPv6 by default. To ensure that Windows 2012/2016 is running in the correct mode to be able to respond to the VIP, the following commands must be run on each Real Server:
For IPv4 addresses:
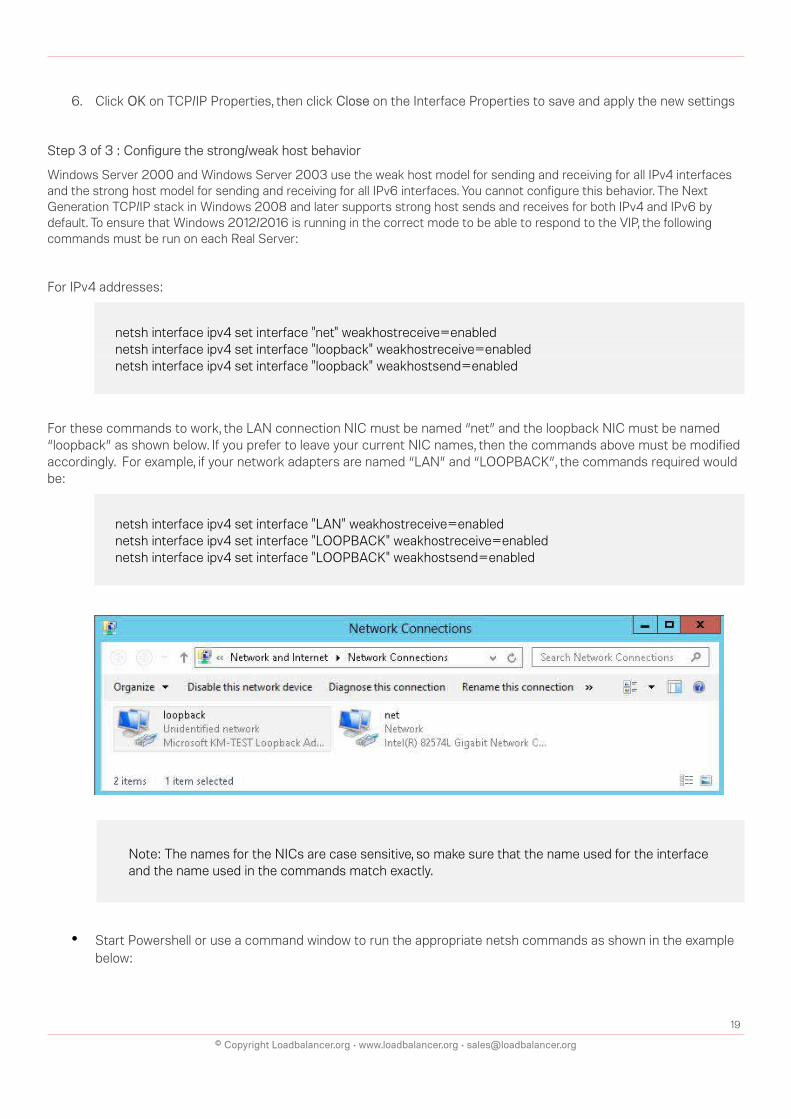
netsh interface ipv4 set interface "net" weakhostreceive=enabled netsh interface ipv4 set interface "loopback" weakhostreceive=enabled netsh interface ipv4 set interface "loopback" weakhostsend=enabled
For these commands to work, the LAN connection NIC must be named “net” and the loopback NIC must be named “loopback” as shown below. If you prefer to leave your current NIC names, then the commands above must be modified accordingly. For example, if your network adapters are named “LAN” and “LOOPBACK”, the commands required would be:
netsh interface ipv4 set interface "LAN" weakhostreceive=enabled netsh interface ipv4 set interface "LOOPBACK" weakhostreceive=enabled netsh interface ipv4 set interface "LOOPBACK" weakhostsend=enabled
Note: The names for the NICs are case sensitive, so make sure that the name used for the interface and the name used in the commands match exactly.
• Start Powershell or use a command window to run the appropriate netsh commands as shown in the example below:
19
© Copyright Loadbalancer.org • www.loadbalancer.org • [email protected]

Repeat steps 1 – 3 on all remaining MergePACS Server(s).
8. Testing & VerificationUnder normal circumstances the Primary Cluster handles all connections. Failover to the Secondary Cluster is handled automatically or manually depending on how the VIP is configured (see page 6).
Automatic FailoverAutomatic failover occurs after 5 minutes. To trigger a failover, the Primary Cluster must be continuously unavailable for this time.
Manual FailoverTo trigger a failover to the Secondary Cluster, the 'Halt' option in the System Overview is used:
(Screen shots for the VNA VIP are shown, the same concept applies to the PACS VIP)
Once Halted, the VIP & RIP will be shown colored blue, connections will then be forwarded to the fallback server, I.e the Secondary Cluster:
To return to the Primary Cluster, the 'Online' option is used:
20
© Copyright Loadbalancer.org • www.loadbalancer.org • [email protected]

Client Connection TestsEnsure that clients can connect via the load balancer to the iConnect Enterprise Archive Cluster / MergePACS cluster. You'll probably need to create new DNS records or modify your existing DNS records, replacing the IP addresses of individual servers or the cluster with the IP address of the Virtual Service on the load balancer.
Note: For more details on testing & diagnosing load balanced services please refer to chapter 12 in the Administration Manual.
9. Technical SupportFor more details about configuring the appliance and assistance with designing your deployment please don't hesitate to contact the support team using the following email address: [email protected]
10. Additional DocumentationThe Administration Manual contains much more information about configuring and deploying the appliance. It's available here:http://pdfs.loadbalancer.org/loadbalanceradministrationv8.pdf
11. ConclusionLoadbalancer.org appliances provide a very cost effective solution for highly available load balanced IBM Watson Health iConnect Enterprise Archive & MergePACS environments.
21
© Copyright Loadbalancer.org • www.loadbalancer.org • [email protected]
12. Appendix1 – Clustered Pair Configuration – Adding a Slave UnitIf you initially configured just the master unit and now need to add a slave - our recommended procedure, please refer to the relevant section below for more details:
Note: A number of settings are not replicated as part of the master/slave pairing process and therefore must be manually configured on the slave appliance. These are listed below:
• Hostname & DNS settings
• Network settings including IP addresses, bonding configuration and VLANs
• Routing configuration including default gateways and static routes
• Date & time settings
• Physical – Advanced Configuration settings including Internet Proxy IP address & port, Firewall table size, SMTP relay and Syslog server• SNMP settings
• Graphing settings
• Firewall Script & Firewall Lockdown Script settings
• Software updates
To add a slave node – i.e. create a highly available clustered pair:
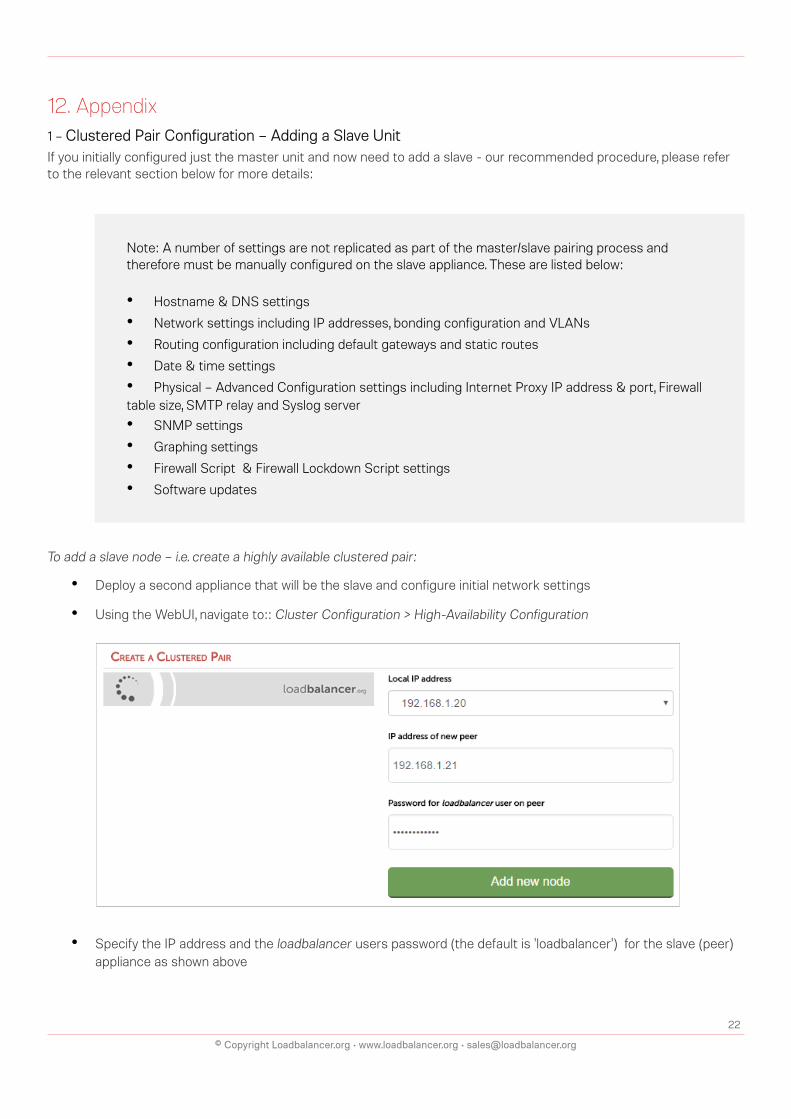
• Deploy a second appliance that will be the slave and configure initial network settings
• Using the WebUI, navigate to:: Cluster Configuration > High-Availability Configuration
• Specify the IP address and the loadbalancer users password (the default is 'loadbalancer') for the slave (peer) appliance as shown above
22
© Copyright Loadbalancer.org • www.loadbalancer.org • [email protected]

• Click Add new node
• The pairing process now commences as shown below:
• Once complete, the following will be displayed:
• To finalize the configuration, restart heartbeat and any other services as prompted in the blue message box at the top of the screen
Note: Clicking the Restart Heartbeat button on the master appliance will also automatically restart heartbeat on the slave appliance.
Note: Please refer to chapter 9 – Appliance Clustering for HA in the Administration Manual for more detailed information on configuring HA with 2 appliances.
23
© Copyright Loadbalancer.org • www.loadbalancer.org • [email protected]

13. Document Revision History
Version Date Change Reason for Change Changed By
1.1.0 2nd August 2019 Styling and layout General styling updates RJC
24
© Copyright Loadbalancer.org • www.loadbalancer.org • [email protected]

About Loadbalancer.orgLoadbalancer.org’s mission is to ensure that its clients’ businesses are never interrupted. The load balancer experts ask the right questions to get to the heart of what matters, bringing a depth of understanding to each deployment. Experience enables Loadbalancer.org engineers to design less complex, unbreakable solutions - andto provide exceptional personalized support.
United Kingdom
Loadbalancer.org Ltd.Compass House, North HarbourBusiness Park, Portsmouth, PO6 4PSUK:+44 (0) 330 380 [email protected]@loadbalancer.org
Canada
Loadbalancer.org Appliances Ltd.300-422 Richards Street, Vancouver,BCV6B 2Z4, CanadaTEL:+1 [email protected]@loadbalancer.org
United States
Loadbalancer.org, Inc.4550 Linden Hill Road, Suite 201Wilmington, DE 19808, USATEL: +1 [email protected]@loadbalancer.org
Germany
Loadbalancer.org GmbHTengstraße 2780798,München, GermanyTEL: +49 (0)89 2000 [email protected]@loadbalancer.org
25
© Copyright Loadbalancer.org • www.loadbalancer.org • [email protected]