Embed Size (px)
Citation preview
Linux for Biologists – Part 2
http://cbsu.tc.cornell.edu/lab/doc/Linux_workshop_Part2.pdf
Robert BukowskiInstitute of Biotechnology
Bioinformatics Facility(aka Computational Biology Service Unit - CBSU)
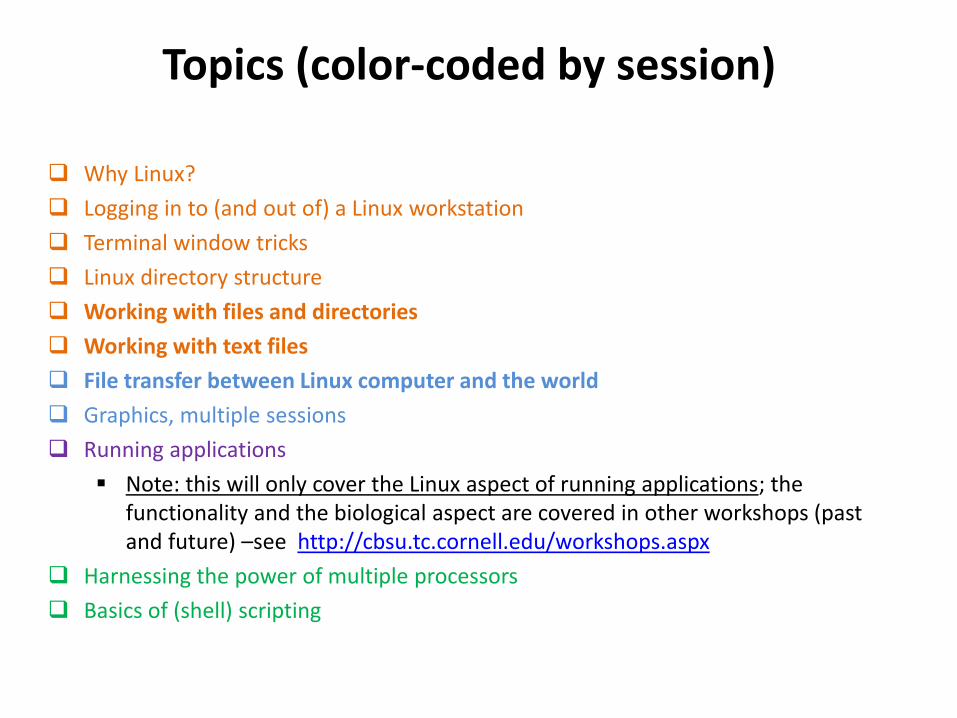
Why Linux?
Logging in to (and out of) a Linux workstation
Terminal window tricks
Linux directory structure
Working with files and directories
Working with text files
File transfer between Linux computer and the world
Graphics, multiple sessions
Running applications
Note: this will only cover the Linux aspect of running applications; the functionality and the biological aspect are covered in other workshops (past and future) –see http://cbsu.tc.cornell.edu/workshops.aspx
Harnessing the power of multiple processors
Basics of (shell) scripting
Topics (color-coded by session)

File Transfer: overview
webAnother Linux or Mac machine
(call it cbsuss04)
Linux workstatione.g., cbsuwrkst2
Mac Windows PC
Download file using web browser (e.g., firefox)OR
Use the URL directly with wget command, e.g., wget ftp://ftp.ncbi.nih.gov/blast/matrices/BLOSUM100
Run scp command from terminal ofeither machine
Use fetch – a graphical file transfer program for MACs to sftp to Linux machine
sftp to Linux machine using any graphical sftp client program, such as:FileZillaWinScpCoreFTP…..
SFTP: secure file transfer protocol
SCP: secure file transfer protocol

File transfer: using graphical sftp clientPC <-> Linux, Mac <-> Linux
On Windows PC: install and use your favorite sftp client program, such as• FileZilla (client): http://filezilla-project.org/• winscp: http://winscp.net/eng/index.php• CoreFTP LE: http://www.coreftp.com/• … others…• When connecting to Lab workstations from a client, use the sftp protocol (or port 22).
You will be asked for your user name and password (the same you use to log in to the lab workstations).
• Transfer text file in text mode, binary files in binary mode (the default “Auto” should be right, but…).
• All clients feature• File explorer-like graphical interface to files on both the PC and on the Linux
machine• Drag-and-drop functionality
On a Mac: file transfer program is fetch (recommended by Cornell CIT)• http://www2.cit.cornell.edu/services/systems_support/filefetch.html#fetchinst• FileZilla also a good choice• graphical user interface• Drag-and-drop functionality
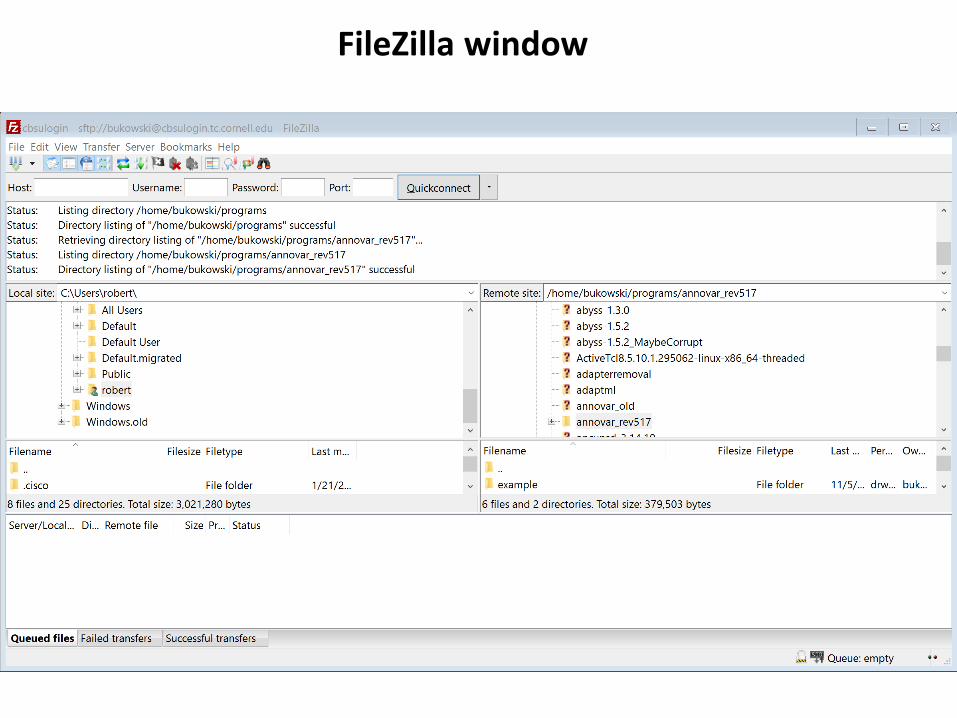
FileZilla window

Files transferred to Linux machine from a Windows or Mac machine often have line endings incompatible with Linux (depends on transfer software used and its settings)
To fix line endings, use dos2unix command
dos2unix my_file mac2unix my_file
(the file my_file will have linux line endings)
dos2unix –n my_file my_file_converted
mac2unix –n my_file my_file_converted
(the file my_file_converted will have linux line endings, the original file my_file will be kept)
Fixing line ending problems

File Transfer: overview
webAnother Linux or Mac machine
(call it cbsuss04)
Linux workstatione.g., cbsuwrkst2
Mac Windows PC
Download file using web browser (e.g., firefox)OR
Use the URL directly with wget command, e.g., wget ftp://ftp.ncbi.nih.gov/blast/matrices/BLOSUM100
Run scp command from terminal ofeither machine
Use fetch – a graphical file transfer program for MACs to sftp to Linux machine
sftp to Linux machine using any graphical sftp client program, such as:FileZillaWinScpCoreFTP…..
SFTP: secure file transfer protocol
SCP: secure file transfer protocol

While logged in on the local machine, execute:
cd /data/reads
scp my_sequence.fa [email protected]:/workdir/files
To copy in the opposite direction:
scp [email protected]:/workdir/files/my_sequence.fa .
File transfer: command-line scpLinux <-> Linux, Mac <-> Linux
NOTES:• scp is a generalization of cp, where the source or the target file is on a remote
machine• Most cp options work with scp (scp –r will recursively copy whole directory)• The remote machine must accept connection requests (depends on network config)
Objective: copy a file /data/reads/my_sequence.fa from the local Linux or Mac machine to directory /workdir/files on a remote Linux machine called cbsuwrkst2.tc.cornell.edu

File Transfer: overview
webAnother Linux or Mac machine
(call it cbsuss04)
Linux workstatione.g., cbsuwrkst2
Mac Windows PC
Download file using web browser (e.g., firefox)OR
Use the URL directly with wget command, e.g., wget ftp://ftp.ncbi.nih.gov/blast/matrices/BLOSUM100
Run scp command from terminal ofeither machine
Use fetch – a graphical file transfer program for MACs to sftp to Linux machine
sftp to Linux machine using any graphical sftp client program, such as:FileZillaWinScpCoreFTP…..
SFTP: secure file transfer protocol
SCP: secure file transfer protocol
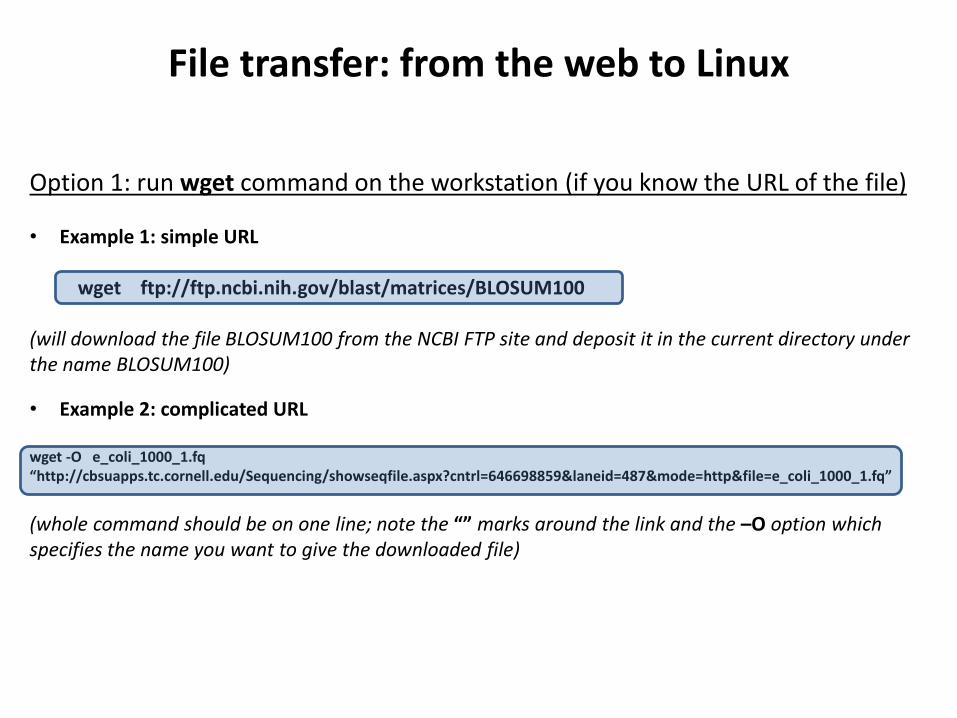
File transfer: from the web to Linux
Option 1: run wget command on the workstation (if you know the URL of the file)
• Example 1: simple URL
wget ftp://ftp.ncbi.nih.gov/blast/matrices/BLOSUM100
(will download the file BLOSUM100 from the NCBI FTP site and deposit it in the current directory under the name BLOSUM100)
• Example 2: complicated URL
wget -O e_coli_1000_1.fq “http://cbsuapps.tc.cornell.edu/Sequencing/showseqfile.aspx?cntrl=646698859&laneid=487&mode=http&file=e_coli_1000_1.fq”
(whole command should be on one line; note the “” marks around the link and the –O option which specifies the name you want to give the downloaded file)
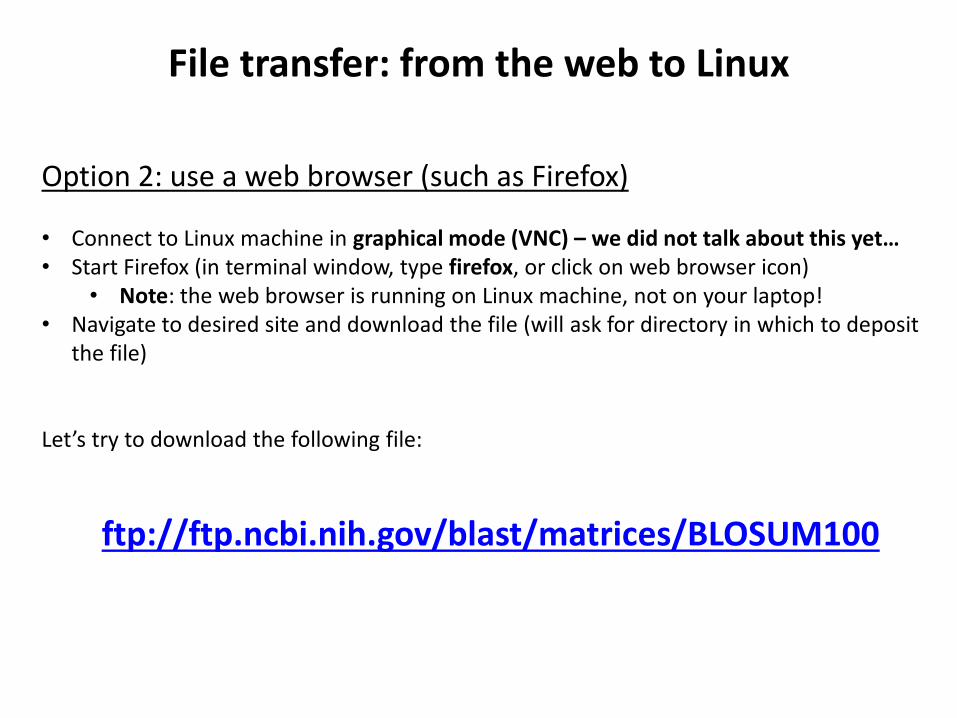
File transfer: from the web to Linux
Option 2: use a web browser (such as Firefox)
• Connect to Linux machine in graphical mode (VNC) – we did not talk about this yet…• Start Firefox (in terminal window, type firefox, or click on web browser icon)
• Note: the web browser is running on Linux machine, not on your laptop!• Navigate to desired site and download the file (will ask for directory in which to deposit
the file)
Let’s try to download the following file:
ftp://ftp.ncbi.nih.gov/blast/matrices/BLOSUM100

Example 3: Downloading Illumina sequencing results
Fragment of notification e-mail from Cornell Genomics Facility:
File transfer: from the web to Linux
Sample: P_Teo_10_b
File: 6581_7527_30809_C877GANXX_P_Teo_10_b_R1.fastq.gz
Size 18570118164 bytes, MD5: 118c0c974a6c4dd81895c26cdd4208e6
Link:
http://cbsuapps.tc.cornell.edu/Sequencing/showseqfile.aspx?mode=http&cntrl=94863491&refid=93804
Sample: P_Teo_11_b
File: 6582_7527_30810_C877GANXX_P_Teo_11_b_R1.fastq.gz
Size 17854406437 bytes, MD5: 20be4a4305b6a2f3260c461536bbf060
Link:
http://cbsuapps.tc.cornell.edu/Sequencing/showseqfile.aspx?mode=http&cntrl=1244420836&refid=93805
e.t.c.
How to get these files onto a Linux machine?

How to get the sequencing files onto a Linux machine?
1. Open Firefox (it’s on a Linux machine, so need to be logged in through VNC) and navigate to each URL – very tedious if the number of files large
2. Use wget commands (provided in the notification e-mail as attachment file download.sh)
wget -q -c -O 6581_7527_30809_C877GANXX_P_Teo_10_b_R1.fastq.gz
http://cbsuapps.tc.cornell.edu/Sequencing/showseqfile.aspx?mode=http&cntrl=9486
3491&refid=93804
wget -q -c -O 6582_7527_30810_C877GANXX_P_Teo_11_b_R1.fastq.gz
http://cbsuapps.tc.cornell.edu/Sequencing/showseqfile.aspx?mode=http&cntrl=1244
420836&refid=93805
A couple of lines from the attached file download.sh (typically there is more than two wget commands):
Transfer this file to your Linux machine and execute it as shell script:
sh ./download.sh

Exercise: batch download of files from sequencing facility
Open your e-mail, find a message “Test Illumina distribution e-mail” with an attachment download.sh
Transfer the attachment file onto your Linux machine. You can do one of the following:
Option 1:• open the attachment in a text editor on your laptop and copy its contents to clipboard (using the
mouse)• in Linux machine terminal, open a new file (in a directory where you want your files downloaded to)
using a text editor of your choice (e.g., nano or vi)• Paste the contents of the clipboard to the new file on Linux machine and save that file.
Option 2:• Save the attachment file on disk on your laptop• Use a file transfer technique of your choice (interactive sftp client, command-line scp or sftp) to
transfer the saved file from laptop to your Linux machine, to the directory where you want the fastqfiles to be downloaded to.
Once the file download.sh is ready on the Linux machine:
• Log in to the Linux machine (if not yet done so)• cd to the directory where the download.sh file has been deposited• Execute the file:
sh ./download.sh
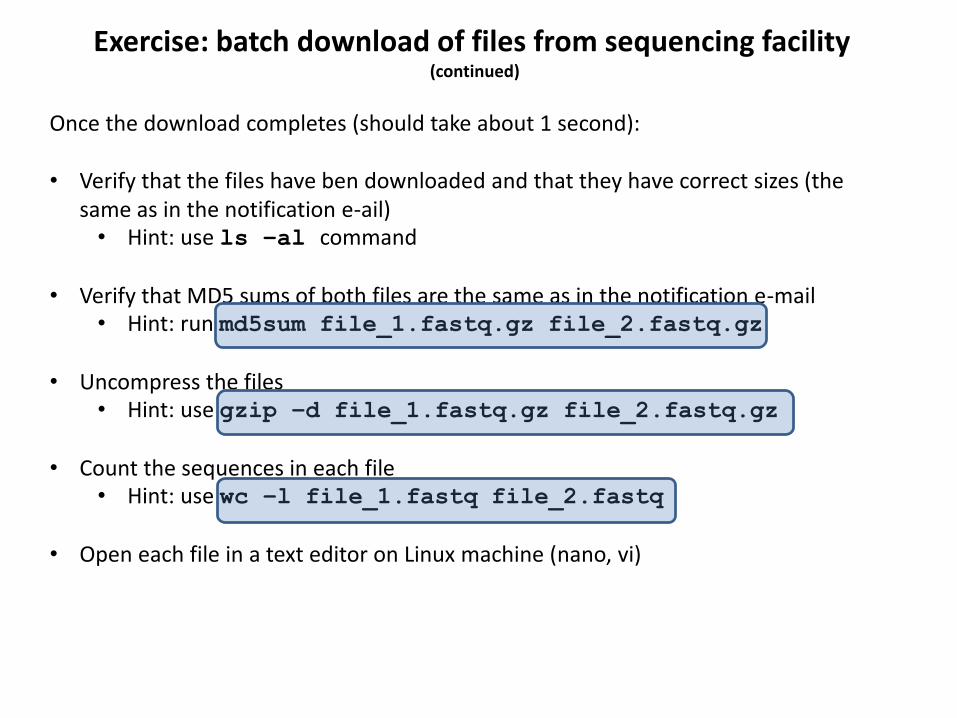
Exercise: batch download of files from sequencing facility(continued)
Once the download completes (should take about 1 second):
• Verify that the files have ben downloaded and that they have correct sizes (the same as in the notification e-ail)• Hint: use ls –al command
• Verify that MD5 sums of both files are the same as in the notification e-mail• Hint: run md5sum file_1.fastq.gz file_2.fastq.gz
• Uncompress the files• Hint: use gzip –d file_1.fastq.gz file_2.fastq.gz
• Count the sequences in each file• Hint: use wc –l file_1.fastq file_2.fastq
• Open each file in a text editor on Linux machine (nano, vi)

Multiple shells and graphics

Running multiple shells at the same time
Start a few separate ssh sessions (e.g., can use “Duplicate session” function in PuTTy)
• Separate window for each shell
screen: a program which allows running multiple shells within one “screen session” in a single terminal window
• All shells run in a single window (which can be divided, but not too convenient)
• can switch between the shells with a few keystrokes• can detach the whole screen session (with all shells running) and re-attach
it later• Screen session survives connection/laptop crashes – perfect way of keeping
long jobs running
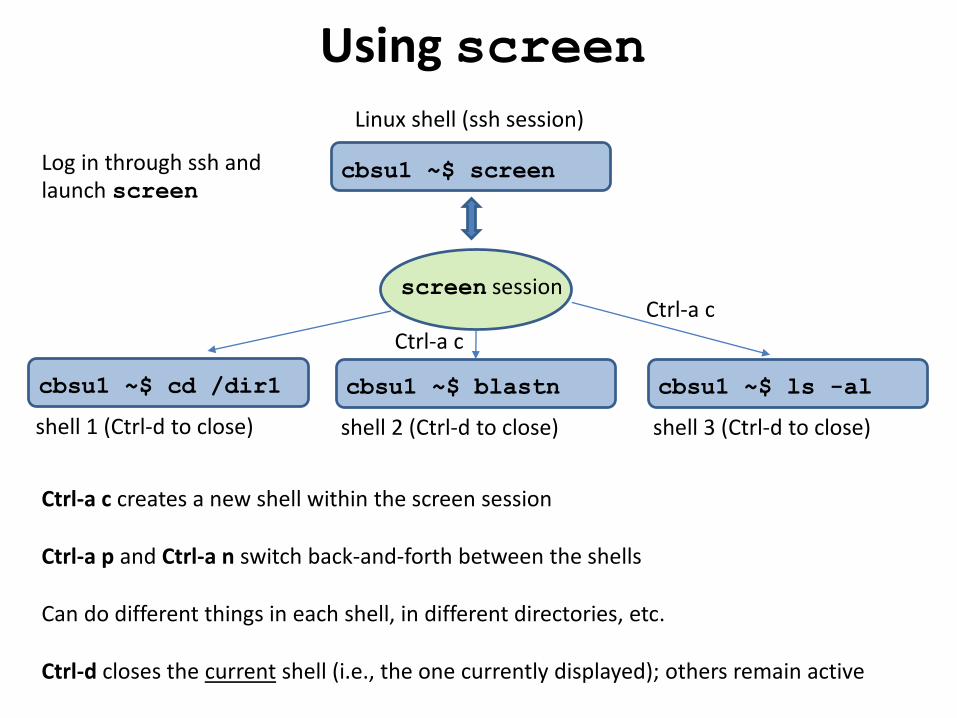
Using screen
cbsu1 ~$ screenLog in through ssh and launch screen
Linux shell (ssh session)
screen session
cbsu1 ~$ cd /dir1
shell 1 (Ctrl-d to close)
cbsu1 ~$ blastn
shell 2 (Ctrl-d to close)
cbsu1 ~$ ls -al
shell 3 (Ctrl-d to close)
Ctrl-a c
Ctrl-a c
Ctrl-a c creates a new shell within the screen session
Ctrl-a p and Ctrl-a n switch back-and-forth between the shells
Can do different things in each shell, in different directories, etc.
Ctrl-d closes the current shell (i.e., the one currently displayed); others remain active

Using screen
cbsu1 ~$ screen
Linux shell (ssh session)
screen session
cbsu1 ~$ cd /dir1
shell 1 (Ctrl-d to close)
cbsu1 ~$ blastn
shell 2 (Ctrl-d to close)
cbsu1 ~$ ls –al
shell 3 (Ctrl-d to close)
Disconnected screen session keeps running on its own, with everything within it.
Ctrl-a dor
Network problemor
Laptop crash
Detach screen session
Using screen
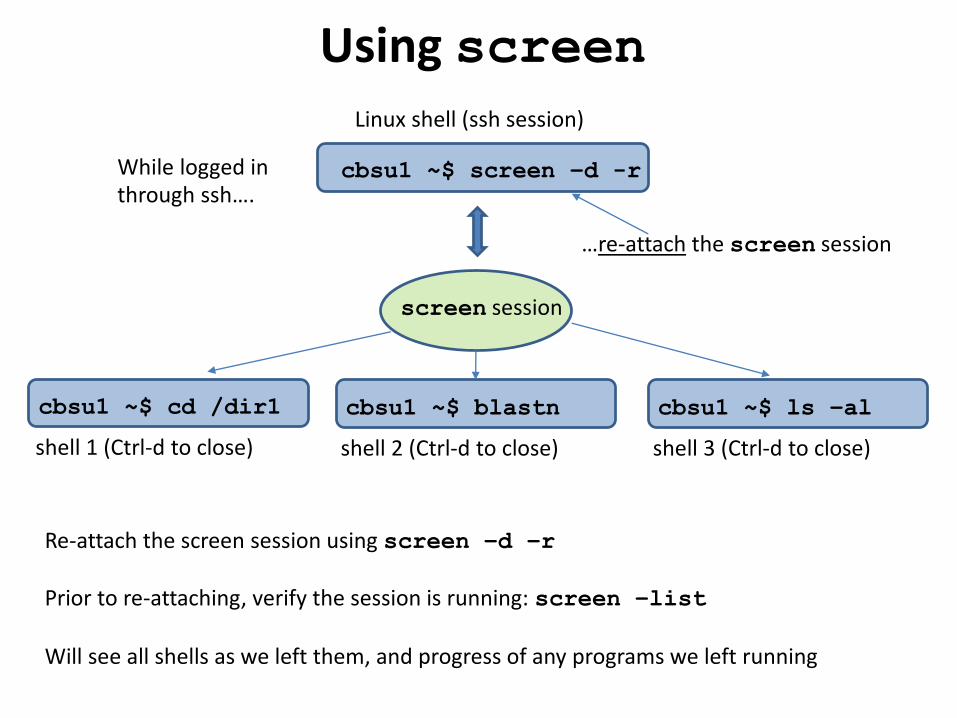
cbsu1 ~$ screen –d -r
Linux shell (ssh session)
screen session
cbsu1 ~$ cd /dir1
shell 1 (Ctrl-d to close)
cbsu1 ~$ blastn
shell 2 (Ctrl-d to close)
cbsu1 ~$ ls –al
shell 3 (Ctrl-d to close)
Re-attach the screen session using screen –d –r
Prior to re-attaching, verify the session is running: screen –list
Will see all shells as we left them, and progress of any programs we left running
While logged in through ssh….
…re-attach the screen session

screen: running multiple shells in one window(an alternative to multiple terminal windows)
After logging in, type screen
Screen command What it does
screen Start a new session
screen -list List all your screen sessions
screen –d –rscreen –d –r [sessionID]
Re-attach previously detached (or unintentionallydisconnected) session – can be done upon next login
Ctrl-a c Create a new window (shell) in a session; can be repeated multiple times
Ctrl-a n Ctrl-a p Switch to next (n), previous (p) window within a session
Ctrl-a “ List all windows in a session, switch to one
Ctrl-a d Detach a session (all windows will continue running)
Ctrl-d Exit form current window (or from whole session, if in last window)
screen -wipe Kill all your screen sessions
For more features/functionality – type screen –h or Ctrl-a ? (within session)Sessions are persistent – will survive connection problems, turning off laptop, etc.
Most useful screen commands:

If not already done so, connect to your assigned workstation via ssh (using PuTTy or other ssh client)
In the terminal window, type screen and hit Enter. You just opened the first window in your screen session.
Type Ctrl-a c (i.e, press Ctrl key and while holding it press a, then let go of both keys and press c). Then do it one more time. You just opened two more screen windows within your session.
Execute the ls –al command in the current window. Then switch to the next window pressing Ctrl-a n. run the pwd command there, and switch to the next window hitting Ctrl-a n again. Switch to previous window using Ctrl-a p. As you cycle through the windows, you will see them as you last left them.
Simulate a network or power problem by closing the PuTTy terminal window (it “X” in the upper right corner).
Using PuTTy, connect to your assigned machine again. In the terminal window, type screen –list. You should see the screen session you left behind.
Type screen –d –r. This will re-connect you to your screen session. Cycle through the windows using Ctrl-a p, Ctrl-a n, or Ctrl-a “. Do you see your windows as you left them?
Gracefully detach your screen session using Ctrl-a d (all your windows will keep running). Then re-attach again using screen –d –r.
Terminate your screen session by hitting Ctrl-d in each window (this will terminate the current window). Doing it in the last window will terminate the screen session (a message will be displayed). Your main PuTTy terminal will keep running.
Exercise: using “screen”

ssh clients like PuTTy give access to an alphanumeric terminal window, but….
A Linux machine can also run graphical applications (e.g., web browsers, GUIs)
How to render Linux-generated graphics remotely on a laptop screen?
For step-by-step instructions on how to use graphical Linux applications while working remotely, seehttp://cbsu.tc.cornell.edu/lab/doc/Remote_access.pdf
Graphics on Linux workstations
In short, there are two options:
• Log in through ssh with X11 forwarding (check option in PuTTy, or ssh –Y on a Mac). The laptop must be running an X-windows manager. Start GUI application in ssh terminal, and the GUI window will appear on your laptop screen. Individual GUI windows are rendered this way.
• Log in to a Linux graphical mode using VNC (Virtual Network Computing)• Start a VNC server on Linux machine (typically installed by default)• Download and start a VNC client on your laptop, connect to VNC server on Linux machine• Your laptop will display whole Linux graphical desktop (just like sitting in front of a
monitor connected to a Linux machine)

VNC: starting VNC server on BioHPC Lab In web browser, navigate to http://cbsu.tc.cornell.edu/, log in (if not yet logged in), click on User:your_id, select tab My Reservations
Click “Connect VNC”, to initialize VNC connection, or “Reset VNC” re-initialize
Select resolution you want
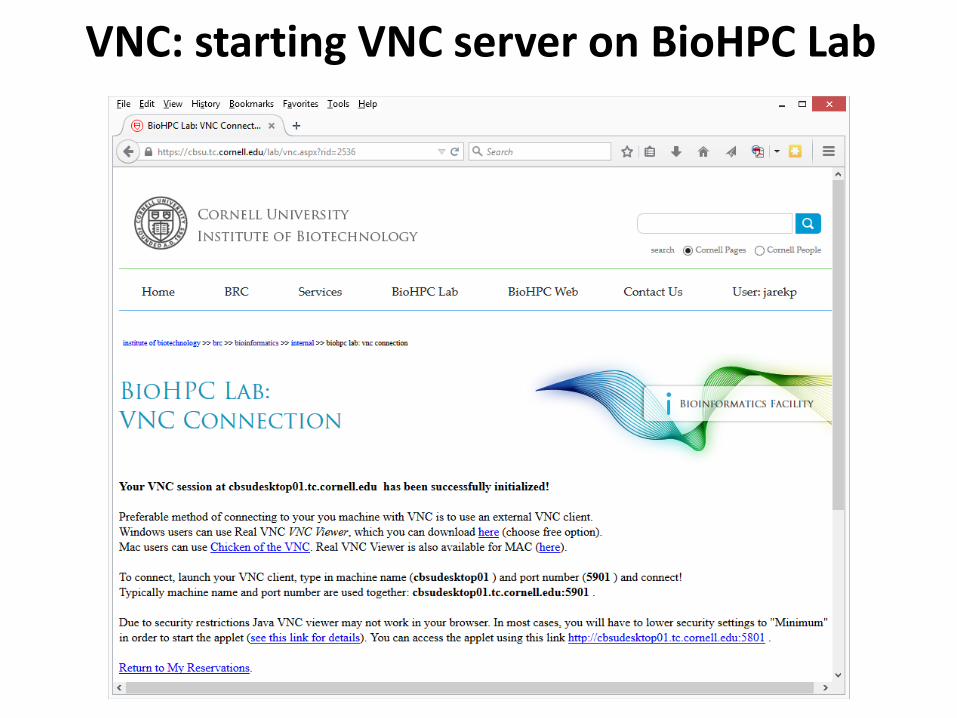
VNC: starting VNC server on BioHPC Lab
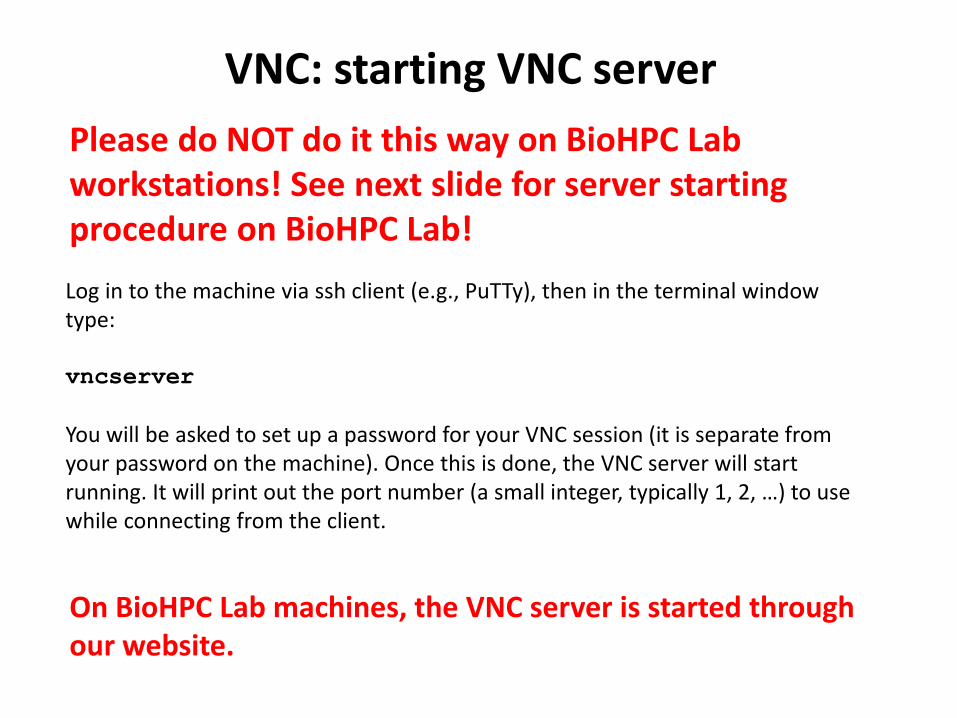
VNC: starting VNC server
Please do NOT do it this way on BioHPC Lab workstations! See next slide for server starting procedure on BioHPC Lab!
Log in to the machine via ssh client (e.g., PuTTy), then in the terminal window type:
vncserver
You will be asked to set up a password for your VNC session (it is separate from your password on the machine). Once this is done, the VNC server will start running. It will print out the port number (a small integer, typically 1, 2, …) to use while connecting from the client.
On BioHPC Lab machines, the VNC server is started through our website.

to install: RealVNC viewer
https://www.realvnc.com/download/viewer/
VNC: downloading a client
This is just an executable file – put it somewhere on your hard drive. No installation required.

VNC: starting the client and logging in

Right-click anywhere within blue desktop, select Open Terminal …. or…. click Applications -> Accessories -> Terminal
VNC: logged in

Exercise: connect to your assigned workstation using VNC
• Go to “My Reservations” pagehttp://cbsu.tc.cornell.edu/lab/lab.aspx , log in, click on “My Reservations” menu link
• Choose resolution (depends on your monitor)
• Click on “Connect VNC”
• Follow prompts to connect your VNC client to your VNC session
• Open terminal window in the VNC desktop by right-click on the desktop background and choosing “Open Terminal”.
• Disconnect (close VNC window) and then reconnect. Is the session still alive?

VNC sessions are persistent (similar to screen)
They run even when the client is disconnected
If you need to reset the session you need to use “Reset VNC” link
Equivalent to Windows Remote Desktop
VNC: summary