Embed Size (px)
Citation preview

Link Wireless Telephone and Accessories Model PTB400/410 Model PTB450 Link Dual Charger Link Quick Charger Link Quad Charger
User Guide
Part Number: 72-0075-09 Issue C

SpectraLink Corporation Link Wireless Telephones and Accessories User Guide
Part Number: 72-0075-09-C.doc Page 2
Trademark Information Polycom® and the logo designs SpectraLink® LinkPlus Link NetLink SVP Are trademarks and registered trademarks of Polycom, Inc. in the United States of America and various countries. All other trademarks used herein are the property of their respective owners.
Patent Information The accompanying product is protected by one or more US and foreign patents and/or pending patent applications held by Polycom, Inc.
Copyright Notice Copyright © 2007, 2008 Polycom, Inc.
All rights reserved under the International and pan-American copyright Conventions.
No part of this manual, or the software described herein, may be reproduced or transmitted in any form or by any means, or translated into another language or format, in whole or in part, without the express written permission of Polycom, Inc.
Do not remove (or allow any third party to remove) any product identification, copyright or other notices.
Every effort has been made to ensure that the information in this document is accurate. Polycom, Inc. is not responsible for printing or clerical errors. Information in this document is subject to change without notice and does not represent a commitment on the part of Polycom, Inc.
Notice Polycom, Inc. has prepared this document for use by Polycom personnel and customers. The drawings and specifications contained herein are the property of Polycom and shall be neither reproduced in whole or in part without the prior written approval of Polycom, nor be implied to grant any license to make, use, or sell equipment manufactured in accordance herewith.
Polycom reserves the right to make changes in specifications and other information contained in this document without prior notice, and the reader should in all cases consult Polycom to determine whether any such changes have been made.
No representation or other affirmation of fact contained in this document including but not limited to statements regarding capacity, response-time performance, suitability for use, or performance of products described herein shall be deemed to be a warranty by Polycom for any purpose, or give rise to any liability of Polycom whatsoever.
Contact Information Please contact your Polycom Authorized Reseller for assistance.
Polycom, Inc. 4750 Willow Road, Pleasanton, CA 94588 http://www.polycom.com

SpectraLink Corporation Link Wireless Telephones and Accessories User Guide
Part Number: 72-0075-09-C.doc Page 2
Table of Contents The Link Wireless Telephone Model PTB450 3
The Link Wireless Telephone Model PTB400/410 4
Overview 5 Status Indicators 5 Quick Start Guide 6
Operating Instructions 7 Basic Operation 7 The Wireless Telephone Headset 8 Setting User Preferences 9 Menu Navigation 9 Menu Options 9
Link Wireless Telephone Accessories 10 Battery Packs 10 Link Dual Charger 11 Link Quick Charger 13 Link Quad Charger 15
General Care of the Wireless Telephone and Chargers 17
Tips for Use 18
Safety Information 19 Wireless Telephones 19 Additional Safety Information for Wireless Telephones 20 Chargers and Battery Packs 20
Renseignements sur la Sécurité pour les Téléphones sans Fil 21 Renseignements sur la Sécurité Pour les Blocs-Piles et les Chargeurs 22
Regulatory Information 23 FCC Information 23 Industry Canada (IC) Information 23 International Certifications 23 Specific Absorption Rate (SAR) Information 24

SpectraLink Corporation Link Wireless Telephones and Accessories User Guide
Part Number: 72-0075-09-C.doc Page 3
The Link Wireless Telephone Model PTB450
The Link Wireless Telephone supports a broad range of enterprise applications and is ideally suited for the general office, finance or hospitality environments. This compact handset offers a rich set of features including a high-resolution graphic display, menu-driven functions and messaging capability – all within a lightweight ergonomic design. A full set of accessories is available including headsets, chargers and carrying cases.
Model PTB450 features a taupe-colored face, a vibrating ringing option and a backlit keypad and display.
SpectraLink Corporation Link Wireless Telephones and Accessories User Guide
Part Number: 72-0075-09-C.doc Page 4
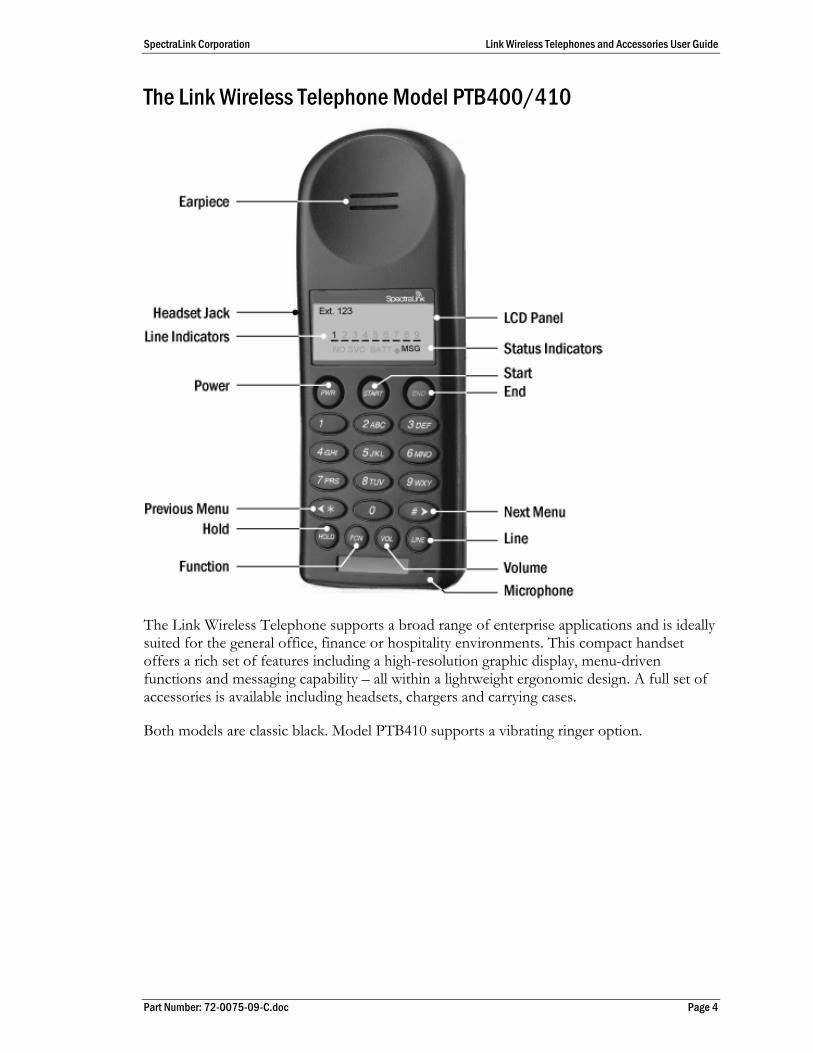
The Link Wireless Telephone Model PTB400/410
The Link Wireless Telephone supports a broad range of enterprise applications and is ideally suited for the general office, finance or hospitality environments. This compact handset offers a rich set of features including a high-resolution graphic display, menu-driven functions and messaging capability – all within a lightweight ergonomic design. A full set of accessories is available including headsets, chargers and carrying cases.
Both models are classic black. Model PTB410 supports a vibrating ringer option.

SpectraLink Corporation Link Wireless Telephones and Accessories User Guide
Part Number: 72-0075-09-C.doc Page 5
Overview Your Link Wireless Telephone is a state of the art communication
device that utilizes radio wave technology to send and receive voice transmissions. It is designed to operate like the familiar cell phone. However, the Wireless telephone utilizes the private telephone system installed in your facility and will not operate outside the area reached by this system.
The following guide is meant to provide general information about your wireless telephone. Contact your system administrator for additional information on how your wireless telephone functions within your telephone system.
Registered model numbers This document covers registered model numbers: Link Wireless Telephones PTB400, PTB410, PTB450 Link Chargers PTQ360, PTC400, BC4900 Link Battery Packs PTS360
Customer support hotline SpectraLink wants you to have a successful installation. If you have questions please contact our Customer Support Hotline at 800 775 5330. The hotline is open Monday through Friday, 6:00 a.m. to 6:00 p.m. Mountain time.
Status Indicators NO SVC The wireless telephone cannot receive or place calls. You may be
outside of the coverage area. Walk back into the covered area. BATT Your Battery Pack charge is low. You will also hear a beep in the
earpiece. Your Battery Pack needs to be recharged. MSG You have a voicemail message.

SpectraLink Corporation Link Wireless Telephones and Accessories User Guide
Part Number: 72-0075-09-C.doc Page 6
Quick Start Guide
Power on Press and hold PWR until double chirp, then
release
Power off Press and hold PWR until single chirp, then
release
Answer call Press START
Hang up Press END
Place call Press START, dial number
Select line Press START then press LINE , then select line number (1-9)
Adjust volume during call
Press VOL while you are talking to toggle between base volume level and a louder volume level
Put call on hold Press HOLD
Mute/Unmute microphone Press FCN then 1

SpectraLink Corporation Link Wireless Telephones and Accessories User Guide
Part Number: 72-0075-09-C.doc Page 7
Operating Instructions Basic Operation
Turn the wireless telephone on Press the PWR key for about one second. You will hear a double chirp. Your extension will display. The NO SVC message will display briefly. When it goes out, you are ready to make and receive calls.
Turn the wireless telephone off Press the PWR key for about one second. You will hear a single chirp. If you accidentally turn your wireless telephone off during a conversation, you can restore your conversation by pressing the PWR key and then the START key, provided the person you are talking to has not hung up.
Place a call Press the START key, wait for dial tone, then dial the number. Dial calls with the wireless telephone exactly as with your desk phone. Your telephone system may require you to select a line by pressing the LINE key, followed by a line number. To hang up when you’ve finished the call, press the END key. Do not use the PWR key to end a call, because that will turn your wireless telephone off and you will not receive calls until you turn the wireless telephone back on.
Mute microphone To mute the microphone so you can hear but won’t be heard, press FCN then press 1. MUTED appears on the wireless telephone display. Press FCN then 1 again to restore voice pickup.
Answer a call The wireless telephone will ring or vibrate to alert you. Additionally, a line indicator on the display may flash, and the display may show information about the call, such as caller’s name and extension. To answer a call, press the START key and hold the earpiece to your ear. If you are on a call and hear subdued ringing, a call is coming in on a second line. To answer this call, put your first call on hold and press the Line key then the line number of the second call.
Access telephone system features
To access the features of your telephone system from the wireless telephone, press FCN anytime while in a call to display a menu of available features. Press the key(s) for the desired feature, or press FCN again to display more options. Select EXIT MENUS to exit. If your telephone system supports softkeys, pressing FCN provides access to softkey functions. You will need to press FCN twice to display the feature menu. Because softkey and system features vary, your system administrator will explain them for your telephone system.
Change volume The wireless telephone has two volume levels, low and high. Set the low volume level by pressing FCN until VOLUME displays. Use keypad to select a level from 1 (softest) to 8 (loudest). High volume is automatically set two levels higher than low volume. Toggle between high and low volume by pressing the VOL key while in a call.
Backlight (PTB450 only)
The backlight comes on when any key is pressed or when there is an incoming call and stays on for ten seconds. It turns off after ten seconds if another key is not pressed within that period.

SpectraLink Corporation Link Wireless Telephones and Accessories User Guide
Part Number: 72-0075-09-C.doc Page 8
The Wireless Telephone Headset SpectraLink offers optional headsets for use in noisy environments
or if you need to have your hands free while talking on the wireless telephone. To use the headset, simply plug it into the jack on the side of the wireless telephone. The headset is specially designed to work properly with The Link Wireless Telephone. We do not recommend using other headsets.
Ringing with headset To hear ringing through a headset, the ring type must be set to SOFT.
Answer a call To answer a call when your headset is plugged in, press any key except PWR or END.
Low headset volume The speaker volume level can be adjusted separately for headset use. Plug the headset in and press FCN until VOLUME displays. Use the keypad to enter a volume level from 1 (softest) to 8 (highest). This sets the low volume. High volume is automatically set two levels higher than low volume. Toggle between high and low volume by pressing the VOL key while in a call.

SpectraLink Corporation Link Wireless Telephones and Accessories User Guide
Part Number: 72-0075-09-C.doc Page 9
Setting User Preferences When the wireless telephone is in standby mode (on but not in use),
press and briefly hold FCN to display the Standby menu which allows you to set user options. Check with your system administrator for specific features supported by your wireless telephone.
Menu Navigation
Press Right arrow to display next menu item.
Press Left arrow to display previous menu item.
Press Zero to select or change item.
Press
FCN to return to previous menu level.
Press
END to exit menus.
Menu Options Volume level Sets audio volume level.
Use keypad to select a level from 1 (softest) to 8 (loudest). Ring type Select Ring type to set the standard ring on the wireless telephone.
Normal is factory default. Vibrator ring works only if your wireless telephone has the optional vibrating ringer. Auxiliary Ring is used only by external applications. Press 0 to select desired ring type. The ring type currently set displays with an asterisk.
High noise mode Adjusts the wireless telephone to account for background noise. Select an option that describes the noise in your environment.
Extension Sets extension number associated with your wireless telephone. Use keypad to enter extension number.
Language Sets the default language for wireless telephone menus. Select the language to be used with your wireless telephone.

SpectraLink Corporation Link Wireless Telephones and Accessories User Guide
Part Number: 72-0075-09-C.doc Page 10
Link Wireless Telephone Accessories Battery Packs
Overview The wireless telephone will need to have its Battery Pack (PTS360) recharged periodically. The Nickel Metal Hydride (NiMH) rechargeable wireless telephone Battery Pack gives you four hours of talk time or 80 hours of stand-by time. Stand-by time is when the phone is turned on, but you are not using it.
Indications of low battery The wireless telephone will notify you when the charge on the Battery Pack becomes low. If the wireless telephone is in use, the BATT message will display and you will hear a soft beep through the earpiece every six seconds. You have two minutes to complete the call or change the Battery Pack. The Battery Pack can be changed while the call is still in progress. Do not press END. Quickly remove the discharged Battery Pack and replace with a charged Battery Pack, press PWR, and then press START to resume the call in progress. If the wireless telephone is idle, you will hear a brief modulated ring signal and the Low Battery message will display. Your wireless telephone will not operate until you replace the Battery Pack. Depending on the charging equipment you have purchased, you will either place the wireless telephone in a Charging Stand to charge the Battery Pack, or you will remove the Pack from the wireless telephone and install it in the Charger.
Caution: Take care not to short the battery contacts on the Battery Pack with metal objects such as coins, keys or paper clips. Shorting the contacts can cause permanent damage.
Battery Pack removal and replacement
To remove the Battery Pack, press down on the oval button above the Battery Pack on the back of the wireless telephone. Slide the Pack toward the bottom of the wireless telephone until it stops, then lift up. To replace the Battery Pack, first properly align the top of the Battery Pack with the arrows on the label on the back of the wireless telephone. Gently press and slide the Pack toward the top of the wireless telephone until it snaps into place. You should not have to force it against the wireless telephone.
Important: Only use SpectraLink Battery Packs with SpectraLink Wireless
Telephones. Do not dip the Battery Pack in water or throw into fire. Do not throw away the Battery Pack with your domestic waste. Take used Battery Packs to an appropriate collection point for recycling or send them back to your supplier or servicing agent.

SpectraLink Corporation Link Wireless Telephones and Accessories User Guide
Part Number: 72-0075-09-C.doc Page 11
Link Dual Charger
Link Wireless Telephone In PTC400 Dual Charger
Overview The Link Dual Charger is a two-slot desktop charger designed to charge the model PTS360 Battery Pack. The handset is placed in the front compartment and a single spare Battery Pack may be placed in the rear slot. Either slot can be chosen to take priority (the first Battery Pack placed into either slot is charged first) so that the handset is always ready for use. Full charging is accomplished in approximately two hours for each Battery Pack. The Link Dual Charger will only charge Nickel Metal Hydride (NiMH) Battery Packs. The Link Dual Charger will only successfully charge NiMH Battery Packs with a YELLOW label on the handset contact side. If the indicator light is flashing with a Battery Pack or handset in the slot, check to make sure the Battery Pack has a YELLOW label.
Power supply Four different models of the power supply for the Link Dual Charger are available for regional power requirements. The correct power supply must be ordered separately when the charger is ordered. If any questions arise, please contact your service representative.
Set up the Link Dual Charger by placing it on a flat, horizontal surface in order to ensure proper contact with the Battery Pack contacts. Connect the power supply to the charger and plug the power supply into an appropriate wall outlet. The LEDs will light only when a handset or Battery Pack is inserted into the slots.

SpectraLink Corporation Link Wireless Telephones and Accessories User Guide
Part Number: 72-0075-09-C.doc Page 12
Operation The user must end any call in progress by pressing the END key on the handset before placing the handset into the charger. The call will not automatically terminate when the handset is placed in the charger. The Battery Pack and handset will only fit into the charger compartments one way. The handset should be inserted into the front slot, facing forward. The Battery Pack alone should be inserted into the rear slot with the side that attaches to the handset facing to the rear. See the cover photo for the correct orientation. Correct placement has been achieved when the charging light is activated. Incorrect placement will not activate the charging light.
Indicator lights
The Link Dual Charger is designed to charge one Battery Pack at a time. Each charging slot has a red light that indicates its current mode. The charging lights have the following characteristics: When both a Battery Pack and a handset are present at the same time, the first one placed into the charger will begin charging. When it is fully charged, the second Battery Pack will charge. When the LED indicator light turns off, the charger is finished charging the Battery Pack in its slot, indicating that the Battery Pack is ready for use. The Link Dual Charger will recharge a single NiMH Battery Pack or a single handset in two hours.
Indication Light Charging Characteristic Solid On Charging. Solid Dim Waiting to charge. Battery Pack in other
slot is charging. Off Done charging, empty slot or unit is not
powered. Flash Error. Battery Pack not charging. Try
again or replace Battery Pack.

SpectraLink Corporation Link Wireless Telephones and Accessories User Guide
Part Number: 72-0075-09-C.doc Page 13
Link Quick Charger
Link PTQ360 Quick Charger and power supply
Overview The Link PTQ360 Quick Charger holds a single PTS360 Battery Pack and can charge it in approximately one hour.
Power supply Four different models of the power supply for the Link Quick Charger are available for regional power requirements. The correct power supply must be ordered separately when the charger is ordered. If any questions arise, please contact your service representative.
Set up the Link Quick Charger by plugging the power supply into the Link Quick Charger and into an appropriate wall outlet. A solid red LED above the empty charger slot indicates that the slot is idle and ready for use. If the LED does not light, check the power supply and plug connection to the charger. If the charger appears to be plugged in correctly, make sure the wall outlet has power.
Position the Battery Pack in the charging slot by aligning the top of the Battery Pack with the tracks on the charging slot then gently sliding the Battery Pack upward onto the charging slot. While the Battery Pack is in the charging slot, the LED above the slot will indicate the status of the charging process and/or the Battery Pack.
LED status indicators
Solid Green—the Battery Pack is charging. The Link Quick Charger takes 60-90 minutes to fully charge a Battery Pack. If the NiMH Battery Pack is hot or cold when placed in the charger, it may take longer to charge. Flashing green—the Battery Pack is fully charged and ready for use. You may leave a fully charged Battery Pack in the Link Quick Charger. However, if you remove a fully charged Battery Pack then replace it in the charger, the charger LED will be solid green until the charger determines that this Battery Pack is fully charged. It may take a few minutes to give the flashing green indication. Solid red or flashing red—the Battery Pack in the charging slot is no longer capable of retaining a charge and is not usable. If the Battery Pack will not charge, do not continue to charge the Battery Pack. Dispose of it properly and do not attempt to use it in the handset. Do not attempt to open or repair a defective Battery Pack.
SpectraLink Corporation Link Wireless Telephones and Accessories User Guide
Part Number: 72-0075-09-C.doc Page 14
Flashing red/green—there is a problem with either the Battery Pack or Link Quick Charger. It may mean the Battery Pack being charged is too hot or too cold. Allow the Battery Pack to stabilize at room temperature and try again. If the Battery Pack will not charge, do not continue to charge the Battery Pack. Dispose of it properly and do not attempt to use it in the handset. Do not attempt to open or repair a defective Battery Pack. If several different Battery Packs cause the charger to show a flashing red or red/green LED, the charger may not be working properly. To verify this, substitute another Link Quick Charger and repeat the operation that caused the failure. If the same Battery Pack lights a green LED when inserted in a different charger, the Link Quick Charger is faulty. Contact your service representative for assistance. Flashing yellow—the Link Quick Charger is testing and conditioning the Battery Pack. This test/condition mode is automatically started every 11th cycle of the charger. Testing the NiMH high-capacity Battery Pack takes approximately eight to ten hours. To manually start the test, press the MODE button. To stop the test, press the MODE button. However, it is highly recommended that the test be allowed to complete.
Battery Pack bins If a handset is to be used during the recharging cycle, fully charged Battery Packs must always be available. Therefore, it is recommended that a bin is available to collect discharged Battery Packs and a second bin for charged Battery Packs. Users can quickly replace their discharged Battery Pack with a charged one. An assigned person can recharge the Battery Packs and move them to the charged bin as they are recharged. It is also recommended that the bins be non-metallic and clearly labeled to identify whether they are intended for charged or discharged Battery Packs.

SpectraLink Corporation Link Wireless Telephones and Accessories User Guide
Part Number: 72-0075-09-C.doc Page 15
Link Quad Charger
Link Quad Charger Model BC4900 (shown with two empty charging bays)
Overview The Link Quad Charger is designed to simultaneously charge four PTS360 NiMH (Nickel Metal Hydride) Battery Packs. The Link Quad Charger is only authorized for use in the U.S. and Canada. The Link Quad Charger may be mounted on a horizontal or vertical surface.
Power supply The power supply that is required for this unit is the SpectraLink part number GCX100A. Set up the Link Quad Charger by plugging the power supply into the Link Quad Charger and into an appropriate wall outlet. A solid red LED above an empty charger slot indicates that the slot is idle and ready for use. If the LEDs do not light, check the power supply and plug connection to the charger. If the charger appears to be plugged in correctly, make sure the wall outlet has power.
Position the Battery Pack in a charging slot by aligning the top of the Battery Pack with the tracks on the charging slot then gently sliding the Battery Pack upward onto the charging slot. While the Battery Pack is in the charging slot, the LED above the slot will indicate the status of the charging process and/or the Battery Pack.
LED status indicators Solid Green—the Battery Pack is charging. The Link Quad Charger takes 60-90 minutes to fully charge a Battery Pack. If the NiMH Battery Pack is hot or cold when placed in the charger, it may take longer to charge. Flashing green—the Battery Pack is fully charged and ready for use. You may leave a fully charged Battery Pack in the Link Quad Charger. However, if you remove a fully charged Battery Pack then replace it in the charger, the charger LED will be solid green until the charger determines that this Battery Pack is fully charged. It may take a few minutes to give the flashing green indication. Solid red or flashing red—the Battery Pack in the charger is no longer capable of retaining a charge and is not usable. If the Battery Pack will not charge, do not continue to charge the Battery Pack. Dispose of it properly and do not attempt to use it in the wireless telephone. Do not attempt to open or repair a defective Battery Pack.

SpectraLink Corporation Link Wireless Telephones and Accessories User Guide
Part Number: 72-0075-09-C.doc Page 16
Flashing red/green—there is a problem with either the Battery Pack or charger. It may mean the Battery Pack being charged is too hot or too cold. Allow the Battery Pack to stabilize at room temperature and try again. If the Battery Pack will not charge, do not continue to charge the Battery Pack. Dispose of it properly and do not attempt to use it in the wireless telephone. Do not attempt to open or repair a defective Battery Pack. If several different Battery Packs cause the charger to show a flashing red or red/green LED, the charger may not be working properly. To verify this, check the Battery Pack in a different slot or substitute another charger and repeat the operation that caused the failure. If the same Battery Pack lights a green LED when inserted in a different slot or charger, the first charger is faulty. Contact your service representative for assistance.
SpectraLink Corporation Link Wireless Telephones and Accessories User Guide
Part Number: 72-0075-09-C.doc Page 17
General Care of the Wireless Telephone and Chargers This section applies to all Link Wireless Telephones and all Link
chargers. Do not drop Avoid dropping the wireless telephone or knocking it against hard
surfaces. Carrying the wireless telephone in a holster or carrying case will help to protect it.
Do not disassemble There are no serviceable parts in the wireless telephone or chargers. You should not open the wireless telephone case nor disassemble the chargers. Doing so will void your warranty.
Cleaning tips Turn off the wireless telephone before you clean it. Never immerse in water. Clean the exterior surfaces, including the charging contacts, with a cloth that has been slightly moistened with water. Take care not to exert undue pressure on charger electrical contacts while wiping.
Wiping the handset surface with a water-dampened cloth or paper towel will remove most films or residues. If the soiling is too stubborn for plain water, a mild detergent solution may be used. Be sure to wipe away any detergent residue with a clean water-dampened cloth.
The wireless telephone may be cleaned with any general-purpose household glass and surface-type cleaner. DO NOT SPRAY THE HANDSET DIRECTLY!
Pre-treated cloths such as used for eyeglasses or cameras may be used to clean the handset. Pre-moistened towelettes may also be used to clean the handset, however, avoid those containing lanolin or aloe as it will leave a slippery residue.
The surface of the handset may be cleaned occasionally with disinfectants used for general cleaning in a medical environment. Isopropyl alcohol may be used occasionally applied by a damp cloth or paper towel. When using alcohol, do not rub the keypad characters vigorously. Doing so will significantly degrade legibility. Do not use furniture polishes, waxes or plasticizer-based cleaner (Armor All™, etc.) Do not use lanolin, aloe, glycerin or other skin care type products. Do not apply any solvent such as acetone, mineral spirits etc. Do not directly spray or immerse the handset.
Headset cleaning Should the headset connector become dirty, a scratchy or intermittent signal may be experienced. To clean the connector, dip the non-padded end of either a wooden or paper handled cotton swab in isopropyl alcohol. Gently insert in the connector and twist, repeating several times. If available, blow compressed air into the connector to clear debris.

SpectraLink Corporation Link Wireless Telephones and Accessories User Guide
Part Number: 72-0075-09-C.doc Page 18
Tips for Use • Before you use the wireless telephone, the Battery Pack must be
charged.
• You can only use the wireless telephone with your facility’s telephone system. It is not a public cellular handset.
• Keep the wireless telephone away from your ear when it is ringing.
• The microphone is below the LINE key. This is a sensitive microphone that works well when the wireless telephone is correctly positioned on your ear. There is no need to speak directly into the microphone, but do not cover it with your hand or cheek when talking.
• The LCD panel displays information about the status of your wireless telephone and prompts you about features.
• If the Battery Pack is low, you will hear a soft beep and see the BATT message in the display.
• Improper disposal of Battery Packs can damage the environment. Dispose of batteries properly.
• To protect the wireless telephone, use a carrying case.

SpectraLink Corporation Link Wireless Telephones and Accessories User Guide
Part Number: 72-0075-09-C.doc Page 19
Safety Information Wireless Telephones
Changes or modifications to this equipment not approved by SpectraLink Corporation may cause this equipment to not comply with part 15 of the FCC rules and void the user’s authority to operate this equipment.
SpectraLink products contain no user-serviceable parts inside. Refer servicing to qualified service personnel.
Operational Warnings
Potentially Explosive Atmospheres Turn off your handset prior to entering any area with a potentially explosive atmosphere. Do not remove, install, or charge batteries in such areas. Sparks in a potentially explosive atmosphere can cause an explosion or fire resulting in bodily injury or even death.
The areas with potentially explosive atmospheres referred to above include fueling areas such as below decks on boats, fuel or chemical transfer or storage facilities, areas where the air contains chemicals or particles such as grain, dust, or metal powders, and any other area where you would normally be advised to turn off your vehicle engine. Areas with potentially explosive atmospheres are often but not always posted.
Batteries All batteries can cause property damage and/or bodily injury, such as burns if a conductive material such as jewelry, keys, or beaded chains touches exposed terminals. The conductive material may complete an electrical circuit (short circuit) and become quite hot. Exercise care in handling any charged battery, particularly when placing it inside a pocket, purse, or other container with metal objects.
Electro Magnetic Interference and Compatibility
Nearly every electronic device is susceptible to electromagnetic interference (EMI) if inadequately shielded, designed, or otherwise configured for electromagnetic compatibility.
Facilities To avoid electromagnetic interference and/or compatibility conflicts, turn off your handset in any facility where posted notices instruct you to do so. Hospitals or health care facilities may be using equipment that is sensitive to external RF energy.
Pacemakers The Health Industry Manufacturers Association recommends that a minimum separation of 6 inches (15 cm) be maintained between a handheld, wireless-radio product and a pacemaker. These recommendations are consistent with the independent research by, and recommendations of, Wireless Technology Research. Persons with pacemakers should: • ALWAYS keep the handset more than 6 inches (15 cm) from their pacemaker when the handset is turned
ON. • Not carry the handset in a breast pocket. • Use the ear opposite the pacemaker to minimize the potential for interference. • Turn the handset OFF immediately if you have any reason to suspect that interference is taking place.
Hearing Aids Some digital wireless handsets may interfere with some hearing aids. In the event of such interference, you may want to consult your hearing-aid manufacturer to discuss alternatives.

SpectraLink Corporation Link Wireless Telephones and Accessories User Guide
Part Number: 72-0075-09-C.doc Page 20
Other Medical Devices If you use any other personal medical device, consult the manufacturer of your device to determine if it is adequately shielded from external RF energy. Your physician may be able to assist you in obtaining this information.
Use While Driving Campus installations and warehouse facilities that use vehicles such as forklifts or golf carts should abide by these guidelines when using wireless telephones: • Give full attention to driving and to the road, aisle, or path. • Use hands-free operation, if available. • Pull off the road, aisle, or path and park before making or answering a call.
For Vehicles Equipped with an Airbag Do not place a portable handset in the area over the airbag or in the airbag deployment area. An airbag inflates with great force. If a handset is placed in the airbag deployment area and the airbag inflates, the handset may be propelled with great force and cause serious injury to occupants of the vehicle.
Additional Safety Information for Wireless Telephones • It is recommended that standard acceptance procedures be followed prior to operating this equipment in
proximity of life-support systems.
• To minimize risk of interference, pacemaker users should not carry the wireless telephone next to the pacemaker.
• Earpiece may retain magnetic objects.
• Operation of the wireless telephone may produce an audible noise noticeable to hearing aid users. It is recommended that a hearing aid compatible headset be used by hearing aid users.
Handset Operation Normal Position Hold the handset as you would any other telephone, with the earpiece to your ear and speak into the microphone. The internal antenna is then positioned properly.
Chargers and Battery Packs • It is normal for the Battery Pack to become warm when charging. • Chargers are only authorized for use in the U.S. and Canada. The correct power supply for your charger
will be provided with the charger. • Chargers operate in a 50° to 85° F (10° to 30° C) environment. Do not expose them to freezing
temperatures or direct sunlight. • Do not place anything in the charger other than the handset or single Battery Pack as appropriate as the
contacts could be bent. Bent contacts can keep the Battery Pack from charging. • Only use SpectraLink Battery Packs with Spectra-Link chargers. • Never use non-SpectraLink charging units as they could damage the Battery Pack.1 • Only use the original plug-in power adapter for the chargers. • Contact your service representative for assistance if you have a faulty Battery Pack or a problem with your
charger. • Replacement Battery Packs are available from your supplier or servicing agent.
1 If you have been issued a charger that carries another brand, please check with your phone system administrator for directions on how to properly use it.

SpectraLink Corporation Link Wireless Telephones and Accessories User Guide
Part Number: 72-0075-09-C.doc Page 21
Renseignements sur la Sécurité pour les Téléphones sans Fil
Les changements ou modifications non approuvés par SpectraLink apportés à cet appareil peuvent rendre ce dernier non-conforme à la partie 15 des règlement de la Commission fédérale des communications et annuler le droit d’utilisation de cet appareil.
Les produits SpectraLink ne comporte aucune pièce interne réparable par l’utilisateur. Confier l’entretien à du personnel qualifié.
Avertissements sur l’Utilisation
Atmosphère potentiellement explosive Éteindre le combiné avant d’entrer dans une zone ayant une atmosphère potentiellement explosive. Ne pas enlever, installer ou charger les blocs-piles dans une telle zone. Une étincelle dans une atmosphère potentiellement explosive peut provoquer une explosion ou un incendie qui peut causer des blessures corporelles ou même la mort.
Les zones ayant une atmosphère potentiellement explosive auxquelles nous référons ci haut comprennent les zones d'alimentation en carburant comme sous le pont d'un bateau, les installations de transfert ou d'entreposage de carburant ou de produits chimiques, les zones où l’air contient des produits chimiques ou des particules comme du grain, de la poussière ou de la poudre de métal et toute autre zone où l’on vous demanderait normalement d’éteindre le moteur de votre véhicule. Les zones ayant une atmosphère potentiellement explosive sous souvent, mais pas toujours, signalées par des affiches.
Piles Toutes les piles peuvent causer des dommages matériels et/ou des préjudices corporels, tels que des brûlures si un matériau conducteur comme un bijou, des clés ou une chaîne touche aux terminaux exposés. Le matériau conducteur peut compléter un circuit électrique (court-circuit) et devenir très chaud. Faire attention en manipulant une pile chargée, particulièrement en la plaçant dans une poche, un sac à main ou un autre contenant qui renferme des objets en métal.
Interférence Électromagnétique et Compatibilité
Presque tous les appareils électroniques sont exposés aux interférences électromagnétiques (EMI) s'ils ne sont pas bien protégés, conçus ou configurés différemment en fonction de la compatibilité électromagnétique.
Installations Afin d’éviter l’interférence électromagnétique et/ou les conflits de compatibilité, éteindre le combiné à l’intérieur de toute installation où des avis vous invitant à le faire sont affichés. Les hôpitaux et les installations de soins de santé peuvent utiliser de l'équipement sensible à l'énergie RF externe.
Stimulateurs cardiaques La Health Industry Manufacturers Association recommande de conserver une distance d’au moins 6 pouces (15 cm) entre un téléphone cellulaire ou un appareil radio sans fil et un stimulateur cardiaque. Ces recommandations sont en accord avec les recherches indépendantes et les recommandations de Wireless Technology Research. Les personnes ayant un stimulateur cardiaque devraient : • Toujours garder le combiné à au moins 6 pouces (15 cm) de leur stimulateur cardiaque lorsque le combiné
est allumé. • Ne pas porter le combiné dans une poche à poitrine. • Utiliser l’oreille du côté opposé au stimulateur cardiaque pour minimiser l’interférence potentielle. • Éteindre immédiatement le combiné si la présence d’une interférence est soupçonnée.
Appareils auditifs Certains téléphones cellulaires numériques sans fil peuvent interférer avec certains appareils auditifs. Si ce type d’interférence se produit, consulter le fabricant d'appareil auditif pour discuter des options.

SpectraLink Corporation Link Wireless Telephones and Accessories User Guide
Part Number: 72-0075-09-C.doc Page 22
Autres appareils médicaux Si tout autre appareil médical est utilisé, consulter le fabricant de l’appareil pour déterminer s’il est adéquatement protégé contre l’énergie RF externe. Un médecin peut aider à obtenir ces renseignements.
Utilisation lors de la Conduite Les installations situées sur un campus et les entrepôts où l’on utilise des véhicules comme des chariots élévateurs à fourche ou des voiturettes de golf doivent se conformer à ces lignes de conduite pour l'utilisation de téléphones sans fil : • Diriger toute son attention à la conduite et à la route, l’allée ou le sentier. • Utiliser la fonction mains libres, si disponible. • Arrêter sur le bord de la route, de l’allée ou du sentier et stationner avant de faire un appel ou de répondre
à un appel.
Pour les véhicules équipés d’un sac gonflable Ne pas placer le téléphone cellulaire sur la surface au-dessus du sac gonflable ou dans la zone où ce dernier se déploie. Un sac gonflable se gonfle avec beaucoup de force. Si un combiné est placé dans la zone de déploiement du sac gonflable et que celui-ci se gonfle, le combiné peut être projeté avec une grande force et causer une blessure grave aux occupants du véhicule.
Renseignements sur la Sécurité Pour les Blocs-Piles et les Chargeurs • Il est normal que le bloc-piles soit chaud pendant la recharge. • L'utilisation des chargeurs est autorisée seulement aux États-Unis et au Canada. Le cordon d’alimentation
approprié est fourni avec votre chargeur. • Le chargeur doit fonctionner dans un environnement dont la température est entre 10° à 30 °C (50° à
85 °F). Ne pas exposer le chargeur à des températures près du point de congélation, ni sous les rayons directs du soleil.
• Ne rien placer d'autre dans le chargeur que le combiné ou un seul bloc-piles tel qu’approprié, car les contacts pourraient se plier. La recharge des bloc-piles pourrait ne pas s’effectuer si les contacts sont pliés.
• Utiliser seulement les blocs-piles SpectraLink dans le chargeur SpectraLink. • N’utiliser jamais des chargeurs autres que SpectraLink car cela pourrait endommager les blocs-piles.2 • Utiliser seulement l’adaptateur d’alimentation enfichable d’origine du chargeur. • Communiquer avec le représentant de service pour obtenir de l'aide si le bloc-piles est défectueux ou si le
chargeur présente un problème.
2 Si vous avez reçu un chargeur qui accepte d’autres marques, veuillez consulter votre administrateur de système de téléphonie au sujet des directives d’utilisation appropriée.

SpectraLink Corporation Link Wireless Telephones and Accessories User Guide
Part Number: 72-0075-09-C.doc Page 23
Regulatory Information FCC Information Wireless Telephones PTB400, PTB410: FCC ID IYGPTB400 PTB450: FCC ID IYGPTB450
This device complies with part 15 of the FCC Rules. Operation is subject to the following two conditions: (1) This device may not cause harmful interference, and (2) this device must accept any interference received, including interference that may cause undesired operation.
Chargers PTQ360, PTC400, BC4900
This equipment has been tested and found to comply with the limits for a Class A digital device, pursuant to Part 15 of FCC rules. These limits are designed to provide reasonable protection against harmful interference when the equipment is operated in a commercial environment. This equipment generates, uses, and can radiate radio frequency energy and, if not installed and used in accordance with the instruction manual, may cause harmful interference to radio communications. Operation of this equipment in a residential area is likely to cause harmful interference in which case the user will be required to correct the interference at his own expense.
Industry Canada (IC) Information Wireless Telephones PTB400, PTB410: IC: 2128B-PTB400 PTB450: IC: 2128B-PTB450
This device complies with RSS-210 of Industry Canada. Operation is subject to the following two conditions: 1) this device may not cause interference, and 2) this device must accept any interference, including interference that may cause undesired operation of the device. Privacy of communications may not be ensured when using this telephone.
Chargers PTQ360, PTC400, BC4900
This Class A digital apparatus complies with Canadian ICES-003. Cet appareil numérique de la classe A est conforme à la norme NMB-003 due Canada.
International Certifications United States Canada3
UL 60950 CAN/CSA-22.2 No. 60950
United States Part 15
3 TUV Rheinland of North America is a Nationally Recognized Testing Laboratory (NRTL) in the United States and is accredited by the Standards Council of Canada to test and certify products to Canadian National Standards. Clients can demonstrate compliance for both U.S. and Canadian markets through a single mark (cTUVus) on their product(s) which denotes compliance to U.S. and Canadian National Standards.

SpectraLink Corporation Link Wireless Telephones and Accessories User Guide
Part Number: 72-0075-09-C.doc Page 24
Specific Absorption Rate (SAR) Information Your wireless telephone is a low power radio transmitter and receiver. When it is ON, it receives and also sends out radio frequency (RF) signals. In August 1996, the Federal Communications Commissions (FCC) adopted RF exposure guidelines with safety levels for hand-held wireless phones. Those guidelines are consistent with the safety standards previously set by both U.S. and international standards bodies: • ANSI C95.1 (1992) American National Standards Institute • NCRP - Report 86 (1986) National Council on Radiation Protection and Measurements • ICNIRP (1996) International Commission on Non-Ionizing Radiation Protection; • DHWC - Safety Code 6 Department of Health and Welfare Canada
Those standards were developed by independent scientific organizations through periodic and thorough evaluation of scientific studies. The standards include a substantial safety margin designed to assure the safety of all persons, regardless of age and health. The exposure standard for wireless mobile phones employs a unit of measurement known as the Specific Absorption Rate, or SAR. The SAR limit set by the FCC is 1.6W/kg.4 Tests for SAR are conducted using standard operating positions specified by the FCC with the phone transmitting at its highest certified power level in all tested frequency bands. Although the SAR is determined at the highest certified power level, the actual SAR level of the phone while operating can be well below the maximum value. This is because the phone is designed to operate at multiple power levels so as to use only the power required to reach the network. In general, the closer you are to a wireless base station antenna, the lower the power output. Before a phone model is available for sale to the public, it must be tested and certified to the FCC that it does not exceed the limit established by the government-adopted requirement for safe exposure. The tests are performed in positions and locations (e.g., at the ear and worn on the body) as required by the FCC for each model. While there may be differences between the SAR levels of various phones and at various positions, they all meet the government requirement for safe exposure. The FCC has granted an Equipment Authorization for this model phone with all reported SAR levels evaluated as in compliance with the FCC RF emission guidelines. SAR information on this model phone is on file with the FCC and can be found under the Display Grant section of http://www.fcc.gov/oet/ea after searching on FCC ID IYGPTB400 or IYGPTB450. Additional information on Specific Absorption Rates (SAR) can be found on the Cellular Telecommunications Industry Association (CTIA) web-site at http://www.ctia.org/. The only authorized headsets that may be utilized with the PTB400/410/450 are those obtainable from SpectraLink or its reseller partners. The peak SAR values of the PTB400/410/450 wireless telephone are Head: 0.065 mW/g Body: 0.022 mW/g SAR: Frequency range 902 – 927 MHz PTB400 wireless telephone Exposure Category: General Population/Uncontrolled Exposure
4 In the United States and Canada, the SAR limit for mobile phones used by the public is 1.6 watts/kg (W/kg) averaged over one gram of tissue. The standard incorporates a substantial margin of safety to give additional protection for the public and to account for any variations in measurements.