Embed Size (px)
Citation preview
Level 13: Creating Yes / No Player Options
Welcome to Level 13 of the RPG Maker VX Introductory Course. In Level 12 we created a locked door
Event.
In this Level, we’ll create a Event that requests the player to select Yes or No in order to receive the
airship.
Before we go ahead and make the airship Event, let’s plan the flow of the Event.
The player speaks with a wise-man in the room with the locked door.
An airship appears outside the Cave of Demons.
Since this is an Event where a vehicle will appear in the Field map after the player speaks with someone,
the process is very similar to what we did with the ship in Level 9. The “Set Vehicle Location” command
will execute after the player speaks with the wise-man and the airship will appear in the Field map.
Step 31: Constructing the Airship Event
Creating the Wise-man Event
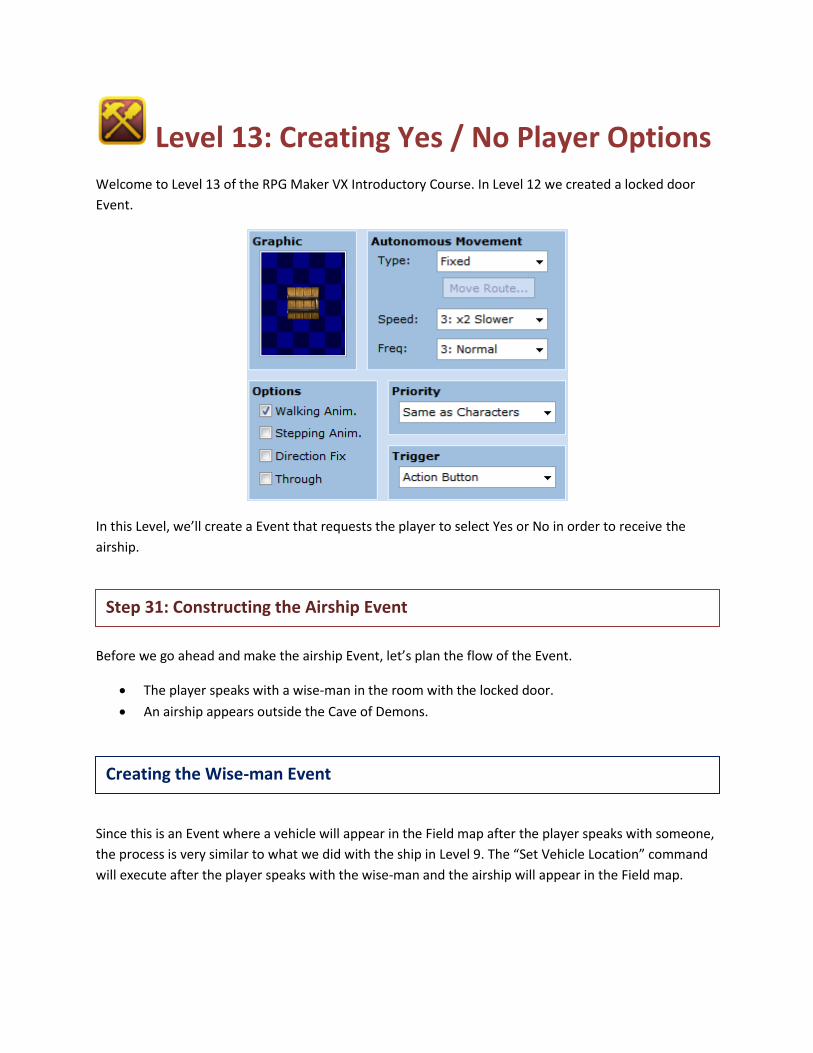
*Creating a new Event.
The wise-man will be waiting behind the locked door in the Cave of Demons Level 2. Right-click on
where you’d like to set him (We’ve selected coordinates 003,004) and select “New Event...” from the
pop-up menu.
*Selecting the Event graphic.
Double-click on the Graphic box to set the graphic for the wise-man. We’ve chosen the old man found in
Actor2, second from the right on the bottom.
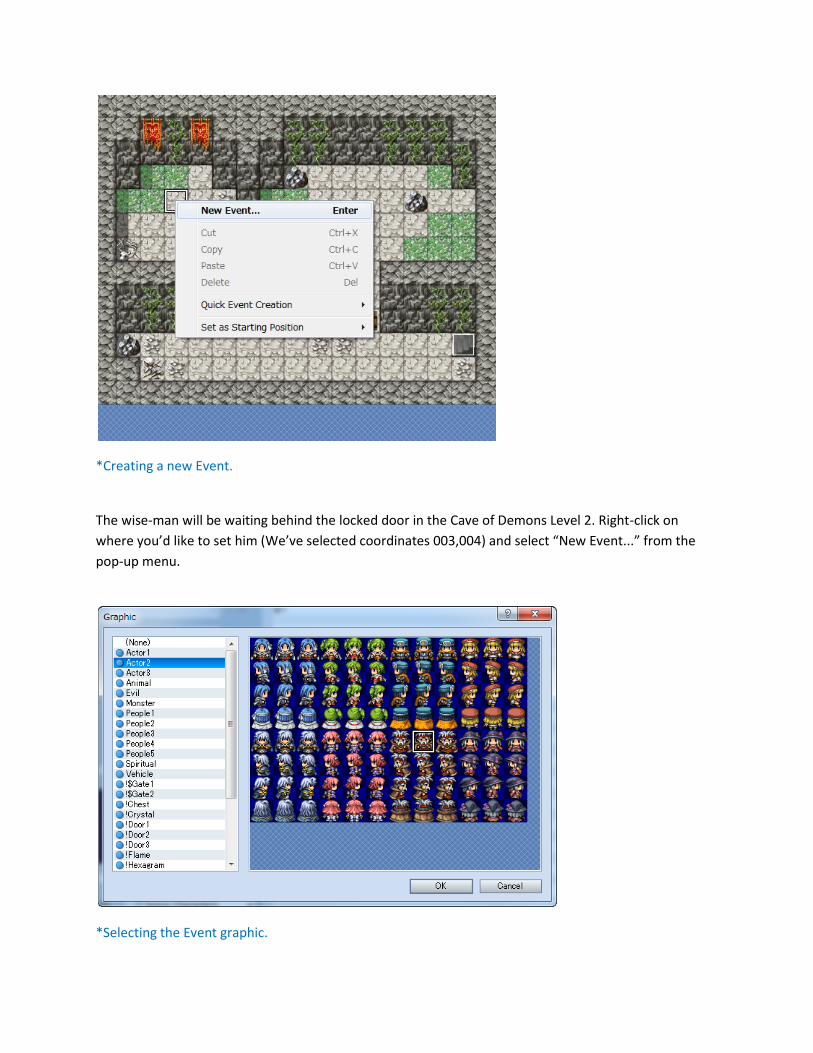
*Setting the options.
The remaining settings may be left at their defaults.
*The Show Text Event Command
Double-click on the “@” mark in the Event Editor and select the “Show Text” command. Click once in the
Text box and input what you’d like the wise-man to say. We’ve also selected the matching face graphic
from the Actor2 list (second from the right, bottom row).
Inputting the Wise-man’s Lines
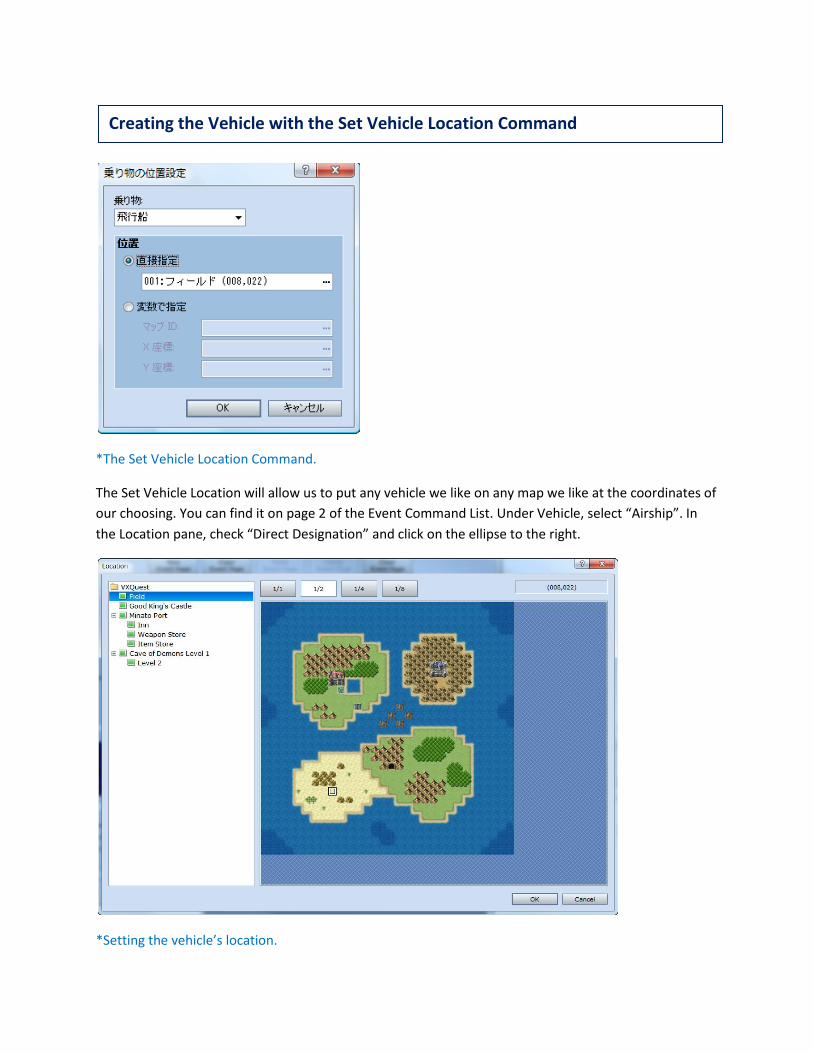
*The Set Vehicle Location Command.
The Set Vehicle Location will allow us to put any vehicle we like on any map we like at the coordinates of
our choosing. You can find it on page 2 of the Event Command List. Under Vehicle, select “Airship”. In
the Location pane, check “Direct Designation” and click on the ellipse to the right.
*Setting the vehicle’s location.
Creating the Vehicle with the Set Vehicle Location Command
In the window that appears, you can set the exact map and coordinates for the vehicle. Select the Field
map from the map tree to the left, and in the preview pane on the right, select a location somewhere
near the entrance to the Cave of Demons. You can put the airship right next to the cave entrance, but
we’ve chosen a spot that is a little further away (coordinates 008,022).
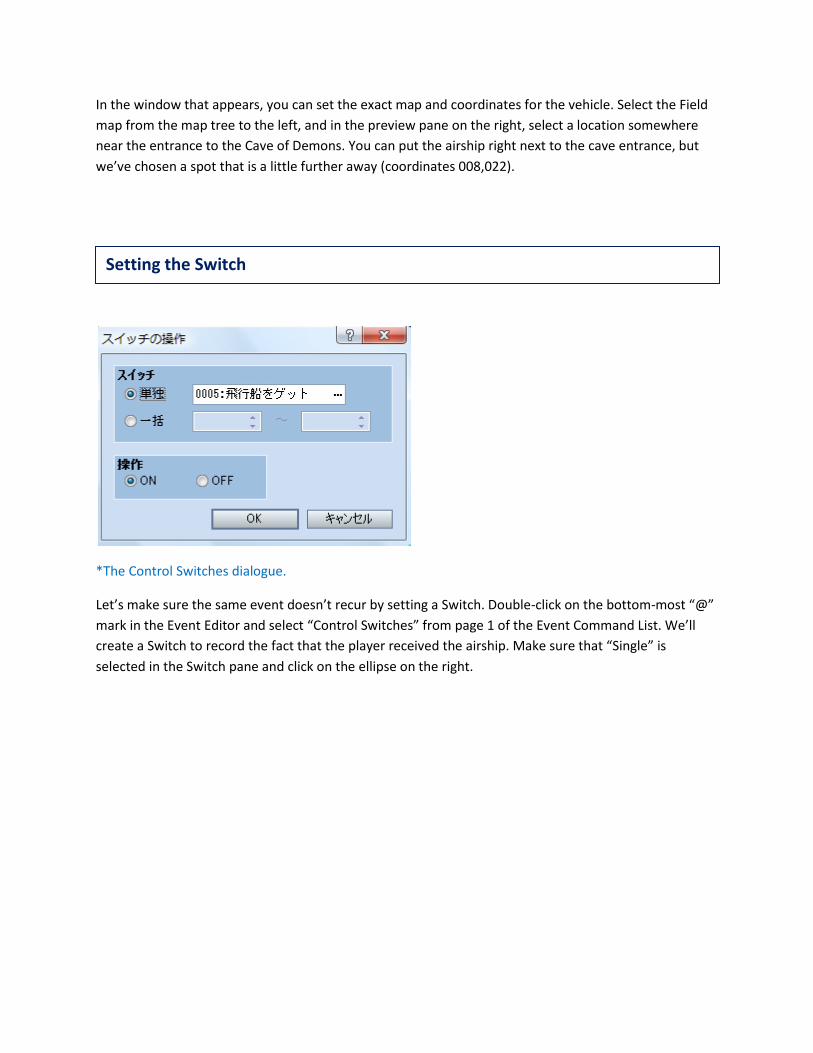
*The Control Switches dialogue.
Let’s make sure the same event doesn’t recur by setting a Switch. Double-click on the bottom-most “@”
mark in the Event Editor and select “Control Switches” from page 1 of the Event Command List. We’ll
create a Switch to record the fact that the player received the airship. Make sure that “Single” is
selected in the Switch pane and click on the ellipse on the right.
Setting the Switch

*Switches dialogue.
Here we’ll use Switch number 0005. Choose an easy to understand name for the Switch. We’ve gone
with “Got the airship”. Click “OK”.

*Event Page 1 completed.
After speaking with the wise-man, the player could walk all the way back up to the Field map, but why
not create an option here for the wise-man to magically transfer the player up to the Field map instead?
To do this, we’ll use a new Event Command called “Show Choices”. The player option will execute on a
new Event Page.
*Creating a new Event Page.
Step 32: Creating a Yes / No Player Option

Click on the “New Event Page” button and create a new Event Page.
*Setting the Event conditions.
Now we’ll set the conditions that need to occur before page 2 of this Event can execute. Click “Switch”
in the Conditions pane and click on the ellipse to the right. From the menu select “0005:Got the airship”.
*Event graphic and option settings.
Select the same graphic for the Event as on page 1 and leave the other settings as they are.

*Asking the player if he wants to transfer up to the Field map.
Instead of just zooming the player up to the top unexpectedly, we’ll present the player with an option.
Use the “Show Text” command to input the wise-man’s question.
Point: Using Choices
In RPG Maker VX, you can create Events where the player can choose from 2 to a total of 4 options.
For example, in a Yes / No situation, you can set one Event to execute if the player selects Yes, and set a
different Event to execute if the player selects No. In a similar way, you can set 4 separate Events to
execute depending on the player’s input.
Presenting the Player with an Option

*Event Command List page 1.
Double-click on the bottom-most “@” mark in the Event Editor to bring up the Event Command List and
select the “Show Choices” command.
*The Show Choices Event Command.
Setting the Show Choices Command

The initial settings already have Yes and No entered into Choice 1 and Choice 2. Text entered into the
Choice boxes are the options that the player will choose from in the game. There will be times when
there are more than 2 possible answers, or the question is not a Yes / No style question. In those cases,
feel free to add the appropriate text in the appropriate box. For our purposes, we will leave the settings
as they are.
The When Cancel pane is for deciding what happens when the player cancels the selection process
before making a selection. The default is “Choice 2”. This means that if the player cancels (say, by
pressing the escape key), then Choice 2 will automatically be selected. “Disallow” means that no
cancelling is allowed. “Branch” is for executing an Event outside of the possible selections. For our
purposes, let’s leave this setting at “Choice 2”.
*The completed Show Choices dialogue.
If your dialogue matches the one above, then click OK”. Next, we’ll create the separate Events that take
place when either Yes or No is selected.
This is the Event for magically transferring the player up to the Field map. We could just use “Transfer”
here, but that would be a bit boring for a magical transfer. Instead, we’re going to use the Flash Screen
command to add a little excitement!
Creating the Yes Event

*Event Command List page 2.
Double-click on the “@” mark directly under “Yes” in the Event Editor. Then select “Flash Screen...” from
page 2 of the Event Command list.
*The Flash Screen Event Command.

The Flash Screen pane is where you can adjust the color and the impact of the flash. Time is for setting
the length of the flash. If the “Wait for Completion” box is checked, then the game will wait until the
flash is over before executing the next command. Leave everything here at the initial settings and click
“OK”.
After the flash, we want the player to appear up on the Field map. We’ll do this with the “Transfer
Player” command this time.
*Event Command List page 2.
The “Transfer Player” command is located on page 2 of the Event Command List.

*Setting the destination map and coordinates.
Setting the destination is the same as with the Quick Event Creation method. Make sure “Direct
Designation” is checked and click on the ellipse on the right. Choose the Field map as the destination
and in the map preview pane, select coordinates 015,020 and double-click. Direction can be left as is.
We’ll need to input the wise-man’s response to the player’s refusal of his offer. Double-click on the “@”
mark under “No” in the Event Editor and use the Show Text command. This completes the wise-man
Event
Creating the No Event
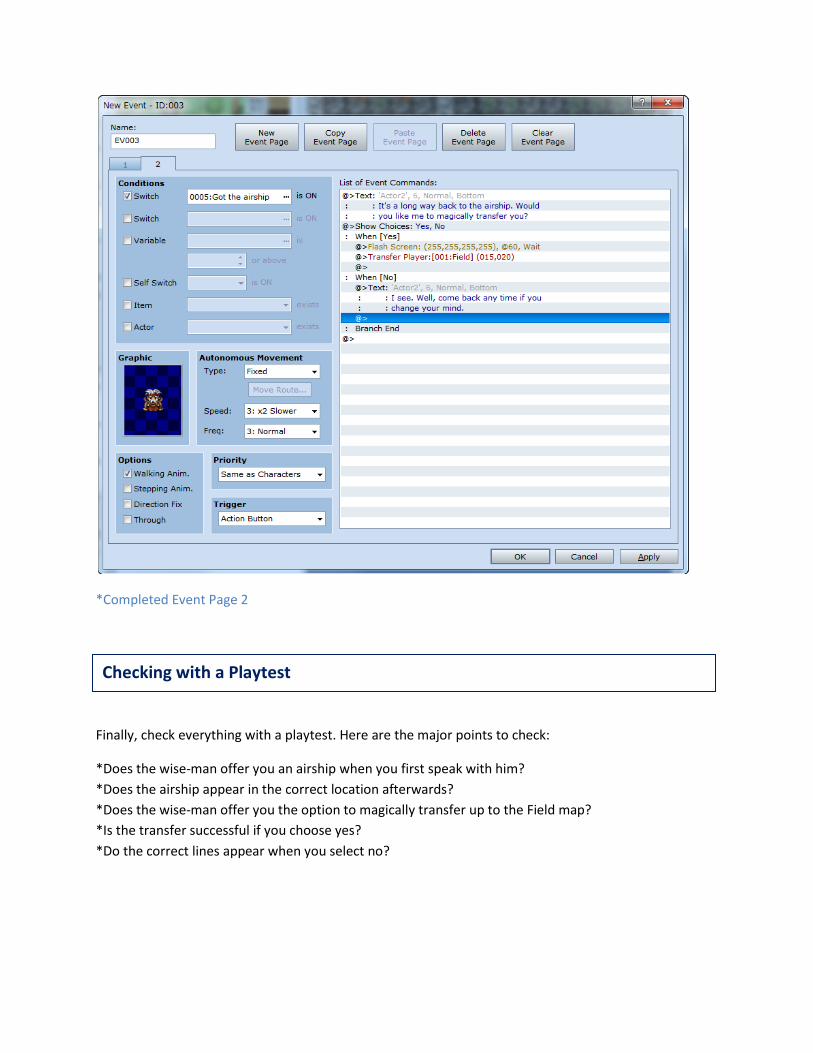
*Completed Event Page 2
Finally, check everything with a playtest. Here are the major points to check:
*Does the wise-man offer you an airship when you first speak with him?
*Does the airship appear in the correct location afterwards?
*Does the wise-man offer you the option to magically transfer up to the Field map?
*Is the transfer successful if you choose yes?
*Do the correct lines appear when you select no?
Checking with a Playtest

*Does the airship appear?
* Do the correct lines appear?
Congratuations! You’ve cleared Level 13. Next, we’ll create the final dungeon, the Devil King’s Lair.
Return to Table of Contents