Embed Size (px)
Citation preview

4.1
Formatting TextAfter completing this lesson, you will be able to:
n Use the Formatting toolbar to format text.
n Apply character effects to text.
n Align text.
n Cut and paste text.
n Use drag and drop to edit text.
n Use collect and paste.
n Apply styles.
n Preview a document.
n Print a document.
Have you ever wished that you could change the format and layout of a document toplace emphasis on key words and phrases? Or have you ever read a document that youcreated and printed, only to find that the information on page 3 should be where theinformation on page 2 is? Microsoft Word has numerous features to help you createand format documents in just the way you want. Word also lets you move and copyinformation throughout a document or even to another document.
In this lesson, you will learn how to apply formatting to make text bold, underlined,and italic, and you’ll learn how to change the size and font style of text. When you edita document, you often need to move or copy text or other objects from one place toanother. In this lesson, you will learn different methods for cutting and copying textand objects. You’ll practice copying and pasting text between different documents.You’ll also learn how to modify the appearance of a paragraph by aligning text.
To complete the procedures in this lesson, you will need to use a file named Brochure04 in the Lesson04 folder in the Word Processing Practice folder that is located onyour hard disk. This document has been created to publicize the services of the publicrelations firm Contoso, Ltd. You’ll change the text, formatting, borders, and shading.For the section in this lesson on moving and copying text, you’ll use the filesMemorandum 04 and Logo 04. These files contain text that you will paste in thebrochure.
Using the Formatting Toolbar to FormatTextAlthough in Word you can change the appearance of text in several different ways,using the Formatting toolbar is the quickest and easiest way to make most text changes.The Formatting toolbar has several buttons and lists that you can use to change textattributes. An attribute is a characteristic such as bold formatting, italics, lowercasing,underlining, font (the style of the characters), font size, and even text color.
The boxes at the left end of the Formatting toolbar are, from left to right, the Style box,the Font box, and the Font Size box, as shown in the following illustration. Theseboxes tell you the name of the style, the name of the font, and the size of the fontcurrently in use. (Styles are covered later in this lesson.) You click the down arrows onthe right sides of the boxes to open the boxes and display content lists.
LESSON 4
In the following exercises, theStandard and Formattingtoolbars have beenseparated.
The buttons on the toolbarstoggle on and off. That is,when you click a button, youturn on the attribute. Whenyou click the button again,you turn off the attribute.

4.2 Word Processing Fundamentals
When you select formatted text, the font and font size of the selected text appear on theFormatting toolbar—in the Font and Font Size boxes—only if the font and font size ofthe selected text is the same. If the font, font style, or font size varies throughout theselected text, the Font, Font Size, and Font Style boxes appear blank on the Formattingtoolbar. If the selected text is bold, italic, or underlined, the relevant button on theFormatting toolbar appears recessed and in a lighter shade.
You can also use the Formatting toolbar to remove formatting. For example, if youwant to remove the bold formatting from a title, you simply select the title text andclick the Bold button.
When you are formatting a document, you can open the Reveal Formatting task pane(from the Format menu) to display the format of the selected text, such as its font andfont effects. The Reveal Formatting task pane allows you to display, change, or clearthe formatting for the selected text. You also can use the Reveal Formatting task paneto select text based on formatting so that you can compare the formatting used in theselected text with formatting used in other parts of the document.
In this exercise, you use the Formatting toolbar buttons to make text bold, italic, andunderlined, and you use the Formatting down arrows to open lists on the Formattingtoolbar to change the font and size of a heading.
1 On the Standard toolbar, click the Open button.
The Open dialog box appears.
2 Click the Look in down arrow, click the icon for your hard disk, double-clickthe Word Processing Practice folder, and then double-click the Lesson04folder.The contents of the Lesson04 folder appear in the Open dialog box.
3 Verify that the file Brochure 04 is selected and click the Open button.
The Open dialog box closes and the file Brochure 04 appears in Word.
4 Select the heading line, Contoso, Ltd. Network.
5 On the Formatting toolbar, click the Bold button, and click the Italic button.
The title appears bold and italic.
6 Double-click the last word of the heading, Network, to select it.
7 On the Formatting toolbar, click the Underline button.
8 Click anywhere.The text is no longer selected, and the word Network is underlined.
9 Triple-click the selection area (the area of the document to the left of thetext).All text in the document appears selected.
10 On the Formatting toolbar, click the Font down arrow.
A list of available fonts appears.
When you create a newdocument, Word uses TimesNew Roman as the font in12-point type as the defaultsetting. A point is theequivalent of 1/72 of an inchin height. So 12-point text isone-sixth of an inch in height.
You can also apply the Boldattribute to selected text bypressing the key combinationCtrl+B. Similarly, you canitalicize selected text bypressing Ctrl+I.
You can also apply theUnderline attribute toselected text by pressingCtrl+U.

Lesson 4 Formatting Text 4.3
11 Scroll down, if necessary, and click Century Schoolbook.
The text changes to the Century Schoolbook font.
12 On the Formatting toolbar, click the Font Size down arrow (to the right ofthe number 12).
A list of font sizes appears.
13 Click 10.The selected text is displayed in a smaller, 10-point font size.
14 Click anywhere.
The text is no longer selected.
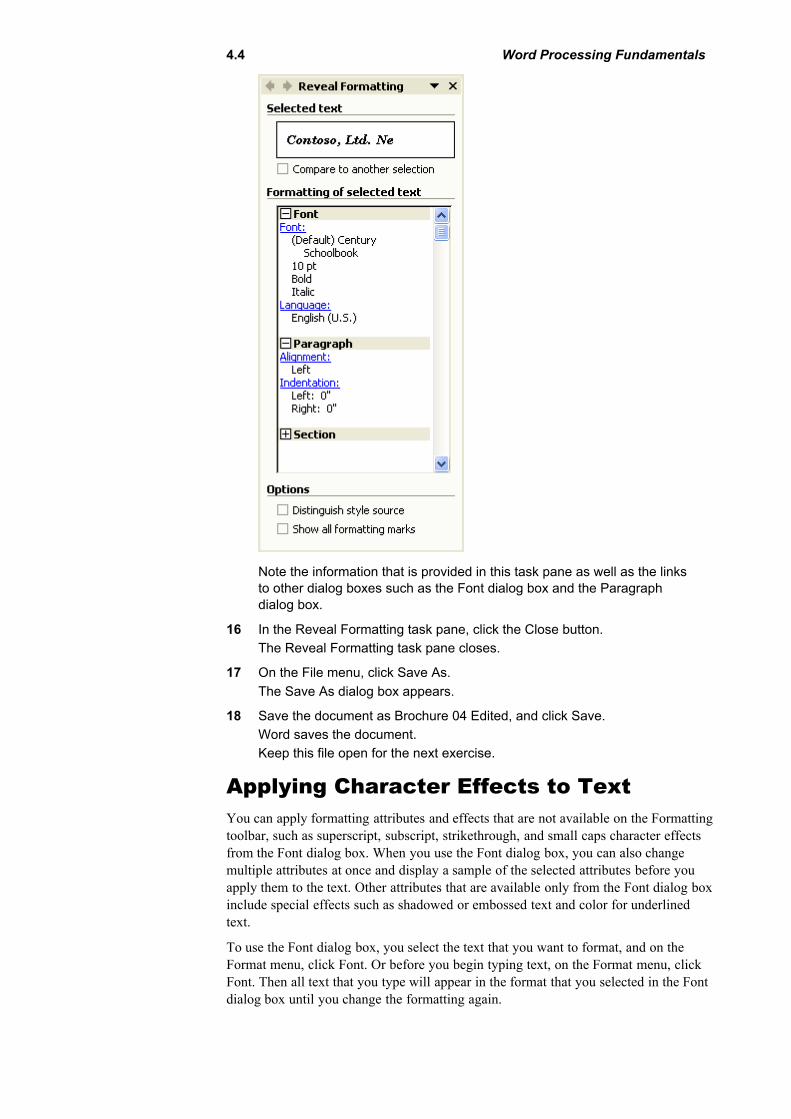
15 On the Format menu, click Reveal Formatting.The Reveal Formatting task Pane appears, displaying the format of theselected text.
Note that the styles listed inthe Font list on yourcomputer screen might bedifferent from the stylesshown in this figure.
The most recently used fontsare listed first in the Font list,followed by an alphabeticallisting of all available fonts.
The Font Size list displayswhole numbers, but you canspecify font sizes in half-pointincrements by typing the fontsize (for example, 10.5) in theFont Size box.
4.4 Word Processing Fundamentals
Note the information that is provided in this task pane as well as the linksto other dialog boxes such as the Font dialog box and the Paragraphdialog box.
16 In the Reveal Formatting task pane, click the Close button.The Reveal Formatting task pane closes.
17 On the File menu, click Save As.
The Save As dialog box appears.
18 Save the document as Brochure 04 Edited, and click Save.Word saves the document.Keep this file open for the next exercise.
Applying Character Effects to TextYou can apply formatting attributes and effects that are not available on the Formattingtoolbar, such as superscript, subscript, strikethrough, and small caps character effectsfrom the Font dialog box. When you use the Font dialog box, you can also changemultiple attributes at once and display a sample of the selected attributes before youapply them to the text. Other attributes that are available only from the Font dialog boxinclude special effects such as shadowed or embossed text and color for underlinedtext.
To use the Font dialog box, you select the text that you want to format, and on theFormat menu, click Font. Or before you begin typing text, on the Format menu, clickFont. Then all text that you type will appear in the format that you selected in the Fontdialog box until you change the formatting again.

Lesson 4 Formatting Text 4.5
Since all the font attributesare visible in the Font dialogbox, modifications can bemade quite easily. You canuse the Preview box to seehow the modifications willlook in the document.

4.6 Word Processing Fundamentals
Aligning Text in a DocumentBy default, text that you type has the Align Left alignment attribute applied. That is,text is aligned with the left margin. However, you can use the Center, Align Right, orJustify attributes to align text. Centered text is placed equally between the left andright margins, right-aligned text is placed at the right margin, and justified text fills outall the space between the right and left margins. To align an existing paragraph, clickanywhere in the paragraph and click one of the following buttons on the Formattingtoolbar.
Use the alignment buttons on complete paragraphs rather than on characters or phrases.You do not need to select all the text in a paragraph before you apply an alignment.You only need to click to place the insertion point somewhere in the paragraph.
The following illustration shows the four different types of alignment attributes:
In this exercise, you center, right-align, left-align, and justify text.
1 Select the first heading line, Contoso, Ltd. Network.
2 On the Formatting toolbar, click the Center button.
The heading line moves to the center of the document.
3 Click anywhere in the first paragraph.
4 On the Formatting toolbar, click the Align Right button.
The paragraph moves to the right margin.
As is true with text attributes,when an alignment attributeis turned on, all text typedfrom that point on is affecteduntil you turn the attribute off.

Lesson 4 Formatting Text 4.7
5 On the Formatting toolbar, click the Align Left button.The paragraph moves back to the left margin.
6 On the Formatting toolbar, click the Justify button.
The lines in the paragraph now extend to both the left and right margins,except for the last line of the paragraph, which doesn’t extend all the wayto the right margin because it is shorter than the other lines.
7 On the Formatting toolbar, click the Align Left button to return the text to itsoriginal alignment.
8 Save and close this document. Keep Word open for the next exercise.
Cutting and Pasting TextWhen you cut and paste text, you are removing text from one location in a documentand placing it in another location in the same document or in a different document.Copying and pasting duplicates the original information in another location ordocument. There are various methods for cutting and pasting text: you can click Cutand Paste on the Edit menu, use the mouse pointer to drag and drop text, or click theCut and Paste buttons on the Standard toolbar. For example, the marketing manager atContoso, Ltd. is updating the company brochure. The new brochure will containinformation from an internal memorandum that was distributed to company employees.To save time, she will copy the information in the memo, rather than retyping it, andwill paste the information into the brochure that she is updating.

4.8 Word Processing Fundamentals
When you use the Copy command, text that you select is duplicated in a new locationwhile also remaining in the original spot. When you use the Cut command, the text thatyou select is taken from its original position and moved to another location.
When you paste something from the Clipboard, the Paste Options button appears nextto the item you have pasted. Clicking the Paste Options button displays a list of actionsWord can take regarding the pasted item. This list will vary depending upon thecontent of the pasted item but generally (for text items) will include: Keep SourceFormatting, Use Destination Styles, Match Destination Formatting, and Keep TextOnly. These options allow you a quick and easy way to format pasted text to match anexisting document—or not, depending upon your needs.
In this exercise, you copy selected text from one document to another, and cut andpaste selected text within the same document.
1 On the Standard toolbar, click the Open button.
The Open dialog box appears with the contents of the Lesson04 folderdisplayed.
2 Select the file named Memorandum 04 and click Open.
Word opens the file.
3 Select the main paragraph of the memo.
4 On the Standard toolbar, click the Copy button.
Nothing changes on the screen, but the text is copied. The main paragraphremains selected.
5 On the File menu, click Close to close the memorandum document.
The brochure document is now visible.
6 Scroll down and click at the end of the document after the wordPhotography.
7 Press Enter twice.The insertion point moves two lines below the word Photography.
To use a shortcut menu tocopy or cut and paste, right-click the selected text, and onthe shortcut menu, click Cutor Copy. To paste text, right-click the location where youwant to paste the text, and onthe shortcut menu, clickPaste.

Lesson 4 Formatting Text 4.9
8 On the Standard toolbar, click the Paste button.
The paragraph remains in the original document, and a copy of theparagraph is inserted at the new location in the brochure.
9 Click the Paste Options button.
The menu of options for pasting opens.
10 Click Match Destination Formatting.The font size changes to 10.
11 Select the fourth paragraph, which begins For more information.
12 On the Standard toolbar, click the Cut button, and press Delete to removethe extra blank line.
The paragraph is removed from its location in the document and is placedon the Clipboard.
13 Click the blank line below the word Photography (the last item in the list ofservices).

4.10 Word Processing Fundamentals
14 Press Enter to separate the paragraph with a blank line, and on theStandard toolbar, click the Paste button.The paragraph appears at the new location after the list of services.
15 On the Standard toolbar, click the Save button.Keep this file open for the next exercise.
Using Drag and Drop to Edit TextTo cut and paste without using the buttons, you can use the drag-and-drop technique.As is true with other editing techniques, you begin by selecting the desired text. Todrag and drop, select the text, position the mouse pointer over the selected text, holddown the left mouse button, and then drag the selection to a new location.
In this exercise, you use drag and drop to move text within a document.
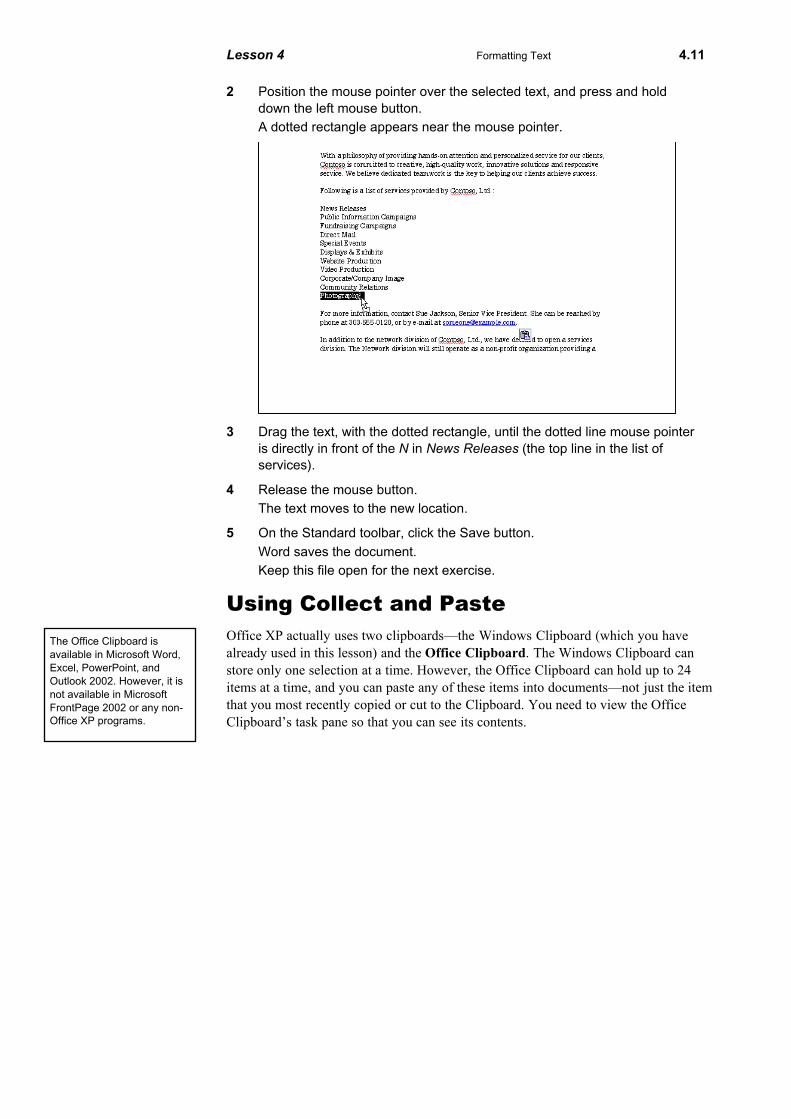
1 Click the selection area to the left of the word Photography to select theentire line.
To copy text using drag anddrop, position the mousepointer over the selected text,hold down the mouse button,hold down Ctrl, and then dragto the new location.
Lesson 4 Formatting Text 4.11
2 Position the mouse pointer over the selected text, and press and holddown the left mouse button.A dotted rectangle appears near the mouse pointer.
3 Drag the text, with the dotted rectangle, until the dotted line mouse pointeris directly in front of the N in News Releases (the top line in the list ofservices).
4 Release the mouse button.The text moves to the new location.
5 On the Standard toolbar, click the Save button.
Word saves the document.Keep this file open for the next exercise.
Using Collect and PasteOffice XP actually uses two clipboards—the Windows Clipboard (which you havealready used in this lesson) and the Office Clipboard. The Windows Clipboard canstore only one selection at a time. However, the Office Clipboard can hold up to 24items at a time, and you can paste any of these items into documents—not just the itemthat you most recently copied or cut to the Clipboard. You need to view the OfficeClipboard’s task pane so that you can see its contents.
The Office Clipboard isavailable in Microsoft Word,Excel, PowerPoint, andOutlook 2002. However, it isnot available in MicrosoftFrontPage 2002 or any non-Office XP programs.

4.12 Word Processing Fundamentals
The Clipboard displays the first 50 characters of text or, if it is a graphic or some otherform of data, as much of the item as is possible. Each item also has an icon next to it,which indicates the program from which it came.
The Clipboard task pane can appear automatically when you copy or cut two itemsconsecutively if you have it set up to do so. If this option is turned off, you canmanually open the Clipboard task pane by clicking Office Clipboard on the Edit menu.
The Office Clipboard can hold up to 24 items. If you try to copy a twenty-fifth item, amessage asks if you want to discard the first item on the Office Clipboard and add thenew item to the end of the Clipboard. If you click OK, the next time you copy an itemfrom any program, the Office Clipboard automatically discards the first item and addsthe new item. If you click Cancel, any new items that you copy won’t be added to theOffice Clipboard until you make space on the Office Clipboard by pasting or cuttingitems already stored there. You won’t see the message again until the Office Clipboardis full. Note that the collected items remain on the Office Clipboard until you quit allopen Office XP programs on your computer.
To adjust the way in which the Office Clipboard works, click the Options button at thebottom of the Clipboard. From the menu choices that appear, you can choose to ShowOffice Clipboard Automatically when you cut or copy two items consecutively or toCollect Without Showing Office Clipboard. If you choose to Show Status Near TaskbarWhen Copying you’ll see a ScreenTip near the Windows taskbar each time you cut orcopy an item. You can also choose Show Office Clipboard Icon on Taskbar, whichplaces an icon on the Windows taskbar. This icon will be displayed anytime you havethe Clipboard open in one of the Office applications. You can then double-click thisicon to display the Office Clipboard.

Lesson 4 Formatting Text 4.13
In this exercise, you open the Clipboard task pane, see how the Office Clipboardhandles multiple items, and then paste from it and clear it.
1 On the Edit menu, click Office Clipboard.
The Clipboard task pane opens.
2 Click the Clear All button.If there were any cut or copied items in the Clipboard, they are cleared.
3 On the Standard toolbar, click the Open button. In the Open dialog box,select the file named Logo 04, and click Open.
Word opens the file.
4 Click the text Contoso, Ltd.Little boxes appear around the logo, indicating that the logo is selected.

4.14 Word Processing Fundamentals
5 On the Standard toolbar, click the Copy button.
The logo is copied from the document and placed in the Clipboard. AScreenTip appears on the taskbar indicating that the item has beencollected. There is one item available in the Clipboard.
6 Close the logo document.
The logo document closes, and the brochure document appears.
7 Double-click in the selection area next to the last paragraph of thebrochure document that begins In addition to the network.
8 On the Standard toolbar, click the Cut button.The paragraph is removed from the document and placed on the OfficeClipboard. The Clipboard task pane now contains two items.
9 Scroll up to the top of the document, and click in front of the letter C in theheading Contoso, Ltd. Network.
10 Press Enter eight times to move the title down.
11 Click at the top of the document to position the insertion point.

Lesson 4 Formatting Text 4.15
12 On the Clipboard task pane, click the logo item.
The logo Contoso, Ltd. now appears at the top of the brochure. (Click anddrag, if necessary, to position the logo in the center of the page.)
13 Scroll down and click the blank line above the second heading, Contoso,Ltd. Services, and then press Enter to insert another blank line.
14 On the Clipboard task pane, click the copied paragraph.
The paragraph is inserted at the bottom of the first section in thedocument.
15 On the Clipboard task pane, click the Clear All button.
16 In the upper-right corner of the Clipboard task pane, click the Close button.The Clipboard task pane closes.
17 On the Standard toolbar, click the Save button to save the document.
Word saves the document.Keep this file open for the next exercise.

4.16 Word Processing Fundamentals
Applying Styles to TextStyles save you time when formatting a document and help you maintain a consistentformat within the same document and from document to document. For example,suppose you are creating a document that contains several subheadings. You wantthese subheadings to be green and in a different font than your text. Instead of usingthe formatting options on the Formatting toolbar every time you type a subheading inthe document, you can create a style.
After you create the style, you simply place the insertion point anywhere in the existingtext or anywhere in the document you want the style to start and click the Style downarrow. Select the style you want, and the text is modified with the chosen style.
Whenever you open a new, blank document, Word automatically attaches a standardtemplate to the document. A template is a preformatted document that has its own setof styles. When you type in a new, blank document, the characters are set in a defaultstyle that is called Normal. The words that you type are automatically formatted in thefont Times New Roman, at 12 points in size, and aligned against the left margin. TheNormal template has five styles, three of which are designed for use as headings. Thenames of styles are located on the Formatting toolbar, in the Style list, as shown in ournext figure.
You can use styles to quickly apply multiple formatting attributes to text. For example,you could specify attributes such as bold, left align, italicize, and even font color, andthen apply all those attributes at the same time by applying a style. Simply select orclick the text, and on the Formatting toolbar, click the Style down arrow, and click thestyle that you want to apply. If you want to apply a style to an entire paragraph, youneed only click anywhere in that paragraph and click the style name in the Style list.You can also apply a style by clicking a blank line, selecting a style from the Style list,and typing. The text that you type from then on appears in the style that you selected.
In this exercise, you apply styles to paragraphs.
A style is a named set offormatting instructions, usedto apply multiple formattingcharacteristics to text in asingle step.

Lesson 4 Formatting Text 4.17
1 Scroll down in the document, and click anywhere in the word Photography,which is the first item in the list of services near the end of the document.
2 On the Formatting toolbar, click the Style down arrow, and click Heading 3.
The style is applied to the current paragraph—in this case, the single linePhotography.
3 Select the remaining list items, click the Style down arrow, and clickHeading 3.The Heading 3 style is applied to all the paragraphs in the list.
4 Click outside of the list to deselect the paragraphs.
The list should look like the one in the following illustration.
5 Click in front of the first line in the last paragraph of the document.
6 On the Formatting toolbar, click the Style down arrow, and click Heading 1.
The style is applied to the entire paragraph.
7 On the Standard toolbar, click the Undo button to remove the formattingthat you just applied.
8 In the last paragraph of the document, select the words For moreinformation.
9 On the Formatting toolbar, click the Style down arrow, and click Heading 3.The style is applied only to the selected text and not to the entireparagraph.
10 Select the P in the word Photography, which is the first item in the list ofservices.
11 Click the Style down arrow, and click Heading 1.The character becomes larger.
12 On the Standard toolbar, click the Undo button to remove the formattingyou just applied.
13 On the Standard toolbar, click the Save button.
Word saves the document.Keep this file open for the next exercise.
On the Edit menu, click theRepeat command to applystyles to multiple paragraphsthat are scattered throughoutthe document. Apply the stylethat you want to use in thefirst paragraph, click or selectthe next paragraph, andpress Ctrl+Y or F4. Use thismethod until you are finishedapplying the style.

4.18 Word Processing Fundamentals
Previewing a DocumentTo see exactly how your document will look after it is printed, you can use PrintPreview. The Print Preview window shows you exactly how the lines on the page willappear when they’re printed and where page breaks will occur. If you don’t like thelayout, you can make adjustments before you print. Using Print Preview can help youidentify desired formatting changes without wasting paper.
tipIn Print Layout view, you can show or hide the white space between the pages.Position the pointer between the pages until the Show White Space pointer or HideWhite Space pointer appears, and then click the page.

Lesson 4 Formatting Text 4.19
In this exercise, you preview a document before printing it.
1 On the Standard toolbar, click the Print Preview button.
2 On the Print Preview toolbar, click the Multiple Pages button, and click thesecond button in the top row to view two pages at a time.
3 Click the One Page button to return to the single-page view.
4 On the Print Preview toolbar, click Close.
The Print Preview closes, and Word returns to the previous view of thedocument.Keep this file open for the next exercise.
importantYou must have a printer to complete the following exercise.
Printing a DocumentYou can use two methods to print a document in Word. One way is to use the Printbutton to print one copy of all pages in the current document using the default printer.This method is convenient when you want to print the entire document. The othermethod is to use the menu to display the Print dialog box. If you want to print multiplecopies of the document, print from a different printer, print selected text, or print arange of pages, you use the Print dialog box to specify any of these options. Forexample, instead of printing out the entire document to review and edit page 6, you canuse the Print dialog box to print page 6 only.
In this exercise, you practice printing a document by using both the Print button andthe Print dialog box, and then you print only a selected block of text.
1 On the Standard toolbar, click the Print button.One copy of the current document is printed on the default printer.
2 Click anywhere on the first page of the document.
3 On the File menu, click Print.The Print dialog box appears.
The screen should looksimilar to the one shownhere. If the ruler isn’t visible,click the View Ruler button.
To print a document in PrintPreview, on the Print Previewtoolbar, click the Print button.
The default printer is thespecific printer that isselected automatically as thelocation where documentswill be printed from yourcomputer.

4.20 Word Processing Fundamentals
4 In the Page range section, click the Current page option, and click OK.The first page of the document is printed.
5 Select the first paragraph, which begins Contoso, Ltd.
6 On the File menu, click Print.The Print dialog box appears.
7 In the Page range section, click the Selection option, and click OK.
The selected text is printed.
You can also print a specificpage other than the currentpage by typing the number ofthe page that you want toprint in the Pages box in thePrint dialog box. To printmultiple pages, but not theentire document, you cantype the page numbers,inserting a comma betweenpage numbers for non-sequential pages or using adash to indicate a continuousrange of sequential pages.For example: 1,3,5 or 4-6.

Lesson 4 Formatting Text 4.21
Lesson Wrap-UpIn this lesson, you learned how to format text. You also learned how to use various textattributes, how to cut or copy and paste text, and how to use the Clipboard to pastemultiple selections. In addition, you applied styles, then previewed and printed thedocument.
If you are continuing to the next lesson:
1 On the Standard toolbar, click the Save button.
Word saves the changes to the file.
2 On the File menu, click Close to close the file.Word closes the file.
If you are not continuing to other lessons:
1 On the Standard toolbar, click the Save button.
Word saves the changes to the file.
2 In the upper-right corner of the Word window, click the Close button.Word closes the file and the Word program closes.
Quick Quiz1 What key combination and shortcut key allow you to apply styles to
multiple nonconsecutive paragraphs?
2 What are four methods to cut and paste a selection of text?
3 Before you print a document, how can you be sure that the margins willlook right?
4 What is a style?
5 What are two ways that you can apply bold formatting to a selection oftext?
6 How can you view multiple selections of text in the Office Clipboard?
7 What is the difference between cutting and copying text?
8 How can you edit a linked object in a Word document?

4.22 Word Processing Fundamentals
Putting It All TogetherExercise 1: If necessary, start Word. Open the document named Invitation 04 fromthe Lesson04 folder. Center all the text in the document. Change the second paragraphfrom the bottom to a 20-point font size, in small caps, blue, and bold. Select the linesof text You’re invited to…, When, and Where, and change them to 16 points and bold.Change all text to the font Garamond. Finally, move the last three paragraphs to the topof the document. Print two copies of the document. Save the document as Invitation04 Edited in the Lesson04 folder.
Exercise 2: Open one of the documents that you have worked with in this lesson andview it in Print Preview. Adjust the margins using the Ruler. Zoom in and out of thedocument using the Magnifier. Zoom in and out of the document using the drop-downlist. View the print preview in full screen and then return to the normal print previewscreen. Use Word’s help files to determine the purpose of the Shrink to Fit button.Would that feature be useful in the document that you opened? If so, use the Shrink toFit button. Leave the document open for the next Exercise.
Exercise 3: Select and copy several paragraphs in your document. (If necessary,manually open the Office Clipboard.) As you are copying text, note the order in whichthe paragraphs are placed on the Clipboard. Which item is at the top of the list? If youclick on the down arrow next to an item, what options are available? When would it beuseful to use the Paste All option on the Office Clipboard?
Exercise 4: In this lesson we briefly explored the Reveal Formatting task pane. Openthe task pane again and click on the links to determine what other dialog boxes areaccessible through this task pane. Think of ways in which this task pane could beuseful in your work with Word. Use Word’s help files to learn more about RevealFormatting. Write a brief explanation of the features available through this task paneand how you would use them. Close the document that you opened for these Exerciseswithout saving any changes.