Embed Size (px)
Citation preview

Lesson 1
Flyer
In this project you’ll assemble a single-page,
black-and-white flyer from start to finish.
The
photograph and most of the text featured
in this flyer are ready for you to import into
PageMaker. You’ll also learn how to type text
directly into a publication and you’ll draw
several graphic elements (square, circle,
and
line).

LESSON 1
8
Flyer
For this lesson, you will open and view the
final version of the flyer, and follow the step-
by-step instructions that introduce some of
the basic features and tools of PageMaker.
Even if you have experience using the
PageMaker application, this introduction
may reveal some useful tips and techniques.
This project covers the following topics:
•
Restoring default PageMaker settings
•
Changing the view of a publication
•
Creating a new publication
•
Opening an existing publication
•
Setting up the horizontal and vertical
rulers
•
Displaying and hiding guides
•
Positioning the zero point
•
Using the pointer tool, the text tool, and
the zoom tool
•
Specifying multiple columns
•
Locking the guides
•
Creating, placing, formatting, and
positioning text and graphic elements
•
Creating a drop cap
•
Applying a tint to text
•
Specifying a hanging indent
•
Creating ruler guides
•
Drawing circles, rectangles, and lines
•
Adjusting the stacking order of elements
on the page
•
Range kerning text
•
Using the Snap to Guides option
•
Printing the flyer on a desktop laser
printer
•
Exporting the flyer to Adobe PDF
If this is your first time using PageMaker, it
should take about 2 hours to complete this
lesson. If you have some experience using
PageMaker, it should take about 90 minutes
to complete this lesson.
Locating files and fonts
All files and fonts needed for this lesson are
found on the
Adobe PageMaker Classroom in
a Book
CD-ROM in the folders 01Lesson
and Fonts, respectively.
Restoring default settings
Before starting PageMaker, delete the
PageMaker 7.0 preferences file to ensure all
settings are returned to their default values.
1
If PageMaker 7.0 is running, choose File
>
Exit or Quit.
2
Locate the PageMaker preferences file in
the following location, depending upon your system:
Windows
\PageMaker 7.0\rsrc\usenglsh\
PM70.cnf
Note:
If Windows is set to hide filename
extensions, the preferences file will instead
appear without the .cnf extension.

9
ADOBE PAGEMAKER 7.0
Classroom in a Book
Macintosh
System Folder: Preferences:
Adobe PageMaker 7.0P Prefs
3
Drag the preferences file to the Recycle Bin (Windows) or Trash (Macintosh).
The PageMaker preferences settings are
returned to their default values.
To preserve your preference settings,
drag the preferences file to a
different
folder. When you are ready to restore the
settings, drag the file back to
its original
folder and click Yes when
asked whether
to overwrite the existing file.
Starting PageMaker
After verifying that the correct fonts are
installed on your computer, you will start
the PageMaker application.
1
In addition to the commonly used
fonts
identified in the Getting Started
chapter, make sure the
following fonts are
installed on your computer: AGaramond,
AGaramond Italic, and Myriad Roman.
Windows only:
Because of the way Windows
handles fonts, AGaramond Italic does not
appear in font menus in Windows applica-
tions. You must apply italic to AGaramond to
use AGaramond Italic.
Myriad, a multiple master typeface, is a sans
serif design. Myriad makes a good text face
as well as providing flexibility for filling dis-
play needs in all sizes and media.
Note:
Serifs are the small strokes at the top
and bottom of a letter. Typefaces without serifs
are generally called sans (without) serifs.
2
Depending on the platform, start PageMaker as follows:
•
In Windows, choose Start > Programs >
Adobe > Adobe PageMaker 7.0 (your
menus
may differ depending upon your
installation).
•
In Mac OS, open the Adobe PageMaker 7.0
folder and double-click the
Adobe®
PageMaker® 7.0 icon.
Once launched, PageMaker displays the
menus and tool box. If necessary, close the
Template and Picture palettes (Windows).
LESSON 1
10
Flyer
Opening an existing publication
Opening the final version of the publication
and following the step-by-step instructions
will help you become acquainted with
PageMaker.
Note:
Windows users need to unlock the
lesson files before using them. For infor-
mation, see Copying the Classroom in a
Book files on page 4.
1
Choose File > Open, and, in the Open
Publication dialog box, locate and
double-
click the 01Final.pmd file in
the
01Lesson
folder.
PageMaker opens the final version of the
publication you will create in this lesson,
with horizontal and vertical rulers extending
along the top and left edges of the publica-
tion window.
2
If the publication window does not fill the
screen, click the Maximize button in the
right corner of the title bar to expand the
window.
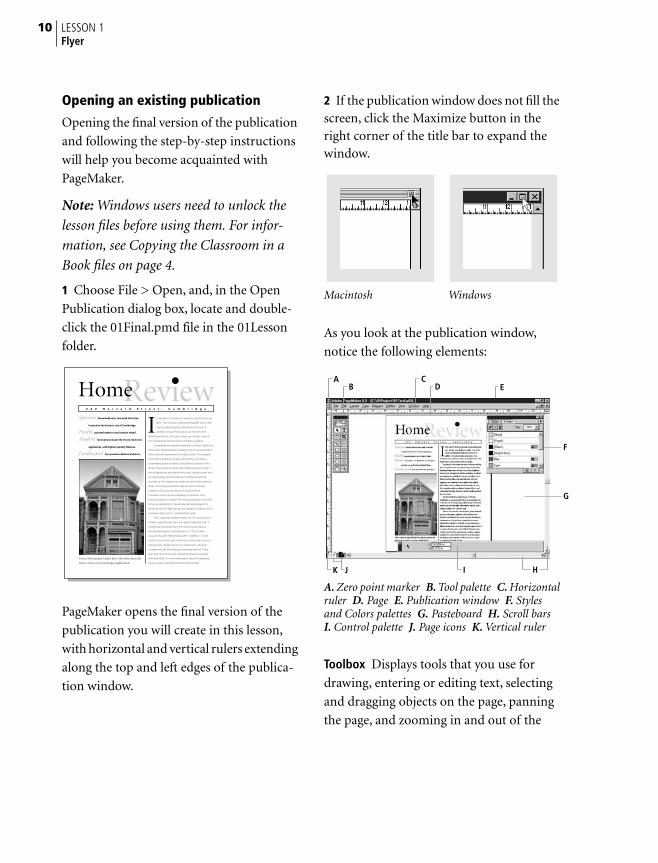
Macintosh Windows
As you look at the publication window,
notice the following elements:
A.
Zero point marker
B.
Tool palette
C.
Horizontal ruler
D.
Page
E.
Publication window
F.
Styles and Colors palettes
G.
Pasteboard
H.
Scroll bars
I.
Control palette
J. Page icons K. Vertical ruler
Toolbox Displays tools that you use for
drawing, entering or editing text, selecting
and dragging objects on the page, panning
the page, and zooming in and out of the
n the heart of the Boston area lies a true architectural
gem. This Victorian dwelling exemplifies turn-of-the-
century New England architecture at its best. In
addition to its prime location just minutes from
downtown Boston, this home enjoys spectacular views of
the Charles River and the downtown Boston skyline.
Completely restored with attention to historic detail this
three-story, three-bedroom residence has incorporated all of
the functional requirements of today's home. The magnifi-
cent interior boasts all original oak finishing, including a
breathtaking spiral bannister, and built-in bookcases in the
library. The kitchen has been fully modernized with state of
the art appliances, yet retains the house’s original charm with
its high ceilings, ornate moldings, and fully operational
woodstove. The original bay windows, refinished hardwood
floors, and ornate paint trim make this home’s interior
complete and as spectacular as its proud exterior.
Consistent with the practical beauty of Victorian archi-
tecture, no space is wasted. The most spectacular room of all
is the converted attic. It clearly takes full advantage of its
immense size and high ceiling with skylights, windows, and a
stairway leading out to a small widow's walk.
This Cambridge residence bestows the colonial charm
of New England's past upon this quaint neighborhood. It
resides just two blocks from the historic house used as
George Washington's headquarters in 1775, and later
occupied by poet Henry Wadsworth Longfellow. A stroll
north on Lyon Street past a hilly intersection looks out over
the pine and maple woods of a nearby park, a dramatic
contrast with the blue Massachusetts bay beyond. These
stunning views must have inspired architects to execute
their best work. For more information about this property
please contact Joan Rutherford at Harbor Realty.
I
Close to the beautiful Charles River, this home shares the
historic charm of its Cambridge neighborhood.
Spacious three bedroom, two bath Victorian
located in the historic city of Cambridge.
Freshly painted exterior and interior detail.
Modern renovations boast the finest electronic
appliances, and highest quality fixtures.
Landscaped by a premiere Boston architect.
ReviewHome3 2 2 H a r v a r d S t r e e t , C a m b r i d g e
K
CB D
I HJ
AE
F
G

11ADOBE PAGEMAKER 7.0Classroom in a Book
page. You click to select a tool. The toolbox
appears in the upper left corner of the pub-
lication window.
Control palette Lets you make precise
changes to text and graphics without
selecting a tool or choosing a menu
command. The Control palette appears in
the lower portion of the publication win-
dow, and changes modes depending upon
what is currently selected.
Page Defines the print area of a publica-
tion. Whenever you create a new publica-
tion, you specify the dimensions of the page.
Only text or graphics on the page will print.
Pasteboard Provides a workspace outside
the page where you can store and manipu-
late elements before positioning them on the
page. The term pasteboard, like many of the
terms in this course, comes from traditional
publishing, where layout artists assemble
text and graphics on a physical pasteboard.
The extra space on the board serves as a
work space for elements not yet placed on
the page.
Styles and Colors palettes Displays the
predefined paragraph styles and colors.
PageMaker also has palettes for layers,
master pages, and hyperlinks (more about
these in later lessons). To save screen space,
PageMaker lets you group the palettes you regularly use, or you can drag a palette out of
the group if you want to display it
independently. To activate a palette, you
click its tab. Each palette also includes: a
menu; a Maximize button to expand and
minimize the palette; and buttons to create
or delete a style, color, layer, etc.
A. Palette tab B. Maximize button C. Palette menuD. Trash button E. New button
Page icons Indicates the currently
displayed page (page one in this case).
PageMaker displays an icon for every page in the publication. To view a page, you click its
page icon. The L and R page icons represent
the left and right master pages.
Text
Cropping
Constrained line
Frame tools
Zoom
Pointer
Rotating
LineRectangle
EllipsePolygon
Hand
C
D
A B
E

LESSON 112Flyer
Changing the view of a publication
PageMaker opens a publication in the view that was selected when it was last saved.
This publication was saved in the Fit in Window view.
Note: When the size of this page is reduced to fit within a 13-inch (or smaller) monitor, the
10-point text is displayed as gray bars (an effect known as greeking).
1 Choose View > Actual Size.
The view of this publication is magnified to its actual size (its size when printed), mak-
ing it possible to read the text.
2 To toggle between the Fit in Window and Actual Size views, while holding down the Ctrl key (Windows) or the Command and Option keys (Macintosh), click the page (use the right mouse button in Windows). Toggle back to the Actual Size view.
3 Click the scroll arrows or drag the scroll bars on the right and bottom edges of the publication window to scroll the page.
You may find it easier to use the following
method to scroll in your publication.
4 Hold down the Alt key (Windows) or Option key (Macintosh), position the pointer on the page or pasteboard, hold down the mouse button until the pointer changes to a grabber hand, and drag in any direction to scroll the view of the page.
5 Click the zoom tool ( ) in the toolbox to select it.
The pointer changes to a magnifying glass.
The zoom tool makes it easy to magnify and
reduce the view of selected portions of the
page. With the zoom tool selected, you can
magnify the view of a specific portion of
the page by either clicking or dragging over
the area.
6 With the zoom tool selected, hold down Ctrl (Windows) or Option (Macintosh).
The plus sign in the zoom tool changes to a minus (–) sign.
7 Click the page to reduce the view of the page.
8 With the zoom tool still selected, drag over any portion of the page. Notice how PageMaker displays a rectangle with a dashed line as you drag the tool. When you release the mouse button, the selected por-tion of the page fills the publication window.
9 Double-click the zoom tool in the toolbox to switch to the Actual Size view. Using a similar shortcut, jump to the Fit in Window
Close to the beautiful Charles River, this home shares the
historic charm of its Cambridge neighborhood.
ReviewHome3 2 2 H a r v a r d S t r e e t , C a m b r i d g e
Spacious three bedroom, two bath Victorian
located in the historic city of Cambridge.
Freshly painted exterior and interior detail.
Modern renovations boast the finest electronic
appliances, and highest quality fixtures.
Landscaped by a premiere Boston architect.
n the heart of the Boston area lies a true architectural
gem. This Victorian dwelling exemplifies turn-of-the-
century New England architecture at its best. In
addition to its prime location just minutes from
downtown Boston, this home enjoys spectacular views of
the Charles River and the downtown Boston skyline.
Completely restored with attention to historic detail this
three-story, three-bedroom residence has incorporated all of
the functional requirements of today's home. The magnifi-
cent interior boasts all original oak finishing, including a
breathtaking spiral bannister, and built-in bookcases in the
library. The kitchen has been fully modernized with state of
the art appliances, yet retains the house’s original charm with
its high ceilings, ornate moldings, and fully operational
woodstove. The original bay windows, refinished hardwood
floors, and ornate paint trim make this home’s interior
complete and as spectacular as its proud exterior.
Consistent with the practical beauty of Victorian archi-
tecture, no space is wasted. The most spectacular room of all
is the converted attic. It clearly takes full advantage of its
immense size and high ceiling with skylights, windows, and a
stairway leading out to a small widow's walk.
This Cambridge residence bestows the colonial charm
of New England's past upon this quaint neighborhood. It
resides just two blocks from the historic house used as
George Washington's headquarters in 1775, and later
occupied by poet Henry Wadsworth Longfellow. A stroll
north on Lyon Street past a hilly intersection looks out over
the pine and maple woods of a nearby park, a dramatic
contrast with the blue Massachusetts bay beyond. These
stunning views must have inspired architects to execute
their best work. For more information about this property
please contact Joan Rutherford at Harbor Realty.
I

13ADOBE PAGEMAKER 7.0Classroom in a Book
view by holding down the Alt key (Windows) or Option key (Macintosh), and double-clicking the zoom tool in the toolbox.
Working with the toolbox and palettes
As you work, you may find the toolbox and
palettes are in your way, especially if you
have a small screen. PageMaker gives you
several options to minimize the impact of
the toolbox and palettes, while still keeping
them handy. You can move the toolbox or
palettes, minimize the palettes so just the
title bar and tabs show, temporarily hide all
the palettes at once, or hide each group of
palettes individually.
Throughout these lessons, feel free to move
or hide the toolbox and palettes as necessary.
1 Select the hand tool ( ).
2 Position the pointer over the title bar of the Styles and Colors palette window, hold down the mouse, and drag the palette to the right edge of the publication window.
You can drag the toolbox or any palette any-
where within the publication window. You can even let part of the palette or toolbox
extend outside the publication window.
You’ll now see how small a palette can be
while still visible.
3 Click the Maximize button in the Styles and Colors palette window until the palette window jumps to its minimum size (just the title bar and palette tabs display).
Maximize Minimize
4 Click the Maximize button in the palette window again to return the palette to its full size.
If you like the palettes handy, but out of the
way, you can move them to the bottom of
the screen. You’ll try this next.
5 Drag the Styles and Colors palette window until its bottom edge aligns with the bottom of the publication window. (In Mac OS, you may need to drag the palette window until its bottom edge aligns with the bottom edge of the monitor screen.) Click the Maximize button in the palette window.
PageMaker reduces the palette to its mini-
mum size and automatically drops it to the bottom of the screen. (Normally when you minimize a palette the titlebar remains
stationary.)
6 Click the Maximize button in the palette window again to return the palette to its full size.
LESSON 114Flyer
If you need to see the full screen, you can
temporarily hide all the palettes and the
toolbox at once.
7 Press the Tab key.
The toolbox, Control palette, and Styles and
Colors palettes disappear.
Note: Be careful using this shortcut when the
text tool is selected. If you have text selected
with the text tool, pressing Tab replaces the
text with a tab character. If you have an inser-
tion point in text, pressing Tab inserts a tab
character into the line.
8 Press Tab again to redisplay the toolbox and palettes.
Finally, you can hide and show the toolbox,
Control palette, or other palettes using the hide or show options on the Window menu.
The Window menu has a hide or show
option for the toolbox and every palette. The options change from show to hide depend-
ing upon whether the toolbox or palette is
displayed or, for palettes that are grouped,
whether the palette is active.
9 Choose Window > Hide Colors.
Because the Colors and Styles palettes are grouped together, PageMaker hides both palettes.
10 Choose Window > Show Styles to redisplay the palettes.
Notice that both palettes are displayed, but now the Styles palette is the active palette.
11 Click the Colors palette tab to make it the active palette (or choose Window > Show Colors).
Using the rulers
The rulers along the top and left borders of
your publication window can help you posi-
tion text and graphic elements on a page.
1 Click the pointer tool ( ) in the toolbox
to select it.
2 Without clicking in your publication, move the pointer around the publication window, and notice how the hairline indica-tors in the vertical and horizontal rulers cor-respond to the position of the pointer.
Also notice how when no text or graphic
elements are selected in your publication,
the Control palette displays the horizontal
and vertical position of the cursor as X and
Y coordinates, respectively.
Note: Since inches is the unit of measure
established for this publication, the Control
palette and the horizontal and vertical rulers
display in inches.
Positioning the zero point
The point on your page (or pasteboard) that aligns with zero on both the horizontal and
vertical rulers is known as the zero point. By default, the zero point of single-sided
publications is located at the upper left
corner of the page. To make it easier to
measure distances from specific areas of
your page, you can move the zero point to any location.

15ADOBE PAGEMAKER 7.0Classroom in a Book
1 Without clicking in your publication,
move the pointer to the upper left corner of the page. Notice how the zeros on the hori-
zontal and vertical rulers are aligned at this
location. (If necessary, click the scroll bars
along the right and bottom edges of the publication window to view the upper left
corner of the page.)
2 With the pointer tool selected, position the pointer on the intersection of the rulers in the upper left corner of your publication window (on the zero point marker as shown below), and hold down the mouse button.
Zero point marker
3 With the mouse button still held down, drag the zero point down and right until the horizontal and vertical guides are roughly aligned with the upper left edge of the letter H in the display text Home Review, and release the mouse button.
The horizontal and vertical rulers indicate
the new location of the zero point.
4 Double-click the crosshair of the zero point to restore the zero point to its default location at the upper left corner of the page.
Setting up the rulers
You can set the horizontal and vertical rulers to the measurement system you prefer. In
general, it’s a good idea to choose a
measurement system before you assemble a
publication.
1 Choose File > Preferences > General.
The Preferences dialog box lets you custom-
ize PageMaker. If a publication is open, the
options you select in the Preferences dialog
box apply to that publication only. If no
publication is open, the options you choose
apply to all new publications you create.
Notice how Inches is selected for both
the Measurements In and Vertical Ruler
options. PageMaker lets you set the
horizontal and vertical rulers to different
units of measurement.
2 Choose Picas for Vertical Ruler and click OK.
RevHome
1
1
2 3 4 5
RevHome
1
1
2 3 4 5

LESSON 116Flyer
The horizontal ruler reflects the unit of
measure (Inches) originally selected for the
Measurements In option. The vertical ruler
indicates picas as the unit of measure.
Note:: Derived from an old term for metal
type of that size, a pica is a measure of type
(approximately equal to 1/6 of an inch),
divided into 12 points (each point equal to .0138 (1/72) of an inch).
Notice how the text and graphic elements
remain in the same position on the page.
Even though you usually work with one unit
of measure throughout a publication, you can see it is possible to change to another
unit of measure at any time without altering
the positioning of elements.
3 As a shortcut to the Preferences dialog box, double-click the pointer tool in the tool box. For Vertical Ruler, choose Inches, and click OK to restore the original measure-ment system.
Sometimes you will want to hide the rulers
so you have more room on the screen to view your publication.
4 Choose View > Hide Rulers to hide the rulers.
5 Choose View > Show Rulers to once again display the rulers.
Displaying guides
Nonprinting guides make it easier to
assemble a publication like this.
1 Choose View > Show Guides to display
all nonprinting guides used to create this publication.
Notice the cyan horizontal and vertical lines
positioned at various locations on the page.
These ruler guides are used to position text
and graphics on the page accurately. It is
possible to have as many as 120 ruler guides
on the page, in any combination of horizon-
tal and vertical.
The pink horizontal lines at the top and bot-
tom of the columns are the top and bottom
margin guides. The darker blue vertical lines
indicate the columns. Column guides help
define areas for text to flow into automati-
cally.
Note: Column guides overlap the left and
right margin guides.
A. Column guides B. Bottom Margin guide C. Ruler guides
1
1
2
3
4
5
6
7
8
9
10
11
2 3 4 5 6 7 8
A
BC

17ADOBE PAGEMAKER 7.0Classroom in a Book
2 If you have altered 01Final.pmd, choose File > Revert, and when prompted, click OK to revert to the original version of the file.
Note: If you have saved any changes made to the 01Final.pmd file, copy the original
01Final.pmd file from the 01Lesson folder on the Adobe PageMaker 7.0 Classroom in a Book CD-ROM.
Planning to print this flyer
It’s a good idea to gather all printing require-
ments before you start to work. Designed to be printed on a 300 dpi (dots per inch) desk-
top laser printer, this flyer (including the
grayscale TIFF image scanned at 100 dpi),
can print successfully on a wide variety of
PostScript and non-PostScript printers.
Most printers do not print to the very edge
of the page. You need to determine the max-
imum printable area your printer can print,
and adapt your designs accordingly. If the
documentation that came with your printer
does not provide the dimensions of the
maximum printable area, you can manually
determine it. To do so, draw a shaded box in
a PageMaker publication that covers an
entire page, and print the page. (By the end
of this lesson you’ll know how to draw and
fill objects.) The resulting printed page will
show you the print area, also known as the imageable area.
Note: If you do not have the required printer,
you can still create the project as directed and
then print it on your own printer by
selecting your printer and its PPD (if it is a
PostScript printer) in the Print dialog box
when it is time to print. You can also use the
Export Adobe PDF command to create an
Adobe PDF version of the project rather than
a printed copy, as described in Creating an
Adobe PDF version of the flyer on page 41.
Assembling a two-column flyerAfter creating a new publication, you will
place and format text and graphics to assem-
ble this two-column flyer.
So that you can use the 01Final.pmd publi-
cation as a reference, leave it open as you
assemble the flyer.
Creating a new publication
After setting the options in the Document
Setup dialog box, you will name and save
your publication.
1 Choose File > New.
The Document Setup dialog box prompts
you to establish some of the specifications
for the flyer.
2 In the Document Setup dialog box, click Double-sided to deselect it and type .75 for the left margin. Make sure the Right, Top,

LESSON 118Flyer
and Bottom options display a value of 0.75 (to establish a .75-inch margin around the entire page).
3 In the Document Setup dialog box, choose 300 for Target Output Resolution and choose (Windows only) the printer that matches your printer for Compose to Printer (or HP LaserJet 5Si if you don’t have a 300 dpi printer). Then click OK.
By default, every publication has at least one
column that spans the area between the left
and right margin guides. For this reason, the dark blue vertical column guides overlap the
pink left and right margin guides.
4 With the pointer tool selected, position the pointer on either vertical dark blue col-umn guide, hold down the mouse button until the cursor becomes a double-headed arrow, and drag the column guide left or right. When you release it, you can view the pink margin guide behind it.
PageMaker lets you adjust the size of a single
column to a different width than the area
between the left and right margin guides.
5 Drag the column guide back to its original position over the margin guide.
Note: Unlike many word-processing applica-
tions, PageMaker makes it possible to print
text and graphics positioned between the edge
of the page and the margins.
6 Choose File > Save As, and in the dialog box type 01Work.pmd for the file name and make sure Publication is selected for Save as Type (Windows) or Save As (Macintosh). Locate and select the 01Lesson folder and click Save.

19ADOBE PAGEMAKER 7.0Classroom in a Book
PageMaker saves the 01Work.pmd
publication.
The .pmd filename extension is
required in PageMaker for Windows
and will be added to a filename if you
don’t include it. PageMaker on the
Macintosh does not require the
filename extension, nor will it add it to
filenames. However, if you transfer
files to a Windows computer, the
extension lets PageMaker for Windows
recognize and open the file.
Specifying column guides
With the .75-inch margins already estab-
lished using the Document Setup dialog
box, you are ready to add column guides and
ruler guides. For this flyer, you will divide
the page into two columns.
1 Choose Layout > Column Guides, and, in the Column Guides dialog box, type 2 for
Number of Columns and .25 for the Space
Between Columns (Windows) or Space
Between (Mac OS), and click OK.
When you specify two or more (up to
twenty) columns, PageMaker automatically
creates columns of equal width, filling the
entire area between the left and right margin
guides. The vertical space between the col-
umns is called the gutter.
To create columns of varying width, you can
drag the column guides, manually resizing
the columns.
2 With the pointer tool selected, position the pointer on any column guide, and drag the column guide to the left or right.
3 Choose Layout > Column Guides, and, in the Column Guides dialog box, notice how Number of Columns is set to Custom. Type 2 for Number of Columns to restore the two columns of equal width, and click OK.
4 Choose File > Save.
Gutter

LESSON 120Flyer
Locking the guides
Once you have established the final design
grid, it is a good idea to lock the guides,
preventing column and ruler guides being
moved accidentally.
1 Choose View > Lock Guides to select the option.
2 Attempt to move the column guides.
Note: If you want to move or delete a guide
(margin, column, or ruler) when the guides
are locked, choose View > Lock Guides to dese-
lect the option. After you move or delete a guide, relock the guides.
Placing a graphic
You will use the Place command to import a photograph into the flyer. PageMaker lets you import, link, and export text and graphic elements that are saved in a PageMaker-compatible format. For more
information on placing graphics, refer to the Adobe PageMaker 7.0 User Guide.
This particular photograph was scanned on a flatbed scanner, imported into Adobe
Photoshop® to be sized for the flyer, and saved as a grayscale TIFF image at a resolution of 100 dpi.
1 Choose File > Place. Locate and open the 01Lesson folder, and then double-click the
01ArtA.tif file.
The pointer changes to a loaded graphic
icon. You will position the graphic icon
where you want the upper left corner of the graphic to appear.
To cancel importing when the loaded
graphic (or text) icon is displayed, click the
pointer tool in the toolbox.
2 With the loaded graphic icon ( Windows or Mac OS), click anywhere on the page to place the photograph.
PageMaker positions the photograph so that its top left corner is aligned with the position
of the top left corner of the loaded graphic
icon where you clicked to place the photo-
graph.
The eight square graphics handles displayed
at the corners and edges of the photograph
indicate the graphic is selected, and make it possible to resize the graphic vertically, hor-
izontally, or both. The Control palette
reflects the attributes of the selected graphic,
and offers another way to manipulate
objects. You can move and resize objects
precisely by entering values in the Control palette.
Now that the photograph is placed in the
flyer, you will position the photograph in the lower left portion of the page, reduce the size
of the photograph, and then undo the resiz-
ing operation.
3 With the pointer tool selected, click in the center of the photograph, and hold down the mouse button until the pointer changes to an arrowhead ( ).
4 With the mouse button still held down, drag the photograph beyond the bottom edge of the page.

21ADOBE PAGEMAKER 7.0Classroom in a Book
PageMaker automatically scrolls the page
when the pointer reaches the edge of the
publication window. If you drag outside the publication window, PageMaker stops
scrolling.
5 With the mouse button still held down, drag the photograph until its left and bot-tom edges are aligned with the left and bot-tom margin guides, respectively, and release the mouse button.
After placing and aligning text in column 2, you will reposition the photograph to be aligned with the text. For now, take this
opportunity to experiment with resizing the photograph.
6 With the pointer tool still selected, click on one of the corner handles, and drag toward the center of the photograph, reducing its size.
Even though it is possible to resize bitmap
images in PageMaker, you will get the best printing results if your images are accurately
sized before you import them into
PageMaker.
7 If necessary, choose Edit > Undo Stretch to restore the photograph to its original size.
Important: PageMaker lets you undo only a single level of modification. Any subsequent
action, even just clicking the mouse, disables
the Undo command.
If you are unable to restore the photograph
to its original size, click the photograph with
the pointer tool to select it, press the Delete
key, and re-import the 01ArtA.tif file as
explained in steps 1 and 2.

LESSON 122Flyer
8 With the pointer tool still selected, hold down Shift and drag the top-center handle of the photograph up towards the top of the page.
Normally when you drag a top or side center
handle, PageMaker resizes only in a vertical
(or horizontal) direction. However, resizing
with the Shift key maintains the proportions
of the image, regardless of the handle you use.
9 Choose Edit > Undo Stretch to restore the photograph to its original size or place it again (as described in steps 1 and 2).
10 Choose File > Save.
Note: Choosing the Save command deselects
all objects in a publication.
Placing text in column 2
You can insert text created in other word-
processing applications into a PageMaker
publication. PageMaker supports a wide
variety of word-processing applications and
text-file formats, including Rich Text For-
mat (.rtf). You can also import text from
documents created using earlier versions of
PageMaker.
For information on installing filters
for importing different file types into
PageMaker, see the Adobe PageMaker
7.0 online Help.
1 Choose File > Place, and, in the dialog
box, double-click the 01TextA.doc file in the
01Lesson folder.
The pointer changes to a loaded text icon.
2 Position the loaded text icon ( ) in column 2 below the top margin guide. Click to place the text (avoid clicking outside of the column).
The text flows into the column automati-
cally.
Note: If you click outside of the column, the text will not flow into the column. If this is the case, make sure the pointer tool is selected,
click the placed text, press the Delete key, and import the 01TextA.doc file again.
The windowshades that stretch horizontally
across the top and bottom borders of the
text indicate the text is selected as a text
block. A text block, like a graphic, is an object
that you can move, resize, and reshape. In

23ADOBE PAGEMAKER 7.0Classroom in a Book
addition to the loops in the center, a selected
text block has square corner handles at each
end of the windowshade. With the pointer
tool selected, you can drag a corner handle
to adjust the size of a text block.
A. Corner handle B. Top windowshade handle C. Bottom windowshade handle
The empty windowshade handle at the top
of a text block indicates the beginning of a
story. The empty windowshade handle at
the bottom of a text block indicates the end
of a story. A story is text recognized by
PageMaker as a single unit. A story can be
one letter or several hundred pages of text,
and can be contained in a single text block
or threaded through many different ones.
3 Position the pointer on the bottom windowshade handle (bottom loop), and drag up to reduce the size of the text block.
A red triangle appears in the bottom win-
dowshade handle, indicating the end of the
story is not displayed.
4 Position the pointer on the bottom windowshade handle (bottom loop), and drag down, making sure the entire story is displayed.
Note: Clicking, rather than dragging, the red
triangle loads the remaining text, causing the
cursor to be displayed as a loaded text icon. If you clicked the triangle by mistake, click the
pointer tool in the toolbox to cancel. Then click
the text again to select it as a text block.
Much like adjusting the height and width
of a graphic element, you can adjust the
height and width of a text block by dragging
a corner handle (at the left and right ends
of the windowshade).
In the heart of the Boston area lies a true architectural gem. This Victorian dwelling exemplifies turn-of-the-century New England architecture at its best. In addition to its prime location just minutes from downtown Boston, this home enjoys spectacular views of the Charles River and the downtown Boston skyline. Completely restored with attention to historic detail this three-story, three-bedroom residence has incorporated the functional requirements of today’s home. The magnifi-cent interior boasts all original oak finishing, including a breathtaking spiral banister, and built-in bookcases in the library. The kitchen has been fully modernized with state of the art appliances, yet retains the house’s original charm with its high ceilings, ornate moldings, and functional wood stove. The original bay windows, refinished hard-wood floors, and ornate paint trim make this home’s interior equally spectacular as its exterior. Consistent with the practical beauty of Victorian architecture, no space is wasted. The most spectacular room of all is the converted attic, taking full advantage of its utterly gigantic size and high ceiling with skylights, windows, and a stairway leading out to a widow's walk. This home bestows the colonial charm of New England's past upon this quaint neighborhood. It resides just two blocks from the historic house used as George Washington's headquarters in 1775, and later occupied by poet Henry Wadsworth Longfellow. A stroll north on Lyon Street past a hilly intersection looks out over the pine and maple woods of a nearby park, a dramatic contrast with the blue Massachusetts bay beyond. These stunning views must have inspired architects to execute their best work. For more information about this property and others in the Boston area contact Joan Rutherford at Harbor Realty.
BA
C
In the heart of the Boston area lies a true architectural gem. This Victorian dwelling exemplifies turn-of-the-century New England architecture at its best. In addition to its prime location just minutes from downtown Boston, this home enjoys spectacular views of the Charles River and the downtown Boston skyline. Completely restored with attention to historic detail this three-story, three-bedroom residence has incorporated the functional requirements of today’s home. The magnifi-cent interior boasts all original oak finishing, including a breathtaking spiral banister, and built-in bookcases in the library. The kitchen has been fully modernized with state of the art appliances, yet retains the house’s original charm with its high ceilings, ornate moldings, and functional wood stove. The original bay windows, refinished hard-wood floors, and ornate paint trim make this home’s interior equally spectacular as its exterior. Consistent with the practical beauty of Victorian architecture, no space is wasted. The most spectacular

LESSON 124Flyer
5 With the pointer tool selected, position the pointer on the bottom left corner handle of the text block in column 2, hold down the mouse button until the pointer changes to a double-headed arrow, drag it in any direction, and release the mouse button, adjusting the width and the height of the text block.
PageMaker automatically reflows the text
within the text block. Depending on the size
of the text block, the red triangle in the bot-
tom windowshade handle may indicate the entire story is not displayed.
6 Choose Edit > Undo Stretch to restore the text block to its original size.
If you are unable to restore the text block to its original size, click the text block with the
pointer tool to select it, press the Delete key,
and import the 01TextA.doc file again as described in steps 1 and 2.
7 Choose File > Save.
Formatting the text in column 2
You will apply character specifications (such as size, typeface, and type style) to the text in column 2 using the Control palette.
Note: To create, edit, or format text, the text
tool must be selected.
1 Choose View > Actual Size.
2 Click the text tool ( ) in the toolbox to select it.
The pointer changes to an I-beam, and the
Control palette displays frequently used
character specification options, providing
quick access to most of the options that are
available from the menus.
You can select a single character or the entire
contents of a text block by dragging the text
tool across the target text. To select a word,
double-click it with the text tool. To select a
paragraph, triple-click it with the text tool.
For this flyer, you need to change the font
and size of all the text in the column. The
next step shows you the easiest way to select
the entire story.
3 With the text tool, click the text in col-umn 2 to establish an insertion point (a blinking vertical bar where you can begin typing). Choose Edit > Select All.
The character specifications you select in the Control palette apply to selected text only.
You will change the font, point size, and
leading.
The point size of a font is the height of the font from the bottom of the descenders
(such as p) to the top of the ascenders (such as h), but does not indicate the height of
each letter. For example, a lowercase “a” set in 12-point type is not 12 points high.
Leading is the vertical space in which text is
placed. Like type size, leading is measured in
points. Unlike type size, which varies with
each letter, leading is an exact measurement.
25ADOBE PAGEMAKER 7.0Classroom in a Book
12-point leading is always 12 points high.
This vertical space for type is also referred to as the slug or the leading slug.
4 In the Control palette, choose Myriad Roman for Font, type 9.5 for Size and 17 for Leading, and click the Apply button.
A. Font pop-up menu B. Size C. Leading D. Apply button
When formatting text using the Control pal-
ette, it is possible to apply the specification
by pressing Enter or Return, rather than
clicking the Apply button. However, if the
Control palette is not active, pressing Enter
or Return instead replaces the selected text
with a hard carriage return.
5 Choose File > Save.
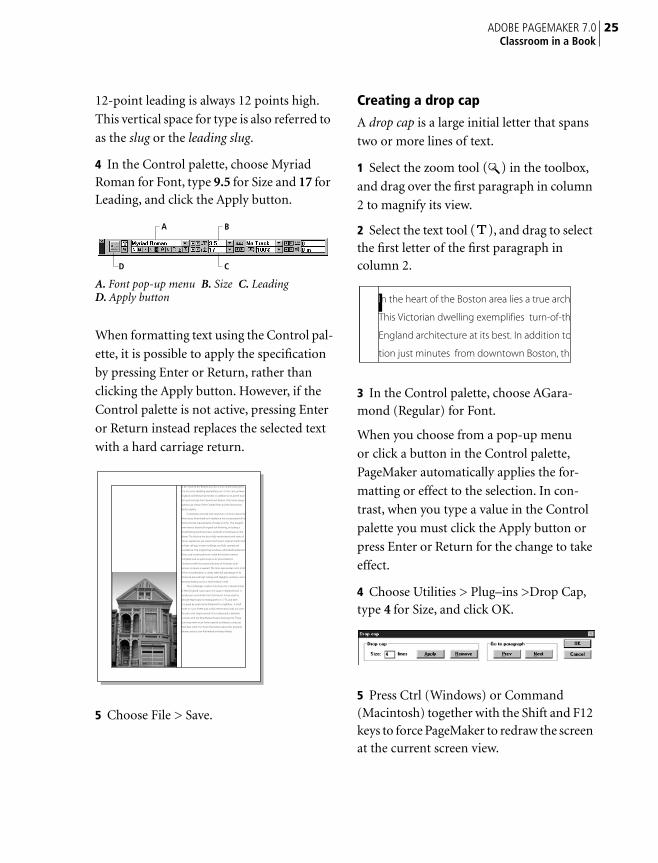
Creating a drop cap
A drop cap is a large initial letter that spans
two or more lines of text.
1 Select the zoom tool ( ) in the toolbox,
and drag over the first paragraph in column
2 to magnify its view.
2 Select the text tool ( ), and drag to select the first letter of the first paragraph in column 2.
3 In the Control palette, choose AGara-mond (Regular) for Font.
When you choose from a pop-up menu
or click a button in the Control palette,
PageMaker automatically applies the for-
matting or effect to the selection. In con-
trast, when you type a value in the Control
palette you must click the Apply button or press Enter or Return for the change to take
effect.
4 Choose Utilities > Plug–ins >Drop Cap, type 4 for Size, and click OK.
5 Press Ctrl (Windows) or Command (Macintosh) together with the Shift and F12 keys to force PageMaker to redraw the screen at the current screen view.
B
D C
A
In the heart of the Boston area lies a true architectural gem.
This Victorian dwelling exemplifies turn-of-the-century New
England architecture at its best. In addition to its prime loca-
tion just minutes from downtown Boston, this home enjoys
spectacular views of the Charles River and the downtown
Boston skyline.
Completely restored with attention to historic detail this
three-story, three-bedroom residence has incorporated all of
the functional requirements of today's home. The magnifi-
cent interior boasts all original oak finishing, including a
breathtaking spiral bannister, and built-in bookcases in the
library. The kitchen has been fully modernized with state of
the art appliances, yet retains the house’s original charm with
its high ceilings, ornate moldings, and fully operational
woodstove. The original bay windows, refinished hardwood
floors, and ornate paint trim make this home’s interior
complete and as spectacular as its proud exterior.
Consistent with the practical beauty of Victorian archi-
tecture, no space is wasted. The most spectacular room of all
is the converted attic. It clearly takes full advantage of its
immense size and high ceiling with skylights, windows, and a
stairway leading out to a small widow's walk.
This Cambridge residence bestows the colonial charm
of New England's past upon this quaint neighborhood. It
resides just two blocks from the historic house used as
George Washington's headquarters in 1775, and later
occupied by poet Henry Wadsworth Longfellow. A stroll
north on Lyon Street past a hilly intersection looks out over
the pine and maple woods of a nearby park, a dramatic
contrast with the blue Massachusetts bay beyond. These
stunning views must have inspired architects to execute
their best work. For more information about this property
please contact Joan Rutherford at Harbor Realty.
In the heart of the Boston area lies a true arch
This Victorian dwelling exemplifies turn-of-th
England architecture at its best. In addition to
tion just minutes from downtown Boston, th
LESSON 126Flyer
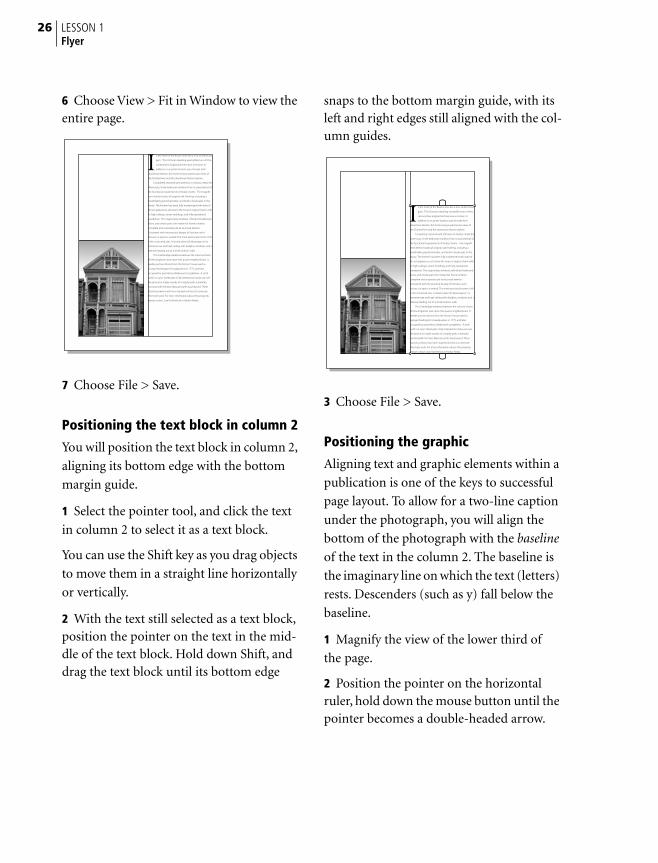
6 Choose View > Fit in Window to view the entire page.
7 Choose File > Save.
Positioning the text block in column 2
You will position the text block in column 2,
aligning its bottom edge with the bottom
margin guide.
1 Select the pointer tool, and click the text
in column 2 to select it as a text block.
You can use the Shift key as you drag objects
to move them in a straight line horizontally
or vertically.
2 With the text still selected as a text block, position the pointer on the text in the mid-dle of the text block. Hold down Shift, and drag the text block until its bottom edge
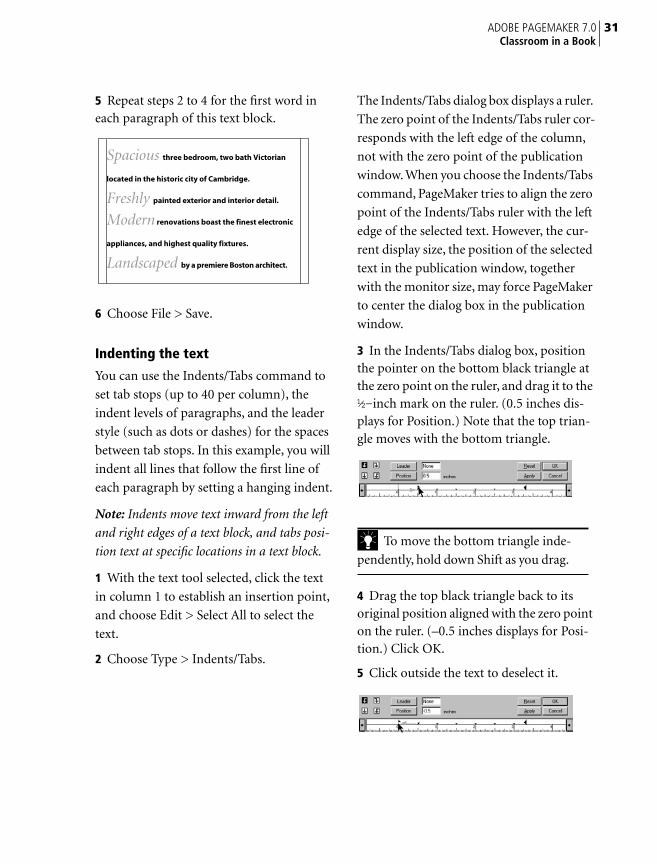
snaps to the bottom margin guide, with its left and right edges still aligned with the col-umn guides.
3 Choose File > Save.
Positioning the graphic
Aligning text and graphic elements within a
publication is one of the keys to successful
page layout. To allow for a two-line caption
under the photograph, you will align the
bottom of the photograph with the baseline
of the text in the column 2. The baseline is
the imaginary line on which the text (letters)
rests. Descenders (such as y) fall below the baseline.
1 Magnify the view of the lower third of the page.
2 Position the pointer on the horizontal ruler, hold down the mouse button until the pointer becomes a double-headed arrow.
n the heart of the Boston area lies a true architectural
gem. This Victorian dwelling exemplifies turn-of-the-
century New England architecture at its best. In
addition to its prime location just minutes from
downtown Boston, this home enjoys spectacular views of
the Charles River and the downtown Boston skyline.
Completely restored with attention to historic detail this
three-story, three-bedroom residence has incorporated all of
the functional requirements of today's home. The magnifi-
cent interior boasts all original oak finishing, including a
breathtaking spiral bannister, and built-in bookcases in the
library. The kitchen has been fully modernized with state of
the art appliances, yet retains the house’s original charm with
its high ceilings, ornate moldings, and fully operational
woodstove. The original bay windows, refinished hardwood
floors, and ornate paint trim make this home’s interior
complete and as spectacular as its proud exterior.
Consistent with the practical beauty of Victorian archi-
tecture, no space is wasted. The most spectacular room of all
is the converted attic. It clearly takes full advantage of its
immense size and high ceiling with skylights, windows, and a
stairway leading out to a small widow's walk.
This Cambridge residence bestows the colonial charm
of New England's past upon this quaint neighborhood. It
resides just two blocks from the historic house used as
George Washington's headquarters in 1775, and later
occupied by poet Henry Wadsworth Longfellow. A stroll
north on Lyon Street past a hilly intersection looks out over
the pine and maple woods of a nearby park, a dramatic
contrast with the blue Massachusetts bay beyond. These
stunning views must have inspired architects to execute
their best work. For more information about this property
please contact Joan Rutherford at Harbor Realty.
I

27ADOBE PAGEMAKER 7.0Classroom in a Book
3 Drag down to create a horizontal ruler guide that is aligned with the baseline of the third to last line of text in column 2, and release the mouse button.
Because you locked the guides earlier in this lesson, once you release the mouse you can-
not adjust the guide. To move or delete the
guide, temporarily unlock the guides
(choose View > Lock Guides to deselect the
option). So that you don’t accidently move
the graphic or the text block, position the
pointer over the guide in the margin or
between columns. Then, either drag the
guide to the correct location, or drag it off
the page to delete it. Then, relock the guides.
4 With the pointer tool selected, hold down Shift (to constrain the movement to 90º), and drag the photograph until its bottom
edge snaps to the horizontal ruler guide (that you just created), with its left and right edges still aligned with the column guides.
The photograph is aligned with the text in column 2, and you are ready to create the caption for the photograph.
5 Choose File > Save.
Creating the caption
Rather than importing existing text into
PageMaker, you will type the two-line
caption below the photograph and position
it so the text block snaps to the bottom
margin guide.
PageMaker has all the word-processing
capabilities you need to type and format
your text from scratch. While it is possible to
create and edit text in layout view, you may
find many advantages to using Story Editor,
the full-featured word processor included
n the heart of the Boston area lies a true architectural
gem. This Victorian dwelling exemplifies turn-of-the-
century New England architecture at its best. In
addition to its prime location just minutes from
downtown Boston, this home enjoys spectacular views of
the Charles River and the downtown Boston skyline.
Completely restored with attention to historic detail this
three-story, three-bedroom residence has incorporated all of
the functional requirements of today's home. The magnifi-
cent interior boasts all original oak finishing, including a
breathtaking spiral bannister, and built-in bookcases in the
library. The kitchen has been fully modernized with state of
the art appliances, yet retains the house’s original charm with
its high ceilings, ornate moldings, and fully operational
woodstove. The original bay windows, refinished hardwood
floors, and ornate paint trim make this home’s interior
complete and as spectacular as its proud exterior.
Consistent with the practical beauty of Victorian archi-
tecture, no space is wasted. The most spectacular room of all
is the converted attic. It clearly takes full advantage of its
immense size and high ceiling with skylights, windows, and a
stairway leading out to a small widow's walk.
This Cambridge residence bestows the colonial charm
of New England's past upon this quaint neighborhood. It
resides just two blocks from the historic house used as
George Washington's headquarters in 1775, and later
occupied by poet Henry Wadsworth Longfellow. A stroll
north on Lyon Street past a hilly intersection looks out over
the pine and maple woods of a nearby park, a dramatic
contrast with the blue Massachusetts bay beyond. These
stunning views must have inspired architects to execute
their best work. For more information about this property
please contact Joan Rutherford at Harbor Realty.
I
1
1
2
3
4
5
6
7
8
9
10
11
2 3 4 5 6 7 8
n the heart of the Boston area lies a true architectural
gem. This Victorian dwelling exemplifies turn-of-the-
century New England architecture at its best. In
addition to its prime location just minutes from
downtown Boston, this home enjoys spectacular views of
the Charles River and the downtown Boston skyline.
Completely restored with attention to historic detail this
three-story, three-bedroom residence has incorporated all of
the functional requirements of today's home. The magnifi-
cent interior boasts all original oak finishing, including a
breathtaking spiral bannister, and built-in bookcases in the
library. The kitchen has been fully modernized with state of
the art appliances, yet retains the house’s original charm with
its high ceilings, ornate moldings, and fully operational
woodstove. The original bay windows, refinished hardwood
floors, and ornate paint trim make this home’s interior
complete and as spectacular as its proud exterior.
Consistent with the practical beauty of Victorian archi-
tecture, no space is wasted. The most spectacular room of all
is the converted attic. It clearly takes full advantage of its
immense size and high ceiling with skylights, windows, and a
stairway leading out to a small widow's walk.
This Cambridge residence bestows the colonial charm
of New England's past upon this quaint neighborhood. It
resides just two blocks from the historic house used as
George Washington's headquarters in 1775, and later
occupied by poet Henry Wadsworth Longfellow. A stroll
north on Lyon Street past a hilly intersection looks out over
the pine and maple woods of a nearby park, a dramatic
contrast with the blue Massachusetts bay beyond. These
stunning views must have inspired architects to execute
their best work. For more information about this property
please contact Joan Rutherford at Harbor Realty.
I

LESSON 128Flyer
with PageMaker. For more information
about the Story Editor, refer to the Adobe
PageMaker 7.0 User Guide.
Just as with formatting text, you must select
the text tool to enter or edit text.
1 Select the text tool ( ), and click in
column 1 below the photograph to establish
an insertion point.
The blinking cursor on the left margin guide
indicates the position of the insertion point.
2 Type the following sentence:
Close to the beautiful Charles River, this home shares the historic charm of its Cambridge neighborhood.
Because you established an insertion point within column 1, the width of the text block automatically equals the width of the
column.
3 With the text tool still selected, triple-click the caption to select it. Triple-clicking text selects a single paragraph.
4 In the Control palette, choose AGara-mond (Regular) for Font, type 11 for Size ( ) and 17 for Leading ( ), and click the Italic button ( ).
Note: When you apply italic to AGaramond,
PageMaker uses AGaramond Italic. On the
Macintosh, you can get the same result if you
select AGaramond Italic directly.
5 Select the pointer tool, click the caption to select it as a text block, hold down Shift (to constrain the movement to 90º), and posi-tion the pointer over the text. Drag the text
block until its bottom edge snaps to the bot-tom margin guide, with its left and right edges still aligned with the column guides.
Because the caption and the text in column
2 both have the same leading value and are snapped to the same guide, their baselines
align.
6 Choose File > Save.
Placing text in column 1
Again, you will place text created and saved with a word-processing application,
automatically flowing it into column 1.
1 Choose View > Fit in Window.
2 Choose File > Place, and in the Place Document dialog box, double-click the 01TextB.doc file in the 01Lesson folder.
The pointer changes to a loaded text icon.
Close to the beautiful Charles River, this home shares the
historic charm of its Cambridge neighborhood.
just two blocks from the historic house used as George
Washington's headquarters in 1775, and later occupied by
poet Henry Wadsworth Longfellow. A stroll north on Lyon
Street past a hilly intersection looks out over the pine and
maple woods of a nearby park, a dramatic contrast with
the blue Massachusetts bay beyond. These stunning views
must have inspired architects to execute their best work.
For more information about this property and others in
the Boston area contact Joan Rutherford at Harbor Realty.

29ADOBE PAGEMAKER 7.0Classroom in a Book
3 With the loaded text icon displayed, click in column 1 a little below the top margin guide to place the text.
The text flows into the column automati-
cally.
4 Select the zoom tool ( ) in the toolbox and drag over the entire left column above the photograph.
5 Select the text tool ( ), click anywhere in the new text block to establish an insertion point, and choose Edit > Select All to select the entire story.
6 In the Control palette, choose Myriad Roman for Font, type 10 for Size and 26 for Leading, click the Bold button ( ).
7 Choose File > Save.
Applying a tint to text
A tint is a lightened color. For this lesson,
you will use the Colors palette to apply a 40% tint of black (gray) to the first word in each paragraph above the photograph.
In addition to applying colors and tints to text, you can apply colors and tints to lines,
rectangles, ellipses, polygons, and mono-
chrome or grayscale bitmap images (such
as TIFF images) that you import into PageMaker.
Close to the beautiful Charles River, this home shares the
historic charm of its Cambridge neighborhood.
n the heart of the Boston area lies a true architectural
gem. This Victorian dwelling exemplifies turn-of-the-
century New England architecture at its best. In
addition to its prime location just minutes from
downtown Boston, this home enjoys spectacular views of
the Charles River and the downtown Boston skyline.
Completely restored with attention to historic detail this
three-story, three-bedroom residence has incorporated all of
the functional requirements of today's home. The magnifi-
cent interior boasts all original oak finishing, including a
breathtaking spiral bannister, and built-in bookcases in the
library. The kitchen has been fully modernized with state of
the art appliances, yet retains the house’s original charm with
its high ceilings, ornate moldings, and fully operational
woodstove. The original bay windows, refinished hardwood
floors, and ornate paint trim make this home’s interior
complete and as spectacular as its proud exterior.
Consistent with the practical beauty of Victorian archi-
tecture, no space is wasted. The most spectacular room of all
is the converted attic. It clearly takes full advantage of its
immense size and high ceiling with skylights, windows, and a
stairway leading out to a small widow's walk.
This Cambridge residence bestows the colonial charm
of New England's past upon this quaint neighborhood. It
resides just two blocks from the historic house used as
George Washington's headquarters in 1775, and later
occupied by poet Henry Wadsworth Longfellow. A stroll
north on Lyon Street past a hilly intersection looks out over
the pine and maple woods of a nearby park, a dramatic
contrast with the blue Massachusetts bay beyond. These
stunning views must have inspired architects to execute
their best work. For more information about this property
please contact Joan Rutherford at Harbor Realty.
I
Spacious three bedroom, two bath Victorian located in
the historic city of Cambridge.
Freshly painted exterior and interior detail.
Modern renovations boast the finest electronic
appliances, and highest quality fixtures.
Landscaped by a premiere Boston architect.

LESSON 130Flyer
1 If not already displayed, click the Colors
palette tab to activate the Colors palette.
PageMaker groups the Styles and Colors pal-
ettes together. (You’ll learn more about
styles in Lessons 3 and 4.) The Colors palette
displays a list of available colors with icons
that indicate the model used to define the
color (such as CMYK or RGB) and the type
of color (such as Spot or Process). You select
the Stroke, Fill, or Both button when you
want to tint or color the stroke (the line or
outline) or fill (the interior) of an object
you’ve drawn in PageMaker.
To apply color (or a tint of a color) to text,
you must select the text with the text tool.
2 With the text tool selected, double-click the first word (in the first paragraph) in col-umn 1 to select it.
Double-clicking text with the text tool
selects an entire word.
3 In the Colors palette, make sure [Black] is selected in the list of colors, and choose 40% from the Tint pop-up menu to apply a 40% tint of black to the text.
In addition to applying a tint, you will
format the first word of each paragraph to display a 20-point italic font.
4 With the first word still selected, in the Control palette choose AGaramond for Font, type 22 for Size, and click the Italic button ( ).
Fill button
Tint pop-up menu
RGB model
Process colorSpot color
CMYK model
Both buttonColors palette tab
Stroke button
Spacious three bedroom, two bath Victorian located in
the historic city of Cambridge.
Freshly painted exterior and interior detail.
Modern renovations boast the finest electronic
appliances, and highest quality fixtures.
Landscaped by a premiere Boston architect.
31ADOBE PAGEMAKER 7.0Classroom in a Book
5 Repeat steps 2 to 4 for the first word in each paragraph of this text block.
6 Choose File > Save.
Indenting the text
You can use the Indents/Tabs command to set tab stops (up to 40 per column), the
indent levels of paragraphs, and the leader
style (such as dots or dashes) for the spaces
between tab stops. In this example, you will
indent all lines that follow the first line of
each paragraph by setting a hanging indent.
Note: Indents move text inward from the left
and right edges of a text block, and tabs posi-
tion text at specific locations in a text block.
1 With the text tool selected, click the text in column 1 to establish an insertion point, and choose Edit > Select All to select the
text.
2 Choose Type > Indents/Tabs.
The Indents/Tabs dialog box displays a ruler.
The zero point of the Indents/Tabs ruler cor-
responds with the left edge of the column,
not with the zero point of the publication
window. When you choose the Indents/Tabs
command, PageMaker tries to align the zero
point of the Indents/Tabs ruler with the left
edge of the selected text. However, the cur-
rent display size, the position of the selected
text in the publication window, together
with the monitor size, may force PageMaker
to center the dialog box in the publication
window.
3 In the Indents/Tabs dialog box, position the pointer on the bottom black triangle at the zero point on the ruler, and drag it to the ½-inch mark on the ruler. (0.5 inches dis-plays for Position.) Note that the top trian-gle moves with the bottom triangle.
To move the bottom triangle inde-
pendently, hold down Shift as you drag.
4 Drag the top black triangle back to its original position aligned with the zero point on the ruler. (–0.5 inches displays for Posi-tion.) Click OK.
5 Click outside the text to deselect it.
Spacious three bedroom, two bath Victorian
located in the historic city of Cambridge.
Freshly painted exterior and interior detail.
Modern renovations boast the finest electronic
appliances, and highest quality fixtures.
Landscaped by a premiere Boston architect.
LESSON 132Flyer
The text in column 1 displays a ½-inch
hanging indent.
6 Choose File > Save.
Creating a ruler guide
Now that the text in column 1 is placed and formatted, you are ready to align it with the
text in column 2. You will create a ruler
guide that touches the baseline of the text in
column 2, and then align the baseline of the
text in column 1 with this guide.
1 Click the hand tool ( ) in the toolbox.
The pointer changes to a hand icon. The hand tool lets you move or pan the page within the publication window.
You will shift the page over a little so you can
see some of the text in column 2 as well.
2 Position the hand tool in the middle of the text block in column 1, hold down the mouse button, and drag left until some of the text in column 2 is displayed. (You want to be able to see a portion of the first line of text in both columns.)
3 From the horizontal ruler, drag to create a horizontal ruler guide that aligns with the baseline of the first line of text in column 2.
As you drag down from the horizontal ruler,
the Y indicator in the Control palette
displays the precise position of the pointer.
4 Select the pointer tool, and click the text in the top portion of column 1 to select it as a text block.
5 Position the cursor on the text block, hold down Shift (to constrain the movement), and hold down the mouse button until the pointer changes to an arrowhead.
If you click on the object or text
block and hold the mouse button down
until the pointer changes to an arrow-
head, PageMaker displays the object or text while you drag it. On the other hand,
if you move a selection immediately,
PageMaker displays only the bounding
box of the object or text block.
Spacious three bedroom, two bath Victorian
located in the historic city of Cambridge.
Freshly painted exterior and interior detail.
Modern renovations boast the finest electronic
appliances, and highest quality fixtures.
Landscaped by a premiere Boston architect.
n the heart of the Boston area lies a true architectural
gem. This Victorian dwelling exemplifies turn-of-the-
century New England architecture at its best. In
addition to its prime location just minutes from
downtown Boston, this home enjoys spectacular views of
the Charles River and the downtown Boston skyline.
Completely restored with attention to historic detail this
three-story, three-bedroom residence has incorporated all of
the functional requirements of today's home. The magnifi-
cent interior boasts all original oak finishing, including a
breathtaking spiral bannister, and built-in bookcases in the
library. The kitchen has been fully modernized with state of
ISpacious three bedroom, two bath Victorian
located in the historic city of Cambridge.
Freshly painted exterior and interior detail.
Modern renovations boast the finest electronic
appliances, and highest quality fixtures.
Landscaped by a premiere Boston architect.
1
1
2
3
4
2 3 4 5 6 7 8

33ADOBE PAGEMAKER 7.0Classroom in a Book
6 With the Shift key still held down, drag the text block until the baseline of the first line of text is aligned with the horizontal ruler guide you just created. Its left edge should still be aligned with the left guide of column 1.
The baselines of the text in both columns are now aligned.
7 Choose File > Save.
Creating the display text
You will create the display text (heading)
and position it above the columns of text.
Display text, by its size, weight, or font
design, is used to attract attention. After
typing the heading and assigning text
attributes, you will align the heading text on a ruler guide.
1 Choose View > Actual Size.
2 Select the text tool ( ) in the toolbox.
3 Click the pasteboard above the page to establish an insertion point. (If necessary, shift the page down to view the pasteboard.)
To pan the page without changing
tools, hold down Alt (Windows) or
Option (Macintosh), and drag the page
as needed. When you release the mouse
button, the pointer returns to the
selected tool.
Before typing the text, you will specify the
character formatting.
4 In the Control palette, select AGaramond for Font, type 82 for Size ( ), and click the Apply button ( ).
5 Type Home Review.
Note: When you create or place text on any
part of the pasteboard (except the pasteboard
to the left of the page), the width of the text
block automatically equals the width of the
area between the left and right margin guides.
6 From the horizontal ruler, drag to create a horizontal ruler guide at 1.5 inches.
You will align the baseline of the text with
this horizontal ruler guide.
7 Select the pointer tool, click the words Home Review to select it as a text block, position the pointer on one of the right corner handles, hold down the mouse button until the pointer changes to a diagonal double-headed arrow, drag it until
n the heart of the Boston area lies a true architectural
gem. This Victorian dwelling exemplifies turn-of-the-
century New England architecture at its best. In
addition to its prime location just minutes from
downtown Boston, this home enjoys spectacular views of
the Charles River and the downtown Boston skyline.
Completely restored with attention to historic detail this
three-story, three-bedroom residence has incorporated all of
the functional requirements of today's home. The magnifi-
cent interior boasts all original oak finishing, including a
breathtaking spiral bannister, and built-in bookcases in the
library. The kitchen has been fully modernized with state of
ISpacious three bedroom, two bath Victorian
located in the historic city of Cambridge.
Freshly painted exterior and interior detail.
Modern renovations boast the finest electronic
appliances, and highest quality fixtures.
Landscaped by a premiere Boston architect.
1
1
2
3
4
2 3 4 5 6 7 8

LESSON 134Flyer
it is roughly aligned with the right edge of the text, and release the mouse button, reducing the width of the text block.
8 With Home Review still selected as a text block, position the pointer on the text block, and hold down the mouse button until the pointer changes to an arrowhead.
9 With the mouse button still held down, drag the text block until the baseline of the display text is aligned with the 1.5-inch hor-izontal ruler guide, with the left edge of the text aligned with the left margin guide, and release the mouse button.
10 Choose File > Save.
Cutting and pasting text
You will cut the word Review, paste it back
into a separate text block, and then increase
its point size.
1 Select the text tool ( ), and double-click
the word Review to select it.
2 Choose Edit > Cut to cut the selected text.
3 Select the pointer tool, click the word Home to select it as a text block, and drag the bottom right corner handle until it is roughly aligned with the right edge of the text, reducing the width of the text block to better organize your work space.
To toggle between the selected tool
and the pointer tool, hold down Ctrl
(Windows) or Command (Macintosh),
and press the spacebar. As you press the
spacebar, the tool changes to the zoom
tool. However, when you release the
spacebar, the tool switches to either the
pointer or the previously selected tool.
(Holding down Ctrl or Command and
the spacebar while you click or drag is a
zoom tool shortcut.)
4 Select the text tool, and choose Edit > Paste.
The pasted text appears as a selected text block.
5 Select the text tool again, and double-click the word Review to select it.
6 In the Control palette, type 122 for Size, and click the Apply button.
Home Review
Home Reviewn the heart of the Boston area lies a true architectural
gem. This Victorian dwelling exemplifies turn-of-the-
century New England architecture at its best. In ISpacious three bedroom, two bath Victorian
located in the historic city of Cambridge.
n the heart of the Boston area lies a true architectural
gem. This Victorian dwelling exemplifies turn-of-the-
century New England architecture at its best. In ISpacious three bedroom, two bath Victorian
located in the historic city of Cambridge.
Home

35ADOBE PAGEMAKER 7.0Classroom in a Book
The word Review is set in a larger point size
than the word Home.
7 Choose File > Save.
Applying a tint to the display text
You will apply a 20% tint of black to Review.
1 In the Colors palette make sure [Black] is selected in the list of colors, and choose 20%
from the Tint pop-up menu.
Now that you have applied a tint of black to the text, reduce the size of the text block and
position it.
2 From the horizontal ruler, drag to create a horizontal ruler guide at 1.75 inches.
3 Select the pointer tool, click the word Review to select it as a text block, and drag a right corner handle until it is roughly aligned with the right edge of the text, reducing the size of the text block.
4 With the text still selected as a text block, drag the text block until the baseline of the text is aligned with the 1.75-inch horizontal ruler guide, with the stem of the uppercase R in the word Review intersecting the lower-case e in the word Home.
To move a text block (or graphic)
in increments, select the text block or
graphic with the pointer tool, and either
press the arrow keys or click the X and Y
nudge buttons in the Control palette.
5 Choose File > Save.
Adjusting the stacking order
Notice how the word Review overlaps the
word Home. Since you just pasted the word
Review back into the publication, the text
object Review is positioned at the top of the stack.
As you place, paste, draw, or create text or
graphic elements, PageMaker keeps track of their stacking order on the page. Moving or
modifying an object does not affect the
stacking order.
1 With the pointer tool selected, click the
word Review to select it as a text block.
2 Choose Element > Arrange > Send to Back to stack the word Review behind the word Home, at the bottom of the stack.
n the heart of the Boston area lies a true architectural
gem. This Victorian dwelling exemplifies turn-of-the-
century New England architecture at its best InISpacious three bedroom, two bath Victorian
located in the historic city of Cambridge.
HomeReviewn the heart of the Boston area lies a true architectural
gem. This Victorian dwelling exemplifies turn-of-the-
century New England architecture at its best InISpacious three bedroom, two bath Victorian
located in the historic city of Cambridge.
ReviewHome

LESSON 136Flyer
Since the Send to Back command sends
the selected text or graphic element to the
bottom of the stack, the word Home over-
laps the word Review.
3 Choose File > Save.
Drawing a circle
PageMaker offers a variety of drawing
tools, giving you more options for creating
graphics. You will use the ellipse tool to draw
a circle, accentuating the dot above the letter
i in the word Review.
1 Select the zoom tool ( ), and drag over
the letter i in the word Review.
Your Adobe PageMaker 7.0 Quick
Reference Card and the PageMaker
online help list keyboard shortcuts for
selecting tools and menu commands.
To access shortcuts in online help,
choose Help > Help Topics, and select
Windows Shortcuts from the Contents
listing (Windows), or choose Help >
PageMaker Help Topics, and select Mac-
intosh Shortcuts from the Contents list-
ing (Macintosh).
2 Click the ellipse tool ( ) in the toolbox to select it.
The pointer changes to a crosshair icon.
You can make the ellipse tool draw a circle by holding down Shift as you drag.
3 Hold down Shift and drag to draw a circle approximately twice the size of the dot above the letter i, and release the mouse button.
If you are not satisfied with the size of the
circle, make sure the graphic handles are dis-
played around the circle (indicating it is
selected), press the Delete key, and draw
another circle.
4 In the Colors palette, make sure the Both button ( ) is selected, and click [Black] to apply the color black to the stroke and fill of the circle.
5 Select the pointer tool, click the circle to select it, and drag it until it is centered on the dot above the letter i.
6 Choose File > Save.
n the heart of the Boston area lies a true architectural
gem. This Victorian dwelling exemplifies turn-of-the-
century New England architecture at its best InISpacious three bedroom, two bath Victorian
located in the historic city of Cambridge.
ReviewHome
Review
Review

37ADOBE PAGEMAKER 7.0Classroom in a Book
Drawing a box
After drawing a box, you will assign a width
to the stroke around the box, and manually
position it below the words Home Review.
1 Choose View > Actual Size, and scroll to view the page just below the display text
Home Review.
2 From the horizontal ruler, drag once to create a horizontal ruler guide at 2 inches and again to create one at approximately 2.3 inches.
3 Click the rectangle tool ( ) in the tool-box to select it.
The pointer changes to a crosshair. Using the
rectangle tool, you can draw rectangles or
squares of any size.
4 Position the crosshair on the intersection of the left margin guide and the 2-inch hor-izontal ruler guide. Hold down the mouse button, and drag to the intersection of the right margin guide and the 2.3-inch hori-zontal ruler guide. Release the mouse button to complete the box.
If you are not satisfied with the rectangle,
make sure the rectangle is selected, and
either drag a graphic handle to the correct
location or press the Delete key, and draw
another rectangle.
5 Choose Element > Stroke > Hairline to assign a stroke style and weight to the stroke of the box.
Note: Even though you will not perceive a
difference in stroke width on most monitors,
the stroke will print correctly on printers with
600 dpi or greater. Most monitors cannot
display fractional stroke widths in the Actual
Size view.
Notice that after you release the mouse but-
ton, part of the box is obscured by the ruler
guide. By default, the ruler guides appear in front of all text and graphics.
6 Choose View > Send Guides to Back to display the guides behind the text and graphics.
The hairline is displayed on the page.
7 Choose File > Save.
Dragging to define a text block
After creating the address text, you will
center the text in the hairline box using the
paragraph view of the Control palette.
To create the display text Home Review, you may recall selecting the text tool, clicking the
pasteboard to establish an insertion point,
and typing the display text. Now, to create
the address text, you will use a different
approach that involves selecting the text
tool, dragging to define a text block (rather
than just clicking), and then typing the
address text.
n the heart of the Boston area lies a true architectural
gem. This Victorian dwelling exemplifies turn-of-the-
century New England architecture at its best. In ISpacious three bedroom, two bath Victorian
located in the historic city of Cambridge.
ReviewHome

LESSON 138Flyer
1 Select the text tool ( ) and position the
I-beam on the bottom left corner of the box
(let it snap to the left margin guide). Hold
down the mouse button, drag diagonally up across the box to the right margin guide
(exact height is not important), and release
the mouse button.
This defines a text block that spans the area between the margin guides. When you
release the mouse button, the blinking cur-
sor is displayed on the left margin guide,
indicating the text insertion point.
Before you type the address, you’ll choose
the font and point size, and scale the width
of the characters using the Horizontal scal-
ing option.
2 In the Control palette, choose Myriad Roman for Font, type 10 for Size ( ), click the Bold button ( ), and choose 130% from the Horizontal Scaling pop-up menu.
Horizontal scaling pop-up menu
3 Type the following address:
322 Harvard Street, Cambridge
You are ready to use the Control palette to apply the paragraph specifications to the address.
Note: When applying one or more paragraph
specifications to a single paragraph, you must
establish an insertion point in the paragraph.
When applying paragraph specifications to
multiple contiguous paragraphs, you must
select some text in each paragraph you want to format.
4 With an insertion point still established in the address, click the Paragraph-view button ( ) in the Control palette.
As with character specification options, the paragraph view of the Control palette pro-
vides quick access to frequently used para-
graph specification options available in the menus.
5 Click the Center-align button in the Control palette to center the text in the text block.
Center-align button
PageMaker centers the text within the text block.
6 Choose File > Save.
n the heart of the Boston area lies a true architectural
gem. This Victorian dwelling exemplifies turn-of-the-
century New England architecture at its best. In ISpacious three bedroom, two bath Victorian
located in the historic city of Cambridge.
ReviewHome

39ADOBE PAGEMAKER 7.0Classroom in a Book
Range kerning the address
In addition to the fonts you use, the spacing
between letters, words, and lines can have
tremendous impact on the look of a publica-
tion. Range kerning is one of the available
techniques for increasing or decreasing the
space between letters.
PageMaker’s kerning is measured in ems. An em is a horizontal space as wide as a font’s
point size. In 12-point type, an em is 12
points wide, while in 48-point type, an em is 48 points wide.
PageMaker accepts kerning values between
-1 and 1 (1 equals 1 em space), accurate to .01 em space. Negative values move charac-
ters closer together, and positive values
move characters further apart.
To kern the address, you will select the entire
range of address text, and enter a precise
value in the Control palette to increase the original letter spacing of the text.
1 With the text tool selected, triple-click the address to select it.
As you learned earlier, triple-clicking text
with the text tool selects an entire para-
graph. Also, notice how the Control palette
still displays the options for formatting
paragraphs.
Note: You can apply range kerning only to a
selected range of text. For example, you cannot
set a range kerning value before typing text.
2 Click the Character-view button in the Control palette, type .75 for Kerning, and click the Apply button to apply range kern-ing to the address.
A. Apply button B. Character-view buttonC. Kerning
3 From the horizontal ruler, drag to create a horizontal ruler guide at approximately 2.2 inches.
The baseline for the address is established.
4 Select the pointer tool, click the address to select it as a text block, press the Up or Down Arrow key on the keyboard until the base-line of the text is aligned with the 2.2-inch horizontal ruler guide.
5 Choose File > Save.
Drawing a vertical line
As a finishing touch to the flyer, you will use the constrained-line tool to draw a vertical
line that will be centered in the gutter (the vertical space between the columns). The
constrained-line tool makes it possible to
draw straight lines that are constrained to 45º angles.
BA C
n the heart of the Boston area lies a true architectural
gem. This Victorian dwelling exemplifies turn-of-the-
century New England architecture at its best. In ISpacious three bedroom, two bath Victorian
located in the historic city of Cambridge.
ReviewHome3 2 2 H a r v a r d S t r e e t , C a m b r i d g e

LESSON 140Flyer
1 Choose View > Snap to Guides to deselect
it, making sure it is unchecked.
Activated when you create a publication,
the Snap to Guides option causes the guides
to exert a magnetic-like pull on text and
graphics objects.
2 From the vertical ruler, drag to create a vertical ruler guide at 4.25 inches.
The vertical ruler guide appears in the center
of the gutter.
3 Choose View > Fit in Window.
4 Drag to create a horizontal ruler guide aligned with the baseline of the last line of text in both columns.
5 Click the constrained-line tool ( ) in the toolbox to select it.
The pointer changes to a crosshair icon.
6 Align the crosshair with the intersection of the bottom edge of the address box and the 4.25-inch vertical ruler guide, and drag down to the new horizontal ruler guide at the bottom of the page to draw the line.
7 With the vertical line still selected, choose Element > Stroke > Hairline to apply a stroke style and weight to the line.
You have completed assembling the flyer, so take a moment to view your work.
8 Choose View >Hide Guides to hide the guides.
9 Choose File > Save to save the 01Work.pmd publication.
Producing the flyerGiven the specifications and requirements
of this black-and-white publication, you can
print it successfully on any 300 dpi desktop
laser printer, and then photocopy the num-
ber of copies you want as needed. You can
also create an Adobe PDF version of the flyer
that you can post on the Web or send to col-
leagues as an e-mail attachment.
Close to the beautiful Charles River, this home shares the
historic charm of its Cambridge neighborhood.
ReviewHomen the heart of the Boston area lies a true architectural
gem. This Victorian dwelling exemplifies turn-of-the-
century New England architecture at its best. In
addition to its prime location just minutes from
downtown Boston, this home enjoys spectacular views of
the Charles River and the downtown Boston skyline.
Completely restored with attention to historic detail this
three-story, three-bedroom residence has incorporated all of
the functional requirements of today's home. The magnifi-
cent interior boasts all original oak finishing, including a
breathtaking spiral bannister, and built-in bookcases in the
library. The kitchen has been fully modernized with state of
the art appliances, yet retains the house’s original charm with
its high ceilings, ornate moldings, and fully operational
woodstove. The original bay windows, refinished hardwood
floors, and ornate paint trim make this home’s interior
complete and as spectacular as its proud exterior.
Consistent with the practical beauty of Victorian archi-
tecture, no space is wasted. The most spectacular room of all
is the converted attic. It clearly takes full advantage of its
immense size and high ceiling with skylights, windows, and a
stairway leading out to a small widow's walk.
This Cambridge residence bestows the colonial charm
of New England's past upon this quaint neighborhood. It
resides just two blocks from the historic house used as
George Washington's headquarters in 1775, and later
occupied by poet Henry Wadsworth Longfellow. A stroll
north on Lyon Street past a hilly intersection looks out over
the pine and maple woods of a nearby park, a dramatic
contrast with the blue Massachusetts bay beyond. These
stunning views must have inspired architects to execute
their best work. For more information about this property
please contact Joan Rutherford at Harbor Realty.
ISpacious three bedroom, two bath Victorian
located in the historic city of Cambridge.
Freshly painted exterior and interior detail.
Modern renovations boast the finest electronic
appliances, and highest quality fixtures.
Landscaped by a premiere Boston architect.
3 2 2 H a r v a r d S t r e e t , C a m b r i d g e
41ADOBE PAGEMAKER 7.0Classroom in a Book
Printing the flyer
1 If you are planning on printing this
project, turn on your printer now and check the printer setup on your computer
For information on setting up your printer
and selecting the appropriate printer driver,
see the Adobe PageMaker 7.0 User Guide.
2 Choose File > Print to open the Print Document dialog box for the type of printer you selected.
In addition to displaying the most fre-
quently used settings, the Print Document
dialog box contains buttons that let you set
additional print options.
3 Select the correct printer (Windows) and PPD for your printer.
Note: The PPD option is not available if you
are printing to a non-PostScript printer.
4 In the Print Document dialog box, click the Color button. In the Print Color dialog box, make sure Grayscale is selected.
5 Click the Print button to print the flyer.
You’ve created and printed the flyer. You can
exit PageMaker now or you can create an
Adobe PDF version of the flyer.
Creating an Adobe PDF version of the flyer
First you will re-save the publication from which you will export to Adobe PDF.
1 Choose File > Save, and save the publica-tion 01Work.pmd in the 01Lesson folder.
When you export to Adobe PDF, PageMaker automatically starts Acrobat Distiller, which processes the file and produces an Adobe PDF version.
2 If you do not have enough free RAM to run Acrobat Distiller simultaneously with PageMaker, close all open applications other than PageMaker.
3 Choose File > Export > Adobe PDF.
Note: In Mac OS, be sure you have already
selected a PostScript driver in the Chooser.
4 In the PDF Options dialog box, select OnScreen for PDF Style and Acrobat for the Printer Style. (The Acrobat printer style is created automatically the first time you export to PDF. For information on creating and editing PDF styles and printer styles, see chapter 12 of the Adobe PageMaker 7.0 User Guide.)

LESSON 142Flyer
In this lesson, you’ll use the default settings in the PDF Options dialog box to create your Adobe PDF file. These default settings are designed to create an Adobe PDF file opti-mized for onscreen viewing.
5 Click the Doc Info tab, and enter informa-tion for filename, subject, author and key-word. For Title, select and delete the file name. Type Home Review in the Title text box. Leave the Subject, Author, and Key-word entries as is.
Document information is often used to refine index searches in document collec-tions. For this reason, you should always replace at least the file name with the docu-ment title. (Note that this and Security are
the only panels in this dialog box in which you can change information without defin-ing a new PDF Style.)
6 Click Export.
7 In the Export PDF As dialog box, make sure the filename is 01Work.pdf. Select the View PDF option (Windows) or View PDF Using option (Mac OS) if you want to open the newly created Adobe PDF file in Acrobat or Acrobat Reader rather than save it and open it at a later time. Click Save to save the PDF version into the 01Lesson folder.
PageMaker creates a PostScript file, and then starts Acrobat Distiller to convert the Post-Script into Adobe PDF. This may take a few minutes, depending on the speed of your computer.
Note: On Mac OS, a window opens showing
the progress of Distiller. The settings displayed
in this window may not match those you
selected in the PDF Options dialog box. Your
PDF files will be created using the correct
settings you specified.

43ADOBE PAGEMAKER 7.0Classroom in a Book
Acrobat or Acrobat Reader will launch auto-matically and display the Adobe PDF ver-sion of your file. Close this PDF file and Acrobat or Acrobat Reader when you have finished reviewing it. (If the PDF file doesn’t open automatically, navigate to the 01Lesson folder and double click the 01Work.pdf. Acrobat or Acrobat Reader will launch and open the newly created Adobe PDF file.)
8 Click the close box in the title bar of 01Work.pmd to close it. If prompted to save, click Yes.
9 Click the close box in the title bar of 01Final.pmd to close the publication. If prompted to save, click No.
Since you will reset the PageMaker prefer-
ences at the beginning of every lesson, exit
the PageMaker application, even if you plan
to move on to the next lesson.
10 Choose File > Exit (Windows) or File > Quit (Macintosh) to exit PageMaker.
Review questions1 What are two ways to change the magnifi-cation of a page?
2 How do you create a non-printing guide line on your page?
3 What does a red triangle in a text block’s bottom windowshade handle indicate?
4 How do you center the lines in a paragraph?
5 What do you call the space between text columns?
Answers1 You can do any of the following:
• Select the zoom tool in the toolbox, and click on or drag over the area you want to magnify. To zoom out, hold down Ctrl
(Windows) or Option (Macintosh), and
click on the page.
• Choose a magnification level from the
View menu.
• In Windows, hold down the Ctrl and Alt
keys and click the right mouse button to
toggle between Fit in Window and Actual
Size views.
• Double-click the zoom tool in the toolbox
to switch to Actual Size view. Hold down Alt
(Windows) or Option (Macintosh) and
double-click the zoom tool to switch to Fit
in Window view.
• Hold down Ctrl (Windows) or Command
(Macintosh) together with the spacebar and
click or drag (covered in Lesson 2).
2 First, make sure rulers are visible along the top and left edges of the window. If not, choose View > Show Rulers. Then position the pointer in either ruler, drag away from the ruler, and release the mouse button to create the guide.
3 The text block contains more text that has not been placed on the page or pasteboard.
4 Select the text tool and click an insertion point in the paragraph. Click the Paragraph-view button in the Control palette, and then click the Center-align button.
5 The gutter.