Embed Size (px)
Citation preview

LED Show T9
LED Show T9Control Software for LED Displays
User Manual
VERSION 10.48

1
About this manual
LEDShowT9 software manual is divided into five major elements.
The first part is a brief description of the software basic information,including chapters I and II content. This section focuses on the software'smain functions and features, the software operating environmentrequirements, the software install, uninstall, migration, upgrades and so on.
The second part describes the software entry, including chapter III andchapter IV. This section focuses on the software in the use of basicfunctions, such as: the software's overall interface, classification andoperational areas; program components, as well as various parts of theconcept of function; software, a variety of menus and their functions;programming process and the properties of the main window, and so on.
The third part is the management and editing program details, includingchapter V to chapter XIV. This section details the LEDSHOWT9 softwareprovides a variety of playback functions, for each function, described indetail the steps the new window, you can set all the properties, as well assome of the practical effects of commonly used.
The fourth part is outside the supporting editorial features, including thechapter XV to chapter XVIII. LEDSHOWT9 software, in addition to LEDdisplay shows the program for editing and playback capabilities, but alsoprovides a wealth of supporting management functions. This sectiondescribes in detail these auxiliary functions. Mainly broadcast in themanagement of regular instruction sheet, software settings, remote operationand user management and so on.
Part V is a common questions. This section answers frequently askedquestions, with universal significance. If users encounter problems in use,first to this part of the search to see if there is no suitable answer. Also, thissection will be frequently updated.
the fifth edition In November 2009

2
ContentsChapter I Overview ...................................................................3Chapter II Software Installation, Uninstalling and Migration.5Chapter III LEDSHOWT9 Quick Start...................................9Chapter IV Programming Process..........................................20Chapter VI Image Play.............................................................36Chapter VII Text Play..............................................................41Chapter VIII Table Play ..........................................................53Chapter IX Database Play .......................................................58Chapter X Clock Window........................................................62Chapter XI Timer Window......................................................67Chapter XIII External Video Window ...................................71Chapter XIV Notice Management ..........................................75Chapter XV Play and control of timing .................................77Chapter XVI Remote Operation .............................................81Chapter XVIII User Management ..........................................87Chapter XIX FAQ.....................................................................88

3
Chapter I. Overview
LEDSHOWT9 is a kind of professional software for control and playspecially developed for LED display screen system. It has the followingcharacteristics:
� The advanced processing engine which greatly improves performanceand speed is adopted.
� It’s simple and easy for use. Clear programme arrangement structure,user-friendly interface and WYSIWYG (what you see is what youget) setting method make it easier for learning and operating.
� With powerful functions, it’s able to play nearly all mainstream mediafiles, including mainstream video(MPG MPEG MPV MPA AVI VCD SWF RM RARMJ ASF...), flash file, image (BMP JPG GIF PNG...),document (TXT RTF/WORD...), table, clock, external video andso on.
� The software makes fine adjustment of each frame to better adapt tolarge LED screen display.
� Abundant video switch animations make the display effect morenatural and vivid.
� Sectionalized special effects and 3D animations with special effectsmake the effect of your display screen more complete.
� Multiple play interfaces are supported, i.e. a computer is able tosimultaneously control several display screens.
� Multipage programme arrangement is supported. Random windowdivision and window overlay.
� Multiple transmission equipment is supported. Standard network cardand transmission card may be selected as the transmissionequipment.
� Remote control and programme broadcast of streaming media serverare supported.
� Play of Office series is supported, including Word, Excel andPowerPoint. Document arrangement is more convenient.
4
� External video input is supported. As for television signals, thesoftware is able to automatically change channels. In addition, thesoftware has various characteristics, such as controlling the focus ofexternal video.
Operating Environment
� Operating System
Windows2000/XP/Vista
� Recommended Computer Configuration
CPU: Dual Core 3.0 GHz
Memory: 4GB
Gigabit Ethernet card (or transmission card) with RTL chip
5
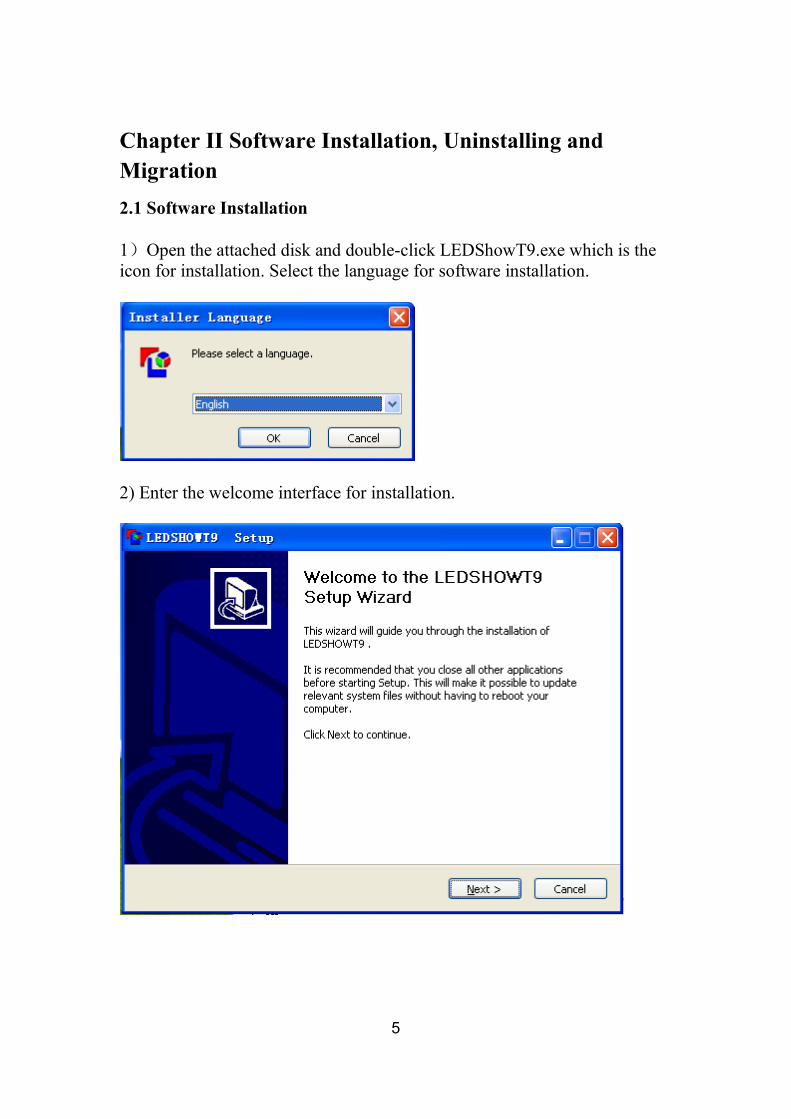
Chapter II Software Installation, Uninstalling andMigration2.1 Software Installation
1 Open the attached disk and double-click LEDShowT9.exe which is theicon for installation. Select the language for software installation.
2) Enter the welcome interface for installation.
6
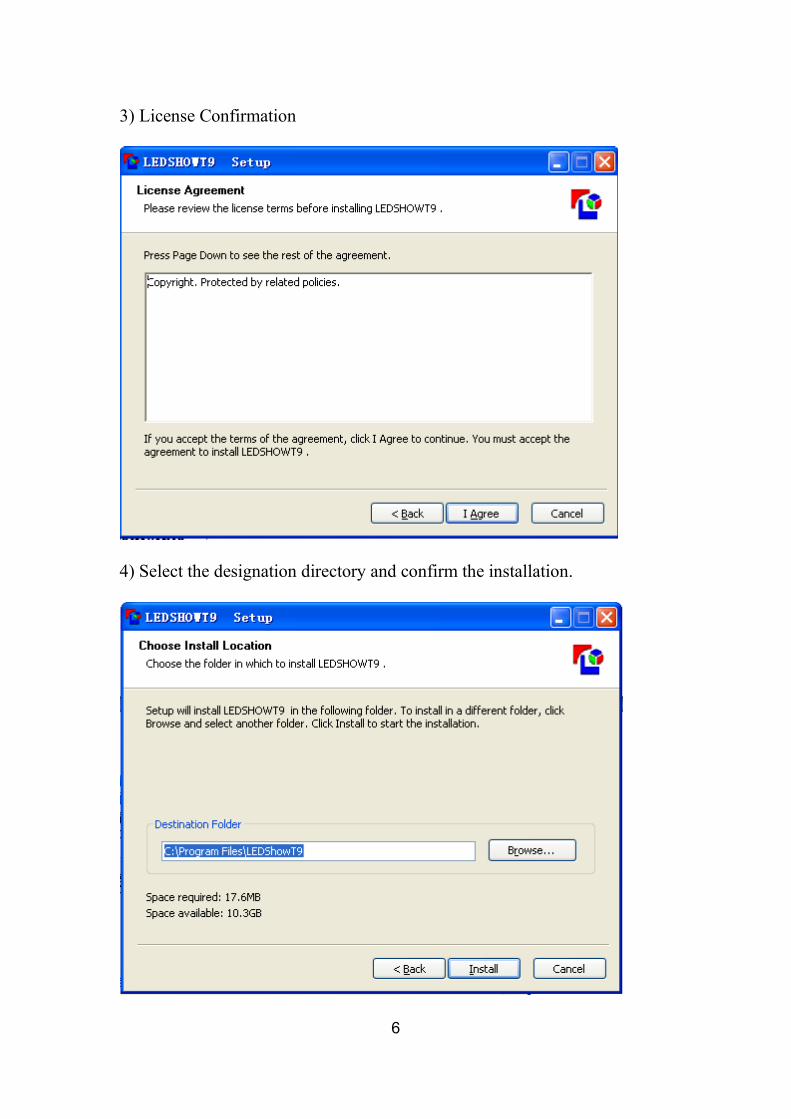
3) License Confirmation
4) Select the designation directory and confirm the installation.

7
5) Confirm the completion of installation.
The system will automatically create desktop shortcut after theinstallation. You may enable the software by double-clicking the desktopshortcut.
2.2 Software Uninstalling
The software has its own uninstalling program. You may choose “AllPrograms →LEDShowT9→Uninstall” in the Start menu. Then the softwarewill be uninstalled automatically.

8
2.3 Software Migration
You may take the following steps if you want to use this software in othercomputers and need to keep the existing setting.
1) Access the installation directory in the computer used by you previouslyand copy all the contents in Folder LedshowT9 to an USB disk.
2) Normally install LEDshowT9 software in the computer to be used.
3) Access the installation directory in the computer to be used and use theLEDshowT9 file in the USB disk to overlay the LEDshowT9 file which hasbeen just created.

9
Chapter III LEDSHOWT9 Quick Start3.1 Understanding Software Interfaces of LEDSHOWT9
You will see the main interface shown in Figure 3-1 after starting up thesoftware. The main interface includes two pages, i.e. play page andoperation page.
Figure 3-1 Main Software Interface of LEDSHOWT9
Play page
Operation page
12
3
4
5
6
10
3.1.1 Play Page
Play page is similar to a canvas. Programme windows all distribute freely onthe canvas. The position and size of a programme window may be setrandomly. Quantities of programme windows and programme pages are notlimited.
3.1.2 Operation Page
Five areas may be divided into:
� Menu area: The part in rectangular frame No.1.
� The area of shortcut icons: The part in rectangular frame No.2.
� The area of the toolbar for programme arrangement: The part inrectangular frame No.3.
� The area of programme tree diagram: The part in rectangular frameNo.4.
� The area of programme attributes: The part in rectangular frame No.5.
� The area of Software work status: The part in rectangular frame No.6.

11
3.2. Programme Management
The programme management of LEDShowT9 adopts the mode of four-tierstructure, i.e. LED screen, programme page, programme window andprogramme (as shown in Figure 3-2).
Figure 3-2 Schematic diagram of Programme Composition
LED screen: LED screen used by the user. Multi-screen display may be setin the software.

12
Programme page: Programme page means the set of a group of programmewindows and programme contents set by the user. Different windows aswell as their sizes, positions and overlay sequences can be set in differentprogrammes.
When programme page is selected from the treenode on the left, theattributes of programme page will appear on the right, including name,background color, background image and play management. As for oneprogramme page, play management allows this programme page to havethree different recurrent play modes:
Recurrent play: Recurrently playing all programmes in programme page.
Recurrent play of all programme pages: Recurrently playing all programmepages in turn.
Regular play: A duration is set for the play in the current programme page.Then, it will go to the next programme page for play.
Programme window: Programme window is the window for play. Thiswindow will be filled with videos and images. Different programmes in thesame window will be played in turn.
Programme content: Programme is the content to be played on LEDscreen, including files, such as video, image, text, etc. as well as othercontents which need to be played on LED screen, such as clock, externalvideo and so on.
13
3.3 Menu and Shortcut Icon
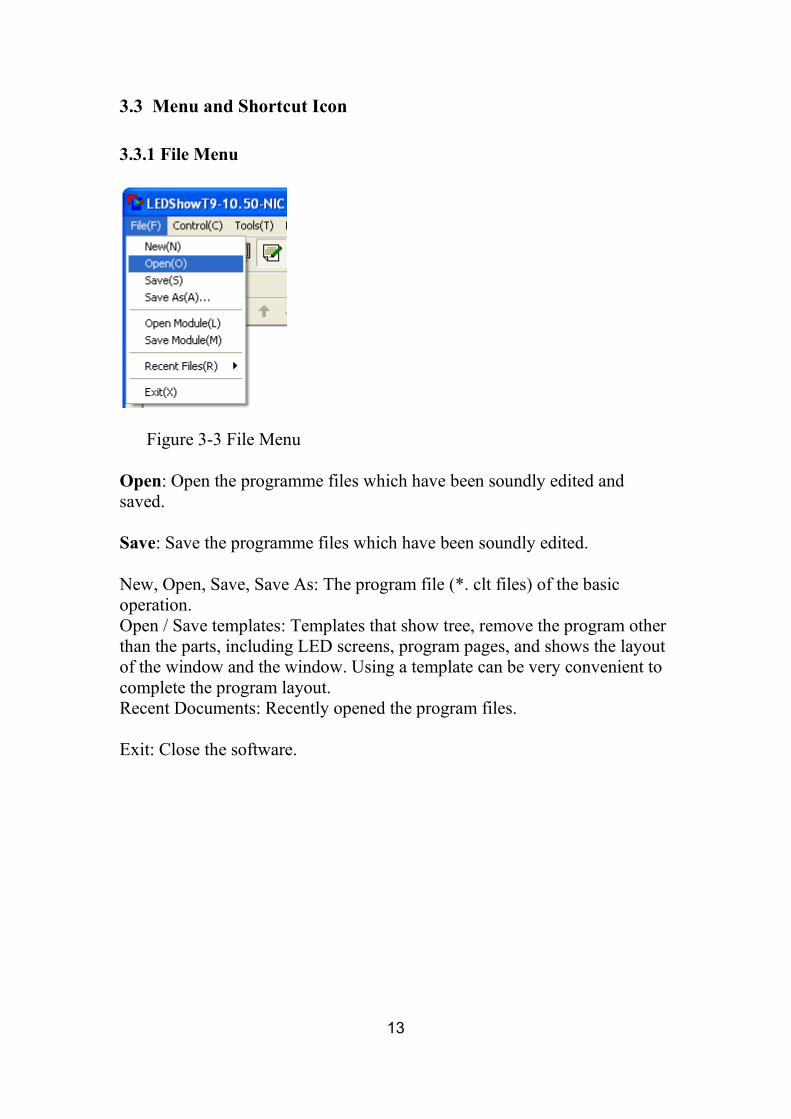
3.3.1 File Menu
Figure 3-3 File Menu
Open: Open the programme files which have been soundly edited andsaved.
Save: Save the programme files which have been soundly edited.
New, Open, Save, Save As: The program file (*. clt files) of the basicoperation.Open / Save templates: Templates that show tree, remove the program otherthan the parts, including LED screens, program pages, and shows the layoutof the window and the window. Using a template can be very convenient tocomplete the program layout.Recent Documents: Recently opened the program files.
Exit: Close the software.
14
3.3.2 Control Menu
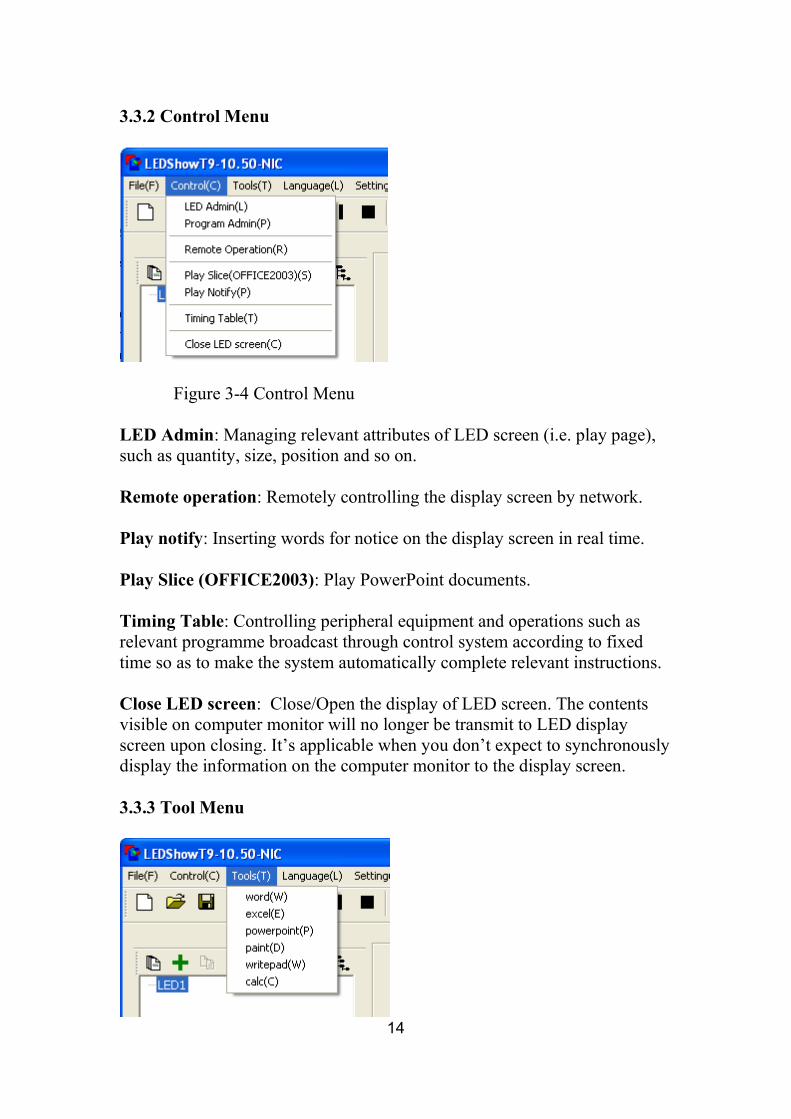
Figure 3-4 Control Menu
LED Admin: Managing relevant attributes of LED screen (i.e. play page),such as quantity, size, position and so on.
Remote operation: Remotely controlling the display screen by network.
Play notify: Inserting words for notice on the display screen in real time.
Play Slice (OFFICE2003): Play PowerPoint documents.
Timing Table: Controlling peripheral equipment and operations such asrelevant programme broadcast through control system according to fixedtime so as to make the system automatically complete relevant instructions.
Close LED screen: Close/Open the display of LED screen. The contentsvisible on computer monitor will no longer be transmit to LED displayscreen upon closing. It’s applicable when you don’t expect to synchronouslydisplay the information on the computer monitor to the display screen.
3.3.3 Tool Menu

15
Figure 3-5 Tool Menu
It’s used for invoking relevant programs and software of the system to editprogramme contents.
3.3.4 Language Menu
Figure 3-6 Language Menu
3.3.5 Setting Menu
Figure 3-7 Setting Menu
Software setting: Setting relevant software parameters
User Admin: Setting different users and corresponding management rights.
Hardware Setting: Setting relevant parameters of display screen hardware.
Hardware Maintain: It’s exclusively for technical personnel. No access isallowed unless passwords are input. Any user’s attention is not needed.

16
Remote Control: Remotely controlling the on and off condition of thepower supply for display screen, air conditioner and sound box.
Brightness Adjustment: Adjusting the brightness and contrast of LEDdisplay screen.
Detect Point By Point (MBI5036): Carrying out error detection of thedisplay screen. MBI5036 chip needs to be used together.
3.3.6 Debugging Menu
Various display modes provided by the software for production test.
3.3.7 External Video
Corresponding menu items will be created automatically when any externalvideo is accessed. It’s used to set the attributes of external video.
3.3.8 Help Menu
Figure 3-8 Help Menu
List and Search: Helping document and displaying electronic instruction foruse.
Everyday Tip: Tip on use of the software.
Online update: Online update software.
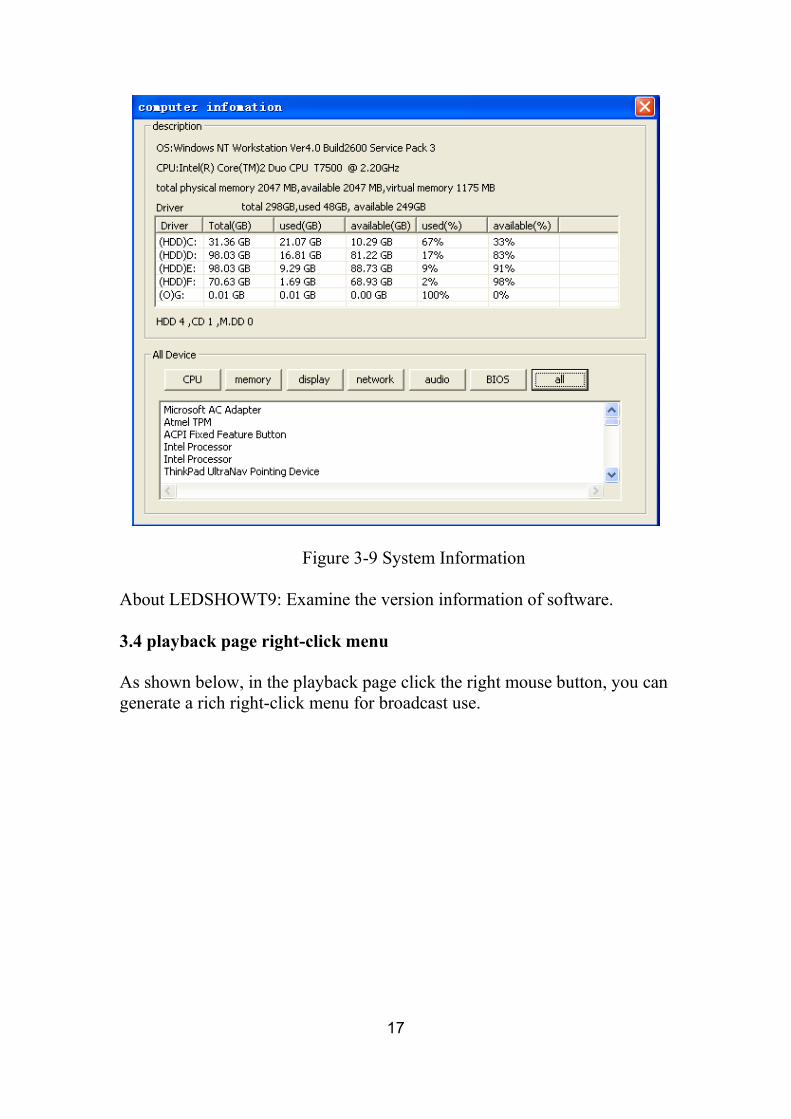
Computer information: Relevant information on the configuration of thecomputer which is used currently.
17
Figure 3-9 System Information
About LEDSHOWT9: Examine the version information of software.
3.4 playback page right-click menu
As shown below, in the playback page click the right mouse button, you cangenerate a rich right-click menu for broadcast use.
18
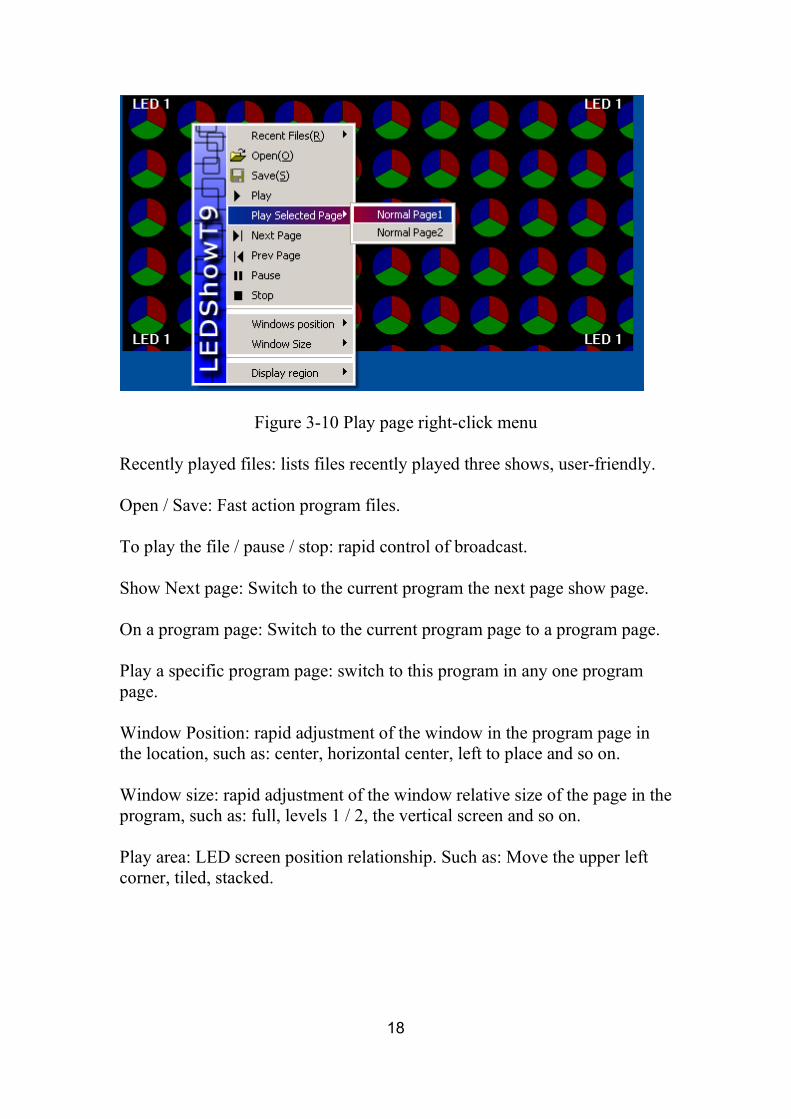
Figure 3-10 Play page right-click menu
Recently played files: lists files recently played three shows, user-friendly.
Open / Save: Fast action program files.
To play the file / pause / stop: rapid control of broadcast.
Show Next page: Switch to the current program the next page show page.
On a program page: Switch to the current program page to a program page.
Play a specific program page: switch to this program in any one programpage.
Window Position: rapid adjustment of the window in the program page inthe location, such as: center, horizontal center, left to place and so on.
Window size: rapid adjustment of the window relative size of the page in theprogram, such as: full, levels 1 / 2, the vertical screen and so on.
Play area: LED screen position relationship. Such as: Move the upper leftcorner, tiled, stacked.
19
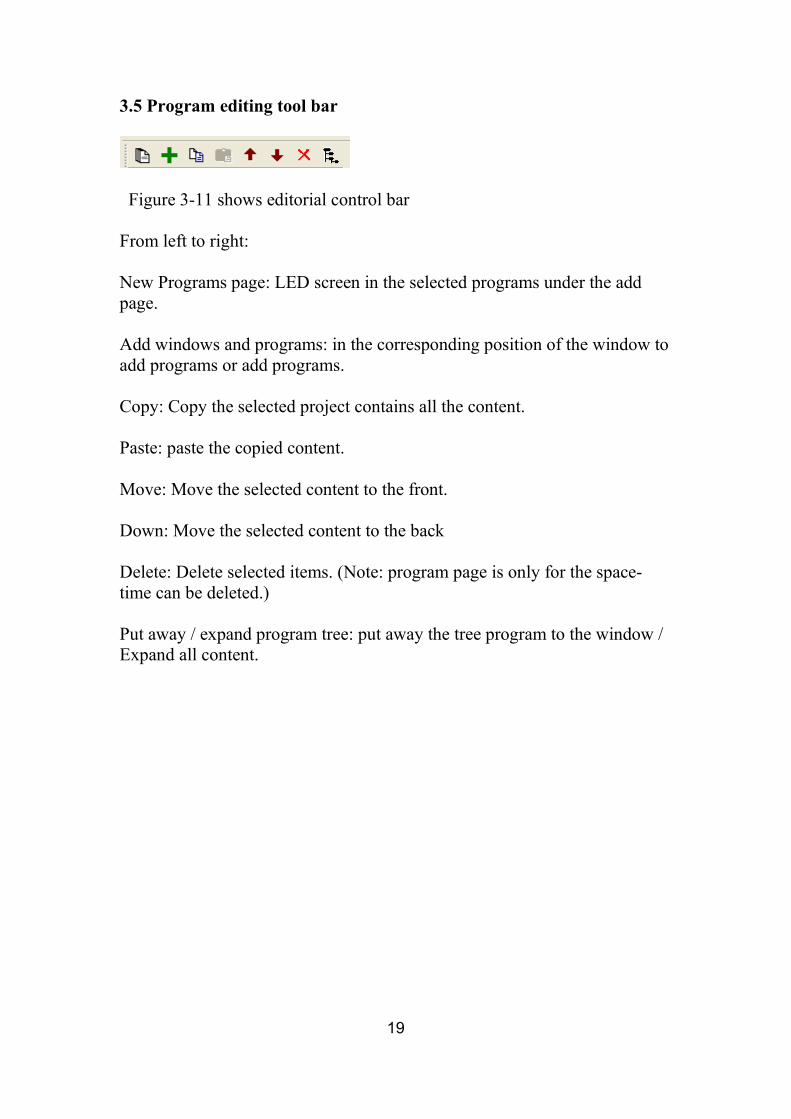
3.5 Program editing tool bar
Figure 3-11 shows editorial control bar
From left to right:
New Programs page: LED screen in the selected programs under the addpage.
Add windows and programs: in the corresponding position of the window toadd programs or add programs.
Copy: Copy the selected project contains all the content.
Paste: paste the copied content.
Move: Move the selected content to the front.
Down: Move the selected content to the back
Delete: Delete selected items. (Note: program page is only for the space-time can be deleted.)
Put away / expand program tree: put away the tree program to the window /Expand all content.
20
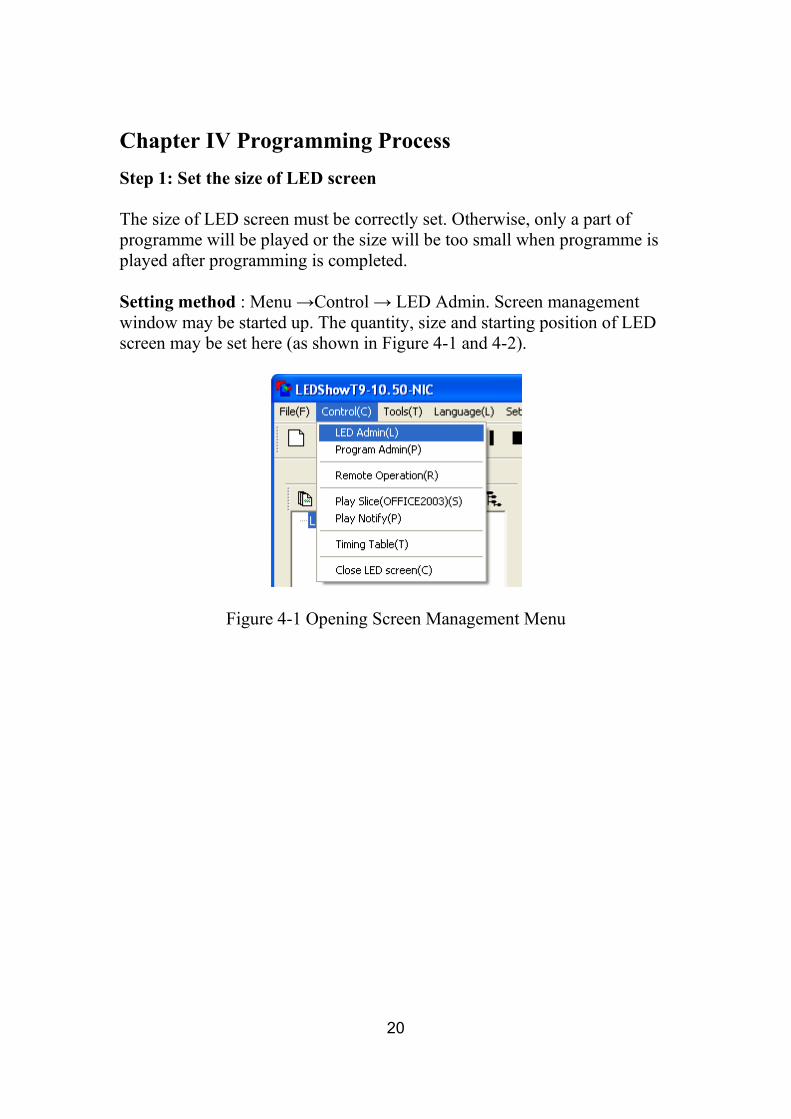
Chapter IV Programming ProcessStep 1: Set the size of LED screen
The size of LED screen must be correctly set. Otherwise, only a part ofprogramme will be played or the size will be too small when programme isplayed after programming is completed.
Setting method : Menu →Control → LED Admin. Screen managementwindow may be started up. The quantity, size and starting position of LEDscreen may be set here (as shown in Figure 4-1 and 4-2).
Figure 4-1 Opening Screen Management Menu
21
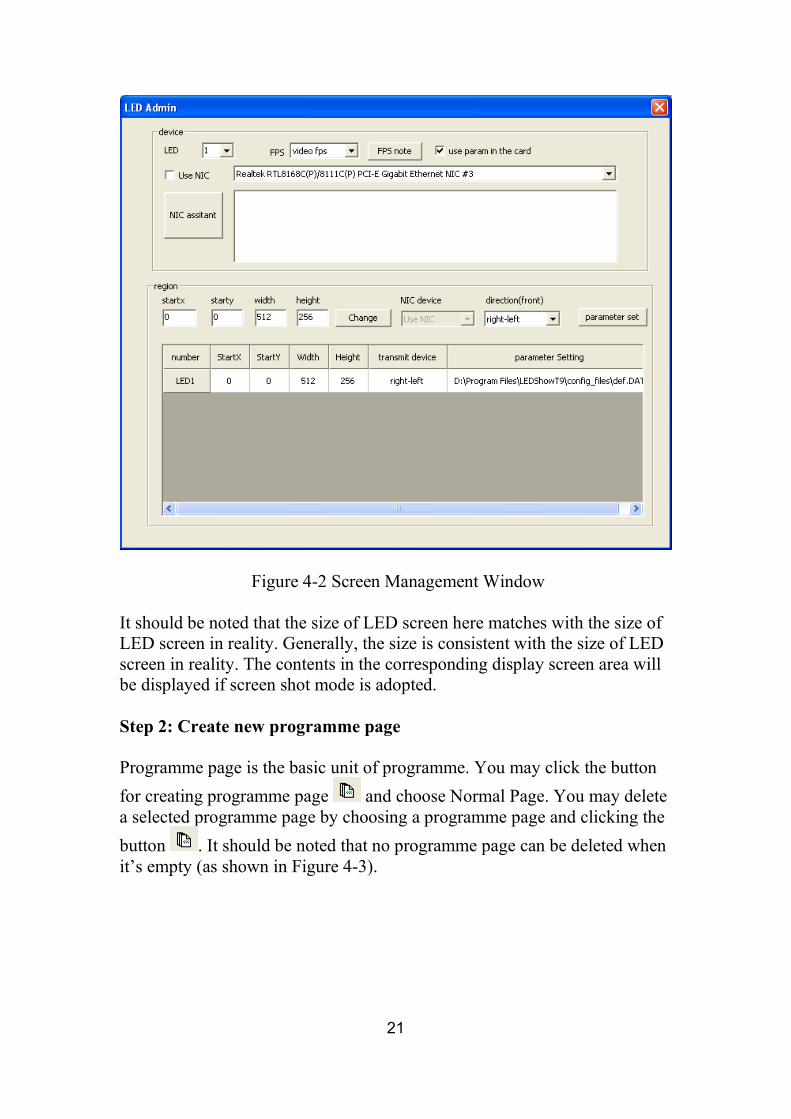
Figure 4-2 Screen Management Window
It should be noted that the size of LED screen here matches with the size ofLED screen in reality. Generally, the size is consistent with the size of LEDscreen in reality. The contents in the corresponding display screen area willbe displayed if screen shot mode is adopted.
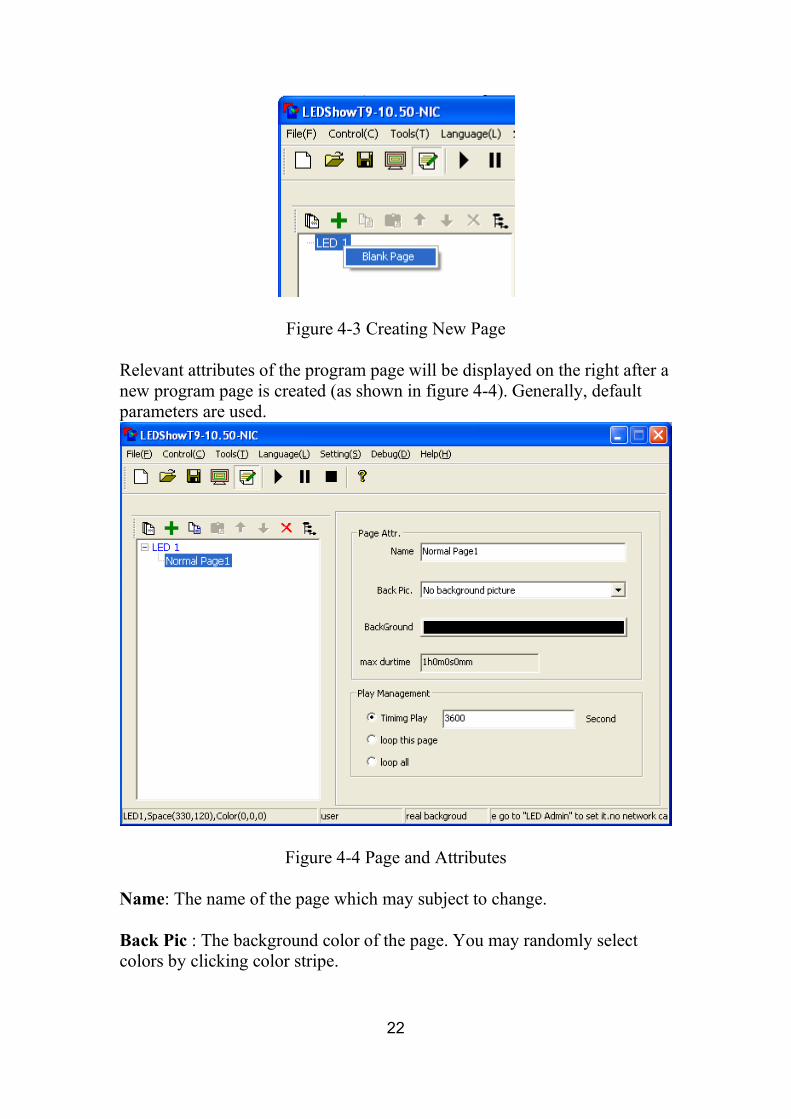
Step 2: Create new programme page
Programme page is the basic unit of programme. You may click the buttonfor creating programme page and choose Normal Page. You may deletea selected programme page by choosing a programme page and clicking thebutton . It should be noted that no programme page can be deleted whenit’s empty (as shown in Figure 4-3).
22
Figure 4-3 Creating New Page
Relevant attributes of the program page will be displayed on the right after anew program page is created (as shown in figure 4-4). Generally, defaultparameters are used.
Figure 4-4 Page and Attributes
Name: The name of the page which may subject to change.
Back Pic : The background color of the page. You may randomly selectcolors by clicking color stripe.

23
Background: You may select image files which need to be set asbackground by browsing.
Max durtime: The time needed by the window which needs the maximumduration in this page. It’s set as the time for playing this during the recurrentplay of pages.
Play management: The modes for time control of this page.
Loop this page: Recurrently playing all in this page.
Loop all: Recurrently playing all pages in turn.
Timing play: A duration is set for the play in the current page. Then, it willgo to the next page for play.
Step 3: Create window
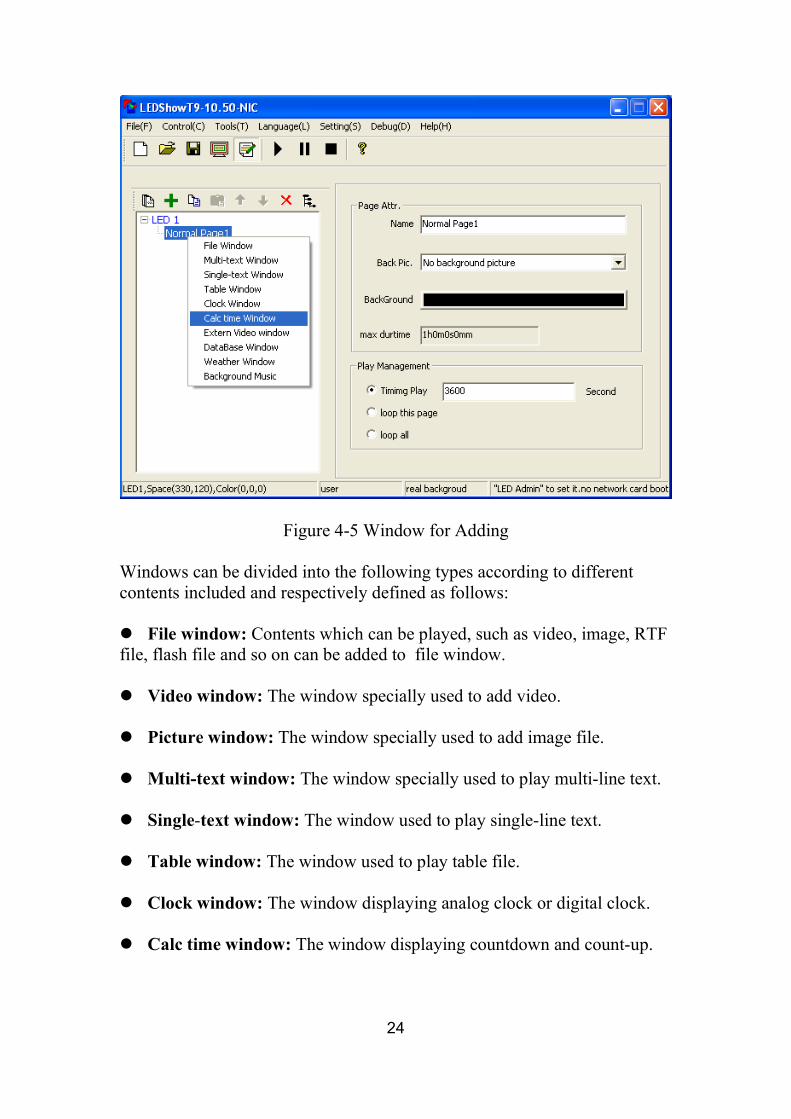
After the programme page is created, you may click button to addprogramme window (as shown in Figure 4-5). Programme window is thewindow in programme page. It’s an important component to realize thereasonable layout and simultaneous play of various programme contents in aprogramme page.
The position of programme window may be dragged by mouse or set bycoordinate. A programme page includes arbitrary multiple windows. Thesizes and positions of these windows may be set arbitrarily.
24
Figure 4-5 Window for Adding
Windows can be divided into the following types according to differentcontents included and respectively defined as follows:
� File window: Contents which can be played, such as video, image, RTFfile, flash file and so on can be added to file window.
� Video window: The window specially used to add video.
� Picture window: The window specially used to add image file.
� Multi-text window: The window specially used to play multi-line text.
� Single-text window: The window used to play single-line text.
� Table window: The window used to play table file.
� Clock window: The window displaying analog clock or digital clock.
� Calc time window: The window displaying countdown and count-up.

25
� Extern video window: The window used to import external video.External video includes the input of external video capture devices, such asDV, camera, TV card, DVD player and so on.
Step 4: Set programme window attributes and edit programme.
All programme windows have common options (as shown in Figure 4-6),including basic attributes, such as window name, maximization, border,starting point X, starting point Y, width, height, color, overlay, totalduration, same animation, preview, switch and so on. Different programmecontents have different attributes which are respectively defined as follows.
Figure 4-6 Programme Window Attributes
Video file: Nearly all video formats are supported, including all media files(AVI/MPEG/ASF/WM), REALPLAY files (RM) and so on. Video file hasvarious attributes (as shown in Figure 4-7). Path, play duration and originalsize are for information only. Volume, opacity, progress, remaining time andspecial effect setting can be set freely.

26
Figure 4-7 Video Attributes
Picture file: All image formats are supported (BMP/JPG/GIF/PNG…).Image file has various attributes (as shown in Figure 4-8). Opacity as well asthe special effect mode, speed, stay duration, etc. of stillness, entering andexiting may be set randomly.
Figure 4-8 Image Programme Attributes
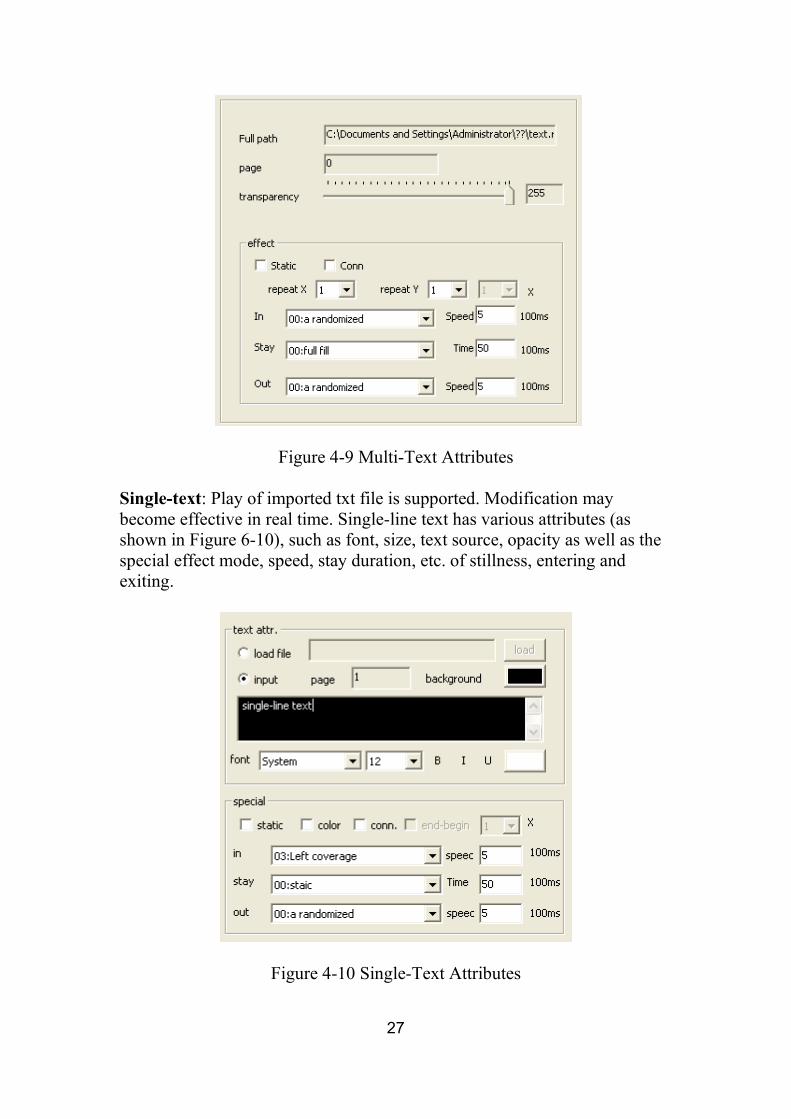
Multi- text: Text file formats are supported (*.doc/*.rtf). Multi-line text hasvarious attributes (as shown in Figure 4-9). Opacity as well as the specialeffect mode, speed, stay duration etc. of stillness, entering and exiting maybe set randomly.
27
Figure 4-9 Multi-Text Attributes
Single-text: Play of imported txt file is supported. Modification maybecome effective in real time. Single-line text has various attributes (asshown in Figure 6-10), such as font, size, text source, opacity as well as thespecial effect mode, speed, stay duration, etc. of stillness, entering andexiting.
Figure 4-10 Single-Text Attributes
28
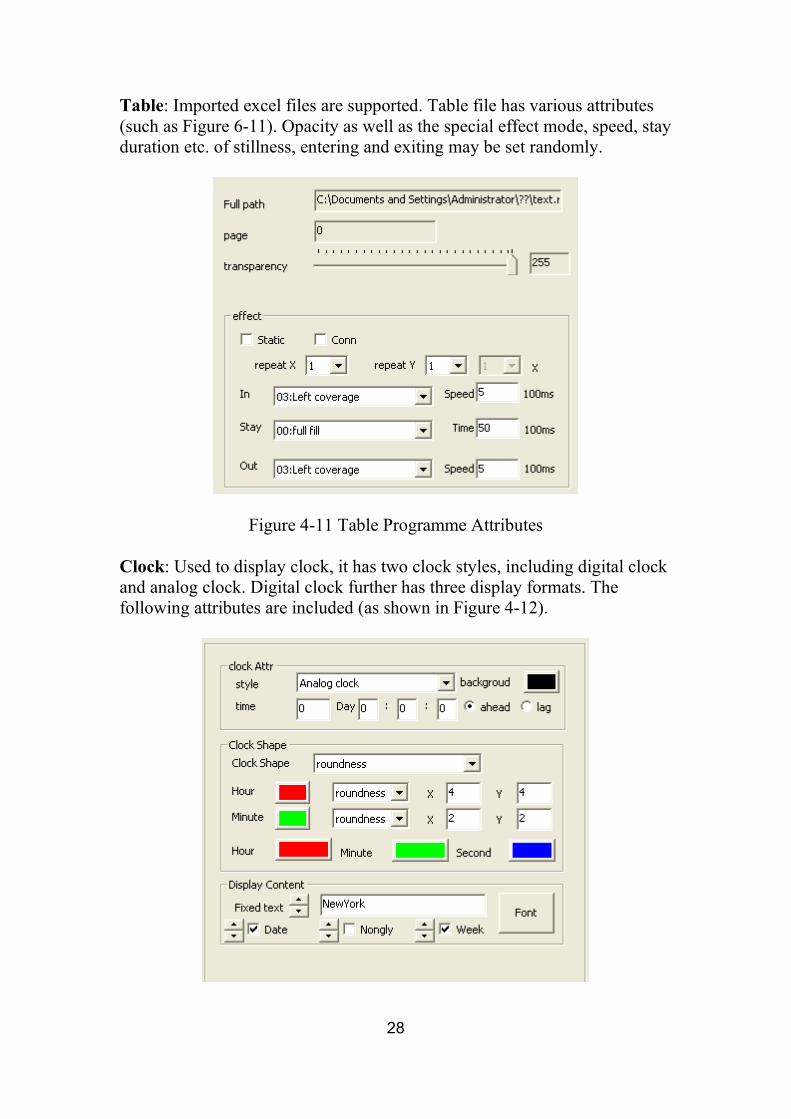
Table: Imported excel files are supported. Table file has various attributes(such as Figure 6-11). Opacity as well as the special effect mode, speed, stayduration etc. of stillness, entering and exiting may be set randomly.
Figure 4-11 Table Programme Attributes
Clock: Used to display clock, it has two clock styles, including digital clockand analog clock. Digital clock further has three display formats. Thefollowing attributes are included (as shown in Figure 4-12).

29
Figure 4-12 Clock Attributes
Timer window: Used to display timer window, it has the following detailedparameter attributes (as shown in Figure 4-13).
Figure 4-13 Video Attributes
External video: It’s used to display video image input by external videodevice (as shown in Figure 4-14). Detailed parameters are in connectionwith video input device. Please refer to the user manual for detailed videoinput devices.
Figure 4-14 External Video Attributes
Step 5: Complete programming and save programme.
The programming of one programme page has been completed by the foursteps above. You may repeat from step 2 to step 4 if multiple programme

30
pages are necessary. Don’t forget saving after completing programming.Click the button for saving or choose Menu→File→Save.
Step 6: Play programme.
Programs are done editing, you can now by clicking on the shortcutbutton or right-click menu control of the broadcast program.
31
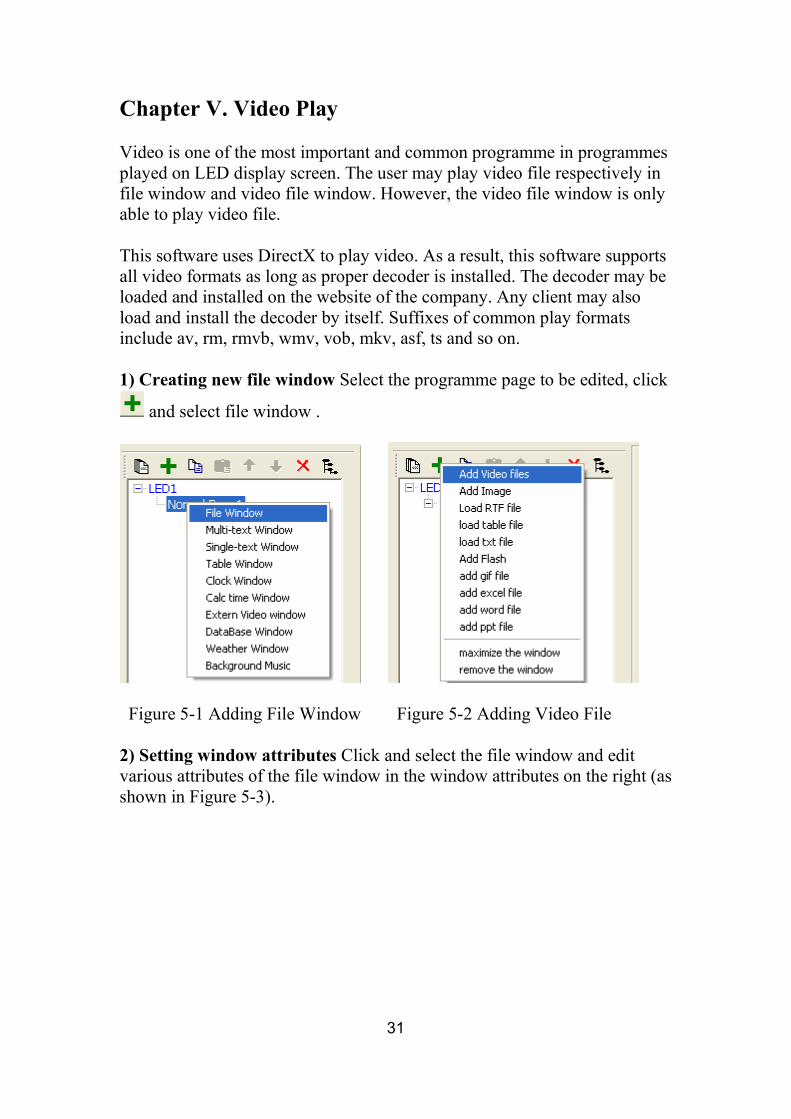
Chapter V. Video Play
Video is one of the most important and common programme in programmesplayed on LED display screen. The user may play video file respectively infile window and video file window. However, the video file window is onlyable to play video file.
This software uses DirectX to play video. As a result, this software supportsall video formats as long as proper decoder is installed. The decoder may beloaded and installed on the website of the company. Any client may alsoload and install the decoder by itself. Suffixes of common play formatsinclude av, rm, rmvb, wmv, vob, mkv, asf, ts and so on.
1) Creating new file window Select the programme page to be edited, click
and select file window .
Figure 5-1 Adding File Window Figure 5-2 Adding Video File
2) Setting window attributes Click and select the file window and editvarious attributes of the file window in the window attributes on the right (asshown in Figure 5-3).
32
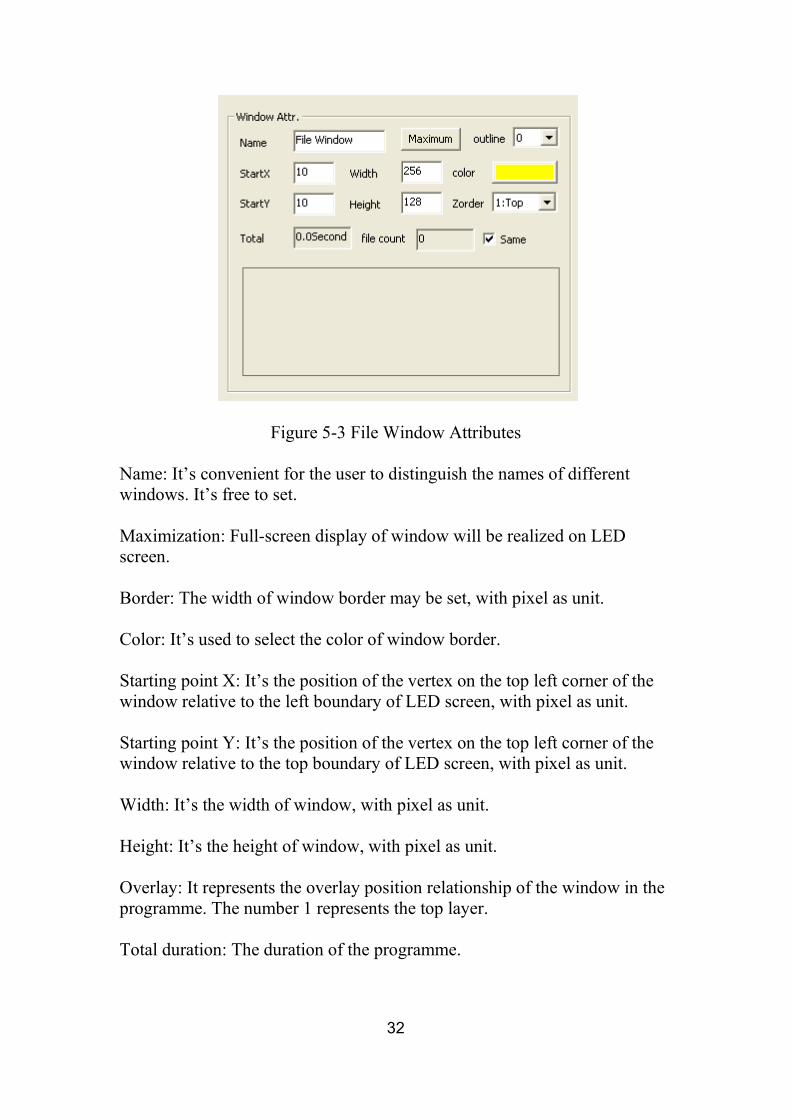
Figure 5-3 File Window Attributes
Name: It’s convenient for the user to distinguish the names of differentwindows. It’s free to set.
Maximization: Full-screen display of window will be realized on LEDscreen.
Border: The width of window border may be set, with pixel as unit.
Color: It’s used to select the color of window border.
Starting point X: It’s the position of the vertex on the top left corner of thewindow relative to the left boundary of LED screen, with pixel as unit.
Starting point Y: It’s the position of the vertex on the top left corner of thewindow relative to the top boundary of LED screen, with pixel as unit.
Width: It’s the width of window, with pixel as unit.
Height: It’s the height of window, with pixel as unit.
Overlay: It represents the overlay position relationship of the window in theprogramme. The number 1 represents the top layer.
Total duration: The duration of the programme.
33
Same animation: It’s used to set all programmes in this window to use thesame special effects.
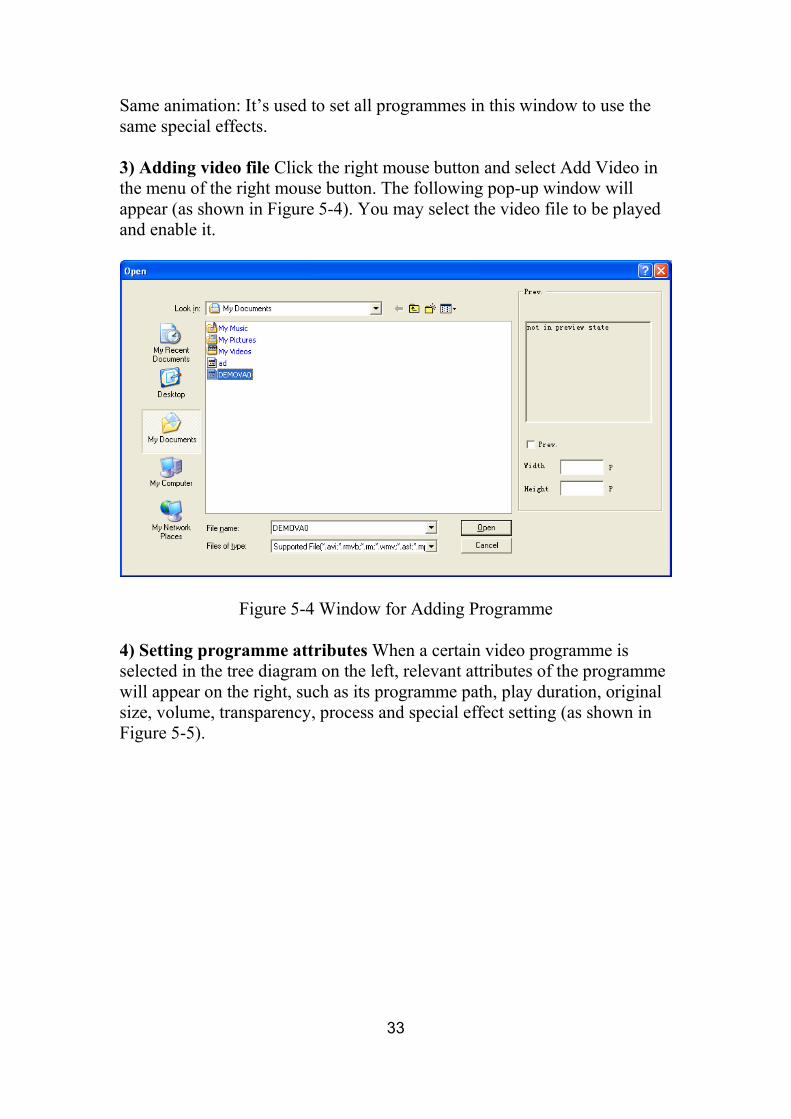
3) Adding video file Click the right mouse button and select Add Video inthe menu of the right mouse button. The following pop-up window willappear (as shown in Figure 5-4). You may select the video file to be playedand enable it.
Figure 5-4 Window for Adding Programme
4) Setting programme attributes When a certain video programme isselected in the tree diagram on the left, relevant attributes of the programmewill appear on the right, such as its programme path, play duration, originalsize, volume, transparency, process and special effect setting (as shown inFigure 5-5).

34
Figure 5-5 Video File Attributes
The user may respectively set video volume, transparency and process in theattributes and simultaneously preview the currently selected videoprogramme in the window of LED screen.
The user may set special effect according to needs and simultaneouslypreview the currently selected video file in the window of LED screen.
Special Effect Setting
Convergence: a program file before playing effects and post-admission to aprogram effects at the same time can be edited out very creative type effects.Effects repeat: You can put up to the window is divided into 16 small parts,for special effects mode, the result is more delicate.Enter: The special effecttype of video entering.
Exit: The special effect type of video exiting.
The speed unit behind both of them is 0.1 second which represents the totaltime for completing the special effect action. The smaller the value is, thefaster the special effect action is.

35
Stay: It’s the time for the image to stay in the window after entering andbefore exiting, with the unit of 0.1 second. There are four display modes ofstay, including 00: stretch, 01: scale, 02: center and 03: tile.
Special effect has the following 52 types. The software will be enrichedfrom time to time according to the user’s requirements. Please pay closeattention to our software update:
00: random, 01: waiting for page turning, 02: page turning, 03: left overlay,04: right overlay, 05: top overlay, 06: bottom overlay, 07: overlay on the topleft corner (diagonal), 08: overlay on the top right corner (diagonal), 09:overlay on the bottom left overlay (diagonal), 10: overlay on the bottomright overlay (diagonal), 11: overlay on the top left corner (straight), 12:overlay on the top right corner (straight), 13: overlay on the bottom leftoverlay (straight), 14: overlay on the bottom right overlay (straight), 15:horizontal shutter, 16: vertical shutter, 17: opening towards left and rightagainst each other, 18: opening towards top and bottom against each other,19: closing from left and right against each other, 20: closing from left andright against each other, 21: moving upwards, 22: moving downwards, 23:moving towards left, 24: moving towards right, 25: moving towards top leftcorner, 26: moving towards top right corner, 27: moving towards bottom leftcorner, 28: moving towards bottom right corner, 29: Mosaic (small), 30:Mosaic (medium), 31: Mosaic (large), 32: Gradient, 33: right-hand turn 360,34: left-hand turn 360, 35: right-hand turn 180, 36: left-hand turn 180, 37:right-hand turn 90, 38: left-hand turn 90, 39: changing from small to large(middle), 40: changing from small to large (top left), 41: change from smallto large (top right), 42: change from small to large (bottom left), 43: changefrom small to large (bottom right), 44: from middle to around (rectangle),45: from around to middle (rectangle), 46: from middle to around(diamond), 47: from around to middle (diamond), 48: from middle to around(cross), 49: from around to middle (cross), 50: 3D animation I, 51: 3Danimation II.
36
Chapter VI Image PlayImage is one of the most generally used contents displayed on full-color andsingle-color and double-color LED display screen. It may be played in filewindow or image box. At present, various formats are supported, such asbmp, jpg, png, gif and so on.
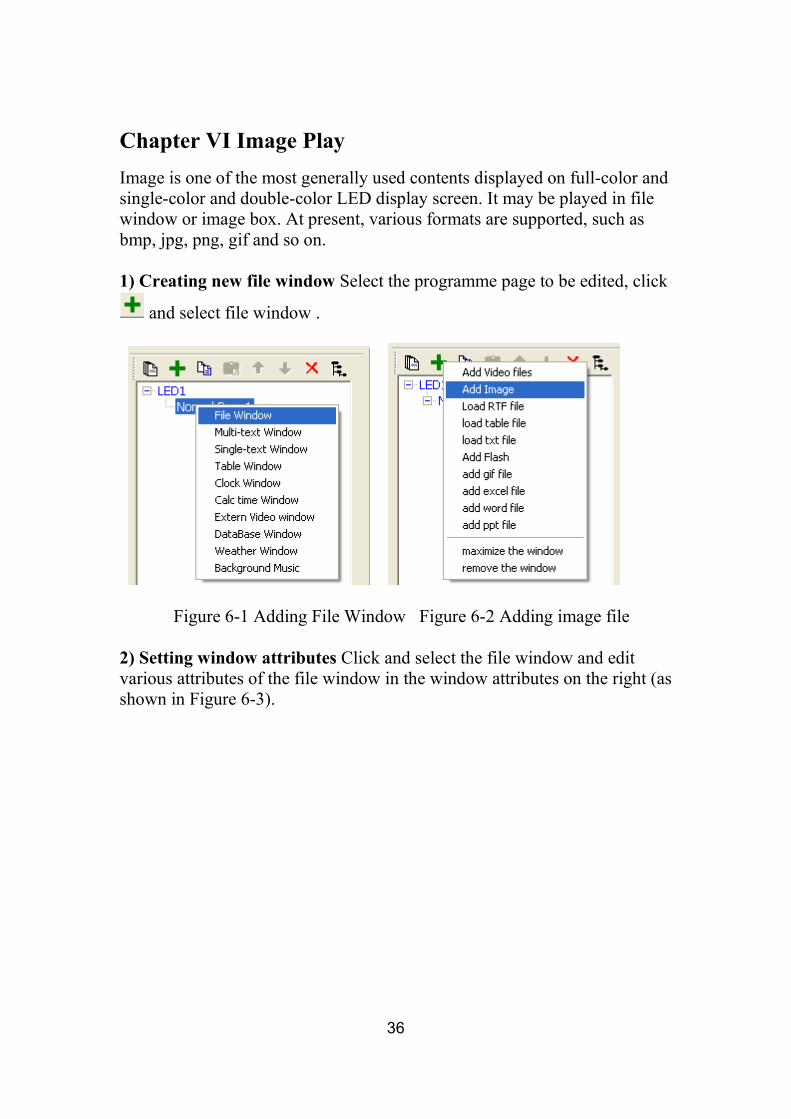
1) Creating new file window Select the programme page to be edited, click
and select file window .
Figure 6-1 Adding File Window Figure 6-2 Adding image file
2) Setting window attributes Click and select the file window and editvarious attributes of the file window in the window attributes on the right (asshown in Figure 6-3).
37
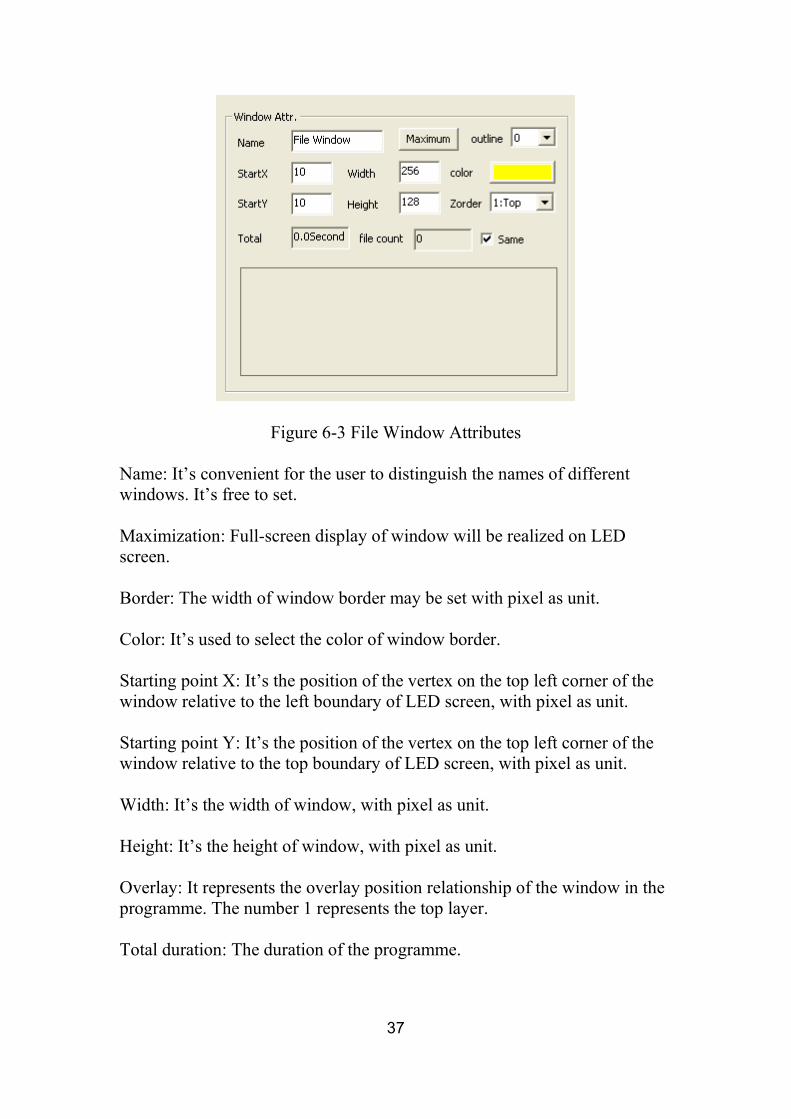
Figure 6-3 File Window Attributes
Name: It’s convenient for the user to distinguish the names of differentwindows. It’s free to set.
Maximization: Full-screen display of window will be realized on LEDscreen.
Border: The width of window border may be set with pixel as unit.
Color: It’s used to select the color of window border.
Starting point X: It’s the position of the vertex on the top left corner of thewindow relative to the left boundary of LED screen, with pixel as unit.
Starting point Y: It’s the position of the vertex on the top left corner of thewindow relative to the top boundary of LED screen, with pixel as unit.
Width: It’s the width of window, with pixel as unit.
Height: It’s the height of window, with pixel as unit.
Overlay: It represents the overlay position relationship of the window in theprogramme. The number 1 represents the top layer.
Total duration: The duration of the programme.

38
Same animation: It’s used to set all programmes in this window to use thesame special effects.
3) Adding image file Click the right mouse button and select Add Image inthe menu of the right mouse button. The following pop-up window willappear (as shown in Figure 6-4). You may select the image file to be playedand enable it.
Figure 6-4 Window for Adding Image
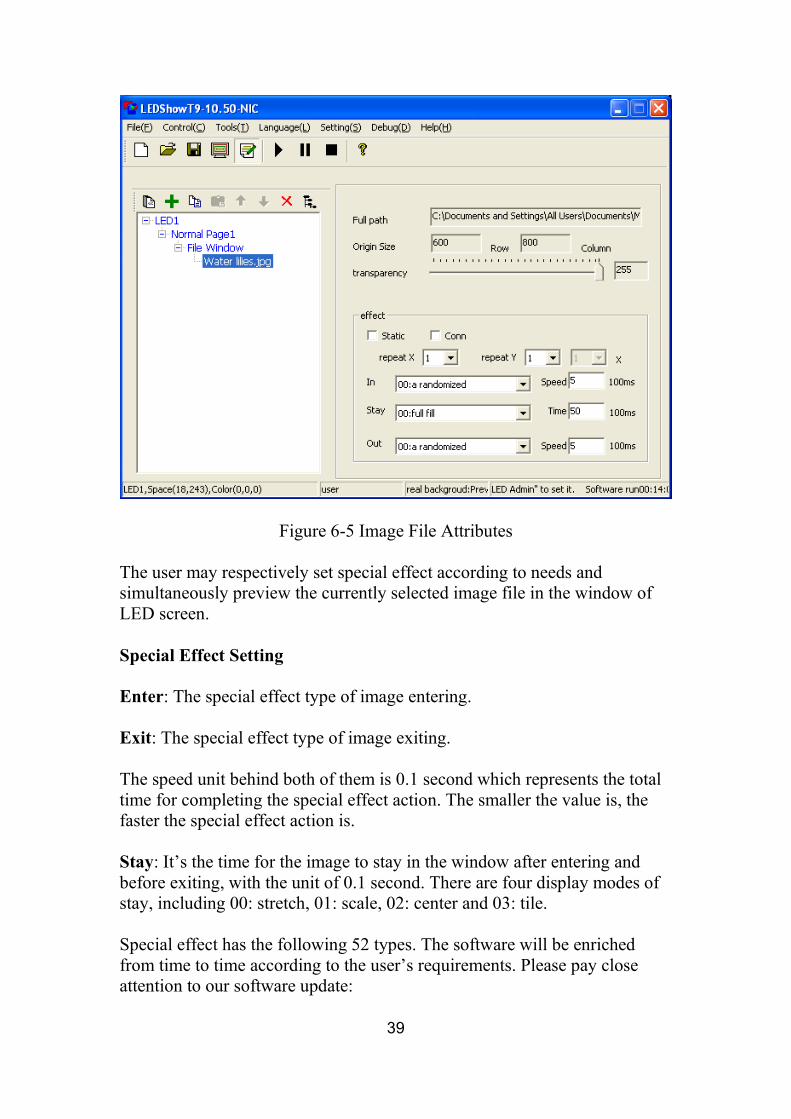
4) Setting programme attributes When a certain image file is selected inthe tree diagram on the left, relevant attributes of the file will appear on theright, such as its path, original size, transparency and special effect of play(as shown in Figure 6-5).
39
Figure 6-5 Image File Attributes
The user may respectively set special effect according to needs andsimultaneously preview the currently selected image file in the window ofLED screen.
Special Effect Setting
Enter: The special effect type of image entering.
Exit: The special effect type of image exiting.
The speed unit behind both of them is 0.1 second which represents the totaltime for completing the special effect action. The smaller the value is, thefaster the special effect action is.
Stay: It’s the time for the image to stay in the window after entering andbefore exiting, with the unit of 0.1 second. There are four display modes ofstay, including 00: stretch, 01: scale, 02: center and 03: tile.
Special effect has the following 52 types. The software will be enrichedfrom time to time according to the user’s requirements. Please pay closeattention to our software update:
40
00: random, 01: waiting for page turning, 02: page turning, 03: left overlay,04: right overlay, 05: top overlay, 06: bottom overlay, 07: overlay on the topleft corner (diagonal), 08: overlay on the top right corner (diagonal), 09:overlay on the bottom left overlay (diagonal), 10: overlay on the bottomright overlay (diagonal), 11: overlay on the top left corner (straight), 12:overlay on the top right corner (straight), 13: overlay on the bottom leftoverlay (straight), 14: overlay on the bottom right overlay (straight), 15:horizontal shutter, 16: vertical shutter, 17: opening towards left and rightagainst each other, 18: opening towards top and bottom against each other,19: closing from left and right against each other, 20: closing from left andright against each other, 21: moving upwards, 22: moving downwards, 23:moving towards left, 24: moving towards right, 25: moving towards top leftcorner, 26: moving towards top right corner, 27: moving towards bottom leftcorner, 28: moving towards bottom right corner, 29: Mosaic (small), 30:Mosaic (medium), 31: Mosaic (large), 32: Gradient, 33: right-hand turn 360,34: left-hand turn 360, 35: right-hand turn 180, 36: left-hand turn 180, 37:right-hand turn 90, 38: left-hand turn 90, 39: changing from small to large(middle), 40: changing from small to large (top left), 41: change from smallto large (top right), 42: change from small to large (bottom left), 43: changefrom small to large (bottom right), 44: from middle to around (rectangle),45: from around to middle (rectangle), 46: from middle to around(diamond), 47: from around to middle (diamond), 48: from middle to around(cross), 49: from around to middle (cross), 50: 3D animation I, 51: 3Danimation II, 52: continuously moving upwards.
41
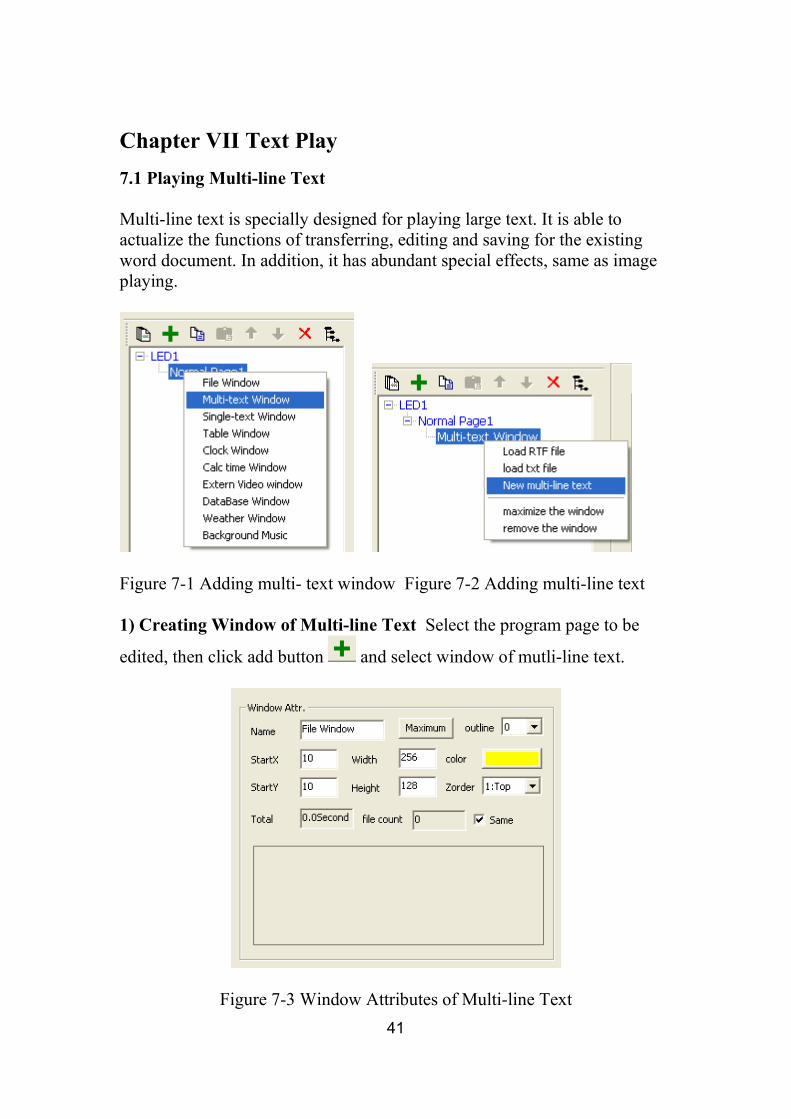
Chapter VII Text Play7.1 Playing Multi-line Text
Multi-line text is specially designed for playing large text. It is able toactualize the functions of transferring, editing and saving for the existingword document. In addition, it has abundant special effects, same as imageplaying.
Figure 7-1 Adding multi- text window Figure 7-2 Adding multi-line text
1) Creating Window of Multi-line Text Select the program page to be
edited, then click add button and select window of mutli-line text.
Figure 7-3 Window Attributes of Multi-line Text
42
2) Setting Window Attributes Left click to select the window of multi-linetext, edit the various attributes of multi-line text on the right windowattributes (see Figure 7-3).
Name: It’s convenient for the user to distinguish the names of differentwindows. It’s free to set.
Maximization: Full-screen display of window will be realized on LEDscreen.
Border: The width of window border may be set, with pixel as unit.
Color: It’s used to select the color of window border.
Starting point X: It’s the position of the vertex on the top left corner of thewindow relative to the left boundary of LED screen, with pixel as unit.
Starting point Y: It’s the position of the vertex on the top left corner of thewindow relative to the top boundary of LED screen, with pixel as unit.
Width: It’s the width of window, with pixel as unit.
Height: It’s the height of window, with pixel as unit.
Overlay: It represents the overlay position relationship of the window in theprogramme. The number 1 represents the top layer.
Total duration: The duration of the programme.
Same animation: It’s used to set all programmes in this window to use thesame special effects.
43
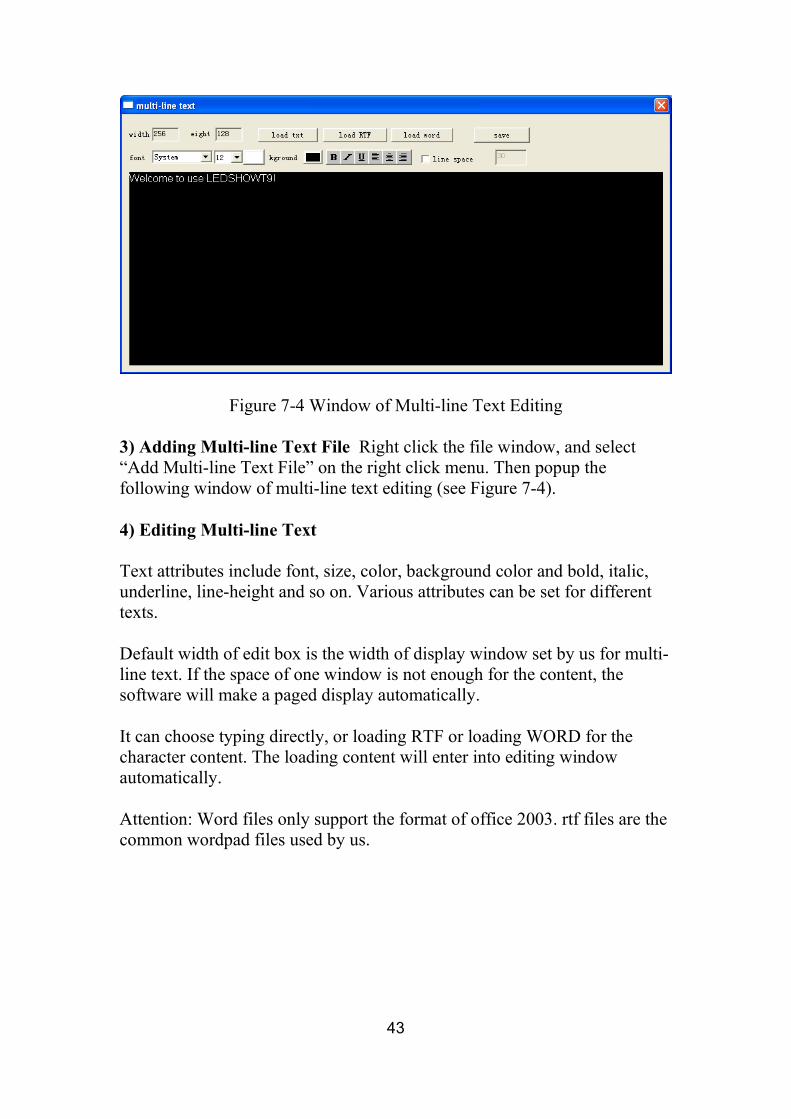
Figure 7-4 Window of Multi-line Text Editing
3) Adding Multi-line Text File Right click the file window, and select“Add Multi-line Text File” on the right click menu. Then popup thefollowing window of multi-line text editing (see Figure 7-4).
4) Editing Multi-line Text
Text attributes include font, size, color, background color and bold, italic,underline, line-height and so on. Various attributes can be set for differenttexts.
Default width of edit box is the width of display window set by us for multi-line text. If the space of one window is not enough for the content, thesoftware will make a paged display automatically.
It can choose typing directly, or loading RTF or loading WORD for thecharacter content. The loading content will enter into editing windowautomatically.
Attention: Word files only support the format of office 2003. rtf files are thecommon wordpad files used by us.
44
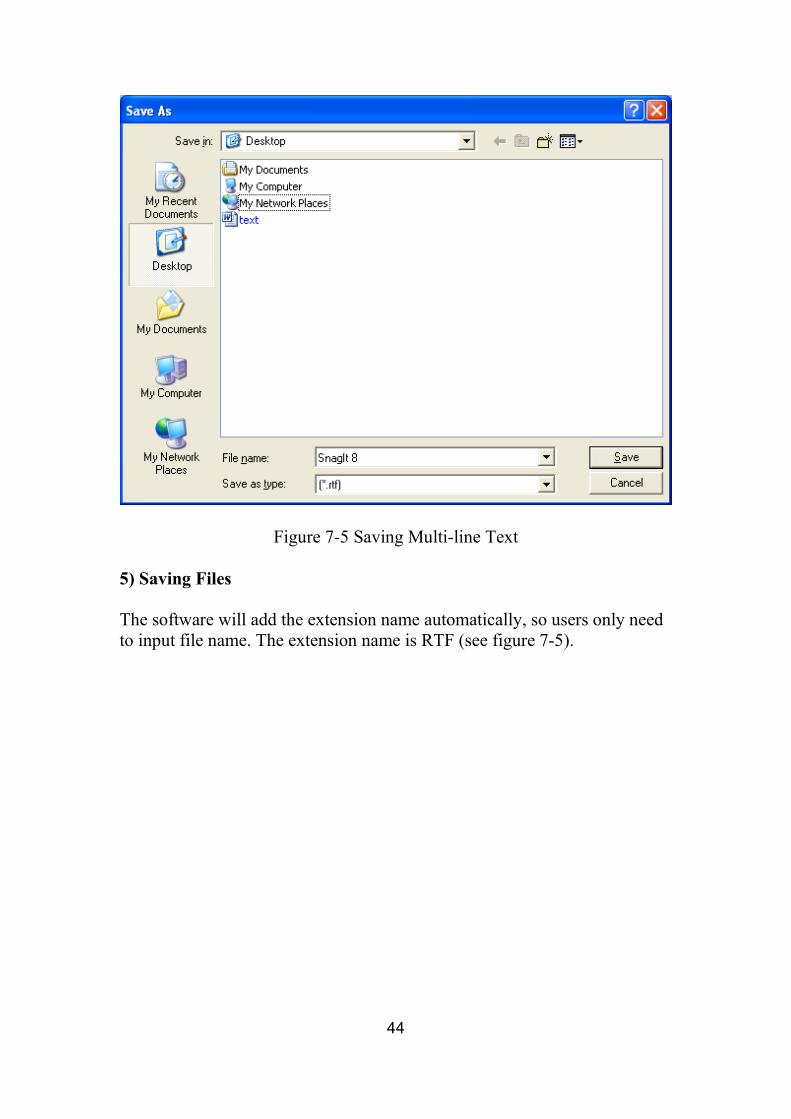
Figure 7-5 Saving Multi-line Text
5) Saving Files
The software will add the extension name automatically, so users only needto input file name. The extension name is RTF (see figure 7-5).

45
Figure 7-6 Attributes of Multi-line Text
6) Setting Programme Attributes For the character display, the samein/out animation and the speed shall be set as the ones during image display(see figure 7-6).
7.2 Playing Single-line Text
Figure 7-7 Adding Single-line Text Window
1). Creating Window of Single-line Text Select the programme page to be
edited, click “Add Button” and select window of single-line text (see
46
figure 7-7). The sofeware will create a single-line text automatically andenter into the interface of editing single-line text.
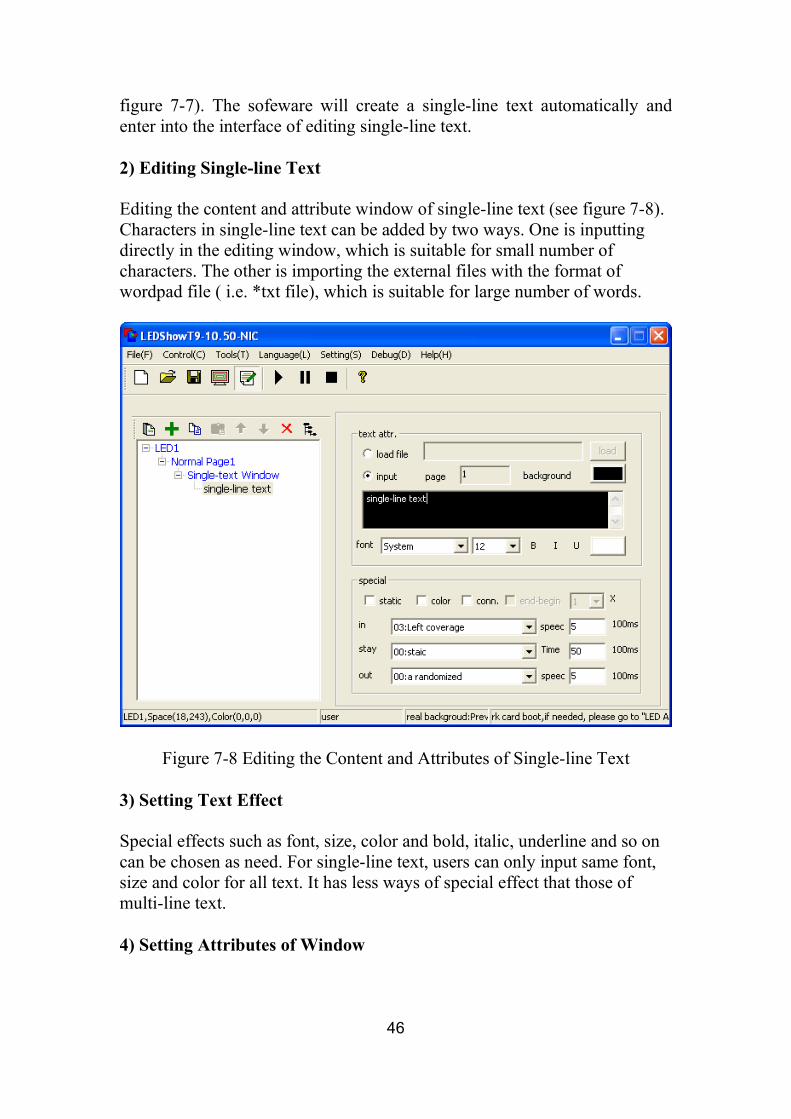
2) Editing Single-line Text
Editing the content and attribute window of single-line text (see figure 7-8).Characters in single-line text can be added by two ways. One is inputtingdirectly in the editing window, which is suitable for small number ofcharacters. The other is importing the external files with the format ofwordpad file ( i.e. *txt file), which is suitable for large number of words.
Figure 7-8 Editing the Content and Attributes of Single-line Text
3) Setting Text Effect
Special effects such as font, size, color and bold, italic, underline and so oncan be chosen as need. For single-line text, users can only input same font,size and color for all text. It has less ways of special effect that those ofmulti-line text.
4) Setting Attributes of Window

47
When desired, users can left click to select the single-line text window andthen edit the various attributes of single-line text window in the rightwindow attributes (see figure 7-9).
Figure 7-9 Window Attributes of Single-line Text
Name: It’s convenient for the user to distinguish the names of differentwindows. It’s free to set.
Maximization: Full-screen display of window will be realized on LEDscreen.
Border: The width of window border may be set, with pixel as unit.
Color: It’s used to select the color of window border.
Starting point X: It’s the position of the vertex on the top left corner of thewindow relative to the left boundary of LED screen, with pixel as unit.
Starting point Y: It’s the position of the vertex on the top left corner of thewindow relative to the top boundary of LED screen, with pixel as unit.
Width: It’s the width of window, with pixel as unit.
Height: It’s the height of window, with pixel as unit.
48
Overlay: It represents the overlay position relationship of the window in theprogramme. The number 1 represents the top layer.
Total duration: The duration of the programme.
Same animation: It’s used to set all programmes in this window to use thesame special effects.
Preview and switch: You may preview the programmes in this window inthe preview box and directly click for switching.

49
7.3 Playing the Edited RTF Files by File Window
Figure 7-10 Adding File Window Figure 7-11 Adding RTF File
1). Creating File Window Select the programme page to be edited, then
click Add Button and select Add File Window to add RTF files in thefile window
Figure 7-12 Window Attributes of File
2) Setting Window Attributes Left click to select the file window and editthe various attributes of file window in the left window attributes (see figure7-12).
50
Name: It’s convenient for the user to distinguish the names of differentwindows. It’s free to set.
Maximization: Full-screen display of window will be realized on LEDscreen.
Border: The width of window border may be set with pixel as unit.
Color: It’s used to select the color of window border.
Starting point X: It’s the position of the vertex on the top left corner of thewindow relative to the left boundary of LED screen, with pixel as unit.
Starting point Y: It’s the position of the vertex on the top left corner of thewindow relative to the top boundary of LED screen, with pixel as unit.
Width: It’s the width of window, with pixel as unit.
Height: It’s the height of window, with pixel as unit.
Overlay: It represents the overlay position relationship of the window in theprogramme. The number 1 represents the top layer.
Total duration: The duration of the programme.
Same animation: It’s used to set all programmes in this window to use thesame special effects.
Preview and switch: You may preview the programmes in this window inthe preview box and directly click for switching.
3) Adding RTF File Right click file window and select “Add RTF File” onthe right menu, then popup the following window (see figure 7-13) andselect the RTF file to be played, at last open the file.

51
Figure 7-13 Adding RTF File Window
4) Setting Programme Attributes When a certain file is selected in thetree diagram on the left, the trace, original size, opacity and special effect ofplay will appear on the right (see figure 7-14).
Figure 7-14 Attributes of RTF Text
52
Users can set special effects as need. At the same time, users can previewthe selected RTF file on the window of LED screen.

53
Chapter VIII Table Play
Figure 8-1 Add Table Window Figure 8-2 Add Table
1). Creating Table Window Select the programme page to be edited and
click “Add Button” , then select table window.
Figure 8-3 Attributes of Table Form
2) Setting window attributes Left click to select the table window, andedit the various attributes of table window on the right window attributes
Name: It’s convenient for the user to distinguish the names of differentwindows. It’s free to set.

54
Maximization: Full-screen display of window will be realized on LEDscreen.
Border: The width of window border may be set, with pixel as unit.
Color: It’s used to select the color of window border.
Starting point X: It’s the position of the vertex on the top left corner of thewindow relative to the left boundary of LED screen, with pixel as unit.
Starting point Y: It’s the position of the vertex on the top left corner of thewindow relative to the top boundary of LED screen, with pixel as unit.
Width: It’s the width of window, with pixel as unit.
Height: It’s the height of window, with pixel as unit.
Overlay: It represents the overlay position relationship of the window in theprogramme. The number 1 represents the top layer.
Total duration: The duration of the programme.
Same animation: It’s used to set all programmes in this window to use thesame special effects.
3) Adding Table Right click the file window, and select “Add Table” onthe right click menu. Then popup table window (see Figure 8-4).
55
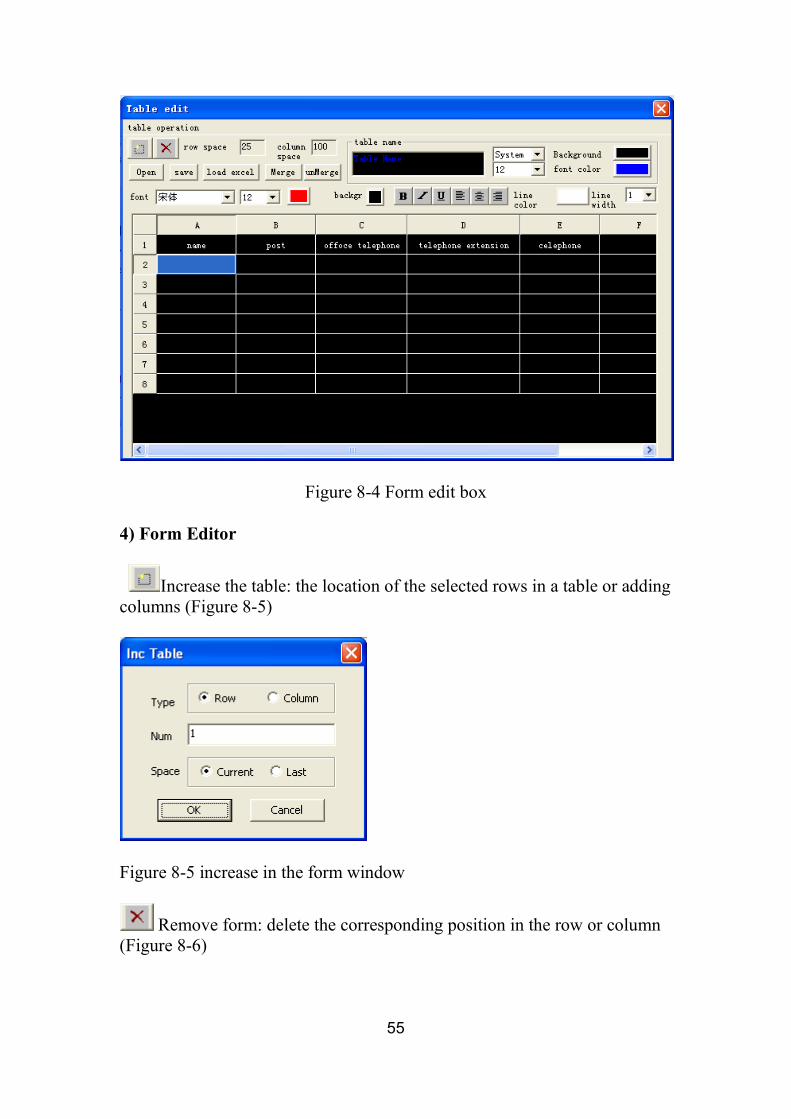
Figure 8-4 Form edit box
4) Form Editor
Increase the table: the location of the selected rows in a table or addingcolumns (Figure 8-5)
Figure 8-5 increase in the form window
Remove form: delete the corresponding position in the row or column(Figure 8-6)

56
Figure 8-6 Remove the form window
Import excel: Importing existing excel file. Note, excel file only supportsexcle2003 format.
Merge: Merge the selected cell.
Split: Split the selected cells have been merged.
Line spacing: Modify the selected cell line spacing.
Column spacing: Modify the selected cell column spacing.
If you see the contents can not be displayed within a window height, thesoftware will automatically display page.
The form you are done editing, you need to save the file, users only need toenter the file name can be, the software will automatically add the extension.Extension *. tbs.
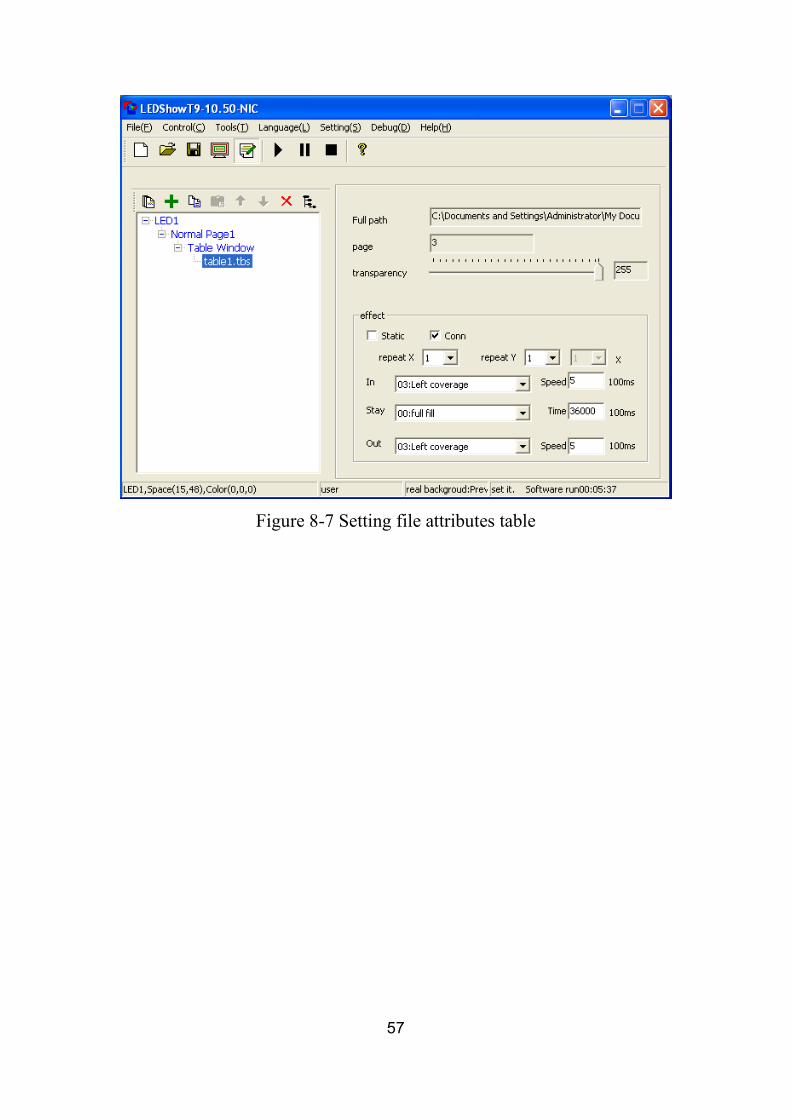
5) Set program properties when the tree on the left when a file is selected,the right will appear in this document's original size, path, attributes such astransparency, and playback effects (Figure 8-7). For the table shows,approach and appearance of the animation and speed settings and imagedisplay is the same.
57
Figure 8-7 Setting file attributes table
58
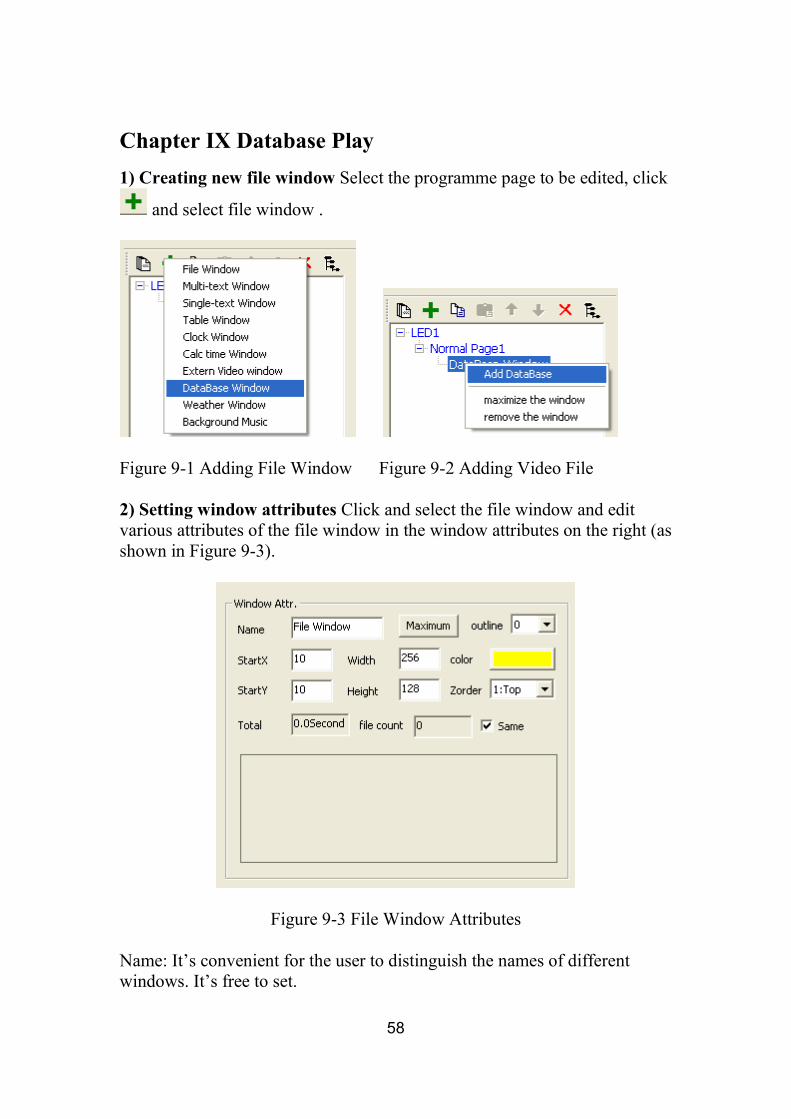
Chapter IX Database Play1) Creating new file window Select the programme page to be edited, click
and select file window .
Figure 9-1 Adding File Window Figure 9-2 Adding Video File
2) Setting window attributes Click and select the file window and editvarious attributes of the file window in the window attributes on the right (asshown in Figure 9-3).
Figure 9-3 File Window Attributes
Name: It’s convenient for the user to distinguish the names of differentwindows. It’s free to set.
59
Maximization: Full-screen display of window will be realized on LEDscreen.
Border: The width of window border may be set, with pixel as unit.
Color: It’s used to select the color of window border.
Starting point X: It’s the position of the vertex on the top left corner of thewindow relative to the left boundary of LED screen, with pixel as unit.
Starting point Y: It’s the position of the vertex on the top left corner of thewindow relative to the top boundary of LED screen, with pixel as unit.
Width: It’s the width of window, with pixel as unit.
Height: It’s the height of window, with pixel as unit.
Overlay: It represents the overlay position relationship of the window in theprogramme. The number 1 represents the top layer.
Total duration: The duration of the programme.
Same animation: It’s used to set all programmes in this window to use thesame special effects.
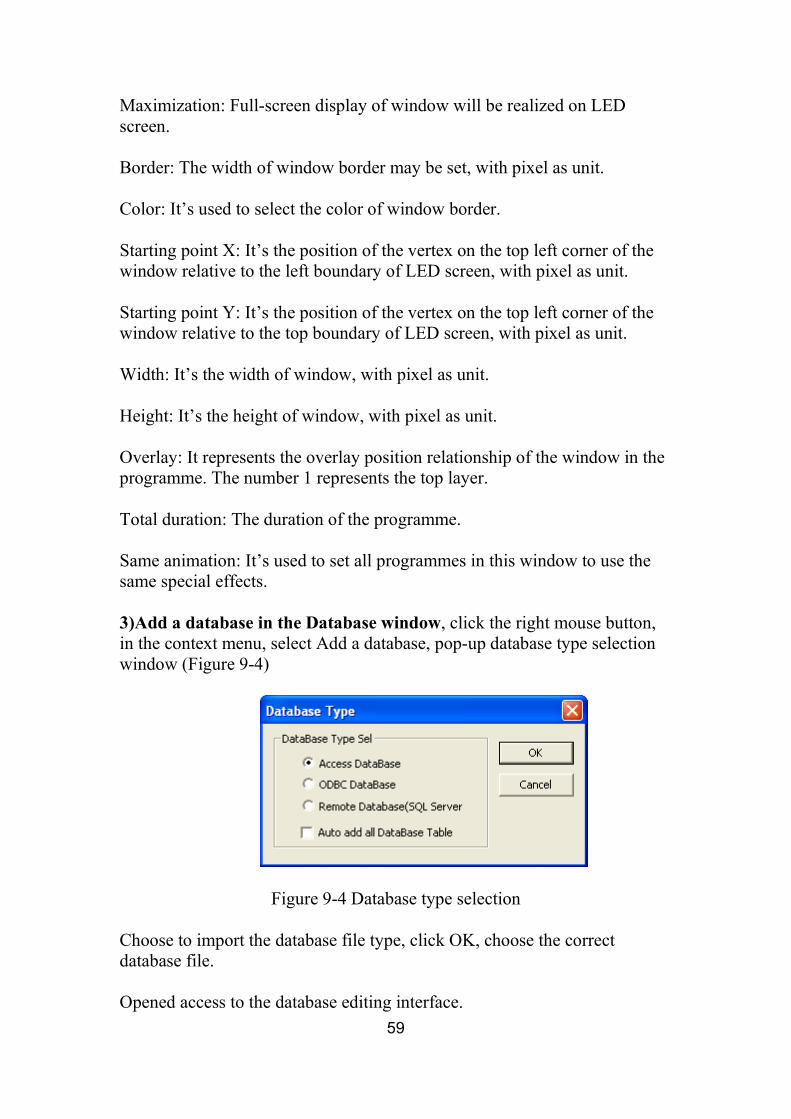
3)Add a database in the Database window, click the right mouse button,in the context menu, select Add a database, pop-up database type selectionwindow (Figure 9-4)
Figure 9-4 Database type selection
Choose to import the database file type, click OK, choose the correctdatabase file.
Opened access to the database editing interface.

60
4) Edit the database shows
Does not display selected columns: do not show hidden items. After hidingout in select some players to recover.
Merge: merge adjacent cells, showed the front part of the combined data.
Split: Split have been merged cell.
Show header: Displays the database header. Remove the hook is not shown.
Line spacing / Column Spacing: select the cell to adjust, modify the linespacing or column spacing value.
SQL Editor: the content of the database used for the selective display. Thespecific use patterns and coding please contact the database provider'stechnical staff.
5) Set program properties when the tree on the left when a file is selected,the right will appear in this document's original size, path, attributes such astransparency, and playback effects (Figure 9-5). For the table shows,approach and appearance of the animation and speed settings and pictureshows the time is the same
61
Figure 9-5 Setting file attributes table
If the user needs to display a complex form of a database, you can edit theSQL statement command. Details please and technical personnel.
62
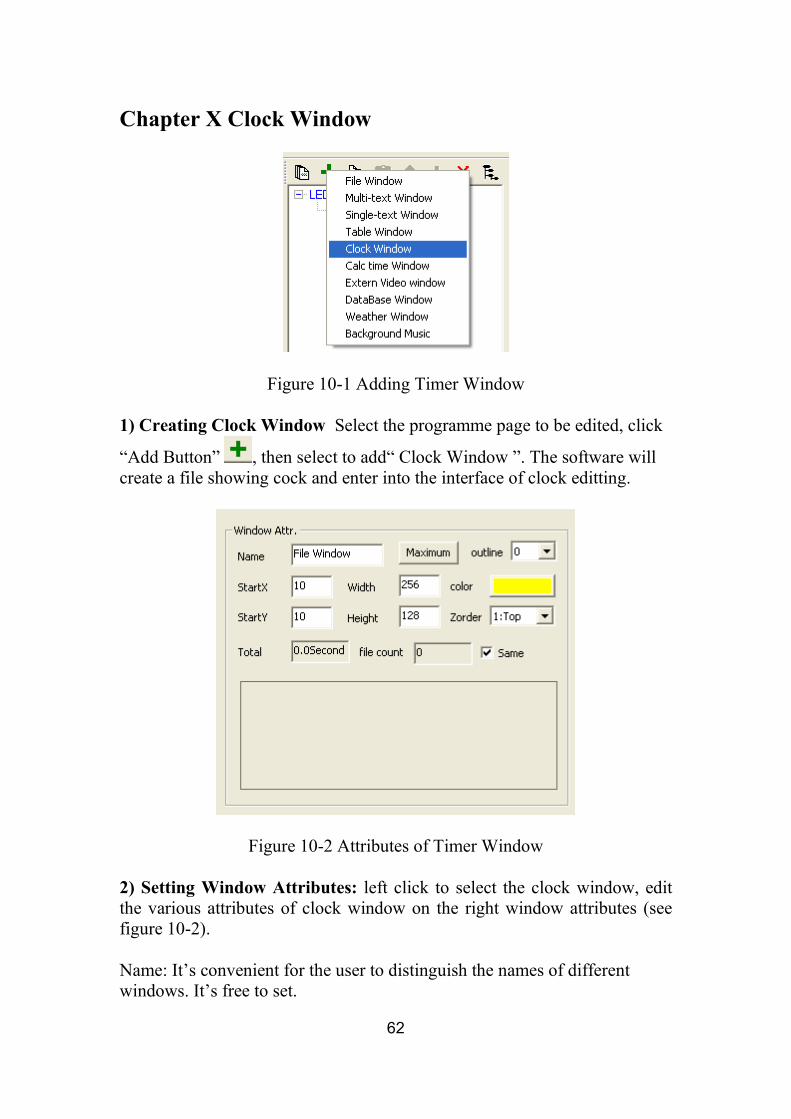
Chapter X Clock Window
Figure 10-1 Adding Timer Window
1) Creating Clock Window Select the programme page to be edited, click
“Add Button” , then select to add“ Clock Window ”. The software willcreate a file showing cock and enter into the interface of clock editting.
Figure 10-2 Attributes of Timer Window
2) Setting Window Attributes: left click to select the clock window, editthe various attributes of clock window on the right window attributes (seefigure 10-2).
Name: It’s convenient for the user to distinguish the names of differentwindows. It’s free to set.
63
Maximization: Full-screen display of window will be realized on LEDscreen.
Border: The width of window border may be set, with pixel as unit.
Color: It’s used to select the color of window border.
Starting point X: It’s the position of the vertex on the top left corner of thewindow relative to the left boundary of LED screen, with pixel as unit.
Starting point Y: It’s the position of the vertex on the top left corner of thewindow relative to the top boundary of LED screen, with pixel as unit.
Width: It’s the width of window, with pixel as unit.
Height: It’s the height of window, with pixel as unit.
Overlay: It represents the overlay position relationship of the window in theprogramme. The number 1 represents the top layer.
Total duration: The duration of the programme.
Same animation: It’s used to set all programmes in this window to use thesame special effects.
Preview and switch: You may preview the programmes in this window inthe preview box and directly click for switching.
64
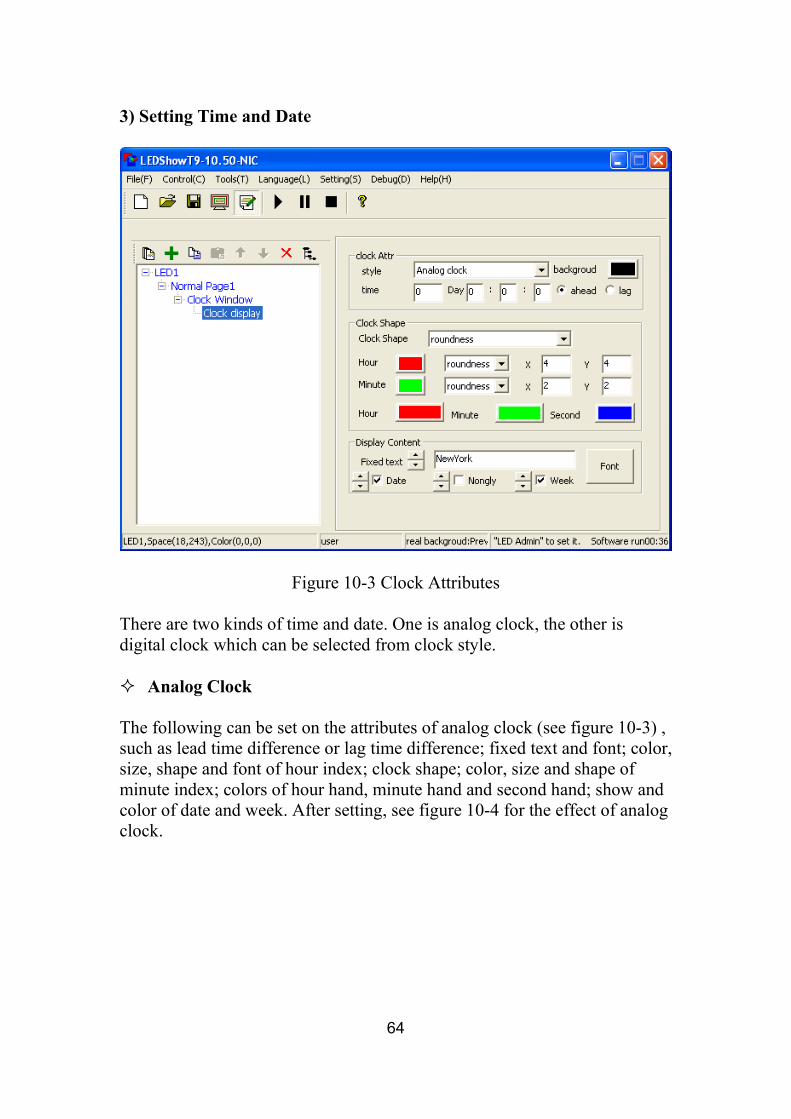
3) Setting Time and Date
Figure 10-3 Clock Attributes
There are two kinds of time and date. One is analog clock, the other isdigital clock which can be selected from clock style.
� Analog Clock
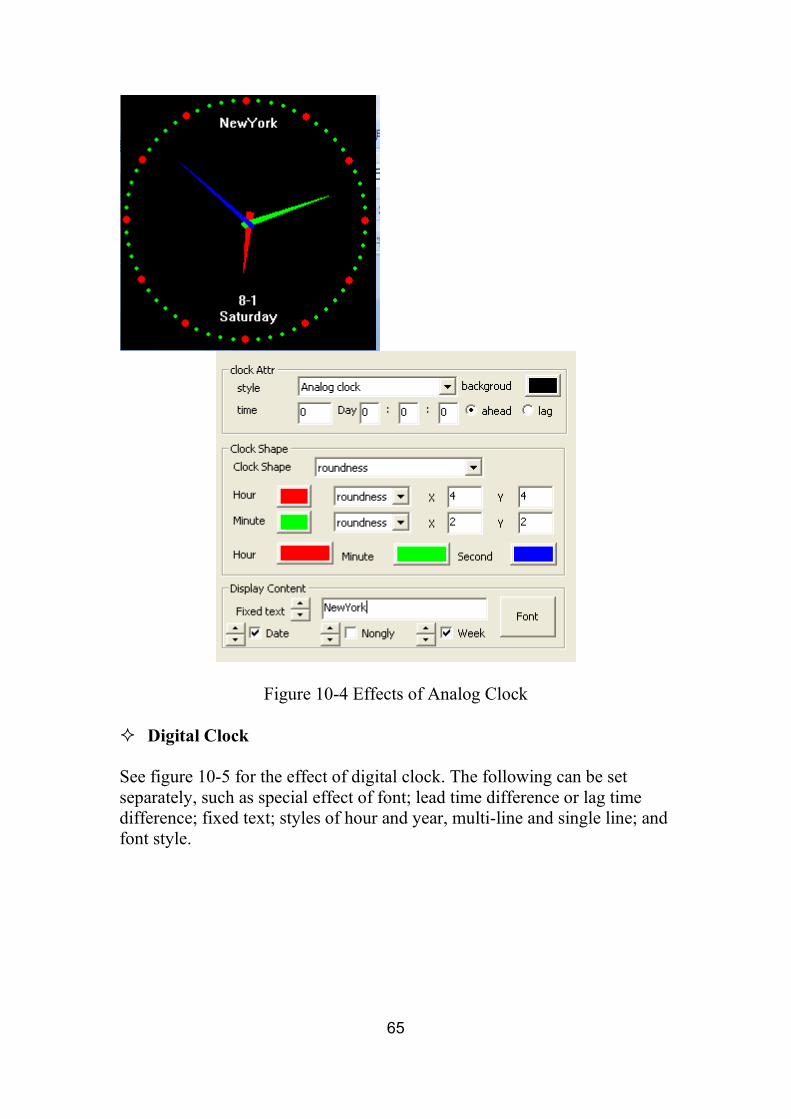
The following can be set on the attributes of analog clock (see figure 10-3) ,such as lead time difference or lag time difference; fixed text and font; color,size, shape and font of hour index; clock shape; color, size and shape ofminute index; colors of hour hand, minute hand and second hand; show andcolor of date and week. After setting, see figure 10-4 for the effect of analogclock.
65
Figure 10-4 Effects of Analog Clock
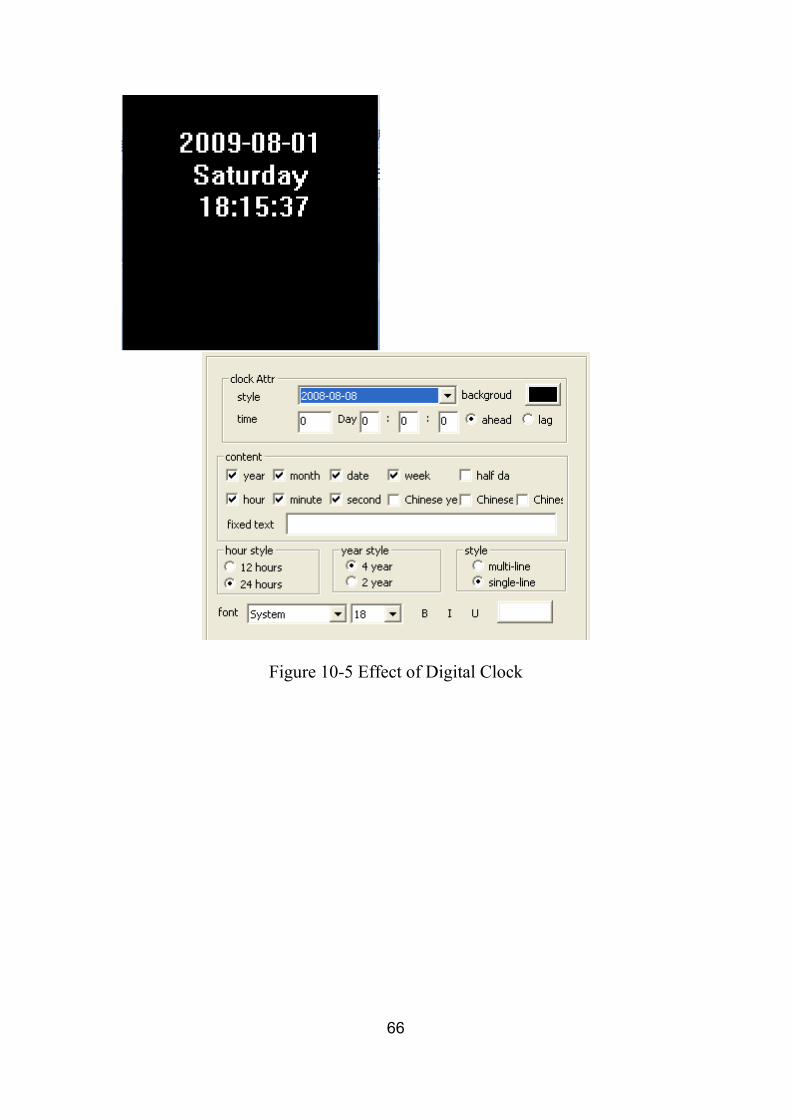
� Digital Clock
See figure 10-5 for the effect of digital clock. The following can be setseparately, such as special effect of font; lead time difference or lag timedifference; fixed text; styles of hour and year, multi-line and single line; andfont style.
66
Figure 10-5 Effect of Digital Clock
67
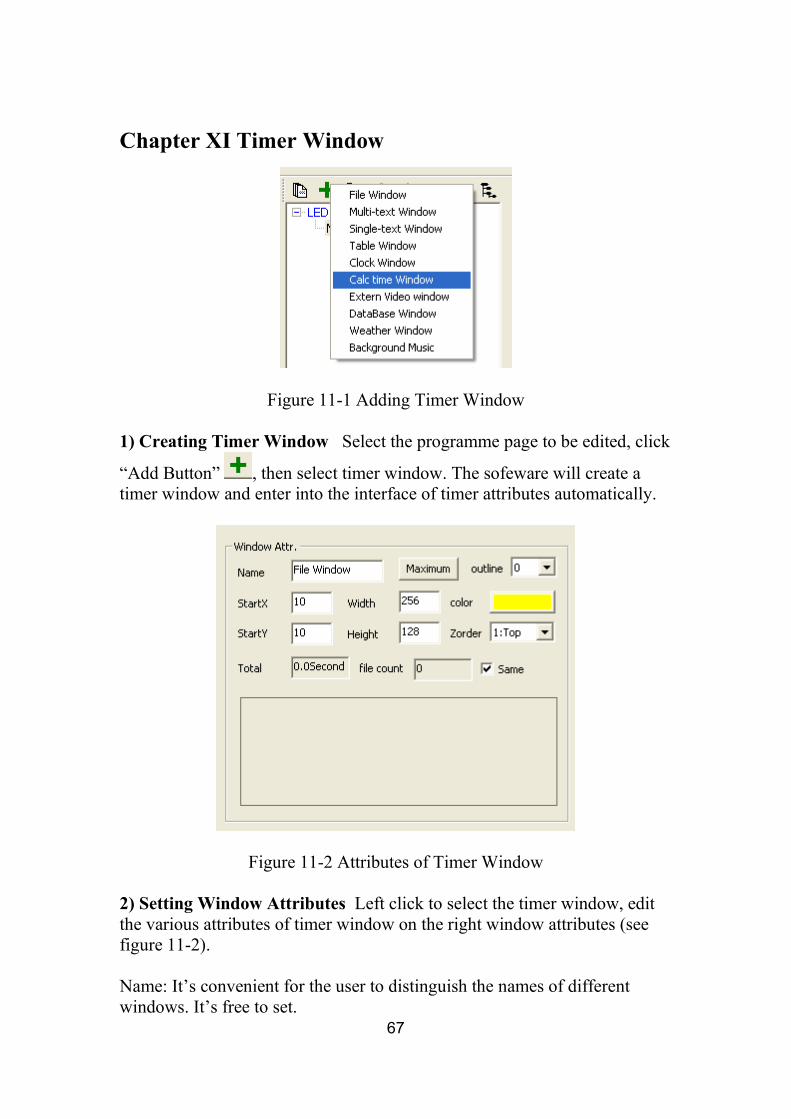
Chapter XI Timer Window
Figure 11-1 Adding Timer Window
1) Creating Timer Window Select the programme page to be edited, click
“Add Button” , then select timer window. The sofeware will create atimer window and enter into the interface of timer attributes automatically.
Figure 11-2 Attributes of Timer Window
2) Setting Window Attributes Left click to select the timer window, editthe various attributes of timer window on the right window attributes (seefigure 11-2).
Name: It’s convenient for the user to distinguish the names of differentwindows. It’s free to set.

68
Maximization: Full-screen display of window will be realized on LEDscreen.
Border: The width of window border may be set, with pixel as unit.
Color: It’s used to select the color of window border.
Starting point X: It’s the position of the vertex on the top left corner of thewindow relative to the left boundary of LED screen, with pixel as unit.
Starting point Y: It’s the position of the vertex on the top left corner of thewindow relative to the top boundary of LED screen, with pixel as unit.
Width: It’s the width of window, with pixel as unit.
Height: It’s the height of window, with pixel as unit.
Overlay: It represents the overlay position relationship of the window in theprogramme. The number 1 represents the top layer.
Total duration: The duration of the programme.
Same animation: It’s used to set all programmes in this window to use thesame special effects.
Preview and switch: You may preview the programmes in this window inthe preview box and directly click for switching.
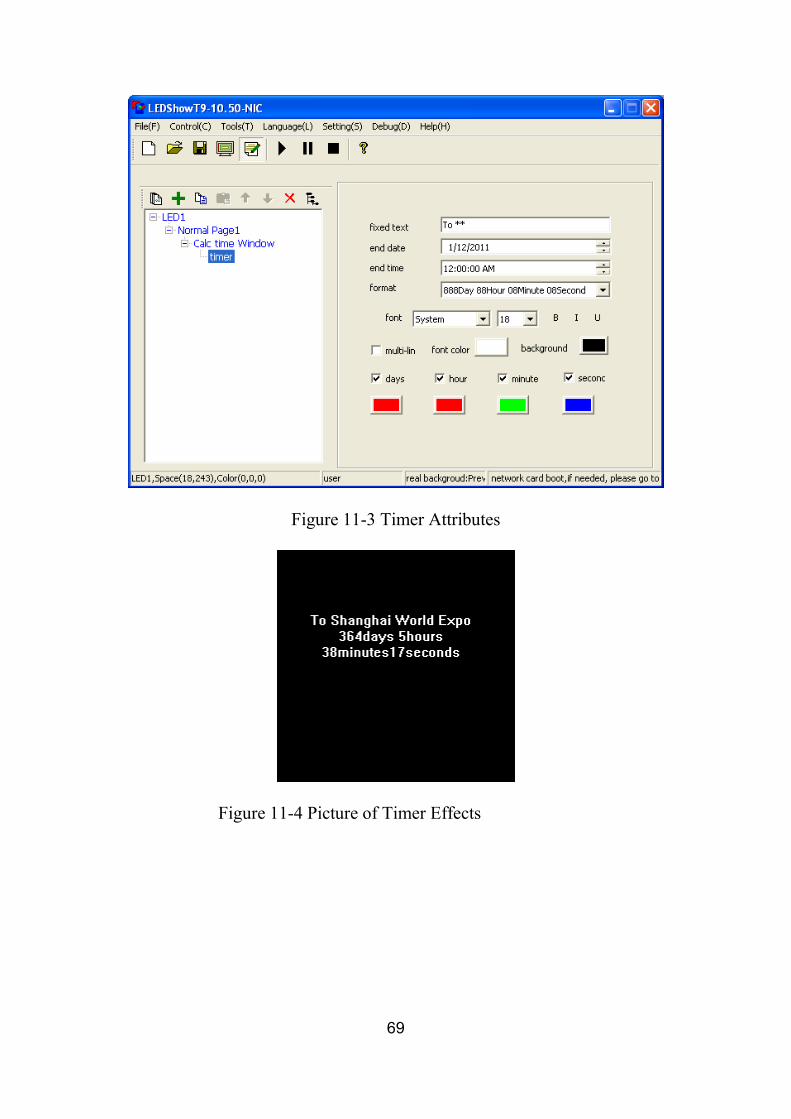
3) Timer Set
See figure 11-3 for timer attributes setting. The following can be set, such asfixed text, special effect of font, size, bold, italic, underline, color; targetdate and duration; whether or not show number of days, hour, minute,second, multi-line and so on. See figure 11-4 for the effect of timer set onthe play window.
69
Figure 11-3 Timer Attributes
Figure 11-4 Picture of Timer Effects
70
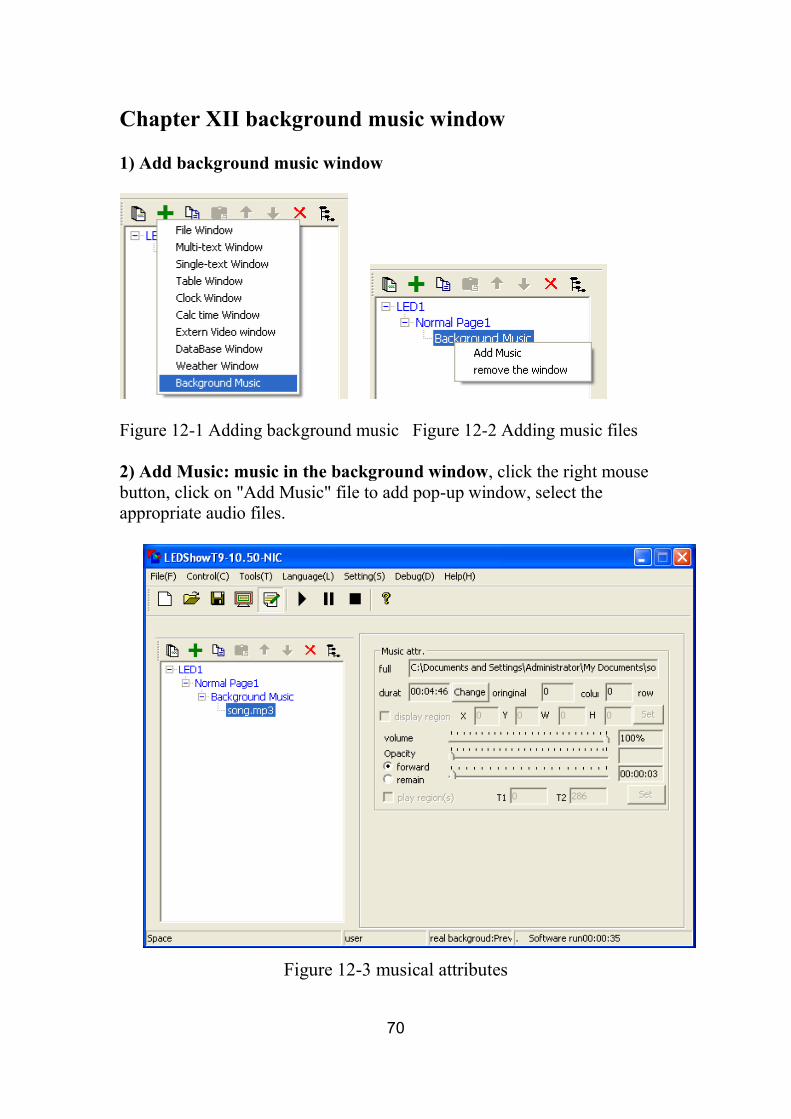
Chapter XII background music window
1) Add background music window
Figure 12-1 Adding background music Figure 12-2 Adding music files
2) Add Music: music in the background window, click the right mousebutton, click on "Add Music" file to add pop-up window, select theappropriate audio files.
Figure 12-3 musical attributes
71
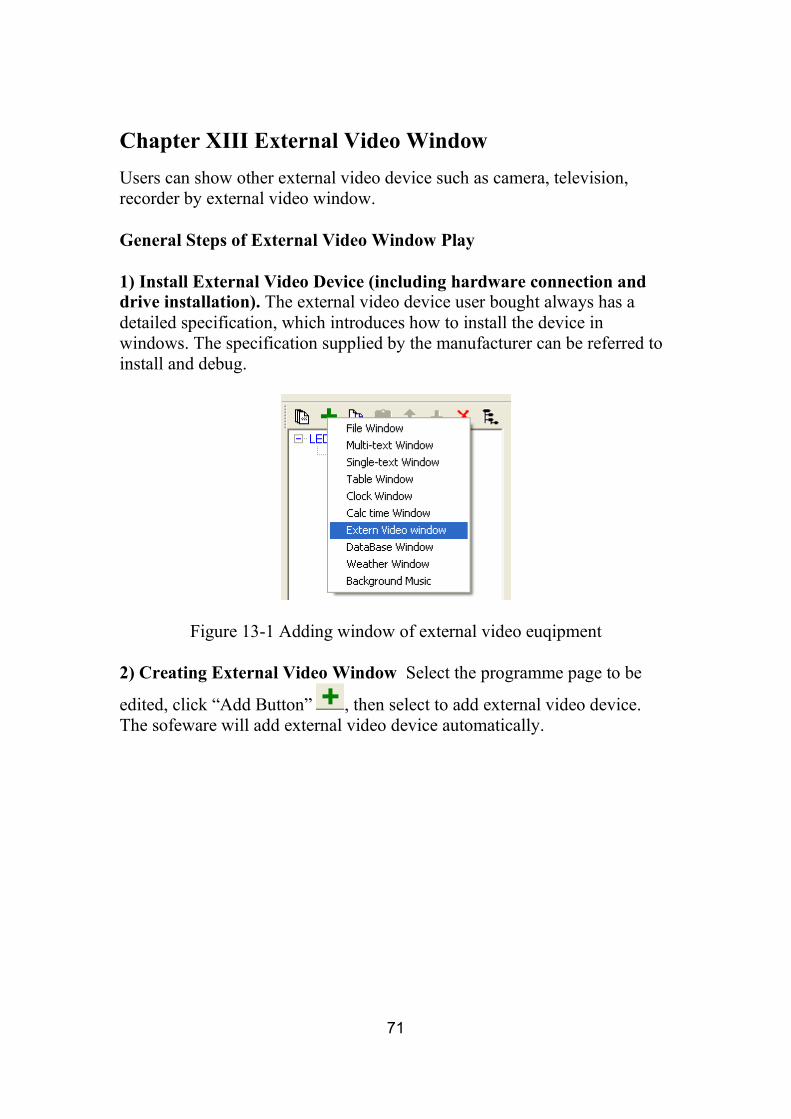
Chapter XIII External Video WindowUsers can show other external video device such as camera, television,recorder by external video window.
General Steps of External Video Window Play
1) Install External Video Device (including hardware connection anddrive installation). The external video device user bought always has adetailed specification, which introduces how to install the device inwindows. The specification supplied by the manufacturer can be referred toinstall and debug.
Figure 13-1 Adding window of external video euqipment
2) Creating External Video Window Select the programme page to be
edited, click “Add Button” , then select to add external video device.The sofeware will add external video device automatically.

72
Figure 13-3 Attributes of External Video Window
3) Setting Window Attributes Left click to select the external videowindow, edit the various attributes of external video window on the rightwindow attributes (see figure 13-3).
Name: It’s convenient for the user to distinguish the names of differentwindows. It’s free to set.
Maximization: Full-screen display of window will be realized on LEDscreen.
Border: The width of window border may be set, with pixel as unit.
Color: It’s used to select the color of window border.
Starting point X: It’s the position of the vertex on the top left corner of thewindow relative to the left boundary of LED screen, with pixel as unit.
Starting point Y: It’s the position of the vertex on the top left corner of thewindow relative to the top boundary of LED screen, with pixel as unit.
Width: It’s the width of window, with pixel as unit.
Height: It’s the height of window, with pixel as unit.
Overlay: It represents the overlay position relationship of the window in theprogramme. The number 1 represents the top layer.
73
Total duration: The duration of the programme.
Same animation: It’s used to set all programmes in this window to use thesame special effects.
Preview and switch: You may preview the programmes in this window inthe preview box and directly click for switching.
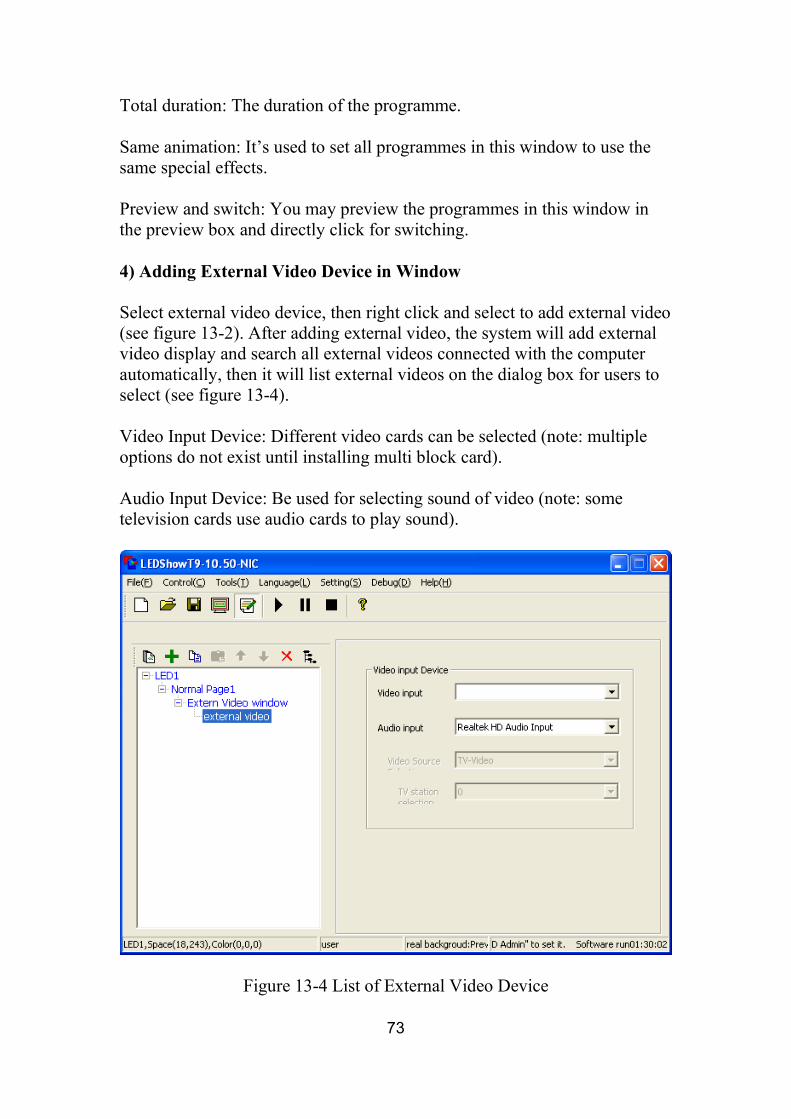
4) Adding External Video Device in Window
Select external video device, then right click and select to add external video(see figure 13-2). After adding external video, the system will add externalvideo display and search all external videos connected with the computerautomatically, then it will list external videos on the dialog box for users toselect (see figure 13-4).
Video Input Device: Different video cards can be selected (note: multipleoptions do not exist until installing multi block card).
Audio Input Device: Be used for selecting sound of video (note: sometelevision cards use audio cards to play sound).
Figure 13-4 List of External Video Device

74
5) Setting Device Attributes
Select ”Menu→ External Video”, the following menus can be seen, such asaudio attributes, video attributes, video interface and so on (see figure 13-5),then click to enter into the interface for setting the detailed attributes ofdevice.

75
Chapter XIV Notice ManagementNotice management is mainly used for inserting temporary notices duringthe programme broadcasting.
1) Opening Window of Notice Management
Click control screen of menu→ broadcasting notices, popup the window ofnotice management (see figure 14-1).
Figure 14-1 Setting Window of Notice Management
2) Setting the Window of Notice Management
The following aspects of notice window can be set in the dialog box ofnotice management, such as position, left border, right border, down border,special effect, background, font and so on. Please refer to the attributesetting of single-line text for concrete setting.
3) Display of Play/Stop Notice
After the setting is done, users can click ”Play” button to broadcast notices,click “Stop” to exit the interface of notice management, and click “Scale” tohide the left attribute options.

76
77
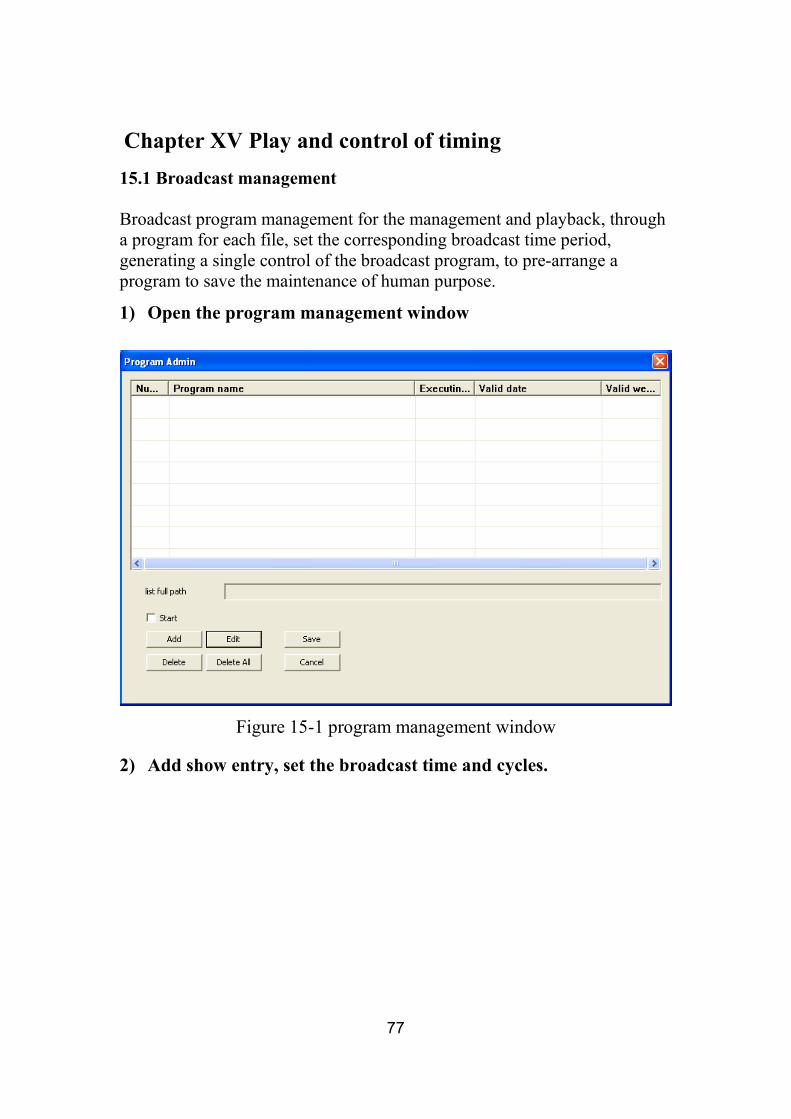
Chapter XV Play and control of timing15.1 Broadcast management
Broadcast program management for the management and playback, througha program for each file, set the corresponding broadcast time period,generating a single control of the broadcast program, to pre-arrange aprogram to save the maintenance of human purpose.
1) Open the program management window
Figure 15-1 program management window
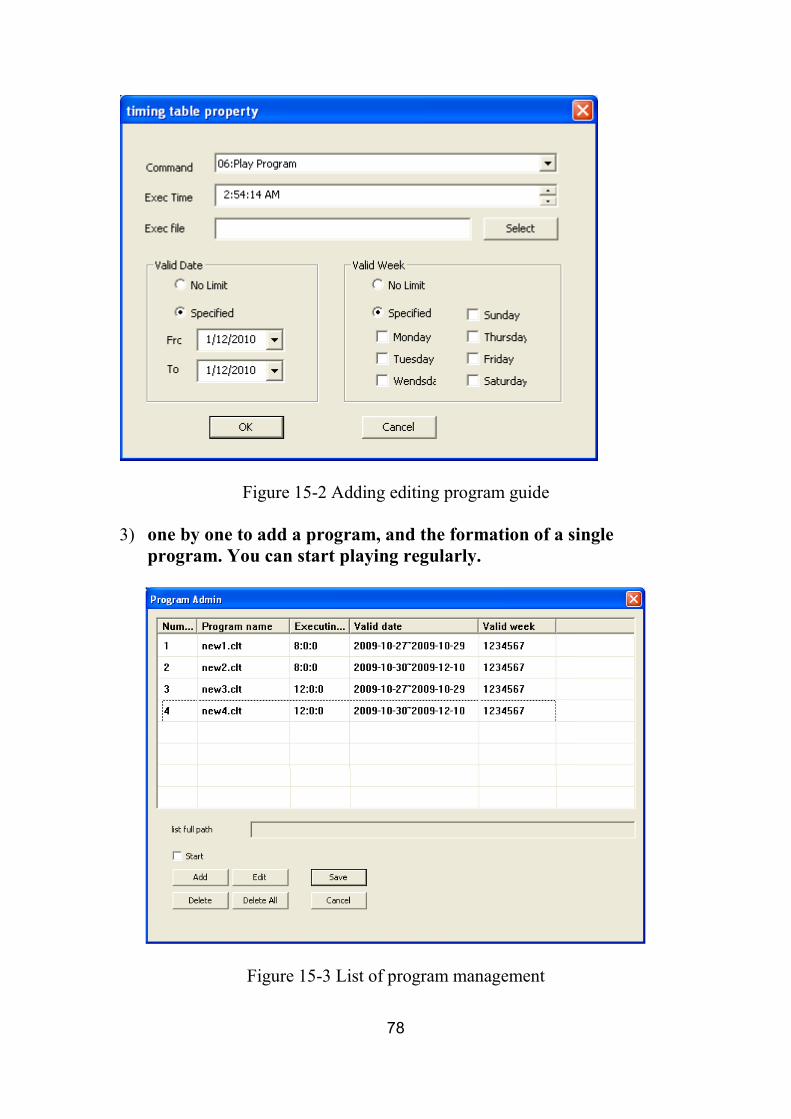
2) Add show entry, set the broadcast time and cycles.
78
Figure 15-2 Adding editing program guide
3) one by one to add a program, and the formation of a singleprogram. You can start playing regularly.
Figure 15-3 List of program management

79
15.2 Instruction Table of Timing
Instruction table of timing is used for controlling peripheral equipment bycontrolling system timing. The operation of this section needs correspondinghardware devices. Please follow the instruction of professional technicians.
1) Interface
Figure 15-4 Instruction Table of Timing
2) Parameters
80
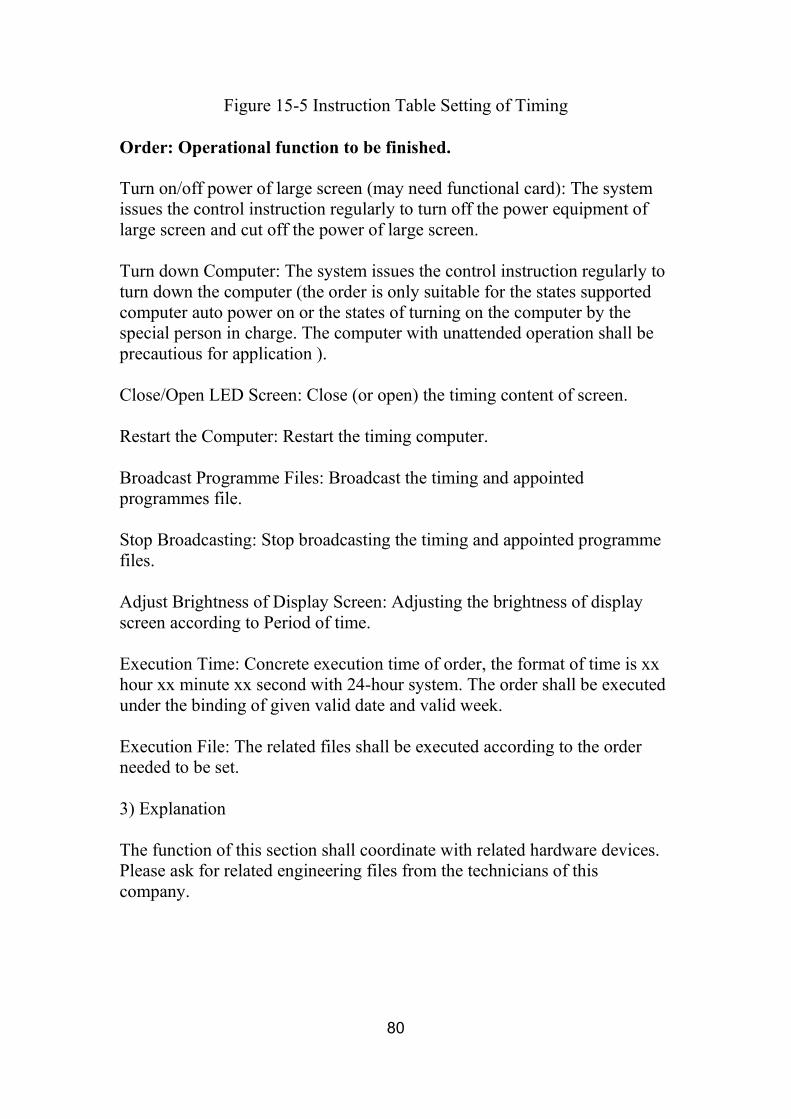
Figure 15-5 Instruction Table Setting of Timing
Order: Operational function to be finished.
Turn on/off power of large screen (may need functional card): The systemissues the control instruction regularly to turn off the power equipment oflarge screen and cut off the power of large screen.
Turn down Computer: The system issues the control instruction regularly toturn down the computer (the order is only suitable for the states supportedcomputer auto power on or the states of turning on the computer by thespecial person in charge. The computer with unattended operation shall beprecautious for application ).
Close/Open LED Screen: Close (or open) the timing content of screen.
Restart the Computer: Restart the timing computer.
Broadcast Programme Files: Broadcast the timing and appointedprogrammes file.
Stop Broadcasting: Stop broadcasting the timing and appointed programmefiles.
Adjust Brightness of Display Screen: Adjusting the brightness of displayscreen according to Period of time.
Execution Time: Concrete execution time of order, the format of time is xxhour xx minute xx second with 24-hour system. The order shall be executedunder the binding of given valid date and valid week.
Execution File: The related files shall be executed according to the orderneeded to be set.
3) Explanation
The function of this section shall coordinate with related hardware devices.Please ask for related engineering files from the technicians of thiscompany.

81
Chapter XVI Remote OperationIf the remote operation is conducted through LAN, the master computercontrolled the LED screen shall be set as the remote control server, othercomputers conducting remote control are all treated as client computers.Remote control server can be controlled by all client computers in network.Client computers can control all remote control servers in network.
16.1 Setting Remote Control Server
Figure 16-1: Setting interface of Remote Control Server
User Name/ Password: During remote control, this server can not beconnected until the user name and responding password are input.
Allowable Remote Control: The remote control of computer is not allowableand the computer will not become a remote control server until selecting thisoption.
82
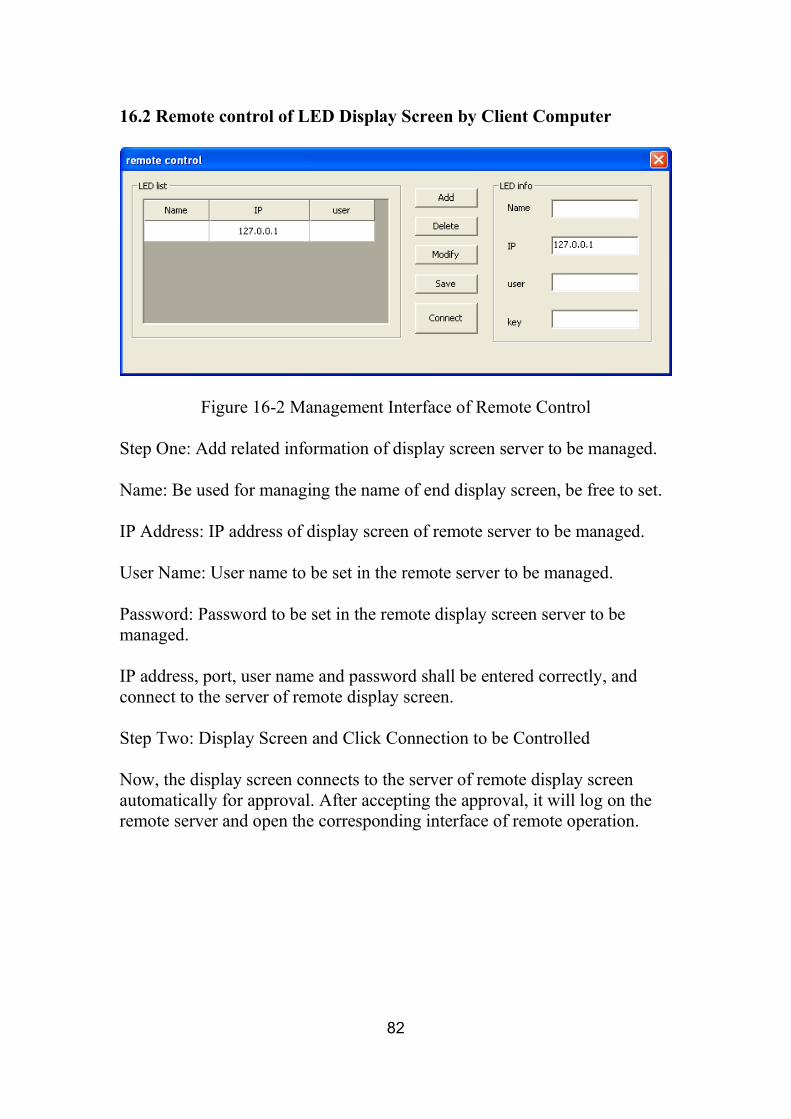
16.2 Remote control of LED Display Screen by Client Computer
Figure 16-2 Management Interface of Remote Control
Step One: Add related information of display screen server to be managed.
Name: Be used for managing the name of end display screen, be free to set.
IP Address: IP address of display screen of remote server to be managed.
User Name: User name to be set in the remote server to be managed.
Password: Password to be set in the remote display screen server to bemanaged.
IP address, port, user name and password shall be entered correctly, andconnect to the server of remote display screen.
Step Two: Display Screen and Click Connection to be Controlled
Now, the display screen connects to the server of remote display screenautomatically for approval. After accepting the approval, it will log on theremote server and open the corresponding interface of remote operation.
83
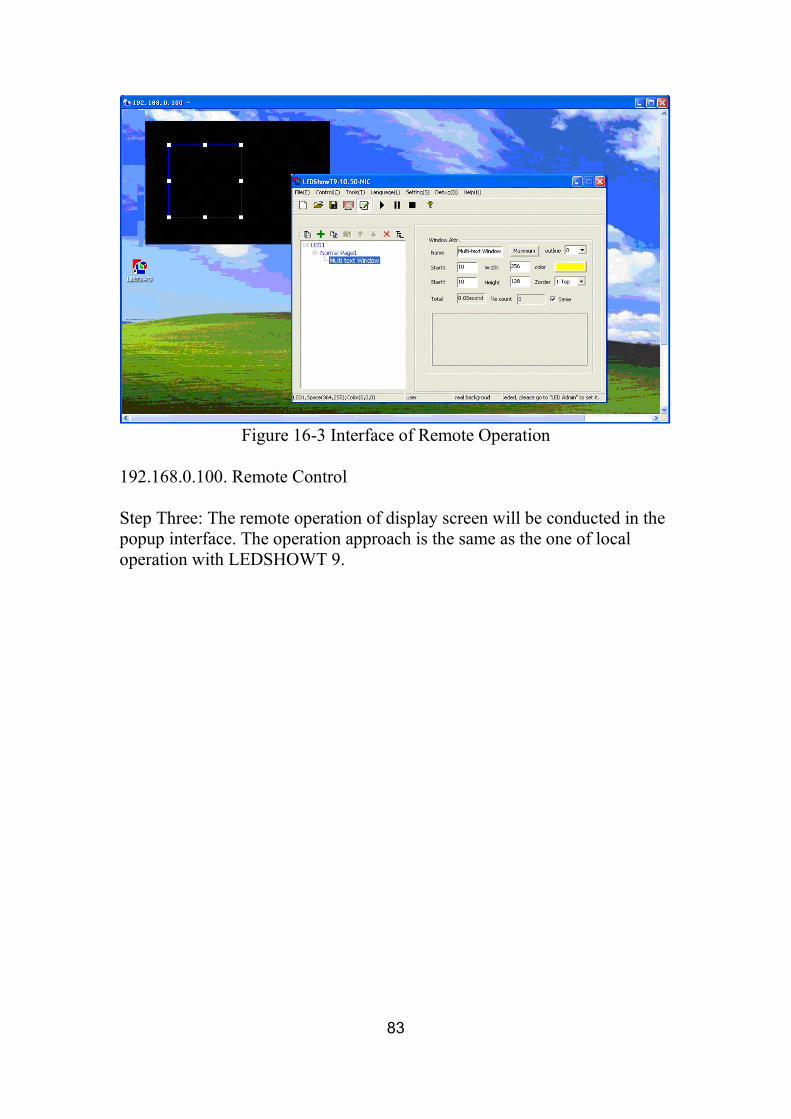
Figure 16-3 Interface of Remote Operation
192.168.0.100. Remote Control
Step Three: The remote operation of display screen will be conducted in thepopup interface. The operation approach is the same as the one of localoperation with LEDSHOWT 9.

84
Chapter XVII Software Setting
Various setting related to software include three optional cards, such asAutoSet, network setting and other setting. Network setting is used forremote control. Please refer to Chapter XVI for related introduction.
17.1 AutoSet
Figure 17-1 AutoSet
In AutoSet, the software has the following functions: start automatic start ofwindows software; automatically play programme during the software start;plug and play of U disk; not display the mouse; broadcasting window bealways on top; immediately minimize software after start; allow to useremote control; play audio; mode of screen capture; not display computerphoto and so on.

85
17.2 Other Setting
Figure 17-2 Other Setting
Allow to Change Programme during Play: The programme only takes effectfor once and is not saved. The software can not be operated next time duringopening until it is selected again.
Transparent Background box: The background box is set as the transparentone.
Automatic Restart during Software Failure: The software will restartautomatically after the exit due to failure.
Timing Start/Stop this Software everyday: Start/Stop this Software at the settime.
Timing Copy: Timing copy the programme.
Record Play Time: Record the time of file play, and save it to theresponding files of set dictionary.

86
Do not Allow Error Hint: When the error occurs during files play, the errordialog box does not popup.
Allow Programme Window to Exceed Background box: Allow programmewindow to exceed background box.

87
Chapter XVIII User Management
User Information
Name/Password: User name and password that the user used to log on.
Permission
Administrator: Be able to conduct all operations, and set users andresponding permissions.
Domain User: Be able to conduct all operations related to the play aspect, beunable to conduct the setting and user management about hardwareparameters of display screen.
Limited User: Only be able to load and play the ready-made programmes.
Need to Log on: After selecting this option, users need to log on whenopening the software.

88
Chapter XIX FAQQ: How to change the quantity, position and size of broadcastingwindow?
A: Setting screen number, starting point of row, starting point of column,length of column, height of row on “Control Screen→ ScreenManagement”. The broadcasting window can be dragged by the mouse tosome position.
Q: How to enter into the setting interface of display screen?
A: “Setting → Hardware Setting”, enter into the setting of display screen.
Q How to deal with some video files which are unable to be played?
A Please download responding decoder, all common video formats will beplayed after installing the decoder.
Q What kind of setting are able to let the software automatically playthe set content after start?
A: First, edit the programme to be played and save it as * clt file. Then,select “Setting→ Software Setting → AutoSet → Autoplay Programmewhen Start” from the menu bar gradually. At last click OK.
Q: Why is the play in computer smooth sometime, but the play indisplay screen not smooth?
A: Please confirm that the network card driver accompanied by the gigabitLAN is installed to ensure that the performance of gigabit LAN has arrivedat the optimal state. If the problem still can not be resolved, please do nothesitate to contact us.
Q How to close the display screen by the software?
A: Select “Control Screen → Close Display of large Screen” from the menubar.
Q: Under Vista operational system, the network card can not be foundin the display card description after opening the network setting byLEDSHOWT9, why?
A: Please select LEDSHOWT9 and right click to find “Attribute→Compatibility→ Rank→ Select ”Please run the program as Administrator”.