Embed Size (px)
Citation preview

Instruments and implantsapproved by the AO Foundation
LCP Anterior Ankle ArthrodesisPlates. Part of the Synthes LockingCompression Plate (LCP) System.
Technique Guide

Introduction
Surgical Technique
Product Information
Table of Contents
LCP Anterior Ankle Arthrodesis Plates 2
Indications 3
Preparation 4
Incisions 4
Osteotomy, Resection and Site Preparation—Tibia 5
Osteotomy and Resection—Fibula 8
Temporary Fixation 10
Insert Distal Screw 11
Axial Compression 11
Insert the 3.5 mm Cortex Screws 12
Insert Distal Angulated Screws 13
Insert the Proximal 4.5 mm Cortex Screws 14
Insert the Proximal Locking Screws 14
Implants 15
Required Instruments 15
Required Sets 15
Synthes
image intensifier control

LCP Anterior Ankle Arthrodesis Plates
ForewordLCP Anterior Ankle Arthrodesis Plates incorporate Combiholes, which combine a dynamic compression unit (DCU)hole with a locking screw hole.
Features– Combi holes in the plate shaft
– Anatomically contoured
– Available with 6 (100 mm) or 7 (116 mm) holes
– All holes accept 4.5 mm cortex, 4.5 mm shaft screwsand 6.5 mm cancellous bone screws
– Locking holes accept 4.0 mm solid, 5.0 mm solid or5.0 mm cannulated locking screws
– Distal elongated DCU holes for greater screw angulationand greater bone purchase
– Proximal notch accepts the articulated tension device(to allow compression or distraction)
– Available in 316L implant quality stainless steel orcommercially pure (CP) titanium.
2 Synthes LCP Anterior Ankle Arthrodesis Plates Technique Guide

Preoperative failed ankle fusion, lateral view Preoperative failed ankle fusion, AP view
Postoperative revised ankle fusion, lateralview
Postoperative revised ankle fusion, AP view
The Synthes LCP Anterior AnkleArthrodesis Plate is indicated forarthrodesis of the ankle joint anddistal tibia.
Synthes 3
Indications

Lateral incision
1Preparation
Complete the preoperative radiograph assessment. Positionthe patient supine on a radiolucent operating table.
2Incisions
Starting at medial malleolus, make a 10 cm–15 cm longanteromedial (pilon type) incision crossing the tibial crestto the lateral side at the musculotendinous junction ofthe anterior tibia. Make an 8 cm long incision at theposterolateral malleolus.
Note: Leave a 7 cm–10 cm bridge between incisions.
4 Synthes LCP Anterior Ankle Arthrodesis Plates Technique Guide
Surgical Technique
Medial incision
7–10 cm

3Osteotomy, resection and site preparation—tibia
Osteotomize the medial malleolus tangent to the shaft.
Synthes 5
Resect the distal articular surface of the tibia, using anoscillating saw. Externally rotate the foot to correspondwith the uninvolved leg.

Surgical Technique continued
3Osteotomy, resection and site preparation—tibiacontinued
Instruments
397.74 Bone Impactor
399.54 Chisel
399.56 16 mm Chisel Blade
Use a chisel and a 16 mm chisel blade to crack the anteriorcortex of the distal tibia.
6 Synthes LCP Anterior Ankle Arthrodesis Plates Technique Guide
Impact the anterior cortex of the tibia using a rectangularbone impactor to inlay the plate slightly. By not removingthe anterior cortex, the plate fixation is bicortical.

Lateral view
5° dorsiflexion
AP view
0°–3° valgus
Mark the talus along the medial side at the proposedosteotomy location, using the “bovie” to make the markin the cartilaginous surface as shown.
With the involved ankle at 5° dorsiflexion in the sagittalplane and neutral (0°–3° valgus) in the frontal plane, makean osteotomy cut to remove as thin a portion as possiblefrom the top of the talus and resect the bone.
Synthes 7
Approximately7°–8° dorsiflexion
Surgical Technique continued
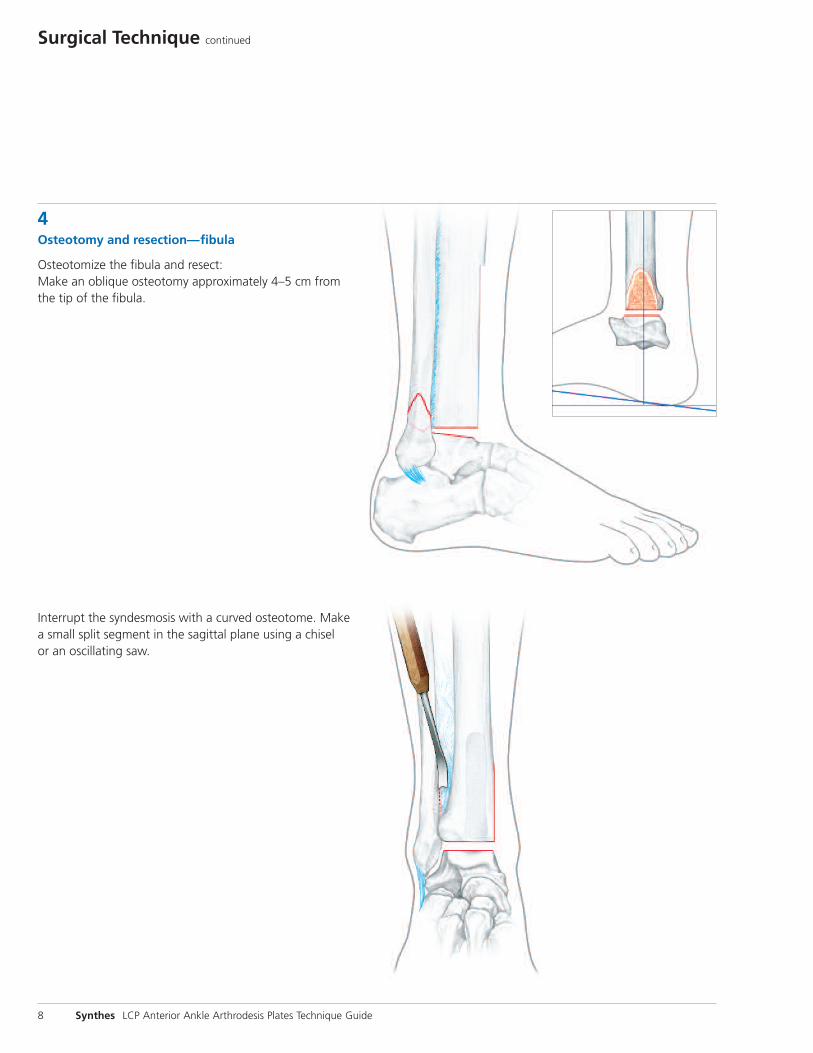
4Osteotomy and resection—fibula
Osteotomize the fibula and resect:Make an oblique osteotomy approximately 4–5 cm fromthe tip of the fibula.
Interrupt the syndesmosis with a curved osteotome. Makea small split segment in the sagittal plane using a chiselor an oscillating saw.
8 Synthes LCP Anterior Ankle Arthrodesis Plates Technique Guide

Make another oblique fibular cut, creating a 1 cm(approximate) bone segment.
Resect the loose portion of the distal fibula.
Synthes 9

Surgical Technique continued
5Temporary fixation
With the involved foot in 0°–3° valgus and 10°–15° outwardrotation, temporarily fix the ankle with 2.5 mm Kirschnerwires.
Prepare the syndesmotic notch with a high-speed burr.
To check for final varus/valgus alignment and flexion/extension alignment before final fixation, place the involvedfoot on a flat surface such as Synthes graphic case lid.
10 Synthes LCP Anterior Ankle Arthrodesis Plates Technique Guide

6Insert distal screw
Instruments
310.31 3.2 mm Drill Bit
314.27 Large Hexagonal Screwdriver
319.10 Depth Gauge
323.46 4.5 mm Universal Drill Guide
Use the 4.5 mm universal drill guide and a 3.2 mm drill bitto predrill the talus for a 6.5 mm cancellous bone screw inthe most distal hole (bent section) of the plate.
Measure for the appropriate screw length using the depthgauge. Insert the appropriate length 6.5 mm cancellousbone screw using the large hexagonal screwdriver.
7Axial compression
Instrument
321.12 Articulated Tension Device*
Use the articulated tension device to place the arthrodesisunder maximum compression.
Synthes 11
* Found in LCP Large Fragment Set

Surgical Technique continued
8Insert the 3.5 mm cortex screws
Instruments
310.25 2.5 mm Drill Bit
323.36 3.5 mm Universal Drill Guide
Use the 3.5 mm universal drill guide and 2.5 mm drill bitto predrill for the 3.5 mm cortex screws. Measure for screwlength using a depth gauge. Insert one appropriate length3.5 mm cortex screw through the fibula and talus. Insertanother appropriate length 3.5 mm cortex screw through thefibula and distal tibia. Remove all preliminary Kirschner wires.
12 Synthes LCP Anterior Ankle Arthrodesis Plates Technique Guide

9Insert distal angulated screws
Instruments
310.31 3.2 mm Drill Bit
314.27 Large Hexagonal Screwdriver
319.10 Depth Gauge
321.12 Articulated Tension Device*
323.46 4.5 mm Universal Drill Guide
While placing the arthrodesis under maximum axial compres-sion using the articulated tension device, use the 4.5 mmuniversal drill guide and a 3.2 mm drill bit to predrill thetibia for a 4.5 mm shaft screw in the most distal elongatedDCU hole of the plate. To gain correct anatomic alignmentof the arthrodesis, this screw should be angled distallyapproximately 30° to the tibia shaft. Measure for screwlength using the depth Gauge. Using the large hexagonalscrewdriver, select and insert the appropriate length 4.5 mmshaft screw so that the screw tip reaches as far as possibleinto the talus.
Repeat this step for the proximal elongated DCU hole. This4.5 mm shaft screw should be angled distally approximately40° to the tibia shaft and pass through the distal tibia. Thescrew tip should reach as far as possible into the talus.
Synthes 13
* Found in LCP Large Fragment Set

Surgical Technique continued
10Insert the proximal 4.5 mm cortex screws
Instruments
310.31 3.2 mm Drill Bit
319.10 Depth Gauge
323.46 4.5 mm Universal Drill Guide
Insert as many 4.5 mm cortex screws as necessary into theproximal portion of the plate
Important: All of the 4.5 mm cortex screws must beinserted prior to insertion of locking screws.
Use the 4.5 mm universal drill guide and a 3.2 mm drill bitto predrill the tibia shaft for a 4.5 mm cortex screw in themost distal Combi hole of the plate. Measure for screwlength using the depth gauge. Select and insert theappropriate length 4.5 mm cortex screw using the largehexagonal screwdriver.
Note: This screw, as well as the remaining screws insertedinto the Combi holes, should be perpendicular to the plateand the tibia shaft.
Repeat this step for the remaining 4.5 mm cortex screws.
11Insert the proximal locking screws
If necessary, insert two or three locking screws into theproximal portion of the plate using established techniquesfor inserting locking screws.
14 Synthes LCP Anterior Ankle Arthrodesis Plates Technique Guide
Refer to the Large Fragment LCP Technique Guide for additional information.
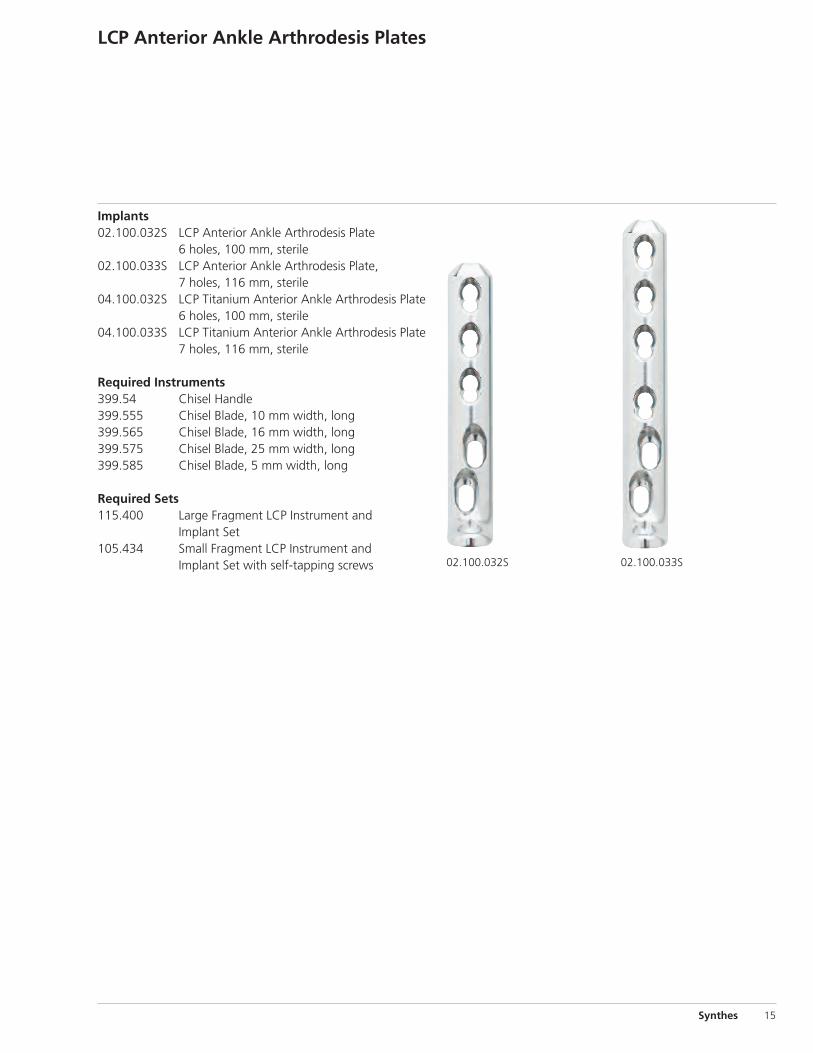
LCP Anterior Ankle Arthrodesis Plates
Synthes 15
02.100.032S 02.100.033S
Implants02.100.032S LCP Anterior Ankle Arthrodesis Plate
6 holes, 100 mm, sterile02.100.033S LCP Anterior Ankle Arthrodesis Plate,
7 holes, 116 mm, sterile04.100.032S LCP Titanium Anterior Ankle Arthrodesis Plate
6 holes, 100 mm, sterile04.100.033S LCP Titanium Anterior Ankle Arthrodesis Plate
7 holes, 116 mm, sterile
Required Instruments399.54 Chisel Handle399.555 Chisel Blade, 10 mm width, long399.565 Chisel Blade, 16 mm width, long399.575 Chisel Blade, 25 mm width, long399.585 Chisel Blade, 5 mm width, long
Required Sets115.400 Large Fragment LCP Instrument and
Implant Set105.434 Small Fragment LCP Instrument and
Implant Set with self-tapping screws

Synthes (USA)1302 Wrights Lane EastWest Chester, PA 19380Telephone: (610) 719-5000To order: (800) 523-0322Fax: (610) 251-9056
Synthes (Canada) Ltd.2566 Meadowpine BoulevardMississauga, Ontario L5N 6P9Telephone: (905) 567-0440To order: (800) 668-1119Fax: (905) 567-3185
© 2006 Synthes, Inc. or its affiliates. All rights reserved. Combi, LCP and Synthes are trademarks of Synthes, Inc. or its affiliates Printed in U.S.A. 3/09 J5288-C
www.synthes.com


![WELCOME [synthes.vo.llnwd.net]synthes.vo.llnwd.net/o16/LLNWMB8/US Mobile/Synthes... · The Institute’s auditorium provides you with the flexibility for presenting to large audiences](https://img.dokumen.tips/doc/110x75/5fd9e640a6e805588f07f5c3/welcome-mobilesynthes-the-instituteas-auditorium-provides-you-with-the.jpg)