Embed Size (px)
Citation preview

Owner’s Manual
LCD TV
MODEL LCD-32CA9SLCD-37CA9SLCD-42CA9S
LCLC

2
TO THE OWNERBefore operating this LCD TV, read this manual thoroughly and operate the LCD TV properly. This LCD TV provides many convenient features and functions. Operating the LCD TV properly enables you to manage those features and maintains it in better condition for a considerable time.Improper operation may result in not only shortening the product-life, but also malfunctions, fire hazard, or other accidents.If your LCD TV seems to operate improperly, read this manual again, check operations and cable connections and try the solutions in the “Troubleshooting” section on page 36 of this booklet. If the problem still persists, contact the dealer where you purchased the LCD TV or the service center.
Safety Precaution
Install the LCD TV in a proper position. If not, it may result in a fire hazard.
Provide appropriate space on the top, sides and rear of the LCD TV cabinet for allowing air circulation and cooling the LCD TV. Minimum clearance must be maintained. If the LCD TV is to be built into a compartment or similarly enclosed, the minimum distances must be maintained. Do not cover the ventilation slot on the LCD TV. Heat build-up can reduce the service life of your LCD TV, and can also be dangerous.
If the LCD TV is not to be used for an extended time, unplug the LCD TV from the power outlet.
SIDE and TOP REAR
10 cm
10 cm
10 cm
6 cm
WARNING : TO REDUCE THE RISK OF FIRE OR ELECTRIC SHOCK, DO NOT EXPOSE THIS APPLIANCE TO RAIN OR MOISTURE.
CAUTIONRISK OF ELECTRIC SHOCK
DO NOT OPEN
READ AND KEEP THIS OWNER'S MANUAL FOR LATER USE.
CAUTION : TO REDUCE THE RISK OF ELECTRIC SHOCK, DO NOT REMOVE COVER (OR BACK). NO USER-SERVICEABLE PARTS INSIDE. REFER SERVICING TO QUALIFIED SERVICE PERSONNEL.
Caution In Installing Handle the LCD TV carefully when installing it and do not drop.
Locate set away from heat, excessive dust, and direct sunlight.
For correct installation and mounting it is strongly recommended to use a trained, authorized dealer. Failure to follow correct mounting procedures could result in damage to the equipment or injury to the installer.
NOTE :When LCD TV is not used for a long period of time, unlighted dots may be observed. This is caused by characteristic of the LCD TV. If this occurs, turn the LCD TV on and leave it on about 1 hour. These dots will gradually disappear.
THIS SYMBOL INDICATES THAT DANGEROUS VOLTAGE CONSTITUTING A RISK OF ELECTRIC SHOCK IS PRESENT WITHIN THIS UNIT.
THIS SYMBOL INDICATES THAT THERE ARE IMPORTANT OPERATING AND MAINTENANCE INSTRUCTIONS IN THE OWNER'S MANUAL WITH THIS UNIT.
LCD-CA9S-NEW.indd 2 12/05/2008 4:10:05 PM
3
SAFETY INSTRUCTIONSAll the safety and operating instructions should be read before the product is operated.
Read all of the instructions given here and retain them for later use. Unplug this LCD TV from AC power supply before cleaning. Do not use liquid or aerosol cleaners. Use a damp cloth for cleaning.
Follow all warnings and instructions marked on the LCD TV.
For added protection to the LCD TV during a lightning storm, or when it is left unattended and unused for long periods of time, unplug it from the wall outlet. This will prevent damage due to lightning and power line surges.
Do not expose this unit to rain or use near water... for example, in a wet basement, near a swimming pool, etc...
Do not use attachments not recommended by the manufacturer as they may cause hazards.
Do not place this LCD TV on an unstable cart, stand, or table. The LCD TV may fall, causing serious injury to a child or adult, and serious damage to the LCD TV. Use only with a cart or stand recommended by the manufacturer, or sold with the LCD TV. Wall or shelf mounting should follow the manufacturer's instructions, and should use a mounting kit approved by the manufacturers.
An appliance and cart combination should be moved with care. Quick stops, excessive force, and uneven surfaces may cause the appliance and cart combination to overturn.
Slots and openings in the back and bottom of the cabinet are provided for ventilation, to insure reliable operation of the equipment and to protect it from overheating.
The openings should never be covered with cloth or other materials, and the bottom opening should not be blocked by placing the LCD TV on a rug, or other similar surface. This LCD TV should never be placed near or over a radiator or heat register.
This LCD TV should not be placed in a built-in installation such as a book case unless proper ventilation is provided.
Never push objects of any kind into this LCD TV through cabinet slots as they may touch dangerous voltage points or short out parts that could result in a fire or electric shock. Never spill liquid of any kind on the LCD TV.
Do not place items such as vases containing liquid on top of the LCD TV.
Do not install the LCD TV near the ventilation duct of air-conditioning equipment.
This LCD TV should be operated only from the type of power source indicated on the marking label. If you are not sure of the type of power supplied, consult your authorized dealer or local power company.
Do not overload wall outlets and extension cords as this can result in fire or electric shock. Do not allow anything to rest on the power cord. Do not locate this LCD TV where the cord may be damaged by persons walking on it.
Do not attempt to service this LCD TV yourself as opening or removing covers may expose you to dangerous voltage or other hazards. Refer all servicing to qualified service personnel.
Unplug this LCD TV from wall outlet and refer servicing to qualified service personnel under the following conditions:a. When the power cord or plug is damaged or
frayed.b. If liquid has been spilled into the LCD TV.c. If the LCD TV has been exposed to rain or water.d. If the LCD TV does not operate normally by following the operating instructions. Adjust only those controls that are covered by the operating instructions as improper adjustment of other controls may result in damage and will often require extensive work by a qualified technician
to restore the LCD TV to normal operation.e. If the LCD TV has been dropped or the cabinet
has been damaged.f. When the LCD TV exhibits a distinct change in
performance-this indicates a need for service.
When replacement parts are required, be sure the service technician has used replacement parts specified by the manufacturer that have the same characteristics as the original part. Unauthorized substitutions may result in fire, electric shock, or injury to persons.
Upon completion of any service or repairs to this LCD TV, ask the service technician to perform routine safety checks to determine that the LCD TV is in safe operating condition.
LCD-CA9S-NEW.indd 3 12/05/2008 4:10:05 PM

4
TABLEFEATURE AND DESIGN .....................................5PREPARATION........................................6
PART NAMES AND FUNCTIONS 6 CONNECTING LCD TV.. . . . . . . . . . . . . . . . . . . . . .8
CONNECTING THE AC POWER CORD 8CONNECTING OUTDOOR AERIAL 8CONNECTING A COMPUTER 9 CONNECTING VIDEO EQUIPMENT 10
BEFORE OPERATION...... . . . . . . . . . . . . . . .11-14OPERATION OF REMOTE CONTROL 11OPERATION RANGE 12 REMOTE CONTROL BATTERIES INSTALLATION 12ON-SCREEN MENU 13
BASIC OPERATION ..........................................16TURNING ON/OFF LCD TV 16 SELECTING INPUT SOURCE 16 CHANNEL SELECTION 16 CHANNEL RECALL 16SOUND SYSTEM 17COLOUR SYSTEM 17DISPLAY 17VOLUME CONTROL 17 ECO 17BASS EXPANDER 17VIDEO MODE 18 AUDIO MODE 18STILL 18STEREO/MONO 18WIDE 19 SPORTS 19OFF TIMER 20 PIP OPERATION 20OPERATION OF REMOTE CONTROL (IN TEXT MODE) 21 TEXT TV 22TEXT REVEAL 22TEXT CANCEL 22TEXT INDEX 22 TEXT SUBCODE 22TEXT SIZE 23 TEXT HOLD 23 TEXT RED 23 TEXT GREEN 23
TEXT YELLOW 23TEXT BLUE 23
MENU OPERATION (TV/AV MODE)..............24CHANNEL 24PICTURE 26SOUND 27TIMER 28 OSD 29 SYSTEM 30
MENU OPERATION (PC/HDMI MODE).......31 PICTURE 31SOUND 32TIMER 32 OSD 32 SYSTEM 33DEALER MODE 34
APPENDIX.........................................................35 CLEANING LCD TV 35FUNCTION OF PRODUCT SAFETY FEATURE 35 TROUBLE SHOOTING 36 TECHNICAL SPECIFICATIONS 37 CONFIGURATION OF VGA TERMINAL 38 MAC ADAPTER 38 SIGNAL MODE COLUMN 38 TABLE OF TOXIC ELEMENT FOR PRODUCTION 39UNINSTALLING STAND BASE 40
TRADEMARKS
Apple, Macintosh, and PowerBook aretrademarks or registered trademarks of AppleComputer,Inc.
IBM and PS/2 are trademarks or registeredtrademarks of International Business Machines, Inc.
Each name of corporations or products in theowner's manual is a trademark or a registered trademark of its respective corporation.
is registered trademarks of HDMI Licensing, LLC.
LCD-CA9S-NEW.indd 4 12/05/2008 4:10:06 PM

5
Feature and Design
1366 x 768 pixel HD LCD Panel with high contrast ratio and wide viewing angle.
High Definition LCD Panel
VIZON Engine, SANYO High Quality Image Processing Technology reproduces clear, dynamic, natural and realistic picture along with HD LCD Panel Technology.
VIZON Engine
Picture
I t 's the Stereo Sound PAL Color TV Broadcasting System upgrading mono-sound TV service to stereo or dual-language sound. (see page 18)
NICAM/A2 Stereo
Bass Expander reinforces bass effect to improve overall sound quality. (see page 17)
Bass Expander
Sound
Just by pressing the button, sport mode optimizes picture and audio settings suitable for each sport program. (see page 19)
Sport ModeFeature
Picture in Picture displays two seperate source (e.g., PC and Video) at the same time. (see page 20)
PIP (1 tuner)
PAL, SECAM, NTSC, NTSC 4.43 system can be connected. (see page 17)
Full Multy System
1080p, 1080i, 720, High Definition signals are receivable.
HD-Ready
Compatibilty
HDMI
Personal Computer/Laptop can be connected with automatic resolution adjustment.
PC Input
HDMI for BluRay Player etc.D-SUB 15-pin for PC input etc.Component Video for DVDS-Video/Video for VCR/DVD
Terminals
It's designed for VESA Standard wall hanging bracket.
Wall Mounting
By entering Dealer mode, Volume Lock, Sart Mode, OSD, RC, Reset, AC Power Mode can be selected.Convenient for placing in Hotel, Hospital, School, Store, Bank etc. (see page 34)
Light Commertial Mode
Others
Dynamic picture and sound performance setting (default setting).
Suitable setting for Football, Golf program etc.
Suitable setting for Skiing, Ice Skating program etc.
Suitable setting for Swimming, Diving program etc.
Suitable setting for Basketball, Boxing program etc.
HDMI provides complete transmission of digital image and sound signals without any quality deterioration. DVI can be connected to HDMI. (see page 9)
LCD-CA9S-NEW.indd 5 12/05/2008 4:10:06 PM

6
INDICATORS
FRONT
CARE FOR USING LCD TV
Do not bump or scratch the panel surface as this causes flaws on the surface of the screen.There may be some tiny black points and/or blight points on the SCREEN. These points are normal.
PREPARATION
PART NAMES AND FUNCTIONS
Panel
Side Controls
Indicator
Timer IndicatorPower Indicator
Infrared Remote Receiver
66 11

7
AV2/
1AA2DES0980-- N5DV
PC INPUT
>PS<
Connect the cable with a plug fromaerial jack to the aerial socket on thecabinet back.
Aerial Jack
Connect video and audio outputs fromvideo equipment.
Video (RCA type)Audio L and R (RCA type)S-Video (mini DIN 4 type)
Connect a television, videorecorder or external audioamplifier to these jacks.
Video (RCA type)Audio L and R (RCA type)
Headphone Jack
Monitor Output Terminals
SIDE TERMINALS
Connect a headphone(stereo) to this jack.When this jack is used,speaker sound will be lost.
PREPARATION
Connect video and audio outputs fromvideo equipment.
DVD component (RCA type)Audio L and R (RCA type)
Video Input Terminal
Connect computer outputs tothese terminals.
RGB (D-SUB)Audio (L / R)
PC Input Terminals
Connect all kinds of HDMI outputequipment to this terminal.
HDMI Cable
HDMI Input Terminal
SIDE CONTROLS
Video Input Terminal
(Each button on the control panel has the same function with its counterpart on theremote control. )
POWER ON/ OFF buttonUsed to turn the LCDTV on or off.
Used to Change channels.Used to select items.
VOLUME (+/-) buttonsUsed to adjust the volume.Used to adjust the value of the selected itemon On- Screen Menu.Used to execute the selected menu onOn-screen menu.
Used to select input source: PC, HDMI2, HDMI1,TV, AV1-S, AV2-DVD.
Open or close the On-Screen Menu.MENU button
INPUT MODE button

8
CONNECTING LCD TV
This LCD TV uses nominal input voltages of 110-242VAC. This LCD TV automatically selects the correct input voltage. It is designed to work with single-phase power systems. To reduce risk of electrical shock, do not plug into any other type of power system. Consult your authorized dealer or service station if you are not sure of the type of power being supplied.Connect the LCD TV with all peripheral equipment before turning the LCD TV on.
CAUTION
For safety, unplug AC power cord when the LCD TV is not in use.
Cable used for connection (This cable is not supplied with this LCD TV.)
Aerial Cable
NOTE:For all aerial circuit problems please consult your local dealer.
Aerial Cable
CONNECTING THE AC POWER CORD
To the AC Outlet (110 - 242V AC) Pulls the AC power cord out from the LCD TV. The AC outlet must be near this equipment and must be easily accessible.
CONNECTING OUTDOOR AERIAL
Outdoor Aerial
AC POWER CORD
LCD-CA9S-NEW.indd 8 12/05/2008 4:10:33 PM

9
AV2/
PC INPUT
CONNECTING LCD TV
Cable used for connection (This cable is not supplied with this LCD TV.)
PC/VGA Cable (D-SUB 15pin)HDMI Cable: HDMI InputMAC Adapter (in the case of connecting Macintosh computer)Audio Cable [Mini Plug (L/R)]
NOTE:When connecting the cable, AC Power Cords of both LCD TV and external equipment should be disconnected from AC outlet. Turn LCD TV and peripheral equipment on before your computer is switched on.
PC
Input
Audio Output(stereo)
MAC Adapter MonitorOutput
HDMI Output
Audio Input (stereo)
HD
MI
Input
CONNECTING A COMPUTER
IBM-compatiblecomputers
or Macintosh computers
(VGA / SVGA / XGA )
Desktoptype
Laptoptype
NOTE : You can connect the DVI source to HDMI input terminal by using the DVI to HDMI converter, and you just can watch image, but without sound.
LCD-CA9S-NEW.indd 9 12/05/2008 4:10:35 PM

10
AV2/
1AA2DES0980-- N5DV
PC INPUT
>PS<
External Audio Equipment
Video Source (example)
DVD Player
Audio cable(RCA X 2)
R
L C
R/P
R,C
B/P
B, Y
Component Video Source (example)
DVD video equipment.(such as DVD player or high-definition TV source)
CONNECTING LCD TV
DVD(RCA X 3)
CONNECTING VIDEO EQUIPMENTCables used for connection (These cables are not supplied with this LCD TV.)
Video Cable(RCA X1), S-Video Cable, Audio Cable (RCA X2) : Video 1 or Video 2Video Cable(RCA X3), Audio Cable (RCA X2) : DVD (Component Video)Video Cable(RCA X1), Audio Cable (RCA X2) : Monitor OutputsHDMI Cable: HDMI Input
NOTE : When connecting the cable, AC Power Cords of both LCD TV and external equipment should be disconnected from AC outlet.
Externalmonitor
Composite Video and Audio Output
AudioSpeaker(stereo)
Audio Amplifier
Note :Video (RCA) output is for TV, AV or S-VIDEO only.
MONITOR OUT
Video cable(RCA x1)
Audio cable (RCA x 2)
S-V
ideo
S-Video Cable
Video and Audio cable (RCA x 3)
R ,
L ,
V
Video Cassette Recorder
Video Disc Player
S-Video output
HDMI Output
HDMI cable
HDMI cable
LCD-CA9S-NEW.indd 10 12/05/2008 4:10:37 PM
11
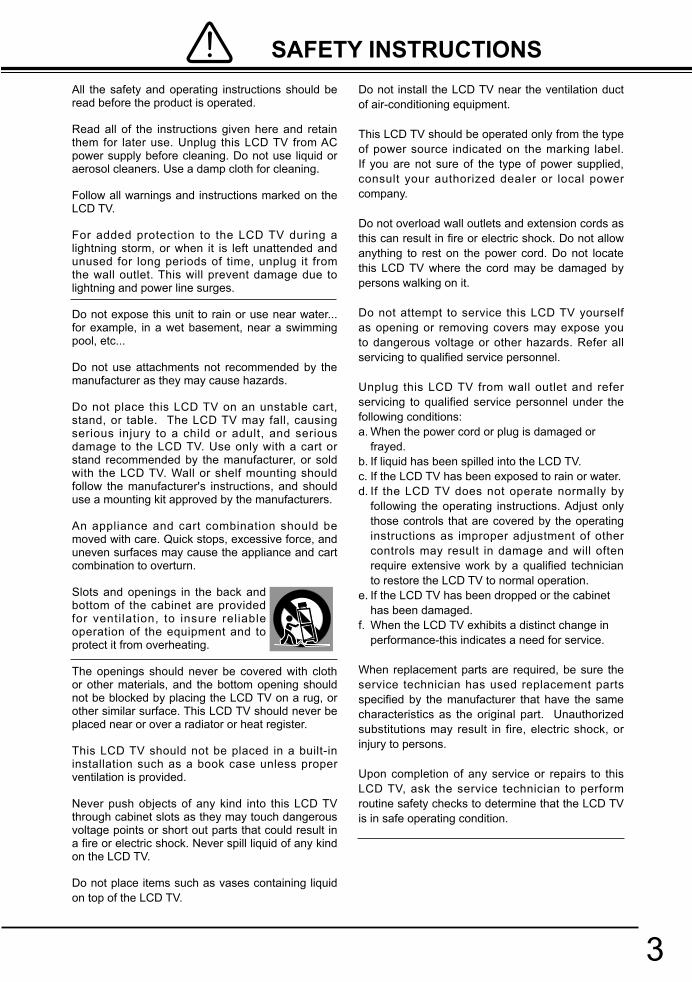
/ / / button
Display button
SOUND SYSTEM button
COLOUR SYSTEM button
ECO button
AUDIO MODE button
CHANNEL RECALL button
WIDE button
BEFORE OPERATION
MENU button
SPORTS button
INPUT button
OPERATION OF REMOTE CONTROL
POWER ON/OFF button
BASS button
MUTE button
NUMERIC buttons
TIMER button
BACK button
TXT/TV button
DIGIT button
STILL button
VIDEO MODE button
PIP button
CHANGE button
STEREO/MONO button
MAIN/SUB button
Note: 1. "USB", "POP", "WOW HD" and "WOOFER" buttons are not used. 2. In different mode, some buttons have different functions. (For details, please refer to page 21.)

12
REMOTE CONTROL BATTERIES INSTALLATION
Remove the battery compartment cover . Insert two size AAA batteries (1.5V) according to "+" and "-" polarity markings inside the battery compartment.
Close the battery compartment cover.
1 2
3
OPERATION RANGE
30 30
1515
BEFORE OPERATION
5m
Point Remote Control toward LCD TV (Infrared Remote Receiver) whenever pressing the buttons. Maximum operating range for Remote Control is about 16.4’ (5m) in front, about 30° to the left or the right, about 15° for up or down.
To insure safe operation, please observe the following precautions:
and install new batteries.
Infrared Remote Receiver
LCD-CA9S-NEW.indd 12 12/05/2008 4:10:44 PM

13
BEFORE OPERATION
TV/AV MODE MENU LIST
MAIN MENU (CHANNEL MENU)
CHANNEL MENU
PICTURE MENU
SOUND MENU
Note: "CHANNEL" menu is only active in TV mode.
ON-SCREEN MENU
SEL ADJ BACK EXITBACK MENU
SOUND MODEBASS
TREBLE
BALANCE
50
50
50
LCD-CA9S-NEW.indd 13 12/05/2008 4:10:51 PM

14
BEFORE OPERATION
SELECT ADJUST BACK EXIT
- - : - -ON TIMER
SEL ADJ BACK EXIT
ON TIMER CH 29
OFF
BACK MENU
OFF TIMER
TIMER MENU
OSD MENU
H-POSITIONV-POSITIONDURATION
SEL ADJ BACK EXIT
LANGUAGE
15 SEC
BACK MENU
TRANSPARENCETTX LANGUAGE WESTERN
SYSTEM MENU
TV/AV MODE MENU LIST
MAIN MENU (CHANNEL MENU)
ON-SCREEN MENU
SEL A DJ BACK EXITBACK MENU
ECO
CHILD LOCKPC ADJUST
LCD-CA9S-NEW.indd 14 12/05/2008 4:10:55 PM
15
SEL A DJ BACK EXITBACK MENU
ECO
CHILD LOCKPC ADJUST
BEFORE OPERATION
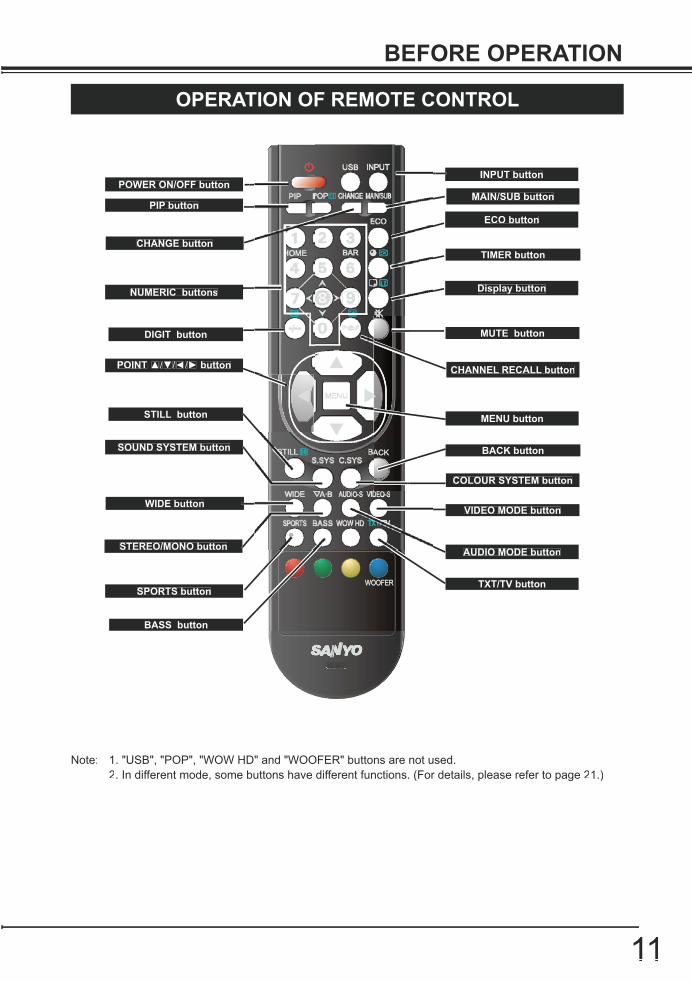
PC/HDMI MODE MENU LIST
MAIN MENU (PICTURE MENU)
H-POSITIONV-POSITIONCLOCKPHASE
SEL ADJ BACK EXITBACK MENU
AUTO ADJUST START
SYSTEM MENU
Note: 1. "PC ADJUST" is only active in PC mode. 2. SOUND/ TIMER/ OSD menu in PC/ HDMI mode is the same as TV/AV mode, please refer to
pages 13~14.
ON-SCREEN MENU
LCD-CA9S-NEW.indd 15 12/05/2008 4:10:57 PM

16
Connect LCD TV's AC Power Cord into an AC outlet.21
3
BASIC OPERATION
TURNING ON / OFF LCD TVComplete the peripheral connections before turning on LCD TV. (Please refer to "CONNECTING LCD TV".)
Press POWER ON/OFF button on Side Controls of LCD TV or on Remote Control to turn it ON. The POWER indicator will light up (green). Press POWER ON/OFF button again to shift it to stand-by status, the POWER indicator will become red.
NO SIGNAL SHUT OFFThis TV set incorporates the NO SIGNAL SHUT OFF function. If no signal is input in TV mode, "OFF 00:10" will display for about 10 minutes and TV will be turned off automatically.
SELECTING INPUT SOURCESelect mode "PC", "HDMI2", "HDMI1", "TV", "AV1-S", or "AV2-DVD" by pressing INPUT button on Remote Control or on Side Controls.
CHANNEL SELECTION
DIRECT SELECTION
There are 256 channels can be selected on the LCD TV.
CHANNEL UP/ DOWNPress POINT buttons on Side Controls or on Remote Controls to select programs.
Press POINT button to select next channel.Press POINT button to select previous channel.
CHANNEL RECALLPress CHANNEL RECALL button to switch between the previous channel and the current channel.For example, now you are watching channel "4", but you watched channel "2" previously. If you press CHANNEL RECALL button, channel "2" will appear immediately.
PCHDMI2HDMI1TVAV1-SAV2-DVD
SOURCE
: OK
For direct access to programmes using the (0-9) numeric button.1) For selection of channel position 0 - 9. Example: For channel position 8, press the “8” button.2) For selection of channel position 10 - 99. For channel position 25, press the DIGIT button to display "- -",
then press “2” and “5” buttons.3) For selection of channel position 100 - 199. For channel position 125, press the DIGIT button twice to
display "1 - -", then press “2” and “5” buttons.4) For selection of channel position 200 - 255. For channel position 235, press the DIGIT button three
times to display "2 - -", then press “3” and “5” buttons.
LCD-CA9S-NEW.indd 16 12/05/2008 4:10:58 PM

17
BASIC OPERATION
VOLUME
Press COLOUR SYSTEM button repeatedly to select "AUTO", "PAL", "SECAM", "NTSC" or "NTSC4.43"until the best colour effect is reached.
50
This function is used to automatically adjust panel's brightness by ambient brightness.Press ECO button on Remote Control to set "ECO ON" or "ECO OFF".
SOUND SYSTEMPress SOUND SYSTEM button repeatedly to select "D/K", "I", "M" or "B/G" until the best sound effect is reached.
COLOUR SYSTEM
DISPLAYPress DISPLAY button on Remote Control to display the status of LCD TV. Press again to remove the dis-play.
VOLUME CONTROLTo adjust the volume value desired by pressing POINT buttons on Remote Control or on Side Controls. The volume dialogue box will appear on the screen for a short while.POINT button to increase volume, and POINT button to decrease volume.
ECO
BASS EXPANDERPress BASS button on Remote Control to set "BASS EXPANDER ON" or "BASS EXPANDER OFF".
11 AUTO D/K MONO
Colour SystemSound System
Channel
Stereo/Mono
LCD-CA9S-NEW.indd 17 12/05/2008 4:10:58 PM

18
User presets picture adjustment in Picture mode.
BASIC OPERATION
Simply press AUDIO MODE button on Remote Control to select the following audio signals:
VIDEO MODE Simply press VIDEO MODE button on Remote Control to select the following video signals:
AUDIO MODE
STILLPress STILL button to switch the still function On or Off.When in PIP mode, still function can still main picture.
To cancel "Still" function:Press STILL button or PIP button to cancel the function, or you can switch the input source to cancel it also.
Note: When the still function is On, the picture will still, but the sound will be remain.
The function doesn't work when the input signal is 1080p.
STEREO/MONOSimply press STEREO/MONO button to select the following audio signals: "STEREO", "MONO", "NICAM", "A" and "B".
PERSONAL
STANDARD
DYNAMIC
SOFT
PERSONAL
STANDARD
DYNAMIC
SOFT
STANDARD
NEWS
MUSIC
PERSONAL
Natural and splendid picture level preset on this LCD TV.
Bright and dynamic picture. It is suitable for nice playback, such as DVD program.
Inhibit strong contrast and colour, it is beneficial for eye protection.
STANDARD
NEWS
MUSIC
PERSONAL
Normal sound state preset on LCD TV.
Select this mode for talk programs.
Select this mode for music programs.
Select this mode for user to call out the preset sound adjustment in SOUND menu.
STILL ON
LCD-CA9S-NEW.indd 18 12/05/2008 4:10:59 PM

19
BASIC OPERATION
COLORFUL WORLD
GREEN FIELD
SNOW WORLD
WATER WORLD
INDOOR SPORT
Select sports mode "Colorful World", "Green Field", "Snow World", "Water World" and "Indoor Sport" by pressing SPORTS button repeatly on Remote Controls.COLORFUL WORLDDynamic picture and sound performance setting (default setting).
Use to watch football program, golf program or etc.
Use to watch skiing program or etc.
Use to watch swimming program, diving program or etc.
Use to watch basketball program, badminton program or etc.
WIDESelect screen size among "Full", "Zoom", "Zoom[Caption-IN]", "Normal" and "Natural Wide" by pressing WIDE button on Remote Controls.
* Only "Full" mode can be selected when the input mode is "VGA" , "HDMI" or "DVD" and the input signal is 1080i, 720p
or 1080p.
Full
Zoom
Provides real 4 : 3 image on 16 : 9 screen.Normal
Provides image to fit width of screen by expanding up/down/left/right of image. This function is suitable to enjoy a normal video signal (4 : 3 aspect ratio) with wide video aspect ratio of 16 : 9 screen.
Natural Wide
Provides image to fit screen size (16 : 9 aspect ratio) by expanding image width and height uniformly. This function can be used for enjoying a letter box mode picture (4 : 3 aspect picture with black bar on top and bottom edges) with wide video aspect of 16 : 9 screen.
Provides the image that is expanded as "Zoom" mode and moved up to show more image to include captions. This function can be used for enjoying a letter box picture with captions.
Provides image to fit width of screen by expanding image width uniformly. This function can be used for enjoying a squeezed video signal with wide video aspect ratio of 16 : 9 screen.When your video equipment (such as DVD) has 16 : 9 output mode, select 16 : 9 and select "Full" to provide better quality.
Zoom [Caption-IN]
Full
Zoom
Zoom [Caption-IN]
Normal
Natural Wide
WIDE button
*
SPORTS
SPORTS button
GREEN FIELD
SNOW WORLD
WATER WORLD
INDOOR SPORT
LCD-CA9S-NEW.indd 19 12/05/2008 4:11:00 PM

20
BASIC OPERATION
OFF TIMERTo set OFF TIMER by pressing TIMER button on Remote Control. The timer dialogue box will appear on the screen for a short while.To select "0 min", "30 min", "60 min", "90 min" or "120 min" with TIMER buttons.
Press PIP button to display sub picture.
During PIP mode, pressing the MAIN/SUB button will switch main and sub picture.The sound on the main picture and the sub-picture also changes at the same time.
Each time PIP button is pressed, the location of sub picture is changed as follows.
Press PIP button or POWER ON/OFF button to exit PIP mode.
PIP OPERATIONUsing PIP function, you can enjoy a TV program and an image such as DVD input from a rear terminal at the same time.
Press CHANGE button in PIP mode can switch input source in Sub picture. (Refer to this page "PIP Combination".
The following combination (Main and Sub picture) in the PIP mode, " " indicates that it is possible for combination, and "X" indications that it is impossible for combination.Note: DVD input terminal should be connected so that AV2-DVD in the following table can be combined with TV or AV1-S,
otherwise it cannot be combined with TV or AV1-S.
Combination of the Main-picture and Sub-picture
PCMAIN
X
SUB HDMI 2 HDMI 1 TV AV1-S AV2-DVD
PC
HDMI 2
HDMI 1
TV
AV1-S
AV2-DVD
X
X
X
X
X
X
X
X
X
Note: The controls belongs to the picture which is TV input in PIP mode. Otherwise, it belongs to the main picture.
Main PictureSub Picture
21
345
LCD-CA9S-NEW.indd 20 12/05/2008 4:11:02 PM
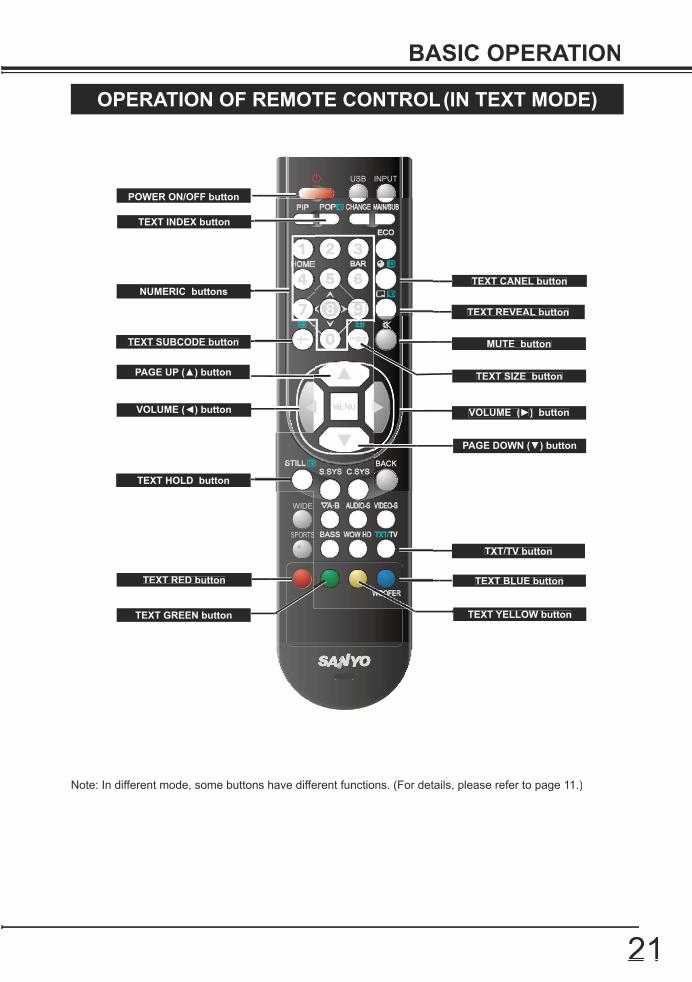
21
BASIC OPERATION
TEXT REVEAL button
TEXT YELLOW button
TXT/TV button
TEXT RED button
OPERATION OF REMOTE CONTROL(IN TEXT MODE)
POWER ON/OFF button
MUTE button
NUMERIC buttonsTEXT CANEL button
TEXT BLUE button
TEXT SUBCODE button
TEXT HOLD button
TEXT INDEX button
TEXT GREEN button
VOLUME ( button VOLUME ( ) button
PAGE DOWN ( ) button
Note: In different mode, some buttons have different functions. (For details, please refer to page 11.)
TEXT SIZE button PAGE UP ( ) button

22
BASIC OPERATION
TEXT/ TV
TEXT REVEAL
TEXT CANCEL
Press TXT/TV button to select teletext. Press again will display:
Note:TEXT mode: TEXT screen is displayed.MIX mode: TV/AV (broadcast image) screen and the contents of TEXT(it superimposed) are displayed simultaneously. CANCEL mode: TEXT/MIX MODE is canceled temporarily and broadcast image is displayed. However, the available key are the same as TEXT mode.In the following state, the TXT/TV button is invalid.
RF non-signal (Auto shut off)AV non-signal (Blue back)
The TXT/TV button is pressed during the CANCEL mode. The CANCEL mode will be canceled, and it will become a TEXT screen.
Press REVEAL button to reveal hidden items on the text page. Some pages such as quiz pages have the answers hidden. The button may have to be held to keep the answer on the screen, or press again to remove the answer.In REVEAL OFF, this indication is not given.REVEAL button does not work except a text function. (The recall button usually operates.)
When press the TEXT CANCEL button in TEXT or MIX mode, the TV picture appears on the screen.CANCEL mode will be canceled if the button pressed once again.CANCEL mode is also canceled by the TXT/TV button.In CANCEL mode, "CAN" is always displayed on the screen upper left.
Press the INDEX button to select the teletext index page in TEXT, MIX, CANCEL mode.
TEXT INDEX
TEXT SUBCODE1. Press TEXT SUBCODE button, “110/. . . .” will be displayed (e.g. the current page is 110).2. Press the NUMERIC buttons(0-9) to enter the sub page. For example, to select sub page 4, press
NUMERIC buttons 0-0-0-4, and "110/0004" will be displayed.
LCD-CA9S-NEW.indd 22 12/05/2008 4:11:04 PM

23
TEXT SIZEPress TEXT SIZE button to enlarge the top half of the text page.Press TEXT SIZE button again to enlarge the bottom half of the text page.Press TEXT SIZE button again to return to the normal size page.
Note:During the top half enlargement or the bottom half enlargement mode, if a page request is performed by [0] - [9] button and the TEXT INDEX button, it will become the normal mode and a page will be requested.If HOLD ON / OFF is performed during the top half enlargement mode, it will still at the top half enlargement mode. (A HOLD symbol display )If HOLD ON / OFF is performed during the bottom half enlargement mode, it will still at the bottom halfenlargement mode. (A HOLD symbol not display )
BASIC OPERATION
TEXT HOLDPress TEXT HOLD button to stop page request and updating .
HOLD ON: The symbol will appear instead of the page number.Update of TELETEXT is forbidden. It stops on the TEXT screen display now.HOLD OFF: A status display will be page number display.TELETEXT page data is updated.
A screen is updated by reception of the UPDATE signal.A screen is eliminated by reception of an ERASE signal.TEXT HOLD button does not work except a text function.
TEXT REDThe page of a red prompt is required. (also cancel mode)
TEXT GREENThe page of a green prompt is required. (also cancel mode)This button does’t work except for TEXT mode .
TEXT YELLOWThe page of a yellow prompt is required. (also cancel mode)This button does’t work except for TEXT mode .
TEXT BLUEThe page of a blue prompt is required. (also cancel mode)
LCD-CA9S-NEW.indd 23 12/05/2008 4:11:04 PM

24
MENU OPERATION (TV/ AV mode)
All receivable channels are automatically tuned in and memorized in consecutive programme position.
After all receivable channels have been found and stored, the TV set will automatically return to programme position “1”.
Note:The CHANNEL menu doesn't work except for TV mode.In PIP mode, the CHANNEL mode doesn't work except for the main picture is TV mode .
Press POINT button will move tuning toward the higher frequencies, and press POINT will move tuning toward the lower frequencies.Press and release POINT or POINT button to search for required TV station. Once a station is located, searching will automatically stop. Continue till desired channel is located.
Use to preset a receivable channel in any desired programme position, e.g. the position with the same number as the channel.
Select channel “3”.
Press POINT to start the channel searching.
Manual search a channel if it cannot be automatically tuned, such as when the signal is poor.
Press and hold POINT or POINT button to search for required TV station.
Select channel “3”.
Press POINT to start the channel searching.
Enter into "CHANNEL" menu, pressing POINT buttons to select "MANUAL SEARCH".
CHANNELSCREEN MENU
Press MENU button and the main menu will appear. Press POINT buttons to select "CHANNEL", and will display CHANNEL menu.Press POINT buttons to select the item desired.
Press POINT buttons to adjust value.
Press BACK button to return to the previous menu. Press MENU button or wait for 5~60 seconds (refer to "DURATION" on page 29) to exit menu operation.
AUTO SEARCH MENU
SEMI-AUTO SEARCH MENU
MANUAL SEARCH MENU
AUTO SEARCH
SEMI-AUTO SEARCH
Enter into "CHANNEL" menu, pressing POINT buttons to select "SEMI-AUTO SEARCH".
MANUAL SEARCH
1
23
1234
Press BACK button to return to the previous menu. Press MENU button or wait for 5~60 seconds (refer to "DURATION" on page 29) to exit menu operation.
1234
Press BACK button to return to the previous menu. Press MENU button or wait for 5~60 seconds (refer to "DURATION" on page 29) to exit menu operation.
LCD-CA9S-NEW.indd 24 12/05/2008 4:11:07 PM
25
MENU OPERATION (TV/ AV mode)
The setting for sound system is only active in TV mode.Press POINT buttons repeatedly to select "D/K", "I", "M" or "B/G" until the best sound effect is reached.
This feature is used to remove unwanted channels from the channel scanning memory.You can skip the unused or undesired channels when you are selecting a channel using POINT but-tons.This function is only active in TV mode.The settings for sound system, colour system or skip are automatically memorized in the programme position.
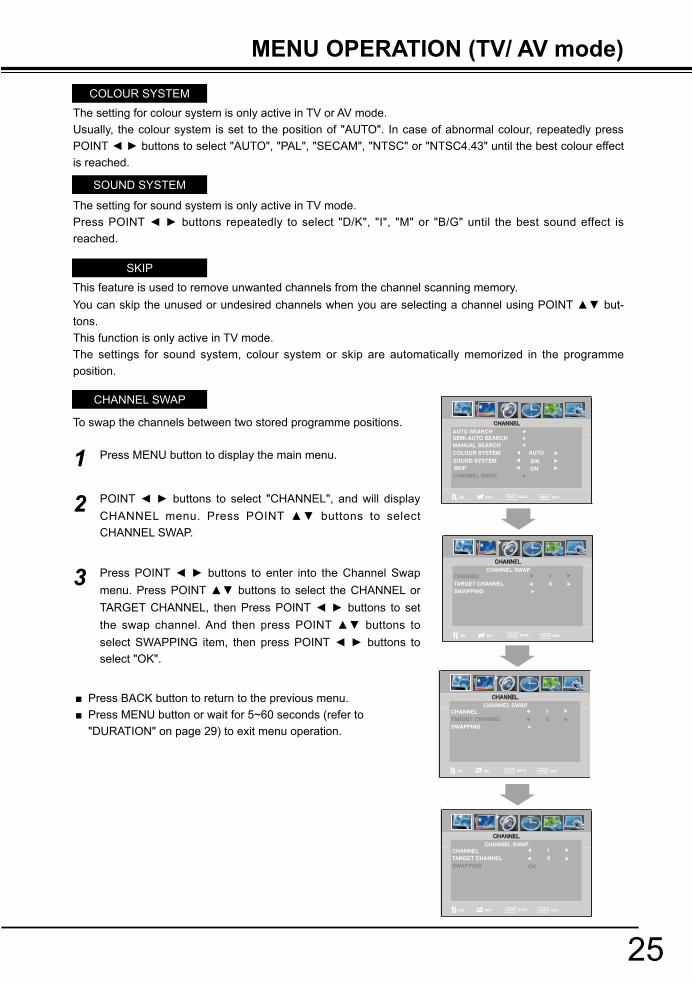
To swap the channels between two stored programme positions.
Press MENU button to display the main menu.
SOUND SYSTEM
COLOUR SYSTEM
The setting for colour system is only active in TV or AV mode. Usually, the colour system is set to the position of "AUTO". In case of abnormal colour, repeatedly press POINT buttons to select "AUTO", "PAL", "SECAM", "NTSC" or "NTSC4.43" until the best colour effect is reached.
SKIP
CHANNEL SWAP
POINT buttons to select "CHANNEL", and will display CHANNEL menu. Press POINT buttons to select CHANNEL SWAP.
Press POINT buttons to enter into the Channel Swap menu. Press POINT buttons to select the CHANNEL or TARGET CHANNEL, then Press POINT buttons to set the swap channel. And then press POINT buttons to select SWAPPING item, then press POINT buttons to select "OK".
1
2
3
Press BACK button to return to the previous menu. Press MENU button or wait for 5~60 seconds (refer to "DURATION" on page 29) to exit menu operation.
LCD-CA9S-NEW.indd 25 12/05/2008 4:11:11 PM
26
MENU OPERATION (TV/ AV mode)
Note:TINT cannot be adjusted when HDMI input.TINT cannot be adjusted except in NTSC / NTSC 4.43 system.
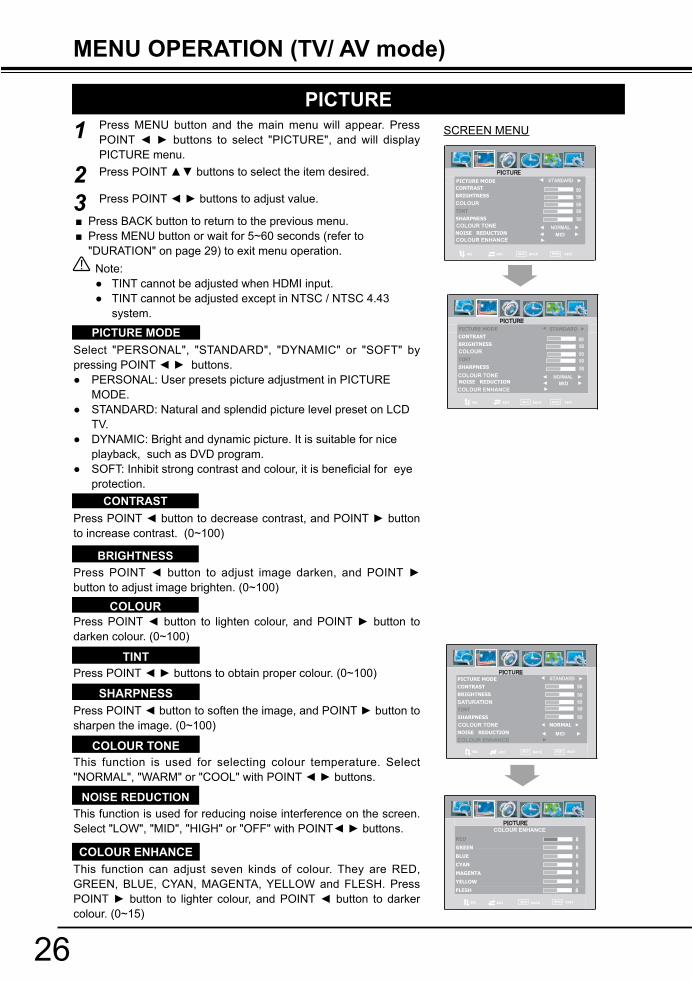
PICTUREPress MENU button and the main menu will appear. Press POINT buttons to select "PICTURE", and will display PICTURE menu.Press POINT buttons to select the item desired.
Press POINT buttons to adjust value.
Select "PERSONAL", "STANDARD", "DYNAMIC" or "SOFT" by pressing POINT buttons.
PERSONAL: User presets picture adjustment in PICTURE MODE.STANDARD: Natural and splendid picture level preset on LCD TV.DYNAMIC: Bright and dynamic picture. It is suitable for nice playback, such as DVD program.SOFT: Inhibit strong contrast and colour, it is beneficial for eye protection.
PICTURE MODE
BRIGHTNESSPress POINT button to adjust image darken, and POINTbutton to adjust image brighten. (0~100)
COLOURPress POINT button to lighten colour, and POINT button to darken colour. (0~100)
TINTPress POINT buttons to obtain proper colour. (0~100)
SHARPNESSPress POINT button to soften the image, and POINT button to sharpen the image. (0~100)
COLOUR TONEThis function is used for selecting colour temperature. Select "NORMAL", "WARM" or "COOL" with POINT buttons.
Press POINT button to decrease contrast, and POINT buttonto increase contrast. (0~100)
CONTRAST
This function is used for reducing noise interference on the screen. Select "LOW", "MID", "HIGH" or "OFF" with POINT buttons.
NOISE REDUCTION
COLOUR ENHANCEThis function can adjust seven kinds of colour. They are RED, GREEN, BLUE, CYAN, MAGENTA, YELLOW and FLESH. Press POINT button to lighter colour, and POINT button to darker colour. (0~15)
SCREEN MENU1
23
Press BACK button to return to the previous menu. Press MENU button or wait for 5~60 seconds (refer to "DURATION" on page 29) to exit menu operation.
LCD-CA9S-NEW.indd 26 12/05/2008 4:11:17 PM
27
MENU OPERATION (TV/ AV mode)
Adjust the balance of the left and right channels. (0~100)
Press POINT button to decrease low frequency sound, and POINT button to increase low frequency sound. (0~100)
Press POINT buttons to select "STANDARD", "NEWS", "MUSIC" or "PERSONAL".
Press POINT button to decrease high frequency sound, and POINT button to increase high frequency sound. (0~100)
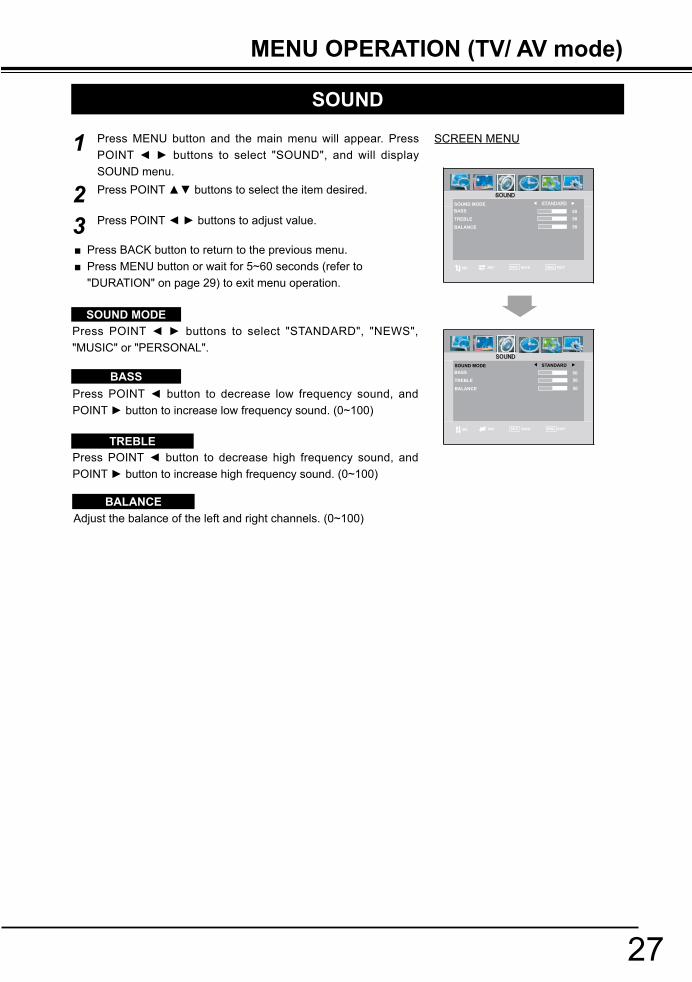
SOUND
Press MENU button and the main menu will appear. Press POINT buttons to select "SOUND", and will display SOUND menu.Press POINT buttons to select the item desired.
Press POINT buttons to adjust value.
SOUND MODE
BASS
TREBLE
BALANCE
SCREEN MENU1
Press BACK button to return to the previous menu. Press MENU button or wait for 5~60 seconds (refer to "DURATION" on page 29) to exit menu operation.
23
SEL ADJ BACK EXITBACK MENU
SOUND MODEBASS
TREBLE
BALANCE
50
50
50
SEL ADJ BACK EXITBACK MENU
SOUND MODEBASS
TREBLE
BALANCE
50
50
50STANDARD
LCD-CA9S-NEW.indd 27 12/05/2008 4:11:19 PM
28
MENU OPERATION (TV/ AV mode)
TIMER
SELECT ADJUST BACK EXIT
- - : - -ON TIMER
SEL ADJ BACK EXIT
ON TIMER CH 29
OFF
BACK MENU
OFF TIMER
SCREEN MENU
SELECT ADJUST BACK EXIT
- - : - -ON TIMER
SEL ADJ BACK EXIT
ON TIMER CH 29
OFF
BACK MENU
OFF TIMER
Press MENU button and the main menu will appear. Press POINT buttons to select "TIMER", and will display TIMER menu.Press POINT buttons to select the item desired.
Press POINT buttons to adjust value.
Note:OFF TIMER and ON TIMER will be automatically cancelled during searching channels.The settings for OFF TIMER and ON TIMER will be automatically cancelled after the settings has been operated for one time.The LCD TV will turn off automatically if it has not been executed any operation in 2 hours.
Once OFF TIMER has been set, when the set time is reached, the TV will shift to stand-by status.
OFF TIMER
To select "OFF", "30 min", "60 min", "90 min" or "120 min" with POINT buttons.
To cancel "OFF TIMER ", you can choose any option by the following ways.
Setting "OFF" in OFF TIMER.Pressing POWER ON/OFF button on Side Controls or on Remote Control.
To set ON TIMER, you can set any time by NUMERIC buttons.
ON TIMER
To cancel "ON TIMER MODE", you can choose any option by the following ways.
Setting "- - : - -" in ON TIMER by press "0" button repeatedly.Disconnecting the AC power cord.
Once ON TIMER has been set, you won't miss any opportunity to watch the program you like.
SELECT ADJUST BACK EXIT
12 : 30ON TIMER
SEL ADJ BACK EXIT
ON TIMER CH 29
OFF
BACK MENU
OFF TIMER
ON TIMER CH
To set channel position, you can set any channel position by NUMERIC buttons (Refer to "DIRECT SELECTION" on page 16.).
This function is only active that ON TIMER has been set. When ON TIMER is reach, the TV will turn on and enter the channel position you set directly .
SELECT ADJUST BACK EXIT
12 : 30ON TIMER
SEL ADJ BACK EXIT
ON TIMER CH 29
OFF
BACK MENU
OFF TIMER
1
23
Press BACK button to return to the previous menu. Press MENU button or wait for 5~60 seconds (refer to "DURATION" on page 29) to exit menu operation.
LCD-CA9S-NEW.indd 28 12/05/2008 4:11:21 PM
29
MENU OPERATION (TV/ AV mode)
H-POSITIONV-POSITIONDURATION
SEL ADJ BACK EXIT
LANGUAGE
15 SEC
BACK MENU
TRANSPARENCETTX LANGUAGE WESTERN
OSDPress MENU button and the main menu will appear. Press POINT buttons to select "OSD", and will display OSD menu.Press POINT buttons to select the item desired.
Press POINT buttons to adjust value.
SCREEN MENU
H-POSITIONV-POSITIONDURATION
SEL ADJ BACK EXIT
LANGUAGE
15 SEC
BACK MENU
TRANSPARENCETTX LANGUAGE WESTERN
ENGLISH
LANGUAGEPress POINT buttons to choose ENGLISH, ARABIC or RUSSIAN.
H-POSITIONOSD moves to the left side when POINT button is pressed. OSD moves to the right side when POINT button is pressed. (0~100)
V-POSITIONOSD moves up when POINT button is pressed.OSD moves down when POINT button is pressed. (0~100)
DURATIONUse this function to set the display time of the MENU when there is no operation on the TV. Press POINT button to decrease time, press POINT button to increase time. (5~60 seconds)
TRANSPARENCEThe background of OSD darkens when POINT button is pressed. The background of OSD lightens when POINT buttonis pressed. (0~100)
TTX LANGUAGEPress POINT buttons to choose WESTERN, EASTERN, RUSSIAN, ARABIC, FARSI for Language display in Teletext mode.
1
23
Press BACK button to return to the previous menu. Press MENU button or wait for 5~60 seconds (refer to "DURATION" on page 29) to exit menu operation.
LCD-CA9S-NEW.indd 29 12/05/2008 4:11:22 PM

30
MENU OPERATION (TV/ AV mode)
Note:"PC ADJUST" can not be selected except for PC mode.
SYSTEMSCREEN MENUPress MENU button and the main menu will appear. Press
POINT buttons to select "SYSTEM", and will display SYSTEM menu.Press POINT buttons to select the item desired.
Press POINT buttons to adjust value.
ECOThis function can automatically adjust panel's brightness by ambient brightness.Press POINT buttons to set "ON" or "OFF".
CHILD LOCKWhen CHILD LOCK is set "ON", the Side Control buttons will be locked except for POWER ON/OFF button .
1
23
Press BACK button to return to the previous menu. Press MENU button or wait for 5~60 seconds (refer to "DURATION" on page 29) to exit menu operation.
SEL A DJ BACK EXITBACK MENU
ECO
CHILD LOCKPC ADJUST
SEL A DJ BACK EXITBACK MENU
ECO
CHILD LOCKPC ADJUST
OFF
LCD-CA9S-NEW.indd 30 12/05/2008 4:11:23 PM

31
PICTURE
Press MENU button and the main menu will appear. Press POINT buttons to select "PICTURE", and will display PICTURE menu.Press POINT buttons to select the item desired.
Press POINT buttons to adjust value.
Select "PERSONAL", "STANDARD", "DYNAMIC" or "SOFT" by pressing POINT buttons.
PERSONAL: User presets picture adjustment in PICTURE MODE.STANDARD: Natural and splendid picture level preset on LCD TV.DYNAMIC: Bright and dynamic picture. It is suitable for nice playback, such as DVD program.SOFT: Inhibit strong contrast and colour, it is beneficial for eye protection.
PICTURE MODE
BRIGHTNESSPress POINT button to adjust image darken, and POINTbutton to adjust image brighten. (0~100)
COLOUR TONEThis function is used for selecting colour temperature. Select "NORMAL", "WARM", "COOL" or "PERSONAL" with POINT buttons.
Press POINT button to decrease contrast, and POINT buttonto increase contrast. (0~100)
CONTRAST
SCREEN MENU
MENU OPERATION (PC/HDMI mode)
Note: The screen menu in HDMI mode will be displayed differently under different condition.1. When the set cannot be received HDMI signal in HDMI mode,
the screen menu will be displayed as right picture. 2. But when the set can be received HDMI signal in HDMI mode,
the screen menu is different, and the details please refer to page 26.
Press POINT button to lighten red tone, and POINT button to deepen red tone. (0~100)
COLOUR-R
Press POINT button to lighten green tone, and POINT buttonto deepen green tone. (0~100)
COLOUR-G
Press POINT button to lighten blue tone, and POINT button to deepen blue tone. (0~100)
COLOUR-B
1
23
Press BACK button to return to the previous menu. Press MENU button or wait for 5~60 seconds (refer to "DURATION" on page 29) to exit menu operation.
LCD-CA9S-NEW.indd 31 12/05/2008 4:11:24 PM

32
SOUNDPress MENU button and the main menu will appear. Press POINT buttons to select "SOUND", and will display SOUND menu.
Press POINT buttons to select the item desired.
Press POINT buttons to adjust value.
SCREEN MENU
Note: For the details, please refer to "SOUND" on page 27.
MENU OPERATION (PC/HDMI mode)
TIMER
SELECT ADJUST BACK EXIT
- - : - -ON TIMER
SEL ADJ BACK EXIT
ON TIMER CH 29
OFF
BACK MENU
OFF TIMER
SCREEN MENUPress MENU button and the main menu will appear. Press POINT buttons to select "TIMER", and will display TIMER menu.Press POINT buttons to select the item desired.
Press POINT buttons to adjust value.
Note: For the details, please refer to "TIMER" on page 28.
H-POSITIONV-POSITIONDURATION
SEL ADJ BACK EXIT
LANGUAGE
15 SEC
BACK MENU
TRANSPARENCETTX LANGUAGE WESTERN
OSDPress MENU button and the main menu will appear. Press POINT buttons to select "OSD", and will display OSD menu.Press POINT buttons to select the item desired.
Press POINT buttons to adjust value.
SCREEN MENU
Note: For the details, please refer to "OSD" on page 29.
Press BACK button to return to the previous menu. Press MENU button or wait for 5~60 seconds (refer to "DURATION" on page 29) to exit menu operation.
Press BACK button to return to the previous menu. Press MENU button or wait for 5~60 seconds (refer to "DURATION" on page 29) to exit menu operation.
Press BACK button to return to the previous menu. Press MENU button or wait for 5~60 seconds (refer to "DURATION" on page 29) to exit menu operation.
1
23
1
23
1
23
SEL ADJ BACK EXITBACK MENU
SOUND MODEBASS
TREBLE
BALANCE
50
50
50
LCD-CA9S-NEW.indd 32 12/05/2008 4:11:26 PM
33
MENU OPERATION (PC/HDMI mode)
SCREEN MENUPress MENU button and the main menu will appear. Press POINT buttons to select "SYSTEM", and will display SYSTEM menu.Press POINT buttons to select the item desired.
Press POINT buttons to adjust value.
ECOThis function can automatically adjust panel's brightness by ambient brightness.Press POINT buttons to set "ON" or "OFF".
CHILD LOCK
SYSTEM
This function is used to adjust the position of image displayed on screen. It can be selected when the LCD TV could be received PC signal and in PC mode. (Refer to "SIGNAL MODE COLUMN" on page 38.)
Press POINT buttons to enter PC SCREEN menu. It can be select "AUTO", "H-POSITION", "V-POSITION", "CLOCK" or "PHASE" to adjust.
Press POINT buttons, and the TV automatically detects incoming signal, and adjust itself to optimize its performance. If the image is not displayed properly, a manual adjustment is required (Refer to following adjustments).
The horizontal picture position will be moved to the left side by pressing POINT button. And it will be moved to the right side by pressing POINT button. (0~100)
The vertical picture position will be moved down side by pressing POINT button. And it will be moved up side by pressing POINT
button. (0~100)
Eliminate flicker from the image. Press POINT buttons to adjust CLOCK. (0~100)
Eliminate disorder from the image. Press POINT buttons to adjust PHASE. (0~100)
AUTO ADJUST
H-POSITION
V-POSITION
CLOCK
PHASE
PC ADJUST
When CHILD LOCK is set "ON", the Side Control buttons will be locked except for POWER ON/OFF button .
1
23
Press BACK button to return to the previous menu. Press MENU button or wait for 5~60 seconds (refer to "DURATION" on page 29) to exit menu operation.
SEL A DJ BACK EXITBACK MENU
ECO
CHILD LOCKPC ADJUST
SEL A DJ BACK EXITBACK MENU
ECO
CHILD LOCKPC ADJUST
OFF
SEL A DJ BACK EXITBACK MENU
ECO
CHILD LOCKPC ADJUST
OFF
H-POSITIONV-POSITIONCLOCKPHASE
SEL ADJ BACK EXITBACK MENU
AUTO ADJUST START
LCD-CA9S-NEW.indd 33 12/05/2008 4:11:29 PM

34
MENU OPERATION
The Dealer Mode has 7 different modes: VOLUME LOCK, TUNING LOCK, START MODE, OSD, RC,RESET and AC POWER MODE.
SIDE CONTROLS
REMOTE CONTROLSVOLUME LOCKThis function is used to limit the maximal volume.
START MODEThe LCD TV will automatically enter to the setting mode while beingturned on. You can select "OFF", "TV", "AV1-S", "AV2-DVD", "PC","HDMI 1" or "HDMI 2" in START MODE. When it is set "OFF", it willkeep the mode before being turning off.
OSD
When it is set "OFF", Corresponding OSD cannot display on thescreen while operating.
RESETThis function returns all setting values to the factory defaultsettings.
DISPLAYbutton
PressPOINT
/buttons
Press POINT buttons to select a maximal volume.
VOLUME LOCK will be the default selection. (When you adjustothers, press POINT buttons to select the item desired.)
Press POINT buttons to select "ON". (The maximaly p )volume is the set value by step 1.)
DEALER MODE MENU
TO DISPLAY DEALER MODE:Press and hold Menu button on Side Controls, and then pressDISPLAY button on remote controls to display Dealer mode menu.YTake the way of setting VOLUME LOCK for example:
Press and hold Menu button on Side Controls, and pressDISPLAY button on remote controls to display Dealer modemenu.
Press menu button to exit menu operation.
DEALER MODE
RC
When it is set "OFF", the Remote Control will be locked and cannotbe used.
VOLUME LOCK
OFFSTART MODEOSDRC
RESET
DEALER MODE
ON
OFF
ON
SEL ADJ EXITMENU
OFFTUNING LOCK
AC POWER MODE ON
TUNING LOCK
The way to prevent user from executing the Tuning function.
AC POWER MODEYou can set "STANDBY", "ON" or "LAST" in AC POWER MODE.When LCD TV is connected to an outlet with AC power cord, it willenter the status as setting.
12
345
MENU button
LCLC
35
Be sure to disconnect the AC Power cord from AC outlet before cleaning the LCD TV. Clean your LCD TV as follows:
Gently wipe the screen and cabinet with dry soft cloth.The screen is likely to be damaged if it is not maintained properly. Do not use hard objects like a hard cloth or paper. Do not use solvents or abrasions.
CAUTION :Do not use benzene, thinner, or any volatile substances to clean the LCD TV. These chemicals may damage the cabinet finish.
AUTO POWER OFF
When a trouble is detected in the LCD TV, the protection function works and turn the LCD TV OFF automatically. When the LCD TV is turned OFF with this function, the POWER indicator becomes red and LCD TV's power cannot be turned ON.Disconnect Power cord and contact sales dealer where you purchased the LCD TV or the service center.
To turn on LCD TV again for checking:1) Disconnect Power cord from AC outlet and plug it on again.2) Refer to "TURNING ON/OFF LCD TV" on Page 15 to attempt to turn on LCD TV. If LCD TV is not turned on, disconnect Power cord and contact to service center.
For protecting product safety, protection feature provided inside LCD TV. Refer to the following please.
CLEANING LCD TV
FUNCTION OF PRODUCT SAFETY FEATURE
APPENDIX
LCD-CA9S-NEW.indd 35 12/05/2008 4:11:32 PM

36
APPENDIX
TROUBLESHOOTINGBefore calling your dealer or service center for assistance, check the matters below once again.1. Make sure you have connected LCD TV to your equipment as described in the section "CONNECTING
LCD TV".2. Check cable connection. Verify that all external equipment and power cords are properly connected.3. Verify that all power is switched on.4. If LCD TV still does not produce an image, re-start the external equipment.5. If the image still does not appear, unplug LCD TV from the external equipment and check the
external equipment. The problem may be with your graphics controller rather than with LCD TV. (When you reconnect LCD TV, remember to turn the external equipment and TV off before you power up LCD TV. Power the equipment back on in order of : LCD TV and external equipment.)
6. If the problem still exists, check the following chart.
R e m o t e Control does not work
Check the batteries.Make sure nothing is between the Remote Receiver and the Remote Control.Make sure you are not too far from LCD TV when using Remote Control. Maximum operating range is 16.4' (5m).
Is direct sunlight or strong artificial light shining on LCD TV's Infrared Remote Receiver? Eliminate the light by closing curtains, pointing the light in a different direction, etc.
No image
Check the connection between the external equipment and LCD TV.When turning LCD TV on, it takes a few seconds to display the image.Check the system that you select is corresponding with the external equipment or the video
equipment.Make sure the temperature is not out of the Operating Temperature (0°C ~ 40°C).Turn off power, then turn on again, re-start LCD TV.
No sound
Check Audio cable connection from Audio input source.Adjust the Audio source.Press VOLUME (+) button.Press MUTE button.
There are tiny black points and/or bright point on the TV
Dark or bright points of light (red, green, or blue) may appear on the screen. This is a characteristic of the LCD panels, not a malfunction of the LCD TV.
LCD panel is being produced with very high accuracy technology. There is 99.99% or more dot pixel, but there is also 0.01 % or less of dot pixel lack or dot pixel that is constantly lighted. This is not defect.
Regarding LCD panel characteristic, it may occur picture remain (look like a mirror) when the screen is changed if it displays same screen for a long time. Changing the picture or turn-off the power supply may recover.
Stripe pattern (moire, interference stripes) may show up on the screen depend on the reflected picture.
A b n o r m a l c o l o u r o f image
Adjust the value of colour. Select different colour system.
NO POWERPlug this LCD TV into the AC outlet.Press ON/STAND-BY button on SIDE Control or on Remote Control to open this LCD TV. Check POWER Indicator. If this indicator flashes, LCD TV has any trouble.
Problem: Try these Solutions
WARNING :High voltages are used to operate this LCD TV. Do not attempt to open the cabinet.
If the problem still persists after following all operating instructions, contact the sales dealer where you purchased LCD TV or the service center. Give the model number and explain the difficulty. We will advise you how to obtain service.
LCD-CA9S-NEW.indd 36 12/05/2008 4:11:33 PM
37
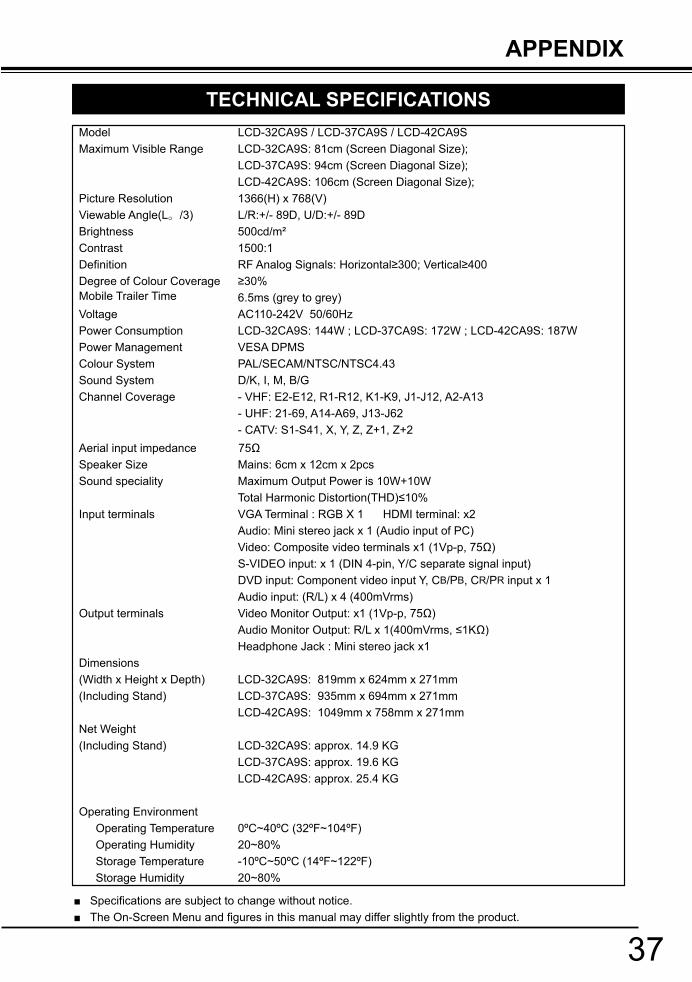
Model LCD-32CA9S / LCD-37CA9S / LCD-42CA9SMaximum Visible Range LCD-32CA9S: 81cm (Screen Diagonal Size); LCD-37CA9S: 94cm (Screen Diagonal Size); LCD-42CA9S: 106cm (Screen Diagonal Size); Picture Resolution 1366(H) x 768(V)Viewable Angle(L。/3) L/R:+/- 89D, U/D:+/- 89D Brightness 500cd/m²Contrast 1500:1
Mobile Trailer Time 6.5ms (grey to grey)Voltage AC110-242V 50/60HzPower Consumption LCD-32CA9S: 144W ; LCD-37CA9S: 172W ; LCD-42CA9S: 187WPower Management VESA DPMS Colour System PAL/SECAM/NTSC/NTSC4.43Sound System D/K, I, M, B/GChannel Coverage - VHF: E2-E12, R1-R12, K1-K9, J1-J12, A2-A13 - UHF: 21-69, A14-A69, J13-J62 - CATV: S1-S41, X, Y, Z, Z+1, Z+2
Speaker Size Mains: 6cm x 12cm x 2pcsSound speciality Maximum Output Power is 10W+10W
Input terminals VGA Terminal : RGB X 1 HDMI terminal: x2 Audio: Mini stereo jack x 1 (Audio input of PC) Video: Composite video terminals x1 ( ) S-VIDEO input: x 1 (DIN 4-pin, Y/C separate signal input) DVD input: Component video input Y, CB/PB, CR/PR input x 1 Audio input: (R/L) x 4 (400mVrms) Output terminals Video Monitor Output: Audio Monitor Output: Headphone Jack : Mini stereo jack x1Dimensions(Width x Height x Depth) LCD-32CA9S: 819mm x 624mm x 271mm(Including Stand) LCD-37CA9S: 935mm x 694mm x 271mm LCD-42CA9S: 1049mm x 758mm x 271mmNet Weight(Including Stand) LCD-32CA9S: approx. 14.9 KG LCD-37CA9S: approx. 19.6 KG LCD-42CA9S: approx. 25.4 KG
Operating EnvironmentOperating Temperature 0ºC~40ºC (32ºF~104ºF)Operating Humidity 20~80%Storage Temperature -10ºC~50ºC (14ºF~122ºF)Storage Humidity 20~80%
APPENDIX
TECHNICAL SPECIFICATIONS
LCD-CA9S-NEW.indd 37 12/05/2008 4:11:33 PM

38
5 123410 9 678
15 14 13 1112
CONFIGURATIONS OF VGA TERMINALS
VGA IN (D-SUB) TERMINALTerminal : D-SUB15 PIN Connect video output terminal of LCD TV to this terminal with VGA Cable (not supplied). When connecting Macintosh computer, the MAC Adapter (not supplied) is required.
Pin Configuration
SIGNAL MODE COLUMN (recommended)
APPENDIX
Red Input
Ground (Horiz.sync.)
Green Input
Sense 2Blue Input
Ground (Red)Ground (Green)Ground (Blue)
1
5
2
43
678
No Connect
Horiz. sync.
Ground (Vert.sync.)
Sense 1Sense 0
Vert. sync.Reserved
9
13
10
1211
1415
This LCD TV can correspond to the signals below. After connecting with the computer, LCD TV can auto-matically recognize the signal from the connected PC( computer)/ HDMI.
PC SIGNAL MODE COLUMN (recommended)
Note:In case LCD TV can not display properly due to the connecting cable or the graphic hardware, please make adjustments about phase, clock and so on.In principle, LCD TV can not display the signal mode which not described in the above column. But sometimes it can display a signal very similar with one of the signal described.If you want to change the definition and colour of PC, please select one from the column. It is not the trouble of LCD TV if interference appears on the picture while switching the signal mode.It is different from CRT Monitor that it is no blink of the picture when the V-Freq. of the signal is 60Hz. It is recommended to select 60Hz V-Freq. of your computer to display better pictures.The Dot Clock of the computer's signal must be less than 100 MHz.Specifications are subject to change without notice.
In case of the following things, some messages will display on the screen.When the input signal from PC is out of the display range, "Out of range " will display.
ON
1
DIP
ON
OFF
2 3 4 5 6
MAC ADAPTER (NOT SUPPLIED)
Set slide switches as shown in the table below depending on RESOLUTION MODE that you want to use before you turn on LCD TV and computer.
Slide Switches (1-6)
ON ON
ON
ON
OFF
OFF
ON
OFF
ON
OFF
OFF
OFF
OFF
OFF
OFF
OFF
1 2 3 4 5 6
19" Mode (1024x768)
16" Mode (832x624)
13" Mode (640x480)
OFF
OFF
LCD-CA9S-NEW.indd 38 12/05/2008 4:11:34 PM
39
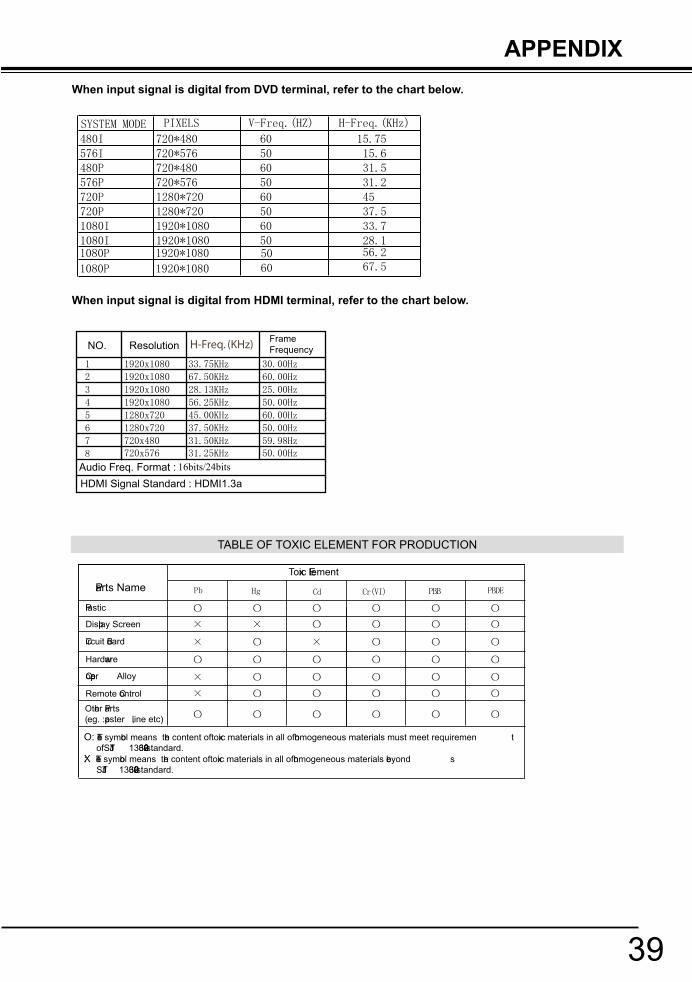
APPENDIXWhen input signal is digital from DVD terminal, refer to the chart below.
When input signal is digital from HDMI terminal, refer to the chart below.
Parts NameToxic Element
Plastic
Display Screen
Circuit Board
Hardware
Remote Control
Other Parts( eg. :paster ,line etc)
O: The symbol means the content of toxic materials in all of homogeneous materials must meet requiremen t of SJ/T1 1363-2006 standard.X: The symbol means the content of toxic materials in all of homogeneous materials beyond s SJ/T1 1363-2006 standard.
Copper Alloy
TABLE OF TOXIC ELEMENT FOR PRODUCTION
FrameFrequencyResolutionNO.
Audio Freq. Format :HDMI Signal Standard : HDMI1.3a
LCD-CA9S-NEW.indd 39 12/05/2008 4:11:35 PM

40
Through in uninstalling work, handling with more than two people is recommended.When holding (moving or lifting) the LCD Display, hold the display's body. Do not handle the LCD TV by holding the attached accessory parts (speakers), otherwise it may result in damage.Before uninstalling, provide a desk (or a part of it) which is strong enough to support the weight of the LCD TV and this stand. The desk must be larger than the LCD Display screen size. The desk's surface must be flat and maintained with soft material (such as a blanket) for protecting the screen surface.Before putting the LCD Display on the desk, make sure there is no object on it. Leaving any object under the screen may cause damage on the screen.The LCD TV with this stand should be uninstalled on flat and level place. Do not place on such as an non flat, unlevel or unstable cart or stand. The display may fall, causing not only serious damage to the products but serious injury to a person.
Uninstalling Stand Base
APPENDIX
CAUTION IN UNINSTALLING STAND BASE
SAFETY NOTEFor correct installing, mounting and uninstalling LCD TV Stand, it is strongly recommended to use a trained, authorized dealer. Failure to follow correct procedures could result in damage to the equipment or injury to the installer.
Uninstalling Stand BasePlace the LCD TV screen facing down on a flat surface place where maintained with soft materials (such as a blanket) for protecting the display screen.
1
Release screw in 6 holes with screw driver.2 Pull the stand base out from the cabinet after all screws already removed.3
Note: For model LCD-42CA9S, release screw in 10 holes with screw driver.
LCD-CA9S-NEW.indd 40 12/05/2008 4:11:36 PM

41
APPENDIX
Uninstalling Stand Base (Continued)
Cover the holes where you remove the stand base from the dust etc. by paste the deck label (supplied) to these holes.
4 Uninstalling the stand base is completed now.
5
LCD-CA9S-NEW.indd 41 12/05/2008 4:11:38 PM

42
Note
LCD-CA9S-NEW.indd 42 12/05/2008 4:11:38 PM

43
Note
LCD-CA9S-NEW.indd 43 12/05/2008 4:11:38 PM

Part No. 1AA6P1P5592-- N5EV (UH3-B) SANYO Electronics CO., Ltd.
LCD-CA9S-NEW.indd 44 12/05/2008 4:11:38 PM