Embed Size (px)
Citation preview

Laboratory Standard Operation
Procedure SOP NO: LAB-BIO-001 V1.0
Determination of Total Coliform and Escherichia Coli by the Multi-well Idexx Method
PAGE: 1 of 3 SOP NO: LAB-BIO-001 V1.0 DATE: October 2009 SUPERSEDES: NEW
TITLE: Determination of Total Coliform and Escherichia Coli by the Multi-well Idexx
Method
SUMMARY: Samples mixed with the Colilert media are sealed in a multi-well package. These packages are then incubated at 35ºC for 24 hours. The wells are read off under daylight and Ultraviolet light. Results are calculated from a chart.
RESPONSIBILITY: Plant Biologist, Laboratory Assistant or designee
SCOPE: This test is applicable to drinking water, storm water, permit samples, ground water, domestic and industrial waste waters.
EQUIPMENT: • Colilert 100-mL sterile vessel • Transportation
• Multi-well package (Quanti-Tray)
• Idexx Quanti-Tray Sealer Model 2X
• Thermolyne Type 142300 Incubator
• UV- light • bench sheet
• Idexx Quanti-Tray/ 2000 MPN Table
• 100mL graduated cylinder
• Latex or nitrile gloves
CHEMICALS/ REAGENTS:
• Desired Water Source
• Idexx Colilert Media, part number:98-12973-00
• Phenova control bacteria, catalog number: QC-MIC-WP
PROCEDURE:
1. The first step is to acquire the water sample(s) that are to be tested. 2. Collect samples in a Colilert 100mL sterile container. 3. Preheat the Quanti-Tray Sealer by turning on the switch located on
the rear panel. 4. Add 100mL sample to an empty Colilert bottle, then open the Colilert
enzyme substrate media packet (located in the drawer below the Quanti-Tray sealer) and add it to the bottle. Cap the bottle and shake vigorously to dissolve the media.
5. If the E. Coli/Total coliform levels are known to be high, a dilution can be made (not to exceed 100mL total volume) using water. Record the

Laboratory Standard Operation
Procedure SOP NO: LAB-BIO-001 V1.0
Determination of Total Coliform and Escherichia Coli by the Multi-well Idexx Method
PAGE: 2 of 3 SOP NO: LAB-BIO-001 V1.0 DATE: October 2009 SUPERSEDES: NEW
PROCEDURE CONT:
volume sample used and the dilution factor on the bench sheet. 6. Use a marker to label the empty, sterile Quanti-Tray containers with
the date, time and sample ID. Trays are located in the cabinet below the Quanti-Tray sealer.
7. Pour the mixture into the Quanti-Tray. 8. Run the tray through the Quanti-Tray sealer using the rubber insert
in an upright direction to avoid spilling any sample. 9. If the tray jams, use the small black button on top of the unit to
reverse the tray. 10. Place sealed trays, bubble side down, in the Thermolyne incubator, set
at 35º±0.5ºC. Record time and temperature on the bench sheet. 11. Incubate for 24 hours. 12. Remove the trays from the incubator. Record date, time and
temperature on the bench sheet. 13. Count the number of yellow wells and record on the bench sheet as
Total Coliform. 14. If results are questionable, incubate for an additional 4 hours, and
recheck. 15. Using the MPN Table, located on the side of the incubator, record the
most probable number (MPN) on the bench sheet. 16. Next use the UV light to count the number of positive E. coli colonies.
Positive colonies are fluorescent blue. Record on the bench sheet as E. coli.
17. Using the same MPN Table, located on the side of the incubator, record the most probable number (MPN) on the bench sheet.
18. Dispose of the used trays, and file the bench sheets in the trays on the north wall under the sliding cabinets.
19. For quality control, each lot of media is tested for performance by inoculating with three control bacteria from Phenova.
Laboratory Standard Operation
Procedure SOP NO: LAB-BIO-001 V1.0
Determination of Total Coliform and Escherichia Coli by the Multi-well Idexx Method
PAGE: 3 of 3 SOP NO: LAB-BIO-001 V1.0 DATE: October 2009 SUPERSEDES: NEW
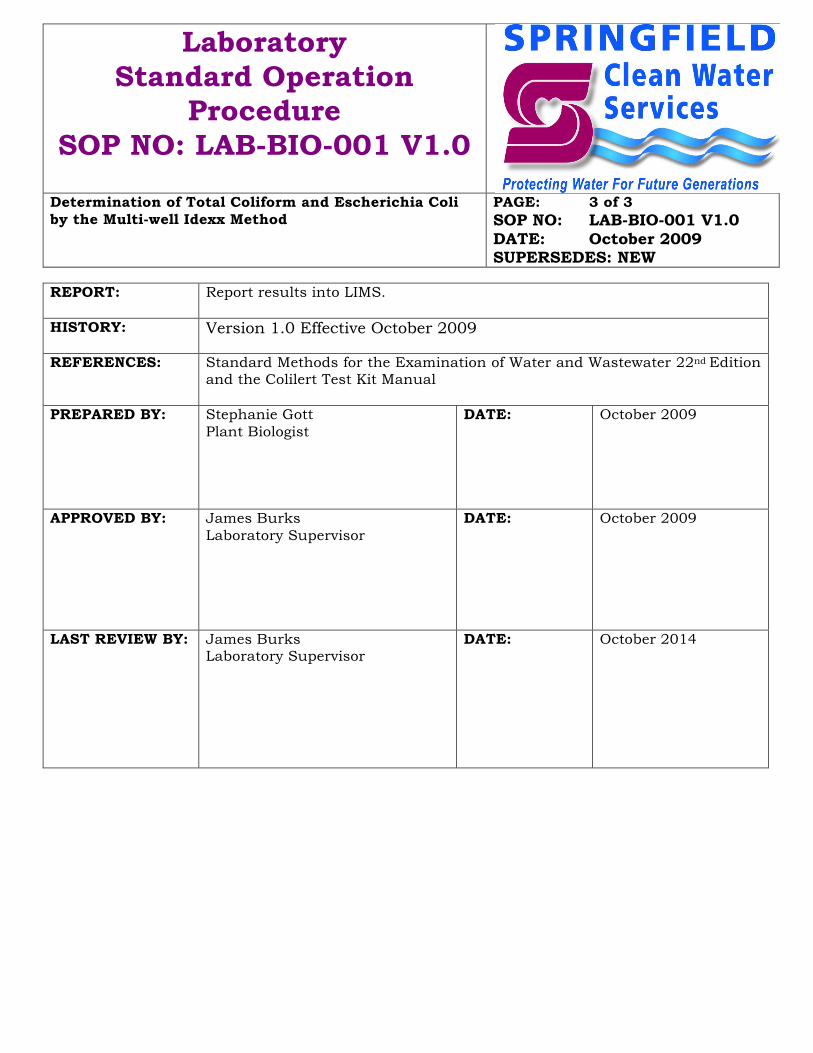
REPORT:
Report results into LIMS.
HISTORY:
Version 1.0 Effective October 2009
REFERENCES: Standard Methods for the Examination of Water and Wastewater 22nd Edition and the Colilert Test Kit Manual
PREPARED BY:
Stephanie Gott Plant Biologist
DATE: October 2009
APPROVED BY:
James Burks Laboratory Supervisor
DATE: October 2009
LAST REVIEW BY:
James Burks Laboratory Supervisor
DATE: October 2014
Laboratory Standard Operation
Procedure SOP NO: LAB-BIO-002 V1.0
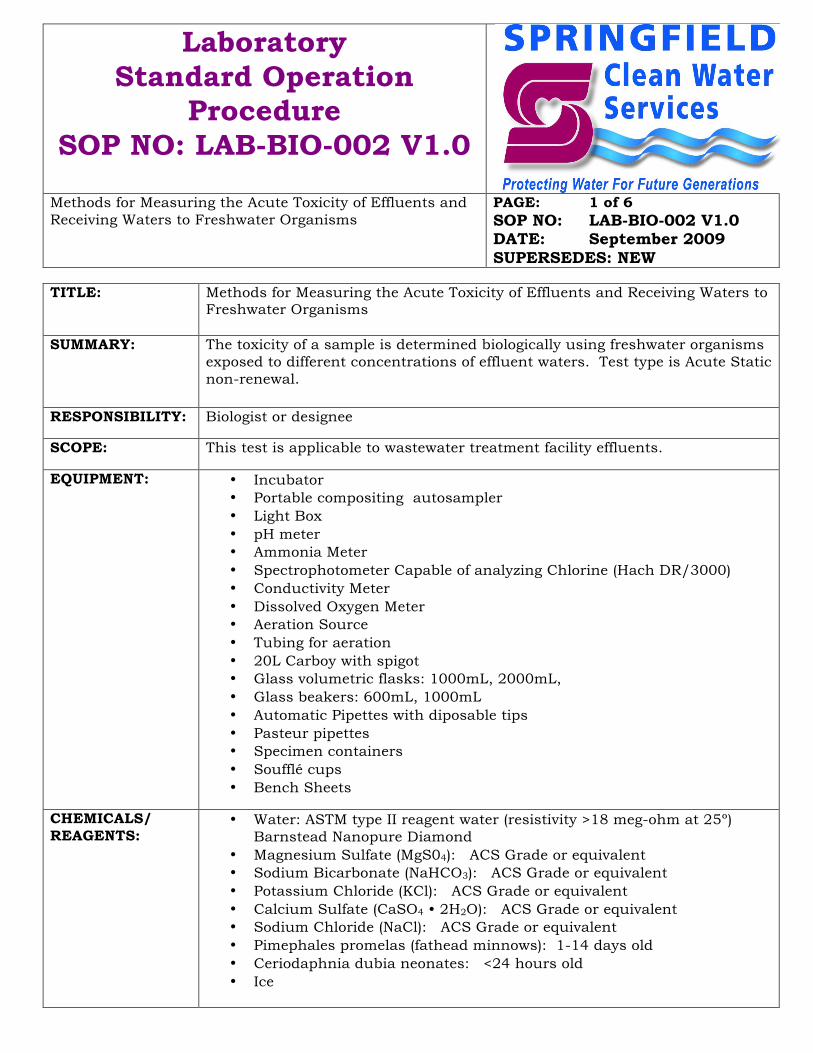
Methods for Measuring the Acute Toxicity of Effluents and Receiving Waters to Freshwater Organisms
PAGE: 1 of 6 SOP NO: LAB-BIO-002 V1.0 DATE: September 2009 SUPERSEDES: NEW
TITLE: Methods for Measuring the Acute Toxicity of Effluents and Receiving Waters to
Freshwater Organisms
SUMMARY: The toxicity of a sample is determined biologically using freshwater organisms exposed to different concentrations of effluent waters. Test type is Acute Static non-renewal.
RESPONSIBILITY: Biologist or designee
SCOPE: This test is applicable to wastewater treatment facility effluents.
EQUIPMENT: • Incubator • Portable compositing autosampler • Light Box • pH meter • Ammonia Meter • Spectrophotometer Capable of analyzing Chlorine (Hach DR/3000) • Conductivity Meter • Dissolved Oxygen Meter • Aeration Source • Tubing for aeration • 20L Carboy with spigot • Glass volumetric flasks: 1000mL, 2000mL, • Glass beakers: 600mL, 1000mL • Automatic Pipettes with diposable tips • Pasteur pipettes • Specimen containers • Soufflé cups • Bench Sheets
CHEMICALS/ REAGENTS:
• Water: ASTM type II reagent water (resistivity >18 meg-ohm at 25º) Barnstead Nanopure Diamond
• Magnesium Sulfate (MgS04): ACS Grade or equivalent • Sodium Bicarbonate (NaHCO3): ACS Grade or equivalent • Potassium Chloride (KCl): ACS Grade or equivalent • Calcium Sulfate (CaSO4 • 2H2O): ACS Grade or equivalent • Sodium Chloride (NaCl): ACS Grade or equivalent • Pimephales promelas (fathead minnows): 1-14 days old • Ceriodaphnia dubia neonates: <24 hours old • Ice

Laboratory Standard Operation
Procedure SOP NO: LAB-BIO-002 V1.0
Methods for Measuring the Acute Toxicity of Effluents and Receiving Waters to Freshwater Organisms
PAGE: 2 of 6 SOP NO: LAB-BIO-002 V1.0 DATE: September 2009 SUPERSEDES: NEW
PREPARATIONS:
Synthetic Water: Fill 20 Liter carboy with 19L Water. Add 1.20g of Magnesium Sulfate, 1.92g of Sodium Bicarbonate, and 0.080g of Potassium Chloride. Aerate solution conservatively to saturate water with oxygen. In a separate 1L volumetric flask, add 400mL water and 1.20g Calcium Sulfate, dilute to volume and mix with stir bar on stir plate overnight. After 24 hours of mixing add Calcium sulfate solution to 20L carboy. Continue aeration until time of use. Reference Toxicant 1: In a 2L Volumetric, add approximately 1L water and 2g Sodium Chloride. Dilute to final volume of 2L. Reference Toxicant 2: In a 2L Volumetric, add approximately 1L water and 4g Sodium Chloride. Dilute to final volume of 2L. Reference Toxicant 3: In a 2L Volumetric, add approximately 1L water and 8g Sodium Chloride. Dilute to final volume of 2L. Reference Toxicant 4: In a 2L Volumetric, add approximately 1L water and 16g Sodium Chloride. Dilute to final volume of 2L. Effluent Dilutions: 100% Effluent Solution: In a 1L volumetric flask measure out 1L of effluent sample. 50% Effluent Solution: In a 1L volumetric flask measure out 1L of effluent sample, pour into a 2L volumetric flask. Dilute to final volume of 2L with water. Mix and pour into 1L volumetric. Remaining solution will be used to make serial dilutions for weaker concentrations. 25% Effluent Solution: Using the remaining 50% solution in the 2L volumetric, add 1L of water to bring to final volume of 2L. Mix and pour into 1L volumetric. Remaining solution will be used to make serial dilutions for weaker concentrations. 12.5% Effluent Solution: Using the remaining 25% solution in the 2L volumetric, add 1L of water to bring to final volume of 2L. Mix and pour into 1L volumetric. Remaining solution will be used to make serial dilutions for weaker concentrations. 6.25% Effluent Solution: Using the remaining 25% solution in the 2L volumetric, add 1L of water to bring to final volume of 2L. Mix thoroughly.

Laboratory Standard Operation
Procedure SOP NO: LAB-BIO-002 V1.0
Methods for Measuring the Acute Toxicity of Effluents and Receiving Waters to Freshwater Organisms
PAGE: 3 of 6 SOP NO: LAB-BIO-002 V1.0 DATE: September 2009 SUPERSEDES: NEW
ANALYSIS SETUP:
1. For overnight shipping, the day before analysis begins, order test organisms from “Aquatic Biosystems, Inc”. Order 350 fathead minnows (10 days old on arrival) and 300 Ceriodaphnia dubia neonates (<24hours old).
2. Set-up auto-sampler for desired effluent 24 hours in advance. To set up auto-sampler, get a charged battery from the battery charging station on the northwest side of the lab and plug battery into connection terminal on pump head. Program auto-sampler to collect 208.3mLs every 30 minutes for a 24 composite sample resulting in 10L. Secure 10L jug inside auto-sampler base and fill the area around the jug with ice to chill the sample during collection. Place lid for sample jug face up inside the sampler.
3. Transport auto-sampler to desired effluent site and lower sampling tube into effluent flow approximately 1-2 feet beneath the surface of the water. Start the auto sampler program for the 24-hour composite.
4. Prepare synthetic water 24 hours in advance and aerate until use. 5. Print bench sheets for samples to be analyzed. Digital copies of the
bench sheets are stored on the “plant data” drive in “WET TEST” folder.
PROCEDURE:
1. Retrieve organisms from Employee building receiving area and bring back to centrifuge counter area of lab. Open the box and inner lid to expose the organisms to ambient lighting and acclimate them to laboratory temperature.
2. Drive to effluent sampling site to retrieve auto-sampler with effluent sample. Open top sampler lid, check status of program to ensure all aliquots have been taken. Screw lid on sample jug to avoid spilling and load into vehicle. Transport sample and auto-sampler to lab.
3. If there is flow in the receiving stream, a sample must be grabbed to make effluent dilutions. Using the 5L container labeled “stream” (found in walk-in incubator), gather a receiving stream sample from corresponding receiving stream, in a location above the effluent discharge and free from influence of effluent. Submerge clean 5L stream container in stream flow with opening facing upstream. Avoid placing hands in or around the opening of the container while filling slowly. Transport receiving stream grab sample to lab.
4. Remove appropriately labeled glassware (600mL and 400mL beakers) from walk-in incubator. Place on large cart and wheel to centrifuge area of lab. Remove foam Daphnia tray from the back shelf of the incubator and place on lab counter next to centrifuge and light box. Label each row of foam tray appropriately and add 4 soufflé cups to each labeled row:
Laboratory Standard Operation
Procedure SOP NO: LAB-BIO-002 V1.0
Methods for Measuring the Acute Toxicity of Effluents and Receiving Waters to Freshwater Organisms
PAGE: 4 of 6 SOP NO: LAB-BIO-002 V1.0 DATE: September 2009 SUPERSEDES: NEW
PROCEDURE CONT:
Daphnia tray Labels (in rows of four): Synthetic water, Receiving Stream, 100% Effluent, 50% Effluent, 25% Effluent, 12.5% Effluent, 6.25% Effluent, TOX 1, TOX2, TOX 3, TOX 4.
5. Make serial effluent dilutions and toxicant solutions (see “Preparations” section of this SOP). Pour a minimum of 200mL of each solution into corresponding labeled glassware for the minnows. For the daphnia tray, pour 25mL (minimum of 15mL) into each 30 mL soufflé cup. Measure out synthetic water and receiving stream and pour into glassware and soufflé cups. Allow samples to reach ambient laboratory temperature.
6. Remove minnows from shipping container and cut the corner of the bag, ensuring that no water or minnows are spilled. Transfer all minnows, by gently pouring, into two 1L beakers. Remove bottle(s) of Daphnia from shipping containers, pour into two 500mL beakers and set on light box.
7. Using a 10mL pipette with plastic pipette tip, gently transfer 10 minnows into each container minimizing stress on the organisms. Look into container to ensure all transferred organisms are living. Movement indicates life. Be careful not to transfer sample water back into organism water during this process.
8. Using a Pasteur pipette, collect 5 Daphnia and gently transfer to each container. Be careful not to transfer sample water back into organism water during this process.
9. Transfer containers with organisms to walk-in incubator. Ensure that the incubator is at 20°±1°C and record in temperature log and on bench sheets. Cover daphnia tray with large plexiglass pane.
10. Label 2 sets of specimen cups, one red and one black, to represent all samples and dilutions from both minnows and daphnia testing i.e. Synthetic water, Receiving Stream, 100% Effluent, 50% Effluent, 25% Effluent, 12.5% Effluent, 6.25% Effluent, TOX 1, TOX2, TOX 3, TOX 4.
11. In the red labeled specimen cups, pour approximately 20mL of each sample into the corresponding cup. In the black labeled specimen cups, measure out 100mL of each sample and add to corresponding cup.
12. Run Total Chlorine analysis on the red labeled specimen cups using the Hach Dr/3000 Spectrophotometer and record results on the bench sheets.
13. Using the black labeled specimen cups, in this order, run Dissolved Oxygen using a Hach HQ430d flexi meter, run Conductivity and pH using a Hach HQ 440d multi meter, and lastly run Ammonia using the Hach HQ 440d multi. Due to the addition of NaOH required for Ammonia analysis, it must be tested last. Record all values on bench

Laboratory Standard Operation
Procedure SOP NO: LAB-BIO-002 V1.0
Methods for Measuring the Acute Toxicity of Effluents and Receiving Waters to Freshwater Organisms
PAGE: 5 of 6 SOP NO: LAB-BIO-002 V1.0 DATE: September 2009 SUPERSEDES: NEW
PROCEDURE CONT:
sheets under appropriate row, under column labeled 0. Discard specimen cups.
14. Discard synthetic water, receiving stream, TOX samples, and effluent dilutions. Wash and rinse glassware, allow to dry overnight.
15. After a 24 hour period, remove glassware and tray with organisms from incubator, place on cart, and roll over to the centrifuge area.
16. Count and record number of live minnows and daphnia using the light box. Movement indicates life. Record results under column labeled 24. Log incubator temperature on bench sheets and return organisms to the incubator.
17. After another 24 hour period (total of 48 hours) remove glassware and tray with organisms from incubator, place on cart, and roll over to centrifuge area.
18. Count and record number of live minnows and daphnia using the light box. Movement indicates life. Record results under column labeled 48. Record temperature of incubator in log and on bench sheet.
19. Label 2 sets of specimen cups, one blue and one black, to represent all samples and dilutions from both minnows and daphnia testing i.e. Synthetic water, Receiving Stream, 100% Effluent, 50% Effluent, 25% Effluent, 12.5% Effluent, 6.25% Effluent, TOX 1, TOX2, TOX 3, TOX 4.
20. From the minnow beakers, pour a representative sample from each into the corresponding black labeled specimen cup while avoiding pouring any minnows into the specimen cups i.e. 25mLs from Synthetic 1-4 for a total of 100mL. For the blue labeled specimen cups, pour a representative sample from each into the corresponding cup up to 100mLs.
21. Using the black and blue labeled specimen cups, in this order, run Dissolved Oxygen using a Hach HQ430d flexi meter, run Conductivity and pH using a Hach HQ 440d multi meter, and lastly run Ammonia using the Hach HQ 440d multi. Due to the addition of NaOH required for Ammonia analysis, it must be tested last. Record all values on bench sheets under appropriate row, under column labeled 48. Discard specimen cups.
22. Discard all samples and wash glassware. Clean autosampler by pumping and purging DI water several times, allow hose to dry. Rinse the 10L autosampler container, disconnect battery and put back on charging station. Put the autosampler in the storage closet in the biology lab.

Laboratory Standard Operation
Procedure SOP NO: LAB-BIO-002 V1.0
Methods for Measuring the Acute Toxicity of Effluents and Receiving Waters to Freshwater Organisms
PAGE: 6 of 6 SOP NO: LAB-BIO-002 V1.0 DATE: September 2009 SUPERSEDES: NEW
RESULTS REPORTING:
1. The WET test will be considered a failure if mortality observed in the effluent concentrations equal to or less than the AEC (100% Effluent) is significantly different (at the 95% confidence level; p=0.05) than that observed in the upstream receiving water control sample. Where upstream receiving water is not available, synthetic laboratory control water is used.
2. Complete Missouri Department of Natural Resources “Whole Effluent Toxicity Report”.
3. Complete Southwest Clean Water Plant Laboratory form “Acute Toxicity Test of Effluent”.
4. Mail completed reports to Water Protection Program PO Box 176 Jefferson City, MO 65102.
HISTORY:
Version 1.0 Effective October 2002 Version 2.0 Revised September 2014
REFERENCES: EPA Methods for Measuring the Acute Toxicity of Effluents and Receiving Waters to Freshwater and Marine Organisms 5th Edition October 2002. Pimephales promelas 2000.0, Ceriodaphnia dubia 2002.0
PREPARED BY:
Stephanie Gott Plant Biologist
DATE:
September 2009
APPROVED BY:
James Burks Laboratory Supervisor
DATE: September 2009
LAST REVIEW BY:
James Burks Laboratory Supervisor
DATE: September 2014
Laboratory Standard Operation
Procedure SOP NO: LAB-BIO-003 V1.0
Measuring Fecal Coliforms in Biosolids by Multiple-Tube Fermentation Procedures
PAGE: 1 of 9 SOP NO: LAB-BIO-003 V1.0 DATE: July 2004 SUPERSEDES: NEW
TITLE: Measuring Fecal Coliforms in Biosolids by Multiple-Tube Fermentation
Procedures
SUMMARY: This method describes the multiple-tube fermentation procedures [also called the most probable number (MPN) procedure] for the detection and enumeration of fecal coliform bacteria in biosolids. This method uses culture-specific media and elevated temperature to isolate and enumerate fecal coliform organisms. Fecal coliform bacteria are used as indicators for the potential presence of other bacterial and viral pathogens. This method is used to determine bacterial density of biosolids in order to satisfy the pathogen reduction requirements of subpart D of Part 503 regulations.
RESPONSIBILITY: Biologist or designee
SCOPE: This test is applicable to wastewater treatment facility biosolids.
EQUIPMENT: • Jacketed Incubator 35ºC±0.5ºC • Waterbath Incubator 44.5º±0.2ºC • Tube rack • Sterile, narrow mouth, square, Plastic Dilution Containers with 99ml
mark • Stir Plate • Stir Bars • Balance • Reagent grade (DI) water • Phosphate buffered dilution water • Eppenddorf “Pipet Helper” • Hach Sterile Borosilicate Glass Pipet Catalog#:2489738 • 300mL Erlenmeyer Flask • Nalgene Autoclavable bottles Catalog#:2405-1000 • Gloves • 10mL Automatic Eppenddorf pipet • Pipet tips • Bench Sheets • EPA Method 1680: Table 4
CHEMICALS/ REAGENTS:
• Hach A1 Media tubes Catalog #:2560915 • Hach Dilution water concentrate, APHA Catalog#: 21431-66

Laboratory Standard Operation
Procedure SOP NO: LAB-BIO-003 V1.0
Measuring Fecal Coliforms in Biosolids by Multiple-Tube Fermentation Procedures
PAGE: 2 of 9 SOP NO: LAB-BIO-003 V1.0 DATE: July 2004 SUPERSEDES: NEW
PREPARATIONS:
Phosphate buffered dilution Water: 1. In a large 4000mL Erlenmeyer flask, located in the northeast corner of
the Biology lab, add 3000mL of DI water. 2. Locate container of Hach Dilution water concentrate, APHA (found in
the glass cabinet on the north side of the Biology lab), inside there are two sizes of reagent pillows, large and small. Using four of each, large and small, cut plastic pillow to open and add to the 3000mL of DI water.
3. Once all eight pillows have been added, fill the flask to the 4000mL mark. Rinse the inner side of the flask to wash down any Hach Dilution water concentrate that may have dripped on the side of the flask.
4. Once filled, mix the flask thoroughly by inverting several times and pour solution into 5 separate 1L Nalgene Autoclavable bottles leaving at least one inch of headspace.
5. Place the 5 bottles equally spaced apart on the tray inside the autoclave. Place lids on bottles, but not screwed on. Place a strip of autoclave indicator tape on the tray.
6. Close the autoclave door tightly and set the program to the bottle function and click start.
7. Once program has finished its cycle, open autoclave door and check indicator tape for development to ensure cycle has been completed.
8. Remove bottles with sterilized water and screw lids on securely.
Dilutions for BBT (liquid samples): Dilution A: In a narrow mouth, plastic, square dilution bottle (filled with 99ml of sterile buffered dilution water) add 11ml of well mixed BBT sample using Eppenddorf “Pipet Helper” and Hach Sterile Borosilicate Glass Pipet, found in wide drawer on north counter of biology lab. Cap bottle and mix by moderate shaking for approximately 10 seconds. The resulting solution is a 10X dilution.
Dilution B: In a narrow mouth, plastic, square dilution bottle (filled with 99ml of sterile buffered dilution water) add 11ml of well mixed Dilution A using Eppenddorf “Pipet Helper” and Hach Sterile Borosilicate Glass Pipet. Cap bottle and mix by moderate shaking for approximately 10 seconds. The resulting solution is a 100X dilution.
Dilution C: In a narrow mouth, plastic, square dilution bottle (filled with 99ml of sterile buffered dilution water) add 11ml of well mixed Dilution B using Eppenddorf “Pipet Helper” and Hach Sterile Borosilicate Glass
Pipet. Cap bottle and mix by moderate shaking for approximately 10
Laboratory Standard Operation
Procedure SOP NO: LAB-BIO-003 V1.0
Measuring Fecal Coliforms in Biosolids by Multiple-Tube Fermentation Procedures
PAGE: 3 of 9 SOP NO: LAB-BIO-003 V1.0 DATE: July 2004 SUPERSEDES: NEW
PREPARATIONS CONT:
seconds. The resulting solution is a 1,000X dilution.
Dilution D: In a narrow mouth, plastic, square dilution bottle (filled with 99ml of sterile buffered dilution water) add 11ml of well mixed Dilution C using Eppenddorf “Pipet Helper” and Hach Sterile Borosilicate Glass Pipet. Cap bottle and mix by moderate shaking for approximately 10 seconds. The resulting solution is a 10,000X dilution.
Dilution E: In a narrow mouth, plastic, square dilution bottle (filled with 99ml of sterile buffered dilution water) add 11ml of well mixed Dilution D using Eppenddorf “Pipet Helper” and Hach Sterile Borosilicate Glass Pipet. Cap bottle and mix by moderate shaking for approximately 10 seconds. The resulting solution is a 100,000X dilution.
Dilution F: In a narrow mouth, plastic, square dilution bottle (filled with 99ml of sterile buffered dilution water) add 11ml of well mixed Dilution E using Eppenddorf “Pipet Helper” and Hach Sterile Borosilicate Glass Pipet. Cap bottle and mix by moderate shaking for approximately 10 seconds. The resulting solution is a 1,000,000X dilution.
Dilutions for Biosolids (solid samples): Dilution A: In s sterilized 300mL Erlenmeyer Flask, weight 30g of biosolids. Add 270mL of sterile, buffered dilution water and mix thoroughly using a stir bar and a stir plate for a minimum of 1 hour. The resulting solution is a 10X dilution.
Dilution B: In a narrow mouth, plastic, square dilution bottle (filled with 99ml of sterile buffered dilution water) add 11ml of well mixed Dilution A using Eppenddorf “Pipet Helper” and Hach Sterile Borosilicate Glass Pipet, found in wide drawer on north counter of biology lab. Cap bottle and mix by moderate shaking for approximately 10 seconds. The resulting solution is a 100X dilution.
Dilution C: In a narrow mouth, plastic, square dilution bottle (filled with 99ml of sterile buffered dilution water) add 11ml of well mixed Dilution B using Eppenddorf “Pipet Helper” and Hach Sterile Borosilicate Glass Pipet. Cap bottle and mix by moderate shaking for approximately 10 seconds. The resulting solution is a 1,000X dilution.
Dilution D: In a narrow mouth, plastic, square dilution bottle (filled with 99ml of sterile buffered dilution water) add 11ml of well mixed Dilution C
using Eppenddorf “Pipet Helper” and Hach Sterile Borosilicate Glass

Laboratory Standard Operation
Procedure SOP NO: LAB-BIO-003 V1.0
Measuring Fecal Coliforms in Biosolids by Multiple-Tube Fermentation Procedures
PAGE: 4 of 9 SOP NO: LAB-BIO-003 V1.0 DATE: July 2004 SUPERSEDES: NEW
PREPARATIONS CONT:
Pipet. Cap bottle and mix by moderate shaking for approximately 10 seconds. The resulting solution is a 10,000X dilution.
Dilution E: In a narrow mouth, plastic, square dilution bottle (filled with 99ml of sterile buffered dilution water) add 11ml of well mixed Dilution D using Eppenddorf “Pipet Helper” and Hach Sterile Borosilicate Glass Pipet. Cap bottle and mix by moderate shaking for approximately 10 seconds. The resulting solution is a 100,000X dilution.
Dilution F: In a narrow mouth, plastic, square dilution bottle (filled with 99ml of sterile buffered dilution water) add 11ml of well mixed Dilution E using Eppenddorf “Pipet Helper” and Hach Sterile Borosilicate Glass Pipet. Cap bottle and mix by moderate shaking for approximately 10 seconds. The resulting solution is a 1,000,000X dilution.
PROCEDURE:
Set-up of BBT Samples: 1. Find the large blue cart located in main lab with labels 1-7 on the x-axis
and dilutions 10x-1,000,000x on the y-axis. Roll the cart into the biology lab and place pre-prepared narrow mouth, plastic square dilution bottles for all 7 columns and for each dilution marked.
2. Gather 7 individual BBT samples, collected by operations and transported to the lab. Using these samples, prepare dilutions A-F as stated in the preparations section for each of the 7 samples using their corresponding bottles from the cart.
3. From refrigerator 1, retrieve the Hach MPN A-1 media tubes and bring them into the biology lab.
4. Place 20 MPN tubes into tube racks (labeled 1-7 on sides of racks) for the BBTs, and place 5 MPN tubes into the rack labeled C for control.
5. Each rack has 4 rows labeled with dilution amounts (1,000x; 10,000x; 100,000x; 1,000,000x) Wearing a pair of sterile gloves, unscrew the tube lids in rack 1 row 1,000,000x dilution and lay topside down.
6. Using the 10mL automatic pipet, pipet 10mL of well mixed sample from sample column 1, dilution 1,000,000x on the cart and transfer into all five MPN tubes on the 1,000,000x row of rack 1. Recap all five tubes in the rack 1 row 1,000,000x. (Begin with weakest dilution, 1,000,000x dilution, to avoid cross contamination.)
7. Unscrew the tube lids in rack 1 row 100,000x dilutions and lay topside down. Using the 10mL automatic pipet, pipet 10mL of well mixed sample from sample column 1, dilution 100,000x on the cart and transfer into all five MPN tubes on the 100,000x row of rack 1. Recap all

Laboratory Standard Operation
Procedure SOP NO: LAB-BIO-003 V1.0
Measuring Fecal Coliforms in Biosolids by Multiple-Tube Fermentation Procedures
PAGE: 5 of 9 SOP NO: LAB-BIO-003 V1.0 DATE: July 2004 SUPERSEDES: NEW
PROCEDURE CONT:
five tubes in the rack 1 row 100,000x. 8. Unscrew the tube lids in rack 1 row 10,000x dilutions and lay topside
down. Using the 10mL automatic pipet, pipet 10mL of well mixed sample from sample column 1, dilution 10,000x on the cart and transfer into all five MPN tubes on the 10,000x row of rack 1. Recap all five tubes in the rack 1 row 10,000x.
9. Unscrew the tube lids in rack 1 row 1,000x dilutions and lay topside down. Using the 10mL automatic pipet, pipet 10mL of well mixed sample from sample column 1, dilution 1,000x on the cart and transfer into all five MPN tubes on the 1,000x row of rack 1. Recap all five tubes in the rack 1, row 1,000x.
10. Repeat Steps 5-9 for remaining tube racks (2-7) using a new pipet tip for each sample.
11. For the control rack, unscrew the lids of all 5 MPN tubes and place top side down on the counter. Using a new pipet tip add 10mL of Phosphate buffered dilution Water into each tube and recap.
12. For all 7 racks of MPN tubes, one at a time, cover the topside (tube caps) with hand and gently invert several times shaking racks gently while inverted to remove any air bubbles that may be present in the smaller tube inside the MPN tube (as this may later create false positives).
13. After all air bubbles have been removed from small inner tube, place all 8 racks (1-7 and control) inside the jacketed incubator, located in control room just west of laboratory, record the time and temperature of incubator on bench sheet (located in the top drawer of the file cabinet in the biology lab – in blue file labeled “lab forms”). Temperature of the jacketed incubator must be set at 35ºC±0.5ºC. Samples/racks will remain in this incubator for 3 hours.
14. After the 3 hour incubation period, remove the racks from jacketed incubator, write time and temperature on bench sheet, and transfer into the water bath incubator located on the west counter of the biology lab. Record the time and temperature the racks are placed into the water bath incubator on the bench sheet. Incubate in water bath at 44.5º±0.2ºC for 21 hours (for a total combined incubation time of 24 hours).
Set-up of Biosolids Samples: 15. Gather 7 individual Biosolids samples, collected by operations and
transported to the lab. Prepare dilution A for each of the 7 samples as described in the preparations section and stir for 1 hour; these will result in 10x dilutions.
16. Clear off the large cart, disposing of BBT sample dilutions, and place clean narrow mouth, plastic square dilution bottles with 99mL of
Laboratory Standard Operation
Procedure SOP NO: LAB-BIO-003 V1.0
Measuring Fecal Coliforms in Biosolids by Multiple-Tube Fermentation Procedures
PAGE: 6 of 9 SOP NO: LAB-BIO-003 V1.0 DATE: July 2004 SUPERSEDES: NEW
PROCEDURE CONT:
Phosphate buffered dilution on columns 1-7 and dilution rows 1,000,000x-100x (the 10x dilutions are the stirred “dilution A” samples in the Erlenmeyer flasks).
17. As stated in the preparations, prepare the serial dilutions B-F of each sample to be analyzed.
18. From refrigerator 1, retrieve the Hach MPN A-1 media tubes and transport to biology lab.
19. Place 20 MPN tubes into tube racks label 1C-7C for the Biosolids, and place 5 MPN tubes into the rack labeled C for control. There is a C next to the rack number for each rack used for the biosolids sample i.e. 1C, 2C.
20. Each rack has 4 rows labeled with dilution amounts (1,000x; 10,000x; 100,000x; 1,000,000x) Wearing a pair of sterile gloves, unscrew the tube lids in rack 1C row 1,000,000x dilution and lay topside down.
21. Using the 10mL automatic pipet, pipet 10mL of well mixed sample from cart on sample column 1, dilution 1,000,000x and transfer into all five MPN tubes on the 1,000,000x row of rack 1C. Recap all five tubes in the rack 1C row 1,000,000x. (begin with weakest dilution, 1,000,000x dilution, to avoid cross contamination)
22. Unscrew the lids for rack 1C row 100,000x dilutions and lay topside down. Using the 10mL automatic pipet, pipet 10mL of well mixed sample from sample column 1, dilution 100,000x on the cart and transfer into all five MPN tubes on the 100,000x row of rack 1C. Recap all five tubes in the rack 1C row 100,000x.
23. Unscrew the lids for rack 1C row 10,000x dilutions and lay topside down. Using the 10mL automatic pipet, pipet 10mL of well mixed sample from sample column 1, dilution 10,000x on the cart and transfer into all five MPN tubes on the 10,000x row of rack 1C. Recap all five tubes in the rack 1C row 10,000x.
24. Unscrew the lids for rack 1C row 1,000x dilutions and lay topside down. Using the 10mL automatic pipet, pipet 10mL of well mixed sample from sample column 1, dilution 1,000x on the cart and transfer into all five MPN tubes on the 1,000x row of rack 1C. Recap all five tubes in the rack 1C, row 1,000x.
25. Repeat Steps 5-9 for remaining tube racks (2C-7C) using a new pipet tip for each sample.
26. For the control rack, unscrew the caps of all 5 MPN tubes and place top side down on the counter. Using a new pipet tip add 10mL of Phosphate buffered dilution Water into each tube and recap.
27. For all 7 racks of MPN tubes, one at a time, cover the topside (tube caps) with hand and gently invert several times shaking racks gently while inverted to remove any air bubbles that may be present in the

Laboratory Standard Operation
Procedure SOP NO: LAB-BIO-003 V1.0
Measuring Fecal Coliforms in Biosolids by Multiple-Tube Fermentation Procedures
PAGE: 7 of 9 SOP NO: LAB-BIO-003 V1.0 DATE: July 2004 SUPERSEDES: NEW
PROCEDURE CONT:
smaller tube inside the MPN tube (as this may later create false positives).
28. After all air bubbles have been removed from small inner tube, place all 8 racks (1C-7C and control) inside the jacketed incubator, located in control room just west of laboratory, and record the time and temperature on bench sheet (located in the top drawer of the file cabinet in the biology lab in blue file labeled “lab forms”). Temperature of the jacketed incubator must be set at 35ºC±0.5ºC, samples will remain in this incubator for 3 hours.
29. After the 3 hour incubation period, remove the racks from jacketed incubator, write time and temperature on bench sheet, and transfer into the water bath incubator located on the west counter of the biology lab. Record the time and temperature the racks are placed into the water bath incubator on the bench sheet. Incubate in water bath at 44.5º±0.2ºC for 21 hours (for a total combined incubation time of 24 hours).
BBT Data Analysis: 1. After 21 hour incubation period in water bath, remove BBT tube racks
and gently place on the counter in the biology lab. Record time and temperature on bench sheet.
2. Starting with rack 1, dilution 1,000,000x remove each MPN tube and record a positive or negative (+/-) result on the bench sheet.
Each tube is examined for growth and gas production. Gas production, with growth, is considered a positive reaction. Failure to produce gas constitutes a negative reaction. Growth is indicated by cloudiness within the entire tube, gas production is indicated by bubble formation in the small inner tube.
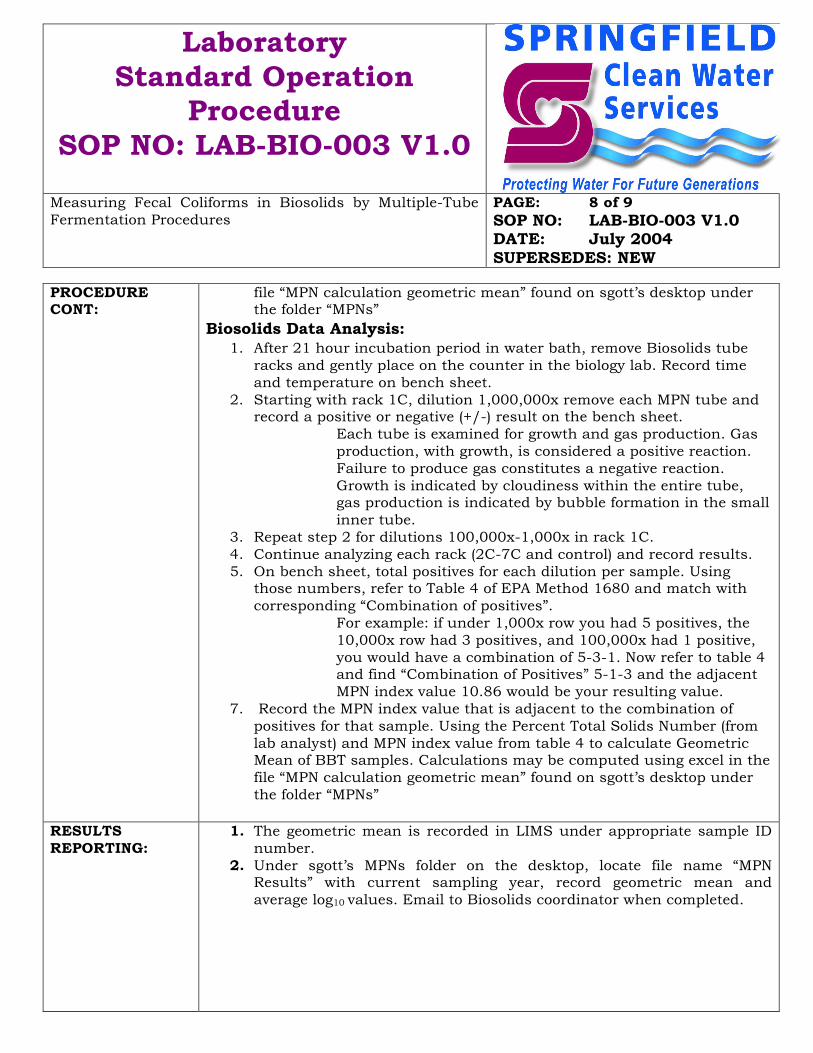
3. Repeat step 2 for dilutions 100,000x-1,000x in rack 1. 4. Continue analyzing each rack (2-7 and control) and record results. 5. On bench sheet, total positives for each dilution per sample. Using
those numbers, refer to Table 4 of EPA Method 1680 and match with corresponding “Combination of positives”.
For example: if under 1,000x row you had 5 positives, the 10,000x row had 3 positives, and 100,000x had 1 positive, you would have a combination of 5-3-1. Now refer to table 4 and find “Combination of Positives” 5-1-3 and the adjacent MPN index value 10.86 would be your resulting value.
6. Record the MPN index value that is adjacent to the combination of positives for that sample. Using the Percent Total Solids Number (from lab analyst) and MPN index value from table 4 to calculate Geometric Mean of BBT samples. Calculations may be computed using excel in the
Laboratory Standard Operation
Procedure SOP NO: LAB-BIO-003 V1.0
Measuring Fecal Coliforms in Biosolids by Multiple-Tube Fermentation Procedures
PAGE: 8 of 9 SOP NO: LAB-BIO-003 V1.0 DATE: July 2004 SUPERSEDES: NEW
PROCEDURE CONT:
file “MPN calculation geometric mean” found on sgott’s desktop under the folder “MPNs”
Biosolids Data Analysis: 1. After 21 hour incubation period in water bath, remove Biosolids tube
racks and gently place on the counter in the biology lab. Record time and temperature on bench sheet.
2. Starting with rack 1C, dilution 1,000,000x remove each MPN tube and record a positive or negative (+/-) result on the bench sheet.
Each tube is examined for growth and gas production. Gas production, with growth, is considered a positive reaction. Failure to produce gas constitutes a negative reaction. Growth is indicated by cloudiness within the entire tube, gas production is indicated by bubble formation in the small inner tube.
3. Repeat step 2 for dilutions 100,000x-1,000x in rack 1C. 4. Continue analyzing each rack (2C-7C and control) and record results. 5. On bench sheet, total positives for each dilution per sample. Using
those numbers, refer to Table 4 of EPA Method 1680 and match with corresponding “Combination of positives”.
For example: if under 1,000x row you had 5 positives, the 10,000x row had 3 positives, and 100,000x had 1 positive, you would have a combination of 5-3-1. Now refer to table 4 and find “Combination of Positives” 5-1-3 and the adjacent MPN index value 10.86 would be your resulting value.
7. Record the MPN index value that is adjacent to the combination of positives for that sample. Using the Percent Total Solids Number (from lab analyst) and MPN index value from table 4 to calculate Geometric Mean of BBT samples. Calculations may be computed using excel in the file “MPN calculation geometric mean” found on sgott’s desktop under the folder “MPNs”
RESULTS REPORTING:
1. The geometric mean is recorded in LIMS under appropriate sample ID number.
2. Under sgott’s MPNs folder on the desktop, locate file name “MPN Results” with current sampling year, record geometric mean and average log10 values. Email to Biosolids coordinator when completed.
Laboratory Standard Operation
Procedure SOP NO: LAB-BIO-003 V1.0
Measuring Fecal Coliforms in Biosolids by Multiple-Tube Fermentation Procedures
PAGE: 9 of 9 SOP NO: LAB-BIO-003 V1.0 DATE: July 2004 SUPERSEDES: NEW
HISTORY:
New Effective July 2004-Replaces EPA Method 1680 October 2002 Draft
REFERENCES: EPA Method 1680: Fecal Coliforms in Sewage Sludge (Biosolids) by Multiple Tube Fermentation Using Lauryl Triptose Broth (LTB) and EC Medium July 2006
PREPARED BY:
Stephanie Gott Plant Biologist
DATE:
July 2004
APPROVED BY:
James Burks Laboratory Supervisor
DATE: July 2004
LAST REVIEW BY:
James Burks Laboratory Supervisor
DATE: July 2014

Laboratory Standard Operation
Procedure SOP NO: LAB-INST-001 V2.0
Determination of Total Cyanide By Flow Injection Analysis Utilizing In-Line Ultraviolet Digestion with Gas Diffusion Separation and Amperometric Detection
PAGE: 1 of 7 SOP NO: LAB-INST-001 V2.0 DATE: March 2013 SUPERSEDES: V1.0
TITLE: Determination of Total Cyanide By Flow Injection Analysis Utilizing In-Line
Ultraviolet Digestion with Gas Diffusion Separation and Amperometric Detection
SUMMARY: The purpose of this method is to determine total and/or amenable cyanide waste water samples. Samples are first mixed with acid reagents, and then introduced into an in-line cyanide distillation unit. In this unit, the samples are passed over a 312 nm UV lamp to cleave metal-CN- complexes. The CN-
released from these complexes during the irradiation combines with protons to form HCN gas. The sample then exits the distillation unit and passes through a sodium hydroxide solution flowing across the bottom of the membrane. The cyanide ion is monitored amperometrically with a silver working electrode, silver/silver chloride reference electrode, and platinum/stainless steel counter electrode, at an applied potential of zero volts. The current generated is proportional to the cyanide concentration present in the original sample. For samples needing the amenable cyanide, the samples are first chlorinated and then analyzed.
RESPONSIBILITY: Chemist or designee
SCOPE: This test is applicable to drinking water, ground water, domestic and industrial waste waters, biosolids and soil samples.
EQUIPMENT:
• Class A glass pipettes: 50mL, 25mL, 20mL, 10mL, 5mL, 4mL, 2.5mL and 1mL
• Class A glass volumetric flasks: 2000mL, 1000mL, 250mL and 100mL
• 500mL Glass beaker and watch glass to fit
• Lachat QuikChem®8500 Series 2 Flow Injection analyzer with sampler, multi-channel proportioning pump, reaction manifold, amperometric detector apparatus, In-Line sample preparation module with heating unit and 312 nm UV lamp, direct voltage detector, silver electrode, silver/silver chloride electrode, platinum/stainless steel electrode, and data system
• 13 x 100 glass disposable culture tubes (Kimble Chase 73500-13100) • Electronic Finnpipettes®: 10mL, 5mL, and 100-1000uL
• Disposable tips for Finnpipettes®
• 1mL disposable graduated transfer pipettes
• Plastic 1L and 2L containers

Laboratory Standard Operation
Procedure SOP NO: LAB-INST-001 V2.0
Determination of Total Cyanide By Flow Injection Analysis Utilizing In-Line Ultraviolet Digestion with Gas Diffusion Separation and Amperometric Detection
PAGE: 2 of 7 SOP NO: LAB-INST-001 V2.0 DATE: March 2013 SUPERSEDES: V1.0
EQUIPMENT CONT:
• Aluminum foil
• Stir plate and magnetic stir bar
CHEMICALS/ REAGENTS:
• Ascorbic Acid (C6H8O6): ACS grade or equivalent
• Citric Acid monohydrate (C6H8O7-H2O): ACS grade or equivalent • Concentrated sulfuric acid (H2SO4): Certified high purity
• Sodium chloride (NaCl): ACS grade or equivalent
• Sodium Hydroxide (NaOH): ACS grade or equivalent
• Bismuth nitrate pentahydrate [ Bi(NO3)3.5H2O]: ACS grade or equivalent • Calcium hypochlorite [ Ca(OCl)2]: ACS grade or equivalent
• Potassium iodide (KI) starch test paper
• H2O2 (3%): ACS grade or equivalent
• Sodium thiosulfate (Na2S2O3): ACS grade or equivalent
• Cyanide standard: 1000 mg/L, ERA Cat# 998 • Water: ASTM type II reagent water (resistivity >18 meg-ohm at 25°C)
Barnstead Nanopure Diamond
PREPARATIONS:
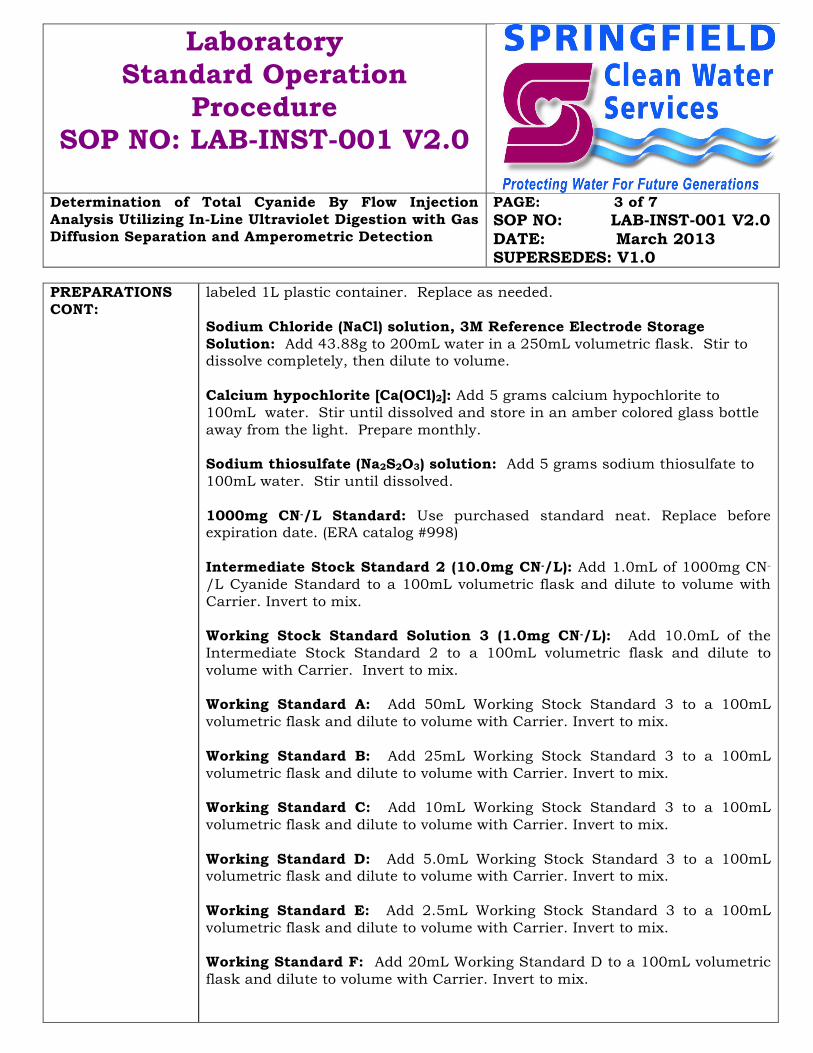
Stock Sodium Hydroxide Solution (1.0M): Add 40.0g sodium hydroxide (NaOH) to 800mL of water in a 1L volumetric flask and stir to dissolve. Dilute to volume with water, stir to mix and transfer to a labeled 1L plastic container. Carrier, Diluent for Standards and Acceptor Solution (0.025M NaOH): Add 50mL of 1M NaOH solution and 1950mL nanopure water to a 2L volumetric flask. Invert several times to mix. Filter the solution thru a 0.45µm vacuum filter and transfer to a labeled 2L plastic container. Total Acid Reagent 1-Modified (TA1M): Add 55mL of concentrated sulfuric acid to 800mL of water in a 1L volumetric flask and cool to room temperature. Add 19g of ascorbic acid and stir until dissolved. Add 19g citric acid and stir until dissolved. Dilute to the mark and transfer to a labeled 1L plastic container. Replace as needed. Total Acid Reagent 2-Modified (TA2M): Add 1 gram of bismuth nitrate pentahydrate to a 1L volumetric flask. Add 55mL of water then carefully add 55mL of concentrated sulfuric acid. Stir until the bismuth nitrate has dissolved. Carefully add 800mL water to the flask and cool to room temperature. Add 19g of ascorbic acid and stir until dissolved. Add 19g citric acid and stir until dissolved. Dilute to the mark and transfer to a
Laboratory Standard Operation
Procedure SOP NO: LAB-INST-001 V2.0
Determination of Total Cyanide By Flow Injection Analysis Utilizing In-Line Ultraviolet Digestion with Gas Diffusion Separation and Amperometric Detection
PAGE: 3 of 7 SOP NO: LAB-INST-001 V2.0 DATE: March 2013 SUPERSEDES: V1.0
PREPARATIONS CONT:
labeled 1L plastic container. Replace as needed. Sodium Chloride (NaCl) solution, 3M Reference Electrode Storage Solution: Add 43.88g to 200mL water in a 250mL volumetric flask. Stir to dissolve completely, then dilute to volume. Calcium hypochlorite [Ca(OCl)2]: Add 5 grams calcium hypochlorite to 100mL water. Stir until dissolved and store in an amber colored glass bottle away from the light. Prepare monthly. Sodium thiosulfate (Na2S2O3) solution: Add 5 grams sodium thiosulfate to 100mL water. Stir until dissolved. 1000mg CN-/L Standard: Use purchased standard neat. Replace before expiration date. (ERA catalog #998) Intermediate Stock Standard 2 (10.0mg CN-/L): Add 1.0mL of 1000mg CN-
/L Cyanide Standard to a 100mL volumetric flask and dilute to volume with Carrier. Invert to mix. Working Stock Standard Solution 3 (1.0mg CN-/L): Add 10.0mL of the Intermediate Stock Standard 2 to a 100mL volumetric flask and dilute to volume with Carrier. Invert to mix. Working Standard A: Add 50mL Working Stock Standard 3 to a 100mL volumetric flask and dilute to volume with Carrier. Invert to mix. Working Standard B: Add 25mL Working Stock Standard 3 to a 100mL volumetric flask and dilute to volume with Carrier. Invert to mix. Working Standard C: Add 10mL Working Stock Standard 3 to a 100mL volumetric flask and dilute to volume with Carrier. Invert to mix. Working Standard D: Add 5.0mL Working Stock Standard 3 to a 100mL volumetric flask and dilute to volume with Carrier. Invert to mix. Working Standard E: Add 2.5mL Working Stock Standard 3 to a 100mL volumetric flask and dilute to volume with Carrier. Invert to mix. Working Standard F: Add 20mL Working Standard D to a 100mL volumetric flask and dilute to volume with Carrier. Invert to mix.

Laboratory Standard Operation
Procedure SOP NO: LAB-INST-001 V2.0
Determination of Total Cyanide By Flow Injection Analysis Utilizing In-Line Ultraviolet Digestion with Gas Diffusion Separation and Amperometric Detection
PAGE: 4 of 7 SOP NO: LAB-INST-001 V2.0 DATE: March 2013 SUPERSEDES: V1.0
PREPARATIONS CONT:
Working Standard G: Add 10mL Working Standard D to a 100mL volumetric flask and dilute to volume with Carrier. Invert to mix. Working Standard H: Add 4.0mL Working Standard D to a 100mL volumetric flask and dilute to volume with Carrier. Invert to mix. Working Standard I (Blank): In a 100mL volumetric flask fill to the mark with Carrier. Blank Spike: Add 200µL of Intermediate Stock Standard 2 (10.0mg CN-/L) to a specimen cup and add 10mL Carrier. Swirl cup to mix. Laboratory Fortified Matrix (LFM): Add 200µL of Intermediate Stock Standard 2 (10.0mg CN-/L) to a specimen cup and add 10mL of sample. Swirl cup to mix.
PROCEDURE:
1. Using LIMS, run a backlog report for CN_Total-W, CN_Total-S, CN_Ammen-W and CN_Ammen-S. Use this as your Run Worksheet.
2. On the Run Worksheet, list the eight (8) standards, the blank and the blank spike. Number them sequentially 1 through 10.
3. Number the first sample as 11,12 (spike set), the next as 13,14 (duplicate set) and the rest of the samples consecutively to the end.
4. Pour the standards and samples into the appropriate test tubes and place into the autosampler rack.
INSTRUMENT SETUP/ANALYSIS:
1. Power up the Lachet QuikChem®8500 Series 2 system by turning on the TRIPP.LITE power strip switch on the shelf behind the instrument.
2. Initialize the XYZ Autosampler by turning it off using the switch on the backside of the unit, waiting a few seconds, and then turning it back on.
3. Turn on the computer, the monitor and the printer. 4. Turn on the In-Line Sample Prep module. 5. Open the software program by selecting the Omnion 3.0 icon on the
computer desktop. 6. Select the “OPEN” folder. In the Menu bar select “Methods,” and open
the “Cyanide In-Line” method. Select “Cyanide temp” file. A box will open and ask “Do you want to change the set points of the relevant heaters?” Select “Yes.” Maximize the “Run Worksheet” window.
7. Open the cabinet above the flow injection analyzer, remove the three required 1 Liter plastic reagent containers for this analysis and place them and one water rinse container on the counter between the autosampler and the pump. Remove the container caps.

Laboratory Standard Operation
Procedure SOP NO: LAB-INST-001 V2.0
Determination of Total Cyanide By Flow Injection Analysis Utilizing In-Line Ultraviolet Digestion with Gas Diffusion Separation and Amperometric Detection
PAGE: 5 of 7 SOP NO: LAB-INST-001 V2.0 DATE: March 2013 SUPERSEDES: V1.0
INSTRUMENT SETUP/ANALYSIS CONT:
8. Make sure the sampling line from the autosampler is connected to the Cyanide manifold.
9. Raise the cover of the Faraday cage (CC-5e). 10. Remove one reference electrode and its o-ring from the Sodium chloride
(3M) solution and install in the electrode holder. Connect the output of the electrode cable to the input of the amperometric controller.
11. Turn on the pump. Clamp down and move the levers to the left one click for the following cartridges: the number 1 cartridge is the purple/purple duraprene water rinse line at the very top; the number 2 cartridge is the orange/white duraprene sample line from the autosampler; the number 3 cartridge is the black/black PVC Carrier reagent line; the number 4 cartridge is the orange/white duraprene NaOH reagent line; the number 5 cartridge is the orange/white duraprene TA1 reagent line and the number 6 cartridge is the orange/white TA2 reagent line.
12. Make sure the sampling needle is in its water rinse, if not, reinitialize the autosampler.
13. Pump water thru all lines to verify there are no leaks in the fittings, around the working electrode gasket, or around the membrane on the diffusion block. After a steady flow with the water switch to reagents and pump thru the manifold.
14. Turn on the amperiometric controller (BASi LC-3D), set the Filter (Hz) to 0.08, the Range nA to 100 and the Cell Mode to STBY. Allow the system to equilibrate for 15 to 20 minutes.
15. Adjust the APP E display to V = 0.0 and the Offset display to nA = 0.0. Turn the Display to Output nA and the Cell Mode to Cell and allow 5 more minutes to stabilize.
16. In the menu bar, select the Preview icon (eyeball). This shows the baseline in real time with air bubbles and baseline. When the baseline has stabilized select Stop (red solid circle). Select Run (green arrow) to start the analysis.
17. After the calibration samples are integrated, verify the run has a minimum correlation coefficient at least 0.995.
18. After the run is complete, remove the reagent lines and place in water for 10 to 15 minutes. Turn off the amperiometric controller and the In- Line Sample Prep module. Recap the reagent containers and store back in the cabinet. Turn off the pump and transfer all pump lines to a container with water and store there until the next run. Turn off the pump and release all pump tube cartridges. (Neatly coil the tubing lines and place on the counter.)
19. For all total cyanide samples, continue to the results reporting. 20. For all amenable cyanide samples, if the total cyanide value is less

Laboratory Standard Operation
Procedure SOP NO: LAB-INST-001 V2.0
Determination of Total Cyanide By Flow Injection Analysis Utilizing In-Line Ultraviolet Digestion with Gas Diffusion Separation and Amperometric Detection
PAGE: 6 of 7 SOP NO: LAB-INST-001 V2.0 DATE: March 2013 SUPERSEDES: V1.0
INSTRUMENT SETUP/ANALYSIS CONT:
than 0.010 mg/L, continue to the Results Reporting and enter the value as <0.005 mg/L amenable cyanide. If the total cyanide value is >0.010 mg/L the sample must be chlorinated and reanalyzed.
CHLORINATION PROCEDURE:
1. Wrap the 500mL beaker and watch glass in aluminum foil. Add a stir bar and 250mL of the original sample to the beaker.
2. Keep the aluminum foil on throughout the entire procedure. 3. Add the Ca(OCl)2 solution drop wise to the solution while stirring.
Maintain the pH between 11 and 12 with addition of the NaOH solution. 4. Place a drop of the treated solution on a strip of KI-starch paper. A
strong blue color indicates sufficient chlorine. Stir this solution for one hour. If necessary add more Ca(OCl)2 or NaOH as needed.
5. After the one hour remove any residual chlorine by adding 4 drops H2O2 (3%) and then 2 drops Na2S2O3 solution. Continue this addition until a test drop on the KI-starch paper shows no color change.
6. Analyze and calculate this sample following the above total cyanide procedure.
7. Report the result as: mg/L CN- amenable to chlorination= (mg/L CN- unchlorinated) – (mg/L CN- chlorinated).
RESULTS REPORTING:
1. In the space above the Channel 1-Cyanide window display, right click the mouse and select “Channel Display Properties”
2. In the “Annotation” box, under “Horizontal” select “(nothing)”. Click the “Accept” box and then click the “Close” box. (This is simply to clean up the report peak scans and make them more legible.)
3. In the menu bar select “Tools”, then “Custom Reports” 4. On the menu bar for that window select the open folder file to open it. 5. Highlight the “Cyanide” file and click “OK”. The saved report template
is now open. Because not all changes can be saved in the template, some manual formatting also has to be done before the report is printed.
6. On the toolbar, select the Yellow cylinder (format) to open the Custom Report Format window
7. Select “Layout”, then select the “Header” font, then under “Size” click 11, and then click “OK” at the bottom of the window. Make sure in the Table tab and the Charts tab the correct dilution options are checked
8. Click “Apply” at the bottom of the “Layout” window and click “Close” 9. On the menu bar click the “Printer icon” and select “Print” 10. After the report has printed, shut the Omnion system down. Click the
red “X” (Close button) in the upper right corner. A box opens and asks,
Laboratory Standard Operation
Procedure SOP NO: LAB-INST-001 V2.0
Determination of Total Cyanide By Flow Injection Analysis Utilizing In-Line Ultraviolet Digestion with Gas Diffusion Separation and Amperometric Detection
PAGE: 7 of 7 SOP NO: LAB-INST-001 V2.0 DATE: March 2013 SUPERSEDES: V1.0
RESULTS REPORTING:
“Do you really want to exit Omnion?” Select “Yes”. Another box opens and asks, “Do you wish to save changes?” Select “No”.
11. Power off the system by turning off the Tripp-Lite plug strip, the computer, the monitor and the printer.
12. Record all data appropriately into LIMS.
REPORT:
Report results to three significant figures.
HISTORY:
Version 1.0 Effective March 2007 Version 2.0 Effective March 2013- Equipment and procedure updated to reflect new instrument.
REFERENCES:
ASTM Method D 7511-09e2
PREPARED BY:
Sandra Werbitzky Chemist
DATE: March 2013
APPROVED BY:
James Burks Laboratory Supervisor
DATE:
March 2013
LAST REVIEW BY:
James Burks Laboratory Supervisor
DATE: March 2014

Laboratory Standard Operation
Procedure SOP NO: LAB-INST-002 V2.0
Determination of Anions by Ion Chromatography with Chemical Suppression of Eluent Conductivity
PAGE: 1 of 8 SOP NO: LAB-INST-002 V2.0 DATE: August 2008 SUPERSEDES: V1.0
TITLE: Determination of Anions by Ion Chromatography with Chemical Suppression of Eluent Conductivity
SUMMARY: Ion chromatography provides a single instrumental technique that can be
used for rapid, sequential measurement of various anions. The purpose of this method is to determine the concentration of common anions such as fluoride, chloride, nitrite, sulfate, nitrate and o-phosphate in drinking water, ground water, and domestic and industrial waste waters. The water sample is injected into the eluent stream and then passes through an ion exchange. The anions are separated on their basis of relative affinities for a low-capacity, strongly basic anion guard and analytical columns. The separated anions go through an eluent regenerating suppressor that provides continuous suppression of eluent conductivity and enhances the analyte response. While in the suppressor the separated ions are converted to their highly conductive acid forms as the conductivity of the eluent is greatly decreased. These separated anions in their acid forms are measured by conductivity. They are identified by their retention times and spikes as compared to standards. Quantization is determined by peak area.
RESPONSIBILITY: Chemist or designee
SCOPE: This test is applicable to drinking water, ground water, domestic and industrial waste waters, biosolids and soil samples. (Solid samples are made to volume, filtered and then analyzed.)
EQUIPMENT:
• Class A glass pipettes: 50mL, 20mL, 10mL, 2.0mL and 1.0mL
• Class A glass volumetric flasks: 200mL and 100mL
• Dionex ICS(Ion Chromatography System) 2000, Dionex AS(Autosampler), computer with Chromeleon software
• Electronic Finnpipettes®: 10mL, 5mL, and 100-1000µL • Disposable tips for Finnpipettes®
• Disposable specimen cups
• Whatman 44 filter paper or equivalent(CFP-44)
• Magnetic stirrer and magnetic stir bars
• 2.0L vacuum filter flask, hose and stopper • 10mL disposable vials (Thermo Scientific Autoselect Polyvial Quantity
100 with caps and septa P/N 055058)
• Dionex IonPac ™ AS18 RFIC™ Analytical Column (4 x 250 mm) P/N

Laboratory Standard Operation
Procedure SOP NO: LAB-INST-002 V2.0
Determination of Anions by Ion Chromatography with Chemical Suppression of Eluent Conductivity
PAGE: 2 of 8 SOP NO: LAB-INST-002 V2.0 DATE: August 2008 SUPERSEDES: V1.0
EQUIPMENT CONT:
060549
• Dionex IonPac™ AG18 RFIC™ Guard Column (4 x 50 mm) P/N 060551
• Dionex ERS 500 4mm Electrolytically Regenerated Suppressor P/N 082540
CHEMICALS/ REAGENTS:
• Dionex EGC III Potassium Hydroxide Eluent Generator Cartridge P/N 074532
• Simple Nutrients Reference Material, Ready-to-Use WastewatR™ ERA Catalog #739
• Minerals Reference Material, ERA Catalog #506
• Chloride Standard: 1000mg/L, ERA Catalog #988 • Fluoride Standard: 1000mg/L, ERA Catalog #989
• Nitrate Standard: 1000mg/L, ERA Catalog #991
• Nitrite Standard: 1000mg/L, ERA Catalog #990
• Phosphate Standard: 1000mg/L, ERA Catalog #993 • Sulfate Standard: 1000mg/L, ERA Catalog #995
PREPARATIONS:
1000mg Chloride Standard: Use purchased standard neat. Replace before expiration date. (ERA catalog #988). 1000mg Fluoride Standard: Use purchased standard neat. Replace before expiration date. (ERA catalog #989). 1000mg Nitrate Standard: Use purchased standard neat. Replace before expiration date. (ERA catalog #991). 1000mg Nitrite Standard: Use purchased standard neat. Replace before expiration date. (ERA catalog #990). 1000mg Phosphate Standard: Use purchased standard neat. Replace before expiration date. (ERA catalog #993). 1000mg Sulfate Standard: Use purchased standard neat. Replace before expiration date. (ERA catalog #995). Working Stock Standard A: Add the following to a 100mL volumetric flask: 1.0mL of 1000mg/L Phosphate Standard 1.0mL of 1000mg/L Fluoride Standard 2.0mL of 1000mg/L Nitrate Standard
Laboratory Standard Operation
Procedure SOP NO: LAB-INST-002 V2.0
Determination of Anions by Ion Chromatography with Chemical Suppression of Eluent Conductivity
PAGE: 3 of 8 SOP NO: LAB-INST-002 V2.0 DATE: August 2008 SUPERSEDES: V1.0
PREPARATIONS CONT:
2.0mL of 1000mg/L Nitrite Standard 10.0mL of 1000mg/L Chloride Standard 10.0mL of 1000mg/L Sulfate Standard Dilute to volume with water. Invert to mix. Working Stock Standard 1: Add the following to a 200mL volumetric flask: 1.0mL of 1000mg/L Phosphate Standard 1.0mL of 1000mg/L Fluoride Standard 2.0mL of 1000mg/L Nitrate Standard 2.0mL of 1000mg/L Nitrite Standard 10.0mL of 1000mg/L Chloride Standard 10.0mL of 1000mg/L Sulfate Standard Dilute to volume with water. Invert to mix. Working Stock Standard 2: Add 60.0mL of Working Stock Standard 1 to a 100mL volumetric flask and dilute to volume with water. Invert to mix. Working Stock Standard 3: Add 20mL Working Stock Standard 1 to a 100mL volumetric flask and dilute to volume with water. Invert to mix. Working Stock Standard 4: Add 10mL Working Stock Standard 1 to a 100mL volumetric flask and dilute to volume with water. Invert to mix. Working Stock Standard 5: Add 10mL Working Stock Standard 4 to a 100mL volumetric flask and dilute to volume with water. Invert to mix. Laboratory Fortified Matrix (LFM): Add 25µL of 1000mg/L Phosphate Standard to an empty specimen cup. Add 10mL of the daily SW Effluent 001 grab sample. Swirl cup to mix. Laboratory Fortified Matrix 2 (LFM2): Add 25µL of the 1000mg/L Nitrate Standard and 25µL of the 1000mg/L Nitrite Standard to an empty specimen cup. Add 10mL of the daily NW Effluent 001 grab sample. Swirl cup to mix. ERA Nutrient Check Standard: If the listed concentration of Phosphate or the listed concentration of Nitrate are greater than the Working Stock Standard 1 (5mg/L Phosphate, and 10mg/L Nitrate) make an appropriate dilution to place it within the range of standards used. If the Nutrient check standard falls within the above range run neat as no dilution is needed. ERA Mineral Check Standard: If any of the listed concentrations of Chloride,
Laboratory Standard Operation
Procedure SOP NO: LAB-INST-002 V2.0
Determination of Anions by Ion Chromatography with Chemical Suppression of Eluent Conductivity
PAGE: 4 of 8 SOP NO: LAB-INST-002 V2.0 DATE: August 2008 SUPERSEDES: V1.0
PREPARATIONS CONT:
Fluoride, and Sulfate are greater than the Working Stock Standard 1 (50mg/L Chloride, 5mg/L Fluoride, and 50mg/L Sulfate) make an appropriate dilution to place it within the range of standards used. If the Mineral check standard falls within the above range run neat as no dilution is needed. SW Effluent Samples: Analyze this sample undiluted and spiked for Phosphate. Additionally, dilute this sample 50/50 with water and analyze for Nitrate. Plant 1 Final Samples: Analyze this sample undiluted for Phosphate. Additionally, dilute this sample 50/50 with water and analyze for Nitrate. Plant 1 Denite Samples: Dilute this sample 50/50 with water and analyze for Nitrate. Centrate Samples: Dilute this sample 1.0mL sample with 9.0mL water in a specimen cup and analyze for Phosphate. Plant 2 Aeration Basin Samples (Zones 1 through 5): Dilute these samples 2mL sample with 8mL water and analyze for Phosphate and Nitrate. NW Selector Basin Samples (Sites 1 through 4): Dilute these samples 2mL sample with 8mL water and analyze for Phosphate and Nitrate. Dilution Comments: The above dilutions are the current ones and subject to change as the sample concentrations change.
INSTRUMENT SETUP:
1. The Dionex ICS-2000, the autosampler (AS), and its computer are always left powered up.
2. Make sure the Chromeleon software program is open to the home page similar the diagram shown below.
3. The 2L Eluent water container sets on top of the ICS-2000 unit. 4. Fill this container to the top with nanopure water that has been
degassed overnight. 5. In the Pump window (upper left) from the above diagram, open the
Pump Settings box. 6. Change the Eluent Bottle volume to 2.00L. 7. To prime the system, select the Prime button.

Laboratory Standard Operation
Procedure SOP NO: LAB-INST-002 V2.0
Determination of Anions by Ion Chromatography with Chemical Suppression of Eluent Conductivity
PAGE: 5 of 8 SOP NO: LAB-INST-002 V2.0 DATE: August 2008 SUPERSEDES: V1.0
INSTRUMENT SETUP CONT:
8. A Chromeleon window opens saying: Please open the waste valve and press OK to continue.
9. The waste valve is located on the lower left pump inside the ICS-2000 front door. Turn the screw valve (waste valve) 1/4 turn counterclockwise. Then press OK.
10. Allow the pump to run until no more air bubbles are seen in the waste line.
11. Press OFF in the pump settings window, then exit the window. 12. In the ICS-2000 System window (middle right) click the Startup button. 13. While the system is stabilizing, set up the current samples to be
analyzed. 14. Using the keyboard press the Control key, then the Tab key. This
opens a file tree with all the batches recorded by year, month and date. 15. Open the most recent batch file, usually the previous days date. 16. Save As the batch to be run as the current date. 17. Now in the template edit the dates of the samples, the dilution factors
and any additional samples that are to be run. 18. When finished, save the file. 19. Control/tab back to the home screen.
Pump
Sample
System Log Injector +AS Autosampler
ICS-2000 System
Column Heater
Real Time Scan
Detector ICS-2000 Eluent Generator

Laboratory Standard Operation
Procedure SOP NO: LAB-INST-002 V2.0
Determination of Anions by Ion Chromatography with Chemical Suppression of Eluent Conductivity
PAGE: 6 of 8 SOP NO: LAB-INST-002 V2.0 DATE: August 2008 SUPERSEDES: V1.0
INSTRUMENT ANALYSIS: INSTRUMENT ANALYSIS CONT:
1. Filter all samples that have any suspended particles in them thru Whatman 44 filter paper.
2. Make the appropriate spikes and dilutions (see above). 3. Remove the autosampler tray from the autosampler. 4. Discard the previous day’s samples leaving the standards and check
samples in the tray and replace them with the current samples. 5. Use the following format:
No. Name Type Dilution Factor 1 Water Matrix 2 Std5 Standard 3 Std4 “ 4 Std3 “ 5 Std2 “ 6 Std A “ 7 Std1 “ 8 Std2 “ 9 Water Matrix 10 001 (date) Unknown 11 001 (date) “ 12 001 (date) spike Spiked 13 Nutrient Ck Std Validate 14 001 (date) ½ Unknown 2.0000 15 001 (date) ½ “ 2.0000 16 Prim Comp (date) “ 17 P1&P2 Inf (date) “ 18 P1 Oxy “ 19 P1 Sec “ 20 Std 2 Validate 21 Water Matrix 22 P1 Final Unknown 23 P1 Final ½ Unknown 2.0000 24 P1 Denite ½ “ 2.0000 25 P2 Aer ML “ 26 RAS “ 27 P2 Final “ 28 TBF “ 29 Centrate “ 10.0000 30 Recycle (date) “ 31 P1 Hdwk out “ 32 P2 Zone 1 1/5 “ 5.0000 33 Std 2 Validate
Laboratory Standard Operation
Procedure SOP NO: LAB-INST-002 V2.0
Determination of Anions by Ion Chromatography with Chemical Suppression of Eluent Conductivity
PAGE: 7 of 8 SOP NO: LAB-INST-002 V2.0 DATE: August 2008 SUPERSEDES: V1.0
INSTRUMENT ANALYSIS CONT:
34 Water Matrix No. Name Type Dilution Factor 35 P2 Zone 2 1/5 Unknown 5.0000 36 P2 Zone 3 1/5 “ 5.0000 37 P2 Zone 4 1/5 “ 5.0000 38 P2 Zone 5 1/5 “ 5.0000 39 NSC 1 1/5 “ 5.0000 40 NSC 2 1/5 “ 5.0000 41 NSC 3 1/5 “ 5.0000 42 NSC 4 1/5 “ 5.0000 43 N PI “ 44 N 001 Eff “ 45 Std 2 Validate 46 Water Matrix 47 N 001 Eff spike Spiked 48 N SC Eff Unknown 49 Mineral Ck Std Validate 50 Std 2 Validate 51 Water Matrix 52 Shutdown * Unknown
(* Make sure the last sample in the run has the Shutdown program selected for its program. All other samples must have the AS18 program selected.)
6. Once the samples are loaded into the tray, place the tray into the
autosampler and close the door. 7. On the home screen main menu top toolbar open Batch. 8. Select Start… and a window will open. 9. Select Add… to find and select the batch with the date that will be run.
Then select Open. 10. Click Ready Check to verify there are no issues or faults that will
prevent the system from running. Exit that window and click Start. 11. The samples will be analyzed automatically and the system will shut
down when finished.

Laboratory Standard Operation
Procedure SOP NO: LAB-INST-002 V2.0
Determination of Anions by Ion Chromatography with Chemical Suppression of Eluent Conductivity
PAGE: 8 of 8 SOP NO: LAB-INST-002 V2.0 DATE: August 2008 SUPERSEDES: V1.0
RESULTS REPORTING:
1. After the run has finished, verify all samples were analyzed by looking at the run template.
2. Check the integration windows for all analytes and standards and make corrections where necessary.
3. To print the results follow the steps below. 4. Control/Tab to open the batch tree file.
5. Right click on the batch file date to be printed. This will open another
window, select Batch Report. 6. A series of report windows are now open. Use the following setting to
print the report:
Use Report Definition: (select) REPORTS/ANIONS_report. With Selected channel: (select) ECD_1 Select sheets to be printed: (select) Summary_INJ VS AREA, Ht, Amt. (select) Print under certain conditions, click the Conditions button A new window opens: (select) Or Print if Sample is the: (select) Last Sample in the sequence. Click OK to exit that window. Click OK again to exit that window. Click OK a last time to print.
REPORT: Report results to three significant figures.
HISTORY:
Version 1.0 Effective June 2005 Version 2.0 Effective August 2008- Updates procedure and equipment to reflect new instrument purchase (ion chromatograph)
REFERENCES:
ASTM Method D 7511-09e2
PREPARED BY:
Sandra Werbitzky Chemist
DATE: August 2008
APPROVED BY:
James Burks Laboratory Supervisor
DATE:
LAST REVIEW BY:
James Burks Laboratory Supervisor
DATE: August 2014

Laboratory Standard Operation
Procedure SOP NO: LAB-INST-002 V2.0
Determination of Anions by Ion Chromatography with Chemical Suppression of Eluent Conductivity
PAGE: 9 of 8 SOP NO: LAB-INST-002 V2.0 DATE: August 2008 SUPERSEDES: V1.0

Laboratory Standard Operation
Procedure SOP NO: LAB-INST-OO3 V2.0
Determination of Total Kjedahl Nitrogen By Flow Injection Analysis (Block Digestor Method)
PAGE: 1 of 9 SOP NO: LAB-INST-003 V2.0 DATE: October 2012 SUPERSEDES: V1.0
TITLE: Determination of Total Kjedahl Nitrogen By Flow Injection Analysis (Block
Digestor Method)
SUMMARY: Samples are digested with sulfuric acid (H2SO4) in a block digestor. Total
Kjeldahl nitrogen is the sum of free-ammonia and organic nitrogen compounds which are converted to ammonium sulfate (NH4)2SO4, under the conditions of the digestion described. Approximately 0.3mL of the digested sample is injected onto the chemistry manifold where its pH is controlled by raising it to a known, basic pH by neutralization and with a concentrated buffer. This in-line neutralization converts the ammonium cation to ammonia, and also prevents undue influence of the sulfuric acid matrix on the pH-sensitive color reaction that follows. The ammonia thus produced is heated with salicylate and hypochlorite to produce blue color which is proportional to the ammonia concentration. The color is intensified by adding sodium nitroprusside. The presence of potassium tartrate in the buffer prevents precipitation of calcium and magnesium. The resulting peak’s absorbance is measured at 660 nm. The peaks are is proportional to the concentration of total kjeldahl nitrogen in the original sample.
RESPONSIBILITY: Chemist or designee
SCOPE: This test is applicable to drinking water, ground water, domestic and industrial waste waters, biosolids and soil samples.
EQUIPMENT:
• Class A glass pipettes: 50mL, 25mL, 10mL, 5mL, and 2.5mL
• Class A glass volumetric flasks: 1000mL, 250mL and 100mL • Lachat QuikChem®8500 Series 2 Flow Injection analyzer with sampler,
multi-channel proportioning pump, reaction manifold, reaction manifold heater, colorimetric detector, data system, 10mm path length glass flow cell and a 660nm interference filter.
• BD 40HT Lachat block digestor with forty 75ml glass round bottom tubes and forty glass cold fingers.
• 2.5mL to 25mL adjustable Dispensette® on a 4 L glass bottle • Hengar granules
• Glass wool, funnels and rack
• 16 x 100 glass disposable culture tubes (Kimble Chase 73500-16100)
• 13 x 100 glass disposable culture tubes (Kimble Chase 73500-13100) • Electronic Finnpipettes®: 10mL, 5mL, and 100-1000µL
Laboratory Standard Operation
Procedure SOP NO: LAB-INST-OO3 V2.0
Determination of Total Kjedahl Nitrogen By Flow Injection Analysis (Block Digestor Method)
PAGE: 2 of 9 SOP NO: LAB-INST-003 V2.0 DATE: October 2012 SUPERSEDES: V1.0
EQUIPMENT CONT:
• Disposable tips for Finnpipettes®
• 1mL disposable graduated transfer pipettes
• Heated stir plate with magnetic stirrer
• pH paper • Timer
• Parafilm
CHEMICALS/ REAGENTS:
• Concentrated sulfuric acid (H2SO4): ACS grade or equivalent
• Red mercuric oxide (HgO): ACS grade or equivalent
• Potassium sulfate K2SO4): ACS grade or equivalent
• Ammonium molybdate tetrahydrate [(NH4)6Mo7O24.4H2O)]: ACS grade or
equivalent
• Antimony potassium tartrate (C8H4O12K2Sb2.3H2O): ACS grade or
equivalent
• Ascorbic Acid (C6H8O6): ACS grade or equivalent • Sodium dodecyl sulfate (CH3(CH2)11OSO3Na): ACS grade or equivalent
• Sodium chloride (NaCl): ACS grade or equivalent
• Sodium Hydroxide (NaOH): ACS grade or equivalent
• Phosphorous standard: 1000 mg/L, ERA Cat# 063 • Water: ASTM type II reagent water (resistivity >18 meg-ohm at 25°C)
Barnstead Nanopure Diamond
• ERA Check Standard: ERA Ready-to-Use WasteWatR Complex Nutrients, Cat# 741
PREPARATIONS:
Mercuric Sulfate Solution: Add ~40mL water and 10mL concentrated sulfuric acid to a 100mL volumetric flask. Add 8.0g of red mercuric oxide and stir until dissolved. Dilute to volume with water. Heating the solution while stirring may be necessary to fully dissolve mercuric oxide. Digestion Solution: Add 133.0g of potassium sulfate and ~700mL of water to a 1L volumetric flask. Gently stir and slowly add 200mL of concentrated sulfuric acid. Add 25.0mL of Mercuric Sulfate Solution. Allow solution to cool to room temperature and dilute to volume with water. Store solution in a labeled plastic container at room temperature to prevent crystallization. Prepare fresh monthly or as needed. Buffer Solution: Add 50g potassium tartrate (or potassium sodium tartrate,

Laboratory Standard Operation
Procedure SOP NO: LAB-INST-OO3 V2.0
Determination of Total Kjedahl Nitrogen By Flow Injection Analysis (Block Digestor Method)
PAGE: 3 of 9 SOP NO: LAB-INST-003 V2.0 DATE: October 2012 SUPERSEDES: V1.0
PREPARATIONS CONT:
K,L-NaKC4H4O6 .4H2O), 50g sodium hydroxide (NaOH), and 26.8g sodium phosphate dibasic heptahydrate (Na2HPO4.7H2O) to 900ml water in a 2L beaker and mix until dissolved. Boil for at least 10 minutes. Cool to room temperature and transfer to a 1L volumetric flask. Dilute to volume with water and invert to mix. Sodium Hydroxide 0.8M Solution: Add 32g sodium hydroxide (NaOH) to 800mL of water in a 1L volumetric flask and stir to dissolve. Dilute to volume with water and stir to mix. Salicylate Nitroprusside: Add 150.0g sodium salicylate [salicylic acid sodium salt, C6H4(OH)(COO)Na, and 1.00g sodium nitroprusside [sodium nitroferricyanide dihydrate,Na2Fe(CN)5NO.2H2O to ~800mL water in a 1L volumetric flask and stir to dissolve. Dilute to volume and invert to mix. Store in a dark bottle and prepare fresh monthly. Hypochlorite Solution: Add 15.0mL of a commercially available solution such as Chlorox bleach [5.25% sodium hypochlorite (NaOCl)] to a 250mL volumetric flask and dilute to volume with water. Invert to mix. Prepare fresh daily Sulfuric Acid/Potassium Sulfate Solution (Carrier and Diluent): Add 31.7g of potassium sulfate to ~800mL of water in a 1L volumetric flask. Slowly add 48mL of sulfuric acid and mix until dissolved. Dilute to volume with water and invert to mix. Store in labeled plastic container. 1000mg N/L Total Kjeldahl Nitrogen Standard: Use purchased standard neat. Replace before expiration date. (ERA catalog #996) Working Standard A (20.0mg N/L): Add 5.0mL of 1000mg N/L Total Kjeldahl Nitrogen Standard to a 250mL volumetric flask and dilute to volume with water. Invert to mix. Adjust pH to <2 with concentrated sulfuric acid (H2SO4). Working Standard B (10.0mg N/L): Add 50mL Working Standard A to a 100mL volumetric flask and dilute to volume with water. Invert to mix. Adjust pH <2 with concentrated sulfuric acid (H2SO4). Working Standard C (5.00mg N/L): Add 25mL Working Standard A to a 100mL volumetric flask and dilute to volume with water. Invert to mix. Adjust pH <2 with concentrated H2SO4. Working Standard D (2.00mg N/L): Add 10mL of Working Standard A to a
Laboratory Standard Operation
Procedure SOP NO: LAB-INST-OO3 V2.0
Determination of Total Kjedahl Nitrogen By Flow Injection Analysis (Block Digestor Method)
PAGE: 4 of 9 SOP NO: LAB-INST-003 V2.0 DATE: October 2012 SUPERSEDES: V1.0
PREPARATIONS CONT:
100mL volumetric flask and dilute to volume with water. Invert to mix. Adjust pH to <2 with concentrated H2SO4.
Working Standard E (1.00mg N/L): Add 5.0mL of Working Standard A to a 100mL volumetric flask and dilute to volume with water. Invert to mix. Adjust pH to <2 with concentrated H2SO4. Working Standard F (0.50mg N/L): Add 2.5mL Working Standard A to a 100mL volumetric flask and dilute to volume with water. Invert to mix. Adjust pH to <2 with concentrated H2SO4. Working Standard G (Blank): Add nothing to a 100ml volumetric flask and dilute to volume with water. Invert to mix. Adjust pH to <2 with concentrated H2SO4. Blank Spike: Add 200µL of 1000mg N/L Total Kjeldahl Nitrogen Standard to a 75mL round bottom tube. Add 20mL of water using a 10.0mL pipette and making sure to rinse sides of flask to ensure that the entire standard is in solution. Laboratory Fortified Matrix (LFM): Add 200µl of 1000mg P/L Phosphorous Standard to a 75mL round bottom tube. Add 20mL of plant effluent sample using a 10.0mL pipette and making sure to rinse sides of flask to ensure the entire standard is in solution. ERA Check Standard: if concentration of N is less than the highest standard (20.0mg N/L) no dilution is needed. If concentration of N is greater than 20.0mg P/L than use an appropriate dilution to place it within the range of your standards (usually 10mLs of standard and 10mLs of water.) (Note: These standards may be combined with the TP standards and digested and analyzed together as a single set for TP and TKN.) Samples Containing Raw/Influent: Prepare by transferring 10mL sample into a digestion tube and adding 10mL of water. Recycle Samples: Prepare by transferring 5mL of sample into a digestion tube and adding 15mL of water. If sample appears to be heavy in solids, transfer only 2mL of sample and add 18mL water. BSTF/North Plant Aeration: Transfer 2mL of sample to a digestion tube and add 18mL of water.

Laboratory Standard Operation
Procedure SOP NO: LAB-INST-OO3 V2.0
Determination of Total Kjedahl Nitrogen By Flow Injection Analysis (Block Digestor Method)
PAGE: 5 of 9 SOP NO: LAB-INST-003 V2.0 DATE: October 2012 SUPERSEDES: V1.0
PROCEDURE:
1. Using LIMS, run a backlog report for TP-W, TP-S, TKN-W, TKN-S, and FF-TKN-W. Use this as your Backlog Worksheet.
2. In a margin of the Run Worksheet, list the six standards, the blank, the spike blank, and the ERA Standard. Number them sequentially 1 through 9.
3. Continue labeling samples in the following order up to 40: • SW 001 samples • Plant influent (PI) samples • Plant recycle samples • Permit samples • Pretreatment samples • Scott Foley’s field soil samples • BBT and BSTF samples • Stormwater samples • North Plant samples
4. Write the manual dilutions you will be using next to the sample ID on the Backlog Worksheet.
5. Line up standards A-G and the ERA Check Standard on the counter (you will need to transfer standards to a specimen cup in order to pipette them.)
6. Transfer 20mL each of standards A-G to digestion tubes 1-7. 7. In digestion tube 8, add 200µL of 1000mg N/L Total Kjeldahl Nitrogen
Standard. Add 20mL of water using a 10.0mL pipette and making sure to rinse sides of flask to ensure the entire standard is in solution.
8. Transfer 20mL of the ERA Check Standard to digestion tube 9. 9. Transfer 20mL of the first Plant Effluent sample into digestion tube 10. 10. Prepare Laboratory Fortified Matrix into digestion tube 11. 11. Transfer 20mL of the next Plant Effluent sample from Backlog
Worksheet into digestion tube 12. 12. Prepare a duplicate of the previous Plant Effluent sample in digestion
tube 13. 13. Continue pipeting samples into digestion tubes following the order of
your Backlog Worksheet. 14. Place block digester rack with up to 40 empty tubes on a laboratory cart
and place next to counter. 15. Add 4 Hengar granules to each tube in the rack. 16. Using a pipette, transfer 5mL of Digestion solution to each digestion
tube. 17. Turn on the BD-40HT controller in the hood by flipping the switch
located on the back of the controller. 18. Go to the menu screen and use the stylus the select the green
highlighted TKN/TP box. Press “START.”
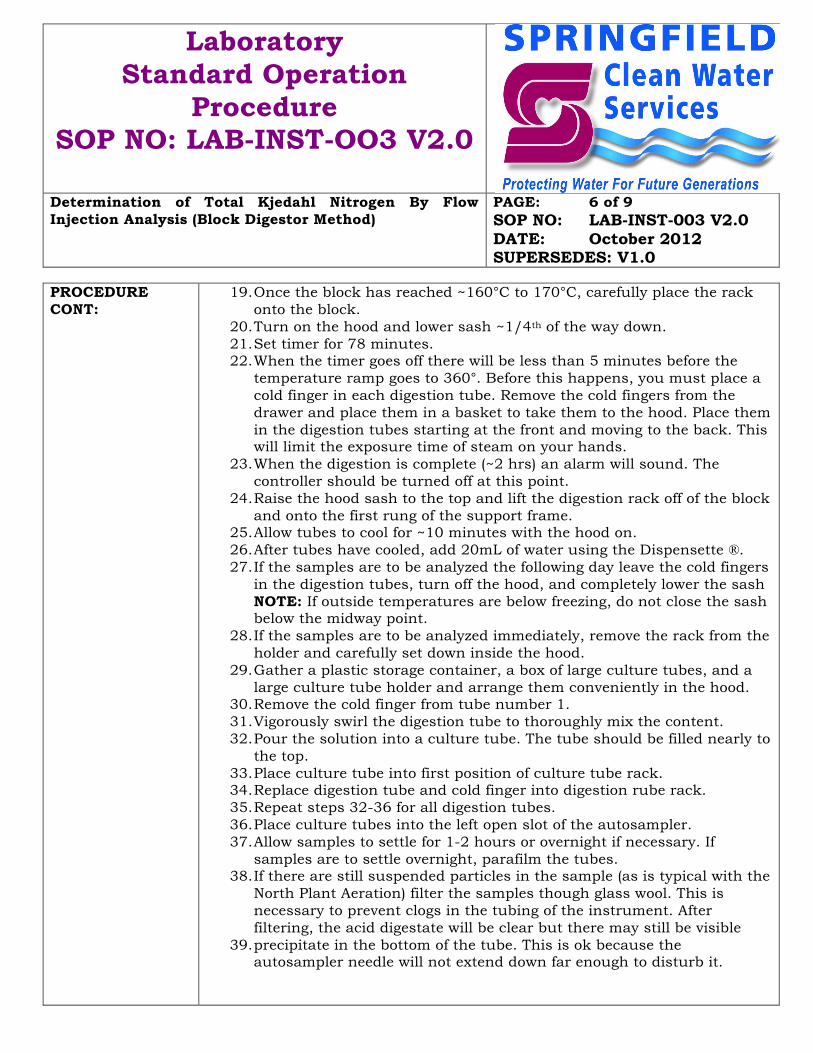
Laboratory Standard Operation
Procedure SOP NO: LAB-INST-OO3 V2.0
Determination of Total Kjedahl Nitrogen By Flow Injection Analysis (Block Digestor Method)
PAGE: 6 of 9 SOP NO: LAB-INST-003 V2.0 DATE: October 2012 SUPERSEDES: V1.0
PROCEDURE CONT:
19. Once the block has reached ~160°C to 170°C, carefully place the rack onto the block.
20. Turn on the hood and lower sash ~1/4th of the way down. 21. Set timer for 78 minutes. 22. When the timer goes off there will be less than 5 minutes before the
temperature ramp goes to 360°. Before this happens, you must place a cold finger in each digestion tube. Remove the cold fingers from the drawer and place them in a basket to take them to the hood. Place them in the digestion tubes starting at the front and moving to the back. This will limit the exposure time of steam on your hands.
23. When the digestion is complete (~2 hrs) an alarm will sound. The controller should be turned off at this point.
24. Raise the hood sash to the top and lift the digestion rack off of the block and onto the first rung of the support frame.
25. Allow tubes to cool for ~10 minutes with the hood on. 26. After tubes have cooled, add 20mL of water using the Dispensette ®. 27. If the samples are to be analyzed the following day leave the cold fingers
in the digestion tubes, turn off the hood, and completely lower the sash NOTE: If outside temperatures are below freezing, do not close the sash below the midway point.
28. If the samples are to be analyzed immediately, remove the rack from the holder and carefully set down inside the hood.
29. Gather a plastic storage container, a box of large culture tubes, and a large culture tube holder and arrange them conveniently in the hood.
30. Remove the cold finger from tube number 1. 31. Vigorously swirl the digestion tube to thoroughly mix the content. 32. Pour the solution into a culture tube. The tube should be filled nearly to
the top. 33. Place culture tube into first position of culture tube rack. 34. Replace digestion tube and cold finger into digestion rube rack. 35. Repeat steps 32-36 for all digestion tubes. 36. Place culture tubes into the left open slot of the autosampler. 37. Allow samples to settle for 1-2 hours or overnight if necessary. If
samples are to settle overnight, parafilm the tubes. 38. If there are still suspended particles in the sample (as is typical with the
North Plant Aeration) filter the samples though glass wool. This is necessary to prevent clogs in the tubing of the instrument. After filtering, the acid digestate will be clear but there may still be visible
39. precipitate in the bottom of the tube. This is ok because the autosampler needle will not extend down far enough to disturb it.

Laboratory Standard Operation
Procedure SOP NO: LAB-INST-OO3 V2.0
Determination of Total Kjedahl Nitrogen By Flow Injection Analysis (Block Digestor Method)
PAGE: 7 of 9 SOP NO: LAB-INST-003 V2.0 DATE: October 2012 SUPERSEDES: V1.0
INSTRUMENT SETUP/ANALYSIS:
1. Power up the Lachet QuikChem®8500 Series 2 system by turning on the TRIPP.LITE power strip switch on the shelf behind the instrument. The system will beep and you will be able to hear valves opening and closing
2. Next manually initialize the XYZ Autosampler by turning it off using the switch on the backside of the unit, waiting a few seconds, and then turning it back on (This is a software glitch and must be done before starting the analysis or you will get an error message later and will not be able to process the samples)
3. Look thru the side panel on the System Unit to see that the lamp comes on. (The lamp bulb is a consumable and will burn out.)
4. Turn on the computer, the monitor and the printer. 5. Open the software program by single clicking the Omnion 3.0 icon on
the computer desktop. 6. Next, single click on the “OPEN” folder. In the Menu bar select
“Methods,” and open the “Total Phos + TKN” folder. In that folder select “00 TKN TKP temp” file. A box will open and ask “Do you want to change the set points of the relevant heaters?” Select “Yes.” This will turn them on and allow them time to equilibrate at the correct temperature. Maximize the “Run Worksheet” window.
7. For each numbered line, enter the appropriate sample ID and any dilutions made in the MDF column (for dilutions the MDF column must also be checked). Re-size the window back. Enter the ERA value for the total phosphorus check standard now and verify the spike concentration levels.
8. Open the cabinet above the flow injection analyzer, remove the required 1 Liter plastic reagent containers for this analysis and place them and one water rinse container on the counter between the autosampler and the pump. Remove the container caps. Make sure there are enough reagents to complete the analysis before running out.
9. After the heater has reached 37°C, turn on the peristaltic pump by pressing the MANUAL RUN/STOP button on the top of the pump. Verify the speed is set at 35.
10. Clamp down and move the levers to the left one click for the following cartridges: the number 1 cartridge is the purple/purple duraprene water rinse line at the very top; the number 7 cartridge is the green/green duraprene sample line from the autosampler; the number 12 cartridge is the orange/orange PVC Carrier reagent line; the number 13 cartridge is the white/white PVC Salicylate-Nitroprusside reagent line; the number 14 cartridge is the orange/white PVC Hypochlorite reagent line; the number 15 cartridge is the blue/blue PVC Buffer reagent line; and the number 16 cartridge is the white/white PVC NaOH reagent line. Pump water thru all lines to verify there are no leaks and

Laboratory Standard Operation
Procedure SOP NO: LAB-INST-OO3 V2.0
Determination of Total Kjedahl Nitrogen By Flow Injection Analysis (Block Digestor Method)
PAGE: 8 of 9 SOP NO: LAB-INST-003 V2.0 DATE: October 2012 SUPERSEDES: V1.0
INSTRUMENT SETUP/ANALYSIS CONT:
there is a smooth even flow (no clogs). 11. Place all lines except the Salicylate-Nitroprusside reagent line in their
appropriate reagent containers. After the Buffer line has reached the mixing tee on the manifold the Salicylate-Nitroprusside reagent line can be placed in its reagent container and then pump until there are no air bubbles and a stable baseline has been obtained. In the menu bar selecting the Preview button (eyeball) will show the baseline in real time with air bubbles and baseline. When the baseline is stable, select Stop (red solid circle). Then select Run (green arrow) and the run will begin.
12. After the calibration samples are done, verify the run has a minimum correlation coefficient at least 0.995.
13. When the run is complete, remove the reagent lines and place in water for 5 to 10 minutes. Recap the reagent containers. Continue pumping to rinse the lines and the manifold, then remove the lines from the water container and pump air through until the lines appear dry.
14. Turn off the pump and release all pump tube cartridges. (Failure to do this last step will prematurely age the pump tubes.) Neatly coil the tubing lines and place on the counter.
RESULTS REPORTING:
1. In the space above the Channel 3-TKN window display, right click the mouse and select “Channel Display Properties”
2. In the “Annotation” box, under “Horizontal” select “(nothing)”. Click the “Accept” box and then click the “Close” box. (This is not necessary; it simply cleans up the report peak scans and makes them more legible.)
3. In the menu bar select “Tools”, then “Custom Reports” 4. On the menu bar for that window select the open folder file to open it. 5. Highlight the “TP and TKN” file and click “OK”. The saved report
template is now open. Because not all changes can be saved in the template, some manual formatting also has to be done before the report is printed
6. On the toolbar, select the Yellow cylinder (format) to open the Custom Report Format window
7. Select “Layout”, then select the “Header” font, then under “Size” click 11, and then click “OK” at the bottom of the window. Make sure in the Table tab and the Charts tab the correct dilution options are checked
8. Click “Apply” at the bottom of the “Layout” window and click “Close” 9. On the menu bar click the “Printer icon” and select “Print”. The reports
are generally 4 to 6 pages long. 10. After the report has printed the Omnion system can be shut down.
Click the red “X” (Close button) in the upper right corner. A box opens and asks, “Do you really want to exit Omnion?” Select “Yes”. Another box opens and asks, “Do you wish to save changes?” Select “No”.

Laboratory Standard Operation
Procedure SOP NO: LAB-INST-OO3 V2.0
Determination of Total Kjedahl Nitrogen By Flow Injection Analysis (Block Digestor Method)
PAGE: 9 of 9 SOP NO: LAB-INST-003 V2.0 DATE: October 2012 SUPERSEDES: V1.0
RESULTS RERPORTING CONT:
11. Power off the system by turning off the Tripp-Lite plug strip, the computer, the monitor and the printer.
12. Record all data into LIMS.
REPORT:
Report results to three significant figures
HISTORY:
Version 1.0 Effective August 2004 Version 2.0 Effective October 2012- Updates procedure and equipment to reflect new equipment purchase
REFERENCES: EPA Method 351.2
PREPARED BY:
Sandra Werbitzky Chemist
DATE: October 2012
APPROVED BY:
James Burks Laboratory Supervisor
DATE: October 2012
LAST REVIEW BY:
James Burks Laboratory Supervisor
DATE: October 2014
Laboratory Standard Operation
Procedure SOP NO: LAB-INST-004 V2.0
Determination of Total Phosphorus in Kjedahl Digests By Flow Injection Analysis
PAGE: 1 of 9 SOP NO: LAB-INST-004 V2.0 DATE: October 2012 SUPERSEDES: V1.0
TITLE: Determination of Total Phosphorus in Kjedahl Digests By Flow Injection
Analysis (Block Digestor Method)
SUMMARY: Waters, wastewaters, waste solids, and/or soils are digested with sulfuric acid
(H2SO4) in a block digestor. Phosphorous is converted to the orthophosphate anion using a mercuric catalyst. The anion is then complexed under acidic conditions using ammonium molybdate and potassium tartrate. The resulting complex is then reduced with ascorbic acid to form a blue colored complex that absorbs 880nm light proportionally to the concentration of orthophosphate.
RESPONSIBILITY: Chemist or designee
SCOPE: This test is applicable to drinking water, ground water, domestic and industrial waste waters, biosolids and soil samples.
EQUIPMENT: • Class A glass pipettes: 50mL, 25mL, 10mL, 5mL, and 2.5mL
• Class A glass volumetric flasks: 1000mL, 250mL and 100mL
• Lachat QuikChem®8500 Series 2 Flow Injection analyzer with sampler, multi-channel proportioning pump, reaction manifold, reaction manifold heater, colorimetric detector, data system, 10mm path length glass flow cell and an 880 nm interference filter.
• BD 40HT Lachat block digestor with forty 75ml glass round bottom tubes and forty glass cold fingers.
• 2.5mL to 25mL adjustable Dispensette® on a 4L glass bottle
• Hengar granules
• Glass wool, funnels and rack • 16 x 100 glass disposable culture tubes (Kimble Chase 73500-16100)
• 13 x 100 glass disposable culture tubes (Kimble Chase 73500-13100)
• Electronic Finnpipettes®: 10mL, 5mL, and 100-1000µL
• Disposable tips for Finnpipettes® • 1mL disposable graduated transfer pipettes
• Heated stir plate with magnetic stirrer
• pH paper
• Timer
• Parafilm

Laboratory Standard Operation
Procedure SOP NO: LAB-INST-004 V2.0
Determination of Total Phosphorus in Kjedahl Digests By Flow Injection Analysis
PAGE: 2 of 9 SOP NO: LAB-INST-004 V2.0 DATE: October 2012 SUPERSEDES: V1.0
CHEMICALS/ REAGENTS:
• Concentrated sulfuric acid (H2SO4): ACS grade or equivalent
• Red mercuric oxide (HgO): ACS grade or equivalent
• Potassium sulfate K2SO4): ACS grade or equivalent
• Ammonium molybdate tetrahydrate [(NH4)6Mo7O24.4H2O)]: ACS grade or
equivalent
• Antimony potassium tartrate (C8H4O12K2Sb2.3H2O): ACS grade or
equivalent
• Ascorbic Acid (C6H8O6): ACS grade or equivalent
• Sodium dodecyl sulfate (CH3(CH2)11OSO3Na): ACS grade or equivalent • Sodium chloride (NaCl): ACS grade or equivalent
• Sodium Hydroxide (NaOH): ACS grade or equivalent
• Phosphorous standard: 1000 mg/L, ERA Cat# 063
• Water: ASTM type II reagent water (resistivity >18 meg-ohm at 25°C) Barnstead Nanopure Diamond
• ERA Check Standard: ERA Ready-to-Use WasteWatR Complex Nutrients, Cat# 741
PREPARATIONS:
Mercuric Sulfate Solution: Add ~40mL water and 10mL concentrated sulfuric acid to a 100.0mL volumetric flask. Add 8.0g of red mercuric oxide and stir until dissolved. Dilute to volume with water. Heating the solution while stirring may be necessary to fully dissolve mercuric oxide. Digestion Solution: Add 133.0g of potassium sulfate and approximately 700mL of water to a 1L volumetric flask. Gently stir and slowly add 200mL of concentrated sulfuric acid. Add 25.0mL of Mercuric Sulfate Solution. Allow solution to cool to room temperature and dilute to volume with water. Store solution in a labeled plastic container at room temperature to prevent crystallization. Prepare fresh monthly or as needed. Stock Ammonium Molybdate Solution: Add 40.0g ammonium molybdate tetrahydrate and ~800mL of water to a 1L volumetric flask. Dilute to volume with water and stir with magnetic stirrer for at least 4 hours until fully dissolved. Store in a labeled plastic container and refrigerate. Stock Antimony Potassium Tartrate Solution: Add 3.22g antimony potassium tartrate and ~800mL of water to a 1L volumetric flask. Dilute to volume with water and mix with a magnetic stirrer until dissolved. Store for up to two months in a labeled dark plastic container. Refrigerate.
Laboratory Standard Operation
Procedure SOP NO: LAB-INST-004 V2.0
Determination of Total Phosphorus in Kjedahl Digests By Flow Injection Analysis
PAGE: 3 of 9 SOP NO: LAB-INST-004 V2.0 DATE: October 2012 SUPERSEDES: V1.0
PREPARATIONS CONT:
Molybdate Color Reagent: Add ~500mL of water followed by 213mL Ammonium Molybdate Solution and 72mL Antimony Potassium Tartrate Solution to a 1L volumetric flask. Dilute to volume with water and invert to mix. Store in labeled plastic container. Ascorbic Acid Reducing Solution: Add 60.0g of ascorbic acid and ~700mL of water to a 1L volumetric flask. Dilute to volume with water and mix with a magnetic stirrer. Add 1.0g sodium dodecyl sulfate and continue mixing. Store in labeled plastic container. Sodium Chloride/Sodium Hydroxide Solution: Add 160.0g of sodium chloride and 20.0g of sodium hydroxide to ~600mL of water in a 1L volumetric flask. Dilute to volume with water and mix. Store in labeled plastic container. Sulfuric Acid/Potassium Sulfate Solution (Carrier): Add 31.7g of potassium sulfate to ~800mL of water in a 1L volumetric flask. Slowly add 48 mL of sulfuric acid and mix until dissolved. Dilute to volume with water and invert to mix. Store in labeled plastic container. 1000mg P/L Phosphorous Standard: Use purchased standard neat. Replace before expiration date. Working Standard A (10.0mg P/L): Add 2.5mL of 1000mg P/L Phosphorous Standard to a 250.0mL volumetric flask and dilute to volume with water. Invert to mix. Adjust pH to <2 with concentrated sulfuric acid (H2SO4). Working Standard B (5.0mg P/L): Add 50mL Working Standard A to a 100.0mL volumetric flask and dilute to volume with water. Invert to mix. Adjust pH <2 with concentrated sulfuric acid (H2SO4). Working Standard C (2.50mg P/L): Add 25mL Working Standard A to a 100mL volumetric flask and dilute to volume with water. Invert to mix. Adjust pH <2 with concentrated H2SO4. Working Standard D: (1.00 mg P/L) Add 10mL of Working Standard A to a 100mL volumetric flask and dilute to volume with water. Invert to mix. Adjust pH to <2 with concentrated H2SO4.
Working Standard E: (0.50 mg P/L) Add 5.0mL of Working Standard A to a 100 mL volumetric flask and dilute to volume with water. Invert to mix. Adjust pH to <2 with concentrated H2SO4.

Laboratory Standard Operation
Procedure SOP NO: LAB-INST-004 V2.0
Determination of Total Phosphorus in Kjedahl Digests By Flow Injection Analysis
PAGE: 4 of 9 SOP NO: LAB-INST-004 V2.0 DATE: October 2012 SUPERSEDES: V1.0
PREPARATIONS CONT:
Working Standard F: (0.25 mg P/L) Add 2.5 mL Working Standard A to a 100mL volumetric flask and dilute to volume with water. Invert to mix. Adjust pH to <2 with concentrated H2SO4. Working Standard G: (Blank) In a 100 ml volumetric flask fill to the mark with water. Invert to mix. Adjust pH to <2 with concentrated H2SO4. Blank Spike: Add 100µL of 1000mg P/L Phosphorous Standard to a 75mL round bottom tube. Add 20mL of water using a 10.0mL pipette and making sure to rinse sides of flask to ensure the entire standard is in solution. Laboratory Fortified Matrix (LFM): Add 100µl of 1000mg P/L Phosphorous Standard to a 75mL round bottom tube. Add 20mL of plant effluent sample using a 10.0mL pipette and making sure to rinse sides of flask to ensure the entire standard is in solution. ERA Check Standard: if concentration of P is less than the highest standard (10.0mg P/L) no dilution is needed. If concentration of P is greater than 10.0mg P/L than use an appropriate dilution to place it within the range of your standards (usually 10mL of standard and 10mLs of water.) (Note: These standards may be combined with the TKN standards and digested and analyzed together as a single set for TP and TKN.) Samples Containing Raw/Influent: Prepare by transferring 10mL sample into a digestion tube and adding 10mL of water. Recycle Samples: Prepare by transferring 5mL of sample into a digestion tube and adding 15mL of water. If sample appears to be heavy in solids, transfer only 2mL of sample and add 18mL water. BSTF/North Plant Aeration: Transfer 2mL of sample to a digestion tube and add 18mL of water. Industrial Samples: The concentration in industrial samples varies greatly so previous values must be used to determine an appropriate dilution. Previous values can be found by searching the location code in LIMS.

Laboratory Standard Operation
Procedure SOP NO: LAB-INST-004 V2.0
Determination of Total Phosphorus in Kjedahl Digests By Flow Injection Analysis
PAGE: 5 of 9 SOP NO: LAB-INST-004 V2.0 DATE: October 2012 SUPERSEDES: V1.0
PROCEDURE:
1. Using LIMS, run a backlog report for TP-W, TP-S, TKN-W, TKN-S, and FF-TKN-W. Use this as your Backlog Worksheet.
2. In a margin of the Run Worksheet, list the six standards, the blank, the spike blank, and the ERA Standard. Number them sequentially 1 through 9.
3. Continue labeling samples in the following order up to 40: • SW 001 samples • Plant influent (PI) samples • Plant recycle samples • Permit samples • Pretreatment samples • Scott Foley’s field soil samples • BBT and BSTF samples • Stormwater samples • North Plant samples
4. Write the manual dilutions you will be using next to the sample ID on the Backlog Worksheet.
5. Line up standards A-G and the ERA Check Standard on the counter (you will need to transfer standards to a specimen cup in order to pipette them.)
6. Transfer 20mL each of standards A-G to digestion tubes 1-7. 7. In digestion tube 8, add 100µL of 1000mg P/L Phosphorous Standard.
Add 20mL of water using a 10.0mL pipette and making sure to rinse sides of flask to ensure the entire standard is in solution.
8. Transfer 20mL of the ERA Check Standard to digestion tube 9. 9. Transfer 20mL of the first Plant Effluent sample into digestion tube 10. 10. Prepare Laboratory Fortified Matrix into digestion tube 11. 11. Transfer 20mL of the next Plant Effluent sample from Backlog
Worksheet into digestion tube 12. 12. Prepare a duplicate of the previous Plant Effluent sample in digestion
tube 13. 13. Continue pipeting samples into digestion tubes following the order of
your Backlog Worksheet. 14. Place block digester rack with up to 40 empty tubes on a laboratory cart
and place next to counter. 15. Add 4 Hengar granules to each tube in the rack. 16. Using a pipette, transfer 5mL of Digestion solution to each digestion
tube. 17. Turn on the BD-40HT controller in the hood by flipping the switch
located on the back of the controller. 18. Go to the menu screen and use the stylus the select the green

Laboratory Standard Operation
Procedure SOP NO: LAB-INST-004 V2.0
Determination of Total Phosphorus in Kjedahl Digests By Flow Injection Analysis
PAGE: 6 of 9 SOP NO: LAB-INST-004 V2.0 DATE: October 2012 SUPERSEDES: V1.0
PROCEDURE CONT:
highlighted TKN/TP box. Press “START.” 19. Once the block has reached ~160°C to 170°C, carefully place the rack
onto the block. 20. Turn on the hood and lower sash ~1/4th of the way down. 21. Set timer for 78 minutes. 22. When the timer goes off there will be less than 5 minutes before the
temperature ramp goes to 360°. Before this happens, you must place a cold finger in each digestion tube. Remove the cold fingers from the drawer and place them in a basket to take them to the hood. Place them in the digestion tubes starting at the front and moving to the back. This will limit the exposure time of steam on your hands.
23. When the digestion is complete (~2 hrs) an alarm will sound. The controller should be turned off at this point.
24. Raise the hood sash to the top and lift the digestion rack off of the block and onto the first rung of the support frame.
25. Allow tubes to cool for ~10 minutes with the hood on. 26. After tubes have cooled, add 20mL of water using the Dispensette ®. 27. If the samples are to be analyzed the following day leave the cold fingers
in the digestion tubes, turn off the hood, and completely lower the sash NOTE: If outside temperatures are below freezing, do not close the sash below the midway point.
28. If the samples are to be analyzed immediately, remove the rack from the holder and carefully set down inside the hood.
29. Gather a plastic storage container, a box of large culture tubes, and a large culture tube holder and arrange them conveniently in the hood.
30. Remove the cold finger from tube number 1. 31. Vigorously swirl the digestion tube to thoroughly mix the content. 32. Pour the solution into a culture tube. The tube should be filled nearly to
the top. 33. Place culture tube into first position of culture tube rack. 34. Replace digestion tube and cold finger into digestion rube rack. 35. Repeat steps 32-36 for all digestion tubes. 36. Place culture tubes into the left open slot of the autosampler. 37. Allow samples to settle for 1-2 hours or overnight if necessary. If
samples are to settle overnight, parafilm the tubes. 38. If there are still suspended particles in the sample (as is typical with the
North Plant Aeration) filter the samples though glass wool. This is necessary to prevent clogs in the tubing of the instrument. After filtering, the acid digestate will be clear but there may still be visible precipitate in the bottom of the tube. This is ok because the autosampler needle will not extend down far enough to disturb it.

Laboratory Standard Operation
Procedure SOP NO: LAB-INST-004 V2.0
Determination of Total Phosphorus in Kjedahl Digests By Flow Injection Analysis
PAGE: 7 of 9 SOP NO: LAB-INST-004 V2.0 DATE: October 2012 SUPERSEDES: V1.0
INSTRUMENT SETUP/ANALYSIS:
1. Power up the Lachet QuikChem®8500 Series 2 system by turning on the TRIPP.LITE power strip switch on the shelf behind the instrument. The system will beep and you will be able to hear valves opening and closing
2. Next manually initialize the XYZ Autosampler by turning it off using the switch on the backside of the unit, waiting a few seconds, and then turning it back on (This is a software glitch and must be done before starting the analysis or you will get an error message later and will not be able to process the samples)
3. Look thru the side panel on the System Unit to see that the lamp comes on. (The lamp bulb is a consumable and will burn out.)
4. Turn on the computer, the monitor and the printer. 5. Open the software program by single clicking the Omnion 3.0 icon on
the computer desktop. 6. Next, single click on the “OPEN” folder. In the Menu bar select
“Methods,” and open the “Total Phos + TKN” folder. In that folder select “00 TKN TKP temp” file. A box will open and ask “Do you want to change the setpoints of the relevant heaters?” Select “Yes.” This will turn them on and allow them time to equilibrate at the correct temperature. Maximize the “Run Worksheet” window.
7. For each numbered line, enter the appropriate sample ID and any dilutions made in the MDF column (for dilutions the MDF column must also be checked). Re-size the window back. Enter the ERA value for the total phosphorus check standard now and verify the spike concentration levels.
8. Open the cabinet above the flow injection analyzer, remove the required 1 Liter plastic reagent containers for this analysis and place them and one water rinse container on the counter between the autosampler and the pump. Remove the container caps. Make sure there is enough reagent to complete the analysis before running out.
9. After the heater has reached 37°C, turn on the peristaltic pump by pressing the MANUAL RUN/STOP button on the top of the pump. Verify the speed is set at 35.
10. Clamp down and move the levers to the left one click for the following cartridges: the number 1 cartridge is the purple/purple duraprene water rinse line at the very top; the number 7 cartridge is the green/green duraprene sample line from the autosampler; the number 8 cartridge is the red/red duraprene Carrier line; the number 9 cartridge is the orange/orange duraprene Molybdate color reagent line; the number 10 cartridge is the orange/white duraprene NaCl-NaOH reagent line; and the number 11 cartridge is the orange/orange duraprene Ascorbic acid reagent line. Pump water thru all lines to verify there are no leaks and there is a smooth even flow (no clogs).

Laboratory Standard Operation
Procedure SOP NO: LAB-INST-004 V2.0
Determination of Total Phosphorus in Kjedahl Digests By Flow Injection Analysis
PAGE: 8 of 9 SOP NO: LAB-INST-004 V2.0 DATE: October 2012 SUPERSEDES: V1.0
INSTRUMENT SETUP/ANALYSIS CONT:
11. Place all lines in their appropriate reagent containers and pump until there are no air bubbles and a stable baseline has been obtained. In the menu bar selecting the Preview button (eyeball) will show the baseline in real time with air bubbles and baseline. When the baseline is stable, select Stop (red solid circle). Then select Run (green arrow) and the run will begin.
12. After the calibration samples are done, verify the run has a minimum correlation coefficient at least 0.995.
13. When the run is complete, remove the reagent lines and place in water for 5 to 10 minutes. Recap the reagent containers. Continue pumping to rinse the lines and the manifold, then remove the lines from the water container and pump air through until the lines appear dry.
14. Turn off the pump and release all pump tube cartridges. (Failure to do this last step will prematurely age the pump tubes.) Neatly coil the tubing lines and place on the counter.
RESULTS REPORTING:
1. In the space above the Channel 2-TKP window display, right click the mouse and select “Channel Display Properties”
2. In the “Annotation” box, under “Horizontal” select “(nothing)”. Click the “Accept” box and then click the “Close” box. (This is not necessary; it simply cleans up the report peak scans and makes them more legible.)
3. In the menu bar select “Tools”, then “Custom Reports” 4. On the menu bar for that window select the open folder file to open it. 5. Highlight the “TP and TKN” file and click “OK”. The saved report
template is now open. Because not all changes can be saved in the template, some manual formatting also has to be done before the report is printed
6. On the toolbar, select the Yellow cylinder (format) to open the Custom Report Format window
7. Select “Layout”, then select the “Header” font, then under “Size” click 11, and then click “OK” at the bottom of the window. Make sure in the Table tab and the Charts tab the correct dilution options are checked
8. Click “Apply” at the bottom of the “Layout” window and click “Close” 9. On the menu bar click the “Printer icon” and select “Print”. The reports
are generally 4 to 6 pages long. 10. After the report has printed the Omnion system can be shut down.
Click the red “X” (Close button) in the upper right corner. A box opens and asks, “Do you really want to exit Omnion?” Select “Yes”. Another box opens and asks, “Do you wish to save changes?” Select “No”.
11. Power off the system by turning off the Tripp-Lite plug strip, the computer, the monitor and the printer.
12. Record all data into LIMS.
Laboratory Standard Operation
Procedure SOP NO: LAB-INST-004 V2.0
Determination of Total Phosphorus in Kjedahl Digests By Flow Injection Analysis
PAGE: 9 of 9 SOP NO: LAB-INST-004 V2.0 DATE: October 2012 SUPERSEDES: V1.0
REPORT:
Report results to three significant figures.
HISTORY:
Version 1.0 Effective August 2004 Version 2.0 Effective October 2012- Changes updates procedure and equipment because of new instrument purchase
REFERENCES: EPA Method 365.4
PREPARED BY:
Sandra Werbitzky Chemist
DATE: October 2012
APPROVED BY:
James Burks Laboratory Supervisor
DATE: October 2012
LAST REVIEW BY:
James Burks Laboratory Supervisor
DATE: October 2014

Laboratory Standard Operation
Procedure SOP NO: LAB-INST-005 V2.0
Determination of the Flashpoint by the Pensky-Martens Closed Cup Method
PAGE: 1 of 2 SOP NO: LAB-INST-005 V2.0 DATE: August 2013 SUPERSEDES: V1.0
TITLE: Determination of the Flashpoint by the Pensky-Martens Closed Cup Method
SUMMARY: A sample is placed in the Sample Cup. Sample ID is entered through the
control panel. The test is run from the main menu. The sample is heated and stirred. At preset temperature intervals, the Shutter will open, the Ignitor will dip into the Cup Aperture, and then the Shutter will close. This will continue until a Flash is detected or the upper limit of the test range is reached.
RESPONSIBILITY: Chemist or designee
SCOPE: This test is applicable to industrial waste water samples.
EQUIPMENT: • SETA Multiflash Flash Point Tester with Pensky-Martens Test Module Model 34100-2
PROCEDURE:
1. Remove the sample cup from the flashpoint tester. 2. Pour sample into the cup up to the line inscribed on the inside of the
Cup. 3. Place the Cup into the Test Area. Place the Lid assembly onto the Cup
and lower the DIPS Pod onto the Cup assembly. 4. Turn on the unit by pressing the green power button on the front base. 5. Rotate the SMART Control to select the Run Test option from the main
menu and press �. 6. The START TEST screen will open. 7. Enter the LIMS sample ID info. Rotate the SMART Control to move the
cursor. Press the up down button (��) while rotating the SMART Control to enter a character directly above the cursor.
8. Press (next) � to save the sample identity to memory. 9. Press (next) � to open the TEST STATUS screen and start the test. 10. After a 12 second count down, the unit will run a pre-test dip. If a flash
occurs the test is aborted. 11. The sample bath will heat up and test for flash until the upper limit of
the temperature range is reached, or a flash is detected. 12. After the test, remove the LID from the CUP. 13. Remove the CUP, rinse it out and pour up the next sample and
continue the steps above. 14. When all samples have been analyzed, turn off the flashpoint tester.

Laboratory Standard Operation
Procedure SOP NO: LAB-INST-005 V2.0
Determination of the Flashpoint by the Pensky-Martens Closed Cup Method
PAGE: 2 of 2 SOP NO: LAB-INST-005 V2.0 DATE: August 2013 SUPERSEDES: V1.0
RESULTS REPORTING:
1. At the end of the test an audible beep will be heard. 2. If the status line displays Flashed, record that temperature into LIMS. 3. If the status line displays No Flash, record >75 in LIMS.
REPORT:
Report results to two whole numbers.
HISTORY:
Version 1.0 Effective August 2004 Version 2.0 Effective August 2013- Changes equipment and procedure to reflect new instrument (flashpoint apparatus)
REFERENCES: ASTM D93
PREPARED BY:
Sandra Werbitzky Chemist
DATE: August 2013
APPROVED BY:
James Burks Laboratory Supervisor
DATE: August 2013
LAST REVIEW BY:
James Burks Laboratory Supervisor
DATE: August 2014

Laboratory Standard Operation
Procedure SOP NO: LAB-LIMS-001
LIMS Analysis batching and Data Entry using PerkinElmer software.
PAGE: 1 of 4 SOP NO: LAB-LIMS-001 V2.0 DATE: July 2013 SUPERSEDES: V1.0
TITLE: LIMS Batching and Data Entry
SUMMARY: Data results for analyses must be batched and entered on a daily or as
completed basis.
RESPONSIBILITY: Chemist, Laboratory Analyst or designee
SCOPE: This procedure is applicable to drinking water, ground water, storm water, domestic and industrial waste water, and treatment plant samples.
EQUIPMENT: • Laboratory Network Computer with PerkinElmer LIMS software
LIMS BATCHING:
1. Double Click on LW Desktop 63 icon. 2. A PerkinElmer password window titled “LABWORKS User Login”
window will open, enter your user name and password. Press “OK.” 3. Double click on QA/QC folder in upper left hand corner. 4. This will open a dropdown menu item named “QA Batch.” Left click this
once. 5. LIMS will load a window titled LABWORKS QA Analysis Batching. 6. In the upper left-hand corner, select file by left clicking on it. 7. Select the option, “New batches by analysis.” 8. This will open a window titled “PickQATests.” In the selection box titled
“Sample selection options” check the circle option for “All samples with selected analyses pending.”
9. Choose with analysis you would like to batch by scrolling through the window titled “Analyses available for batching” and then clicking on the analysis to highlight it blue. Clicking on the blue highlighted analysis again will deselect it. You can also quick search for the analysis by typing in the analysis code or analysis name in the empty search box. Multiple analyses can be selected at one time.
10. Select “OK” when done selecting the analysis you need. 11. LIMS will load a new window titled “Batch Selections.” Maximize this
window to better view all selections. Deselect any sample you are not going to analyze. Select “OK” when you have ensured all analyses you need to do have a checkmark next to them.
12. LIMS will load a new window titled “Batch Size Specification.” Ensure all numbers under the “Number Samples” column are the same as the numbers under the “Batch size” column. If any do not match, change the number in the “Batch size” column to match the “Number Samples” column by double clicking on the Batch size box and use the arrow keys to increase/decrease the value. When all numbers are correct, select “OK.”
Laboratory Standard Operation
Procedure SOP NO: LAB-LIMS-001
LIMS Analysis batching and Data Entry using PerkinElmer software.
PAGE: 2 of 4 SOP NO: LAB-LIMS-001 V2.0 DATE: July 2013 SUPERSEDES: V1.0
LIMS BATCHING CONT:
13. LIMS will load a new window titled “Batch QA Sample specification.” Select “OK.
14. LIMS will now load a window titled “Batch QA Sample Specification” with a message stating how many new QA/QC batches were successfully created. Select “OK” to finish batching the samples.
15. Close the QA/QC batching window.
LIMS DATA ENTRY: :
1. Double click on the “Results Entry” folder in upper left hand corner of LIMS.
2. This will open a dropdown menu item named “Enter Sample Results.” Left click this once.
3. This will open a window titled “LABWORKS Result Entry.” Select the analysis you’d like to enter the results for by either:
a. Select the QAQC Batches option in the Left-hand window to drop down a set of options for data entry. Select “Batch Creation Dates” by left-clicking on it once. This will update the right-hand window to say “Enter values for batch selection:” Select the date the analysis was batched by clicking on the arrow in the date window and selecting the calendar day by double clicking on the date. Hit enter.
b. Left-hand click the “Find” button once. This will bring up all analyses batched on the date you selected. Scroll through the options and select the batch you’d like to enter values for. Multiple tests can be selected at the same time.
c. When done, click on the button labeled “View Selections.” This will bring up a list of samples included in the batch selection.
d. Click on the button labeled “Enter Selection.”
OR e. Select the QAQC Batches option in the Left-hand window to drop
down a set of options for data entry. Select “Batch Numbers” by left-clicking on it once. This will update the right-hand window to say “Enter or scan search values:” Leave the first text box set to “equals.” Enter the batch number in the middle empty text box. Hit enter. Multiple batch numbers can be added.
f. Left-hand click the “Find” button once. This will bring up all analyses batched under the batch number you typed in.
g. Click on the empty box under the “check All” column next to the batched test you’d like to enter results for.

Laboratory Standard Operation
Procedure SOP NO: LAB-LIMS-001
LIMS Analysis batching and Data Entry using PerkinElmer software.
PAGE: 3 of 4 SOP NO: LAB-LIMS-001 V2.0 DATE: July 2013 SUPERSEDES: V1.0
LIMS DATA ENTRY CONT:
h. Click on “View Selections.” This will bring up a list of samples included in the batch selection.
i. Click on the button labeled “Enter Selection.”
4. After selecting “Enter Selection,” LIMS will load a window titled “Result Entry.” Maximize this window and enter your results. Ensure that each result field has a corresponding analyst field with your initials in it.
5. When finished, double-check all field results to ensure they match the results from your analyses.
6. Right click on each field results and select “Validate analysis” when you are sure the result it correctly entered.
7. After all results have been validated, click “Save” in the upper right-hand corner of the “Result Entry” window. LIMS will begin loading the results.
8. When LIMS is finished loading, a window will appear titled “LABWORKS Result Entry.” This window can be used to begin the data entry process again. If you are finished entering results for all analyses, close the window.
REPORT:
Ensure all data are entered correctly and validated.
HISTORY:
Version 1.0 Effective August 2007 Version 2.0 Detailed new validation procedure. Updated format.
PREPARED BY:
Kari Reynolds Laboratory Analyst
DATE:
July 2013
APPROVED BY:
James Burks Laboratory Supervisor
DATE: July 2013
LAST REVIEW BY:
James Burks Laboratory Supervisor
DATE: July 2014
Laboratory Standard Operation
Procedure SOP NO: LAB-LIQ-001 V2.0
Ammonia as N using Ammonia Selective Electrode Method
PAGE: 1 of 4 SOP NO: LAB-LIQ-001 V2.0 DATE: April 2011 SUPERSEDES: V1.0
TITLE:
Ammonia as N using Ammonia Selective Electrode Method
SUMMARY: The NH3-N/L of a sample is determined electrometrically using a hydrophobic gas-permeable membrane to separate the sample solution from an electrode internal solution of ammonium chloride
RESPONSIBILITY: Laboratory Analyst or designee
SCOPE: This test is applicable to drinking water, ground water, domestic and industrial waste waters, biosolids and soil samples.
EQUIPMENT: • HACH HQ440d Multipurpose Meter • Ammonia selective probe: Intellical Ammonia ISENH3181 Probe • Magnetic stirrer and TFE stir bar • 1000mL volumetric flask • 100mL volumetric pipette • Beaker or specimen cup ~150mL • Kimwipes
CHEMICALS/ REAGENTS:
• Ammonium Chloride: Fisher A661, ACS grade • 10 Molar NaOH Solution: Fisher UN1823, ACS grade • Deionized (DI) H20 • Nitrogen Standard: Ricca 5450-1, 10ppm N • Ammonia Electrode Filling Solution: HACH 44472-26 • NH3 Storage Solution: HACH 24065-49
PREPARATIONS:
• Stock Ammonium Chloride Solution (1000 mg NH3-N/L); In a 1000mL volumetric flask, dissolve 3.819g NH4Cl (dried at 100 oC) in DI water, mix well, and dilute to volume (1.00mL = 1.00mg N = 1.22mg NH3).
• 100mg NH3-N/L Standard: Prepare standard by pipetting 100mL of the Stock Ammonium Chloride Solution (1000mg NH3-N/L) into a 1000mL volumetric flask, dilute to volume with DI water and mix thoroughly.
• 10.0mg NH3-N/L Standard: Prepare standard by pipetting 100mL of the 100mg NH3-N/L Standard into a 1000mL volumetric flask, dilute to volume with DI water and mix thoroughly.
• 1.00mg NH3-N/L Standard: Prepare standard by pipetting 100mL of
the 10.0mg NH3-N/L Standard into a 1000mL volumetric flask, dilute to

Laboratory Standard Operation
Procedure SOP NO: LAB-LIQ-001 V2.0
Ammonia as N using Ammonia Selective Electrode Method
PAGE: 2 of 4 SOP NO: LAB-LIQ-001 V2.0 DATE: April 2011 SUPERSEDES: V1.0
PREPARATIONS CONT:
volume with DI water and mix thoroughly.
• 0.1mg NH3-N/L Standard: Prepare standard by pipetting 100mL of the 1.00mg NH3-N/L Standard into a 1000mL volumetric flask, dilute to volume with DI water and mix thoroughly.
• 10N NaOH Solution: Dissolve 400g of Sodium Hydroxide in 800mL of
DI water in a 1000mL volumetric flask. Mix solution thoroughly on stir plate with stir bar to dissolve sodium hydroxide and allow solution to cool. Add DI water and dilute to volume.
INSTRUMENT CALIBRATION:
HACH HQ440d Multipurpose Meter Calibration 1. Turn on power (Blue Button upper left corner). 2. Press black arrow keys (located in center of meter) up or down to select
NH3 calibration. 3. Probe is stored in a 1000ppm NH3 storage solution (in specimen cup
w/out stir bar) on a magnetic stir plate. 4. Pour approximately 100mL of the previously prepared 1.00ppm NH3
buffer into a specimen cup, immerse electrode in buffer solution, turn stir plate on and adjust the speed of the stir bar.
5. Add a 1mL volume (1 pump from reagent container) of previously prepared 10M NaOH solution to raise pH above 11, stir standard at a slow constant rate to provide homogeneity and minimize any possible loss of ammonia from the solution.
6. Press the calibrate button (black button located to left of arrow keys). 7. Display offers option to read (right button) or cancel (left button), press
right button for read. 8. Allow the meter to stabilize and lock in a value. 9. Remove the 1.00ppm NH3 buffer and rinse the probe off with DI water 10. Pour approximately 100mL of the previously prepared 10.0ppm NH3
buffer into a specimen cup. 11. Place the NH3 probe into the 10.0ppm NH3 buffer, add a stir bar, add
1mL of NaOH solution, and press the black button for read located on the right side of the meter.
12. Allow the meter to stabilize and lock in a value. 13. Remove the 10.0ppm NH3 and rinse the probe off with DI water. 14. Pour approximately 100mL of the previously prepared 100.0 ppm NH3
buffer into a specimen cup. 15. Place the NH3 probe into the 100.0ppm NH3 buffer, add a stir bar, add
1mL of NaOH solution, and press the black button for read located on the right side of the meter.

Laboratory Standard Operation
Procedure SOP NO: LAB-LIQ-001 V2.0
Ammonia as N using Ammonia Selective Electrode Method
PAGE: 3 of 4 SOP NO: LAB-LIQ-001 V2.0 DATE: April 2011 SUPERSEDES: V1.0
INSTRUMENT CALIBRATION CONT:
16. Allow the meter to calibrate for the 100.0ppm NH3 buffer and record the slope % for the calibration on the bench sheet.
17. Press the black button for done located in the top row in the center of the meter, then press the black left button for store once.
18. Is there a minimum slope requirement? Make sure slope is at least 100% +/- 5%. If slope requirement is not met, repeat steps 4-18.
19. Once the meter has stored the slope for the standards, remove the 100.0ppm NH3-N buffer and rinse the probe off with DI water.
20. Pour approximately 100mL of the previously purchased 10.0ppm nitrogen standard into a specimen cup. This is the independent check standard.
21. Place the NH3-N probe into the 10.0ppm NH3-N Independent Check Standard buffer, add a stir bar, add 1mL of NaOH solution, and allow the meter to calculate the NH3-N of the 10.0ppm nitrogen standard.
22. Record the concentration of the 10.0ppm nitrogen standard on the bench sheet.
23. The calculated value of the N standard must be 100% ± 10% or 10ppm ± 1ppm to pass. If the standard does not meet acceptance criteria, first fill a specimen cup with fresh standard and reanalyze. If it still does not meet criteria, recalibrate the meter. If acceptance criteria are not met after recalibration, notify supervisor.
24. Additionally, following a successful calibration, a distilled water blank should be analyzed with the addition of 1mL 10 molar NaOH. The blank should have a reading of <0.1ppm. If not then notify supervisor.
25. Additionally, following a successful calibration, a 0.1ppm standard should be analyzed with the addition of 1mL 10 molar NaOH. The standard should have a reading of 0.1 ppm ± 10%. If not, notify supervisor.
SAMPLE ANALYSIS:
HACH HQ440d Multipurpose Meter Sample Analysis 1. Add ~100mL of sample in a clean specimen cup containing a stirring
bar (If multiple samples are to be tested then arranging the order of samples to be analyzed in such a way as to progress in ascending magnitude of ammonia concentration will expedite the analytical sequence.)
2. Prior to analysis the calibrated probe shall be placed in 100mL of laboratory DI water containing 1mL of 10 molar NaOH until a meter reading of <0.1ppm ammonia is attained.
3. Rinse probe with DI water and gently dry with a Kimwipe. Immerse probe into specimen cup at a depth that will not interfere with stir bar. Add 1mL of 10 molar NaOH. Stir at a slow constant rate to provide homogeneity.
Laboratory Standard Operation
Procedure SOP NO: LAB-LIQ-001 V2.0
Ammonia as N using Ammonia Selective Electrode Method
PAGE: 4 of 4 SOP NO: LAB-LIQ-001 V2.0 DATE: April 2011 SUPERSEDES: V1.0
SAMPLE ANALYSIS CONT:
4. Record the highest obtained NH3 reading of the sample on the SWTP bench sheet then remove and rinse probe with DI water. (Note: Samples exhibiting an ammonia reading of >100ppm shall be diluted to a concentration level which falls between the calibration standards values and then re-analyzed.)
5. Repeat steps 1 through 4 for additional samples. (Note: Step number 2 can be excluded for additional samples if samples are analyzed in an order of ascending magnitude of ammonia concentration.)
6. Before storing electrode in storage solution, make sure that the following daily samples have been analyzed: SW Raw, SW Sec, SW Final, SW Eff, SW Eff Duplicate, SW Eff Spike SW Primary Comp, SW Plant 1& 2 INF, SW Recycle, NW Raw, NW Recycle, and NW Eff.
7. When finished testing samples store the NH3 probe in a 1000ppm NH3 buffer or certified storage solution.
REPORT: Record NH3 to three significant figures with one decimal place maximum.
HISTORY:
Version 1.0 Effective August 2004 Version 2.0 Effective April 2011- Procedure and equipment updated to reflect new multimeter.
REFERENCES: Standard Methods 4500-NH3 Ammonia-Selective Electrode Method
PREPARED BY:
Mark Smith Laboratory Analyst
DATE: April 2011
APPROVED BY:
James Burks Laboratory Supervisor
DATE: April 2011
LAST REVIEW BY:
James Burks Laboratory Supervisor
DATE: April 2014

Laboratory Standard Operation
Procedure SOP NO: LAB-LIQ-002 V2.0
Electrometric determination of pH using HACH HQ440d Multipurpose Meter
PAGE: 1 of 4 SOP NO: LAB-LIQ-002 V2.0 DATE: August 2013 SUPERSEDES: V1.0
TITLE: Electrometric determination of pH
SUMMARY: The pH of a sample is determined electrometrically using a glass electrode in
combination with an ATC probe.
RESPONSIBILITY Laboratory Analyst or designee
SCOPE: This test is applicable to drinking water, ground water, domestic and industrial waste waters samples.
EQUIPMENT: • HACH HQ440d Multipurpose Meter with HACH glass electrode • Magnetic stirrer and TFE stir bar • 100mL beaker or sample container
CHEMICALS/ REAGENTS:
• pH 4.00 buffer concentrate: Beckman Coulter P/N 3005 • pH 7.00 buffer concentrate: Beckman Coulter P/N 3007 • pH 10.01buffer concentrate: Beckman Coulter P/N 30019 • Independent Check Standard pH 7.00 Buffer: BDH Middle East LLC
P/N BDH5048-4L • HACH Potassium Chloride Reference Electrode Filling Solution: HACH
P/N 50280 for HQ440d Multi Probe • pH Storage Solution: HACH P/N 27565 • Deionized H20
PREPARATIONS:
pH 4.00 Calibration Solution: Add entire contents of pH 4.00 buffer concentrate to a 500mL volumetric flask and dilute to volume with DI H20. pH 7.00 Calibration Solution: Add entire contents of pH 7.00 buffer concentrate to a 500mL volumetric flask and dilute to volume with DI H20. pH 10.01 Calibration Solution: Add entire contents of pH 10.01 buffer concentrate to a 500mL volumetric flask and dilute to volume with DI H20.

Laboratory Standard Operation
Procedure SOP NO: LAB-LIQ-002 V2.0
Electrometric determination of pH using HACH HQ440d Multipurpose Meter
PAGE: 2 of 4 SOP NO: LAB-LIQ-002 V2.0 DATE: August 2013 SUPERSEDES: V1.0
INSTRUMENT CALIBRATION:
pH meters are calibrated daily using a three point calibration curve. Follow appropriate meter specific procedure below. HACH HQ440d Multipurpose Meter Calibration
1. Turn on power for meter (Blue Button upper left corner). 2. Press black arrow keys (located in center of meter) up or down to select
pH or NH3 calibration. 3. Probe is stored in a pH 4.00 solution (in specimen cup w/ stir bar) on a
magnetic stir plate, turn stir plate on, and adjust the speed of the stir bar.
4. Stir standard at a slow constant rate to provide homogeneity and suspension of solids while avoiding the creation of CO2 by overly mixing sample.
5. Press the calibrate button (black button located to left of arrow keys). 6. Display offers option to read (right button) or cancel (left button), press
right button for read. 7. Allow the meter to lock into place and record the reading on bench
sheet. 8. Remove the pH 4.00 buffer and rinse the probe off with DI water. 9. Pour approximately 50mL of the previously prepared pH 7.00 buffer
into a specimen cup. 10. Place the pH probe into the pH 7.00 buffer, add a stir bar and press the
black button for read located on the right side of the meter. 11. Allow the meter to lock into place and record the reading on bench
sheet. 12. Remove the pH 7.00 buffer and rinse the probe off with DI water 13. Pour approximately 50mL of the previously prepared pH 10.01 buffer
into a specimen cup. 14. Place the pH probe into the pH 10.01 buffer, add a stir bar and press
the black button for read located on the right side of the meter. 15. Allow the meter to lock into place and record the reading on bench
sheet. 16. Press the black button for done located in the top row in the center of
the meter, then press the black left button for store twice . 17. Once the meter has stored the slope for the standards, remove the pH
10.01 buffer and rinse the probe off with DI water. 18. Acceptable criteria for slope, 100% ± 5%. 19. Pour approximately 50mL of the previously purchased pH 7.00
Independent Check Standard buffer into a specimen cup. 20. Place the pH probe into the pH 7.00 Independent Check Standard
buffer, add a stir bar and allow the meter to calculate the pH of the pH 7.00 Independent Check Standard buffer.

Laboratory Standard Operation
Procedure SOP NO: LAB-LIQ-002 V2.0
Electrometric determination of pH using HACH HQ440d Multipurpose Meter
PAGE: 3 of 4 SOP NO: LAB-LIQ-002 V2.0 DATE: August 2013 SUPERSEDES: V1.0
INSTRUMENT CALIBRATION CONT:
21. Record the pH of the pH 7.00 Independent Check Standard buffer on the bench sheet if buffer remains within (± 0.1) pH of 7.00, if not recalibrate the instrument.
22. If the slope or independent check standard do not meet acceptance criteria after recalibration, notify supervisor.
23. Once calibration passes samples may be analyzed.
SAMPLE ANALYSIS:
HACH HQ440d Multipurpose Meter Sample Analysis NOTE: Samples must be analyzed within 15 minutes of collection.
1. For daily NPDES samples, fill beakers or sample containers with 50 to 100mL of the following samples: SW Raw, SW Sec, SW Final, SW Eff Duplicate, SW Primary Comp, SW Plant 1&2 INF, and SW Recycle.
2. Pour 50-100ml of any non NPDES samples requiring analysis. 3. After rinsing probe with DI water and gently wiping electrodes, immerse
them into sample specimen cup and stir sample at a constant rate to provide homogeneity and suspension of solids while avoiding the creation of CO2 by overly mixing sample.
4. Record the pH reading of each sample on the SWTP bench sheet. 5. Rinse probe thoroughly with DI water after each sample, then immerse
the probe in a fresh portion of the next sample and read and record pH. 6. When finished testing samples store the pH probe in a pH 4.00 buffer or
certified storage solution.
REPORT: Record pH to 0.1 pH units
HISTORY:
Version 1.0 Effective August 2004 Version 2.0 Effective August 2013- Procedure and equipment updated to reflect new pH meter and probe

Laboratory Standard Operation
Procedure SOP NO: LAB-LIQ-002 V2.0
Electrometric determination of pH using HACH HQ440d Multipurpose Meter
PAGE: 4 of 4 SOP NO: LAB-LIQ-002 V2.0 DATE: August 2013 SUPERSEDES: V1.0
REFERENCES: Standard Methods 4500-H+ B. Electrometric Method
PREPARED BY:
Derek Gillis Laboratory Analyst
DATE:
August 2013
APPROVED BY:
James Burks Laboratory Supervisor
DATE: August 2013
LAST REVIEW BY:
James Burks Laboratory Supervisor
DATE: August 2014
Laboratory Standard Operation
Procedure SOP NO: LAB-LIQ-003 V2.0
Gravimetric Determination of Total Suspended Solids Dried at 103-105°C
PAGE: 1 of 6 SOP NO: LAB-LIQ-003 V2.0 DATE: AUG 2014 SUPERSEDES: V1.0
TITLE: Gravimetric Determination of Total Suspended Solids Dried at 103-105°C
SUMMARY: A well-mixed sample is filtered through a glass-fiber filter and dried at 103-
105°C. The increase in weight of the filter represents the total suspended solids.
RESPONSIBILITY: Laboratory Analyst or designee
SCOPE: This test is applicable to drinking water, ground water, domestic and industrial waste water samples.
EQUIPMENT: • Fisher Scientific Isotemp Oven (103-105°C) • Porcelain Evaporating Dishes, 90-mm diameter • Desiccator containing color indicator for moisture • Mettler Toledo Analytical Balance • Graduated cylinder and beakers • 1000mL Filter Flask with Membrane Funnel • 25-250mL volumetric glassware • 1-10mL volumetric pipette • Whatman 934-AH Glass Microfiber Filters PN 1827-058
CHEMICALS/ REAGENTS:
• Diatomaceous Earth Celatom FW-80 or equivalent • Deionized (DI) H20
PREPARATIONS:
1000ppm Diatomaceous Earth: In a 1000mL volumetric flask, dissolve 1g Diatomaceous Earth (dried at 100°C) in DI water, mix well, and dilute to volume.
INSTRUMENT CALIBRATION:
1. On the Mettler Toledo Analytical Balance, use a clean balance brush to gently sweep off any particles on the balance scale. Select the “Adjust .int” button on the lower left-hand side of the touch screen to begin the automatic calibration. This will take 10-20 seconds to complete.
2. After the calibration has completed, select “OK” on the touch screen. 3. Press the “�0�” button in the lower right-hand side of the touchpad. 4. Using tweezers, place a 5g calibration weight onto the scale. Record to the
nearest 0.1g in the Daily Calibration Logbook for the Liquids Side Lab. 5. Weight must be ± 0.5g to pass calibration. 6. Check the temperature of the display on the Scientific Isotemp Oven (103-
105°C). Record this value to the nearest 0.1°C on the Daily Calibration Logbook for the Liquids Side Lab.
7. Check the internal temperature of the oven by opening the oven door and

Laboratory Standard Operation
Procedure SOP NO: LAB-LIQ-003 V2.0
Gravimetric Determination of Total Suspended Solids Dried at 103-105°C
PAGE: 2 of 6 SOP NO: LAB-LIQ-003 V2.0 DATE: AUG 2014 SUPERSEDES: V1.0
INSTRUMENT CALIBRATION CONT:
viewing the thermometer to the nearest 0.1°C. Record this value on the Daily Calibration Logbook for the Liquids Side Lab.
PROCEDURE:
Preparing the Filters for Daily Analysis 1. Filters are prepared weekly by opening a new 100-count box of Whatman
934-AH Glass Microfiber Filters. Using a fine point black Sharpie® permanent marker, label the outer edge of each fiber circle on a scale of 1 – 100. Place all 100 filters into a porcelain crucible and place overnight in the Fisher Scientific Isotemp Oven at 103-105°C.
2. After drying for at least 24 hours, place the crucible containing the filters into a desiccator. Wait 20 minutes for the papers to cool.
3. After the papers are cool, use tweezers to weigh each paper to the nearest 0.1 mg. Record the number of the paper in the “Filter ID” column on the TSS daily worksheet. Fill in the corresponding weight in the “Initial Mass (mg)” column. When finished, place all the papers into a crucible and put them back into the oven for 1 hour.
4. After 1 hour, remove the crucible containing the papers and place it back into a desiccator. Wait 20 minutes for the papers to cool.
5. After the papers are cool, use tweezers to weigh each paper to the nearest 0.1 mg for a second time. Fill in the corresponding weight in the “Initial Mass (mg)” column. Once the crucibles have been weighed a second time, place them into the desiccator until they are needed for TSS.
6. Average the two weigh-ins of the papers and record this in the “Initial Weight – Avg.” column of the worksheet. Round to the nearest 0.1 mg.
7. The TSS worksheet is now ready to be used for the TSS test.
Preparing the Filters for Storm Water or Industry Analysis 1. Filters are prepared weekly by opening a new 100-count box of Whatman
934-AH Glass Microfiber Filters. Using a fine point black Sharpie® permanent marker, label the outer edge of each fiber circle on a scale of A-Z. Place all 26 filters into a porcelain crucible and place overnight in the Fisher Scientific Isotemp Oven at 103-105°C.
2. After drying for at least 24 hours, place the crucible containing the filters into a desiccator. Wait 20 minutes for the papers to cool.
3. After the papers are cool, use tweezers to weigh each paper to the nearest 0.1 mg. Record the alphabetical value of the paper in the “Filter ID” column on the Industry/Storm water worksheet. Fill in the corresponding weight in the “Initial Mass (mg)” column. When finished, place all the papers into a crucible and put them back into the oven for 1 hour.
4. After 1 hour, remove the crucible containing the papers and place it back
Laboratory Standard Operation
Procedure SOP NO: LAB-LIQ-003 V2.0
Gravimetric Determination of Total Suspended Solids Dried at 103-105°C
PAGE: 3 of 6 SOP NO: LAB-LIQ-003 V2.0 DATE: AUG 2014 SUPERSEDES: V1.0
PROCEDURE CONT:
into a desiccator. Wait 20 minutes for the papers to cool. 5. After the papers are cool, use tweezers to weigh each paper to the nearest
0.1 mg for a second time. Fill in the corresponding weight in the “Initial Mass (mg)” column. Once the crucibles have been weighed a second time, place them into the desiccator until they are needed for TSS.
6. Average the two weigh-ins of the papers and record this in the “Initial Weight – Avg.” column of the worksheet. Round to the nearest 0.1 mg.
7. The values on the TSS Industry/Storm water worksheet can be transcribed to the Daily worksheet when such samples arrive. When there are <13 Industry/Storm water filters remaining, make a new batch of filter. Use the remaining filters from the previous batch before using a new batch.
Analyzing TSS 1. TSS samples are stored in the following locations:
a. SW composite samples are stored in 1-gallon plastic jugs and are
stored in the Operator Fridge. These samples are carried into the Wet Lab area during the morning hours and are kept there until they are dumped at the end of the day.
b. NW samples are stored in 1-gallon plastic bottles. However, these bottles are not stored in the operator fridge because they are delivered daily from the North Plant. They are dropped off in the Sample Room in the early morning hours (6:30 AM – 7:30 AM) and are transferred to the Wet lab until they are needed for analysis.
c. Industry and Stormwater samples are stored in various containers and are placed in the Sample room refrigerators. Delivery times for these samples vary.
2. Using a pre-made worksheet with the initial weights for all daily samples already averaged, start by filling in the analyst’s initials and the current date of the analysis. Fill in the samples dates under the “Sample Date” column. Blanks and Standards will always have the current date. If a daily sample is missing, bring it to the attention of the supervisor. If a sample cannot be analyzed, cross it out on the premade worksheet.
3. Check the sample room refrigerators/sample room log book for additional TSS samples that are not done on a daily basis, such as any Industry or Stormwater samples. These samples will be in containers that are labeled in blue marker.
4. If there are any Industry or Stormwater samples, write down the name, sample date, and sample ID in a blank space under the “Sample Name” column on the TSS worksheet.

Laboratory Standard Operation
Procedure SOP NO: LAB-LIQ-003 V2.0
Gravimetric Determination of Total Suspended Solids Dried at 103-105°C
PAGE: 4 of 6 SOP NO: LAB-LIQ-003 V2.0 DATE: AUG 2014 SUPERSEDES: V1.0
PROCEDURE CONT:
• Industry example: 7/22/13, Milky Way, AB10556 • Stormwater example: 7/22/13, Stormwater, AB07347
5. Each blank space on the TSS worksheet for Industry and Stormwater
samples allows for duplicate analyses. Use the Industry/Stormwater worksheet and select the first two available pre-weighed filters (ranging from A-Z). Cross out the filters that will be used for the Industry/Stormwater samples (2 filters will be needed per sample) and transcribe the weights of the filters to the Daily worksheet.
6. For daily samples, volumes that yield the best results for dried residue are already filled in on the worksheet. Use these volume ranges.
a. For all daily samples, use –pre-labeled glassware to measure the
corresponding samples. This glassware will be located on a sample cart or on a drying rack above the Liquids Lab sink.
b. On the first two days of the workweek, use a pre-labeled 250mL flask when measuring the SW and NW effluent samples. This glassware can be found in the cabinet above the filtering apparatus or on a drying rack above the Liquids Lab sink.
c. For industry/stormwater samples, choose an appropriate sample volume that will yield between 2.5 and 200mg of dried residue. Fill out the volume that will be used under the “Vol. (mL) column on the worksheet. If <10minutes are required to complete filtration, decrease the sample volume. There are no pre-labeled glassware for these samples.
7. Assemble the filter apparatus and turn on the air suction. 8. Using tweezers, place the filter paper with the corresponding value for the
blank into the filter funnel with the label facing upwards. 9. Pour 25mL of DI water into a graduated cylinder and slowly pour this
amount onto the filter paper. Try to keep the liquid concentrated in the center of the filter paper.
10. Wash the graduated cylinder with three successive 10mL washings and pour these onto the filter paper as well.
11. Continue suction for at least 15 seconds after the filter funnel stops dripping.
12. Carefully peel the filter paper out of the funnel using a pair of tweezers and place it into a crucible.
13. The 1000ppm Diatomaceous Earth Standard is located against the South wall of the Liquids Lab. Shake the container vigorously for 20 seconds and quickly pour 25mL into a graduated cylinder.

Laboratory Standard Operation
Procedure SOP NO: LAB-LIQ-003 V2.0
Gravimetric Determination of Total Suspended Solids Dried at 103-105°C
PAGE: 5 of 6 SOP NO: LAB-LIQ-003 V2.0 DATE: AUG 2014 SUPERSEDES: V1.0
PROCEDURE CONT:
14. Using tweezers, place the filter paper with the corresponding value for the Standard into the filter funnel with the label facing upwards.
15. Pour the 25mL of Standard onto the filter paper. Try to keep the liquid concentrated in the center of the filter paper Wash the graduated cylinder with three successive 10mL washings and pour these onto the filter paper as well.
16. Continue suction for at least 15 seconds after the filter funnel stops dripping.
17. Carefully peel the filter paper out of the funnel using a pair of tweezers. If the sample does not appear to stick well to the filter, fold the filter in half with the label still visible.
18. Repeat steps 27-31 for the remaining samples. 19. Once all samples have been filtered and placed into a crucible, place the
crucible in the Fisher Scientific Isotemp Oven (103-105°C), located on the Liquid Lab side.
20. Allow samples to dry for at least 1 hour in the oven. 21. While samples are drying, clean the filtering apparatus and all glassware
with hot soapy water. Rinse thoroughly with DI water and dry on a drying rack. Once the glassware is dry, put it back in its appropriate location.
22. After the samples have dried for 1 hour, use tongs to remove the crucible from the oven and transfer it to a desiccator for 20 minutes until the sample filters are cool.
23. Ensure that the Mettler Toledo Analytical Balance has been properly calibrated using a 5g weight. Use tweezers to weigh each filter paper to the nearest 0.1mg and record the value of the corresponding filter under the “Final Mass (mg)” column of the Daily TSS worksheet.
24. After weighing each paper, place it into a crucible. Once all the papers have been placed into a crucible, put them back into the oven for 1 hour.
25. After 1 hour, use tongs to remove the crucible containing the papers and place it back into a desiccator. Wait 20 minutes for the papers to cool.
26. After the papers are cool, use tweezers to weigh each paper to the nearest 0.1 mg for a second time. Fill in the corresponding weight in the “Final Mass (mg)” column.
27. Once the crucibles have been weighed a second time, average the two weigh-ins of the papers and record this in the “Final Weight – Avg.” column of the worksheet. Round to the nearest 0.1 mg.
28. To obtain the amount of TSS per daily sample, subtract the Final mass from the Initial mass of the filter paper. Multiply this value by the correct multiplier and record the new value under the “TSS (mg/L)” column. If the value is <1, record is as <1.
29. Because Industry and Stormwater samples are analyzed in duplicates, the sample (mg/L) and sample duplicate (mg/L) will need to be averaged.
Laboratory Standard Operation
Procedure SOP NO: LAB-LIQ-003 V2.0
Gravimetric Determination of Total Suspended Solids Dried at 103-105°C
PAGE: 6 of 6 SOP NO: LAB-LIQ-003 V2.0 DATE: AUG 2014 SUPERSEDES: V1.0
PROCEDURE CONT:
30. Record this value off to right hand side of the “TSS (mg/L) column for the corresponding sample.
31. If additional pages are used for extra samples (Industry/Stormwater), number each page and staple all pages to the first worksheet.
CALCULATIONS: 𝑚𝑔 𝑡𝑜𝑡𝑎𝑙 𝑠𝑢𝑠𝑝𝑒𝑛𝑑𝑒𝑑 𝑠𝑜𝑙𝑖𝑑𝑠/𝐿 =
𝐴 − 𝐵 𝑋 1000𝑠𝑎𝑚𝑝𝑙𝑒 𝑣𝑜𝑙𝑢𝑚𝑒,𝑚𝐿
Where: A = weight of filter +dried residue, mg B = weight of filter, mg
REPORT: Record TSS to three significant figures with one decimal place maximum.
HISTORY: Version 1.0 Effective August 2004 Version 2.0 Effective August 2014- Procedure changed to reflect when north plant samples arrive, duplicate weighings, filter identification and new bench sheets.
REFERENCES: Standard Methods 2540 D Total Suspended Solids Dried at 103-105°C.
PREPARED BY:
Kari Reynolds Laboratory Analyst
DATE: August 2014
APPROVED BY:
James Burks Laboratory Supervisor
DATE: August 2014
LAST REVIEW BY: James Burks Laboratory Supervisor
DATE: New

Laboratory Standard Operation
Procedure SOP NO: LAB-LIQ-003 V2.0
Gravimetric Determination of Total Suspended Solids Dried at 103-105°C
PAGE: 7 of 6 SOP NO: LAB-LIQ-003 V2.0 DATE: AUG 2014 SUPERSEDES: V1.0

Laboratory Standard Operation
Procedure SOP NO: LAB-LIQ-004 V3.0
5-Day BOD Test PAGE: 1 of 13 SOP NO: LAB-LIQ-004 V3.0 DATE: July 2013 SUPERSEDES: V2.0
TITLE:
Determination of Biochemical Oxygen Demand using 5-Day BOD test
SUMMARY: Airtight bottles are filled with diluted and seeded samples and incubated for 5 days. A dissolved oxygen (DO) reading are taken before and after incubation and the difference in initial and final DO is used to calculate the biochemical oxygen demand (BOD).
RESPONSIBILITY: Laboratory Analyst or designee
SCOPE: This test is applicable to drinking water, ground water, domestic and industrial waste water samples.
EQUIPMENT: • 300mL BOD bottles with ground-glass stopper and plastic caps • Symphony™ VWR Incubator at 20°C +/- 1°C • HACH HQ440D multimeter with pH probe • HACH HQ430d flexi DO Meter • 1000mL volumetric flasks • Stir plate with TFE lined stir bar
CHEMICALS/ REAGENTS:
• Potassium Phosphate Monobasic(K2HPO4):Fisher P-288, ACS grade • Potassium Phophsate Dibasic(KH2PO4):LabChem LC20095-1 ACS
grade • Sodium Phosphate: Fisher S374-500, ACS grade • Ammonium Chloride: Fisher A661-500, ACS grade • Magnesium Sulfate: Fisher M63-500, ACS grade • Calcium Chloride: LabChem LC12725-1, ACS grade • Ferric Chloride: Fisher 188-100, ACS grade • NaOH: Fisher UN1823, ACS grade (or equivalent) • H2SO4: J.T Baker 9673-33, Concentrated (or equivalent) • D-(+)-Glucose: Alfa Aesar A16828, 99% • D-Glutamic Acid: Alfa Aesar A14191, 99+% • Deionized (DI) water • Sodium Sulfite
PREPARATIONS:
Phoshpate Buffer Solution: Dissolve 8.5g of potassium phosphate dibasic, 21.75g of potassium phosphate monobasic, 33.4g of sodium phosphate, and 1.7g of ammonium chloride in ~500mL of DI water. Dilute to volume in a 1L volumetric flask with DI water. Magnesium Sulfate Solution: Dissolve 22.5g of magnesium sulfate in

Laboratory Standard Operation
Procedure SOP NO: LAB-LIQ-004 V3.0
5-Day BOD Test PAGE: 2 of 13 SOP NO: LAB-LIQ-004 V3.0 DATE: July 2013 SUPERSEDES: V2.0
PREPARATIONS CONT:
~500mL of DI water. Dilute to volume in a 1L volumetric flask with DI water. Ferric Chloride Solution: Dissolve 0.25g of ferric chloride in ~500mL of DI water. Dilute to volume in a 1L volumetric flask with DI water. Glucose-Glutamic Acid Solution: Dry glucose and glutamic acid at 103°C for 1 hour. Add 150mg each of glucose and glutamic acid to a 1L volumetric flask and dilute to volume with DI water. Ammonium Chloride Solution: Dissolve 1.15g of ammonium chloride in ~500mL of DI water. Adjust pH to 7.2 with sodium hydroxide solution and dilute to volume in a 1L volumetric flask with DI water. Sodium Hydroxide solution: dissolve 40g of sodium hydroxide if DI water. Dilute to volume in a 1L volumetric flask with DI water. Sulfuric Acid Solution: While stirring, slowly add 28mL of concentrated sulfuric acid to a 1L volumetric flask containing ~500mL of DI water. Dilute to volume with DI water.
WORKSHEET:
1. Check the sample room refrigerators/sample room log book for any industry or storm water samples. These samples will be in containers that are labeled in blue marker. If there are no Industry or storm water samples, skip to step #6
2. If there are any industry or storm water samples, write down the name, sample date, and sample ID on the back of the first page of the BOD worksheet(s).
• Industry example: Milky Way 7/22 AB10556 • Storm water example: Storm water 7/22 AB07347
3. Look up the location codes for any industry or storm water sample and include that information on the back of the first page of the BOD worksheet(s).
• Industry example: Milky Way 7/22 AB10556 IP-043-001 4. After finding the Location code of the industry sample, review the
LIMS and write down the ranges of the results. • Industry example: Milky Way 7/22 AB10556 Range 390 –
7000mg/L 5. Using the following calculations in Table 1, choose at least three
dilutions that will cover the range of the sample’s previous runs. If the sample range does not fall within the ranges listed in Table 1, further dilutions may be necessary.

Laboratory Standard Operation
Procedure SOP NO: LAB-LIQ-004 V3.0
5-Day BOD Test PAGE: 3 of 13 SOP NO: LAB-LIQ-004 V3.0 DATE: July 2013 SUPERSEDES: V2.0
WORKSHEET CONT:
Industry example: Previous data in LIMS show that Milky Way can range from 390 – 7000mg/L. Choosing 4 test runs that consist of 1, 2, 5, and 10 mL of sample will cover a continuous range of 200 – 7,500mg/L. Storm water example: There are no previous data in LIMS for this particular storm water sample. Therefore, it is recommended to do one dilution using 200mL of sample
6. A premade worksheet exists for regular daily BOD analysis (see Monday, Tuesday/Thursday worksheet attachments). On the premade worksheet, put down the initials of the analyst preparing the worksheet and fill in the date that the test is being set-up.
7. Fill out the Take-off date of the samples. To do this, add 5 days to the date the BOD test was set up.
8. If a sample is missing, cross it out on the premade worksheet. 9. If additional samples are added, use a blank BOD worksheet and fill
out the Sample ID columns with the additional sample names. Add industries first and storm water samples second according to the outline in Table 2.
10. If additional pages are used for extra samples, number each page and staple them to the premade worksheet.
11. Once the Sample ID and dates have been filled out on all worksheets, write down the mL of sample used and the corresponding dilution factor according to Table 3.
12. To determine the amount of BOD incubation bottles needed for the test run, start by counting the amount of Sample ID boxes you have filled out on the worksheet. Each Sample ID will require a series of 3 BOD bottles (2 for the 5-day incubation and a third for the initial DO reading). Using the BOD cart, place the series in rows as show by Figure 1.
13. Using Figure 1 as a guideline, write down the number (#) located on each bottle label that will be used for 5-day incubation in the Bottle # column on the worksheet. Columns and rows will follow the Sample ID order on the BOD worksheet.
• Example: all three bottles in Column 1 Row 1 will be the Control, followed by the three bottles in Column 1 Row 2 as the SW Raw, etc.
14. With the exception of the STD, each Sample ID will have two numbered bottles that will be used for 5-day incubation and a third bottle which will be discarded after the initial DO reading (see Figure 1).
15. The Standard will have 3 numbered bottles that will all be used for 5-

Laboratory Standard Operation
Procedure SOP NO: LAB-LIQ-004 V3.0
5-Day BOD Test PAGE: 4 of 13 SOP NO: LAB-LIQ-004 V3.0 DATE: July 2013 SUPERSEDES: V2.0
WORKSHEET CONT: PROCEDURE:
day incubation. The initial DO reading will be taken from the third bottle of the series which will not be discarded. To prevent accidental discard of the third standard bottle during initial DO readings, it is recommended to put a colored ring around the neck of the bottle.
16. At this point in the SOP, you should have the following columns filled out on the worksheet: • Initials of Analyst preparing the test • Date of Set-up • Date of Take-Off • Page Numbers on all pages • Bottle # - entire column • Sample ID – entire column • mL/L (amount of sample used for analysis) – entire column • Dilution factor – entire column
Preparing Samples for Analysis 1. SW composite samples are stored in 1-gallon plastic jugs and are located
in the Operator Fridge. These samples are carried into the Wet Lab area during the morning hours and are kept there until they are dumped at the end of the day. There are additional storage areas/rules to be aware of:
• The SW Raw and SW Effluent samples are not dumped on a nightly basis. Instead, they are placed back in the Operator Fridge at the end of the day.
• All NW samples are also stored in 1-gallon plastic bottles. However, these bottles are not stored in the operator fridge because they are delivered daily from the North Plant. They are dropped off in the Sample Room in the early morning hours until they are needed for analysis in the Wet Lab. Besides Tuesdays, all NW composite jugs are dumped at the end of the day.
• On Tuesdays, the SW Raw, SW Effluent, NW Raw, and NW Effluent composite jugs are stored in the BOD Fridge for analysis on Wednesday. These are the “previous day’s comp.” samples. (See Table 2)
• The BOD Standard is stored in the BOD refrigerator. • The BOD Nutrients are stored in the BOD refrigerator. • All composite samples are poured from the jugs into labeled
250mL sample cups for BOD analysis in the early morning. 2. Pre-labeled 1000mL flasks corresponding to the samples shown in Table
2 can be found in the same cabinet as the BOD incubation bottles. On

Laboratory Standard Operation
Procedure SOP NO: LAB-LIQ-004 V3.0
5-Day BOD Test PAGE: 5 of 13 SOP NO: LAB-LIQ-004 V3.0 DATE: July 2013 SUPERSEDES: V2.0
PROCEDURE CONT:
Wednesdays, composite bottles from the previous day will not have a pre-labeled flask and will instead use an unlabeled flask. Industry and storm water samples will also use an unlabeled flask.
3. Arrange 1000mL flasks on counter in the order shown in Figure 2. The first flask will be the control, followed by the SW Raw, etc. The amount of flasks used for analysis will vary depending on the weekday and any additional industry/storm water samples.
4. Place the 250mL sample cups (poured earlier in the morning, see step #15) with the corresponding flask. The following samples will have exceptions:
• The Standard flask will not have a labeled 250mLsample cup. Instead, pour about 40mL of Standard (located in the BOD fridge) into a 100mL sample cup and place this next to the Standard flask.
• SW and NW effluent samples will not have a labeled 250mL sample cup. Instead, place the corresponding 1-gallon composite jug next to the flask(s).
• The Control flask will not have a sample cup because it will be filled with Dilution Water only.
• Industry and Storm water samples will not have a labeled 250mL sample cup. Fill a 100mL sample cup and place it next to the corresponding sample.
5. Count the amount of flasks on the counter. This number should correspond to the amount of Sample ID lines used in the BOD worksheet. This number will determine the liters needed for the dilution water mixture.
6. Take the number of flasks counted and add 5 to it. Then round this number up to the nearest multiple of 5 to get the total amount of liters needed for the dilution water mixture. Fill up the Dilution Water bucket with DI water until you reach that total.
• Example: you have 18 flasks. The liters of DI water needed for the dilution water mixture would be 18 + 5 = 23 liters. Rounded up to the nearest multiple of 5 would be 25 liters total needed for the dilution water mixture.
7. Add the following BOD Nutrient Standards (located in the BOD fridge): • 1mL of Phosphate Buffer per liter of DI water in the Dilution Water
bucket • 1mL of Magnesium Sulfate per liter of DI water in the Dilution
Water bucket • 1mL of Calcium Chloride per liter of DI water in the Dilution Water
bucket

Laboratory Standard Operation
Procedure SOP NO: LAB-LIQ-004 V3.0
5-Day BOD Test PAGE: 6 of 13 SOP NO: LAB-LIQ-004 V3.0 DATE: July 2013 SUPERSEDES: V2.0
PROCEDURE CONT:
• 1mL of Ferric Chloride per liter of DI water in the Dilution Water bucket
8. Pour the nutrients into the Dilution Water bucket and begin aerating the mixture. The DO of the Dilution Water must reach 8.4-8.8 mg/L when beginning the BOD test. To check the DO of the mixture, it is recommended that the Dilution Water be aerated for 3 minutes at a time and allowed to settle for 30min prior to measuring the DO.
Beginning the BOD Test 9. Batch the BOD samples in the LIMS system using the analysis code
BOD-PREP-W and BOD-W. Write down the batch number for BOD-W on the BOD worksheet.
10. Measure the pH of any Industry and/or Storm water sample. Write down the initial pH on the BOD worksheet under the Initial pH column. If the pH is outside of the range 6.0-8.0, adjust the sample to 7.00-7.10 using NaOH or H2SO4. These solutions are located by the pH meter. Write the final pH in the Adjusted pH column on the worksheet.
11. If any 1:100 dilutions are needed for the Industry or Storm water samples, make them after the pH is adjusted.
12. Calibrate the DO meter and record the following on the worksheet: • Calibration DO, Temp., Slope
13. Measure the DO of the Dilution water to make sure it is still in the range of 8.4-8.8 m/L. Record the following on the worksheet:
• Dilution Water Temp 14. Using the digital clock in the Wet Lab area, record the Room Temperature
on the worksheet and the time you are beginning the test. 15. Begin adding the appropriate amount of each sample to each 1000mL
flask when the test is ready to begin. (See Table 2 for the mL needed from each sample)
16. Add 2mL of Seed to the Standard, SW/NW effluent, Industry, and Storm water sample flasks.
17. Begin filling each flask with Dilution Water up to the 1000mL mark. 18. Once a flask is diluted to 1000mL, take the following steps:
• Invert it 3 times to thoroughly mix the solution and immediately pour it into the corresponding row of incubation bottles.
• Begin reading the DO on the third incubation bottle. • Tap the sides of the other two incubation bottles with the glass
stoppers to help bring any air bubbles to the surface of the sample. • Once the air bubbles are knocked free, cork the two incubation
bottles with the glass stoppers and then cover each one with a plastic cap.

Laboratory Standard Operation
Procedure SOP NO: LAB-LIQ-004 V3.0
5-Day BOD Test PAGE: 7 of 13 SOP NO: LAB-LIQ-004 V3.0 DATE: July 2013 SUPERSEDES: V2.0
PROCEDURE CONT: ANALYSIS:
• Record the DO of the third incubation bottle in the Initial DO column on the worksheet (no greater than 1 decimal place). If the third incubation bottle is not from the Standard, discard it.
• If the third dilution bottle is from the Standard, knock out the air bubbles, cork it with a glass stopper, and cap it with a plastic lid after taking the initial DO reading.
19. After all of the samples have been poured into the incubation bottles and properly capped, check the temperature of the BOD incubator using the glass thermometer inside the incubator on the first shelf. Record the Incubator Temp. on the worksheet.
20. Begin loading the samples into the BOD incubator beginning with the last sample on the worksheet and ending with the first sample. Take care to store the bottles in the same order as the worksheet.
• The top shelf of the incubator is used for Wednesday samples. The middle shelf is for Thursday samples, and the bottom shelf if for Friday samples.
21. Clean up the area by thoroughly rinsing each container (flask/cup/bucket/etc.) with tap water.
• Do not dump the SW effluent and SW Raw 1-gallon composites. Store these samples in the Operator Fridge.
• Dump all other composite samples. • Put the unused BOD standard back into the BOD fridge. • Incubation bottles do not need to be rinsed with tap water.
Instead, wash all discarded incubation bottles in the dishwasher with minimal soap.
22. At this point in the SOP, you should have the following columns filled out for Set-up on the worksheet:
• DO Calibration (DO, Temp., Slope) • Dilution Water Temp • Incubator Temp. • Room Temp.
23. Log onto LIMS and enter “D” (done) for all samples under the analysis code BOD-PREP-W.
Analyzing DO after 5-day incubation period
1. Calibrate the DO meter and record the following on the worksheet under the Analysis area:
a. Calibration DO, Temp., Slope 2. Using the digital clock in the Wet Lab area, record the Room Temperature
and the time you are beginning the test under the Taken Off column on the worksheet.
Laboratory Standard Operation
Procedure SOP NO: LAB-LIQ-004 V3.0
5-Day BOD Test PAGE: 8 of 13 SOP NO: LAB-LIQ-004 V3.0 DATE: July 2013 SUPERSEDES: V2.0
PROCEDURE CONT: CALCULATIONS:
3. Before the sample bottles are pulled out of the BOD incubator, check the temperature of the incubator using the glass thermometer inside the incubator on the first shelf. Record the Incubator Temperature under the Analysis area on the worksheet.
4. Begin pulling all samples out of the fridge starting with the first set of samples on the worksheet that needs to be completed. Refer to Table 4 for a schedule of BOD test dates.
5. Pull off all of the plastic caps. Do not pull out the glass stoppers until the DO for that sample is ready to be measured.
6. Starting with the first series of samples, pull out the glass stoppers and measure the DO. Record the DO in the Final DO column (no greater than 1 decimal place).
7. Using the first sample, record the Dilution Water Temp on the worksheet. 8. Continue reading the DO for each sample until all samples have been
measured. 9. Empty and wash all incubation bottles in the dishwasher.
Calculating and Submitting Data to LIMS
1. Subtract the values in the Final DO column from the Initial DO column to get the DO I-F.
2. Average the two values in the DO I-F column for the seed and divide this number by 10. Write down the resulting value in the Seed Factor: (Seed DO I-F)/10 area on the worksheet.
3. Subtract the Seed Factor from the DO I-F column for all samples after the Seed row and write the corresponding values in the Seed column.
4. Using the Seed column, multiply the value by the Dilution Factor for all samples and write down the new values in the BOD column.
5. Average the duplicate values for each sample and write this number in the 5-Day BOD column. The Standard will have a triplicate value to average.
6. For Industry and Storm water samples: a. Do not use a value if the Initial DO was not depleted by at least
2mg/L and/or if the remaining DO after 5-day incubation is not greater than 1mg/L.
b. Average all acceptable values in the 5-Day BOD column and write this number close to the 5-Day BOD column for the Industry samples. Circle this value and draw connecting lines to the values that were used to obtain that average.
7. Review the BOD worksheet results with the supervisor if there are any discrepancies.
8. Using the analysis code BOD-W and the batch number on the worksheet,

Laboratory Standard Operation
Procedure SOP NO: LAB-LIQ-004 V3.0
5-Day BOD Test PAGE: 9 of 13 SOP NO: LAB-LIQ-004 V3.0 DATE: July 2013 SUPERSEDES: V2.0
CALCULATIONS CONT:
pull up the BOD test on the LIMS. Enter 3 significant figures (no greater than 1 decimal place) for each final value from the worksheet. If a sample is less than 2mg/L, enter <2.0.
9. Fill in the following QA/QC data under the SW Effluent sample: a. B_BOD – This is the blank. Enter the value of the control. b. D_BOD – This is the duplicate. Enter the value of the duplicate SW
Effluent. c. L_BOD – This is the Standard. Enter the average of the 3 Standard
samples. d. S_BOD – This is the spike. Enter the value of the SW Eff. Spike.
10. Once all data have been saved in LIMS, fill in the validation date in the lower right-hand corner of the worksheet and initial it. Put the completed worksheet in the BOD tray for storage.
REPORT: BOD (mg/L) to three 3 significant figures (not more than one decimal place).
HISTORY: Version 1.0 Effective August 2004 Version 2.0 Effective July 2011-Updates to procedure and equipment to reflect change from O2 permeable membrane probe to LDO probe. Version 3.0- Effective July 2013 Updated to include current sample list, new bench sheet and added updated figures. Updated format.
REFERENCES: Standard Methods 5210 B. 5-Day BOD Test
PREPARED BY: Kari Reynolds Laboratory Analyst
DATE: July 213
APPROVED BY: James Burks Laboratory Supervisor
DATE: July 2013
APPROVED BY:
James Burks Laboratory Supervisor
DATE: July 2014

Laboratory Standard Operation
Procedure SOP NO: LAB-LIQ-004 V3.0
5-Day BOD Test PAGE: 10 of 13 SOP NO: LAB-LIQ-004 V3.0 DATE: July 2013 SUPERSEDES: V2.0
Table 1- BOD Sample Ranges. Sample range calculations are based on the dilution water having an initial DO of 8.5mg/L. (1/100) indicates a prior dilution of 1mL of sample into 100mL of DI water.
mL Sample Dilution Factor Min Max (1/100) 5 20,000 40,000 150,000 (1/100) 10 10,000 20,000 75,000 (1/100) 20 5,000 10,000 37,500 (1/100) 25 4,000 8,000 30,000 (1/100) 40 2,500 5,000 18,750 (1/100) 50 2,000 4,000 15,000 1 1,000 2,000 7,500 2 500 1,000 3,750 5 200 400 1,500 10 100 200 750 20 50 100 375 25 40 80 300 40 25 50 187.5 50 20 40 150 100 10 20 75 200 5 10 37.5 500 2 4 15
Table 2- Sample worksheet order. *-The Standard is run in triplicate and will take up two Sample ID lines on a worksheet. **-Industry samples must have at least three dilutions and therefore will take up at least three Sample ID lines on a worksheet. ***- Storm water samples will vary for the # of sample lines on a worksheet and may not have a sample name or LIMS records.
Wednesday Thursday Friday
Control Control Control
SW Raw (previous day’s comp.)
SW Raw (today’s composite)
SW Raw (today’s composite)
NW Raw (previous day’s comp.)
Primary Influent Primary Influent
SW Raw (today’s composite) Plant 1 & 2 Plant 1 & 2

Laboratory Standard Operation
Procedure SOP NO: LAB-LIQ-004 V3.0
5-Day BOD Test PAGE: 11 of 13 SOP NO: LAB-LIQ-004 V3.0 DATE: July 2013 SUPERSEDES: V2.0
Primary Influent SW Secondary SW Secondary
Plant 1 & 2 SW Recycle SW Recycle
SW Secondary NW Raw (today’s composite)
NW Raw (today’s composite)
SW Recycle NW Recycle NW Recycle
NW Raw (today’s composite) Seed Seed
NW Recycle Standard* Standard*
Seed SW Eff. (today’s composite)
SW Eff. (today’s composite)
Standard* SW Eff. Dup. (today’s comp.)
SW Eff. Dup. (today’s comp.)
SW Eff. (previous day’s comp.)
SW Eff. Spike (today’s comp.)
SW Eff. Spike (today’s comp.)
NW Eff. (previous day’s comp.)
NW Eff. (today’s composite)
NW Eff. (today’s composite)
SW Eff. (today’s composite) Industry** Industry**
SW Eff. Dup. (today’s comp.)
Storm water*** Storm water***
SW Eff. Spike (today’s comp.)
NW Eff. (today’s composite)
Industry**
Storm water***

Laboratory Standard Operation
Procedure SOP NO: LAB-LIQ-004 V3.0
5-Day BOD Test PAGE: 12 of 13 SOP NO: LAB-LIQ-004 V3.0 DATE: July 2013 SUPERSEDES: V2.0
Table 3- Recommended sample amounts and corresponding dilution factors. *-The control consists of dilution water only and therefore does not have a dilution factor. **-The spike consists of 500mL of SW Eff. and an additional 10mL of Std. Industry and Storm water samples will have various dilutions according to the ranges listed in Table 1.
Sample ID mL Dil.
Factor
Sample ID mL Dil.
Factor
Control* n/a n/a Seed 20 50
SW Raw (previous day’s comp.)
20 50 Standard 20 50
NW Raw (previous day’s comp.)
20 50 SW Eff. (previous day’s comp.)
20 50
SW Raw (today’s comp.) 20 50 NW Eff. (previous day’s comp.)
500 2
SW Primary Inf. 20 50 SW Eff. (today’s comp.) 500 2
SW Plant 1 & 2 20 50 SW Eff. Duplicate (today’s comp.)
500 2
SW Secondary 200 5 SW Eff. Spike (today’s comp.)**
500 2
SW Recycle 10 100 NW Eff (today’s comp.) 500 2
NW Raw (today’s comp.) 20 50 Industry varies
varies
NW Recycle 10 100 Storm water varies
varies

Laboratory Standard Operation
Procedure SOP NO: LAB-LIQ-004 V3.0
5-Day BOD Test PAGE: 13 of 13 SOP NO: LAB-LIQ-004 V3.0 DATE: July 2013 SUPERSEDES: V2.0
Table 4 - BOD test schedule. Samples are measured for final DO 5 days after initial set-up. *-On Tuesdays, the SW and NW Eff/Raw composites need to be stored in the BOD fridge at the end of the day.
Sunday Monday Tuesday Wednesday Thursday Friday Saturday
Read Last
Wed.’s Run
Read Last Thurs.’s
Run
Read Last Fri.’s Run
* Set up BODs
Set up BODs
Set up BODs
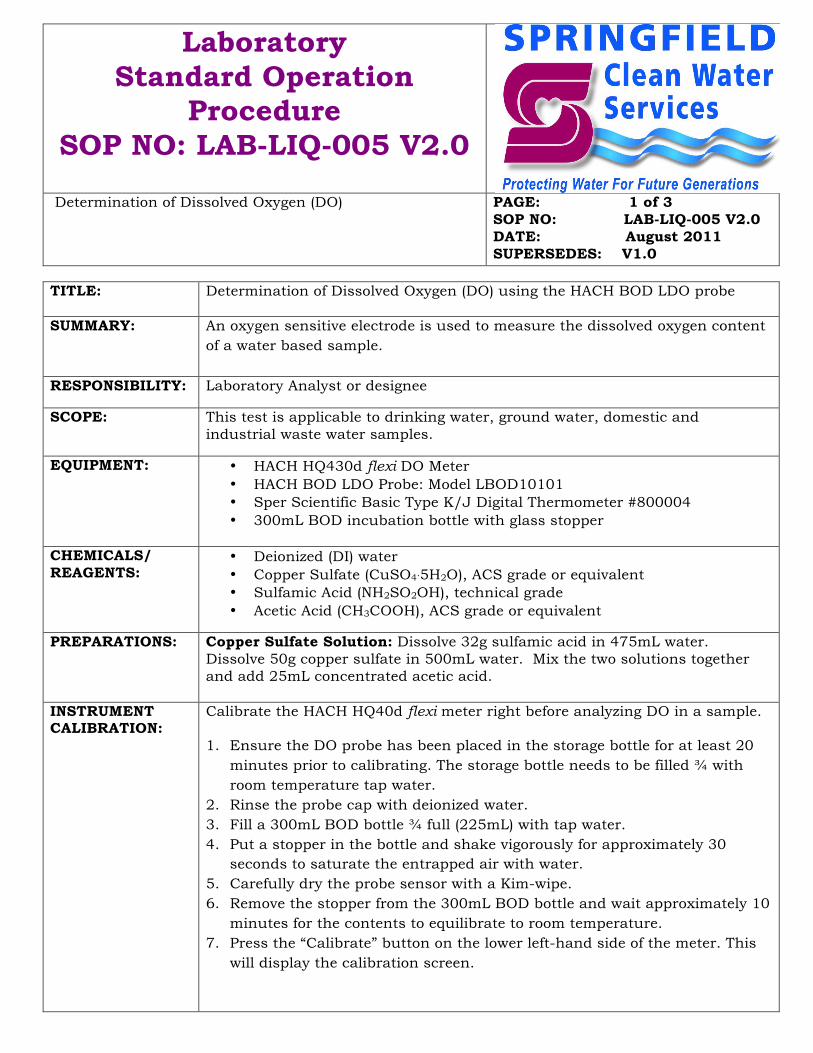
Laboratory Standard Operation
Procedure SOP NO: LAB-LIQ-005 V2.0
Determination of Dissolved Oxygen (DO)
PAGE: 1 of 3 SOP NO: LAB-LIQ-005 V2.0 DATE: August 2011 SUPERSEDES: V1.0
TITLE: Determination of Dissolved Oxygen (DO) using the HACH BOD LDO probe
SUMMARY: An oxygen sensitive electrode is used to measure the dissolved oxygen content
of a water based sample.
RESPONSIBILITY: Laboratory Analyst or designee
SCOPE: This test is applicable to drinking water, ground water, domestic and industrial waste water samples.
EQUIPMENT: • HACH HQ430d flexi DO Meter • HACH BOD LDO Probe: Model LBOD10101 • Sper Scientific Basic Type K/J Digital Thermometer #800004 • 300mL BOD incubation bottle with glass stopper
CHEMICALS/ REAGENTS:
• Deionized (DI) water • Copper Sulfate (CuSO4.5H2O), ACS grade or equivalent • Sulfamic Acid (NH2SO2OH), technical grade • Acetic Acid (CH3COOH), ACS grade or equivalent
PREPARATIONS: Copper Sulfate Solution: Dissolve 32g sulfamic acid in 475mL water. Dissolve 50g copper sulfate in 500mL water. Mix the two solutions together and add 25mL concentrated acetic acid.
INSTRUMENT CALIBRATION:
Calibrate the HACH HQ40d flexi meter right before analyzing DO in a sample. 1. Ensure the DO probe has been placed in the storage bottle for at least 20
minutes prior to calibrating. The storage bottle needs to be filled ¾ with room temperature tap water.
2. Rinse the probe cap with deionized water. 3. Fill a 300mL BOD bottle ¾ full (225mL) with tap water. 4. Put a stopper in the bottle and shake vigorously for approximately 30
seconds to saturate the entrapped air with water. 5. Carefully dry the probe sensor with a Kim-wipe. 6. Remove the stopper from the 300mL BOD bottle and wait approximately 10
minutes for the contents to equilibrate to room temperature. 7. Press the “Calibrate” button on the lower left-hand side of the meter. This
will display the calibration screen.

Laboratory Standard Operation
Procedure SOP NO: LAB-LIQ-005 V2.0
Determination of Dissolved Oxygen (DO)
PAGE: 2 of 3 SOP NO: LAB-LIQ-005 V2.0 DATE: August 2011 SUPERSEDES: V1.0
INSTRUMENT CALIBRATION CONT:
8. Press the “Read” button on the lower right-hand side of the meter. The instrument will begin the calibration.
9. When the calibration is complete, the instrument will beep and it will display the temperature and DO of the calibration in the upper-right hand part of the display screen. Record these values on the DO worksheet.
10. Press the “Done” button in the lower right-hand side of the screen. The display will now show the slope of the calibration. Record this on the DO worksheet.
11. Press the “Store” button to finish the calibration. The DO probe is now ready for analysis.
PROCEDURE:
1. A premade worksheet exists for regular daily DO analysis. On the premade worksheet, put down the initials of the analyst preparing the worksheet and fill in the date that the test is being set-up.
2. Samples are collected in 300mL BOD bottles with a glass stopper. Samples are preserved using 5mL of Copper Sulfate solution.
3. To analyze for DO, take the 300mL sample bottle and invert several times to thoroughly mix. Ensure the glass lid stay on tight during mixing.
4. After thoroughly mixing, remove the glass stopper and place the DO probe into the bottle.
5. Turn on the stirring rod by pressing the button at the top of the probe once.
6. Allow the DO meter to stabilize on a value. 7. Record the stabilized value to 3 significant figures with no more than one
decimal place. 8. Turn off the stirring roc by pressing the button at the top of the probe once. 9. Thoroughly rinse the probe tip in cool tap water. Do not wipe of the bottom
of the probe tip. 10. Repeat steps 3-9 for additional samples. 11. When done, rinse the thoroughly rinse the probe with cool water. Do not
wipe the bottom of the probe tip. 12. Store the probe in a 300mL BOD bottle that is 2/3 full of tap water. Ensure
the stirring rod on the probe is turned off. 13. Record on Bench sheet and in LIMS
Laboratory Standard Operation
Procedure SOP NO: LAB-LIQ-005 V2.0
Determination of Dissolved Oxygen (DO)
PAGE: 3 of 3 SOP NO: LAB-LIQ-005 V2.0 DATE: August 2011 SUPERSEDES: V1.0
REPORT: Record to three significant figures with one decimal place maximum. HISTORY: Version 1.0 Effective August 2004
Version 2.0- Equipment updated to reflect change from Oxygen permeable membrane probe to LDO probe.
REFERENCES: EPA 360.1/SM-4500-O(G)/HACH 10360
PREPARED BY:
Jim Burks Laboratory Supervisor
DATE: August 2014
APPROVED BY:
James Burks Laboratory Supervisor
DATE: August 2014
LAST REVIEW BY:
James Burks Laboratory Supervisor
DATE: August 2014

Laboratory Standard Operation
Procedure SOP NO: LAB-LIQ-006 V1.0
Determination of Hardness by the EDTA Titrimetric Method
PAGE: 1 of 2 SOP NO: LAB-LIQ-006 V1.0 DATE: October 2009 SUPERSEDES: NEW
TITLE: Determination of Hardness by the EDTA Titrimetric Method
SUMMARY: EDTA forms a soluble complex when added to a solution of calcium and
magnesium metal cations. Adding dye to a sample containing those free ions at pH 10.0 produces a wine red color. Then using EDTA to titrate that sample will change the color from wine red to blue as the metal ions are complexed, indicating the endpoint of the titration.
RESPONSIBILITY: Chemist, laboratory analyst or designee
SCOPE: This test is applicable to drinking water, ground water, domestic and industrial waste water samples.
EQUIPMENT: • 50mL glass burette and stand • Stir plate and magnetic stir bar • 300mL Erlenmeyer flasks • 50mL glass graduated cylinder • 5mL automatic pipet and tips
CHEMICALS/ REAGENTS:
• Hach EDTA Titrant, 0.02N (part number 205-53) • Hach Buffer Solution, Hardness 1 (part number 424-32) • Hach Manver Hardness 2 Indicator (part number 851-99)
PROCEDURE:
1. Measure 50mL of sample into a 300 mL Erlenmeyer flask. 2. Add 2.0mL of buffer solution. (We use twice the amount called for in the
official method due to sample preservation with sulfuric acid. For non-preserved samples, 1.0mL is sufficient.)
3. Add one packet of Indicator and stir. 4. Fill burette with EDTA titrant and record initial volume. 5. Titrate with titrant until the sample turns completely blue and record
final volume. 6. This method is usable for up to 500ppm hardness. Use a smaller
sample size and dilute with water to 50mL for samples that are >500ppm. Adjust the multiplier to compensate for the dilution in the calculations.
CALCULATIONS:
Volume of titrant used in mL X 20 = Hardness mg/L CaCO3

Laboratory Standard Operation
Procedure SOP NO: LAB-LIQ-006 V1.0
Determination of Hardness by the EDTA Titrimetric Method
PAGE: 2 of 2 SOP NO: LAB-LIQ-006 V1.0 DATE: October 2009 SUPERSEDES: NEW
REPORT:
Report results to three significant figures.
HISTORY:
Version 1.0 Effective October 2014
REFERENCES: Standard Methods for the Examination of Water and Wastewater, 22nd Edition, 2340 C.
PREPARED BY:
Gary Kellogg Chemist
DATE: October 2009
APPROVED BY:
James Burks Laboratory Supervisor
DATE: October 2009
LAST REVIEW BY:
James Burks Laboratory Supervisor
DATE: October 2014
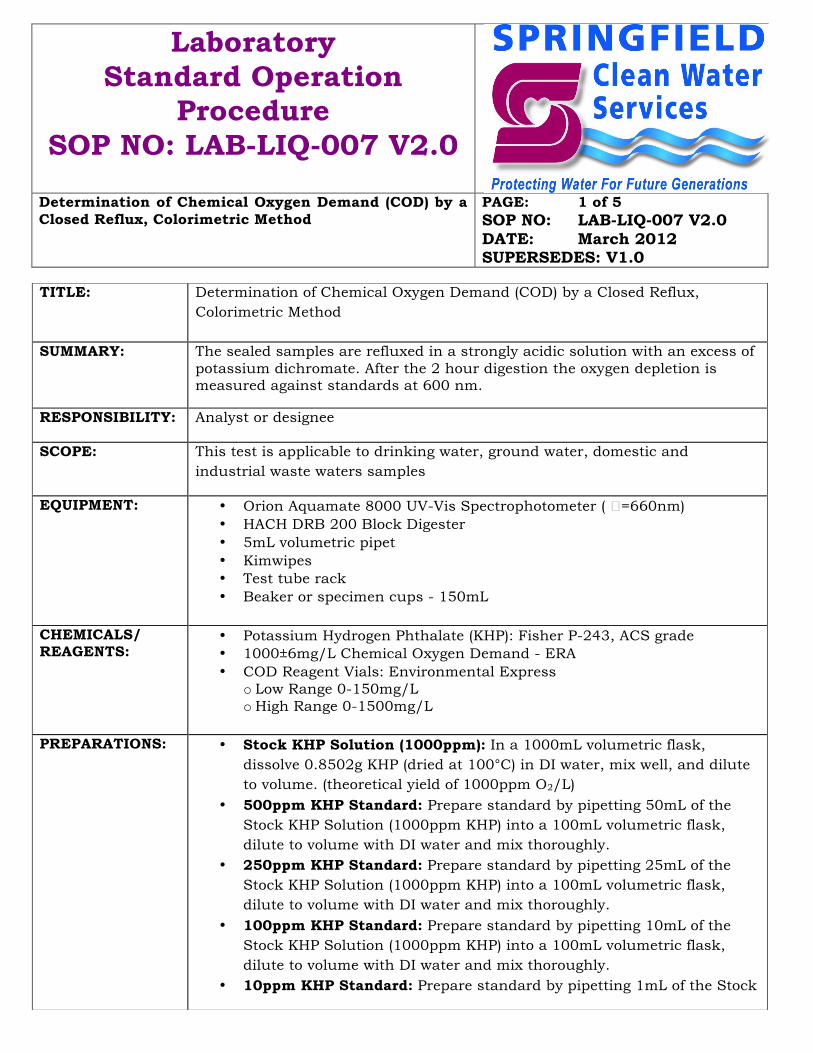
Laboratory Standard Operation
Procedure SOP NO: LAB-LIQ-007 V2.0
Determination of Chemical Oxygen Demand (COD) by a Closed Reflux, Colorimetric Method
PAGE: 1 of 5 SOP NO: LAB-LIQ-007 V2.0 DATE: March 2012 SUPERSEDES: V1.0
TITLE: Determination of Chemical Oxygen Demand (COD) by a Closed Reflux, Colorimetric Method
SUMMARY: The sealed samples are refluxed in a strongly acidic solution with an excess of
potassium dichromate. After the 2 hour digestion the oxygen depletion is measured against standards at 600 nm.
RESPONSIBILITY: Analyst or designee
SCOPE: This test is applicable to drinking water, ground water, domestic and industrial waste waters samples
EQUIPMENT:
• Orion Aquamate 8000 UV-Vis Spectrophotometer ( �=660nm) • HACH DRB 200 Block Digester • 5mL volumetric pipet • Kimwipes • Test tube rack • Beaker or specimen cups - 150mL
CHEMICALS/ REAGENTS:
• Potassium Hydrogen Phthalate (KHP): Fisher P-243, ACS grade • 1000±6mg/L Chemical Oxygen Demand - ERA • COD Reagent Vials: Environmental Express
o Low Range 0-150mg/L o High Range 0-1500mg/L
PREPARATIONS:
• Stock KHP Solution (1000ppm): In a 1000mL volumetric flask, dissolve 0.8502g KHP (dried at 100°C) in DI water, mix well, and dilute to volume. (theoretical yield of 1000ppm O2/L)
• 500ppm KHP Standard: Prepare standard by pipetting 50mL of the Stock KHP Solution (1000ppm KHP) into a 100mL volumetric flask, dilute to volume with DI water and mix thoroughly.
• 250ppm KHP Standard: Prepare standard by pipetting 25mL of the Stock KHP Solution (1000ppm KHP) into a 100mL volumetric flask, dilute to volume with DI water and mix thoroughly.
• 100ppm KHP Standard: Prepare standard by pipetting 10mL of the Stock KHP Solution (1000ppm KHP) into a 100mL volumetric flask, dilute to volume with DI water and mix thoroughly.
• 10ppm KHP Standard: Prepare standard by pipetting 1mL of the Stock

Laboratory Standard Operation
Procedure SOP NO: LAB-LIQ-007 V2.0
Determination of Chemical Oxygen Demand (COD) by a Closed Reflux, Colorimetric Method
PAGE: 2 of 5 SOP NO: LAB-LIQ-007 V2.0 DATE: March 2012 SUPERSEDES: V1.0
PREPARATIONS CONT:
KHP into a 100mL volumetric flask, dilute to volume with DI water and mix thoroughly.
INSTRUMENT SETUP/ANALYSIS:
1. The COD worksheet consists of a control, a series of standards, and an independent check. On the worksheet, put down the initials of the analyst preparing the worksheet and fill in the date (mm/dd/yy) that the test is being set-up.
2. Circle the range of the analysis (Low or High). 3. Fill out the Sample ID lines with the samples that will be analyzed. 4. Select one sample at random to have a duplicate analysis. Add the
sample to the worksheet as “(sample name) Duplicate.” 5. Fill out the date each sample was collected in the Sample Date column.
Samples have a holding time of 2 weeks. 6. Assign a vial number to each sample and record this in the Vial #
column of the worksheet. 7. The Control, Standards, and Independent Check already have an
assigned Vial # on the worksheet based on a 0-1500mg/L analysis. If a 0-150mg/L range is needed for analysis, cross off any Standard on the worksheet that are >150mg/L.
8. Continue numbering samples in the same numerical order as the standards. Therefore, the first sample added to the 0-1500mg/L worksheet will be Vial# 8.
9. When finished, batch the COD test in the LIMS using the code COD_W. 10. Ensure all samples and standards have reached room temperature
before beginning the COD test. • Liquid standards are stored in the BOD fridge, dry standards are in
the Liquids Side cabinet.
• Samples requiring COD analysis are stored in the Sample Room fridge. These samples are usually found in ½-gallon plastic jugs.
• Sample Vials are located in the manufacturer’s box in the COD cabinets
11. Preheat the block digester to 150°C: • Turn on the block digester by first flipping the switch located on the
lower left-hand side of the back of the instrument. The digester screen will read “Initializing” when first turned on.
• After 10-15 seconds, the screen will display the current temperature of the digester and the option “COD Start.” Press the left and/or right COD start button depending on which side of the block digester the test tubes will be digested.
Laboratory Standard Operation
Procedure SOP NO: LAB-LIQ-007 V2.0
Determination of Chemical Oxygen Demand (COD) by a Closed Reflux, Colorimetric Method
PAGE: 3 of 5 SOP NO: LAB-LIQ-007 V2.0 DATE: March 2012 SUPERSEDES: V1.0
INSTRUMENT SETUP/ANALYSIS CONT:
• If both sides of the block digester are needed, start both sides simultaneously by pressing both “COD Start” buttons.
• The block digester will usually take 10-15 minutes to reach 150°C and will sound an alarm when ready.
12. While the block digester is preheating, remove the amount of COD vials needed for analysis from storage and place them in a test tube rack. There should be one COD vial per line used on the worksheet.
13. Label the vial lids with the corresponding Vial # from the worksheet. Ensure that vials are in numerical order beginning with #1.
14. Remove the cap from Vial #1. Pipet 2mL of DI water into the vial - this is the control. The contents of the vial will begin to warm up as soon as the DI water is added, use caution.
15. Replace the cap and secure it tightly. 16. Immediately invert the vial 10 times to mix the sample. The vial will
become very hot, use caution. 17. Wipe the vial with a Kim Wipe and place it back into the test tube rack. 18. Repeat steps 11-14 for all samples on the worksheet, including the
standards. 19. Once the block digester has reached 150°C, place all sample vials into
the block digester. 20. Ensure the digester lid is closed and begin the digestion process by
hitting the start button on the block digester. This will begin a 2-hour digestion period – allow the sample to digest for the full 2 hours.
21. Once the block digester has incubated the sample vials for 2 hours, it will sound an alarm. Remove the vials immediately and place them in a test tube rack. The vials will be very hot so use caution.
22. Carefully invert each vial several times and then place it back in the test tube rack.
23. Place the test tube rack inside a storage cabinet and allow them to cool for at least 30minutes. It is important that the samples are stored in a dark area to cool.
24. While the instrument is turned off, open the cell holder door and inspect the cell holder. Ensure that single cell holder is installed before turning on the Spectrophotometer.
25. Turn on the Aquamate 8000 UV-Vis Spectrophotometer by flipping the switch in the lower-left hand corner on the back of the instrument.
26. Allow the instrument 10-15 seconds to load the SmartStart menu. • If the instrument does not load the SmartStart menu, press the
“esc” button on the button panel twice.
• Press the “test” button on the button panel once.

Laboratory Standard Operation
Procedure SOP NO: LAB-LIQ-007 V2.0
Determination of Chemical Oxygen Demand (COD) by a Closed Reflux, Colorimetric Method
PAGE: 4 of 5 SOP NO: LAB-LIQ-007 V2.0 DATE: March 2012 SUPERSEDES: V1.0
INSTRUMENT SETUP/ANALYSIS CONT:
• Select the SmartStart option in the lower-left hand area on the display screen.
27. On the SmartStart menu, use the up and down arrow buttons on the control panel to select the COD test range needed for analysis and then press “enter” on the control panel. • COD_LOW_RANGE is for 0-150mg/L analyses
• COD_HIGH_RANGE is for 0-1500mg/L analyses 28. In the bottom right hand corner of the screen, select the option for “run
Stds.” The instrument will begin to calibrate and check the turrets. 29. Check the list of standards on the display screen to ensure they match
the worksheet. • Std. 1 – 10.00, Std. 2 – 100.0, etc.
30. Do no invert the blank. Instead, wipe it with a Kim Wipe and place it directly into the single cell holder.
31. In the bottom left, screen, select “Measure Blank.” The instrument will quickly beep twice when the sample has been analyzed. Remove the blank and place it back into the test tube rack.
32. Press “Measure Std.” The display will say “Insert Standard 1.” 33. Do not invert Standard 1. Instead, wipe it with a Kim Wipe and insert it
into the single cell holder. 34. Press “ENTER” to analyze the first standard. The instrument will beep
twice when the sample has been analyzed. 35. Record the value of the Standard 1 (mg/L) on the worksheet. Remove
Standard 1 and place it back into the test tube rack. 36. Repeat steps 33-36 for the remaining standards. 37. After Standard 5 is analyzed, the display will read “Working…” Wait
until it is finished. 38. Press “Run Test” in the bottom right hand corner of the screen. 39. Wipe the blank with a Kim Wipe and insert it into the single cell holder.
Do not shake it. Select the option “Measure Sample.” 40. Wait for the instrument to finish displaying “Working…” while it
analyzes the sample. When finished, record the results in mg/L. The control should be zero.
41. Repeat steps 40-41 for the test samples. 42. When finished analyzing all the samples, turn off the instrument. 43. Return all used vials back into the manufacturer’s box. Ensure that all
lids are secured tightly. Using a red sharpie, cross out the vial number on each vial to indicate it has been used.

Laboratory Standard Operation
Procedure SOP NO: LAB-LIQ-007 V2.0
Determination of Chemical Oxygen Demand (COD) by a Closed Reflux, Colorimetric Method
PAGE: 5 of 5 SOP NO: LAB-LIQ-007 V2.0 DATE: March 2012 SUPERSEDES: V1.0
REPORT: Report results to three significant figures with one decimal place maximum. If the value of the COD is <10, record the value as <10 on the worksheet.
HISTORY:
Version 1.0 Effective August 2004 Version 2.0 Effective March 2012-Procedure and equipment updated to reflect new instrument (Orion UV/VIS)
REFERENCES:
Standard Methods SM 5220 D Closed Reflux Colorimetric Method
PREPARED BY:
James Burks Laboratory Analyst
DATE: March 2012
APPROVED BY:
James Burks Laboratory Supervisor
DATE:
March 2012
LAST REVIEW BY:
James Burks Laboratory Supervisor
DATE: March 2014

Laboratory Standard Operation
Procedure SOP NO: LAB-LIQ-008 V2.0
Temperature
PAGE: 1 of 3 SOP NO: LAB-LIQ-008 V2.0 DATE: July 2013 SUPERSEDES: V1.0
TITLE: Thermometer determination of temperature
SUMMARY: The temperature of a sample or instrument device is determined using a
partial submersion thermometer that has been checked against a precision thermometer certified by the National Institute of Standards and Technology (NIST).
RESPONSIBILITY: Laboratory Analyst or designee
SCOPE: This procedure is applicable to drinking water, ground water, domestic and industrial waste waters samples.
EQUIPMENT: • Sper Scientific Digital K/J Thermometer 059273 • NIST Certified Precision Thermometer (0.1°C) • 500mL glass beaker
CHEMICALS/ REAGENTS:
• Deionized (DI) H2O
INSTRUMENT CALIBRATION:
Monthly NIST Precision Thermometer Check Once a month, temperature devices in the lab must be checked against an NIST certified thermometer. Once a year, the accuracy of the laboratory certified thermometers must be verified by the National Institute of Standards and Technology (NIST). The verification process includes checking the endpoints of the desired temperature range for the thermometers. The date and the results of the checks are kept on file in the Laboratory File room.
1. To begin the monthly check, obtain a NIST certified thermometer with a scale marked for every 0.1°C. These thermometers are stored in the laboratory thermometer drawer.
2. Fill a 500mL glass beaker with 250mL DI water. 3. Immerse the NIST certified thermometer in the 500mL glass beaker.
Ensure the thermometer will not fall out of the glassware and lead to breakage.
4. Alongside the NIST thermometer, place the temperature device that will be used for analysis in the glass beaker.
5. If either temperature device is a partial immersion model, ensure the device is submerged to the submersion line.
6. Allow the water and thermometers to stabilize. 7. Compare the two measurements. The device’s temperature sensor must
agree with the NIST reference thermometer within the accuracy of that devices sensor (i.e. ± 0.1°C).

Laboratory Standard Operation
Procedure SOP NO: LAB-LIQ-008 V2.0
Temperature .
PAGE: 2 of 3 SOP NO: LAB-LIQ-008 V2.0 DATE: July 2013 SUPERSEDES: V1.0
INSTRUMENT CALIBRATION CONT:
8. Record the date, time, and initials of the analyst performing the check in a temperature logbook. Record the results to the nearest accuracy range of the device.
9. If the measurements do not agree, the temperature device may not be working properly and the laboratory supervisor should be notified.
ANALYSIS:
Daily Temperature Checks Laboratory incubators, refrigerators, ovens, etc., must be checked for the appropriate temperature ranges on a daily basis. These devices must also undergo a monthly temperature check against an NIST certified thermometer.
1. Ensure the instrument that is being checked has had at least one hour without outside interference (i.e., the device is at a stable temperature).
2. On a daily temperature logbook, record the date, time and initials of the analyst performing the daily temperature check under the instrument that is being checked.
3. Record the digital temperature reading the instrument is registering in the logbook.
4. Open up the instrument, and check the internal temperature probe. This temperature probe is separate from the device and was placed there by a laboratory analyst for daily temperature checks.
5. Record the reading of the internal probe. 6. Ensure the digital temperature and the internal temperatures agree
within reference to the instrument. 7. If the measurements do not agree, the temperature device or probe may
not be working properly and the laboratory supervisor must be notified.
Analyzing a sample for temperature 1. Grabs samples must be analyzed for temperature immediately after
collection. If not immediately, obtain temperature within 15minutes of collection.
2. Composite samples cannot be used for temperature permit analysis. No preservatives exist for temperature analysis.
3. If the sample is sensitive to contamination, collect duplicate grab samples and use the duplicate to perform a temperature analysis. Discard afterwards. Immediately after collection of a grab sample, insert a temperature probe that has been checked against an NIST certified thermometer.
4. Allow the temperature to stabilize and record the temperature to the nearest 0.1°C.
Removed the temperature probe and clean using DI water. Dry with a paper towel and store according to manufacturer’s specifications.
Laboratory Standard Operation
Procedure SOP NO: LAB-LIQ-008 V2.0
Temperature .
PAGE: 3 of 3 SOP NO: LAB-LIQ-008 V2.0 DATE: July 2013 SUPERSEDES: V1.0
REPORT:
Record temperature to three significant figures to the nearest 0.1°C
HISTORY:
Version 1.0 Effective August 2004 Version 2.0 Effective July 2013- Procedure reflects the use of new thermometers
REFERENCES: Standard Methods 2550 B. Laboratory and Field Methods
PREPARED BY:
Kari Reynolds Laboratory Analyst
DATE:
July 2013
APPROVED BY:
James Burks Laboratory Supervisor
DATE: July 2013
LAST REVIEW BY:
James Burks Laboratory Supervisor
DATE: July 2014

Laboratory Standard Operating
Procedure SOP NO: LAB-ORG-001 V3.0
Determination of Purgeable Organic Compounds by GC-MS
PAGE: 1 of 11 SOP NO: LAB-ORG-001 V3.0 DATE: October 2014 SUPERSEDES: V2.0
TITLE: Determination of Purgeable Organic Compounds by GC-MS
SUMMARY: Helium is bubbled through a 5mL H20 sample in a purge and trap system.
Purgeable organic compounds are transferred from aqueous phase to vapor phase and adsorbed to a sorbent trap. The trap is then heated and flushed with helium so that the purgeable organics are desorbed onto the GC column and detected by a mass spectrometer.
SCOPE: This method is applicable to all parameters listed in Table 1.2 and can be extended to include Acrolein (STORET NO. 34210) and Acrylonitrile (STORET NO. 34215). This method is suitable for determining purgeable organics in municipal and industrial organics.
EQUIPMENT: • GC-MS with purge and trap system • Column : Restek Rtx-VMS 20m X 0.18mm X 1um P/N: 49914 • Trap: Supelco “J” type trap (BTEXTRAP) for Tekmar 3000 • Blank Trap: Supelco 1/8”X12” Glass lined “G0” trap, P/N: 14-4164-003 • 10uL, 50uL and 250uL micro syringes • 5 or 10mL glass hypodermic syringe with Luerlok tip • 50, 250, 500 mL volumetric flasks
CHEMICALS/ REAGENTS:
• 4-Bromofluorobenzene: Restek P/N 30067, 2500ug/mL • Calibration Mix #1: Restek P/N 30020, 2000 ug/mL • Calibration Mix#2: Restek P/N 30021, 2000ug/mL • Calibration Mix #3: Restek P/N 30022, 2000ug/mL • 624 Internal Standard Mix: Restek 30023, 1500 ug/mL • 624 Surrogate Standard: Restek 30243, 2000ug/mL • M-Xylene: Restek P/N 30424, 2000ug/mL • O-Xylene: Restek P/N 30425, 2000ug/mL • P-Xylene: Restek P/N 30426, 2000ug/mL • Acrolein: Restek P/N 30645, 5000 ug/mL • Acrylonitrile: Restek P/N 30246, 2000ug/mL • 502.2 Calibration Standard: Phenova ALO-101200, 2000ug/mL • VOA Gases Standard: Phenova ALO-101206, 2000ug/mL • 501 Trihalomethanes Standard: Phenova ALO-101209, 2000ug/mL • Styrene: Restek P/N 30410, 2000ug/mL • Nanopure DI H20 • MeOH: Fisher Optima grade, P/N: UN1230 (or equivalent)
GC-MS CONDITIONS:
• Column : Rtx-VMS 20m X 0.18mm X 1um P/N: 49914 • Carrier Gas: Helium

Laboratory Standard Operating
Procedure SOP NO: LAB-ORG-001 V3.0
Determination of Purgeable Organic Compounds by GC-MS
PAGE: 2 of 11 SOP NO: LAB-ORG-001 V3.0 DATE: October 2014 SUPERSEDES: V2.0
GC-MS CONDITIONS CONT:
• Detector : Mass spectrometer • Flow rate : 1.0 ml/min • Run time : 19 minutes • Oven Conditions: Initial temperature 20°C, hold 4min. Ramp temperature • at 8°C/min to 90°C, hold 0 min. Ramp at 25°C/min to 150°C, hold 2 min
PREPARATIONS:
Tuning/Internal Standard Solution (15ug/mL BFB +15ug/mL ISTDs): Using a micro syringe, transfer 75ul of 2,000ppm BFB stock solution and 100ul of 1,500 ppm Internal Standard Stock solution to a 10.0mL volumetric flask. Dilute to volume with MeOH. Surrogate Spiking Solution: Using a micro syringe, transfer 75ul of 624 Surrogate Standard Solution to a 10.0mL volumetric flask and dilute to volume with MeOH. Secondary Stock Standards (50ppm)*: Using a micro syringe, transfer 250ul each of Calibration mix #1, Calibration mix #2, Calibration mix #3, O-Xylene, M-Xylene, P-Xylene, 624 Surrogate Solution, and acrolein to a 10.0ml volumetric flask and dilute to volume with MeOH. Additionally, add 500ul of acrylonitrile standard. Store refrigerated with zero headspace for up to 24 hours. *If sample is industrial wastewater, add 250ul of styrene standard. Quality Control Check Standard Stock: Transfer 50uL each of 502.2 Calibration Standard, VOA Gases Standard, and 502 Trihalomethanes Standard to a 10.0mL volumetric flask. Dilute to volume with MeOH. Calibration Solutions: These solutions are only good for 2 hours. Additional standards can be made if needed to bracket the expected concentration range of a sample. 1ppb Calibration Solution: Using a micro syringe, add 10ul of Secondary Stock Standard to a 500.0ml volumetric flask and dilute to volume with H20. 5ppb Calibration Solution: Using a micro syringe, add 50ul of Secondary Stock Standard to a 500.0ml volumetric flask and dilute to volume with H20.
Laboratory Standard Operating
Procedure SOP NO: LAB-ORG-001 V3.0
Determination of Purgeable Organic Compounds by GC-MS
PAGE: 3 of 11 SOP NO: LAB-ORG-001 V3.0 DATE: October 2014 SUPERSEDES: V2.0
PREPARATIONS CONT: PROCEDURE:
10ppb Calibration Solution: Using a micro syringe, add 100ul of Secondary Stock Standard to a 500.0ml volumetric flask and dilute to volume with H20. 20ppb Calibration Solution: Using a micro syringe, add 200ul of Secondary Stock Standard to a 500.0ml volumetric flask and dilute to volume with H20. 25ppb Calibration Solution: Using a micro syringe, add 100ul of Secondary Stock Standard to a 250.0ml volumetric flask and dilute to volume with H20. 50ppb Calibration Solution: Using a micro syringe, add 100ul of Secondary Stock Standard to a 100.0ml volumetric flask and dilute to volume with H20. At the beginning of each day, the instrument must pass the tuning criteria as described in table 1.1. Additionally, the system should be checked for air/gas/moisture leaks. To check for leaks, follow these steps: NOTE: Read entire procedure before beginning.
1. Open “PolarisQ Tune” from the controller desktop 2. Open the diagnostics tab, choose run tests, and uncheck all boxes except
for “Vacuum System Test” 3. Choose “Perform selected tests” and ensure it passes. 4. Exit out of the diagnostics screen and click the green button labeled “On”
(the filament is now on) 5. Open the Experiments tab and select “Air water.” 6. Ensure that the TIC displayed on screen is less than 5e6. The peak at m/z
28 (nitrogen) must have a relative abundance of 100. Two other peaks at m/z 18 (H2O) and m/z 32 (O2) will also be present and may vary in intensities but the O2 peak should always be larger than the H2O peak.
7. Go back to the home screen and select the “cal gas” button and choose EI/NICI. Allow a few moments for the cal gas to stabilize.
8. After the cal gas has stabilized, ensure that peaks at m/z ratios of 69, 131, 197, 219, 264, 414, 502, and 614 can be observed. It may take several moments before the m/z 614 peak is observable.
9. Once the system has been verified to be leak free, analyst can proceed to tuning.
To ensure the instrument is properly tuned, follow these steps: 1. Open “Xcalibur” from the controller desktop
Laboratory Standard Operating
Procedure SOP NO: LAB-ORG-001 V3.0
Determination of Purgeable Organic Compounds by GC-MS
PAGE: 4 of 11 SOP NO: LAB-ORG-001 V3.0 DATE: October 2014 SUPERSEDES: V2.0
PROCEDURE CONT:
2. Select “Sequence setup” 3. Enter in a sample name (i.e 15DEC12_Tune) 4. Double click on the blank under “Inst. Method” and select “EPA-624B.” 5. Double click the box under “Path” and select an appropriate folder under
C:\Xcalibur\Data. If no folder exists, create one and label it with the current day’s date.
6. Double click the box under “Proc Method” and select “624Q-3pt” 7. Click the blank below “Sample Type” and from the drop down menu select
“Blank” 8. Highlight the entire sample row by clicking the box with the asterisk
located to the left of the box labeled “Sample Name” 9. Press the play button (start analysis button) located in the toolbar at the
top of the screen. The sample has now been added to the acquisition queue and the GC program will start once it receives the trigger from the purge and trap.
10. Minimize Xcalibur and from the controller desktop open “VOC teklink 2.4” 11. In the status window that appears ensure that under mode it reads
“Purge Ready” and under method it reads “Default Water.” 12. The instrument is now ready to perform an injection. 13. To prepare the tuning solution, first rinse a 5.0mL or 10.0mL hypodermic
syringe with luerlok fitting by removing the syringe plunger and rinsing the barrel several times with fresh DI H20.
14. After several rinses, fill the syringe barrel full of DI H20 and reinsert the plunger. Adjust the final volume of the syringe to 5.0mL while the syringe is inverted to ensure that all air bubbles are removed. Close the valve on the luerlok tip.
15. Using an appropriate sized microsyringe (10-25ul), transfer 10ul of Tuning/Internal Standard Solution to the hypodermic syringe by opening the valve of the luerlok tip, inserting the micro syringe and depressing the plunger. Make sure there are no air bubbles in either syringe before and after adding the Tuning/Internal Standard Solution. Make sure to close the luerlok tip after adding the Tuning/Internal Standard Solution.
16. To purge the sample, place the male luerlok fitting of the sample syringe into the female luerlok fitting of the purge and trap assembly. Open the valve on the purge and trap assembly and then open the valve of the sample syringe. Depress the plunger and ensure the contents of the syringe are completely discharged into the purging chamber. Always make sure to hold the plunger on the sample syringe as pressure from the purge and trap could push out the plunger or push sample back into the syringe. Close the valve on the syringe and then close the valve on the purge and trap assembly.
17. Press the play button (begin purge).
Laboratory Standard Operating
Procedure SOP NO: LAB-ORG-001 V3.0
Determination of Purgeable Organic Compounds by GC-MS
PAGE: 5 of 11 SOP NO: LAB-ORG-001 V3.0 DATE: October 2014 SUPERSEDES: V2.0
PROCEDURE CONT:
18. The sample will now be purged and injected and data acquisition will begin automatically.
19. Once data acquisition is complete, open Xcalibur and select “Qual Browser.”
20. Open the folder you designated as the path and select your sample by name.
21. In qual browser, you will see two window panes. The top is a chromatogram of your sample. The bottom is the corresponding mass spectrum. The BFB peak must be indentified and the mass spectrum compared against acceptance criteria.
22. To verify the identity of the BFB peak, select the icon in the bottom window pane to the right of the spectrum that looks like a tack. In the chromatogram window pane, place your cursor of the BFB peak.
23. The mass spectrum window pane will display the mass spectrum of the peak and RT you selected. BFB has a primary ion at m/z 95 (with 100% relative abundance) and two secondary ions at m/z (174, 176)
24. If the mass spectrum does not correspond to BFB, repeat step 22 on a different peak until BFB is identified.
25. Once BFB is identified, right click on the mass spectrum and select Export àClipboard (Exact mass)
26. Open Envirolab forms from the controller desktop 27. Select the” tune report config” tab and click import spectrum 28. The software will automatically import the peak abundances from the
copied mass spectrum and compare them to the acceptance criteria. If the criteria are met, print the report and proceed to calibration. (See Table 1.3 for criteria)
To calibrate the instrument, follow these steps: 1. Return to the Excalibur sequence you created for tuning the instrument 2. Amend the sequence to add 1ppb, 5ppb 10ppb, 20ppb, 25ppb standard,
and 50ppb standard (or any standard you are running) in the name field of the sequence
3. Ensure that the file path is set to the desired location. 4. Select “STD Bracket” from the sample type menu 5. Select “1,” “2,” X” (where X is the calibration level of the standard) for
each respective standard in the standard level drop down menu 6. Enter “icX” (where X is the number of standards being analyzed) in the
“report type” field for the third standard (this code is used by the Envirolab software to generate the initial calibration report.
7. Highlight the three standards and press the “Run Sequence” button 8. Add the first standard to a luerlok syringe and adjust volume to 5mL. 9. Add 10uL of the Tuning/Internal Standard Solution and inject into purge
cell.
Laboratory Standard Operating
Procedure SOP NO: LAB-ORG-001 V3.0
Determination of Purgeable Organic Compounds by GC-MS
PAGE: 6 of 11 SOP NO: LAB-ORG-001 V3.0 DATE: October 2014 SUPERSEDES: V2.0
PROCEDURE CONT:
10. Repeat steps 8-9 for the remaining standards. 11. Parameters in the standard should be qualitatively identified by
comparing the primary and secondary masses of each parameter to the values listed in Table 1.3.
12. Once all standards are analyzed, ensure initial calibration criteria are met using the Envirolabs software. Open the software, select “Initial Calibration Report” and load the sequence you previously created. Any compound that does not meet initial calibration criteria (%RSD of RFs <35%) will be flagged with a “<<<” symbol.
13. If any or all compounds fail calibration criteria, review the RFs (response factors) generated in the initial calibration report to determine the cause of failure. If a single standard appears to be the problem, the standard can be reanalyzed. If calibration still fails, the set of standards can be prepared using only the compounds that failed the initial calibration.
14. Once the initial calibration passes and the blank is determined to be free of interferences (no peak above MDL), the Quality Control Check Standard can be analyzed. Add the independent check standard to your Xcalibur sequence and enter “qr” in the report type field and change the sample type from STD bracket to unknown.
15. Add the Quality Control Check Standard to a 5ml luerlok syringe and adjust volume to 5mL.
16. Add 10uL of Tuning/Internal Standard Solution and 10uL of surrogate spiking solution. Inject into purge cell and start purge.
17. Analyze the sample and determine if it meets criteria by generating a quantitation report using the Envirolabs software. Select Quantitation Report and load your saved Xcalibur sequence. To pass, the concentration of your standard must meet the criteria in table 5 of EPA method 624.
18. Analysis of samples can now proceed. Fill a hypodermic syringe with sample and adjust volume to 5.0mls. Add 10ul Tuning/Internal Standard Solution and 10uL of Surrogate Spiking Solution and add to purge cell. Assign the sample a name with location and sample number (i.e Ravenwood_AB12034) in the Xcalibur sequence and analyze as an unknown with “qr” in the report type.
19. Parameters in the sample should be qualitatively identified by comparing primary and secondary masses to the values listed in Table 1.2 and by comparison of retention times (RT) to the high level calibration standard. For a positive identification, the RT of the parameter in the sample must elute +/- 30 seconds of the RT of the parameter in the high level standard.
20. At least one sample per run should be ran in duplicate (if there is enough sample to do so).
Laboratory Standard Operating
Procedure SOP NO: LAB-ORG-001 V3.0
Determination of Purgeable Organic Compounds by GC-MS
PAGE: 7 of 11 SOP NO: LAB-ORG-001 V3.0 DATE: October 2014 SUPERSEDES: V2.0
PROCEDURE CONT: CALCULATIONS: SAFETY:
21. At least one sample per run should be spiked. A sample can be spiked at 22. 20ppb by adding 10 ul of Quality Control Check Standard Stock to 5.0ml
of sample 23. Generate a quantitation report to verify it meets the acceptance criteria in
Table 5 of EPA method 624 24. After all samples are analyzed, a bracketing continuous calibration
standard should be analyzed. Generally, the previously prepared midlevel standard is used. The RF must be ± 20% of the average RF from the intial calibration curve.
25. After run is complete, enter data into LIMS. LIMS will calculate the recovery of the spike sample.
Equation 1.
RF= Response Factor As = Area of the characteristic m/z for the parameter to be measured. Ais = Area of the characteristic m/z for the internal standard. Cis = Concentration of the internal standard. Cs = Concentration of the parameter to be measured Equation 2.
As = Area of the characteristic m/z for the parameter or surrogate standard to be measured. Ais = Area of the characteristic m/z for the internal standard. Cis = Concentration of the internal standard. The toxicity or carcinogenicity of each reagent used in this method has not been precisely defined; however, each chemical compound should be treated as a potential health hazard. Exposure to these chemicals must be reduced to the lowest possible level by whatever means available. Make all preparations in fume hood with gloves and appropriate PPE. The following parameters covered by this method have been tentatively classified as known or suspected human or mammalian carcinogens:
• benzene • carbon tetrachloride • chloroform • 1,4-dichlorobenzene • vinyl chloride

Laboratory Standard Operating
Procedure SOP NO: LAB-ORG-001 V3.0
Determination of Purgeable Organic Compounds by GC-MS
PAGE: 8 of 11 SOP NO: LAB-ORG-001 V3.0 DATE: October 2014 SUPERSEDES: V2.0
INTERFERENCES: Impurities in the purge gas, organic compounds outgassing from the plumbing
ahead of the trap, and solvent vapors in the laboratory account for the majority of contamination problems. The analytical system must be demonstrated to be free from contamination under the conditions of the analysis by running laboratory reagent blanks. Samples can be contaminated by diffusion of volatile organics (particularly fluorocarbons and methylene chloride) through the septum seal into the sample during shipment and storage. 3 Contamination by carry-over can occur whenever high level and low level samples are sequentially analyzed. To reduce carry-over, the purging device and sample syringe must be rinsed with reagent water between sample analyses. Whenever an unusually concentrated sample is encountered, it should be followed by an analysis of reagent water to check for cross contamination. For samples containing large amounts of water-soluble materials, suspended solids, high boiling compounds or high pureeable levels, it may be necessary to wash the purging device with a Liquinox solution, rinse it with deionized water, and then dry it in a 105°C oven between analyses. The trap and other parts of the system are also subject to contamination; therefore, frequent bakeout and purging of the entire system may be Required.

Laboratory Standard Operating
Procedure SOP NO: LAB-ORG-001 V3.0
Determination of Purgeable Organic Compounds by GC-MS
PAGE: 9 of 11 SOP NO: LAB-ORG-001 V3.0 DATE: October 2014 SUPERSEDES: V2.0
APPENDIX:
Table 1.2 Applicable Parameters
Parameter CAS No.
Benzene . . . . . . . . . . . . . . . . . . . . . . . . . . . . . . . . . . . . . . 71-43-2 Bromodichloromethane . . . . . . . . . . . . . . . . . . . . . . . . . . 75-27-4 Bromoform . . . . . . . . . . . . . . . . . . . . . . . . . . . . . . . . . . . 75-25-2
Bromomethane . . . . . . . . . . . . . . . . . . . . . . . . . . . . . . . . 74-83-9 Carbon tetrachloride . . . . . . . . . . . . . . . . . . . . . . . . . . . . 56-23-5 Chlorobenzene . . . . . . . . . . . . . . . . . . . . . . . . . . . . . . . . 108-90-7
Chloroethane . . . . . . . . . . . . . . . . . . . . . . . . . . . . . . . . . . 75-00-3
2-Chloroethylvinyl ether . . . . . . . . . . . . . . . . . . . . . . . . . 110-75-8 Chloroform . . . . . . . . . . . . . . . . . . . . . . . . . . . . . . . . . . . 67-66-3 Chloromethane . . . . . . . . . . . . . . . . . . . . . . . . . . . . . . . . 74-87-3 Dibromochloromethane . . . . . . . . . . . . . . . . . . . . . . . . . . 124-48-1
1,2-Dichlorobenzene . . . . . . . . . . . . . . . . . . . . . . . . . . . . 95-50-1 1,3-Dichlorobenzene . . . . . . . . . . . . . . . . . . . . . . . . . . . . 541-73-1 1,4-Dichlorobenzene . . . . . . . . . . . . . . . . . . . . . . . . . . . . 106-46-7 1,1-Dichloroethane . . . . . . . . . . . . . . . . . . . . . . . . . . . . . . 75-34-3 1,2-Dichloroethane . . . . . . . . . . . . . . . . . . . . . . . . . . . . . . 107-06-2 1,1-Dichloroethane . . . . . . . . . . . . . . . . . . . . . . . . . . . . . . 75-35-4 trans-1,2-Dichloroethene . . . . . . . . . . . . . . . . . . . . . . . . . 156-60-5 1,2-Dichloropropane . . . . . . . . . . . . . . . . . . . . . . . . . . . . 78-87-5 cis-1,3-Dichloropropene . . . . . . . . . . . . . . . . . . . . . . . . . . 10061-01-5 trans-1,3-Dichloropropene . . . . . . . . . . . . . . . . . . . . . . . . 10061-02-6
Ethyl benzene . . . . . . . . . . . . . . . . . . . . . . . . . . . . . . . . . 100-41-4
Table 1.1 BFB Key m/z Abundance Criteria
Mass m/z Abundance criteria 50 . . . . . . . . . . . . . . . . . . . . . . . . . . 15-40% of Mass 95 75 . . . . . . . . . . . . . . . . . . . . . . . . . . 30-60% of Mass 95 95 . . . . . . . . . . . . . . . . . . . . . . . . . . Base Peak, 100% Relative Abundance 96 . . . . . . . . . . . . . . . . . . . . . . . . . . 5-9% of Mass 95 173 . . . . . . . . . . . . . . . . . . . . . . . . . <2% of Mass 174 174 . . . . . . . . . . . . . . . . . . . . . . . . . >50% of Mass 95 175 . . . . . . . . . . . . . . . . . . . . . . . . . 5-9% of Mass 174 176 . . . . . . . . . . . . . . . . . . . . . . . . . >95% but 101% of Mass 174 177 . . . . . . . . . . . . . . . . . . . . . . . . . 5-9% of Mass 176

Laboratory Standard Operating
Procedure SOP NO: LAB-ORG-001 V3.0
Determination of Purgeable Organic Compounds by GC-MS
PAGE: 10 of 11 SOP NO: LAB-ORG-001 V3.0 DATE: October 2014 SUPERSEDES: V2.0
APPENDIX CONT:
Methylene chloride . . . . . . . . . . . . . . . . . . . . . . . . . . . . . 75-09-2 1,1,2,2-Tetrachloroethane . . . . . . . . . . . . . . . . . . . . . . . . . 79-34-5 Tetrachloroethene . . . . . . . . . . . . . . . . . . . . . . . . . . . . . . 127-18-4 Toluene . . . . . . . . . . . . . . . . . . . . . . . . . . . . . . . . . . . . . . 108-88-3 1,1,1-Trichloroethene . . . . . . . . . . . . . . . . . . . . . . . . . . . . 71-55-6 1,1,2-Trichloroethene . . . . . . . . . . . . . . . . . . . . . . . . . . . . 79-00-5 Trichloroethane . . . . . . . . . . . . . . . . . . . . . . . . . . . . . . . . 79-01-6 Trichlorofluoromethane . . . . . . . . . . . . . . . . . . . . . . . . . . 75-69-4 Vinyl chloride . . . . . . . . . . . . . . . . . . . . . . . . . . . . . . . . . 75-01-4
Table 1.3 Parameters with Primary and Secondary Masses
Parameter Primary Mass Secondary Mass Chloromethane 50. 52 Bromomethane 94 96 Vinyl chloride 62 64 Chloroethane 64 66 Methylene chloride 84 49, 51, and 86 Trichlorofluoromethane 101 103 1,1-Dichloroethene 96 61 and 98 1,1-Dichloroethane 163 65, 83, 85, 98, and 100 trans-1,2-Dichloroethene 96 61 and 98 Chloroform 83 85 1,2-Dichloroethane 98 62, 64, and 100. 1,1,1-Trichloroethane 97 99, 117, and 119 Carbon tetrachloride 117. 119 and 121 Bromodichloromethane 127 83, 85, and 129 1,2-Dichloropropane 112 63, 65, and 114 trans-1,3-Dichloropropene 75 77 Trichloroethene 130 95, 97, and 132 Benzene 78 . Dibromochloromethane 127 129, 208, and 206 1,1,2-Trichloroethane 97 83, 85, 99, 132, and 134 cis-1,3-Dichloropropene 75 77 2-Chloroethylvinyl ether 106 63 and 65 Bromoform 173. 171, 175, 250, 252, 254,
256 1,1,2,2-Tetrachloroethane 168 83, 85, 131, 133,
and166 Tetrachloroethene 164 129, 131, and 166
Laboratory Standard Operating
Procedure SOP NO: LAB-ORG-001 V3.0
Determination of Purgeable Organic Compounds by GC-MS
PAGE: 11 of 11 SOP NO: LAB-ORG-001 V3.0 DATE: October 2014 SUPERSEDES: V2.0
APPENDIX CONT:
Toluene 92 91 Chlorobenzene 112 114 Ethyl benzene 106 91 1,3-Dichlorobenzene 146 148 and 113. 1,2-Dichlorobenzene 146 148 and 113 1,4-Dichlorobenzene 146 148 and 113
REPORT:
Concentration of any detected parameter in ppb If parameter is not detected or below MDL report “<Xppb” where X is the MDL
HISTORY: Version 1.0 Effective November 2006 Version 2.0 Effective July 2014- Added procedure for spiking samples. Updated format. Version 3.0 Effective October 2014-Makes changes to standard preparations, surrogate spiking solution and vendor for Quality Control Check Standard.
REFERENCES: APPENDIX A TO PART 136 METHODS FOR ORGANIC CHEMICAL ANALYSIS OF MUNICIPAL AND INDUSTRIAL WASTEWATER
PREPARED BY:
Kevin Cline Chemist
DATE: October 2014
APPROVED BY:
James Burks Laboratory Supervisor
DATE: October 2014
Laboratory Standard Operating
Procedure SOP NO: LAB-ORG-002 V3.0
Determination of Base/Neutrals and Acids in Municipal and Industrial Wastewaters
PAGE: 1 of 21 SOP NO: LAB-ORG-002 V3.0 DATE: October 2014 SUPERSEDES: V2.0
TITLE: Determination of Base/Neutrals and Acids in Municipal and Industrial
Wastewaters
SUMMARY: Approximately 1L of sample is serially extracted using methylene chloride at pH greater than 11 and again at pH less than 2. The extract is dried and concentrated and analyzed using GC-MS. The parameters of interest are quantitated using internal calibration techniques.
SCOPE: This method covers the determination of a number of organic compounds that are partitioned into an organic solvent and are amenable to gas chromatography. The parameters listed in Tables 2.1, 2.2, and 2.3 may be qualitatively and quantitatively determined using this method. This method is suitable for use with municipal and industrial discharges.
EQUIPMENT: • Polaris Q GC-MS with controller • Column : ZB-SemiVolatiles 30m X 0.25mm X .25um P/N: 7HG-G027-11 • 5mL volumetric flask • Scintillation vial • 250uL and 500uL syringes micro syringes • 1.00mL class A volumetric pipettes • 1000mL graduated cylinders • 250mL beakers • Boiling chips • K &D Extraction Apparatus • 3 ball Snyder column • 3 ball micro Snyder column • 250mL Erlenmeyer flasks • PTFE boiling chips • Silanized glass wool • Drying column • pH paper • Water bath with concentric ring cover • Exhaust hood • Durafilm Laboratory Sealing Film • Muffle furnace
CHEMICALS/ REAGENTS:
• SV Tune Solution: Restek P/N: 31001, 2500ug/mL • 605 Benzidines Calibration Mix: Restek P/N: 31030, 2000 ug/mL • 606 Phthalate Esters Calibration Mix: Restek P/N: 31031, 2000ug/mL • 607 Nitrosamines Calibration Mix: Restek P/N: 31032, 2000ug/mL

Laboratory Standard Operating
Procedure SOP NO: LAB-ORG-002 V3.0
Determination of Base/Neutrals and Acids in Municipal and Industrial Wastewaters
PAGE: 2 of 21 SOP NO: LAB-ORG-002 V3.0 DATE: October 2014 SUPERSEDES: V2.0
CHEMICALS/ REAGENTS CONT:
• 609 Nitroaromatics and Isophorone Cal Mix: Restek P/N: 31033, 2000 ug/mL • SV Calibration Mix #5: Restek P/N: 31011, 2000ug/mL • 611 Haloethers Calibration Mix: Restek P/N: 31034, 2000ug/mL • 612 Chlorinated Hydrocarbons Mix: Restek P/N: 31035, 2000ug/mL • 604 Phenols Calibration Mix: Restek P/N:31029, 2000ug/mL • Method 525.2 Internal Standard Mix: Restek P/N: 31825, 1000ug/mL • Revised B/N Surrogate Mix: Restek P/N: 31888, 5000ug/mL • Internal Standard Mix, EPA 526: Restek P/N: 31696, 1000 and 2000 ug/mL • Acid Surrogate Standard Mix (4/89): Restek P/N: 31063, 10000 ug/mL • Benzidines Mixture: Ultra Scientific P/N: US-105N, 2000ug/mL • Base/Neutral Extractables Mixture: Ultra Scientific P/N: SVM-102, 2000ug/mL • Phenols Mixture: Ultra Scientific P/N: US-107N, 2000ug/mL • Aroclor 1016 Standard: Restek 32006, 1000ug/mL • Aroclor 1221 Standard: Restek 32007, 1000ug/mL • Aroclor 1232 Standard: Restek 32008, 1000 ug/mL • Aroclor 1242 Standard: Restek 32009, 1000ug/mL • Aroclor 1248 Standard: Restek 32010, 1000ug/mL • Aroclor 1254 Standard: Restek 32011, 1000ug/mL • Aroclor 1260 Standard: Restek 32012, 1000ug/mL • 608 Calibration Mix: Restek 32022, 200ug/mL • Technical Chlordane Mix: Restek 32021, 1000ug/mL • Toxaphene Standard: Restek 32005, 1000ug/mL • Methylene Chloride: EMD OmniSolv P/N: DX0831 (or equivalent) • Acetone: Fluka P/N:344180, pesticide grade • NaOH: EMD P/N SX0590-7, ACS grade (or equivalent) • Sulfuric Acid: J.T. Baker P/N: A300-212, ACS grade • DI/Nanopure water • Sodium Sulfate: EMD P/N: SX0760-E (dried at 400°C)
GC-MS CONDITIONS:
• Column : ZB-SemiVolatiles 30m X 0.25mm X .25um P/N: 7HG-G027-11 • Carrier Gas: Helium • Detector : Mass spectrometer • Flow rate : 1.0 ml/min • Injection volume: • Oven Conditions: Initial temperature 40.0°C, hold 4 minutes. Ramp
temperature at 9°C/min to 220°C, hold 0 minutes. Ramp temperature at 10°C to 300°C, hold 10 minutes
• Run time : 42 minutes

Laboratory Standard Operating
Procedure SOP NO: LAB-ORG-002 V3.0
Determination of Base/Neutrals and Acids in Municipal and Industrial Wastewaters
PAGE: 3 of 21 SOP NO: LAB-ORG-002 V3.0 DATE: October 2014 SUPERSEDES: V2.0
PREPARATIONS:
DFTPP Tuning Solution: Add a small amount of methylene chloride to a 10mL volumetric flask. Using a micro syringe, add 100ul of SV Tune Solution. Dilute to volume with acetone. B/N Stock Calibration Solution: Prepare a stock calibration solution by adding 500uL of 605 Benzidines Calibration Mix, 606 Phthalate Esters Calibration Mix, 607 Nitrosamines Calibration Mix, 609 Nitroaromatics and Isophorone Calibration Mix, SV Calibration mix #5, 611 Haloethers calibration mix, and 612 chlorinated Hydrocarbons Mix to a 5.0mL volumetric flask containing a small amount of acetone. Add 200uL of Revised B/N Surrogate Mix. Dilute to volume with acetone. Store Restek standards in dark freezer until expiration. Stock Calibration Solutions are stored in dark freezer for up to six months or until it fails calibration criteria, whichever is less. Check frequently for evaporation. Acids Stock Calibration Solution: Prepare a stock calibration solution by adding 500uL of 604 Phenols Calibration mix to a 5.0mL volumetric flask containing a small amount of acetone. Additionally, add 100ul of Acid Surrogate Standard Mix (4/89). Dilute to volume with acetone. Solution can be used until it fails calibration criteria or 6 months, whichever is less. Restek standards and Stock calibration solutions are stored in dark freezer. PCB Stock Calibration Solution: Prepare a stock calibration solution by adding 500ul each of Aroclor 1016 Standard, Aroclor 1221 Standard, Aroclor 1232 Standard, Aroclor 1242 Standard, Aroclor 1248 Standard, Aroclor 1254 Standard, and Aroclor 1260 Standard to a 5.0mL volumetric flask containing a small amount of acetone. Dilute to volume with acetone. Restek Standards and Stock calibration solutions are stored in the dark at room temperature. Pesticide Stock Calibration Solution: Prepare a stock solution by adding 500uL each Chlordane Mix and Toxaphene Standard to a 5.0mL volumetric flask containing a small amount of acetone. Dilute to volume with acetone. Solution can be used until it fails calibration criteria or 6 months, whichever is less. Restek standards and Stock calibration solutions are stored in dark freezer. B/N and Acids Working Calibration Solutions: A minimum of three calibration solutions must be used to build the initial B/N and Acids calibration curve. Any solution that does not contain a parameter of interest can be omitted. Make sure any parameter detected in sample is not greater than the highest concentration standard in calibration curve. The curve should be made to bracket the expected concentration of any parameter of interest in the sample. To prepare solutions, add a small amount of acetone to a 1.0mL volumetric flask and add the appropriate amount of B/N or Acids Stock Calibration Solution and Method 525.2 Internal Standard Mix or Internal Standard mix, EPA 526 from the chart

Laboratory Standard Operating
Procedure SOP NO: LAB-ORG-002 V3.0
Determination of Base/Neutrals and Acids in Municipal and Industrial Wastewaters
PAGE: 4 of 21 SOP NO: LAB-ORG-002 V3.0 DATE: October 2014 SUPERSEDES: V2.0
PREPARATIONS CONT:
below (Figure 1). Dilute to volume with acetone when finished. PCB Working Calibration Solutions: A minimum of three calibration solutions must be used to build the PCB initial calibration curve. Any solution that does not contain a parameter of interest can be omitted. Make sure any parameter detected in sample is not greater than the highest concentration standard in calibration curve. The curve should be made to bracket the expected concentration of any parameter of interest in the sample. To prepare solutions, add a small amount of acetone to a 1.0mL volumetric flask and add the appropriate amount of PCB Stock calibration solution and Method 525.2 Internal Standard Mix from the table below (Figure 2) Pesticide Working Calibration Solutions: A minimum of three calibration solutions must be used to build the Pesticide initial calibration curve. Any solution that does not contain a parameter of interest can be omitted. Make sure any parameter detected in sample is not greater than the highest concentration standard in calibration curve. The curve should be made to bracket the expected concentration of any parameter of interest in the sample. To prepare solutions, add a small amount of acetone to a 1.0mL volumetric flask and add the appropriate amount of Pesticide Stock calibration solution, 608 Calibrations mix and Method 525.2 Internal Standard Mix from the table below (Figure 2) Figure 1. Volumes needed for preparation of B/N Working Calibration STDS
uL of Stock Standard (Acid/BN) uL of ISTD (ACID/BN) Calibration Solution 1
50/50 25/25
Calibration Solution 2
150/125 25/25
Calibration Solution 3
250/250 25/25
Calibration Solution 4
375/375 25/25
Calibration Solution 5
500/500 25/25
Calibration Solution 6
625/625 25/25
Calibration Solution 7
750/750
25/25
Calibration Solution 8
875/875 25/25
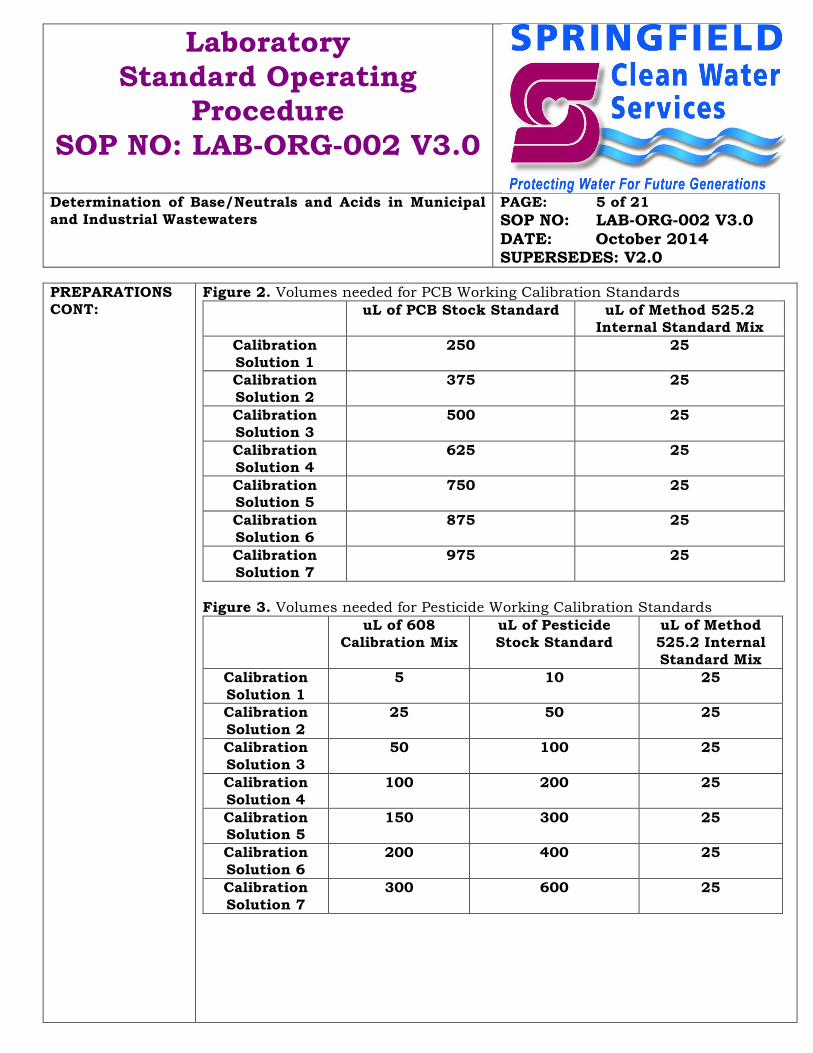
Laboratory Standard Operating
Procedure SOP NO: LAB-ORG-002 V3.0
Determination of Base/Neutrals and Acids in Municipal and Industrial Wastewaters
PAGE: 5 of 21 SOP NO: LAB-ORG-002 V3.0 DATE: October 2014 SUPERSEDES: V2.0
PREPARATIONS CONT:
Figure 2. Volumes needed for PCB Working Calibration Standards uL of PCB Stock Standard uL of Method 525.2
Internal Standard Mix Calibration Solution 1
250 25
Calibration Solution 2
375 25
Calibration Solution 3
500 25
Calibration Solution 4
625 25
Calibration Solution 5
750 25
Calibration Solution 6
875 25
Calibration Solution 7
975
25
Figure 3. Volumes needed for Pesticide Working Calibration Standards
uL of 608 Calibration Mix
uL of Pesticide Stock Standard
uL of Method 525.2 Internal Standard Mix
Calibration Solution 1
5 10 25
Calibration Solution 2
25 50 25
Calibration Solution 3
50 100 25
Calibration Solution 4
100 200 25
Calibration Solution 5
150 300 25
Calibration Solution 6
200 400 25
Calibration Solution 7
300 600
25

Laboratory Standard Operating
Procedure SOP NO: LAB-ORG-002 V3.0
Determination of Base/Neutrals and Acids in Municipal and Industrial Wastewaters
PAGE: 6 of 21 SOP NO: LAB-ORG-002 V3.0 DATE: October 2014 SUPERSEDES: V2.0
PREPARATIONS CONT: PROCEDURE:
Surrogate Spiking Solution: Prepare Surrogate spiking solution by adding 100uL of Acid Surrogate Standard Mix (4/89) and 200ul of Revised B/N Surrogate Mix to a 10.0mL flask containing a small amount of acetone. Dilute to volume with acetone. Addition of 1.00 mL of this solution to 1000 mL of sample is equivalent to a concentration of 100 µg/L of each surrogate standard. Store the spiking solution at 4°C in Teflon-sealed glass container. The solution should be checked frequently for stability. The solution must be replaced after six months or sooner if comparison with quality control check standards indicates a problem. Quality Control Check Standard: Prepare the Quality Control Check Standard by adding 250uL Ultra Scientific Benzidines Mixture, Base/Neutral Extractables Mixture, and Phenols Mixture to a 5.0mL volumetric flask containing a small amount of acetone. Dilute to volume with acetone and store in a glass Teflon sealed container in the lab freezer. Addition of 1.00mL of the Independent Check standard to 1L of reagent water is equivalent to 100ug/L of each parameter Sodium Hydroxide Solution (10 N):Dissolve 40 g of NaOH (ACS) in reagent water and dilute to 100 mL. Sulfuric acid (1+1): Slowly, add 50 mL of H2SO4 ) to 50 mL 50mL reagent water. Sample Preparation/Extraction: The following steps describe the extraction procedure used to extract a batch of samples
1. Check logbook for any samples requiring analysis. If samples require B/N and Acids analysis, check if they also require PCBs and Pesticides.
2. Remove any samples to be analyzed from the refrigerator and allow to warm to room temperature (samples must be extracted within 1 week of collection and analyzed within 40 days).
3. Record sample names and the date of extraction on the bench sheet. 4. After samples have warmed to room temperature, transfer each sample to
a 1000mL graduated cylinder and record the volume on the bench sheet 5. Transfer the sample to the extraction apparatus. 6. Repeat steps 3-4 for all samples to be analyzed. 7. One sample per batch should be spiked by adding 1.00mL of Quality
Control Check Standard using a class A pipette. 8. A Quality Control Check Standard should be analyzed by adding 1.00mL
of Quality Control Check Standard to 1L of reagent water using a class A pipette. The frequency of the Independent Check Standard is dependent on the performance of the sample spike. The frequency should be at least 5% of all samples analyzed unless all criteria of the spike are met.
9. If a field dupe is submitted it should be analyzed with its counterpart
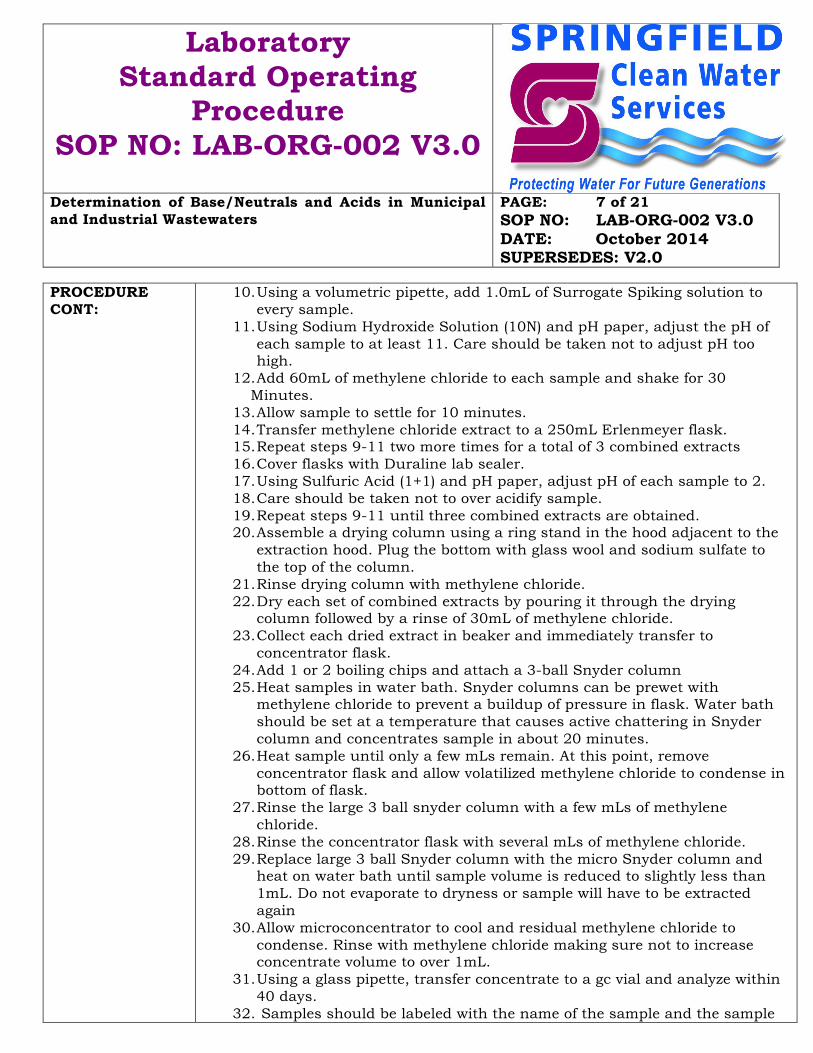
Laboratory Standard Operating
Procedure SOP NO: LAB-ORG-002 V3.0
Determination of Base/Neutrals and Acids in Municipal and Industrial Wastewaters
PAGE: 7 of 21 SOP NO: LAB-ORG-002 V3.0 DATE: October 2014 SUPERSEDES: V2.0
PROCEDURE CONT:
10. Using a volumetric pipette, add 1.0mL of Surrogate Spiking solution to every sample.
11. Using Sodium Hydroxide Solution (10N) and pH paper, adjust the pH of each sample to at least 11. Care should be taken not to adjust pH too high.
12. Add 60mL of methylene chloride to each sample and shake for 30 Minutes.
13. Allow sample to settle for 10 minutes. 14. Transfer methylene chloride extract to a 250mL Erlenmeyer flask. 15. Repeat steps 9-11 two more times for a total of 3 combined extracts 16. Cover flasks with Duraline lab sealer. 17. Using Sulfuric Acid (1+1) and pH paper, adjust pH of each sample to 2. 18. Care should be taken not to over acidify sample. 19. Repeat steps 9-11 until three combined extracts are obtained. 20. Assemble a drying column using a ring stand in the hood adjacent to the
extraction hood. Plug the bottom with glass wool and sodium sulfate to the top of the column.
21. Rinse drying column with methylene chloride. 22. Dry each set of combined extracts by pouring it through the drying
column followed by a rinse of 30mL of methylene chloride. 23. Collect each dried extract in beaker and immediately transfer to
concentrator flask. 24. Add 1 or 2 boiling chips and attach a 3-ball Snyder column 25. Heat samples in water bath. Snyder columns can be prewet with
methylene chloride to prevent a buildup of pressure in flask. Water bath should be set at a temperature that causes active chattering in Snyder column and concentrates sample in about 20 minutes.
26. Heat sample until only a few mLs remain. At this point, remove concentrator flask and allow volatilized methylene chloride to condense in bottom of flask.
27. Rinse the large 3 ball snyder column with a few mLs of methylene chloride.
28. Rinse the concentrator flask with several mLs of methylene chloride. 29. Replace large 3 ball Snyder column with the micro Snyder column and
heat on water bath until sample volume is reduced to slightly less than 1mL. Do not evaporate to dryness or sample will have to be extracted again
30. Allow microconcentrator to cool and residual methylene chloride to condense. Rinse with methylene chloride making sure not to increase concentrate volume to over 1mL.
31. Using a glass pipette, transfer concentrate to a gc vial and analyze within 40 days.
32. Samples should be labeled with the name of the sample and the sample
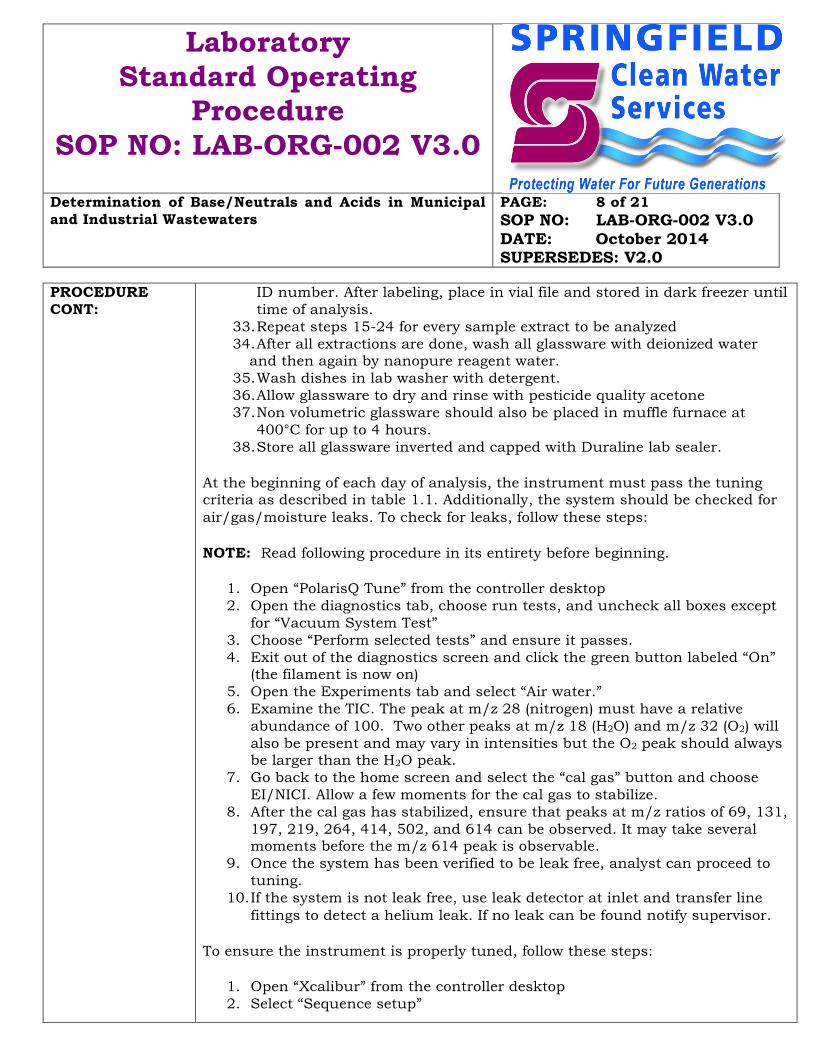
Laboratory Standard Operating
Procedure SOP NO: LAB-ORG-002 V3.0
Determination of Base/Neutrals and Acids in Municipal and Industrial Wastewaters
PAGE: 8 of 21 SOP NO: LAB-ORG-002 V3.0 DATE: October 2014 SUPERSEDES: V2.0
PROCEDURE CONT:
ID number. After labeling, place in vial file and stored in dark freezer until time of analysis.
33. Repeat steps 15-24 for every sample extract to be analyzed 34. After all extractions are done, wash all glassware with deionized water
and then again by nanopure reagent water. 35. Wash dishes in lab washer with detergent. 36. Allow glassware to dry and rinse with pesticide quality acetone 37. Non volumetric glassware should also be placed in muffle furnace at
400°C for up to 4 hours. 38. Store all glassware inverted and capped with Duraline lab sealer.
At the beginning of each day of analysis, the instrument must pass the tuning criteria as described in table 1.1. Additionally, the system should be checked for air/gas/moisture leaks. To check for leaks, follow these steps:
NOTE: Read following procedure in its entirety before beginning.
1. Open “PolarisQ Tune” from the controller desktop 2. Open the diagnostics tab, choose run tests, and uncheck all boxes except
for “Vacuum System Test” 3. Choose “Perform selected tests” and ensure it passes. 4. Exit out of the diagnostics screen and click the green button labeled “On”
(the filament is now on) 5. Open the Experiments tab and select “Air water.” 6. Examine the TIC. The peak at m/z 28 (nitrogen) must have a relative
abundance of 100. Two other peaks at m/z 18 (H2O) and m/z 32 (O2) will also be present and may vary in intensities but the O2 peak should always be larger than the H2O peak.
7. Go back to the home screen and select the “cal gas” button and choose EI/NICI. Allow a few moments for the cal gas to stabilize.
8. After the cal gas has stabilized, ensure that peaks at m/z ratios of 69, 131, 197, 219, 264, 414, 502, and 614 can be observed. It may take several moments before the m/z 614 peak is observable.
9. Once the system has been verified to be leak free, analyst can proceed to tuning.
10. If the system is not leak free, use leak detector at inlet and transfer line fittings to detect a helium leak. If no leak can be found notify supervisor.
To ensure the instrument is properly tuned, follow these steps:
1. Open “Xcalibur” from the controller desktop 2. Select “Sequence setup”

Laboratory Standard Operating
Procedure SOP NO: LAB-ORG-002 V3.0
Determination of Base/Neutrals and Acids in Municipal and Industrial Wastewaters
PAGE: 9 of 21 SOP NO: LAB-ORG-002 V3.0 DATE: October 2014 SUPERSEDES: V2.0
PROCEDURE CONT:
3. Enter in a sample name (i.e 15DEC12_Tune) 4. Double click on the blank under “Inst. Method” and select the appropriate
method 5. Double click the box under “Path” and select an appropriate folder under
C:\Xcalibur\Data. If no folder exists, create one and label it with the current day’s date.
6. Double click the box under “Proc Method” and select the appropriate method
7. Click the blank below “Sample Type” and from the drop down menu select “Blank”
8. Highlight the entire sample row by clicking the box with the asterisk located to the left of the box labeled “Sample Name”
9. Press the play button (start analysis button) located in the toolbar at the top of the screen. The sample has now been added to the acquisition queue and will be injected when the GC initial conditions are met
10. Data acquisition will begin automatically. 11. Once data acquisition is complete, open Xcalibur and select “Qual
Browser.” 12. Open the folder you designated as the path and select your sample by
name. 13. In qual browser, you will see two window panes. The top is a
chromatogram of your sample. The bottom is the corresponding mass spectrum. The DFTPP peak must be indentified and the mass spectrum compared against acceptance criteria.
14. To verify the identity of the DFTPP peak, select the icon in the bottom window pane to the right of the spectrum that looks like a tack. In the chromatogram window pane, place your cursor of the DFTPP peak.
15. The mass spectrum window pane will display the mass spectrum of the peak and RT you selected. DFTPP has a primary ion at m/z 198 (with 100% relative abundance) and two secondary ions at m/z (51, 127)
16. If the mass spectrum does not correspond to DFTPP, repeat step 12-14 on a different peak until DFTPP is identified.
17. Once DFTPP is identified, right click on the mass spectrum and select Export àClipboard (Exact mass)
18. Open Envirolab forms from the controller desktop 19. Select the” tune report config” tab and click import spectrum 20. The software will automatically import the peak abundances from the 21. copied mass spectrum and compare them to the acceptance criteria. If the
criteria are met, print the report and proceed to calibration. (See Table 1.1 for criteria)

Laboratory Standard Operating
Procedure SOP NO: LAB-ORG-002 V3.0
Determination of Base/Neutrals and Acids in Municipal and Industrial Wastewaters
PAGE: 10 of 21 SOP NO: LAB-ORG-002 V3.0 DATE: October 2014 SUPERSEDES: V2.0
PROCEDURE CONT:
To calibrate the instrument, follow these steps:
1. Return to the Excalibur sequence you created for tuning the instrument 2. Amend the sequence to add at least three standards (Standard 1,
Standard 2, Etc.)in the name field of the sequence. 3. Ensure that the file path is set to the desired location. 4. Select “STD Bracket” from the sample type menu. 5. Select the corresponding standard numbers for each respective standard
in the standard level drop down menu. 6. Enter “icx,” where x is the number of standards you are using, in the
“report type” field of the final standard (this code is used by the Envirolab software to generate the initial calibration report”).
7. Highlight the three standards and press the “Run Sequence” button. 8. Parameters in the standard should be qualitatively identified by
comparing the primary and secondary masses of each parameter to the values listed in Tables 3.1,3.2 and 3.3.
9. Once all standards are analyzed, ensure initial calibration criteria are met using the Envirolabs software. Open the software, select “Initial Calibration Report” and load the sequence you previously created. Any compound that does not meet initial calibration criteria will be flagged with a “<<<” symbol. Acceptance criteria for Initial Calibration is a %RSD of the RRFs <35%. If the RSD of a generated RRF is <35% it can be considered invariant across the range of the curve.
10. If any or all compounds fail calibration criteria, review the RFs (relative response factors) generated in the initial calibration report to determine the cause of failure. If a single standard appears to be the problem, the standard can be reanalyzed. If calibration still fails, the set of standards can be prepared using only the compounds that failed the initial calibration.
11. If calibration does not pass with a new set of standards notify supervisor. System will require troubleshooting.
12. Once the initial calibration passes analyze a blank by adding it to the sequence. Select “unknown” from the sample type menu and enter “QR” in the report section.
13. Once the blank is determined to be free of interferences (having no peaks above the MDL for that parameter), the independent check standard can be analyzed. Add the independent check standard to your Xcalibur sequence and enter “qr” in the report type field and change the sample type from STD bracket to unknown. Inject the standard.
14. Analyze the sample and determine if it meets criteria by generating a quantitation report using the Envirolabs software. Select Quantitation Report and load your saved Xcalibur sequence. Check each parameter

Laboratory Standard Operating
Procedure SOP NO: LAB-ORG-002 V3.0
Determination of Base/Neutrals and Acids in Municipal and Industrial Wastewaters
PAGE: 11 of 21 SOP NO: LAB-ORG-002 V3.0 DATE: October 2014 SUPERSEDES: V2.0
PROCEDURE CONT:
against the values in Table 4.1 to see if it passes. 15. Analysis of samples can now proceed. 16. Parameters in the sample should be qualitatively identified by comparing
primary and secondary masses to the values listed in Tables 3.1, 3.2 and 3.3 and by comparison of retention times (RT) to the high level calibration standard. For a positive identification, the RT of the parameter in the sample must elute +/- 30 seconds of the RT of the parameter in the high level standard and the mass spectrum of the analyte in the sample must conform to the spectrum of the parameter in the standard.
17. After all samples are analyzed, a bracketing continuous calibration standard should be analyzed. Generally, a previously prepared midlevel standard is used. RRF should be ± 20% of the average RF from the initial calibration curve.
18. To check the Continuing calibration criteria, enter “CC” to the report type column of the Continuing calibration standard.
19. Open the Envirolabs software and under the “Continuing Calibration” tab open the current sequence.
20. %Differences will be displayed and any parameters that do not meet the criterion will be flagged “<<<”.
21. A DFTPP tune should also be injected every twelve hours to ensure the instrument has not drifted out of tune.
22. Obtain quantitation reports of every sample by entering “QR” into the “report” column for every sample analyzed.
23. Open envirolabs and under the “Quantitation Reports” tab open the current sequence.
24. Print and review all reports. 25. If all criteria are met, enter data into LIMS. 26. LIMS will calculate concentrations of any sample and recoveries of any
spiked samples analyzed. Compare to acceptance criteria in Table 4.1.
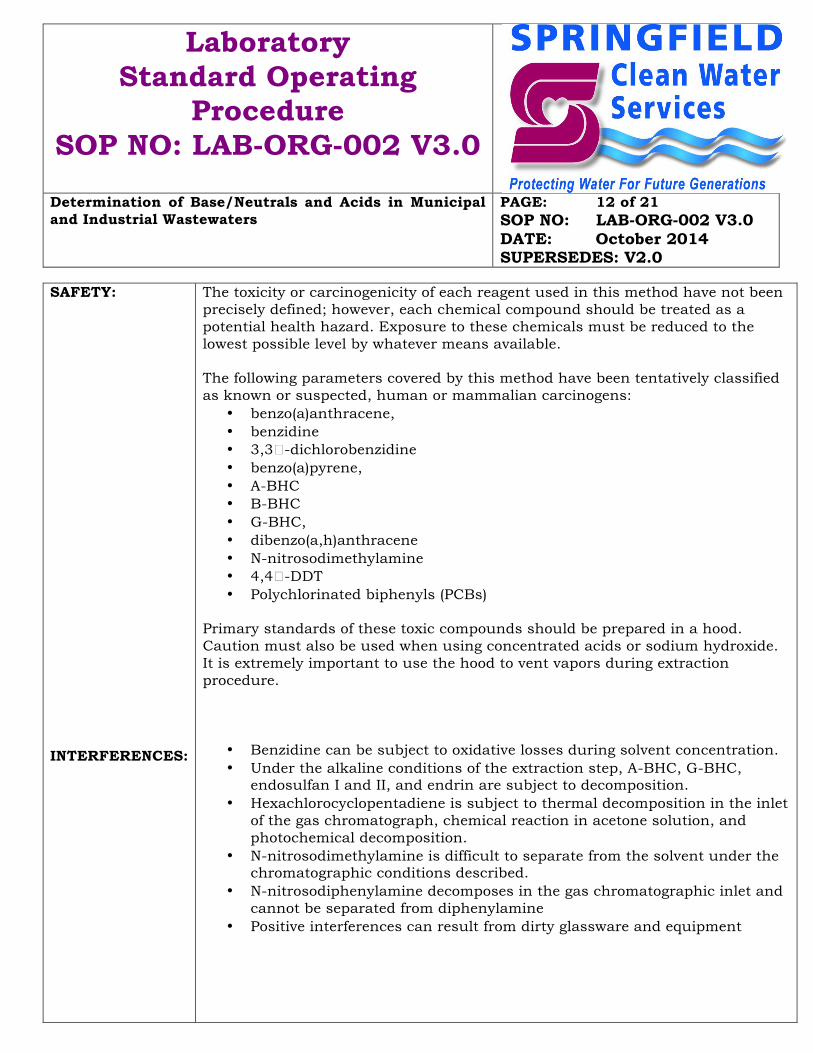
Laboratory Standard Operating
Procedure SOP NO: LAB-ORG-002 V3.0
Determination of Base/Neutrals and Acids in Municipal and Industrial Wastewaters
PAGE: 12 of 21 SOP NO: LAB-ORG-002 V3.0 DATE: October 2014 SUPERSEDES: V2.0
SAFETY: INTERFERENCES:
The toxicity or carcinogenicity of each reagent used in this method have not been precisely defined; however, each chemical compound should be treated as a potential health hazard. Exposure to these chemicals must be reduced to the lowest possible level by whatever means available. The following parameters covered by this method have been tentatively classified as known or suspected, human or mammalian carcinogens:
• benzo(a)anthracene, • benzidine • 3,3�-dichlorobenzidine • benzo(a)pyrene, • A-BHC • B-BHC • G-BHC, • dibenzo(a,h)anthracene • N-nitrosodimethylamine • 4,4�-DDT • Polychlorinated biphenyls (PCBs)
Primary standards of these toxic compounds should be prepared in a hood. Caution must also be used when using concentrated acids or sodium hydroxide. It is extremely important to use the hood to vent vapors during extraction procedure.
• Benzidine can be subject to oxidative losses during solvent concentration. • Under the alkaline conditions of the extraction step, A-BHC, G-BHC,
endosulfan I and II, and endrin are subject to decomposition. • Hexachlorocyclopentadiene is subject to thermal decomposition in the inlet
of the gas chromatograph, chemical reaction in acetone solution, and photochemical decomposition.
• N-nitrosodimethylamine is difficult to separate from the solvent under the chromatographic conditions described.
• N-nitrosodiphenylamine decomposes in the gas chromatographic inlet and cannot be separated from diphenylamine
• Positive interferences can result from dirty glassware and equipment

Laboratory Standard Operating
Procedure SOP NO: LAB-ORG-002 V3.0
Determination of Base/Neutrals and Acids in Municipal and Industrial Wastewaters
PAGE: 13 of 21 SOP NO: LAB-ORG-002 V3.0 DATE: October 2014 SUPERSEDES: V2.0
CALCULATIONS: APPENDIX:
Equation 1.
𝑅𝐹 =𝐴𝑠 𝐶𝑖𝑠𝐴𝑖𝑠 𝐶𝑠
RF= Response Factor As = Area of the characteristic m/z for the parameter to be measured. Ais = Area of the characteristic m/z for the internal standard. Cis = Concentration of the internal standard. Cs = Concentration of the parameter to be measured Equation 2.
𝐶𝑜𝑛𝑐𝑒𝑛𝑡𝑟𝑎𝑖𝑡𝑜𝑛 𝑝𝑝𝑏 =𝐴𝑠 𝐼𝑠
𝐴𝑖𝑠 𝑅𝐹 (𝑉𝑜)
As = Area of the characteristic m/z for the parameter or surrogate standard to be measured. Is = Amount of internal standard added to each extract (ug) Ais = Area of the characteristic m/z for the internal standard. Cis = Concentration of the internal standard.
Table 1.1 DFTPP Key m/z Abundance Criteria
Mass m/z Abundance criteria 51 30-60 percent of Mass 198. 68 Less than 2 percent of Mass 69. 70 Less than 2 percent of Mass 69. 127 40-60 percent of Mass 198. 197 Less than 1 percent of Mass 198. 198 Base peak, 100 percent relative abundance. 199 5-9 percent of Mass 198. 275 10-30 percent of Mass 198. 365 Greater than 1 percent of Mass 198. 441 Present but less than Mass 443. 442 Greater than 40 percent of Mass 198. 443 17-23 percent of Mass 442.
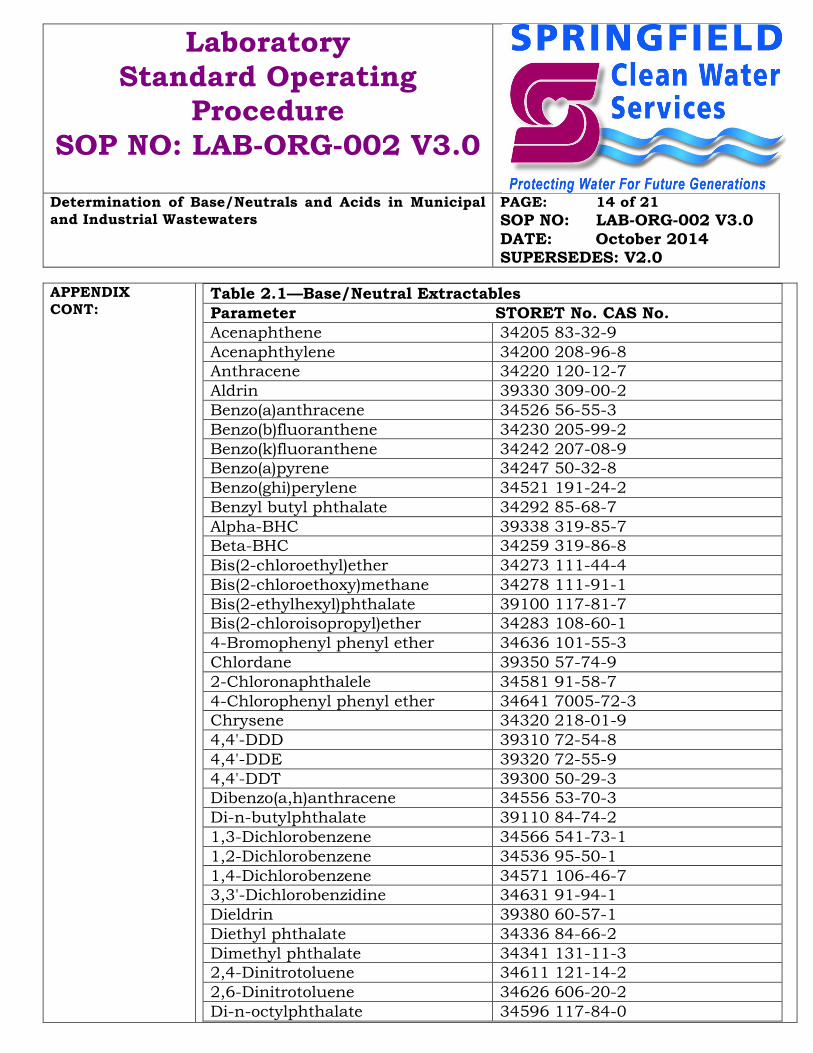
Laboratory Standard Operating
Procedure SOP NO: LAB-ORG-002 V3.0
Determination of Base/Neutrals and Acids in Municipal and Industrial Wastewaters
PAGE: 14 of 21 SOP NO: LAB-ORG-002 V3.0 DATE: October 2014 SUPERSEDES: V2.0
APPENDIX CONT:
Table 2.1—Base/Neutral Extractables Parameter STORET No. CAS No. Acenaphthene 34205 83-32-9 Acenaphthylene 34200 208-96-8 Anthracene 34220 120-12-7 Aldrin 39330 309-00-2 Benzo(a)anthracene 34526 56-55-3 Benzo(b)fluoranthene 34230 205-99-2 Benzo(k)fluoranthene 34242 207-08-9 Benzo(a)pyrene 34247 50-32-8 Benzo(ghi)perylene 34521 191-24-2 Benzyl butyl phthalate 34292 85-68-7 Alpha-BHC 39338 319-85-7 Beta-BHC 34259 319-86-8 Bis(2-chloroethyl)ether 34273 111-44-4 Bis(2-chloroethoxy)methane 34278 111-91-1 Bis(2-ethylhexyl)phthalate 39100 117-81-7 Bis(2-chloroisopropyl)ether 34283 108-60-1 4-Bromophenyl phenyl ether 34636 101-55-3 Chlordane 39350 57-74-9 2-Chloronaphthalele 34581 91-58-7 4-Chlorophenyl phenyl ether 34641 7005-72-3 Chrysene 34320 218-01-9 4,4'-DDD 39310 72-54-8 4,4'-DDE 39320 72-55-9 4,4'-DDT 39300 50-29-3 Dibenzo(a,h)anthracene 34556 53-70-3 Di-n-butylphthalate 39110 84-74-2 1,3-Dichlorobenzene 34566 541-73-1 1,2-Dichlorobenzene 34536 95-50-1 1,4-Dichlorobenzene 34571 106-46-7 3,3'-Dichlorobenzidine 34631 91-94-1 Dieldrin 39380 60-57-1 Diethyl phthalate 34336 84-66-2 Dimethyl phthalate 34341 131-11-3 2,4-Dinitrotoluene 34611 121-14-2 2,6-Dinitrotoluene 34626 606-20-2 Di-n-octylphthalate 34596 117-84-0
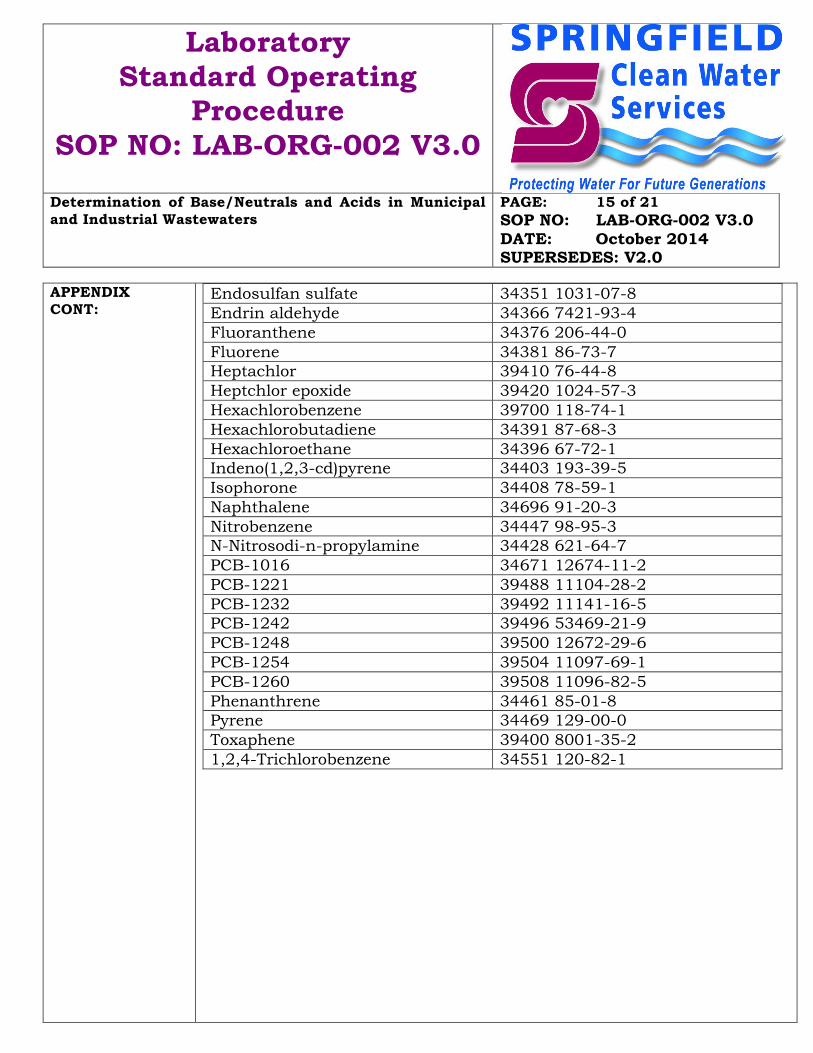
Laboratory Standard Operating
Procedure SOP NO: LAB-ORG-002 V3.0
Determination of Base/Neutrals and Acids in Municipal and Industrial Wastewaters
PAGE: 15 of 21 SOP NO: LAB-ORG-002 V3.0 DATE: October 2014 SUPERSEDES: V2.0
APPENDIX CONT:
Endosulfan sulfate 34351 1031-07-8 Endrin aldehyde 34366 7421-93-4 Fluoranthene 34376 206-44-0 Fluorene 34381 86-73-7 Heptachlor 39410 76-44-8 Heptchlor epoxide 39420 1024-57-3 Hexachlorobenzene 39700 118-74-1 Hexachlorobutadiene 34391 87-68-3 Hexachloroethane 34396 67-72-1 Indeno(1,2,3-cd)pyrene 34403 193-39-5 Isophorone 34408 78-59-1 Naphthalene 34696 91-20-3 Nitrobenzene 34447 98-95-3 N-Nitrosodi-n-propylamine 34428 621-64-7 PCB-1016 34671 12674-11-2 PCB-1221 39488 11104-28-2 PCB-1232 39492 11141-16-5 PCB-1242 39496 53469-21-9 PCB-1248 39500 12672-29-6 PCB-1254 39504 11097-69-1 PCB-1260 39508 11096-82-5 Phenanthrene 34461 85-01-8 Pyrene 34469 129-00-0 Toxaphene 39400 8001-35-2 1,2,4-Trichlorobenzene 34551 120-82-1
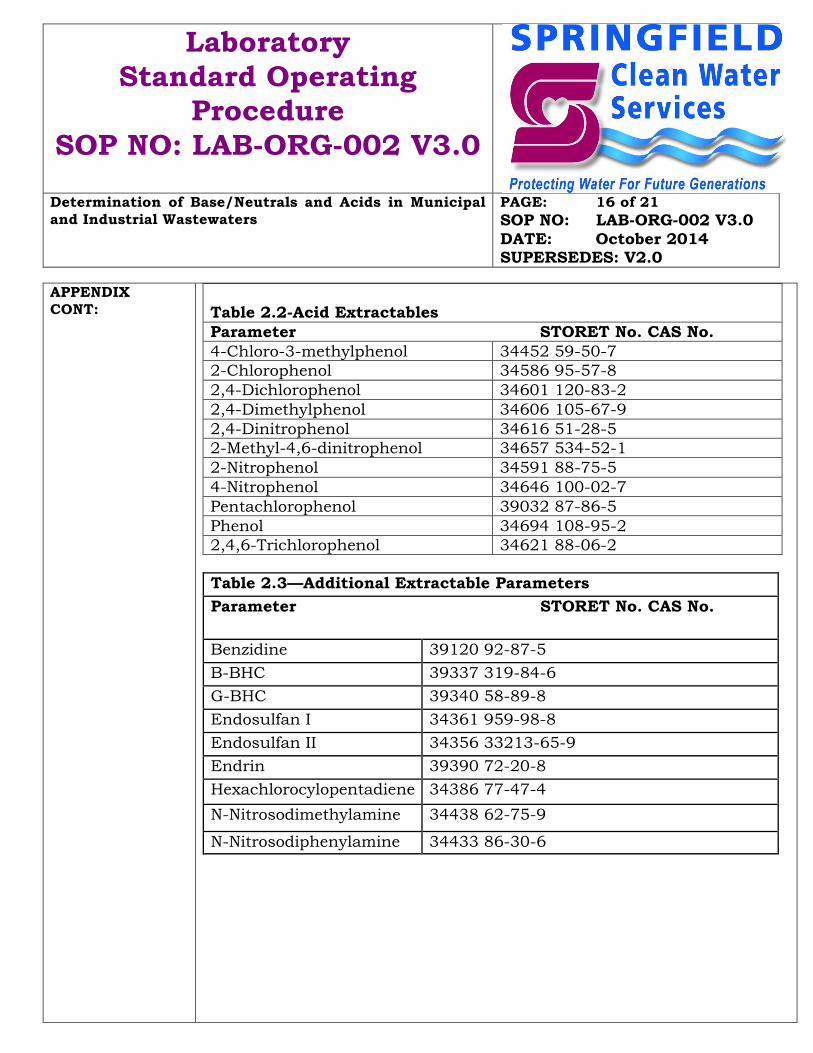
Laboratory Standard Operating
Procedure SOP NO: LAB-ORG-002 V3.0
Determination of Base/Neutrals and Acids in Municipal and Industrial Wastewaters
PAGE: 16 of 21 SOP NO: LAB-ORG-002 V3.0 DATE: October 2014 SUPERSEDES: V2.0
APPENDIX CONT:
Table 2.2-Acid Extractables Parameter STORET No. CAS No. 4-Chloro-3-methylphenol 34452 59-50-7 2-Chlorophenol 34586 95-57-8 2,4-Dichlorophenol 34601 120-83-2 2,4-Dimethylphenol 34606 105-67-9 2,4-Dinitrophenol 34616 51-28-5 2-Methyl-4,6-dinitrophenol 34657 534-52-1 2-Nitrophenol 34591 88-75-5 4-Nitrophenol 34646 100-02-7 Pentachlorophenol 39032 87-86-5 Phenol 34694 108-95-2 2,4,6-Trichlorophenol 34621 88-06-2
Table 2.3—Additional Extractable Parameters Parameter STORET No. CAS No.
Benzidine 39120 92-87-5
B-BHC 39337 319-84-6
G-BHC 39340 58-89-8
Endosulfan I 34361 959-98-8
Endosulfan II 34356 33213-65-9
Endrin 39390 72-20-8
Hexachlorocylopentadiene 34386 77-47-4
N-Nitrosodimethylamine 34438 62-75-9
N-Nitrosodiphenylamine 34433 86-30-6
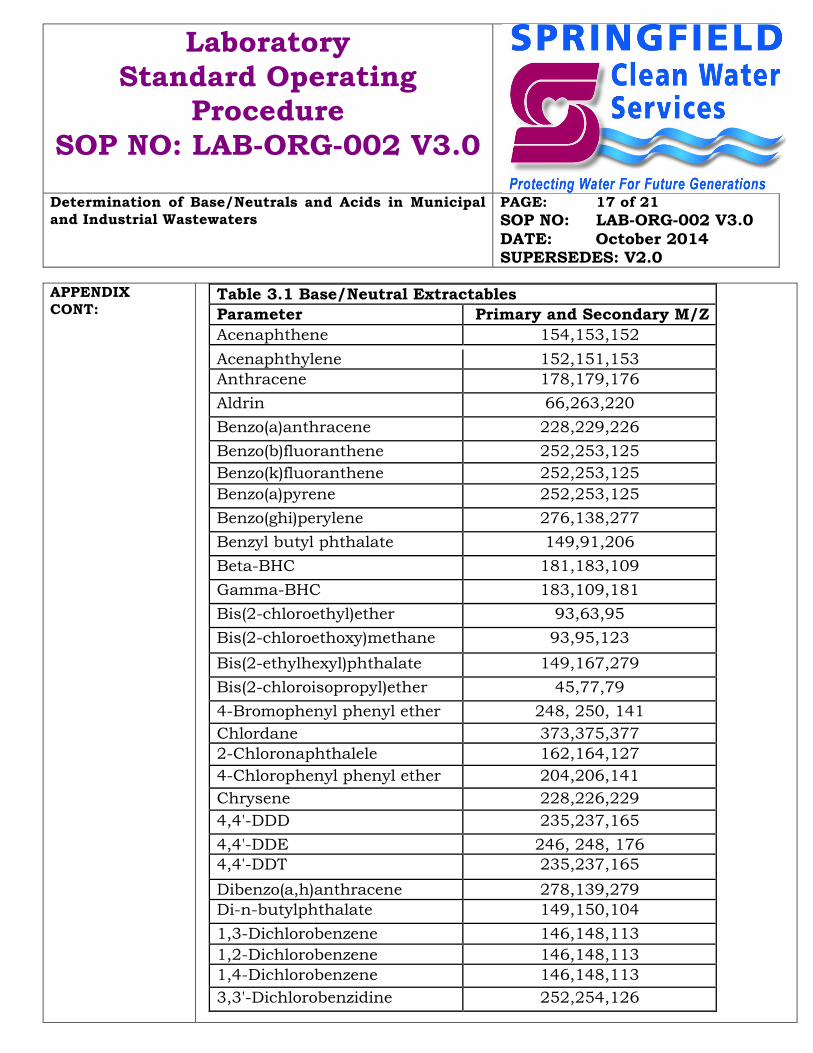
Laboratory Standard Operating
Procedure SOP NO: LAB-ORG-002 V3.0
Determination of Base/Neutrals and Acids in Municipal and Industrial Wastewaters
PAGE: 17 of 21 SOP NO: LAB-ORG-002 V3.0 DATE: October 2014 SUPERSEDES: V2.0
APPENDIX CONT:
Table 3.1 Base/Neutral Extractables Parameter Primary and Secondary M/Z Acenaphthene 154,153,152
Acenaphthylene 152,151,153 Anthracene 178,179,176
Aldrin 66,263,220
Benzo(a)anthracene 228,229,226
Benzo(b)fluoranthene 252,253,125 Benzo(k)fluoranthene 252,253,125 Benzo(a)pyrene 252,253,125
Benzo(ghi)perylene 276,138,277
Benzyl butyl phthalate 149,91,206
Beta-BHC 181,183,109
Gamma-BHC 183,109,181
Bis(2-chloroethyl)ether 93,63,95
Bis(2-chloroethoxy)methane 93,95,123
Bis(2-ethylhexyl)phthalate 149,167,279
Bis(2-chloroisopropyl)ether 45,77,79
4-Bromophenyl phenyl ether 248, 250, 141 Chlordane 373,375,377 2-Chloronaphthalele 162,164,127 4-Chlorophenyl phenyl ether 204,206,141 Chrysene 228,226,229 4,4'-DDD 235,237,165
4,4'-DDE 246, 248, 176 4,4'-DDT 235,237,165
Dibenzo(a,h)anthracene 278,139,279 Di-n-butylphthalate 149,150,104
1,3-Dichlorobenzene 146,148,113 1,2-Dichlorobenzene 146,148,113 1,4-Dichlorobenzene 146,148,113 3,3'-Dichlorobenzidine 252,254,126
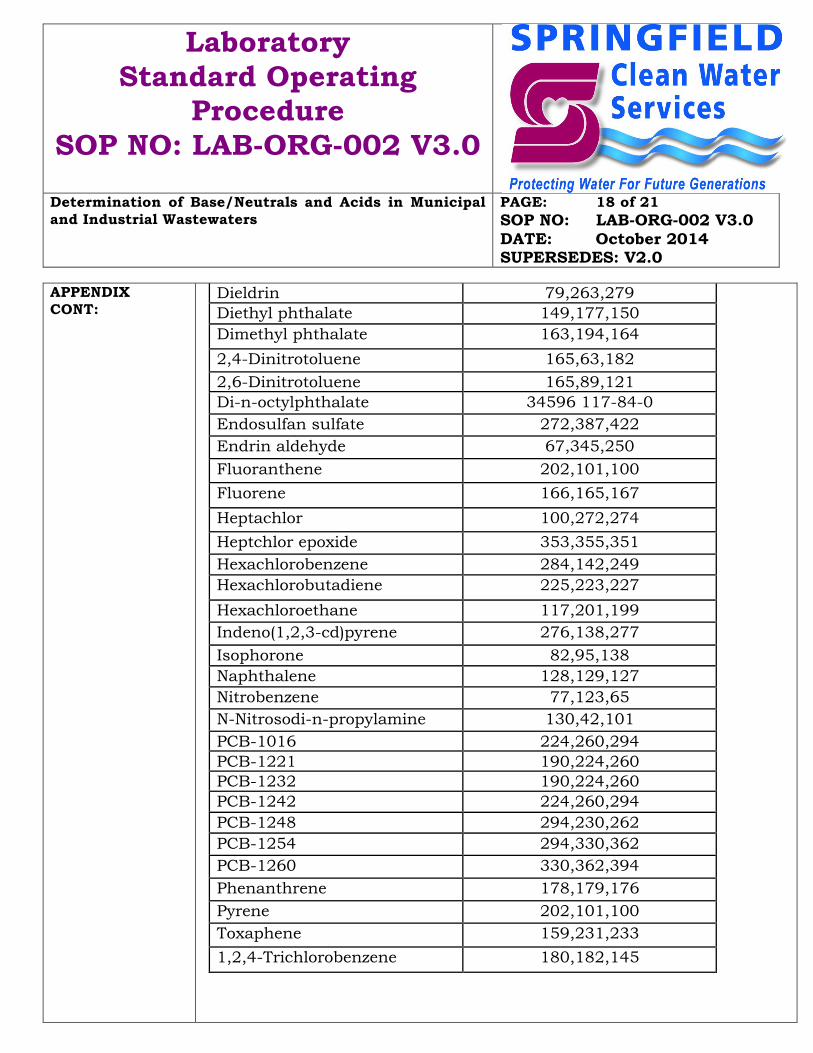
Laboratory Standard Operating
Procedure SOP NO: LAB-ORG-002 V3.0
Determination of Base/Neutrals and Acids in Municipal and Industrial Wastewaters
PAGE: 18 of 21 SOP NO: LAB-ORG-002 V3.0 DATE: October 2014 SUPERSEDES: V2.0
APPENDIX CONT:
Dieldrin 79,263,279 Diethyl phthalate 149,177,150 Dimethyl phthalate 163,194,164
2,4-Dinitrotoluene 165,63,182
2,6-Dinitrotoluene 165,89,121 Di-n-octylphthalate 34596 117-84-0 Endosulfan sulfate 272,387,422 Endrin aldehyde 67,345,250
Fluoranthene 202,101,100
Fluorene 166,165,167
Heptachlor 100,272,274
Heptchlor epoxide 353,355,351 Hexachlorobenzene 284,142,249 Hexachlorobutadiene 225,223,227
Hexachloroethane 117,201,199 Indeno(1,2,3-cd)pyrene 276,138,277
Isophorone 82,95,138 Naphthalene 128,129,127 Nitrobenzene 77,123,65 N-Nitrosodi-n-propylamine 130,42,101 PCB-1016 224,260,294 PCB-1221 190,224,260 PCB-1232 190,224,260 PCB-1242 224,260,294 PCB-1248 294,230,262 PCB-1254 294,330,362 PCB-1260 330,362,394 Phenanthrene 178,179,176 Pyrene 202,101,100 Toxaphene 159,231,233
1,2,4-Trichlorobenzene 180,182,145

Laboratory Standard Operating
Procedure SOP NO: LAB-ORG-002 V3.0
Determination of Base/Neutrals and Acids in Municipal and Industrial Wastewaters
PAGE: 19 of 21 SOP NO: LAB-ORG-002 V3.0 DATE: October 2014 SUPERSEDES: V2.0
APPENDIX CONT:
Table 3.2-Acid Extractables
Parameter Primary and Secondary M/Z 4-Chloro-3-methylphenol 142,107,144 2-Chlorophenol 128,64,130
2,4-Dichlorophenol 162,164,98
2,4-Dimethylphenol 122,107,121
2,4-Dinitrophenol 184,63,154
2-Methyl-4,6-dinitrophenol 198,182,77 2-Nitrophenol 139,65,109
4-Nitrophenol 65,139,109
Pentachlorophenol 266,264,268
Phenol 94,65,66
2,4,6-Trichlorophenol 34621 88-06-2 Table 4.1 QC Acceptance Criteria Parameter Concentration of
Quality Control Check Standard
%Recovery of Spike
Acenaphthene 60.1-132.3 47-145 Acenaphthylene 53.5-126.0
33-145 Anthracene 43.4-118 27-133
Aldrin 7.2-152.2 DL-166 Benzo(a)anthracene DL-199.7 33-143 Benzo(b)fluoranthene 42.0-140.4 24-159 Benzo(k)fluoranthene 25.2-145.7 11-162 Benzo(a)pyrene 31.7-148.0 17-163 Benzo(ghi)perylene DL-195.0 DL-219 Benzyl butyl phthalate DL-139.9 DL-152 Beta-BHC 41.5-130.6 24-149 Gamma-BHC DL-100.0 DL-110 Bis(2-chloroethyl)ether 42.9-126.0 12-158

Laboratory Standard Operating
Procedure SOP NO: LAB-ORG-002 V3.0
Determination of Base/Neutrals and Acids in Municipal and Industrial Wastewaters
PAGE: 20 of 21 SOP NO: LAB-ORG-002 V3.0 DATE: October 2014 SUPERSEDES: V2.0
APPENDIX CONT:
Bis(2-chloroethoxy)methane
49.2-164.7 33-184
Bis(2-ethylhexyl)phthalate 28.9-136.8 8-158 Bis(2-chloroisopropyl)ether 62.8-138.6 36-166 4-Bromophenyl phenyl ether
64.9-114.4 53-127
2-Chloronaphthalene 64.5-113.5 60-118 4-Chlorophenyl phenyl ether
38.4-144.7 25-158
Chrysene DL-134.5 17-168 4,4'-DDD 19.2-119.7 DL-145 4,4'-DDE 19.2-119.7 4-136 4,4'-DDT DL-170.6 DL-203 Dibenzo(a,h)anthracene DL-199.7 DL-227 Di-n-butylphthalate 8.4-111 1-118 1,3-Dichlorobenzene 16.7-153.9 DL-172 1,2-Dichlorobenzene 48.6-112.0 32-129 1,4-Dichlorobenzene 37.3-105.7 20-124 3,3'-Dichlorobenzidine 8.2-212.5 DL-262 Dieldrin 44.3-119.3 29-136 Diethyl phthalate DL-100.0 DL-114 Dimethyl phthalate DL-100.0 DL-112 2,4-Dinitrotoluene 47.5-126.9 39-139 2,6-Dinitrotoluene 68.1-136.7 50-158 Di-n-octylphthalate 18.6-131.8 4-146 Endosulfan sulfate DL-103.5 DL-107 Endrin aldehyde DL-188.8 DL-209 Fluoranthene 42.9-121.3 26-137 Fluorene 71.6-108.4 59-121 Heptachlor DL-172.2 DL-192 Heptchlor epoxide 70.9-109.4 26-155 Hexachlorobenzene 7.8-141.5 DL-152 Hexachlorobutadiene 37.8-102.2 24-116

Laboratory Standard Operating
Procedure SOP NO: LAB-ORG-002 V3.0
Determination of Base/Neutrals and Acids in Municipal and Industrial Wastewaters
PAGE: 21 of 21 SOP NO: LAB-ORG-002 V3.0 DATE: October 2014 SUPERSEDES: V2.0
APPENDIX CONT:
Hexachloroethane 55.2-100.0 40-113 Indeno(1,2,3-cd)pyrene DL-150.9 DL-171 Isophorone 46.6-180.2 21-196 Naphthalene 35.6-119.6 21-133 Nitrobenzene 54.3-157.6 35-180 N-Nitrosodi-n-propylamine 13.6-197.9 DL-230 PCB-1260 19.3-121.0 DL-164 Phenanthrene 65.2-108.7 54-120 Pyrene 69.6-100 52-115 1,2,4-Trichlorobenzene 57.3-129.2 44-142
REPORT:
Report concentration of any parameter above MDL. Any compound not detected or detected below MDL report as (<X) where X is the MDL in ug/L.
HISTORY: Version 1.0 Effective November 2006 Version 2.0 Effective July 2013- Adds procedure for spiking samples. Updates format. Version 3.0 Effective October 2014-Makes changes to standard preparations and vendor for Quality Control Check Samples. Updates format.
REFERENCES: APPENDIX A TO PART 136 METHODS FOR ORGANIC CHEMICAL ANALYSIS OF MUNICIPAL AND INDUSTRIAL WASTEWATER METHOD 625—BASE/NEUTRALS AND ACIDS
PREPARED BY: Kevin Cline Chemist
DATE: October 2014
APPROVED BY: James Burks Lab Supervisor
DATE: October 2014
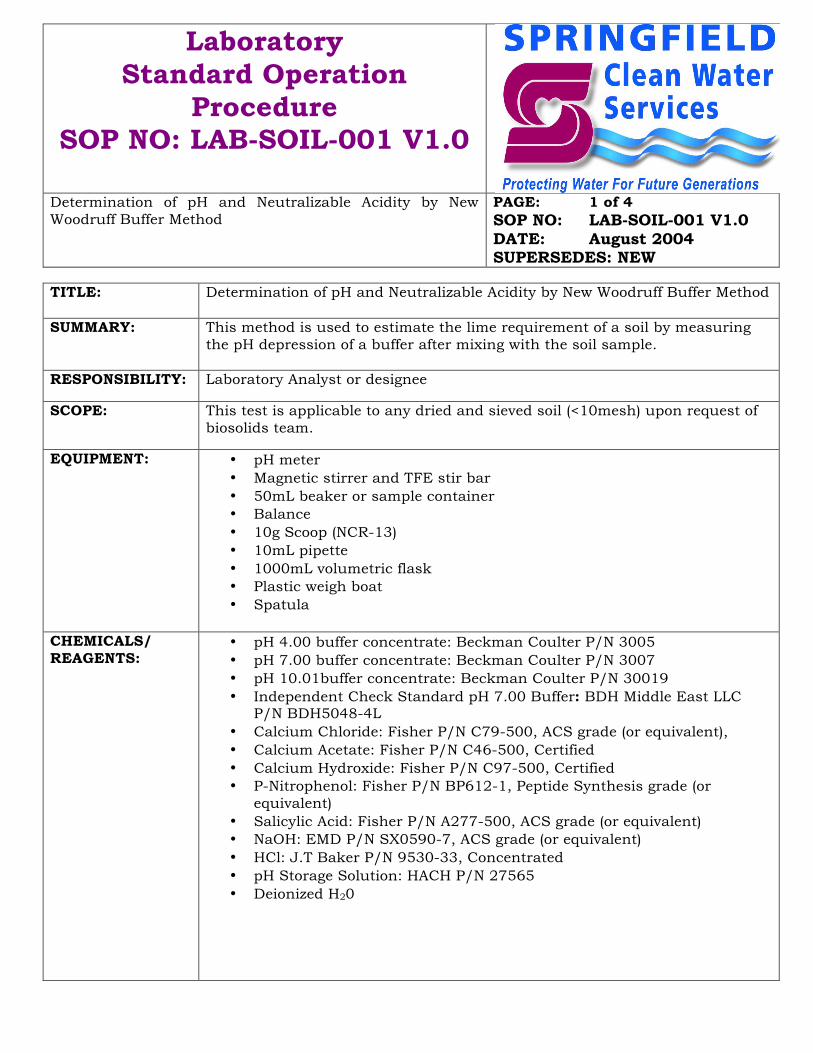
Laboratory Standard Operation
Procedure SOP NO: LAB-SOIL-001 V1.0
Determination of pH and Neutralizable Acidity by New Woodruff Buffer Method
PAGE: 1 of 4 SOP NO: LAB-SOIL-001 V1.0 DATE: August 2004 SUPERSEDES: NEW
TITLE: Determination of pH and Neutralizable Acidity by New Woodruff Buffer Method
SUMMARY: This method is used to estimate the lime requirement of a soil by measuring
the pH depression of a buffer after mixing with the soil sample.
RESPONSIBILITY: Laboratory Analyst or designee
SCOPE: This test is applicable to any dried and sieved soil (<10mesh) upon request of biosolids team.
EQUIPMENT: • pH meter • Magnetic stirrer and TFE stir bar • 50mL beaker or sample container • Balance • 10g Scoop (NCR-13) • 10mL pipette • 1000mL volumetric flask • Plastic weigh boat • Spatula
CHEMICALS/ REAGENTS:
• pH 4.00 buffer concentrate: Beckman Coulter P/N 3005 • pH 7.00 buffer concentrate: Beckman Coulter P/N 3007 • pH 10.01buffer concentrate: Beckman Coulter P/N 30019 • Independent Check Standard pH 7.00 Buffer: BDH Middle East LLC
P/N BDH5048-4L • Calcium Chloride: Fisher P/N C79-500, ACS grade (or equivalent), • Calcium Acetate: Fisher P/N C46-500, Certified • Calcium Hydroxide: Fisher P/N C97-500, Certified • P-Nitrophenol: Fisher P/N BP612-1, Peptide Synthesis grade (or
equivalent) • Salicylic Acid: Fisher P/N A277-500, ACS grade (or equivalent) • NaOH: EMD P/N SX0590-7, ACS grade (or equivalent) • HCl: J.T Baker P/N 9530-33, Concentrated • pH Storage Solution: HACH P/N 27565 • Deionized H20

Laboratory Standard Operation
Procedure SOP NO: LAB-SOIL-001 V1.0
Determination of pH and Neutralizable Acidity by New Woodruff Buffer Method
PAGE: 2 of 4 SOP NO: LAB-SOIL-001 V1.0 DATE: August 2004 SUPERSEDES: NEW
PREPARATIONS:
pH 4.00 Calibration Solution: Add entire contents of pH 4.00 buffer concentrate to a 500mL volumetric flask and dilute to volume with DI H20. pH 7.00 Calibration Solution: Add entire contents of pH 7.00 buffer concentrate to a 500mL volumetric flask and dilute to volume with DI H20. pH 10.01 Calibration Solution: Add entire contents of pH 10.01 buffer concentrate to a 500mL volumetric flask and dilute to volume with DI H20. 0.01M Calcium Chloride Solution: Transfer 1.46g of calcium chloride to a 1000mL volumetric flask and dilute to volume with DI H20. Mix thoroughly. 6N HCl Solution: Mix 500mL of concentrated HCl with 500mL DI H20. Mix thoroughly. Solution can be scaled as needed. 6M NaOH Solution: Add 240g of NaOH pellets to a 1000mL volumetric flask and dilute to volume with DI H20. Mix thoroughly. Solution can be scaled as needed. New Woodruff Buffer Solution: Dissolve 10g of calcium acetate and 4.0g calcium hydroxide in 500ml of cool distilled water. Heat to 70°C 200mL distilled water and add 12.0g of p-nitrophenol. Add 10.0g salicylic acid to the solution and mix for 1-2 minutes. Pour in the p-nitrophenol solution and mix. Bring the solution to volume in a 1000mL volumetric flask and adjust the pH to 7.0 +/- 0.05 with 6N NaOH or 6N HCl. Note: To avoid undesirable side reactions p-nitrophenol solution must be added promptly.
INSTRUMENT CALIBRATION:
pH meters are calibrated daily using a three point calibration curve. Follow appropriate meter specific procedure below if meter has not been calibrated
1. Turn on power for meter by plugging the meter in or pressing any button to remove meter from sleep mode.
2. The probe is stored in a pH 4.00 buffer (in specimen cup w/ stir bar) on a magnetic stir plate, turn stir plate on and adjust the speed of the stir bar.
3. Stir standard at a slow constant rate to provide homogeneity and suspension of solids while avoiding the creation of CO2 by overly mixing sample.
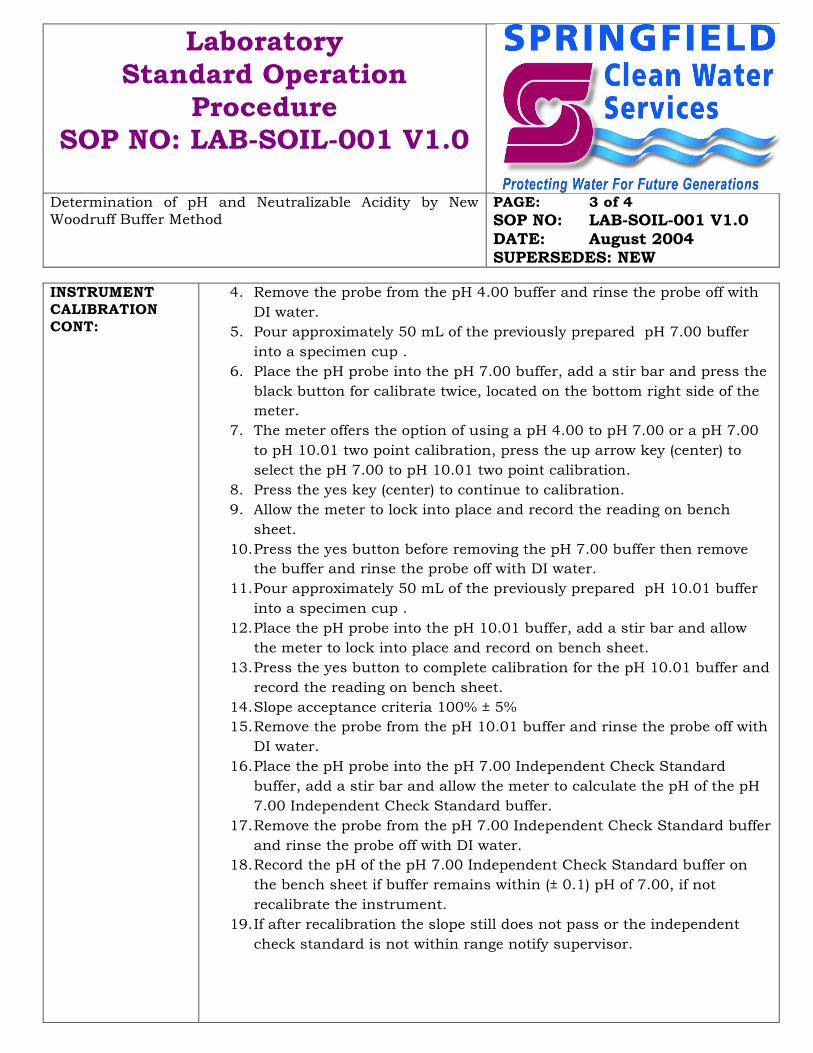
Laboratory Standard Operation
Procedure SOP NO: LAB-SOIL-001 V1.0
Determination of pH and Neutralizable Acidity by New Woodruff Buffer Method
PAGE: 3 of 4 SOP NO: LAB-SOIL-001 V1.0 DATE: August 2004 SUPERSEDES: NEW
INSTRUMENT CALIBRATION CONT:
4. Remove the probe from the pH 4.00 buffer and rinse the probe off with DI water.
5. Pour approximately 50 mL of the previously prepared pH 7.00 buffer into a specimen cup .
6. Place the pH probe into the pH 7.00 buffer, add a stir bar and press the black button for calibrate twice, located on the bottom right side of the meter.
7. The meter offers the option of using a pH 4.00 to pH 7.00 or a pH 7.00 to pH 10.01 two point calibration, press the up arrow key (center) to select the pH 7.00 to pH 10.01 two point calibration.
8. Press the yes key (center) to continue to calibration. 9. Allow the meter to lock into place and record the reading on bench
sheet. 10. Press the yes button before removing the pH 7.00 buffer then remove
the buffer and rinse the probe off with DI water. 11. Pour approximately 50 mL of the previously prepared pH 10.01 buffer
into a specimen cup . 12. Place the pH probe into the pH 10.01 buffer, add a stir bar and allow
the meter to lock into place and record on bench sheet. 13. Press the yes button to complete calibration for the pH 10.01 buffer and
record the reading on bench sheet. 14. Slope acceptance criteria 100% ± 5% 15. Remove the probe from the pH 10.01 buffer and rinse the probe off with
DI water. 16. Place the pH probe into the pH 7.00 Independent Check Standard
buffer, add a stir bar and allow the meter to calculate the pH of the pH 7.00 Independent Check Standard buffer.
17. Remove the probe from the pH 7.00 Independent Check Standard buffer and rinse the probe off with DI water.
18. Record the pH of the pH 7.00 Independent Check Standard buffer on the bench sheet if buffer remains within (± 0.1) pH of 7.00, if not recalibrate the instrument.
19. If after recalibration the slope still does not pass or the independent check standard is not within range notify supervisor.
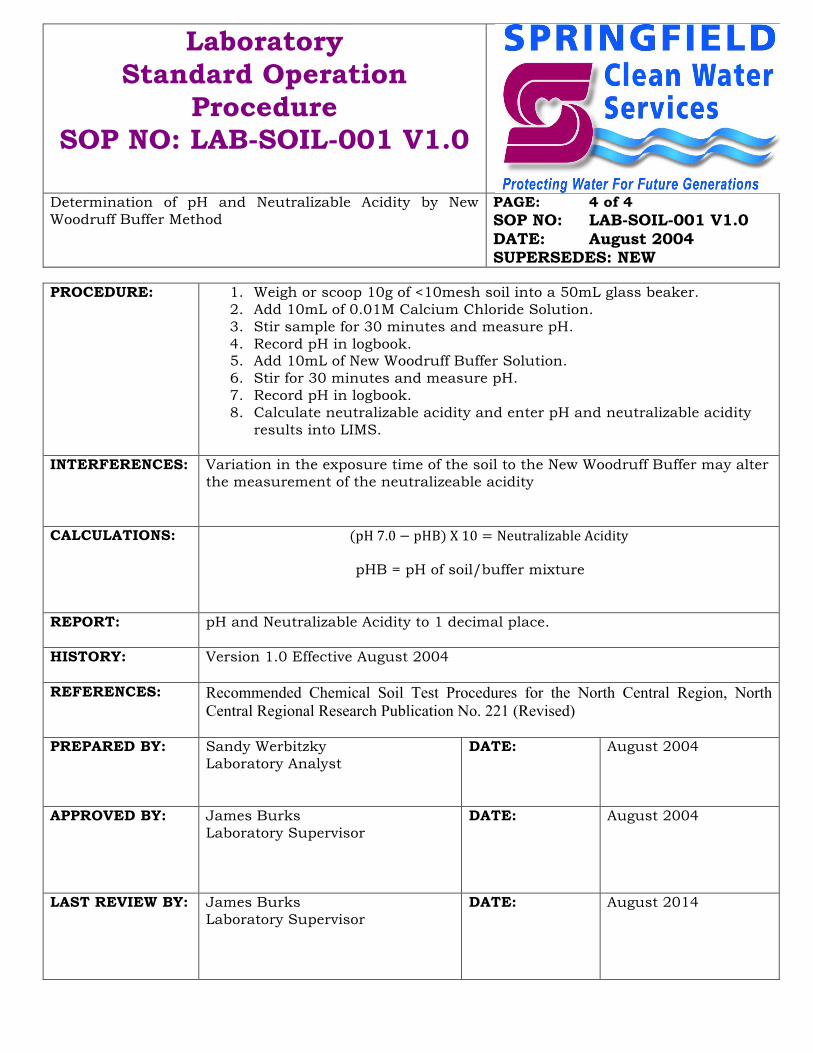
Laboratory Standard Operation
Procedure SOP NO: LAB-SOIL-001 V1.0
Determination of pH and Neutralizable Acidity by New Woodruff Buffer Method
PAGE: 4 of 4 SOP NO: LAB-SOIL-001 V1.0 DATE: August 2004 SUPERSEDES: NEW
PROCEDURE: 1. Weigh or scoop 10g of <10mesh soil into a 50mL glass beaker.
2. Add 10mL of 0.01M Calcium Chloride Solution. 3. Stir sample for 30 minutes and measure pH. 4. Record pH in logbook. 5. Add 10mL of New Woodruff Buffer Solution. 6. Stir for 30 minutes and measure pH. 7. Record pH in logbook. 8. Calculate neutralizable acidity and enter pH and neutralizable acidity
results into LIMS.
INTERFERENCES:
Variation in the exposure time of the soil to the New Woodruff Buffer may alter the measurement of the neutralizeable acidity
CALCULATIONS: (pH 7.0 − pHB) X 10 = Neutralizable Acidity pHB = pH of soil/buffer mixture
REPORT: pH and Neutralizable Acidity to 1 decimal place.
HISTORY: Version 1.0 Effective August 2004
REFERENCES: Recommended Chemical Soil Test Procedures for the North Central Region, North Central Regional Research Publication No. 221 (Revised)
PREPARED BY:
Sandy Werbitzky Laboratory Analyst
DATE:
August 2004
APPROVED BY:
James Burks Laboratory Supervisor
DATE: August 2004
LAST REVIEW BY:
James Burks Laboratory Supervisor
DATE: August 2014

Laboratory Standard Operation
Procedure SOP NO: LAB-SOIL-002 V1.0
Determination of Organic Matter in Soil using Loss of Weight on Ignition
PAGE: 1 of 2 SOP NO: LAB-SOIL-002 V1.0 DATE: August 2004 SUPERSEDES: NEW
TITLE: Determination of Organic Matter in Soil using Loss of Weight on Ignition
SUMMARY: This method is used to determine the %OM (Organic matter) in a soil by
igniting a soil sample and calculating the weight loss on ignition.
RESPONSIBILITY: Laboratory Analyst or designee
SCOPE: This test is applicable to any dried and sieved soil (<10mesh) from the SW Missouri region upon request of biosolids team.
EQUIPMENT: • Lindberg Blue M Muffle Furnace (360°C) • Crucible or pre-ignited glass beaker (~20-50mL) • Balance with +/- 1mg sensitivity • Spatula
PROCEDURE: 1. Scoop 5 to 10g of dried, ground (10mesh) soil into tarred crucible or
tared pre-ignited beaker. 2. Dry for 2 hours at 105°C (if soil is gypsiferous or low OM, hear for 2
hours at 150°C). 3. Record weight to +/- 0.001g. 4. Heat at 360°C for two hours. 5. Cool to 150°C (samples can be placed in 150°C oven to cool). 6. Calculate %weight loss and organic matter. 7. Enter results into LIMS.
INTERFERENCES: Variations in heating time can affect results. Care should be taken to maintain consistent heating times.
CALCULATIONS:
% 𝐋𝐎𝐈 =wt. at 105°C − wt. at 360°C X 100
wt. at 105°C
% 𝐎𝐫𝐠𝐚𝐧𝐢𝐜 𝐌𝐚𝐭𝐭𝐞𝐫 =% LOI0.956
REPORT: pH and Neutralizable Acidity to 1 decimal place.

Laboratory Standard Operation
Procedure SOP NO: LAB-SOIL-002 V1.0
Determination of Organic Matter in Soil using Loss of Weight on Ignition
PAGE: 2 of 2 SOP NO: LAB-SOIL-002 V1.0 DATE: August 2004 SUPERSEDES: NEW
HISTORY: Version 1.0 Effective August 2004 REFERENCES: Recommended Chemical Soil Test Procedures for the North Central Region, North
Central Regional Research Publication No. 221 (Revised)
PREPARED BY:
Sandy Werbitzky Laboratory Analyst
DATE:
August 2004
APPROVED BY:
James Burks Laboratory Supervisor
DATE: August 2004
LAST REVIEW BY:
James Burks Laboratory Supervisor
DATE: August 2014

Laboratory Standard Operation
Procedure SOP NO: LAB-SOIL-003 V1.0
Determination of Extractable Phosphorous in Soil Using Bray and Kurtz P-1 Test
PAGE: 1 of 4 SOP NO: LAB-SOIL-003 V1.0 DATE: August 2004 SUPERSEDES: NEW
TITLE: Determination of Extractable Phosphorous in Soil Using Bray and Kurtz P-1 Test
SUMMARY: Ortho-Phosphate is extracted from soils and developed using a color inducing
reagent. The absorbance/transmittance is then compared to a standard curve established using a UV/VIS Spectrophotometer at 882nm
RESPONSIBILITY: Laboratory Analyst or designee
SCOPE: This test is suitable for most soils in the North Central region. It is applicable to soils that contain <2% dolomite and calcium carbonate. It should not be used on soils containing large amounts of lime.
EQUIPMENT: • Standard 1 or 2 gram NCR-13 soil scoop • 10mL automatic pipette • 50mL Erlenmeyer flasks • Stir plates with magnetic stirrer • Hot Plate • Glass funnel • Whatman No. 42 or 2 filter paper • Milton Roy UV/VIS Spectrophotometer (�= 882nm) • pH meter • Volumetric flasks • Computer for calculations
CHEMICALS/ REAGENTS:
• Ammonium fluoride: Fisher P/N: A665-100, ACS grade • HCl: J.T Baker P/N: 9530-33, Concentrated • Ammonium hydroxide: BDH P/N: BDH3018, 28-30% (ACS grade) • Potassium dihydrogen phosphate: Fisher P/N: P285-500, ACS grade • Deionized water • Ammonium molybdate: BDH P/N: 12054-85-2, ACS grade • Antimony potassium tartrate: Fisher P/N: A867-250, USP grade • Sulfuric acid: Fisher P/N: A300-S12, ACS Plus • Ascorbic acid: Amresco P/N: 200-066-2, ACS grade
PREPARATIONS: Extractant 0.025M HCl in 0.03M NH4F: Dissolve 11.11g of ammonium fluoride in 9 L of deionized water. Add 250 mL of 1.00M HCl and make to 10 L volume. Mix Thoroughly. Adjust pH to 2.6 +/- 0.05 and store in polyethylene. Scale as needed.
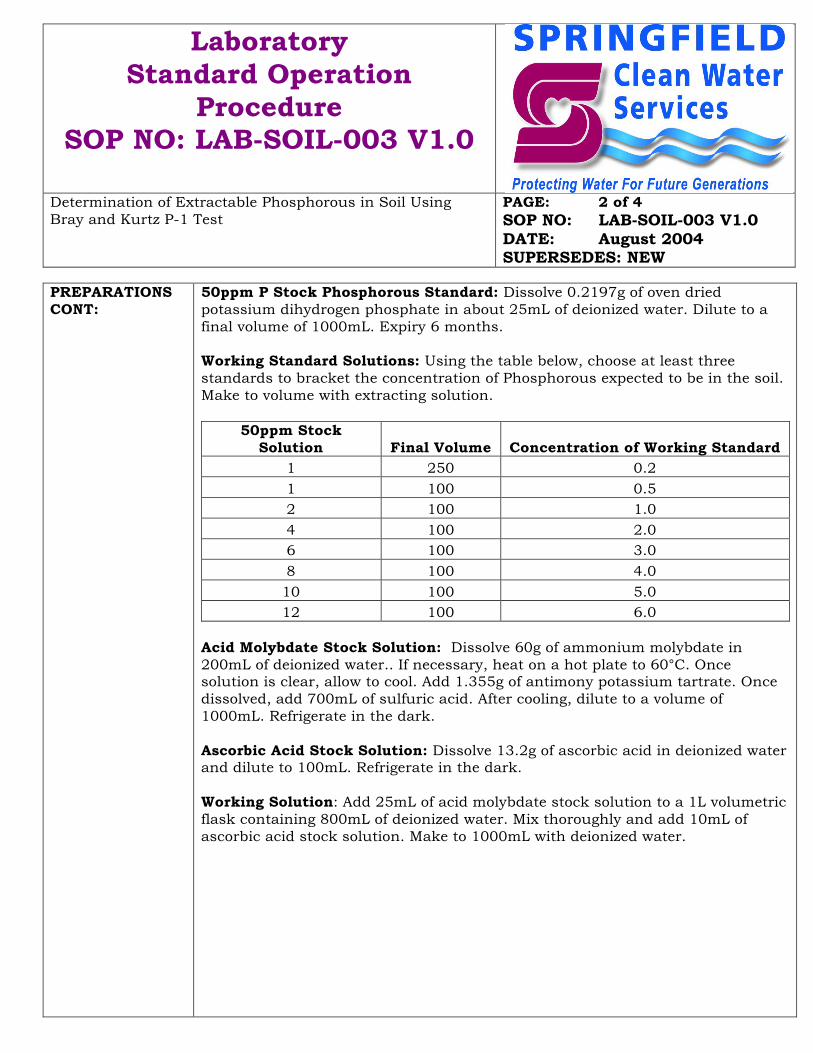
Laboratory Standard Operation
Procedure SOP NO: LAB-SOIL-003 V1.0
Determination of Extractable Phosphorous in Soil Using Bray and Kurtz P-1 Test
PAGE: 2 of 4 SOP NO: LAB-SOIL-003 V1.0 DATE: August 2004 SUPERSEDES: NEW
PREPARATIONS CONT:
50ppm P Stock Phosphorous Standard: Dissolve 0.2197g of oven dried potassium dihydrogen phosphate in about 25mL of deionized water. Dilute to a final volume of 1000mL. Expiry 6 months. Working Standard Solutions: Using the table below, choose at least three standards to bracket the concentration of Phosphorous expected to be in the soil. Make to volume with extracting solution.
50ppm Stock Solution Final Volume Concentration of Working Standard
1 250 0.2
1 100 0.5 2 100 1.0
4 100 2.0 6 100 3.0
8 100 4.0
10 100 5.0 12 100 6.0
Acid Molybdate Stock Solution: Dissolve 60g of ammonium molybdate in 200mL of deionized water.. If necessary, heat on a hot plate to 60°C. Once solution is clear, allow to cool. Add 1.355g of antimony potassium tartrate. Once dissolved, add 700mL of sulfuric acid. After cooling, dilute to a volume of 1000mL. Refrigerate in the dark. Ascorbic Acid Stock Solution: Dissolve 13.2g of ascorbic acid in deionized water and dilute to 100mL. Refrigerate in the dark. Working Solution: Add 25mL of acid molybdate stock solution to a 1L volumetric flask containing 800mL of deionized water. Mix thoroughly and add 10mL of ascorbic acid stock solution. Make to 1000mL with deionized water.

Laboratory Standard Operation
Procedure SOP NO: LAB-SOIL-003 V1.0
Determination of Extractable Phosphorous in Soil Using Bray and Kurtz P-1 Test
PAGE: 3 of 4 SOP NO: LAB-SOIL-003 V1.0 DATE: August 2004 SUPERSEDES: NEW
PROCEDURE:
1. Turn on spectrophotometer and set to 882nm. Allow unit to warm for 30 minutes.
2. Scoop 2g of soil and quantitatively transfer to 50mL Erlenmeyer flask. 3. Add 20mL of extracting solution and stir for 5 minutes. 4. Filter the extracts through Whatman No. 42 or 2 paper. Collect extracts in
another Erlenmeyer flask or a beaker. If solutions are not clear, refilter. 5. Using an automatic pipette, transfer 2mL of the extract to a clean
Erlenmeyer flask. 6. Using an automatic pipette, add 8mL of working solution and gently stir. 7. Prepare a blank by following steps 1-5 with no sample. 8. Allow 10 minutes for color development. Color is stable for 2 hours. 9. Blank the spectrophotometer by filling a cuvette with blank and zeroing the
instrument with blank in sample cell. 10. Measure %Transmittance of all samples to be analyzed. 11. Prepare a standard curve by pipetting 5 mL of each working standard to a
Erlenmeyer flask and developing color with working solution. 12. Measure %T of each standard. 13. Using Excel, plot %T Vs. Concentration of each standard . 14. Use the resulting equation to calculate ppm P in filtrate. 15. Multiply ppm P in filtrate by 10 to calculate ppm P in soil. 16. Enter data into LIMS.
CALCULATIONS:
Y = mX + b
ppm P in soil =Y − bm
X 10 Where, Y= %Transmittance M = slope of standard curve X= ppm P in filtrate b= Y-intercept

Laboratory Standard Operation
Procedure SOP NO: LAB-SOIL-003 V1.0
Determination of Extractable Phosphorous in Soil Using Bray and Kurtz P-1 Test
PAGE: 4 of 4 SOP NO: LAB-SOIL-003 V1.0 DATE: August 2004 SUPERSEDES: NEW
REPORT: Extractable phosphorous to one decimal place.
HISTORY: Version 1.0 Effective August 2004
REFERENCES: Recommended Chemical Soil Test Procedures for the North Central Region, North Central
Regional Research Publication No. 221 (Revised)
PREPARED BY:
Sandy Werbitzky Laboratory Analyst
DATE:
August 2004
APPROVED BY:
James Burks Laboratory Supervisor
DATE: August 2004
LAST REVIEW BY:
James Burks Laboratory Supervisor
DATE: August 2014

Laboratory Standard Operation
Procedure SOP NO: LAB-SOL-001 V1.0
Gravimetric determination of Total Suspended Solids (TSS) using glass microfiber filters
PAGE: 1 of 3 SOP NO: LAB-SOL-001 V1.0 DATE: April 2004 SUPERSEDES: NEW
TITLE: Gravimetric determination of Total Suspended Solids (TSS) using glass
microfiber filters
SUMMARY: Total suspended solids are determined by filtering a well mixed sample through a glass microfiber filter and drying to constant weight at 103-105°C. The filters plus residue are weighed and the increase in weight represents the total suspended solids.
RESPONSIBILITY: Laboratory Analyst or designee
SCOPE: This test is applicable to drinking water, ground water, domestic and industrial waste water samples.
EQUIPMENT: • Analytical balance capable of weighing 0.1mg • Desiccator with color changing desiccant • Drying oven at 103-105°C • Aluminum dish • Magnetic stirrer with TFE stir bar • Glass microfiber filter Whatman 934-AH P/N:1827-125 • Buchner Funnel and 1L Buchner flask • Black marker • Tweezers
CHEMICALS/ REAGENTS:
• Deionized H20 • Diatomaceous Earth: Aldrich Celatom FW-80
PREPARATIONS:
1000ppm Diatomaceous Earth Standard: Add 1.0g of diatomaceous earth to a 1000mL volumetric flask and dilute to volume with deionizeed water.
PROCEDURE: 1. Label filters with abbreviation for sample using black marker (include a filter labeled ‘Control” and “Standard”).
2. Place labeled filter in buchner apparatus with labeled side down and turn on vacuum.
3. Rinse filter with three 10mL aliquots of deionized water. 4. Fold filters in half and place in aluminum tray. 5. Place tray in oven at 105°C and allow filters to dry for 24 hours. 6. Remove aluminum tray from oven and place filters in desiccator and
allow to cool to room temperature (~1 hour).
Laboratory Standard Operation
Procedure SOP NO: LAB-SOL-001 V1.0
Gravimetric determination of Total Suspended Solids (TSS) using glass microfiber filters
PAGE: 2 of 3 SOP NO: LAB-SOL-001 V1.0 DATE: April 2004 SUPERSEDES: NEW
PROCEDURE CONT:
7. After filters are cooled, record weight (in g) to 4 decimal places. 8. Place filters back in oven to dry for 1 hour. 9. Remove filters from oven and allow to cool in desiccator for ~1 hour. 10. Record weight of filters on bench sheet. 11. Place filters back in oven to dry for 1 hour. 12. Remove filters from oven and allow to cool in desiccator for ~1 hour. 13. Record weight of filters on bench sheet. 14. Place filters in oven and allow to dry overnight. Remove filters from oven
following morning and allow to cool in desiccator for 1hr. 15. Record weight of filters. Ensure that the last 2 weights do not differ by
more than 4% or 0.5mg (whichever is less). 16. If filters have not reached a constant weight, continue drying in 1 hour
intervals until they do. 17. Once filters have reached a constant weight analysis can begin. 18. First prepare a control by placing the filter paper labeled “control” into
the buchner apparatus and adding vacuum.. 19. Wet with filter with deionized water. 20. Measure 25mL of deionized water using a graduated cylinder. Slowly
add the control/sample to the center of the filter to prevent any sample from being lost to the sides of the funnel. Allow it to filter through.
21. Using tweezers, remove filter and fold in half twice and place into aluminum tray.
22. Analyze standard by adding filter labeled “standard” to Buchner apparatus and adding vacuum.
23. Measure 25mL of 1000ppm diatomaceous earth standard using a grad cylinder and add to buchner apparatus. Allow it to filter through.
24. Rinse graduated cylinder with deionized water and filter it as well. 25. Remove filter and fold in half twice and place into aluminum tray. 26. For all samples needing analysis, measure 25mL of sample using a
graduated cylinder (for weekly NPDES samples this includes: P1 OXY MIX LIQ, P2 AERATION ML, NW AERATION, and NW AERATION DUPLICATE).
27. Place the appropriately labeled filter to the buchner apparatus and add the corresponding 25mL sample aliquot. Allow sample to filter through.
28. Rinse graduated cylinder with deionized water and filter it as well. 29. Fold all sample filters in half twice and add to aluminum tray. 30. Place tray in oven and allow filters to dry for 1-2 hours.

Laboratory Standard Operation
Procedure SOP NO: LAB-SOL-001 V1.0
Gravimetric determination of Total Suspended Solids (TSS) using glass microfiber filters
PAGE: 3 of 3 SOP NO: LAB-SOL-001 V1.0 DATE: April 2004 SUPERSEDES: NEW
PROCEDURE CONT:
31. Remove tray from oven, cool filters for 1hr in desiccator, and record weight.
32. Place filters back in tray and continue drying in oven for 45 minutes to 1 hour.
33. Remove tray from oven, cool filters for 1hr in desiccator, and record weight.
34. Place filters back in tray and dry in oven for 1 hour. 35. Remove tray from oven, cool filters for 1 hr in desiccators. 36. Record weight of filters. Ensure that the last 2 weights do not differ by
more than 4% or 0.5mg (whichever is less. 37. Calculate TSS.
CALCULATIONS:
𝑇𝑆𝑆 𝑚𝑔𝐿
= 𝐹𝑖𝑛𝑎𝑙 𝑤𝑒𝑖𝑔ℎ𝑡 𝑚𝑔 − 𝑇𝑎𝑟𝑒 𝑤𝑒𝑖𝑔ℎ𝑡 𝑚𝑔 𝑋 40
REPORT:
Report TSS to three significant figures
HISTORY:
Version 1.0 Effective April 2004
REFERENCES: Standard Methods 2540 D Total Suspended Solids Dried at 103-105°C
PREPARED BY:
James Burks Laboratory Supervisor
DATE: April 2004
APPROVED BY:
James Burks Laboratory Supervisor
DATE: April 2004
LAST REVIEW BY:
James Burks Laboratory Supervisor
DATE: April 2014

Laboratory Standard Operation
Procedure SOP NO: LAB-SOL-002 V2.0
Electrometric determination of pH using Orion PerpHecT Meter
PAGE: 1 of 3 SOP NO: LAB-SOL-002 V2.0 DATE: August 2013 SUPERSEDES: V1.0
TITLE: Electrometric determination of pH
SUMMARY: The pH of a sample is determined electrometrically using a glass electrode in combination with an ATC probe.
RESPONSIBILITY Laboratory Analyst or designee
EQUIPMENT: • Orion PerpHecT LogR Meter with Orion temperature probe • Glass Electrode: Thermo 9107BNMD • Magnetic stirrer and TFE stir bar • 100mL beaker or sample container
CHEMICALS/ REAGENTS:
• pH 4.00 buffer concentrate: Beckman Coulter P/N 3005 • pH 7.00 buffer concentrate: Beckman Coulter P/N 3007 • pH 10.01buffer concentrate: Beckman Coulter P/N 30019 • Independent Check Standard pH 7.00 Buffer: BDH Middle East LLC
P/N BDH5048-4L • Orion Ag/AgCl Reference Electrode Filling Solution (Orion 900011) for
9272BN Probe, purchased from Thermo Scientific • Orion ROSS Reference Electrode Filling Solution (Orion 810007) for
8272BN Probe, purchased from Thermo Scientific • pH Storage Solution: HACH P/N 27565 • Deionized H20
PREPARATIONS:
pH 4.00 Calibration Solution: Add entire contents of pH 4.00 buffer concentrate to a 500mL volumetric flask and dilute to volume with DI H20 pH 7.00 Calibration Solution: Add entire contents of pH 7.00 buffer concentrate to a 500mL volumetric flask and dilute to volume with DI H20 pH 10.01 Calibration Solution: Add entire contents of pH 10.01 buffer concentrate to a 500mL volumetric flask and dilute to volume with DI H20
INSTRUMENT CALIBRATION:
pH meters are calibrated daily using a three point calibration curve. Follow appropriate meter specific procedure below. Orion PerpHecT LogR Meter Model 320 Calibration
1. Turn on power for meter by plugging the meter in or pressing any button to remove meter from sleep mode.
Laboratory Standard Operation
Procedure SOP NO: LAB-SOL-002 V2.0
Electrometric determination of pH using Orion PerpHecT Meter
PAGE: 2 of 3 SOP NO: LAB-SOL-002 V2.0 DATE: August 2013 SUPERSEDES: V1.0
INSTRUMENT CALIBRATION CONT:
2. The probe is stored in a pH 4.00 buffer (in specimen cup w/ stir bar) on a magnetic stir plate, turn stir plate on and adjust the speed of the stir bar.
3. Stir standard at a slow constant rate to provide homogeneity and suspension of solids while avoiding the creation of CO2 by overly mixing sample.
4. Remove the probe from the pH 4.00 buffer and rinse the probe off with DI water.
5. Pour approximately 50 mL of the previously prepared pH 7.00 buffer into a specimen cup.
6. Place the pH probe into the pH 7.00 buffer, add a stir bar and press the black button for calibrate twice, located on the bottom right side of the meter.
7. The meter offers the option of using a pH 4.00 to pH 7.00 or a pH 7.00 to pH 10.01 two point calibration, press the up arrow key (center) to select the pH 7.00 to pH 10.01 two point calibration.
8. Press the yes key (center) to continue to calibration. 9. Allow the meter to lock into place and record the reading on bench
sheet. 10. Press the yes button before removing the pH 7.00 buffer then remove
the buffer and rinse the probe off with DI water. 11. Pour approximately 50 mL of the previously prepared pH 10.01 buffer
into a specimen cup. 12. Place the pH probe into the pH 10.01 buffer, add a stir bar and allow
the meter to lock into place and record on bench sheet. 13. Press the yes button to complete calibration for the pH 10.01 buffer and
record the reading on bench sheet. 14. Slope acceptance criterion 100% ±5% 15. Remove the probe from the pH 10.01 buffer and rinse the probe off with
DI water. 16. Place the pH probe into the pH 7.00 Independent Check Standard
buffer, add a stir bar and allow the meter to calculate the pH of the pH 7.00 Independent Check Standard buffer.
17. Remove the probe from the pH 7.00 Independent Check Standard buffer and rinse the probe off with DI water.
18. Record the pH of the pH 7.00 Independent Check Standard buffer on the bench sheet if buffer remains within (± 0.1) pH of 7.00, if not recalibrate the instrument.
19. If after recalibration the slope still does not pass or the independent check standard is not within range notify supervisor.

Laboratory Standard Operation
Procedure SOP NO: LAB-SOL-002 V2.0
Electrometric determination of pH using Orion PerpHecT Meter
PAGE: 3 of 3 SOP NO: LAB-SOL-002 V2.0 DATE: August 2013 SUPERSEDES: V1.0
SAMPLE ANALYSIS:
Orion PerpHecT LogR Meter Model 320 Sample Analysis NOTE: Samples must be analyzed within 15 minutes of collection
1. For liquid samples, fill beakers or sample containers with 50 to 100mL of sample. (Use this preparation for the following daily NPDES samples: Digester samples 1-4, Primary Clarifier samples 1 & 2, BBT, BSTF Centrate, NW Thick Sludge, NW Sludge Basin 2).
2. Prepare solid samples by diluting 1g of sample in 50mL of DI H20 (Use this preparation for NPDES cake sample).
3. After rinsing probe with DI water and gently wiping electrodes, immerse them into sample specimen cup and stir sample at a constant rate to provide homogeneity and suspension of solids while avoiding the creation of CO2 by overly mixing sample.
4. Record the pH reading of each sample on the SWTP bench sheet. 5. Rinse probe thoroughly with DI water after each sample, then immerse
the probe in a fresh portion of the next sample and read and record pH. 6. When finished testing samples store the pH probe in a pH 4.00 buffer or
certified storage solution.
REPORT: Record pH to 0.1 pH units
HISTORY: Version 1.0 Effective August 2004 Version 2.0 Effective August 2014- Updated equipment and procedure to reflect new instrument (pH meter)
REFERENCES: Standard Methods 4500-H+ B. Electrometric Method
PREPARED BY:
James Burks Laboratory Supervisor
DATE: August 2013
APPROVED BY:
James Burks Laboratory Supervisor
DATE: August 2013
LAST REVIEW BY:
James Burks Laboratory Supervisor
DATE: August 2014

Laboratory Standard Operation
Procedure SOP NO: LAB-SOL-003 V1.0
Gravimetric determination of % Total Suspended Solids and % Total Volatile Suspended Solids
PAGE: 1 of 2 SOP NO: LAB-SOL-003 V1.0 DATE: August 2004 SUPERSEDES: NEW
TITLE: Gravimetric determination of % Total Suspended Solids and % Total Volatile
Suspended Solids
SUMMARY: A well-mixed sample is poured from a specimen cup into a pre-weighed Rose crucible, and then the sample in the crucible is dried for two hour to a constant weight at 103°C to 105°C. The volatile residue is then ignited at 550°C in a muffle furnace. The loss of weight on ignition is reported as percent volatile suspended solids.
RESPONSIBILITY: Laboratory Analyst or designee
EQUIPMENT: • Analytical Balance capable of weighing 0.1 mg • 5.0000 gram check weight for balance • Drying oven at 103-105°C (Fischer Scientific: Isotemp Oven Model:718F) • Muffle Furnace at 550 °C (Thermo Scientific: Lindberg Blue M) • Porcelain Rose Crucible • Metal Cart • Metal Tongs
PROCEDURE:
1. Calibrate analytical balance using a 5.0000 gram weight. 2. Pre-weigh each crucible, recording the weight (initial weight) on a bench
sheet before adding sample to crucible. 3. After weight has been recorded, pour 5 grams of the sample into its pre-
labeled crucible while it is still on the analytical balance. 4. Record the weight (wet weight) on the bench sheet. 5. After all samples have been poured and weighed, place the crucibles in
the oven at 103-105oC to dry for two hours. 6. After samples have dried place the crucibles on a metal cart to cool 7. After samples have cooled weigh the crucibles to 3 decimals and record
the weight (dry weight). 8. Using forceps or tongs only, place rose crucibles in the muffle furnace
at 550°C for 30 to 45 minutes. 9. Using forceps or tongs only, remove rose crucibles from the muffle
furnace and place crucibles on the metal cart (do not touch hot crucibles).
10. After crucibles have cooled for 30 – 45 minutes, weigh and record the crucible weight (final weight).
11. Calculate results.

Laboratory Standard Operation
Procedure SOP NO: LAB-SOL-003 V1.0
Gravimetric determination of % Total Suspended Solids and % Total Volatile Suspended Solids
PAGE: 2 of 2 SOP NO: LAB-SOL-003 V1.0 DATE: August 2004 SUPERSEDES: NEW
CALCULATIONS: Total Suspended Solids (%)
% 𝑻𝑺𝑺 =𝑨− 𝑩 ×𝟏𝟎𝟎𝑪− 𝑩 ,
Where: A = weight of filter + dried residue, mg (dry weight) B = weight of crucible, mg (tare weight) C = weight of crucible + wet sample, mg
Volatile Suspended Solids (%)
% 𝑽𝑺𝑺 =𝑨−𝑫 ×𝟏𝟎𝟎𝑨− 𝑩
Where: A = weight of filter + dried residue, mg (dry weight) B = weight of crucible, mg (tare weight) D = weight of residue + dish or filter after ignition, mg (final weight)
REPORT: Report %TSS and %VSS to three significant figures.
HISTORY: Version 1.0 Effective August 2004
REFERENCES: Standard Methods 2540 G
PREPARED BY:
James Burks Laboratory Supervisor
DATE: August 2004
APPROVED BY:
James Burks Laboratory Supervisor
DATE: August 2004
LAST REVIEW BY:
James Burks Laboratory Supervisor
DATE: August 2014

Laboratory Standard Operation
Procedure SOP NO: LAB-SOL-004 V1.0
Gravimetric determination of Total Suspended Solids and Total Volatile Suspended Solids for Internal Control of Operational Parameters
PAGE: 1 of 3 SOP NO: LAB-SOL-004 V1.0 DATE: August 2004 SUPERSEDES: NEW
TITLE: Gravimetric determination of Total Suspended Solids and Total Volatile
Suspended Solids
SUMMARY: Total Suspended Solids are determined by filtering a well-mixed sample through a glass fiber filter. The residue retained on the filter is dried to a constant weight at 103°C to 105°C and used for the calculation of TSS. The residue is then ignited at 550°C in a muffle furnace. The loss of weight on ignition is reported as mg/L Volatile Suspended Solids.
RESPONSIBILITY: Laboratory Analyst or designee
SCOPE: This test is applicable to drinking water, ground water, domestic and industrial waste water samples.
EQUIPMENT: • Analytical balance capable of weighing 0.1mg • Desiccator with color changing desiccant • Drying oven at 103-105°C • Aluminum dish • Muffle Furnace at 550°C • Porcelain Rose Crucible • Magnetic stirrer with TFE stir bar • Whatman 44 Ashless P/N:1444-150 • Buchner Funnel and 1L Buchner flask • 25 mL graduated cylinder • Tweezers • Metal Tongs
CHEMICALS/ REAGENTS:
• Deionized H20
• Diatomaceous Earth: Aldrich Celatom FW-80
PREPARATIONS:
1000ppm Diatomaceous Earth Standard: Add 1.0g of diatomaceous earth to a 1000mL volumetric flask and dilute to volume with deionizeed water.

Laboratory Standard Operation
Procedure SOP NO: LAB-SOL-004 V1.0
Gravimetric determination of Total Suspended Solids and Total Volatile Suspended Solids for Internal Control of Operational Parameters
PAGE: 2 of 3 SOP NO: LAB-SOL-004 V1.0 DATE: August 2004 SUPERSEDES: NEW
PROCEDURE:
1. Label filters with abbreviation for sample using black marker and include a filter labeled ‘Control” and “Standard” (also label crucibles for any sample requiring volatile suspended solids).
2. Fold paper into fourths. 3. Place labeled filter in oven at 103°C to 105°C overnight to obtain initial
dry weight. 4. Remove filters from oven and allow to cool in desiccator for 15-30
minutes. 5. Weigh cooled filter papers on balance to 3 decimal places. 6. Record this weigh on bench sheet as “initial weight”. 7. Repeat steps until initial weights for all control, standard, and sample
filters are obtained. 8. Rinse Control filter with DI water and add to Buchner apparatus. 9. Turn on vacuum and add 25mL of DI water using a graduated cylinder 10. Allow vacuum to dry filter before removing using tweezers. 11. Fold filter into fourths with the labeled side facing out and place in
aluminum tray. 12. Rinse the Standard filter with DI water and add to Buchner apparatus. 13. Using a 25mL graduated cylinder, add 25mL of 1000ppm Diatomaceous
Earth Standard to the center of filter. 14. Rinse graduated cylinder with several portions of water and add to
filter. 15. Allow vacuum to dry filter before removing using tweezers. 16. Fold filter into fourths with labeled side out and place into aluminum
tray. 17. Repeat steps used for Standard and Control filters for any remaining
samples (ensure that at least 10% of samples are prepared in duplicate).
18. Place aluminum tray into oven and allow filters to dry for 2 hours. 19. Remove aluminum tray from oven and place filters in desiccator for 1
hour to cool. 20. Weigh filters to 3 decimal places. 21. If volatile solids are to be determined, obtain a tare weight for labeled
crucibles. 22. Place filter papers in appropriately labeled crucible. 23. Using metal tongs, place crucibles in furnace for 30 to 45 minute. 24. Using metal tongs, remove crucibles from furnace and place on metal
cart to cool for 30-45 minutes. 25. After crucibles are cooled, record weight.

Laboratory Standard Operation
Procedure SOP NO: LAB-SOL-004 V1.0
Gravimetric determination of Total Suspended Solids and Total Volatile Suspended Solids for Internal Control of Operational Parameters
PAGE: 3 of 3 SOP NO: LAB-SOL-004 V1.0 DATE: August 2004 SUPERSEDES: NEW
CALCULATIONS: Total Suspended Solids (mg/L)
𝒎𝒈 𝑻𝑺𝑺 𝑳 (𝑪) = 𝑨 − 𝑩 𝑿 𝟒𝟎
Where:
A = weight of filter + dried residue, mg
B = weight of filter, mg
C = mg TSS/L
Volatile Suspended Solids (mg/L)
𝒎𝒈 𝑽𝑺𝑺 𝑳 = 𝑬 − 𝑫 𝑿 𝟒𝟎 − 𝑪
Where:
D= weight of dish before ignition, mg
E = weight of residue + dish or filter after ignition, mg
REPORT: Report TSS to three significant figures.
HISTORY: Version 1.0 Effective April 2014
REFERENCES: Standard Methods 2540 B/E Total Suspended Solids Dried at 103-105°C
PREPARED BY:
James Burks Laboratory Supervisor
DATE: August 2004
APPROVED BY:
James Burks Laboratory Supervisor
DATE: August 2004
LAST REVIEW BY:
James Burks Laboratory Supervisor
DATE: August 2014

Laboratory Standard Operation
Procedure SOP NO: LAB-SOL-005 V1.0
Gravimetric determination of Total Dissolved Solids using glass microfiber filters
PAGE: 1 of 3 SOP NO: LAB-SOL-005 V1.0 DATE: August 2004 SUPERSEDES: NEW
TITLE: Gravimetric determination of Total Dissolved Solids (TDS) using glass
microfiber filters
SUMMARY: A well-mixed sample is filtered through a glass microfiber filter and the residue retained on the filter is discarded. 25 ml of the filtered solution is poured into a porcelain Rose Crucible and dried in the oven to a constant weight at 103°C to 105°C. The residue is then weighed and reported as mg/L total dissolved solids.
RESPONSIBILITY Laboratory Analyst or designee
SCOPE: This test is applicable to drinking water, ground water, domestic and industrial waste water samples.
EQUIPMENT: • Analytical balance capable of weighing 0.1 mg • Desiccator with color changing desiccant • Drying oven at 180°C • Porcelain Rose Crucible • Glass Microfiber Filters Whatman 934-AH/ N:1827-055 • Nalgene 150 mL filter apparatus • 25 mL graduated cylinder • Deionized Water
CHEMICALS/ REAGENTS:
• Deionized H20 • Diatomaceous Earth: Aldrich Celatom FW-80
PREPARATIONS: 1000ppm Diatomaceous Earth Standard: Add 1.0g of diatomaceous
earth to a 1000mL volumetric flask and dilute to volume with deionized water.
PROCEDURE:
1. Before testing, dry crucibles in oven over night. 2. Remove from oven and allow crucibles to cool in desiccator for at least
one hour before weighing. 3. Weigh crucibles (record as tare weight on worksheet). 4. Place crucibles in oven for one hour. 5. Remove from oven and allow crucibles to cool in desiccator for at least
one hour. 6. Record weight. If weights are within 5mg, proceed to next step. If
weights are not within 5mg, repeat drying and cooling cycle until criteria is met.
7. Assemble Nalgene filtering apparatus.
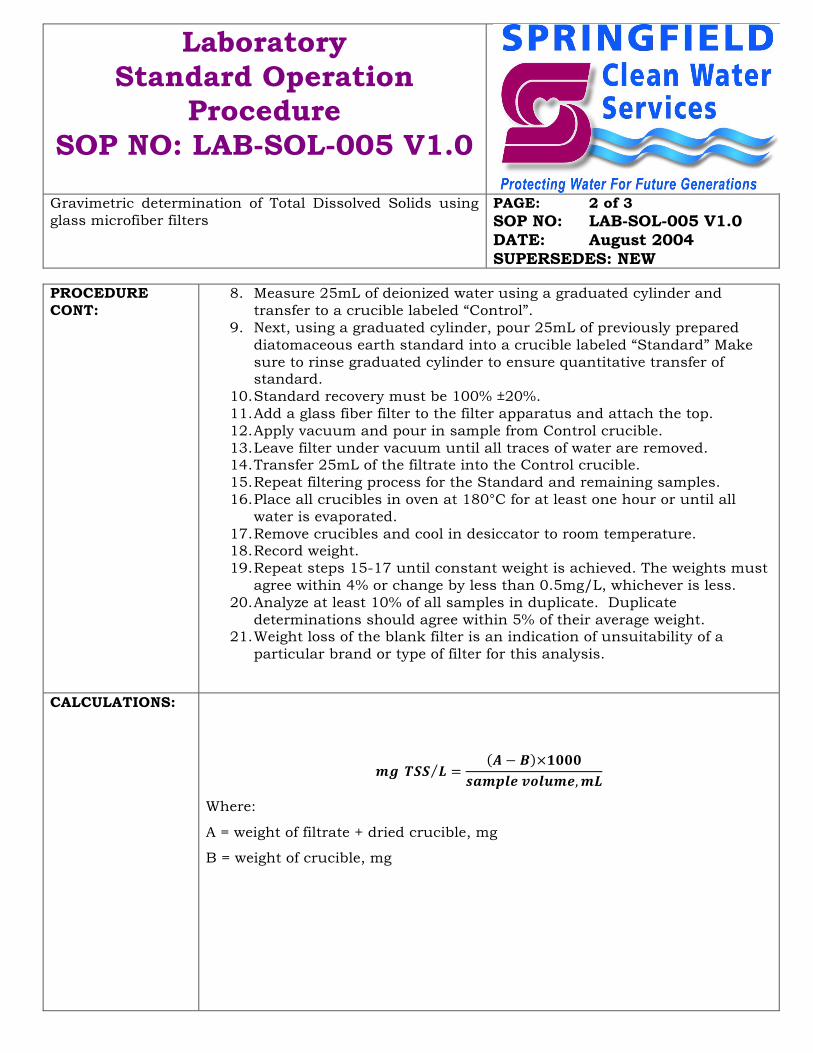
Laboratory Standard Operation
Procedure SOP NO: LAB-SOL-005 V1.0
Gravimetric determination of Total Dissolved Solids using glass microfiber filters
PAGE: 2 of 3 SOP NO: LAB-SOL-005 V1.0 DATE: August 2004 SUPERSEDES: NEW
PROCEDURE CONT:
8. Measure 25mL of deionized water using a graduated cylinder and transfer to a crucible labeled “Control”.
9. Next, using a graduated cylinder, pour 25mL of previously prepared diatomaceous earth standard into a crucible labeled “Standard” Make sure to rinse graduated cylinder to ensure quantitative transfer of standard.
10. Standard recovery must be 100% ±20%. 11. Add a glass fiber filter to the filter apparatus and attach the top. 12. Apply vacuum and pour in sample from Control crucible. 13. Leave filter under vacuum until all traces of water are removed. 14. Transfer 25mL of the filtrate into the Control crucible. 15. Repeat filtering process for the Standard and remaining samples. 16. Place all crucibles in oven at 180°C for at least one hour or until all
water is evaporated. 17. Remove crucibles and cool in desiccator to room temperature. 18. Record weight. 19. Repeat steps 15-17 until constant weight is achieved. The weights must
agree within 4% or change by less than 0.5mg/L, whichever is less. 20. Analyze at least 10% of all samples in duplicate. Duplicate
determinations should agree within 5% of their average weight. 21. Weight loss of the blank filter is an indication of unsuitability of a
particular brand or type of filter for this analysis.
CALCULATIONS:
𝒎𝒈 𝑻𝑺𝑺 𝑳 =𝑨 − 𝑩 ×𝟏𝟎𝟎𝟎
𝒔𝒂𝒎𝒑𝒍𝒆 𝒗𝒐𝒍𝒖𝒎𝒆,𝒎𝑳
Where:
A = weight of filtrate + dried crucible, mg
B = weight of crucible, mg

Laboratory Standard Operation
Procedure SOP NO: LAB-SOL-005 V1.0
Gravimetric determination of Total Dissolved Solids using glass microfiber filters
PAGE: 3 of 3 SOP NO: LAB-SOL-005 V1.0 DATE: August 2004 SUPERSEDES: NEW
REPORT:
Report TDS to three significant figures.
HISTORY:
Version 1.0 Effective August 2004
REFERENCES:
Standard Methods 2540 C Total Suspended Solids Dried at 103-105°C
PREPARED BY:
James Burks Laboratory Supervisor
DATE: August 2004
APPROVED BY:
James Burks Laboratory Supervisor
DATE: August 2004
LAST REVIEW BY:
James Burks Laboratory Supervisor
DATE: August 2014
Laboratory Standard Operation
Procedure SOP NO: LAB-SOL-006 V2.0
Spectophotometric Determination of Sulfides in Waste Water- Methylene Blue Method
PAGE: 1 of 3 SOP NO: LAB-SOL-006 V2.0 DATE: August 2013 SUPERSEDES: V1.0
TITLE: Spectrophotometric Determination of Sulfides in Waste Water
SUMMARY: Hydrogen sulfide and acid soluble metallic sulfides convert N, N-dimethyl-p-
phenylenediamine oxalate directly to methylene blue. The intensity of the blue color development is directly proportional to the amount of sulfide present in the original sample and is used to determine the concentration.
RESPONSIBILITY: Laboratory Analyst or designee
SCOPE: This method is applicable for determining sulfide content in fresh water, wastewater, and sea water.
EQUIPMENT: • Spectrophotometer: Orion Aquamate 8000 UV-VIS Spectrophotometer (�=668nm) with an expanded scale capable of 0.1mg/L resolution between 0.005mg/L and 80 mg/L
• Mechanical Pipette: Eppendorf Research Plus 0.5 to 5mL with tips • Specimen Cups: plastic, 120mL capacity • Instrument Cuvette • 100mL volumetric flask • 25mL graduated cylinder • Analytical Balance • Kimwipes
CHEMICALS/ REAGENTS:
• Sulfide 1 Reagent: Hach P/N 1816-49 500mL containing demineralized water and sulfuric acid.
• Sulfide 2 Reagent – Hach P/N 1817-49 500mL containing potassium dichromate and demineralized water.
• Deionized Water • Zinc Acetate: Fisher Z20-500 (or equivalent) • NaOH: Fisher UN1823, ACS grade (or equivalent)
PREPARATIONS:
Zinc Acetate Solution (2M): Add 43.9g of zinc acetate to a 100mL volumetric flask. Dilute to volume with deionized water Sodium Hydroxide Solution (6M): Add 24.0g of NaOH to a 100mL volumetric flask. Dilute to volume with deionized water

Laboratory Standard Operation
Procedure SOP NO: LAB-SOL-006 V2.0
Spectophotometric Determination of Sulfides in Waste Water- Methylene Blue Method
PAGE: 2 of 3 SOP NO: LAB-SOL-006 V2.0 DATE: August 2013 SUPERSEDES: V1.0
PROCEDURE:
1. On Monday, gather samples labeled “Headworks In” and “Headworks Out.” If the samples are not to be analyzed immediately, preserve with zinc acetate by adding 0.2mL of 2M zinc acetate solution and enough 6M NaOH to raise pH above 9.0. Refrigerate samples at 4ºC. After preservation samples may be held 14 days.
2. Turn on spectrophotometer (black button in back left corner). 3. Allow instrument to auto calibrate. 4. On the menu, scroll down and select “Sulfide.” Press enter. 5. Verify the instrument wavelength is set to 668nm. 6. Press “Run Test” on the lower right had corner of the screen. 7. Allow the instrument to auto calibrate during following steps. 8. Set up three specimen cups labeled “Control,” “Headworks In,” and
“Headworks Out.” 9. With a graduated cylinder, fill the Control with 50mL of deionized water. 10. Fill the remaining two cups with 25mL of deionized water. 11. Add 25mL of the “Headworks In” sample to the appropriate cup. 12. Add 25mL of the “Headworks Out” sample to the appropriate cup. 13. Using a mechanical pipette, add 2mL of Sulfide 1 reagent to each cup. 14. Using a mechanical pipette, add 2mL of Sulfide 2 reagent to each cup. 15. Allow samples to react for 5-10 minutes while observing color change. 16. Fill a cuvette with the Control sample and wipe off the outside of the
cuvette with a kimwipe . 17. Place the cuvette in the spectrophotometer turret slot labeled “B”. 18. Fill a cuvette with the Headworks In sample and wipe off the outside of
the cuvette with a kimwipe. 19. Place the cuvette in the spectrophotometer turret slot labeled “2”. 20. Fill a cuvette with Headworks Out sample and wipe off the outside of
the cuvette with a kimwipe. 21. Place the cuvette in the spectrophotometer turret slot labeled “4” 22. Close sample shield. 23. Select “Measure Blank” on instrument. Allow instrument to measure
blank. 24. Adjust the instrument to sample holder 2 by pressing “2” on the lower
right side of the spectrophotometer. 25. Select “Measure Sample” on instrument. Allow instrument to measure
sample. 26. Record measurement on bench sheet. 27. Adjust the instrument to sample holder 4 by pressing the “4” button on
lower right side of the instrument. 28. Select “Measure Sample” on instrument. Allow instrument to measure
second sample. 29. Record measurement on bench sheet.
Laboratory Standard Operation
Procedure SOP NO: LAB-SOL-006 V2.0
Spectophotometric Determination of Sulfides in Waste Water- Methylene Blue Method
PAGE: 3 of 3 SOP NO: LAB-SOL-006 V2.0 DATE: August 2013 SUPERSEDES: V1.0
PROCEDURE CONT:
30. Open sample shield and remove the cuvettes. Empty and rinse cuvettes with deionized water and allow to drain.
31. Close sample shield and turn off instrument.
CALCULATIONS: The instrument reports sulfide directly in mg/L units. Since the sample are diluted by half before measurement, the value reported by the instrument needs to be multiplied by a factor of 2 to get final sulfide value.
REPORT: Report the sulfide to the nearest 0.01 unit.
HISTORY:
Version 1.0 Effective August 2004 Version 2.0 Effective August 2013- Changed procedure and equipment to reflect new equipment purchase (UV/VIS)
REFERENCES: Standard Methods 4500-S2- D. Methylene Blue Method
PREPARED BY:
James Burks Laboratory Supervisor
DATE: August 2013
APPROVED BY:
James Burks Laboratory Supervisor
DATE: August 2013
LAST REVIEW BY:
James Burks Laboratory Supervisor
DATE: August 2014