Embed Size (px)
Citation preview

V1.5.5.2715
- 0 -
Key And Storage Management Software Manual

V1.5.5.2715
- 1 -
1. Log-in .......................................................................................................................................... 2
1.1.1 Pick up keys: ............................................................................................................................... - 3 -
2. Menu ............................................................................................................................................ 4
2.1.1 Log .............................................................................................................................................. - 5 -
2.1.2 Report.......................................................................................................................................... - 6 -
2.1.3 Users ......................................................................................................................................... - 10 -
2.1.4 Groups ...................................................................................................................................... - 14 -
2.1.5 Keys ........................................................................................................................................... - 16 -
2.1.6 Booking ..................................................................................................................................... - 18 -
2.1.7 Lockup ...................................................................................................................................... - 20 -
2.1.8 Time Restriction ....................................................................................................................... - 23 -
2.1.9 Right Groups ............................................................................................................................ - 25 -
3. Setup ........................................................................................................................................... 29
3.1.1 Info............................................................................................................................................ - 29 -
3.1.2 Cabinet ...................................................................................................................................... - 30 -
3.1.3 Network ..................................................................................................................................... - 39 -
3.1.4 Database ................................................................................................................................... - 40 -
3.1.5 Commands ................................................................................................................................ - 41 -
3.1.6 Synch. ....................................................................................................................................... - 42 -
3.1.7 Support ...................................................................................................................................... - 42 -
3.1.8 System ....................................................................................................................................... - 43 -
3.1.9 Language ................................................................................................................................... - 52-
4. Proper shut down of the cabinet ............................................................................................... 54
6. Web-based configuration .......................................................................................................... 55
7. AKCS proxy settings .................................................................................................................. 68

V1.5.5.2715
- 2 -
1. Log-in
Log In:
There are two types of log in by default, it depends on how you set up the cabinet:
1. Typing in your access code then pressing Enter
2. Showing your valid ID Card to the reader.
For higher security:
1. Access code + Fingerprint reader
2. ID Card + PIN Code + Fingerprint reader
In case of a mistyped Code or Invalid Card “Access Denied” error message will appear on the screen.
If you have mistyped your code, please press “Del” and start over. After a successful login your
username will appear at the bottom left corner of the screen.

V1.5.5.2715
- 3 -
1.1.1 PICK UP KEYS:
1. After a successful Log In, those keys appear on the screen which you have permission to use.
Select the keys by touching them on the screen. A green light indicates next to the name of
the key if it has been selected Enter The system indicates where your selected keys are
by blinking their positions. You can remove the keys
Key names in black are out of the cabinet, if you select such a key you will be informed who
took it last time. In one Log in session you are able to pick up 1 to 10 keys. See page
Buttons on the right side of the screen:
- All: Selects all of your keys which are in the cabinet
- None: Unmarks all selected keys
- Cancel: The system returns to the log-in screen.
The system automatically returns to the Log In screen after 10 seconds of inactivity.
1.1.2 KEY RETURN:
Type in your log in code then press Enter. The door(s) will open and you can return the key(s) into the
cabinet.
If you have a cabinet without door you can insert keys into the cabinet without logging in. In this case
in the Log the name of the user who has previously picked up the key will appear in brackets.

V1.5.5.2715
- 4 -
2. Menu
Administrator functions:
The terminal administrator has the right to configure the cabinet by using the “Menu” button.
In the “Menu” the followings are available:
- “Logout”: Logs out and the system returns to default state (Log In screen)
- “Log”: View log files
- “Reports”: View reports
- “Users”: Check and edit user permissions and access
- “Groups”: Check and edit group permissions and access
- “Keys”: View and edit keys
- “Booking”: Creating reservations
- “Time rest.”: Set up the forbidden time period
- “Right groups”: Sub administrator permissions can be set up here.
- “Setup”: System configuration
- “Lockup”: Box or Key lockup function

V1.5.5.2715
- 5 -
2.1.1 LOG
The system records all events: error, sabotage, login, logout, key removal, key return and so on.
You can navigate between the log data items by using right and left arrows. Between the navigation
buttons you can find information about the number of log records, the current page, and how many
pages are there totally. If you are on the first page the list is automatically updated whenever a new
event occurs.
If you cannot see the last row of the list, just move the list into the right direction on the touch screen
using your fingers.
You can filter the log by filling in the "Filter" text box. Tap the Filter text box -a keyboard will
appear- then type in your information or part of it to search for and press Enter. You can look for
event name, user name, key name or event description as well. If you are interested in a date, type the
date in yyyy.mm.dd format, and only that day's events will appear in the log. To stop filtering delete
contents from the "Filter" text box.
For faster operation, the log is divided into more pages. Up to 200 log events are displayed on each
page. On the PC screen you can see 100 000 events and in the Backup memory 200 000 events are
stored, so the number of Total stored events is: 300 000. Navigate between the pages using the right
and left arrow buttons or you can go directly to the selected page. To do this, tap the text box next to
the “Page” word and type in the requested page number. If the page number you entered is too high,
V1.5.5.2715
- 6 -
the log will automatically go the last page. The log will be automatically updated if you are on the first
page.
The log list columns contain the following information:
Date: When the event has been established.
Event: Login/out, Key return, Theft etc.
Pos: Number of the key/box place related to the event.
Key/Box: Name of the Key/Box if the event is related to key itself.
User: Person’s name who invoked the event.
Description: Those card numbers which are not in the system, weight in the box.
Press the „Back” button to get back to the main menu.
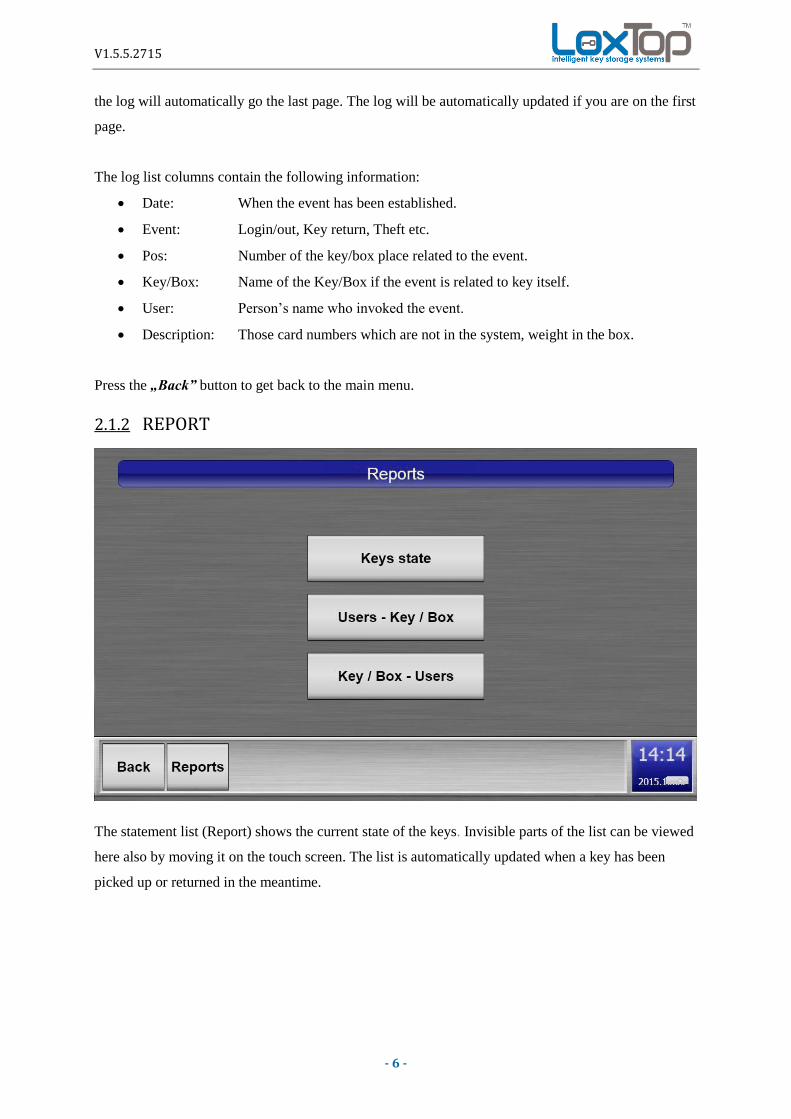
2.1.2 REPORT
The statement list (Report) shows the current state of the keys. Invisible parts of the list can be viewed
here also by moving it on the touch screen. The list is automatically updated when a key has been
picked up or returned in the meantime.

V1.5.5.2715
- 7 -
2.1.2.1 Keys state
The columns contain the following data:
Key: Name of the key
Type: Key or Box
State: Current state of the key/box
Pos.: Position regarding the key/box
Date: Date of last event
User: The name of the person who had last access to the key, and who has returned the key.
V1.5.5.2715
- 8 -
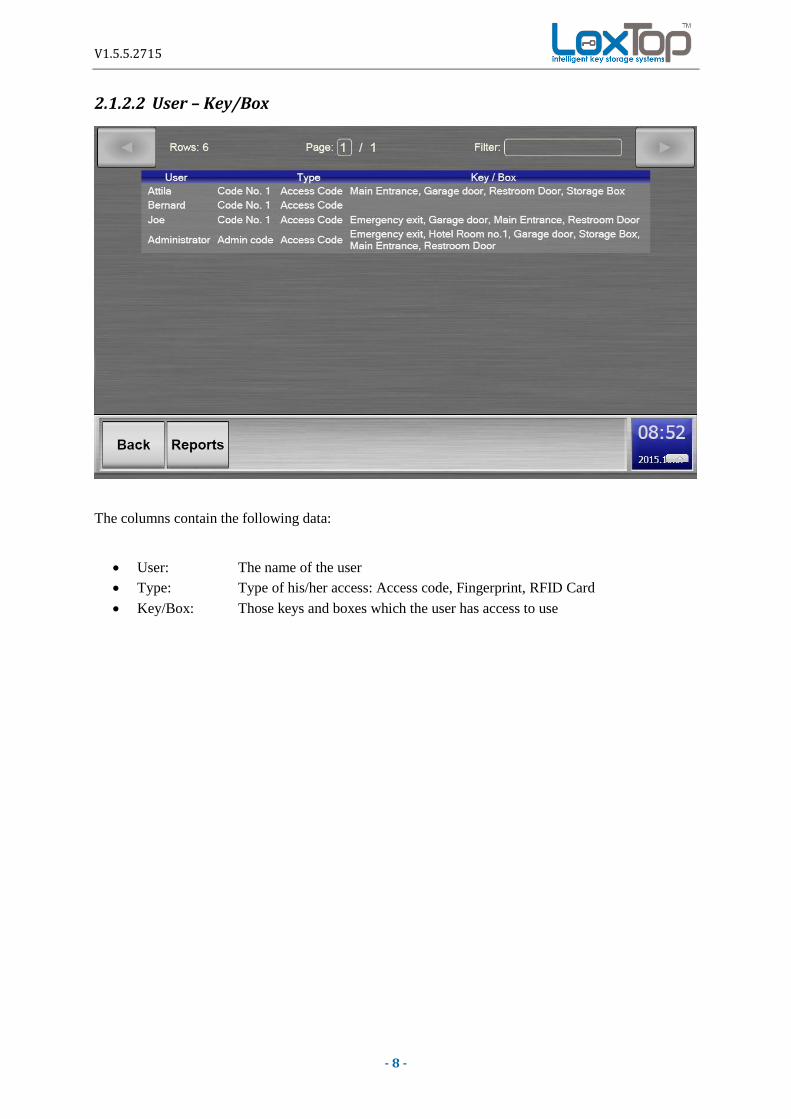
2.1.2.2 User – Key/Box
The columns contain the following data:
User: The name of the user
Type: Type of his/her access: Access code, Fingerprint, RFID Card
Key/Box: Those keys and boxes which the user has access to use

V1.5.5.2715
- 9 -
2.1.2.3 Key/Box User
The columns contain the following data:
Key / Box: Number and name of the key
Type: Key or box
User: The user who has access to the keys/boxes

V1.5.5.2715
- 10 -
2.1.3 USERS
The user’s and key holder’s personal details as well as their access codes and keys assigned to the IDs
can be set and maintained in the “Users” menu. The names of the recorded persons appear on the
surface in a boxed form.
Select a person: Tap the name in the box, the selected box gets a yellow frame
Filtering persons: press “Filter”type requested information press “OK”
After filtering, only those users will remain in the list, whose personal data contains any
requested information. To switch off filtering press the text box again, and delete the entered
characters. If you want to find the user of a card, show the card to the card reader. If the
system can identify the user after reading the card, he will be automatically selected within the
list. If card reading is performed by a filtered list, and the person cannot be found in the list,
then the system notifies you to switch off filtering and try your search again.
Operations:
„Back”: Back to main menu.
„New”: Add new user.
„Edit”: Modify selected user from the list.
„Delete”: Erase selected user(s) from the list.
“History”: Check history of the selected user.

V1.5.5.2715
- 11 -
2.1.3.1 Add new users and Access
Log in as an Administrator MenuUsersNewFill in the fields of the personal information on
the user face (tap the requested field and a virtual keyboard appears type the textPress “Enter” or
“OK” buttonsAccess (*1) New (the length of the new code depends on the previous set up
settings i.e. min. and max. length of the code, does it have prefix etc.)Type your access
codeEnterOKRights (here you can set up the rights of the user) Key permissions Select the
key(s)/box(es). With the Buttons at the bottom can be selected “All” or cancel the marks with the
None buttonSave
*1: Or show an RFID card to the readerYes Type the Name of the Card Enterfor higher
security a PIN can be attached at the bottom of the screenEnter your PINAdd Rights as above
mentioned.
Start Date/End date: It is also possible to give a predefined time period for a user where s/he will be
able to use the system. Before and after that date the user won’t be able to use the system
Max. login count: You can set how many times a user can log in to the system by adjusting the “Max.
login count”. It is also indicated of how many logins have been used up by the user by checking the
“Login count”.
Picked up keys count limit: You can set maximum how many keys a user can hold at himself at a
time. If they reach this number, they won’t be able to pick up additional keys until they return the
previously picked up ones.

V1.5.5.2715
- 12 -
When the user tries to access the cabinet out of the predefined time window he gets a “Your access is
not valid!” message from the system indicating the Start/End date of his access period.
V1.5.5.2715
- 13 -
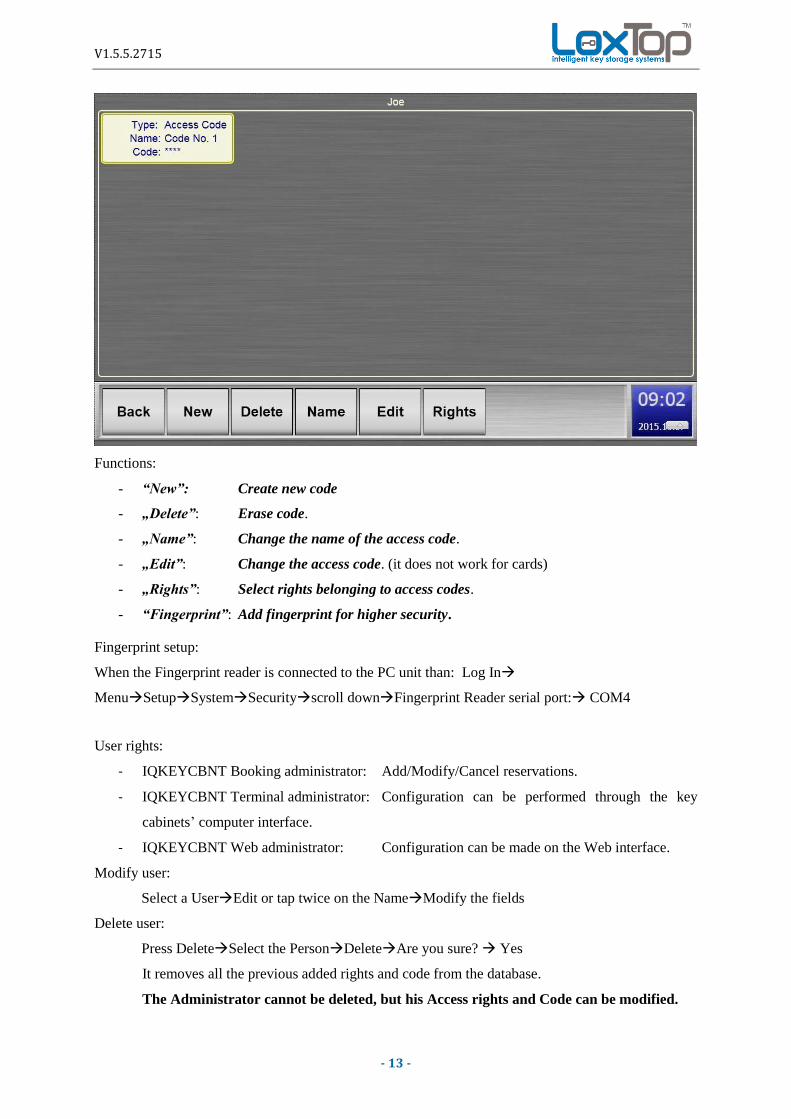
Functions:
- “New”: Create new code
- „Delete”: Erase code.
- „Name”: Change the name of the access code.
- „Edit”: Change the access code. (it does not work for cards)
- „Rights”: Select rights belonging to access codes.
- “Fingerprint”: Add fingerprint for higher security.
Fingerprint setup:
When the Fingerprint reader is connected to the PC unit than: Log In
MenuSetupSystemSecurityscroll downFingerprint Reader serial port: COM4
User rights:
- IQKEYCBNT Booking administrator: Add/Modify/Cancel reservations.
- IQKEYCBNT Terminal administrator: Configuration can be performed through the key
cabinets’ computer interface.
- IQKEYCBNT Web administrator: Configuration can be made on the Web interface.
Modify user:
Select a UserEdit or tap twice on the NameModify the fields
Delete user:
Press DeleteSelect the PersonDeleteAre you sure? Yes
It removes all the previous added rights and code from the database.
The Administrator cannot be deleted, but his Access rights and Code can be modified.

V1.5.5.2715
- 14 -
2.1.4 GROUPS
If a User is added to a Group (s)he has the Rights to use those keys -which are added to the Group-
with his/her own code.
2.1.4.1 New
- Add the name of the group Description (cleaners)

V1.5.5.2715
- 15 -
2.1.4.2 Key permissions
- You have to add the key permissions to the group. Users -who are in the group- will have
access to the selected keys and also to those keys which are added to their profile.
2.1.4.3 Members
- A member of the group can pick those keys up which are added to the group with his own
code.
A member can use his access code/card to pick up keys which have been added to the group.

V1.5.5.2715
- 16 -
2.1.5 KEYS
You can rename, delete keys here. You can check their status by selecting one and touching the “Info”
button. Also you are able to check the history of a specific key if you select it, and touch the “History”
button.
2.1.5.1 Name
- The name of the key can be changed.
2.1.5.2 Delete
- Deletes the selected key from the database

V1.5.5.2715
- 17 -
2.1.5.3 Info
You can check the status and detailed information of the keys by selecting one and touching
the “Info” button.
2.1.5.4 History (Log)
You can check the history of a specific key if you select it, and touch the “History” button.

V1.5.5.2715
- 18 -
2.1.6 BOOKING
In the IQ Key and Value Storage Management Systems the booking is a function, which is useful for
the users to reserve keys and boxes for themselves for a time period.
The booking function is needed if the admin/user wants to ensure the unique access to specific keys
for predetermined time-frames.
Multiple users can have simultaneous reservations for the same key or for the same box which can be
configured in the options.
There can be a booking administrator in the system, who can make reservations on behalf of the users.
When you add a new user you can give the user rights as a booking administrator

V1.5.5.2715
- 19 -
2.1.6.1 Creating new bookings
2.1.6.2 Search
You can search / filter among the existing bookings by specifying the start or end of the booking,
search for the user or for the specific key / box.
2.1.6.3 Info

V1.5.5.2715
- 20 -
You’re able to check who made the booking, also for which period that particular key is booked.
2.1.6.4 Delete
A booking can only be deleted by those who created it or by the booking administrator.
2.1.7 LOCKUP FUNCTION
The terminal’s lockup function enables the users to lock a box or a key permanently for a certain
period of time. During this time period no one will be able to access those boxes or keys which are
locked up. One example when the lockup function can be used is if electronic devices are stored in the
boxes and they need a few hours of charging before they can be used again.
It’s important to note that only the administrator has the right to delete lockups.
2.1.7.1 Enabling the lockup function
To enable the lockup function please do the following:
Log In MenuSetupSystemSecurityscroll downLockup enabled
The administrator (or a user with proper access level) can also set the default/minimum/maximum
lockup time in the Security menu.

V1.5.5.2715
- 21 -
2.1.7.2 Creating a new lockup
When the user/admin logs in to the cabinet he can see an “Options” button on the right side of the
screen.
After pressing this button a “Lockup” button will appear in the place of the User’s name in the bottom
left corner. (see the picture below)
After the user has selected which key or box (more than one can be selected at a time) he would like to
lock, he has to press the “Lockup” button (see the picture on the previous page) to set the time period

V1.5.5.2715
- 22 -
of the lockup. Carefully read the lockup description before pressing the “Ok” button, because the
lockup can’t be deleted once it’s saved.
It’s easy for the users to identify which boxes are locked, because there is a small lock symbol next to
those key and box names which are locked. (see the picture below)
2.1.7.3 Deleting a lockup
To delete a lockup the administrator has to go to Log In Menu Lockup. He can delete the
lockup from the list by selecting it, and by pressing the delete button.

V1.5.5.2715
- 23 -
2.1.8 TIME REST.
Under the “Time rest.” tab you can adjust time periods when the users are able to pick up their keys.
You can set the allowed/forbidden periods in 30minute increments for each weekday. One or multiple
users/groups can be added to each “Time restriction”. You can also set which keys/boxes can be used
by the selected users during a Time Restriction period. Multiple time restrictions can be created in one
cabinet.

V1.5.5.2715
- 24 -
Set periods: The forbidden/allowed periods of the Keys/Boxes.
Users: The User who is related to the usage of the Keys/Boxes.
Keys: Set up of the keys which are in the Time Restriction.
Groups: Groups which are related to the Time Restriction.
On the example (see the picture on previous page) we have set the weekend as a forbidden period. The
users in this Time Restriction can only pick their keys up from Monday to Friday.
They can’t access the keys and/or boxes on Saturday and Sunday.
Forbidden periods:

V1.5.5.2715
- 25 -
If you select this option you will be able to mark the forbidden time periods.
Each field equals to a 30minute timeframe.
Allowed periods:
If you select this option you will be able to mark the allowed time periods.
Each field equals to a 30minute timeframe.
Red:
During this period the key/box cannot be used.
Green:
During this period the key/box can be used.
Save:.
The restricted time period can be saved here.
Email alarm:
If you mark this and the email function is properly set up in the cabinet’s system settings, then
the cabinet will send the email alert in case of a missing key.
Relative time restriction:
You can set a timeframe in a time restriction in which the user has to return the key(s) before
this time period runs out. The counter starts at the time of key pickup. When this time runs out
the system sends an email to a pre-set email address with a message that the key has not been
returned.
2.1.9 RIGHT GROUPS:
The cabinet has 3 default privileges, these are the followings:
- Terminal administrator has the right to configure the Cabinet
- Web administrator has the right to configure the cabinet through the web interface
- Booking administrator can create Bookings on behalf of others
If you need a group where the features of privileges can be customized, you have to create a new Right
group and customize the permissions for the group.

V1.5.5.2715
- 26 -
Once you have created a new group, set the privileges to it.

V1.5.5.2715
- 27 -

V1.5.5.2715
- 28 -
After setting up the permissions, assign the permission to the people’s entry codes.
One access code/ user can be added to multiple groups. In this case, the right connection is „Or”.
For instance:
You have assigned a user’s entry code to a group where you enabled the Terminal Login, and the
View Log, and you also added this code to a group where you enabled the WEB interface entry.
In this case with this access to the terminal and to the Web interface the user can log in and check the
Log through the Web interface and the Terminal.
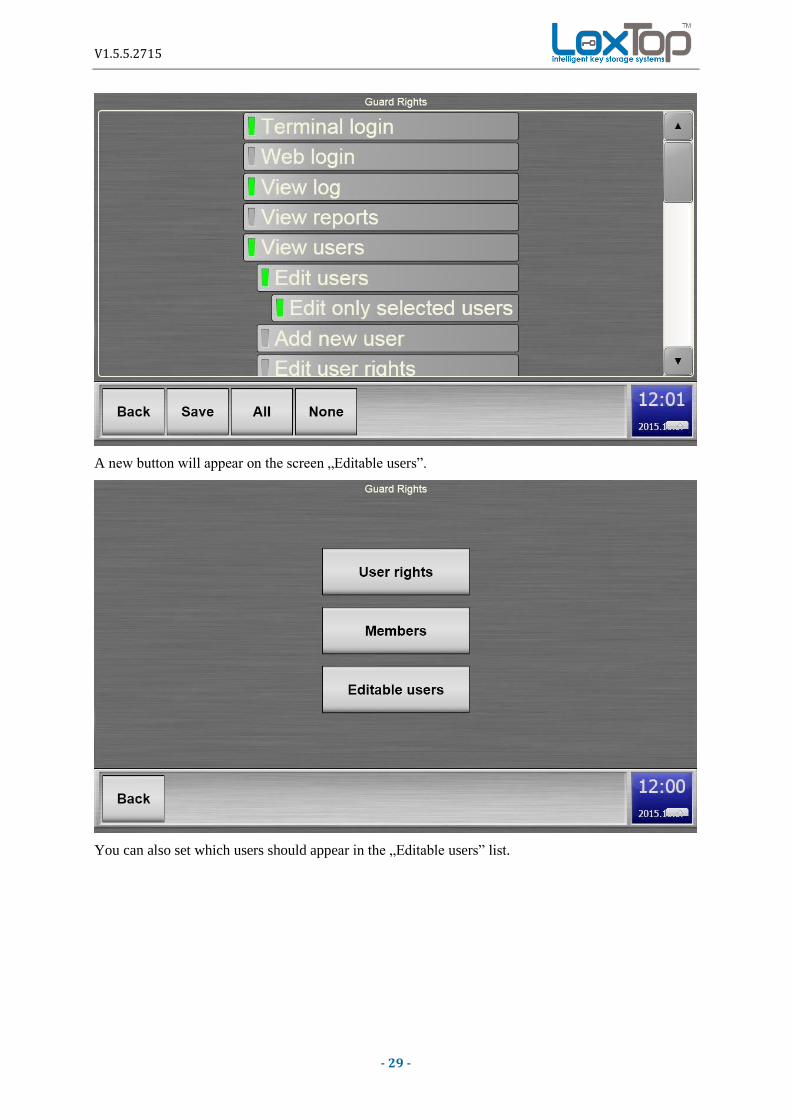
The Group Manager has the right to modify only certain users if you select the “Only the selected
users”.
V1.5.5.2715
- 29 -
A new button will appear on the screen „Editable users”.
You can also set which users should appear in the „Editable users” list.

V1.5.5.2715
- 30 -
Right Group:
Terminal login
Web login
View log
View reports
View users
Edit users
Edit only selected users
Add new user
Edit user rights
View groups
Edit group rights
Edit group members
View keys
Edit keys
Edit bookings
View Time Rest.
Edit Time Rest.
View right groups
Edit right groups
Setup
System information
Cabinet
Network
Database
Commands
Synchronization
Support
Language
System

V1.5.5.2715
-- 29 --
3. Setup
From the main menu you can get to another function selector screen by pressing the "Setup" button, where
you can make adjustments in the system and the software, and you can also check the hardware’s state.
3.1.1 INFO
Under the “Info” tab you will find the technical details of the cabinet.

V1.5.5.2715
-- 30 --
3.1.2 CABINET
After selecting the "Cabinet" menu, a list regarding the cabinet status will be shown.
Meaning of the columns in the list:
1. column: Pos.: Key position number
2. column: S. Status LED
- normal operation (green)
- error in operation (red)
3. column: Optical sensor:
- key is placed in (light blue)
- key is removed (dark blue)
4. column: Key identification (RFID):
- number of the identified key
- key could not be recognized (Unknown key)
- key has been removed (empty field)
5. column: State message
- „Keyplace OK.” : normal operation
- technical fault, no communication (Not alive!)
- „Key place error!” : Logical fault, the state of the optical sensor and the state
of the RFID identifier is not matching.
6. column: Gramm: - Shows weight of the item in the box.

V1.5.5.2715
-- 31 --
3.1.2.1.1 Filter
Data within the table can be filtered (Filter):
3.1.2.1.1.1 All
all items will appear in the list, no filtering,
3.1.2.1.1.2 Error
a) only faulty key places will be displayed in the list,
b) only seamlessly operating key locations will appear in the list,
3.1.2.1.1.3 Key
Key: a) lists only that positions where a key is in,
b) lists only the empty key positions (where no key has been inserted).
3.1.2.1.2 Refresh
Available instructions (Commands):
- update list,
3.1.2.1.3 Open
- manually open key position selected from the list,
3.1.2.1.4 Info
- View information about a given key place.
3.1.2.1.5 Tare
- Sets up the tray to “0” gram
The "Open" and "Info" commands work only if a key position is highlighted in the list. A grey frame
indicates the selection.

V1.5.5.2715
-- 32 --
Weight measure / Scale:
3.1.2.1.6 Scale
In order to save an item’s weight in the cabinet menu, select the appropriate box from the list and then the
“Scale” button at the bottom of the screen then follow instructions below.
- Valid weight: place the item on the measure tray. After you have pressed the „Save current as valid”
button, the weight of the item will be saved and displayed next to the „Valid weight” title.
- Diff. limit: You can set how many grams (plus, minus) can be the difference between the valid and
the measured weight before the system sets off an alarm. Note: the minimum difference limit is
10grams. For example if you set the difference limit to 10 grams, and set the valid weight to 100, the
system will accept the weight as valid from 90 to 110grams. If it’s out of this range the system will
generate a warning.
- Save current as valid: After you have placed your item on the measure tray you can save its weight
by pressing this button.
- Tare: You can set the measure tray to zero by pressing this button.

V1.5.5.2715
-- 33 --
Upon touching the text field next to the “Valid weight” title you will be able to set the weight manually.
Upon touching the text field next to the “Diff. limit” title you can set the allowed weight difference in
grams. The measured weight can differ from the saved weight by this amount to be detected as still valid.

V1.5.5.2715
-- 34 --
If the user places an item into the box which doesn’t have the correct weight, the system will generate a
warning. The user can get a more detailed information about the error by pressing the yellow warning
symbol.
V1.5.5.2715
-- 35 --
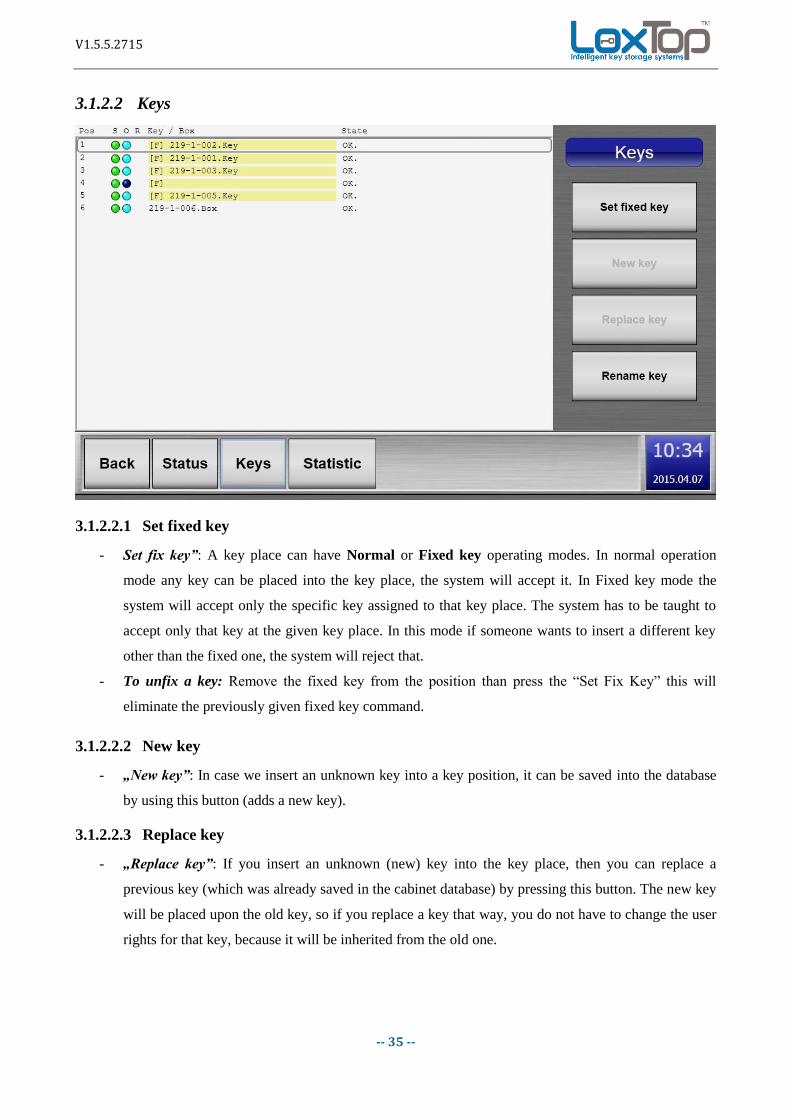
3.1.2.2 Keys
3.1.2.2.1 Set fixed key
- Set fix key”: A key place can have Normal or Fixed key operating modes. In normal operation
mode any key can be placed into the key place, the system will accept it. In Fixed key mode the
system will accept only the specific key assigned to that key place. The system has to be taught to
accept only that key at the given key place. In this mode if someone wants to insert a different key
other than the fixed one, the system will reject that.
- To unfix a key: Remove the fixed key from the position than press the “Set Fix Key” this will
eliminate the previously given fixed key command.
3.1.2.2.2 New key
- „New key”: In case we insert an unknown key into a key position, it can be saved into the database
by using this button (adds a new key).
3.1.2.2.3 Replace key
- „Replace key”: If you insert an unknown (new) key into the key place, then you can replace a
previous key (which was already saved in the cabinet database) by pressing this button. The new key
will be placed upon the old key, so if you replace a key that way, you do not have to change the user
rights for that key, because it will be inherited from the old one.

V1.5.5.2715
-- 36 --
3.1.2.2.4 Rename key
- „Rename key”: This button is active only if the selected key place in the list contains a known key.
After pressing the button and entering the name, the key name will be altered, so it will appear in the
system with its new name. Name modifications do not have effect on the users’ permissions related
to keys.

V1.5.5.2715
-- 37 --
3.1.2.3 Hardware
In order for the Hardware button to be shown in the Cabinet menu you have to turn it on in the Commands
menu with the “SERVICE MODE ON” command.
V1.5.5.2715
-- 38 --
3.1.2.3.1 Clear address
- "Clear address”: Deletes the logical address of a key position. The communication to the key place
is lost after deletion.
3.1.2.3.2 Set address
- "Set address": Sets the logical address of a key position. After activating this command, all of those
key places start flashing where they do not have logical address. Insert a key while the LED of the
key position is blinking, the system will learn which key place should have the address. After
inserting the key, the other blinking key places will go off automatically.
3.1.2.3.3 Auto addressing
- "Auto Address": The automatic addressing of key positions. The software finds all the key locations
that do not have address yet, it means they are currently not communicating and the addressing
command will be sent to each one. For proper operation the cabinet’s configuration must be set in
"Setup > System > Blocks" menu.
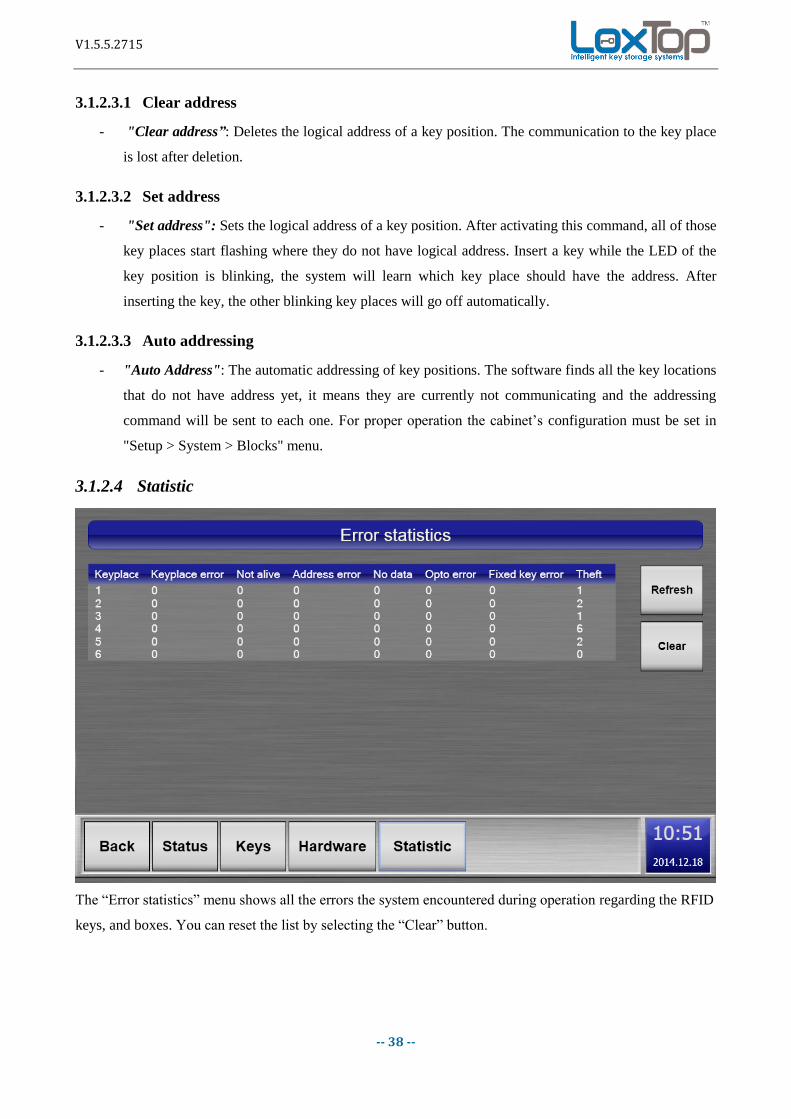
3.1.2.4 Statistic
The “Error statistics” menu shows all the errors the system encountered during operation regarding the RFID
keys, and boxes. You can reset the list by selecting the “Clear” button.

V1.5.5.2715
-- 39 --
3.1.3 NETWORK
Network connection
You can configure the network settings of the cabinet on this interface.
In the "Network Interface" section you can select the Ethernet interface used by the system. Upon selection,
you can set the parameters for each network.
The "DHCP" mode makes a kind of automatic configuration possible; it does not require an operator’s
intervention.
Warning! The DHCP mode is only available when the cabinet’s computer is connected to a network with
a DHCP server that carries out the automatic IP configuration task.
If you are unsure about the operation mode, please contact your network system administrator!
In the "Static IP" settings mode each parameters must be given manually.
• "IP Address": the unique network ID of the cabinet, eg.: 192.168.0.99
• "Subnet mask”: network mask, for example: 255.255.255.0
• "Gateway" the gateway’s IP address, eg.: 192.168.0.254
• "DNS1", "DNS2" network name server IP addresses.
After entering the parameters pressing the "Set config" button will save the settings. The "Get config" button
can be used to retrieve the previously set values or to read the values given by the DHCP server.

V1.5.5.2715
-- 40 --
3.1.4 DATABASE
3.1.4.1 Backup.
By pressing the "Backup" button, the entire database can be saved in binary format onto the hard disk and to
the Flashdrive. The system's last saved state can be restored from backup later.
In the Auto backup you can set the exact times when you want the system to perform an automatic backup.

V1.5.5.2715
-- 41 --
3.1.5 COMMANDS
Executing commands
Some of the system settings may only be changed by issuing commands. To run a command press the text
field and enter the appropriate command on the appearing input screen, then press the "Send" button to
execute it. The „Block” field indicates the CAN Bus channel of the cabinet where the command will be sent.
Using the "Parameters" button you can view the current settings. The command prompt can be activated
again by pressing the "Commands" button on the user interface. You can return to the previous menu with
the "Back" button.
- "UPGRADE". The cabinet starts to upgrade in the next minute and updates the license information
as well.
- „CREATEKEYS” It creates keys from unknown to normal keys.
- “GETST0 GETSTS0PURGE, KEYRF, FIXKEY” are inactive commands, not used
- "PARAM" The Key-place parameters can be specified.
- "TEST1" Opens key places in 5-key groups.
- "TEST2" Opens key places one by one.
- "TEST3" Opens key places in 10- key groups.
- "TESTSTOP" Stops the test.
- "LAMPON" The lamp is turned on (cabinet output panel), regardless of the cabinet’s state.

V1.5.5.2715
-- 42 --
- "LAMPOFF" The lamp is turned off (cabinet output).
- "DOOR1ON" Switches the first door relay on. (AJT1)
- "DOOR2ON" Switches the second door relay on. (AJT2)
- "DOOR1OFF" Turns the first door relay off. (AJT1)
- "DOOR2OFF" Turns the second door relay off. (AJT2)
- "WARNOUTON" Turns the sabotage relay (cabinet output) on.
- "WARNOUTOFF" Turns the sabotage relay off.
- "ERROUTON" Turns the fault relay (cabinet error output) on.
- "ERROUTOFF" Turns the fault relay off.
- „LANGCODE” The language code can be entered manually.
- „LICCODE” The licence code can be entered manually.. (Divided by „dots” .)
3.1.6 SYNCH.
Synchronisation
Synchronizations between cabinets means that all the saved data will be transferred to all cabinets that are in
Synch mode with the current cabinet.
1-3 cabinets can be connected together without any sync server.
4-8 cabinets can be connected together and one of them will be the “Master” cabinet the others are “slaves”
8- cabinets can be connected together but a Middleware synch is needed.

V1.5.5.2715
-- 43 --
3.1.6.1 Master
- The server who receives the data from the slaves, and forward the data to the other slaves.
3.1.6.2 Slave
- The one who sends and receives signal from the Master.
3.1.6.3 New
- New slave can be added to the network.
3.1.6.4 Delete
- Can be deleted from the sync.
3.1.7 SUPPORT
For remote support service the cabinet has to be connected to the Network through an Ethernet cable and be
online.
With the help of the TeamViewer application it is possible to manage software modifications remotely.
3.1.8 SYSTEM
3.1.8.1 Date
Date and time setup
The system date, sound volume and system alias name can be set in this menu and you can even exit from
the graphical terminal (Graphical User Interface) and restart your computer.

V1.5.5.2715
-- 44 --
The alias name is needed if the cabinet is synchronized with other cabinets. In this case this name will be
displayed in the rest of the cabinets when information regarding this cabinet needs to be shown.
To set date and time, enter the correct date and time into the corresponding fields, then press the "Set Date"
button. After setting the clock the adjusted time should be displayed in the lower right corner.
To adjust system volume, move the slider to the appropriate direction, then touch the "Test" button to check
it.
To exit the cabinet software press the "Exit" button, you can also initiate a full system restart by pressing the
"Reboot" button.
3.1.8.2 Reader
You can set the card reader type connected to the cabinet. Use the arrows to select the current card reader
and save it.
Enable web card reader: If you mark this field you will be able to add/modify card remotely through the
Web interface applications.

V1.5.5.2715
-- 45 --
3.1.8.3 Blocks
The configuration of key positions in the cabinet can be carried out here. In the "Number of Blocks" field
you can set the amount of individual channels where the key positions are located. This number ranges from
1 to 4. If the system detects that there is only one channel connected to the keys, then this field is not
editable.
You can set the number of keys belonging to each channel in the additional fields. If you have set all the
fields to the appropriate value, save the configuration by clicking on the "Save" button.
The number of keys which can be used in a given key cabinet is enabled by the Licence code. If you would
like to expand the cabinet with more key modules please contact our Support Centre.
The panels of the cabinet can be decreased by changing the key panels to blank panels and changing the
number of the keys in the “Block setup”

V1.5.5.2715
-- 46 --
3.1.8.4 Timing
System timings can be adjusted here.
- "Opened key duration": how long the key place should be open when picking up a key.
- "Max. keys to open in one time": the amount of keys that can be picked up in one log-in from the
cabinet.

V1.5.5.2715
-- 47 --
- “Number of keys per page at login”: If you have hundreds of keys within one system and want to
make the key pick up faster you can set a number such as 50, and 50 keys will appear on the screen
per page. You can use the arrows to change between the pages.
- “Auto open of single key / box”: if marked than the box/ key will be released automatically
- "1. door relay control time": Pull-in duration of the first door’s relay.
- "2. door relay control time": Pull-in duration of the second door’s relay
- "Main door alarm timeout": The maximum time of the main door’s opened state. If the door will
not be closed within this time, the system generates an alarm. (In most cases it refers to the safe
cabinet’s door only.)
- "1. door alarm timeout": The maximum time of the first door’s opened state. If the door will not be
closed within this time, the system generates an alarm.
- "2. door alarm timeout": The maximum time of the second door’s opened state. If the door will not
be closed within this time, the system generates an alarm.
- “Invert main door input”: not in use
- “Invert door 1 Input”: not in use
- “Invert door 2 input”: not in use
- “Invert sabotage input:” not in use
- “Auto Logout time”: The system will log out automatically when this time runs out.
- “Screen off Timeout”: The screen turns off according to this time.
3.1.8.5 Security

V1.5.5.2715
-- 48 --
"Access code prefix length":
- The length of the generated random prefix that is added to the beginning of the access code. Its
value can be from 0 to 4. In case of 0 the system will not generate prefix codes but it will give an
alert if there are identical codes and the code given for the second time will not be accepted.
"Access Code min. length":
- The minimum length of access codes. A shorter code than this will not be accepted when adding a
new code or changing an existing code.
"Access code max. length":
- The maximum length of access codes. A longer code than this will not be accepted when adding a
new code or when changing an existing code.
"Admin can create fixed code":
- You can set here whether a Web administrator can generate fixed codes. If a fixed access code is
generated on the web interface, the user does not have to change it at the first login. Picking up keys
is immediately available.
“Show Card ID”:
- Marking this you will be able to see the ID of the RFID Card when registering.
“Default PIN Code”:
- This PIN code can be assigned to RFID Cards, which are added through the WEB interface
"Disable interface authentication":
- Authentication is off.
"Disable interface CRC check":
- Switch off CRC checking.
"Interface session exp. time":
- The expiration time of the started work processes.

V1.5.5.2715
-- 49 --
"Interface CRC addition":
- The data to be calculated every time into CRC when sending data to the interface.
"Max. log record number ":
- The maximum number of records in the active log. If there are more log entries, then the added
number the historic records will be stored in the archive log.
"Max. archive record number":
- The maximum number of records stored in the archive log. If there are more log records than this,
the oldest records are deleted.
"Monitor off at main door close":
- Available only at units built in Safes. Switches off the screen when closing the main door.
“Beep on Error”:
- The cabinet starts to beep if there is an error.
“Error message”:
- In case of an Error this message appears on the screen. (Telephone number, email address etc.)
“Multiple rights warning”:
- If the administrator wants to add a key to multiple users He will be notified that the key already has
a user.
“Booking enabled”:
- Activates the booking system software.

V1.5.5.2715
-- 50 --
- “Multiple Booking”: Different users can book the same key but in different Time periods.
- Key manager can open every keys/boxes: The key manager is a right level. In this level s/he has
access to all keys in the cabinet so s/he doesn’t have to log in again to pick up more than 10 keys
within one log in session. After s/he removed the first key another key opens.
- “Fingerprint reader enabled”: Activates the fingerprint reader, (optional).
- Fingerprint reader serial port: COM 4 (default)
- Reserved weight limit: If the weight is above the given number in the box the system indicates that
the box is occupied in the cabinet menu. It is available with built in measuring tray.
- Time Restriction enabled: Activates the time restriction function.
- Wrong login count before error: After introduction of maximum number of codes the system starts
to beep and an error message appears on the screen.
- Reset wrong login counter after: The cabinet resets automatically after set number of seconds.

V1.5.5.2715
-- 51 --
“Worktime log”:
- Logs the Start and End time of work. If activated the software terminal offers two options:“Start of
work”, “End of work” when the user logs in. There is also a “Skip” button at the bottom of the
screen for those users, who doesn’t need worktime checking or if they log in for other purposes, like
for example to open their storage boxes to get their phones at lunch break.
Employers can easily check their employees’ worktime in the log by using the filter function (“Start
of work”, or “End of work”).
“Lockup Enabled”:
- Activates the lockup function.
“Lockup def. time”:
- The default lockup time can be adjusted.
“Lockup min. time”:
- The minimum lockup time can be set.
“Lockup max. time”:
- The maximum lockup time can be set.

V1.5.5.2715
-- 52 --
3.1.8.5 Email
SMTP Setting
Setup of the Mailing Server: Menu – Setup – System – Email
The cabinet itself does not contain Mailing server functions, instead of this it sends emails through a
preprogramed mailing server using SMTP protocol.
Setting options:
SMTP Server: The name of the mailing server or IP address
Port: The SMTP communication goes through Port 25 or in case of secure connection
(SSL) on Port 578
Use SSL: It should be switched on if the communication goes through on a secured channel
with the mail server. (Secured)
Username: If the mailing server requires a log in, please type in the login name here.
Password: Password of the username.
Sender account: The email alerts will be sent from this account.
Password: Password of the sender account.
Mailing address: The mails will be sent here.
Email alarm delay: This is the time when the email alerts will be sent out.
„Send test mail” you can send a test mail and check if everything is correct by using this button.
In case you can’t send test mails please check the settings again and also check the local firewall settings.
In many cases the mailing servers are using the sender account and password for identification.

V1.5.5.2715
-- 53 --
3.1.9 LANGUAGE
The language of the cabinet can be set up by using the arrows and by selecting the desired language. Also
you have the option to choose a maximum of 4 quick language options which will be available on the log-in
screen.
As you can see on the example below, we selected 4 languages to be displayed on the log-in screen.

V1.5.5.2715
-- 54 --
Now every user can choose from the selected language options. By touching one of the flags the cabinet will
switch to the preferred language.

V1.5.5.2715
-- 55 --
4. Proper shut down of the cabinet
Before shutdown, the batteries should be disconnected from the power supply in order to completely
disconnect the cabinet from electricity.
You may stop the system by accessing the "Reboot” button from the “Setup” -> "System” menu.
Just unplug the cabinet once the PC shuts down and the display turns off.
Caution!
If you do not remove the power, the safety electronics’ Watchdog circuit will restart the system.

V1.5.5.2715
-- 56 --
5. Web-based configuration You can connect the cabinet to networks. If the cabinet computer is connected directly to an external PC,
then cross UTP cable is required for the connection, otherwise if the cabinet computer is connected with
other computers in the network using switch or router, then normal (straight) UTP cables can be used. After
connecting the cabinet to the network, you have to set up the IP addresses, gateways etc. Please refer to
chapter 3.1.3 Network connection in this manual. If you are unsure about the settings please ask your
network administrator.
To have access to the key cabinet from a remote computer (a computer within the same network, where the
cabinet is also connected to) you have to open up a web browser and navigate to:
http://iqkeycbnt<cabinetnumber>/AKCS_Web
<cabinetnumber>: You can check the cabinet number on the sticker inside the key cabinet’s door. Or in the
cabinet terminal software if you go to Administrator >Menu > Setup > Info menu, the first row
(MACHINENAME) shows the key cabinet’s serial number. In this example the cabinet’s serial number is:
10024, so browse to http://iqkeycbnt10024/akcs_web or http://ip number/akcs_web
Login
Web-based login
For login type in your access code, or if you have a desktop card reader first click with the mouse into the
Access code field, then read your card. Afterwards click on Login button.

V1.5.5.2715
-- 57 --
The Web interface has more or less the same function as the cabinet. If the booking is enabled then a User
can Add, modify and cancel reservations for his/her keys
The Main Menu on web-interface
Web Main Menu functions
Users: View, Add or Edit users and their access rights, Export/Import users
Groups: View, Add or Edit groups. Add keys, and users to the group
Right groups: View, Add or Edit right groups. Add different rights, and users to the group
Lists: View the Log, check which key is taken or which ones are in the cabinet, Check
key-place statuses
Keys: View key list, Edit/Rename or Delete keys
Booking: In the IQ Key and Value Storage Management Systems the booking function is an
application, which is useful for the users to reserve keys and boxes for themselves to
a given date / time. It is needed, in order to ensure the unique access to these keys or
boxes for a specific time.
Time rest. More time restriction can be created in one cabinet, but 1 key/box can be included
only in one time restriction.
Setup: Cabinet configuration settings: View info about key-places; set key name; view
license code and expiration date; set software language and keyboard layout
language; view system information; check out database information; set computer
clock and date; set network synchronization with other cabinet.

V1.5.5.2715
-- 58 --
Users
List of key users (users)
To add a new key user, click on “New User” and fill in the personal data.
If you wish to get back to the main menu, click “Menu” in the top left corner.
To edit (modify) or delete a user click “Edit” or “Delete” right in the user row.
Add key user - Set user data

V1.5.5.2715
-- 59 --
After you have created a new key user by clicking on “New User”, you have to assign a new temporary
access code to the user. The user will change this temporary code to a permanent one when he/she logs into
the cabinet for the very first time. To give a new temporary code, click “Edit” at the user row and then click
“New Temporary Access Code”. The system generates a temporary code, then give a name for the code
and click “Save”.
Set user access code

V1.5.5.2715
-- 60 --
When the user logs in to the system with his temporary code, he will receive a notification to change that
code. After pressing the OK button, the user will have two options. If he selects “Card” and then shows an
access card to the card reader, he will be able to use that to log in to the system. If he selects the “Access
code” option then he will be able to type in a new access code and save it (this access code will be the new
valid code).
Now you have to assign keys to the key user, which ones the user is allowed to pick up.
To do this, click on “Set keys”.
Set keys

V1.5.5.2715
-- 61 --
You can give permission to pick up all keys by clicking on “Select all” button, while “Deselect all” clears all
previous selections, otherwise you can click the desired keys one by one. When you are done, click on
“Save”.
Now set user rights for the key user by clicking on “Set user rights” at the user settings.
Set user access rights
Web Administrator: The user is allowed to configure the cabinet from the web interface.
Terminal Administrator: The user is permitted to use the cabinet from the key cabinet’s built-in
terminal.
Booking administrator: The user can add/Modify/Cancel of reservations
If you click both, then the user will have rights to use the cabinet also from the remote web-interface and also
from the cabinet’s computer.
When user settings are done click Save to get back to the User list.
In case you would like to add several users you may perform a mass upload of users with the Import
function.
V1.5.5.2715
-- 62 --
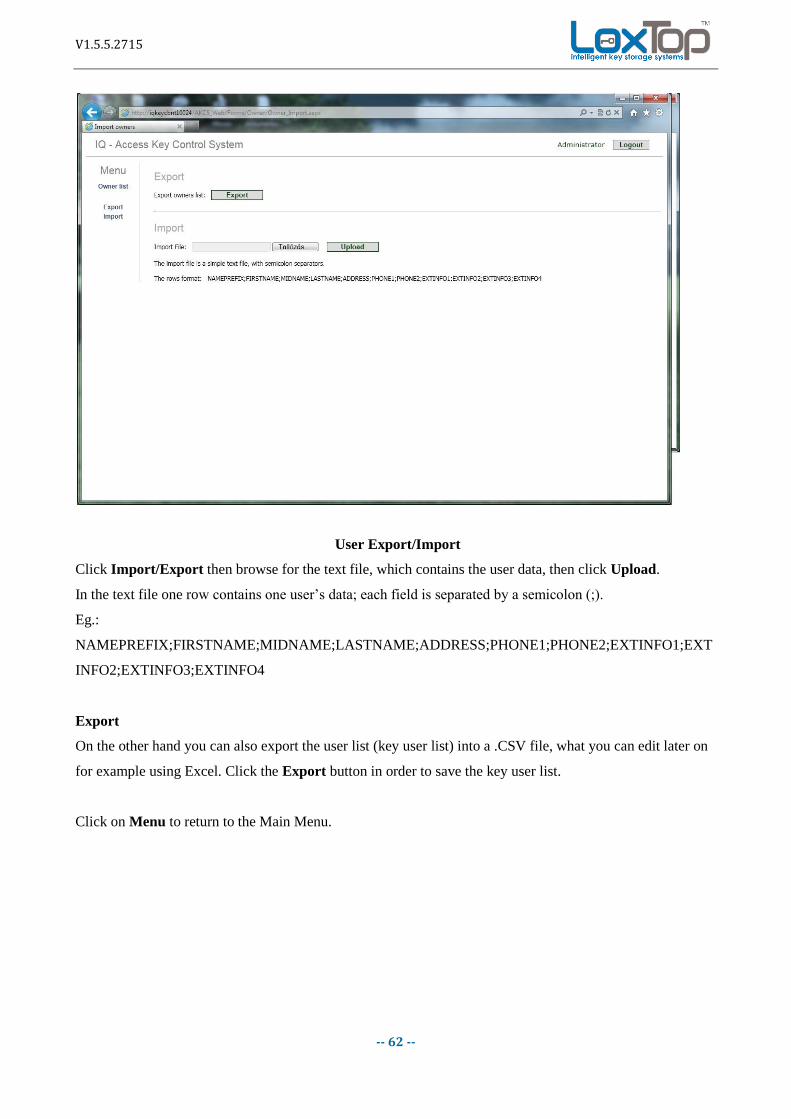
User Export/Import
Click Import/Export then browse for the text file, which contains the user data, then click Upload.
In the text file one row contains one user’s data; each field is separated by a semicolon (;).
Eg.:
NAMEPREFIX;FIRSTNAME;MIDNAME;LASTNAME;ADDRESS;PHONE1;PHONE2;EXTINFO1;EXT
INFO2;EXTINFO3;EXTINFO4
Export
On the other hand you can also export the user list (key user list) into a .CSV file, what you can edit later on
for example using Excel. Click the Export button in order to save the key user list.
Click on Menu to return to the Main Menu.

V1.5.5.2715
-- 63 --
Groups
You can create/edit/add key permissions/members to a group. You can also search for a group in the list by
typing in the group name or part of it into the textbox on top of the page.
Right groups

V1.5.5.2715
-- 64 --
Lists
In the Log you can see the system events.
Lists - Event Log
Menu: Return to the Main menu
Log: View the Log, check cabinet events
User <> Key: Check which key is absent or which ones are in the cabinet, which user has removed
or returned the key and at what time (key history)
Cabinet status: Check the key-places’ and boxes’ hardware status

V1.5.5.2715
-- 65 --
To check the key statuses click on User<>Key:
Lists – Key history
This list shows the history of the keys: which keys are in the cabinet, which ones are out, who took it away
and when the keys were put back.
V1.5.5.2715
-- 66 --
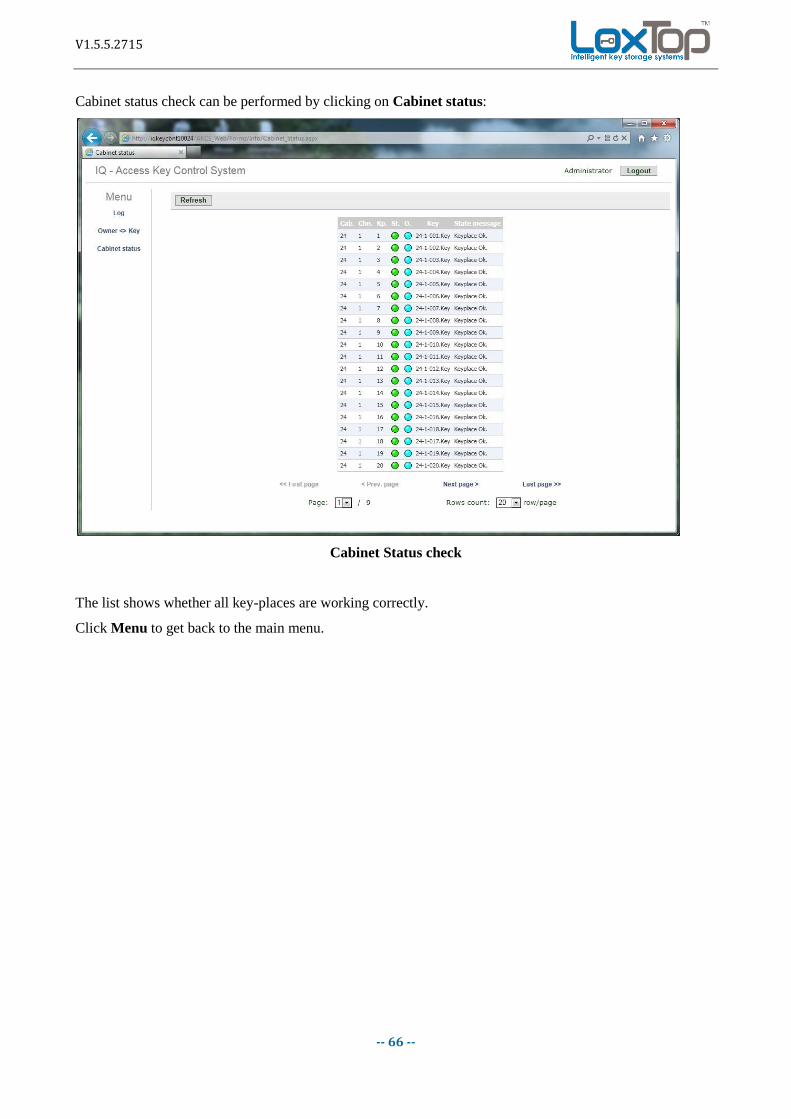
Cabinet status check can be performed by clicking on Cabinet status:
Cabinet Status check
The list shows whether all key-places are working correctly.
Click Menu to get back to the main menu.

V1.5.5.2715
-- 67 --
Keys
Here you can Edit, Rename or Delete the keys.
Keys

V1.5.5.2715
-- 68 --
Setup
Setup
Cabinet setup: View key place statuses and key place info, Rename Key / Set key name
License: Check out current license code and expiration date
Language: Set Software Language and Keyboard layout language
Information: View key cabinet’s system information
Database: View database information
Date & Time: Set cabinet computer’s date and time
Synchronization: Synchronize the cabinet with other cabinets in the network; specify this cabinet to be
Master or Slave

V1.5.5.2715
-- 69 --
Proxy settings
The following instructions will help you to set the proxy settings in the cabinet.
First, you will have to exit the Terminal software.
On the windows’ desktop, click on the Start button and then click on “Run”.
Type “cmd” into the textbox and click on OK button.
Type the inetcpl.cpl command into the command line and press Enter.

V1.5.5.2715
-- 70 --
Now you should see the Internet Properties window.
Click on the Connection tab, and then the LAN settings button.
In the Proxy settings section, enable the “Use a proxy server…” checkbox and set your proxy server
details.
After you have set everything, save it with the OK button. The cabinet will use this proxy to connect to
your network. If you want to save these settings permanently, you will need to save with the “commit c
drive” command in the Terminal Software’s “Commands” menu.

V1.5.5.2715
-- 71 --
In case the Terminal software is too old and does not support this command please use the following
command in the Windows command window:
“ewfmgr c: -commit”
You need to run this command twice, and restart the cabinet.
Notes
……………………………………………………………………………………………………………………………....
……………………………………………………………………………………………………………………………....
……………………………………………………………………………………………………………………………....
……………………………………………………………………………………………………………………………....
……………………………………………………………………………………………………………………………....
……………………………………………………………………………………………………………………………....
……………………………………………………………………………………………………………………………....
……………………………………………………………………………………………………………………………....
……………………………………………………………………………………………………………………………....
……………………………………………………………………………………………………………………………....
……………………………………………………………………………………………………………………………....
……………………………………………………………………………………………………………………………....
……………………………………………………………………………………………………………………………....
……………………………………………………………………………………………………………………………....
……………………………………………………………………………………………………………………………....
……………………………………………………………………………………………………………………………....
……………………………………………………………………………………………………………………………....

V1.5.5.2715
-- 72 --
……………………………………………………………………………………………………………………………...
……………………………………………………………………………………………………………………………....
……………………………………………………………………………………………………………………………....
……………………………………………………………………………………………………………………………....
……………………………………………………………………………………………………………………………....
……………………………………………………………………………………………………………………………....
……………………………………………………………………………………………………………………………....
……………………………………………………………………………………………………………………………....
……………………………………………………………………………………………………………………………....
……………………………………………………………………………………………………………………………....
……………………………………………………………………………………………………………………………....
……………………………………………………………………………………………………………………………....
……………………………………………………………………………………………………………………………....
……………………………………………………………………………………………………………………………....
……………………………………………………………………………………………………………………………....
……………………………………………………………………………………………………………………………....
……………………………………………………………………………………………………………………………....
……………………………………………………………………………………………………………………………....
……………………………………………………………………………………………………………………………....
……………………………………………………………………………………………………………………………....