Embed Size (px)
Citation preview

CALIFORNIA STATE SCIENCE FAIR2007 PROJECT SUMMARY
Ap2/07
Name(s) Project Number
Project Title
Abstract
Summary Statement
Help Received
Jeremy J. Alexander
What Is the Optimum Leverage Point to Achieve Maximum Distancewith My Catapult?
J0201
Objectives/GoalsMy project's goal was to determine at which pivot point of my catapult was themost effective to throw a golf ball the farthest distance.
Methods/MaterialsMy methods for testing are launching ten golf balls for each pivot point. Thereare three pivot points and each one is distanced one and one half inches apart.Pivot point C is 5 1/2 inches from the four pound counterweight and also is the closest pivot point to thecounterweight. Followed by point C is pivot point B, which is 7 inches from the counterweight. Pivotpoint A is the farthest pivot point from the counterweight and is 8 1/2 inches away.Materials:Catapult Beam 26 1/2 inchesPlatform two feet length, one foot widthUpright Posts with dowel hole, 15 inch height Dowel diameter 5/16 inch x one foot lengthSling a 3 inch and 7 inch string and leather pouch(10) standard golf balls(10) 2 inch drywall screws(4) wheel casters
ResultsMy hypothesis of pivot point C launching a golf ball the farthest was correct. Pivot point A, however, hada much more consistent range of distances. Pivot point A's lowest distance was nineteen feet, while itshighest was twenty-five feet.Pivot point C launched a golf ball twenty-six feet and several others in thelow twenties.However some launches were unsuccessful.Pivot point C's lowest were four and thirteenfeet. If you look at pivot point B, the distances were not good. Three launches went backwards. The otherlaunches didn't go far.
Conclusions/DiscussionThe reason why there were unsuccessful launches was because of the sling.The sling will release the ballat an unpredictable time. When the sling does an arch, one of the strings could be not tight enough tomake a complete arch. Since the string was loose, the ball relased too early and went backwards.Thestring may have also been too tight and performed the arch too long. This would make the ball go low andnot go far.
My science project is about a trebuchet with three pivot points that launches golf balls and I want to knowwhich pivot point will launch a golf ball the farthest.
My dad helped me build the trebuchet.

CALIFORNIA STATE SCIENCE FAIR2007 PROJECT SUMMARY
Ap2/07
Name(s) Project Number
Project Title
Abstract
Summary Statement
Help Received
Garrett Arbuckle; Brandon Seeto
The Effects of Rolling Resistance on Different Surfaces
J0202
Objectives/GoalsThe objective of our project is to find out why some cars travel faster on a surface with less friction than asurface with more friction and potentially waste more fossil fuel. We would like to know if the roughnessof the surface on our track will effect the amount of time it would take for a car to finish the lane. Wehypothesize that the surface of the track will effect the amount of time it takes a Hot Wheel toy car tofinish the lane.
Methods/MaterialsWe constructed a model track out of a 1.22 meter by 0.3048 meters wide. The track was raised on thestarting end to allow the cars to roll down the incline. We used three different grades of sandpaper foreach lane. Lane #1 had the smoothest surface with 1500-grade sandpaper, 220-grade sandpaper in lane#2, and 60-grade sandpaper in lane #3. We used three of the same type of Hot Wheel toy cars to run thetest data/trials. Each car was allowed to roll down each lane fifteen times. The finished times were notedand results were recorded for the data.
ResultsOur results overall showed that lane #1 had less resistance than lanes #2 and #3. This allowed the cars tofinish the track faster in lane #1 as compared to lanes #2 and lane #3 in each of the trials.
Conclusions/DiscussionOur hypothesis was proven to be valid because the cars traveled faster on a surface with less friction. Ourdata shows that a car will travel slower on a surface with greater resistance as compared to a surface withless resistance. The rougher the road, the longer it will take for the car to travel using more force andenergy. The effects of rolling resistance are factors in how fast a car can travel. Better maintained roads,like lane #1 of our track will reduce in amount of travel time and could potentially save on the amount offuel used by a vehicle. Smoother roads provide less friction and could possibly increase car mileage.
A car on a road with less resistance will travel faster than on a road with more resistance.
Our dads helped us purchase supplies needed for the track. They helped us build and construct the track. Our moms helped us set up the project display board and transporting it to the school and county sciencefairs. Our science fair teacher provided guidance, support, and learning.

CALIFORNIA STATE SCIENCE FAIR2007 PROJECT SUMMARY
Ap2/07
Name(s) Project Number
Project Title
Abstract
Summary Statement
Help Received
Matthew J. Armstrong
Truss Me: The Impact of Structural Design on the Strength of a Truss
J0203
Objectives/GoalsObjective: The objective for this experiment was to find out which truss design, a Warren, a Warren withVertical Supports, a Pratt, or a Curved Chord Pratt, would have the best strength to weight ratio. Thehypothesis for this experiment was that the Curved Chord Pratt would have the best strength to weightratio.
Methods/MaterialsMaterials and Methods: To perform this experiment three trusses were built for each design (a Warren, AWarren with Vertical Supports, a Pratt, and a Curved Chord Pratt). They were built using wood glue andclear pine wood. They were then weighed. Then a truss was selected to be tested and placed on twobarstools. Then a rope was attached to the truss and sent threw a pulley and then connected to a tensionscale. The scale was then pulled until the truss broke. The breaking weight was recorded. Then the testwas repeated with the other trusses. After all the trusses were tested the breaking weight for each trusswas divided by its weight. This gives the strength to weight ratio.
ResultsResults: The average strength to weight ratio for the Pratt was 1128 ounces to 1 ounce. The average ratiofor the Warren was 1013 ounces to 1 ounce. The average ratio for the Warren with Vertical Supports was1182 ounces to 1 ounce. The average ratio for the curved Chord Pratt was >1416 ounces to 1 ounce.
Conclusions/DiscussionConclusion: The results of this experiment support the hypothesis. Even though the Curved Chord Prattmaxed out the scale at 177 pounds without breaking, it still had the best ratio and held the most weight.The results show that even though these trusses have very similar weights, their changes in design make abig difference in their breaking weight. It is important to choose the right truss design because of theirdifference in strength. The Warren is made for light loads like small cars or people because of its simpledesign and ease to build. The Curved Chord Pratt is made for very heavy loads like big, heavy trains, andfinally the Warren with Vertical Supports and the Pratt are made for loads like heavy cars or trucks andlight trains.
This project is about how the importance of truss design effects how much weight it can support.
Father helped build and test the bridges.

CALIFORNIA STATE SCIENCE FAIR2007 PROJECT SUMMARY
Ap2/07
Name(s) Project Number
Project Title
Abstract
Summary Statement
Help Received
Matthew W. Baldwin
Will the Bog Break the Log?
J0204
Objectives/GoalsMy objective is to find if relative humidity affects the strength of wood. I predict that as relative humidityrises, the strength of wood will diminish. I don't think that temperature will have much noticeable effect asa factor.
Methods/MaterialsI subjected 3 identical dowel sticks made up of the same wood to 3 different levels of humidity: a normal,29% humidity room, a steamed pot at 88% humidity, and a totally saturated (100% humidity) bucket ofwater. After exposing them at an equal amount of time, I measured the kilograms of pressure required tosnap the sticks.
ResultsOn average, the sticks exposed to room-temperature humidity (29%) broke under the weight of 11.31kg.The totally saturated, submerged sticks (100%) broke on average of 7.4kg. The steamed sticks exposed toan average of 88% humidity broke under the average weight of 5.57kg.
Conclusions/DiscussionThe results of my experiment were quite surprising. As I hypothesized, increased humidity did weaken thewood sticks. What was surprising was that the sticks which were totally saturated in water were harder tobreak than the sticks heavily steamed in 88% humidity. The 2 groups of steamed sticks were close inhumidity, but quite different in temperature; it appears that heat indeed played a factor in this experiment.So my hypothesis was both right and wrong. My results did not go with the logic that sticks subjected to100% humidity would be more easily broken then with 88% humidity, so the heat of the steam may havebeen a factor. But nevertheless, humidity does indeed affect the strength of wood.
My project is about whether or not relative humidity will affect the strength of wood.
My mom helped me gather materials for the experiment.

CALIFORNIA STATE SCIENCE FAIR2007 PROJECT SUMMARY
Ap2/07
Name(s) Project Number
Project Title
Abstract
Summary Statement
Help Received
Michael D. Bucher
Ramp It Up!
J0205
Objectives/GoalsThe goal of this experiment was to determine which angle (20,25,30,35,40,45,50, degrees) of an inclinedramp would provide the maximum height and distance that an RC (remote controlled) monster truck,driven at a constant speed, could achieve. The hypothesis was that the inclined ramp positioned at a 45degree angle would provide the maximum height and distance that the RC monster truck could travel.
Methods/Materials1. Placed 2 x 4 blocks of plywood underneath the Flybox inclined ramp to obtain the various angles, andthen measured each angle with a large protractor for accuracy.2. Drove the nitro powered RC monster truck off the ramp five times.3. Increased the ramp angle by five degrees and performed five more trials.4. Repeated procedure at each angle until the maximum angle of 50 degrees had been reached.
ResultsThe combined results of this experiment showed that the 30 degree launch angle was the most successfulin achieving maximum height and distance. When launched at the 45 and 50 degree angles, the RC trucktraveled the shortest distances.
Conclusions/DiscussionMy hypothesis, based on research indicating that projectiles launched from a 45 degree angle will achievemaximum height and distance, was wrong. In theory, the launch velocity is independent of the launchangle, however that was not the case in this experiment. The RC truck generated its projectile velocitythrough a combination of the horizontal velocity, which began at the take-off 10' from the ramp, and thevertical velocity that was generated at the launch angle of the ramp.
Determine the optimal angle for launching an RC monster truck from an inclined ramp to achievemaximum height and distance.
Mother helped take pictures of the experiment and helped edit report. Dad helped measure speed of themonster truck. Cousin helped videotape the jumps and record data.
CALIFORNIA STATE SCIENCE FAIR2007 PROJECT SUMMARY
Ap2/07
Name(s) Project Number
Project Title
Abstract
Summary Statement
Help Received
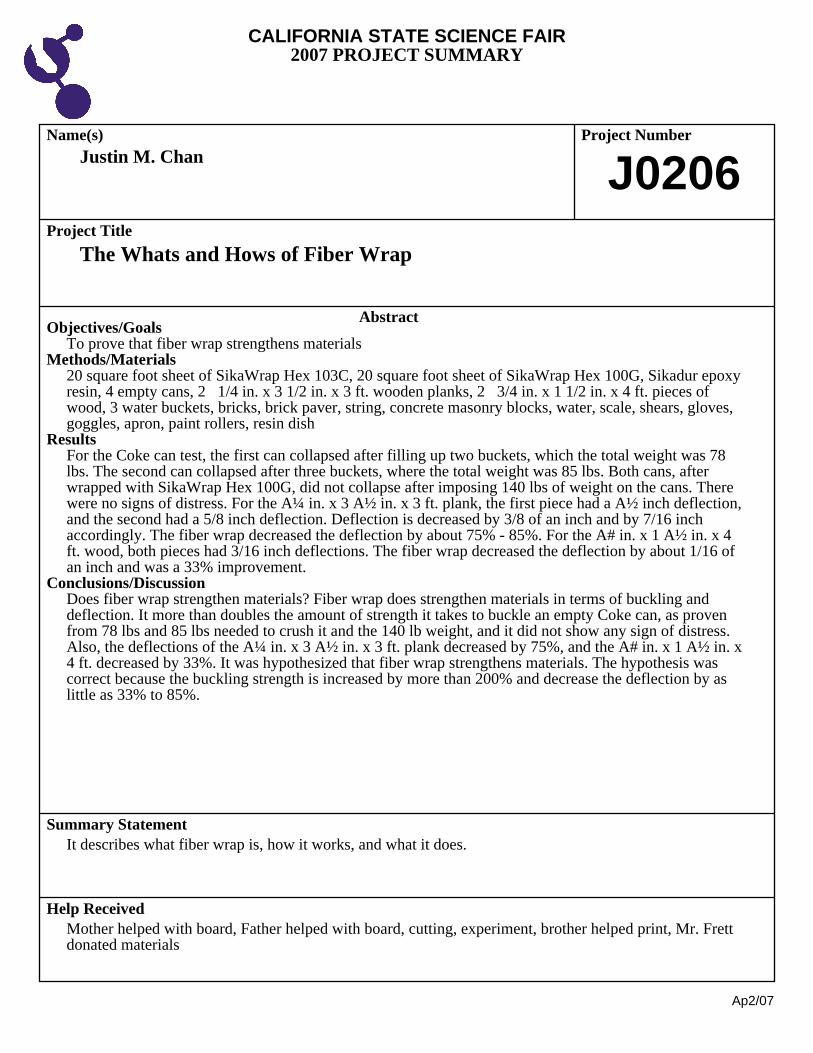
Justin M. Chan
The Whats and Hows of Fiber Wrap
J0206
Objectives/GoalsTo prove that fiber wrap strengthens materials
Methods/Materials20 square foot sheet of SikaWrap Hex 103C, 20 square foot sheet of SikaWrap Hex 100G, Sikadur epoxyresin, 4 empty cans, 2 1/4 in. x 3 1/2 in. x 3 ft. wooden planks, 2 3/4 in. x 1 1/2 in. x 4 ft. pieces ofwood, 3 water buckets, bricks, brick paver, string, concrete masonry blocks, water, scale, shears, gloves,goggles, apron, paint rollers, resin dish
ResultsFor the Coke can test, the first can collapsed after filling up two buckets, which the total weight was 78lbs. The second can collapsed after three buckets, where the total weight was 85 lbs. Both cans, afterwrapped with SikaWrap Hex 100G, did not collapse after imposing 140 lbs of weight on the cans. Therewere no signs of distress. For the A¼ in. x 3 A½ in. x 3 ft. plank, the first piece had a A½ inch deflection,and the second had a 5/8 inch deflection. Deflection is decreased by 3/8 of an inch and by 7/16 inchaccordingly. The fiber wrap decreased the deflection by about 75% - 85%. For the A# in. x 1 A½ in. x 4ft. wood, both pieces had 3/16 inch deflections. The fiber wrap decreased the deflection by about 1/16 ofan inch and was a 33% improvement.
Conclusions/DiscussionDoes fiber wrap strengthen materials? Fiber wrap does strengthen materials in terms of buckling anddeflection. It more than doubles the amount of strength it takes to buckle an empty Coke can, as provenfrom 78 lbs and 85 lbs needed to crush it and the 140 lb weight, and it did not show any sign of distress.Also, the deflections of the A¼ in. x 3 A½ in. x 3 ft. plank decreased by 75%, and the A# in. x 1 A½ in. x4 ft. decreased by 33%. It was hypothesized that fiber wrap strengthens materials. The hypothesis wascorrect because the buckling strength is increased by more than 200% and decrease the deflection by aslittle as 33% to 85%.
It describes what fiber wrap is, how it works, and what it does.
Mother helped with board, Father helped with board, cutting, experiment, brother helped print, Mr. Frettdonated materials

CALIFORNIA STATE SCIENCE FAIR2007 PROJECT SUMMARY
Ap2/07
Name(s) Project Number
Project Title
Abstract
Summary Statement
Help Received
Kristy Chang; Lana Ho
Bring on the Heat! A Project Concerning Stirling Engines
J0207
Objectives/GoalsThe problem is: How does changing the temperature of the water in a Stirling Engine affect its rate ofrotation and the amount of water left over from the reservoirs? It is hypothesized that the highesttemperature of water would result in the RPM of the flywheel of the engine surpassing the RPM of anengine heated at a lower temperature, and that the most amount of water would be evaporated. Thehypothesis was based on both Charles and Boyles Laws, which relate gas temperature to volume, andvolume to pressure.
Methods/MaterialsTo test the hypothesis, one would first build the engine according to the procedure. After doing so, onewould fill the reservoirs with water and regulate the temperatures with candles. Each trial would be testedunder the same conditions. All tests would be repeated five times.
ResultsAfter recording and analyzing data, one would find that the results support the hypothesis. With thetemperature of the reservoirs at 100 C, the RPM of the flywheel was greater than the trials that involvedthe engine being heated at a lower temperature. The average RPM for the engine heated at 100 C was24.6, which was larger than the others. As temperature increased, more water was evaporated. Theaverage amount of water left over from five cups at 100 C was 4.2 cups.
Conclusions/DiscussionThe hypothesis was correct. As the temperature of the water in the engine increased, the RPM of theflywheels increased, and the amount of water evaporated from the reservoir increased. Using thatinformation, one would be able to create a more efficient Stirling Engine.
The project tests how the temperature of the water in a Stirling Engine affects its RPM and the amount ofwater evaporated from the reservoir.
Parents helped with obtaining supplies

CALIFORNIA STATE SCIENCE FAIR2007 PROJECT SUMMARY
Ap2/07
Name(s) Project Number
Project Title
Abstract
Summary Statement
Help Received
Isaac V. Cohen
The Effects of Gyroscopic Force on a Stationary Body
J0208
Objectives/GoalsTo demonstrate gyroscopic force
Methods/MaterialsTo begin my experiment I needed the following materials:¡#Bigger bike wheel (68.58 cm diameter)¡#Smaller bike wheel (50.8 cm diameter)¡#Two handles per wheel¡#A stool that can freely rotate over 360¢ª¡#Person to spin the wheel ¡#A scale to weigh the wheelsOnce all the materials were bought and collected I was able to begin my experiment. These are the steps needed to conduct the experiment:¡#1st: Sit on the stool on your knees. (See photo below). Align the mark on the stool with the 0#¬graduation. ¡#2nd: While sitting on the stool, hold the smaller wheel in front of you and keep it horizontal.¡#3rd: Have a friend spin the wheel.¡#4th: Rotate the axis of the spinning wheel 180#¬ and notice the torque it exerts on your wrists. Alsonotice the rotation of the stool as the wheel is tilted.¡#5th: Repeat Steps 1-4 five times and record.¡#6th: Repeat from Step #1 with the bigger wheel
ResultsSpinning the larger wheel resulted in a larger stool rotation. More force can be felt at the handles whenmoving the larger wheel through different angles.
Conclusions/DiscussionConclusion:The formulas that describe the energy developed from a spinning gyro involve how the mass isdistributed. Two wheels of the same mass but one with its mass further from the center of rotation willgenerate more force.Further Research:I would like to learn more kinematics and how the laws of motion describe complex mechanisms. Alsomaybe I would like do this experiment on a bigger scale
Demonstrating gyroscopic force
Mr. Nelson (Mrs. Nelson's dad) and My dad, Mr. Cohen helped with equations.

CALIFORNIA STATE SCIENCE FAIR2007 PROJECT SUMMARY
Ap2/07
Name(s) Project Number
Project Title
Abstract
Summary Statement
Help Received
Foster D. Collins
Urban Solar Electric Panel Steering Testing and Proposed New SystemDesign
J0209
Objectives/GoalsThe objective of the original/first phase of this project was to test if a simple solar panel steering systemmight improve panel energy production enough to reduce the overall system cost by requiring fewerpanels.
Methods/MaterialsA solar tracking system was created using Lego Mindstorms robotics components. Steered and fixedpanels were mounted on a south-facing rooftop fixture tilted up so that both squarely faced the sun atnoon. Output voltages of the panels were recorded on a computer every 40 seconds for 14 days of testing.
Resultssteered panel produced an average of 31% more energy each day. This encouraging advantage motivatedthe addition of Phase 2 of the project to run 15 more days of testing with the fixed panel mounted atmore-realistic, non-ideal orientations, as are more likely on typical houses. The fixed panel waspositioned flat on two of the roof surfaces, which were not as steep as the ideal angle and not facingdirectly south. The new test data showed such significantly greater relative energy output for the steeredsystem, 129% and higher, that Phase 3 was added with the objective of creating new 3-D CAD designconcepts for low-profile, low-cost steering systems for residential rooftop use.
Conclusions/DiscussionThe new preliminary concepts have modular arrays of 16-inch square panels steered by interconnectedlinkages, which eliminates the need to have a steering motor for every panel. Such steered rooftop solarsystems should be attractive to urban home owners because they are low-profile and of such higher paneloutput efficiency that they should be less expensive than flat-on-the-roof installations typically offered bysolar installation companies.
A preliminary design was created for a new solar panel steering system for urban use; because the projecttesting proved that steered solar panels work much better than ones typically mounted flat on roofs.
My dad: contacted solar panel companies, soldered solar cells, helped with data acquisition software,initiated system design concepts, did most of the 3-D CAD modeling, helped with display board graphics;Engineer friend: explained electrical theory for panel and load resistor wiring.
CALIFORNIA STATE SCIENCE FAIR2007 PROJECT SUMMARY
Ap2/07
Name(s) Project Number
Project Title
Abstract
Summary Statement
Help Received
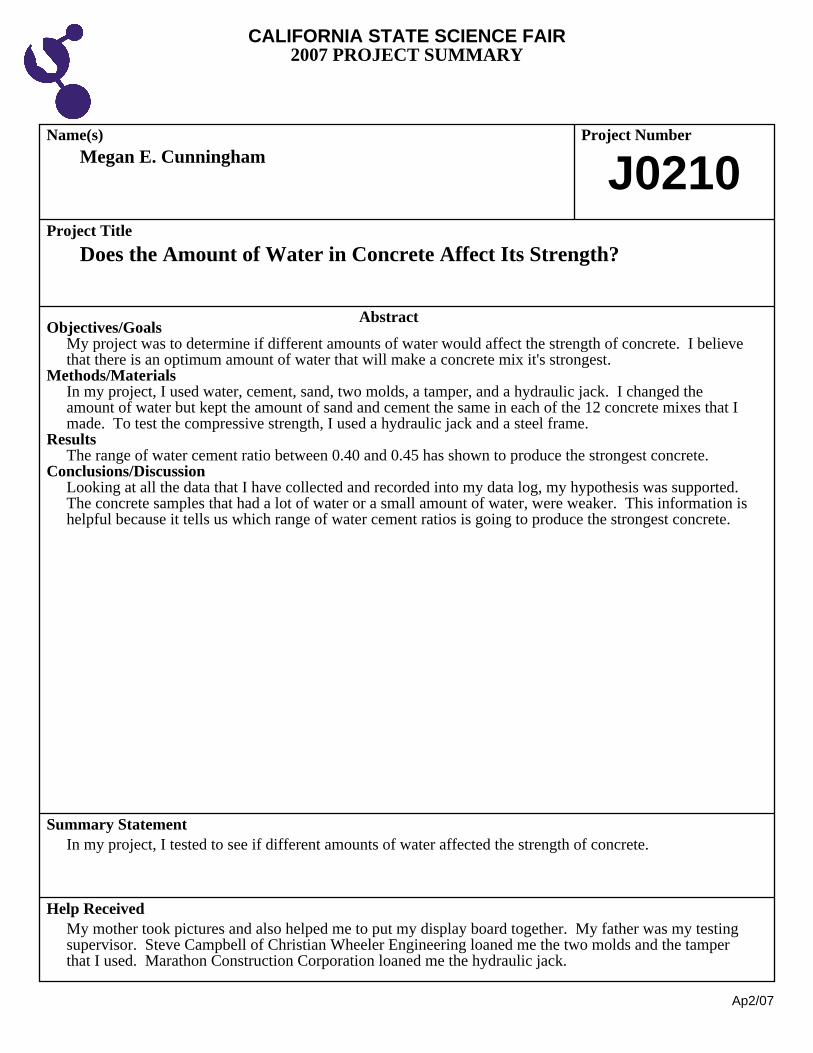
Megan E. Cunningham
Does the Amount of Water in Concrete Affect Its Strength?
J0210
Objectives/GoalsMy project was to determine if different amounts of water would affect the strength of concrete. I believethat there is an optimum amount of water that will make a concrete mix it's strongest.
Methods/MaterialsIn my project, I used water, cement, sand, two molds, a tamper, and a hydraulic jack. I changed theamount of water but kept the amount of sand and cement the same in each of the 12 concrete mixes that Imade. To test the compressive strength, I used a hydraulic jack and a steel frame.
ResultsThe range of water cement ratio between 0.40 and 0.45 has shown to produce the strongest concrete.
Conclusions/DiscussionLooking at all the data that I have collected and recorded into my data log, my hypothesis was supported. The concrete samples that had a lot of water or a small amount of water, were weaker. This information ishelpful because it tells us which range of water cement ratios is going to produce the strongest concrete.
In my project, I tested to see if different amounts of water affected the strength of concrete.
My mother took pictures and also helped me to put my display board together. My father was my testingsupervisor. Steve Campbell of Christian Wheeler Engineering loaned me the two molds and the tamperthat I used. Marathon Construction Corporation loaned me the hydraulic jack.

CALIFORNIA STATE SCIENCE FAIR2007 PROJECT SUMMARY
Ap2/07
Name(s) Project Number
Project Title
Abstract
Summary Statement
Help Received
Joey C. Gibbs
Determining the Stop Rate on Different Surfaces with Different TirePressures
J0211
Objectives/GoalsUsing a KTM 65cc dirtbike, I determined how tire pressure would affect the stop rate of the bike ondifferent surfaces.
Methods/MaterialsI am using my KTM 65cc dirtbike. I first did a safety and maintenace inspection. I then praciticed gettingthe bike to 15 mph using a speed gun. I had a highway patrolman use speed gun. He would signal when Ihit 15 mph. After practicin this. I would slam on back brake at the signal.I then determined which surface I would begin with. I started concrete.The different surfaces were: concrete, asphalt, packed dirt, loamy soil, and sand.I began with a tire pressure of 25psiThe different tire pressures used were: 25, 15 and 5psi.I rode my bike on concrete until I hit 15 mph. I then slammed on back brake at the signal. I then measured the stopping rate with a tape measure.3 trials for each surface under each tire pressure.
Results5psi - longest - concrete 32'9" shortest - loamy soil 15'3" 15 psi - longest concrete 42'6" shortest - loamy soil 18'6"25psi - longest concret 47' shortest - loamy soil 24'3"
other surfaces fell between the above results.Conclusions/Discussion
I learned that different tire pressures affect the stopping rate. A lower tire pressure showed that it willstop faster. However, if tire pressure is too low, not enough air for tire to work properly. It will effecthow smooth your ride is, and could ruin rims.For safety puposes, if you really want to be able to stop quicker, you should have a tire pressure a littlelower than recommended. Recommended amount is 10.
My project will determine how tire pressure effects stopping rate of a dirt bikes.
teacher taught scientific process, dad helped with supervision, officer Butler CA CHP, helped with safetyand speed gun.

CALIFORNIA STATE SCIENCE FAIR2007 PROJECT SUMMARY
Ap2/07
Name(s) Project Number
Project Title
Abstract
Summary Statement
Help Received
Alec Gronberg; Chaz Marshall
The Effect of Blowgun Length on the Energy of Its Projectile
J0212
Objectives/GoalsOur project was designed to determine how the barrel length of a blowgun affects the energy of theprojectile.
Methods/MaterialsTo conduct our experiment we first used a 61.0 cm (2 ft) blowgun. We then laid out a wooden trough,and put a wooden dowel at the end of the trough. We lined up the blowgun so the end of it was pointed atthe center of the dowel. We then put the projectile (the dart) into the blowgun. Next we turned on the aircompressor and fitted the nozzle into the mouthpiece of the blowgun. We pulled the trigger, the projectileshot into the dowel, and we measured how far the dowel went. We also did this with the 91.4 cm (3 ft)blowgun, the 152.4 cm (5 ft) blowgun, and the 121.9 cm (4 ft) blowgun. For our experiment we neededtwo 61.0 cm (2 ft) blowgun barrels, one 91.4 cm (3 ft) blowgun barrel, two blowgun mouthpieces, twoconnectors, five stun darts, one wooden trough (244 cm), one 2.5 cm (one in) wooden dowel, onemeasuring stick, one air compressor, and one nozzle. The 121.9 cm (4 ft) blowgun barrel is made byattaching a 61.0 cm (2 ft) blowgun with another 61.0 cm (2 ft) blowgun barrel. The 152.4 cm (5 ft)blowgun barrel is made by attaching a 61.0 cm (2 ft) blowgun with a 91.4 cm (3 ft) blowgun barrel.
ResultsAfter we had conducted our experiment we found that the lengths for the different lengths of blowguns, inorder of distance, was, the 91.4 cm (3 ft) blowgun at 49.66 cm, then the 61.0 cm (2 ft) blowgun at 51.2cm, then the 121.9 cm (4 ft) blowgun at 71.58 cm, and finally the 152.4 cm (5 ft) blowgun at 82.94 cm.
Conclusions/DiscussionOur results proved that the longer the barrel length is, the more energy there is in the projectile. Thereason we think that the 91.4 cm blowgun had the least about of energy in the projectile is because we hadone bad trial. In this one bad trial we had a measurement which was far below the average of the othertrials and this brought its average down. If we hadn#t done that one trial, the order of blowguns frommost powerful to least powerful, would be the 152.4 cm (5 ft) blowgun, then the 121.9 cm (4 ft) blowgun,then the 91.4 cm (3 ft) blowgun, and finally the 61.0 cm (2 ft) blowgun.
Our project is about the relevance of barrel length of a blowgun, to the energy of its projectile.
We went to Sid's Apholstrey to use their air compressor to conduct our experiment.

CALIFORNIA STATE SCIENCE FAIR2007 PROJECT SUMMARY
Ap2/07
Name(s) Project Number
Project Title
Abstract
Summary Statement
Help Received
Alyssa M. Herman
Rolling Backpacks: Do They Really Reduce the Stress on Your Spine?
J0213
Objectives/GoalsThe goal of my experiment was to evaluate and compare the compression and twisting forces on the spinecaused by the use of a rolling and regular backpack. I hypothesized that the use of a rolling backpack witha given book load would result in a lesser downward pressure and twisting force on the lower spine thanuse of a regular backpack.
Methods/MaterialsI built a simple life size model of myself out of wood with wheels to allow travel and with shoulders andarms to hold a backpack. I modified the model to test two different forces. Model 1 was equipped with aweight scale at the region of the lumbar spine to assess downward force in pounds. In Model 2 the scalewas replaced by a torque wrench to assess the twisting force in foot-pounds. Each model was tested over adistance fo 50 feet using first a regular backpack and then a rolling backpack carrying book loads of 0lbs,10lbs, 20lbs, and 30lbs. Weight and then torque recordings were taken every 10 feet in each trial.
ResultsModel 1: the control at 0lbs recorded 0lbs. For the rest of the book loads the weight recorded on the scalefor the rolling backpack was always less than the regular backpack. Rolling to regular backpack recordedweight ratios were as follows: 10lb load (1:19), 20lb load (1:11), and 30lb load (1:9). Model 2: the controlat 0lbs recorded 0 foot-pounds. For the rest of the book loads the torque recorded for the rolling backpackwas always less than the regular backpack. Rolling to regular backpack recorded torque ratios were asfollows: 10lb load (1:12), 20lb load (1:6), and 30lb load (1:5).
Conclusions/DiscussionThe data from this experiment supported my hypothesis that use of a rolling backpack did in factsignificantly reduce the downward pressure and twisting pressure on the region of the lumbar spine whencompared to a regular backpack. Knowing these findings will likely influence a student's or parent's futurechoice of a backpack and hopefully result in less back pain and injury.
I evaluated the compression and twisting forces exerted at the lumbar spine region when using a rollingverses a regular backpack.
My Father helped me build the experimental Models. My teachers Mr Demaria and Dr Dunn reviewed myproject.

CALIFORNIA STATE SCIENCE FAIR2007 PROJECT SUMMARY
Ap2/07
Name(s) Project Number
Project Title
Abstract
Summary Statement
Help Received
Austin J. Hiatt
Determining the Fastest Gear Set-Up on a Single Speed BMX Bikethrough a Designated Course
J0214
Objectives/GoalsThe objective of my project is to determine the best gear combinations and crank arm lengths for a singlespeed BMX race bike on a designated course.
Methods/MaterialsA 2006 Redman Expert XL BMX Racing Frame with 20" wheels was used with 6 different gear set-upswith 160mm and 165mm crank arms. A testing course was selected on an American Bicycle AssociationSanctioned Track and measured with a measuring wheel. Using a hydrraulic strating gate and a line andcones marking the finishing point, I tested the different gear set-ups using a stop-watch to track theresults. I rested during each gear change as to be sure that fatigue would not effect the results.
ResultsAfter running several tests on the designated course, I recorded my results on a chart. The smaller frontchain ring and rear cogs with the 165mm crank arms proved to be the fastest combinations.
Conclusions/DiscussionAfter testing the gear combinations, I realized that the 37 front chain ring gear with a 13 rear gear usingthe 165mm crank arms produces the fastest average time on the first straight of Tulare BMX track. Thisset-up had the perfect resistance against my feet at top end speed and surprisingly did not take that mucheffort to get moving. The slowest set-up was the 43 front chain ring gear with a 16 rear gear using the165mm crank arms. This set-up was the easiest to get going because of the torque it produces during thestart. However, the gear had lost all resistance against my feet at top speed.
My project is about finding the fastest gear set-up for me that has the fastest time on the first straight of aBMX course which is a crucial part of the track in a BMX race.
My dad helped with the timing and changing gears during the testing as well as helping to put the boardtogether.

CALIFORNIA STATE SCIENCE FAIR2007 PROJECT SUMMARY
Ap2/07
Name(s) Project Number
Project Title
Abstract
Summary Statement
Help Received
Arian E. Khansari
Strength Test for Bridges
J0215
Objectives/GoalsThe problem that I set out to solve by conducting my experiment was, "How do the different structuraldesigns of the beam bridge, the triangle bridge, the double truss bridge, and the arch bridge affect theamount of weight each bridge can support before collapsing?" My hypothesis was that the arch bridgewould be able to hold the most weight because I believed the arch to be the strongest, most durable shape.I also thought that the double truss bridge would come in second, the triangle bridge in third, and thebeam bridge last.
Methods/MaterialsThe materials that I used in my project were 27 feet (325 inches or 8.3 meters) of 1/4-inch (.62-cm) balsawood, a craft knife, tacky glue, a wooden block about 2 X 3 X ½ inches (5 X 7.5 X 1.25 cm), aneye-socket screw, a S-hook, four straight pins, a shallow pan of water, two tables of equal height, a scale,a large plastic bucket, sandpaper, and weights. I began my project by using a cutting knife to cut the balsawood into the sizes that I would need to build the bridges. I had been soaking four pieces of balsa wood inwater for about three days when I took one out and tried to bend it for the arch bridge. However, itsnapped. Because of this, I was unable to make or test the arch bridge. Regardless, I finished cutting thewood for the other bridges, glued the pieces together, and left them to dry. Later on, I came back andconducted the actual testing. I did this by placing a wooden block on each bridge, hanging a bucket fromthis wooden block, and then adding weights into the bucket until the bridge collapsed. Lastly, I weighedeach bucket on a scale and recorded the results.
ResultsAfter conducting the testing, the beam bridge had supported 17 lbs., the triangle bridge had held 35 lbs.,and the double truss bridge had carried 39.5 lbs. before finally collapsing. However, I did not receive anyresults from the arch bridge, as I was unable to build and test that bridge.
Conclusions/DiscussionI concluded that my hypothesis was proven partially correct, as the double truss bridge did carry moreweight than the triangle bridge, and the triangle bridge did hold more weight than the beam bridge.However, I was unable to receive any results from the arch bridge, making that part of my experimentinconclusive and neither proving nor disproving that particular section of my hypothesis.
Testing the strenght of the beam bridge, the triangle bridge, the double truss bridge, and the arch bridge.
Mom helped by driving me around to buy materials, Dad helped by giving me tips on how to cut the wood
CALIFORNIA STATE SCIENCE FAIR2007 PROJECT SUMMARY
Ap2/07
Name(s) Project Number
Project Title
Abstract
Summary Statement
Help Received
Emily T.H. Le
Walk, Stop, and Stroll
J0216
Objectives/GoalsCan mechanical legs work and move without the use of electricity, rather the amount of energy suppliedby the maneuvering of the lever by human hands? What type of soles would provide the most grips, orconduct the most friction, to prevent the legs from slipping while supporting weight?
Methods/Materials10_10cm springs8_3cm springs2_ 35cm wooden bars2_40cm wooden bars 1_26cm x 26cm board(wooden),25_ 2cm screws6_large rubber1 pair of rubber soles1 pair Dr. Sholl#s gel pads1 pair plasticsoles2_12cm rods1_1kg weight1_500g weight1_700g weight1 rolloftape1_screwdriver1_pliars1_scissors3m of wire6 _hinges 2_15.5cm x 7cm wooden board4_ 2m longthin rope1.
Resultsleft leg, the wood block for knee is slightly curved in, uneven when nailed block in (small) crack becausenot thick enough hinge on right for feet is closer to edge, unstable hinge, place protruding, first timechange so that pieces of wood touch one another wood board on ,uneven first time one leg (left) bendinwards, hinge on top tiny holes because tried to staple springs inif legs are towards back, can stand ifslightly forward, fall over left leg has more balance right leg slightly bent(hip)board slightly tippedforward to keep stableright leg slant outward to standcannot stand on one leg with one leg bent, fall overimmediatelyfeet about 5cm apart left leg is closer in side the board(hip)right leg (hinge) on hip moreagapefeet, slanted outward to standscrew loose on left (foot)can stand without distance between feet.
Conclusions/DiscussionApparently, in my case, mechanical legs cannot work or move by using only energy produced by Homosapiens# hands.the feet are too small to be able to support the weight above it. The springs that are usedwere too coiled together causing it to pull in which makes the legs unable to stand upright.Adding theblock of wood in between the #femur# and #tibia# prevented the #kneecap# to bend backwards. Also theboard that connected the two legs and acted as a #hip# were connected by hinges so that every time thelegs move the weight would thrust forward.Also, the ankle or heel part was held together by a hingemaking the feet swing to nearly 180 degrees with every step to change that I made the tibia touch the feetcompletely and that made the legs too stiff and unable to balance. The springs were too tightly coiledwhich only made the legs bend and not straighten.There is also no center of mass for the legs.
How mechanical legs can work without using electricity and use energy supplied through human hands.
Father_cutting wood, Chris,Bryan, Brandon, Alan (home depot), Thy_taking pictures

CALIFORNIA STATE SCIENCE FAIR2007 PROJECT SUMMARY
Ap2/07
Name(s) Project Number
Project Title
Abstract
Summary Statement
Help Received
Annie G. Lefley
Plies to Perfection: The Force on Your Patellar Tendon
J0217
Objectives/GoalsThe objective of my science fair project is to test my hypothesis that if a person does a grande plie, thenthere will be more tension on the patellar tendon than if a person does a demi plie.
Methods/MaterialsTo test this hypothesis, my dad and I built a model knee that contained a spring to measure tension. Tocollect my data, I first held the knee in the desired position, which was determined by measuring theinside angle of the knee. I then tightened the string, or tendon, using a guitar tuner. I adjusted the tensionuntil the knee stayed in position. Once the knee was in position, I measured how much the spring, orquadriceps, had extended. To convert the extension into tension, I used the equation: Tension = Spring Extension x Spring Constant + Pretension The pretension is the minimum amount of force it takes for the spring to begin extending.Once I collected my data, I graphed it using Microsoft Excel. My graph showed that the tension on thepatellar tendon goes up at a faster than linear rate as the plie gets deeper. Putting in a trend line, Iobtained the equation: y = 0.0007x^2 + 0.0176x+ 0.8411 to describe the relationship between the angle of the plie (x) and the tension on the patellar tendon (y). I then formed the equation: Tension = 8.35[(Sin(90-[½ inside angle])) x 2] to model the theoretical tension on the patellar tendon on my knee model.
ResultsThere was 100% more tension on the patellar tendon in a grande plie than a demi plie. The tensionpredicted by the theoretical equation above was reasonably close to the measured force, but not preciselythe same.
Conclusions/DiscussionIn conclusion, my data support my hypothesis. There is approximately 100% more tension in a grandeplie than there is in a demi plie. I think the reason that the theoretical force did not entirely agree with themodel, is because of the many complications of my model that were hard to measure, and include in mytheoretical equation. For example, the string is not perpendicular to the upper leg all of the time, as mytheoretical equation assumes, the heel rises, and there are varous frictions around the ankle and hip. All ofthese things make it difficult to have a perfectly accurate theoretical equation.
The objective of my project is to see whether there was more tension on the patellar tendon in a grandeplie or a demi plie, two moves in ballet.
My dad helped build the model; James Neilson, a PhD student at UCSB help with equations; My teacherMrs. Miller helped with the theoretical tension.
CALIFORNIA STATE SCIENCE FAIR2007 PROJECT SUMMARY
Ap2/07
Name(s) Project Number
Project Title
Abstract
Summary Statement
Help Received
Connor M. Lynch
Hydrogen Fuel: Clean and Powerful!
J0218
Objectives/GoalsThe objective of this project was to demonstrate that by replacing the fuel source of a gasoline combustionengine with hydrogen gas would produce fewer detrimental emissions while still maintaining a practicallevel of performance.
Methods/MaterialsIn order to fully evaluate both aspects of my hypothesis, I developed four separate testing experiments.First, I converted a 5 hp Briggs & Stratton gasoline engine to burn hydrogen gas as its fuel source. ThenI took the converted engine to Fast Lane Auto for an emissions test while running on gasoline and whilerunning on hydrogen. The next experiment, speed, was measured in RPM (revolutions per minute) using atachometer which measure the revolutions of the axel while running on gasoline and while running onhydrogen. For my final test, power, I constructed a differential strap brake which measures the differentialpressure required to stop the engine at idle speed. This test was also done while gasoline was burning andwhile hydrogen was burning. I then plugged these measurements into a horsepower conversion formulawhich gave me the horsepower that was exerted when each different type of fuel was burned.
ResultsThe results from the emissions test showed the engine running on hydrogen demonstrated an 84%reduction in carbon monoxide, 60% reduction in carbon dioxide and a 272 ppm increase in hydrocarbonemissions when compared to the engine running on gasoline. While burning gasoline in the engine theaxle had an overall average of 1740 rpm. Where as the same engine burning hydrogen had an overallaverage of 1725 rpm. After putting the weight differences into the horsepower conversion formula thehorsepower that the gasoline powered engine exerted was 2.81. While the horsepower from the hydrogenpowered engine was 2.21.
Conclusions/DiscussionThis experiment demonstrated that an engine running on hydrogen would have an overall positive impact,and would be practical to implement in society.
I converted a gasoline powered engine to run on hydrogen to prove that a hydrogen powered enginewould produce fewer emissions while still maintaining an equal power performance when compared to agasoline powered engine.
UCSB Graduate Student

CALIFORNIA STATE SCIENCE FAIR2007 PROJECT SUMMARY
Ap2/07
Name(s) Project Number
Project Title
Abstract
Summary Statement
Help Received
Stephanie L. Merrill
Green Concrete
J0219
Objectives/GoalsThe purpose of this experiment was to determine if adding waste materials to concrete affects its strength. There are two goals to be achieved by adding waste materials to concrete. First, it could be a great way touse materials that clog landfills. Second, the waste materials could make the concrete lighter. Thus, theexperiment was to find out if a lightweight concrete could be made from waste materials without affectingthe strength.
Methods/MaterialsThe experiment involved adding different amounts of waste materials to test cylinders of concrete. Tenconcrete cylinders were prepared, including a control, and different amounts of Styrofoam, cardboard, andtire rubber were added to nine cylinders. Then, the cylinders were brought to the concrete testing lab tocure for 30 days. After the concrete cylinders cured for 30 days, the strength of the concrete cylinderswas tested. The strength was tested by using a compression machine that increased the pressure placed onthe concrete cylinders until they failed.
ResultsThe waste materials made the concrete cylinders weaker. The Styrofoam cylinders were the strongest andthe tire rubber cylinders were the weakest. The weight of the concrete samples was affected as well. Generally, adding waste materials to the concrete cylinders decreased the weight of the cylinders.
Conclusions/DiscussionThe waste materials made the concrete weaker. The more of the waste material added, the weaker theconcrete became. Surprisingly, the rubber, the densest of the waste materials, had the most negative affecton the concrete strength. The Styrofoam concrete was the strongest. The weight of the concrete sampleswas affected as well. Generally, adding waste materials to the concrete cylinders decreased the weight ofthe cylinders.
While adding waste materials to concrete may help the environment, the strength of the concrete isweakened.
My father helped me carry and mix the concrete. Geotechnics, Inc. provided the testing facility.

CALIFORNIA STATE SCIENCE FAIR2007 PROJECT SUMMARY
Ap2/07
Name(s) Project Number
Project Title
Abstract
Summary Statement
Help Received
Eric C. Mintz
The Effects of a Dynamic Load on Structural Integrity
J0220
Objectives/GoalsSince I live in California where earthquakes are common, I decided to look at earthquake effects on thestructural integrity of arches make from materials of different flexibilities. My hypothesis was that archessupporting a significant weight that are too flexible would lose structural integrity too easily. Someflexibility is required since an arch made of material that is too rigid will not be able to absorb significantground movement. Therefore, a material with moderate flexibility would be most desirable.
Methods/MaterialsI designed and had the arches cut made out of different plastics having seven different flexibilities but allthe same compression strength. I tested 63 arches, nine replicates for each of seven materials (ABS,Acetal, Acrylic, Fiberglass, Garolite, Polycarbonate, and Nylon 6/6). I fastened each arch to a fixture and#shaker# table that I designed and built. Using a counter I then measured how fast the shaker table wasmoving and chose three frequencies that the shaker table would go at, 7 hertz, 3 hertz, and 1 hertz. I thensteadily poured water into a container hung from each arch while it was on the moving shaker table untilthe arch either broke or buckled. I then recorded the average weight at which each arch type failed.
ResultsThe arches composed of the #acetal# material were able to hold the most weight, 3813 grams, which wasfor times more than the acrylic arches which had the least average weight bearing capacity. The materialthat was second strongest under these conditions was polycarbonate, which supported on average 2410grams before breaking.
Conclusions/DiscussionMy results supported my hypothesis that a moderate flexibility for the weighted arches was best able totolerate the #ground# motions.
This project tests the weight-bearing capacity of different arches in motion on a shaker table I built tosimulate earthquake movement.
Grandfather let me borrow tools; Connie Chow taught me how to use solid works; Professor at UCSDanswered some of my questions; Father bought me the materials.

CALIFORNIA STATE SCIENCE FAIR2007 PROJECT SUMMARY
Ap2/07
Name(s) Project Number
Project Title
Abstract
Summary Statement
Help Received
Diego R. Munoz-Cowan
Truss Bridge Tests
J0221
Objectives/GoalsMy objective is to learn which of three truss bridges will support support the most mass. The threebridges are: the Baltimore (Pratt), the Lattice, and the Subdivided Warren. I believe that the Latticebridge will support the most mass because it has the most triangular supports.
Methods/MaterialsThree different truss bridges were constructed using toothpicks and glue. They were each built onsame-sized pieces of rectangular cardboard, Each bridge had the same top, roadbed and cube platforms. Each bridge had a different truss design. I then put a rod with a cord across the roadbed of each bridge. Tied to the end of the cord was abucket. Then, I slowly poured water into the bucket until each of the bridges collapsed and touched thecardboard base. Lastly, I weighed the bucket, rod, and cord, and added it to the weight of the water.
ResultsThe Lattice supported the most mass. The Subdivided Warren supported the second greatest amount ofmass. The Baltimore (Pratt) supported the least amount of mass.
Conclusions/DiscussionMy hypothesis was correct. The Lattice bridge supported the most mass (6575 gm.). My conclusion isthat it supported the most mass because it had the most triangular supports.
My project is to find out which of three different truss bridge designs is the strongest.
My mother helped me to type the report. My father cut out the cardboard rectangles.

CALIFORNIA STATE SCIENCE FAIR2007 PROJECT SUMMARY
Ap2/07
Name(s) Project Number
Project Title
Abstract
Summary Statement
Help Received
Denise A. Navarro
How Does a Trebuchet Work?
J0222
Objectives/GoalsThe purpose of the project was to build one trebuchet made of wood with supplies in my school'swoodshop class. I changed each feature in order to see at which settings it will perform its best. I alsotested to see which feature to change in order to accurately hit a target on the floor at 6.25 and 10 m. I hadto document my test well by creating a daily log, research paper, and visual display board.My hypothesis was that in order for the projectile to go a greater distance, I believe the length of the slingstring should be longer, the hook should be curved more, the lever arm should be longer, and the fulcrumshould be higher. In order to hit the target, the lever arm should be adjusted.
Methods/MaterialsI used a trebuchet made of wood, a hackie sack, string, a meter stick, and safety goggles. When I changedthe features of the trebuchet, I kept all the other things constant just to be as accurate as possible. Ichanged the length of the sling string from 35-54 cm. I changed the curvature of the hook from a flatsemi-circle to a fully curved semi-circle. I varied the length of the lever arm from 70-100 cm. I alsochanged the height of the fulcrum from 54-60 cm. In order to hit the target, i changed the curve of thehook, the length of the lever arm, and the height of the fulcrum.
ResultsThe projectile went farther when the sling of the sling string was longer, the curve of the hook wasgreater, the lever arm was longer, and the height of the fulcrum was higher. The best feature to change inorder to hit the target was the length of the lever arm beacuse it allowed me to aim better.
Conclusions/DiscussionIn conclusion, my hypothesis was correct. When the lengths of the sling string and the lever arm waslonger, the projectil went farther. When the hook was curved more and the hieght of the fulcrum washigher, the projectile went farther. The best feature to change to hit the target was the lever arm.
I built one trebuchet made of wood and test each of its different variables to see at which settings it willperform the best and hit two targets on the floor.
Mr. Wade helped me build the trebuchet in his woodshop class; Mrs. Genota helped me with the researchpaper and display borad; my parents helped me with my purchases.
CALIFORNIA STATE SCIENCE FAIR2007 PROJECT SUMMARY
Ap2/07
Name(s) Project Number
Project Title
Abstract
Summary Statement
Help Received
Ralph M. Sathre
Does JB-Weld Have a Usable Strength in Space?
J0223
Objectives/GoalsMy objective was to stimulate the research of space glues that could have prevented the heat shield failureon the Space Shuttle Columbia and future spacecraft repairs by making repairs while in space. I firststarted with simple tests on a smaller scale with a common epoxy glue, JB-Weld, which was purchased atHome Depot. I created several devices that tested JB-Weld in space like conditions for Shear, Tension,Torsion and Compression forces while vacuumed and at temperatures from -17 to 260 degrees C. I wassearching for new methods of actually applying these glues while in a space like environment which is acurrent problem for N.A.S.A.
Methods/MaterialsI used springs, wires, Popsicle sticks and 15mm diameter glass tubes to create these testing devices thatwere then vacuumed and subjected to hot and cold cycles as in space. I also simulated mixing thecompounds in a vacuum to see if they would harden and be useable in space by astronauts.
ResultsThe epoxy, once cured above 10 degrees C, hardened into a useable product for the most part during hotand cold cycles. The hardened product at -17C appeared to not develop a brittleness common to ice at thattemperature indicating that its strength may continue to be useful at much lower temperatures possiblyapproaching those lower temperatures of space. My experiment did not test to those lower temperatures.My tests were successful in all strength categories and only failed 6 out of 10 torsion tests at highertemperatures than that on the moon.
Conclusions/DiscussionJB-Weld may have a useable strength in space. During one of my final tests in a vacuum, I realized adifferent approach for astronauts to use. Instead of the conventional two part epoxy where each part mustbe thoroughly mixed with the other, my experiment showed that by the simple touching of one part to theother a hardened epoxy can be created where a chemical reaction is started at the interface of bothsubstances eliminating mixing. This concept actually happened in my experiment with JB-Weld whileunder a vacuum to some degree. If scientific research could develop products that did not require mixingbut only touching then this approach would greatly simplify the application of epoxy for spacecraftrepairs.
I tested an epoxy glue for useable strength for spacecraft repairs while in space by astronauts.
Used lab equipment and supervised during vacuuming and glasswork by licenced neon manufacturer

CALIFORNIA STATE SCIENCE FAIR2007 PROJECT SUMMARY
Ap2/07
Name(s) Project Number
Project Title
Abstract
Summary Statement
Help Received
Alexander J. Sercel
Effect of Propellant Variation and Aerodynamic Drag on PotatoCannon Performance
J0224
Objectives/GoalsThis research effort was to gain a better understanding of the physics and engineering principles related tothe operation of a potato cannon. Research goals were to find out which common household propellantworks best, how much propellant is best, and to learn how air drag effects the trajectory of the potato.
Methods/MaterialsI made a potato gun and launch stand using PVC and materials available at the hardware store and testedit using a variety of propellant quantities and types. Trajectory performance was recorded on a digitalvideo camera with a calibrated backdrop to capture spud velocity and launch elevation angle. Trajectoryrange was recorded by flagging ground impact locations then using a tape. Flight distance was predictedusing a computer algorithm in a spreadsheet to numerically integrate the equations of motion. Bycomparing measured spud flight range to predicted range, an indirect measurement of potato dragcoefficient was obtained.
ResultsSpud launch velocities were observed in the range of 20 to 60 m/s. At low fuel amounts, corresponding to0.5 seconds of spray injection, spud launch speed varied from 30 to 40 m/s. At increasing fuel amounts(up to 2 s of spray), spud launch speed varied from 20 to 60 m/s. Flight ranges of up to 100 m wereobserved to be less than that which was predicted in the absence of atmospheric drag. Flight range wasaccurately predicted when drag effects were accounted for in the trajectory integration.
Conclusions/DiscussionWhen there is too much fuel, the gun either works very well or doesn#t have enough oxygen to burnproperly. If the fuel mixture is too lean, the gun works predictably but doesn#t have as much launchenergy. A medium fuel mixture is ideal for repeatable results because you have higher power than a leanmixture and you don#t run the risk of flooding the chamber. The top three propellants I used all containdenatured ethanol as a main ingredient suggesting that ethanol is an excellent propellant.
My numerical results show that you can't accurately predict how far a potato cannon will shoot unless youinclude the effects of air drag. It is possible to integrate the equations of motion of a flying potato in aspreadsheet in which the trajectory is broken up into time slices of about 0.01 seconds. This allows accurate prediction of the shape of the potato's trajectory, including the effects of atmospheric drag.
I addressed two questions related to the performance of a potato cannon: What is the best type andquantity of propellant, and how much aerodynamic drag does the potato have in flight?
My parents took me to the hardware store and bought my materials, my father safety checked everything Idid and operated the video camera, my father showed me how to use some features on the computer I hadnot previously used, and my whole family helped me collect field data on test days.

CALIFORNIA STATE SCIENCE FAIR2007 PROJECT SUMMARY
Ap2/07
Name(s) Project Number
Project Title
Abstract
Summary Statement
Help Received
Analisa K. Shields-Estrada
Does Structure Affect Strength?
J0225
Objectives/GoalsMy goal was to explore the relationship between the structure of a material and its strength. I answeredthe question: Will changing the structure (or the form: flat, rolled, twisted, and braided) of a materialaffect its strength? My hypothesis was: The braided structure of the materials will be the strongest.
Methods/MaterialsI created four different bridge structures, flat, rolled, twisted and braided, for each of three differentmaterials, cotton, fabric, plastic and paper. I used four 21.65 cm x 14 cm pieces of each material for eachstructure. Within material, all of the 4 structures were of similar mass. Overturned yogurt containerssecured with tape were the bridge supports. To measure the strength of the structures, I placed eachacross the supports to form a bridge, placed weights on top until the structure broke, then measured andrecorded the mass of the weights. I repeated three trials for each structure.
ResultsFor each material, changing the structure changed its strength. Across the three materials, the strength ofthe types of structures varied similarly: The rolled structures were the strongest supporting the most massby far (ranging from 15.73g to 7500.00g), the twisted structures were the second strongest (ranging from5.70g to 189.97g), the braided structures were the third strongest for paper and fabric (ranging from to8.00g to 93.33g), the flat structures were the weakest for paper and fabric (ranging from 1.00g to 9.00g). The braided and flat plastic structures were both very weak supporting only 1g of mass. A secondaryfinding was that the paper was stronger than the fabric, and the fabric was stronger than the plastic.
Conclusions/DiscussionStructure affected strength across all materials. The data did not support my hypothesis, which stated thatthe braided structure would be the strongest. My project attempted to model and demonstrate the processof changing a materials# structure to change its strength. Scientists have used this idea innanotechnology. Carbon nanotubes, a new form of carbon that scientists have made usingnanotechnology, are 50 times stronger than steel and have a diameter of only 1 to 10 nanometers.
My project explores the relation between the structure of a material and its strength.
Mrs. Kilkenny helped me specify my hypothesis. Peggy Estrada helped me refine my braiding techniquesand taught me how to iron.
CALIFORNIA STATE SCIENCE FAIR2007 PROJECT SUMMARY
Ap2/07
Name(s) Project Number
Project Title
Abstract
Summary Statement
Help Received
Courtney J. Shipp
Maximizing the Trajectory of a Trebuchet
J0226
Objectives/GoalsThe purpose of this project is to determine the relationship between several variables of a trebuchet andthe distance it is able to throw a projectile. These variables include the length of the counterweight arm,the length of the throwing arm and the length of the sling. It was hypothesized that if the counterweightarm, throwing arm, and sling were lengthened, then the trajectory would be maximized and the trebuchetwould throw the projectile farther.
Methods/MaterialsA trebuchet is a siege weapon that was used in Europe during the Middle Ages before gunpowder wasinvented. To run this experiment, a model trebuchet was built using PVC and a golf ball was launchedfifteen times with each of the following variables: counterweight arms with lengths of 4, 5, 6, 7, 8 and 9inches; throwing arms with lengths of 16, 18, 20, 22, and 24 inches and slings with lengths of 16, 18, 20,22, and 24 inches.
ResultsThe 6 inch counterweight arm, 20 inch throwing arm and 20 inch sling combination maximized thetrajectory and produced the longest throws, with the distances declining as the counterweight arm,throwing arm, or sling were shortened or lengthened.
Conclusions/DiscussionThese parameters were optimal because at this setting the trebuchet was releasing the golf ball at an idealangle after the golf ball had received the maximum amount of energy the trebuchet could transfer to it. With other combinations of the variables, the trebuchet would release the golf ball either too early or toolate. This affected the amount of energy transferred to the golf ball. When the trebuchet released the golfball too late, energy was lost in the release from the sling. When the ball was released too early, it had notreceived all the energy the trebuchet had to transfer. Therefore, the results did not support the hypothesis.
This project tested a trebuchet by varying the length of the counterweight arm, throwing arm and sling todetermine which combination would maximize the trajectory of a golf ball launched from the trebuchet.
My family helped me to run experiments and collect data accurately, my dad helped me glue the trebuchettogether, and my mom helped me arrange my board.

CALIFORNIA STATE SCIENCE FAIR2007 PROJECT SUMMARY
Ap2/07
Name(s) Project Number
Project Title
Abstract
Summary Statement
Help Received
Katelyn E. Shipp
Standing Tall: Strength of Shapes
J0227
Objectives/GoalsThe purpose of this project was to find out which shape of column is the strongest and will support themost weight. It was hypothesized that the circular shaped column would be the strongest and wouldsupport the most weight.
Methods/MaterialsA column is a vertical structure that is used to support a large load, usually in the form of a building orstructure. This experiment involved making several different shaped columns, lifting and setting multipleweights onto the columns until the columns failed, and recording the data. The tests were run usingtriangular shaped columns, square shaped columns, hexagonal shaped columns, octagonal shaped columnsand cylindrical shaped columns. Each shape of column was tested thirty different times with fourcolumns used in each trial.
Originally the experiment was performed 10 times using 110 lb cardstock to make columns that were 5.5inches tall. In order to validate the results, the entire experiment was run again using 110 lb cardstock and11 inch tall columns and then a third time using 28 lb copy paper and 5.5 inch tall columns. This gave atotal of thirty data points for each shape of column. Throughout all the experiments the perimeter of thecolumns was kept constant at 6 inches.
ResultsThe results of the experiment supported the hypothesis. The cylindrical shaped column was by far thestrongest column and supported the most weight.
Conclusions/DiscussionThe cylindrical shaped column is the strongest is because of corners. The flat sides of the shapes do notsupport structural load. Therefore, it is the corners of the shapes that give the columns their strength. Thetriangle has three corners to support its load, the square has four, the hexagon has six and the octagon haseight corners. In contrast, the circle can be viewed as having 360 corners. Thus, the circle is by far thestrongest shaped column.
This experiment tested 5 shapes of columns (triangle, square, hexagon, octagon, circle) varying the heightand thickness of the material to determine which shape was the strongest and could support the moststructural load before failure.
I would like to thank my dad for lifting some of the weights that were too heavy for me to lift, my sisterfor taking pictures during my tests, and my mom for helping me organize my science fair presentationboard.
CALIFORNIA STATE SCIENCE FAIR2007 PROJECT SUMMARY
Ap2/07
Name(s) Project Number
Project Title
Abstract
Summary Statement
Help Received
Henry R. Solomon
Bend It Like Beckham or Magnus Force?
J0228
Objectives/GoalsI would like to learn how to kick a soccer ball in such a way that it appears to be heading straight, butcurves away from goalie (or wall of defenders at the last second. I was always curious how DavidBeckham of the Los Angeles Galaxy was able to bend the ball around a wall of defenders and score anamazing goal. I would like to learn his awesome trick.
Methods/MaterialsUse one size four soccer ball, one tape meause, one soccer goal that is 25 feet wide, and one soccer field.
Follow these steps to complete the experiment:1. Place a size four soccer ball 18 yards away from a 25 foot wide goal.2. Lay a tape measure arcoss the goal line.3. Draw an X on the inflation hole of the ball. This will represent the middle of the ball.4. Then draw 3 more Xs at 40mm, 80mm, and 120mm to the right of the center of the ball.5. Kick the ball 20 times at each X, making sure that the top of your foot makes contact with each X.6. After each kick, record how far to the right the ball was when it was half way to the goal, and when itenters the goal.7. Once the ball has been kicked 20 times at each X, the experiment will have been completed.
ResultsThe ball curved the most when it was kicked at 80mm to the right of the center of the ball. When it washalfway to the goal, the average kick was 1.45 feet to the right of the center of the goal. When the ball wasin the goal, it was 6.475 feet to the left of the center of the goal.
Conclusions/DiscussionWhen the results were calculated the ball curved the most when it was kicked at 80mm to the right of thecenter of the ball. It curved about 7.9 feet in total. This was surprising because the conductor predictedthat it would curve the most when it was kicked at 120mm. In order for the Magnus Force to come intoplay, the ball has to have enough force applied to it. Because 120mm is so far to the right, it is hard toapply enough force. However, 80mm is not so far to the right, so more force was able to be applied. If youkick a ball in the right place with enough force, it will curve the most.
I tested where to kick a soccer ball so it generates enough curve to bend around the goalie.
My mother helped organize research and my father helped me meausre the curve of the ball when I didmy experiment.

CALIFORNIA STATE SCIENCE FAIR2007 PROJECT SUMMARY
Ap2/07
Name(s) Project Number
Project Title
Abstract
Summary Statement
Help Received
Garrett E. Sons
Determining the Damage of a Tsunami Wave Based on the Building'sShape, Angle, and Location
J0229
Objectives/GoalsThe purpose of my science fair project is to determine whether the buildings shape, angle, and locationhas an effect on the Tsunamis damage.
Methods/MaterialsThe first thing I have to do to conduct my testing is to buy an aquarium measuring 1' by 2' by 1' long. Thereservoir will be 1 foot wide by 9 inches. The sand beach will be 1 3/4 inches high by 1 foot wide by 11inches long. I will use wood buildings and put them in different locations and angles. The buildingsshapes will be a circle, triangle, and square.To make a tsunami I will partition one end of the aquarium. That area will contain the water. To start thetsunami, the partition will be raised to let the water out towards the building located at the other end of theaquarium. Measuring the lean of the buildings alows me to observe wich building will withstand the forceof the tsunami best.The variables I used are: The buildings will be, 2 triangle pieces of wood 3" high by 2" by 2". 2 circlepeices of wood 3" high by 2" diameter. 2 square pieces of wood 3" high by 2" by 2". 810 pounds ofwater. 59 pounds of sand.
ResultsAfter comleting all 60 testings of switching buildings angles and locations. I found out what building gotknocked over the least and what building got knoced over the most. Also every thing in between. Thebuilding that got knocked over the least was the square when its line e,f was facing the tsunami and thesquare was on the left side of the aquarium it got knocked to 88.3 degrees. The building that got knockedover the most was the triangle when its angle a was facing the tsunami and it was on the right side of theaquarium it got knocked to 57.9 degrees.
Conclusions/DiscussionOverall I learned many things doing my project. I learned what buildings stand up the best and worst. Ilearned that a buildings density maters on the damage and much more from my research and testings. Lastly I learned what I could next year.
Determining if the shape, angle, and location of a building will minimize the damage of a Tsunami wave.
Grandpa helped build test ocean; Cousin helped with some typing.

CALIFORNIA STATE SCIENCE FAIR2007 PROJECT SUMMARY
Ap2/07
Name(s) Project Number
Project Title
Abstract
Summary Statement
Help Received
Morgan W. Spadone
Portable Water Heater
J0230
Objectives/GoalsTo build a portable hot water heater using house hold materials.
Methods/MaterialsCollect the materials: heater hose, thermos, copper tubing, on/off valves, hose clamps, tube connector,charcoal chimney starter, epoxy glue, charcoal and water pump. Wrap the copper tubing around thechimney in an upward spiral. Cut two hoses and insert one at the top and bottom of thermos. Then connectto the copper tubing. Add shut-off valves and water pump. Fill thermos with water, add chacoal andnewspaper to chimney,ignite. Once charcoal is hot, pump water through coils and allow thermalsiphoning to take over, heating the entire tank.
ResultsAt first the pump was leaking. Adjustments had to be made to stop the leak. The pump was braced up sonot to leak. In following tests the water in the 5 gallon tank did increase from 60 degrees F to 98 degres Fwithin 90 minutes. The temperature of the water on top of the thermos was measured at 115 degrees F.
Conclusions/DiscussionWhen water is heated in a closed container, convection occurs causing cooler water to sink and warmwater to rise. Additionally, thermal siphoning occurs when the water is heated. The warm water movesin a circle through the thermos out the hose, through the coils and back into the thermos again. Thistechnique could be used for outdoor survival during emergencies. More testing using environmentally"friendly" materials would be beneficial to improve upon this invention.
A portable hot water heater to be used for outdoor living or in the event of an emergency where hot wateris needed.
My dad helped me select the items from the hardware store. He also helped me with the power tools,Exacto knife and when using the epoxy glue. My mom helped with the testing when having to light thecharcoal. She also helped me glue and cut paer for my presentation board.

CALIFORNIA STATE SCIENCE FAIR2007 PROJECT SUMMARY
Ap2/07
Name(s) Project Number
Project Title
Abstract
Summary Statement
Help Received
Conor E. Stanton
Faster Flips: Angular Momentum and Gymnastics
J0231
Objectives/GoalsMy goal in this project was to find out why it is easier for a gymnast to do a tuck positioned flip comparedto a lay-out flip. My hypothesis was that when the mass in a rotating object is moved closer to its centerof rotation, it will rotate faster than with its mass further away from the center of rotation.
Methods/MaterialsAn apparatus was built with a rotating arm with masses which could be moved closer or farther from theaxis of rotation. A mass suspended over one end of the arm could be dropped to exert a force and get thearm to rotate. Experimental trials were conducted with the moveable masses positioned at differentrotational radiuses. For each trial, the number of revolutions the object made in a fixed period of time wascounted. Materials included wood; screws and bolts; a large mass to drop; string to suspend the mass; aruler and a stopwatch.
ResultsThe experiment showed that with the same force applied, the object consistently rotated faster with itsmass closer to its center of rotation. Trials were done with the masses at several different radiuses. Onmy first trials the rotation slowed down much faster when the rotating weight was closer to the center ofrotation. I think this might have something to do with friction overpowering the lower inertia of thespinning mass. More initial force and a shorter timing period seemed to reduce the impact of friction orother forces on the results.
Conclusions/DiscussionThe experimental results support my hypothesis. Newton's 1st law states that a mass at rest tends to stay atrest and a mass in motion tend to stay in motion unless acted upon by an external force. For a massrotating around an axis, this is called rotational inertia, and this inertia increases as the distance of themass from the center of rotation increases and vice versa. This means given the same force, the mass willbe accelerated to a higher velocity as it is moved closer to the axis of rotation. When a mass is in motionit has something called momentum which is conserved. As a gymnast starts a somersault and pulls into atuck position, the momentum from the takeoff is conserved but the radius of the rotating mass getssmaller, so the velocity of the spin increases. This makes it easier to do the somersault with less forcethan if the gymnast stayed in a layout position.
My project explores the relationship between mass, acceleration, and momentum in circular motion.
My dad helped me build the experimental apparatus, and he also asked me lots of questions.

CALIFORNIA STATE SCIENCE FAIR2007 PROJECT SUMMARY
Ap2/07
Name(s) Project Number
Project Title
Abstract
Summary Statement
Help Received
Kristie M. Tagawa
It's the Blades That Count
J0232
Objectives/GoalsMy project involves the testing and research of wind turbine design and the electricity it generates. I aminterested in this subject area because there has been much discussion and debate about changing the wayAmerica generates electrical power. One alternative energy source often suggested is the use of windpower. I want to determine if the number of blades on a wind turbine has a direct affect on the amount ofpower the wind turbine will produce. My hypothesis states: if a wind turbine contains more blades, then itwill generate more electricity than a wind turbine that contains fewer blades.
Methods/MaterialsI began my experiment by constructing a replica of a wind turbine. I used a cardboard box to simulate awind tunnel which housed a generator mounted on a metal base. To make the wind turbine blades, I gluedmodel airplane propellers together in sets of 2, 3, 4 and 6 blades. Next, I attached a set of blades to thegenerator and turned on a fan which served as the wind source. I then recorded the voltage that the windturbine produced shown on the multi-meter. I repeated this three times with each set of blades.
ResultsAfter analyzing the data, I recorded the results. The wind turbine with three blades produced the greatestamount of energy. The turbine with four blades produced less energy than wind turbine with three blades.The turbine with six blades produced even a lesser amount energy than the turbine with four blades.Finally, the wind turbine with two blades produced the least amount of energy out of all of the blades.
Conclusions/DiscussionI concluded that a wind turbine containing three blades generates the most amount of electricity. Windturbines with greater or less than three blades do not produce the same output of electricity. If I were to conduct this experiment again, I would test the four wind turbines used in my experiment atdifferent wind speeds. I would also test a larger sample of blade sets with varying shapes and sizes. Thisproject can benefit society in several ways. Wind power could prove to decrease the dependence on fossilfuels and other non-renewable energy sources. It is beneficial to society because it is a clean energysource that does not produce carbon dioxide, mercury or any other type of air pollution. Investing in windpower is a smart and necessary move for an economical and ecological future.
My project involves determining how the number of blades that a wind turbine contains affects theamount of electricity it generates.
Parents purchased materials for project. Father supervised the soldering and electrical procedures of theexperiment.

CALIFORNIA STATE SCIENCE FAIR2007 PROJECT SUMMARY
Ap2/07
Name(s) Project Number
Project Title
Abstract
Summary Statement
Help Received
Matthew A. Tatarka-Brown
Stressed Out
J0233
Objectives/GoalsWhich structural beam shape will withstand the most load-bearing weight?
Methods/MaterialsFive different polystyrene beam shapes, cut to 15 inches, three of each polystyrene beam shapes, a fivegallon bucket (to put bricks in), thirteen bricks (to put in bucket), a hose (to fill up the bucket when thebricks cannot break the beam), a test stand, a gram and ounce scale (to weigh each beam), a regularbathroom scale (to measure the weight of the bucket), a notebook, two clamps (to hold down the beams),an S hook (to hold the bucket to the beam), a camera (to take pictures of the project), a stopwatch (if thewater & the bricks do not break the beam, count to two minutes), safety glasses, and a carpenter's square(to measure deflection).
Cut each beam to the length of fifteen inches, weigh each beam with the ounce & gram scale, set up yourtest stand with a twelve inch gap, clamp the first beam at both ends, put the #S# hook on the center, hangthe bucket from the #S# hook, load one layer of bricks into the bucket, record deflection, repeat until allbricks are used, fill remaining space in the bucket with water slowly until the beam breaks or the bucket isfull, when beam breaks, dismount the bucket & record it's weight. If the beam does not break leave thebucket full for two minutes, remove the bucket and weigh it. Photograph the results. Repeat thisprocedure for each beam. Analyze the data.
ResultsThe Square beam withstood the most weight with 70 pounds. The H beam withstood 68, I beamwithstood 63 pounds and the T beam followed with 45 pounds in order. The weakest beam was the Zbeam, which withstood 38 pounds on average.
Conclusions/DiscussionI conclude that if you need to support a tremendous amount of load-bearing weight upon a beam, use aSquare beam.
This project tests five structural beam shapes to determine which, Square, H, I, T, or Z, has the greatestload-bearing capacity.
My step-father helped set up the test bench, loaded the bricks and took many of the photographs, mymother and step-father helped with the poster board.

CALIFORNIA STATE SCIENCE FAIR2007 PROJECT SUMMARY
Ap2/07
Name(s) Project Number
Project Title
Abstract
Summary Statement
Help Received
Grace F. Tobias
The Effect of Centrifugation on Standard Fecal Flotation Procedures inthe Recovery of Parasitic Ova in Beef Cattle
J0234
Objectives/GoalsMy objective is to determine if adding a centrifugation step to a standard fecal floatation procedure willresult in an increase in the number of parasitic ova recovered from fecal specimens obtained from beefcattle.
Methods/MaterialsFresh fecal samples were collected from 6 beef calves. These 6 month old calves weighing approximately450 pounds were unweaned and had not been previously treated for parasites. Equal aliquots of eachsample were tested in triplicate using standard fecal floatation procedure and a fecal floatation procedureusing a centrifuged specimen. The number of ova recovered in each test was counted and recorded.
ResultsIn 5 of the 6 samples (83%), the centrifuged sample recovered greater numbers of ova.
Conclusions/DiscussionI conclude from this data that the addition of a centrifugation step to a standard fecal floatation procedureincreases the likelihood that parasitic ova will be recovered in greater numbers. The addition of thecentrifugation step decreases the probability of false negative test results especially in specimens with lowtotal ova counts.
My project is about improving the reliability of fecal examination for parasites.
I used lab equipment at my father's veterinary practice. My mother helped in identifiying parasitic ova.

CALIFORNIA STATE SCIENCE FAIR2007 PROJECT SUMMARY
Ap2/07
Name(s) Project Number
Project Title
Abstract
Summary Statement
Help Received
Cameron W. Wallace
The Sweet Zone of a Ball-Bat Collision
J0235
Objectives/GoalsRecent research on baseball bats by Robert Adair, Rod Cross and Daniel Russell has shown what happenswhen the bat hits a ball, and why there are some locations on the barrel that result in less vibration for thebatter. The goal of my project is to understand where on the barrel of a baseball bat will cause the leastvibration when hitting a ball. Is there a single "sweet spot" or a larger "sweet zone" where the vibration isthe least?
Methods/MaterialsI began by building a model of a freely supported bat holder. Dr. Daniel Russell from KetteringUniversity advised me how to use SpectraPLUS Software to find the frequency of the first three bendingmodes and the location of the barrel nodes of the first three bending modes for each bat being tested. With some expert help I adjusted the settings on the software to display a graph of amplitude (vibration)vs. frequency. Using this set-up, I tested three bats two times each. First I hit each bat on the tapered endusing a plastic handle and found the frequency of the first, second and third bending modes, and thestrength of vibration (decibels) for each mode. Then I hit each bat every 1/2" across the barrel, labelingthe node as the place on the bat where the vibration for each mode was the least.
Results(1) The location of the nodes of the first and second bending modes were the same for both trials for allthree bats. The location of the node for the third bending mode was the same for two bats, and 1/2"different for the third bat; (2) Subtracting the amplitude at the node for each bending mode from theoriginal amplitude calculated the vibration loss at the node. The node of the first bending mode had thelargest effect on reducing the overall vibration. The node of the second bending mode had the secondlargest effect on reducing the overall vibration. The node of the third bending mode had the least effecton reducing the overall vibration.
Conclusions/DiscussionMy hypothesis was that every bat I tested would have a certain area on the barrel of the bat where thevibrations were the least when hit by a ball. This area would be the "sweet zone" of the baseball bat. Myresults show that hitting a bat between the nodes of the first and second bending modes causes the leastvibration. My conclusion is that the "sweet zone" of a baseball bat is between the nodes of the first andsecond bending modes. This proves that my hypothesis is correct.
My project uses an accelerometer and vibrational analysis software to determine where a baseball bathitting a baseball would result in the least vibration; a single "sweet spot" or a larger "sweet zone?"
Greg Hildebrand gave me advice on using an accelerometer; Dr. Daniel Russell, Kettering University,advised me on how to test baseball bats using an accelerometer; Will Bagnall and Talitha Stimson helpedto install the SpectraPLUS Software; My father helped build the freely supported bat holder.
CALIFORNIA STATE SCIENCE FAIR2007 PROJECT SUMMARY
Ap2/07
Name(s) Project Number
Project Title
Abstract
Summary Statement
Help Received
David A. Whiteside
Projectile Efficiencies for a Kinetic Energy Weapon of MedievalWarfare
J0236
Objectives/GoalsThe objective of this project is to find the optimum ratio of counter weight to projectile weight. Anothergoal is to find if the optimum ratio, if there is one, will hold strong between three different projectileweights.
Methods/MaterialsOne will need power tools, saws, a nail gun, wood and a set of instructions to guide you as you build thetrebuchet. One will also need a projectile or tennis ball, weights for the counter weight, and a measuringtape to measure the distance of each launch.
ResultsThe data shows that for projectile group #one# the optimum ratio is 92:1. The optimum ratio forprojectile group #two# is 59:1. The optimum ratio for projectile group #three# is 34:1.
Conclusions/DiscussionWhen the data is studied, it is shown that there is no over all optimum ratio that is listed throughout all theprojectile weights. There is a pattern that is shown, but not with enough sample size to be statisticallysignificant. This is a pattern that shows when the projectile weight is increased; the ratio between counterweight and projectile becomes smaller.
This project was trying to find if there was an optimum ratio between counter wheight and projectilewheight and what was the ratio if there was one.
Mother helped type the report; Friend helped retrieve ball after launches; Dad supervised the building ofthe trebuchet.

CALIFORNIA STATE SCIENCE FAIR2007 PROJECT SUMMARY
Ap2/07
Name(s) Project Number
Project Title
Abstract
Summary Statement
Help Received
Jonathan A. Wilde
ToughBot: The Pursuit of a Better Urban Search and Rescue Robot
J0237
Objectives/GoalsThe goal of my project is to build a highly robust custom autonomous search and rescue robot platform. The design of the robot would be a major improvement on previous designs. The robot would be tested toensure that it met design criteria such as having redundant obstacle detection systems and being made outof tough materials.
Methods/MaterialsI first constructed the main prototype circuit board for the robot. Upon completion, I machined the bodyout of polycarbonate and assembled the robot. I then programmed software libraries and test programs forthe robot. Finally, I tested the robot by dropping it from two feet onto the ground to test its impactresistance, having it attempt to drive over a piece of PVC tubing to see how it would drive over roughterrain, and by having it drive up a slippery slope to test the traction of the treads.
ResultsThe impact resistance test revealed a weak tread link and the rough terrain test revealed that the plastictreads were too slippery. These issues were quickly fixed by replacing the weak tread link and by coatingthe treads in rubber.
Conclusions/DiscussionA small, tough, lightweight, and easy-to-program robot is clearly feasible. This prototype can clearlysurvive the hardships that a current search and rescue robot goes through and climb over the same types ofobjects that a current one can. The prototype even meets many of the specifications set by the Center forRobot Assisted Search and Rescue. A robot like this could clearly make the search and rescue industrysafer and more efficient than ever before.
The focus of the project is to build a robust custom urban search and rescue robot platform and test itunder simulated conditions.
Father taught how to use oscilloscope; Used power tools under supervision of father.

CALIFORNIA STATE SCIENCE FAIR2007 PROJECT SUMMARY
Ap2/07
Name(s) Project Number
Project Title
Abstract
Summary Statement
Help Received
Dylan T. Woodbury
Breaking Point: Using Pasta to Find the Effect of Length andCross-Sectional Area on the Strength of an Object
J0238
Objectives/GoalsThe objective is to determine whether the cross-sectional area and the length of an object affects thestrength and by how much. I believe that the pasta with the greatest cross-sectional area will be strongest,and will therefore support the most weight. I also believe that shorter pieces of pasta will be stronger thanlonger pieces because longer pieces bend more easily.
Methods/MaterialsThree different types of pasta of the same brand were used: thin spaghetti, normal spaghetti, and linguini. For each type of pasta, five different lengths were used: two, four, six, eight, and ten inches. I set twoblocks, with a notch in them to hold the pasta, on two tables. The tables were moved closer to or fartherfrom each other, depending on what the span of the pasta had to be. A piece of yarn tied to a plastic cupwas rested over the pasta. I had someone apply pressure to each end of the pasta to prevent the ends frombending and to keep the pasta from moving. I then dropped pennies one by one into the cup until thepasta broke. This was repeated ten times for each length of each type of pasta. All trials were done insideon the same day to control for atmospheric conditions such as humidity and temperature.
ResultsThe linguini (greatest cross-sectional area) held the most pennies while the thin spaghetti (smallestcross-sectional area) held the least pennies. For each type of pasta, the shortest length (2 inches) held themost pennies, while the longest length (10 inches) held the least. As the length increased, the number ofpennies that each type of pasta could support decreased.
Conclusions/DiscussionMy conclusion is that the strength of an object is definitely affected by its cross-sectional area and length. As cross-sectional area increases, the strength of the object increases. As the length increases, thestrength of the object decreases.
My project is about finding whether the cross-sectional area and length of an object affects its strength.
Father helped with graphs and regression equations; Father and Mother held down the pasta while Idropped pennies in the cup.
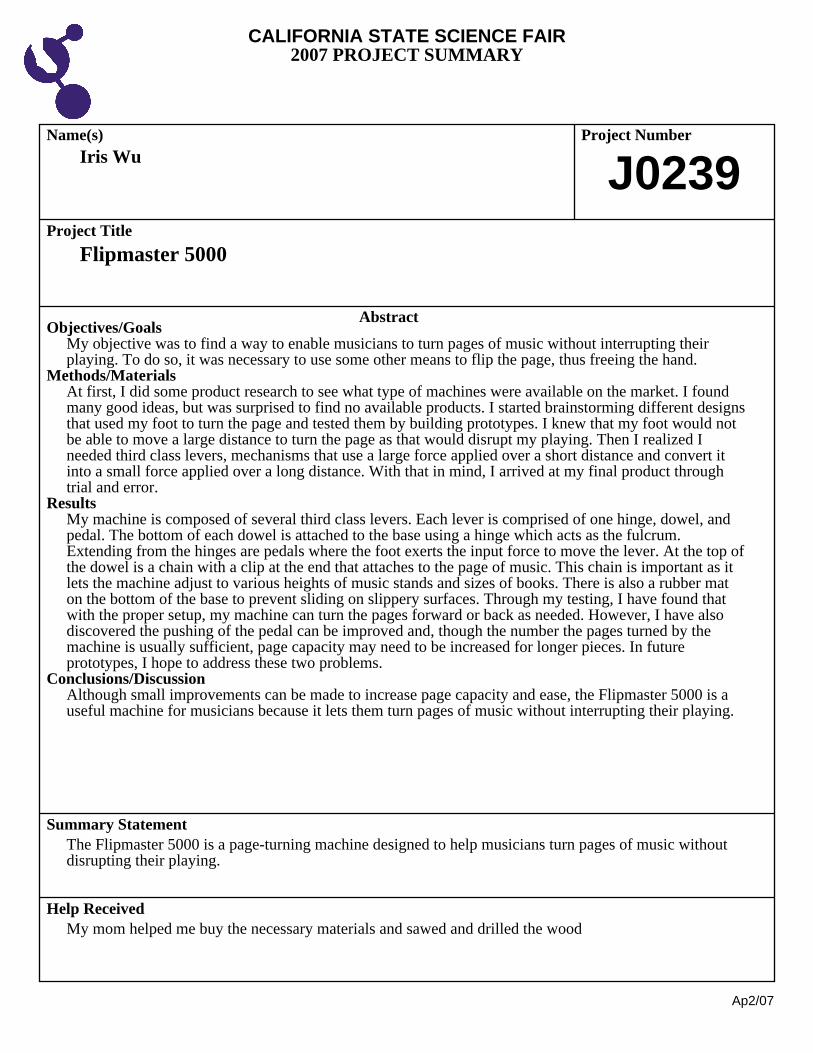
CALIFORNIA STATE SCIENCE FAIR2007 PROJECT SUMMARY
Ap2/07
Name(s) Project Number
Project Title
Abstract
Summary Statement
Help Received
Iris Wu
Flipmaster 5000
J0239
Objectives/GoalsMy objective was to find a way to enable musicians to turn pages of music without interrupting theirplaying. To do so, it was necessary to use some other means to flip the page, thus freeing the hand.
Methods/MaterialsAt first, I did some product research to see what type of machines were available on the market. I foundmany good ideas, but was surprised to find no available products. I started brainstorming different designsthat used my foot to turn the page and tested them by building prototypes. I knew that my foot would notbe able to move a large distance to turn the page as that would disrupt my playing. Then I realized Ineeded third class levers, mechanisms that use a large force applied over a short distance and convert itinto a small force applied over a long distance. With that in mind, I arrived at my final product throughtrial and error.
ResultsMy machine is composed of several third class levers. Each lever is comprised of one hinge, dowel, andpedal. The bottom of each dowel is attached to the base using a hinge which acts as the fulcrum.Extending from the hinges are pedals where the foot exerts the input force to move the lever. At the top ofthe dowel is a chain with a clip at the end that attaches to the page of music. This chain is important as itlets the machine adjust to various heights of music stands and sizes of books. There is also a rubber maton the bottom of the base to prevent sliding on slippery surfaces. Through my testing, I have found thatwith the proper setup, my machine can turn the pages forward or back as needed. However, I have alsodiscovered the pushing of the pedal can be improved and, though the number the pages turned by themachine is usually sufficient, page capacity may need to be increased for longer pieces. In futureprototypes, I hope to address these two problems.
Conclusions/DiscussionAlthough small improvements can be made to increase page capacity and ease, the Flipmaster 5000 is auseful machine for musicians because it lets them turn pages of music without interrupting their playing.
The Flipmaster 5000 is a page-turning machine designed to help musicians turn pages of music withoutdisrupting their playing.
My mom helped me buy the necessary materials and sawed and drilled the wood

CALIFORNIA STATE SCIENCE FAIR2007 PROJECT SUMMARY
Ap2/07
Name(s) Project Number
Project Title
Abstract
Summary Statement
Help Received
David A. Zarrin
The Effect of Wheels on Catapult Efficiency
J0240
Objectives/GoalsThe Greek inventor of the catapult, Archimedes, found that wheels increase launch distance of projectiles.He might not have known the physics behind his experiments. I wanted to understand and prove thephysics of why adding wheels to a catapult increases launch distance of a projectile.
Methods/MaterialsI found a catapult simulator on the Internet. After 40 simulated trials, I found the best arm ratiodimension. I built a catapult with removable wheels using the simulated dimensions. To clearly see thelaunch motion, I used a video camera to tape each launch with and without wheels. I loaded the video intoa computer and analyzed the motion frame-by-frame until I understood the effect of wheels on catapults.
ResultsI found that wheels help transfer more of the weight#s potential energy to the projectile. Wheels allow theweight to drop faster in a straight line thus transferring more energy in a shorter amount of time to theprojectile. Also, the projectile is launched while the catapult has a forward motion adding to the speed andlaunch distance of the projectile. In my experiment, the weight dropped in 0.33 sec. with wheels and 0.37sec. without wheels. Wheels increase the launch distance by 21.5%
Conclusions/DiscussionCatapults with wheels launch projectiles farther than catapults without wheels because:1. Weight on the catapult wants to go straight down (gravitational force).2. For the weight to drop straight down, the catapult must move backward and then forward. 3. Forward motion of the catapult happens as the projectile is launched, giving the projectile a boost.4. The catapult with wheels launch time was 0.33 sec. According to the video frames, removing wheelsslowed the launch time down to 0.37 sec, transferring less energy to the projectile.5. In catapults without wheels the weight is forced to travel down in an arc.6. When this happens the arm slows down, decreasing the amount of energy transferred to the projectile.7. There is no boost from the forward motion because without wheels, the catapult cannot move. I learned: 1. Physics and affect of catapult wheels on launch distance.2. Newtons Laws, potential and kinetic energy concepts.3. Computer simulators to find ideas without building real models.4. Measurement techniques using video cameras.5. Calculating object speeds using distance and time.6. Using computer programs: Photoshop, Premiere Pro, and Excel.
I wanted to understand and prove the physics of why adding wheels to a catapult increases the launchdistance of a projectile.
Mr. Simon Zarrin (father) helped with dangerous aspects of the project (power tools, catapult safety)