Embed Size (px)
Citation preview

IT District Wide Applications SDUSD PeopleSoft Mileage
3/3/2010 1
Mileage
SDCS PeopleSoft Training – Financials
March 2010
DISTRICT WIDE APPLICATIONS

IT District Wide Applications SDUSD PeopleSoft Mileage
3/3/2010 2
Table of Contents
How to Log into Oracle PeopleSoft to do Mileage Expense Reports ............... 3
Workflow – How it All Happens ......................................................................... 3
Chartfield Setup .................................................................................................... 4
Enter Your Budget Information – Example Exercise .............................................................. 4
Authorize Other Employees to Create Expense Reports on Your Behalf ...... 5
Authorize Others to Submit Your Expense Report For You – Example Exercise .................. 5
Mileage Expense Reports ..................................................................................... 8
Mileage within San Diego County – Creating an Expense Report from a Blank Form – Example Exercise .................................................................................................................... 8
Red Flags: What to Do When You Get One – Example Exercise ........................................ 17
Delete a Single Day Entry from a Mileage Expense Report – Example Exercise ................ 19
Copy from an Old Existing Report – Example Exercise ....................................................... 22
What to Do If Your Mileage Expense Report is Sent Back – Example Exercise ................. 25
How to Check the Status of a Submitted Expense Report – Example Exercise ................... 28
Tips & Tricks for Expense Reports .................................................................. 31
Maintain the Best Computer Connections ....................................................... 32
Clear Cache Files – Example Exercise .................................................................................. 32
Support – How to Find Help .............................................................................. 36

IT District Wide Applications SDUSD PeopleSoft Mileage
3/3/2010 3
Introduction and General Information Many employees can get reimbursed from our school district for eligible mileage incurred on their own private vehicles. Generally, this means that if your supervisor requires you to use your own vehicle to accomplish your work, you can get reimbursed for the mileage. To get reimbursed you must create and submit an Expense Report that contains details about your mileage expenses (where you went, when you went, and why you went).
If you want to get reimbursed for mileage incurred within San Diego County, you do not need prior authorization (a Travel Authorization). If you want to get reimbursed for mileage incurred outside San Diego County, you will need to submit a Travel Authorization prior to the travel. (Please see the Expenses Manual chapter on creating Travel Authorizations).
How to Log into Oracle PeopleSoft to do Mileage Expense Reports
Launch Microsoft Internet Explorer Go to: https://dwa.sandi.net Enter your User ID # (6-digit Employee ID number. If you don’t know it, ask your
supervisor or just look on your paycheck stub) Enter your personal DWA password (You must create one the first time you use
PeopleSoft. Please see the Job Aid “Setting Up Your DWA Password”) Click “Sign in” On the next page (portal page) click “Financials Supply Chain 8.9” On the next page, in the main menu on the left, click “Employee Self Service” or
“Travel and Expenses” depending on what you want to do.
Workflow – How it All Happens The flowchart below shows where the Mileage Expense Report goes and what happens to it, after you submit it.
Submit Expense Report
Report Goes to Dept. Approver
Report is Budget-Checked by
Approver
(If Report Passes Budget-Check, it can be Approved)
Department Head/ Principal Approves Report
Accounts Payable Technician Approves Report
Employee is Reimbursed
Report Goes to A/P Technician
IT District Wide Applications SDUSD PeopleSoft Mileage
3/3/2010 4
Chartfield Setup The first time an employee submits an expense report, the employee must setup their Chartfield string. This determines which budget is to be used to pay for the mileage reimbursement.
This is a one-time setup. It should not need to be repeated each time an employee submits an expense report.
Enter Your Budget Information – Example Exercise
Step by Step: One-Time Chartfield Setup
The following steps show how to set up your Chartfield string. This string of numbers tells the district which budget to use to pay for your mileage. Once you enter the string of numbers and save it, the string will stay put whether you shut down the computer or not. You can change the Chartfield string at any time.
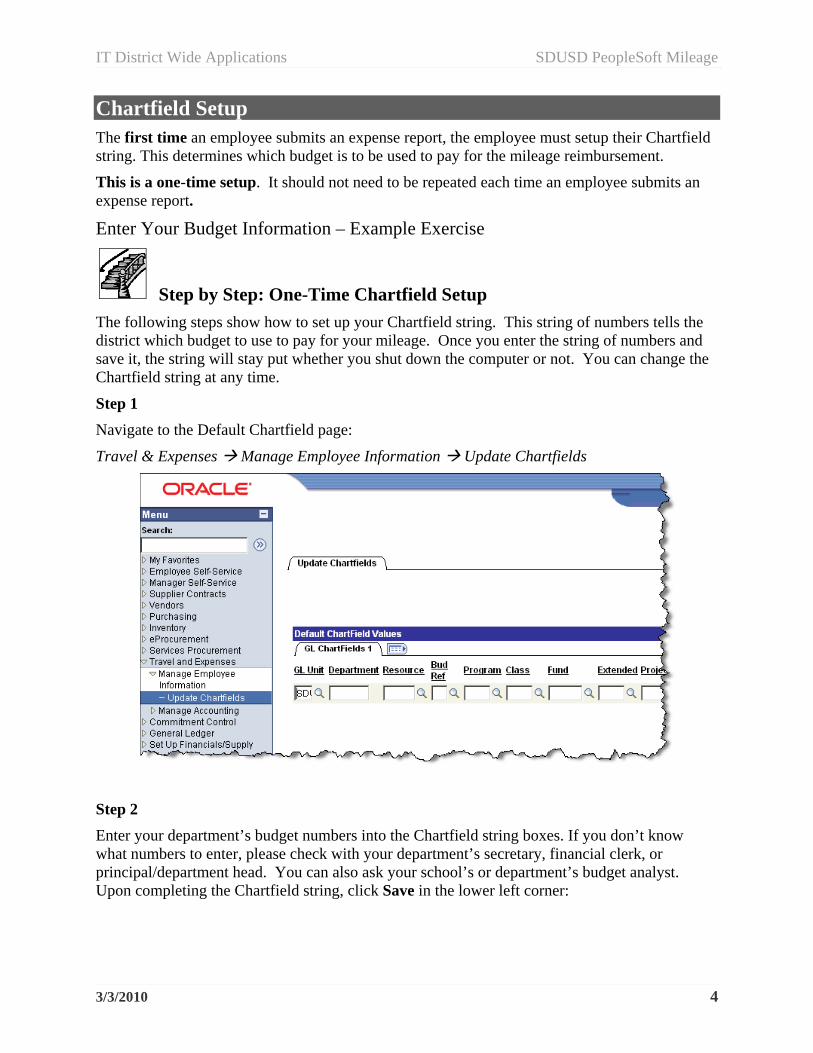
Step 1
Navigate to the Default Chartfield page:
Travel & Expenses Manage Employee Information Update Chartfields
Step 2
Enter your department’s budget numbers into the Chartfield string boxes. If you don’t know what numbers to enter, please check with your department’s secretary, financial clerk, or principal/department head. You can also ask your school’s or department’s budget analyst. Upon completing the Chartfield string, click Save in the lower left corner:

IT District Wide Applications SDUSD PeopleSoft Mileage
3/3/2010 5
Authorize Other Employees to Create Expense Reports on Your Behalf An employee may authorize another employee to create Expense Reports on his/her behalf. An example might be a teacher authorizing the main office’s Financial Clerk or Administrative Assistant to create a Mileage Expense Report on the teacher’s behalf.
NOTE: It is highly recommended that everyone create and submit his/her own mileage expense reports. Then there are fewer chances for mistakes or miscommunications.
Authorize Others to Submit Your Expense Report For You – Example Exercise
Step by Step: Authorize Another Employee to Create & Submit Expense Reports on Your Behalf
The following steps walk you through the two tasks you must complete to accomplish this.
Step 1
First, you must update your Chartfield string just one time. Please follow the Step-by-Step instructions above, entitled “One-Time Chartfield Setup”. Step 2
Next, to authorize another employee (to become your “proxy”), you must follow this navigation:
Employee Self-Service Travel & Expenses User Preferences Delegate Entry Authority
(See Illustration on Next Page).
Enter your Department’s budget numbers here

IT District Wide Applications SDUSD PeopleSoft Mileage
3/3/2010 6
Step 3
Click the plus sign on the right side of the page. This opens a new, blank ID box:
IT District Wide Applications SDUSD PeopleSoft Mileage
3/3/2010 7
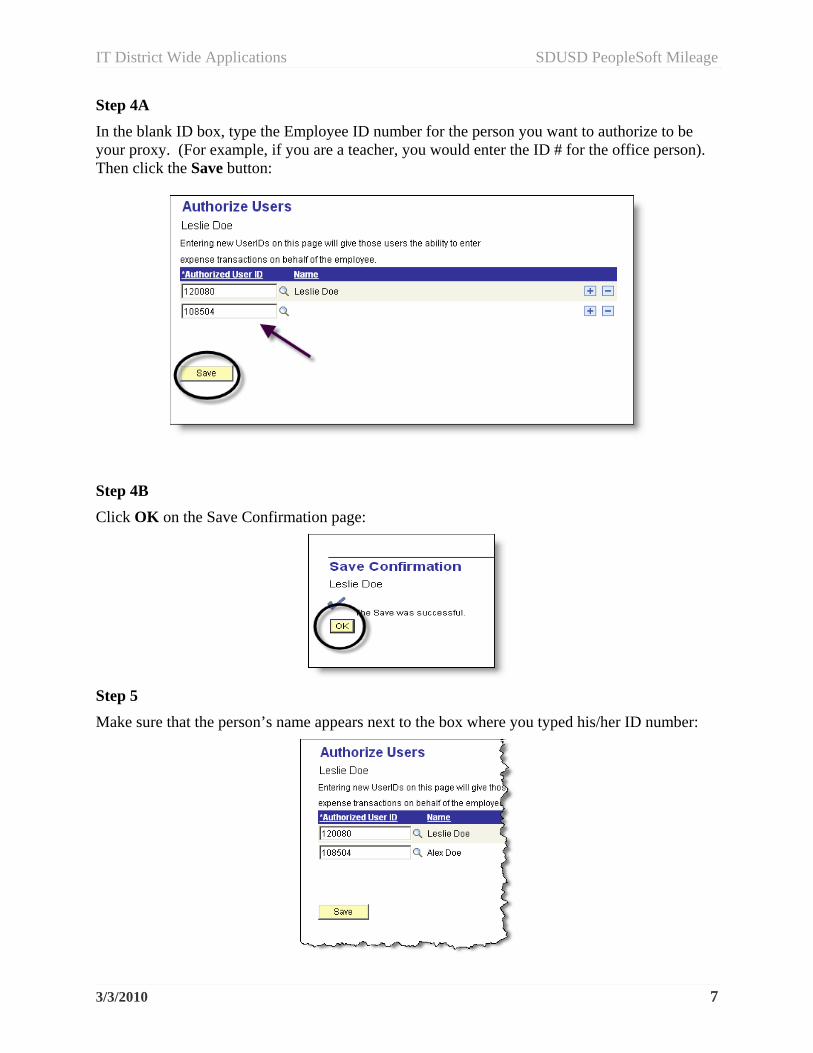
Step 4A
In the blank ID box, type the Employee ID number for the person you want to authorize to be your proxy. (For example, if you are a teacher, you would enter the ID # for the office person). Then click the Save button:
Step 4B
Click OK on the Save Confirmation page:
Step 5
Make sure that the person’s name appears next to the box where you typed his/her ID number:

IT District Wide Applications SDUSD PeopleSoft Mileage
3/3/2010 8
You are done. You may now log out of PeopleSoft. The person you gave authority to can now sign into PeopleSoft Financials themselves to create and submit expense reports on your behalf, with your name attached to the reports. You can still create your own reports, too.
Mileage Expense Reports To get reimbursed for eligible mileage you incur on your own private vehicle, you must create and submit an Expense Report.
If you want to get reimbursed for mileage incurred within San Diego County, it does not require authorization prior to incurring the expense. You do not need to create a Travel Authorization.
If you want to get reimbursed for mileage incurred outside San Diego County, it does require that a Travel Authorization be created and submitted prior to the travel. Please see the appropriate job aids and/or user handbook or manual for Travel Expenses.
Mileage within San Diego County – Creating an Expense Report from a Blank Form – Example Exercise
The following steps walk you through how to create an Expense Report for Mileage within San Diego County.
Step by Step: Create a Mileage Expense Report from a Blank Form
Step 1
Navigate to the Expense Reports home page, and start a new Expense Report by clicking Create:
Navigation: Employee Self-Service Travel and Expenses Center Expense Report Create
IT District Wide Applications SDUSD PeopleSoft Mileage
3/3/2010 9
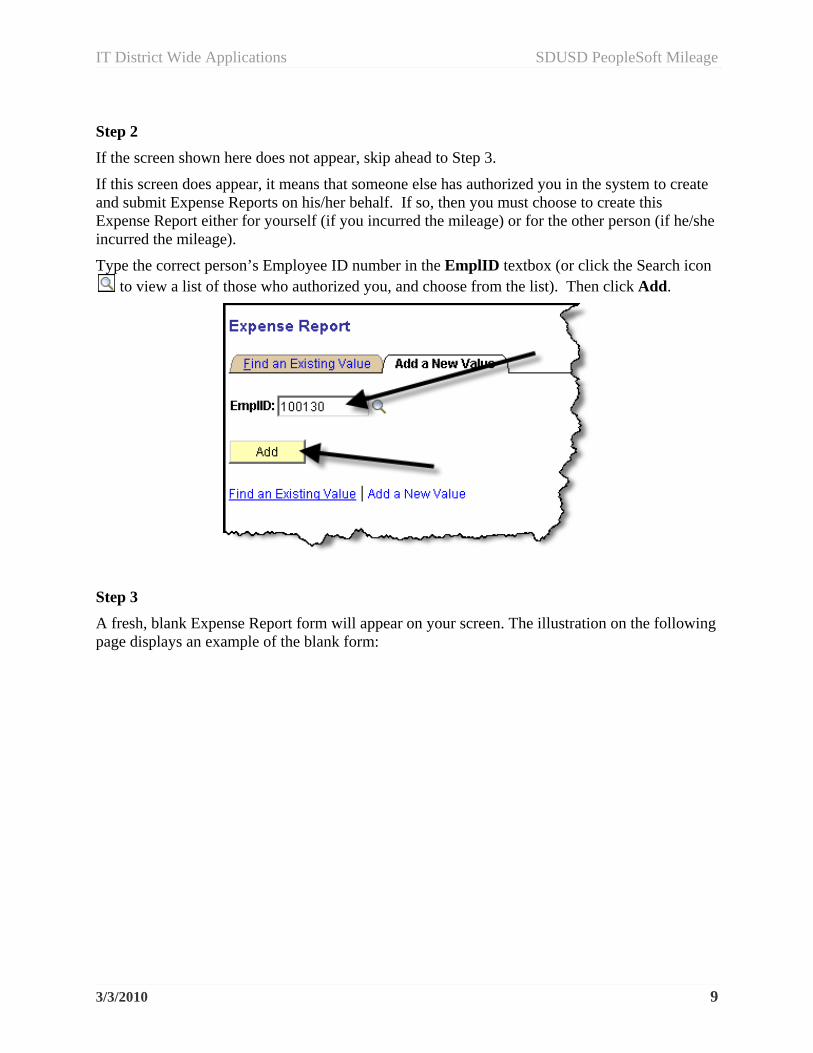
Step 2
If the screen shown here does not appear, skip ahead to Step 3.
If this screen does appear, it means that someone else has authorized you in the system to create and submit Expense Reports on his/her behalf. If so, then you must choose to create this Expense Report either for yourself (if you incurred the mileage) or for the other person (if he/she incurred the mileage).
Type the correct person’s Employee ID number in the EmplID textbox (or click the Search icon to view a list of those who authorized you, and choose from the list). Then click Add.
Step 3
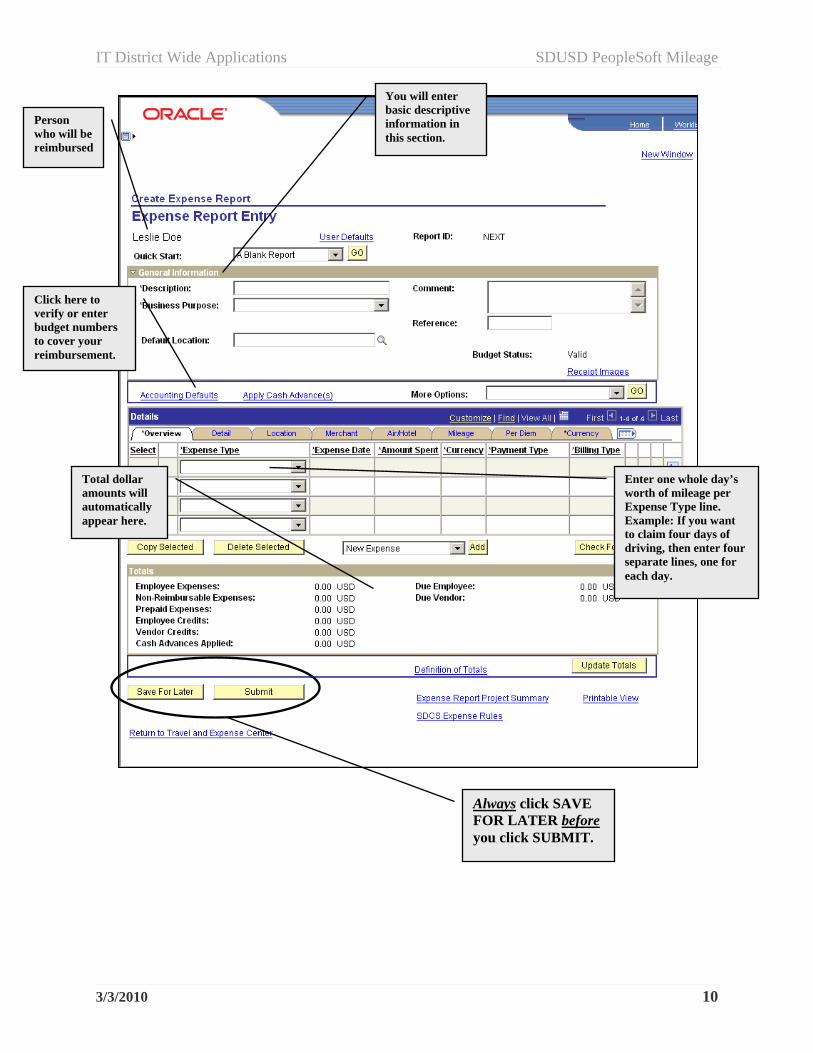
A fresh, blank Expense Report form will appear on your screen. The illustration on the following page displays an example of the blank form:
IT District Wide Applications SDUSD PeopleSoft Mileage
3/3/2010 10
Person who will be reimbursed
You will enter basic descriptive information in this section.
Click here to verify or enter budget numbers to cover your reimbursement.
Enter one whole day’s worth of mileage per Expense Type line. Example: If you want to claim four days of driving, then enter four separate lines, one for each day.
Total dollar amounts will automatically appear here.
Always click SAVE FOR LATER before you click SUBMIT.

IT District Wide Applications SDUSD PeopleSoft Mileage
3/3/2010 11
Step 4
In the General Information section you must do two things: Fill in the required information, and verify or update the default accounting information (budget numbers, aka Chartfield string). It doesn’t matter which you do first.
The screen below displays an example of typical details entered in the required fields:
A. Description – Type “Mileage” and the month and year, thus: Mileage November 2008
B. Business Purpose – Choose Other-written desc required.
C. Default Location – Type San Diego.
D. Comment – Here you must type your justification for getting reimbursed for mileage. One example: Travel to various district locations as required by my job to provide nursing services to students.
Step 5
Below the Default Location, click the link, Accounting Defaults:

IT District Wide Applications SDUSD PeopleSoft Mileage
3/3/2010 12
Step 6
The last step brought you into the Chartfield page that affects only this one Expense Report. Budget numbers you enter or edit here will affect this report, and no other. Take the time to check each Chartfield to be sure it is correctly filled in. Pay special attention to the DeptID Chartfield. Be sure it contains the Department ID number for the school principal or department head you want to approve this Expense Report. When done, click OK.
NOTE: The budget numbers shown in this example are not real; you must use your own department’s budget numbers!
Step 7
The last step brought you back into the Expense Report Entry page, illustrated below. To enter your first day’s worth of mileage, choose the Mileage IN SD County selection in the first Expense Type line’s drop-down menu:

IT District Wide Applications SDUSD PeopleSoft Mileage
3/3/2010 13
Step 8
You will see several fields appear to the right of Mileage IN SD County. Fill them in as shown in the example below. The Expense Date should be the date of the day you are claiming mileage for. The Payment Type should always be Not Applicable for mileage entries.
Finally, click the green arrow on the far right side to move on to the next screen:
Step 9
Enter the Description. Here you must put in where you went that day. Be sure to include all places you drove to that directly involved your job tasks. Then click the green arrow again:
Step 10
Enter the total number of miles you are claiming for that day, in whole numbers. If your personal record (if you keep one) shows a partial mile (for example, 3.7 miles) then you must round it off. Then click the green arrow again:
Step 11
That completes one line entry for one single day of claimed mileage. You are ready to enter another entry for another day.
Before you do anything else, click the Save For Later button located in the bottom-left corner of the screen. This will ensure your work is saved and won’t get lost or deleted. Then keep repeating Steps 7 through 10 until all the days of mileage you wish to claim within one single month have been entered.
Click the Save For Later button frequently as you work (after each new line entry)
NOTE: After you click Save For Later you may lose the blank entry lines. To bring out more blank lines for you to use, follow the steps after this illustration:

IT District Wide Applications SDUSD PeopleSoft Mileage
3/3/2010 14
Steps to Add More Blank Lines:
A. Click the plus sign button on the far right side of the screen:
B. Enter the number of blank lines you want and click OK:
C. Extra blank lines will appear for you to use. If the Overview tab is not in front, you need to click on it to bring it forward:
Step 12
After you’ve finished entering all the lines of day-to-day mileage you want to claim, and you have clicked the Save For Later button, your screen may resemble this example:
IT District Wide Applications SDUSD PeopleSoft Mileage
3/3/2010 15
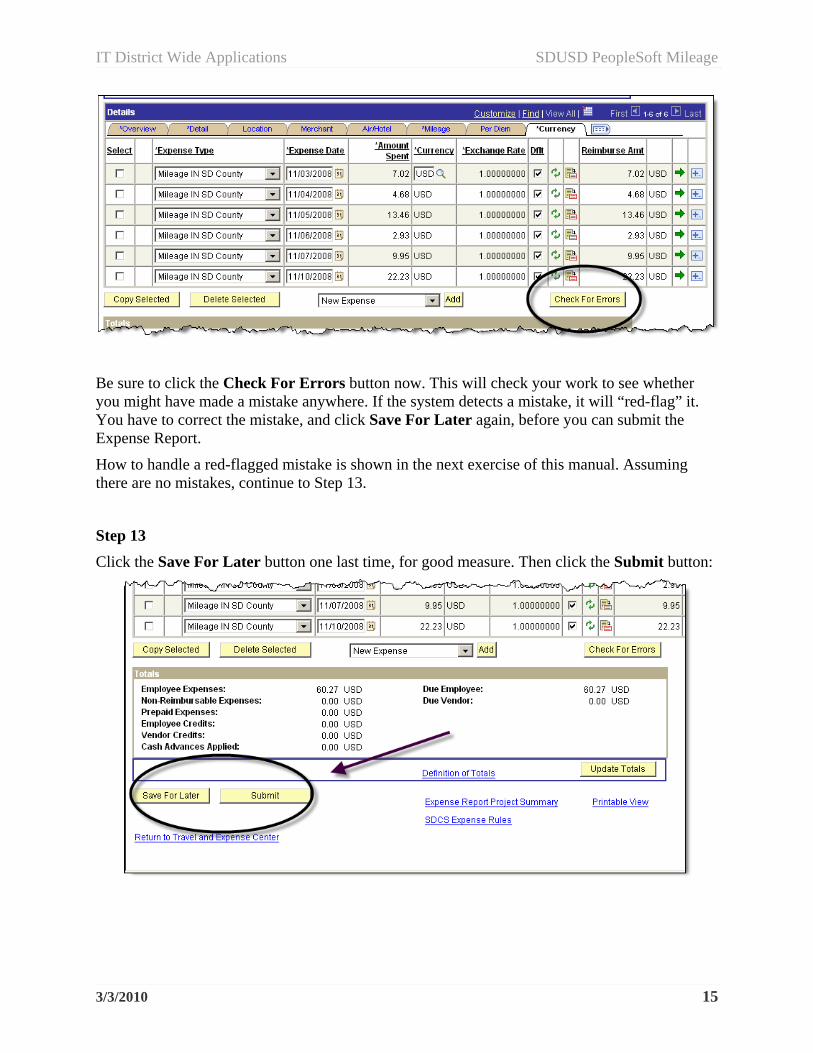
Be sure to click the Check For Errors button now. This will check your work to see whether you might have made a mistake anywhere. If the system detects a mistake, it will “red-flag” it. You have to correct the mistake, and click Save For Later again, before you can submit the Expense Report.
How to handle a red-flagged mistake is shown in the next exercise of this manual. Assuming there are no mistakes, continue to Step 13.
Step 13
Click the Save For Later button one last time, for good measure. Then click the Submit button:

IT District Wide Applications SDUSD PeopleSoft Mileage
3/3/2010 16
Step 14
If you are certain this Expense Report is ready for approval, click the OK button. That sends it off to your Department Head or Principal for their approval. Be aware that once you submit it, the report cannot be edited anymore, unless your Department Approver sends it back to you electronically. Once it is approved, the report automatically goes to the Accounts Payable department for processing. You can expect to receive your check in the mail in about 2 – 4 weeks:
Step 15
You will see your Expense Report once again. You can log out of the computer at this point. If you want to print a hardcopy for yourself first, click the Printable View link in the lower-right corner. Then print the form:

IT District Wide Applications SDUSD PeopleSoft Mileage
3/3/2010 17
Red Flags: What to Do When You Get One – Example Exercise
Each time you click the Check For Errors button you hope that it doesn’t find any errors, so that you can continue to save and submit your Mileage Expense Report. But sooner or later a mistake is made. When that happens a small red flag appears on the screen next to the expense line with the error. You can save the expense report with errors on it, but you can’t submit it until the errors are resolved. This next Step-by-Step exercise walks you through the typical method used to resolve red flags. It begins from the point of having checked for errors on a typical mileage expense report, and encountering a red flag for the first time.
Step by Step: Fix a Red Flagged Error
Step 1
Click on the red flag to open it and see what the problem is:
Step 2
The detail page for that expense opens up and displays where the trouble is located. In the top left area there is text that describes the issue; and the field with the problem is highlighted in red. In this example, we forgot to enter a description of where we drove that day:

IT District Wide Applications SDUSD PeopleSoft Mileage
3/3/2010 18
Step 3
We clicked inside the red field, typed in the required details, and then clicked the Check Expense For Errors button to clear out the red flag:
Step 4
After clearing the red flagged error, we can now click the link, Return to Expense Report, located in the lower-left corner:

IT District Wide Applications SDUSD PeopleSoft Mileage
3/3/2010 19
Step 5
Back on the Expense Report page we are ready to click Save For Later (always do that before you submit) and then click Submit:
Delete a Single Day Entry from a Mileage Expense Report – Example Exercise
The following steps walk you through how to delete one or more single day entries from a Mileage Expense Report. You might want to delete a day (or several days) from your report before you submit it. For example, if you accidentally entered an extra day into the report, or if you entered a range of days but were out sick during a day or two within the range, you would need to delete such days.
NOTE: You can ONLY delete days from a Mileage Expense Report if you have not yet submitted the report! Once you submit the report, you can no longer edit it in any way.
Step by Step: Delete a Single Day from Your Mileage Expense Report
Step 1

IT District Wide Applications SDUSD PeopleSoft Mileage
3/3/2010 20
You must first be sure you are viewing the Expense Report Entry page of the report. This is the main page of the form. The Expense Report Entry page looks like the following example:
Step 2
Find the day you wish to delete, under the section (about the middle of the page).
Step 3

IT District Wide Applications SDUSD PeopleSoft Mileage
3/3/2010 21
Click a checkmark into the Select checkbox on the far left side of the line you wish to delete. In this illustrated example below, we selected the line for November 4th:
Step 4
Click the Delete Selected button:
Step 5
Click the OK button to confirm the deletion:
The Expense Report Entry page is displayed again, and you’ll notice that the day you deleted is indeed gone.

IT District Wide Applications SDUSD PeopleSoft Mileage
3/3/2010 22
If you’re ready to submit this revised report, remember to click the Save For Later button first; then click the Submit button.
Copy from an Old Existing Report – Example Exercise
The following steps walk you through how to create an Expense Report for Mileage within San Diego County by copying from a previously created Expense Report and simply changing or updating the information. This approach may save you time if the report you are creating needs to be quite similar to a past report.
Step by Step: Create a Mileage Expense Report from an Old Existing Report
Step 1
Navigate to the Expense Reports home page, and start a new Expense Report by clicking Create.
Step 2
If the screen shown here does not appear, skip ahead to Step 3. If this screen does appear, it means that someone else has authorized you in the system to create and submit Expense Reports on h/her behalf. If so, then you must choose to create this Expense Report either for yourself (if you went on the trip) or for the other person (if h/she went on the trip).
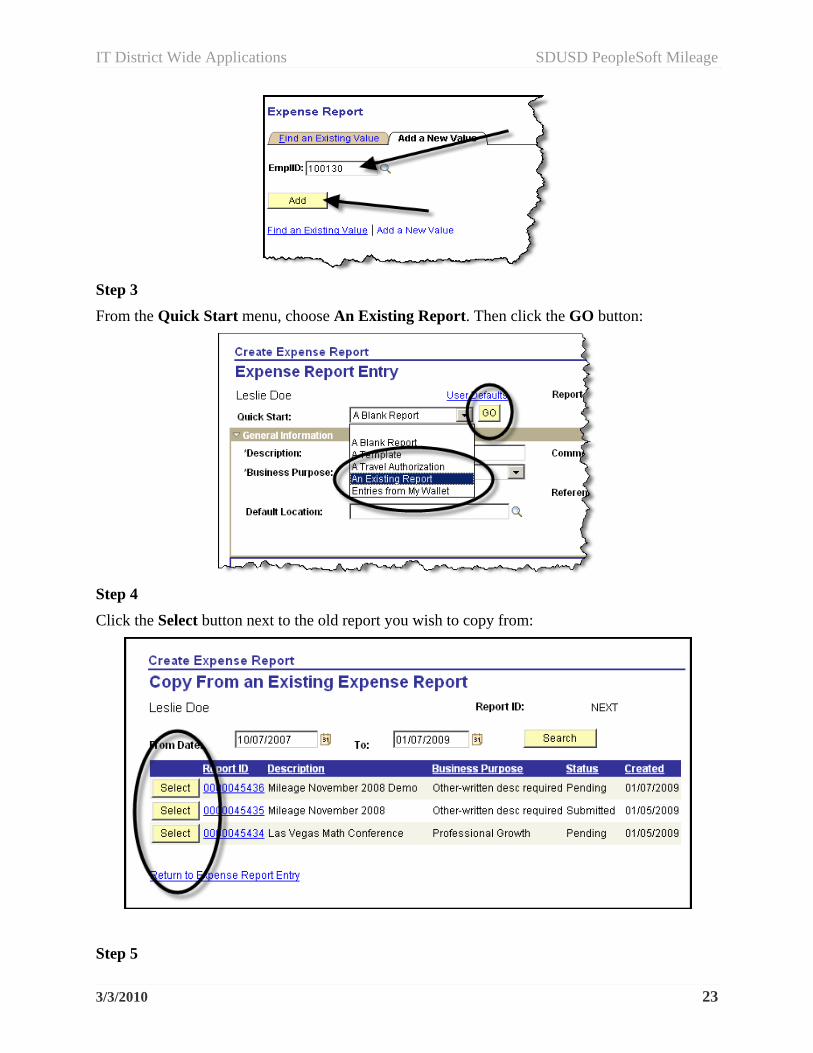
Type the correct person’s Employee ID number in the EmplID textbox. Then click Add.
IT District Wide Applications SDUSD PeopleSoft Mileage
3/3/2010 23
Step 3
From the Quick Start menu, choose An Existing Report. Then click the GO button:
Step 4
Click the Select button next to the old report you wish to copy from:
Step 5
IT District Wide Applications SDUSD PeopleSoft Mileage
3/3/2010 24
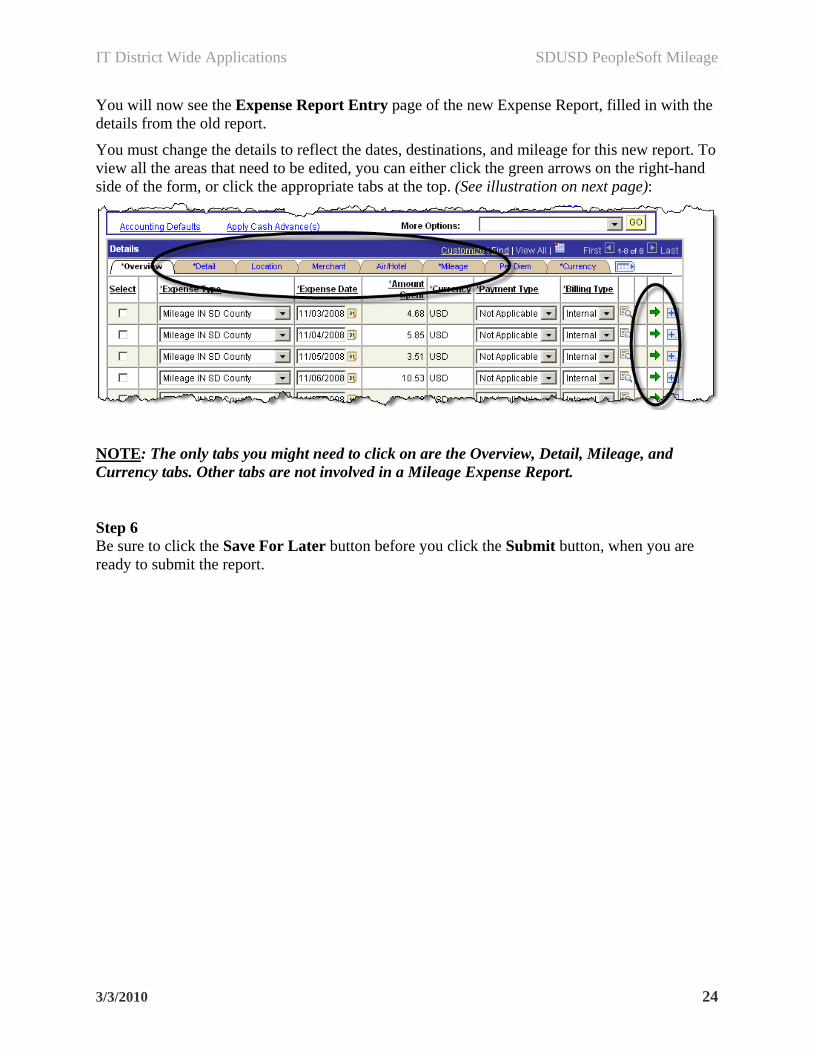
You will now see the Expense Report Entry page of the new Expense Report, filled in with the details from the old report.
You must change the details to reflect the dates, destinations, and mileage for this new report. To view all the areas that need to be edited, you can either click the green arrows on the right-hand side of the form, or click the appropriate tabs at the top. (See illustration on next page):
NOTE: The only tabs you might need to click on are the Overview, Detail, Mileage, and Currency tabs. Other tabs are not involved in a Mileage Expense Report.
Step 6 Be sure to click the Save For Later button before you click the Submit button, when you are ready to submit the report.
IT District Wide Applications SDUSD PeopleSoft Mileage
3/3/2010 25
What to Do If Your Mileage Expense Report is Sent Back – Example Exercise
Someday you may find that a mileage expense report you submitted is Sent Back to you instead of approved. This occurs when an Approver has some reason for wanting you to make a change on the report and resubmit it. You’ll know it was sent back to you if you receive an automated e-mail telling you so.
NOTE: Just in case you don’t get the e-mail, you should make a habit of checking the status of your submitted report every few days. An exercise showing how to check a report’s status follows this exercise.
The most common reasons why this might happen are:
Budget Error - There is a budget problem; maybe there isn’t enough money in the budget to pay for your mileage at the moment. Or, perhaps that particular budget has not been activated in the system yet.
User Error - There is a problem with your report. Maybe you accidentally omitted something. Or maybe you made a typographical error.
The usual ways to resolve these problems are:
Resolve a Budget Error –
This is something only your Approver can handle. He/She will know there is a budget problem as soon as they try to budget-check the report. The Approver must then contact the Budget Analyst and ask that person to either transfer funds into the budget and make sure it is activated, or else provide you with the code numbers for a different budget you can use in its place (in the Chartfields).
Then the Approver must type an explanation of what you must do (like changing the budget numbers, for example) onto the form, and send it back to you for revision.
You can then make the changes necessary on the form and resubmit it.
Resolve a User Error–
You will know what the problem is when you open and view the report. In the upper-right corner you will see a note typed to you from the Approver. Click on the typed words to view the entire note. This should tell you what to do.
Follow the instructions in that note, and resubmit the form.
The following steps walk you through how to resolve a mileage expense report that was sent back for revision.
Step by Step: Fix a Mileage Expense Report that was Sent Back
Step 1
Navigate to the Expense Report home page and click the Modify link:

IT District Wide Applications SDUSD PeopleSoft Mileage
3/3/2010 26
Step 2
Click the Search button on the Find an Existing Value tab. (Leave the begins with field blank):
The Expense Report should open automatically. (If it doesn’t, you probably need to choose it from a list of 2 or more Expense Reports available for editing…The list would appear automatically):

IT District Wide Applications SDUSD PeopleSoft Mileage
3/3/2010 27
Step 3
Look in the top right-hand corner of the report for a bold, underlined comment typed in by the Approver, and click on it:
IT District Wide Applications SDUSD PeopleSoft Mileage
3/3/2010 28
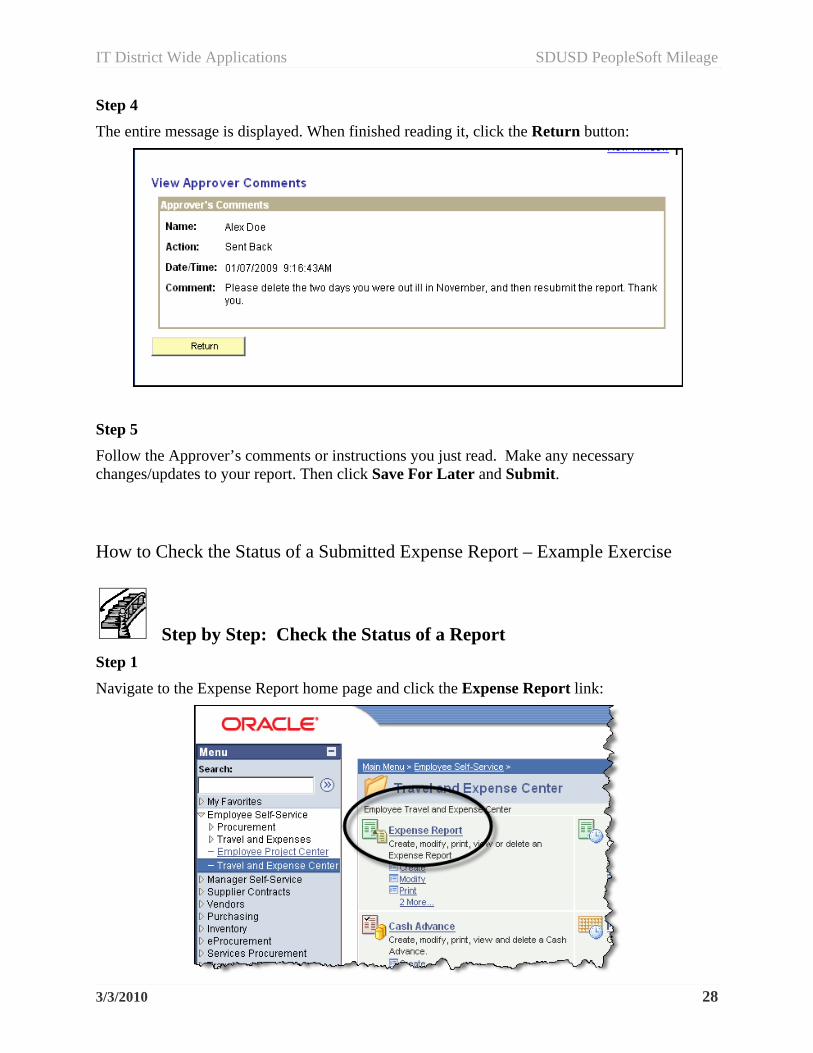
Step 4
The entire message is displayed. When finished reading it, click the Return button:
Step 5
Follow the Approver’s comments or instructions you just read. Make any necessary changes/updates to your report. Then click Save For Later and Submit.
How to Check the Status of a Submitted Expense Report – Example Exercise
Step by Step: Check the Status of a Report
Step 1
Navigate to the Expense Report home page and click the Expense Report link:
IT District Wide Applications SDUSD PeopleSoft Mileage
3/3/2010 29
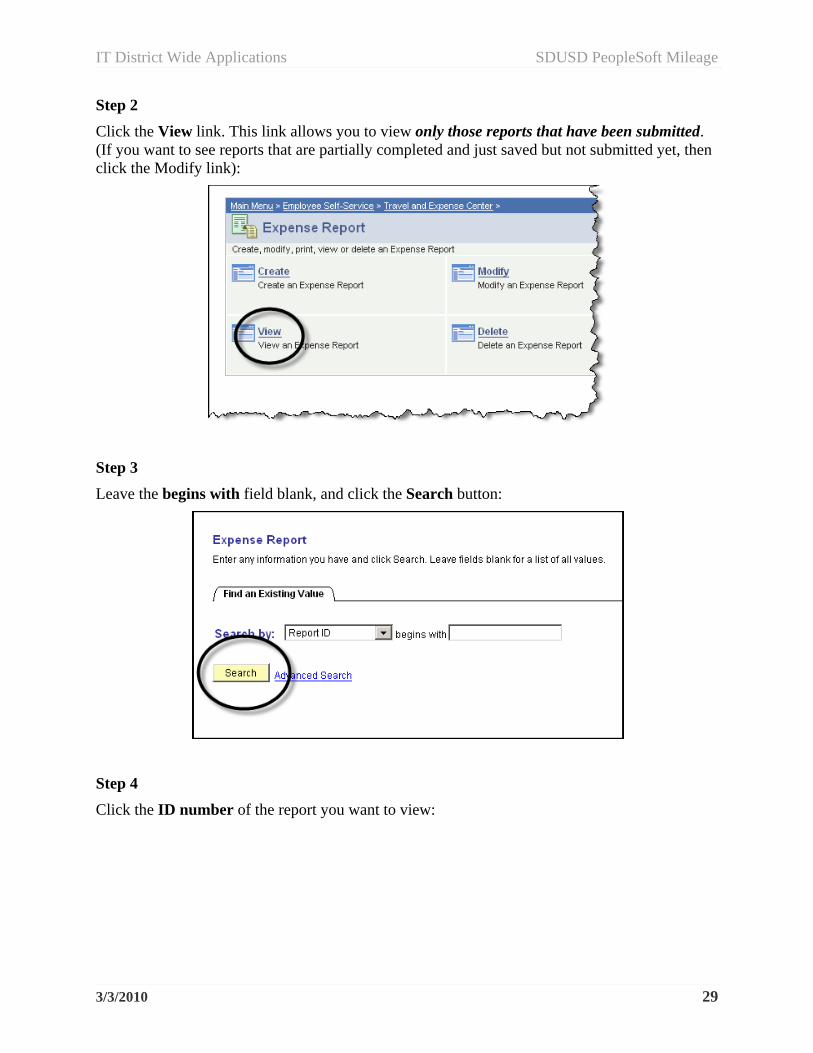
Step 2
Click the View link. This link allows you to view only those reports that have been submitted. (If you want to see reports that are partially completed and just saved but not submitted yet, then click the Modify link):
Step 3
Leave the begins with field blank, and click the Search button:
Step 4
Click the ID number of the report you want to view:
IT District Wide Applications SDUSD PeopleSoft Mileage
3/3/2010 30
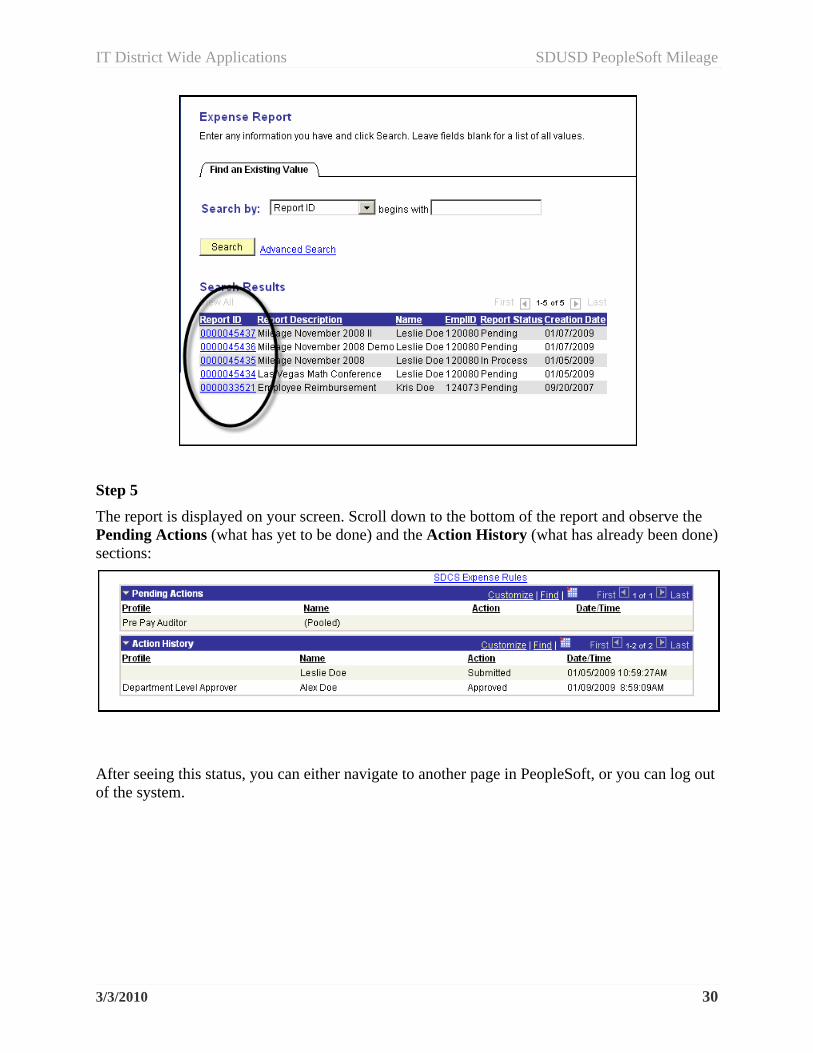
Step 5
The report is displayed on your screen. Scroll down to the bottom of the report and observe the Pending Actions (what has yet to be done) and the Action History (what has already been done) sections:
After seeing this status, you can either navigate to another page in PeopleSoft, or you can log out of the system.

IT District Wide Applications SDUSD PeopleSoft Mileage
3/3/2010 31
Tips & Tricks for Expense Reports Don’t Get Logged Out Unexpectedly! If you think it might take you longer than 15 minutes to complete an Expense Report, take these steps to ensure the system won’t kick you out unexpectedly, which can cause you to lose the Expense Report.
After you log into PeopleSoft and after you click the Financials Supply Chain link, go back to the portal page (where you signed in) and close that window by its X button in the upper right corner.
Always click Save For Later just before you click Submit. That way you will ensure nothing will get lost or deleted.
Be as Complete as Possible – Include all pertinent details for each and every expense line in the Expense Report. Don’t assume you can abbreviate or take shortcuts. You may end up having the report sent back for revision, which means a delay since you will have to edit it and resubmit it, or maybe even start all over.
Verify Chartfields on Each Report – In the beginning of every Expense Report you create, as soon as you arrive at the General Information page, you should ALWAYS verify your Chartfield string (budget code numbers). Do this by clicking the link, Accounting Defaults. It will take you right to the Chartfield page. Make sure that all budget code numbers are entered correctly in the Chartfields, especially the DeptID code. Then click OK. This procedure can save you headaches later on; it prevents the Expense Report from being sent to the wrong approver, and it ensures that the proper budget is used.
Complete Mileage Entries with All Details – Be sure to include all necessary details and information when you fill in the Description fields for your day entries on Mileage Expense Reports. Include your destinations whether you went to just one place that day, or to several places. If you leave anything out, your Expense Report might be sent back or denied, and your reimbursement check will be delayed.
No Future Dates on Expense Reports – Expense Reports do not allow you to enter any future dates. You can only enter current or past dates for expenses incurred.
SDCS Expense Rules – At the bottom of any Expense Report Entry page, you will find a link called SDCS Expense Rules. When you click this link it brings you to a page with all the district’s rules and policies on eligible expenses. At the bottom of this page you can click Return to go back to where you left off.
Don’t Click the Back Button – A general rule to follow when using any PeopleSoft
applications is to never click the Back button on your browser window. Doing so can make you lose your work, and even kick you completely out of the software program. You will always be able to find a menu choice or other link to click on within the page, to bring you back to the previous page or to other pages.

IT District Wide Applications SDUSD PeopleSoft Mileage
3/3/2010 32
Maintain the Best Computer Connections It is important for you to maintain your Oracle PeopleSoft application connection so that it remains in optimum working condition.
To do this, you must complete a quick, simple, routine task about once a week. The task is called “Clearing [or Deleting] Your Cache Files”.
Cache files are files that are deposited onto your computer’s hard drive every time you click to a new web page while you’re on the Internet. They are also referred to as Cookies or Temporary Internet Files. They are generally harmless. But if you ignore them, they pile up every time you use the Internet. They can pile up so much that it can cause your computer to perform sluggishly, or even start to get weird error messages. So, it’s important for you to clear out all the cache files every day, to make room for the new ones that will come in.
The following steps walk you through the procedure for clearing cache files.
Clear Cache Files – Example Exercise
Step by Step: Clear Cache Files
Step 1
Launch Microsoft Internet Explorer . It makes no difference which web site or web page is displayed on your screen.
Step 2
Click Tools on the menu bar at the top of the screen:

IT District Wide Applications SDUSD PeopleSoft Mileage
3/3/2010 33
Step 3
Click Internet Options on the Tools menu:
Step 4
Click Delete Cookies on the General menu:
Step 5
Click OK:
IT District Wide Applications SDUSD PeopleSoft Mileage
3/3/2010 34
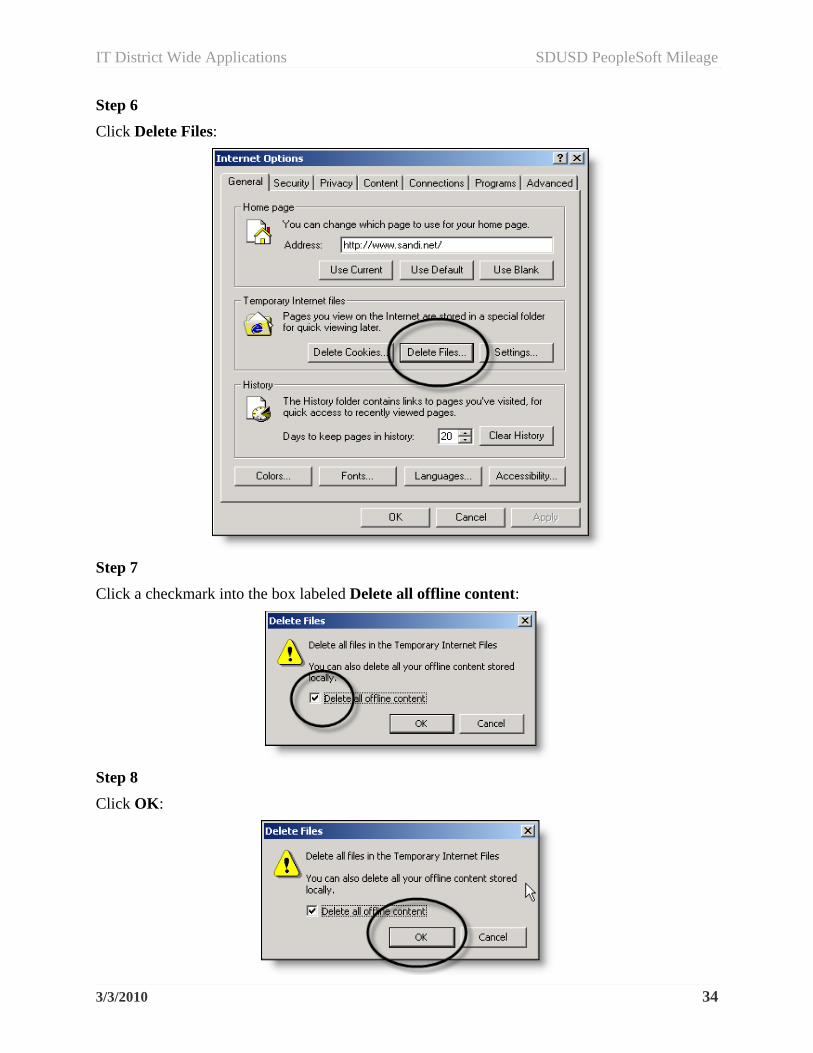
Step 6
Click Delete Files:
Step 7
Click a checkmark into the box labeled Delete all offline content:
Step 8
Click OK:

IT District Wide Applications SDUSD PeopleSoft Mileage
3/3/2010 35
Step 9
Click the OK button at the bottom:
Step 10
Close your browser window (Microsoft Internet Explorer). Re-launch it when you are ready to resume working on the Internet. This last step will refresh the browser and make it completely clean.
IT District Wide Applications SDUSD PeopleSoft Mileage
3/3/2010 36
Support – How to Find Help NOTE: DO NOT call the IT Help Desk. They cannot offer support on any PeopleSoft software applications.
You have several ways to get help with the district’s PeopleSoft Financials Travel & Expenses software. Your support options are listed and explained here in the order of how you should proceed.
1) First, you need to carefully read (or re-read) your training materials (user manual, job aids). Most questions can be answered there.
To print out extra copies of training materials please go online to:
http://www.sandi.net/peoplesoft/readandlearn
That brings you to a web page where you can click and print out many different job aids and manuals (handbooks).
2) If you need more help than what the training materials provide, the second thing you can do is attend an Open Lab session. Open Lab is a free help clinic provided for all district employees who have already completed the related training class. Open Lab is held on a regular basis, usually about two or three Fridays per month. At Open Lab you can receive individualized, one-on-one assistance from the Travel & Expenses instructor with specific problems or questions you may have while using the Travel and Expenses software. Open Lab is a first-come-first-served arrangement. No appointments are taken. Just show up, and bring your work and all pertinent information with you.
For details on when and where Open Lab takes place (the schedule is posted every month on the district’s DWA web site), please go online to:
http://www.sandi.net/peoplesoft/training
That brings you to a web page where you can find the Open Lab schedule, as well as other information about training classes.
3) After you have done Steps 1 and/or 2 above, if you still feel you need further assistance, please contact an Accounts Payable Technician. As of the printing of this manual, here is a list of Accounts Payable staff members who can assist you, on the next pages:

IT District Wide Applications SDUSD PeopleSoft Mileage
3/3/2010 37
SAN DIEGO UNIFIED SCHOOL DISTRICT
Office of Chief Financial OfficerAccounts Payable Department -
Room 3141 Vendor Assignments Effective
11/02/09 A/P Fax Number:
(619)725-7769
Vendors are assigned to A/P staff alphabetically by the payee's last name or company name.
Employee Travel Authorizations and Expense Reports are assigned to A/P staff alphabetically by the traveler's last name.
TRAVELER or VENDOR NAME
A/P TECHNICIAN PHONE NUMBER (619) E-Mail Addresses:
A Cristi Childers 725-7683 Abe - [email protected] Ba - Bd (except Barnes &
Noble) Phuong Pham 725-7761 Cindy - [email protected]
Barnes & Noble Cindy Stephens 725-7763 CoCo - [email protected]
Be - Bz Cordae Auld 725-7758 Cristi - [email protected]
Cellular Telephone Service Sheryl Stearns 725-7757 Cordae - [email protected]
C Cindy Stephens 725-7763 Kitty - [email protected]
D Sheryl Stearns 725-7757 Magda - [email protected]
E Magda Henein 725-7760 Margaret - [email protected]
F Margaret Gomes 725-7768 Nancy - [email protected]
G Cordae Auld 725-7758 Phuong - [email protected]
Gas & Electric Utilities Margaret Gomes 725-7768 Sheryl - [email protected]
H Phuong Pham 725-7761 Stephanie - [email protected]
I CoCo Velazquez 725-7759 Tina - [email protected]
J Tina Jair 725-7764
K Magda Henein 725-7760
L Cindy Stephens 725-7763
Ma - Mh CoCo Velazquez 725-7759
Mi - Mz Abe Caluza 725-7771
N Kitty Jackson 725-7751
O Stephanie Trump 725-7765
Pa - Pm Stephanie Trump 725-7765
Pn - Pz Abe Caluza 725-7771
Q Nancy Miraflor 725-7766
R Kitty Jackson 725-7751

IT District Wide Applications SDUSD PeopleSoft Mileage
3/3/2010 38
S (except San Diego & Sup't of Schools Tina Jair 725-7764
San Diego Nancy Miraflor 725-7766
Superintendent of Schools Margaret Gomes 725-7768 Telephone Service - Land
Lines Magda Henein 725-7760
T CoCo Velazquez 725-7759
U Nancy Miraflor 725-7766
V Nancy Miraflor 725-7766
W (except Whoo's Smart) Phuong Pham 725-7761
Whoo's Smart Kitty Jackson 725-7751
Water/Sewer Utility Service Abe Caluza 725-7771
X Nancy Miraflor 725-7766
Y Nancy Miraflor 725-7766
Z Nancy Miraflor 725-7766