Embed Size (px)
Citation preview

15-601139 Issue 05b - (04 August 2011)
one-X Portal for IP Office Installation
IP Office 7.0

one-X Portal for IP Office Installation Page 215-601139 Issue 05b (04 August 2011)IP Office 7.0
© 2011 AVAYA All Rights Reserved.
NoticesWhile reasonable efforts have been made to ensure that the information inthis document is complete and accurate at the time of printing, Avayaassumes no liability for any errors. Avaya reserves the right to make changesand corrections to the information in this document without the obligation tonotify any person or organization of such changes.
Documentation disclaimerAvaya shall not be responsible for any modifications, additions, or deletionsto the original published version of this documentation unless suchmodifications, additions, or deletions were performed by Avaya.
End User agree to indemnify and hold harmless Avaya, Avaya's agents,servants and employees against all claims, lawsuits, demands and judgmentsarising out of, or in connection with, subsequent modifications, additions ordeletions to this documentation, to the extent made by End User.
Link disclaimerAvaya is not responsible for the contents or reliability of any linked Web sitesreferenced within this site or documentation(s) provided by Avaya. Avaya isnot responsible for the accuracy of any information, statement or contentprovided on these sites and does not necessarily endorse the products,services, or information described or offered within them. Avaya does notguarantee that these links will work all the time and has no control over theavailability of the linked pages.
WarrantyAvaya provides a limited warranty on this product. Refer to your salesagreement to establish the terms of the limited warranty. In addition, Avaya’sstandard warranty language, as well as information regarding support for thisproduct, while under warranty, is available to Avaya customers and otherparties through the Avaya Support Web site: http://www.avaya.com/support.Please note that if you acquired the product from an authorized Avaya reselleroutside of the United States and Canada, the warranty is provided to you bysaid Avaya reseller and not by Avaya.
LicensesTHE SOFTWARE LICENSE TERMS AVAILABLE ON THE AVAYA WEBSITE,HTTP://SUPPORT.AVAYA.COM/LICENSEINFO/ ARE APPLICABLE TO ANYONEWHO DOWNLOADS, USES AND/OR INSTALLS AVAYA SOFTWARE,PURCHASED FROM AVAYA INC., ANY AVAYA AFFILIATE, OR AN AUTHORIZEDAVAYA RESELLER (AS APPLICABLE) UNDER A COMMERCIAL AGREEMENTWITH AVAYA OR AN AUTHORIZED AVAYA RESELLER. UNLESS OTHERWISEAGREED TO BY AVAYA IN WRITING, AVAYA DOES NOT EXTEND THISLICENSE IF THE SOFTWARE WAS OBTAINED FROM ANYONE OTHER THANAVAYA, AN AVAYA AFFILIATE OR AN AVAYA AUTHORIZED RESELLER, ANDAVAYA RESERVES THE RIGHT TO TAKE LEGAL ACTION AGAINST YOU ANDANYONE ELSE USING OR SELLING THE SOFTWARE WITHOUT A LICENSE. BYINSTALLING, DOWNLOADING OR USING THE SOFTWARE, OR AUTHORIZINGOTHERS TO DO SO, YOU, ON BEHALF OF YOURSELF AND THE ENTITY FORWHOM YOU ARE INSTALLING, DOWNLOADING OR USING THE SOFTWARE(HEREINAFTER REFERRED TO INTERCHANGEABLY AS “YOU” AND “ENDUSER”), AGREE TO THESE TERMS AND CONDITIONS AND CREATE ABINDING CONTRACT BETWEEN YOU AND AVAYA INC. OR THE APPLICABLEAVAYA AFFILIATE (“AVAYA”).
Avaya grants End User a license within the scope of the license typesdescribed below. The applicable number of licenses and units of capacity forwhich the license is granted will be one (1), unless a different number oflicenses or units of capacity is specified in the Documentation or othermaterials available to End User. "Designated Processor" means a singlestand-alone computing device. "Server" means a Designated Processor thathosts a software application to be accessed by multiple users. "Software"means the computer programs in object code, originally licensed by Avayaand ultimately utilized by End User, whether as stand-alone products orpre-installed on Hardware. "Hardware" means the standard hardwareoriginally sold by Avaya and ultimately utilized by End User.
License typesDesignated System(s) License (DS). End User may install and use each copyof the Software on only one Designated Processor, unless a different numberof Designated Processors is indicated in the Documentation or other materialsavailable to End User. Avaya may require the Designated Processor(s) to beidentified by type, serial number, feature key, location or other specificdesignation, or to be provided by End User to Avaya through electronic meansestablished by Avaya specifically for this purpose.
CopyrightExcept where expressly stated otherwise, no use should be made of materialson this site, the Documentation(s) and Product(s) provided by Avaya. Allcontent on this site, the documentation(s) and the product(s) provided byAvaya including the selection, arrangement and design of the content isowned either by Avaya or its licensors and is protected by copyright and otherintellectual property laws including the sui generis rights relating to theprotection of databases. You may not modify, copy, reproduce, republish,upload, post, transmit or distribute in any way any content, in whole or inpart, including any code and software. Unauthorized reproduction,transmission, dissemination, storage, and or use without the express writtenconsent of Avaya can be a criminal, as well as a civil, offense under theapplicable law.
Third Party Components Certain software programs or portions thereof included in the Product maycontain software distributed under third party agreements ("Third PartyComponents"), which may contain terms that expand or limit rights to usecertain portions of the Product ("Third Party Terms"). Information regardingdistributed Linux OS source code (for those Products that have distributed theLinux OS source code), and identifying the copyright holders of the ThirdParty Components and the Third Party Terms that apply to them is availableon the Avaya Support Web site: http://support.avaya.com/Copyright.
Preventing toll fraud"Toll fraud" is the unauthorized use of your telecommunications system by anunauthorized party (for example, a person who is not a corporate employee,agent, subcontractor, or is not working on your company's behalf). Be awarethat there can be a risk of toll fraud associated with your system and that, iftoll fraud occurs, it can result in substantial additional charges for yourtelecommunications services.
Avaya fraud interventionIf you suspect that you are being victimized by toll fraud and you needtechnical assistance or support, call Technical Service Center Toll FraudIntervention Hotline at +1-800-643-2353 for the United States and Canada.For additional support telephone numbers, see the Avaya Support Web site:http://support.avaya.comSuspected security vulnerabilities with Avaya products should be reported toAvaya by sending mail to: [email protected].
TrademarksAvaya and Aura are trademarks of Avaya, Inc.The trademarks, logos and service marks (“Marks”) displayed in this site, thedocumentation(s) and product(s) provided by Avaya are the registered orunregistered Marks of Avaya, its affiliates, or other third parties. Users arenot permitted to use such Marks without prior written consent from Avaya orsuch third party which may own the Mark. Nothing contained in this site, thedocumentation(s) and product(s) should be construed as granting, byimplication, estoppel, or otherwise, any license or right in and to the Markswithout the express written permission of Avaya or the applicable third party.Avaya is a registered trademark of Avaya Inc. All non-Avaya trademarks arethe property of their respective owners.
Downloading documentsFor the most current versions of documentation, see the Avaya Support Website: http://www.avaya.com/support
Contact Avaya SupportAvaya provides a telephone number for you to use to report problems or toask questions about your product. The support telephone number is1-800-242-2121 in the United States. For additional support telephonenumbers, see the Avaya Web site: http://www.avaya.com/support

one-X Portal for IP Office Installation Page 315-601139 Issue 05b (04 August 2011)IP Office 7.0
Contents
Contentsone-X Portal for IP Office1.
..................................................................... 81.1 Server Requirements
..................................................................... 81.2 Small Community Network Support
..................................................................... 91.3 Providers
..................................................................... 101.4 one-X Portal for IP Office Settings
..................................................................... 121.5 Telephony Notes
Installation2...................................................................... 152.1 Installation Requirements
..................................................................... 182.2 Check the IP Office Security Settings
..................................................................... 202.3 Add Licenses
..................................................................... 212.4 Configure Users
..................................................................... 222.5 Checking Available Server Ports
..................................................................... 232.6 Install the one-X Portal for IP Office Software
..................................................................... 262.7 Initial Server Configuration
..................................................................... 302.8 Test User Connnection
..................................................................... 302.9 Disable Java Updates
Maintenance3...................................................................... 353.1 Manually Starting the Service
..................................................................... 363.2 Adding an Additional IP Office
..................................................................... 393.3 Changing IP Office Details
..................................................................... 413.4 Adding an LDAP External Directory Source
..................................................................... 423.5 Adding/Deleting Users
..................................................................... 423.6 Editing User Settings
..................................................................... 453.7 Backing Up the Database
..................................................................... 463.8 Restoring a Previous Backup
..................................................................... 473.9 Checking and Updating the System Directory
..................................................................... 483.10 Checking the External LDAP Directory
..................................................................... 493.11 Upgrading one-X Portal for IP Office
..................................................................... 503.12 Downgrading one-X Portal for IP Office
..................................................................... 513.13 Removing one-X Portal for IP Office
..................................................................... 533.14 Remote Logging
..................................................................... 573.15 Troubleshooting
..................................................................... 583.16 Agent Gadget Control
Administration4...................................................................... 614.1 Login
..................................................................... 614.2 Logout
..................................................................... 624.3 Health
............................................................................ 624.3.1 Component Status
............................................................................ 624.3.2 Key Recent Events
............................................................................ 634.3.3 Active Sessions
............................................................................ 634.3.4 Environment
..................................................................... 644.4 Configuration
............................................................................ 644.4.1 Providers
............................................................................ 684.4.2 Users
............................................................................ 704.4.3 Backups
............................................................................ 704.4.4 CSV
............................................................................ 714.4.5 Branding
..................................................................... 724.5 Diagnostics
............................................................................ 724.5.1 Logging Configuration
............................................................................ 734.5.2 Logging Viewer
............................................................................ 734.5.3 Network Routes
............................................................................ 744.5.4 IP Office Connections
............................................................................ 744.5.5 Database Integrity
..................................................................... 754.6 Directory Integration
............................................................................ 754.6.1 Directory Synchronisation
............................................................................ 764.6.2 System Directory
............................................................................ 774.6.3 LDAP Directory Search
..................................................................... 784.7 Help & Support
Backup/Restore5...................................................................... 805.1 Superuser Login
..................................................................... 815.2 System Status
..................................................................... 815.3 Configuration
..................................................................... 825.4 DB Operations
............................................................................ 825.4.1 Backup
............................................................................ 835.4.2 Restore
Glossary6................................................................................87Index


one-X Portal for IP Office Installation Page 515-601139 Issue 05b (04 August 2011)IP Office 7.0
one-X Portal for IP Office
Chapter 1.

one-X Portal for IP Office Installation Page 715-601139 Issue 05b (04 August 2011)IP Office 7.0
one-X Portal for IP Office:
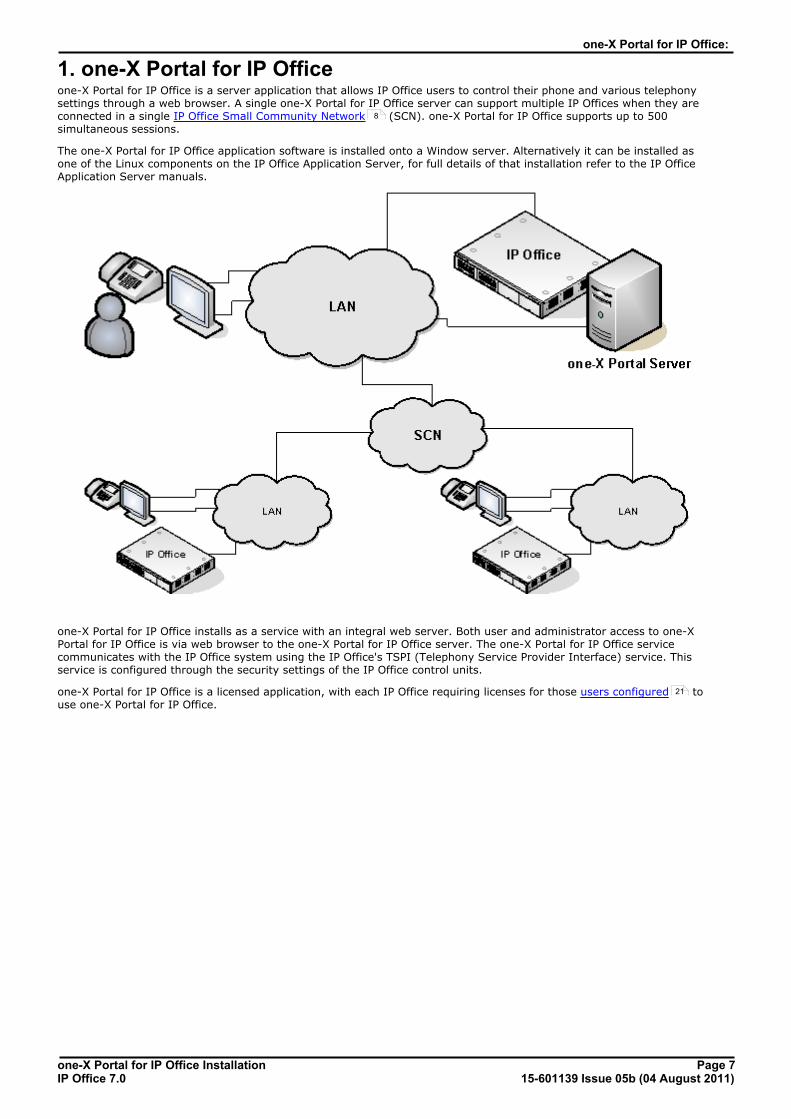
1. one-X Portal for IP Officeone-X Portal for IP Office is a server application that allows IP Office users to control their phone and various telephonysettings through a web browser. A single one-X Portal for IP Office server can support multiple IP Offices when they areconnected in a single IP Office Small Community Network (SCN). one-X Portal for IP Office supports up to 500simultaneous sessions.
The one-X Portal for IP Office application software is installed onto a Window server. Alternatively it can be installed asone of the Linux components on the IP Office Application Server, for full details of that installation refer to the IP OfficeApplication Server manuals.
one-X Portal for IP Office installs as a service with an integral web server. Both user and administrator access to one-XPortal for IP Office is via web browser to the one-X Portal for IP Office server. The one-X Portal for IP Office servicecommunicates with the IP Office system using the IP Office's TSPI (Telephony Service Provider Interface) service. Thisservice is configured through the security settings of the IP Office control units.
one-X Portal for IP Office is a licensed application, with each IP Office requiring licenses for those users configured touse one-X Portal for IP Office.
8
21
one-X Portal for IP Office Installation Page 815-601139 Issue 05b (04 August 2011)IP Office 7.0
1.1 Server Requirementsone-X Portal for IP Office is currently supported with all components installed on a single server meeting the followingrequirements:
· Administrator Account: During installation you must be logged in using an account with full administrator rights.
· Operating System: Windows 2003 or Windows 2008 (32-bit and 64-bit).
· Processor: Intel Pentium D945 Dual Core or AMD Athlon64 4000+ or better.
· RAM Memory: 2GB minimum.
· Available Hard Disk Space: 10GB.
· TCP/IP Port: The default ports are 8080 and 8666. These can be changed if required during installation of the server software ifnecessary. See Checking Available Ports .
· Firewall Exceptions Exceptions should be added to the server firewall for incoming access on the TCP ports above. If the firewall is alsoused to control outgoing access, an exception for access to TCP port 50814 on the IP Office IP address should alsobe added.
1.2 Small Community Network Supportone-X Portal for IP Office is supported within a Small Community Network (SCN) of IP Office systems.
· In a Small Community Network, only a single server running one-X Portal for IP Office is supported. This one-XPortal for IP Office can support up to 500 simultaneous user sessions.
· Each IP Office on which one-X Portal for IP Office users are located must meet the requirements for one-X Portal forIP Office. That includes systems to which one-X Portal for IP Office users may temporarily hot desk.
· In a Small Community Network, one Voicemail Pro server is used as the centralized voicemail server for alltelephone systems in the network. The one-X Portal for IP Office must be configured to use that voicemail server.
· Voicemail configuration does allow additional voicemail servers in a Small Community Network in roles asdistributed voicemail server. However the one-X Portal for IP Office should only be configured to use thecentralized voicemail server.
· one-X Portal for IP Office does not provide additional Small Community Network features. It only supports featuresthat are supported by each user's IP Office systems. For example, the system park buttons controls provided byone-X Portal for IP Office are not supported between different systems in an Small Community Network. This meansthat one-X Portal for IP Office users can only park and unpark calls on the IP Office system on which they areregistered.
22
one-X Portal for IP Office Installation Page 915-601139 Issue 05b (04 August 2011)IP Office 7.0
one-X Portal for IP Office: Small Community Network Support
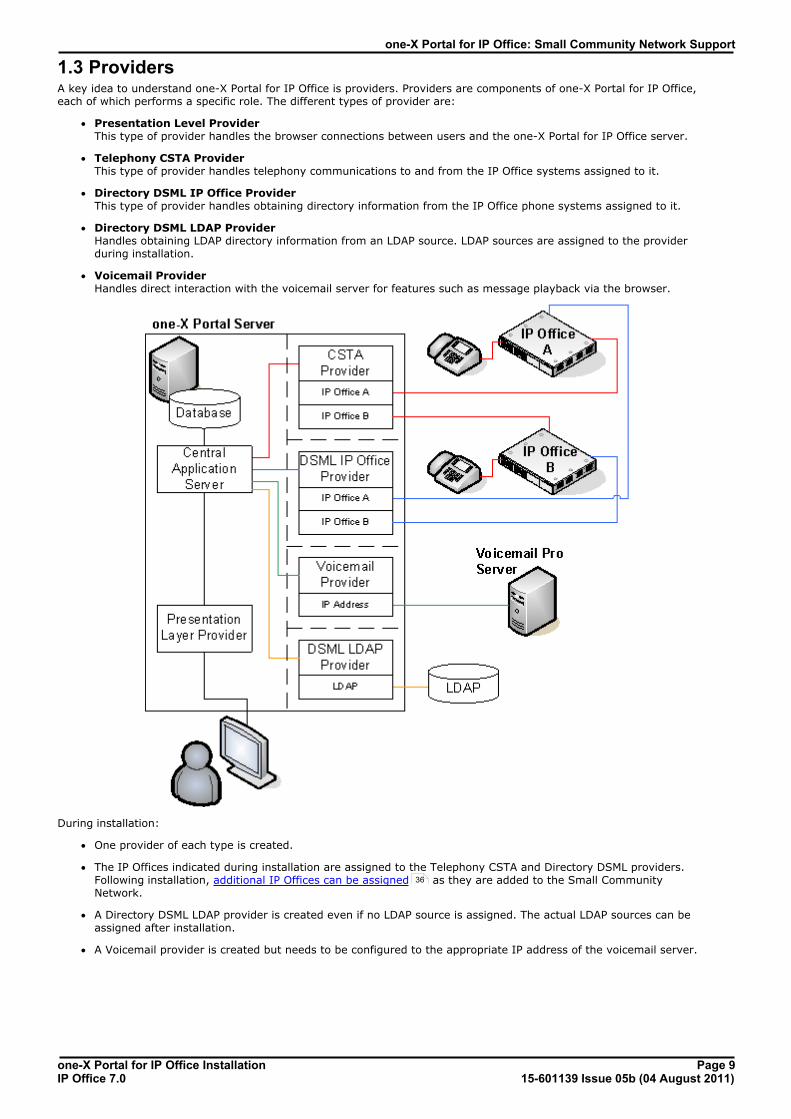
1.3 ProvidersA key idea to understand one-X Portal for IP Office is providers. Providers are components of one-X Portal for IP Office,each of which performs a specific role. The different types of provider are:
· Presentation Level Provider This type of provider handles the browser connections between users and the one-X Portal for IP Office server.
· Telephony CSTA Provider This type of provider handles telephony communications to and from the IP Office systems assigned to it.
· Directory DSML IP Office Provider This type of provider handles obtaining directory information from the IP Office phone systems assigned to it.
· Directory DSML LDAP Provider Handles obtaining LDAP directory information from an LDAP source. LDAP sources are assigned to the providerduring installation.
· Voicemail Provider Handles direct interaction with the voicemail server for features such as message playback via the browser.
During installation:
· One provider of each type is created.
· The IP Offices indicated during installation are assigned to the Telephony CSTA and Directory DSML providers.Following installation, additional IP Offices can be assigned as they are added to the Small CommunityNetwork.
· A Directory DSML LDAP provider is created even if no LDAP source is assigned. The actual LDAP sources can beassigned after installation.
· A Voicemail provider is created but needs to be configured to the appropriate IP address of the voicemail server.
36
one-X Portal for IP Office Installation Page 1015-601139 Issue 05b (04 August 2011)IP Office 7.0
1.4 one-X Portal for IP Office SettingsThe sections below detail which user and directory data is stored by the one-X Portal for IP Office server and which isstored by the telephone systems.
DirectoriesThe various directories available to a one-X Portal for IP Office user are taken from a number of sources:
· Personal Directory As personal directory records are added, they are stored by both the one-X Portal for IP Office application and bythe telephone system and kept in synch. The telephone system can only store up to 100 personal directory entriesper user (subject to its own system limits), any additional entries beyond that are stored by one-X Portal for IPOffice only.
· Personal directory records stored by one-X Portal for IP Office can contain several numbers, with one selectedas the Primary phone number. The matching records stored in the IP Office configuration contains just onenumber, that being the one selected as the Primary phone number. Changing the Primary phone numberselection in one-X Portal for IP Office will update the number stored in the IP Office configuration to match.
· The system limit for total personal directory records depends on the IP Office control unit being used. Whenthis limit is reached, additional personal directory records are stored by one-X Portal for IP Office only.
· IP500/IP500v2: 10800 total personal directory records.
· Users with a 1608, 1616, 9400, 9500 or 9600 phones can edit or delete contacts through the phone's menus(primary phone number only). Users with 1608, 1616 or 9600 Series phones can edit or delete contactsthrough the phone's menus (primary phone number only).
· System Directory The system directory contains records for all the users and groups on the IP Office systems assigned to one-XPortal for IP Office plus the system directory entries stored in the configuration of those systems. It does notinclude directory records those systems obtain by LDAP and or HTTP import.
· In an IP Office Small Community Network, the system directory entries configured on one IP Office system canbe dynamically shared by other IP Offices in the network. This is a Centralized System Directory. The IP Officeused to store the system directory used by the other systems should be one of those also assigned to one-XPortal for IP Office.
· If multiple IP Office systems are configured to operate with one-X Portal for IP Office, the system directories ofeach are combined by one-X Portal for IP Office into a single system directory for use by one-X Portal for IPOffice users. If the same name exists in more than one IP Office system directory, that name will exist asmultiple records in the one-X Portal for IP Office system directory. If this is undesirable, the centralized systemdirectory feature supported by IP Office 5.0 and higher systems should be used to have the system directoryrecord configured on just one IP Office but shared by HTTP import on the other IP Offices.
· Since the system directories are available to all one-X Portal for IP Office users, the number must be dialableby all one-X Portal for IP Office users. Alternatively, short codes should be used to ensure that numbersselected from the one-X Portal for IP Office system directory are interpreted correctly by the user's own IPOffice
· The one-X Portal for IP Office administrator can add System Directory contacts that are stored as part ofthe one-X Portal for IP Office configuration rather than IP Office configuration. These contacts can havemultiple phone numbers and email addresses in the same way as user's Personal Directory contacts, but areavailable to all one-X Portal for IP Office users.
· External Directory The external directory is not stored by one-X Portal for IP Office. Instead one-X Portal for IP Office performs a livesearch of the external directory source configured for one-X Portal for IP Office usage.
76
41
one-X Portal for IP Office Installation Page 1115-601139 Issue 05b (04 August 2011)IP Office 7.0
one-X Portal for IP Office: one-X Portal for IP Office Settings
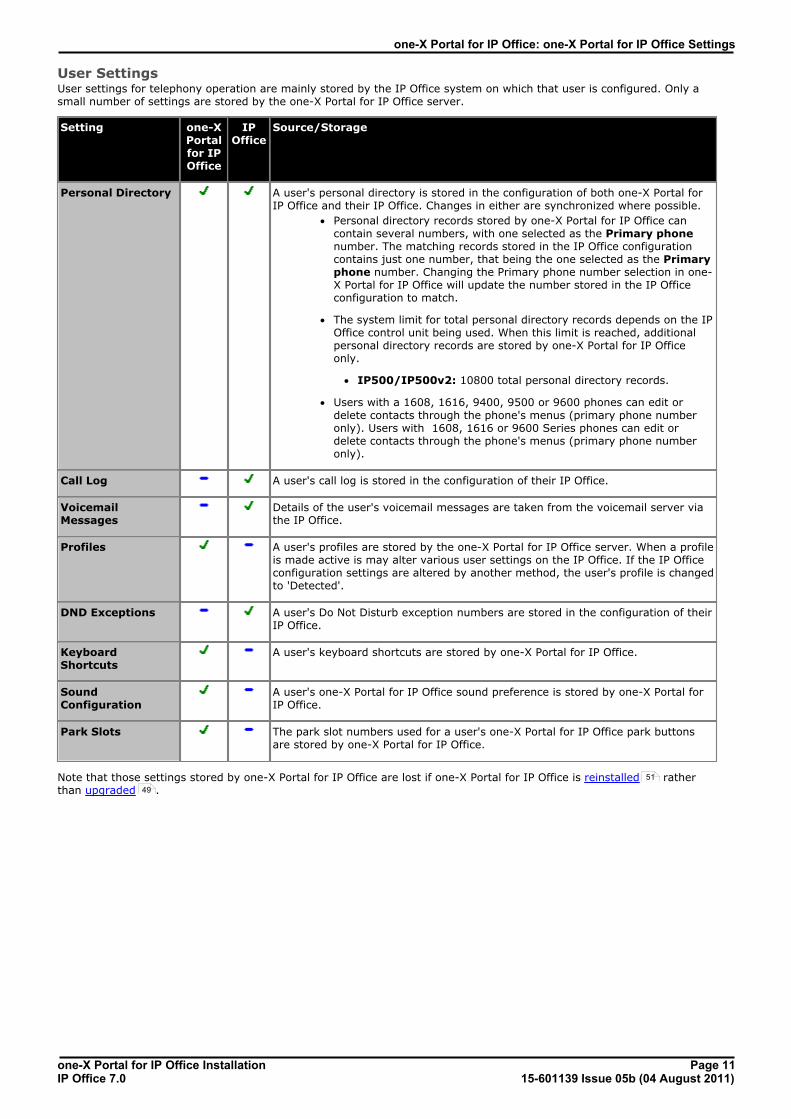
User SettingsUser settings for telephony operation are mainly stored by the IP Office system on which that user is configured. Only asmall number of settings are stored by the one-X Portal for IP Office server.
Setting one-XPortalfor IPOffice
IPOffice
Source/Storage
Personal Directory A user's personal directory is stored in the configuration of both one-X Portal forIP Office and their IP Office. Changes in either are synchronized where possible.
· Personal directory records stored by one-X Portal for IP Office cancontain several numbers, with one selected as the Primary phonenumber. The matching records stored in the IP Office configurationcontains just one number, that being the one selected as the Primaryphone number. Changing the Primary phone number selection in one-X Portal for IP Office will update the number stored in the IP Officeconfiguration to match.
· The system limit for total personal directory records depends on the IPOffice control unit being used. When this limit is reached, additionalpersonal directory records are stored by one-X Portal for IP Officeonly.
· IP500/IP500v2: 10800 total personal directory records.
· Users with a 1608, 1616, 9400, 9500 or 9600 phones can edit ordelete contacts through the phone's menus (primary phone numberonly). Users with 1608, 1616 or 9600 Series phones can edit ordelete contacts through the phone's menus (primary phone numberonly).
Call Log A user's call log is stored in the configuration of their IP Office.
VoicemailMessages
Details of the user's voicemail messages are taken from the voicemail server viathe IP Office.
Profiles A user's profiles are stored by the one-X Portal for IP Office server. When a profileis made active is may alter various user settings on the IP Office. If the IP Officeconfiguration settings are altered by another method, the user's profile is changedto 'Detected'.
DND Exceptions A user's Do Not Disturb exception numbers are stored in the configuration of theirIP Office.
KeyboardShortcuts
A user's keyboard shortcuts are stored by one-X Portal for IP Office.
SoundConfiguration
A user's one-X Portal for IP Office sound preference is stored by one-X Portal forIP Office.
Park Slots The park slot numbers used for a user's one-X Portal for IP Office park buttonsare stored by one-X Portal for IP Office.
Note that those settings stored by one-X Portal for IP Office are lost if one-X Portal for IP Office is reinstalled ratherthan upgraded .
51
49
one-X Portal for IP Office Installation Page 1215-601139 Issue 05b (04 August 2011)IP Office 7.0
1.5 Telephony NotesWhile the one-X Portal for IP Office displays information about calls and allows the user to perform actions such as answeror make call, all control of the user's phone and call is still performed via the telephone system.
Incoming CallsThe calls that reach the one-X Portal for IP Office user are still fully controlled by the IP Office system settings. Forexample, the user's call waiting settings, number of call appearance buttons, etc. This applies to both user calls and callsto hunt groups of which the user is a member. Issues with incoming calls not alerting the one-X Portal for IP Office userwill be down to IP Office system configuration settings.
Outgoing CallsThe outgoing calls that the one-X Portal for IP Office user can make will be subject to the user's IP Office configurationsettings. The one difference is that the user can use one-X Portal for IP Office to make additional calls. For example, whenall the appearance buttons on a user's phone are in use, they can still use one-X Portal for IP Office to make additionalcalls.
On some type of phones, the call log shown by the phone and the phone's redial function use information stored by thephone. When that is the case, those functions will not include calls made using the one-X Portal for IP Office.
Call Gadget ButtonsWithin the sub-tab shown for each call being handled by the one-X Portal for IP Office users, a number of buttons areincluded. The buttons indicate actions that the user can perform or initiate and vary according to factors such as the typeof phone, the current state of the call, whether the user already has other calls connected or held, etc.
It is important to understand that it is not the one-X Portal for IP Office application that controls which buttons aredisplayed. The actions currently performable on each call are indicated to one-X Portal for IP Office as part of theinformation from the IP Office system.
When the user is using a phone that the IP Office system cannot force off-hook, the following differences are applicable.
· When an incoming calls is presented while the phone is on-hook, one-X Portal for IP Office will not enable the Answer button. The user needs to manually take the phone off hook to answer the call using the phone's owncontrols.
· When making a call from one-X Portal for IP Office with the phone is on-hook (for example after entering a numberand clicking on Call or having selected to play a voicemail message), the IP Office will call the user's phone and willonly make the outgoing call when answered.
Some phones allow actions such as entering the number to call without going off-hook. This is called en-bloc dialing. TheIP Office system, and therefore the one-X Portal for IP Office, is unaware of such activity until the prepared digits are sentfrom the phone.
· This typically applies to phones on DECT systems and to SIP extensions.
· Avaya 1400, 1600, 9400, 9500 and 9600 Series phones can be optionally set to use en-bloc dialing.

one-X Portal for IP Office Installation Page 1315-601139 Issue 05b (04 August 2011)IP Office 7.0
Installation
Chapter 2.
one-X Portal for IP Office Installation Page 1415-601139 Issue 05b (04 August 2011)IP Office 7.0
2. InstallationThis section covers the installation of a one-X Portal for IP Office server using default settings. This is the recommendedoption except for installers with advanced one-X Portal for IP Office experience.
· Important Installation of one-X Portal for IP Office is greatly simplified if each IP Office contains at least one user alreadylicensed and configured for one-X Portal for IP Office operation. It is also vital to check the security settings of eachIP Office.
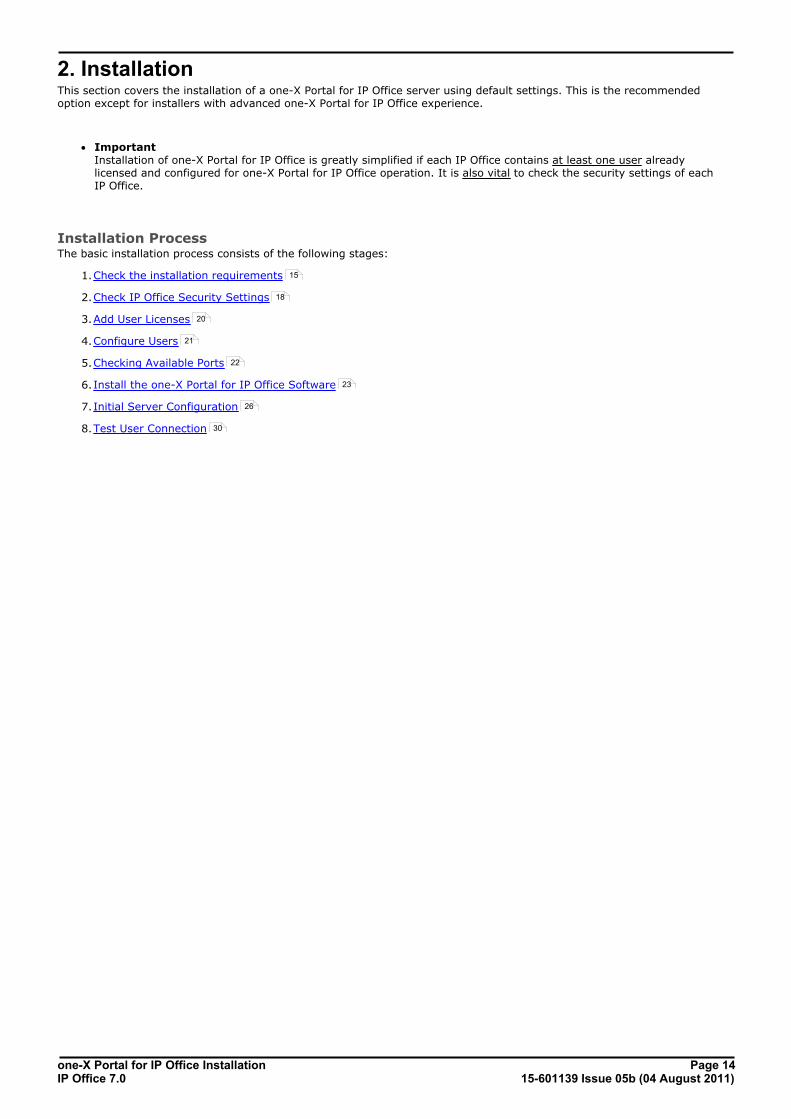
Installation ProcessThe basic installation process consists of the following stages:
1.Check the installation requirements
2.Check IP Office Security Settings
3.Add User Licenses
4.Configure Users
5.Checking Available Ports
6.Install the one-X Portal for IP Office Software
7.Initial Server Configuration
8.Test User Connection
15
18
20
21
22
23
26
30
one-X Portal for IP Office Installation Page 1515-601139 Issue 05b (04 August 2011)IP Office 7.0
Installation:
2.1 Installation RequirementsEnsure that the following requirements are met before beginning installation of the one-X Portal for IP Office software onthe server PC. Failure to do so will cause the one-X Portal for IP Office server to operate incorrectly.
IP Office Software· o IP Office Applications DVD
For a Windows based server installation, the IP Office Applications DVD includes the software for installation of one-X Portal for IP Office. It also includes software for installation of IP Office Manager and the IP Office System StatusApplication which are required during one-X Portal for IP Office installation.
· o IP Office Application Server DVD For a Linux based server installation, the one-X Portal for IP Office application is included as one of the applicationsthat can be selected during the IP Office Application server installation. A copy of the IP Office Application DVD isstill required for the IP Office Manager application.
·
IP Office System Requirements· o IP Office System
If the system running pre-IP Office Release 7.0 software, it must be upgraded as per the relevant IP OfficeTechnical Bulletins before proceeding.
· Users licensed and configured with the Office User, Teleworker User or Power User profiles can be configuredfor as one-X Portal for IP Office users. Those licensed and configured for with Teleworker User or Power Userprofiles can also be enabled for one-X Portal for IP Office telecommuter mode.
· For systems being upgraded from IP Office Release 5, existing one-X Portal for IP Office licenses remainvalid and can be used to enable one-X Portal for IP Office for users set to the Basic User profile.
Server PC Requirements
one-X Portal for IP Office is currently supported with all components installed on a single server meeting the followingrequirements:
· Administrator Account: During installation you must be logged in using an account with full administrator rights.
· Operating System: Windows 2003 or Windows 2008 (32-bit and 64-bit).
· Processor: Intel Pentium D945 Dual Core or AMD Athlon64 4000+ or better.
· RAM Memory: 2GB minimum.
· Available Hard Disk Space: 10GB.
· TCP/IP Port: The default ports are 8080 and 8666. These can be changed if required during installation of the server software ifnecessary. See Checking Available Ports .
· Firewall Exceptions Exceptions should be added to the server firewall for incoming access on the TCP ports above. If the firewall is alsoused to control outgoing access, an exception for access to TCP port 50814 on the IP Office IP address should alsobe added.
22
one-X Portal for IP Office Installation Page 1615-601139 Issue 05b (04 August 2011)IP Office 7.0
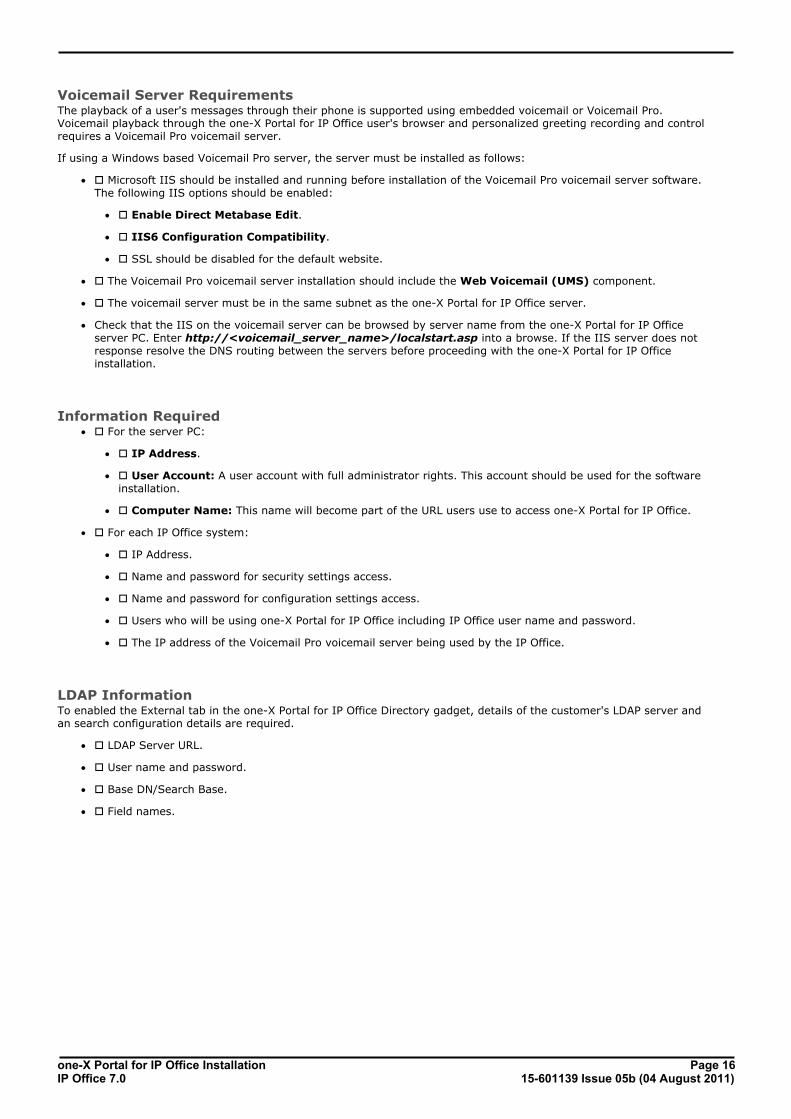
Voicemail Server RequirementsThe playback of a user's messages through their phone is supported using embedded voicemail or Voicemail Pro.Voicemail playback through the one-X Portal for IP Office user's browser and personalized greeting recording and controlrequires a Voicemail Pro voicemail server.
If using a Windows based Voicemail Pro server, the server must be installed as follows:
· o Microsoft IIS should be installed and running before installation of the Voicemail Pro voicemail server software.The following IIS options should be enabled:
· o Enable Direct Metabase Edit.
· o IIS6 Configuration Compatibility.
· o SSL should be disabled for the default website.
· o The Voicemail Pro voicemail server installation should include the Web Voicemail (UMS) component.
· o The voicemail server must be in the same subnet as the one-X Portal for IP Office server.
· Check that the IIS on the voicemail server can be browsed by server name from the one-X Portal for IP Officeserver PC. Enter http://<voicemail_server_name>/localstart.asp into a browse. If the IIS server does notresponse resolve the DNS routing between the servers before proceeding with the one-X Portal for IP Officeinstallation.
Information Required· o For the server PC:
· o IP Address.
· o User Account: A user account with full administrator rights. This account should be used for the softwareinstallation.
· o Computer Name: This name will become part of the URL users use to access one-X Portal for IP Office.
· o For each IP Office system:
· o IP Address.
· o Name and password for security settings access.
· o Name and password for configuration settings access.
· o Users who will be using one-X Portal for IP Office including IP Office user name and password.
· o The IP address of the Voicemail Pro voicemail server being used by the IP Office.
LDAP InformationTo enabled the External tab in the one-X Portal for IP Office Directory gadget, details of the customer's LDAP server andan search configuration details are required.
· o LDAP Server URL.
· o User name and password.
· o Base DN/Search Base.
· o Field names.
one-X Portal for IP Office Installation Page 1715-601139 Issue 05b (04 August 2011)IP Office 7.0
Installation: Installation Requirements
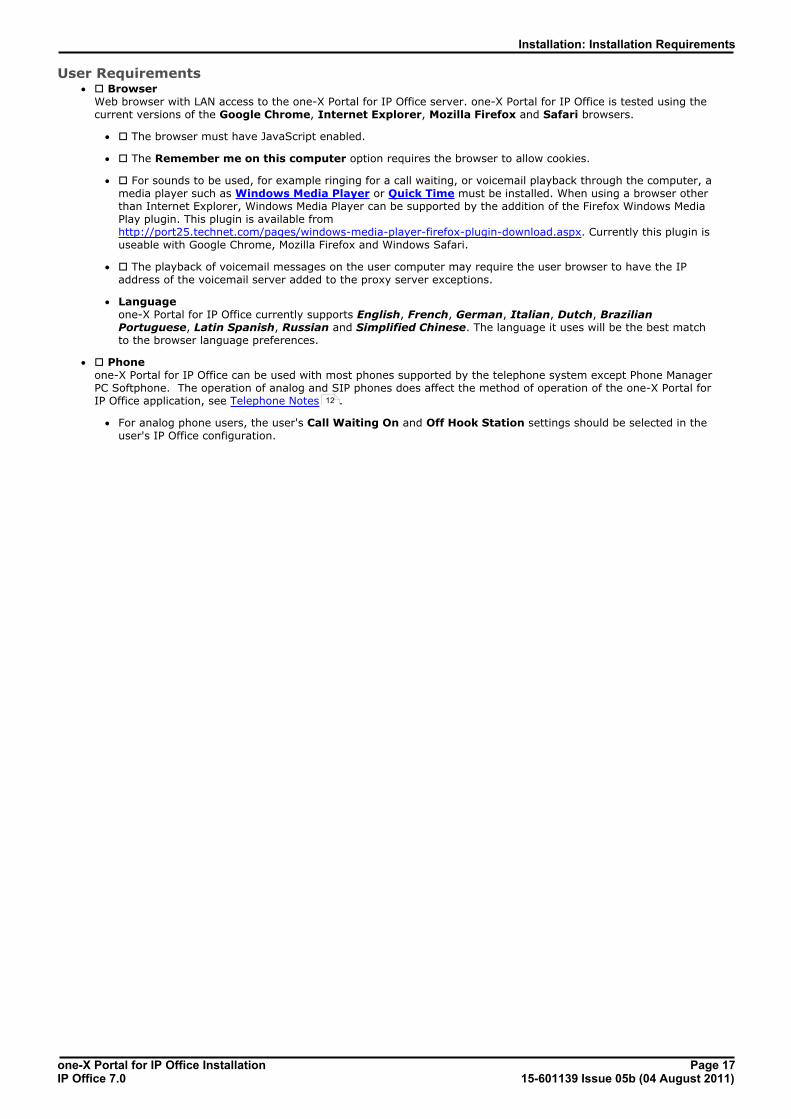
User Requirements· o Browser
Web browser with LAN access to the one-X Portal for IP Office server. one-X Portal for IP Office is tested using thecurrent versions of the Google Chrome, Internet Explorer, Mozilla Firefox and Safari browsers.
· o The browser must have JavaScript enabled.
· o The Remember me on this computer option requires the browser to allow cookies.
· o For sounds to be used, for example ringing for a call waiting, or voicemail playback through the computer, amedia player such as Windows Media Player or Quick Time must be installed. When using a browser otherthan Internet Explorer, Windows Media Player can be supported by the addition of the Firefox Windows MediaPlay plugin. This plugin is available from http://port25.technet.com/pages/windows-media-player-firefox-plugin-download.aspx. Currently this plugin isuseable with Google Chrome, Mozilla Firefox and Windows Safari.
· o The playback of voicemail messages on the user computer may require the user browser to have the IPaddress of the voicemail server added to the proxy server exceptions.
· Language one-X Portal for IP Office currently supports English, French, German, Italian, Dutch, BrazilianPortuguese, Latin Spanish, Russian and Simplified Chinese. The language it uses will be the best matchto the browser language preferences.
· o Phone one-X Portal for IP Office can be used with most phones supported by the telephone system except Phone ManagerPC Softphone. The operation of analog and SIP phones does affect the method of operation of the one-X Portal forIP Office application, see Telephone Notes .
· For analog phone users, the user's Call Waiting On and Off Hook Station settings should be selected in theuser's IP Office configuration.
12

one-X Portal for IP Office Installation Page 1815-601139 Issue 05b (04 August 2011)IP Office 7.0
2.2 Check the IP Office Security SettingsBefore attempting to connect an IP Office to a one-X Portal for IP Office server you must check the IP Office securitysettings. one-X Portal for IP Office uses a specific service and security service user account for the connection. This serviceis not necessarily present by default.
· Important: Perform this Process from the one-X Portal for IP Office Server PC It is strongly recommended that this and other IP Office configuration actions are performed using IP OfficeManager installed on the server PC. That then also tests the network routing between the server PC and the IPOffice system.
· Important: Security Name and Password This process uses the default security name and password assumed by one-X Portal for IP Office installation forTCPA/TSPI access to an IP Office 5.0+ system. If using the Advanced option during one-X Portal for IP Officeinstallation, alternate names and passwords can be used. However, that is only recommended for installerswith experience of previous one-X Portal for IP Office installations.
1.Start IP Office Manager and select File | Advanced | Security Settings.
2.Select the IP Office system and click OK.
3.Enter the user name and password for access to the IP Office's security settings.
4.Select Services. On systems running IP Office 5.0+ software the list of services will include an entry for anEnhanced TSPI service. This is the service used by the one-X Portal for IP Office service to access the IP Office.You need to ensure that the IP Office security configuration includes a Service User and Right Group configured touse this service.
5.Select Rights Groups.
6.The list of Rights Groups should contain a group called TCPA Group. Select this group and then the EnhancedTSPI tab. The option for Enhanced TSPI Access should be selected as shown above. If this is not the case correctthe security settings, creating a new group of necessary.
one-X Portal for IP Office Installation Page 1915-601139 Issue 05b (04 August 2011)IP Office 7.0
Installation: Check the IP Office Security Settings
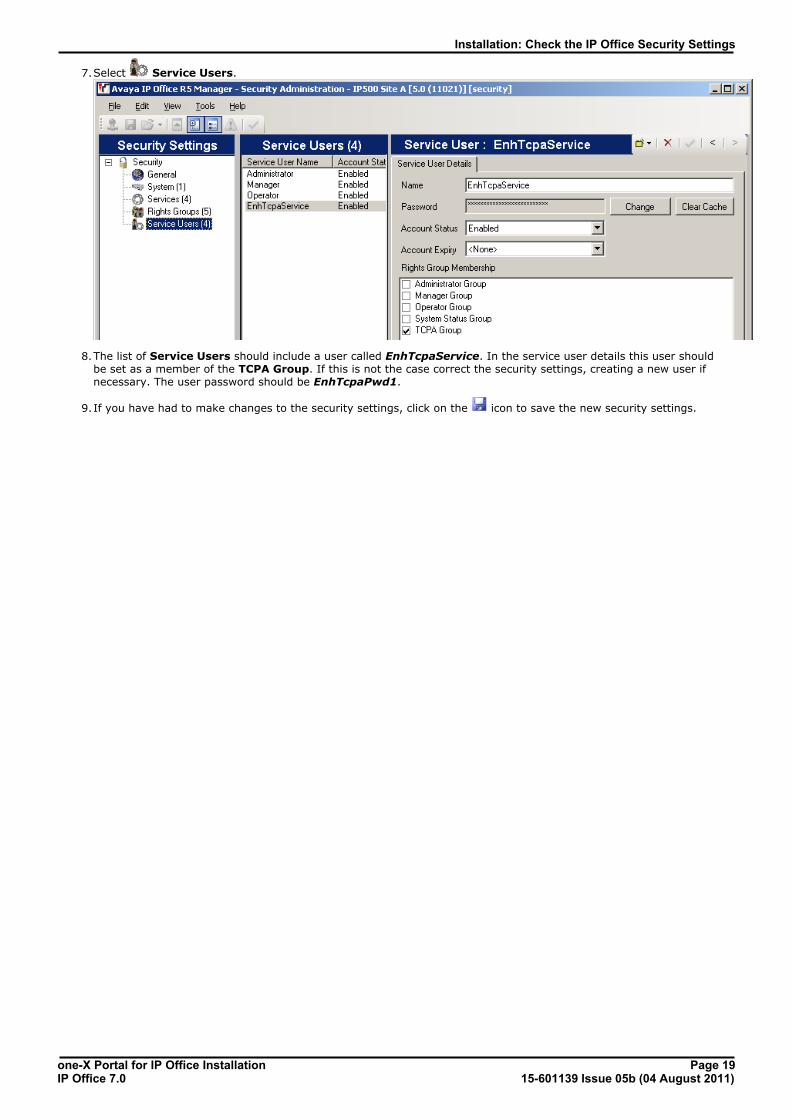
7.Select Service Users.
8.The list of Service Users should include a user called EnhTcpaService. In the service user details this user shouldbe set as a member of the TCPA Group. If this is not the case correct the security settings, creating a new user ifnecessary. The user password should be EnhTcpaPwd1.
9. If you have had to make changes to the security settings, click on the icon to save the new security settings.
one-X Portal for IP Office Installation Page 2015-601139 Issue 05b (04 August 2011)IP Office 7.0
2.3 Add LicensesEach user for one-X Portal for IP Office must be configured to a user profile that includes support for one-X Portal forIP Office. User profiles other than Basic User, which does not include support for one-X Portal for IP Office usage,required an appropriate user profile license in the IP Office system configuration.
It is strongly recommended that these licenses are added to the IP Office configuration and validated before one-X Portalfor IP Office is installed. Each license is specific to the serial number of the IP Office system's Feature Key serial numberand licenses a specific number of users. Multiple licenses can be added for a larger total number of users.
· Users licensed and configured with the Office User, Teleworker User or Power User profiles can be configuredfor as one-X Portal for IP Office users. Those licensed and configured for with Teleworker User or Power Userprofiles can also be enabled for one-X Portal for IP Office telecommuter mode.
· For systems being upgraded from IP Office Release 5, existing one-X Portal for IP Office licenses remainvalid and can be used to enable one-X Portal for IP Office for users set to the Basic User profile.
· Users can refresh their browser without being logged out. All data will be retrieved from the server as if they hadjust logged in again. The user can also navigate to another website and back to one-X Portal for IP Office and stillbe logged in. If the user presses the Esc button, they will be prompted whether they wish to log out. If they do not,the browser will be refreshed. With some browsers, for example Firefox, if a user closes the browser withoutlogging out, when they reopen the browser they will be logged straight back in. If a user closes their browser ratherthan logging out, the license they were using will remain consumed by them for up to 6 hours.
1.Start IP Office Manager and click on the icon.
2.Select the IP Office and click OK.
3.Enter the user name and password for access to the IP Office's configuration settings.
4.Click on License.
5.Click on to enter a new license.
6.Enter the license or licenses provided for one-X Portal for IP Office operation on that system.
7.If the license has been entered correctly, the License Type will shown. The License Status will be Unknown.The Instances will show the number of users who can now be configured for one-X Portal for IP Office operationusing that license.
8.Click on to save the updated configuration back to the IP Office system.
9.Reload the IP Office configuration and select License again.
10.Check that the License Status is now Valid.
11.Repeat this process for any other IP Office's that will be supported by the one-X Portal for IP Office server.
21
one-X Portal for IP Office Installation Page 2115-601139 Issue 05b (04 August 2011)IP Office 7.0
Installation: Add Licenses
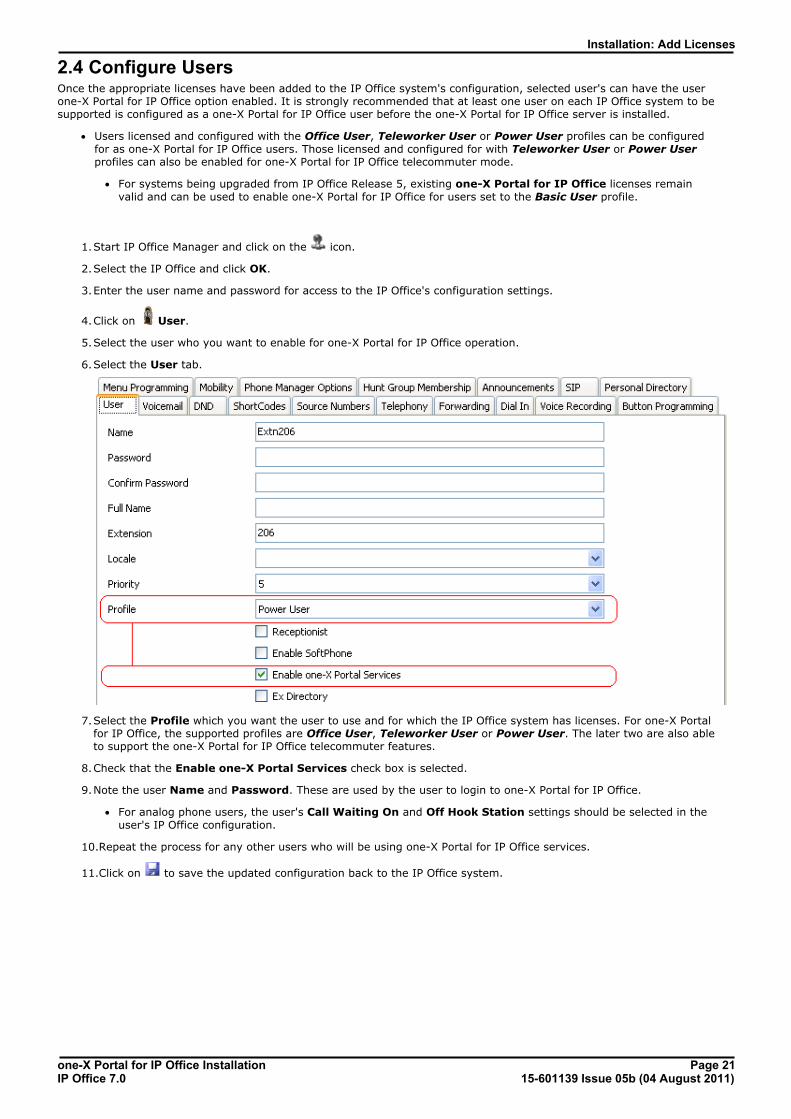
2.4 Configure UsersOnce the appropriate licenses have been added to the IP Office system's configuration, selected user's can have the userone-X Portal for IP Office option enabled. It is strongly recommended that at least one user on each IP Office system to besupported is configured as a one-X Portal for IP Office user before the one-X Portal for IP Office server is installed.
· Users licensed and configured with the Office User, Teleworker User or Power User profiles can be configuredfor as one-X Portal for IP Office users. Those licensed and configured for with Teleworker User or Power Userprofiles can also be enabled for one-X Portal for IP Office telecommuter mode.
· For systems being upgraded from IP Office Release 5, existing one-X Portal for IP Office licenses remainvalid and can be used to enable one-X Portal for IP Office for users set to the Basic User profile.
1.Start IP Office Manager and click on the icon.
2.Select the IP Office and click OK.
3.Enter the user name and password for access to the IP Office's configuration settings.
4.Click on User.
5.Select the user who you want to enable for one-X Portal for IP Office operation.
6.Select the User tab.
7.Select the Profile which you want the user to use and for which the IP Office system has licenses. For one-X Portalfor IP Office, the supported profiles are Office User, Teleworker User or Power User. The later two are also ableto support the one-X Portal for IP Office telecommuter features.
8.Check that the Enable one-X Portal Services check box is selected.
9.Note the user Name and Password. These are used by the user to login to one-X Portal for IP Office.
· For analog phone users, the user's Call Waiting On and Off Hook Station settings should be selected in theuser's IP Office configuration.
10.Repeat the process for any other users who will be using one-X Portal for IP Office services.
11.Click on to save the updated configuration back to the IP Office system.
one-X Portal for IP Office Installation Page 2215-601139 Issue 05b (04 August 2011)IP Office 7.0
2.5 Checking Available Server PortsThe one-X Portal for IP Office application installs as a service (Avaya one-X Portal) listening on a port. By default it usesport 8080. The backup and restore service also use port 8666 by default.
It is important to check that these ports are not already in use by other applications. If they are, a different unused portnumber should be specified during the one-X Portal for IP Office software installation. The only way to change the portsfollowing installation is to remove and then reinstall the software .
Whichever ports are selected, ensure that incoming TCP access to those ports is allowed in the server's firewallexceptions.
· Ports Used by the one-X Portal for IP Office In addition to the ports used to access the one-X Portal for IP Office server from a browser client, variouscomponents of the one-X Portal for IP Office also use ports to communicate. The full set of ports used by one-XPortal for IP Office are listed below.
· 4560 - This port is used by log4j socket appender.
· 8080 - Default HTTP browser access port. This port number can be changed during installation.
· 8443 - Used for HTTPS access to one-X Portal
· 8005 - Used by the Tomcat shutdown listener
· 9092 - The database component of the one-X Portal for IP Office uses this port.
· 8666 - This port is used by the JVMX component of the one-X Portal for IP Office. This port number can bechanged during installation.
· Listing Ports Already in Use To check which ports are already in use on the server, the command netstat -an > ports.txt can be used. Thiswill create a text file ports.txt listing all the ports on which the server is currently listening. Check that none of theports required by one-X Portal for IP Office are already in use. If they are, there will be a conflict between theapplication already using the port and one-X Portal for IP Office when one-X Portal for IP Office is installed.
· Reserved Ports There are a number of ports used by other Avaya IP Office applications. If any of these are specified duringinstallation, the installer will ignore the selection and default to installing on port 8080. Examples of reserved portsare:
· 8089 - Default port used by IP Office Conferencing Center application.
· 8888 - Default port used by ContactStore for IP Office.
· Other Commonly Used Ports Ports in the 8000 range are also frequently used by other applications.
· 8081 - Default port used by IIS for Sharepoint Administration access.
80
51
one-X Portal for IP Office Installation Page 2315-601139 Issue 05b (04 August 2011)IP Office 7.0
Installation: Checking Available Server Ports
2.6 Install the one-X Portal for IP Office Software
Linux ServerThe Linux based version of one-X Portal for IP Office is installed as one of the selectable application in the IP OfficeApplication Server installation process. For details of that process refer to the IP Office Application Server InstallationManual.
Windows ServerThe following process is used for installation of the one-X Portal for IP Office software on a Windows server. It is stronglyrecommended that you do not start software installation until the previous installation steps (IP Office security settings, one-X Portal for IP Office licenses , user configuration ) have been completed.
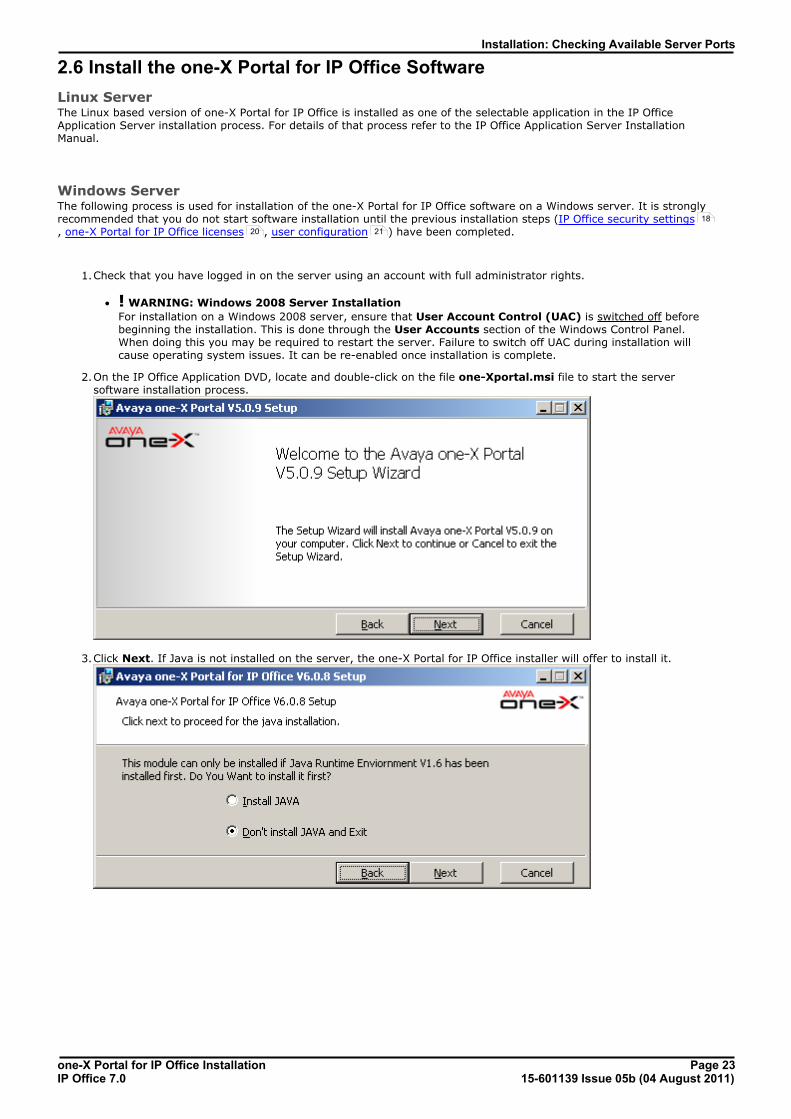
1.Check that you have logged in on the server using an account with full administrator rights.
· ! WARNING: Windows 2008 Server Installation
For installation on a Windows 2008 server, ensure that User Account Control (UAC) is switched off beforebeginning the installation. This is done through the User Accounts section of the Windows Control Panel.When doing this you may be required to restart the server. Failure to switch off UAC during installation willcause operating system issues. It can be re-enabled once installation is complete.
2.On the IP Office Application DVD, locate and double-click on the file one-Xportal.msi file to start the serversoftware installation process.
3.Click Next. If Java is not installed on the server, the one-X Portal for IP Office installer will offer to install it.
18
20 21
one-X Portal for IP Office Installation Page 2415-601139 Issue 05b (04 August 2011)IP Office 7.0
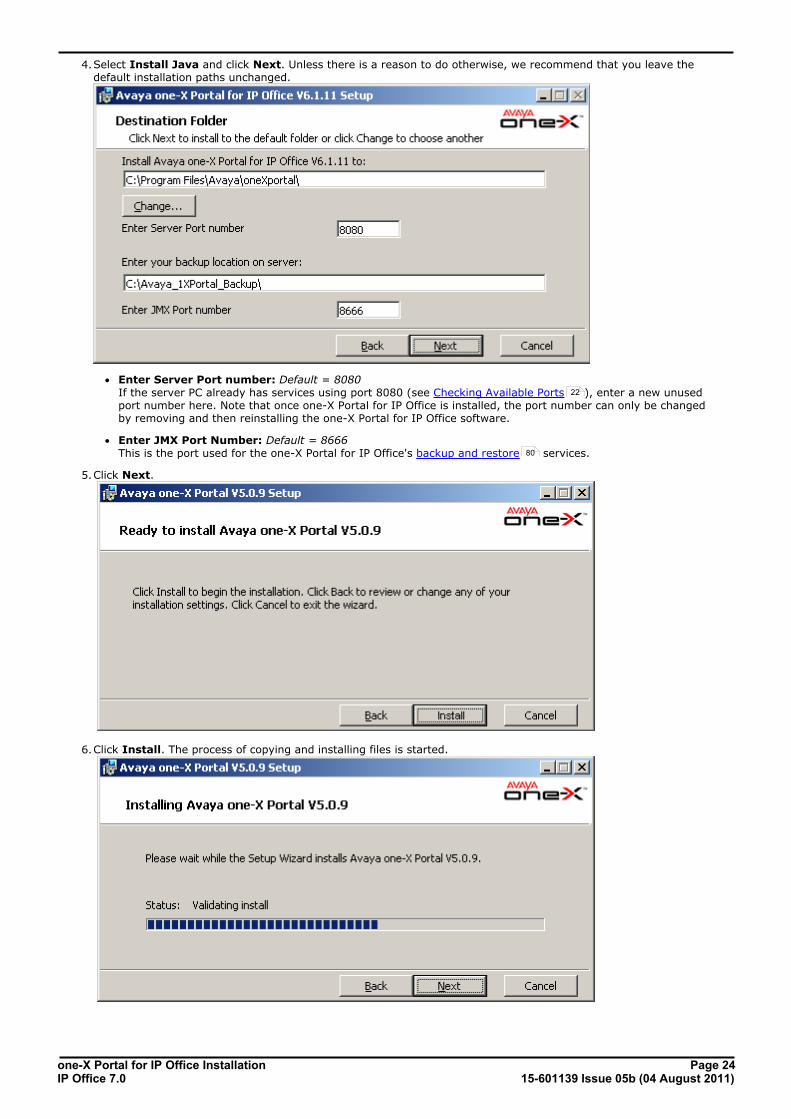
4.Select Install Java and click Next. Unless there is a reason to do otherwise, we recommend that you leave thedefault installation paths unchanged.
· Enter Server Port number: Default = 8080 If the server PC already has services using port 8080 (see Checking Available Ports ), enter a new unusedport number here. Note that once one-X Portal for IP Office is installed, the port number can only be changedby removing and then reinstalling the one-X Portal for IP Office software.
· Enter JMX Port Number: Default = 8666 This is the port used for the one-X Portal for IP Office's backup and restore services.
5.Click Next.
6.Click Install. The process of copying and installing files is started.
22
80
one-X Portal for IP Office Installation Page 2515-601139 Issue 05b (04 August 2011)IP Office 7.0
Installation: Install the one-X Portal for IP Office Software
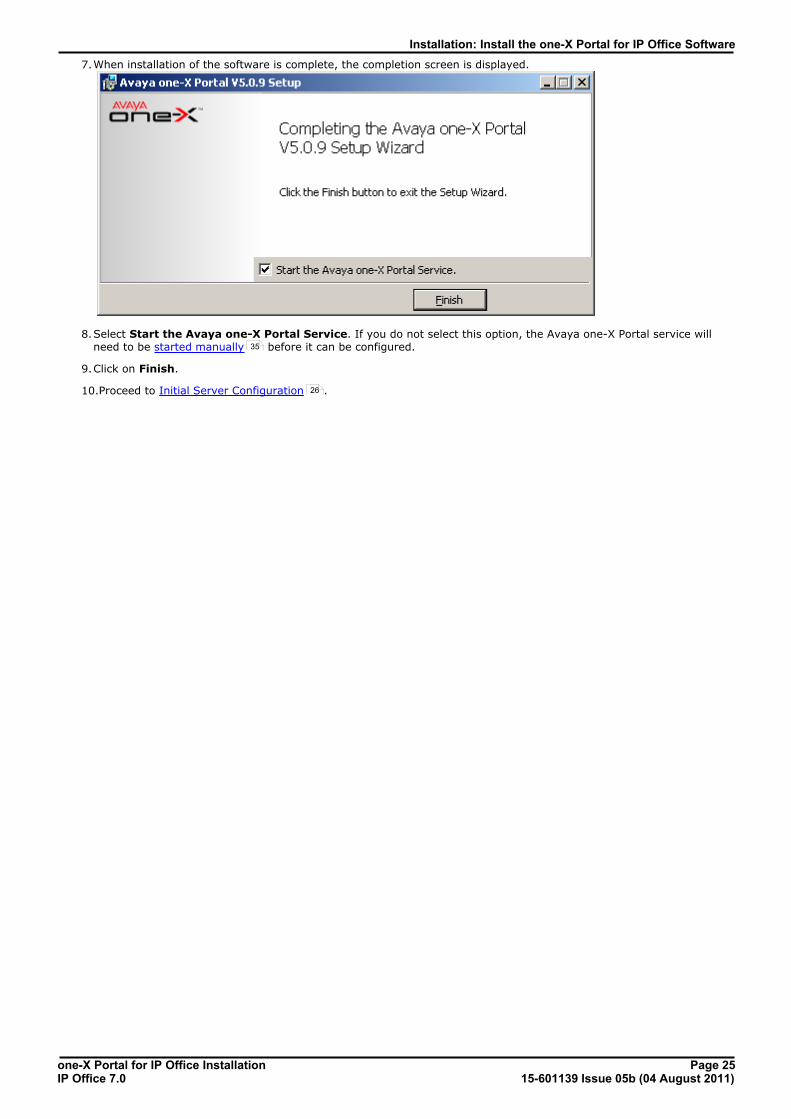
7.When installation of the software is complete, the completion screen is displayed.
8.Select Start the Avaya one-X Portal Service. If you do not select this option, the Avaya one-X Portal service willneed to be started manually before it can be configured.
9.Click on Finish.
10.Proceed to Initial Server Configuration .
35
26
one-X Portal for IP Office Installation Page 2615-601139 Issue 05b (04 August 2011)IP Office 7.0
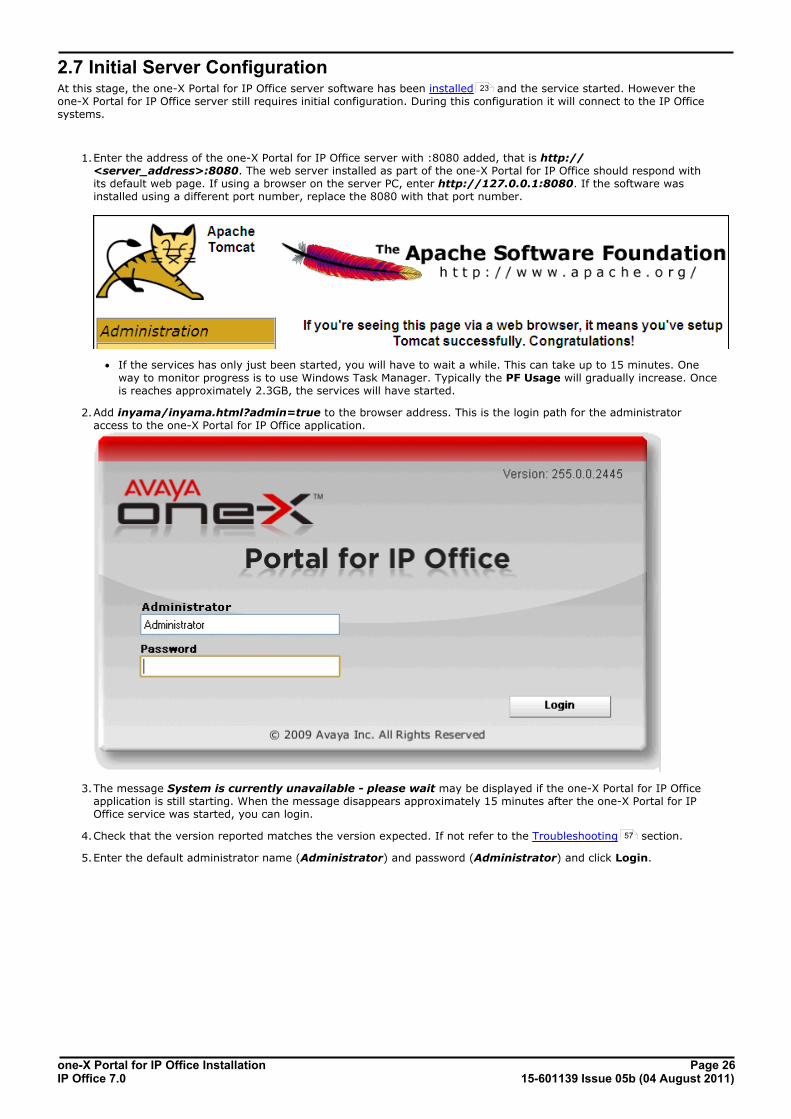
2.7 Initial Server ConfigurationAt this stage, the one-X Portal for IP Office server software has been installed and the service started. However theone-X Portal for IP Office server still requires initial configuration. During this configuration it will connect to the IP Officesystems.
1.Enter the address of the one-X Portal for IP Office server with :8080 added, that is http://<server_address>:8080. The web server installed as part of the one-X Portal for IP Office should respond withits default web page. If using a browser on the server PC, enter http://127.0.0.1:8080. If the software wasinstalled using a different port number, replace the 8080 with that port number.
· If the services has only just been started, you will have to wait a while. This can take up to 15 minutes. Oneway to monitor progress is to use Windows Task Manager. Typically the PF Usage will gradually increase. Onceis reaches approximately 2.3GB, the services will have started.
2.Add inyama/inyama.html?admin=true to the browser address. This is the login path for the administratoraccess to the one-X Portal for IP Office application.
3.The message System is currently unavailable - please wait may be displayed if the one-X Portal for IP Officeapplication is still starting. When the message disappears approximately 15 minutes after the one-X Portal for IPOffice service was started, you can login.
4.Check that the version reported matches the version expected. If not refer to the Troubleshooting section.
5.Enter the default administrator name (Administrator) and password (Administrator) and click Login.
23
57
one-X Portal for IP Office Installation Page 2715-601139 Issue 05b (04 August 2011)IP Office 7.0
Installation: Initial Server Configuration
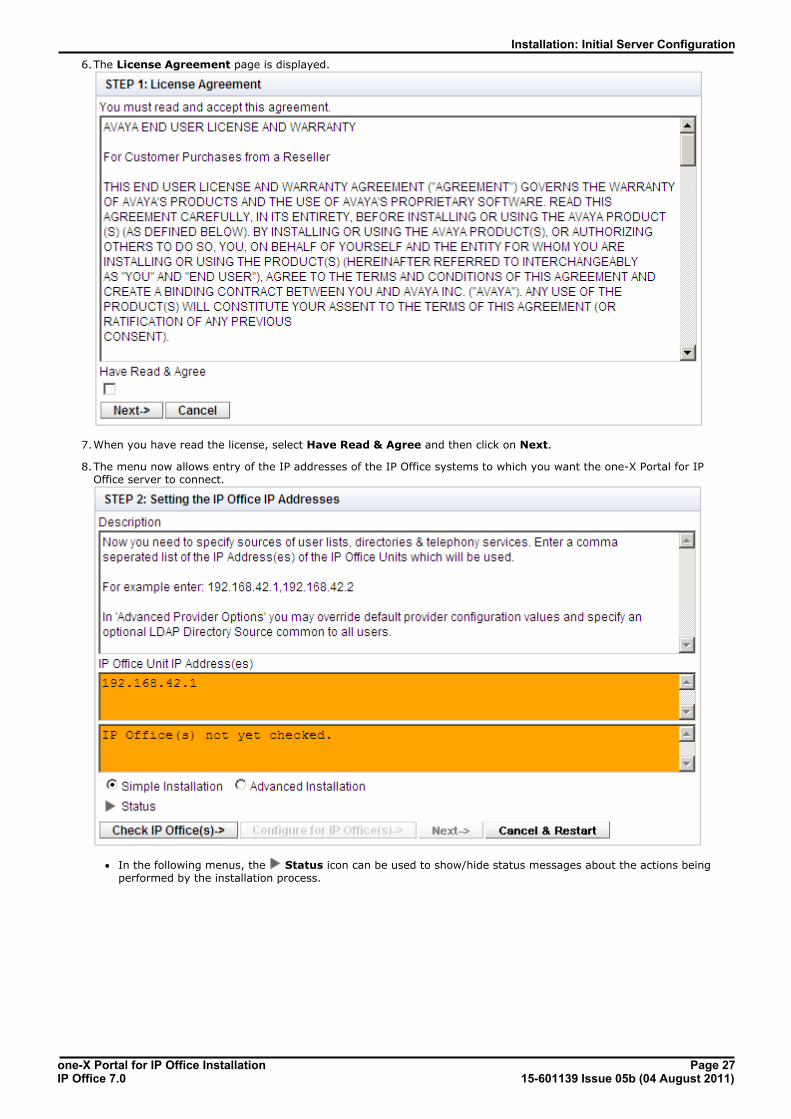
6.The License Agreement page is displayed.
7.When you have read the license, select Have Read & Agree and then click on Next.
8.The menu now allows entry of the IP addresses of the IP Office systems to which you want the one-X Portal for IPOffice server to connect.
· In the following menus, the Status icon can be used to show/hide status messages about the actions beingperformed by the installation process.
one-X Portal for IP Office Installation Page 2815-601139 Issue 05b (04 August 2011)IP Office 7.0
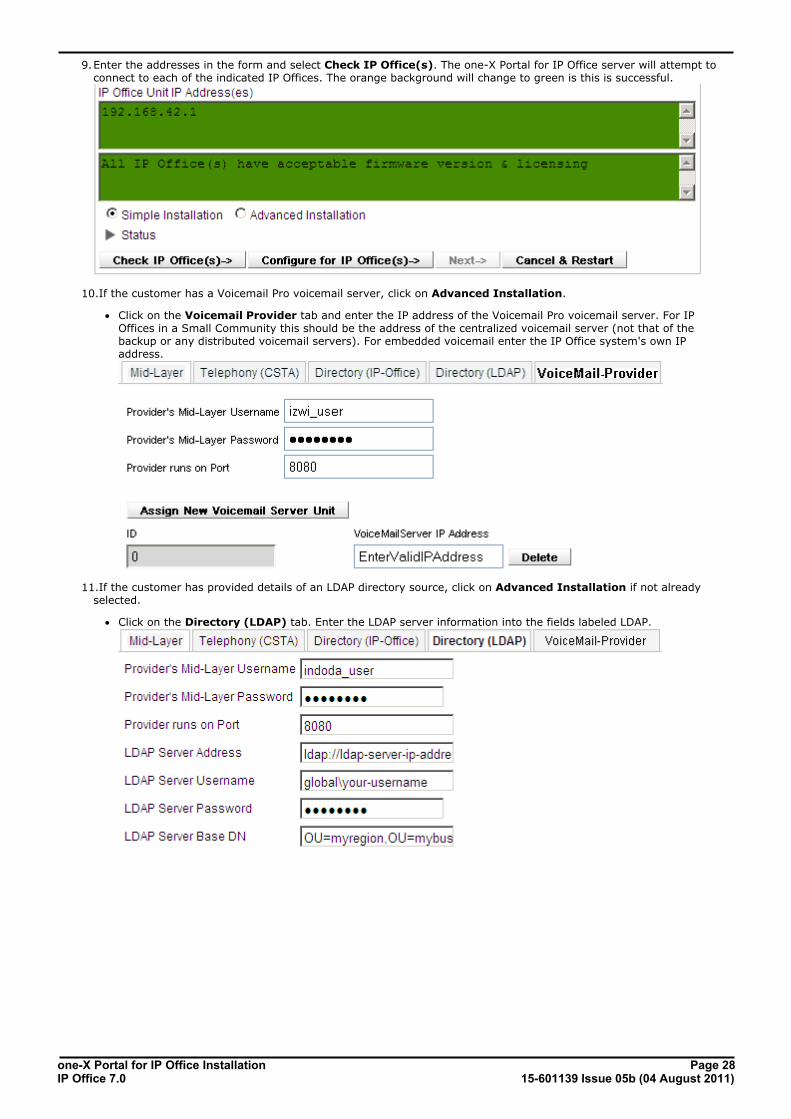
9.Enter the addresses in the form and select Check IP Office(s). The one-X Portal for IP Office server will attempt toconnect to each of the indicated IP Offices. The orange background will change to green is this is successful.
10.If the customer has a Voicemail Pro voicemail server, click on Advanced Installation.
· Click on the Voicemail Provider tab and enter the IP address of the Voicemail Pro voicemail server. For IPOffices in a Small Community this should be the address of the centralized voicemail server (not that of thebackup or any distributed voicemail servers). For embedded voicemail enter the IP Office system's own IPaddress.
11.If the customer has provided details of an LDAP directory source, click on Advanced Installation if not alreadyselected.
· Click on the Directory (LDAP) tab. Enter the LDAP server information into the fields labeled LDAP.
one-X Portal for IP Office Installation Page 2915-601139 Issue 05b (04 August 2011)IP Office 7.0
Installation: Initial Server Configuration
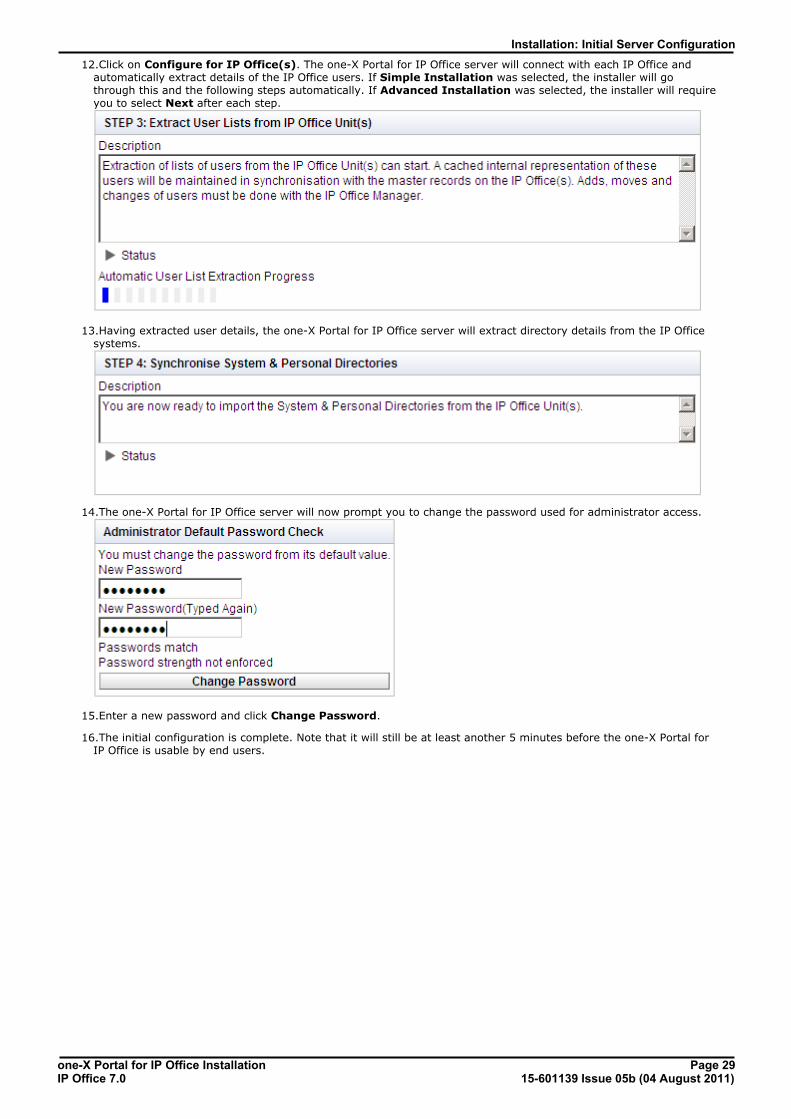
12.Click on Configure for IP Office(s). The one-X Portal for IP Office server will connect with each IP Office andautomatically extract details of the IP Office users. If Simple Installation was selected, the installer will gothrough this and the following steps automatically. If Advanced Installation was selected, the installer will requireyou to select Next after each step.
13.Having extracted user details, the one-X Portal for IP Office server will extract directory details from the IP Officesystems.
14.The one-X Portal for IP Office server will now prompt you to change the password used for administrator access.
15.Enter a new password and click Change Password.
16.The initial configuration is complete. Note that it will still be at least another 5 minutes before the one-X Portal forIP Office is usable by end users.
one-X Portal for IP Office Installation Page 3015-601139 Issue 05b (04 August 2011)IP Office 7.0
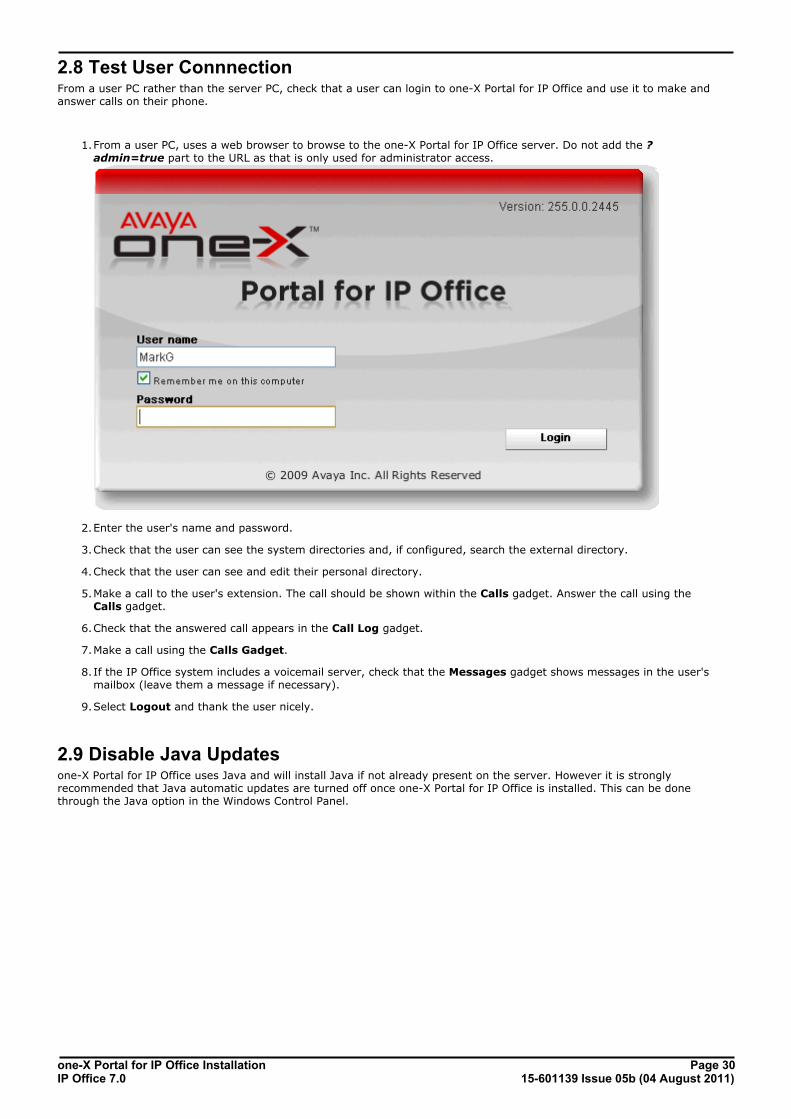
2.8 Test User ConnnectionFrom a user PC rather than the server PC, check that a user can login to one-X Portal for IP Office and use it to make andanswer calls on their phone.
1.From a user PC, uses a web browser to browse to the one-X Portal for IP Office server. Do not add the ?admin=true part to the URL as that is only used for administrator access.
2.Enter the user's name and password.
3.Check that the user can see the system directories and, if configured, search the external directory.
4.Check that the user can see and edit their personal directory.
5.Make a call to the user's extension. The call should be shown within the Calls gadget. Answer the call using theCalls gadget.
6.Check that the answered call appears in the Call Log gadget.
7.Make a call using the Calls Gadget.
8. If the IP Office system includes a voicemail server, check that the Messages gadget shows messages in the user'smailbox (leave them a message if necessary).
9.Select Logout and thank the user nicely.
2.9 Disable Java Updatesone-X Portal for IP Office uses Java and will install Java if not already present on the server. However it is stronglyrecommended that Java automatic updates are turned off once one-X Portal for IP Office is installed. This can be donethrough the Java option in the Windows Control Panel.

one-X Portal for IP Office Installation Page 3115-601139 Issue 05b (04 August 2011)IP Office 7.0
Installation: Disable Java Updates


one-X Portal for IP Office Installation Page 3315-601139 Issue 05b (04 August 2011)IP Office 7.0
Maintenance
Chapter 3.

one-X Portal for IP Office Installation Page 3415-601139 Issue 05b (04 August 2011)IP Office 7.0
3. MaintenanceThis section covers various post installation activities that may need to be performed.
· Manually Starting the Service
· Adding an Additional IP Office
· Changing an IP Office Details
· Adding/Deleting Users
· Editing User Settings
· Adding an LDAP Directory Source
· Checking the External LDAP Directory
· Backing Up the Database
· Restoring a Previous Backup
· Checking and Updating the System Directory
· Upgrading one-X Portal for IP Office
· Downgrading one-X Portal for IP Office
· Removing one-X Portal for IP Office
· Remote Logging
· Agent Gadget Control
one-X Portal for IP Office 6.1 and higher supports an additional set of backup and restore options.
35
36
39
42
42
41
48
45
46
47
49
50
51
53
58
80
one-X Portal for IP Office Installation Page 3515-601139 Issue 05b (04 August 2011)IP Office 7.0
Maintenance:
3.1 Manually Starting the Service
Linux ServerLog into the web controls pages of the IP Office Application server hosting the one-X Portal for IP Office application. Theinitial Home page displays the status of all the applications installed on the server. If the one-X Portal for IP Officeapplication is Stopped, click on the Start button to start the application.
The Auto Start checkbox can be selected to ensure that the application is always started after any restart of the server.
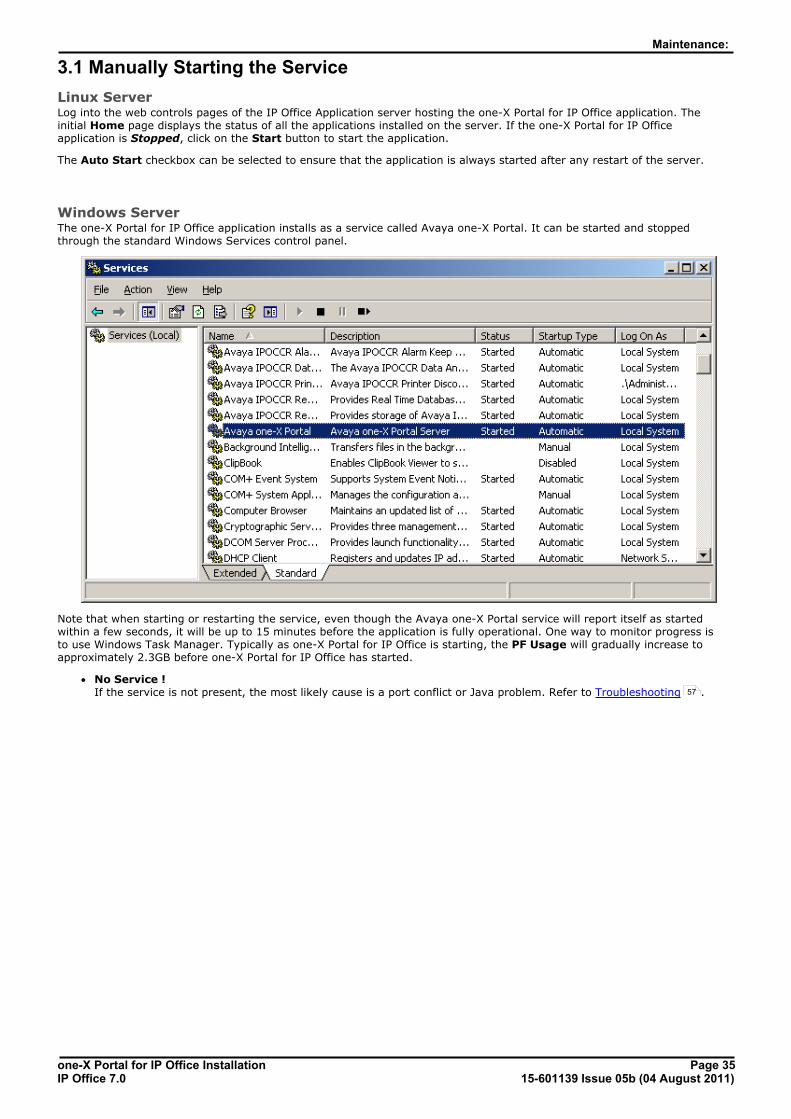
Windows ServerThe one-X Portal for IP Office application installs as a service called Avaya one-X Portal. It can be started and stoppedthrough the standard Windows Services control panel.
Note that when starting or restarting the service, even though the Avaya one-X Portal service will report itself as startedwithin a few seconds, it will be up to 15 minutes before the application is fully operational. One way to monitor progress isto use Windows Task Manager. Typically as one-X Portal for IP Office is starting, the PF Usage will gradually increase toapproximately 2.3GB before one-X Portal for IP Office has started.
· No Service ! If the service is not present, the most likely cause is a port conflict or Java problem. Refer to Troubleshooting . 57
one-X Portal for IP Office Installation Page 3615-601139 Issue 05b (04 August 2011)IP Office 7.0
3.2 Adding an Additional IP OfficeTo add an additional IP Office within the Small Community Network, its IP address needs to be assigned to the Telephony(CSTA) provider and to the Directory (DSML IP Office) provider.
· Warning This process requires the Avaya one-X Portal service to be restarted. During the restart one-X Portal for IP Officewill not be available to all users for up to 15 minutes.
1.Before adding another IP Office to the one-X Portal for IP Office configuration:
· Check that the IP Office has been configured with the security settings for one-X Portal for IP Officeoperation.
· Check that the IP Office is licensed for one-X Portal for IP Office.
· Check that at least one user on the IP Office has been enabled for one-X Portal for IP Office .
2.Log in to the administrator menus.
3.Check that the IP Office can be seen from the one-X Portal for IP Office server.
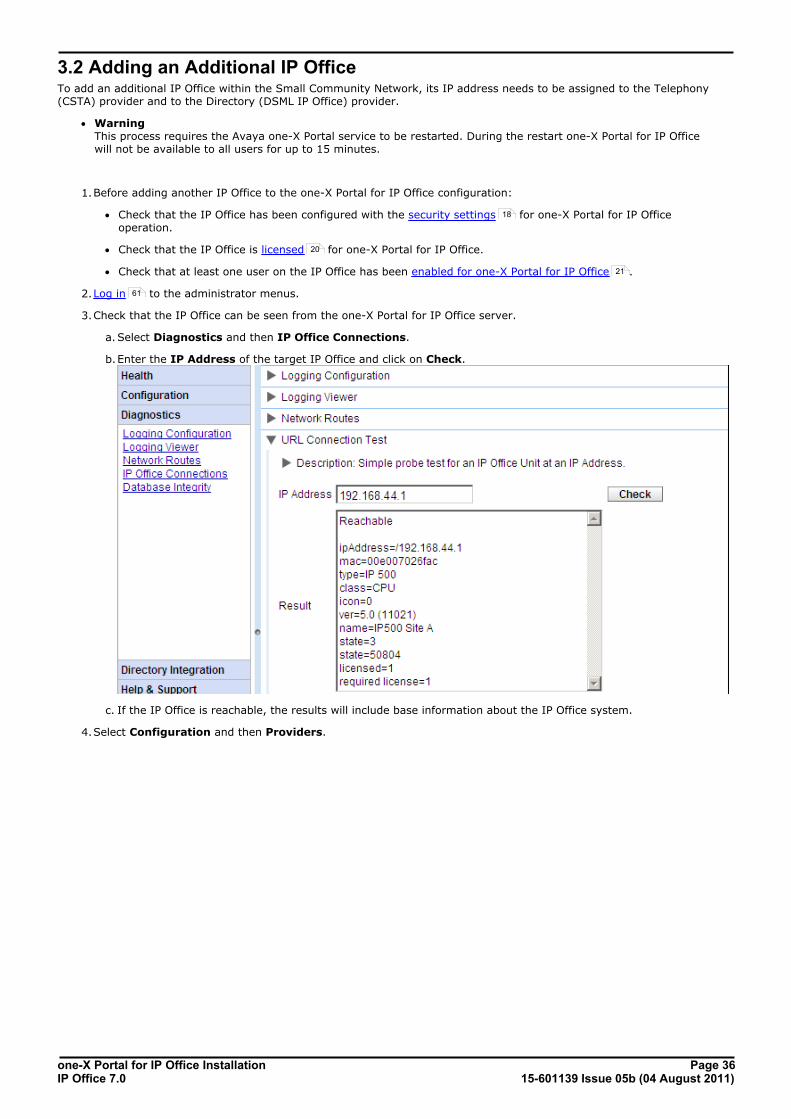
a.Select Diagnostics and then IP Office Connections.
b.Enter the IP Address of the target IP Office and click on Check.
c. If the IP Office is reachable, the results will include base information about the IP Office system.
4.Select Configuration and then Providers.
18
20
21
61
one-X Portal for IP Office Installation Page 3715-601139 Issue 05b (04 August 2011)IP Office 7.0
Maintenance: Adding an Additional IP Office
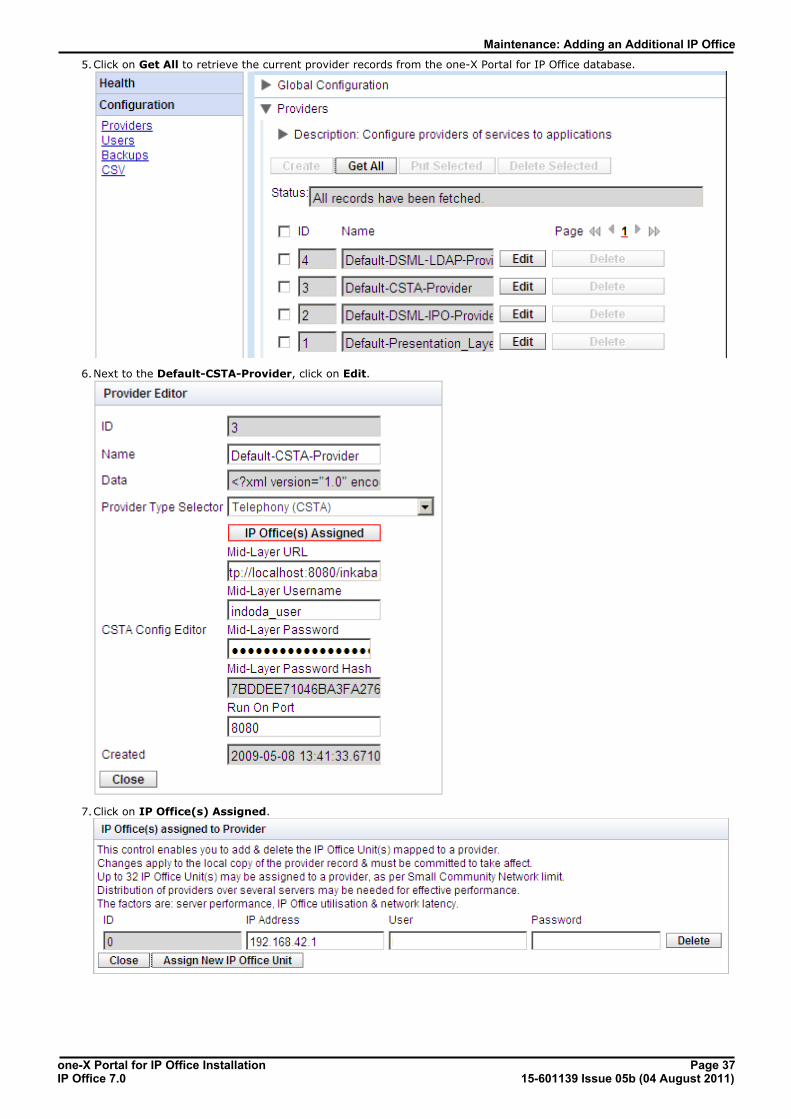
5.Click on Get All to retrieve the current provider records from the one-X Portal for IP Office database.
6.Next to the Default-CSTA-Provider, click on Edit.
7.Click on IP Office(s) Assigned.
one-X Portal for IP Office Installation Page 3815-601139 Issue 05b (04 August 2011)IP Office 7.0
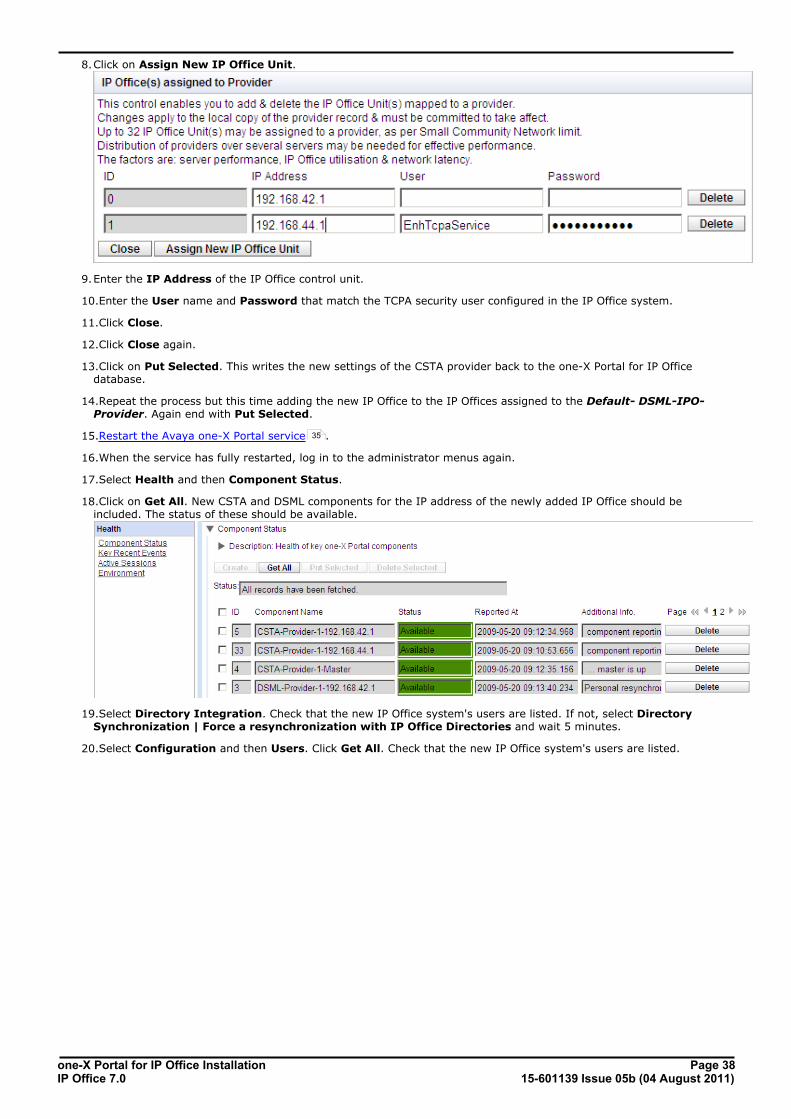
8.Click on Assign New IP Office Unit.
9.Enter the IP Address of the IP Office control unit.
10.Enter the User name and Password that match the TCPA security user configured in the IP Office system.
11.Click Close.
12.Click Close again.
13.Click on Put Selected. This writes the new settings of the CSTA provider back to the one-X Portal for IP Officedatabase.
14.Repeat the process but this time adding the new IP Office to the IP Offices assigned to the Default- DSML-IPO-Provider. Again end with Put Selected.
15.Restart the Avaya one-X Portal service .
16.When the service has fully restarted, log in to the administrator menus again.
17.Select Health and then Component Status.
18.Click on Get All. New CSTA and DSML components for the IP address of the newly added IP Office should beincluded. The status of these should be available.
19.Select Directory Integration. Check that the new IP Office system's users are listed. If not, select DirectorySynchronization | Force a resynchronization with IP Office Directories and wait 5 minutes.
20.Select Configuration and then Users. Click Get All. Check that the new IP Office system's users are listed.
35
one-X Portal for IP Office Installation Page 3915-601139 Issue 05b (04 August 2011)IP Office 7.0
Maintenance: Adding an Additional IP Office
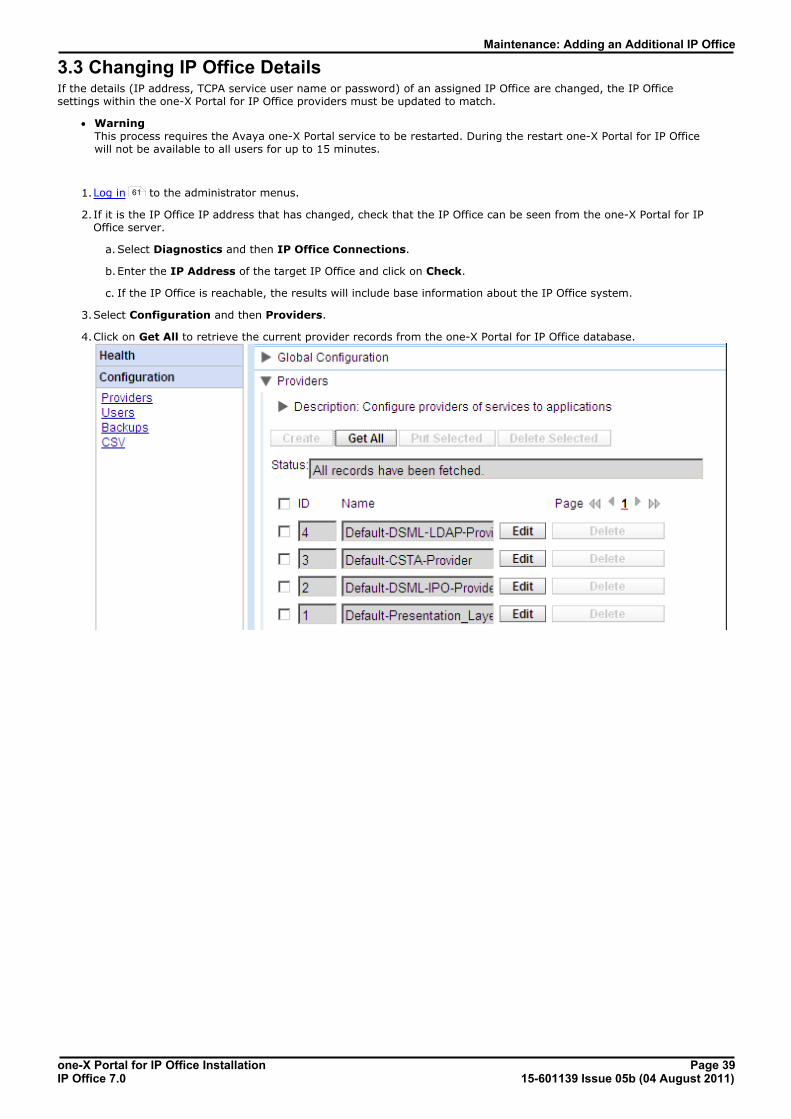
3.3 Changing IP Office DetailsIf the details (IP address, TCPA service user name or password) of an assigned IP Office are changed, the IP Officesettings within the one-X Portal for IP Office providers must be updated to match.
· Warning This process requires the Avaya one-X Portal service to be restarted. During the restart one-X Portal for IP Officewill not be available to all users for up to 15 minutes.
1.Log in to the administrator menus.
2.If it is the IP Office IP address that has changed, check that the IP Office can be seen from the one-X Portal for IPOffice server.
a.Select Diagnostics and then IP Office Connections.
b.Enter the IP Address of the target IP Office and click on Check.
c. If the IP Office is reachable, the results will include base information about the IP Office system.
3.Select Configuration and then Providers.
4.Click on Get All to retrieve the current provider records from the one-X Portal for IP Office database.
61
one-X Portal for IP Office Installation Page 4015-601139 Issue 05b (04 August 2011)IP Office 7.0
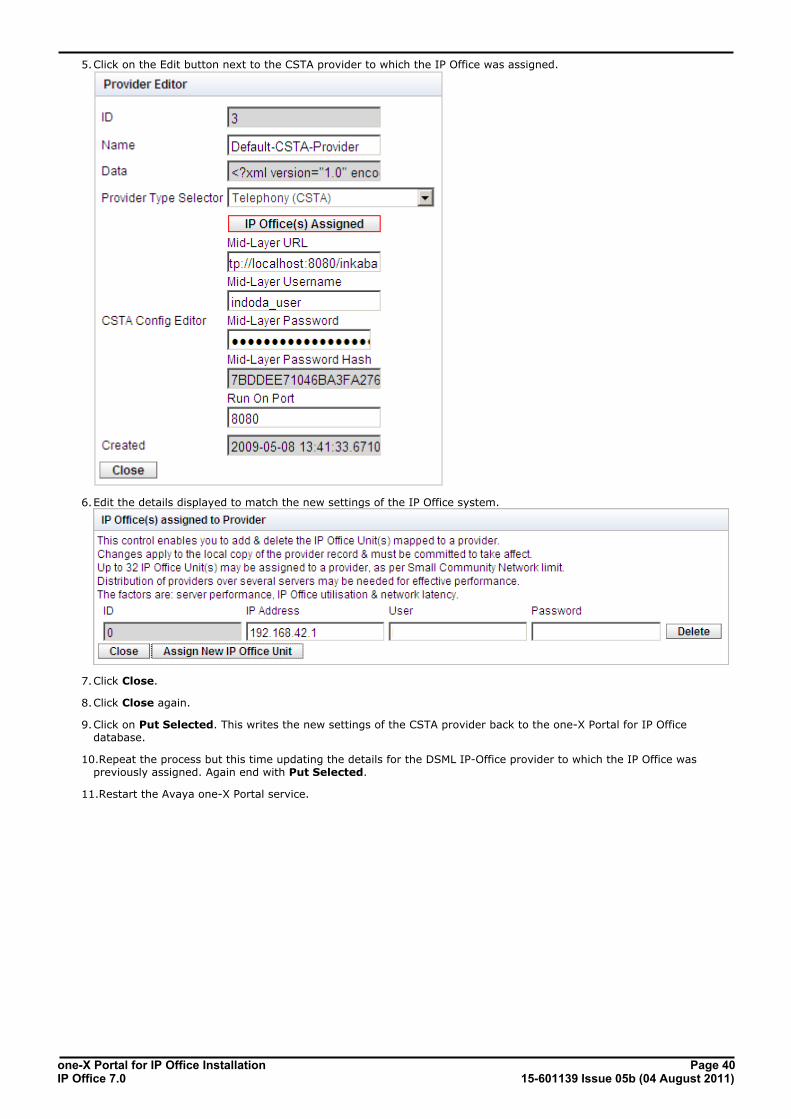
5.Click on the Edit button next to the CSTA provider to which the IP Office was assigned.
6.Edit the details displayed to match the new settings of the IP Office system.
7.Click Close.
8.Click Close again.
9.Click on Put Selected. This writes the new settings of the CSTA provider back to the one-X Portal for IP Officedatabase.
10.Repeat the process but this time updating the details for the DSML IP-Office provider to which the IP Office waspreviously assigned. Again end with Put Selected.
11.Restart the Avaya one-X Portal service.
one-X Portal for IP Office Installation Page 4115-601139 Issue 05b (04 August 2011)IP Office 7.0
Maintenance: Changing IP Office Details
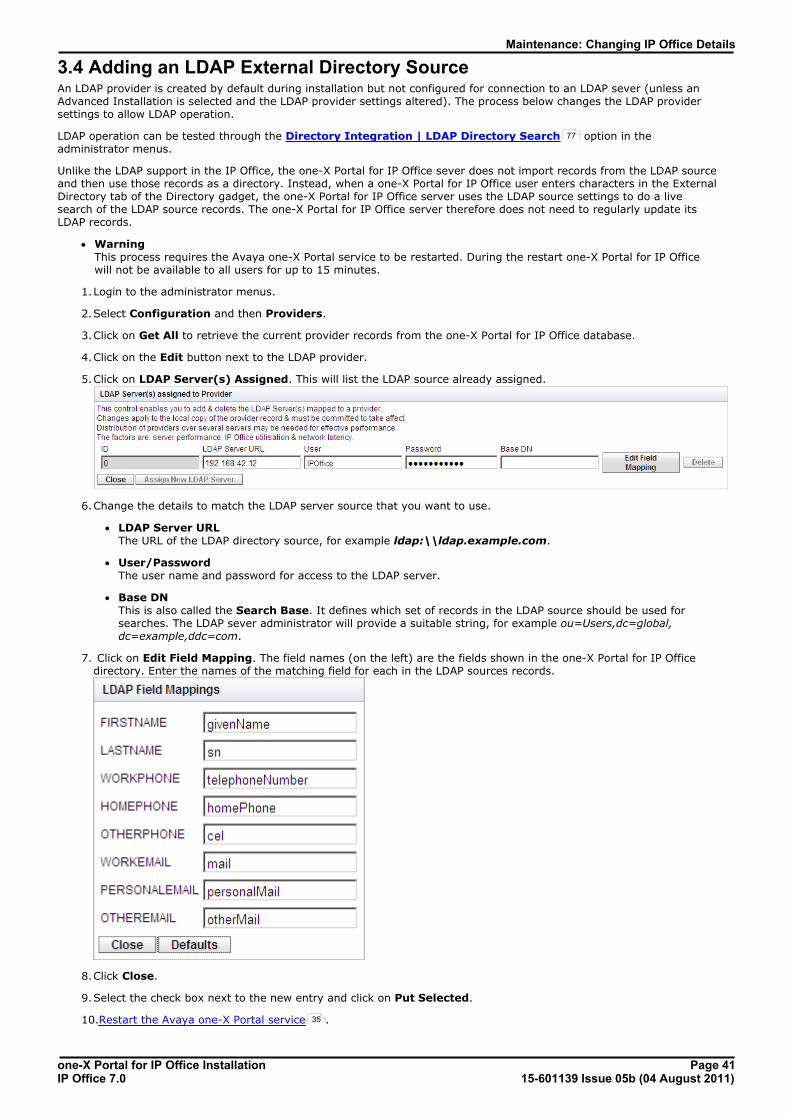
3.4 Adding an LDAP External Directory SourceAn LDAP provider is created by default during installation but not configured for connection to an LDAP sever (unless anAdvanced Installation is selected and the LDAP provider settings altered). The process below changes the LDAP providersettings to allow LDAP operation.
LDAP operation can be tested through the Directory Integration | LDAP Directory Search option in theadministrator menus.
Unlike the LDAP support in the IP Office, the one-X Portal for IP Office sever does not import records from the LDAP sourceand then use those records as a directory. Instead, when a one-X Portal for IP Office user enters characters in the ExternalDirectory tab of the Directory gadget, the one-X Portal for IP Office server uses the LDAP source settings to do a livesearch of the LDAP source records. The one-X Portal for IP Office server therefore does not need to regularly update itsLDAP records.
· Warning This process requires the Avaya one-X Portal service to be restarted. During the restart one-X Portal for IP Officewill not be available to all users for up to 15 minutes.
1.Login to the administrator menus.
2.Select Configuration and then Providers.
3.Click on Get All to retrieve the current provider records from the one-X Portal for IP Office database.
4.Click on the Edit button next to the LDAP provider.
5.Click on LDAP Server(s) Assigned. This will list the LDAP source already assigned.
6.Change the details to match the LDAP server source that you want to use.
· LDAP Server URL The URL of the LDAP directory source, for example ldap:\\ldap.example.com.
· User/Password The user name and password for access to the LDAP server.
· Base DN This is also called the Search Base. It defines which set of records in the LDAP source should be used forsearches. The LDAP sever administrator will provide a suitable string, for example ou=Users,dc=global,dc=example,ddc=com.
7. Click on Edit Field Mapping. The field names (on the left) are the fields shown in the one-X Portal for IP Officedirectory. Enter the names of the matching field for each in the LDAP sources records.
8.Click Close.
9.Select the check box next to the new entry and click on Put Selected.
10.Restart the Avaya one-X Portal service .
77
35
one-X Portal for IP Office Installation Page 4215-601139 Issue 05b (04 August 2011)IP Office 7.0
3.5 Adding/Deleting UsersThe one-X Portal for IP Office server is synchronized with the users that exist on the IP Office systems. Users are addedand or deleted through the IP Office configuration.
Changes to users on the IP Office systems will be updated within one-X Portal for IP Office after approximately 5 minutes.
3.6 Editing User SettingsMost of the settings set by one-X Portal for IP Office users through their Configuration tab, for example Profiledefinitions, are stored as part of the one-X Portal for IP Office database. As the one-X Portal for IP Office administrator youcan view and edit those settings. The exception is DND Exception numbers which are part of the user's configuration readfrom the IP Office system.
Setting one-XPortalfor IPOffice
IPOffice
Source/Storage
Personal Directory A user's personal directory is stored in the configuration of both one-X Portal forIP Office and their IP Office. Changes in either are synchronized where possible.
· Personal directory records stored by one-X Portal for IP Office cancontain several numbers, with one selected as the Primary phonenumber. The matching records stored in the IP Office configurationcontains just one number, that being the one selected as the Primaryphone number. Changing the Primary phone number selection in one-X Portal for IP Office will update the number stored in the IP Officeconfiguration to match.
· The system limit for total personal directory records depends on the IPOffice control unit being used. When this limit is reached, additionalpersonal directory records are stored by one-X Portal for IP Officeonly.
· IP500/IP500v2: 10800 total personal directory records.
· Users with a 1608, 1616, 9400, 9500 or 9600 phones can edit ordelete contacts through the phone's menus (primary phone numberonly). Users with 1608, 1616 or 9600 Series phones can edit ordelete contacts through the phone's menus (primary phone numberonly).
Call Log A user's call log is stored in the configuration of their IP Office.
VoicemailMessages
Details of the user's voicemail messages are taken from the voicemail server viathe IP Office.
Profiles A user's profiles are stored by the one-X Portal for IP Office server. When a profileis made active is may alter various user settings on the IP Office. If the IP Officeconfiguration settings are altered by another method, the user's profile is changedto 'Detected'.
DND Exceptions A user's Do Not Disturb exception numbers are stored in the configuration of theirIP Office.
KeyboardShortcuts
A user's keyboard shortcuts are stored by one-X Portal for IP Office.
SoundConfiguration
A user's one-X Portal for IP Office sound preference is stored by one-X Portal forIP Office.
Park Slots The park slot numbers used for a user's one-X Portal for IP Office park buttonsare stored by one-X Portal for IP Office.
one-X Portal for IP Office Installation Page 4315-601139 Issue 05b (04 August 2011)IP Office 7.0
Maintenance: Editing User Settings
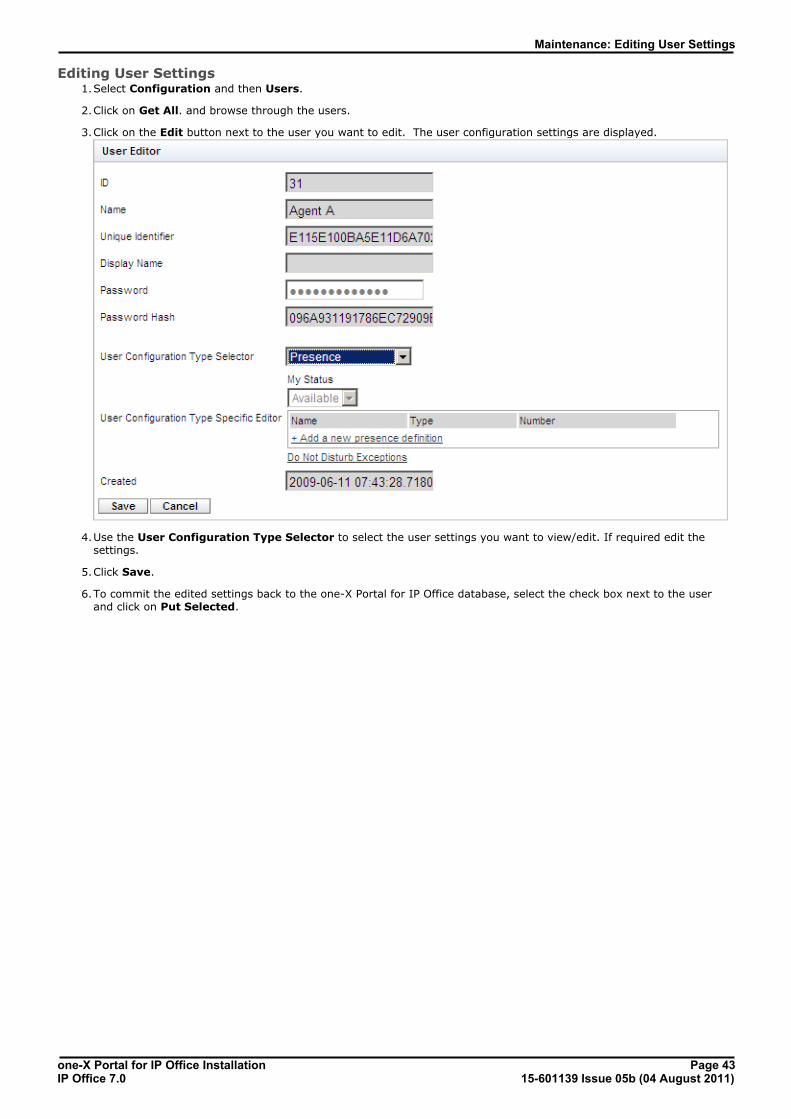
Editing User Settings1.Select Configuration and then Users.
2.Click on Get All. and browse through the users.
3.Click on the Edit button next to the user you want to edit. The user configuration settings are displayed.
4.Use the User Configuration Type Selector to select the user settings you want to view/edit. If required edit thesettings.
5.Click Save.
6.To commit the edited settings back to the one-X Portal for IP Office database, select the check box next to the userand click on Put Selected.
one-X Portal for IP Office Installation Page 4415-601139 Issue 05b (04 August 2011)IP Office 7.0
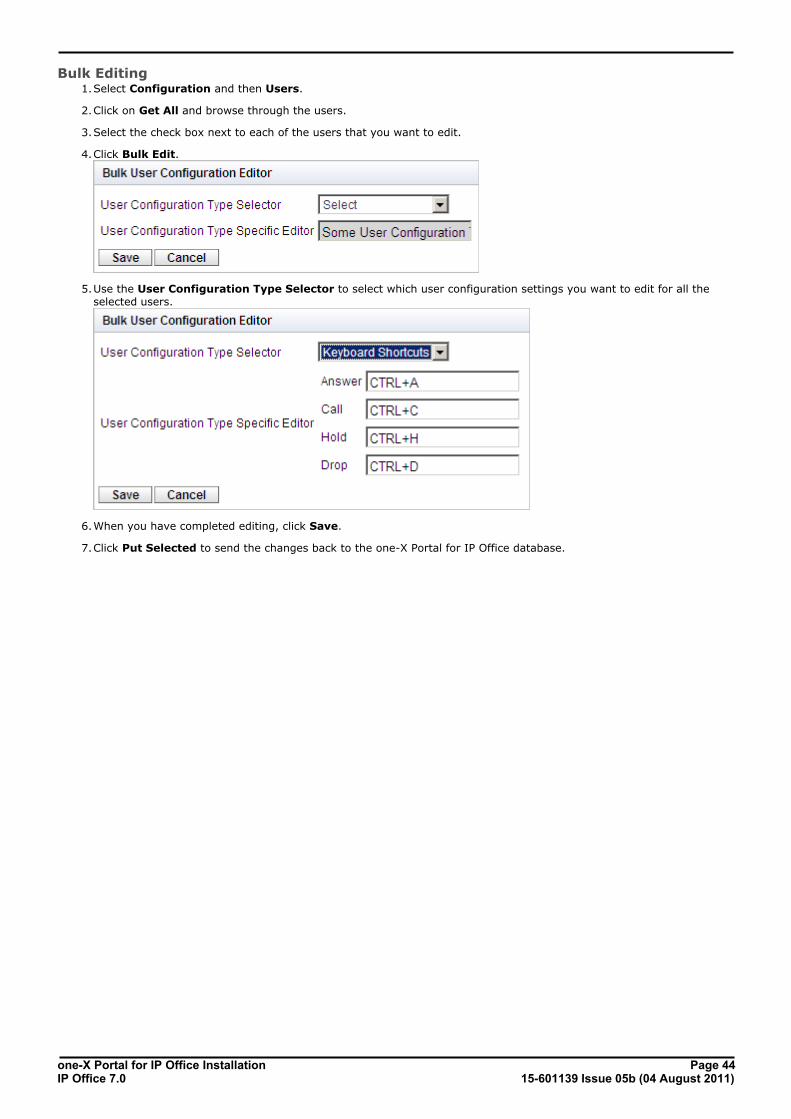
Bulk Editing1.Select Configuration and then Users.
2.Click on Get All and browse through the users.
3.Select the check box next to each of the users that you want to edit.
4.Click Bulk Edit.
5.Use the User Configuration Type Selector to select which user configuration settings you want to edit for all theselected users.
6.When you have completed editing, click Save.
7.Click Put Selected to send the changes back to the one-X Portal for IP Office database.
one-X Portal for IP Office Installation Page 4515-601139 Issue 05b (04 August 2011)IP Office 7.0
Maintenance: Editing User Settings
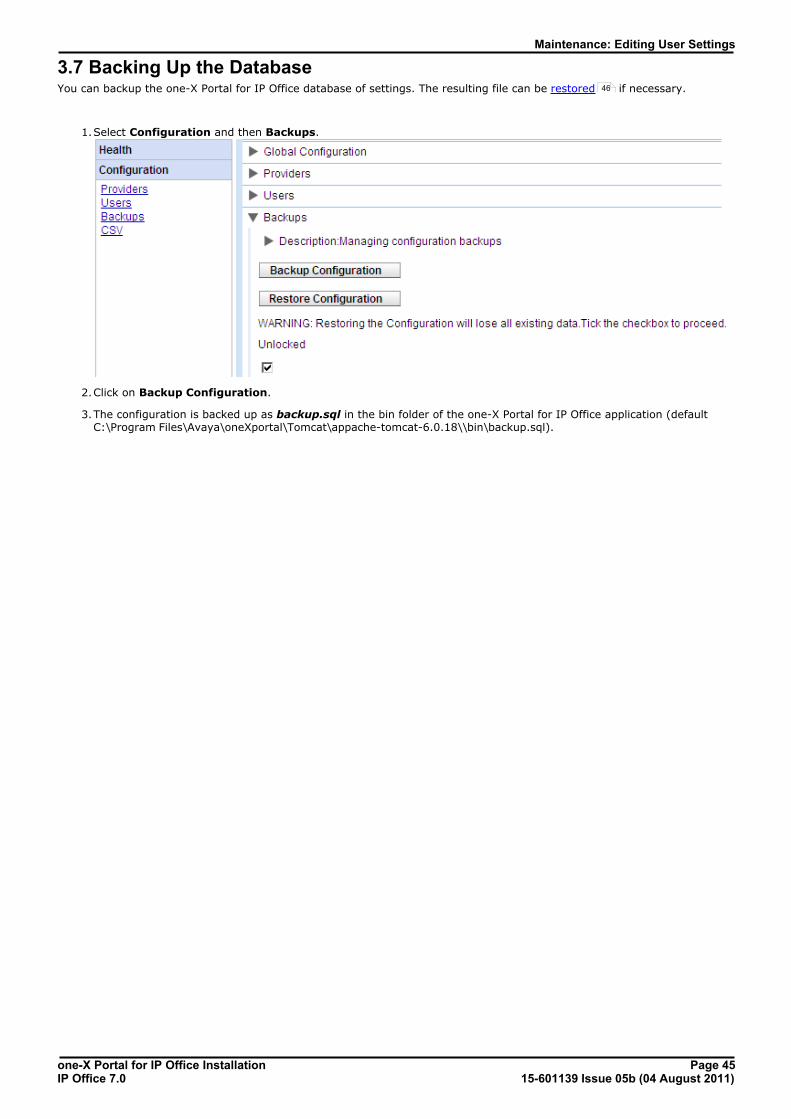
3.7 Backing Up the DatabaseYou can backup the one-X Portal for IP Office database of settings. The resulting file can be restored if necessary.
1.Select Configuration and then Backups.
2.Click on Backup Configuration.
3.The configuration is backed up as backup.sql in the bin folder of the one-X Portal for IP Office application (defaultC:\Program Files\Avaya\oneXportal\Tomcat\appache-tomcat-6.0.18\\bin\backup.sql).
46
one-X Portal for IP Office Installation Page 4615-601139 Issue 05b (04 August 2011)IP Office 7.0
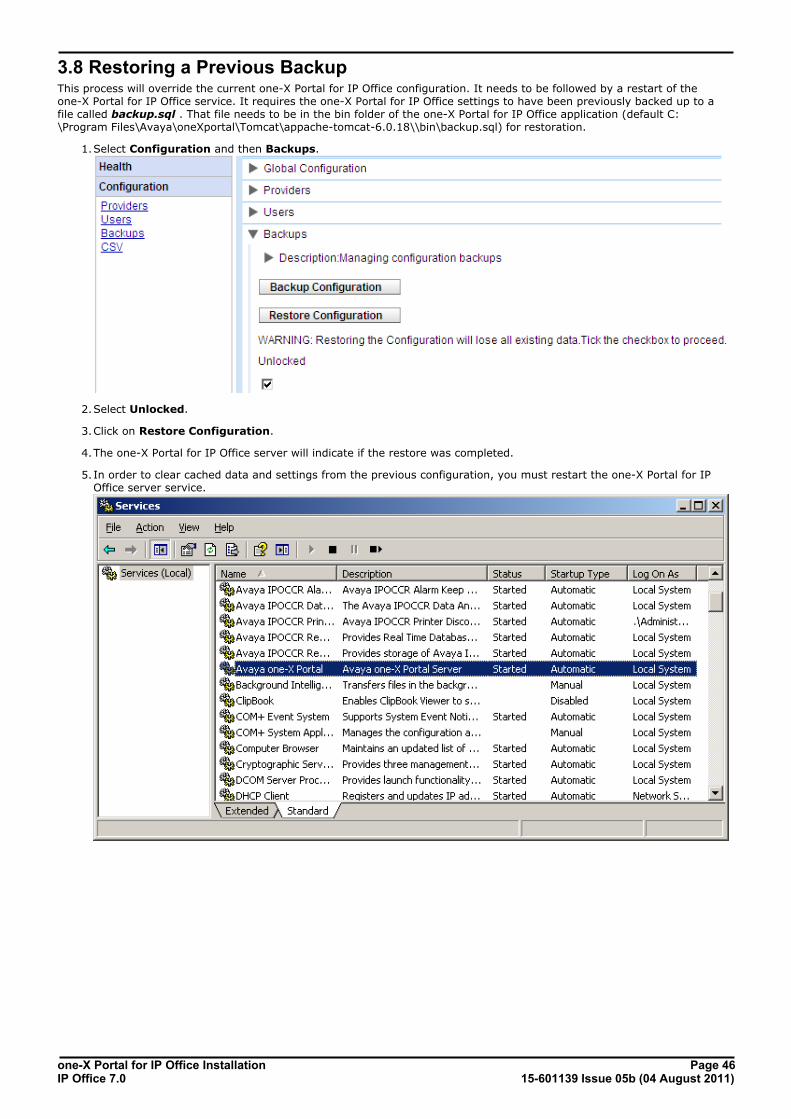
3.8 Restoring a Previous BackupThis process will override the current one-X Portal for IP Office configuration. It needs to be followed by a restart of theone-X Portal for IP Office service. It requires the one-X Portal for IP Office settings to have been previously backed up to afile called backup.sql . That file needs to be in the bin folder of the one-X Portal for IP Office application (default C:\Program Files\Avaya\oneXportal\Tomcat\appache-tomcat-6.0.18\\bin\backup.sql) for restoration.
1.Select Configuration and then Backups.
2.Select Unlocked.
3.Click on Restore Configuration.
4.The one-X Portal for IP Office server will indicate if the restore was completed.
5.In order to clear cached data and settings from the previous configuration, you must restart the one-X Portal for IPOffice server service.
one-X Portal for IP Office Installation Page 4715-601139 Issue 05b (04 August 2011)IP Office 7.0
Maintenance: Restoring a Previous Backup
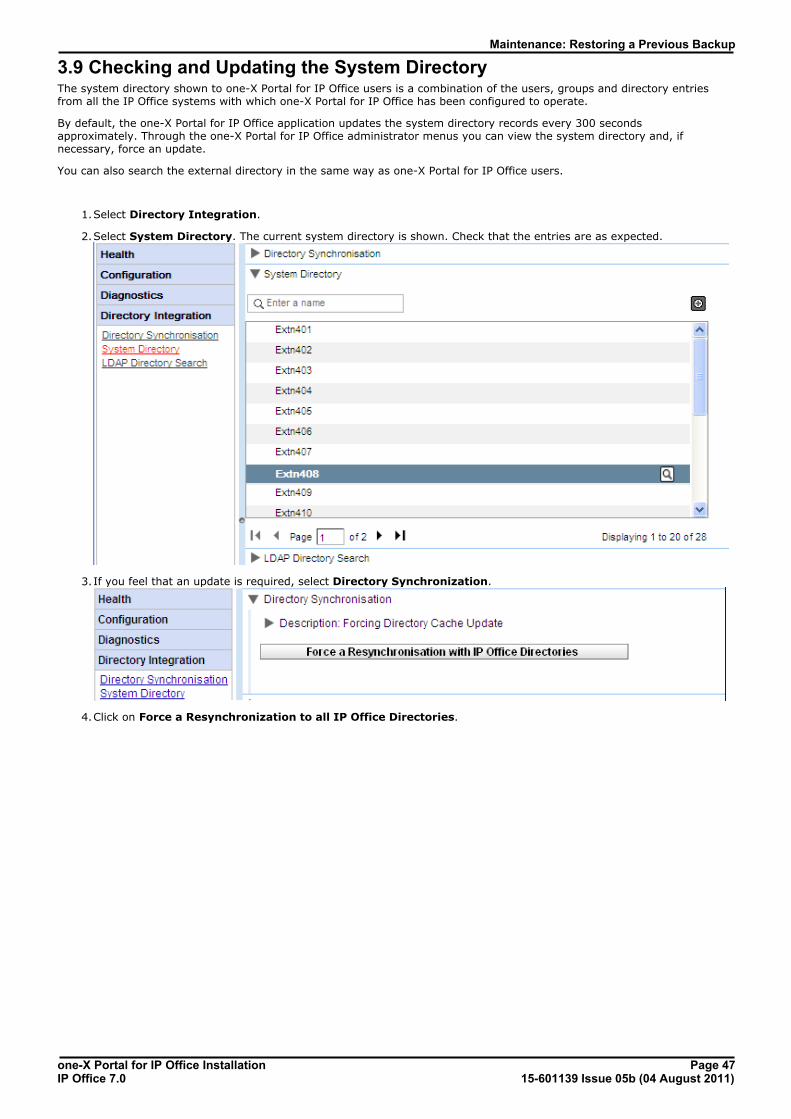
3.9 Checking and Updating the System DirectoryThe system directory shown to one-X Portal for IP Office users is a combination of the users, groups and directory entriesfrom all the IP Office systems with which one-X Portal for IP Office has been configured to operate.
By default, the one-X Portal for IP Office application updates the system directory records every 300 secondsapproximately. Through the one-X Portal for IP Office administrator menus you can view the system directory and, ifnecessary, force an update.
You can also search the external directory in the same way as one-X Portal for IP Office users.
1.Select Directory Integration.
2.Select System Directory. The current system directory is shown. Check that the entries are as expected.
3.If you feel that an update is required, select Directory Synchronization.
4.Click on Force a Resynchronization to all IP Office Directories.
one-X Portal for IP Office Installation Page 4815-601139 Issue 05b (04 August 2011)IP Office 7.0
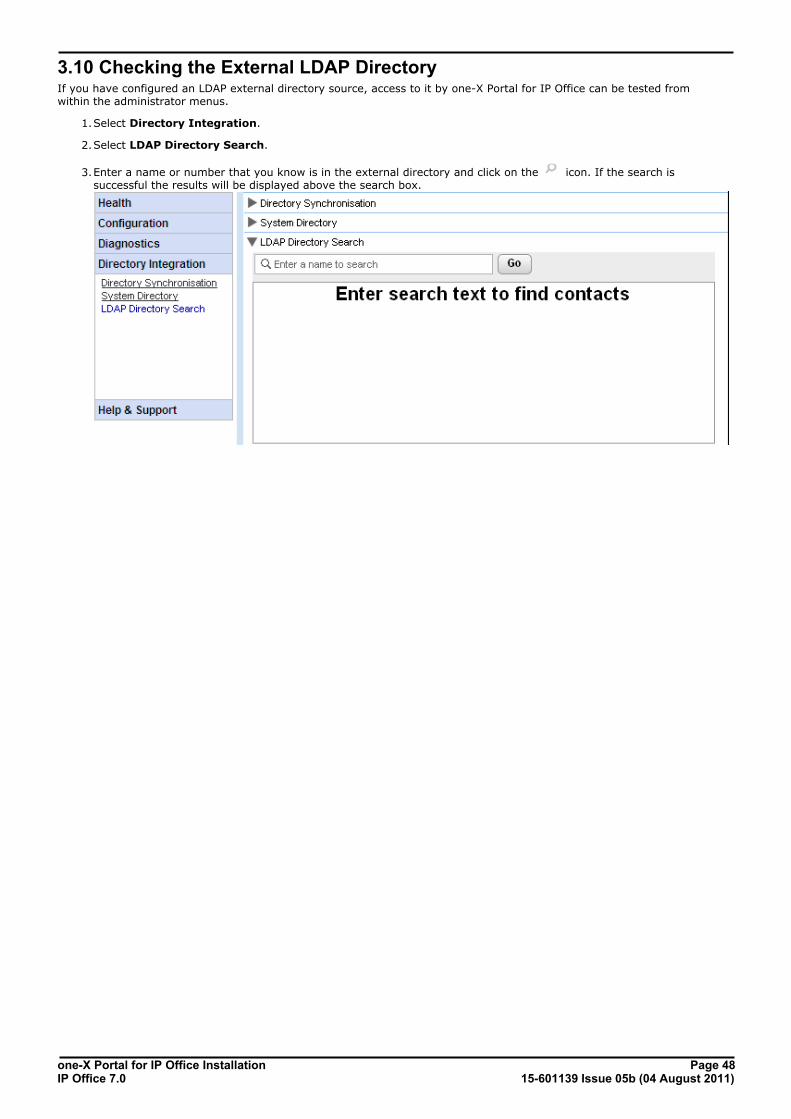
3.10 Checking the External LDAP DirectoryIf you have configured an LDAP external directory source, access to it by one-X Portal for IP Office can be tested fromwithin the administrator menus.
1.Select Directory Integration.
2.Select LDAP Directory Search.
3.Enter a name or number that you know is in the external directory and click on the icon. If the search issuccessful the results will be displayed above the search box.
one-X Portal for IP Office Installation Page 4915-601139 Issue 05b (04 August 2011)IP Office 7.0
Maintenance: Checking the External LDAP Directory
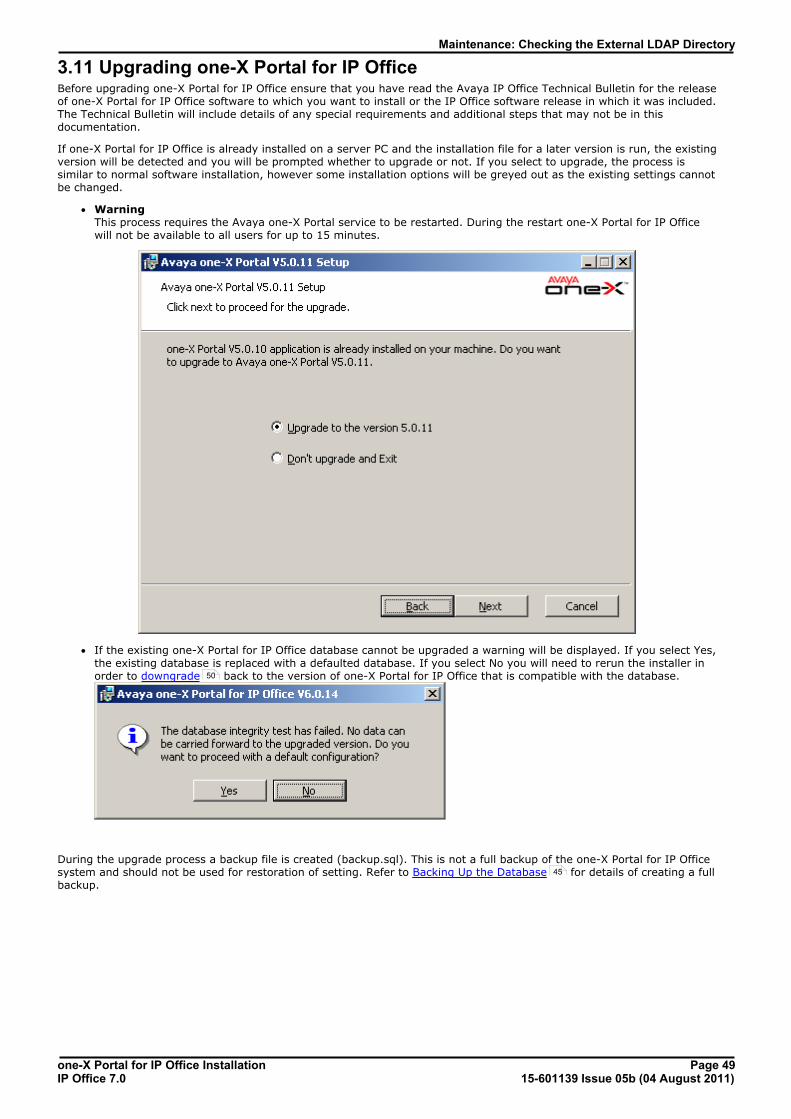
3.11 Upgrading one-X Portal for IP OfficeBefore upgrading one-X Portal for IP Office ensure that you have read the Avaya IP Office Technical Bulletin for the releaseof one-X Portal for IP Office software to which you want to install or the IP Office software release in which it was included.The Technical Bulletin will include details of any special requirements and additional steps that may not be in thisdocumentation.
If one-X Portal for IP Office is already installed on a server PC and the installation file for a later version is run, the existingversion will be detected and you will be prompted whether to upgrade or not. If you select to upgrade, the process issimilar to normal software installation, however some installation options will be greyed out as the existing settings cannotbe changed.
· Warning This process requires the Avaya one-X Portal service to be restarted. During the restart one-X Portal for IP Officewill not be available to all users for up to 15 minutes.
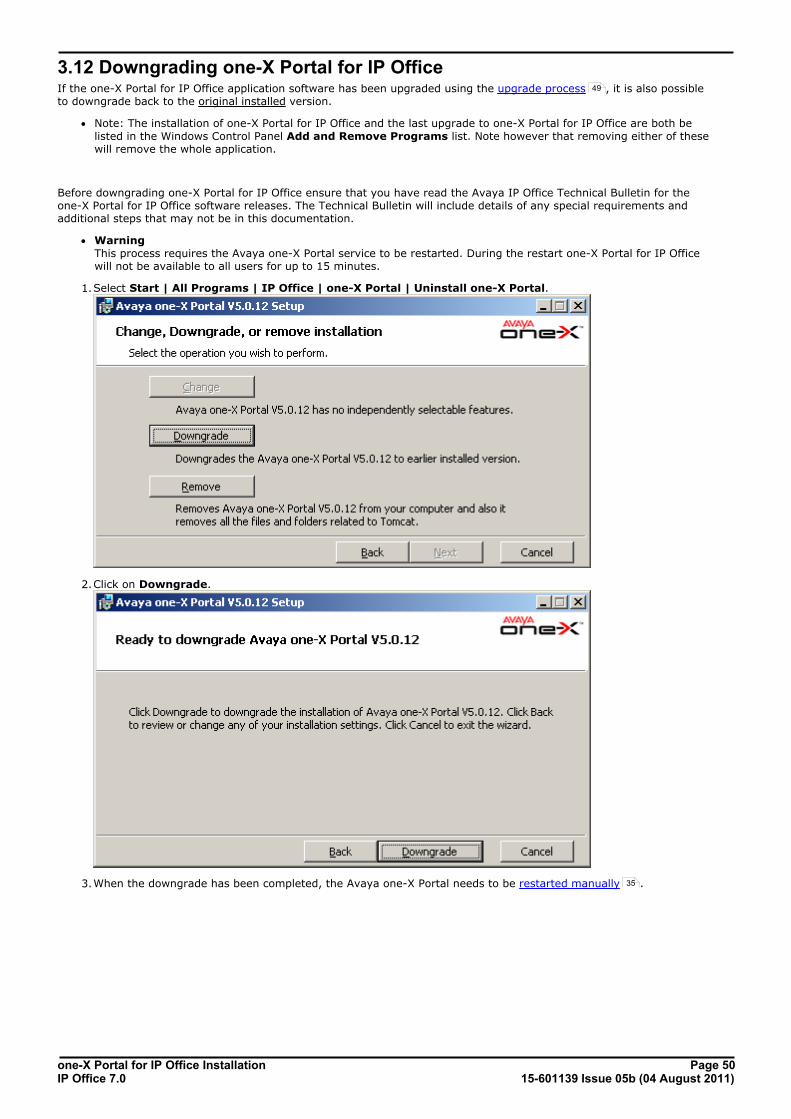
· If the existing one-X Portal for IP Office database cannot be upgraded a warning will be displayed. If you select Yes,the existing database is replaced with a defaulted database. If you select No you will need to rerun the installer inorder to downgrade back to the version of one-X Portal for IP Office that is compatible with the database.
During the upgrade process a backup file is created (backup.sql). This is not a full backup of the one-X Portal for IP Officesystem and should not be used for restoration of setting. Refer to Backing Up the Database for details of creating a fullbackup.
50
45
one-X Portal for IP Office Installation Page 5015-601139 Issue 05b (04 August 2011)IP Office 7.0
3.12 Downgrading one-X Portal for IP OfficeIf the one-X Portal for IP Office application software has been upgraded using the upgrade process , it is also possibleto downgrade back to the original installed version.
· Note: The installation of one-X Portal for IP Office and the last upgrade to one-X Portal for IP Office are both belisted in the Windows Control Panel Add and Remove Programs list. Note however that removing either of thesewill remove the whole application.
Before downgrading one-X Portal for IP Office ensure that you have read the Avaya IP Office Technical Bulletin for theone-X Portal for IP Office software releases. The Technical Bulletin will include details of any special requirements andadditional steps that may not be in this documentation.
· Warning This process requires the Avaya one-X Portal service to be restarted. During the restart one-X Portal for IP Officewill not be available to all users for up to 15 minutes.
1.Select Start | All Programs | IP Office | one-X Portal | Uninstall one-X Portal.
2.Click on Downgrade.
3.When the downgrade has been completed, the Avaya one-X Portal needs to be restarted manually .
49
35
one-X Portal for IP Office Installation Page 5115-601139 Issue 05b (04 August 2011)IP Office 7.0
Maintenance: Downgrading one-X Portal for IP Office
3.13 Removing one-X Portal for IP OfficeThere are 2 methods for removing the one-X Portal for IP Office application.
Uninstalling one-X Portal for IP OfficeThis method of removal allows selection of whether backups of the database and log files should be kept.
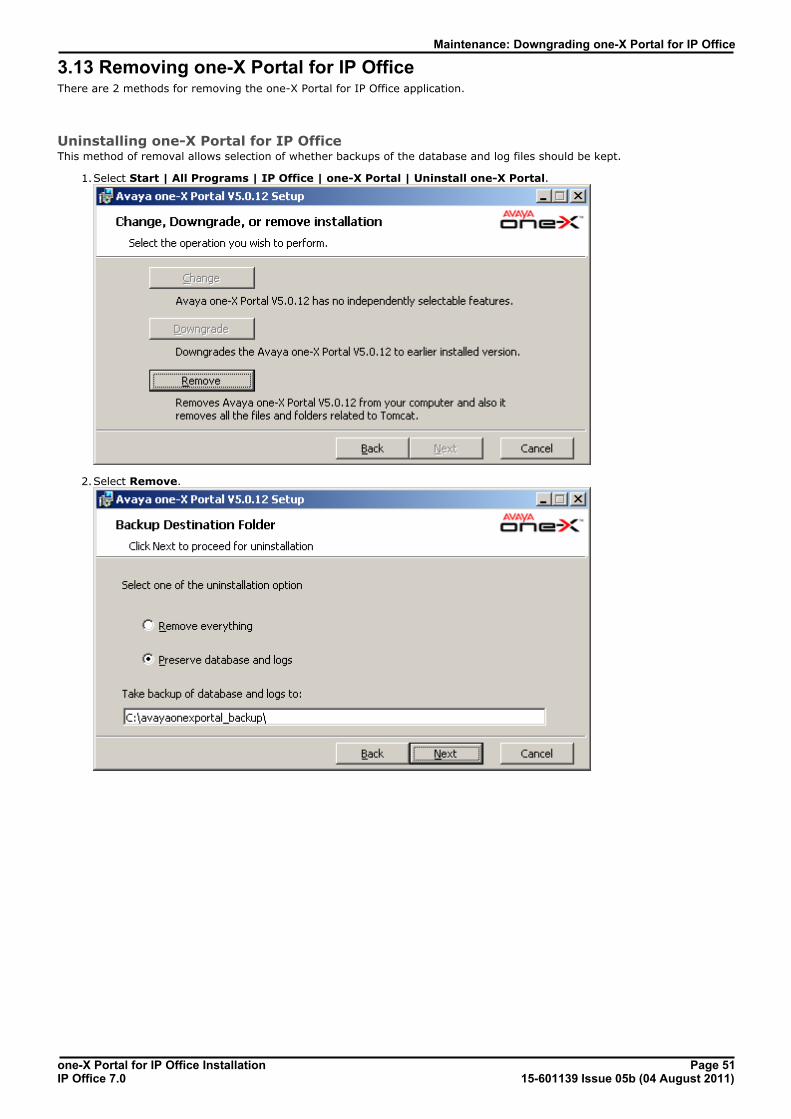
1.Select Start | All Programs | IP Office | one-X Portal | Uninstall one-X Portal.
2.Select Remove.
one-X Portal for IP Office Installation Page 5215-601139 Issue 05b (04 August 2011)IP Office 7.0
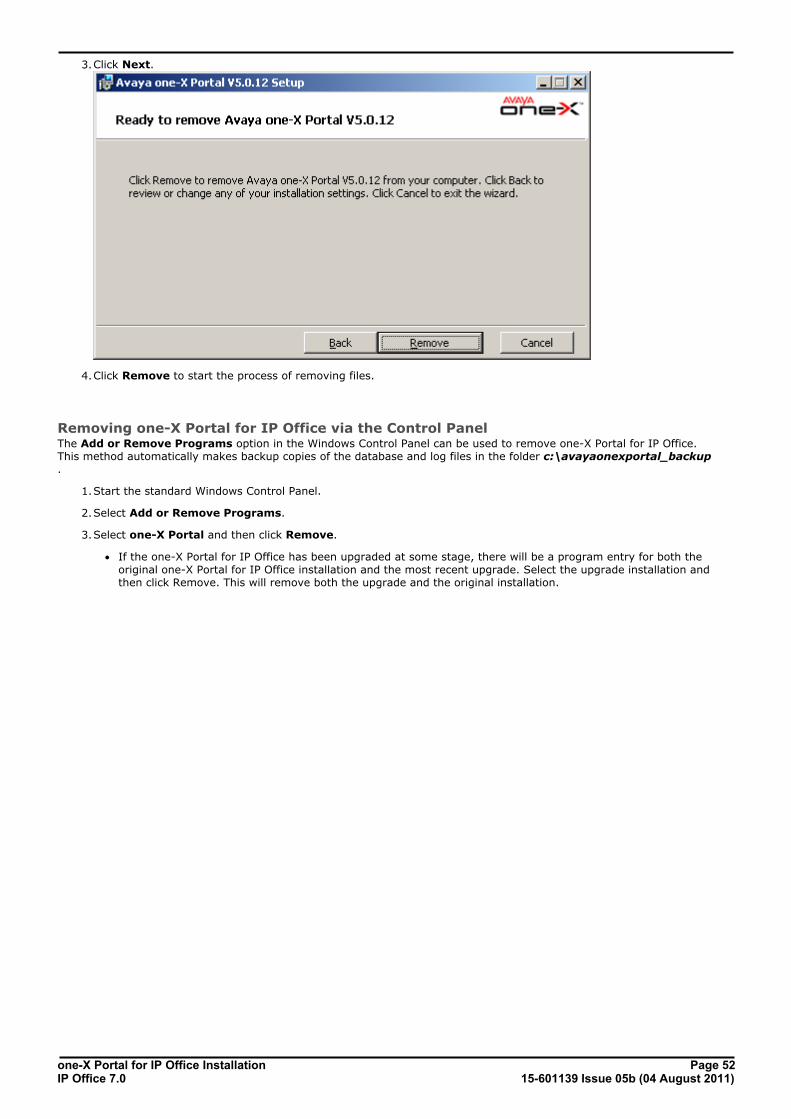
3.Click Next.
4.Click Remove to start the process of removing files.
Removing one-X Portal for IP Office via the Control PanelThe Add or Remove Programs option in the Windows Control Panel can be used to remove one-X Portal for IP Office.This method automatically makes backup copies of the database and log files in the folder c:\avayaonexportal_backup.
1.Start the standard Windows Control Panel.
2.Select Add or Remove Programs.
3.Select one-X Portal and then click Remove.
· If the one-X Portal for IP Office has been upgraded at some stage, there will be a program entry for both theoriginal one-X Portal for IP Office installation and the most recent upgrade. Select the upgrade installation andthen click Remove. This will remove both the upgrade and the original installation.
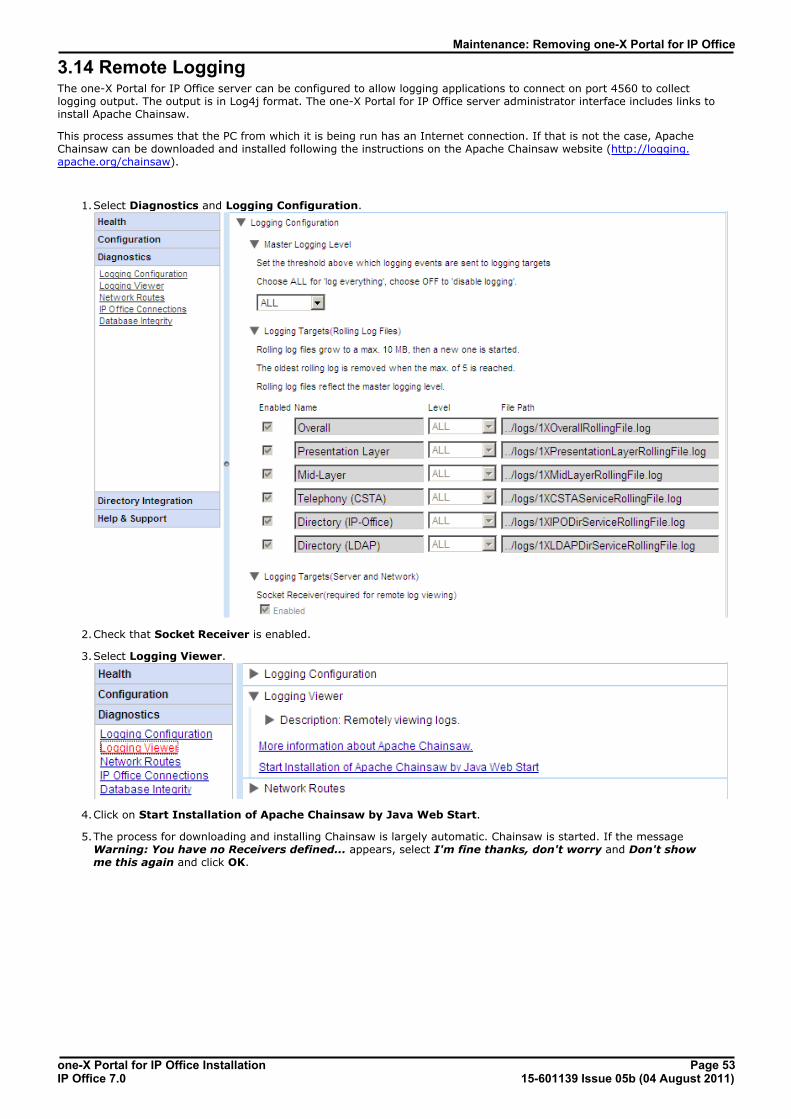
one-X Portal for IP Office Installation Page 5315-601139 Issue 05b (04 August 2011)IP Office 7.0
Maintenance: Removing one-X Portal for IP Office
3.14 Remote LoggingThe one-X Portal for IP Office server can be configured to allow logging applications to connect on port 4560 to collectlogging output. The output is in Log4j format. The one-X Portal for IP Office server administrator interface includes links toinstall Apache Chainsaw.
This process assumes that the PC from which it is being run has an Internet connection. If that is not the case, ApacheChainsaw can be downloaded and installed following the instructions on the Apache Chainsaw website (http://logging.apache.org/chainsaw).
1.Select Diagnostics and Logging Configuration.
2.Check that Socket Receiver is enabled.
3.Select Logging Viewer.
4.Click on Start Installation of Apache Chainsaw by Java Web Start.
5.The process for downloading and installing Chainsaw is largely automatic. Chainsaw is started. If the message Warning: You have no Receivers defined... appears, select I'm fine thanks, don't worry and Don't showme this again and click OK.
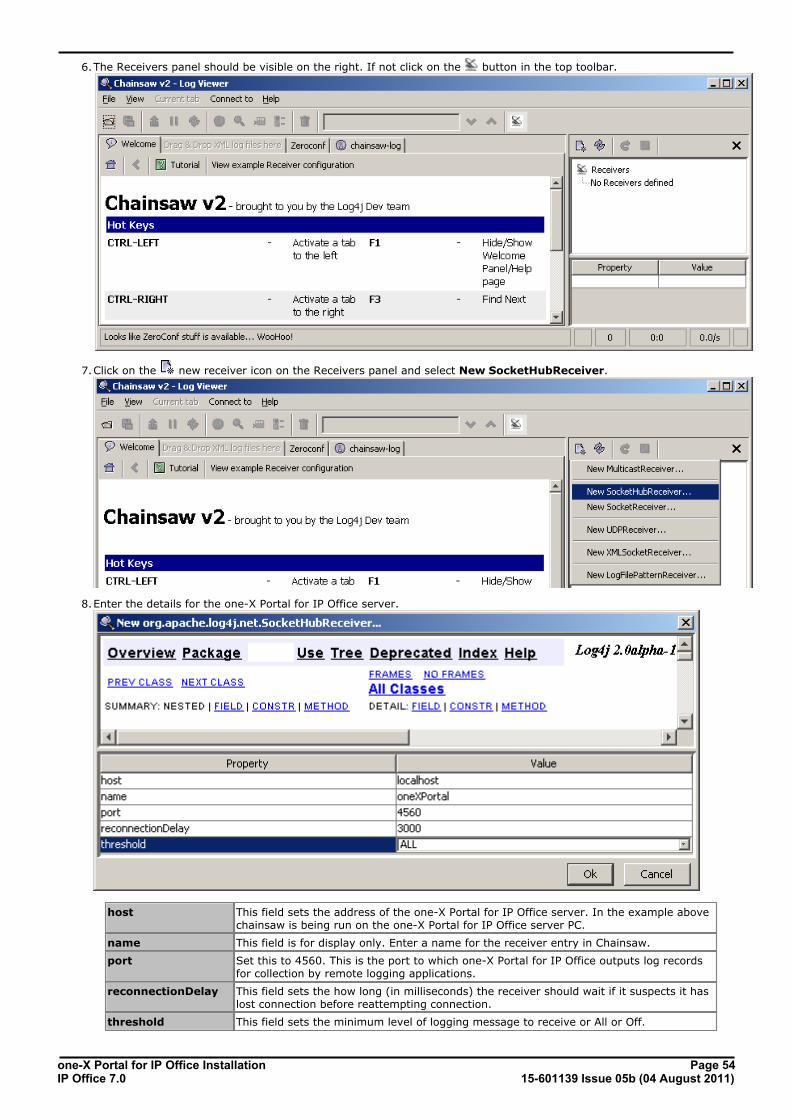
one-X Portal for IP Office Installation Page 5415-601139 Issue 05b (04 August 2011)IP Office 7.0
6.The Receivers panel should be visible on the right. If not click on the button in the top toolbar.
7.Click on the new receiver icon on the Receivers panel and select New SocketHubReceiver.
8.Enter the details for the one-X Portal for IP Office server.
host This field sets the address of the one-X Portal for IP Office server. In the example abovechainsaw is being run on the one-X Portal for IP Office server PC.
name This field is for display only. Enter a name for the receiver entry in Chainsaw.
port Set this to 4560. This is the port to which one-X Portal for IP Office outputs log recordsfor collection by remote logging applications.
reconnectionDelay This field sets the how long (in milliseconds) the receiver should wait if it suspects it haslost connection before reattempting connection.
threshold This field sets the minimum level of logging message to receive or All or Off.
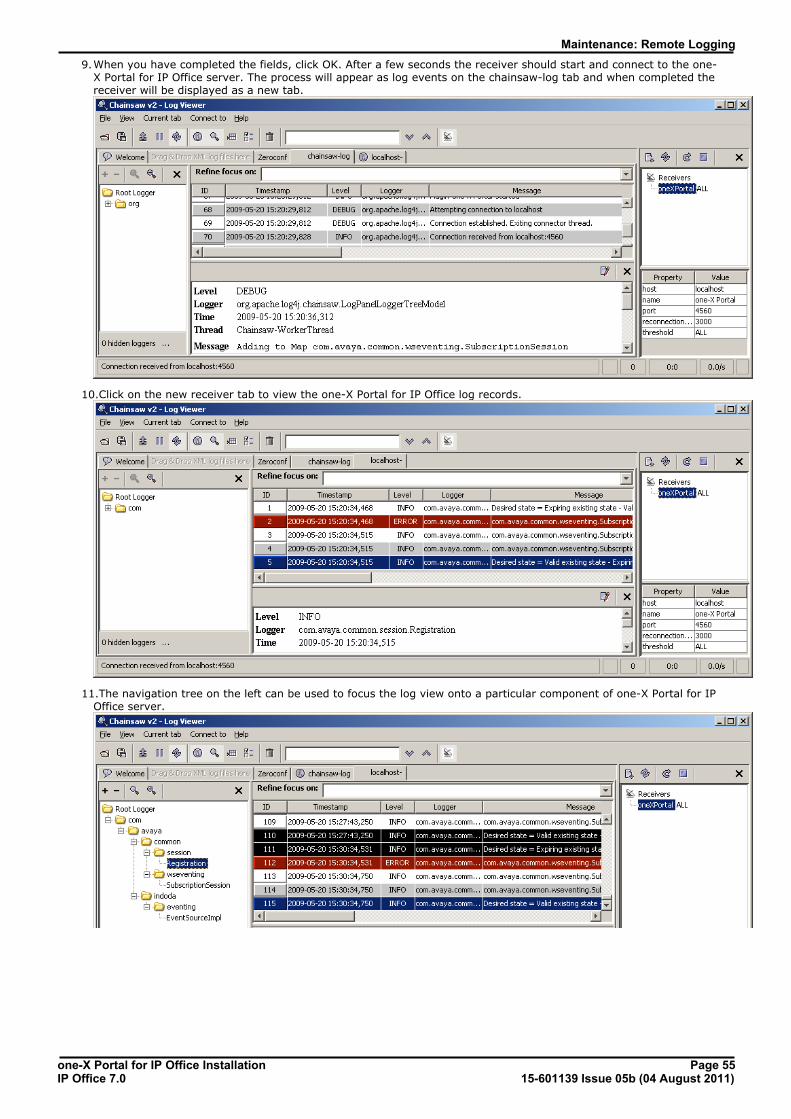
one-X Portal for IP Office Installation Page 5515-601139 Issue 05b (04 August 2011)IP Office 7.0
Maintenance: Remote Logging
9.When you have completed the fields, click OK. After a few seconds the receiver should start and connect to the one-X Portal for IP Office server. The process will appear as log events on the chainsaw-log tab and when completed thereceiver will be displayed as a new tab.
10.Click on the new receiver tab to view the one-X Portal for IP Office log records.
11.The navigation tree on the left can be used to focus the log view onto a particular component of one-X Portal for IPOffice server.
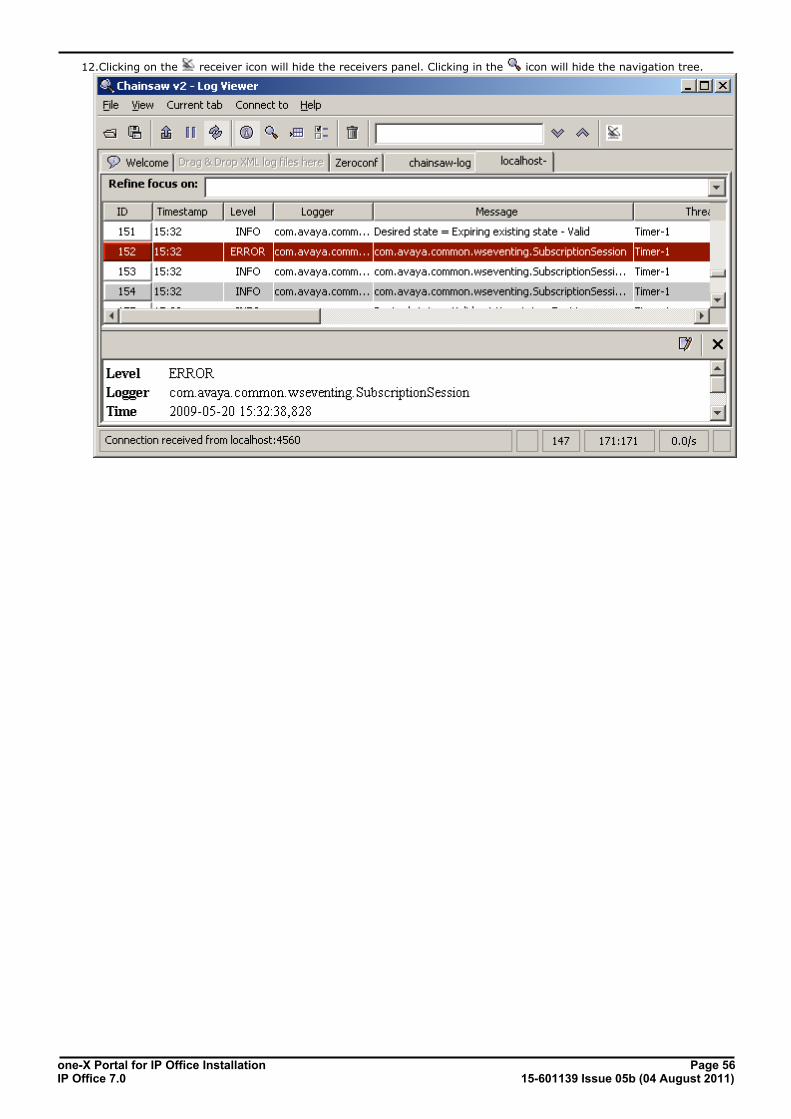
one-X Portal for IP Office Installation Page 5615-601139 Issue 05b (04 August 2011)IP Office 7.0
12.Clicking on the receiver icon will hide the receivers panel. Clicking in the icon will hide the navigation tree.

one-X Portal for IP Office Installation Page 5715-601139 Issue 05b (04 August 2011)IP Office 7.0
Maintenance: Remote Logging
3.15 Troubleshooting
Version Mismatch Problem
Symptoms · Database integrity check fails.
· When starting one-X Portal for IP Office, the version shown on the login page is the previous versionand differs from that reported by Windows (Start | Programs | IP Office | Avaya one-X Portalfor IP Office | Unistall VX.XX) menu.
Cause Normally the one-X Portal for IP Office installer will automatically stop any Tomcat web serverassociated with a previous installation of one-X Portal for IP Office. However it has been found that it insome cases it fails to stop the Tomcat server but will still report successful completion of theinstallation process. This leads to a version mismatch between components.
Resolution 1.Remove one-X Portal for IP Office .
2.Manually delete the one-X Portal for IP Office application folder (by default C:\ProgramFiles\Avaya\oneXportal). You need to reboot the server if the folder is reported a locked.
3.Install the new version of one-X Portal for IP Office.
one-X Portal for IP Office Does Not Start
Symptoms · one-X Portal for IP Office fails to start.
· Prorun Error appears in the Tomcat server log files.
· Other Java applications fail to run on the server (for example the IP Office System StatusApplication).
Resolution 1.Check for a port conflict . If one exists either remove the other application or install one-XPortal for IP Office using a different port.
2.Using the Windows Add or Remove Programs applet, remove Java.
3.Remove one-X Portal for IP Office .
4.Install one-X Portal for IP Office .
74
51
22
51
23
one-X Portal for IP Office Installation Page 5815-601139 Issue 05b (04 August 2011)IP Office 7.0
3.16 Agent Gadget ControlThose users configured as CCR Agents within the IP Office configuration are shown the one-X Portal for IP Office AgentControl gadget. They can use this to control various settings including enabling or disabling their membership of varioushunt groups.
Through the IP Office configuration, you can select for which groups the user is able to control their group membership.This will affect both the one-X Portal for IP Office and also the group control menu options on some phones (1400, 1600,9400, 9500 and 9600 Series).
1.Using IP Office Manager, receive the configuration from the IP Office system.
2.Select User and select the user whose setting you want to change.
3.Select the Menu Programming tab and then the Hunt Group sub-tab.
4.The menu displays the hunt groups of which the user is a member and the functions that the user can perform foreach of those groups.
5.To allow the user to enable or disable their group membership for a particular group, select the Can ChangeMembership option for that group.
6.Save the configuration back to the IP Office system.

one-X Portal for IP Office Installation Page 5915-601139 Issue 05b (04 August 2011)IP Office 7.0
Administration
Chapter 4.

one-X Portal for IP Office Installation Page 6015-601139 Issue 05b (04 August 2011)IP Office 7.0
4. AdministrationThe one-X Portal for IP Office administration menu provides a range of options for monitoring and configuring the one-XPortal for IP Office application.
Menu Sub-Menu Description
Health Component Status List the last status change of the server components.
Key Recent Events View the last 20 events on the server.
Active Sessions Show how many sessions are cached by one-X Portal for IPOffice.
Environment Show a summary of the one-X Portal for IP Office server PC.
Configuration Providers View and edit the providers.
Users View and edit user one-X Portal for IP Office settings.
Backups Backup the one-X Portal for IP Office configuration database.Also restore a previous backup.
CSV Export the user directory and system directory.
Diagnostics Logging Configuration Configure the level and method of logging supported.
Logging Viewer Install and launch Chainsaw for log viewing.
Network Routes Test the IP connection path to an IP address.
IP Office Connections Test the IP connection path to an IP Office.
Database Integrity Test the structure of the database.
DirectoryIntegration
Directory Synchronization Force a system directory update by the server.
System Directory View the one-X Portal for IP Office system directory.
LDAP Directory Search View the external directory for which the one-X Portal for IPOffice server has been configured.
Help & Support Help Access one-X Portal for IP Office help installed on the server.
Avaya Support Access the Avaya support web site for Avaya applications.
About View information about the one-X Portal for IP Office version.
It is important to understand that the one-X Portal for IP Office administrator menus operate as an off-line editor. Within aparticular menu, data is fetched (using a GET command) from the database, edited and then sent back to the database(using a PUT command).
Within each menu, the clicking on the icon next to Description can be used to show/hide a short description of themenus function and content.
62 62
62
63
63
64 64
68
70
70
72
73
73
74
74
75
75
76
77
78 78
78
78
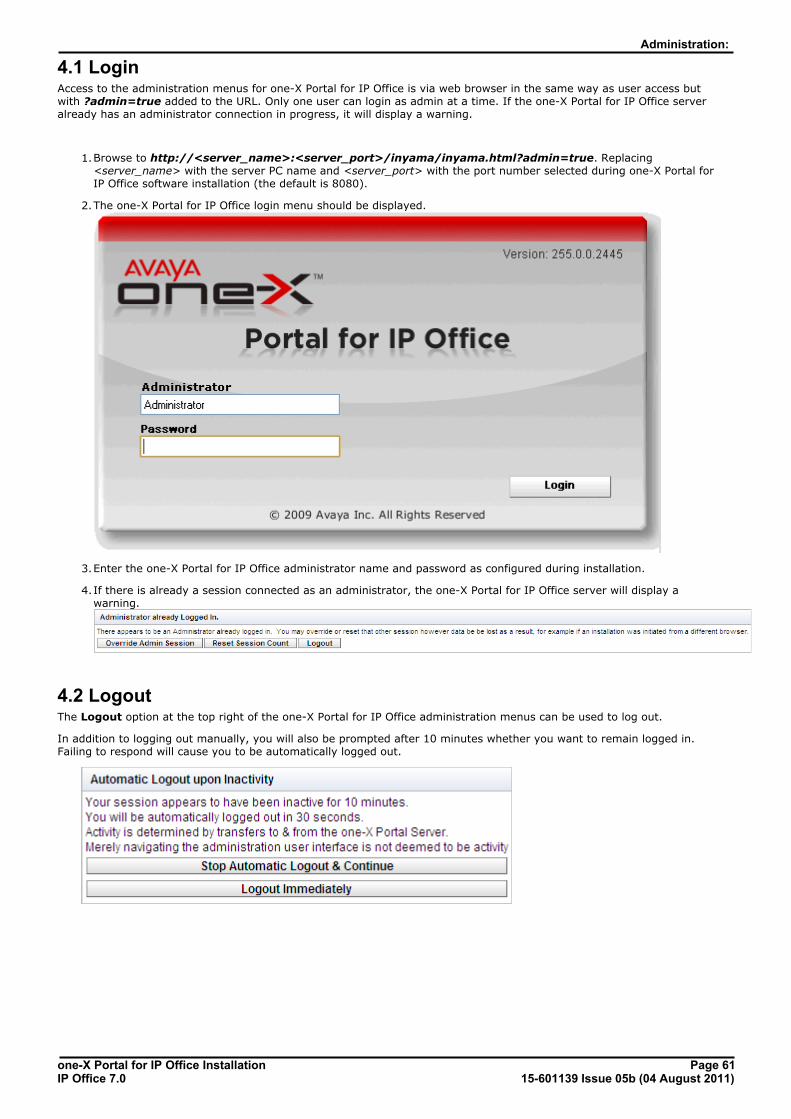
one-X Portal for IP Office Installation Page 6115-601139 Issue 05b (04 August 2011)IP Office 7.0
Administration:
4.1 LoginAccess to the administration menus for one-X Portal for IP Office is via web browser in the same way as user access butwith ?admin=true added to the URL. Only one user can login as admin at a time. If the one-X Portal for IP Office serveralready has an administrator connection in progress, it will display a warning.
1.Browse to http://<server_name>:<server_port>/inyama/inyama.html?admin=true. Replacing<server_name> with the server PC name and <server_port> with the port number selected during one-X Portal forIP Office software installation (the default is 8080).
2.The one-X Portal for IP Office login menu should be displayed.
3.Enter the one-X Portal for IP Office administrator name and password as configured during installation.
4.If there is already a session connected as an administrator, the one-X Portal for IP Office server will display awarning.
4.2 LogoutThe Logout option at the top right of the one-X Portal for IP Office administration menus can be used to log out.
In addition to logging out manually, you will also be prompted after 10 minutes whether you want to remain logged in.Failing to respond will cause you to be automatically logged out.
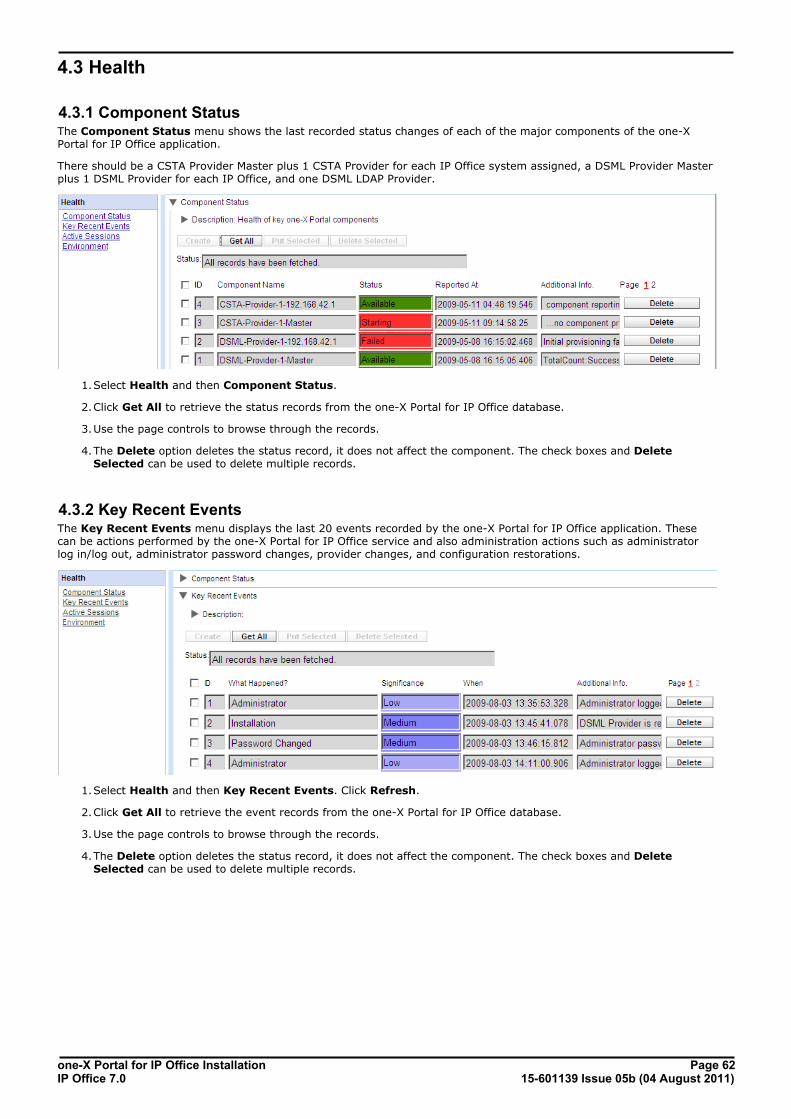
one-X Portal for IP Office Installation Page 6215-601139 Issue 05b (04 August 2011)IP Office 7.0
4.3 Health
4.3.1 Component StatusThe Component Status menu shows the last recorded status changes of each of the major components of the one-XPortal for IP Office application.
There should be a CSTA Provider Master plus 1 CSTA Provider for each IP Office system assigned, a DSML Provider Masterplus 1 DSML Provider for each IP Office, and one DSML LDAP Provider.
1.Select Health and then Component Status.
2.Click Get All to retrieve the status records from the one-X Portal for IP Office database.
3.Use the page controls to browse through the records.
4.The Delete option deletes the status record, it does not affect the component. The check boxes and DeleteSelected can be used to delete multiple records.
4.3.2 Key Recent EventsThe Key Recent Events menu displays the last 20 events recorded by the one-X Portal for IP Office application. Thesecan be actions performed by the one-X Portal for IP Office service and also administration actions such as administratorlog in/log out, administrator password changes, provider changes, and configuration restorations.
1.Select Health and then Key Recent Events. Click Refresh.
2.Click Get All to retrieve the event records from the one-X Portal for IP Office database.
3.Use the page controls to browse through the records.
4.The Delete option deletes the status record, it does not affect the component. The check boxes and DeleteSelected can be used to delete multiple records.
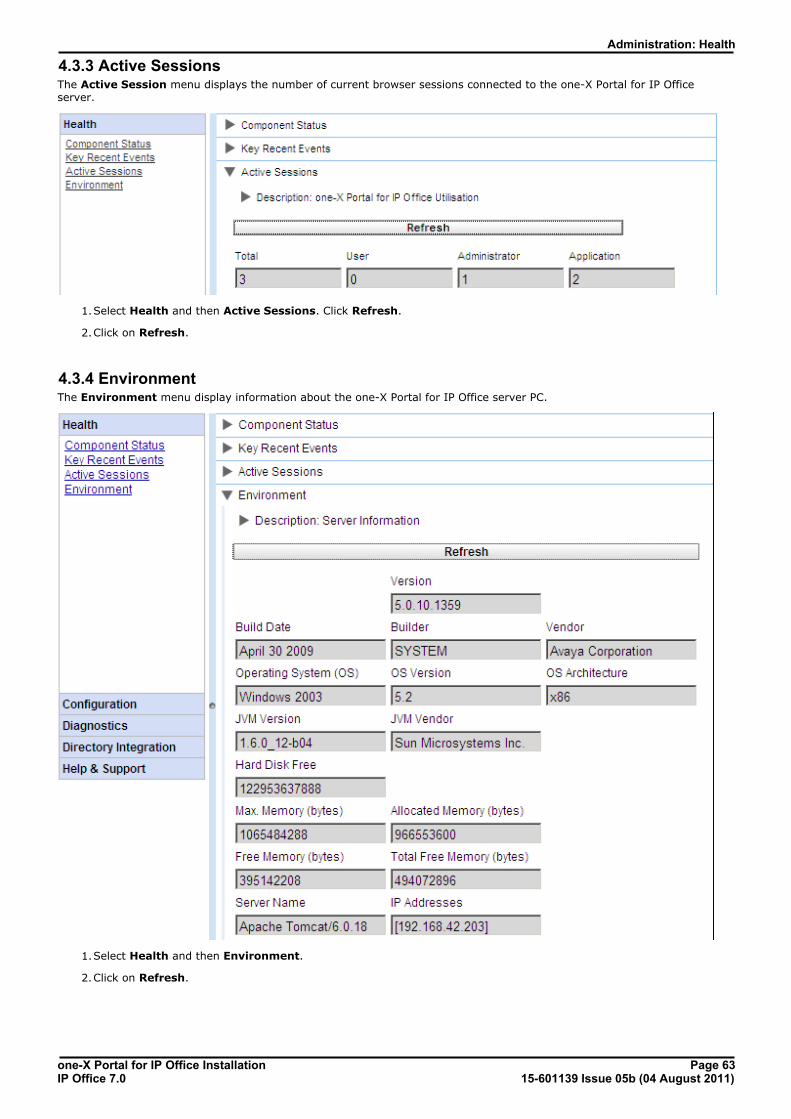
one-X Portal for IP Office Installation Page 6315-601139 Issue 05b (04 August 2011)IP Office 7.0
Administration: Health
4.3.3 Active SessionsThe Active Session menu displays the number of current browser sessions connected to the one-X Portal for IP Officeserver.
1.Select Health and then Active Sessions. Click Refresh.
2.Click on Refresh.
4.3.4 EnvironmentThe Environment menu display information about the one-X Portal for IP Office server PC.
1.Select Health and then Environment.
2.Click on Refresh.
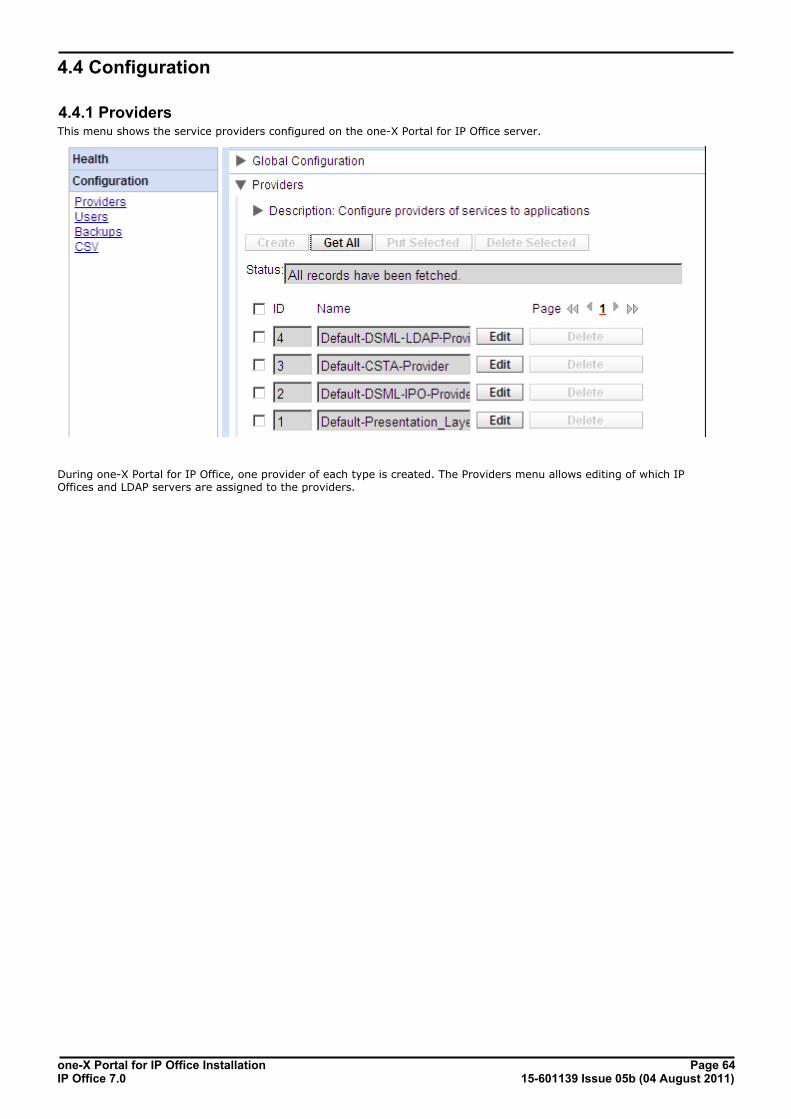
one-X Portal for IP Office Installation Page 6415-601139 Issue 05b (04 August 2011)IP Office 7.0
4.4 Configuration
4.4.1 ProvidersThis menu shows the service providers configured on the one-X Portal for IP Office server.
During one-X Portal for IP Office, one provider of each type is created. The Providers menu allows editing of which IPOffices and LDAP servers are assigned to the providers.
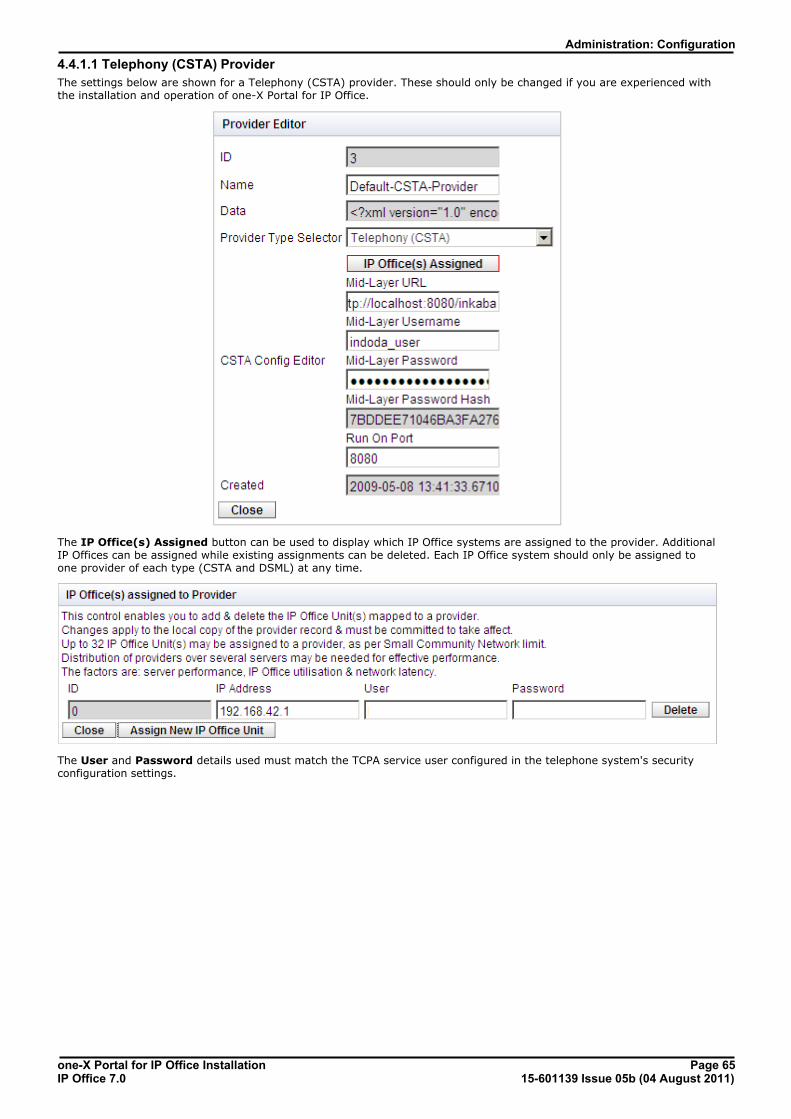
one-X Portal for IP Office Installation Page 6515-601139 Issue 05b (04 August 2011)IP Office 7.0
Administration: Configuration
4.4.1.1 Telephony (CSTA) Provider
The settings below are shown for a Telephony (CSTA) provider. These should only be changed if you are experienced withthe installation and operation of one-X Portal for IP Office.
The IP Office(s) Assigned button can be used to display which IP Office systems are assigned to the provider. AdditionalIP Offices can be assigned while existing assignments can be deleted. Each IP Office system should only be assigned toone provider of each type (CSTA and DSML) at any time.
The User and Password details used must match the TCPA service user configured in the telephone system's securityconfiguration settings.
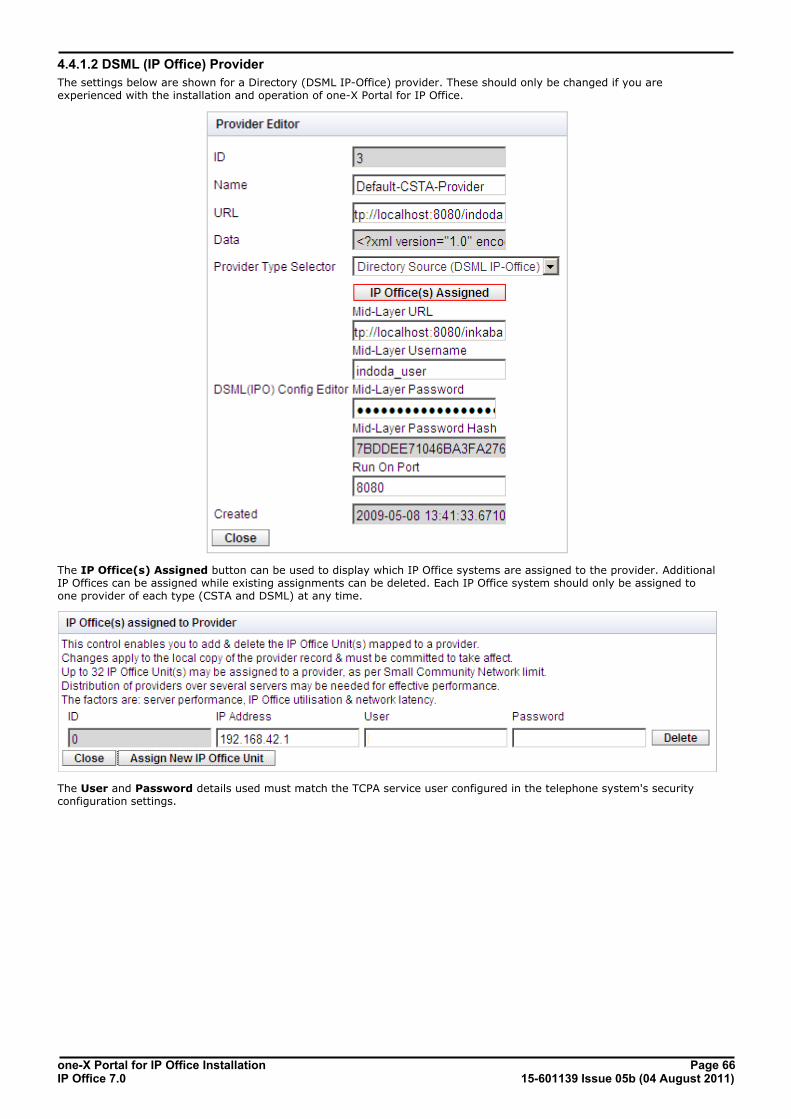
one-X Portal for IP Office Installation Page 6615-601139 Issue 05b (04 August 2011)IP Office 7.0
4.4.1.2 DSML (IP Office) Provider
The settings below are shown for a Directory (DSML IP-Office) provider. These should only be changed if you areexperienced with the installation and operation of one-X Portal for IP Office.
The IP Office(s) Assigned button can be used to display which IP Office systems are assigned to the provider. AdditionalIP Offices can be assigned while existing assignments can be deleted. Each IP Office system should only be assigned toone provider of each type (CSTA and DSML) at any time.
The User and Password details used must match the TCPA service user configured in the telephone system's securityconfiguration settings.
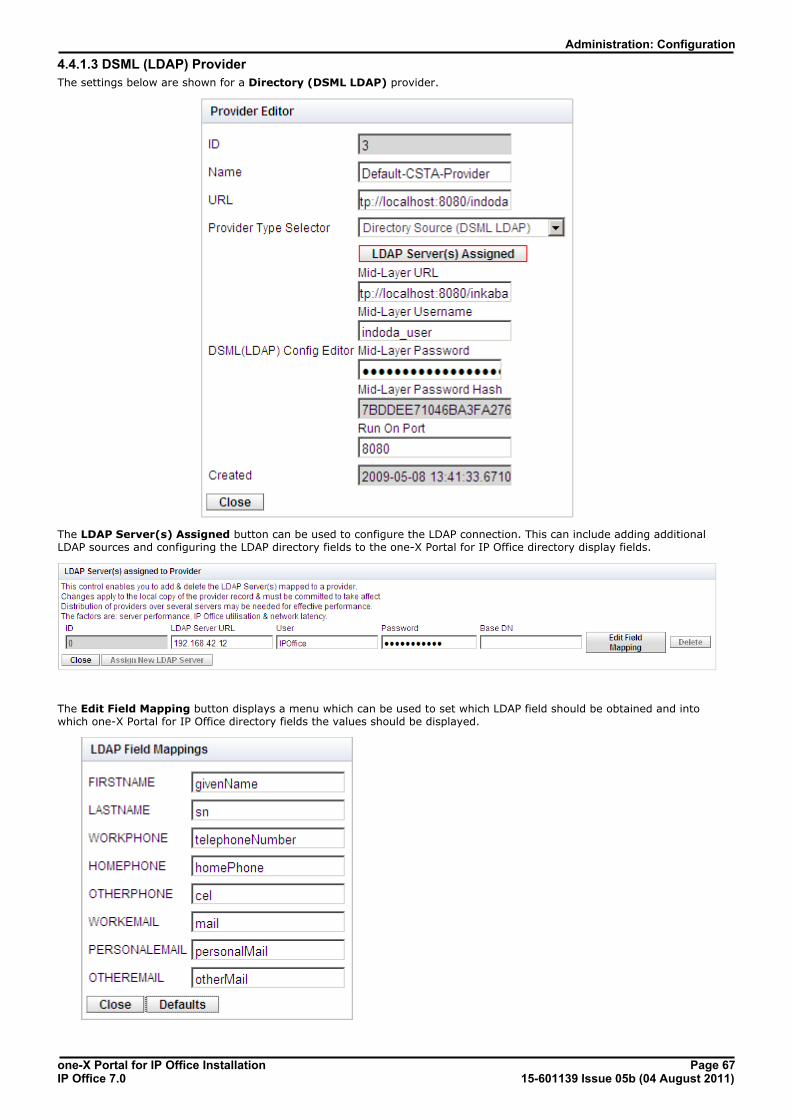
one-X Portal for IP Office Installation Page 6715-601139 Issue 05b (04 August 2011)IP Office 7.0
Administration: Configuration
4.4.1.3 DSML (LDAP) Provider
The settings below are shown for a Directory (DSML LDAP) provider.
The LDAP Server(s) Assigned button can be used to configure the LDAP connection. This can include adding additionalLDAP sources and configuring the LDAP directory fields to the one-X Portal for IP Office directory display fields.
The Edit Field Mapping button displays a menu which can be used to set which LDAP field should be obtained and intowhich one-X Portal for IP Office directory fields the values should be displayed.
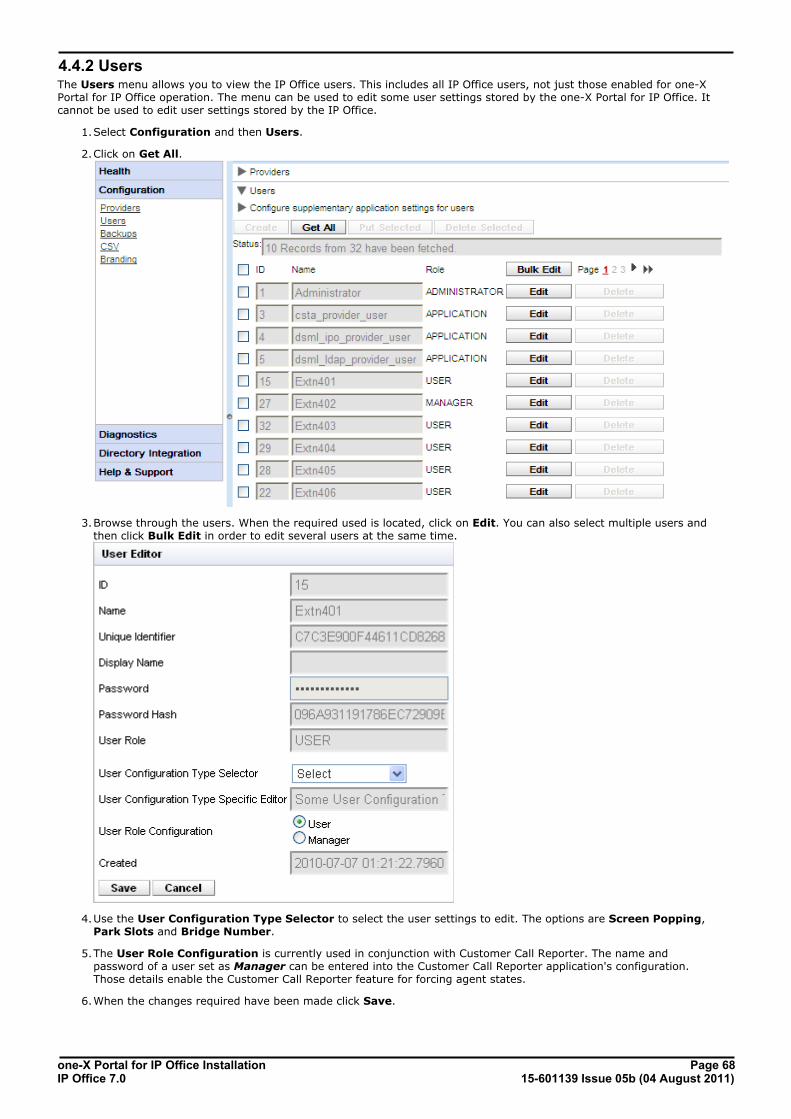
one-X Portal for IP Office Installation Page 6815-601139 Issue 05b (04 August 2011)IP Office 7.0
4.4.2 UsersThe Users menu allows you to view the IP Office users. This includes all IP Office users, not just those enabled for one-XPortal for IP Office operation. The menu can be used to edit some user settings stored by the one-X Portal for IP Office. Itcannot be used to edit user settings stored by the IP Office.
1.Select Configuration and then Users.
2.Click on Get All.
3.Browse through the users. When the required used is located, click on Edit. You can also select multiple users andthen click Bulk Edit in order to edit several users at the same time.
4.Use the User Configuration Type Selector to select the user settings to edit. The options are Screen Popping,Park Slots and Bridge Number.
5.The User Role Configuration is currently used in conjunction with Customer Call Reporter. The name andpassword of a user set as Manager can be entered into the Customer Call Reporter application's configuration.Those details enable the Customer Call Reporter feature for forcing agent states.
6.When the changes required have been made click Save.

one-X Portal for IP Office Installation Page 6915-601139 Issue 05b (04 August 2011)IP Office 7.0
Administration: Configuration
7.If changes have been made to any user records, use the Put Selected button to write those changes into the one-X Portal for IP Office database.
If you think that the user records do not match the users configured on the IP Office systems, the Directory Integration| Directory Synchronization menu can be used to force an update from the IP Office systems.75
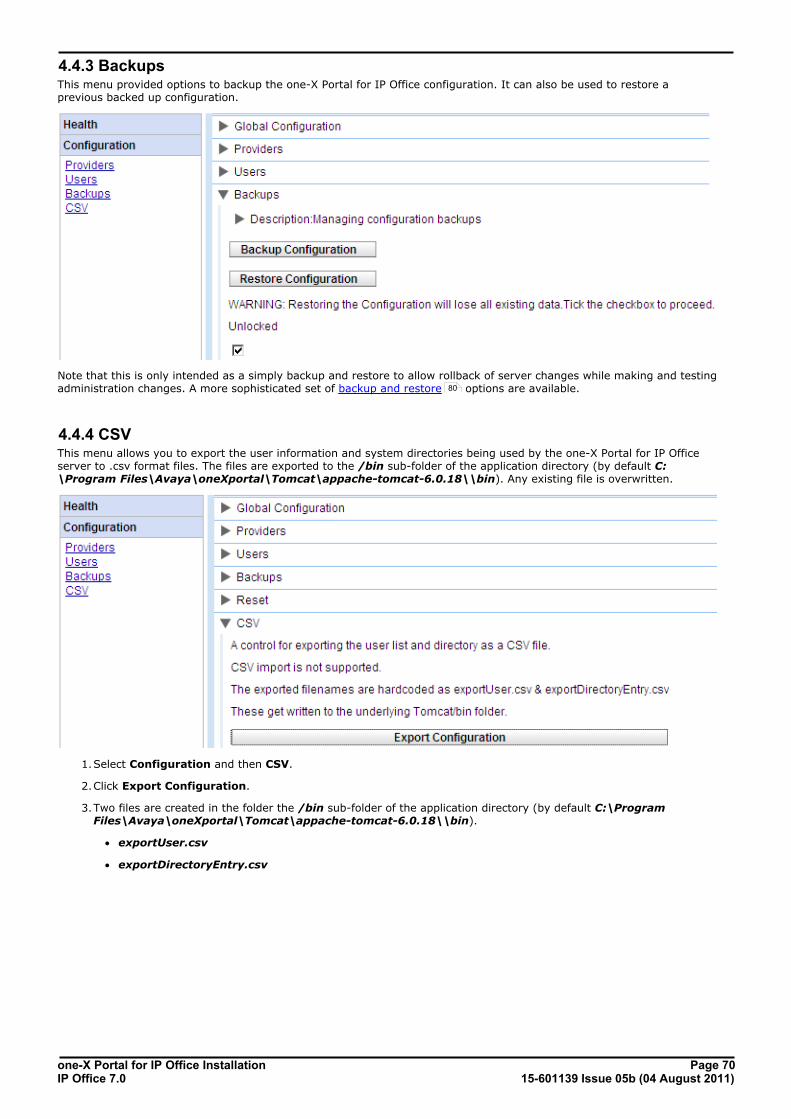
one-X Portal for IP Office Installation Page 7015-601139 Issue 05b (04 August 2011)IP Office 7.0
4.4.3 BackupsThis menu provided options to backup the one-X Portal for IP Office configuration. It can also be used to restore aprevious backed up configuration.
Note that this is only intended as a simply backup and restore to allow rollback of server changes while making and testingadministration changes. A more sophisticated set of backup and restore options are available.
4.4.4 CSVThis menu allows you to export the user information and system directories being used by the one-X Portal for IP Officeserver to .csv format files. The files are exported to the /bin sub-folder of the application directory (by default C:\Program Files\Avaya\oneXportal\Tomcat\appache-tomcat-6.0.18\\bin). Any existing file is overwritten.
1.Select Configuration and then CSV.
2.Click Export Configuration.
3.Two files are created in the folder the /bin sub-folder of the application directory (by default C:\ProgramFiles\Avaya\oneXportal\Tomcat\appache-tomcat-6.0.18\\bin).
· exportUser.csv
· exportDirectoryEntry.csv
80
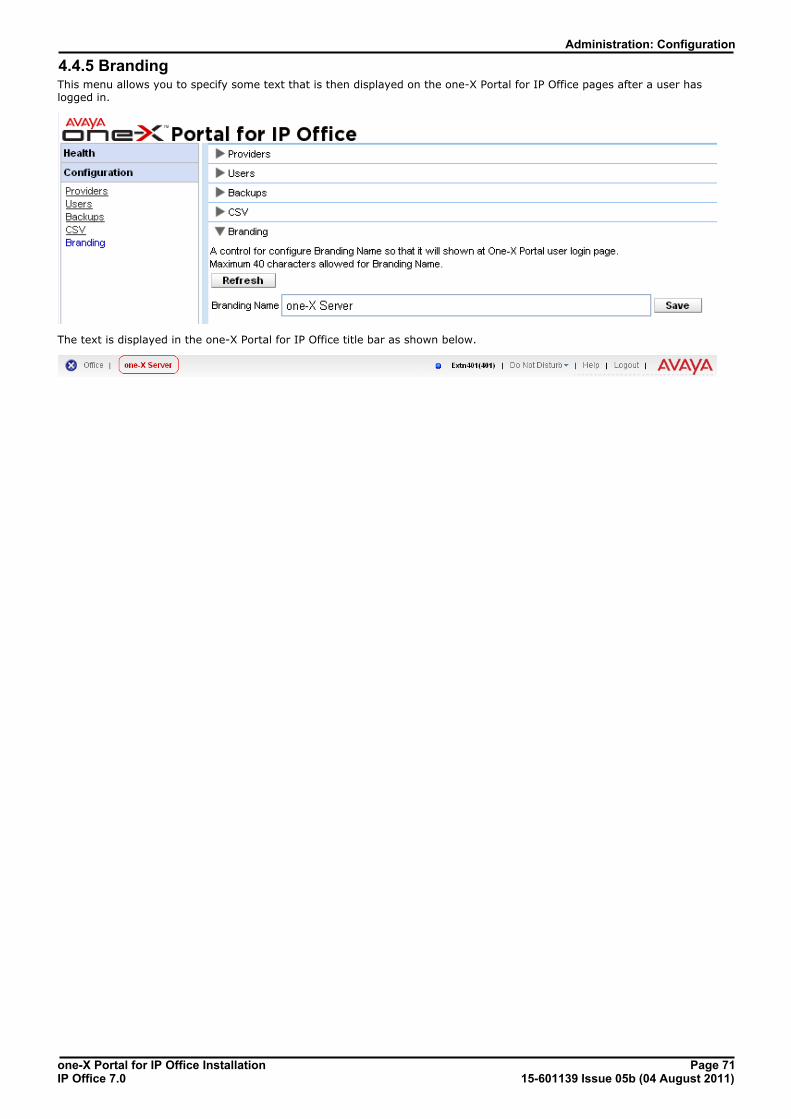
one-X Portal for IP Office Installation Page 7115-601139 Issue 05b (04 August 2011)IP Office 7.0
Administration: Configuration
4.4.5 BrandingThis menu allows you to specify some text that is then displayed on the one-X Portal for IP Office pages after a user haslogged in.
The text is displayed in the one-X Portal for IP Office title bar as shown below.
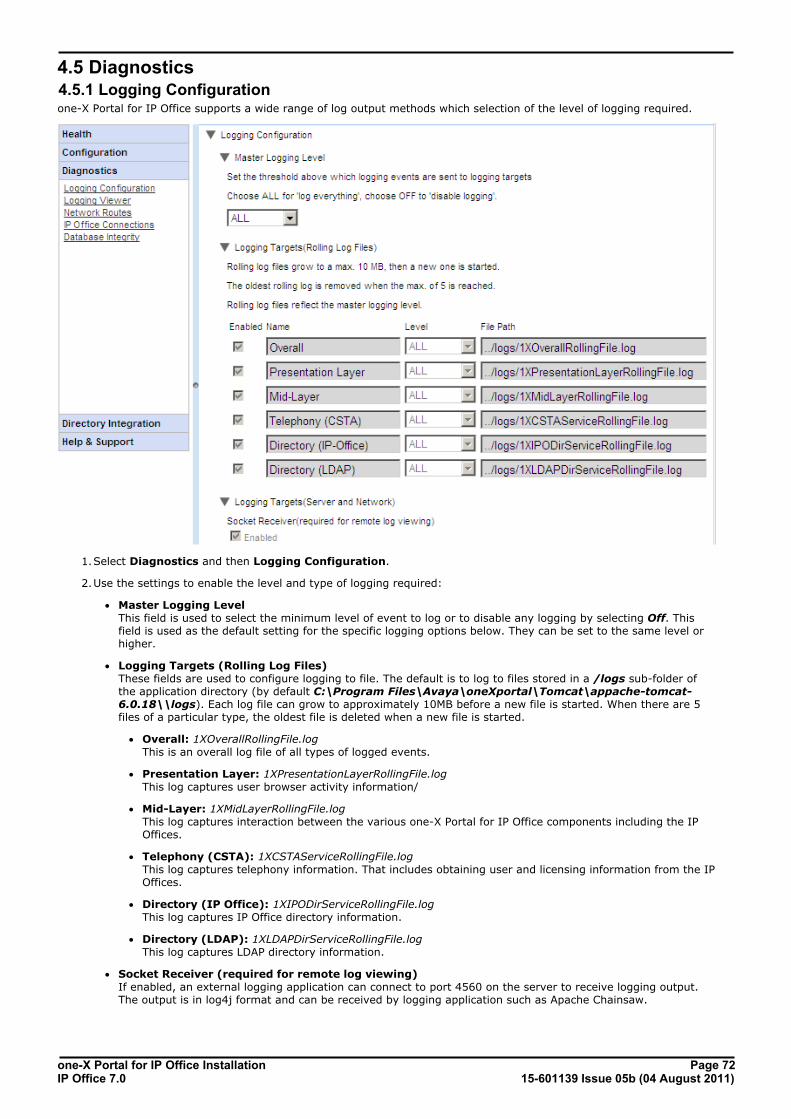
one-X Portal for IP Office Installation Page 7215-601139 Issue 05b (04 August 2011)IP Office 7.0
4.5 Diagnostics4.5.1 Logging Configurationone-X Portal for IP Office supports a wide range of log output methods which selection of the level of logging required.
1.Select Diagnostics and then Logging Configuration.
2.Use the settings to enable the level and type of logging required:
· Master Logging Level This field is used to select the minimum level of event to log or to disable any logging by selecting Off. Thisfield is used as the default setting for the specific logging options below. They can be set to the same level orhigher.
· Logging Targets (Rolling Log Files) These fields are used to configure logging to file. The default is to log to files stored in a /logs sub-folder ofthe application directory (by default C:\Program Files\Avaya\oneXportal\Tomcat\appache-tomcat-6.0.18\\logs). Each log file can grow to approximately 10MB before a new file is started. When there are 5files of a particular type, the oldest file is deleted when a new file is started.
· Overall: 1XOverallRollingFile.logThis is an overall log file of all types of logged events.
· Presentation Layer: 1XPresentationLayerRollingFile.logThis log captures user browser activity information/
· Mid-Layer: 1XMidLayerRollingFile.logThis log captures interaction between the various one-X Portal for IP Office components including the IPOffices.
· Telephony (CSTA): 1XCSTAServiceRollingFile.log This log captures telephony information. That includes obtaining user and licensing information from the IPOffices.
· Directory (IP Office): 1XIPODirServiceRollingFile.logThis log captures IP Office directory information.
· Directory (LDAP): 1XLDAPDirServiceRollingFile.logThis log captures LDAP directory information.
· Socket Receiver (required for remote log viewing) If enabled, an external logging application can connect to port 4560 on the server to receive logging output.The output is in log4j format and can be received by logging application such as Apache Chainsaw.
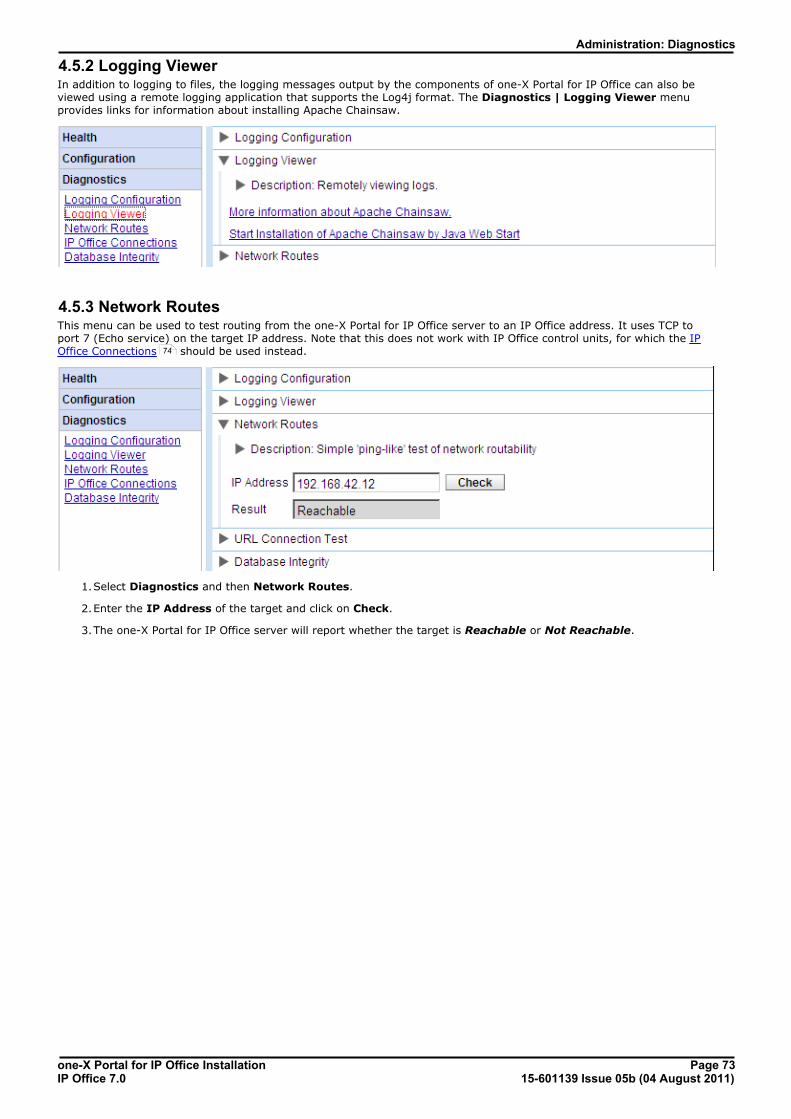
one-X Portal for IP Office Installation Page 7315-601139 Issue 05b (04 August 2011)IP Office 7.0
Administration: Diagnostics
4.5.2 Logging ViewerIn addition to logging to files, the logging messages output by the components of one-X Portal for IP Office can also beviewed using a remote logging application that supports the Log4j format. The Diagnostics | Logging Viewer menuprovides links for information about installing Apache Chainsaw.
4.5.3 Network RoutesThis menu can be used to test routing from the one-X Portal for IP Office server to an IP Office address. It uses TCP toport 7 (Echo service) on the target IP address. Note that this does not work with IP Office control units, for which the IPOffice Connections should be used instead.
1.Select Diagnostics and then Network Routes.
2.Enter the IP Address of the target and click on Check.
3.The one-X Portal for IP Office server will report whether the target is Reachable or Not Reachable.
74

one-X Portal for IP Office Installation Page 7415-601139 Issue 05b (04 August 2011)IP Office 7.0
4.5.4 IP Office ConnectionsThis menu can be used to check the connection between the one-X Portal for IP Office server and a particular IP Office.The connection check uses the standard discovery method used by IP Office applications such as IP Office Manager(connection to port 50804 of the IP Office control unit).
1.Select Diagnostics and then IP Office Connections.
2.Enter the IP Address of the target IP Office and click on Check.
3. If the IP Office is reachable, the results will include base information about the IP Office system.
4.5.5 Database IntegrityThis menu can be used to check the database structure. It will return Pass if the tables and fields within the database areas expected for the particular version of one-X Portal for IP Office. It does not check the data within the fields.
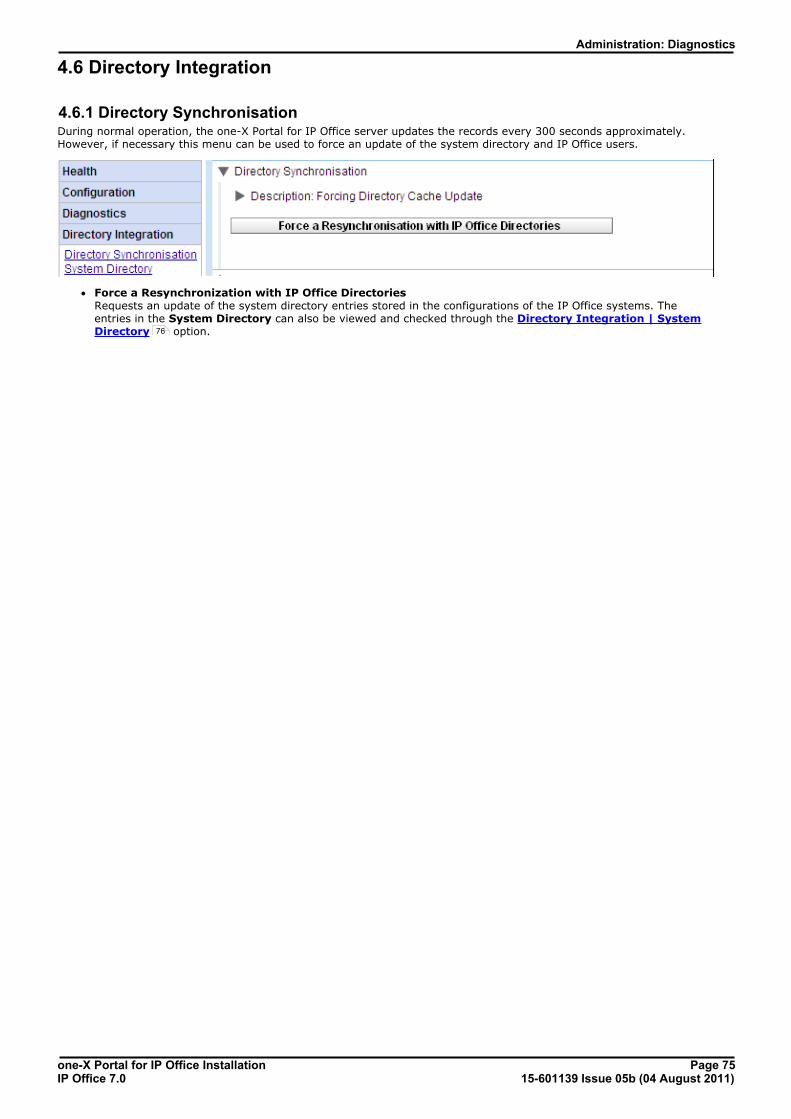
one-X Portal for IP Office Installation Page 7515-601139 Issue 05b (04 August 2011)IP Office 7.0
Administration: Diagnostics
4.6 Directory Integration
4.6.1 Directory SynchronisationDuring normal operation, the one-X Portal for IP Office server updates the records every 300 seconds approximately.However, if necessary this menu can be used to force an update of the system directory and IP Office users.
· Force a Resynchronization with IP Office Directories Requests an update of the system directory entries stored in the configurations of the IP Office systems. Theentries in the System Directory can also be viewed and checked through the Directory Integration | SystemDirectory option.76
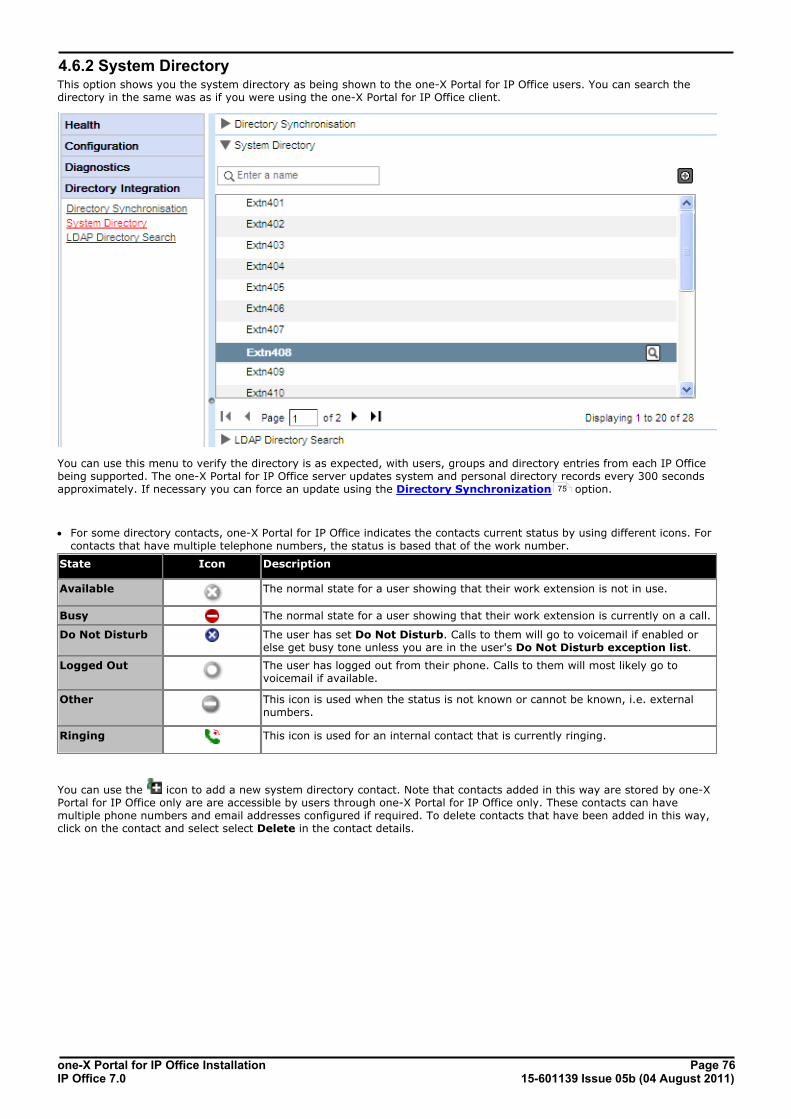
one-X Portal for IP Office Installation Page 7615-601139 Issue 05b (04 August 2011)IP Office 7.0
4.6.2 System DirectoryThis option shows you the system directory as being shown to the one-X Portal for IP Office users. You can search thedirectory in the same was as if you were using the one-X Portal for IP Office client.
You can use this menu to verify the directory is as expected, with users, groups and directory entries from each IP Officebeing supported. The one-X Portal for IP Office server updates system and personal directory records every 300 secondsapproximately. If necessary you can force an update using the Directory Synchronization option.
· For some directory contacts, one-X Portal for IP Office indicates the contacts current status by using different icons. Forcontacts that have multiple telephone numbers, the status is based that of the work number.
State Icon Description
Available The normal state for a user showing that their work extension is not in use.
Busy The normal state for a user showing that their work extension is currently on a call.
Do Not Disturb The user has set Do Not Disturb. Calls to them will go to voicemail if enabled orelse get busy tone unless you are in the user's Do Not Disturb exception list.
Logged Out The user has logged out from their phone. Calls to them will most likely go tovoicemail if available.
Other
This icon is used when the status is not known or cannot be known, i.e. externalnumbers.
Ringing This icon is used for an internal contact that is currently ringing.
You can use the icon to add a new system directory contact. Note that contacts added in this way are stored by one-XPortal for IP Office only are are accessible by users through one-X Portal for IP Office only. These contacts can havemultiple phone numbers and email addresses configured if required. To delete contacts that have been added in this way,click on the contact and select select Delete in the contact details.
75

one-X Portal for IP Office Installation Page 7715-601139 Issue 05b (04 August 2011)IP Office 7.0
Administration: Directory Integration
4.6.3 LDAP Directory SearchThis option allows you to search the external directory in the same way as one-X Portal for IP Office users. This allows youto test the operation of the LDAP Provider.
1.Select Directory Integration.
2.Select LDAP Directory Search.
3.Enter a name or number that you know is in the external directory and click on the icon. If the search issuccessful the results will be displayed above the search box.
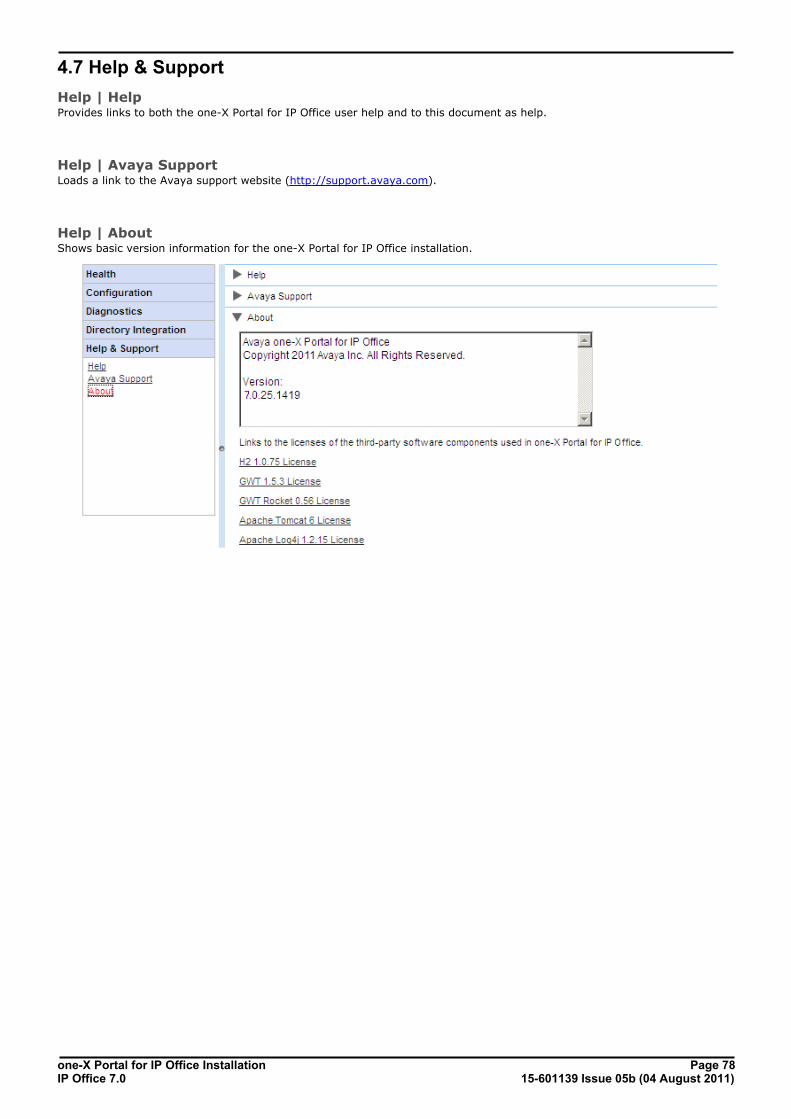
one-X Portal for IP Office Installation Page 7815-601139 Issue 05b (04 August 2011)IP Office 7.0
4.7 Help & Support
Help | HelpProvides links to both the one-X Portal for IP Office user help and to this document as help.
Help | Avaya SupportLoads a link to the Avaya support website (http://support.avaya.com).
Help | AboutShows basic version information for the one-X Portal for IP Office installation.

one-X Portal for IP Office Installation Page 7915-601139 Issue 05b (04 August 2011)IP Office 7.0
Backup/Restore
Chapter 5.
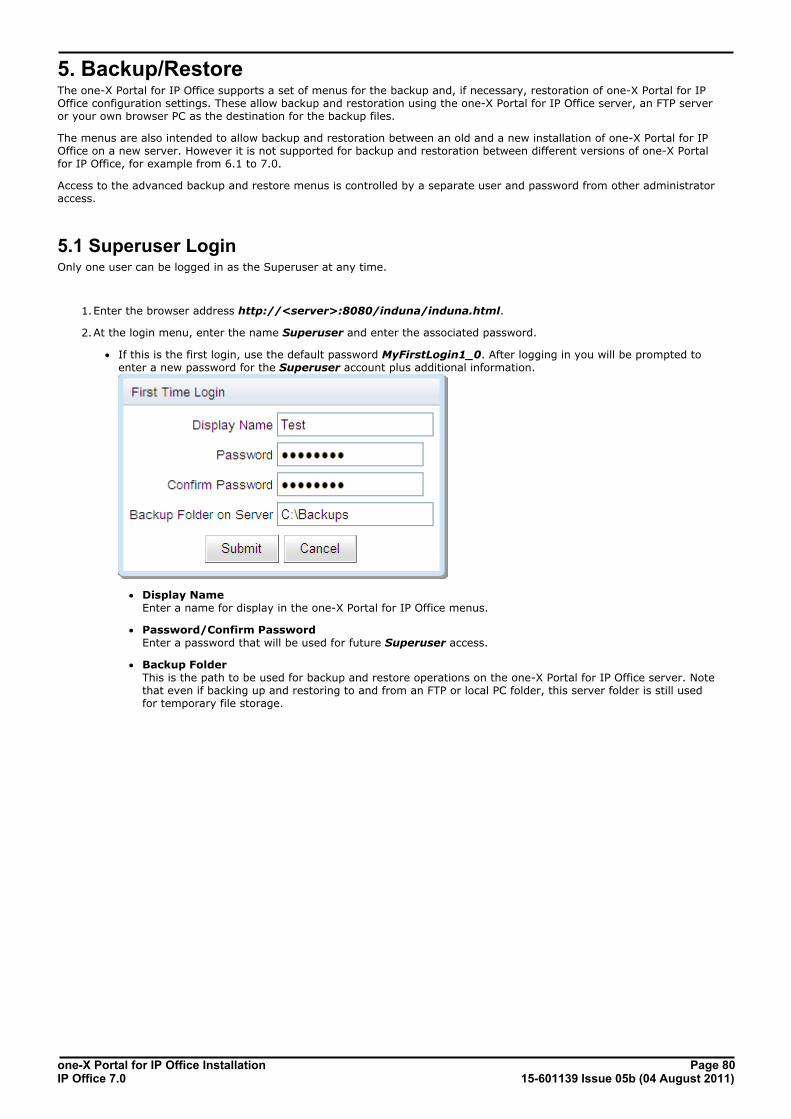
one-X Portal for IP Office Installation Page 8015-601139 Issue 05b (04 August 2011)IP Office 7.0
5. Backup/RestoreThe one-X Portal for IP Office supports a set of menus for the backup and, if necessary, restoration of one-X Portal for IPOffice configuration settings. These allow backup and restoration using the one-X Portal for IP Office server, an FTP serveror your own browser PC as the destination for the backup files.
The menus are also intended to allow backup and restoration between an old and a new installation of one-X Portal for IPOffice on a new server. However it is not supported for backup and restoration between different versions of one-X Portalfor IP Office, for example from 6.1 to 7.0.
Access to the advanced backup and restore menus is controlled by a separate user and password from other administratoraccess.
5.1 Superuser LoginOnly one user can be logged in as the Superuser at any time.
1.Enter the browser address http://<server>:8080/induna/induna.html.
2.At the login menu, enter the name Superuser and enter the associated password.
· If this is the first login, use the default password MyFirstLogin1_0. After logging in you will be prompted toenter a new password for the Superuser account plus additional information.
· Display Name Enter a name for display in the one-X Portal for IP Office menus.
· Password/Confirm Password Enter a password that will be used for future Superuser access.
· Backup Folder This is the path to be used for backup and restore operations on the one-X Portal for IP Office server. Notethat even if backing up and restoring to and from an FTP or local PC folder, this server folder is still usedfor temporary file storage.
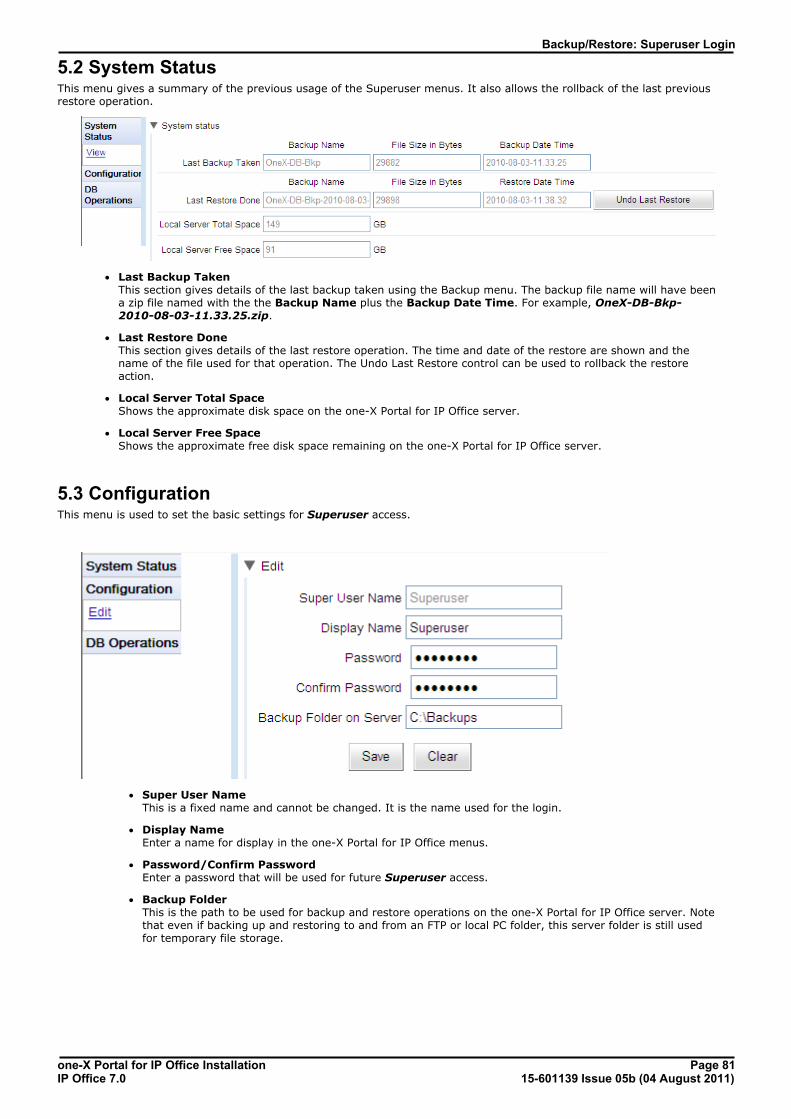
one-X Portal for IP Office Installation Page 8115-601139 Issue 05b (04 August 2011)IP Office 7.0
Backup/Restore: Superuser Login
5.2 System StatusThis menu gives a summary of the previous usage of the Superuser menus. It also allows the rollback of the last previousrestore operation.
· Last Backup Taken This section gives details of the last backup taken using the Backup menu. The backup file name will have beena zip file named with the the Backup Name plus the Backup Date Time. For example, OneX-DB-Bkp-2010-08-03-11.33.25.zip.
· Last Restore Done This section gives details of the last restore operation. The time and date of the restore are shown and thename of the file used for that operation. The Undo Last Restore control can be used to rollback the restoreaction.
· Local Server Total Space Shows the approximate disk space on the one-X Portal for IP Office server.
· Local Server Free Space Shows the approximate free disk space remaining on the one-X Portal for IP Office server.
5.3 ConfigurationThis menu is used to set the basic settings for Superuser access.
· Super User Name This is a fixed name and cannot be changed. It is the name used for the login.
· Display Name Enter a name for display in the one-X Portal for IP Office menus.
· Password/Confirm Password Enter a password that will be used for future Superuser access.
· Backup Folder This is the path to be used for backup and restore operations on the one-X Portal for IP Office server. Notethat even if backing up and restoring to and from an FTP or local PC folder, this server folder is still usedfor temporary file storage.
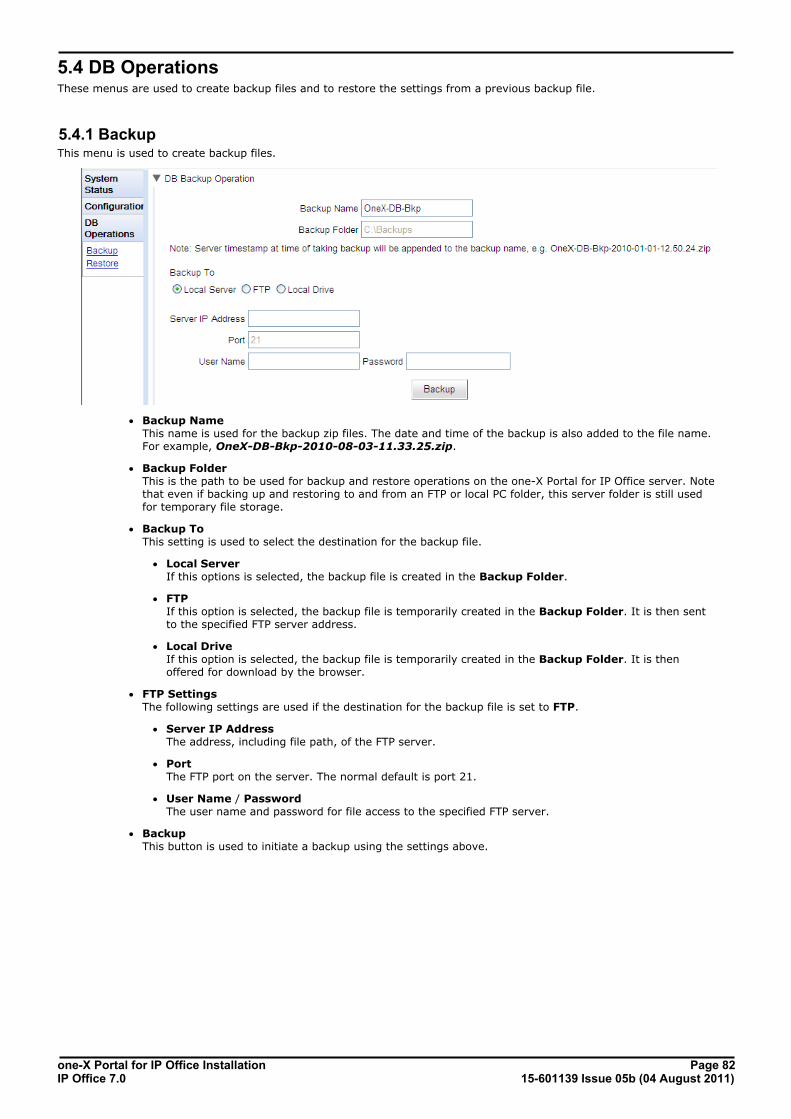
one-X Portal for IP Office Installation Page 8215-601139 Issue 05b (04 August 2011)IP Office 7.0
5.4 DB OperationsThese menus are used to create backup files and to restore the settings from a previous backup file.
5.4.1 BackupThis menu is used to create backup files.
· Backup Name This name is used for the backup zip files. The date and time of the backup is also added to the file name.For example, OneX-DB-Bkp-2010-08-03-11.33.25.zip.
· Backup Folder This is the path to be used for backup and restore operations on the one-X Portal for IP Office server. Notethat even if backing up and restoring to and from an FTP or local PC folder, this server folder is still usedfor temporary file storage.
· Backup To This setting is used to select the destination for the backup file.
· Local Server If this options is selected, the backup file is created in the Backup Folder.
· FTP If this option is selected, the backup file is temporarily created in the Backup Folder. It is then sentto the specified FTP server address.
· Local Drive If this option is selected, the backup file is temporarily created in the Backup Folder. It is thenoffered for download by the browser.
· FTP Settings The following settings are used if the destination for the backup file is set to FTP.
· Server IP Address The address, including file path, of the FTP server.
· Port The FTP port on the server. The normal default is port 21.
· User Name / Password The user name and password for file access to the specified FTP server.
· Backup This button is used to initiate a backup using the settings above.

one-X Portal for IP Office Installation Page 8315-601139 Issue 05b (04 August 2011)IP Office 7.0
Backup/Restore: DB Operations
5.4.2 RestoreThis menu is used to select a previous backup file and then use that file for a restore operation. Before the restorationoccurs, a backup of the current configuration is made and stored in the Backup Folder for use with the Undo LastRestore control. Restoration is only supported from a backup of the same one-X Portal for IP Office version.
· Restore From This setting is used to select the destination from which the previous backup file should be selected.
· Local Server If this options is selected, the backup file for the restore is selected from the configured BackupFolder.
· FTP If this option is selected, the backup file for the restore is selected from the specified FTP serveraddress.
· Local Drive If this option is selected, the backup file for the restore is selected using a file browse menu to locatea file on the browser PC.
· FTP Settings The following settings are used if the destination for the backup file is set to FTP.
· Server IP Address The address, including file path, of the FTP server.
· Port The FTP port on the server. The normal default is port 21.
· User Name / Password The user name and password for file access to the specified FTP server.
· Show Available Backups This button is shown when Restore From option is set to Local Server or FTP. When clicked, a list of theavailable backup files at the selected location is shown. Select a file and click Restore to begin therestoration process.
81
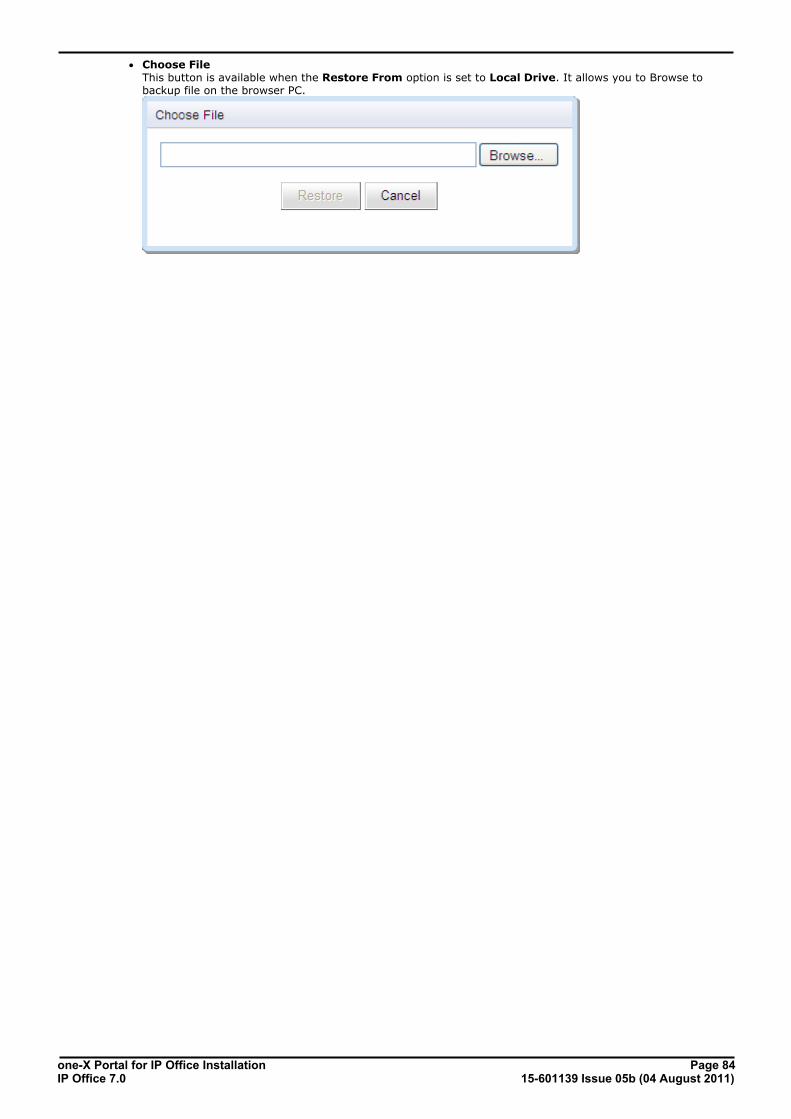
one-X Portal for IP Office Installation Page 8415-601139 Issue 05b (04 August 2011)IP Office 7.0
· Choose File This button is available when the Restore From option is set to Local Drive. It allows you to Browse tobackup file on the browser PC.

one-X Portal for IP Office Installation Page 8515-601139 Issue 05b (04 August 2011)IP Office 7.0
Glossary
Chapter 6.

one-X Portal for IP Office Installation Page 8615-601139 Issue 05b (04 August 2011)IP Office 7.0
6. GlossaryCSTA - Computer Supported Telecommunications Application.
Indoda - The Zulu word for 'man'.
Induna - The Zulu word for 'advisor', 'great leader' or 'ambassador'.
Inyama - The Zulu word for 'meat' or, when applied to people, 'flesh'. For example 'inyama nenyama' is 'face to face' or'in the flesh'.
Inkaba - The Zulu word for 'navel' or 'centre'. For example 'inkaba yedolobha' is 'town centre'.
Izwi - The Zulu word for 'voice'.
TCPA - Thin Client Productivity Application.
TSPI - Telephony Service Provider Interface.
one-X Portal for IP Office Installation Page 8715-601139 Issue 05b (04 August 2011)IP Office 7.0
Index
Index44560 53
88080 22
AAbout 60
Active Sessions 60, 63
Add IP Office 36LDAP 41
Licenses 20
User 42Administrator
Help 78
Login 26
Name 61Agent 58Apache
Chainsaw 53, 73
Applications DVD 15Assign
IP Office 36, 39
IP Office (CSTA) 65
IP Office (Directory) 66LDAP Provider 67Providers 64
Automatic logout 61
Avaya Support 60
BBackup 45, 70
Restore 46
Backups 60
Base DN 41browser 15Bulk Edit 42, 68
User 42
CCall Log 42Chainsaw 53, 73Component Status 60, 62
Computer Supported Telecommunications Application 86
Configuration 60Backup 45Backups 70
Bulk Edit 42
CSV 70During installation 26Export 70
Providers 64
Restore 46, 70User 21Users 68
Control Panel 51
Cookies 15CSTA 65, 86CSTA (IP Office) Provider 65
CSV 60, 70
DDatabase
Backup 45, 70Check 74
Restore 46, 70
Sanity Check 74
Database Integrity 60Deinstall 51Delete
IP Office 39
User 42Diagnostics 60
Connections 74
Database Integrity 74
IP Office Connections 74Logging Configuration 53, 72Logging Viewer 53, 73
Network Routes 73
Directories 10Directory
Export 70
Resynch 47, 75
Directory (DSML IP Office) 66Directory (DSML LDAP) 67Directory DSML IP Office Provider 9
Directory DSML LDAP Provider 9
Directory Integration 60Directory Synchronization 47, 75
Directory Intergration
LDAP 48, 77
System Directory 47, 76Directory Search
LDAP 48, 77
System Directory 47, 76
Directory Synchronization 60DND Exceptions 42Downgrading 50
DSML (IP Office) Provider 66
DSML (LDAP) Provider 67DVD 15
EEcho 73
Edit
Bulk Edit 42IP Office Security Settings 18IP Office settings 39
User settings 42, 68
Enable one-X Portal Services 21Enhanced TSPI 18Enhanced TSPI Access 18
Enhanced TSPI service 18
EnhTcpaService 18Environment 60Events 62
Exceptions 42
Explorer 15Export Configuration 70exportDirectoryEntry.csv 70
exportUser.csv 70
External Directory 10Search 48, 77
FField Mapping 41, 67
Firefox 15
Firewall 15, 22Force a Resynchronization 47, 75
GGroup 58
HHard Disk 15

one-X Portal for IP Office Installation Page 8815-601139 Issue 05b (04 August 2011)IP Office 7.0
Health 60
Active Sessions 63Component Status 62Environment 63
Key Recent Events 62
Help 60About 78Avaya Support 78
Help 78
Hunt Group 58
IImmediate logout 61Initial configuration 26
Install
Software 23Internet Explorer 15IP Office
Applications DVD 15
Check 26Connections 60CSTA Provider 65
Directory Provider 66
License 20Security Settings 18Select 26
System Requirements 15
User configuration 21
JJava Web Start 53JavaScript 15
KKey Recent Events 60, 62
Keyboard Shortcuts 42
LLDAP
Assign 41
Directory Search 48, 60, 77
Provider 67License
Add 20
Listing Ports 22
Log Files 72Log4j format 53Logging 53
Configuration 60
Level 72Targets 72Viewer 53, 60
Logging Configuration 53
Login 30, 61Administrator 26
Logout 61
MMaintenance 34
Master Logging Level 72Membership 58Messages 42
Mozilla Firefox 15
NName 21Network Routes 60, 73Not Reachable 73
OOperating System 15
Override Admin Session 61
PPark Slots 42Password 21, 61
Change 26
Personal Directory 10, 42
PING 73Port 15
4560 53
7 73
8080 23Set 23
Ports 22
Presence 42
Presentation Level Provider 9Provider 9, 60
Assign 64
CSTA (IP Office) 65
Directory (DSML IP Office) 66Directory (DSML LDAP) 67DSML (IP Office) 66
DSML (LDAP) 67
View 64
QQuick Time 15
RRAM Memory 15
Reachable 73
Recent Events 62Remember me on this computer 15Remote Logging 53
Remove
IP Office 39one-X Portal for IP Office 51User 42
Reserved Ports 22
Reset Session Count 61Restart Service 35Restore 46, 70
Backup 45
Resynchronization 47, 75Rights Group 18Rolling Log Files 72
Routes 73
SSafari 15Sanity 74Search
LDAP 48, 77
System Directory 47, 76Search Base 41Security Settings 18
Server
Information 63PC Requirements 15Version 63
Service
Restart 35Service User 18Services 18
Sessions 63
Settings Backup 45Bulk Edit 42
Restore 46
one-X Portal for IP Office Installation Page 8915-601139 Issue 05b (04 August 2011)IP Office 7.0
Index
Settings
User 21Shortcuts 42Socket Receiver 53, 72
Software
Install 23Start Service 35Status 62
Synchronization 47, 75
System Directory 10, 60Directory Search 47, 76Export 70
Resynch 47, 75
TTCP Port 7 73TCPA 86TCPA Group 18
Telephony CSTA Provider 9
Telephony Service Provider Interface 86Test
External Directory 48, 77
IP Office connection 74
LDAP Directory 48, 77Network Route 73System Directory 47, 76
User Login 30
Thin Client Productivity Application 86TSPI 86
UUninstall 51
Upgrading 49
User Add 42Bult Edit 42
Configuration 21
Delete 42Edit settings 42Export 70
Help 78
Login 30Name 21Password 21
User name 21
Users 60Active 63Edit settings 68
Resynch 47, 75
View 68
VVersion 63View
Component Status 62
Key Recent Events 62Providers 64
Voicemail Messages 42
WWindows Media Player 15


one-X Portal for IP Office Installation Page 9115-601139 Issue 05b (04 August 2011)IP Office 7.0

one-X Portal for IP Office Installation Page 9215-601139 Issue 05b (04 August 2011)IP Office 7.0
Performance figures and data quoted in this document are typical, and must bespecifically confirmed in writing by Avaya before they become applicable to anyparticular order or contract. The company reserves the right to make alterationsor amendments to the detailed specifications at its discretion. The publication of
information in this document does not imply freedom from patent or otherprotective rights of Avaya or others.
All trademarks identified by the ® or ™ are registered trademarks or trademarks,respectively, of Avaya Inc. All other trademarks are the property of their
respective owners.
This document contains proprietary information of Avaya and is not to bedisclosed or used except in accordance with applicable agreements.
© 2011 Avaya Inc. All rights reserved.