Embed Size (px)
Citation preview

Introduction to Physical Computing Tinkering with Light, Sound, and Motion
A guide for explorations and sharing possibilities
for Young Makers mentors
© March 2015, Maker Education Initiative
This work is licensed under a Creative Commons AttributionShareAlike 4.0 International License
This workshop, along with the Young Makers program, is made possible
with the generous support of Google for Education and Oracle.

Introduction to Physical Computing Tinkering with Light, Sound, and Motion A guide for explorations and sharing possibilities for Young Makers mentors
This guide is intended to help you make the best use of your Maker Ed workshop experience and the materials you’ve received to bring physical computing possibilities to your Young Makers clubs. We’ll share facilitation tips and suggestions to help you provide your own introduction to physical computing workshops. We’re excited to know that you’ll be continuing to learn along with young makers, as you tinker and help seed the development of new projects made possible by the power of tiny programmable Arduinos and the prototyping possibilities of breadboards. Facilitation: Tips and Goals This workshop and guide are meant to inspire and support your work in introducing physical computing concepts to youth in ways that are empowering, effective, and youthcentered. We recognise that you already have your own style of interaction and experience with your particular group of young makers. Whatever we suggest facilitationwise, we are excited to know that you will adapt and improve upon these approaches to create fun, playful, informative, and inspiring workshop sessions. General Facilitation Tips What practices and mindsets help provide the best possible experiences for you and your Young Makers club members?
● Reflect upon what you notice, and ask questions to help lead to discoveries. ● Collect and document in a variety of ways at every stage of your workshops. ● Find and connect those who may be struggling in a particular area with those who may
have found a solution. Your role is to enhance peertopeer support.
2

● Let your group know that while some struggle is expected, if they are really stuck, you will help connect them to peers or help directly when needed.
● Admit and celebrate what you don’t yet know, and share your excitement about learning with and from young makers.
● Celebrate and share mysteries, and recognise efforts driven by curiosity and playfulness.
Goals of Facilitation What do we hope to achieve, and provide?
● Plenty of opportunities to play and collaborate ● Exploration, discovery, and experimentation ● Experience with new materials and skills ● Use of familiar materials in contexts that encourage the discovery of new uses ● Youth empowerment to discover and learn independently ● Peertopeer exchange and support of newly gained skills, ideas and concepts ● A wide variety of questions and challenges providing multiple routes to success ● The development of new, adapted and/or unique projects ● A fun, inspiring, and memorable introduction to physical computing possibilities
Tips from the classroom These common mantras from classroom teacher are helpful to keep in mind when working with a groups of young makers, especially if they get stuck:
● Think, pair, share: allowing time to think, encouraging pairing, and group sharing ● “Ask two others before you ask me” ● “Spend another two minutes trying”
Sample Language “Wow, you really stuck with this and figured that out after all those problems. Would it be OK with you if I sent others to you for help if they need it with this kind of thing?” “I notice you keep finding new ways of connecting those LEDs! Have you drawn any of these setups, and recorded any of your observations? I’d love to be able to share them with everyone.” “I notice you are really struggling with this. I wonder if someone else has encountered the same problem. Let’s check.” “I hear your frustration. I would be frustrated too after so much work. Would you like to take a break and come back to it? Perhaps you can help this other pair with the battery connection you got working earlier?
3
“Wow. That does not make any sense to me either. How cool is it that we have this mystery? I wonder what’s going on? If you figure it out, can you tell me so that I can share it with everyone?” “Whoa. That’s a crazy number of LEDs and wires! I see some LEDs are on, while others turn off when you plug that one in. This would be useful as an example of how complex this all can be. Can I take a picture to save and share it? I’ll bet Maker Ed would love to see what you made as well!” Answers and Expertise When you are investigating with young makers, you don’t need to have all of the answers. This is an area where your young makers will quickly become both teachers and learners as all share their questions, discoveries, and ideas as you problem solve and playfully explore together. Your role is to help facilitate their learning through questions, observations, providing appropriate challenges, and modeling collaborative, inquirybased, and playful approaches. Physical Computing: Goals and Context Physical computing provides tools that bridge the analog and digital worlds. From the inputs of sensors to environment to outputting light, sound, and/or motion, interaction becomes possible, and through coding, endlessly customizable. These options are becoming increasingly less expensive and easier to use. With Trinkets, Arduinos have been simplified and reduced in cost so that projects using them become much more achievable. Arduino Unos that cost $35 can, in many cases, be replaced with Trinkets that cost $6 or less. Physical Computing Skill and Content Goals
● Familiarity with breadboards ● Experience with breadboard exploration and troubleshooting using LEDs ● Ability to install and use Adafruits’ Trinket Arduino IDE ● Familiarity with code library and resources for Trinkets ● Ability to change parameters and experiment with existing code examples ● Experience using piezo speakers (sound), micro servos (motion) and NeoPixel RGB
LEDs (light) ● Adaptation and building experience using one or more elements of sound, light, and
motion ● Comfort and ability to apply these skills and content knowledge to a unique project ● Confidence in supporting youth in using Trinkets and/or breadboards for their unique
projects
4
Preparation: Planning your Workshop Time When planning your workshop time with young makers, it’s handy to think about how best to take advantage of everyone being together, as well as what might be left for individual pursuits and explorations with siblings and/or parents and guardians. We suggest planning time to:
● Play and explore with materials from the beginning ● Revisit, explore and build ● Share and learn from each other ● Work together, and have the option of working alone ● Take breaks! ● Troubleshoot ● Slow down and enjoy the mysteries and learnings as they arise ● Reflect and document
This workshop for Young Makers’ mentors has been a packed six hours. Very likely, your workshop will be spread over several sessions, or take place in a shorter amount of time with more time left for experimentation. Some suggested session breakdowns
● Session One: Breadboarding and circuit explorations ● Session Two: Soldering! Thinking about project possibilities with light, sound, and
motion. ○ If you have only one or a few soldering irons, you may choose to combine
Session One with this session, and rotate young makers at the soldering station(s).
● Session Three: Computer Code Trinket example creation/ exploration ● Session Four: A closer look behind the code, tweaking, playing and developing unique
projects.
Beginning with Breadboarding and Circuit Exploration Breadboarding provides a great way to dive right into material exploration!. Right away, your young makers will be invited to explore and discover concepts of breadboarding, prototyping, and circuitry on their own. While there most certainly will be struggles and challenges, taking these on leads to shared discovery, learning, and delight. There are mysteries to be discovered in this process, ones that may help drive curiosity about circuits. Many you will not have an explanation for (this is a good thing!) and many you all may work together to figure out what is going on. As you have experienced in your workshop, there are many hidden variables and challenges when it comes to the use of LEDs. Different LED color combinations, the order and polarity of
5
connections, amount of voltages, and the kinds of ways that LEDs are connected to one or more batteries all adds up to make things pretty complicated. This allows for observations and struggles that can inspire more investigation and revelations about circuits, voltages, breadboards and LEDs. Overall, this step helps to set a tone of being OK with things that are not completely solved, which is especially useful for your investigations using the Trinkets and coding, where an even greater number of physical and digital variables exist. Exploring circuits and breadboarding This phase allows for the exploration of Breadboards, LEDs, and the discovery of the affordances of using breadboards for electrical connections. We’ve given our Young Makers mentors transparent breadboards so that some of the “black box” mystery of how the rows and columns are connected is a bit less obscure. For your young makers, we’ve provided lessexpensive opaque breadboards that preserve more of the mystery of the board’s connections. Materials and Preparation: Provide, per pair of students:
● 12 breadboards ● Stranded wire jumpers, enough to share throughout the group ● LED assortments ● CR2032 Lithium coin cells ● Long breadboard headers (see below) for one method of connecting batteries to the
breadboard ● Tape, and optionally: wooden clothespins (spring and solid)
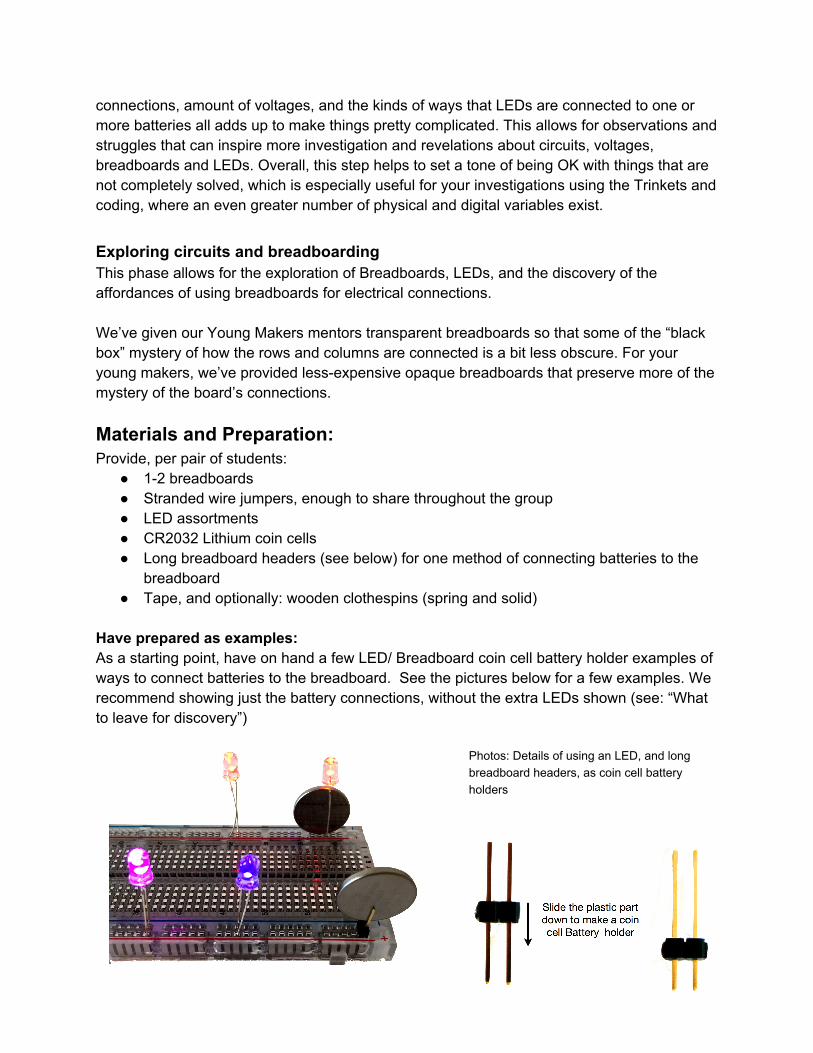
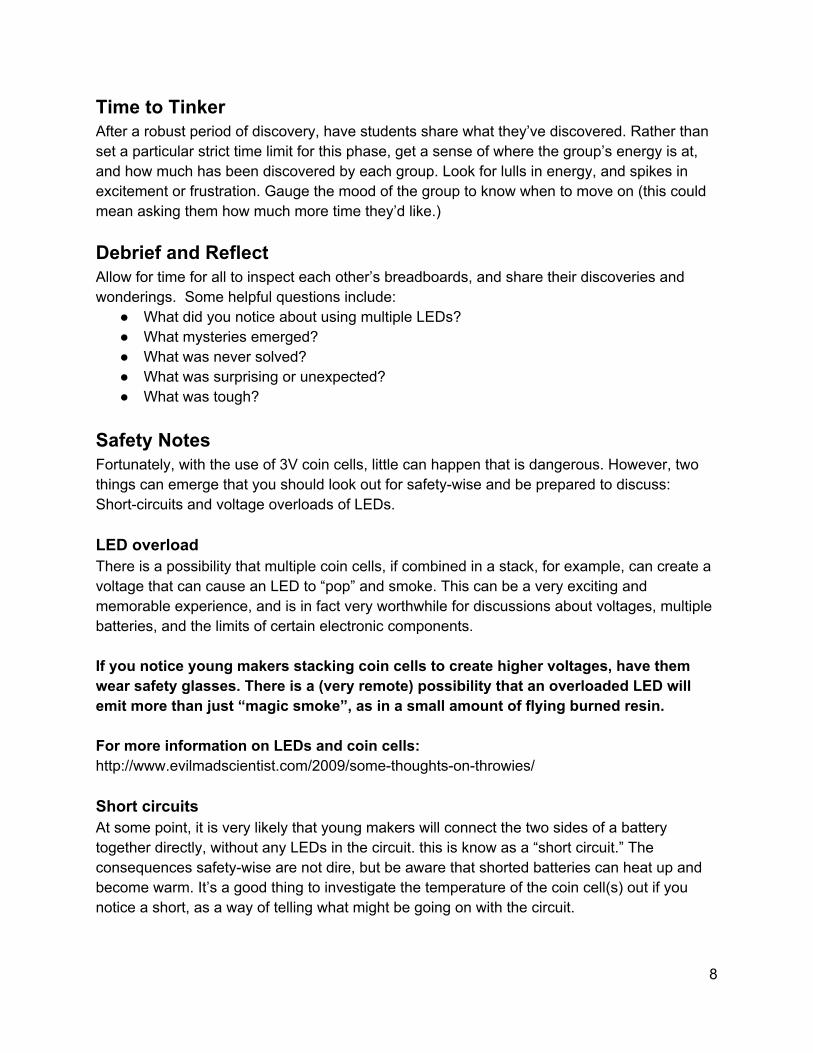
Have prepared as examples: As a starting point, have on hand a few LED/ Breadboard coin cell battery holder examples of ways to connect batteries to the breadboard. See the pictures below for a few examples. We recommend showing just the battery connections, without the extra LEDs shown (see: “What to leave for discovery”)
Photos: Details of using an LED, and long breadboard headers, as coin cell battery holders
6

Suggested Order of Exploration Begin with coin cells and LEDs only Likely by now, your young makers have had at least some, if not extensive, experience with getting LEDs to light up when using only coin cells and LEDs. This is good time to have them share observations and what they have learned about LEDs. Then: Bring on the breadboards! It’s time to see what possibilities the breadboard and jumper wires bring with multiple LEDs! You have transparent breadboards to serve as examples. While the breadboards we have provided you with for your young makers are opaque, you can invite examination of the transparent board to see what can be learned from it. Facilitating Discovery Suggested prompts
● What is possible with multiple LEDs, batteries, and breadboards? ● How might we get more than one LED to light up? ● What do you notice about combining multiple LEDs and batteries, and how
breadboards work? Sample language “You’ve had experience with LEDs. Let’s explore ways that we might use multiple LEDs with these breadboards. What is possible with them? What might we learn about these breadboards, and more about LEDs and coin cells?” What to show Little at first. Ask, if your group is new to breadboards, what do you notice about them? What do you wonder about? What do you notice about the jumper wires? How might they work? (demonstrate jumper use for them only if necessary) After exploring ways of connecting LEDs to the coin cell batteries without the breadboards, explore together various ways of connecting both sides of three Volt (3V) Coin battery to the breadboard as a place to start breadboard explorations. What to leave for discovery The actual lighting up of combinations of LEDs using the breadboard. In response to struggles with LED circuit basics, allow and encourage support from peers first before jumping in to help directly.
7
Time to Tinker After a robust period of discovery, have students share what they’ve discovered. Rather than set a particular strict time limit for this phase, get a sense of where the group’s energy is at, and how much has been discovered by each group. Look for lulls in energy, and spikes in excitement or frustration. Gauge the mood of the group to know when to move on (this could mean asking them how much more time they’d like.) Debrief and Reflect Allow for time for all to inspect each other’s breadboards, and share their discoveries and wonderings. Some helpful questions include:
● What did you notice about using multiple LEDs? ● What mysteries emerged? ● What was never solved? ● What was surprising or unexpected? ● What was tough?
Safety Notes Fortunately, with the use of 3V coin cells, little can happen that is dangerous. However, two things can emerge that you should look out for safetywise and be prepared to discuss: Shortcircuits and voltage overloads of LEDs. LED overload There is a possibility that multiple coin cells, if combined in a stack, for example, can create a voltage that can cause an LED to “pop” and smoke. This can be a very exciting and memorable experience, and is in fact very worthwhile for discussions about voltages, multiple batteries, and the limits of certain electronic components. If you notice young makers stacking coin cells to create higher voltages, have them wear safety glasses. There is a (very remote) possibility that an overloaded LED will emit more than just “magic smoke”, as in a small amount of flying burned resin. For more information on LEDs and coin cells: http://www.evilmadscientist.com/2009/somethoughtsonthrowies/ Short circuits At some point, it is very likely that young makers will connect the two sides of a battery together directly, without any LEDs in the circuit. this is know as a “short circuit.” The consequences safetywise are not dire, but be aware that shorted batteries can heat up and become warm. It’s a good thing to investigate the temperature of the coin cell(s) out if you notice a short, as a way of telling what might be going on with the circuit.
8
The concepts of overloads and short circuits are extremely useful to have in mind when working with Trinket circuits later on, when the consequences of short circuiting can include damaging something more expensive than batteries and LEDs, such as the Trinkets. Resources and Delving Deeper For much more about breadboards, here’s an excellent overview with lots of details, from Sparkfun: https://learn.sparkfun.com/tutorials/howtouseabreadboard Ways of extending this exploration While exploring with breadboards, and making connections with wires, LEDs, and batteries, the concepts of switches naturally emerge. Switches make and break circuits, and can be very simple or considerable more complex. For electrical and electronic fundamentals, It’s very valuable to invite the creation of various kinds of switches with simple materials such as paper clips, cardboard and/ or foam core sheets. brass brads (large size) alligator clip leads. Here are some examples of ways to continue circuit construction and explorations, using these affordable materials: http://www.instructables.com/id/BuildaSimpleCircuitfromaPizzaBoxNoSolder/ http://highhillhomeschool.blogspot.com/2012/04/makeyourownelectricalswitch.html Circuit blocks are also extremely valuable and fun way of extending these explorations. They may be created and added onto continually by your group. Here’s two great resources for circuit blocks: http://tinkering.exploratorium.edu/circuitboards http://makeshoppgh.com/?s=circuit+blocks
Preparing Trinkets & NeoPixels for Breadboards Melting Metal: Soldering Trinkets and NeoPixels In order for Trinkets and NeoPixels to be used with breadboards, they must be prepared by soldering headers (See: “Preparing the Trinket,” Getting Started with Adafruit Trinket Pages 1719). This is a step you may choose to skip if necessary, for time and logistics. If so, you will have to prepare Trinkets and NeoPixels in advance. This may be an opportunity to get parents involved who have never soldered. We recognise that having enough soldering irons, a large enough space with ventilation, and the time for this step might be a limiting factor in working with Trinkets.
9
Materials and Preparation
● At least one Soldering Kit ● Damp sponge(s) one per kit ● A wellventilated area ● Adafruit Trinkets and NeoPixels ● Extra breadboard headers ● Safety goggles, enough for anyone in the vicinity of soldering to wear. ● In addition, a desoldering pump is highly recommended, such as:
http://www.amazon.com/DesolderingVacuumSolderSuckerRemoval/dp/B003FHYL7I/ref=sr_1_1?
What to have ready as examples
● NeoPixel and Trinkets presoldered with breadboard headers ● Pictures and/or examples of soldering mistakes, such as using too much solder,
bridges between pins, and poor solder joints (See the Adafruit soldering guide links below for examples).
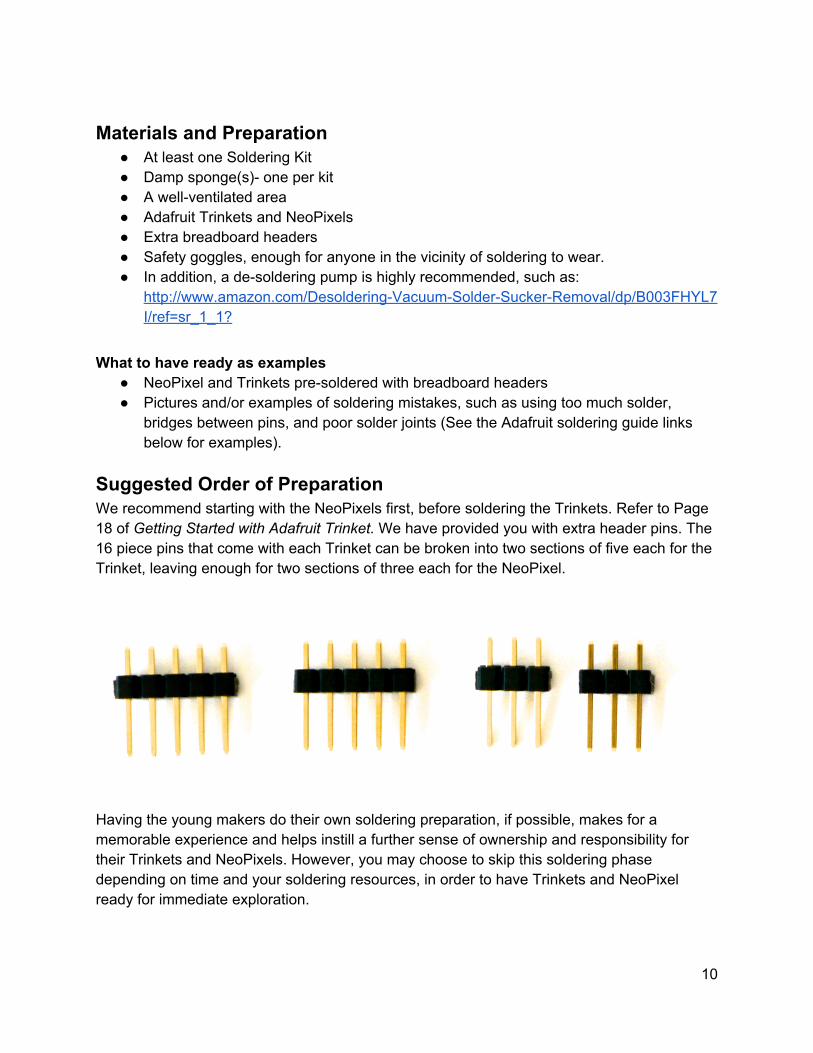
Suggested Order of Preparation We recommend starting with the NeoPixels first, before soldering the Trinkets. Refer to Page 18 of Getting Started with Adafruit Trinket. We have provided you with extra header pins. The 16 piece pins that come with each Trinket can be broken into two sections of five each for the Trinket, leaving enough for two sections of three each for the NeoPixel.
Having the young makers do their own soldering preparation, if possible, makes for a memorable experience and helps instill a further sense of ownership and responsibility for their Trinkets and NeoPixels. However, you may choose to skip this soldering phase depending on time and your soldering resources, in order to have Trinkets and NeoPixel ready for immediate exploration.
10
Facilitating Skills Building and Discovery Suggested prompts Let’s get our Trinkets and NeoPixels ready for use, and practice making strong electrical connections by soldering while we are at it. Let’s melt some metal! What to show There are many excellent videos that help demonstrate good soldering technique. One great resource is How to make a Good Solder Joint, from Adafruit’s Guide to Excellent Soldering: https://learn.adafruit.com/adafruitguideexcellentsoldering/ https://learn.adafruit.com/adafruitguideexcellentsoldering/makingagoodsolderjoint What to leave for discovery It’s exciting to see how solder is “sucked” into the space between the lead and the hole on the circuit board. To see and inspect solder connections more effectively, it is helpful to have magnifying glasses on hand. For those who have never soldered before, before jumping in to NeoPixel and Trinket soldering, it is helpful to begin by having them melt a small amount of solder on the tip of the iron, then wiping the excess off on a damp sponge. This needs to be done with new tips anyway, and is known as tinning (see the above soldering resources). Building skills Soldering can be more than just a useful skill. The visceral power of melting metal, and the perceived danger of working with tools that can burn is exciting, memorable, and most of all, empowering. Soldering is an area where youth can readily take the lead in helping peers. We suggest asking for youth leaders to take a leadership role in helping peers to solder, and keep things safe. These are great roles to invite of someone who might normally be shy, for example, as an opportunity to build leadership skills. This kind of leadership can be taken further. Imagine, for example. the empowerment of asking your club members to help teach adults how to solder and help lead in facilitating any aspect of physical computing. Debrief and Reflect After all club members have had a chance to solder, and all of the NeoPixels and Trinkets are prepared, gather and examine each for inspection. Are the solder joints of high quality? Are there any solder bridges between pins? This is a good time to catch and fix any potential soldering errors before connecting these components to the breadboard and computers. Sample questions
● What was tough? ● Was anything easy?
11
● How did soldering make you feel? Was anyone nervous? Excited? Scared? Confident? All of these?
● If you were to help teach soldering, do you have any tips for beginners? ● How else might we use the skill of soldering?
Safety Notes Soldering is exciting. It does involve some danger of burns, fires, and splashed molten metal, and does produce fumes which should not be breathed in. We have provided you with a soldering kit that includes unleaded solder, which we highly recommend that you continue to use around youth. When soldering it is helpful to keep the following in mind:
● Ample ventilation is extremely important. Open at least a few windows and doors if possible, and/or run a fan that circulates interior air to the outside.
● A dedicated space, i.e. a soldering station, is preferable, with table protection, such as cardboard, or non flamable fabric (that you would not mind having small burns in). No plastic tablecloths!
● Eye protection is ALWAYS required when around soldering stations, even if you are not the one soldering.
● Can we say this again? ALWAYS wear eye protection, even when you are not soldering, whenever close to a soldering iron.
● Unplug soldering irons whenever they are not being used and someone is not right next to them, right away, no exceptions. It does take time for soldering irons to warm up after being unplugged, but the cost of this time is well worth eliminating the risk of an iron being left plugged in and unattended.
Talking to Trinkets: Setting up Computers In this step, you’ll help young makers set up their computers to be able to communicate with and Program trinkets. In all likelihood, you’ll have incredible capable digital natives among your young makers that could take over this step, given the links. Materials and Preparation For materials, you will need at least one computer, preferably one laptop per pair. Per pair, you will also need the USB to MiniUSB cables we provide, and all of the prepared Trinkets. We suggest that you read and become familiar with chapter two of Getting Started with Adafruit Trinket, pages 915. Potential issues with PCs and Macs are well explained in this chapter. Have prepared in advance
● A computer previously setup with the Adafruit Arduino IDE (integrated development environment ).
12
● Optional: A computer with the Adafruit Arduino IDE uninstalled, to setup as young makers are setting up
Facilitating Skill Building and Sharing A main goal for facilitating this session is to guide and facilitate, but as Apple does so well when supporting customers, never to do it directly for them. This may require patience, but the experience of actually doing every step of setting up makes for much more empowerment. This is also another great youth leadership opportunity. You may choose to ask for club member volunteers to take the lead in this step. They might work out of your copy of Getting Started with Adafruit Trinket, and/or use Adafruits’s resources for setting up computers for Trinkets (see link below). Suggested prompt “In order to prepare our Trinkets to ‘talk’ to the world, and make things happen by programming them, we have to install the right software on our computer. This is something that can be a bit challenging given the differences between computers and operating systems, so let’s help each other out.” What to show Show each pair of students how to reach Adafruit’s setup page with links for downloading Adafruit IDEs, and tips and steps for installation. You may navigate from learn.adafruit.com or follow the direct link: https://learn.adafruit.com/introducingtrinket/settingupwitharduinoide You may also choose to use Adafruit’s Introducing trinket pdf, which covers IDE installation as well: https://learn.adafruit.com/downloads/pdf/introducingtrinket.pdf PC installation help We have learned that issues with PCs in particular can complicate this installation, mainly those involving the necessity of installing the proper drivers (a challenge often shared by all forms of Arduinos IDEs as well). For the Trinket, below are the step’s we’ve successfully taken for installing on Windows computers. Also note that the file for downloading the IDE is ~94MB, and that for some PCs, extracting this file may take a considerable amount of time. Here is a step by step guide to installing the USBtinyISP driver for Windows:
13
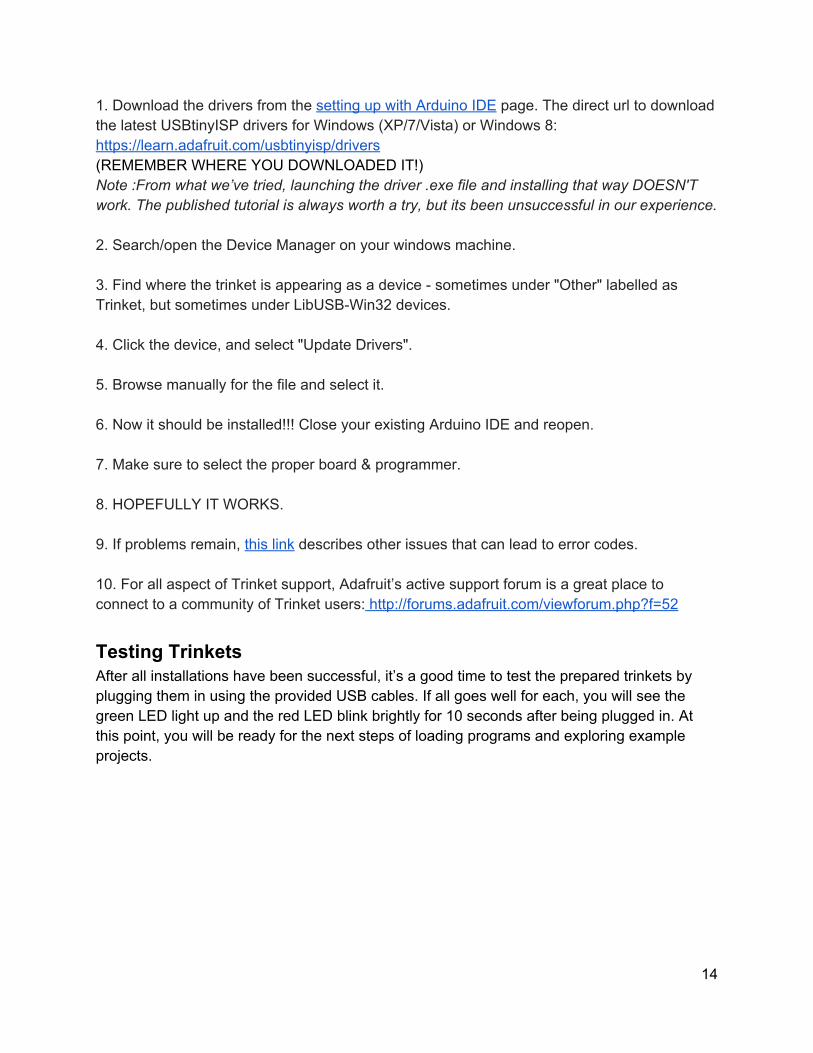
1. Download the drivers from the setting up with Arduino IDE page. The direct url to download the latest USBtinyISP drivers for Windows (XP/7/Vista) or Windows 8: https://learn.adafruit.com/usbtinyisp/drivers (REMEMBER WHERE YOU DOWNLOADED IT!) Note :From what we’ve tried, launching the driver .exe file and installing that way DOESN'T work. The published tutorial is always worth a try, but its been unsuccessful in our experience. 2. Search/open the Device Manager on your windows machine. 3. Find where the trinket is appearing as a device sometimes under "Other" labelled as Trinket, but sometimes under LibUSBWin32 devices. 4. Click the device, and select "Update Drivers". 5. Browse manually for the file and select it. 6. Now it should be installed!!! Close your existing Arduino IDE and reopen. 7. Make sure to select the proper board & programmer. 8. HOPEFULLY IT WORKS. 9. If problems remain, this link describes other issues that can lead to error codes. 10. For all aspect of Trinket support, Adafruit’s active support forum is a great place to connect to a community of Trinket users: http://forums.adafruit.com/viewforum.php?f=52 Testing Trinkets After all installations have been successful, it’s a good time to test the prepared trinkets by plugging them in using the provided USB cables. If all goes well for each, you will see the green LED light up and the red LED blink brightly for 10 seconds after being plugged in. At this point, you will be ready for the next steps of loading programs and exploring example projects.
14

Explorations with Light, Sound, and Motion Tinkering with Trinket Project Examples Now that you’ve prepared the computers, Trinkets and NeoPixels, it’s time to dive into building, exploring, and tinkering with projects examples! In this phase, students will progress from the simplest example of a blinking LED to examples that demonstrate changing colors and behavior of special addressable variable color LEDs, sound responding to light musically, and motion of servo motors being controlled by potentiometers, (variable resistors). The following sections apply to all four different project examples. all found in Getting Started with Adafruit Trinket. We will give an overview of preparation and approaches for all examples. followed by specific notes and links for each example Trinket project. We encourage continued work in pairs for this step, though solo investigation is an option. For any working alone on these examples, we recommend asking if they would be available to help others as a way to help engage with and support your group. Materials and Preparation Materials per pair
● 1 computer ● 1 USB to miniUSB cable ● 12 breadboards ● 12 Trinkets ● 2 NeoPixels ● 1 piezo speaker ● 1 resistor ● 1 CdS photoresistor ● 1 LED assortment pack ● Plentiful breadboard jumper wires
Note: For the servo example, we have provided you with one micro servo. These are not included in the materials for your club members. You may use your servo to allow for this example to be built and used by one pair or small group at a time.
15
Have prepared
● Multiple large color printouts of each breadboard diagram (see each example session for links)
● A prebuilt version of one Trinket project example, both as a reference and backup to use in case of extreme frustration. We suggest the Theremin or Two Neopixel example.
● One laptop or computer per pair of young makers with installed Adafruit Arduino IDE. In advance, read through all sections of Getting Started with Adafruit Trinket for each example option you provide. Suggested Order of Exploration Begin with the simplest example for everyone, the “Hello World!” blinking of LEDs. Then, invite pairs to choose between the Theramin, two NeoPixels, and servo examples. Allow your club members to stay with any one example as long as they wish. Many may go far indepth with a few of the examples rather than trying them all right away. Depth and engagement is great! All group members will be sharing their experiences and examples, so all will learn from the full range of examples and their “mutated/changed” variations. Facilitating Discovery These examples are by necessity initially more prescriptive that our earlier approach of exploring to discover the affordances of breadboards. They start with combining specific ways of hooking up Trinkets on breadboards with various electronic components that must be “correct” in order to work in combination with code that is specific for each example. Once starting with these specific example configurations, we then allow for and encourage “breaking” and tweaking tinkering with the code and experimenting and customizing the example circuits. Suggested prompts and questions
● As we build these examples, and look at the example code, we get to learn from them, but even better, we get to learn by changing the code. Experiment! Try different things, change certain numbers, and see what mysteries of how the code works are revealed.
● How might these examples be customized, combined, and changed? ● As you explore, think about what projects of your own that these examples might help
inspire.
16
● Don’t be afraid to “break” the code! You can always reload the original program and start again. Interesting and unexpected things often happen when you “mess up” programs.
What to show Start by showing the diagrams for the examples (at first just for the LED “Hello World!” setup, then for the rest after this initial shared experience. We suggest printing large color versions of the circuit and breadboard diagrams for each example (Links provided below). What to leave for discovery Even though you may have prepared one or more finished examples, it is powerful to allow the young makers to experience how each one works after successfully building the example and loading the code before you show how it works. You may use a prebuilt example to help guide or rescue a team that is struggling to get one to work, but it’s best to have the first demonstration of each of the light, sound, and motion examples be by the young makers. Challenges In general, encourage experimentation and reverse engineering of each code example. See each example below for possible specific challenges. Debrief and Reflect Building these examples and tweaking code and setups can become very engaging, and take up any amount of time that you allow. It’s a long process full of deadends and glorious discoveries. Goals of reflecting on these examples include encouraging further experimentation, including all in the learning and sharing process, and building the foundations of custom projects and code. Example debriefing and reflection questions
● What did you notice about the format of the code? What seemed to be in common among all code examples?
● What unexpected things happened when you changed things? Share some stories. ● What did you notice about the comments in the code? How did they help guide you in
what you could change? In what ways did you “break” the code? ● For everything— code, circuit building, working together, exploring, etc— what kinds of
things did you learn, and what did you learn from others? ● What project ideas have these examples and investigations inspired?
17

18

Trinket Project Example Details and Resources Here we provide details on each of the four possible examples, including links to circuit diagrams and corresponding example code, as well as where you will find the examples within the book Getting Started With Adafruit Trinket. We include special notes and safety possible Hello World! Blinking LEDs Before delving into the rest of the examples, we suggest starting with getting a single external LED to blink. This helps tie the Trinket explorations to the initial breadboarding and LED explorations. In physical computing, getting an LED to blink is known as a “Hello world!” experience, a name that has deep history in computer programming tradition. Getting Started With Adafruit Trinket Pages: 2128 Circuit Diagram: https://github.com/trinketbook/GettingStartedWithTrinket/blob/master/Chapter%203%20Diagrams/Figure%2039%20LED.png Code: https://github.com/trinketbook/GettingStartedWithTrinket/tree/master/Chapter%203%20Code/Chapter3_01Blink Special notes You will notice that no breadboard diagram is provided, while a circuit diagram is. This simple example provides a nice challenge to translate the provided circuit diagram into a breadboard configuration, making use of the earlier work to explore and familiarize with breadboards and how they work. Don’t forget that you will need to adapt the code example given above to change the LED pin to #2 (see the “Connections” section on page 26 of the book) Once the Trinkets have said Hello to the world... Invite playing with the timing of the LEDs! Possible challenge:
● Modify the circuit and code to control and additional LED on Pin #0. Note: there are complications to using pins #3 AND #4, see “Not All Pins are the Same” on page 25.
Once everyone has built and loaded, and played with changing the code for blinking LEDs, we suggest introducing a menu of the next examples, so that pairs (highly encouraged) can
19
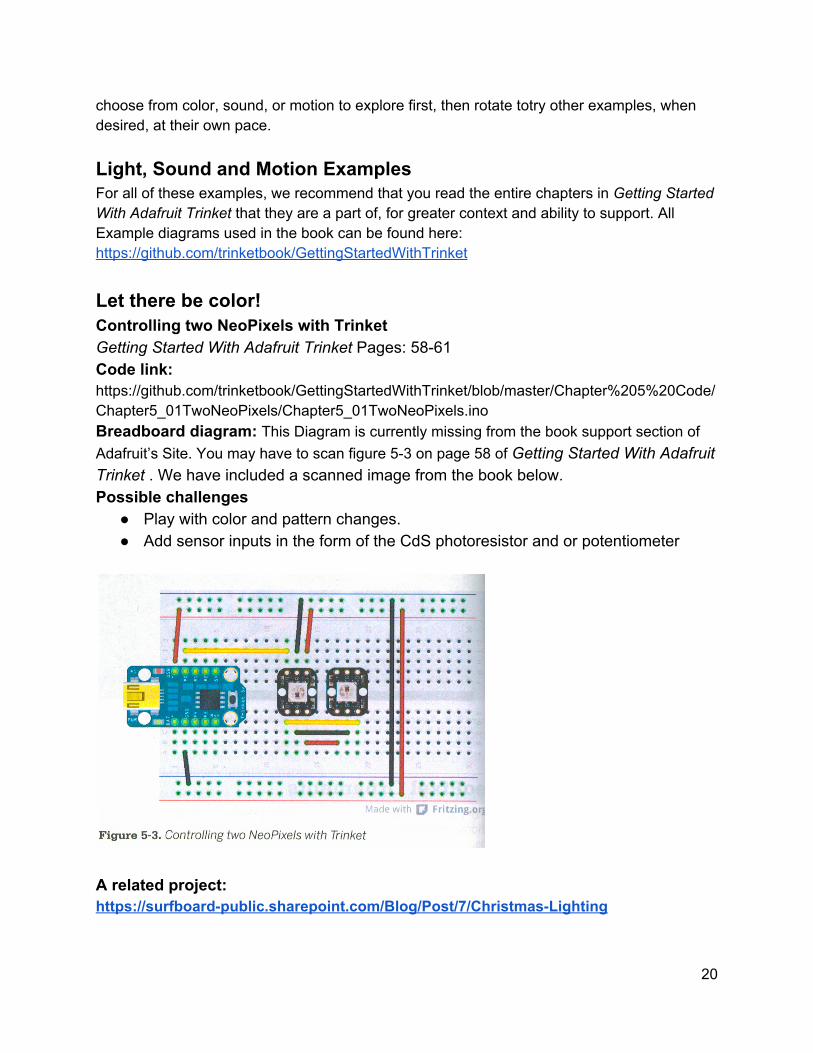
choose from color, sound, or motion to explore first, then rotate totry other examples, when desired, at their own pace. Light, Sound and Motion Examples For all of these examples, we recommend that you read the entire chapters in Getting Started With Adafruit Trinket that they are a part of, for greater context and ability to support. All Example diagrams used in the book can be found here: https://github.com/trinketbook/GettingStartedWithTrinket Let there be color! Controlling two NeoPixels with Trinket Getting Started With Adafruit Trinket Pages: 5861 Code link: https://github.com/trinketbook/GettingStartedWithTrinket/blob/master/Chapter%205%20Code/Chapter5_01TwoNeoPixels/Chapter5_01TwoNeoPixels.ino Breadboard diagram: This Diagram is currently missing from the book support section of Adafruit’s Site. You may have to scan figure 53 on page 58 of Getting Started With Adafruit Trinket . We have included a scanned image from the book below. Possible challenges
● Play with color and pattern changes. ● Add sensor inputs in the form of the CdS photoresistor and or potentiometer
A related project: https://surfboardpublic.sharepoint.com/Blog/Post/7/ChristmasLighting
20
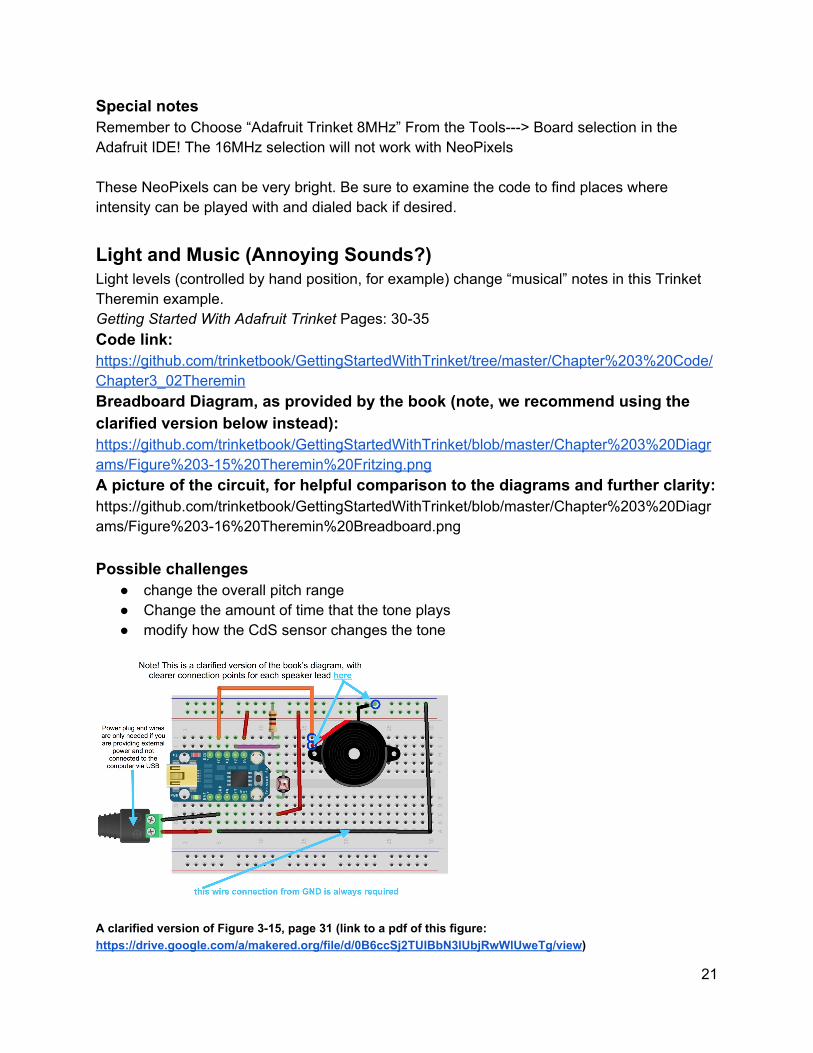
Special notes Remember to Choose “Adafruit Trinket 8MHz” From the Tools> Board selection in the Adafruit IDE! The 16MHz selection will not work with NeoPixels These NeoPixels can be very bright. Be sure to examine the code to find places where intensity can be played with and dialed back if desired. Light and Music (Annoying Sounds?) Light levels (controlled by hand position, for example) change “musical” notes in this Trinket Theremin example. Getting Started With Adafruit Trinket Pages: 3035 Code link: https://github.com/trinketbook/GettingStartedWithTrinket/tree/master/Chapter%203%20Code/Chapter3_02Theremin Breadboard Diagram, as provided by the book (note, we recommend using the clarified version below instead): https://github.com/trinketbook/GettingStartedWithTrinket/blob/master/Chapter%203%20Diagrams/Figure%20315%20Theremin%20Fritzing.png A picture of the circuit, for helpful comparison to the diagrams and further clarity: https://github.com/trinketbook/GettingStartedWithTrinket/blob/master/Chapter%203%20Diagrams/Figure%20316%20Theremin%20Breadboard.png Possible challenges
● change the overall pitch range ● Change the amount of time that the tone plays ● modify how the CdS sensor changes the tone
A clarified version of Figure 315, page 31 (link to a pdf of this figure: https://drive.google.com/a/makered.org/file/d/0B6ccSj2TUIBbN3lUbjRwWlUweTg/view)
21
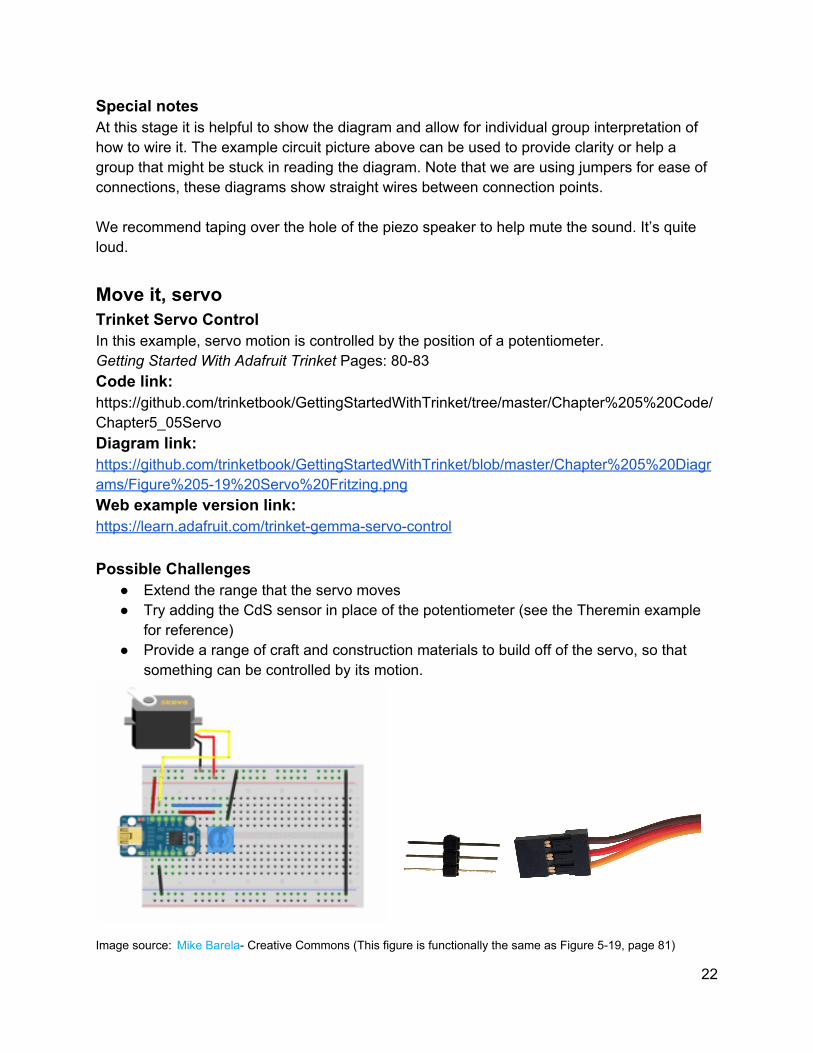
Special notes At this stage it is helpful to show the diagram and allow for individual group interpretation of how to wire it. The example circuit picture above can be used to provide clarity or help a group that might be stuck in reading the diagram. Note that we are using jumpers for ease of connections, these diagrams show straight wires between connection points. We recommend taping over the hole of the piezo speaker to help mute the sound. It’s quite loud. Move it, servo Trinket Servo Control In this example, servo motion is controlled by the position of a potentiometer. Getting Started With Adafruit Trinket Pages: 8083 Code link: https://github.com/trinketbook/GettingStartedWithTrinket/tree/master/Chapter%205%20Code/Chapter5_05Servo Diagram link: https://github.com/trinketbook/GettingStartedWithTrinket/blob/master/Chapter%205%20Diagrams/Figure%20519%20Servo%20Fritzing.png Web example version link: https://learn.adafruit.com/trinketgemmaservocontrol Possible Challenges
● Extend the range that the servo moves ● Try adding the CdS sensor in place of the potentiometer (see the Theremin example
for reference) ● Provide a range of craft and construction materials to build off of the servo, so that
something can be controlled by its motion.
Image source: Mike Barela Creative Commons (This figure is functionally the same as Figure 519, page 81)
22
Special notes For the micro servos we have provided for you, the colors of the servo leads are brown, Red, and yellow. Brown is ground, corresponding to the black wire in the example’s circuit diagram. Yellow and red are are the same, yellow for signal and red for +5 Volts. Safety note: If you hook these up in the wrong order, you can short and overheat the servo to the point that it melts the plastic body! To connect the servo to the breadboard, use a three pin section of the long breadboards headers we provide to create a socket (see photo above). Next Steps After building and exploring these circuits, and tinkering with the code, there are many ways to continue explorations and project development. Among them:
● Provide more time for continued open exploration, code modification ● Add a sensor input, or change sensor inputs, for any of the example configurations ● Introduce advanced challenges, such as combining examples for multiple inputs and
outputs. ● invite the addition of materials, such as various simple paper, craft, art, and simple
building materials. ● Take more time to research and explore other Trinket project examples. There are a
huge amount of sample Arduino projects out there. While not all of them can be adapted to the simplified Trinket, a huge amount of existing projects can, providing foundations for further unique projects.
Sharing your workshops and Young Makers club member projects Among the most important next steps is for you to share your workshops, explorations, and projects on our Google+ community. Your continued participation in documentation and sharing your reflections will improve future workshops, and help provide funding for more workshops and materials for Young Makers mentors and club members. Our community of maked educators an be found here: https://plus.google.com/communities/108516741770696736815 Additional Trinket Project Resources Beyond the book, there is an everexpanding amount of helpful Trinketspecific materials. Trinkets are relatively new in the Arduino/ physical computing world, but there are already many welldocumented examples of projects using them. The following are but a few example sources.
23

Adafruit’s library of Trinketrelated projects and tutorials: https://learn.adafruit.com/search?q=trinket Arduining’s physical computing mini projects (Trinket category): http://arduining.com/category/trinketprojects/ Instructables: http://www.instructables.com/howto/trinket+Adafruit/
Final Thoughts, and Project Possibilities Our primary goal of providing your young maker with Trinkets, breadboards and components is to encourage further exploration and project development. How do we best foster invention and innovative projects? While we certainly hope for the development of unique projects, we also recognise that many may be more of an adaptation or recreation of existing projects. This approach is still valuable for learning, and can set the foundation for future projects and creations. Physical Computing, while made vastly easier and cheaper by boards such as the trinket, can be still tremendously challenging in many ways. Challenging, and incredibly powerful. It’s exciting to know that our young makers have access to these tool and the invitation to explore, share, and learn. We cannot thank you enough for empowering our young makers with the tools of physical computing. With your help, more young makers will create things that are cool, familiar, fun, and projects that we cannot yet imagine. They will solve problems, and empower each other. They will take the power of physical computing and bring in the personal, playful, and inventive. We can’t wait to see what they make!
Notes:
24
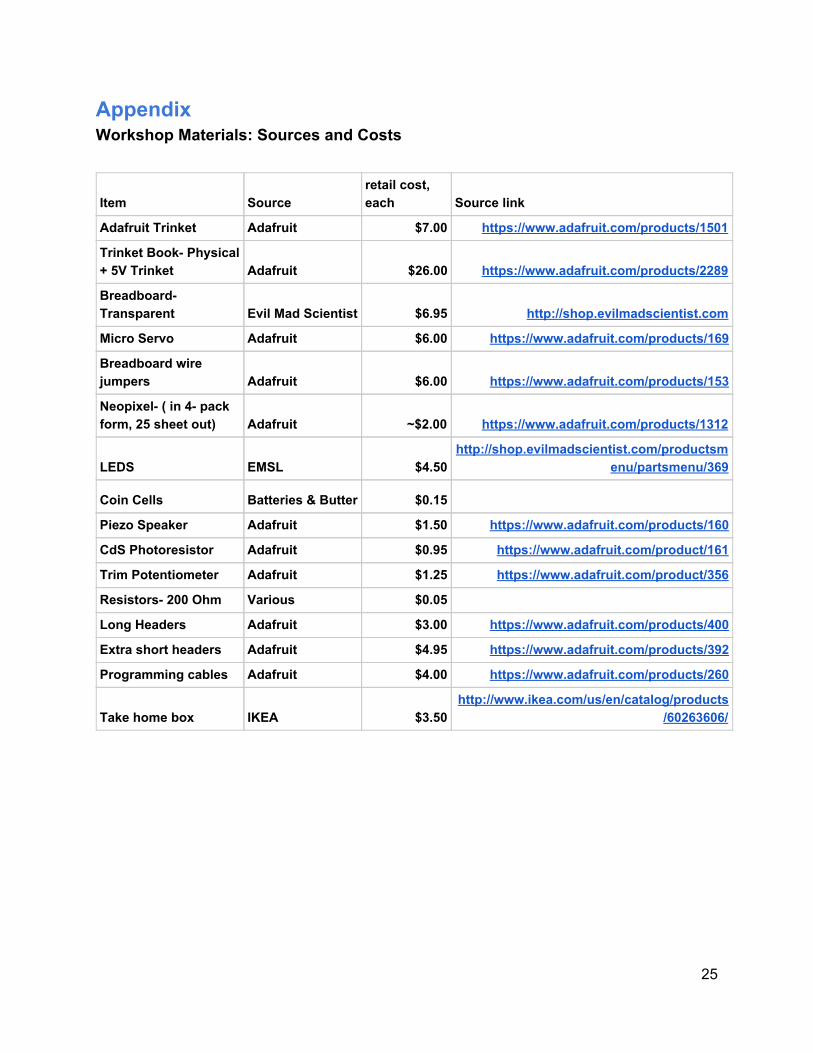
Appendix Workshop Materials: Sources and Costs
Item Source retail cost, each Source link
Adafruit Trinket Adafruit $7.00 https://www.adafruit.com/products/1501
Trinket Book Physical + 5V Trinket Adafruit $26.00 https://www.adafruit.com/products/2289
Breadboard Transparent Evil Mad Scientist $6.95 http://shop.evilmadscientist.com
Micro Servo Adafruit $6.00 https://www.adafruit.com/products/169
Breadboard wire jumpers Adafruit $6.00 https://www.adafruit.com/products/153
Neopixel ( in 4 pack form, 25 sheet out) Adafruit ~$2.00 https://www.adafruit.com/products/1312
LEDS EMSL $4.50 http://shop.evilmadscientist.com/productsm
enu/partsmenu/369
Coin Cells Batteries & Butter $0.15
Piezo Speaker Adafruit $1.50 https://www.adafruit.com/products/160
CdS Photoresistor Adafruit $0.95 https://www.adafruit.com/product/161
Trim Potentiometer Adafruit $1.25 https://www.adafruit.com/product/356
Resistors 200 Ohm Various $0.05
Long Headers Adafruit $3.00 https://www.adafruit.com/products/400
Extra short headers Adafruit $4.95 https://www.adafruit.com/products/392
Programming cables Adafruit $4.00 https://www.adafruit.com/products/260
Take home box IKEA $3.50 http://www.ikea.com/us/en/catalog/products
/60263606/
25