Embed Size (px)
Citation preview
University of Sydney Libraries
1 Designed for use with EndNote X6
Introduction to EndNote X6 for Macs
This workshop introduces the basics of using the EndNote software with Macs. Contents
• Create an EndNote Library • How to move/adjust the preview window • Add references manually to the Library • Direct export from a database • Export references from library catalogue • Find full text and attach it to your citations • View PDF attachments • Manage references using Groups • Find and remove duplicate references in your EndNote Library • Backup, compress and/or email EndNote Library Create an EndNote Library
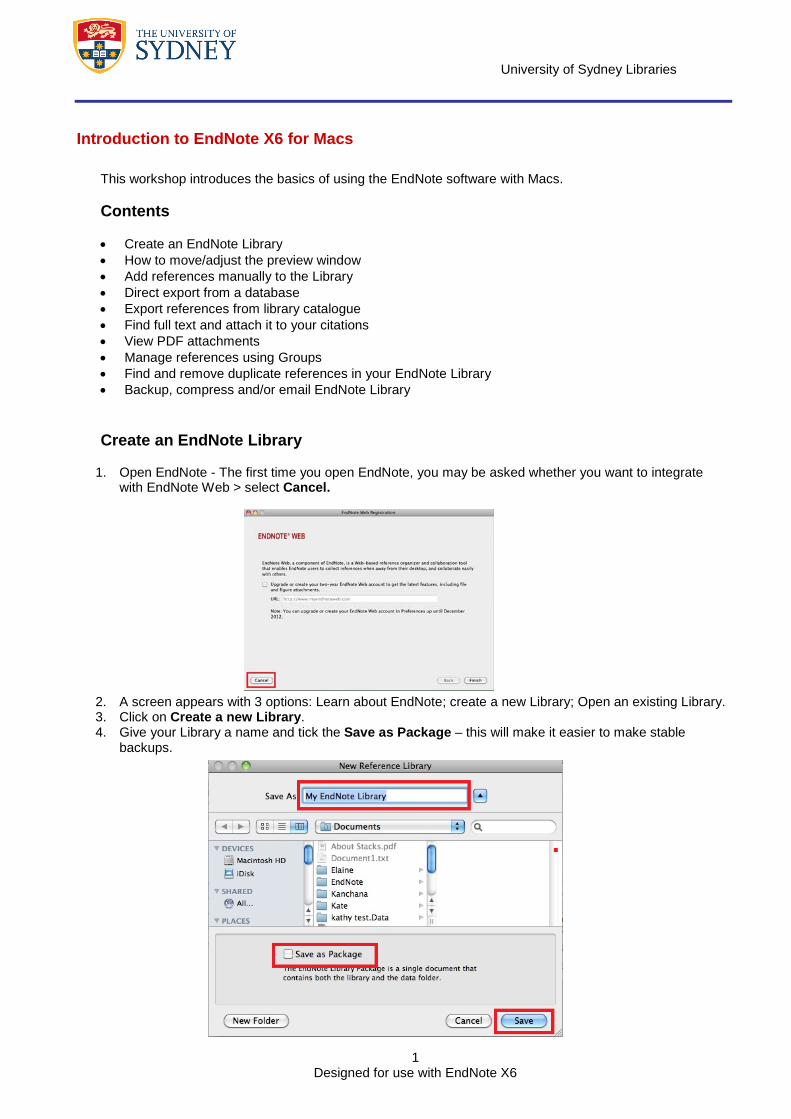
1. Open EndNote - The first time you open EndNote, you may be asked whether you want to integrate
with EndNote Web > select Cancel.
2. A screen appears with 3 options: Learn about EndNote; create a new Library; Open an existing Library. 3. Click on Create a new Library. 4. Give your Library a name and tick the Save as Package – this will make it easier to make stable
backups.

University of Sydney Libraries
2 Designed for use with EndNote X6
5. Click on Save to save it to your computer. If you plan to use more than one computer, it is important that you save your library on a flash drive.
6. This is your personal Library in which you save your references 7. The new library appears as an empty EndNote library Create additional EndNote libraries 1. Go to File > New 2. Give your Library a name and save it How to move/adjust the preview window Click the layout buttons in the lower right-hand corner of the library window to change the layout view of the library window.
Add references manually to the Library 1. From the toolbar select References > New Reference
2. The template defaults to a Journal Article reference. Use the Reference Type drop-down menu at the
top of the screen to change the selection (e.g. Book, Web Page)
University of Sydney Libraries
3 Designed for use with EndNote X6
3. Use the fields displayed to enter the information required (you don’t need to fill them all out, just the ones you need for your citation)
4. Enter Author as Surname (comma) initial (full stop) – if there is more than one Author, enter the name of additional authors on a new line. If the author is an organisation enter a comma after the name (e.g. World Health Organization,).
5. Use capitalisation as recommended by the bibliographic style you are using. 6. Once finished entering information, select File > Save. 7. Select File > Close Reference to return to your Library. 8. Your reference will be previewed in the preview pane. Use the drop down from the preview pane to
change the bibliographic output style.
Direct export from a database 1. We recommend the Firefox Internet browser for browsing our databases and transferring records to
EndNote. 2. Most databases will have an option to “export to …” or “save references to …” button that will enable
you to save to EndNote. 3. There is a list of major databases and brief instructions on how to export into EndNote from them
through the EndNote subject guide,(http://libguides.library.usyd.edu.au/endnote) under Using Databases.
Example: Direct export from OvidSP databases (eg. Medline, ERIC, PsycInfo) using Firefox.
1. Leave your EndNote Library open. 2. Open Firefox and go to: sydney.edu.au/Library 3. Click on Databases and Electronic Resources. 4. Click on the letter that corresponds to the name of your chosen OvidSP database from the alphabetical
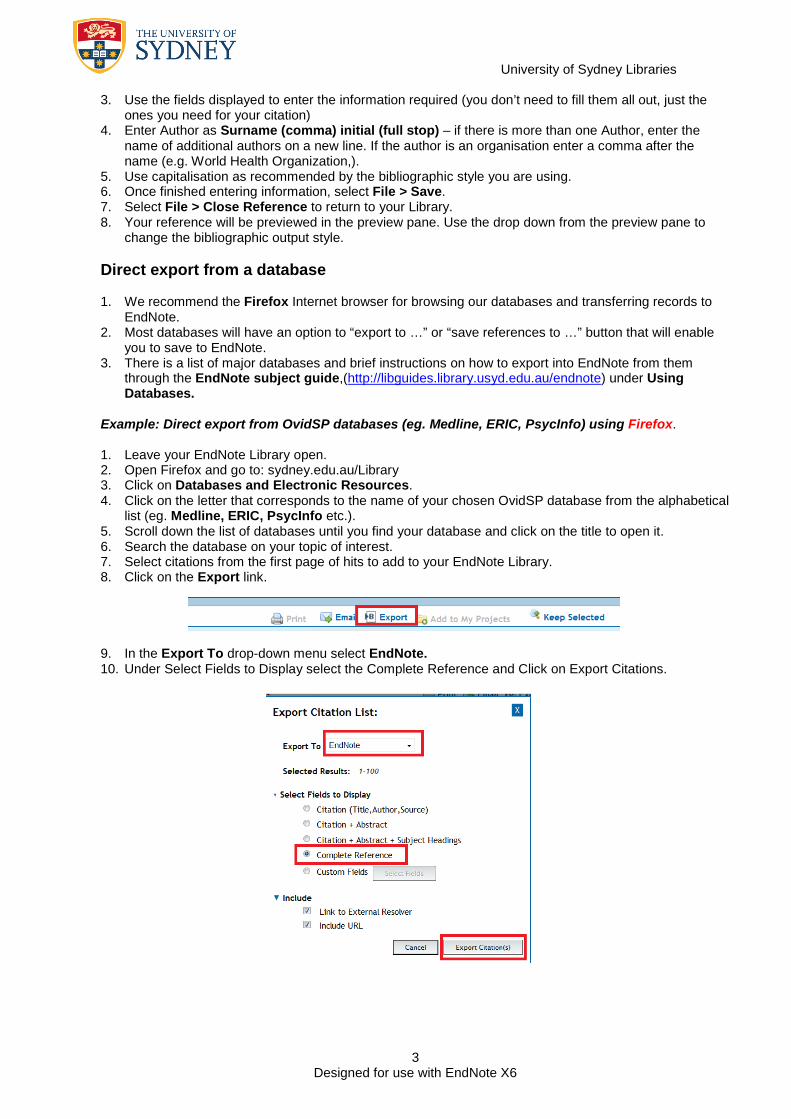
list (eg. Medline, ERIC, PsycInfo etc.). 5. Scroll down the list of databases until you find your database and click on the title to open it. 6. Search the database on your topic of interest. 7. Select citations from the first page of hits to add to your EndNote Library. 8. Click on the Export link.
9. In the Export To drop-down menu select EndNote. 10. Under Select Fields to Display select the Complete Reference and Click on Export Citations.
University of Sydney Libraries
4 Designed for use with EndNote X6
11. Following window will appear on your screen.
12. Click on Open and the records will be exported directly into your EndNote Library under imported
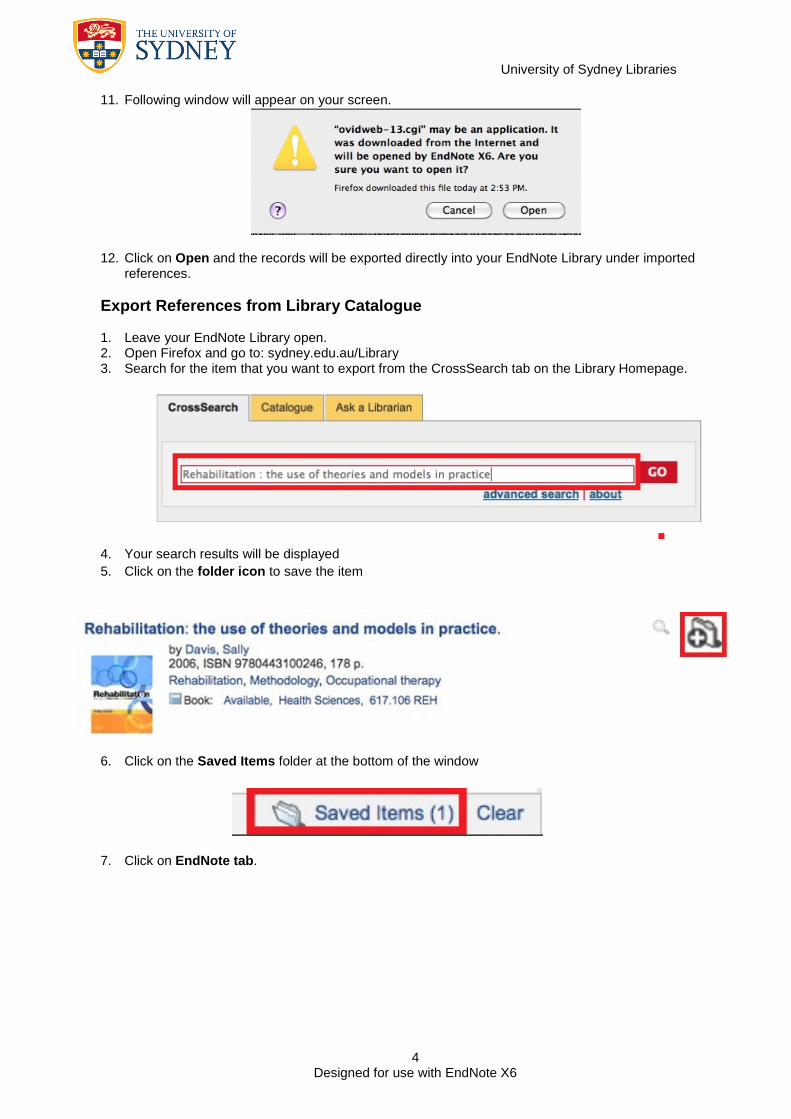
references. Export References from Library Catalogue 1. Leave your EndNote Library open. 2. Open Firefox and go to: sydney.edu.au/Library 3. Search for the item that you want to export from the CrossSearch tab on the Library Homepage.
4. Your search results will be displayed 5. Click on the folder icon to save the item
6. Click on the Saved Items folder at the bottom of the window
7. Click on EndNote tab.

University of Sydney Libraries
5 Designed for use with EndNote X6
8. Select Open with EndNote X6 and click on OK.
13. Click on Open and the records will be exported directly into your EndNote Library under imported references.
University of Sydney Libraries
6 Designed for use with EndNote X6
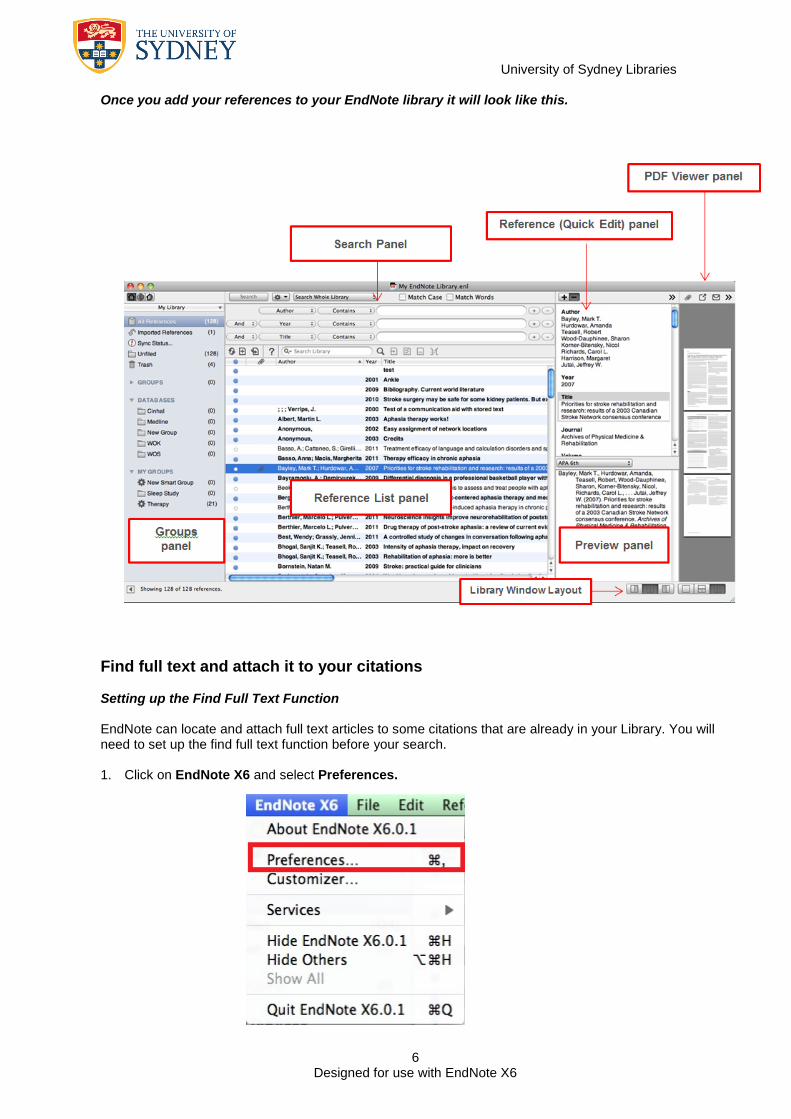
Once you add your references to your EndNote library it will look like this.
Find full text and attach it to your citations Setting up the Find Full Text Function EndNote can locate and attach full text articles to some citations that are already in your Library. You will need to set up the find full text function before your search.
1. Click on EndNote X6 and select Preferences.
University of Sydney Libraries
7 Designed for use with EndNote X6
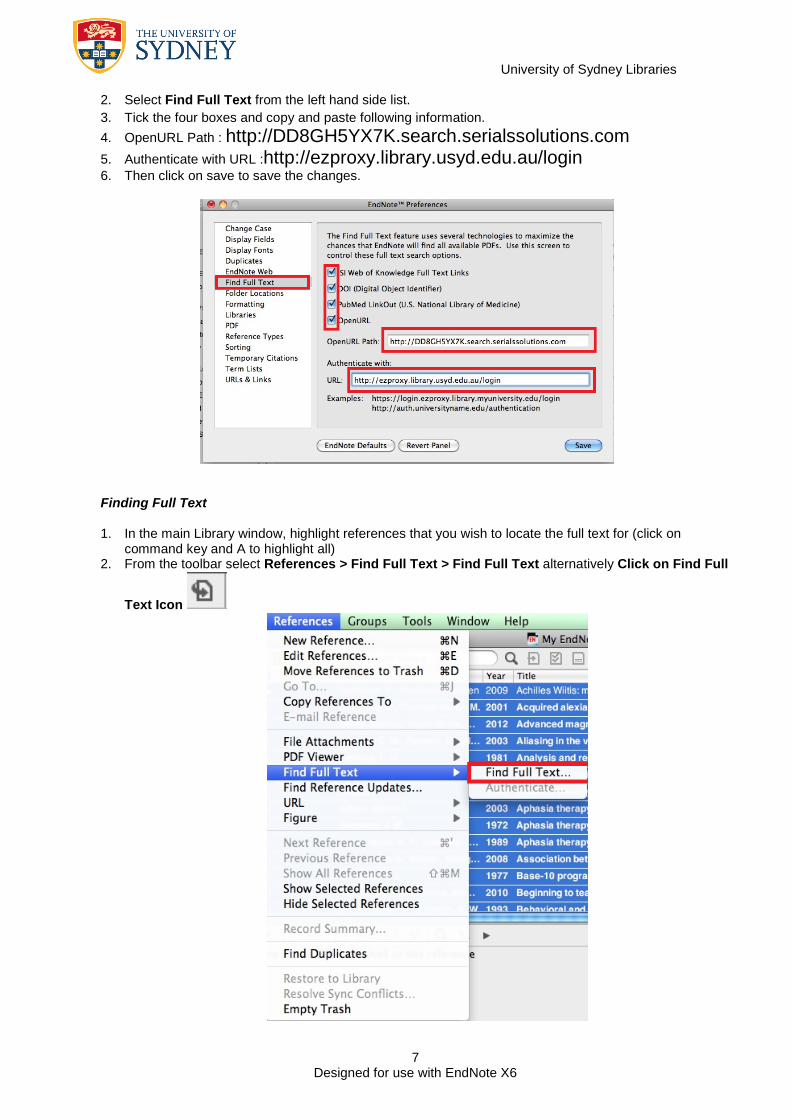
2. Select Find Full Text from the left hand side list. 3. Tick the four boxes and copy and paste following information. 4. OpenURL Path : http://DD8GH5YX7K.search.serialssolutions.com 5. Authenticate with URL :http://ezproxy.library.usyd.edu.au/login 6. Then click on save to save the changes.
Finding Full Text
1. In the main Library window, highlight references that you wish to locate the full text for (click on
command key and A to highlight all) 2. From the toolbar select References > Find Full Text > Find Full Text alternatively Click on Find Full
Text Icon

University of Sydney Libraries
8 Designed for use with EndNote X6
3. Login to eResources using your Unikey and password or library borrowing number and name.
Once you login click Continue. 4. Check the Copyright notice (see http://sydney.edu.au/Library/about/policies/copyright/ for assistance)
and click Continue to proceed 5. EndNote will search for full text for the selected references. 6. A temporary Find Full Text Group will appear on the left pane. It remains for the current session, but
disappears when you close the Library.
7. If EndNote is able to locate the full text, it will be attached to your reference, and you will see a paper clip icon next to the reference in the attachments column. Note: Full text may not be automatically retrieved. This can be due to your subject area, network speed, firewalls etc. If full text is not attached you can manually attach the full text using the steps below:
Attach Full Text Manually 1. Make sure that you have downloaded the full text file onto your computer or USB 2. Open the relevant reference by double clicking it. 3. From the toolbar select References > File Attachments > Attach File
OR Click on the “Paper Clip” icon on the Quick Edit Pane and select Attach PDF
University of Sydney Libraries
9 Designed for use with EndNote X6
4. Browse to the PDF file you saved on your hard drive or USB, and select the article and click on Open 5. The file will appear in the File Attachments field of the reference. View PDF Attachments 1. To view the full text, double click on the reference to open it and scroll down to the File Attachments
field. Double click on the file icon to open it. OR
1. Select a Layout View from the Layout buttons located in the right-hand corner of the library window.
2. To open the PDF in a reference window click on Open PDF icon from the main library window.
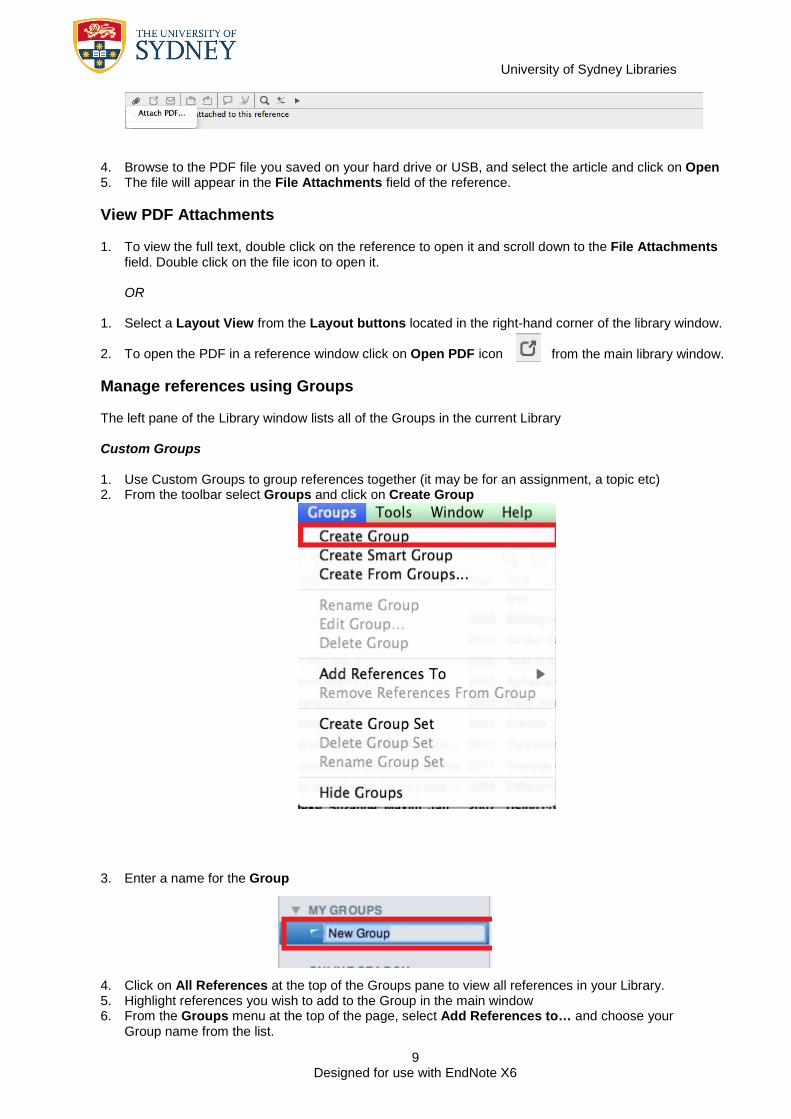
Manage references using Groups The left pane of the Library window lists all of the Groups in the current Library Custom Groups 1. Use Custom Groups to group references together (it may be for an assignment, a topic etc) 2. From the toolbar select Groups and click on Create Group
3. Enter a name for the Group
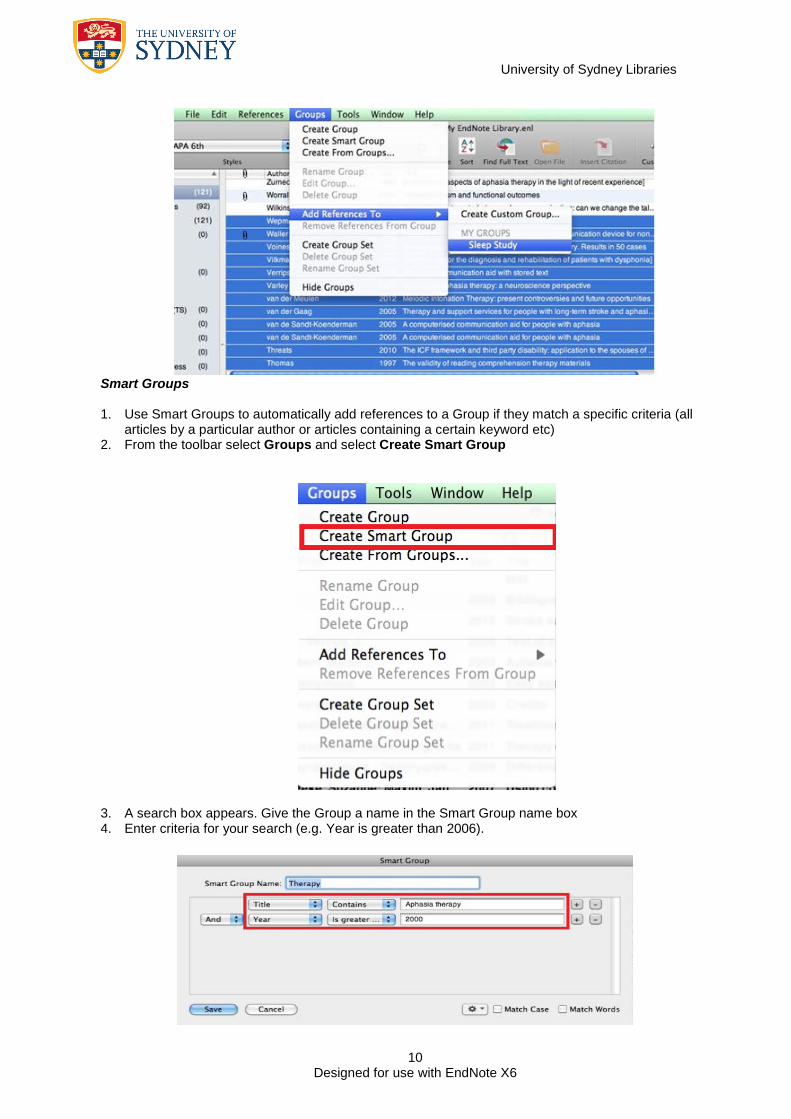
4. Click on All References at the top of the Groups pane to view all references in your Library. 5. Highlight references you wish to add to the Group in the main window 6. From the Groups menu at the top of the page, select Add References to… and choose your
Group name from the list.
University of Sydney Libraries
10 Designed for use with EndNote X6
Smart Groups
1. Use Smart Groups to automatically add references to a Group if they match a specific criteria (all
articles by a particular author or articles containing a certain keyword etc) 2. From the toolbar select Groups and select Create Smart Group
3. A search box appears. Give the Group a name in the Smart Group name box 4. Enter criteria for your search (e.g. Year is greater than 2006).

University of Sydney Libraries
11 Designed for use with EndNote X6
5. Click Save 6. A new Group will appear under Smart Groups at the left of the page 7. As you add more references to your Library, references meeting the search criteria will be
automatically added to your Smart Group.
Groups Sets 1. Create Group sets to organise your groups into sets. You can create up to 500 group sets. 2. From the toolbar select Groups > Create Group Sets
3. Enter the name of the Group Sets 4. You can add sub groups under Group Sets using the instructions for Create Group. Find and Remove Duplicate References in your EndNote Library The Find Duplicates window highlights fields that contain non-matching text so you can quickly compare the records. 1. Select References > Find Duplicates

University of Sydney Libraries
12 Designed for use with EndNote X6
2. The Find Duplicates window will appear (see below picture) 3. Compare each set of duplicate references 4. Select Keep This Record to keep one of the duplicate references or select Skip to keep both
references
On completion of finding duplicates, go to the Trash under My Library in the left pane. 5. Right click to empty trash and remove the duplicate references from your Library.
Backup, Compress and/or email your EndNote Library Backup EndNote Backing up your Library is essential if you are working on an important project or upgrading to a new version of EndNote. 1. Select File > Save a Copy 2. Save the backup copy to a different drive - this will help ensure that you can use the backup if your
main Library gets corrupted or your computer breaks 3. Leave ‘Copy’ or type ‘Backup’ on the end of the file name so you tell it apart from your main Library Maintaining backups Periodically (or after every new addition if desired) create a new backup copy then delete the old back up copy or date each backup.
University of Sydney Libraries
13 Designed for use with EndNote X6
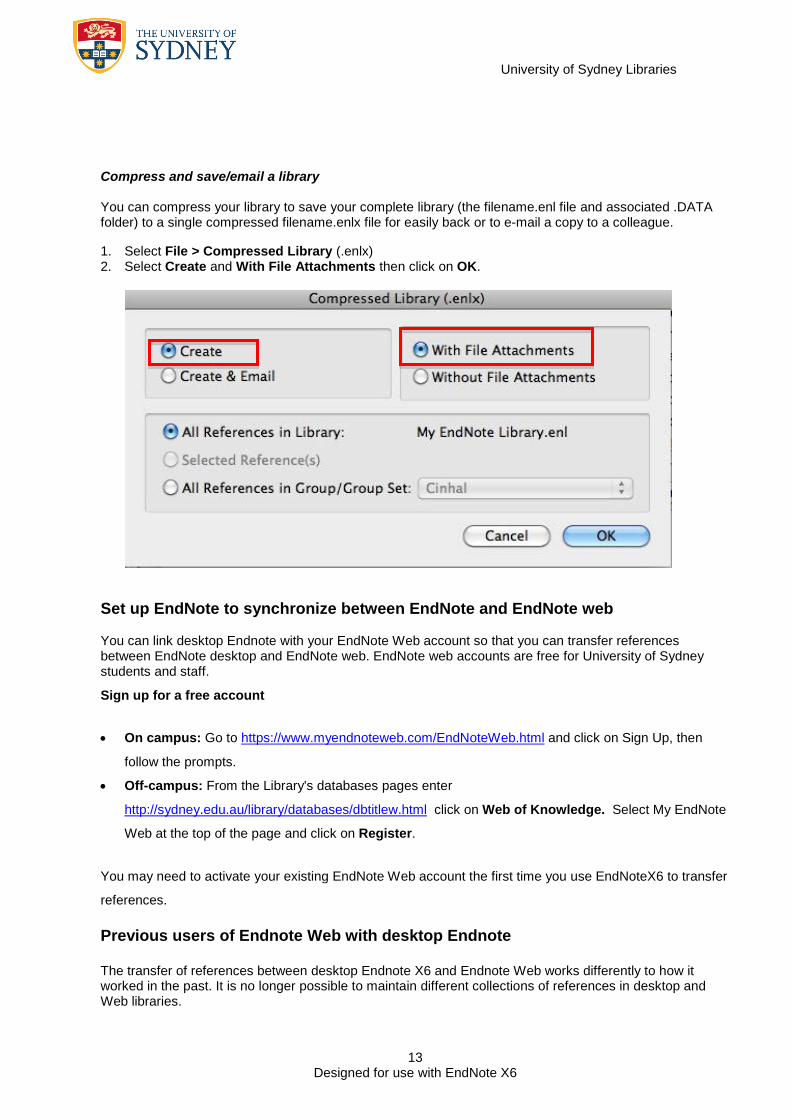
Compress and save/email a library You can compress your library to save your complete library (the filename.enl file and associated .DATA folder) to a single compressed filename.enlx file for easily back or to e-mail a copy to a colleague. 1. Select File > Compressed Library (.enlx) 2. Select Create and With File Attachments then click on OK.
Set up EndNote to synchronize between EndNote and EndNote web You can link desktop Endnote with your EndNote Web account so that you can transfer references between EndNote desktop and EndNote web. EndNote web accounts are free for University of Sydney students and staff.
Sign up for a free account
• On campus: Go to https://www.myendnoteweb.com/EndNoteWeb.html and click on Sign Up, then
follow the prompts.
• Off-campus: From the Library's databases pages enter
http://sydney.edu.au/library/databases/dbtitlew.html click on Web of Knowledge. Select My EndNote
Web at the top of the page and click on Register.
You may need to activate your existing EndNote Web account the first time you use EndNoteX6 to transfer
references.
Previous users of Endnote Web with desktop Endnote The transfer of references between desktop Endnote X6 and Endnote Web works differently to how it worked in the past. It is no longer possible to maintain different collections of references in desktop and Web libraries.
University of Sydney Libraries
14 Designed for use with EndNote X6
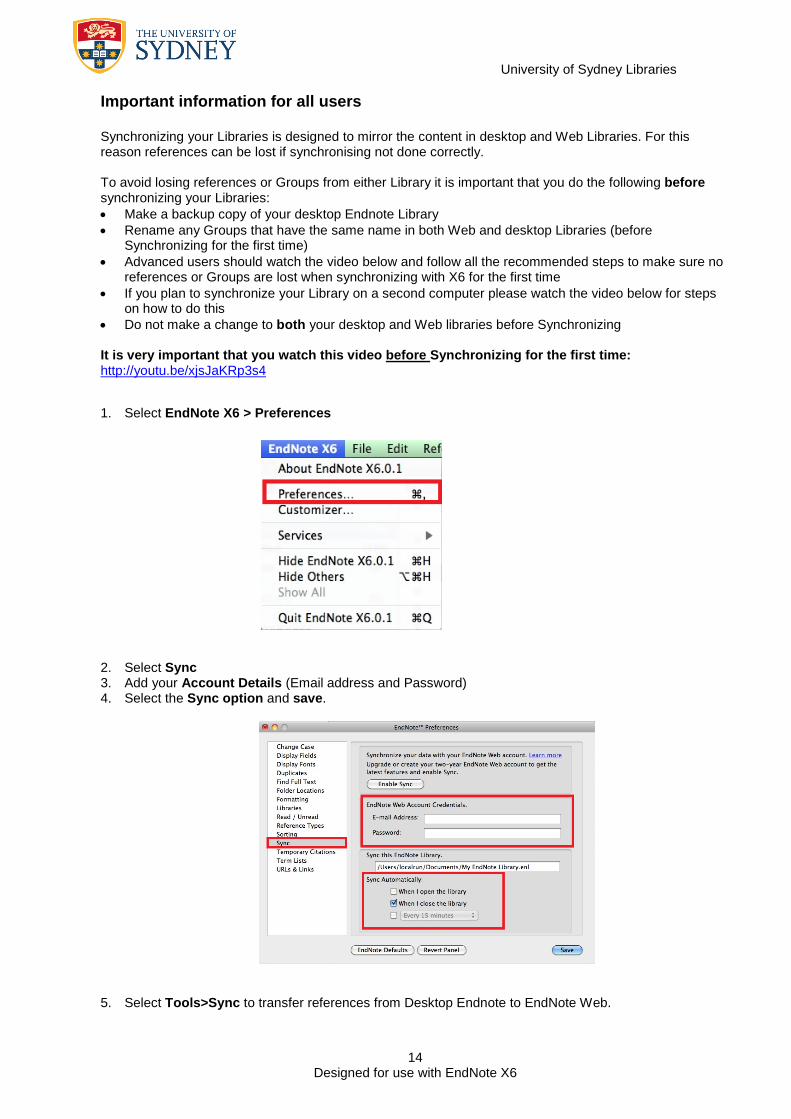
Important information for all users Synchronizing your Libraries is designed to mirror the content in desktop and Web Libraries. For this reason references can be lost if synchronising not done correctly. To avoid losing references or Groups from either Library it is important that you do the following before synchronizing your Libraries: • Make a backup copy of your desktop Endnote Library • Rename any Groups that have the same name in both Web and desktop Libraries (before
Synchronizing for the first time) • Advanced users should watch the video below and follow all the recommended steps to make sure no
references or Groups are lost when synchronizing with X6 for the first time • If you plan to synchronize your Library on a second computer please watch the video below for steps
on how to do this • Do not make a change to both your desktop and Web libraries before Synchronizing It is very important that you watch this video before Synchronizing for the first time: http://youtu.be/xjsJaKRp3s4
1. Select EndNote X6 > Preferences
2. Select Sync 3. Add your Account Details (Email address and Password) 4. Select the Sync option and save.
5. Select Tools>Sync to transfer references from Desktop Endnote to EndNote Web.

University of Sydney Libraries
15 Designed for use with EndNote X6
For further information University of Sydney EndNote guide: http://libguides.library.usyd.edu.au/endnote Contact your Faculty Liaison Librarian: http://www.library.usyd.edu.au/contacts/subjectcontacts.html EndNote support: http://www.endnote.com/support/


![endnote [Recovered] (2) - Cop2ybayanbox.ir/view/1195444694941962090/EndNote-workshop-Dr-Sab… · Endnote Web ˘ˇˆ • Group Panel ... Microsoft PowerPoint - endnote [Recovered]](https://img.dokumen.tips/doc/110x75/607ef223cfec8740d60ebf4a/endnote-recovered-2-endnote-web-a-group-panel-microsoft-powerpoint.jpg)