Embed Size (px)
Citation preview

Introduction ................................................1
Sequence of Play ........................................2
Campaign Set-Up ........................................2
Start of Week ..............................................9
Pre-Combat................................................10
Combat ......................................................12
Post-Combat ..............................................16
End of Week ..............................................17
End of Campaign ......................................19
Optional Rules ..........................................19
Credits ......................................................19
Sample Game ............................................20
• IntroductionYou are the commander of a Panzer Kampfgruppe. Your groupcan fight its way through any of World War II’s greatestcampaigns, starting with the Invasion of Poland in 1939, andcarrying through France, North Africa, Russia, Italy, and D-Day!
Each of your Campaigns involve both operational and tacticaldecisions. At the start of a Campaign, you select the Units andCommanders to make up your Command. During each Weekof the Campaign, you decide which Allied Battalions to attack,which of your forces to allocate, and then resolve each battleusing the tactical battlefield.
Your Commanders gain Experience with every battle, but theyalso gain Stress. Each Week, you must decide how hard topush your men.

2
• Sequence of PlayThis rulebook is organized according to this Sequence of Play.
Campaign Set-UpSelect Campaign CardSelect Objective CardDraw Battalion CardsBuy UnitsSelect Commanders
Start of WeekSpecial Condition CardAssign Units
Pre-CombatEvent CardPlace Turn CounterPlace Terrain TilesPlace Friendly UnitsPlace Enemy Units
CombatFast Move and AttackRoll for Enemy MovementEnemy ActionsSlow Move and AttackAdvance Turn Counter
Post-CombatEvent CardBattalion StatusRecord Commander StressRecord Commander Experience Points
End of WeekMove BattalionsOn LeaveAdjust Special Option PointsRepair/ReplacePriority R&R
End of CampaignCampaign Outcome
• Campaign Set-Up Tactical Display Sheet
Place the TacticalDisplay Sheet on thetable in front of you.Use this Display toresolve the Combatsteps of each Battle.
This sheet contains theBattlefield, Sequenceof Play, Battle Turntrack, Operational
Map, Enemy Tactical Movement chart, and areas to place someof your cards.
Head Quarters SheetPlace the Head Quarters Sheet next to theTactical Display Sheet. This sheet hashelpful reference charts and generalinformation you will need to play thegame as well as areas to place some ofyour cards.
CardsSeparate the cards by type: Unit cards, Commander cards,Campaign cards, Objective cards, Battalion cards, Event cards,and Special Condition cards.

3
Form a Special Condition Deck, and anEvent Deck. Shuffle each of the twodecks, and place them face down in thelabeled areas on the Tactical DisplaySheet.
When you need to draw a card and nocards remain in a deck, shuffle thediscards to form a new deck.
Separate the threetypes of Battalioncards, and formthree decks of:Assault, Supply,and Commandcards. Each
Battalion card has its type noted on its card back.
Do not form decks for Campaign cards, Objective cards, Unitcards, and Commander cards. You select cards from each type,at the beginning of a Campaign.
CountersStress - Used to record the Stress yourCommanders suffer during a Campaign.
Tactics - Used to record the number of Tactics usesyour Commanders and Units have in a Battle.
Enemy Unit - The Flag indicates theUnit’s country. The backside showsthe Unit when it is Destroyed.
German Unit - With Numbers indicating Unitnumbers.
Scout - Used to increase Battle Turns.
Truck - Used to reduce the cost of attacking enemyBattalions deep in enemy territory.
Enemy Battalion - Full and HalfStrength. Used to show the Battalion’sposition on the Operational Map.
Damage CountersGather the Vehicle/Infantry Damage Counters and put them inan opaque cup. The Damage counters are two-sided.
The camouflaged side is for Damage inflicted onyour Infantry.
The gray side is for Damage inflicted on yourVehicles.
Player LogThe information you record on thePlayer Log determines CommanderPromotion, and shows Special OptionPoint expenditures, Combat UnitStatus, and Victory Points earned.Photocopy this sheet or download itfrom www.dvg.com.
The DieWhenever a die roll is called for in the game, roll a ten-sideddie (1d10). This will generate random numbers from 1 to 10.Some dice have numbers ranging from 1 to 10, others rangefrom 0 to 9. Treat the die’s “0” face as being a “10”.
End of a CampaignThe Campaign ends when you complete the last Week of yourCampaign, or when you must pay a Special Option Point andcannot do so, or when you achieve a Great result.
Select Campaign CardChoose the Campaign card you would like touse and place it on the Head Quarters Sheet.
We recommend starting with the Poland1939 Introductory Campaign for your firstCampaign.
The parts of a Campaign card are as follows:

4
1 - Campaign Name and EnemyForce
Example: In the Poland 1939Campaign, you will fight against thePolish forces.
2 - Year of the CampaignYou may only choose GermanUnits whose years of serviceinclude this year.
3 - Difficulty Level The difficulty Levels from easiest
to hardest are: Introductory, Standard, Advanced, and Expert.
4 - Special Option PointsThis number modifies the number of SO (Special Option)points you get at the start of the Campaign, from yourObjective card.
5 - Terrain
Each Campaign card lists the Terrain typeused during its Campaign: Desert,European, or Winter.
The 8 Terrain tiles with the brown triangles areused in Desert Campaigns.
The 8 Terrain tiles with the green triangles are usedin European Campaigns.
The 8 Terrain tiles with the gray triangles are usedin the Winter Campaigns.
6 - Special NotesEach Campaign has Special Notes that modify the Campaign.
7 - Commander Skill Levels
Each Campaign showsyour startingCommander Skilllevels. You get oneCommander for each
Unit you purchase. From lowest to highest the CommanderSkill Levels are: Recruit, Green, Average, Skilled, Veteran, andAce.
Record the name of yourCampaign card on the PlayerLog.
Select Objective CardChoose the Objective card you would like touse and place it on the Head Quarters Sheet.We recommend using the For the Reich!Objective for your first Campaign.
These cards show information specific toyour chosen type of Objective.
The parts of an Objectivecard are as follows:
1 - Objective Name
2 - Starting SO PointsEach Objective cardspecifies the number ofSpecial Option points (SOpoints) you have at thebeginning of the Campaign.
This number is modified bythe SO points informationon your Campaign card.
Example: When playing theFor The Reich! Objective (40 SO), in the US Italy 1943 Campaign(+19 SO), you get 59 SO points at the start of the Campaign.
You purchase Units with your Special Option points. SO pointsmay also be expended during Special Conditions and Events.
Record your starting SO points on the Player Log.
3 - WeeksYou have the designated number of Weeks to complete theCampaign.
Record the number of Weeks on the PlayerLog. You’ll also record each Week’sactivities on the Player Log.
4 - Weekly SO Points At the end of each Campaign Week, you gain this number ofSO points. Record this number on the Player Log Sheet.
5 - Battalion Point ValueThis number shows the total value of Battalion Victory Pointsyou randomly draw at the start of the Campaign.
6 - Special NotesEach Objective card has specific rules that modify yourCampaign.
7 - Evaluation
5
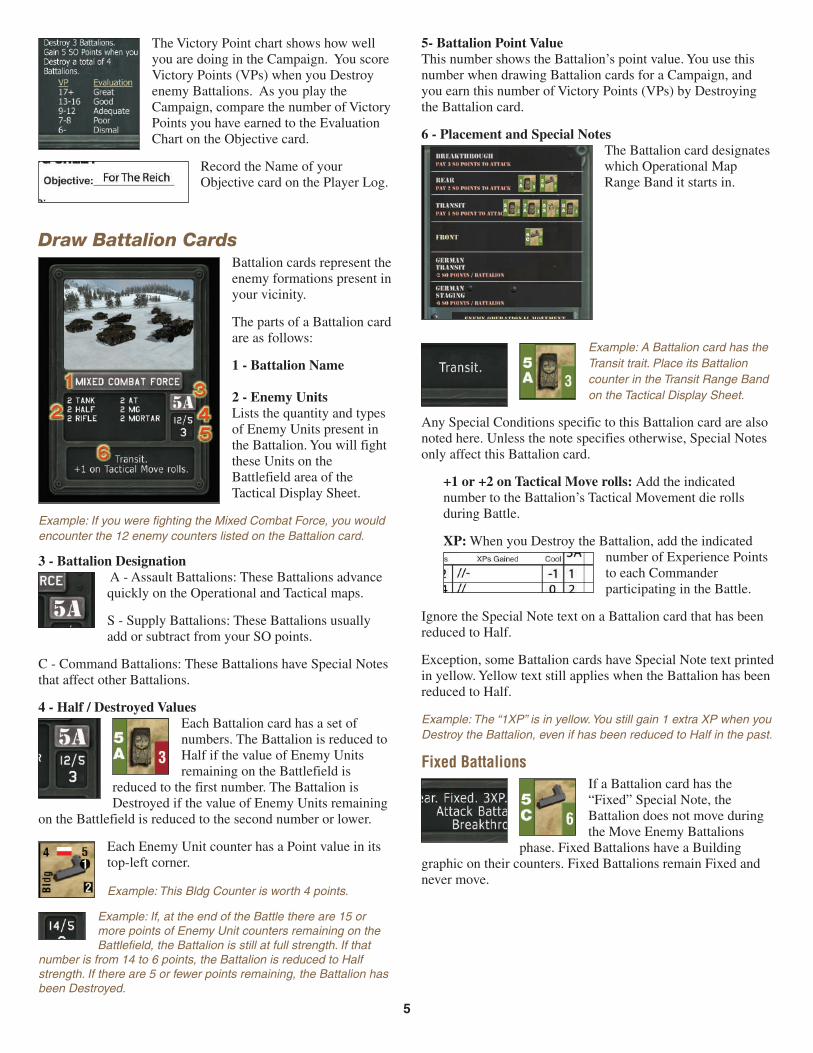
The Victory Point chart shows how wellyou are doing in the Campaign. You scoreVictory Points (VPs) when you Destroyenemy Battalions. As you play theCampaign, compare the number of VictoryPoints you have earned to the EvaluationChart on the Objective card.
Record the Name of yourObjective card on the Player Log.
Draw Battalion CardsBattalion cards represent theenemy formations present inyour vicinity.
The parts of a Battalion cardare as follows:
1 - Battalion Name
2 - Enemy UnitsLists the quantity and typesof Enemy Units present inthe Battalion. You will fightthese Units on theBattlefield area of theTactical Display Sheet.
Example: If you were fighting the Mixed Combat Force, you wouldencounter the 12 enemy counters listed on the Battalion card.
3 - Battalion DesignationA - Assault Battalions: These Battalions advancequickly on the Operational and Tactical maps.
S - Supply Battalions: These Battalions usuallyadd or subtract from your SO points.
C - Command Battalions: These Battalions have Special Notesthat affect other Battalions.
4 - Half / Destroyed ValuesEach Battalion card has a set ofnumbers. The Battalion is reduced toHalf if the value of Enemy Unitsremaining on the Battlefield is
reduced to the first number. The Battalion isDestroyed if the value of Enemy Units remaining
on the Battlefield is reduced to the second number or lower.
Each Enemy Unit counter has a Point value in itstop-left corner.
Example: This Bldg Counter is worth 4 points.
Example: If, at the end of the Battle there are 15 ormore points of Enemy Unit counters remaining on theBattlefield, the Battalion is still at full strength. If that
number is from 14 to 6 points, the Battalion is reduced to Halfstrength. If there are 5 or fewer points remaining, the Battalion hasbeen Destroyed.
5- Battalion Point ValueThis number shows the Battalion’s point value. You use thisnumber when drawing Battalion cards for a Campaign, andyou earn this number of Victory Points (VPs) by Destroyingthe Battalion card.
6 - Placement and Special NotesThe Battalion card designateswhich Operational MapRange Band it starts in.
Example: A Battalion card has theTransit trait. Place its Battalioncounter in the Transit Range Bandon the Tactical Display Sheet.
Any Special Conditions specific to this Battalion card are alsonoted here. Unless the note specifies otherwise, Special Notesonly affect this Battalion card.
+1 or +2 on Tactical Move rolls: Add the indicatednumber to the Battalion’s Tactical Movement die rollsduring Battle.
XP:When you Destroy the Battalion, add the indicatednumber of Experience Pointsto each Commanderparticipating in the Battle.
Ignore the Special Note text on a Battalion card that has beenreduced to Half.
Exception, some Battalion cards have Special Note text printedin yellow. Yellow text still applies when the Battalion has beenreduced to Half.
Example: The “1XP” is in yellow. You still gain 1 extra XP when youDestroy the Battalion, even if has been reduced to Half in the past.
Fixed BattalionsIf a Battalion card has the“Fixed” Special Note, theBattalion does not move duringthe Move Enemy Battalions
phase. Fixed Battalions have a Buildinggraphic on their counters. Fixed Battalions remain Fixed andnever move.

6
Determine and Place BattalionsDraw cards from the 3 Battalion decks in thefollowing order: Assault, Assault, Supply,Command.
Draw one card from the Assault deck, thenanother card from the Assault deck, then onecard from the Supply deck, and finally onecard from the Command deck. Repeat thecycle as needed.
Once you draw a Battalion card and its Battalionpoint value brings the total equal to, or in excess of,the Objective card’s Battalion point value, stopdrawing Battalion cards. The Battalion cards drawn,
including the last card drawn, are part of your Campaign.
Example: You are playing theCut-Off Objective which has 23Battalion points. You drawBattalion 5A worth 3 points, 8Aworth 4 points, 5S worth 2points, 6C worth 5, 1A worth 5,7A worth 3, and 2S worth 2. Youhave now drawn 24 points ofBattalions, so you stop drawing.You will fight these 7 Battalions.
Set aside the remainingBattalion cards. You will not
use them during the Campaign.
The designation on theBattalion card correspondsto a Battalion Counter.
Find the counter for eachBattalion appearing in your Campaign.For easy reference, the Victory Pointvalue is printed on each counter.
Place the Battalion Counters on theTactical Display Sheet’s Operational
Map. Each Battalion card designates where on the OperationalMap the counter is placed. The Battalion counters are placedwith their Full side facing up.
Example: The 1S Supply Convoy is placed in the Breakthroughband on the Operational Map.
Place the Battalion cards on the HeadQuarters Sheet in the Battalion cards area.
Buy UnitsSelect the Unit cards you would like to haveunder your command. You can only selectUnits that have a Service life that includesthe Year of your Campaign.
Be sure and save a few SO points topurchase Trucks, Scouts, and still have acouple SO’s to spend once the Campaignstarts.
Example: The British North AfricaCampaign takes place in 1941. All Unitspurchased for this Campaign must havea Service life including 1941. The STUG
III Long has a Service life of 1941-45, so it can be purchased forthis Campaign.
The parts of a Unit card areas follows:
1 - Unit Name
2 - Service LifeThe years this Unit was inservice.
3 - Unit NumberThis number isalso found on aUnit counter.The Unit card is
placed in front of you on thetable, and the Unit counterwill be placed on the Terrain
tiles during Combat.
4 - Special Option PointsSpend this number of SO points to purchase this Unit.
5 - Unit TypeUnits have the following types: Armor, Unarmored, Artillery,and Infantry.
6 - Special NotesAny Special Notes pertaining to this Unit are noted in this area.
+1, +2, or +3 Attack vs. Infantry:Add the notedmodifier to the Unit’s Attack rolls when attacking EnemyInfantry Units.
+1 or +2 Attack vs. Vehicles:Add the noted modifier tothe Unit’s Attack rolls when attacking Enemy VehicleUnits.
+1 Die When Stationary: If the Unit does not Moveduring the Battle turn, it gets to roll 1 extra Attack die.
No Die Bonus For Advancing: The Unit does not get toroll an extra die for Advancing.
Large: Each time you assign this Unit to a Battle, youmust pay 1 SO point during the Repair/Replace step. If

7
you do not pay the SO point, Destroy the Unit and removethe Commander who was commanding the Unit from theCampaign.
Transport: This Unit can move 1 Infantry Unit and/or 1Artillery Unit when it moves.
Tactic: The Unit starts each Battle with the noted numberof Tactic counters.
Command Tactic: The Unit starts each Battle with thenoted number of Tactic counters and can use them asCommand Tactics.
7 - SpeedThe maximum number of hexes this Unit can move during itsturn.
8 - AttackYou must roll this number or higher on any of your Attack diceto Destroy an Enemy Unit.
9 - RangeThis Unit can attack enemy forces in any hex within its attackrange. Some Units cannot Attack at Range 0 (their own hex).
Example: The STUG III has an Attack Range of 1-3. It cannotAttack at Range 0.
10 - DefenseSubtract this number from all enemy attacks rolled against thisUnit.
Example: The STUG III has a Defense of 1. An Enemy Unit rollstwo Attacks against it, rolling a 7 and 4. The STUG’s Defensesubtracts 1, reducing the rolls to a 6 and 3.
Record on the Player Log the SOpoints you spend on Units.
Find the Unit Counters that havethe same Unit numbers as the Unit cards you selected. Placethe Unit counters near the Tactical Display Sheet.
Place the Unitcards on theHead QuartersSheet.
We suggest abalancedselection ofUnits.
For example:2 or 3 Armor,1 or 2
Unarmored, 2 or 3 Infantry, and 0 or 1 Artillery. Also, be sureand leave a few points unspent, to purchase Support forces,Promote your Commanders, or save them for future uses.
Select CommandersYou automatically get one Commander foreach Unit you purchased. You cannot selectextra Commanders.
The Campaign card shows the number ofCommanders you receive at each SkillLevel. You must select Commanders in orderof Skill level from lowest to highest: firstRecruit, then Green, Average, Skilled,
Veteran, and finally Ace.
Once you have selectedthe specified number ofRecruit Commanders, youthen select the specifiednumber of Green
Commanders, and so on.
If you select more Commanders than are listed, all additionalCommanders have the Skill level noted with the asterisk.
Example: You are playingthe Poland 1939 Campaign.You purchased 9 Units. Youmust choose exactly 9Commanders. According to
the Campaign card, the first 3 Commanders are Recruits, the next2 are Green, the next is Average, and the next Commander isSkilled. After gaining the 7 Commanders with the Skill levels foundon the Campaign card, the 2 final Commanders are Green.
If you had purchased only 6 Units, you would receive 3 Recruit, 2Green, and 1 Average Commander.
Each Commander card has two sides that show differentExperience Levels. Each Commander’s Name has 3 cards witha total of 6 Skill Levels.
A Commander can onlyCommand the type of Unit listedon his card.
Example: If you purchased 2Armor Units, 1 Unarmored Unit, 3 Infantry Units, and 1
Artillery Unit, you must select 2 Armor Commanders, 1 UnarmoredCommander, 3 Infantry Commanders, and 1 Artillery Commander.
Commanders are not permanently assigned to a specific Unit.They can Command any Unit of that type.
Select the Commander cards you would like to have in yourcommand. You may not choose more than one card with thesame Commander’s Name.

8
The parts of a Commander’scard are as follows:
1 - Commander’s Name
2 - Unit TypeA Commander can onlyCommand Units of the Typelisted on his card.
3 - Skill RatingIn order from lowest tohighest, the Skill Levels are:Recruit, Green, Average,Skilled, Veteran, and Ace.
4 - XP (Experience Points)The number of Experience Points the Commander must earn tobe Promoted to his next higher Skill Level.
5 - CoolCool removes Stress from the Commander after a Battle. ACool of “-1” actually adds 1 point of Stress to a Commanderwho participated in a Battle.
6 - StressCommanders suffer Stress just for participating in a Battle.Commanders can suffer additional Stress when attacked duringa Battle.
If a Commander’s Stress fallsinto the “Okay” range, heuses his “Okay” Skill Values.
Example: The Okay Stress range on the sample card is 0 to 9.
Commanders exceeding the Okay range become Shaken,causing him to use his lower Skill values.
Example: The Shaken Stress range on the sample card is 10 to18.
Commanders exceeding the Shaken Range become Unfit.
Example: The Unfit range on the sample card is 19 and above.
7 - StatusOkay, Shaken, or Unfit. This is based on the Commander’scurrent Stress points.
8 - SpeedFast or Slow. A Fast Commander Attacks before the EnemyAttacks each Battle Turn. A Slow Commander Attacks after theEnemy Attacks each Battle Turn.
9 - Attack Rating at Range 0, or Range 1+Modifies the Commander’s die rolls when attacking the enemy.
Use the Range 0 modifier when attacking Enemy Units in hissame hex.
Use the Range 1+ modifier when attacking Enemy Unitsoutside his hex.
10 - Special NotesAny Special Notes pertaining to this Commander are noted inthis area. Special Notes cannot be used when the Commanderis Unfit.
Medic: At the start of the Repair/Replace step, each ofyour Medics can do one of the following: Freely remove aWounded Commander counter, freely remove a CasualtyDamage, or freely remove 2 Stress from one Commander.
Mechanic:At the start of the Repair/Replace step, each ofyour Mechanics can do one of the following: Freelyremove 1 Vehicle Damage counter, or pay the Large SOpoint cost of 1 Large Vehicle.
Cautious: The Commander’s Unit cannot Move (even ifMoved by a Transport) and Attack in the same Battle Turn.
Overdrive:You can add 1 to the Speed of the Unit eachtime it is about to Move, but the Commander suffers 1Stress.
Spotter: The Unit ignores blocking Line of Sight Terrainhexes.
Marksman: Enemy Units do not gain a Terrain Coverbonus when defending against this Unit’s Attacks.
Tactic: Expend a Tactic counter for the Unit during eitherthe Fast or Slow step when it is not scheduledto act. The Unit can now act during this stepfor this Battle Turn in addition to actingduring its normal step.
Example: Commander Gerver is a Fast Commander. Heattacks during the Fast Move and Attack phase, then uses aTactic counter to attack again during the Slow Move andAttack phase.
Command Tactic: The same as Tactic, except the Unitcan expend the Tactic for another Unit to use.
Example: Commander Uwe uses a Command Tactic to allow(Slow) Commander Hans to attack during the Fast Move andAttack phase. Hans can also attack again during his normalSlow Move and Attack phase.
Close Combat: Roll 1 extra die for the Unit when itperforms Range 0 Attacks.
After selecting your Commanders, find their other Skill levelcards, and place them in the Promoted Commander Cards areaon the Head Quarters Sheet. You will need them when yourCommanders get Promoted during the Campaign.
Commander Promotion PriorityAfter selecting your Commanders, you may spend SO pointsto immediately Promote one or more of your Commanders tohis next higher Skill Level.
When you Promote a Commander pay 3 SO points for eachSkill Level improvement. You can Promote a Commandermore than once.

9
Example: I choose to use Commander Promotion to increaseWeber from Average to Skilled. I pay 3 SO points and use theWeber Skilled card in my Campaign.
Record theCommanderNames, SkillLevels, XPsneeded forPromotion, andCool points onthe Player Log.
Record thenumber of Commanders you have with the Medic or MechanicSkills on the Player Log.
Trucks and ScoutsYou can also purchase support forces.
TrucksEach Truck counter costs 2 SO points. Each Week,each Truck assigned to an Enemy Battalion in theBreakthrough, Rear, or Transit Range Bandsubtracts 2 from your SO point cost to attack the
Battalion.
You can use each Truck once each Week.
You can assign multiple Trucks to a single Battalion.
You may also purchase Trucks during the Repair/Replace stepeach Week.
The counter mix does limit your purchases.
ScoutsEach Scout Motorcycle counter costs 1 SO point.Each Scout assigned to an Enemy Battalion adds 1Battle Turn to the Battle.
You can use each Scout once each Week.
You can assign multiple Scouts to a single Battalion.
You may also purchase Scouts during the Repair/Replace stepeach Week.
The counter mix does limit your purchases.
Enemy UnitsGather the 36 Enemy Unit counters for your selectedCampaign. Each Enemy Unit has its national flag on the top ofits counter.
Poland France United Russia UnitedKingdom States
Place the Enemy Units to the side of the Tactical Display Sheetto use during the Combat steps.
Set-Up CompleteRecord on the Player Log the number of SO points you spenton Trucks, Scouts, and Promotions.
Write the number of remaining SOpoints in the SO points box of thefirst column.
This completes the Set-Up steps. You are now ready to startyour Campaign.
• Start of WeekPerform the following steps each Week of the Campaign.
Special Condition CardDraw a card from the Special Conditiondeck on the Tactical Display Sheet andfollow the card’s directions.
Unless the card text says otherwise, theSpecial Condition applies to all of theBattles fought during the Week, and takeseffect immediately. Any costs must also bepaid immediately.
Assign UnitsEach Week, you will need to attack 1 to 3 Enemy Battalions todo well in the Campaign. Compare the Victory Points you willearn by Destroying each Battalion to the Evaluation chart onthe Objective card to get an idea of which Enemy Battalionsyou need to Destroy during the Campaign.
Choose which Battalions you will Attack during this CampaignWeek. Then, select the Units and Commanders that will Attackeach Battalion, and place their cards together for later use.Each Unit assigned to a Battle must have a Commander of thesame Type.
Example: To attack a Battalion, I assign: My Panzer I (Commandedby Albert), Mortar Team (Ackermann), SD.KFZ.231 (Bach), RifleTeam (Eschbach), and Field Gun (Gerver).
You may not assign Unfit or Wounded Commanders to aBattle. You may not assign Vehicles with Engine or SuspensionDamage to a Battle.
Select the Battalion you would like to fight firstfor the Week. Write the number of the Battalionyou have chosen to Attack on the Player Log inthe Battalion Target box. Place the Battalioncard you have chosen to attack in the Battalioncard box on the Tactical Display Sheet.
We suggest assigning roughly 7 points of Unit cards for eachVictory Point a Battalion is worth for the IntroductoryCampaign. This increases to about 12 Unit points for eachBattalion Victory Point in the more challenging Campaigns.

10
On LeaveYou may choose to leave some Commanders out of the Week’sBattles. These Commanders are assumed to be On Leave andwill regain 4 Stress points at the end of the Week.
Operational Move CostIf you assign Units to attack Enemy Battalions in their Transit,Rear, or Breakthrough Range Bands, you must immediatelypay SO points.
Transit: If you attack a Battalion in the Transit area, you mustpay 1 SO point when you assign Units.
Rear: If you attack a Battalion in the Rear area, you must pay2 SO points when you assign Units.
Breakthrough: If you attack a Battalion in the Breakthrougharea, you must pay 3 SO points when you assign Units.
In addition to the costs noted above, you must pay 1 extra SOpoint for each Enemy Battalion in the German Staging,German Transit, and Front Range Bands.
Example: If you attack a Battalion in the Rear, you must pay 2 SOpoints. If there is 1 enemy Battalion in the German Transit RangeBand and 1 enemy Battalion in the Front, the total cost is 4 SOpoints.
Remember to pay 2 fewer SO points for each Truck you assignto the Battalion.
Perform the Pre-Combat, Combat, and Post-Combat steps foreach Battle before moving on to the next Battle.
• Pre-CombatPerform the following steps at the start of each Battle.
Event CardDraw an Event card, and apply the effects ofthe top section.
This represents the time when the Units arepreparing for the battle until they reach theBattlefield.
Unless an Eventcard statesotherwise, Eventsonly apply to thecurrent Battle, andthe Commandersand Unitsparticipating inthat Battle. Alleffects and costsare immediate.
Place Turn CounterEach Battle lasts 5Turns. Place the TurnCounter on the “1”Box on the Tactical
Display Sheet’s Time Track.
Place any Scouts you assigned tothe Battle next to the Battle Turnstrack as a reminder of the extra
Turns you can use during the Battle.
Terrain TilesGather the 8 Terrain Tilesspecified by your Campaigncard. Each Battle, shuffle the 8Terrain Tiles and randomlyplace 6 of them on the 6 Tilespaces on the Tactical Displaysheet.
The remaining 2 tiles will notbe used during the Battle.
The 6 Tiles form your Battlefield for the Battle.
Each Tile has an arrow. Place the Tileson the Tactical Display Sheet with allarrows pointing toward the top edge ofthe Tactical Display Sheet.
Each Tile is divided into 4 hexes.
You will move your Unitsand the Enemy Unitsacross the hexes duringthe Battles.
Place Friendly UnitsGather the Unit cards and counters, as well as theirCommanders, and place them next to the Tactical DisplaySheet. Place your Unit counters in any hexes in the bottomrow.

11
This graphicshows the 8Enemy startinghexes at the topof the map, aswell as the 4Germanstarting hexesat the bottomof the map.
Place Enemy UnitsThe quantity and type of Enemy Units present are shown onthe Battalion card, however their hex locations on theBattlefield are not known until you begin the battle.
Each Battalion card shows thenumber and type of EnemyUnits you engage during theBattle.
Example: When engaging theSupply Convoy, you’ll encounter2 Rifle Teams, 2 Machine Gun
Teams, 4 Trucks, and 2 Armored Cars.
Gather the Enemy Unit counters forthe Battle. Enemy Units have twosides, an Active side and a Destroyedside.
Roll a die foreach Enemy Unitto determine itshex placement.
The InitialEnemy PlacementDiagramrepresents the top2 rows of theBattlefield.
Place the Enemy Unit counters on the Battlefield with theirActive sides up.
Example: I gather the 10 Enemy Units for the Supply Convoy androll 10 dice. The first die roll is a 4, so I place the first Enemy Unitin the forth hex. The second roll is a 7 so I place the secondEnemy Unit in the 6th hex, as indicated on the Sheet. I continuerolling and placing until all the Enemy Units are placed.
Half BattalionsIf a Battalion is at Half Strength due to a previousBattle, place only 1/2 of each Unit type listed onthe Battalion card.
Example: If the Mixed Combat Forcewas at Half Strength, I would onlyplace: 1 Tank, 1 Half Track, 1 RifleTeam, 1 Anti-Tank Team, 1 MachineGun Team, and 1 Mortar Team.
Enemy UnitsEach Enemy Unit Counter represents one vehicle, structure, orgroup of soldiers.
The specific values vary for each Allied Nation.
Point Value:The Battlefield value of the Unit.
Attack:This number indicates the die roll or higher the Enemy mustroll to inflict a Hit.
Range:The maximum number of hexes the Unit can Attack. If theUnit has a Range value of 0, it can only Attack Units in itssame Hex.
Unit Type:Identifies the Unit’s Type.
Defense:Each Attack roll targeting a Unit will be modified by theTarget’s Defense value.

12
Example: When Attacking a Polish Tank, I roll a dieand subtract the Tank’s Defense value of 1 from myroll.
• CombatDuring each Battle Turn, resolve the following steps. Use theTurn Counter to keep track of the current Turn.
Fast - Move and AttackCommanders with a Speed rating of Fast, moveand Attack before Enemy Actions each turn.Commanders with a Speed rating of Slow,move and Attack after the Enemy Actions eachturn.
Resolve the movement and attack for each Fast Commanderbefore moving on to the next Fast Commander. Once all FastCommanders have acted, move on to the Enemy Actions step.
Unit MovementA Unit’s Speed shows the maximum numberof hexes it can move each Battle Turn. Movinginto a hex counts as 1 movement of a Unit’sSpeed.
Infantry can either Move 1 hex or Attack. Ifthe Commander of the Infantry Unit choosesto do both, he suffers the indicated Stress.
Artillery Units cannot Move and Attack duringthe same Battle Turn.
Units with the Transport abilitycan freely pick up and move anInfantry Unit, and/or Artillery inits same hex up to the Transport’s
Speed. The Transporting Unit, and Units being Transported,must all start the turn in the same hex. The Transport can notdrop off a Unit in a hex and keep moving.
A Transported Unit can not move before or after beingTransported, or be Transported again during the same turn.
Example: A SD.KFZ. 251 is in the same hex as a Mortar Team. Itcan Move up to 2 Hexes. It can also freely pick up and move theMortar Team up to 2 hexes.
Example: If the Mortar Team’s Commander has the sameFast/Slow rating as the Half Track’s Commander, it can Attackwithout taking Stress from Moving.
Infantry and Artillery can still be Transported even though ithas Attacked during the Battle Turn.
Infantry and Artillery can still Attack even though it has beenTransported this Battle Turn.
When Infantry are Transported, it does not count as moving forpurposes of suffering Stress. The Infantry does not suffer the
Stress for Moving and Attacking.
RetreatingIf you Move a Unit off the bottom edge of the Battlefield, theUnit Retreats out of the Battle. Place it off to the side until theend of the Battle. Retreated Units go through Post-Combatactivities as normal.
If all your Units have been Destroyed or Retreated, end theBattle.
CoverBeing in a Cover Hex adds to a Unit’s Defense.
There are two types of Cover. Trees and Rocks provide LightCover. Buildings provide Heavy Cover.
Heavy Cover
Light Cover
Light Cover adds 1 to a Unit’s Defense.
Heavy Cover adds 2 to a Unit’s Defense.
Cover does not apply to Attacks conducted at Range 0.
Example: You are Attacking aBuilding located in LightCover, from a range of 1. TheBuilding has a Defense of 2.The Light Cover increases its
Defense to 3. If you were in the Building’shex (Range 0), it would have a Defense of2.
One Hit Destroys an Enemy Unit counter. Whenyou Destroy a Unit, flip the counter to itsDestroyed side. Once Destroyed, a Unit no longermoves or attacks.
Line of SightIf there is more than one equally direct path, the Attackerchooses the path that will give it a Line of Sight to the target.
Any Light or Heavy Cover hex blocks Line of Sight. A Unitcannot Attack an Enemy Unit if there is a Cover hex between itand its target.
Trace the most direct path through the hexes separating theAttacker’s hex from the target’s hex.
If the path is blocked by a Cover hex at any point, theAttacker’s Line of Sight is blocked.
13
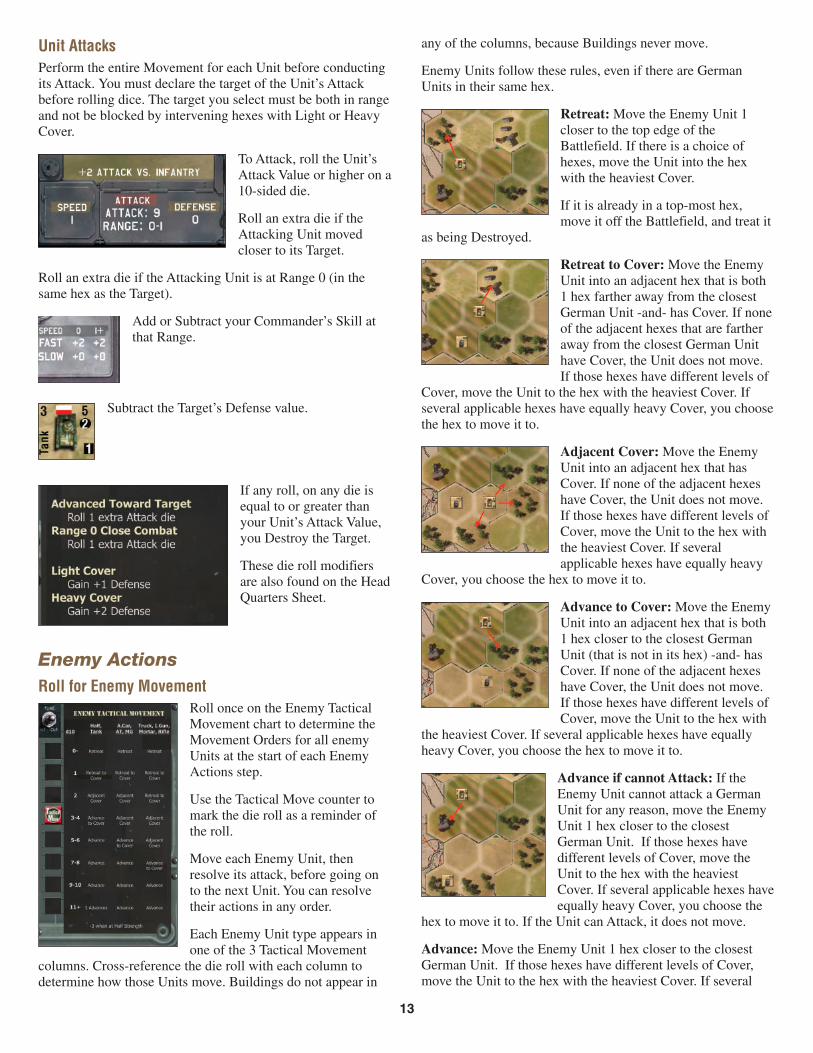
Unit AttacksPerform the entire Movement for each Unit before conductingits Attack. You must declare the target of the Unit’s Attackbefore rolling dice. The target you select must be both in rangeand not be blocked by intervening hexes with Light or HeavyCover.
To Attack, roll the Unit’sAttack Value or higher on a10-sided die.
Roll an extra die if theAttacking Unit movedcloser to its Target.
Roll an extra die if the Attacking Unit is at Range 0 (in thesame hex as the Target).
Add or Subtract your Commander’s Skill atthat Range.
Subtract the Target’s Defense value.
If any roll, on any die isequal to or greater thanyour Unit’s Attack Value,you Destroy the Target.
These die roll modifiersare also found on the HeadQuarters Sheet.
Enemy ActionsRoll for Enemy Movement
Roll once on the Enemy TacticalMovement chart to determine theMovement Orders for all enemyUnits at the start of each EnemyActions step.
Use the Tactical Move counter tomark the die roll as a reminder ofthe roll.
Move each Enemy Unit, thenresolve its attack, before going onto the next Unit. You can resolvetheir actions in any order.
Each Enemy Unit type appears inone of the 3 Tactical Movement
columns. Cross-reference the die roll with each column todetermine how those Units move. Buildings do not appear in
any of the columns, because Buildings never move.
Enemy Units follow these rules, even if there are GermanUnits in their same hex.
Retreat:Move the Enemy Unit 1closer to the top edge of theBattlefield. If there is a choice ofhexes, move the Unit into the hexwith the heaviest Cover.
If it is already in a top-most hex,move it off the Battlefield, and treat it
as being Destroyed.
Retreat to Cover:Move the EnemyUnit into an adjacent hex that is both1 hex farther away from the closestGerman Unit -and- has Cover. If noneof the adjacent hexes that are fartheraway from the closest German Unithave Cover, the Unit does not move.If those hexes have different levels of
Cover, move the Unit to the hex with the heaviest Cover. Ifseveral applicable hexes have equally heavy Cover, you choosethe hex to move it to.
Adjacent Cover:Move the EnemyUnit into an adjacent hex that hasCover. If none of the adjacent hexeshave Cover, the Unit does not move.If those hexes have different levels ofCover, move the Unit to the hex withthe heaviest Cover. If severalapplicable hexes have equally heavy
Cover, you choose the hex to move it to.
Advance to Cover:Move the EnemyUnit into an adjacent hex that is both1 hex closer to the closest GermanUnit (that is not in its hex) -and- hasCover. If none of the adjacent hexeshave Cover, the Unit does not move.If those hexes have different levels ofCover, move the Unit to the hex with
the heaviest Cover. If several applicable hexes have equallyheavy Cover, you choose the hex to move it to.
Advance if cannot Attack: If theEnemy Unit cannot attack a GermanUnit for any reason, move the EnemyUnit 1 hex closer to the closestGerman Unit. If those hexes havedifferent levels of Cover, move theUnit to the hex with the heaviestCover. If several applicable hexes haveequally heavy Cover, you choose the
hex to move it to. If the Unit can Attack, it does not move.
Advance:Move the Enemy Unit 1 hex closer to the closestGerman Unit. If those hexes have different levels of Cover,move the Unit to the hex with the heaviest Cover. If several

14
applicable hexes have equally heavy Cover, you choose the hexto move it to.
2 Advances: Perform the Advanceorder for the Unit two times.
Example: You roll a 2 for the Enemy Tactical Movement. TheBattalion has a note to add 1 to its Tactical Move rolls, so the rollbecomes a 3.
Each enemy Tank and Half Track will Advance 1 hex toward theclosest German Unit if they are not in a position that already allowsthem to Attack. Each enemy Rifle, Anti-Tank, and Machine Gun willAdvance 1 hex if there is a hex that is both closer to the closestGerman Unit -and- has Light or Heavy Cover. Each enemy Truck,Infantry Gun, Mortar Team, and Armored Car will move to anadjacent hex if the hex has Light or Heavy Cover.
Subtract 3 from the roll if you are rolling for aBattalion that is at Half Strength, or if you havereduced the number of enemy forces on theBattlefield to the Half Strength Value.
Example: I am Attacking the Supply Convoy and I have reducedthe Value of forces on the Battlefield to 6 points. It is now at HalfStrength. On all future turns I subtract 3 from their Movement rolls.
Enemy AttacksAfter you move each Enemy Unit,resolve its Attack before going on tothe next Enemy Unit.
Each Enemy Unit may only Attackone German Unit each Turn. A Unit automatically targets theclosest German Unit it is allowed to Attack.
Use the Line of Sight rules as you did for the German Units.
If more than one German Unit is equally close, attack theGerman Unit that requires the lowest Attack die roll to Hit. Ifthere is more than one equally close German Unit that requiresthe same lowest attack die roll to Hit, choose which one isAttacked.
To Attack, roll their Attack Value or higher on a10-sided die.
Roll an extra die if that Enemy Unit moved closerto the targeted German Unit.
Roll an extra die if the Enemy Unit is at Range 0 (in the sameHex as the targeted German Unit).
Subtract the German Unit’s Defense Value,found on the Unit’s card from all the die rolls.A -1 Defense actually makes it 1 point easierto Attack the Unit.
Add 1 to a target’s Defense Value when it is inLight Cover and being Attacked by Units at a Range of 1 ormore.
Add 2 to a target’s Defense Value when it is in Heavy Coverand being Attacked by Units at a Range of 1 or more.
For each die that rolls equal to or greater than the Unit’s AttackValue, draw 1 Damage counter from the counter cup.
Draw Damage counters for each Attack, as it is made.
Example: A Polish Tank was at range 2 from a German Panzer III(Short). The Polish Tank moved 1 hex closer to the Panzer III thisturn. The Polish Tank normally needs a 5 or higher to hit, but thePanzer III has a Defense of 1, and the Panzer is in a Light Coverhex, so the Polish Tank needs to roll a 7 or higher. The Polish Tankgets to roll 1 die for Attacking, and a 2nd die because it movedcloser. I roll 2 dice for the Polish Tank and get a 7 and 9. Theserolls inflict 2 Hits. I draw 2 Damage counters from the cup and referto their gray Vehicle Damage sides.
Vehicle HitsThe gray Vehicle side of the Damage counter shows theDamage inflicted on your Vehicle Unit.
Unless otherwise stated, Damage can only be removed duringthe Repair/Replace step.
Your Vehicle Units are: Armored and Unarmored.
1 Stress: Place the counter on the Commandercard. The Commander suffers 1 Stress.
Commander KIA (Killed In Action): Removethe Commander from the Campaign. Return thecounter to the cup. The Unit continues to operatein the Battle, but without its Commander’s skills.
Treat the Unit as being Slow.
Commander Wounded: Place the counter on theCommander card. No immediate effect. If theCommander suffers a 2nd Commander WoundedDamage counter, he is KIA. A Wounded
Commander cannot enter a new Battle until you pay to removethis counter.

15
Destroyed 2 Stress: Destroy the Unit and removeit from the Campaign. Return the counter to thecup. Place a 2 Stress counter on the Commander.
Engine 1 Stress: Place the counter on the Unitcard and 1 Stress counter on its Commander card.The Vehicle cannot move during the Battle. If itsuffers a 2nd Engine Damage, it is Destroyed. The
Vehicle cannot enter a new Battle until you pay to remove thiscounter.
Exposed: Place the counter on the Unit. EnemyUnits add 2 to their Attack rolls against this Unitstarting on the next Battle turn. Discard thiscounter when the Unit moves.
Machine Gun: Place the counter on the Unit card.The Unit cannot attack at Range 0.
No Effect: No effect.
Suspension 1 Stress: Place the counter on theUnit card. The Vehicle cannot move during theBattle. If it suffers a 2nd Suspension Damage, it isDestroyed. The Vehicle cannot enter a new Battle
until you pay to remove this counter. The Commander suffers 1Stress.
Hull: Place the counter on the Unit card. If itsuffers a 2nd Hull Damage, it is Destroyed.
Glancing: Place the counter on the Unit card.Until repaired, inflict 1 Stress on each Commanderassigned to this Vehicle at the start of each futureBattle.
Gun: Place the counter on the Unit card. The Unitcannot attack at Range 2+.
Explosion: Destroy the Unit, KIA theCommander, and remove them from theCampaign. Return the counter to the cup.
Infantry HitsThe green and brown Infantry side of the Damage countershows what has happened to your Infantry Unit.
Unless otherwise stated, Damage can only be removed duringthe Repair/Replace step.
Your Infantry Units are: Infantry and Artillery.
Commander Wounded: Place the counter on theCommander card. No immediate effect. If theCommander suffers a 2nd Commander WoundedDamage counter, he is KIA. A Wounded
Commander cannot enter a new Battle until you pay to removethis counter.
Commander KIA (Killed in Action): Removethe Commander from the Campaign. Return thecounter to the cup. The Unit continues to operatein the Battle, but without its Commander’s skills.
Treat the Unit as being Slow.
1 Stress: Place the counter on the Commandercard. The Commander suffers 1 Stress.
Casualty: Place the counter on the Unit card. If itsuffers a 2nd Casualty Damage, it is Destroyed.
Exposed: Place the counter on the Unit. EnemyUnits add 2 to their Attack rolls against this Unitstarting on the next Battle turn. Discard thiscounter when the Unit moves.
Immobile (Temporary): Place the counter on theUnit card. During the Unit’s next time to act, youmay either choose to have it not move and discardthis counter, or have it Move and have the
Commander suffer 1 Stress. This Move restriction also appliesto Infantry and Artillery Units being Transported. If youchoose to suffer the Stress, place a 1 Stress counter on theCommander card.
Suppressed (Temporary): Place the counter onthe Unit card. During the Unit’s next time to act,you may either choose to have it not attack anddiscard this counter, or have it attack and have the
Commander suffer 1 Stress. If you choose to suffer the Stress,place a 1 Stress counter on the Commander card.
No Effect: No effect.
Mowed Down: Destroy the Unit, KIA theCommander, and remove them from theCampaign. Return the counter to the cup.
Damage Counter RulesIf a counter has no effect on a Unit, return it to the cup, and donot draw a replacement.
Example: Your Unit with a maximum range of 1 suffers a Gun Hit.Since your Unit cannot attack at Range 2+, the Hit has no effect.Return it to the cup.

16
At the end ofthe Battle,record eachUnit’s Numberand any lastingDamage on the
Player Log and return all Damage counters to the cup. If theDamage is not Repaired at the end of the Week, find theDamage counters in the cup and place them back on the Unitbefore it enters the next Battle.
If a Unit’s Commander has been KIA during the Battle, redrawany future Damage counters that only inflict Stress. Also, theUnit cannot choose to suffer Stress when Immobile orSuppressed.
Example: Your Rifle Team’s Commander suffered a KIA earlier inthe Battle. You now draw a 1 Stress counter. Redraw the Hitcounter.
Example: Your Rifle Team’s Commander suffered a KIA earlier inthe Battle. You now draw a Suppressed counter. During the Unit’snext time to act, it cannot take the option to suffer 1 Stress andAttack.
Slow - Move and AttackAfter the Enemy Units Move and Attack, yourSlow Units move and Attack.
Use the same procedure as you did for your FastUnits.
Advance Turn CounterCompare the total value of active Enemy Units on theBattlefield to the Half/Destroyed numbers on the Battalioncard.
If the Battalion has been reduced to Half strength, subtract 3from their Tactical Move rolls until the end of the Battle.
If the Battalion has been Destroyed, end the Battle.
If additional Units are added to a Battalion, add their values tothe total.
Example: In the Russia East Front 1943 Campaign,you add 2 USA Tanks to every Battalion (1 Tank if theBattalion starts a Battle at Half Strength). The 2 Tanksare worth 6 points. Add their 6 points to the RussianUnit values when determining if the Battalion is at Full
Strength, Half Strength, or Destroyed.
Advance the Turn Counter by 1 space.
Repeat Combat StepsRepeat the Combat steps for the next Battle Turn until youhave conducted 5 Battle Turns.
Gain 1 extra Turn for each Scout you assigned to the Battle.
German LossesUnlike other Leader games, in Tiger Leader, you do not sufferVictory Point penalties for having your Units Destroyed andyour Commanders Killed. Combat losses were an expectedoccurrence during WWII.
• Post-CombatEvent Card
Draw an Event card and resolve the Event inthe bottom section.
Battalion StatusIf the Battalion was Destroyed during the Battle, remove theBattalion counter from the Operational Map and set theBattalion card aside.
If the Battalion was reduced to Half, flip theBattalion Counter to its Half side and return theBattalion card to the Head Quarters Sheet.
If the Battalion is still at Full strength, return theBattalion card to the Head Quarters Sheet.
Ignore the Special Note text on a Battalion card that has beenreduced to Half. Exception, some Battalion cards have SpecialNote text printed in yellow. Yellow text still applies when theBattalion has been reduced to Half.
If the Battalion was Destroyed duringthe Battle, record an “X” in the Statusand write the number of Victory Points(VPs) from the Battalion card on theVPs Gained line.
If the Battalion was reduced to Half,record a “1/2” on the Battalion Status line, and gain half of theVictory Points for the Battalion, rounding down. If you laterDestroy the Battalion, gain its remaining VPs.
Example: You reduce a 5 VP Battalion to Half and gain 2 VPs. Youlater Destroy it and gain the remaining 3 VPs.
If you fail to reduce the Battalion to Half or Destroy theBattalion, place an “F” in the Battalion Status and record a 0(zero) on the VPs Gained line.

17
Record Commander StressInflict 2 Stresson eachCommanderwhoparticipated inthe Battle. Addto these 2
Stress any Stress the Commander suffered during the Battledue to Damage.
Reduce a Commander’s Stress points by his CoolSkill. This number was also written on the Player Logat the start of the Campaign.
Example: A Commander started a Battle with 3 Stress. Hesuffered 1 Stress due to Damage during the Battle, and 2 Stressfor being in the Battle. He has a Cool of 2. He ends the Battle with4 Stress.
Cool only modifies the Stress a Commander suffers at the endof a Battle. It does not affect the Stress suffered due to Eventsand other game actions.
Commanders in the Battle with a “-1” Cool suffer 1 extra pointof Stress at the end of a Battle.
Record the current number of Stress points for eachCommander on the Player Log, in the column for the currentBattle.
Record Commander ExperiencePoints (XPs)
XPs are awarded to allCommanders assigned to theBattle. Give eachCommander who participatedin the Battle 1 Experience
Point in the XPs Gained column on the Player Log.
If the Battalion was Destroyed, each Commander assigned tothe Battle gains 1 additional Experience Point.
Commanders can alsogain Experience due toBattalion cards, orEvent cards.
Promoting CommandersCheck forCommanderPromotions afterrecording allExperience Points.
Promote a Commander if his Experience Pointtotal is equal to or greater than the ExperiencePoint number shown on his card. If aCommander is Promoted, exchange his card for
his next higher Commander Skill Level card and note his newExperience Level on the Player Log.
Commanders Promote from: Recruit to Green, Green toAverage, Average to Skilled, Skilled to Veteran, and Veteran toAce.
Example: Average Skill Level Weber just completed a successfulBattle, gaining 2 XPs. He previously earned 3 XPs. This brings hisnew total to 5. He Promotes from Average to Skilled.
If a Commander is Promoted, recheck his Stress points total todetermine if he is Okay, Shaken, or Unfit. Also check to see ifhis Cool rating changed, and record his new Cool on the PlayerLog.
Once a Commander is Promoted, he loses the ExperiencePoints that gained him the Promotion. Record the new numberof Experience Points he must earn to reach the next Skill Levelon the Player Log.
Example: Average Weber needed 4 Experience Points to Promotefrom Average to Skilled. Previously, he had earned 3 ExperiencePoints. He earned 2 Experience Points during this Battle. 1 Point isadded to his previous 3 XPs to Promote him to Skilled, and the lastExperience Point is retained and counted toward his Promotion toVeteran.
Next BattleIf there are more Battles scheduled for the Week, return to thestart of the Pre-Combat Step.
• End of WeekMove Battalions
Roll a die for eachsurviving EnemyBattalion and consult thechart on the TacticalDisplay Sheet in theEnemy Operational
Movement section.
Assault Battalions, Support Battalions, and CommandBattalions each have a row on the chart with the specific dierolls needed to Advance, Hold, or Retreat.
The rolls determine if the Battalion Advances one Range Bandcloser to your German Staging Range Band, Holds position, orRetreats one Range Band toward the Enemy Breakthrough.Battalions will not retreat behind their Enemy BreakthroughRange Band or past the German Staging Range Band.
Never roll for Fixed Battalions. They alwaysremain in their starting Range Bands.

18
When you roll for the Operational movement ofHalf Strength Battalions, Subtract 3 from the dieroll.
Example: You roll for the enemy Battalion Movement.They have an Assault Battalion in the Front. You roll a die and get a9. It Advances to the German Transit. They have a Support in theTransit, which rolls a 4, and stays in the Transit. They also move aHalf Strength Assault in the Rear, it rolls a 2, -3 for being at Half,resulting in a roll of negative 1, which Retreats it to the
Breakthrough.
On LeaveAny Commander that does not participate in a Battle during anentire Week recovers 4 Stress points. Do not modify thisnumber by the Commander’s Cool.
Example: Weber has suffered 10 Stress fromprevious Battles. On Week 3 he is notassigned to a Battle. Weber remains on theHead Quarters Sheet and recovers 4 Stress.He has a Cool of 1, but this does not effecthis Stress recovery. Weber now has 6 Stress.
Adjust Special Option PointsGain Special Option Points
Consult your Objective card or Player Logto see how many Weekly SO points yougain.
Record the new SO points on the PlayerLog in the SO points box.
Lose Special Option Points (Map)Lose 2 SO points for each Enemy Battalion in the GermanTransit Range Band.
Lose 6 SO points for each Enemy Battalion in the GermanStaging Range Band.
Record the lost SO points in the “+/- SO Points” area on yourPlayer Log.
If you are unable to pay the SO points, the Campaign ends infailure.
Repair/ReplaceGerman UnitsYou can purchase new German Units during this step. Pay theUnit’s cost in SO points and add the new Unit to your group.Immediately select 1 Recruit Commander of that type to jointhe Campaign. You may not choose a Commander who’s Namehas already appeared in the Campaign.
You cannot reuse a Unit with the same Unit Number as one
previously Destroyed in the Campaign. The card mix doeslimit purchasing options.
UpgradeIf you would like to Upgrade a Unit in your group, you canturn in one or more undamaged Units. You gain the turned-inUnit’s Cost in SO points toward the purchase of a new Unit.The new Unit must have a higher SO point cost than the totalof all turned-in Units.
Example: You turn in a 3 SO point SD.KFZ.251 and a 2 SO pointRifle Team, worth a total of 5 SO points. You also spend 4 of yourSO points to buy a Marder II for 9 SO points.
If the new Unit is of the same Type as the old Unit, you do notget a new Commander.
If the new Unit is of a different Type than the old Unit, discardany 1 Commander of the old Unit’s Type and select a RecruitCommander of the new Unit’s Type.
If you traded in more than 1 Unit, discard Commanders so youdo not end up with more Commanders than Units.
You may Upgrade more than one Unit during this step. Youmay also repurchase the Units you removed from your forcesduring the Upgrade.
Commander ReplacementsThis is useful when a Commander has suffered a KIA or isUnfit or Wounded.
If a Commander is KIA, discard the Commander and add aRecruit Commander to your group of the same Type.
The Commander cannot have the same Name as a Commanderalready in the Campaign, or that was previously part of theCampaign. The card mix does limit purchasing options.
If a Commander is Unfit or Wounded, you many choose todiscard the Commander and add a Recruit Commander to yourgroup of the same Type.
You may replace more than one Commander during this step.
You may adjust the new Commander’s Skill Level at this timeby paying 3 SO points for each Skill Level increase.
You cannot have more Commanders than Units. You mustalways have the same number of Commanders as the Type ofUnit they can Command.
Repair Units & Heal CommandersYou may use SO points to Repair Units. One SO point removesone Damage Counter from a Unit.
It requires 2 SO points to remove an Engine Damage counter.
A Unit may participate in a Battle while Damaged unless thespecific Damage specifies otherwise.
You may spend 1 SO point to discard a Commander Woundedcounter. A Commander cannot enter a new Battle whileWounded.

19
Remember to use your Commander Medic and MechanicSkills during this step.
Large CostPay 1 SO point for each Large Unit assigned to a Battalion. Ifyou cannot pay the SO point cost, remove the Large Unit andthe Commander assigned to it during the Battle from theCampaign.
Priority R&ROnce at the end of each Week, you may spend 5 SO points toremove 2 Stress from every Commander in your group.
Next WeekIf there are more Weeks in your Campaign, return to the Startof Week section of the Sequence of Play.
• End of the CampaignCampaign Outcome
After all Battles are resolved for theCampaign’s last Week, find yourCampaign result on the Objectivecard. Compare your total VictoryPoints to the numbers listed on theObjective card you were playing.
Example: If you were playing thePoland 1939 Campaign with the For the Reich! Objective, and youearned 15 Victory Points, you would have earned a GoodCampaign Evaluation.
• Optional RulesDecide which Optional Rules you will use at the start of theCampaign.
TenacityAt the end of the last turn of each Battle, you can decide toextend the Battle by 1 turn. If you do so, each participatingCommander suffers 1 extra Stress at the end of the Battle.
Pay 1 SO point at the start of the Campaign to use this rule.
Battlefield HeroicsRule #1 - If one of your Units needs to roll a 10 to Attack, androlls an unmodified “10” on any of its Attack dice, theCommander gains 1 extra XP at the end of the Battle.
Rule #2 - If a Commander’s Unit is Destroyed, and anotherUnit of the same type is in his hex later in the Battle and thenew Unit has a KIA, Unfit, or Wounded Commander, you mayhave the Unitless Commander take command of the Unit.
Pay 1 SO point at the start of the Campaign to use both ofthese rules.
• CreditsGame Design Dan VerssenGame Development Kevin VerssenInitial Concept Rick MartinDisplay Sheet Art Cloud QuinotCard Frame Art: Paul HoefenerGerman Soldier Card Art Gordon Napier3D Art Gundus MootRulebook Holly VerssenRulebook Edits Andreas Neugebauer
Gary Loughran

20
• Sample GameTo begin, I place the Tactical Display Sheet and Head QuartersSheet in front of me on the table. I then separate the cards intopiles: Units, Commanders, Battalions, Events, and SpecialConditions. I shuffle the Event cards and Special Conditioncards, and place each deck face down on their noted areas onthe Tactical Display Sheet. I also separate the Battalion cardsinto 3 piles: Assault, Supply, and Command.
Set-UpFor this sample game, I choose to play the "Poland 1939"Campaign with the "For The Reich!" Objective. I place these 2cards on the Head Quarters Sheet. I move the remainingCampaign and Objective cards off to the side.
I need to draw Battalion cards until I get at least 24 points ofcards. I draw the following Battalion cards from their 3 piles:8A (4 points), 3A (1 point), 6S (4 points), 3C (2 points), 1A (5points), 7A (3 points), 5S (2 points), and 6C (5 points). Thisgives me a total of 26 points.
I collect their Battalioncounters and place them on theOperational Map: 3A (GermanStaging), 6C (Front), 7A(Transit), 8A (Transit), 5S(Transit), 3C (Transit), 6S(Rear), 1A (Rear).
I now purchase my Units thathave a Service life including1939. I can spend up to 40Special Option points. I get 40
points from the Objective card and 0 extra points from theCampaign card. I purchase: Rifle Team #902 (2 points), MortarTeam #932 (4 points), Experienced Anti-Tank Team #1003 (7points), SD.KFZ.231 #732 (6 points), SD.KFZ.251 #753 (4points), Field Gun #962 (4 points), Panzer I #153 (3 points),and Panzer IV Short #444 (8 points). I spent 38 out of my 40points, leaving me with 2 points to spend.
The Campaign card lists the specific Skill Levels of my first 7Commanders. Each Commander after the 7th will be Green.
I then select my Commanders: Albert (Recruit), Ackermann(Recruit), Bach (Recruit), Klein (Green), Eschbach (Green),Gerver (Average), Müller (Skilled), and Saltz (Green).
I do not perform any Priority Commander Promotions.
I choose to purchase 1 Truck for 2 SO points. Thisexpends the last of my SO points.
I record theCampaign card,Commander, andSO pointinformation on thePlayer Log Sheet. Ialso record that Ihave 1Commander withMedic Skill(Eschbach). At thebottom of theSheet, I recordreminder notes forthe enemyBattalion SpecialAbilities that Imight need toreference.
Week #1I now start the first Week of the Campaign.
I draw a Special Condition card, and get "Fuel Shortage." If Ihad an SO point to spend, I could avoid this set back, but Idon't. All of my Battles this Week will last only 4 Turns insteadof 5.
I now assign Units to the different Battalions I want to Attack.I am trying to get a Great Campaign Evaluation, and I onlyhave 3 Weeks to do it. I must earn on average 6 Victory Pointseach Week. With that in mind, I attack: 3A (1 point) and 6C (5points). Normally, it would cost 1 SO point to Attack 6Cbecause 3A is in the German Staging Range Band, but I assignmy Truck to the 6C Battle. The Truck reduces my SO pointcost by 2, so I don’t need to pay any SO points.
I am pushing my forces to engage both Battalions. I think the6C Battle might be a challenge.
To attack 3A, I assign my ExperiencedAnti-Tank Team commanded by Saltz andSD.KFZ.251 commanded by Klein.
To attack 6C, I assign: Panzer I (Albert),Mortar Team (Ackermann), SD.KFZ.231(Bach), Rifle Team (Eschbach), Field Gun(Gerver), and Panzer IV Short (Müller).
Clarification: A Commander is notpermanently assigned to a Unit. Albert, for
example, does not always have to command the Panzer I, buthe does always have to command an Armor Unit.
Battle with 3AI start the battle by drawing an Event card, and get, "IntenseBattle".
I place the Battle Turn counter on the "1" space.

21
I gather the 8 green-triangle European Terrain Tiles (as listedon the "Poland 1939" Campaign card), randomize them, anduse the top 6 in the stack. I place them randomly on the 6Terrain Tile spaces on the Tactical Display Sheet with theirgreen triangles pointing to the top of the Sheet.
I now place my 2 German Units in any hexes in the bottomrow. I place the SD.KFZ.251 in the bottom left hex. I alsoplace the Experienced Anti-Tank Team in that same hex.
I place the 6 Polish Units: 2 Half Tracks, 2 Trucks, and 2Armored Cars. I roll a die for each, and they end up in thefollowing hexes along the top two rows:
Following the InitialEnemy PlacementDiagram, I roll a 1 for aHalf Track and place itin the first hex of the toprow.
I then roll a 4 for aTruck and place itin the rightmosthex of the top row.I roll an 8 for thesecond Half Track,a 5 for theArmored Car, a 3for the secondTruck, and a 10for the secondArmored Car.
This is how theywould normallystart the Battle,except I drew the"Intense Battle"
Event card.
I move the Polish Units 1 hextoward me as if they had justreceived an Advance order. Ialso move my 2 Units forward1 hex.
I now start the 1st Battle Turn.
Turn #1I start by having my Fast Commanders act. Both of myCommanders are Slow, but my Experienced Anti-Tank Teamhas a Tactic counter.
I spend their Tactic counter by removing thecounter from the Unit card. This allows the Anti-Tank Team to act now. I move my Anti-Tank Team1 hex forward to be at range 1 from a Polish Half
Track. I declare the Team will attack the Half Track. TheCommander would normally suffer 2 Stress for moving andattacking during the same turn, but he has the Aggressive Skill,so he does not suffer the Stress. I now roll for their attack. Iroll 1 die for attacking, and 1 die for having moved closer tothe target during this Unit’s turn. I get +2 on my rolls due tothe Anti-Tank Team's Special Ability when attacking Vehicles.Commander Saltz has +0 Skill at "Range 1+" which does notmodify the rolls. The Half Track is not in Cover and has aDefense of 0, so it does not modify my rolls. The Anti-TankTeam normally needs to roll a 6 or higher to hit and Destroythe Half Track. My 2 die rolls are a 6 and a 7, which becomean 8 and 9. That's 2 Hits! The Half Track is Destroyed.
I do not have any other Fast Commanders, so it is time for thePolish Units to act.
I roll a die for their Tactical Movement, and roll a 6. I place the"Tactical Move" counter on the space next to the "5-6" range asa reminder. I now resolve the movement and attack for each oftheir Units.
I decide to startwith their HalfTrack. I cross-reference "5-6"and "Tank and
Half Track" and get an "Advance if cannot Attack" result. TheHalf Track can attack my Anti-Tank Team, so it doesn't move. Iroll 1 die for its attack. It needs to roll an 8 or higher to hit, butmy Team has a Defense of 1, so it needs to roll a 9 or higher. Iroll and get a 5. It misses.
Next, I move one of their Trucks, which has an "AdjacentCover" result. There are hexes in front and behind it that haveLight Cover, so it can move to either one. I choose to have itmove forward into the Light Cover.
I now move their other Truck. The other Truck has twoadjacent hexes with Light Cover, so I choose to move theTruck forward into the hex with Light Cover.
The Armored Carsget an "AdjacentCover" result. OneArmored Car hasno Cover inadjacent hexes, soit does not move.The otherArmored Car canretreat or advanceinto adjacenthexes with LightCover. I choose tohave it advance,and move the

22
counter into the Light Cover hex. This Armored Car has movedwithin range 1 of my SD.KFZ.251 and Anti-Tank Team. I nowdetermine which of my Units the Armored Car will attack.Both Units are at range 1. My SD.KFZ.251 has a Defense of 0,and my Anti-Tank Team has a Defense of 1, so the ArmoredCar attacks my SD.KFZ.251. It needs to roll a 7 or higher tohit, and it gets to roll 2 dice, one for attacking, and 1 for havingmoved closer. I roll a 7 and 8 for 2 hits.
I draw 2 Damage counters and look attheir gray Vehicle sides: "1 Stress" and"Glancing". I place the 1 Stress onKlein and the Glancing on the
SD.KFZ.251.
This ends the Polish move and attack step. I now resolve mySlow step.
I start withSD.KFZ.251, andadvance it 1 hex toenter the same hexas one of theArmored Cars. Ineed to roll 9 orhigher to hit,which isn’t good,but I do get to roll4 dice: 1 forattacking, 1 formoving closer, 1for being in thesame hex, and 1for the "For The
Reich" special rule. This is a range 0 attack, so the ArmoredCar does not gain a Defensive bonus for being in Cover. I roll:3, 7, 8, and 10. I score 1 Hit, and Destroy the Armored Car.
Next, my Anti-Tank Team advances 1 hex closer to one of theTrucks to decrease the range to 1. Even though my Anti-TankTeam used a Tactic to act during the Fast step, it still gets to actduring its normal step. My Team needs to roll a 6 to hit, butthey get +2 vs. Vehicles, +1 because the Truck has a Defenseof -1, and must subtract 1 because the Truck is in Light Cover.Overall, they need to roll a 4 or higher to hit. I get to roll 2dice, and roll a 3 and 8, scoring 1 hit, and Destroying theTruck.
This ends the first turn of Battle.
I advance the Battle Turn counter to the 2 space.
I check to determine their Battalion's status by adding up thevalues of their remaining Units on the map: Half Track (2),Armored Car (1), and Truck (1) for a total of 4 points. TheBattalion is now at Half Strength.
Turn #2I do not have Fast Commanders, and I do not have any Tacticsremaining, so I do not act during the Fast step.
I resolve the Enemy Movement by rolling a die. I get a 10,
minus 3 for being at Half Strength, which results in themgetting a roll of a 7.
Their Half Track "Advances" toward my closest Unit. TheSD.KFZ.251 and Anti-Tank Team are equally close. I chooseto have it advance toward the SD.KFZ.251. At range 1 it rolls 2attack dice, needing a 9 to hit, and rolls a 3 and 10.
The 10 inflicts a Hit. I draw an "Engine 1 Stress"counter and place it on the SD.KFZ.251 card.
Their Armored Car does not move and attacks myAnti-Tank Team. It needs an 8 to hit and rolls 1
die. It rolls a 4, and misses.
Their Truck Advances 1 closer to my Anti-Tank Team andmoves into the Team's hex. The Truck needs to roll a 10 to hit,and my Team has a Defense of 1, so the Truck cannot hit it.
This ends the enemy step. I now resolve my Slow step.
I choose my SD.KFZ.251 to act first and have it attack the HalfTrack 1 hex away. It cannot move due to its Engine Damage. Itneeds to roll a 9 to hit, but Klein has a -1 Skill at range 1 ormore, so I actually need a 10 to hit. I roll a 6 and miss.
Next, I have my Anti-Tank Team move into the Armored Car'shex and attack the Armored Car at range 0. I need a 4 to hit,and I get to roll 4 dice. I roll: 1, 4, 7, and 9, and Destroy theArmored Car.
This ends the 2nd Battle Turn. I move on to the 3rd BattleTurn.
Turn #3I have no Fast Commanders, so I resolve the enemy attacks.This will be the last turn of Battle. Battles normally last 5turns, but this Battle was reduced by 1 turn due to the FuelShortage and by another turn due to the Battalion's SpecialAbility text.
Their Movement roll is a 5, reduced to 2 for being at HalfStrength.
Their Half Track Advances to Coverand moves into my SD.KFZ.251'shex. It needs to roll an 8 to hit. It rolls3 dice, and rolls: 4, 8, and 10, for 2
hits. I draw a "Suspension 1 Stress" and "Hull".
Their Truck Retreats to Cover, and moves into my Anti-TankTeam's hex. It still cannot hit the Team.
This ends their attacks, and now I resolve my Slow attacks.
My Anti-Tank Team attacks the Truck. It needs a 3 to hit, and Iroll 3 dice: 4, 5, 8, and Destroy the Truck.
The total value of enemy Units on the map is now 2. Thisdrops them into the Destroyed range, so I end the battle eventhough there are enemy Units still on the map and it is themiddle of my turn. I remove the 3A Battalion card and 3Acounter from the Campaign.

23
I draw a Post-Combat Event card, and get "Allied Armor".
I record my Commander Stress on the Player Log. Kleinsuffers 2 Stress for being in the battle, plus 3 Stress due toDamage, for a total of 5. He is Shaken. Saltz suffers 2 Stressfrom being in the battle. He is still Okay.
If any of my Commanders participating in the Battle had aCool other than “0”, I would apply their Cool Skill modifier tothe amount of Stress they suffered.
I record theExperience Pointsfor myCommanders.Both Klein andSaltz gain 2Experience Points,1 for participatingin the Battle, and 1for Destroying theBattalion. NeitherCommanderPromotes.However, due tothe Special Noteon the "Poland1939" Campaigncard, allCommanders gain1 extra XP after
each battle. So, both Klein and Saltz gain a 3rd XP. Klein nowhas enough XP, and Promotes to Average. I swap out his Greencard for the Average card.
Battle with 6CI then resolve the battle against 6C. I shuffle the 8 EuropeanTerrain Tiles and select 6 new ones at random.
It is a hard fought battle, but I knew that from the start. By theend of the battle, I Destroyed 6C, but a couple of my Unitswere shot-up and several Commanders suffered heavy Stress.During the battle, Bach suffered a "Commander KIA"Damage, and I remove him from the Campaign. I record theStress, Damage, and XP for all Commanders and Unitsparticipating in the 6C battle on the Player Log Sheet. I remove6C's Battalion card and counter from the Campaign.
This completes the Week's battles, and I move on to the End ofWeek phase.
End of WeekI roll for each of theirBattalions to determinetheir OperationalMovement.
The "For The Reich"card adds 5 to theirOperational Move rollsduring the 1st Week.
The "Allied Armor"Event card also adds 1to all Assault BattalionMove rolls this Week.
I roll for 1A, and get a 4, plus 6, which becomes a 10, andresults in an Advance, so I move 1A to the Transit RangeBand. I roll for 7A, and it Advances to the Front. I roll for 8Aand it Advances to the Front. I roll for 5S and it Advances tothe Front. I roll for 6S and it Holds in the Rear. I roll for 3Cand it Advances to the Front.
Due to 5S's SpecialAbility, I must choose toAdvance any 1 non-Fixed Battalion. I move6S from the Rear to theTransit. 6S's SpecialAbility moves itselffrom the Transit to theFront.
I adjust my SpecialOption points. I gain 6from the Objective, but Ilose 1 due to 3C's
Special Ability, so overall I gain 5, which brings me up to 5. Inow spend the SO points.
Eschbach uses his Medic Skill to freely remove a "CommanderWounded" Damage from Albert. I spend 2 SO points to repair#753's Engine Damage.
I spend 2 SO pointspurchasing Rifle Team #903. Ialso get a Recruit Commanderto command the new Unit,
and I choose Steiner.
Because Bach suffered a KIA, I get tofreely replace him. I choose RecruitCommander Petrus.
This leaves me with 1 SO point left over,which I will save for the next Week. This completes Week 1 of3 in this Campaign.

To see more, please visit us at: www.dvg.com
Some of our fine DVG games...
DO
W
N IN FLAMES
D
RA G O N
S!D
RA G O N
S!
DO
W
N IN FLAMES
LE A D E R
CO R S A I R
A
LEXANDER
FIE
LD COMMAND
ER
FO R C E S
SP E C I A L
M
A R I N E AIR
HO
R
NET LEADER II
EARTH
GONE MAD!
S
TALINGRAD
BATTLE FOR
L
EA D E R I I
HO R N E T
W
ORLD WAR I
DO
W
N IN FLAMES
CA R R I E R A I R G R OU
P
HO
R
NET LEADER II
TERRA
STARFORCE


![TOWARDS VATICAN II’S CENTENARY: YOUR NEXT FIFTY YEARS · 2017-07-08 · TOWARDS VATICAN II’S CENTENARY: YOUR NEXT FIFTY YEARS ... Fall 2016] TOWARDS VATICAN II’S CENTENARY 5](https://img.dokumen.tips/doc/110x75/5e7bcc2c5f9e2b0e0173ef43/towards-vatican-iias-centenary-your-next-fifty-years-2017-07-08-towards-vatican.jpg)