Embed Size (px)
Citation preview

Intelligent Search Optimization Guide
Fully Utilizing Language Workbench Options
InQuira Version 8.1.2Document Number IM80-AG-00
August 27, 2008
InQuira851 Traeger Ave.
Suite 125San Bruno, CA 94066

Copyright InformationCopyright © 2002 - 2008 Inquira, Inc.Product Documentation Copyright © 2003 - 2008 Inquira, Inc.
Restricted RightsThis software and documentation is subject to and made available only pursuant to the terms of the license agreement between your organization and InQuira, Inc. and may be used or copied only in accordance with the terms of that agreement. It is against the law to copy the software and documentation except as specifically allowed in the agreement and InQuira will take all necessary steps to protect its interests in the software and documentation.
This document may not, in whole or in part, be copied, photocopied, reproduced, translated, or reduced to any electronic medium or machine readable form without written prior consent from InQuira, Inc., which may be withheld in its sole and absolute discretion.
The information in this document is subject to change without notice and does not represent a commitment on the part of InQuira, Inc. The software and documentation are provided “AS IS” without warranty of any kind including without limitation, any warranty of merchantability or fitness for a particular purpose. Further, InQuira, Inc. does not warrant, guarantee, or make any representations regarding the use, or the results thereof. Although reasonable measures have been taken to ensure validity, the information in this document is not guaranteed to be accurate or error free.
Trademarks and Service MarksInQuira, Inc., InQuira 8, InQuira 7, InQuira 6, InQuira 5, InQuira Natural Interaction Engine, Information Manager, and Call Center Advisor are trademarks or registered trademarks of InQuira, Inc.
Siebel 7, Siebel Call Center 7, and all other Siebel products are the property of Siebel Systems, Inc.
Sentry Spelling-Checker Engine Copyright © 2000 Wintertree Software, Inc.
All other trademarks and registered trademarks contained herein are the property of their respective owners

Contents
Preface: About This Guide . . . . . . . . . . . . . . . . . . . . . . . . . . . . . . . . . . . . . . . . . . . . . . . . 1In This Guide . . . . . . . . . . . . . . . . . . . . . . . . . . . . . . . . . . . . . . . . . . . . . . . . . . . 2Contacting InQuira . . . . . . . . . . . . . . . . . . . . . . . . . . . . . . . . . . . . . . . . . . . . . . . 2InQuira Customer Support . . . . . . . . . . . . . . . . . . . . . . . . . . . . . . . . . . . . . . . . . 4InQuira Product Documentation . . . . . . . . . . . . . . . . . . . . . . . . . . . . . . . . . . . . 5
Intelligent Search Documentation . . . . . . . . . . . . . . . . . . . . . . . . . . . . . . . . 6Intelligent Search Analytics Documentation . . . . . . . . . . . . . . . . . . . . . . . . 7Information Manager Documentation . . . . . . . . . . . . . . . . . . . . . . . . . . . . . 8Contact Center Documentation . . . . . . . . . . . . . . . . . . . . . . . . . . . . . . . . . . 9Screen and Text Representations . . . . . . . . . . . . . . . . . . . . . . . . . . . . . . . . . 9References to World Wide Web Resources . . . . . . . . . . . . . . . . . . . . . . . . . 9
Chapter 1 Dictionary Manager Advanced Features . . . . . . . . . . . . . . . . . . . . . . . . . . . . 11Advanced Features of Concepts . . . . . . . . . . . . . . . . . . . . . . . . . . . . . . . . . . . . . 12
Index IML . . . . . . . . . . . . . . . . . . . . . . . . . . . . . . . . . . . . . . . . . . . . . . . . . . 12Openclass . . . . . . . . . . . . . . . . . . . . . . . . . . . . . . . . . . . . . . . . . . . . . . . . . . . 13Subsumes . . . . . . . . . . . . . . . . . . . . . . . . . . . . . . . . . . . . . . . . . . . . . . . . . . . 13
Intelligent Search Optimization Guide iii

Advanced Features of Rules . . . . . . . . . . . . . . . . . . . . . . . . . . . . . . . . . . . . . . . . 14Business Conditions . . . . . . . . . . . . . . . . . . . . . . . . . . . . . . . . . . . . . . . . . . . 14
Add Business Conditions . . . . . . . . . . . . . . . . . . . . . . . . . . . . . . . . . . . . 15Add Deferred Condition . . . . . . . . . . . . . . . . . . . . . . . . . . . . . . . . . . . . . . . . 16Add Answer Action . . . . . . . . . . . . . . . . . . . . . . . . . . . . . . . . . . . . . . . . . . . 16Add Facet Restriction . . . . . . . . . . . . . . . . . . . . . . . . . . . . . . . . . . . . . . . . . . 17Add Set Attribute . . . . . . . . . . . . . . . . . . . . . . . . . . . . . . . . . . . . . . . . . . . . . 18Add Relative Weights . . . . . . . . . . . . . . . . . . . . . . . . . . . . . . . . . . . . . . . . . 18Add Scope Weights . . . . . . . . . . . . . . . . . . . . . . . . . . . . . . . . . . . . . . . . . . . 20Add Suppress Rule . . . . . . . . . . . . . . . . . . . . . . . . . . . . . . . . . . . . . . . . . . . . 21
Answer Action Methods for Rules . . . . . . . . . . . . . . . . . . . . . . . . . . . . . . . . . . . 22Specific Excerpt Answer Action Method . . . . . . . . . . . . . . . . . . . . . . . . . . . 22Search Answer Action Method . . . . . . . . . . . . . . . . . . . . . . . . . . . . . . . . . . 23Structured Query Answer Action Method . . . . . . . . . . . . . . . . . . . . . . . . . . 24Glossary Answer Action Method . . . . . . . . . . . . . . . . . . . . . . . . . . . . . . . . . 25Plug-in Answer Action Method . . . . . . . . . . . . . . . . . . . . . . . . . . . . . . . . . . 26Process Wizard Answer Action Method . . . . . . . . . . . . . . . . . . . . . . . . . . . 26
Alias Lists . . . . . . . . . . . . . . . . . . . . . . . . . . . . . . . . . . . . . . . . . . . . . . . . . . . . . . 27Create a New Alias List . . . . . . . . . . . . . . . . . . . . . . . . . . . . . . . . . . . . . . . . 27Alias List Tools . . . . . . . . . . . . . . . . . . . . . . . . . . . . . . . . . . . . . . . . . . . . . . 29
Import Text Files . . . . . . . . . . . . . . . . . . . . . . . . . . . . . . . . . . . . . . . . . . 29Validate Alias Lists . . . . . . . . . . . . . . . . . . . . . . . . . . . . . . . . . . . . . . . . 29
Advanced Feature of Alias Lists . . . . . . . . . . . . . . . . . . . . . . . . . . . . . . . . . 30Set Overriding . . . . . . . . . . . . . . . . . . . . . . . . . . . . . . . . . . . . . . . . . . . . 30
Exception Lists . . . . . . . . . . . . . . . . . . . . . . . . . . . . . . . . . . . . . . . . . . . . . . . . . . 31Edit an Exception List . . . . . . . . . . . . . . . . . . . . . . . . . . . . . . . . . . . . . . . . . 32Create a New Exception List . . . . . . . . . . . . . . . . . . . . . . . . . . . . . . . . . . . . 33Exception List Tools . . . . . . . . . . . . . . . . . . . . . . . . . . . . . . . . . . . . . . . . . . 34
Intent Hierarchy . . . . . . . . . . . . . . . . . . . . . . . . . . . . . . . . . . . . . . . . . . . . . . . . . 34Create a new Intent Hierarchy . . . . . . . . . . . . . . . . . . . . . . . . . . . . . . . . . . . 35
User Profiles . . . . . . . . . . . . . . . . . . . . . . . . . . . . . . . . . . . . . . . . . . . . . . . . . . . . 37Create a new User Profile . . . . . . . . . . . . . . . . . . . . . . . . . . . . . . . . . . . . . . . 37User Profile Tools . . . . . . . . . . . . . . . . . . . . . . . . . . . . . . . . . . . . . . . . . . . . 38
Validate Profile . . . . . . . . . . . . . . . . . . . . . . . . . . . . . . . . . . . . . . . . . . . 38Show Concepts Tree . . . . . . . . . . . . . . . . . . . . . . . . . . . . . . . . . . . . . . . . . . . . . . 38Subject Maps . . . . . . . . . . . . . . . . . . . . . . . . . . . . . . . . . . . . . . . . . . . . . . . . . . . 39
Edit Subject Maps . . . . . . . . . . . . . . . . . . . . . . . . . . . . . . . . . . . . . . . . . . . . 40Change the Default Subject Map . . . . . . . . . . . . . . . . . . . . . . . . . . . . . . 41
InQuira Language Analysis . . . . . . . . . . . . . . . . . . . . . . . . . . . . . . . . . . . . . . . . 41Language Analysis Components . . . . . . . . . . . . . . . . . . . . . . . . . . . . . . . . . 42The Language Analysis Process . . . . . . . . . . . . . . . . . . . . . . . . . . . . . . . . . . 42
The Content Store and Indexes . . . . . . . . . . . . . . . . . . . . . . . . . . . . . . . 43Analyzing Requests . . . . . . . . . . . . . . . . . . . . . . . . . . . . . . . . . . . . . . . . 43
iv Intelligent Search Optimization Guide

Evaluating Requests . . . . . . . . . . . . . . . . . . . . . . . . . . . . . . . . . . . . . . . 43Evaluating Spelling . . . . . . . . . . . . . . . . . . . . . . . . . . . . . . . . . . . . . 44Evaluating Business Conditions . . . . . . . . . . . . . . . . . . . . . . . . . . . 44Evaluating Language Conditions . . . . . . . . . . . . . . . . . . . . . . . . . . . 44
Defining Response Criteria . . . . . . . . . . . . . . . . . . . . . . . . . . . . . . . . . . 45Types of Actions . . . . . . . . . . . . . . . . . . . . . . . . . . . . . . . . . . . . . . . 45
Evaluating Actions . . . . . . . . . . . . . . . . . . . . . . . . . . . . . . . . . . . . . . . . 45The Scoring Process . . . . . . . . . . . . . . . . . . . . . . . . . . . . . . . . . . . . . . . . . . . . . 46
Search Component Scores . . . . . . . . . . . . . . . . . . . . . . . . . . . . . . . . . . . . . . 47The Document Relevance and Recency Scores . . . . . . . . . . . . . . . . . . . . . 47
Evaluating Anaphora . . . . . . . . . . . . . . . . . . . . . . . . . . . . . . . . . . . . . . . 48Creating the Salience List . . . . . . . . . . . . . . . . . . . . . . . . . . . . . . . . 48Identifying Anaphoric Expressions . . . . . . . . . . . . . . . . . . . . . . . . . 49Determining the Head of the Anaphoric Expression . . . . . . . . . . . . 50Testing Referring Expressions Within the Current Request . . . . . . 50Resolving Anaphoric Expressions . . . . . . . . . . . . . . . . . . . . . . . . . . 51Annotating the Anaphoric Expression . . . . . . . . . . . . . . . . . . . . . . . 52
Chapter 2 Process Wizards . . . . . . . . . . . . . . . . . . . . . . . . . . . . . . . . . . . . . . . . . . . . . . . . 53Implementing the Process Wizard Feature . . . . . . . . . . . . . . . . . . . . . . . . . . . . 55Process Wizard Elements . . . . . . . . . . . . . . . . . . . . . . . . . . . . . . . . . . . . . . . . . 55
Process Wizard Steps . . . . . . . . . . . . . . . . . . . . . . . . . . . . . . . . . . . . . . . . . . 56Process Wizard Fields . . . . . . . . . . . . . . . . . . . . . . . . . . . . . . . . . . . . . . . . . 56Process Wizard Conditions and Transitions . . . . . . . . . . . . . . . . . . . . . . . . 56Process Wizard User Interface Elements . . . . . . . . . . . . . . . . . . . . . . . . . . . 57
Accessing the Process Wizard Editor . . . . . . . . . . . . . . . . . . . . . . . . . . . . . . . . 57Using the Process Wizard Editor . . . . . . . . . . . . . . . . . . . . . . . . . . . . . . . . . . . . 59
The Graphic View . . . . . . . . . . . . . . . . . . . . . . . . . . . . . . . . . . . . . . . . . . . . 60Step Displays in the Graphic View . . . . . . . . . . . . . . . . . . . . . . . . . . . . 61
Process Wizard Editor Step Identification . . . . . . . . . . . . . . . . . . . . 63Conditions and Transitions in the Graphic View . . . . . . . . . . . . . . . . . 63
The Process Wizard Inspector . . . . . . . . . . . . . . . . . . . . . . . . . . . . . . . . . . . 64The Default Step . . . . . . . . . . . . . . . . . . . . . . . . . . . . . . . . . . . . . . . . . . . . . 66The Process Step Inspector . . . . . . . . . . . . . . . . . . . . . . . . . . . . . . . . . . . . . 67
The Step Fields Tab . . . . . . . . . . . . . . . . . . . . . . . . . . . . . . . . . . . . . . . . 69The Step Transitions Tab . . . . . . . . . . . . . . . . . . . . . . . . . . . . . . . . . . . . 70The Step Preview Tab . . . . . . . . . . . . . . . . . . . . . . . . . . . . . . . . . . . . . . 71
The Shared Fields Inspector . . . . . . . . . . . . . . . . . . . . . . . . . . . . . . . . . . . . 72Tutorial: Creating a Process Wizard . . . . . . . . . . . . . . . . . . . . . . . . . . . . . . . . . 74
Scenario: Creating a Process to Assist Message Retrieval . . . . . . . . . . . . . 74Designing the Wizard . . . . . . . . . . . . . . . . . . . . . . . . . . . . . . . . . . . . . . . . . 75Designing the Process Steps . . . . . . . . . . . . . . . . . . . . . . . . . . . . . . . . . . . . 76Designing Step Fields . . . . . . . . . . . . . . . . . . . . . . . . . . . . . . . . . . . . . . . . . 77
Intelligent Search Optimization Guide v

Designing Step Conditions and Transitions . . . . . . . . . . . . . . . . . . . . . . . . . 78Defining the Process Using the Process Wizard Editor . . . . . . . . . . . . . . . . 80
Defining a New Process . . . . . . . . . . . . . . . . . . . . . . . . . . . . . . . . . . . . . 80Defining the Initial Step . . . . . . . . . . . . . . . . . . . . . . . . . . . . . . . . . . . . . 82
Defining the Introductory Text Field . . . . . . . . . . . . . . . . . . . . . . . . 83Defining the User Options for the Initial Step . . . . . . . . . . . . . . . . . 83Previewing the Initial Step . . . . . . . . . . . . . . . . . . . . . . . . . . . . . . . . 85
Defining Information Steps . . . . . . . . . . . . . . . . . . . . . . . . . . . . . . . . . . 86Defining the Email Message Location Step (Step 2A) . . . . . . . . . . 86Creating the Email Location Step . . . . . . . . . . . . . . . . . . . . . . . . . . 87Specifying the Condition for the Email Location Step . . . . . . . . . . 87Specifying the Email Location Step Name . . . . . . . . . . . . . . . . . . . 88Defining the Introductory Text Field for the Email Location Step . 89Defining User Options for the Email Location Step . . . . . . . . . . . . 90
Defining Solution Steps . . . . . . . . . . . . . . . . . . . . . . . . . . . . . . . . . . . . . 91Defining the Local Email Solution Step . . . . . . . . . . . . . . . . . . . . . 91Creating the Local Email Solution Step . . . . . . . . . . . . . . . . . . . . . . 91Specifying the Condition for the Local Email Solution Step . . . . . . 92Defining the Text Field for the Local Email Solution Step . . . . . . . 93
Tutorial Review . . . . . . . . . . . . . . . . . . . . . . . . . . . . . . . . . . . . . . . . . . . . . . 95Creating Process Wizards . . . . . . . . . . . . . . . . . . . . . . . . . . . . . . . . . . . . . . . . . . 96
Creating New Process Wizards . . . . . . . . . . . . . . . . . . . . . . . . . . . . . . . . . . 96Defining a New Process Wizard . . . . . . . . . . . . . . . . . . . . . . . . . . . . . . 97Copying an Existing Process Wizard . . . . . . . . . . . . . . . . . . . . . . . . . . . 98
Creating Process Steps . . . . . . . . . . . . . . . . . . . . . . . . . . . . . . . . . . . . . . . . . . . . 99Creating a New First Step . . . . . . . . . . . . . . . . . . . . . . . . . . . . . . . . . . . . . . 101Designating a New First Step . . . . . . . . . . . . . . . . . . . . . . . . . . . . . . . . . . . . 101Deleting Process Steps . . . . . . . . . . . . . . . . . . . . . . . . . . . . . . . . . . . . . . . . . 102Unused Steps . . . . . . . . . . . . . . . . . . . . . . . . . . . . . . . . . . . . . . . . . . . . . . . . 103
Previewing Steps . . . . . . . . . . . . . . . . . . . . . . . . . . . . . . . . . . . . . . . . . . . . . . . . 103Previewing Steps within the Process Step Inspector . . . . . . . . . . . . . . . . . . 104Previewing Steps within a Browser . . . . . . . . . . . . . . . . . . . . . . . . . . . . . . . 105
Defining Fields . . . . . . . . . . . . . . . . . . . . . . . . . . . . . . . . . . . . . . . . . . . . . . . . . . 106Specifying Field Types . . . . . . . . . . . . . . . . . . . . . . . . . . . . . . . . . . . . . . . . . 108Specifying a Search Action within a Step Field . . . . . . . . . . . . . . . . . . . . . . 111
Creating Shared Fields . . . . . . . . . . . . . . . . . . . . . . . . . . . . . . . . . . . . . . . . . . . . 111Creating a New Shared Field from an Existing Shared Field . . . . . . . . . . . 114Adding a Shared Field to a Process Step . . . . . . . . . . . . . . . . . . . . . . . . . . . 114
Defining Conditions . . . . . . . . . . . . . . . . . . . . . . . . . . . . . . . . . . . . . . . . . . . . . . 115Specifying Condition Field Names . . . . . . . . . . . . . . . . . . . . . . . . . . . . . . . 115Specifying Condition Values . . . . . . . . . . . . . . . . . . . . . . . . . . . . . . . . . . . . 116
Defining Transitions . . . . . . . . . . . . . . . . . . . . . . . . . . . . . . . . . . . . . . . . . . . . . . 117
vi Intelligent Search Optimization Guide

Creating Dictionary Rules to Invoke Process Wizards . . . . . . . . . . . . . . . . . . . 118Assigning the Process Wizard Action to a Rule . . . . . . . . . . . . . . . . . . . . . 118
The Process Wizard User Interface . . . . . . . . . . . . . . . . . . . . . . . . . . . . . . . . . . 119The Process Wizard Answer . . . . . . . . . . . . . . . . . . . . . . . . . . . . . . . . . . . . 119The Step Display Area . . . . . . . . . . . . . . . . . . . . . . . . . . . . . . . . . . . . . . . . . 120Modifying the Process Wizard User Interface . . . . . . . . . . . . . . . . . . . . . . 120
Chapter 3 Personal Navigation Setup. . . . . . . . . . . . . . . . . . . . . . . . . . . . . . . . . . . . . . . . 123Personalized Navigation Presentation . . . . . . . . . . . . . . . . . . . . . . . . . . . . . . . . 125Personalized Navigation Implementation . . . . . . . . . . . . . . . . . . . . . . . . . . . . . 126The Personalized Navigation application . . . . . . . . . . . . . . . . . . . . . . . . . . . . . 126Personalized Navigation Application Components . . . . . . . . . . . . . . . . . . . . . . 127
Taxonomies . . . . . . . . . . . . . . . . . . . . . . . . . . . . . . . . . . . . . . . . . . . . . . . . . 128Facets . . . . . . . . . . . . . . . . . . . . . . . . . . . . . . . . . . . . . . . . . . . . . . . . . . . . . . 129Classifiers . . . . . . . . . . . . . . . . . . . . . . . . . . . . . . . . . . . . . . . . . . . . . . . . . . 129Taxonomy Builders . . . . . . . . . . . . . . . . . . . . . . . . . . . . . . . . . . . . . . . . . . . 130Formatters . . . . . . . . . . . . . . . . . . . . . . . . . . . . . . . . . . . . . . . . . . . . . . . . . . 130Comparators . . . . . . . . . . . . . . . . . . . . . . . . . . . . . . . . . . . . . . . . . . . . . . . . . 130
Implementing Personalized Navigation . . . . . . . . . . . . . . . . . . . . . . . . . . . . . . . 131Activating the Personalized Navigation User Interface Layout . . . . . . . . . 131Accessing the Personalized Navigation Application . . . . . . . . . . . . . . . . . . 132Defining a Navigation Application . . . . . . . . . . . . . . . . . . . . . . . . . . . . . . . 132
Configuring the Navigation Application . . . . . . . . . . . . . . . . . . . . . . . . 134Defining Taxonomies . . . . . . . . . . . . . . . . . . . . . . . . . . . . . . . . . . . . . . . . . 135Defining Taxonomy Display Properties . . . . . . . . . . . . . . . . . . . . . . . . . . . 136Specifying Automatic Facet Creation . . . . . . . . . . . . . . . . . . . . . . . . . . . . . 139Specifying the Content Source for the Taxonomy . . . . . . . . . . . . . . . . . . . 140Specifying Generation Options . . . . . . . . . . . . . . . . . . . . . . . . . . . . . . . . . . 142
Automatically Generating Facets for Database Content . . . . . . . . . . . . 142Generating a Date Taxonomy for a Selected Column . . . . . . . . . . . 143Generating a Numeric Range (Price) Taxonomy . . . . . . . . . . . . . . 144Generating a Facet Based on a Single Column . . . . . . . . . . . . . . . . 146Generating a Taxonomy Based on Multiple Columns . . . . . . . . . . 146
Automatically Generating Facets for Document Content . . . . . . . . . . . 147Generating a Taxonomy Based on Directory Structure . . . . . . . . . . 147Generating a Taxonomy from Concepts . . . . . . . . . . . . . . . . . . . . . 148Generating a Taxonomy from Meta-Tags . . . . . . . . . . . . . . . . . . . . 149Configuring the Preprocessor to Preserve Meta Tags for Classification 150
Manually Assigning Database Content to a Facet . . . . . . . . . . . . . . . . . 150Assigning All Table Entries to a Facet . . . . . . . . . . . . . . . . . . . . . . 151Assigning Selected Tables to a Selected Facet . . . . . . . . . . . . . . . . 151
Intelligent Search Optimization Guide vii

Manually Assigning Document Content to a Facet . . . . . . . . . . . . . . . . 152Assigning Documents to a Facet by Collection . . . . . . . . . . . . . . . . 152Assigning Documents to a Facet by Type . . . . . . . . . . . . . . . . . . . . 153Assigning Documents to a Facet by Language . . . . . . . . . . . . . . . . 154Assigning Documents to a Taxonomy by Content . . . . . . . . . . . . . . 154Assigning Documents to a Facet by URL . . . . . . . . . . . . . . . . . . . . 155
Performing Data Classification . . . . . . . . . . . . . . . . . . . . . . . . . . . . . . . . . . 156Referring to Facets from Dictionary Rules . . . . . . . . . . . . . . . . . . . . . . . . . 157
Referring to Facets by Name . . . . . . . . . . . . . . . . . . . . . . . . . . . . . . . . . 157Selecting Facets within Rules . . . . . . . . . . . . . . . . . . . . . . . . . . . . . . . . 158Selecting Multiple Facets from the Tree Display . . . . . . . . . . . . . . . . . . 159Selecting Multiple Facets using IML . . . . . . . . . . . . . . . . . . . . . . . . . . . 159Using VIL in Rules that Select Content Categories . . . . . . . . . . . . . . . . 160Restricting the Display for Facets Above a Selected Facet . . . . . . . . . . 160Preventing a Facet from Displaying . . . . . . . . . . . . . . . . . . . . . . . . . . . . 161Specifying Approximate Facet Matching . . . . . . . . . . . . . . . . . . . . . . . 161Selecting a Range of Content Categories . . . . . . . . . . . . . . . . . . . . . . . . 162Responding to Requests for Non-Existent Content Categories . . . . . . . 162Facet expansion in addition to restriction . . . . . . . . . . . . . . . . . . . . . . . 162Understanding Facet Counts . . . . . . . . . . . . . . . . . . . . . . . . . . . . . . . . . 163
Using Advanced Facet Definition Settings . . . . . . . . . . . . . . . . . . . . . . . . . 164Specifying Advanced Facet Display Settings . . . . . . . . . . . . . . . . . . . . 166
Using Advanced Data Classification . . . . . . . . . . . . . . . . . . . . . . . . . . . . . . 172Using an SQL Condition to Classify Content . . . . . . . . . . . . . . . . . . . . . . . 172Classifying Content Based on Database Column Values . . . . . . . . . . . . . . . 173
Configuring Multiple Taxonomy levels from Structured Columns . . . . 174Configuring the Appearance of Structured Column Child Facet Names 174Example: Creating a Taxonomy from Database Categories . . . . . . . . . 174Example: Creating a Taxonomy from Dates in a Database . . . . . . . . . . 176Example: Creating a Price Taxonomy from a Database . . . . . . . . . . . . 178
Classifying Large Taxonomies by Accessing the Data at Runtime . . . . . . . 179Classifying Content by Collection . . . . . . . . . . . . . . . . . . . . . . . . . . . . . . . . 180Classifying Content by Document Type . . . . . . . . . . . . . . . . . . . . . . . . . . . 181Using IML Expressions to Classify Content . . . . . . . . . . . . . . . . . . . . . . . . 183Classifying Content Based on Language . . . . . . . . . . . . . . . . . . . . . . . . . . . 184Classifying Content Based on HTML Meta Tags . . . . . . . . . . . . . . . . . . . . 185
Example: Creating a Taxonomy from Document Metadata . . . . . . . . . 186Classifying Content Based on Dictionary Concepts . . . . . . . . . . . . . . . . . . 188Classifying Content by Directory Structure . . . . . . . . . . . . . . . . . . . . . . . . . 189Classifying Content by URL . . . . . . . . . . . . . . . . . . . . . . . . . . . . . . . . . . . . 190Using the Unstructured Content Classifier . . . . . . . . . . . . . . . . . . . . . . . . . . 191
viii Intelligent Search Optimization Guide

Personalized Navigation Application Classification Components . . . . . . . . . . 192Structured Data Classifiers . . . . . . . . . . . . . . . . . . . . . . . . . . . . . . . . . . . . . 193
The SQL Classifier . . . . . . . . . . . . . . . . . . . . . . . . . . . . . . . . . . . . . . . . 193The Structured Column Classifier . . . . . . . . . . . . . . . . . . . . . . . . . . . . . 194The Ad Hoc Column Classifier . . . . . . . . . . . . . . . . . . . . . . . . . . . . . . . 196
Ad Hoc Column Classifier Settings . . . . . . . . . . . . . . . . . . . . . . . . . 196Unstructured Data Classifiers . . . . . . . . . . . . . . . . . . . . . . . . . . . . . . . . . . . 198
The Collection Classifier . . . . . . . . . . . . . . . . . . . . . . . . . . . . . . . . . . . . 199The Document Type Classifier . . . . . . . . . . . . . . . . . . . . . . . . . . . . . . . 200The Meta Tag Classifier . . . . . . . . . . . . . . . . . . . . . . . . . . . . . . . . . . . . 201The Ontology Classifier . . . . . . . . . . . . . . . . . . . . . . . . . . . . . . . . . . . . . 202The Site Graph Classifier . . . . . . . . . . . . . . . . . . . . . . . . . . . . . . . . . . . 204The URL Classifier . . . . . . . . . . . . . . . . . . . . . . . . . . . . . . . . . . . . . . . . 205The Unstructured Content Classifier . . . . . . . . . . . . . . . . . . . . . . . . . . . 206The IML Classifier . . . . . . . . . . . . . . . . . . . . . . . . . . . . . . . . . . . . . . . . 207The Language Classifier . . . . . . . . . . . . . . . . . . . . . . . . . . . . . . . . . . . . 208
Advanced Data Classifier . . . . . . . . . . . . . . . . . . . . . . . . . . . . . . . . . . . . . . 208The Template Classifier . . . . . . . . . . . . . . . . . . . . . . . . . . . . . . . . . . . . . 209
IML Template Settings . . . . . . . . . . . . . . . . . . . . . . . . . . . . . . . . . . 209On-the-fly Range Template Settings . . . . . . . . . . . . . . . . . . . . . . . . 210Structured To Unstructured Template Settings . . . . . . . . . . . . . . . . 212URL Template Settings . . . . . . . . . . . . . . . . . . . . . . . . . . . . . . . . . . 212
Personalized Navigation Application Taxonomy Builders . . . . . . . . . . . . . 213The String Taxonomy Builder . . . . . . . . . . . . . . . . . . . . . . . . . . . . . . . . 214The Date Taxonomy Builder . . . . . . . . . . . . . . . . . . . . . . . . . . . . . . . . . 215The Directory Taxonomy Builder . . . . . . . . . . . . . . . . . . . . . . . . . . . . . 217The Range Taxonomy Builder . . . . . . . . . . . . . . . . . . . . . . . . . . . . . . . 218
Specifying Regular Expression Substitutions . . . . . . . . . . . . . . . . . . . . . . . 220Personalized Navigation Application Comparators . . . . . . . . . . . . . . . . . . 221Personalized Navigation Application Formatters . . . . . . . . . . . . . . . . . . . . 222
Chapter 4 User Manager . . . . . . . . . . . . . . . . . . . . . . . . . . . . . . . . . . . . . . . . . . . . . . . . . . 223Using User Manager . . . . . . . . . . . . . . . . . . . . . . . . . . . . . . . . . . . . . . . . . . . . . 224Add New User . . . . . . . . . . . . . . . . . . . . . . . . . . . . . . . . . . . . . . . . . . . . . . . . . . 226
User Permissions . . . . . . . . . . . . . . . . . . . . . . . . . . . . . . . . . . . . . . . . . . . . . 227Modify a User Account . . . . . . . . . . . . . . . . . . . . . . . . . . . . . . . . . . . . . . . . 227Delete a User Account . . . . . . . . . . . . . . . . . . . . . . . . . . . . . . . . . . . . . . . . . 227
The Preference Service . . . . . . . . . . . . . . . . . . . . . . . . . . . . . . . . . . . . . . . . . . . 230Access to Preference Data . . . . . . . . . . . . . . . . . . . . . . . . . . . . . . . . . . . . . . 230Hierarchical Namespace Traversal . . . . . . . . . . . . . . . . . . . . . . . . . . . . . . . 230
Preference Types . . . . . . . . . . . . . . . . . . . . . . . . . . . . . . . . . . . . . . . . . . . . . . . . 231
Intelligent Search Optimization Guide ix

Business Data Providers . . . . . . . . . . . . . . . . . . . . . . . . . . . . . . . . . . . . . . . . . . . 231The Session Provider . . . . . . . . . . . . . . . . . . . . . . . . . . . . . . . . . . . . . . . . . . 231
Session Provider Preferences . . . . . . . . . . . . . . . . . . . . . . . . . . . . . . . . . 232Creating Custom Providers . . . . . . . . . . . . . . . . . . . . . . . . . . . . . . . . . . . . . . . . 232
Defining a Provider in the Application . . . . . . . . . . . . . . . . . . . . . . . . . . . . 233Creating Custom Preferences . . . . . . . . . . . . . . . . . . . . . . . . . . . . . . . . . . . . . . . 233Configuring Preferences . . . . . . . . . . . . . . . . . . . . . . . . . . . . . . . . . . . . . . . . . . . 234Editing Preferences . . . . . . . . . . . . . . . . . . . . . . . . . . . . . . . . . . . . . . . . . . . . . . 235
The Context Variables Page . . . . . . . . . . . . . . . . . . . . . . . . . . . . . . . . . . . . . 236Displaying the Editable Context Variable List . . . . . . . . . . . . . . . . . . . . . . 236The Editing: Context Variables Page . . . . . . . . . . . . . . . . . . . . . . . . . . . . . . 236Selecting a Context Variable for Editing . . . . . . . . . . . . . . . . . . . . . . . . . . . 237The Editing: Context Variables: Variables Page . . . . . . . . . . . . . . . . . . . . . 237Adding and Modifying Context Variable Preference Parameters . . . . . . . . 237
The Preference API . . . . . . . . . . . . . . . . . . . . . . . . . . . . . . . . . . . . . . . . . . . . . . 238The getPreference Method . . . . . . . . . . . . . . . . . . . . . . . . . . . . . . . . . . . . . . 239The getExternalString Method . . . . . . . . . . . . . . . . . . . . . . . . . . . . . . . . . . . 239The getExternalCode Method . . . . . . . . . . . . . . . . . . . . . . . . . . . . . . . . . . . 239The getPreferenceValue Method . . . . . . . . . . . . . . . . . . . . . . . . . . . . . . . . . 240The SetPreferenceValue Methods . . . . . . . . . . . . . . . . . . . . . . . . . . . . . . . . 240The rundown Method . . . . . . . . . . . . . . . . . . . . . . . . . . . . . . . . . . . . . . . . . . 242The getPreferences Method . . . . . . . . . . . . . . . . . . . . . . . . . . . . . . . . . . . . . 243The getPreferenceKeys Method . . . . . . . . . . . . . . . . . . . . . . . . . . . . . . . . . . 243
The Provider API . . . . . . . . . . . . . . . . . . . . . . . . . . . . . . . . . . . . . . . . . . . . . . . . 244The Provider Default Constructor . . . . . . . . . . . . . . . . . . . . . . . . . . . . . . . . 244The getType Method . . . . . . . . . . . . . . . . . . . . . . . . . . . . . . . . . . . . . . . . . . 244The get Methods . . . . . . . . . . . . . . . . . . . . . . . . . . . . . . . . . . . . . . . . . . . . . . 245The set Method . . . . . . . . . . . . . . . . . . . . . . . . . . . . . . . . . . . . . . . . . . . . . . . 247The toString Method . . . . . . . . . . . . . . . . . . . . . . . . . . . . . . . . . . . . . . . . . . 247The Provider rundown Method . . . . . . . . . . . . . . . . . . . . . . . . . . . . . . . . . . 247
x Intelligent Search Optimization Guide

Preface About This Guide
This guide is intended to be used by those already familiar with the features covered in the Intelligent Search Language Tuning Guide, and want to use the InQuira Language Workbench to further optimize the features of InQuira Intelligent Search.
Intelligent Search Optimization Guide 1

In This Guide
The Optimizing InQuira Intelligent Search Guide is divided into the following sections:
Contacting InQuira
You can contact InQuira by mail, telephone, fax, and email.
Chapter 1, Dictionary Manager Advanced Features
Describes how to use the advanced features of the Dictionary Manager. See Chapter 2, Dictionary Manager in the Intelligent Search Language Tuning Guide for information how to use the basic features of the Dictionary Manager.
Chapter 2, Process Wizards Describes how to create Process Wizards that respond to specific questions with preconfigured dialogs.
Chapter 3, Personal Navigation Setup
Describes how to implement the InQuira Personalized Navigation feature to categorize application content and display a hierarchy of the results, such as products and models, services, and prices, in the User Interface.
Chapter 4, User Manager Describes the InQuira User Manager component accessed from within the Language Workbench that allows you to create and set permissions for Language Workbench users.
Chapter 5, Configuring Access to Business Data
Describes the Preference Service that accesses and stores business data items obtained from configured data sources.
Address: 851 Traeger Ave.
Suite 125
San Bruno, CA 94066Telephone: (650) 246-5000InQuira Customer Support Hotline:
(888) 947-8324
NOTE: See InQuira Customer Support on page 4 for more information on reporting incidents to InQuira Customer Support.
Fax: (650) 264-5036
2 Intelligent Search Optimization Guide

Email: For sales information, send email to [email protected]. For product support, send email to [email protected].
World Wide Web: Learn more about InQuira products, solutions, services, and support on the world wide web at: www.inquira.com.
Intelligent Search Optimization Guide 3
InQuira Customer Support
InQuira Customer Support is available from 6:30 am to 4:30 pm PST, excluding InQuira holidays.
For Priority 1 incidents, such as when a production system hangs or crashes, or when continued use of the product is impossible, please use the support hotline: (888) 947-8324.
IMPORTANT: We accept Priority 1 requests only by telephone. We recommend that you send a follow-up email for Priority 1 requests after contacting InQuira Customer Support using the support hotline.
For Priority 2, 3, and 4 incidents, as described below, please contact InQuira Customer Support by email at: [email protected].
Incident response times are determined by the following priority definitions:
Priority Contact Response Time Definition 1 The InQuira Customer
Support hotline: (888) 947-8324
1 business hour A production system hangs or crashes, or continued use of the product is impossible.
2 [email protected] 8 business hours The product is usable with major restrictions on functionality.
3 [email protected] 16 business hours The product is usable with minor restrictions on functionality.
4 [email protected] 3 business days You have a question or an enhancement request pertaining to the software or the documentation.
4 Intelligent Search Optimization Guide

InQuira Product Documentation
InQuira documentation is available only to licensed users of our software products and may not be redistributed in any form without express permission from InQuira, Inc.
The InQuira documentation is available in PDF format. It is packaged in the /docs directory, within the /inquira directory, for example:
<InQuira_install_dir>/inquira/docs
NOTE: You need a PDF reader application installed on each processor on which you plan to view the InQuira product documentation. The Adobe Acrobat reader is available from Adobe Systems at: http://www.adobe.com.
Detailed information about each product document set is available in:
• Intelligent Search Documentation on page 6
• Intelligent Search Analytics Documentation on page 7
• Information Manager Documentation on page 8
• Contact Center Documentation on page 9
If you encounter a problem, need help using the documentation, or want to report an error in the content, please contact InQuira Customer Support as described in InQuira Customer Support on page 4.
If you need help obtaining InQuira product documentation, or want to obtain permission to redistribute a portion of the contents, please contact your InQuira account representative.
Intelligent Search Optimization Guide 5

Intelligent Search Documentation
Intelligent Search is distributed with the following documentation.
Document Number DescriptionIntelligent Search Installation Guide
IS80-IG-00 This guide is intended for technical staff who are responsible for installing InQuira 8.1. It provides detailed information on installing InQuira 8.1 and configuring the application on a single processor using the Installation Configuration Environment facility.
Intelligent Search Administrator's Guide and Reference
IS80-CA-00 This guide is intended for system and application administrators who need to configure an InQuira 8.1 application in an enterprise environment. It describes InQuira 8.1 integration, development, configuration, and maintenance processes and tasks.
Intelligent Search Language Administration Guide
IS80-LA-00 This guide is intended for business users and subject matter experts who need to create and maintain the language processing elements of a InQuira 8.1 application using the System Manager. This book provides usage information about the System Manager, conceptual information about the InQuira 8.1 language objects, and task information about the process of managing the user experience provided by the InQuira 8.1 application.
Intelligent Search Tuning Guide
IS80-LD-00 This guide is intended for application developers who need to create and maintain advanced InQuira 8.1 language-processing elements using the Dictionary and other InQuira Language Workbench applications.
Optimizing InQuira Intelligent Search
IS80-AG-00 This guide is intended for application developers who need to implement InQuira 8.1 advanced features, including Personalized Navigation and Process Wizards.
Intelligent Search Application Developer’s Guide
IS80-API-00 This guide provides information about integrating and customizing the InQuira 8.1 Personalized Response User Interface.
6 Intelligent Search Optimization Guide

Intelligent Search Analytics Documentation
Intelligent Search Analytics is distributed with the following documentation.
Intelligent Search Language Reference
IS80-LRG-00 This guide is for language developers implementing InQuira 8.1 applications that utilize the intent libraries and advanced language processing functions. These guides are published as separate documents that provide reference information for each industry-specific intent library. Each reference also contains complete descriptions of InQuira Match Language and Variable Instantiation Language.
Intelligent Search User Interface Guide
IS80-UI-00 This guide is intended for application developers who need to customize the InQuira 8.1 Personalized Response User Interface, and integrate it with a production web application. It contains information about the elements and features of the User Interface, and provides guidelines for integrating it into an enterprise web architecture, customizing its appearance and functionality, and implementing various special features.
Document Number DescriptionInQuira Analytics Installation Guide
IA80-IG-00 This guide is intended for technical staff who are responsible for installing Intelligent Search Analytics. It provides detailed information on installing and configuring the Intelligent Search Analytics product for use with an InQuira 8.1 application.
Analytics User Guide IA80-CA-00 This guide is intended for systems and application administrators who need to configure the Intelligent Search and Information Manager Analytics components to report on InQuira 8.1 application performance.
Intelligent Search Optimization Guide 7

Information Manager Documentation
InQuira Information Manager is distributed with the following documentation.
Document Number DescriptionInformation Manager Installation Guide
IM80-IG-00 This guide is intended for technical staff who are responsible for installing InQuira Information Manager. It provides detailed information on installing and configuring the Information Manager product.
Information Manager Administration Guide
IM80-CA-00 This guide is intended for systems and application administrators who need to configure and administer an InQuira Information Manager application, and integrate it with an InQuira 8.1 application. It also contains information for general business users who need to use the Information Manager to create and manage content.
Information Manager Content Authoring Guide
IM80-AG-00 This guide is intended for technical staff who are responsible for authoring content in InQuira Information Manager. It provides detailed information on creating content and managing workflow tasks in the Information Manager console.
Information Manager Developer’s Guide
IM80-WSR-00 This guide is intended for application developers who need to integrate Information Manager content, content category, and user and security functions with external applications. It contains reference information and examples for all packages, classes, methods, and interfaces of the Information Manager Web Services API.
8 Intelligent Search Optimization Guide

Contact Center Documentation
The InQuira 8.1 contact center products are distributed with the following documentation.
Screen and Text Representations
The product screens, screen text, and file contents depicted in the documentation are examples. We attempt to convey the product's appearance and functionality as accurately as possible; however, the actual product contents and displays may differ from the published examples.
References to World Wide Web Resources
For your convenience, we refer to Uniform Resource Locators (URLs) for resources published on the World Wide Web when appropriate. We attempt to provide accurate information; however, these resources are controlled by their respective owners and are therefore subject to change at any time.
Document Number DescriptionContact Center Advisor Integration Guide
CA80-IG-00 This guide is intended for application developers and systems administrators who need to plan for and integrate the InQuira Contact Center Advisor with an InQuira application and a supported CRM application.
Intelligent Search Siebel Integration Guide
CAS80-IG-00 This guide is intended for application developers and systems administrators who need to plan for and integrate InQuira 8.1 with Siebel 7 Enterprise Applications using the Siebel Adapter for InQuira 8.1.
Intelligent Search Optimization Guide 9

10 Intelligent Search Optimization Guide

Chapter 1 Dictionary Manager Advanced Features
The InQuira Dictionary Manager is a component accessed from within the Language Workbench that allows you to customize and maintain the Dictionary Objects used by InQuira Intelligent Search to return the best possible answers.
NOTE: Before using the information in this chapter, it is advised that you familiarize yourself with the Intelligent Search Language Tuning Guide.
In addition to the Advanced Features of Concepts on page 12 and Advanced Features of Rules on page 14, this chapter describes the following Dictionary Objects:
• Answer Action Methods for Rules on page 22
• Alias Lists on page 27
• Exception Lists on page 31
• Intent Hierarchy on page 34
• User Profiles on page 37
• Show Concepts Tree on page 38
• Subject Maps on page 39
For information on Dictionary Objects not included, please see the Intelligent Search Language Tuning Guide.
This chapter also describes:
• InQuira Language Analysis on page 41
• The Scoring Process on page 46
Intelligent Search Optimization Guide 11

Advanced Features of Concepts
This section explains how to use the advanced features of Concepts. For more information on Concepts please see Intelligent Search Language Tuning Guide
• Select Advanced from the Concept window. The following options are displayed:
- Index IML on page 12 (Checked by default.)
- Openclass on page 13(Unchecked by default.)
- Subsumes on page 13 (Checked by default.)
Index IML
The Index IML option located in the Advanced menu of the Concept window is checked by default, regardless of whether the Concept contains IML. When the Index IML option is checked, the System Manager reindexes the Concept (including the associated IML) upon running an indexing job. For more information on Indexing, please see Intelligent Search Administration Guide.
If the Index job is too slow, you may uncheck the Index IML option. To uncheck the Index IML option from multiple Concepts use the Dictionary Find Tool to find Concepts with Indexing IML set.
Once all the Concepts with IML indexing are displayed:
• Select All Concepts.
• ‘Right-click’, and select Unset index IML.
12 Intelligent Search Optimization Guide

Openclass
The Openclass option located in the Advanced menu of the Concept window allows you to manually classify a Concept as openclass. An Openclass Concept defines an open-ended class of strings which fit a particular pattern, but which do not have interchangeable meanings. Typical examples are email addresses and dates. Openclass Concepts must be defined with IML.
The Openclass option is unchecked by default. Upon checking the Openclass option, the query containing the Openclass Concept is annotated with an #OPENCLASS label on the string. This #OPENCLASS label prevents Concept-related Search Component Rules (for example, Required Concept SC) from firing. Instead InQuira Intelligent Search uses a set of specific Openclass Search Component Rules that match on the string-form representation, and do not match on synonyms or clusters.
For example, a query containing the string “1/12/10” is annotated with the openclass <Date IML> Concept. This Concept triggers InQuira Intelligent Search to find the numbers in a string, versus finding the numbers individually.
Subsumes
The Subsumes option located in the Advanced menu of the Concept window is checked by default.
When the Subsumes option is checked, the Concept containing multiple words matches only on a string that includes all the parts of the Concept. If unchecked, then the Concept matches on any part of the Concept.
For example, if the Subsumes option is checked, “information manager” is annotated with only the Concept <information manager>. If the Subsumes option is unchecked, “information manager” is annotated with the Concepts <information manager>, <information>, and <manager>.
Intelligent Search Optimization Guide 13

Advanced Features of Rules
This section explains how to use the advanced features of Rules. For more information on Rules please see Intelligent Search Language Tuning Guide.
Select Advanced from the Rule window. The following options are displayed:
• Business Conditions on page 14
• Add Deferred Condition on page 16
• Add Facet Restriction on page 17
• Add Set Attribute on page 18
• Add Relative Weights on page 18
• Add Scope Weights on page 20
• Add Suppress Rule on page 21
This section also provides Answer Action Methods for Rules on page 22.
Business Conditions
Business Conditions enable you to tailor search results based on context, such as the user’s identity, location, or date and time of the query. You can configure Business Conditions to access information from the user’s current InQuira session, as well as from external sources of user and session information.
Business Conditions make use of Context Variables. Context Variables are properties that correspond to configured preferences within InQuira. With the exception of date- and time- parameters, you must configure providers for all preferences. For more information, please see Chapter 5, Configuring Access to Business Data.
14 Intelligent Search Optimization Guide
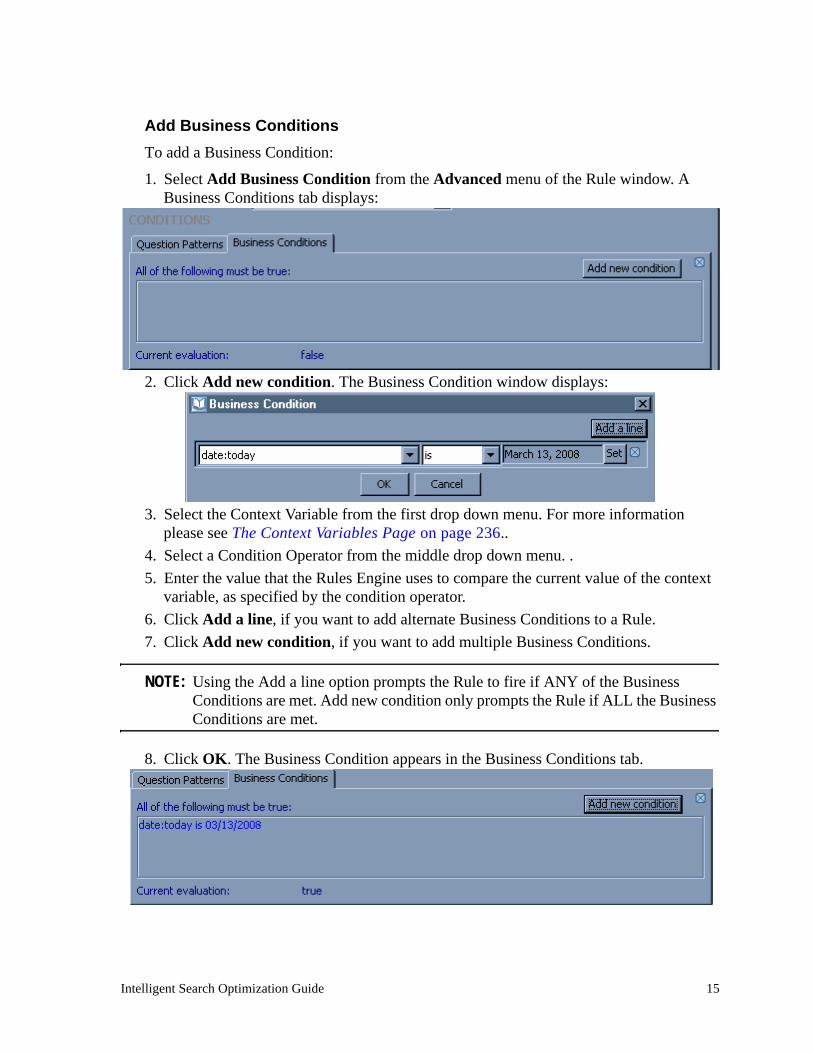
Add Business ConditionsTo add a Business Condition:
1. Select Add Business Condition from the Advanced menu of the Rule window. A Business Conditions tab displays:
2. Click Add new condition. The Business Condition window displays:
3. Select the Context Variable from the first drop down menu. For more information please see The Context Variables Page on page 236..
4. Select a Condition Operator from the middle drop down menu. .5. Enter the value that the Rules Engine uses to compare the current value of the context
variable, as specified by the condition operator.6. Click Add a line, if you want to add alternate Business Conditions to a Rule. 7. Click Add new condition, if you want to add multiple Business Conditions.
NOTE: Using the Add a line option prompts the Rule to fire if ANY of the Business Conditions are met. Add new condition only prompts the Rule if ALL the Business Conditions are met.
8. Click OK. The Business Condition appears in the Business Conditions tab.
Intelligent Search Optimization Guide 15

If the created Business Condition is currently satisfied, the Business Conditions tab displays “Current evaluation: true.” If the Business Condition is not satisfied, meaning the Rule is not triggered for response, the tab displays, “Current evaluation: fail.”
To remove a Business Condition:
1. Right-click on the Business Condition.2. Click Remove.
The Business Condition deletes without confirmation.3. Select Save from the File menu.
Add Deferred Condition
A Deferred Condition is used to return a specific Rule, typically a Managed Answer Rule, when less than a set number of results appear on the search results page.
To add a Deferred Condition:
1. Select Add Deferred Conditions from the Advanced menu of the Rule window. The Deferred Conditions tab displays:
2. Enter a number in the Number of results returned is less than field.3. Select Save from the File menu.
NOTE: To delete a Deferred Condition select the icon located on the Deferred Conditions tab.
Add Answer Action
A Managed Answer Rule may have multiple Answer Actions. For more information on Answer Actions, please see Intelligent Search Language Tuning Guide.
16 Intelligent Search Optimization Guide

Add Facet Restriction
You can restrict the scope of Search Actions using the by adding Facet Restrictions. Facets are created using the Personal Navigation Setup. For more information, please see Personal Navigation Setup.
To add a Facet Restriction:
1. Select Add Facet Restriction from the Advanced menu of the Rule window. The Facet Restriction tab displays:
2. Select a facet from the tree structure. Using a comma to separate facets, you may select more than one facet.
3. Select Save from the File file menu of the Rules window.
Intelligent Search Optimization Guide 17

Add Set Attribute
The Set Attribute option allows you to use Business Condition context variables for use within subsequent Rules. In order to test Dictionary Objects that make use of Business Conditions using Test Drive, it is necessary to establish Rules with Set Attributes. Using a Rule with a Set Attribute allows you to simulate the passing of a context variable through the User Interface. For more information on context variables, please see Chapter 5, Configuring Access to Business Data.
To add a Set Attribute:
1. Select Add Set Attribute from the Advanced menu of the Rule window. The Set Attri-bute tab displays:
2. Select a context variable from the drop down menu.3. Enter the value of the context variable.4. Select Save from the File file menu of the Rules window.‘
Add Relative Weights
You can specify custom values for weighting the score components used to rank unstructured search results by adding Relative Weights.
You can apply relative weights to the current Rule (local), or to all Rules that specify the Search method (global).
In order to specify local relative weights the Rule must contain an Answer Action using the Search method. For more information, please see Search Answer Action Method on page 23.
To specify global relative weights create a relative weights action without an accompanying Search Action. The Relative Weights parameters applies to all unstructured search results, unless they result from a Rule with specific relative weight settings.
You can specify Relative Weights based on any language conditions and available Business Conditions. For more information, please see Business Conditions on page 14.
18 Intelligent Search Optimization Guide

To add a Relative Weight:
1. Select Add Relative Weights from the Advanced menu of the Rule window. The Rel-ative Weight tab displays:
2. Enter a percentage to weight the Search Component score relative to the Relevance and Recency scores in the % Search Components field.
3. In the Relevance of documents field, specify a percentage to weight the relevance score relative to the Search Component and Recency scores.
4. In the Recency of documents field, specify a percentage to weight the Recency score relative to the Search Component and Relevance scores. The Recency score relies on the date/time stamp of a file.
NOTE: The combination of all scores must equal 100%.
For more information on Search Component Scores and Document Relevance and Recency scores, please see Chapter 5, Configuring Access to Business Data.
Intelligent Search Optimization Guide 19

Add Scope Weights
You can specify custom values for weighting the document scope in which an answer is located using the Add Scope Weights option. The Rules Engine uses scope weights to calculate the total score for a response during scoring process.
You can apply scope weights to the current Rule (local), or to all Rules that specify the Search method (global).
You specify weights only for the current Rule by including a Scope Weights action and an Answer Action using the Search method in the same Rule. For more information, please see Search Answer Action Method on page 23.
You specify global scope weights by specifying the Scope Weights action without an accompanying Search Action. The Scope Weights parameters applies to all unstructured search results, unless they result from a Rule with specific scope weight settings.
To add a Scope Weight:
1. Select Add Scope Weights from the Advanced menu of the Rule window. The Scope Weight tab displays:
2. In the % Document field, specify a percentage to weight the score when an answer is located anywhere within the document.
3. Specify a percentage to weight the score when an answer is located within a section of the document in the % Section field.
4. Specify a percentage to weight the score when an answer is located within a sentence in a document in the % Sentence field.
NOTE: The combination of all scores must equal 100%.
20 Intelligent Search Optimization Guide

Add Suppress Rule
You can specify the suppression of subsequent Rules using the Suppress Rules option. The Suppress Rules tab provides options to:
• Suppress processing of all subsequent Rules
• Suppress processing for only the specified Rules
To suppress Rule processing:
1. Select Suppress Rules from the Advanced menu of the Rule window. The Suppress Rules tab displays:
2. Specify to terminate Rule matching or Rules to exclude from processing.
- To terminate Rule matching, check the Stop looking for more Rules box.
Intelligent Search Optimization Guide 21

- To exclude Rules from processing after this Rule has fired, drag and drop Rule names from with a Rule window or as a result of the Dictionary Find Tool into the empty field.
You can delete Rules from the suppression list by right-clicking and selecting Remove from List, doing so prevents further answers from being displayed.
Answer Action Methods for Rules
The following section explains Rules using the following Answer Action Methods:
• Specific Excerpt Answer Action Method on page 22
• Search Answer Action Method on page 23
• Answer Action Methods for Rules on page 22
• Glossary Answer Action Method on page 25
• Plug-in Answer Action Method on page 26
• Process Wizard Answer Action Method on page 26
For more information on creating Rules, please see Intelligent Search Language Tuning Guide.
Specific Excerpt Answer Action Method
The Specific Excerpt Answer Action is used to display specific excerpts within the Content Store.
To use the Specific Excerpt Answer Action:
1. Select Specific Excerpt from the drop down menu of the Method field of the Rule window. The Answer: Specific Excerpt tab displays:
22 Intelligent Search Optimization Guide

2. Enter text in the Custom Link Text to display as the actual text of the link to the answer. For example to display the link text InQuira Customer Support instead of www.inquira.com/support/index.htm.
NOTE: The Custom Link Text field is only valid when used with the Link Excerpt and Raw Excerpt algorithms. For more information please see Intelligent Search Administration Guide.
3. In the Title field, enter text to match within excerpt titles.4. In the Specific Excerpt field, enter text to match within excerpts.5. Select Save from the File menu in the Rule window.
Search Answer Action Method
The Search Answer Action is used to search within indexed unstructured content.
An example of a Search Answer Action is the Launch Document Search Rule. The Launch Document Search Rule does not use any IML, but retrieves all unstructured search results using default ranking.
NOTE: If you create additional Rules with the Search Answer Action Method, you need to suppress the Launch Document Search Rule. Otherwise, you may see the same document retrieved multiple times by different Search Component Rules.
To use the Search Answer Action:
1. Select Search from the drop down menu of the Method field of the Rule window. The Answer: Search tab displays
2. Enter valid IML to specify matching criteria for the excerpts generated by the Rules Engine in the Retrieve document excerpts using this IML.
Intelligent Search Optimization Guide 23

3. (Optional.) Check the Retrieve document excerpts using default ranking to return results using the standard Search Component assignment and scoring process.
NOTE: You can use the IML field and the Default Ranking option independently of, or in conjunction with one another.
4. Select Number of results must not exceed from the drop down menu. 5. Select Save from the File menu in the Rule window.
Structured Query Answer Action Method
The Structured Query Answer Action is used to specify retrieval from configured sources of structured data.
To use the Structured Query Answer Action:
1. Select Structured Query from the drop down menu of the Method field of the Rule window. The Answer: Structured Query tab displays
2. Select a Data Source to query from the drop down menu. Please see the Intelligent Search Administration Guide for information on configuring data sources for struc-tured information retrieval.
3. In the Title of results field, enter text to specify a title under which the query results are displayed.
4. In the Description field, enter text to specify an optional description for the query results.
5. In the Structured Query field, enter the SQL query to submit.
24 Intelligent Search Optimization Guide

6. (Optional.) Enter IML in the IML to restrict Structured Query to restrict the results of the query. The Rules Engine filters the query results based on matching the specified IML.
7. (Optional.) Check the Retrieve structured results using default ranking if you want to return results using the standard Search Component assignment and scoring process.
8. Enter the number of Table rows to display with description.9. From the drop down menu, select the Number of results must not exceed. 10.Select Save from the File menu in the Rule window.
Glossary Answer Action Method
The Glossary Answer Action is used to display terms and definitions from prepared glossaries. For more information, please see Alias Lists on page 27.
NOTE: InQuira provides a preconfigured Rule, “Definition of” to use with the Alias List called “Glossary.”
To use the Glossary Answer Action:
1. Select Glossary from the drop down menu of the Method field of the Rule window. The Answer: Glossary tab displays:
2. Select the alias list from the Glossary Alias List to use drop down menu.3. In the Retrieve a glossary entry for the term referred to by this variable enter the
variable set in the Rule condition that corresponds to the desired glossary entry. 4. Select Save from the File menu in the Rule window.
Intelligent Search Optimization Guide 25

Plug-in Answer Action Method
The Plug-in Answer Action is used to create a response using an external method.
To use the Plug-in Answer Action:
1. Select Plug-in from the drop down menu of the Method field of the Rule window. The Answer: Plug-in tab displays:
2. Select a Plugin from the drop down menu.3. If displayed, enter text in the Description field in response satisfying the description.4. Select Save from the File menu in the Rule window.
Process Wizard Answer Action Method
The Process Wizard Answer Action is used to display a Process Wizard in response to a query.
To use the Process Wizard Action:
1. Select Process Wizard from the drop down menu of the Method field of the Rule win-dow. The Answer: Process Wizard tab displays:
2. Select the process wizard you want to use from the drop down menu.3. Select Save from the File menu in the Rule window.
26 Intelligent Search Optimization Guide

Alias Lists
Alias Lists are Dictionary Objects that provide a means of substituting one term for another. Alias Lists are transformative where, unlike Concepts, a word or abbreviation in a user query is replaced with an associated value. For example, the existence of the delivered US State Abbreviations Alias List associates a user query containing “NY” with “New York.”
Creating Alias Lists in Dictionary Manager allows InQuira Intelligent Search to:
• Provide definitions to key terms using the Answer Action Methods for Rules on page 22.
• Identify values for common abbreviations such as, state names or stock symbols.
Create a New Alias List
By creating new Alias Lists, you allow InQuira Intelligent Search to recognize terms or abbreviations as having a set value.
To create a new Alias List:
1. In Dictionary Manager, click the New Alias List icon or select New Alias List from the File menu.
The Alias List window displays:
2. Enter a descriptive name for the Alias List in the Name field.
Intelligent Search Optimization Guide 27

3. (Optional.) Fill in the Description field. 4. The Description field has no impact on InQuira Intelligent Search results. It is used to
clarify the intended function of the Alias List among users.5. (Optional.) Enter any information regarding the Intent Response in the Notes field. 6. The Notes field has no impact on InQuira Intelligent Search results. It is used to track
comments on Rule modification among users.7. Check the Enabled box. (This is checked by default.) If the Enabled box is not checked
the Intent Response is ignored by InQuira Intelligent Search.8. Select the Domain from the drop down list. Only Domains you have permission for are
displayed. The Domain field is set to the most recently saved Domain by default. For more information on Domains see the preceding section Intelligent Search Language Tuning Guide.
9. Select a List Type from the drop down menu. Choose from standard, Root Concept Property, or Context Variable Property.
- Standard is the default.
- Root Concept Alias Lists create a list that contains ONLY children of a root concept defined in the Root Concept field. For example: Product and Product types.
- Context Variable Alias Lists create a list that corresponds to the context variable defined from the drop down menu in the Context Variable field. For example: User Location and State Abbreviations.
10.Enter a word, phrase, Concept, or global variable in the Keys column.
NOTE: To reference a Concept you must use angle brackets, for example, <information manager>. To reference a Global Variable you must use the pound sign, for example #GLOBALVARIABLE.
11.Enter a term for InQuira Intelligent Search to associate with the corresponding key term.
28 Intelligent Search Optimization Guide

Alias List Tools
Before saving an Alias List, you can verify the function of the Alias List by selecting Validate Alias Lists on page 29 from the Tool menu in the Alias List window.
You may also choose to Import Text Files on page 29.
Import Text FilesTo import existing Alias Lists to be used by your current version of InQuira Intelligent Search:
• From Dictionary Manager, select Import Text Files from the Tools menu of the Alias Lists window. The Import Alias Lists file finder displays.
• Select the directory containing the .xml file containing Alias Lists and select Import. The imported Alias List displays.
Validate Alias ListsAfter selecting Validate Alias List from the Tools menu, InQuira Intelligent Search automatically checks the validity of your Alias List. If the Alias List is valid the following Alias List is Valid dialog displays.
Intelligent Search Optimization Guide 29

Advanced Feature of Alias Lists
This section explains how to use the advanced feature of Alias Lists, Set Overriding on page 30.
Set OverridingAlias Lists with the same name and values can belong to multiple Dictionary Domains. If Alias Lists with the same name occur, the default override behavior is determined by the order of Domains in the Domain List. For more information on Domains and Domain Lists, please see Intelligent Search Language Tuning Guide.
Using the Set Overriding option, you can specify custom override behavior.
• Select Set Overriding from the Advanced menu of the Alias Window. The overriding options append to the Alias List window:
• Choose between Entry Overriding or Global Overriding.
Entry Overriding specifies that Keys and Values assigned in the current Alias List are override entries with the same Keys and Values of Alias Lists of the same name in higher ranked Domains.
Global Overriding specifies that the current Alias List overrides an Alias List with the same name in a higher ranked Domain for all entries, not just for the Keys and Values the two Alias Lists share.
30 Intelligent Search Optimization Guide

Exception Lists
Use Exception Lists to create exceptions to the stemming process used by InQuira Intelligent Search. The stem of a word is the root form of the word—the word minus any inflection. For example, "work" is the stem of "works," "working," and "worked." Stemming accounts for changes in word shape owing to the context in which words occur without altering the meaning of the word.
In English, stemming covers the relations represented in the following table—for noun, plural; for verbs, person and tense inflection; for adjectives, comparatives:
Stemming does not cover the relation between the words in columns A and B in the following table. Unlike the previous list, these are meaning-altering relations: the words in B add some meaning component to those in A.
The LLLA (Low Level Language Analysis) Service of InQuira handles stemming.1 You can see the stem of a word in Test Drive, Annotations, Stem.
In some cases, it is necessary to add a stemming exception or modify the basic stemming rules. A typical case arises with acronyms. For example, the Product name “Ikes” is stemmed to “Ik”, as InQuira Intelligent Search recognizes -es as a suffix. To prevent this we must add “Ikes” to the Exception List as described in the following section.
Part of Speech Stem Inflected Form
noun dog dogsverb carry carriedverb carry carriesverb carry carryingadjective nice nicer
A B
love loverlove lovableRussia Russianitalic italicizeromantic romanticismstupid stupidityfool foolish
1. Third party software, Basis, handles stemming for foreign languages.
Intelligent Search Optimization Guide 31

Edit an Exception List
To edit an Exception List
1. Using the Dictionary Find Tool, select the language specific Exception List. The Exception List displays:
NOTE: If the language you want to edit does not appear, please see Create a New Exception List on page 33.
2. Click Add a line. A new line appends to the bottom of the list.3. In the Stems column, enter the preferred stemmed form of the word.4. In the Tokens column, enter the word as it appears in a user query. Using a comma to
separate the words, you may enter more than one form per stem. A token consisting of multiple parts may be added to the Exception List if the associated stem consists of the same number of words.
NOTE: Exception Lists are case sensitive. A token entered using capitals matches only strings with the same capitalization; however, if the token is entered in lower case it matches a string in any case.
5. Select Save, from the File menu of the Exception List window. The newly created exception appears alphabetically.
32 Intelligent Search Optimization Guide

NOTE: A stem may only appear once on the Exception List. Upon saving, a stem listed twice gets condensed to one instance with the associated tokens appearing on one line separated by a comma.
IMPORTANT: Modifications to an Exception List does not affect live Intelligent Search results until you Commit Dictionary Changes to Central Repository (vcroot), perform a full content re-index, and synch the changes to the production environment. To see the effects of a new or modified Exception List without committing, use Test Drive.For more information, see Intelligent Search Administration Guide.
Create a New Exception List
To create a new Exception List:
1. In Dictionary Manager, select the icon or New Exception List from the File menu. The Exception List window displays:
2. Select the language the Exception List is intended for from the drop down menu in the Name field.
NOTE: If the language you desire does not display in the drop down menu, then an Exception List for the language has been created. Please see Edit an Exception List on page 32.
3. (Optional.) Enter a definition into the Description field.
The Description field is used to clarify the meaning among users, and can be used to find dictionary objects.
4. (Optional). Enter any information regarding the Concept in the Notes field.
Intelligent Search Optimization Guide 33

5. The Notes field has no impact on InQuira Intelligent Search results. It is used to track comments on Concept modification among users.
6. Check the Enabled box. (This is checked by default.) If the Enabled box is not checked, the Exception list is ignored by InQuira Intelligent Search.
7. In the Stems column, enter the preferred stemmed form of the word.8. In the Tokens column, enter the word as it appears in a user query. Using a comma to
separate the words, you may enter more than one form per stem.
9. To add exceptions, select Add a line. A new line appends to the bottom of the list.10.Select Save, from the File menu of the Exception List window. The newly created
exception appears alphabetically.
IMPORTANT: Modifications to an Exception List do not affect live Intelligent Search results until you perform, a full content reindex, and the changes have been synchronized to the production environment. For more information, see Intelligent Search Administration Guide. To see the effects of a new or modified Exception List without committing, use Test Drive.
Exception List Tools
To import an existing Exception List:
1. Select Import Text File from the Tools menu in the Exception List window. The Import Exception List file finder displays.
2. Select the Exception List as a *.csv file, and select Import. The Exception List imports.
3. Third party software, Basis, handles stemming for foreign languages
Intent Hierarchy
Intents are organized as parent, siblings, and child nodes in an Intent Hierarchy. Intent Hierarchies descend from a single node at the highest level called All Intents. The position of the Intent within the Intent Hierarchy determines its precedence in being selected as an answer to a user query. The Rules Engine selects the lowest-level matching Intent in the hierarchy as the best possible response. If a low-level Intent does not satisfy a user query, the Rule Engine works backwards to match on a higher-level Intent. This process, referred
34 Intelligent Search Optimization Guide
to as degradation, ensures that InQuira Intelligent Search returns the most specific Intent Response to a user query. For more information on Intents, Intent Responses, please see Intelligent Search Language Tuning Guide.
Create a new Intent Hierarchy
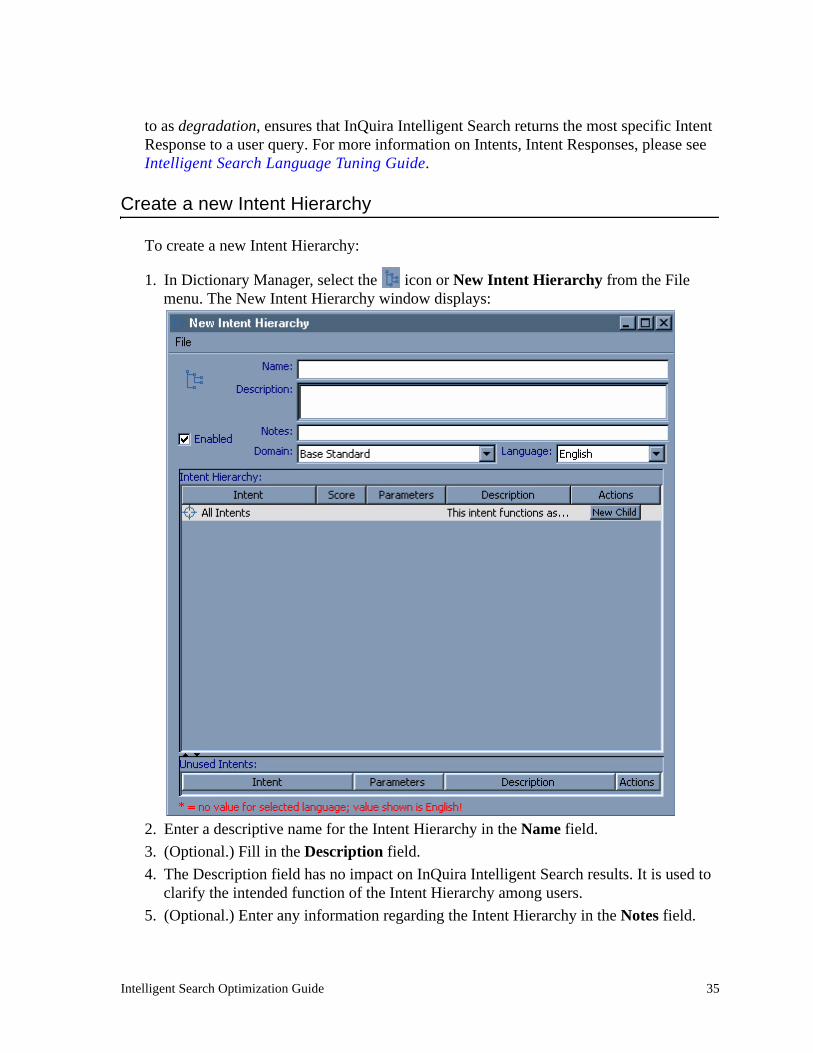
To create a new Intent Hierarchy:
1. In Dictionary Manager, select the icon or New Intent Hierarchy from the File menu. The New Intent Hierarchy window displays:
2. Enter a descriptive name for the Intent Hierarchy in the Name field.3. (Optional.) Fill in the Description field. 4. The Description field has no impact on InQuira Intelligent Search results. It is used to
clarify the intended function of the Intent Hierarchy among users.5. (Optional.) Enter any information regarding the Intent Hierarchy in the Notes field.
Intelligent Search Optimization Guide 35

6. The Notes field has no impact on InQuira Intelligent Search results. It is used to track comments on Intent Hierarchy modification among users.
7. Check the Enabled box. (This is checked by default.) If the Enabled box is not checked the Intent Hierarchy is ignored by InQuira Intelligent Search.
8. Select the Domain from the drop down list. Only Domains you have permission for are displayed. The Domain field is set to the most recently saved Domain by default. For more information on Domains see the preceding section Intelligent Search Language Tuning Guide.
9. Select the Language from the drop down menu.10.Select New Child to add Intents to the new Intent Hierarchy. For more information on
Intents, please see Intelligent Search Language Tuning Guide.11.Select Save, from the File menu of the User Profile window.
36 Intelligent Search Optimization Guide

User Profiles
User Profiles are a type of Business Condition used to restrict an Intent Response. When using User Profiles, the set condition(s) must be satisfied by the user query in order to display the associated Intent Response.
For more information on Business Conditions, please see Business Conditions on page 14. For more information on Intent Responses, please see Intelligent Search Language Tuning Guide.
Create a new User Profile
To create a new User Profile:
1. In Dictionary Manager, select the icon or New User Profile from the File menu. The New User Profile window displays:
2. Enter a descriptive name for the User Profile in the Name field.3. (Optional.) Fill in the Description field. 4. The Description field has no impact on InQuira Intelligent Search results. It is used to
clarify the intended function of the User Profile among users.5. (Optional.) Enter any information regarding the User Profile in the Notes field. 6. The Notes field has no impact on InQuira Intelligent Search results. It is used to track
comments on User Profile modification among users.7. Check the Enabled box. (This is checked by default.) If the Enabled box is not checked
the User Profile is ignored by InQuira Intelligent Search.
Intelligent Search Optimization Guide 37

8. Select the Domain from the drop down list. Only Domains you have permission for are displayed. The Domain field is set to the most recently saved Domain by default. For more information on Domains see the preceding section Intelligent Search Language Tuning Guide.
9. Click Add new condition. The Business Condition window displays.10.Complete the Business Conditions as described in Add Business Conditions on
page 15.11.Select Save, from the File menu of the User Profile window.
User Profile Tools
Before saving a User Profile, you can verify the function of the User Profile by selecting an Validate Profile on page 38 from the Tool menu in the User Profile window.
Validate ProfileAfter selecting Validate Profile from the Tools menu, InQuira Intelligent Search automatically checks the validity of your User Profile.
Show Concepts Tree
The Concepts tree displays hierarchies of Concept type of or part of relationships defined in the Dictionary. The hierarchies originate at specified Root Concepts, as described in Specifying the Root Concepts for the Dictionary Manager. The hierarchy displayed below each Root Concept reflects the Concept relationships defined below it in the Ontology.
You can edit concepts by selecting them directly from the Concepts tree, and you can add concepts to other Dictionary objects by dragging and dropping them directly from the Concepts tree.
38 Intelligent Search Optimization Guide

Subject Maps
Subject Maps are used in conjunction with the language and subject parameters passed with a user query to determine which Domain List to use in processing the query. Subject Maps are used to associate the pairings of a subject area and language with a Domain Lists. For example, the Automotive Subject Map contains the automotive Domain Lists for each language.
Intelligent Search Optimization Guide 39

Edit Subject Maps
To edit Subject Maps:
1. In Dictionary Manager, select Edit Subject Maps from the Tools menu. The Subject Maps window displays:
2. Click Add new Subject Map. The New Subject Map displays:
3. Enter a descriptive name in the Name list.4. (Optional.) Enter a definition into the Description field.5. The Description field is used to clarify the meaning among users, and can be used to
find dictionary objects.6. (Optional). Enter any information regarding the Concept in the Notes field.7. The Notes field has no impact on InQuira Intelligent Search results. It is used to track
comments on Concept modification among users.8. Check the Enabled box. (This is checked by default.) If the Enabled box is not
checked, the Exception list is ignored by InQuira Intelligent Search.9. Select a Language from the drop down menu.
40 Intelligent Search Optimization Guide

NOTE: Subjects Map can contain only one Domain List per language.
10.Select a Domain List from the drop down menu.11.Click Add a line, to add multiple domain lists from other languages.
Change the Default Subject MapThe default Subject Map is used to determine which Domain List is used to process user requests. To set the default Subject Map:
1. Select Default subject map from the Instance section of the Advanced Configura-tion Facility in System Manager. The Editing: Dictionary screen displays:
2. Enter the name of the Subject Map created in Dictionary Manager in the default-sub-jectmap field.
3. Click OK. The changes are saved upon closing.4. Restart InQuira by typing inquira restart in the ICE prompt.
For more information on the Advanced Configuration Facility, please see Intelligent Search Administration Guide.
InQuira Language Analysis
InQuira performs language analysis during both content processing and request processing. Content processing is the means by which InQuira collects, standardizes, and indexes the application content. Request processing is the means by which InQuira Intelligent Search processes and responds to user requests.
During content processing, Intelligent Search identifies the concepts that occur in the application content, performs additional semantic analysis, and records the resulting information as a set of indexes.
During request processing, Intelligent Search determines the context, conditions, and concepts that occur in user requests by matching the content of the request against the information in the Dictionary. It uses that information to construct a set of criteria that
Intelligent Search Optimization Guide 41

defines the best possible responses to the request. It then matches the best answer criteria to the content indexes, and retrieves the corresponding documents from the Content Store for display to the end user.
Language Analysis Components
The InQuira components that interact to perform language analysis include:
• The Content Store, which stores the application content and associated data
• The Language Analyzer, which performs basic semantic analysis of both user requests and application content
• The Dictionary, which contains the Concepts and Rules that set the criteria for the best possible answer
• The Rules Engine, which matches user requests to Rules by comparing request content to business conditions and language conditions, and generates a list of actions that the application must perform to generate the best possible response.
• The Evaluator, which scores and ranks the results of the various actions
The Language Analysis Process on page 42 describes the interaction of the language analysis components during request processing.
The Language Analysis Process
InQuira performs language analysis during both content processing and request processing.
During content processing, InQuira collects, standardizes, and indexes the application content. The Language Analyzer analyzes each word in the content and establishes its relationship to:
• The Concept information defined in the Dictionary
• The structure of the document in which it is located
The Language Analyzer stores the resulting semantic information in the Content Store for use during request processing.
During request processing, the Language Analyzer:
• Analyzes the request using the Concepts stored in the Dictionary
and the Rules Engine:
• Evaluates the request using the Rules stored in the Dictionary
• Compiles the list of actions, which are potential application responses to the request
42 Intelligent Search Optimization Guide

The Evaluator:
• Evaluates the actions, and ranks the responses based on their scores, as described in The Scoring Process on page 46
• Formats the responses for display by the User Interface
The Content Store and IndexesDuring content processing, the Language Analyzer analyzes each word in the unstructured application content. The Language Analyzer stores the results of its analysis as a set of indexes.
Analyzing RequestsWhen a user submits a question or request using Intelligent Search, the User Interface passes the request to the Rules Engine. The Rules Engine creates a sentence object that contains the user input and additional user profile and session information.
During sentence object creation, the Rules Engine calls the Language Analyzer. The Language Analyzer identifies the basic linguistic and semantic components of the user request. This information is used by the Rules Engine during request evaluation.
The Language Analyzer also resolves the meaning of pronouns and other implicit references to concepts that occurred in previous requests within the session, as described in Evaluating Anaphora on page 48.
Evaluating RequestsThe Rules Engine evaluates the sentence object against the set of Rules contained in the Dictionary. The Rules specify language and business conditions that potentially match various aspects of user requests as described in:
• Language Conditions
• Business Conditions
The evaluation process includes the phases described in:
• Evaluating Spelling on page 44
• Evaluating Business Conditions on page 44
• Evaluating Language Conditions on page 44
Intelligent Search Optimization Guide 43

Evaluating SpellingThe Rules Engine evaluates the spelling of the words in the sentence object using a packaged spelling checker program. For more information on the spelling checker program, see the Intelligent Search Administration Guide.
Evaluating Business ConditionsBusiness Conditions are special conditions within Rules that match contextual information about the user or the current session. During request processing, a component called the Preference Service collects contextual user and session information from configured sources, and adds this information to the sentence object.
NOTE: You must have the Business Rules module installed to use the Preference Service and Business Conditions within Rules.
The Rules Engine uses the information added by the Preference Service to evaluate Business Conditions, and matches only Rules whose conditions are met by the information in the request.
The Rules Engine evaluates Rules with matched Business Conditions and Rules that do not specify Business Conditions for language conditions, and eliminates Rules with Business Conditions that do not match.
See Chapter 5, Configuring Access to Business Data for more information on the Preference Service and accessing session and user context information.
Evaluating Language ConditionsLanguage Conditions are conditions within a Rule that match the content of the user request.
NOTE: The Rules Engine evaluates Language Conditions only for Rules having true or no Business Conditions. See Evaluating Business Conditions on page 44 for more information.
You set Language Conditions within Rules to specify actions based on the language content of the user request. The content that you can configure to match includes actual words and phrases, as well as, the more general meaning or intent. You can specify Language Conditions in the form of question patterns specified in IML, as described in Question Patterns
The Language Analyzer performs additional analysis on various semantic elements (words and phrases) as requested by the Rules Engine during this phase.
44 Intelligent Search Optimization Guide

Defining Response CriteriaThe Rules Engine defines response criteria by creating a list of the actions specified by the Rules that are true for the request. Rules can specify one or more of several types of actions, as described in Types of Actions on page 45.
The list of actions associated with a particular request constitutes the criteria for determining:
• The information retrieval methods and strategy
• The supplemental responses displayed in the Personalized Response User Interface answer portlets
Types of ActionsRules can specify both information retrieval actions and actions that affect how the Rules Engine processes the current Rule or subsequent Rules. Information retrieval actions include:
• Searching the indexed content in the Content Store
• Executing a structured data query
• Displaying custom content
• Displaying glossary definitions
Rule processing actions include:
• Setting an attribute for use in Business Conditions
• Restarting the request-response process with a new question
See Types of Actions on page 45 for more information on the types of information retrieval actions you can specify.
Evaluating ActionsThe Evaluator analyzes the actions in the action list by ranking the responses they produce by their response scores. The high-scoring results represent the best available responses to the user request, which are displayed in the appropriate display area of the User Interface.
The InQuira Personalized Response User Interface displays responses in the various portlets based on the answer purpose specified in the Rule that generated the response. See Answer Purposes for more information on specifying answer purposes in Rules.
Intelligent Search Optimization Guide 45

The Scoring Process
Response scoring begins when the Evaluator processes the action list associated with a request. The action list can contain a large number of actions, including Search Components that specify multiple search criteria.
During action evaluation, the Evaluator considers every word in the indexed content as a potential match for the search criteria contained in the action list. A question generally has multiple responses, and each response that the Evaluator identifies has an associated document excerpt, which is the compiled text that the User Interface displays as an answer on the results page.
NOTE: Frequently accessed index data is maintained in cache memory, as is common practices for information retrieval systems.
To determine response scores for results, the Evaluator:
• Matches the search criteria to the words within the indexed content, and generates a score for each associated excerpt, as described in Access to Preference Data on page 230
• Evaluates document metadata associated with each excerpt to determine document recency and document relevance scores, as described in The Document Relevance and Recency Scores on page 47.
• Uses a weighted averaging technique to combine these elements into a final score, as described in Relative Weights.
Each excerpt that the application generates as a response receives a score. Each response's score is made up of several score values, which the application combines and weighs to calculate the total response score. The response score range is from 0 to 1.0, with 1.0 being the highest possible score.
46 Intelligent Search Optimization Guide

Search Component Scores
Each Search Component has a specified score value, which is an indicator of its value in relation to the condition with which it is associated.
Each Search Component range is associated with one or more excerpts defined by the Excerpt Service. A given excerpt can contain multiple search components of varying values.
The Evaluator calculates a score for each excerpt based on:
• The scores of the Search Components that the excerpt contains
• The proximity of the Search Components within the excerpt
Excerpts that contain enough high value search components are considered candidate responses. The Evaluator then calculates the document relevance and recency scores for the candidate excerpts.
The Document Relevance and Recency Scores
Each excerpt is associated with a document. During content processing, the application indexes information about:
• Each document's popularity and relevance within the collection
The relevance value for a document is calculated based on link analysis and density of the search terms. This value cannot be set manually. You can see a document's relevancy score in the Unstructured results in Test Drive when it is returned as a search result. Launch Document Search type rules use this value to set the relative weights of relevance and search components. The default weight for relevance is 0.000001%.
• The last update to the document
The Evaluator assigns document relevance and recency scores based on this information. The Recency score relies on the date/time stamp of a file. The relevance and recency scores are combined and weighed with the Search Component score to determine the total response score. The relative weights for response sub-scores are determined by global settings in the application configuration, as described in the Intelligent Search Administration Guide, or by settings specified within Rules that are override the global settings for this response as describe in Add Relative Weights on page 18.
NOTE: This relevance weight should always have very low importance since it functions as a tie breaker in finding default search results. For the size of the content searched on a given site, factors like link analysis don't indicate relevance as reliably as they do when searching the whole web. The most important factor is the search components, which match words in the query with words in the content.
Intelligent Search Optimization Guide 47

Evaluating AnaphoraInQuira can process requests in which an important concept that occurred in a previous request is replaced by a substitute word or phrase. The term anaphora refers to the relationship between the grammatical substitute (usually a pronoun such as it) and the previously occurring concept.
During language analysis, InQuira resolves anaphoric expressions by matching the substitute word or phrase with the correct concept occurring in a previous request, and annotating the current request with the concept information for its predecessor.
For example, an initial request:
Where can I buy a <product>?
might be followed by:
Does it come in blue?
The Language Analyzer processes anaphoric expressions by:
• Creating a list of candidate concepts, or salience list, for each user request, as described in Creating the Salience List on page 48
• Determining that a word or phrase refers to a concept that occurred in a previous question, as described in Identifying Anaphoric Expressions on page 49
• Matching the referring expression to the correct concept, as described in Resolving Anaphoric Expressions on page 51
• Annotating the relevant portion of the request for use by the Rules Engine, as described in Annotating the Anaphoric Expression on page 52
Creating the Salience ListThe Language Analyzer creates a salience list for each request that it processes. The salience list contains concepts that occur within the question that are potentially useful for resolving anaphoric expressions within subsequent requests.
IMPORTANT: The Language Analyzer does not perform anaphora resolution for the first question in a session, as there is no previous question, and therefore, no salience list.
The Language Analyzer adds Concepts to the salience list if:
• The Concept is part of a noun phrase
• The Concept is not a determiner or a pronoun
NOTE: Pronoun Concepts are added to the salience list only when the Rules Engine has annotated a Concept from a previous anaphora resolution. This level of annotation
48 Intelligent Search Optimization Guide

enables the Language Analyzer to resolve anaphoric expressions within requests that are twice or more removed from the original Concept occurrence.
• The Concept priority level exceeds a minimum threshold. See Concept Priority Levels for more information on Concept priority levels.
The Language Analyzer partially orders the candidate concepts within the salience list using the following criteria:
• Search Component score. See The Scoring Process on page 46 for more information on search component scoring.
• Concept priority level
• Sentence position (Concepts having equal Search Component scores and Concept priority levels are ordered according to their position in the request)
• Range length (concepts associated with a longer range of words within the request are ranked higher)
NOTE: The primacy of the Search Component score is based on the probability that concepts belonging to industry and application domains, which usually have higher Search Component scores, are preferred candidates for anaphora resolution.
The Language Analyzer stores the salience list with the session information so that it is available to the Rules Engine for processing the next request.
Identifying Anaphoric ExpressionsThe Language Analyzer identifies referring expressions using the InQuira Match Language (see Chapter 2, IML Reference for more information on IML). The anaphora-specific IML expressions match referring expressions, and eliminate non-referring pronoun expressions by testing each word in the question against the following criteria:
Expression Definition Examplesit (pronoun) The word it, except when used
existentially, as in the phrase is it true that... or what does it mean when...
Does it come in blue?
Intelligent Search Optimization Guide 49

When the Language Analyzer identifies a referring expression, it:
• Determines the head of the expression, as described in Determining the Head of the Anaphoric Expression on page 50
• Tests whether the referring expression can be resolved within the current request, as described in Testing Referring Expressions Within the Current Request on page 50
Determining the Head of the Anaphoric ExpressionThe Language Analyzer determines the head of the referring expression. For single pronouns, the head of the expression is the pronoun itself. For noun phrases, for example, the car, the Language Analyzer determines car to be the head.
Testing Referring Expressions Within the Current RequestThe Language Analyzer checks whether the referring expression can be resolved within the current sentence by:
• Creating a salience list for the current request
• Checking that each member of the salience list occurs prior to the referring expression (with no overlap)
• Checking that and all semantic constraints apply
If the Language Analyzer locates a valid concept within the current sentence's salience list, it uses that concept to resolve the referring expression, and anaphora resolution is complete. For example, in the following request:
In the <product>, does it come with air conditioning standard?
the pronoun it resolves to the concept associated with <product>.
deictics Words that are direct indicators. Currently defined deictic words are:
• this
• that
• these
• those
Where can I buy this?
Are there any cheaper than these?
deictic noun phrases
Noun phrases formed from the defined deictics.
Do you have this product_type in blue?
50 Intelligent Search Optimization Guide

Resolving Anaphoric ExpressionsThe Language Analyzer resolves anaphoric expressions by checking the previous request's salience list to locate any concepts that fit semantically with the referring expression. It checks each noun phrase candidate concept (such as the car or this car) in order, for semantic constraints. If the semantic constraints fail, it then checks the next list member.
The Language Analyzer locates concepts for anaphora resolution using concept relations defined in the Ontology. The Language Analyzer uses internally defined methods to locate the appropriate type of or part of relation for a referring expression. For example, the expression the car refers to a specific type of car, model_name, that occurred in the previous request; and the expression the wheel refers to a part of the car, model_name, that occurred in the previous request. See InQuira Language Analysis on page 41 for more information.
A candidate concept can resolve only one referring expression in a request. The Language Analyzer removes concepts from the list once they are used to resolve an anaphoric expression.
Intelligent Search Optimization Guide 51

Annotating the Anaphoric ExpressionThe Language Analyzer completes the anaphora resolution process by applying the #ANAPHORA label over the range of the request that contains the original referring expression. See Language Analysis Labels on page 168 in the InQuira Language Tuning Guide for more information on the types of labels that the Language Analyzer assigns during language analysis.
52 Intelligent Search Optimization Guide

Chapter 2 Process Wizards
You can create custom dialogs and implement them as answers that display in response to specified questions using InQuira Process Wizards. A Process Wizard is a decision tree that walks the user through a series of questions to either find the solution to a problem or to narrow the search for the answer to their original question. The Process Wizard feature automatically responds to specified user requests by presenting a sequence of steps that:
• Solicit more specific information from users
• Present the specific information they are seeking
• Optionally perform a search based on the information provided through the dialog
The User Interface presents Process Wizard dialogs as answers to specified questions based on custom dictionary rules that you define. When users ask questions that match Process Wizard rules, the User Interface presents a specially formatted answer on the answer page. When users select the process wizard answer, the User Interface presents the Process Wizard steps, and uses the information in the user's responses to present the desired information or to refine the initial query and perform an additional search.
For example, you could create a Process Wizard about billing problems consisting of multiple steps designed to diagnose and present solutions based on additional information
Intelligent Search Optimization Guide 53

provided by the user, and create a Dictionary rule to present the process as an answer in response to questions about billing problems.
When users submit a request that matches the process rule, for example, a request containing the phrase retrieve messages:
The User Interface displays a special Process Wizard answer at the top of the answer page:
When a user selects the Process Wizard answer, the User Interface displays the initial step of the process that you have created to diagnose and resolve the user's specific problem related to retrieving messages:
54 Intelligent Search Optimization Guide

Implementing the Process Wizard Feature
You implement Process Wizards within your application by:
• Creating one or more process wizards using the Process Wizard Editor application of the InQuira Language Workbench, as described in Creating Process Wizards on page 96.
• Creating or modifying Dictionary rules to invoke the process wizard in response to user requests, as described in Creating Dictionary Rules to Invoke Process Wizards on page 118.
The default User Interface contains page templates to display process wizard answers, as described in The Process Wizard User Interface on page 119; no User Interface customization is required to implement Process Wizards.
IMPORTANT: For quick assistance in creating and implementing a basic process wizard, see the tutorial, Tutorial: Creating a Process Wizard on page 74, which describes in detail how to create a process wizard to assist users in retrieving messages from a hypothetical email, voice, and instant message system.
Process Wizard Elements
A Process Wizard contains various elements that you create and define using the Process Wizard Editor. Elements within a process include:
• Process steps, which are the individual modules that are presented to the user in the Process Wizard User Interface, as described in Process Wizard Steps on page 56.
• Fields within the process steps, which contain the text and user option elements that provide information and solicit user responses, as described in Process Wizard Fields on page 56.
• Conditions and transitions, which are the logical framework for determining the navigation through the process based on the options selected by the user, as described in Process Wizard Conditions and Transitions on page 56.
• The process wizard User Interface components, which include a special answer format, and special Process Wizard presentation pages, as described in Process Wizard User Interface Elements on page 57.
Intelligent Search Optimization Guide 55

Process Wizard Steps
A Process Wizard consists of any number of process steps that you design and create to:
• Solicit information from end users
• Guide end users to specific information
Process steps are individual components that consist of any number of fields that you can define. Fields within process steps include text fields to provide information and option fields that display options or accept input from users as they progress through a process.
See Creating Process Steps on page 99 for more information.
Process Wizard Fields
Fields within process steps include text fields to provide information and option fields that display options or accept input from users as they progress through a process.
You can define individual fields that are specific to a process as well as shared fields that you can re-use in multiple processes or use as templates to easily create variants of common types of fields.
See Defining Fields on page 106 and Creating Shared Fields on page 111 for more information.
Process Wizard Conditions and Transitions
You connect process steps to one another by specifying conditions and transitions. Conditions correspond to the various user options presented within a step, and transitions are the method of connecting to the next logical step in the process based on a selected condition.
You define conditions and transitions by:
• Creating a condition for each user option in a step
• Associating a transition with each condition
See Defining Conditions on page 115 and Defining Transitions on page 117 for more information.
56 Intelligent Search Optimization Guide

Process Wizard User Interface Elements
The process wizard User Interface components include the special answer format that displays in the standard answer area when a user request matches the process wizard rule, the pages that correspond to the steps within the process, and a side-bar that summarizes users' responses as they progress through the process wizard.
See The Process Wizard User Interface on page 119 for more information.
Accessing the Process Wizard Editor
You access the Process Wizard Editor from the Dictionary Manager application of the InQuira Language Workbench, using any of these methods:
• Select the Process Wizard icon , on the Dictionary Manager toolbar
• Select Process Wizard Editor from the Dictionary Manager Tools menu
• Select Display Process Wizard Editor from the Tools menu of a Dictionary rule
If there are no process wizards currently defined, the Process Wizard Editor displays a dialog that prompts you to create a directory to contain the initial process wizard information:
• Enter a directory name, or accept the default value (pw_1), and select OK
Intelligent Search Optimization Guide 57

The Process Wizard Editor displays a new process wizard, or the most recently accessed process wizard if any exist.
See Using the Process Wizard Editor on page 59 for more information.
58 Intelligent Search Optimization Guide

Using the Process Wizard Editor
The Process Wizard Editor displays in a separate window from the Dictionary Manager.
NOTE: You can close the Process Wizard Editor without affecting the Dictionary Manager; however, closing the Dictionary Manager also closes the Process Wizard Editor.
The Process Wizard Editor display is divided into two sections:
• The Graphic View, as described in The Graphic View on page 60
• The Inspector View, which initially displays the Process Wizard Inspector, and which you can toggle to display the Process Step Inspector and the Shared Fields Inspector. (See The Process Wizard Inspector on page 64, The Process Step Inspector on page 67, and The Shared Fields Inspector on page 72 for more information.)
You can change the relative sizes of the graphic view and wizard inspector by selecting and dragging the dividing bar to the left or right as needed. You can expand either of the areas completely by selecting the appropriate arrow icon located on the divider.
The Process Wizard Editor displays the following functions above the graphic view and wizard inspector:
Function DescriptionProcess Wizard Use this to select an existing process wizard. The Process
Wizard Editor selects the most recently accessed wizard by default.
Steps Use this field to display any of the defined process steps from the used and unused steps lists. Used steps are those that are included in the current process. Unused steps are defined steps that are not currently included in the process.
Shared Fields Use this field to view, create, and modify fields that are intended for use in multiple processes, as described in The Shared Fields Inspector on page 72 and Creating Shared Fields on page 111
Intelligent Search Optimization Guide 59

The Graphic View
The Process Wizard Editor graphic view displays the selected process wizard as an arrangement of:
• Labeled boxes representing the process steps
• Lines connecting the steps representing the transitions, for which you can also display labels indicating the condition associated with each transition.
The steps are arranged within the graphic view as a tree, starting with the initial step. The graphic view arranges the subsequent steps into rows; the row in which a step is displayed is determined by its transition relationships; each step is displayed below all steps that transition to it.
NOTE: The layout of the steps and connections within the graphic view is automatically determined by the data in the process inspector; you cannot directly edit the graphic view. The Process Wizard does not support loops within solution paths.
60 Intelligent Search Optimization Guide

The graphic view displays each process step as a rectangle, labeled with:
• The name of the step
• The step ID
You can adjust the display size of the graphic view to fit more process steps into the screen using the Size to Fit checkbox located near the bottom of the Process Wizard Editor display.
Step Displays in the Graphic ViewWhen the Process Wizard Inspector is active in the inspector view (see The Process Wizard Inspector on page 64), the graphic view displays the process steps in cyan (blue-green). If you select a process step, the inspector view displays the Process Step Inspector (see The Process Step Inspector on page 67) and the graphic view displays the selected step in yellow.
You can select a step within the graphic view to display its data in the Process Step Inspector:
• Select (click on) a step in the graphic view
Intelligent Search Optimization Guide 61

The Process Wizard Editor:
• Displays the step in yellow within the graphic view
and• Displays the step details in the step inspector
NOTE: You can toggle to the Process Wizard Inspector by selecting (clicking) anywhere in the background of the graphic view when the Process Step Inspector is active.
62 Intelligent Search Optimization Guide

Process Wizard Editor Step IdentificationThe Process Wizard Editor maintains unique IDs for each process step. The step ID is composed of:
• The row number, which can be in the range of 1-99
• A letter that corresponds to the step's column position within the row (A-Z)
For example, the third step in the second row has the ID: 2C.
NOTE: The step ID is based only on the step's position within the process, not its contents; moving a step from one position in the process to another changes the step ID. The Process Wizard Editor automatically arranges the steps within the process as you create or delete steps, conditions, and transitions.
Conditions and Transitions in the Graphic ViewThe graphic view displays transitions as lines that connect the process steps.
When you select a step, the Process Wizard Editor displays:
• Bold transition lines from the selected step
• Text that identifies the conditions that apply to each transition
Intelligent Search Optimization Guide 63

You can display all of the conditions for the process using the Show Conditions field located near the bottom of the Process Wizard Editor display.
The Process Wizard Inspector
The Process Wizard Inspector displays detailed information about the current process wizard.
The Process Wizard Inspector displays the following fields and functions:
Field DescriptionProcess ID Indicates the internal name of the process wizard, which also
corresponds to the name of the data directory in which it is stored. InQuira stores Process Wizard data in the directory:
<InQuira_home>/base/development/content/applications/default/dictionary/processWizards
64 Intelligent Search Optimization Guide

The Process Wizard Inspector also displays information about the default step, as described in The Default Step on page 66.
Process Name Specify the name of the process wizard. The User Interface displays the contents of this field as the title of the link to the process wizard.
First Step Indicates the current first step in the process, and lists the additional steps. You can change the first step First Step menu and the New First Step button, as described in Creating a New First Step on page 101 and Designating a New First Step on page 101.
Wizard Description Specify an optional description of the process wizard. The application displays the contents of this field as additional text in the link to the process wizard.
Intelligent Search Optimization Guide 65

The Default Step
Each process wizard includes a default step, which is a generic step that the Process Wizard displays when:
• There is a gap in the process created by a condition for which no transition is defined
• The user selects Next, without responding in a way that satisfies any of the step's conditions
You can customize the default step by editing the following fields:
NOTE: The default step does not support user options, conditions, transitions, or the Next button.
You can display a preview of the default step using the Preview Default Step in Browser button. The default step displays in a separate browser window.
Field DescriptionDefault Step Label Use this field to specify the name to display in the graphic
view if this step is explicitly specified in a transition. The default value is Thanks!
Default Step Message Use this field to specify plain text or HTML that the User Interface displays to the end user. The default value is:
If your question was not answered, please call our Customer Support
66 Intelligent Search Optimization Guide

The Process Step Inspector
You can view and modify the details of a process step using the Process Step Inspector.
You access the Process Step Inspector by selecting a step:
• From the Graphic View
• From either of the drop-down Steps menus at the top of the Process Wizard Editor
The Process Step Inspector displays the following functions and fields:
Function DescriptionStep ID Displays the step ID, as described in Process Wizard Editor
Step Identification on page 63.Step Name Displays the step name, which is used only within the Process
Wizard Editor.Step Fields tab Displays details for the fields defined for the selected process
step, as described in The Step Fields Tab on page 69.
Intelligent Search Optimization Guide 67

Step Transitions tab Displays details for the transitions defined for the selected process step, as described in The Step Transitions Tab on page 70.
Step Preview tab Displays a preview of the selected process step, as described in The Step Preview Tab on page 71.
Preview Step in Browser
Click to display the current step as it is to be displayed in the default User Interface. The Process Wizard Editor displays the step in a separate browser window, as described in Previewing Steps within a Browser on page 105
68 Intelligent Search Optimization Guide

The Step Fields TabYou can view and modify the fields within a process step using the Step Fields tab of the Process Step Inspector. You can define various types of fields to provide information, present options, and accept input from users as they progress through the steps in a process.
The Step Fields table displays one field on each line, and the last line of the table is always blank to accept input to define a new field.
You define a field by specifying the following parameters, as described in Defining Fields on page 106:
Field DescriptionType Use this field to specify the field type, which can be a unique
instance of a field, or an instance of a shared field. The field type determines the functionality of the field, as described in Specifying Field Types on page 108.
Intelligent Search Optimization Guide 69

The Step Transitions TabYou can view, create, and edit the transitions defined for a step using the Step Transitions tab. Transitions determine the steps that are presented to users based on their response to one or more user options.
The Step Transitions table displays one transition on each line, and the last line of the table is always blank to accept input to define a new transition.
Each transition corresponds to a condition; if you specify a transition that refers to multiple conditions, all of the conditions must be true for the transition to occur (an AND relationship). You can specify that a transition occurs based on any of multiple conditions being true (an OR relationship) by adding multiple transitions to the same step.
You can add transitions to existing steps, or create a new step for a transition.
See Defining Transitions on page 117 for more information on using the Step Transitions fields and functions.
The Step Transitions table displays the following fields for defining transitions and conditions:
Field Name (For Conditions)
Use this parameter to specify a unique ID to use to refer to the field when specifying Conditions and Transitions, as described in Defining Conditions on page 115.
Description Use this field to specify:
• markup and text for html fields
• markup and text for user option fields (checkbox, radio, select, text)
Field or Function DescriptionGo To Step Use this field to select an existing step as the destination step
for this transition.New Step Use this field to create a new step as the destination step for
this transition.
70 Intelligent Search Optimization Guide

The Step Preview TabYou can display a draft view of the current step using the Step Preview tab.
The Step Preview tab displays a general HTML rendering of the step fields; however, it is not as complete as the preview displayed in a separate browser window, as described in Previewing Steps within a Browser on page 105.
The Step Preview tab provides an efficient way to verify the text and options of all the steps in a process. For example, you can select the Step Preview tab, then select each step in the graphic view.
Up/Dn (Up/Down) Use these controls to change the order of transitions within the table as desired for presentation within the graphic view.
NOTE: The order of the transitions within a step has no impact on the process for the end user.
Conditions for Selected TransitionField Name Use this field to specify the condition for the transition.Op (Operator) Use this field to specify the operator to use as the basis of
comparison for the user response and the specified value.Value Use this field to specify the value to compare the user
response to evaluate the condition
Intelligent Search Optimization Guide 71

The Shared Fields Inspector
You can view, create, and manage step fields that can be shared among multiple steps and processes using the Shared Fields Inspector. Shared fields enable you to create and manage a central library of commonly used fields and templates for use within process steps.
You can use shared fields:
• As standard fields shared among multiple process wizards
• As templates for creating similar fields
You access the Shared Fields Inspector from the Shared Fields button at the top of the Process Wizard Editor window:
72 Intelligent Search Optimization Guide

The Shared Fields Inspector lists all of the shared fields defined within your application. The last row of the table is always blank to accept new shared field definitions.
The Shared Fields table contains the following fields:
Field DescriptionShared Field Type (for Step Inspector)
Use this field to specify a unique ID to use to refer to the field when adding the field to a process step.
Description for Selected Field
Use this field to specify:
• markup and text for html fields
• markup and text for user option fields (checkbox, radio, select, text)
Value Name (for Conditions)
Use this field to specify the value name for the option for use in specifying conditions and transitions.
Intelligent Search Optimization Guide 73

See Creating Shared Fields on page 111 for more information.
Tutorial: Creating a Process Wizard
This section guides you through the basic steps of creating a process wizard. This tutorial provides:
• Step-by-step instructions to design and implement a process for a hypothetical scenario
• Explanations of the selected options
• References to more detailed information about additional options and features
Scenario: Creating a Process to Assist Message Retrieval
In this scenario, we create a simple process to help end-users retrieve messages from a hypothetical service that provides:
• Voice mail
• Instant messaging
In addition, the process also needs to account for the fact that users have the capability to retrieve voice and email messages from:
• Their home location (computer or telephone)
• A remote location
To assist users in retrieving any type of message, from either location, we create a process consisting of steps to:
• Determine the type of message the user is trying to retrieve
• Determine the location from which the user is trying to retrieve email or voice mail
• Present the appropriate solution based on the responses to the user options
Value Use this field to specify the value that displays for the option.Default Use this checkbox to specify that this option is pre-selected
when this field is displayed to the user.
74 Intelligent Search Optimization Guide

NOTE: Tutorial Review on page 95 contains an image of the completed process wizard as displayed in the graphic view for your reference.
Designing the Wizard
To begin the process wizard we can design the process by creating a diagram showing the steps and transitions that we want to include in the process:
NOTE: The process diagrams in this section are similar to, but not intended to represent exactly, the graphic view displayed within the Process Wizard Editor.
Designing the Process Steps on page 76 describes the types of steps that are included in the process and their arrangement within the process diagram.
Intelligent Search Optimization Guide 75

Designing the Process Steps
The process design diagram shows three types of process steps:
• The initial step, which is the entry point into the process wizard. The initial step is displayed when a user selects a process wizard answer from the User Interface answer page. See Defining the Initial Step on page 82 for more information.
• Information steps, which are intermediate steps that prompt the user for required information
• Solution steps, which provide the appropriate information or action in response to the information entered by the user in previous steps
The process steps are arranged as a set of branching steps, connected to one another by lines that represent the transitions based on the conditions defined within each step. Each set of connected steps represents a path from the entry point to a solution.
Since there is a maximum of three steps from the entry point to a solution, we can label the rows of the diagram 1-3. Within each row, we label the steps alphabetically, as shown in the following diagram:
This labeling scheme is used by the Process Wizard Editor when arranging the steps defined within a process.
Designing Step Fields on page 77 describes the basic process of designing the text and user options that you define as fields within the various process steps.
76 Intelligent Search Optimization Guide
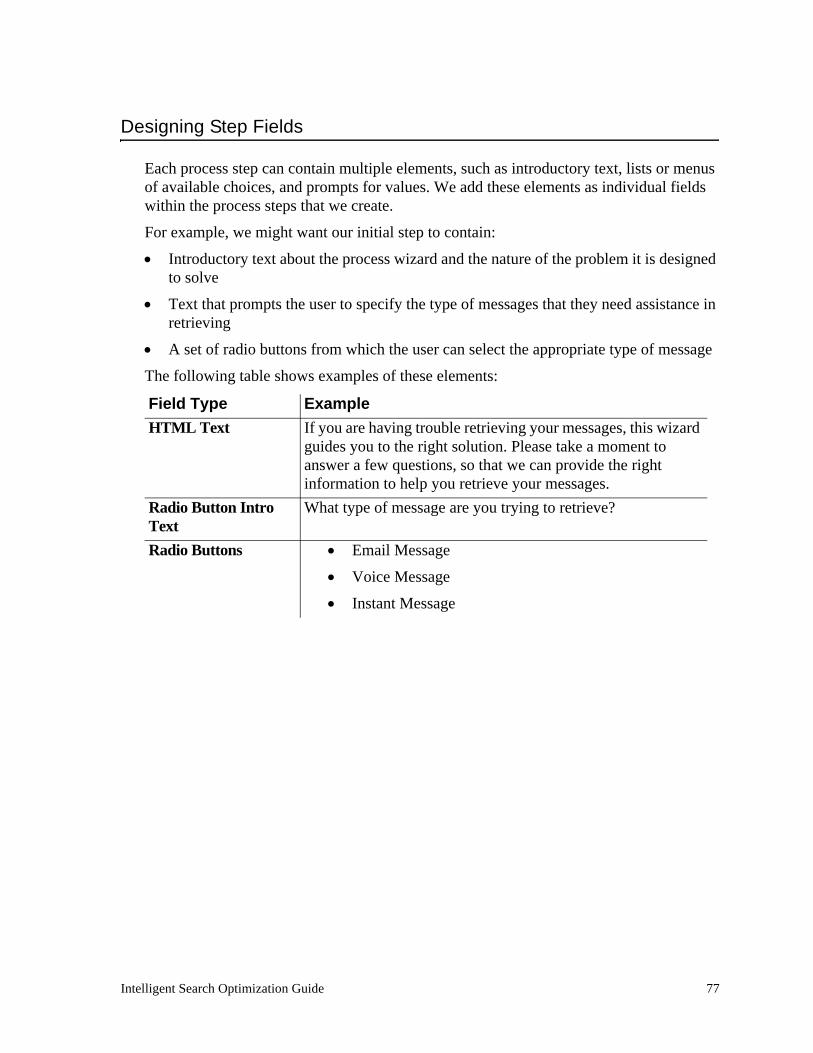
Designing Step Fields
Each process step can contain multiple elements, such as introductory text, lists or menus of available choices, and prompts for values. We add these elements as individual fields within the process steps that we create.
For example, we might want our initial step to contain:
• Introductory text about the process wizard and the nature of the problem it is designed to solve
• Text that prompts the user to specify the type of messages that they need assistance in retrieving
• A set of radio buttons from which the user can select the appropriate type of message
The following table shows examples of these elements:
Field Type ExampleHTML Text If you are having trouble retrieving your messages, this wizard
guides you to the right solution. Please take a moment to answer a few questions, so that we can provide the right information to help you retrieve your messages.
Radio Button Intro Text
What type of message are you trying to retrieve?
Radio Buttons • Email Message
• Voice Message
• Instant Message
Intelligent Search Optimization Guide 77

The following graphic is an example of the step as we display to the end user:
NOTE: The Back and Finish buttons are automatically included within each step. When we add transition steps from the initial step, the Next button automatically displays in place of the Finish button.
Designing Step Conditions and Transitions on page 78 describes how to design the conditions, which correspond to the user options, and transitions, are the destination steps that correspond to each condition.
Designing Step Conditions and Transitions
The steps in our process are connected to one another by conditions, which correspond to the possible user responses to the prompts within the process steps. Each condition is associated with a transition, which determines the next step that displays in the process.
The following tables show the conditions and transitions that we create for our process. Each table represents a row in the process diagram displayed in Designing the Process Steps on page 76. For each step within the row, the Condition column lists the available user options and their transition steps.
NOTE: The steps labeled Solution Step: (2C, 3A, 3B, and 3C) have no conditions and transitions, since they are the final steps in the process.
78 Intelligent Search Optimization Guide
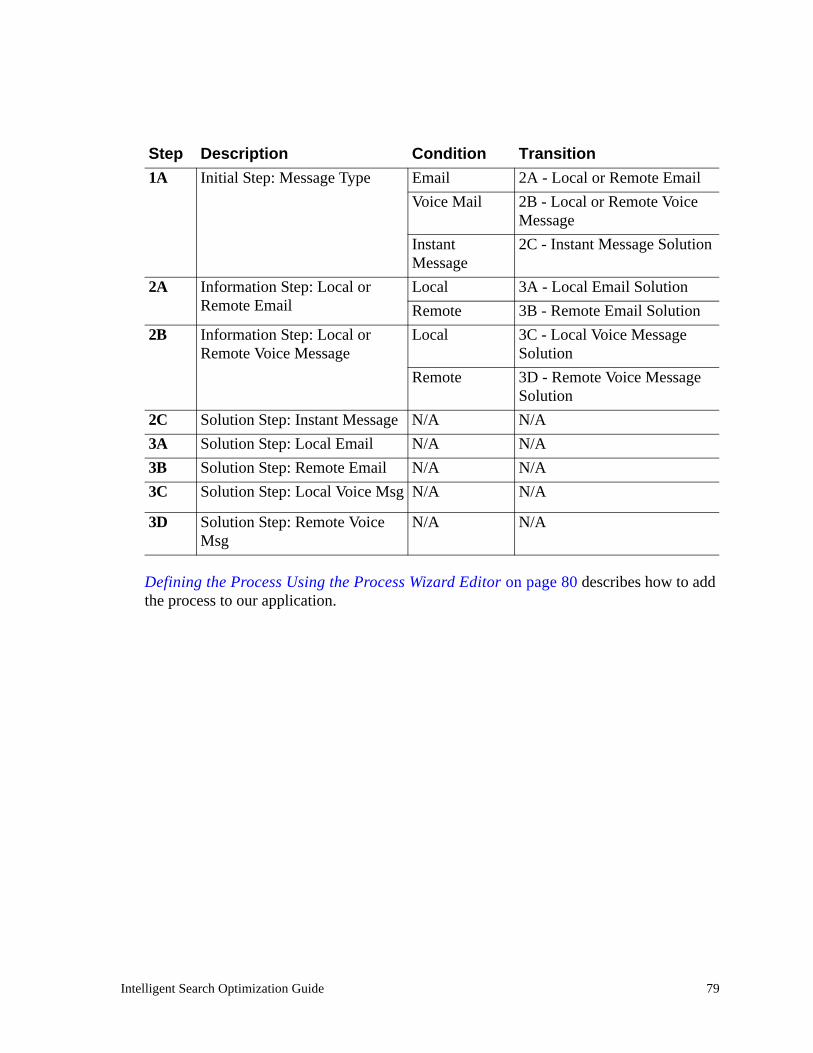
Defining the Process Using the Process Wizard Editor on page 80 describes how to add the process to our application.
Step Description Condition Transition1A Initial Step: Message Type Email 2A - Local or Remote Email
Voice Mail 2B - Local or Remote Voice Message
Instant Message
2C - Instant Message Solution
2A Information Step: Local or Remote Email
Local 3A - Local Email SolutionRemote 3B - Remote Email Solution
2B Information Step: Local or Remote Voice Message
Local 3C - Local Voice Message Solution
Remote 3D - Remote Voice Message Solution
2C Solution Step: Instant Message N/A N/A3A Solution Step: Local Email N/A N/A3B Solution Step: Remote Email N/A N/A3C Solution Step: Local Voice Msg N/A N/A
3D Solution Step: Remote Voice Msg
N/A N/A
Intelligent Search Optimization Guide 79

Defining the Process Using the Process Wizard Editor
To create the process we perform the following steps using the Process Wizard Editor:
• Define a new process, as described in Defining a New Process on page 80
• Define the initial step, conditions, and transitions, as described in Defining the Initial Step on page 82
• Define the intermediate information steps, conditions, and transitions, as described in Defining Information Steps on page 86
• Define the solution steps, as described in Defining Information Steps on page 86
See Accessing the Process Wizard Editor on page 57 and Using the Process Wizard Editor on page 59 for more information on accessing and using the features of the Process Wizard Editor.
Defining a New ProcessTo define a new process:
• Start the Process Wizard Editor, as described in Accessing the Process Wizard Editor on page 57
The Process Wizard Editor selects the most recently accessed process wizard. If no process wizards are currently defined, the Process Wizard Editor prompts you to name the directory for the initial process wizard data.
• Enter the directory name and select OK
80 Intelligent Search Optimization Guide
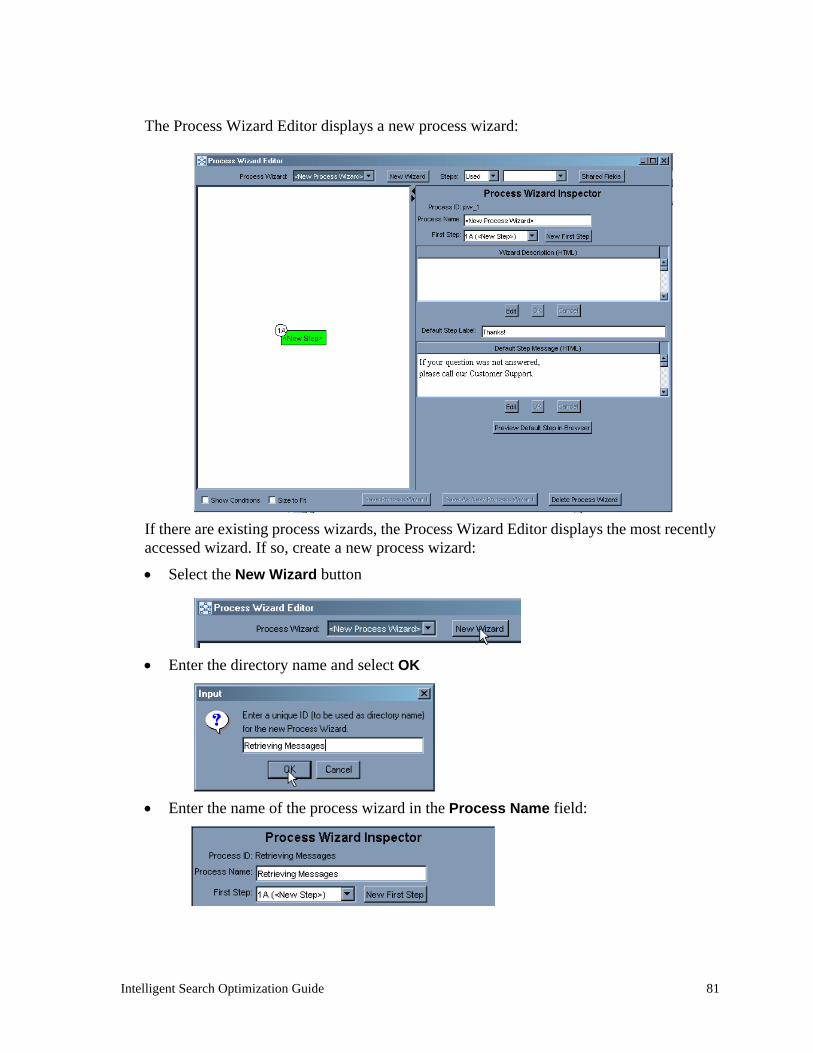
The Process Wizard Editor displays a new process wizard:
If there are existing process wizards, the Process Wizard Editor displays the most recently accessed wizard. If so, create a new process wizard:
• Select the New Wizard button
• Enter the directory name and select OK
• Enter the name of the process wizard in the Process Name field:
Intelligent Search Optimization Guide 81

NOTE: You can save the new process at any time using the Save Process Wizard button located below the process diagram window.
Next, we define the initial step in the process definition area, as described in Defining the Initial Step on page 82.
Defining the Initial StepIn this section, we create the initial step, and define within it the following fields:
• Introductory text about the process wizard and the nature of the problem it is designed to solve
• A set of radio buttons from which the user can select the appropriate message type
To define the initial process step:
• Select 1A(<New Step>) the graphic view
The Process Wizard Editor displays the Process Step Inspector.
• Enter a new name in the Step Label field:
We can now define the text field for our introductory text, as described in Defining the Introductory Text Field on page 83.
82 Intelligent Search Optimization Guide

Defining the Introductory Text FieldWe define the introductory text field using the Step Fields tab of the Process Step Inspector. The introductory text introduces the wizard to the user.
The Step Fields table contains a default entry for an html field, which we edit for our process. To edit the default entry:
• Since this field is informational, there are no conditions to specify. Leave the Name (For Conditions) column of the default html entry blank:
• Select the Edit button below the Description field, and enter the introductory text:
NOTE: You can enter any valid text formatting html in the Description field.
We can now define the user options field for the initial step, as described in Defining the User Options for the Initial Step on page 83.
Defining the User Options for the Initial StepWe define the user options field by creating a new field in the Step Fields table. The user options field prompts users to select the type of message for which they need assistance from a set of radio buttons.
To create a new field for the user options:
• Select the empty field below the introductory text field by clicking in the Type column, and select radio from the drop-down list:
Intelligent Search Optimization Guide 83

• Select the Field Name (for Conditions) column and override the default field name by entering a meaningful field name for the condition, which prompts users to select a message type:
See Defining Conditions on page 115 for more information.
• Enter the Description for the user options field:
• Enter condition value names and values for the email, voice message, and instant message options
NOTE: You can use the checkbox in the Default column to specify that an option is selected by default when the step displays. For this process, we assume that the email option is the most likely user response and should therefore be selected by default.
We can now display a preview of our initial step, as described in Previewing the Initial Step on page 85, then continue defining our process by specifying transitions to the various information steps, as described in Defining Information Steps on page 86.
Value Name (For Condition)
Value Default
email Email Yesvoice Voice Noinstant Instant Message No
84 Intelligent Search Optimization Guide

Previewing the Initial StepWe can display a preview of the initial step:
• By selecting the Step Preview tab of the Process Step Inspector:
• By selecting the Preview Step in Browser button near the bottom of the Process Step Inspector screen:
The Process Wizard Editor invokes a browser window to display the current process step:
Intelligent Search Optimization Guide 85

NOTE: See Previewing Steps on page 103 for more information on displaying previews of process steps.
We can now continue creating the process by defining information steps, as described in Defining Information Steps on page 86.
Defining Information StepsIn this section, we define a step that presents user options to solicit the required information from end-users. In Defining the Initial Step on page 82, we created our initial step, which asks users to specify the type of message that they need help retrieving. In order to direct users to the appropriate solution for the type of message they are interested in, we need to define steps to determine whether users need assistance:
• Retrieving email messages from their home location or from a remote location
• Retrieving voice messages from their home location or from a remote location
NOTE: Users who select the instant message option transition directly to the instant message solution step, as described in Defining the Instant Message Solution Step, since there is no distinction between home and remote locations when receiving instant messages.
For this tutorial we create the email location step, which prompts users to specify whether they are trying to retrieve messages from their home location or from a remote location.
Defining the Email Message Location Step (Step 2A)To define a step that prompts users to specify whether they need assistance retrieving email messages from their home computer (local), or from another computer (remote):
• Create a new step, as described in Creating the Email Location Step on page 87.
• Specify the condition that we want to associate with the new step, as described in Specifying the Condition for the Email Location Step on page 87.
• Define the fields within the new step, as described in Specifying the Email Location Step Name on page 88.
86 Intelligent Search Optimization Guide

Creating the Email Location StepWe create the email location step using the New Step function of the Process Step Inspector's Step Transitions tab:
• Select the initial step (1A)
The Process Wizard Editor displays the Process Step Inspector
• Select the Step Transitions tab and select the New Step button
The Process Wizard Editor creates a new step with the default name 2A (<New Step>).
We specify the conditions for the email location step, as described in Specifying the Condition for the Email Location Step on page 87.
Specifying the Condition for the Email Location StepTo define the transition from the initial step to the new email location step, we specify the condition using the Conditions for Selected Transition table of the Step Transitions tab.
We use the Field Name and Value Names that we defined in Defining the User Options for the Initial Step on page 83 to specify that the transition to the email location step occurs when users select the email option on the initial screen.
• Select the Field Name column of the Conditions for Selected Transition table, then select the field 1A.message_type from the drop-down list
Intelligent Search Optimization Guide 87

• Select the Value column, then select the value email from the drop-down list
NOTE: The Process Wizard Editor selects the Operator (Op) = by default.
We can now specify the step name, as described in Specifying the Email Location Step Name on page 88, and define the fields for the email location step .
Specifying the Email Location Step NameTo specify the name of the email location step, we use the Step Name field of the Process Step Wizard. To define the step name:
• Select the step 2A(<New Step>) the graphic view
The Process Wizard Editor displays the Process Step Inspector.
• Enter the new name in the Step Label field:
We can now define the text field for our introductory text, as described in Defining the Introductory Text Field for the Email Location Step on page 89.
88 Intelligent Search Optimization Guide

Defining the Introductory Text Field for the Email Location StepWe define the introductory text field for the email location step using the Step Fields tab of the Process Step Inspector. The introductory text asks the user to specify whether they are trying to retrieve local or remote messages.
The Step Fields table contains a default entry for an html field, which we edit for our process. To edit the default entry:
• Select the default html entry
• Select the Edit button below the Description field, and enter the introductory text:
NOTE: You can enter any valid text formatting html in the Description field.
We can now define the user options field for the email location step, as described in Defining User Options for the Email Location Step on page 90.
Intelligent Search Optimization Guide 89

Defining User Options for the Email Location StepWe define the user options using the same processes described in Defining the User Options for the Initial Step on page 83. The user options field for this step prompts users to select a radio button that corresponds to the location from which they are trying to retrieve messages.
To create the user options field:
• Select the empty field below the introductory text field by clicking in the Type column, and select radio from the drop-down list:
• Select the Field Name column and override the default field name by entering an appropriate field name for the condition:
See Defining Conditions on page 115 for more information.
• Enter the Description for the user options field:
• Enter condition value names and values for the local and remote options.
NOTE: You can specify that an option be selected by default; for this process, we assume that the local option is the most likely user response and should therefore be selected by default.
Value Name (For Condition)
Value Default
local My regular computer Yesremote A different computer No
90 Intelligent Search Optimization Guide

You can use the same processes to define the corresponding voice mail location step (2B) and its fields.
This tutorial continues with an example of a solution step, as described in Defining the Local Email Solution Step on page 91.
Defining Solution StepsIn this section, we define a step that presents a solution based on selected user options. In Defining Information Steps on page 86, we created the email location step, which prompts users to specify whether they are trying to retrieve messages from their home location or from a remote location.
For this tutorial we create the local email solution step, as described in Defining the Local Email Solution Step on page 91, which provides information about how to retrieve email from the user's regular home or office computer.
Defining the Local Email Solution StepTo define a solution step that provides information based on the specified user options in our process, we:
• Create a new step, as described in Creating the Email Location Step on page 87
• Specify the condition that we want to associate with the new step, as described in Specifying the Condition for the Email Location Step on page 87
• Define the fields within the new step
Creating the Local Email Solution StepWe create the email location step using the same process as used in Creating the Email Location Step on page 87, except that we create a step in the third row of our process by selecting the New Step function from the email location step (2A):
• Select the email location step (2A)
The Process Wizard Editor displays the Process Step Inspector.
Intelligent Search Optimization Guide 91

• Select the Step Transitions tab and select the New Step button
The Process Wizard Editor creates a new step with the default name 3A (<New Step>).
• Select the new step in the graphic view and rename it to Local Email Solution
We specify the condition for the local email solution step, as described in Specifying the Condition for the Local Email Solution Step on page 92.
Specifying the Condition for the Local Email Solution StepTo define the transition from the email location step, we specify the condition using the Conditions for Selected Transition table of the Step Transitions tab.
We use the Field Name and Value Names that we defined in Defining User Options for the Email Location Step on page 90 to specify that the transition to the local email solution step occurs when users select the local email option from the email location step.
• Select the Field Name column of the Conditions for Selected Transition table, then select the field 2A.email_location from the drop-down list
• Select the Value column, then select the value local from the drop-down list
NOTE: The Process Wizard Editor selects the Operator (Op) = by default. See Specifying Transition Operators for more information.
92 Intelligent Search Optimization Guide

We can now define the html field for the local email solution step, as described in Defining the Text Field for the Local Email Solution Step on page 93.
Defining the Text Field for the Local Email Solution StepThe local email solution step contains only one field, an html field that explains how to retrieve email messages from the user's home computer.
The Step Fields table contains a default entry for an html field, which we edit for our process.
To edit the default entry:
• Select the default html entry
• Select the Edit button below the Description field, and enter the solution text:
NOTE: The following provides an example of simple html markup.
Intelligent Search Optimization Guide 93

When you save the step, the Process Wizard Editor formats the html markup in the field:
94 Intelligent Search Optimization Guide

Tutorial Review
You have now completed the Process Wizard tutorial; note that we did not provide a detailed description of creating each sibling step in each row; however, the following illustration provides a view of a completed Process Wizard based on the scenario described in Scenario: Creating a Process to Assist Message Retrieval on page 74 for your reference:
Intelligent Search Optimization Guide 95

Creating Process Wizards
You create process wizards for your application using the Process Wizard Editor application in the InQuira Language Workbench to:
• Create a new process wizard that includes the step, field, condition, and transition definitions, as described in Creating New Process Wizards on page 96.
• Define the individual steps within the process wizard, as described in Creating Process Steps on page 99.
• Define the fields, conditions, and transitions within the steps, as described in Defining Fields on page 106, Defining Conditions on page 115, and Defining Transitions on page 117.
Creating New Process Wizards
You can create new process wizards:
• Using the New Wizard button to create an empty process wizard, as described in Defining a New Process Wizard on page 97
• Using the Save As New Process Wizard function to create a copy of an existing wizard, as described in Copying an Existing Process Wizard on page 98
NOTE: The Process Wizard Editor assigns a unique internal ID to each process wizard in the form: pw_<sequence_number>.
96 Intelligent Search Optimization Guide

Defining a New Process WizardTo define a new process wizard:
• Select the New Wizard button on the Process Wizard Editor screen:
The Process Wizard Editor creates a new process wizard named New Process Wizard containing only the default first step, 1A(<New Step>).
You can begin defining steps for your process wizard by overwriting the default step parameters and defining additional steps, as described in Creating Process Steps on page 99.
Intelligent Search Optimization Guide 97

Copying an Existing Process WizardYou can copy an existing process wizard for use as a template to create additional process wizards, or for any other purpose, using the Save As New Process Wizard function in the Process Wizard Inspector.
The Save As New Process Wizard button is enabled whenever a previously saved wizard is selected.
To copy an existing process wizard:
• Select the process wizard in the Process Wizard Editor, then select the Save As New Process Wizard button
The Process Wizard Editor displays the New Process Wizard Name dialog:
• Enter the desired name for the new process wizard and select OK
The Process Wizard Editor displays the new process wizard.
98 Intelligent Search Optimization Guide

Creating Process Steps
You can create process steps using the New Step function in the Step Transitions tab of the step inspector.
When you create a new step, the Process Wizard Editor:
• Automatically assigns the new step to the level below the step from which it was created
• Labels the step according to its level, and the order in which it was created
For example, the first step that you create from the default step is labeled 2A(<New Step>). The next step that you create at the second level is labeled 2B(<New Step>), and the first step that you create at the third level (child of 2A or 2B) is labeled 3A(<New Step>).
NOTE: You can also create a new top level step, as described in Creating a New First Step on page 101 or Designating a New First Step on page 101.
To create a process step:
• Select an existing step to be the parent of the new step
• Select the Step Transitions tab, then select the New Step button
Intelligent Search Optimization Guide 99

The Process Wizard Editor displays the new step, with the default label <New Step>:
To change the step label:
• Select the new step and edit the Step Label field
You can define fields, conditions, and transitions for the new step, as described in Defining Fields on page 106, Defining Conditions on page 115, and Defining Transitions on page 117.
100 Intelligent Search Optimization Guide
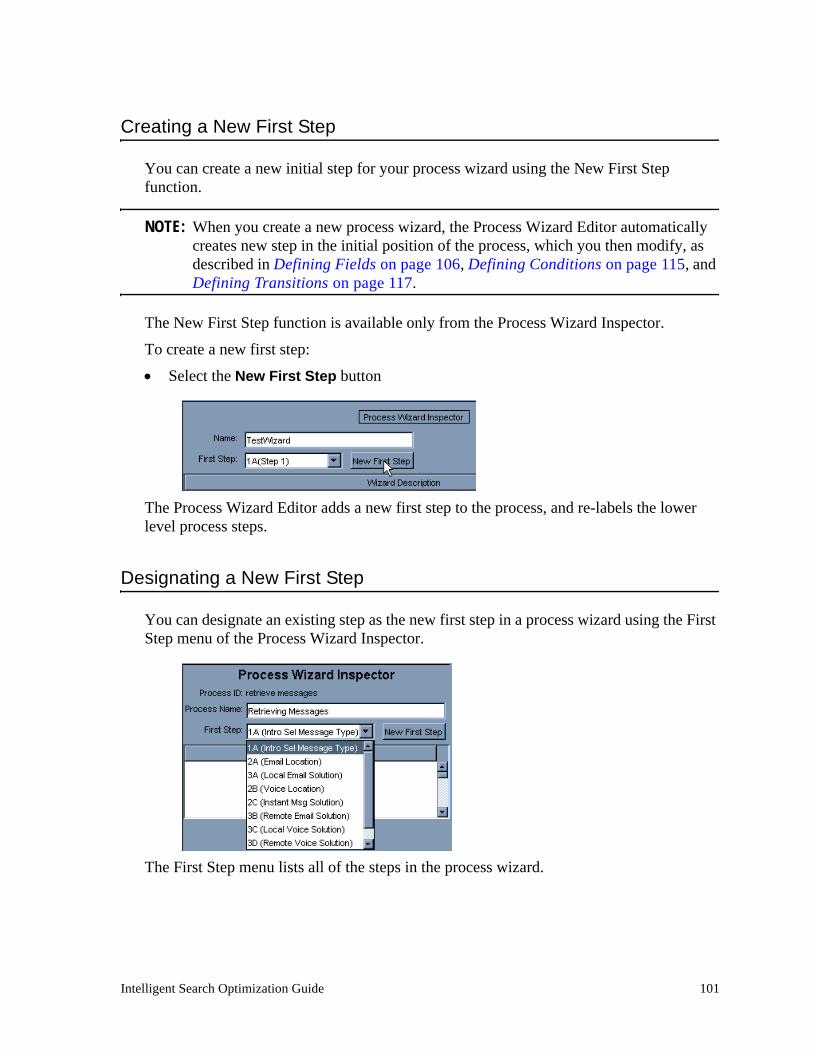
Creating a New First Step
You can create a new initial step for your process wizard using the New First Step function.
NOTE: When you create a new process wizard, the Process Wizard Editor automatically creates new step in the initial position of the process, which you then modify, as described in Defining Fields on page 106, Defining Conditions on page 115, and Defining Transitions on page 117.
The New First Step function is available only from the Process Wizard Inspector.
To create a new first step:
• Select the New First Step button
The Process Wizard Editor adds a new first step to the process, and re-labels the lower level process steps.
Designating a New First Step
You can designate an existing step as the new first step in a process wizard using the First Step menu of the Process Wizard Inspector.
The First Step menu lists all of the steps in the process wizard.
Intelligent Search Optimization Guide 101
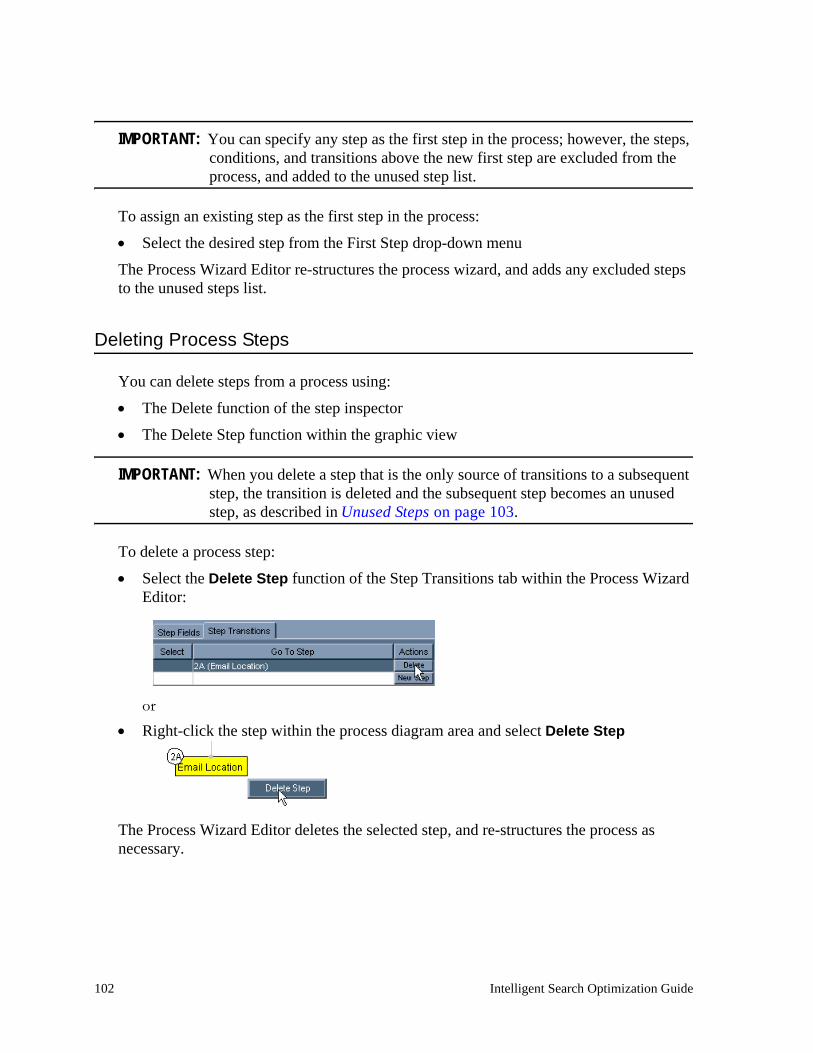
IMPORTANT: You can specify any step as the first step in the process; however, the steps, conditions, and transitions above the new first step are excluded from the process, and added to the unused step list.
To assign an existing step as the first step in the process:
• Select the desired step from the First Step drop-down menu
The Process Wizard Editor re-structures the process wizard, and adds any excluded steps to the unused steps list.
Deleting Process Steps
You can delete steps from a process using:
• The Delete function of the step inspector
• The Delete Step function within the graphic view
IMPORTANT: When you delete a step that is the only source of transitions to a subsequent step, the transition is deleted and the subsequent step becomes an unused step, as described in Unused Steps on page 103.
To delete a process step:
• Select the Delete Step function of the Step Transitions tab within the Process Wizard Editor:
or• Right-click the step within the process diagram area and select Delete Step
The Process Wizard Editor deletes the selected step, and re-structures the process as necessary.
102 Intelligent Search Optimization Guide

Unused Steps
The Process Wizard Editor allows you to define and save steps that are not used within the process. The Process Wizard Editor classifies any step that is not accessible from the initial step by a series of transitions as an unused step. You can display unused steps using the Steps menu.
NOTE: The Process Wizard Editor also displays unused steps as candidates for transitions, as described in Defining Transitions on page 117.
To display an unused step:
• Select Unused from the Process Wizard Editor Steps menu:
The Process Wizard Editor lists the unused steps.
• Select an unused step to display its details in the Process Step Inspector
Previewing Steps
You can view the steps within a process wizard using:
• The Step Preview tab of the Process Step Inspector, as described in Previewing Steps within the Process Step Inspector on page 104
• The Preview Step in Browser function, as described in Previewing Steps within a Browser on page 105
Intelligent Search Optimization Guide 103

Previewing Steps within the Process Step Inspector
You can view the basic content and format of a step using the Step Preview tab of the Process Step Inspector.
The Step Preview tab displays basic formatting for selected steps; however, the HTML rendering is not as complete as when viewed using the browser preview function.
This preview mode is useful for quickly reviewing a process by selecting the Step Preview tab, then selecting multiple steps in sequence from the graphic view area.
To display a preview of a selected step:
• Select the Step Preview tab
The Process Wizard Editor displays the formatted contents of the current step:
You can preview other steps in the process by selecting them in the graphic view.
104 Intelligent Search Optimization Guide

Previewing Steps within a Browser
You can view detailed formatting for a single step using the Preview Step in Browser function of the Step Inspector. The Preview Step in Browser function displays the current step in a separate browser window using basic formatting.
To display a preview of a selected step:
• Select Preview Step in Browser
The Process Wizard Editor displays the current step in a separate browser window:
NOTE: The < Back and Next > buttons are not functional in preview mode.
Intelligent Search Optimization Guide 105

Defining Fields
You can define fields within process steps using the Step Fields tab within the Process Wizard Editor. Step fields define the components of the step, such as informational text and user options that are displayed in the User Interface.
The User Interface displays step fields in the order in which they are defined in the Step Fields table. The bottom row of this table is always empty to accommodate a new option. You can change the order of fields within a step using the Up and Down icons at the right of the Step Fields table.
NOTE: When you create a new field, the Process Wizard Editor creates a default html field.
To define a new field:
• Select the Type cell in the last row of the Step Fields area, then select the desired Type for the new field from the drop-down menu
NOTE: See Specifying Field Types on page 108 for more information on the types of fields you can define within steps.
The Process Wizard Editor creates the selected field type, for example:
106 Intelligent Search Optimization Guide

• Specify the following additional parameters for the field:
You can delete or change the order of fields within steps using the Delete and up and down arrows in the Step Fields tab:
Parameter DescriptionName (For Conditions)
Use this parameter to specify a unique ID that you used to refer to the field when specifying Conditions and Transitions, and any type-specific attributes, as described in Defining Conditions on page 115.
Description Use this parameter to specify:
• formatted text for html fields
• formatted introductory text for user option fields (checkbox, radio, select, text)
Additional Attributes See Defining Conditions on page 115 and Defining Transitions on page 117 for more information on the attributes associated with each field type.
Intelligent Search Optimization Guide 107

Specifying Field Types
You specify the Type for a field to determine whether the field is informational (html), or whether it presents user options for use in setting conditions for subsequent step transitions.
The following table describes the available field types:
Type Descriptioncheckbox Use this field to define a set of options where users can select one
or more options from the set by clicking in empty checkboxes. To specify a checkbox field, enter:
• An optional heading or introductory text for the checkbox options in the Description field
• Labels for each checkbox option in the Conditions Value field
• A brief Value Name for use in specifying transitions
• An optional default selection from among the optionsSee Defining Conditions on page 115 for more information.
html Use this field to define an informational field. You specify an html field by entering any valid html in the Description field of the Step Inspector. The User Interface displays the formatted html, for example:
108 Intelligent Search Optimization Guide

radio Use this field to define a set of options where users can select only one option from a list of radio buttons. To specify a radio field, enter:
• An optional heading or introductory text for the radio options in the Description field
• Labels for each radio option in the Conditions Value field
• A brief Value Name for use in specifying transitions
• An optional default selection from among the optionsSee Defining Conditions on page 115 for more information.
search Use this field to launch an InQuira search based on the user responses to the fields within the process wizard, as described in Specifying a Search Action within a Step Field on page 111.
Use both the "text" and the "search" fields in your step. The "text" field creates a free-form text field to enter search text into; the "search" option creates a search button on the Process Wizard UI which subsequently invokes the search.
Intelligent Search Optimization Guide 109

select Use this field to define a set of options where users can select only one option from the set. To specify a select field, enter:
• An optional heading or introductory text for the select listbox in the Description field
• Labels for each selection option in the Conditions Value field
• A brief Value Name for use in specifying transitions
• An optional default selection from among the selection options
See Defining Conditions on page 115 for more information.
text Use this field to define an area in which users can enter free-form text. To specify a text field, enter:
• An optional heading or introductory text for the text field in the Description field
• A label for the text field in the Conditions Value field
• A brief Value Name for use in specifying transitions
• An optional default selection from among the optionsSee Defining Conditions on page 115 for more information.
NOTE: This is required for search steps. See search, above.
110 Intelligent Search Optimization Guide

Specifying a Search Action within a Step Field
To define a search action within a step field, you associate the search field with a context variable.
NOTE: You must have context variables defined within your application. See Working with Business Rules on page 94 for more information on setting context variables.
The application submits the value of the context variable as additional input with the question to influence the search result.
When you specify a search field type, the Process Wizard User Interface replaces the Next or Finish button with a button labeled Search.
IMPORTANT: You can specify the search action only in the final step of a process.
When an end user invokes search from the Process Wizard User Interface, the application submits a request containing:
• The original question
• Additional user context variables set to the values specified by the user responses
Creating Shared Fields
You can create, view, and modify shared fields for use within multiple Process Wizards. You can use shared fields:
• As standard fields shared among multiple process wizards
• As templates for creating similar fields
Shared fields enable you to create and manage a collection of commonly used fields and templates for use within process steps.
For example, you could define a global Yes/No radio button field, which you could use:
• In its basic form wherever a simple Yes or No response is required
• As a template for defining Yes/No options that require additional information or qualification
You can also create shared fields containing a standard message and set of options for choices that are presented consistently in multiple processes.
For example, you could create select fields for products, operating systems, or colors.
Intelligent Search Optimization Guide 111

You define shared fields in the same way that you define basic step fields.
NOTE: You cannot define a shared field using the search field type; search field definitions require internal mapping that is specific to the process wizard in which it is used.
To define a shared field:
• Select the Shared Fields button near the top of the Process Wizard Editor
The Process Wizard Editor displays the Shared Fields Inspector.
• Select the Type cell in the last row of the Shared Fields area, then select the desired Type for the new field from the drop-down menu
NOTE: See Specifying Field Types on page 108 for more information on the types of fields you can define within shared steps.
The Process Wizard Editor creates the selected field type, and supplies a default field name, for example:
112 Intelligent Search Optimization Guide

• Specify the following parameters for the shared field:
• Save the shared field by selecting the Save Shared Field button
The Process Wizard Editor saves the new shared field.
Parameter DescriptionShared Field Type (For Step Inspector)
Use this parameter to specify a type name for use in the Step Inspector. The Step Inspector uses the value of this field to display this shared field as an option in the Type menu, as described in Adding a Shared Field to a Process Step on page 114.
Description Use this parameter to specify:
• formatted text for html fields
• formatted introductory text for user option fields (checkbox, radio, select, text)
Value Name (For Conditions
Use this field to specify a value name for each option within the set of user options defined for this field.
Value Use this field to specify the text to display within the User Interface for each condition name within the set of user options defined for this field.
Default Use this field to specify whether this option should be pre-selected by default.
Intelligent Search Optimization Guide 113
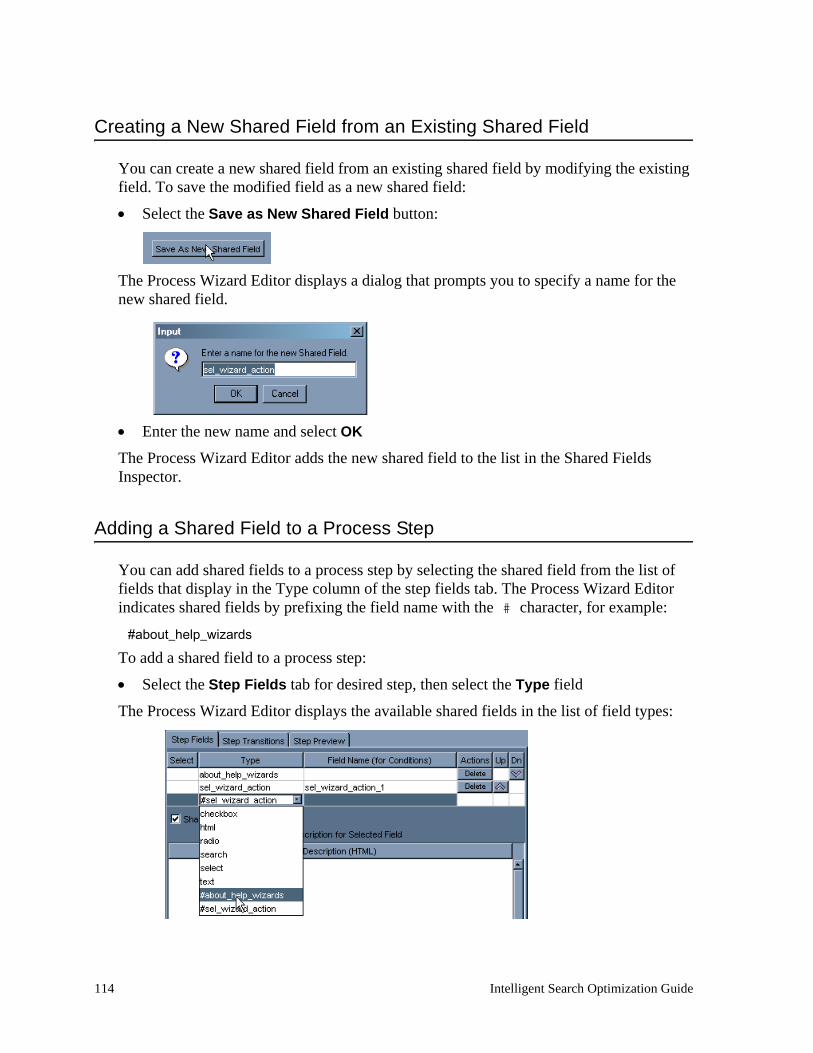
Creating a New Shared Field from an Existing Shared Field
You can create a new shared field from an existing shared field by modifying the existing field. To save the modified field as a new shared field:
• Select the Save as New Shared Field button:
The Process Wizard Editor displays a dialog that prompts you to specify a name for the new shared field.
• Enter the new name and select OK
The Process Wizard Editor adds the new shared field to the list in the Shared Fields Inspector.
Adding a Shared Field to a Process Step
You can add shared fields to a process step by selecting the shared field from the list of fields that display in the Type column of the step fields tab. The Process Wizard Editor indicates shared fields by prefixing the field name with the # character, for example:
#about_help_wizards
To add a shared field to a process step:
• Select the Step Fields tab for desired step, then select the Type field
The Process Wizard Editor displays the available shared fields in the list of field types:
114 Intelligent Search Optimization Guide

• Select the desired shared field
The Process Wizard Editor adds the shared field to the selected step.
Defining Conditions
Conditions are parameters that you define within step fields that offer multiple user options. You use conditions to specify the transition to the next step in the process for each user option. For example, a step field that asks a user to select a processor type might specify a transition to a different step for each possible response.
You specify conditions for the following types of fields:
• Checkbox
• Radio
• Select
You define conditions for the user option fields within process steps by specifying:
• The Field Name (For Conditions) field, as described in Specifying Condition Field Names on page 115
• An operation and a value in the Options for Selected Field table, as described in Specifying Condition Values on page 116
Specifying Condition Field Names
To specify a field name for a condition:
• Select the type of condition (checkbox, radio, or select)
The Process Wizard Editor automatically enters a default field name corresponding to the selected field type:
Intelligent Search Optimization Guide 115

• Rename the field name, for example:
• Specify condition values for each user option in the field, as described in Specifying Condition Values on page 116
Specifying Condition Values
You specify condition values by specifying:
• The condition value
• The display value
• Whether an option is selected by default when the step is displayed
in the Options for Selected Field table.
To Specify condition values:
• Enter appropriate values in the fields, for example:
Parameter DescriptionValue Name (For Conditions)
Use this field to specify a value name for each option within the set of user options defined for this field.
Value Use this field to specify the text to display within the User Interface for each condition name within the set of user options defined for this field.
Default Use this field to specify whether this option should be pre-selected by default.
116 Intelligent Search Optimization Guide

Defining Transitions
Transitions are the mechanisms that determine the next step to display in the process based on a user-selected condition. You specify transitions for the condition values (user options) that you define within a step.
NOTE: If you do not specify a transition for a condition, the Process Wizard displays the default step when a user selects that condition.
You specify transitions using the Step Transitions tab of the Process Wizard Editor.
To specify a transition for a step:
• Select the Step Transitions tab
• Specify the following transition fields:
Field DescriptionGo to Step Use this field to select or create the step to which you want to
transition.Actions Use this field to create a new process step for the transition, or
to delete a transition.Conditions for Selected Transition
This table displays the following fields to specify conditions:
Field Name Use this field to specify the condition that applies to the currently selected transition step (the Go to Step field).
Op (Operator) Use this field to specify an operator to evaluate the condition.Value Use this field to specify the value that you want to apply to the
currently selected transition step.
Intelligent Search Optimization Guide 117

Creating Dictionary Rules to Invoke Process Wizards
You configure a process wizard for use by the application by creating a rule that invokes the process wizard as a response (action) to the appropriate user request and context (condition).
To create process wizard rule:
• Create a rule and define the rule's condition so that it matches the desired request(s) using the Dictionary Manager, as described in Working with Rules on page 71
• Define the rule's action to invoke the desired process wizard, as described in Assigning the Process Wizard Action to a Rule on page 118
Assigning the Process Wizard Action to a Rule
You assign the process wizard to a rule by specifying the rule's action using the Answer purpose and the Process Wizard answer method.
NOTE: The Answer purpose is the only supported purpose for displaying process wizards in the User Interface.
To specify the process wizard answer method:
• Select the Answer purpose from the Purpose drop-down menu
• Select Process Wizard from the Methods drop-down menu on the rule's Actions tab
The Dictionary Manager displays a drop-down menu of the process wizards currently defined in the Dictionary.
118 Intelligent Search Optimization Guide

• Select the desired process wizard from the drop-down menu
The rule is available to the application when you commit your changes to the Dictionary.
The Process Wizard User Interface
The Process Wizard User Interface is a set of specific pages designed for use with Process Wizards. When users select an Process Wizard answer from the standard answer page, the User Interface invokes the Process Wizard User Interface pages to display the selected Process Wizard.
NOTE: The Process Wizard User Interface is automatically configured for use within the standard User Interface.
The Process Wizard User Interface consists of the following major elements:
• The Process Wizard answer, which displays on the answer page, as described in The Process Wizard Answer on page 119
• The step display area, which contains the steps defined for the process, as well as the navigation buttons (Back, Next, Finish), as described in The Step Display Area on page 120
• The process summary column, which displays information about the previous steps that the user has taken to progress through the wizard, as described in The Step Display Area on page 120
The Process Wizard Answer
When an end-user submits a request to the application that matches a process wizard rule, the User Interface displays a special Process Wizard answer in the standard answer area, for example:
If users select the link in the process wizard answer, the User Interface displays the initial step of the process wizard.
Intelligent Search Optimization Guide 119

The Step Display Area
When users select a Process Wizard answer, the application displays the initial step in the Process Wizard User Interface step display area.
The Process Wizard User Interface displays a summary of the user's previous responses to the left of the step display area. The summary displays below the heading Your Responses.
Each response is displayed as a link that navigates back to the process step.
Modifying the Process Wizard User Interface
You can modify Process Wizard User Interface elements to suit the needs of your application by editing the Process Wizard User Interface files, located in one of the following locations:
<InQuira_root>/inquira/int/<subdirectory>
where:
<subdirectory> is one of the following:
• css
• js
• xsl/search
CSS Files Description
120 Intelligent Search Optimization Guide

NOTE: The file int/xsl/process_wizard/step.xsl is used only for previewing steps in the Process Wizard Editor, and is not used in the Process Wizard User Interface.
qna_wizard_style .css
This is the style sheet that specifies the style and formatting for the elements that are specific to the Process Wizard User Interface and are not part of the standard search.
Java Script Files Descriptionqna_wizard.js This is a JavaScript library that contains Process Wizard
User Interface-specific functionality.
XSL Files Descriptionwizard.xsl This is the main Process Wizard User Interface file that
contains the basic page definition (similar to the ui_search*.xsl files) and utilities for the wizard pages.
wizard_fields.xsl This file contains all of the templates used to render any defined wizard fields such as radio buttons, text boxes, select boxes, HTML areas, etc. on the UI.
wizard_history .xsl
This file contains the templates for displaying the user's choice history as well as the support templates for any actions generated by the history information such as links back to previous pages.
Intelligent Search Optimization Guide 121

122 Intelligent Search Optimization Guide

Chapter 3 Personal Navigation Setup
You can implement the InQuira Personalized Navigation feature to categorize application content and display a hierarchy of the results, such as products and models, services, and prices, in the User Interface. When Personalized Navigation is implemented, users can select among content categories to display information limited to the selected areas of interest.
You can also integrate Personalized Navigation with InQuira question answering to automatically generate answers to natural language questions based on the categories of information referenced in users' questions. For example, users can get results related to a specific price range either by selecting the appropriate price facet or by referring to a price in their question.
Intelligent Search Optimization Guide 123

Personalized Navigation provides end users with the choice of displaying application content by selecting category links within the navigation area of the question page. For example, users can select from content categories displayed in the User Interface:
The links in the navigation area (left column) correspond to the content categories (also called facets). Users can select from the available categories to locate a particular item of interest.
Personalized Navigation can also refer to Dictionary rules so that a user question such as “What books do you have between $10 and $20?" automatically selects content categories.
Personalized Navigation includes built-in data classification tools and methods to:
• Define any number of categories and subcategories for classification.
InQuira provides a variety of built-in classification methods to classify structured and unstructured data, including methods to access database fields, site graph, meta-tags, and concept relations.
• Classify application data at multiple levels.
You can classify application content at the sentence level, section level, or any other portion of a document, and create Dictionary rules to restrict results based on classification during question processing.
• Leverage Dictionary concept definitions to categorize data.
You can use the concept information stored in the Dictionary to create taxonomies, and schedule taxonomy updates so that any changes to the ontology or content are automatically reflected in the navigation categories.
124 Intelligent Search Optimization Guide

• Classify unstructured data based on structured data.
You can use structured data categories to access related unstructured content, so that, for example, unstructured data consisting of book reviews listed by titles can be categorized by the prices and publication years contained in a separate database.
Personalized Navigation Presentation
InQuira provides delivered User Interface implementation for Personalized Navigation featuring:
• Seamless integration with the standard InQuira search implementation.
Personalized Navigation presents results based on selected content categories, enabling users to select facets that then restrict or expand the scope of their original question.
• Dictionary leveraging of InQuira natural language processing.
Dictionary rules can select content categories when concepts are referenced in users' question, leveraging the full power of InQuira natural language processing. For example, users get classified results from questions such as:
What books were published in 1992? What books cost around $15? What books cost between $12 and $18?
• Support for "upward" navigation by selection or by question processing.
Personalized Navigation supports navigation to back out of a selected category to any higher level category. More importantly, users can expand the scope of a natural language question. For example, consider a question about car models:
Special deals for Sputniks?
followed by selecting the Sedans facet.
The application expands the scope of the question to mean:Special deals for (all sedans)?
Intelligent Search Optimization Guide 125

Personalized Navigation Implementation
You implement Personalized Navigation by creating hierarchies of information categories, called taxonomies. You define and create the various levels of your taxonomies using the Personalized Navigation application in the InQuira Language Workbench.
The Personalized Navigation application contains tools and methods to:
• Associate your application content with the categories defined in your taxonomy.
• Generate subcategories within the taxonomy based on properties within your application content.
The basic Personalized Navigation application process uses a simple four step dialog to prompt you for the information required to build a taxonomy. You can use Personalized Navigation application advanced settings to explicitly specify content classification, as described in Using Advanced Facet Definition Settings on page 164.
NOTE: You can tailor the question answering and presentation aspects of Personalized Navigation by adding custom Dictionary rules to access classification information, as described in Referring to Facets from Dictionary Rules on page 157. You can also use classification in question processing without displaying navigation in the User Interface.
The Personalized Navigation application
You define and create taxonomies for your application content using the Personalized Navigation application in the InQuira Language Workbench.
The Personalized Navigation application contains tools and methods to:
• Associate your application content with the categories defined in your taxonomy.
• Generate subcategories within the taxonomy based on properties within your application content.
Personalized Navigation Application Classification Components on page 192 describes the components of the Personalized Navigation application.
126 Intelligent Search Optimization Guide

Personalized Navigation Application Components
The Personalized Navigation application uses the following components for classifying application data:
• Taxonomies – The classification schemes that organize the units of information, such as documents, sentences, and database entries, into a hierarchical structure, as described in Taxonomies on page 128.
• Facets – The individual categories within a taxonomy, as described in Facets on page 129.
• Classifiers – The procedures that associate facets with the relevant data within the application content, as described in Classifiers on page 129.
• Taxonomy Builders – Procedures that you configure within a classifier to generate additional sub-facets during the classification process, as described in Taxonomy Builders on page 130.
• Formatters – Procedures that control how facet names are presented in the User Interface, as described in Formatters on page 130.
• Comparators – Modules that compare values of facet items to determine display order, as described in Comparators on page 130.
In addition, there are packaged rules within the Dictionary that support Personalized Navigation functions; you create custom rules to reference specific facets, as described in Referring to Facets from Dictionary Rules on page 157.
Intelligent Search Optimization Guide 127

Taxonomies
A taxonomy is a classification of objects. For Personalized Navigation the items classified in the taxonomy are items of relevant information, such as documents, sentences, and database entries, that belong to defined categories, such as product model, and price.
For any given item in the taxonomy, all objects classified in that item are implicitly classified for all parent items in the taxonomy. For example, in the taxonomy illustrated below , every Fantasy book is also a Speculative book and also a Fiction book.
In Personalized Navigation, the categories created by the classification process (either automatically generated or manually created) are referred to as facets.
128 Intelligent Search Optimization Guide

Facets
Facets are the individual information categories within a taxonomy. You define facets that correspond to the categories of information that you want to make available to end users, either by defining them manually or by using the Personalized Navigation application classifiers.
For example, you could manually define set of facets based on fiction book sub-genres, such as Mystery, Romance, and Speculative, and use the Personalized Navigation application classifiers to generate additional child facets based on values stored in a database.
Classifiers
Classifiers are Personalized Navigation application procedures that you configure to create taxonomies and associate application content with the facets within the taxonomies. InQuira contains various classifiers to access both structured and unstructured data sources, as described in Personalized Navigation Application Classification Components on page 192.
Intelligent Search Optimization Guide 129

Taxonomy Builders
Taxonomy builders are procedures that you configure within classifiers to create new facets during the classification process. Taxonomy builders enable you to automate the facet creation process, as well as automatically update the facets within data repositories that are subject to frequent change. See Personalized Navigation Application Taxonomy Builders on page 213 for more information on configuring taxonomy builders within classifiers.
Formatters
Formatters are procedures within taxonomy builders that perform string substitution on facet names so that you can control their presentation within the User Interface. See Personalized Navigation Application Formatters on page 222 for information on configuring formatters within classifiers.
Comparators
Comparators are modules within taxonomy builders that compare two values and determine whether the first is less than, equal, or greater than the second. See Personalized Navigation Application Comparators on page 221 for more information on configuring comparators within classifiers.
130 Intelligent Search Optimization Guide

Implementing Personalized Navigation
You implement Personalized Navigation using the Personalized Navigation application within the InQuira Language Workbench to define content categories, and by configuring the User Interface presentation elements.
To implement Personalized Navigation:
• Activate the Personalized Navigation User Interface template, as described in Activating the Personalized Navigation User Interface Layout on page 131.
• Access the Personalized Navigation application, as described in Accessing the Personalized Navigation Application on page 132.
• Select or define a navigation application, as described in Defining a Navigation Application on page 132.
• Define taxonomies and facets within the navigation application, as described in Defining Taxonomies on page 135.
• Create any necessary Dictionary rules to reference taxonomies, as described in Referring to Facets from Dictionary Rules on page 157.
• Classify the application data, as described in Performing Data Classification on page 156.
Activating the Personalized Navigation User Interface Layout
To implement the Personalized Navigation User Interface elements, you activate the Personalized Navigation User Interface layout, ui_search_and_browse.xsl, located in:
int/xsl/search/main.xsl
The main.xsl file contains an include statement for the Personalized Navigation User Interface layout.
The following is an example of the include statements within the main.xsl file, showing the Personalized Navigation layout enabled:
<!-- Options for Search UI Main Screens --> <!--xsl:import href="ui_search_basic.xsl"/--> <xsl:import href="ui_search_and_browse.xsl"/> <!--xsl:import href="ui_search_vrep.xsl"/-->
IMPORTANT: You can enable only one of the include statements for your application.
Intelligent Search Optimization Guide 131

Accessing the Personalized Navigation Application
You access the Personalized Navigation application:
• From the InQuira Language Workbench Launcher.
- Enter a valid User name and password.
- Select Personalized Navigation Setup from the Application drop-down menu.
• From other InQuira Language Workbench applications, such as the User Manager.
- Click on the Personalized Navigation application icon , displayed in the lower right corner of the main application window.
The InQuira Language Workbench displays the Personalized Navigation application screen:
The Personalized Navigation application displays a tree containing the Default navigation application and any other currently defined applications.
You can select the Default folder to define taxonomies within the Default navigation application, or define additional navigation applications.
Defining a Navigation Application
Navigation applications are collections of content categories, or taxonomies that you define for your InQuira application. You can define any number of navigation applications in addition to the Default application.
132 Intelligent Search Optimization Guide
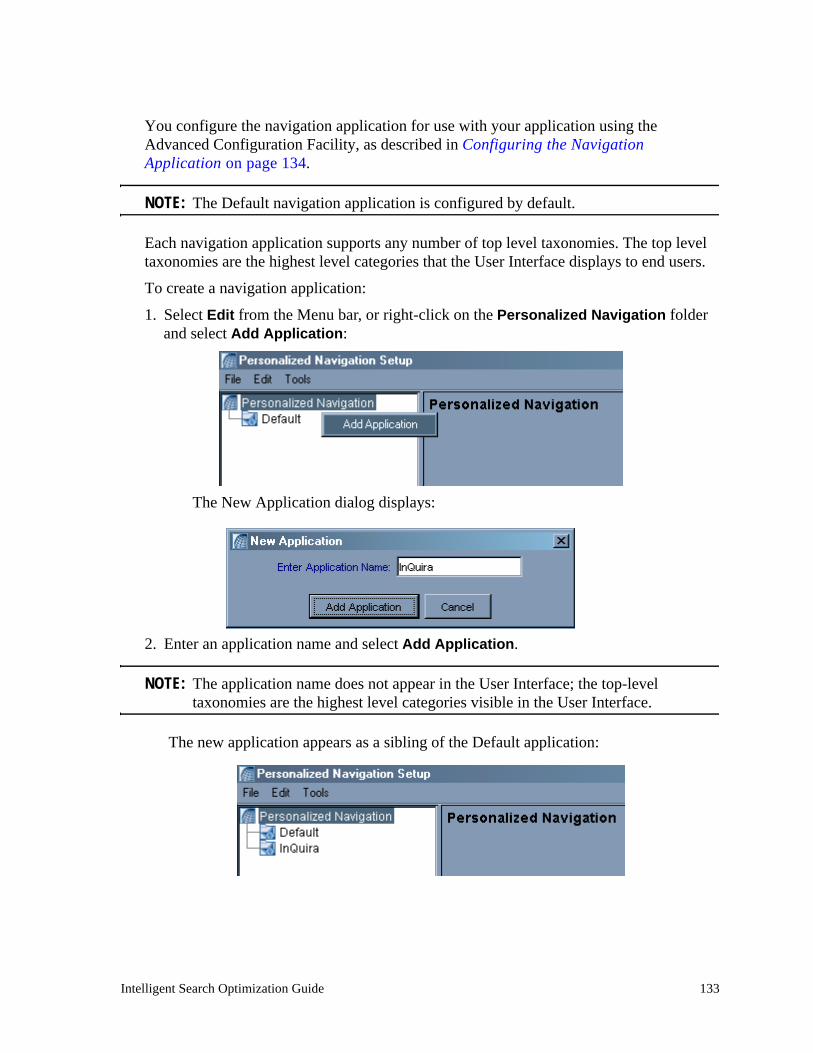
You configure the navigation application for use with your application using the Advanced Configuration Facility, as described in Configuring the Navigation Application on page 134.
NOTE: The Default navigation application is configured by default.
Each navigation application supports any number of top level taxonomies. The top level taxonomies are the highest level categories that the User Interface displays to end users.
To create a navigation application:
1. Select Edit from the Menu bar, or right-click on the Personalized Navigation folder and select Add Application:
The New Application dialog displays:
2. Enter an application name and select Add Application.
NOTE: The application name does not appear in the User Interface; the top-level taxonomies are the highest level categories visible in the User Interface.
The new application appears as a sibling of the Default application:
Intelligent Search Optimization Guide 133

Configuring the Navigation ApplicationIf you define facets within a navigation application other than the default (Default), you must configure the alternate navigation application for use with the application.
NOTE: The Personalized Navigation application displays alternate navigation applications as siblings of the Default application.
You configure a navigation application on the Service Configuration page of the Advanced Configuration Facility.
To configure a navigation application:
1. Select Service Configurations from the Advanced Configuration Facility menu.
The Service Configurations page displays the current instance configurations:
2. Select the desired instance.
The Service Configurations page displays parameters for the Navigation Service.
3. Specify the name of the alternate navigation application in the Default Navigation Application ID field, and select OK to save your configuration changes.
134 Intelligent Search Optimization Guide

Defining Taxonomies
You define taxonomies (content categories) for a navigation application using the Personalized Navigation application setup process.
NOTE: Personalized Navigation includes advanced functions for creating and defining content categories that you access using the Show Advanced Setup option in the Tools menu, as described in Using Advanced Facet Definition Settings.
To create a top level taxonomy within a navigation application:
1. Select the application folder, then right-click and select Add Taxonomy or select the New Taxonomy button in the upper right portion of the display:
The New Taxonomy dialog displays.
2. Enter the name for the new taxonomy as you want it to display in the User Interface and select Add Taxonomy.
The new taxonomy appears as a node under the selected application:
You can define additional taxonomies as siblings and children of the new taxonomy using the same process.
Intelligent Search Optimization Guide 135

Defining Taxonomy Display Properties
You can define taxonomies to be displayed in the User Interface, or to be used only internally by the application's request and response processing.
To define the display properties of a taxonomy:
1. Select the taxonomy folder for the category:
The Personalized Navigation application prompts you to specify whether this taxonomy:
- Displays in the User Interface and is available for end users to select.
- or -
- Does not display in the User Interface and is available only for reference by Dictionary Rules
2. Select one of the following display options:
Yes Specifies that this taxonomy displays in the User Interface. The User Interface displays the Web Interface Settings dialog.
No Specifies that this taxonomy is used only for reference by Dictionary Rules.
136 Intelligent Search Optimization Guide

The Personalized Navigation application displays the Web Interface Settings dialog for taxonomies that are specified to display in the User Interface:
3. Specify the following Navigation Area display options:
Show taxonomy before a question is asked.
Select this checkbox to specify that the category displays in the Personalized Navigation column of the User Interface.
For example the categories Price, Year of Publication, and Collections are set to display in the initial question page before a question has been asked:
Intelligent Search Optimization Guide 137
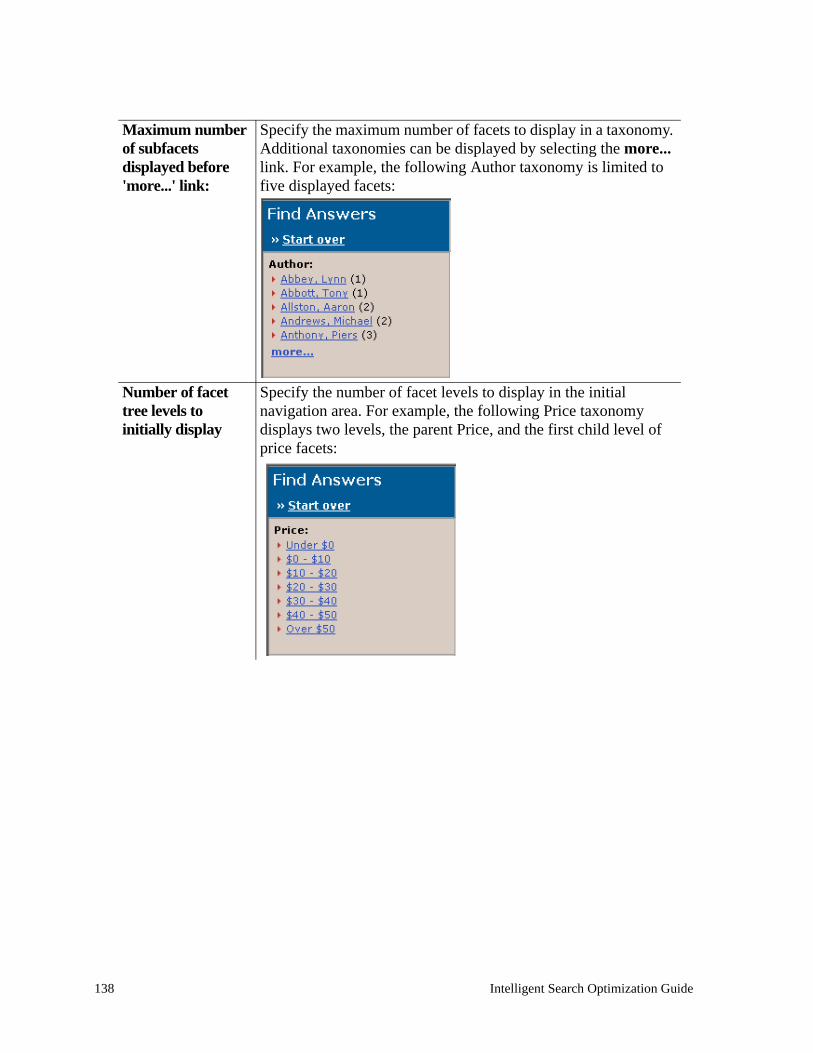
Maximum number of subfacets displayed before 'more...' link:
Specify the maximum number of facets to display in a taxonomy. Additional taxonomies can be displayed by selecting the more... link. For example, the following Author taxonomy is limited to five displayed facets:
Number of facet tree levels to initially display
Specify the number of facet levels to display in the initial navigation area. For example, the following Price taxonomy displays two levels, the parent Price, and the first child level of price facets:
138 Intelligent Search Optimization Guide
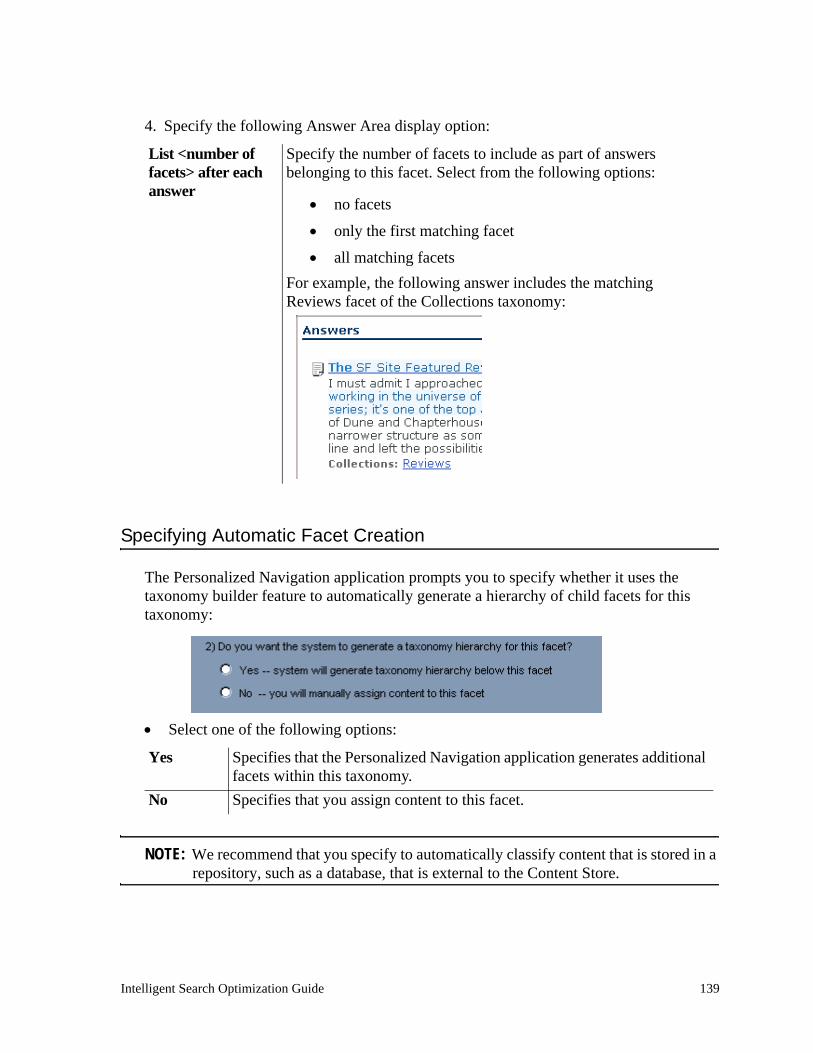
4. Specify the following Answer Area display option:
Specifying Automatic Facet Creation
The Personalized Navigation application prompts you to specify whether it uses the taxonomy builder feature to automatically generate a hierarchy of child facets for this taxonomy:
• Select one of the following options:
NOTE: We recommend that you specify to automatically classify content that is stored in a repository, such as a database, that is external to the Content Store.
List <number of facets> after each answer
Specify the number of facets to include as part of answers belonging to this facet. Select from the following options:
• no facets
• only the first matching facet
• all matching facetsFor example, the following answer includes the matching Reviews facet of the Collections taxonomy:
Yes Specifies that the Personalized Navigation application generates additional facets within this taxonomy.
No Specifies that you assign content to this facet.
Intelligent Search Optimization Guide 139

The Personalized Navigation application prompts you in later steps to specify:
• The source of the content to use.
• Additional generation information, depending on the type of content source you select, as described in Specifying Generation Options on page 142.
Specifying the Content Source for the Taxonomy
The Personalized Navigation application prompts you to specify whether the content for the taxonomy resides:
• In a database
• In unstructured documents
• Select one of the following options:
For taxonomy content that resides in a database, the Personalized Navigation displays the Database Content Settings dialog:
• Select a database from the list of currently configured schema on the Structured Data page of the Advanced Configuration Facility Instances section
Yes Specifies that the content for this taxonomy resides in a database.
IMPORTANT: The database must be configured as a source of structured data for your application, as described in the Intelligent Search Application Development Guide.
The Personalized Navigation application displays the Database Content Settings dialog.
No Specifies that the content for this taxonomy resides in unstructured content.
140 Intelligent Search Optimization Guide

The Personalized Navigation application prompts you to specify generation options.
Intelligent Search Optimization Guide 141

Specifying Generation Options
The Personalized Navigation application presents options to:
• Automatically generate facets from database or document content
• Manually assign database or document content to facets
based on the following options, and the selections you specified in Specifying Automatic Facet Creation on page 139:
Automatically Generating Facets for Database ContentIf you chose to automatically generate facets for database content, the Personalized Navigation application displays the following generation options:
• Select one of the following options:
- Generate a date taxonomy for a date column, as described in Generating a Date Taxonomy for a Selected Column on page 143
- Generate a numeric range taxonomy for a numeric column, as described in Generating a Numeric Range (Price) Taxonomy on page 144
- Generate a taxonomy based on the contents of one table column, as described in Generating a Facet Based on a Single Column on page 146
If You Chose to.... Go to...have the Personalized Navigation application automatically generate facets for database content...
Automatically Generating Facets for Database Content on page 142
have the Personalized Navigation application automatically generate facets for document content...
Automatically Generating Facets for Document Content on page 147
manually assign content to facets for database content...
Manually Assigning Database Content to a Facet on page 150
manually assign content to facets for document content...
Manually Assigning Document Content to a Facet on page 152
142 Intelligent Search Optimization Guide

- Generate a taxonomy based on the contents of multiple table columns, as described in Generating a Taxonomy Based on Multiple Columns on page 146
Generating a Date Taxonomy for a Selected ColumnThis option creates a date taxonomy based on the selected date column and additional parameters.
To generate a date taxonomy for a date column, specify the following parameters:
See Classifying Content Based on Database Column Values on page 173 for more information on classifying database content.
Field DescriptionSelect the date column to use
Select a column from the list. The Personalized Navigation application examines the available fields in the specified database and provides a list of columns that contain date data.
Generate a 3 level (year/month/day) taxonomy
Select to automatically generate a three level hierarchy consisting of the facet levels Year, Month, and Day.
Show facet for the current (day, week, month, year):
Select to generate only the specific facets. The Personalized Navigation application displays a field in which you can specify a facet label to override the default.
Show facet for all dates: Select to generate a single taxonomy of facets for all dates. The Personalized Navigation application displays a field for in which you can specify a label to override the default.
Intelligent Search Optimization Guide 143

Generating a Numeric Range (Price) TaxonomyThis option creates a numeric range taxonomy, such as a price taxonomy, based on a selected numeric column and additional parameters:
• Specify the following options:
Field DescriptionSelect the numeric column to use
Select a column from the list. The Personalized Navigation application examines the available fields in the specified database and provides a list of columns that contain numeric data.
Currency values Select the checkbox to specify that facets sort by currency in ascending order.
144 Intelligent Search Optimization Guide

See Classifying Content Based on Database Column Values on page 173 for more information on classifying database content.
Show 'less than minimum' facet:
Select this option to create a facet for values less than the Minimum. The Personalized Navigation application creates a facet labeled:
Under <minimum_value>
for example,
Under $5.00where 5 is the value of the Minimum parameter.
Show 'greater than maximum' facet:
Select this option to create a facet for values greater than the Maximum. The Personalized Navigation application creates a facet labeled:
Over <maximum_value>
for example,
Over $50.00where 50 is the value of the Maximum parameter.
Facet levels: Specify the number of levels for the taxonomy, and the number of facets within each level. For example, enter 5, 2 to specify that the top level taxonomy is divided into five facets, and the second level is divided into two facets.
Generate levels beyond level n at runtime
Select the checkbox to create taxonomy levels dynamically at runtime when specifically selected by the user. Use this setting when:
• The results of conventionally classifying the data ae very large.
• The performance loss of accessing the data source at runtime is acceptable.
Intelligent Search Optimization Guide 145

Generating a Facet Based on a Single ColumnThis option creates a taxonomy based on a selected database column. The taxonomy contains a facet for each unique value in the selected column.
To generate a taxonomy based on a selected column, select a column from the list.
See Classifying Content Based on Database Column Values on page 173 for more information classifying database content.
Generating a Taxonomy Based on Multiple ColumnsThis option creates a taxonomy based multiple selected columns. The Personalized Navigation application creates a taxonomy level for each column, in the order specified. You can use the arrows in the Table Columns field to change the order of the columns.
To generate a numeric range taxonomy for a numeric column, select the columns to use.
See Classifying Content Based on Database Column Values on page 173 for more information classifying database content.
146 Intelligent Search Optimization Guide
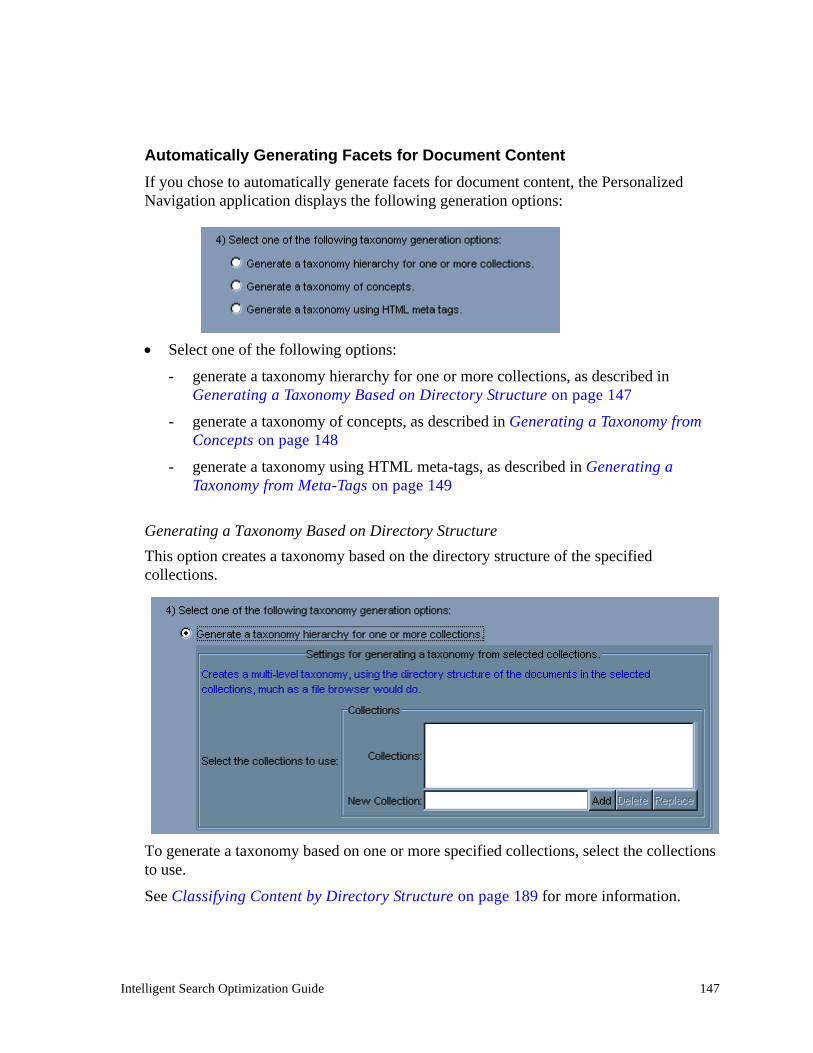
Automatically Generating Facets for Document ContentIf you chose to automatically generate facets for document content, the Personalized Navigation application displays the following generation options:
• Select one of the following options:
- generate a taxonomy hierarchy for one or more collections, as described in Generating a Taxonomy Based on Directory Structure on page 147
- generate a taxonomy of concepts, as described in Generating a Taxonomy from Concepts on page 148
- generate a taxonomy using HTML meta-tags, as described in Generating a Taxonomy from Meta-Tags on page 149
Generating a Taxonomy Based on Directory StructureThis option creates a taxonomy based on the directory structure of the specified collections.
To generate a taxonomy based on one or more specified collections, select the collections to use.
See Classifying Content by Directory Structure on page 189 for more information.
Intelligent Search Optimization Guide 147

Generating a Taxonomy from ConceptsThis option creates a taxonomy based on specified Dictionary concepts. You can specify the following concept criteria:
• Concepts to be automatically discovered by the application:
Specify representative concepts for which you want the system to locate and generate taxonomies for similar concepts. You can use the % character as a wildcard. For example, specify:
noun.<application_name>.%
to generate a taxonomy based on the hierarchy of noun concepts that are specific to your application.
• Concepts to include as the basis of the taxonomy:
Specify one or more concepts that you want to use as the basis of the taxonomy. You can use the % character as a wildcard.
• Concepts to exclude from the taxonomy
148 Intelligent Search Optimization Guide

Specify any concepts that you want to exclude from taxonomies. The Personalized Navigation application excludes the children of excluded concepts unless they are explicitly included as separate entries. You can use the % character as a wildcard.
See Classifying Content Based on Dictionary Concepts on page 188 for more information.
Generating a Taxonomy from Meta-TagsThis option creates a taxonomy based on the values of specified HTML meta-tags.
The Personalized Navigation application creates multiple levels based on meta-tags of increasing specificity, for example:<meta name="Genre" content="Fiction"/> <meta name="SubGenre" content="Speculative"/> <meta name="SubSubGenre" content="Fantasy"/>
Within each taxonomy, it creates a facet for each unique content value within a specified tag.
IMPORTANT: You must ensure that the meta-tags that you specify for classification are added to the Preprocessor's HTML converter configuration file (<InQuira-home>\src\prep\html.config), as described in Configuring the Preprocessor to Preserve Meta Tags for Classification on page 150 .
To generate the taxonomy, enter the desired meta-tags.
See Classifying Content Based on HTML Meta Tags on page 185 for information on the advanced Meta Tag classifier settings.
Intelligent Search Optimization Guide 149

Configuring the Preprocessor to Preserve Meta Tags for ClassificationYou must add the meta-tags that you want to use for Personalized Navigation to the configuration file that controls the behavior of the InQuira Preprocessor.
The Preprocessor is a module that prepares application content for use by InQuira by translating it from its native format to a standard XML format called InQuira Input XML. By default, the Preprocessor removes meta-tags from documents.
To add meta-tags to the Preprocessor configuration:
• Edit the Preprocessor HTML configuration file:<inquira_home>\inquira\src\prep
• Add a directive for each meta tag that you want to use in categorization in the form:meta name="<tag_name>" <tab> !meta
For example to configure the meta tag:
<meta name="Genre" content="Fiction"/>
• Specify:meta name="Genre" <tab> !meta
The output of this directive is stored in the application's meta-index, in the form:
<p> <meta>[[[GENRE]][[Fiction]]]</meta> </p>
Manually Assigning Database Content to a FacetIf you chose to manually assign database content to the new facet, the Personalized Navigation application displays the following generation options:
• Select one of the following options:
- Assign all table entries to the facet, as described in Assigning All Table Entries to a Facet on page 151
- Assign selected table entries to the facet, as described in Assigning Selected Tables to a Selected Facet on page 151
150 Intelligent Search Optimization Guide

Assigning All Table Entries to a FacetThis option creates a facet (single taxonomy level) containing the all table entries for the specified datasource.
See Classifying Content Based on Database Column Values on page 173 for more information on classifying database content.
Assigning Selected Tables to a Selected FacetThis option creates a taxonomy level containing all entries in the specified data source that match the specified SQL condition.
To assign selected table entries to a selected facet enter a condition to select table entries using any valid SQL to construct a where clause, such as:
where <field> <comparison> <value>
where:
E x a m p l e :where id=5
See Using an SQL Condition to Classify Content on page 172 for more information.
field(s) Specifies one of more fields from which to select.comparison Specifies how to compare the field value with the specified value,
for example =, <, >.value Specifies the value to compare against to determine selection, for
example 5.
Intelligent Search Optimization Guide 151

Manually Assigning Document Content to a FacetIf you chose to manually assign document content to the new facet, the Personalized Navigation application displays the following generation options:
• Select one of the following options:
- Assign document collections to the facet, as described in Assigning Documents to a Facet by Collection on page 152
- Assign documents to the facet by type, as described in Assigning Documents to a Facet by Type on page 153
- Assign documents to the facet by language, as described in Assigning Documents to a Facet by Language on page 154
- Assign documents to the facet by content, as described in Assigning Documents to a Taxonomy by Content on page 154
- Assign documents to the facet by URL, as described in Assigning Documents to a Facet by URL on page 155
Assigning Documents to a Facet by CollectionThis option assigns all documents within the specified collections to this facet (single taxonomy level).
152 Intelligent Search Optimization Guide

To assign document collections to a selected facet, enter one or more collections. The order in which you list the collections does not affect composition of the taxonomy level.
See Classifying Content by Collection on page 180 for more information.
Assigning Documents to a Facet by TypeThis option creates a taxonomy consisting of facets for each selected document type. You can select one or more of the following document types:
• HTML
• IQXML
• MS-EXCEL
• MS-POWERPOINT
• MS-WORD
• RTF
• TEXT
• UNKNOWN
• XML
To assign document collections to a selected facet, specify one or more document types
See Classifying Content by Document Type on page 181 for more information.
Intelligent Search Optimization Guide 153

Assigning Documents to a Facet by LanguageThis option creates a taxonomy containing facets for each specified language. Each facet contains only documents identified as belonging to the specified language.
To assign documents to the facet by language, add one or more languages.
See Classifying Content Based on Language on page 184 for more information.
Assigning Documents to a Taxonomy by ContentThis option assigns content to this taxonomy based on InQuira Match Language (IML) expressions. See Chapter 2, IML Reference for more information on using IML.
154 Intelligent Search Optimization Guide

To assign documents to the facet by content:
• Specify an IML expression to match the desired content
• Select document scope you want to apply the expression to
For example, you could specify the IML expression cat OR dog and the Document scope to match all documents that contain the words cat or dog.
Similarly, you could specify the Sentence scope to match only sentences that contain the words cat or dog.
See Using IML Expressions to Classify Content on page 183 for information on the advanced IML classifier settings.
Assigning Documents to a Facet by URLThis option assigns content to this taxonomy based on regular expression matches to a document URL. See Specifying Regular Expression Substitutions on page 220 for more information on specifying regular expressions to match document URLs.
To assign documents to a taxonomy by URL, specify a regular expression to match the desired URL.
See Classifying Content by URL on page 190 for more information.
Intelligent Search Optimization Guide 155

Performing Data Classification
Once you have configured data classification, you operate the classification process to build the taxonomies for your application using the Personalized Navigation application.
The classification process associates the configured taxonomies with the actual application content, and stores the classification information in the application index.
To perform the classification operation:
• Select the navigation application configured for your application
• Select Classify on the Classify tab
When the Classify operation is complete, the system automatically displays the Generated Taxonomy tab, showing the results as a tree.
You can also operate the classification process by:
• Configuring a scheduled task, as described in the Intelligent Search Administration Guide
• Executing the following command on the command line:% scheduler run Navigation -f <navigation application list>
where <navigation application list> specifies one or more navigation applications to classify.
IMPORTANT: You must execute the Key Map command prior to classification if you have taxonomies that reference structured data sources, the referenced data sources are not configured for hybrid search, and the data source has changed since the last classification process.
scheduler run KeyMap -d <datasource list>
156 Intelligent Search Optimization Guide

The Key Map command is also available as a scheduled task in the Advanced Configuration Facility.
Referring to Facets from Dictionary Rules
You can configure a rule to select one or more content categories during request processing using the Advanced Add Facet Restriction function:
The Dictionary Manager displays the Facet Restriction tab within the Rule window:
The Facet Restriction tab displays the currently configured navigation application.
Referring to Facets by NameYou refer to facets within rules by their full facet names. A full facet name is a string constructed from the names of the facets that compose the path to the desired facet from the root of the taxonomy. Each facet name within the string is separated by a period. For example, the string:
Genre.Fiction.Mystery
refers to the facet Mystery within Fiction, within the root taxonomy, Genre.
Intelligent Search Optimization Guide 157

NOTE: You must use an escape character (\) to denote a period within a category name.
You can use the wildcard character (*) to refer to content categories. For example, the reference:
Genre.*.Fantasy
matches the first category in the taxonomy Genre that has the name Fantasy using a standard breadth first search (the first, shallowest possible match). If there is no match, the category is removed from the expression.
Selecting Facets within RulesTo specify facet selection in a rule:
• Select Add Facet Restriction from the Advanced menu
The Rule window displays the Facet Restriction tab:
The Facet Restriction tab provides the following methods for selecting content categories:
• A text field, in which you specify the full name of the facet in quotes, for example, "Genre.Fiction". You can enter IML expressions; the application interprets text within quotes as references rather than tokens.
• A tree structure showing the currently classified content categories, in which you can select the appropriate facet.
You can use both methods to specify multiple facets within a single action.
158 Intelligent Search Optimization Guide

NOTE: The Personalized Navigation application displays the options that you specify in the text field in the tree display, and vice versa.
Selecting Multiple Facets from the Tree DisplayYou can select multiple facets in the tree display using the Shift and Control (Ctrl) keys to specify:
• The intersection of the taxonomies
and
• A union of the facets within the taxonomies
For example, selecting the facets Mystery, Fantasy, and Biography:
produces the expression:
("Genre.Fiction.Mystery" OR "Genre.Fiction.Speculative.Fantasy") OVERLAP "Genre.Non Fiction"
Selecting Multiple Facets using IMLYou can use IML to select multiple facets within a single action. For example, you can specify to select two facets, or only results belonging to multiple facets.
To select two facets, facet_a and facet_b, specify:
"facet_a" OR "facet_b"
To select results that belong to both facet_a and facet_b, specify:
"facet_a" OVERLAP "facet_b"
Intelligent Search Optimization Guide 159

NOTE: The expression "facet_a" IS "facet_b" returns only exact matches for document scope. For example, it correctly returns all documents that were classified as category_a and category_b; however, it does not return a document classified as category_a and containing a section classified as category_b, as does the OVERLAP operator.
Using VIL in Rules that Select Content CategoriesYou can use VIL within expressions that refer to specific values within numeric or range-based facets, such as individual prices within a price range facet.
For example, a rule that matches prices and creates a category restriction using VIL similar to:
Price.*.{price}.
instantiates based on the individual price in the question, but never matches category names expressed as ranges, such as $5-$9.99.
To match a specific value with the appropriate range category, specify:
Price.<>*.price
NOTE: This specification requires that the content category have defined minimum and maximum values and a comparator. Some classifiers automatically specify these parameters.
Restricting the Display for Facets Above a Selected FacetYou can specify additional facet restriction within rules to override the default User Interface behavior, which displays the higher level facets of selected facets, so that users can expand the scope of the results.
To restrict users from accessing higher level facets, use the RESTRICTION parameter:
"RESTRICTION(facet_name)"
IMPORTANT: RESTRICTION is special syntax within the Personalized Navigation functionality, and is not an IML operator.
160 Intelligent Search Optimization Guide

Preventing a Facet from DisplayingYou can specify a rule to remove a facet from the display using the ISNT operator in the form:
"<facet_parent>" ISNT "<facet_parent.facet_child>"
For example, to prevent the Non Fiction facet from displaying, specify:
"Genre" ISNT "Genre.Non Fiction"
Specifying Approximate Facet MatchingYou can specify to match facets based on an approximate value in the question using the ~* wildcard. The wildcard specifies to first search for a facet that completely contains the value referred to in the question. If no containing facet is matched, the wildcard specifies to match the parent facet.
For example, the question:
Show me books published around 1998
might match a date facet selection rule:
Year.<>*.1998
to return the facet:
1998
You can use the wildcard to specify:
Year.~*.1998
to return the facet:
1990 - 1999
NOTE: This function requires that the facets have minimum and maximum values, and a comparator specified, as described in The Range Taxonomy Builder on page 218 and The Personalized Navigation application on page 126.
Intelligent Search Optimization Guide 161

Selecting a Range of Content CategoriesYou can specify to select a range of facets within a single rule using the * IML operator in the format:
"Price.<>*.$0" * "Price.<>*.$22"
For example, the question:
What books cost between $0 and $22
matches the following restriction:
"Price.<>*.$0" * "Price.<>*.$22"
to select the facets:
$0-$9.99 $10-$19.99 $20-$29.99
NOTE: This function requires that the facets have minimum and maximum values, and a comparator specified, as described in The Range Taxonomy Builder on page 218 and The Personalized Navigation application on page 126
Responding to Requests for Non-Existent Content CategoriesYou can specify to select the best possible facet for questions that request non-existent data using the greater-than (>*) and less-than (<*) wildcards.
For example, the request:
Show me books published after 1945
does not match any facets for data starting at 1960. You can use the wildcard:
<*
to match the closest facet greater than the requested value.
Facet expansion in addition to restrictionPersonalized Navigation supports navigation to back out of a selected category to any higher level category. More importantly, users can expand the scope of a natural language question. For example, given the question:
What books were published in 1992?
You can select a facet to expand your scope to 1990-1999.
162 Intelligent Search Optimization Guide

You can also expand the scope of unstructured searches. For example, consider a question about car models:
Special deals for Civics?
followed by selecting the Sedans facet.
The application expands the scope of the question to mean:
Special deals for (all sedans)?
even though the original question text still references Civics.
Understanding Facet CountsThe facet counts are how many documents match the facet, determined by the classifiers in the taxonomy.xml set up in the Personalized Navigation Tool in Workbench, for the candidate set of the question asked. Facet counts include all structured and unstructured answers for all purposes, by default, but does not include managed answers.
The facets are intended to help the user see what other results are available so they can better filter their results. They are not intended as a navigation tool, to see all results matching a facet for any question.
The number in the parentheses next to a facet shows the minimum number of results that could be a match when the facet is selected. This number is based on the candidate set for a question asked, rather than the number of search results shown to the user, referred to here as the result set. The candidate set is the set of documents that the system determines are a match for the question, which is most often larger than the result set displayed to the user. In fact, the candidate set is a superset of the result set.
NOTE: The user may not see all results depending upon the maximum answers displayed. Also, there may be more results depending upon the search algorithm that builds matches.
The candidate set of documents is based on the search component rules in the system. Using the search component rules, the system populates the candidate set with at least as many answers as the result set, assuming there are that many matching answers. The system starts at the top importance level and proceeds down the other importance levels until it fills up the result set. Once the result set size is met, the engine does not proceed to the next search component importance level. So, if the result set size is met with just Required importance level matches, the candidate set is populated with all the Required matches and it does not pull the Very Important, Important, etc. importance level matches. This assumes that the facet setting guarantee-max-results is set to false, the default setting.
If a document is not in this candidate set, it is impossible for it to be returned by the search algorithm as an answer; all possible answers must come from the candidate set. It is this
Intelligent Search Optimization Guide 163

candidate set that is used to create the facet counts. Changing the minimum threshold does not change the candidate set, and therefore not change the facet counts.
Using Advanced Facet Definition Settings
The Personalized Navigation application provides additional advanced settings for defining and creating taxonomies.
You can display the advanced settings for new or existing taxonomies by selecting the Show Advanced Setup option of the Personalized Navigation application tools menu.
NOTE: Selecting the Show Advanced Setup option at any point in the simple Personalized Navigation dialog process displays the corresponding advanced setup. You can toggle between the dialog and the advanced setup at any time.
For example, selecting the Show Advanced Setup option immediately after creating a new taxonomy displays the Basic Options in a forms format instead of the simple dialog format, and makes available the Advanced settings.
164 Intelligent Search Optimization Guide

In the following graphic, Basic Options are noted with .
Intelligent Search Optimization Guide 165

Specifying Advanced Facet Display SettingsThe Advanced Facet Display Settings tab provides advanced options to control whether and how each facet that you create displays in the User Interface.
Basic Option Description Enabled Use this setting to specify whether this facet is used to
classify data. Facets are enabled by default. Deselect the checkbox to exclude this facet from the classification process.
For Initial Browse Use this setting to specify whether this facet displays on the initial page before users ask a question or select a facet. Facets are included in the initial browse by default. Deselect the checkbox to specify that the facet does not display on the initial page.
Hidden Use this setting to specify whether this facet and its children are excluded from the User Interface display and available only to Dictionary rules. Select the checkbox to exclude the facet and its children from the User Interface.
Classify Structured Results
Use this setting to specify whether structured results include the most specific facet matched by that excerpt in this taxonomy. Select the checkbox to include the most specific facet matched for this excerpt in the answer display.
Classify Unstructured Results
Use this setting to specify whether unstructured results include the most specific facet matched by that excerpt in this taxonomy. Select the checkbox to include the most specific facet matched for this excerpt in the answer display.
Classify Results (All Possible)
Use this setting to specify whether results include all the most specific facets in this taxonomy. Select the checkbox to include the all specific facets matched for this excerpt in the answer display.
Max Children Use this setting to specify the maximum number of children of this facet to display before the end user must explicitly request more by selecting a more... link. The default is 20.
Specify an integer as the maximum number of children to display.
Display Depth Use this setting to specify whether The number of levels in the taxonomy that should be displayed to the end user. The default is 2.
Specify an integer as the number of taxonomy levels to display.
166 Intelligent Search Optimization Guide
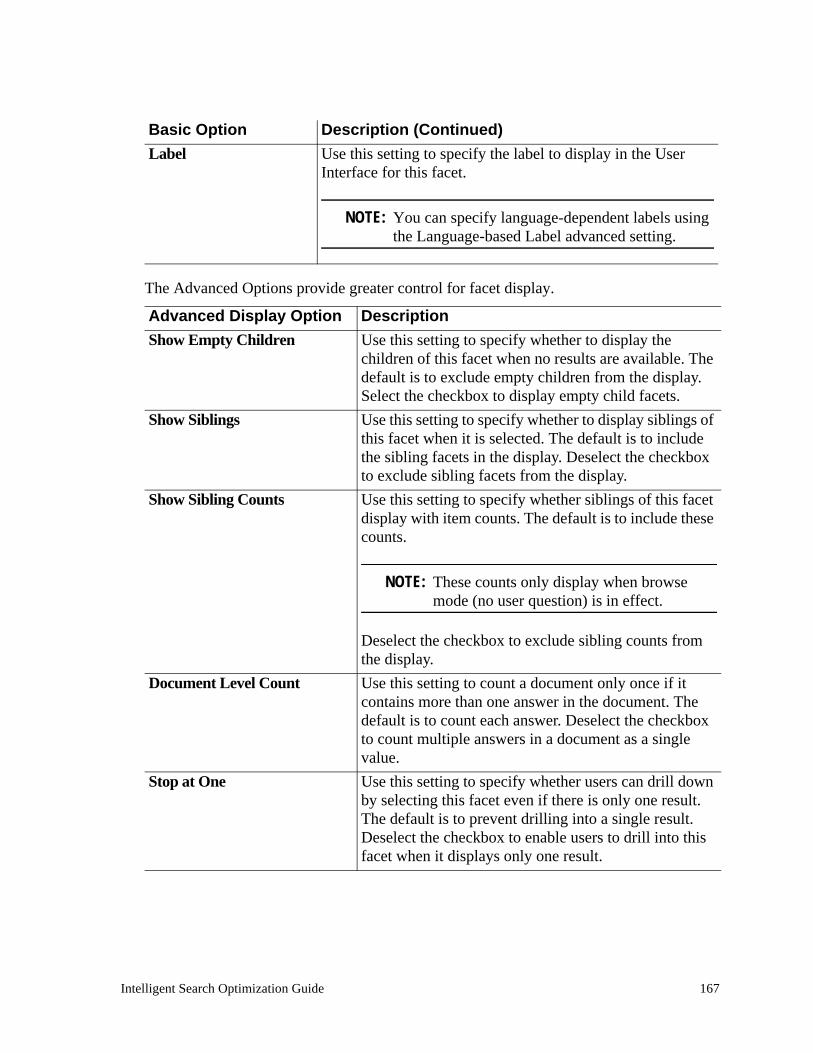
The Advanced Options provide greater control for facet display.
Label Use this setting to specify the label to display in the User Interface for this facet.
NOTE: You can specify language-dependent labels using the Language-based Label advanced setting.
Advanced Display Option Description Show Empty Children Use this setting to specify whether to display the
children of this facet when no results are available. The default is to exclude empty children from the display. Select the checkbox to display empty child facets.
Show Siblings Use this setting to specify whether to display siblings of this facet when it is selected. The default is to include the sibling facets in the display. Deselect the checkbox to exclude sibling facets from the display.
Show Sibling Counts Use this setting to specify whether siblings of this facet display with item counts. The default is to include these counts.
NOTE: These counts only display when browse mode (no user question) is in effect.
Deselect the checkbox to exclude sibling counts from the display.
Document Level Count Use this setting to count a document only once if it contains more than one answer in the document. The default is to count each answer. Deselect the checkbox to count multiple answers in a document as a single value.
Stop at One Use this setting to specify whether users can drill down by selecting this facet even if there is only one result. The default is to prevent drilling into a single result. Deselect the checkbox to enable users to drill into this facet when it displays only one result.
Basic Option Description (Continued)
Intelligent Search Optimization Guide 167

Expand Rule Selected Facets Use this setting to specify whether facets selected by the Dictionary rules are expanded as if they were selected explicitly by the user. The default is to leave the rule-selected facets un-expanded. Select the checkbox to expand rule-selected facets.
Include Parent's Rules Use this setting to specify whether rules associated with the parent facet are evaluated in addition to this facet's rules. The default is to evaluate the parent facet's rules. Deselect the checkbox to restrict evaluation to the current facet.
Ignore Unknown Facets Select to have unknown facets ignored by language rules while processing searches. This prevents broken logic from returning zero search results.
NOTE: This value is required only for facets that are referenced by Dictionary rules that perform approximate matching.
Allow Facet Expansion Select to have the navigation facet expanded in the UI . When a user performs a search and a matching rule contains a facet restriction, selecting this option allows for the taxonomy to be expanded to the level of the facet restriction in the UI navigation.
For example, the taxonomy Product contains Product.Widget. A user search matches a rule with a restriction to Product.Widget. In the UI, the Product navigation is expanded to show Product.Widget, the same as if the user had clicked on Product to expand it.
Classify Results (Only Subselected)
Select this to perform facet-level excerpting for the lowest level facet.
Automatic When selected, this indicates that Information Manager created the facet and dynamically populates it.
Include generic higher level facets
Select this to add a _GENERIC facet under each of the parent nodes. The generic facet includes all the documents of the children. Results from generic facets are included in search results.
Advanced Display Option Description (Continued)
168 Intelligent Search Optimization Guide

Display generic higher level facets
Related to the preceding option, in addition to being included in search results, this allows the generic facets to display in the UI as well.
For example, if you restrict to something like “Software.InQuira.8x”, by default only results that are classified that specifically display. However, there may be a support document that applies to all versions of InQuira, but if you restricted to Software.InQuira.8x, then it does not display, because it is not as specific. By including the generic facets, results that are applicable to all InQuira, and all Software display. But results that apply to Software.Windows does not display, because these are not on the same set of branches that you have followed.
Classify Results (all generic facets)
Select to display all generic facets in the UI.
Maximum Count Per Classification
Use this setting to specify the maximum number of results to be counted for a particular piece of classified unstructured data. The default is the maximum number of results allowed to be returned for a document.
Minimal parent depth for unknown generic facets
Enter the minimum parent depth for creating generic facets if Include generic higher level facets is selected. The higher the number, the deeper into the taxonomy generic facets are created. Default is 1.
Arbitrary Data Use this to send any static XML data for use on the UI.
Advanced Display Option Description (Continued)
Intelligent Search Optimization Guide 169

Minimum Value Use this setting to specify the smallest value for this facet.
NOTE: This setting is required only for facets that are referenced by Dictionary rules that perform approximate matching.
You can specify any type of value that can be compared, such as numbers, currencies, names, etc.
NOTE: Some taxonomy builders set these values automatically. If they are not set, then Personalized Navigation uses the facet name for both values.
Maximum Value Use this setting to specify the maximum value for this facet.
NOTE: This setting is required only for facets that are referenced by Dictionary rules that perform approximate matching.
You can specify any type of value that can be compared, such as numbers, currencies, names, etc.
NOTE: Some taxonomy builders set these values automatically. If they are not set, then Personalized Navigation uses the facet name for both values.
Advanced Display Option Description (Continued)
170 Intelligent Search Optimization Guide
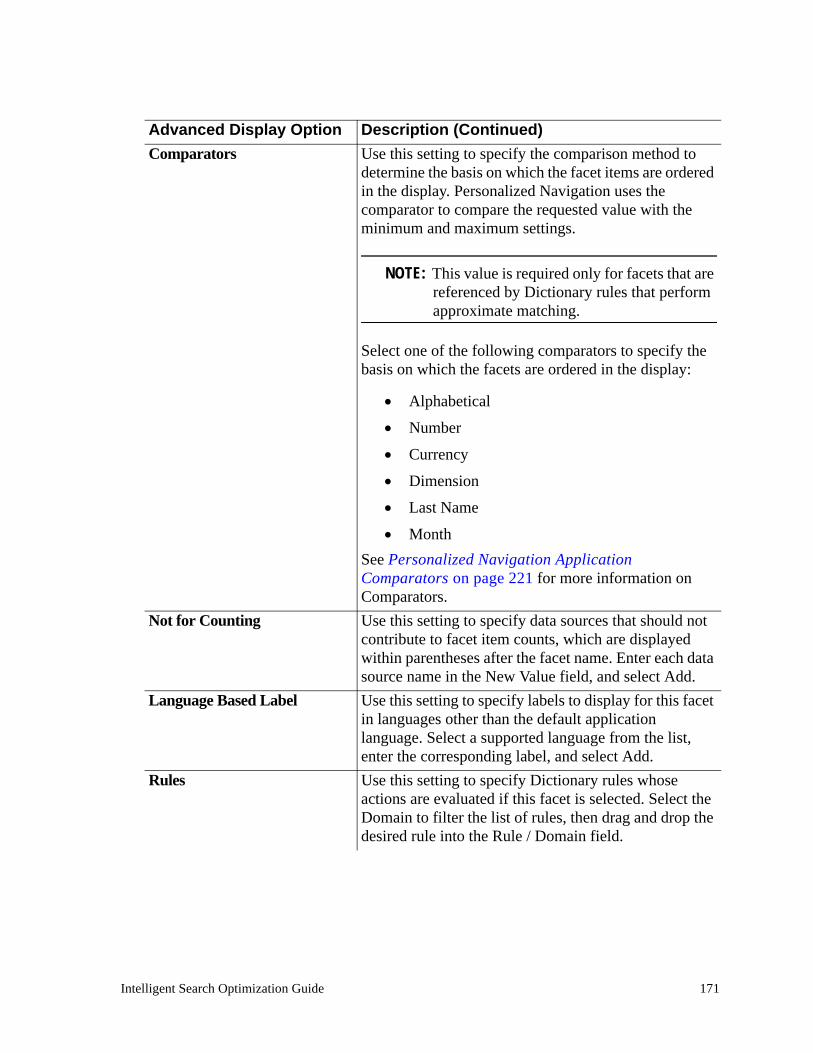
Comparators Use this setting to specify the comparison method to determine the basis on which the facet items are ordered in the display. Personalized Navigation uses the comparator to compare the requested value with the minimum and maximum settings.
NOTE: This value is required only for facets that are referenced by Dictionary rules that perform approximate matching.
Select one of the following comparators to specify the basis on which the facets are ordered in the display:
• Alphabetical
• Number
• Currency
• Dimension
• Last Name
• MonthSee Personalized Navigation Application Comparators on page 221 for more information on Comparators.
Not for Counting Use this setting to specify data sources that should not contribute to facet item counts, which are displayed within parentheses after the facet name. Enter each data source name in the New Value field, and select Add.
Language Based Label Use this setting to specify labels to display for this facet in languages other than the default application language. Select a supported language from the list, enter the corresponding label, and select Add.
Rules Use this setting to specify Dictionary rules whose actions are evaluated if this facet is selected. Select the Domain to filter the list of rules, then drag and drop the desired rule into the Rule / Domain field.
Advanced Display Option Description (Continued)
Intelligent Search Optimization Guide 171

Using Advanced Data Classification
The Classifiers tab in the Personalized Navigation application advanced settings displays options for specifying data classification. You specify classification for a selected facet by configuring one or more classifiers to:
• Identify the properties of the data that you want to include in the current facet
• Identify the properties of the data that you want to include in generated facets that are the children and sub-children of the current facet
The Personalized Navigation application contains classifiers to access data from structured and unstructured application content.
Using an SQL Condition to Classify Content
You can use the SQL classifier to classify content based on an SQL condition. This classifier selects all entries in the specified data source that match the specified SQL condition.
NOTE: This classifier does not generate child facets. There is no taxonomy builder associated with this classifier.
You specify the SQL condition using any valid SQL to construct a where clause, such as:
where <field> <comparison> <value>
where:
E x a m p l e :where id=5
field(s) Specifies one of more fields from which to select.comparison Specifies how to compare the field value with the specified value,
for example: =, <, >value Specifies the value to compare against to determine selection, for
example 5.
172 Intelligent Search Optimization Guide

This classifier formats the column values as specified in the default database column formatter, so that they match the corresponding display in the results table. You can achieve more control over formatting structured facets using the Structured Column classifier
See The SQL Classifier on page 193 for detailed descriptions of the SQL classifier settings.
Classifying Content Based on Database Column Values
The Structured Column classifier creates a taxonomy based on the entries of one or more columns in a structured datasource.
You can use this classifier to create multiple taxonomy levels of increasing specificity, for example, Country -> State -> City, or Sector -> Industry -> Company.
You can also use this classifier with the appropriate taxonomy builder to create taxonomies for dates, prices, and URLs.
You configure a column classifier by specifying the data source name and the column names that you want to capture. The Structured Column classifier creates a facet for each unique value within the specified column, for example, each unique model name in the model_name column. It also creates a separate level for each column that you specify.
NOTE: You may receive SQL errors if one or more of the columns you specified does not exist in the specified schema or table.
You can use additional Structured Column classifier features to:
• Configure multiple taxonomy levels from structured columns
• Configure the appearance of the child facet names
• Specify an optional View for the database
Intelligent Search Optimization Guide 173

See The Structured Column Classifier on page 194 for detailed descriptions of the Structured Column classifier settings.
Configuring Multiple Taxonomy levels from Structured ColumnsYou can configure multiple taxonomy levels by specifying multiple column names. The column classifier uses each column in the list to create child facets of the preceding column, so that specifying three columns results in three taxonomy levels.
NOTE: You may receive SQL errors if one or more of the columns you specified does not exist in the specified schema or table.
Configuring the Appearance of Structured Column Child Facet NamesYou can configure the appearance of the child facet names by specifying regular expressions to perform operations on the column values, such as capitalizing names and removing unwanted characters. See Specifying Regular Expression Substitutions on page 220 for more information on using regular expression replacement.
Example: Creating a Taxonomy from Database CategoriesIn this example, we create a taxonomy from data stored in a database using the structured column classifier.
Consider a database of information about books that contains following categories, or columns:
Genre SubGenre SubSubGenre
Assume that we have defined a navigation application Books, and added a Genre taxonomy:
174 Intelligent Search Optimization Guide

To configure the structured column classifier for the Genre taxonomy:
• Select Genre, and select the Classifiers tab
The Personalized Navigation application interface displays the Classifiers screen.
• Select the Structured Column classifier type from the Structured Classifier group, and select Add Classifier
The Structured Column classifier tab displays.
• Configure the structured column classifier as follows:
Parameter ConfigurationDatasource Name Select the desired data source from the list of data sources
configured for your application.Fields Use the New Value field to enter the field names in the order in
which they occur in the taxonomy:
Genre SubGenre SubSubGenre
Taxonomy Builder The Column classifier uses the default String taxonomy builder to create child facets from the values contained in the specified columns.
Intelligent Search Optimization Guide 175

The generated taxonomy contains facets that correspond to the values of the various field names associated with the configured columns, for example:
NOTE: The facets are ordered within the taxonomy in alphabetical order by default. You can change the order of the facets within a taxonomy using a comparator, as described in The Personalized Navigation application on page 126.
Example: Creating a Taxonomy from Dates in a DatabaseIn this example, we create a taxonomy from dates stored in a database using the structured column classifier.
Assume that we have defined taxonomy called Date:
To configure the structured column classifier for the Date taxonomy:
• Select Date, then select the Classifiers tab
The Personalized Navigation application interface displays the Classifiers screen.
• Select the Structured Column classifier type from the Structured Classifier group, and select Add Classifier
176 Intelligent Search Optimization Guide

The Structured Column classifier tab displays.
• Configure the basic structured column classifier settings as follows:
• Select Show Advanced Settings, and select Date Taxonomy Builder from the Taxonomy Builder drop-down menu
The Structured Column screen displays the Date Taxonomy Builder settings.
• Accept the default (Create Standard) or configure additional Date classification options
Parameter ConfigurationDatasource Name Select the desired data source from the list of data sources
configured for your application.Fields Use the New Value field to enter the name of the date column.
Intelligent Search Optimization Guide 177

The generated taxonomy contains standard date facets that correspond to the values of the date fields names associated with the configured columns, for example:
Example: Creating a Price Taxonomy from a DatabaseIn this example, we use the Structured Column classifier to create a taxonomy based on price.
To configure the Structured Column classifier for the Price taxonomy:
• Create and select the facet named Price, then select the Facet Settings tab
• Select the Currency comparator from the Advanced Facet Settings
• Select the Classifiers tab, add the Structured Column classifier, and configure the basic settings as follows:
Parameter ConfigurationDatasource Name Select the desired data source from the list of data sources
configured for your application.Fields Use the New Value field to enter the name of the price column.
178 Intelligent Search Optimization Guide

• Select the Range taxonomy builder from the Advanced Classifiers setting, and specify the following values:
The resulting taxonomy contains the facets:
NOTE: There is no Below $0 facet be cause no prices are below zero.
Classifying Large Taxonomies by Accessing the Data at Runtime
You can use the Ad Hoc Column classifier to create a numeric range-based taxonomy, such as prices or years, dynamically at runtime when specifically selected by the user.
You should use the Ad Hoc Column classifier when:
Parameter ConfigurationMinimum Value Specify 0 to set the minimum price value to include in the facet.
This value sets the lower boundary of the range of the facet.Maximum Value Specify 50 to set the maximum price value to include in the facet.
This value sets the upper boundary of the range of the facet.Depth Specify 2 to set the number of levels of the taxonomy.Branching Factor Enter 5,2 to specify that the first level of the facet is divided into
five equal partitions, and that the second level facets is divided into two.
Tolerance Enter .01 to specify that values differing by this amount are treated as separate entries in the taxonomy, such that items priced at $3.99 are selectable separately from item priced at $3.98.
Intelligent Search Optimization Guide 179

• The results of conventionally classifying the data are very large.
• The performance loss of accessing the data source at runtime is acceptable .
You can also use the Ad Hoc Column classifier in combination with the Structured Column classifier to create a taxonomy that is partially pre-calculated and partially created at runtime.
You configure the Ad Hoc Column classifier by specifying the data source and column name that you want to classify. Specify minimum and maximum values for the specified field to include in the facet.
Specify a Branching Factor, which is the number of parts into which the specified range should be divided. The default value is 5, which specifies that a range of 0 - 50 is divided as:
0 - 10 10 - 20 20 - 30 30 - 40 40 - 50
Specify the Tolerance, which is maximum difference between two values that is significant. For example, for US currency, the tolerance is .01 (1 cent). The default is 0.
You can specify additional parameters to control the appearance of the generated facets, as described in Configuring the Appearance of Structured Column Child Facet Names on page 174.
See The Ad Hoc Column Classifier on page 196 for detailed descriptions of the Ad Hoc Column classifier settings.
Classifying Content by Collection
The Collection classifier classifies all documents in the specified collections. You can use this classifier to define a taxonomy that matches all content in the specified collections at the document level.
180 Intelligent Search Optimization Guide

When end users select a collection-based facet, the application restricts results to only documents from the associated collections.
You configure the Collection classifier by specifying a list of the collections that you want to include in the facet definition. Specify collections by selecting from the list of collections configured for your application in the New Value field. The order in which you list the collections does not affect the facet.
NOTE: This classifier does not create child facets. There is no taxonomy builder associated with this classifier.
You can specify an advanced Collection facet setting to specify that document information for each matching document is stored explicitly in the application's index.
The Collection classifier matches every document in the specified collections; however by default it does not explicitly store the document information in the index; instead it uses a more economical method of associating the collection facet with the specified collection content.
There are some cases, such as when using Dictionary rules to perform advanced content restriction, in which the system requires that the document information is explicitly contained in the index.
You specify explicit classification using the Explicit Classification setting in the advanced settings. Select the checkbox to specify explicit classification.
See The Collection Classifier on page 199 for detailed descriptions of the Collection classifier settings.
Classifying Content by Document Type
The Document Type classifier creates a taxonomy based on document type. It generates a facet for each selected document type:
Intelligent Search Optimization Guide 181

• HTML
• IQXML
• MS-EXCEL
• MS-POWERPOINT
• MS-WORD
• RTF
• TEXT
• UNKNOWN
• XML
When end users select a document type facet, the application restricts results to only documents of the specified types.
See The Document Type Classifier on page 200 for detailed descriptions of the Document Type classifier settings.
182 Intelligent Search Optimization Guide

Using IML Expressions to Classify Content
The IML classifier classifies unstructured content based on InQuira Match Language (IML) expressions. See Chapter 2, IML Reference for more information on using IML.
You can use this classifier to define a facet that matches all content that matches the specified IML. When end users select an IML-based facet, the application restricts results to only content that matches the specified IML.
NOTE: This classifier does not create child facets. There is no taxonomy builder associated with this classifier.
You configure an IML classifier by specifying:
• The IML expression
• The scope you want to apply the expression to
For example, you could specify the expression cat OR dog and the Document scope to match all documents that contain the words cat or dog.
Similarly, you could specify the Sentence scope to match only sentences that contain the words cat or dog.
See The IML Classifier on page 207 for detailed descriptions of the IML classifier settings.
Intelligent Search Optimization Guide 183

Classifying Content Based on Language
The Language classifier creates a taxonomy based on document language. It generates a facet for each selected document type:
• English
• French
• German
• Italian
• Japanese
• Korean
• Spanish
• Traditional Chinese
When end users select a language-based facet, the application restricts results to documents identified as being in the specified languages.
See The Language Classifier on page 208 for detailed descriptions of the Language classifier settings.
184 Intelligent Search Optimization Guide

Classifying Content Based on HTML Meta Tags
The Meta Tag classifier generates a taxonomy based on the values of specified meta-tags within HTML documents. Meta-tags are mark-up that specify information about a document that is not meant to be displayed by the browser.
You can use this classifier to create multiple levels of facets based on the specified meta-tags of increasing specificity, for example:<meta name="Genre" content="Fiction"/> <meta name="SubGenre" content="Speculative"/> <meta name="SubSubGenre" content="Fantasy"/>
You configure a meta-tag classifier by specifying the meta tag name for each level in your taxonomy. The Meta Tag classifier creates a facet for each unique content value within the specified tag, for example, each unique content value (Fiction, Nonfiction, etc.) associated with a Genre meta-tag. It creates a separate level for each meta-tag that you specify, in the order listed.
IMPORTANT: You must ensure that the meta-tags that you specify for classification are added to the Preprocessor configuration file, as described in Configuring the Preprocessor to Preserve Meta Tags for Classification on page 150.
You can use advanced Meta Tag classifier features to configure child facet creation by specifying and configuring a taxonomy builder.
See Personalized Navigation Application Classification Components on page 192 for detailed descriptions of the Meta Tag classifier settings.
Intelligent Search Optimization Guide 185

Example: Creating a Taxonomy from Document MetadataIn this example, we classify documents based on the content of metadata tags using the Meta Tag classifier.
Consider a collection of documents that contain meta-data that define the following content categories:
<meta name="Genre" content="Fiction"/> <meta name="SubGenre" content="Speculative"/> <meta name="SubSubGenre" content="Fantasy"/>
To configure the metadata classifier for the Genre facet:
• Select the Genre facet, and select the Classifiers tab
The Personalized Navigation interface displays the Classifiers screen.
• Select the Meta Tag classifier type from the Unstructured Classifier group, and select Add Classifier
The Meta Tag classifier tab displays.
• Configure the meta tag classifier as follows:
Parameter ConfigurationMeta Tags Use the New Value field to enter the field names in the order in
which they occur in the taxonomy:
Genre SubGenre SubSubGenre
186 Intelligent Search Optimization Guide

The generated taxonomy contains facets that correspond to the values of the various field names associated with the configured columns, for example:
Taxonomy Builder Use the default String taxonomy builder. You configure the taxonomy builder in the Advanced Settings. The String taxonomy builder sorts sibling facets alphabetically by default. You can configure a comparator to sort the facets differently, as described in The Personalized Navigation application on page 126.
Intelligent Search Optimization Guide 187

Classifying Content Based on Dictionary Concepts
The Ontology classifier generates a taxonomy from specified Dictionary concepts.
The Ontology classifier creates facets from the specified concepts, and creates additional levels of the taxonomy from the children of the specified concepts.
You can specify IML to restrict the content that matches the generated facets so that, for example, only documents that contain the facet label concept in the title match when the facet is selected.
You use the Ontology classifier by specifying one or more entries to match:
• Concepts that you want the system to identify
• Concepts that you specify, either explicitly or by using the wildcard character
The Ontology classifier creates concept facet names in the form:
<concept_description>
if the concept's description is short enough, or
<concept_name>
without part of speech and domain information.
You specify IML to restrict the content match by specifying any valid IML, and selecting the desired result scope from the listbox.
See The Ontology Classifier on page 202 for detailed descriptions of the Ontology classifier settings.
188 Intelligent Search Optimization Guide

Classifying Content by Directory Structure
The Site Graph classifier generates a taxonomy based on a specified directory structure. This produces a taxonomy that resembles a file explorer.
You specify the directory structures to classify by collection.
You can specify to classify content based on the URL of the document as it was crawled, rather than the URL that is displayed in the User Interface using the Fetch URL setting.
You can also modify directory names using the Prefix field to globally remove a specified prefix string from the URL, or by configuring the Directory taxonomy builder.
See The Site Graph Classifier on page 204 for detailed descriptions of the Site Graph classifier settings.
Intelligent Search Optimization Guide 189

Classifying Content by URL
This classifier assigns content to the facet based on regular expression matches to document URLs.
NOTE: This classifier does not generate child facets. There is no taxonomy builder associated with this classifier.
You use the URL classifier by specifying a regular expression to match relevant characteristics of URL names within your application content.
NOTE: The URL classifier processes regular expressions according to the rules and standards defined for using regular expressions within Java applications.
Useful symbols in regular expressions include:
Symbol Function. matches any character* causes the previous character or expression to match zero or
more times+ causes the previous character or expression to match one or
more times(?i) added to the beginning of a string, causes the following string
to match regardless of case.
190 Intelligent Search Optimization Guide

E x a m p l e s :
The regular expression:
"ab+c"
matches all strings that:
• start with "a"
• end with "c"
and
• have any number of "b"s in between
The regular expression:"abc.*"
matches all strings that
• start with "abc"
and
• are followed by anything
See The URL Classifier on page 205 for detailed descriptions of the URL classifier settings.
Using the Unstructured Content Classifier
This classifier classifies data within unstructured content that matches specified IML expressions. Each IML expression matches (or sets a variable on) data that generates one level in the taxonomy.
See Chapter 2, IML Reference for more information about IML.
Intelligent Search Optimization Guide 191

You use the Unstructured Content classifier by specifying one or more document collections, and one or more IML expressions to match.
You can also configure the taxonomy builder to determine child facet creation. The String taxonomy builder is the default.
See The Unstructured Content Classifier on page 206 for detailed descriptions of the Unstructured Content classifier settings.
Personalized Navigation Application Classification Components
The Personalized Navigation application provides access to the following content classification components:
• Structured data classifiers, as described in Structured Data Classifiers on page 193
• Unstructured data classifiers, as described in Unstructured Data Classifiers on page 198
• Structured or unstructured data classifier, as described in Advanced Data Classifier on page 208
• Taxonomy builders, as described in Personalized Navigation Application Taxonomy Builders on page 213
• Comparators, as described in The Personalized Navigation application on page 126
• Formatters, as described in Personalized Navigation Application Formatters on page 222
192 Intelligent Search Optimization Guide

Structured Data Classifiers
Personalized Navigation provides the following classifiers for structured data.
The SQL ClassifierThis classifier selects all entries in the specified data source that match a specified SQL condition.
NOTE: This classifier does not generate child facets. There is no taxonomy builder associated with this classifier.
Basic Classifiers DescriptionSQL Classifier This classifier selects all entries in the specified data source that
match a specified SQL condition, as described in The SQL Classifier on page 193.
Structured Column Classifier
This classifier creates a taxonomy based on the entries of one ore more columns in a structured source, as described in The Structured Column Classifier on page 194.
Advanced Classifiers
Description
Ad Hoc Column Classifier
This classifier creates a numerical range-based taxonomy, such as prices or years, at run time when specifically selected by a user, as described in The Ad Hoc Column Classifier on page 196.
Basic Setting DescriptionDatasource Name Select the desired data source from the structured data sources
configured for your application.
Intelligent Search Optimization Guide 193

The Structured Column ClassifierThis classifier creates taxonomies based on the entries of one or more columns in a structured datasource.
You can use this classifier to create multiple levels of facets of increasing specificity, for example, Country -> State -> City, or Sector -> Industry -> Company.
You can also use this classifier for structured data such as dates, prices, and URLs by selecting the appropriate taxonomy builder in the advanced settings.
SQL Condition Specify an SQL condition that selects the appropriate values from the specified table for this facet. You use this classifier by specifying one or more conditions that include the contents of the WHERE clause, for example, id=5.
Basic Setting DescriptionDatasource Name Select the desired data source from the structured data sources
configured for your application.Fields Specify one or more columns to use to create facets using the
New Value field. The structured column classifier creates a separate level for each column that you specify.
194 Intelligent Search Optimization Guide

Advanced Setting
Description
Regular expressions
Specify one or more optional regular expressions to match features of the column names that you want to replace. Use the New Value field to add regular expressions to the list. See Specifying Regular Expression Substitutions on page 220 for more information.
Regular expression replacements
Specify a corresponding replacement value for each regular expression. Use the New Value field to add replacement expressions. See Specifying Regular Expression Substitutions on page 220 for more information.
SQL View Specify an optional view of the data source. This is generally required only when you need to perform a table join.
Taxonomy Builder Select and configure an optional taxonomy builder to generate child facets for this facet, as described in Personalized Navigation Application Taxonomy Builders on page 213 . The default is to use the String taxonomy builder to create facets at all levels for which you have specified columns in the Fields setting.
Intelligent Search Optimization Guide 195

The Ad Hoc Column ClassifierYou can use the Ad Hoc Column classifier to create a numeric range-based taxonomy, such as prices or years, dynamically at runtime when specifically selected by the user.
You should use the Ad Hoc Column classifier when:
• The results of conventionally classifying the data are very large.
• The performance loss of accessing the data source at runtime is acceptable .
You can also use the Ad Hoc Column classifier in combination with the Structured Column classifier to create a taxonomy that is partially pre-calculated and partially created at runtime.
Ad Hoc Column Classifier Settings
Basic Setting DescriptionDatasource Name Select the desired data source from the structured data sources
configured for your application.Field name Specify the column to use to create the facet. Minimum Value Specify the smallest value to include in the facet. The default is 0.0.Maximum Value Specify the largest value to include in the facet. The default is 0.0.Branching Factor Specify the number of parts into which the specified range should
be divided. The default value is 5, which specifies that the range of values is divided into five facets.
For example, the range 0 - 50 is divided into:
0 - 10 10 - 20 20 - 30 30 - 40 40 - 50
196 Intelligent Search Optimization Guide

Tolerance Specify the maximum difference between two values that is significant. For example, for US currency, setting the tolerance to .01 (1 cent), generates facets in the form $10.00 - $19.99.
You can use the advanced Display Tolerance setting to round off facet values as described below.
Advanced Setting
Description
Display Tolerance Select this checkbox to subtract the Tolerance value from the range when displayed in the User Interface. For example, if the Tolerance value is set to .01 (1 cent), the range $10.00 - $15.00 is displayed as $10.00 - $14.99.
Formatter Specify the formatter to generate the display name for the facet, as described in Personalized Navigation Application Formatters on page 222. The default is the Database Column formatter, which displays the value of the column as the facet name.
Intelligent Search Optimization Guide 197

Unstructured Data Classifiers
Personalized Navigation provides the following basic and advanced classifiers for unstructured data.
Basic Classifier Description Collection This classifier classifies all documents in the specified collections,
as described in The Collection Classifier on page 199.Document Type This classifier classifies documents based on their format types, for
example HTML or PDF, as described in The Document Type Classifier on page 200.
Meta Tag Classifier This classifier generates a taxonomy based on the values of specified HTML meta-tags, as described in The Meta Tag Classifier on page 201.
Ontology Classifier This classifier generates a taxonomy from specified Dictionary concepts, as described in The Ontology Classifier on page 202.
Site Graph Classifier
This classifier generates a taxonomy based on directory structure, as described in The Site Graph Classifier on page 204.
URL Classifier This classifier classifies based on regular expression matches against the document URL, as described in The URL Classifier on page 205.
Unstructured Content
This classifier classifies data within unstructured content by executing a list of IML expressions, as described in The Unstructured Content Classifier on page 206.
IML Classifier This classifier classifies unstructured content based on IML expression matches, as described in The IML Classifier on page 207.
Language Classifier This classifier classifies a document based on the language in which it is written, as described in The Language Classifier on page 208.
198 Intelligent Search Optimization Guide

The Collection ClassifierThe Collection classifier classifies all documents in the specified collections.
NOTE: This classifier does not generate child facets. There is no taxonomy builder associated with this classifier.
Basic Setting DescriptionCollections Specify one or more collections to classify by selecting from the
list of configured collections for the application.
Advanced Setting
Description
Explicit Classification
Select to specify that all documents be explicitly stored in the facet.
NOTE: This is only necessary to support advanced restriction of collections in the Dictionary rules. See Referring to Facets from Dictionary Rules on page 157 for more information.
Intelligent Search Optimization Guide 199

The Document Type ClassifierThis classifier classifies documents based on their format types, such as HTML, PDF, or IQXML.
NOTE: This classifier does not generate child facets. There is no taxonomy builder associated with this classifier.
Basic Setting DescriptionDocument Types Select the document types that you want to classify from this list.
Use the Shift and Ctrl keys to select multiple document types.
200 Intelligent Search Optimization Guide

The Meta Tag ClassifierThis classifier generates a taxonomy based on the values of specified meta-tags.
Basic Setting DescriptionMeta Tags Specify one or more meta tags to use to create facets using the
New Values field. The Meta Tag classifier creates a new taxonomy level for each meta tag in the order specified.
Advanced Setting
Description
Taxonomy Builder Select a taxonomy builder to use for this facet, as described in Personalized Navigation Application Taxonomy Builders on page 213. The String Taxonomy Builder is the default.
Intelligent Search Optimization Guide 201

The Ontology ClassifierThis classifier generates a taxonomy from specified Dictionary concepts and their children.
Specify Concept names in the format:
<part_of_speech>.<domain_name>:<concept_headword>
Basic Setting DescriptionAuto Detect Concepts
Specify representative concepts for which you want the system to locate and generate taxonomies for similar concepts. You can use the % character as a wildcard. For example, specify:
noun.<application_name>:%
to generate a taxonomy based on the hierarchy of noun concepts that are specific to your application.
Include Concepts Specify one or more concepts that you want to use as the basis of the taxonomy.
Exclude Concepts Specify any concepts that you want to exclude from taxonomies. The Ontology classifier excludes the children of excluded concepts unless they are explicitly included as separate entries.
You can use the % character as a wildcard.
202 Intelligent Search Optimization Guide

Advanced Setting
Description
IML Expression Specify an optional IML expression to evaluate to determine which documents are matched by this facet. Use [] to designate the concept within the IML expression.
Desired Result Scope
The IML expression is searched for only within the specified scope
• Document
• Title
• Reference
• Section
• Subtitle
• Sentence
• Any
Intelligent Search Optimization Guide 203

The Site Graph ClassifierThis classifier generates a taxonomy based on a specified directory structure.
Basic Setting DescriptionCollections Select one or more collections to classify from the list of
configured collections for the application. Use the New Value field to add collections to the list.
Advanced Setting
Description
Fetch URL Select to classify based on the URL of the document as it was crawled, rather than the URL that is displayed in the User Interface.
204 Intelligent Search Optimization Guide

The URL ClassifierThis classifier classifies based on regular expression matches against the document URL.
NOTE: This classifier does not generate child facets. There is no taxonomy builder associated with this classifier.
Directory Taxonomy Builder
Specify settings for the Directory taxonomy builder, as described in The Directory Taxonomy Builder on page 217.
Setting DescriptionURL Regular Expression
Specify one or more regular expressions to match the URLs.
Setting DescriptionFetch URL Select to classify based on the URL of the document as it was
crawled, rather than the URL that is displayed in the User Interface.
Intelligent Search Optimization Guide 205

The Unstructured Content ClassifierThis classifier classifies data within unstructured content that matches specified IML expressions. Each IML expression matches (or sets a variable on) data that generates one level in the taxonomy.
See Chapter 2, IML Reference for more information about IML.
Basic Setting DescriptionCollections Specify one or more collections use for this facet.IML Expressions Specify one or more IML expressions to evaluate to determine
which documents are matched by this facet. Each IML expression generates a new level in the taxonomy.
Advanced Setting
Description
Taxonomy Builder Specify settings for a taxonomy builder, as described in Personalized Navigation Application Taxonomy Builders on page 213. The String taxonomy builder is the default.
206 Intelligent Search Optimization Guide
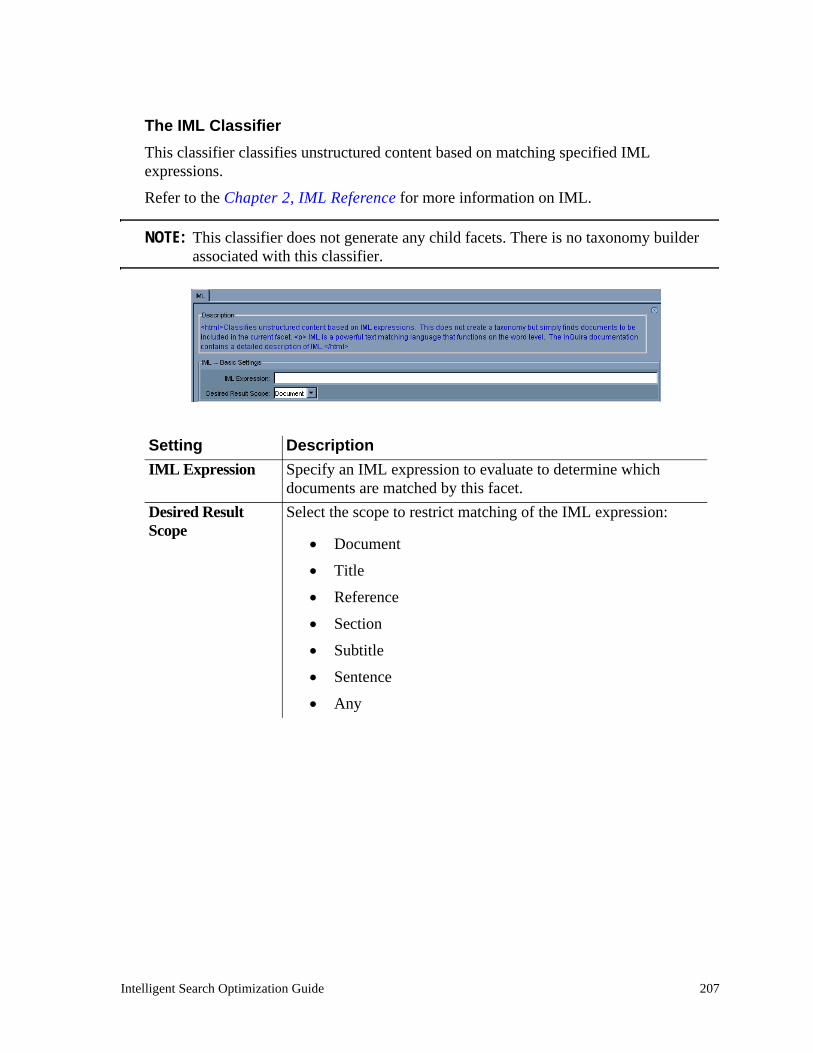
The IML ClassifierThis classifier classifies unstructured content based on matching specified IML expressions.
Refer to the Chapter 2, IML Reference for more information on IML.
NOTE: This classifier does not generate any child facets. There is no taxonomy builder associated with this classifier.
Setting DescriptionIML Expression Specify an IML expression to evaluate to determine which
documents are matched by this facet.Desired Result Scope
Select the scope to restrict matching of the IML expression:
• Document
• Title
• Reference
• Section
• Subtitle
• Sentence
• Any
Intelligent Search Optimization Guide 207

The Language ClassifierThis classifier classifies documents based on their encoded language.
Advanced Data Classifier
Personalized Navigation provides the following advanced classifier for structured or unstructured data.
Basic Setting DescriptionLanguage Select one or more languages to include in this taxonomy. Each
selected language creates an separate facet.
208 Intelligent Search Optimization Guide

The Template ClassifierThe Template classifier adds further classification to an existing taxonomy. For every element of the taxonomy, this classifier attempts to apply the template and, if the template successfully creates a new classifier, it is added to that element.
This is particularly useful in creating a taxonomy for both unstructured and structured data. The taxonomy could, for example, be initially created with the Structured Column classifier and then a Template classifier could be used to add IML classifiers for the unstructured data.
To access the Template classifier:
1. On the Classifiers tab, select Classifier Group: Other.2. Select Advanced Classifiers.
Template displays in the Classifier Type field. 3. Click Add Classifier to define the Template classifier.
The Personalized Navigation window displays the Template Settings section.
IML Template SettingsClassifies unstructured content based on IML expressions. This does not create a taxonomy but simply finds documents to be included in the current facet.
Basic Setting DescriptionTemplate Select a classifier template to use for this facet. The options are:
• IML• On-the-fly Range• Structured To Unstructured• URL
Additional settings must be defined for each type of template. See the following sections for details.
Intelligent Search Optimization Guide 209

IML is a powerful text matching language that functions on the word level. The InQuira documentation contains a detailed description of IML.
On-the-fly Range Template SettingsThis classifier creates a numerical range based taxonomy, such as prices or years, at run time when specifically selected by a user. This should be done when the taxonomy would be too big if created prior to run time by the Structured Column classifier and the performance loss of continually accessing the data source is unimportant.
This classifier can also be used in combination with the Structured Column classifier to create a taxonomy that is partially precomputed and partially created at run time.
Basic Setting Description IML Expression Specify an IML expression to evaluate to determine which documents
are matched by this facet.Desired Result Scope Select the scope to restrict matching of the IML expression:
• Document• Title• Reference• Section• Subtitle• Sentence• Any
Collections Select one or more collections to classify from the list of configured collections. Use the New Value field to add collections to the list.
210 Intelligent Search Optimization Guide

Basic Setting Description Datasource Name Select the desired data source from the structured data sources configured
for your application.Field Name Specify the column to use to create the facet. Display Tolerance Select to subtract the Tolerance value from the range when displayed in
the User Interface. For example, if the Tolerance value is set to .01 (1 cent), the range $10.00 - $15.00 is displayed as $10.00 - $14.99.
See Tolerance below for more information.Minimum/Maximum Value
Specify the smallest and largest value to include in the facet. The default is 0.0.
Branching Factor Specify the number of parts into which the specified range should be divided. The default value is 5, which specifies that the range of values are divided into five facets. For example, the range 0 - 50 is divided into:
0 - 10 10 - 20 20 - 30 30 - 40 40 - 50
Tolerance Specify the maximum difference between two values that is significant. For example, for US currency, setting the tolerance to .01 (1 cent), generates facets in the form $10.00 - $19.99.
Use the Display Tolerance setting to round off facet values in the UI.Formatter Specify the formatter to generate the display name for the facet, as
described in Personalized Navigation Application Formatters on page 222. The default is the Database Column Formatter, which displays the value of the column as the facet name.
Intelligent Search Optimization Guide 211

Structured To Unstructured Template Settings
URL Template SettingsClassifies based on regular expression matches against the document URL. This does not generate a taxonomy but merely selects matching documents to be classified in this facet.
Regular expressions are a powerful method for matching text. Three particularly useful symbols in regular expressions are:
Basic Setting Description Bridge Column Specify the column to use to create the facet.Template Options are:
• IML – See IML Template Settings on page 209.
• URL – See URL Template Settings on page 212.
Symbol Description. (Dot) In the default mode, this matches any character except a newline.
* (Asterisk) Causes the previous symbol to match zero or more times. ab* matches a, ab, or a followed by any number of b's.
+ (Plus) Causes the previous symbol to match one or more times. ab+ will match 'a' followed by any non-zero number of 'b's; it will not match just 'a'.
212 Intelligent Search Optimization Guide

For example, if you want to match all strings starting with a, ending with c, and containing any number of bs in between, you would use the regular expression ab+c. If you want to match abc followed by anything at all, you would use abc*.
Personalized Navigation Application Taxonomy Builders
Taxonomy Builders are procedures that you configure within classifiers to create new facets during the classification process. Taxonomy builders enable you to:
• Generate facets in your taxonomy programmatically
• Automatically update facets within data repositories that are subject to frequent change
Taxonomy builders provide a convenient method of automating the classification process, which in many cases can be difficult or impossible to perform manually.
For example, to classify a database having category and subcategory fields, we could create each facet by hand, and configure a structured column classifier to select the appropriate row for each facet. However, this be an impractical approach for data containing hundreds of facets, especially if the structure is subject to frequent change.
Taxonomy builders use the data from the classifier in which they are configured to construct new taxonomy sub-facets. Each time the data is classified, the classifier reconstructs the taxonomy to correspond to any changes to the referenced data.
Basic Setting Description URL Regular Expression
Specify one or more regular expressions to match the URLs.
Case Sensitive Select to indicate that the URL epression is case sensitive.Fetch URL Select to classify based on the URL of the document as it was crawled,
rather than the URL that is displayed in the User Interface.
Intelligent Search Optimization Guide 213

You can use taxonomy builders with the following classifiers:
• The Structured Column classifier
• The Meta Tag classifier
• The Site Graph classifier (only the Directory taxonomy builder is available)
You configure taxonomy builders by specifying values for various parameters that correspond to properties of the data that you want to classify. You can configure taxonomy builders to classify data based on directory structures, dates, text strings, and ranges of values, as described in:
• The String Taxonomy Builder
• The Date Taxonomy Builder
• The Directory Taxonomy Builder
• The Range Taxonomy Builder
The String Taxonomy BuilderThe String taxonomy builder generates taxonomy entries based on the text strings contained within the target data.
You configure the String taxonomy builder by specifying various optional and required parameters. The Directory Taxonomy Builder screen displays the configuration settings:
The following table describes the String Taxonomy Builder settings.
Advanced Parameter
Description
Combine Levels Select this parameter to specify to combine any non-branching paths into a single facet.
Comparators Use this field to specify optional comparators to determine the order of the facets. See The Personalized Navigation application on page 126 for more information on using Comparators within Taxonomy Builders.
214 Intelligent Search Optimization Guide

The Date Taxonomy BuilderThe Date taxonomy builder generates taxonomy entries based on date values within the target data. The Date taxonomy builder also contains settings to create facets for dynamically defined dates, such as Today and This Week.
You configure the Date taxonomy builder by specifying various optional and required parameters. The Date Taxonomy Builder screen displays the basic and advanced configuration settings:
Formatters Use this field to specify optional formatters to determine the labels of facets within the User Interface. See Personalized Navigation Application Formatters on page 222 for more information on using Formatters within Taxonomy Builders.
Basic Parameters
Description
Create Standard Use this field to specify a basic taxonomy that includes years, months, and days.
Create Today Use this field to create a facet for items occurring today. For example, to categorize news articles by their posting date.
NOTE: This facet requires classification on a daily basis.
Intelligent Search Optimization Guide 215

Create This Week Use this field to create a facet for items occurring this week. Weeks are defined as Sunday - Saturday.
NOTE: This facet requires classification on a daily basis.
Create This Month Use this field to create a facet for items occurring this month.
NOTE: This facet requires classification on a daily basis.
Create This Year Use this field to create a facet for items occurring this year. For example, to categorize books by their publication date.
NOTE: This facet requires classification on a daily basis.
Create All Dates Use this field to create a facet containing all dates.Combine Levels Select this parameter to specify to combine any non-branching
paths into a single facet.Today Label Use this field to specify the text for the Today facet, for example,
Today's Articles.This Week Label Use this field to specify the text for the This Week facet.This Month Label Use this field to specify the text for the This Month facet.This Year Label Use this field to specify the text for the This Year facet.All Dates Label Use this field to specify the text for the All Dates facet.Language Use this field to specify the language in which the dates should
be rendered. Supported languages include any that java supports.Comparators Use this field to specify optional comparators to determine the
order of the facets. See The Personalized Navigation application on page 126 for more information on using Comparators within Taxonomy Builders.
Formatters Use this field to specify optional formatters to determine the presentation of facets within the User Interface. See Personalized Navigation Application Formatters on page 222 for more information on using Formatters within Taxonomy Builders.
216 Intelligent Search Optimization Guide

The Directory Taxonomy BuilderThe Directory taxonomy builder generates taxonomy entries based on directory paths within a file system. The result resembles a file browser.
You configure the Directory taxonomy builder by specifying various optional and required parameters. The Directory Taxonomy Builder screen displays the basic and advanced configuration settings:
Basic Parameter DescriptionPrefixes Use this optional parameter to remove a specified common prefix
in the directory names from the facet names.
NOTE: To remove multiple prefixes, use the Regular Expressions field in the Advanced section.
Advanced Parameter
Description
Combine Levels Select this parameter to specify to combine any non-branching paths into a single facet.
Comparators Use this field to specify optional comparators to determine the order of the facets. See The Personalized Navigation application on page 126 for more information on using Comparators within Taxonomy Builders.
Intelligent Search Optimization Guide 217

The Range Taxonomy BuilderYou can use the Range taxonomy builder to generate taxonomy entries that subdivide a range of values. The resulting taxonomy is a subdivided range of values. The Range Taxonomy Builder screen displays following basic and advanced settings.
Formatters Use this field to specify optional formatters to determine the presentation of facets within the User Interface. See Personalized Navigation Application Formatters on page 222 for more information on using Formatters within Taxonomy Builders.
Regular Expressions
Use this field to specify optional regular expressions to transform matching strings to the corresponding expressions specified in the Regular Expressions replacements field. See Specifying Regular Expression Substitutions on page 220 for more information on using regular expression substitution within Taxonomy Builders.
Regular expression replacements
Use this field to specify optional regular expression replacements for strings that match the corresponding expressions specified in the Regular Expressions field. See Specifying Regular Expression Substitutions on page 220 for more information on using regular expression substitution within Taxonomy Builders.
218 Intelligent Search Optimization Guide

Basic Parameter DescriptionDo Above Use this field to create a facet containing all items whose value is
greater than the Maximum Value setting, for example Over $50.00.
Do Below Use this field to create a facet containing all items whose value is less than the Minimum Value setting, for example Under $5.00.
Minimum Value Use this field to specify the minimum value to use as a range boundary, for example, $5.00.
Maximum Value Use this field to specify the maximum value to use as a range boundary, for example, $50.00.
Depth Use this field to specify the number of levels for the taxonomy. For example, specify a depth of 2 to create top level facets and second level facets such that selecting the top level facet displays the second level facets.
Tolerance Use this field to specify the maximum difference between two values that is significant, such as .01 (one cent) for currency.
Branching Factors Use this field to specify a list of values to divide the taxonomy ranges into. For example, enter 5, 2 to specify that the top level taxonomy is divided into five facets, and the second level is divided into two facets. If there are more levels (specified by the Depth parameter) than branching entries, the lower levels use the last entry in the list.
Advanced Parameter
Description
Display Tolerance Use this field to specify a value to subtract from the range when displaying, so that the range $10-$15 displays as $10-$14.99.
Above Label Use this field to specify the name of the facet showing values more than the Maximum. You can use the characters [] which are replaced by the maximum value. For example, specify:
Over []
to display
Over $50.00
where 50 is the value of the Maximum parameter.
Intelligent Search Optimization Guide 219

Specifying Regular Expression Substitutions
The Structured Column classifier and the Directory taxonomy builder provide fields in which you can specify regular expressions and corresponding replacement expressions to capture and replace strings to use as facet names.
You specify regular expression replacements as two separate lists of corresponding values.
Below Label Use this field to specify the name of the facet showing values less than the Minimum. You can use the characters [] which are replaced by the minimum value. For example, specify:
Under []
to display
Under $50.00
where 50 is the value of the Minimum parameter.Formatters Use this field to specify optional formatters to determine the
presentation of facets within the User Interface. See Personalized Navigation Application Formatters on page 222 for more information on using Formatters within Taxonomy Builders.
Parameter DescriptionRegular Expression Specify one or more regular expressions to match some
characteristic of the field or directory name.
Each entry must be paired with a corresponding replacement entry.
Regular Expression replacements
Specify one or more strings as replacements for the characteristics of the field or directory names that match the specified regular expressions.
220 Intelligent Search Optimization Guide

Replacements can include grouping syntax. For example, specifying:
([0-9]+)
and the replacement expression
"$1"
results in all numbers being quoted.
Personalized Navigation Application Comparators
Comparators are modules that compare two values and determine whether the first is less than, equal, or greater than the second. You use Comparators to determine the order in which the facets are displayed in the User Interface. You use Comparators within the String, Date, and Directory taxonomy builders.
You specify Comparators as a list of one or more items. Each entry in the list applies to the corresponding level of the taxonomy. If there are more levels than comparator entries, the lower levels use the last entry in the list.
For example, to specify a top level of a taxonomy level sorted alphabetically, followed by a second level sorted by date, enter:
Alphabetical Number
The resulting taxonomy might resemble:
Fiction NonfictionMystery Romance SpeculativeHistory Biography{Price range}
The Personalized Navigation application provides the following comparators:
Comparator DescriptionAlphabetical Use this comparator to specify that facets be sorted
alphabetically.
Intelligent Search Optimization Guide 221

Personalized Navigation Application Formatters
Formatters are procedures that perform string substitution on facet names as they are created by taxonomy builders, so that you can control their presentation within the User Interface.
You use Formatters within the String, Date, Directory, and Range taxonomy builders.
You specify Formatters as a list of one or more items. Each entry in the list applies to the corresponding level of the taxonomy. If there are more levels than formatter entries, the lower levels use the last entry in the list.
The Personalized Navigation application provides the following formatters:
Number Use this comparator to specify that facets be sorted numerically.Currency Use this comparator to specify that facets be sorted by currency
in ascending order.Dimension Use this comparator to sort facets based on dimensions that
include regular numbers (1, 3, 29, etc.), fractions (1/4, 3/8, etc.), and fractions combined with numbers (e.g. 1-1/4, 1 1/4, 19-3/8, etc.).
Last Name Use this comparator to specify that facets be sorted alphabetically by last name.
Month Use this comparator to specify that facets be sorted in calendar order by month name.
Formatter DescriptionDatabase Column Formatter
Use this formatter to specify that the User Interface displays the value of the configured column as closely as possible to the corresponding display on the answer page.
Name Formatter Use this formatter to specify that the User Interface displays person name values in the form <surname>, <name>.
222 Intelligent Search Optimization Guide

Chapter 4 User Manager
The InQuira User Manager is a component accessed from within the Language Workbench that allows you to create and set permissions for Language Workbench users. To access User Manager please see Intelligent Search Language Tuning Guide.
This Chapter explains:
• Using User Manager on page 224
• Add New User on page 226
Intelligent Search Optimization Guide 223

Using User Manager
Upon opening User Manager the following screen displays:
224 Intelligent Search Optimization Guide

The following installed Users appear in addition to any custom created user accounts.:
User Login Default Password PermissionsAdministrator Administrator • Dictionary Manager
• User Manager
• Test Drive
• Quality Monitor
• Edit Base, Industry data
• DOMAIN_GROUPS PERMISSIONS
• Add Company Layer Domains
• Personalized Navigation Setup
• Administration Console
Intelligent Search Optimization Guide 225

Add New User
You can add Language Workbench Users by selecting Add new user from the User Manager screen. The New user entry screen displays:
NOTE: Only Language Workbench Users with the User Manager permission set are able to create and modify user accounts
.
• Enter the name of the User in the Full name field.
• Enter the name to be used for logging into the Language Workbench in the Login field.
• Enter the password to be used with the Login in the New password field.
NOTE: The password must be at least eight characters long, and contain both letters and numbers.
• Reenter the password in the Confirm new password field.
• Select the Permissions to be associated with the User. For more information, please see Permissions.
• Click Save new user to save the newly created user. Upon saving, the Username appears in the User Accounts screen.
226 Intelligent Search Optimization Guide

User Permissions
The following are the permissions available to each user:
Modify a User Account
To modify a User Account:
• Double-click the Username you like to modify from the User Accounts screen.
• After you make modifications, select Save new user. The changes take effect automatically.
Delete a User Account
To delete a user account: highlight the username and select Delete. The user name deletes.
Dictionary Manager Allows the User to access Dictionary Manager.You can assign the following advanced Dictionary Manager permissions described below:
• Edit Base, Industry Data
• Add Company Layer DomainsUser Manager Allows the User to access User Manager.Test Drive Allows the User to access Test Drive.Quality Monitor Allows the User to access Quality Monitor.Edit Base, Industry data
Allows the User to create and modify Dictionary Objects that belong to Base and Industry level domains in Dictionary Manager.
DOMAIN_GROUPS PERMISSIONS
Allows the User to create and modify Domains and Domain Lists used in Dictionary Manager.
Add Company Layer Domains
Allows the User to create Company Layer Domains used in Dictionary Manager.
Personalized Navigation Setup
Allows the User to access Personalized Navigation Setup.
Administration Console
Allows the User to access System Manager to configure InQuira Intelligent Search.
View only Administration Console
Allows the User to view but not modify configurations in System Manager.
Intelligent Search Optimization Guide 227

228 Intelligent Search Optimization Guide

Appendix A Configuring Access to Business Data
InQuira accesses business data through the Preference Service, which accesses and stores business data items that it obtains from configured data sources. The data sources that the Preference Service accesses are called providers, and the data items that it uses are called preferences.
You can configure InQuira to access business data from the following types of Providers:
• The current InQuira session
• External sources, such as CRM packages
You access business data for use by the Business Rules module, which is a separate component that enables you to:
• Configure the Preference Service to access Preference data from Providers
• Set Business Conditions within Rules based on user, session, and other context information
Intelligent Search Optimization Guide 229

Business Conditions within Rules enable you to tailor application response based on various aspects of:
• User identity and activity
• Session activity
The Rules Engine evaluates Business Conditions within Rules by comparing the values obtained by the Preference Service to the values specified within the Business Condition.
The Preference Service
The Preference Service manages the business data preferences obtained by the configured data providers.
InQuira includes a session provider that is installed and configured with the application. The session provider is designed to access only preference data for a given session; it does not store persistent preference data for use in multiple sessions. See The Session Provider on page 231 for more information.
Access to Preference Data
The Preference Service uses a key to obtain preference values from configured providers. Keys take the form of multiple strings concatenated by the period (.) character, for example:
string.string.string
The concatenated parts enable namespace traversal for data retrieval, as described in Hierarchical Namespace Traversal on page 230.
Hierarchical Namespace Traversal
The multi-part key format that the Preference Service uses to access preference data supports hierarchical name space traversal for data retrieval.
The Preference Service locates the value of keys by attempting to match a complete key name, for example, color.car.ext. If it fails to locate the required key, it can create and use progressively smaller sub-keys, for example color.car, then color.
You can configure a preference to require exact key matching rather than hierarchical name space traversal using the exactMatch parameter, as described in Configuring Preferences on page 234.
230 Intelligent Search Optimization Guide

Preference Types
You can configure InQuira to access the following types of business data:
• User context data: User context data includes user profile information, such as user name and IP address.
• Session context data: Session context data includes session-dependent information, such as URLs and pages visited.
• Question context data: Question context enables the Rules Engine to dynamically set the value of a configured preference based on information in the user's question.
You can access data using InQuira's configured session provider, or using a custom provider that you configure using the process described in Creating Custom Preferences on page 233.
Session Provider Preferences on page 232 describes the user and session context preferences that are configured for the InQuira Session Provider.
Business Data Providers
Providers are the means of accessing various sources of business data, which can include the web- or application server hosting the InQuira session, as well as external sources of business data, such as CRM applications.
The InQuira session provider is installed and configured with the product. Session Provider Preferences on page 232 describes the individual preferences that are configured for the session provider.
You can define and configure additional providers using the process described in Creating Custom Preferences on page 233.
The Session Provider
InQuira includes a session provider that is installed and configured with the application. The session provider is designed to access only preference data for a given session; it does not store persistent preference data for use in multiple sessions.
Session Provider Preferences on page 232 describes the individual preferences that are configured for these providers.
Intelligent Search Optimization Guide 231

Session Provider PreferencesThe Session provider is installed and configured with the InQuira product. The Session provider defines the following Preferences that you can include in business conditions:
Creating Custom Providers
You can define and configure custom Providers for the application by:
• Creating a custom provider that implements the Provider application programming interface (API)
• Defining the custom provider to the application, as described in Defining a Provider in the Application on page 233
• Configuring Preferences to use the provider, as described in Configuring Preferences on page 234
Preference DescriptionRequest Base URL Request Referer Page User Host User IPAddress User Name
The Preference Service obtains user data from a Principal object (javax.security.Principal) in the request. The principal object can be created by:
• a user agent, as in JSP and ASP pages
• the HTTP request headers, as are present for standard login message boxes in web browsers
• a login request
• a custom preference handler, as described in Creating Custom Preferences on page 233
Time (Now) Today's Date
The Preference Service obtains time and date data from the current system time. This data is not stored in the Preference Service.
232 Intelligent Search Optimization Guide

Defining a Provider in the Application
You define a Provider using the providers map in the application configuration file. The providers map includes an entry for each provider defined for the application. Providers that are defined in the map are then available to individual preferences, as described in Configuring Preferences on page 234.
The following example shows the default Session provider configuration in the providers map:
<map name="providers" type="PreferenceProvider" /> <entry name="sessionProvider" type="PreferenceProvider" />
where:
Creating Custom Preferences
You can define and configure custom business data preferences for the application by:
• Creating a custom Preference that implements the Preference application programming interface (API), as described in The Provider API on page 244.
• Adding the Preference to the application, as described in Configuring Preferences on page 234.
providers Specifies the map that defines the Preference providers. You must have at least one session provider entry in this list. The Session provider is defined by default for the application.
sessionProvider Is an entry that refers to the default sessionProvider. Each defined provider must be specified as an entry in this map.
Intelligent Search Optimization Guide 233

Configuring Preferences
You can configure Preferences for the Preference Service using the Advanced Configuration Facility. The Preferences page of the Advanced Configuration Facility accesses a preferences map within the application configuration file that specifies parameters for each defined Preference.
The following example shows the format of the preferences map:
<map name="preferences" controller="com.inquira.preference.PreferenceController"> <entry name="key" type="string" /> <entry name="traversalType" type="integer" /> <entry name="exactMatch" type="boolean" /> <list name="providers" type="PreferenceProvider" /> <entry name="purpose" type="string" /> <entry name="dataTypeClass" type="string" /> </map>
The Preference parameter elements correspond to the used to specify Preference parameters in the Advanced Configuration Facility, as described in Adding and Modifying Context Variable Preference Parameters on page 237.
where:
Key Specifies the key required to access this Preference, for example, color.car.ext
Traversal Type Specifies how to traverse the hierarchical name space for keys that contain multiple parts when multiple providers are defined for this preference. Valid values are:
Names First
Exhaust the name space in the first provider before asking the next provider
Providers FirstTry the full key on all providers before processing sub-keys
Exact Match Is a Boolean value that specifies whether the full key is required to find the Preference. Valid values are:
• On- the full key is required
• Off - the full key is not requiredPurpose Specifies whether the Preference is accessible from the Business
Rules module. Specify BusinessCondition to make the Preference available to the Business Rules module.
234 Intelligent Search Optimization Guide

Editing Preferences
You can create and modify preferences using the Context Variables section of the Advanced Configuration Facility.
To edit preferences:
• Select Context Variables from the Advanced Configuration Facility menu
The Context Variable page displays.
The Context Variables page displays the currently defined context variables available to the Business Condition module. Each context variable corresponds to a configured preference that has a defined purpose of BusinessCondition.
To display context variables as selectable items:
• Click Edit on the Context Variables page
The Context Variables page displays the list of defined context variables as hypertext links, and displays an Add New Item link. You can select an existing context variable to modify its preference criteria, or define a new context variable.
Data Type Class Name
Specifies the data type for this Preference, as defined in the Business Condition module. Valid values are:
• Date
• Facet
• Integer
• Real
• String
• Time
Modifiable by Search System
Specifies that the value of the parameter can be changed dynamically by the Business Condition module. See Chapter 5, Configuring Access to Business Data for more information on creating Business Conditions that set Preference values based on question context information.
Providers Specifies the Providers that the application can use to access data for this Preference. You must specify at least one provider to configure a Preference. The Preference Service processes the list of providers in the order specified.
Intelligent Search Optimization Guide 235

To modify an existing preference:
• Select the corresponding context variable from the list
To define a new preference and context variable:
• Click Add New Item from the list
The Variables page displays fields that define the preference for the selected variable.
You can use the fields on the Variables page to add or modify preference parameters for the selected context variable.
• Specify values for the parameters, as described in Configuring Preferences on page 234
• Click OK to update the application configuration
The Context Variables Page
The Context Variables page displays the currently defined context variables available to the Business Condition module. Each context variable corresponds to a configured preference that has a defined purpose of BusinessCondition.
Displaying the Editable Context Variable List
To display context variables as selectable items:
• select the Edit button on the Context Variables page
The Editing:Context Variables page displays.
The Editing: Context Variables Page
The Editing:Context Variables page displays the list of defined context variables as hypertext links, and displays an Add New Item link.
236 Intelligent Search Optimization Guide

Selecting a Context Variable for Editing
You can select an existing context variable to modify its preference criteria, or define a new context variable.
To modify an existing preference:
• Select the corresponding context variable from the list
To define a new preference and context variable:
• Click Add New Item from the list
The Editing:Context Variables:Variables page displays.
The Editing: Context Variables: Variables Page
The Editing:Context Variables:Variables page displays fields that define the preference for the selected variable.
Adding and Modifying Context Variable Preference Parameters
You can use the fields on the Editing:Context Variables:Variables page to add or modify preference parameters for the selected context variable.
• Specify values for the parameters, as described in Configuring Preferences on page 234
• Click OK to update the application configuration
Intelligent Search Optimization Guide 237

The Preference API
You can create a preference handler by implementing the Preference API. The Preference API is defined in com.inquira.common.Prefs. It includes the following methods:
• The getPreference Method on page 239
• The getExternalString Method on page 239
• The getExternalCode Method on page 239
• The getPreferenceValue Method on page 240
• The SetPreferenceValue Methods on page 240
• The rundown Method on page 242
• The getPreferences Method on page 243
• The getPreferenceKeys Method on page 243
238 Intelligent Search Optimization Guide

The getPreference Method
The getExternalString Method
The getExternalCode Method
Method: getPreferenceSyntax: public Preference getPreference(java.lang.String key)
where:key Specifies the preference nameDescription: This method retrieves the preference definition for a key from the
configuration service. If the preference has not been defined, a dynamic preference object is created and returned.
Returns: The Preference object that corresponds to the requested key
Method: getExternalStringSyntax: public java.lang.String
getExternalString(java.lang.String key)
where:key Specifies the preference name Description: This method returns the string representation of the preference value
as defined by an external provider.Returns: Returns the string value for the specified preference
Method: getExternalCodeSyntax: public java.io.Serializable
getExternalCode(java.lang.String key)
where:key Specifies the preference nameDescription: This method returns the native form of the preference value as
defined by the provider. This can be null if no key access using this preference value is required that is based not on the external string.
Returns: The code value for specified preference
Intelligent Search Optimization Guide 239
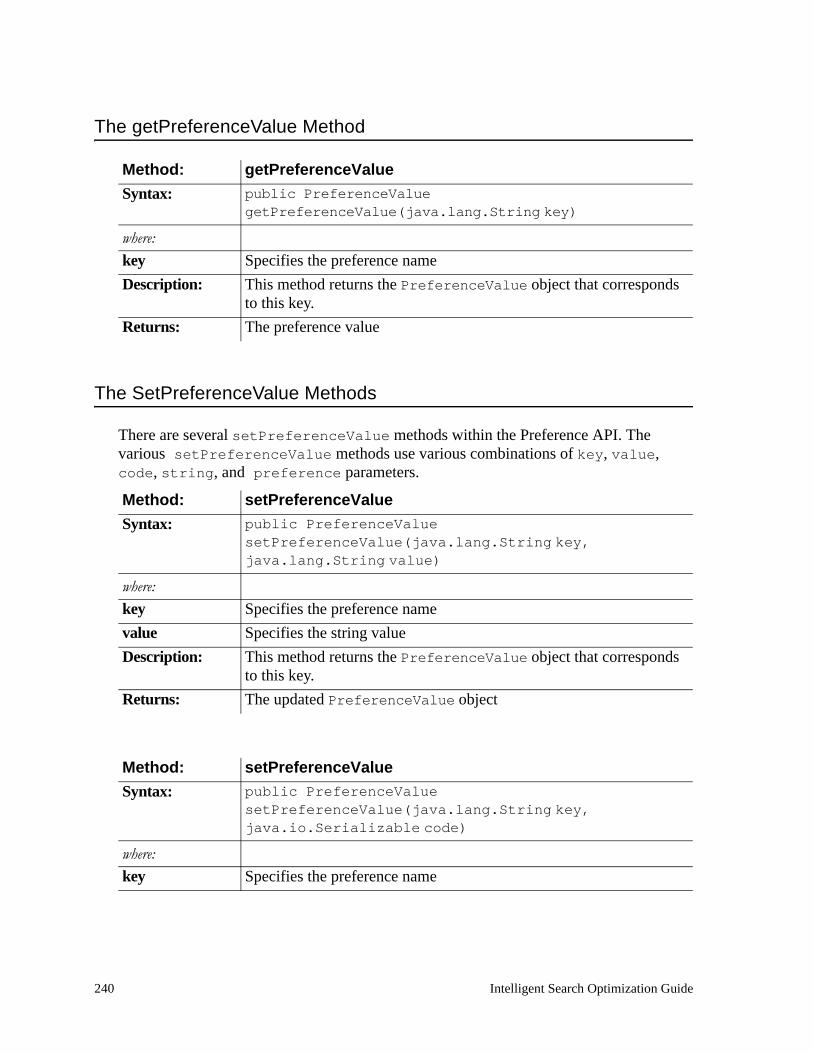
The getPreferenceValue Method
The SetPreferenceValue Methods
There are several setPreferenceValue methods within the Preference API. The various setPreferenceValue methods use various combinations of key, value, code, string, and preference parameters.
Method: getPreferenceValueSyntax: public PreferenceValue
getPreferenceValue(java.lang.String key)
where:key Specifies the preference nameDescription: This method returns the PreferenceValue object that corresponds
to this key.Returns: The preference value
Method: setPreferenceValueSyntax: public PreferenceValue
setPreferenceValue(java.lang.String key, java.lang.String value)
where:key Specifies the preference namevalue Specifies the string valueDescription: This method returns the PreferenceValue object that corresponds
to this key.Returns: The updated PreferenceValue object
Method: setPreferenceValueSyntax: public PreferenceValue
setPreferenceValue(java.lang.String key, java.io.Serializable code)
where:key Specifies the preference name
240 Intelligent Search Optimization Guide

Description: This method sets the code for the preference to the code argument, the string value to code.toString( ) with the given key, and returns the updated PreferenceValue object. If no preference with this key exists, it creates a new preference using only the session preferences.
Returns: The updated PreferenceValue object
Method: setPreferenceValueFull Name: public PreferenceValue
setPreferenceValue(Preference preference, java.lang.String value)
where:key Specifies the key valuevalue Specifies the string valueDescription: This method sets the value for the preference with the given key and
returns the updated PreferenceValue object. If no preference with this key exists, it creates a new preference using only the session preferences.
Returns: The updated PreferenceValue object
Method: setPreferenceValueSyntax: public PreferenceValue
setPreferenceValue(Preference preference, java.lang.String value, java.io.Serializable code)
where:preference Specifies the preferencevalue Specifies the string valuecode Specifies the code valueDescription: This method sets the value and code for the preference with the given
preference and returns the updated PreferenceValue object. If no preference with this key exists, it creates a new preference using only the session preferences.
Returns: The updated PreferenceValue object
Intelligent Search Optimization Guide 241

The rundown Method
Refer to rundown() in the JavaDoc documentation for more information.
Method: setPreferenceValueSyntax: public PreferenceValue
setPreferenceValue(java.lang.String key, java.lang.String value, java.io.Serializable code)
where:value Specifies the string valuecode Specifies the code valueDescription: This method sets the value and code for the preference with the given
key and returns the updated PreferenceValue object. If no preference with this key exists, it creates a new preference using only the session preferences.
Returns: The updated PreferenceValue object
Method: setPreferenceValueSyntax: public PreferenceValue
setPreferenceValue(PreferenceValue value)
where:value Specifies the preference valueDescription: This method sets the value for the preference with the given key and
returns the passed PreferenceValue object. If no preference with this key exists, it creates a new preference using only the session preferences.
Returns: The updated PreferenceValue object
Method: rundownSyntax: public void rundown() throws TransportException
Description: The rundown method is called after every completion of a request from the Execution.rundown() method.
Throws: TransportException
242 Intelligent Search Optimization Guide

The getPreferences Method
The getPreferenceKeys Method
Method: getPreferencesSyntax: public java.util.Collection getPreferences()
Description: This method retrieve a list of all defined preferences. The returned list contains Preference objects.
Returns: A list of all Preference objects.
Method: getPreferenceKeysSyntax: public java.util.Collection getPreferenceKeys()
Description: This method retrieve a list of all defined preference keys. The returned list contains String objects.
Returns: A list of all String objects
Intelligent Search Optimization Guide 243

The Provider API
You can create a custom provider to access business data by implementing the Provider API. Providers must extend the class com.inquira.preference.AbstractProvider, which includes the following methods:
• The Provider Default Constructor on page 244
• The getType Method on page 244
• The get Methods on page 245
• The set Method on page 247
• The toString Method on page 247
• The Provider rundown Method on page 247
The Provider Default Constructor
The getType Method
Method: AbstractProviderSyntax: public AbstractProvider()
Description: Specifies the default constructor. A default constructor is required so that the class can be loaded dynamically.
Method: getTypeDescription: This method should not be overridden. The static String variable
type should be initialized in a static initializing code block. For example:
static {type = ‘my type’}Returns: The provider type as a string
244 Intelligent Search Optimization Guide

The get Methods
There are two get methods within the Provider API; a namespace hierarchy traversal method, and a non-traversal method.
Name: getSyntax: public PreferenceValue get(java.lang.String key, byte
depth, byte traversalDepth)
where:key Specifies the preference namedepth Specifies the number of elements in the keytraversalDepth Specifies the number of elements that can be removed from the key to
create sub-keysDescription: This method retrieves the value that corresponds to the key argument
within this provider. The number of key elements is specified by the depth parameter.
This function traverses the namespace hierarchy for the key by attempting to locate sub-keys if the full key location fails. Sub-keys are created by removing the final key element; for example:
color.car.ext -> color.car -> color
You can limit namespace traversal by specifying a traversal depth argument. This argument specifies the number of key elements that can be removed to create sub-keys. For example:
key = color.car.ext depth = 3 traversalDepth = 1
specifies that the only valid keys are color.car.ext and color.car.
get is dependent on the get(String) method, which must be implemented by all subclasses. This method does not have to be overridden in custom providers unless the functionality is not required.
Returns: a PreferenceValue object with the appropriate values set
null if no match is found
Intelligent Search Optimization Guide 245

Method: getSyntax: protected abstract PreferenceValue
get(java.lang.String key)
where:key Specifies an exact key nameDescription: This abstract method is called by get(String,byte,byte) to find
the value for a given key. This method does not create and match sub-keys to traverse the key namespace; it only checks for an exact key match. This method must be defined by all provider classes and must implement the specific functionality for this provider.
Returns: • the PreferenceValue object, if it locates the exact key
• null, if it does not locate the exact key
246 Intelligent Search Optimization Guide

The set Method
The toString Method
The Provider rundown Method
Method: setSyntax: protected abstract boolean
set(java.lang.String key, PreferenceValue value)
where:value Specifies the preference valueDescription: This abstract method sets the value for the implied preference of the
value object.Returns: The preference value
Method: toStringSyntax: public java.lang.String toString()
Description: This method returns information about the provider that can be useful for debugging.
Overrides: toString in the class java.lang.Object Returns: Information about the provider
Method: rundownSyntax: public abstract void rundown()
Description: This method is called when the preference services’ rundown method is called. This method should store and retain preference values for this provider.
Intelligent Search Optimization Guide 247

248 Intelligent Search Optimization Guide