Embed Size (px)
Citation preview

Redpaper
IBM® WebSphere®
Integrating IBM Integration Designer with IBM WebSphere DataPower SOA Appliances
Overview
This IBM® Redpaper™ publication can help solution developers integrate IBM Integration Designer with IBM WebSphere® DataPower® Service-Oriented Architecture (SOA) appliances. It provides step-by-step instructions for configuring the tools and deploying the developed files.
Integration Designer Version 7.5 provides a new DataPower capability that designers use to create stylesheets locally and immediately deploy those stylesheets to the DataPower SOA Appliance on which a service is hosted. Integration Designer also unites two cutting-edge technologies and simplifies stylesheet development and deployment.
The paper is organized into the following sections:
� Introduction to Integration Designer and WebSphere DataPower SOA appliances� Overview� Installation and configuration of Integration Designer� Configuration of the WebSphere DataPower SOA Appliance� Development with Integration Designer and DataPower� Publishing files to the WebSphere DataPower SOA Appliance� Configuring a service on the WebSphere DataPower SOA Appliance
Rolf WittichWahe Sedrakian
Andreas JaenschStefan Schwarz
© Copyright IBM Corp. 2012. All rights reserved. ibm.com/redbooks 1
Introduction to Integration Designer and WebSphere DataPower SOA appliances
We begin with a description of Integration Designer and WebSphere DataPower SOA appliances.
WebSphere DataPower SOA appliances
WebSphere DataPower SOA appliances are sealed hardware platforms that are designed to simplify, help secure, and accelerate your SOA environment. The 1U rack-mountable, tamper-proof network devices are designed to process XML at near-wire speed.
The DataPower family provides a broad range of capabilities, from basic XML acceleration that uses the XA35 Appliance, to XML threat protection and digital signature creation and validation that use the XS40, to complete integration with WebSphere MQ, WebSphere Java Message Service (JMS), and Tibco that uses the XI50. DataPower SOA appliances are compatible with later versions, meaning that all features of the XA35 model are available on the XS40, and all XS40 features are available on the XI50.
The instructions provided in this paper are based on the DataPower XA35, XS40, and XI50 appliances. Each example was developed and tested on these devices and on the older XM70 Low Latency Messaging (LLM) Appliance.
Integration Designer
Integration Designer is part of the new IBM Business Process Manager platform Version 7.5. Formerly known as IBM WebSphere Integration Developer, Integration Designer is now shipped as part of the IBM Business Process Manager Advanced configuration authoring environment.
Integration Designer is an Eclipse-based design tool you use to visually construct business process execution language (BPEL) processes, data transformations, services, and integrations with other applications and back-end systems. The Integration Designer tool achieves these design capabilities through the use of a comprehensive set of adapters.
New Integration Designer functionality
Integration Designer provides a new WebSphere DataPower capability that the solution designer uses to create interfaces such as Web Services Description Language documents (WSDLs), data types such as business objects (BOs), and XML maps that use a graphical user interface.
A key part of this new capability is the DataPower appliances view, in which connections to WebSphere DataPower SOA appliances are configured and managed. The designer uses this view to transfer files to and from appliances and to access the web management interfaces of the devices.
2 Integrating IBM Integration Designer with IBM WebSphere DataPower SOA Appliances
Installation and configuration of Integration Designer
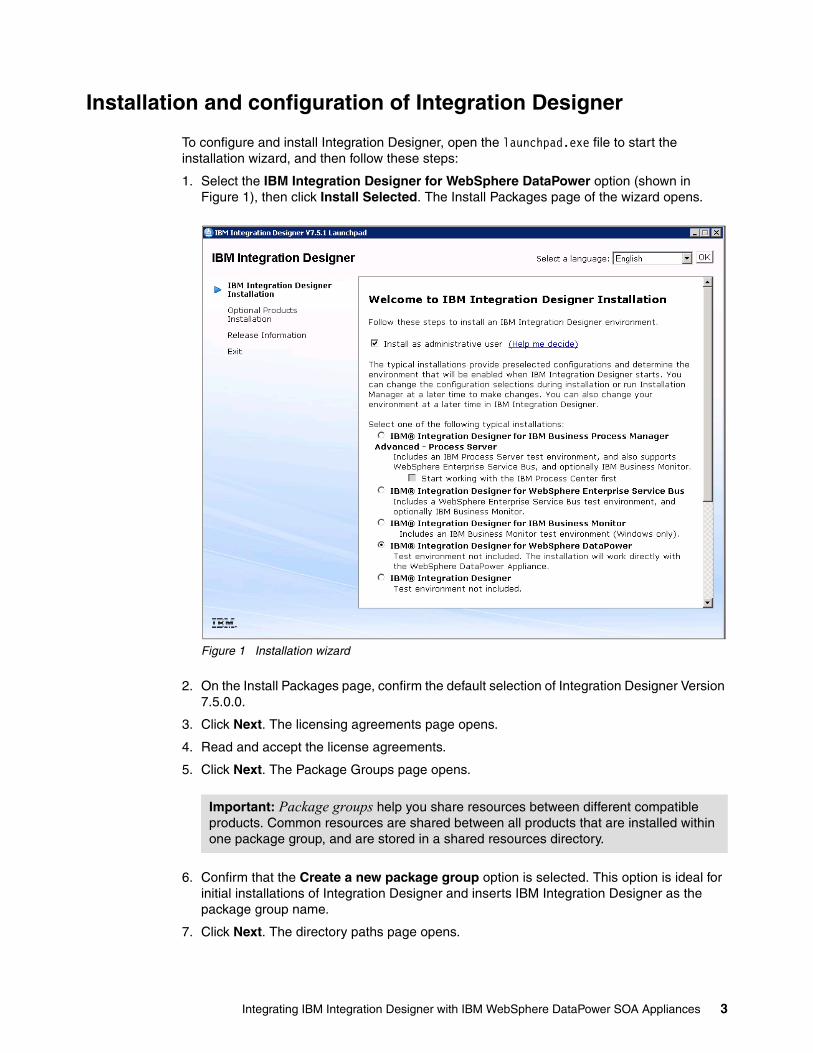
To configure and install Integration Designer, open the launchpad.exe file to start the installation wizard, and then follow these steps:
1. Select the IBM Integration Designer for WebSphere DataPower option (shown in Figure 1), then click Install Selected. The Install Packages page of the wizard opens.
Figure 1 Installation wizard
2. On the Install Packages page, confirm the default selection of Integration Designer Version 7.5.0.0.
3. Click Next. The licensing agreements page opens.
4. Read and accept the license agreements.
5. Click Next. The Package Groups page opens.
6. Confirm that the Create a new package group option is selected. This option is ideal for initial installations of Integration Designer and inserts IBM Integration Designer as the package group name.
7. Click Next. The directory paths page opens.
Important: Package groups help you share resources between different compatible products. Common resources are shared between all products that are installed within one package group, and are stored in a shared resources directory.
Integrating IBM Integration Designer with IBM WebSphere DataPower SOA Appliances 3

8. Confirm the directory paths match the following paths:
– The default path to the shared directory for common artifacts is C:/IBM/SDPShared.
– Enter an installation path. Select a relatively short path, such as C:/IBM/ID75, to avoid potential conflicts with the path length limitations of Windows operating systems.
9. Click Next.
10.Accept the remaining default options by continuing to click Next on each page of the installation wizard until you reach the Summary page.
11.On the Summary page, click Install.
IBM Installation Manager installs Integration Designer for WebSphere DataPower according to the configuration options you selected in the wizard. The first time you start Integration Designer, you are prompted to designate a workspace location for Integration Designer to store the files it generates.
Integration Designer opens with the default view displayed. Unless otherwise noted, the default view is the starting point for all Integration Designer instructions provided in this paper.
Configuration of the WebSphere DataPower SOA Appliance
With Integration Designer successfully installed, configuring the WebSphere DataPower SOA Appliance is the next step.
XML Management Interface
A WebSphere DataPower SOA Appliance is configured and managed through the XML Management Interface. Administrators use this interface to send status and configuration requests through a standard SOAP interface that uses SOAP messages. Managing files also are used through the use of SOAP calls. Developers can upload WSDLs or Extensible Stylesheet Language Transformations (XSLTs) and deploy them to services that run on the SOA Appliance.
The XML Management Interface requires the HTTPS protocol for all communication. By default, the interface acts as a Secure Sockets Layer (SSL) server and uses the default system keys included with the SOA Appliance. These keys are the same as the keys used for the WebGUI and Secure Shell (SSH) interface, but administrators can employ their own keys.
For more information about the XML Management Interface, see the IBM Redpaper publication WebSphere DataPower SOA Appliance: The XML Management Interface, REDP-4446, which is available at this website:
http://www.redbooks.ibm.com/abstracts/redp4446.html
Preferences and settings
The XML Management Interface of a DataPower device is enabled from the WebGUI or the command-line interface (CLI).
Using the WebGUITo enable the XML Management Interface from the WebGUI, follow these steps:
1. Using an administrator account, log on to the default domain on the DataPower device.
4 Integrating IBM Integration Designer with IBM WebSphere DataPower SOA Appliances

2. Select Network Management XML Management Interface. A configuration window opens, as shown in Figure 2.
Figure 2 Configuration window for the XML Management Interface
3. Set the Local IP Address (or use an alias) for the interface.
4. Set the Port Number on which you want the interface to run.
5. Edit the Access Control List (ACL), or create an ACL, to prevent unauthorized access to the XML Management Interface by following these steps:
a. Click [...]. The pre-configured Access Control List opens.
b. Set the Administrative State to enabled.
c. Click Entry.
d. Set the ACL to allow or deny specific IP Address ranges. The IP address format must be in slash notation; for example, 1.2.3.4/24 if your subnet mask is 255.255.255.0 or /32 for a single client.
Important: The pre-configured Access Control List is not available in older firmware versions, which instead show a + (plus sign) that is used to create a list.
Click + (plus sign) if it is present, enter a name for your ACL (for example, MyACL), and proceed to the next step.
Integrating IBM Integration Designer with IBM WebSphere DataPower SOA Appliances 5
e. Click Apply. The IP Address entry now is displayed in the list.
f. Repeat steps d - e for as many IP Address range entries as are needed.
6. Under Enabled Services, select the SOAP Configuration Management and AMP Endpoint check boxes.
7. Click Apply to finalize your settings.
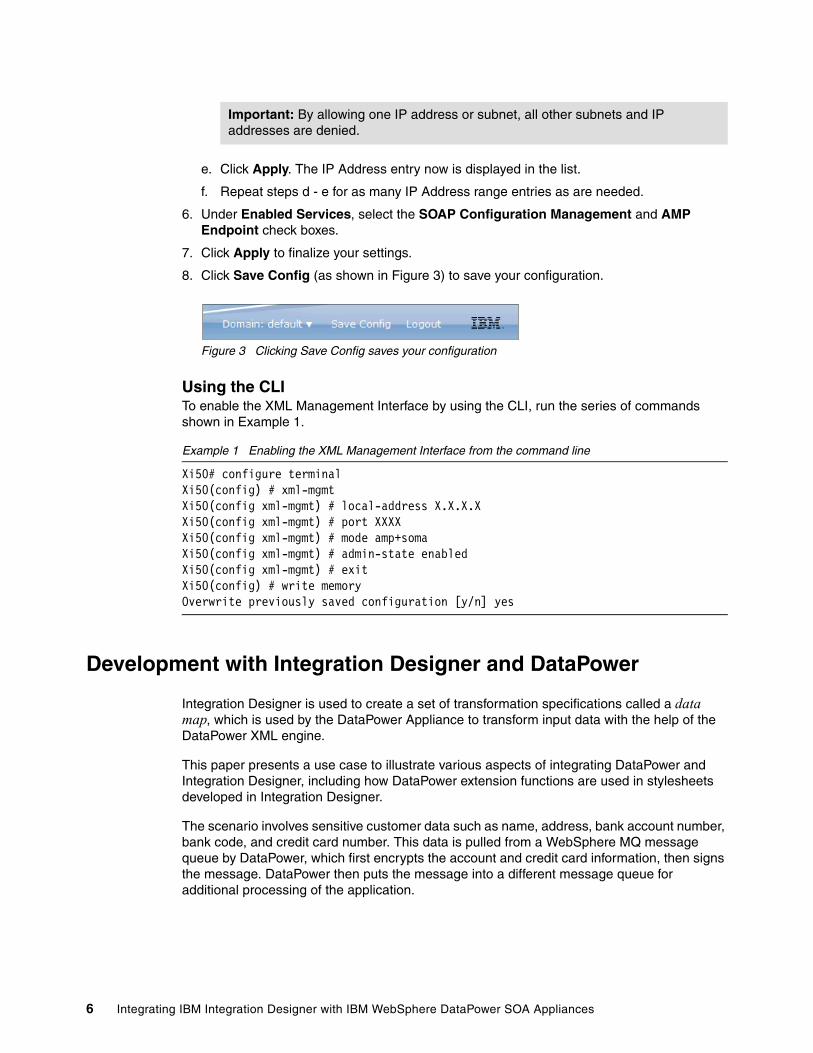
8. Click Save Config (as shown in Figure 3) to save your configuration.
Figure 3 Clicking Save Config saves your configuration
Using the CLITo enable the XML Management Interface by using the CLI, run the series of commands shown in Example 1.
Example 1 Enabling the XML Management Interface from the command line
Xi50# configure terminalXi50(config) # xml-mgmtXi50(config xml-mgmt) # local-address X.X.X.XXi50(config xml-mgmt) # port XXXXXi50(config xml-mgmt) # mode amp+somaXi50(config xml-mgmt) # admin-state enabledXi50(config xml-mgmt) # exitXi50(config) # write memoryOverwrite previously saved configuration [y/n] yes
Development with Integration Designer and DataPower
Integration Designer is used to create a set of transformation specifications called a data map, which is used by the DataPower Appliance to transform input data with the help of the DataPower XML engine.
This paper presents a use case to illustrate various aspects of integrating DataPower and Integration Designer, including how DataPower extension functions are used in stylesheets developed in Integration Designer.
The scenario involves sensitive customer data such as name, address, bank account number, bank code, and credit card number. This data is pulled from a WebSphere MQ message queue by DataPower, which first encrypts the account and credit card information, then signs the message. DataPower then puts the message into a different message queue for additional processing of the application.
Important: By allowing one IP address or subnet, all other subnets and IP addresses are denied.
6 Integrating IBM Integration Designer with IBM WebSphere DataPower SOA Appliances
Creating a data map
To create a data map by using Integration Designer, you first create a DataPower Library to store the artifacts (such as business objects or interfaces) that are deployed to an appliance to help process XML messages. Then you create a business object to designate the data that is delivered as input to the data map. Then you build the data map.
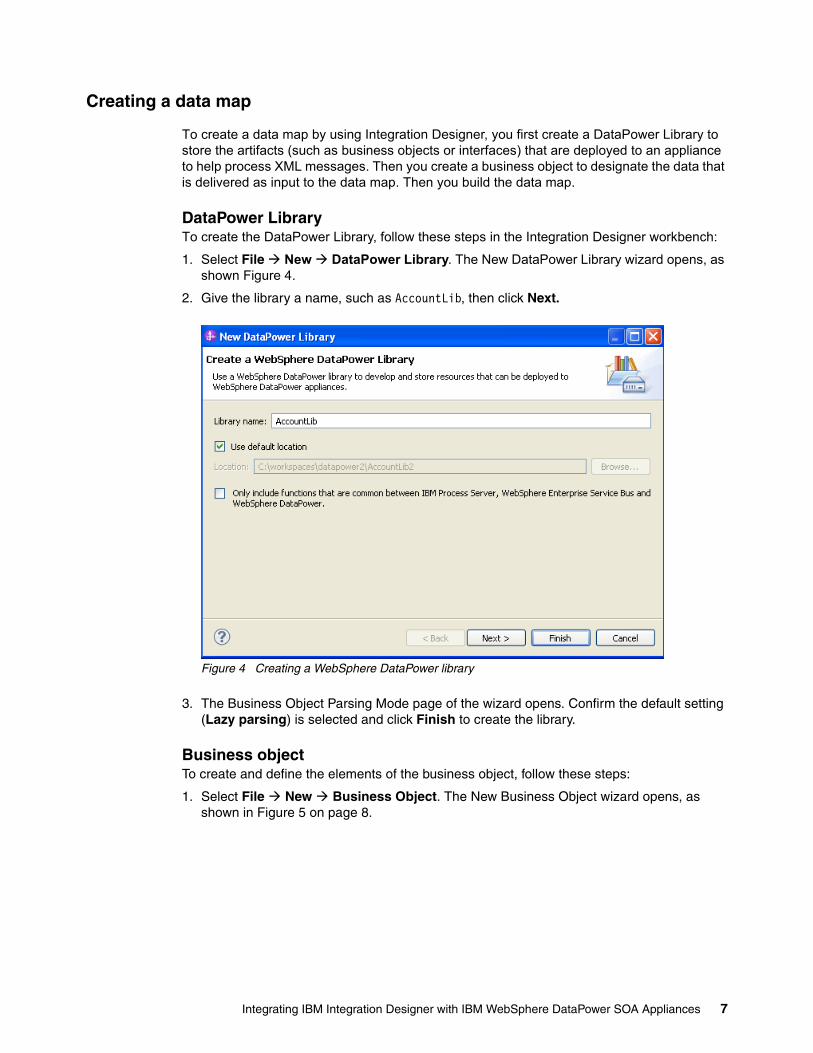
DataPower LibraryTo create the DataPower Library, follow these steps in the Integration Designer workbench:
1. Select File New DataPower Library. The New DataPower Library wizard opens, as shown Figure 4.
2. Give the library a name, such as AccountLib, then click Next.
Figure 4 Creating a WebSphere DataPower library
3. The Business Object Parsing Mode page of the wizard opens. Confirm the default setting (Lazy parsing) is selected and click Finish to create the library.
Business objectTo create and define the elements of the business object, follow these steps:
1. Select File New Business Object. The New Business Object wizard opens, as shown in Figure 5 on page 8.
Integrating IBM Integration Designer with IBM WebSphere DataPower SOA Appliances 7

Figure 5 Creating a business object
a. Give the object a name, such as customerData.
b. Select the Create the business object as an element check box. You can create a test XML stylesheet by first creating the object as an element.
c. Click Finish to initiate creation of the object (the default selections on the ensuing pages of the wizard are sufficient to create the object). The New Business Object wizard closes and the Business Object view of the new customerData object opens.
2. In the Business Object view, follow these steps to populate the customerData object with the elements shown in Figure 6:
a. Select the customerData business object.
b. Click the Add a field to a business object icon. An empty element is displayed in the business object.
c. Name the first element firstname, as shown in Figure 6.
d. Repeat steps a - c for the rest of the elements of the object, matching the names provided in Figure 6.
e. Select File Save to save the populated business object.
Figure 6 Business object elements
8 Integrating IBM Integration Designer with IBM WebSphere DataPower SOA Appliances

Data mapThe data map is used to define the input and output information flow and encrypt the most sensitive elements of the customerData object: AcctNumber, BankCodeNumber, and CCNumber.
To create the map, follow these steps:
1. Select File New Data Map to start the New Data Map wizard, as shown in Figure 7.
Figure 7 New Data Map window
Follow these steps:
a. Specify the library associated with the data map, in this case, AccountLib.
b. Enter a name for the data map, such as encryptionMap.
c. Click Next.
2. The next wizard page is where you define the input and output data for the map. Follow these steps:
a. Click Add. The Data Type Selection window opens (Figure 8 on page 10) in which you can filter the existing data types.
Integrating IBM Integration Designer with IBM WebSphere DataPower SOA Appliances 9

Figure 8 Data Type Selection window
b. Type customer in the Filter by type, namespace, or file field. Entering this information finds all data types whose name includes the word customer.
c. Select customerData from the Matching data types field.
d. Click OK. The customerData object is added as input.
3. Repeat steps 2a - 2d to add the customerData object as output.
4. Click Finish to complete the map creation process and close the wizard.
After completing the New Data Map wizard, the Data Map window opens to display the new data map, as shown in Figure 9 on page 11. The input data is displayed on the left side of the window; the output data is on the right side.
10 Integrating IBM Integration Designer with IBM WebSphere DataPower SOA Appliances

Figure 9 The encryption map
The firstname, name, Street, and City elements are to be moved 1:1, without encryption, from input to output. To map this action, complete these steps in the Data Map window:
1. Hover your cursor over the first element on the input side (firstname). A handle is displayed to the right of the element.
2. Click and drag the handle to create a transformation that connects the input element to its corresponding element on the output side. By default, this transformation is a Move transformation, meaning the data is unchanged when moved from input to output.
3. Repeat steps 1- 2 for the name, Street, and City elements.
The AcctNumber, BankCodeNumber, and CCNumber elements are encrypted by using the dp:encrypt-string function. To map this transformation, complete these steps in the Data Map window:
1. Hover your cursor over the AcctNumber element to make the handle appear.
2. Click and drag the handle to connect the input element to its corresponding element on the output side. A Move transformation is displayed between the elements.
3. Click the small triangle beside Move. The Transformations list opens.
4. Expand Cryptographic Functions and select the dp:encrypt-string function. Selecting this function establishes that the data associated with the AcctNumber element is encrypted as it is moved.
Repeat steps 1- 4 for the BankCodeNumber and CCNumber elements.
After the data map is updated to show the correct transformations between the input and output elements, the properties for the encryption transformations must be set.
To modify the properties, complete these steps in the Data Map window:
1. Click the dp:encrypt-string transformation for the CCNumber element to select it.
2. Open the data map Properties view by clicking the Properties tab in the bottom pane of the window, as shown in Figure 10 on page 12. If the Properties view is not available, select Window Show View Properties.
Integrating IBM Integration Designer with IBM WebSphere DataPower SOA Appliances 11

3. Set the properties for the CCNumber element as shown in Table 1.
Table 1 Encryption properties for CCNumber element
4. Repeat steps 1- 3 for the AcctNumber and BankCodeNumber elements. Use the same values as shown in Table 1, except for the text value, which must be modified to match the name of the element; for example, $AcctNumber and $BankCodeNumber.
These examples use an AES 256-bit key. A full list of available encryption algorithms are found in the DataPower Information Center at the following website:
http://publib.boulder.ibm.com/infocenter/wsdatap/4mt/index.jsp
Figure 10 The Properties view showing encryption properties for CCNumber
When completed, the data map and business object files must be transferred to the DataPower Appliance. This process is explained in “Transferring files to and from a DataPower Appliance” on page 16.
Publishing files to the WebSphere DataPower SOA Appliance
After you develop resources for WebSphere DataPower appliances, you can use the DataPower appliances view to connect to the appliances and publish the files to them. You can also download artifacts from your appliance to Integration Designer to modify them.
Accessing the DataPower Appliances view
To go to the DataPower Appliances view, select Window Show View DataPower Appliances.
Name Type Value
algorithm xs:string 'http://www.w3.org/2001/04/xmlenc#aes256-cbc'
key xs:string 'name:sensitiveDataKey'
text xs:string $CCNumber
Important: The prefix name: must be present before the actual key name. The name of the key must match what is configured in DataPower, or the data map does not work with DataPower appliances.
12 Integrating IBM Integration Designer with IBM WebSphere DataPower SOA Appliances
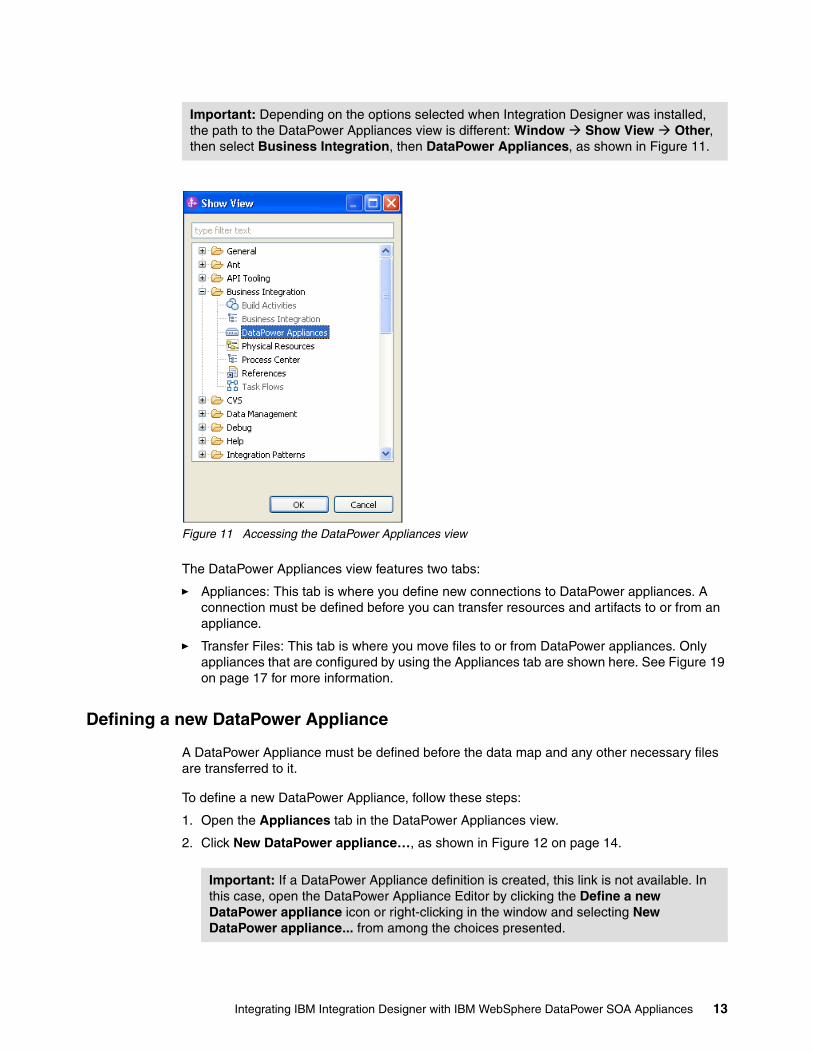
Figure 11 Accessing the DataPower Appliances view
The DataPower Appliances view features two tabs:
� Appliances: This tab is where you define new connections to DataPower appliances. A connection must be defined before you can transfer resources and artifacts to or from an appliance.
� Transfer Files: This tab is where you move files to or from DataPower appliances. Only appliances that are configured by using the Appliances tab are shown here. See Figure 19 on page 17 for more information.
Defining a new DataPower Appliance
A DataPower Appliance must be defined before the data map and any other necessary files are transferred to it.
To define a new DataPower Appliance, follow these steps:
1. Open the Appliances tab in the DataPower Appliances view.
2. Click New DataPower appliance…, as shown in Figure 12 on page 14.
Important: Depending on the options selected when Integration Designer was installed, the path to the DataPower Appliances view is different: Window Show View Other, then select Business Integration, then DataPower Appliances, as shown in Figure 11.
Important: If a DataPower Appliance definition is created, this link is not available. In this case, open the DataPower Appliance Editor by clicking the Define a new DataPower appliance icon or right-clicking in the window and selecting New DataPower appliance... from among the choices presented.
Integrating IBM Integration Designer with IBM WebSphere DataPower SOA Appliances 13

Figure 12 Defining a new DataPower Appliance
3. The DataPower Appliance Editor in which you create the definition is shown Figure 13. Define the appliance by completing the fields in the DataPower Appliance Editor, as shown in Figure 13.
Figure 13 The DataPower Appliance Editor
4. Test the new definition by clicking Test the connection.
Communication with a DataPower Appliance requires an SSL connection, with an appropriate security certificate stored in the Integration Designer truststore. The first time you attempt to connect to a DataPower Appliance, you are asked whether to trust the certificate sent by the appliance (as shown in Figure 14 on page 15). Click Trust Certificate to save the incoming signer certificate in the default truststore (<ID_install_root>\jdk\jre\lib\security\cacerts).
14 Integrating IBM Integration Designer with IBM WebSphere DataPower SOA Appliances

Figure 14 The Trust Certificate window is displayed when an appliance is first contacted
At the time of this writing, there is no way to manage or delete a certificate in the truststore. To delete a certificate manually, use the iKeyman utility that is provided with IBM Java Virtual Machine.
If the certificate on the DataPower Appliance is changed, the next connection attempt fails. In this case, the Trust Certificate window is displayed and a new certificate is saved to the truststore.
5. If the connection is successful, the window shown in Figure 15 opens.
Figure 15 Notification of a successful connection to a DataPower appliance
If the connection fails, the window shown in Figure 16 is displayed and presents suggested steps to resolve the problem. In particular, check the setting of the connection and the availability of the appliance.
Figure 16 Notification of a failed connection to a DataPower appliance
Integrating IBM Integration Designer with IBM WebSphere DataPower SOA Appliances 15

After the new appliance definition is created and successfully tested, it is displayed in the list of appliances on the Appliances tab. The definition also shows a version number in the Firmware Version column, as shown in Figure 17. If no firmware version is displayed, an initial successful connection to the DataPower Appliance is not made.
Figure 17 The Appliances tab showing a successful appliance definition
Transferring files to and from a DataPower Appliance
The Transfer Files tab in the DataPower Appliances view offers the ability to send and receive artifacts to and from a DataPower Appliance. To send and receive artifacts, they must be available in a DataPower Library (see “DataPower Library” on page 7), and a DataPower Appliance must be defined as described in “Defining a new DataPower Appliance” on page 13.
The following numbers correspond to the numbers in Figure 18:
Figure 18 The Transfer Files tab in the DataPower Appliances view
1. IBM Integration Designer:
Use the DataPower library list to select the library where your artifacts are found, or where you want downloaded files to be stored. Files and folders can be transferred only from a DataPower library; at the time of this writing, other modules are not supported as file transfer sources.
If a new library is needed, such as when downloading artifacts you did not work with previously, click New Library to create a library in the Integration Designer workspace.
2. Transfer Directory (Integration Designer):
The contents of the selected DataPower Library are displayed here. Use the icons at the top of the display to browse to the appropriate file or folder (or create a folder), then click Transfer > or Transfer All >> to move files in either direction.
1
2
3
4
16 Integrating IBM Integration Designer with IBM WebSphere DataPower SOA Appliances

3. WebSphere DataPower Appliance:
Use the Appliance list to select the appliance where you want artifacts to be uploaded or downloaded. If no appliance definitions were created, the Appliance list is empty.
4. Transfer Directory (WebSphere DataPower Appliance):
The artifacts associated with the selected DataPower Appliance are displayed here. Use the icons at the top of the display to browse to the appropriate file or folder (or create a folder), then click Transfer > or Transfer All >> to move files in either direction.
To transfer files, such as the data map and business object, to your DataPower Appliance, complete these steps:
1. Access the DataPower Appliances view.
2. Select the Transfer Files tab (see Figure 19).
3. Use the lists under WebSphere DataPower Appliance to select the DataPower Appliance to which the files are transferred.
4. Use the Transfer Directory under IBM Integration Designer to select the files to be transferred. In this example, the files are customerData.xsd and encryptionMap.xsl.
5. Click Transfer > to upload the selected files. Multiple selections are allowed.
Figure 19 Transferring files to an appliance from the DataPower Appliances view
File namingFile transfers between Integration Designer and DataPower appliances require that the asset names comply with common naming conventions. File and directory names can contain any of the following characters:
� all alphanumeric characters� underscore (_)� hyphen (-)� period (.)
Asset names cannot contain two consecutive periods (..).
Integrating IBM Integration Designer with IBM WebSphere DataPower SOA Appliances 17
For more information about the naming requirements of files, see Appendix A of the IBM WebSphere DataPower SOA Appliance Handbook, which is available at this website:
http://www.ibmpressbooks.com/bookstore/product.asp?isbn=9780137148196
Keep file and folder names as short as possible because the full name of the asset combines the name of the file or folder and the path to it. The following limitations must be considered:
� Base file name: Maximum of 128 characters� Maximum length (if subdirectories are supported): 4000 characters� Maximum length (if subdirectories are not supported): 4128 characters
File validationBefore uploading artifacts (such as transformation files) to an appliance, check the displayed list of files for error markers. If needed, IBM Integration Designer provides an XML Mapping validator to help identify problems in the transformations within a file.
The validator also checks the implemented transformations of the file against the firmware version of the DataPower Appliance. Only Version 3.8.2 or later of the XI50 Appliance firmware supports XML Mapping transformations. Files with transformations or functions not supported by the available firmware version are not uploaded to the appliance.
Configuring a service on the WebSphere DataPower SOA Appliance
With the files published to the DataPower Appliance, you can configure a service that uses the stylesheet that was developed in Integration Designer.
Creating the Multi-Protocol Gateway
To create the Multi-Protocol Gateway, complete these steps:
1. Log in to the DataPower Appliance by using the WebGUI. Select the application domain in which you want the service to run. In our case, the domain is called WID_DP.
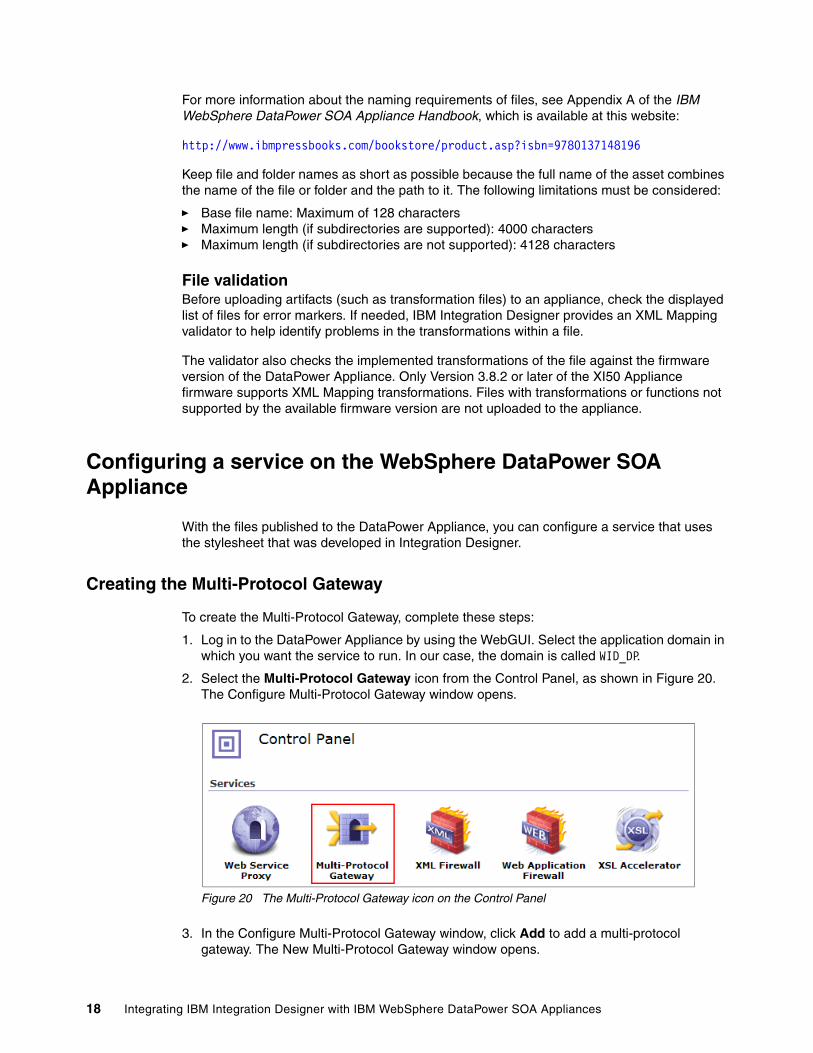
2. Select the Multi-Protocol Gateway icon from the Control Panel, as shown in Figure 20. The Configure Multi-Protocol Gateway window opens.
Figure 20 The Multi-Protocol Gateway icon on the Control Panel
3. In the Configure Multi-Protocol Gateway window, click Add to add a multi-protocol gateway. The New Multi-Protocol Gateway window opens.
18 Integrating IBM Integration Designer with IBM WebSphere DataPower SOA Appliances

4. In the New Multi-Protocol Gateway window, specify a name for the service, such as MQ2MQ, in the Multi-Protocol Gateway Name field.
5. Configure the gateway according to the steps outlined in “Configuring the Multi-Protocol Gateway” on page 19.
6. Click Apply to save your settings for the Multi-Protocol Gateway.
Configuring the Multi-Protocol Gateway
In configuring the gateway, three specific settings are critical: the Multi-Protocol Gateway Policy, the front-side settings, and the back-side settings.
Multi-Protocol Gateway PolicyTo add a multi-protocol gateway policy, follow these steps:
1. On the Configure Multi-Protocol Gateway window, click + (plus sign) beside the Multi-Protocol Gateway Policy drop-down list, as shown in Figure 21.
Figure 21 The + (plus sign) beside the Multi-Protocol Gateway Policy list
The Configure Multi-Protocol Gateway Style Policy window opens.
2. On the Configure Multi-Protocol Gateway Style Policy window (see Figure 22), specify a name for the policy, such as WID_MPGW, in the Policy Name field and click Apply Policy.
Figure 22 The Configure Multi-Protocol Gateway Style Policy window
Integrating IBM Integration Designer with IBM WebSphere DataPower SOA Appliances 19

After the policy is created, you must create and configure a policy rule for the client-to-server request. Here you use the previously developed stylesheet for our use case scenario, so that incoming messages are encrypted and signed.
To configure the policy rule, follow these steps:
1. In the Rule portion of the Configure Multi-Protocol Gateway Style Policy window, click New Rule. A rule is generated with a name that consists of the policy name, the text string rule, and the number of the rule, as shown in Figure 23.
Figure 23 After choosing the rule direction, a small Match icon is displayed in the window
2. In the Rule Direction list, select Client to Server.
3. You use the Match icon ( ) to configure the matching rule.
The matching rule specifies the matching type and URL for incoming requests. In our scenario, we use a wildcard character to match all possible URLs, so any incoming request are handled by this rule.
Double-click the Match icon. The Configure a Match Action window opens, as shown in Figure 24.
Figure 24 The Configure a Match Action window
4. In the Configure a Match Action window, click + (plus sign) to create a match rule, as shown Figure 24. The Configure Matching Rule window opens, which features two tabs, Main and Matching Rule.
5. On the Main tab of the Configure Matching Rule window (see Figure 25 on page 21), specify the name of the matching rule, such as match_all.
20 Integrating IBM Integration Designer with IBM WebSphere DataPower SOA Appliances
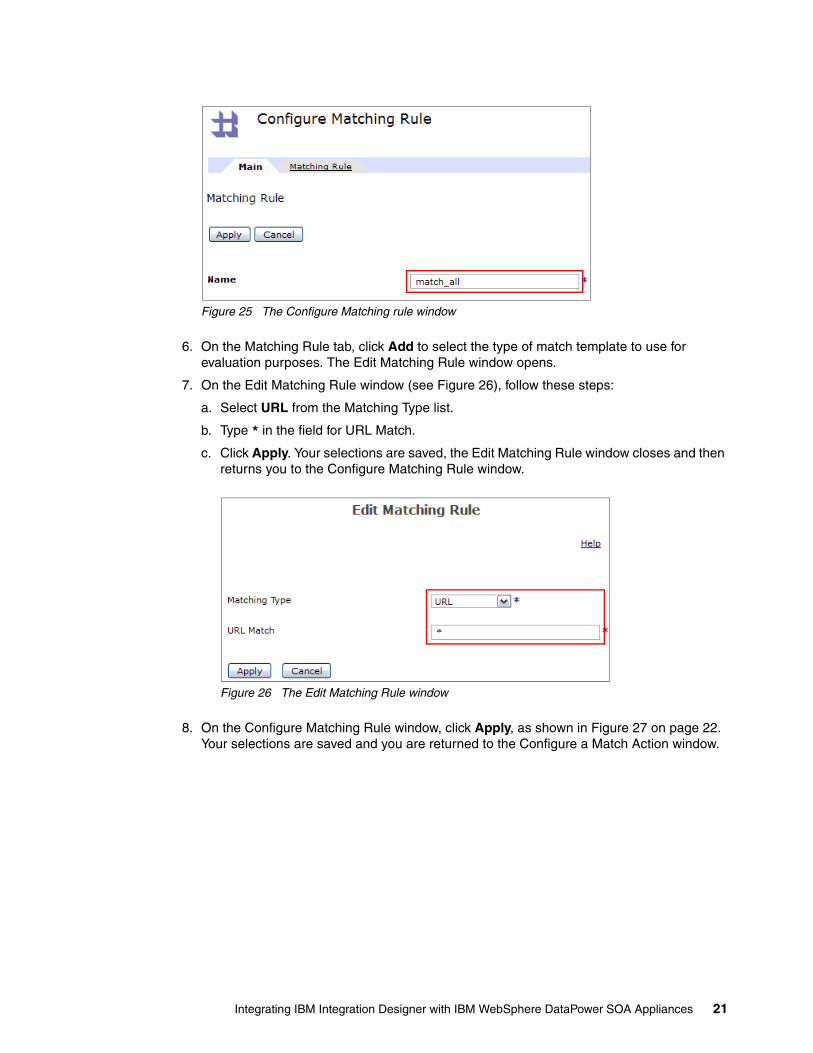
Figure 25 The Configure Matching rule window
6. On the Matching Rule tab, click Add to select the type of match template to use for evaluation purposes. The Edit Matching Rule window opens.
7. On the Edit Matching Rule window (see Figure 26), follow these steps:
a. Select URL from the Matching Type list.
b. Type * in the field for URL Match.
c. Click Apply. Your selections are saved, the Edit Matching Rule window closes and then returns you to the Configure Matching Rule window.
Figure 26 The Edit Matching Rule window
8. On the Configure Matching Rule window, click Apply, as shown in Figure 27 on page 22. Your selections are saved and you are returned to the Configure a Match Action window.
Integrating IBM Integration Designer with IBM WebSphere DataPower SOA Appliances 21

Figure 27 The Matching Rule tab on the Configure Matching Rule window
9. On the Configure a Match Action window, click Done to save your match action settings, as shown in Figure 28. This action closes the Configure a Match Action window and returns you to the Rule portion of the Configure Multi-Protocol Gateway Style Policy window.
Figure 28 Saving your match action settings on the Configure a Match Action window
10.On the Configure Multi-Protocol Gateway Style Policy window, click and drag the Transform Action icon and place it to the right of the Match icon on the policy line, as shown in Figure 29.
Figure 29 The Transform Action icon on the Configure Multi-Protocol Gateway Style Policy window
22 Integrating IBM Integration Designer with IBM WebSphere DataPower SOA Appliances

11.Double-click the Transform Action icon to open the Configure Transform Action window.
12.On the Basic tab of the Configure Transform Action window (as shown in Figure 30), follow these steps:
a. In the Input field, use the list to select INPUT.
b. Select Use XSLT specified in this action.
c. In the Processing Control File list, select the encryptionMap.xsl stylesheet file that was generated during the data map creation process and imported into the local:/// folder.
d. In the Output field, use the list to select PIPE.
e. Leave the default selections for all other fields.
Figure 30 Selecting the stylesheet from the list on the Configure Transform Action window
f. Click Done. The Configure Transform Action window closes and returns you to the Rule portion of the Configure Multi-Protocol Gateway Style Policy window.
13.On the Configure Multi-Protocol Gateway Style window, click and drag the Sign icon and place it to the right of the Transform Action icon on the policy line, as shown in Figure 31 on page 24.
Integrating IBM Integration Designer with IBM WebSphere DataPower SOA Appliances 23

Figure 31 The Sign icon on the Configure Multi-Protocol Gateway Style Policy window
14.Double-click the Sign icon to open the Configure Sign Action window (see Figure 32). On the Configure Sign Action window, follow these steps:
a. For this example, choose Enveloped Method for the Envelope Method and Raw XML Document, including SAML for Enveloped for the Message Type, as shown in Figure 32.
Figure 32 Selecting the Envelope Method and Message Type on the Configure Sign Action window
b. From the lists, select SignKey for the Key and SignCert for the Certificate, as shown in Figure 33.
Figure 33 Choosing the encryption key and certificate on the Configure Sign Action window
However, if the key and certificate objects on your DataPower Appliance are not configured, they must be configured now. Follow these steps:
a. Click + (plus sign) beside the Key field in the Configure Sign Action window to open the Configure Crypto Key window.
b. In the Configure Crypto Key window, enter a name for the key object, such as SignKey.
24 Integrating IBM Integration Designer with IBM WebSphere DataPower SOA Appliances

c. Under File Name, select either the existing private key or click Upload to open a window to upload the key to the cert:/// directory. In our use case scenario, we used a new private key and so must upload it by using these steps:
i. Browse to find your private key on your local device and click Open. In our case, the file is named sensitiveDataKey-privkey.pem.
ii. Click Upload to transfer the file to the appliance. If the upload is successful, a notification is displayed.
iii. Click Continue to close the window and return to the Configure Crypto Key window.
d. On the Configure Crypto Key window, specify the password if your key requires one. In our scenario, the key does not have a password.
e. Click Apply to confirm your changes and to return to the Configure Sign Action window.
f. Repeat these steps to configure the certificate. In our case, the certificate is named sensitiveDataKey-sscert.pem.
15.On the Configure Sign Action window, click XPath Tool to open the Build XPath Expression window. You open this window to generate an XPath expression that identifies the elements on which to sign, as shown in Figure 34. The XPath Tool option is only available if you selected the specific Envelope Method and Message Type shown in Figure 32 on page 24.
Figure 34 Click XPath Tool to begin building the necessary XPath expression
16.In the Build XPath Expression from sample XML file window (see Figure 35), complete the following steps:
a. Use the list to select the sample.xml file, which was previously imported into the local:/// folder. If the file is not yet available, click Upload to upload your sample request to the DataPower Appliance.
b. Set the Namespace Handling value to uri, as shown in Figure 35. This option designates how DataPower handles the namespaces in the XPath expression. By setting this option to uri, DataPower checks the namespace uri of the element and the local name.
Figure 35 The Build XPath Expression window
Integrating IBM Integration Designer with IBM WebSphere DataPower SOA Appliances 25
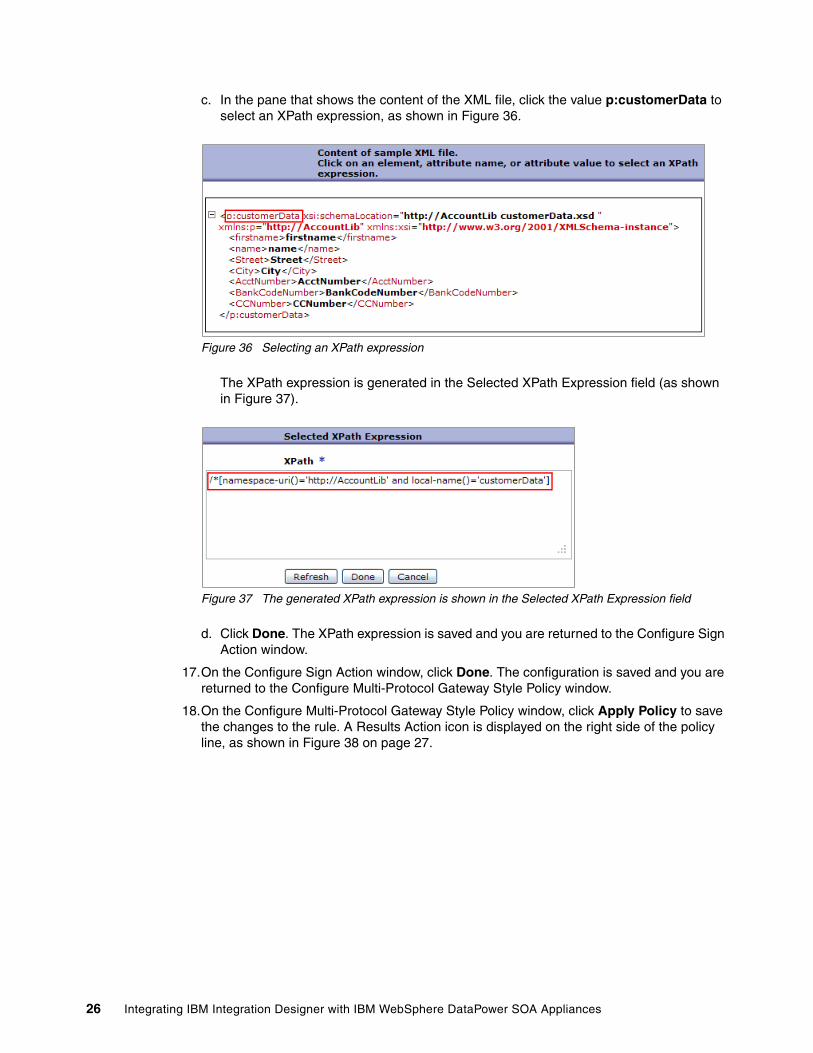
c. In the pane that shows the content of the XML file, click the value p:customerData to select an XPath expression, as shown in Figure 36.
Figure 36 Selecting an XPath expression
The XPath expression is generated in the Selected XPath Expression field (as shown in Figure 37).
Figure 37 The generated XPath expression is shown in the Selected XPath Expression field
d. Click Done. The XPath expression is saved and you are returned to the Configure Sign Action window.
17.On the Configure Sign Action window, click Done. The configuration is saved and you are returned to the Configure Multi-Protocol Gateway Style Policy window.
18.On the Configure Multi-Protocol Gateway Style Policy window, click Apply Policy to save the changes to the rule. A Results Action icon is displayed on the right side of the policy line, as shown in Figure 38 on page 27.
26 Integrating IBM Integration Designer with IBM WebSphere DataPower SOA Appliances

Figure 38 The Processing Policy window after the appearance of the Results Action icon
Next you must create and configure a policy rule action for the server-to-client response, just as you did for the client-to-server action. Follow these steps:
1. From the Processing Policy window, select New Rule to create a policy rule. A rule name is generated, consisting of the policy name, the text string rule, and the number of the rule, as shown in Figure 39.
Figure 39 After choosing the rule direction, a small Match icon is displayed in the window
2. In the Rule Direction list, select Server to Client.
3. The match rule determines whether an incoming request is accepted. If the request is accepted, the match rule determines the processing policy that handles the request.
Integrating IBM Integration Designer with IBM WebSphere DataPower SOA Appliances 27

On the Configure Multi-Protocol Gateway Style Policy window, double-click the Match icon. The Configure a Match Action window opens, which features two tabs, Main and Matching Rule.
4. From the list, select the match_all rule (see Figure 40) that you defined during the client-to-server configuration process.
Figure 40 Selecting the defined match_all rule on the Configure a Match Action window
5. Click Done. The server-to-client match action settings are saved and you are returned to the Processing Policy window.
6. On the Processing Policy window, click Apply Policy to save your server-to-client policy rule. A Results Action icon is displayed on the right side of the policy line, as shown in Figure 41 on page 29.
7. Close the Processing Policy window by clicking Close Window in the upper-right corner, as shown in Figure 41 on page 29.
28 Integrating IBM Integration Designer with IBM WebSphere DataPower SOA Appliances

Figure 41 Closing the Processing Policy window
You are now at the Configure Multi-Protocol Gateway window.
Front-side and back-side settingsWith the processing policy rules established for both the client-to-server and server-to-client paths, the settings of the front-side and back-side handlers to manage client connections to the Multi-Protocol Gateway must be configured.
Front-side handlerTo create and configure the front-side handler, follow these steps:
1. On the Configure Multi-Protocol Gateway page, in Front side settings window, click + (plus sign) to add a Front Side Protocol. A list of options is available, as shown in Figure 42 on page 30.
Integrating IBM Integration Designer with IBM WebSphere DataPower SOA Appliances 29

Figure 42 Choosing front-side handler settings
2. Select MQ Front Side Handler from the list. The Configure MQ Front Side Handler window opens.
3. Name your MQ Front Side Handler, such as MQ2MQ_FSH, in the Name field.
4. Create a WebSphere MQ queue manager that corresponds to a queue manager that runs on another host in the network. This WebSphere MQ queue manager enables the communication between the DataPower SOA device and the specified queue manager.
To create and configure a WebSphere MQ queue manager, follow these steps:
a. Click + (plus sign) beside the Queue Manager field on the Configure MQ Front Side Handler window. A list of options is shown (see Figure 43).
Figure 43 Creating a queue manager from the Configure MQ Front Side Handler window
b. Select MQ Queue Manager. The Configure MQ Queue Manager window opens.
30 Integrating IBM Integration Designer with IBM WebSphere DataPower SOA Appliances

c. On the Configure MQ Queue Manager window, specify a name for the queue manager, such as DP_WID_MQ, in the Name field, as shown in Figure 44.
Figure 44 The Configure MQ Queue Manager window
d. In the Host Name field, specify the host name or IP address and the listening port of the WebSphere MQ server where the queue manager is running. Contact your WebSphere MQ server administrator for the correct port number; the default listening port is 1414, but the listening port of the MQ server used in this scenario is 1405.
e. In the Queue Manager Name field, specify the name of the queue manager.
f. In the Channel Name field, enter the channel name if it is different from the default queue manager on the identified host. The default is SYSTEM.DEF.SVRCONN.
g. In the User Name field, specify the user name that is sent to the WebSphere MQ server to identify the DataPower client.
h. In the Maximum Message Size field, declare the allowable maximum size of messages in bytes.
i. Keep the default settings for all other fields, then click Apply to save the queue manager configuration and return to the Configure MQ Front Side Handler window.
5. On the Configure MQ Front Side Handler window, use the Get Queue field to specify the get queue, such as WID_MQ2MQ_GET, where the MQ Front Side Handler receives messages (see Figure 45 on page 32).
Integrating IBM Integration Designer with IBM WebSphere DataPower SOA Appliances 31

Figure 45 Specifying the Get Queue on the Configure MQ Front Side Handler window
6. Keep the default settings for all other fields, then click Apply. The Configure MQ Front Side Handler window closes and returns you to the Configure Multi-Protocol Gateway page.
Back-side handlerThe back-side handler is used to manage server connections to the Multi-Protocol Gateway.
DataPower provides two options to use the Type URL:
� Static-backend: The gateway sends all requests to the URL defined by the back-end URL.
� Dynamic-backend: The gateway dynamically determines the URL of the back-end server when the request is processed.
In this scenario, we use the default setting, Static Backend URL. To define the Static Backend URL, follow these steps:
1. On the Configure Multi-Protocol Gateway page, find the settings of the Back side section and click MQHelper, as shown in Figure 46. The URL Builder window opens (see Figure 47 on page 33).
Figure 46 Defining the Static Backend URL
32 Integrating IBM Integration Designer with IBM WebSphere DataPower SOA Appliances

2. On the URL Builder window, follow these steps:
a. Select the queue manager from the Queue Manager list. The manager must be the same queue manager (DP_WID_MQ) that you defined when configuring the Front-Side Handler.
b. In the RequestQueue field, specify the queue to which response messages are sent. In this scenario, the request queue is WID_PUT.
Figure 47 URL Builder window
c. Keep the default settings for all other fields, then click Build URL. The URL Builder window closes and you are returned to the Configure Multi-Protocol Gateway window.
On the Configure Multi-Protocol Gateway window, the URL that was generated is displayed in the Backend URL field:
dpmq://DP_WID_MQ/?ReplyQueue=WID_PUT
The first part of the URL, dpmq://, indicates that the service uses the WebSphere MQ protocol.
3. On the Configure Multi-Protocol Gateway window, select XML in both the Response Type and Request Type lists, as shown in Figure 48 on page 34. These selections are made because the message traffic in this scenario is formatted in XML.
Integrating IBM Integration Designer with IBM WebSphere DataPower SOA Appliances 33

Figure 48 Declare that messages are formatted in XML
4. Click Apply to save the settings for the Multi-Protocol Gateway.
We configured a service that uses the stylesheet that was developed in Integration Designer. We then uploaded to the DataPower Appliance by using the XML Management Interface, and implemented the stylesheet into a Multi-Protocol Gateway Service (MPGW) on DataPower. The MPGW takes requests out of the MQ GET queue on the WebSphere MQ server, encrypts and signs them, and puts them in the PUT queue. The service is now ready to use.
The team who wrote this paper
Rolf Wittich is a Certified IT Specialist and IBM Certified Solution Developer for DataPower. In his current role as a Support Engineer, he is part of the worldwide DataPower Level 2 Support team and located in Boeblingen, Germany. Rolf has over five years of DataPower experience and wrote the IBM Redpaper publication WebSphere DataPower SOA Appliance: The XML Management Interface, REDP-4446.
Wahe Sedrakian is a Support Engineer and IBM Certified Solution Developer for DataPower within IBM WebSphere DataPower Customer Support. He is located in Boeblingen, Germany and is a part of the worldwide DataPower Level 2 Support team. Before he started his career at IBM as a employee, he studied computer science at the University of Rostock. He completed his thesis while working in the IBM Software Lab in Boeblingen, Germany, focusing on additional utilization of the Cell Broadband Engine to increase the performance of the Data Warehouse Accelerator.
Andreas Jaensch is a Support Engineer and has six years of experience as an instructor for middleware products and operating systems at IBM. He also has six years of experience in customer support. His past positions include resolving software-related problems reported by customers by using WebSphere Integration Developer and Business Process Management.
Stefan Schwarz is a Support Engineer on the WebSphere Integration Developer and Business Process Management (BPM) team at the IBM Boeblingen Software Lab in Germany. He has six years of experience that includes areas in WebSphere, Java Runtime Environment, and Eclipse.
Now you can become a published author, too!
Here’s an opportunity to spotlight your skills, grow your career, and become a published author—all at the same time! Join an ITSO residency project and help write a book in your area of expertise, while honing your experience using leading-edge technologies. Your efforts will help to increase product acceptance and customer satisfaction, as you expand your network of technical contacts and relationships. Residencies run from two to six weeks in length, and you can participate either in person or as a remote resident working from your home base.
34 Integrating IBM Integration Designer with IBM WebSphere DataPower SOA Appliances

Obtain more information about the residency program, browse the residency index, and apply online at:
http://www.ibm.com/redbooks/residencies.html
Stay connected to IBM Redbooks
� Find us on Facebook:
http://www.facebook.com/IBMRedbooks
� Follow us on Twitter:
http://twitter.com/ibmredbooks
� Look for us on LinkedIn:
http://www.linkedin.com/groups?home=&gid=2130806
� Explore new Redbooks publications, residencies, and workshops with the IBM Redbooks weekly newsletter:
https://www.redbooks.ibm.com/Redbooks.nsf/subscribe?OpenForm
� Stay current on recent Redbooks publications with RSS Feeds:
http://www.redbooks.ibm.com/rss.html
Integrating IBM Integration Designer with IBM WebSphere DataPower SOA Appliances 35

36 Integrating IBM Integration Designer with IBM WebSphere DataPower SOA Appliances

Notices
This information was developed for products and services offered in the U.S.A.
IBM may not offer the products, services, or features discussed in this document in other countries. Consult your local IBM representative for information on the products and services currently available in your area. Any reference to an IBM product, program, or service is not intended to state or imply that only that IBM product, program, or service may be used. Any functionally equivalent product, program, or service that does not infringe any IBM intellectual property right may be used instead. However, it is the user's responsibility to evaluate and verify the operation of any non-IBM product, program, or service.
IBM may have patents or pending patent applications covering subject matter described in this document. The furnishing of this document does not grant you any license to these patents. You can send license inquiries, in writing, to: IBM Director of Licensing, IBM Corporation, North Castle Drive, Armonk, NY 10504-1785 U.S.A.
The following paragraph does not apply to the United Kingdom or any other country where such provisions are inconsistent with local law: INTERNATIONAL BUSINESS MACHINES CORPORATION PROVIDES THIS PUBLICATION “AS IS” WITHOUT WARRANTY OF ANY KIND, EITHER EXPRESS OR IMPLIED, INCLUDING, BUT NOT LIMITED TO, THE IMPLIED WARRANTIES OF NON-INFRINGEMENT, MERCHANTABILITY OR FITNESS FOR A PARTICULAR PURPOSE. Some states do not allow disclaimer of express or implied warranties in certain transactions, therefore, this statement may not apply to you.
This information could include technical inaccuracies or typographical errors. Changes are periodically made to the information herein; these changes will be incorporated in new editions of the publication. IBM may make improvements and/or changes in the product(s) and/or the program(s) described in this publication at any time without notice.
Any references in this information to non-IBM websites are provided for convenience only and do not in any manner serve as an endorsement of those websites. The materials at those websites are not part of the materials for this IBM product and use of those websites is at your own risk.
IBM may use or distribute any of the information you supply in any way it believes appropriate without incurring any obligation to you.
Any performance data contained herein was determined in a controlled environment. Therefore, the results obtained in other operating environments may vary significantly. Some measurements may have been made on development-level systems and there is no guarantee that these measurements will be the same on generally available systems. Furthermore, some measurements may have been estimated through extrapolation. Actual results may vary. Users of this document should verify the applicable data for their specific environment.
Information concerning non-IBM products was obtained from the suppliers of those products, their published announcements or other publicly available sources. IBM has not tested those products and cannot confirm the accuracy of performance, compatibility or any other claims related to non-IBM products. Questions on the capabilities of non-IBM products should be addressed to the suppliers of those products.
This information contains examples of data and reports used in daily business operations. To illustrate them as completely as possible, the examples include the names of individuals, companies, brands, and products. All of these names are fictitious and any similarity to the names and addresses used by an actual business enterprise is entirely coincidental.
COPYRIGHT LICENSE:
This information contains sample application programs in source language, which illustrate programming techniques on various operating platforms. You may copy, modify, and distribute these sample programs in any form without payment to IBM, for the purposes of developing, using, marketing or distributing application programs conforming to the application programming interface for the operating platform for which the sample programs are written. These examples have not been thoroughly tested under all conditions. IBM, therefore, cannot guarantee or imply reliability, serviceability, or function of these programs.
© Copyright International Business Machines Corporation 2012. All rights reserved.Note to U.S. Government Users Restricted Rights -- Use, duplication or disclosure restricted by GSA ADP Schedule Contract with IBM Corp. 37

®
Redpaper™
This document REDP-4882-00 was created or updated on August 16, 2012.
Send us your comments in one of the following ways:� Use the online Contact us review Redbooks form found at:
ibm.com/redbooks� Send your comments in an email to:
[email protected]� Mail your comments to:
IBM Corporation, International Technical Support OrganizationDept. HYTD Mail Station P0992455 South RoadPoughkeepsie, NY 12601-5400 U.S.A.
Trademarks
IBM, the IBM logo, and ibm.com are trademarks or registered trademarks of International Business Machines Corporation in the United States, other countries, or both. These and other IBM trademarked terms are marked on their first occurrence in this information with the appropriate symbol (® or ™), indicating US registered or common law trademarks owned by IBM at the time this information was published. Such trademarks may also be registered or common law trademarks in other countries. A current list of IBM trademarks is available on the Web at http://www.ibm.com/legal/copytrade.shtml
The following terms are trademarks of the International Business Machines Corporation in the United States, other countries, or both:
DataPower®IBM®
Redbooks®Redpaper™
Redbooks (logo) ®WebSphere®
The following terms are trademarks of other companies:
Windows, and the Windows logo are trademarks of Microsoft Corporation in the United States, other countries, or both.
Java, and all Java-based trademarks and logos are trademarks or registered trademarks of Oracle and/or its affiliates.
Cell Broadband Engine is a trademark of Sony Computer Entertainment, Inc., in the United States, other countries, or both and is used under license therefrom.
Other company, product, or service names may be trademarks or service marks of others.
38 Integrating IBM Integration Designer with IBM WebSphere DataPower SOA Appliances