Embed Size (px)
Citation preview

Instruction Manual Multi Synergic 280 - Multi Synergic 350 - Multi Synergic 400F - Multi Synergic 500- Multi Synergic 500F and Accessories
Multi Synergic 280 - Multi Synergic 350 - Multi Synergic 400F - Multi Synergic 500- Multi Synergic 500F and Accessories
This manual must be completed by the “CE Operating and service maual” Edition of 26/03/2015
Instruction Manual Multi Synergic 280 - Multi Synergic 350 - Multi Synergic 400F - Multi Synergic 500/500F and Accessories
GB
Engl
ish

Instruction Manual Multi Synergic 280 - Multi Synergic 350 - Multi Synergic 400F - Multi Synergic 500- Multi Synergic 500F and Accessories

Instruction Manual Multi Synergic 280 - Multi Synergic 350 - Multi Synergic 400F - Multi Synergic 500- Multi Synergic 500F and Accessories
INDEX
DESCRIPTION CHAP. PAGE
1. DECLARATION OF CONFORMITY 05
2. RAEE standards 06
3. Safety precautions 06
4. General description 06
5. STAND BY 07
6. VRD - VOLTAGE REDUCTION DEVICE 07
7. ALARMS AND SETTINGS 07
8. POWER SUPPLY QUALITY IN THE VOLTAGE, IN THE MISSING PHASE, 07
IN THE FREQUENCY
9. OUTPUT WELDING CONDITIONS, SHORT CIRCUIT OR WELDING OVER LIMITS 07
10. AUXILIARY ELECTRONIC WARNING AND FAILURE 08
11. WATER COOLING UNIT STATUS 08
12. COMMUNICATION WITH THE EXTERNAL WIRE FEEDER 08
13. SPECIAL FUNCTIONS 09
14. ACCESSORIES 10
16. MAIN FEATURES MULTI SYNERGIC 350 11
17. MAIN FEATURES MULTI SYNERGIC 500 12
18. MAIN FEATURES MULTI SYNERGIC 500F 13
19. FRONT PANEL FUNCTIONS AND ADJUSTMENTS 14
20. FRONT PANEL LAYOUT 15
21. MANUAL ELECTRODE SETTING. CONNECT THE WORK PIECE CABLE TO 16
THE NEGATIVE RECEPTACLE, AND THE ELECTRODE OLDER T THE POSITIVE
RECEPTACLERECEPTACLE
22. TIG SETTING. CONNECT THE GAS INPUT TO THE GAS REGULATOR AND 17
ADJUST THE GAS FLOW BETWEEN 6 TO 8 LITRES PER MINUTE. DJUST THE
GAS FLOW BETWEEN 6 TO 8 LITRES PER MINUTE
DESCRIPTION CHAP. PAGE
23. MANUAL PULS TIG SET 18
24. SYNERGIC TIG SETTING 19
25. MIG-MAG WELDING 20
26. MIG-MAG MANUAL 21
27. MIG-MAG SYNERGIC 22
28. PULS MIG SYNERGIC 23
29. PULS MIG SYNERGIC PROGRAMS 24
30. MIG SYNERGIC PROGRAMS 24
31. DIGITAL TORCH 26
32. MULTI SYNERGIC 280 SPART PARTS 27
35. MULTI SYNERGIC 280 WELDING DIAGRAM 30
36. MULTI SYNERGIC 350 SPART PARTS 31
39. MULTI SYNERGIC 350 WELDING DIAGRAM 34
40. MULTI SYNERGIC 500 SPART PARTS 35
43. MULTI SYNERGIC 500 WELDING DIAGRAM 38
44. MULTI SYNERGIC 500F SPART PARTS 39
47. MULTI SYNERGIC 500F WELDING DIAGRAM 42
48. MULTI fil MIG Remote Wire Feeder 43
49. MULTI FIL MIG WIRE FEEDER SPARE PARTS 51
50. MULTI FIL MIG WIRE FEEDER DIAGRAM 52
51. MULTI FIL MIG WIRE FEEDER SPARE PARTS - DIAGRAM 53
52. PACKED 54
53. HOW TO FIX THE TROLLEY IN THE POWER SOURCE 55
54. HOW TO FIX THE COOLER UNIT AND THE TROLLEY IN THE POWER SOURCE 56

Instruction Manual Multi Synergic 280 - Multi Synergic 350 - Multi Synergic 400F - Multi Synergic 500- Multi Synergic 500F and Accessories
1
WARNINGIMPORTANT: BEFORE STARTING THE EQUIPMENT, READ THE CONTENTS OF THIS MANUAL, WHICH MUST BE STORED IN A PLACE FAMILIAR TO ALLUSERS FOR THE ENTIRE OPERATIVE LIFE-SPAN OF THE MACHINE.THIS EQUIPMENT MUST BE USED SOLELY FOR CUTTING OPERATIONS.
INTRODUCTIONTo obtain the best performance from the machine and ensure the longest possible life of all its components you must careffully follow the instructions for use and maintenance detailed in this manual. In the interest of our customers we suggest any maintenance or repair of the equipment is made by qualified personnel. All our products are subject to a constant development. We are therefore constrained to reserve the right to make any necessary or useful changes in design and equipment.
ROUTINE MAINTENANCEPrevent metal powder from accumulating inside the equipment. Disconnect the power supply before every operation ! Carry out the following periodic controls on the power source:
• Clean the power source inside by means of low-pressure compressed air and soft bristel brushes.• Check the electric connections and all the connection cables.For the use and maintenance of the pressure reducers, consult the specific manuals.

Instruction Manual Multi Synergic 280 - Multi Synergic 350 - Multi Synergic 400F - Multi Synergic 500- Multi Synergic 500F and Accessories
5
1. DECLARATION OF CONFORMITY
TER SRL - Via Leopardi, 13 - 36030 Caldogno (VI) Italy
declares that the machines descripted in this manual must be use solely for professional purposes in an industrial environment and they are manufactured in compliance with the instructions contained in the harmonized standard:2006/95/CE (LDV) – 2004/108/CE (EMC) – 2002/95 (RoHs)and with the instructions contained in the harmonized standard, if applicable: EN 60974-1 EN 60974-2 EN 60974-3 EN 60974-5 EN 60974-7 EN 60974-10 EN 60974-12
Maurizio Terzo Direttor Generale Date 30/01/2012
IN CASE OF ANY TECHNICAL PROBLEM ASK FOR QUALIFIED SERVICE ASSISTANCE
The equipment don’t compiles with EN/ IEC 61000-3-12. The installer or the user must be sure that it can be connected to the public low voltage power line, if necessary, in consultation with the network distributor.

Instruction Manual Multi Synergic 280 - Multi Synergic 350 - Multi Synergic 400F - Multi Synergic 500- Multi Synergic 500F and Accessories
6
2. RAEE STANDARDSThe symbol on the product or on its packaging indicates that this product may not be treated as household waste. Instead it shall be handed over to the applicable collection point for the recycling of electrical and electronic equipment. By ensuring this product is disposed of correctly, you will help
prevent potential negative consequences for the environment and human health, which could otherwise be caused by inappropiate waste handling of this product. For more detailed information about recycling of this product, please contact your local city office, your household waste disposal service or the shop where you purchased the product.
3. SAFETY PRECAUTIONSWELDING AND ARC CUTTING CAN BE HARMFUL TO YOURSELF AND OTHERS. The user must therefore be educated against the hazards, summarized below, de-riving from welding operations.
RISK of FIRE and BURNSSparks (sprays) may cause fires and burn the skin; you should therefore make sure there are no flammable materials in the area, and wear appro-priate protective garments.
NOISEThis machine does not directly produce noise exceeding 80dB. The plas-ma cutting/welding procedure may produce noise levels beyond said limit; users must therefore implement all precautions required by law.
PACE MAKERThe magnetic fields created by high currents may affect the operation of pacemakers. Wearers of vital electronic equipment (pacemakers) should consult their physician before beginning any arc welding, cutting, gouging or spot welding operations.
EXPLOSIONSDo not weld in the vicinity of containers under pressure, or in the presence of explosive dust, gases or fumes. All cylinders and pressure regulators used in welding operation should be handled with care.
ELECTRIC SHOCK – May be fatalInstall and earth the welding machine according to the applicable regu-lations. Do not touch live electrical parts or eletrodes with bare skin, gloves or wet clothing.Isolate yourselves from both the earth and the workpiece. Make sure your working position is safe.
FUME and GASES – May be hazardous to your healthKeep your head away from fumes. Work in the presence of adequate ven-tilation, and use ventilators around the arc to prevent gases from forming in the work area.
ARC RAYS – May injure the eyes and burn the skinProtect yuor eyes with welding masks fitted with filtered lenses, and protect your body with appropiate safety garments.Protect others by installing adequate shields or curtains.
4. GENERAL DESCRIPTIONThis machine is a constant direct current power source, designed for welding electrically conductive materials (metals and alloys) using the electical arc procedure.

Instruction Manual Multi Synergic 280 - Multi Synergic 350 - Multi Synergic 400F - Multi Synergic 500- Multi Synergic 500F and Accessories
7
5. STAND BY
The machine stops its main functions when it is not continuosly used, in order to reduce the power consumption at 10W; the “STANDBY” icon lights. The fan works only when the machine needs to be cooled down; during light applications, the fan normally doesn’t work.
The water cooling unit, if any, works only on MIG process; at the end of the mig weld-ing process, it works for further 180 sec.
6. VRD - VOLTAGE REDUCTION DEVICE
This feature reduces the output no load voltage <25V.It increases the safety conditions of the operator: the no load volt-age is not dan-gerous but any contact between human body and live parts may cause a shock with lost of equilibrium control or similar.
The VRD feature is activated with “VRD” light on. The feature is always “on”: the system grants efficient arc stricking even with a no load voltage <15V.On manual MIG process it becomes automatically “off”.To set the VRD on On or Off, push the pushbutton for ten seconds up to the icon VRD light on or the icon V>20 light on
7. ALARMS AND SETTINGS
The power sources Multi synergic are completed with a monitoring system of the machine conditions in order to avoid failure in the machine and in the welding.In particular the alarms involve in: Power supply quality in the voltage, in the missing phase, in the frequency.Output welding conditions, short circuit or welding over limits Inverter over heating or over load or over current. Auxiliary electronic warning and failure wire feeder status water cooling unit status communication with the external wire feeder.REFER TO THE TROUBLESHOOTING, PARAGRAPH FOR THE DETAILS
8. POWER SUPPLY QUALITY IN THE VOLTAGE, IN THE MISSING PHASE, IN THE FREQUENCY:
The tri-phase welding generators have an input voltage of 400V ( min 340V – max 480V). MULTI SYNERGIC versions can be supplied with motor generators and/or long cables (within the min/max input voltage limits).In case current exceeds the mentioned limits (current peaks), machine functions stop and display shows the detected current peak.Reset the machine by switching the main ON/OFF knob.The tri-phase version detects even the right presence of the three current phases and, should one of those fail for > 20 m/s, machine functions stop and display will show the missing phase. Again, reset the machine by switching the main ON/ OFF knob.In the case of shift of supply net frequency the machine is stopped an the ap-propriate alarm is shown in the display (this case can occurs when the supply is coming from motor generator and the the frequency goes outside the limits of 50-60 Hz.
9. OUTPUT WELDING CONDITIONS, SHORT CIRCUIT OR WELDING OVER LIMITS
A circuit test is released every time you switch “ON” the machine. The correct output polarities are checked-out and in case of an eventual short circuit detec-tion, machine enters in alarm standby showing on the display:Once short circuit conditions are removed, machine test will continue correctly.Short circuit conditions may appear even during the welding job: in case they persist continuously for more than 5 sec, generator enter in “short circuit alarm”. The “anti sticking” icon lights too.Fires, burns and shocks may be caused by uncorrected current outputs.Reasons may be found on:• involuntary failures on mig jobs which may release, without any control, the weld ing wire: it melt entering in contact with negative polarities generating pos-sible fire and burn conditions• damaged cables, with insulation losses, etc.In case of any output failure, the machine enters in alarm condition showing: ALL OUT

Instruction Manual Multi Synergic 280 - Multi Synergic 350 - Multi Synergic 400F - Multi Synergic 500- Multi Synergic 500F and Accessories
8
The MULTI series generators are characterised by a its ED factor – 40% at 40°C and power supply may, in certain cases, be sufficient for this output but the used can adjust higher power output causing damages on the existing supply network. (or can use long interconnecting cable at maximum output current).The MULTI SYNERGIC series controls regularly the output power Vs the input power value and in case of any discrepancy the welding stops and the display will shows:
ALL Ed xxx: The machine will be available again at the end of the count-down shown on the display.
INVERTER OVER HEATING OR OVER LOAD OR OVER CURRENTThe MULTI SYNERGIC series generators are fan cooled. Forced ventilation is activated once the inverter temperature exceed the 40°C and fan turns automatically off once inter-nal components are correctly cooled.Fan cooling is anyway rarely activated: it may occurs when duty cycle has been exceed-ed, in case of high environment temperatures, etc.In case of overheating, output is disabled and display will shows:ALL OL
10. AUXILIARY ELECTRONIC WARNING AND FAILUREThe Internal electronic is governed by software and when errors come from the execution of the cycles the display shows the alarms that can be ALL MEM, ALL TAB, I2C OCC, when those alarms occurs may be the machine still works, refer to the troubleshooting for the solution.
WIRE FEEDER STATUSThe wire feeder is digitally controlled, and ever, the wire speed has the right value, in the case that something doesn’t works properly two alarms indicates the kind of failure :ALL ENC and ALL BRA that means a wrong or missing speed or a wrong or missing brake status of the motor at the end of the welding, refer to the troubleshoot-ing for the solution.
11. WATER COOLING UNIT STATUS
When the generator is equipped with the cooling unit, the correct cooling liq-uid circulation is constantly controlled. The cooling unit works only when Mig, Pulsed Mig or Tig processes are activated.The cooling unit pump is activated switching the torch trigger and turns off after some time that the welding job end.In case of liquid circulation failures, output is disabled and display will show:ALL h2oReset the machine switching the main knob ON/OFF.Long inactivity periods may damage the cooling unit pump or generate momen-tary re-start problems. First ensure the presence of liquid inside the tank and control the right positioning of the in/out hoses – following instructions may help:• unplug the water-out blu hose from the machine rear panel and plug a tempo-rary hose• push & release the torch trigger once: cooling unit pump test should be acti-vated for 15 seconds• cooling liquid should flow from the temporary hose: if not, repeat the pump test as above• once ensured the correct liquid flowing, restore the original hose• if necessary, control the correct liquid flowing at the intermediary levels, i.e wire feeder unit rear and front
12. COMMUNICATION WITH THE EXTERNAL WIRE FEEDER
The external wire feeder can be connected to the connectors of the back panel of the machine, the machine recognise the wire feeder and starts to communicate.The control from the machine is passed to the wire feeder when the torch switch of the wire feeder is pressed or when one of the pushbuttons of the wire feeder is touched.When an error in the communication between the machine and the wire feeder ap-pear, the two display of the wire feeder show thee lines instead the values, this prob-lem often occurs when the interconnecting cable connectors are loose or internal wires of the interconnecting cable are open.

Instruction Manual Multi Synergic 280 - Multi Synergic 350 - Multi Synergic 400F - Multi Synergic 500- Multi Synergic 500F and Accessories
9
13. SPECIAL FUNCTIONS
RESET TO DEFAULT SETTING FUNCTION (default working parameters)Press for 10 seconds the switch SW1 until the display show the menu load default working parameters. Confirm YES by the switch under display yes.
LOCK JOBS FUNCTIONThis function is activated only if insert the digital torch.LOCK JOBS : press SW2 for 5 seconds.UN LOCK JOBS : press SW2 for 10 seconds.With LOCK JOBS is it only possible change the JOBS parameters.All other setting are locked. If it press a switch or it moved a knob the display shows “LOCK JOB” function activated.
SEE SET / SEE REAL FUNCTIONSet MANUAL MMA mode, set current 123A (in to display 1), set arcforce 45 (in to dipslay 2).Press SW3 for 3 seconds If is active the function see set, and you want activate the function see real.Press SW3 for 3 seconds If is active the function see real, and you want activate the function see set.In SEE SET mode during the welding the display show setting parameters.In SEE REAL mode during the welding the display show real working parameters : output current and output voltage.
SEE POWER MODULE TEMPERATUR FUNCTIONSet MANUAL MMA mode, set current 123A (in to display 1), set arcforce 50 (in to dipslay 2).Press SW3 for 3 seconds, unless the display show the temperatur read from the NTC in the power module.
DISPLAY SOFTWARE VERSION FUNCTION OF ROUCH PANELSet MANUAL MMA mode, set current 123A (in to display 1), set arcforce 55 (in to dipslay 2).Press SW3 for 3 seconds, unless the display show the touch pannel software version, and other parameter.
INC FUNCTION.press torch switch for 3 seconds untill display show, INC and the motor stops. Release and re-press the torch switch, the wire comes out without gas at speeds up to 10 m / min.
SPEED WIRE CALIBRATIONpress torch switch for 3 seconds, untill display show INC and the motor stops release the torch switch and press SW4 button 3 times, untill display show SPD SET, press torch switch again, the wire exits without gas first at three m/min and then to 10 m/min, then stops. This operation serves to control board to calibrate the motor speed and must be performed to load, with the wire inserted in the sheath.

Instruction Manual Multi Synergic 280 - Multi Synergic 350 - Multi Synergic 400F - Multi Synergic 500- Multi Synergic 500F and Accessories
10
14. ACCESSORIESThe Multi synergic series has the capability to recognise the accessory connected and install it. The external wire feeder can be connected trough the interconnecting cable and the machine recognise it and switch from internal control to wire feeder control just using the torch switch or with a simple touch in the wire feeder or machine control.The interconnecting cable is recognised in its impedance and automatically the pa-rameter make a compensation in order to grant the same results also with different length of the cables.Digital torches, MIG or TIG can be installed also in a second time, the process recog-nise their presence and start to work in the SMART mode.Water cooling unit can be installed with a simple operation to put the power source over it and connect the cable. The process recognise it and start to drive the water cooler in MIG or TIG, only during the welding and control the flow rate of the cooling liquid. Remote control as manual or foot control can be connected in the front of the machines and gives the adjustment in the main parameter without any extra setting by the user. Digital remote control can be connected in the wire feeder, they work in simple way,giving to the user a powerful extra control up to a smart interface to me-chanical automatised applications.
15. MAIN FEATURES MULTI SYNERGIC 280 :
The base machine includes the trolley and the bottle support, water cooling cannot be used in the Multi Synergic 280, the accessories as external wire feeder and inter-connecting cable can be used at any time as expansion. The other accessories as digital torches and DRC can be connected at any time.
Three phase multifunction de-veloped for light in-dustrial ap-plications. The base machine is equipped with robust digital controlled wire feeder built in, the trolley and ro-bust gas bottle support.Especially appreciate in the synergic MIG-MAG applica-
tions with fast mig characteristic and for its easy to use au¬to-learning front panel.Offer also the very often used pulse mig programs for aluminium wire 1,2mm, stain-less steel 1,0 mm, mild steel 1,0 mm and silicon bronze 0,8 mm for these applica-tions that needs something more, (the base program use the plus concept technol-ogy with double pulse capability).

Instruction Manual Multi Synergic 280 - Multi Synergic 350 - Multi Synergic 400F - Multi Synergic 500- Multi Synergic 500F and Accessories
11
Included the welding process of Stick electrode and TIG features with manual adjust-ment or syn-ergic direct thickness adjustment.This version of Multi Synergic 280 has the second wire feeder connected with five meters intercon-necting cable.The external wire feeder can use a different pro-cess with also different wire and gasfrom the built in wire feeder and allow an easy change of the work in use.The selection between the two process, the inter-nal or the external is done only by-pressing the torch switch of the process selected.Different length of interconnecting cable can be selected from the accessory list.
16. MAIN FEATURES MULTI SYNERGIC 350 :
The base machine includes the trolley and the bottle support, water cooling cannot be used in the Multi Synergic 350 base but must be chosen the Multi Synergic 350W that have built in the water cooling unit , the accessories as external wire feeder and interconnecting cable can be used at any time as expansion. The other accessories as digital torches and DRC can be connected at any time.
Complete version of the Multi synergic 350 for universal applications with the the water cooling unit built in the bottom side of the trolley and the second wire feeder connected with five meters interconnecting cable.The external wire feeder can use a different process with also different wire and gas from the built in wire feeder and allow an easy change of the work in use.The external wire feeder can use a water or air cooled torch.The selection between the two process, the internal or the external is done only by pressing the torch switch of the process selected.Different length of interconnecting cable can be select-ed from the accessory list.This version of Multi Synergic 350W has the water cooling unit built in the bottomside of the trolley.The water cooling system can be used in MIG-MAG and pulse mig process andalso in the TIG applications . Special controls drive the water cooling unit only during the welding and monitor the efficiency of the cooling liq-uid flow.High power 350 three phase Multifunction with the latest innovation of the Multi Synergic family.With its 350A, 40% duty cycle is ideal for Industrial metal fabrications. The base machine is equipped with robust digital controlled wire feeder built in, the trolley and robust gas bottle support.Especially appreciate in the synergic MIG-MAG applications with fast mig charac-teristic and for its easy to use au¬to-learning front panel.Offer also the very often used pulse mig programs for alu-minium wire 1,2mm, stain-less steel 1,0 mm, mild steel 1,0 mm and silicon bronze 0,8 mm for these applica-tions that needs something more, (the base program use the plus concept technol-ogy with double pulse capability.Included the welding process of Stick electrode and TIG features with manual ad-justment or synergic direct thick-ness adjustment.

Instruction Manual Multi Synergic 280 - Multi Synergic 350 - Multi Synergic 400F - Multi Synergic 500- Multi Synergic 500F and Accessories
12
17. MAIN FEATURES MULTI SYNERGIC 500
The base machine includes the trolley and the bottle support, water cooling can-not be used in the Multi Synergic 500 base but must be chosen the Multi Synergic 500W that have built in the water cooling unit , the accessories as external wire feeder and interconnecting cable can be used at any time as expansion. The other accessories as digital torches and DRC can be connected at any time.
Complete version of the Multi synergic 500 for univer-sal and heavy applications with the the water cooling unit built in the bottom side of the trolley and the sec-ond wire feeder connected with five meters intercon-necting cable.The external wire feeder can use a different process with also different wire and gas from the built in wire feeder and allow an easy change of the work in use.The external wire feeder can use a water or air cooled torch.The selection between the two process, the internal or the external is done only by pressing the torch switch of the process selected.Different length of interconnecting cable can be se-lected from the accessory list.This version of Multi Synergic 500 has the water cool-ing unit built in the bottom side of the trolley.The water cooling system can be used in MIG-MAG and pulse mig process and also in the TIG applications .Special controls drive the water cooling unit only dur-ing the welding and monitor the efficiency of the cool-ing liquid flow.Three phase multifunction developed for heavy indus-trial applications with 500A at ED 40%. Complete manual and synergic multifunction with se-lection of MMA, TIG, MIG MAG ideal for any kind of application.The base machine is equipped with robust digital con-trolled wire feeder built in, the trolley and robust gas bottle support.Especially appreciate in the synergic MIG-MAG appli-cations with fast mig charac-teristic and for its easy to use au¬to-learning front panel.Offer also the very often used pulse mig programs for aluminium wire 1,2mm, stain-less steel 1,2 mm, mild steel 1,2 mm and silicon bronze for these applica-tions that needs something more, (the base program use the plus concept technology with double pulse capabi¬lity).Included the welding process of Stick electrode and TIG features with manual ad-justment or synergic direct thickness

Instruction Manual Multi Synergic 280 - Multi Synergic 350 - Multi Synergic 400F - Multi Synergic 500- Multi Synergic 500F and Accessories
13
18. MAIN FEATURES MULTI SYNERGIC 500F The base machine includes the trolley and the bottle support, water cooling cannot be used in the Multi Synergic 500 base but must be chosen the Multi Synergic 500W that have built in the water cooling unit. The accessories as digital torches and DRC can be connected at any time.The external wire feeder can use a water or air cooled torch.Different length of interconnecting cable can be se-lected from the accessory list.This version of Multi Synergic 500 has the water cool-ing unit built in the bottom side of the trolley.The water cooling system can be used in MIG-MAG and pulse mig process and also in the TIG applications .Special controls drive the water cooling unit only dur-ing the welding and monitor the efficiency of the cool-ing liquid flow.Three phase multifunction developed for heavy indus-trial applications with 500A at ED 40%. Complete manual and synergic multifunction with se-lection of MMA, TIG, MIG MAG ideal for any kind of application.The base machine is equipped with robust digital con-trolled wire feeder built in, the trolley and robust gas bottle support.Especially appreciate in the synergic MIG-MAG appli-cations with fast mig charac-teristic and for its easy to use au¬to-learning front panel.Offer also the very often used pulse mig programs for aluminium wire, stainless steel, mild steel and silicon bronze for these applica-tions that needs something more, (the base program use the plus concept technology with double pulse capabi¬lity).Included the welding process of Stick electrode and TIG features with manual ad-justment or synergic direct thickness
DESCRIPTION MULTI SYNERGIC 500F MULTI SYNERGIC 500FW Power supply (+15% / -15%) V 400 3 Ph 400 3 Ph Fuses (Tig) A T25 T25Rated duty cycle in 10 min 40 °C 40% ED 40% EDRated secondary current A 500 500Permanent sec. current 100% A 320 320Rated Power (Stick)KVA 32 32Permanent power 100% (Stick) KVA 15 15Overload protection Thermal ThermalRegulation field in STICK mode A 20 ÷ 500 20 ÷ 500Regulation field in TIG DC mode A 5 ÷ 500 5 ÷ 500Regulation field in MIG-MAG mode A 20 ÷ 500 20 ÷ 500No load voltage (S) (K) V 74 74Max secondary current A 800 800Short circuit limit A 850 850Stick electrode possibility mm 6,0 6,0Protection class Ip 21-S Ip 21-SInsulation class H HHot Start OK OKAnti Sticking OK OK Arc Force OK OKTig ignition Lift Arc Lift ArcRemote control receptacle Analog/and digital Analog/and digitalVRD Voltage reduction device 20V OK. OKWater cooling unit OPTIONAL. INCLUDEDGas botthe trolley Built in Built inWidth-Height-Length mm 310 x 430 x 550 310 x 430 x 575Weight Kg 85 85
MULTI SYNERGIC 500F MULTI SYNERGIC 500FW

Instruction Manual Multi Synergic 280 - Multi Synergic 350 - Multi Synergic 400F - Multi Synergic 500- Multi Synergic 500F and Accessories
14
19. FRONT PANEL FUNCTIONS AND ADJUSTMENTS
Work mode in actual use.The icons light on when
selected, between :Mma; TIG, TIG PULSE; MIG
and MIG PULSE.
First pushbutton MODE,allow to change the working
mode. The working MODE are: Mma; TIG, TIG PULSE;
MIG and MIG PULSE.
Second pushbutton SYNERGICTrough this pushbutton, it is
possible to the modality manual or synergic selecting the kind of
material under welding.
Third push buttonThough this pushbutton is
possible to select that diameter,in Mma the size of electrode, in
TIG the tungsten, and in Mig and Pulse Mig the wire diameter.
This lamp, showsif the digital torchadjustment select jobs or adjust the welding parameter in analog way.
Job position, anywelding process-can have its own-jobs levels. To select jobs, the digital torch must be used.
Main knobModify the main inwelding: In MMA, TIG, Synergic MIG and Puls MIG ad-just the current, in Manual MIG adjust the voltage.
Secondary knob.Adjust the second level parameters: MMA, Arc-force TIG, nothing Pulse TIG, frequency Manual MIG,wire speed Synergic Mig and Puls MIG, the arclenght
Fifth pushbutton.Trough this pushbutton is possible to select the torch switch cycle:2T; 2TS(with slopes);4T; 4TS ( with slopes);Timer.In MMA is also possible select/de-select the function VRD heldingthe pushbutton for 5seconds.
Forth pushbutton, trough this push-button it is possible to adjust otherparameters that are in function with the working modality chosen with the first pushbutton.
Torch switch cycle icons that can be selected trough the fifth push-button between:Timer, simple two step, two step with slopes, simple 4 step and 4 step with slopes.
Warning indications for VRD, overheating, output in short circuit...
Area where are selected the manual mode or, in Synergy Mode, the ma-terial to be welded or the type of electrode used in MMA mode.
Area where are selected, in Synergy Mode, the size of the wire, or the size of electrode in MMA mode or the diameter of tungsten electrode in TIG mode.
Main display, show, the set and real voltage, in MIGMAG manual mode, or the set and real current in the other setting.In Alarm mode gets the ALL indication.
Second display, shows the set wire speed and real current in Manual MIG-MAG mode, or the voltage, the material thickness, the inductance, the frequency of double pulsation.. In function of the selected icon trough the forth push button.

Instruction Manual Multi Synergic 280 - Multi Synergic 350 - Multi Synergic 400F - Multi Synergic 500- Multi Synergic 500F and Accessories
15
20. FRONT PANEL LAYOUT
FRONT PANEL
MIG TORCH
INTERNALWIRE FEEDERACCESS
TIGTORCHSWITCH
REMOTECONTROLSOCKET
POSITIVEOUTPUT
NEGATIVEOUTPUT
TIG GAS OUT
TIG TORCH SWITCH
REMOTE CONTROL SOCKET
TIG GAS OUT NEGATIVE OUTPUT
POSITIVE OUTPUT
ONLY MULTI SYNERGIC 500F AND MULTI SYNERGIC 500FW
Instruction Manual Multi Synergic 280 - Multi Synergic 350 - Multi Synergic 400F - Multi Synergic 500- Multi Synergic 500F and Accessories
16
21. MANUAL ELECTRODE SETTING. CONNECT THE WORK PIECE CABLE TO THE NEGATIVE RECEPTACLE, AND THE ELECTRODE OLDER T THE POSITIVE RECEPTACLE
SELECT MMA IN MANUAL:With the first push button, select STICKWith the second push button select MANUALWith the main knob, adjust the welding current.
ADJUST THE WELDING DYNAMIC:With the forth pushbutton select the dynamic icon. The second display show the current set value.
ADJUST THE WELDING DYNAMIC:With the second knob, adjust the desired valueThe dynamic can be adjusted from 0 to 100%Dynamic increase the current for arc strikingDynamic increase the current during drop transfer.
SELECT MMA IN SYNERGYC:With the second push button, select the typeof the electrode.
SELECT MMA IN SYNERGYC:With the third pushbutton select the size of theelectrode.
ADJUST THE WELDING CURRENT AND DYNAMIC:With the FIRST knob, adjust the desired value,the second display shows the material thickness. Dynamic is automatic, but can be increased or Decreased in % as the operator desire.
1 2 3
4 5 6
Instruction Manual Multi Synergic 280 - Multi Synergic 350 - Multi Synergic 400F - Multi Synergic 500- Multi Synergic 500F and Accessories
17
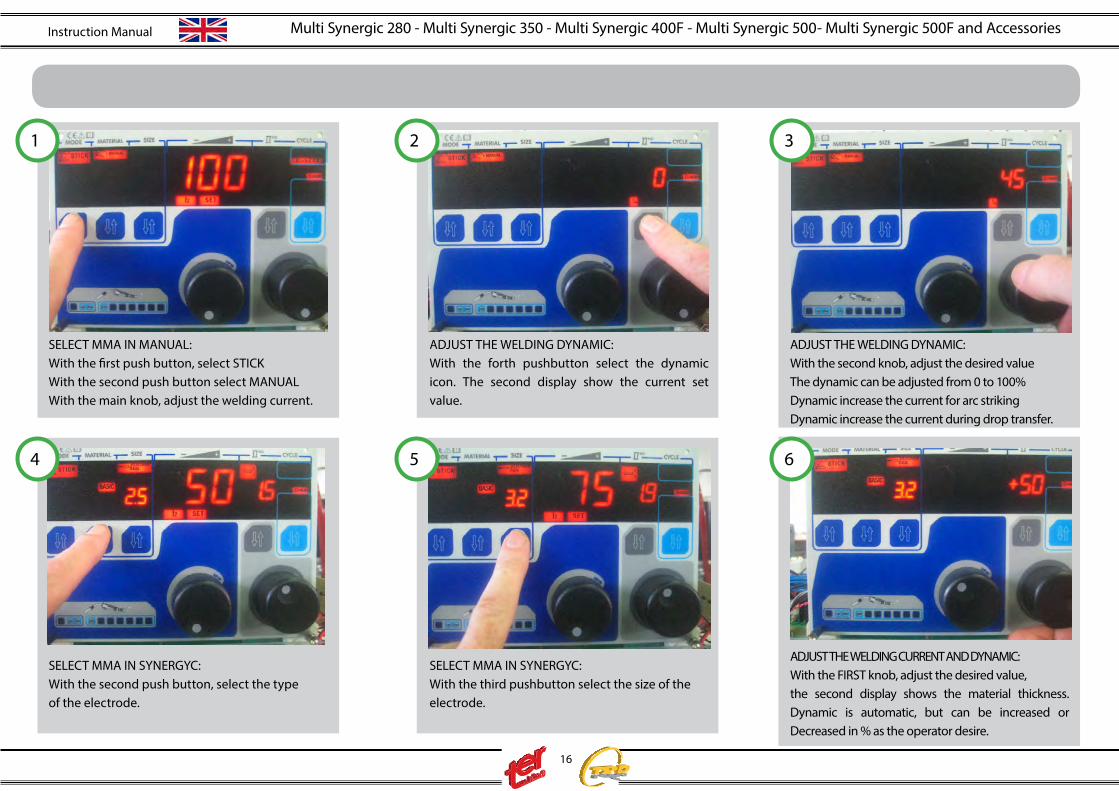
22. TIG SETTING. CONNECT THE GAS INPUT TO THE GAS REGULATOR AND ADJUST THE GAS FLOW BETWEEN 6 TO 8 LITRES PER MINUTE. NOTE: generator provided with cooling unit can support even gas cooled tig torches. Do not forget to close the water circuit by using a suitable by-pass hose placed between the inlet and outlet nipples (front and rear).
Full control of the cycle and easy access control. Pre-gas; initial current; up slope; down slope; final craterfiller current; post gas pulser TIG version.
SELECT MANUAL TIG MODE:With the first push button, select TIG
SELECT THE TORCH SWITCH CYCLE:With the fifth push button select the torch switch Cycle. If the timer cycle is se-lected, than the time isadjustable with the se-lection trough the forth Push button.
ADJUST THE SECOND LEVEL PARAMETERWith the forth push button select the other welding parameter and adjust, with the secondknob, to the desired value PRE GAS; POST GAS, icons light on and the Second display shows the value.
ADJUST THE TIG CYCLE PARAMETERS:When a cycle 2 step with slopes or 4 step withSlope, is selected, the forth knob has also theCapability to select the start current, up slope,down slope and stop current.All the data are stored in the internal memory
push the torch trigger
slow down the torch until the ceramic nozzle touch theworkpiece; in this phase held the torch and avoid any contact between tungsten and workpiece
keeping the nozzle in contact, turn the torch until the tungsten enters in contact with the workpiece
maintaining the nozzle-work piece contact, turn back the torch to the original posi-tion; the arc strikes and the welding can be performed
1 2 3
4 5
6

Instruction Manual Multi Synergic 280 - Multi Synergic 350 - Multi Synergic 400F - Multi Synergic 500- Multi Synergic 500F and Accessories
18
23. MANUAL PULS TIG SET
SELECT MANUAL PULSE TIG MODE:With the first push button, select TIG PULSE.
SELECT ALL THE OTHER PARAMETERS:PULS TIG is a different session and have its own Torch switch cycle, and second level pa-rameters, they will be recovered when Manual PULS TIG is selected, adjust all off them, as in Manual Tig.
SELECT THE FREQUENCY:With the forth push button is possible also toselect the frequency of pulsation and adjust itThe adjustment is from 0,2 Hz up to 2 KHz.
SELECT PULSE TIG PARAMETERS:For the expert welders is also possible to adjust The pa-rameters of pulsation as :I LOW (background current during pulsation) and Bal-ance ( ratio between ON and OFF in the pulse). The peak pulse is self calculate by the processor
1 2 3
4

Instruction Manual Multi Synergic 280 - Multi Synergic 350 - Multi Synergic 400F - Multi Synergic 500- Multi Synergic 500F and Accessories
19
In this example, the down slope synergic value is increased of 6%.The value is stored in the internal memory.
24. SYNERGIC TIG SETTING
SELECT SYNERGY TIG OR PULSE MODE:With the first push button, select TIG or TIG PULSE with the second push button select the material in welding.
COMPLETE THE TIG SYNERGY SELECTION:with the third push button select the diameter of the tungsten electrode of the tig torch.From this time all the adjustment are automati-cally done from the synergy selection.
Adjust the welding current , in the little displayThe value of the suggested thickness of the welding material is proposed. The selection of the Torch switch cycles is the same of the manual setting.
The second level parameters change as the set current change giving ever the optimal value.If the expert user need to increase or decrease the synegic value of one of these values, push the forth push button and select the value to be changes.
1 2 3
4
Once selected the value that need to be changed, Use the second knob to adjust.The little display, shows the correction value in % That can increase or decrease up to 100% the current synergic value.
5 6
Instruction Manual Multi Synergic 280 - Multi Synergic 350 - Multi Synergic 400F - Multi Synergic 500- Multi Synergic 500F and Accessories
20
25. MIG-MAG WELDING:
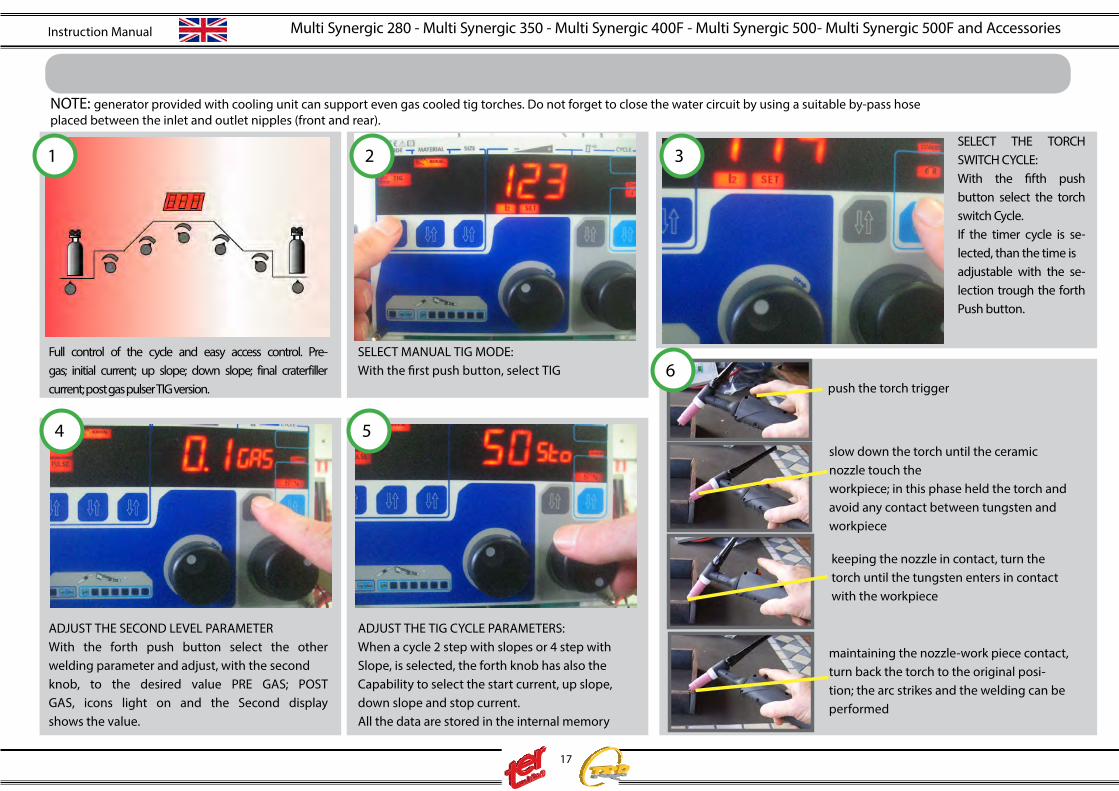
MULTI SYNERGIC POWER SOURCE HAS THE POSSIBILITIES TO PERFORM MIG-MAG WELDING IN MANUAL OR IN SYNERGY, FOR ADVANCEDAPPLICATION, THERE ARE ALSO THE POSSIBILITIES TO USE THE PROCESS PULS MIG FOR THE MOST COMMON MATERIALS.
The wire feeder unit can receive 200 or 300 mm size wire spools. Make sure your wire spool is correctly and safely fixed to the pinionthan adjust the friction screw.
a) match the driving rolls located into the driving motor with your wire type and size.
b) insert the wire into the driving rolls and push it till the machine euro adaptor. Lock the driving rolls properly.
c) connect the mig torch to the machine euro adaptor.
d) press the torch trigger: wire drives for 5 sec. and stops once the display will light “INC”.
e) release the torch trigger and press it again: wire drives now into the torch at 10 mt/min, until trigger remain pressed.
f) Fit the shielding gas hose in to the back panel of the machine (gas nipple marked with MIG). Adjust the flow rate between 16/22 lt/min. depending on the welding task.
g) connect the earth clamp plug to the negative polarity.
h) adjust the welding parameter in one of the following three mode : MANUAL, SYNERGY OR PULSE MIG.

Instruction Manual Multi Synergic 280 - Multi Synergic 350 - Multi Synergic 400F - Multi Synergic 500- Multi Synergic 500F and Accessories
21
ADJUST THE SECOND LEVEL PARAMETERWith the forth push button select the otherwelding parameter and adjust, with the secondknob, to the desired value PRE GAS; POST GAS, icons light on and the Second display shows the value.
SELECT THE TORCH SWITCH CYCLE:With the fifth push button select the torch switch Cycle. If the timer cycle is selected, than the time is adjustable with the selection trough the forth Push button
26. MIG-MAG MANUAL
ADJUST THE THE PARAMETERS:During the welding, the real voltage and real Current are shown in the two display, adjust the voltage and wire speed up to the optimal transfer Occurs . The induc-tance has important rules in the Welding result, adjust it as fine control.
SELECT MIG-MAG IN MANUAL:With the first push button, select MIG With the second push button select MANUAL With the main knob, adjust the welding voltageThe main display shows the preset voltage
SELECT MIG-MAG IN MANUAL:With the second knob, adjust the WIRE SPEEDThe second display shows the preset speed.
ADJUST THE WELDING DYNAMIC:With the forth push button is possible to select theInductance icon, the display shows the preset val-ue Between 1 to 20 ( 20 is maximum inductance value) Adjust the inductance according to the ap-plication.
1 2 3
4
5
6

Instruction Manual Multi Synergic 280 - Multi Synergic 350 - Multi Synergic 400F - Multi Synergic 500- Multi Synergic 500F and Accessories
22
With the second knob, the arc length can e adapted to the welding, The adjustment of the arc length is +/- 20 and a symbol of the arc length light on during the regulation
Adjust the welding current , in the little displayThe value of the suggested thickness of the welding material is proposed.
27. MIG-MAG SYNERGIC
To modify the second level parameters, select with the forth push button.Once selected, use the second knob to adjust. The little display, shows the correction value in % That can increase or decrease up to 100% thecurrent synergic value.
SELECT SYNERGY MIG-MAG MODE:With the first push button, select MIG With the second push button select the material in Welding.
Complete the MIG Synergy selection:With the third push button select the diameter of The wire in use.. From this time all the adjust-ment are automatically done from the synergy selection.
Some synergic programs has more than one ver-sion In this during the selection of the wire diam-eter. The main display shows an indication about this Program, use the main knob to select the de-sired ones.
1 2 3
4 5 6
After 3 seconds of the adjustment trough one of the two knobs, the right display show the wire speed auto selected for the setting parameter.
22

Instruction Manual Multi Synergic 280 - Multi Synergic 350 - Multi Synergic 400F - Multi Synergic 500- Multi Synergic 500F and Accessories
23
To modify the second level parameters, selectwith the forth push button.Once selected, use the second knob to adjust. The little display, shows the correction value in % That can in-crease or decrease up to 100% the current synergic value.
With the second knob, the arc length can e adapted to the welding, The adjustment of the arc length is +/- 20 and a symbol of the arc length light on during the regulation
28. PULS MIG SYNERGIC
To select the double pulse, push the forth push button up to the icon FREQUENCY light on and Adjust the double frequency level with the second knob.
SELECT PULS MIG- MODE:There are only five puls program in Multi Syn-ergic Starting from synergic program, push the first push button, if the program exist, the puls icon light on.
Adjust the welding current , in the little display The value of the suggested thickness of the welding material is proposed.
1 2 3
46
5
SELECT PULS MIG- MODE:If the program in MIG is not included in one of the Table the choose of pulse mig cannot be completed. For aviable pro-grams to see table “PULSE MIG SYNERGIC PROGRAMS (page 24).

Instruction Manual Multi Synergic 280 - Multi Synergic 350 - Multi Synergic 400F - Multi Synergic 500- Multi Synergic 500F and Accessories
24
29. PULS MIG SYNERGIC PROGRAMS
29. PULS MIG SYNERGIC PROGRAMS
MULTI SYNERGIC 280
MULTI SYNERGIC 350
MULTI SYNERGIC 400F
MULTI SYNERGIC 500K
MULTI SYNERGIC 500F
MULTI SYNERGIC 500F2
SG2 1,0 SG2 1,0 SG2 1,0 SG2 1,2 SG2 0,9 SG2 0,9
SST 1,0 SST 1,0 SG2 1,2 SST 1,0 SG2 1,2 SG2 1,2ALMG 1,2 ALMG 1,2 SST 1,0 ALMG 1,2 SST 0,9 SST 0,9ALSI 1,2 ALSI 1,2 SST 1,2 ALSI 1,2 SST 1,0 SST 1,0CUSI 0,8 CUSI 0,8 ALMG 1,0 CUSI 0,8 ALMG 1,0 ALMG 1,2
- - ALMG 1,2 - ALMG 1,2 ALMG 1,6
- - ALSI 1,2 - ALSI 1,2 ALSI 1,2
- - - . - ALSI 1,6
note : the puls mig synergic programs as table-2 available from software release multisyn v_1_2_r46
MULTI SYNERGIC 280 MULTI SYNERGIC 350 MULTI SYNERGIC 400F MULTI SYNERGIC 500 MULTI SYNERGIC-500F
SG2 1,0 SG2 1,0 SG2 1,0 SG2 1,2 SG2 0,9
SST 1,0 SST 1,0 SST 1,0 SST 1,0 SG2 1,0
ALMG 1,2 ALMG 1,2 ALMG 1,2 ALMG 1,2 SG2 1,2
ALSI 1,2 ALSI 1,2 ALSI 1,2 ALSI 1,2 SST 0,9
CUSI 0,8 CUSI 0,8 CUSI 0,8 SST 1,2
- - - - ALMG 1,0
- - - - ALMG 1,2
- - - - ALSI 1,2
table-1
table-2

Instruction Manual Multi Synergic 280 - Multi Synergic 350 - Multi Synergic 400F - Multi Synergic 500- Multi Synergic 500F and Accessories
25
30. MIG SYNERGIC PROGRAMS
MULTI SYNERGIC 280 MULTI SYNERGIC 350 MULTI SYNERGIC 400F MULTI SYNERGIC 500 MULTI SYNERGIC 500F/F2SG2 0,8 SG2 0,8 SG2 0,8 SG2 0,8 SG2 0,8SG2 0,9 SG2 0,9 SG2 0,9 SG2 0,9 SG2 0,9SG2 1,0 SG2 1,0 SG2 1,0 SG2 1,0 SG2 1,0SG2 1,2 SG2 1,2 SG2 1,2 SG2 1,2 SG2 1,2
SG2 0,8 CO2 SG2 1,6 SG2 1,6 SG2 1,6 SG2 1,6SG2 0,9 CO2 SG2 0,8 CO2 SG2 0,8 CO2 SG2 0,8 CO2 SG2 0,8 CO2SG2 1,0 CO2 SG2 0,9 CO2 SG2 0,9 CO2 SG2 0,9 CO2 SG2 0,9 CO2SG2 1,2 CO2 SG2 1,0 CO2 SG2 1,0 CO2 SG2 1,0 CO2 SG2 1,0 CO2
SST 0,8 SG2 1,2 CO2 SG2 1,2 CO2 SG2 1,2 CO2 SG2 1,2 CO2SST 0,9 SG2 1,6 CO2 SG2 1,6 CO2 SG2 1,6 CO2 SG2 1,6 CO2SST 1,0 SST 0,8 SST 0,8 SST 0,8 SST 0,8SST 1,2 SST 0,9 SST 0,9 SST 0,9 SST 0,9
ALMG 1,0 SST 1,0 SST 1,0 SST 1,0 SST 1,0ALMG 1,2 SST 1,2 SST 1,2 SST 1,2 SST 1,2ALMG 1,6 SST 1,6 SST 1,6 SST 1,6 SST 1,6ALSI 1,0 ALMG 1,0 ALMG 1,0 ALMG 1,0 ALMG 1,0ALSI 1,2 ALMG 1,2 ALMG 1,2 ALMG 1,2 ALMG 1,2ALSI 1,6 ALMG 1,6 ALMG 1,6 ALMG 1,6 ALMG 1,6ALBZ 0,8 ALSI 1,0 ALSI 1,0 ALSI 1,0 ALSI 1,0FLUX 1,2 ALSI 1,2 ALSI 1,2 ALSI 1,2 ALSI 1,2CUSI 0,8 ALSI 1,6 ALSI 1,6 ALSI 1,6 ALSI 1,6CUSI 0,9 ALBZ 0,8 ALBZ 0,8 ALBZ 0,8 ALBZ 0,8CUSI 1,0 FLUX 1,2 FLUX 1,2 FLUX 1,2 FLUX 1,2CUSI 1,2 CUSI 0,8 CUSI 0,8 CUSI 0,8 CUSI 0,8
CUSI 0,9 CUSI 0,9 CUSI 0,9 CUSI 0,9CUSI 1,0 CUSI 1,0 CUSI 1,0 CUSI 1,0CUSI 1,2 CUSI 1,2 CUSI 1,2 CUSI 1,2

Instruction Manual Multi Synergic 280 - Multi Synergic 350 - Multi Synergic 400F - Multi Synergic 500- Multi Synergic 500F and Accessories
26
Any program of Pulse mig can be switched in double pulse at any time without the need to change the program.All the adjustment de-scripted for the pulse mig are the same, the selection for doublepulsation is like a switch that allow to pass from a kind of continuously pulse mig welding to a pulsation with a variable frequency from 0,5 to 4 time per seconds, all the other parameters of double pulsation are set in automatic,.NOTE: for expert welders it is possible to modify some parameters of double pulsa-tion for special application, but the optimal regulation is the default one given from the synergy. All the program are store into session, these session are:ELECTRODE sessionTIG sessionPULSE TIG sessionMANUAL MIG-MAG sessionPULSE MIG sessionAll the data, from the main parameter and torch cycles to the “second level user changes”, are stored inside the sessions.The setting parameter and this session come back if selected with the first pushbut-ton of the welding modality or when the mig torch switch is pressed, for example after a welding in stick electrode, if the mig torch switch is pressed, the session became the last selected with the last parameters (in this case MIG-MAG manual with proper setting of voltage, wire speed,....) This setting is also stored as job point and can be selected between the six jobs of the session of MIG_MAG ( refer to the job session). Special torches can be used in the multi Synergic.
In TIG, when the digit torch is used, it is possible to adjust the welding current directly from the push buttons of the torch, in synergy mode, all the parameters changes according to the synergy selection. This kind of solution helps the user that don’t need to adjust the other parameters at the new current set.In MIG, the use of the DIGIT MIG torch allow the direct setting from the handle of the torch. The DIGIT MIG Torch has four push buttons in the top of the handle.It is enough to connect the torch to the Binzel connector and than the machine rec-ognise the external control and accept the remote adjustment.There are two mode of working with the torch:Analog adjustmentJobs adjustment
NOTE: The torch adjust trough its pushbuttons also during welding, but 4 step or 4 step + slopes cycles must be used.

Push together
Top Button +Selects between
jobs
Top Button +Sets the current (or the voltage in
MIG manual)Right Button +
Adjusts the arc length inside the job
Right Button +Adjust the arc length
in synergic (or the wire speed in MIG manual)
Bottom Button -Selects between
jobs
Bottom Button -Sets the current (or the voltage in
MIG manual)
Left Button -Adjusts the arc length
inside the job
Left Button -Adjust the arc length
in synergic (or the wire speed in MIG manual)
The digital Torch has two operational modes. SET and JOBS. To switch from on mode to another, Push the Left and Bottom together.In JOB mode any adjustment can be done from the front panel and is stored inside the current JOB
MULTI-SYNERGIC - LOGIC TORCH OPERATION
SET MODEJOB MODE

Instruction Manual Multi Synergic 280 - Multi Synergic 350 - Multi Synergic 400F - Multi Synergic 500- Multi Synergic 500F and Accessories
28
32. MULTI SYNERGIC 280 SPART PARTS
1
2
3
4
5
19
18
17
16
13
14
15
20

Instruction Manual Multi Synergic 280 - Multi Synergic 350 - Multi Synergic 400F - Multi Synergic 500- Multi Synergic 500F and Accessories
29
7
8
6
9
9
9
11
10
12
27
28
30
3129
34 33
26
32
22
21
25
24
33. MULTI SYNERGIC 280 SPART PARTS

Instruction Manual Multi Synergic 280 - Multi Synergic 350 - Multi Synergic 400F - Multi Synergic 500- Multi Synergic 500F and Accessories
30
n° CODE DESCRIPTION Rif. WEL.DIAGRAM1 N-18-JK-01-RT22 PREHEATING PLUG X382 N-07-070000-07-00 MAIN SWITCH 32A – 400V S13 N-40-141010-04-00 BACK SIDE 14 POLES SOCKET X14 R-40-160810-01-00 FAST SOCKET X55 R-37-130210-01-00 FAN GRIG PROTECTION -6 R-37-221100-02-00 SPOOL SUPPORT -7 N-39-106309-01-A0 PROGRAM INPUT SERIAL PORT X448 R-37-210423-01-00 WIRE FEEDER MOTOR MOT19 N-51-PH02-033-B ABSORBITION PCB PCB6, PCB710 R-04-010300-26-00 RECTIFIER D1, D211 R-03-010303-10-01 TOROIDAL TRANSFORMER TV112 R-03-020200-27-01 OUTPUT CHOKE L113 N-51-TR-T212-A DIGITAL DISPLAY CONTROL PCB114 - PLEXIGLAS PANEL PROTECTION -15 R-37-231410-05-01 KNOB -16 R-40-180000-09-00 FLANGE BRASS COMPONENTS X4317 R-24-031000-01-A0 GAS CONNECTOR COMPONENTS -18 N-40-140120-01-00 INPUT TORCH SWITCH CONNECTOR TWO POLES X2819 N-40-140120-05-00 INPUT REMOTE CONTROL CONNECTOR FIVE POLES X3020 R-40-160810-01-00 FEMALE FAST SOCKET X3, X521 T236B PCB MULTI SYNERGIC 280 CURRENT PROBE LOAD BOARD (T236B) PCB222 R-51-TR-T229-A POWER DRIVER BOARD PCB524 N-51-TR-T192-B-RL PROBE FILTER PCB925 N-51-PH02-085-B-RL EMC BOARD PCB326 R-51-TR-T233-A SUPPLY VOLTAGE MONITOR PCB827 R-06-010000-10-00 HALL PROBE HALL128 N-51-PK03-015-C-RL DRIVER MODULE PCB PCB429 N-51-PH02-083-A-RL SNUBBER PCB GC-PH-83-A0 PCB1130 R-04-050100-01-00 POWER IGBT MODULE Q131 R-04-010403-02-00 3PH BRIDGE RECTIFIER B132 R-37-140110-02-00 GAS VALVE EV1, EV233 N-37-120221-02-00 FAN FAN134 N-23-020602-05-A0 FAN COVER -
34. MULTI SYNERGIC 280 SPART PARTS

Instruction Manual Multi Synergic 280 - Multi Synergic 350 - Multi Synergic 400F - Multi Synergic 500- Multi Synergic 500F and Accessories
31
35. MULTI SYNERGIC 280 WELDING DIAGRAM

Instruction Manual Multi Synergic 280 - Multi Synergic 350 - Multi Synergic 400F - Multi Synergic 500- Multi Synergic 500F and Accessories
32
36. MULTI SYNERGIC 350 SPART PARTS
1
2
3
4
5
19
18
17
16
13
14
15
20

Instruction Manual Multi Synergic 280 - Multi Synergic 350 - Multi Synergic 400F - Multi Synergic 500- Multi Synergic 500F and Accessories
33
7
8
6
9
9
9
11
10
12
27
28
30
3129
34 33
26
32
22
21
25
24
37. MULTI SYNERGIC 350 SPART PARTS

Instruction Manual Multi Synergic 280 - Multi Synergic 350 - Multi Synergic 400F - Multi Synergic 500- Multi Synergic 500F and Accessories
34
n° CODE DESCRIPTION Rif. WEL.DIAGRAM1 N-18-JK-01-RT22 PREHEATING PLUG X382 N-07-070000-07-00 MAIN SWITCH 32A – 400V S13 N-40-141010-04-00 BACK SIDE 14 POLES SOCKET X14 R-40-160810-01-00 FAST SOCKET X55 R-37-130310-01-00 FAN GRIG PROTECTION -6 R-37-221100-02-00 SPOOL SUPPORT -7 N-39-106309-01-A0 PROGRAM INPUT SERIAL PORT X448 R-37-210423-01-00 WIRE FEEDER MOT19 N-51-PH02-033-B ABSORBITION PCBA PCB6-PCB7 PCB6, PCB710 R-04-010300-22-00 RECTIFIER D1, D211 R-03-010303-24-00 TOROIDAL TRANSFORMER TV112 R-03-020200-17-01 OUTPUT CHOKE L113 N-51-TR-T212-A DIGITAL DISPLAY CONTROL PCB114 PLEXIGLAS PANEL PROTECTION -15 R-37-231410-05-01 KNOB -16 R-40-180000-09-00 FLANGE BRASS COMPONENTS X4317 R-24-031000-01-A0 GAS CONNECTOR COMPONENTS -18 N-40-140120-01-00 INPUT TORCH SWITCH CONNECTOR TWO POLES X2819 N-40-140120-05-00 INPUT REMOTE CONTROL CONNECTOR FIVE POLES X3020 R-40-160810-01-00 FEMALE FAST SOCKET X3, X521 T236C PCB MULTI SYNERGIC 350 CURRENT PROBE LOAD BOARD (T236C) PCB222 R-51-TR-T229-A POWER DRIVER BOARD PCB524 N-51-TR-T192-B-RL PROBE FILTER PCB925 N-51-PH02-085-B-RL EMC BOARD PCB326 R-51-TR-T233-A SUPPLY VOLTAGE MONITOR PCB827 R-06-010000-10-00 HALL PROBE HALL128 R-04-050100-02-00 DRIVER MODULE PCB PCB429 N-51-PH02-083-A-RL SNUBBER PCB GC-PH-83-A0 PCB1130 R-04-050100-01-00 POWER IGBT MODULE Q131 R-04-010401-00-00 3PH BRIDGE RECTIFIER B132 R-37-140110-02-00 SOLENOID EV1, EV233 N-37-120522-02-00 FAN FAN134 N-23-020602-07-A0 FAN COVER -
38. MULTI SYNERGIC 350 SPART PARTS

Instruction Manual Multi Synergic 280 - Multi Synergic 350 - Multi Synergic 400F - Multi Synergic 500- Multi Synergic 500F and Accessories
35
39. MULTI SYNERGIC 350 WELDING DIAGRAM

Instruction Manual Multi Synergic 280 - Multi Synergic 350 - Multi Synergic 400F - Multi Synergic 500- Multi Synergic 500F and Accessories
36
MULTI SYNERGIC 400F SPART PARTS
19
18
17
13
14
15
20
2
4
3
5
7
1

Instruction Manual Multi Synergic 280 - Multi Synergic 350 - Multi Synergic 400F - Multi Synergic 500- Multi Synergic 500F and Accessories
37
9
9
9
11
10
12
27
28
30
3129
34 33
2622
21
25
MULTI SYNERGIC 400F SPART PARTS
25
24
wire feederspart parts page 44
Unit Coolerspart parts page....

Instruction Manual Multi Synergic 280 - Multi Synergic 350 - Multi Synergic 400F - Multi Synergic 500- Multi Synergic 500F and Accessories
38
n° CODE DESCRIPTION Rif. WEL.DIAGRAM1 MALE FAST SOCKET 2 N-07-070000-03-00 MAIN SWITCH 60A – 400V S13 N-40-141010-04-00 BACK SIDE 14 POLES SOCKET X14 R-40-160810-01-00 FAST SOCKET X55 R-37-130310-01-00 FAN GRIG PROTECTION -9 N-51-PH02-033-B ABSORBITION PCBA PCB6-PCB7 PCB6, PCB710 R-04-010300-47-00 RECTIFIER D1, D211 R-03-010200-03-00 MAIN TRANSFORMER TV112 R-03-020103-06-00 OUTPUT CHOKE L113 N-51-TR-T212-A DIGITAL DISPLAY CONTROL PCB114 PLEXIGLAS PANEL PROTECTION -15 R-37-231410-05-01 KNOB -16 R-40-180000-09-00 FLANGE BRASS COMPONENTS X4317 R-24-031000-01-A0 GAS CONNECTOR COMPONENTS -18 N-40-140120-01-00 INPUT TORCH SWITCH CONNECTOR TWO POLES X2819 N-40-140120-05-00 INPUT REMOTE CONTROL CONNECTOR FIVE POLES X3020 R-40-160810-01-00 FEMALE FAST SOCKET X3, X521 T236D PCB MULTI SYNERGIC 500 CURRENT PROBE LOAD BOARD (T236D) PCB222 R-51-TR-T229-A POWER DRIVER BOARD PCB523 R-51-TR-T235-A HALF BRIDGE CURRENT FOLLOWER PCB1024 N-51-TR-T192-B-RL PROBE FILTER PCB925 N-51-PH02-085-B-RL EMC BOARD PCB326 R-51-TR-T233-A SUPPLY VOLTAGE MONITOR PCB827 R-06-010000-10-00 HALL PROBE HALL128 N-51-PK03-015-C-RL DRIVER MODULE PCB PCB429 N-51-PH02-083-A-RL SNUBBER PCB GC-PH-83-A0 PCB1130 R-04-050100-05-00 POWER IGBT MODULE Q131 R-04-010401-00-00 3PH BRIDGE RECTIFIER B133 N-37-120321-01-00 FAN FAN134 N-23-020602-15-A0 FAN COVER -
MULTI SYNERGIC 400F SPART PARTS

Instruction Manual Multi Synergic 280 - Multi Synergic 350 - Multi Synergic 400F - Multi Synergic 500- Multi Synergic 500F and Accessories
39
MULTI SYNERGIC 400F WELDING DIAGRAM

Instruction Manual Multi Synergic 280 - Multi Synergic 350 - Multi Synergic 400F - Multi Synergic 500- Multi Synergic 500F and Accessories
40
40. MULTI SYNERGIC 500 SPART PARTS
1
2
3
4
5
19
18
17
16
13
14
15
20

Instruction Manual Multi Synergic 280 - Multi Synergic 350 - Multi Synergic 400F - Multi Synergic 500- Multi Synergic 500F and Accessories
41
7
8
6
9
9
9
11
10
12
27
28
30
3129
34 33
26
32
22
21
25
24
41. MULTI SYNERGIC 500 SPART PARTS

Instruction Manual Multi Synergic 280 - Multi Synergic 350 - Multi Synergic 400F - Multi Synergic 500- Multi Synergic 500F and Accessories
42
n° CODE DESCRIPTION Rif. WEL.DIAGRAM1 N-18-JK-01-RT22 PREHEATING PLUG X382 N-07-070000-03-00 MAIN SWITCH 60A – 400V S13 N-40-141010-04-00 BACK SIDE 14 POLES SOCKET X14 R-40-160810-01-00 FAST SOCKET X55 R-37-130310-01-00 FAN GRIG PROTECTION -6 R-37-221100-02-00 SPOOL SUPPORT -7 N-39-106309-01-A0 PROGRAM INPUT SERIAL PORT X448 R-37-210423-01-00 WIRE FEEDER MOT19 N-51-PH02-033-B ABSORBITION PCBA PCB6-PCB7 PCB6, PCB710 R-04-010300-47-00 RECTIFIER D1, D211 R-03-010303-16-00 TOROIDAL TRANSFORMER TV112 R-03-020103-06-00 OUTPUT CHOKE L113 N-51-TR-T212-A DIGITAL DISPLAY CONTROL PCB114 PLEXIGLAS PANEL PROTECTION -15 R-37-231410-05-01 KNOB -16 R-40-180000-09-00 FLANGE BRASS COMPONENTS X4317 R-24-031000-01-A0 GAS CONNECTOR COMPONENTS -18 N-40-140120-01-00 INPUT TORCH SWITCH CONNECTOR TWO POLES X2819 N-40-140120-05-00 INPUT REMOTE CONTROL CONNECTOR FIVE POLES X3020 R-40-160810-01-00 FEMALE FAST SOCKET X3, X521 T236D PCB MULTI SYNERGIC 500 CURRENT PROBE LOAD BOARD (T236D) PCB222 R-51-TR-T229-A POWER DRIVER BOARD PCB524 N-51-TR-T192-B-RL PROBE FILTER PCB925 N-51-PH02-085-B-RL EMC BOARD PCB326 R-51-TR-T233-A SUPPLY VOLTAGE MONITOR PCB827 R-06-010000-10-00 HALL PROBE HALL128 N-51-PK03-015-C-RL DRIVER MODULE PCB PCB429 N-51-PH02-083-A-RL SNUBBER PCB GC-PH-83-A0 PCB1130 R-04-050100-05-00 POWER IGBT MODULE Q131 R-04-010401-00-00 3PH BRIDGE RECTIFIER B132 R-37-140110-02-00 SOLENOID EV1, EV233 N-37-120321-01-00 FAN FAN134 N-23-020602-15-A0 FAN COVER -
42. MULTI SYNERGIC 500 SPART PARTS

Instruction Manual Multi Synergic 280 - Multi Synergic 350 - Multi Synergic 400F - Multi Synergic 500- Multi Synergic 500F and Accessories
43
43. MULTI SYNERGIC 500 WELDING DIAGRAM

Instruction Manual Multi Synergic 280 - Multi Synergic 350 - Multi Synergic 400F - Multi Synergic 500- Multi Synergic 500F and Accessories
44
44. MULTI SYNERGIC 500F SPART PARTS
19
18
17
13
14
15
20
2
4
3
5
7
1

Instruction Manual Multi Synergic 280 - Multi Synergic 350 - Multi Synergic 400F - Multi Synergic 500- Multi Synergic 500F and Accessories
45
9
9
9
11
10
12
27
28
30
3129
34 33
2622
21
25
45. MULTI SYNERGIC 500F SPART PARTS
25
24
wire feederspart parts page 44
Unit Coolerspart parts page....

Instruction Manual Multi Synergic 280 - Multi Synergic 350 - Multi Synergic 400F - Multi Synergic 500- Multi Synergic 500F and Accessories
46
n° CODE DESCRIPTION Rif. WEL.DIAGRAM1 MALE FAST SOCKET 2 N-07-070000-03-00 MAIN SWITCH 60A – 400V S13 N-40-141010-04-00 BACK SIDE 14 POLES SOCKET X14 R-40-160810-01-00 FAST SOCKET X55 R-37-130310-01-00 FAN GRIG PROTECTION -9 N-51-PH02-033-B ABSORBITION PCBA PCB6-PCB7 PCB6, PCB710 R-04-010300-47-00 RECTIFIER D1, D211 R-03-010200-03-00 MAIN TRANSFORMER TV112 R-03-020103-06-00 OUTPUT CHOKE L113 N-51-TR-T212-A DIGITAL DISPLAY CONTROL PCB114 PLEXIGLAS PANEL PROTECTION -15 R-37-231410-05-01 KNOB -16 R-40-180000-09-00 FLANGE BRASS COMPONENTS X4317 R-24-031000-01-A0 GAS CONNECTOR COMPONENTS -18 N-40-140120-01-00 INPUT TORCH SWITCH CONNECTOR TWO POLES X2819 N-40-140120-05-00 INPUT REMOTE CONTROL CONNECTOR FIVE POLES X3020 R-40-160810-01-00 FEMALE FAST SOCKET X3, X521 T236D PCB MULTI SYNERGIC 500 CURRENT PROBE LOAD BOARD (T236D) PCB222 R-51-TR-T229-A POWER DRIVER BOARD PCB523 R-51-TR-T235-A HALF BRIDGE CURRENT FOLLOWER PCB1024 N-51-TR-T192-B-RL PROBE FILTER PCB925 N-51-PH02-085-B-RL EMC BOARD PCB326 R-51-TR-T233-A SUPPLY VOLTAGE MONITOR PCB827 R-06-010000-10-00 HALL PROBE HALL128 N-51-PK03-015-C-RL DRIVER MODULE PCB PCB429 N-51-PH02-083-A-RL SNUBBER PCB GC-PH-83-A0 PCB1130 R-04-050100-05-00 POWER IGBT MODULE Q131 R-04-010401-00-00 3PH BRIDGE RECTIFIER B133 N-37-120321-01-00 FAN FAN134 N-23-020602-15-A0 FAN COVER -
46. MULTI SYNERGIC 500F SPART PARTS

Instruction Manual Multi Synergic 280 - Multi Synergic 350 - Multi Synergic 400F - Multi Synergic 500- Multi Synergic 500F and Accessories
47
47. MULTI SYNERGIC 500F WELDING DIAGRAM

Instruction Manual Multi Synergic 280 - Multi Synergic 350 - Multi Synergic 400F - Multi Synergic 500- Multi Synergic 500F and Accessories
48
0
2
1
11
10
4
8 9
SOARE PARTS OF UNIT COOLER
N° CODICE DESCRIZIONE RIF. SCHEMA0 N-40-160910-11-00 WATER SPEED-PASS ACCESS BLOCK RED -1 R-38-107080-01-00 EXTERNAL WATER PIPE BYPASS -2 N-40-160910-10-00 WATER SPEED-PASS ACCESS BLOCK BLUE 3 N-37-120522-01-00 FAN FAN14 N-40-160910-11-00 WATER SPEED-PASS ACCESS BLOCK RED -5 R-24-031200-13-A0 PLASTIC PLUG -6 R-24-032200-07-A0 90°PLASTIC ELBOW -7 R-37-310000-01-00 WATER-PUMP PUMP18 R-37-340000-01-00 HEAT EXCHANGER DEVICE -9 R-38-107080-01-00 EXTERNAL WATER PIPE BYPASS -10 N-40-160910-10-00 WATER SPEED-PASS ACCESS BLOCK BLUE -11 R-37-320000-04-00 WATER CONTAINER -12 R-06-030001-02-00 FLOW SENSORS FLUX1
0
2
1
6
5
3 7
12
11
10
4
8

Instruction Manual Multi Synergic 280 - Multi Synergic 350 - Multi Synergic 400F - Multi Synergic 500- Multi Synergic 500F and Accessories
49
SCHEMATICS OF UNIT COOLER

Instruction Manual Multi Synergic 280 - Multi Synergic 350 - Multi Synergic 400F - Multi Synergic 500- Multi Synergic 500F and Accessories
50
48. MULTI FIL MIG REMOTE WIRE FEEDER
REMOTE WIRE FEEDER UNIT SETTING - MIG/MAG MANUAL
The remote wire feeder unit can be connected to the generator by an
interconnecting cable which carries power cable, control signals, gas
hose and eventual hoses for the torch cooling.
REMOTE WIRE FEEDER UNIT SETTING - COMMAND REFERNCES
DISPLAY-1 DISPLAY-2
K1 K2
L27 L21 L22 L23 L24 L25 L26
L10
L9
L8L6L5L4L2L1
L7
L11
L12
L13L3
L14 L15
L16 L17 L18 L19 L20
L28 L29 L30 L31 L32
L33 L34 L35 L36 L37
REMOTE WIRE FEEDER UNIT SETTING - MODE SELECT
Push the knob K1, rotate K1 for se-lect the welding mode, push K1 for confirm.Push K1 and then rotate K1forSelect MMA mode
Push K1 and then rotate K1forSelect Manual MIG mode
Push K1 and then rotate K1forSelect synergic MIG mode

Instruction Manual Multi Synergic 280 - Multi Synergic 350 - Multi Synergic 400F - Multi Synergic 500- Multi Synergic 500F and Accessories
51
Push K1 and then rotate K1forSelect synergic MIG PULS mode
Push K1 and then rotate K1 forSelect Twice MIG mode
Rotate K1 for set wire speed. Display-1 show the wire speed in mt/min.
Rotate K1 for set currentDisplay-1 show set current.
Rotate K2 for set AF
Rotate K2 for set voltage Display-2 show the set voltage.
K1
K2
K1K2
K1
K1
Push knob K2 until the icon Induc-tance (L14) is on. Rotate K2 for adjust the inductance setting.Display-2 show the set inductance. The display return to show the default setting value 5 seconds after last adjustment .
MMA MODE : PARAMETER SETTING
MANUAL MIG MODE : PARAMETER SETTING
Wire Speed Setting - Mig Manual
Wire Voltage Setting - Manual MIG mode
Inductance Setting - Manual MIG mode

Instruction Manual Multi Synergic 280 - Multi Synergic 350 - Multi Synergic 400F - Multi Synergic 500- Multi Synergic 500F and Accessories
52
Default icon Arc Lenght set (L12) is on. Rotate knob K2 for adjust the set-ting of lenght arc.Display-2 show the set arc lenght.
Push knob K2 until icon CYCLE (L15) is ON. Rotate K2 for select the torchswitch Cycle.
Set 2T cycle with icon L16 is on.
Set 2T slope cycle with icon L16 and L18 are on.
Set 4T cycle with icon L17 is on.
Set 4T slope cycle with icon L17 and L18 are on.
Timer cycle with icon L19 is on.
Default icon Iset is on Rotate K1 for adjust set current, or use wire speed setting.
Push K1 until icon ser speed L1 is on.Rotate K1 for adjust wire speed.Display-1 show the wire speed in mt/min.
Select the Torch switch cycle - Manual MIG mode SYNERGIC MIG MODE : PARAMETER SETTING
Current Setting- Synergic MIG mode
Wire Speed Setting - Synergic MIG mode
Arc Lenght Setting - Synergic MIG mode
K2
K2K2K2
K2 K2
K2
K1
K1

Instruction Manual Multi Synergic 280 - Multi Synergic 350 - Multi Synergic 400F - Multi Synergic 500- Multi Synergic 500F and Accessories
53
Push knob K2 until the icon Thickness setting (L13) is on. Rotate K2 for adjust the thickness.Display-2 show the set of value. The display return to show the de-fault setting value 5 seconds after last adjustment .
Push knob K2 until the icon Induc-tance (L14) is on. Rotate K2 for adjust the inductance setting.Display-2 show the set inductance. The display return to show the default setting value 5 seconds after last adjustment
K2
Push knob K2 until icon CYCLE (L15) is ON. Rotate K2 for select the torchswitch Cycle.
Set 2T cycle with icon L16 is on
Set 2T slope cycle with icon L16 and L18 are on.
Set 4T cycle with icon L17 is on.
Set 4T slope cycle with icon L17 and L18 are on.
Timer cycle with icon L19 is on.
Inductance Setting - Synergic MIG mode
Thickness Setting - Synergic MIG mode
Select the Torch switch cycle - Synergic MIG mode
K2
K2
K2 K2K2
K2 K2

Instruction Manual Multi Synergic 280 - Multi Synergic 350 - Multi Synergic 400F - Multi Synergic 500- Multi Synergic 500F and Accessories
54
Default icon Iset is on Rotate K1 for adjust set current, or use wire speed setting.
Push K1 until icon ser speed L1 is on.Rotate K1 for adjust wire speed.Display-1 show the wire speed in mt/min.
Default icon Arc Lenght set (L12) is on. Rotate knob K2 for adjust the set-ting of lenght arc.Display-2 show the set arc lenght.
Push knob K2 until the icon Induc-tance (L14) is on. Rotate K2 for adjust the inductance setting.Display-2 show the set inductance. The display return to show the default setting value 5 seconds after last adjustment
K2
Push knob K2 until the icon Thickness setting (L13) is on. Rotate K2 for adjust the thickness.Display-2 show the set of value. The display return to show the de-fault setting value 5 seconds after last adjustment .
Current Setting - PULSE MIG mode
PULSE MIG MODE: PARAMETER SETTING
Wire Speed Setting - PULSE MIG mode
Arc Lenght Setting - PULSE MIG mode
Inductance Setting - PULSE MIG mode
Thickness Setting - PULSE MIG mode
K1
K1
K2
K2

Instruction Manual Multi Synergic 280 - Multi Synergic 350 - Multi Synergic 400F - Multi Synergic 500- Multi Synergic 500F and Accessories
55
Default icon Iset is on Rotate K1 for adjust set current, or use wire speed setting.
Push K1 until icon ser speed L1 is on.Rotate K1 for adjust the wire speed.Display-1 show the wire speed in mt/min.
Push K1 until icon Twice set L8 is on.Rotate K1 for adjust twice frequency. Display-1 show the frequency.
Push knob K2 until icon CYCLE (L15) is ON. Rotate K2 for select the torch switch Cycle.
Set 2T cycle with icon L16 is on
Set 2T slope cycle with icon L16 and L18 are on.
Set 4T cycle with icon L17 is on.
Set 4T slope cycle with icon L17 and L18 are on.
Timer cycle with icon L19 is on.
Select the Torch switch cycle - PULSE MIG modeTWICE MIG MODE: PARAMETER SETTING
Current Setting - Twice MIG mode
Wire Speed Setting - Twice MIG mode
Twice Frequenzy Setting - Twice MIG mode
K2
K2 K2 K2
K2 K2
K1
K1
K1

Instruction Manual Multi Synergic 280 - Multi Synergic 350 - Multi Synergic 400F - Multi Synergic 500- Multi Synergic 500F and Accessories
56
Default icon Arc Lenght set (L12) is on. Rotate knob K2 for adjust the set-ting of lenght arc.Display-2 show the set arc lenght.
Push knob K2 until the icon Induc-tance (L14) is on. Rotate K2 for adjust the inductance setting.Display-2 show the set inductance. The display return to show the default setting value 5 seconds after last adjustment K2
Push knob K2 until the icon Thickness setting (L13) is on. Rotate K2 for adjust the thickness.Display-2 show the set of value. The display return to show the de-fault setting value 5 seconds after last adjustment .
Push knob K2 until icon CYCLE (L15) is ON. Rotate K2 for select the torchswitch Cycle.
Set 2T cycle with icon L16 is on
Set 2T slope cycle with icon L16 and L18 are on.
Set 4T cycle with icon L17 is on.
Set 4T slope cycle with icon L17 and L18 are on.
Timer cycle with icon L19 is on.
Arc Lenght Setting - Twice MIG mode
Inductance Setting - Twice MIG mode
Thickness Setting - Twice MIG mode
Select the Torch switch cycle - Twice MIG mode
K2
K2
K2
K2 K2 K2
K2 K2

Instruction Manual Multi Synergic 280 - Multi Synergic 350 - Multi Synergic 400F - Multi Synergic 500- Multi Synergic 500F and Accessories
57
press K1 for 3 second until the led “type of material” start to flash.Rotate K1 for selection and confirm by pressing the knob K1.
K1 K2
pres K2 for 3 second until the led “size of wire” start to flash. Rotate K2 for change wire, then confirm by pressing the knob K2.
K1 K2
WIRE AND SIZE SELECTION
Select wire type Select tickness of material
only for Multi Wave

Instruction Manual Multi Synergic 280 - Multi Synergic 350 - Multi Synergic 400F - Multi Synergic 500- Multi Synergic 500F and Accessories
58
49. MULTI FIL MIG WIRE FEEDER SPARE PARTS
N° Code Description Rif. Wel.Diagram1 R-37-221100-02-00 SPOOL SUPPORT 2 R-37-210423-01-00 WIRE FEEDER MOTOR MOT13 R-38-115020-01-00 BRASS TUBE 4 R-40-180000-09-00 FLANGE BRASS COMPONENTS X115 R-37-380000-01-10 PLASTIC CASE 6 R-37-231410-05-01 KNOB 7 N-44-20110426-04 7 POLES AIR SOCKET (FEMALE) X_WIRE_FEEDER_7P FEMALE8 N-40-160910-11-00 FAST SOCKET RED
MULTI FIL MIG WIRE FEEDER SPARE PARTS
N° Code Description Rif. Wel.Diagram10 R-37-221400-04-00 BRASS COMPONENTS 11 N-40-141020-09-00 14 POLES AIR SOCKET (MALE) X312 R-40-160910-07-00 FAST SOCKET X1013 R-37-160320-07-00 UNIVERSAL WHEEL 14 R-37-140110-02-00 SOLENOID VALVE EV115 N-37-190401-07-00 HASP 16 R-37-190401-05-00 LEFT CABLE SUPPORT R-37-190401-06-00 RIGHT CABLE SUPPORT 18 Z0077AA 40X32X10 wire feeder rolls V type 0,8-1,0 mm18 Z0024AA 40X32X10 wire feeder rolls V type 1,2-1,6 mm
MULTI FIL MIG WIRE FEEDER SPARE PARTS
2
11
12
14
8
159
13
10
5
9
4
6
7
8
3
2
18

Instruction Manual Multi Synergic 280 - Multi Synergic 350 - Multi Synergic 400F - Multi Synergic 500- Multi Synergic 500F and Accessories
59
50. MULTI FIL MIG WIRE FEEDER DIAGRAM

Instruction Manual Multi Synergic 280 - Multi Synergic 350 - Multi Synergic 400F - Multi Synergic 500- Multi Synergic 500F and Accessories
60
6
1
3
2
7
10
4
11
8
9
5 8
7
12
51. MULTI FIL MIG WIRE FEEDER SPARE PARTS - DIAGRAM
N° Code Description Rif. Wel.Diagram1 MALE DINS CONNECTOR 50mm2 X12 MULTI-CABLE 14 POLES x 0,75mm2 3 GAS TUBE SOCKET (MALE) 4 14 POLES AIR SOCKET (MALE) X35 FEMALE DINS CONNECTOR 50mm2 X26 R-37-300000-05-00 PROTECTIVE SHEATH 7 14 POLES AIR SOCKET (FEMALE) X48 WATER TUBE SOCKET (MALE) 9 GAS TUBE SOCKET (FEMALE) 10 WATER RED TUBE 11 WATER BLU TUBE 12 POWER CABLE 70mm2 POWER CABLE
R-37-300000-05-00

Instruction Manual Multi Synergic 280 - Multi Synergic 350 - Multi Synergic 400F - Multi Synergic 500- Multi Synergic 500F and Accessories
61
Power source includes:Power source 280 or 350 or 500.Rolls kit that includes 2 rolls V type 0,8-0,1, 2 rolls U type 1,2-1,6 mounted in the feeder.Instruction manual.
Water cooling unit includes:Water cooling.Two by-pass pipe with quick connector.Instruction manual.
Trolley includes:Frame with front wheels.Bottle support with back large wells.Side tool support.Bottle support with fixing belt.Interconnecting cable support.Instruction manual.
Also the wire feeder, (when used) arrives as packed in dedicated formers:
The wire feeder kits include:Wire feeder.Wire feeder support.Kit wells.Rolls kit that includes 2 rolls V type 0,8-0,1, 2 rolls U type 1,2-1,6 mounted in the feeder mecha-nism.Instruction manual.
52. PACKED
The machine, the water cooling unit and the trolley are packed separately in dedicated former protections:

Instruction Manual Multi Synergic 280 - Multi Synergic 350 - Multi Synergic 400F - Multi Synergic 500- Multi Synergic 500F and Accessories
62
2 1
3
4 Mount side tool support (B) in power source (A), use screw M6.
A
Mount bottle support with fixing belt (c), use screw M6.
Mount frame with front wheels (D) and bottle support with back large wells (E), use screw M6 (J).
Mount interconnecting cable support (F) in power source, use screw M5 (K).
53. HOW TO FIX THE TROLLEY IN THE POWER SOURCE

Instruction Manual Multi Synergic 280 - Multi Synergic 350 - Multi Synergic 400F - Multi Synergic 500- Multi Synergic 500F and Accessories
63
1
2
3
4
5
Mount side tool support (B) in power source, use screw M6
Mount bottle support with fixing belt (c) in power source, use screw M6
Mount frame with front wheels (D) and bottle support with back large wells (E) in water cooler (G), use screw M6
Mount interconnecting cable support (F) in trol-ley, use screw M5
Mount water cooler with trolley in power source, use screw M6
6Electrical connection
cooling unit
54. HOW TO FIX THE COOLER UNIT AND THE TROLLEY IN THE POWER SOURCE
Instruction Manual Multi Synergic 280 - Multi Synergic 350 - Multi Synergic 400F - Multi Synergic 500- Multi Synergic 500F and Accessories
65
Ter srl Via Giacomo Leopardi, 13 - 36030 Caldogno (VI) ITALY • Ph: +39 0444 586440 - Fax: +39 0444 905764 • e-mail: [email protected]